Article

A Comparative Study on Characterization and High-Temperature Wear Behaviors of Thermochemical Coatings Applied to Cobalt-Based Haynes 25 Superalloys

1
Faculty of Engineering and Natural Sciences, Department of Metallurgy and Materials Engineering, Iskenderun Technical University, Iskenderun 31200, Hatay, Türkiye
2
Graduate School, Department of Metallurgy and Materials Engineering, Iskenderun Technical University, Iskenderun 31200, Hatay, Türkiye
*
Author to whom correspondence should be addressed.
Coatings 2023, 13(7), 1272; https://doi.org/10.3390/coatings13071272
Submission received: 26 May 2023 / Revised: 19 June 2023 / Accepted: 22 June 2023 / Published: 20 July 2023

Abstract

:
This study investigated the characteristic properties of aluminizing, boronizing, and boro-aluminizing coatings grown on Haynes 25 superalloys and their effects on the high-temperature wear behavior. The coating processes were conducted in a controlled atmosphere at 950 °C for 3 h. Characterization studies were performed using scanning electron microscopy, energy-dispersive spectroscopy, X-ray diffraction analysis, nanoindentation testing, and high-temperature wear tests. It was determined that the thickness values of aluminide, boride, and boride–aluminide coatings were 140 ± 1.50 µm, 37.58 ± 2.85 µm, and 14.73 ± 1.71 µm, and their hardness values were 12.23 ± 0.9 GPa, 26.34 ± 2.33 GPa, and 23.46 ± 1.29 GPa, respectively. The hardness of the coatings resulted in reduced wear volume losses both at room temperature and at 500 °C. While the best wear resistance was obtained in the boronized sample at room temperature due to its high hardness, the best wear resistance at 500 °C was obtained in the boro-aluminized sample with the oxidation–reduction effect of Al content and the lubricating effect of B content in the boro-aluminide coating. This indicates that the presence of aluminum in boride layers improves the high-temperature wear resistance of boride coatings. The coated samples underwent abrasive wear at room temperature, whereas at 500 °C, the wear mechanism shifted to an oxidative-assisted adhesive wear mechanism.

1. Introduction

Co-based superalloys are widely used to produce components operating under high-temperature and high-pressure conditions. Cobalt-based alloys possess higher melting temperatures than Fe- and Ni-based alloys due to the elevated melting point of cobalt. Consequently, these alloys display flatter stress–rupture curves, which in turn grant them enhanced stress and tensile capacities in high-temperature applications [1]. As with other superalloys, there are two types of Co-based superalloys used in industrial applications: cast (e.g., X40 or MAR-M-302) and wrought (e.g., Haynes 25; Haynes 188, S-816) alloys [2,3].
Cobalt-based superalloys, similar to other superalloys, feature microstructures comprising an FCC γ matrix along with several strengthening phases. However, when compared to nickel–iron or nickel-based superalloys, the precipitation hardening in cobalt-based superalloys is not as effective as in the nickel-based superalloys [3,4,5]. This necessitates strengthening cobalt-based superalloys primarily through carbide formation and/or solid-solution strengthening [6]. Numerous studies have been conducted to form carbide precipitates to improve the mechanical properties of cobalt, nickel, or iron superalloys [4,5,7,8,9]. While some of these studies aimed to form regional carbides throughout the alloy’s microstructure [4,5,7,8,9], others focused on forming aluminide nitride, boride, carbide, etc., on the surface of these alloys [10,11,12,13]. These advanced surface coatings often offer a more cost-effective approach to increasing service life. Thermochemical methods are commonly employed for applying these coatings on the surfaces of superalloys [14].
Thermochemical coating processes are surface modification applications based on forming a chemically bonded layer on the surface of the alloy by activating a chemical-based material with heat [15,16]. These methods involve using heat and chemical reactions to grow a coating onto a metal substrate. While modifying the surface properties, the material’s bulk properties (internal structure) are mainly preserved in these methods [16]. The coatings obtained can improve surface properties such as hardness, wear resistance, corrosion resistance, and thermal stability, which are directly related to the service lives of the materials. Thermochemical coatings have been applied to various materials groups, including steel, aluminum, titanium, super alloys, entropy alloys, and even cermet [17], finding applications in industries such as aviation, automotive, energy, and manufacturing where enhanced surface properties are required for improved performance and durability. Several studies have reported improvements in these alloys’ wear and oxidation resistance, ranging from room temperature up to 750 °C, thanks to these coatings [17,18]. However, upon reviewing the literature, it can be observed that while these thermomechanical coatings on cobalt-based superalloys have been investigated for their wear resistance in various biological fluids at room temperature [11,19,20], their high-temperature wear behavior has been rarely studied [21].
However, cobalt-based superalloys have many applications in high-temperature abrasive environments such as gas turbines, nuclear power plants, high-temperature furnaces, and the oil and gas industry [1,2,22]. When thermomechanical coatings are applied to the surfaces of these superalloys, they improve surface hardness and chemical inertness and provide a thermal barrier effect, resulting in enhanced oxidation, corrosion, and wear resistance at high temperatures [10,11,12,13,14,17,18,19,20,21]. These advantages enhance the performance of cobalt-based superalloys, enabling their use in more challenging operating conditions.
Depending on the specific application requirements and the desired coating properties, various thermomechanical coating methods can be applied to cobalt-based superalloys, such as nitriding, aluminizing, boriding, carburizing, and so on [10,14]. However, the high hardness and stability of boride layers up to 1000 °C [17], as well as the high coating thickness and oxidation resistance of aluminide coatings at high temperatures [18], have highlighted the need for further investigation of these methods. Therefore, this study focused on determining the characteristic properties of coatings obtained through boriding, aluminizing, and boro-aluminizing processes applied to Haynes 25 cobalt-based superalloys and investigating their effect on the high-temperature wear resistance of these alloys.

2. Materials and Methods

A cobalt-based superalloy, Haynes 25 (also commonly known as L605), was used as the substrate material in the study. The Haynes 25 superalloy combines cobalt, nickel, chromium, and tungsten elements. The chemical composition of the Haynes 25 superalloy, provided by the manufacturer, is 10% Ni, 20% Cr, 15% W, 3% Fe, 1.5% Mn, 0.4% Si, and 0.1% C, and the remainder is Co [23].

2.1. Procedure of Thermochemical Coatings

Haynes 25 samples with dimensions of 30 × 30 × 4 mm3 were cut into suitable pieces for coating processes using a precision cutting machine. Before the coating process, the Haynes 25 samples were subjected to surface preparation to remove residues. This involved grounding the samples with 400–1000 grit SiC sandpapers, rinsing them in flowing water, and drying them with ethyl alcohol. A powder mixture consisting of 90% B4C (boron carbide) and 10% NaBF4 (sodium tetrafluoroborate) was used for the boriding process. The aluminizing process utilized a mixture of 30% pure Al, 60% Al2O3, and 10% NH4Cl. In the boro-aluminizing process, a powder blend was formed by taking 50% of the weight of each of the powders, as mentioned before. The coating processes were carried out in controlled atmosphere conditions at 950 °C for 3 h. The samples, placed inside pots with threaded mouths made of AISI 321 stainless steel, were covered with a layer of powder with a minimum thickness of 10 mm. The pots were tightly sealed to prevent air ingress. After the coating processes were completed, the samples were removed from the furnace and allowed to cool in an open-air environment.

2.2. Characterization

The coated samples were cut into dimensions of 15 × 15 × 4 mm3 to obtain metallographic examination samples and XRD samples. The samples prepared for microstructure analysis were subjected to traditional grinding and polishing processes, and the surfaces were etched in a 1:3 HNO3/HCl solution to obtain fine microstructure visibility.
Vickers microhardness measurements with a load of 100 gf and a dwell time of 15 s were conducted to determine the hardness of the coatings on the cross-sectional surface of the Haynes 25 superalloy, moving from the surface towards the matrix. For fracture toughness evaluation, a load of either 300 gf or 500 gf was applied for 15 s, depending on the coating. Nanoindentation measurements were performed to examine the relationship between the nanohardness and microhardness of the coatings and to determine the elastic modulus of the obtained coatings. Nanoindentation testing was conducted with a 10 µm N load and a dwell time of 15 s.
The microstructural characterization of the coatings resulting from the coating processes was conducted using a Nikon MA100 optical microscope and a Thermo Fisher Scientific Apreo S model scanning electron microscope (SEM). The phase structures of the obtained coatings were determined using a Malvern Panalytical EMPYREAN X-ray diffractometer. During the analysis, a beam of Ka radiation (λ = 1.540598 Å) and a 1° diffraction pattern in the angular range of 20°–90° were employed.
The wear tests of the samples were performed using a TURKYUS brand wear testing machine with the ball-on-disk method. The tests were conducted at room temperature and 500 °C, with a sliding speed of 250 mm/s, a load of 15 N, and a sliding distance of 500 m against an Al2O3 ball. The dimensions of the wear marks formed on the worn sample surfaces, including the depth and width, were measured using a 2D profilometer. The obtained data were then used in the following equations to calculate the wear rate, as previously reported in our studies [14,17].
L = 2 π r
V = 0.25 π W D
W r = V F S
In these equations, L represents the length of the wear track in millimeters (mm), V denotes the volume of the wear track in cubic millimeters (mm3), r stands for the radius of the wear track in millimeters (mm), W represents the average width of the wear track in micrometers (μm), D represents the average depth of the wear track in micrometers (μm), F refers to the applied test load in Newtons (N), S represents the sliding distance in meters (m), and Wr denotes the wear rate in cubic millimeters per Newton-meter (mm3/Nm). Then, the worn surfaces were examined via SEM, and the wear mechanisms were discussed by taking EDS from the necessary places.

3. Results and Discussion

3.1. XRD and Microstructure Analyses

Figure 1 presents the XRD patterns of uncoated and coated samples.
When examining Figure 1a, it can be observed that the as-received samples of Haynes 25 alloy exhibit dominant γ-Co phase peaks at 43.51°, 50.63°, and 74.69°. Additionally, a minor presence of the M23C6 phase is detected at 46.43 degrees in the untreated sample. In the aluminized sample (Figure 1b), the phase structure is primarily composed of the Co2Al5 phase, and a minor amount of the Co2CrAl phase is also identified. In the boronized sample, the dominant phases consist of CoB and Co2B, while the alloy’s composition leads to the formation of Cr4B3, Ni3B, and WB4 phases. In the boronized sample, the dominant phases are CoB and Co2B, while the alloy’s chemical composition has minor peaks corresponding to Cr4B3, Ni3B, and WB4 phases (Figure 1c). In the boro-aluminized sample, the dominant phase is CoAl, and Co4B, WB4, and CrB phases are also present in low peak intensities. The presence of minor boron-containing phases alongside the boro-aluminized coating is attributed to the lower initiation temperature of the aluminizing process, allowing aluminum to diffuse for a certain duration before boron diffuses into the structure. The samples were examined using SEM for a detailed analysis of the phase structures, and EDS line analysis was performed throughout the coatings (Figure 2, Figure 3 and Figure 4).
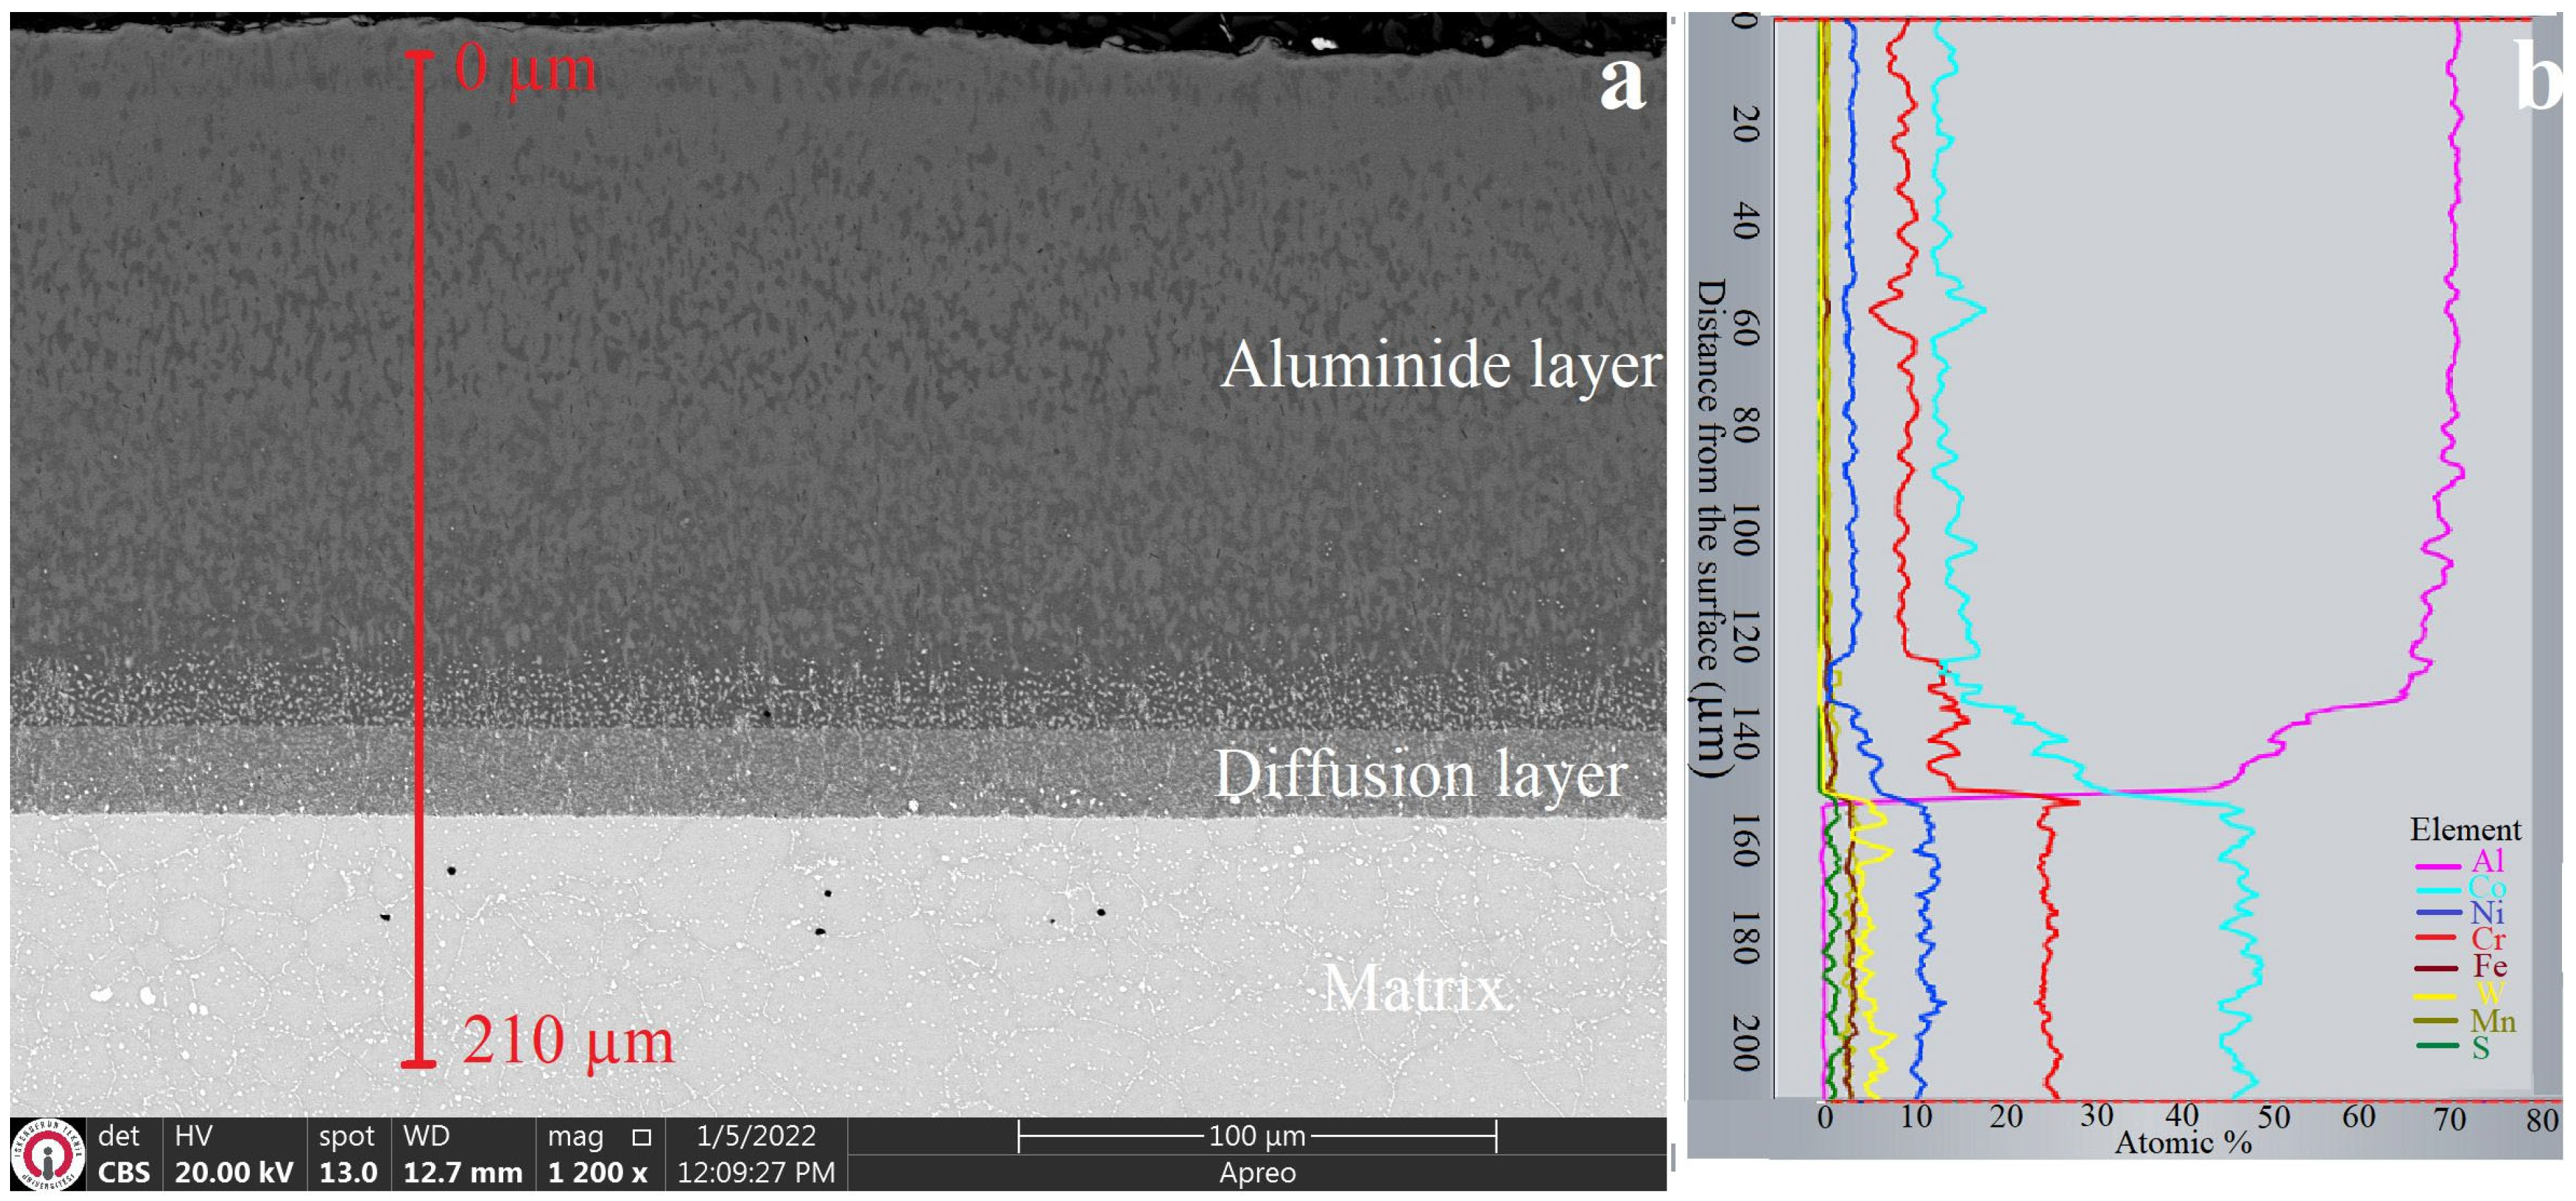
When Figure 2 is examined, it is seen that there are three different color concentrations on the surface of the Haynes 25 alloy. These regions are (i) continuously ~140 ± 1.50 µm thick, crack-free, porosity-free, and with a uniform coating on the surface towards the interior of the Al ratio; (ii) a ~20 µm thick diffusion layer where Al content drops from 70 to 50 atomically; and (iii) the matrix structure of the Haynes 25 alloy. Considering the alloying elements constituting the coating layer, it was determined that Al, Co, Cr, and Ni are present in the coating. On the other hand, it was determined that Mn, W, and Fe are not included in the structure. EDS line analyses determined that the elements in the coating layer are in agreement with Lee et al.’s [24] findings and the XRD analysis findings shown in Figure 1.
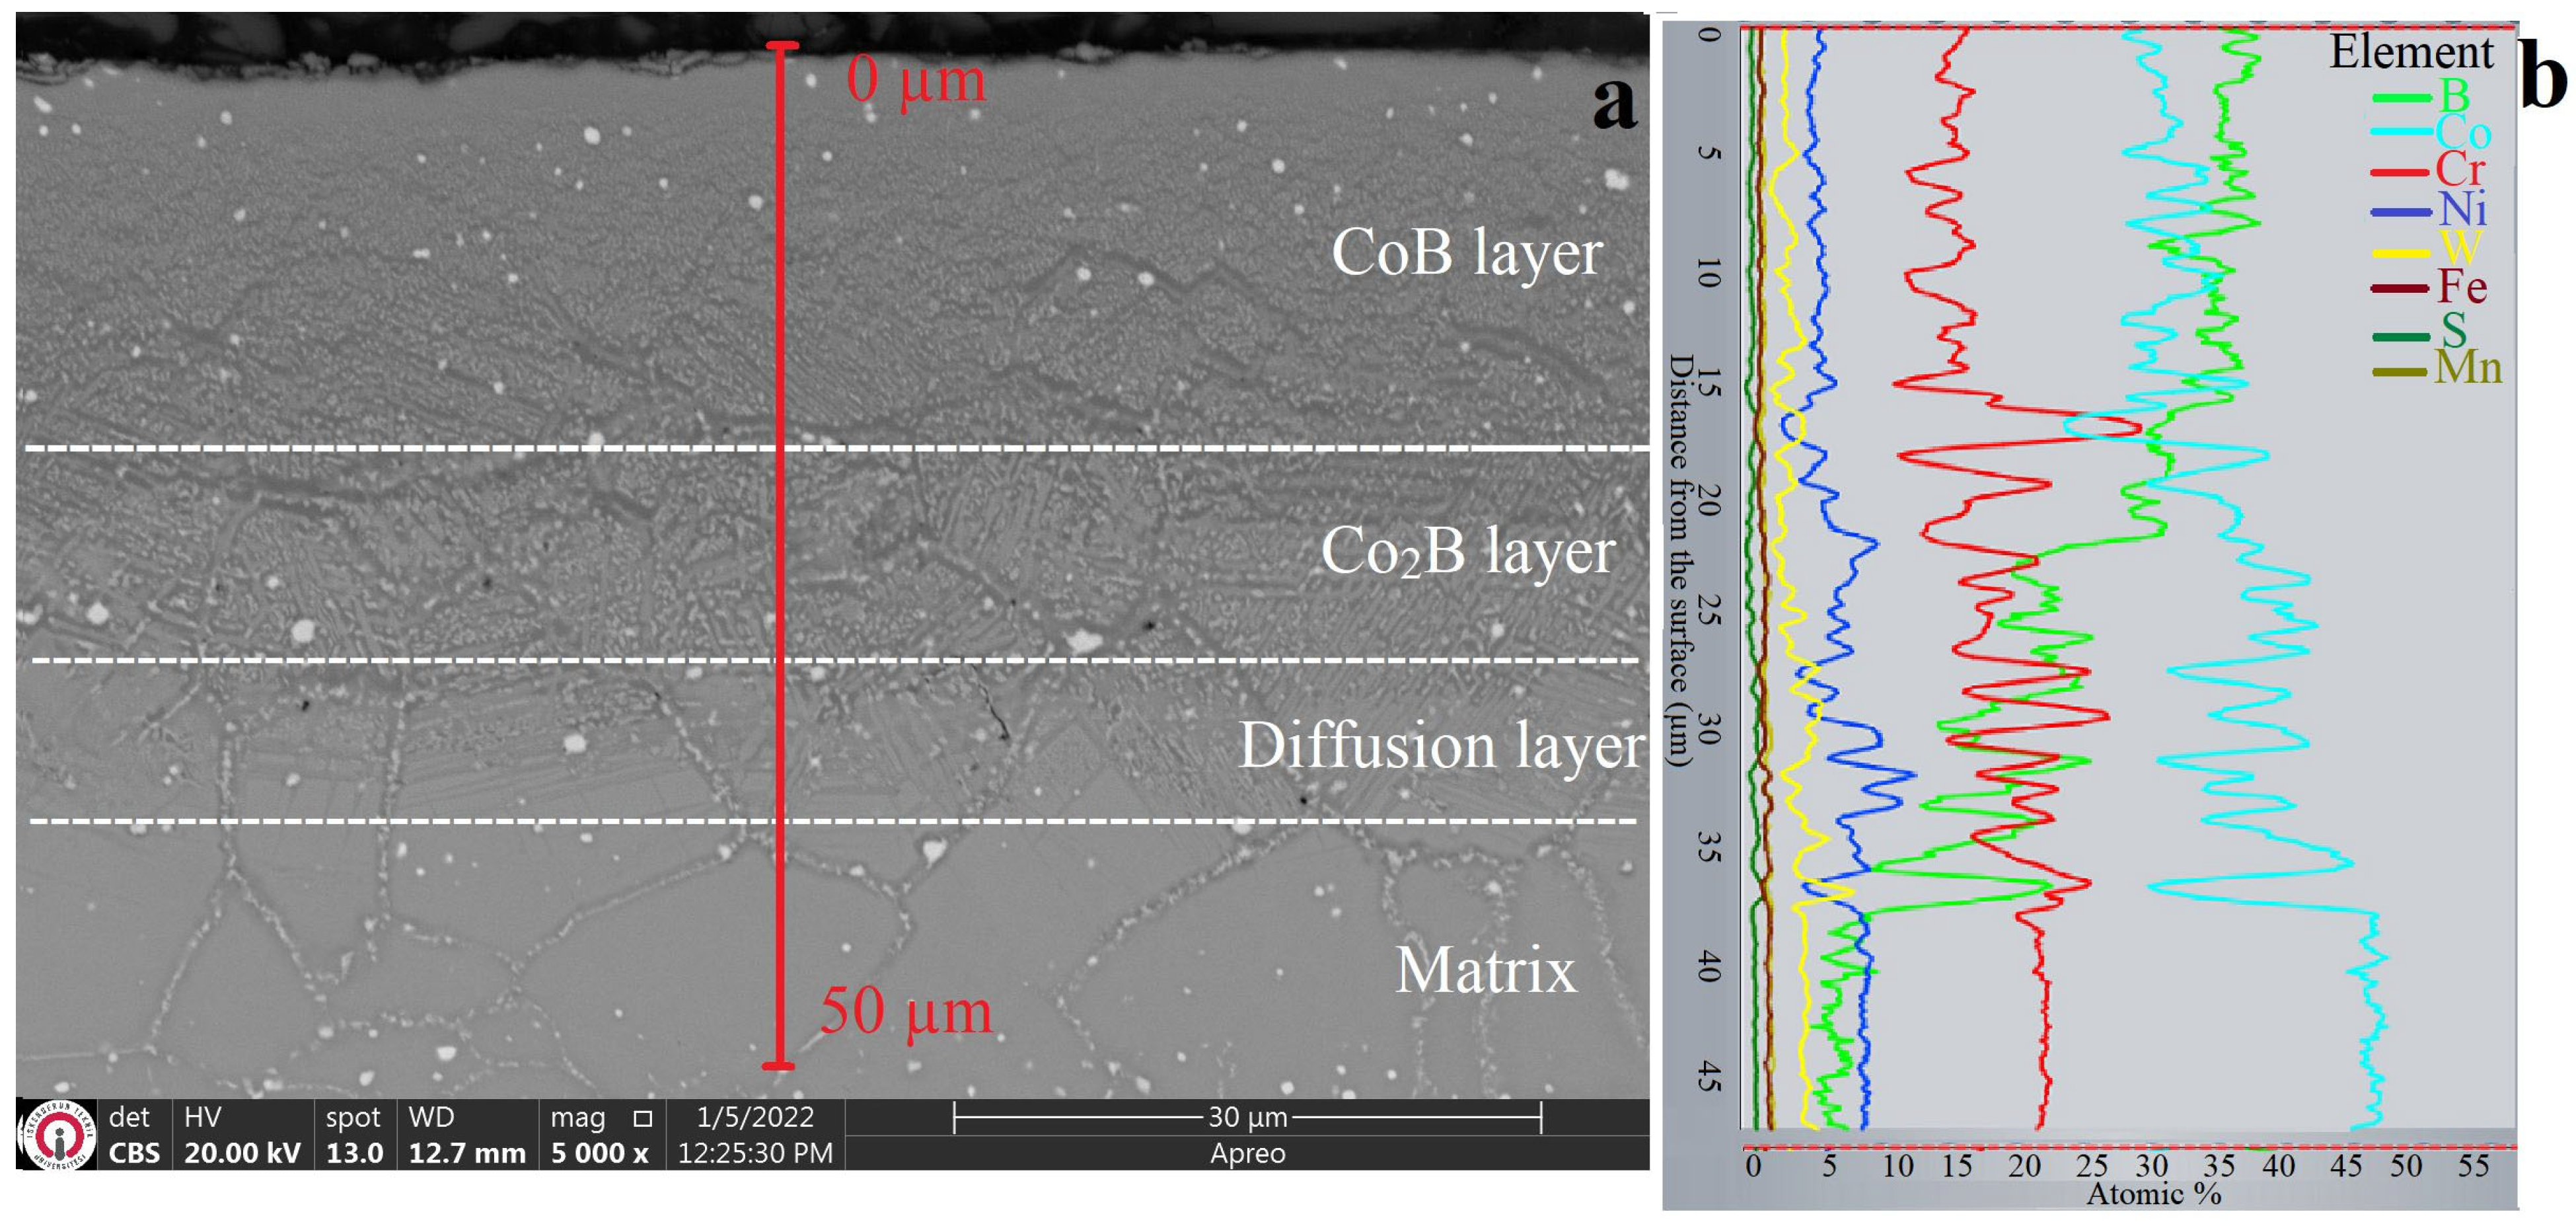
The SEM microstructure analysis of the boronized sample reveals (i) a uniform coating thickness of approximately 37.58 ± 2.85 µm with a consistent structure on the surface; (ii) a diffusion zone between the boride layer and substrate where boron diffusion occurs through grain boundaries, and the Kirkendall effect is absent; and (iii) an unaffected matrix structure that remains unchanged by heat treatment. The EDS line analysis confirms the presence of ordered layers, namely the CoB layer, Co2B layer, and diffusion zone, as indicated by the boron and cobalt atomic ratios. The boride layers exhibit decreasing boron ratios and increasing cobalt ratios from the surface to the interior. The EDS line analysis also shows the presence of minor amounts of Cr, Ni, and W in both boride layers, particularly in CoB. These findings are consistent with those of previous studies on boronized cobalt-based superalloys, in which CoB and Co2B phases are commonly observed. The occurrence of the Kirkendall effect in the diffusion region varies among these studies. It is reported to occur in some studies [19,25], while it is not observed in others [20,21], including this study. These discrepancies can be attributed to differences in boronizing powder content, temperature, and the duration of boriding in the coating process.
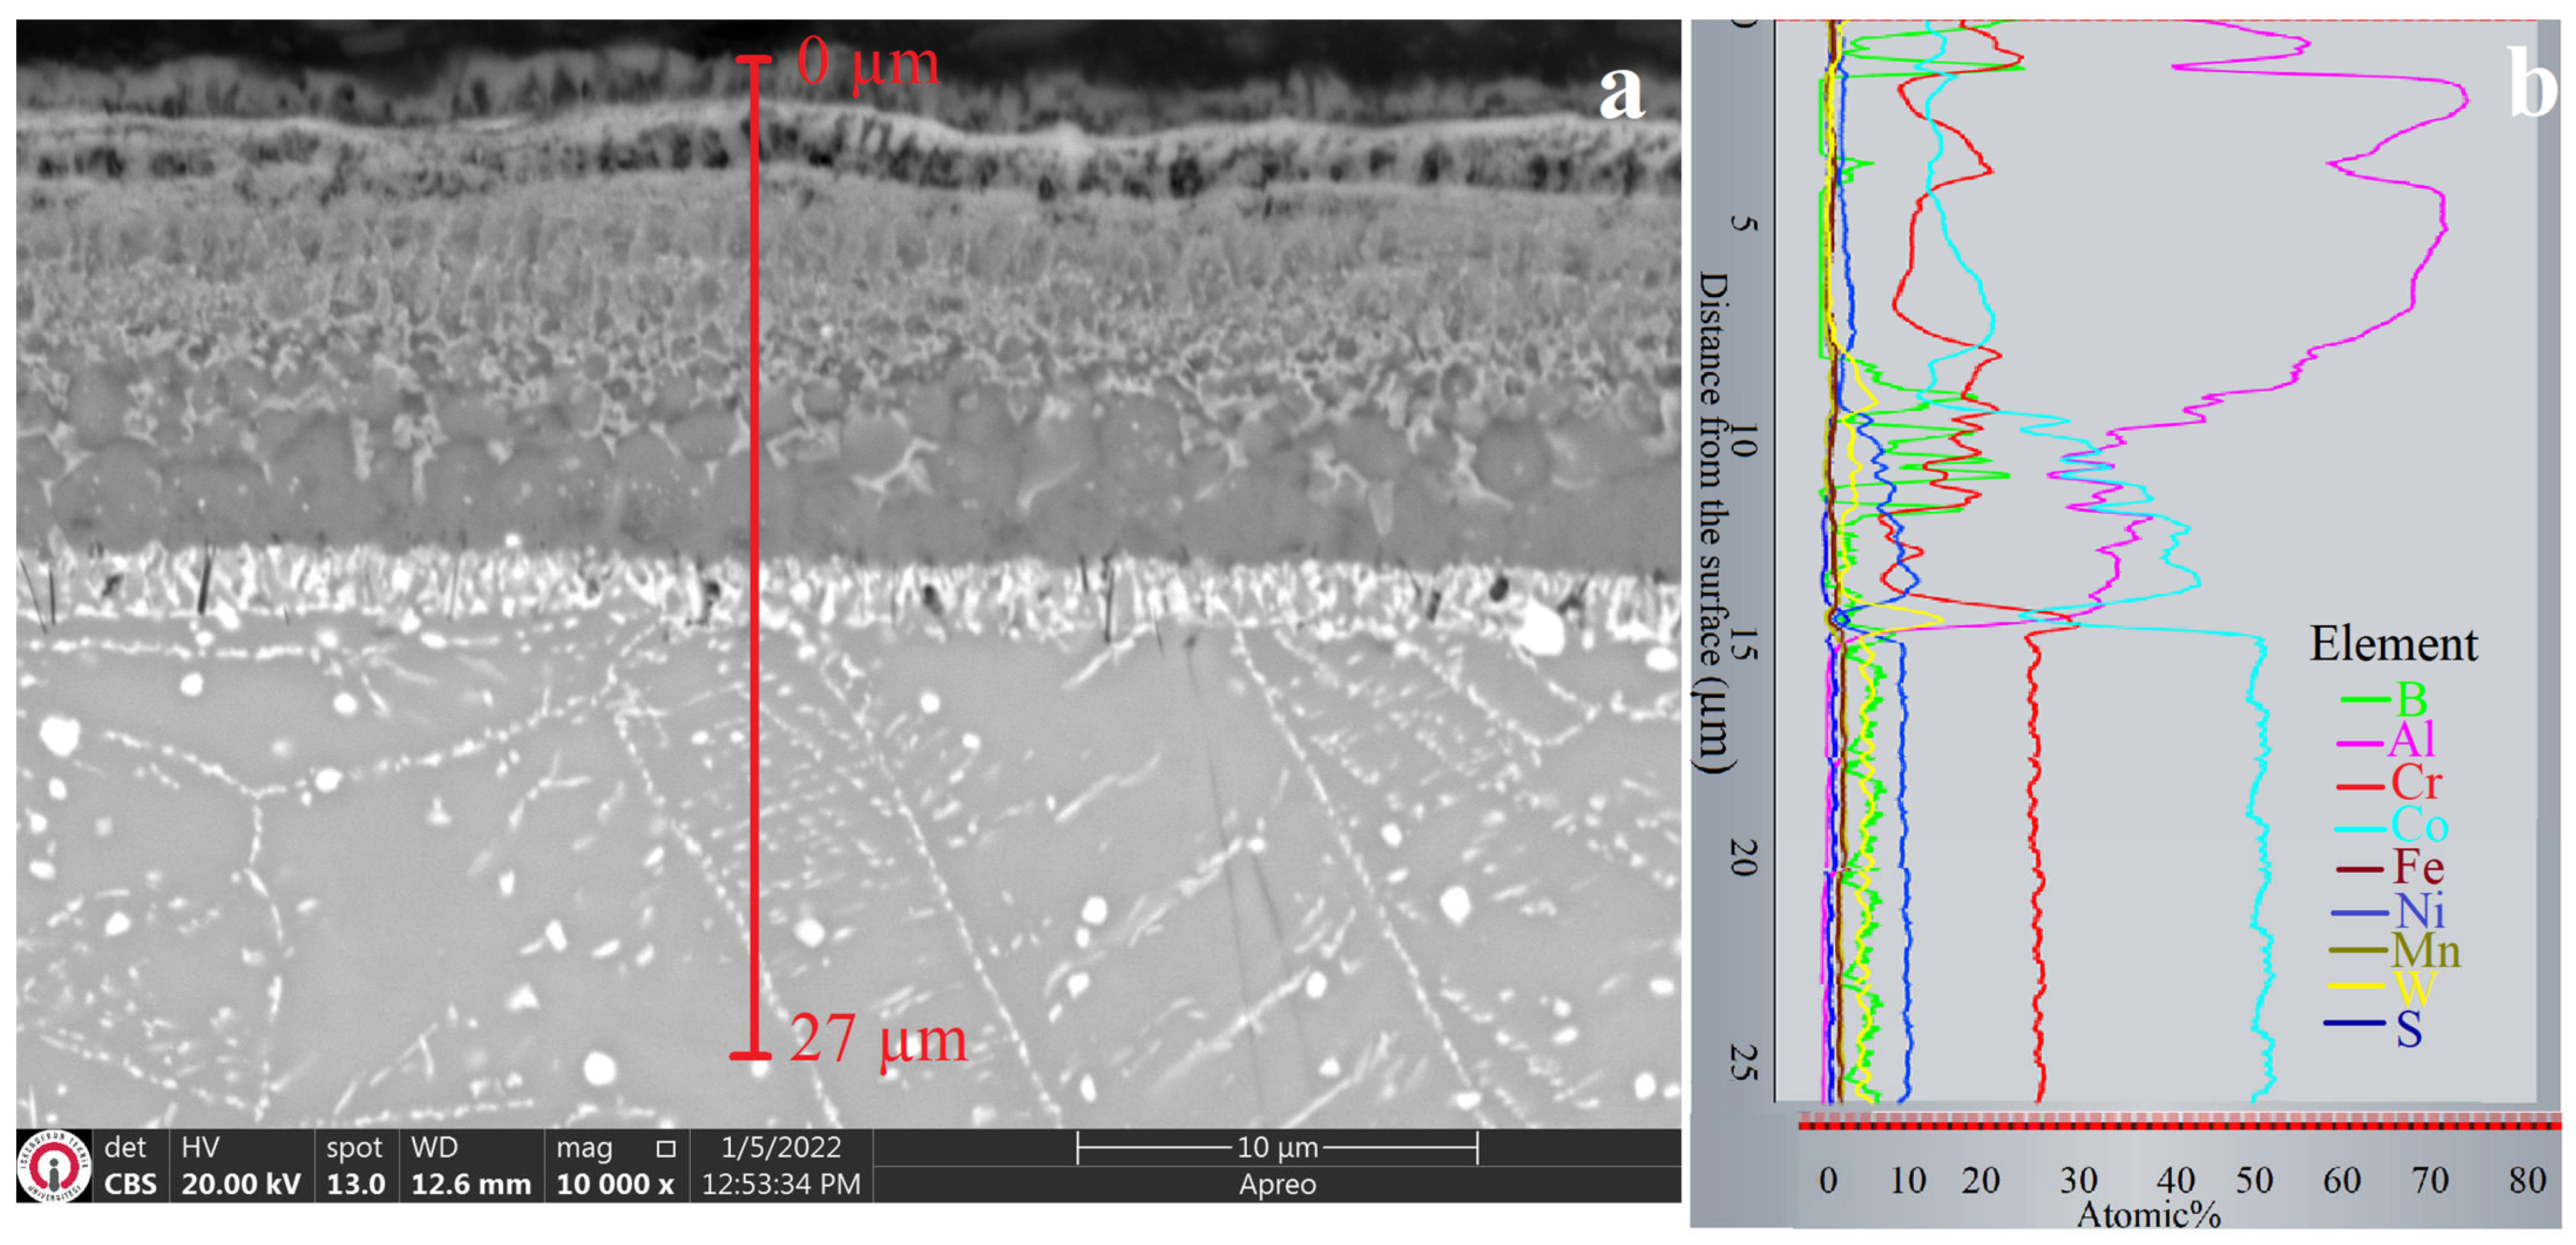
The boro-aluminized sample (Figure 4) exhibits a heterogeneous microstructure, unlike the aluminized and boronized samples. The EDS line analysis reveals boron diffusion on the outermost surface and between the coating and substrate. However, in the intermediate region, boron diffusion is minimal, except some regions that show lamellar boron compounds. Additionally, the boro-aluminized coating is considerably thinner compared to the aluminized and boronized samples, indicating limited solubility between aluminum and boron, which adversely affects coating growth kinetics. Only one study on boro-aluminizing superalloys reported NiAl, Ni3Al, and a small amount of CrB phases as the phase structure in Ni-based Mar-M247 superalloys [26]. Therefore, the presence of both boride and aluminide phases in the boro-aluminized sample is agreeable with the findings in the literature. Another important point is that about atm. %3–5 boron in the matrix is observed in the boronized (Figure 3) and boro-aluminized (Figure 4) samples. This is due to the high margin of error in detecting light elements such as boron in chemical compositions measured via EDS in SEM. When the studies in the literature are examined, it can be seen that the error is about 1% for Fe in the chemical composition determination with SEM-EDS, whereas it is 2% for heavy elements and about 3% for light elements [27].
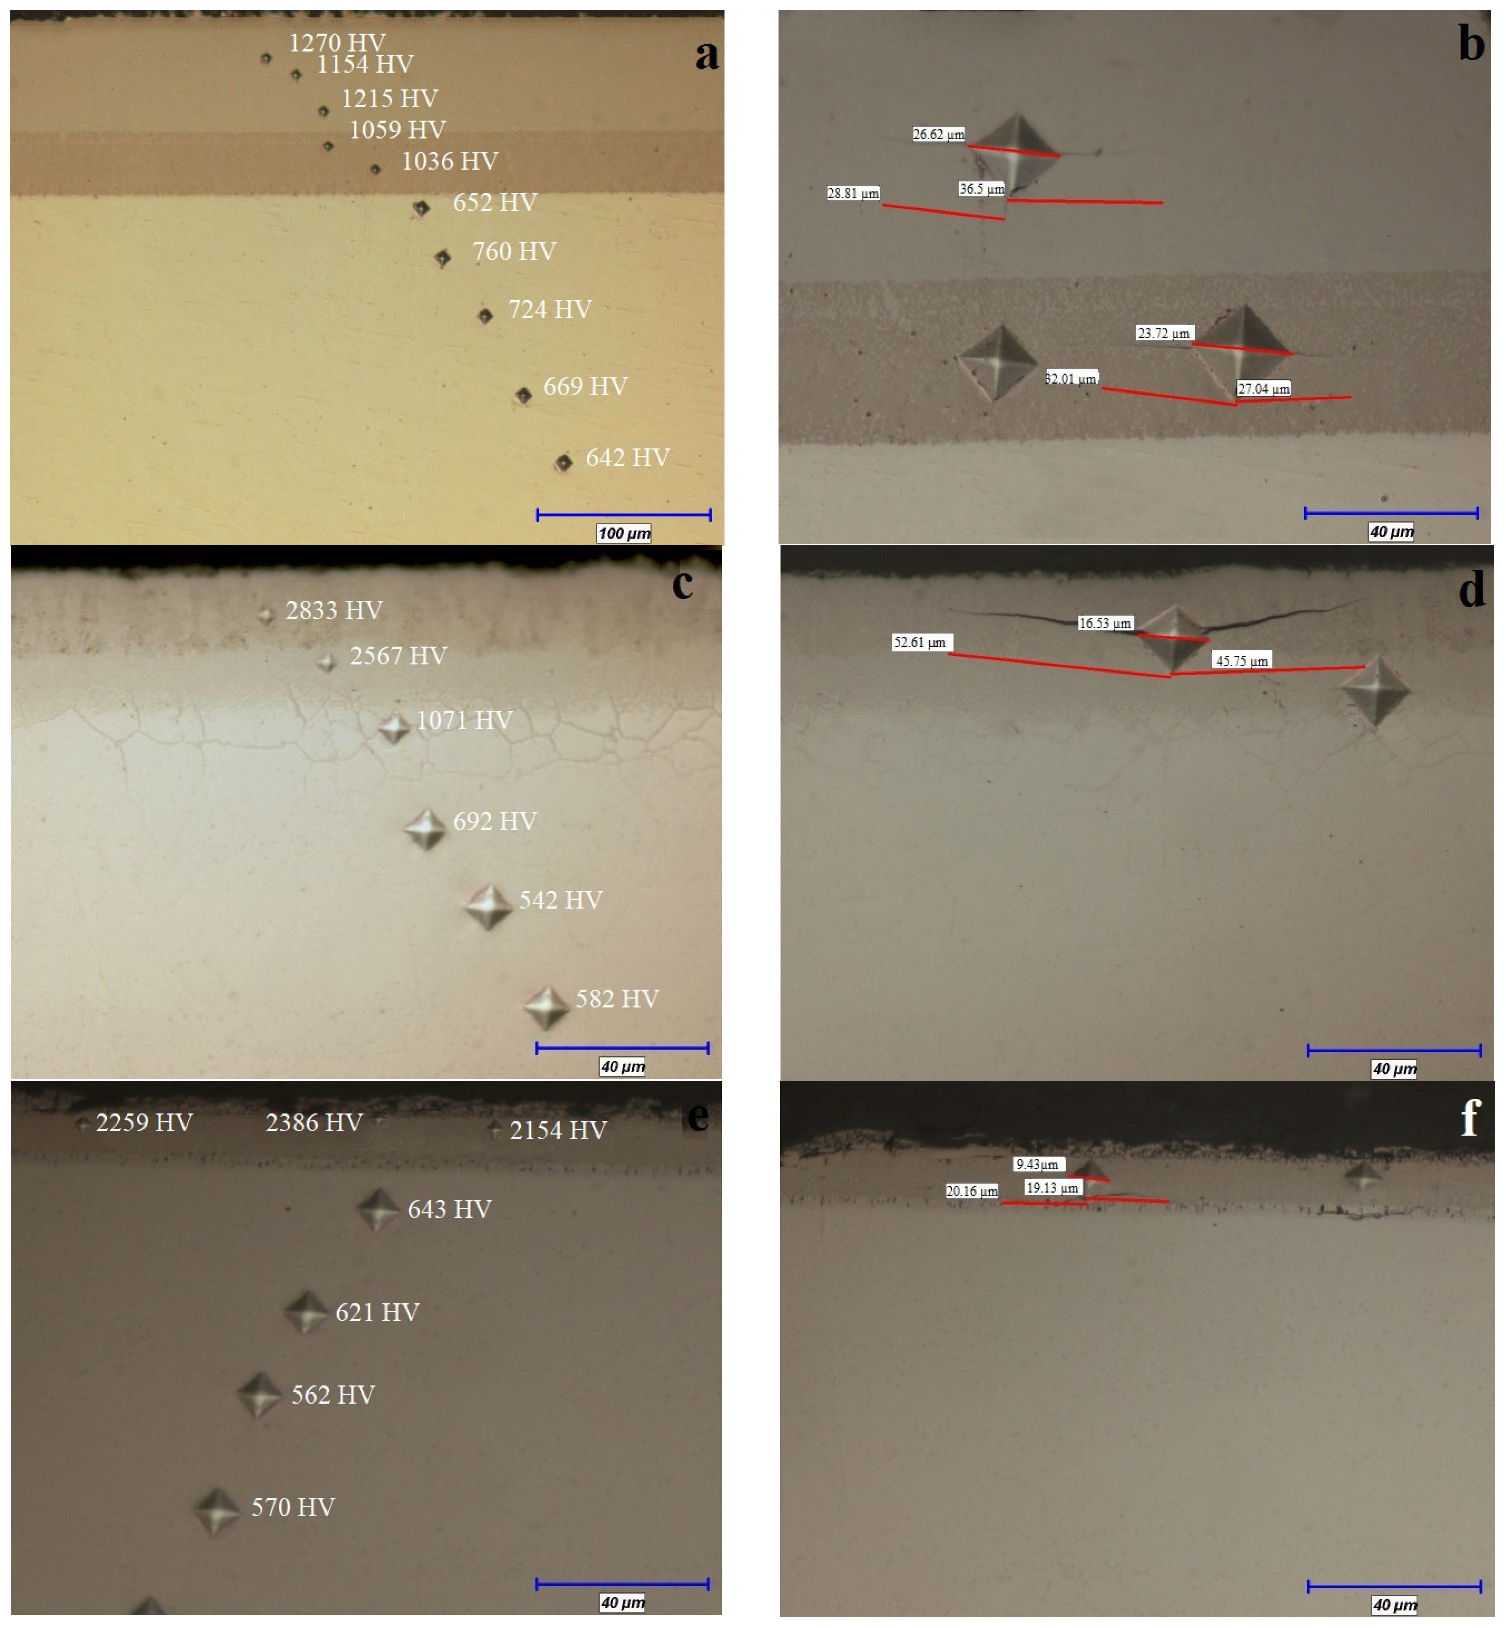
Figure 5 shows microhardness and fracture toughness measurements, while Table 1 provides nanoindentation hardness and elastic modulus values for the coatings.
As shown in Figure 5 and Table 1, the boronized sample exhibits the highest hardness of 2833 HV0.1, followed by the boro-aluminized sample, with a hardness value of 2386 HV0.1. The lower hardness in the boro-aluminized sample is attributed to its non-uniformity. The aluminide coating has the lowest hardness of 1270 HV0.1. These hardness values are consistent with the nanoindentation results in Table 1. Moreover, the coatings’ elastic modulus values surpass that of the untreated material. Considering Figure 5, it is observed that the hardness generally decreases from the surface to the matrix in all samples. This decrease is attributed to the reduced diffusion of the diffused element towards the interior. While there is a significant decrease in hardness between the coating and diffusion zone, the relatively small decrease in hardness within the matrix region indicates that the matrix remains unaffected by heat treatments and maintains its original structure. The highest hardness values are found in the boride layer due to the presence of harder phases like Cr-B and W-B in the Co-B and Co2B phases [19,20,21]. Additionally, numerous studies have reported that phases containing aluminum exhibit lower hardness values compared to boride phases [18,24,26].
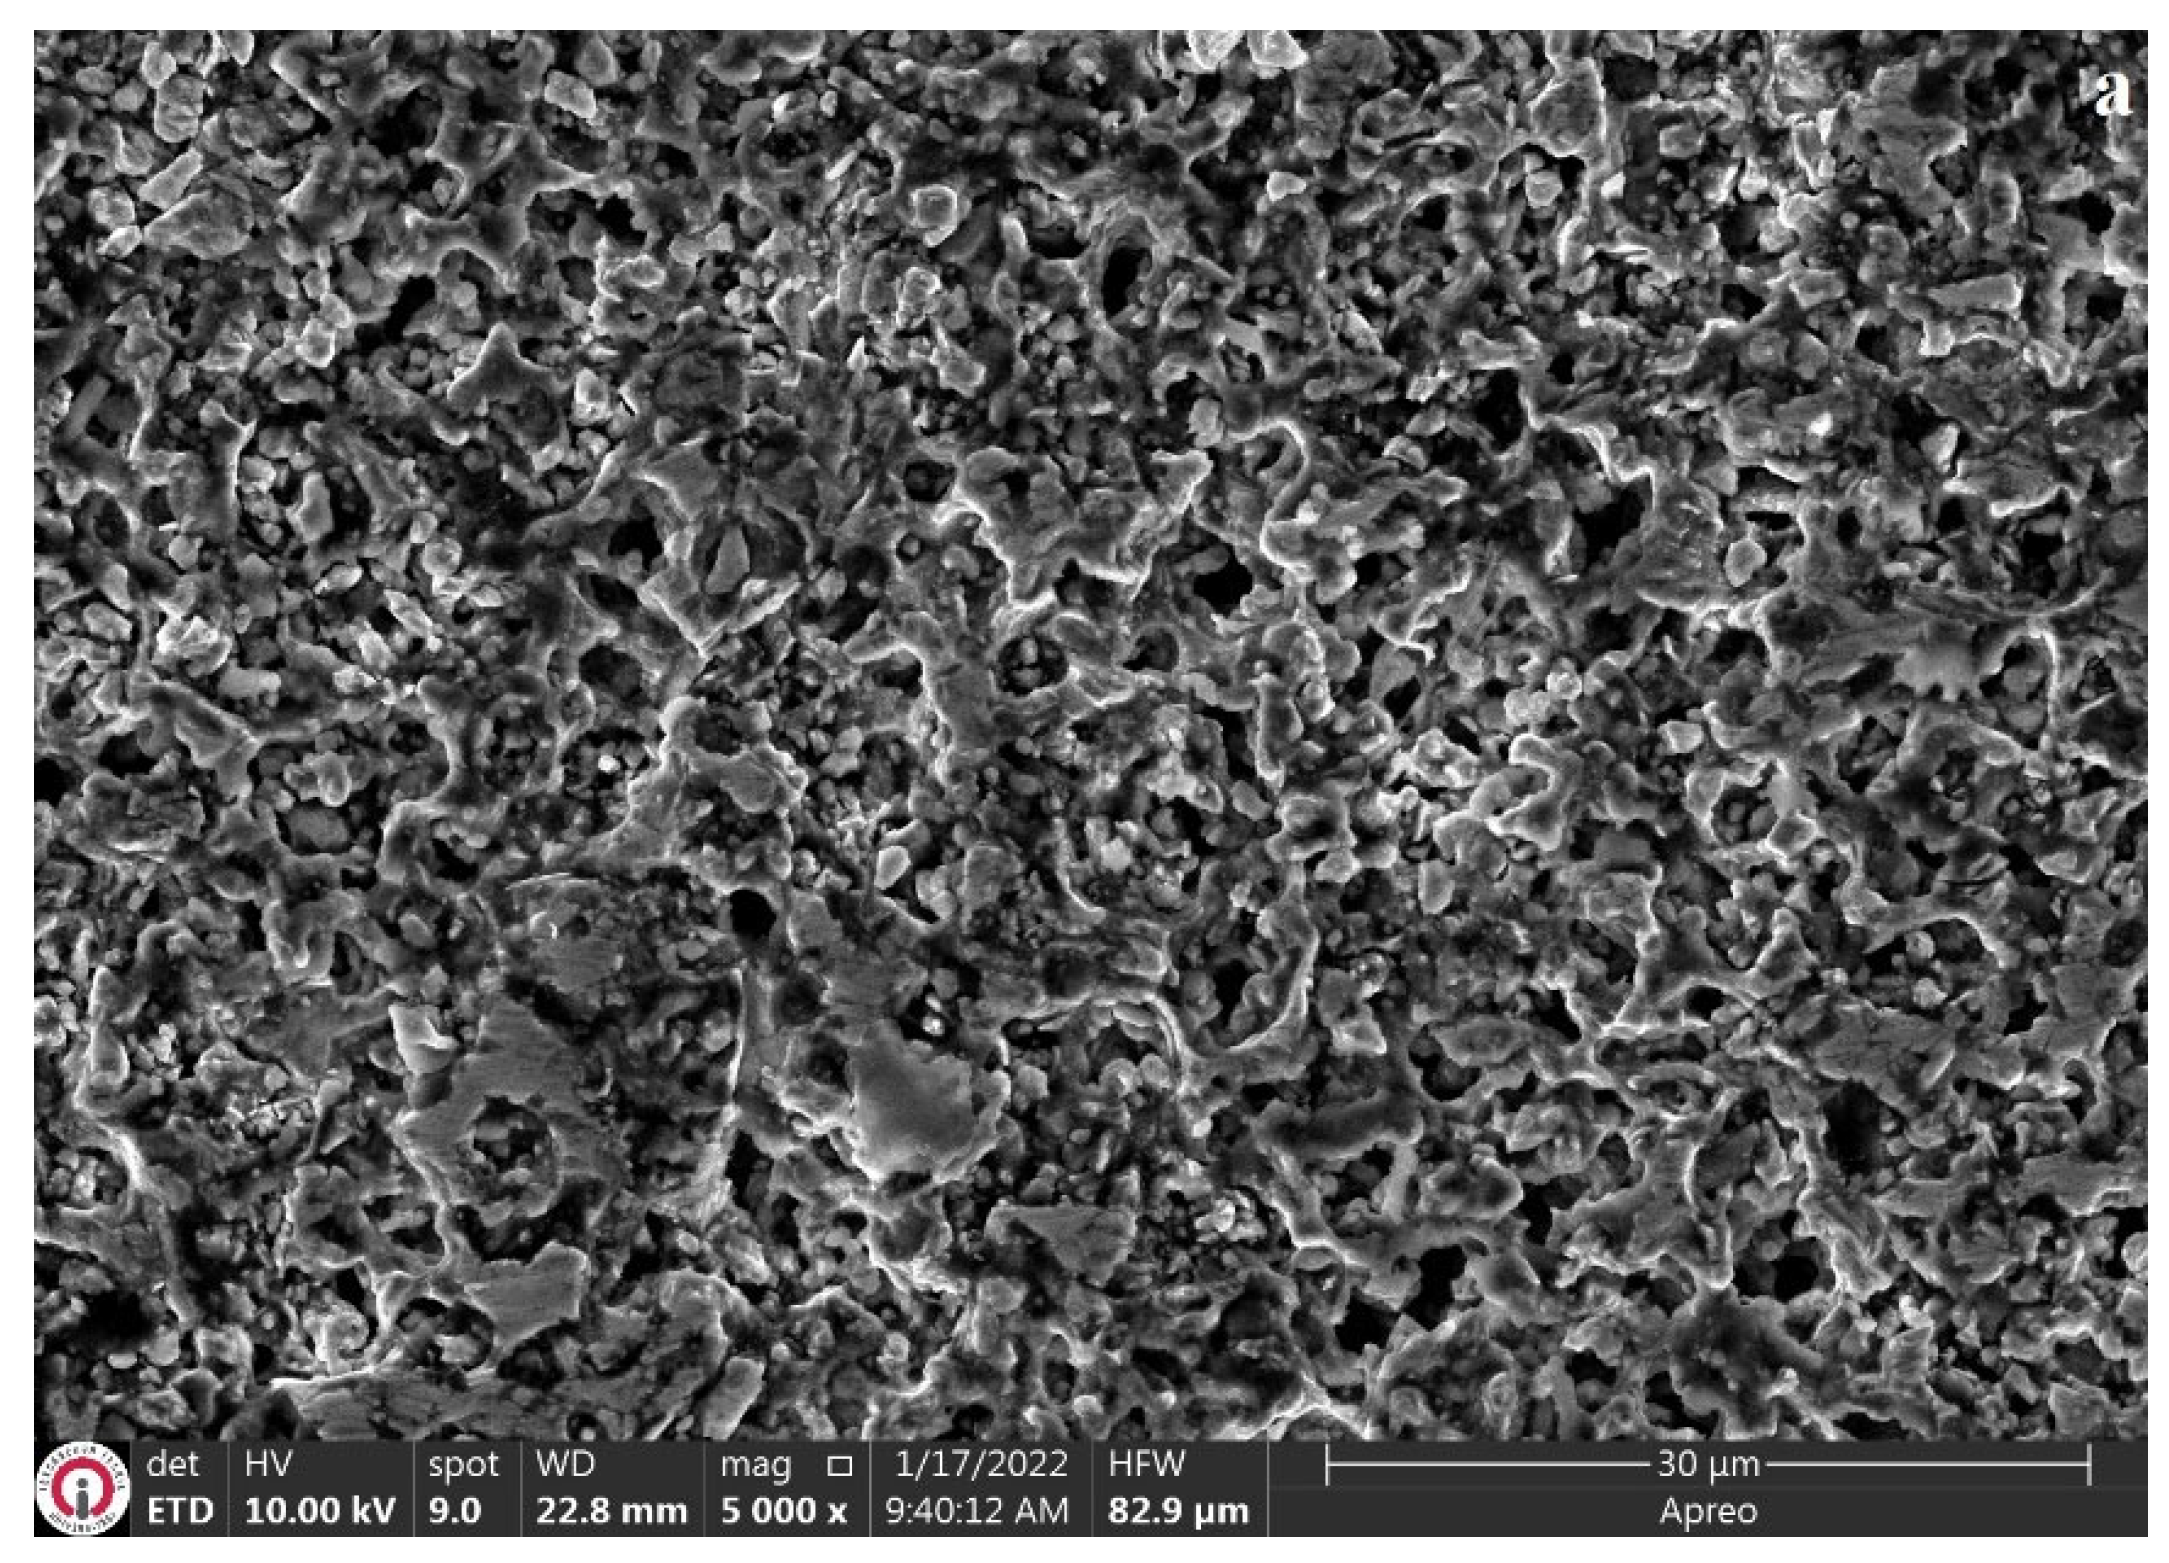
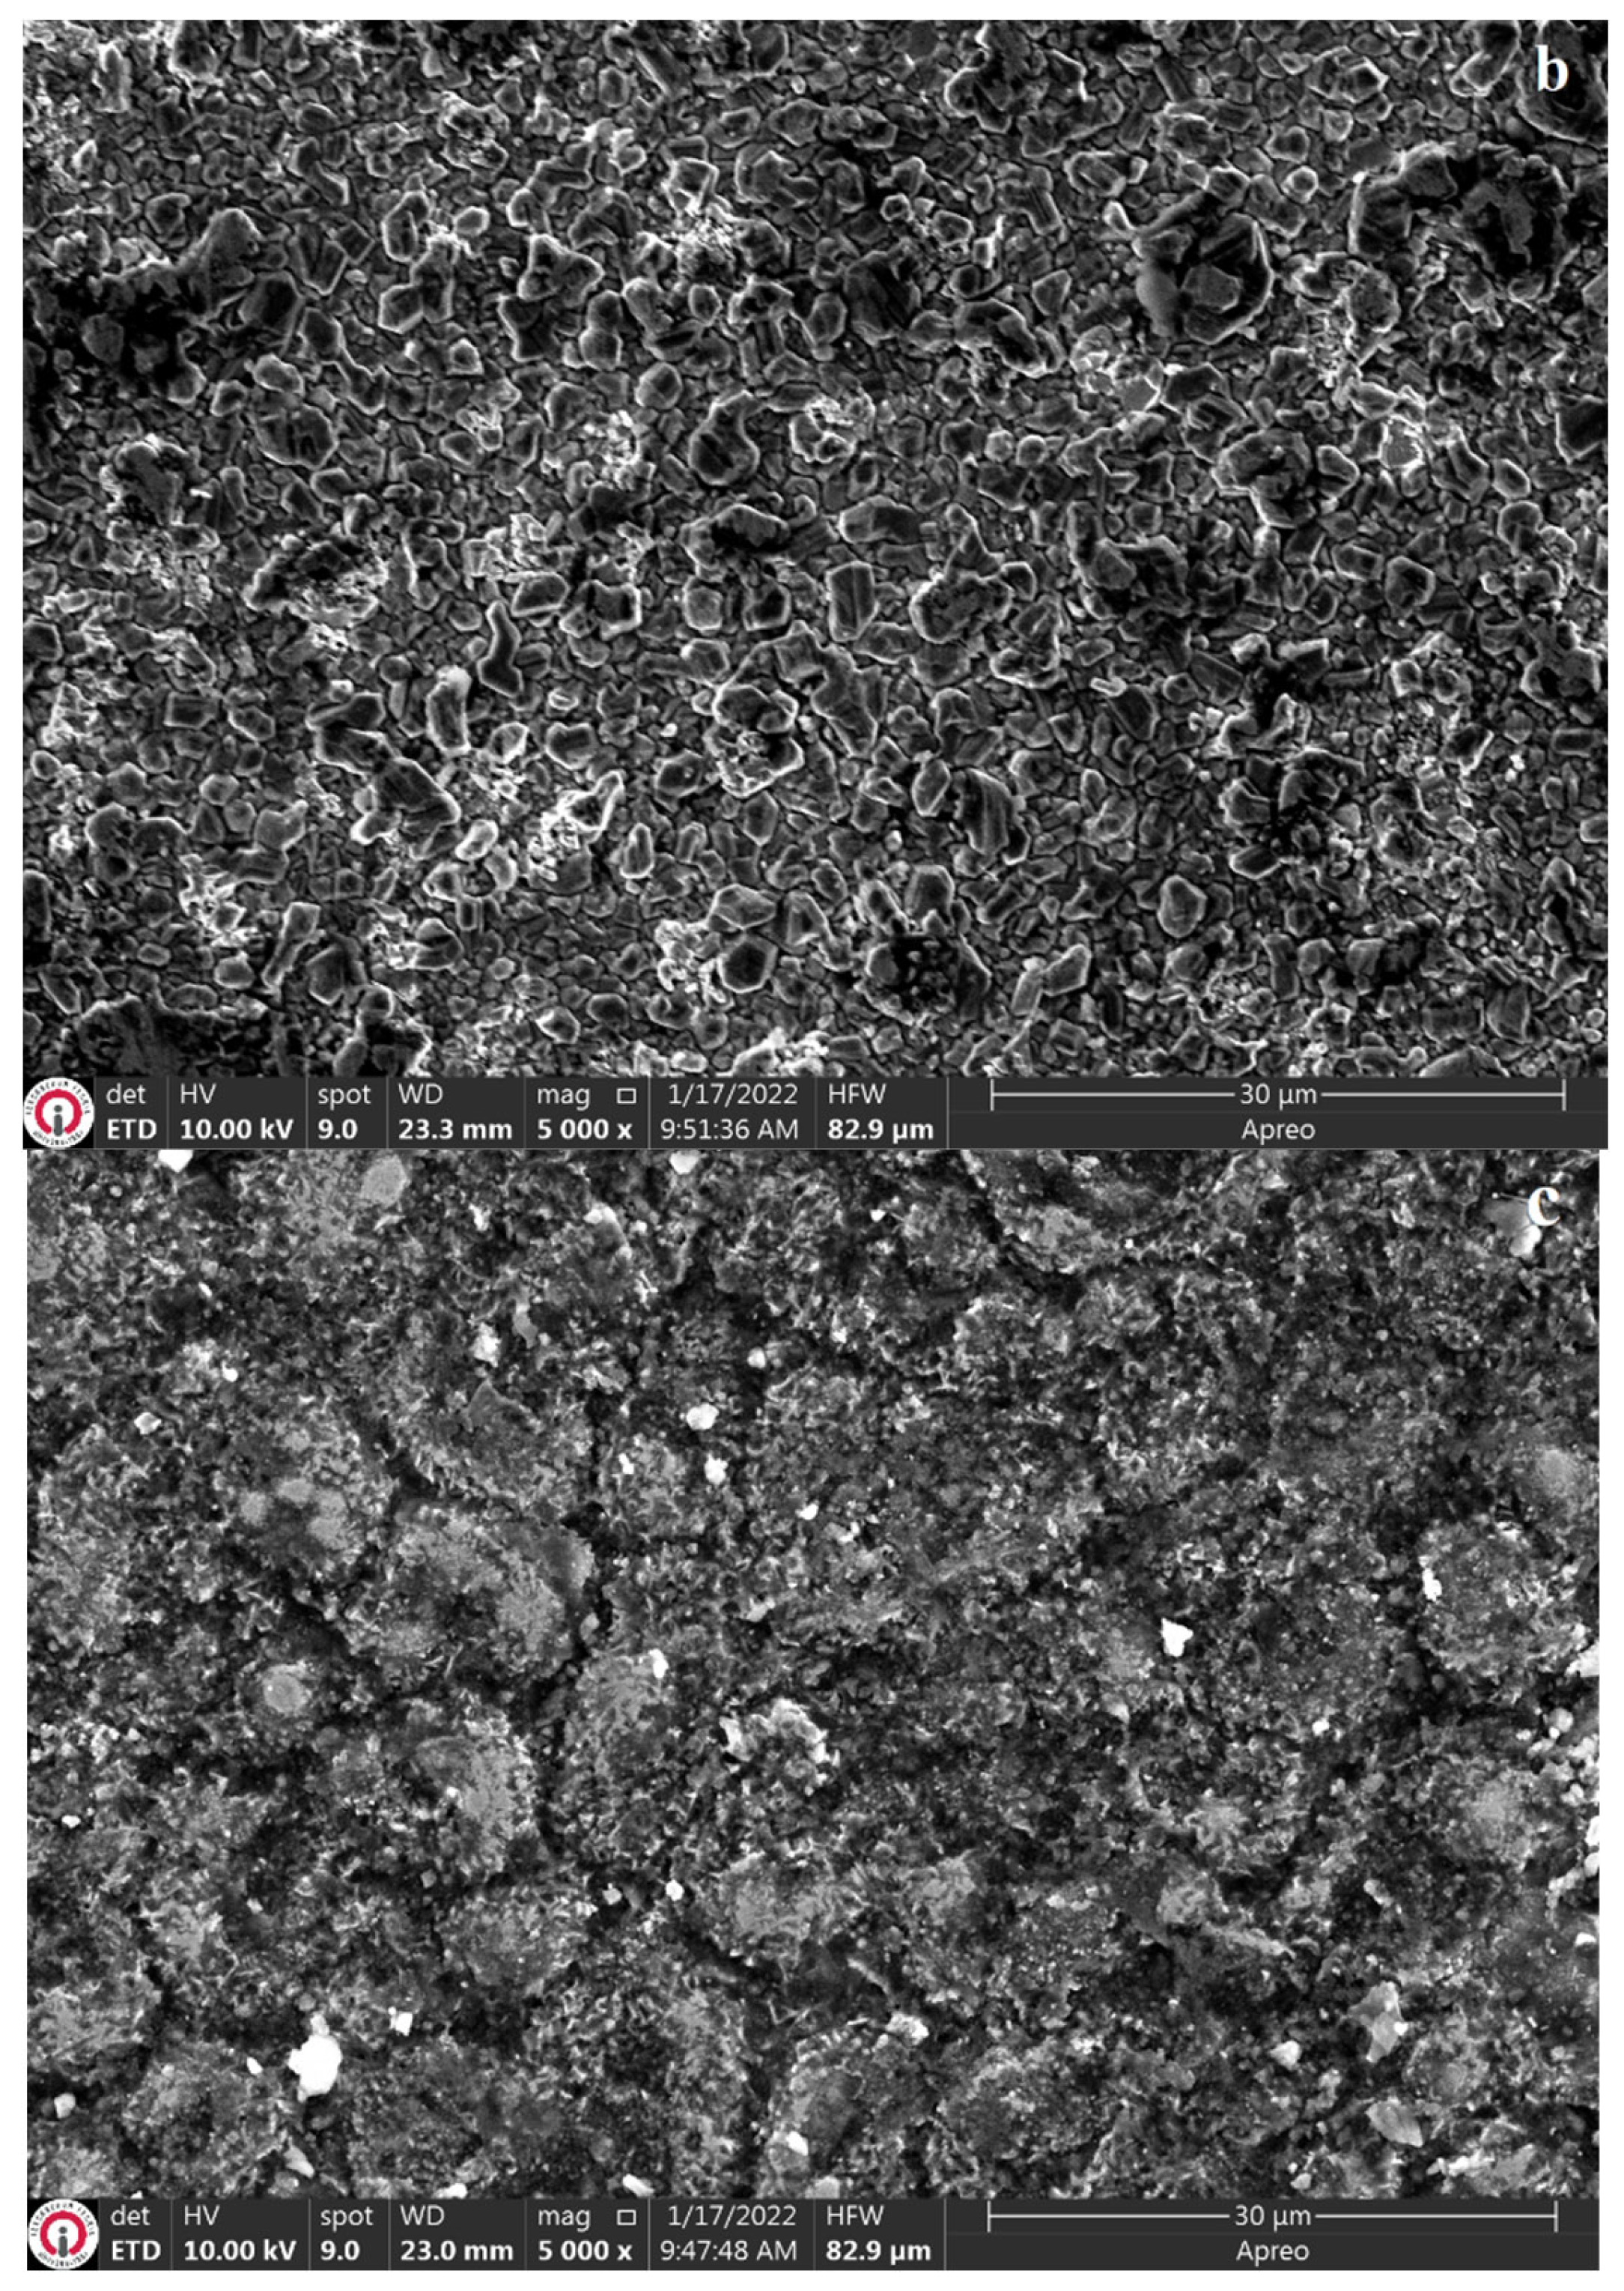
Figure 6 presents the SEM surface view of the (a) aluminized, (b) boronized, and (c) boro-aluminized samples.
A porous structure was observed on the surface when the aluminized sample was examined (Figure 6a). In contrast, in the boronized sample (Figure 6b), the surface had a more crystalline appearance but formed as many small dendritic structures. In the boro-aluminized sample (Figure 6c), although larger crystalline grains and grain boundaries were observed, the surface had a smoother structure. The average roughness values taken over the samples were 1.25, 0.26, and 0.21 for aluminizing, boronizing, and boro-aluminizing, respectively.

3.2. Friction and Wear Behavior

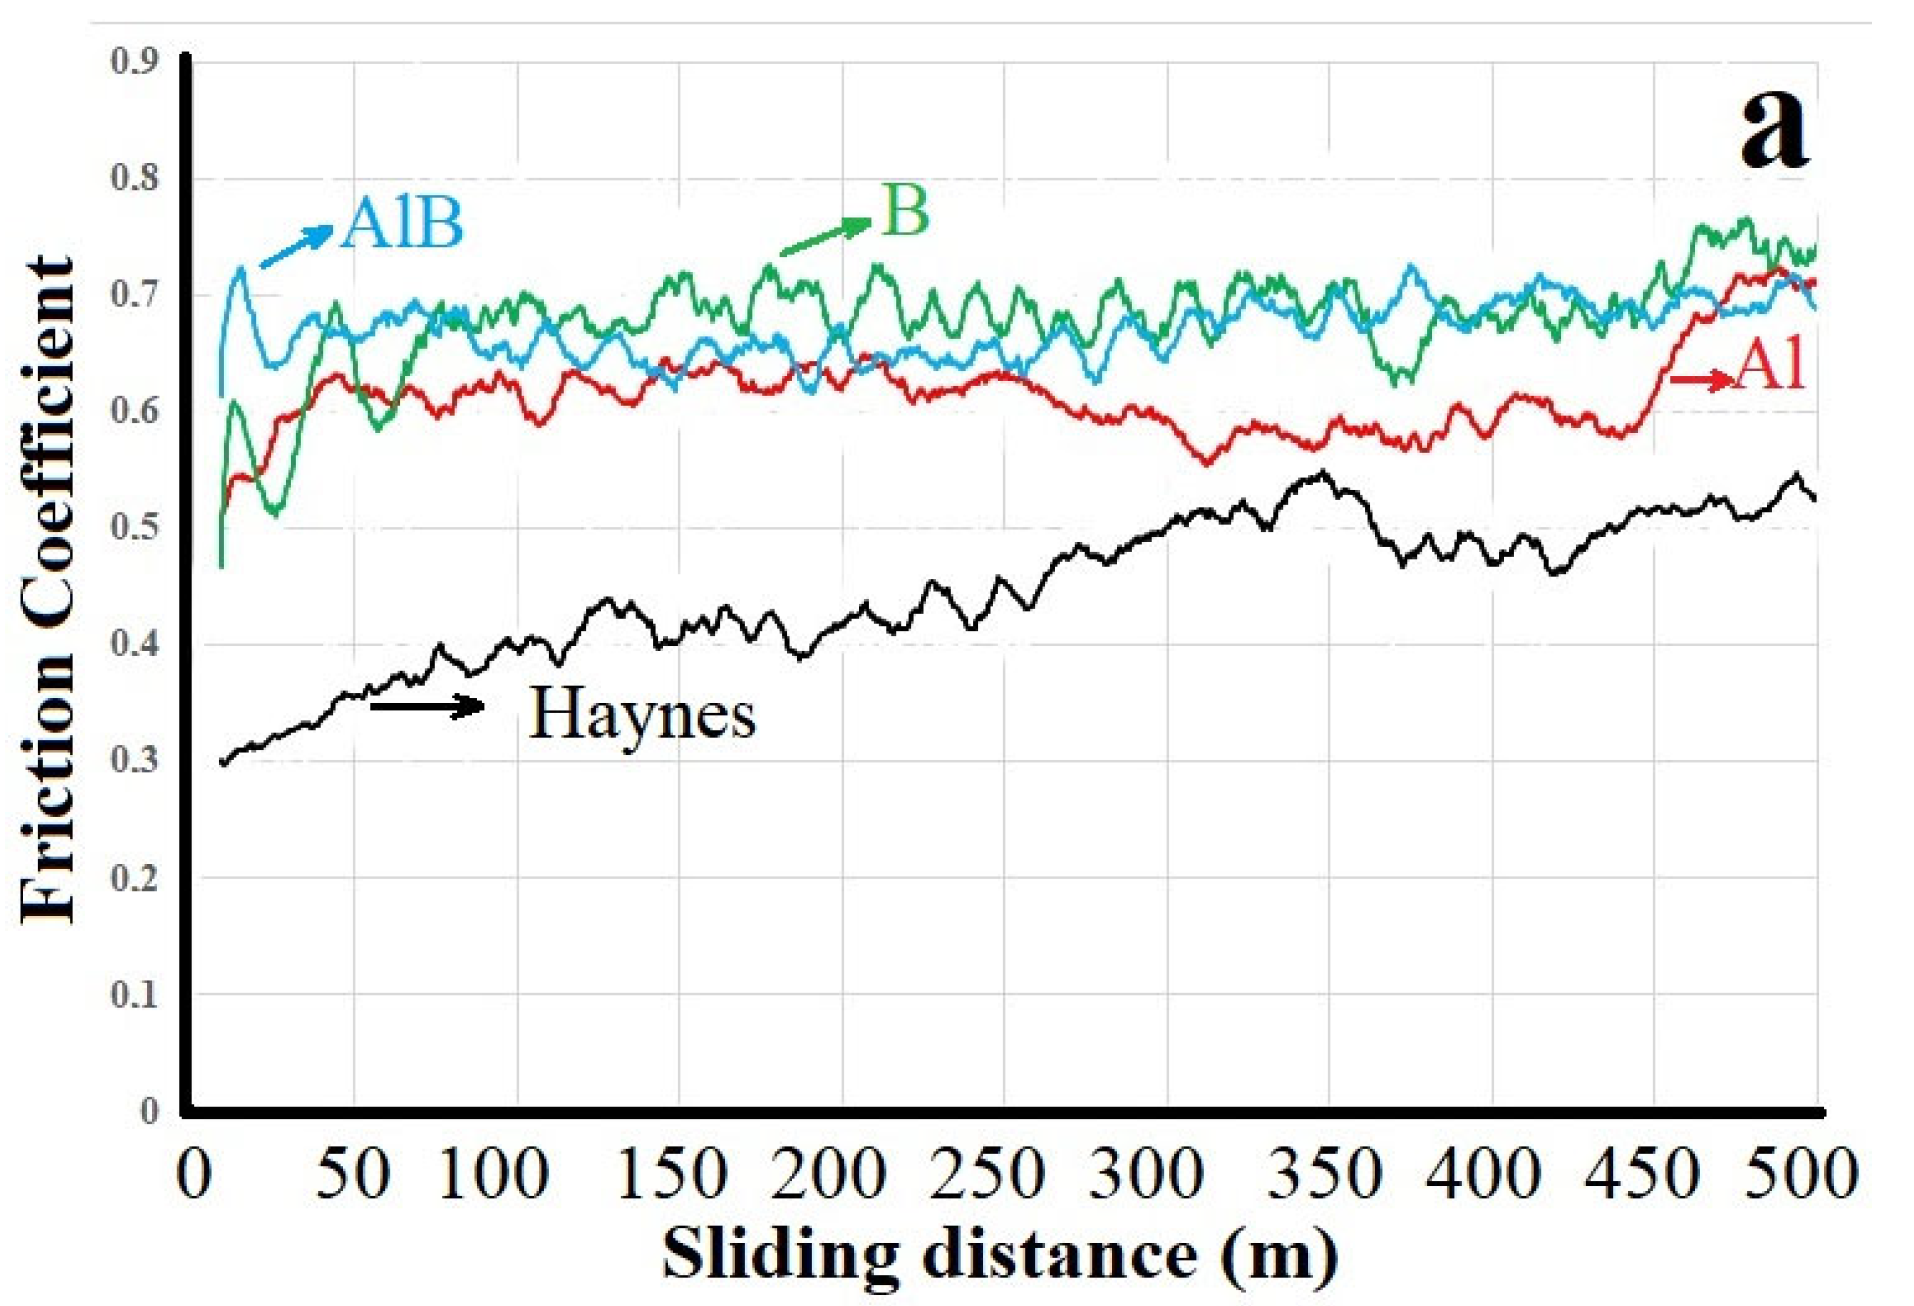
Figure 7 displays the friction coefficient graphs of uncoated and coated samples at room temperature and 500 °C.
In Figure 7a, the untreated Haynes 25 alloy exhibits a lower friction coefficient than the thermochemically coated samples. However, the friction coefficient continuously increases as the sliding distance increases. This is due to the untreated alloy’s lower surface hardness, leading to increased contact area as the abrasive ball sinks into the substrate. The coated samples initially show similar friction coefficient trends with each other. Then, the boronized and boro-aluminized samples maintain a stable friction coefficient of around 0.65, while the aluminized sample exhibits a decrease within the range of 250–450 m sliding distance, followed by an increase between 450 and 500 m. The higher friction coefficient in the boronized and boro-aluminized samples is attributed to the hardness of the boride phases, which provide excellent wear resistance, as mentioned in a previous study [28]. In Figure 7b, the untreated Haynes 25 alloy and the aluminized sample show a stable trend with a friction coefficient of approximately 0.4 throughout the high-temperature wear test. This indicates a lower friction coefficient compared to that at room temperature, possibly due to sample softening caused by the high temperature and preheating process. The boronized and boro-aluminized samples, however, exhibit higher friction coefficient trends at high temperature. This can be attributed to the stability of boride phases, such as CoB, at elevated temperatures and the oxidation of these phases during the open-air wear tests at 500 °C. The oxidized compounds possibly acted as abrasive particles, leading to a higher friction coefficient [29,30].
Table 2 presents the wear rates of the samples. Both at room temperature and 500 °C, the untreated Haynes alloy exhibits the highest wear rate. Among the thermochemically coated samples, the aluminized sample has higher wear volume losses compared to the boronized and boro-aluminized samples. At room temperature, the wear rates of the boronized and boro-aluminized samples are similar. However, at 500 °C, the boro-aluminized sample demonstrates approximately 1.7 times better wear resistance than the boronized sample.
At room temperature, the untreated Haynes alloy, having the lowest hardness, experiences the highest wear rate. The central contact area between the abrasive ball and the substrate is expected to have the most intense interaction-induced friction forces, as indicated by the darker contrast in the SEM wear trace photographs. These regions are subject to both compressive and shearing loads, with the softer surface allowing easier penetration by the abrasive ball initially [29]. However, strain hardening of the material surface and the formation of oxide layers due to friction heat contribute to the material’s resistance for a certain period [31,32]. The resistance depends on the material’s chemical composition and the composition of the oxide layer. Nevertheless, the formed oxide layer will eventually break, exhibiting an abrasive effect. The second highest wear rate at room temperature is observed in the aluminized sample, which has relatively low hardness compared to other samples. X-ray examinations revealed the presence of Co2Al5 and Co2CrAl phases in this sample after the aluminizing treatment. Insufficient bonding forces between these formed phases during interaction may lead to rapid material transfer. Additionally, wear debris particles included in the system may cause damage due to their abrasive effect, lacking sufficient bonding strength on the surface. This is evident from the higher wear depth in the aluminized sample compared to the untreated sample, as shown in Table 2. At room temperature, the boronized sample exhibits the best wear resistance due to its high hardness, which directly affects the compressive and shearing forces that cause damage to the opposing surface. On the other hand, the boro-aluminized sample demonstrates wear resistance similar to the borided samples, despite having a lower hardness than the boronized samples. This is attributed to its higher resistance to crack initiation and higher load-carrying capacity, indicated by the higher H3/E2 values [33]. The sub-surface hardness of the boro-aluminized sample effectively withstands the opposing surface, allowing the oxide layer formed during friction to remain on the surface and act as both a load-bearing and lubricating agent, reducing the wear rate.
The relative wear rates of the coated samples are slightly lower than those of the untreated samples at high temperatures, and the ranking of wear rates remains similar to that at room temperature. The boro-aluminized sample has a slightly lower wear rate than the boronized sample at high temperatures. The influence of the tribological environment, especially the effect of temperature, becomes more significant. The increased affinity of elements with oxygen at higher temperatures leads to the faster formation of an oxide layer on the surface, while the thermal softening of the material surface facilitates easier material transfer. This was evident in the wear tracks of the samples tested at 500 °C, which exhibited more plastic deformation, extrusion marks, and the increased presence of wear debris [34,35]. The higher wear resistance of the boro-aluminized sample at 500 °C can be attributed to two factors. Firstly, the significant amount of Al in the boron-aluminized sample slowed down the growth kinetics of the oxide layer, resulting in reduced oxidation and less material removal during wear [36]. This was supported by the lowest wear track depth observed in this sample. The second reason could be related to the effect of the hardness–fracture toughness relationship on wear resistance. Although fracture toughness and wear resistance are different properties, they are interconnected in hard coatings. Higher fracture toughness can contribute to improved wear resistance, but an optimal balance between toughness and hardness is crucial. In the absence of an optimal balance, the hard coating layer may fracture, triggering three-body abrasion and resulting in more material loss during wear. On the other hand, if the hardness is low, it may not provide sufficient resistance to plastic deformation against abrasive contact. In this study, it can be suggested that the boron-aluminized sample exhibits a more optimal level between hardness and fracture toughness compared to the other samples, as it shows comparable wear resistance to the boronized sample with the hardest coating at room temperature, and it demonstrates higher wear resistance than the boronized sample in the high-temperature wear test.

3.3. Characterization of Wear Mechanisms

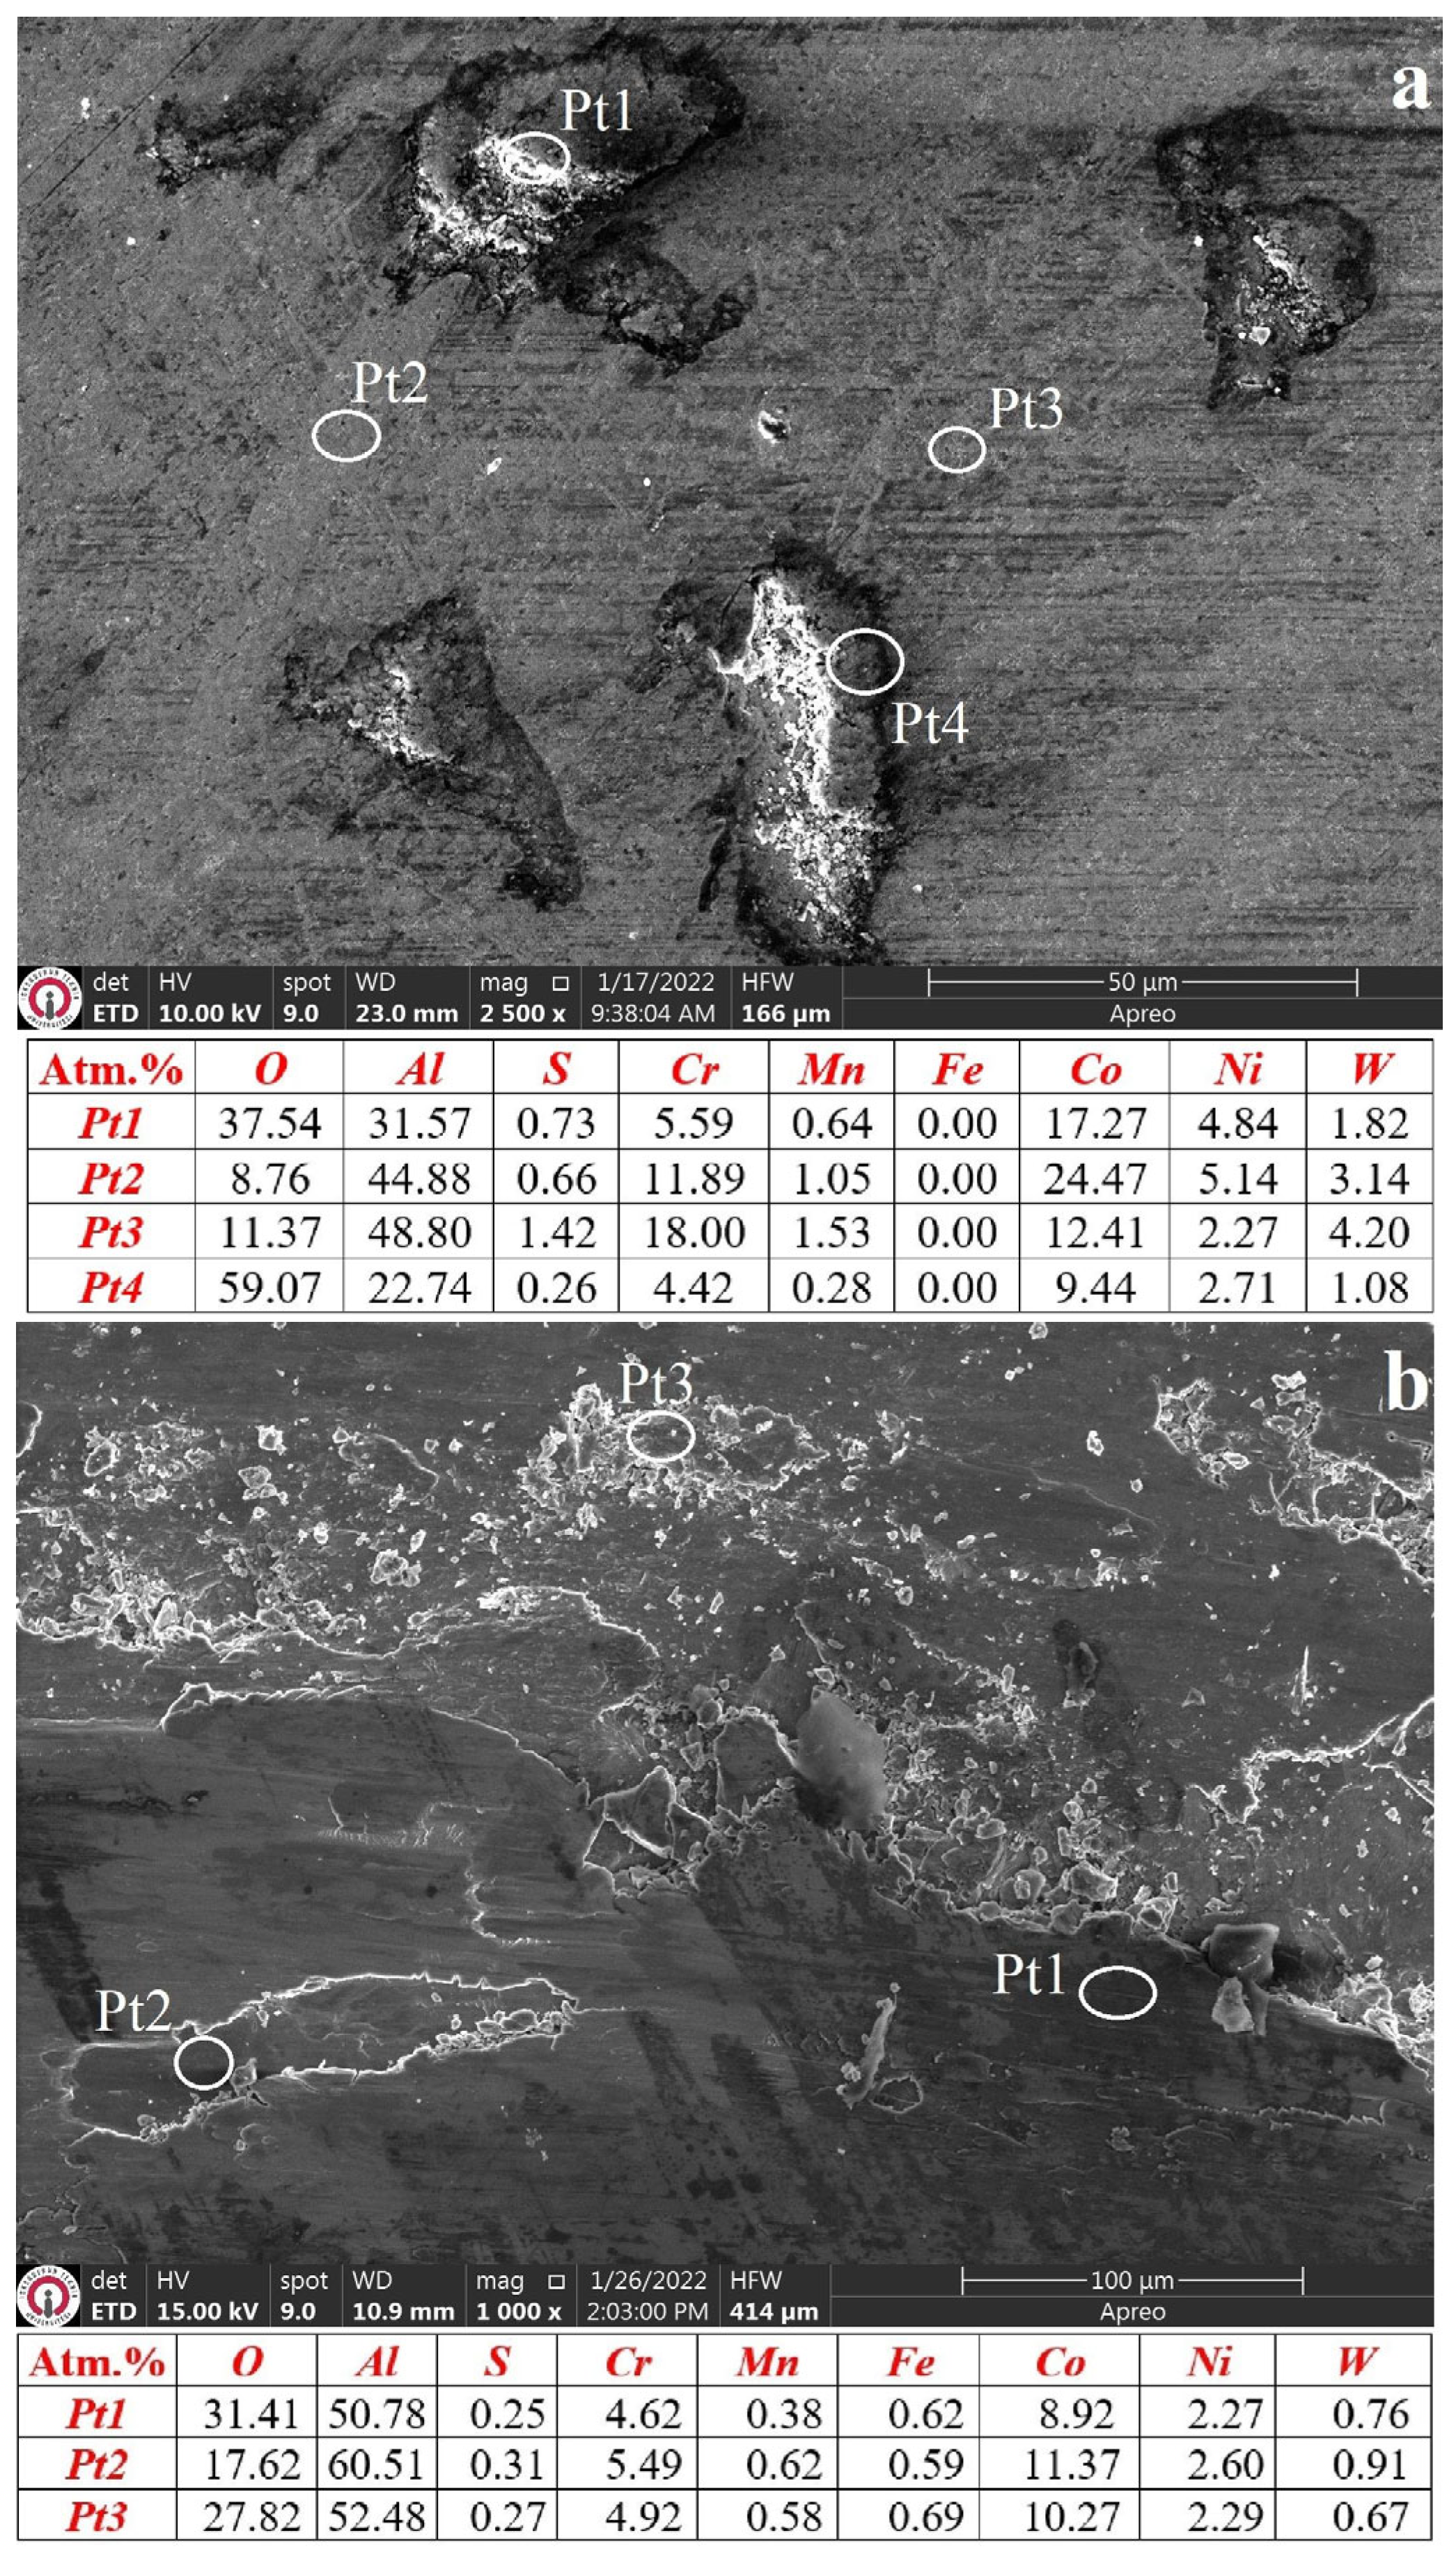
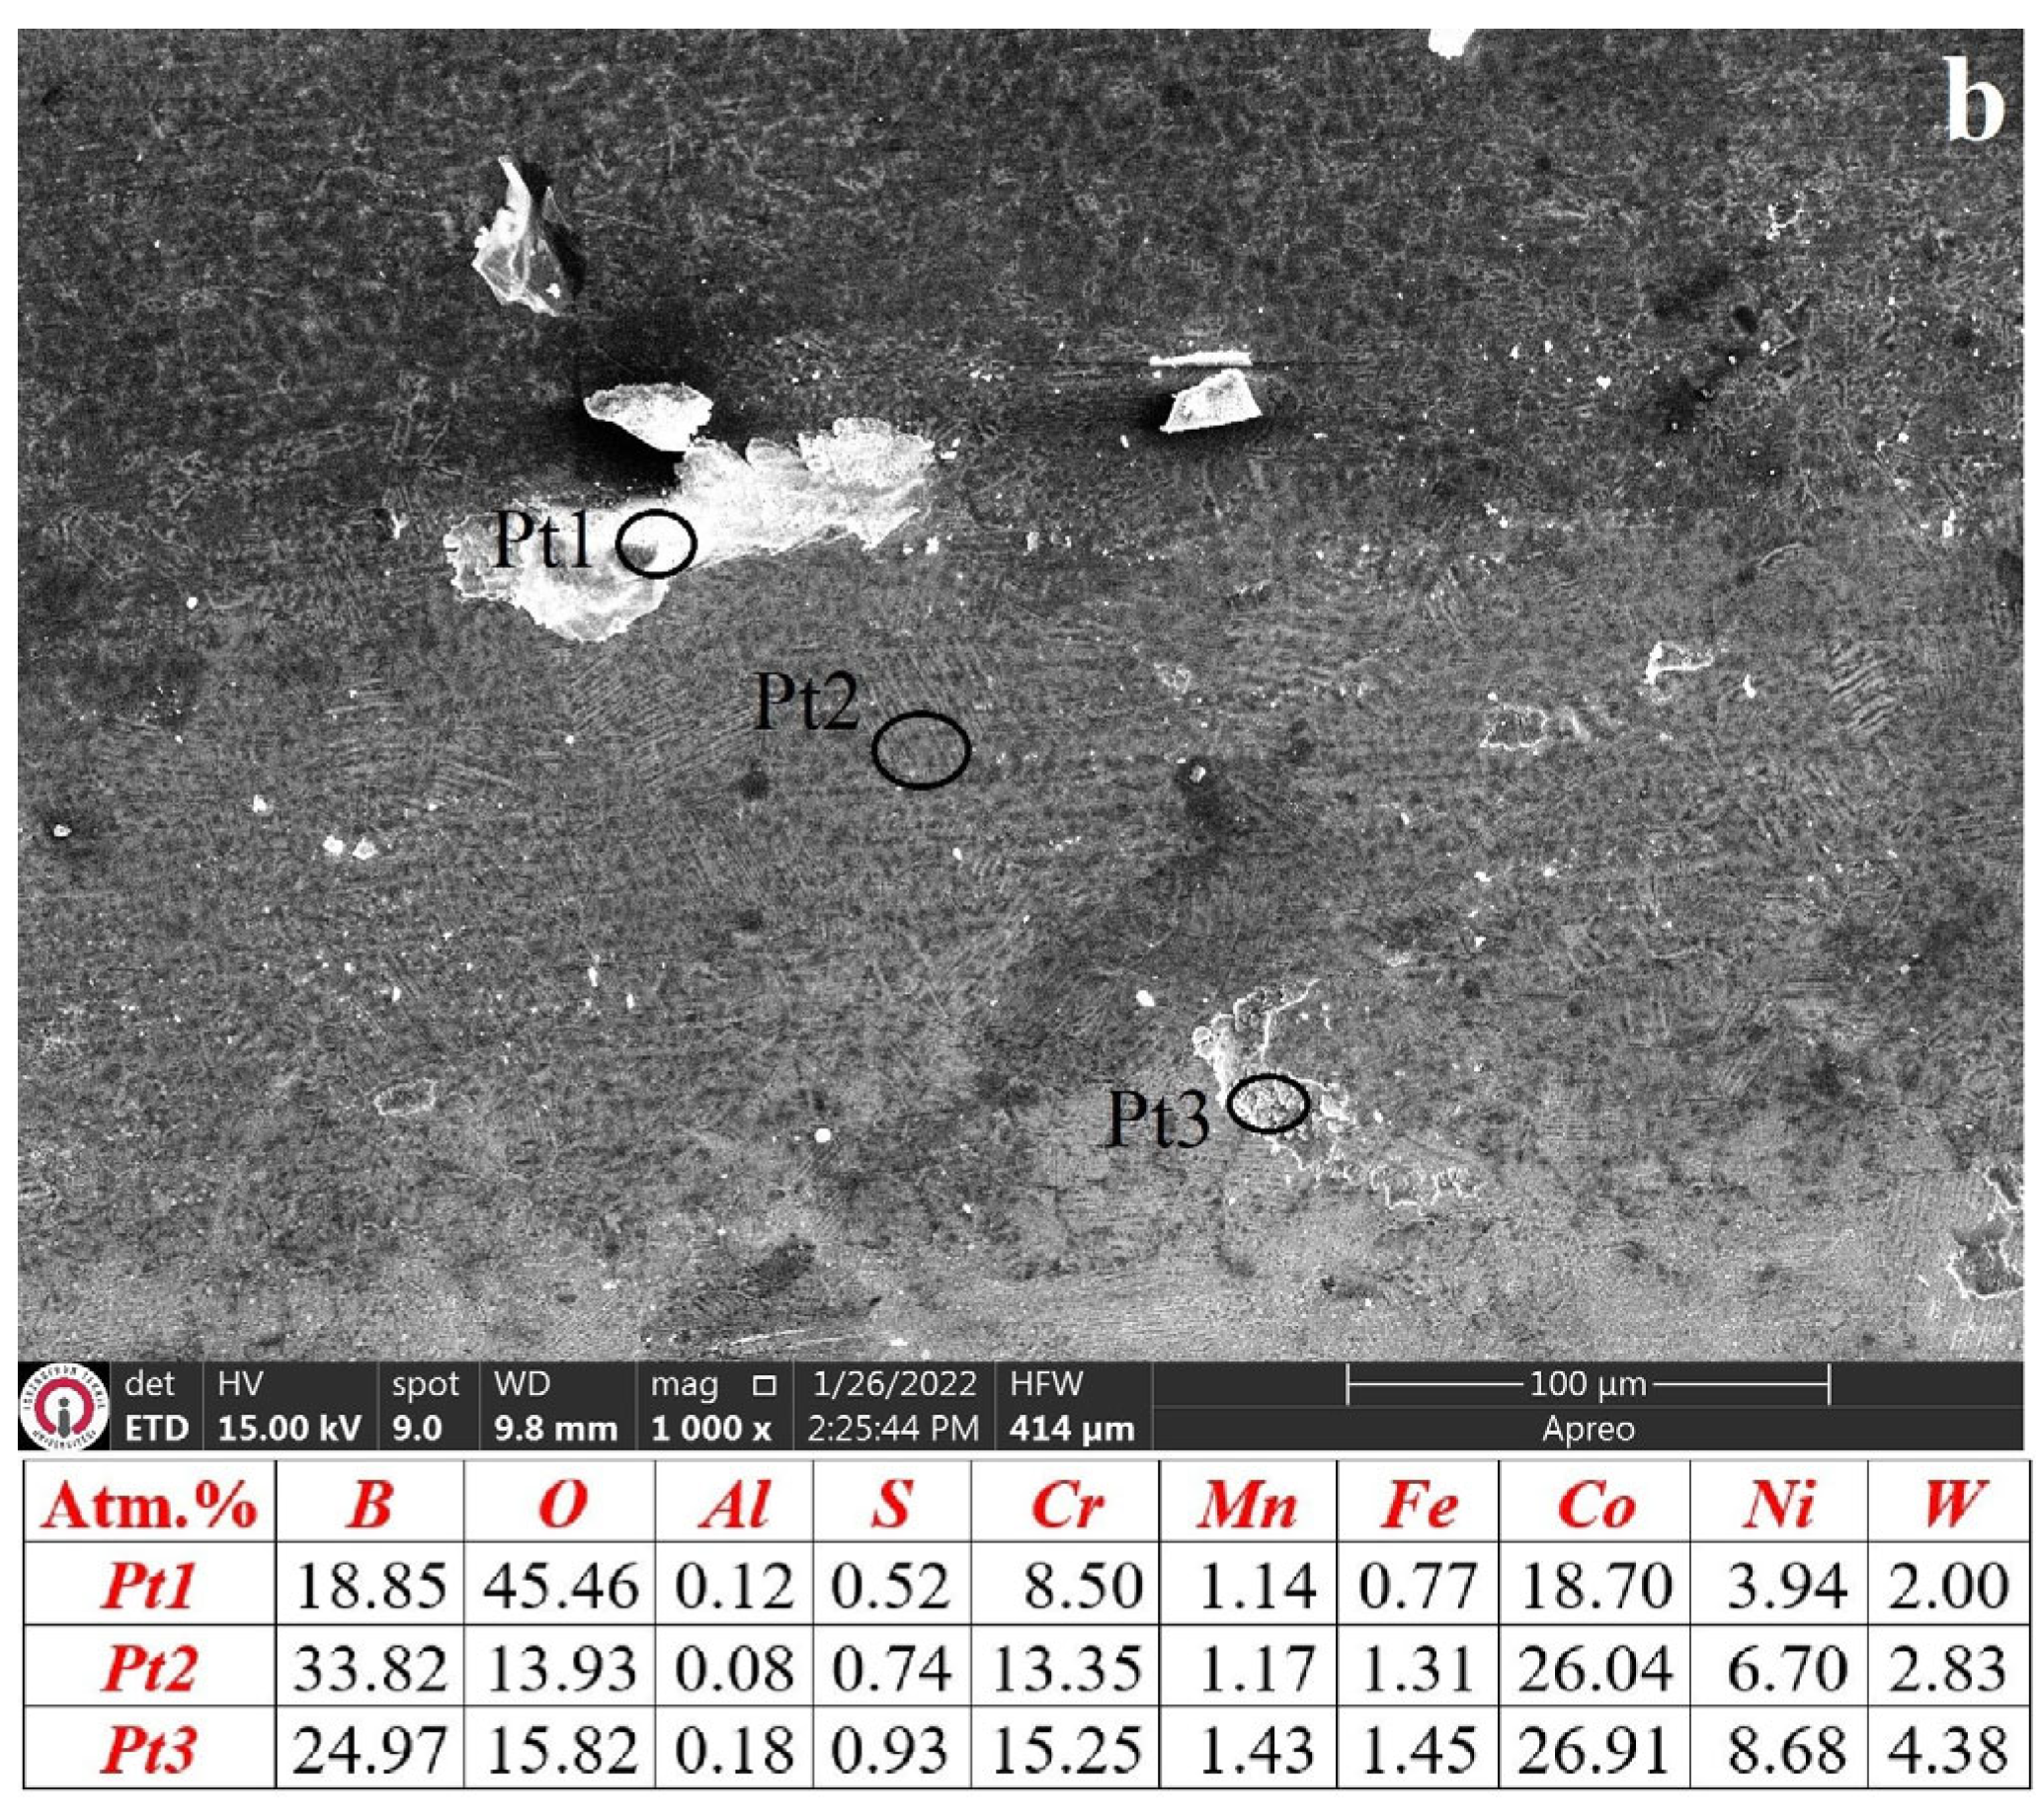
Worn surface SEM images and EDS analyses of uncoated and thermochemically coated samples are presented in Figure 8, Figure 9, Figure 10 and Figure 11.
When examining the gray and black regions in Figure 8a, it is evident that the oxidation rate is increased, particularly in the black areas. Additionally, the presence of extruded wear debris on the surface and the clear visibility of microgrooves can be observed. It is understood that the wear debris on the surface is the cause of these groove formations. This can be attributed to the as-machined Haynes 25 alloy having a low surface hardness, resulting in less resistance against the abrasive ball and severe plastic deformation [37]. EDS analyses conducted on this sample indicate that in the black regions (Figure 8a (Pt2 and Pt3)), where the damage is greater, the oxygen content ranges from 36% to 40%. This suggests that the oxides formed on the surface are broken during the wear process and serve as abrasives. On the other hand, a dark-colored continuous plastered layer and white fractured region are seen in some areas on Figure 8b. It can be said that an oxidation-type wear mechanism occurs in the black regions of the sample [17,38]. The EDS analysis shows an increase in the oxide content. Oxygen contents ranging from 46% to 52% are observed in the spot analyses from Figure 8b, higher than those seen in the sample worn at room temperature (Figure 8a). In this region, the forces in the surface interaction sections against the ball are not sufficient to press the oxidation by-products, resulting in the accumulation of wear debris and the formation of relatively less worn surface areas, possibly due to the effect of centrifugal force.
When the worn surface of the aluminized specimen at room temperature was examined (Figure 9a), the presence of fractures in the form of localized pits in some areas is observed along with microscratches on the surface. Despite the fractures in these pits (Figure 9 (Pt1 and Pt4)), the aluminum content ranges from 22% to 31%, while in other non-fractured areas (Figure 9 (Pt2 and Pt4)), it ranges from 44% to 48%. This indicates that the aluminum coatings maintain their presence on the surface even in the fractured regions after wear. It can be understood that a wear depth of up to 70 µm occurs, corresponding to half of the thickness of the aluminum coating. The oxidation-type wear can be associated with the relatively smooth surface of the aluminized samples [39]. The surface appearance of the aluminum-coated sample, which was worn at 500 °C, is significantly different from the aluminum-coated sample worn at room temperature. Upon detailed examination of the worn surface appearance, it is understood that oxidation, which occurs at high temperatures, is more pronounced, and the gradual surface deformation due to the breaking of the oxide layer under repeated loading results in a rougher surface compared to the ambient temperature. Despite having a more damaged surface appearance compared to room temperature, the EDS analyses indicate a higher aluminum content than Figure 9a. This indicates that although the Al-O layer forms more rapidly at high temperatures, it cannot withstand the wear process sufficiently [40] and breaks before reaching a sufficient thickness. This situation, where the broken oxide layer acts as an abrasive on the surface, leads to the highest volume loss occurring in the aluminum-coated sample among the coated samples.
Figure 10a shows thin capillary scratches and pitting-style black regions on the surface. These scratches are believed to result from the breaking of hard boride asperities due to the resistance of boride layers to plastic deformation. The high hardness and elastic modulus of the coating contribute to its resistance against abrasive contact, leading to less ball penetration into the surface [28,29]. The borided samples exhibit lower wear track widths and depths compared to other samples, indicating their smooth structure plays a load-bearing role and enhances wear resistance [29]. The EDS analysis confirms the presence of boride layers on the surface, further contributing to wear resistance. However, under high-temperature wear conditions, the boronized sample shows a smoother surface with larger-scale wear debris, indicating easier wear at higher temperatures. The formation of oxide layers is accelerated at elevated temperatures, and thermal fatigue and chemical structure lead to faster detachment of the oxide layer. The EDS analysis also shows higher amounts of O2 on the surface, suggesting an oxidative-supported wear mechanism. It should be noted that the grown boride layers may not provide the desired oxidation resistance at high temperatures, as reported by Erdogan et al. (2021) for a Nimonic 80A Ni-based superalloy [39].
Figure 11 shows that the boro-aluminized sample has a worn surface appearance similar to the boronized sample tested at room temperature. However, there are more wear debris particles on the boro-aluminized sample. This is likely due to the presence of both boride and aluminide phases in the structure, which respond differently to the applied load. The EDS analysis confirms that the wear debris contains aluminum in one region (Pt2) and both boron and aluminum in other regions (Pt1 and Pt3). The erosion of the soft aluminide phases compared to the hard boron phases results in cavity formation on the surface, leading to slightly lower wear resistance for the boro-aluminized sample at room temperature. At elevated temperatures, a change in the wear mechanism occurs. Dark regions in Figure 11b indicate a higher oxide content. These oxide layers extrude and detach from the weaker edge regions, transforming into wear particles. The deposition of these particles (B2O3) on the surface provides a lubricating effect, as indicated by the decrease in the friction coefficient with increasing sliding distance [41]. The presence of boron and the retarding effect of aluminum on oxidation contribute to the superior wear resistance of the boron-aluminized sample in high-temperature wear tests [42]. However, detached particles cause abrasion and scratches on certain surface areas. EDS analysis shows lower aluminum ratios compared to pre-wear samples, indicating the greater impact of the high-temperature wear process on the aluminum phases in the coating.

4. Conclusions

This study investigated the characteristic properties of aluminide, boride, and boro-aluminide coatings formed on a cobalt-based Haynes 25 superalloy and their effects on the high-temperature wear behavior of the alloy. The obtained findings can be summarized as follows:
  • Chemically bonded, crack-free, and porosity-free aluminide, boride, and boro-aluminide coatings were obtained on the surface of the Haynes 25 superalloy using cost-effective package cementation techniques.
  • The obtained coatings had thicknesses ranging from 14.73 to 140 µm and hardness values ranging from 1270 to 2833 HV0.1, depending on the coating method.
  • The dominant phases obtained through the coatings were Co2Al5 in aluminide coating, CoB and Co2B in boride coating, and CoAl and Co4B in boro-aluminide coating.
  • Thermochemical coatings improved the wear resistance of the Haynes 25 alloy both at room temperature and at 500 °C.
  • The highest wear resistance was achieved in the boronized sample with the highest hardness at room temperature, while at 500 °C, the best wear resistance was obtained in the boron-aluminized sample with the highest H3/E2′ and optimal fracture toughness.
  • The wear mechanism is dependent on the wear temperature, surface characteristics of the coatings, and mechanical properties of the coatings. A significant increase in oxidative and adhesive wear mechanisms was observed at high temperatures.
  • This study has shown that the wear resistance of the widely used Haynes-25 alloy in high-temperature applications can be improved 10-fold with boro-aluminide coating based on the relationship between hardness, elastic modulus, and fracture toughness.

Author Contributions

A.G.: Conceptualization, methodology, validation, formal analysis, writing—original draft preparation, visualization, supervision. Ö.E.: Methodology, software, formal analysis, investigation. All authors have read and agreed to the published version of the manuscript.

Funding

This research received no external funding.

Institutional Review Board Statement

Not applicable.

Informed Consent Statement

Not applicable.

Data Availability Statement

Not applicable.

Acknowledgments

This article is derived from the master’s studies of Ömer Ergin, who continued her master’s education at the Iskenderun Technical University Undergraduate Education Institute under the supervision of Ali Günen.

Conflicts of Interest

The authors declare no conflict of interest.

References

  1. Geddes, B.; Leon, H.; Huang, X. Overview of Superalloys. In Superalloys: Alloying and Performance; ASM International: Almere, The Netherlands, 2010; pp. 9–16. [Google Scholar]
  2. Gialanella, S.; Malandruccolo, A.; Gialanella, S.; Malandruccolo, A. Superalloys. In Aerospace Alloys; Springer: Berlin/Heidelberg, Germany, 2020; pp. 267–386. [Google Scholar]
  3. De Faria Cunha, F.A.; de Andrade Reis, R.; Gonçalves, S.P.; Fernandes, F.A.P.; Baldan, R.; de Sousa Malafaia, A.M. Cyclic Oxidation Behavior of Conventional and Niobium-Modified MAR-M246 Superalloy at 900 and 1000 °C. Coatings 2023, 13, 519. [Google Scholar] [CrossRef]
  4. Youdelis, W.V.; Kwon, O. Carbide phases in cobalt base superalloy: Role of nucleation entropy in refinement. Met. Sci. 1983, 17, 379–384. [Google Scholar] [CrossRef]
  5. Jokisaari, A.M.; Naghavi, S.S.; Wolverton, C.; Voorhees, P.W.; Heinonen, O.G. Predicting the morphologies of γ precipitates in cobalt-based superalloys. Acta Mater. 2017, 141, 273–284. [Google Scholar] [CrossRef]
  6. Coutsouradis, D.; Davin, A.; Lamberigts, M. Cobalt-based superalloys for applications in gas turbines. Mater. Sci. Eng. 1987, 88, 11–19. [Google Scholar] [CrossRef]
  7. Gui, W.; Zhang, H.; Yang, M.; Jin, T.; Sun, X.; Zheng, Q. The investigation of carbides evolution in a cobalt-base superalloy at elevated temperature. J. Alloys Compd. 2017, 695, 1271–1278. [Google Scholar] [CrossRef]
  8. Akande, I.G.; Oluwole, O.O.; Fayomi, O.S.I.; Odunlami, O.A. Overview of mechanical, microstructural, oxidation properties and high-temperature applications of superalloys. Mater. Today Proc. 2021, 43, 2222–2231. [Google Scholar] [CrossRef]
  9. Vorontsov, V.A.; McAuliffe, T.P.; Hardy, M.C.; Dye, D.; Bantounas, I. Precipitate dissolution during deformation induced twin thickening in a CoNi-base superalloy subject to creep. Acta Mater. 2022, 232, 117936. [Google Scholar] [CrossRef]
  10. Nourpoor, P.; Javadian, S.; Sabour Rouh Aghdam, A.; Ghadami, F. Microstructure Investigation and Cyclic Oxidation Resistance of Ce-Si-Modified Aluminide Coating Deposited by Pack Cementation on Inconel 738LC. Coatings 2022, 12, 1491. [Google Scholar] [CrossRef]
  11. Cuao-Moreu, C.A.; Campos-Silva, I.; Delgado-Brito, A.M.; Garcia-Sanchez, E.O.; Juarez-Hernandez, A.; Diabb-Zavala, J.M.; Hernandez-Rodriguez, M.A.L. Effect of laser surface texturing and boriding on the tribocorrosion resistance of an ASTM F-1537 cobalt alloy. Wear 2023, 523, 204799. [Google Scholar] [CrossRef]
  12. Chen, Y.; Cai, Y.; Yuan, C.; Kong, W.; Wang, Y.; Wen, X.; Liu, X. Effect of internal nitridation on microstructure and mechanical properties of cobalt-based superalloy under high-temperature nitrogen atmosphere. Mater. Charact. 2023, 200, 112851. [Google Scholar] [CrossRef]
  13. Xiong, J.C.; Li, J.R.; Liu, S.Z.; Zhao, J.Q.; Han, M. Effects of carburization on recrystallization behavior of a single crystal superalloy. Mater. Charact. 2010, 61, 749–755. [Google Scholar] [CrossRef]
  14. Günen, A.; Gürol, U.; Koçak, M.; Çam, G. Investigation into the influence of boronizing on the wear behavior of additively manufactured Inconel 625 alloy at elevated temperature. Prog. Addit. Manuf. 2023, 1–21. [Google Scholar] [CrossRef]
  15. Winter, K.M.; Kalucki, J.; Koshel, D. Process technologies for thermochemical surface engineering. In Thermochemical Surface Engineering of Steels; Woodhead Publishing: Cambridge, UK, 2015; pp. 141–206. [Google Scholar]
  16. Günen, A.; Kanca, Y.; Karahan, İ.H.; Karakaş, M.S.; Gök, M.S.; Kanca, E.; Çürük, A. A comparative study on the effects of different thermochemical coating techniques on corrosion resistance of STKM-13A steel. Metall. Mater. Trans. A 2018, 49, 5833–5847. [Google Scholar] [CrossRef]
  17. Günen, A.; Lindner, T.; Karakaş, M.S.; Kanca, E.; Töberling, G.; Vogt, S.; Gök, M.S.; Lampke, T. Effect of the boriding environment on the wear response of laser-clad AlCoCrFeNi high entropy alloy coatings. Surf. Coat. Technol. 2022, 447, 128830. [Google Scholar] [CrossRef]
  18. Yener, T.; Doleker, K.M.; Erdogan, A.; Oge, M.; Er, Y.; Karaoglanli, A.C.; Zeytin, S. Wear and oxidation performances of low temperature aluminized IN600. Surf. Coat. Technol. 2022, 436, 128295. [Google Scholar] [CrossRef]
  19. Mu, D.; Shen, B.L. Oxidation resistance of boronized CoCrMo alloy. Int. J. Refract. Met. Hard Mater. 2010, 28, 424–428. [Google Scholar] [CrossRef]
  20. Doñu-Ruiz, M.; López-Perrusquia, N.; Renteria-Salcedo, A.; Flores-Martinez, M.; Anda, E.R.-D.; Muhl, S.; Hernández-Navarro, C.; García, E. Tribocorrosion behavior of boride coating on CoCrMo alloy produced by thermochemical process in 0.35% NaCl solution. Surf. Coat. Technol. 2021, 425, 127698. [Google Scholar] [CrossRef]
  21. Öğe, M.; Küçük, Y.; Öğe, T.Ö.; Günen, A.; Kanca, Y.; Gök, M.S. Effect of boriding on high temperature tribological behavior of CoCrMo alloy. Tribol. Int. 2023, 187, 108697. [Google Scholar] [CrossRef]
  22. Donachie, M.J.; Donachie, S.J. Superalloys: A Technical Guide; ASM International: Almere, The Netherlands, 2002. [Google Scholar]
  23. Kramer, D.P.; McDougal, J.R.; Ruhkamp, J.D.; McNeil, D.C.; Koehler, F.A.; Booher, R.A.; Howell, E.I. Application of the cobalt based superalloy Haynes Alloy 25 (L605) in the fabrication of future radioisotope power systems. In AIP Conference Proceedings; American Institute of Physics: College Park, MI, USA, 1998; Volume 420, pp. 1167–1172. [Google Scholar]
  24. Lee, J.W.; Kuo, Y.C. Cyclic oxidation behavior of a cobalt aluminide coating on Co-base superalloy AMS 5608. Surf. Coat. Technol. 2005, 200, 1225–1230. [Google Scholar] [CrossRef]
  25. Delgado-Brito, A.M.; López-Suero, D.; Ruiz-Ríos, A.; García-León, R.A.; Martínez-Trinidad, J.; Oseguera-Peña, J.; Campos-Silva, I. Effect of the diffusion annealing process in the indentation properties of cobalt boride layer. Ceram. Int. 2019, 45, 7767–7777. [Google Scholar] [CrossRef]
  26. Cho, J.H.; Kim, T.W.; Son, K.S.; Yoon, J.H.; Kim, H.S.; Leisk, G.G.; Mitton, D.B.; Latanision, R.M. Aluminizing and boroaluminizing treatments of Mar-M247 and their effect on hot corrosion resistance in Na2SO4–NaCl molten salt. Met. Mater. Int. 2003, 9, 303–310. [Google Scholar] [CrossRef]
  27. Paoletti, L.; Bruni, B.M.; Gianfagna, A.; Mazziotti-Tagliani, S.; Pacella, A. Quantitative energy dispersive X-ray analysis of submicrometric particles using a scanning electron microscope. Microsc. Microanal. 2011, 17, 710–717. [Google Scholar] [CrossRef]
  28. Günen, A.; Döleker, K.M.; Korkmaz, M.E.; Gök, M.S.; Erdogan, A. Characteristics, high temperature wear and oxidation behavior of boride layer grown on nimonic 80A Ni-based superalloy. Surf. Coat. Technol. 2021, 409, 126906. [Google Scholar] [CrossRef]
  29. Gök, M.S.; Küçük, Y.; Erdoğan, A.; Öge, M.; Kanca, E.; Günen, A. Dry sliding wear behavior of borided hot-work tool steel at elevated temperatures. Surf. Coat. Technol. 2017, 328, 54–62. [Google Scholar] [CrossRef]
  30. Hardell, J.; Kassfeldt, E.; Prakash, B. Friction and wear behaviour of high strength boron steel at elevated temperatures of up to 800 °C. Wear 2008, 264, 788–799. [Google Scholar] [CrossRef]
  31. Chen, C.; Lv, B.; Ma, H.; Sun, D.; Zhang, F. Wear behavior and the corresponding work hardening characteristics of Hadfield steel. Tribol. Int. 2018, 121, 389–399. [Google Scholar] [CrossRef]
  32. Kato, K. Wear in relation to friction—A review. Wear 2000, 241, 151–157. [Google Scholar] [CrossRef]
  33. Beake, B.D. The influence of the H/E ratio on wear resistance of coating systems—Insights from small-scale testing. Surf. Coat. Technol. 2022, 442, 128272. [Google Scholar] [CrossRef]
  34. Chuang, M.H.; Tsai, M.H.; Wang, W.R.; Lin, S.J.; Yeh, J.W. Microstructure and wear behavior of AlxCo1.5CrFeNi1.5Tiy high-entropy alloys. Acta Mater. 2011, 59, 6308–6317. [Google Scholar] [CrossRef]
  35. Günen, A.; Bölükbaşı, Ö.S.; Özgürlük, Y.; Özkan, D.; Odabaş, O.; Somunkıran, İ. Effect of Cr addition on properties and tribological behavior at elevated temperature of boride layers grown on borosintered powder metallurgy alloys. Met. Mater. Int. 2023, 29, 748–766. [Google Scholar] [CrossRef]
  36. Wu, J.M.; Lin, S.J.; Yeh, J.W.; Chen, S.K.; Huang, Y.S.; Chen, H.C. Adhesive wear behavior of AlxCoCrCuFeNi high-entropy alloys as a function of aluminum content. Wear 2006, 261, 513–519. [Google Scholar] [CrossRef] [Green Version]
  37. Dhakne, A.; Jaju, S.; Shukla, S. Review on analysis of enhancing wear properties through thermo-mechanical treatment and grain size. Mater. Today Proc. 2022, 60, 2270–2272. [Google Scholar] [CrossRef]
  38. Zhang, Q.Y.; Chen, K.M.; Wang, L.; Cui, X.H.; Wang, S.Q. Characteristics of oxidative wear and oxidative mildwear. Tribol. Int. 2013, 61, 214–223. [Google Scholar] [CrossRef]
  39. Erdogan, A.; Yener, T.; Doleker, K.M.; Korkmaz, M.E.; Gök, M.S. Low-temperature aluminizing influence on degradation of nimonic 80A surface: Microstructure, wear and high temperature oxidation behaviors. Surf. Interfaces 2021, 25, 101240. [Google Scholar] [CrossRef]
  40. Polcar, T.; Cavaleiro, A. High-temperature tribological properties of CrAlN, CrAlSiN and AlCrSiN coatings. Surf. Coat. Technol. 2011, 206, 1244–1251. [Google Scholar] [CrossRef]
  41. Erdemir, A. Boron-Based Solid Nanolubricants and Lubrication Additives; Wiley & Sons, Ltd.: Chichester, UK, 2008; pp. 203–223. [Google Scholar]
  42. Wang, L.; Nie, X. Effect of annealing temperature on tribological properties and material transfer phenomena of CrN and CrAlN coatings. J. Mater. Eng. Perform. 2014, 23, 560–571. [Google Scholar] [CrossRef]
Figure 1. XRD patterns of (a) untreated, (b) aluminized, (c) boronized, and (d) boro-aluminized Haynes 25 samples.
Coatings 13 01272 g001
Figure 2. (a) Cross-sectional view and (b) EDS line analysis of the aluminide coating formed on Haynes 25 superalloy after aluminizing at 950 °C for 3 h.
Coatings 13 01272 g002
Figure 3. (a) Cross-sectional view and (b) EDS line analysis of the boride coating formed on Haynes 25 superalloy after boronizing at 950 °C for 3 h.
Coatings 13 01272 g003
Figure 4. (a) Cross-sectional view and (b) EDS line analysis of the boro-aluminide coating formed on Haynes 25 superalloy after boro-aluminizing at 950 °C for 3 h.
Coatings 13 01272 g004
Figure 5. Hardness profiles and fracture toughness traces formed on the section surfaces. (a) Al hardness trace, (b) Al fracture toughness trace, (c) B hardness trace, (d) B fracture toughness trace, (e) Al-B hardness trace, (f) Al-B fracture toughness trace.
Coatings 13 01272 g005
Figure 6. Surface morphology of coated samples: (a) aluminized, (b) boronized, (c) and boro-aluminized.
Coatings 13 01272 g006aCoatings 13 01272 g006b
Figure 7. The friction coefficient values obtained from wear tests conducted at (a) room temperature (RT) and (b) 500 °C.
Coatings 13 01272 g007aCoatings 13 01272 g007b
Figure 8. Surface image of untreated Haynes 25 superalloy worn (a) at room temperature and (b) at 500 °C.
Coatings 13 01272 g008
Figure 9. Surface image of aluminized Haynes 25 superalloy worn (a) at room temperature and (b) at 500 °C.
Coatings 13 01272 g009
Figure 10. Surface image of boronized Haynes 25 superalloy worn at (a) room temperature and (b) at 500 °C.
Coatings 13 01272 g010aCoatings 13 01272 g010b
Figure 11. Surface image of boro-aluminized Haynes 25 superalloy worn (a) at room temperature and (b) at 500 °C.
Coatings 13 01272 g011
Table 1. Nanoindentation results of the obtained coatings.
SampleRa (µm)Microhardness Nanohardness
SampleRa (µm)(HV)Layer 1Layer 2Layer 3Layer 4
Al1.25Max. 127012.23 ± 0.915.14 ± 1.07.66 ± 0.3---------
B0.26Max. 283326.34 ± 2.3323.54 ± 1.811.0 ± 4.67.9 ± 1.73
Al-B0.21Max. 238623.46 ± 1.2918.25 ± 0.6112.92 ± 0.327.43 ± 0.14
PropertiesElasticity modulus (GPa)
SampleFracture toughnessCoating thickness (µm)Layer 1Layer 2Layer 3Layer 4
Al1.88 ± 0.08140 ± 1.5152.56 ± 16.26196.96 ± 5.3177.97 ± 6.9---
B0.94 ± 0.0537.58 ± 2.85206.36 ± 3.68200.89 ± 7.40151.66 ± 28.22135.08 ± 22.26
Al-B1.06 ± 0.0614.73 ± 1.71177.56 ± 8.44203.03 ± 13.30117.16 ± 8.6126.14 ± 5.43
Note: Layer 1, layer 2, layer 3, and layer 4 represent the separation of coating layers from the surface to the inner parts of the pictures given in Figure 2, Figure 3 and Figure 4.
Table 2. Wear scar depths and widths of Haynes 25 samples.
Wear Test
Temperature
SamplesWear Trace Width (µm)Wear Trace
Depth (µm)
Wear Rate
mm3/Nm
24 °CUntreated1515.67 ± 37.8948.33 ± 1.9323.89 ± 0.7
Al797.23 ± 15.9470.00 ± 2.8018.20 ± 0.7
B775.17 ± 12.928.00 ± 0.322.02 ± 0.09
AlB815.87 ± 20.408.67 ± 0.352.31 ± 0.1
500 °CUntreated1934.33 ± 55.2755.33 ± 2.7734.90 ± 1.2
Al1279.00 ± 30.4554.00 ± 1.8022.52 ± 0.7
B941.83 ± 19.6216.33 ± 0.635.02 ± 0.2
AlB982.53 ± 32.7510.00 ± 0.363.20 ± 0.1
Disclaimer/Publisher’s Note: The statements, opinions and data contained in all publications are solely those of the individual author(s) and contributor(s) and not of MDPI and/or the editor(s). MDPI and/or the editor(s) disclaim responsibility for any injury to people or property resulting from any ideas, methods, instructions or products referred to in the content.