Article

Evaluation of the Influence of Shaft Shape Errors on the Rotation Accuracy of Aerostatic Spindle—Part 1: Modeling

1
School of Mechanical and Precision Instrument Engineering, Xi’an University of Technology, Xi’an 710048, China
2
School of Mechatronics Engineering, Zhongyuan University of Technology, Zhengzhou 451191, China
*
Author to whom correspondence should be addressed.
Electronics 2022, 11(9), 1304; https://doi.org/10.3390/electronics11091304
Submission received: 29 March 2022 / Revised: 16 April 2022 / Accepted: 19 April 2022 / Published: 20 April 2022
(This article belongs to the Special Issue Mechatronic Control Engineering)

Abstract

:
In the research on the aerostatic spindle, for quantifying the influence of shaft shape errors on its rotation accuracy, the calculation models of unbalanced air film force (UAFF) and centrifugal inertia force (CIF) are established. Based on the typical shape of the shaft, three composite cylinder models are constructed. The data sources are selected from the cylindricity measurement results of the shaft and substituted into the model for calculation. The results show that, for the shaft in this paper, when the roundness deviation is ≤1.25 μm and the cylindricity deviation is ≤2 μm, the influence of shape errors on the rotation accuracy of the shaft is small enough. The harmonic analysis of the data source shows that the magnitude and stability of the UAFF on the shaft are determined by the actual shape of the shaft’s cylindrical surface, and cannot be inferred only by the value of shape errors.

1. Introduction

The aerostatic spindle uses compressed air to fill the gap between the bearing and the shaft to make the shaft float inside the bearing. Compared with the traditional spindle, it has the advantages of high rotation accuracy, low noise and frictionless [1]. The rotation accuracy of the aerostatic spindle is mainly affected by the shape error of the shaft [2], which will make the air film thickness change continuously when the shaft rotates. It can be seen from the Reynolds equation that the change in air film thickness will produce pressure fluctuation and cause UAFF. It is one of the key factors influencing spindle rotation accuracy and has a significant impact on the surface processing quality of parts [3,4,5,6].
Many researchers have studied the influence of the deviations from ideal surface topography of the shaft and bearing on the performance of the aerostatic spindle and bearing. The results of a theoretical analysis by Pande and Somasundaram [7] indicated that manufacturing errors will significantly affect the performance characteristics of aerostatic journal bearings. Stout et al. [8] studied the shape error of the bearing, and the results show that the parallelism, roundness and tilt of the bearing will affect its load capacity. Bhat et al. [9] analyzed the influence of surface profiling errors on the performance of a flat pad aerostatic bearing by using the Pareto optimization method, and concluded that multi-orifice aerostatic flat pad bearings are highly sensitive to surface profile variations and the surface profiles of bearings should be accurately controlled during machining. Through numerical and experimental research, Cui et al. [10,11] found that the bearing characteristics were significantly influenced by the manufacturing error, and the radial running accuracy of journal bearings can be improved by reducing the waviness amplitude or spatial wavelength. Wang et al. [12,13] studied the axial and circumferential surface waviness of aerostatic journal bearings by using the finite difference method and linear perturbation theory, and the results show that the amplitude of surface waviness has a significant impact on the capacity, stiffness and damping of bearings. Sun et al. [14] studied the effect of shaft shape errors on dynamic characteristics of a rotor-bearing system and the quantitative relationship between shaft shape errors and bearing reaction forces of the rotor-bearing system was obtained. Dimofte [15,16] pointed out that the three-wave bearing shows a better load capacity than the three-wave-groove bearing and the three-lobe bearing at any applied load and running regime, but the three-wave bearings are mare sensitive to the direction of the applied load than the other bearings. Charitopoulos et al. [17] analyzed the effect of manufacturing errors on the load capacity and friction coefficient of the textured micro-thrust bearings and revealed that the performance of textured micro-thrust bearings could be improved by manufacturing errors. In addition to the shape error, assembly faults will also significantly affect the spindle performance, as angular misalignment deteriorates the pressure distribution between the shaft and the bearing surfaces, and an air bearing with angular misalignment is more sensitive to the dynamic motions of the shaft in the bearing [18].
It is generally believed that in order to obtain optimal performance of aerostatic bearings, the air film thickness should usually be 5–20 μm, and the shape error of the mating surface is required to be better than 1/10 of the air film thickness, which presents a challenge for the manufacturing capability [19,20], and the precision of the shaft is much more important than that of the bearing [21]. In the present research of the aerostatic spindle, the shape error of the shaft and bearing is mostly constructed by a trigonometric function, which is quite different from the actual situation. When the spindle rotates, the topography of any position on the shaft surface will affect the air film distribution, and then affect the rotation accuracy, but the shape errors, such as waviness, roundness and cylindricity, are unable reflect the topography of the shaft. In this paper, the calculation models of UAFF and CIF considering shaft shape errors are established, and then the representative shaft roundness error data selected from the measurement database of a cylindricity instrument are used for calculation. The analysis results give the recommended roundness and cylindricity deviations to ensure shaft rotation accuracy, and provide theoretical support for the influence of shape errors on the spindle rotation accuracy. The analysis and calculation method in this paper will be a useful reference in the design, manufacture and test process of the aerostatic spindle.

2. Theoretical Model

According to the position of the thrust surface, the shaft of the aerostatic spindle can be divided into ‘T’ type, ‘+’ type and ‘H’ type. The most common and stable is the ‘H’ type shaft, as shown in Figure 1. Thrust surfaces are distributed at both ends of the shaft, which can minimize the axial movement and tilt of the shaft during rotation. Assuming that the thrust surface of the shaft is an ideal shape, the axial movement and tilt of the shaft can be ignored.
This spindle is made for precision micro-grinding, which has high requirements for rotation accuracy. The journal bearings and thrust bearings adopt multiple orifices evenly arranged to provide sufficient load capacity. As the continuous working time of the spindle is short, it is cooled by air flow. The exhaust air at the front end of the spindle is discharged from the outer edge of the thrust bearing, and the exhaust air at the rear end of the spindle is collected to cool the motor and then discharged. The motor is an AC frameless motor, the motor rotor is installed at the rear end of the shaft and the stator is fixed in a special frame (not shown in Figure 1).

2.1. Model of the UAFF

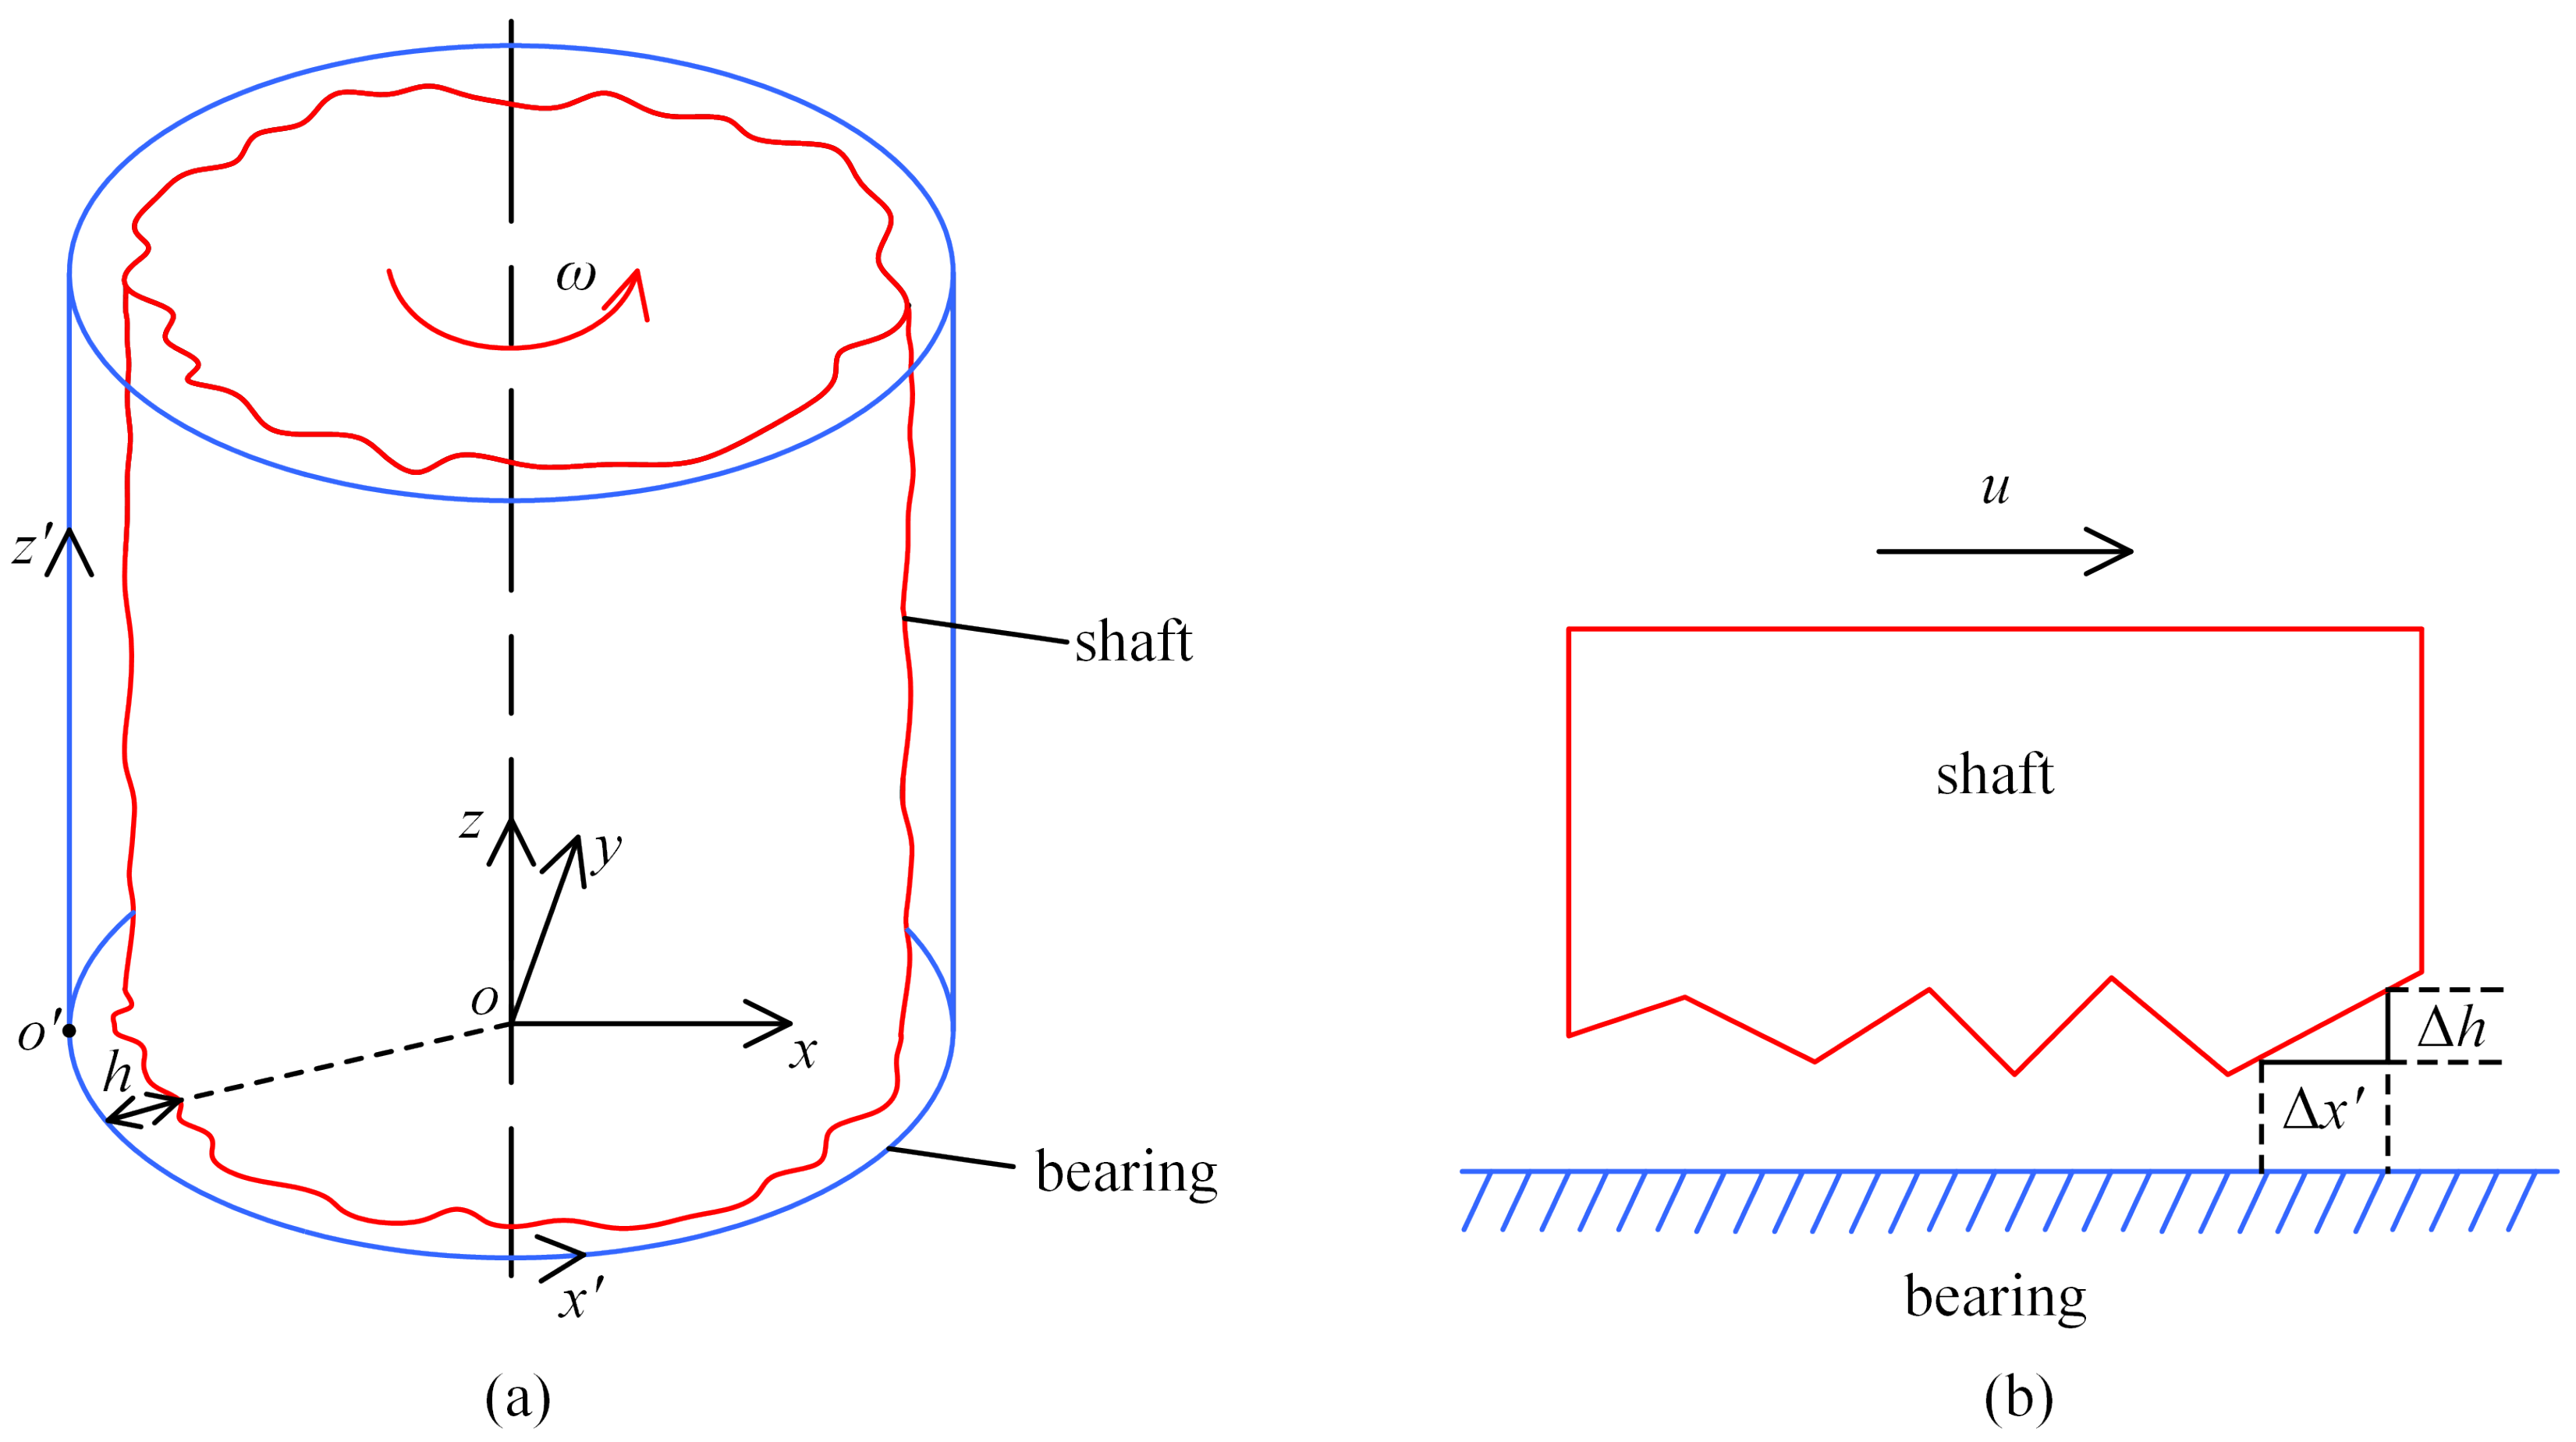
Figure 2a is a schematic diagram of the spindle considering the radial shape error of the shaft. It can be seen that the shape error of the shaft surface directly affects the uniformity of the film thickness distribution between the bearing and the shaft. A two-dimensional closed cylindrical coordinate system x o z is established on the inner surface of the bearing, where the x -axis is at the bottom of the bearing inner surface and the z -axis is parallel to the z-axis in the Cartesian coordinate system, then the film thickness and pressure at any position on the shaft surface can be indexed with h x z and p x z .
The general form of the Reynolds equation applicable to this coordinate system is [22]
x ρ h 3 6 η p x + z ρ h 3 6 η p z = x ρ h ( u a + u b ) + z ρ h ( w a + w b ) + 2 h ρ t ρ u a h x ρ w a h z .
Some assumptions are as follows:
a. The bearing is stationary, i.e., u b = 0 , w b = 0.
b. The shaft is rigid and without axial movement, i.e., w a = 0.
c. The spindle is fully cooled and without local expansion, i.e., h ( ρ / t ) = 0.
d. The air is ideal gas, which can be obtained according to the equation of state that is ρ / p = ρ a t m / p a t m .
e. The shaft is in fixed eccentric motion.
Based on the above assumptions, the dynamic error of the spindle is only the rotation error.
Let u = u a , add the inflow term V i n at the orifice entrance [23] and Equation (1) can be changed into
x p h 3 6 η p x + z p h 3 6 η p z = x ( p h u ) + 2 p V i n .
The first term on the right side of Equation (2) is the Couette term, which can be divided into the pressure wedge term h u ( p / x ) , stretch term p h ( u / x ) and physical wedge term p u ( h / x ) , in which the stretch term of the rigid shaft is zero. When there are shape errors on the shaft surface (see Figure 2), the physical wedge term is not zero, therefore, Equation (2) can be arranged as
x p h 3 p x + z p h 3 p z = 6 η u p h x + h p x + 12 η p V i n .
By employing the dimensionless parameters
x = D X , z = L Z , h = h 0 H , p = p a t m P , Ψ = D 2 L 2 , Λ = 12 η u D h 0 2 p a t m , Q = 24 η D 2 h 0 3 p a t m 2 V i n ,
Equation (4) can be written as:
X H 3 P 2 X + Ψ Z H 3 P 2 Z = Λ P H X + H P X + Q P .
Divide the shaft into m grids along the x -direction and n grids along the z -direction. Rewrite Equation (5) by using the finite difference method (see Equations (A1)–(A10) in Appendix A) [24], and the following equation can be obtained
P i , j = F i , j 2 + 4 E i , j I i , j F i , j 2 E i , j .
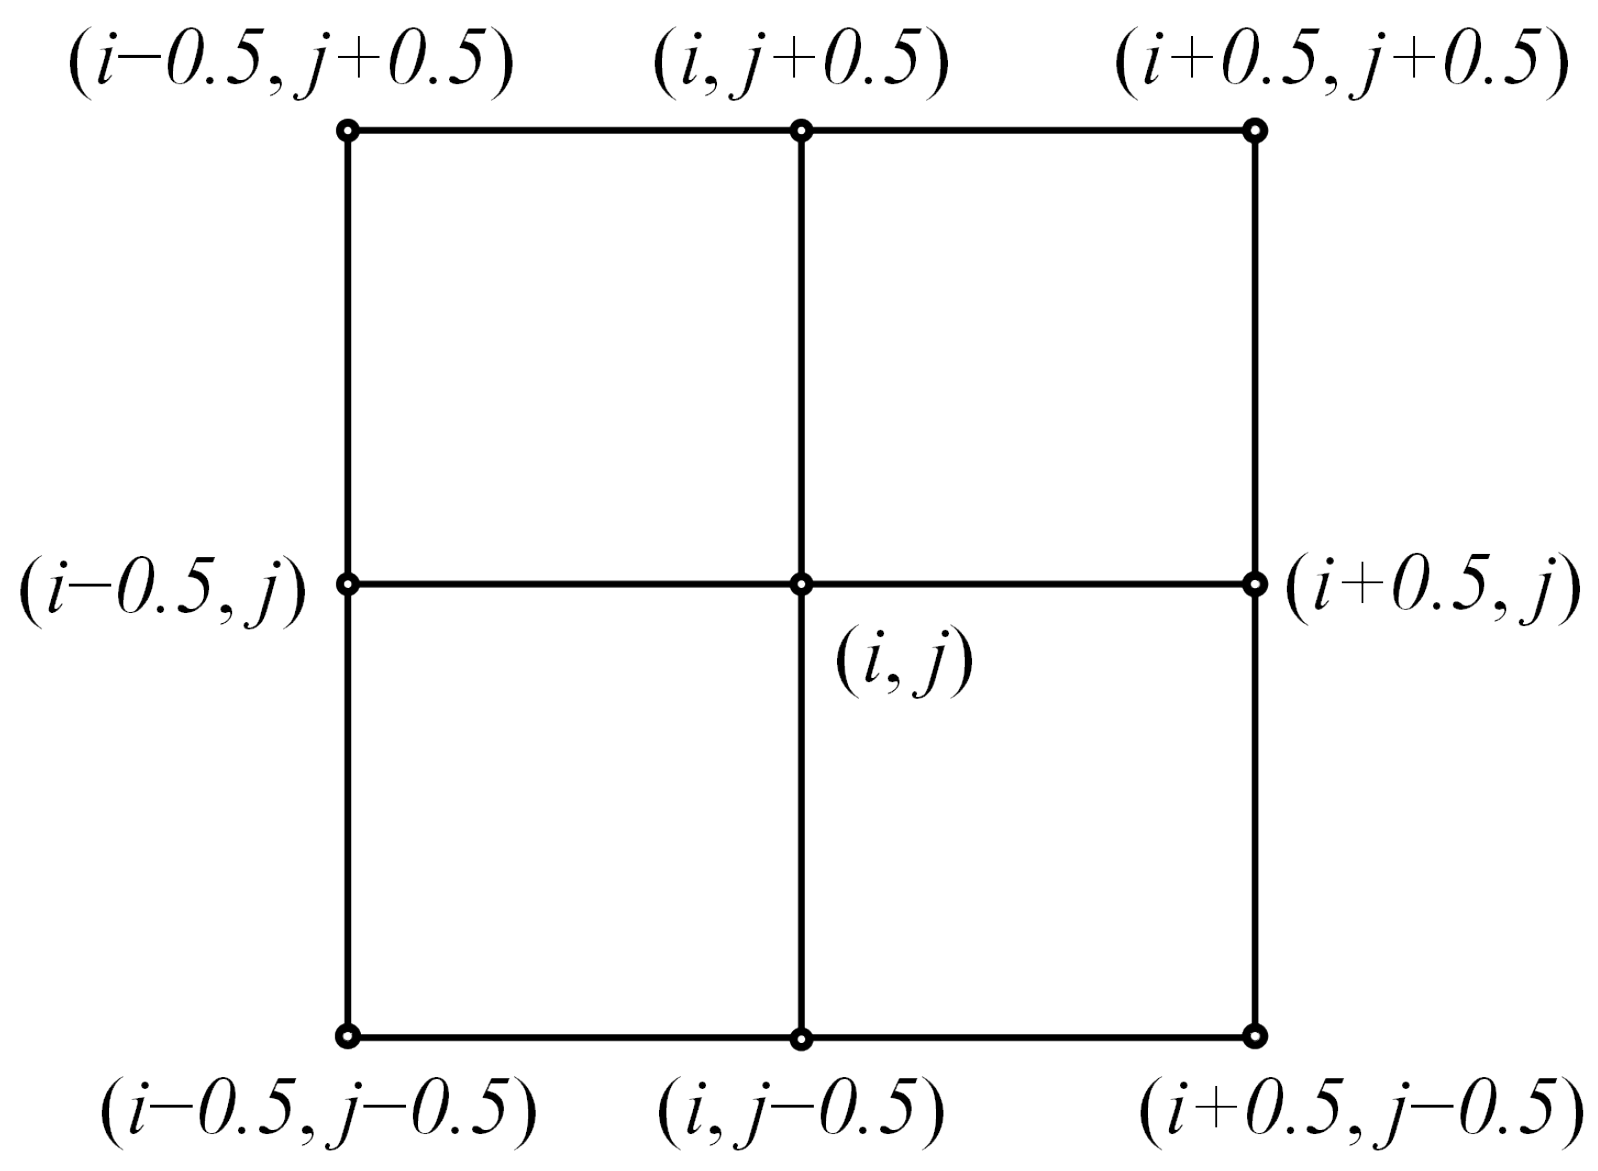
Using Equation (6), the surface pressure P i , j at node ( i , j ) of the shaft can be calculated. The action range of P i , j is the area surrounded by 9 nodes in Figure 3, and the dimensionless area is Δ X Δ Z .
The resultant force of the air film force on the j-th section of the shaft in the Cartesian coordinate system is
F x ( j ) a i r F y ( j ) a i r = i = 1 m P i , j 1 cos θ i sin θ i p a Δ X Δ Z Δ x Δ z
where
θ i = 2 π m i .
The total UAFF on the shaft is
F x a i r F y a i r = j = 1 n F x ( j ) a i r F y ( j ) a i r .

2.2. Model of the CIF

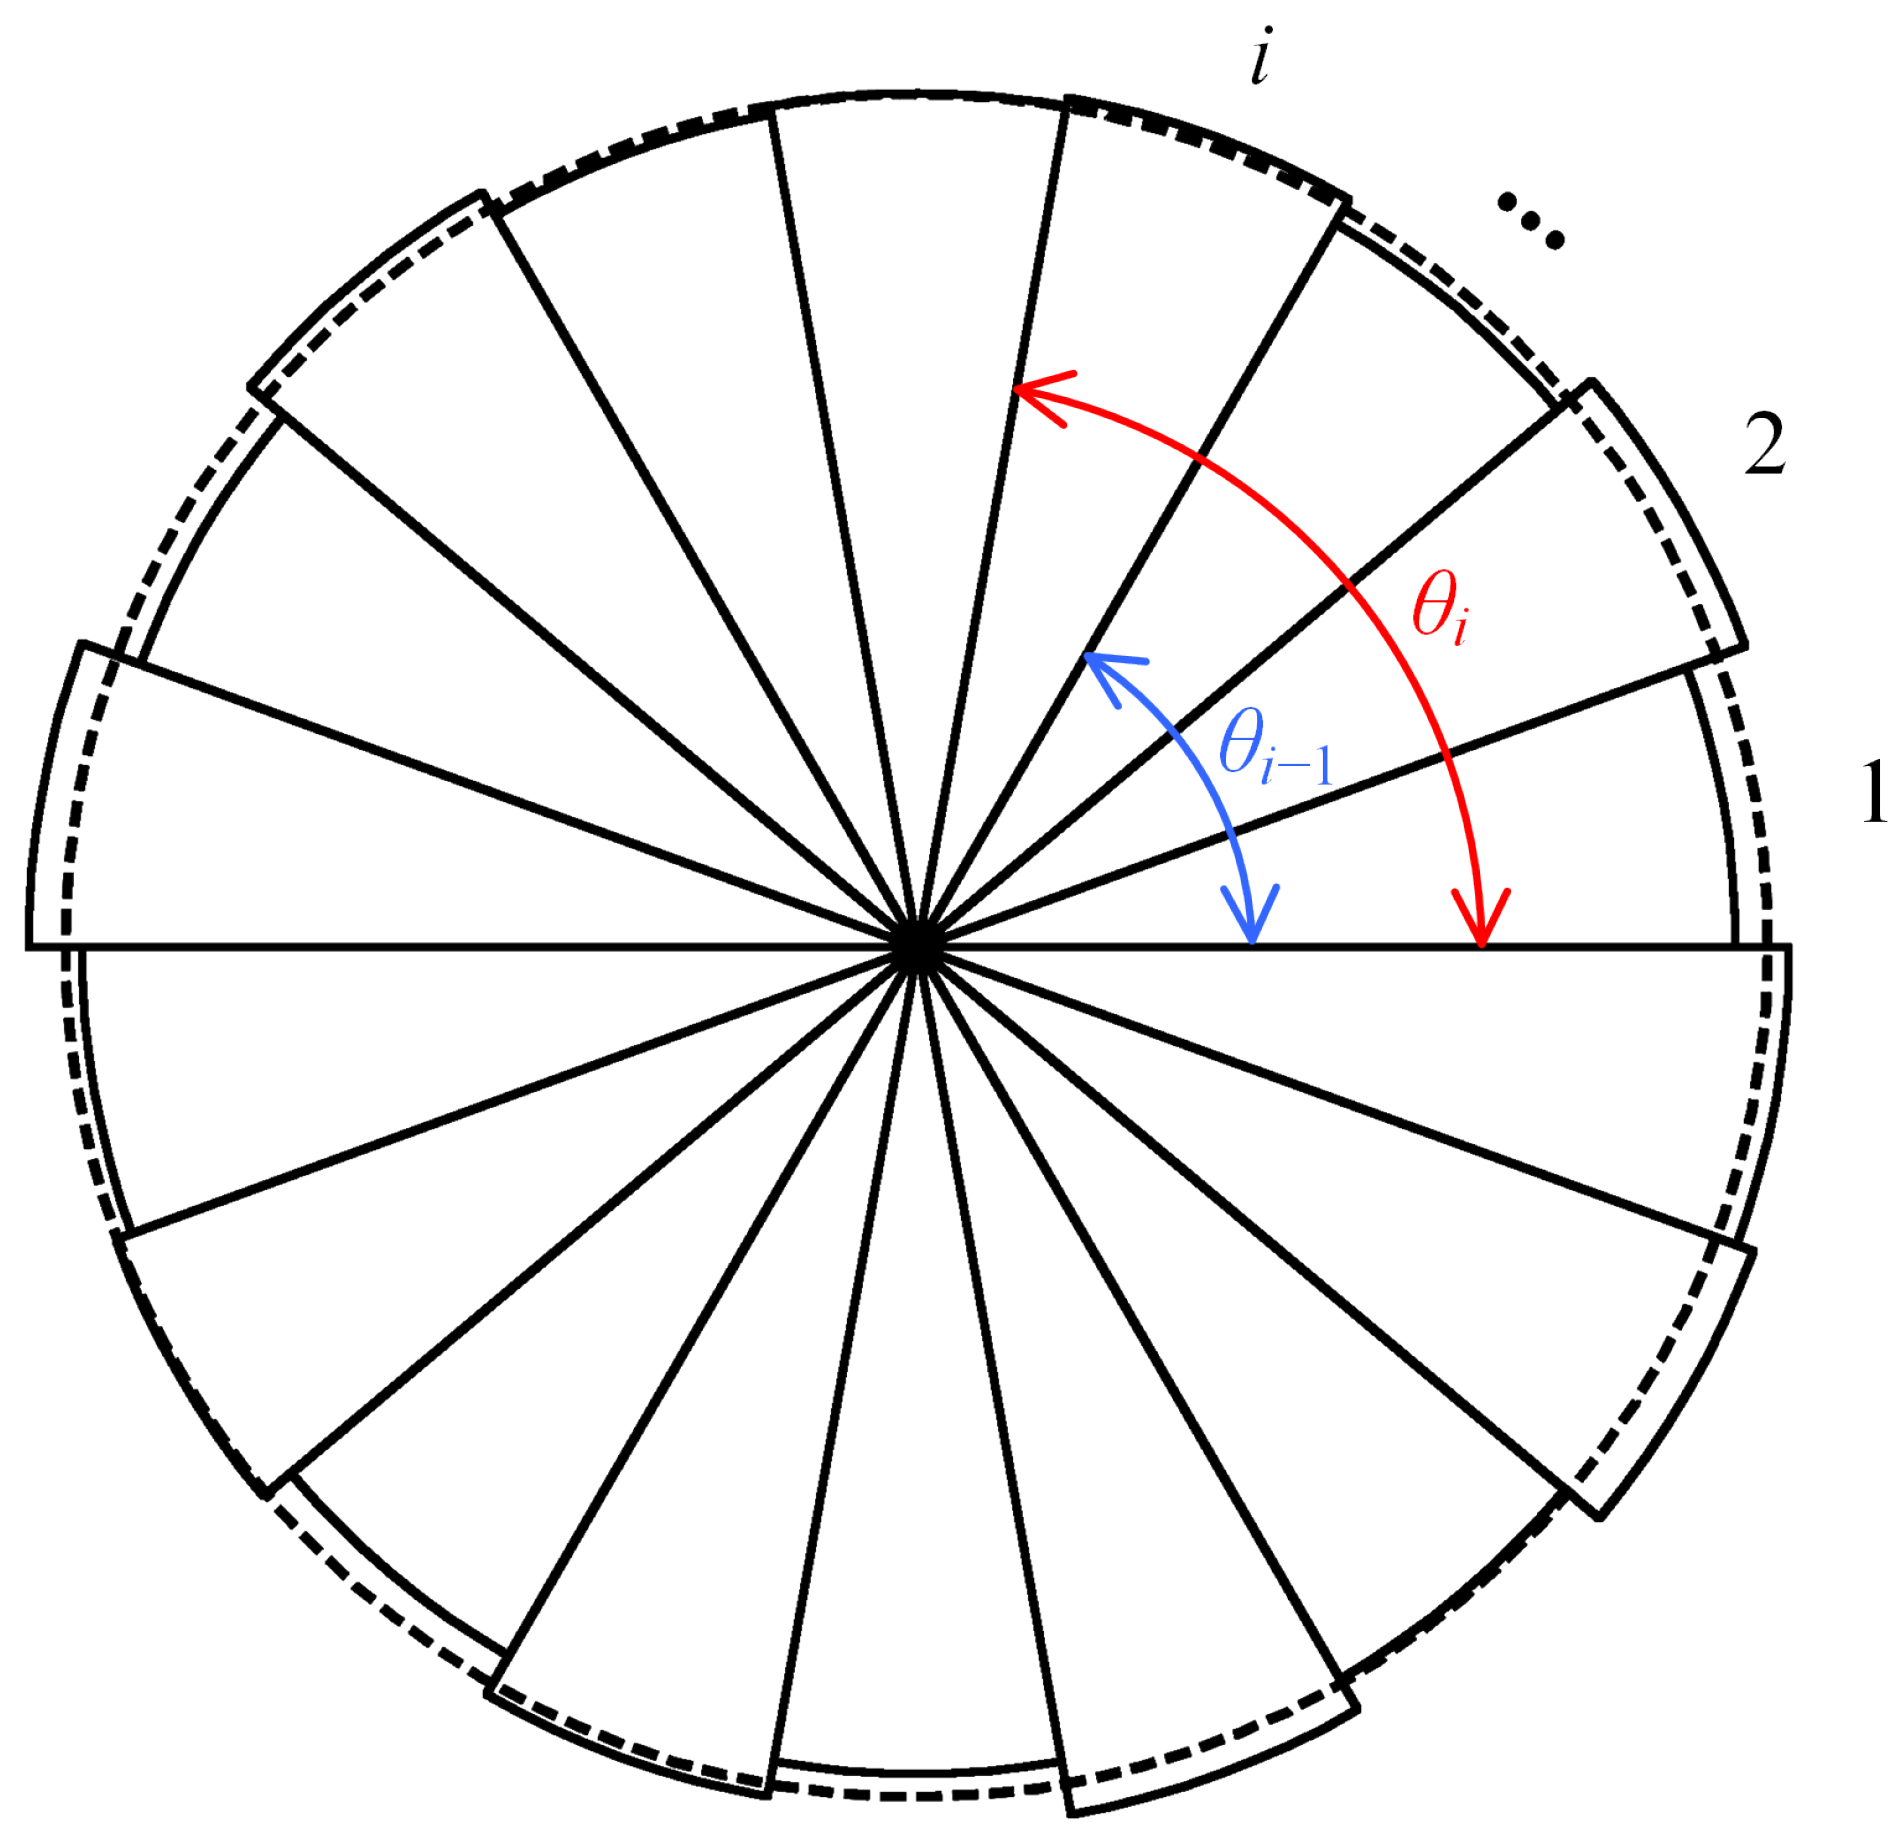
Due to the shape errors of the shaft, the actual centroid of the shaft will deviate from the ideal position, and the CIF will be generated when the shaft rotates. Divide the shaft into n segments along the z-axis and, when the n is large enough, each segment can be regarded as a slice. Divide the j-th slice into m sectors, as shown in Figure 4, where the included angle of each sector is 2 π / m and the radius of the i-th sector is r i , j , and if the area density of the sheet is μ d e n s i t y , then the mass of the i-th sector is
M i , j = 1 m μ d e n s i t y π r i , j 2 .
The centroid coordinates of the i-th sector are
x ¯ i , j = m π r i , j 2 = m π r i , j 2 θ i 1 θ i cos θ d θ 0 r i , j ρ ¯ 2 d ρ ¯ = m π r i , j 2 sin θ θ i 1 θ i ρ ¯ 3 3 0 r i , j = m 3 π sin θ i sin θ i 1 r i , j , y ¯ i , j = m 3 π cos θ i 1 cos θ i r i , j .
The total centroid coordinate of the j-th slice is
x ¯ j , y ¯ j , z ¯ j = i = 1 m M i , j x ¯ i , j i = 1 m M i , j , i = 1 m M i , j x ¯ i , j i = 1 m M i , j , 2 j 1 2 Δ z .
The total centroid coordinate of the shaft is
x ¯ , y ¯ , z ¯ = j = 1 n i = 1 m M i , j x ¯ j j = 1 n i = 1 m M i , j , j = 1 n i = 1 m M i , j y ¯ j j = 1 n i = 1 m M i , j , j = 1 n i = 1 m M i , j z ¯ j j = 1 n i = 1 m M i , j .
The mass of the shaft is
M = j = 1 n i = 1 m M i , j .
Assuming that the axis of rotation coordinate of the shaft is ( x r o t a t i o n , y r o t a t i o n ), the CIF can be calculated by the following equation:
F x C I F F y C I F = M ω 2 x ¯ x r o t a t i o n y ¯ y r o t a t i o n .
Then the resultant force on the shaft is
F x t o t a l F y t o t a l = F x a i r F y a i r + F x C I F F y C I F .

2.3. Construction of Shaft Cylinder

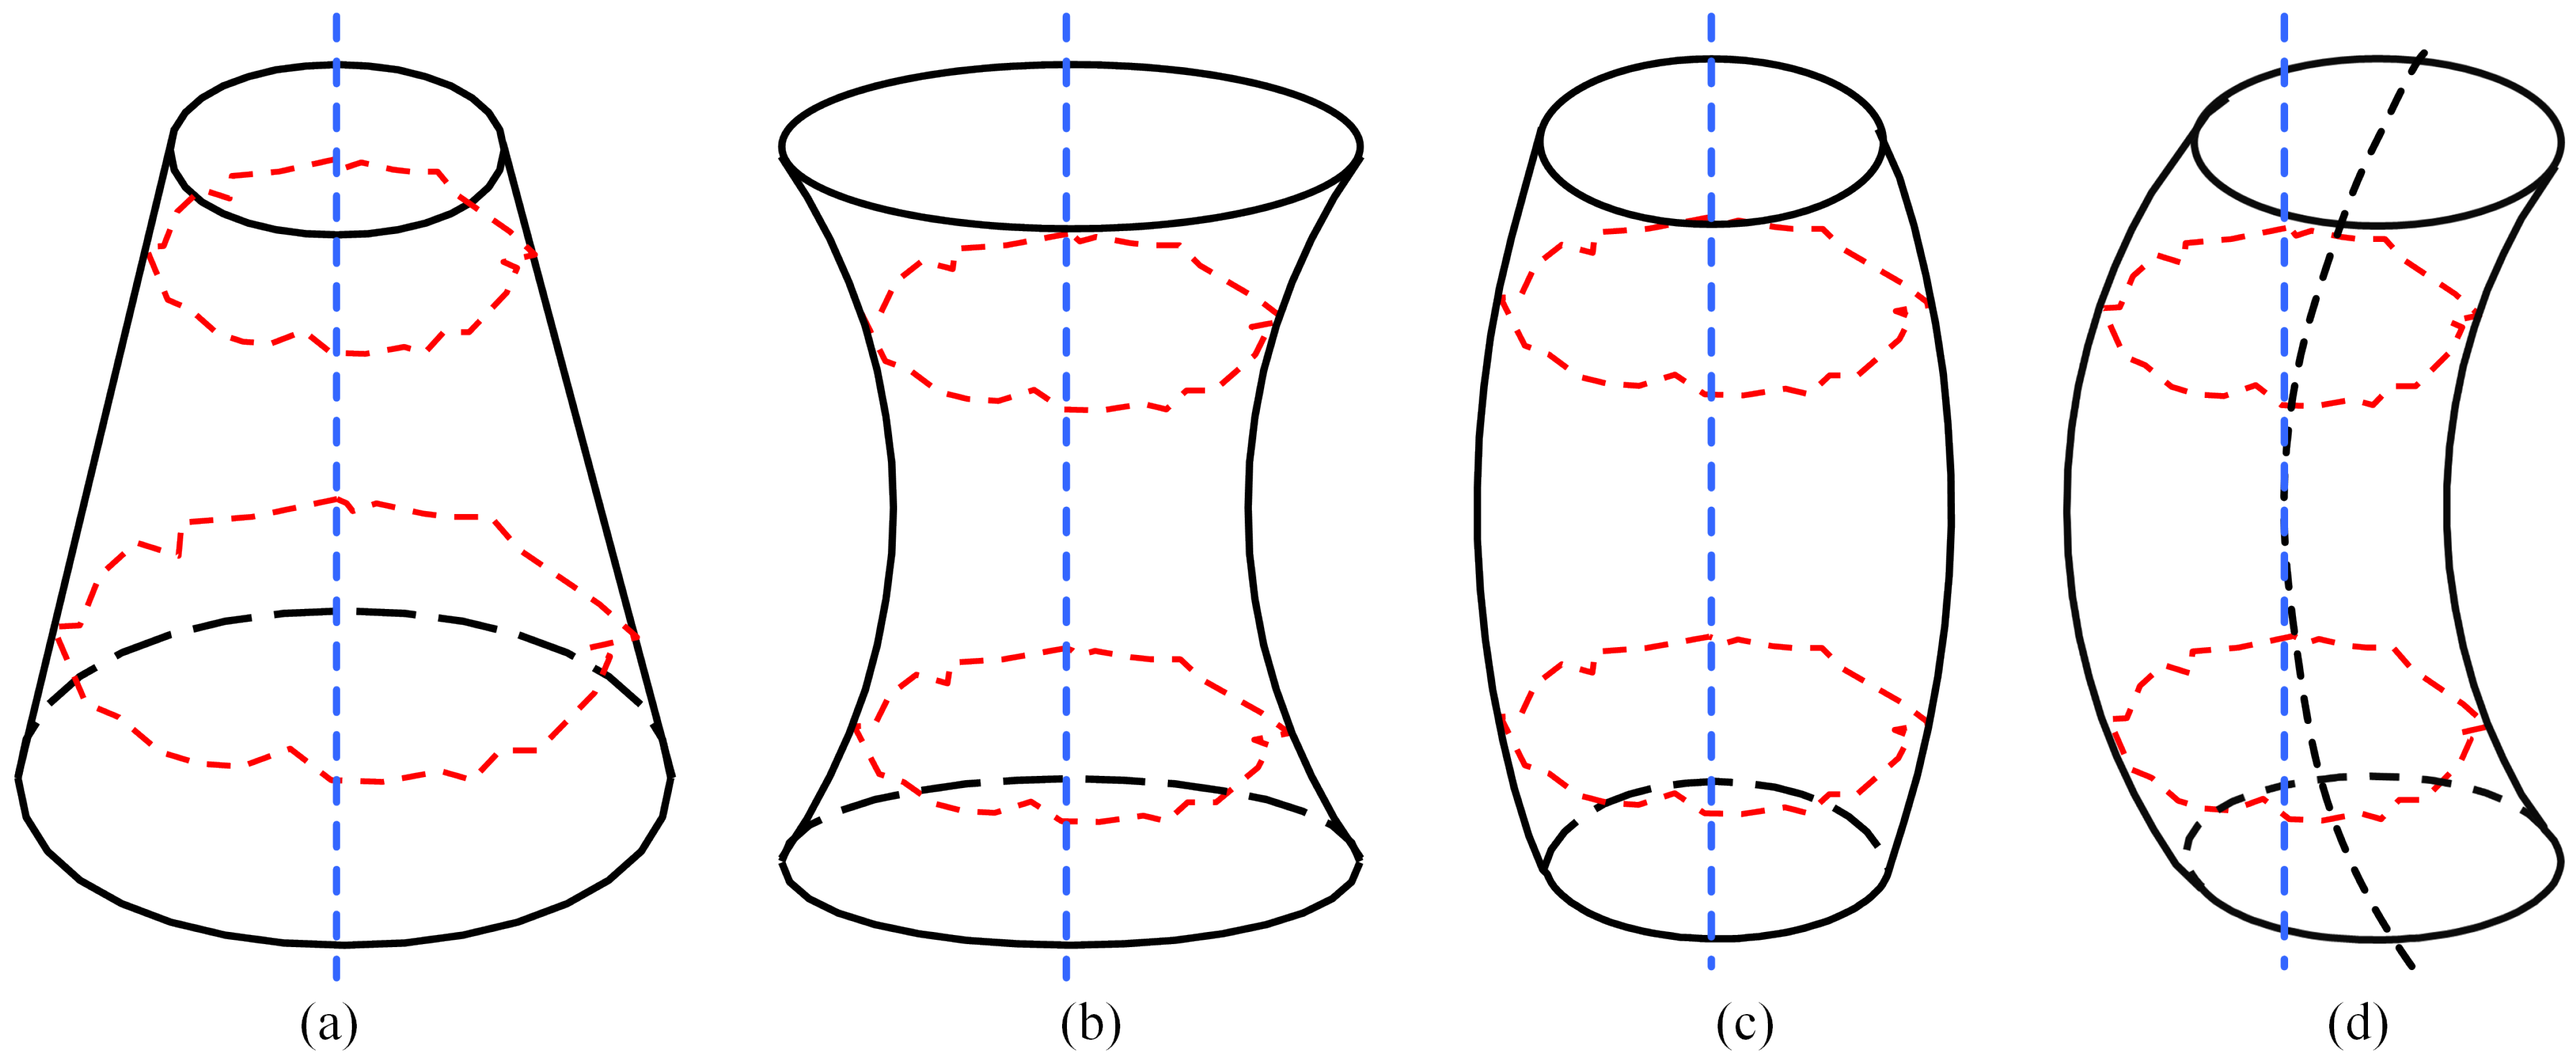
The shape of the shaft cylinder can be divided into four categories: conical (Figure 5a), concave (Figure 5b), convex (Figure 5c) and banana-shaped (Figure 5d). The conical, concave and convex shapes are axisymmetric shapes and, when they rotate around the axis, the change in the radial film gap is only determined by the section shape, which has little impact on the stability of the shaft. When the banana-shaped shaft rotates, the centers of different sections will deviate from the axis, resulting in significant changes in the air film gap, which has a great impact on the stability of the shaft. The actual shape of the shaft cylinder is composed of one or more of the four shapes.
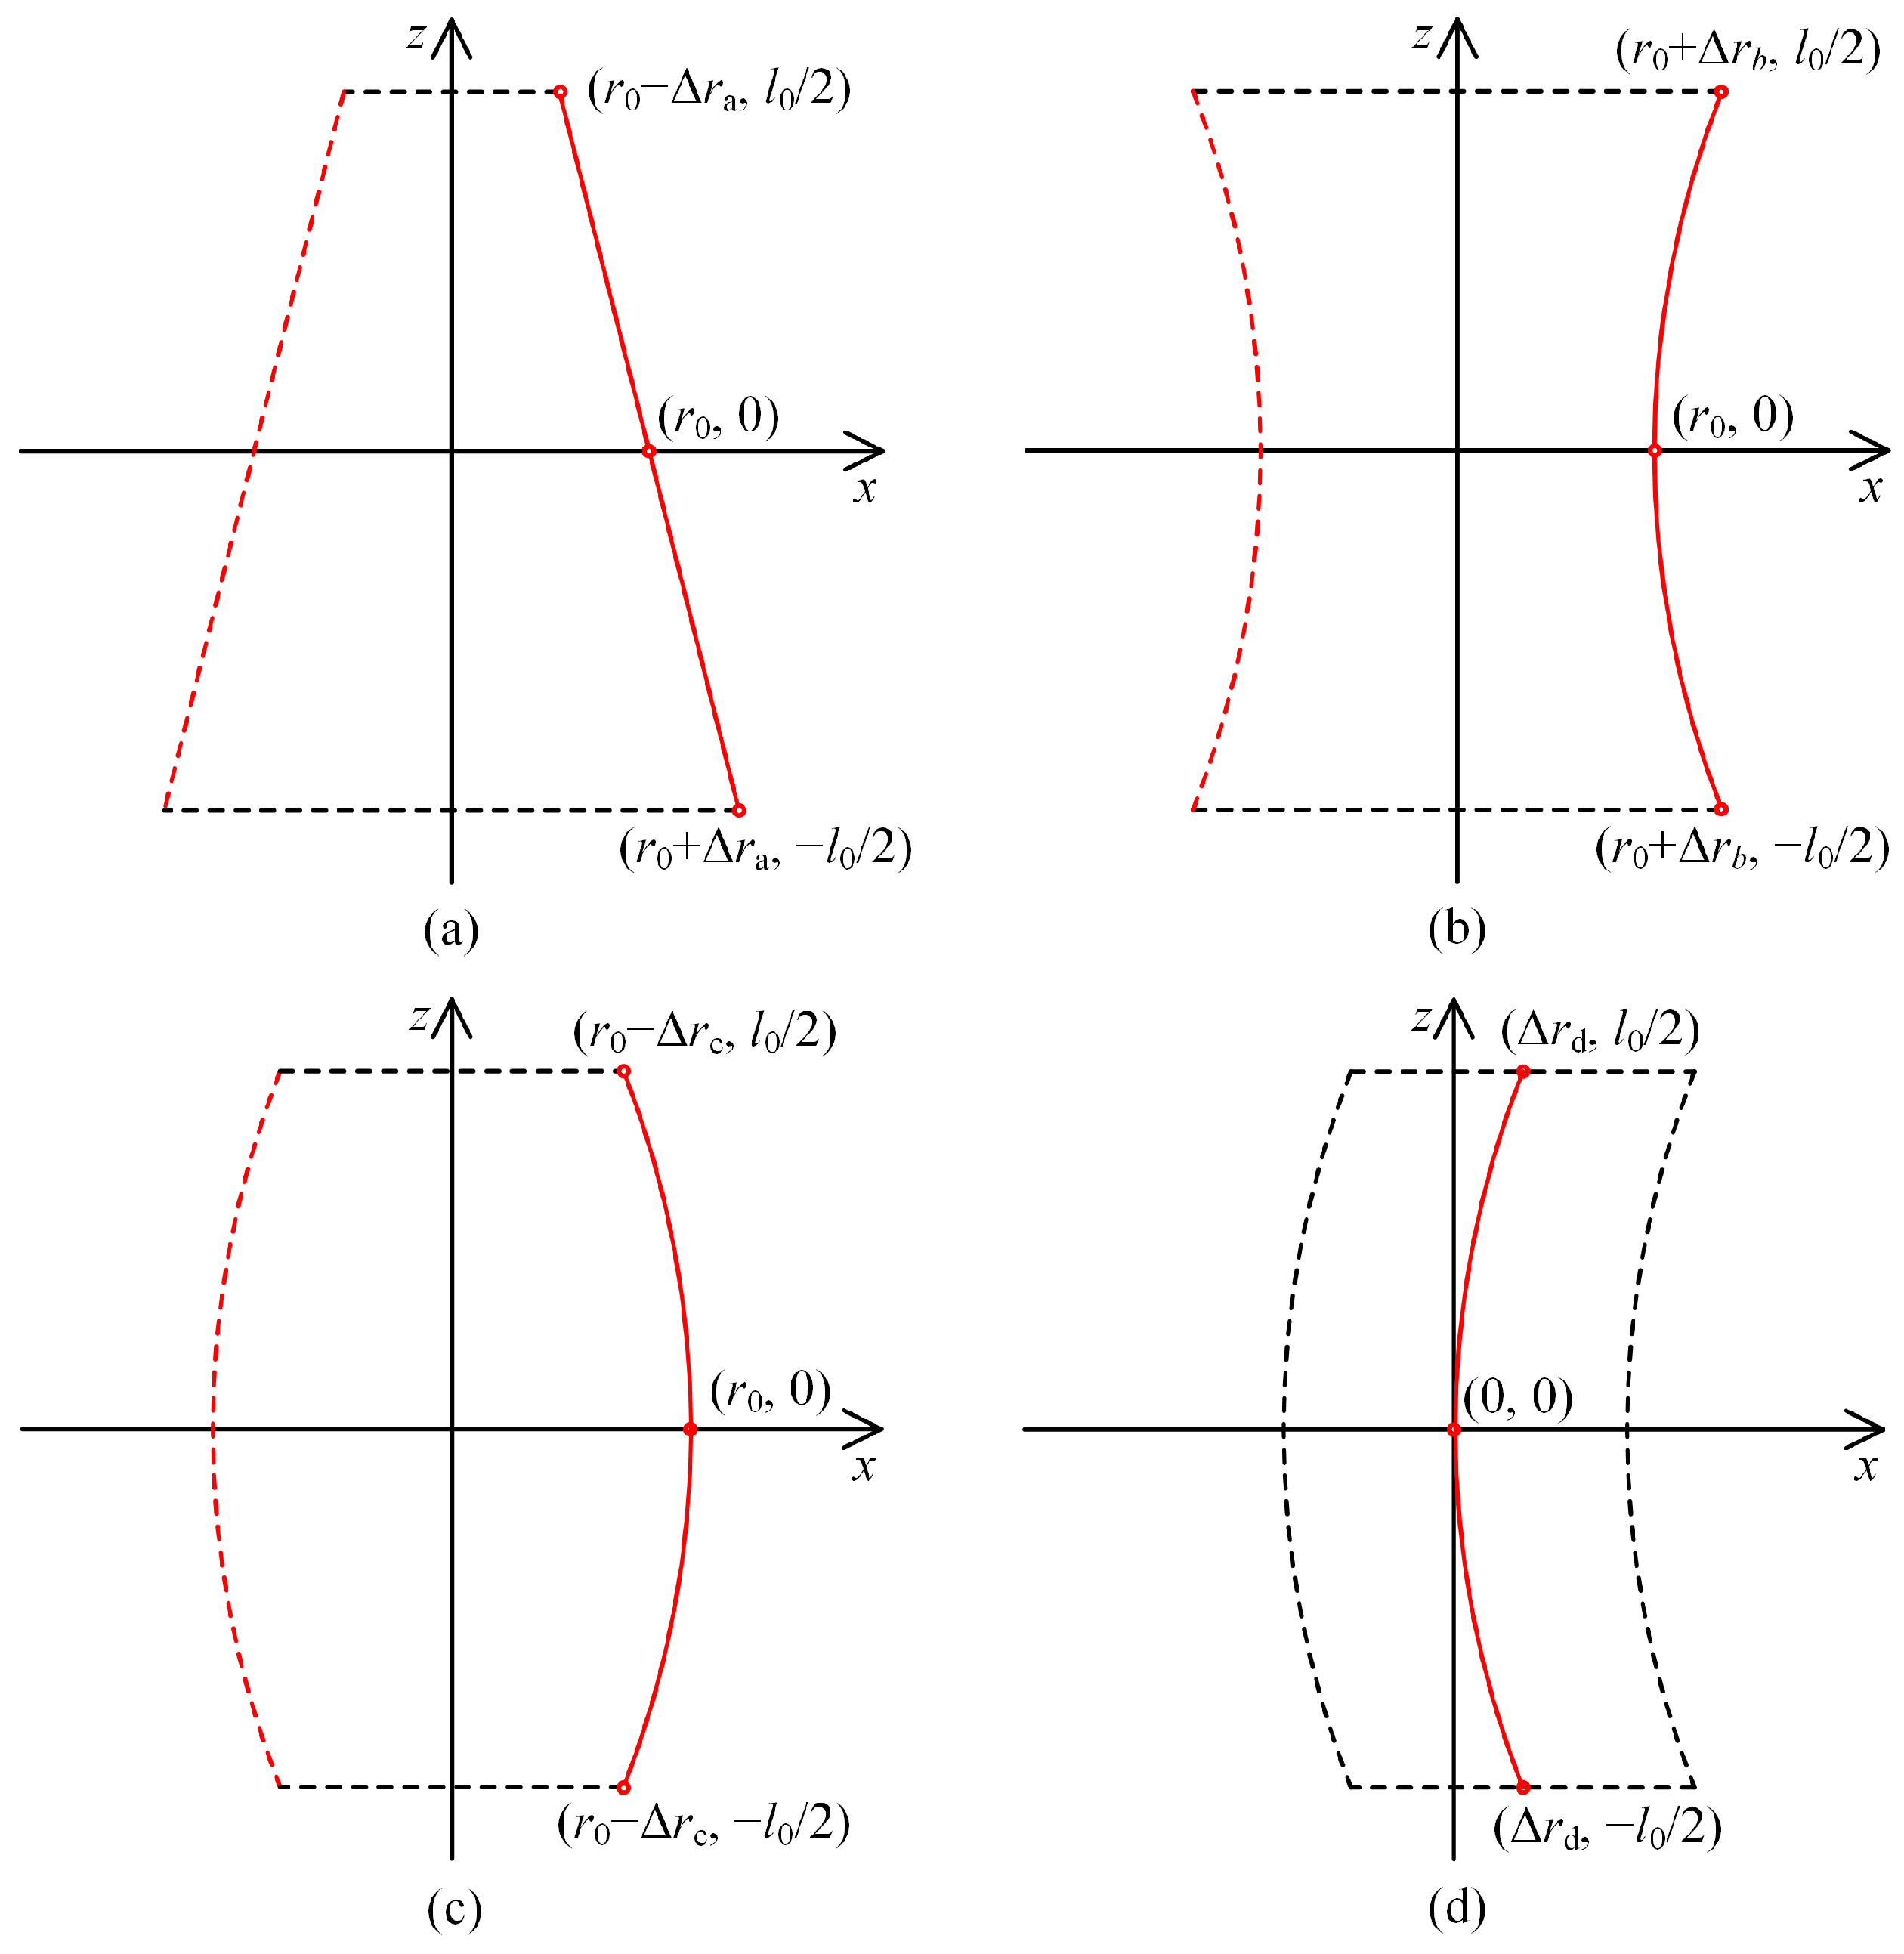
It is necessary to construct a shaft cylinder to analyze the influence of shape errors on rotation accuracy. In this paper, the shaft cylinder is constructed by scaling and moving the datum section following the characteristic line. The characteristic line in Figure 5a is a straight line, and the characteristic lines in Figure 5b–d are curves. In order to simplify the construction process, the curve is defined as an arc. The red dotted line in Figure 5 represents the actual shape of the datum section. Since the conical, concave and convex shapes are axisymmetric shapes, the generatrix is used as the characteristic line (the red solid line in Figure 6a and the red arcs in Figure 6b,c). The horizontal distance between any point of the generatrix and the z-axis is the nominal radius of the current section (see Equation (17) (a)–(c)), and the center of all sections is on the z-axis. In Figure 5d, the connecting line of the section center is used as the characteristic line (the red arc in Figure 6d), the x-direction coordinate of any point of the characteristic line can be expressed as Equation (18) and the shape of the section at different heights is the same.
r z c y l i n d e r = r 0 2 Δ r a l 0 z ( a ) r 0 r a r c ( b ) 2 z 2 + r a r c ( b ) ( b ) r 0 + r a r c ( c ) 2 z 2 r a r c ( c ) ( c )
x z c y l i n d e r = r a r c ( d ) r a r c ( d ) 2 z 2 .
The radius of the characteristic arc can be obtained by using the chord length and bow altitude method:
r a r c ( i ) = l 0 2 8 Δ r i + Δ r i 2 , i = b , c , d .
The cylindricity is determined by three factors: the section’s roundness, the average size difference of sections and the center position of sections. The latter two factors correspond to Δ r a Δ r b and Δ r c in Figure 6a–c, and Δ r d in Figure 6d, respectively. The Δ r d in Figure 6d represents the deviation of the section center from the axis of the cylinder. Through the measurement of a large number of shafts, it is found that the deviation exists in all shafts, but it is generally less than 0.1 μm. Therefore, three shaft cylinders are constructed by combining banana-shaped with conical, concave and convex shapes, respectively, then the cylindricity deviation calculated by
C Y L t = r z = l 0 / 2 max r z = l 0 / 2 min + Δ r d = R O N t d a t u m + 2 Δ r a + Δ r d ( a ) r z = l 0 / 2 max r z = 0 min + Δ r d = R O N t d a t u m + Δ r b + Δ r d ( b ) r z = 0 max r z = l 0 / 2 min + Δ r d = R O N t d a t u m + Δ r c + Δ r d ( c ) .

3. Calculation Settings

3.1. Selection and Processing of Data Sources

In previous studies, researchers mostly used trigonometric functions to construct shaft shape errors, and the shaft surface is very smooth and the error distribution is very regular, which is quite different from the actual shaft surface. In order to study the influence of shape errors on shaft rotation accuracy, the R10 series of preferred number is used to determine five roundness deviations as the datum according to the machining requirement of aerostatic shafts, which are 0.63 μm, 0.80 μm, 1 μm, 1.25 μm and 1.60 μm, respectively. Then, five corresponding roundness measurement data are selected from the measurement database of the cylindricity instrument as the data sources. The peak-to-valley roundness deviations of these data sources are 0.58 μm, 0.79 μm, 1 μm, 1.24 μm and 1.58 μm, respectively. These values are based on Gaussian filtering and least squares evaluation. To ensure the diversity of analysis, the data sources are selected from different shafts. Figure 7 shows the roundness measurement diagram (linear and polar) of each data source. In order to facilitate comparison, each linear diagram adopts the same abscissa and the same ordinate. It can be seen that the shapes of each source are quite different. The polar diagram of Figure 7a is oval, and the other diagrams are multi-lobed.
Each data source is scaled according to five datums, and a total of twenty-five sets of data are obtained for the next calculation. The scaling method is shown in Equation (21), and the data source is in polar format.
r i d a t u m = r i s o u r c e r s o u r c e R O N t d a t u m R O N t s o u r c e + r 0 .

3.2. Parameters of Cylinder Construction

Firstly, a cylinder with the same deviation of roundness and cylindricity is constructed to study the influence of roundness on shaft rotation accuracy separately, that is Δ r i = 0 ( i = a , b , c , d ) , which is constructed by using the five datums in the previous section.
Secondly, the cylinder with compound deviations is constructed. According to the machining requirements of aerostatic shafts, four cylindricity deviations are determined, which are 1.5 μm, 2 μm, 2.5 μm and 3 μm, respectively. Only three sources are selected to construct the cylinder in order to control the amount of calculation, which are Source-B, Source-C and Source-D, respectively. The value of each parameter can be calculated by using Equation (21), where Δ r d = 0.1 μm. See Table 1 for other parameters.

3.3. Settings of Numerical Calculation

The spindle has two rows of orifices, with 8 orifices in each row, see Table 2 for the specific parameters. To balance the calculation efficiency and accuracy, set 360 grids in the in the circumferential direction ( x -direction) and 100 grids in the axial direction ( z -direction), and the speed range is [1000, 15,000] r/min.

4. Results and Discussion

4.1. Effect of the Roundness

The twenty-five sets of roundness data are filtered [25,26] and imported into the simulation model for calculation, and the calculation results of UAFF (see Figure 8a–e) and CIF (see Figure 8f) on the shaft are obtained. It can be seen that for the shaft constructed based on the same data source, in general, the smaller the roundness deviation, the smaller and more stable the force on the shaft at different speeds. Comparing Figure 8a–e horizontally, it can be found that even if the roundness deviation values are the same, the force on the shaft constructed based on different sources will vary greatly. The peak-to-valley roundness deviation of Source-B (0.79 μm) is smaller than Source-C (1 μm) and Source-D (1.24 μm), but the UAFF is larger. The reason for these results is that the roundness deviation only represents the difference between the maximum and minimum values in the roundness measurement data, and cannot reflect the actual shape of the shaft, while the shaft shape directly affects the film thickness and then affects the UAFF. When the roundness error value is large, for example, 1.6 μm, the UAFF of the shaft changes greatly at different speeds, and the force will be very small at some speeds, such as 10,000 r/min and 12,000 r/min in Figure 8b and 9000 r/min and 14,000 r/min in Figure 8e. This is because the air in some parts cannot reach a stable state in time and cannot produce enough air film force at higher speeds [2].
The CIF is directly proportional to the square of the angular velocity (see Equation (15)), therefore, only the CIF at the speed of 15,000 r/min is calculated (see Figure 8f). It can be seen that the value of the CIF is very small under all settings, and the impact on the shaft rotation accuracy can be ignored.
By using Equation (22), the stiffness of the shaft can be calculated to evaluate the influence of the UAFF on the rotation accuracy of the shaft [27].
K = F e + Δ e a i r F e a i r Δ e .
The main stiffness of the shaft is about 40 N/μm. If the shaft eccentricity caused by UAFF is limited to 0.05 μm, the UAFF shall be less than 2 N. As can be seen from Figure 8a–e, the UAFF on every shaft is less than 2 N. However, when the roundness deviation is 1.6 μm, the UAFF fluctuates greatly with the speed; when the roundness deviation is 0.63 μm, the UAFF on the shaft is the smallest and changes little with the speed, but it presents a challenge for the manufacturing capability. Therefore, the roundness deviation of the shaft can be selected as 0.8 μm, 1 μm and 1.25 μm.

4.2. Harmonic Analysis of Data Source

The radial measurement accuracy of the Taylor Hobson 585LT cylindricity instrument is ±0.01 μm, and the default number of sampling points is 18,000 points per revolution, so the data measured by the cylindricity instrument can reflect the surface topography of the shaft well. The topography can be decomposed into several fluctuations by harmonic analysis, and Figure 9 is the harmonic analysis diagram of Source-B under 1–50 undulations per revolution (UPR). It can be seen that the amplitude of the 1st harmonic is the largest, which is produced by the eccentricity of the shaft to the datum axis and has nothing to do with the shape of the shaft. The 1st harmonic will be suppressed during roundness analysis, as shown in Figure 7, which will not affect the measurement results. There are two reasons for the 2nd harmonic, one is that the axis of the shaft is not parallel to the cylindricity instrument datum axis, and the other is that the shaft is oval. If the shaft is machined by centreless grinding or held by an overtightened three jaw chuck, the 3rd harmonic will be produced [28]. Higher order harmonics can be induced by the effects of the tool on the part, such as machine chatter.
Harmonic analysis is carried out on all sources in turn. After suppressing the first harmonic, draw a 100% stacked bar (see Figure 10) for the wave of 2–50 UPR according to its amplitude proportion. The numbers in the stacked bar are the amplitude proportion of the current wave, those whose amplitude proportion is less than 2% are not displayed. It can be observed from Figure 10 that the amplitude proportion of low-order harmonics is large and the high-order harmonics is small. The amplitude of the 2nd and 3rd harmonic of Source-A and Source-C accounts for a large proportion, while the shapes of Source-A and Source-C are relatively smooth as Figure 7a,c shows, so the change in air film gap will be relatively small when the shaft rotates, and the UAFF should be small, which is consistent with the calculation results (see Figure 8a,c).
The details above show that through the harmonic analysis of the measured data of shaft roundness, the UAFF can be reasonably predicted.

4.3. Effect of the Cylindricity

Source-B, Source-C and Source-D are used to construct the cylinder and calculate the UAFF according to the parameter settings in Table 1. Figure 11, Figure 12 and Figure 13 are the calculation results of different cylinders. For ease of comparison, the three subgraphs of each cylinder adopt the same abscissa and the same ordinate. The UAFF on conical shafts constructed by different data sources and cylindricity are relatively close, and the force is smaller as the speed increases, as shown in Figure 11. As can be seen from Figure 12, for a concave shaft, the UAFF on the shaft is directly proportional to the cylindricity deviation. When the cylindricity deviation is less than 2 μm, the UAFF at all speeds is not more than 2 N. The UAFF on the convex shaft is inversely proportional to the cylindricity error value, and the UAFF on this shaft is the smallest of the three, as shown in Figure 13. In general, the UAFF on the three shafts decreases with the increase in rotating speed. When the cylindricity deviation is less than 2 μm, the resulting shaft eccentricity shall not exceed 0.05 μm.

5. Conclusions

When the spindle is running, the rotation accuracy is affected by the coupling of manufacturing errors, assembly faults, unbalanced magnetic pull in the motor, thermal deformation and other factors. It is difficult to determine the influence of a certain factor on the final rotation accuracy. Based on the setting and calculation of this paper, the following conclusions can be drawn:
  • The shape error of the cylindrical surface of the shaft will make it subject to UAFF during rotation. In general, the smaller the error, the smaller the UAFF. When the roundness deviation is ≤1.25 μm, and the cylindricity deviation is ≤2 μm, the influence of the shape error on the rotation accuracy of shaft is small enough.
  • The CIF caused by the shape error is very small (<1 × 10 5 N), and the influence of this force on the rotation accuracy can be ignored. The magnitude of the CIF is determined by the shaft mass, rotation speed and the eccentricity of the center of mass relative to the center of rotation, so the calculation of the CIF is still necessary for an actual situation.
  • The magnitude and stability of the UAFF on the shaft are determined by the actual shape of the shaft cylindrical surface. The harmonic analysis method can be used to analyze the shaft shape and predict the UAFF reasonably.
  • Although the roundness deviation and cylindricity deviation given in this paper are not suitable for all types of aerostatic spindle, the analysis and calculation method in this paper can still provide useful guidance for the design and manufacturing of aerostatic spindles.

Author Contributions

Conceptualization, G.Z.; methodology, J.Z.; software, G.Z. and H.Y.; validation, K.Z. and G.D.; formal analysis, J.Z. and H.Y.; investigation, J.Z. and H.Y.; data curation, G.Z. and T.C.; writing—original draft preparation, G.Z.; writing—review and editing, J.Z. and T.C.; visualization, K.Z. and G.D.; funding acquisition, J.Z. and H.Y. All authors have read and agreed to the published version of the manuscript.

Funding

This research was funded by the National Natural Science Foundation of China, grant number 51875586.

Data Availability Statement

The data presented in this study are available on reasonable request from the corresponding author.

Conflicts of Interest

The authors declare no conflict of interest.

Appendix A

X H 3 P 2 X = H i + 0.5 , j 3 Δ X 2 P i + 1 , j 2 P i , j 2 H i 0.5 , j 3 Δ X 2 P i , j 2 P i 1 , j 2 .
Z H 3 P 2 Z = H i , j + 0.5 3 Δ Z 2 P i , j + 1 2 P i , j 2 H i , j 0.5 3 Δ Z 2 P i , j 2 P i , j 1 2 .
P H X = H i + 1 , j H i 1 , j 2 Δ X P i , j .
H P X = P i + 1 , j P i 1 , j 2 Δ X H i , j .
Substituting Equations (A1)–(A4) into Equation (5):
H i + 0.5 , j 3 Δ X 2 P i + 1 , j 2 + H i 0.5 , j 3 Δ X 2 P i 1 , j 2 + H i , j + 0.5 3 Ψ Δ Z 2 P i , j + 1 2 + H i , j 0.5 3 Ψ Δ Z 2 P i , j 1 2 H i + 0.5 , j 3 + H i 0.5 , j 3 Δ X 2 + H i , j + 0.5 3 + H i , j 0.5 3 Δ Z 2 Ψ P i , j 2 = Λ H i + 1 , j H i 1 , j 2 Δ X + Q P i , j + Λ H i , j 2 Δ X P i + 1 , j P i 1 , j .
To simplify the abo Equation (A5), set
A i , j = H i + 0.5 , j 3 Δ X 2 , B i , j = H i 0.5 , j 3 Δ X 2 , C i , j = H i , j + 0.5 3 Ψ Δ Z 2 , D i , j = H i , j 0.5 3 Ψ Δ Z 2 , E i , j = A i , j + B i , j + C i , j + D i , j F i , j = Λ H i + 1 , j H i 1 , j 2 Δ X + Q , G i , j = Λ H i , j 2 Δ X .
Equation (A5) can be changed to
A i , j P i + 1 , j 2 + B i , j P i 1 , j 2 + C i , j P i , j + 1 2 + D i , j P i , j 1 2 E i , j P i , j 2 = F i , j P i , j + G i , j P i + 1 , j P i 1 , j .
Set
I i , j = A i , j P i + 1 , j 2 + B i , j P i 1 , j 2 + C i , j P i , j + 1 2 + D i , j P i , j 1 2 + G i , j P i 1 , j P i + 1 , j .
Equation (A7) is further simplified as
E i , j P i , j 2 + F i , j P i , j I i , j = 0 .
By using the solution of one variable quadratic equation, the following equation can be obtained:
P i , j = F i , j 2 + 4 E i , j I i , j F i , j 2 E i , j .

References

  1. Gao, S.; Cheng, K.; Chen, S.; Ding, H.; Fu, H. Computational design and analysis of aerostatic journal bearings with application to ultra-high speed spindles. Proc. Inst. Mech. Eng. Part J. Mech. Eng. Sci. 2017, 231, 1205–1220. [Google Scholar] [CrossRef]
  2. Cappa, S.; Reynaerts, D.; Al-Bender, F. Reducing the radial error motion of an aerostatic journal bearing to a nanometre level: Theoretical modelling. Tribol. Lett. 2014, 53, 27–41. [Google Scholar] [CrossRef]
  3. Yabe, H. A study on run-out characteristics of externally pressurized gas journal bearing: Rotor run-out characteristics. JSME Int. J. Ser. Dyn. Control. Robot. Des. Manuf. 1994, 37, 355–361. [Google Scholar] [CrossRef] [Green Version]
  4. Yabe, H. A study on run-out characteristics of externally pressurized gas journal bearing: Modified DF method for point-source solution. JSME Int. J. Ser. C Dyn. Control. Robot. Des. Manuf. 1994, 37, 362–368. [Google Scholar] [CrossRef] [Green Version]
  5. Zhang, S.; To, S.; Cheung, C.; Wang, H. Dynamic characteristics of an aerostatic bearing spindle and its influence on surface topography in ultra-precision diamond turning. Int. J. Mach. Tools Manuf. 2012, 62, 1–12. [Google Scholar] [CrossRef]
  6. Zhang, S.; To, S.; Wang, S.; Zhu, Z. A review of surface roughness generation in ultra-precision machining. Int. J. Mach. Tools Manuf. 2015, 91, 76–95. [Google Scholar] [CrossRef]
  7. Pande, S.; Somasundaram, S. Effect of manufacturing errors on the performance of aerostatic journal bearings. Wear 1981, 66, 145–156. [Google Scholar] [CrossRef]
  8. Stout, K.J. The Effect of Manufacturing Variations on the Performance of Externally Pressurized Gas-Lubricated Journal Bearings. Proc. Inst. Mech. Eng. Part J. Mech. Eng. Sci. 1985, 199, 299–309. [Google Scholar] [CrossRef]
  9. Bhat, N.; Barrans, S.; Kumar, A. Performance analysis of Pareto optimal bearings subject to surface error variations. Tribol. Int. 2010, 43, 2240–2249. [Google Scholar] [CrossRef] [Green Version]
  10. Cui, H.; Wang, Y.; Yue, X.; Huang, M.; Wang, W. Effects of manufacturing errors on the static characteristics of aerostatic journal bearings with porous restrictor. Tribol. Int. 2017, 115, 246–260. [Google Scholar] [CrossRef]
  11. Cui, H.; Wang, Y.; Yue, X.; Huang, M.; Wang, W.; Jiang, Z. Numerical analysis and experimental investigation into the effects of manufacturing errors on the running accuracy of the aerostatic porous spindle. Tribol. Int. 2018, 118, 20–36. [Google Scholar] [CrossRef]
  12. Wang, X.; Xu, Q.; Wang, B.; Zhang, L.; Yang, H.; Peng, Z. Effect of surface waviness on the static performance of aerostatic journal bearings. Tribol. Int. 2016, 103, 394–405. [Google Scholar] [CrossRef]
  13. Wang, X.; Xu, Q.; Huang, M.; Zhang, L.; Peng, Z. Effects of journal rotation and surface waviness on the dynamic performance of aerostatic journal bearings. Tribol. Int. 2017, 112, 1–9. [Google Scholar] [CrossRef]
  14. Sun, F.; Zhang, X.; Wang, X.; Su, Z.; Wang, D. Effects of Shaft Shape Errors on the Dynamic Characteristics of a Rotor-Bearing System. J. Tribol. 2019, 141, 101701. [Google Scholar] [CrossRef]
  15. Dimofte, F. Wave journal bearing with compressible lubricant—Part I: The wave bearing concept and a comparison to the plain circular bearing. Tribol. Trans. 1995, 38, 153–160. [Google Scholar] [CrossRef]
  16. Dimofte, F. Wave journal bearing with compressible lubricant—Part II: A comparison of the wave bearing with a wave-groove bearing and a lobe bearing. Tribol. Trans. 1995, 38, 364–372. [Google Scholar] [CrossRef]
  17. Charitopoulos, A.; Efstathiou, E.; Papadopoulos, C.; Nikolakopoulos, P.; Kaiktsis, L. Effects of manufacturing errors on tribological characteristics of 3-D textured micro- thrust bearings. CIRP J. Manuf. Sci. Technol. 2013, 6, 128–142. [Google Scholar] [CrossRef]
  18. Dal, A.; Karaçay, T. Effects of angular misalignment on the performance of rotor-bearing systems supported by externally pressurized air bearing. Tribol. Int. 2017, 111, 276–288. [Google Scholar] [CrossRef]
  19. Gao, Q.; Chen, W.; Lu, L.; Huo, D.; Cheng, K. Aerostatic bearings design and analysis with the application to precision engineering: State-of-the-art and future perspectives. Tribol. Int. 2019, 135, 1–17. [Google Scholar] [CrossRef]
  20. Dupont, R. Robust rotor dynamics for high-speed air bearing spindles. Precis. Eng. 2015, 40, 7–13. [Google Scholar] [CrossRef]
  21. Song, M.; Azam, S.; Jang, J.; Park, S.S. Effect of shape errors on the stability of externally pressurized air journal bearings using semi-implicit scheme. Tribol. Int. 2017, 115, 580–590. [Google Scholar] [CrossRef]
  22. Hamrock, B.J.; Schmid, S.R.; Jacobson, B.O. Fundamentals of Fluid Film Lubrication; CRC Press: Boca Raton, FL, USA, 2004. [Google Scholar]
  23. Morosi, S.; Santos, I.F. Active lubrication applied to radial gas journal bearings. Part 1: Modeling. Tribol. Int. 2011, 44, 1949–1958. [Google Scholar] [CrossRef]
  24. Zhang, G.; Zheng, J.; Yu, H.; Zhao, R.; Shi, W.; Wang, J. Rotation Accuracy Analysis of Aerostatic Spindle Considering Shaft’s Roundness and Cylindricity. Appl. Sci. 2021, 11, 7912. [Google Scholar] [CrossRef]
  25. Kang, Y.; Wang, F.; Qiu, Z.; Zhang, H.; Shi, Z.; Gu, F. A novel iteration method for estimation of bearing dynamic coefficients in the rotor-bearing system. Int. J. Hydromechatronics 2021, 4, 277–294. [Google Scholar] [CrossRef]
  26. Jie, D.; Zheng, G.; Zhang, Y.; Ding, X.; Wang, L. Spectral kurtosis based on evolutionary digital filter in the application of rolling element bearing fault diagnosis. Int. J. Hydromechatronics 2021, 4, 27–42. [Google Scholar] [CrossRef]
  27. Lo, C.Y.; Wang, C.C.; Lee, Y.H. Performance analysis of high-speed spindle aerostatic bearings. Tribol. Int. 2005, 38, 5–14. [Google Scholar] [CrossRef]
  28. Zhang, P. Accuracy prediction model of an orifice-compensated aerostatic bearing. Precis. Eng. 2021, 72, 837–846. [Google Scholar] [CrossRef]
Figure 1. Structural diagram of an ‘H’ type spindle.
Electronics 11 01304 g001
Figure 2. Schematic diagram of spindle considering radial shape errors of shaft: (a) overall view; (b) microcosmic view facing the z -axis.
Electronics 11 01304 g002
Figure 3. Schematic diagram of computation nodes.
Electronics 11 01304 g003
Figure 4. Schematic diagram of sector discretization of shaft slice.
Electronics 11 01304 g004
Figure 5. Typical categories of shaft cylinder: (a) conical; (b) concave; (c) convex; (d) banana-shaped.
Electronics 11 01304 g005
Figure 6. Construction of cylinder: (a) conical; (b) concave; (c) convex; (d) banana-shaped.
Electronics 11 01304 g006
Figure 7. Roundness measurement diagram (linear and polar) of five sources: (a) Source-A; (b) Source-B; (c) Source-C; (d) Source-D; (e) Source-E.
Electronics 11 01304 g007
Figure 8. The force on the shaft under the action of roundness error: (a) UAFF, Source-A; (b) UAFF, Source-B; (c) UAFF, Source-C; (d) UAFF, Source-D; (e) UAFF, Source-E; (f) CIF.
Electronics 11 01304 g008
Figure 9. Harmonic analysis of Source-B.
Electronics 11 01304 g009
Figure 10. Stacked bar of amplitude proportion.
Electronics 11 01304 g010
Figure 11. The UAFF on the conical shaft: (a) Source-B; (b) Source-C; (c) Source-D.
Electronics 11 01304 g011
Figure 12. The UAFF on the concave shaft: (a) Source-B; (b) Source-C; (c) Source-D.
Electronics 11 01304 g012
Figure 13. The UAFF on the convex shaft: (a) Source-B; (b) Source-C; (c) Source-D.
Electronics 11 01304 g013
Table 1. Parameters of cylinder construction (μm).
Cylindricity Deviation1.522.53
Data sourceBCDBCDBCDBCD
Roundness deviation0.811.250.811.250.811.250.811.25
Δ r a 0.30.20.080.550.450.330.80.70.581.050.950.83
Δ r b / Δ r c 0.60.40.151.10.90.651.61.41.152.11.91.65
Table 2. Spindle parameters.
ParametersValue
Bearing diameter (D/mm)50
Bearing length (L/mm)50
Nominal radius clearance ( h 0 /mm)0.01
Orifice diameter (d/mm)0.16
Supplied pressure ( p s / P a t m )4
Air dynamic viscosity ( η /Pa·s)1.845 × 10 5
Shaft material38CrMoAl
Shaft density ( ρ s h a f t /kg/m 3 )7.85 × 10 3
Publisher’s Note: MDPI stays neutral with regard to jurisdictional claims in published maps and institutional affiliations.