Article

Design and Testing of Impacted Stiffened CFRP Panels under Compression with the VERTEX Test Rig

Institut Clément Ader (UMR 5312), ISAE-SUPAERO–INSA–IMT Mines Albi–UPS–CNRS, 31400 Toulouse, France
*
Author to whom correspondence should be addressed.
Aerospace 2023, 10(4), 327; https://doi.org/10.3390/aerospace10040327
Submission received: 31 January 2023 / Revised: 10 March 2023 / Accepted: 11 March 2023 / Published: 25 March 2023
(This article belongs to the Topic Composites in Aerospace and Mechanical Engineering)

Abstract

:
Aeronautical composite primary structures must evidence sufficient residual strength in the presence of damage for compliance with damage tolerance requirements. The study of stiffener debonding on panels subjected to compression after impact is performed in that scope. Compression leads to the buckling of the skin between the stiffeners, and thus a complex loading of the bonding between the skin and the stiffener. This paper describes the development of a stiffened specimen for the VERTEX multiaxial test rig as a first step towards the study of the damage tolerance evaluation of stiffened structures, under combined loadings and at the intermediate scale of the test pyramid. By using virtual testing, the specimen was designed to produce the phenomenology of interest as the first damage, i.e., the debonding of the stiffener from the centre. Three samples were manufactured and subjected to low velocity impacts at various locations and energies. Then the three samples were subjected to compression after impact, up to the stiffener debonding, under a post-buckling regime of the skin. Test loading evolution is described with force fluxes and global strains, obtained from in situ stereo-correlation. The different impacts were found to give different types of damage but similar residual strength to compression after impact.

1. Introduction

In the aeronautical industry, stiffened panel structures (such as fuselage sections) are sized within the framework of the test pyramid (Figure 1) [1]. This is a process of building large complex mechanical tests on the basis of smaller simpler tests, up to the definition of the full structure of a new aircraft. The base of the test pyramid is made up of numerous coupons for the characterisation of material properties and their statistical variability, to derive the allowables for damage tolerance and the environmental effects. From this basis, tests on structural elements are considered, mainly composed of small mechanical parts and elementary geometries. Following a building block approach, each new level of the test pyramid considers larger and fewer tests based on the previous levels, up to the top of the test pyramid, where the full structure of an aircraft is tested. The possible exposure of an aircraft structure to one-off load cases (called the Limit Load) cannot be neglected, so it is sized to withstand these with a certain safety factor (called the Ultimate Load) [1]. The structure is also designed to sustain adequate loads in the presence of damages, such as bird strikes or uncontained engine failure. The structures can also be subjected to more discreet events, such as a tool dropped during maintenance, possibly leading to internal damage not readily detected during an inspection, but that will eventually propagate with fatigue. Sizing addresses this by considering Barely Visible Impact Damage (BVID).
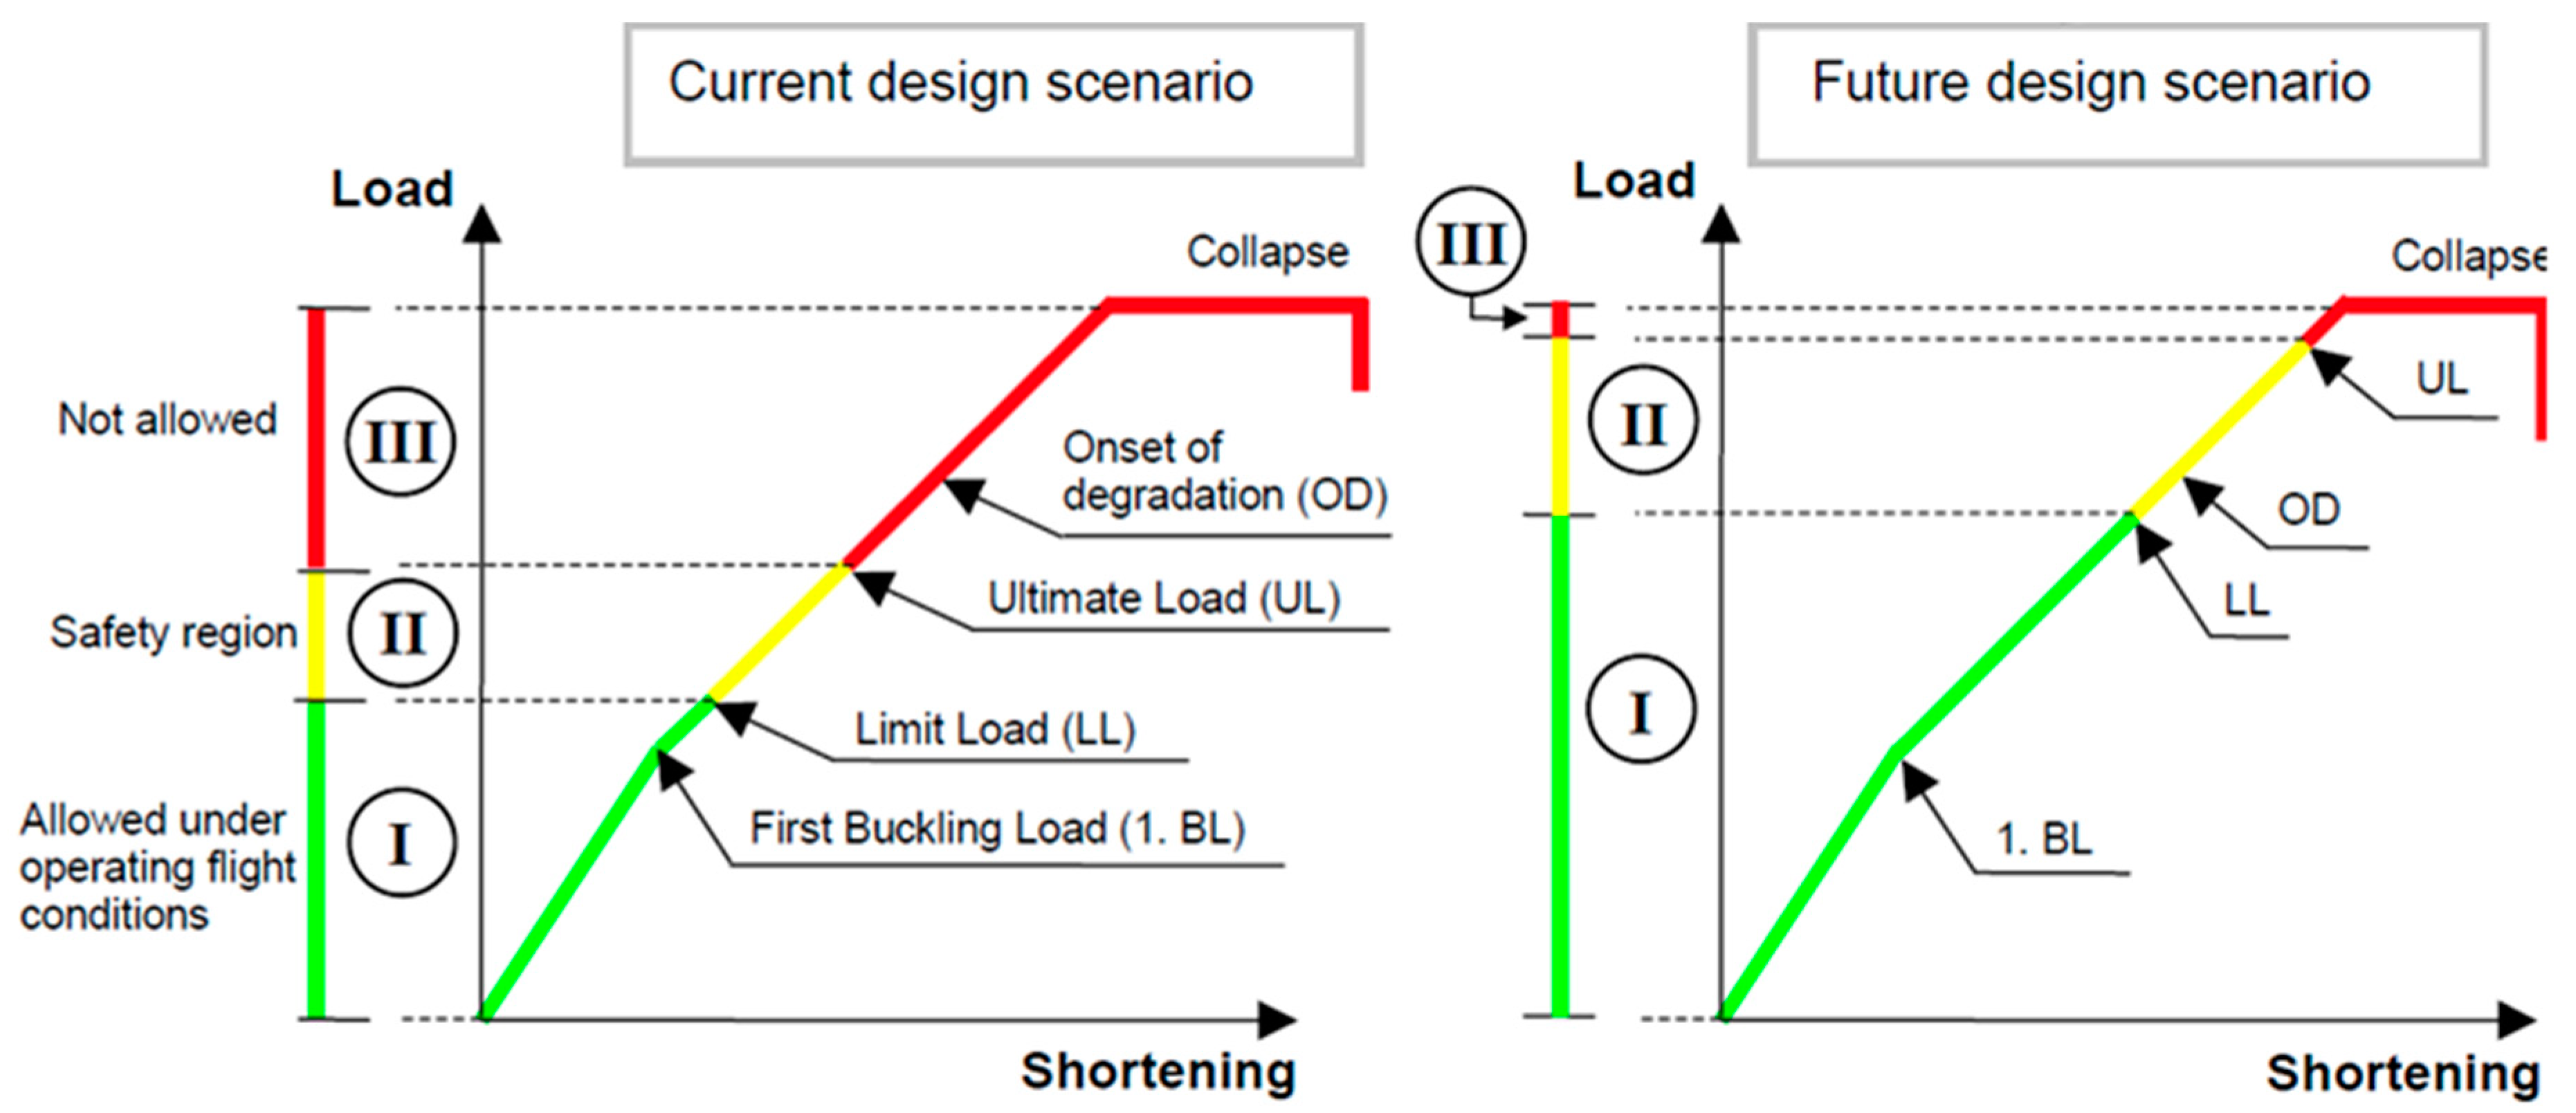
Although pristine Carbon Fibre Reinforced Polymers (CFRP) offer high resistance to fatigue compared to usual metallic materials, a complexity arises from the debonding of stiffeners under post-buckling, and its propagation under repeated cycles of compression. To avoid over-complexity in the sizing of repetitive debonding propagation during post-buckling, the stiffened panels are sized not to buckle below Limit Loads in most cases. Two decades ago, Meeks et al. [3] pointed out that “allowing post-buckling below limit load could offer a considerable reduction in weight”. Research in recent decades has continuously studied composite stiffener debonding under the post-buckling regime [4,5,6,7] and even proposed solutions to specifically address damage tolerance under post-buckling [8,9,10]. Therefore, it is of interest to better understand the damage tolerance behaviour of stiffened composite structures versus post-buckling capabilities in order to be able to open sizing to a larger potential of structure strength under post-buckling conditions [11] (Figure 2). Allowing the buckling for lower loads would relax a sizing constraint and may thus enable a mass reduction in composite panels.
Research concerning the damage tolerance evaluation of stiffened panels takes place at several scale levels, matching the test pyramid principle (Figure 1). The aircraft fuselage is basically a large cylinder with stringers and frames that stiffen the overall structure to avoid buckling collapse under global bending and torsion. Since the fuselage is a complex and expensive part, structural studies are performed at lower scale on large, stiffened panels that are representative of sections of the fuselage (Figure 1–subcomponent and details) [13,14,15]. Such large tests allow skin-stiffener separation, referred to here as “debonding”, to be identified as a key structural failure mechanism. Early studies identified the instrumental effect of skin buckles in the debonding process because of local bending and twisting at buckle crests and nodes [3]. Large stiffened panels are also costly to manufacture; thus the complex numerical models used to develop them must be validated at lower scales. Therefore, small panels with a single stiffener (Figure 1–elements) are subjected to basic compression [16,17], or tested under four-point bending, to focus on the debonding in simple controlled conditions [2,18].To reproduce the local bending and twisting generated by buckles more representatively, seven-point bending tests reproduce buckling modes, to challenge models on controlled, stable and representative test cases [19,20]. Numerical models developed on previous elements can then be scaled for virtual testing on large, stiffened panels [21,22], up to the full fuselage to be sized.
Research on the effects of defects, and the validation of damage tolerance, require many configurations to be tested, notably considering impact locations and energies [3,23,24], which makes the development of virtual testing a very suitable solution. Many studies have therefore focused on the modelling of compression after impact [25,26,27,28], but this requires long computation times (generally from 1 h to 1 day or more) and is generally limited to small, flat plates. When large, stiffened panels are considered, modelling becomes a multi-scale issue, since buckling is a global, structural problem, whereas impact and debonding are local phenomena. Therefore, some studies have developed global-local approaches to properly simulate their interactions within a reasonable computation time [22,29]. To complete the test pyramid overview, coupon characterisation of material properties is obviously a fundamental input for models, and the critical issue of skin-stiffener separation motivates thorough coupon characterisation and representation of debonding [2,30,31].
Between the large, stiffened panels (Figure 1–details) and small, structural elements (Figure 1–element), there is compromise, referred to here as the “intermediate scale”: large enough to representatively reproduce skin buckles and associated debonding, but still compact enough (approximately 500 mm) to cost-effectively focus on the phenomenology of interest. The literature proposes some tests at this intermediate scale [32], mostly with basic compression [3,4,33], but also some shear with specific deformable square setups [21,34]. Telford et al. [35] recently highlighted similar issues regarding testing scales and representativeness; thus, they developed a bending test on stiffened samples to study buckling at the intermediate scale, more representatively than usual pure in-plane compression. The VERTEX test rig [36] allows combinations of tension/compression, shear and pressure to be generated on intermediate-scale specimens, to represent larger structural issues, as it embeds the specimen in a large compliant bench.
This paper focuses on the development of VERTEX tests on a stiffened sample, as a first step towards the study of the damage tolerance of stiffened samples, under a large range of loadings representative of large structure issues but at moderate cost. First, thanks to virtual testing, the specimen was designed to generate the phenomenology of interest under compression: stiffener debonding from the interaction with skin buckling, despite nearby strong boundary conditions. Eventually, the manufactured samples were subjected to various impacts at low velocity and then compression after impact, in order to study damage tolerance under a post-buckling regime.

2. Experimental Specimen Configuration

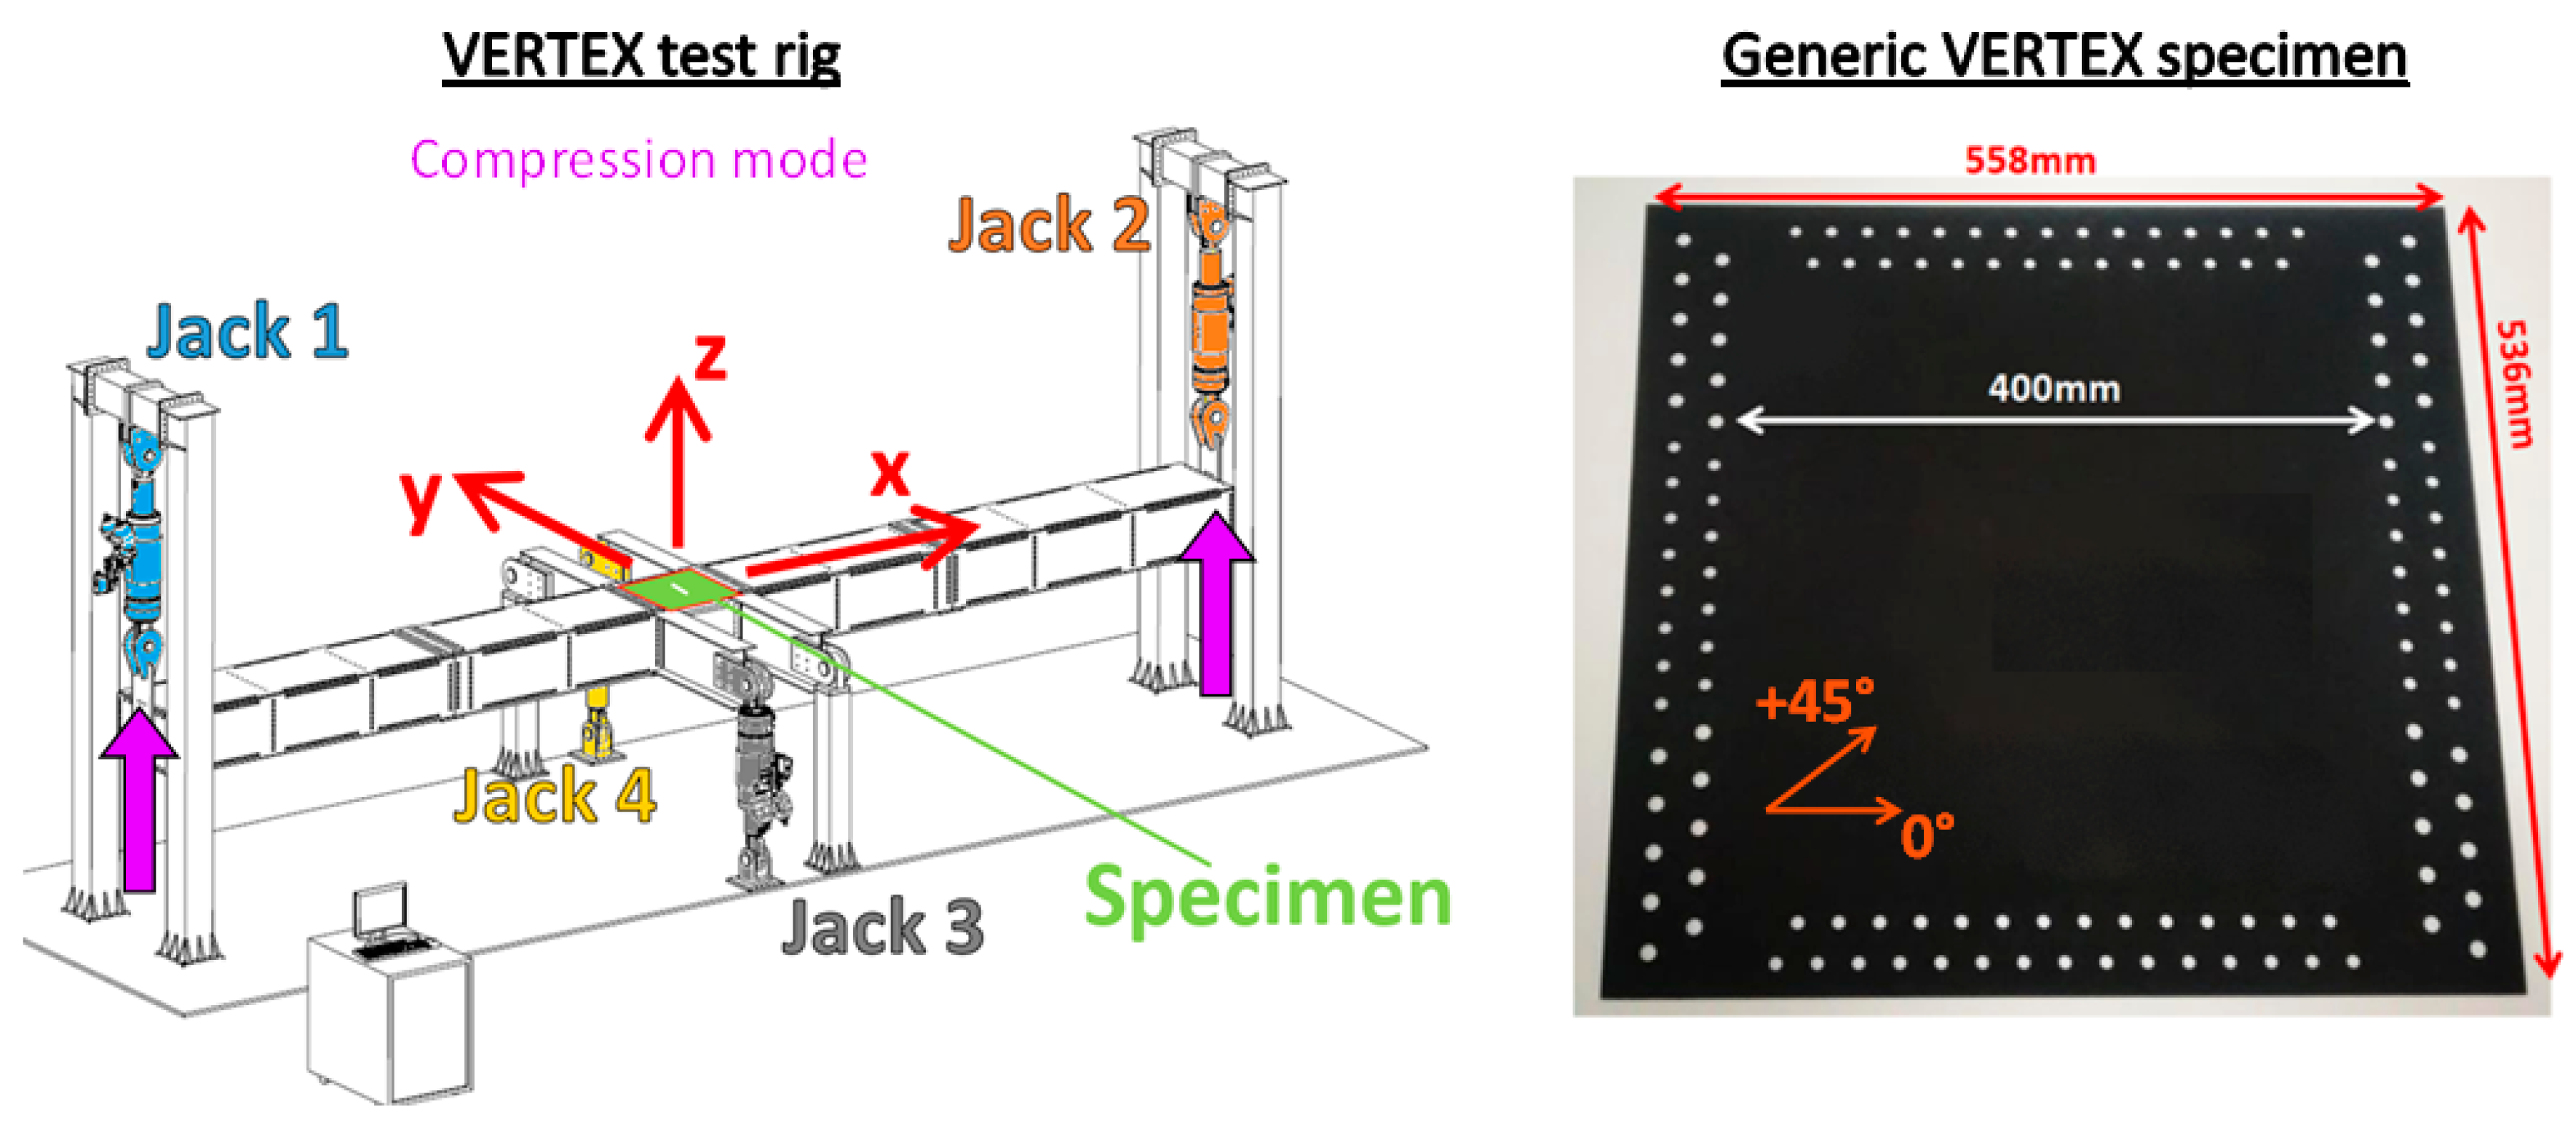
The VERTEX test bench [36,37] is basically a long hollow box with a sample bolted in the centre (Figure 3–left). Despite the multi-axial capabilities of the bench, the present study focuses on compression loadings. Compression was achieved by pulling up jacks 1 and 2, which bent the main beam of the bench, thus locally generating compression on the specimen (Figure 3–left). The specimen was a 558 mm × 536 mm plate, leaving a 400 mm × 400 mm useful zone between the tabs bolted with 128 holes (Figure 3–right).
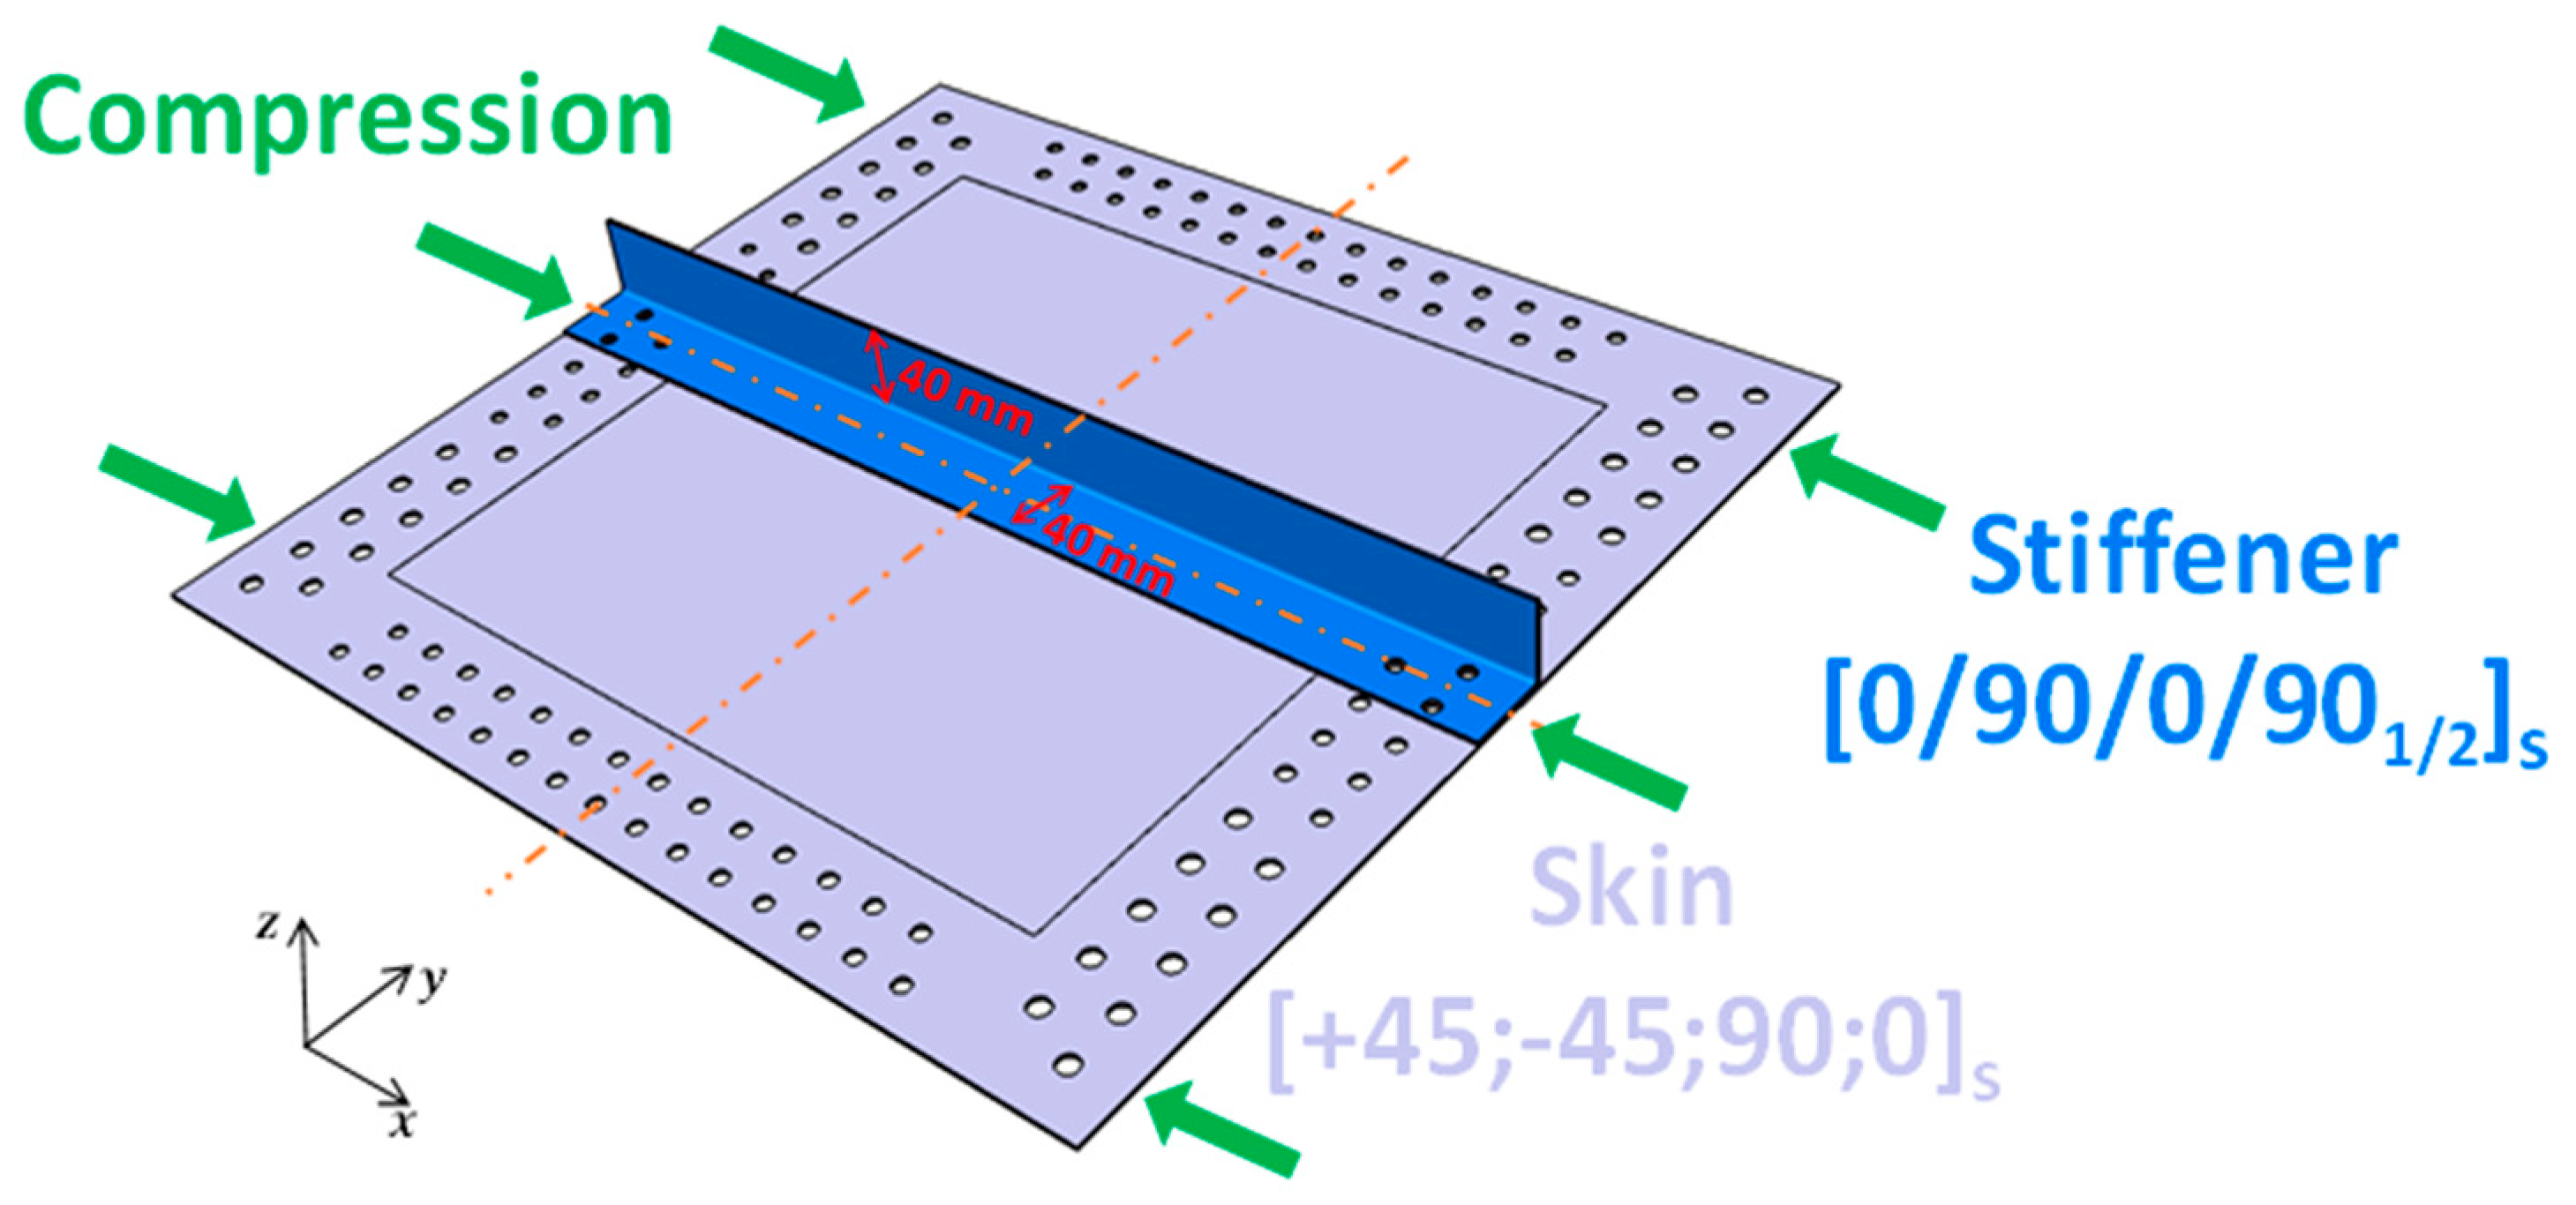
This section presents all the fixed parameters, whereas the next section optimises other geometrical parameters. A VERTEX stiffened specimen was developed as a first step towards studying stiffened panels under combined loadings after impact. It was formed by bonding a single L-stiffener onto a flat skin (Figure 4), both elements being composite laminates of T700GC/M21 (carbon fibres and epoxy resin, see Table 1 for properties). The stiffener and the skin were respectively stacked according to [0/90/0/90/0/90/0] and [+45; −45; 90; 0]s stacking sequences, adding up to thicknesses of 1.8 mm and 2.1 mm. The skin and the stiffener were cured separately, then bonded with an adhesive film and consolidated in an oven (epoxy film adhesive, HexBond ST1035—250 g/m2 supported, from Hexcel). The general L-shape of the stiffener was chosen to keep the manufacturing simple. The manufacturing process is detailed in Section 4, as are the choices of other parameters of the stiffener geometry.
Three identical samples were manufactured, to test three impact configurations and the subsequent compression (see impact details in Section 5). The three samples are referred to as Sample1, Sample2, and Sample3.

3. Specimen Sizing

3.1. Issues and Objectives

The specimen considered was quite small compared to usual stiffened panels and, to simplify manufacturing, it did not have over-thickness under the tab. Therefore, it challenged possible failures under the tabs where the loads were introduced. The purpose of this specimen was to study the structural strength of a stiffened panel, especially the debonding of the stiffener precipitated by an impact damage event. Therefore, it was useful to design the test in such a way as to be able to observe the desired phenomenology (central debonding initiation and centre to border debonding propagation) before it was spoiled by undesired phenomena (especially debonding from tabs, where the load was introduced). Numerical simulations were developed to virtually test some technological solutions and size the geometrical parameters of the stiffener, so as to ensure and favour the central debonding of the specimen against other undesired failure modes.
The purpose of the numerical simulations was basically to predictably discriminate the debonding scenario; Figure 5 illustrates debonding from centre to border (scenario A) and debonding from border to centre (scenario B). Hence, the modelling effort was directed towards the representativeness of debonding in the useful zone and in the tab junctions. The impact was expected to generate a central debonding before compression, logically favouring the desired Scenario A. Therefore, the specimen was sized to favour Scenario A over B, for compression without impact, which was a conservative sizing strategy. This avoided having to rely on the prediction capacity of impact simulations, and also allowed for the possibility of performing relevant tests on pristine samples later.

3.2. Numerical Model

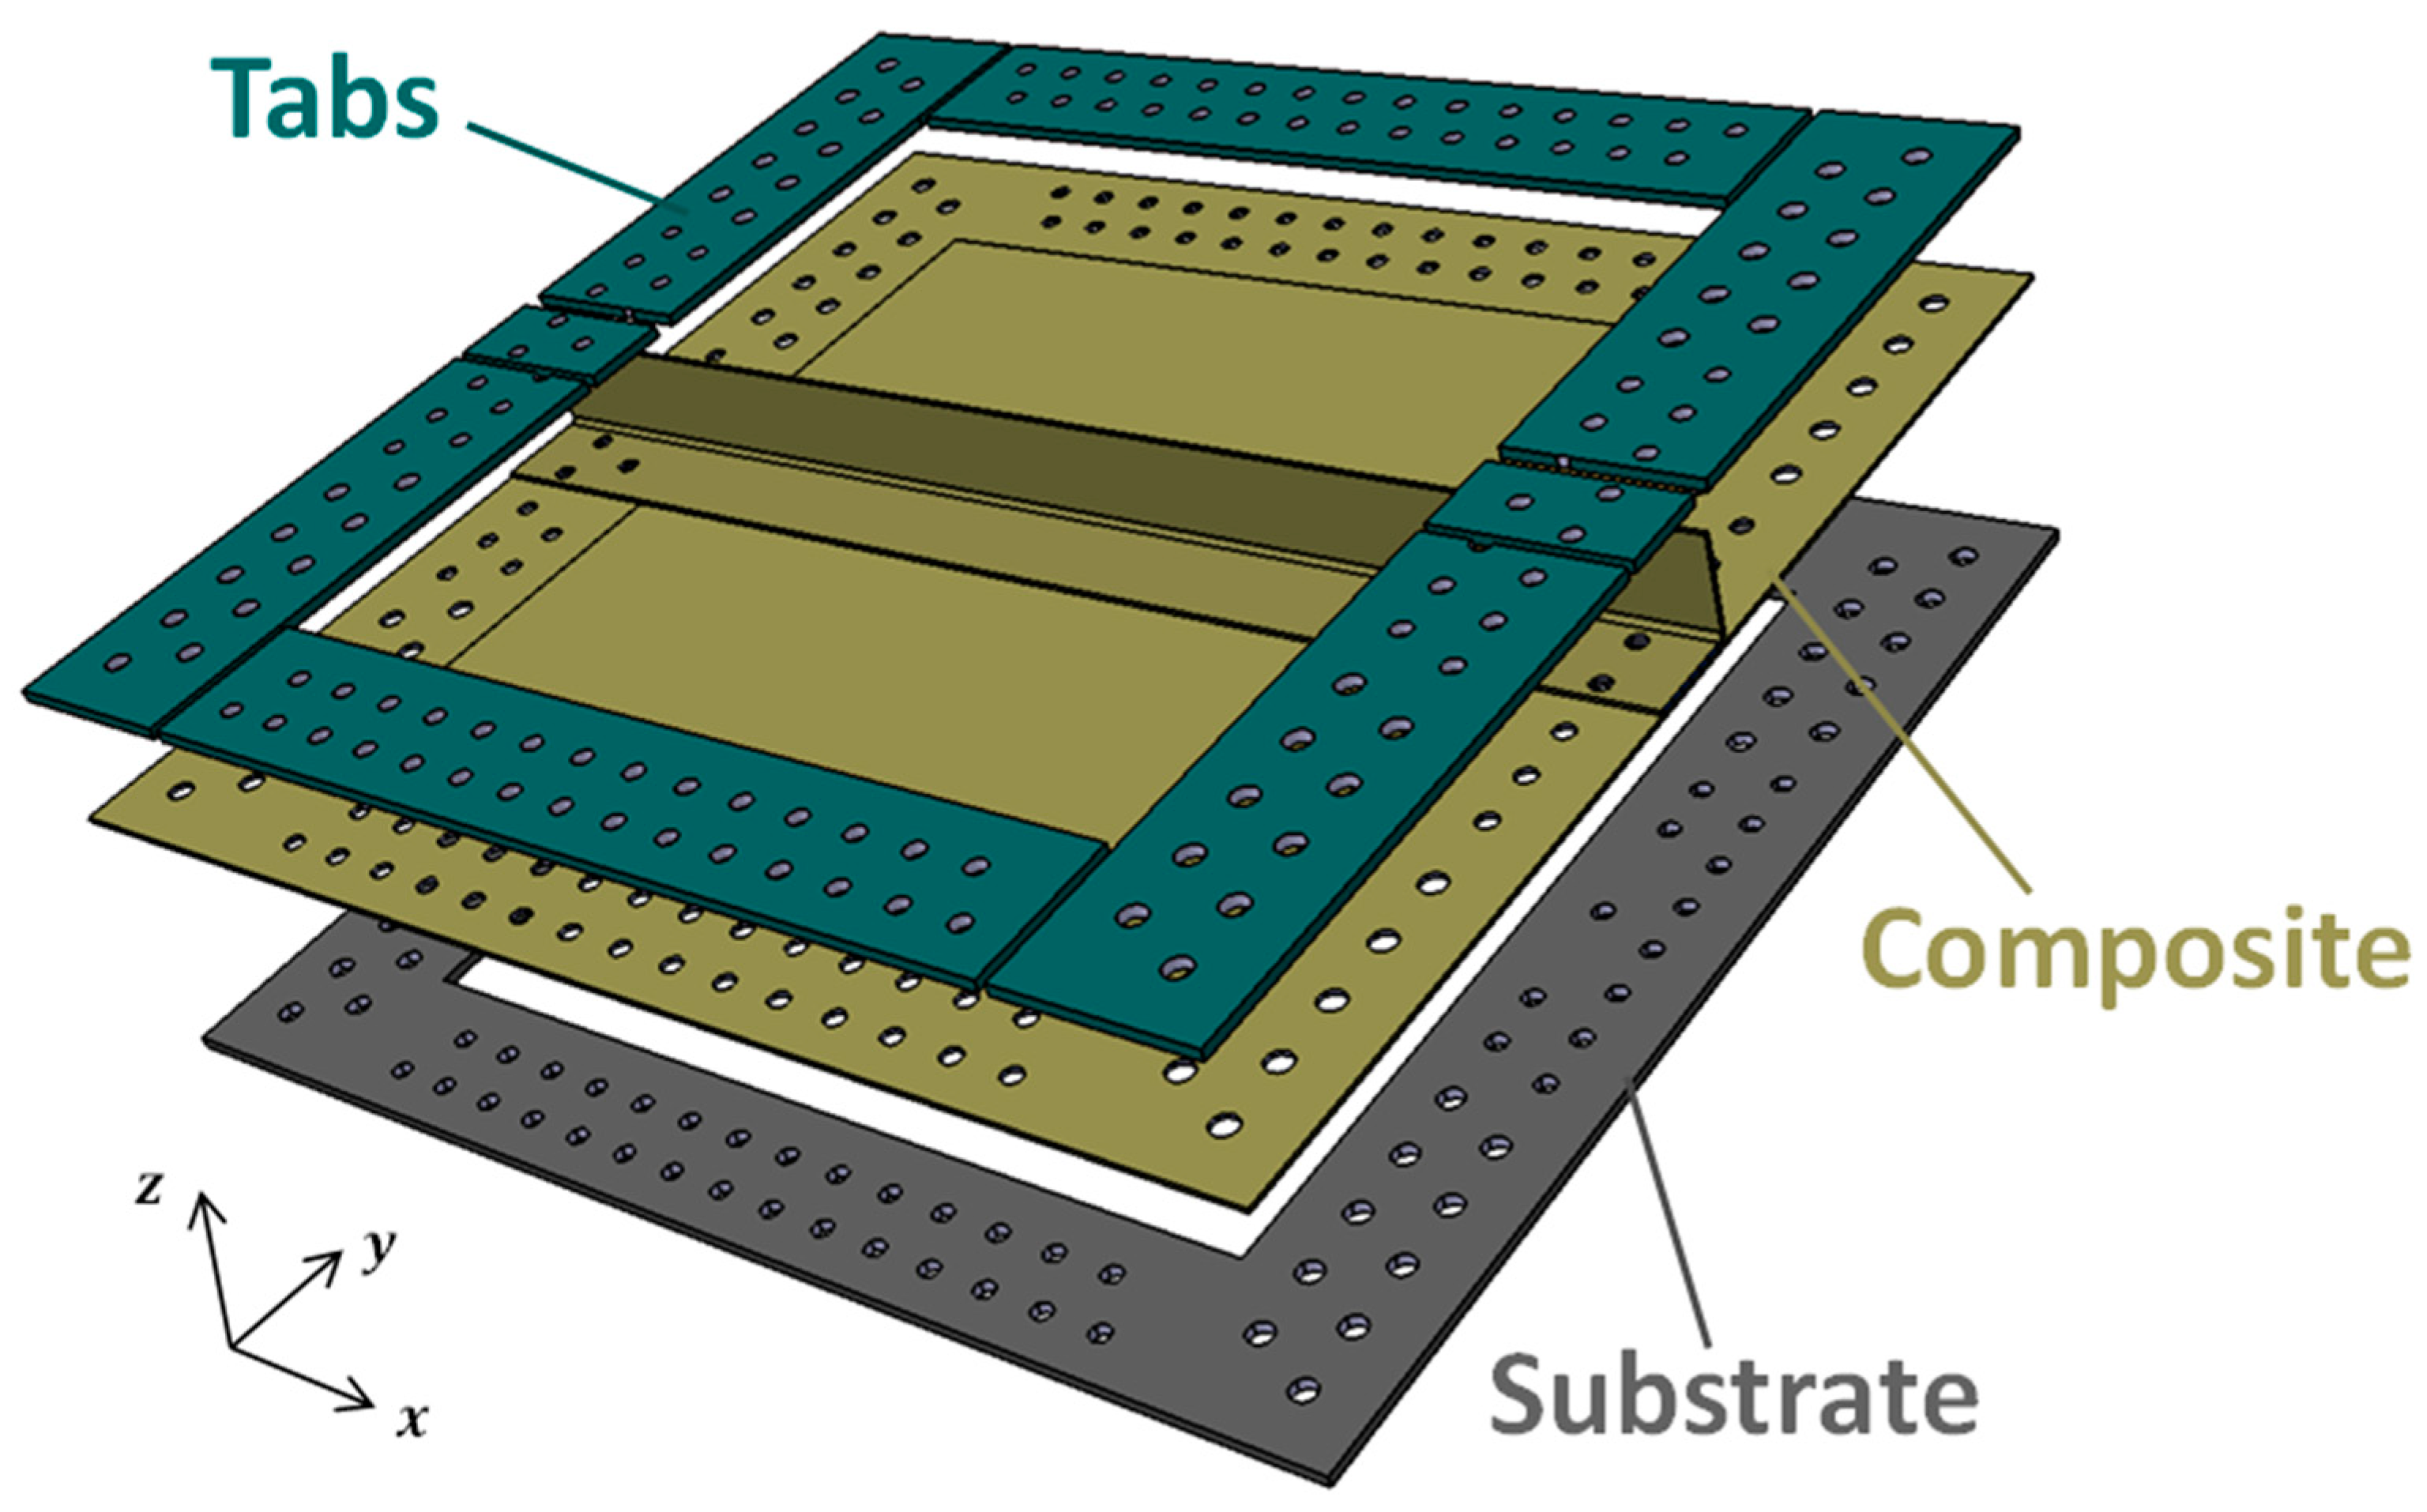
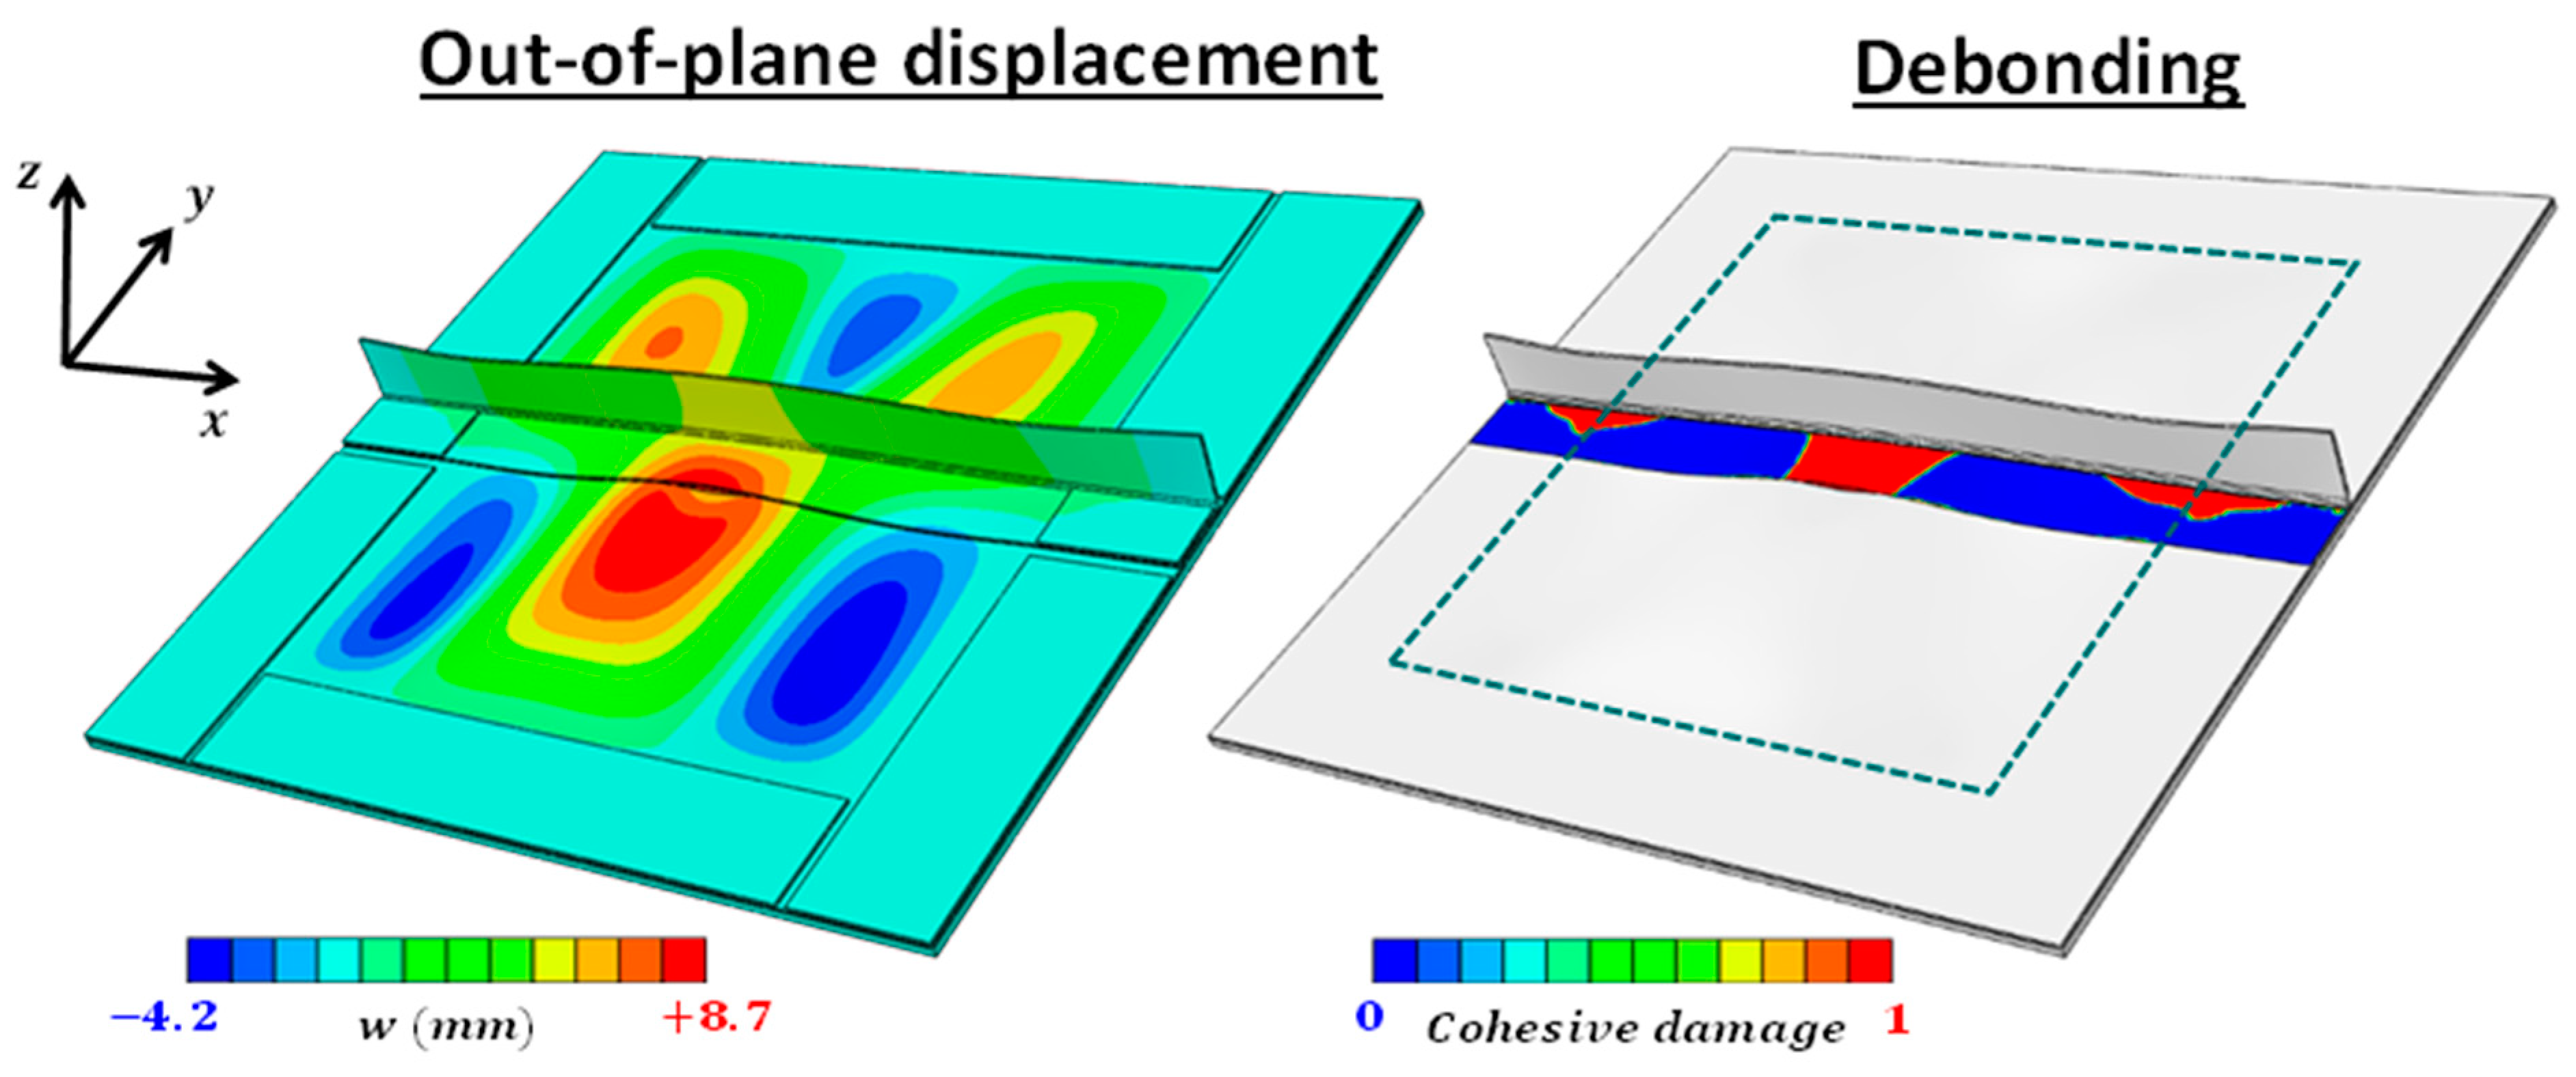
As illustrated in Figure 6 and Figure 7, the skin and the stiffener were modelled with thick shell elements and bonded with cohesive elements, without representation of the bolting holes. The composite was modelled elastic with a composite layup, from the elastic properties of the ply (Table 1). The substrate (the part of the bench in contact with the sample) and the tabs were modelled with standard aluminium elastic properties, and natively bonded to the composite through common nodes on a conformal mesh. The cohesive elements were modelled with an initial thickness (0.2 mm) and a damageable behaviour, according to the maximum stresses and energy release rates presented in Table 1. Therefore, the simulation can represent progressive damage and even debonding separations when cohesive elements were fully damaged, and contacts were modelled to avoid stiffener/skin penetration. The damage state of each cohesive element could be accessed, giving a visual representation of the debonding evolution during the simulation (Figure 9, presented later).
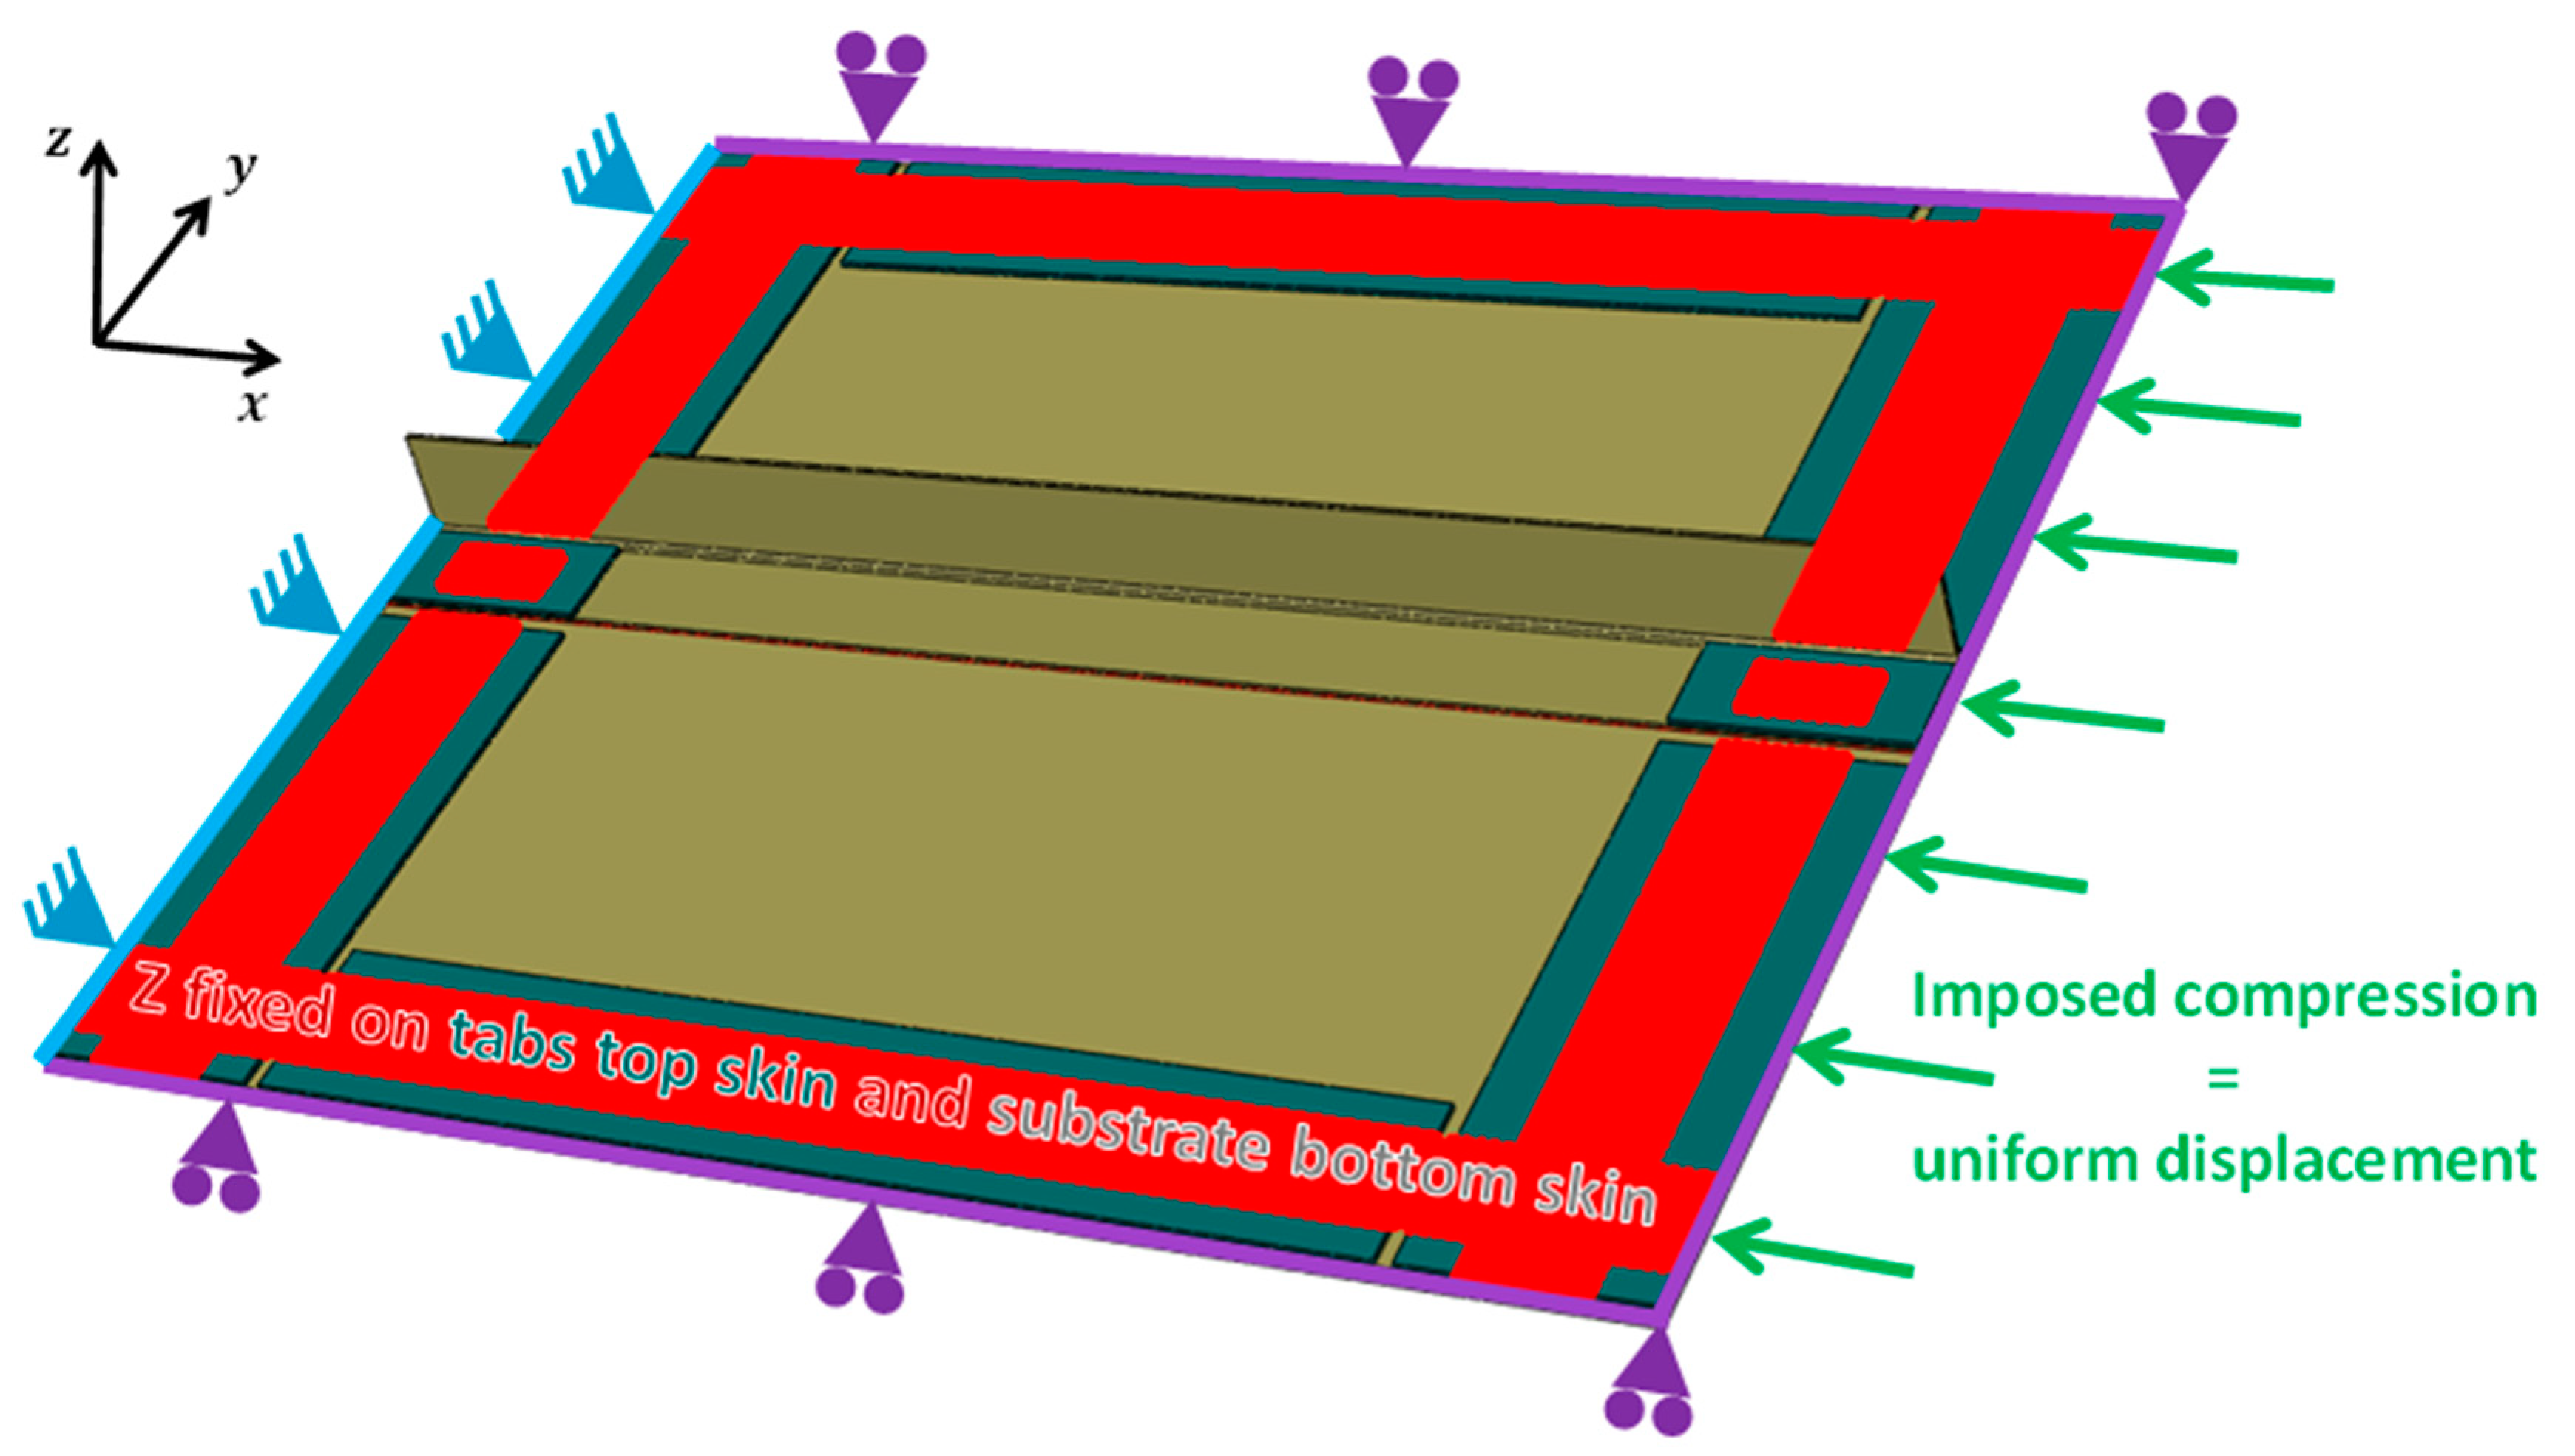
The boundary conditions of the model are described in Figure 8: the exterior contour of the sample was blocked along y   and z , and the compression loading along x   was enforced as a uniform displacement imposed on the right side (relative to the fixed left side). Even though the boltholes (see the 128 holes in Figure 4) were not modelled in any part, their action was modelled on nearby nodes as null displacement along z (see red region in Figure 8), both on the top skin of the tabs and on the bottom skin of the substrate.
In the first model versions, a null z displacement was initially applied directly to the composite, in all the tab regions; this was found to trigger large debonding at the tab borders. The model was refined by modelling compliant tabs, as this was considered to be more representative than the previous strong boundary conditions. The simulated border debonding was significantly reduced, but this was not enough to prevent it completely (Figure 9–right, see red areas at the tab borders). The phenomenon is complex to model representatively, as it would need the tabs-composite friction slipping to be accurately modelled. Such modelling was considered to be too complex and unreliable. Instead, Scenario B was taken as a serious threat to the good execution of the test, and some virtual testing was performed to mitigate it (presented in the next subsection).
The meshing was conformal and had only one element in the thickness for each part. The meshing was specifically refined on the bonding region between the tabs (elements were 2 mm along x and 1 mm along y ) to focus the simulation efforts on representing the debonding of interest. The model had one million degrees of freedom, loaded at 10 mm/s over 0.2 s; this simulated loading speed was much faster than the actual experiment in order to decrease the calculation time, and it was verified that lower loading speed did not have a significant effect on the result. It took approximately 7 h to simulate a compression from the pristine condition to the total debonding, by the Explicit solver of Abaqus with a 1 × 10 7 s time step on 36 CPUs.
The model managed to reproduce the first buckling mode shape and critical buckling value, as they were consistent with linear buckling simulations. With an increase in imposed compression, the number of buckles increased and the areas of debonding grew progressively (Figure 9). Three areas of initial debonding always appeared: one in the middle of the useful zone, and two at the junction between the tabs and the useful zone (see the red spots in Figure 9, showing cohesive damage). These were initially progressive and small, but eventually led to an explosive global debonding (from a given area of initial debonding), as it quickly propagated debonding to all the adhesive film between the tabs. Depending on some of the design parameters implemented (see next section) and buckling modes obtained, the global debonding either came from the centre and propagated towards the tabs, or vice versa; these scenarios are referred to as Scenario A or Scenario B, as discussed previously regarding Figure 5. There were many buckling modes with nearby critical values that were already overshot before the first debonding. Therefore, the settled buckling modes were quite elusive, as a few different modes could appear chaotically between simulations. However, the literature [3] identifies the critical role of buckles on the occurrence of debonding for pristine samples, as they generate local moments in addition to the primary compression. In fact, the occurrence of the global debonding was found to be very sensitive to the settled buckling mode during simulations; this effect is not specifically studied in this paper, but it is thoroughly discussed in ongoing studies on notched flat samples.

3.3. Virtual Testing of Configurations

The model developed allowed two possible scenarios to be identified (Figure 5: desired Scenario A and undesired Scenario B). The utility of this model is to discriminate which scenario should appear during the test, and thus work on the specimen design parameters until Scenario A’s occurrence is confirmed. Since it was questionable whether the model border debonding was representative, some configurations presented here were tested virtually to favour Scenario A over B, to ultimately maximise the chances of success of the test. More specifically, favouring scenario A over B means observing Scenario A and observing the smallest possible debondings at the border when the global debonding occurs at the centre (Figure 5).
The second objective of sizing with virtual tests was to ensure that stiffener debonding occurred during the post-buckling phase, as this was the phenomenology under study. The third objective was to have debonding before the first ply fibre failure, as this was not the phenomenology of interest. This last objective was easily achieved for such tests on pristine samples; until full debonding, the fibre strain always remained below 50% of its failure threshold.
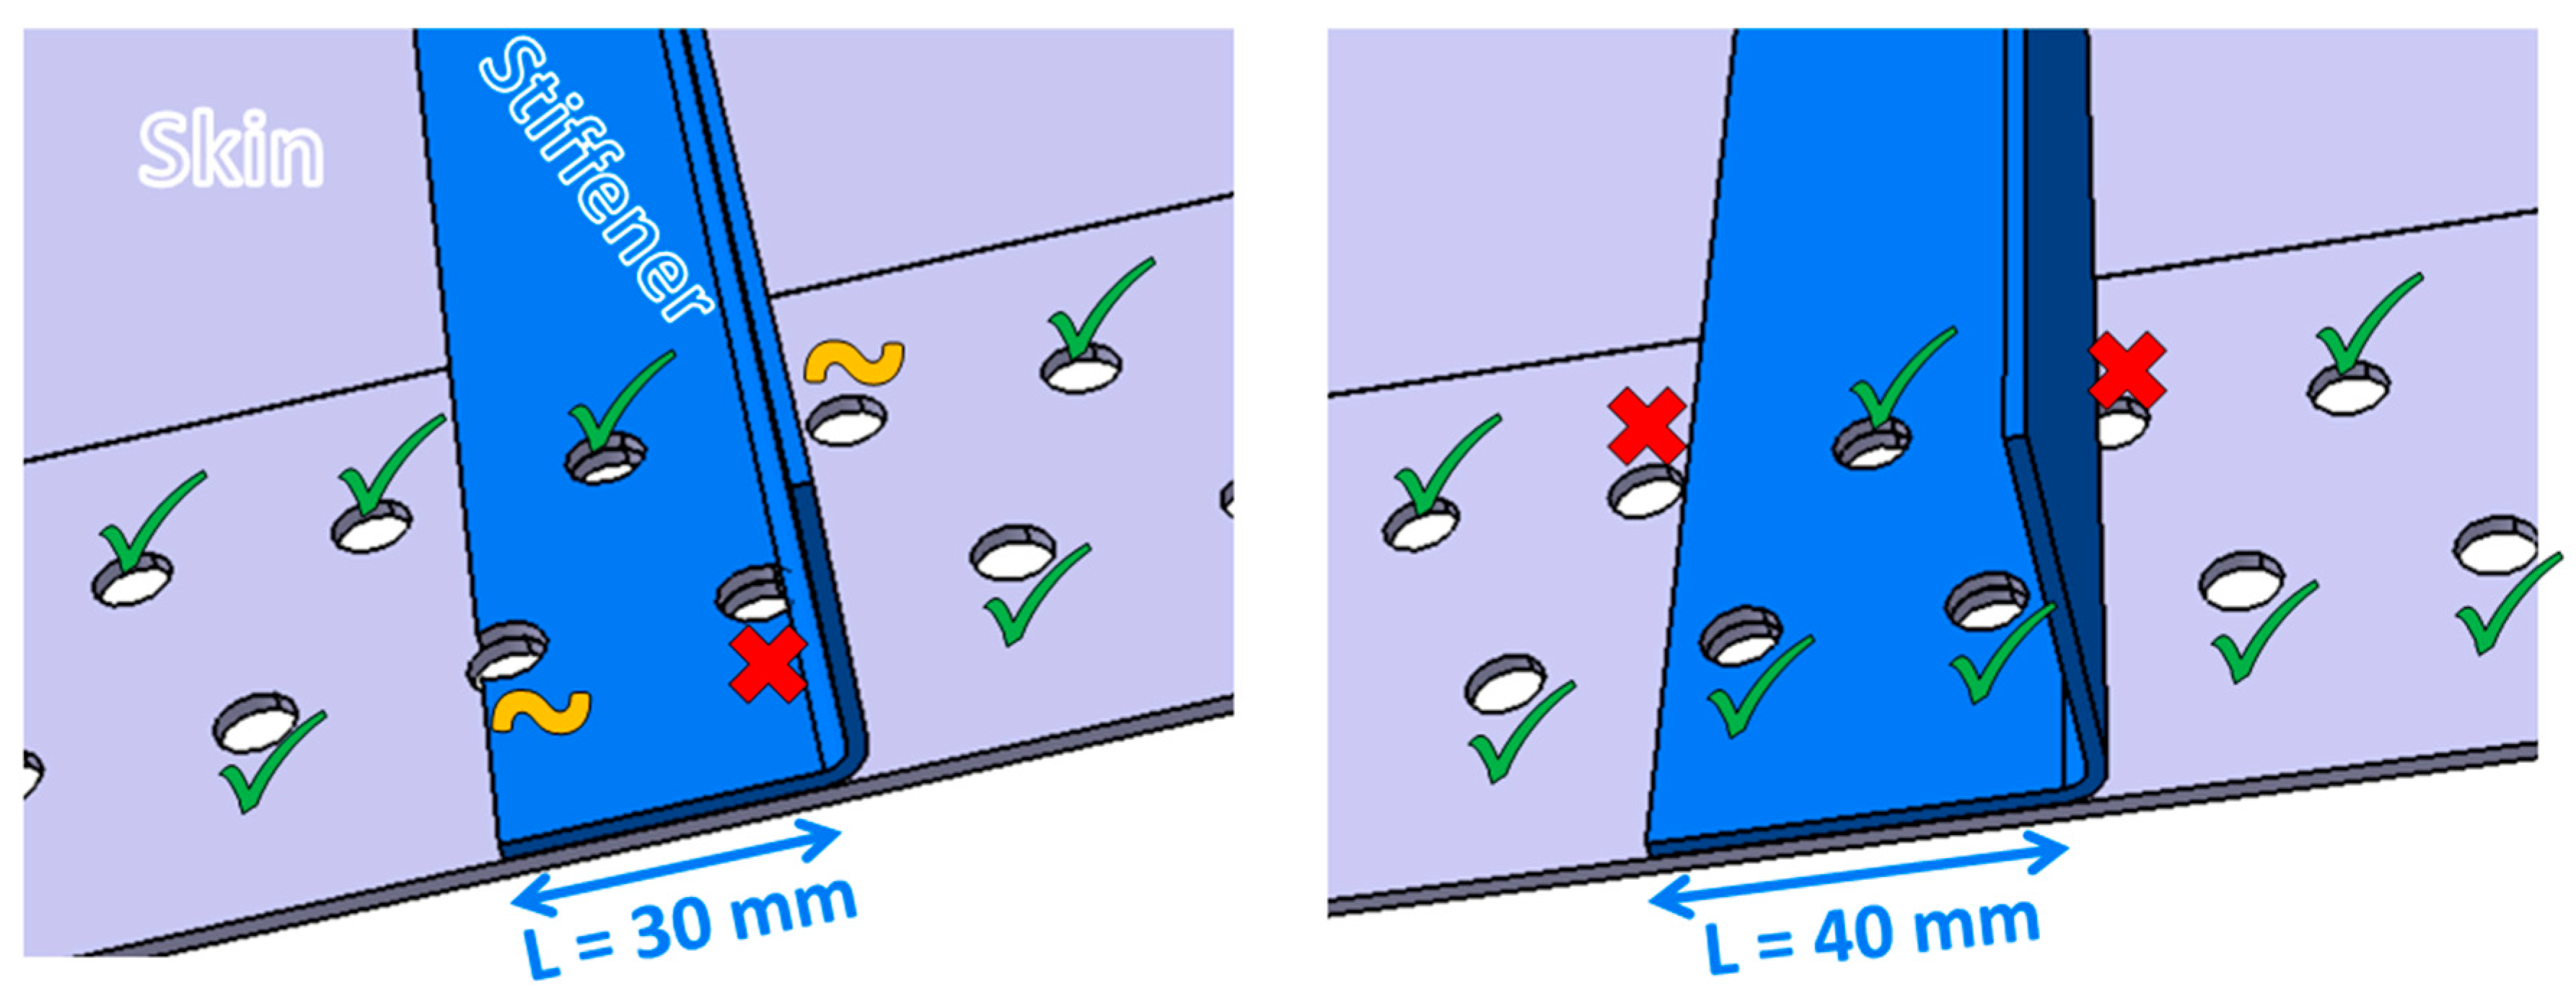
The first virtual tests focused on the width of the stiffener arms (flange and web, identical width): a sensitivity analysis considered the effect of three arm widths (20 mm, 30 mm and 40 mm). The results were mainstream and are not illustrated here: the wider arms gave the greater resistance to debonding, but this did not have a clear effect on the debonding scenario. With the properties of the manufactured adhesive film being uncertain, the larger arm width (40 mm) was chosen to ensure that debonding appeared clearly after buckling. Moreover, the 40 mm arm width was also chosen because of practical issues regarding bolthole positioning (Figure 10). This width provided enough clearance to bolt three holes on each side of the flange, which was believed to possibly be important to properly loading the stiffener along with the skin.
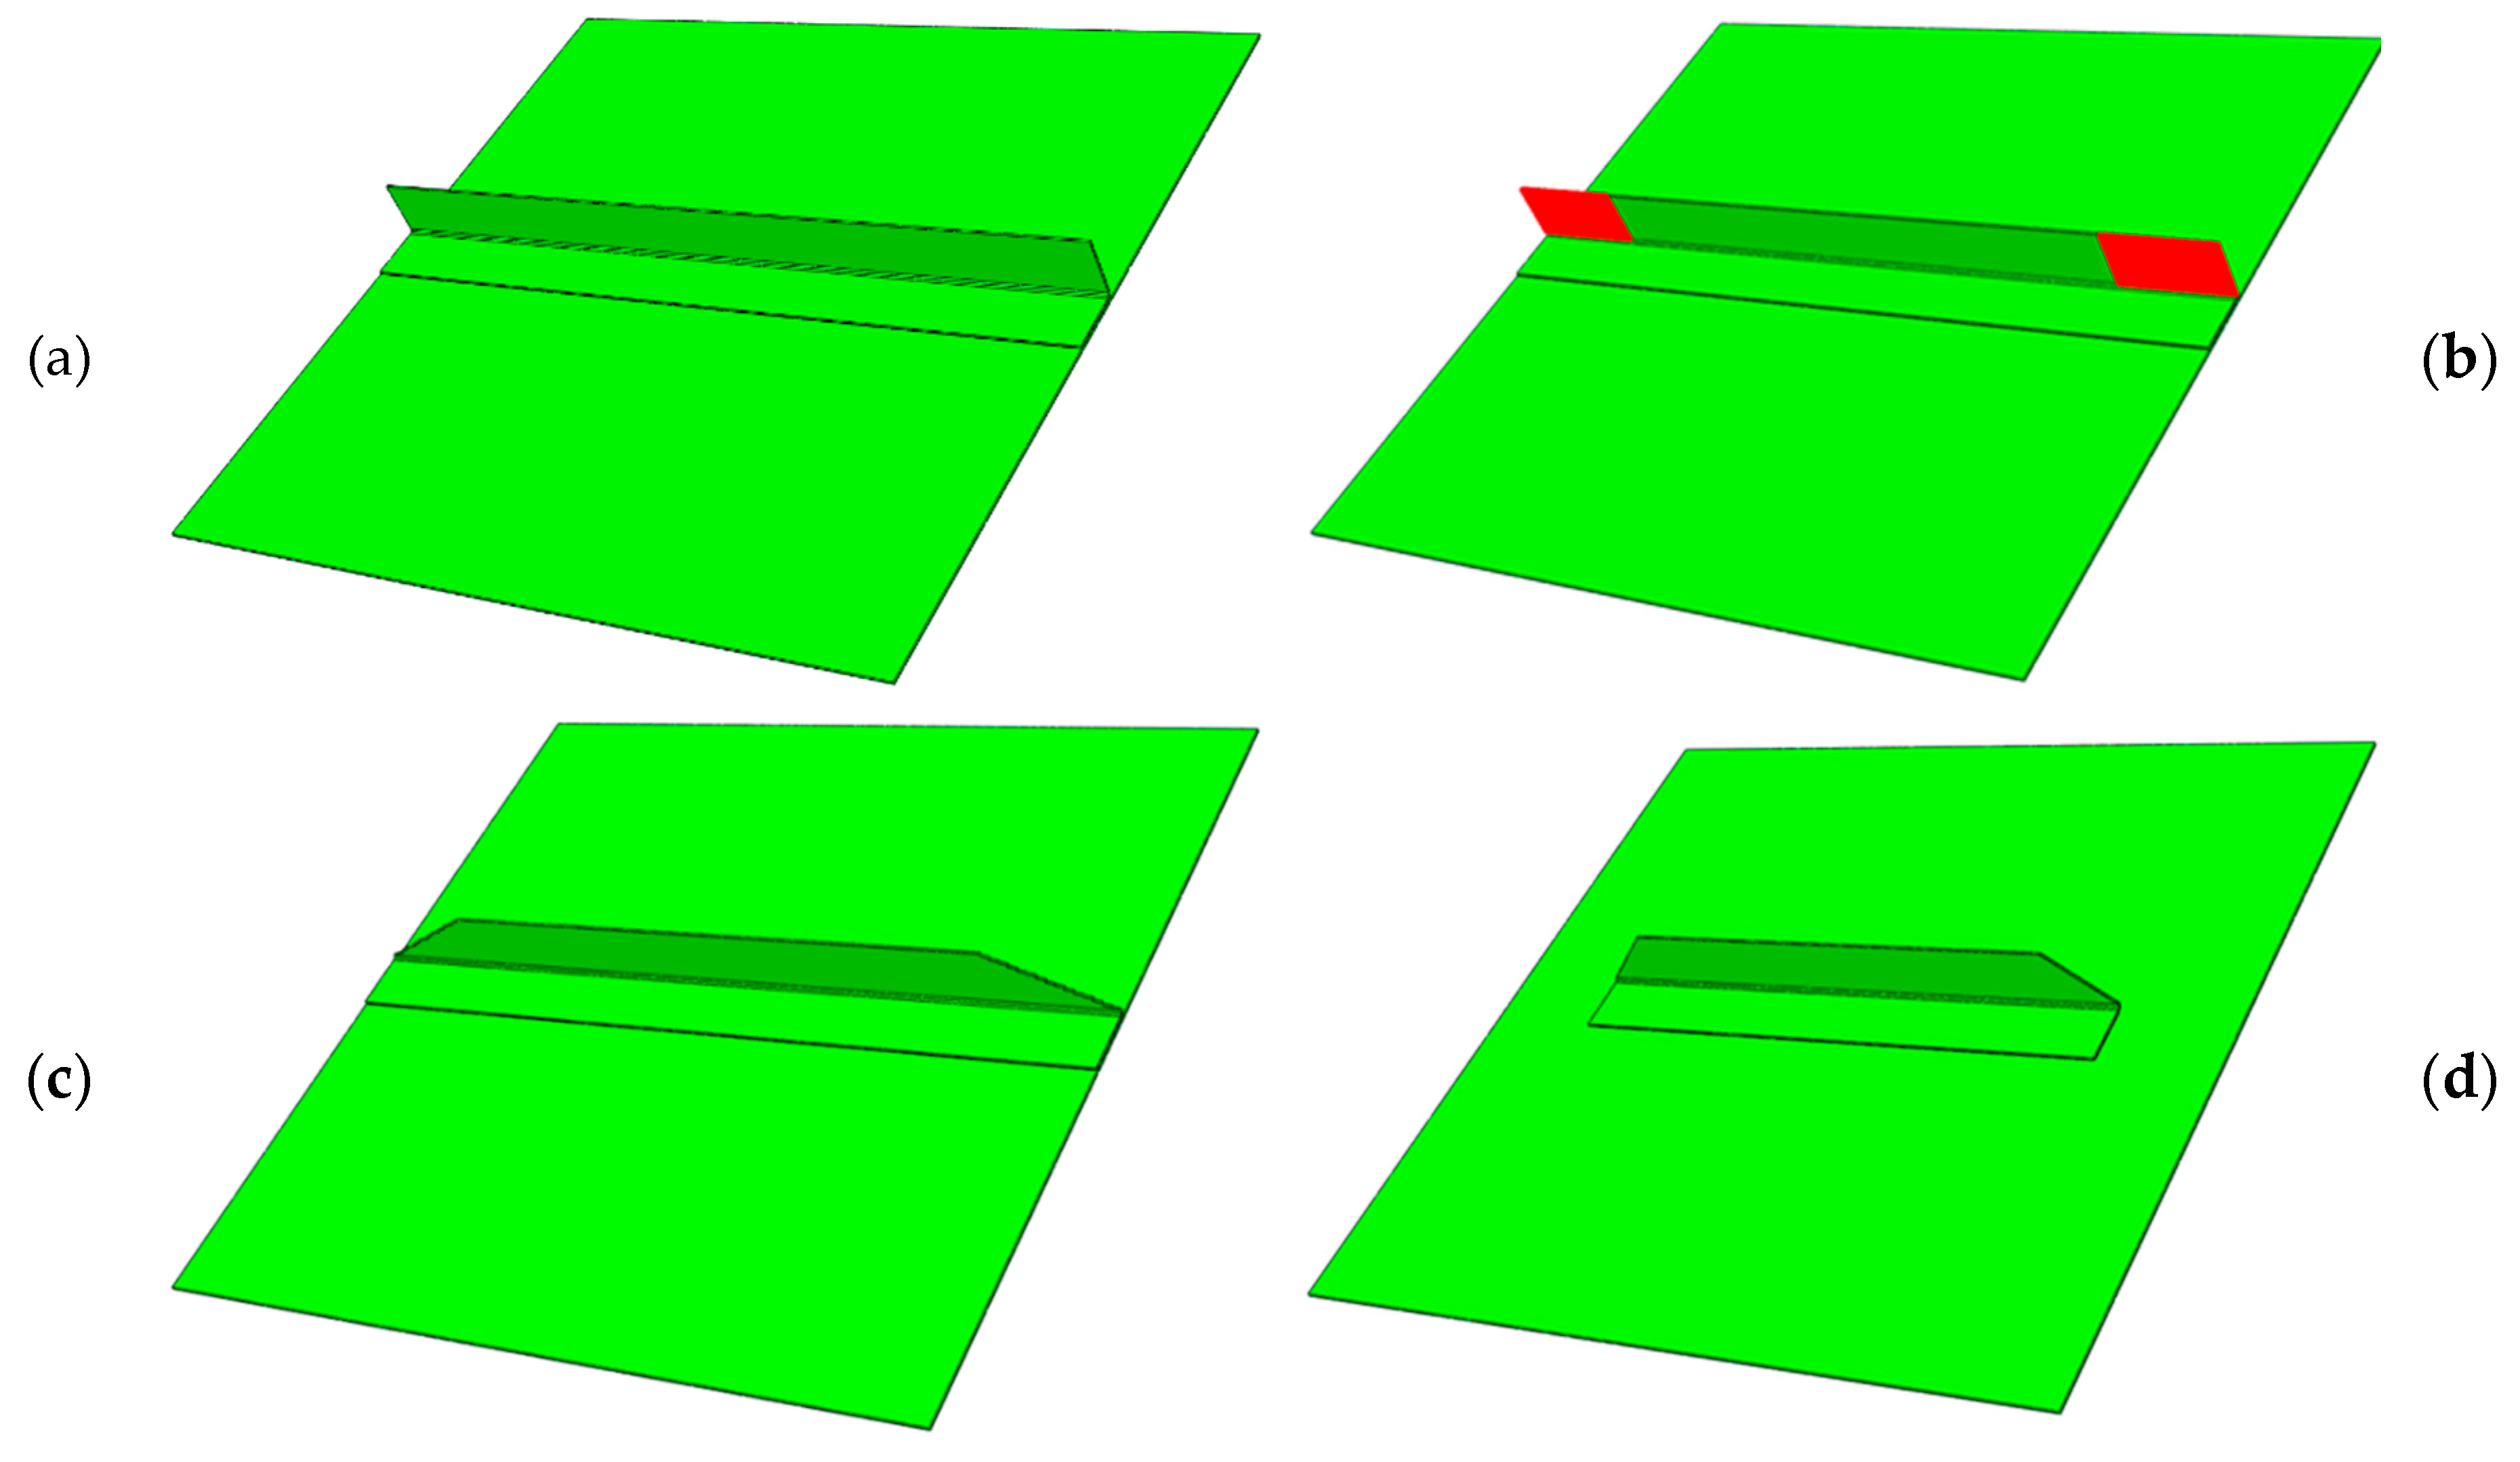
The scalability of the FE modelling was exploited to test three technological solutions (Figure 11) to mitigate border debonding, compared to the reference case presented above (Figure 11a). None of these three solutions gave significantly better results, so they were not adopted. First, the stiffener web was blocked in the tab region (Figure 11b) because local debonding initiations were found to be correlated. Second, the web tips were tapered in the tab region (Figure 11c) to try to enforce a smooth load introduction into the web of the useful zone. Third, the stiffener was interrupted before the tab region (Figure 11d) to try to avoid border debondings at the tab junction with the useful zone.

3.4. Results

As presented above, the reference configuration adopted was a stiffener with 40 mm arms, non-interrupted, non-tapered and with a free web (Figure 11a). The simulated debonding scenario was a global explosive debonding from centre to border, after some localised progressive debondings at the centre and the border (Figure 5).
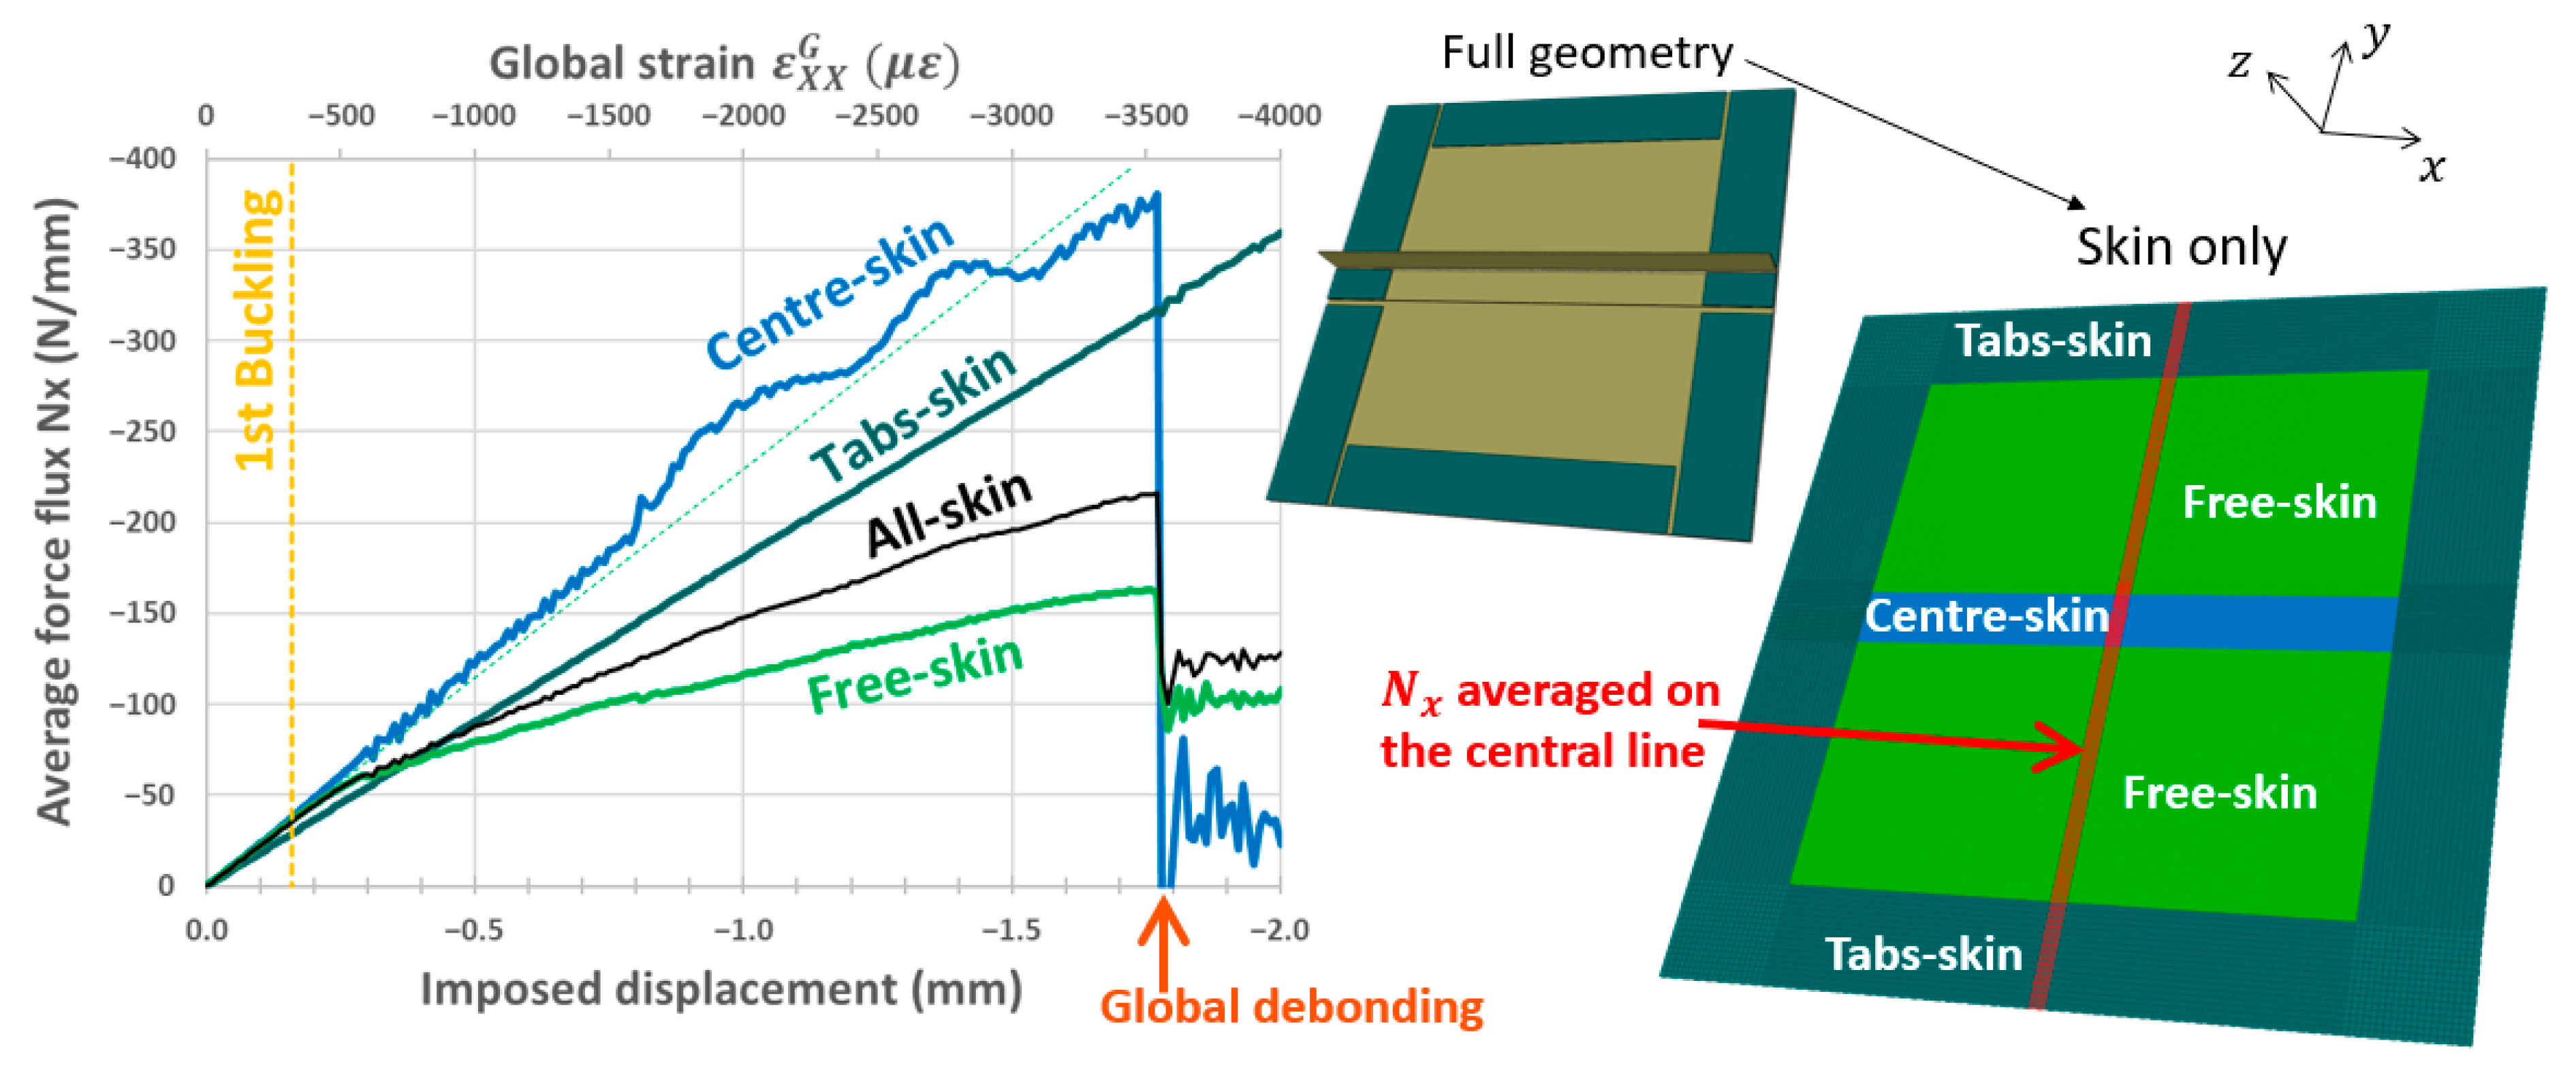
In addition to the results presented earlier in Figure 9, Figure 12 analyses the load going through the main regions of the skin: the skin below the tabs, =called “Tabs-skin”; the skin below the stiffener, called “Centre-skin”; and the skin alone, called “Free-skin”. The force fluxes are averaged on the central y line (see red zone in Figure 12), in order to plot each average flux evolution against the imposed x displacement. Before the first buckling, the Free-skin and the Centre-skin have a linear behaviour, then the Free-skin buckles and loses stiffness. Eventually, there was a global debonding that separated the skin from the stiffener on the full useful length of the sample, causing a global buckling of the skin below the stiffener, and leading to a major drop in load. The Tabs-skin is not affected by the first buckling or the global debonding, because it is supported by the tabs and the substrate; therefore, it remains flat and with a linear behaviour. The global debonding happened for a load that was seven times larger than the first buckling load, which ensured debonding after buckling in experiments, even with some reasonable manufacturing defects.

4. Manufacturing

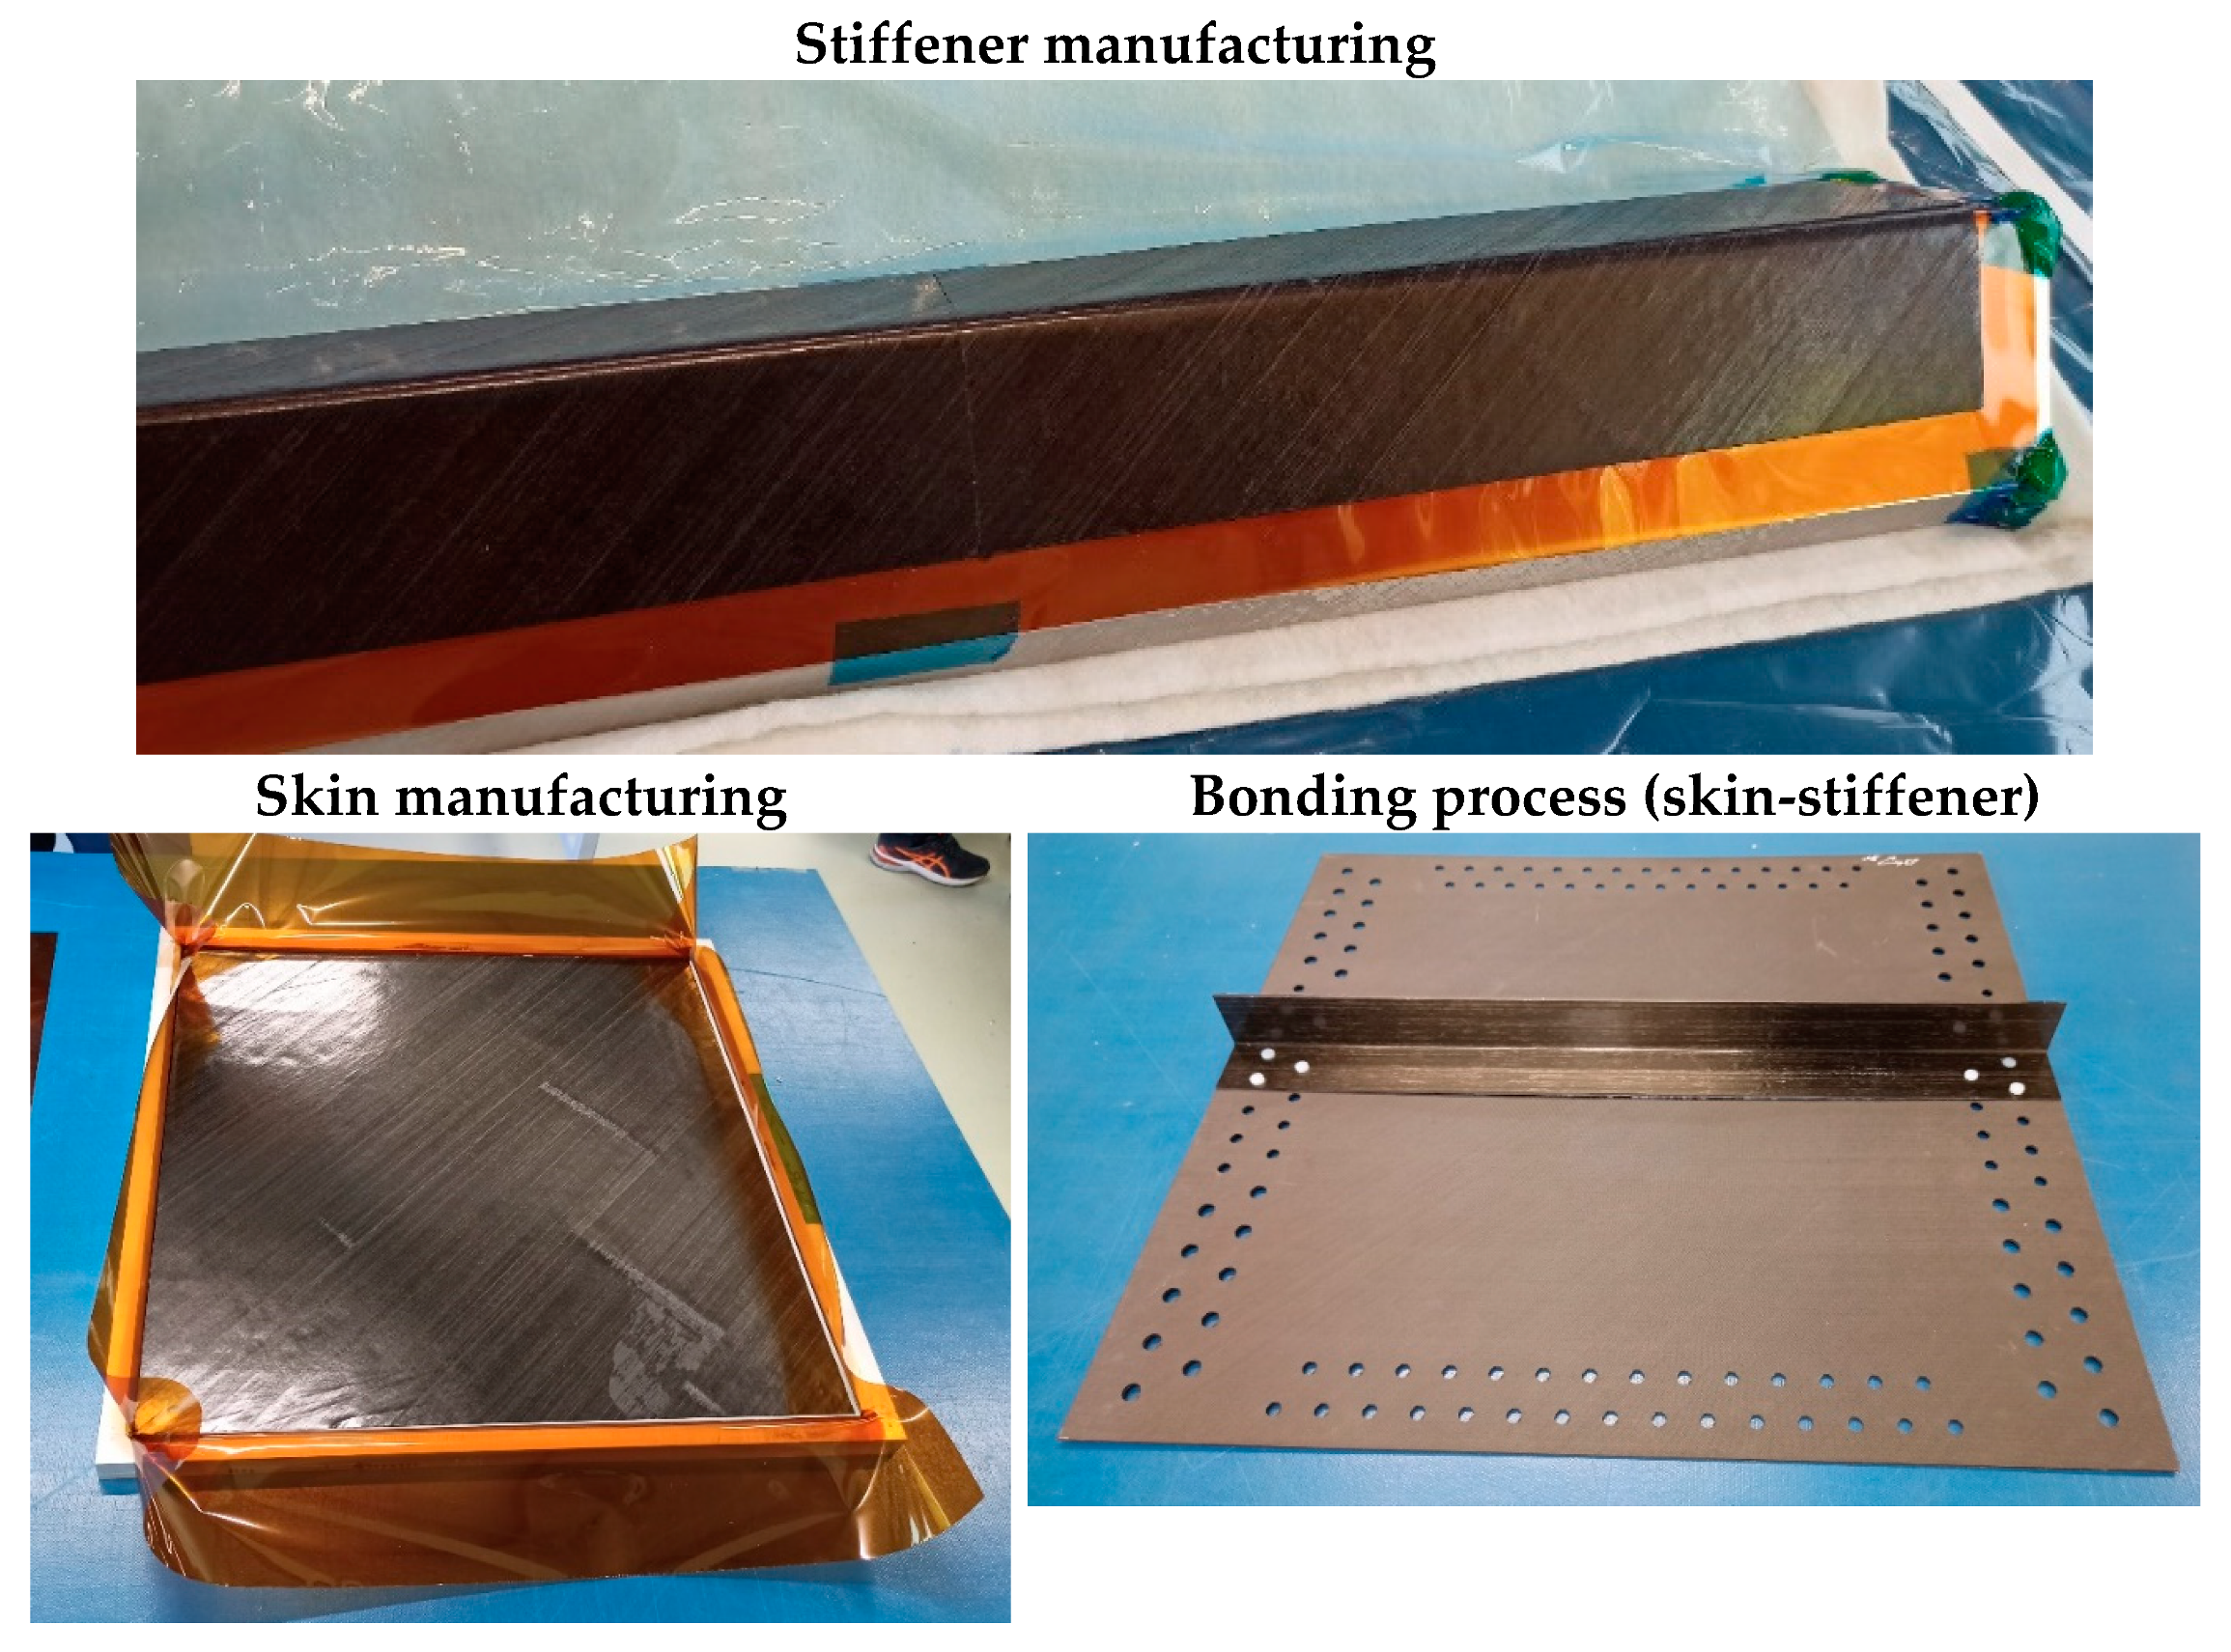
Figure 13 illustrates the main steps in the sample manufacturing. The L-stiffener was manufactured in a convex aluminium mould (Figure 13–stiffener)—as described by Journoud et al. [40], who studied curvature defects—with an inner corner radius of 2.5 mm. The mould was milled with 92° between the two useful faces, so the composite spring-back would lead to a 90° angle between the stiffener flange and web. The stiffener was consolidated in an autoclave for two hours at 180 °C and 7 bar. The skin was consolidated with a heating press and an aluminium mould (Figure 13–skin), as was done to manufacture flat specimens in a previous study [41].
Once the skin and the stiffener were consolidated, the next main steps were: the bonding, the trimming (milling of the contours of the skin and the stiffener), and the drilling (milling of the holes to be bolted). The order between these steps can offer different compromises; to ensure good relative positioning and to avoid over-complexifying the machining, it was decided that everything be milled (trimming and drilling of skin and stiffener separately) and for the two parts to then be bonded.
The stiffener was bonded to the skin by an epoxy adhesive film (HexBond ST1035—250 g/m2 supported, from Hexcel). To position the stiffener on the skin precisely, both parts were milled before the bonding, so matching holes could be pinned together during consolidation: see the white nylon pins inserted through the six common holes of the skin and stiffeners (Figure 13–bonding). A release agent was applied to the pins so that they could be removed safely despite the contact with the adhesive after curing; extra care was taken not to apply release agent to the surface to be bonded. Moreover, in order to ensure proper adhesion, the skin and stiffener surfaces were highly textured thanks to peel plies during their respective consolidation. The processing guidelines of the adhesive film notably recommend curing at 110 °C for 150 min and 1.5 bar. To avoid the expense of using an autoclave, this cycle was performed using a simple oven and vacuum setup, amplifying the vacuum force (Figure 14). A large “hat-plate” was subjected to the vacuum pressure differential (+0.8 bar), but this was leaning on two narrower pillars (Figure 14–dummy pillar on the left and useful pillar on the right), so the pressure differential was amplified considering the load flowing through the two pillars. The distance between the two pillars was sized with respect to their width, so as to obtain the target pressure of 1.5 bar on the useful adhesive film. During the bonding of Sample1, the back-plate (Figure 14) was not used, and the process enforced an important spring-back of the skin (10 mm out-of-plane deflection), so a back-plate was used for Sample2 and Sample3, which efficiently cancelled the spring-back.

5. Impact

5.1. Method

Damage tolerance evaluation would focus on Barely Visible Impact Damage indentation impacts, thanks to a preliminary calibration to find the BVID energy, which requires several test runs with dedicated samples before the useful tests. The present study considers only three samples as a first step to open VERTEX tests to stiffened panels under loading after impact, while exploring some impact configurations. Hence, the impact energies tested were not calibrated to BVID, but they were arbitrarily set to 30 J and 45 J, as these energy levels are coherent with classical BVID energy for dropped tools on this type of structure [42]. Impacts were generated with a drop tower system, using a 2.06 kg mass attached to a hemispherical impactor of 16 mm diameter.
The sample to be impacted was simply supported on a centred aluminium frame with a 400 mm × 250 mm opening (Figure 15–left), and softly constrained with loose tape (Figure 15–right) to maintain positioning and avoid excessive wobbling of the sample after impact. The 400 mm length matched the unsupported area of the sample on the VERTEX test rig for compression after impact. The 250 mm length is twice the typical width between two stringers in a fuselage, in order to be representative of the impact boundary conditions when a tool is actually dropped on a stringer. The impactor rebounds were stopped manually to avoid secondary impacts.
A first laser telemeter was used to measure the displacement on the bottom face of the sample (Figure 15–laser 1). A second laser determined the initial speed of the impactor (Figure 15–laser 2) and thus the effective impact energy. A piezoelectric sensor was integrated in the impactor to measure contact force during impact.
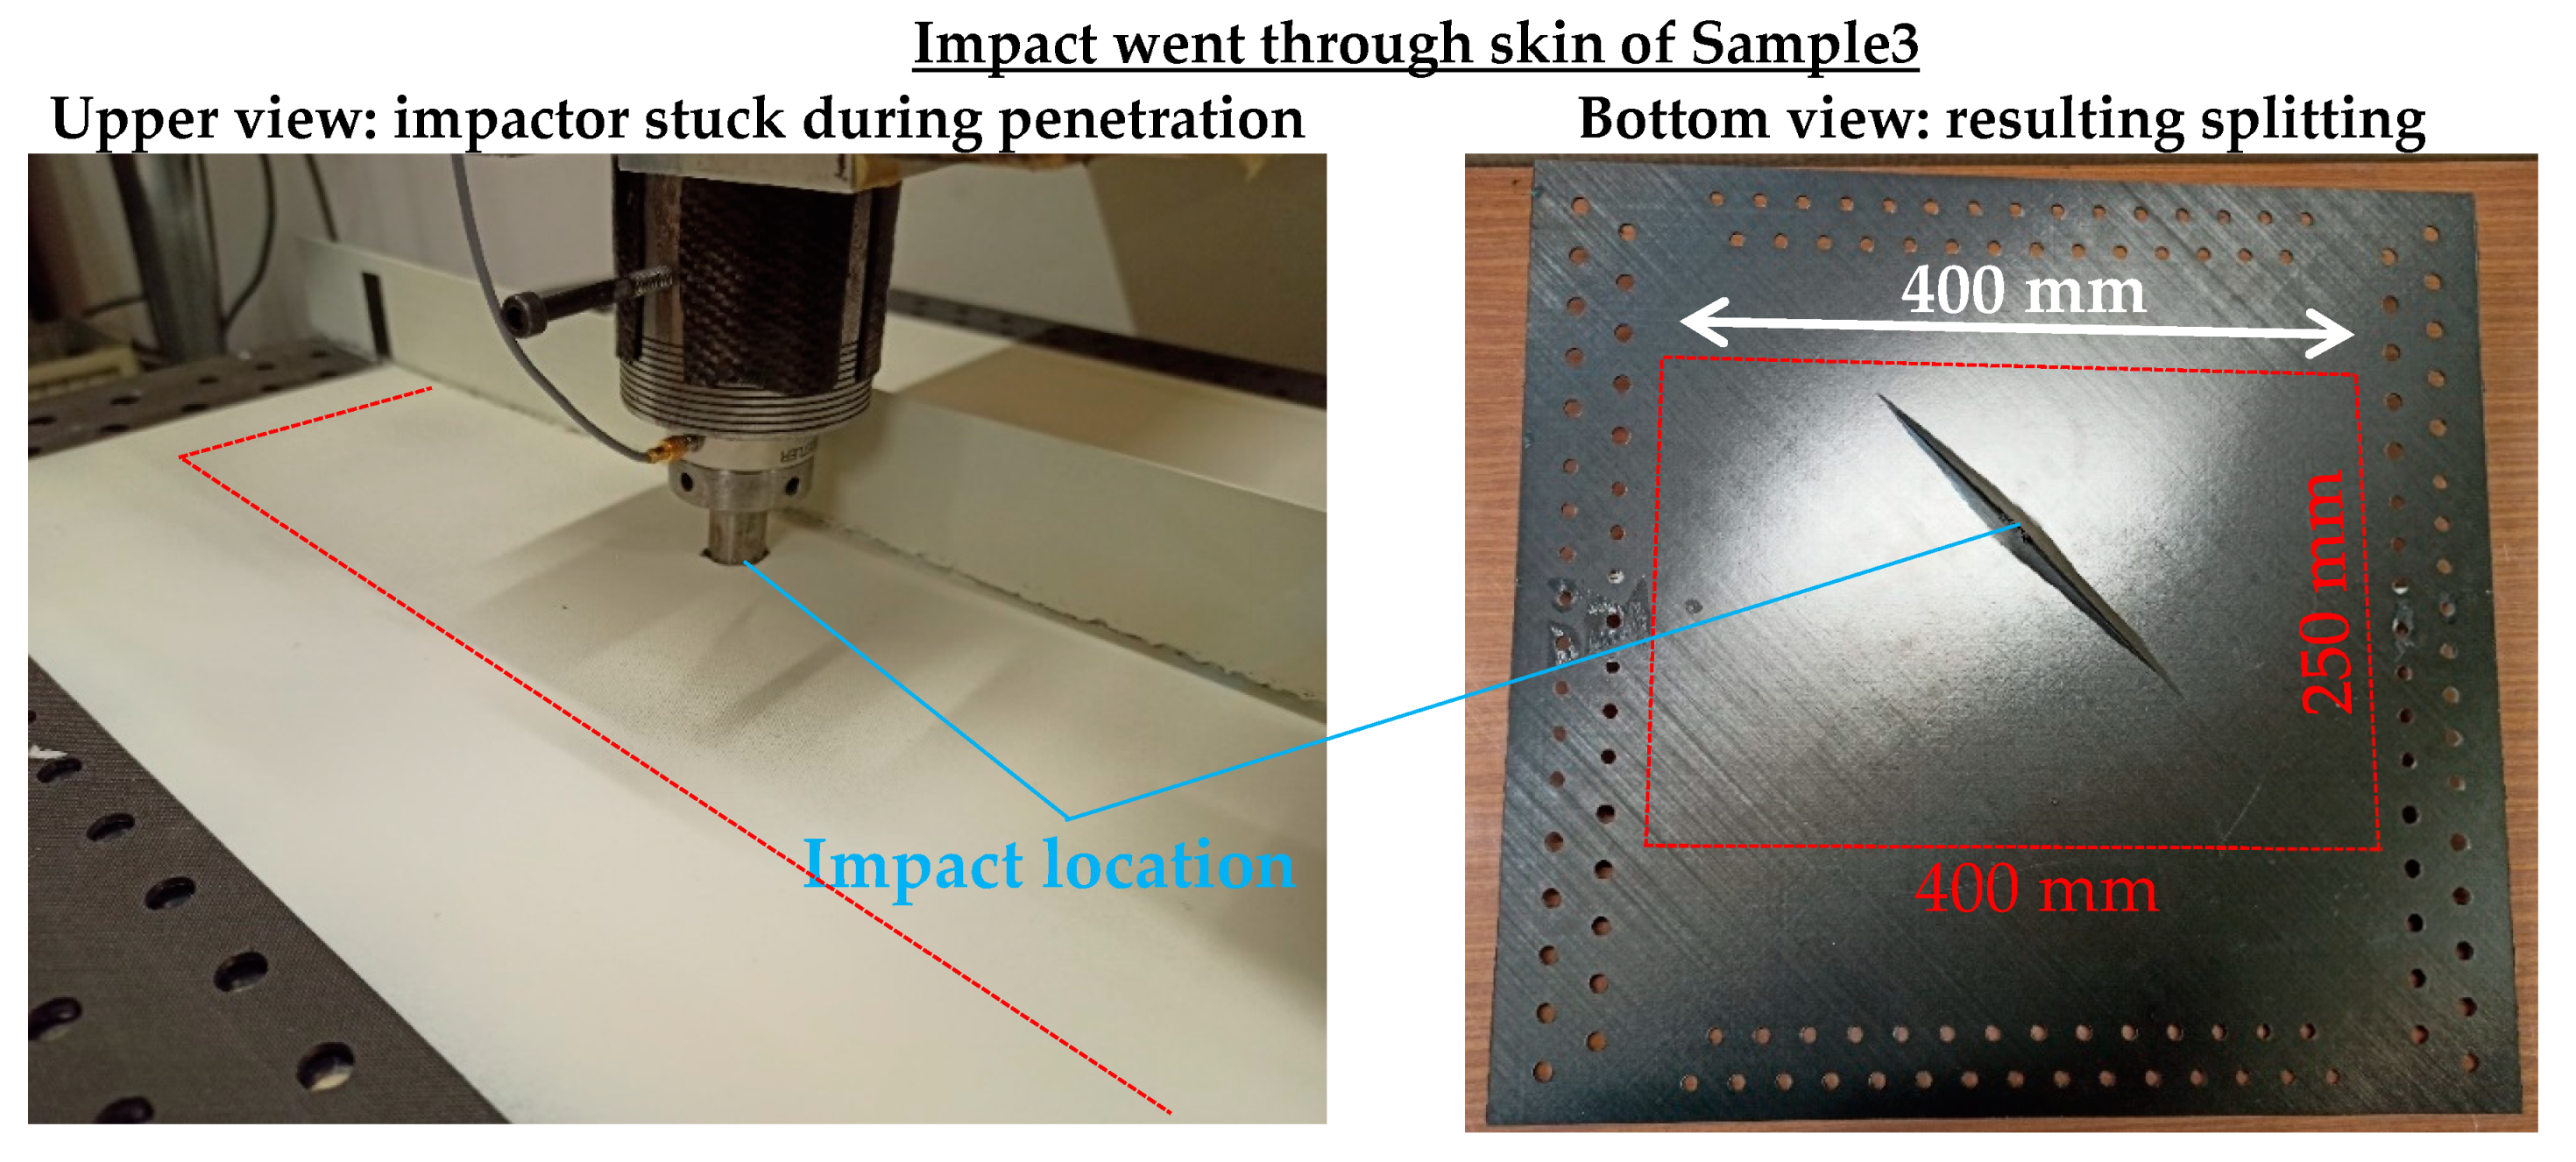
For Sample1, a 30 J impact was performed on the stiffener flange at the centre of the specimen (Figure 16). The impact’s permanent indentation was almost invisible and the C-Scan (presented later with Figure 18) showed little debonding, so, for Sample2, the same position was impacted at 45 J to be closer to BVID phenomenology and to have more substantial debonding to study. Sample3 was impacted at another location, on the skin on the other side of the web (Figure 16), to explore the influence of impact location and challenge numerical models on a wide range of cases. Sample3 was impacted at 45 J, because, for Sample2, this energy gave damage in the targeted interval but, this time, it unexpectedly led to a catastrophic perforation of the skin by the impactor.

5.2. Experimental Results

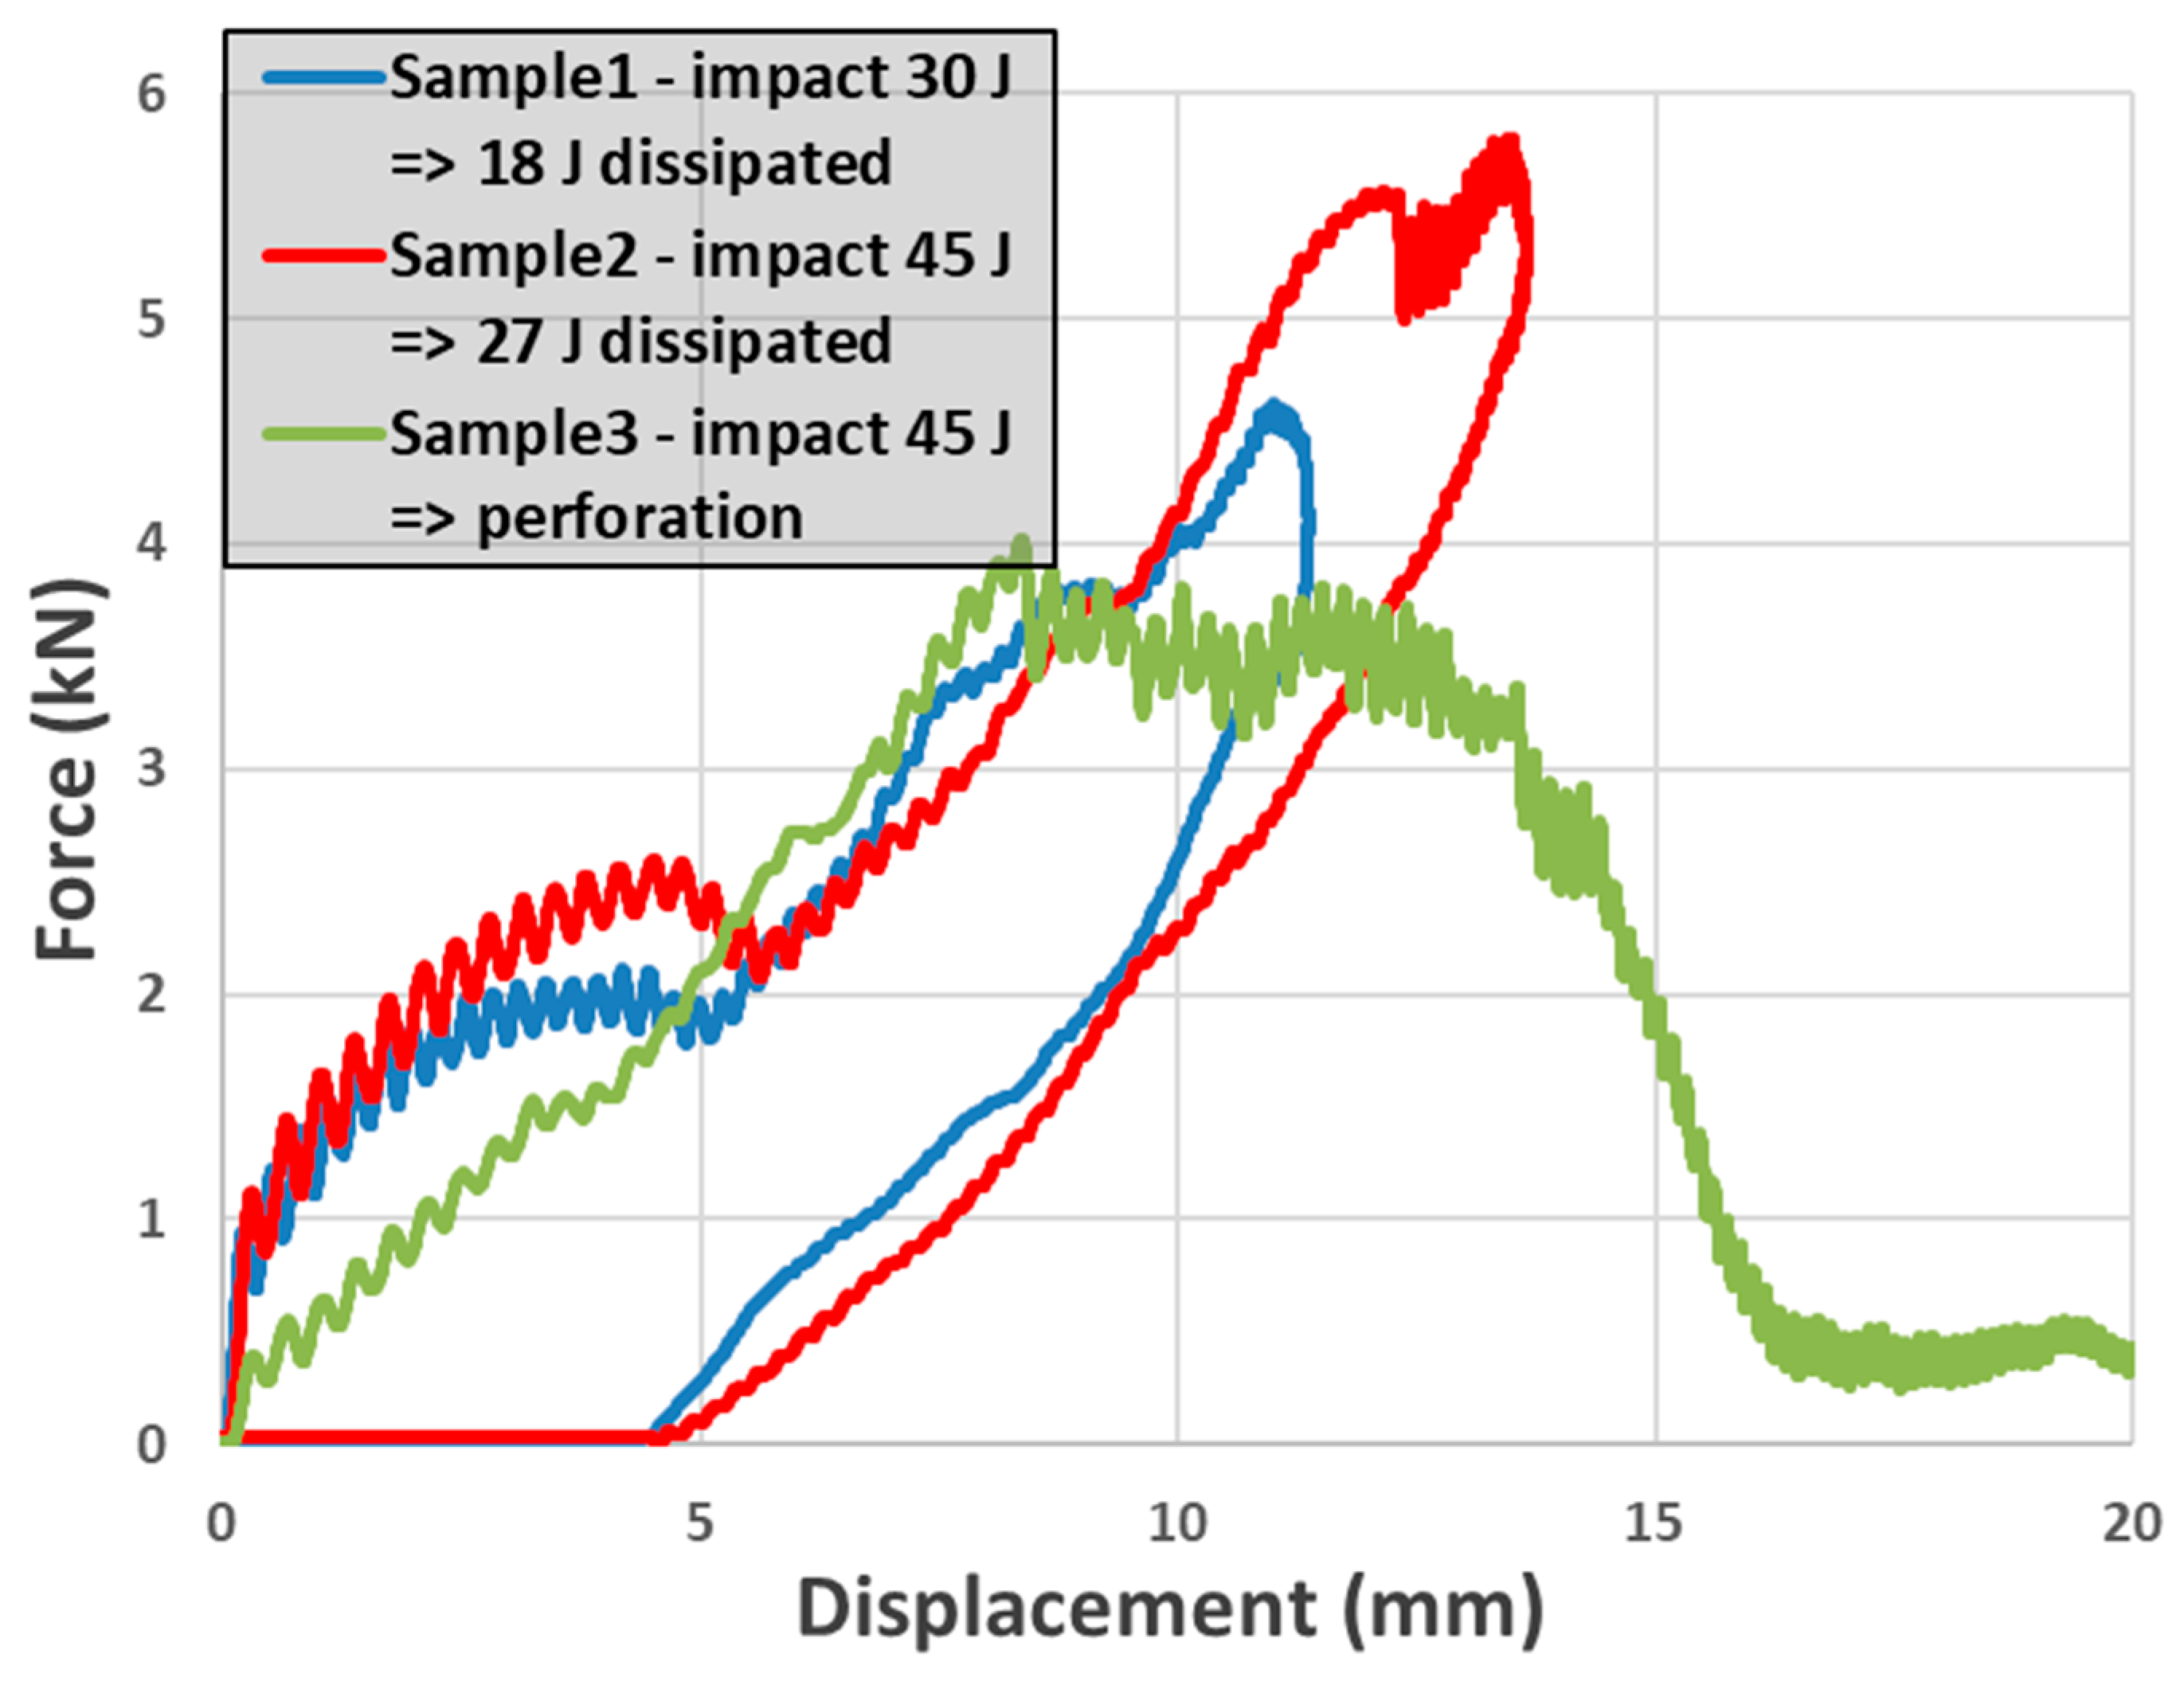
The force and displacement sensors described above allowed the force-displacement impact curves to be plotted (Figure 17).
Forces were smoothed with a mobile average filter to damp the oscillations of the first mode of the structure. The curves were integrated to determine the area inside them, representing the energy dissipated by the sample through damage, notably because of the skin-stiffener debonding. Sample1 dissipated 18 J of the 30 J initial kinematic energy of the impactor; Sample2 dissipated 27 J of the initial 45 J. For Sample3, the impactor perforated the specimen (from 15 mm displacement on Figure 17) and became stuck in the composite (Figure 19–left), so the initial 45 J was completely dissipated by the sample, but some of it was dissipated by friction and splitting (Figure 19–right).
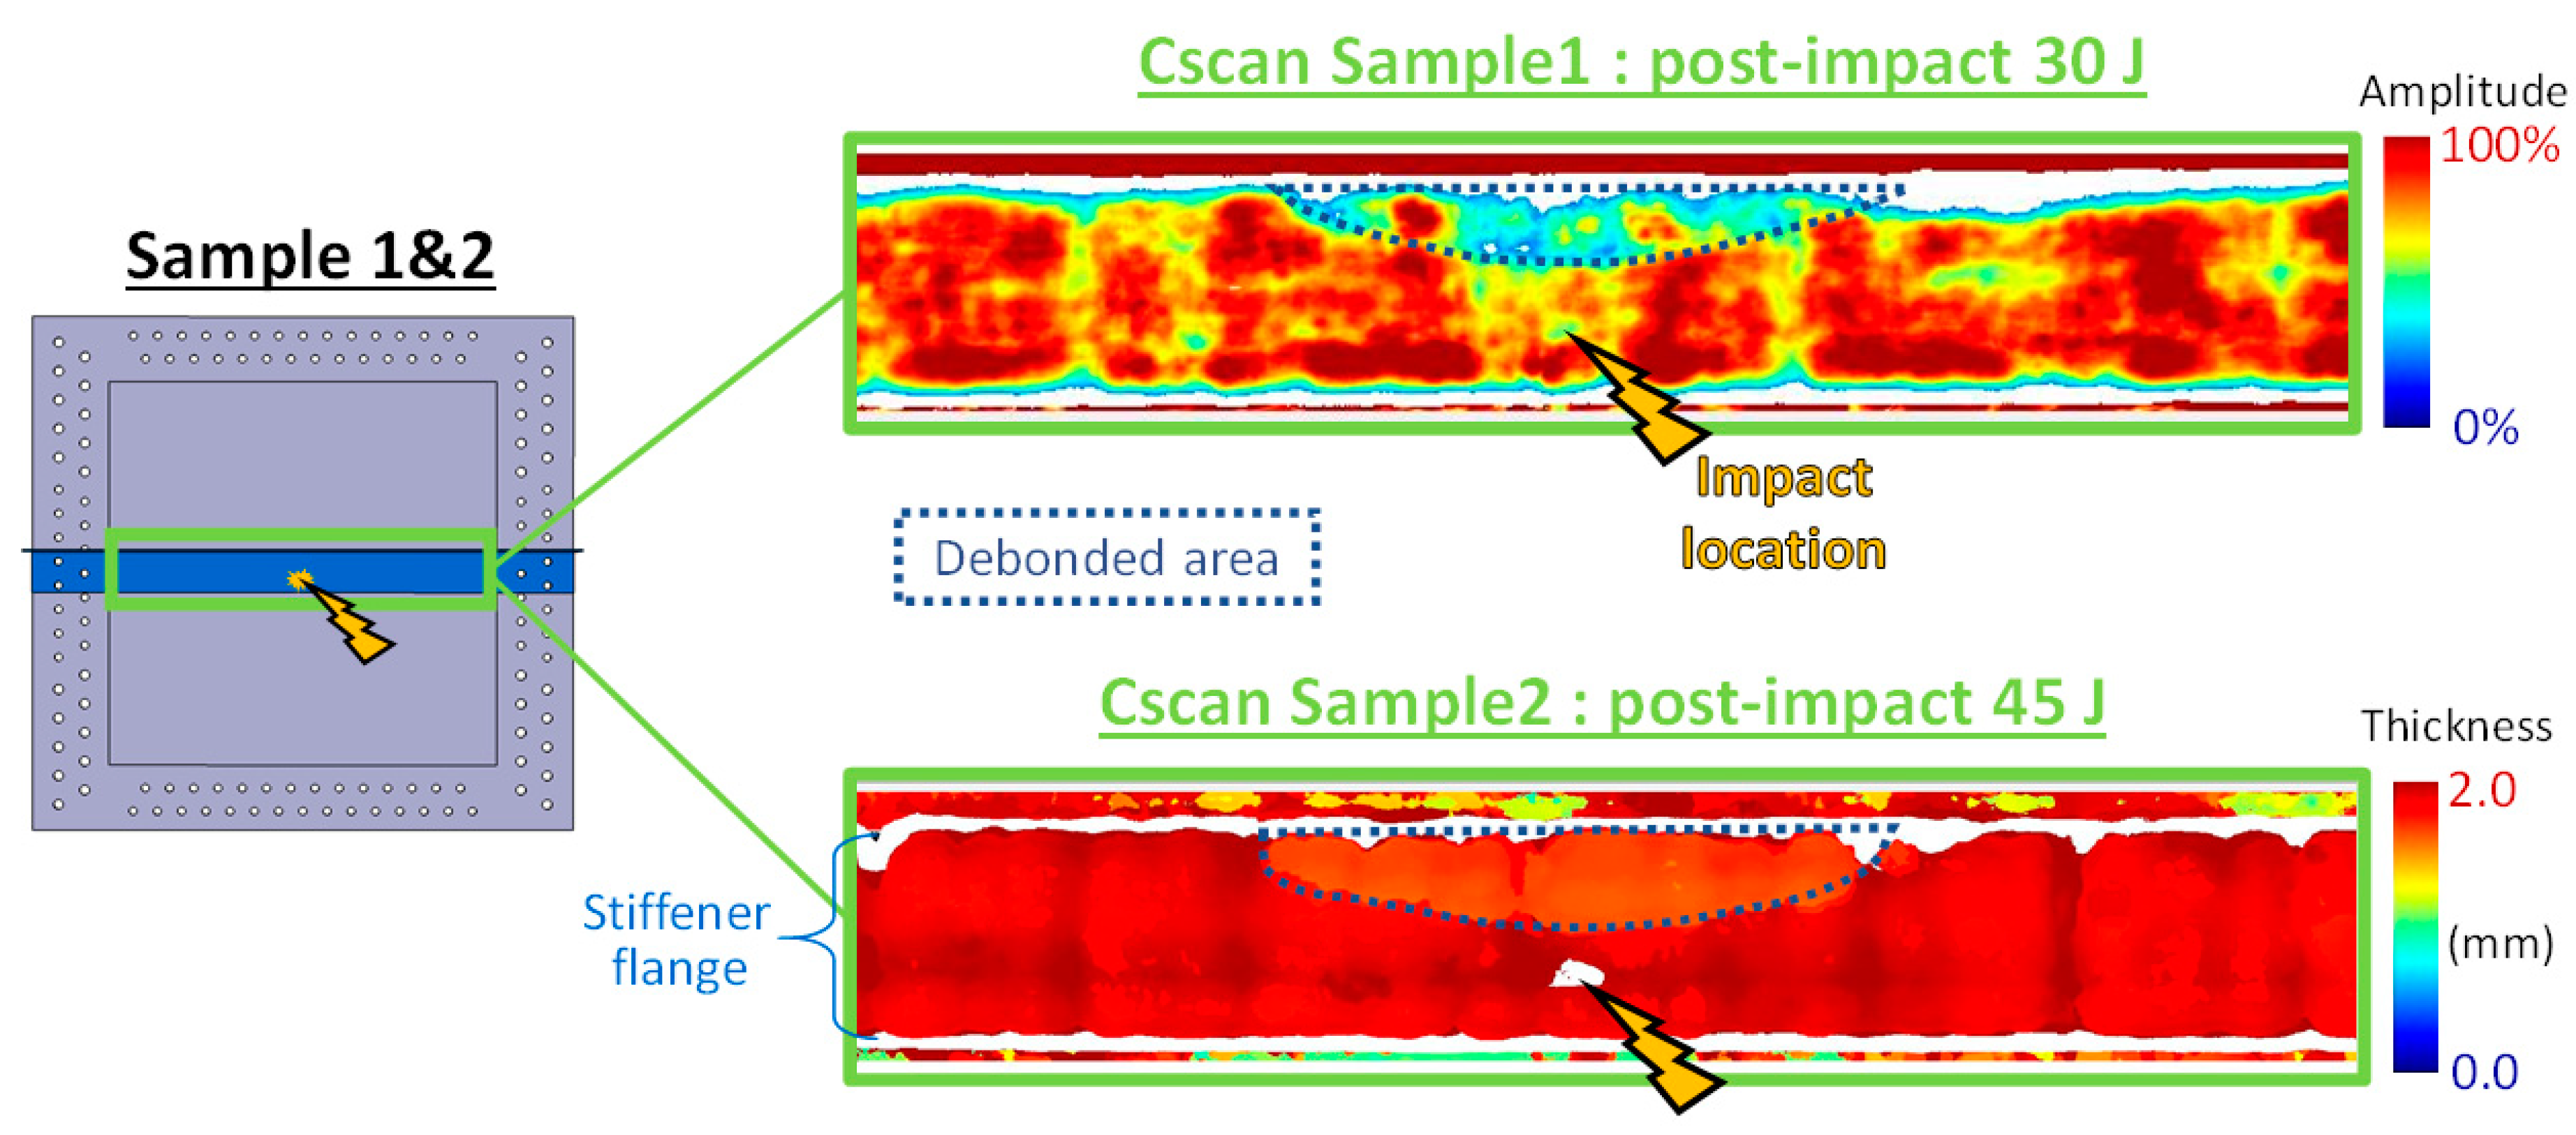
On the stiffener flange area, ultrasonic C-Scans were performed on each sample after impact to observe possible debonding and delamination caused by the impact. Figure 18 shows C-Scans obtained on Sample1 and Sample2 by probing from the top surface of the specimen, as probing from below did not give better results. In the fields shown in Figure 18, the white horizontal stripes match the transitions between the skin alone and the stiffener (seen from above), as the sharp steps of thickness impair the signal. The impact location can also be seen; it can be interpreted as local damage of the composite under the impactor.
Performing C-Scans on wide samples can be challenging. This was particularly the case for Sample1, where the substantial out-of-plane deflection caused variable incidence between the ultrasonic probe and the local surface, which greatly impaired the signal amplitude and thus the quality of the result. It is also hypothesised that the ultrasonic wave rebounded on the second composite-adhesive interface, instead of the opposite free surface. Therefore, the elements of interest (actual adhesive, adhesive porosity, adhesive debonding, adhesive-composite interface rebound) were difficult to distinguish by means of the wave “time of flight” because they were positioned at a similar depth. Thus, the debonding of Sample1 was easier to observe on the signal amplitude than on the wave time of flight (Figure 18–Sample1). Sample2 enabled clear detection of the debonded area from the field of time of flight (Figure 18–Sample2).
Both C-Scans show a similar debonding from the stiffener curvature (flange-web transition), but not a delaminated area centred around the impact location as is usually observed for impacts on flat specimens. The debonded area of Sample2 is larger than Sample1, which was expected because Sample2 was impacted at higher energy and dissipated more energy, for the same impact location.
While Sample1 and Sample2 gave minimal impact indentation and no visible damage on the bottom face, the impact on Sample3 perforated the skin and led to major splitting on the back face (Figure 19). This was not intended, as it is a different phenomenon from BVID-type impacts. However, it was still considered in this study in order to assess the effect of a clearly visible impact on the resistance to compression after impact.

5.3. Numerical Simulation

Before performing impacts on Sample1 and Sample2, numerical simulations were performed to verify that the 30 J impact on the stiffener flange would generate a significative damage to be studied: of substantial size, but restricted to the centre of the specimen. Impact damage calibration was not performed with numerical simulation as it would have required an additional important modelling effort on a large complex specimen, and the predictions of such simulations are not particularly reliable. It has to be restated that the purpose of the numerical model was to guide the tests, but not to perform a dialogue with the experiments.
The numerical simulations presented in Section 3 (for sizing of the specimen under compression without impact) were adapted: the sample modelled was freed from boundary conditions and the supporting frame (400 mm × 250 mm opening) was modelled with an analytical rigid surface and contact to avoid composite-frame penetration. The impactor was simply modelled by a rigid half-sphere surface, tied to a mass element. An initial velocity was imposed on the impactor, so it fell towards the sample with the required kinetic energy.
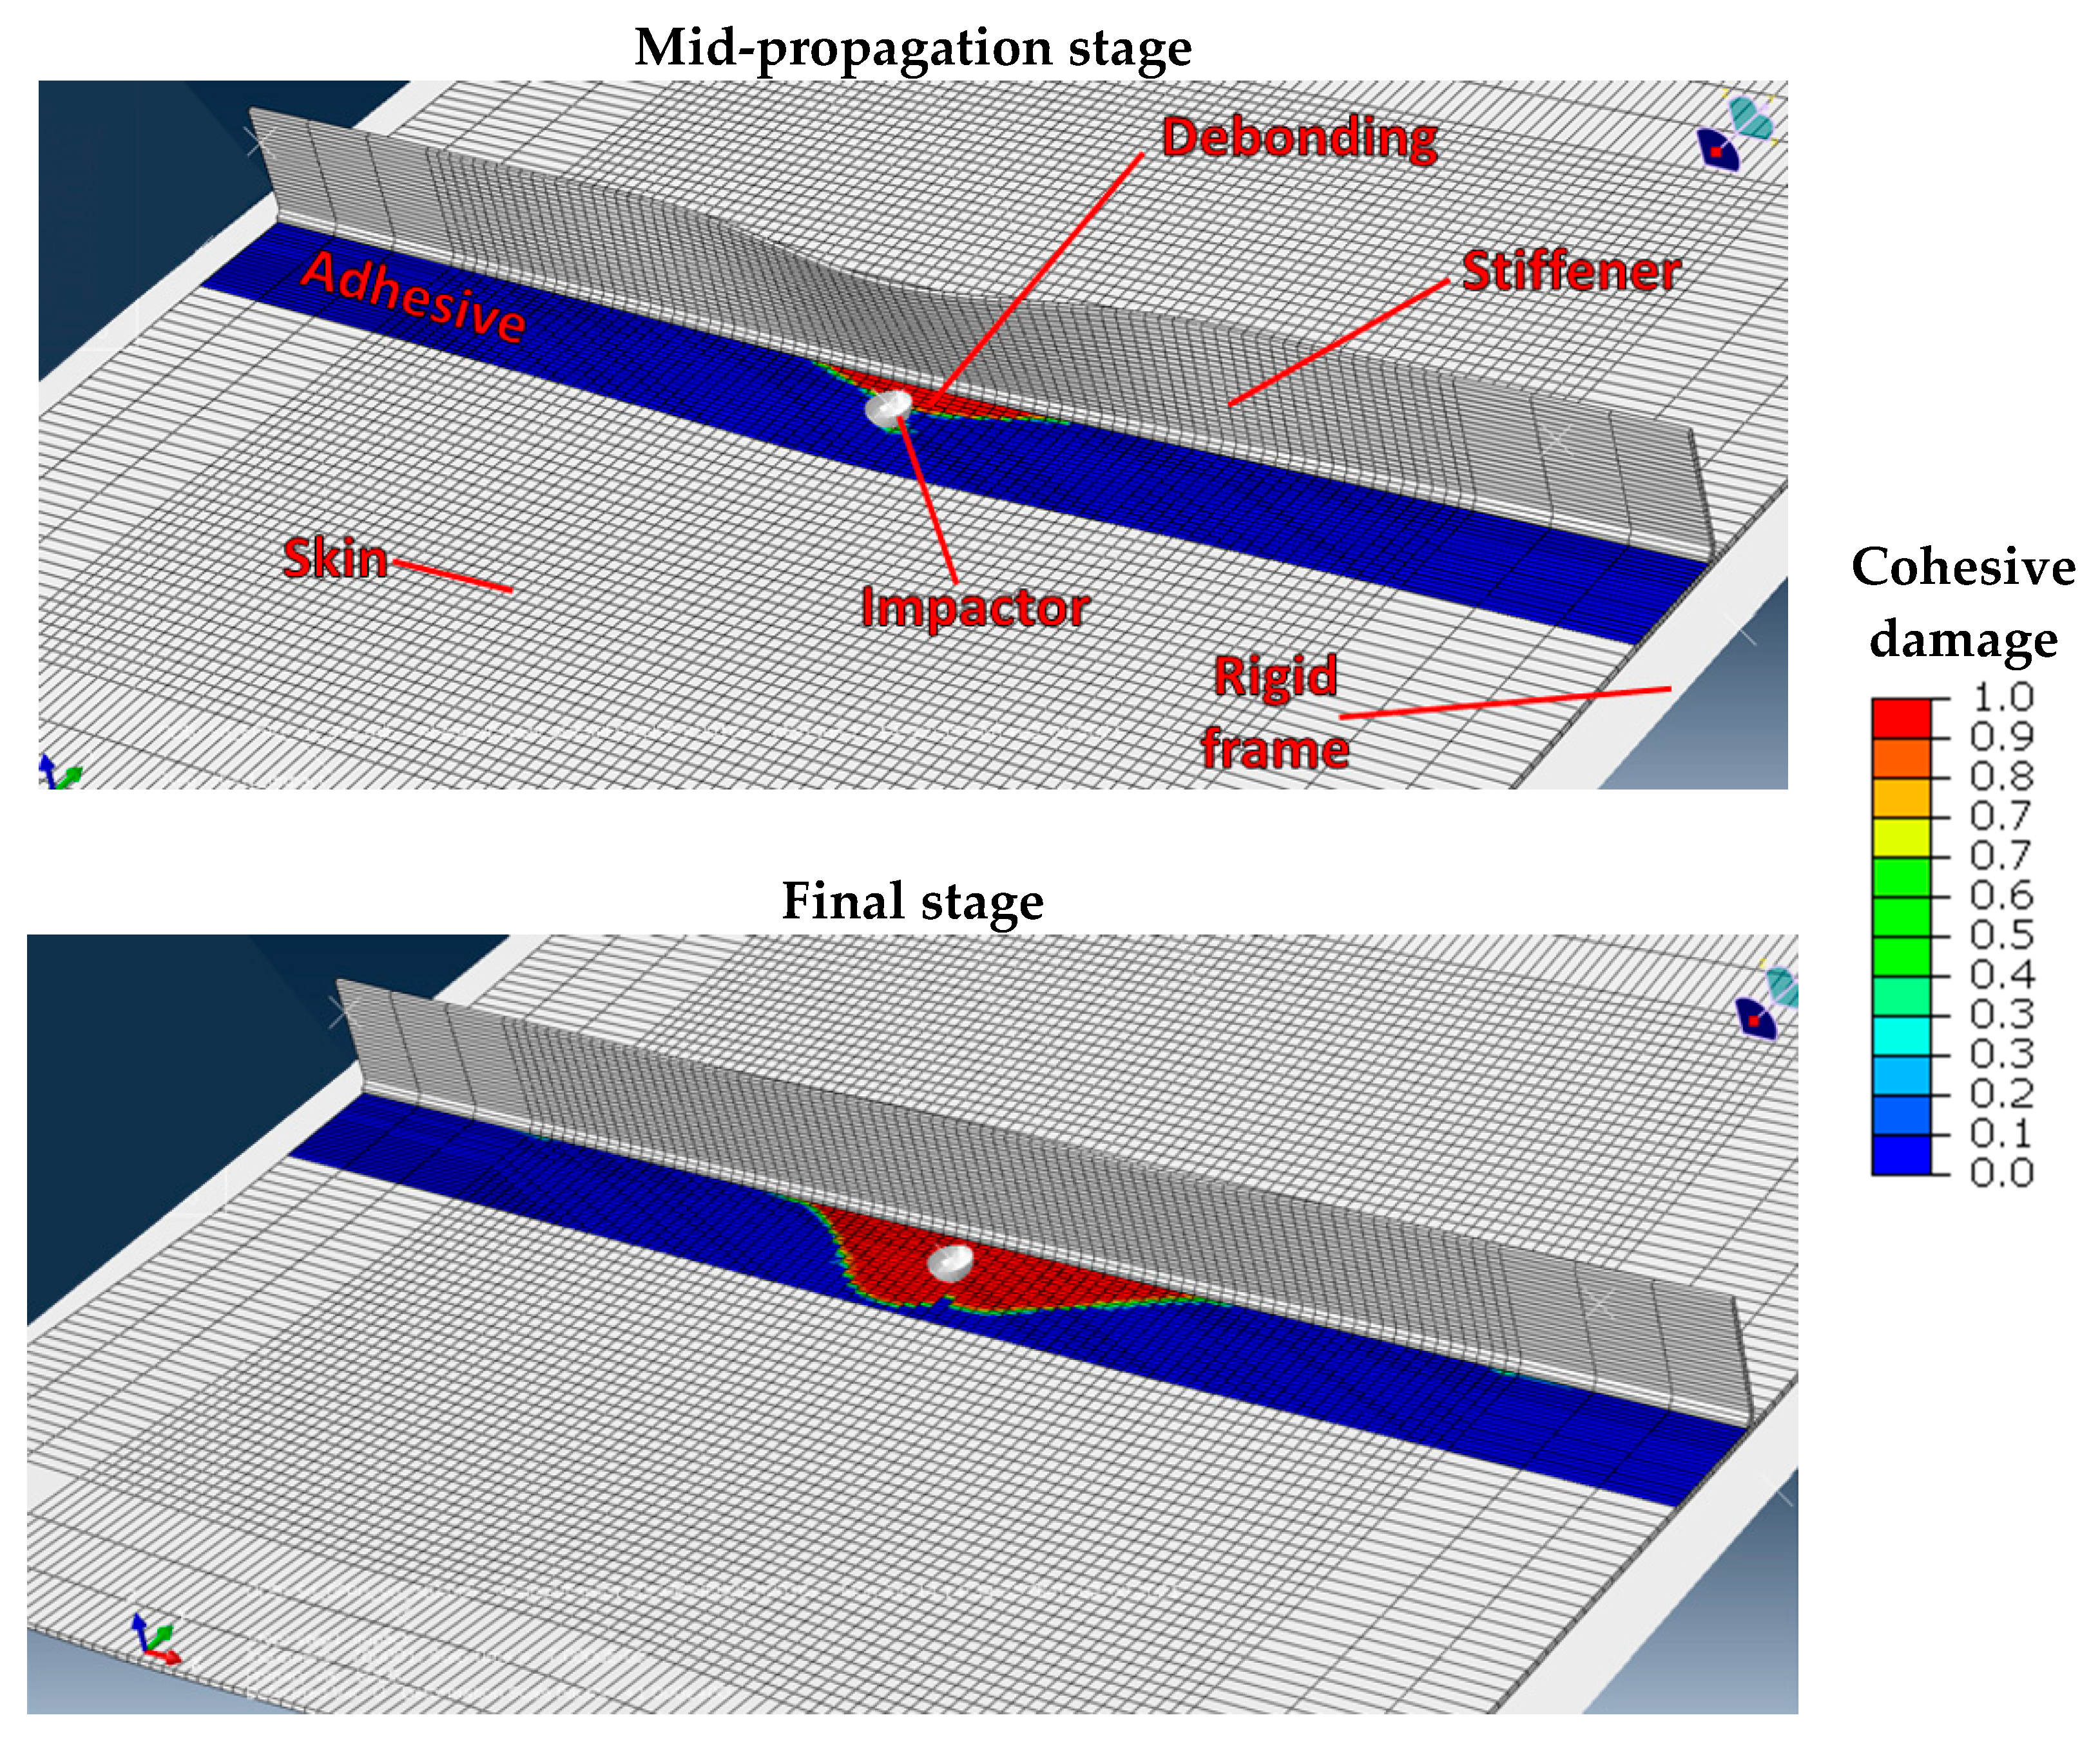
Figure 20 shows the progress of a numerical simulation of a 30 J impact on the stiffener flange. As described above for compression simulations, the damage variable of each cohesive element was plotted to observe the debonding progression during the simulation. The numerical simulations successfully predicted the failure scenario: central debonding propagating from the stiffener corner towards the flange tip, and no significant debonding propagation originating from the impact location. However, the numerical simulation was seen to overestimate the debonded area when the final stage of the simulation (Figure 20) was compared with the Sample1 C-Scans (Figure 18), as both of which were impacted at 30 J. This overestimation of debonding stemmed from, first, the non-modelling of composite damage under the impactor (which is assumed to have dissipated some energy) and, second, the lack of material characterisation of this specific manufactured bonding (maximum stresses and critical energy release rates).

6. Compression after Impact

The test after impact was performed with the VERTEX test rig presented above. Although the rig can combine tension/compression-shear-pressure loading, this study focuses on compression as a first step before studying the damage tolerance of stiffened panels under a wide range of loadings.

6.1. Monitoring

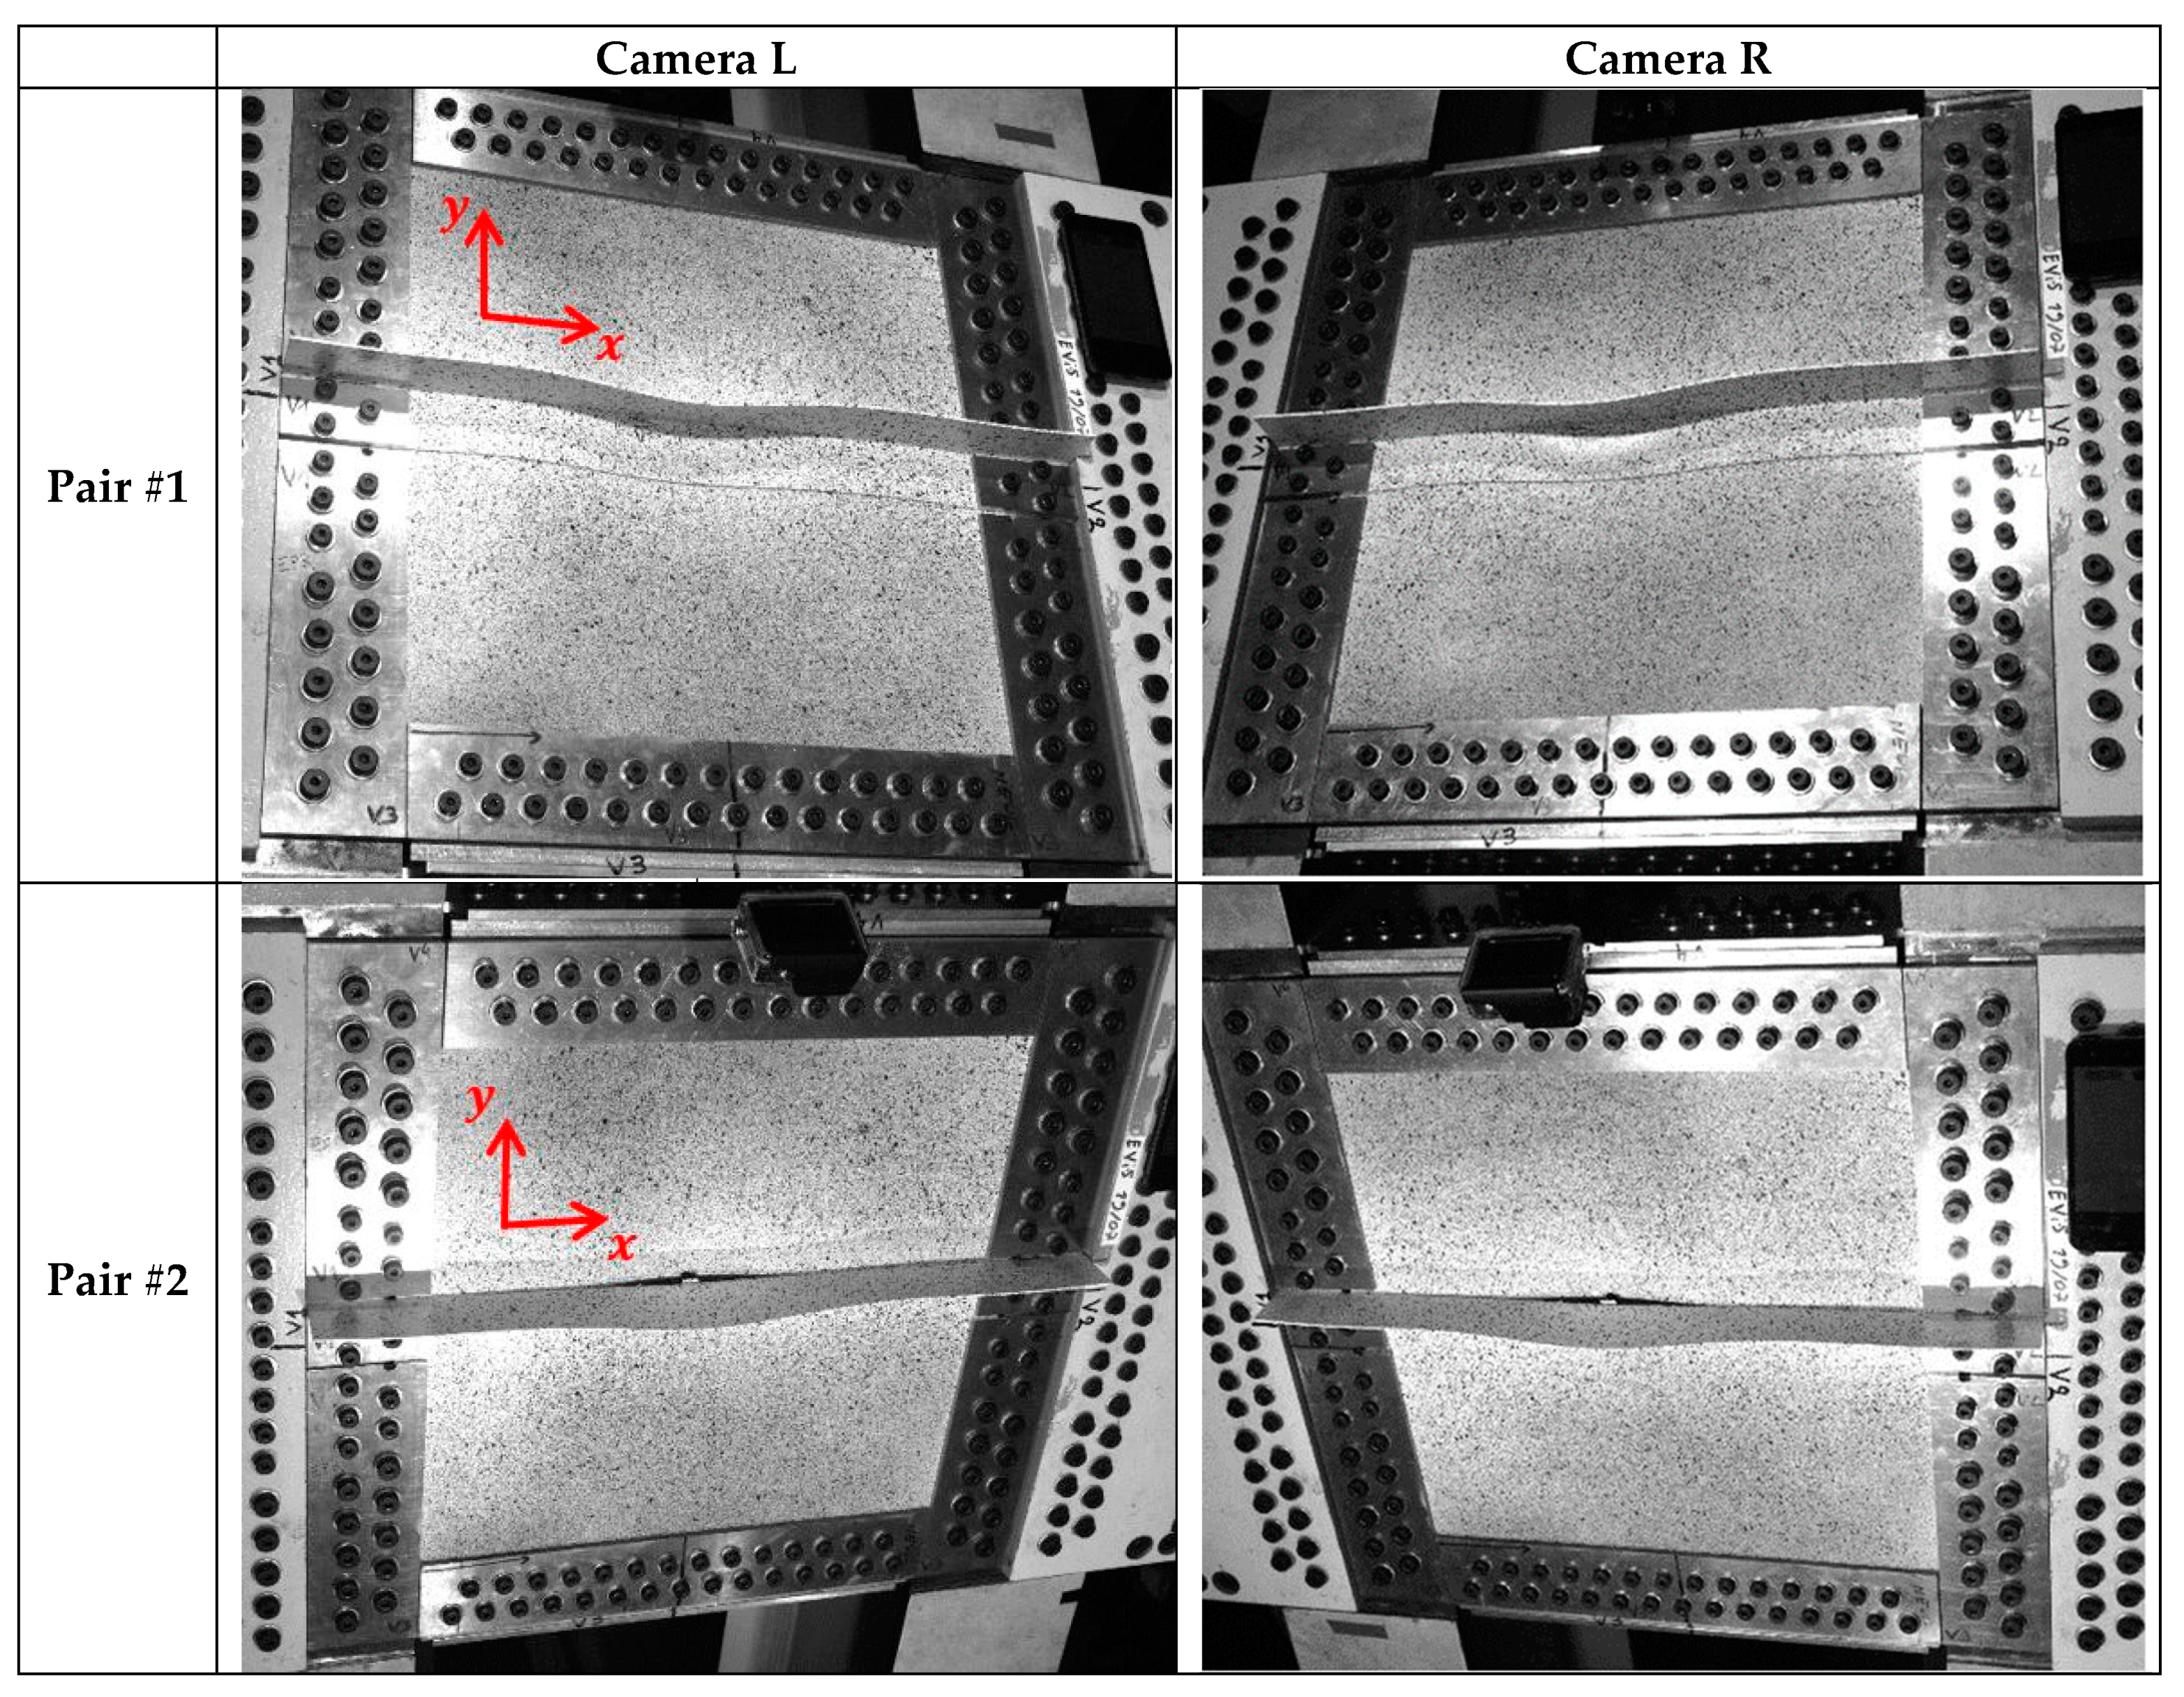
The experiments were highly instrumented (infrared camera, high-speed camera, GoPro for a qualitative close-up view, acoustic antenna), but this paper focuses on the main results given by two pairs of optical cameras used for stereo-correlation on the speckle pattern (Figure 21). Stereo-correlation on flat specimens can be achieved with only one pair of cameras [37], but the web of stiffened specimens can generate blind spots for stereo-correlation, at least on the skin or the web itself. Two pairs of cameras were placed such that, first, each camera viewed the full size of the specimen and, second, each pair of cameras was placed on a different side of the web (Figure 21). Therefore, there was no blind spot for stereo-correlation at any point on the top side of the specimen useful zone (subset = 25 px; step = 3 px; filter = 5 px; 1 px   0.29 mm). As 3D correlation (stereo-correlation) is performed after a calibration phase using a calibration chart, the tilt angles are not an issue. U and V displacement have been recalculated in a coordinate system associated with the specimen. W displacement is calculated with a mean Z plane as a reference.
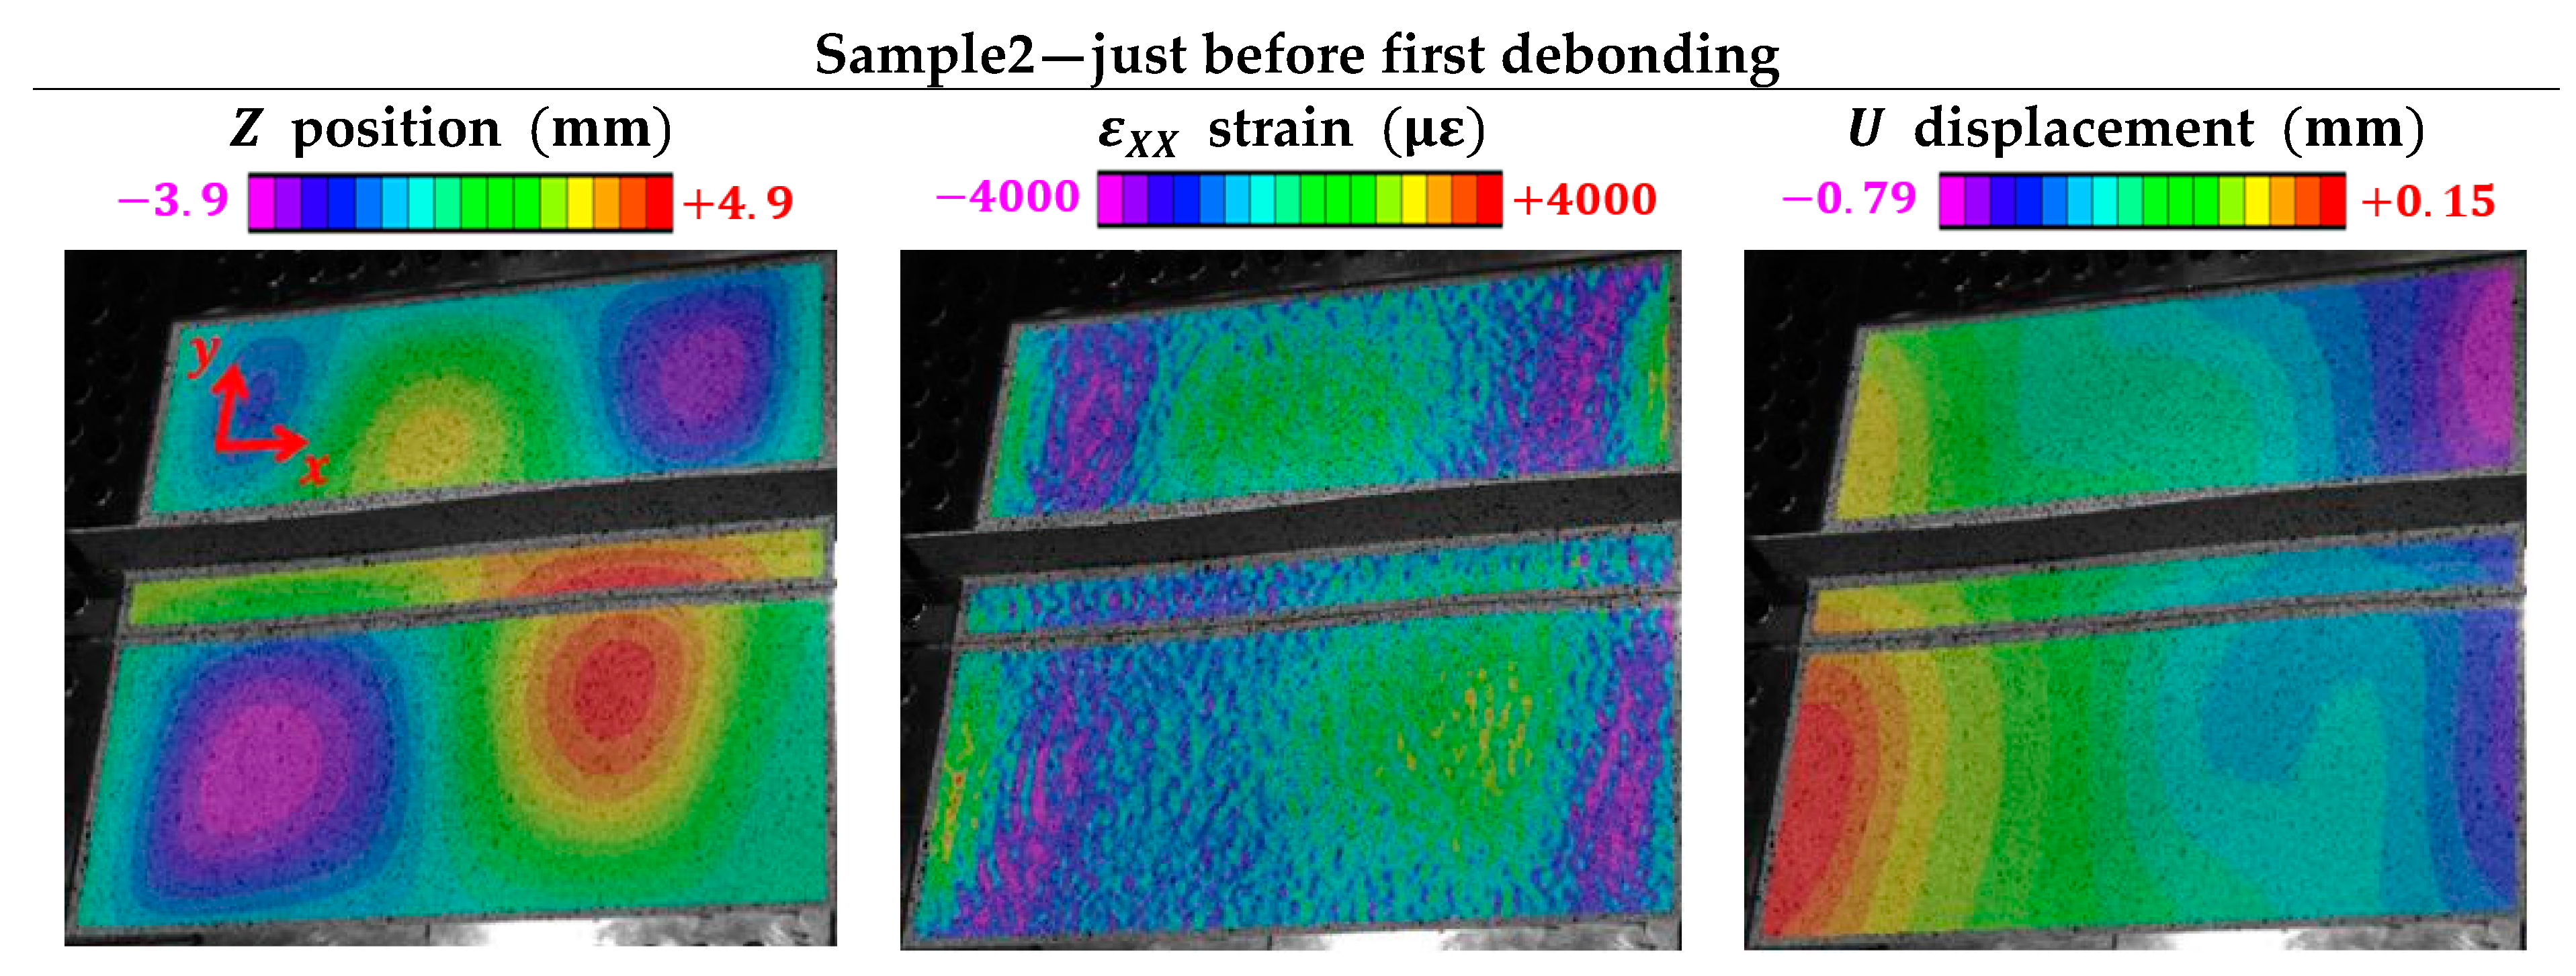
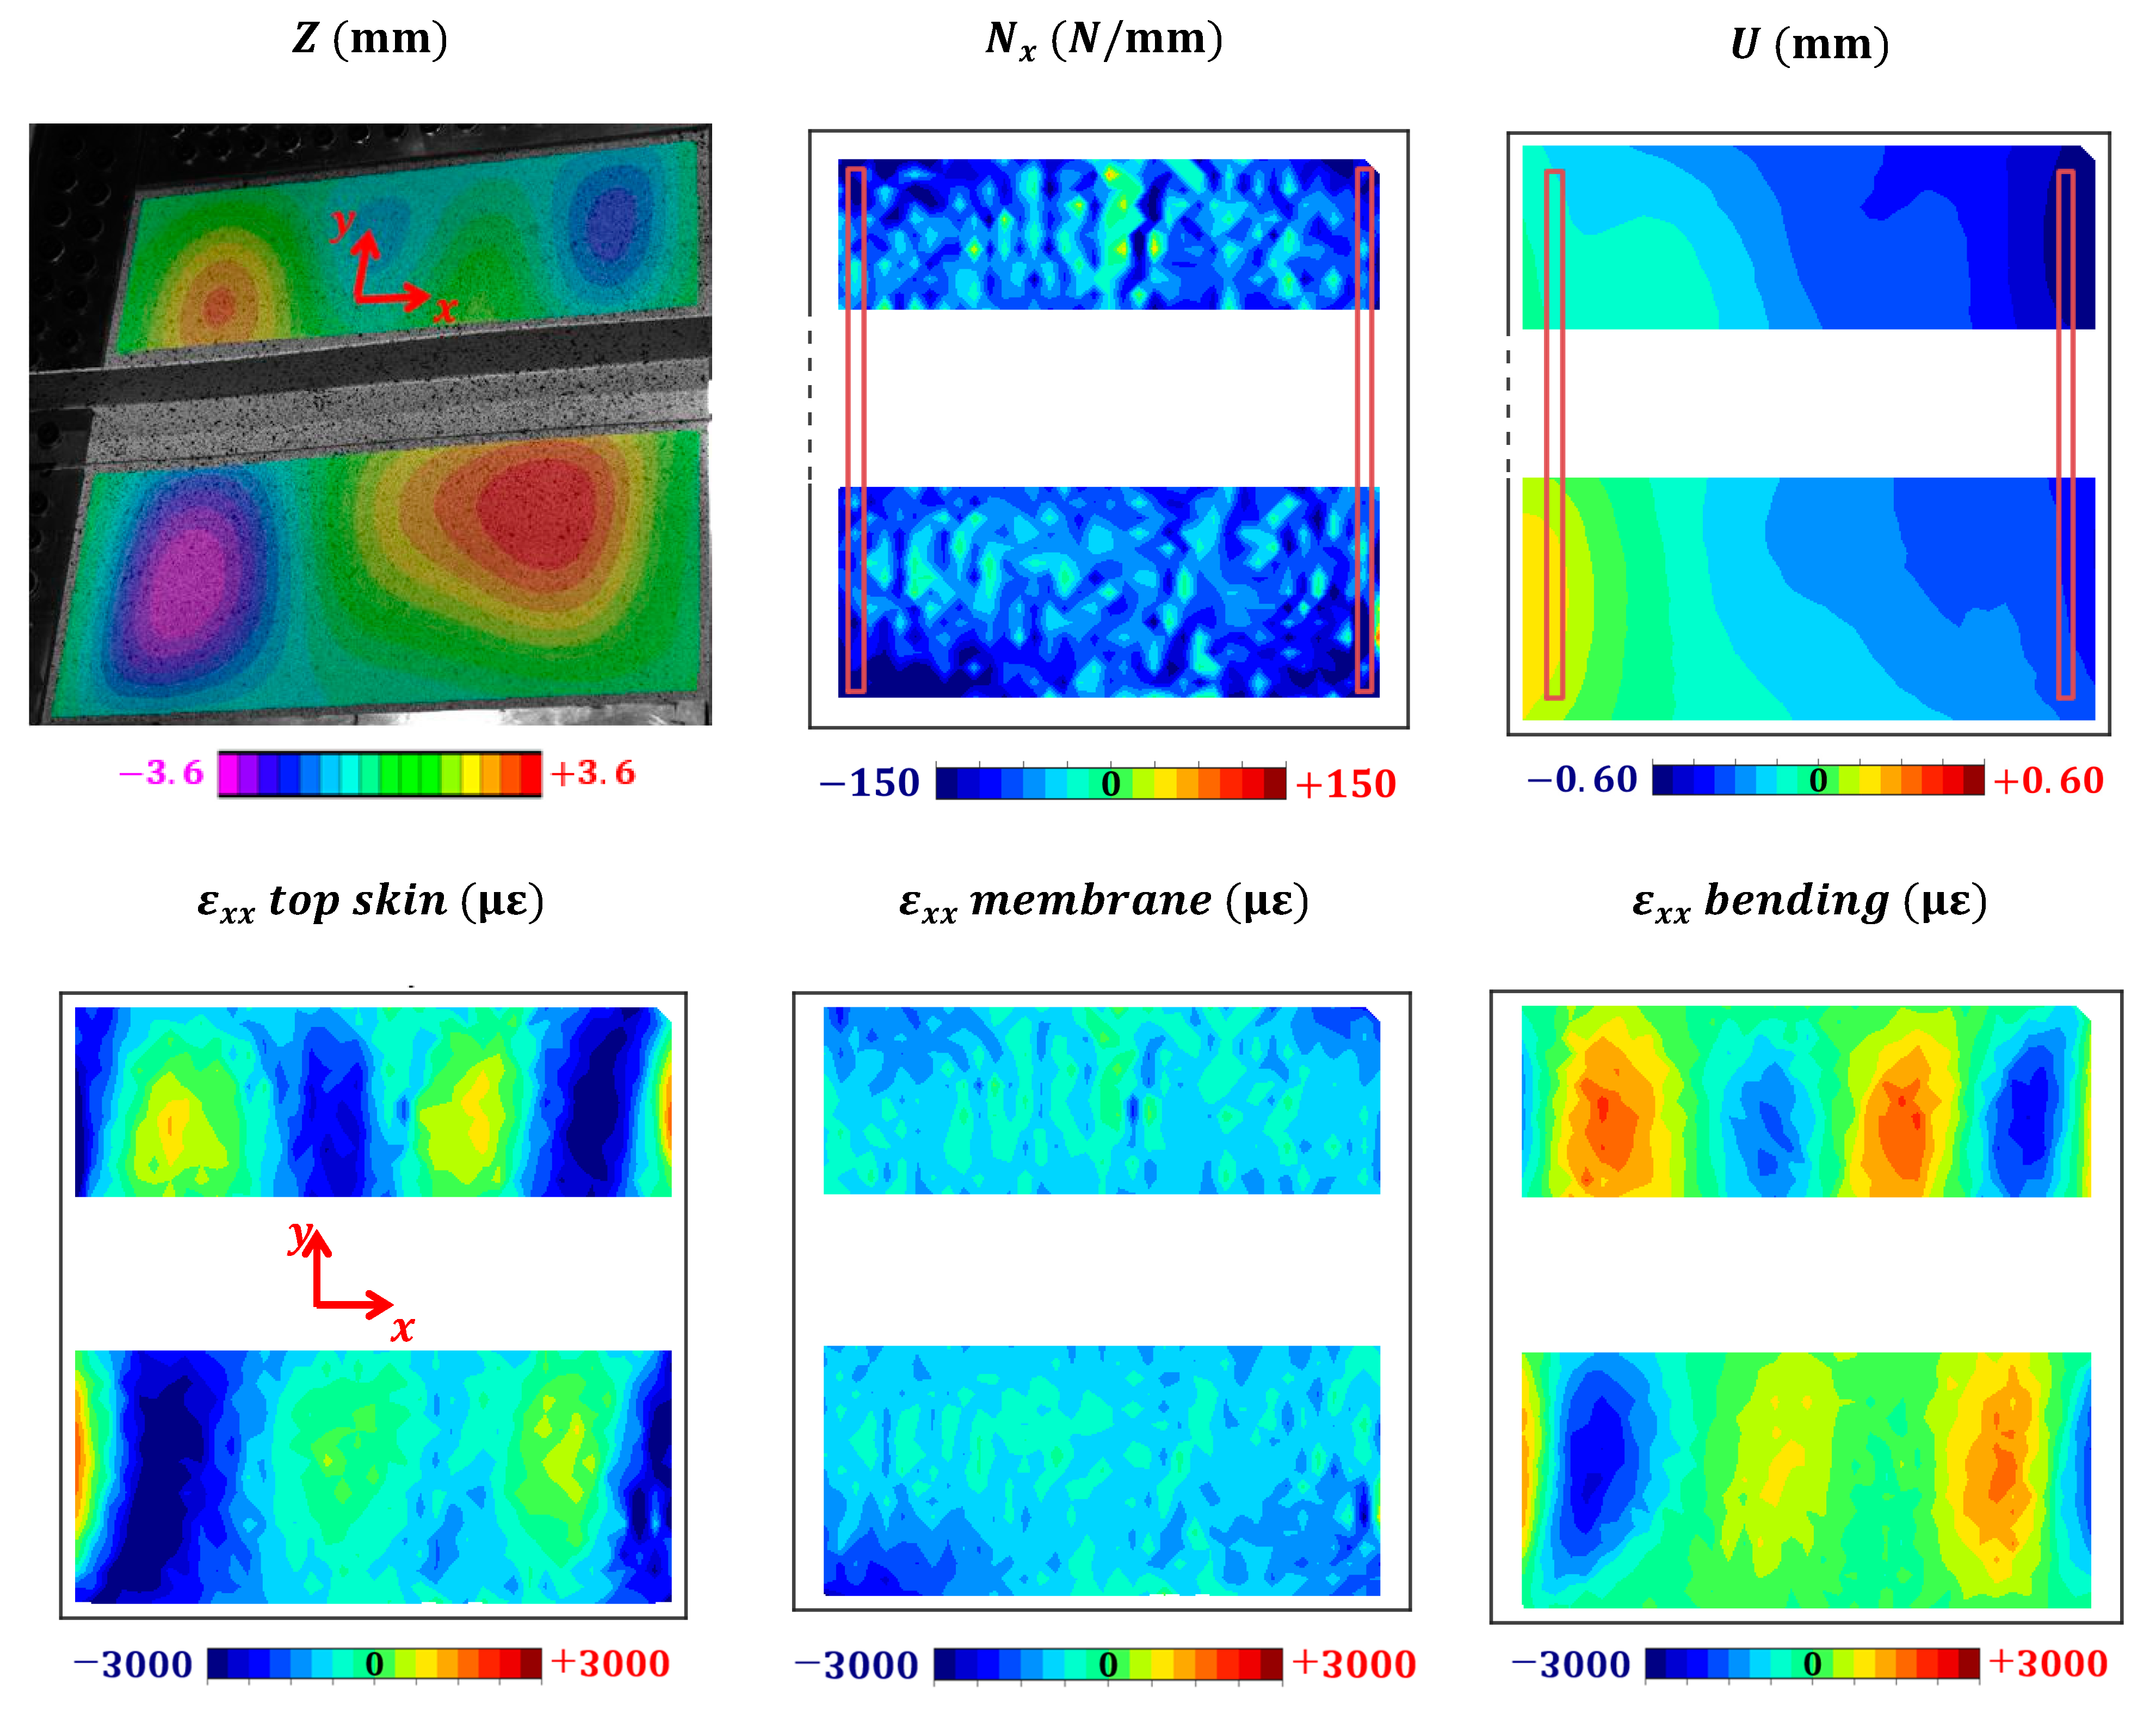
This configuration was interesting for the development of ongoing research aiming to combine stereo-correlation data of the same object viewed from different perspectives, but the current study only performed stereo-correlation with a classic local subset method, using the commercial software VIC-3D-7. Figure 22 shows the main fields of interest obtained by stereo-correlation from Camera Pair #1 (Figure 21) on most of the skin and the stiffener flange. The U displacement field represents the useful displacement field of compression, while the Z position field allows for the observation of the buckling mode settled. The strain field was observed on the top surface of the sample, which is a combination of the membrane strain (generated by the useful compression) and the bending strain (generated by the buckles bending).

6.2. Loading Assessment: Force Flux and Global Strain

The VERTEX bench generates non-uniform loading shapes [37], which can be observed in Figure 22 with the non-uniform U displacements imposed on the sample edges. This is due to the fact that the sample is embedded in a large compliant structure, which also prevents the use of jack displacement/force as a direct indicator of the sample loading state. This issue was overcome by stereo-correlation on the full field of the sample to comprehensively measure its loading state [37,41]. Figure 23 plots the relevant fields obtained directly from stereo-correlation (positions, displacements, ε x x top skin) and the relevant fields that can be computed from them ( N x force flux, ε x x membrane and bending). Membrane and bending strains are computed from the top skin strain and second derivatives of the out-of-plane displacement (Equation (1)), and the force flux is computed from the elastic stiffness of the matrix (Equation (2)) [37]. The N x force flux field gives a relevant measure of the useful longitudinal compression loading state, because panels are usually sized with force flux conditions on the edges. The decomposition of the strain into the membrane component and the bending component allows for an explicit evaluation of the contribution of the imposed in-plane loading over the resulting buckles bending, and of the possible ply failure. In Figure 23, the out-of-plane buckles clearly match the flexion strain, whereas the membrane strain is mostly uniform.
Note that the camera resolution and the speckle pattern were not refined enough to obtain valid stereo-correlation results on the stiffener flange; even though the displacement fields looked smooth from a macroscopic point of view, a very high noise level appeared on the flux fields because their computation involved local first derivatives (strains) and second derivatives (curvature) of displacement fields. Therefore, the flux fields on the stiffener flange were too spoiled to be used here. Moreover, the angle between the cameras and the stiffener web was too far from the optimal perpendicular configuration, so no reliable stereo-correlation could be performed on the web with the local-subset method used. Hence, all test data presented below are restricted to the Free-skin area of the samples. This will provide important feedback for future tests, where the camera configuration should be reconsidered: for example, with a first pair of cameras focusing on the skin from a perpendicular viewpoint (neglecting the web observation) and a second pair of cameras focusing on the stiffener (like Pair #1 but with a 45° angle and zoomed). With the same equipment, this new configuration should enable a proper flux computation over the whole area of the sample and help to observe the stiffener debonding better.
In order to plot the loading intensity evolution over a test, the fields need to be aggregated into representative scalars [37]. The global strain is defined as the relative displacement of the two red rectangles plotted in Figure 23, similarly to a large virtual extensometer measuring the longitudinal strain. The N x flux field is averaged, also in the red boxes shown in Figure 23, to obtain a single scalar representative of the overall N x intensity at the borders. The global strain ε x x G is representative of the displacement of the bench (input on the sample), whereas the average flux N x is representative of the resulting force (output of the sample). Plotting N x against ε x x G allows the sample’s transfer function to be visualised (output generated in response to inputs) and can thus describe the sample behaviour over the test (see Figure 28 presented later).
ε _ _ M ( x , y , z ) U p p e r   s k i n m e a s u r e d = ε 0 x ( x , y ) ε 0 y ( x , y ) γ 0 x y ( x , y ) M e m b r a n e d e d u c e d + z h e i g h t / 2 . 2 w x 2 ( x , y ) 2 w y 2 ( x , y ) 2 2 w x y ( x , y ) c u r v a t u r e B e n d i n g   ( u p p e r   s k i n ) c o m p u t e d  
Equation 1. Computation of membrane strains from upper skin measurements, assuming the classical plate theory.
[ N x N y T x y N x N y M x y ] F l u x = [ A _ _ B _ _ B _ _ D _ _ ] S t i f f n e s s . [ ε 0 x ε 0 y γ 0 x y 2 w x 2 2 w y 2 2 2 w x y ] P l a t e   s t r a i n s
Equation 2. Computation of force and moment fluxes from the stiffness matrix and plate strains, according to the classical plate theory.

6.3. Debonding Observations

Figure 24 shows pictures of all tests from the cameras used for stereo-correlation; the debonding events are obvious because they had already propagated and opened over most of the area of interest. However, the interest of such a test lies in the early stages of debonding (first crack and propagation up to global debonding). Figure 25 shows pictures just after the first observable debonding of Sample3, on both sides of the web. First debonding (Figure 28) could be quite discreet, especially for Sample1, where other views (from GoPro and high-speed camera, not presented here) were necessary to properly identify the first debonding occurrence and propagation. This is important feedback for coming tests; debonding identification is a key point of the test, but it can be elusive from full-field cameras, so it is important to have some cameras focused on the web tips. A grazing perspective was found to give much clearer views for debonding identification, especially for closed cracks, and grazing lighting may also improve the contrast of cracks.

6.4. Debonding Interaction with Buckles

Figure 26 shows the out-of-plane position, before and after the identified main debonding, for each test. Buckles play an important role in debonding initiation and propagation [3], as the debonding is created by the coalescence of a negative buckle from the skin below the stiffener and a negative buckle from above the stiffener, which eventually form a negative global buckle (referred to as tunnelling in Figure 26 and marked with yellow arrows). Additional loading essentially propagates and opens this initial debonding.
These tests and observations lay the groundwork for experimental/numerical confrontation, possibly with the model presented above, to develop and challenge models of damaged stiffened panels under post-buckling regimes.

6.5. Results and Discussion

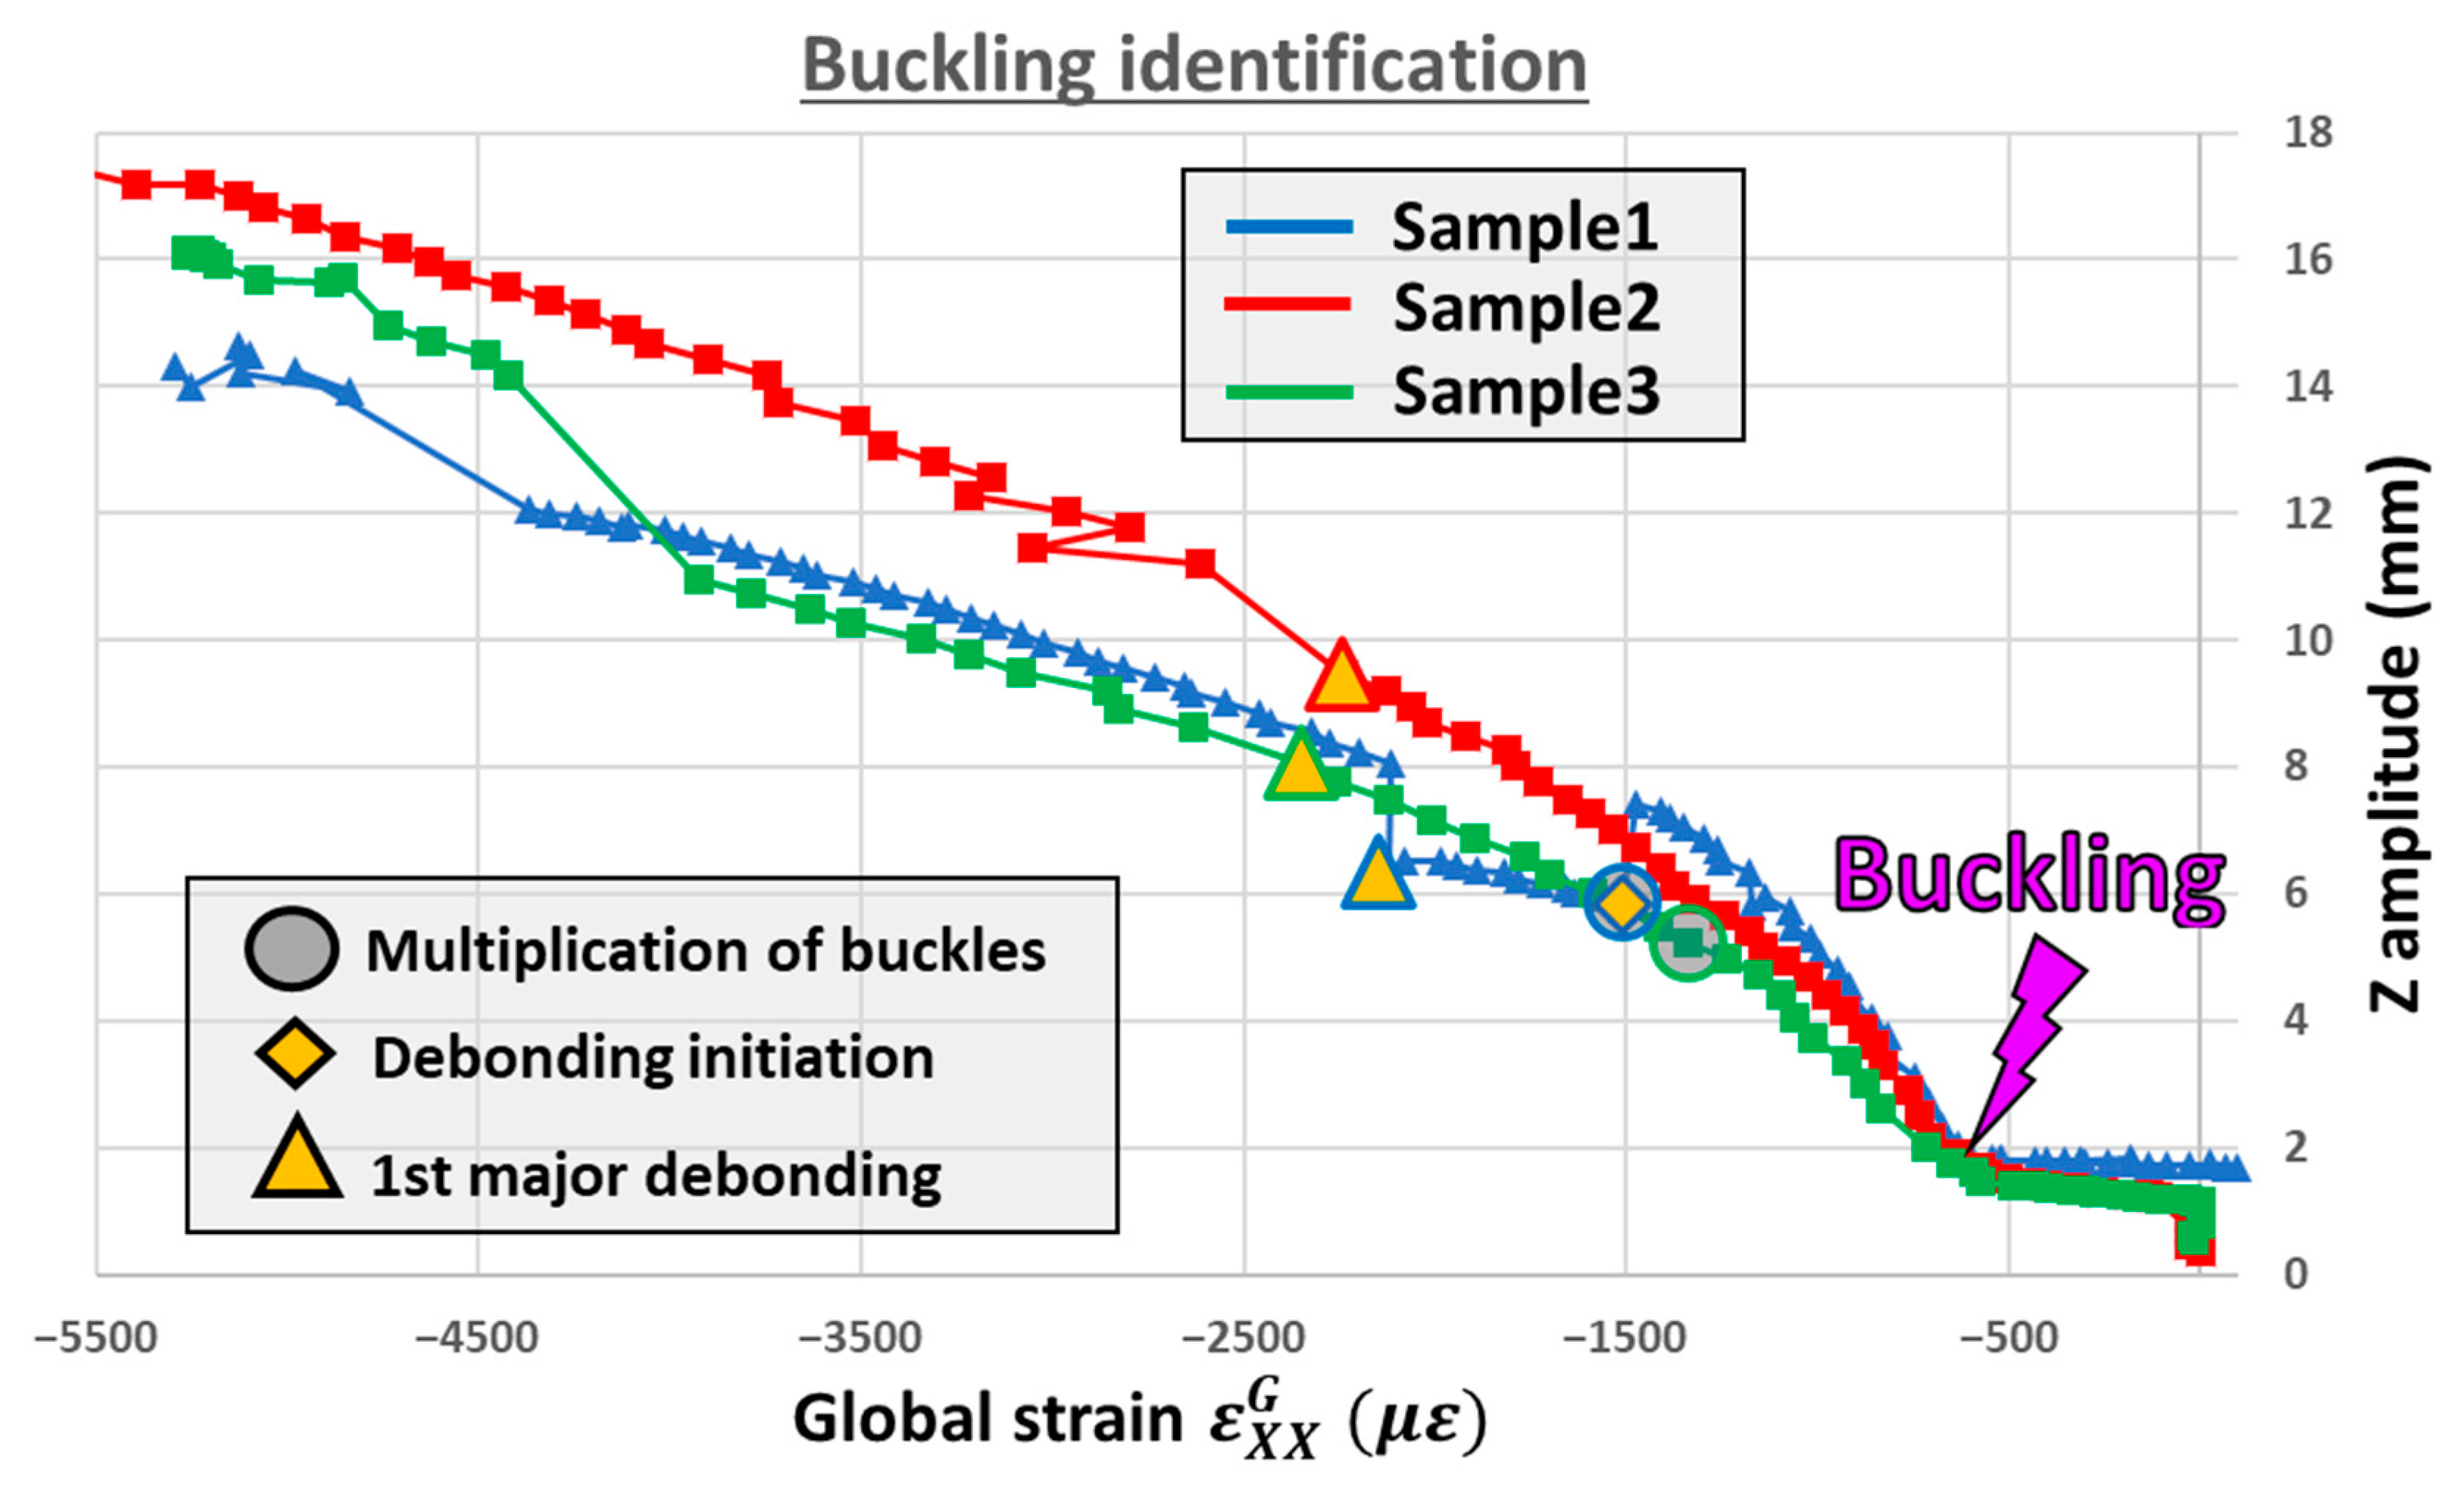
Figure 27 plots the Z amplitude (height difference between maximum and minimum) against the global longitudinal strain, which is basically a load-deflection curve of a compression test but with more suitable metrics. In this way, buckling can be clearly identified on the first sharp inflexion of the curve. The three curves in Figure 27 do not start at zero because of the initial spring-back of the samples (manufacturing defects) and because of the small pre-loading applied when the samples were initially clamped to the bench [37]. The Z amplitude is different for each test, mostly because each sample had a different buckling mode installed (Figure 26).
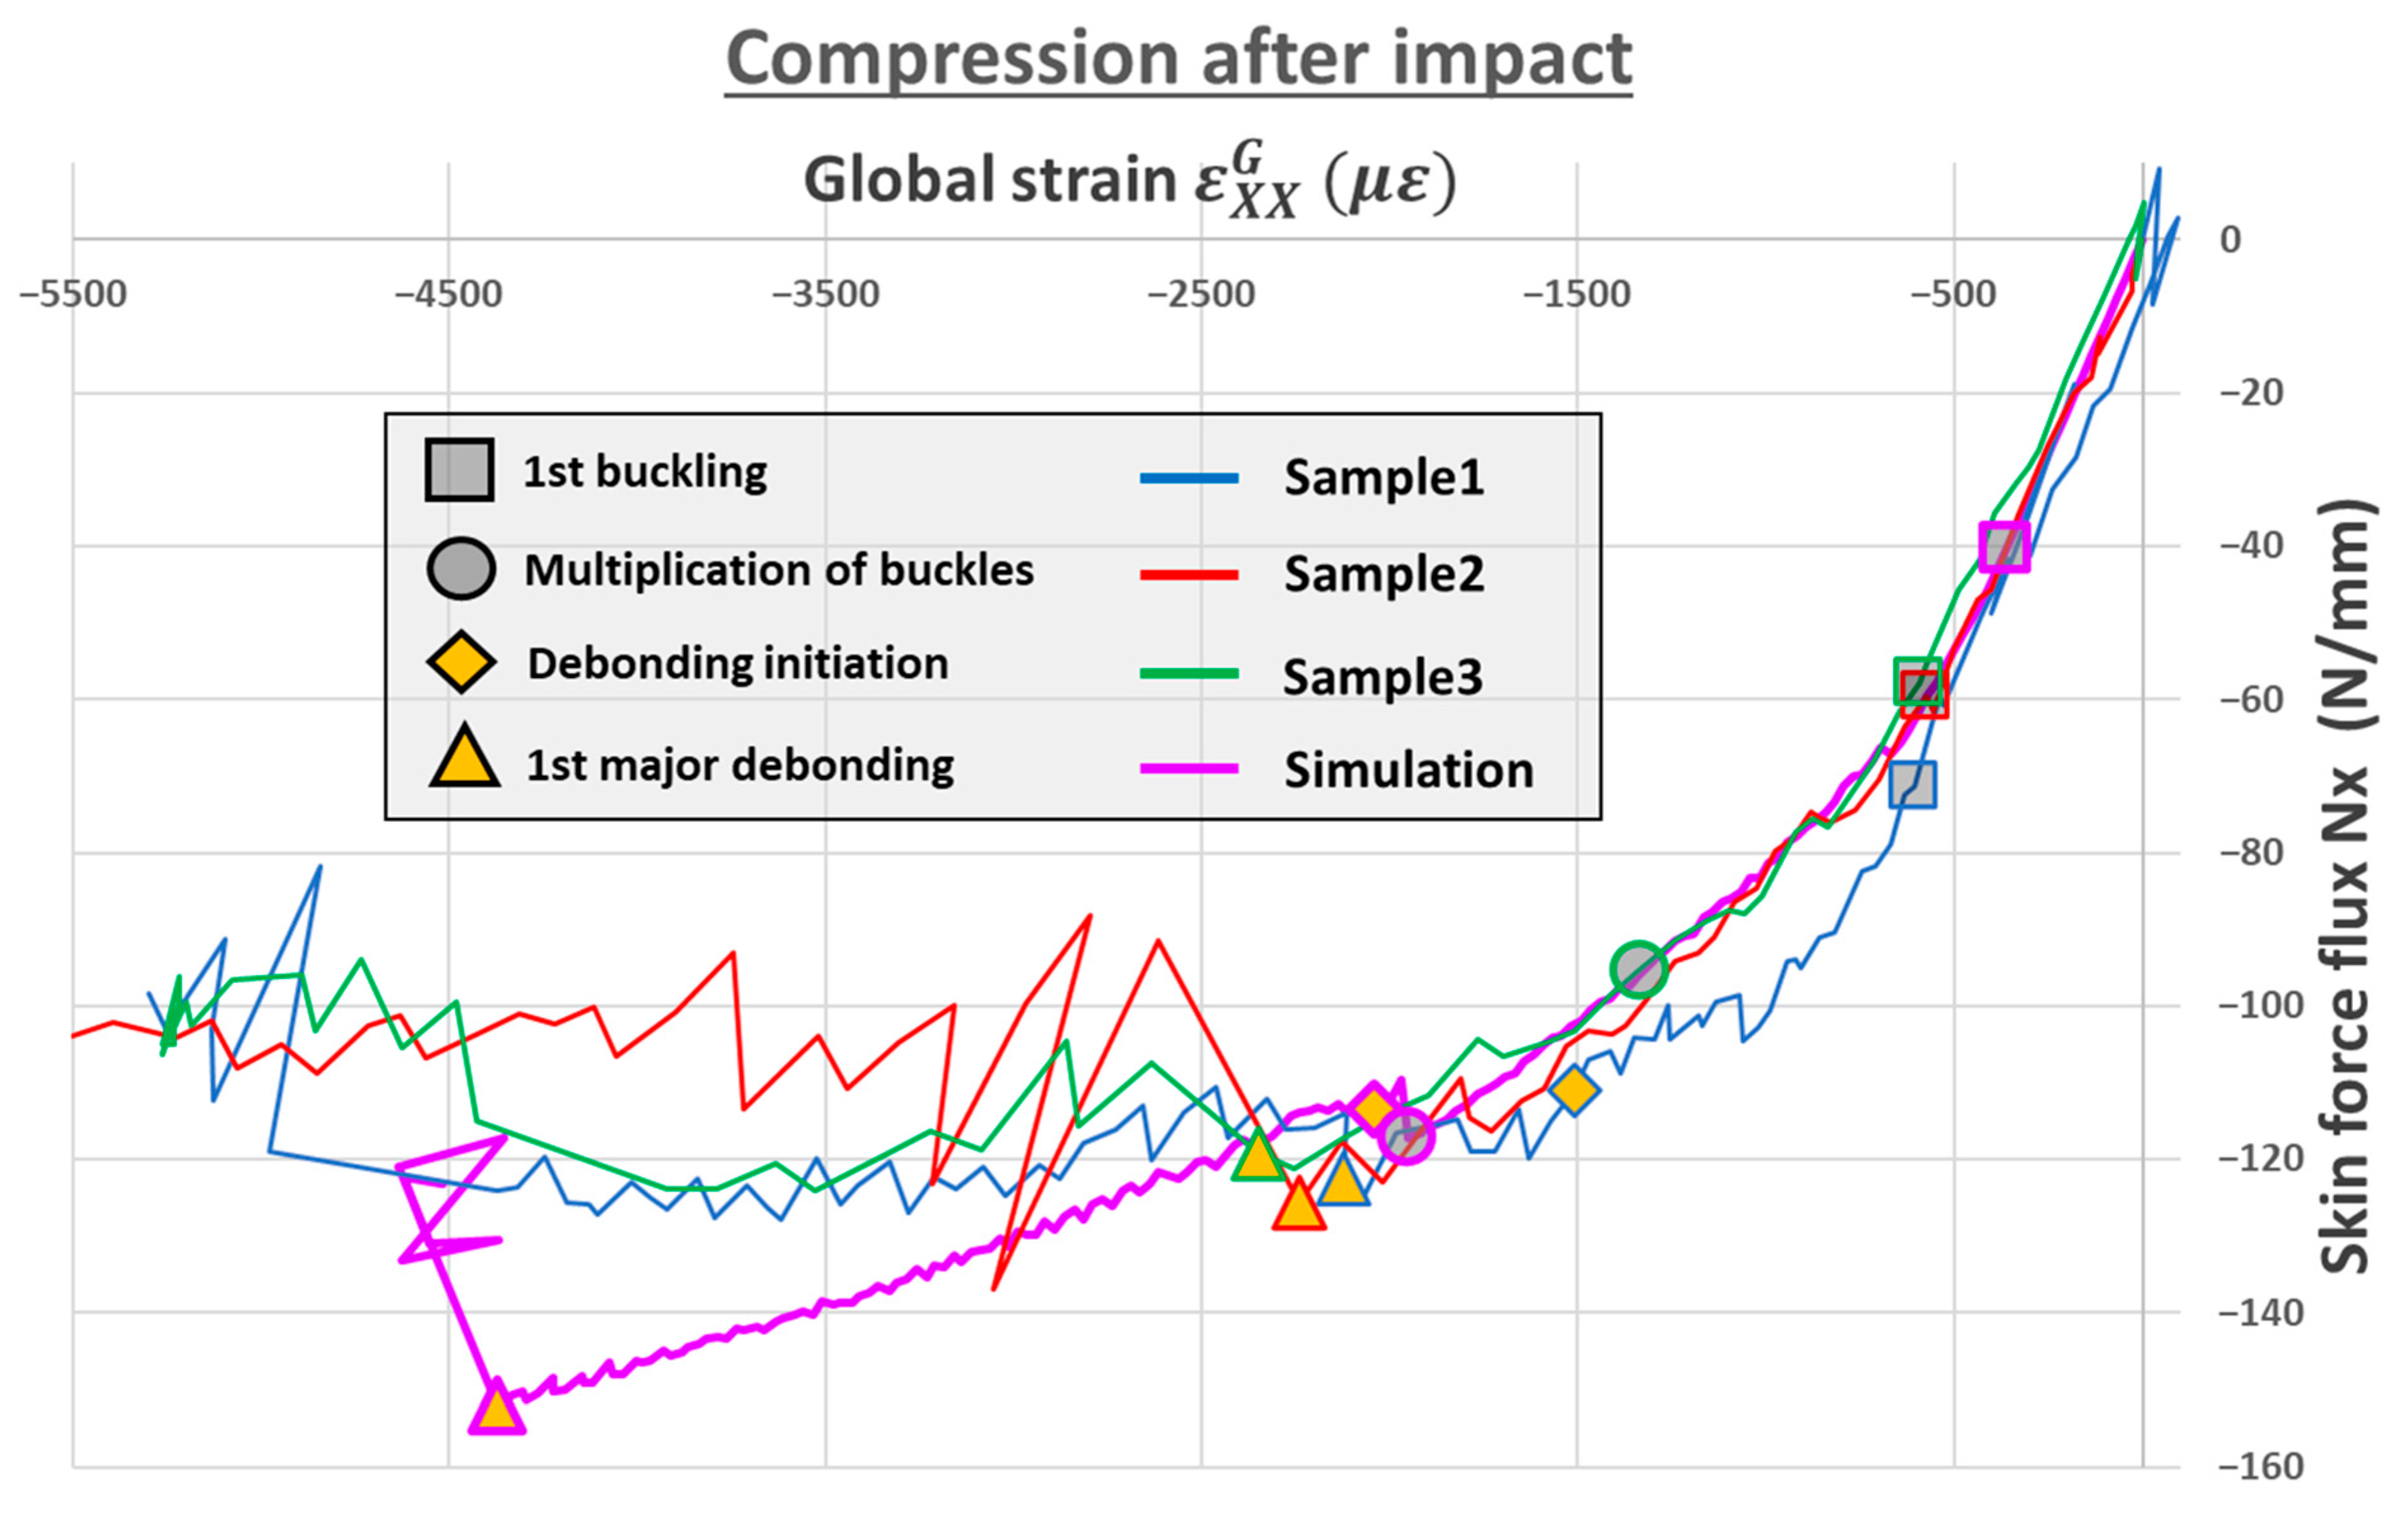
Figure 28 plots the skin force flux against the global strain. As explained above, they are representative of the sample mechanical input and output, so this graph is a representation of the transfer function of the main mechanical behaviour of the samples. As usual, before buckling, there is a linear relation between the imposed global strain and the resulting force; then, after buckling, the skin stiffness decreases.
Sample2 gave the simpler scenario, as the increasing load created buckling and a stiffness reduction for the skin, then a first sudden and major debonding appeared. After the first debonding, the load was thresholding at N x = 120   N / mm and eventually dropped in late stages of the test, where the stiffener was fully debonded and the skin globally buckled. Just after the first major debonding of Sample2, the numerical noise of the force flux was exceptionally high, without any clear cause.
Sample3 produced basically the same scenario, except there was a buckle multiplication before the first major debonding (post-buckling mode transition with additional waves), as is often observed for tests on stiffened panels [4,21,33].
For Sample1, the damage scenario was different, as a debonding initiation appeared, then propagated progressively and, finally, a major debonding occurred as for Sample2 and Sample3 (Figure 28). The debonding initiation of Sample1 occurred simultaneously with a buckle multiplication—locally on the top half of the skin—whereas major debonding on all three samples led to a global buckling of the skin (Figure 26).
For the simulation, the same simulation as in Section 3 was considered (compression on a pristine specimen, used for sizing)—the force fluxes and the global strain were computed exactly as for the experiments (Figure 23). The first part of the simulation is very similar to the experiment, as there is a buckling, then a multiplication of the buckles and debonding initiation for similar force fluxes. Numerically, the debonding was progressive all along, so in Figure 28, the debonding initiation is identified thanks to the first cohesive damage, and the first major debonding is matched with the global debonding. The second part of the simulation does not match the experiments, as the stiffness degradation and the major debonding happen later. It is believed that this difference occurs mainly from the lack of representation of the impact (debonding precursor) and the over-estimation of the bonding strength properties. Note that the numerical buckling occurs earlier than the experimental bucklings, which is believed to be due to the difference in boundary conditions applied by the model compared to the VERTEX test bench.
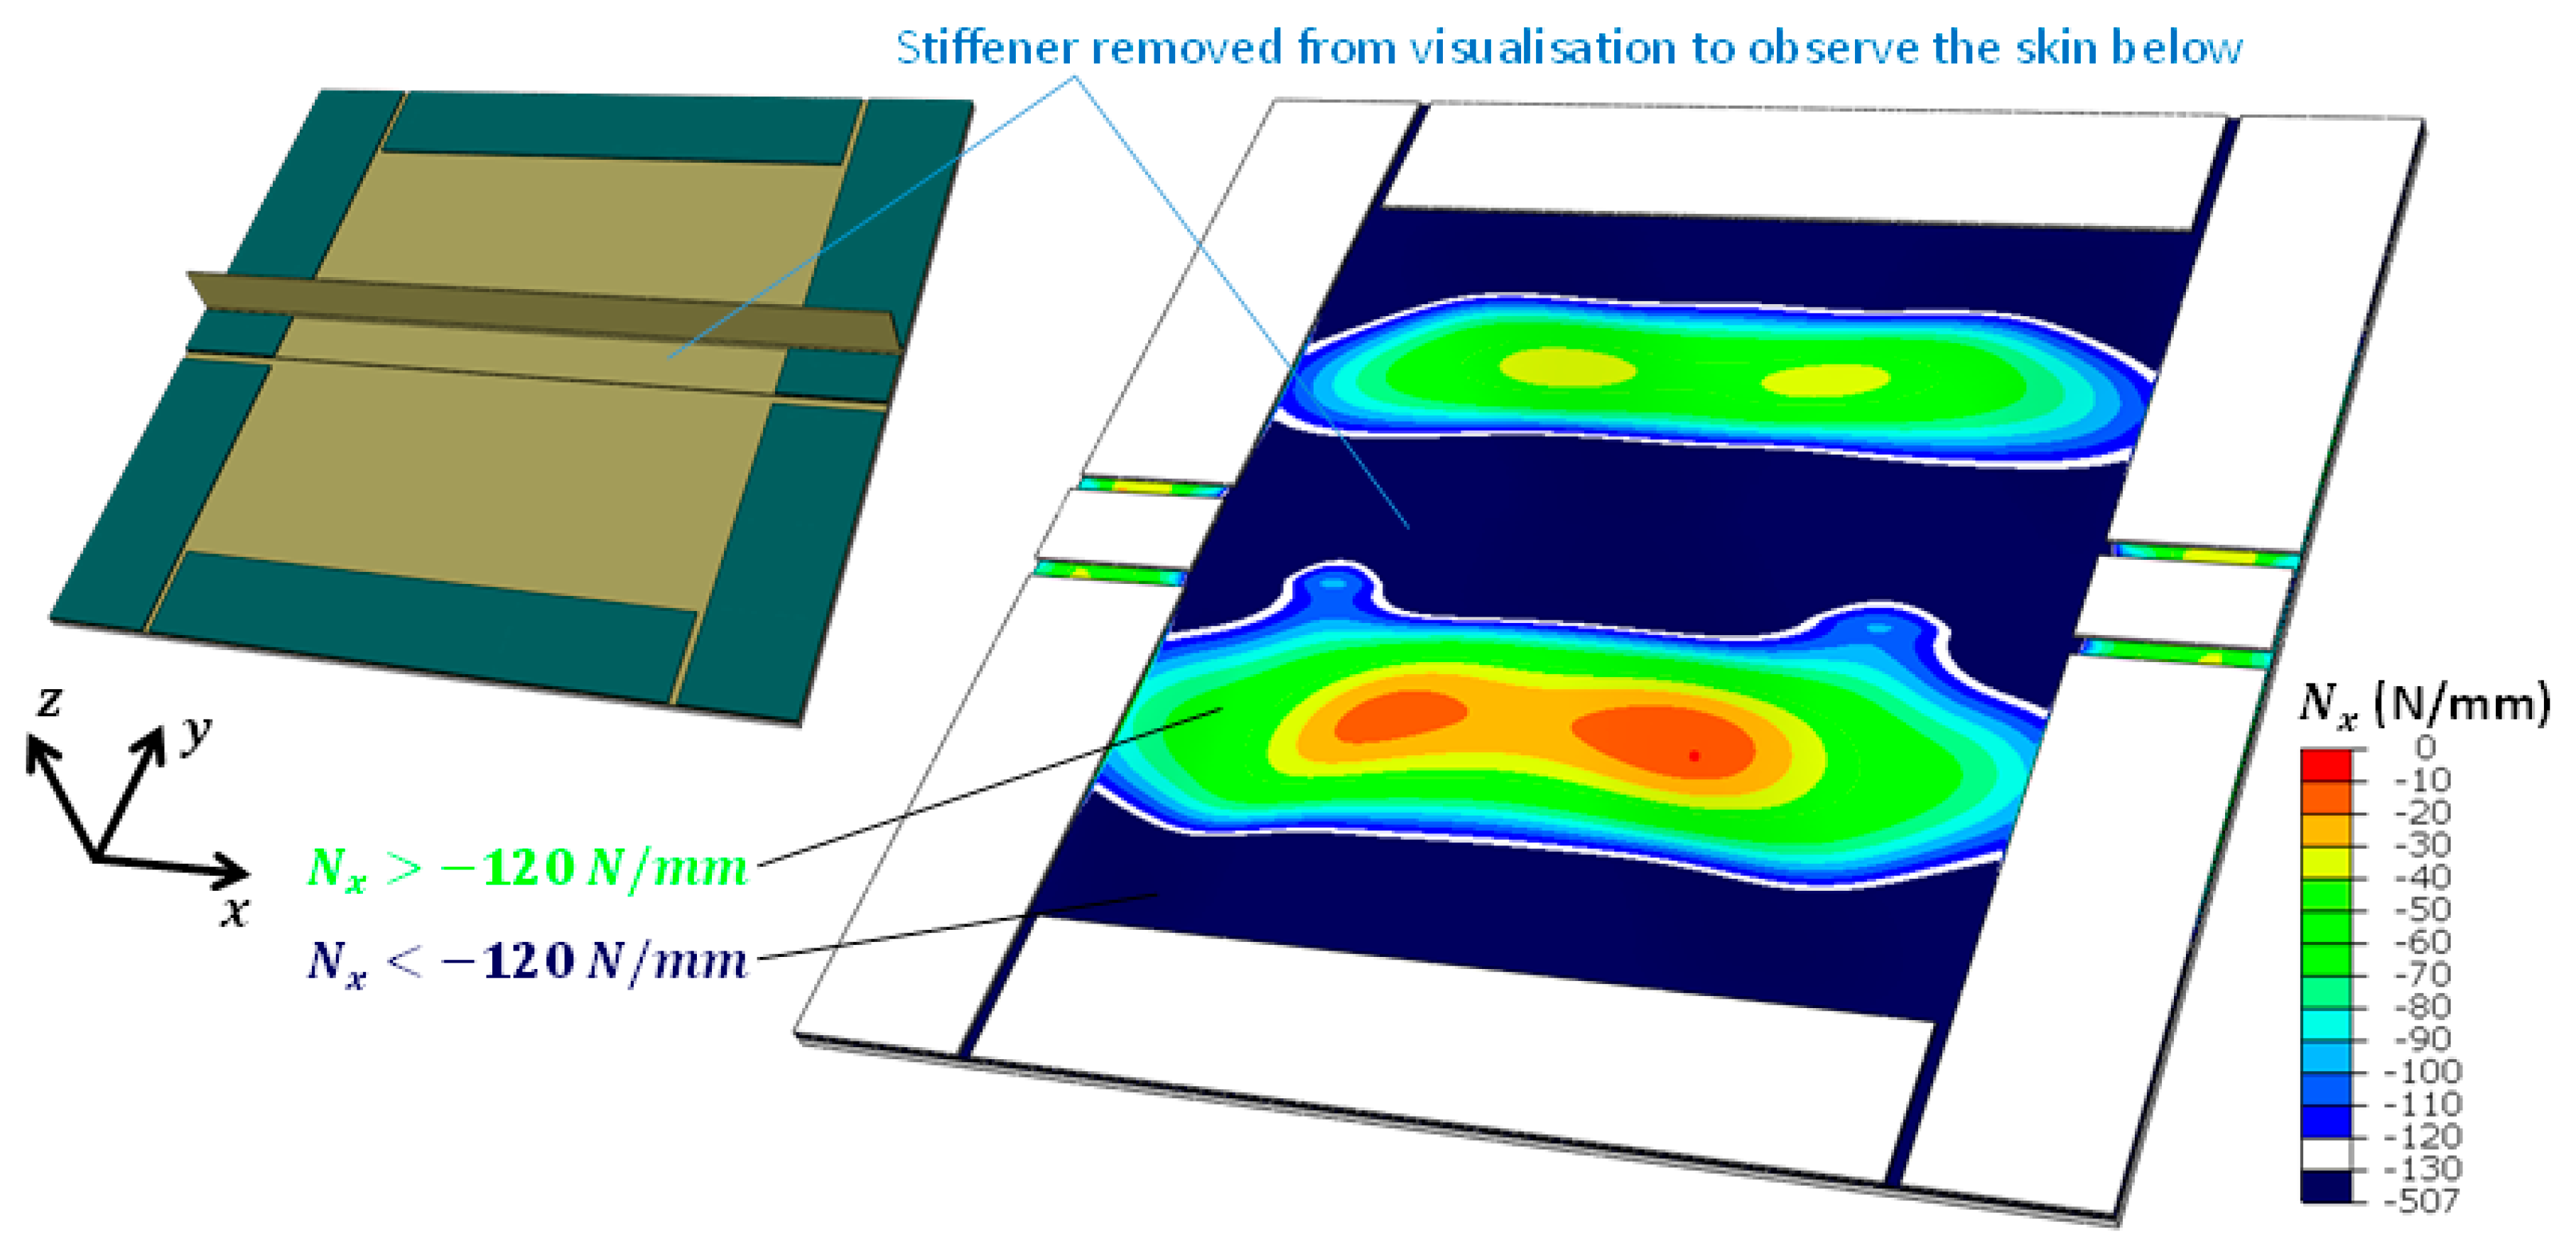
All three samples first buckled on the Free-skin regions for N x e x p 60   N / mm . This value of the buckling force flux matches the theoretical buckling load obtained for a Free-skin alone, i.e., one of the two thin parts of the plate of dimension 400   mm   × 180   mm simply supported on all four edges using the EDSU (Buckling of rectangular specially orthotropic plates, 1995, http://www.esdu.com, accessed on 30 January 2023) N x t h 61   N / mm . All three samples also had a common maximum load threshold of N x 120   N / mm . Force fluxes were averaged on the Free-skin width (Figure 23, see the two skin parts on each side of the stiffener), but we should keep in mind that during post-buckling, the force flux is actually much higher closer to the edges (tab and stiffener) than on the centre. Indeed, Figure 29 shows the force flux repartition on the sample, and the centre of the two Free-skins are clearly unloaded compared to their edges.
The effects of the impact (on the compression residual performance) were not substantial: for all three samples, the buckling load and the first major debonding load were basically the same. This result is surprising since Sample3 showed catastrophic damage (Figure 19) compared to Sample1, which showed almost invisible impact damage. Thus, the magnitude of the damage caused by impacts did not have a substantial effect on post-impact strength under compression.

7. Conclusions

A stiffened composite specimen was developed for the VERTEX test rig, as a first step towards structural testing on stiffened panels under a wide range of loadings. The specimen was modelled with Finite Elements to test some technological solutions with virtual testing, in order to design the experiment in such a way that the phenomenology of interest would actually appear during the tests. Compression was simulated on pristine specimens, up to the debonding of the stiffener from the skin, represented with cohesive elements.
Three samples were manufactured and subjected to compression after impact, to open the VERTEX analysis of damage tolerance on stiffened samples. The three samples were subjected to low velocity impact by means of a drop tower, with various energies at different locations on the sample. Tests of compression after impact on the VERTEX rig were analysed by Digital Image stereo-Correlation (DIC). Force fluxes and global strains were computed, as relevant metrics of the sample loading state, to represent the evolution of sample behaviour as it was subjected to post-buckling and stiffener debonding. Despite the very three different damage magnitudes, the three samples had similar failure scenarios and debonding loads, so the overall compression strength was not found to be very dependent on the initial damage. This surprising result can be explained by the small effect of the impact on the post-buckling behaviour; indeed, the finale failure of the plate is driven by the post-buckling behaviour of the whole plate and not by the local impact damage. Nevertheless, in order to confirm these results, a compression test on a pristine sample may offer a clear reference, and of course, additional tests with the same or other impact conditions could make it possible to test the phenomena scattering. Moreover, impacting at a different location relative to the buckle repartition may modify the results. The impact was here located in the middle of the stiffener, which was a buckling node. Impacting at a buckling antinode location may have a different influence on the behaviour of these panels since the damaged area would be more loaded.
Ongoing research aims to exploit the compression-shear-pressure loading capabilities of the VERTEX bench, to study damage tolerance on stiffened samples that are more representative of fuselage sections and industrial practices, with a large range of loadings after calibrated BVID impacts. Better camera configurations will enable the stiffener loading state to be properly monitored and debondings to be more clearly identified; these improvements are necessary for a thorough study of debonding on stiffened panels. Refined modelling of damage propagation is planned, with the Discrete Ply Model [43], to benchmark this model on representative stiffened panel issues and to develop thorough test-simulation dialogues.

Author Contributions

Conceptualization, F.G., C.B., B.C. and J.S.; methodology, F.G., C.B., B.C. and J.S.; software, F.G., C.B., B.C. and J.S.; validation, F.G., C.B., B.C. and J.S.; formal analysis, F.G., C.B., B.C. and J.S.; investigation, F.G., C.B., B.C. and J.S.; data curation, F.G., C.B., B.C. and J.S.; writing—original draft preparation, F.G.; writing—review and editing, F.G., C.B., B.C. and J.S.; supervision, C.B., B.C. and J.S.; project administration, J.S.; funding acquisition, J.S. All authors have read and agreed to the published version of the manuscript.

Funding

This work was funded by the “Fondation Jean-Jacques et Felicia Lopez-Loreta pour l’Excellence Académique” (https://fondation-jjll.org/en/presentation/, accessed on 30 January 2023) as part of the VIRTUOSE (VIRTUal testing of aerOnautical StructurEs) project (https://websites.isae-supaero.fr/virtuose/, accessed on 30 January 2023).

Data Availability Statement

Not applicable.

Acknowledgments

The academic authors gratefully acknowledge Airbus contribution. This work was granted access to the HPC resources of CALMIP.

Conflicts of Interest

The authors declare no conflict of interest. The funders had no role in the design of the study; in the collection, analyses, or interpretation of data; in the writing of the manuscript; or in the decision to publish the results.

References

  1. Rouchon, J. Certification of Large Airplane Composite Structures. 1990. Available online: https://www.icas.org/ICAS_ARCHIVE/ICAS1990/ICAS-90-1.8.1.pdf (accessed on 30 January 2023).
  2. Bertolini, J.; Castanié, B.; Barrau, J.-J.; Navarro, J.-P. Multi-level experimental and numerical analysis of composite stiffener debonding. Part 1: Non-specific specimen level. Compos. Struct. 2009, 90, 381–391. [Google Scholar] [CrossRef] [Green Version]
  3. Meeks, C.; Greenhalgh, E.; Falzon, B.G. Stiffener debonding mechanisms in post-buckled CFRP aerospace panels. Compos. Part A Appl. Sci. Manuf. 2005, 36, 934–946. [Google Scholar] [CrossRef]
  4. Falzon, B.G.; Steven, G.P. Buckling mode transition in hat-stiffened composite panels loaded in uniaxial compression. Compos. Struct. 1997, 37, 253–267. [Google Scholar] [CrossRef]
  5. Riccio, A.; Raimondo, A.; Di Felice, G.; Scaramuzzino, F. A numerical procedure for the simulation of skin–stringer debonding growth in stiffened composite panels. Aerosp. Sci. Technol. 2014, 39, 307–314. [Google Scholar] [CrossRef]
  6. Romano, F.; Di Caprio, F.; Auriemma, B.; Mercurio, U. Numerical investigation on the failure phenomena of stiffened composite panels in post-buckling regime with discrete damages. Eng. Fail. Anal. 2015, 56, 116–130. [Google Scholar] [CrossRef]
  7. Safdar, N.; Daum, B.; Scheffler, S.; Rolfes, R. Experimental determination of a probabilistic failure envelope for carbon fiber reinforced polymers under combined compression–shear loads. Int. J. Solids Struct. 2022, 244-245, 111585. [Google Scholar] [CrossRef]
  8. Wiggenraad, J.F.M.; Greenhalg, E.S.; Olsson, R. Design and Analysis of Stiffened Composite Panels for Damage Resistance and Tolerance. National Aerospace Laboratory NLR. 2002. Available online: https://reports.nlr.nl/server/api/core/bitstreams/4fd9e329-770f-4deb-96f6-ba071fa0ace1/content (accessed on 30 January 2023).
  9. Kosztowny, C.J.; Waas, A.M. Postbuckling response of unitized stiffened textile composite panels: Experiments. Int. J. Non-linear Mech. 2021, 137, 103814. [Google Scholar] [CrossRef]
  10. Cartié, D.D.; Dell’Anno, G.; Poulin, E.; Partridge, I. 3D reinforcement of stiffener-to-skin T-joints by Z-pinning and tufting. Eng. Fract. Mech. 2006, 73, 2532–2540. [Google Scholar] [CrossRef]
  11. Degenhardt, R.; Rolfes, R.; Zimmermann, R.; Rohwer, K. COCOMAT—Improved material exploitation of composite airframe structures by accurate simulation of postbuckling and collapse. Compos. Struct. 2006, 73, 175–178. [Google Scholar] [CrossRef]
  12. Akterskaia, M. Global-Local Progressive Failure Analysis of Composite Panels Including Skin-Stringer Debonding and Intralaminar Damage. PhD Thesis, University of Hannover, Hannover, Germany, 2019. [Google Scholar]
  13. Yap, J.W.; Scott, M.L.; Thomson, R.S.; Hachenberg, D. The analysis of skin-to-stiffener debonding in composite aerospace structures. Compos. Struct. 2002, 57, 425–435. [Google Scholar] [CrossRef]
  14. Knight, N.F.; Starnes, J.H.; Tarnes, J.H. Postbuckling behavior of selected curved stiffened graphite-epoxy panels loaded in axial compression. AIAA J. 1988, 26, 344–352. [Google Scholar] [CrossRef]
  15. Hao, C.; Nan, C.Y.; Bo, Y.Z.; Lei, L. Experimental Research on the Stability behavior of Composite Curved Stiffened Fuselage Panel under Four-Point-Bending load. IOP Conf. Ser. Mater. Sci. Eng. 2019, 563, 022005. [Google Scholar] [CrossRef]
  16. Zou, D.; Bisagni, C. Skin–Stiffener Separation in T-Stiffened Composite Specimens in Postbuckling Condition. J. Aerosp. Eng. 2018, 31, 4. [Google Scholar] [CrossRef] [Green Version]
  17. Kolanu, N.R.; Raju, G.; Ramji, M. A unified numerical approach for the simulation of intra and inter laminar damage evolution in stiffened CFRP panels under compression. Compos. Part B Eng. 2020, 190, 107931. [Google Scholar] [CrossRef]
  18. Yetman, J.; Sobey, A.; Blake, J.; Shenoi, R. Modelling the variability of skin stiffener debonding in post-cured top-hat stiffened panels. Compos. Struct. 2018, 211, 187–195. [Google Scholar] [CrossRef] [Green Version]
  19. Van Rijn, J.C.F.N.; Wiggenraad, J.F.M. A Seven-Point Bending Test to Determine the Strength of the Skin-Stiffener Interface in Composite Aircraft Panels’. National Aerospace Laboratory NLR. 2000. Available online: https://core.ac.uk/download/pdf/53034637.pdf (accessed on 30 January 2023).
  20. Kosztowny, C.J.; Davila, C.G.; Song, K.C.; Rose, C.; Jackson, W. Experimental and Numerical Analysis of Skin-Stiffener Separation Using a Seven Point Bend Configuration. In Proceedings of the AIAA Scitech 2019 Forum 2019, San Diego, CA, USA, 7–11 January 2019. [Google Scholar] [CrossRef]
  21. Bertolini, J.; Castanié, B.; Barrau, J.-J.; Navarro, J.-P.; Petiot, C. Multi-level experimental and numerical analysis of composite stiffener debonding. Part 2: Element and panel level. Compos. Struct. 2009, 90, 392–403. [Google Scholar] [CrossRef] [Green Version]
  22. Vescovini, R.; Dávila, C.; Bisagni, C. Failure analysis of composite multi-stringer panels using simplified models. Compos. Part B Eng. 2013, 45, 939–951. [Google Scholar] [CrossRef]
  23. Sun, W.; Guan, Z.; Ouyang, T.; Tan, R.; Zhong, X. Effect of stiffener damage caused by low velocity impact on compressive buckling and failure modes of T-stiffened composite panels. Compos. Struct. 2018, 184, 198–210. [Google Scholar] [CrossRef]
  24. Zou, J.; Lei, Z.; Bai, R.; Liu, D.; Jiang, H.; Liu, J.; Yan, C. Damage and failure analysis of composite stiffened panels under low-velocity impact and compression after impact. Compos. Struct. 2020, 262, 113333. [Google Scholar] [CrossRef]
  25. Rivallant, S.; Bouvet, C.; Hongkarnjanakul, N. Failure analysis of CFRP laminates subjected to compression after impact: FE simulation using discrete interface elements. Compos. Part A Appl. Sci. Manuf. 2013, 55, 83–93. [Google Scholar] [CrossRef] [Green Version]
  26. Cózar, I.R.; Turon, A.; González, E.; Vallmajó, O.; Sasikumar, A. A methodology to obtain material design allowables from high-fidelity compression after impact simulations on composite laminates. Compos. Part A Appl. Sci. Manuf. 2020, 139, 106069. [Google Scholar] [CrossRef]
  27. Reiner, J.; Zobeiry, N.; Vaziri, R. Efficient finite element simulation of compression after impact behaviour in quasi-isotropic composite laminates. Compos. Commun. 2021, 28, 100967. [Google Scholar] [CrossRef]
  28. Chaibi, S.; Bouvet, C.; Laurin, F.; Rannou, J.; Berthe, J.; Congourdeau, F.; Martini, D. Experimental and Numerical Study of Damages Induced by Low-Velocity Impact on 4th Generation Composite Laminates. In Proceedings of the American Society for Composites 2020, Online, 4–17 September 2020. [Google Scholar] [CrossRef]
  29. Akterskaia, M.; Jansen, E.; Hühne, S.; Rolfes, R. Efficient progressive failure analysis of multi-stringer stiffened composite panels through a two-way loose coupling global-local approach. Compos. Struct. 2018, 183, 137–145. [Google Scholar] [CrossRef]
  30. Abbadi, A.; Michel, L.; Castanié, B. Experimental Analysis of Debonding of Skin/Stringer Interfaces under Cyclic Loading and Ageing. Adv. Compos. Lett. 2014, 23, 096369351402300602. [Google Scholar] [CrossRef] [Green Version]
  31. Davila, C.; Camanho, P.; de Moura, M. Mixed-mode decohesion elements for analyses of progressive delamination. In Proceedings of the 19th AIAA Applied Aerodynamics Conference, Anaheim, CA, USA, 11–14 June 2001. [Google Scholar] [CrossRef] [Green Version]
  32. Zucco, G.; Oliveri, V.; Rouhi, M.; Telford, R.; Clancy, G.; McHale, C.; O’Higgins, R.; Young, T.; Weaver, P.; Peeters, D. Static test of a variable stiffness thermoplastic composite wingbox under shear, bending and torsion. Aeronaut. J. 2020, 124, 635–666. [Google Scholar] [CrossRef]
  33. van Dooren, K.; Tijs, B.; Waleson, J.; Bisagni, C. Skin-stringer separation in post-buckling of butt-joint stiffened thermoplastic composite panels. Compos. Struct. 2023, 304, 116294. [Google Scholar] [CrossRef]
  34. da Silva, D.C.; Donadon, M.V.; Arbelo, M.A. A semi-analytical model for shear buckling analysis of stiffened composite panel with debonding defect. Thin-Walled Struct. 2021, 171, 108636. [Google Scholar] [CrossRef]
  35. Telford, R.; Peeters, D.; Rouhi, M.; Weaver, P. Experimental and numerical study of bending-induced buckling of stiffened composite plate assemblies. Compos. Part B Eng. 2022, 233, 109642. [Google Scholar] [CrossRef]
  36. Serra, J.; Pierré, J.; Passieux, J.; Périé, J.; Bouvet, C.; Castanié, B. Validation and modeling of aeronautical composite structures subjected to combined loadings: The VERTEX project. Part 1: Experimental setup, FE-DIC instrumentation and procedures. Compos. Struct. 2017, 179, 224–244. [Google Scholar] [CrossRef] [Green Version]
  37. Grotto, F.; Bouvet, C.; Castanié, B.; Serra, J. Experimental behaviour of aeronautical notched carbon fibre reinforced thermoplastic panels under combined tension-shear-pressure loadings. Eng. Fail. Anal. 2023, 146, 107075. [Google Scholar] [CrossRef]
  38. Serra, J.; Bouvet, C.; Castanié, B.; Petiot, C. Experimental and numerical analysis of Carbon Fiber Reinforced Polymer notched coupons under tensile loading. Compos. Struct. 2017, 181, 145–157. [Google Scholar] [CrossRef] [Green Version]
  39. Hexcel Corporation. Datasheet for HexBond ST1035 Epoxy Film Adhesive’. 2019. Available online: https://www.hexcel.com/user_area/content_media/raw/HexBondST1035pdf(1).pdf (accessed on 30 January 2023).
  40. Journoud, P.; Bouvet, C.; Castanié, B.; Ratsifandrihana, L. Experimental analysis of the effects of wrinkles in the radius of curvature of L-shaped carbon-epoxy specimens on unfolding failure. Compos. Part A Appl. Sci. Manuf. 2022, 158, 106975. [Google Scholar] [CrossRef]
  41. Serra, J.; Pierré, J.; Passieux, J.; Périé, J.; Bouvet, C.; Castanié, B.; Petiot, C. Validation and modeling of aeronautical composite structures subjected to combined loadings: The VERTEX project. Part 2: Load envelopes for the assessment of panels with large notches. Compos. Struct. 2017, 180, 550–567. [Google Scholar] [CrossRef] [Green Version]
  42. Abdulhamid, H.; Bouvet, C.; Michel, L.; Aboissière, J.; Minot, C. Influence of internally dropped-off plies on the impact damage of asymmetrically tapered laminated CFRP. Compos. Part A Appl. Sci. Manuf. 2015, 68, 110–120. [Google Scholar] [CrossRef] [Green Version]
  43. Trellu, A.; Pichon, G.; Bouvet, C.; Rivallant, S.; Castanié, B.; Serra, J.; Ratsifandrihana, L. Combined loadings after medium velocity impact on large CFRP laminate plates: Tests and enhanced computation/testing dialogue. Compos. Sci. Technol. 2020, 196, 108194. [Google Scholar] [CrossRef]
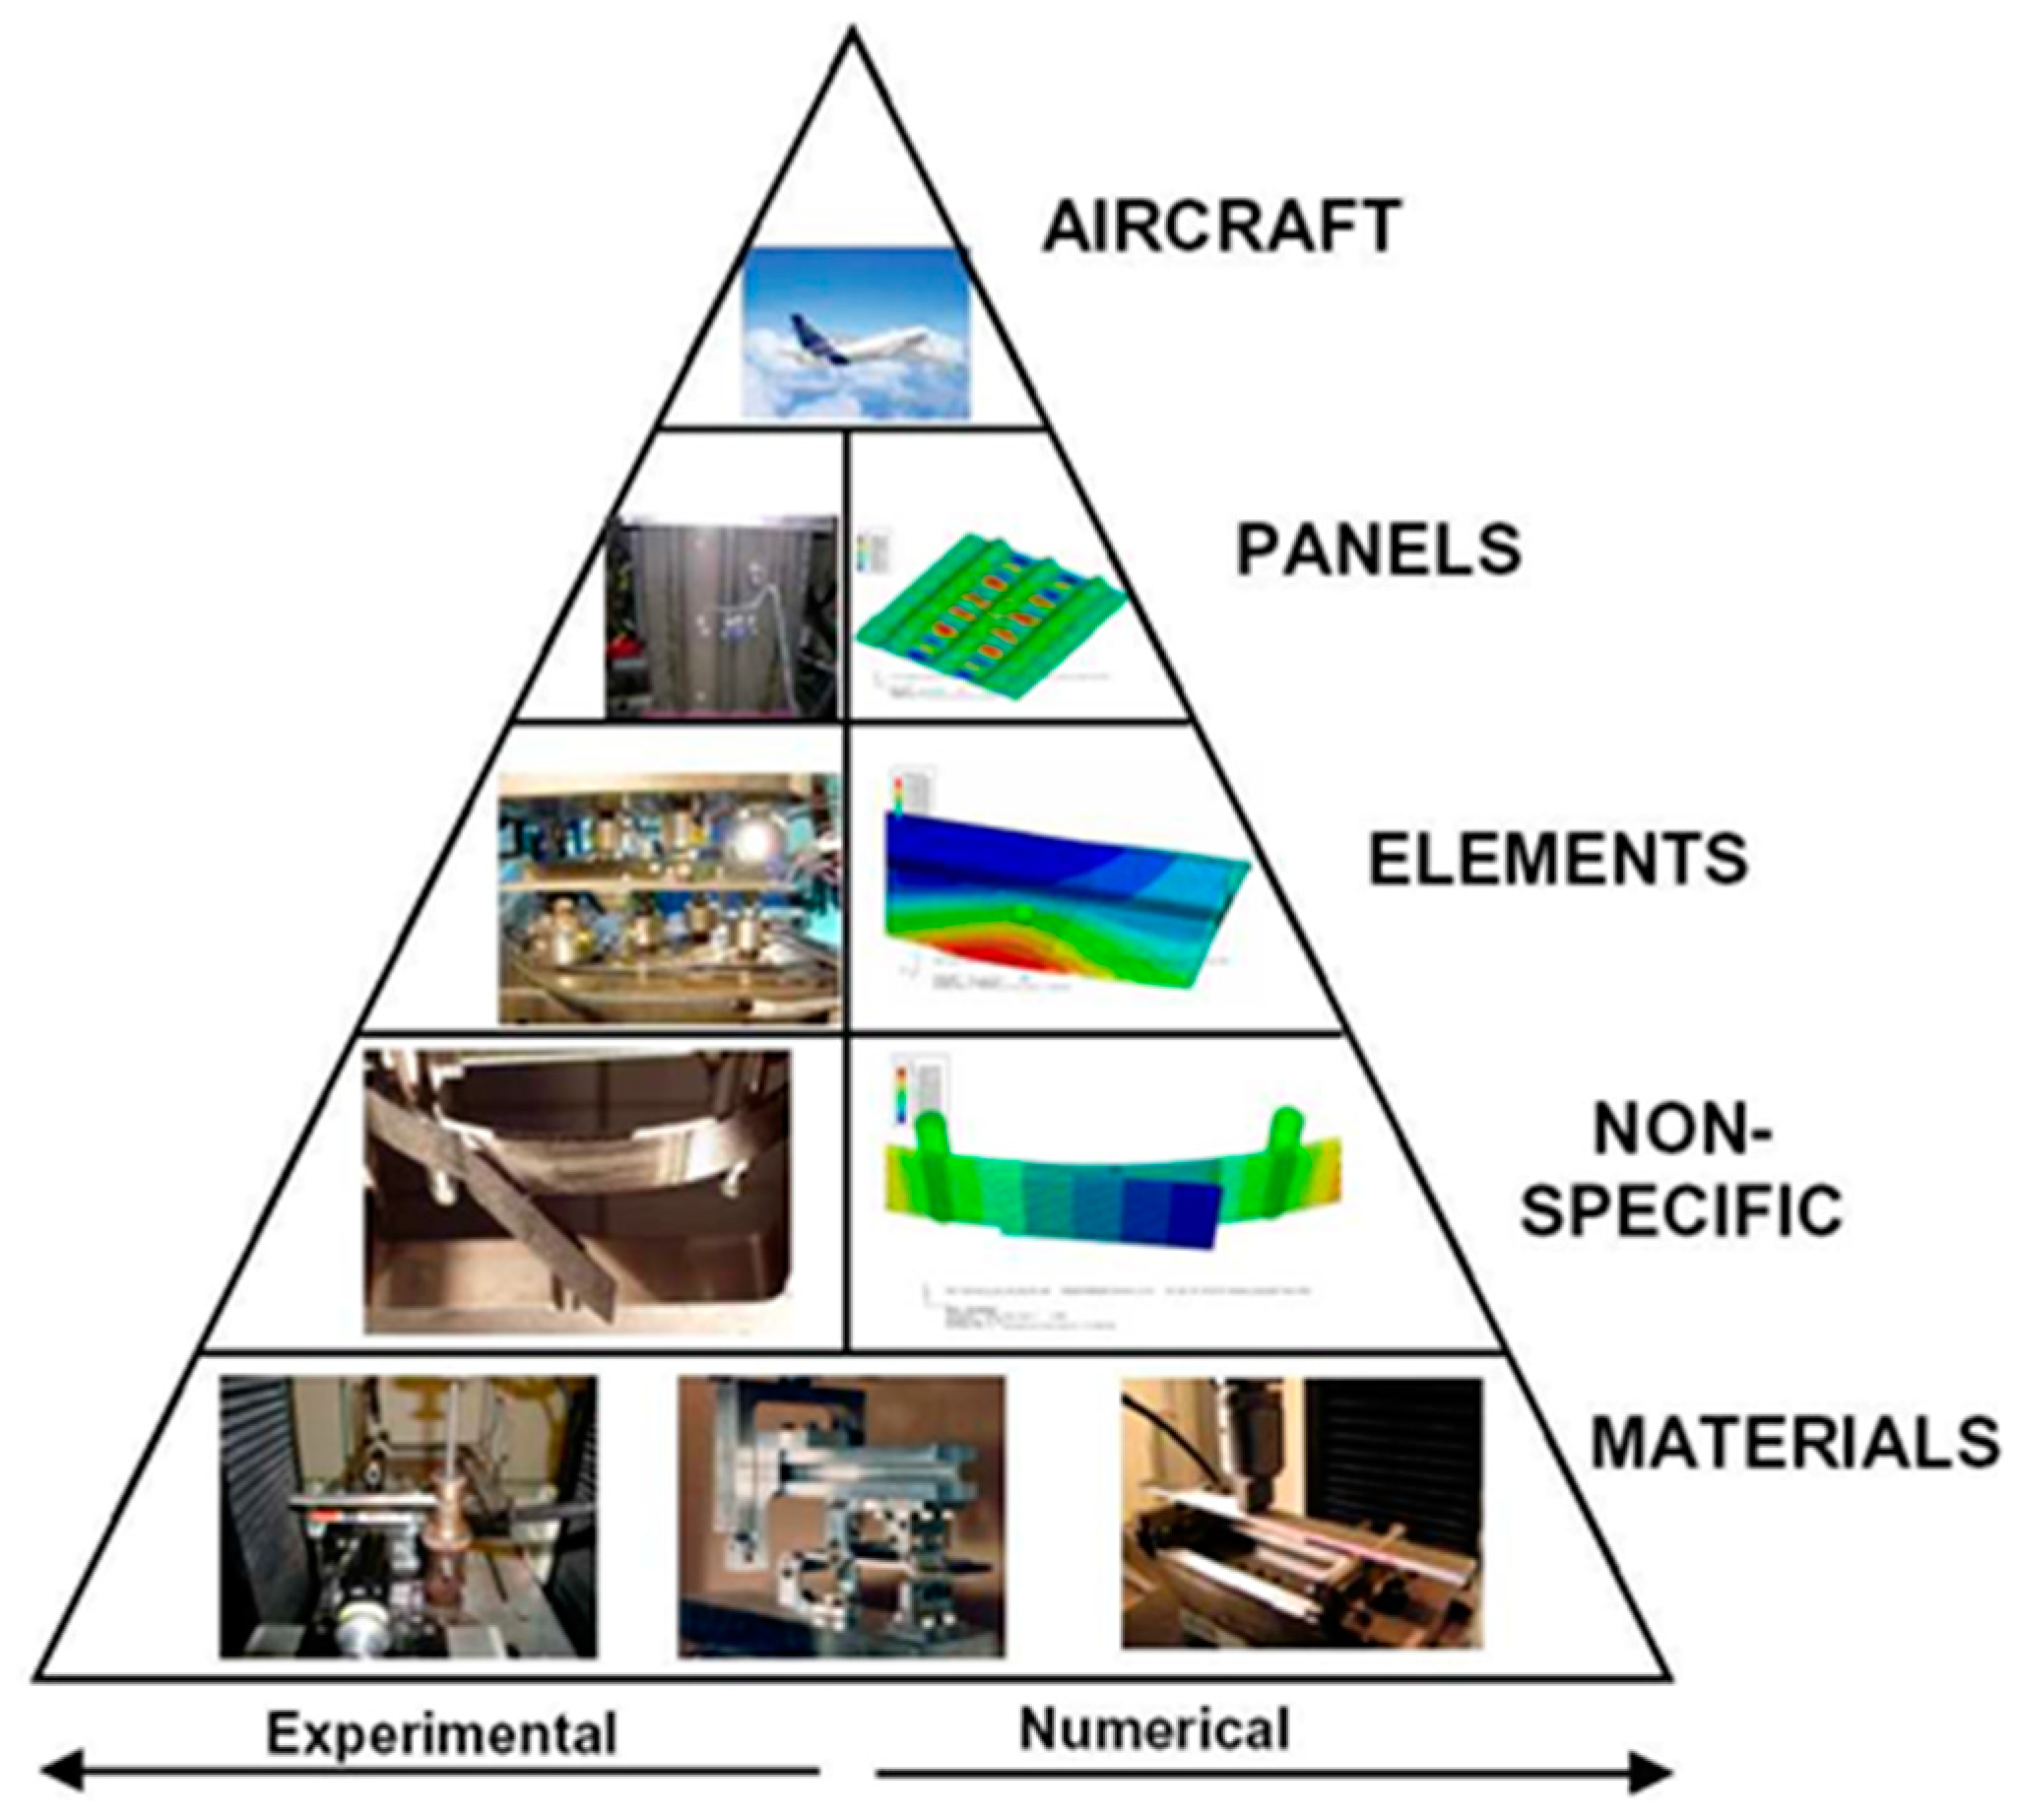
Figure 1. Pyramid of test from Rouchon [1] adaptated by Bertolini et al. [2] focusing on stiffened panels and the experiment-simulation duality.
Aerospace 10 00327 g001
Figure 2. Current and possible future design scenarios for typical stringer-stiffened composite panels; opening of flight conditions towards unexploited potential of post-buckling and contained damage (drawn from [11,12]).
Aerospace 10 00327 g002
Figure 3. (left) VERTEX test rig illustration; (right) Generic shape of a flat VERTEX specimen.
Aerospace 10 00327 g003
Figure 4. CAD model of the stiffened sample considered: L-stiffener in blue and skin in grey.
Aerospace 10 00327 g004
Figure 5. Two main scenarios of stiffener debonding, identified during preliminary simulations: propagation from centre to border (A) or from border to centre (B). The modelling and numerical results are introduced up to Figure 9.
Aerospace 10 00327 g005
Figure 6. Exploded view of the parts considered, thanks to CAD of actual parts.
Aerospace 10 00327 g006
Figure 7. Geometrical FE modelling of the parts: composite skin, composite stiffener, epoxy adhesive film, aluminium tabs, aluminium substrate.
Aerospace 10 00327 g007
Figure 8. Boundary conditions imposed to represent compression of the sample along the x direction.
Aerospace 10 00327 g008
Figure 9. Simulation of the stiffened panel under compression, during the first steps of the global debonding from centre to border. (left) Out-of-plane displacement showing two arrays of compressive buckles; (right) debonding seen through the damage variable of cohesive elements.
Aerospace 10 00327 g009
Figure 10. Bolting compliance of each hole of the stiffened specimen, depending on the stiffener flange width.
Aerospace 10 00327 g010
Figure 11. Test of some technological solutions regarding the stiffener geometry. (a) Reference case: full and uninterrupted stiffener; (b) blocked web: transverse motion blocked on the red areas, matching the tabs region; (c) tapered web: triangle cut on the tab region; (d) interrupted stiffener (and tapered web): limited to the useful zone, i.e., out of the tab region.
Aerospace 10 00327 g011
Figure 12. Average flux evolution in the main regions of the skin, during the compression simulation, up to the complete debonding of the stiffener.
Aerospace 10 00327 g012
Figure 13. Main steps of the specimen manufacturing process.
Aerospace 10 00327 g013
Figure 14. Tooling for pressure amplification on the adhesive film during the bonding process at the oven—cross-section view.
Aerospace 10 00327 g014
Figure 15. Setup used to impact the samples with a drop tower system: (left) frame alone with a 400 mm × 250 mm opening, (right) sample positioned on the frame.
Aerospace 10 00327 g015
Figure 16. Impact locations and energy for the three samples: Sample1 and Sample2 were impacted at the same point of the stiffener flange, Sample3 was impacted on the skin.
Aerospace 10 00327 g016
Figure 17. Force-displacement curves of impacts on the three samples and energy dissipated during the impact, obtained from the areas inside the curve.
Aerospace 10 00327 g017
Figure 18. C-Scans of Sample1 and Sample2 revealing a debonded area between the skin and the stiffener, close to the impact location.
Aerospace 10 00327 g018
Figure 19. Pictures of the impact on Sample3: the impactor went through the skin, leaving a major splitting on the bottom face.
Aerospace 10 00327 g019
Figure 20. Damage of skin-stiffener bonding for a numerical simulation of impact at 30 J: debonding from the stiffener’s angle to the centre of its flange. The stiffener flange has been visually removed to appreciate the damage of cohesive elements located below.
Aerospace 10 00327 g020
Figure 21. Points of view of the two pairs of cameras used for stereo-correlation, looking down onto Sample1 between the first debonding and the main debonding-tunnelling.
Aerospace 10 00327 g021
Figure 22. Loading state of Sample2 just before first debonding, obtained by stereo-correlation on the 400 mm × 400 mm useful zone.
Aerospace 10 00327 g022
Figure 23. Fields computed ( N x force flux, ε x x membrane and bending) from the fields measured (positions, displacements, ε x x top skin)—Sample1 just before debonding.
Aerospace 10 00327 g023
Figure 24. Observation of the three samples at the final stage of the compression tests: the stiffener is entirely debonded and the debonding crack is open along most of its length.
Aerospace 10 00327 g024
Figure 25. Zoomed observation of the first debonding of Sample3, from both sides of the stiffener.
Aerospace 10 00327 g025
Figure 26. Buckle shapes before and after the first major debonding of the stiffener for each test: tunnelling of negative skin buckles under the stiffener (yellow arrow).
Aerospace 10 00327 g026
Figure 27. Identification of buckling for the three tests considered.
Aerospace 10 00327 g027
Figure 28. Longitudinal force flux against global strain for the three tests considered and the simulation from Section 3.
Aerospace 10 00327 g028
Figure 29. Simulated field of force flux N x   ( f o r   Δ U = 1.25   mm   ; ε x x G = 2500   µ ε ) , showing a highly heterogeneous flux on the Free-skin after its buckling.
Aerospace 10 00327 g029
Table 1. Material properties used for numerical simulations.
SymbolValueName
Ply elastic properties (T700GC/M21 CFRP) [38]
E l 115 , 000   MPa Young’s modulus in fibre direction
E t 7700   MPa Transverse Young’s modulus
ν l t 0.3   Poisson’s ratio
G l t 4800   MPa In-plane shear modulus
G t z 3000   MPa Out-of-plane shear modulus
t p l y 0.26   mm Ply thickness
Bonding properties (epoxy film adhesive) [39]
E b 3000   MPa Young’s modulus, isotropic
σ n 30   MPa Tensile strength
σ t 41   MPa In-plane shear strength
G I c 0.3   N / mm Critical energy release rate in Mode I
G I I c 1.0   N / mm Critical energy release rate in Mode II
t b o n d 0.2   mm Bond thickness
Disclaimer/Publisher’s Note: The statements, opinions and data contained in all publications are solely those of the individual author(s) and contributor(s) and not of MDPI and/or the editor(s). MDPI and/or the editor(s) disclaim responsibility for any injury to people or property resulting from any ideas, methods, instructions or products referred to in the content.