Article

Multicriteria Analytical Model for Mechanical Integrity Prognostics of Reactor Pressure Vessels Manufactured from Forged and Rolled Steels

by
Alvaro Rodríguez-Prieto
1,2,*,
Manuel Callejas
2,
Ernesto Primera
3,4,
Guglielmo Lomonaco
5,6 and
Ana María Camacho
1
1
Department of Manufacturing Engineering, Universidad Nacional de Educación a Distancia (UNED), 28040 Madrid, Spain
2
Department of Industrial Inspection and Technical Assistance, SGS Tecnos, 28042 Madrid, Spain
3
Department of Applied Statistics, University of Delaware, 531 South College Avenue, Newark, DE 19716, USA
4
Machinery and Reliability Institute (MRI), 2149 Adair Ct, Mobile, AL 36695, USA
5
GeNERG, Dipartimento di Ingegneria Meccanica, TEC Division, Energetica, Gestionale e dei Trasporti (DIME), Università di Genova (UNIGE), Via all’Opera Pia, 15A, 16145 Genoa, Italy
6
Istituto Nazionale di Fisica Nucleare (INFN), Sezione di Genova, Via Dodecaneso 33, 16146 Genoa, Italy
*
Author to whom correspondence should be addressed.
Mathematics 2022, 10(10), 1779; https://doi.org/10.3390/math10101779
Submission received: 18 April 2022 / Revised: 13 May 2022 / Accepted: 21 May 2022 / Published: 23 May 2022
(This article belongs to the Special Issue Mathematical Modelling and Multi-Criteria Optimisation in Engineering)

Abstract

:
The aim of this work is to present a new analytical model to evaluate jointly the mechanical integrity and the fitness-for-service of nuclear reactor pressure-vessels steels. This new methodology integrates a robust and regulated irradiation embrittlement prediction model such as the ASTM E-900 with the ASME Fitness-for-Service code used widely in other demanding industries, such as oil and gas, to evaluate, among others, the risk of experiencing degradation mechanisms such as the brittle fracture (generated, in this case, due to the irradiation embrittlement). This multicriteria analytical model, which is based on a new formulation of the brittle fracture criterion, allows an adequate prediction of the irradiation effect on the fracture toughness of reactor pressure-vessel steels, letting us jointly evaluate the mechanical integrity and the fitness-for-service of the vessel by using standardized limit conditions. This allows making decisions during the design, manufacturing and in-service of reactor pressure vessels. The results obtained by the application of the methodology are coherent with several historical experimental works.

1. Introduction

The burning of fossil fuels, such as coal and oil, which account for two-thirds of all greenhouse gases [1], has dramatically increased the carbon dioxide content of the Earth’s atmosphere over the last century [2]. Nuclear power, along with renewable options, is a clean alternative to decrease carbon dioxide emissions. The safe and long-term operation of nuclear reactors is one of the most discussed challenges in nuclear power engineering. The radiation-induced degradation of nuclear design materials limits the operational lifetime of all nuclear installations or at least decreases their safety margin [3]. Ferritic steels commonly used for the manufacture of reactor pressure vessels of light water reactors (LWR) exhibit in-service aging resulting in decreased ductility and toughness. In addition, diminished toughness has implications also for the reliability of this equipment under seismic loading conditions [4]. A reduction in the reliability of a component can cause a series of undesirable consequences related to safety and competitiveness, as well as economic investments in maintenance and repair. In this way, the reliability of a component, and that of the equipment and/or system in which it is installed, is closely related to the number of failures that it will present in a given time interval. However, this reliability can be optimized by using advanced analysis models.
Data modeling is essential to mathematically characterize the trend in the behavior of the materials and components that define a system. On many occasions, the data obtained tend to show patterns (models or trends). Likewise, the use of IoT (Internet of Things) technologies makes it possible to have operation data in real time that can modify the “operating windows” considered, improving the adjustment of the model to the actual operating conditions. The developments in the fields of industrial Big Data technologies have made it possible to collect a lot of meaningful industrial processes and quality-based data that can be analyzed using contemporary statistical methods and machine learning techniques. Then, the extracted knowledge can be used for predictive maintenance or prognostic health management [5].
These strategies, therefore, make it possible to reduce the probability of failures (and their associated consequences), increase plant availability, minimize production losses and repair costs, as well as reduce the risk of fatal accidents. Decision making is the most critical and fundamental tool, which decision makers use to compare and rank different objects and alternatives based on a few particular criteria to make the best possible decision [6]. This is especially of interest in the materials selection processes for demanding applications such as nuclear power equipment. The nuclear reactor pressure vessel (RPV) comprises an enclosure of great thickness, typically between 200 and 300 mm, consisting of symmetrical elementary components of revolution connected together by welding end to end [7]. RPVs are made up of a cylindrical body and a hemispherical bottom and lid. The body and hemispheres are made up of rings that, in turn, are made up of curved and vertically welded sheets, although in some of the more recently manufactured vessels, there has been an attempt to avoid welding, for which complete forging pieces are manufactured [8]. The RPV is made up of special ferritic steels internally cladded with stainless steel.
The steels used in the power production industry have been evolving continuously over the last few decades. The main advances have taken place in improving their mechanical behavior and their fracture toughness in order to avoid problems caused by brittle fractures when working in aggressive environments [9]. Because of the irradiation coming from the core, the beltline region of LWR pressure vessels experiences a slow deterioration of its mechanical properties, which is known as irradiation embrittlement. An accurate prediction of the severity of this phenomenon at each time during the operating life of the RPV is fundamental in order to prevent the vessel from experiencing stress states that may lead to a non-ductile propagation of a critical crack that may be present in the vessel walls, thus yielding vessel failure [10]. Tanguy et al. [11] performed different experiments to establish a comparison of fracture toughness with Charpy energy data for different levels of irradiation, showing that irradiation possibly causes a brittle fracture. During long-term operation, the fast neutron fluence causes the ferritic steel of RPV to be susceptible to brittle fracture, especially in the beltline region corresponding to the reactor core. The embrittled vessel shell may fracture due to a preexisting fabrication flaw and leads to a through-wall crack [12]. Nevertheless, the use of Charpy data from experimental testing is a time-consuming strategy to estimate ductile-to-brittle transition temperature. Thus, the selection of RPV steel based on the suitability against irradiation embrittlement can be addressed not only by performing trial-error testing [13] but also by performing analysis combining consolidated prediction models with other standardized methodologies.
Ductile-to-brittle transition refers to an observable change in fracture mode with decreasing temperature—from slow ductile crack growth to rapid cleavage. It is exhibited by body-centered cubic metals and presents a challenge for the integrity assessment of structural components made of such metals [14]. Neutron irradiation embrittlement of RPV steels causes the most severe damage during the operation of nuclear power plants [15]; therefore, it is considered crucial to perform a prognosis, in the design phase, of the mechanical integrity conditioned by the irradiation embrittlement. It is, in general, essential to investigate correlations between the microstructure and properties of materials [16]. Over recent decades, irradiation hardening and embrittlement have been widely observed in nuclear structural materials with different crystalline structures [15,17,18,19,20], e.g., face-centered cubic (FCC) [21,22,23,24], body-centered cubic (BCC) [25,26,27] and hexagonal close-packed (HCP) [28,29,30] materials [31]. Crystals present both translational and orientational properties of symmetry, which govern their physical properties [32].
Odette et al. [33] concluded that, in ferritic steels typically used in the manufacture of RPV, pernicious copper-rich precipitates are generated during irradiation that are responsible for irradiation embrittlement in RPV materials. The core structure for a small copper-rich precipitate, composed of three rows along with the dislocation core, changes dramatically from symmetric to nonsymmetric (degenerate) during irradiation [34]. In addition, another intriguing phenomenon under radiation is the self-organization of defects, such as the void superlattices, which have been observed in a list of BCC and FCC metals and alloys when the irradiation conditions fall into certain windows defined by temperature and dose rate. Thus, symmetry breaking is induced by anisotropic vacancy diffusion [35].
Structural components located near nuclear fuel assemblies in LWRs are exposed to intense radiation fields. Neutron irradiation causes significant changes in material properties and, in some cases, results in the degradation of structural integrity [36]. Neutron irradiation affects the material properties and hence the structural integrity of reactor pressure vessels in nuclear power plants. Mitigation of irradiation damage is one of the major issues within nuclear plant life management [37].
The ASME code [38] states that for both non-irradiated and irradiated vessel materials, the variation in fracture toughness with temperature is indexed through the transition temperature called RTDBT (reference temperature). To determine experimentally the value of the ∆RTDBT (ductile-to-brittle transition temperature shift) and, therefore, the fracture toughness (KIC) of the irradiated material, monitoring capsules are included in the vessel between the core and the wall. These capsules contain specimens of the vessel material, both welds and thermally affected zone and base material. The surveillance capsules are periodically removed in order to test the specimens, which allows us to know in advance the state of the material that makes up the vessel. The capsules include tensile, Charpy impact and fracture toughness specimens, as well as the instrumentation necessary to monitor neutron fluence and temperature [8]. Traditional material research relies on a considerable amount of experimental trial designs, which are time-consuming and costly [39]. There are several consolidated prediction models to estimate the ∆RTDBT in irradiated RPV steels; these are mainly the NUREG/CR-6551 [40] and ASTM E-900 [41]. Therefore, it could be possible to obtain the KIC from the calculated ∆RTDBT, reformulating the customary KIC determination schemes.
Symmetry is usually integrated into different considerations for calculation. The applied loads are considered symmetrical, and the crack is initiated and propagated symmetrically from this position [42]. Symmetry is also found inside a cross-section of a nuclear power reactor core [43]; therefore, the neutron incidence can also be considered symmetric. For a long time, cracked structures have triggered various researchers to develop a structural integrity approach and design models to address the fracture problems [44]. The consequences of a failure can have a negative impact on the structure of machines, employees and the environment [45]. In addition, it is crucial to study damaged materials (for example, materials with cracks and with unduly chemical composition restrictions) to assess the fitness-for-service along with the mechanical integrity. The use of analytical prediction methods allows saving time and cost related to the performance of experimental tests with the aim of making a decision on the suitable selected material that prevents future failures.
The aim of this work is to present a new analytical model to evaluate jointly the mechanical integrity and the fitness-for-service of nuclear reactor pressure-vessel steels, considering a robust and regulated irradiation embrittlement prediction model, ASTM E-900 [41], and the fitness-for-service calculations used widely in other demanding industries such as oil and gas. This methodology involves the analysis and correlation between multiple chemical and mechanical requirements to evaluate, among others, the risk of experiencing degradation mechanisms such as brittle fracture (promoted, in this case, by the irradiation embrittlement). The components analyzed in this study are pressurized with the following mean operating conditions: 1.80 × 10⁶ Pa of pressure (P), a range of neutron fluence of ф = 1–5 × 10¹⁹ n/cm2 and an irradiation temperature (T) up to 300 °C.
Therefore, the analytical model, which is based on a new formulation of the brittle fracture criterion, allows an adequate prediction of the irradiation effect on the fracture toughness of reactor pressure vessel steels, letting us jointly evaluate the mechanical integrity and the fitness-for-service of the vessel by a novel methodology; that, finally, includes very practical elements such as failure assessment diagrams (FAD) and risk matrixes, very useful for the industry.

2. Methodology

The analytical methodology (Figure 1) is divided into four steps: a ΔRTDBT estimation based on the U.S. Nuclear Regulatory Commission (NRC) ASTM E-900 prediction model (Step 1), followed by an adaptation of the ASME Fitness-For-Service (FFS) code to obtain the fracture toughness (KIC) considering standardized limit conditions (Step 2) and the construction of a FAD and a risk matrix of integrity loss (Step 3). Finally, a validation of limit conditions and results based on the conclusions from experimental works is performed (Stage 4).

2.1. Step 1—Ductile-to Brittle-Transition Temperature Estimation Based on ASTM E-900 Prediction Model

The reactor pressure vessel (RPV) in LWR represents a fundamental line of defense against a release of radiation in case of an accident [46]. Thus, regulations that govern the operation of commercial nuclear power plants require conservative margins of fracture toughness, both during normal operation and under accident scenarios [47]. The correct interpretation of the significance of defects, in terms of the probability of in-service failure, requires considerable skill; this is because many of the primary properties {such as embrittlement), which ultimately influence service performance, cannot be monitored directly so that one has to find some relationship between these properties and those structural defects which can be monitored either during fabrication or during service [48]. Materials of nuclear reactor pressure vessels exposed to neutron radiation that is generated by nuclear fission reactions experience appreciable damage at even very low doses of radiation, producing embrittlement and a shift of the ductile-to-brittle transition temperature (∆RTDBT). Nanoscale microstructures induced by irradiation obstruct the migration of dislocations, and this interaction prevents plastic deformation and induces steel embrittlement [27]. Neutron irradiation degrades the mechanical properties of RPV steels, and the extent of the degradation is determined by the type and structure of the steel and other factors such as neutron fluence, irradiation temperature, neutron fluence and chemical composition [8,26,27]. At the reactor operating temperature, the vessel material exhibits a ductile behavior. However, the constant bombardment of neutrons on the walls of the vessel produces a decrease in its mechanical properties, losing its ductility and being brittle at increasingly higher temperatures.
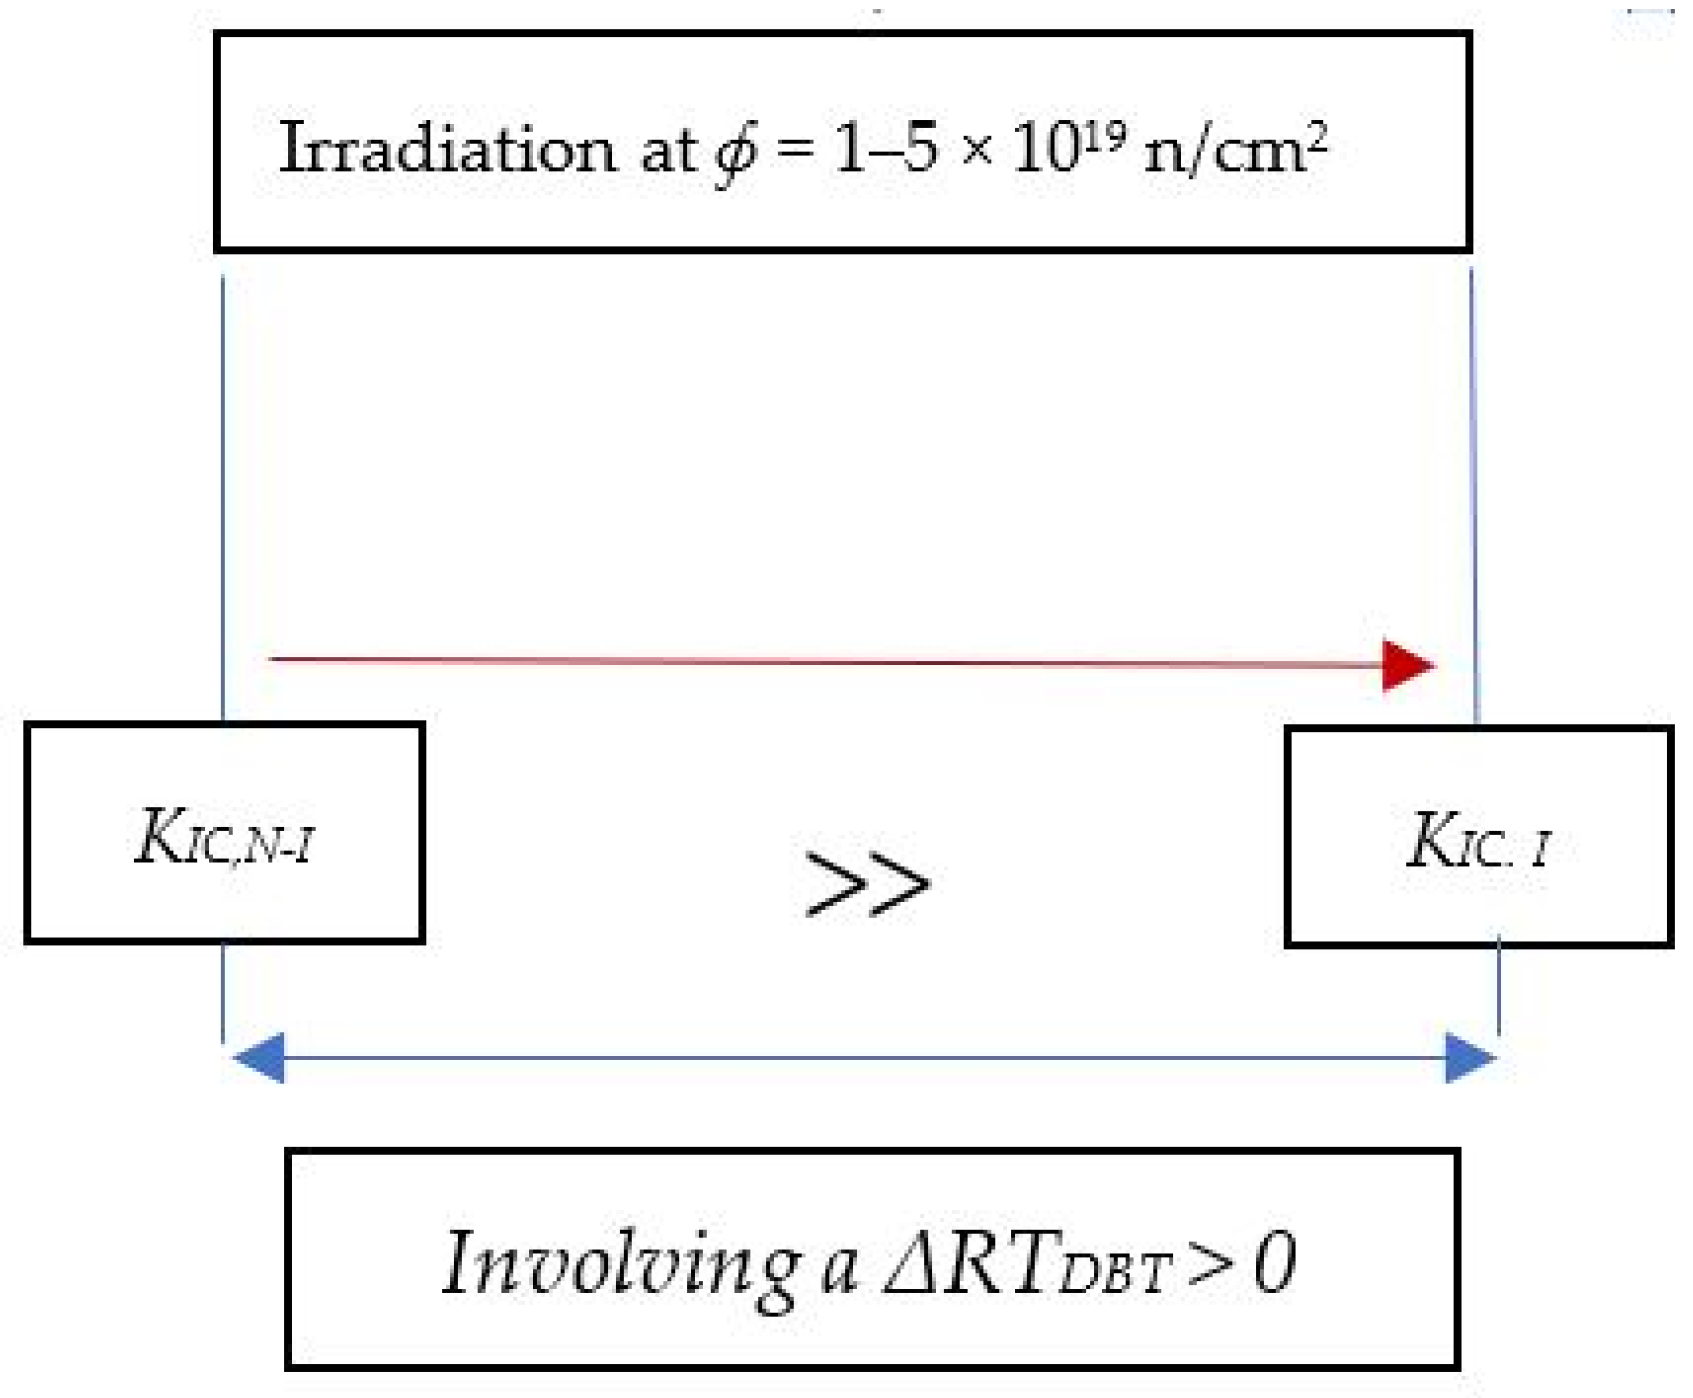
The degree of embrittlement depends on the fuel distribution, the neutron spectrum to which the vessel wall is subjected and the operating temperature. Therefore, the experts present a basic safety criterion, ensuring sufficient toughness of the steel of the vessel throughout its useful life. The quantification of this effect is carried out by evaluating the displacement experienced by the ΔRTDBT. Often, displacements of up to 200 °C have been recorded [40,49]. The method is developed around the concept of reference temperature (RTDBT), below which brittle fracture occurs even in the presence of small notches and from which the phenomenon of the ductile-brittle transition develops [50]. Figure 2 exhibits a scheme that represents the displacement of KIC and ΔRTDBT due to neutron irradiation. KIC after irradiation (RTDBT-I) is diminished with respect to the previous value before irradiation (typically between a neutron fluence, φ, between 1 and 5 × 10¹⁹ n/cm2.
RPV steels are exposed to neutron radiation, and their ductile-to-brittle transition temperature before irradiation (RTDBT-NI) experienced a shift (ΔRTDBT) changing, therefore, towards a higher transition temperature (RTDBT-I), as Equation (1) provides.
R T D B T I = R T D B T N I + Δ R T D B T
However, by using prediction models such as ASTM E900-02, it is possible to accurately estimate the ΔRTDBT allowing to estimate further the fracture toughness after irradiation (KIC-I) by using the analytical scheme given in ASME code [51] to be used finally in the calculation scheme of ASME FFS-1 [52].
ASTM E900-02 prediction model
ASTM E900-02 [41] provides improvements with respect the historical R.G. 1.99 Rev.2 prediction model [53]. Thus, Equation (2) shows the main two terms that grouped several calculation parameters.
Δ R T D B T   = S M D + C R P
SMD term (Equation (3)) is related to stable matrix defects, which are defined as complex vacancy solute clusters and nanovoids, which do not fully dissolve over an extended period of time [54]. The CRP term (Equation (4)) is associated with copper-rich precipitates that causes hardening. These three terms could be calculated by using Equations (3)–(6).
S M D = A exp C T c T c + 460 1 + C P   P φ t α          
C R P = B   1 + C N i   Ν i η F C u G φ t
CRP contribution is calculated by obtaining the F(Cu) (Equation (5)) and the G(φt) (Equation (6)) parameters.
F C u = 0 ,   C u C u t h ; C u C u t h ,   C u > C u t h
G φ t = ½ + ½ tanh log φ t + C t   t f     μ σ
The used calculation parameters are shown in Table 1.
The fracture toughness of a material is conventionally assessed in terms of the critical value of some crack tip field characterizing parameters at the initiation of unstable crack growth [58].
When fracture toughness data are not available, an estimation procedure based on the RTDBT can provide fracture toughness for ferritic steels. The Equation (7) for the fracture toughness mode 1 (KIC) curve is given by [59], where T is the operating temperature:
KIC = 36.5 + 22.783 exp [0.036(T − RTDBT)] (MPa √m, °C)
The ASME B&PV code [59] describes the use of mode 1—opening mode (tensile stress normal to the plane of the crack) that is used in the methodology used in this research work.

2.2. Step 2—Adaptation of ASME FFS Code to Obtain the Fracture Toughness Considering Standardized Limit Conditions

API 579-1/ASME FFS-1, Fitness-For-Service [51] is a recognized standard developed by the American Society of Mechanical Engineers (ASME) and by the American Petroleum Institute (API) that describes several fitness-for-service (FFS) assessment methodologies for pressurized equipment used mainly in the oil and gas, as well as chemical and petrochemical industries. This code contains several sections related to the assessment procedures for calculating the consequences on the installation safety due to damage mechanisms such as a brittle fracture or different types of corrosion, among many others. It is well known that the brittle crack propagation is governed by the stress intensity factor at the crack edges. When it is exceeded a critical value of fracture toughness (KIC), referred as plain strain fracture toughness, the propagation occurs. KIC depends on the type of crack and, in particular, on the actual toughness of the material, i.e., the toughness calculated accounting for the irradiation effect [10].
The toughness is the resistance of a material to brittle fracture when a crack is present.
The KIC parameter is a measure of the material’s resistance to brittle fracture in plane strain and is usually known as the fracture toughness in plane strain. The rapid crack extension is predicted to occur when K reaches KIC, with KIC being a unique material property for a given material condition, temperature, and loading rate. Stress intensity factor based on primary stresses (KIP) calculated in surface and deepest part of a crack of 1.5 mm (maximum allowable dimension—before considering this a relevant indication—according to ASME B&PV VIII [60]), considering that secondary stresses and residual stresses are null. The stress intensity factor (KI) is calculated [51] as follows (Equation (8)):
K I = σ 1 G 1 a t π a Q 2
where
Q = 1 + 1.464 a c 1.65
a/c = 1, a = 1.6 mm and a/t = 0.01 if t = 245 mm (typical mean thickness of a PWR-RPV).
G1 = 0.1870117 for zero order (A0) for a/c = 1, t/Ri = 0.11 if Ri = 2200 mm (typical mean radius of a PWR-RPV).
σ1 = 1.80 × 10⁶ Pa.
The toughness ratio is calculated by using Equation (10):
K r = K I P + φ K I S R K I C = K I P K I C
if φKISR = 0 considering null the plasticity interaction factor
From fracture mechanics testing of RPV steels, a KIR curve was established as a lower bound curve that has to be used in the design phase [61].

3. Results

3.1. Step 3—Construction of a Failure Assessment Diagram (FAD) and a Risk Matrix of Integrity Loss

To evaluate the suitability for service based on the response against the irradiation embrittlement, an assessment is performed by defining first the brittle collapse scenario (a) to represent a failure assessment diagram—FAD (b) and, finally, to construct a risk matrix (c).
This type of diagram is very useful for performing design-for-reliability tasks that reduce the necessity of trial-and-error tests and allow to improve the safety of the design.
(a) Brittle collapse of cracked section
For brittle failure situations in cracked components, in which linear-elastic behavior is dominant, fracture mechanics establishes that fracture occurs when the applied stress intensity factor (KI) is equal to the material fracture toughness (KIC) [62]. The crack ignition occurs if KI ≥ KIc. KIC is calculated as Equation (7) indicated, and ratio Kr can be defined (Equation (11)).
K r = K I K I C
KI = stress concentration factor applied under normal conditions on the crack.
KIC = fracture toughness based on crack initiation determined at crack end temperature.
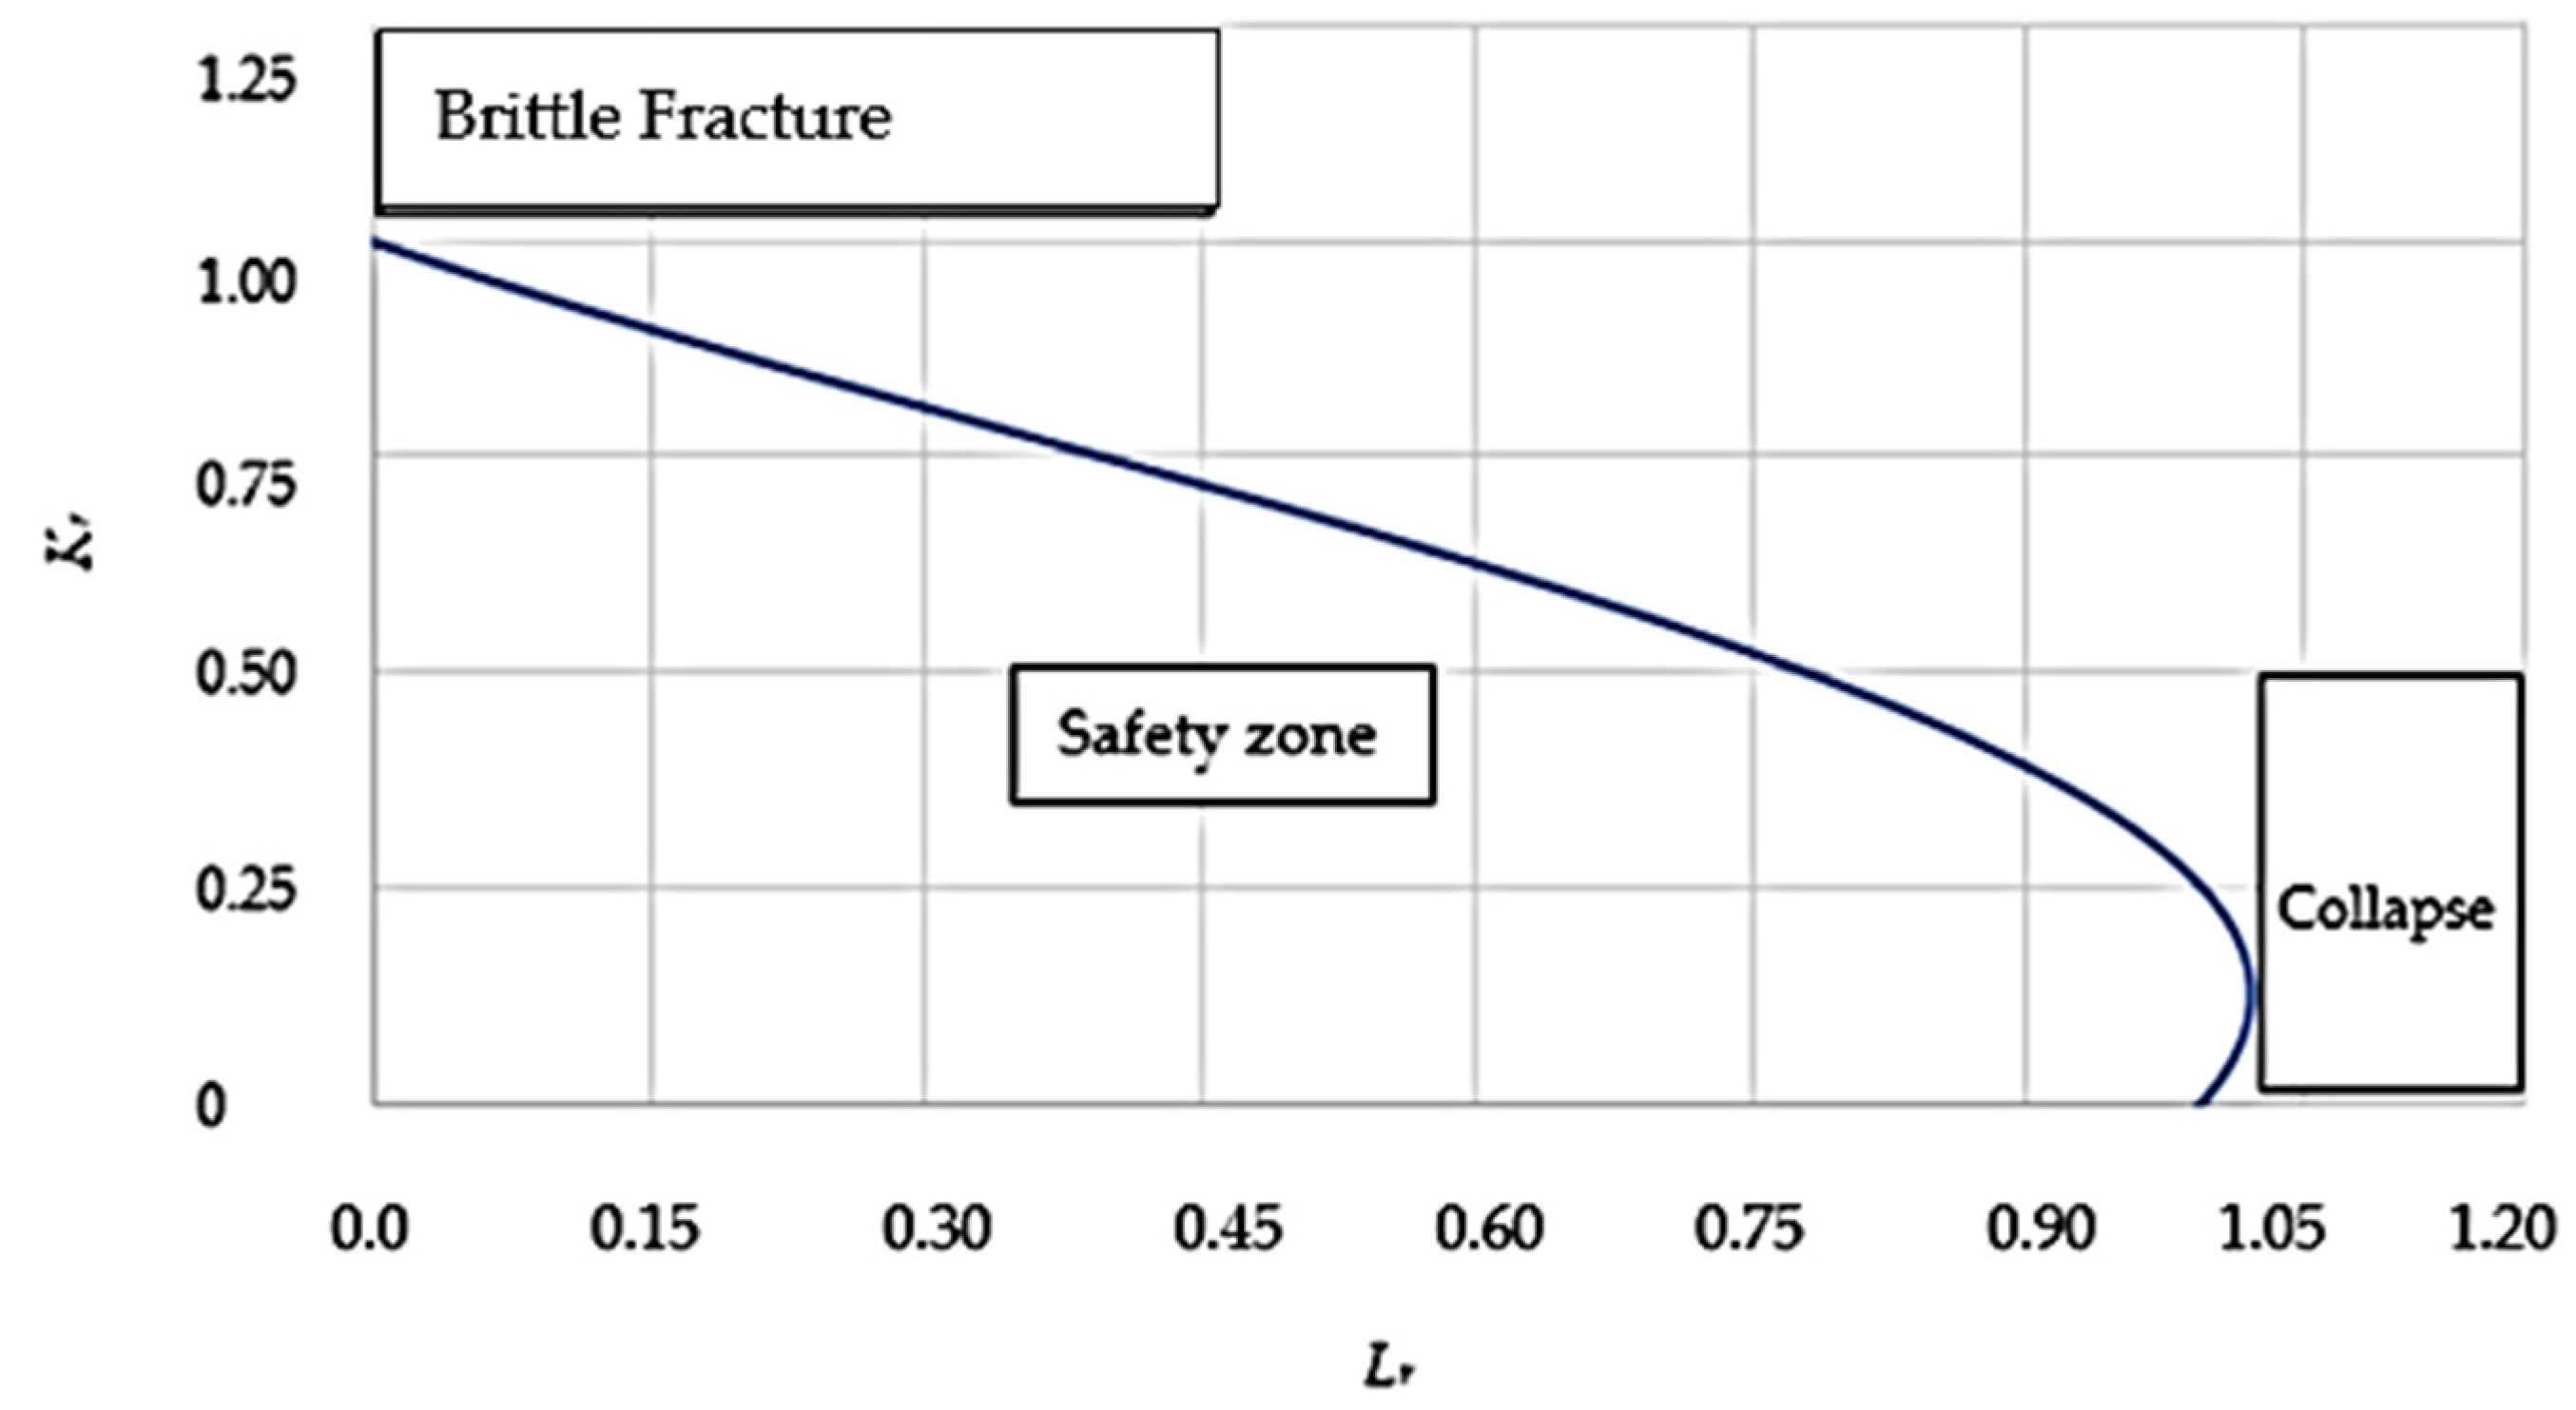
Then, if Kr < 1 → safety zone and brittle fracture occurs if Kr > 1.
For fracture assessments, the plane of the flaw hall is assumed to be normal to the maximum principal tensile stress [52].
(b) Construction of the FAD
Once obtained Kr, Lr is calculated to be a similar scheme to BS 7910 [63]. However, Lr cutoff value L r m a x P is, in this case, given by the ratio, showing a characteristic value for every material analyzed (Equation (12)):
L r m a x P = σ T S σ Y S σ Y S
where
σYS: Yield strength.
σTS: Ultimate tensile strength.
The maximum Lr threshold value, LPr(max), should also be applied to the calculated FAD curve to determine the plastic collapse limit [52]. The fracture assessment of much-pressurized equipment is conducted using a FAD assessment similar to the specified in BS 7910 [63,64,65,66]. Figure 3 provides a failure assessment diagram focused on the brittle fracture of reactor pressure-vessel steels.
As observed in Figure 3, the safety zone is constrained under Kr = 1 and Lr = 1. The material, therefore, would be susceptible to experiencing brittle fracture when Kr > 1, and it can suffer collapse if Lr is greater than 1. The standardized requirements for chemical composition of materials [8] analyzed are shown in Table 2. They are necessary to obtain the potential ∆RTDBT based on materials’ chemical requirements and the irradiation and temperature conditions using the calculation parameters indicated in Table 1.
Thus, Figure 4 provides the estimated Kr (calculated from Equations (8)–(11)) for several materials used in the manufacturing of reactor pressure vessels, covering materials used in different generations of reactors.
As Figure 4 demonstrates, the materials with less susceptibility to brittle fracture are materials developed for the second generation of reactors and so on, i.e., the A336 Gr. F91, 15Kh2MFA, A533 Gr. B Cl.1, A508 Gr. N, 15Kh2MFA, A508 Cl.2, A508 Cl.3, 16MND5, A336 Gr. F22V, 20MnMoNi55, 22NiMoCr37, 15Kh2MFAA and 15Kh2NMFAA.
Thus, 15kh2NMFAA, 15kh2MFAA, 22NiMoCr37 and 20MnMoNi55 provide the lower Kr. On the other hand, materials developed for the first generations (A212B, A302B, A543B and A336) provide greater values of Kr. G3120 SQV2A and G3204 SFVQ1A are just in the limit (Kr = 1).
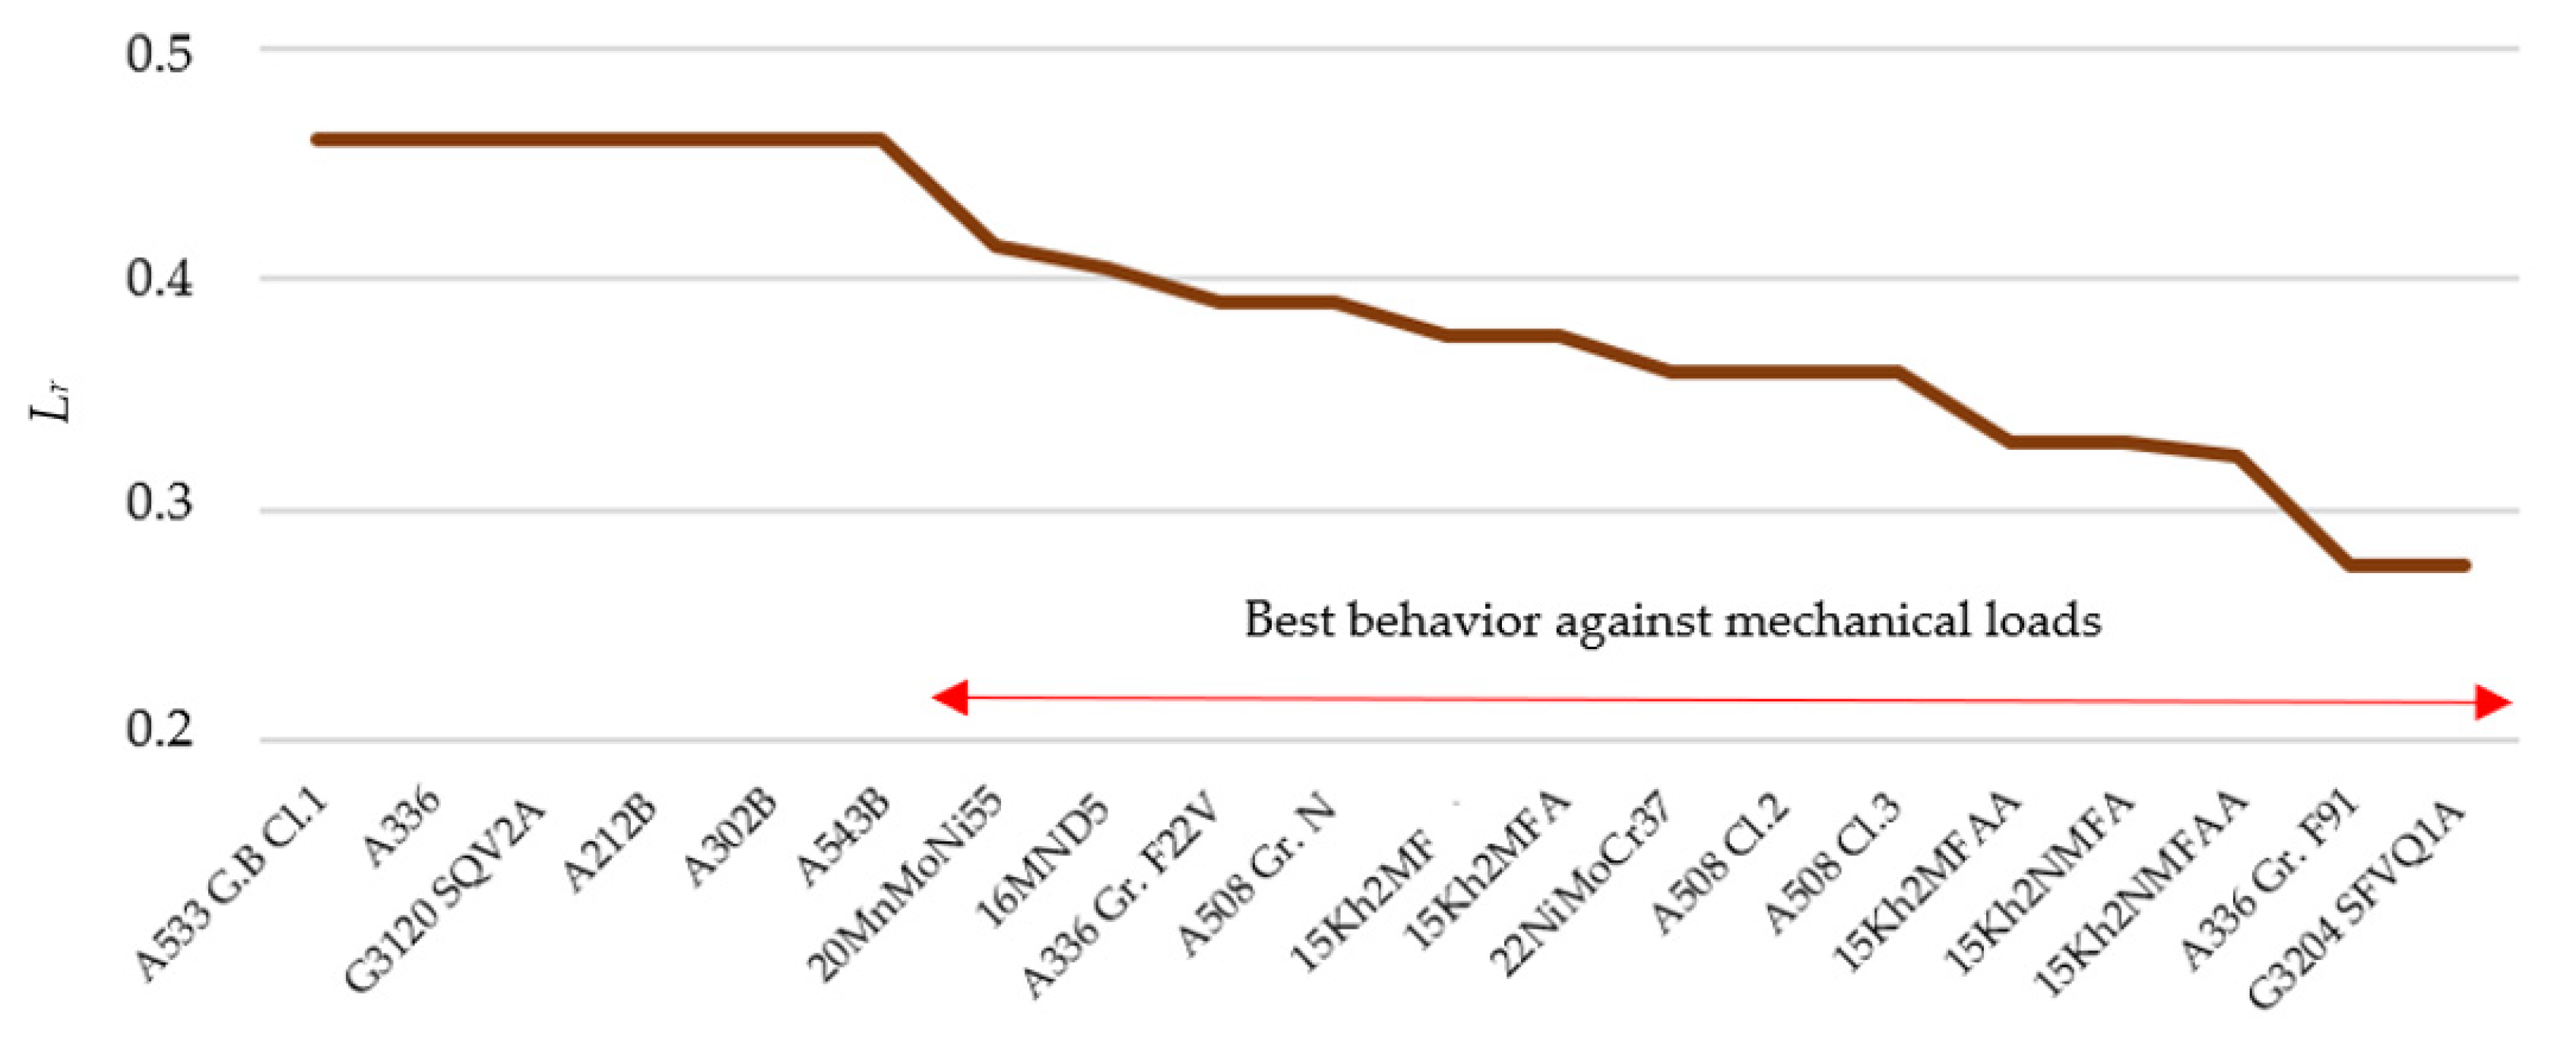
Figure 5 exhibits Lr for each material analyzed.
When Lr is lower, the response to mechanical loads is more efficient (from an approach focused on the mechanical integrity of material), generating less permanent deformation (the ratio σTS/σYS is lower). On the other hand, if the Kr is higher, the susceptibility to brittle fracture is greater. As Figure 5 provides, the mechanical response of plates (rolled materials) is, in general, poorer than forging materials.
(c) Construction of Risk Matrix
To construct the risk matrix, risk of integrity loss (RIL) is defined as (Equation (13)):
R I L = K r ·   L r
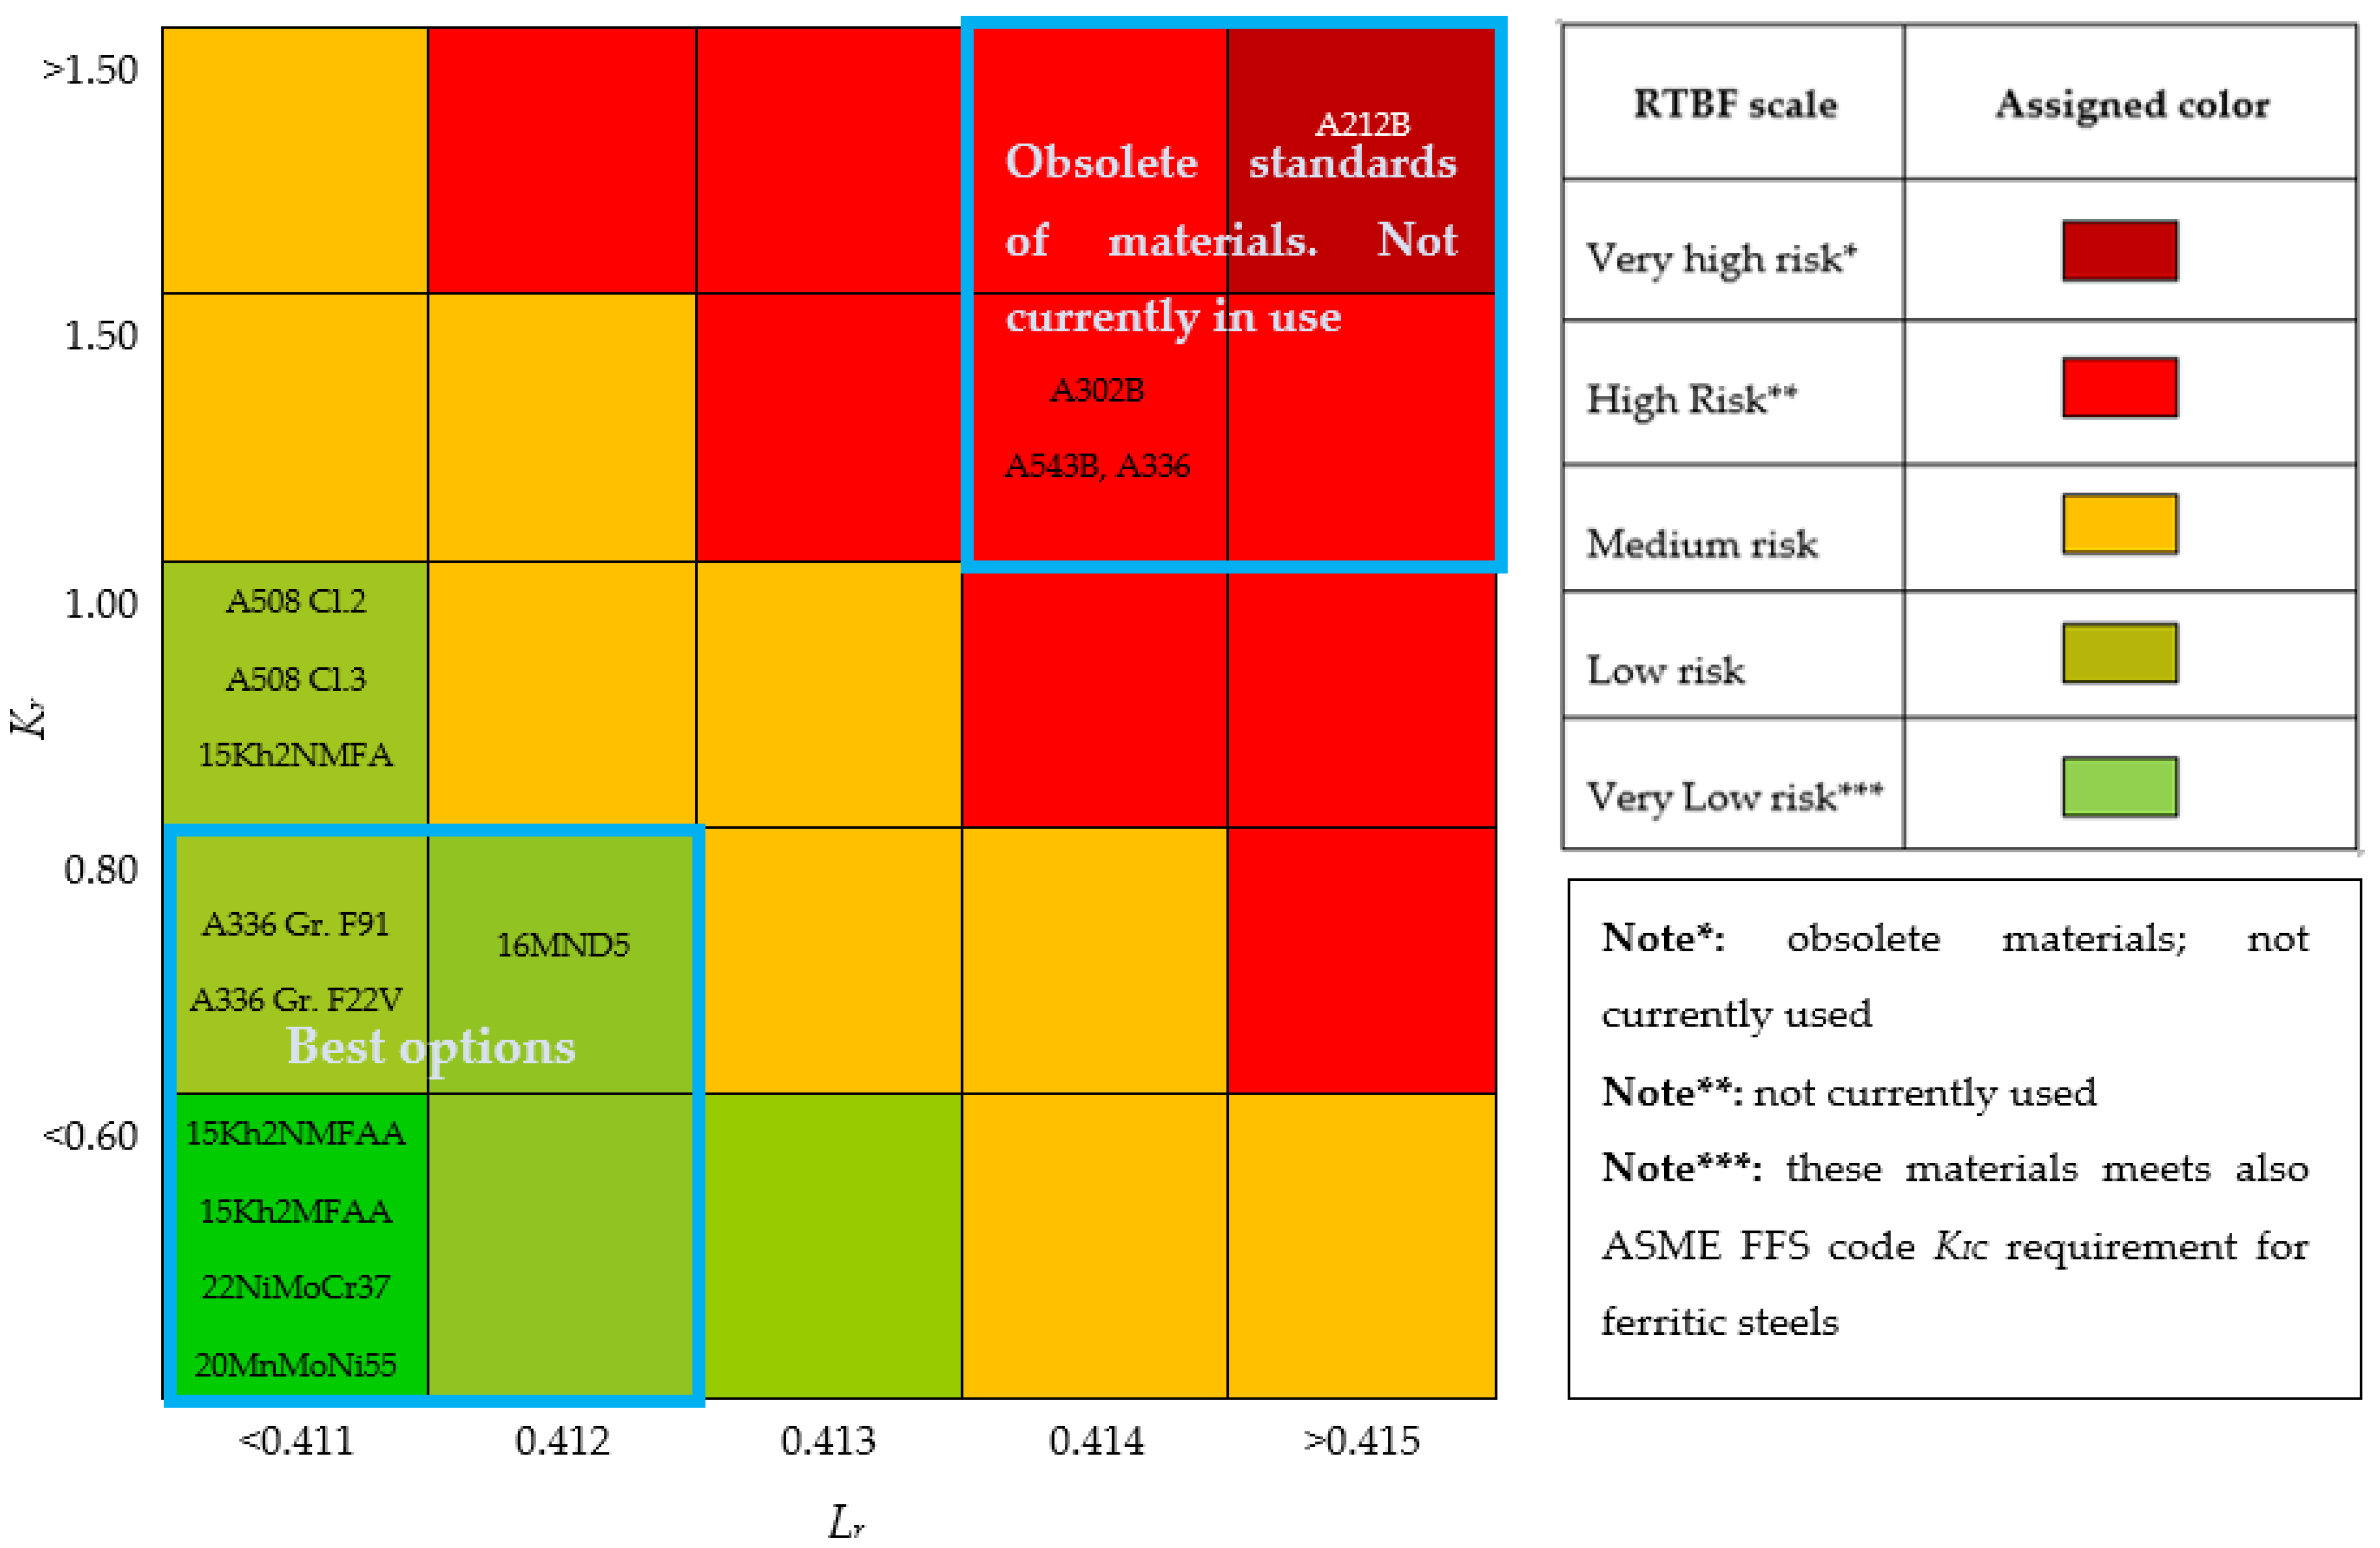
Figure 6 provides the RIL matrix for the materials analyzed that serves as a decision matrix for the most suitable material to prevent potential failures. Thus, the minimum risk is provided by the 15kh2NMFAA, 15kh2MFAA, 22NiMoCr37, 20MnMoNi55, A336 Gr. F22V, A508 Cl.2, A508 Cl.3, 16MND5, A336 Gr. F91 and A508 Gr. N.
Therefore, the selection criteria related to reducing the brittle fracture susceptibility are minimized the RIL value. Subsequently, a multicriteria matrix representation is a visual and easy way to show the RIL of best options (according to obtained Kr and Lr values) analyzed materials, allowing to extract conclusions such as the materials with lower RTBF (very low risk) correspond to the most consolidated standards (15Kh2NMFAA, 15Kh2MFAA, 22NiMoCr37 and 20MnMoNi55) followed by other consolidated and new standards (A508 Cl.2, A508 Cl.3, 16MND5 and A336 Gr. F22V).
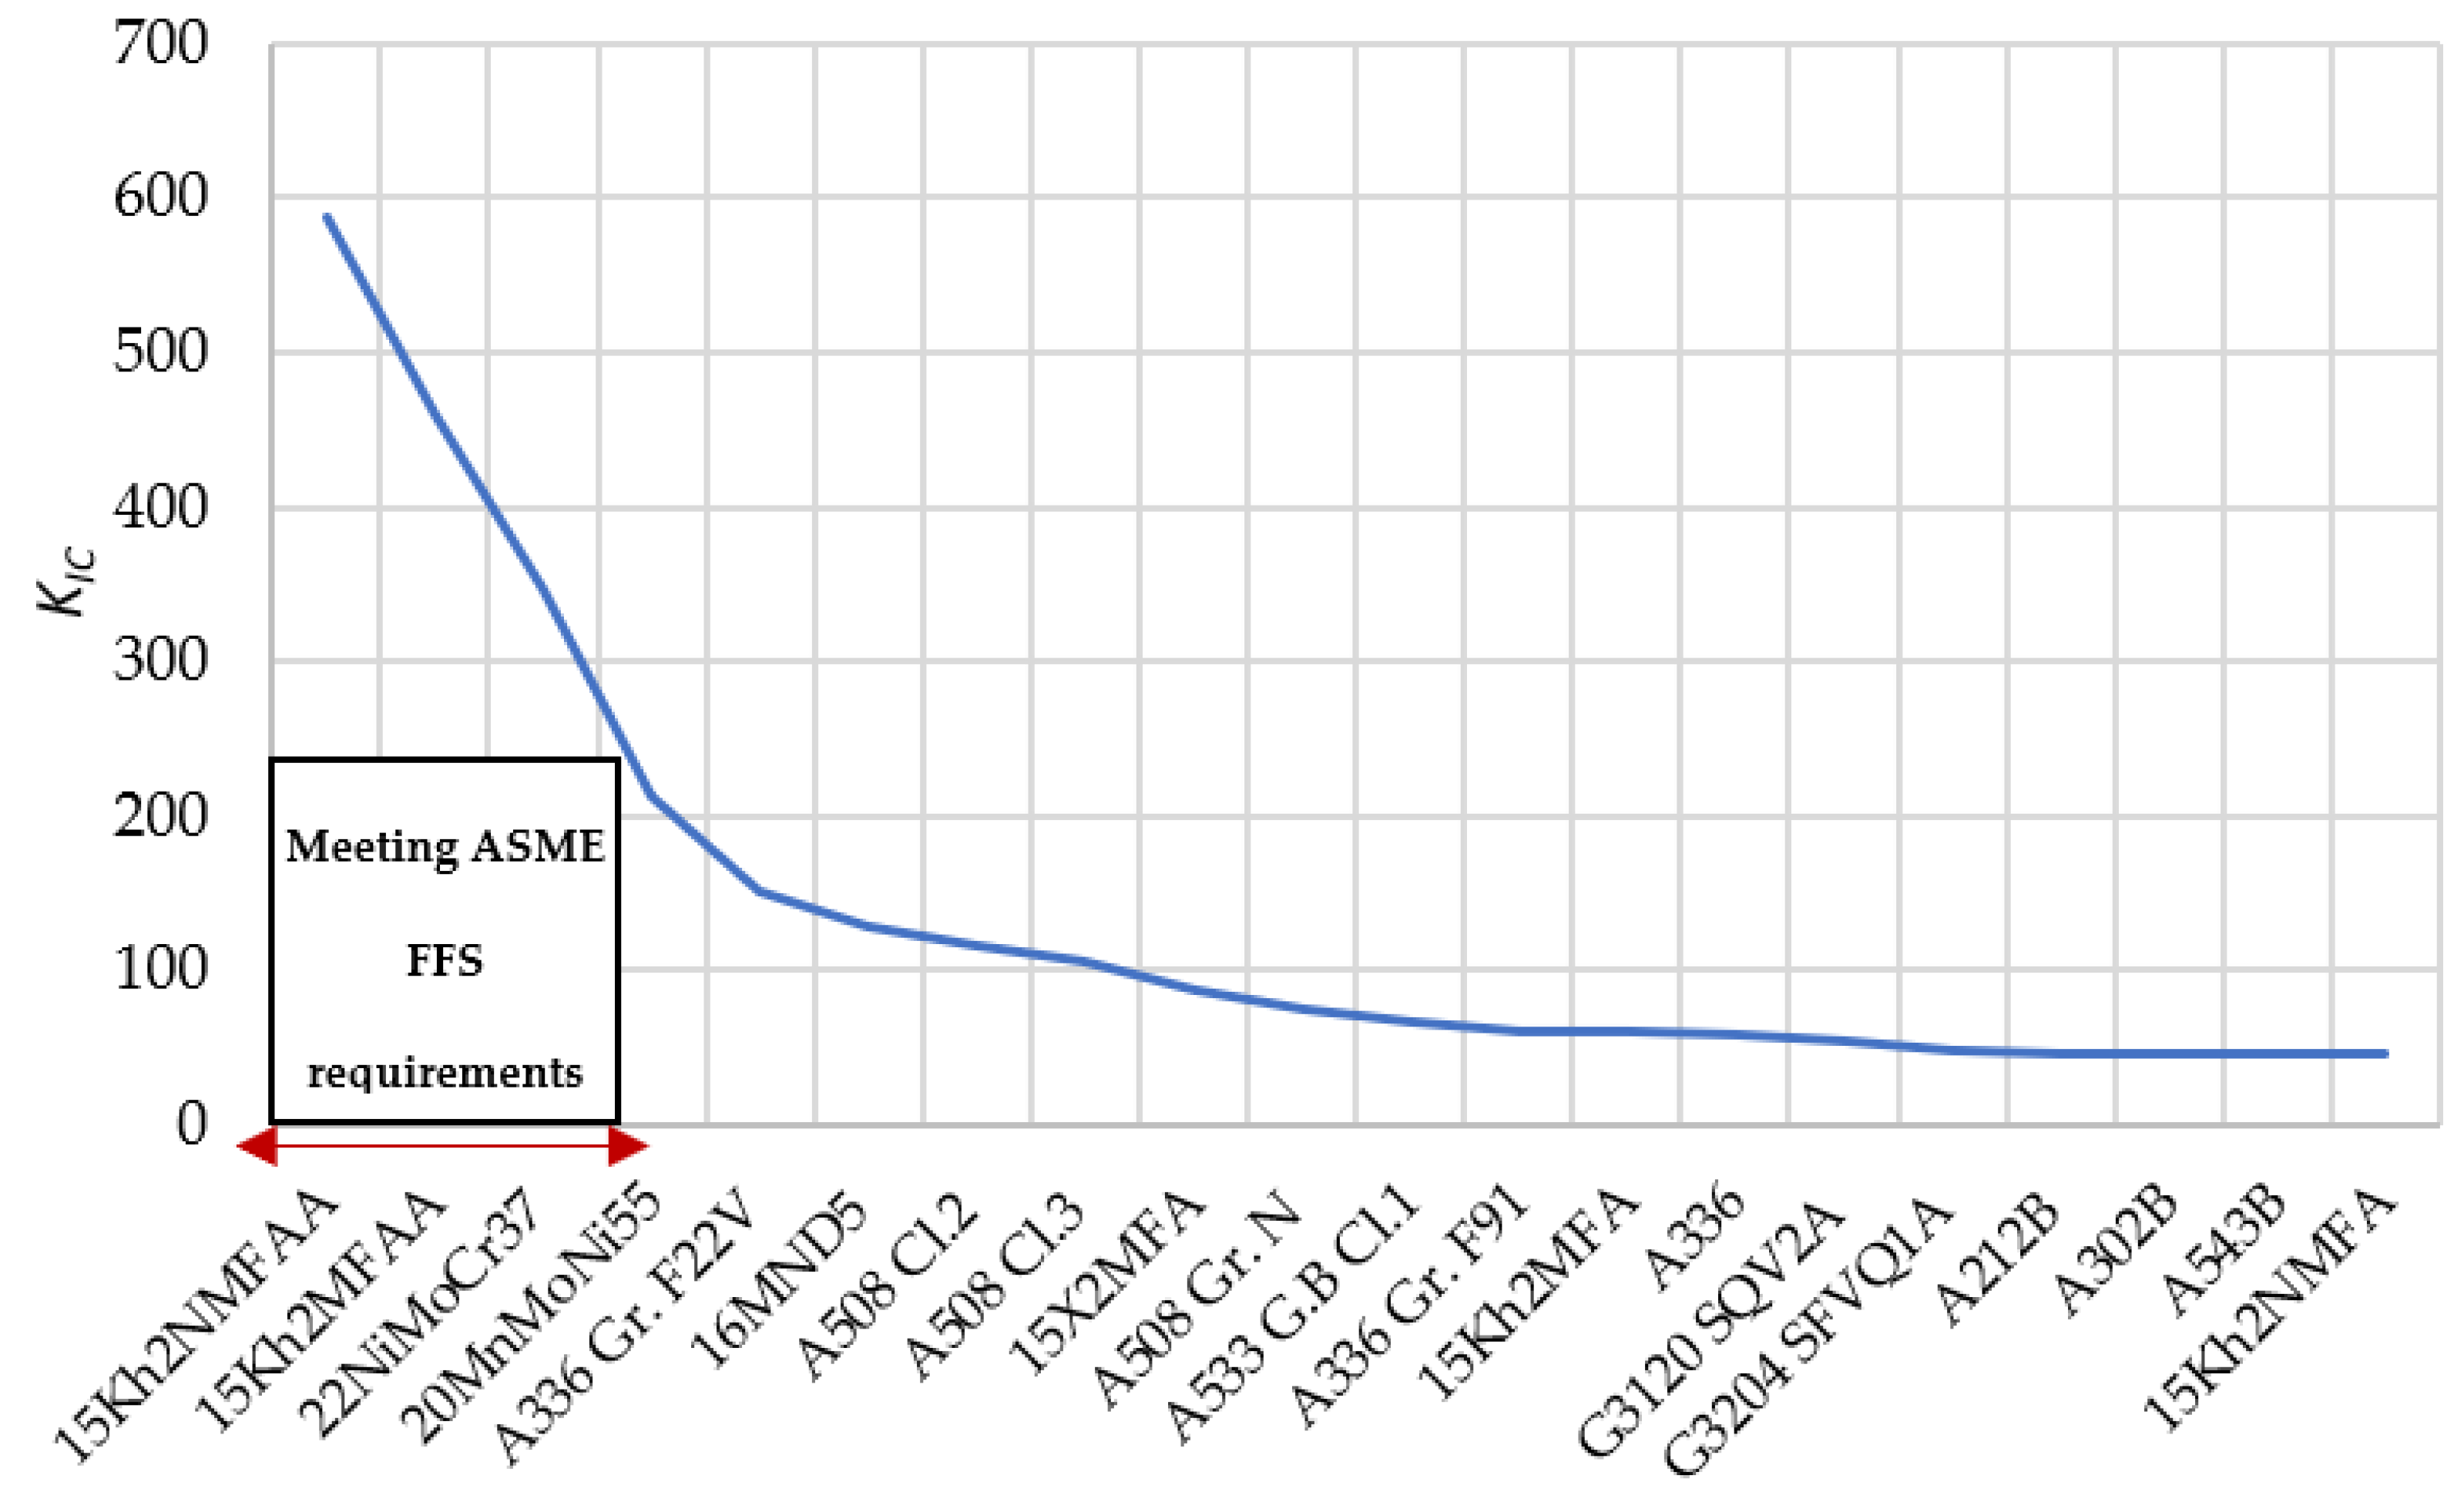
As Figure 6 exhibits, more used materials specifications used in the modern designs of reactors provide a low RIL. In addition, the specifications 15Kh2MFA, 15Kh2NMFA, 20MnMoNi55 and 22NiMoCr37 meet the KIC requirement established by ASME FFS for ferritic steels. These materials have as a characteristic a very stringent control of impurities, so the mechanical integrity prediction by the analytical model presented in this work is very sensitive to impurities restrictions.

3.2. Step 4—Validation of Limit Conditions and Results Based on the Conclusions from Experimental Works

Determination of KIC on the upper shelf would be impracticable since it would require big specimens. ASME FFS-1 [52] provides, therefore, a threshold of KIC equal to 220 MPa · √m, valid for ferritic steels, aligned with the requirement for the ASME B&PV code [38] reference curve. On the other hand, from 150 °C, the irradiation embrittlement is less severe due to annealing effects [67], as demonstrated by experimental works [55,68,69]. Figure 7 shows the predicted KIC for every studied material.
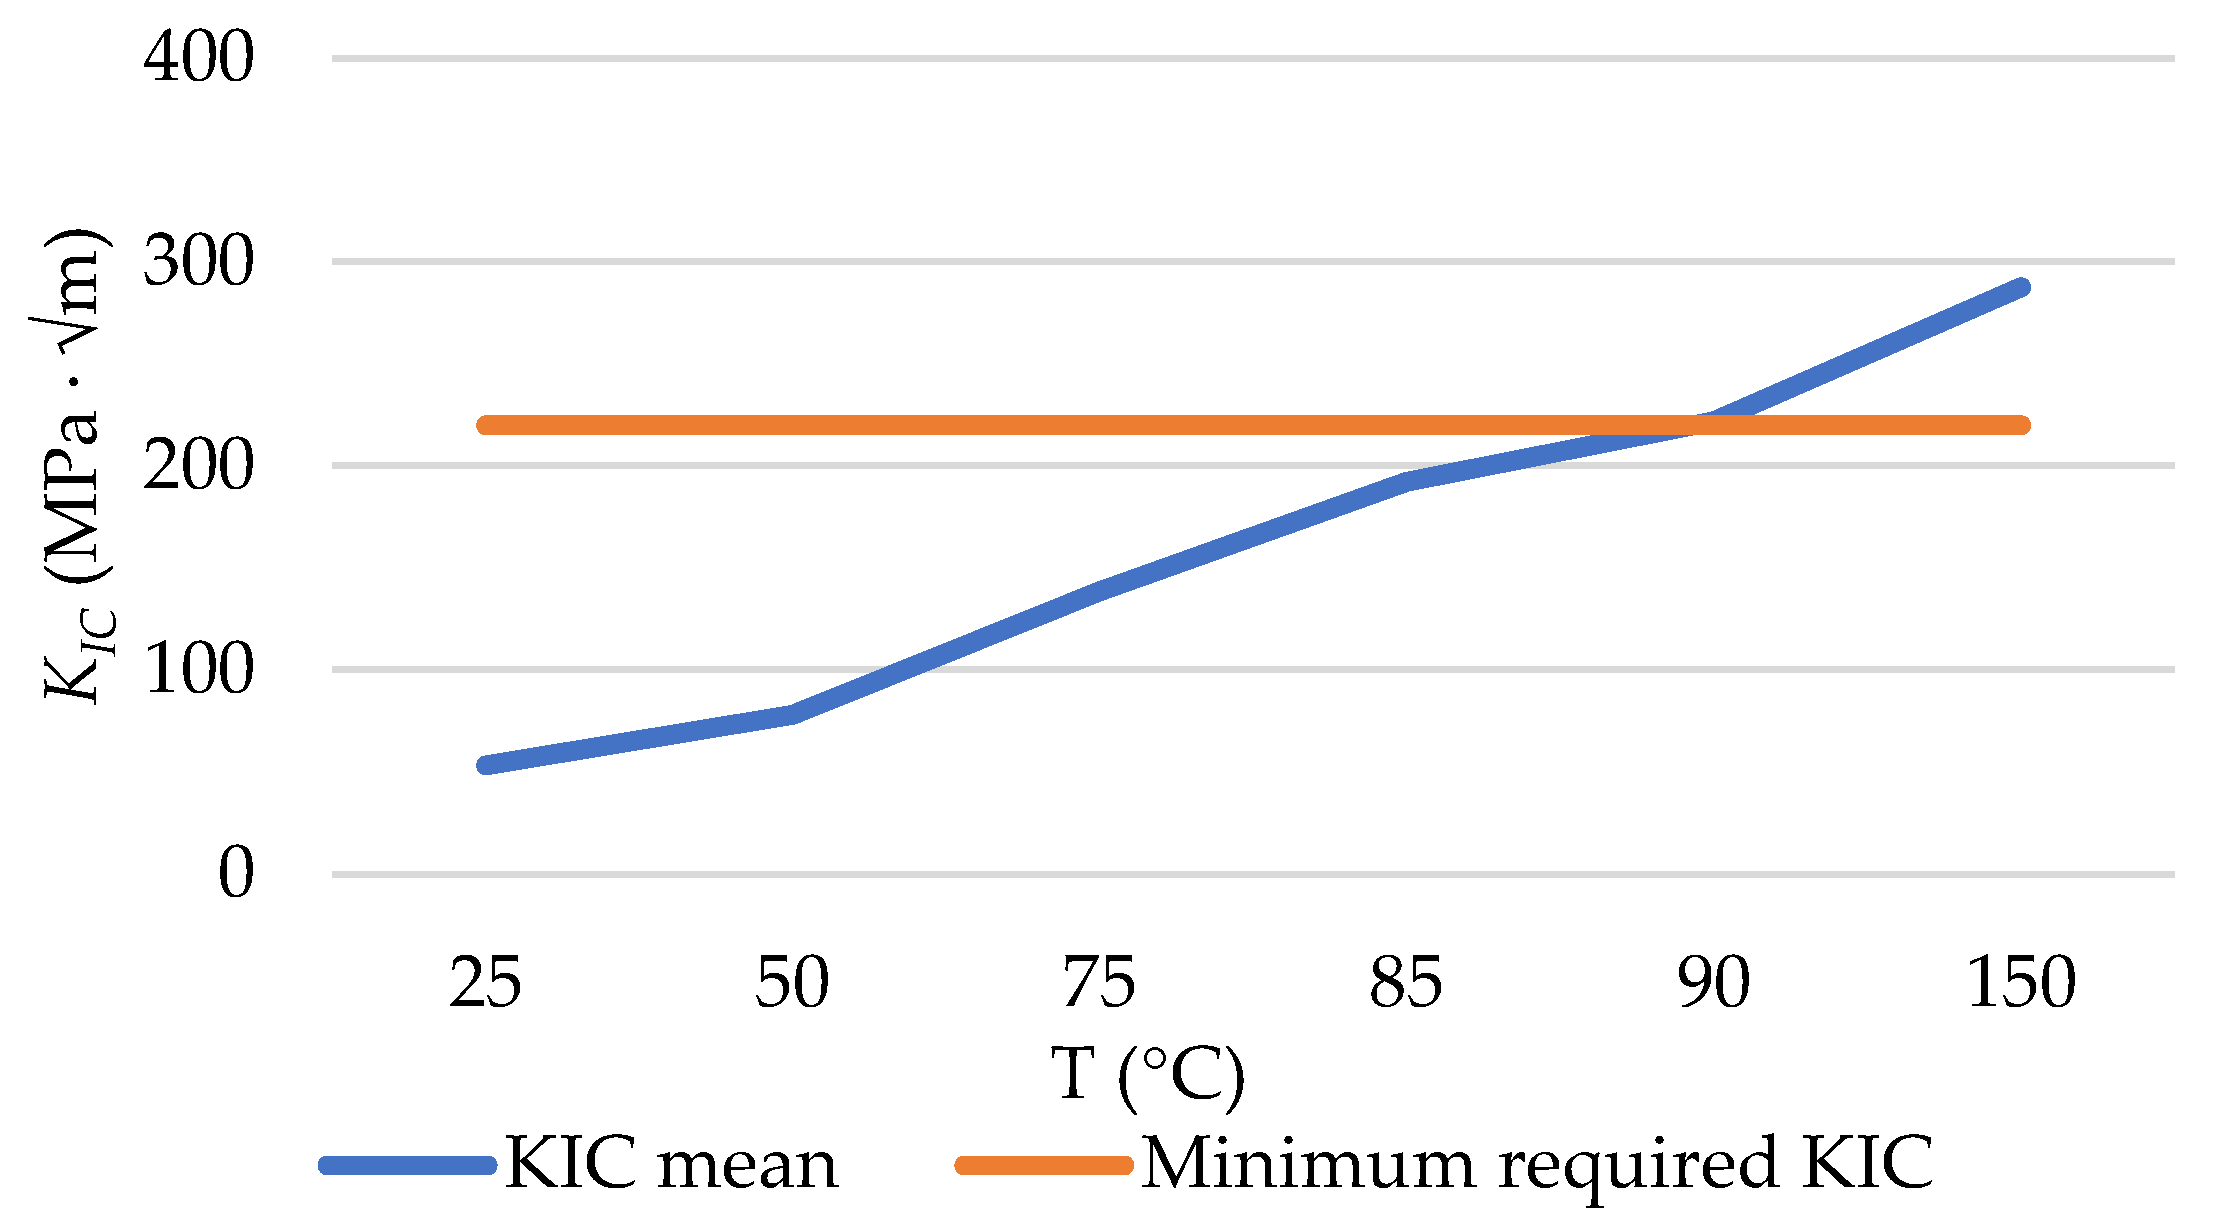
Analogously, the application of the KIC, min (minimum required value of fracture toughness) constraint for ferritic steels provided by ASME FFS-1 [52] shows the same best options: 15kh2NMFAA and 15kh2MFAA (both with very stringent control of impurities) as well as the 22NiMoCr37 and 20MnMoNi55. All of these specifications are highlighted due to their very stringent mechanical and chemical requirements. Figure 8 provides, for the material 15kh2NMFAA, the KIC variation versus in-service temperature compared with the minimum required KIC according to ASME FFS. Thus, from T = 85.5 °C, KIC mean is greater than 220 MPa · √m since it could be considered as a minimum temperature to ensure that the minimum value of KIC is always reached.
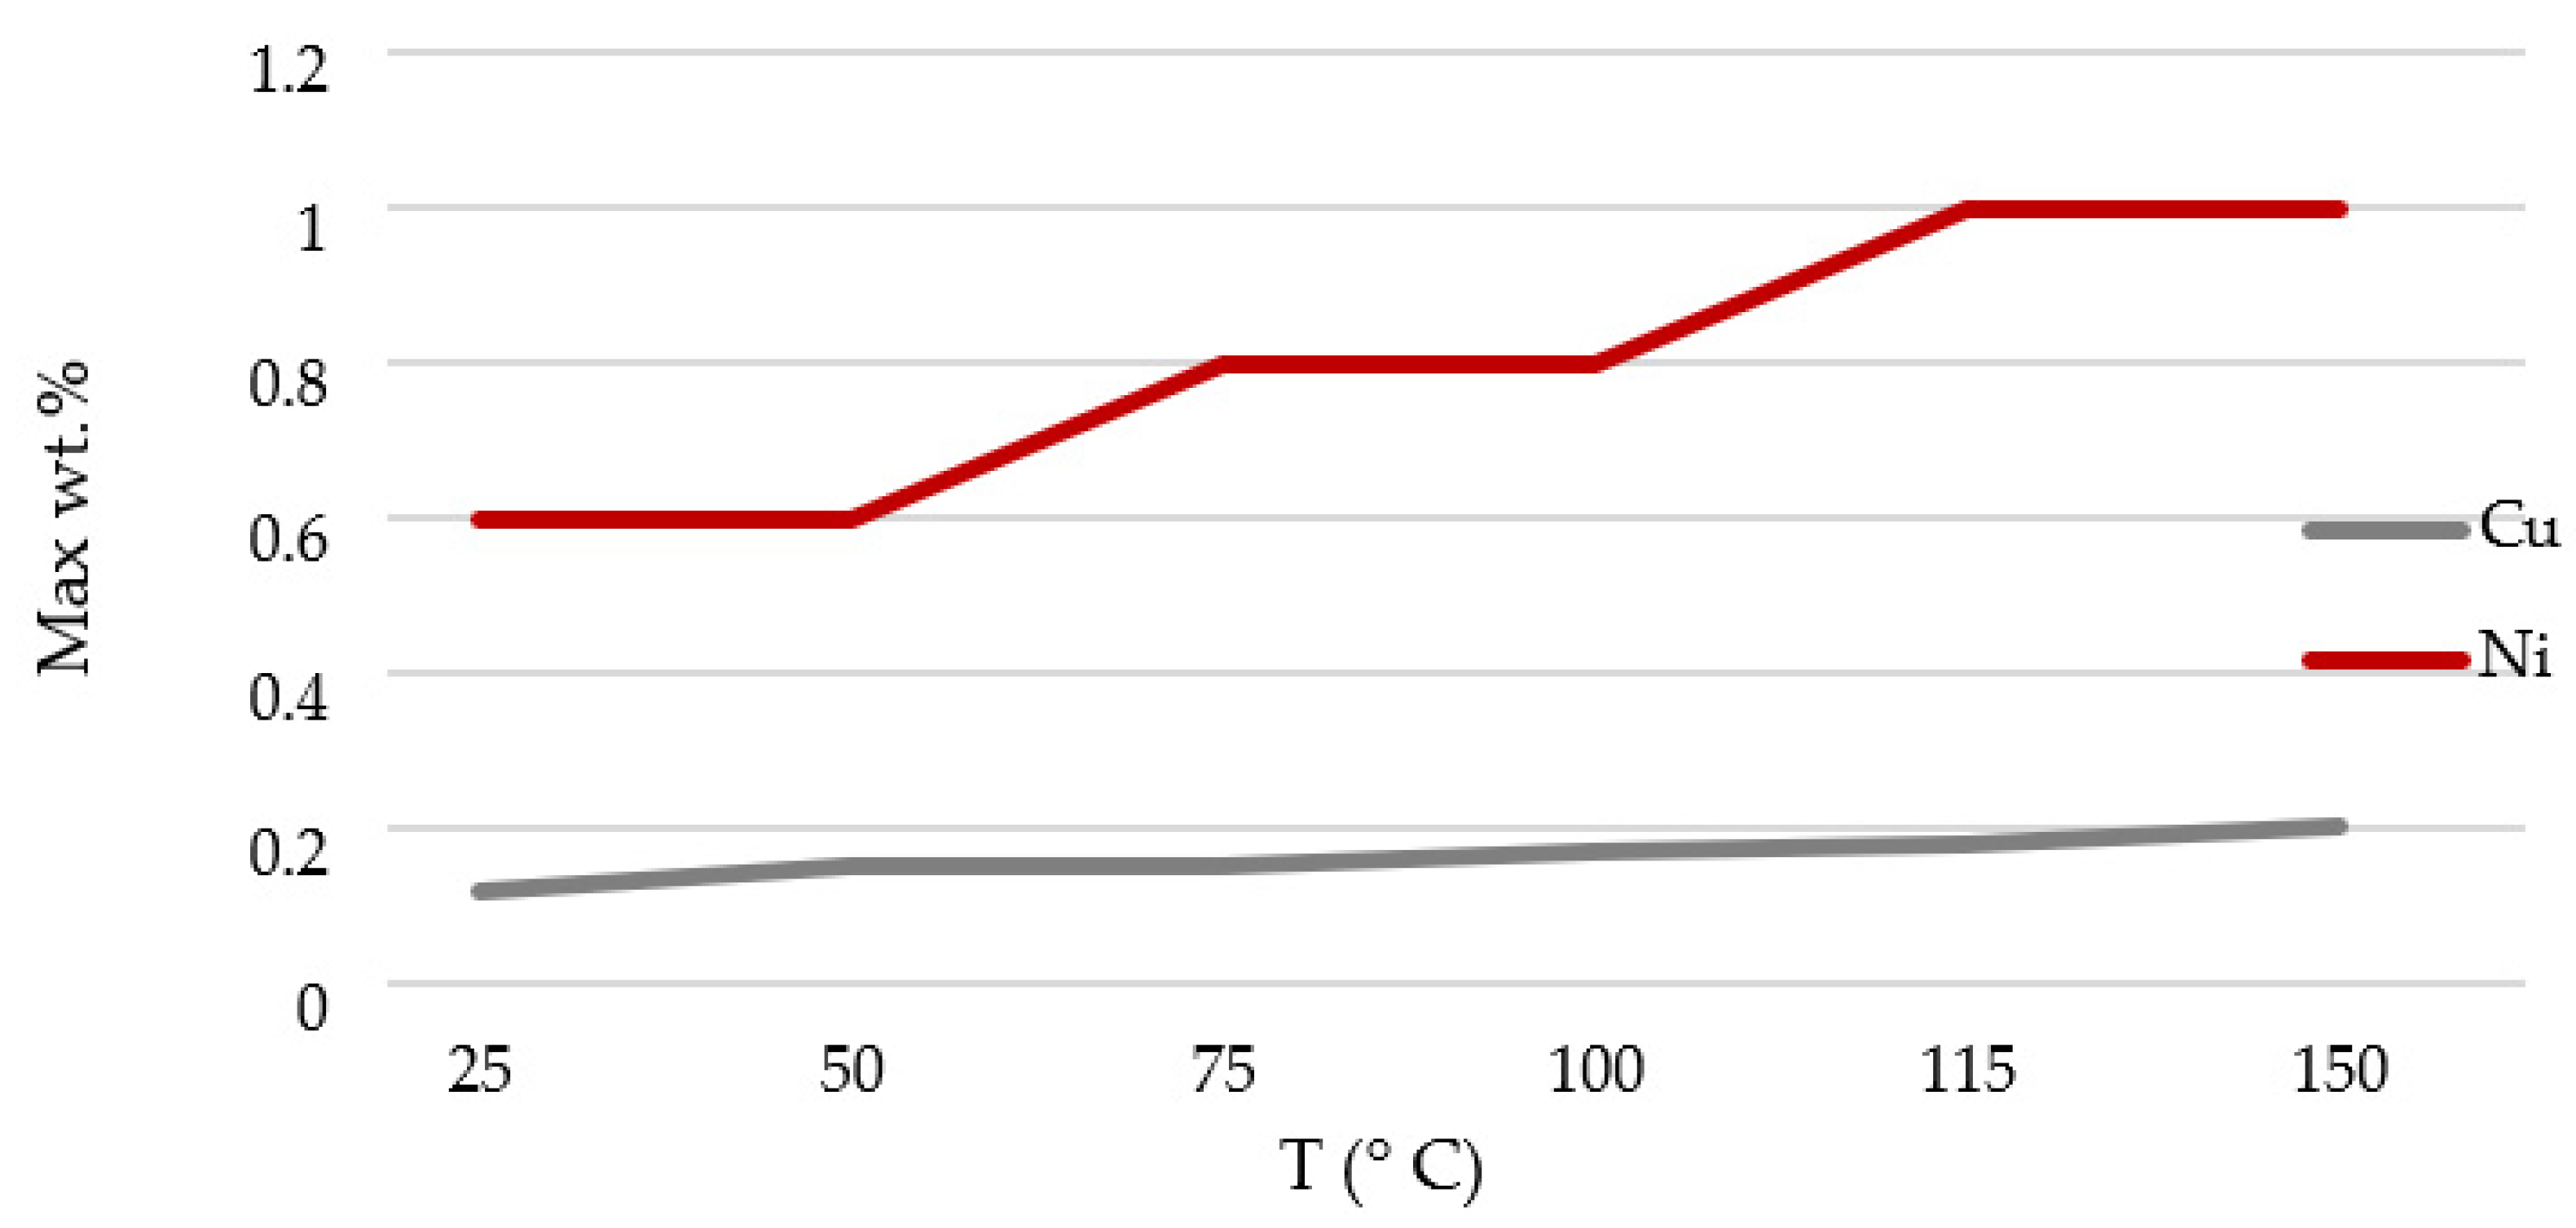
Figure 9 provides KIC versus typical values of Cu wt% and Ni wt% in the ferritic steels used in the manufacture of reactor pressure vessels. This figure also indicates the maximum Cu and Ni wt% contents to meet the KIC requirements established by the ASME FFS code.
For most unirradiated mild steels, the ΔRTDBT is between −50 °C and 20 °C. The process of irradiation hardening, through the formation of clusters of interstitial or vacancy defects, increases the friction stress of these steels and thereby raises the transition temperature [70].
Using the maximum ΔRTDBT specified by KTA 3203 to avoid additional safety calculations [71], i.e., 40 °C, and assuming a considered maximum RTDBT N-I = 50 °C according to Fisher et al. [68], the maximum RTDBT, I would be equal to 90 °C. The result obtained (maximum RTDBT, I = 85.5 °C to meeting the ASME FFS KIC requirements, i.e., a minimum KIC equal to 220 MPa · √m) by using this novel methodology is coherent with the maximum RTDBT, I according to experimental works and the limits (based on a large operational experience) provided by KTA 3203 [71].
To keep KIC > 220 MPa · √m, Cu wt% is 0.15 and Ni wt% 0.60 that is more stringent than predictions based on other models: Cu ≤ 0.16, ∀ 0.4 < Ni ≤ 0.6 ∀ P according to R.G. 1.99 Rev.2 [53]; Cu ≤ 0.15, ∀ Ni < 0.6 and P < 0.02 according to NUREG CR 6551 [40] and Cu ≤ 0.15, ∀ 0.2 ≤ Ni < 1.2 and P < 0.02 according to ASTM E900-02 [41]. In addition, the results obtained verify the observation performed by Fisher et al. in which KIC varies from about 35 MPa · √m (at T = ΔRTDBT − 50 °C) to about 200 MPa · √m (at T = ΔRTDBT + 50 °C) [10]. Thus, a ΔRTDBT > 14.5 °C (according to the calculation provided by Equation (1)) implies a KIC similar (220 MPa · √m) to that one required by ASME FFS (220 MPa · √m). Therefore, it would be recommended that the brittle fracture should be specially monitored under 150 °C. This agrees with the conclusions of Pachur [67] that showed as an irradiation temperature of 150 °C produces the greatest fragility of the material, being this less for a higher temperature. This is due to the fact that an increase in the irradiation temperature favors the repair of defects produced by neutron bombardment through a process of annealing the material [67].
By applying this methodology, a 220 MPa · √m is only obtained with a Cu wt% restriction of 0.15% and a Ni wt% restriction of 0.60%. Therefore, these restrictions are interesting to be considered in preliminary materials selection tasks performed in the equipment design phase [72]. Since the KIC is a parameter that is increased with the temperature, the requirements of Cu wt% and Ni wt% content are more stringent for a lower temperature, as Figure 10 shows.

4. Conclusions

In this work, a novel analytical methodology to predict the in-service mechanical integrity of rolled and forging steels—used in the manufacture of RPV—has been proposed. The methodology connects two robust models such as ASTM E900 and ASME FFS code to predict the KIC using standardized requirements. Thus, the suitability of several materials has been estimated. In addition, the results from the methodology have been validated by comparing with experimental results from well-established and recognized historical research works.
In the new methodology, several new elements have been incorporated, such as the use of the fitness-for-service calculations concept and the construction of a risk matrix, allowing a multiperspective approach that helps find the suitable solution to ease the arduous material selection task in a demanding industry such as the nuclear one. The analytical model, which is based on a new formulation of the brittle fracture criterion, has allowed an adequate prediction of the irradiation effect on the fracture toughness of reactor pressure vessel steels, letting us jointly evaluate the mechanical integrity and the fitness-for-service of the vessel by a novel methodology. The major conclusions from this work can be summarized as follows:
  • The matrix representation shows the RIL of the best options of analyzed materials (according to obtained Kr and Lr values), allowing to extract conclusions such as the materials with lower RIL (very low risk) correspond to the most consolidated standards (15Kh2NMFAA, 15Kh2MFAA, 22NiMoCr37 and 20MnMoNi55) followed by other consolidated and new standards (A508 Cl.2, A508 Cl.3, 16MND5 and A336 Gr. F22V). These forging materials are consolidated grades used in the PWR 3-4 generation and, therefore, are currently still in operation. In addition, other historical forging grades such as 16MND5 show very safe conditions.
  • Obsolete materials specifications (A212B, A302B, A543B and A336) provide the worst mechanical integrity, corresponding these materials to rolled materials.
  • It has been concluded that, according to the methodology, to keep KIC > 220 MPa · √m as required by ASME FFS code [52], Cu wt% should be lower than 0.15 and Ni wt% lower than 0.60; these limits are more stringent than predictions based on other models: Cu ≤ 0.16, ∀ 0.4 < Ni ≤ 0.6 ∀P according to R.G. 1.99 Rev.2 [53]; Cu ≤ 0.15, ∀ Ni < 0.6 and P < 0.02 according to NUREG CR 6551 [40] and Cu ≤ 0.15, ∀ 0.2 ≤ Ni < 1.2 and p < 0.02 according to ASTM E900-02 [41].
  • In addition, the results obtained by applying this methodology verify the observation performed by Fisher et al., in which KIC varies from about 35 MPa · √m (at T = ΔRTDBT − 50 °C) to about 200 MPa · √m (at T = ΔRTDBT + 50 °C).
  • According to the methodology outputs, it would be recommended that the brittle fracture should be specially monitored under 150 °C. This agrees with the conclusions of Pachur [67] that showed an irradiation temperature of 150 °C produces the greatest brittleness of the material, this being less for a higher temperature since irradiation temperature favors the repair of defects by annealing.
In summary, this analytical method allows to save time and reduce costs related to trial-and-error tests to make a decision on the suitability and safety of different candidate materials. The new formulation of the brittle fracture mathematical criterion helps make a decision from the analysis of standardized requirements (discrete variables) using a multicriteria approach solved as a decision matrix (risk matrix). In addition, the chemical composition restrictions obtained by the analytical model can be useful to be incorporated in technical guides for materials inspection.
In the future, this methodology could be used to predict the suitability of materials for other demanding applications, being a useful tool for materials selection tasks considering a design-for-reliability approach.

Author Contributions

Conceptualization, A.R.-P.; Formal analysis, A.R.-P.; Funding acquisition, A.R.-P. and A.M.C.; Investigation, A.R.-P., M.C., E.P. and G.L.; Methodology, A.R.-P. and A.M.C.; Project administration, A.R.-P. and A.M.C.; Resources, A.R.-P., M.C. and A.M.C.; Supervision, A.R.-P.; Validation, A.R.-P.; Writing—original draft, A.R.-P.; Writing—review and editing, A.R.-P., M.C., E.P., G.L. and A.M.C. All authors have read and agreed to the published version of the manuscript.

Funding

This work is part of the scope of activities included in the transfer contract of research results with reference 2019-CTINV-0068. This work has been funded by the project 2021V/-TAJOV/006 from the UNED Call for Research Projects named “Young Talents 2021” and by the Annual Grants Call of the E.T.S.I. Industriales of UNED through the project of reference 2022-ETSII-UNED-01.

Institutional Review Board Statement

Not applicable.

Informed Consent Statement

Not applicable.

Data Availability Statement

Not applicable.

Acknowledgments

This work has been realized in the framework of the activities of the Research Group of the UNED “Industrial Production and Manufacturing Engineering (IPME)”and the Industrial Research Group “Advanced Failure Prognosis for Engineering Applications”.

Conflicts of Interest

The authors declare no conflict of interest.

Abbreviations

ΔRTDBTDuctile-to-brittle transition temperature shift
APIAmerican Petroleum Institute
ASMEAmerican Society of Mechanical Engineers
BCCBody-Centered Cubic
CRPCopper-Rich Precipitates
FADFailure Assessment Diagrams
FCCFace-Centered Cubic
FFSFitness For Service
HCPHexagonal Close-Packed
KIStress concentration factor applied under normal conditions on the crack
KIStress intensity factor
KICFracture toughness based on crack initiation determined at crack end temperature
LrCutoff value
LWRLight Water Reactor
NRCU.S. Nuclear Regulatory Commission
RILRisk of integrity loss
RPVReactor pressure vessel
RTDBTReference temperature
RTDBT-IDuctile-to-brittle transition temperature before irradiation
RTDBT-NIDuctile-to-brittle transition temperature after irradiation
SMDStable Matrix Defects
ΦNeutron flux

References

  1. IPCC. Climate Change 2014: Synthesis Report. Contribution of Working Groups I, II and III to the Fifth Assessment Report of the Intergovernmental Panel on Climate Change; Intergovernmental Panel on Climate Change (IPCC): Geneva, Switzerland, 2014. [Google Scholar]
  2. Wang, C.-N.; Dang, T.-T.; Tibo, H.; Duong, D.-H. Assessing renewable energy production capabilities using DEA window and Fuzzy TOPSIS model. Symmetry 2021, 13, 334. [Google Scholar] [CrossRef]
  3. Slugeň, V.; Sojak, S.; Egger, W.; Krsjak, V.; Simeg Veternikova, J.; Petriska, M. Radiation damage of reactor pressure vessel steels studied by positron annihilation spectroscopy—A Review. Metals 2020, 10, 1378. [Google Scholar] [CrossRef]
  4. Murty, K.L.; Seok, C.S. Fracture in ferritic reactor steel—Dynamic strain aging and cyclic loading. JOM 2001, 53, 23–26. [Google Scholar] [CrossRef]
  5. Oh, E.; Lee, H. An imbalanced data handling framework for industrial big data using a gaussian process regression-based generative adversarial network. Symmetry 2020, 12, 669. [Google Scholar] [CrossRef] [Green Version]
  6. Faizi, S.; Sałabun, W.; Ullah, S.; Rashid, T.; Więckowski, J. A new method to support decision-making in an uncertain environment based on normalized interval-valued triangular fuzzy numbers and COMET technique. Symmetry 2020, 12, 516. [Google Scholar] [CrossRef] [Green Version]
  7. Allan, V. Manufacture of Pressure Vessels for light Water Reactor Core and the Pressure Vessels for Reactor Core. China Patent CN1015948B, 16 October 1987. [Google Scholar]
  8. Rodríguez-Prieto, A.; Frigione, M.; Kickhofel, J.; Camacho, A.M. Analysis of the technological evolution of materials requirements included in reactor pressure vessel manufacturing codes. Sustainability 2021, 13, 5498. [Google Scholar] [CrossRef]
  9. Arroyo Martínez, B.; Álvarez Laso, J.A.; Gutiérrez-Solana, F.; Cayón Martínez, A.; Jirón Martínez, Y.J.; Seco Aparicio, A.R. A proposal for the application of failure assessment diagrams to subcritical hydrogen induced cracking propagation processes. Metals 2019, 9, 670. [Google Scholar] [CrossRef] [Green Version]
  10. Ferroni, P. LWR Pressure Vessel Embrittlement and Conditions of Validity of Current Predictive Methodologies; Department of Nuclear Engineering, Massachussets Institute of Technology (MIT) Publications: Boston, MA, USA, 2006. [Google Scholar]
  11. Tanguy, B.; Bouchet, C.; Bugat, S.; Besson, J. Local approach to fracture based prediction of the ΔRT56J and ΔRTKIc, 100 shifts due to irradiation for an A508 pressure vessel steel. Eng. Fract. Mech. 2006, 73, 191–206. [Google Scholar] [CrossRef] [Green Version]
  12. Chou, H.W.; Huang, C.-C. Probabilistic structural integrity analysis of boiling water reactor pressure vessel under low temperature overpressure event. Int. J. Nucl. Energy 2015, 2015, 785041. [Google Scholar] [CrossRef] [Green Version]
  13. Rodríguez-Prieto, A.; Camacho, A.M.; Aragón, A.M.; Sebastián, M.A.; Yanguas-Gil, A. Polymers selection for harsh environments to be processed using additive manufacturing techniques. IEEE Access 2018, 6, 29899–29911. [Google Scholar] [CrossRef]
  14. Yankova, M.S.; Jivkov, A.P.; Patel, R. Incorporation of obstacle hardening into local approach to cleavage fracture to predict temperature effects in the ductile to brittle transition regime. Materials 2021, 14, 1224. [Google Scholar] [CrossRef] [PubMed]
  15. Bai, X.; Wu, S.; Liaw, P.K.; Shao, L.; Gigax, J. Effect of heavy ion irradiation dosage on the hardness of SA508-IV reactor pressure vessel steel. Metals 2017, 7, 25. [Google Scholar] [CrossRef] [Green Version]
  16. Smirnov, A.; Smirnova, E.; Alexandrov, S. A new experimental method for determining the thickness of thin surface layers of intensive plastic deformation using electron backscatter diffraction data. Symmetry 2020, 12, 677. [Google Scholar] [CrossRef]
  17. Li, Q.; Shen, Y.; Zhu, J.; Huang, X.; Shang, Z. Evaluation of irradiation hardening of P92 steel under Ar ion irradiation. Metals 2018, 8, 94. [Google Scholar] [CrossRef] [Green Version]
  18. Jitsukawa, S.; Suzuki, K.; Okubo, N.; Ando, M.; Shiba, K. Irradiation effects on reduced activation ferritic/martensitic steels-tensile, impact, fatigue properties and modelling. Nucl. Fusion 2009, 49, 733–737. [Google Scholar] [CrossRef]
  19. Alamo, A.; Horsten, M.; Averty, X.; Materna-Morris, E.I.; Rieth, M.; Brachet, J.C. Mechanical behavior of reduced-activation and conventional martensitic steels after neutron irradiation in the range 250–450 degrees C. J. Nucl. Mater. 2000, 283, 353–357. [Google Scholar] [CrossRef]
  20. Hojna, A. Overview of intergranular fracture of neutron irradiated austenitic stainless steels. Metals 2017, 7, 392. [Google Scholar] [CrossRef] [Green Version]
  21. Li, M.; Sokolov, M.A.; Zinkle, S.J. Tensile and fracture toughness properties of neutron-irradiated CuCrZr. J. Nucl. Mater. 2009, 393, 36–46. [Google Scholar] [CrossRef]
  22. Fabritsiev, S.A.; Pokrovsky, A.S. Effect of irradiation temperature on microstructure, radiation hardening and embrittlement of pure copper and copper-based alloy. J. Nucl. Mater. 2007, 367, 977–983. [Google Scholar] [CrossRef]
  23. Sharma, G.; Mukherjee, P.; Chatterjee, A.; Gayathri, N.; Sarkar, A.; Chakravartty, J.K. Study of the effect of alpha irradiation on the microstructure and mechanical properties of nanocrystalline Ni. Acta Mater. 2013, 61, 3257–3266. [Google Scholar] [CrossRef]
  24. Singh, B.N.; Horsewell, A.; Toft, P. Effects of neutron irradiation on microstructure and mechanical properties of pure iron. J. Nucl. Mater. 1999, 271, 97–101. [Google Scholar] [CrossRef]
  25. Zinkle, S.J.; Singh, B.N. Microstructure of neutron-irradiated iron before and after tensile deformation. J. Nucl. Mater. 2006, 351, 269–284. [Google Scholar] [CrossRef]
  26. Fukuda, M.; Hasegawa, A.; Tanno, T.; Nogami, S.; Kurishita, H. Property change of advanced tungsten alloys due to neutron irradiation. J. Nucl. Mater. 2013, 442, 273–276. [Google Scholar] [CrossRef]
  27. Cockeram, B.V.; Smith, R.W.; Leonard, K.J.; Byun, T.S.; Snead, L.L. Development of microstructure and irradiation hardening of Zircaloy during low dose neutron irradiation at nominally 358 degrees C. J. Nucl. Mater. 2011, 418, 46–61. [Google Scholar] [CrossRef]
  28. Onimus, F.; Bechade, J.L.; Duguay, C.; Gilbon, D.; Pilvin, P. Investigation of neutron radiation effects on the mechanical behavior of recrystallized zirconium alloys. J. Nucl. Mater. 2006, 358, 176–189. [Google Scholar] [CrossRef]
  29. Marmy, P.; Leguey, T. Impact of irradiation on the tensile and fatigue properties of two titanium alloys. J. Nucl. Mater. 2001, 296, 155–164. [Google Scholar] [CrossRef]
  30. Li, M.; Byun, T.S.; Snead, L.L.; Zinkle, S.J. Low-temperature thermally-activated deformation and irradiation softening in neutron-irradiated molybdenum. J. Nucl. Mater. 2008, 377, 409–414. [Google Scholar] [CrossRef]
  31. Xiao, X. Fundamental mechanisms for irradiation-hardening and embrittlement: A review. Metals 2019, 9, 113. [Google Scholar] [CrossRef] [Green Version]
  32. Cécile, M.; Christian, R.; Michel, S. Symmetry and Physical Properties of Crystals; Springer: Berlin/Heidelberg, Germany, 2014. [Google Scholar]
  33. Odette, G.R.; Lucas, G.; Klingensmith, R. The influence of metallurgical variables on the temperature dependence of irradiation hardening in pressure vessel steels. In Proceedings of the 17th International Symposium on Effects of Radiation on Materials, Sun Valley, ID, USA, 20–23 June 1996; American Society for Testing and Materials: West Conshohocken, PA, USA; pp. 606–622. [Google Scholar]
  34. Ghoniem, N.M.; Kioussis, N. Multiscale Modeling of the Deformation of Advanced Ferritic Steels for Generation IV Nuclear Energy; Report DE-FC07-06ID14748; International Nuclear Energy Research Initiative (I-NERI): Washington, DC, USA, 2009. [Google Scholar]
  35. Zhang, Y.; Gao, Y.; Sun, C.; Schwem, D.; Jiang, C.; Gan, J. Symmetry breaking during defect self-organization under irradiation. Mater. Theory 2020, 4, 4. [Google Scholar] [CrossRef]
  36. Fukuya, K. Current understanding of radiation-induced degradation in light water reactor structural materials. J. Nucl. Sci. Technol. 2013, 50, 213–254. [Google Scholar] [CrossRef] [Green Version]
  37. Torronen, K.; Pelli, R.; Planman, T.; Valo, M. Irradiation Embrittlement Mitigation (NEA-CSNI-R--94-1); Nuclear Energy Agency of the OECD (NEA): Paris, France, 1993. [Google Scholar]
  38. ASME Boiler & Pressure Vessel Code (BPVC); American Society of Mechanical Engineers: New York, NY, USA, 2019.
  39. Rodríguez-Prieto, A.; Primera, E.; Callejas, M.; Camacho, A.M. Reliability-based evaluation of the suitability of polymers for additive manufacturing intended to extreme operating conditions. Polymers 2020, 12, 2327. [Google Scholar] [CrossRef] [PubMed]
  40. Eason, E.D.; Wright, J.E.; Odette, G.R. Improved Embrittlement Correlations for Reactor Pressure Vessel Steels; NUREG/CR-6551; U.S. Nuclear Regulatory Commission (NRC): Washington, DC, USA, 1998.
  41. ASTM E900; Standard Guide for Predicting Radiation-Induced Transition Temperature Shift in Reactor Vessel Materials. American Society for Testing and Materials: Philadelphia, PA, USA, 2002.
  42. Lie, S.T.; Yang, Z.M. BS7910:2005 Failure assessment diagram (FAD) on cracked circular hollow section (CHS) welded joints. Adv. Steel Constr. 2009, 5, 406–420. [Google Scholar]
  43. Nissan, E. An Overview of AI Methods for in-Core Fuel Management: Tools for the Automatic Design of Nuclear Reactor Core Configurations for Fuel Reload, (Re)arranging New and Partly Spent Fuel. Designs 2019, 3, 37. [Google Scholar] [CrossRef] [Green Version]
  44. Montassir, S.; Yakoubi, K.; Moustabchir, H.; Elkhalfi, A.; Rajak, D.K.; Pruncu, C.I. Analysis of crack behaviour in pipeline system using FAD diagram based on numerical simulation under XFEM. Appl. Sci. 2020, 10, 6129. [Google Scholar] [CrossRef]
  45. Petrović, D.V.; Tanasijević, M.; Stojadinović, S.; Ivaz, J.; Stojković, P. Fuzzy model for risk assessment of machinery failures. Symmetry 2020, 12, 525. [Google Scholar] [CrossRef] [Green Version]
  46. Rodríguez-Prieto, A.; Camacho, A.M.; Mendoza, C.; Lomonaco, G. Evolution of standardized specifications on materials, manufacturing and in-service inspection of nuclear reactor vessels. Sustainability 2021, 13, 10510. [Google Scholar] [CrossRef]
  47. Smith, C.; Nanstad, R.; Odette, R.; Clayton, D.; Matlack, K.; Ramuhalli, P.; Light, G. Roadmap for Nondestructive Evaluation of Reactor Pressure Vessel Research and Development by the Light Water Reactor Sustainability Program; ORNL/TM-2012/380; International Atomic Energy Agency (IAEA): Vienna, Austria, 2012; p. 56. [Google Scholar]
  48. IAEA-145; Non-Destructive Testing for Reactor Core Components and Pressure Vessels. International Atomic Energy Agency (IAEA): Vienna, Austria, 1971; p. 537.
  49. Rodríguez-Prieto, A. Análisis de Requisitos Tecnológicos de Materiales Especificados en Normativas Reguladas y su Repercusión Sobre la Fabricación de Recipientes Especiales para la Industria Nuclear. Ph.D. Thesis, Universidad Nacional de Educación a Distancia, Madrid, Spain, 2014; p. 457. [Google Scholar]
  50. Steele, L.E. Neutron Irradiation Embrittlement of Reactor Pressure Vessel Steels; International Atomic Energy Agency Publications: Vienna, Austria, 1975. [Google Scholar]
  51. Yoon, K.K. Fracture Toughness Data Analysis Using the Master Curve Method; WRC Bulletin No. 486 Part 3; Welding Research Council (WRC): Shaker Heights, OH, USA, 2003. [Google Scholar]
  52. API 579-1/ASME FFS-1. Fitness-for-Service, 2nd ed.; American Petroleum Institute (API): Washington, DC, USA, 2016. [Google Scholar]
  53. R.G 1.99 Rev.2; Radiation Embrittlement of Reactor Vessel Materials. Nuclear Regulatory Commission (NRC): Washington, DC, USA, 1988; pp. 1–9.
  54. Kirk, M.; Santos, C.; Eason, E.; Wright, J.; Odette, G.R. Updated embrittlement trend curve for reactor pressure vessel steels. In Proceedings of the 17th International Conference on Structural Mechanics in Reactor Technology (SMiRT 17), Prague, Czech Republic, 17–22 August 2003. [Google Scholar]
  55. Rodríguez-Prieto, A.; Camacho, A.M.; Sebastián, M.A. Selection of candidate materials for reactor pressure vessels using irradiation embrittlement prediction models and a stringency level methodology. Proc. Inst. Mech. Eng. Part L 2019, 233, 965–976. [Google Scholar]
  56. Amayev, A.D.; Kryukov, A.M.; Sokolov, M.A. Recovery of the transition temperature of irradiated WWER-440 Vessel Metal by Annealing. In Radiation Embrittlement of Nuclear Reactor Pressure Vessels Steels: An International Review; Steele, L.E., Ed.; American Society for Testing and Materials: Philadelphia, PA, USA, 1993; p. 374. [Google Scholar]
  57. Server, W.L.; Lott, R.G.; Rosinski, S.T.; English, C. Recent surveillance data and a revised embrittlement correlation. J. ASTM Int. 2005, 2, 1–10. [Google Scholar] [CrossRef]
  58. Ritchie, R.O.; Thompson, A.W. On macroscopic and microscopic analyses for crack initiation and crack growth toughness in ductile alloys. Metall. Trans. A 1985, 16A, 233–248. [Google Scholar] [CrossRef] [Green Version]
  59. ASME B&PVC XI; Rules for In-Service Inspection of Nuclear Power Plant Components, Division 1, Rules for Inspection and Testing of Components of Light-Water-Cooled Plants. American Society of Mechanical Engineers (ASME): New York, NY, USA, 2021; pp. 1–784.
  60. ASME B&PVC VIII; Rules for Construction of Pressure Vessels, Division 1. American Society of Mechanical Engineers (ASME): New York, NY, USA, 2021; pp. 1–804.
  61. KTA 3201.2; Components of the Reactor Coolant Pressure Boundary of Light Water Reactors Part 2: Design and Analysis. Nuclear Safety Standards Commission (KTA): Salzgitter, Germany, 2017; pp. 1–162.
  62. Cicero, S.; Fuentes, J.D.; Procopio, I.; Madrazo, V.; González, P. Critical distance default values for structural steels and a simple formulation to estimate the apparent fracture toughness in U-Notched conditions. Metals 2018, 8, 871. [Google Scholar] [CrossRef] [Green Version]
  63. BS 7910; Guide on Methods for Assessing the Acceptability of Flaws in Fusion Welded Structures. British Standard Institution: London, UK, 2019.
  64. Kim, Y.K.; Oh, B.T.; Kim, J.H. Effects of crack tip constraint on the fracture toughness assessment of 9% Ni steel for cryogenic application in liquefied natural gas storage tanks. Materials 2020, 13, 5250. [Google Scholar] [CrossRef] [PubMed]
  65. Matvienko, Y.G. Failure Assessment Diagrams in Structural Integrity Analysis. In Damage and Fracture Mechanics; Boukharouba, T., Elboujdaini, M., Pluvinage, G., Eds.; Springer: Dordrecht, The Netherlands, 2009; pp. 173–182. [Google Scholar]
  66. Vaze, K.K. Structural integrity aspects of reactor safety. Sadhana Acad. Proc. Eng. Sci. 2013, 38, 971–997. [Google Scholar] [CrossRef] [Green Version]
  67. Pachur, D. Apparent embrittlement saturation and radiation mechanisms of reactor pressure vessel steels. ASTM STP 1981, 725, 5–19. [Google Scholar]
  68. Rodríguez-Prieto, A.; Camacho, A.M.; Sebastián, M.A. Materials selection criteria for nuclear power applications: A decision algorithm. JOM 2016, 68, 496–506. [Google Scholar] [CrossRef]
  69. Rodríguez-Prieto, A.; Camacho, A.M.; Sebastián, M.A. Multicriteria materials selection for extreme operating conditions based on a multiobjective analysis of irradiation embrittlement and hot cracking prediction models. Int. J. Mech. Mater. Des. 2018, 14, 617–634. [Google Scholar] [CrossRef]
  70. Fisher, S.B.; Harbottle, J.E.; Aldridge, N. Radiation hardening in magnox pressure-vessel steels. Philos. Trans. A. Math. Phys. Eng. Sci. 1985, 315, 301–332. [Google Scholar]
  71. KTA 3203; Monitoring the Radiation Embrittlement of Material of the Reactor Pressure Vessel of Light Water Reactors. Nuclear Safety Standards Commission (KTA): Salzgitter, Germany, 2017; pp. 1–18.
  72. ASME B&PVC III; Rules for Construction of Nuclear Facility Components-Division 1-Subsection NE-Class MC Components. American Society of Mechanical Engineers (ASME): New York, NY, USA, 2021; pp. 1–176.
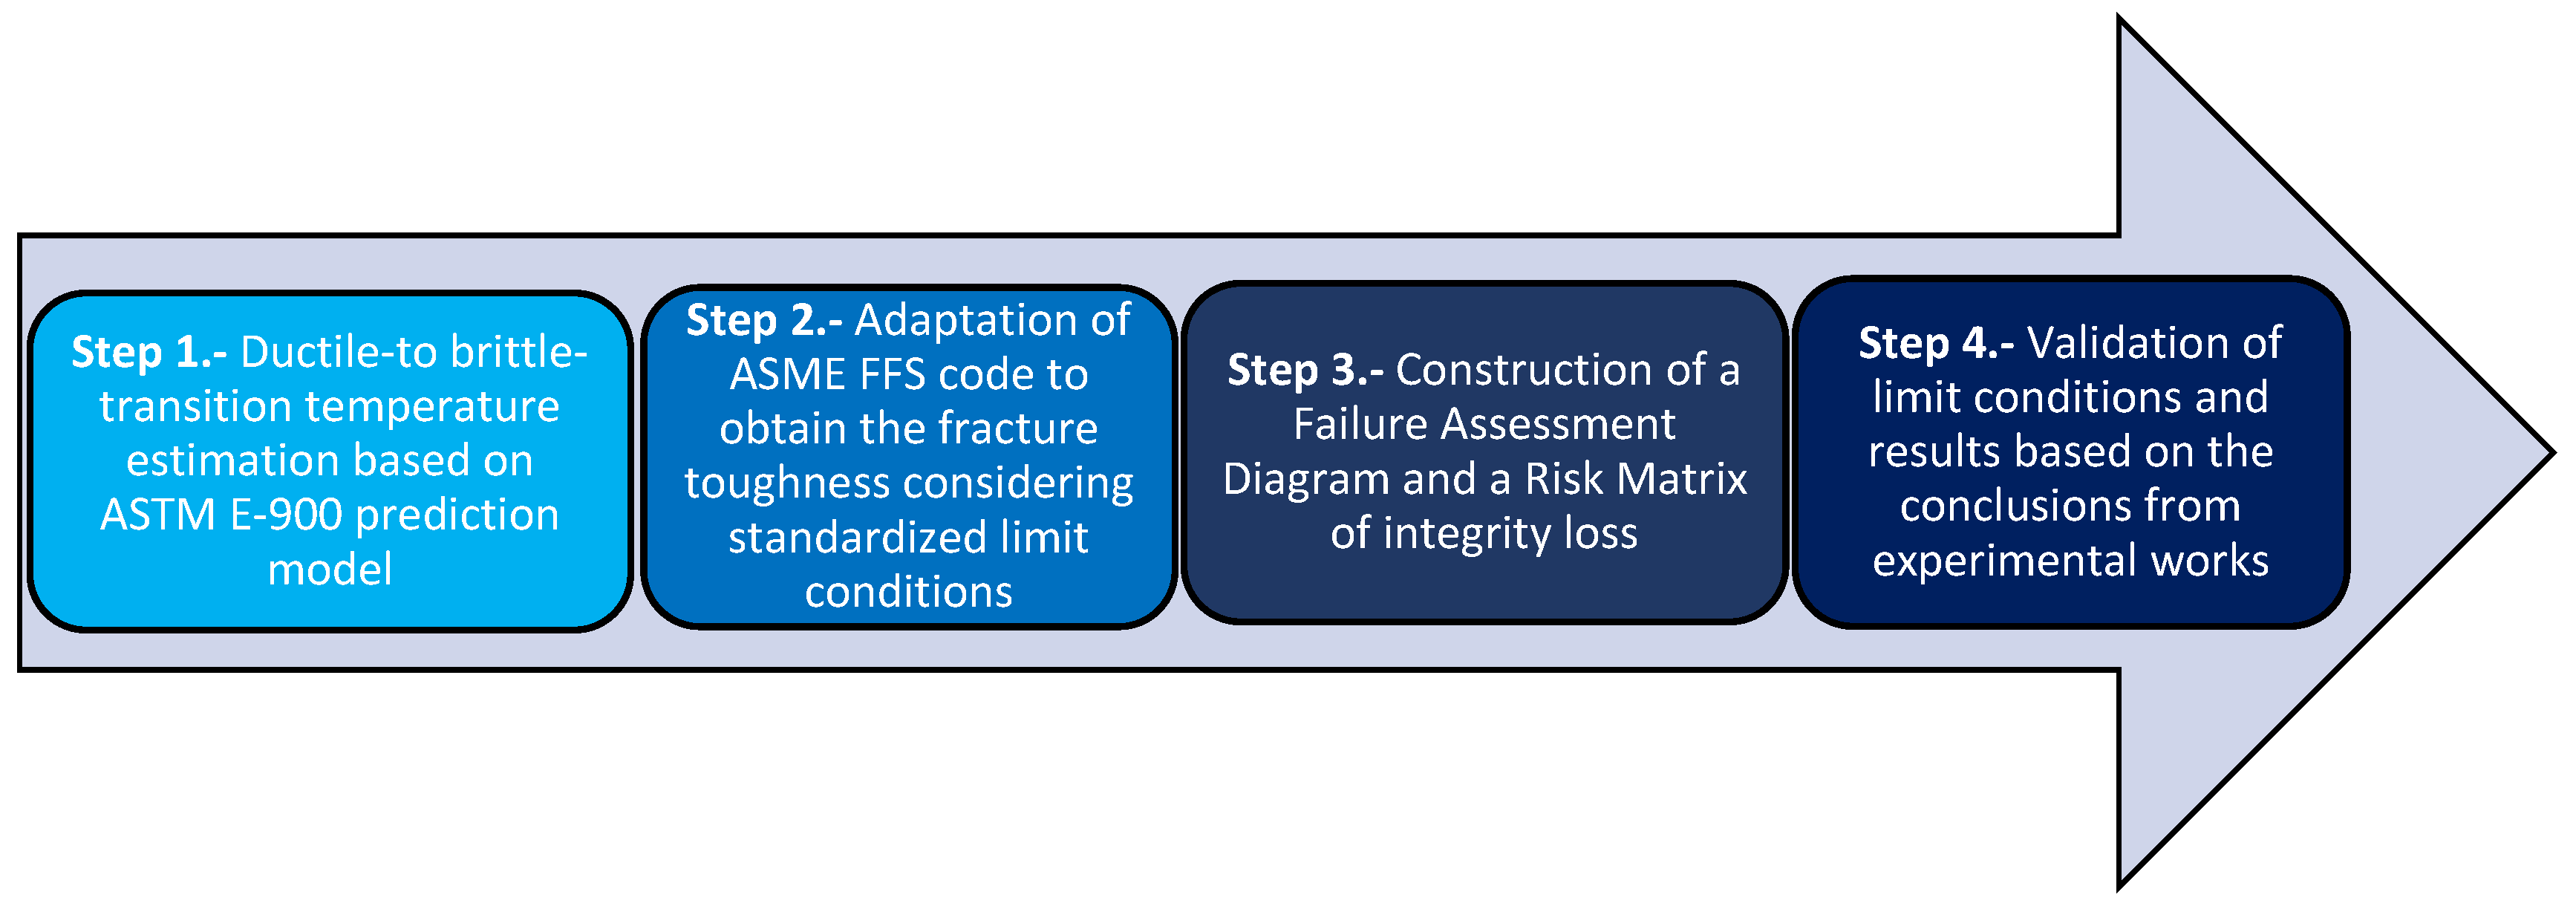
Figure 1. Methodology to perform mechanical integrity prognostics.
Mathematics 10 01779 g001
Figure 2. Irradiation effect on KIC and ΔRTDBT.
Mathematics 10 01779 g002
Figure 3. Failure assessment diagram.
Mathematics 10 01779 g003
Figure 4. Kr for the materials analyzed.
Mathematics 10 01779 g004
Figure 5. Lr for every analyzed material.
Mathematics 10 01779 g005
Figure 6. Risk matrix according to RIL.
Mathematics 10 01779 g006
Figure 7. KIC for the materials analyzed.
Mathematics 10 01779 g007
Figure 8. KIC variation versus temperature compared with the minimum required KIC according to ASME FFS.
Mathematics 10 01779 g008
Figure 9. KIC versus Cu wt% and Ni wt%.
Mathematics 10 01779 g009
Figure 10. Maximum Cu wt% and Ni wt% versus operation temperature to ensure a KIC lower than 220 MPa · √m.
Mathematics 10 01779 g010
Table 1. Parameters used in the SMD and CRP calculation according to ASTM E900-02 model [40,55,56,57].
SMD TermCRP Term
DescriptionValue UsedDescriptionValue Used
Aforging, Aplates6.70 × 1018Bforging128
CTc2.07 × 104BplatesNote 4208 (156)
TcNote 1 (°F)572CNi2.106
CP0Ni (wt%)0–1.2
P Note 2 (wt%)0.02η1.173
φtNote 3(n/cm2)3 × 1019κ0.577
α0.5076Cuth0.072
Note 1: Selected operating temperature
Note 2: Limit proposed by Amayev et al. [56] to limit pernicious effects on mechanical behavior
Note 3: Neutron fluence rate
Note 4: 156 for rolled materials without CE mark
Note 5: Considered 40 years of design
Cu (wt%)0–0.4
Φt (n/cm2)3 × 1019
Ct0
μ18.24
tfNote 5(h)360,000
Table 2. Chemical limits used in the analysis.
RPV MaterialChemical Requirements (Maximum wt%)
CuNi
ASTM A 212 B (rolled)N.S.N.S.
ASTM A 302 B (rolled)N.S.N.S.
ASTM A 543 B (rolled)N.S.4.00
A 336 (rolled)N.S.0.50
ASTM A 533 Grade B Cl.1 (rolled)0.120.73
JIS G-3120 SQV2 A (rolled)N.S.0.70
ASTM A 508 Grade 2 (forging)0.201.00
ASTM A 508 Grade N (forging)0.253.90
DIN 22NiMoCr37 (forging)0.111.00
ASTM A 508 Gr. 3 (forging)0.201.00
DIN 20MnMoNi55 (forging)0.120.85
RCC 16 MND5 (forging)0.200.80
JIS G 3204 SFVQ1A (forging)N.S.1.00
ASTM A 336 Grade F22V (forging)0.200.25
ASTM A 336 Grade F91N.S.1.50
WWER 15Kh2МF (forging)0.300.40
WWER 15Kh2MFA (forging)0.300.40
WWER 15Kh2NMFA (forging)0.300.40
WWER 15Kh2NMFAA (forging)0.080.40
Note 1: NS—not specified.
Publisher’s Note: MDPI stays neutral with regard to jurisdictional claims in published maps and institutional affiliations.