Abstract
This study investigated how welding affects the thermal deformation of square cells produced for casks, which are dry storage containers for spent nuclear fuel. We aimed to minimize structural deformation by utilizing STS316L as the material for the square cells. We explored a method of subdividing the square cells and joining them through butt welding. Keeping the upper plate thickness constant, GTA butt welding was conducted while varying the column’s wall thickness, followed by measurement with a laser vision sensor. The heat conduction and thermal strain were then calculated using a finite element analysis (FEM). Both experimental and analytical results confirmed that there was significant thermal deformation in the cases of thick-walled columns due to variations in heat conduction distribution, with the resulting deformation patterns depending on thickness.
1. Introduction
The integrity of a welded structure denotes its ability to function safely and reliably over an extended period. Several factors contribute to this. Firstly, the choice of materials used in constructing welded structures is paramount. Predominantly, high-strength materials like steel are utilized, and it is essential to select materials with suitable strength and corrosion resistance. Moreover, the welding process significantly influences the integrity of the structure. Employing correct welding techniques and suitable welding materials is imperative to ensure the optimal strength of welded joints. Furthermore, the structural design must be meticulously tailored to suit environmental conditions and intended usage. Rigorous load calculations and strength analyses are indispensable in crafting secure structures.
Spent nuclear fuel must be stored until final processing or disposal. It is generally stored in a welded structure and is divided into temporary storage and intermediate storage. Maintaining storage facilities for spent nuclear fuel is crucial because any leakage of radioactive material can have serious adverse effects on both people and the environment. Today, nuclear power is being promoted as a promising contribution to long-term energy supplies, especially considering the increasing costs of oil and natural gas.
In the nuclear power industry, a cask is a special container used to store used nuclear fuel in dry form or to transport it to intermediate storage facilities. Currently, research on dual-purpose casks for dry intermediate storage and long-distance transportation is being actively conducted in Korea [1,2]. Conceptual design and development research on dry storage modules for spent nuclear fuel is also underway [3]. Studies are also being conducted to optimize the cross-sectional design for ensuring the handling efficiency and structural safety of spent nuclear fuel disposal containers [4].
The internal structure of the cask in a spent nuclear fuel storage facility consists of a canister, basket, disk, and support rod. The basket is an internal structure that supports the spent nuclear fuel and is made of stainless steel plates in the shape of square tubes. The basket used in the spent nuclear fuel storage container is a lattice structure that supports the nuclear fuel rods as well as the storage container. Since spent nuclear fuel rods must be placed within designated spaces, a precise basket structure is required [5]. To manufacture the square tubular basket structures, welding is essential.
When designing the storage container (cask), the possibility of falling accidents during transportation due to unexpected occurrences must be considered. For this reason, impact test research is being actively conducted [6,7], including a study that performed a structural analysis according to continuous impact and drop angles [8].
Considering this design requirement, the square tube structure basket must have excellent shock absorption efficiency, and since the basket is placed within a limited space inside the canister, it must be manufactured with a precise structure.
Recently, a study was conducted to determine the influence of the number and location of weld lines in the production of welded square tube structures on energy absorption parameters. The results of this study showed that welding a sheet plate into a square tube shape at four corners resulted in increased shock absorption efficiency [9]. However, to achieve this, it is necessary to maintain the structure’s uniformity by minimizing thermal deformation caused by welding during manufacturing.
In this study, gas tungsten arc butt welding experiments were performed on a portion of a square tube, and a numerical analysis was conducted using the finite element method. In the past, many comparative analyses have been conducted on the results of GTA butt welding experiments, including thermal–structural analyses [10,11]. Numerous tube joint welding experiments and numerical analysis studies using GTA butt welding have also been conducted [12,13], along with many numerical analysis studies on temperature distribution, and residual stress analyses in GTA T-type joint welding [14,15]. The shapes of the GTA butt welded specimens in previous studies have had a symmetrical structure, and most of the canister internal structures were austenitic stainless steel. Previous studies have shown the results of GTA weld thermal analyses and numerical analyses of residual stress when using stainless steel to manufacture pressure vessels and nuclear reactor components [16,17]. Thermal deformation results from various thicknesses of surface-hardened specimens were analyzed after the GTAW process. The results confirmed that the total deformation of the welded plate was 15 times higher when the specimen thickness was 2 mm, compared to when the specimen thickness was 6 mm [18].
The present study employed a new perspective to conduct basic research on the production of square tube-shaped structures using GTA butt welding. Firstly, this study analyzed the thermal diffusion behavior in an asymmetric structure during welding and proposes a method to minimize thermal deformation. Heat diffusion behavior was confirmed to depend on the asymmetric structure and side wall thickness. Structural thermal deformation is induced as the temperature distribution changes depending on heat diffusion, and that diffusion can be guided in a direction to minimize thermal deformation depending on the structure of the welded specimen. Accordingly, an excellent square tube structure could be manufactured. In this study, numerical analyses and experiments were conducted to compare and analyze heat diffusion in an asymmetric structure and the resulting thermal deformation tendency.
2. Experimental Procedure
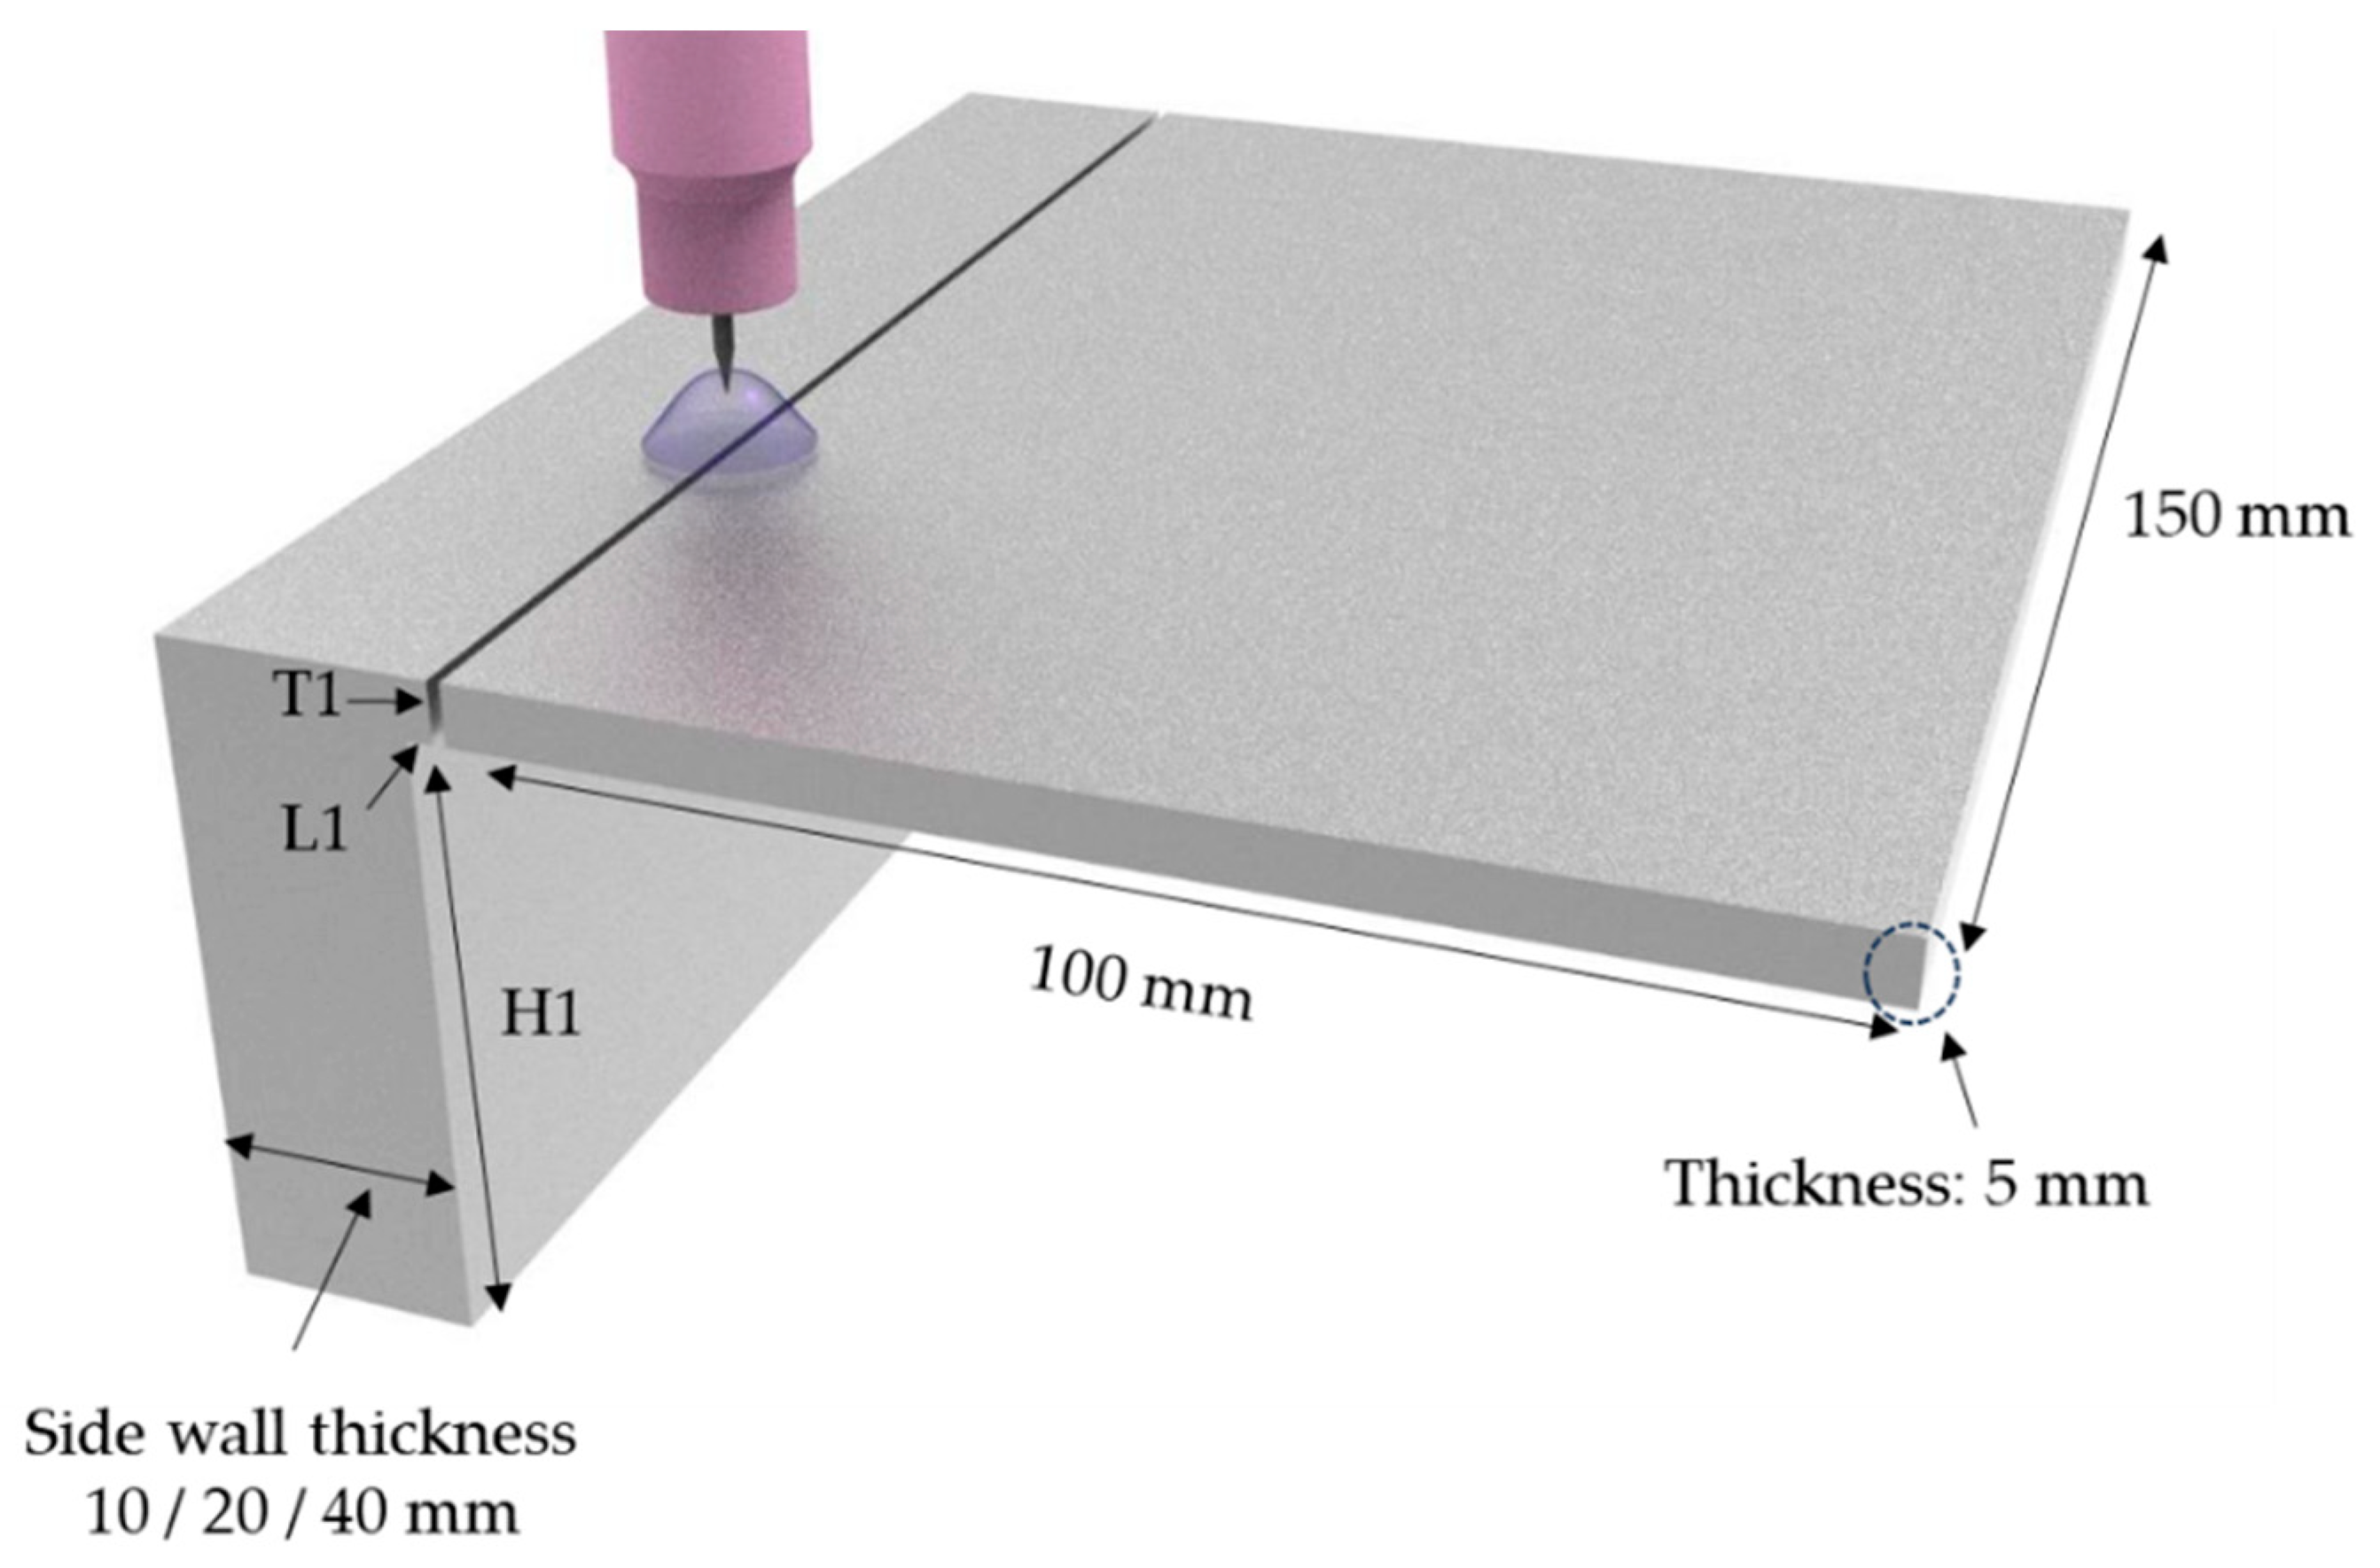
The experimental specimen used was STS316L because the basket of the cask material was STS316L, and its composition is listed in Table 1. The specimen used in this experiment is depicted in Figure 1. It was shaped to allow for the assessment of thermal diffusion, depending on the thickness of the side wall, and the resulting thermal deformation tendency. In the experiment, the gas tungsten arc butt welding method was applied, and the autogenous welding method was conducted without adding filler wire.

Table 1.
STS316L elemental composition (wt.%).

Figure 1.
Specimen shapes.
The process conditions for the GTAW experiment are outlined in Table 2, and the side wall thickness of the specimen was chosen as a welding variable in Table 3. Initially, Case 1 was selected to observe thermal deformation behavior without tack welding. In the subsequent cases, 3-point tack welding was conducted first, positioned 20 mm away from both ends and the center location based on the butt weld line, followed by butt welding.

Table 2.
Welding process conditions.

Table 3.
Experiment case.
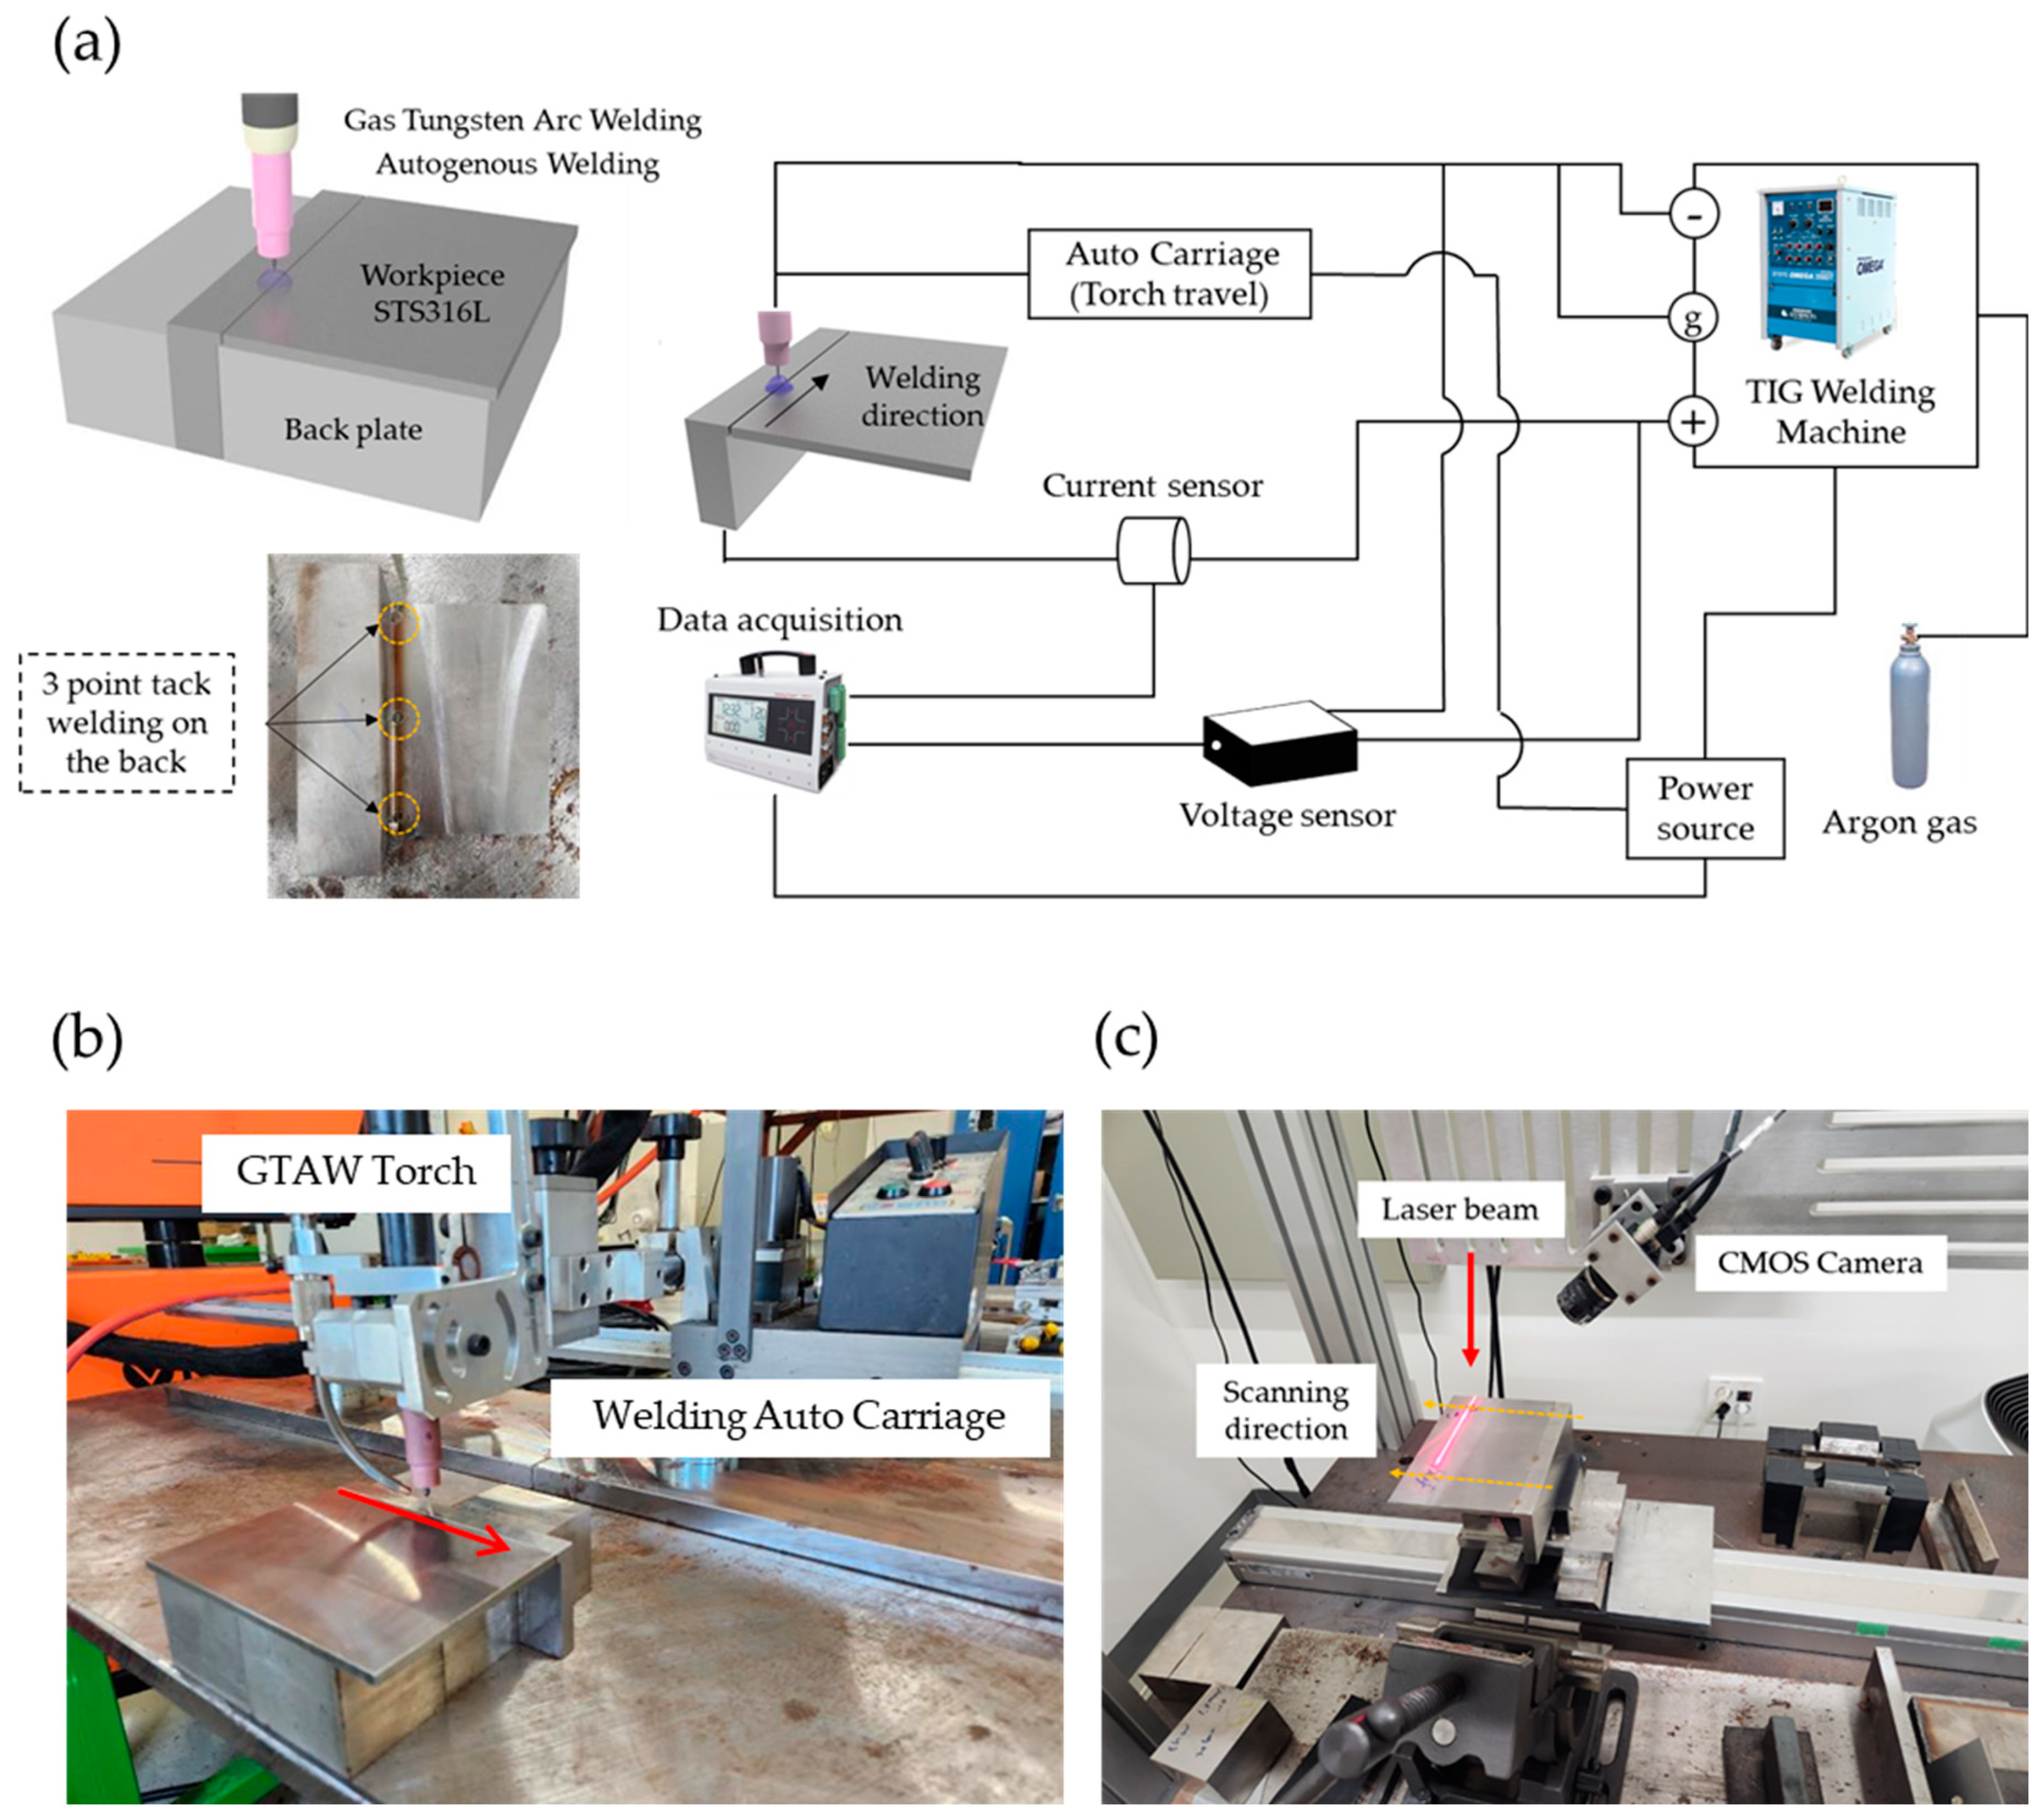
For this experiment, GTAW butt welding was executed using a TIG welding machine (OMEGA-350DT, SAMJIN Wel-tech, Busan, Korea) with a welding torch installed on an automated carriage. Because it was necessary to support the side wall and plate, the experiment was carried out by supporting the back plate in the space below and next to the specimen, as illustrated in Figure 2.

Figure 2.
Gas tungsten arc butt welding process experiment setup and bead profile monitoring setup. (a) Gas tungsten arc butt experiment schematic diagram and tack location information, (b) welding experiment configuration, and (c) specimen deformation measurement after welding experiment: bead profile monitoring setup.
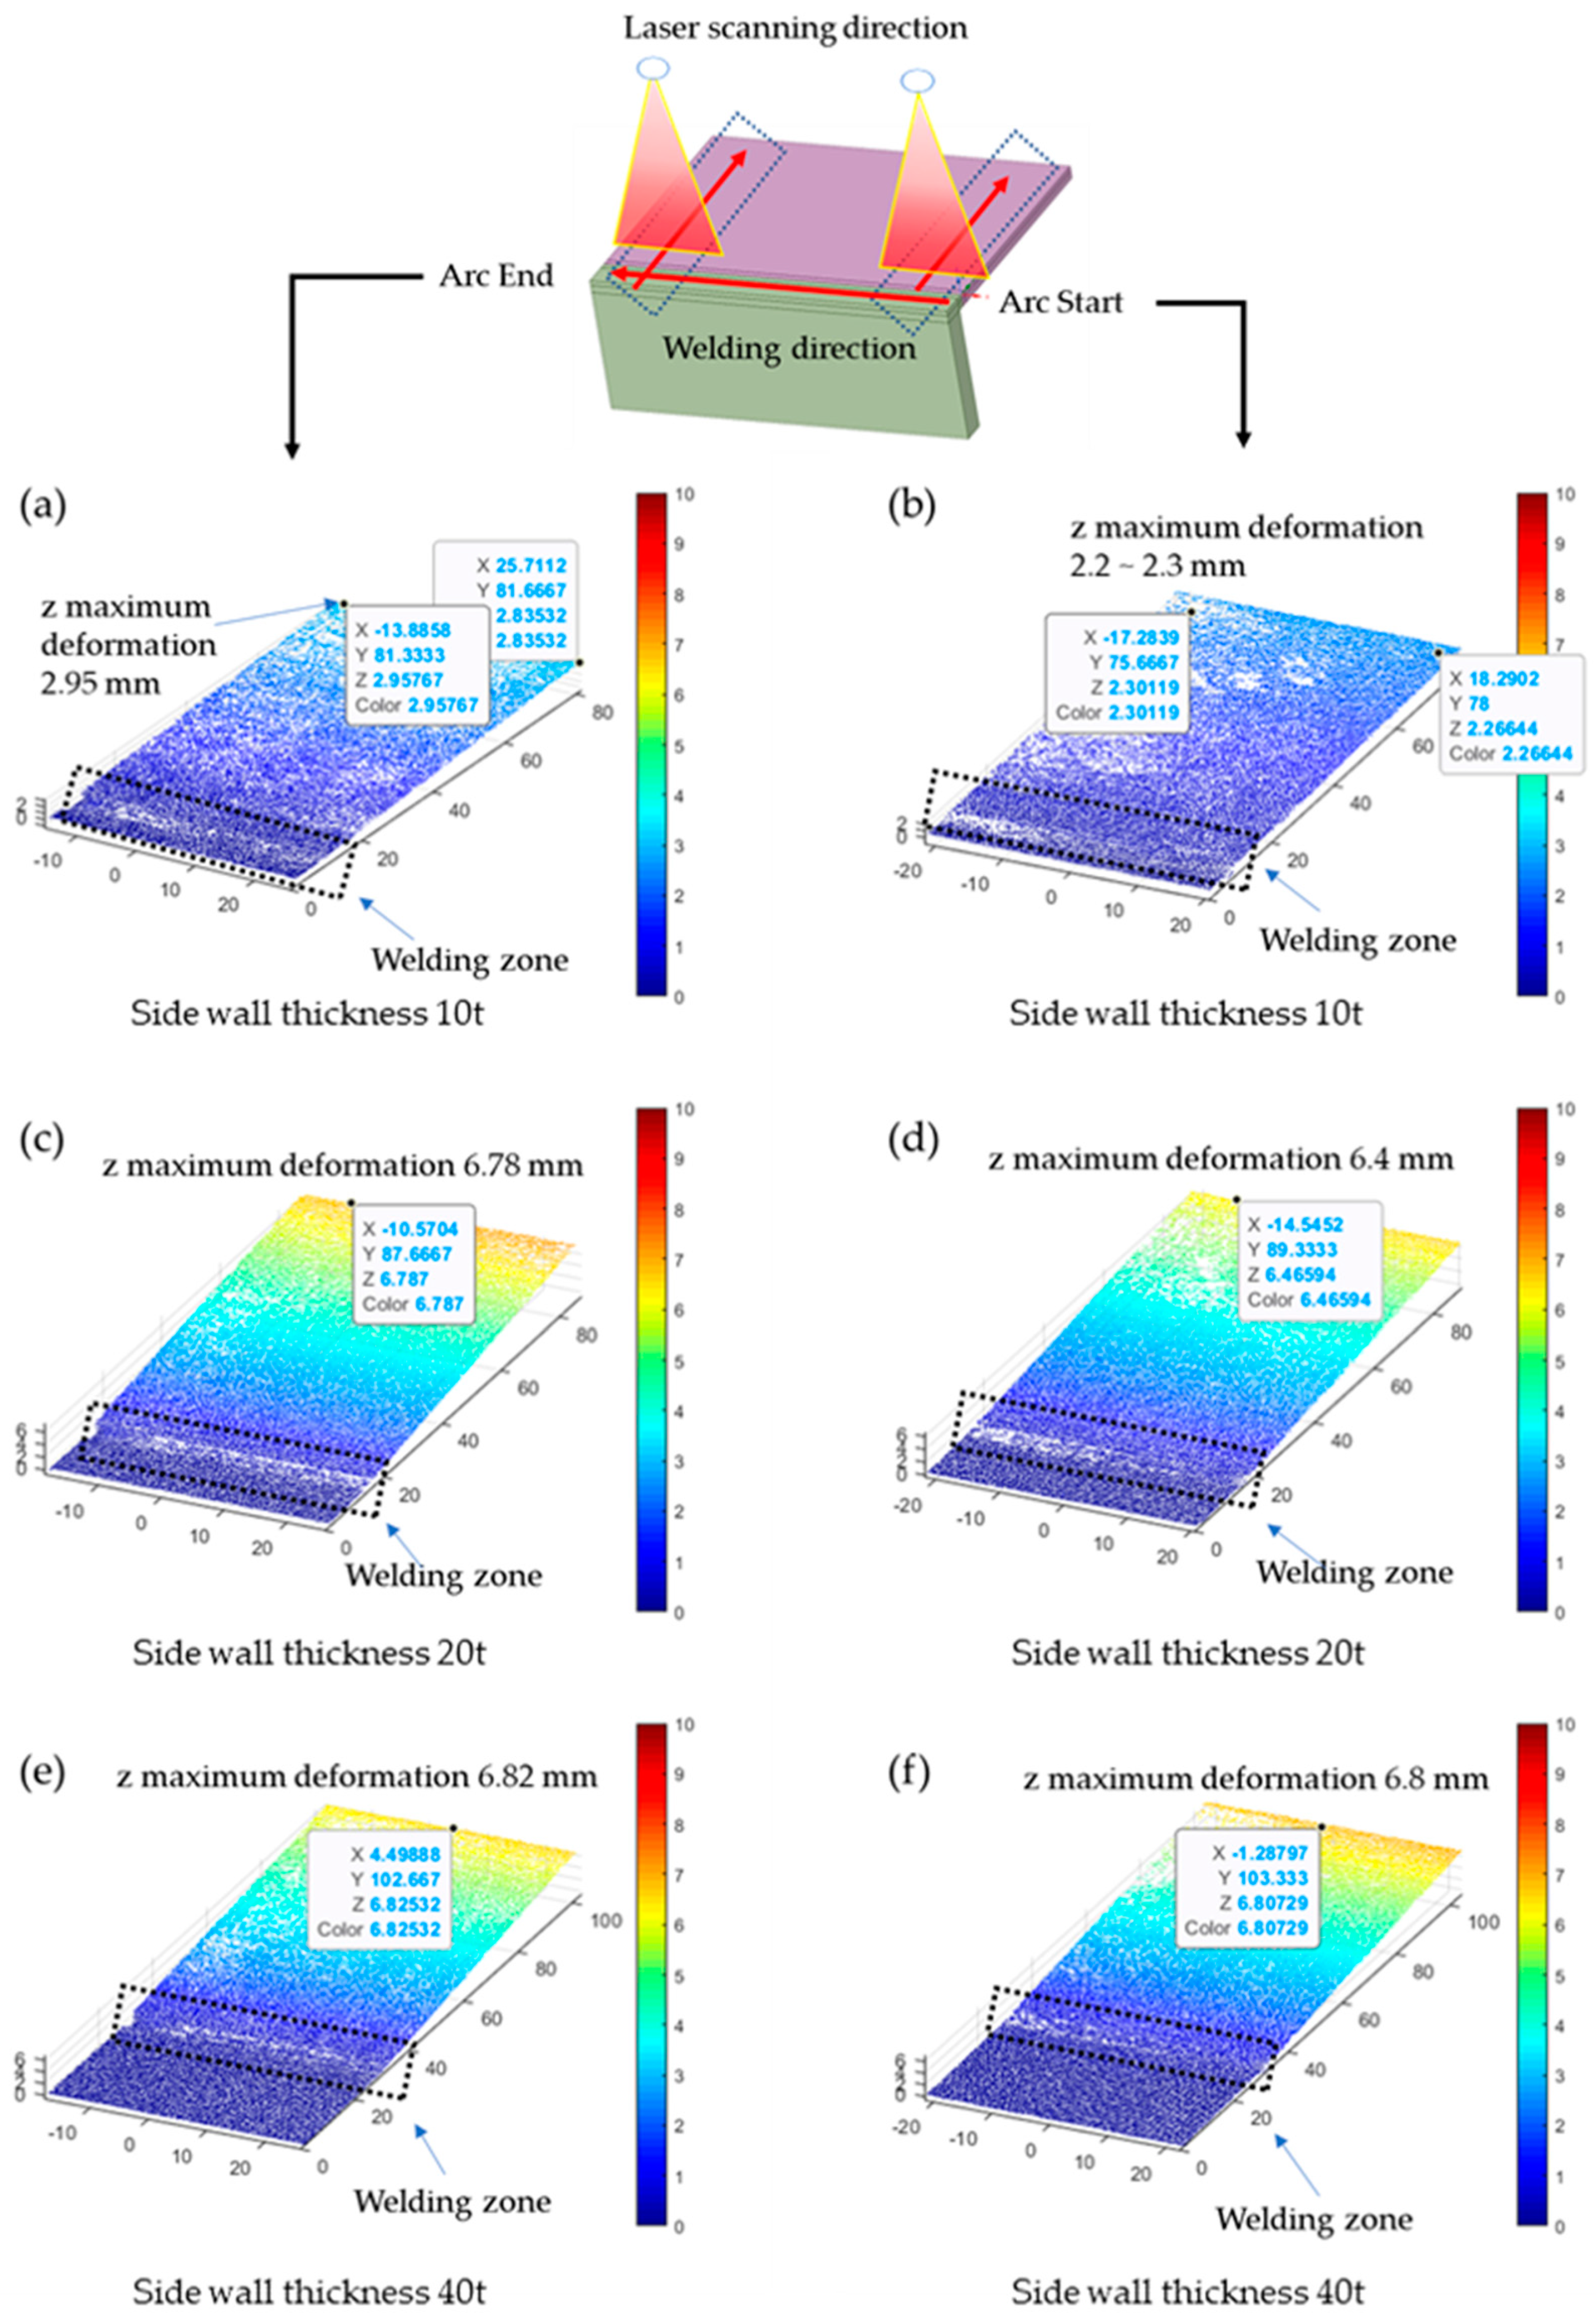
During welding, the current and voltage were measured at a sampling rate of 10 Hz using a monitoring system (WEA-3000, Monitech, Busan, Korea). Thermal deformation measurements for each case were conducted, as depicted in Figure 2c, using a laser (CYL20ADJ, Laser Solution Korea, Ansan, Korea), a CMOS camera (BFS-U3-32S4C-C, FLIR, Wilsonville, OR, USA), and a FWHM (full width at half maximum) 10 nm Bandpass filter (660 nm, Midwest Optics, Palatine, IL, USA). Laser scanning was performed using the optical triangulation method. The laser projected a line pattern onto the specimen’s surface, and the reflected laser was captured by a camera to generate a surface image. The 2D coordinate data obtained through the camera shots were converted into 3D coordinate data to assess the z-displacement change at the end of the plate due to thermal deformation. The experimental results were then compared and analyzed through a numerical analysis.
3. Analytical Model
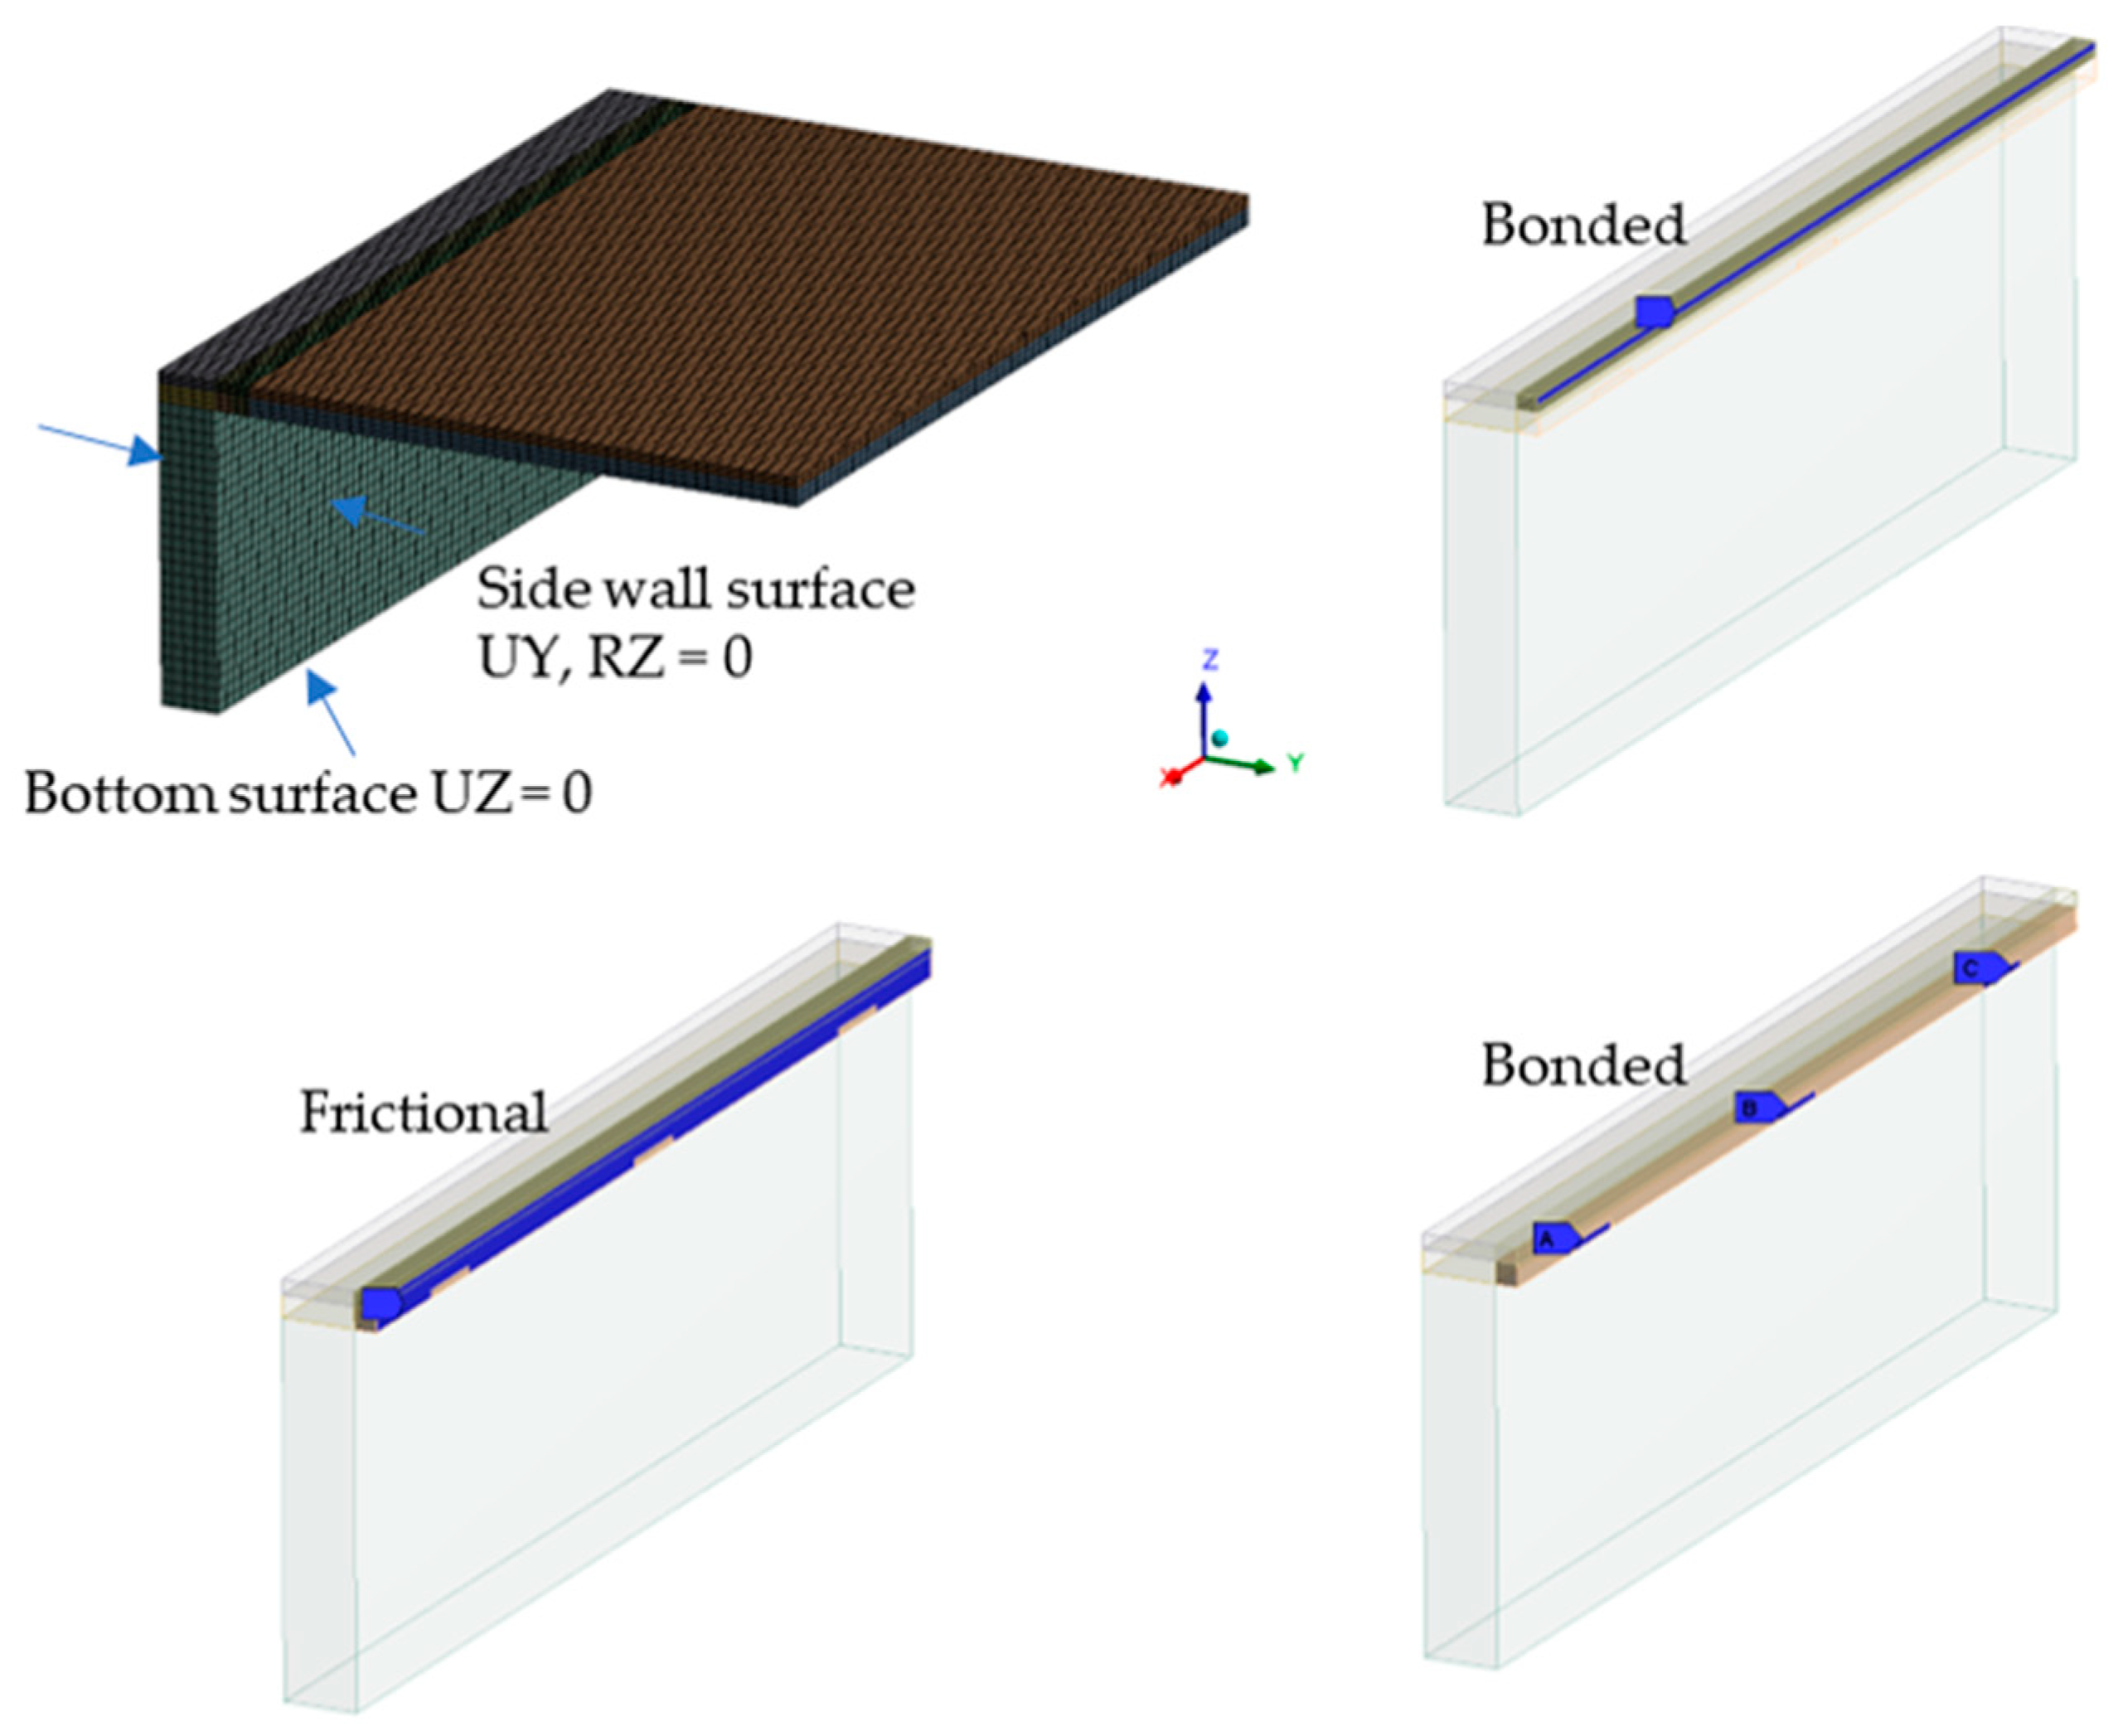
In this study, a numerical analysis was conducted using the finite element method (FEM) with ANSYS 19.1 software. A thermal–structural analysis was performed utilizing the transient thermal and structural model to predict the thermal deformation resulting from welding. The geometry, mesh, and boundary conditions of the analysis model are depicted in Figure 3.

Figure 3.
Mesh and boundary conditions.
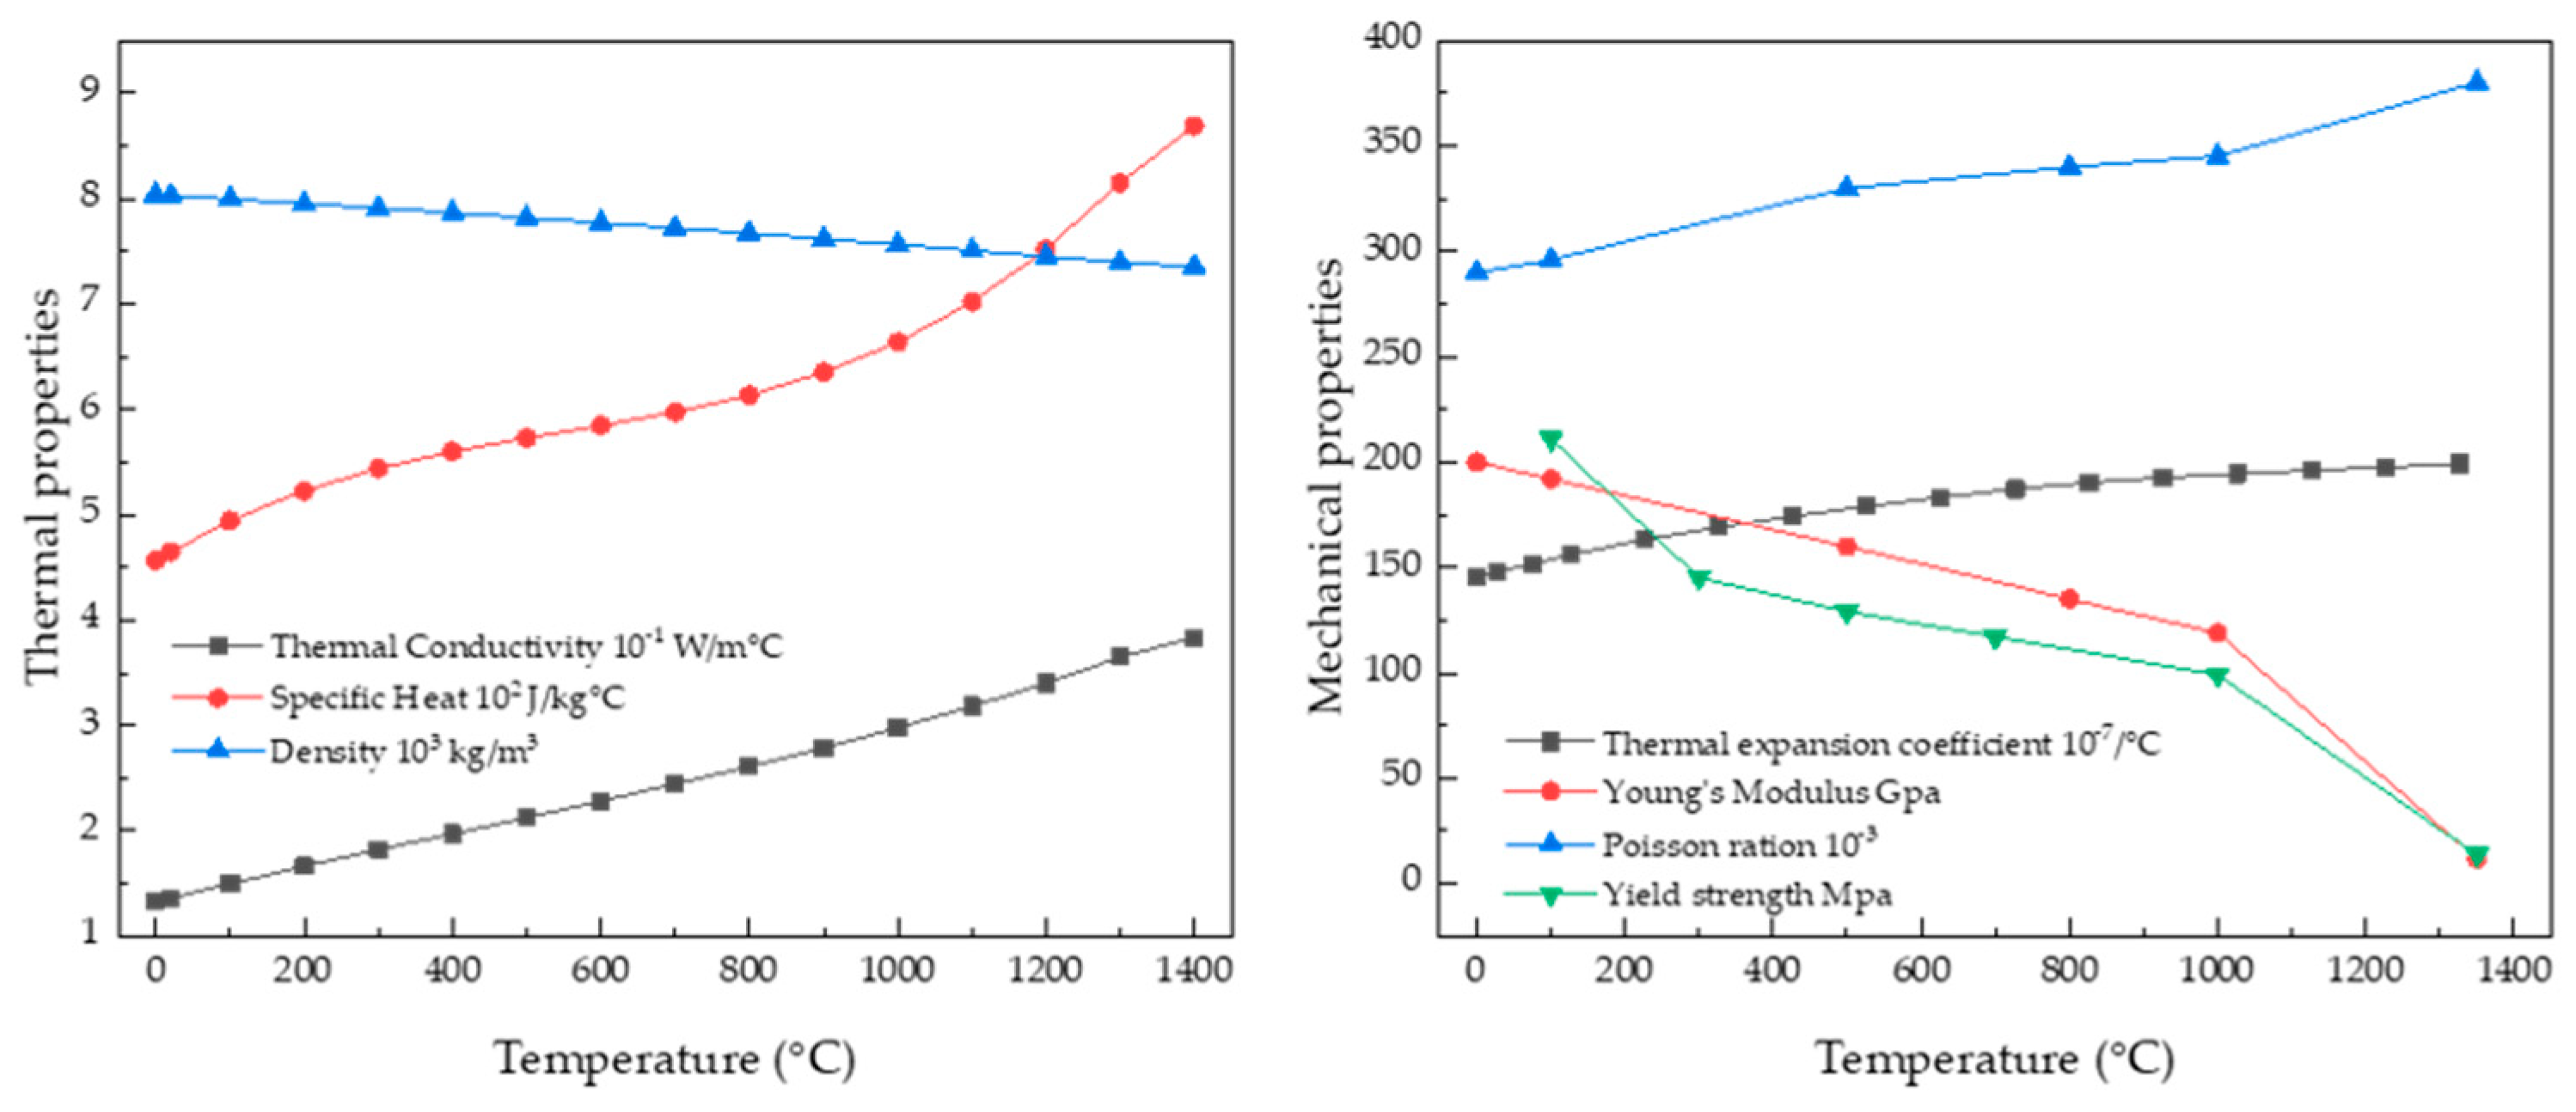
The size of the element was set to 0.5 mm within 3 mm in the +y and −y directions and 2 mm in the −z direction based on the welding center line on the upper plate, and the remaining 3 mm in the −z direction was set to 1mm size. On the side walls, the y and z directions were set to 2 mm, and the element size in the x direction for both the upper plate and side walls was set to 1 mm. Contact conditions were established considering three main scenarios. Firstly, considering the penetration depth of the weld zone, the adhesion condition was set to a depth of 1 mm. The tack welding area was modeled at 5 mm, considering the width of the bead, with the penetration depth also set to 1 mm, thus establishing three regions as adhesion conditions. Lastly, friction conditions were applied to surfaces other than the weld area, with a friction coefficient set to 0.6. The thermal and mechanical properties of the materials used in the simulation model are shown in Figure 4.

Figure 4.
STS316L thermal physical properties [19].
3.1. Thermal Analysis
In the thermal transfer analysis model, the heat source was implemented utilizing the dual-ellipsoidal mathematical model as illustrated in Figure 5 [20]. Parameters , , , and were set to 12 mm, 1.5 mm, 6 mm, and 12 mm, respectively. The dual-ellipsoidal heat source model is commonly utilized in gas tungsten arc welding analyses without additional filler wire. However, the criteria for selecting the parameters of the dual-ellipsoidal heat source model are not clearly defined. In the analysis, the parameters of the heat source model were set larger than the Fusion Zone (FZ) boundary obtained through actual experiments. This discrepancy arose due to the neglect of convective heat transfer driven by the forces acting within the molten pool, which consider only heat conduction phenomena. Thus, a correction of the parameters of the heat source was necessary. These findings indicate the limitations of the dual-ellipsoidal heat source model, which considers only heat conduction phenomena in finite element method (FEM)-based thermal–structural analyses for welding deformation. Therefore, the FZ boundary obtained from actual experiments was not suitable as parameters for the heat source in the analysis. In situations where only heat conduction phenomena are considered, it is necessary to increase the effective radius of the heat source to compensate for the convective heat transfer effects within the molten pool and to uniformly distribute the heat flux. represents the arc efficiency of the heat source and was set to 0.8 [21], the current and voltage were set according to the data measured in the welding experiment, and the welding speed was set to 5 mm/s.
where is the heat distribution of the welding heat source, is the arc efficiency, is the welding voltage, and is the welding current. In Equations (2) and (3), is the welding speed, is the welding time, and , and represent the heat source density distribution of the front half and rear half. and are the factors of the heat deposited in the rear and front quadrants of the double ellipsoid.
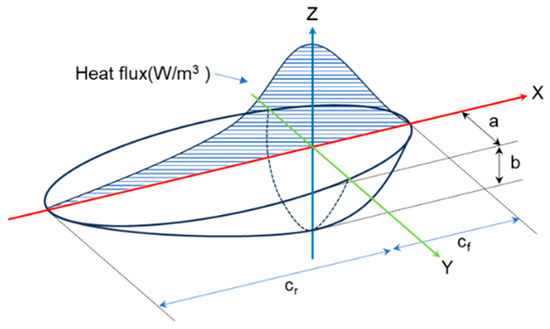
Figure 5.
Double ellipsoid heat source model.
A transient thermal analysis was conducted to examine the heat diffusion behavior over time in an asymmetric structure. The analysis duration was set to 30 s to align with the actual welding experiment time. The natural convection heat transfer coefficient across the entire surface of the welded specimen was specified as 8 W/m2 °C, with an emissivity value of 0.6 [22]. The SOLID90 element was utilized for the analysis, employing uniform mesh settings. This element type offers advanced features, with each node possessing one degree of freedom for temperature. It comprises 8 nodes per element and 20 nodes per solid. The thermal diffusion behavior was scrutinized with enhanced accuracy using this element method.
The thermal analysis follows the equilibrium Equation (6), as described by the following:
where is the internal heat source rate, and , , and are the conductivity, specific heat, and density of the material, respectively. is the heat transfer coefficient by convection, is the surface temperature of the material, is the ambient temperature, is the emissivity, and is the Stefan–Boltzmann constant.
3.2. Mechanical Analysis
In the transient structural analysis, the mesh employed was the same as used previously, and the temperature results were imported corresponding to the time of the heat transfer analysis. The structural analysis was conducted with conditions identical to those in the heat transfer analysis, i.e., for 30 s. The mesh utilized the SOLID186 method, which represents solid geometry with a uniform structure. Each solid comprised 20 nodes, with each node exhibiting displacement behavior in the x, y, and z directions. Refer to Figure 3 for essential contact and boundary conditions relevant to the mechanical structural analysis.
The induced plastic deformation is related to the von Mises criterion and the equivalent stress is defined by the following equation:
where is the equivalent stress and are the principal stresses.
Creep behavior was not considered since the thermal cycle involved in welding does not maintain a constant highest temperature point [23,24]. The calculation of the elastic strain assumes isotropic behavior following Hooke’s law, with the elastic modulus and Poisson’s ratio being temperature-dependent functions.
The total strain can be given by the following equation:
where is the total strain, is the elastic strain, is the plastic strain, and is the thermal strain.
When performing butt welding, since the plate thickness is 5 mm, significant deformation may occur during welding. Therefore, in the analysis settings, the large deformation option for conducting nonlinear analysis was activated.
4. Results and Discussion
The results of Case 1, where tack welding was not performed, revealed upward lifting deformation along the welding progression direction. Excessive deformation occurred at the end of the arc, leading to an attachment between the tungsten electrode and the specimen. Figure 6 demonstrates that a comparable trend was observed in both the experimental and simulation results. However, in the tack welding cases, less pronounced thermal deformation was observed. Hence, for butt structures, such as those depicted in Figure 6, tack welding or mechanical constraints should be applied before welding.
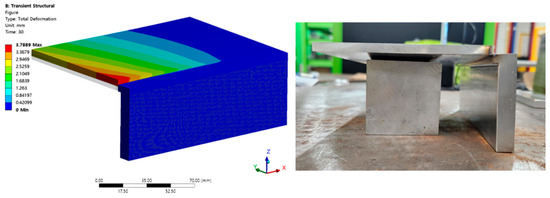
Figure 6.
Non tack welding results.
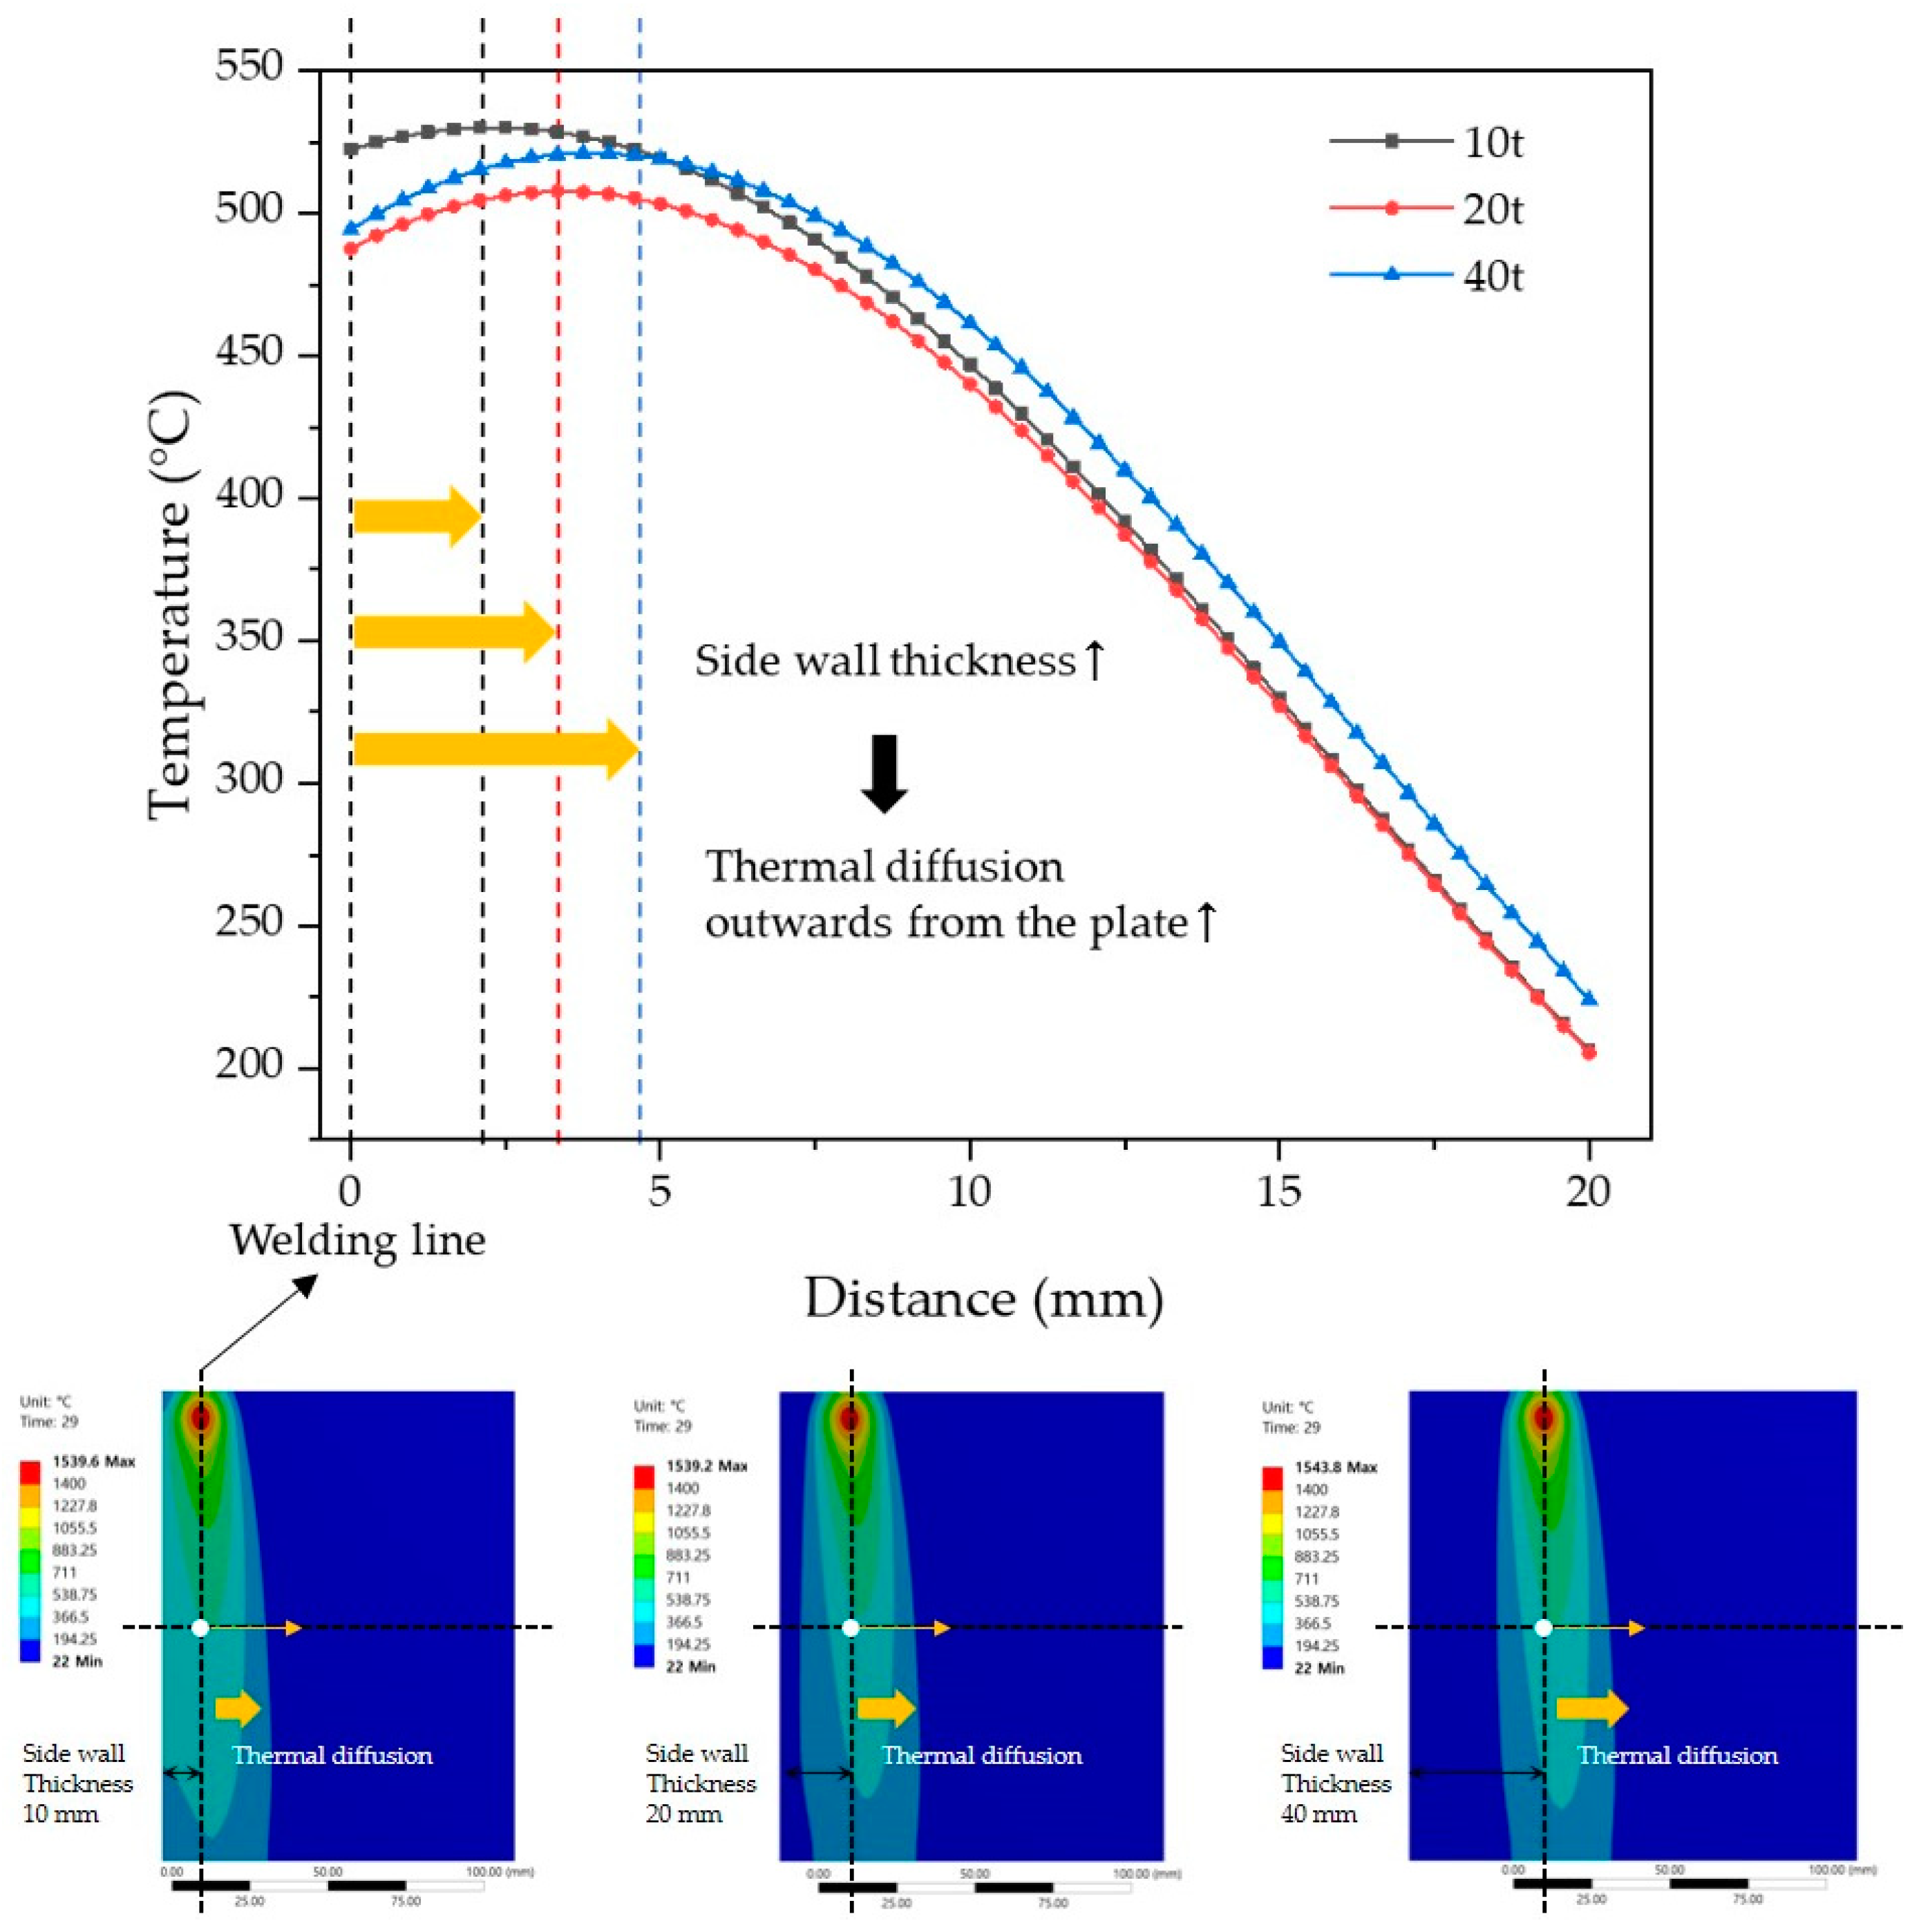
Temperature data taken from along the surface are presented in Figure 7, spanning a distance of 20 mm along the x-axis from the weld center line, with reference to the center of the upper surface of the specimen. Observing the graph, it is evident that as the thickness of the side wall increases, heat diffusion occurs towards the outer regions of the plate. As the side wall thickness increases, the penetration of heat into the side wall diminishes, facilitating smoother heat dissipation to the outer regions of the plate. Examining the graph in Figure 7, at 0 mm the weld center line lies on the x-axis. Near the arc end, there is a more pronounced accumulation of heat towards the outer regions of the plate from the weld center line, resulting in an asymmetry in the temperature distribution.
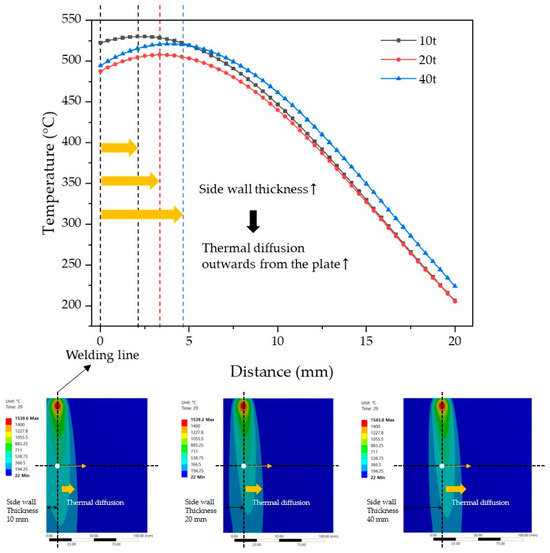
Figure 7.
The temperature distribution according to the thermal diffusion on the surface of the specimen.
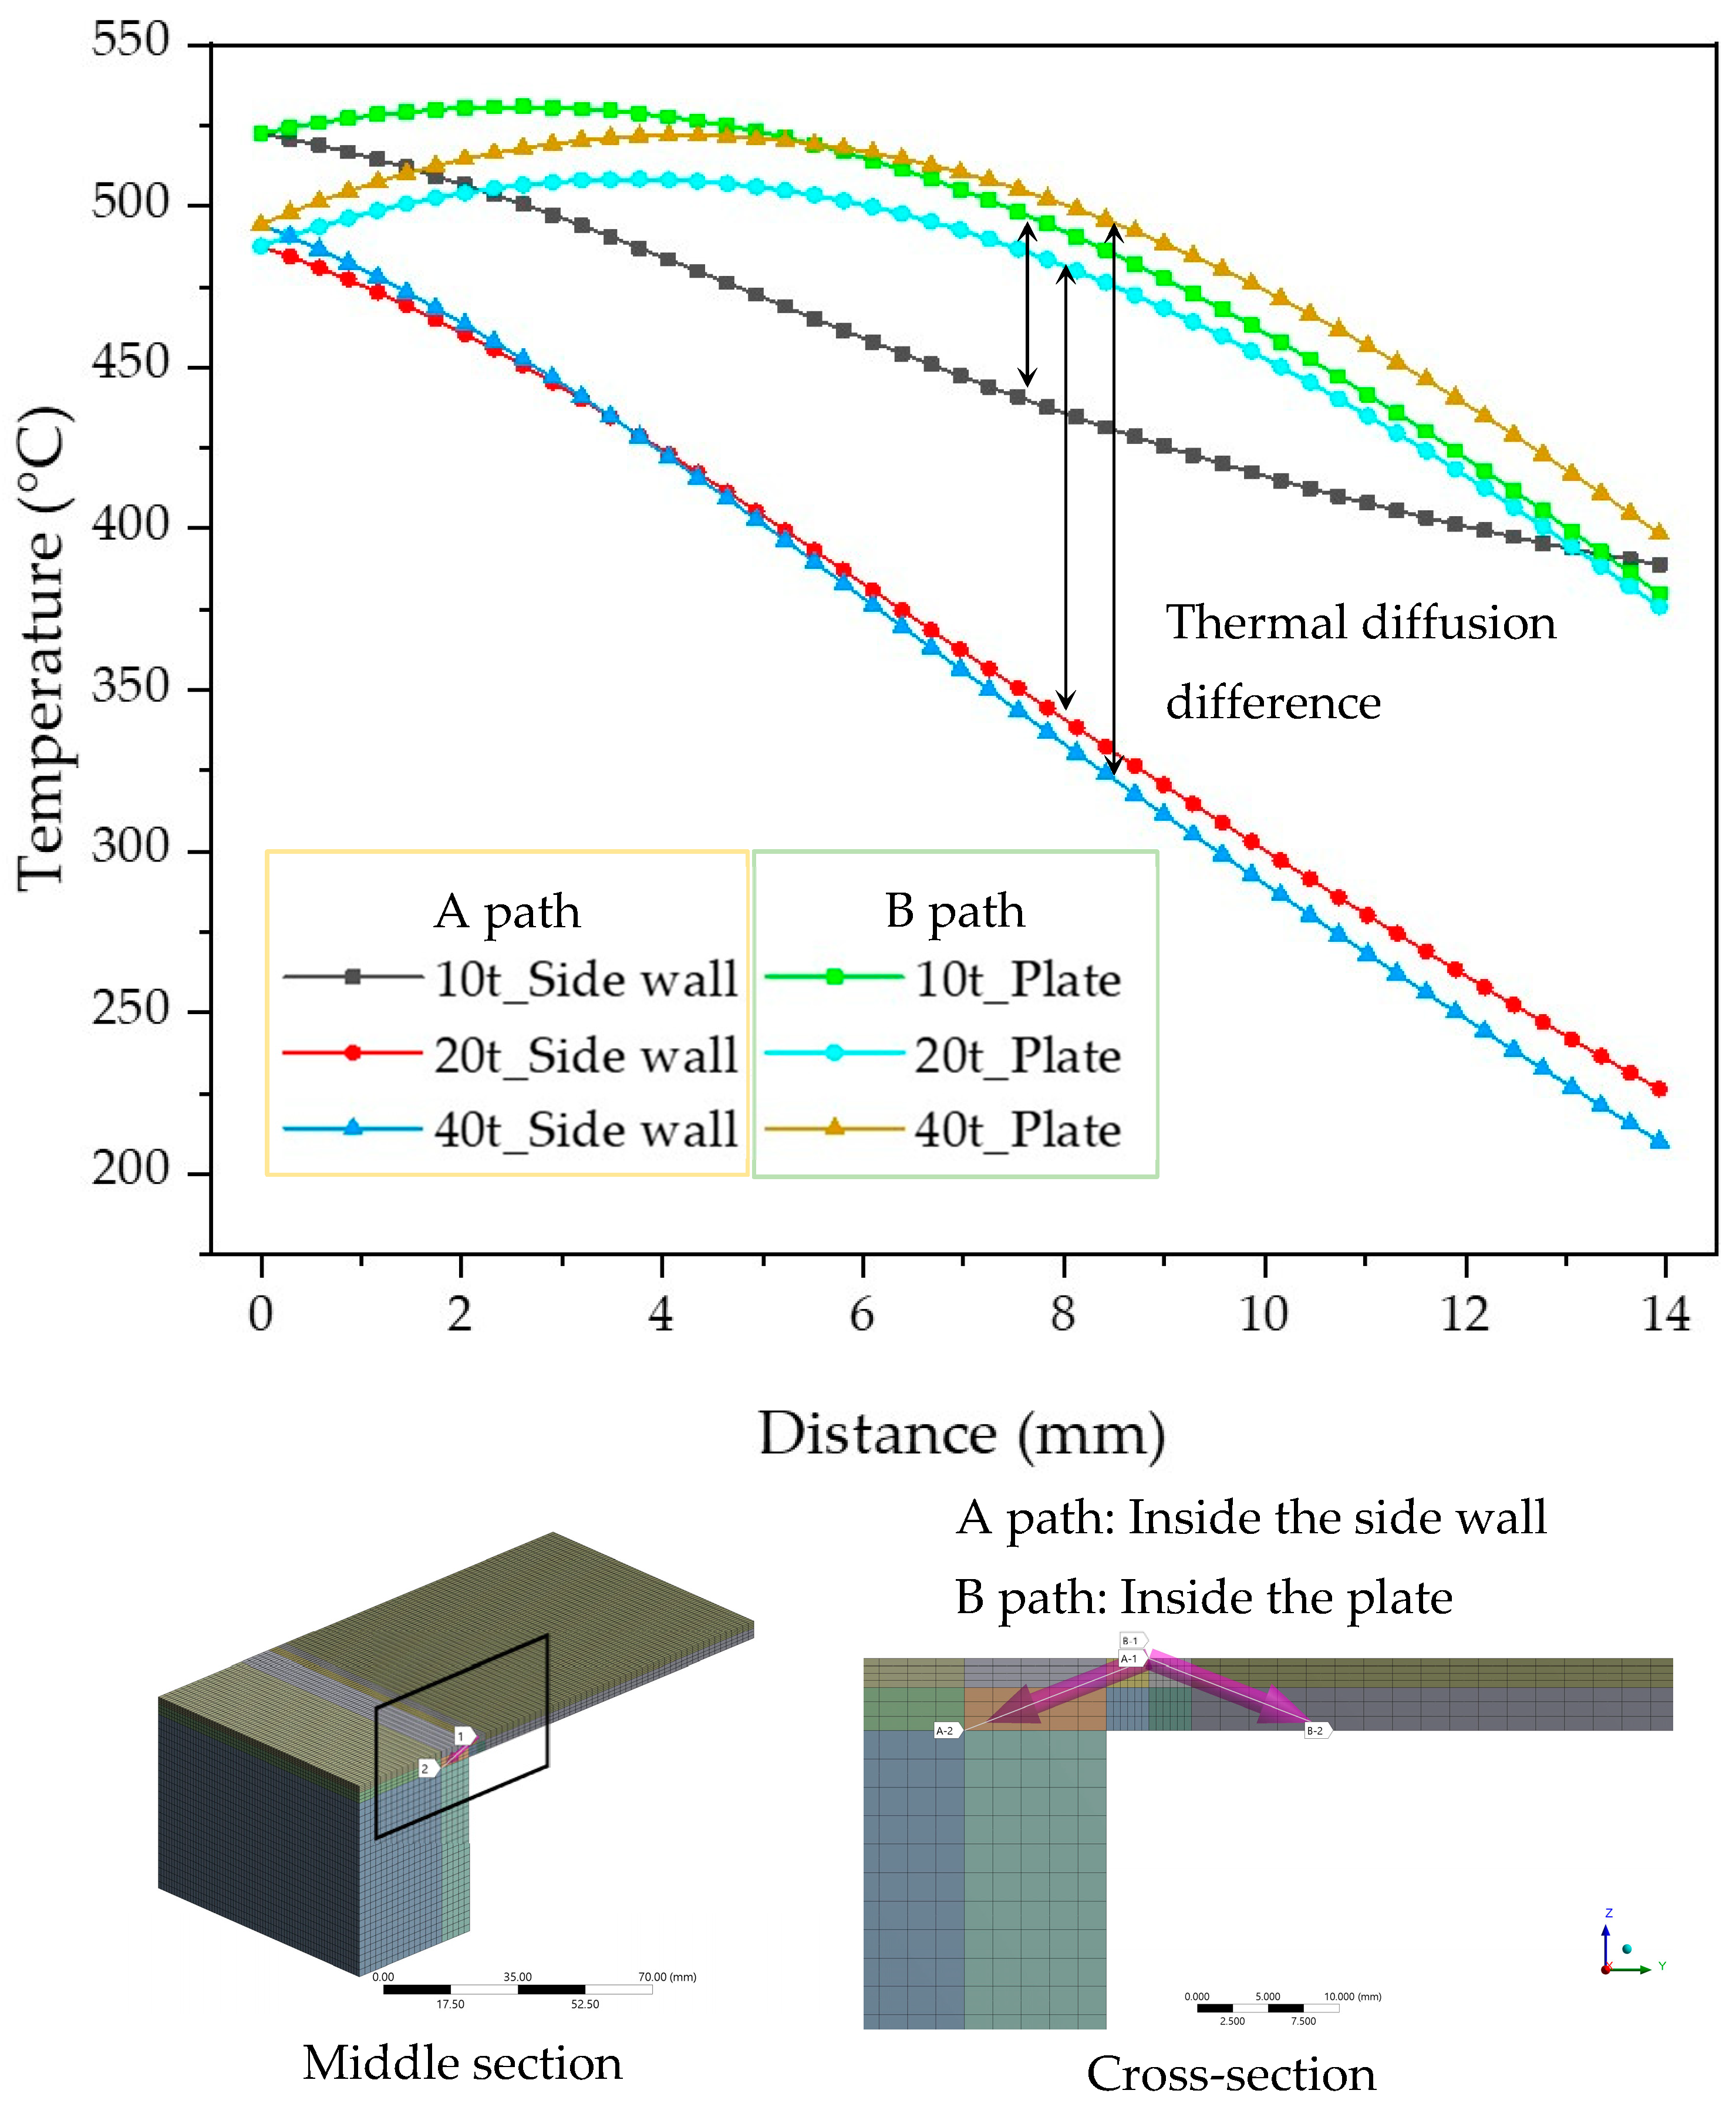
To compare thermal diffusion based on side wall thickness, a symmetrical path was established within the specimen, centered on the weld line. The temperature results corresponding to distance are depicted in Figure 8. Subsequently, when the side wall thickness is 10 mm, thermal diffusion is most symmetrically spread. However, as the thickness increases, thermal diffusion extends beyond the plate, resulting in increased asymmetry. It is observed that the largest temperature difference occurred when the side wall thickness was 40 mm.
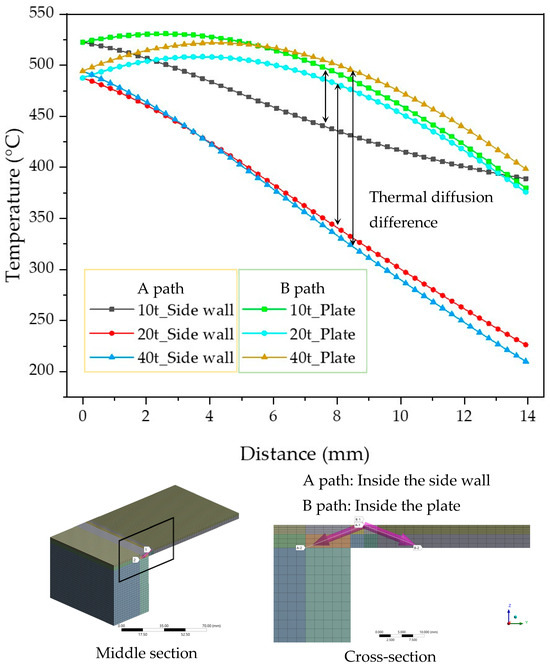
Figure 8.
Thermal diffusion balance results according to side wall thickness.
Figure 9 presents a comparison of cooling rates and thermal diffusion towards the side wall when monitoring the temperature over time, with a focus on the node point designated at the corner of the side wall. The graphs display varying maximum temperature outcomes depending on the thickness of the side walls. In the case of the thickest side wall, 40t, the maximum temperature is relatively lower compared to the results of other side wall thicknesses, indicating that heat diffusion into the interior of the side was not as effective. Such results suggest that temperature non-uniformity may lead to structural distortion or thermal deformation from a structural standpoint. As the heat source progresses, it reaches its peak temperature, followed by continuous heat conduction during the cooling phase. Given that the node location is at the edge of the side wall, it was anticipated that the cooling rate would significantly slow down if heat penetration occurred smoothly near the side wall. Consequently, the cooling rate increases with the increase in side wall thickness. However, the cooling rates for thicknesses of 20t and 40t are nearly similar, as demonstrated in the results. This is because increasing the thickness of the side walls promotes heat transfer outward from the plate and delays heat diffusion inward within the side walls. Consequently, thicker wall sections exhibit faster cooling rates at nodal positions, whereas relatively thinner 10t sections demonstrate slower cooling rates.
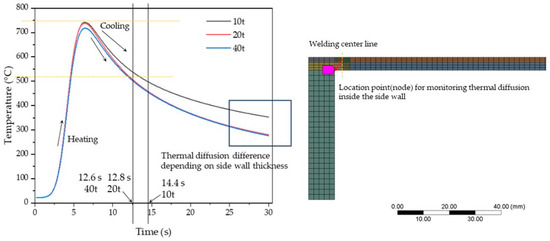
Figure 9.
The cooling rate in the side wall edge node.
A structural analysis was conducted utilizing the temperature distribution diagram obtained from the heat transfer analysis, and the thermal deformation results are illustrated in Figure 10. Upon comparing and analyzing the results based on side wall thickness, it is clear that the deformation increases with increasing wall thickness. However, the results for thicknesses of 20t and 40t have similar amounts of deformation. This trend parallels the findings of the heat transfer analysis and can be attributed to differences arising from internal thermal diffusion. More specifically, in conjunction with the temperature distribution from the thermal transfer analysis, it can be explained that for a sidewall thickness of 10t, internal heat diffusion occurs relatively smoothly along the sidewall direction compared to other sidewall thicknesses, resulting in a symmetric temperature distribution along the sidewall direction and towards the outside of the plate, thereby minimizing thermal deformation. Conversely, as the sidewall thickness increases, heat is induced to dissipate outward from the plate. For sidewall thicknesses of 20t and 40t, the heat diffusion rates show little difference and cooling rates are similar, resulting in a structural analysis indicating a deformation difference of approximately 0.2 mm at the maximum plate end. These interpretations are based on welding conditions with clamping; therefore, while significant thermal deformation in the welding direction is absent without clamping, a slight upward trend is consistently observed. As the sidewall thickness increases, longitudinal deformation decreases, but transverse deformation becomes more pronounced, rendering it unsuitable for structural fabrication. At the maximum plate end, the maximum deformation value for a sidewall thickness of 40t is approximately twice as large as that for 10t. Given these trends, reducing sidewall thickness can promote smooth internal heat diffusion along the sidewall direction, achieving thermal symmetry and minimizing thermal deformation.
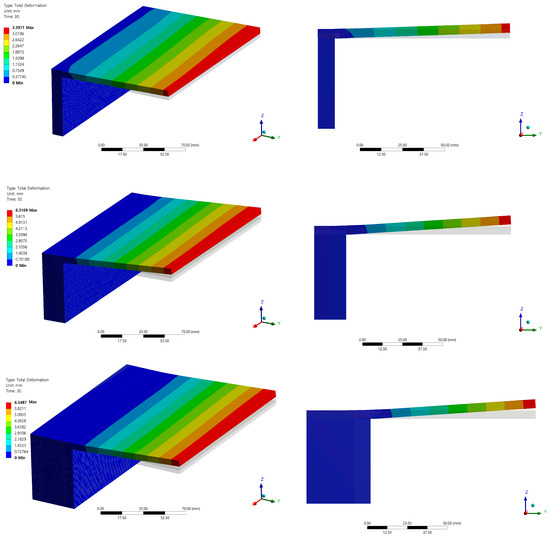
Figure 10.
Total deformation with side wall thicknesses of 10/20/40 t.
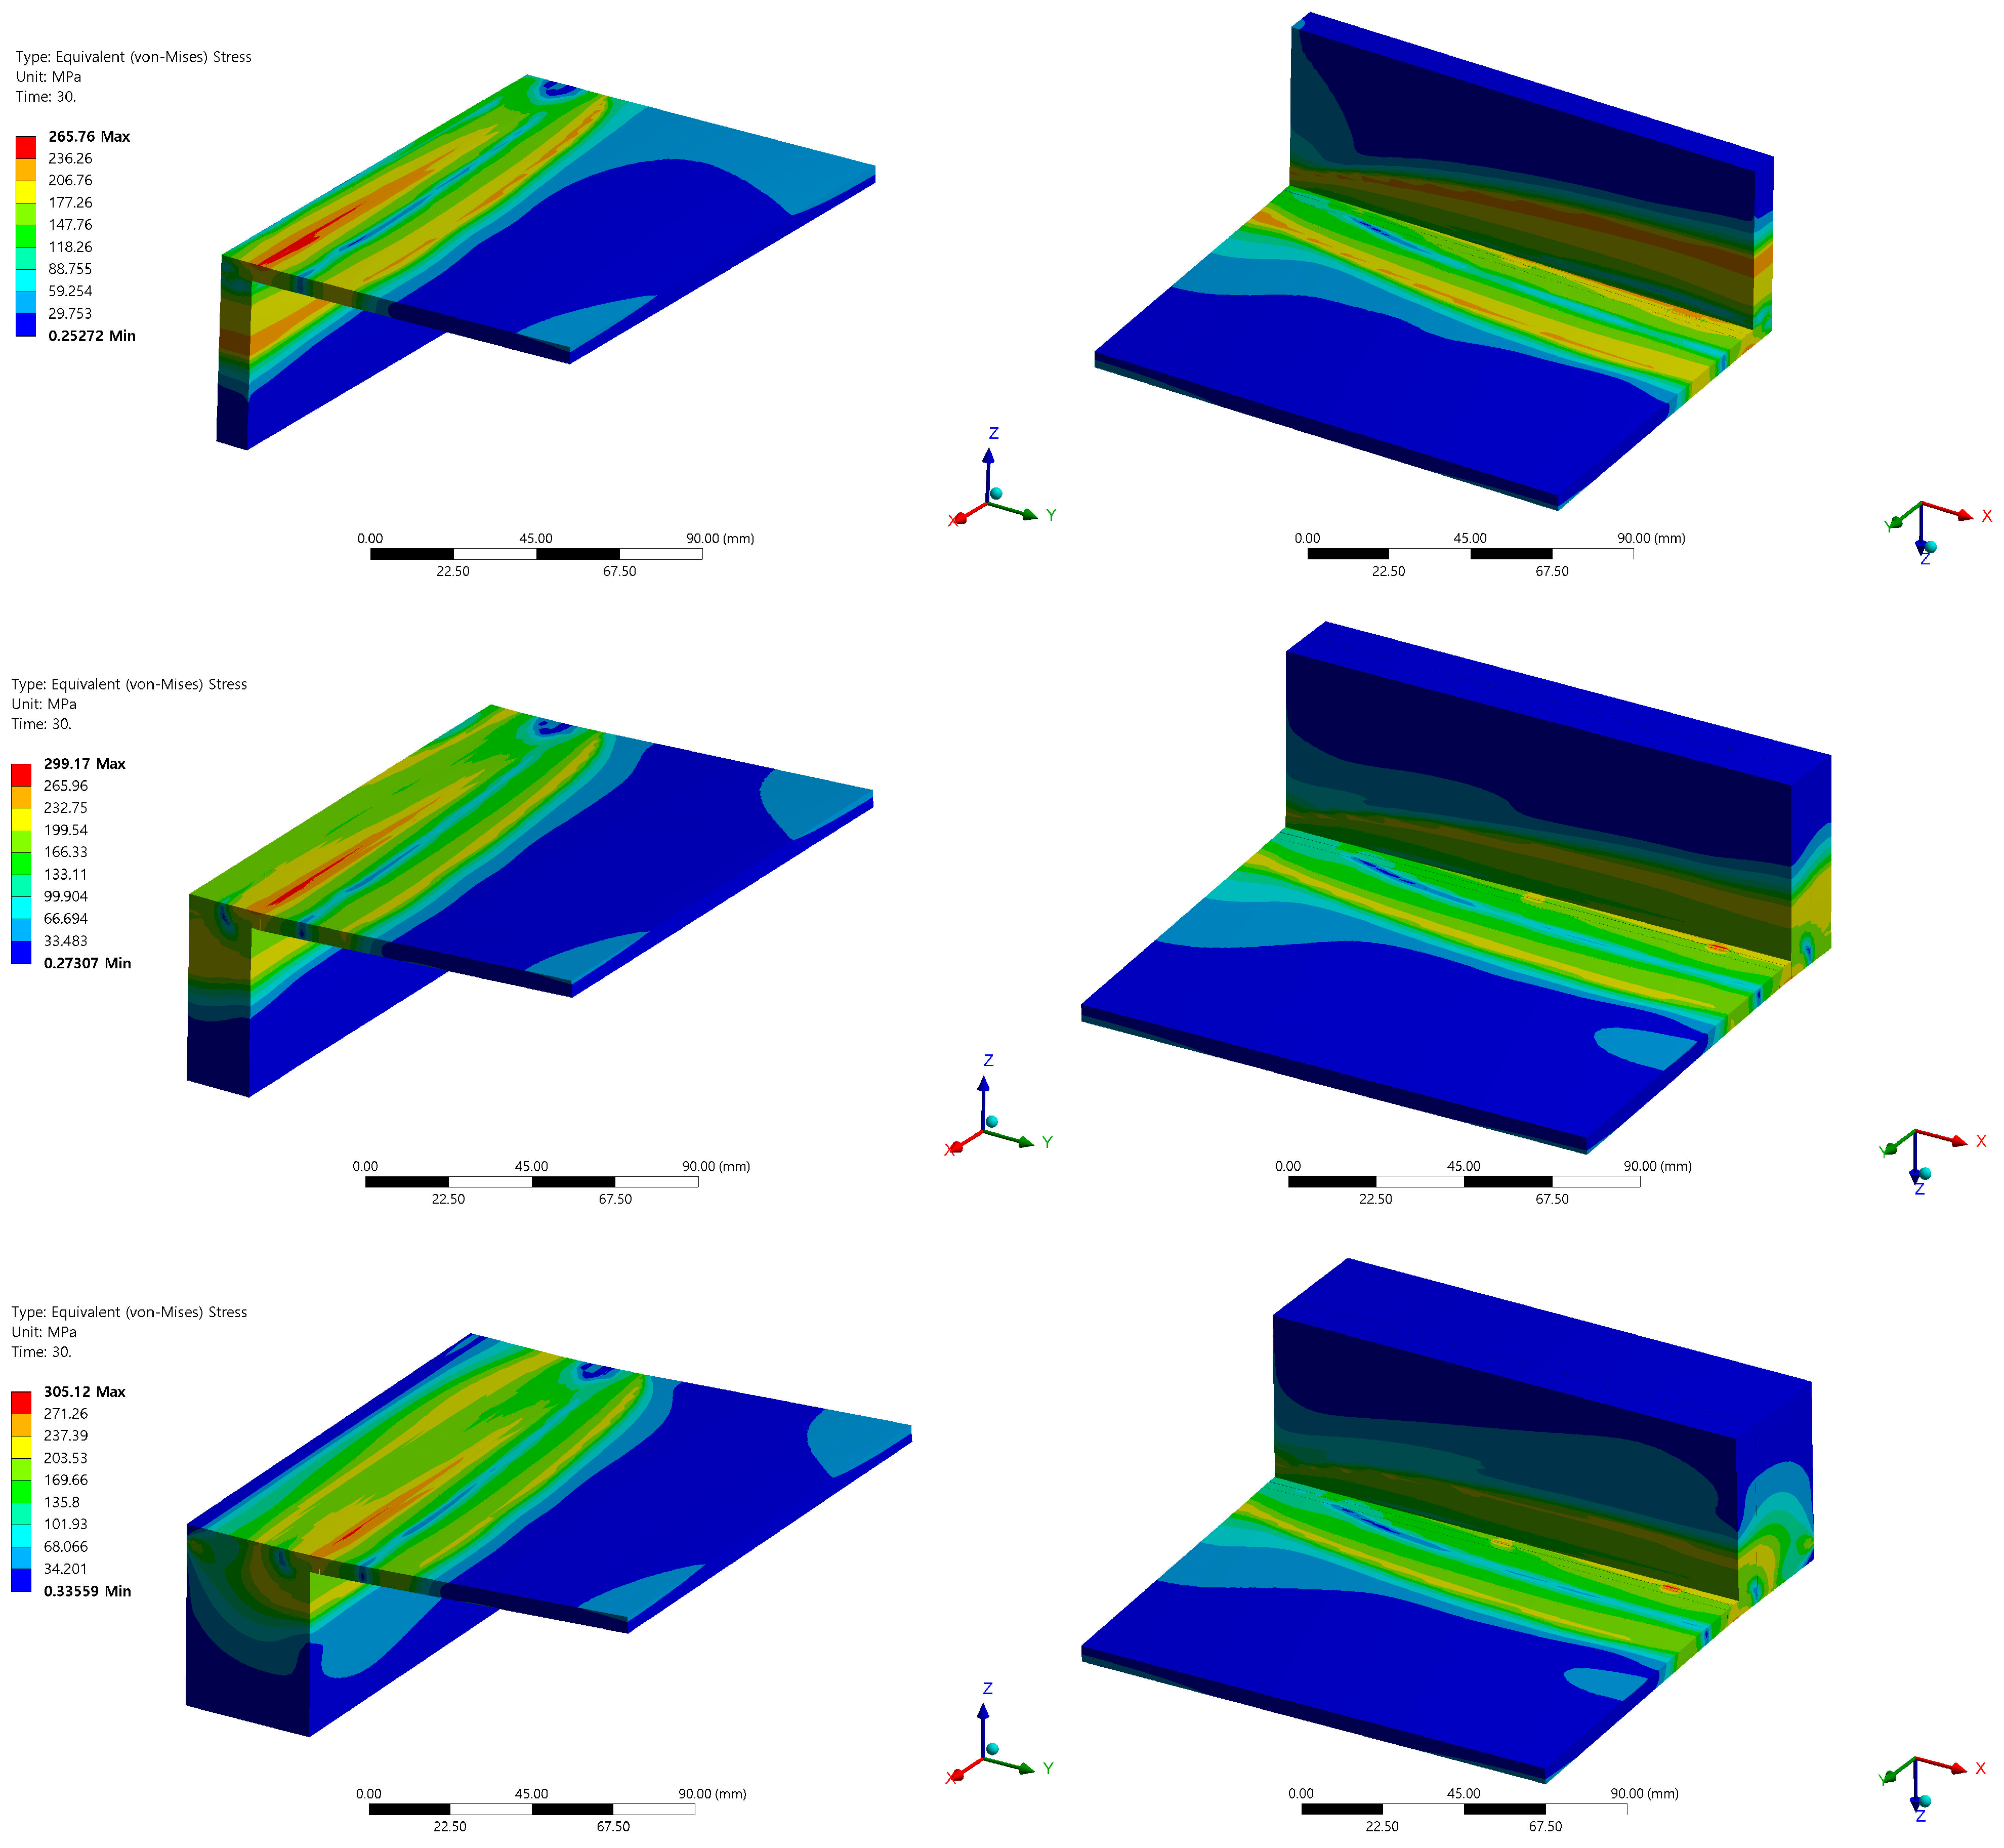
The von Mises stress distribution results at the end of the arc are depicted in Figure 11. Typically, welding cracks and defects require examination as they often manifest at the beginning and end of an arc. The heat source is the last to enter at the end of the arc, so excluding the end reveals the overall tensile residual stress along the weld line, as well as compressive residual stress existing near the weld line. Notably, residual stress is most pronounced near the arc start, which creates a risk of welding cracks as it approaches the yield stress level of the STS316L material.
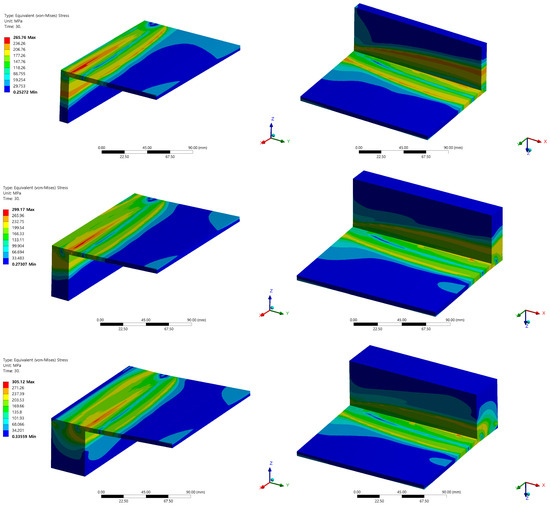
Figure 11.
von Mises stress with side wall thicknesses of 10/20/40 t.
Significant stress accumulation is confirmed in the tack-welded area on the back of the specimen. It is noted that thicker side walls correspond to larger residual stress, although there is no significant numerical difference between the results for 20t and 40t. The evaluation of the residual stress values determined they are within a safe range compared to tensile stress, indicating no structural concerns.
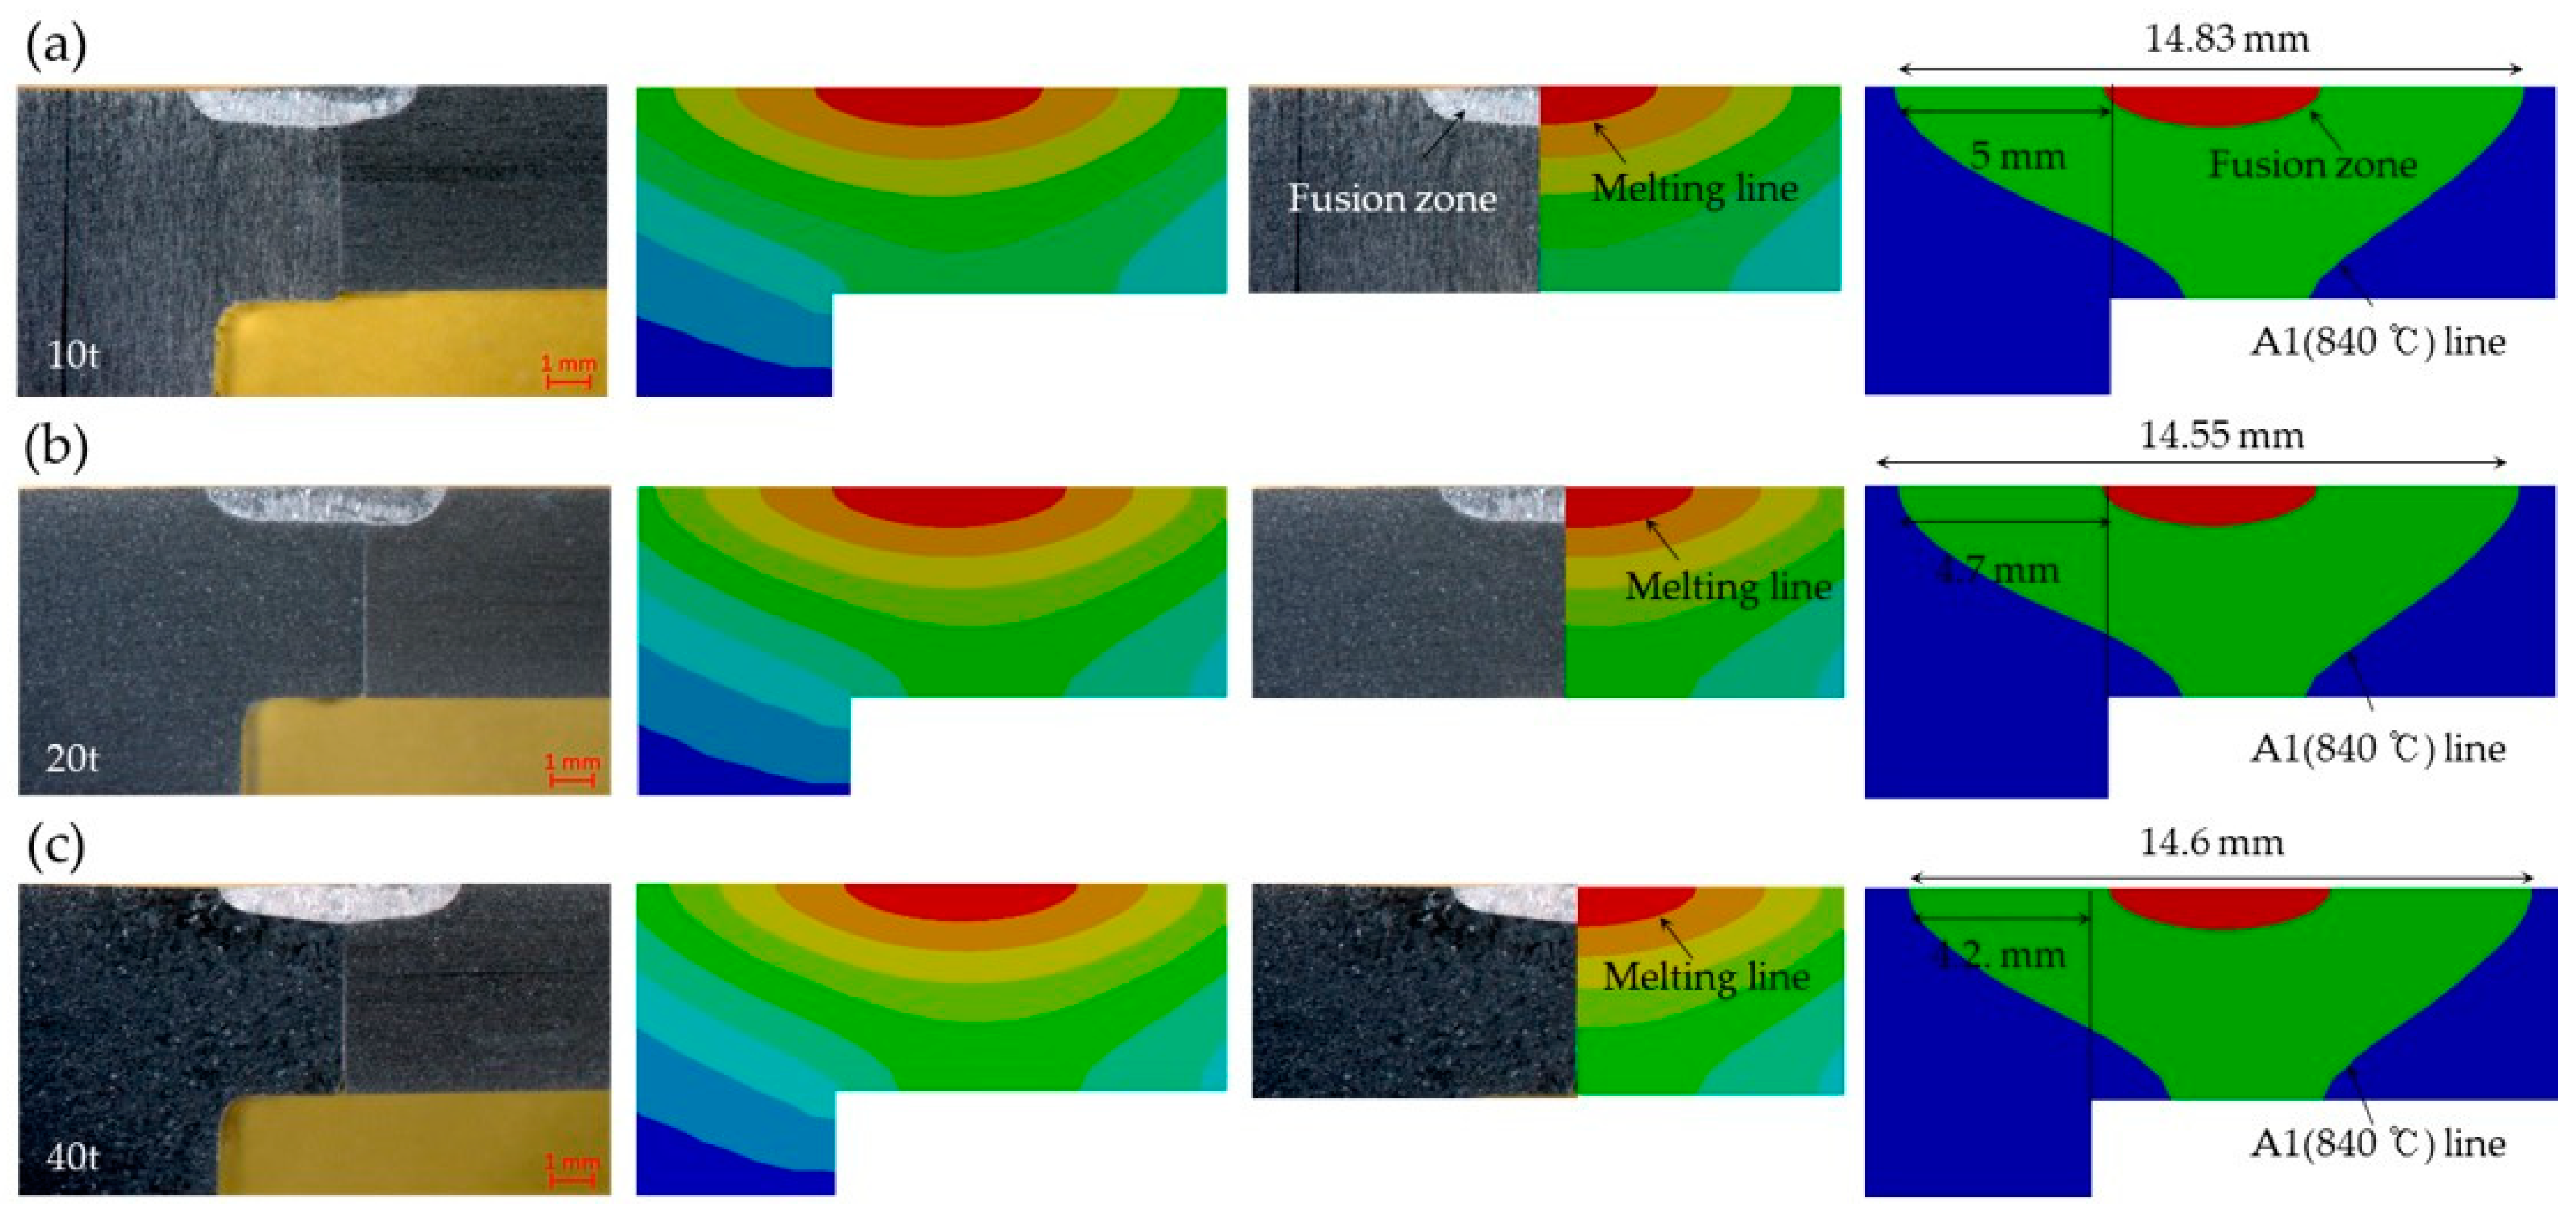
The results from the macro cross-section of the welding test specimen and the cross-section of the analysis results were compared and are illustrated in Figure 12. Overall, the experimental findings indicate that the size of the fusion zone remains consistent irrespective of the side wall thickness, displaying similarity in size. Similarly, the analysis results also reveal an almost uniform fusion zone size. However, it is observed that the size of the fusion zone within the weld area remains consistent regardless of the side wall thickness, with no deviation in the molten pool. Nonetheless, variations in temperature distribution following the passage of the heat source are evident depending on the side wall thickness. The results were confirmed by analyzing the temperature distribution in the heat-affected zone (HAZ) on the cross-section. For a sidewall thickness of 10t, the HAZ region is predominantly distributed widest, while for 20t and 40t, similar results are observed. Such trends could be influenced by the rate of thermal diffusion. In the case of a sidewall thickness of 10t, internal thermal diffusion is more effective along the sidewall direction, resulting in a wider HAZ area in that direction due to delayed cooling rates compared to other wall thicknesses. As the wall thickness increases, internal thermal diffusion becomes less effective, leading to increased cooling rates, consequently reducing the HAZ area. These trends are consistent with previous research findings. Previous studies have indicated that the expansion of the heat-affected zone is restricted by surrounding metal, resulting in compressive stresses. It has been found that the magnitude of compressive stress reaches its maximum as the distance from the weld bead increases [25]. Consequently, as the sidewall thickness increases, a wider HAZ area forms outward from the plate, inducing compressive stresses and resulting in larger residual stresses and maximum deformation values compared to results with different thicknesses.
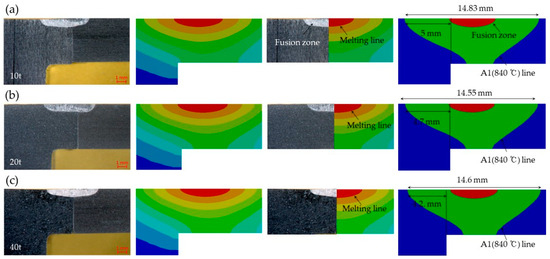
Figure 12.
Comparison of experimental and simulation results for macro cross-sectional analysis and analysis of HAZ changes according to side wall thickness in the simulation. (a) Result for side wall thickness 10t, (b) Result for side wall thickness 20t, (c) Result for side wall thickness 30t.
To quantify the thermal deformation of the specimens after the welding experiment, the surface of the welded specimens was profiled using a laser and CMOS camera. The acquired 2D data was then processed using Matlab software (2017b) and arranged into 3D data, which was visualized as shown in Figure 13. Welding test specimens were laser scanned transversely at the arc start and arc end areas to convert 2D data into 3D coordinate data. The z-displacement at the end of the plate was then examined. The results indicated that the magnitude of deformation increases with increasing side wall thickness. Interestingly, the magnitude of deformation does not differ significantly in the 20t and 40t cases. This trend aligns with the numerical analysis results.

Figure 13.
Arc start/end laser scanning measurement data.
5. Conclusions
When butt welding is performed on an asymmetric structure, relatively large thermal deformation may occur due to the asymmetry in thermal diffusion. To confirm this trend, heat diffusion was analyzed according to the side wall thicknesses of STS316L specimens using a finite element method computer analysis, and experiments were conducted to verify the results. Consequently, it was determined that as the thickness of the side wall increases, it interferes with the smooth internal thermal diffusion to the wall surface. Instead, heat is discharged to the outside of the plate, inducing angular deformation and increasing overall deformation. The von Mises stress distribution also reflected asymmetric heat diffusion, which leads to an increase in residual stress. However, the difference in temperature and stress distribution between thicknesses of 20t and 40t was minimal.
Although the thermal diffusion rate in the side wall direction slowed down as the side wall thickness increased, it was not linearly inversely proportional, suggesting the presence of a critical thickness needed to delay thermal diffusion. Nonetheless, despite this critical thickness and consequent delay in thermal diffusion, thermal deformation could be minimized by reducing the side wall thickness to 5t, which equaled the plate thickness, instead of 10t. This adjustment promoted uniform temperature and stress distribution due to the symmetry of thermal diffusion. Structural thermal deformation induced by welding can be influenced by heat diffusion behavior, specimen structure, and constraint conditions. The results of this study indicate it is possible to reduce thermal deformation by considering the effects of asymmetric heat diffusion and related ways of controlling deformation. This study suggests a method for minimizing thermal deformation during welding processes.
Author Contributions
Conceptualization, T.N., G.-H.J. and D.-W.C.; Data curation, G.-H.J.; Investigation, T.N., G.-H.J., S.K. and S.-K.K.; Methodology, T.N. and G.-H.J.; Resources, K.K., Y.K., S.K., S.-H.A., S.-H.B. and S.K.; Validation, T.N., G.-H.J. and J.B.; Visualization, T.N., G.-H.J., J.B. and S.-H.B.; Writing—original draft, T.N., G.-H.J. and D.-W.C.; Writing—review & editing, T.N., G.-H.J. and D.-W.C.; Supervision, D.-W.C. All authors have read and agreed to the published version of the manuscript.
Funding
This work was supported by the Korea Institute of Energy Technology Evaluation and Planning (KETEP), with a grant funded by the Korean government (MOTIE) (No. 2021171020001B) and the Korea Institute of Machinery and Materials (KIMM, NK250C).
Data Availability Statement
Data are contained within the article.
Conflicts of Interest
Authors Taehyung Na, Kiyoung Kim and Yongdeog Kim are employed by the company Korea Hydro & Nuclear Power. The remaining authors declare that the research was conducted in the absence of any commercial or financial relationships that could be construed as a potential conflict of interest.
References
- Ko, J.H.; Park, J.H.; Jung, I.S.; Lee, G.U.; Baeg, C.Y.; Kim, T.M. Shielding Analysis of Dual Purpose Casks for Spent Nuclear Fuel under Normal Storage Conditions. Nucl. Eng. Technol. 2014, 46, 547–556. [Google Scholar] [CrossRef]
- Kim, T.; Dho, H.; Baeg, C.Y.; Lee, G.U. Preliminary Safety Analysis of Criticality for Dual-Purpose Metal Cask under Dry Storage Conditions in South Korea. Nucl. Eng. Des. 2014, 278, 414–421. [Google Scholar] [CrossRef]
- Kim, T.; Kim, K.; Lee, D.; Na, T.; Chung, S.; Kim, Y. Conceptual Design, Development, and Preliminary Safety Evaluation of a PWR Dry Storage Module for Spent Nuclear Fuel. Appl. Sci. 2022, 12, 4587. [Google Scholar] [CrossRef]
- Seo, J.; Shin, C.; Yoon, H.; Lee, S. Optimization of the Spent Nuclear Fuel Disposal Cask Considering Structural Safety. J. Radiat. Ind. 2021, 15, 251–257. [Google Scholar] [CrossRef]
- Na, T.; Lee, Y.; Kim, T.; Lee, D. Design and Structural Safety Evaluation of Canister for Dry Storage System of PWR Spent Nuclear Fuels. J. Nucl. Fuel Cycle Waste Technol. 2023, 21, 559–570. [Google Scholar] [CrossRef]
- Hanifehzadeh, M.; Gencturk, B.; Mousavi, R. A Numerical Study of Spent Nuclear Fuel Dry Storage Systems under Extreme Impact Loading. Eng. Struct. 2018, 161, 68–81. [Google Scholar] [CrossRef]
- Almomani, B.; Lee, S.; Kang, H.G. Structural Analysis of a Metal Spent-Fuel Storage Cask in an Aircraft Crash for Risk Assessment. Nucl. Eng. Des. 2016, 308, 60–72. [Google Scholar] [CrossRef]
- Im, J.; Lee, E.-H.; Ra, C.W.; Park, N.-C. Finite Element Analysis of Dry Storage Cask Slap Down Oblique Drop. Trans. Korean Soc. Noise Vib. Eng. 2022, 32, 67–73. [Google Scholar] [CrossRef]
- Kazemi, M.; Ahmadi, M. Effect of Welding Process on Energy Absorption Parameters of a Square Tube with Emphasis on the Number and Position of Welding Lines. Trans. Indian Inst. Met. 2024, 77, 1151–1160. [Google Scholar] [CrossRef]
- Ahmad, A.S.; Wu, Y.; Gong, H.; Nie, L. Finite Element Prediction of Residual Stress and Deformation Induced by Double-Pass TIG Welding of Al 2219 Plate. Materials 2019, 12, 2251. [Google Scholar] [CrossRef]
- Joo, S.M.; Bang, H.S.; Bang, H.S.; Park, K.S. Numerical Investigation on Welding Residual Stress and Out-of-Plane Displacement during the Heat Sink Welding Process of Thin Stainless Steel Sheets. Int. J. Precis. Eng. Manuf. 2016, 17, 65–72. [Google Scholar] [CrossRef]
- Peng, J.; Li, X. A Numerical Simulation of the Seismic Performance and Residual Stress of Welded Joints in Building Steel Structures Based on the Finite Element Method. Processes 2024, 12, 263. [Google Scholar] [CrossRef]
- Wang, R.; Zhang, J.X.; Liu, C.; Serizawa, H.; Murakawa, H. Welding Distortion Investigation in Fillet Welded Joint and Structure Based on Iterative Substructure Method. Sci. Technol. Weld. Join. 2009, 14, 396–403. [Google Scholar] [CrossRef]
- Velaga, S.K.; Ravisankar, A. Finite Element Based Parametric Study on the Characterization of Weld Process Moving Heat Source Parameters in Austenitic Stainless Steel. Int. J. Press. Vessel. Pip. 2017, 157, 63–73. [Google Scholar] [CrossRef]
- Kumar, R.; Mahapatra, M.M.; Pradhan, A.K.; Giri, A.; Pandey, C. Experimental and Numerical Study on the Distribution of Temperature Field and Residual Stress in a Multi-Pass Welded Tube Joint of Inconel 617 Alloy. Int. J. Press. Vessel. Pip. 2023, 206, 105034. [Google Scholar] [CrossRef]
- Singh, S.; Kumar, M.; Sodhi, G.P.S.; Buddu, R.K.; Singh, H. Development of thick copper claddings on SS316L steel for In-vessel components of fusion reactors and copper-cast iron canisters. Fusion Eng. Des. 2018, 128, 126–137. [Google Scholar] [CrossRef]
- Vemanaboina, H.; Akella, S.; Buddu, R.K.; Yelamasetti, B.; Matam, M.B.; Salem, K.H.; Saxena, K.K.; Prakash, C.; Buddhi, D. Prediction of Thermal and Residual Stress Distributions in SS304 Materials for Nuclear Application Using Finite Element Analysis. Int. J. Interact. Des. Manuf. 2023, 1–8. [Google Scholar] [CrossRef]
- Savas, A. Investigating the Thermal and Structural Responses in Hard-Facing Application with the GTAW Process. J. Theor. Appl. Mech. 2021, 59, 343–353. [Google Scholar] [CrossRef]
- Capriccioli, A.; Frosi, P. Multipurpose ANSYS FE Procedure for Welding Processes Simulation. Fusion Eng. Des. 2009, 84, 546–553. [Google Scholar] [CrossRef]
- Goldak, J.; Chakravarti, A.; Bibby, M. A New Finite Element Model for Welding Heat Sources; Springer: Berlin/Heidelberg, Germany, 1984. [Google Scholar]
- Ravisankar, A.; Velaga, S.K.; Rajput, G.; Venugopal, S. Influence of Welding Speed and Power on Residual Stress during Gas Tungsten Arc Welding (GTAW) of Thin Sections with Constant Heat Input: A Study Using Numerical Simulation and Experimental Validation. J. Manuf. Process. 2014, 16, 200–211. [Google Scholar] [CrossRef]
- Izumi, T.; Arai, M. Numerical Simulation of the 3D Propeller Repair Process by Laser Cladding of SUS316L on SUS304. J. Manuf. Process. 2023, 98, 234–253. [Google Scholar] [CrossRef]
- Deng, D.; Kiyoshima, S. FEM Analysis of Residual Stress Distribution near Weld Start/End Location in Thick Plates. Comput. Mater. Sci. 2011, 50, 2459–2469. [Google Scholar] [CrossRef]
- Xie, W.; Fan, C.; Yang, C.; Liu, Y. Comparison of Welding Temperature Fields, Residual Stress Distributions and Deformations of Gas Tungsten Arc (GTA) and Ultrasonic–Wave–Assisted Gas Tungsten Pulsed Arc (U–GTPA) Welded DP780 Steel Joints. Int. J. Therm. Sci. 2023, 184, 108009. [Google Scholar] [CrossRef]
- Chen, B.; Hashemzadeh, M.; Soares, C. Numerical analysis of the effects of weld parameters on distortions and residual stresses in butt welded steel plates. In Developments in Maritime Transportation and Exploitation of Sea Resources; Taylor & Francis Group: Abingdon, UK, 2014; pp. 309–320. [Google Scholar]
Disclaimer/Publisher’s Note: The statements, opinions and data contained in all publications are solely those of the individual author(s) and contributor(s) and not of MDPI and/or the editor(s). MDPI and/or the editor(s) disclaim responsibility for any injury to people or property resulting from any ideas, methods, instructions or products referred to in the content. |
© 2024 by the authors. Licensee MDPI, Basel, Switzerland. This article is an open access article distributed under the terms and conditions of the Creative Commons Attribution (CC BY) license (https://creativecommons.org/licenses/by/4.0/).

