Protocol for the Design and Assembly of a Light Sheet Light Field Microscope
Abstract
:1. Introduction
2. Experimental Design
2.1. Materials
- Silver protected mirrors (Thorlabs, USA, PF10-03-P01)
- Kinematic mounts (Thorlabs, USA, KM100)
- Aperture irises (Thorlabs, USA, ID20)
- f = 7.5 mm achromat (Thorlabs, USA, AC050-008-A-ML)
- f = 40 mm achromat (Edmund Optics, Barrington, NJ, USA, 49–354)
- 1” lens mount (Thorlabs, USA, LMR1/M)
- 0.5” les mount (Thorlabs, USA, SMR05/M)
- f = 65 mm f-θ lens (Sill Optics, Wendelstein, Germany, S4LFT0061/065)
- f = 250 mm achromat (Edmund Optics, USA, 49–366)
- f = 75 mm mounted achromatic cylindrical lens (Thorlabs, USA, LJ1703RM)
- N PLAN 10x NA 0.25 dry objective (Leica Microsystems, Wetzlar, Germany)
- f = 100 mm achromat (Edmund Optics, USA, 49–360)
- Cage plate (Thorlabs, USA, CP02/M)
- SM1 coupler (Thorlabs, USA, SM1T2)
- SM1 to C-mount adapter (Thorlabs, USA, SM1A9)
- 4” cage rods (Thorlabs, USA, ER4-P4)
- Dichroic beam splitter (Semrock, USA, FF560-FDi02)
- Cage cube (Thorlabs, USA, CM1-DCH/M)
- Fluorescence band-pass filter for GFP (Chroma, USA, ET525/50 m)
- Fluorescence band-pass filter for GFP (Chroma, USA, ET575/50 m)
- LUMFLN 60x NA 1.1 water immersion objective (Olympus, Tokyo, Japan, LUMFLN 60XW)
- f = 150 mm achromat (Edmund Optics, USA, 49–362)
- 1:1 Relay pair (Thorlabs, USA, MAP10100100-A)
- Lens tube for 1” optics (Thorlabs, USA, SM30L05)
- Microlense array (RPC, USA, MLA-S100-f21)
- 6-axis kinematic mount (Thorlabs, USA, K6XS)
2.2. Equipment
- 488 nm CW diode laser (Oxxius, Lannion, France, LBX-488-50-CSB-PP)
- Galvanometric mirrors (Edmund Optics, USA, 6215H)
- CCD monochrome camera (Point Grey, BC, Canada, Black Fly 13H2M)
- Micromanipulator (Sutter Instruments, Novato, CA, USA, MPC-200)
- sCMOS camera (Hamamatsu, Japan, ORCA flash 4.0 V2)
- xyz kinematic mount (Newport, RI, USA, 9063-XYZ-M)
3. Procedure
3.1. Construction of Light Sheet Illumination
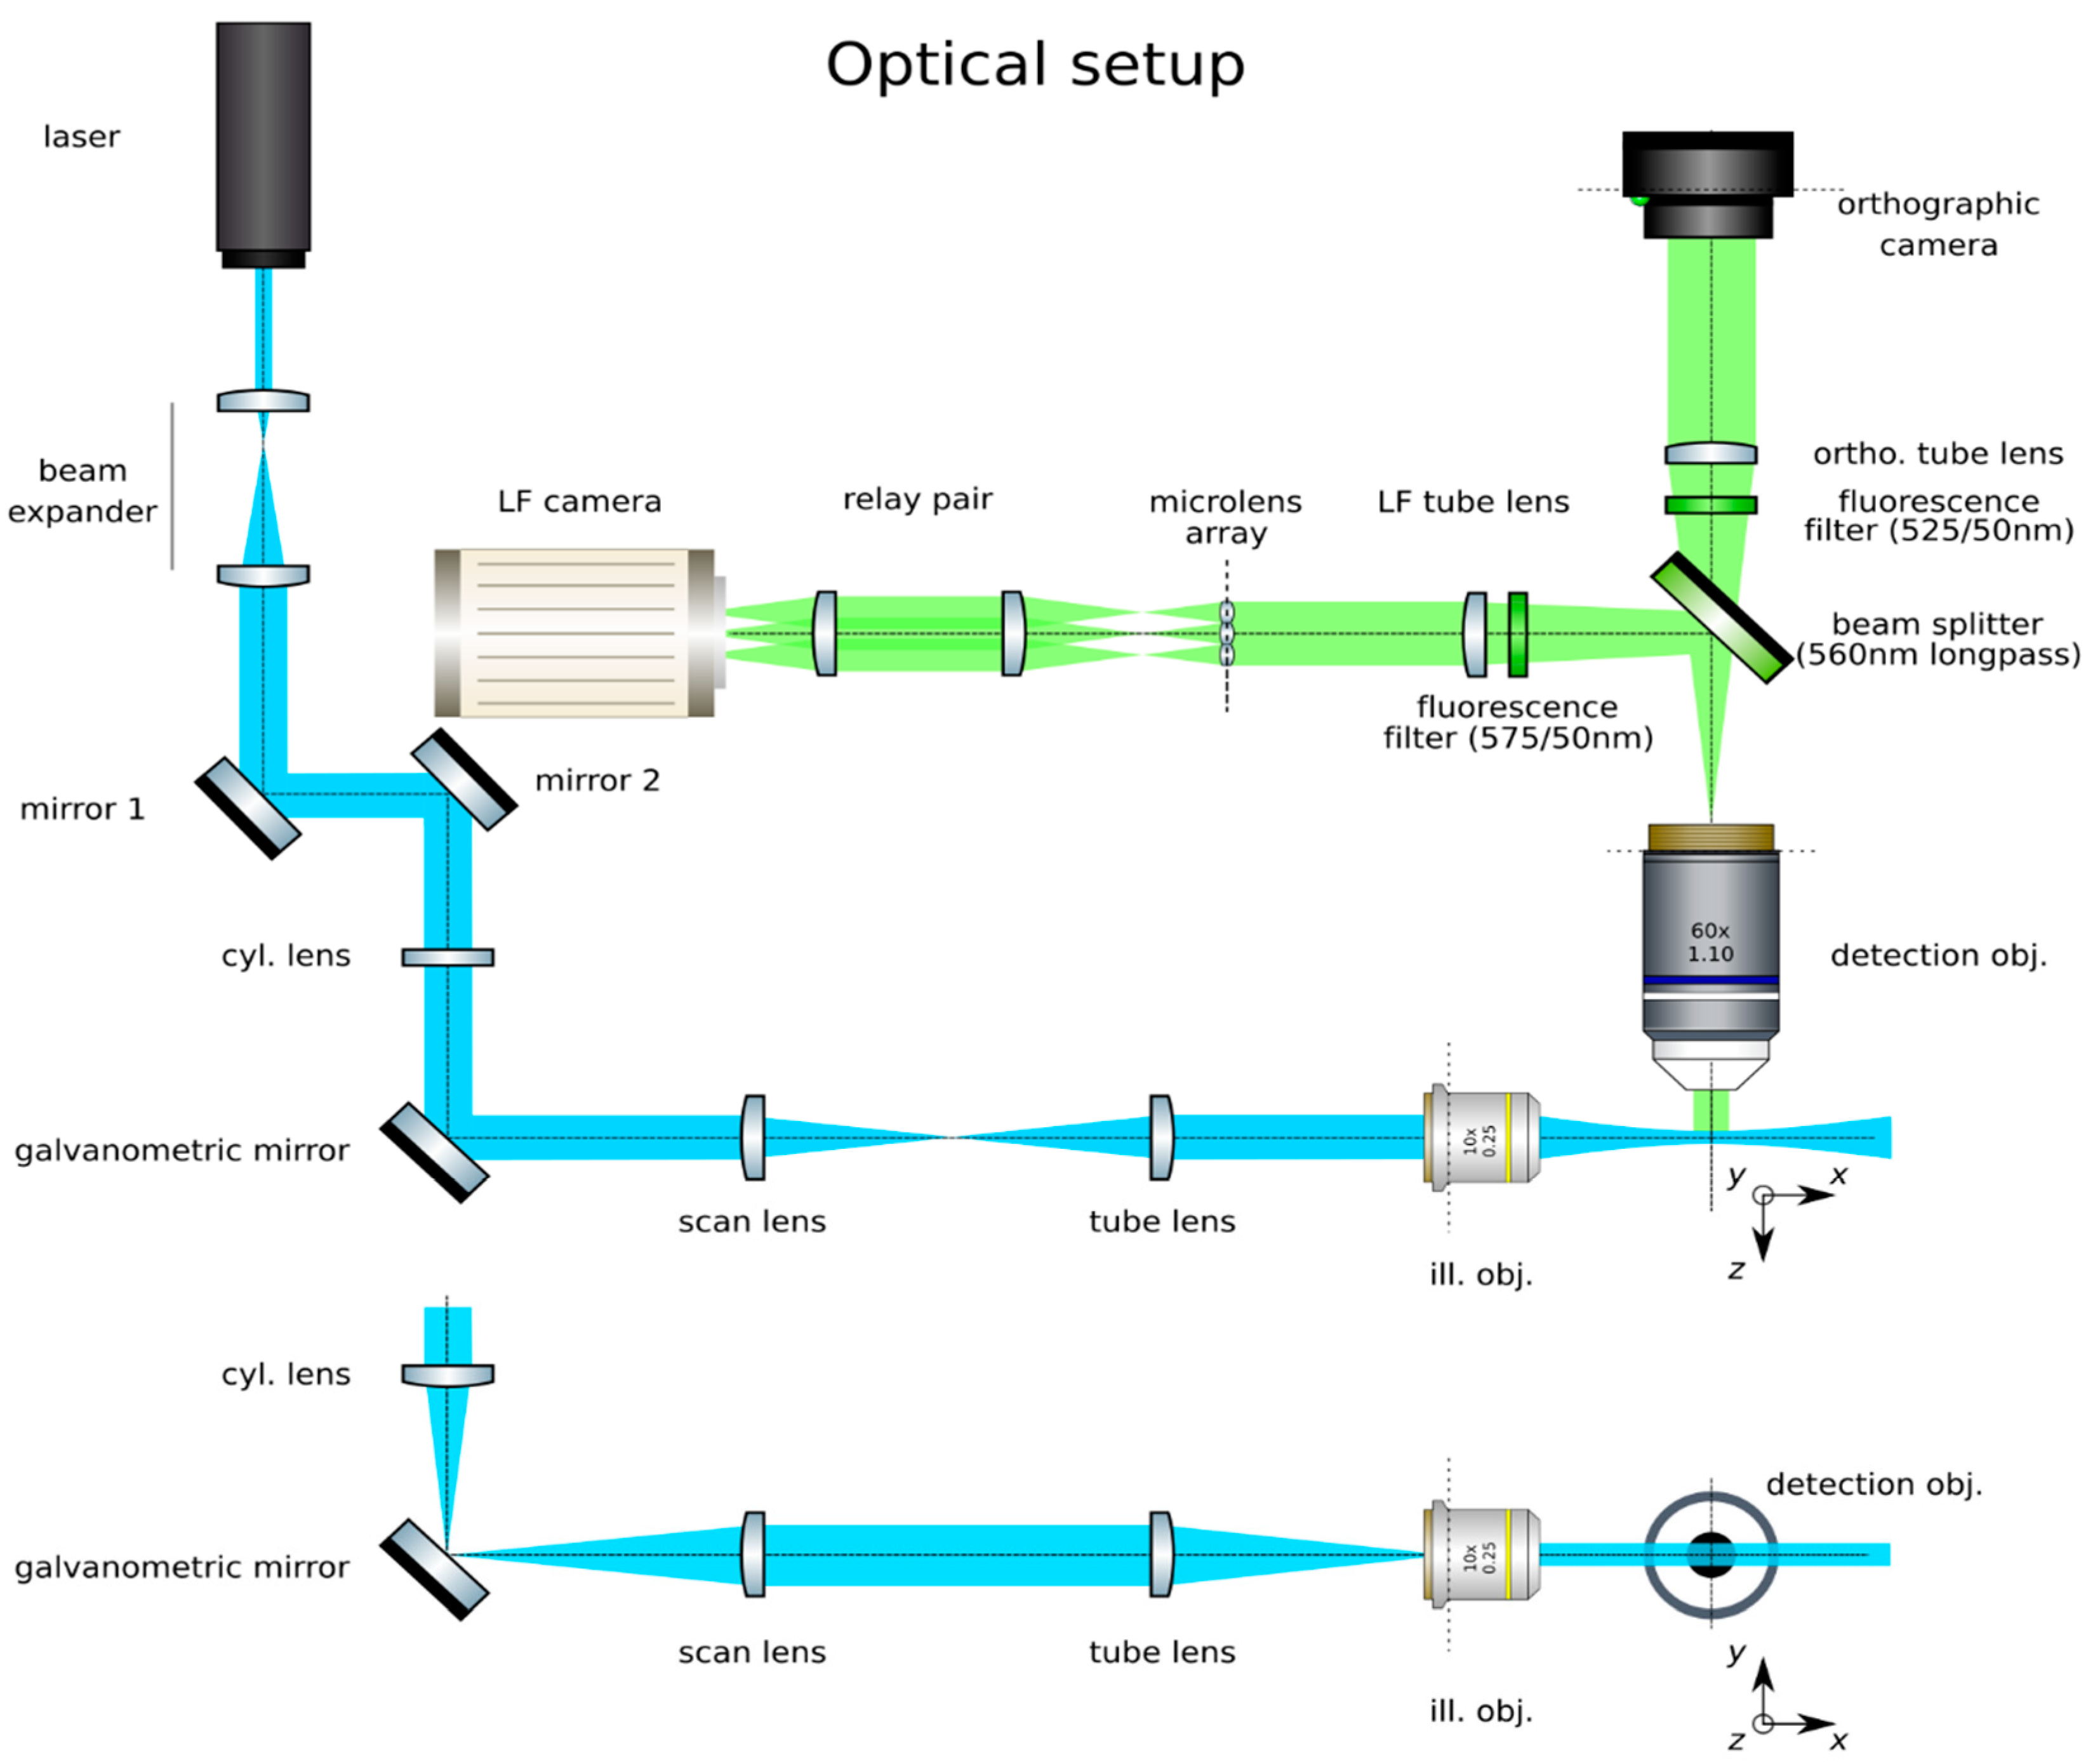
- Trace the beam path: Trace the beam path from the laser (Oxxius, LBX-488-50-CSB-PP) to the place where the sample will go by means of mirrors (Thorlabs, PF10-03-P01) in kinematic mounts (Thorlabs, KM100), as in Figure 2. Place the galvanometric mirror (Edmund Optics, 6215H) in the path. Mark the beam path at its end (ideally downstream from the sample’s position) with a pair of irises (Thorlabs, ID20). Do not change the position of the irises afterwards.
- Expand the beam: Expand the laser beam as shown in Figure 3. Mount a pair of lenses, one of short negative focal length (Thorlabs, f = 7.5 mm, AC050-008-A-ML) and a second lens of positive long focal length (Edmund Optics, f = 40 mm, 49–354) in lens mounts (Thorlabs, SMR05/M and LMR1/M, respectively). First, insert the short lens in the beam path. Finely adjust the position and orientation of this lens to make sure that the center of the beam still passes through the center of the irises. Insert the lens of larger focal length approximately 47.5 mm (the sum of the focal lengths) downstream from the first lens. Finely adjust its position and orientation to make sure that the center of the beam still passes through the center of the irises. Alternatively, cage plates (Thorlabs, CP02/M) and cage rods (Thorlabs, ER3-P4) may be used to ensure that the lenses are aligned along the optical axis. Adjust its position along the optical axis to ensure that an expanded collimated beam is achieved. This may be verified by measuring the width of the beam at two points downstream and ensuring that it remains constant by focusing the beam at infinity (i.e., several meters away), or with the aid of a shearing interferometer (Thorlabs, SI050).
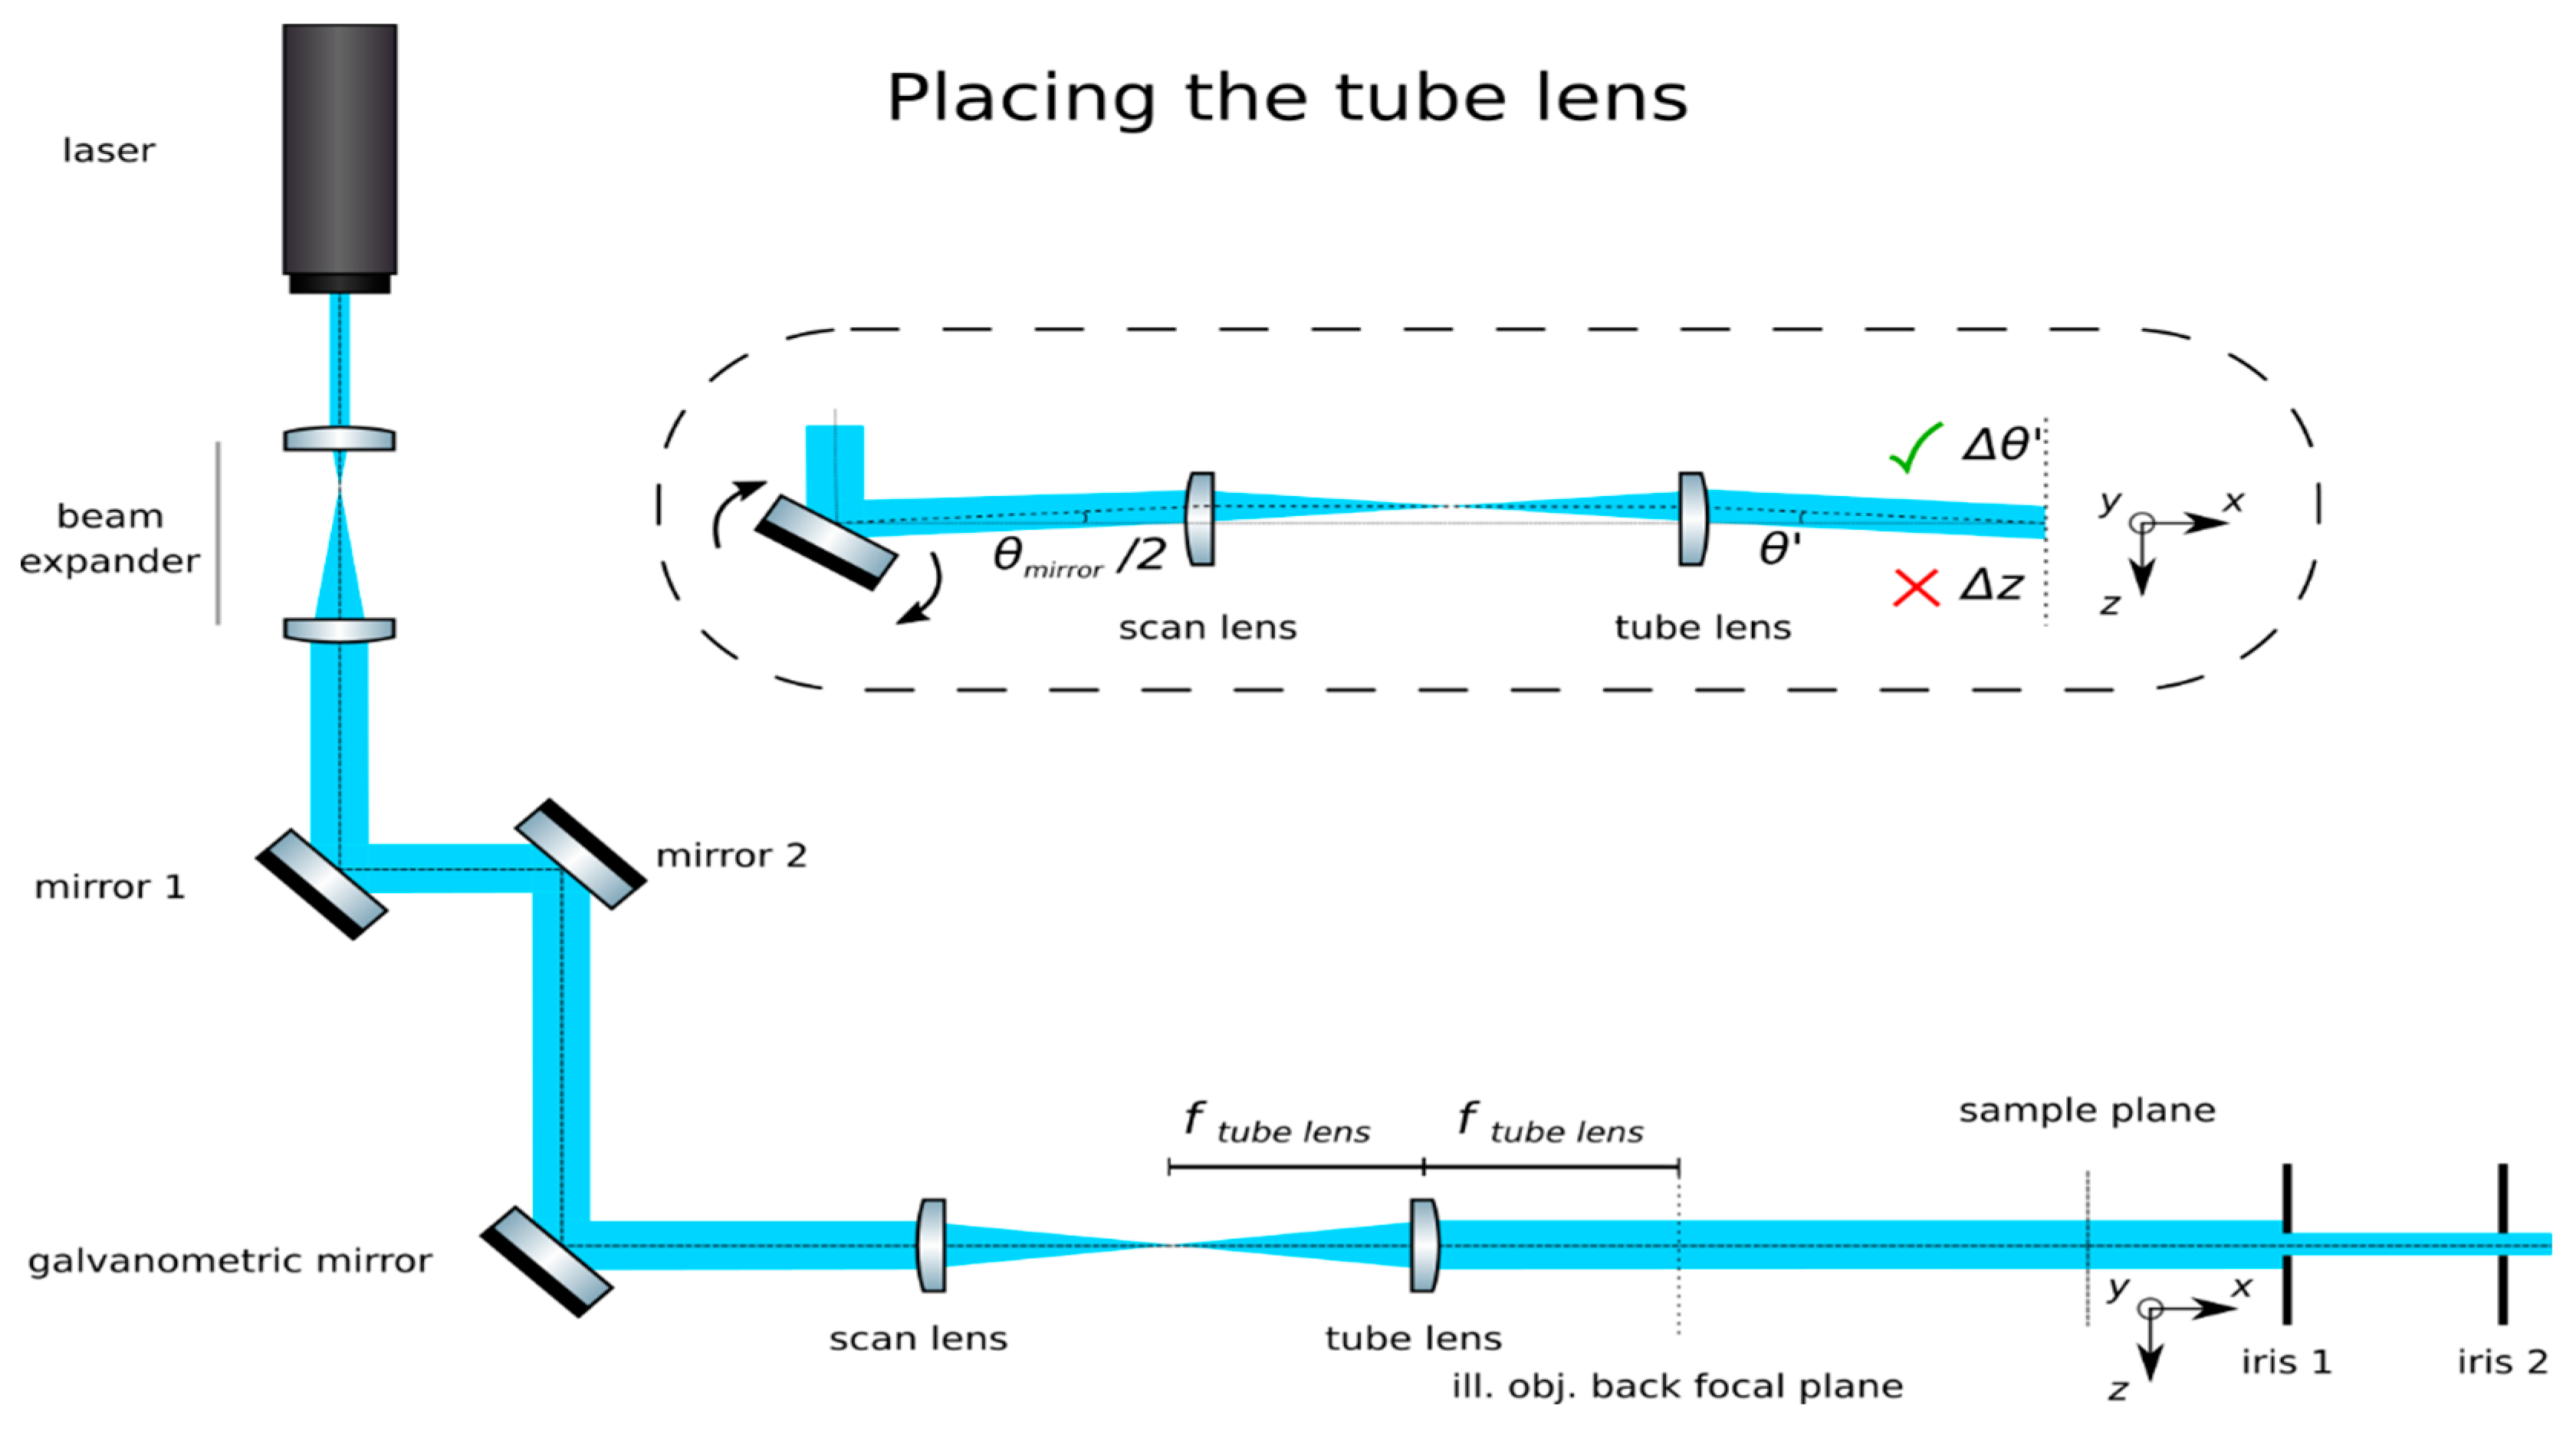
CRITICAL STEP: Insert the scan lens: Place the scan lens (We use an f-θ lens as scan lens. A regular achromat may be used as well). (Sill Optics, S4LFT0061/065) a focal length downstream from the galvanometric mirror, as in Figure 4. Finely adjust its position to ensure that rotations of the mirror produce translations of the beam from the main optical axis while remaining parallel to it. Additionally, check that translations correspond to rotations following the equation
- Optional Step: Produce a calibration function for the galvanometric mirror: The controlling software of some galvanometric mirrors often indicate the voltage applied to the device, but not the induced angle of rotation. Manufacturers should include the relationship in their documentation. Collect data for a beam displacement vs. voltage calibration function, namely z(V).
- Insert the tube lens: Place the tube lens (Edmund Optics, f = 250 mm, 49–366) and adjust its position until a collimated beam is obtained, as in Figure 5.
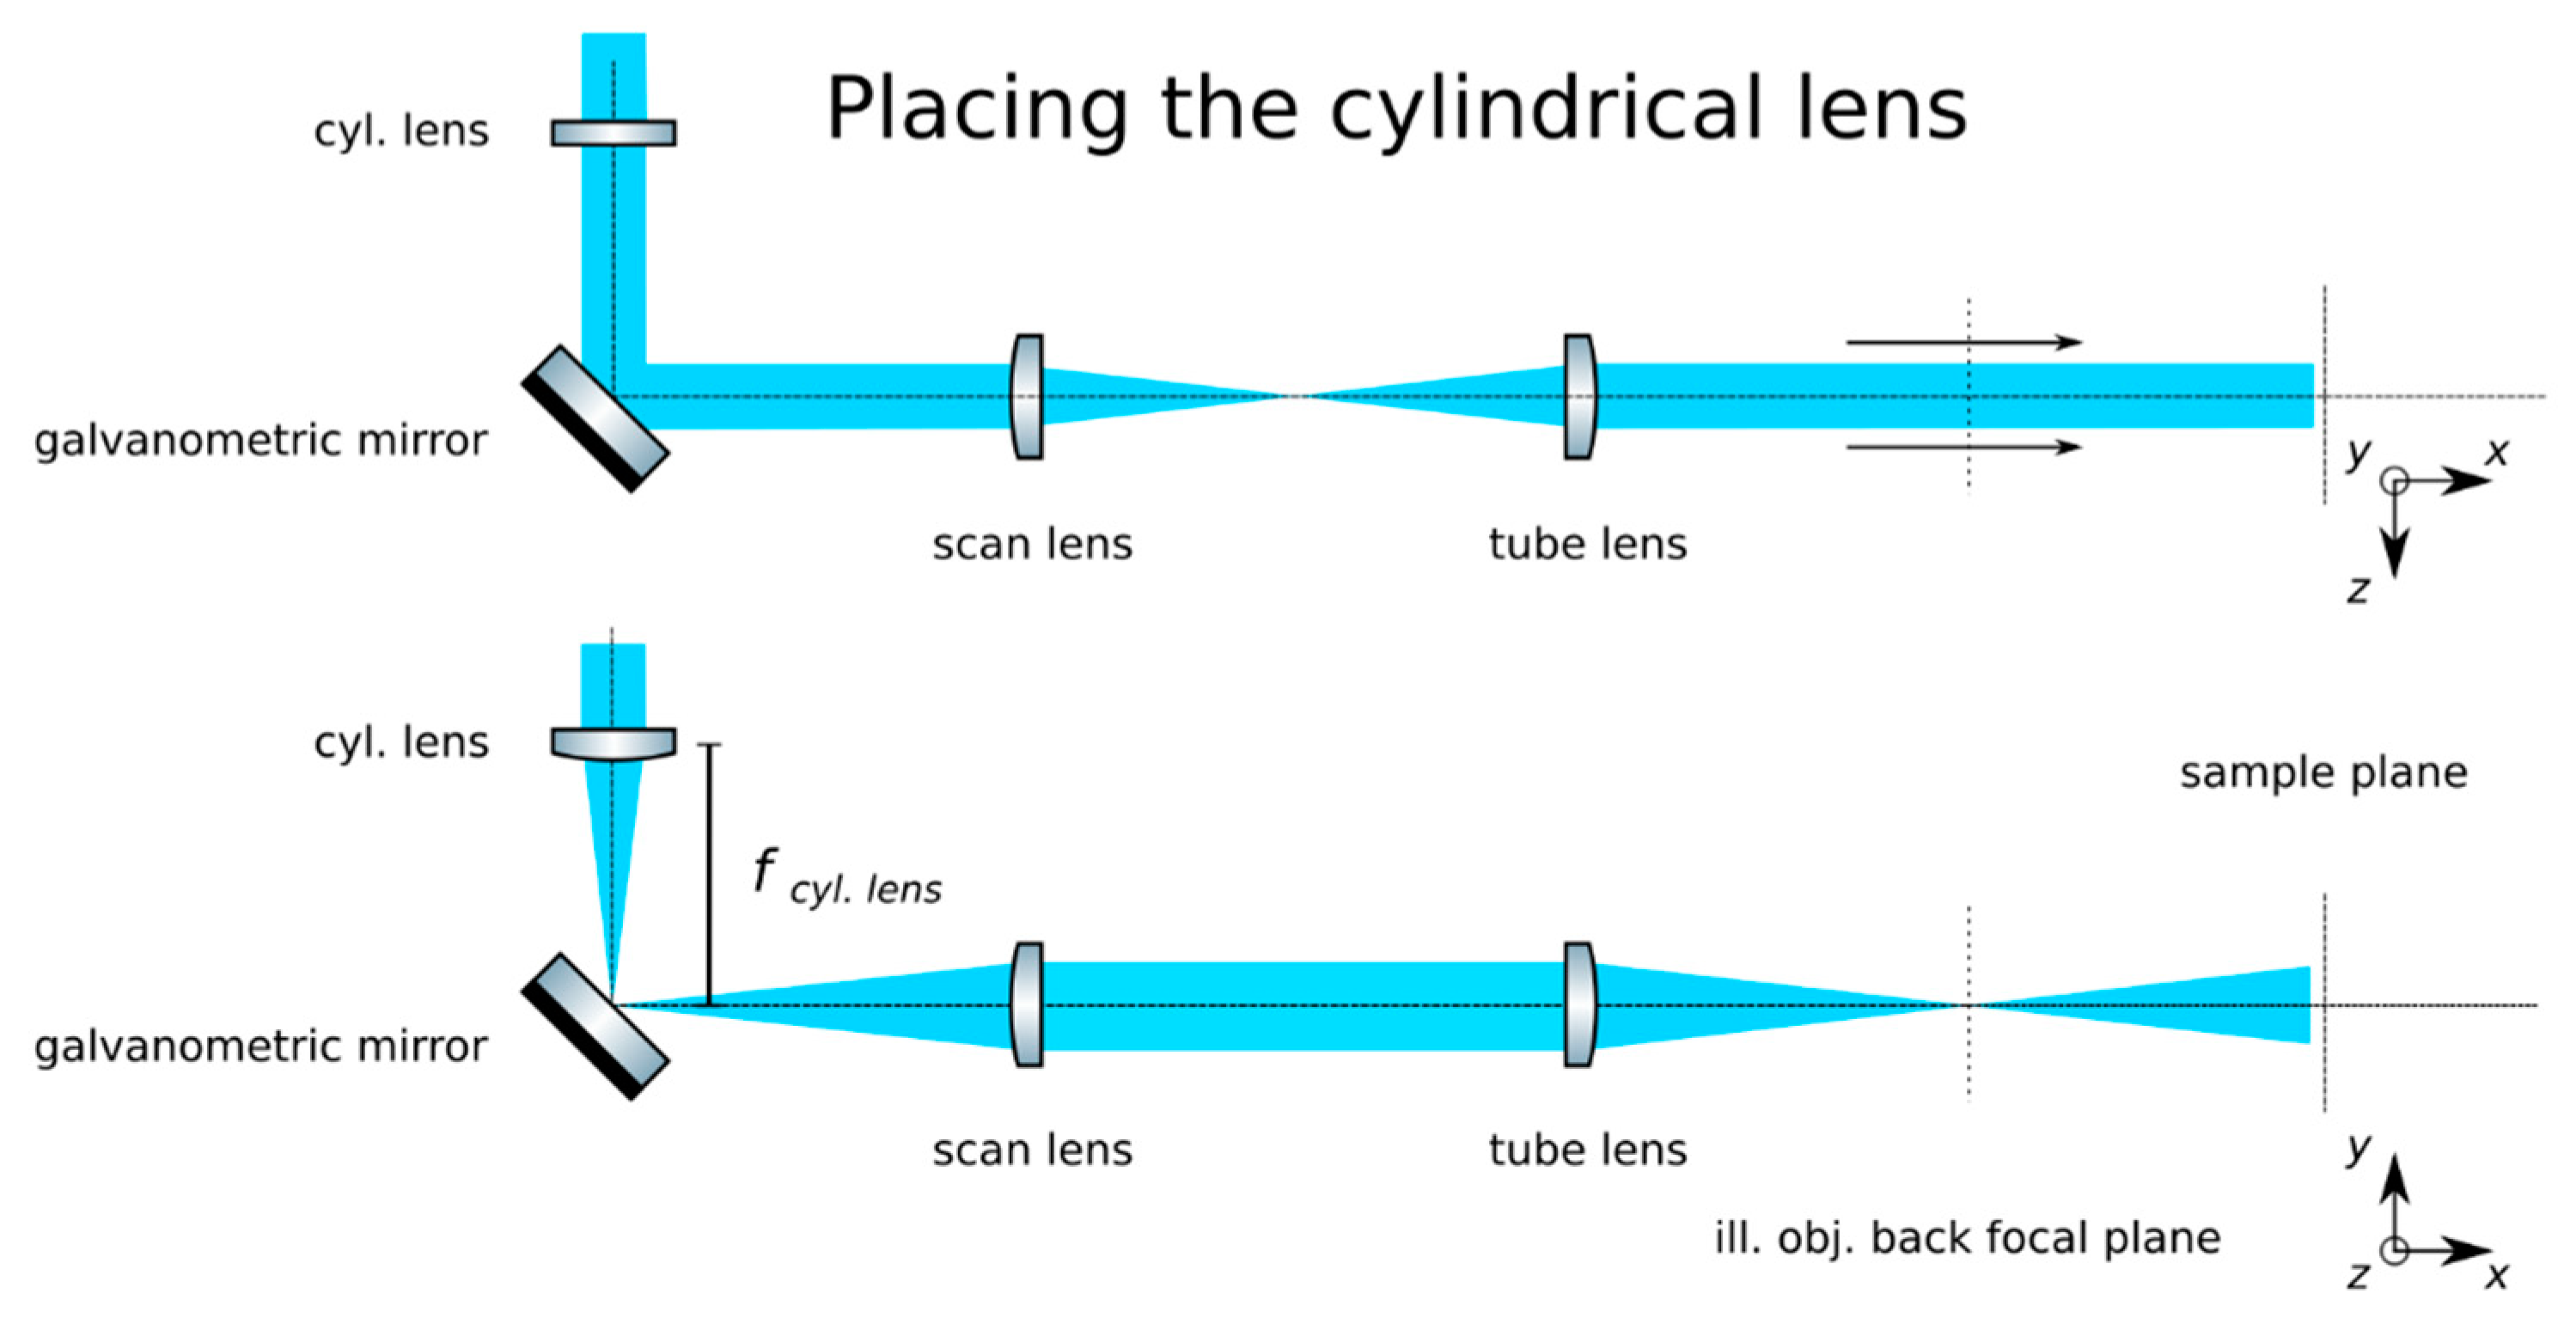
- Insert the cylindrical lens: Place the cylindrical lens (Thorlabs, f = 75mm, LJ1703RM) and adjust its position along the optical axis until a sharp focused line appears precisely on the galvanometric mirror, as in Figure 6. Galvanometric mirrors are very small; check that the beam is not clipped by the mirror. The orientation of the lens matters: place its flat face pointing toward its focus and ensure that a line along the z-axis will be produced at the back pupil of the illumination objective.
- Check the alignment: The focused line formed by the cylindrical lens should be relayed by the scan and tube lenses onto the back focal plane of the microscope objective. Check that while rotating the galvanometric mirror, the light sheet rotates but is not displaced at this plane.
- Insert the illumination objective: Place the illumination microscope objective (Leica N PLAN 10x NA 0.25). Adjust its position along the optical axis until a beam which is collimated along the y-axis but highly divergent along the z-axis is achieved, as in Figure 7.
3.2. Construction of the Orthographic Detection
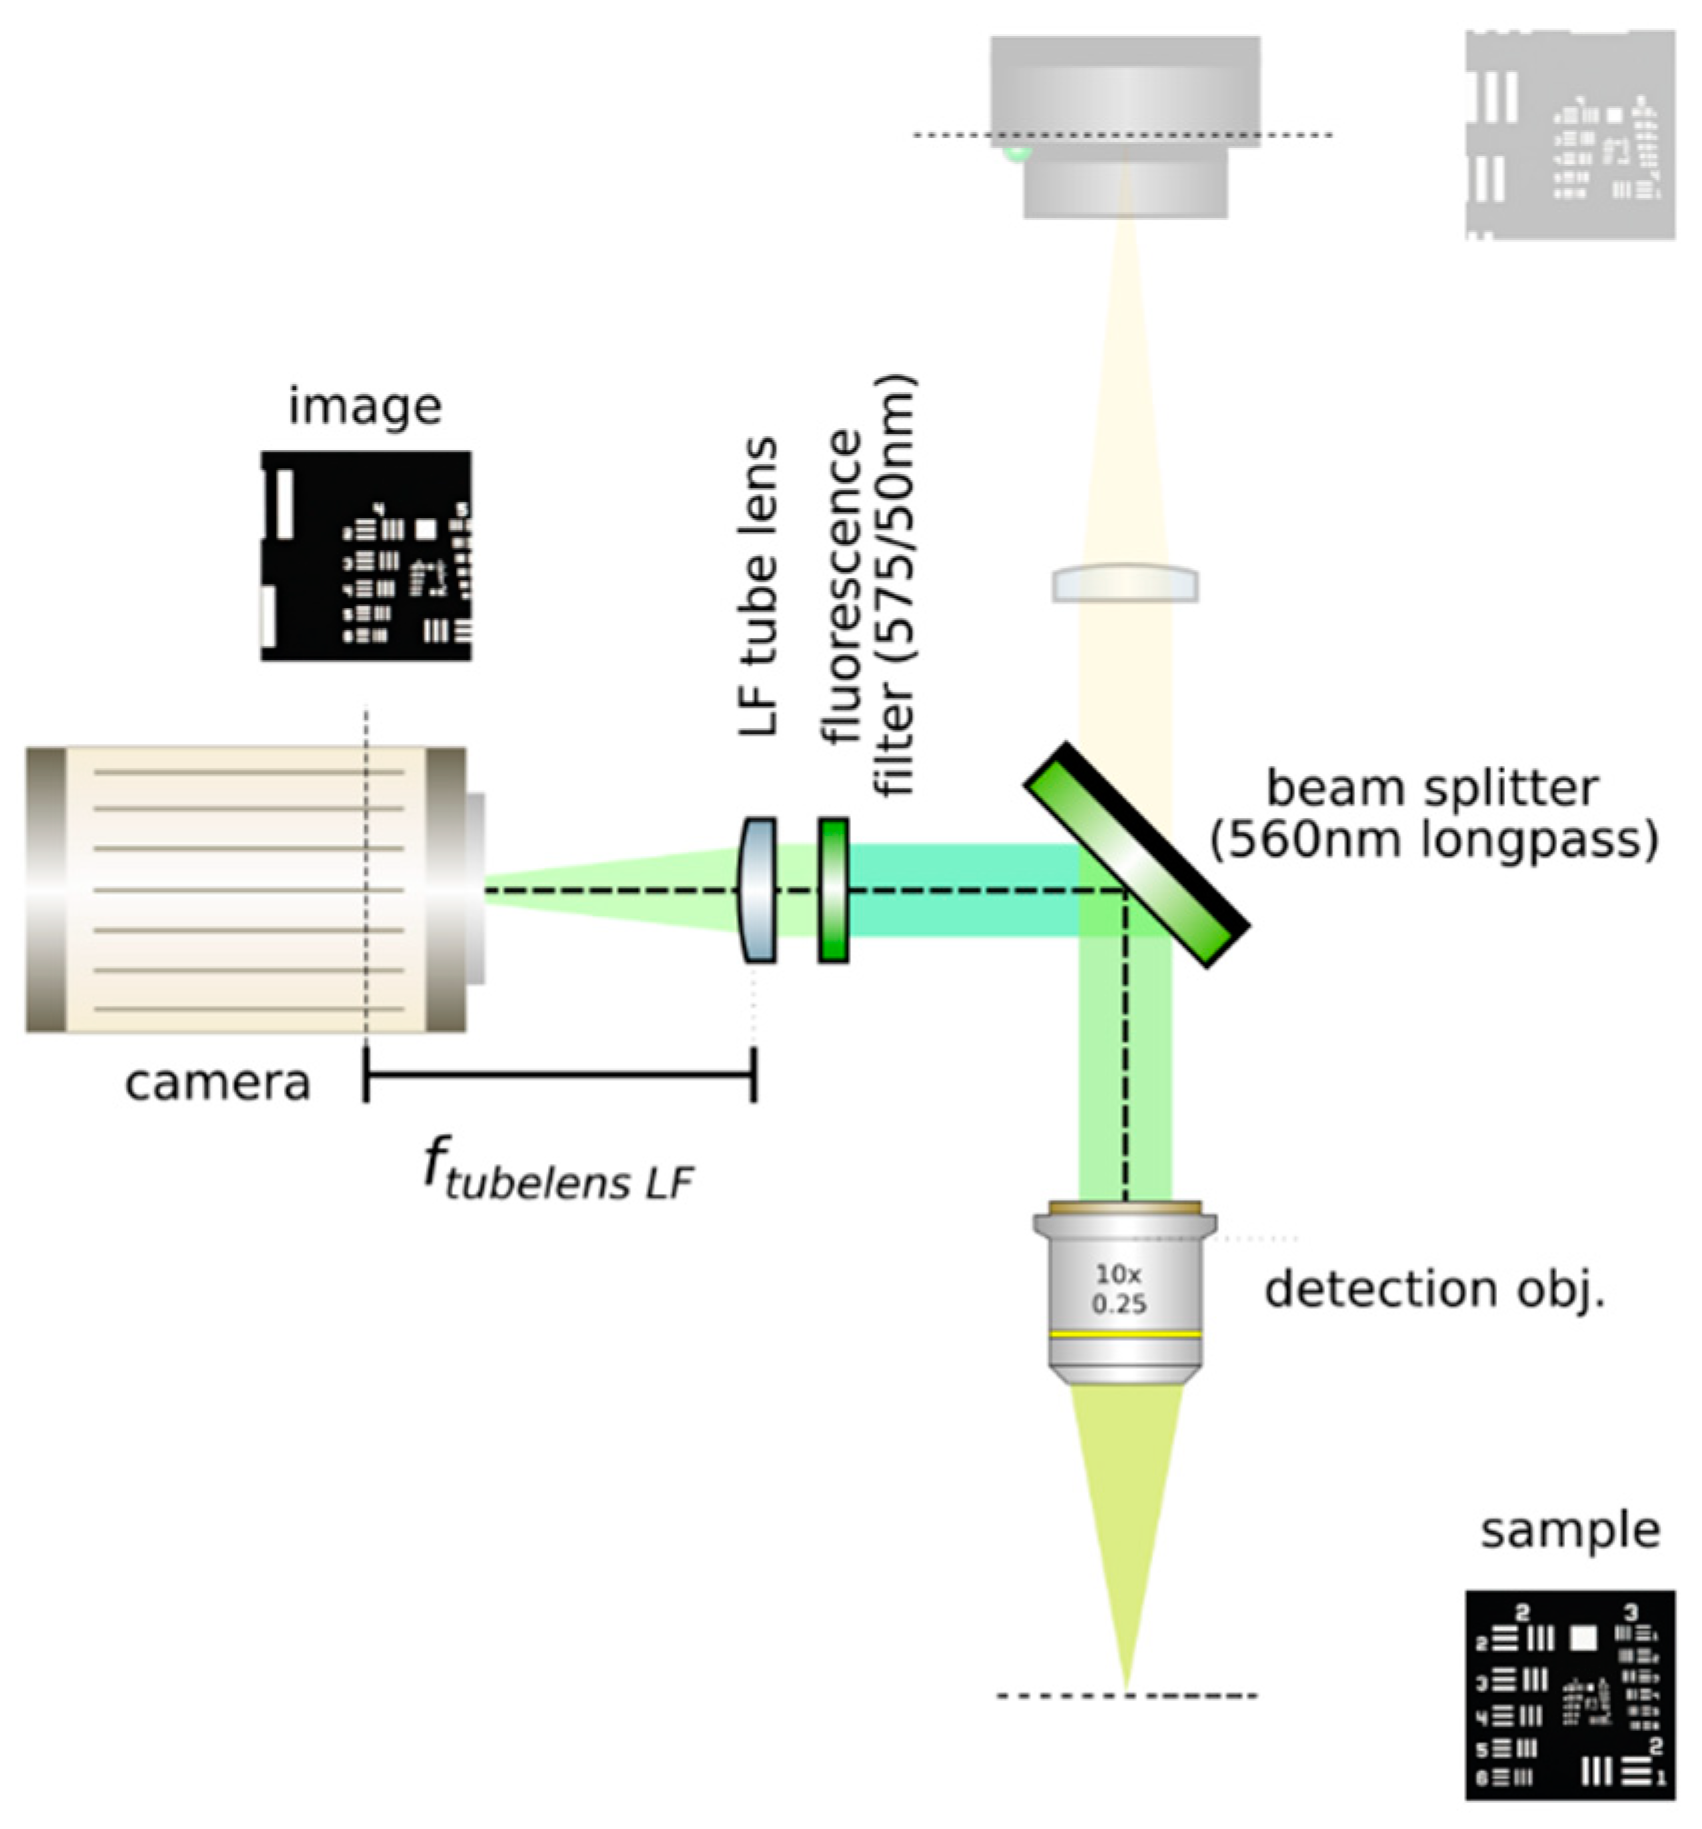
- Set up an orthographic detection system: Mount an achromatic tube lens (Edmund Optics, f = 100 mm, 49–360) in a cage plate (Thorlabs, CP02/M). Attach an inspection camera (Point Grey, Black Fly 13H2M) to a cage plate by means of a SM1 coupler (Thorlabs, SM1T2) and a SM1 to C-mount adapter (Thorlabs, SM1A9). Assemble the cage system with the use of four rods (Thorlabs, ER4). Adjust the distance from the tube lens to the camera sensor by obtaining a point-like image of a collimated light beam, or alternatively, by imaging a distant object, as in Figure 8.
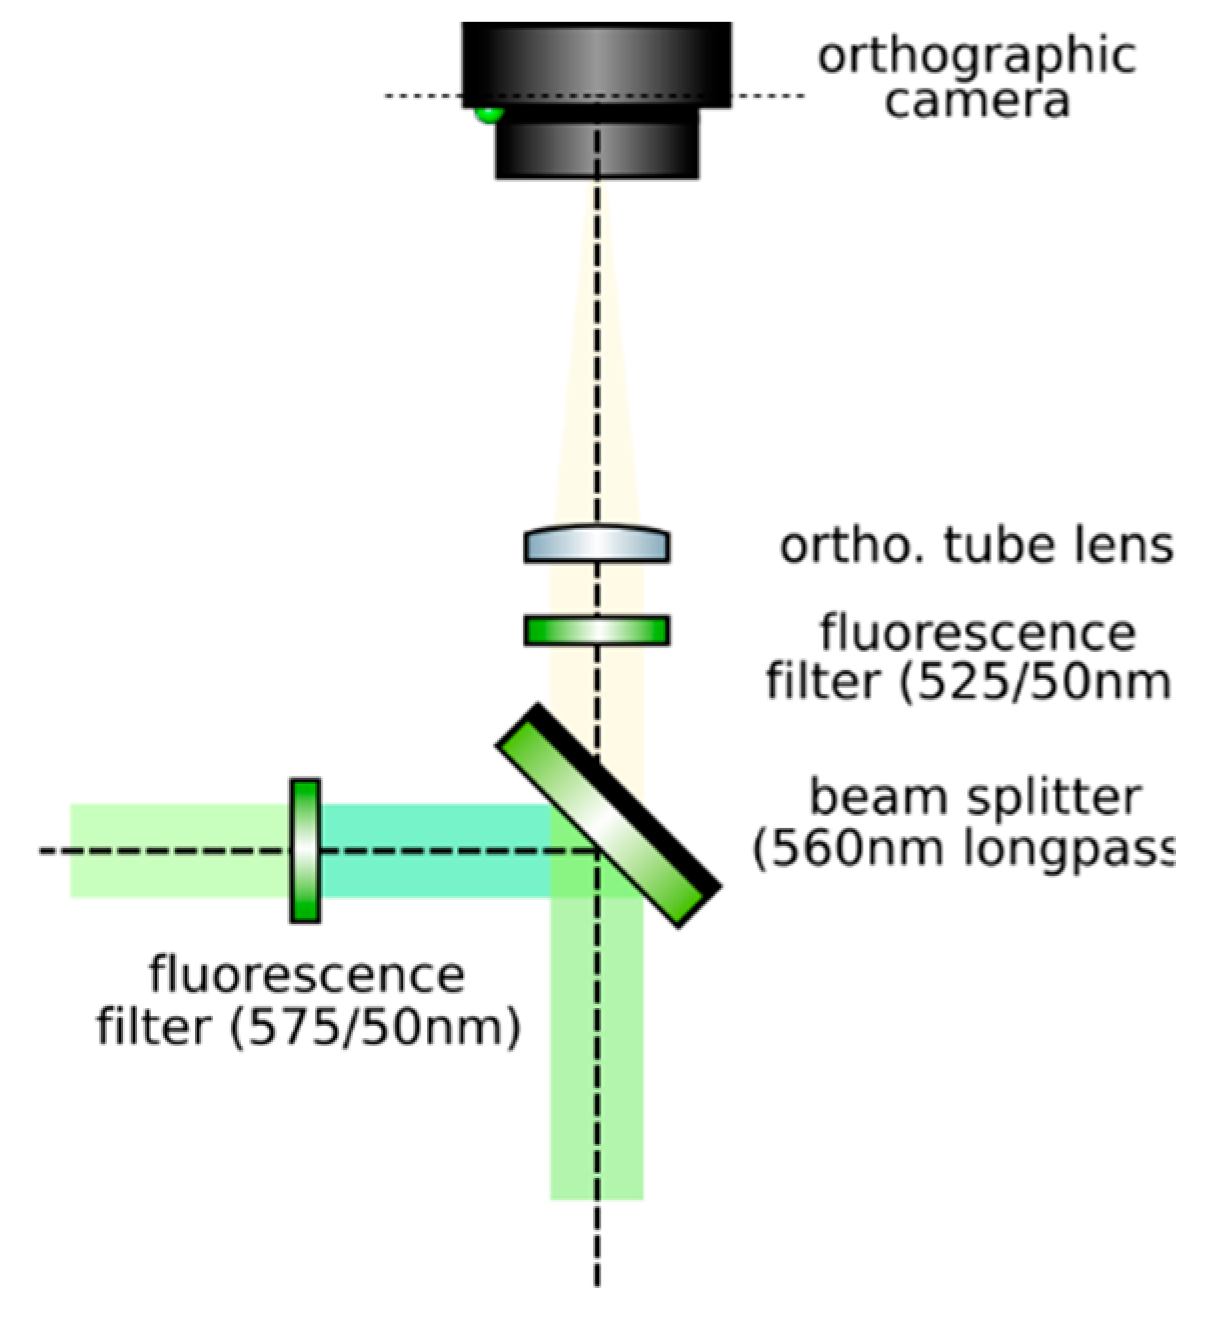
- Insert the beamsplitter: Mount a dichoric beamsplitter (Semrock, FF560-FDi02) in a cage cube (Thorlabs, CM1-DCH/M). Attach the cube to the cage system built on step 1 so that the transmitted light from the beamsplitter reaches the inspection camera. Mind the orientation of the beamsplitter (refer to the manufacturer’s documentation for this).
- Insert two fluorescence filters: Mount a fluorescence band-pass filter (Chroma, ET525/50 m) in a cage plate. Attach the cage plate to the cage cube from step 2 by means of cage rods. Light reflected from the dichroic filter should then go through the bandpass filter. Mind the orientation of the bandpass filter. Mount a second fluorescence band-pass filter (Chroma, USA, ET575/50 m), this time for the inspection camera. See Figure 9.
- Insert a detection objective: Mount an infinity-corrected microscope objective 140–170 mm in front of the achromatic tube lens to a cage plate, as in Figure 10. Use a dry long-working distance objective for microscope construction, even if the apparatus is designed to work with water immersion objectives. We use a Leica 10× NA 0.25 air objective with external M25 threads that we couple via a thread adapter (Thorlabs, SM1A12) to a cage plate. Attach the cage plate to the two by means of cage rods.
- Use homogeneous high-NA illumination: Place a Köhler Illumination module in front of the objective. Maximize the NA of the illumination to reduce the depth of field of the system and thus ensure better positioning of the light field camera in the upcoming steps.
- Focus a high contrast sample: Place a flat, high-contrast sample (ideally of known size) and obtain a sharp image of it on the inspection camera by adjusting its distance to the microscope objective, as in Figure 11. A micromanipulator (Sutter Instruments, MPC-200) is useful for this task. Keep the sample in this fixed position.
3.3. Construction of the Light Field Detection
CRITICAL STEP: Insert the LF tube lens: Mount the main tube lens, an f = 150 mm achromat (Edmund Optics, 49–362), in a cage plate. Insert this cage plate in the cage rods from step 3, after the bandpass filter. The light field system is an afocal detection system, and thus, the detection objective and the LF tube lens must form a 4f system, as in Figure 12; that is, the back focal plane of the detection objective and the front focal plane of the main tube lens must coincide. To achieve this, send a collimated beam through the objective and adjust the position of the LF tube lens until a collimated (although expanded) beam exits it.
- Place a second camera: Attach a second camera that will record the light fields (Hamamatsu, ORCA flash 4.0 V2) to an xyz kinematic mount (Newport, 9063-XYZ-M), as in Figure 13. Place the camera downstream from the LF tube lens. Move it until a centered sharp image of the target appears in focus. While inspecting both cameras simultaneously, adjust the lateral and vertical position of the LF camera until both images are centered in the same place of the sample (one will be reflected by the beam splitter). Fix the camera to this position.
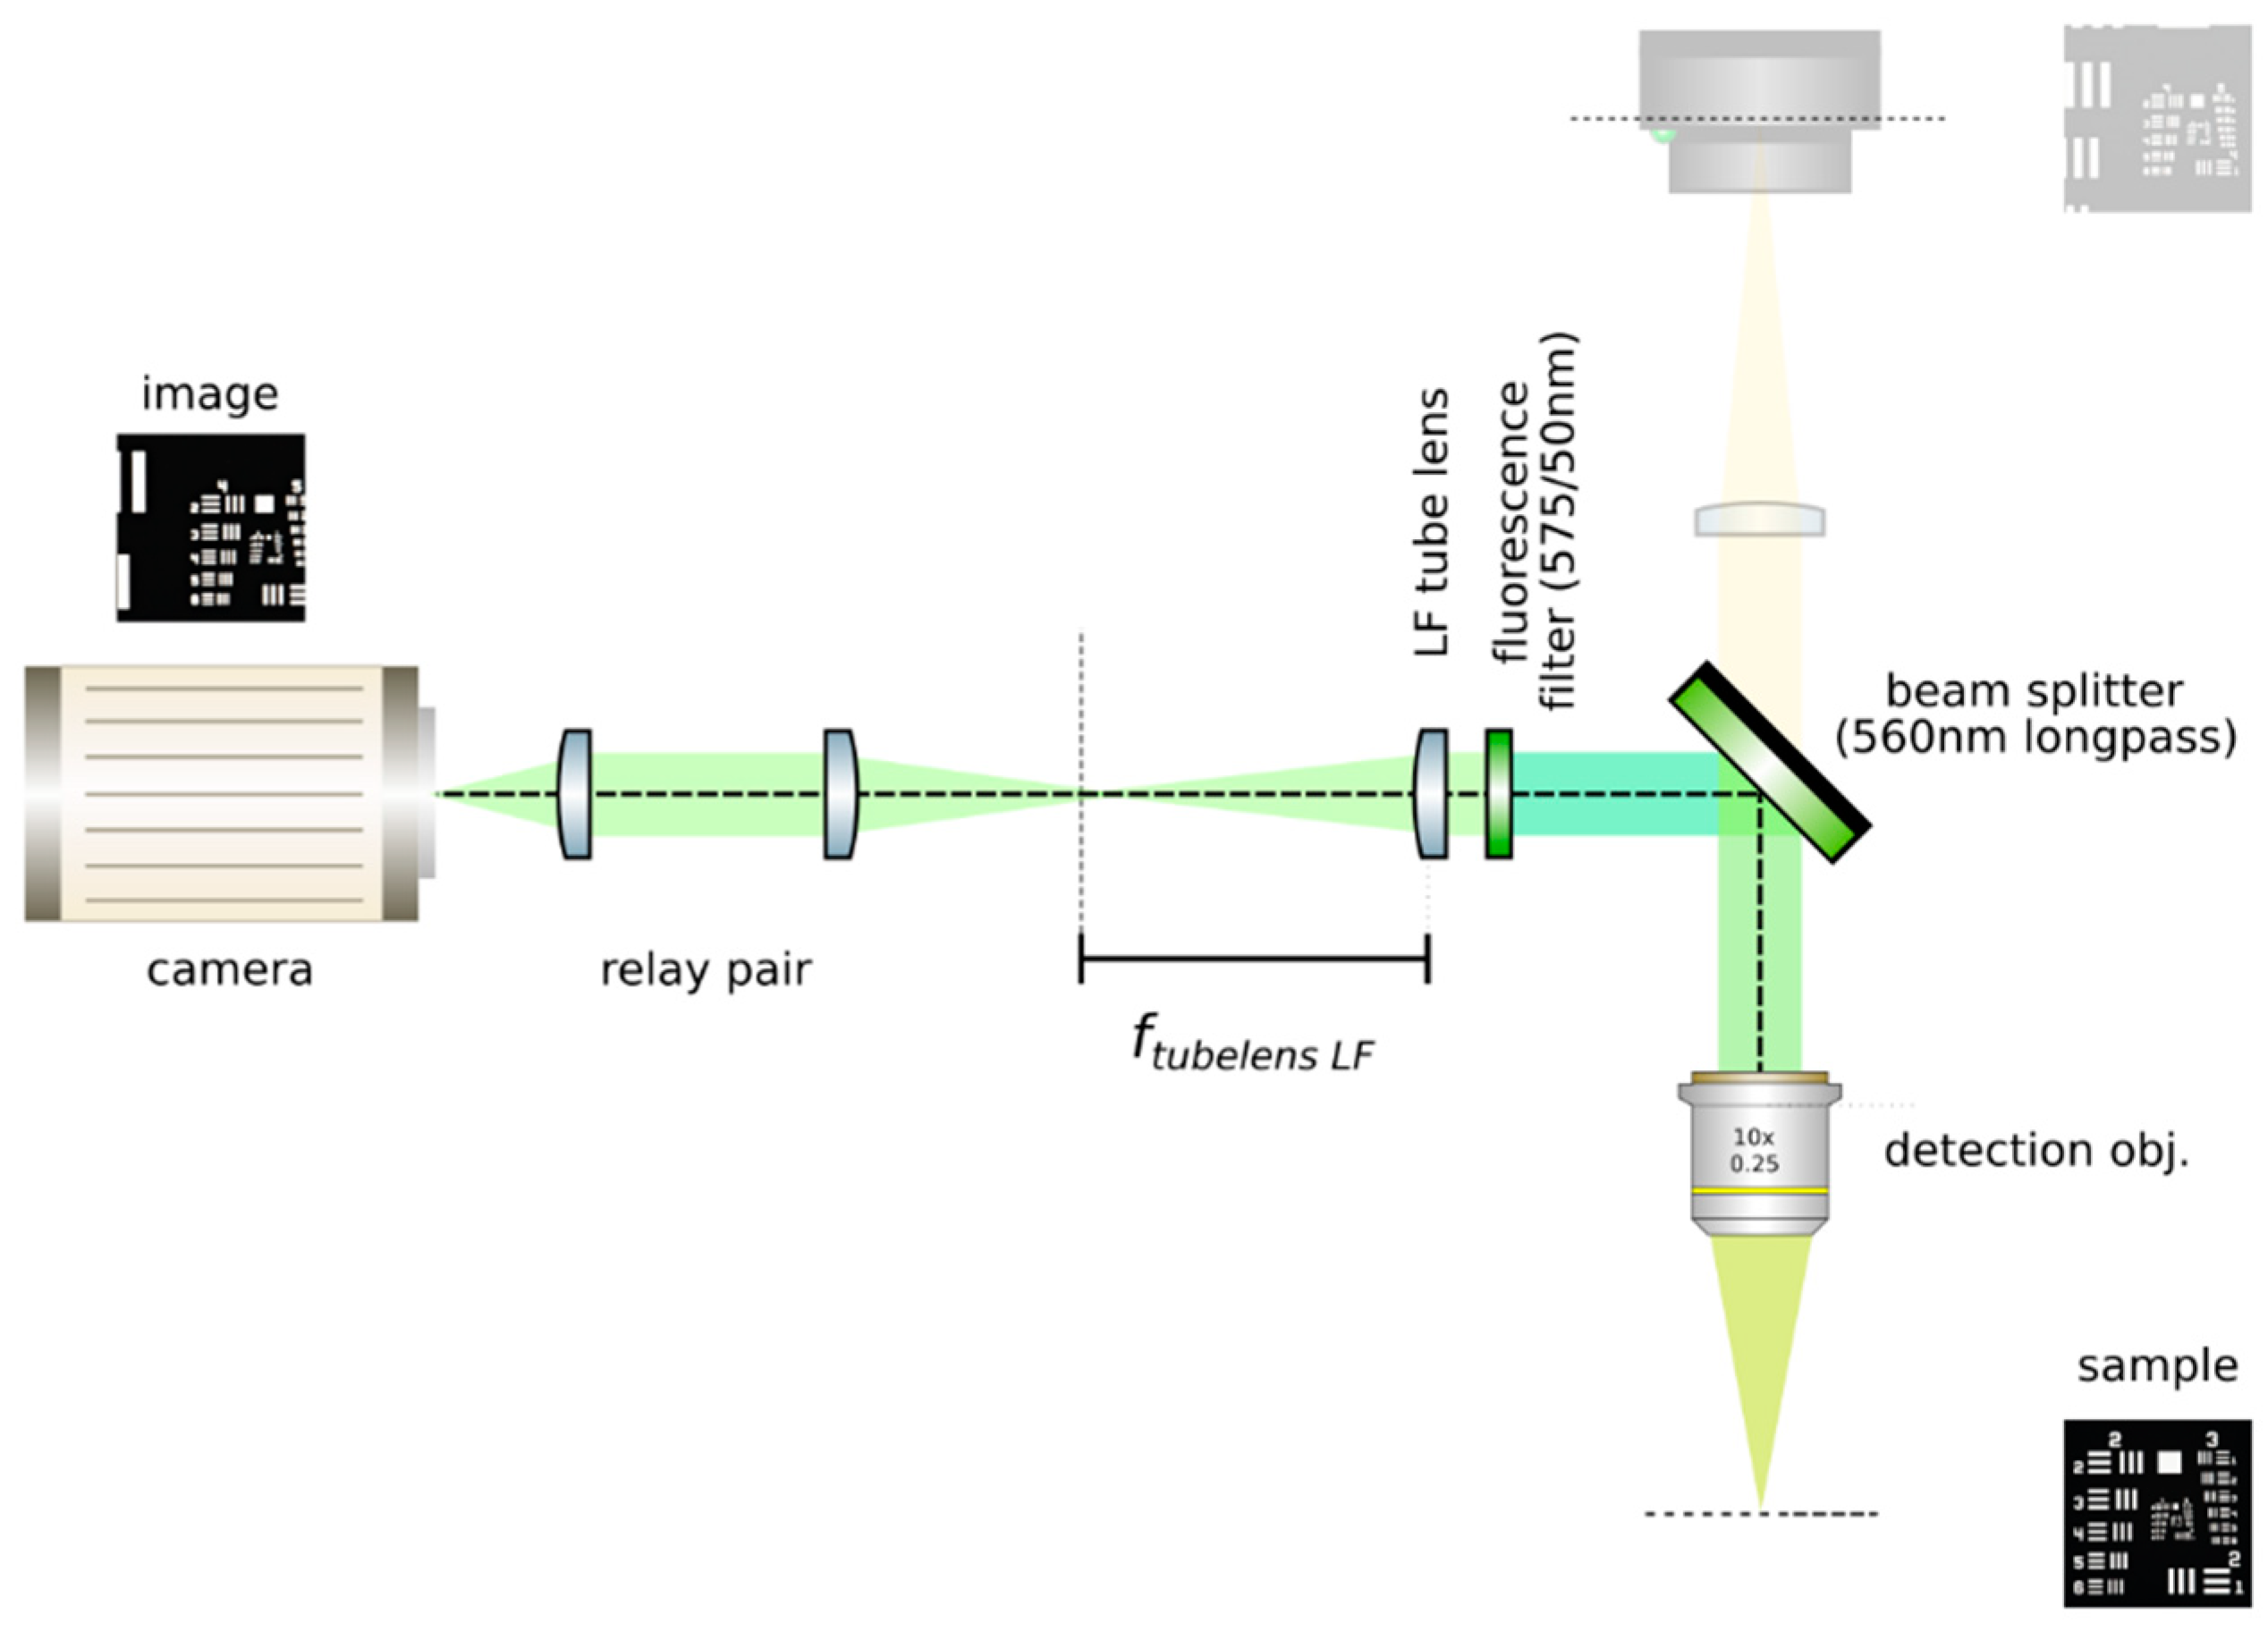
CRITICAL STEP: Acquire a reference image: Acquire an image of the sample at this moment. Measure it using image analysis software, such as ImageJ [22]. This image is important to guarantee that the right magnification is achieved when a relay pair of lenses is inserted in the upcoming steps. Keep the sample at its position until indicated. Do not pause the protocol until the end of step 4. The position of the sample may be lost, and magnification of the system may not be guaranteed.
- Insert a relay pair: Move the main camera away from the main tube lens in order to give space to a relay lens pair. Insert the relay pair (Thorlabs, MAP10100100-A) in the light field detection; see Figure 14. Ideally, it should be mounted so that it may be moved jointly with the main camera, as by attaching it to a lens tube (Thorlabs, SM30L05). The relay pair is needed to project the back focal plane of the microlenses onto the LF camera’s chip, as microlenses have a very short focal length. Adjust the positions of the camera and the relay pair until a sharp image with the desired magnification (that introduced by the relay pair) is achieved. Calculate the magnification by measuring the size of the sample’s image and comparing it with the one obtained in step 3.
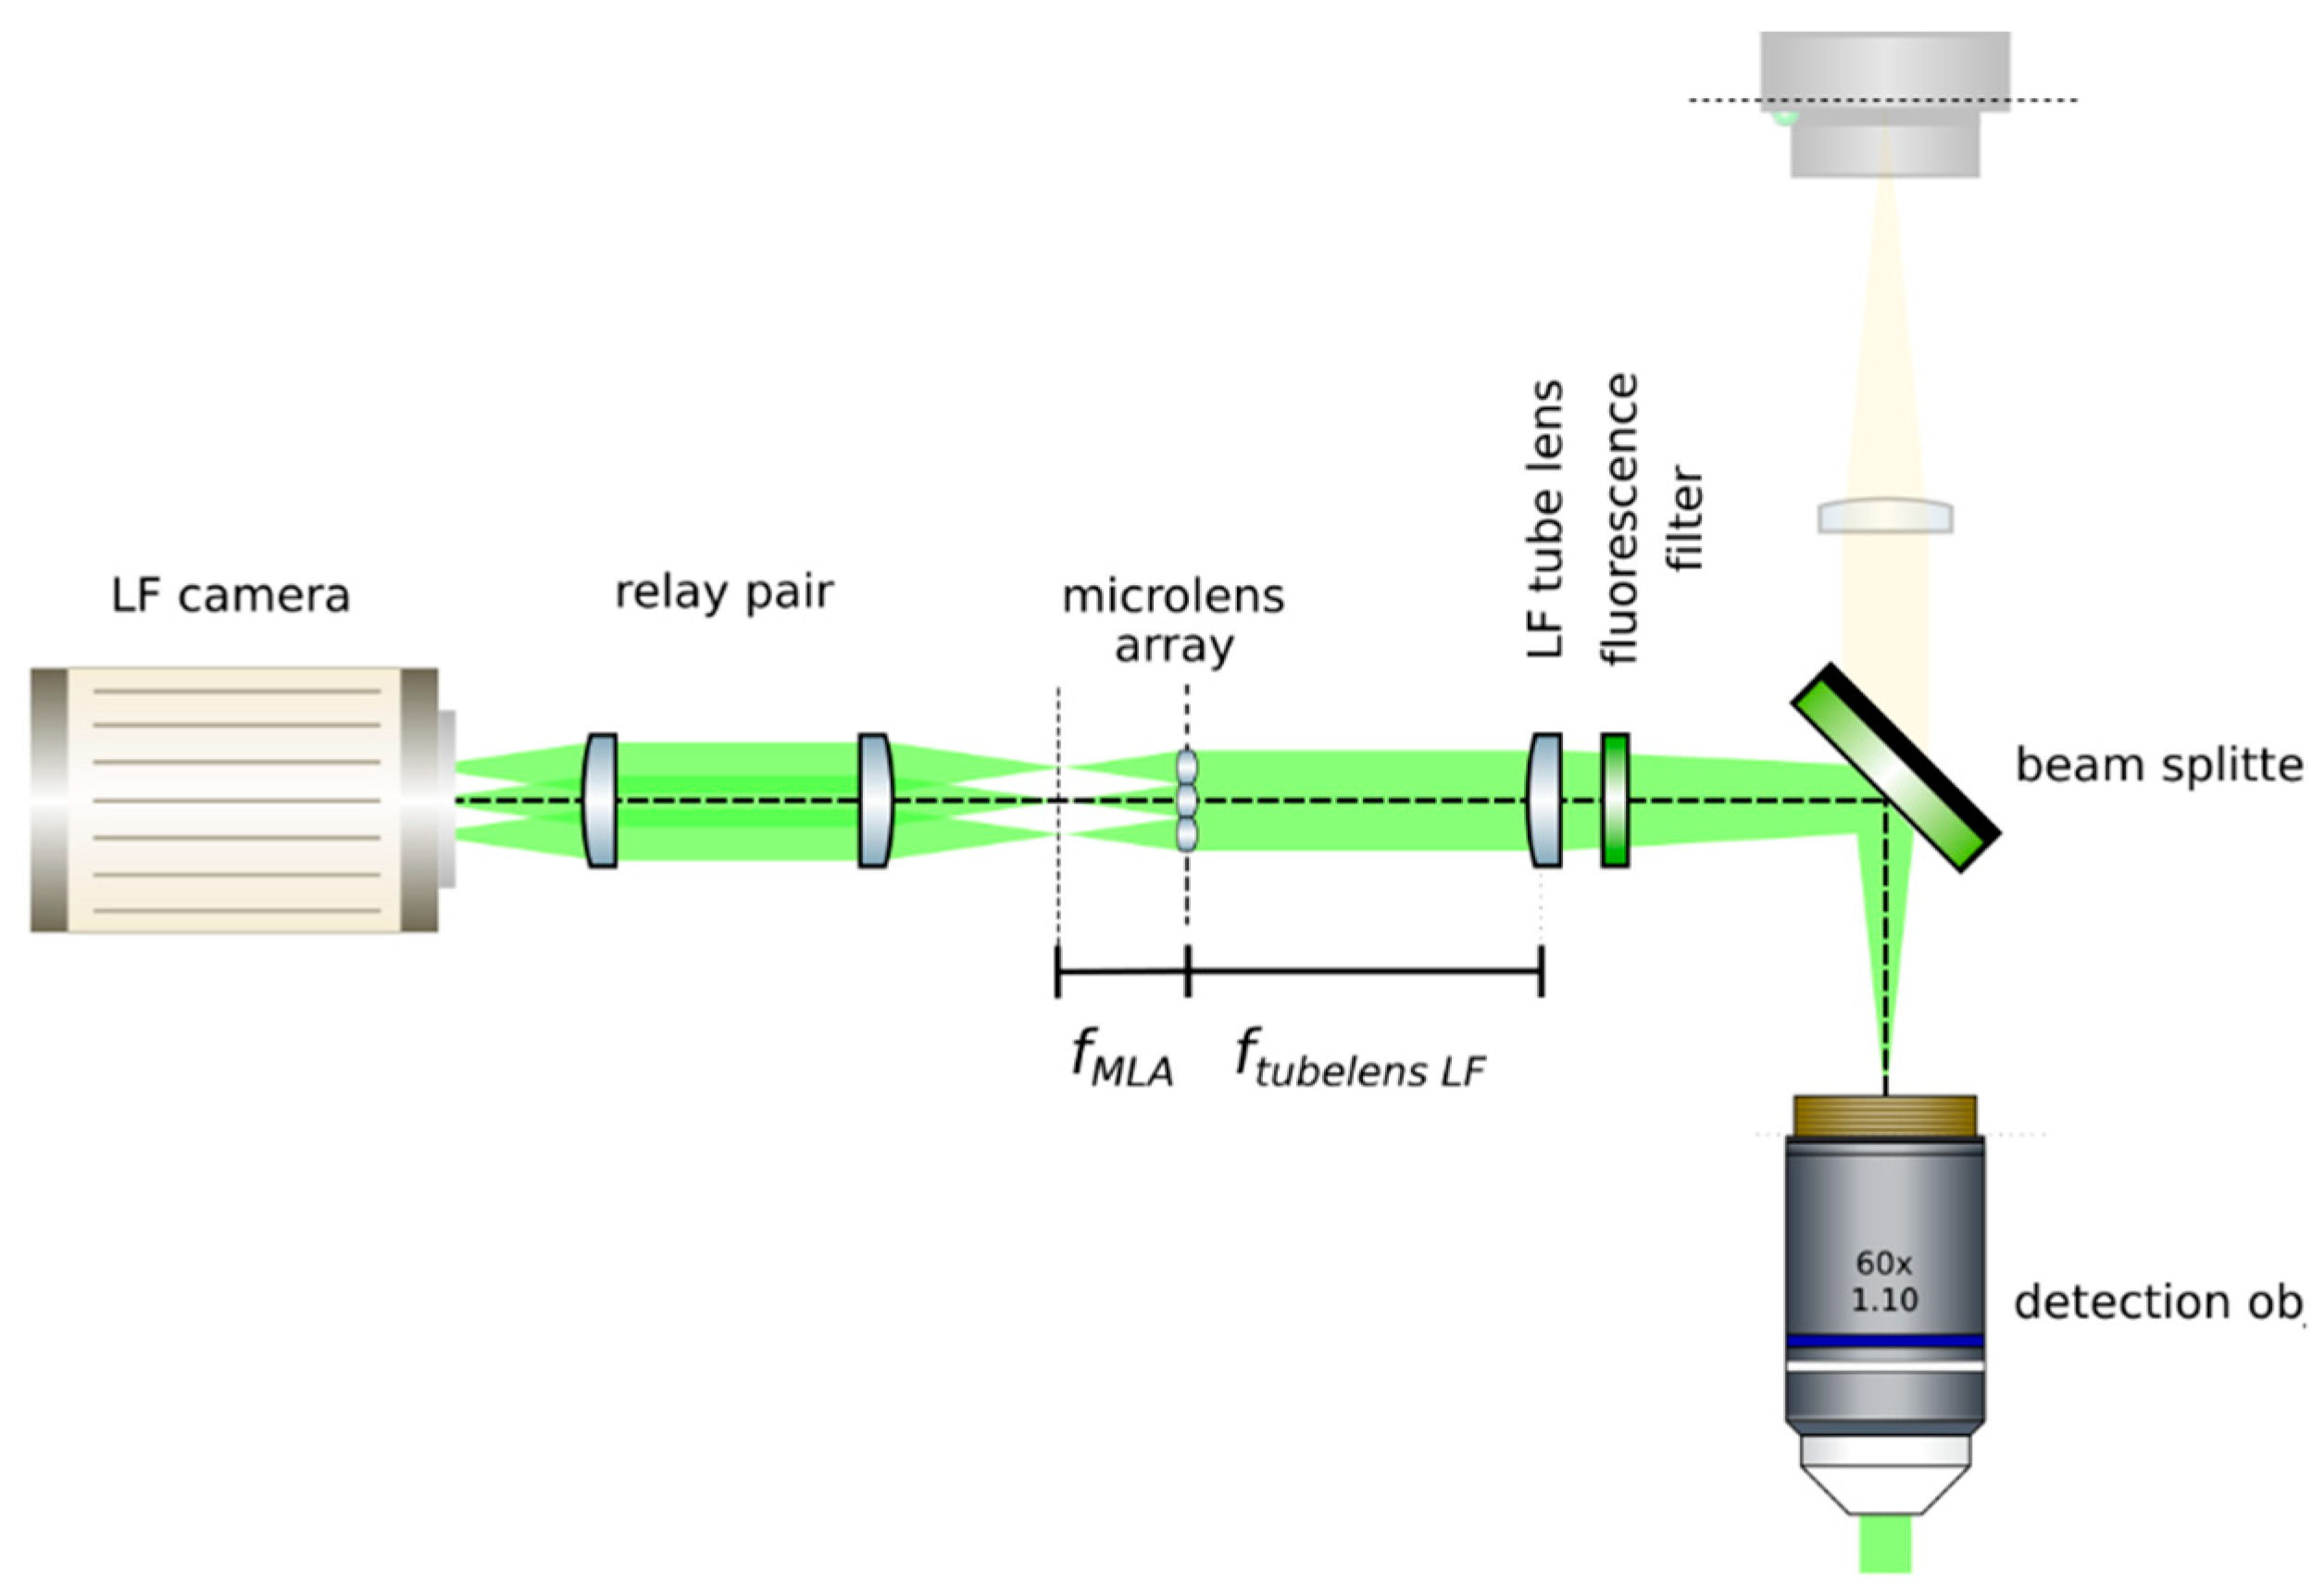
- Insert the microlens array: Mount a microlens array (RPC, MLA-S100-f21) in a 6-axis kinematic mount (Thorlabs, K6XS). Insert the microlens array at the image plane of the LF tube lens, as in Figure 15. The microlenses will sit on the image plane of the main tube lens when a sharp image of their edges appears on top of the sample. Adjust the pitch and yaw angles of the microlens array by means of the 6-axis kinematic mount until the central region of the microlens array is uniformly in focus. Rotate the microlens array to have it as aligned as possible with the pixel grid of the camera. Move the camera backwards and place the relay pair. An image of the sample should appear in focus with the correct magnification (from the relay).
- OPTIONAL STEP: Remove the sample from the field of view.
CRITICAL STEP: Image the back focal plane of the microlenses: Provide paraxial illumination, as in Figure 15. This may be done by closing both the field and aperture diaphragm of the Köhler illumination system or by sending an expanded well-collimated beam through the detection.
- Move the relay pair and the main camera away from the microlens array by its back focal length. Image the back focal plane of the microlenses. This will be achieved when a grid of the smallest spots is visible, such as in Figure 16. If possible, use light of a long wavelength to maximize the effects of diffraction on the lenslet array [23].
- Place the high NA detection objective: Put the high magnification, high NA objective (Olympus, LUMFLN 60XW) in the detection path. We use a custom 3D printed chamber to place the sample. Record a light field, such as the one in Figure 17.
4. Expected Results
Author Contributions
Funding
Acknowledgments
Conflicts of Interest
References
- Lechleiter, J.D.; Lin, D.T.; Sieneart, I. Multi-Photon Laser Scanning Microscopy Using an Acoustic Optical Deflector. Biophys. J. 2002, 83, 2292–2299. [Google Scholar] [CrossRef] [Green Version]
- Botcherby, E.J.; Juškaitis, R.; Booth, M.J.; Wilson, T. An optical technique for remote focusing in microscopy. Opt. Commun. 2008, 281, 880–887. [Google Scholar] [CrossRef] [Green Version]
- Dunsby, C. Optically sectioned imaging by oblique plane microscopy. Opt. Express 2008, 16, 20306–20316. [Google Scholar] [CrossRef] [PubMed]
- Holekamp, T.F.; Turaga, D.; Holy, T.E. Fast Three-Dimensional Fluorescence Imaging of Activity in Neural Populations by Objective-Coupled Planar Illumination Microscopy. Neuron 2008, 57, 661–672. [Google Scholar] [CrossRef] [PubMed] [Green Version]
- Fahrbach, F.O.; Voigt, F.F.; Schmid, B.; Helmchen, F.; Huisken, J. Rapid 3D light-sheet microscopy with a tunable lens. Opt. Express 2013, 21, 21010–21026. [Google Scholar] [CrossRef] [PubMed] [Green Version]
- Bouchard, M.B.; Voleti, V.; Mendes, C.S.; Lacefield, C.; Grueber, W.B.; Mann, R.S.; Bruno, R.M.; Hillman, E.M. Swept confocally-aligned planar excitation (SCAPE) microscopy for high-speed volumetric imaging of behaving organisms. Nat. Photonics 2015, 9, 113. [Google Scholar] [CrossRef]
- Olarte, O.E.; Andilla, J.; Artigas, D.; Loza-Alvarez, P. Decoupled illumination detection in light sheet microscopy for fast volumetric imaging. Optica 2015, 2, 702. [Google Scholar] [CrossRef]
- Migliori, B.; Datta, M.S.; Dupre, C.; Apak, M.C.; Asano, S.; Gao, R.; Boyden, E.S.; Hermanson, O.; Yuste, R.; Tomer, R. Light sheet theta microscopy for rapid high-resolution imaging of large biological samples. BMC Biol. 2018, 16, 57. [Google Scholar] [CrossRef]
- Javidi, B.; Yeom, S.; Moon, I.; Daneshpanah, M. Real-time automated 3D sensing, detection, and recognition of dynamic biological micro-organic events. Opt. Express 2006, 14, 3806–3829. [Google Scholar] [CrossRef]
- Levoy, M.; Ng, R.; Adams, A.; Footer, M.; Horowitz, M. Light Field Microscopy. In ACM SIGGRAPH 2006 Papers; ACM: New York, NY, USA, 2006; pp. 924–934. [Google Scholar]
- Prevedel, R.; Yoon, Y.G.; Hoffmann, M.; Pak, N.; Wetzstein, G.; Kato, S.; Schrödel, T.; Raskar, R.; Zimmer, M.; Boyden, E.S.; et al. Simultaneous whole-animal 3D imaging of neuronal activity using light-field microscopy. Nat. Methods 2014, 11, 727. [Google Scholar] [CrossRef]
- Truong, T.V.; Holland, D.B.; Madaan, S.; Andreev, A.; Troll, J.V.; Koo, D.E.; Keomanee-Dizon, K.; McFall-Ngai, M.J.; Fraser, S.E. Selective volume illumination microscopy offers synchronous volumetric imaging with high contrast. BioRxiv 2018. [Google Scholar] [CrossRef] [Green Version]
- Wagner, N.; Norlin, N.; Gierten, J.; de Medeiros, G.; Balázs, B.; Wittbrodt, J.; . Hufnagel, L.; Prevedel, R. Instantaneous isotropic volumetric imaging of fast biological processes. Nat. Methods 2019, 16, 497. [Google Scholar] [CrossRef] [PubMed]
- Aimon, S.; Katsuki, T.; Jia, T.; Grosenick, L.; Broxton, M.; Deisseroth, K.; Sejnowski, T.J.; Greenspan, R.J. Fast near-whole–brain imaging in adult Drosophila during responses to stimuli and behavior. PLoS Biol. 2019, 17, e2006732. [Google Scholar] [CrossRef] [PubMed]
- Grosenick, L.M.; Broxton, M.; Kim, C.K.; Liston, C.; Poole, B.; Yang, S.; Andalman, A.; Scharff, E.; Cohen, N.; Yizhar, O.; et al. Identification of Cellular-Activity Dynamics across Large Tissue Volumes in the Mammalian Brain. BioRxiv 2017. [Google Scholar] [CrossRef]
- Ng, R.; Levoy, M.; Brédif, M.; Duval, G.; Horowitz, M.; Hanrahan, P. Light field photography with a hand-held plenoptic camera. Comput. Sci. Tech. Rep. CSTR 2005, 2, 1–11. [Google Scholar]
- Kim, J.; Jung, J.H.; Jeong, Y.; Hong, K.; Lee, B. Real-time integral imaging system for light field microscopy. Opt. Express 2014, 22, 10210. [Google Scholar] [CrossRef] [PubMed]
- Pégard, N.C.; Liu, H.Y.; Antipa, N.; Gerlock, M.; Adesnik, H.; Waller, L. Compressive light-field microscopy for 3D neural activity recording. Optica 2016, 3, 517–524. [Google Scholar] [CrossRef]
- Wolff, J.M.; Castro, D.; Arbeláez, P.; Forero-Shelton, M. Light-sheet enhanced resolution of light field microscopy for rapid imaging of large volumes. In Proceedings of the Three-Dimensional and Multidimensional Microscopy: Image Acquisition and Processing XXV, (SPIE), San Francisco, CA, USA, 22 February 2018; p. 10499. [Google Scholar]
- Taylor, M.A.; Nöbauer, T.; Pernia-Andrade, A.; Schlumm, F.; Vaziri, A. Brain-wide 3D light-field imaging of neuronal activity with speckle-enhanced resolution. Optica 2018, 5, 345. [Google Scholar] [CrossRef]
- Olarte, O.E.; Andilla, J.; Gualda, E.J.; Loza-Alvarez, P. Light-sheet microscopy: A tutorial. Adv. Opt. Photonics 2018, 10, 111. [Google Scholar] [CrossRef]
- Schneider, C.A.; Rasband, W.S.; Eliceiri, K.W. NIH Image to ImageJ: 25 years of image analysis. Nat. Methods 2012, 9, 671–675. [Google Scholar] [CrossRef]
- Zhang, Z. A Practical Introduction to Light Field Microscopy. Available online: https://graphics.stanford.edu/software/LFDisplay/lfmintro.pdf (accessed on 25 June 2016).
- Broxton, M.; Grosenick, L.; Yang, S.; Cohen, N.; Andalman, A.; Deisseroth, K.; Levoy, M. Wave optics theory and 3-D deconvolution for the light field microscope. Opt. Express 2013, 21, 25418–25439. [Google Scholar] [CrossRef] [PubMed]








© 2019 by the authors. Licensee MDPI, Basel, Switzerland. This article is an open access article distributed under the terms and conditions of the Creative Commons Attribution (CC BY) license (http://creativecommons.org/licenses/by/4.0/).
Share and Cite
Madrid-Wolff, J.; Forero-Shelton, M. Protocol for the Design and Assembly of a Light Sheet Light Field Microscope. Methods Protoc. 2019, 2, 56. https://doi.org/10.3390/mps2030056
Madrid-Wolff J, Forero-Shelton M. Protocol for the Design and Assembly of a Light Sheet Light Field Microscope. Methods and Protocols. 2019; 2(3):56. https://doi.org/10.3390/mps2030056
Chicago/Turabian StyleMadrid-Wolff, Jorge, and Manu Forero-Shelton. 2019. "Protocol for the Design and Assembly of a Light Sheet Light Field Microscope" Methods and Protocols 2, no. 3: 56. https://doi.org/10.3390/mps2030056
APA StyleMadrid-Wolff, J., & Forero-Shelton, M. (2019). Protocol for the Design and Assembly of a Light Sheet Light Field Microscope. Methods and Protocols, 2(3), 56. https://doi.org/10.3390/mps2030056


