Proceeding Paper

Transparent Object Shape Measurement Based on Deflectometry †

Opto-Electronics Department, Sichuan University, Chengdu 610065, China
*
Author to whom correspondence should be addressed.
Presented at the 18th International Conference on Experimental Mechanics (ICEM18), Brussels, Belgium, 1–5 July 2018.
Proceedings 2018, 2(8), 548; https://doi.org/10.3390/ICEM18-05428
Published: 9 July 2018
(This article belongs to the Proceedings of The 18th International Conference on Experimental Mechanics)

Abstract

:
This paper proposes a method for obtaining surface normal orientation and 3-D shape of plano-convex lens using refraction stereo. We show that two viewpoints are sufficient to solve this problem under the condition that the refractive index of the object is known. What we need to know is that (1) an accurate function that maps each pixel to the refraction point caused by the refraction of the object. (2) light is refracted only once. In the simulation, the actual measurement process is simplified: light is refracted only once; and the accurate one-to-one correspondence between incident ray and refractive ray is realized by known object points. The deformed grating caused by refraction point is also constructed in the process of simulation. A plano-convex lens with a focal length of 242.8571 mm is used for stereo data acquisition, normal direction acquisition, and the judgment of normal direction consistency. Finally, restoring the three-dimensional information of the plano-convex lens by computer simulation. Simulation results suggest that our method is feasibility. In the actual experiment, considering the case of light is refracted more than once, combining the calibration data acquisition based on phase measurement, phase-shifting and temporal phase-unwrapping techniques to complete (1) calibrating the corresponding position relationship between the monitor and the camera (2) matching incident ray and refractive ray.

1. Introduction

Phase Measuring Deflectometry (PMD), which is stemmed from structured illumination measurement technology, is based on the deflection of light to determine the 3D shape of the object. In practical application, PMD can be used to measure two kinds of objects, that is, mirror or mirror like object, and transparent phase object. The former uses the reflection law of light to record the mirror image of the standard fringe of the tested object, and calculates the three-dimensional surface shape of the mirror object according to the phase change of the image fringe. The latter determines the equivalent wave-front distribution by measuring the changes of standard fringe caused by transparent objects.
Petet et al. [1]. put forward a method for measuring mirror objects based on active PMD, the method determines the original ray and the offset ray caused by the object according to the ray tracing method. The intersection point, i.e., the measured mirror surface point, is calculated according to the straight line equation of two rays. Then the three-dimensional surface shape of the measured mirror surface can be obtained.
Knauer [2,3], Pet and so on also proposed the stereo PMD to complete the full field measurement of the specular objects, and use the matching technology similar to stereo vision to complete the measurement of the tested object.
Canabal [4] proposed a work to test the surface shape of a graded refractive index positive plano-convex lens by using structured illumination measurement technology. A computer monitor is used to display the gray-scale modulated grating pattern and to photograph the deformation fringe and standard fringe respectively. The light deflection caused by the phase object is calculated from the phase difference and converted into the wave-front slope, which can lead the reconstruction of the wave surface distribution of the measured object.
Liu et al. [5] proposed an active PMD technique with simple operation and high flexibility. In a calibrated camera system, the deflected ray direction through the measured object is determined by the active movement of the standard sinusoidal fringe plane (without any calibrated mechanical device). Compared with the original ray without the object, the deflection angle and the wave-front gradient can be calculated, and the reconstruction of the wave-front is completed according to the numerical integration.
In addition, the researchers also try to calculate the surface of transparent objects by means of ray tracing. Among them, Nigel J. Morris and Kiriakos N. Kutulakos [6] developed an optimized algorithm based on the stereo vision to complete the instantaneous measurement of liquid morphologies with time flow. In this method, a standard checkerboard is placed under the liquid, for a ray from the camera, the deflection of the ray is only related to the liquid surface and the refractive index of the liquid, and each incident ray is refracted only once. Therefore, when the system parameters are known, the surface shape of liquid can be determined by stereo normal vector consistency constraint.
A method based on stereo vision to measure the shape of plano-convex lens is proposed in this paper. The two orthogonal sinusoidal fringes are displayed on a computer screen, which can produce enough information to calculate the world coordinates in a calibrated stereo-vision system. Once the premise of refractive index is known, the one-to-one correspondence between the refraction points and the imaging points of the two cameras are found respectively, the incident ray and refractive ray can be obtained, a height of the object is assumed, the corresponding normals of the two cameras can be calculated by refraction law. Because the normal of the object is only related to the shape of the object itself, there is only one normal direction. Only when the two normals of the candidate object point under the two cameras are equal, the candidate object point information can be considered as the real three-dimensional information of the object.

2. Principle

When the two camera system is calibrated, we can use the stereo normal vector consistency constraint to calculate the 3D data for the tested transparent object. In this paper, we treat the camera model as a pinhole model, describing the imaging process of the camera based on perspective projection, and assumed that there is only one refraction for each incident ray.

2.1. Laws of Refraction in Vector Form

According to the laws of refraction in vector form (Figure 1a), we can know the incident ray, the refractive ray, and the normal are coplanar. If we know the incident ray and the refractive ray, the normal can be linearly represented by the incident ray and refractive ray as:
N = ( r β i ) / ( r β i )
where N is the normalized normal of the incident ray, i and r are the normalized incident and refractive rays, β is the ratio of n and n’, which represent the refractive index in the air and that of the plano-convex lens medium respectively.
As shown in Figure 1b, when calculating the normal direction, we know that the incident ray must pass through the camera’s optical center C1 in the pinhole camera model. Assumed that Q1 is the point of the corresponding refractive ray on the refraction plane, S is the object point, the incident ray and the refractive ray can be expressed as [7]:
i = S C 1 S C 1 ,   r = Q 1 S Q 1 S
Similarly, if we know the incident ray and the normal, the refractive ray can be got by:
r = i + Γ N
where Γ = n 2 n 2 + ( N i ) 2 N i .

2.2. Stereo Normal Vector Consistency Constraint

When the displayed fringes are imaged via a transparent object, the refraction ray will follow the refraction law and hit a point on the screen, i.e., a pixel on the CCD chip will be matched with the point on the screen. But the information is not enough to help us find the exact location of the transparent object, because there are more candidate object points as shown in Figure 2a. If a second camera is employed, we can get the exact location (Figure 2b).
The process of stereo determining the position of an object is as follows (Figure 2b): First, starting from CCD1, the incident ray C1P1 is determined by the camera optical center C1 and the image point P1, P1 is the image of Q1 on the refraction plane passing through a point S of the object surface. Apparently all the points, e.g., S and S1, which are on the incident ray C1P1, can satisfy the refraction law as shown in Figure 2a. Second, when S and S1 are projected onto the CCD2 image plane, the pixel P2 and P3 can be got, and they are matched with the points Q2 and Q3 on the refraction plane respectively. Then the incident ray and refractive ray corresponding to the CCD2 camera for point S are SP2 and SQ2 respectively, and a new normal (N’) is calculated. For the assumed point S1, we can get another normal (N1). Then we can calculate the normal difference.
E = arccos ( N N )
where N and N’ are the two normals from left camera and right camera separately. Apparently for each candidate point on the incident ray C1P1, there will be a lot of normals. Only when E is zero, i.e., the two normals are collinear, it is considered that the point Sis the correct position of the object. But in the real case, E can’t be zero, then a proper threshold has to be used to find the correct normal. With this method, the whole three-dimensional information of the object can be obtained.

2.3. Pose Calculation

To calculate the monitor position, the sinusoidal fringe patterns are displayed on the monitor [8]. Typically, a standard sinusoidal grating intensity function can be expressed by:
I x ( x , y ) = a + b cos ( 2 π x / P x )
I y ( x , y ) = a + b cos ( 2 π y / P y )
Equations (5) and (6) are one-dimensional fringes with only x and y direction respectively. Among them, a, b are the normal number; Px and Py is fringe period respectively. The well-known phase-shifting and temporal phase-unwrapping techniques can be used to extract the phase distributions of each pixel. Then the 3D coordinates can be got by:
{ x = ϕ u ( u , v ) P x / 2 π + k x 0 y = ϕ v ( u , v ) P y / 2 π + k y 0 z = 0
where kx0, ky0 are constant w.r.t the starting point of the phase unwrapping. ϕu(u,v) and ϕv(u,v) are the unwrapped phase distributions for the two direction fringes respectively. Then the monitor position in the camera coordinate can be got.
When the tested object is placed above the monitor, the same pixel will see a different point of the monitor. Then we can get the corresponding world coordinates (x,y,z) via the deformed phase distributions via the known extrinsic parameters.

3. Simulation

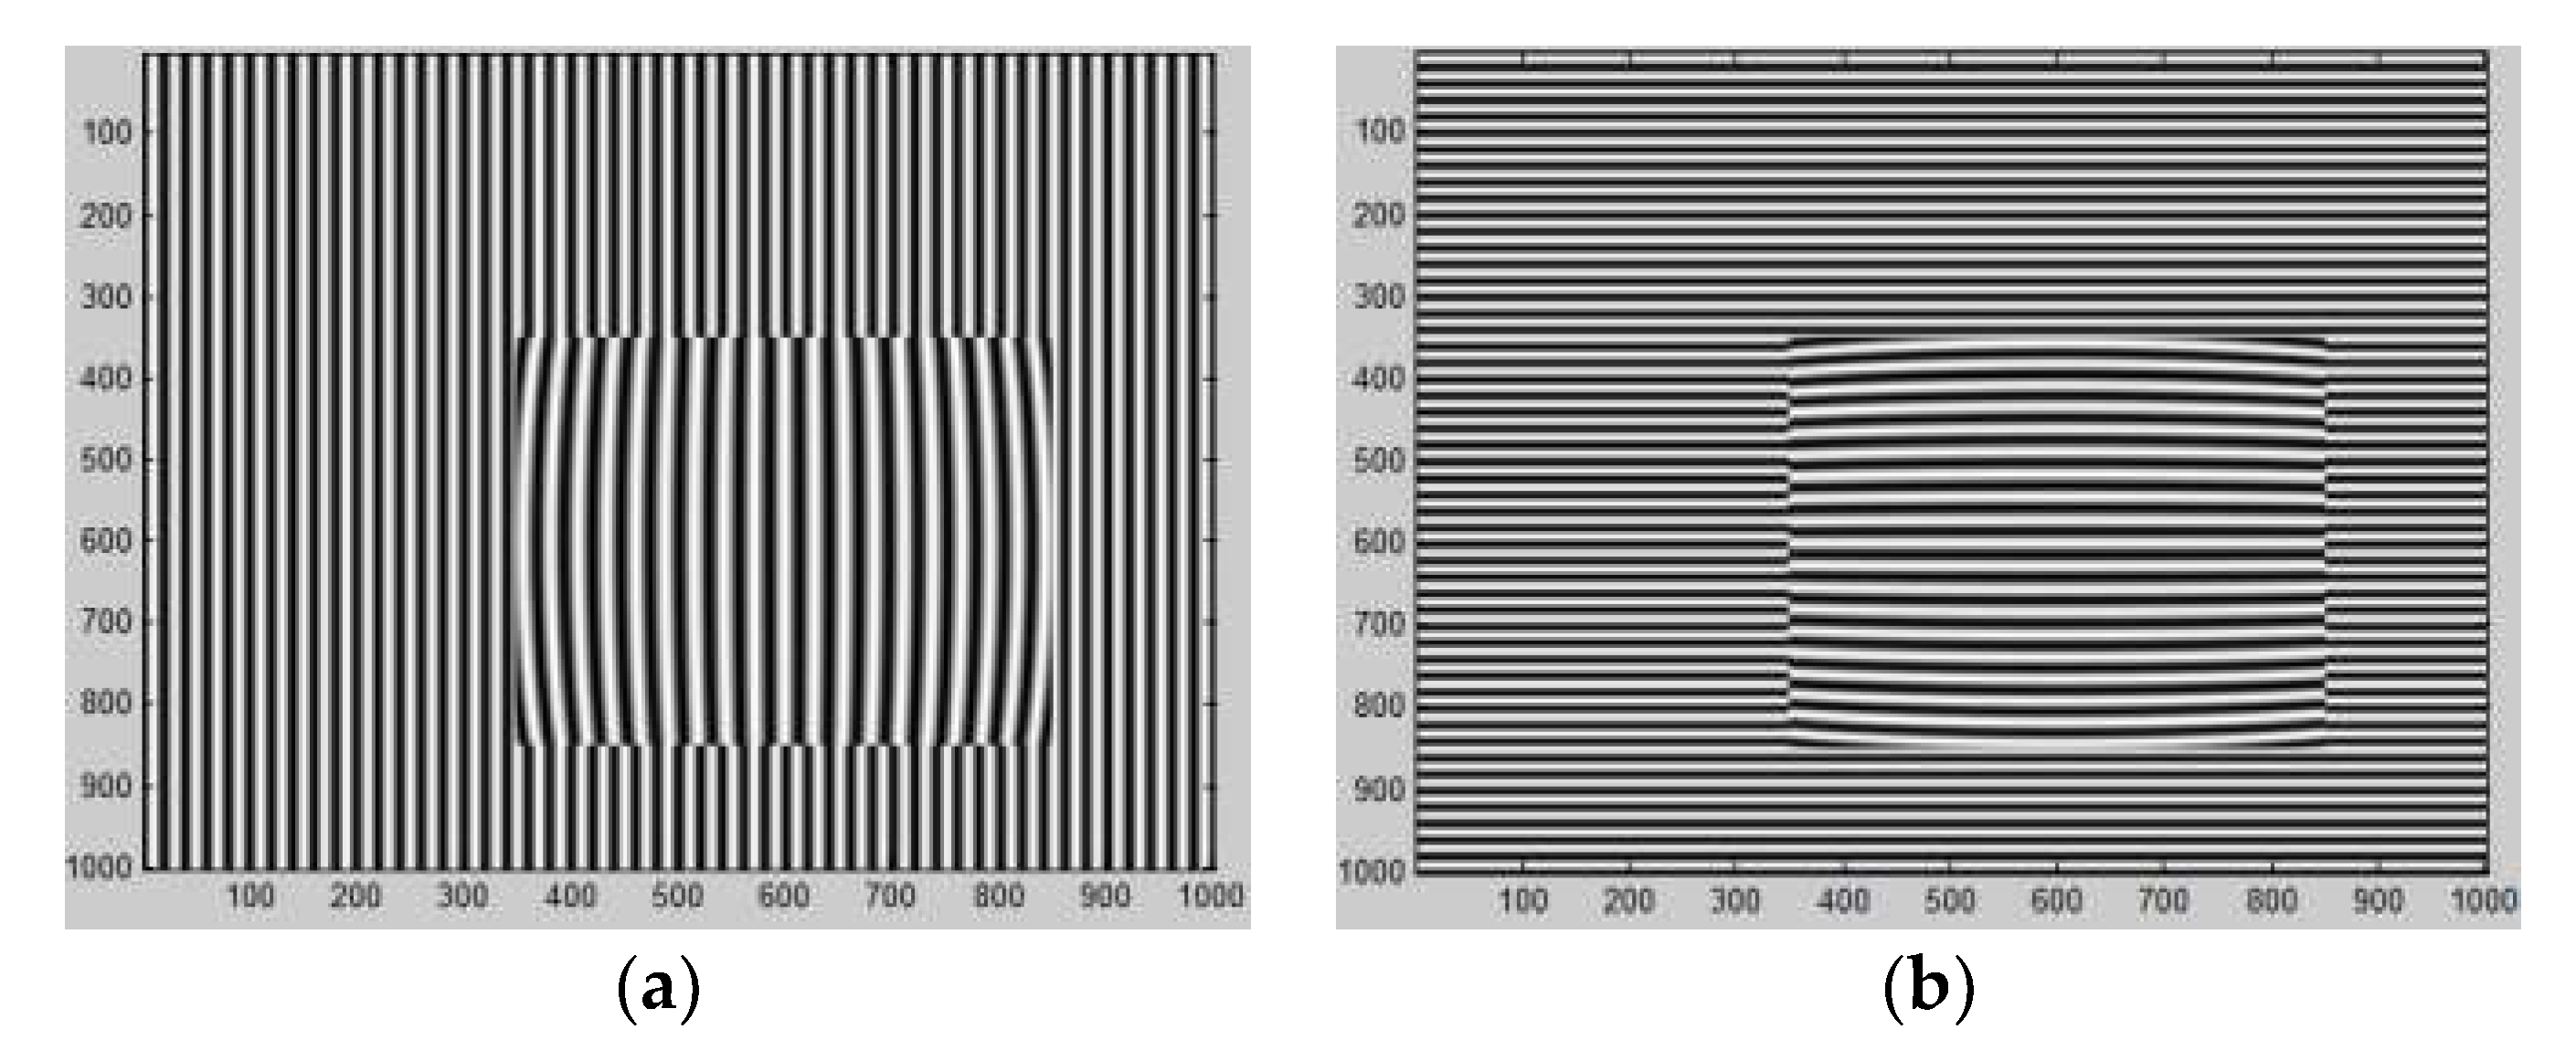
In simulation, the resolution of both cameras is 1200 × 1600, and the focal length of the two camera is 5905.1 pixel and 5862.4 pixel. The refractive index is 1.7. It is assumed that the tested object is a sphere with a radius of 100 mm, and assumed that there is only one refraction and the refractive ray will hit the fringe screen, which is located at the z = 0 mm. The tested object is shown in Figure 3a in the left camera coordinate system. In Figure 3b, it shows the relationship between the angle and the candidate z coordinate for one pixel. The restored object after one calculation is shown in Figure 3c. The final relationship between the angle and the candidate z coordinates after iterative process, and the final object shape are shown in Figure 3d,e. The reconstruction error is shown in Figure 3f. The simulated original and deformed grating are shown in Figure 4a,b.

4. Experiment

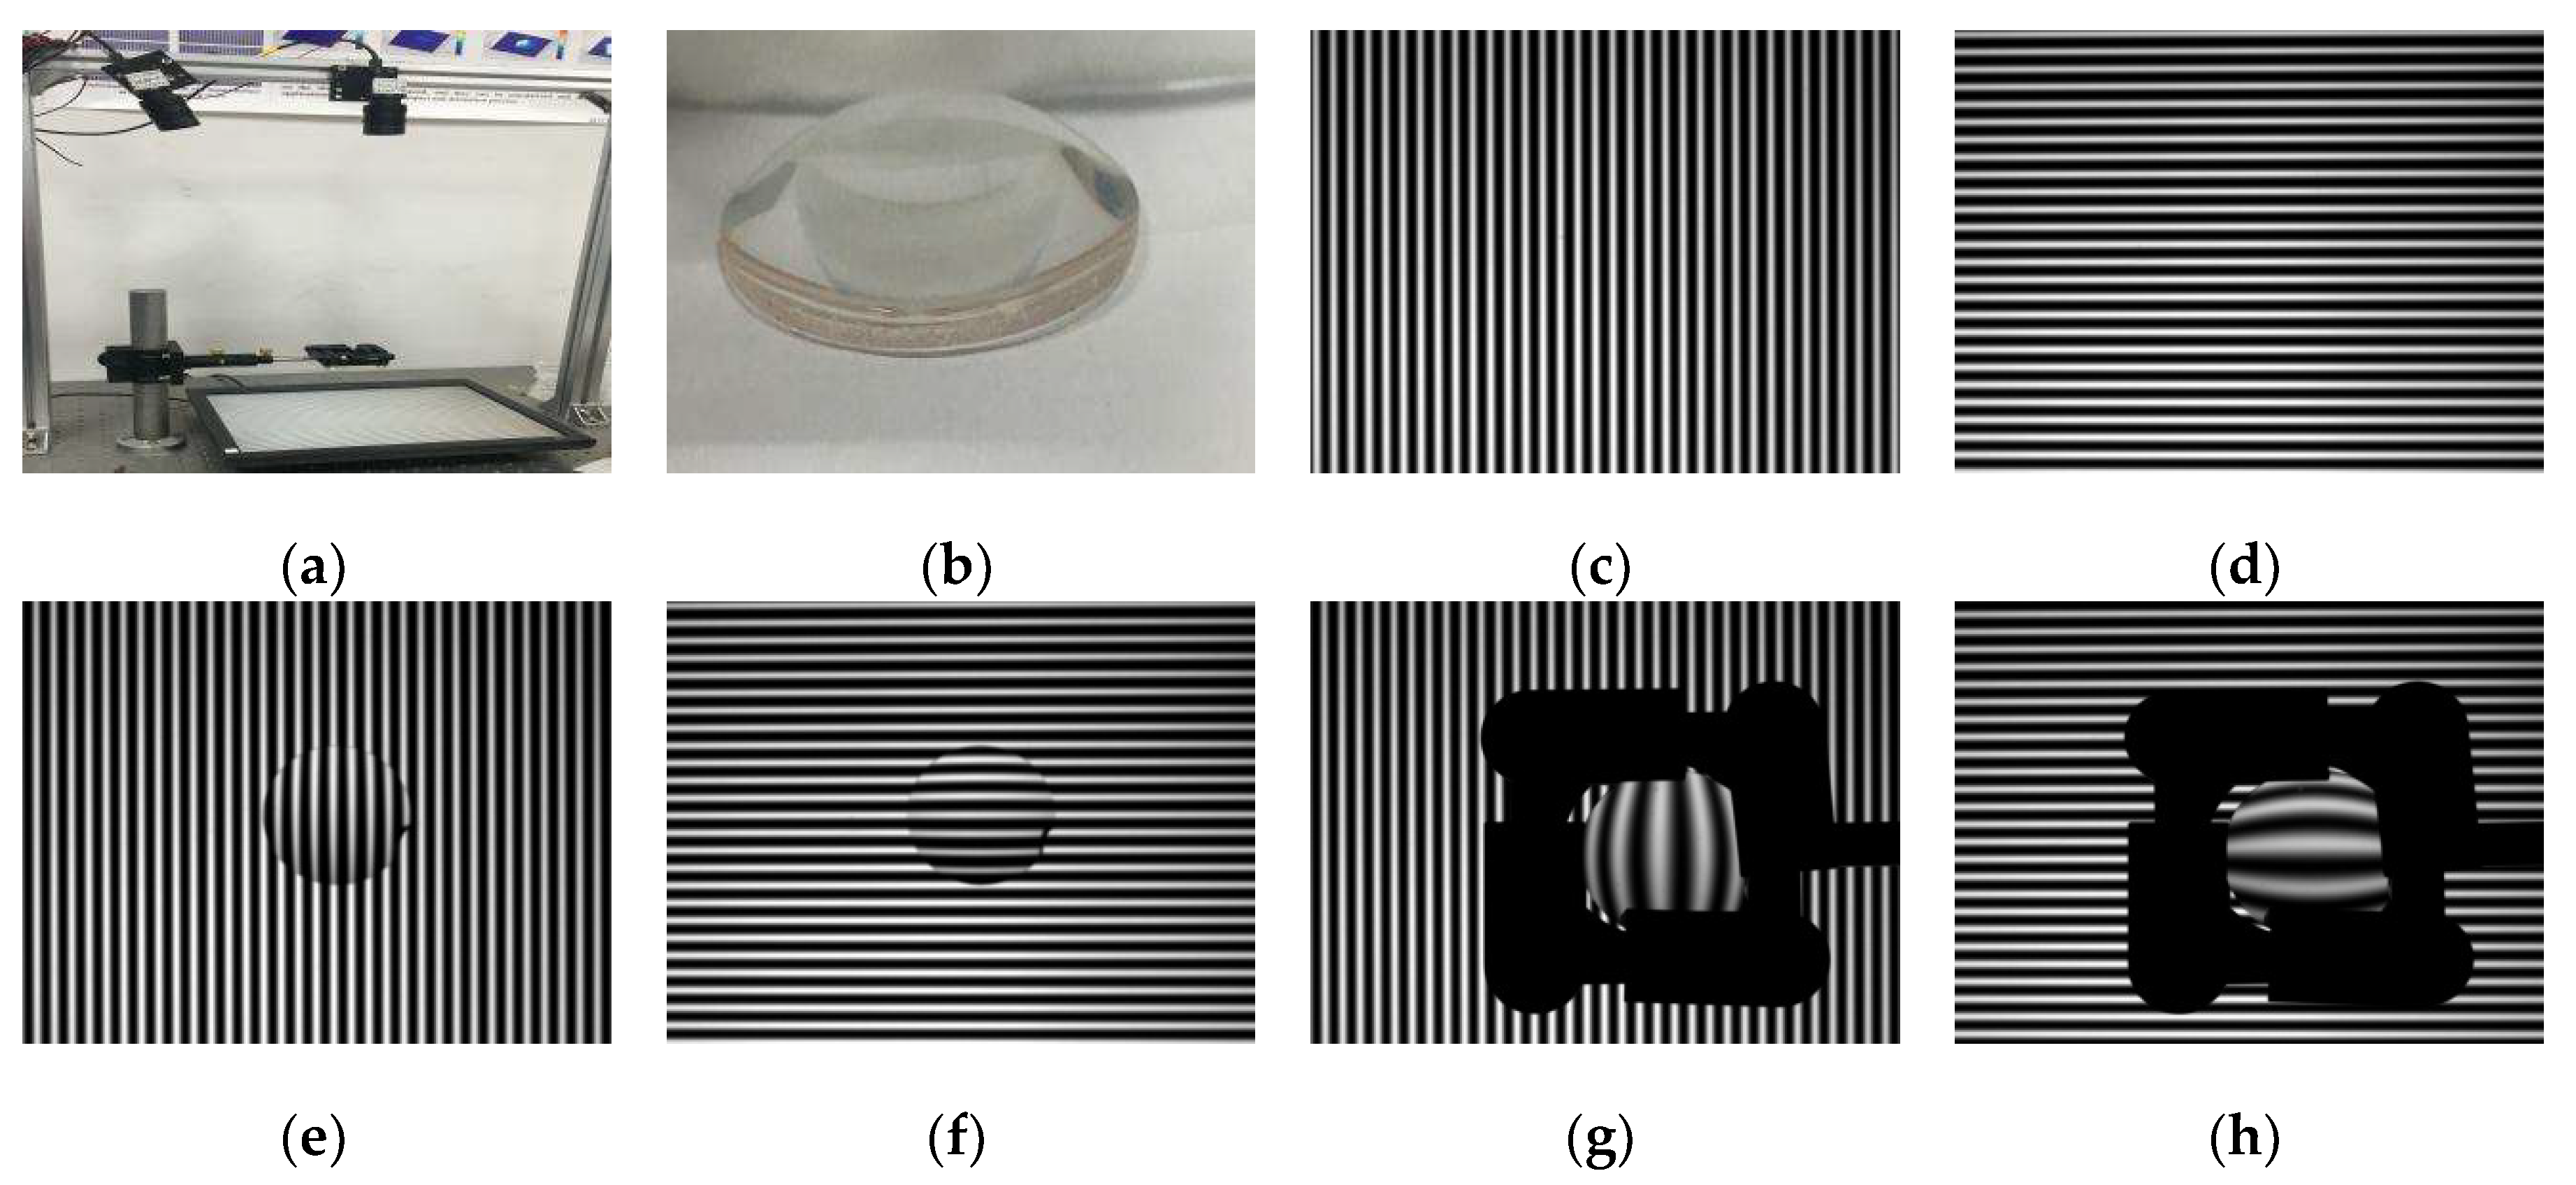
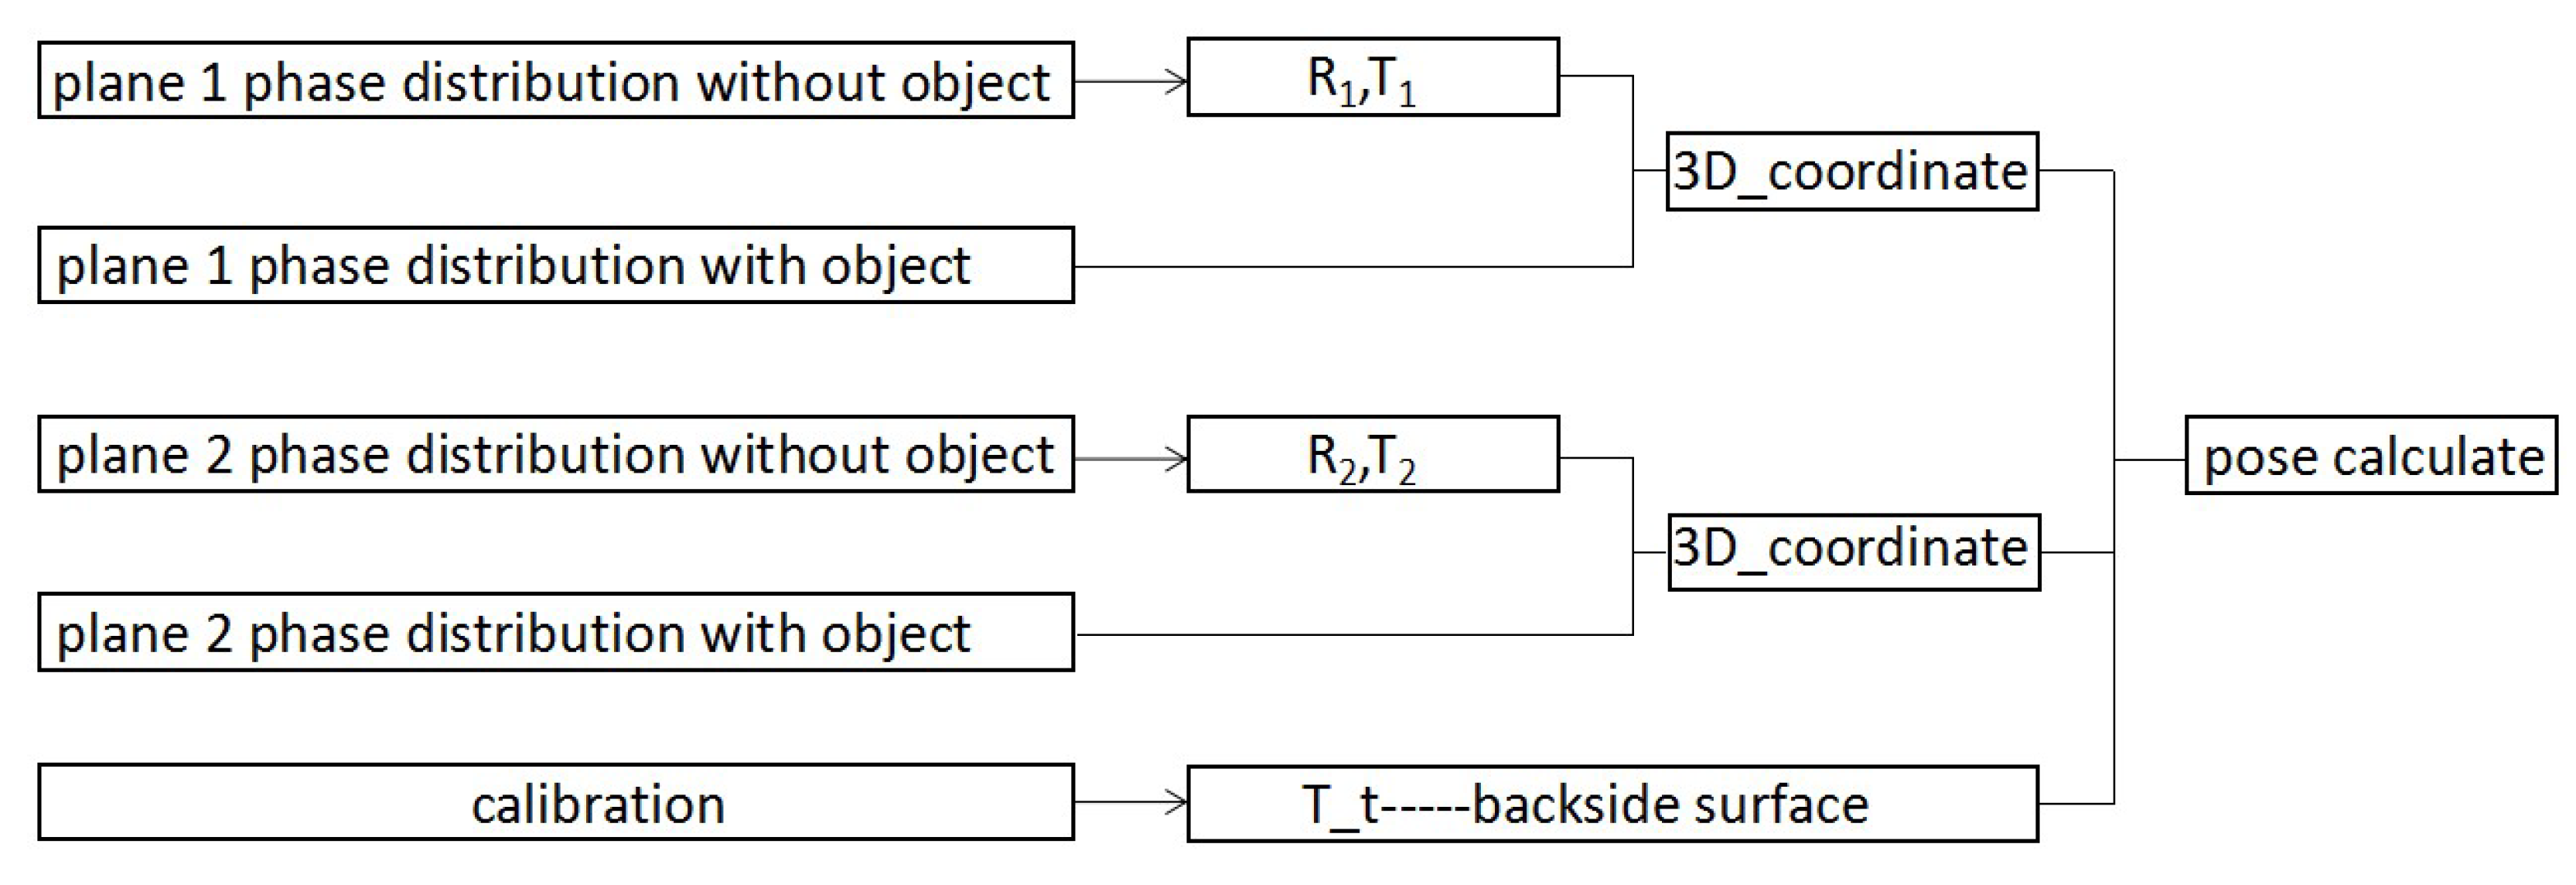
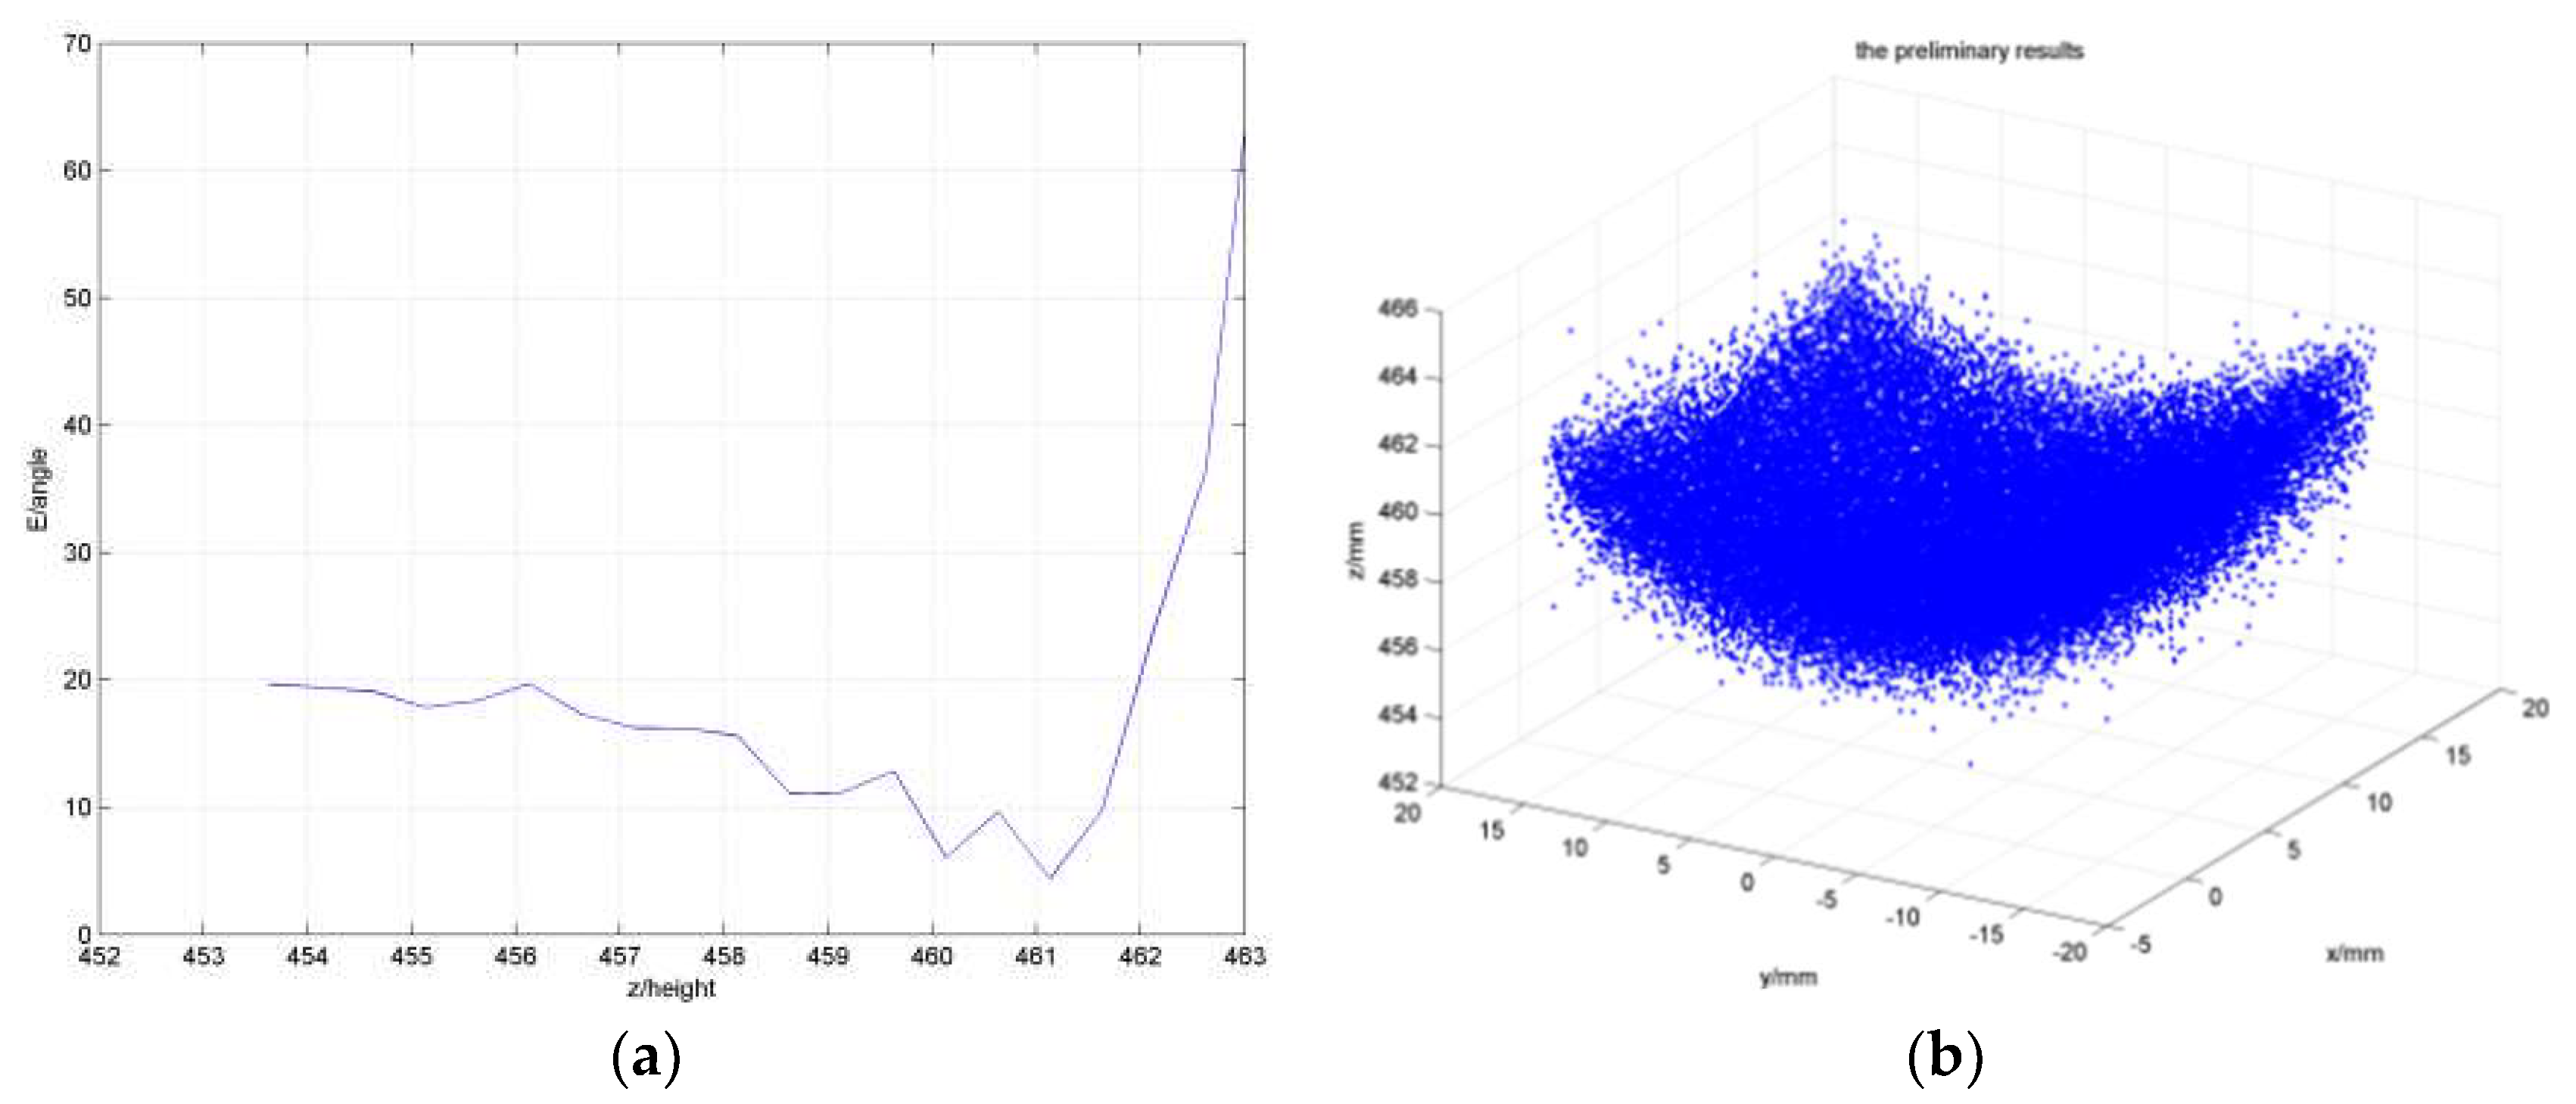
In the experiment, the setup and the tested plano-convex lens are shown in Figure 5a,b. The monitor is a Philips 170S with resolution 1280 × 1024 and the lateral resolution 0.264 mm/pixel, and the sinusoidal fringe period is 16 pixels. The resolution of two cameras is 1200 × 1600 with the pixel size 4.4 μm × 4.4 μm. The focal lengths are 5905.1 and 5862.4 pixels. The standard sinusoidal fringes are displayed on the monitor as shown in Figure 5c,d. Note that there is no significant deformation on the captured fringe images, when the tested plano-convex lens is attached on the monitor as shown in Figure 5e,f. Therefore, the tested object is placed above the monitor to produce the significant deformation as shown in Figure 5g,h. But it makes the points of the refraction ray, which go out from the plano-convex lens, become unknown. Then we introduce another measurement by moving the screen to give us another point on the refraction ray. Then we can get the exact direction of the refraction ray. Assumed that the location of the back side of the plano-convex lens is known, then we can get all the exact points of the refraction ray, where is the location of the backside surface. The process is shown in Figure 6 and Figure 7 shows estimated location vs. the z coordinates and the preliminary results.

5. Conclusions

Based on the active PMD technique, a new method for restoring the three-dimensional information of transparent phase object is proposed in this paper. In this method, the tested object is placed between the calibrated CCD and the monitor, the standard fringes and the deformed fringes are taken by CCD, moving the monitor to complete the measurement again. According to the stereo normal vector consistency constraint, the 3D shape of the tested object can be restored. The method is reasonable and feasible as shown in the simulation. In the experiment, the “minimum” angle and the preliminary results can be found according to the stereo normal vector consistency constraint. There is no doubt that the improvement of the guessed backside positions can lead to the more accurate three-dimensional information of the tested object.

Acknowledgments

The authors acknowledge the support by National Key Scientific Apparatus Development project (2013YQ49087901).

References

  1. Petz, M.; Tutsch, R. Measurement of optically effective surfaces by imaging of gratings. Proc. SPIE Int. Soc. Opt. Eng. 2003, 5, 288–294. [Google Scholar]
  2. Knauer, M.C.; Hausler, G. Phase measuring deflectometry: A new approach to measure specular free-form surfaces. Proc. SPIE Int. Soc. Opt. Eng. 2004, 5457, 366–376. [Google Scholar]
  3. Kaminski, J.; Lowitzsch, S.; Knauer, M.C.; Häusler, G. Full-Field Shape Measurement of Specular Surfaces. Fringe 2005; Springer: Berlin/Heidelberg, Germany, 2006; pp. 372–379. [Google Scholar]
  4. Canabal, H.A.; Alonso, J. Automatic wavefront measurement technique using a computer display and a charge-coupled device camera. Opt. Eng. 2002, 41, 822–826. [Google Scholar] [CrossRef]
  5. Liu, Y. Research on Key Technology and Application of Phase Measurement Deflection. Ph.D. Thesis, Sichuan University, Chengdu, China, 2007. [Google Scholar]
  6. Morris, N.J.W.; Kutulakos, K.N. Dynamic Refraction Stereo. IEEE Trans. Pattern Anal. Mach. Intell. 2011, 33, 1518–1531. [Google Scholar] [CrossRef] [PubMed]
  7. Gomit, G.; Chatellier, L.; Calluaud, D.; David, L. Free surface measurement by stereo-refraction. Exp. Fluids 2013, 54, 1540. [Google Scholar] [CrossRef]
  8. Liu, Y.; Su, X. Camera Calibration method based on Phase Measurement. Opto-Electron. Eng. 2007, 34, 65–69. [Google Scholar]
Figure 1. The sketch of Refraction. (a) Laws of refraction in vector form; (b) correspondence between the pixel point and the refraction point.
Proceedings 02 00548 g001
Figure 2. (a) Ambiguities in single view; (b) stereo restoration of 3d shape of objects.
Proceedings 02 00548 g002
Figure 3. The simulation results. (a) The tested object in the left camera coordinate system; (b) the relationship between the angle and the candidate z coordinate for one pixel; (c) the restored object; (d) the final relationship between the angle and the candidate z coordinates after iterative process; (e) the final object shape; (f) the reconstruction error.
Proceedings 02 00548 g003
Figure 4. The original grating and the deformed grating. (a) Vertical; (b) horizontal.
Proceedings 02 00548 g004
Figure 5. (a) The experimental setup; (b) the tested plano-convex lens; (c,d) the captured original standard sinusoidal fringes in the vertical and horizontal directions, respectively; (e,f) the fringe images by placing the plano-convex lens directly on the monitor; (g,h) the fringe images by placing the plano-convex lens above the monitor.
Proceedings 02 00548 g005
Figure 6. The experiment process.
Proceedings 02 00548 g006
Figure 7. (a) The relationship between the candidate object and the angle; (b) the preliminary results.
Proceedings 02 00548 g007
Publisher’s Note: MDPI stays neutral with regard to jurisdictional claims in published maps and institutional affiliations.