Article

A New Method for High Resolution Surface Change Detection: Data Collection and Validation of Measurements from UAS at the Nevada National Security Site, Nevada, USA

1
Earth Systems Observations Group (EES-14), Los Alamos National Laboratory, Earth and Environmental Sciences Division, Los Alamos, NM 87544, USA
2
International Arctic Research Center, University of Alaska Fairbanks, Fairbank, AK 99775, USA
*
Author to whom correspondence should be addressed.
Drones 2021, 5(2), 25; https://doi.org/10.3390/drones5020025
Submission received: 19 March 2021 / Revised: 9 April 2021 / Accepted: 11 April 2021 / Published: 14 April 2021
(This article belongs to the Special Issue Drone-Based Photogrammetric Mapping for Change Detection)

Abstract

:
The use of uncrewed aerial systems (UAS) increases the opportunities for detecting surface changes in remote areas and in challenging terrain. Detecting surface topographic changes offers an important constraint for understanding earthquake damage, groundwater depletion, effects of mining, and other events. For these purposes, changes on the order of 5–10 cm are readily detected, but sometimes it is necessary to detect smaller changes. An example is the surface changes that result from underground explosions, which can be as small as 3 cm. Previous studies that described change detection methodologies were generally not aimed at detecting sub-5-cm changes. Additionally, studies focused on high-fidelity accuracy were either computationally modeled or did not fully provide the necessary examples to highlight the usability of these workflows. Detecting changes at this threshold may be critical in certain applications, such as global security research and monitoring for high-consequence natural hazards, including landslides. Here we provide a detailed description of the methodology we used to detect 2–3 cm changes in an important applied research setting—surface changes related to underground explosions. This methodology improves the accuracy of change detection data collection and analysis through the optimization of pre-field planning, surveying, flight operations, and post-processing the collected data, all of which are critical to obtaining the highest output data resolution possible. We applied this methodology to a field study location, collecting 1.4 Tb of images over the course of 30 flights, and location data for 239 ground control points (GCPs). We independently verified changes with orthoimagery, and found that structure-from-motion, software-reported root mean square errors (RMSEs) for both control and check points underestimated the actual error. We found that 3 cm changes are detectable with this methodology, thereby improving our knowledge of a rock’s response to underground explosions.

1. Introduction

The detection and measurement of small-scale surface changes can facilitate critical interpretations of broader surface and larger-scale subsurface processes [1,2,3,4,5]. Additionally, these small-scale detections and measurements have furthered scientific understanding of a variety of geologic research areas, including earthquake damage [6,7,8,9], groundwater depletion [10,11,12,13], and effects of mining activities [14,15]. Historically, these measurements were either not possible or required time-intensive techniques with limited spatial coverage, such as level lines. The advent of uncrewed aerial systems (UAS) offers the ability to collect data over spatially extensive areas, thereby expanding surface topographic measurements and change detection to new areas, difficult terrain, and more challenging targets.
The most common method to detect changes from UAS is through the use of structure-from-motion photogrammetry, referred to herein as SfM. SfM is a growing method in the modern Earth sciences and remote sensing communities, where 3D structure (i.e., topography) is determined from photographs with different viewing angles [16]. Compared with other surface change techniques, using UAS to perform SfM photogrammetric analyses is low cost, offers high data accuracy and resolution, and can capture a large spatial area. Additionally, the capabilities and speed of computational SfM data processing are steadily increasing. This collection method has facilitated advances for many scientific investigations, including object height detection [17,18], geomorphic change [19,20], geologic change [3], glacial change [21], and cliff stability [22].
Much of the recent research in UAS-based topographic change measurement methodologies has been focused on increasing the accuracy [23,24,25] and efficiency [26,27,28] of digital elevation model (DEM) production from SfM photogrammetry. Some methodological studies have focused on reducing the above ground level (AGL) flight height of the UAS, to achieve a lower ground sample distance (GSD; the real-world space contained within a pixel of data) and therefore increase accuracy [17,29]. Other studies have focused on the methods for the optimization of survey control alignment [26,30,31]. Another area of analysis regarding the execution of SfM collections has involved improving the precision of tying the structure (topography) to real-world coordinates. While research continues to improve the ability to georeference images based on camera positions [32,33,34], currently the independent measurement of ground control points (GCPs) yields the highest accuracy in the final 3D topographic model. In general, a higher number and density of GCPs results in higher model accuracy [23,24,27,35]. Analyses from Agüera-Vega et al. ([23], 2017) suggest that the maximum obtainable model accuracy is 1.5x the GSD value, and it only approaches that value as the number of GCPs relative to the number of photos increases. This means that in large areas or in regions where high image volumes are obtained, large numbers of surveyed GCPs are required to achieve maximum accuracy, which runs counter to the value of UAS as both a rapid acquisition method and a non-invasive site interrogation tool.
Statistical modeling of GCP distribution errors [26,30] indicates that there is an optimal number and spacing for achieving lower vertical (height, or z direction) residual error. Other studies focused on the distribution of GCPs [23,27,36] found that a well-designed GCP plan, with close spacing and even distribution, is essential for reducing errors and assessing the accuracy of an SfM-created elevation model.
Despite this previous work, very small-scale changes (on the order of <5 cm) remain challenging to detect and distinguish from analytical noise, particularly when the survey area is large. Several aspects of applied Earth sciences and engineering stand to advance tremendously with increased robustness in very small-scale change detection, including global security research, monitoring and potential early warning for high-consequence natural hazards like landslides and earthquakes, and time-varying stability analyses of critical infrastructure such as dams and tunnels. A critical application space for centimeter-scale change detection is underground explosion monitoring [37,38]. Subtle surface changes from underground explosions create challenges in the interpretation and association of surface changes with explosion events, especially without high temporal cadence on topographic data collection. Additionally, the nature of explosive experimentation sites make access difficult and dangerous for personnel. Historical data analyses of underground explosions show that the broader type and style of surface deformation are controlled by a variety of features, including the size of the explosion, the depth of the burial, and the geologic environment [39,40,41,42,43]. However, the constraints on these older interpretations use measurements of offsets on fractures and level lines, which have a limited spatial extent and may miss subtle changes over the full area of interest. Recent topographic studies of underground conventional high-explosive experiments, using terrestrial light detection and ranging (LiDAR) and UAS-based SfM photogrammetric data, detected surface changes with a vertical magnitude of less than 15 cm in an underground conventional high-explosive experimental test bed in granitic rock [37]. Schultz-Fellenz et al. ([38], 2020) discussed the difference between the surface changes resulting from underground conventional high-explosive experiments and those from legacy underground nuclear explosions (conducted prior to the 1992 nuclear testing moratorium), and hypothesized that geologic setting may play a more significant role in governing the spatial extent and topographic expression of surface changes resulting from underground explosions.
High-impact, high-consequence applications require collection methodology that prioritizes high resolution and campaign replicability over speed of collection. This study presents a new comprehensive workflow that optimizes data collection and processing to achieve the highest resolution currently attainable, based on previous advances in all components of the workflow, including pre-field planning, data collection, data processing, and data validation. We applied this methodology to a field study location, collecting 1.4 TB of images over the course of 30 flights, and location data for 239 GCPs, and independently verified positional changes with orthoimagery. This workflow produces high-resolution and accurate centimeter-scale orthoimagery and digital elevation models to enable precise surface change detection analyses for any application where high precision is a priority.

2. Materials and Methods

2.1. Setting

Developing this workflow involved campaigns to collect photogrammetric data using sensors onboard UAS. For the purpose of this study, we use UAS to refer to the complete system(s) of an aircraft plus its payload. Deployment of the UAS and camera occurred prior to, and again following, the execution of a single underground conventional high-explosive experiment in an alluvial basin. The Dry Alluvium Geology (DAG) test bed in Nevada served as host to a series of experiments in Phase II of the U.S. Department of Energy’s National Nuclear Security Administration (NNSA) Source Physics Experiment (SPE). SPE is designed to improve the seismic discrimination of underground explosions, through a carefully designed series of controlled, underground, conventional high-explosive experiments [43]. We employed our workflow for two of the Phase II experiments, DAG-2 and DAG-4; each experiment involved the controlled collection of photogrammetric data both before and after.
Compared to the work of Schultz-Fellenz et al. ([37], 2018), which analyzed data from SPE Phase I conducted in granite, this alluvial test bed offers different site conditions, most notably the lower-strength rock. To achieve similarly scaled depths of burial to the Phase I experimental series [44] while producing similar seismic amplitudes, the explosive experiments at the DAG test bed were larger yield and conducted at greater depth. As a function of this, this study’s surface change collection area needed to be more spatially extensive, but executed within a similarly tightly constrained collection time before and after the experiment [37]. Related to this, our study required the detection of features at the same scale as Schultz-Fellenz et al. ([37,38], 2018, 2020), but a variety of constraints prohibited the deployment of a similarly spatially-dense ground control network. Thus, a modified and streamlined workflow was needed. In addition, given the purpose of these measurements, it is critical to have constraints on the uncertainty of measurement to determine whether a signal of a certain size was real or an artifact of uncorrected error.
The study area was the DAG test bed within the Nevada National Security Site (NNSS), located approximately 70 miles northwest of Las Vegas, NV, USA. The DAG test bed is located in a deep sedimentary basin, with low topographic relief (14 m difference in elevation between highest and lowest surveyed points within the study area). Superimposed on this low-relief landscape are a number of collapse craters from legacy underground nuclear explosions (UNEs), which are inaccessible for ground survey measurements. The site also contains modern, anthropogenic structures and topographic features (e.g., gravel paths, drilling sump pits) built for the purpose of carrying out the DAG experiments.
The study area is generally rectangular and occupies ~0.3 km2 (Figure 1). The area includes a number of obstacles, including a large crane for lifting and lowering the experimental package down holes, a major road, and high-voltage powerlines. We were not able to collect contiguous airborne imagery over the entire area, due to restrictions on allowable flight distances from these obstacles. For the purpose of this study, we focused on the region east of the main road, in the area closest to the emplacement location of the underground experiment, also known as surface ground zero (SGZ).

2.2. UAS Equipment

Our workflow was developed to achieve the goal of detecting and distinguishing 2–3 cm surface changes from noise. This work is split into two parts: the field data collection campaign, and the post-processing of collected data. In general, the postprocessing was more time-consuming, whereas the field deployments required significant investments of personnel and budget to complete.

2.2.1. The Airframe

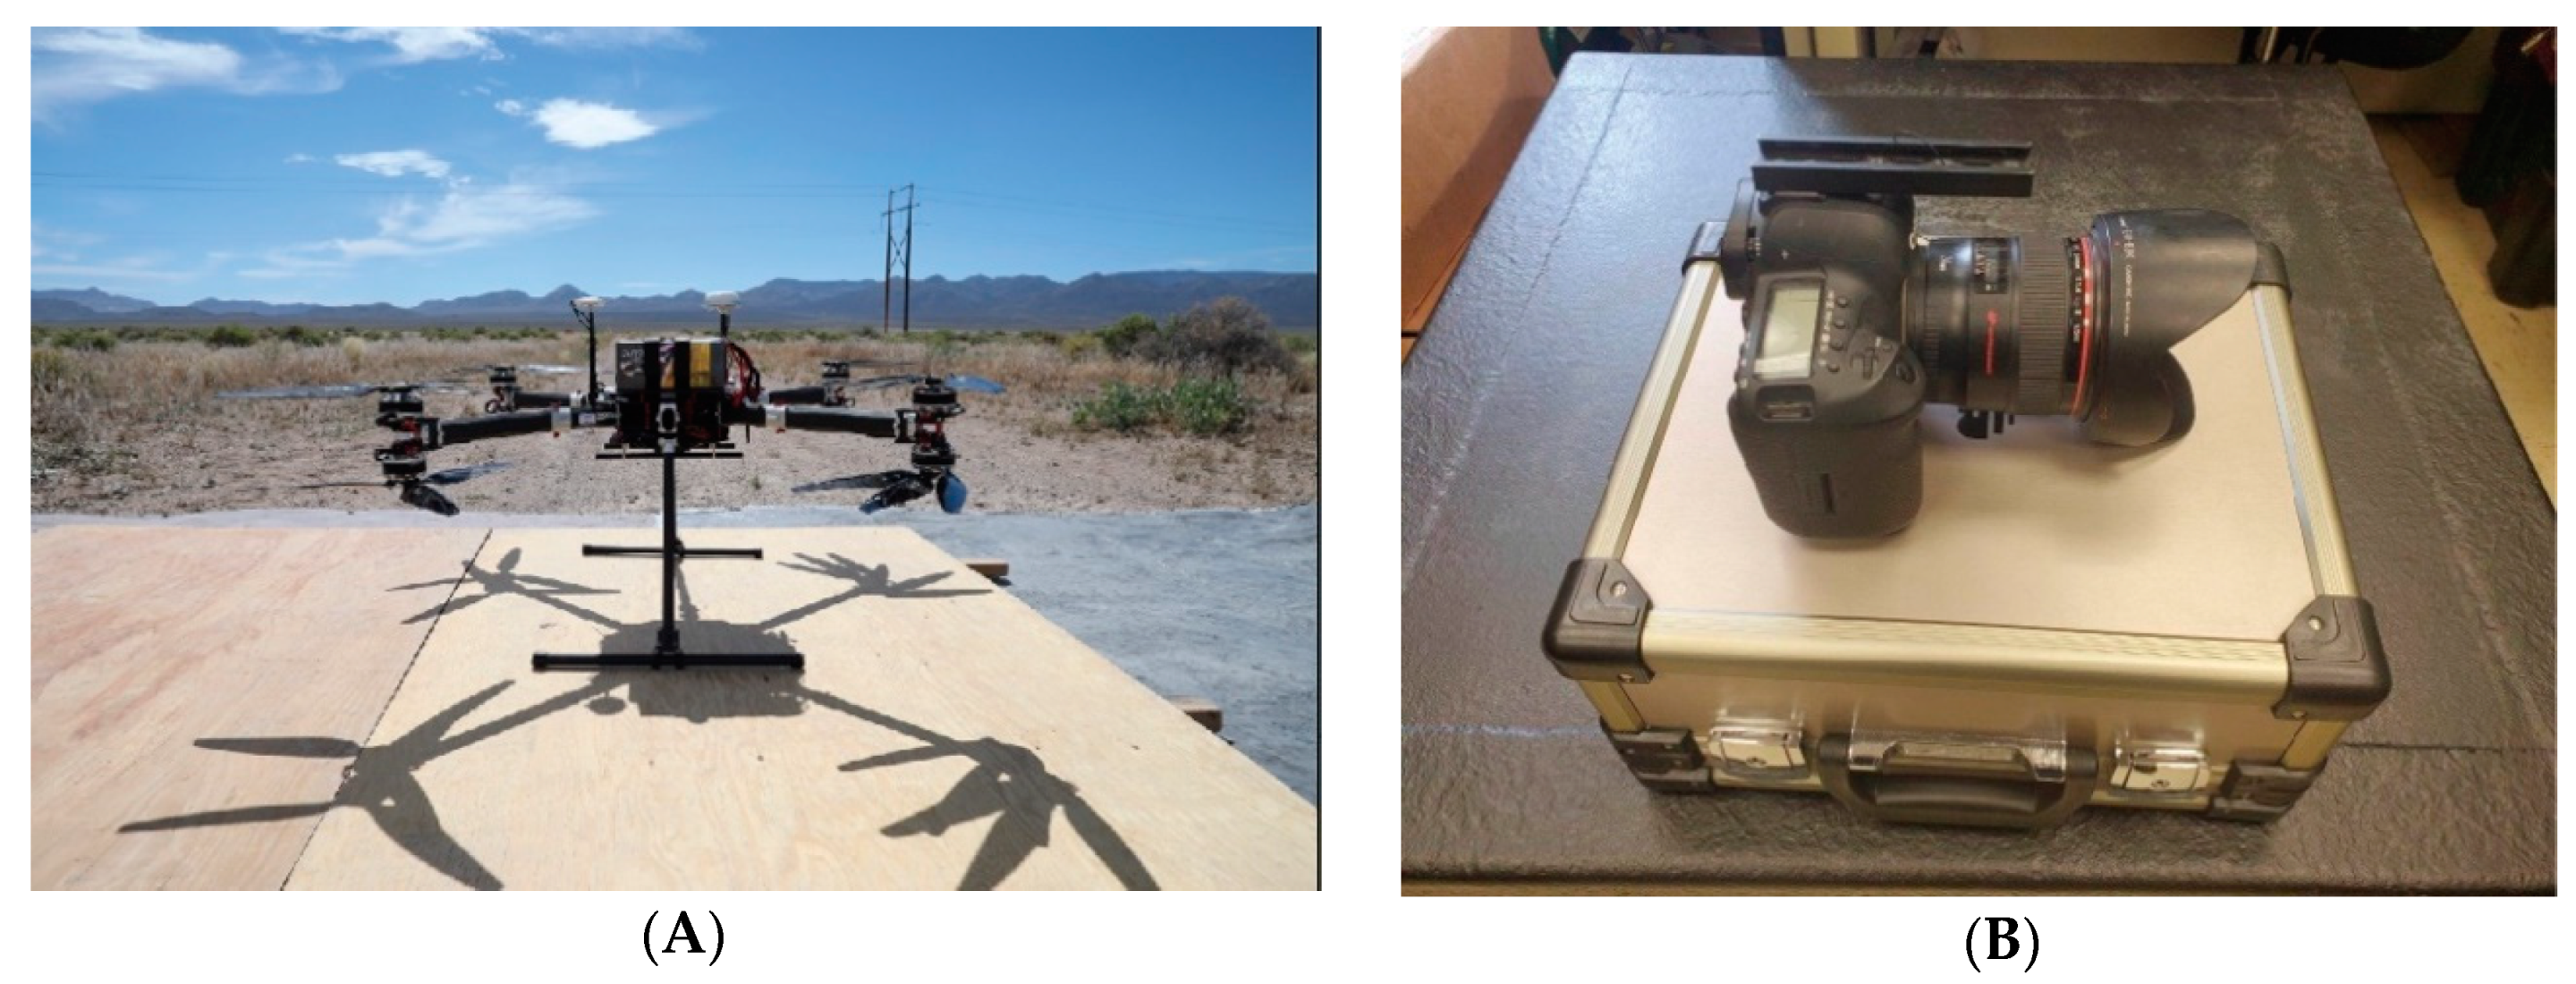
In the field, the team captured photogrammetric data using a camera (described below) fixed-mounted to a Gryphon Aether Gullwing X8 UAS platform (Figure 2A). This airframe was chosen for two key reasons: (1) its ability to carry a larger, higher-resolution camera than what many stock UAS can deploy; and (2) to ensure we could execute the airborne operations and data collection within the FAA part 107 requirements for small UAS. While not applicable for this specific mission per se, this airframe was selected for its ability to safely fly a photogrammetric sensor and other payloads at high elevations and density altitudes (>2200 m). Flights were conducted following FAA and NNSS regulations, with a certified pilot, co-pilot, visual observers, and ground team.

2.2.2. The Camera

We used a fixed-mounted Canon EOS 5D Mark IV camera DSLR onboard the UAS for the collection of our imagery (Figure 2B) combined with a Canon EF 24 mm f/1.4 L II USM with an EW-83K lens hood. This provided a 36 × 24 mm full frame sensor with 30.4 megapixels, which resulted in 6720 × 4480 pixel images.
Specific flight parameters were selected to obtain a GSD smaller than 0.25 cm/pixel and sufficient image overlap, while minimizing flight time. We used our camera’s pixel size, the lens focal length, and our chosen GSD to calculate our desired flight AGL. Using these parameters, a flight altitude of 22–25 m AGL was targeted. We also oriented flight lines to achieve a 60–80% frontal overlap and a 60% side overlap for each photo, as recommended by prior studies and our processing software [3]. To achieve the desired image overlap, we operated at a forward flight speed of ~1 m/s, and set an automatic camera shutter trigger to capture imagery every one second. The direction of the camera was set to be slightly forward of vertically downward relative to the grounded airframe, to correct for the slight nose-down pitch during forward flight. This produced near-nadir imagery. Test flights performed prior to the field campaign confirmed that the system performed as intended, and that imagery collected at the calculated altitudes provided sufficient resolution to locate the desired fiducial information on our ground control points (see Section 2.3.1 for additional discussion).

2.2.3. SD Card Set-Up

Secure digital (SD) memory cards were used to store and transfer the digital images captured by the Canon 5D camera. Prior to use, we tested each memory card for performance and capacity with F3 software, using the f3write and f3read commands [45]. Cards with suitable read and write performance (no errors) and that were usable at the stated capacity were then formatted with the in-camera Canon 5D formatting tool. Data writing to the camera was set up to record high-resolution JPEG files stored on 128 or 256 GB SD cards, where each image had an average size of 20 MB. Since our main objective involved obtaining the highest possible model accuracy, we did not compress the JPEG images and used the highest standard resolution our camera could provide. Previous studies have suggested increased compression of JPEG images can cause a decrease in the accuracy of model outputs [46,47]. When comparing JPEGs with the minimum photo compression to other photo formats, including uncompressed formats such as RAW or DNG, JPEGs provide the best orthophoto and model accuracy [48]. However, we did not experiment with collecting other photo formats, due to our concerns that our camera would be unable to store these alternative formats, with their larger file sizes, on the SD card at our required collection rate. For the two DAG experiments, this workflow served to record 1.4 TB of images over the course of thirty flights. The camera was set up to take a photo every second, which resulted in ~1–2 thousand photos per flight. A full SD card was swapped out for a blank card when the operating SD card had a remaining image capacity of less than 2000 photos, to ensure we did not run out of disk space and miss parts of the flight footprint.

2.3. Survey Equipment

We surveyed the positions of our GCPs using a Trimble R10 real time kinematic (RTK) Global Positioning System (GPS) surveying base station, with two rovers to expedite the collection time for the total survey. During the DAG-2 experiment, we used one R10 rover and one R8 rover, due to equipment availability. The R8 rover has the same precision as the R10 but is an older model. During the DAG-4 experiment, we used two R10 rovers.

2.3.1. Survey Grid Plan

The team developed a GCP grid and survey plan, underpinned by a need to maximize vertical model accuracy. Previous studies suggest that the vertical accuracy of the model surface deteriorates with increased distance from a ground control point [30,35,36,49]. Based on previous UAS photogrammetry work aimed at maximizing vertical accuracy [37,38], we opted to install semi-permanent GCPs, and ensured that no location within the study area was more than 60 m from a GCP, except ground locations we could not access. The GCPs were placed in several overlapping grid patterns, with some points moved to account for loose soils or inaccessible areas. These overlapping grids consisted of GCPs with approximately 60 m spacing. To increase accuracy near SGZ, the predicted location of the greatest surface change, we reduced spacing to 30 m between GCPs (Figure 3). In addition, we interspersed several additional “check point” GCPs between our standardized 30 and 60 m spacings. These targets served as extra points to assess the model’s accuracy during processing. A total of 239 GCPs were surveyed before and after each experiment, of which 219 were used as model inputs (“control points”), and 20 check points were used for assessing accuracy. Check points were primarily installed in between the gridded check points, with distribution primarily in the outer areas of the study area. We attempted to use the same control and check points for each pre- and post- experiment. There were situations where a GCP was removed by wind or animals; in these cases, the GCP was replaced as close to the same location as in the pre-experiment, or an adjacent GCP was selected as a new check point. The dataset from the east of the main road is presented here; thus, our total control and check points for each experiment were fewer than the total control and check points which were surveyed for each experiment.
The construction of the GCPs included 5 mm thick, UV-resistant matte-laminated, 22 cm × 28 cm, brightly colored paper that stood out well against the ground and vegetation. Each GCP had a unique letter and number combination printed on it for identification, and was installed in preplanned rows and columns to aid in location identification and image postprocessing. All GCPs included a black 1 cm × 1 cm square in the center of the paper to help identify the center fiducial. We chose UV-resistant laminate, as previous field testing and experience indicated the harsh desert sun can cause both normal paper and traditional laminate to fade to near white within a week. The matte laminate reduced reflections in the imagery, which could inhibit the identification of the black square during image postprocessing. We secured the GCPs to the ground with four corner nails, and a surveyors’ nail embedded in the center of the sheet. This surveyors’ nails served as the key fiducials for both in-field survey measurement before and after the experiment (see Section 2.3.2) and were identifiable in imagery as computational tie points for the orthoimages and topographic models (see Section 2.7). Installation of the center survey nail occurred first, and if it visibly moved after the rest of the GCP was secured, the team removed and reinstalled the GCP at a more stable nearby location. Some GCPs in especially soft ground required 12.7 cm long center nails and multiple repositions before they were deemed stable.

2.3.2. Survey Procedure

A secure and level base station GPS is very important, since any measurement error in the base location will be added to every measured rover location. We leveled our base station tripod, tied it to weighted buckets, and used ankle weights on the tripod legs to reduce movement during any high winds or other events.
The RTK survey base station was set-up ~1.2 km north of SGZ on a pre-existing deeply embedded wooden survey mark. We chose this location to avoid surface impacts from the underground explosive experimental test bed, and to be close enough to our survey location to reduce measurement variability in the rover associated with distance from the base station.
Before collection of rover location data, we allowed the base position to initialize for 15 min to avoid anomalous positioning locations and unnecessary inaccuracy. We used a weighted plummet and a compass to calibrate the rover poles’ bubble levels.
At each survey point, before collecting location information, we ensured that the rover pole was vertical, the presence of sufficient GPS satellites, and the stability of the GCP marker. In some cases, the center nail had vertical give, in which case the approximate movement was recorded to be added later to the measurement error total for that point. Location information for each GCP was collected for a minimum of 30 s, with several points being surveyed for longer periods of time to allow for increased confidence in the collection accuracy. Survey points that required additional collection time were located far from the base station, or near berms or other minor topographic changes in outlying areas. Deviations in position were checked during data collection, and the collection was repeated if the presented accuracy on the rover controller surpassed 1 cm in the horizontal or 2 cm in the vertical direction.
Due to a constantly changing connection to varying satellites, there is a possibility that a survey location could shift throughout the day. Approximately every six hours, all of the satellites connected to the RTK system will have changed. In order to counter any potential inaccuracies caused by this, we re-surveyed a few control points every 6 h to see if the field recordings varied significantly, and more importantly to have information to correct surveyed points later if there is a major shift due to satellite connection.
We also collected several random survey points more than once during both the pre-experiment and post-experiment collection. The variance between the easting, northing, and elevation values of these points was checked to ensure there was no major variance in our final surveying product (see Table 1). We also used these points to check for any potential offset related to the use of 2 different rovers.

2.4. Flight Operations

Flight operations employed manual, piloted takeoffs and landings, and automated, waypoint-guided data collection missions. Automated missions, designed in advance of operations, were deployed using Universal Ground Control Software (UgCS) (SPH Engineering, Riga, Latvia) and typically flown in a boustrophedonic (“lawnmower”) pattern. The team scouted the site for any obstacles prior to flight (e.g., powerlines, roadways, buildings, and significant ground slope changes). When necessary, visual observers positioned at appropriate locations offered constant verbal communication to ensure safe flight operations. Real-time comparisons between UAS-reported altitude AGL and basemap-reported AGL determined whether mid-flight adjustments were required to ensure safe and effective data collections, especially near crater features with high degrees of topographic change (Figure 1).
During field operations, we achieved a 20 min/flight mean flight time, and averaged 20 min of ground preparation before resuming flight operations. Between flights, the team checked a number of operational and data parameters to ensure quality: post and pre-flight checks took place; we verified data preservation and quality, and replaced batteries and memory cards for both the UAS and payload as necessary. UAS battery charging took place at a nearby indoor location with access to 110 V AC line power, using two four-channel battery charging systems (Rotor Craft RC, Winter Garden, FL, USA). UAS batteries were allowed to cool between flights, and recharged over a period of approximately one hour. Battery cells were balanced during each charge, and any battery displaying abnormal performance was taken out of service.
We collected photographs exclusively with near-nadir (+/− approximately 10 degrees) view directions. With a relatively low topographic relief, extensive ground control, an after-market camera, low flight altitude, and slow flight speed, we expect that errors due to the radial doming effect [34,50] would be minimal. The addition of more oblique imagery may have the potential to improve accuracy beyond the results presented here, but was beyond the scope of our study.

2.5. Photo Field Review

Photos were examined immediately following the completion of flying each day, or immediately after changing the SD card. The photo review validated the completeness of image collection over the flight line and identified any issues with camera focus or image quality that would require a repeat data collection for any particular area. A review of photos would also occur if the camera battery was depleted upon landing, to identify collection gaps.
To decrease processing times, we removed unnecessary photos to reduce data size that would eventually be input into post-processing software. Unnecessary photos included those taken during the ascent and descent above the launch location, replicate photos from hovering, and photos taken during transit to and from the target collection area.
In addition, we removed every third image obtained during times when the UAS executed multiple repeat passes over the same areas. This replicated collection occasionally occurred due to adverse conditions, flight software failures, or excess overlap between adjacent flights. This reduction in photos was determined based on an observed ~20–40% overlap present between every third image, which would permit the removal of such images without sacrificing resolution. This filtering reduced the number of input photos and helped reduce excessive overlap to 4–9 photos over most ground locations throughout the study site. With this manual filtering, the initial 10,000–12,000 photos collected during a single pre- or post-experiment collection was reduced to around 6500–8000 photos.

2.6. Survey Corrections

To obtain optimal GCP survey data, we post-processed our survey base location through the Online Positioning User Service (OPUS). OPUS, a service provided by the United States National Oceanic and Atmospheric Administration (NOAA), provides corrections for the base station’s location from continuous operating reference stations (CORS). For optimal comparison to the CORS station, we computed this correction to the base location two weeks after completing the survey. All survey data were processed using Trimble Business Center (TBC) software, including correcting the base location with our corrections received from OPUS, which reprojected the other surveyed GCPs based on this correction. GCPs were additionally corrected to a localized estimate for the “true” ground surface, instead of the much larger projection grid. Due to the low topographic relief in our location, and the relatively small survey location size, we identified little variations between the projection grid and ground corrections (<1 mm in most cases).

2.7. Creating the Orthoimages and Topographic Models

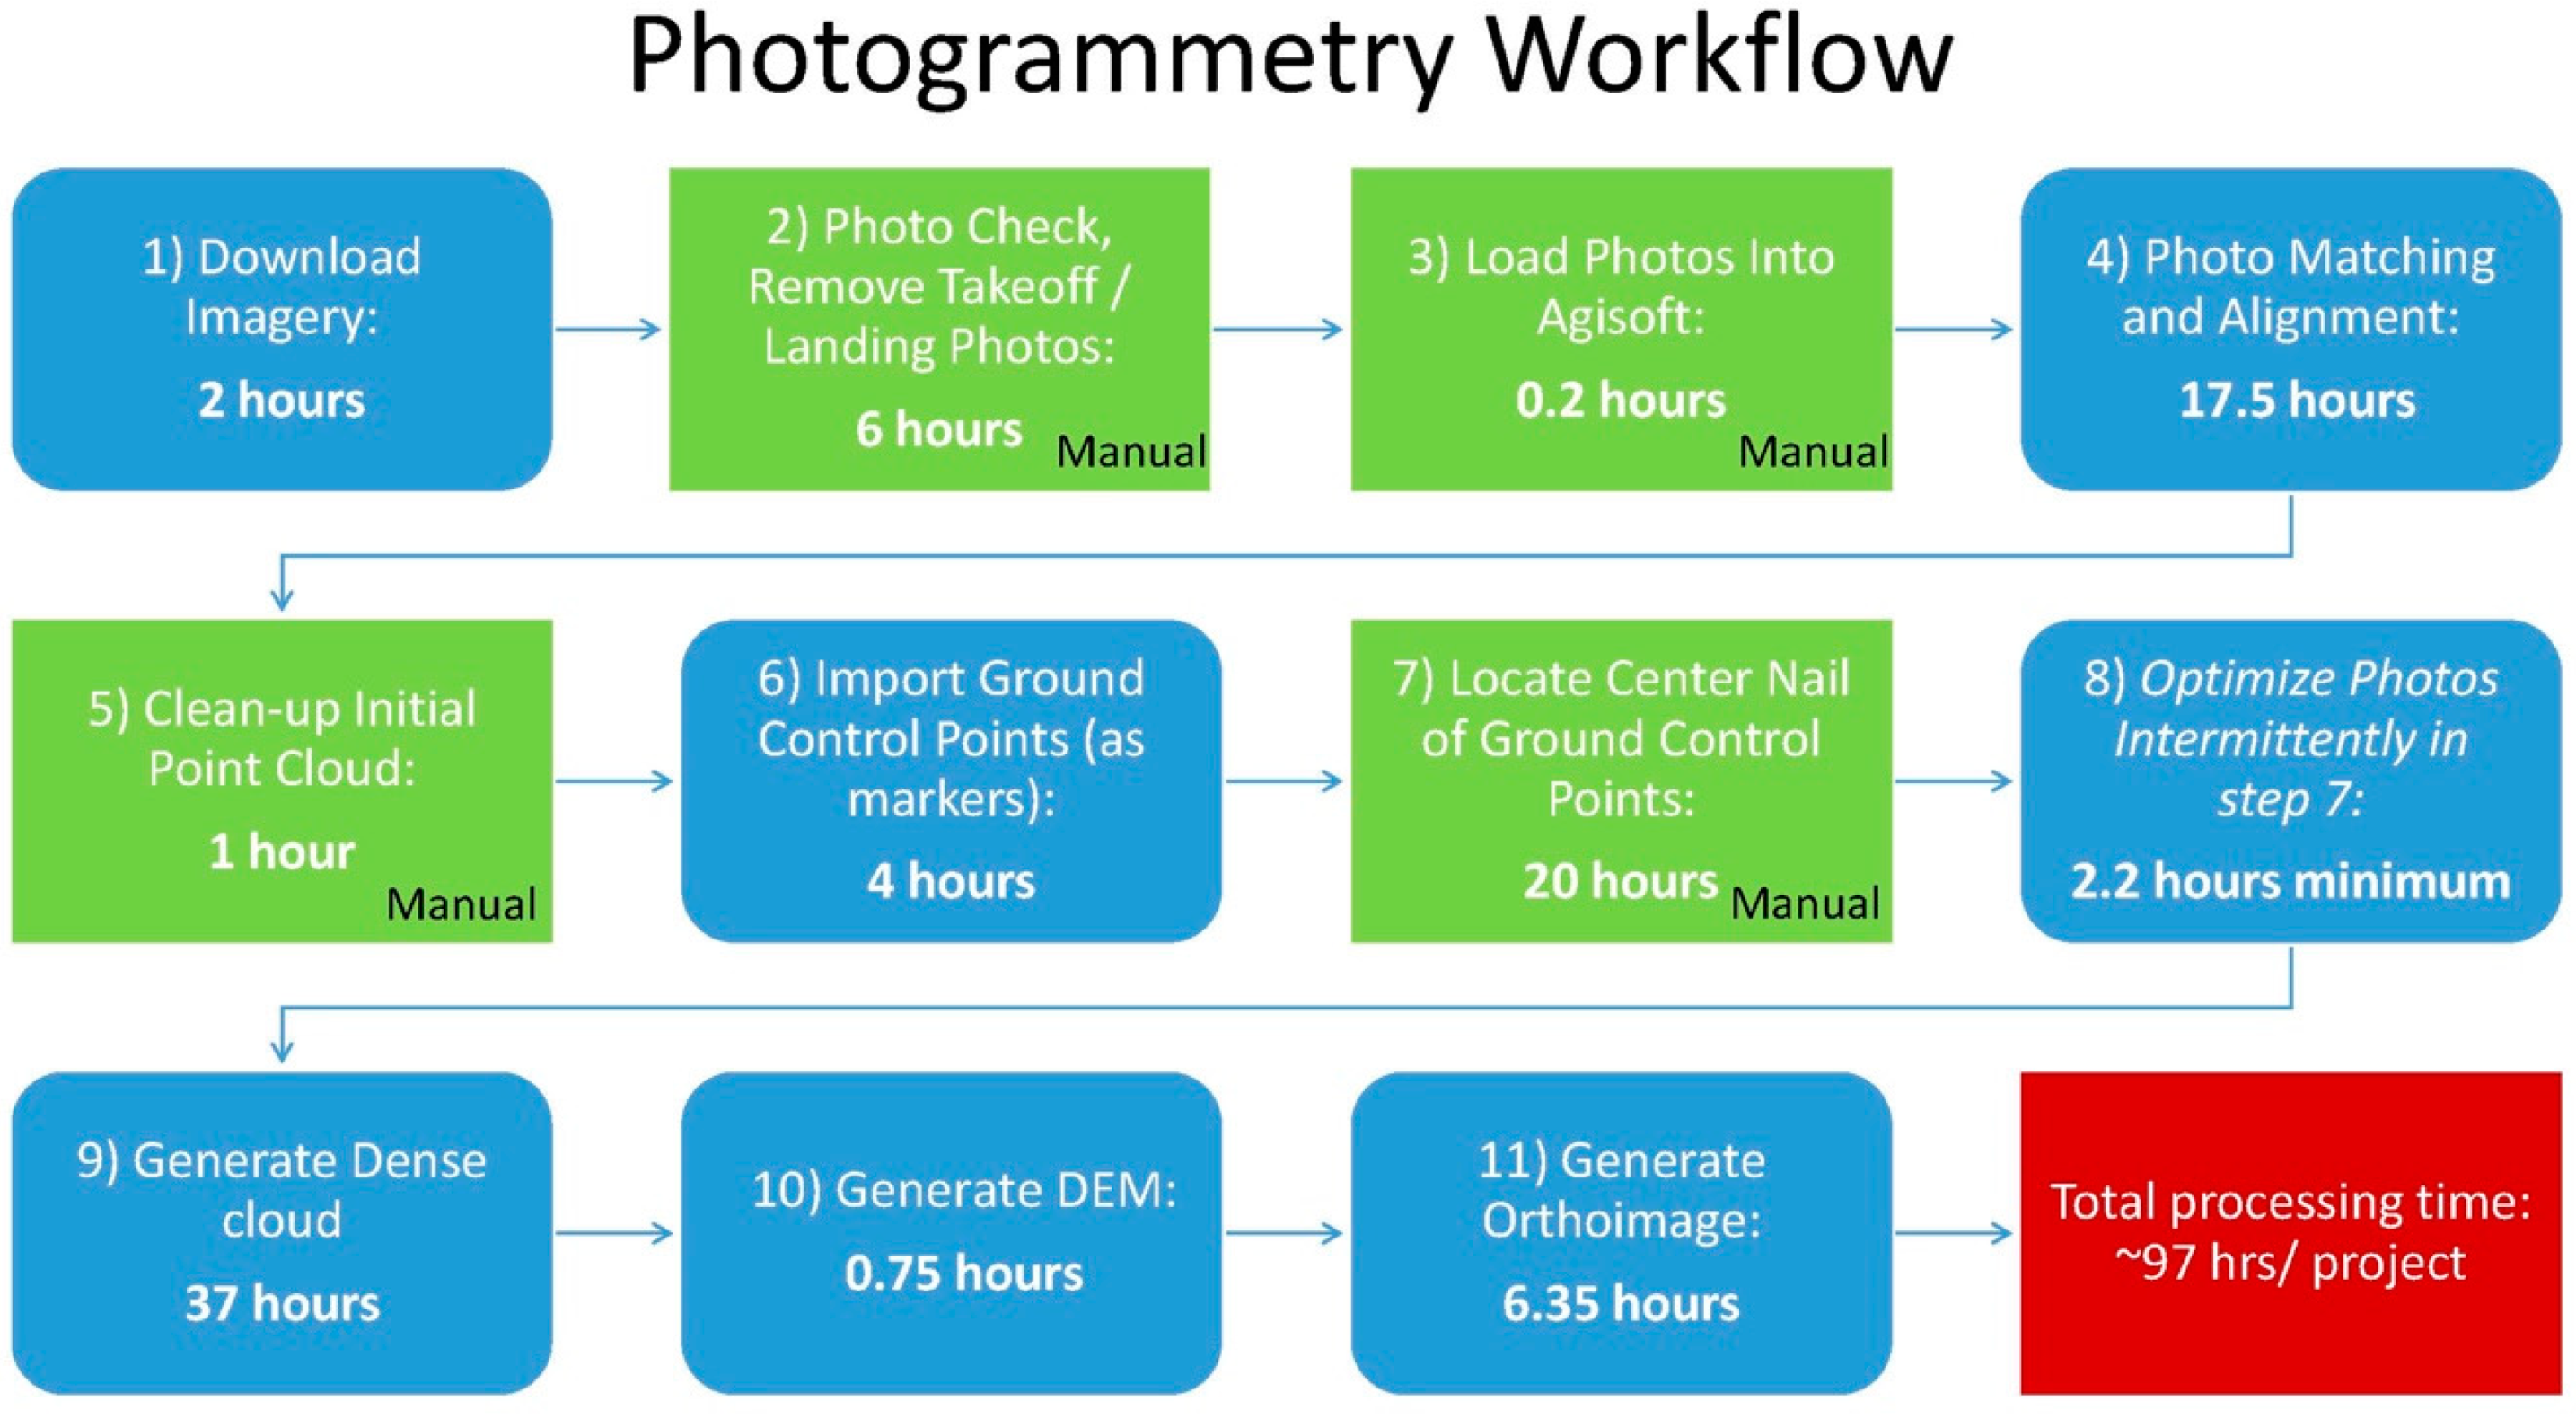
To create our photogrammetric models, we used Agisoft Photoscan (V. 1.3.3 build 4827). Agisoft is a robust software package used widely in geoscience to develop SfM models; however, its proprietary nature makes it difficult to deeply understand its processing functions. Our process is largely the same that recommended in the Agisoft user manual and the methods of previous studies [26,36], but has been combined, modified, and adapted to handle a large number of photos (Figure 4). All of our data were processed on a Microsoft Windows 10 PC, with an Intel Xenon E5 CPU, Nvidia Quadro M4000 GPU, and 96 GB of Ram.
We had four different collections: pre-DAG-2, post-DAG-2, pre-DAG-4, and post-DAG-4, each at a different point in time. The workflow shown in Figure 4 was repeated for each of the four collections. Time for each step is for 1 collection.
  • Download the imagery to external hard drives (usually done in the field, during deployment).
  • Check the dataset for completeness, and perform a preliminary filtering, as described in the field methodology above (also completed in the field, or en route back to base camp from the field site).
  • Load the imagery into Agisoft Photoscan.
  • Use Agisoft Photoscan to stitch photos together by identifying “tie points” in photos that match in adjacent photos. Agisoft then locates each photo’s position relative to those points and creates an initial point cloud from these tie points.
  • Following initial photo alignment, edit the tie points using the gradual selection toolset. This removes tie points with large errors, or those which were not tied to a location accurately (which usually arise due to insufficient overlap of photos).
  • For each GCP, create a marker within the Agisoft software. Once a marker was identified, it was checked against a map containing all of the GCP locations, to ensure that no points were missing.
  • For each marker, filter all of the photos which contain the marker. From these photos we ensured that the estimated location provided by Agisoft was on the center nail of our GCP. If the marker location in any of the photos was not on the center nail, we moved it to that location. This was completed for all markers. Following this, we attempted an initial assessment of the model to find any locations with large vertical or horizontal errors. This was done by looking at the root mean square error (RMSE) for each marker (automatically calculated by Agisoft). RMSE in Agisoft is a measure of the distance between a marker’s surveyed location and the model’s estimated location for that point. Problem areas, defined by large RMSEs, were examined in the sparse cloud, and nearby markers were examined to make sure there were no mis-located center nails. If the large RMSE values persisted, we would readjust the model by: (1) realigning the photos involved in placing the marker, (2) deleting low quality photos, and (3) ensuring the sparse cloud had no anomalous points (above or below the model surface) and deleting them if there were. After the sparse cloud was clean through the initial cleanup, and markers were located, the points were re-projected using the camera calibration tool to attempt to correct any additional distortion caused by the photos themselves. We chose to run the tool with the default settings to avoid over-biasing our photos to match the ground surface. Around 20 markers were selected as check points to help assess the accuracy of the model. These markers used as check points were deselected from use in the model building, and the camera realignment tool was run another time without these markers, affecting the alignment. This effectively provides a second RMSE calculation on the model from points not directly affecting model creation.
  • The dense point cloud should be built from the sparse cloud using high settings, and mild depth filtering. This step generally took between 18–28 h, depending on the number of photos, but required little human input and large blocks of dedicated computational processing time.
  • Using Agisoft, create the DEM directly from the dense cloud, with the cell size set to 2 cm. We found 2 cm produces a product with high enough resolution to detect small changes, while producing a manageable file size.
  • Build the orthoimages from the DEM using a cell size set to 1.5 cm to reduce the final file sizes. For the pre-DAG-2 experiments, we created DEMs and orthoimages at the maximum possible output (cell size of 0.0012 m). This resulted in 1 TB file sizes, which was computationally unwieldy for the full collection area.
This computational workflow yielded a DEM and orthoimage for each collection that could be analyzed by itself (Figure 5), or in comparison with other collected DEMs to quantify surface change.

2.8. DEMs and Subtraction

We exported the DEMs from Agisoft, and imported them into ESRI ArcMap 10.6 and ArcPro 2.1 and visually inspected them, looking for gaps or other issues. We then calculated hillshades from these DEMs, which we visually inspected for completeness and major anomalies. We found no major issues on review of these hillshade products.
Similarly, we exported the orthoimages from Agisoft, and imported them into ESRI ArcMap 10.6 and ArcPro 2.1 and visually inspected them, looking for quality and completeness. One issue we found was odd juxtaposition of shadows and other differences in white balance. This appeared at the boundaries between flights collected at different times of day, or under different lighting conditions. We found that the later collections had fewer color balance issues, due to the higher efficiency in collecting data, where flights were conducted with smaller time gaps between them. These lighting issues were also mitigated with a more thorough initial filtering of redundant photos in step 2.
For each experiment (DAG-2 or DAG-4), we subtracted the pre-experiment DEM from the post-experiment DEM. This difference indicates the change in the modeled surface over a span of days to weeks, a time period that included the explosive experiment. We checked whether each model’s horizontal alignment could have produced apparent changes in elevation by looking at unmoved objects such as buildings. We did not see uplift-subsidence pairs on opposite sides of these objects, indicating negligible horizontal misalignment in these areas.

3. Results

3.1. Survey Data

Our survey data suggested that we maintained <2 cm vertical and horizontal precision in GCP measurements throughout all four collections: pre-DAG-2, post-DAG-2, pre-DAG-4, and post-DAG-4. To confirm this, we examined the difference between the easting, northing, and elevation of several GCPs surveyed twice during a single collection (Table 1). The absolute differences between these GCPs are presented in Table 1, and GCPs which were surveyed by different rovers are noted with a plus (+) symbol. These values suggest that there are usually < 1 cm variations in the vertical direction (elevation) between replicate measurements, with only three GCPs showing a difference between 1 to 2.5 cm. The easting and northing of these repeat-measured GCPs have more variations than the vertical differences, with GCPs having variation of < 1 cm. Overall, these values suggest little variations in the GPS-measured locations for GCPs, supporting that on a per project basis, our survey locations are not a major additional source of error.

3.2. Topographic Change

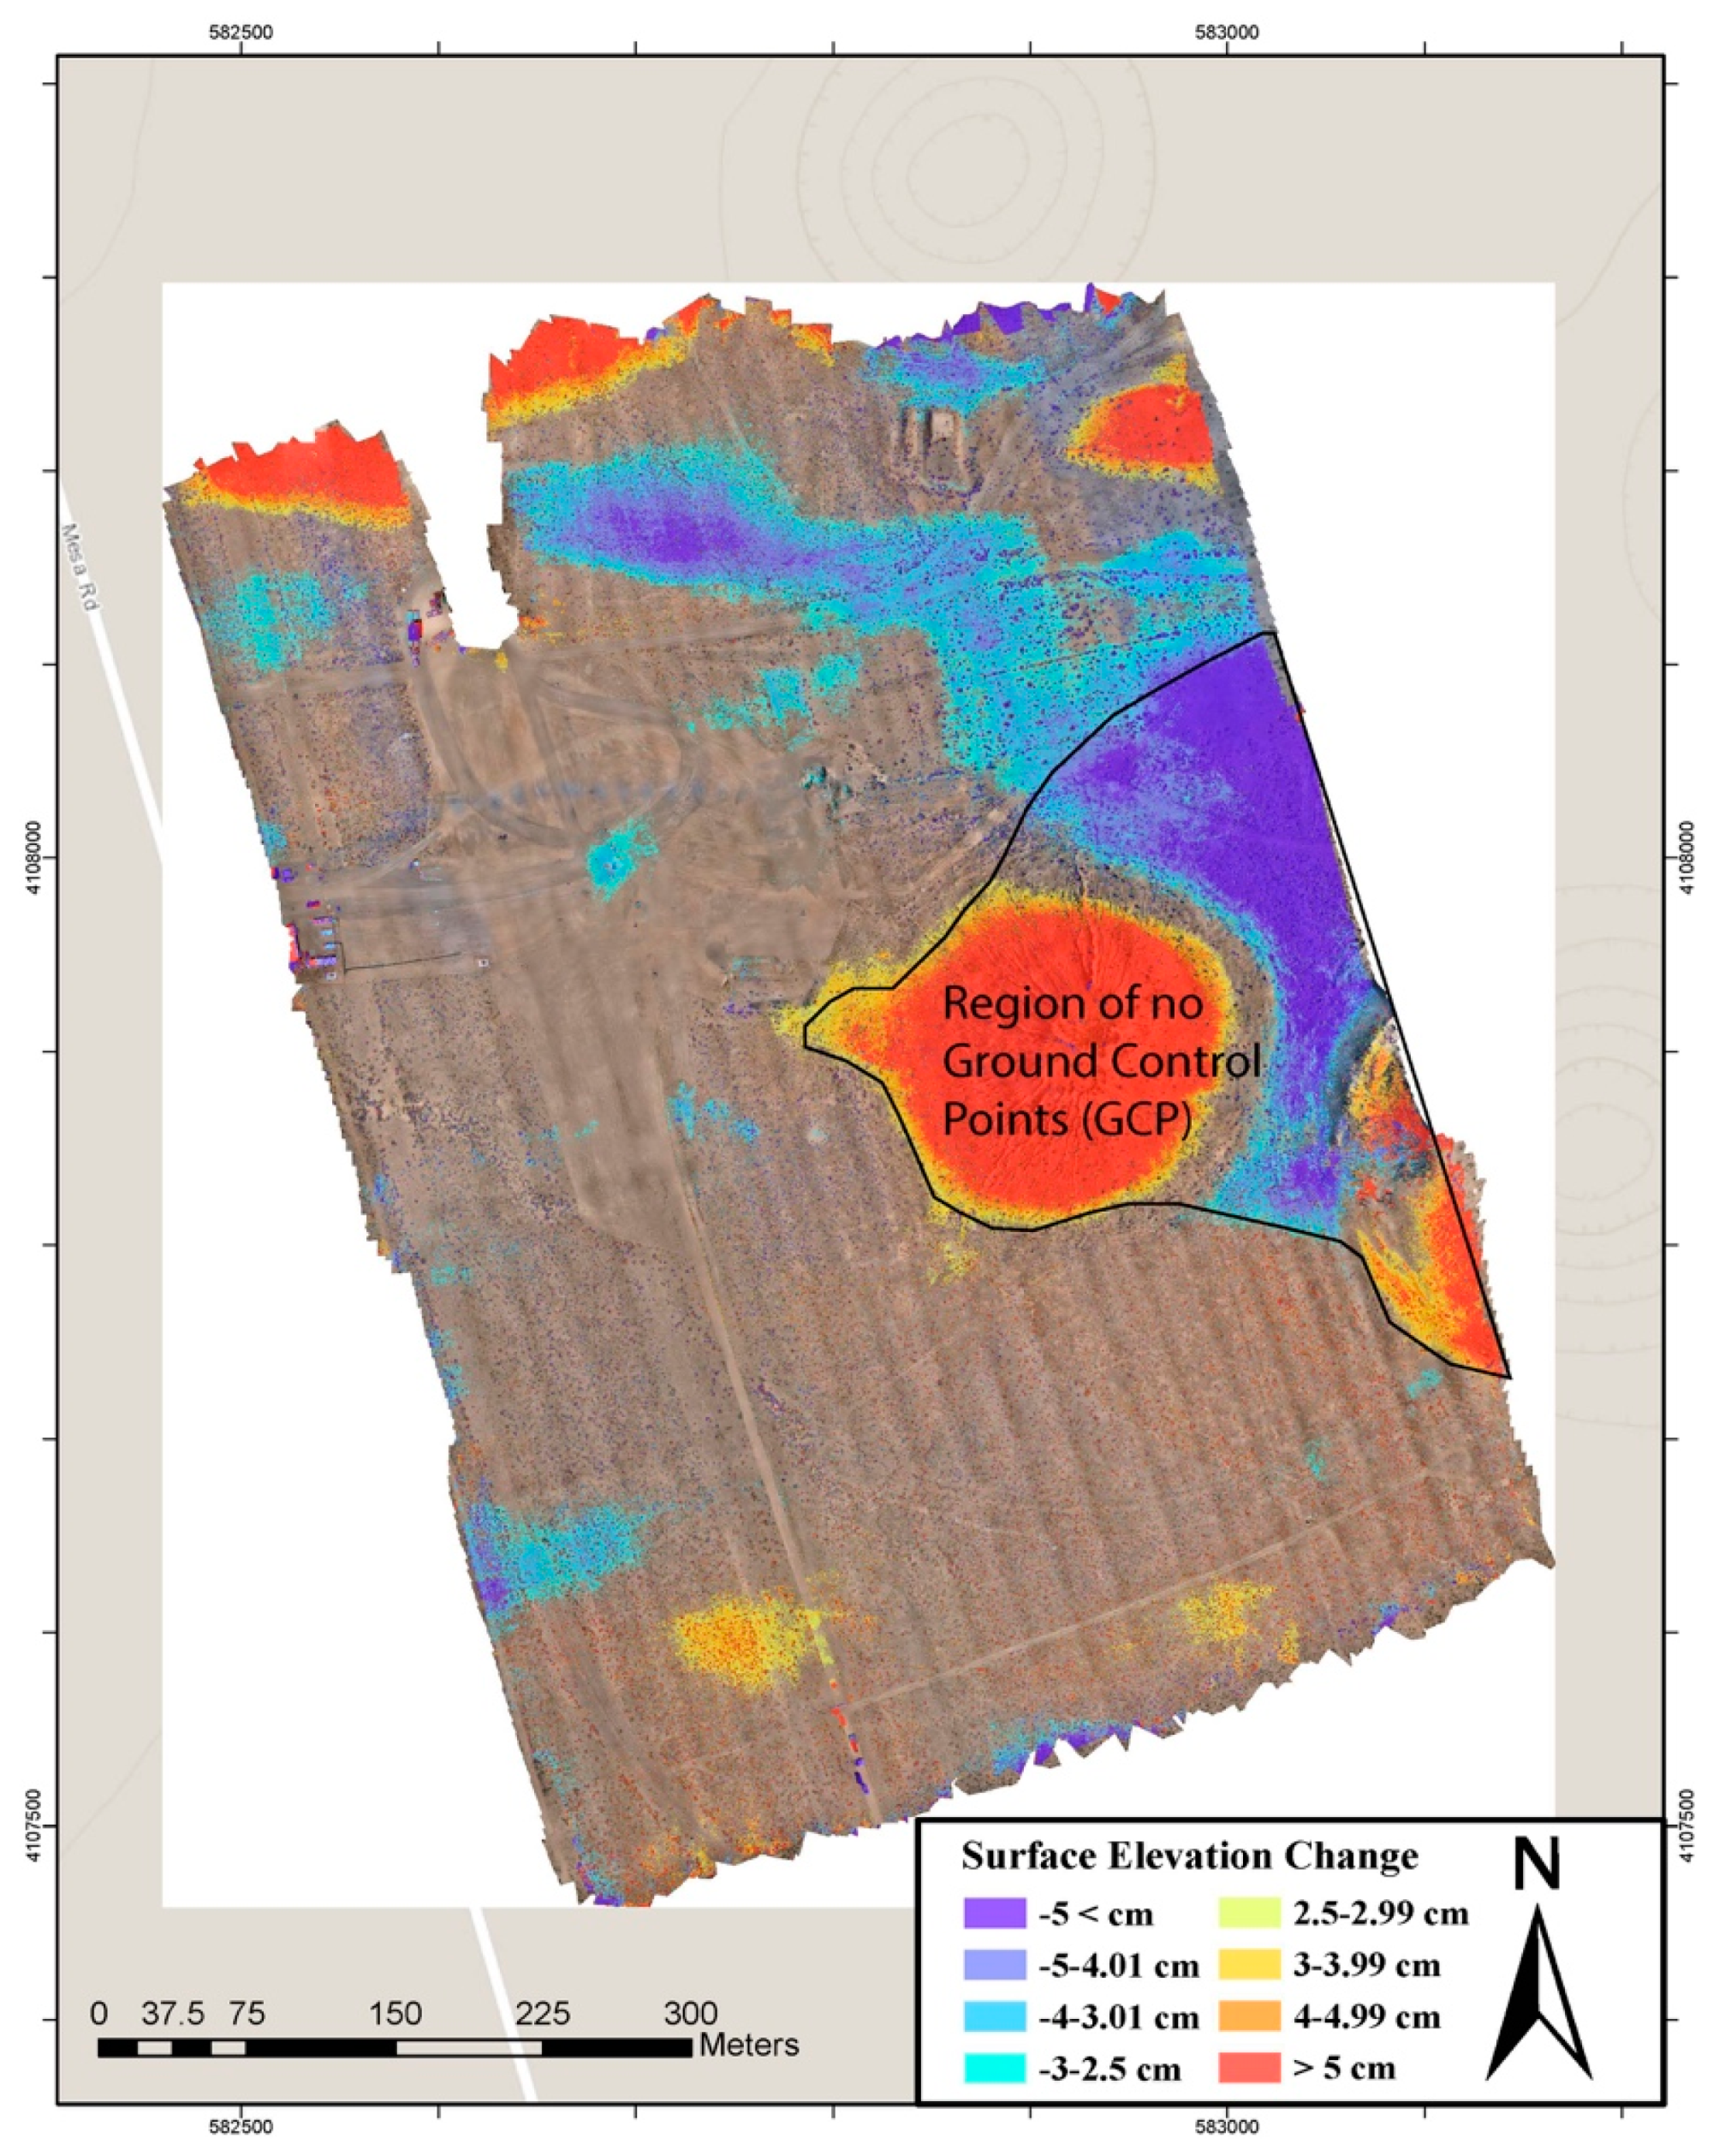
Figure 6 presents the full vertical change detected by subtracting the DAG-4 pre-experiment elevation from the post-experiment elevation. Overall, most of the study area experienced a change less than the 2.5 cm noise threshold (discussed below). Areas that showed changes greater than 2.5 cm included the area near SGZ, and parts of the northeastern study area, which show localized areas of subsidence. Larger changes of uplift within the craters on the eastern edge of the study area, and the subsidence detected in between the craters, are likely anomalous; however, we present these as-is to demonstrate the performance of Agisoft Photoscan in the absence of ground control. These craters were inaccessible to ground measurements and thus had no ground control points. Therefore, it is currently impossible to compare GCP data to DEM values from either the pre-experiment or post-experiment datasets within the craters. Elevation changes along the edges of the study area are likely computationally generated edge effects caused by a lack of GCPs to constrain the model’s edges.

3.3. Agisoft Reported RMSE

One of the most common ways to report SfM model errors is the RMSE reported by Agisoft for control and check points [25,26]. The RMSE is calculated from the difference between the observed values (GCPs) and the modeled values (SfM model). Agisoft internally calculates values in the easting, northing, and vertical directions based on the input location of GCP and the location the SfM model places points. As control points in Agisoft are used for model generation, this makes the use of check points crucial for validating model RMSE [49]. Our results indicate that Agisoft-reported RMSEs of control points underestimate the error.
For control points used in DAG-4 models, Agisoft reports RMSE values averaging 1.0 cm for the horizontal direction, and 0.5 cm in elevation (Table 2). For check points, these values were slightly higher, at 1.2 cm for the horizontal direction and 1.2 cm for the vertical direction.

4. Discussion

4.1. Data Validation

The average RMSE in the SfM model was 1.2 cm in both horizontal and vertical directions, and the published RTK precision was 1.5 cm vertically and 0.8 cm horizontally. Our resurveyed point analysis suggests less than 1 cm variation during a survey collection (Table 1). However, these measurements do not account for all uncertainty. An important source of potential uncertainty that is not measurable is the potential for tilting of the surveying equipment during GCP measurement, which could produce a horizontal offset on the scale of ~10 cm. In addition, Agisoft is a proprietary software that makes it difficult to independently verify the errors. This software also asks for GCP measurement precision in its input, but it is unclear how this value is used to propagate error. These immeasurable effects add to uncertainty, affecting the ability to identify and interpret topographic changes. Whether a model-detected change is real or an artifact is an important topic that is sometimes left undiscussed in UAS-based SfM studies.
We looked for independent constraints on minimum size detectable change. We used the imagery associated with the detected changes to evaluate whether the vertical differences were associated with interpretable changes (e.g., object movement), or whether they arose from artifacts of larger-than-expected uncertainty. We analyzed both discrete small-scale features and broader features, since the uncertainties associated with each may differ.

4.2. Discrete Change

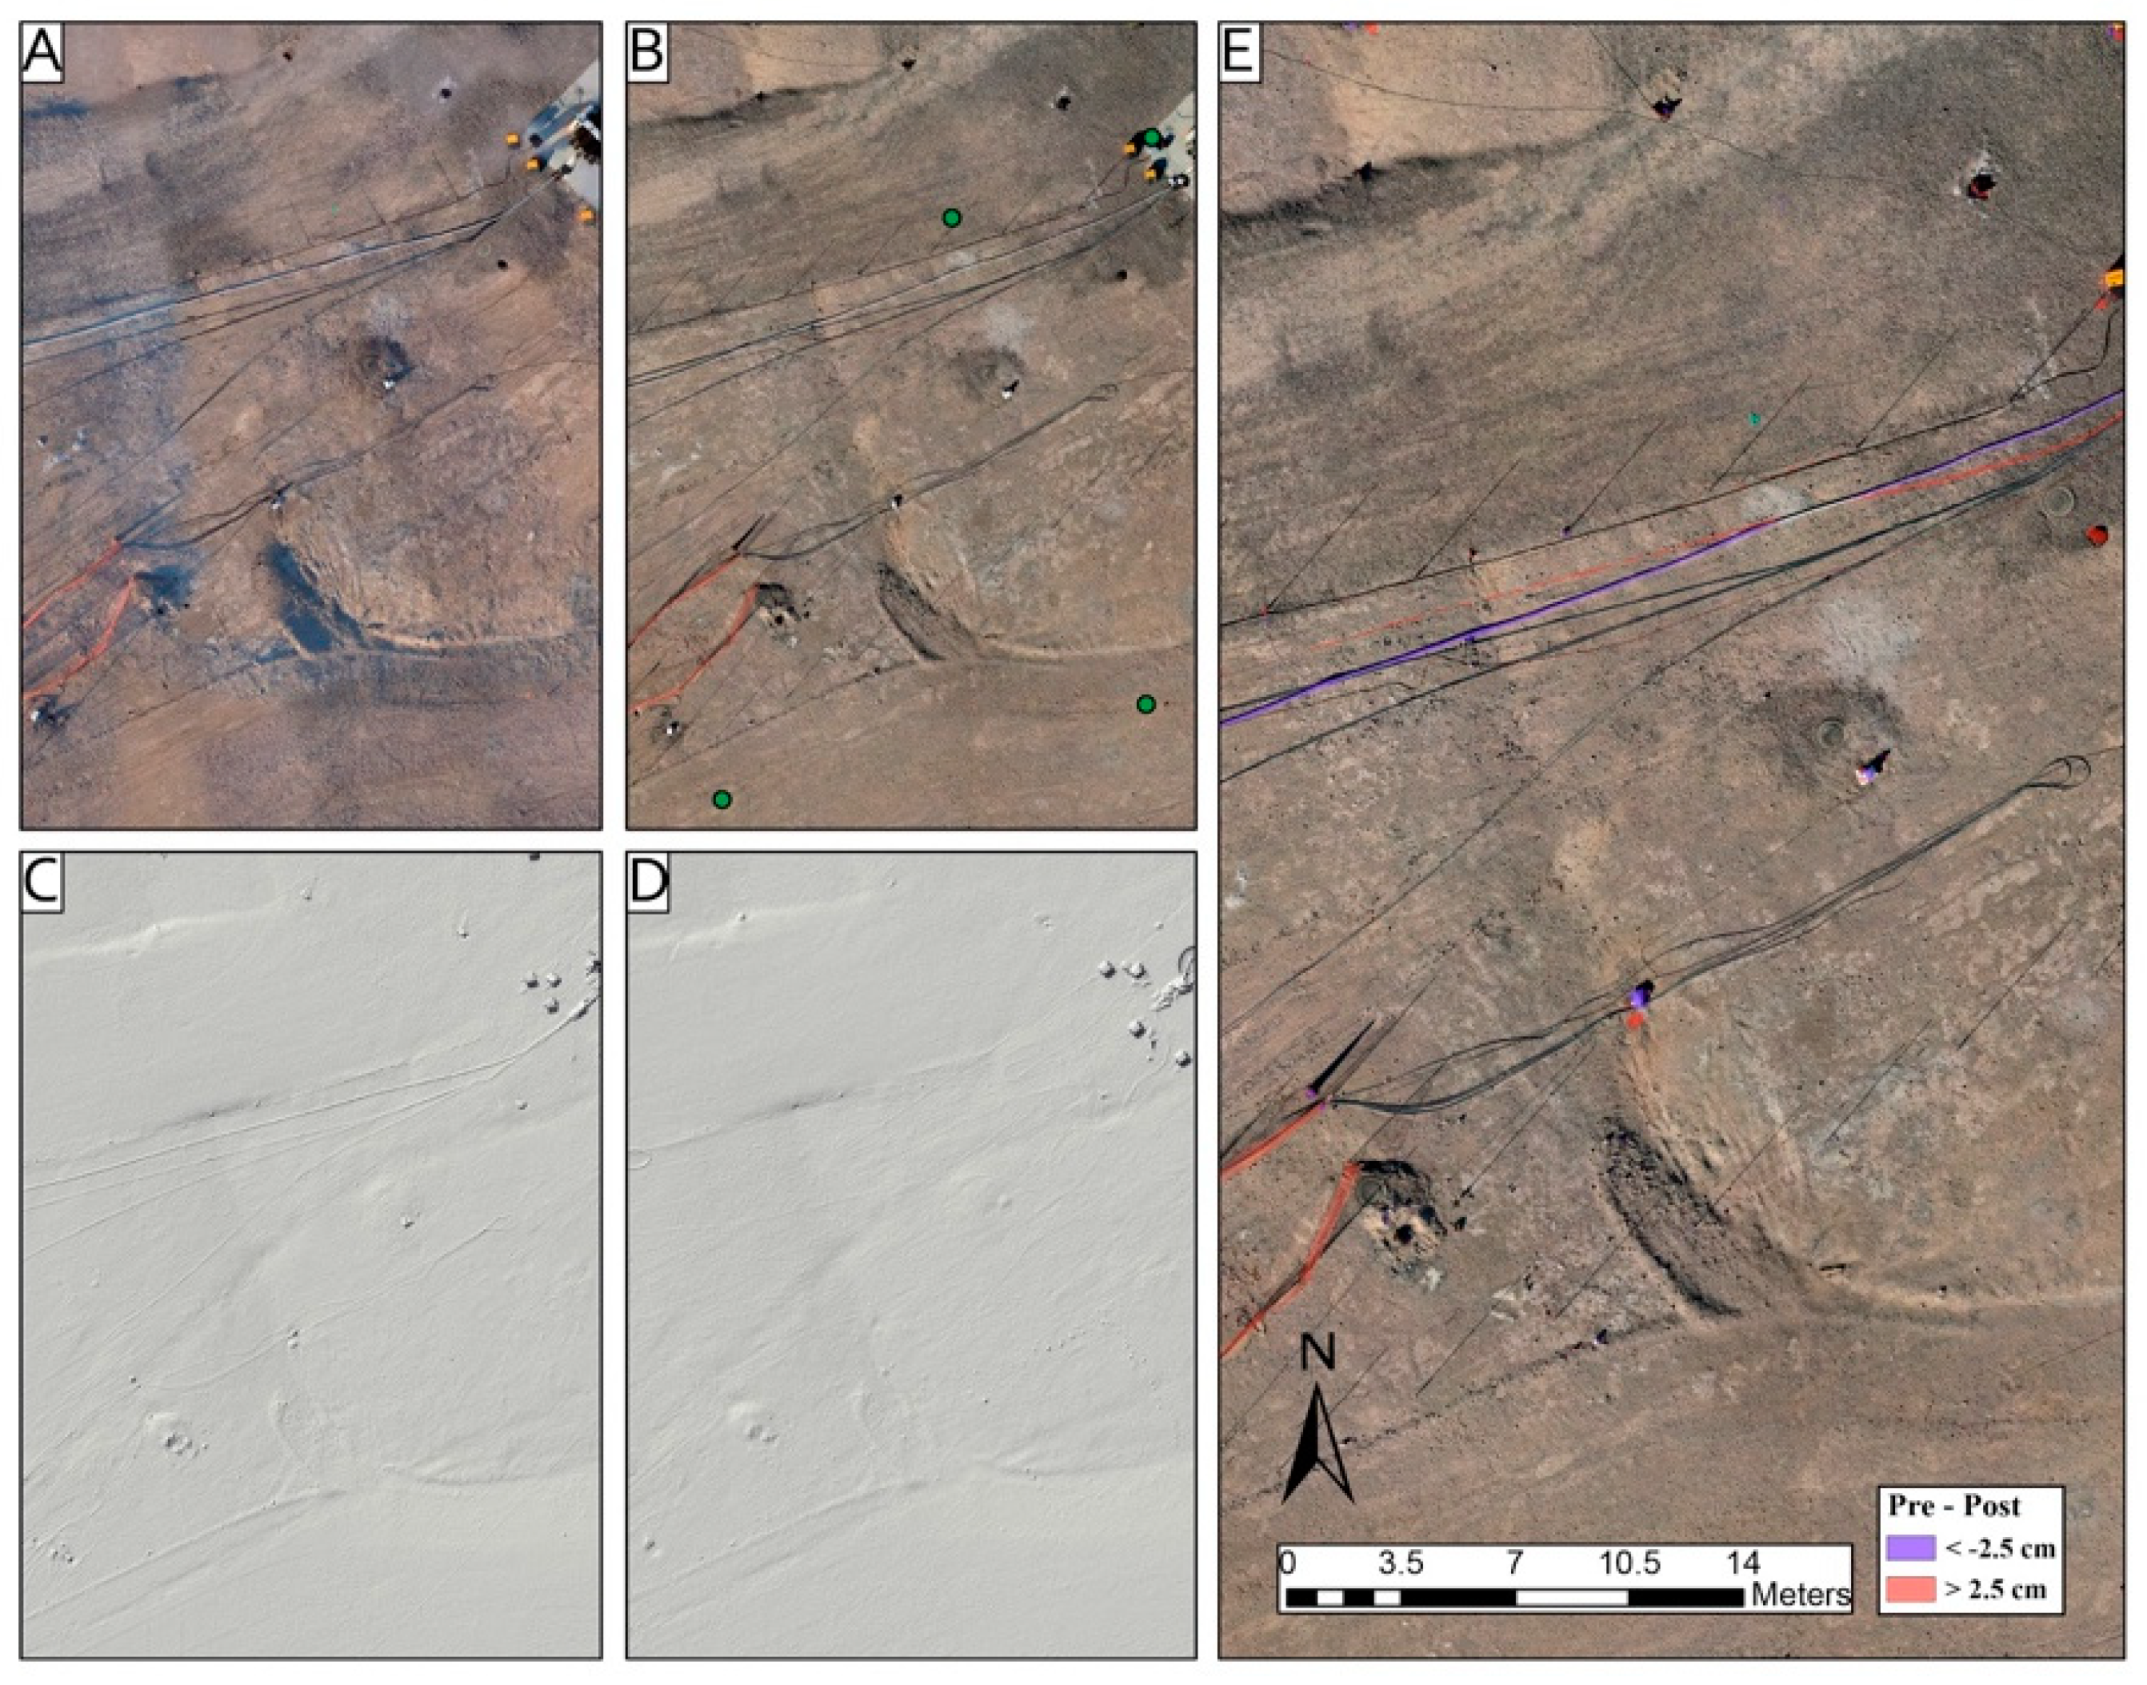
Figure 7 and Figure 8 show examples of discrete non-topographic changes, where a 5 cm diameter cable was moved from its DAG-4 pre-experiment position to a new location post-experiment. Note that because the collections spanned many days, this change may not have resulted from the explosive experiment. It is possible a person moved the cable during preparations for the experiment, or following experiment execution while acquiring data from other sensors deployed around the test bed.
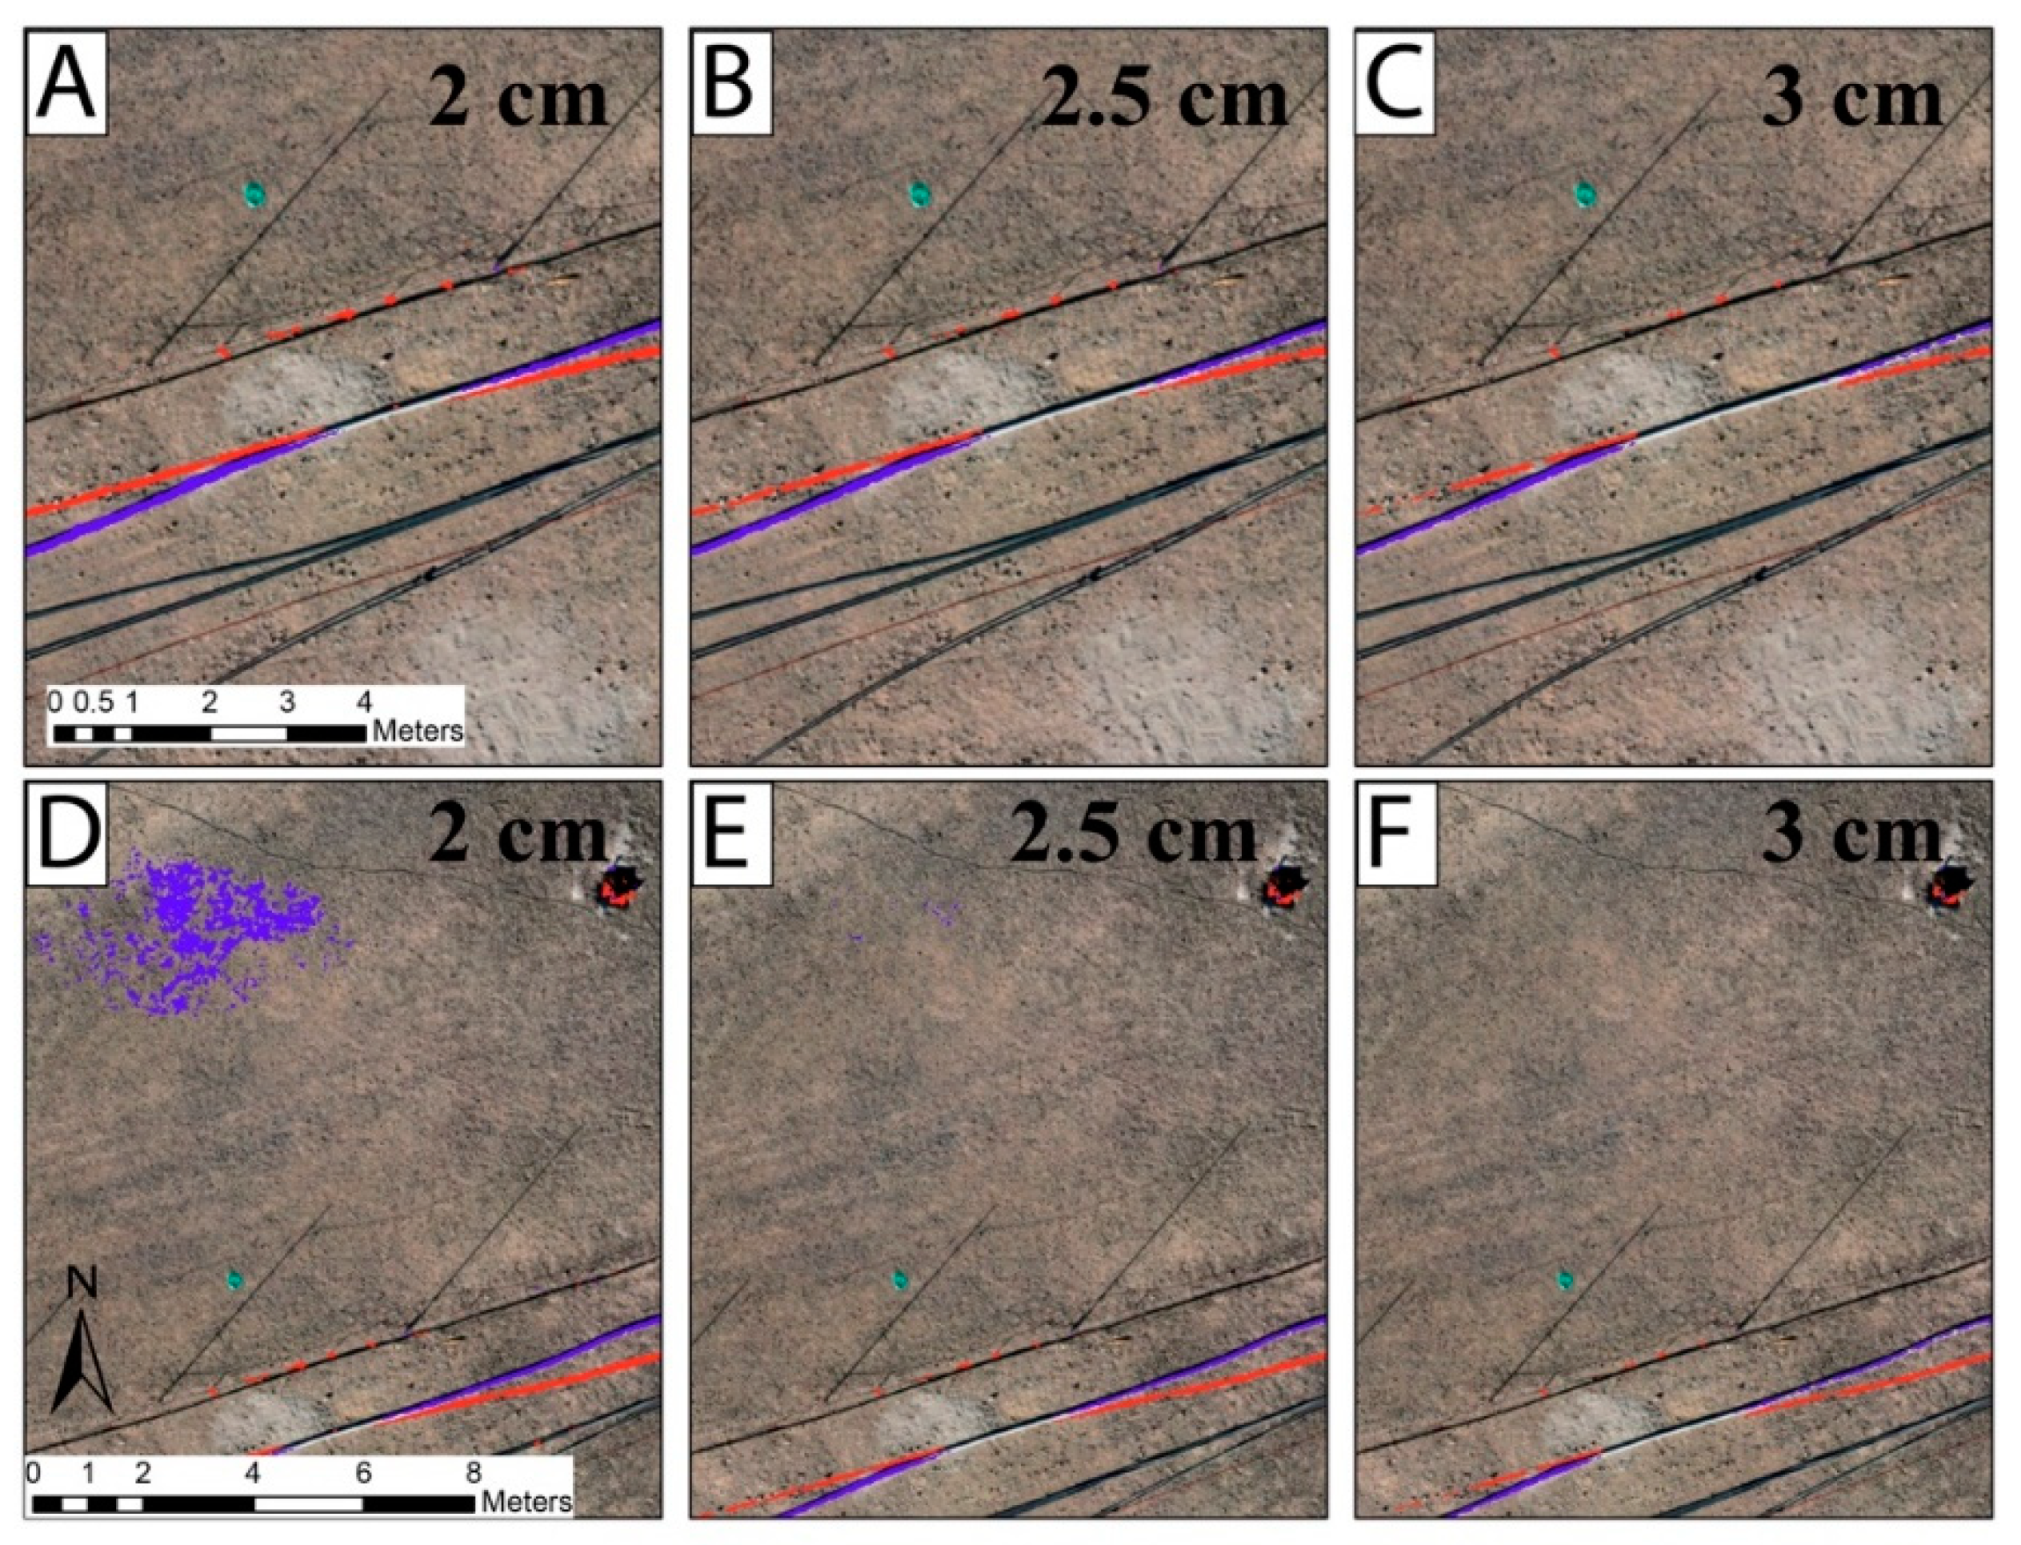
We explored different thresholds for detecting this cable movement, looking for suitable detection without excessive noise (Figure 8). When the threshold for change was set to 2 cm, and changes of less than this amount were considered to be within error, the cable motion was readily detected (Figure 8a), but there was considerable noise (Figure 8d). When the threshold for change was set to 2.5 cm, these models correctly identified both the addition of the cable and the subtraction of the cable as measurable (Figure 8b), and the noise in the flat area was greatly reduced (Figure 8e). When the threshold was set to 3 cm, there were some pixels that do not register the change from the moved cable (left side of Figure 8c), but there is no noise in the flat area (Figure 8f). Thus, we preferred the use of a 2.5 cm threshold for detectable change (e.g., Figure 6), although this still produces some artifacts.

4.3. Broad-Scale Change

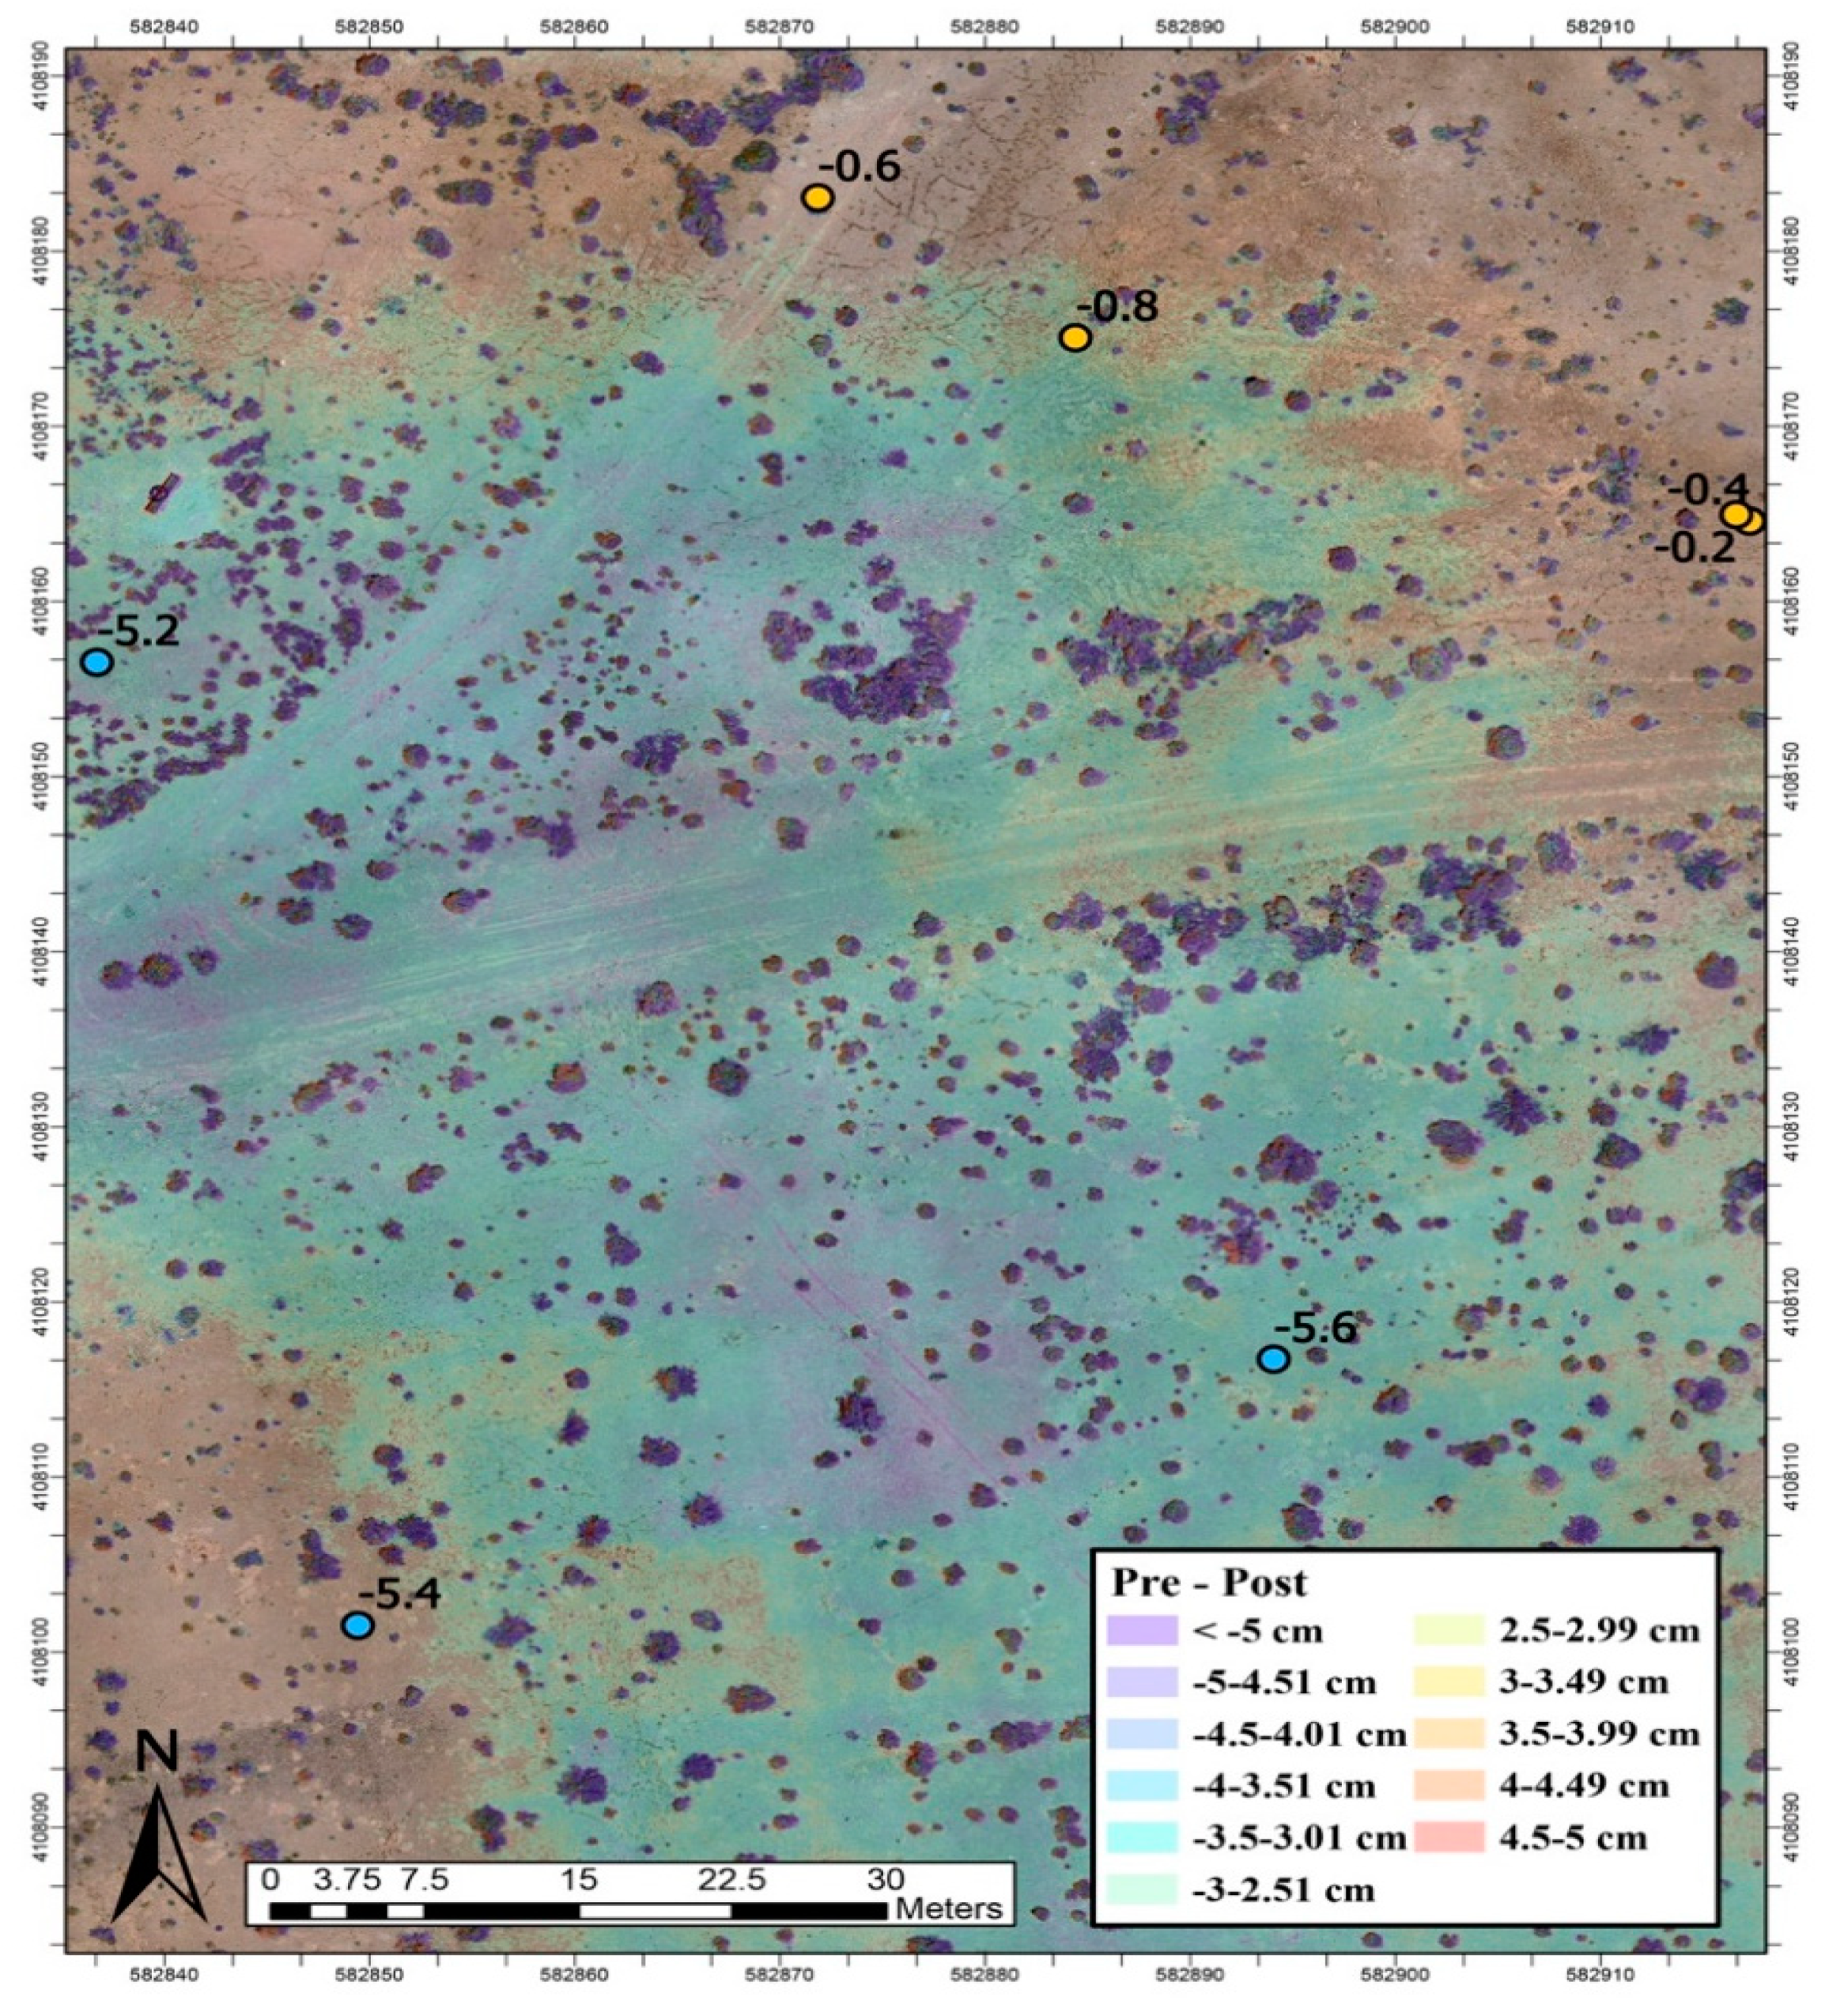
The difference DEM shows broad areas of low-magnitude (e.g., ~5 cm) subsidence (Figure 9). These areas roughly match up with the differences in elevation observed in the GCPs, although there are some variations in the scales of vertical difference from the SfM models and from the survey points.

4.4. Artifacts

Figure 8d shows a region of localized sparse subsidence (blue on panel; upper left). It is unclear whether this area experienced some movement following the experiment, or whether the represented change was an artifact created from issues with one or both of the DEMs. Artifacts in the data increase in number with smaller cut-offs, and using a cut-off below the resolution of the survey equipment (~1.5 cm vertical), GSD, or the RMSE results in a change detection map that is extremely difficult to interpret.
In locations that experienced broad, low-magnitude topographic changes, the magnitudes of change in the photogrammetry-derived DEM at specific points do not always match the magnitudes of change at the surveyed GCPs at those same points (Figure 9). The reason for this is unclear, and cannot be extracted from the proprietary SfM processing software. Some possible options for this error unrelated to software performance include: (1) The GCP locations have more error at that site; (2) the DEM model has more error at that site; or (3) both the GCPs and DEM have normal amounts of error that coincidentally happen to be in opposite directions at that specific location. Option 3 is not preferred because it requires considerable coincidence for three adjacent GCPs to all show 5–6 cm changes from random errors. Given the relatively low errors from repeat surveys of GCPs, we prefer option 2, where the DEM has greater error than expected in this location.
As the highest accuracy in SfM models requires close proximity to ground control [30,36], areas without GCPs would be expected to have larger errors. However, the lack of GCPs also precludes an assessment of the amount of additional error. Our study area included collapse craters from legacy U.S. underground nuclear explosions. Those craters were inaccessible, and thus we cannot use this workflow to validate the spatial extent and magnitude of the difference-model-reported change within the craters.
For this work, we found that changes <2.5 cm were generally within error and indistinguishable from noise. Discrete changes >2.5 cm included some minor noise/artifacts, but were largely real changes that could be validated. For example, we had the ability to visually inspect and confirm the cable movement, and could further see this change by comparing pre-experiment and post-experiment imagery (e.g., Figure 7 and Figure 8). It is less clear how to validate broader-scale changes from imagery. Therefore, the interpretations of real change vs. artifacts for these broad features require care. We did find that the software-reported values of error were insufficient, and relying upon these error values for certain applications—such as this explosion monitoring research case—could have significant undesirable consequences. Validation of results still requires significant human expert involvement at the present time. It is possible that future advancements in avenues such as machine learning and artificial intelligence could optimize all components of this workflow–field deployment, data reduction, and change validation.

5. Conclusions

We have developed, deployed, and tested a field-based data collection and data processing method for detecting surface topographic changes as small as 2.5 cm over an area of 0.3 km2. This method involved the use of cameras mounted on small UAS to obtain dense imagery data for SfM analysis. Using this workflow, we repeatedly produced digital elevation models with uncertainties in the order of 2–2.5 cm. Agisoft reported RMSEs of about 1–2 cm, which is considerably smaller than the errors we could verify. We used repeated measurements on several ground control points to assess errors that result from the surveying procedure, finding the largest difference in vertical position to be 2.1 cm, and the average difference in vertical position to be 0.8 cm. We used the imagery to validate some of the discrete changes, such as the changed positions of a cable (Figure 7 and Figure 8), boxes and containers, sandbags, and tripods. With these examples we found that the use of a cut-off of 2.5 cm allowed us to detect many changes without being overwhelmed by noise. We compared the SfM model to the survey data for constraints on error for broad-scale features, and found differences of up to 2.9 cm. We find larger apparent changes in craters and along edges, where ground control was sparse or absent. Considered together, we found that changes of greater than 3 cm are likely to be real and not artifacts, as long as these changes are near GCPs. Changes smaller than 3 cm may be trusted if they correspond to changes in the imagery. Therefore, SfM-software-reported errors alone are minima, and should not be used without independent verification. As UAS SfM modeling continues to advance, the ability and need for high-resolution and accurate models will only increase. This methodology, along with the large body of previously published work, can assist with further investigations of small-scale changes in larger spatial settings, and offers a launching point for those seeking to optimize deployment and data analyses.

Author Contributions

Conceptualization, B.C., E.S., and E.S.-F.; methodology, B.C., E.S., E.S.-F., A.C., E.L., J.D., and D.M.; validation, B.C. and E.S.; formal analysis, B.C.; investigation, B.C., E.S., E.S-F., A.C., E.L., J.D., and D.M.; data curation, B.C., E.L., and J.D.; writing—original draft preparation, B.C.; writing—review and editing, E.S., B.C., A.C., D.M., E.S.-F., E.L., and J.D.; visualization, B.C. and E.S.; project administration, E.S.-F.; funding acquisition, E.S.-F. All authors have read and agreed to the published version of the manuscript.

Funding

Los Alamos National Laboratory, an affirmative-action/equal opportunity employer, is operated by Triad National Security, LLC for the National Nuclear Security Administration of the U.S. Department of Energy under contract 89233218CNA000001.

Data Availability Statement

The data presented in this study are available upon request to the corresponding author. The data will be available starting 1 July 2021 following a 2-yr data hold policy from the completion of the experimental series in 1 July 2019.

Acknowledgments

The Source Physics Experiments (SPE) would not have been possible without the support of many people from several organizations. The authors thank NNSA, the Office of Defense Nuclear Nonproliferation Research and Development (DNN R&D), and the SPE working group, a multi-institutional, interdisciplinary group of scientists and engineers. The United States Government retains and the publisher, by accepting the article for publication, acknowledges that the United States Government retains a non-exclusive, paid-up, irrevocable, worldwide license to publish or reproduce the published form of this manuscript, or allow others to do so, for United States Government purposes. The U.S. Department of Energy will provide public access to these results of federally sponsored research in accordance with the DOE Public Access Plan (http://energy.gov/downloads/doe-public-access-plan). The views expressed in this article do not necessarily represent the views of the U.S. Department of Energy or the United States Government. This document is unclassified and has been approved for unlimited release (LA-UR-21-21753).

Conflicts of Interest

The authors declare no conflict of interest.

References

  1. Glenn, N.F.; Streutker, D.R.; Chadwick, D.J.; Thackray, G.D.; Dorsch, S.J. Analysis of LiDAR-derived topographic information for characterizing and differentiating landslide morphology and activity. Geomorphology 2006, 73, 131–148. [Google Scholar] [CrossRef]
  2. Drǎgut, L.; Eisank, C.; Strasser, T. Local variance for multi-scale analysis in geomorphometry. Geomorphology 2011, 130, 162–172. [Google Scholar] [CrossRef] [Green Version]
  3. Bemis, S.P.; Micklethwaite, S.; Turner, D.; James, M.R.; Akciz, S.; Thiele, S.T.; Bangash, H.A. Ground-based and UAV-Based photogrammetry: A multi-scale, high-resolution mapping tool for structural geology and paleoseismology. J. Struct. Geol. 2014, 69, 163–178. [Google Scholar] [CrossRef]
  4. Davies, D.R.; Valentine, A.P.; Kramer, S.C.; Rawlinson, N.; Hoggard, M.J.; Eakin, C.M.; Wilson, C.R. Earth’s multi-scale topographic response to global mantle flow. Nat. Geosci. 2019, 12, 845–850. [Google Scholar] [CrossRef]
  5. Lindsay, J.B.; Newman, D.R.; Francioni, A. Scale-optimized surface roughness for topographic analysis. Geoscience 2019, 9, 322. [Google Scholar] [CrossRef] [Green Version]
  6. Liao, J.; Shen, S. Detection of land surface change due to the Wenchuan earthquake using multitemporal advanced land observation satellite-phased array type L-band synthetic aperture radar data. J. Appl. Remote Sens. 2009. [Google Scholar] [CrossRef]
  7. Kaya, G.T.; Musaoǧlu, N.; Ersoy, O.K. Damage assessment of 2010 Haiti earthquake with post-earthquake satellite image by support vector selection and adaptation. Photogramm. Eng. Remote Sens. 2011, 77, 1025–1035. [Google Scholar] [CrossRef]
  8. Ishitsuka, K.; Tsuji, T.; Matsuoka, T. Detection and mapping of soil liquefaction in the 2011 Tohoku earthquake using SAR interferometry. Earth Planets Sp. 2013, 64, 1267–1276. [Google Scholar] [CrossRef] [Green Version]
  9. Menderes, A.; Erener, A.; Sarp, G. Automatic Detection of Damaged Buildings after Earthquake Hazard by Using Remote Sensing and Information Technologies. Procedia Earth Planet. Sci. 2015, 15, 257–262. [Google Scholar] [CrossRef] [Green Version]
  10. Galloway, D.L.; Hudnut, K.W.; Ingebritsen, S.E.; Phillips, S.P.; Peltzer, G.; Rogez, F.; Rosen, P.A. Detection of aquifer system compaction and land subsidence using interferometric synthetic aperture radar, Antelope Valley, Mojave Desert, California. Water Resour. Res. 1998, 34, 2573–2585. [Google Scholar] [CrossRef]
  11. Chai, J.C.; Shen, S.-L.; Zhu, H.; Zhang, X. Land subsidence due to groundwater drawdown in Shanghai. Geotechnique 2004, 54, 143–147. [Google Scholar] [CrossRef]
  12. Higgins, S.; Overeem, I.; Tanaka, A.; Syvitski, J.P.M. Land subsidence at aquaculture facilities in the Yellow River delta, China. Geophys. Res. Lett. 2013, 40, 3898–3902. [Google Scholar] [CrossRef]
  13. Erban, L.E.; Gorelick, S.M.; Zebker, H.A. Groundwater extraction, land subsidence, and sea-level rise in the Mekong Delta, Vietnam. Environ. Res. Lett. 2014, 9, 084010. [Google Scholar] [CrossRef]
  14. Phang, M.K.; Simpson, T.A.; Brown, R.C. Investigation of Blast-Induced Underground Vibrations from Surface Mining; Department of Interior Office of Surface Mining Report, U.S.; 1983. [Google Scholar]
  15. Chowdhury, A.H.; Wilt, T.E. Characterizing Explosive Effects on Underground Structures; U.S. Nuclear Regulatory Commission report NUREG/CR-7201, U.S.; 2015. [Google Scholar]
  16. Westoby, M.J.; Brasington, J.; Glasser, N.F.; Hambrey, M.J.; Reynolds, J.M. “Structure-from-Motion” photogrammetry: A low-cost, effective tool for geoscience applications. Geomorphology 2012, 179, 300–314. [Google Scholar] [CrossRef] [Green Version]
  17. Howell, R.G.; Jensen, R.R.; Petersen, S.L.; Larsen, R.T. Measuring Height Characteristics of Sagebrush (Artemisia sp.) Using Imagery Derived from Small Unmanned Aerial Systems (sUAS). Drones 2020, 4, 6. [Google Scholar] [CrossRef] [Green Version]
  18. Kameyama, S.; Sugiura, K. Estimating Tree Height and Volume Using Unmanned Aerial Vehicle Photography and SfM Technology, with Verification of Result Accuracy. Drones 2020, 4, 19. [Google Scholar] [CrossRef]
  19. Javernick, L.; Brasington, J.; Caruso, B. Modeling the topography of shallow braided rivers using Structure-from-Motion photogrammetry. Geomorphology 2014, 213, 166–182. [Google Scholar] [CrossRef]
  20. Neugirg, F.; Stark, M.; Kaiser, A.; Vlacilova, M.; Della Seta, M.; Vergari, F.; Schmidt, J.; Becht, M.; Haas, F. Erosion processes in calanchi in the Upper Orcia Valley, Southern Tuscany, Italy based on multitemporal high-resolution terrestrial LiDAR and UAV surveys. Geomorphology 2016, 269, 8–22. [Google Scholar] [CrossRef]
  21. Bash, E.A.; Moorman, B.J.; Menounos, B.; Gunther, A. Evaluation of SfM for surface characterization of a snow-covered glacier through comparison with aerial lidar. J. Unmanned Veh. Syst. 2020, 139, 1–21. [Google Scholar] [CrossRef]
  22. Cucchiaro, S.; Cavalli, M.; Vericat, D.; Crema, S.; Llena, M.; Beinat, A.; Marchi, L.; Cazorzi, F. Monitoring topographic changes through 4D-structure-from-motion photogrammetry: Application to a debris-flow channel. Environ. Earth Sci. 2018, 77, 1–21. [Google Scholar] [CrossRef]
  23. Agüera-Vega, F.; Carvajal-Ramírez, F.; Martínez-Carricondo, P. Assessment of photogrammetric mapping accuracy based on variation ground control points number using unmanned aerial vehicle. Meas. J. Int. Meas. Confed. 2017, 98, 221–227. [Google Scholar] [CrossRef]
  24. Martínez-Carricondo, P.; Agüera-Vega, F.; Carvajal-Ramírez, F.; Mesas-Carrascosa, F.J.; García-Ferrer, A.; Pérez-Porras, F.J. Assessment of UAV-photogrammetric mapping accuracy based on variation of ground control points. Int. J. Appl. Earth Obs. Geoinf. 2018, 72, 1–10. [Google Scholar] [CrossRef]
  25. Čerňava, J.; Chudý, F.; Tunák, D.; Saloň, Š.; Vyhnáliková, Z. The vertical accuracy of digital terrain models derived from the close-range photogrammetry point cloud using different methods of interpolation and resolutions. Cent. Eur. For. J. 2019, 66, 198–205. [Google Scholar] [CrossRef]
  26. Tonkin, T.N.; Midgley, N.G.; Graham, D.J.; Labadz, J.C. The potential of small unmanned aircraft systems and structure-from-motion for topographic surveys: A test of emerging integrated approaches at Cwm Idwal, North Wales. Geomorphology 2014, 226, 35–43. [Google Scholar] [CrossRef] [Green Version]
  27. Villanueva, J.K.S.; Blanco, A.C. Optimization of ground control point (GCP) configuration for unmanned aerial vehicle (UAV) survey using structure from motion (SFM). Int. Arch. Photogramm. Remote Sens. Spat. Inf. Sci. ISPRS Arch. 2019, 42, 167–174. [Google Scholar] [CrossRef] [Green Version]
  28. Meinen, B.U.; Robinson, D.T. Mapping erosion and deposition in an agricultural landscape: Optimization of UAV image acquisition schemes for SfM-MVS. Remote Sens. Environ. 2020, 239, 111666. [Google Scholar] [CrossRef]
  29. Melita, C.D.; Guastella, D.C.; Cantelli, L.; Di Marco, G.; Minio, I.; Muscato, G. Low-Altitude Terrain-Following Flight Planning for Multirotors. Drones 2020, 4, 26. [Google Scholar] [CrossRef]
  30. Tonkin, T.N.; Midgley, N.G. Ground-control networks for image based surface reconstruction: An investigation of optimum survey designs using UAV derived imagery and structure-from-motion photogrammetry. Remote Sens. 2016, 8, 786. [Google Scholar] [CrossRef] [Green Version]
  31. Nagendran, S.K.; Tung, W.Y.; Mohamad Ismail, M.A. Accuracy assessment on low altitude UAV-borne photogrammetry outputs influenced by ground control point at different altitude. IOP Conf. Ser. Earth Environ. Sci. 2018, 169, 1–9. [Google Scholar] [CrossRef]
  32. Jóźków, G.; Toth, C. Georeferencing experiments with UAS imagery. ISPRS Ann. Photogramm. Remote Sens. Spat. Inf. Sci. 2014, II–1, 25–29. [Google Scholar] [CrossRef] [Green Version]
  33. Carbonneau, P.E.; Dietrich, J.T. Cost-effective non-metric photogrammetry from consumer-grade sUAS: Implications for direct georeferencing of structure from motion photogrammetry. Earth Surf. Process. Landforms 2017, 42, 473–486. [Google Scholar] [CrossRef] [Green Version]
  34. Kalacska, M.; Lucanus, O.; Arroyo-Mora, J.P.; Laliberté, É.; Elmer, K.; Leblanc, G.; Groves, A. Accuracy of 3d landscape reconstruction without ground control points using different uas platforms. Drones 2020, 4, 13. [Google Scholar] [CrossRef] [Green Version]
  35. Sanz-Ablanedo, E.; Chandler, J.H.; Rodríguez-Pérez, J.R.; Ordóñez, C. Accuracy of Unmanned Aerial Vehicle (UAV) and SfM photogrammetry survey as a function of the number and location of ground control points used. Remote Sens. 2018, 10, 1606. [Google Scholar] [CrossRef] [Green Version]
  36. James, M.R.; Robson, S.; Smith, M.W. 3-D uncertainty-based topographic change detection with structure-from-motion photogrammetry: Precision maps for ground control and directly georeferenced surveys. Earth Surf. Process. Landforms 2017, 42, 1769–1788. [Google Scholar] [CrossRef]
  37. Schultz-Fellenz, E.S.; Coppersmith, R.T.; Sussman, A.J.; Swanson, E.M.; Cooley, J.A. Detecting Surface Changes from an Underground Explosion in Granite Using Unmanned Aerial System Photogrammetry. Pure Appl. Geophys. 2017, 175, 3159–3177. [Google Scholar] [CrossRef] [Green Version]
  38. Schultz-Fellenz, E.S.; Swanson, E.M.; Sussman, A.J.; Coppersmith, R.T.; Kelley, R.E.; Miller, E.D.; Crawford, B.M.; Lavadie-Bulnes, A.F.; Cooley, J.R.; Vigil, S.R.; et al. High-resolution surface topographic change analyses to characterize a series of underground explosions. Remote Sens. Environ. 2020, 246. [Google Scholar] [CrossRef]
  39. Wilmarth, V.R.; McKeown, F.A. Structural Effects of Rainier, Logan, and Blanca Underground Nuclear Explosions, Nevada Test Site, Nye County, Nevada; U.S. Geological Survey Prof. Paper. 400–B, U.S.; 1960. [Google Scholar]
  40. Barosh, P.J. Relationships of Explosion-Produced Fracture Patterns to Geologic Structure in Yucca Flat, Nevada Test Site; Nevada Test Site. Geol. Soc. Am. Memoir 110, U.S.; 1968. [Google Scholar]
  41. Dickey, D. Fault Displacement as a Result of Underground Nuclear Explosions; Nevada Test Site. Geol. Soc. Am. Memoir 110, U.S.; 1968. [Google Scholar]
  42. Morris, R. Topographic and Isobase Maps of the Cannikin Sink, Amchitka Island, Alaska; U.S. Geological Survey Technical Report USGS-474-175, U.S.; 1973. [Google Scholar]
  43. App, F. Permanent Displacement of the Ground Surface Resulting from Underground-Nuclear-Test-Induced Ground Shock; Lawrence Livermore National Laboratory Report CONF-850953, U.S.; 1985. [Google Scholar]
  44. Snelson, C.M.; Abbott, R.E.; Broome, S.T.; Mellors, R.J.; Patton, H.J.; Sussman, A.J.; Townsend, M.J.; Walter, W.R. Chemical explosion experiments to improve nuclear test monitoring. EOS Trans. Am. Geophys. Union 2013, 94, 237–239. [Google Scholar] [CrossRef]
  45. Machado, M. f3—Fight Flash Fraud. Available online: https://fight-flash-fraud.readthedocs.io/en/latest/introduction.html (accessed on 20 May 2018).
  46. Chao, J.; Chen, H.; Eckehard, S. On the design of a novel jpeg quantization table for improved feature detection performance. IEEE Int. Conf. Image Process. 2013, 1675–1679. [Google Scholar] [CrossRef]
  47. Akçay, Ö.; Erenoğlu, R.C.; Avşar, E.Ö. the Effect of Jpeg Compression in Close Range Photogrammetry. Int. J. Eng. Geosci. 2017, 2, 35–40. [Google Scholar] [CrossRef] [Green Version]
  48. Alfio, V.S.; Costantino, D.; Pepe, M. Influence of image tiff format and jpeg compression level in the accuracy of the 3d model and quality of the orthophoto in uav photogrammetry. J. Imaging 2020, 6, 30. [Google Scholar] [CrossRef]
  49. James, M.R.; Robson, S. Mitigating systematic error in topographic models derived from UAV and ground-based image networks. Earth Surf. Process. Landf. 2014, 39, 1413–1420. [Google Scholar] [CrossRef] [Green Version]
  50. Nesbit, P.R.; Hugenholtz, C.H. Enhancing UAV-SfM 3D model accuracy in high-relief landscapes by incorporating oblique images. Remote Sens. 2019, 11, 239. [Google Scholar] [CrossRef] [Green Version]
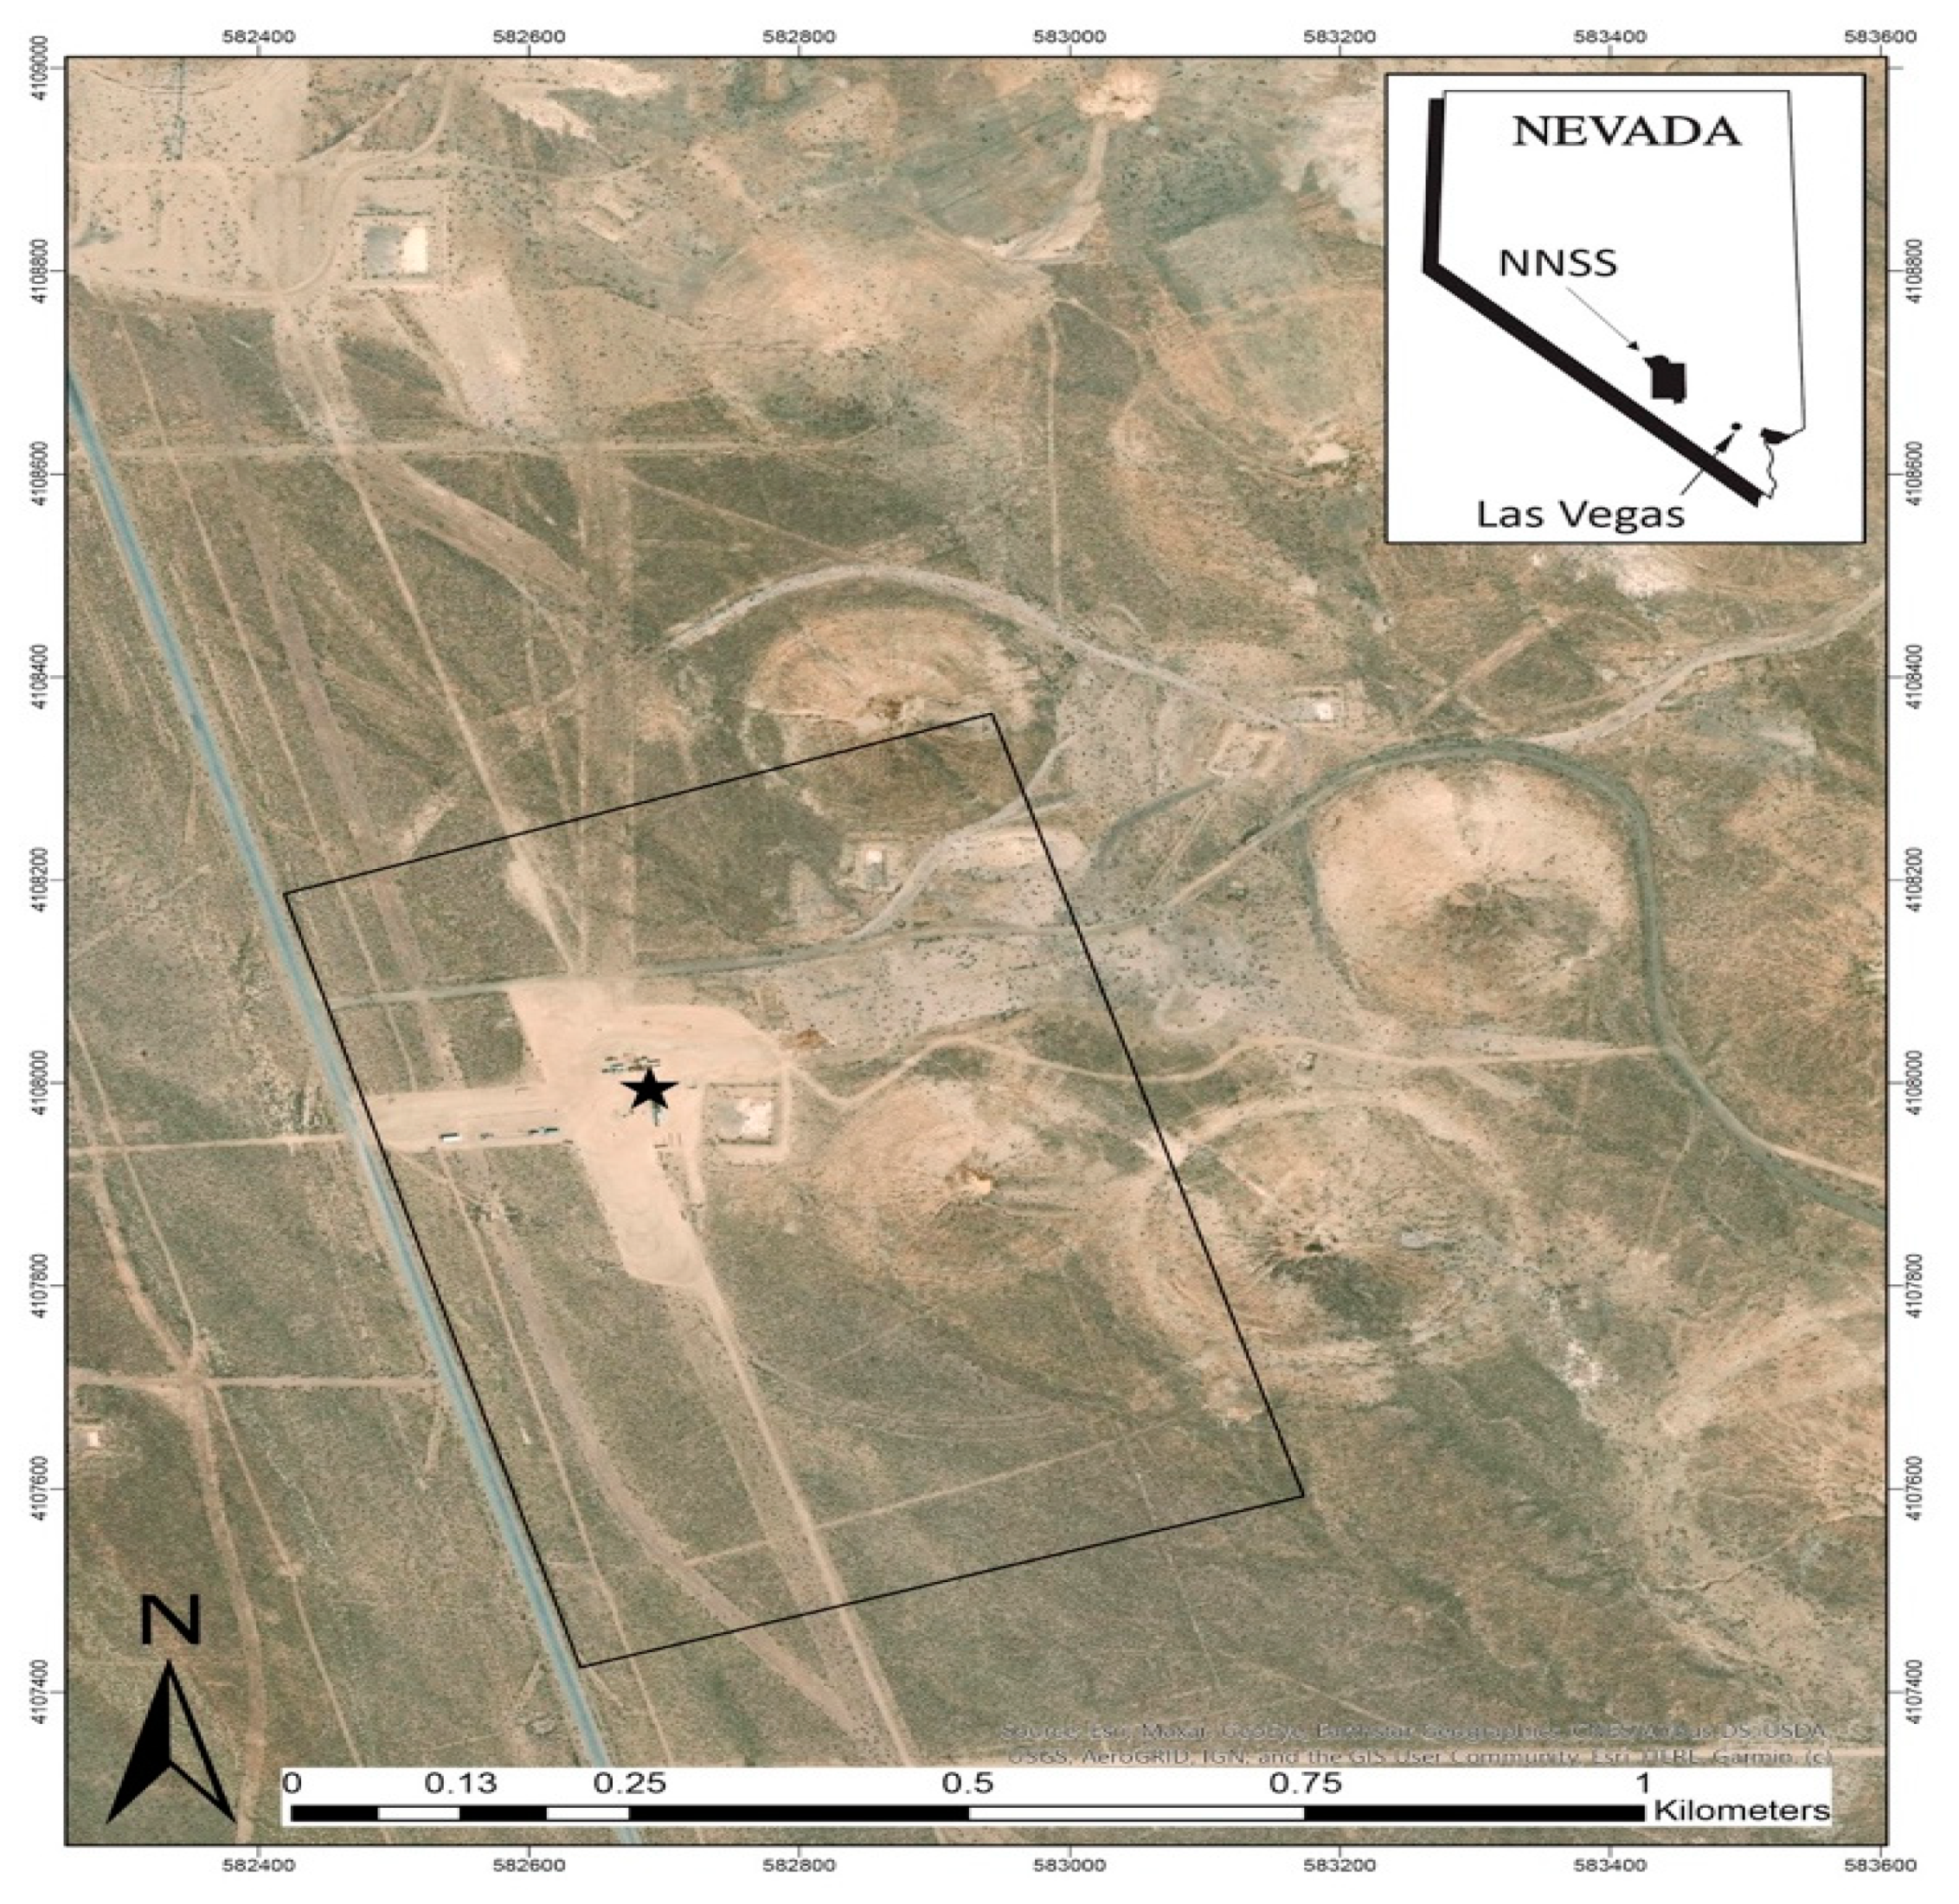
Figure 1. Field site. This work was completed at the Nevada National Security Site, located in south-central Nevada, northwest of Las Vegas, NV (See inset). The Dry Alluvium Geology (DAG) study area (black box) includes the DAG experimental emplacement hole (black star), also known as the surface ground zero (SGZ) location, for all explosions in the DAG series. Collapse craters created from legacy U.S. underground nuclear explosions are visible east of SGZ, and fall within portions of the study area.
Drones 05 00025 g001
Figure 2. Uncrewed aerial system (UAS) equipment used in this workflow. (A) Gryphon UAS used during flight missions. (B) Canon EOS 5D Mark IV DSLR camera, which was fixed-mounted to the UAS in (A) for the collection of structure-from-motion photogrammetric data.
Drones 05 00025 g002
Figure 3. Location of DAG-4 campaign ground control points (GCPs). Point spacing < 100 m from SGZ (inside red polygon) is roughly 30 m, with ~60 m spacing in other areas. The survey base station was located ~1.2 km northwest of SGZ.
Drones 05 00025 g003
Figure 4. Workflow for processing photogrammetry with Agisoft PhotoScan. Blue boxes represent automated and/or computationally intensive steps; green boxes represent manual, user-guided steps; red box synthesizes the approximate total post-processing time per collection.
Drones 05 00025 g004
Figure 5. Products of the computational workflow using field-collected photogrammetric data from UAS. Orthoimages (A,B) and DEMs (C,D) produced using workflow steps 1–10 as listed above. (A,C) DAG-4 pre-experiment conditions. (B,D) DAG-4 post-experiment conditions.
Drones 05 00025 g005
Figure 6. Surface elevation changes resulting from DAG-4, using this study’s method. DEM differencing subtracts the pre-DAG-4 surface from the post-DAG-4 surface. Warmer colors represent uplift; cooler colors represent subsidence. While the craters on the eastern side of the model show uplift, this region and the band of subsidence in between have no GCP constraint, so we have no data to confirm these changes. Values between −2.5 cm and 2.5 cm are not shown.
Drones 05 00025 g006
Figure 7. Examples of discrete changes (cable movement), shown in high-resolution orthoimages and DEMs. All orthoimages have a resolution of 1.5 cm and DEMs have a resolution of 2 cm. (A) Pre-experiment Orthoimage. (B) Post-experiment orthoimage. (C) Hillshade DEM pre-experiment. (D) Same as (C), post-experiment. (E) DEM difference overlaid on the post-experiment orthoimage. Red indicates a positive vertical change (cable moved to location). Blue indicates a negative vertical change (cable moved from location).
Drones 05 00025 g007
Figure 8. Comparative DEM changes between pre-DAG-4 and post-DAG-4 at three different thresholds. Elevation changes with magnitudes less than the value shown are colorless and assumed to be within the noise. Red indicates uplift; blue indicates subsidence. The 5-cm-diameter cable shown in the image was shifted slightly north between pre-DAG-4 and post-DAG-4. (A) The detected change of the cable with a 2 cm cut-off. (B) The detected change of the cable with a 2.5 cm cut-off. (C) The detected change of the cable with a 3 cm cut-off. (D) The detected surface change just north of the cable with a 2 cm cut-off. (E) The detected surface change just north of the cable with a 2.5 cm cut-off. (F) The detected surface change just north of the cable with a 3 cm cut-off.
Drones 05 00025 g008
Figure 9. Example of a broad-area (~50 m width) topographic change between pre-DAG-4 and post-DAG-4. The maximum subsidence shown here is ~7 cm. This highlights discrepancies in observed (surveyed) versus calculated (Agisoft-derived) change values at individual points. One of the larger differences is at the lower left GCP, where the computed model shows 2.5 cm subsidence and the comparison of the GCP’s location from survey data shows 5.4 cm subsidence.
Drones 05 00025 g009
Table 1. Differences in position in centimeters from repeat measurements of the same GCP within a single collection. Some of these were measured with 2 different GPS receivers.
GCP NameΔ Easting (cm)Δ Northing (cm)Δ Elevation (cm)
0e + 11.290.670.97
2a +1.631.412.11
2e +0.540.181.18
4d +1.431.650.25
6d +1.661.811.29
7r0.200.320.60
11c0.290.030.53
post g10.130.280.25
post 3i +1.461.940.98
post 4d +1.661.200.14
post 3h +0.351.730.90
Average0.971.020.84
1 A plus (+) sign denotes that the point was surveyed by different RTK rovers.
Table 2. Root mean square error (RMSE) values for control and check points for DAG-4, as reported by Agisoft.
NameX-Error (cm)Y-Error (cm)Z-Error (cm)XY-Error (cm)Total (cm)
DAG4-Pre Control0.8870.9380.5511.2911.403
DAG4-Pre Check1.4391.0890.9471.8052.038
DAG4-Post Control1.0011.1450.5331.5201.611
DAG4-Post Check1.2871.0981.3911.6132.190
DAG4- All Control0.9441.0410.5421.4061.507
DAG4- All Check1.3631.0931.1691.7092.114
Publisher’s Note: MDPI stays neutral with regard to jurisdictional claims in published maps and institutional affiliations.