Article

Measurement of Cracks in Concrete Bridges by Using Unmanned Aerial Vehicles and Image Registration

1
Department of Civil and Environmental Engineering, Imperial College London, London SW7 2AZ, UK
2
Center for Space and Remote Sensing Research, National Central University, No. 300, Jhongda Rd, Jhongli District, Taoyuan City 32001, Taiwan
3
Department of Civil Engineering, National Central University, No. 300, Jhongda Rd, Jhongli District, Taoyuan City 32001, Taiwan
*
Author to whom correspondence should be addressed.
Drones 2023, 7(6), 342; https://doi.org/10.3390/drones7060342
Submission received: 6 April 2023 / Revised: 19 May 2023 / Accepted: 23 May 2023 / Published: 25 May 2023

Abstract

:
Crack development is a clear indicator of the durability of concrete bridges. Traditional bridge inspections that rely inspectors to climb on bridges with lift cars are unsafe for inspectors and also time- and labor-consuming. Therefore, this research proposes a solution that applies unmanned aerial vehicles (UAV) and high-resolution digital cameras to measure concrete bridge cracks. An experiment was conducted on an Ai-He concrete bridge located in Yangmei District, Taoyuan City, Taiwan. Two types of images were taken. Close-up images observed cracks more clearly, and long-range images covered the ground control points. We registered these two types of images to establish the absolute coordinate system with ground control points and tie points through block triangulation. This research examines three approaches of generating tie points: (1) manually select tie points with features on the bridge such as nails and dots, (2) randomly input tie points generated from Scale-Invariant Feature Transform (SIFT), and (3) randomly input tie points generated from SIFT as the initial tie points and perform automatic tie generation with the ERDAS Leica Photogrammetry Suite (LPS) image matching module (automatic tie generation). Afterwards, close-up images were processed into orthorectified images with 0.1 mm pixel size for crack size measurements. Crack sizes were determined by a manual measurement approach and an inflection point approach for comparison. This research established a workflow for UAV bridge inspection that locates and measures cracks in concrete bridges, which consequently provides a safe and cost-efficient concrete bridge crack monitoring solution with acceptable accuracies.

1. Introduction

1.1. Background

Numerous natural disasters, such as earthquakes and typhoons, can cause continuous and gradual damages to infrastructures. Meanwhile, concrete bridges carrying heavy traffic every day suffer fatigue stress and cyclic loading, which create cracks on the concrete surface [1] that can consequently result in potential concrete failure. Thus, among the bridge inspection items, crack inspection has been listed as an important indicator to evaluate the damage level of bridges. For example, the regulation in Taiwan defines that any infrastructures with crack widths over 0.2 mm are at high risk and require immediate maintenance [2]. On the other hand, ref. [3] indicates the maximum tolerable crack widths in different exposure conditions, as shown in Table 1, for infrastructures with stable service loading. Furthermore, beams with cracks in widths wider than 0.012 in should be repaired immediately and the method of maintenance depends on the size of the crack width, as shown in Table 2 [4].
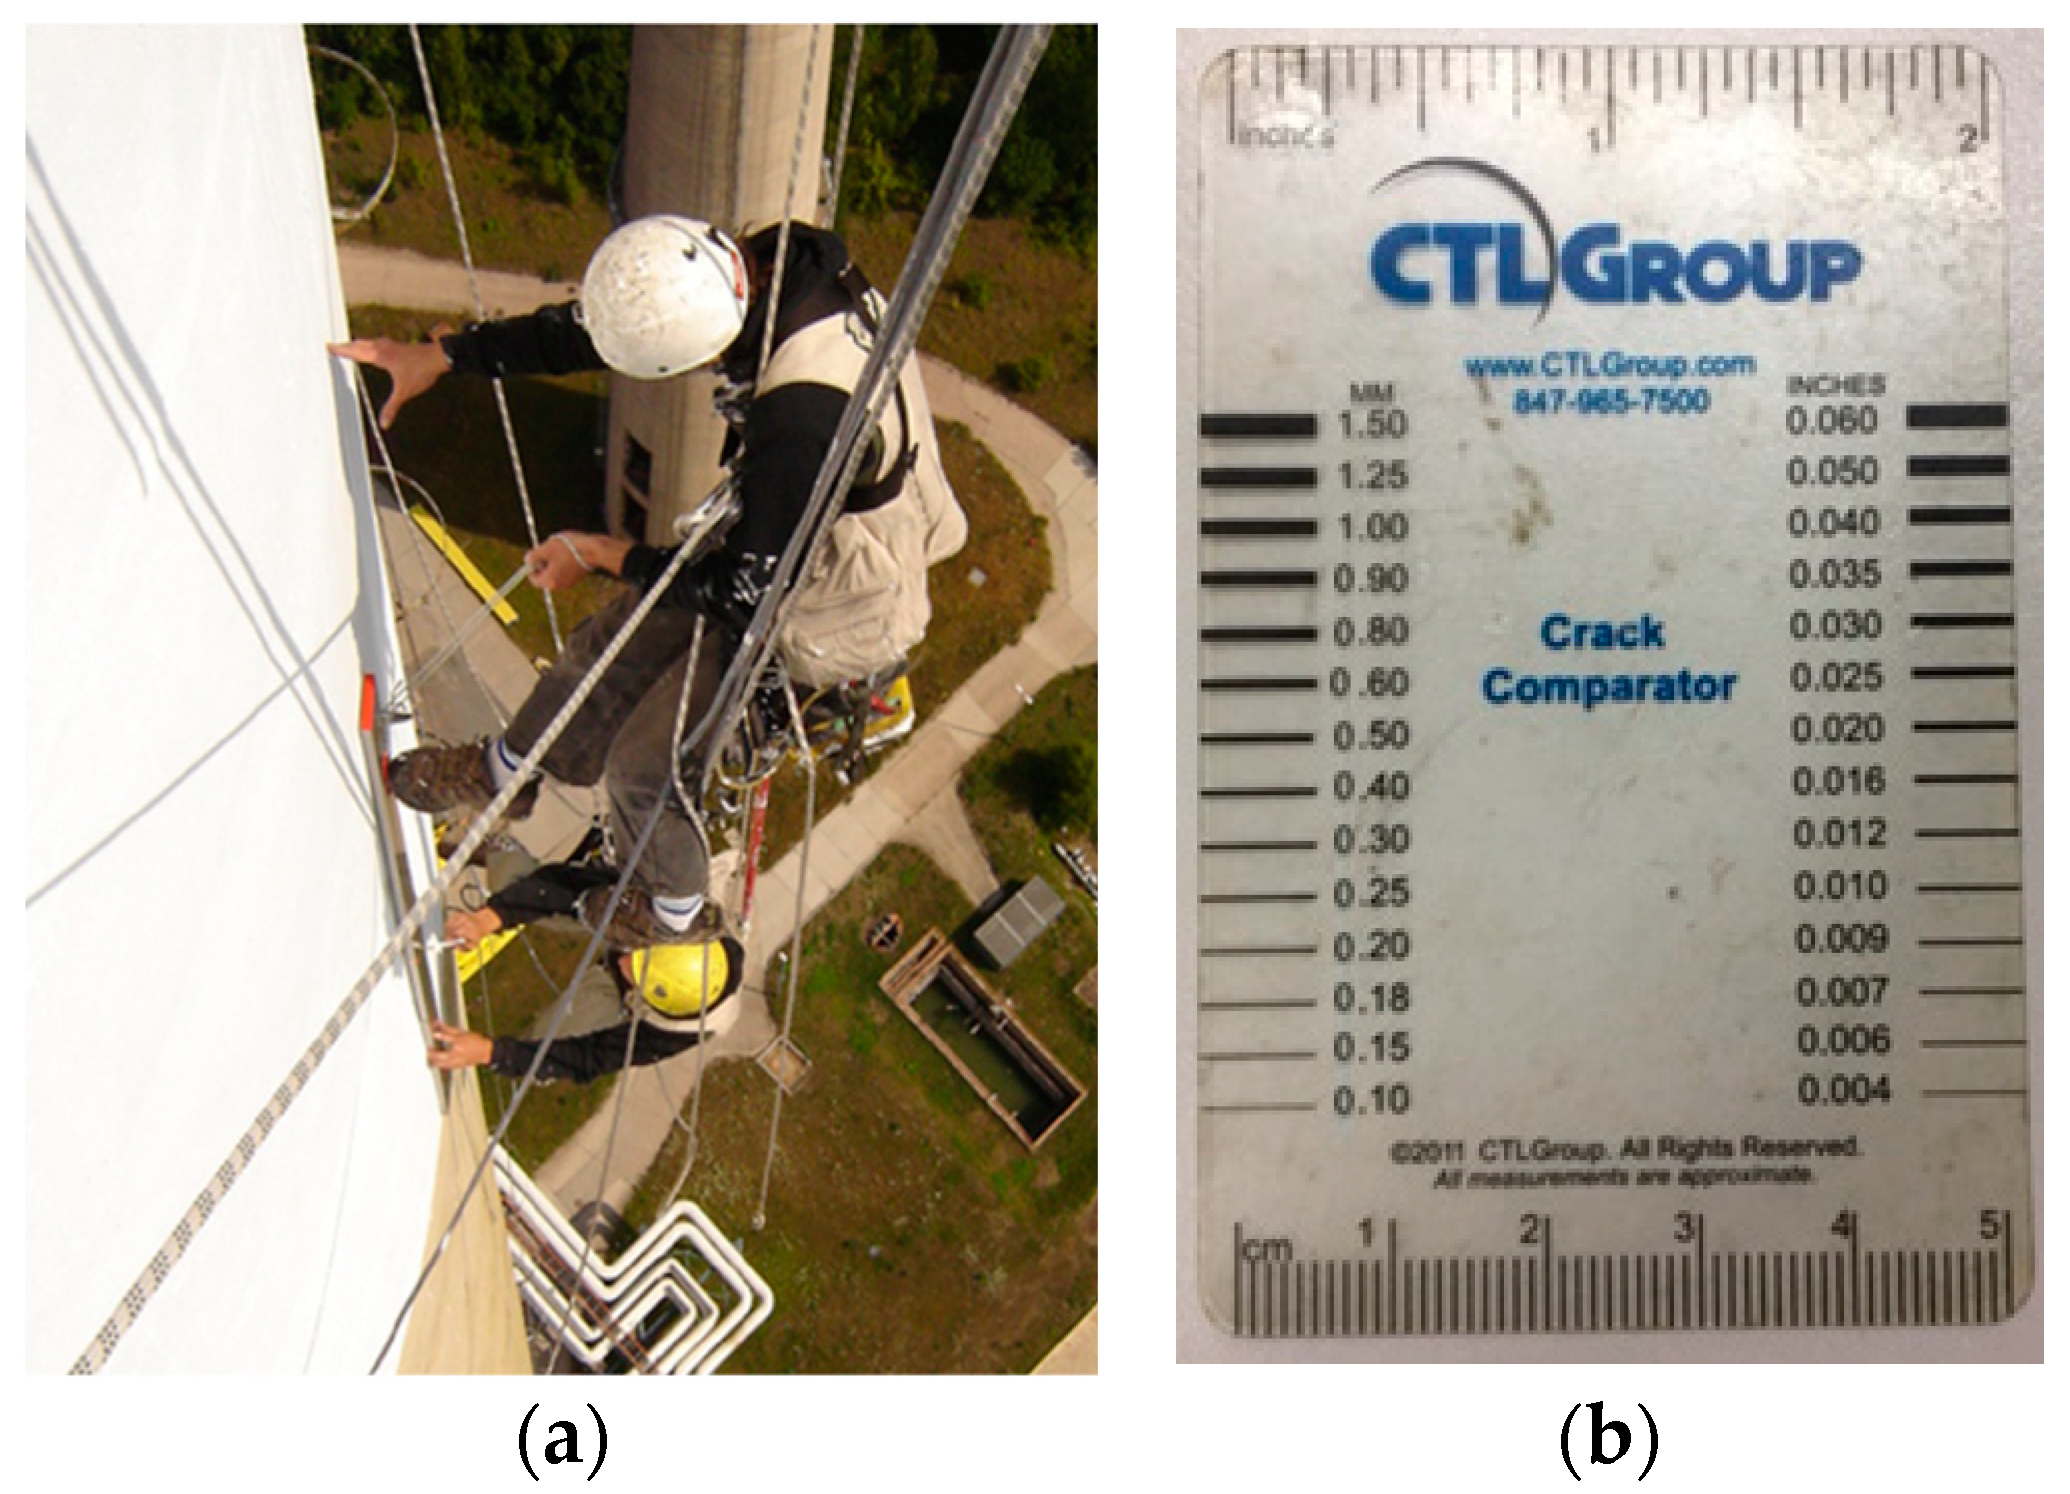
In the past decades, well-trained inspectors have climbed on bridges with ladders or cables to measure cracks with crack scalars, as shown in Figure 1. Since cracks can be everywhere over a bridge and some regions are unreachable with ladders, inspectors usually need to be carried by scaffoldings or robotic arms. In order to ensure the safety of inspectors, refs. [5,6] designed robotic arms to detect cracks on bridges with high-resolution digital cameras. During their experiment, they measured the distance between bridges and cameras to establish image scales for the calculation of actual crack sizes.
However, considering the high cost of robotic arms [7], using unmanned aerial vehicles (UAV) with high-resolution cameras could be a feasible alternative for bridge inspections [8]. Applying UAVs to bridge inspections can reduce the high expense from traditional inspections and could easily access more regions of a bridge [9].
Figure 1. (a) Inspectors climbing on the bridge [10], and (b) a crack scalar for crack width measurements.
Drones 07 00342 g001

1.2. Concrete Bridge Crack Inspection with UAV

In recent years, using UAVs has become an alternative solution for bridge inspections, which is safe for inspectors, can reach different places of a bridge easily and efficiently, and avoids the high cost of robotic arms. Ref. [11] proposed a method to inspect extensive infrastructures in an efficient way with digital images retrieved from a UAV. Since cracks along concrete edges and corners were excessively detected, a new strategy combining the hat transform and HSV thresholding techniques was proposed to achieve detection with good accuracy. Ref. [12] proposed structure health monitoring with a three-dimensional model of infrastructures generated from Lidar and image data. Moreover, an infrared sensor was mounted on the UAV to detect cracks in infrastructures with thermal changes. However, these two proposed solutions can only detect cracks but not measure the actual sizes, as the image scales are unknown.
Ref. [13] proposed a hybrid method for crack detection in bridges with a self-designed UAV. A camera module (LS-20150) and an ultrasonic displacement sensor (HC-SR04) were mounted on the UAV to provide digital images and corresponding distances-to-target to determine the actual image scales. To solve the problem of overestimating crack widths or losing the information of crack lengths, this research applied a hybrid approach employing two sets of binarization parameters with Sauvola’s method [14]. After calculation and adjustment, the sizes of the cracks could be determined. However, in this research, to determine the actual crack sizes, the UAV camera needed to continuously take vertical photos on bridge surfaces during the flight to avoid the errors caused by the inclination of the camera, which was a very challenging task.
In close-range photogrammetry, it is able to establish a scale between object and image space with the collinear condition equation and exterior orientation parameters (EOPs) of the digital camera. During the UAV flight mission, UAV onboard GPS sensors provide approximate coordinates of drones or cameras [15]. However, when onboard, GPS sensors are not precise and accurate enough for engineering applications [16]. Furthermore, GNSS signals are easily interfered with by transmission lines, telecommunication towers, high relief, or nearby buildings, as well as natural factors such as wind, solar weather, or electromagnetic waves [17]. In this case, the EOPs of the UAV images measured by onboard GPS sensors cannot achieve accurate georeferencing. Thus, in order to measure the sizes of small targets such as cracks from UAV images, suitable orientation modeling is required to address this issue.
In this case, ref. [18] proposed a method that utilized SONY α7R2 with a 50 mm fixed focal length mounted on a UAV, and the exterior orientation parameters and camera calibration coefficients were derived with Agisoft PhotoscanPro software. Afterwards, the authors utilized object-based image analysis (OBIA) [19,20] to classify object features for distinguishing the crack and non-crack areas with predefined rules. In order to detect cracks with three-dimensional coordinates, the authors applied semi-global matching (SGM) [21] to find the conjugate points and conduct space intersection. The author found out the main concrete spalling area with the elevation model and also provided spatial information, including the main direction, length, width, area, and volume, to eliminate the extra parts of cracks and the effect of salt-and-pepper noise. However, the analysis of the measurement accuracy was not provided, and just one specific case was given in this research.
With the development in computer vision and the optimization of machine learning (ML) and deep learning (DL) models, cracks can be detected through high-resolution images and videos. Spatially Tuned RobUst Multi-feature (STRUM) contains three types of ML classifiers, including support vector machines (SVM), adaboost, and random forest, with a robust line segment detector and spatially tuned multiple feature computation. The proposed method could automatically detect cracks on concrete bridges with 90% accuracy based on thousands of crack images, and the concept of a crack density map was provided in this research [22]. The accuracy achieved 96.37% for crack detection, with the image classification model consisting of Atrous convolution, the Atrous Spatial Pyramid Pooling (ASPP) module, and depth-wise separable convolution based on two convolution neural networks (CNN). The model was tested with 2068 bridge crack images collected by the Phantom 4 Pro’s CMOS surface array camera at a resolution of 1024 × 1024. The crack database was published as an open source to promote the development of crack detection algorithms for future research [23]. Two other concrete crack datasets, Concrete Crack Images for Classification (CCIC) [24] and SDNET 2018 [25], are widely applied in training and testing crack detection algorithms, which are composed of benchmarks with cracked and non-cracked images in various conditions. With SDNET, the studies provided a crack region map by CNN and image stitching [26] and developed the 1D-CNN-LSTM method approaching 99.05%, 98.90%, and 99.25% accuracy, respectively, on the training, validation, and testing datasets [27]. The proposed method trained and tested with CCIC and SDNET and a supplementary dataset from the researchers reached 99.24% accuracy for concrete crack detection. The method combined with the InceptionResnet-v2 module, multi-scale feature fusion method, and GKA clustering (K-means clustering method based on a genetic algorithm) without pretraining [28]. You Only Look Once (YOLO) version 4 was applied in concrete bridge crack detection with videos to reduce the storage and improve the computational speed [29]. These studies proposed various ML and DL models with different datasets with high accuracy. However, the models were not yet applied in a real-world bridge inspection. Furthermore, the sizes and locations of the cracks on the bridges that influenced the bridge inspection assessments were not considered in these studies.

1.3. Research Objective

A workflow for UAV bridge inspection with concrete crack positioning and size measurements is proposed in this research. To ensure the proposed method can be applied in real-world scenarios, bridge inspection fieldwork was conducted in this research. A control survey was involved to establish the 3D absolute coordinates. The proposed solution provides a safer and more efficient concrete crack inspection with lower expenses and acceptable accuracy.

2. Methodology

2.1. Workflow

As shown in Figure 2, since the UAV mounts a nonmetric camera, we need to calibrate the camera to reduce the errors from the principal point displacements and lens distortions. Afterwards, we take close-up and long-range images on the cracks and the targeted bridge. As the absolute coordinate system can be constructed through control points covered by long-range images, we register close-up images to long-range images to obtain the absolute coordinates of each pixel in the images and resample the images to ortho-images. With close-up ortho-images, manual measurement and an inflection point approach are applied in the crack size measurements. Finally, the measured crack sizes are validated with in situ reference measurements from surveyors.

2.2. Camera Calibration

In order to eliminate image distortions, as shown in Figure 3, camera calibration is required. The high-resolution nonmetric prime lens camera mounted on the UAV changes the image scopes with digital zooms, which does not change the actual focal lengths. Since taken images from larger digital zooms do not improve the resolution, in our research, we only apply the original resolution (i.e., 1×) images and derive the interior orientation parameters (IOPs) through iWitnessPROTM.
iWitnessPROTM can automatically detect features [30] and uses ten parameters for image coordinate correction functions. The calibration parameters, as the functions show below, include the principal points ( x p and y p ); the distance between image coordinates and principal points r; the radial distortion parameters K 1 , K 2 , and   K 3 ; the decentering distortion parameters P 1 and P 2 ; and the affine distortion parameters B 1 and B 2 [31].
x ¯ = x x p
y ¯ = y y p
r = x ¯ 2 + y ¯ 2  
dr = K 1 r 3 + K 2 r 5 + K 3 r 7  
x c = x ¯ + x ¯ d r r + P 1 ( r 2 + 2 x ¯ 2 ) + 2 P 2 x ¯ y ¯ + B 1 x ¯ + B 2 y ¯  
y c = y ¯ + y ¯ d r r + P 2 ( r 2 + 2 y ¯ 2 ) + 2 P 1 x ¯ y ¯  
where x ¯ and y ¯ are the distance between the image coordinates and principal points in two-dimensions, r is the distance between the image coordinates and principal points, dr is the symmetrical distortion, and ( x c , y c ) is the image coordinates of the principal point after corrections.
In order to achieve ten parameters, we set the calibration board to different heights on a flat plane, as shown in Figure 4, and take images with 1× digital zoom with different rotations and orientations. Next, we input those images into iWitnessPROTM to calculate the parameters through self-bundle adjustment [31]. Self-bundle adjustment is a set of collinearity condition equations with corrections, as shown in the equations below, which requires multiple overlapped images with normalized features to calculate the exterior parameters and object space coordinates by adjusting the parameters in the functions through an iterative process until convergence.
x a = δ x f m 11 ( X A X 0 ) + m 12 ( Y A Y 0 ) + m 13 ( Z A Z 0 ) m 31 ( X A X 0 ) + m 32 ( Y A Y 0 ) + m 33 ( Z A Z 0 ) + Δ x
y a = δ y f m 21 ( X A X 0 ) + m 22 ( Y A Y 0 ) + m 23 ( Z A Z 0 ) m 31 ( X A X 0 ) + m 32 ( Y A Y 0 ) + m 33 ( Z A Z 0 ) + Δ y
where ( x a , y a ) is an image coordinate, ( δ x , δ y ) is the principal point displacement, f is the focal length, m 11 to m 33 is the rotation matrix, ( X A , Y A , Z A ) is an object space coordinate, ( X 0 , Y 0 , Z 0 ) is the coordinates of the perspective center, and Δx and Δy are the lens distortions.

2.3. Image Taking

In the experiment, we take images of the cracks in Ai-He Bridge, a concrete bridge in Yangmei District, Taoyuan City, Taiwan. We find some features on the bridge such as nails or dots to serve as control points and check points. For image-taking, there are four requirements:
(1)
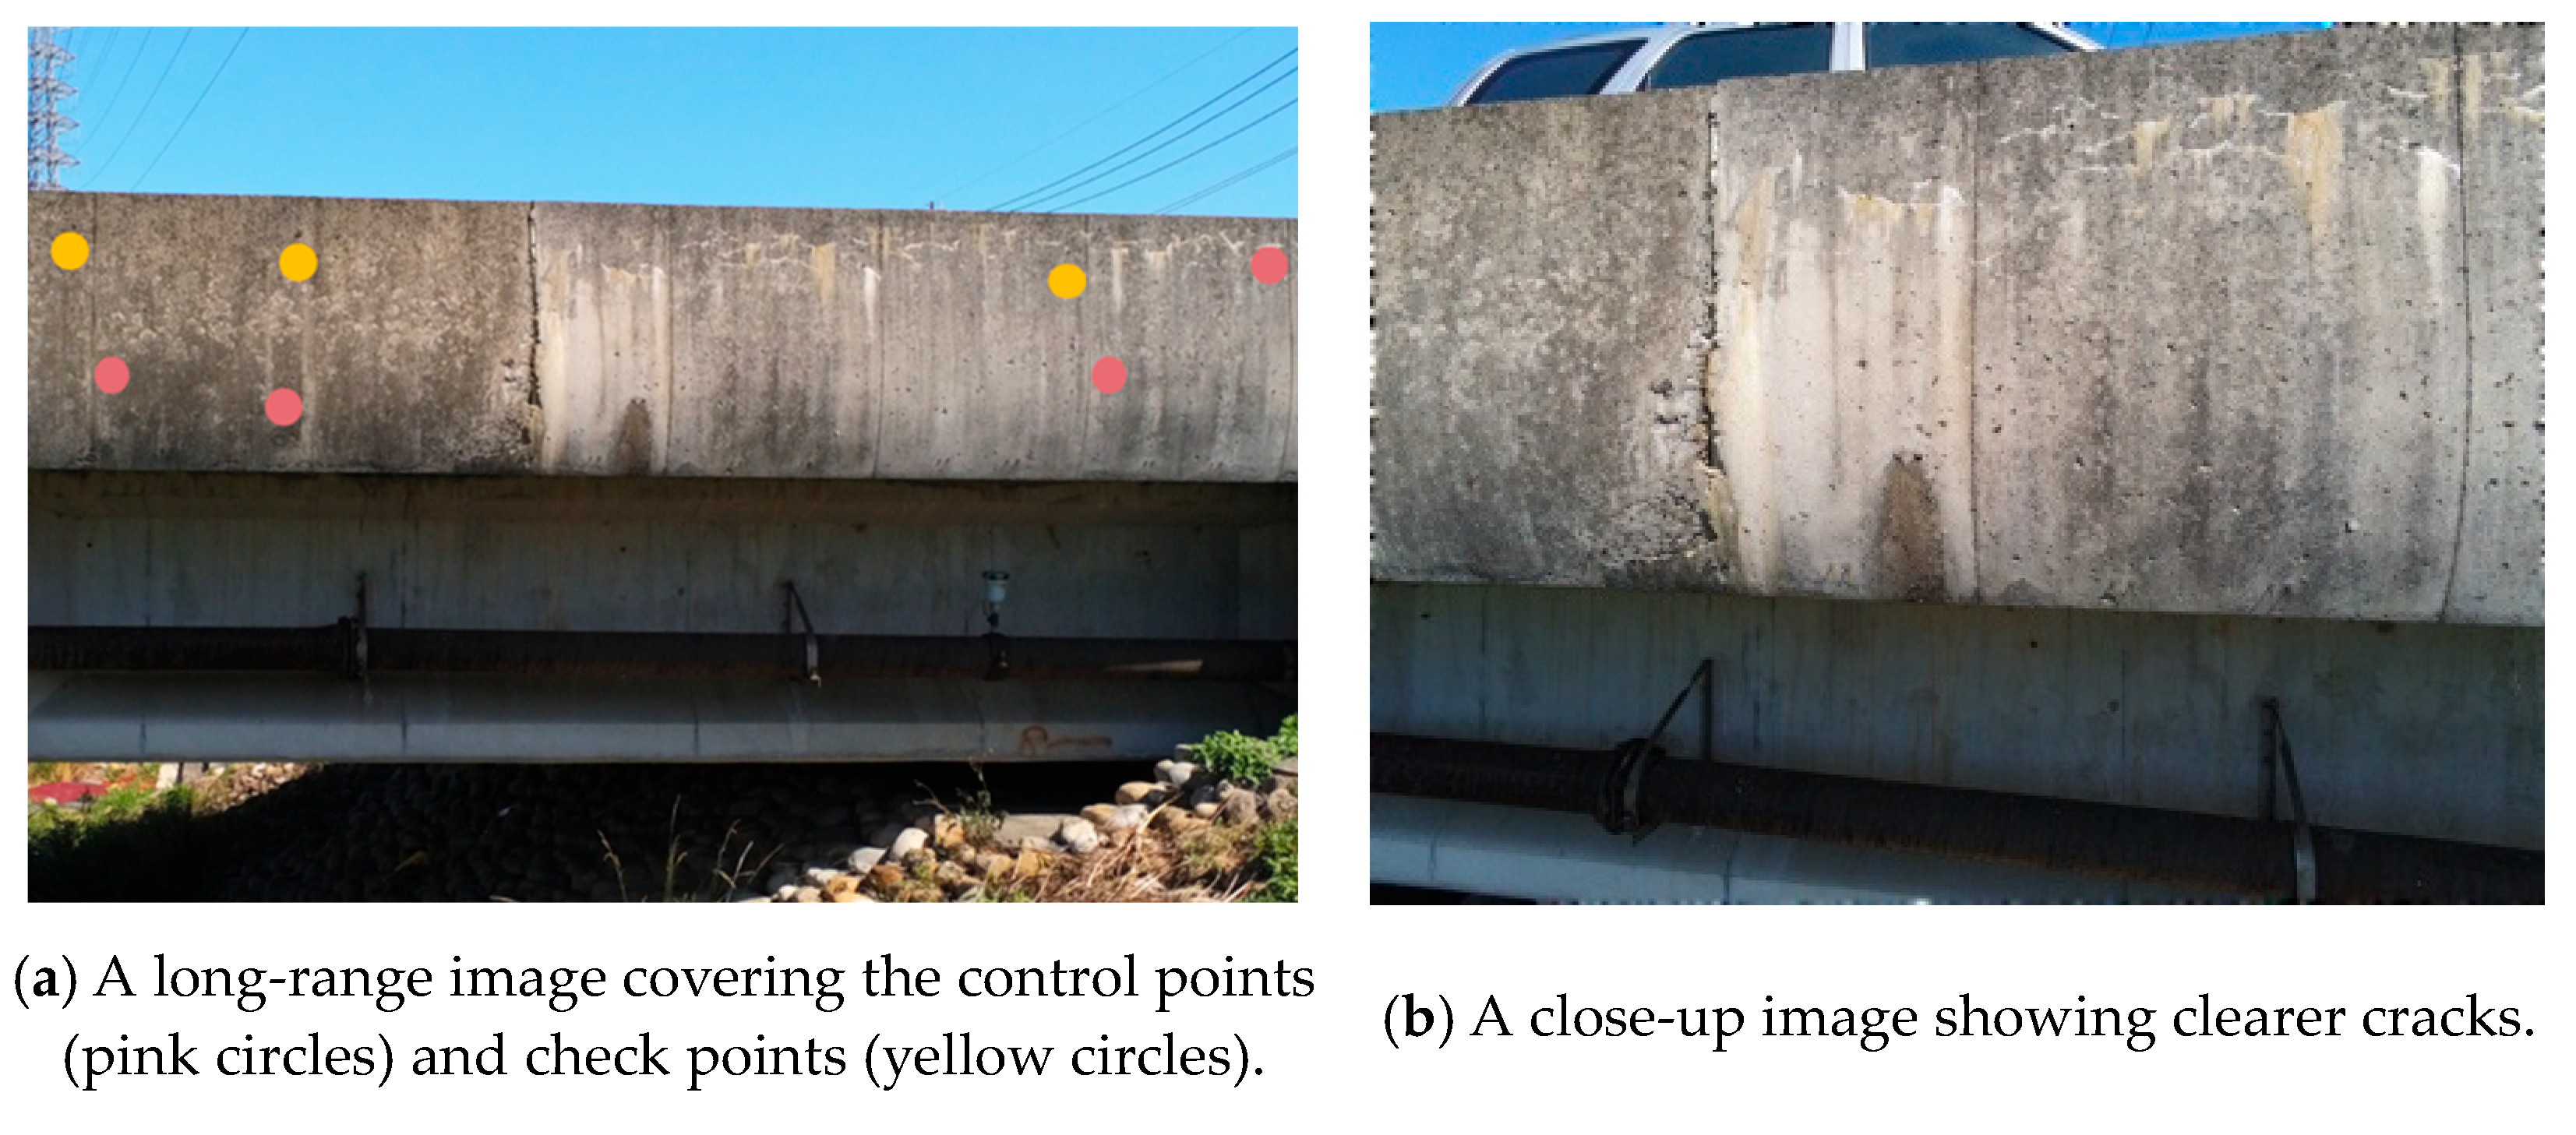
For long-range images, there should be at least three control points included to establish the absolute coordinate system, as shown in Figure 5a.
(2)
In order to clearly identify cracks and measure crack widths precisely, close-up images are taken, as shown in Figure 5b.
(3)
Image registrations are required to register close-up images to the absolute coordinate system via long-range images; thus we must ensure the sufficiency of overlapped regions between close-up images and long-range images.
(4)
Considering the flight safety, at least 1-m distance between the UAV and the bridge is suggested while taking images. To avoid crashes with obstacles, the images are taken from different orientations.

2.4. Image Orientation and Registration

Long-range and close-up concrete crack images are taken during this research. To establish the absolute coordinate system, 4 control points and 5 check points in the long-range images are applied, which are measured by the total stations with the free station measuring method, as shown in Figure 6. The close-up images and long-range images are registered through ERDAS Leica Photogrammetry Suite (LPS) block triangulation to fit all images to the absolute coordinate system.

2.4.1. Scale-Invariant Feature Transform (SIFT)

SIFT is published by Lowe in 2004, which includes four steps: scale-space extrema detection, keypoint localization, orientation assignment, and keypoint descriptor. In scale-space extrema detection, an image pyramid is built through Laplace Transform that can reduce the ambiguity among images. An image is divided into fourths in every octave to ensure the features can be extracted from images on different scales. Next, the extrema are selected among different octaves in the difference of Gaussian scale space as keypoints for registering images with different scales.
In the stage of keypoint localization, the features are accurately localized with the calculation of Taylor expansion of the scale-space function, D ( x ) , as shown in Equation (9). The 0.5 offset x ^ in Equation (10) is set to eliminate the features that lie too close together. The function D ( x ^ ) in Equation (11) is useful for rejecting instable extrema with a low contrast, where, if D ( x ^ ) is less than 0.03, it will be discarded. The Hessian matrix, as shown in Equation (12), is also applied at this stage in order to eliminate small amounts of noises due to the poorly determined keypoint locations on the edges.
D ( x ) = D + D x x + 1 2 x T 2 D x 2 x
x ^ = 2 D 1 x 2 D x  
D ( x ^ ) = D + 1 2 D T x x ^
H = [ D x x D x y D x y D y y ]  
To achieve rotation invariance, by assigning consistent orientation at each keypoint on the image patch, ref. [32] used neighborhood gray value gradients as the orientation parameters and set the keypoint as the center for resampling. The image patch was accumulated into the histogram of the gradient orientation with the range 0 to 360 degrees and 10 degrees as a unit, where the peak among the 36 columns represented the dominant direction.
For the keypoint descriptor, the information from the previous stages are described as vectors to maintain invariance of the orientation, reduce noises from the calculations, and improve the precision of feature matching. To be specific, this research creates a keypoint-centered 16 × 16 moving window in a scale, and the arrow shows the gradient orientation of each pixel. Afterwards, the 16 × 16 moving window is divided into 16 (4 × 4) subregions, which means every subregion includes 8 orientation bins and turns out 128 (16 × 8) elements in total for each keypoint.

2.4.2. Automatic tie Point Generation in LPS

Automatic tie point generation in LPS can be divided into three steps with three different image-matching methods: area-based matching, feature-based matching, and relation-based matching [33].
Area-based matching determines the correspondence between two image areas according to the similarity of their gray level values. Cross-correlation and least square correlation are involved in this matching method. Cross-correlation calculates the correlation coefficient of the gray values between a moving window and a target window. Least square correlation derives the transformation parameters that best fit a search window to a target window.
Feature-based matching determines the correspondence between two image features and recognizes the best fit features as matches after the features are extracted from the Förstner interest operator. The Förstner interest operator requires distinct initial selected points that should be easily distinguished locally for selecting the optimal window to generate tie points between two images [34].
Larger features composed of many local features rely on relation-based matching for image registration [35]. Relation-based matching is also called structural matching, which establishes a correspondence from the primitives of one structural description to the primitives of a second structural description. This technique not only uses image features but also automatically selects features through image structures, which determines the correspondence of geometrical or topological relations [36].

2.5. Orthorectification

Orthorectification computes the geographic locations of each pixel on the ground [37], which is a process of reducing geometric errors inherent within the perspective photography and imagery. The input parameters include the UAV imagery, interior orientation parameters from the camera calibrations, and a digital elevation model (DEM) and exterior orientation parameters retrieved from block triangulation [38]. Through block triangulation, the least square adjustment techniques minimize the errors associated with camera instability and topographic relief displacement.
In this research, both the DEM of the bridge and the exterior parameters are retrieved from block triangulation. The relief displacements for curved surfaces of the bridge can also be corrected with the DEM.

2.6. Crack Width Measurement

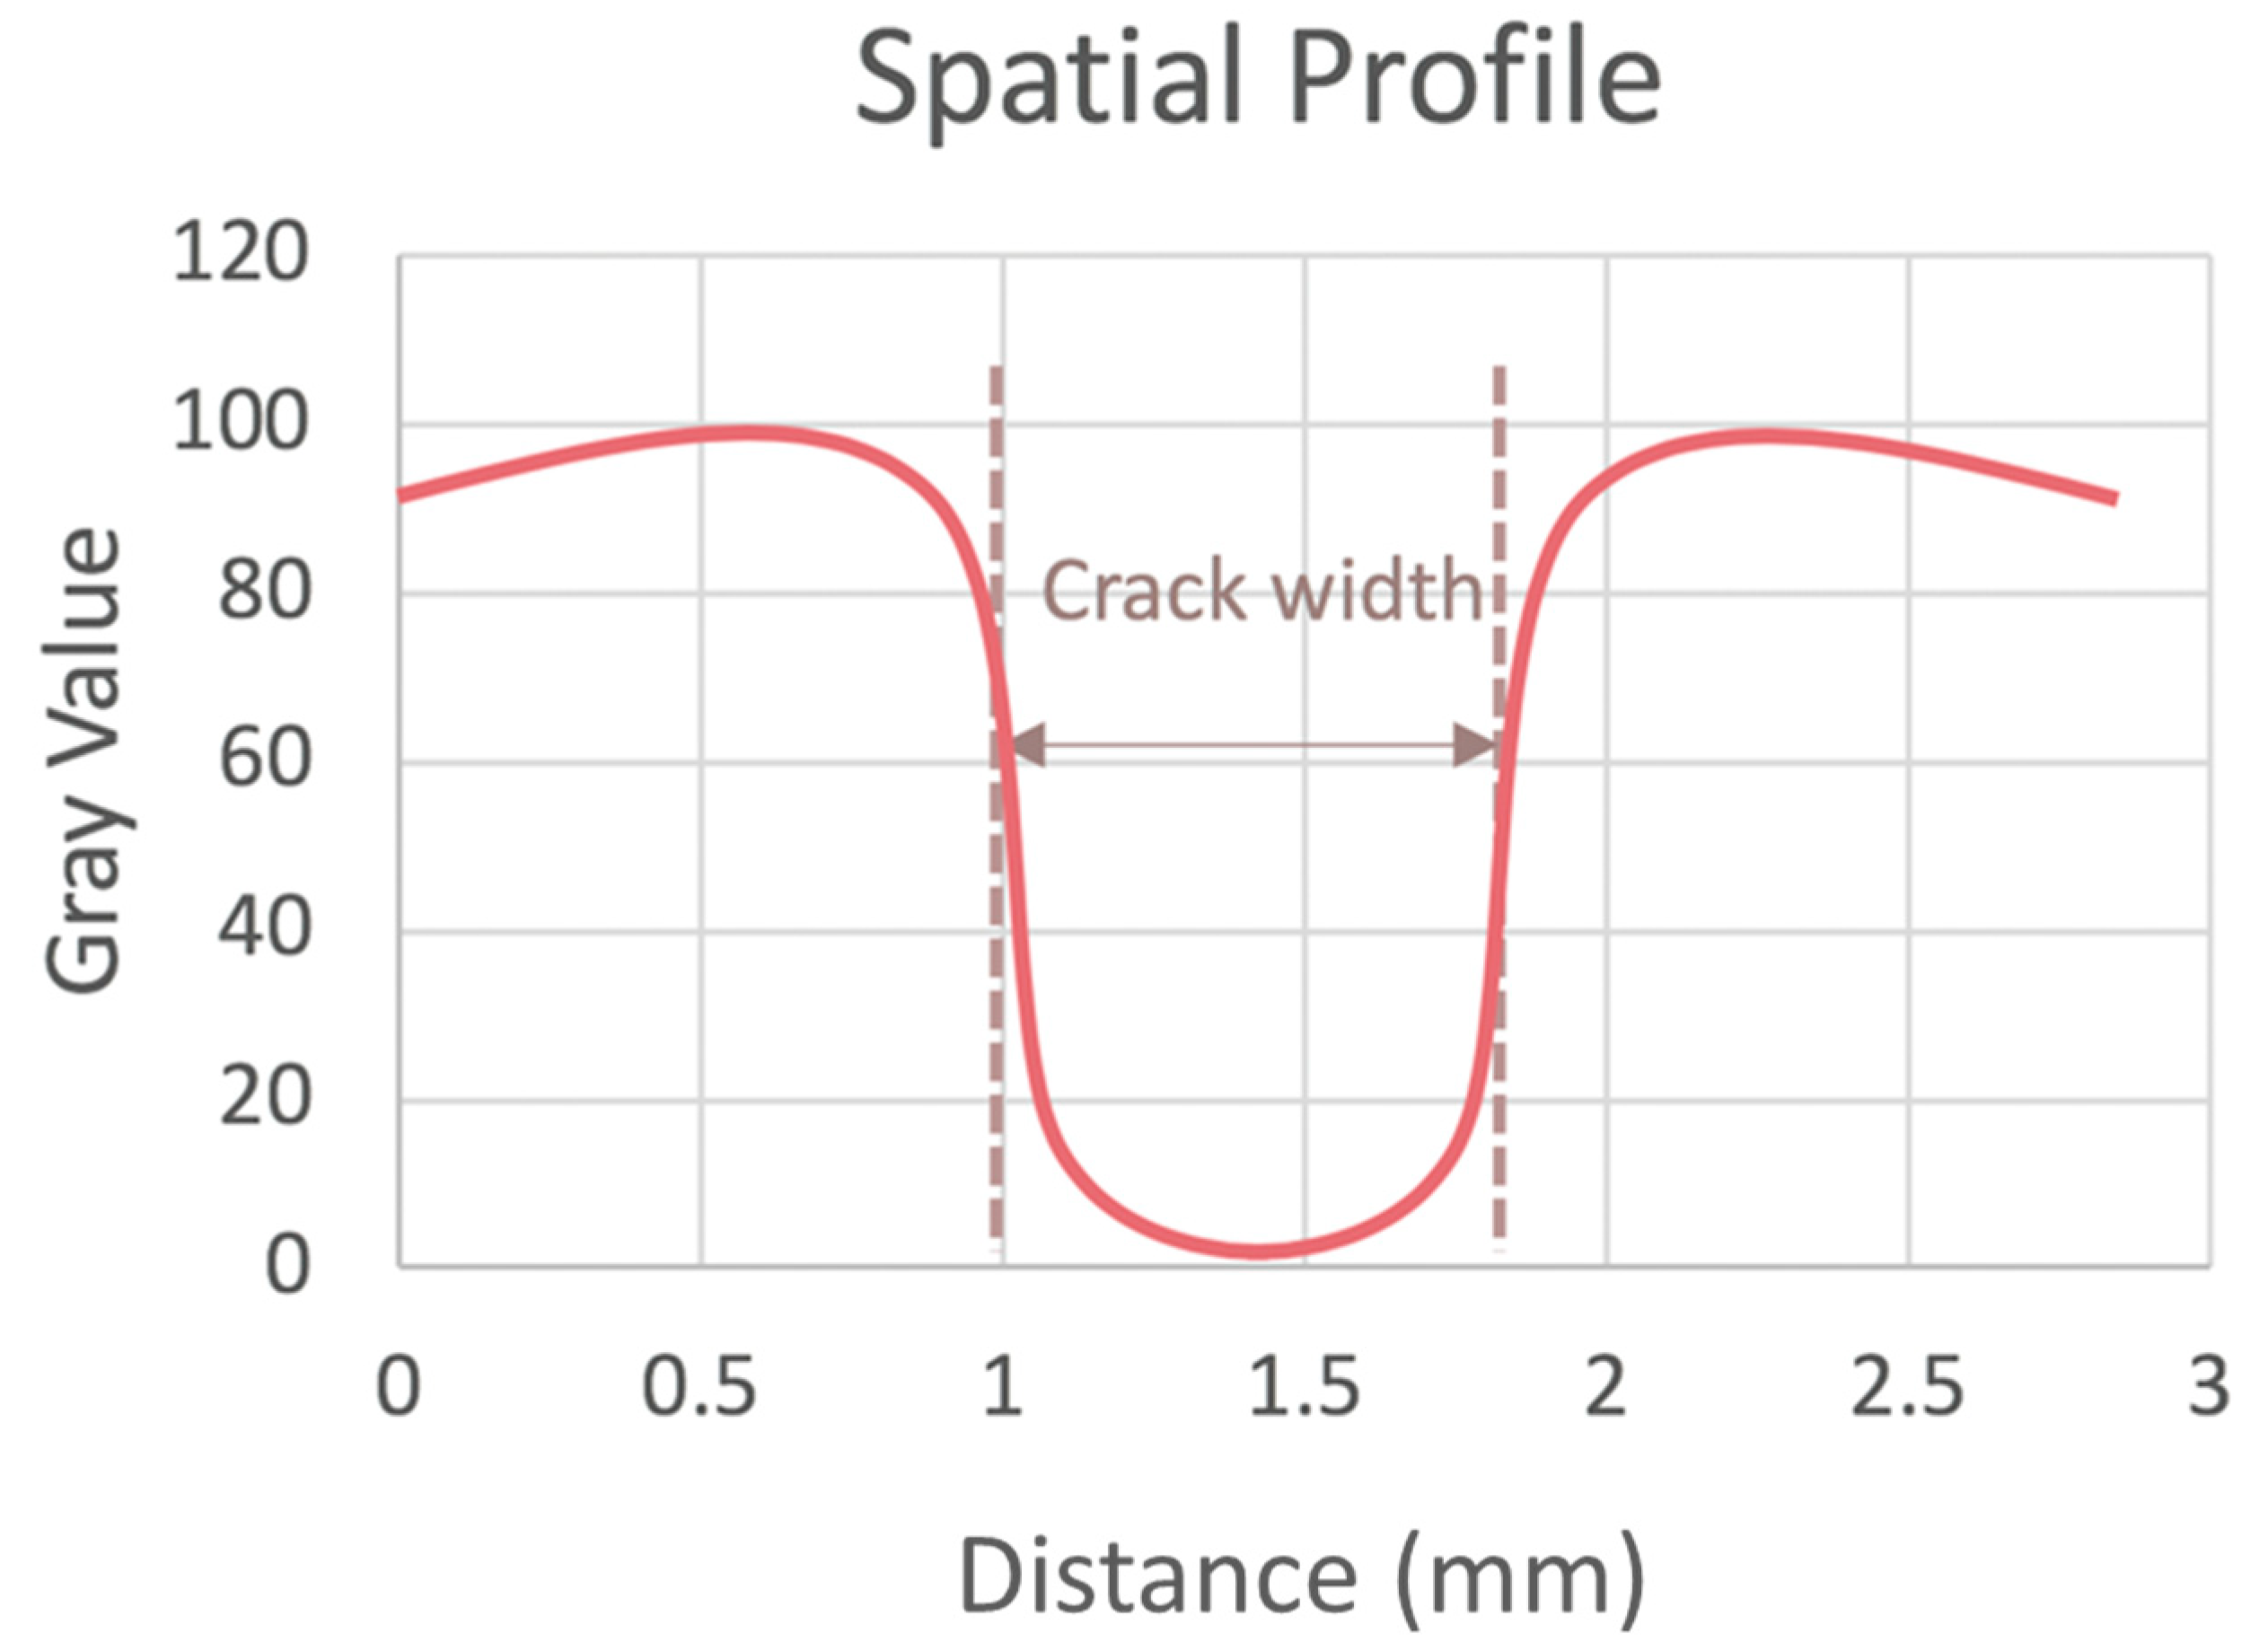
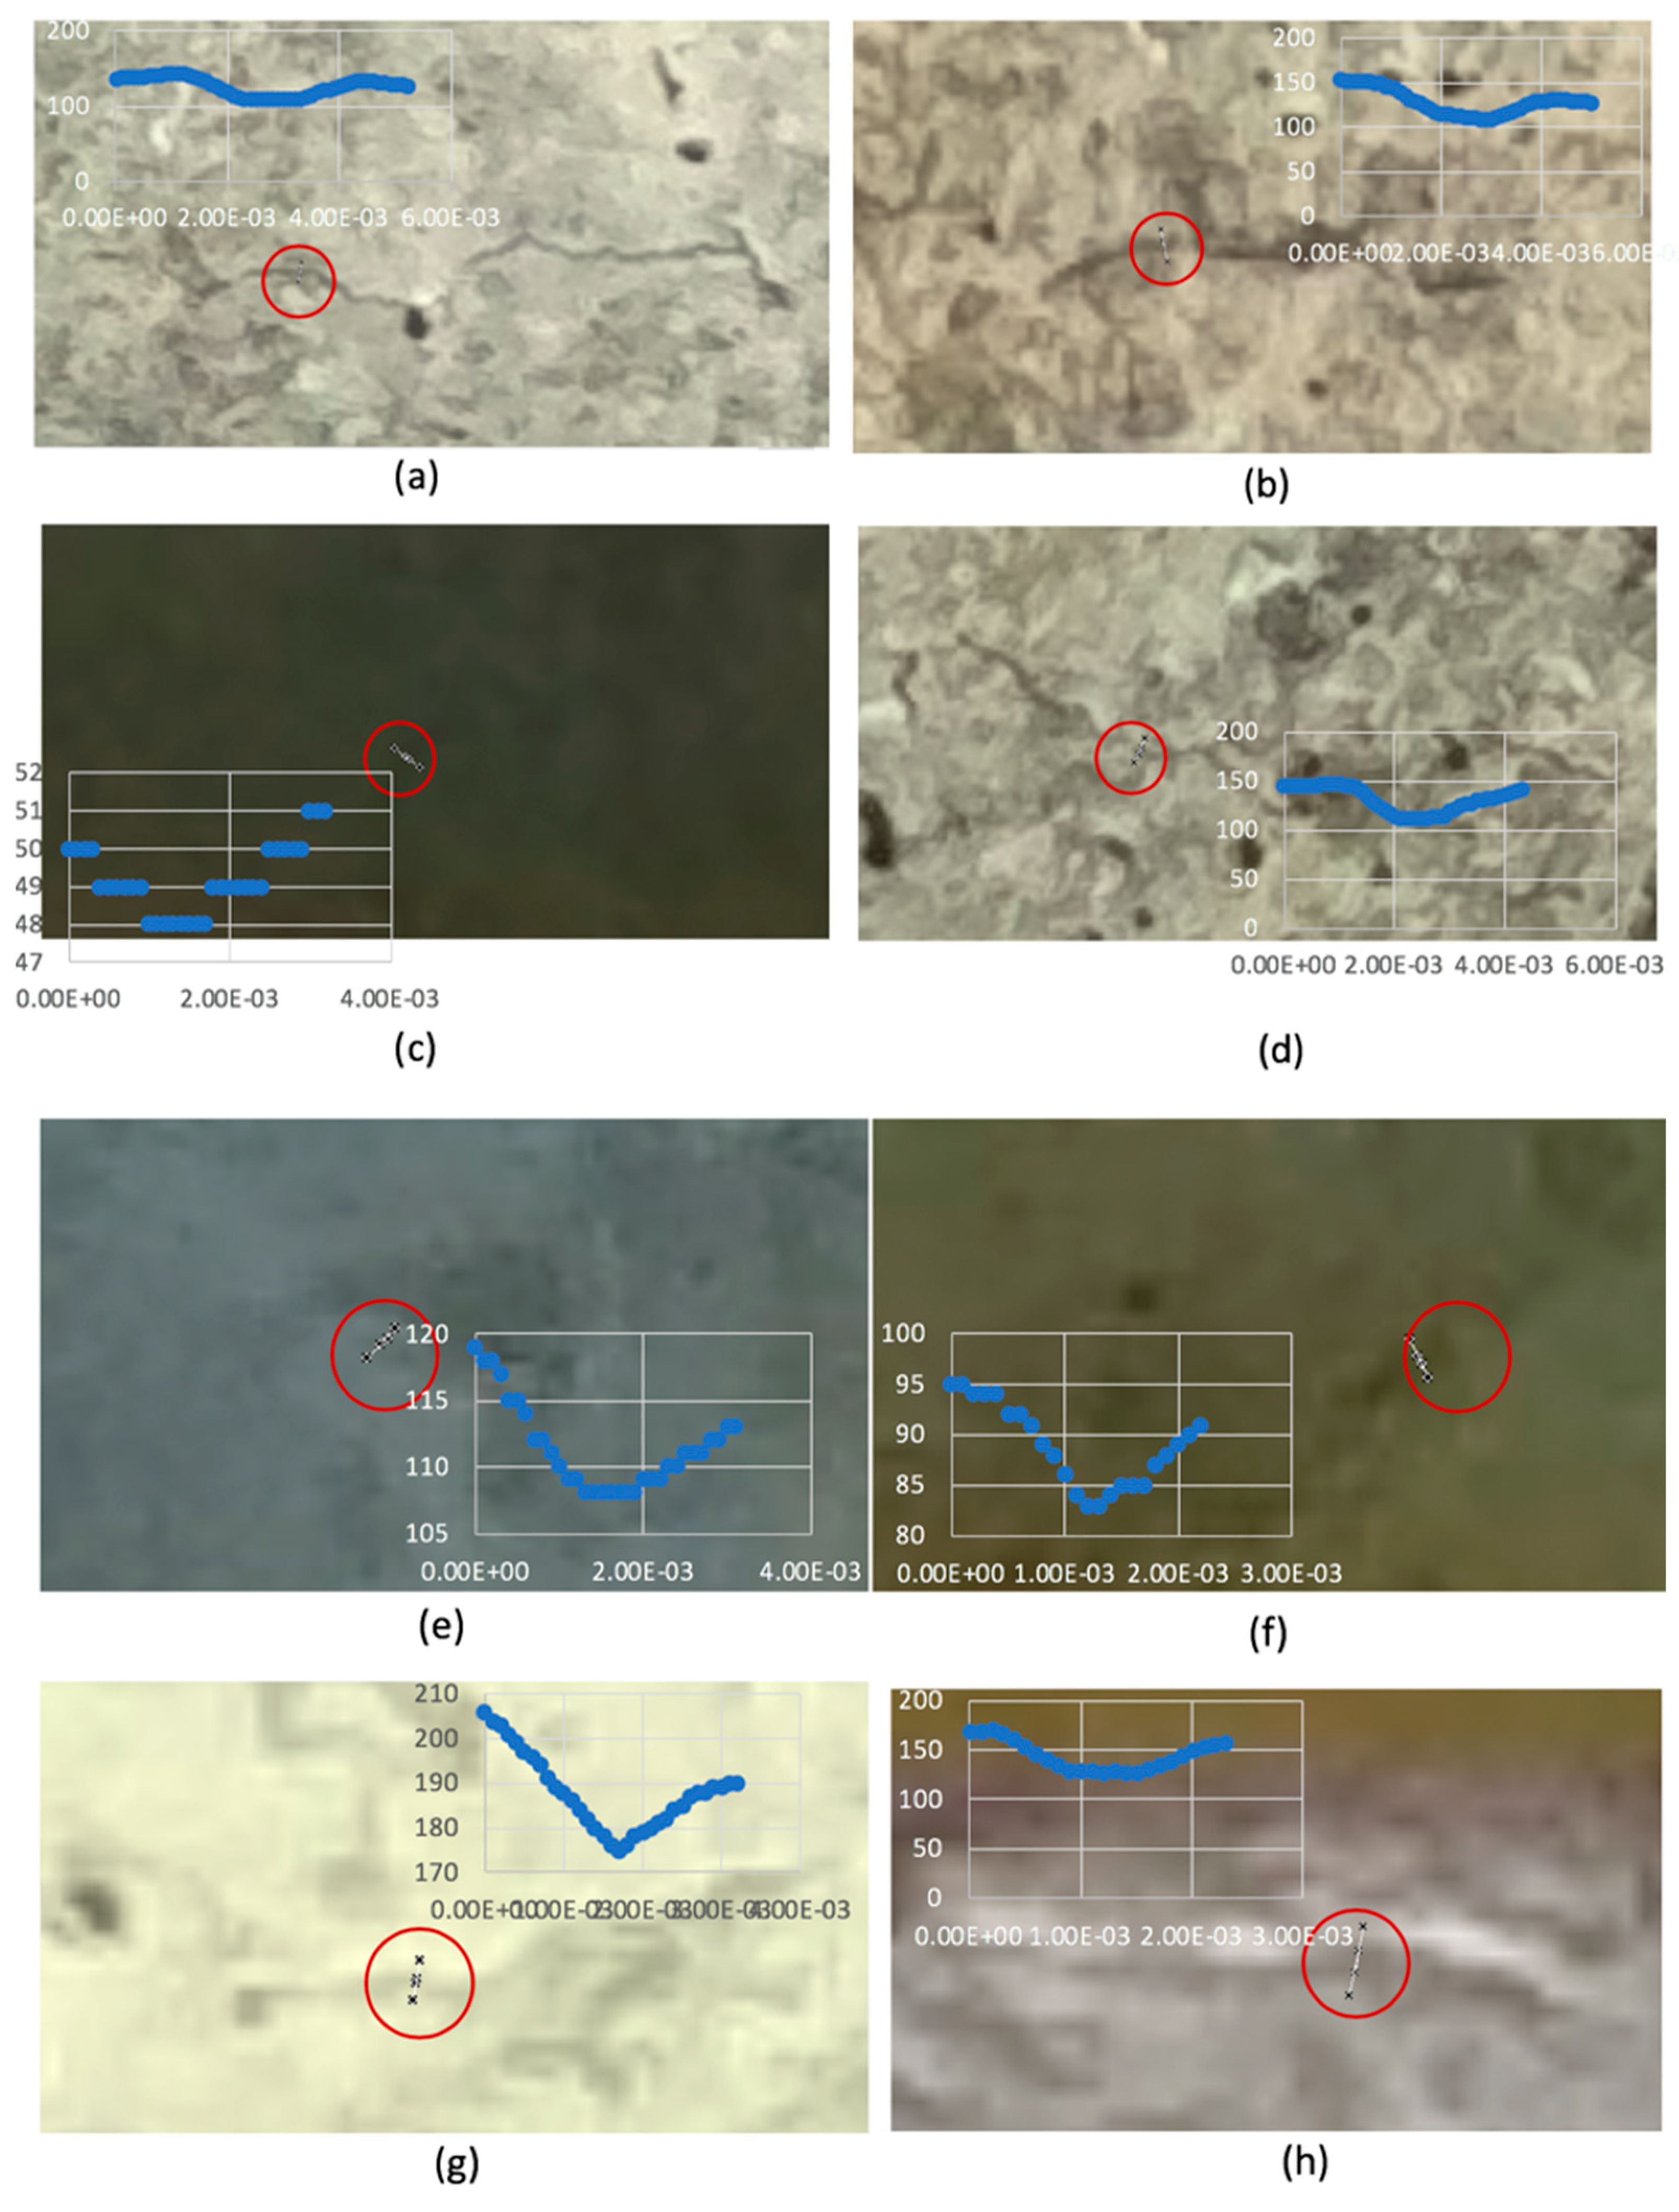
To measure crack widths, we first identify cracks and their locations through the ortho-images generated from LPS and manually select the tangent line and normal line on the same section of a crack. Afterwards, we measure crack widths with two approaches: (1) We identify the edges of a crack manually and apply the measurement tool in ERDAS IMAGINE 2013 image processing software to determine the distance between the edges as the crack width. (2) We draw a normal line on the selected sections of cracks with a spatial profile tool to retrieve the gray value profile for the selected section of the crack, as shown in Figure 7. Afterwards, we identify inflection points from the gray value profile as the edges of cracks, and the number of pixels between two inflection points is converted into the crack width.

3. Results

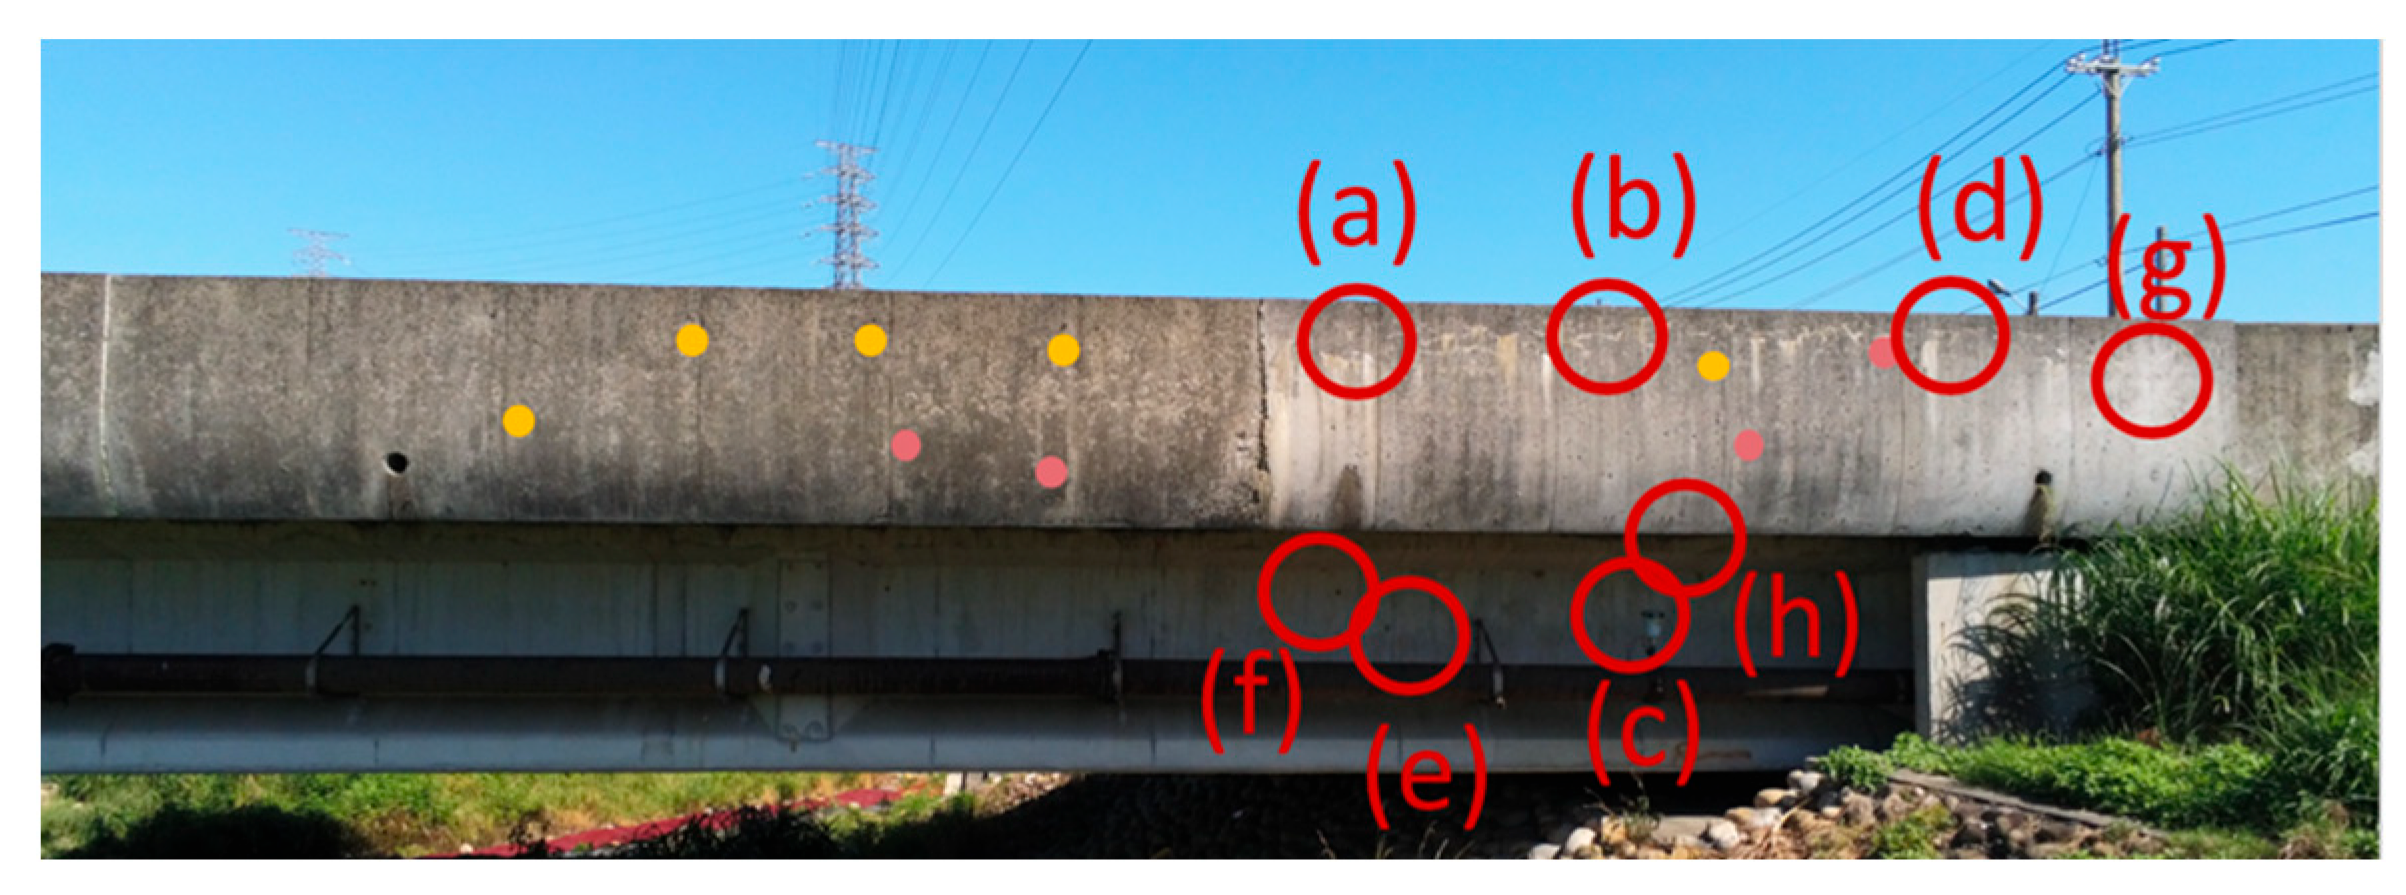
The experiment was conducted on Ai-He Bridge, which is located in Yangmei District, Taoyuan City, Taiwan. The bridge is 6.5 m long and mainly built as a concrete structure. With the low illumination and the space limitation under the bridge, only cracks on the side of the bridge were selected targets in this experiment, as shown in Figure 8.

3.1. Image Orientation and Registration

Since the camera mounted on the UAV only applies digital zoom, which means the resolution would not be changed while zooming, this research only measures cracks with 1× images. First, we separated images into two groups: long-range images and close-up images and select four images and seven images for each. Afterwards, we built the absolute coordinate system through the block triangulation in LPS with four control points, five check points, and tie points that were selected in three different ways.
The three approaches of tie points extraction were executed as follows:
  • Method (1): Manually select tie points with features such as nails and dots on the bridge.
  • Method (2): Randomly input 250 tie points generated from SIFT.
  • Method (3): Randomly input 110 tie points generated from SIFT as the initial tie points and perform automatic tie generation with LPS until 350 tie points are reached.
As shown in Table 3, the first method by which tie points are manually selected performs the best results for image registration, with only 1.2 μm for the total image unit weight root mean square error (RMSE), 6.4 mm deviation in the x direction, 6.6 mm deviation in the y direction, and 39.1 mm deviation in the z direction.
In Table 4, tie points generated by SIFT perform show the worst result, with 68.1 μm total image unit weight RMSE, 152 mm deviation in the x direction, 387.8 mm in the y direction, and 290.9 mm in the z direction. Since 250 tie points are randomly selected, the poor distribution of tie points is a disadvantage that causes larger errors than applying well-distributed tie points. Furthermore, according to [39], SIFT can reach 100% correct matches but with 0.52 pixel accuracy on average, 0.928 pixel deviation in the horizontal direction and 0.7 pixel deviation in the vertical direction, which leads to larger errors due to error propagation through the calculation of block triangulation. For these two reasons, the result for the second method has 68.1 μm total image unit weight RMSE, 152 mm deviation in the x direction, 388 mm deviation in the y direction, and 291 mm in the z direction, which consequently cause failure during the orthorectification process.
In the third method, to achieve the requirement of feature-based matching and automatically generate tie points, we first input 110 tie points generated from SIFT, which is enough to perform automatic tie point generation in LPS. According to the results published by [40], automatic tie point generation in LPS can reach 0.41 pixel RMSE, which is better than SIFT. Moreover, since the overall method includes relation-based matching, tie points are better distributed compared to the random selection in the second method. In the experiment of the third method, with some trial and error, we obtained the result of using total 350 tie points to achieve 11 μm total image unit weight RMSE, 19.9 mm deviation in the x direction, 4.3 mm deviation in the y direction, and 11 mm direction in the z direction, as shown in Table 5. As a result, manual tie point selection can still perform the best, while automatic tie point generation with LPS can achieve acceptable results.

3.2. Orthorectification

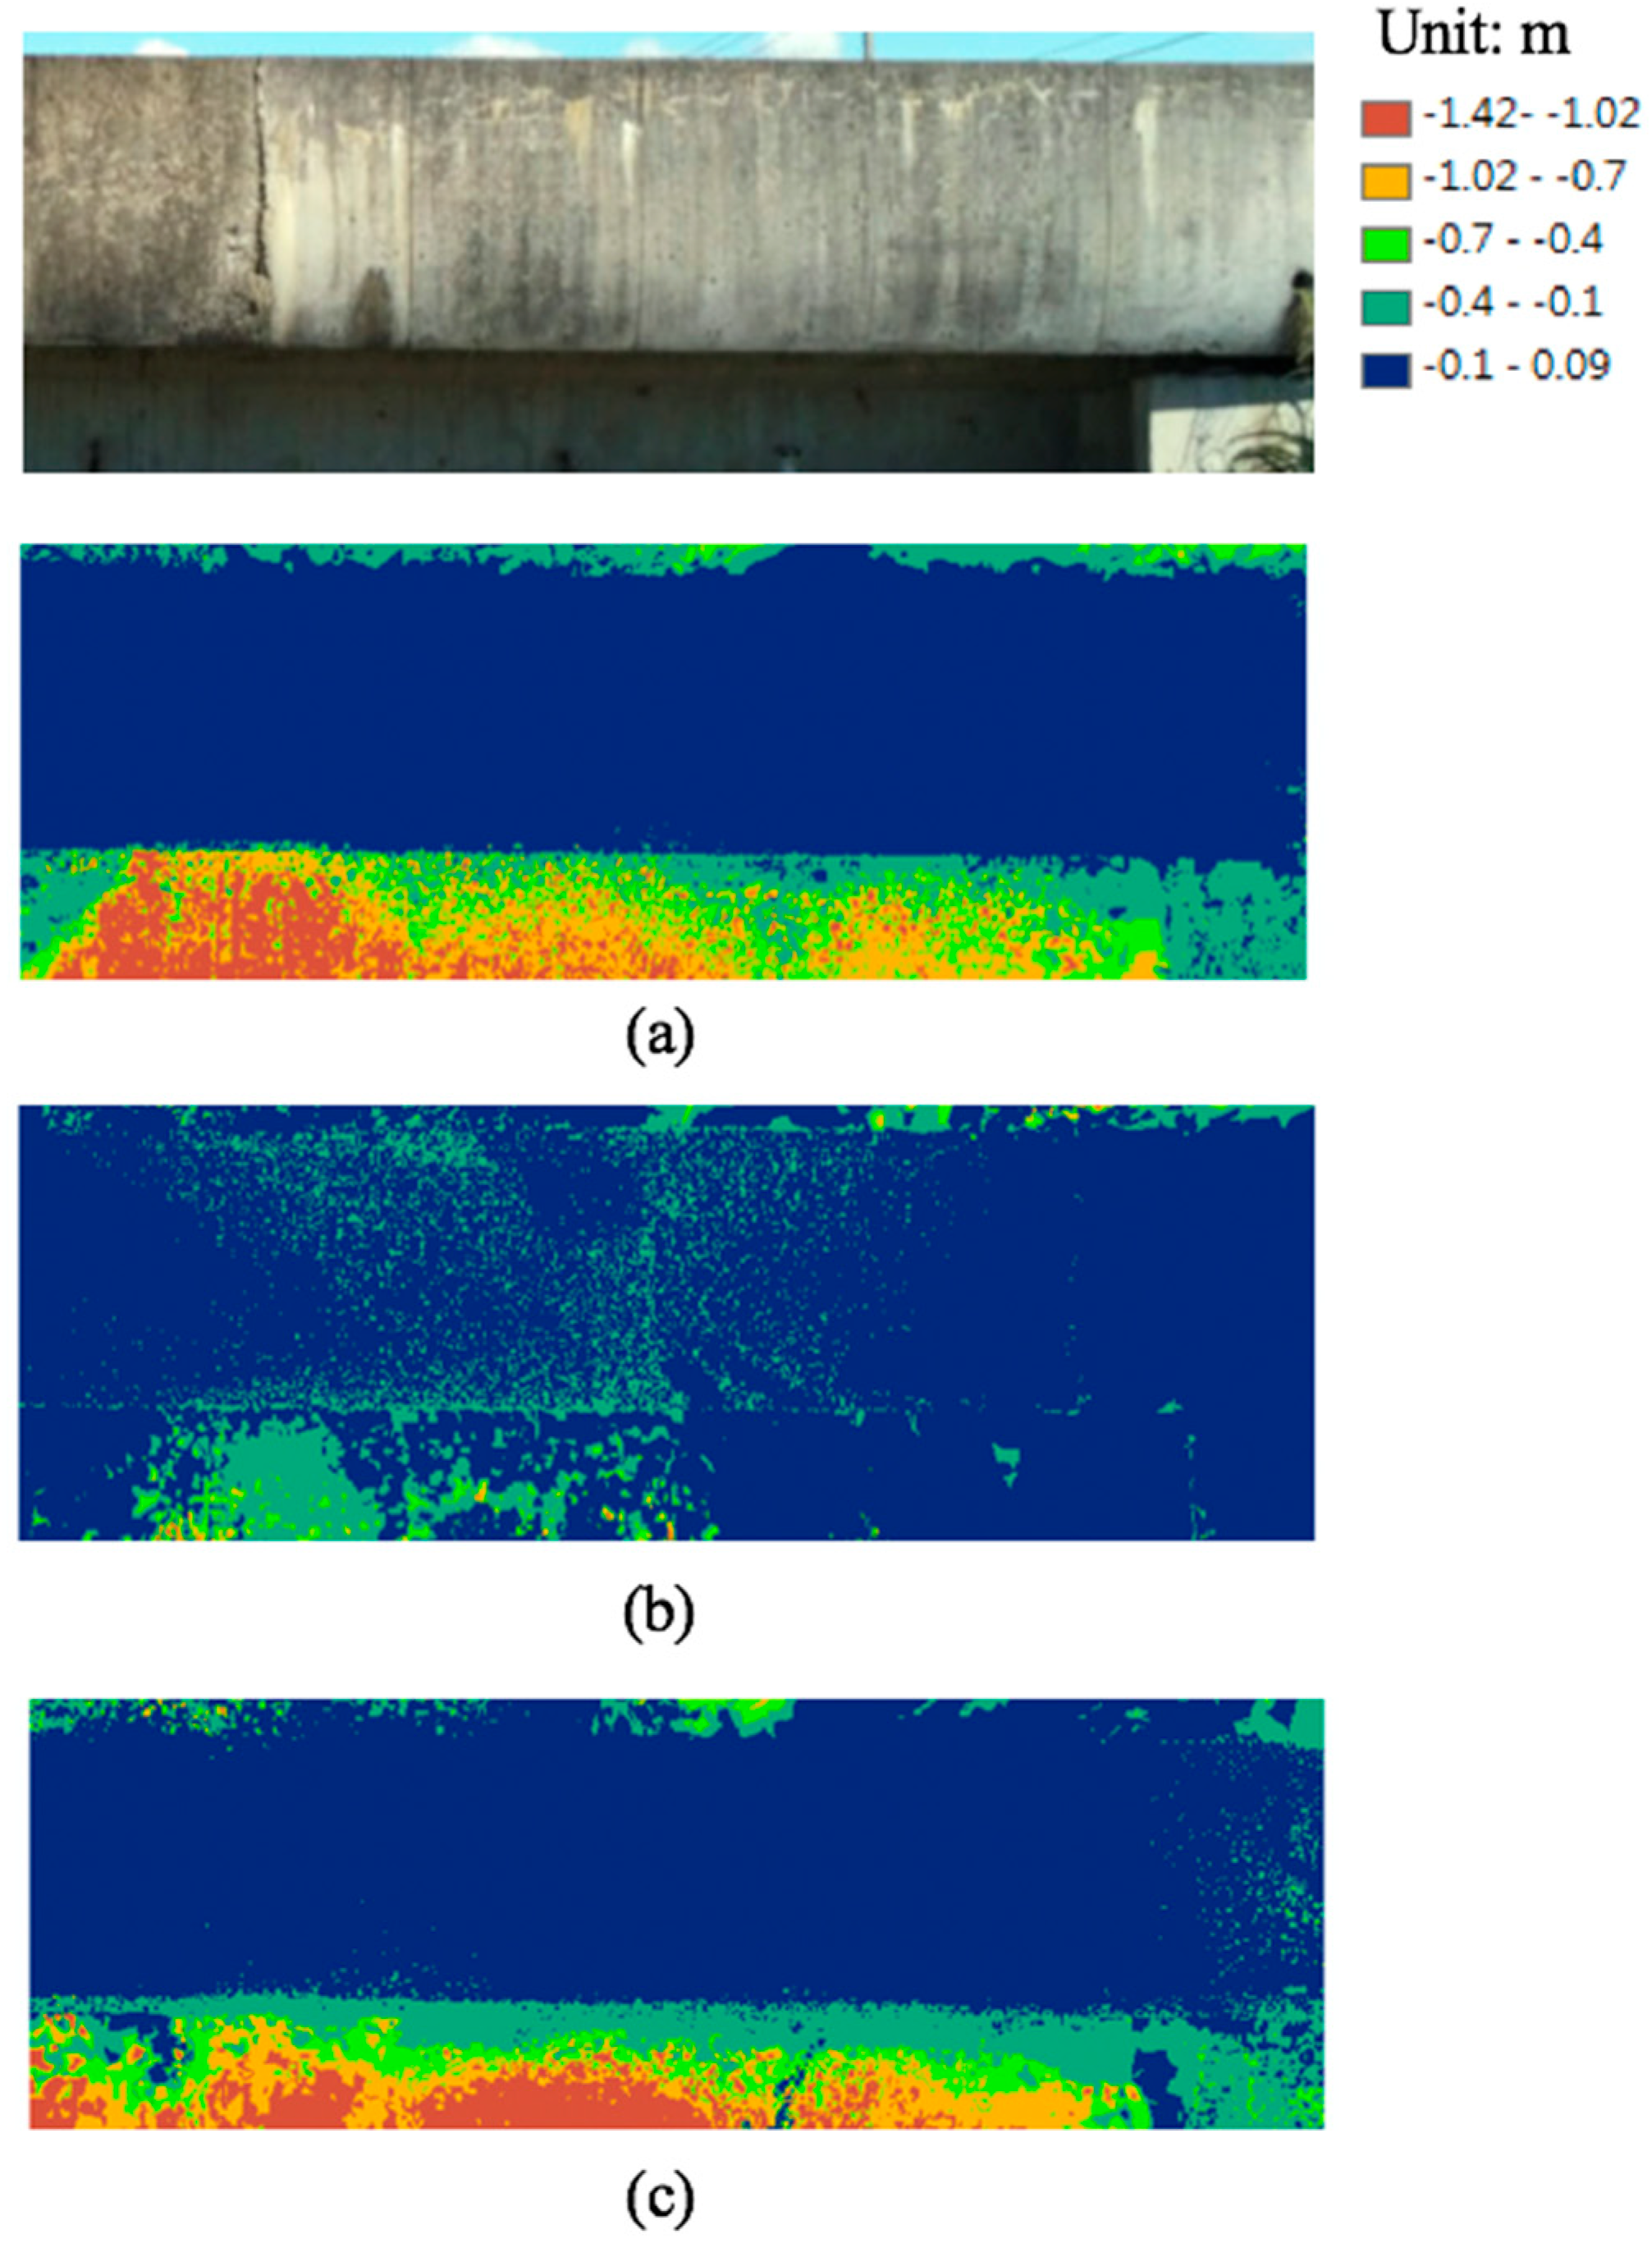
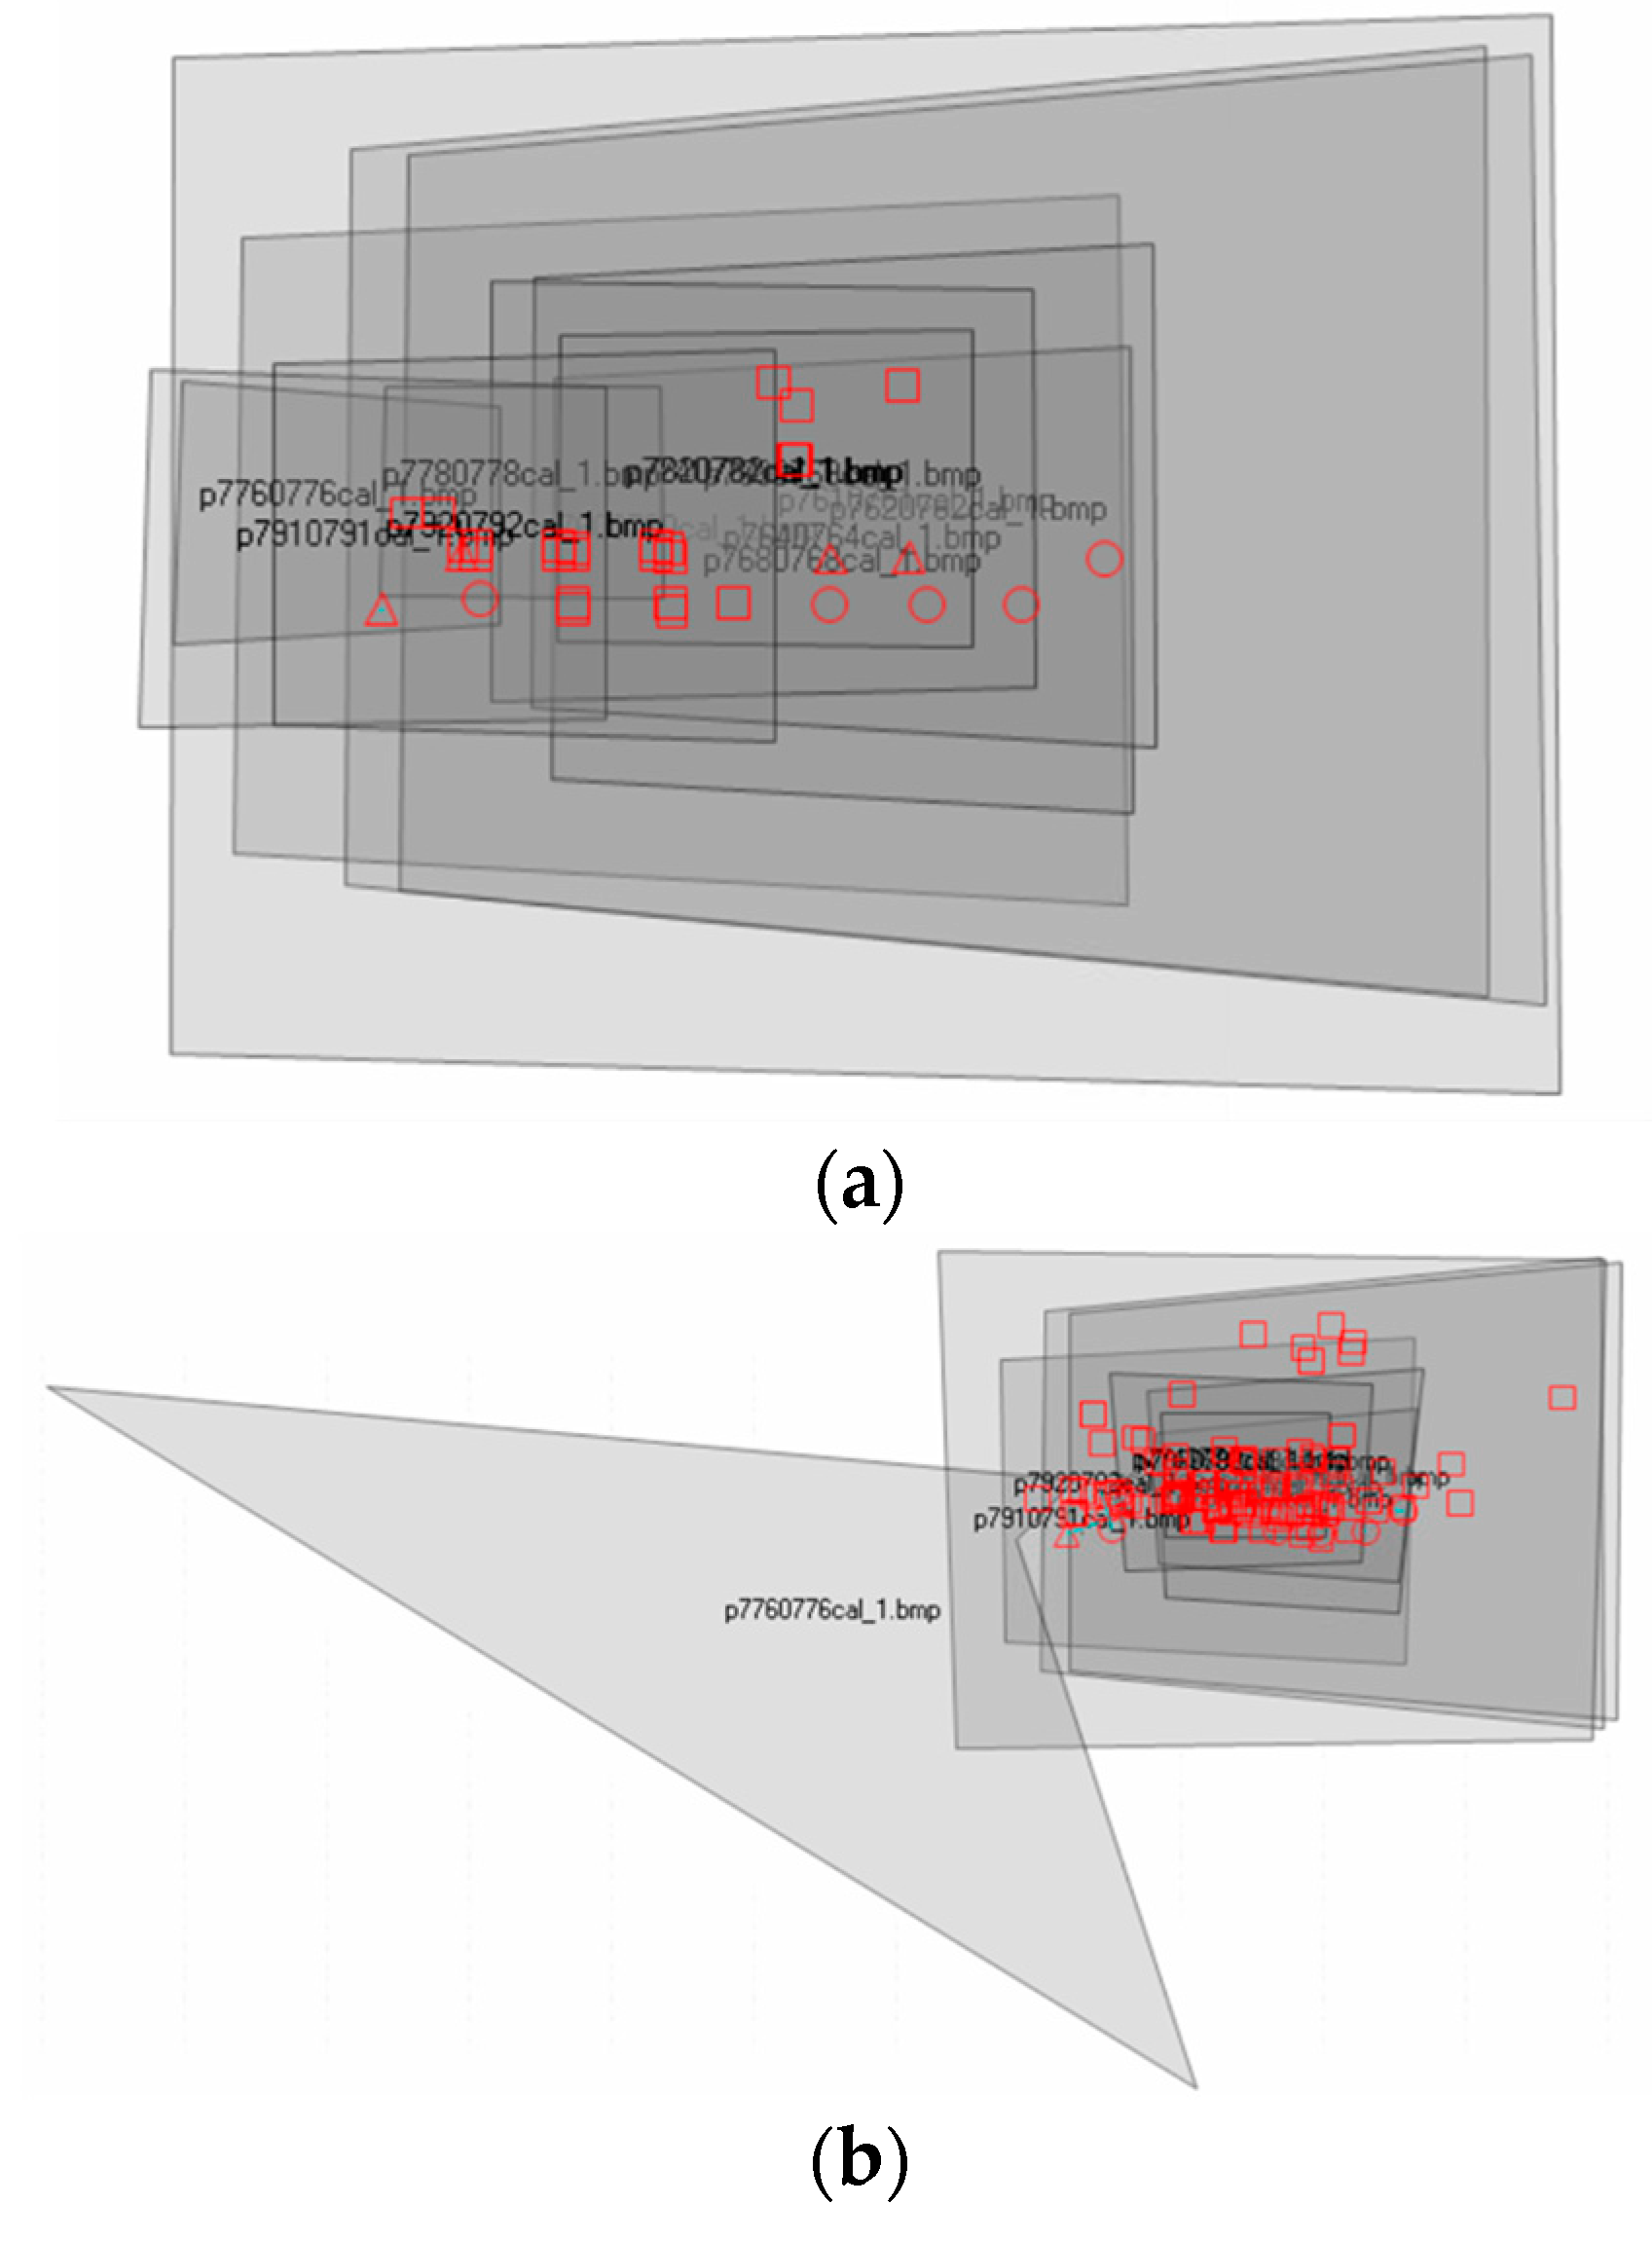
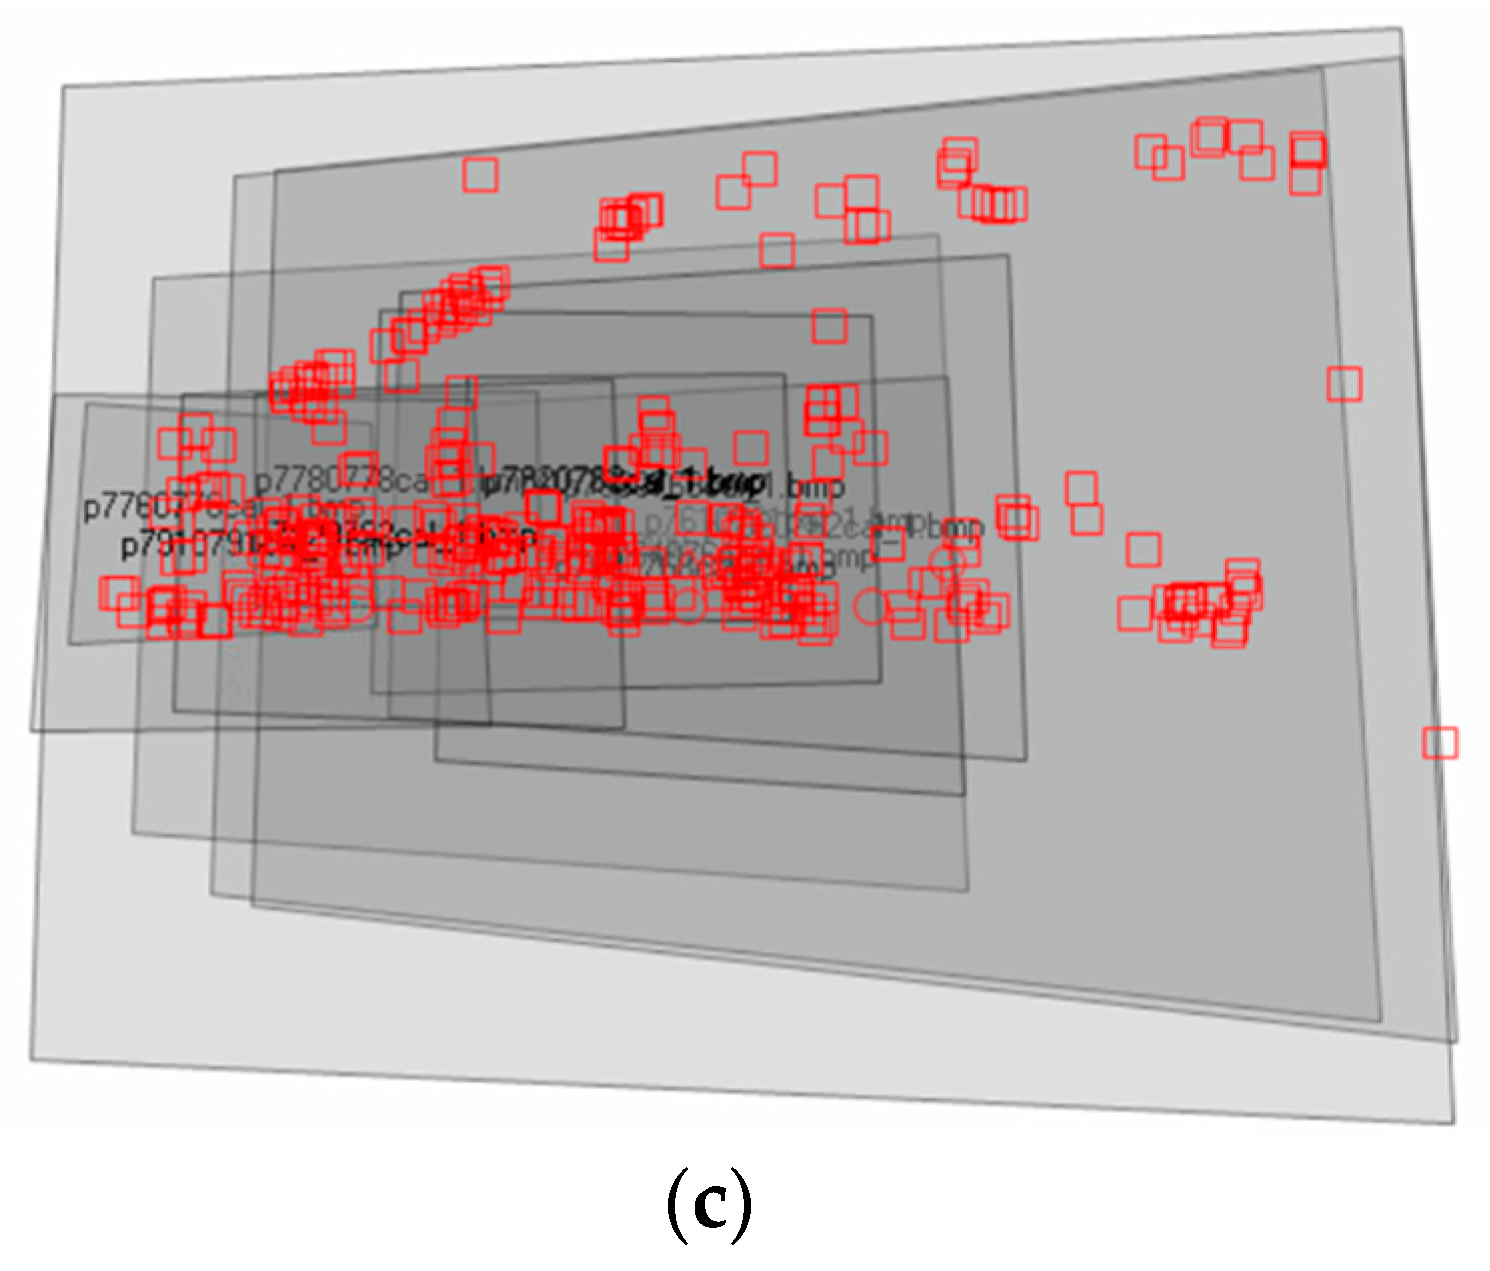
Through block triangulation, all images are fitted into an absolute coordinate system, where the elevation of the upper part of the bridge is set as 0, and the DEMs of the bridge are generated with three different methods, as shown in Figure 9. The digital images are projected onto the DEM of the bridge and resampled to the ortho-images with 0.1 mm pixel size by bilinear interpolation. Through the generated DEM, the sizes and locations of the cracks in the concrete bridges are obtained in this research. Comparing the three results with different tie point generation methods, the DEM and the illustration of ortho-images retrieved from the manual tie point selection are shown in Figure 9a and Figure 10a, and the automatic tie point generation with SIFT-LPS is shown in Figure 9c and Figure 10c. These two results are similar, which indicates that automatic tie point generation can achieve acceptable accuracy. However, according to the generated DEMs, the results retrieved from both manual selection and automatic tie point generation are not as smooth as the actual surface of the bridge and have large errors on the lower part of the bridge, as shown in Figure 9a,c, which were caused by the lack of control points. Furthermore, according to the triangulation summary, block triangulation with automatic tie point generation from SIFT-LPS includes larger errors in the horizontal direction, which can be observed in Figure 10c and, consequently, become an error source for the crack size measurements.
In addition, the large error of block triangulation with automatic tie point generation from SIFT (i.e., the second method) results in a bumping DEM and large distortions in the orthorectification process, as shown in Figure 9b and Figure 10b. While there are three images terribly distorted (i.e., image 76, 91, and 92), these images cannot be applied in the crack size measurements.

3.3. Crack Size Measurement

Since there are three approaches in the stage of image registration and two methods for the crack size measurements, as shown in Table 6, six combinations of results are examined here.
(1)
M1: Measure cracks manually in the ortho-images that the tie points retrieved manually.
(2)
M2: Measure cracks with inflection points in the ortho-images that the tie points retrieved manually.
(3)
M3: Measure cracks manually in the ortho-images that the tie points retrieved only from SIFT.
(4)
M4: Measure cracks with inflection points in the ortho-images that the tie points retrieved only from SIFT.
(5)
M5: Measure cracks manually in the ortho-images that the tie points retrieved from SIFT and LPS.
(6)
M6: Measure cracks with inflection points in the ortho-images that the tie points retrieved from SIFT and LPS.
Due to the difficulty in obtaining in situ measurements, our experiment only has eight cracks: (a), (b), (c), (d), (e), (f), (g), and (h) to evaluate, as shown in Figure 11. This research measures crack sizes in ortho-images with ERDAS IMAGINE 2013. As shown in Figure 11, considering cracks have different widths along their propagation, we selected the widest cross-section on each crack for crack width measurements. Gray value profiles of cracks are also provided in Figure 12 that can tell the difference in gray values when the tangent line meets the crack in the selected cross-section.
Table 7 shows the in situ crack size measurements from the surveyors; Table 8 shows the mean difference, mean relative difference, and root mean square difference (RMSD) from each method; Table 9 contains the crack size measurements, absolute difference (AD), and relative difference (RD) of each crack from each method; and Figure 13 is a bar chart showing the relative difference of each crack from each method. The following are our observations.
  • First of all, as aforementioned, M3 and M4 have large errors in block triangulation, and three ortho-images cannot be generated that are required for cracks (b), (c), (d), (g), and (h). Hence, as shown in Table 9, there is no measurement from M3 and M4 for these cracks. With only three measurements, we decided to exclude these two methods from Table 8. Please also notice that these unavailable measurements are not shown in Figure 12.
  • As shown in Table 8, M1 with the fully manual method achieves the best results, with 0.18 mm RMSD, 0.15 mm mean difference (MD), and 25.41% mean relative difference (MRD), which can also be easily observed in Figure 12.
  • In addition to M3 and M4, M6 (i.e., the most automatic solution) has the worst results, as shown in Figure 12. As shown in Table 9, M6 achieves 1.13 mm RMSD, 1.04 mm MD, and 187.1% MRD, which shows that the distribution of tie points is more important than the number of tie points. Moreover, tie points selected with SIFT are not accurate enough to establish an accurate 3D absolute coordinate system. The errors from the tie point selection and the generation of DEMs propogate the final crack size measurements.
  • In the experiment, the ortho-images are resampled to a 0.1 mm resolution, which is smaller than the original pixel size of the images (i.e., about 0.5 mm). During the interpolation process, non-crack pixels near crack edges receive values from crack pixels, which can eventually be mistaken as cracks. Therefore, the crack width measurements from ortho-images are always larger than the in situ measurements, which also causes displacement of the inflection points during crack size measurements.
  • In addition, as shown in Table 9, crack size measurements from the inflection points with the M2, M4, and M6 solutions have obviously larger differences than the ones measured manually in cracks (c), (d), (e), (f), (g), and (h).
  • As the reference data were measured by three surveyors and the cracks were very thin, surveyors faced difficulties when identifying the precise locations of crack edges. To be specific, there were 0.05 mm to 0.3 mm differences between the measurements from three surveyors, implying that it is hard to retreive very accurate ground truth data for the validation of crack size measurements.
  • Overall, these observations in Table 9 indicate that manual work may still be more reliable than automatic processes when measuring very small targets (i.e., cracks) from UAV images.
  • Furthermore, we discussed some detailed observations as follows.
  • As shown in Figure 11, both cracks (a) and (b) are large and clear on the images. Therefore, as identifying the edges of these cracks is relatively easy, these two cracks have smaller differences in the in situ measurements. This also shows that the depths of the cracks and the illlumination of the crack areas strongly influenced the clearance of the images and further impacted the accuracy of the crack measurements.
  • As shown in Figure 10, cracks (c), (e), and (f) are situated at the lower part of the bridge, where the low illumination conditions result in low gray values and low contrast, which cause difficulties in identifying the edges of cracks. Furthermore, the generated DEMs for the lower part of the bridge have large errors. As a result, these three cracks have larger differences in the in situ measurements than the ones located in the upper part of the bridge that receive enough illumination.
  • Furthermore, for thin and shallow cracks, such as cracks (c), (e), and (f), which are blurry in the images, determining the edges of these cracks is a difficult task that may result in larger uncertainty. Thus, in Table 9, the accuracies of these cracks are relatively worse than other cracks when using both the manual and automatic methods.
  • Moreover, since crack (e) is located in a concrete erosion area, the crack edges cannot be precisely identified, which also results in a large difference, as shown in Figure 12. The erosion areas and the texures of the concrete can cause huge errors for crack size measurements.
  • In general, based on our experience, high-resolution images are always preferable. Multiple images taken from different orientations to measure the same cracks would also be helpful and more reliable.

4. Suggestions

Based on the experimental results, we believe that the proposed procedure could be applied to provide acceptable crack width measurements via UAVs. However, based on our experience, several improvements could be made for higher accuracy, which are explained as follows.
  • During our experiment, since the cracks are very thin, where some are close to the image resolution, identifying the crack edges is a very difficult task for both manual measurements and image processing. Therefore, higher-resolution cameras are required to take clearer images for crack size measurements.
  • Taking images of cracks under low illumination condition results in a low contrast, which increases the difficulty and uncertainty when identifying the crack edges. Therefore, lighting equipment should be included.
  • Identifying the edges of cracks that are located in concrete erosion areas is also difficult, where multiple images taken from different orientations can help to reduce the uncertainty.
  • Since taking images closer can help obtain higher-resolution close-up images, the distance between the UAV and the bridge could be shortened if some safety equipment was included.

5. Conclusions

This research proposes a procedure of applying UAV and image registration to concrete bridge crack inspection. To establish the absolute coordinate system while measuring and locating cracks precisely, we register close-up images to long-range images with block triangulation and ground control points. During the registration process, three approaches are applied for tie point generation. Afterward, ortho-images are produced to measure the crack sizes in the absolute coordinate system, where two crack size measurement methods are applied. The proposed solution was examined on the Ai-He concrete bridge located in Yangmei District, Taoyuan City, Taiwan.
Overall, there are four main contributions/observations in this research:
(1)
We propose a safe and efficient concrete crack inspection method by using UAVs.
(2)
We register close-up images and long-range images to establish the absolute coordinates of the cracks.
(3)
Compared to the in situ measurements from three surveyors, the best proposed approach can measure crack widths with a 0.18 mm root mean square difference (RMSD), 0.15 mm mean difference, and 25.41% mean relative difference.
(4)
The manual crack size measurements with automatic tie point generation combined with SIFT and LPS perform an acceptable result with a 0.46 mm RMSD, 0.4 mm mean difference, and 72.42% mean relative difference.
(5)
Even for surveyors collecting in situ measurements, it is still challenging to identify the edges of cracks, which means that the results could still be affected by subjective judgements.

Author Contributions

Conceptualization, H.-Y.L.; data curation, H.-Y.L.; formal analysis, H.-Y.L.; investigation, H.-Y.L. and C.-Y.H.; methodology, H.-Y.L. and C.-Y.H.; project administration, C.-Y.H. and C.-Y.W.; supervision, C.-Y.H. and C.-Y.W.; validation, H.-Y.L.; visualization, H.-Y.L.; writing—original draft, H.-Y.L.; and writing—review and editing C.-Y.H. All authors have read and agreed to the published version of the manuscript.

Funding

This research received no external funding.

Institutional Review Board Statement

Not applicable.

Informed Consent Statement

Not applicable.

Data Availability Statement

Raw data were generated during the experiment on Ai-He Bridge, Yangmei District, Taoyuan City, Taiwan. Derived data supporting the findings of this study are available from the corresponding author on request.

Acknowledgments

The authors acknowledge the colleagues in the Department of Civil Engineering at National Central University for their assistance in the bridge inspection fieldwork, including Chang, Wen-Chi, Yeh, Ting-Yu, and Hsu, Yu-Sheng.

Conflicts of Interest

The authors declare no conflict of interest.

References

  1. Mohan, A.; Poobal, S. Crack detection using image processing: A critical review and analysis. Alex. Eng. J. 2018, 57, 787–798. [Google Scholar] [CrossRef]
  2. Ministry of Transportation and Communications. The maintenance and inspection regulation of railway. In The Regulation of the Standard in Engineering Department; Ministry of Transportation and Communications for Railways: Taipei, Taiwan, 2018. Available online: https://www.rootlaw.com.tw/LawContent.aspx?LawID=A040110051025100-1090324 (accessed on 19 October 2019).
  3. ACI 224R-90. Control of Cracking in Concrete Structures; America Concrete Institute: Farmington Hills, MI, USA, 2008; Available online: https://www.researchgate.net/profile/Saad-Altaan/post/What-are-the-types-of-crack-and-their-causes-and-remedies-in-concrete-structures/attachment/5b4c79f8b53d2f89289a56d8/AS%3A648972947443713%401531738616217/download/224R_01.pdf (accessed on 15 April 2020).
  4. National Academies of Sciences. Engineering, and Medicine Control of Concrete Cracking in Bridges; The National Academies Press: Washington, DC, USA, 2017. [Google Scholar] [CrossRef]
  5. Sutter, B.; Arnaud, L.; Pham, M.T.; Gouin, O.; Jupille, N.; Kuhn, M.; Lulé, P.; Michaud, P.; Rémy, P. A semi-autonomous mobile robot for bridge inspection. Autom. Constr. 2018, 91, 111–119. [Google Scholar] [CrossRef]
  6. Oh, J.-K.; Jang, G.; Oh, S.; Lee, J.H.; Yi, B.-J.; Moon, Y.S.; Lee, J.S.; Choi, Y. Bridge inspection robot system with machine vision. Autom. Constr. 2009, 18, 929–941. [Google Scholar] [CrossRef]
  7. Adhikari, R.S.; Moselhi, O.; Bagchi, A. Image-Based Retrieval of Concrete Crack Properties for Bridge Inspection. Autom. Constr. 2013, 39, 180–194. [Google Scholar] [CrossRef]
  8. Duque, L. UAV-Based Bridge Inspection and Computational Simulations. Master’s Thesis, South Dakota State University, Brookings, SD, USA, 2017. Available online: https://www.proquest.com/dissertations-theses/uav-based-bridge-inspection-computational/docview/2009047567/se-2 (accessed on 15 April 2020).
  9. Muhammad, O.; Lee, M.; Mojgan, H.M.; Hewitt, S.; Parwaiz, M. Use of gaming technology to bring bridge inspection to the office. Struct. Infrastruct. Eng. 2019, 15, 1292–1307. [Google Scholar] [CrossRef]
  10. Hallermann, N.; Morgenthal, G. Visual Inspection Strategies for Large Bridges Using Unmanned Aerial Vehicles (UAV); IABMAS: Shanghai, China, 2014. [Google Scholar]
  11. Sankarasrinivasan, S.; Balasubramanian, E.; Karthik, K.; Chandrasekar, U.; Gupta, R. Health Monitoring of Civil Structures with Integrated UAV and Image Processing System. Procedia Comput. Sci. 2015, 54, 508–515. [Google Scholar] [CrossRef]
  12. Eschmann, C.; Wundsam, T. Web-Based Georeferenced 3D Inspection and Monitoring of Bridges with Unmanned Aircraft Systems. J. Surv. Eng. 2017, 143, 04017003. [Google Scholar] [CrossRef]
  13. Kim, H.; Lee, J.; Ahn, E.; Cho, S.; Shin, M.; Sim, S.H. Concrete Crack Identification Using a UAV Incorporating Hybrid Image Processing. Sensors 2017, 17, 2052. [Google Scholar] [CrossRef]
  14. Sauvola, J.; Pietikäinen, M. Adaptive document image binarization. Pattern Recognit. 2000, 33, 225–236. [Google Scholar] [CrossRef]
  15. Rehak, M.; Mabillard, R.; Skaloud, J. A Micro-UAV with the Capability of Direct Georeferencing. In The International Archives of the Photogrammetry, Remote Sensing and Spatial Information Sciences; XL-1/W2; ISPRS: Prague, Czech Republic, 2013; pp. 317–323. [Google Scholar] [CrossRef]
  16. Gupta, R. Four Key GPS Test Consideration for Drone and UAV Developers; Spirent: Crawley, UK, 2015; Available online: https://www.spirent.com/blogs/gps_test_considerations_for_drones_and_uva_developers (accessed on 15 April 2020).
  17. Tahar, K.N.; Kamarudin, S.S. UAV Onboard Gps in Positioning Determination. In The International Archives of the Photogrammetry, Remote Sensing and Spatial Information Sciences; XLI-B1; ISPRS: Prague, Czech Republic, 2016; pp. 1037–1042. [Google Scholar] [CrossRef]
  18. Rau, J.Y.; Hsiao, K.W.; Jhan, J.P.; Wang, J.C.; Fang, W.C.; Wang, J.L. Bridge Crack Detection Using Multi-Rotary Uav and Object-Base Image Analysis. Commission 2017, VI, WG VI/4. Available online: https://www.int-arch-photogramm-remote-sens-spatial-inf-sci.net/XLII-2-W6/311/2017/isprs-archives-XLII-2-W6-311-2017.pdf (accessed on 19 November 2019).
  19. Blaschke, T. Object based image analysis for remote sensing. ISPRS J. Photogramm. Remote Sens. 2010, 65, 2–16. [Google Scholar] [CrossRef]
  20. Lang, S.; Albrecht, F.; Blaschke, T. OBIA- Tutorial, Centre for Geoinformatics (Z_GIS); Paris-Lodron University Salzburg: Salzburg, Austria, 2011; Available online: https://studylib.net/doc/14895995/obia-%E2%80%93-tutorial-introduction-to-object-based-image-analys (accessed on 15 April 2020).
  21. Hirschmuller, H. Stereo processing by semiglobal matching and mutual information. IEEE Trans. Pattern Anal. Mach. Intell. 2008, 30, 328–341. [Google Scholar] [CrossRef]
  22. Prasanna, P.; Dana, K.J.; Gucunski, N.; Basily, B.B.; La, H.M.; Lim, R.S.; Parvardeh, H. Automated Crack Detection on Concrete Bridges. IEEE Trans. Autom. Sci. Eng. 2016, 13, 591–599. [Google Scholar] [CrossRef]
  23. Xu, H.; Su, X.; Wang, Y.; Cai, H.; Cui, K.; Chen, X. Automatic Bridge Crack Detection Using a Convolutional Neural Network. Appl. Sci. 2019, 9, 2867. [Google Scholar] [CrossRef]
  24. Özgenel, Ç.F. Concrete Crack Images for Classification; V2; Mendeley Data. 2019. Available online: https://data.mendeley.com/datasets/5y9wdsg2zt/2 (accessed on 25 March 2019). [CrossRef]
  25. Maguire, M.; Dorafshan, S.; Thomas, R.J. SDNET2018: A Concrete Crack Image Dataset for Machine Learning Applications; Utah State University: Logan, UT, USA, 2018. [Google Scholar] [CrossRef]
  26. Zhang, Q.; Barri, K.; Babanajad, S.K.; Alavi, A.H. Real-Time Detection of Cracks on Concrete Bridge Decks Using Deep Learning in the Frequency Domain. Engineering 2021, 7, 1786–1796. [Google Scholar] [CrossRef]
  27. Choi, D.; Bell, W.; Kim, D.; Kim, J. UAV-Driven Structural Crack Detection and Location Determination Using Convolutional Neural Networks. Sensors 2021, 21, 2650. [Google Scholar] [CrossRef]
  28. Wang, J.; He, X.; Faming, S.; Lu, G.; Cong, H.; Jiang, Q. A Real-Time Bridge Crack Detection Method Based on an Improved Inception-Resnet-v2 Structure. IEEE Access 2021, 9, 93209–93223. [Google Scholar] [CrossRef]
  29. Zhang, J.; Qian, S.; Tan, C. Automated bridge crack detection method based on lightweight vision models. Complex Intell. Syst. 2022, 9, 1–14. [Google Scholar] [CrossRef]
  30. iWitness. iWitnessPRO Photogrammetry Software. Available online: https://www.iwitnessphoto.com/iwitnesspro_photogrammetry_software/ (accessed on 25 March 2019).
  31. Fraser, C.S. Digital Camera Selif-calibration. ISPRS J. Photogramm. Remote Sens. 1997, 52, 149–159. [Google Scholar] [CrossRef]
  32. Lowe, D.G. Distinctiveimage features from scale-invariant keypoints. Int. J. Comput. Vis. 2004, 60, 91–110. [Google Scholar] [CrossRef]
  33. LPS Manager. Introduction to Photogrammetry. User’s Guide. 2010. Available online: http://geography.middlebury.edu/data/gg1002/handouts/lps_pm.pdf (accessed on 18 June 2019).
  34. Förstner, W.; Gülch, D. A Fast Operator for Detection and Precise Location of Distinct Points, Corners and Centres of Circular Features. In International Archives of the Photogrammetry, Remote Sensing and Spatial Sciences, Intercommission Workshop; ISPRS: Interlaken, Switzerland, 1987; Available online: https://cseweb.ucsd.edu/classes/sp02/cse252/foerstner/foerstner.pdf (accessed on 15 April 2020).
  35. Remondino, F.; El-Hakim, S.F.; Gruen, A.; Zhang, L. Turning images into 3-D models. IEEE Signal Process. Mag. 2008, 25, 55–65. [Google Scholar] [CrossRef]
  36. Wang, Y. Principles and applications of structural image matching. J. Photogramm. Remote Sens. 1998, 53, 154–165. [Google Scholar] [CrossRef]
  37. Leprince, S.; Barbot, S.; Ayoub, F.; Avouac, J.P. Automatic and Precise Orthorectification, Coregistration, and Subpixel Correlation of Satellite Images, Application to Ground Deformation Measurements. Geosci. Remote Sens. IEEE Trans. 2007, 45, 1529–1558. [Google Scholar] [CrossRef]
  38. Laliberte, A.S. Acquisition, orthorectification, and object-based classification of Unmanned Aerial Vehicle (UAV) imagery for rangeland monitoring. Photogramm. Eng. Remote Sens. 2010, 76, 661–672. Available online: https://www.researchgate.net/publication/267327287_Acquisition_orthorectification_and_object-based_classification_of_Unmanned_Aerial_Vehicle_UAV_imagery_for_rangeland_monitoring (accessed on 15 April 2020). [CrossRef]
  39. Sun, Y.L.; Wang, J. Performance Analysis of SIFT Feature Extraction Algorithm in Application to Registration of SAR Image. In Proceedings of the MATEC Web of Conferences, Hong Kong, China, 26–27 April 2016; Volume 44, p. 01063. [Google Scholar] [CrossRef]
  40. Bhatta, B. Urban Growth Analysis and Remote Sensing: A Case Study of Kolkata, India 1980–2010; Springer: Berlin/Heidelberg, Germany, 2012. [Google Scholar] [CrossRef]
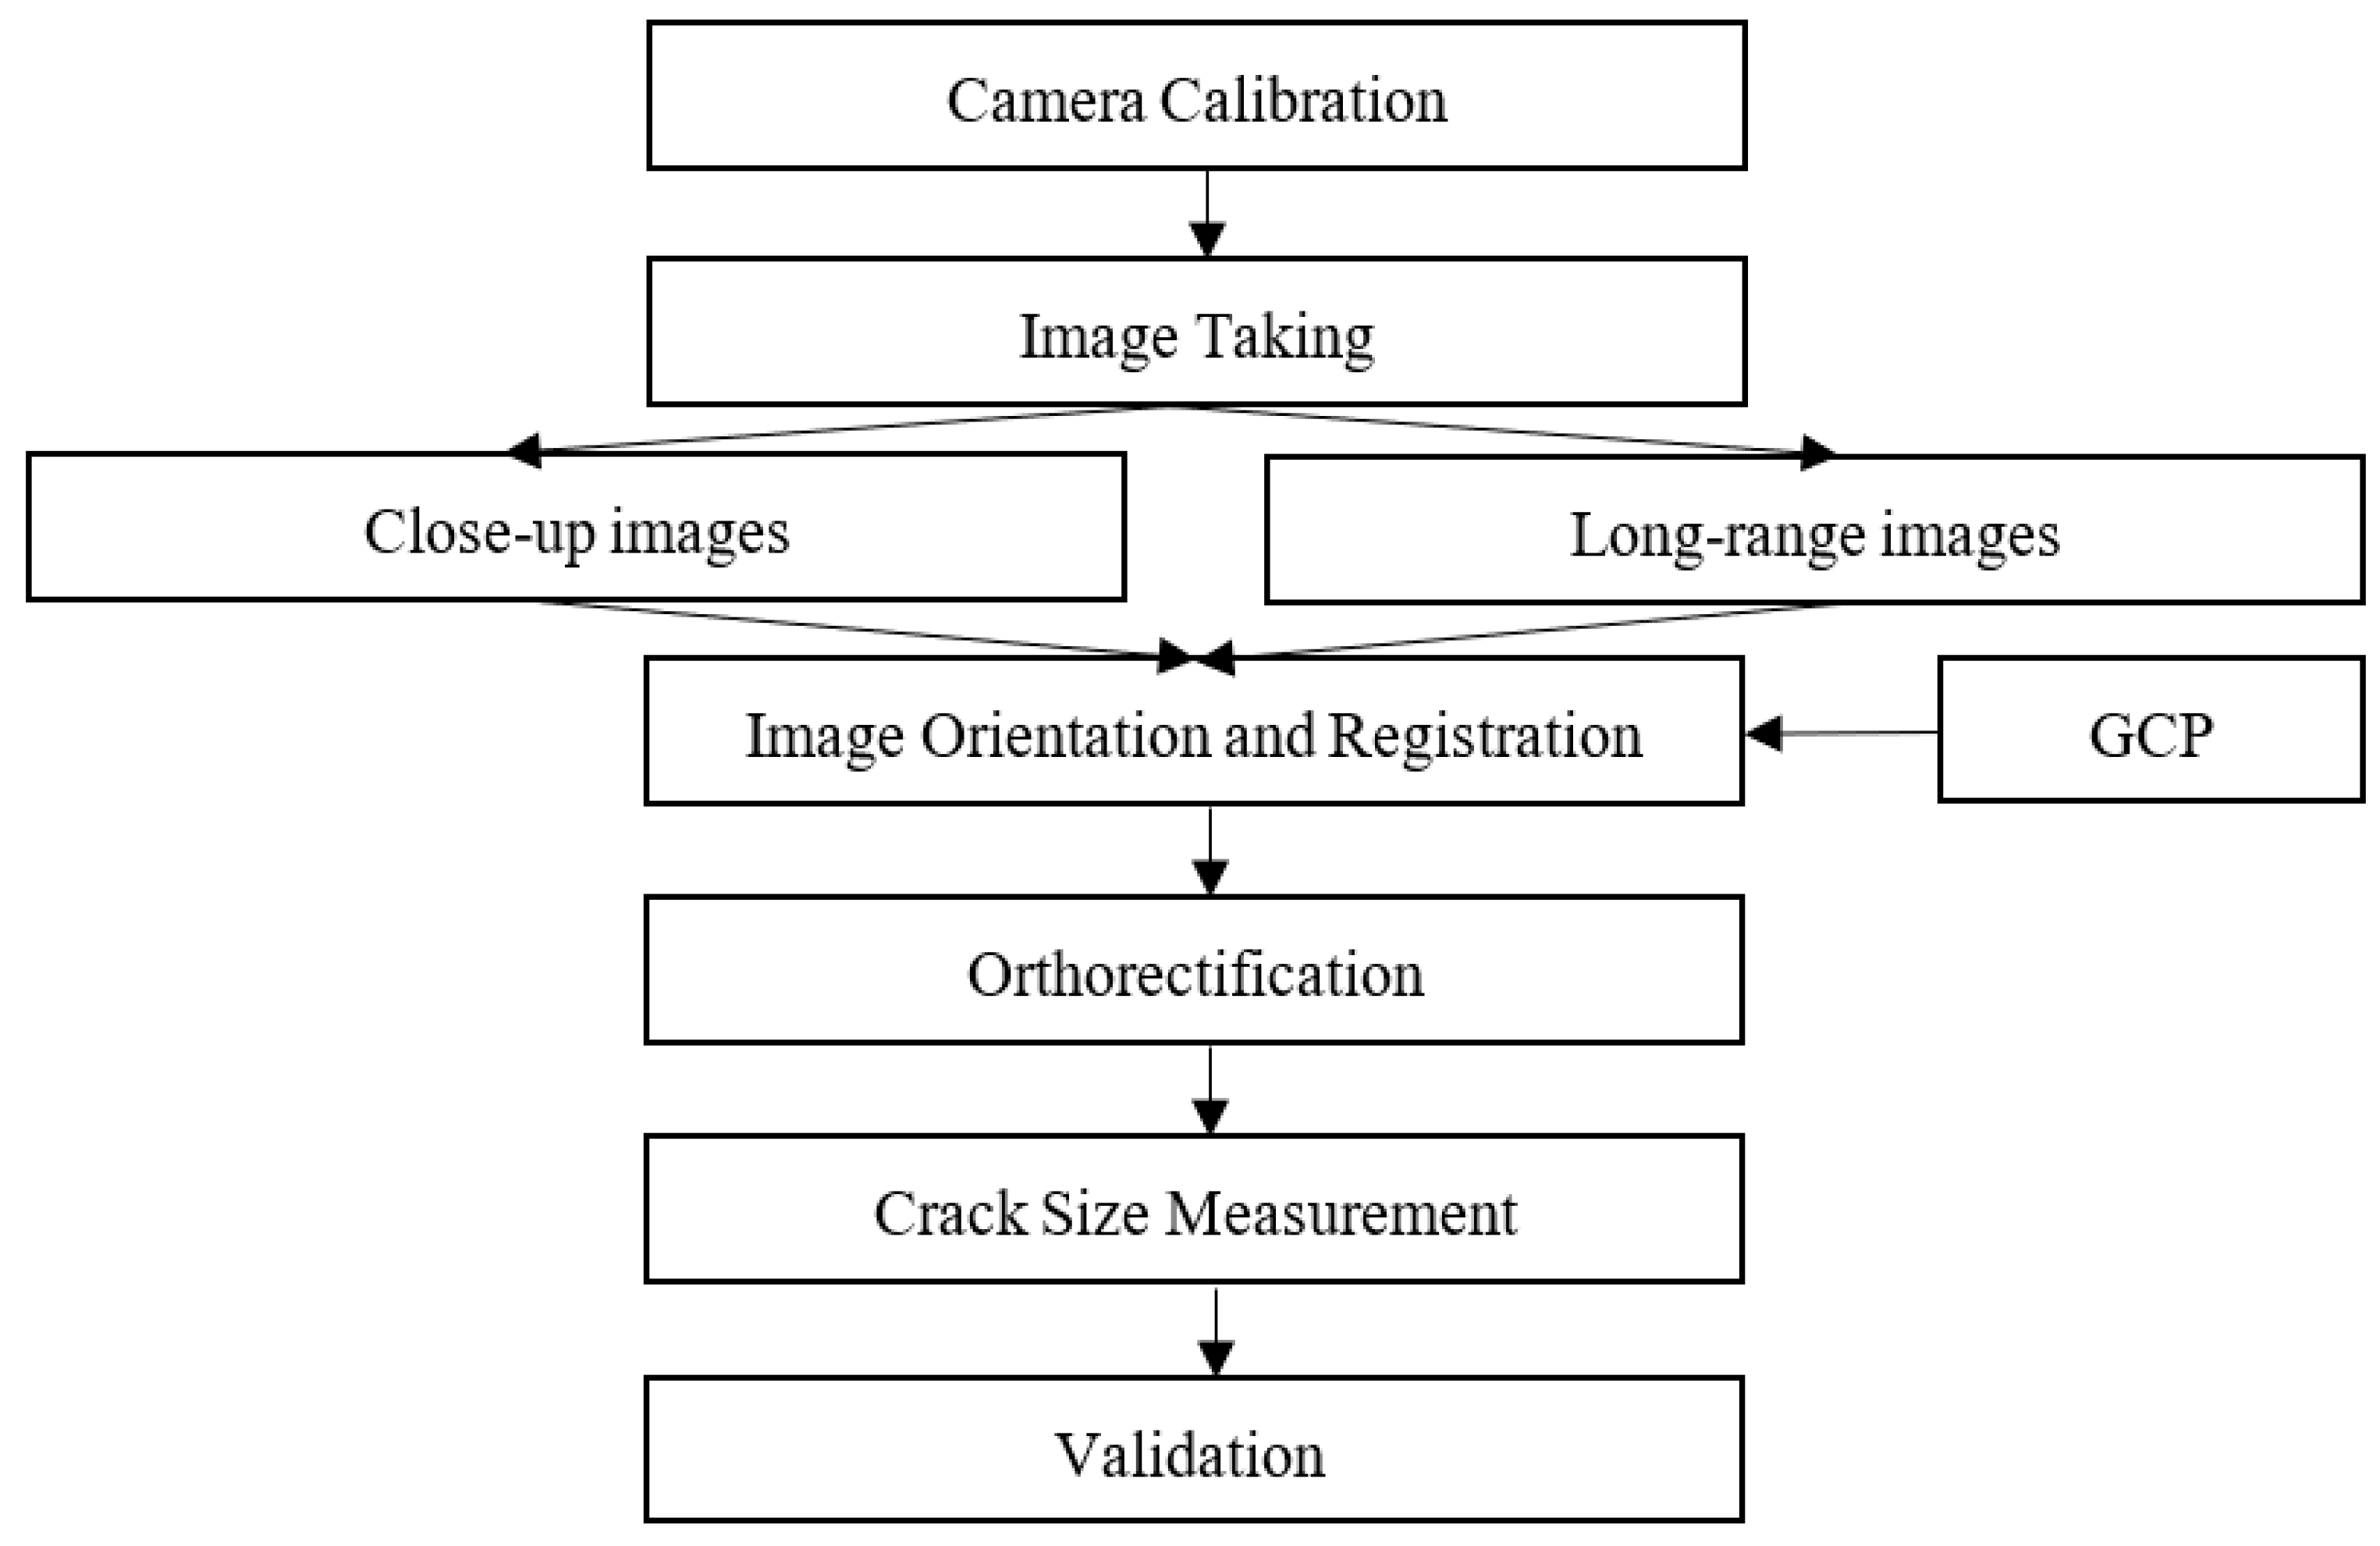
Figure 2. The overall workflow.
Drones 07 00342 g002
Figure 3. An illustration of the images before and after camera calibrations: (a) before calibration and (b) after calibration.
Drones 07 00342 g003
Figure 4. The calibration boards with orange and green features at different heights.
Drones 07 00342 g004
Figure 5. A long-range (a) and a close-up (b) image of the concrete bridge.
Drones 07 00342 g005
Figure 6. The distribution of control points (pink circles) and check points (yellow circles) on Ai He Bridge.
Drones 07 00342 g006
Figure 7. The illustration of identifying a crack width through the inflection points in the gray value profile.
Drones 07 00342 g007
Figure 8. Ai-He Bridge, which is located in Yangmei District, Taoyuan City, Taiwan.
Drones 07 00342 g008
Figure 9. The DEM results from (a) the manual tie point selection, (b) the tie point generation with SIFT, and (c) the tie point generation from SIFT–LPS.
Drones 07 00342 g009
Figure 10. The illustration of ortho-images results from (a) the manual tie point selection, (b) the tie point generation with SIFT, and (c) the tie point generation from SIFT-LPS.
Drones 07 00342 g010aDrones 07 00342 g010b
Figure 11. The distribution of the cracks in Ai-He Bridge.
Drones 07 00342 g011
Figure 12. The (ah) cracks on close-up images, and the selected cross-sections and their gray value profiles.
Drones 07 00342 g012
Figure 13. Relative differences of each crack from each method.
Drones 07 00342 g013
Table 1. The maximum tolerable crack widths in different exposure conditions for concrete structures [3].
Exposure ConditionCrack Width (in.)
Dry air or protective membrane0.016
Humidity, moist air, soil0.012
Deicing chemicals0.007
Seawater, seawater spray, wetting, and drying0.006
Water-retaining structures0.004
Table 2. The method of maintenance in different sizes of crack widths for concrete structures [4].
Crack in Width x (in.)Method of Maintenance
0.012 < x < 0.025The beam should be repaired by filling the cracks and coating the end for 4 ft with an approved sealant.
0.025 < x < 0.05The beam should be filled by epoxy injection and the end for 4 ft of the beam web coated with an approved sealant.
x > 0.05The beam should be rejected unless shown that the structural capacity and long-term durability are sufficient.
Table 3. The triangulation summary for method (1).
Total Image Unit Weight RMSE: 1.2 (μm)
Control Point RMSECheck Point RMSE
Ground X (mm)-Ground X (mm)6.4
Ground Y (mm)-Ground Y (mm)6.6
Ground Z (mm)-Ground Z (mm)39.1
Image X (μm)0.9Image X (μm)2.4
Image Y (μm)1.3Image Y (μm)1.9
Table 4. The triangulation summary for method (2).
Total Image Unit Weight RMSE: 68.1 (μm)
Control Point RMSECheck Point RMSE
Ground X (mm)-Ground X (mm)152
Ground Y (mm)-Ground Y (mm)387.8
Ground Z (mm)-Ground Z (mm)290.9
Image X (μm)5448.6Image X (μm)178.6
Image Y (μm)1222.7Image Y (μm)744.5
Table 5. The triangulation summary for method (3).
Total Image Unit Weight RMSE: 11 (μm)
Control Point RMSECheck Point RMSE
Ground X (mm)-Ground X (mm)19.9
Ground Y (mm)-Ground Y (mm)4.3
Ground Z (mm)-Ground Z (mm)11
Image X (μm)8.5Image X (μm)1.6
Image Y (μm)5Image Y (μm)1.6
Table 6. Six methods for crack size measurements.
Crack Size MeasurementManual MeasurementMeasurement with Inflection Point
Tie Point Generation
Manual tie point selectionM1M2
Tie point generation with SIFTM3M4
Tie point generation with SIFT-LPSM5M6
Table 7. The in situ crack size measurements from the surveyors (unit: mm).
Crack(a)(b)(c)(d)(e)(f)(g)(h)
Surveyor
Surveyor 11.41.40.550.90.350.450.550.6
Surveyor 21.31.20.50.950.350.450.450.65
Surveyor 31.41.10.610.350.450.40.65
avg. measurement1.371.230.550.950.350.450.470.63
Table 8. The mean difference, mean relative difference, and root mean square difference from each method (unit: mm).
Method Mean Difference Mean Relative Difference Root Mean Square Difference
M10.1525.41%0.18
M20.80147.37%0.9
M50.4072.42%0.46
M61.04187.1%1.13
Table 9. The crack size measurement, absolute difference (AD), and relative difference (RD) of each crack from each method (unit: mm).
Crack(a)(b)(c)(d)(e)(f)(g)(h)
M11.51.40.61.20.70.50.50.8
AD0.130.170.050.250.350.050.030.17
RD9.76%13.51%9.09%26.32%100%11.11%7.14%26.32%
M21.51.671.672.221.640.91.551.24
AD0.130.441.121.271.290.451.080.61
RD9.76%35.41%203.64%133.68%368.57%100%232.14%95.79%
M31.5---1.30.9--
AD0.13---0.950.45--
RD9.73%---271.14%100%--
M42.08---2.381--
AD0.71---2.030.55--
RD51.82%---580%122.22%--
M51.41.71.41.30.90.70.90.9
AD0.030.470.850.350.550.250.430.27
RD2.44%37.84%154.55%36.84%157.14%55.56%92.86%42.11%
M61.422.331.672.331.671.392.141.33
AD0.051.101.121.381.320.941.670.70
RD3.90%88.92%203.64%145.26%377.14%208.89%358.57%110.47%
Disclaimer/Publisher’s Note: The statements, opinions and data contained in all publications are solely those of the individual author(s) and contributor(s) and not of MDPI and/or the editor(s). MDPI and/or the editor(s) disclaim responsibility for any injury to people or property resulting from any ideas, methods, instructions or products referred to in the content.