Article

Laser Welding of AISI 316L Stainless Steel Produced by Additive Manufacturing or by Conventional Processes

LGP, ENIT/INPT, Université de Toulouse, 47 Av. d’Azereix, 65000 Tarbes, France
*
Author to whom correspondence should be addressed.
J. Manuf. Mater. Process. 2021, 5(4), 136; https://doi.org/10.3390/jmmp5040136
Submission received: 10 November 2021 / Revised: 10 December 2021 / Accepted: 12 December 2021 / Published: 14 December 2021
(This article belongs to the Special Issue Advanced Joining Processes and Techniques)

Abstract

:
Among all the additive manufacturing techniques, Laser Powder Bed Fusion (LBPF), also called Selective Laser Melting (SLM), is the most common technique due to its high capability of building complex parts with generally improved mechanical properties. One of the main drawbacks of this technique is the sample size limitation, which depends on elaborating chamber dimensions. In this study, we investigate the viability of obtaining large parts with the laser welding of additive manufactured plates. A comparison of the microstructure and the tensile mechanical properties of SLM-welded plates and cold-rolled welded plates was performed. This paper shows the possibility of obtaining defect-free parts. Even if welding has a low impact on the microstructure of the SLM samples, fractures are located on the fusion zone, and a decrease in ductility of around 30% compared to the base metal is observed.

1. Introduction

AISI 316L (316L) is an austenitic stainless steel well known for its high corrosion resistance and mechanical properties. Compared to standard steel, the composition of austenitic stainless steel includes a high amount of Cr and Ni. The Ni content not only stabilizes the austenite phase at low temperatures but also improves the corrosion resistance; 316L is protected from corrosion by a Cr2O3 oxide layer [1] and therefore it is widely used in various industries. AISI 316L can be produced by conventional elaboration processes such as casting, rolling, and forging. Conventional 316L has been welded for a long time by various processes, including lasers [2,3,4,5,6]. Microstructures produced by welding consist of a fusion zone with a dendritic structure. The lack of cracks can be explained by a ferritic–austenite solidification mode. This fusion zone is surrounded by a small heat-affected area [2]. For the tensile properties, a low-impact-energy input was measured [2]. A similar tensile strength, but with loss of ductility, was measured in comparison to unwelded materials [3]. One advantage of using laser welding compared to other welding methods is the higher cooling rate leading to a thinner dendritic structure and higher tensile strength [5]. Moreover, due to its good weldability, it can also be produced by Additive Manufacturing (AM) processes. AM processes can produce geometrically complex parts from a computer-aided design [7]. Among all additive manufacturing techniques, Laser Powder Bed Fusion (LBPF), also called Selective Laser Melting (SLM), is the most common technique due to its high capability for building complex parts with generally improved mechanical properties [7].
The relationship between SLM building parameters, microstructures, and mechanical properties has been widely studied [8,9,10,11]. Currently, optimized building parameters for such common materials are included in commercial SLM devices. One of the main drawbacks of this technique is the sample size limitation, which depends on elaborating chamber dimensions. To obtain larger parts, one solution is to weld small parts. Laser welding enables a high-power density for a low-heat-energy input and high cooling rates [12,13]. These welding characteristics make it possible to weld thin parts, such as those obtained by SLM. Moreover, the SLM and new welding lasers exploit the same technique (Yb: YAG); therefore, the same laser–matter interaction is expected. These similarities may minimize microstructure changes in samples produced by SLM [12]. Therefore, laser welding is a promising technique by which to join small additive manufactured parts.
A few studies involving various welding methods of various additive manufactured materials have been reported. Regarding additive manufactured materials, the welding of steel [14,15,16,17,18,19,20,21], titanium alloys [22,23,24,25,26,27], aluminum alloys [28,29,30], and Ni-based superalloys [12,31] have been reported. Regarding AM techniques, the welding of SLM parts [12,14,16,17,18,20,24,27,28,29,30,31], robotized laser/wire-directed energy deposition parts [15], binder jetting [19], electron beam melting [22,23,25], and wire arc AM [26] have been reported. Regarding welding methods, laser welding [12,14,15,16,18,23,24,26,28,29,31], Tungsten Inert Gaz (TIG) welding [17,21,22], resistance spot welding [19], laser-arc hybrid welding [20], Friction Stir Welding (FSW) [25,28,29], and Electron Beam Welding (EBM) [27,30] have been tested. All of these studies show the weldability of additive manufactured components or heterogeneous welding (AM part with conventional part).
More specifically, some studies involved welding of 316L stainless steel produced by SLM [14,32,33]. An energy density higher than 60 J/mm is necessary to have a weld with full penetration without pores for SLM 3 mm thick sheets [14]. However, when the energy density is higher than 120 J/mm, hot cracking was observed during SLM sheet welding, while this was not observed on cold-rolled (CR) plate welding [14]. A. Ascari et al. have shown that the lasering parameters have little influence on the tensile properties of heterogeneous SLM/cold-rolled 316L beads [33]. Regarding the mechanical properties of SLM-welded samples, they show a higher yield stress, higher ultimate tensile stress (UTS), and a lower elongation at break than CR-welded samples [32]. However, this tensile behavior was not compared to non-welded samples, and the position of the fracture (base metal or on the fusion zone) was not clarified.
The literature review shows the possibility of welding 316L produced by additive manufacturing with a higher sensitivity to hot cracking. However, these studies focused on welded materials. Indeed, the influence of the weld on the microstructure and mechanical properties has not yet been clarified. Moreover, some questions remain: what is the influence of the SLM surface roughness on the weldability? What are the microstructure and texture of welded additive manufactured 316L? What is the influence of the elaboration process on weld microstructures and mechanical properties? What is the influence of welding on tensile properties and deformation mechanisms? Therefore, to answer these questions and to fill the information gap in the literature, this comprehensive study compares the butt-joints laser welding of small plates obtained by two different manufacturing processes: cold-rolled and SLM. To de-correlate additive manufacturing process influence and laser welding influence, four different samples types of 316L were investigated. Welded samples were compared to non-welded samples considered as reference samples. The impact of both production methods and welding was investigated on microstructures (SEM (EDX, EBSD)) and mechanical properties (hardness, tensile).

2. Materials and Methods

2.1. Materials

For this study, 316L cold-rolled and SLM sheets with a thickness of 2 mm were employed. Cold-rolled sheets were provided by Asmobax (Lons, France). SLM sheets were built on 3D Systems ProX300 devices (3D system, Rock Hill, SC, USA). The manufacturing parameters are displayed in Table 1.
For welding, sheets 150 (or 130) mm in length, 33 mm in height, and 2 mm in thickness were built, whereas for the reference SLM tensile tests, sheets 18 mm in length, 65 mm in height, and 2 mm in thickness were produced. The experimental welding setup is presented in Figure 1 and detailed in [35].
The composition of both CR and SLM sheets was measured by a foundry master spark OES spectrometer (Oxford), and the results (average and standard deviations of three measurements) are listed in Table 2. The composition of both is similar; however, one can mention the slightly higher amount of Si and Mo in the SLM samples. From these compositions, the Ni and Cr equivalent composition was calculated, and the result is plotted in Table 2 [35]. While plotting this equivalent composition on a Schaeffler diagram, between 5% and 10% of ferrite was expected.

2.2. Laser Welding

Prior to welding, CR sheets were mechanically polished with SiC paper (P600). In order to preserve the SLM surface rugosity, the SLM sheets were not polished. Both samples were cleaned in a fluonitric aqueous solution. Laser welding was performed on a TrueLaser Cell 3000 (Trumpf) coupled with a TruDisk Yb: YAG (Pmax = 3.3 kW) laser source. The experimental welding setup was as described in previous studies [13,35,36]. From preliminary experiments, welding parameters were selected. They are displayed in Table 3.
On both the CR- and SLM-welded plates, and on the SLM references sheets, a stress relief heat treatment was performed. This consisted of 6 h at 300 °C in room atmosphere followed by slow cooling (10 h to reach room temperature). No oxidation evidence was observed. The CR references sheets were furnished annealed; therefore, they were not subjected to this stress relief heat treatment. This heat treatment should have a minimum impact on the microstructure and mechanical properties [37,38].

2.3. Microstructural Characterization

After welding, whole seams were checked by X-ray radiography. Imaging was performed on an Easytom X-ray tomograph (RX solutions) with a polychromatic source operated at a voltage of 133 keV and a pixel lateral isotropic size of 9 μm.
For the general microstructural characterization, sample cross-sections were observed using a Leica wild M420 binocular and a ZEISS EVO HD15LS scanning electron microscope (SEM) coupled with an energy-dispersive X-ray (EDX; Oxford X-Max 50 mm2 detectors (E = 15 kV, WD = 11 mm)). The sample preparations consisted of several steps, starting with an automatic mechanical polishing (Mecatech 334) and ending with the use of P2500 SiC grit papers. The final polishing steps were performed using colloid alumina solutions (3 µm, 1 µm and 0.25 µm). Then, samples were etched depending on the base materials’ elaboration process: 1 min in a 55% HCl + 20% HNO3 + 25% CH3OH solution for CR sheets and a few seconds in a 2/3 HCl + 1/3 HNO3 solutions for SLM sheets.
For grain observations and characterization, Electron Back-Scattered Diffraction (EBSD) maps were acquired on an SEM (JEOL JSM-7000F, E = 20 keV, WD = 15 mm) coupled with an OXFORD Nordlys Fast camera. Prior to the observations, the samples were polished with P1000 SiC paper and were then electropolished (40 s, 28 V) with an A3 solution (Lectropol-5, Struers). SEM-EBSD maps were acquired with a step size of 0.1 µm for a high-magnification map (base metal CR samples) and 0.8 µm for low-magnification maps. Analyses were performed using Channel 5 software.

2.4. Mechanical Characterization

Vickers hardness was measured using Zwick/Roell ZHV2.5 equipment with a 1 kg load (HV1). All tests were performed using the EN ISO 6507-1 norm. Tensile tests were performed with an electromechanical Instron 5892 tensile machine with a cross-head displacement control mode (2 mm/min leading to an approximative strain rate of 2 × 10⁻³ s−1) on a dog-bone sample with a gauge length of 25 mm and a cross-section of 10 × 2 mm² [13]. Prior to the tensile tests, welded samples were polished with P600 SiC paper. According to the literature, a roughness (Ra) below 0.5 µm was expected [39]. The strain measurement was carried out with a digital video extensor system. In addition, the tensile tests of welded samples were recorded by a pair of 5.0 Mpix cameras. Digital Image Correlation (DIC) was performed on the top surface of the assemblies using Vic3D software. This configuration allowed a magnification of 1362 pix·mm−1 and a strain spatial resolution of approx. 95 µm. Yield stresses are not easily determined, and elastoplastic transition was determined using 0.2% proof stress.

3. Results

3.1. Microstructure

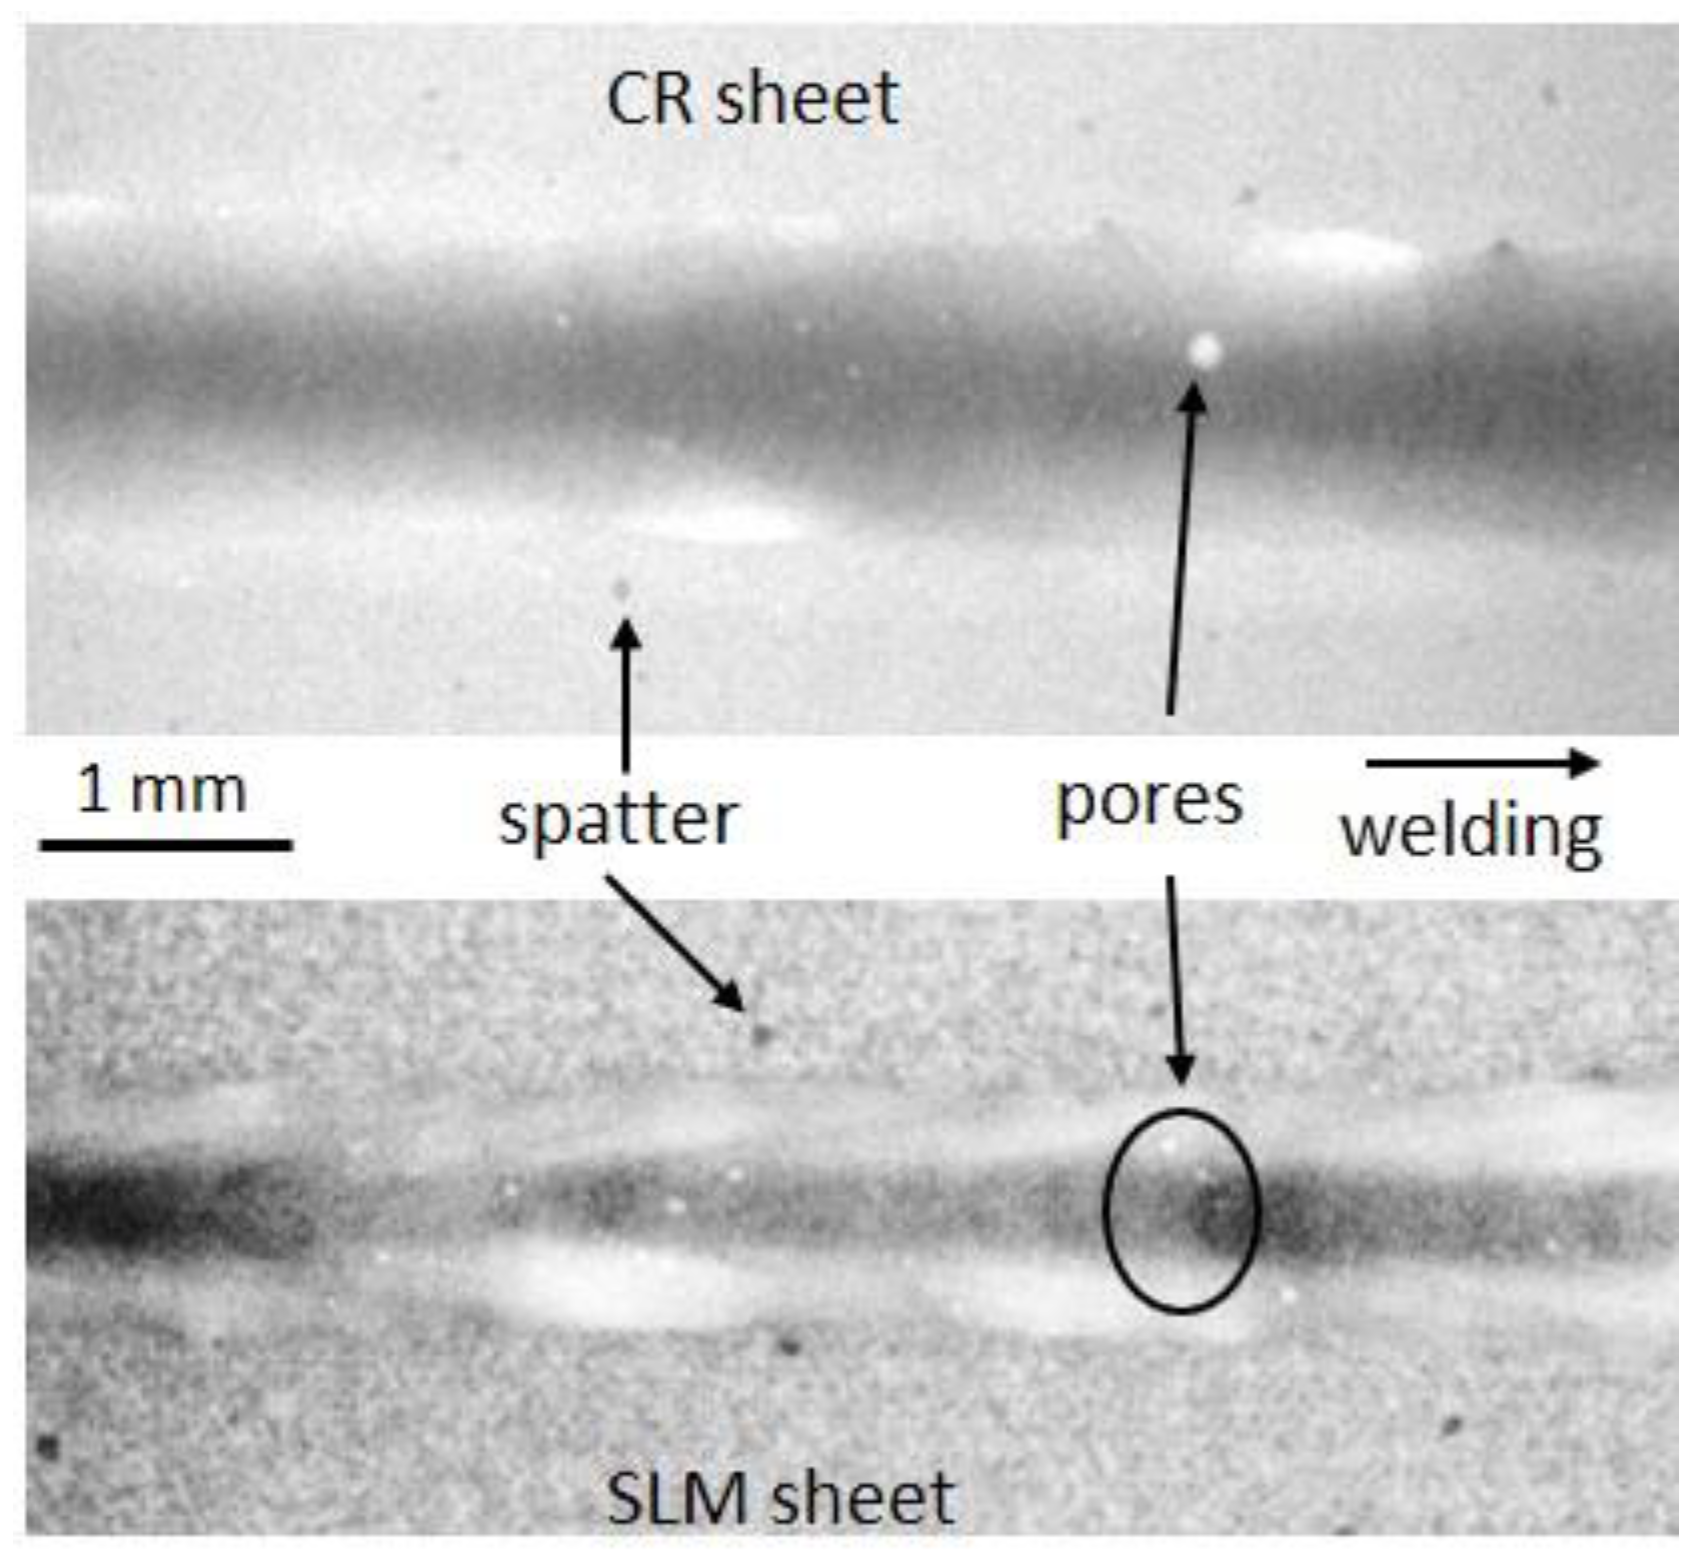
After welding, initially, X-ray radiography was performed to ensure the lack of large microstructural defects such as pores or cracks. Due to the pixel size (9 µm), only defects larger than 20 µm could be detected. As shown in Figure 2, no cracks were found, which is in accordance with the literature for 316L material laser welded [2,3,4,5,6,14,32,33]; some spatters and also some pores were observed. Defects were analyzed following the NF EN ISO 13919-1 (2019) norm. The data extracted from X-ray radiography are plotted in Table 4. Seam porosity was very weak (less than 0.5%). SLM had a higher number of pores; however, their size and repartition were more homogeneous. Both seams were considered acceptable for a B-quality index.
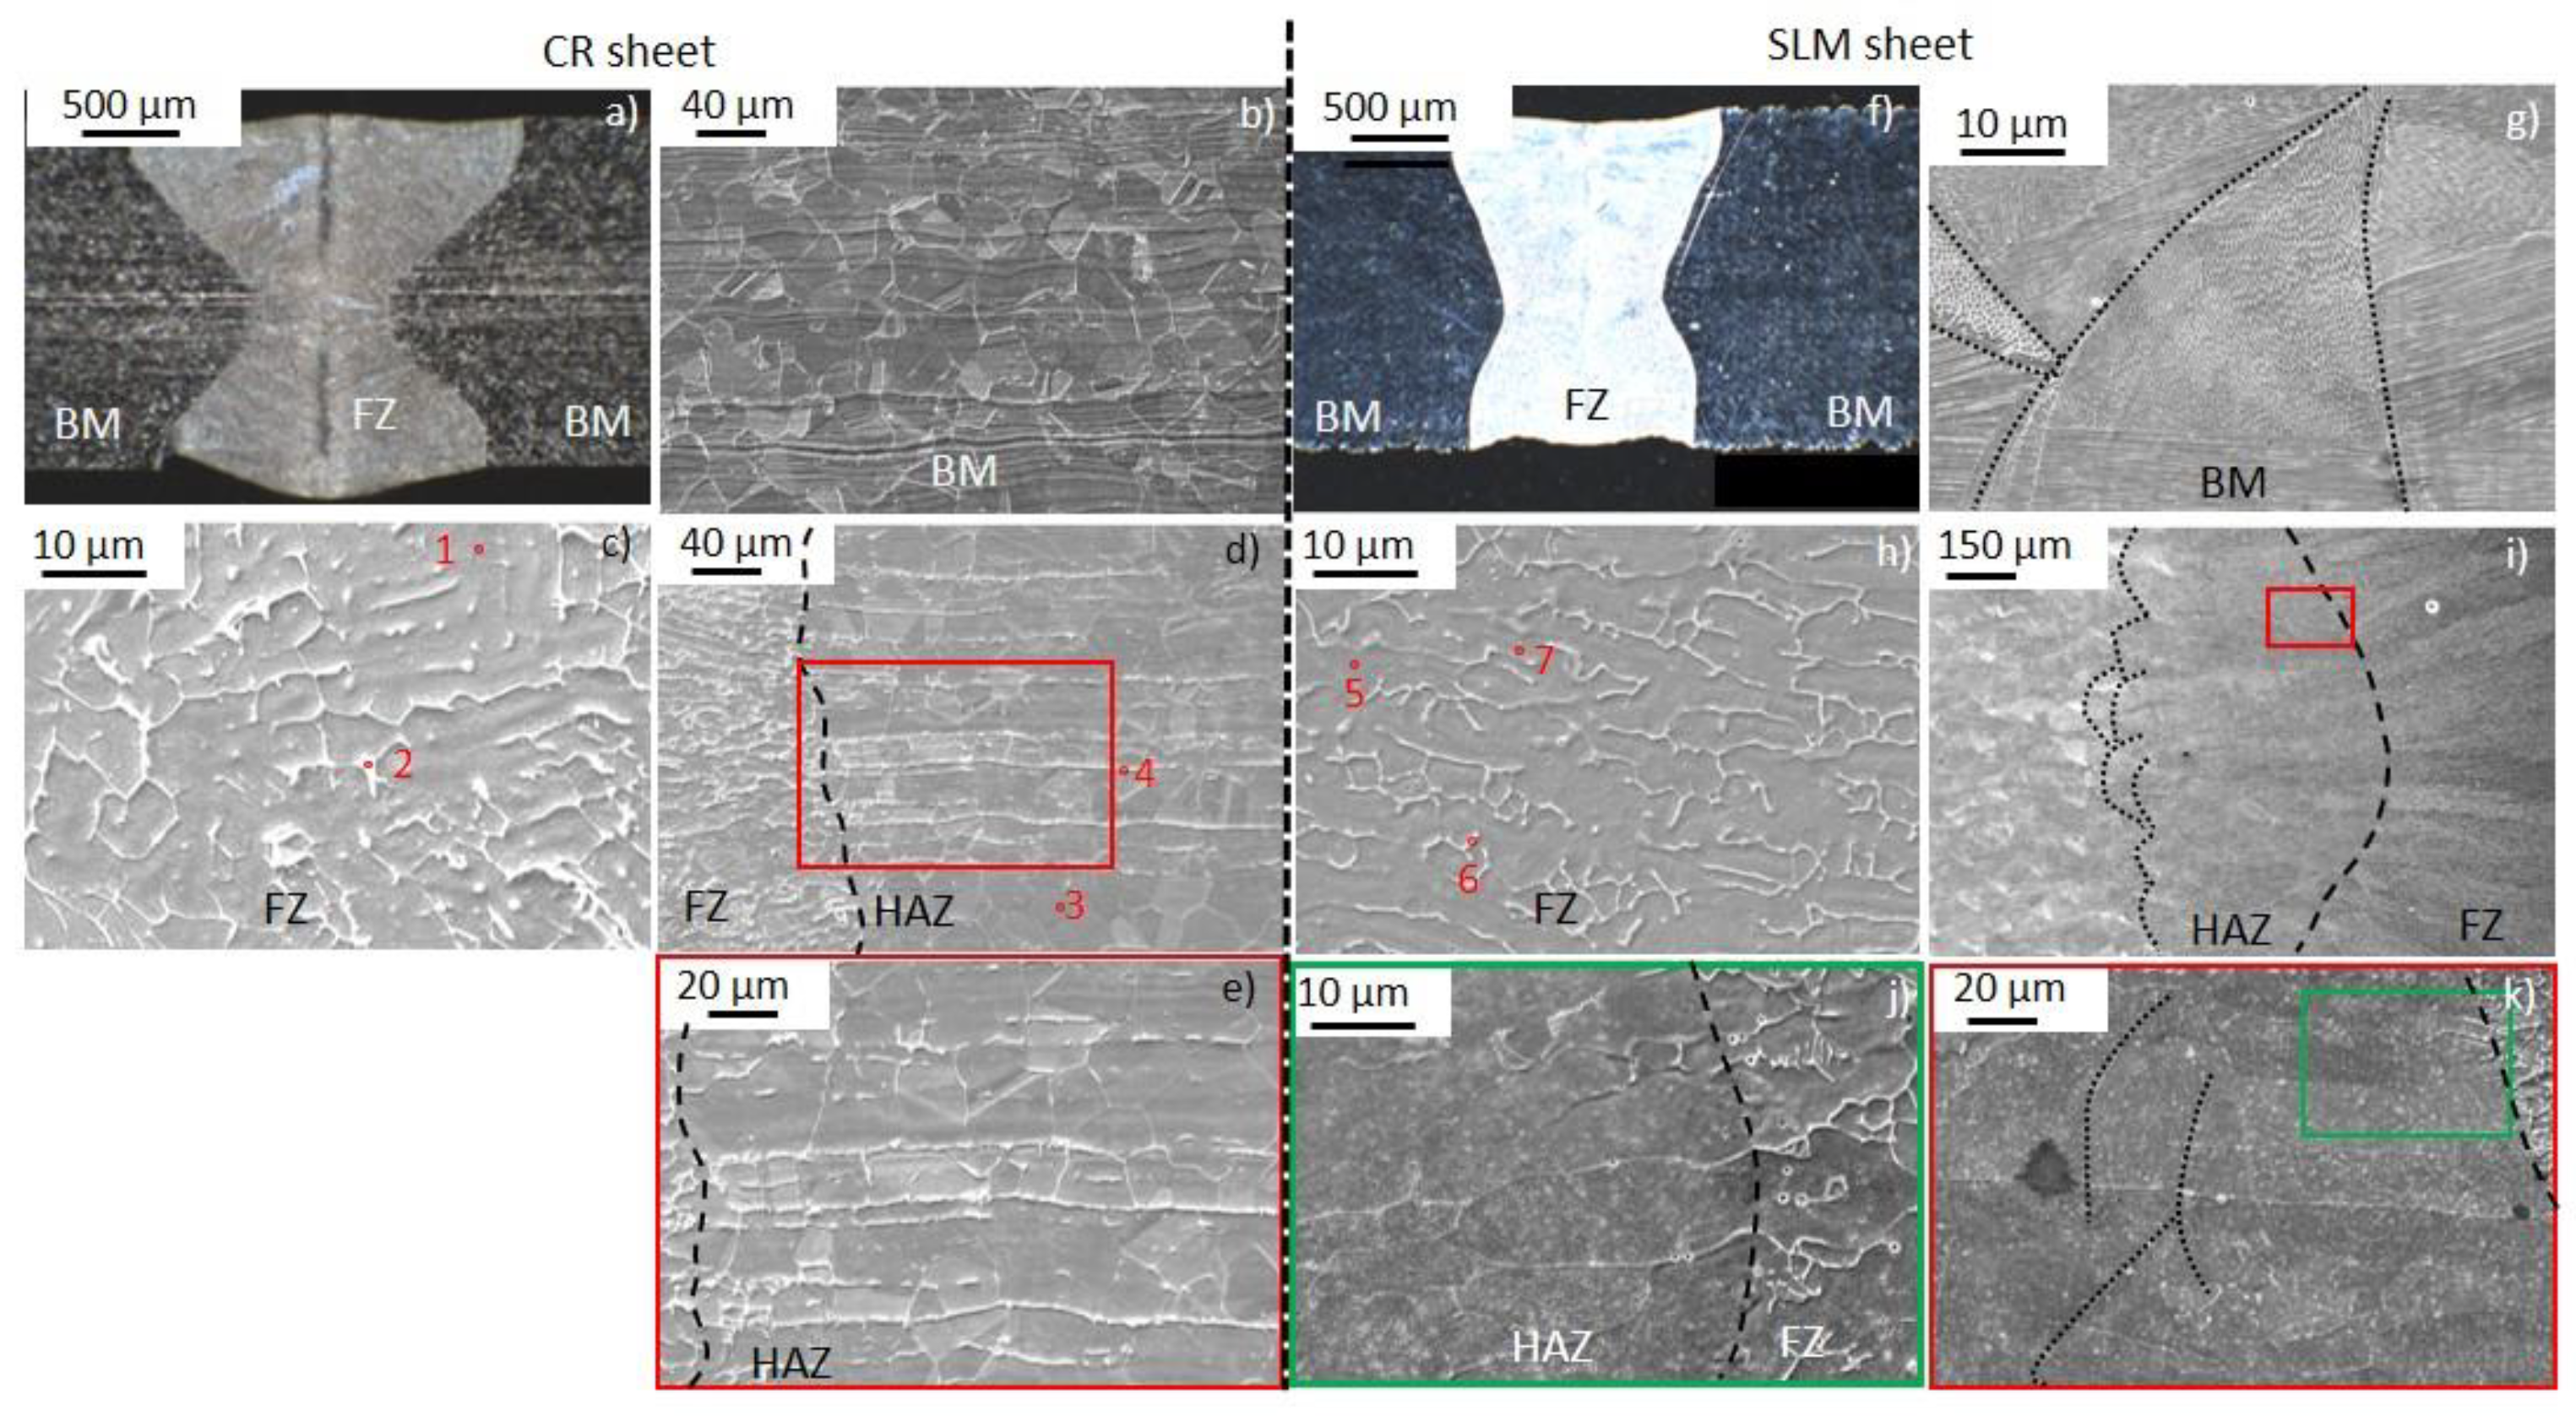
Welded cross-sections were observed with binoculars and SEM. The results of these observations for the welded CR sheets and welded SLM sheets are presented in Figure 3. Seam geometrical analyses were performed following NF 06 395 (2010) as presented in Figure 1, and the results are displayed in Table 5. Red dots correspond to the EDX chemical analysis location. The results of the composition are displayed in Table 6.
The cold-rolled sheet base metal consisted of typical cold-rolled austenitic grains including twin boundaries (cf. Figure 3b). Some microsegregation lines created by the cold-rolling process were observed, such as in [40]. The cold-rolled sheet Fusion Zone (FZ) welds exhibited a strong hourglass shape with small reinforcements for both faces and a tiny undercut groove on the cross-sections (cf. Figure 3a). This shape is in accordance with cold-rolled plates welded with a similar input energy [3]. Its microstructure consists of dendritic grains (Figure 3c). The inter-dendritic area was enriched in Cr and Mo and depleted of Ni (cf. Figure 3 (dots 1 and 2)). This could correspond to a ferritic phase [41]. In the heat-affected zone (HAZ) and Partially Melted Zone (cf. Figure 3d,e), the transition from equiaxed grains to dendritic grains occurred. Some very small grains, elongated perpendicularly to the Partially Melted Zone (PMZ), were also observed. Compared to the equiaxed grains (dot 3 in Figure 3d), these grains were enriched in Cr and Mo (dot 4). These grains were organized in strings, corresponding to the microsegregation mentioned above. Similar grains have already been observed in the HAZ of welded 316L [32,42]. The HAZ-BM transition is not well defined by microstructural changes.
The SLM sheet weld showed a somewhat X-shaped geometry with no reinforcement on either face and also showed a face groove on the top and a tiny shrinkage groove (cf. Figure 3f). The Fusion Zone (FZ) microstructure was very similar to that of the welded cold-rolled sheets (cf. Figure 3h). Dendritic grains with an inter-dendritic zone enriched in Cr and Mo (cf. Figure 3 (dots 5 and 6)) were also observed. In addition, many dark dots were observed. They are Mn, Si, and O rich and relatively depleted of Fe, Cr, and Ni. They probably correspond to MnxSiyOz oxides commonly observed in 316L [43,44,45]. In the HAZ (cf. Figure 3i–k), the SLM melt pool boundaries and SLM dendrites were partially erased. From the FZ, the first melt pool boundaries are highlighted by dotted lines. Some heat treatments enable the partial or total erasure of melt pool boundaries and dendrites [37,38]. Therefore, from the microstructural features, the HAZ thickness can be estimated to be around 500 µm. In the base metal (cf. Figure 3g), melt pool boundaries and columnar dendritic grains growth were observed, as commonly reported in the literature for 316L elaborated by SLM [7,8,10,37,38].
In the FZ area and in the BM of the SLM samples, the dendrite thicknesses and ferrite content were measured from threshold images, and the results are shown in Table 7. On one hand, irrespective of the elaboration process and surface roughness, for both samples, a dendritic growth with a dendrite composition corresponding to austenite and interdendritic space composition corresponding to ferrite was observed. The Creq/Nieq ratio (around 1.6 here) leads to a ferritic–austenitic mode of solidification resulting in a ferritic skeleton at room temperature [46]. Moreover, similar dendrite thicknesses in the fusion zone were measured, implying similar cooling rates. On the other hand, the dendrite thickness of the SLM base metal was almost ten times thinner than that of the fusion zone. This result highlights the slower cooling rate of welding compared to the SLM process. Regarding the ferrite content, similar values for all dendritic areas were measured and were consistent with the Schaeffler diagram [47]. Moreover, this can be decreased by adapting the welding parameters [4,48,49].
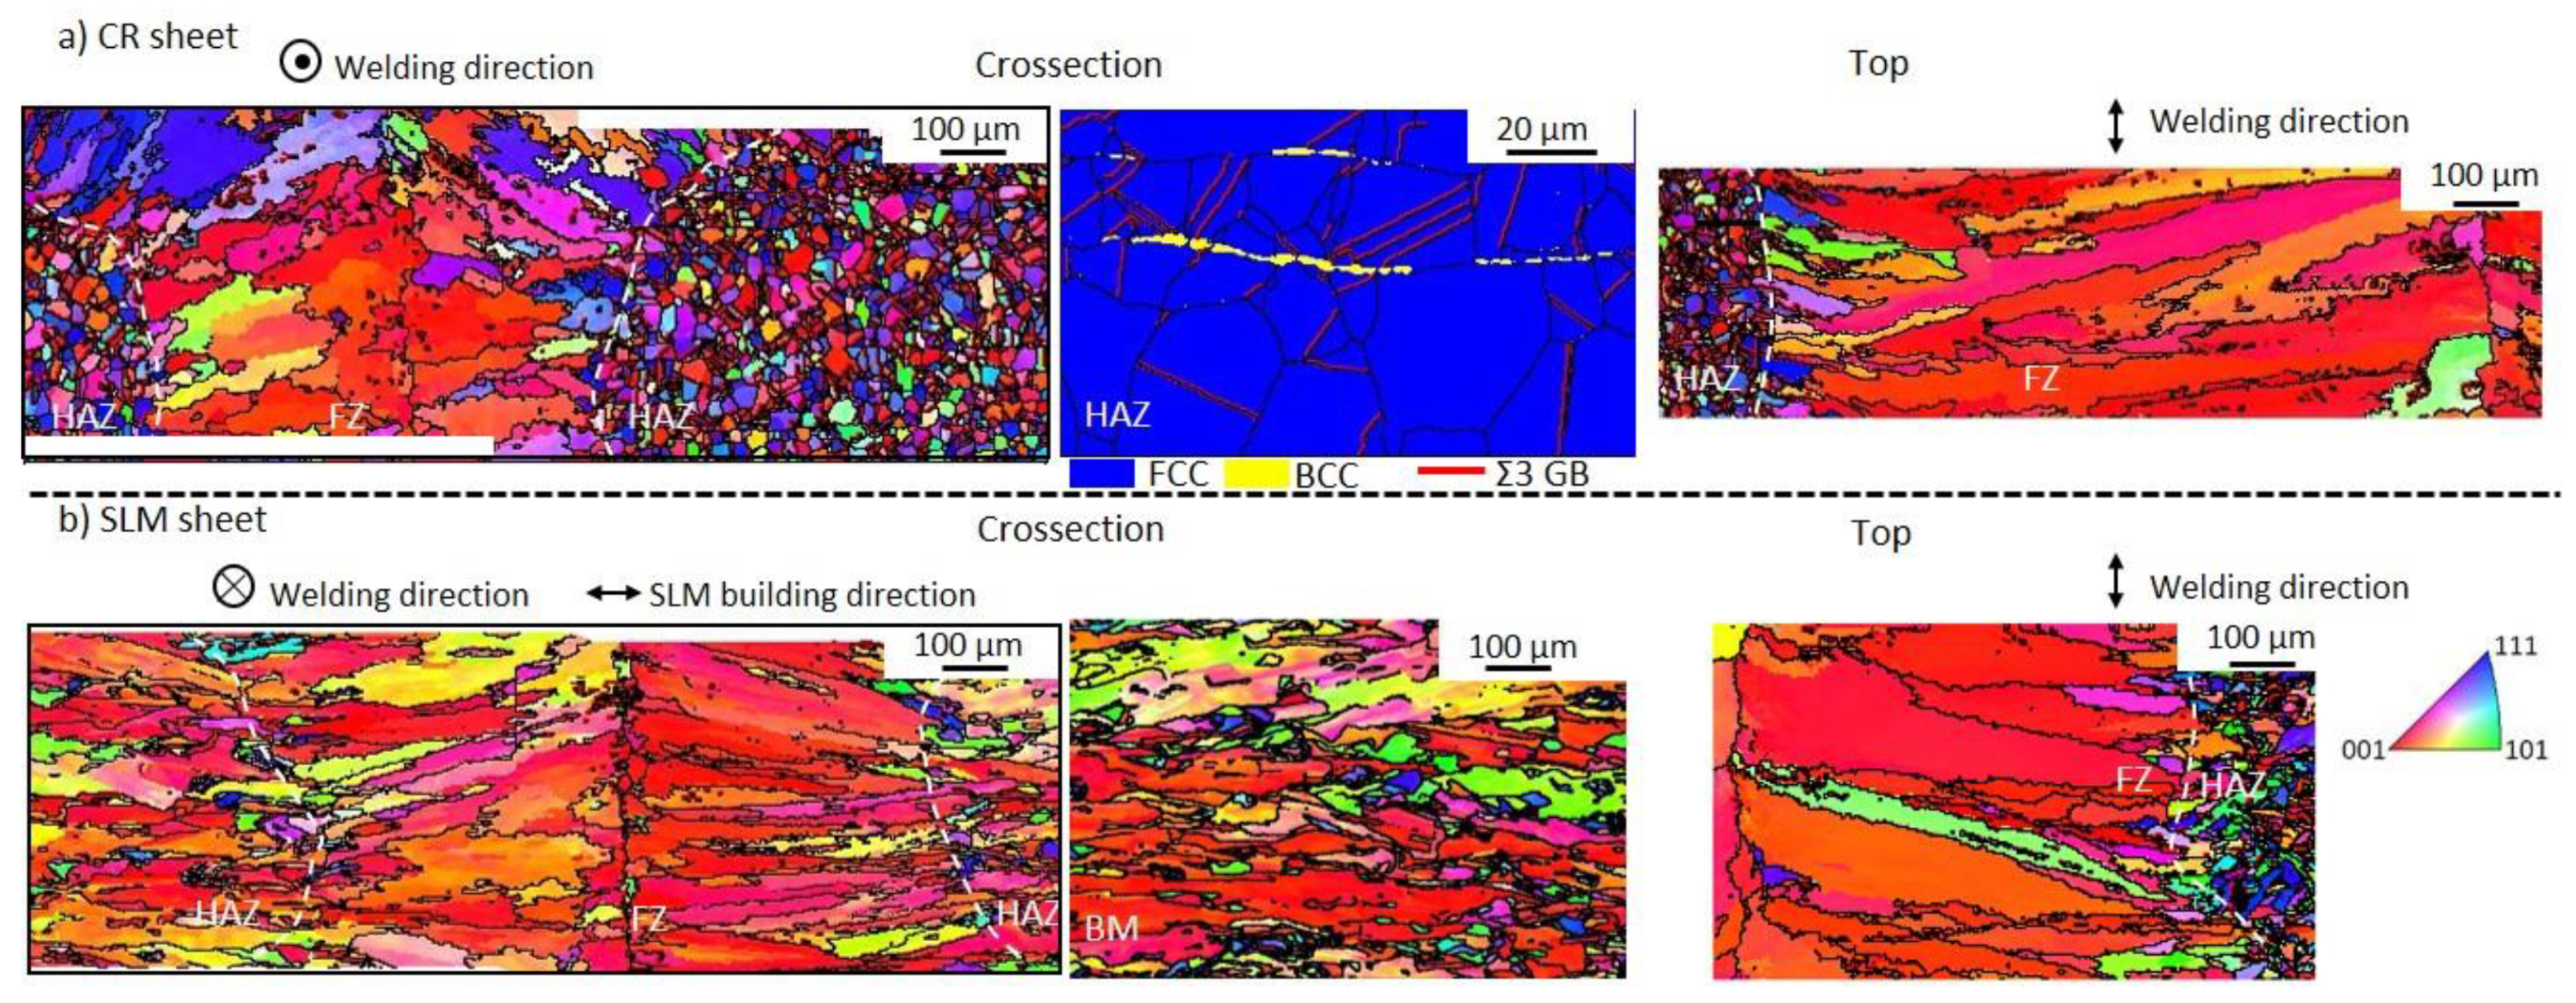
In addition to the SEM observations, EBSD maps were obtained to analyze the grain size and texture. Figure 4a shows the inverse pole figure X (perpendicular to laser beam travel) of one part of a CR sample cross-section (left) and top (right).
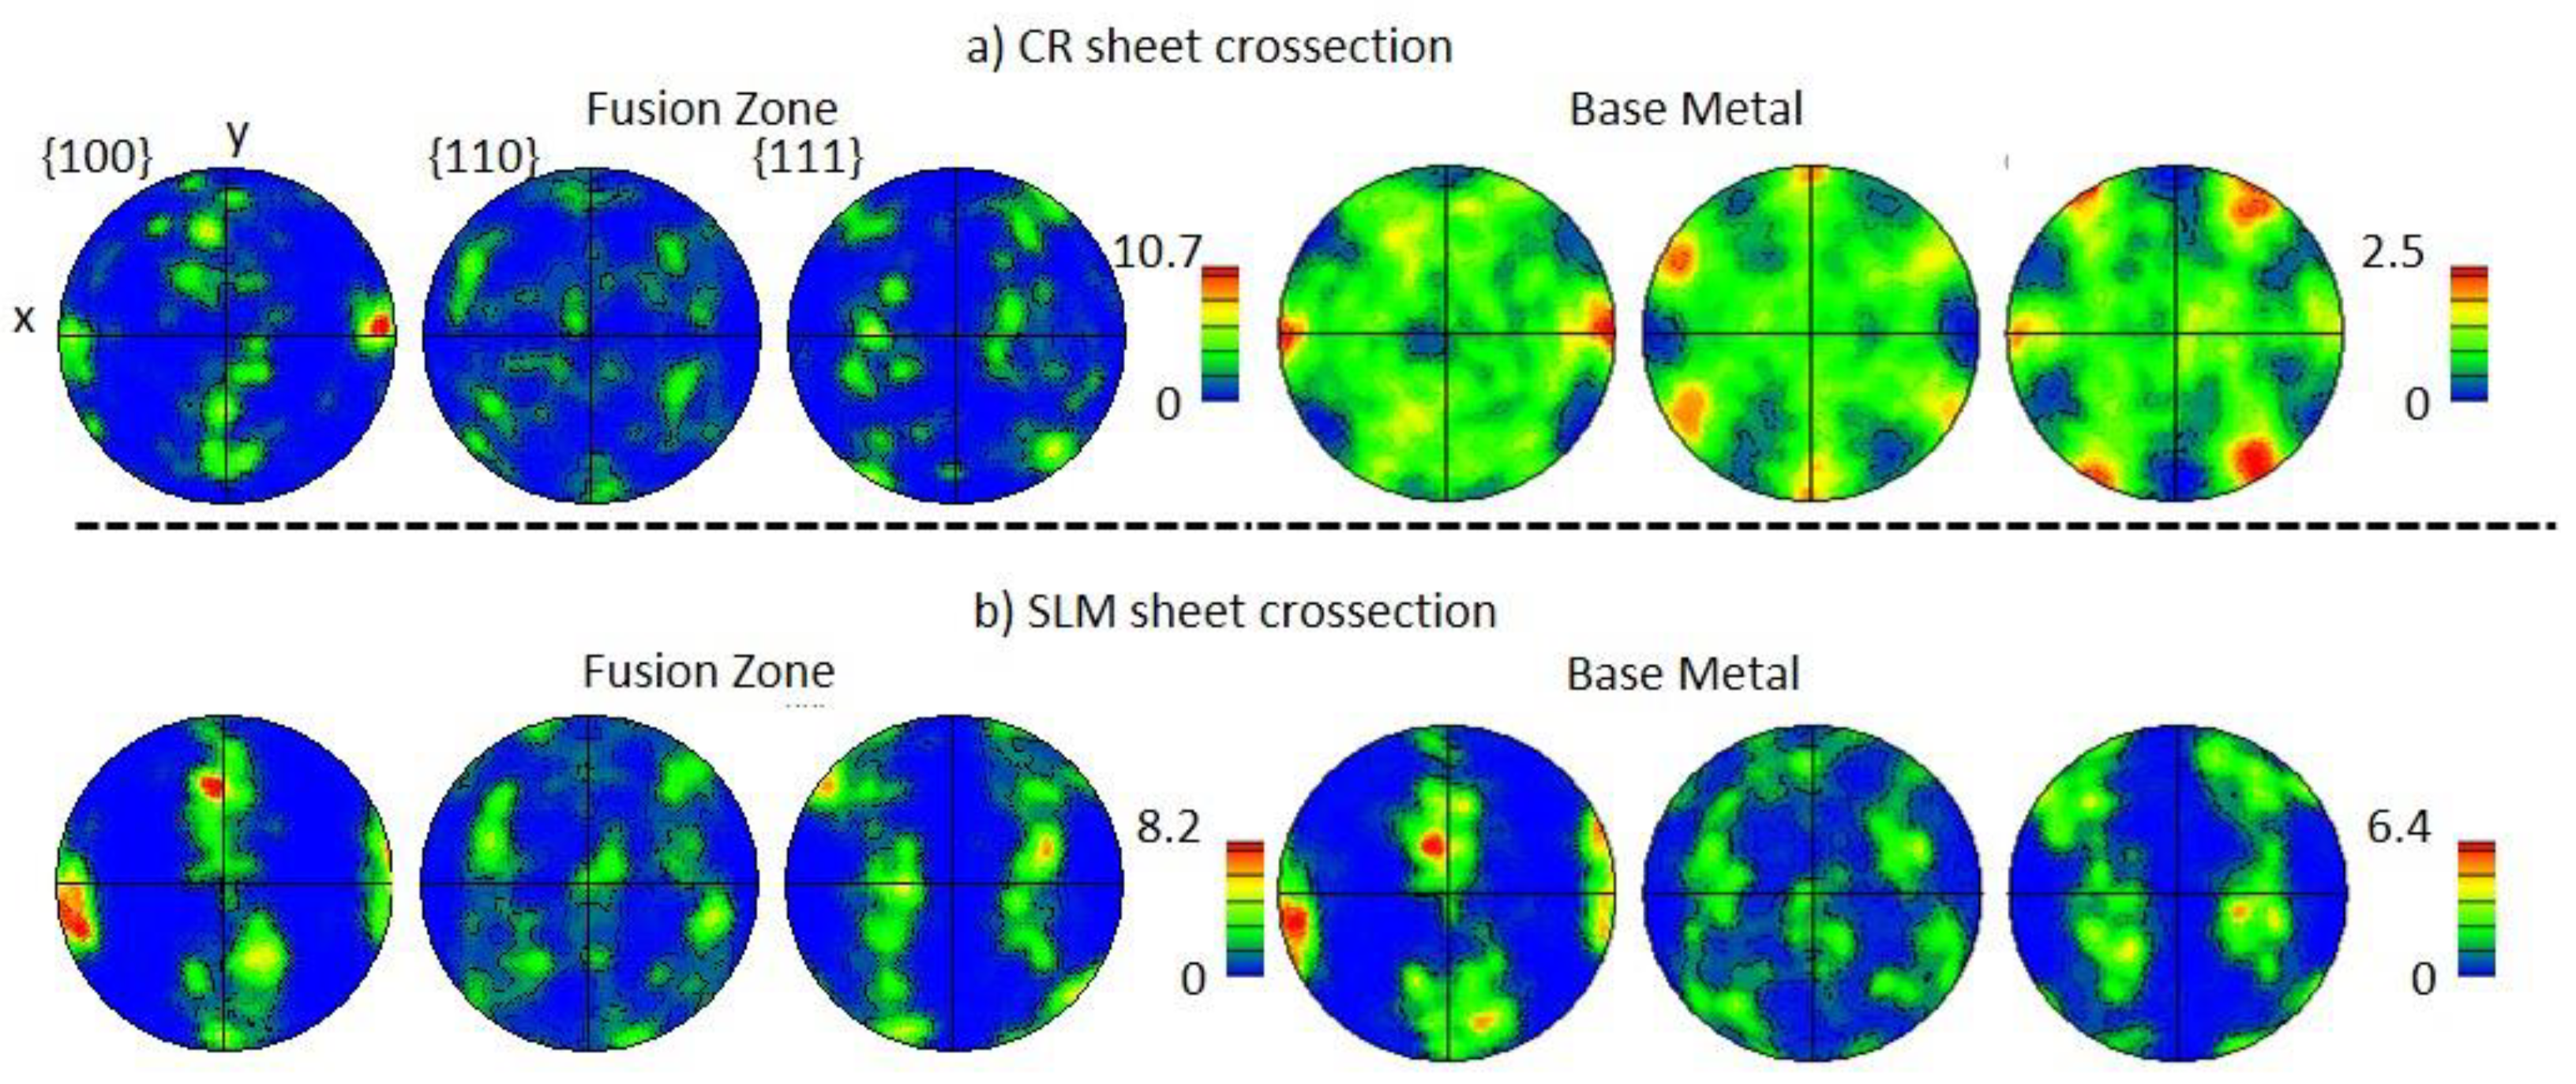
In the middle, a phase map of the HAZ is displayed. This map confirms the presence of ferrite in the HAZ of the CR samples. Figure 4b shows the inverse pole figure X for one part of the SLM sample cross-section (left and middle) and SLM sample top (right), respectively. First of all, the fusion zones and SLM BM consist of a large columnar grain, which grew in the direction of the largest thermal gradient. The weld center beads are well defined by the grain boundaries. The SLM sheet weld, base metal, and CR sheet fusion zone (around 25% of both seam thicknesses is represented) show large austenitic grains with a strong texture in the <100> direction, which is confirmed by Figure 5 with the pole figure. This multiscale structure (dendrites vs. grains) and this texture are consistent with the literature on 316L CR laser-welded plates [49,50].
Although the CR sheet BM consisted of equiaxial non-textured twined austenitic grains, the SLM BM microstructure was close to the SLM FZ microstructure. This result was confirmed by the similar pole figure (Figure 5b). Moreover, the pole figure of the fusion zone indicates a similar texture for both samples (CR and SLM). From the EBSD maps, some morphological parameters of the grains were extracted (cf. Table 8).
As already observed in the macrography, the weld front is larger for the CR samples compared to the SLM samples. Their larger grain area can be explained by the larger head front because the average grain thickness for both samples is about 55 µm. In the fusion zone, the grains are much larger than in the base metal. On the weld surface, the grains are larger than on the cross-section due to a larger fusion zone. The SLM FZ grains are more elongated than the CR FZ grains. However, they can all be considered anisotropic (aspect ratio > 2). Except for the austenitic grains (CR base metal), all the grains show a low internal disorientation.

3.2. Mechanical Properties

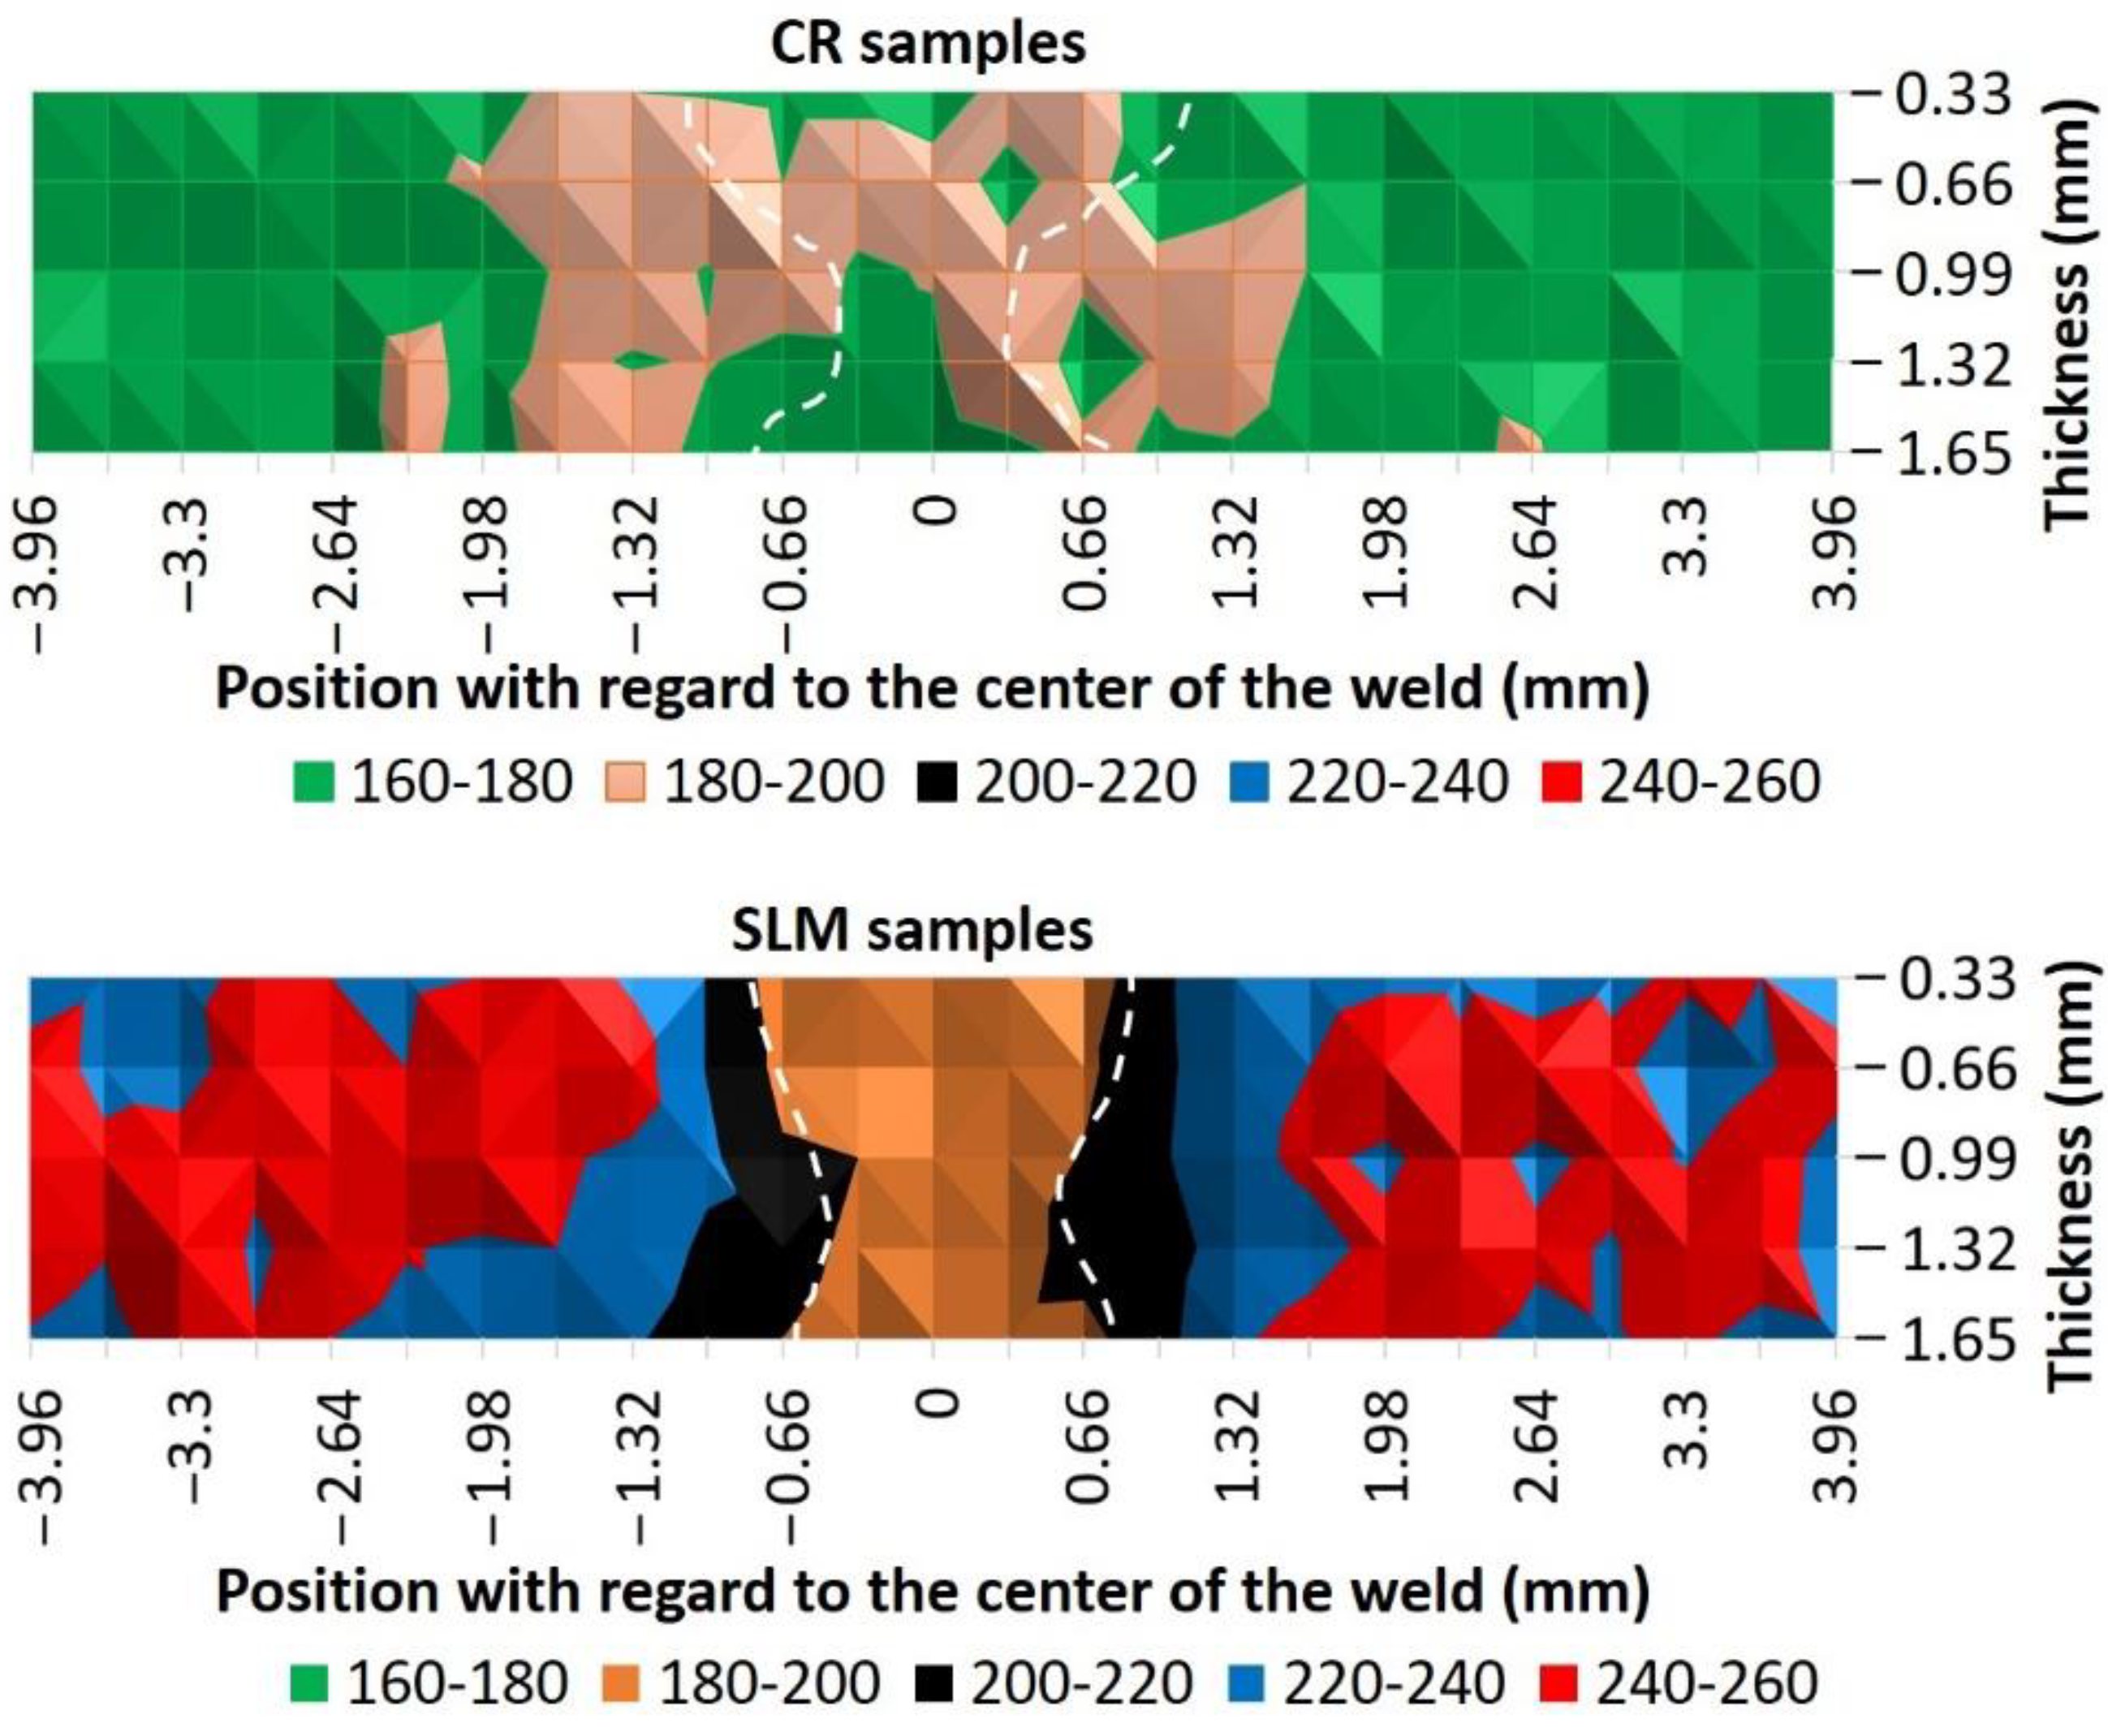
The impact of the processes on mechanical properties was also analyzed. First, at a local scale, the evolution of hardness in the welded sample cross-section was measured (cf. Figure 6).
The FZ interface position is represented by dashed lines. On the top of the figure, the result for the welded CR sheet is displayed. Far from the middle of the fusion zone, the hardness magnitude is included between 160 and 170 (HV1), while within 2.5 mm from the middle of the fusion zone, the hardness varies from 170 and 200 (HV1). Although the microstructure is totally different between the fusion zone (dendritic grains) and base metal (equiaxed grains), the hardness variation is weak (40 HV1). Moreover, the fusion zone and heat-affected zone positions are not obviously defined. This weak hardness evolution or higher hardness in the HAZ compared to FZ can be explained by the welding parameters [3,5,51,52]. At the bottom of the figure, the result for the welded SLM sheet is displayed. Contrary to the welded CR sheet, the fusion zone, heat-affected zone, and the base metal can be easily identified by the hardness. The heat-affected zone thickness can be estimated at around 600 µm. The lowest hardness corresponds to the fusion zone (180–200 HV1) followed by the heat-affected zone (200–220 HV1) and base metal (220–260 HV1). The fusion zone defined by the hardness value is consistent with that defined by the microstructure feature. A smaller dendrite thickness can explain a larger hardness in the base metal. This hardness evolution is consistent with that measured in the literature for TIG welding [41].
The hardness’ averages in the fusion zone and base metal results are synthesized in Table 9. The CR sheet base metal hardness was lower than that of the SLM sheet base metal. The base metal hardness is consistent with that in the literature [32,33].
Then, the macroscopic mechanical behavior was investigated by tensile tests. The tensile curves are plotted in Figure 7.
Three tests were performed for each condition. Yield stress, ultimate tensile strength, and elongation at break values were extracted from these curves, and the results are shown in Table 9. First, one can observe a good reproducibility. All samples showed an elasto-plastic behavior with large ductility. The fracture occurred in the FZ in all samples, except for SLM Welded #1. The SLM samples had weak strain hardening, especially compared to that of the CR samples. As already observed in the literature [8,32], SLM samples show a higher yield stress and a lower elongation to failure. The welded CR sheets showed a slight yield stress increase, which might be explained by a higher mean hardness of its FZ. However, the elongation at break decreased. The welding process implies a loss of ductility of around 15%. This loss of ductility is consistent with previous observations [2,3,51]. Expect for the elongation at break, which differs between SLM sheets and welded SLM sheets, the other tensile parameters were similar. The tensile properties of these welded samples were consistent with those measured by [8].

4. Discussion

4.1. Material Health

On one hand, the SLM process may induce some porosities into the base metal, which would have been reported in the fusion zone. On the other hand, the SLM process generates any residual stresses which would have been caused crack after the welding process. However, neither surface roughness, nor materials’ initial composition or initial microstructure show a significant influence on weld defects formation. Both materials enable the formation of crack-free and high-quality index welds.

4.2. Fuzion Zone Geometry and Microstructure

The weld geometry is linked with the laser–matter interaction. In our case, the X-shape geometry is more consistent with a conduction mode than a pure keyhole mode [52]. Even if both samples present an X-shape geometry, the width difference between the minimum width and face width (W0/FW) is more important for CR sheets than SLM sheets. Another difference worth mentioning is the presence of reinforcement in the CR-welded sheets, while SLM-welded sheets tend to have a groove. As already observed in the literature [14], weld heads are larger for CR sheets than SLM sheets, and better penetration for SLM sheets is observed. However, these authors [14] observed a large difference in weld geometry. On the contrary, authors [32,33] who performed dissimilar welds, showed rather symmetrical welds, which is more consistent with our results. Regarding the FZ area, it was larger in one of the CR samples than in the SLM samples. This is consistent with the literature [14], which shows a slightly lower melting efficiency for SLM samples.
Considering the same laser parameters and similar materials, a similar geometry would have been expected. However, the surface roughness of our materials is different (SLM plates were neither polished nor machined). This surface roughness can modify laser-matter interaction (especially laser reflection on the surface) and it can also modify the wettability and surface tension. Another point to mention is the composition difference; the oxygen amount was not measured but it is expected higher for SLM samples. This composition difference can affect melting temperature. We should also notice that, contrary to SLM sheets, CR sheets exhibit a slight macrosegregation between plate center and plate surface. These segregations induce ferritic grains observable in HAZ. These ferritic grains are only visible from around 350 µm, which may explain the wide variation of FZ width. However, similar weld minimum widths were measured for both materials, meaning that heat exchange and thermal gradients are similar.
We will now focus on grain formation. Both FZ and BM SLM arise from an epitaxial growth. Therefore, the limit between BM and FZ is not clearly defined by the microstructure. Regarding the CR samples at the HAZ-FZ interface, the grains grow from equiaxed grains with various orientations. A competition between orientations is observed with a reduction in some orientations and expansion of the <100> direction. Therefore, the number of grains is around two or three times more elevated at the HAZ/FZ interface than in the weld center. This different grain formation mechanism leads to a different grain shape. Grains in the FZ of SLM samples have a higher aspect ratio than grain in the FZ of CR samples. The analysis of the different EBSD maps on the top face showed that the dendritic grains meet in the center of the weld on the joint plane. High heat supply and high welding speed produced a water-dropped weld bath. The heat input and the welding speed were too high to obtain an elliptic melting bath, but they were not sufficient to cause heterogeneous nucleation at the weld pool center line.
While using the same laser parameters on the same materials (316L) obtained from different processes (CR or SLM), some similarities and some differences were observed. A different geometry of the FZ due to a different laser–matter interaction and a different FZ grain formation due to different microstructures in the BM are observed. However, the same minimum weld width, the same dendrite thickness, the same ferrite content, the same texture and the absence of nucleation at the weld pool center line are observed due to the same solidification mode and the same thermal gradient.

4.3. Relation Microstructure-Properties

Contrary to CR welded plates, laser welding has a significant impact on the hardness of SLM welded plates. The position of BM, HAZ and FZ can be easily distinguished by hardness variation. However, due to the same thermal gradient in the fusion zone, similar dendrite thickness was measured. This microstructural similarity leads to a similar hardness in the fusion zone (190–200 HV1).
To analyze the influence of microstructure on the mechanical behavior of each assembly, deformation during the tensile test was followed by digital image correlation. Figure 7 proposes an evaluation of the strain level difference between the FZ and the considered base metal. For the CR weld samples, the strain level in the FZ was weaker during the early stages of the test. This could be explained by a relatively fine solidification microstructure with ferrite dispersion strengthening the FZ. However, when approaching rupture, the HAZ and then the FZ tended to develop high levels of strain rate compared to the BM. For this particular phenomenon, the ferritic phase and pores observed in the fusion zone could be a damage enhancer. As for the behavior of the SLM welds, the FZ was systematically the preferred strain zone until fracture, which is consistent with refined dendrites in SLM BM and a relatively coarser microstructure in the FZ.
All tensiles’ results are consistent with the hardness measurements and microstructural features.

5. Conclusions

In this study, the viability of obtaining large parts with the laser welding of additive manufactured AISI 316L plates was investigated. All the welds were performed with the same parameters. A comparison of the microstructure (SEM, EDX, and EBSD) and the mechanical properties (hardness and tensile) of SLM weld plates and cold-rolled (CR) weld plates was performed. The CR laser-welded plates showed a microstructure and mechanical properties consistent with those in the literature. The main conclusions are enumerated below.
  • Both welds were defect-free and had X-shape geometry. However, the SLM weld seam showed a different geometry with no reinforcement and had an almost constant width throughout the thickness and a lower melting efficiency;
  • The composition led to a ferritic–austenitic mode of solidification, resulting in a ferritic skeleton at room temperature. Both fusion zones showed a ferrite content around 8%, which is consistent with the Schaeffler diagram.
  • Both texture (<100> in the solidification direction) and grain characteristics (anisotropic dendritic grains elongated in the solidification direction) of the fusion zone were similar, irrespective of the base metal microstructure. However, an epitaxial growth was observed in both the SLM base metal and fusion zone, while the fusion zone of the CR sheet resulted from grain growth with a privileged orientation from austenitic twined equiaxed grains.
  • Hardness variation was clearly observed in the SLM heat-affected zone and fusion zone compared to base metal, but this variation was less significant in the CR samples. Both fusion zones presented a similar hardness, which is consistent with similar welding parameters and dendrite thickness in the fusion zone.
  • Fracture occurred in the fusion zone for all samples. Welding had a low impact on the elastic and hardening behavior; however, necking behavior was modified. Although a decrease in ductility of around 30% compared to the base metal was observed, the welded samples from SLM plates still presented a ductile behavior with an elongation at break of around 40%.
  • Even if failure occurred in the fusion zone in both configurations, the straining sequences were different. Regarding the SLM weld samples, strain developed preferentially in the fusion zone where the final fracture occurred. This is consistent with the lower hardness and the larger dendrite thickness in the fusion zone compared to the base metal. A different behavior was observed for the CR weld samples: strain initially developed in the base metal and then became preponderant in the fusion zone. The heterogenous microstructure of the fusion zone could favor damaging and, as a consequence, correspond to the failure zone.
In conclusion, laser welding is a powerful solution to obtain large parts from additive manufactured small parts. The impact of welding on both microstructure and tensile mechanical properties is limited.

Author Contributions

Conceptualization, M.M., Y.B. and J.A.; validation, P.P., M.M. and Y.B., J.A.; investigation, P.P., M.M. and Y.B.; writing—original draft preparation, M.M., Y.B. and J.A.; writing—review and editing, M.M., Y.B. and J.A.; supervision, J.A. All authors have read and agreed to the published version of the manuscript.

Funding

This research received no external funding.

Data Availability Statement

The data presented in this study are available on request from the corresponding author. The data are not publicly available because the data also form part of an ongoing study.

Acknowledgments

The authors would like to acknowledge Jean Denis Béguin, Jade Pécune, and Nathalie Aubazac for their technical support and CEF3D platform for producing SLM samples.

Conflicts of Interest

The authors declare no conflict of interest.

References

  1. Huang, X.; Xiao, K.; Fang, X.; Xiong, Z.; Wei, L.; Zhu, P.; Li, X. Oxidation Behavior of 316L Austenitic Stainless Steel in High Temperature Air with Long-Term Exposure. Mater. Res. Express 2020, 7, 066517. [Google Scholar] [CrossRef]
  2. El-Batahgy, A.-M. Effect of Laser Welding Parameters on Fusion Zone Shape and Solidification Structure of Austenitic Stainless Steels. Mater. Lett. 1997, 32, 155–163. [Google Scholar] [CrossRef]
  3. Yamada, H.; Kawamura, H.; Tsuchiya, K.; Kalinin, G.; Kohno, W.; Morishima, Y. Re-Weldability Tests of Irradiated 316L(N) Stainless Steel Using Laser Welding Technique. J. Nucl. Mater. 2002, 307, 1584–1589. [Google Scholar] [CrossRef]
  4. Samanta, S.K.; Mitra, S.K.; Pal, T.K. Influence of Welding Speed on Microstructure and Oxidation Behaviour of Laser Welded Austenitic Stainless Steels. ISIJ Int. 2006, 46, 100–105. [Google Scholar] [CrossRef]
  5. Yilbas, B.S.; Akhtar, S. Laser Welding of AISI 316 Steel: Microstructural and Stress Analysis. J. Manuf. Sci. Eng. 2013, 135, 031018. [Google Scholar] [CrossRef]
  6. Dontu, O.; Moreno, J.L.O.; Ciobanu, R.; Branzei, M.; Besnea, D. Study on Laser Welding of AISI 316L Austenitic Stainless Steel. J. Optoelectron. Adv. Mater. 2015, 17, 1444–1449. [Google Scholar]
  7. DebRoy, T.; Wei, H.L.; Zuback, J.S.; Mukherjee, T.; Elmer, J.W.; Milewski, J.O.; Beese, A.M.; Wilson-Heid, A.; De, A.; Zhang, W. Additive Manufacturing of Metallic Components—Process, Structure and Properties. Prog. Mater. Sci. 2018, 92, 112–224. [Google Scholar] [CrossRef]
  8. Liverani, E.; Toschi, S.; Ceschini, L.; Fortunato, A. Effect of Selective Laser Melting (SLM) Process Parameters on Microstructure and Mechanical Properties of 316L Austenitic Stainless Steel. J. Mater. Process. Technol. 2017, 249, 255–263. [Google Scholar] [CrossRef]
  9. Ahmadi, A.; Mirzaeifar, R.; Moghaddam, N.S.; Turabi, A.S.; Karaca, H.E.; Elahinia, M. Effect of Manufacturing Parameters on Mechanical Properties of 316L Stainless Steel Parts Fabricated by Selective Laser Melting: A Computational Framework. Mater. Des. 2016, 112, 328–338. [Google Scholar] [CrossRef]
  10. Tucho, W.M.; Lysne, V.H.; Austbø, H.; Sjolyst-Kverneland, A.; Hansen, V. Investigation of Effects of Process Parameters on Microstructure and Hardness of SLM Manufactured SS316L. J. Alloy. Compd. 2018, 740, 910–925. [Google Scholar] [CrossRef]
  11. Gu, D.; Shen, Y. Processing Conditions and Microstructural Features of Porous 316L Stainless Steel Components by DMLS. Appl. Surf. Sci. 2008, 255, 1880–1887. [Google Scholar] [CrossRef]
  12. Jokisch, T.; Marko, A.; Gook, S.; Üstündag, Ö.; Gumenyuk, A.; Rethmeier, M. Laser Welding of SLM-Manufactured Tubes Made of IN625 and IN718. Materials 2019, 12, 2967. [Google Scholar] [CrossRef] [Green Version]
  13. Faye, A.; Balcaen, Y.; Lacroix, L.; Alexis, J. Effects of Welding Parameters on the Microstructure and Mechanical Properties of the AA6061 Aluminium Alloy Joined by a Yb: YAG Laser Beam. J. Adv. Join. Process. 2021, 3, 100047. [Google Scholar] [CrossRef]
  14. Matilainen, V.-P.; Pekkarinen, J.; Salminen, A. Weldability of Additive Manufactured Stainless Steel. Phys. Procedia 2016, 83, 808–817. [Google Scholar] [CrossRef] [Green Version]
  15. Akbari, M.; Kovacevic, R. Joining of Elements Fabricated by a Robotized Laser/Wire Directed Energy Deposition Process by Using an Autogenous Laser Welding. Int. J. Adv. Manuf. Technol. 2019, 100, 2971–2980. [Google Scholar] [CrossRef]
  16. Kuryntsev, S.V. The Influence of Pre-Heat Treatment on Laser Welding of T-Joints of Workpieces Made of Selective Laser Melting Steel and Cold Rolled Stainless Steel. Opt. Laser Technol. 2018, 107, 59–66. [Google Scholar] [CrossRef]
  17. Mohyla, P.; Hajnys, J.; Sternadelová, K.; Krejčí, L.; Pagáč, M.; Konečná, K.; Krpec, P. Analysis of Welded Joint Properties on an AISI316L Stainless Steel Tube Manufactured by SLM Technology. Materials 2020, 13, 4362. [Google Scholar] [CrossRef]
  18. Yang, J.; Wang, Y.; Li, F.; Huang, W.; Jing, G.; Wang, Z.; Zeng, X. Weldability, Microstructure and Mechanical Properties of Laser-Welded Selective Laser Melted 304 Stainless Steel Joints. J. Mater. Sci. Technol. 2019, 35, 1817–1824. [Google Scholar] [CrossRef]
  19. Luo, C.; Lai, Z.; Zhang, Y. Improvement of Mechanical Properties of Dissimilar Spot-Welded Joints of Additively Manufactured Stainless Steels. J. Manuf. Process. 2020, 54, 210–220. [Google Scholar] [CrossRef]
  20. Casalino, G.; Campanelli, S.L.; Ludovico, A.D. Laser-Arc Hybrid Welding of Wrought to Selective Laser Molten Stainless Steel. Int. J. Adv. Manuf. Technol. 2013, 68, 209–216. [Google Scholar] [CrossRef]
  21. Huysmans, S.; Peeters, E.; De Bruycker, E.; De Prins, K. Weldability Study of Additive Manufactured 316L Austenitic Stainless Steel Components—Welding of AM with Conventional 316L Components. Weld World 2021. [Google Scholar] [CrossRef]
  22. Madeja, M.; Karoluk, M.; Smolina, I. Welding of Ti-5Al-5Mo-5 V-1Cr-1Fe Parts Manufactured in the Electron Beam Melting. Mater. Des. 2020, 195, 108969. [Google Scholar] [CrossRef]
  23. Sun, Y.Y.; Wang, P.; Lu, S.L.; Li, L.Q.; Nai, M.L.S.; Wei, J. Laser Welding of Electron Beam Melted Ti-6Al-4V to Wrought Ti-6Al-4V: Effect of Welding Angle on Microstructure and Mechanical Properties. J. Alloys Compd. 2019, 782, 967–972. [Google Scholar] [CrossRef]
  24. Wits, W.W.; Becker, J.M.J. Laser Beam Welding of Titanium Additive Manufactured Parts. Procedia CIRP 2015, 28, 70–75. [Google Scholar] [CrossRef] [Green Version]
  25. Sankar, G.S.; Karthik, G.M.; Mohammad, A.; Kumar, R.; Janaki Ram, G.D. Friction Welding of Electron Beam Melted γ-TiAl Alloy Ti–48Al–2Cr–2Nb. Trans. Indian Inst. Met. 2019, 72, 35–46. [Google Scholar] [CrossRef]
  26. Xu, M.; Chen, Y.; Zhang, T.; Deng, H.; Ji, D. Effects of Solution Treatment on Laser Welding of Ti–6Al–4V Alloy Plate Produced through Wire Arc Additive Manufacturing. Metals 2020, 10, 1310. [Google Scholar] [CrossRef]
  27. Chen, X.; Zhang, J.; Chen, X.; Cheng, X.; Huang, Z. Electron Beam Welding of Laser Additive Manufacturing Ti–6.5Al–3.5Mo–1.5Zr–0.3Si Titanium Alloy Thick Plate. Vacuum 2018, 151, 116–121. [Google Scholar] [CrossRef]
  28. Moeini, G.; Sajadifar, S.V.; Wegener, T.; Brenne, F.; Niendorf, T.; Böhm, S. On the Low-Cycle Fatigue Behavior of Friction Stir Welded Al–Si12 Parts Produced by Selective Laser Melting. Mater. Sci. Eng. A 2019, 764, 138189. [Google Scholar] [CrossRef]
  29. Du, Z.; Tan, M.J.; Chen, H.; Bi, G.; Chua, C.K. Joining of 3D-Printed AlSi10Mg by Friction Stir Welding. Weld World 2018, 62, 675–682. [Google Scholar] [CrossRef]
  30. Nahmany, M.; Hadad, Y.; Aghion, E.; Stern, A.; Frage, N. Microstructural Assessment and Mechanical Properties of Electron Beam Welding of AlSi10Mg Specimens Fabricated by Selective Laser Melting. J. Mater. Process. Technol. 2019, 270, 228–240. [Google Scholar] [CrossRef]
  31. Zhang, Y.; Hu, X.; Jiang, Y. Study on the Microstructure and Fatigue Behavior of a Laser-Welded Ni-Based Alloy Manufactured by Selective Laser Melting Method. J. Mater. Eng. Perform. 2020, 29, 2957–2968. [Google Scholar] [CrossRef]
  32. Rautio, T.; Jalava-Kanervio, J.; Kumpula, J.; Mäkikangas, J.; Järvenpää, A. Microstructure and Mechanical Properties of Laser Butt Welded Laser Powder Bed Fusion Manufactured and Sheet Metal 316L Parts. Key Eng. Mater. 2020, 861, 9–14. [Google Scholar] [CrossRef]
  33. Ascari, A.; Fortunato, A.; Liverani, E.; Gamberoni, A.; Tomesani, L. New Possibilities in the Fabrication of Hybrid Components with Big Dimensions by Means of Selective Laser Melting (SLM). Phys. Procedia 2016, 83, 839–846. [Google Scholar] [CrossRef] [Green Version]
  34. Giganto, S.; Zapico, P.; Castro-Sastre, M.Á.; Martínez-Pellitero, S.; Leo, P.; Perulli, P. Influence of the Scanning Strategy Parameters upon the Quality of the SLM Parts. Procedia Manuf. 2019, 41, 698–705. [Google Scholar] [CrossRef]
  35. Schaeffler, A.L. Constitution Diagram for Stainless Steel Weld Metal. Met. Prog. 1949, 56, 680. [Google Scholar]
  36. Faye, A.; Balcaen, Y.; Lacroix, L.; Alexis, J. Autogenous Yb:YAG Laser Disk Welding Domain of AA6061-T4 Aluminium Alloy. Int. J. Eng. Res. Sci. 2020, 6, 1–8. [Google Scholar] [CrossRef]
  37. Salman, O.O.; Gammer, C.; Chaubey, A.K.; Eckert, J.; Scudino, S. Effect of Heat Treatment on Microstructure and Mechanical Properties of 316L Steel Synthesized by Selective Laser Melting. Mater. Sci. Eng. A 2019, 748, 205–212. [Google Scholar] [CrossRef]
  38. Ronneberg, T.; Davies, C.M.; Hooper, P.A. Revealing Relationships between Porosity, Microstructure and Mechanical Properties of Laser Powder Bed Fusion 316L Stainless Steel through Heat Treatment. Mater. Des. 2020, 189, 108481. [Google Scholar] [CrossRef]
  39. Goossens, F.; Cherif, M.; Cahuc, O. Study of Polishing AISI 316L with Structured Abrasive. Int. J. Mach. Mach. Mater. 2015, 17, 434–453. [Google Scholar]
  40. Habraken, L.; de Brouwer, J.-L. Centre de recherches métallurgiques (Liège, Belgique). In De Ferri Metallographia: Bases de la Métallographie, Français. I.; Presses Académiques Européennes: Bruxelles, Belgium, 1966. [Google Scholar]
  41. Järvinen, J.-P. Welding of Additively Manufactured Stainless Steel Parts: Comparative Study between Sheet Metal and selective Laser Melted Parts. Master’s Thesis, Lappeenranta University of Technology, Lappeenranta, Finland, 2014. [Google Scholar]
  42. Moteshakker, A.; Danaee, I. Microstructure and Corrosion Resistance of Dissimilar Weld-Joints between Duplex Stainless Steel 2205 and Austenitic Stainless Steel 316L. J. Mater. Sci. Technol. 2016, 32, 282–290. [Google Scholar] [CrossRef]
  43. Yan, F.; Xiong, W.; Faierson, E.; Olson, G.B. Characterization of Nano-Scale Oxides in Austenitic Stainless Steel Processed by Powder Bed Fusion. Sci. Mater. 2018, 155, 104–108. [Google Scholar] [CrossRef]
  44. Saeidi, K.; Gao, X.; Zhong, Y.; Shen, Z.J. Hardened Austenite Steel with Columnar Sub-Grain Structure Formed by Laser Melting. Mater. Sci. Eng. A 2015, 625, 221–229. [Google Scholar] [CrossRef]
  45. Lou, X.; Andresen, P.L.; Rebak, R.B. Oxide Inclusions in Laser Additive Manufactured Stainless Steel and Their Effects on Impact Toughness and Stress Corrosion Cracking Behavior. J. Nucl. Mater. 2018, 499, 182–190. [Google Scholar] [CrossRef]
  46. Huang, Y.M.; Wu, Y.M.; Pan, C.X. EBSD Study of Solidification Characteristics of Austenitic Stainless Steel Weld Pool. Mater. Sci. Technol. 2010, 26, 750–753. [Google Scholar] [CrossRef]
  47. Kell, J.; Tyrer, J.R.; Higginson, R.L.; Thomson, R.C. Microstructural Characterization of Autogenous Laser Welds on 316L Stainless Steel Using EBSD and EDS. J. Microsc. 2005, 217, 167–173. [Google Scholar] [CrossRef]
  48. Pravin, K.M.; Varahamoorthi, R.; Gnanamurugan, K. Farvesh Modelling and Optimization of Process Parameters to Obtain Maximum Tensile Strength for Laser Butt Welding of 316L Austenitic Stainless Steel Sheets. Mater. Today Proc. 2020, 26, 1380–1388. [Google Scholar] [CrossRef]
  49. Kumar, N.; Mukherjee, M.; Bandyopadhyay, A. Comparative Study of Pulsed Nd:YAG Laser Welding of AISI 304 and AISI 316 Stainless Steels. Opt. Laser Technol. 2017, 88, 24–39. [Google Scholar] [CrossRef]
  50. Ragavendran, M.; Vasudevan, M. Laser and Hybrid Laser Welding of Type 316L(N) Austenitic Stainless Steel Plates. Mater. Manuf. Process. 2020, 35, 922–934. [Google Scholar] [CrossRef]
  51. Graneix, J.; Beguin, J.D.; Alexis, J.; Masri, T. Weldability of Superalloys Hastelloy X by Yb: YAG Laser. Adv. Mater. Res. 2015, 1099, 61–70. [Google Scholar] [CrossRef] [Green Version]
  52. Rajasekhar, K.; Harendranath, C.S.; Raman, R.; Kulkarni, S.D. Microstructural Evolution during Solidification of Austenitic Stainless Steel Weld Metals: A Color Metallographic and Electron Microprobe Analysis Study. Mater. Charact. 1997, 38, 53–65. [Google Scholar] [CrossRef]
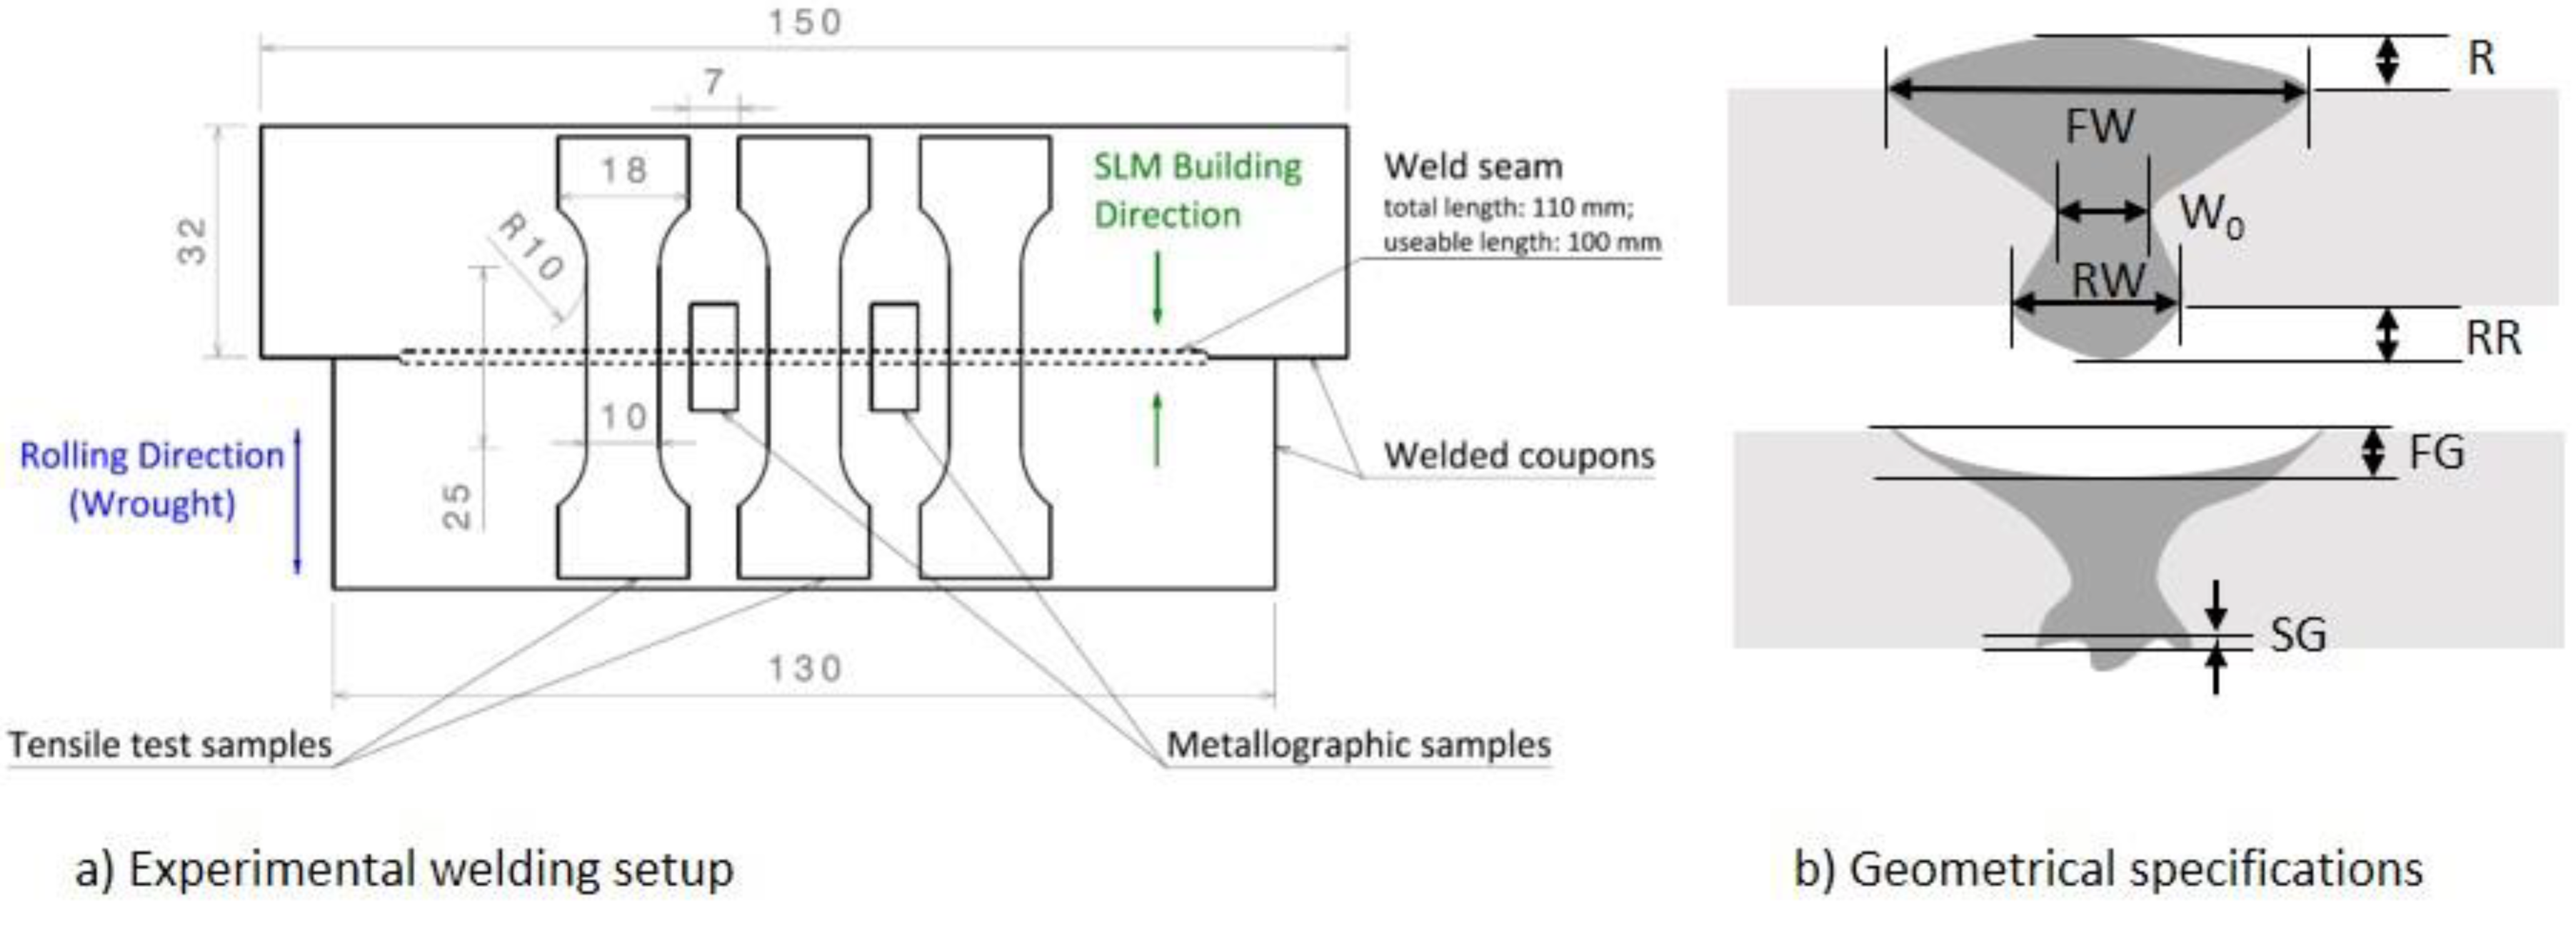
Figure 1. (a) Experimental welding setup. (b) Standard geometrical specifications described in EN ISO 6947.
Jmmp 05 00136 g001
Figure 2. Radiography of the worst seam parts for the CR sample and SLM samples, respectively.
Jmmp 05 00136 g002
Figure 3. Welded cold-rolled sheets: macrography of the weld seam (a); higher magnification of base metal (BM) (b); fusion zone—heat-affected zone (HAZ) boundary (d,e) and fusion zone (FZ) (c); welded SLM sheets: macrography of the weld seam (f); higher magnification of base metal (BM) (g); fusion zone—heat-affected zone (HAZ) boundary (ik) and fusion zone (FZ) (h). Dashed lines correspond to fusion zone boundaries. Dotted lines correspond to melt pool boundaries. Red dots correspond to SEM-EDX point analysis positions.
Jmmp 05 00136 g003
Figure 4. (a) (Left) SEM-EBSD inverse pole figure (IPF) X cross-section map of welded CR; (middle) phase map of the heat-affect area (HAZ) and SEM-EBSD inverse pole figure (IPF) X top map of welded CR (right). (b) SEM-EBSD inverse pole figure (IPF) X maps of cross-section welded SLM (left), base metal SLM (middle), and top welded SLM (right), respectively. Black lines correspond to random grain boundaries and red lines to Σ3 twin grain boundaries (GB).
Jmmp 05 00136 g004
Figure 5. Pole figures of the crystallographic planes (001), (011), and (111) for the fusion zone and base metal of a welded cold-rolled sheet (a) and a welded SLM sheet (b), respectively.
Jmmp 05 00136 g005
Figure 6. Cross-section hardness evolution of welded samples. Dashed lines correspond to the limit of the fusion zone.
Jmmp 05 00136 g006
Figure 7. Stress–strain tensile curves of reference and welded samples. Reference samples corresponds to non-welded samples. (Right) Evolution of axial strain difference between Fusion Zone (FZ) and Base Metal (BM) with the global strain.
Jmmp 05 00136 g007
Table 1. SLM manufacturing parameters.
Laser Power (W)Laser Scanning Speed (mm/s)Layer Thickness (μm)Hatching Distance (μm)Scanning Strategy
21518004050Hexagonal path [34]
Table 2. Material composition (weight percent) and Ni and Cr equivalent according to the Schaeffler formula.
FeCSiMnPSCrMoNiNNi eqCr eq
CR69.27
± 0.06
0.025
± 0.001
0.409
± 0.002
1.104
± 0.005
0.027
± 0.001
<0.00516.14
± 0.07
1.90
± 0.01
10.3
± 0.1
0.11
± 0.01
11.618.7
SLM68.44
± 0.16
0.021
± 0.001
0.66
± 0.03
1.011
± 0.006
0.023
± 0.001
<0.00516.31
± 0.15
2.196
± 0.005
10.74
± 0.03
0.17
± 0.01
11.919.5
Table 3. Welding parameters.
Power (kW)Welding Travel Speed (m·min−1)Focal Diameter (μm)Power Density (W·mm−2)Energy Density (J·mm−2)Argon Flux (L·min−1)
1.511201.33 × 10795525
Table 4. Porosity analysis from X-ray radiography.
SamplePorosity (%)Pore NumberPore Max. Diameter (mm)Pore Diameter (mm)
CR 0.28717058 ± 24
SLM0.311110057 ± 22
Table 5. Seam geometrical description.
SampleCR SheetSLM Sheet
Face width (FW) 2.261.56
Root width (RW)1.81.29
Minimum width (W0)0.730.89
Reinforcement (R)0.05NA
Face groove (FG)NA0.09
Root reinforcement (RR)0.20
Shrinkage groove (SG)0.10.06
W0/FW0.320.57
RW/FW0.80.83
Area (mm2)3.22.35
Table 6. Local compositions of welded samples measured by SEM-EDX. Red and blue colors highlight an element with a rich or poor composition, respectively.
Mass %FeCrNiMoMnSiOSP
1 CR FZ dendrites69.4617.1310.281.310.650.400.500.230.03
2 CR FZ inter-dendritic64.0222.136.022.770.480.420.580.430.15
3 CR HAZ matrix64.4917.4911.001.891.110.340.560.090.00
4 CR HAZ lines64.724.195.343.260.640.480.640.60.15
5 SLM FZ dendrites65.9217.4412.592.090.550.760.410.190.04
6 SLM FZ inter-dendritic66.4421.046.873.570.330.820.570.280.09
7 SLM FZ dark dots52.4516.48.641.056.14.4810.350.470.06
Table 7. Dendrite thickness and ferrite content of the fusion zone and SLM base metal.
SampleCR Sheet Fusion ZoneSLM Sheet Fusion ZoneSLM Sheet Base Metal
Dendrite thickness (μm)3.5 ± 0.83.1 ± 0.80.5 ± 0.2
Ferrite content8 ± 38 ± 39 ± 2
Table 8. Summary of some microstructural characteristics: average grain diameter, grain shape aspect ratio, and average Grain Orientation Spread (GOS).
Analysis Area (mm²)Grain Area (µm²)Grain Aspect RatioGrain Orientation Spread (°)
CR sheet Base Metal0.40400 ± 5311.7 ± 0.714 ± 13
CR sheet Fusion Zone cross-section0.271519 ± 48602.2 ± 1.02.3 ± 6.4
CR sheet Fusion Zone Top 0.474853 ± 6002.0 ± 0.91.1 ± 3.7
SLM sheet Base Metal0.46466 ± 31363.4 ± 2.22.5 ± 4.5
SLM sheet Fusion Zone cross-section0.381869 ± 47744.4 ± 3.62.3 ± 4.4
SLM sheet Fusion Zone Top0.502623 ± 3192.8 ± 1.82.5 ± 6.1
Table 9. Vickers hardness of Base Metal (BM) and Fusion Zone (FZ) and tensile properties of the reference and welded samples.
CR SheetWelded CR SheetSLM SheetWelded SLM Sheet
Hardness BM (HV1)164 ± 5166 ± 6241 ± 5238 ± 6
Hardness FZ (HV1)NA190 ± 8NA197 ± 5
Yield stress (MPa)261 ± 19Not Applicable423 ± 5Not Applicable
Ultimate Tensile Strength (Mpa)602 ± 2598 ± 3568 ± 5568 ± 2
Elongation at break (%)73 ± 656 ± 351 ± 142 ± 14
Failure positionBase Metal#1, #2, #3 Fusion ZoneBase Metal#1 Base metal
#2, #3 Fusion Zone
Publisher’s Note: MDPI stays neutral with regard to jurisdictional claims in published maps and institutional affiliations.