Article

Enhanced Abrasion Resistance of Spark Plasma Sintered and HVOF Sprayed Hadfield High Manganese Steel by Turning and Diamond Smoothing

1
Institute of Materials Science and Engineering, Materials and Surface Engineering Group, Chemnitz University of Technology, D-09107 Chemnitz, Germany
2
Institute for Machine Tools and Production Processes, Professorship Micromanufacturing Technology, Chemnitz University of Technology, D-09107 Chemnitz, Germany
*
Author to whom correspondence should be addressed.
J. Manuf. Mater. Process. 2022, 6(2), 48; https://doi.org/10.3390/jmmp6020048
Submission received: 29 March 2022 / Revised: 14 April 2022 / Accepted: 16 April 2022 / Published: 17 April 2022
(This article belongs to the Special Issue Surface Integrity in Machining and Post-processing)

Abstract

:
Austenitic high-manganese steels (HMnS) offer very high wear resistance under dynamic loading due to their high work hardening capacity. However, resistance to static abrasive loading is limited. Various approaches to increasing abrasion resistance are known from traditionally manufactured metallurgical components. These confirm the high potential for surface protection applications. In this work, the powder of the Hadfield HMnS X120Mn12 is prepared and processed by high-velocity oxy-fuel (HVOF) spraying and spark-plasma sintering (SPS). A good correlation was observed between the results of the HVOF and SPS specimen. Different surface conditions of the coatings and the sintered specimens were prepared by machining. Compared to the polished state, turning and diamond smoothing can increase the surface hardness from 220 HV to over 700 HV significantly. Regardless of the surface finish condition, similar good wear resistance can be demonstrated due to strong work hardening under sliding and reciprocating wear loading. In contrast, the finish machining process clearly influences abrasion resistance in the scratch test with the best results for the diamond smoothed condition. Especially against the background of current trends toward alternative coating systems, the presented results offer a promising approach for the development of HMnS in the field of coating technology.

1. Introduction

Due to their good ductility–toughness ratio, high-manganese steels (HMnS) are widely used as structural materials. The high work hardening capacity under impact and shock loads allows for applications with superimposed tribological stress [1,2]. The reason for this is a significant increase in surface hardness and wear resistance, which can also be observed for tribological systems subject to sliding load [3,4,5]. In general, both the hardness penetration depth and the surface hardness rise as the dynamic load is increased [6]. On the other hand, under static abrasive load, the wear resistance is less pronounced. While Ingber et al. observed a significant increase in the hardness of Hadfield steel in two-body wear with bonded SiC abrasive and water as an intermediate medium, Tęcza demonstrated similar wear erosion to carbon steels in the Miller test regime [7,8,9,10]. Approaches to enhance the material properties are therefore not limited to the mechanical properties, but also aim to improve the tribological property profile. Starting from classical Hadfield steel, this includes not only the modification of the alloy but also targeted dispersion strengthening by reinforcing particles [6,11,12,13,14,15]. Furthermore, the microstructure can already be influenced by a targeted temperature control during cooling from the melt or subsequent heat treatment, whereby the mechanical properties as well as the corrosion and wear resistance can be improved [16,17,18,19,20,21]. In addition to cast alloys, a wide range of investigations have already been carried out on products produced by powder metallurgy [22,23,24,25,26]. In this context, mostly high-alloy systems are considered which cannot be produced by casting or be machined subsequently. Volynova et al. considered hot extrusion as a suitable variant for shaping in a single process step. Depending on the size of the powder particles, specific properties are obtained. Recrystallization processes take place mainly at the boundaries of fine particles, while for large particles the formation of nuclei takes place within the particles. However, the recrystallization step has no influence on the mechanical properties, if the phase fractions of the initial and transformation microstructures are the same [22,23,24].
Different development approaches are being pursued to adapt the surface functionality to the structural properties by specifically changing the chemical composition of the surface layer region. Salak et al. achieved an increase in the Mn content of the surface layer zone by treating sintered HMnS in a Mn vapor shell, which improved the wear resistance [26]. In addition to such diffusion processes, coating processes have also been considered a possibility for surface functionalization. Pelletier et al. successfully processed Hadfield steel powder by laser cladding [27]. In the transition area of the wear marks, deformation bands were observed which are indicative of work hardening under reciprocating wear conditions [28]. The unique property profile of HMnS also makes these materials interesting even for surface protection applications. In addition to the coating processes already considered, thermal spraying is particularly suitable. By high-velocity oxy-fuel (HVOF) spraying, coatings can be produced without metallurgical intermixing with the substrate while maintaining a low thermal load on the feedstock [29,30]. This ensures the integrity and functionality of the coating material. In addition to the possibility of setting defined surface conditions, turning and diamond smoothing of the coating enable surface strengthening [31,32,33,34]. Machining of HMnS castings has already proven to be suitable for surface hardening [35,36]. A process combination between thermal spraying of HMnS and finishing of the coating systems enables surface functionalization with a gradation of the coating properties by work hardening.
This study focuses on X120Mn12 HMnS as coating materials in thermal spray processes. The grading of the coating properties is investigated against the background of mechanical finishing, by face turning and subsequent diamond smoothing. Thereby, an improvement of the abrasive resistance under static load is intended. Hence, the results provide the basis for further development approaches for the promising material system of HMnS in the context of coating processes.

2. Materials and Methods

2.1. Sample Manufacturing

With the high kinetic thermal spray process HVOF and spark plasma sintering (SPS) two different powder metallurgical manufacturing processes were used for processing the HMnS X120Mn12. The direct comparison of HVOF and SPS samples allows for the assessment of process parameters with regard to their influence on the material properties.
The powder feedstock material was provided by TLS Technik GmbH (Bitterfeld, Germany). The chemical composition as shown in Table 1 and a size range of −50 + 20 µm was specified by the manufacturer. HVOF coating was applied on the plane area of cylindrical substrate materials made of stainless steel EN 1.4404 (AISI 316L) with a diameter of 40 mm and a height of 6 mm. Pretreatment was conducted by grit blasting using the blasting medium Alodur EK F 24 with a particle size of −850 + 600 µm. A blasting pressure of 2.5 bar, a distance of 200 mm under an angle of 70° was applied. Subsequently, ultrasonic cleaning in ethanol has been carried out. For the coating process, the kerosene HVOF system K2 was used (GTV Verschleißschutz GmbH, Luckenbach, Germany).
The spraying parameters are summarized in Table 2. A coating thickness of approx. 30 µm was aimed as deposition rate per overrun. 24 repetitions were carried out to achieve a final thickness of approx. 700 µm. Cooling breaks were applied after respectively five overruns. Cylindrical specimens with a diameter of 40 mm and a height of 6 mm were fabricated by spark plasma sintering (SPS) using an SPS KCE FCT-HP D 25-SI (FCT Systeme GmbH, Frankenblick, Germany) equipped with a pyrometer for temperature measurement. Graphite tools consisting of dies, cones, and a matrix were used for this purpose. Additionally, a graphite foil with a thickness of 0.3 mm was placed between the powder and the die and matrix as a separating agent. To ensure uniform temperature distribution, the graphite dies, and the matrix was thermally insulated. Prior to the sintering process, the recipient was purged twice with argon and evacuated (<1 mbar). The heating rate was set at 100 K/min. After reaching a compression pressure of 50 MPa, the samples were sintered at a temperature of 1050 °C for 5 min. Subsequently, a cooling rate of 150 K/min to 300 °C was achieved by passively cooling using the water-cooled punches.

2.2. Mechanical Surface Finishing

Mechanical finishing by face turning and diamond smoothing of the coatings and sintered specimens was carried out on a precision lathe SPINNER type PD 32 (Spinner, Sauerlach, Germany). For this, the specimens were mounted on their outer diameter. To guarantee constant manufacturing conditions an unchanged machining speed is necessary. For this purpose, centric drilling, characterized by a diameter of 8 mm was manufactured. To ensure a uniform depth of cut in the finish turning experiments, pre-machining of the specimens was necessary. This was realized in two cutting steps with a depth of cut of about 0.1 mm, a feed of 0.05 mm, and a cutting speed of 100 m/min. Subsequently, finish turning was performed with the same cutting speed. The depth of cut (0.2 mm) and the feed (ft = 0.075 mm) were chosen higher to increase the stresses in the shear zone. Turning experiments were realized dry.
CBN-tipped indexable inserts of the type CCGW 09T304 were used for finishing. In conjunction with the tool holder used the cutting-edge angle of the minor cutting edge was 5°. For the specimens, which were only machined by turning, tools characterized by a sharp cutting edge (radius < 10 µm) and a nominal rake angle of 0° were chosen. According to a previous investigation analyzing the machining of thermally sprayed coatings such a cutting-edge geometry is expected to be suitable [32,33,37,38]. In contrast, for the specimens, subsequently finished by diamond smoothing, finish turning was realized using indexable inserts exhibiting an increased cutting-edge rounding (about 40 µm) and a nominal rake angle of −25°. Hence, the effective rake angle was reduced and consequently, the passive force was increased, which should achieve higher surface hardness values and an increased affected layer.
Diamond smoothing was performed subsequently to face turning using a tool with a spherical body of monocrystalline diamond with a radius of 2 mm. The smoothing force (150 N), the feed (fs = 0.05 mm), and the speed (70 m/min) were kept unchanged. The smoothing force was chosen according to the results in [34]. Higher forces may result in the occurrence of microcracks. Emulsion flood cooling was used, to reduce friction between tool and workpiece and improve sliding behavior.

2.3. Characterization

Cross-sections were prepared by standard metallographic procedures. The resulting samples were mounted into conductive resin, followed by grinding and polishing. Subsequently, the morphology, microstructure, and chemical composition were investigated by light microscopy with an Olympus GX51 (Olympus, Shinjuku, Japan). Microhardness measurements using different loads were conducted on the surface using FISCHERSCOPE HM2000 XYm (Helmut Fischer GmbH, Sindelfingen, Germany). The average Vickers microhardness and standard deviation have been derived from ten single measurements. The geometrical surface properties of the polished and machined surfaces were analyzed using a stylus instrument Mahr type LD 120 (Mahr, Göttingen, Germany). The stylus was characterized by a radius of 2 µm. The measuring was done in the direction of the feed motion respectively in the radial direction of the specimens. The selection of the measuring length and the filtering of the profile were realized in accordance with ISO 11562. For validation of the roughness values, each specimen was measured at five evenly distributed positions. Additionally, the machined surfaces were detected using a 3D laser scanning microscope Keyence type VK-9700 (Keyence, Osaka, Japan).
The wear behavior was investigated under different loading conditions. In addition to sliding wear with a ball-on-disk tribometer (Tetra, Ilmenau, Germany) and vibration stress with an SVT tribometer (Wazau, Berlin, Germany), resistance to static abrasive load was carried out in scratch tests using a CSM Revetest RST device (CSM Instruments SA, Peseux, Switzerland). The parameters used are summarized in Table 3. Three measurements have been conducted to determine the average value for every parameter set. The resulting tracks of reciprocating wear were investigated with the optical profilometer MikroCAD 3-D (LMI Technologies Inc., Burnaby, Canada). The ball-on-disk wear tracks were investigated with a T4000 (Jenoptik/ Hommel, Jena, Germany). In the case of the scratch test, tactile measurements were performed with the truncated diamond cone tip of the wear tester at a load of 0.9 N.

3. Results

Finishing of the surfaces caused a significant decrease of the comparatively high initial roughness values of the specimens. The lowest values were obtained for the SPS specimens after polishing and diamond smoothing. Table 4 provides an overview of the roughness values determined.
Comparing the surface roughness values after machining the SPS specimens and HVOF coating systems, higher values were determined for the latter. This can be attributed to the extent of structural defects. In dependence on the machining condition, pores and pull-outs appear in different proportions, shown by the surface images in Figure 1. Defects in the SPS and HVOF structure are due to pores in the polished state. Surface images of the turned and smoothed condition show that their proportion appears to decrease in SPS structure. This can be attributed to material deposits due to cold welding as a result of plastic deformation. However, for the HVOF coatings, a coarsening of the defects is observed by turning. This can be attributed to local material pull-out around pores. The cause is the weak structural bond, which is essentially based on mechanical interlocking. The extent of the defects can be significantly reduced by subsequent diamond smoothing, which can be attributed to the effects already described for SPS. The reduced valley depth (Rvk) corresponds to the proportion of opened pores and pull-outs in the HVOF coating. Generally, diamond smoothing after turning results in a decrease in the mean values for Ra, Rz, and Rvk.
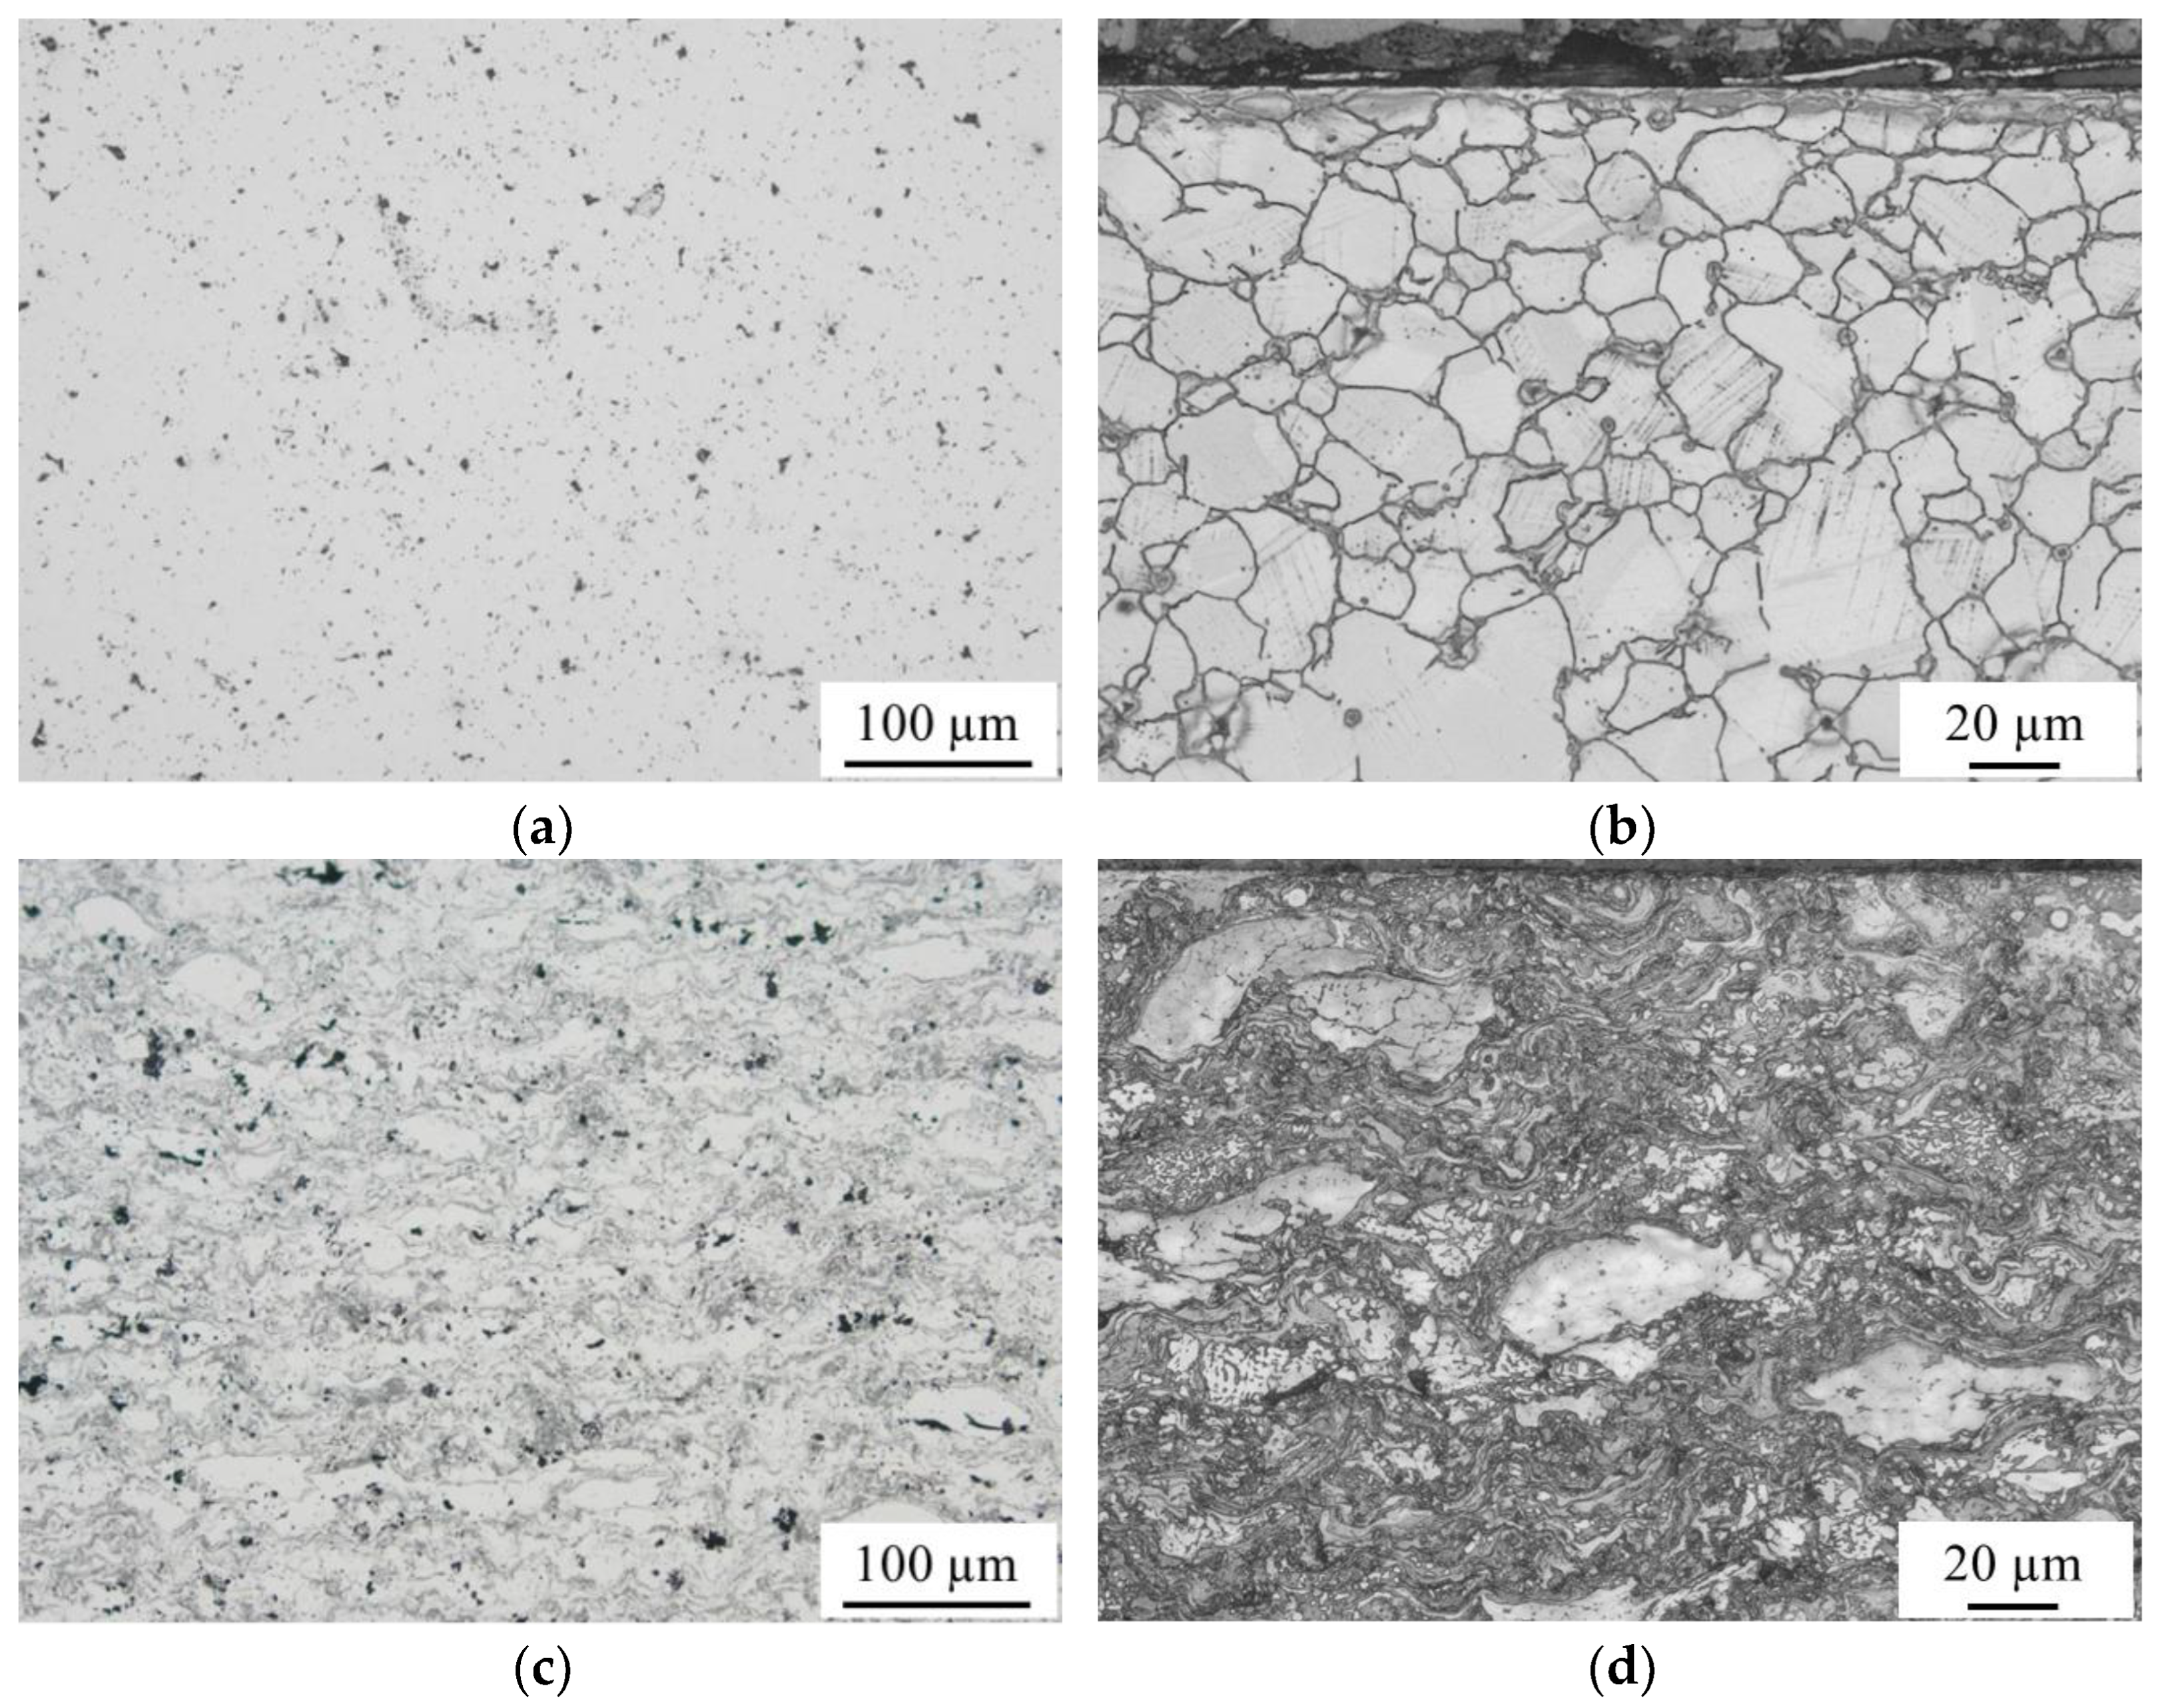
Figure 2 shows the surface area of the diamond-smoothed specimens in the etched state by cross-section micrographs. Despite a slight remaining porosity, the sintered samples were characterized by a homogeneous structure. This was also evident from the etched cross-sections. The etching attack on the sintered structure was limited to the former powder particle boundaries. In addition, the sintered structure exhibited a recrystallization structure. Within the former powder particles, large crystallites were visible, some of which extended over the entire particle area, Figure 2b. Next to a higher pore content, the coating systems exhibited lamella structures with dark contrast between the individual particles. This is due to process-related oxidation of the feedstock material as a result of the reaction with the atmosphere during processing and the associated local variations in the chemical composition. In addition to the oxidation during the coating process, the finer-grained structural composition was responsible for the stronger contrast caused by the etching Figure 2d. Individual particles in the HVOF coating system remained to be characterized by the typical initial dendritic structure of the powder feedstock. Thus, the dendrite boundaries within individual particles could be etched. The etching allowed deformation bands to be partially displayed in the surface area of the SPS samples. These covered large areas within discrete individual particles. In some cases, different orientations were apparent. The deformation bands did not extend beyond the former powder particle boundaries. Accordingly, a similar deformation structure could be obtained by the surface finishing as already demonstrated by Chen et al. after a sliding load [6]. Due to the fine-grained dendritic structure, such phenomena could not be observed in the coating systems.
In addition to the structural changes, measurements of the surface hardness showed a correlation between the surface finish and the increase in hardness. Furthermore, the results shown in Figure 3 also indicate an influence of the production process. In the case of the SPS manufactured specimens, the highest hardness values were measured for a low test load. By increasing the test load, a significant decrease in hardness was detectable, especially for the polished and turned specimens. This suggests that the hardened zone is limited to the immediate surface area. The high variation of the measurement results under low test load in the turned condition can be attributed to the high roughness values and the low hardening depth. In contrast, only a slight decrease in the hardness value with increasing test load was observed for the diamond-smoothed specimens. This indicates a higher depth effect of the work hardening. The clear influence of the surface finish on the resulting surface hardness was less pronounced for the HVOF coating systems. In general, an increase from the polished to the turned to the diamond-smoothed condition was detectable. The hardness level of the polished state was higher than that of the SPS samples. In addition to the significantly coarser recrystallization structure, the process-related oxidation also contributes to an increase in hardness. These effects are superimposed by work hardening as a result of the high process kinetics during the impact of the particles on the surface. While turning only caused a slight increase, the hardness level after diamond smoothing was in the range of the SPS sample.
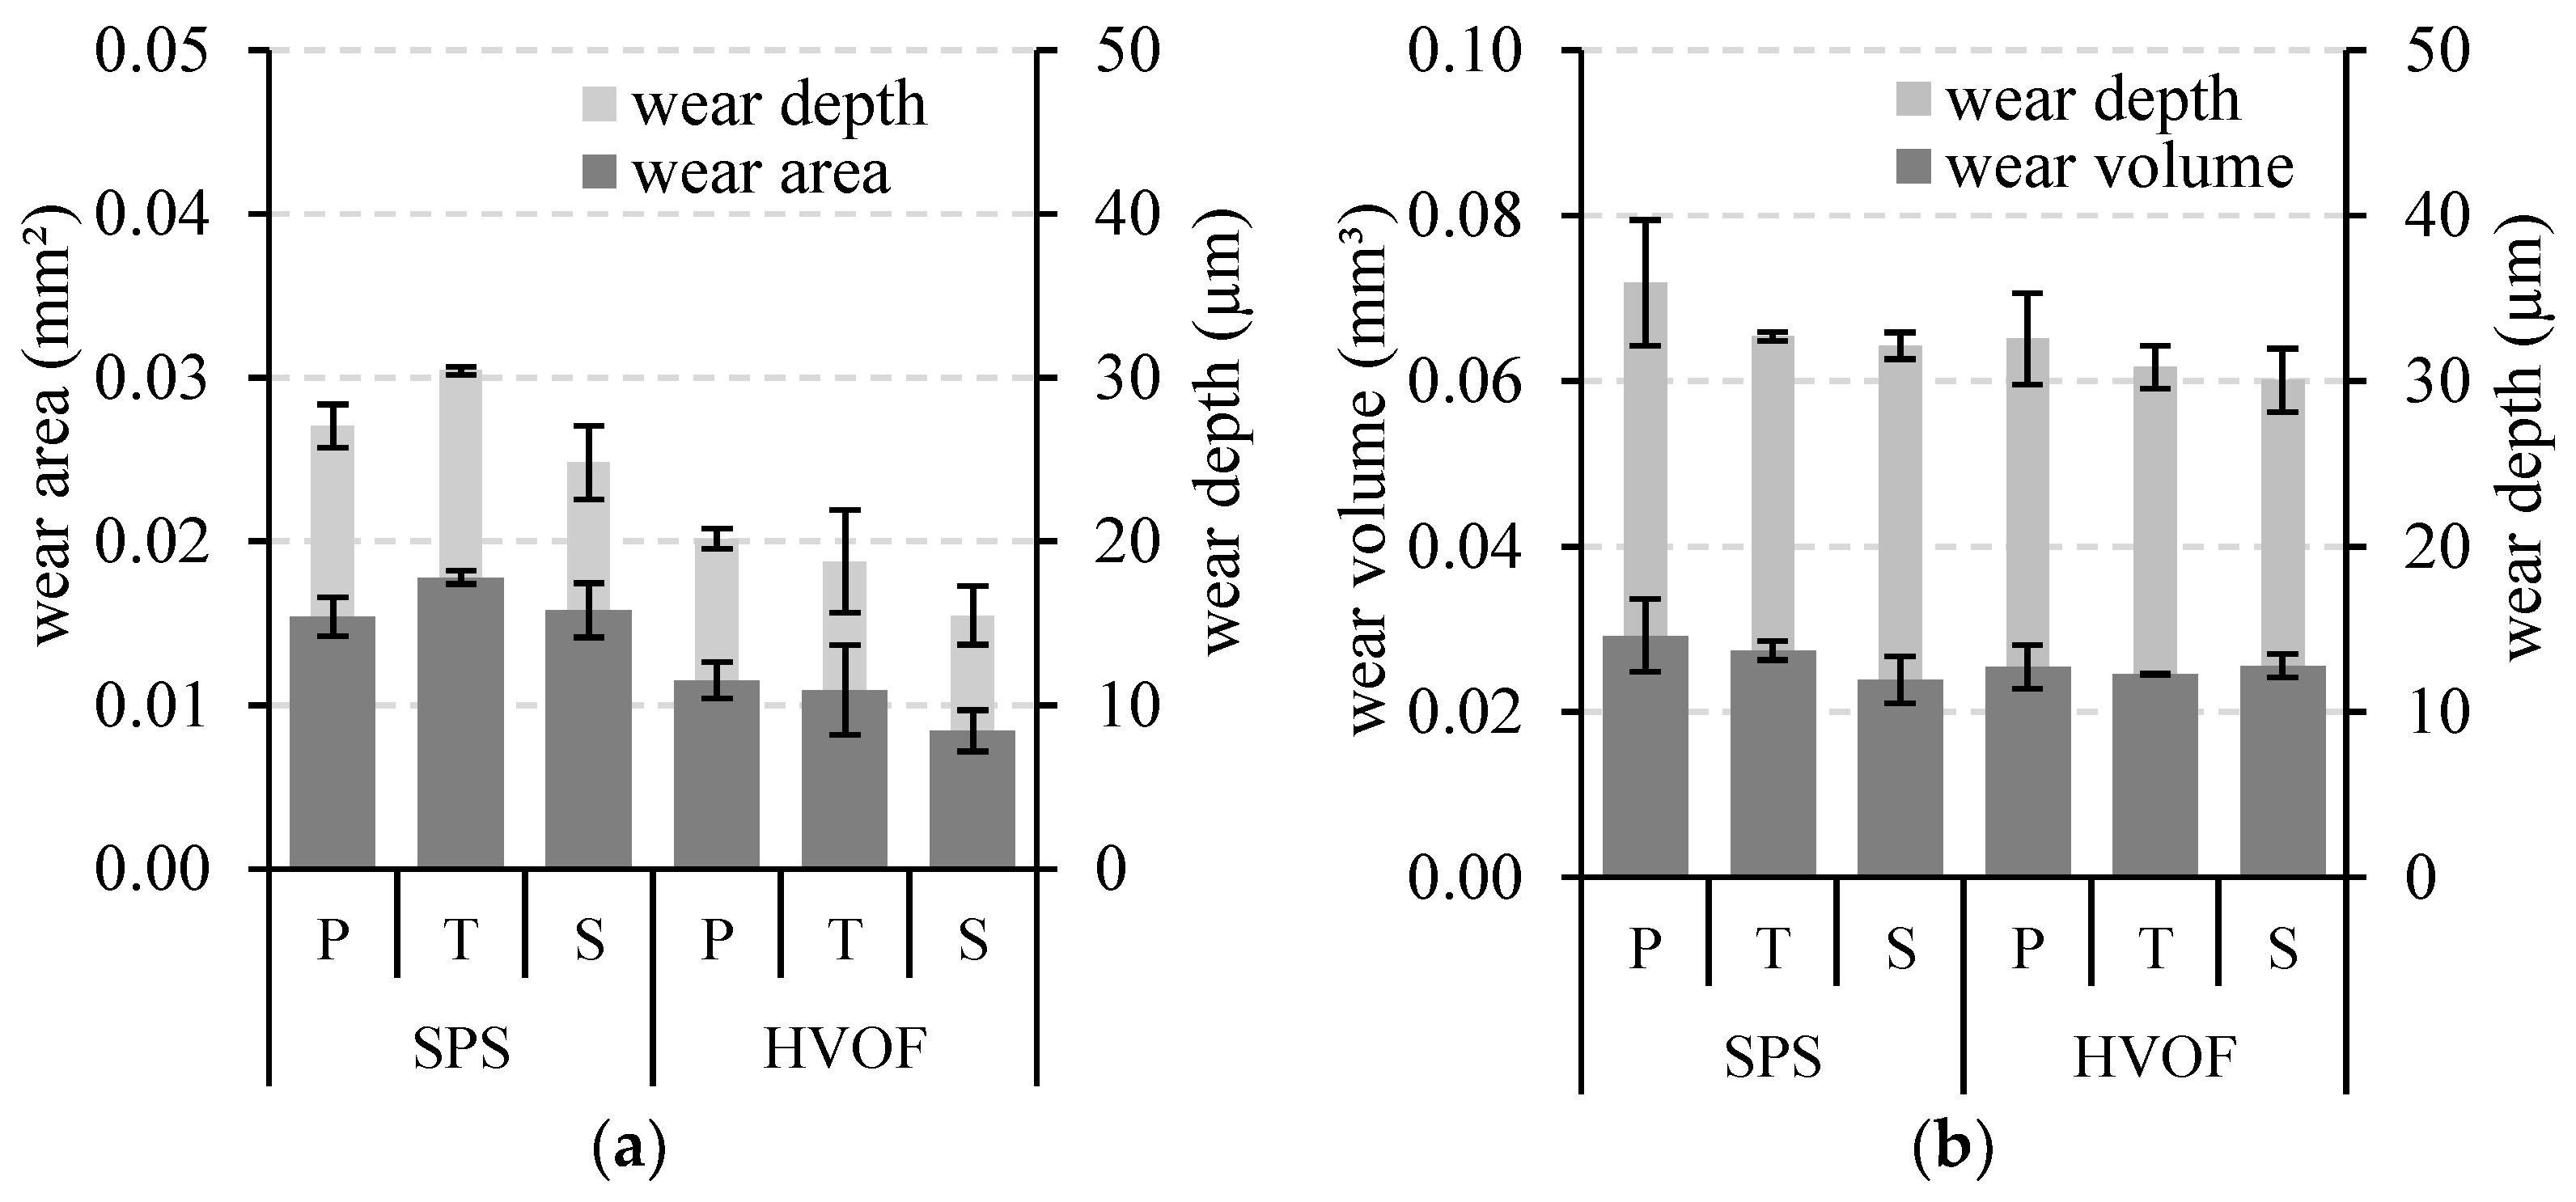
Despite the clear differences in the surface hardness, no significant dependence between the finishing condition of the surface and the wear resistance could be demonstrated under sliding and reciprocating wear loads, Figure 4. The ball-on-disk test showed a comparable wear level, especially between the polished and the turned condition. The coating systems exhibited a higher sliding wear resistance. In contrast, the reciprocating wear resistance of the coatings and the sintered specimens were similar regardless of the manufacturing process and the surface finish condition. This indicates in situ work hardening under reciprocating wear test conditions. Due to the high frequency and cyclic loading, an impact-like load effect is realized. This does not occur to the same extent under sliding loads. Accordingly, the higher basic hardness of the coating systems can contribute to better wear resistance. The wear resistance of the different powder metallurgical X120Mn12 systems under reciprocating load was similar to that of the boronized IN718 HVOF coating systems [39]. Under the same test conditions, the wear resistance under sliding load did not reach the level of the surface-hardened coating variant, but it was significantly higher than that of the austenitic IN718 coating. Generally, this confirms the high wear resistance of the HMnS products. The independency of the post-processing condition also confirms the statements made by Lychagin et al. on the work hardening capacity under sliding stress [3,4]. As reported by Sabzi et al., the work hardening capacity under impact loading is the highest [1]. Thus, no influence of the manufacturing process and surface finishing could be found under reciprocating load.
On the other hand, under abrasive stress in the scratch test, there is a clear influence of the surface finish on the resulting indentation depth. Figure 5 shows the average indentation depth under different loads as a function of the surface finish. As described by Tęcza, the work hardening capacity under abrasive load is limited [8]. Accordingly, no advantage could be demonstrated by turning compared to the polished condition. In contrast, diamond smoothing led to a significant reduction in wear depth. This is due to the high contact pressure during diamond smoothing which causes a strong work hardening. With increasing indentation force, there was a linear increase in the wear depth. Although in the polished and turned condition, the wear depth of the SPS specimens was significantly higher compared to the HVOF coatings, the difference was considerably reduced by diamond smoothing. Among the various wear loads, the strongest dependencies on the surface machining condition were found under abrasive stress. Consequently, the described surface finishing process offers great potential for applications under complex tribologically stressed operating conditions.

4. Conclusions

A new approach for the use of HMnS in surface protection applications was presented for the Hadfield alloy X120Mn12. The powder feedstock was successfully processed by HVOF and SPS. In general, the results confirm the high work hardening capacity of powder metallurgy products through mechanical surface finishing. The resulting increase in surface hardness directly affects tribological properties. While polishing contributes slightly to the work hardening of the surface, the highest work hardening was achieved by diamond smoothing. Due to their microstructural properties, the HVOF coatings exhibited higher initial hardness than the SPS samples. This was accompanied by an increase in wear resistance under sliding and abrasive loads. Regardless of the manufacturing process and the surface finish, no differences were found for reciprocating wear. This is due to in-situ work hardening under impact loads. Under abrasive conditions, the strongest influence of surface conditioning was found. A significant increase in abrasive wear resistance could be achieved by diamond smoothing. In general, good wear protection was observed regardless of the loading condition. This confirms the potential of the proposed process combination of powder metallurgical processes and mechanical surface finishing for applications under complex tribological operating conditions.

Author Contributions

Conceptualization, T.L. (Thomas Lindner) and H.L.; methodology, T.L. (Thomas Lindner), H.L. and B.P.; validation and investigation, T.L. (Thomas Lindner), H.L., B.P. and N.H.; writing—original draft preparation, T.L. (Thomas Lindner) and B.P.; writing—review and editing and supervision, H.L, A.S. and T.L. (Thomas Lampke); project administration, T.L. (Thomas Lindner), A.S. and T.L. (Thomas Lampke); funding acquisition, T.L. (Thomas Lindner). All authors have read and agreed to the published version of the manuscript.

Funding

The study was funded via Sächsische Aufbaubank—Förderbank/SAB-100382175 by the European Social Fund ESF and the Free state of Saxony. Jmmp 06 00048 i001

Institutional Review Board Statement

Not applicable.

Informed Consent Statement

Not applicable.

Data Availability Statement

Not applicable.

Acknowledgments

The support by Robert Glaßmann, Paul Seidel (all from the Institute of Materials Science and Engineering) is gratefully acknowledged.

Conflicts of Interest

The authors declare no conflict of interest.

References

  1. Sabzi, M.; Farzam, M. Hadfield manganese austenitic steel: A review of manufacturing processes and properties. Mater. Res. Express 2019, 6, 1065C2. [Google Scholar] [CrossRef]
  2. Allende-Seco, R.; Artigas, A.; Bruna, H.; Carvajal, L.; Monsalve, A.; Sklate-Boja, M.F. Hardening by Transformation and Cold Working in a Hadfield Steel Cone Crusher Liner. Metals 2021, 11, 961. [Google Scholar] [CrossRef]
  3. Lychagin, D.V.; Filippov, A.V.; Novitskaya, O.S.; Kolubaev, A.V.; Moskvichev, E.N.; Fortuna, S.V.; Chumlyakov, Y.I. Deformation and wear of Hadfield steel single crystals under dry sliding friction. Wear 2022, 488–489, 204126. [Google Scholar] [CrossRef]
  4. Lychagin, D.V.; Filippov, A.V.; Kolubaev, E.A.; Novitskaia, O.S.; Chumlyakov, Y.I.; Kolubaev, A.V. Dry sliding of Hadfield steel single crystal oriented to deformation by slip and twinning: Deformation, wear, and acoustic emission characterization. Tribol. Int. 2018, 119, 1–18. [Google Scholar] [CrossRef]
  5. Emurlaev, K.; Gerasimenko, T.; Abdimazhan, D. Nondestructive evaluation of material state near the friction interface under dry sliding. Mater. Today Proc. 2021, 38, 1526–1529. [Google Scholar] [CrossRef]
  6. Chen, C.; Lv, B.; Ma, H.; Sun, D.; Zhang, F. Wear behavior and the corresponding work hardening characteristics of Hadfield steel. Tribol. Int. 2018, 121, 389–399. [Google Scholar] [CrossRef]
  7. Ingber, J.; Lippmann, S.; Kunert, M. Two-body abrasion resistance of high-carbon metastable austenitic steels. In Proceedings of the 30th Anniversary International Conference on Metallurgy and Materials, Brno, Czech Republic, 26–28 May 2021; pp. 459–465. [Google Scholar] [CrossRef]
  8. Tęcza, G. Changes in Abrasive Wear Resistance during Miller Test of High-Manganese Cast Steel with Niobium Carbides Formed in the Alloy Matrix. Appl. Sci. 2021, 11, 4794. [Google Scholar] [CrossRef]
  9. Qian, L.; Feng, X.; Zhang, F. Deformed microstructure and hardness of hadfield high manganese steel. Mater. Trans. 2011, 52, 1623–1628. [Google Scholar] [CrossRef] [Green Version]
  10. Machado, P.C.; Pereira, J.I.; Sinatora, A. Subsurface microstructural dynamic recrystallization in multiscale abrasive wear. Wear 2021, 486–487, 204111. [Google Scholar] [CrossRef]
  11. Zhang, C.; Xie, J.; Lu, H.; Huang, X.; Wang, W.; Wang, A.; Ma, F.; Ding, G. Study on the microstructure of high manganese steel composites strengthened by ceramic. In Proceedings of the 9th World Foundry Congress 2010, Hangzhou, China, 16–20 October 2010; Volume 3, pp. 911–913. [Google Scholar]
  12. Tęcza, G. Changes in Microstructure and Abrasion Resistance during Miller Test of Hadfield High-Manganese Cast Steel after the Formation of Vanadium Carbides in Alloy Matrix. Materials 2022, 15, 1021. [Google Scholar] [CrossRef]
  13. Zhou, Z.; Shan, Q.; Jiang, Y.; Li, Z.; Zhang, Z. Effect of nanoscale V2C precipitates on the three-body abrasive wear behavior of high-Mn austenitic steel. Wear 2019, 436–437, 203009. [Google Scholar] [CrossRef]
  14. Vdovin, K.; Pesin, A.; Feoktistov, N.; Gorlenko, D. Surface Wear in Hadfield Steel Castings DOPED with Nitrided Vanadium. Metals 2018, 8, 845. [Google Scholar] [CrossRef] [Green Version]
  15. Siafakas, D.; Matsushita, T.; Lauenstein, Å.; Ekengård, J.; Jarfors, A.E.W. The Influence of Deoxidation Practice on the As-Cast Grain Size of Austenitic Manganese Steels. Metals 2017, 7, 186. [Google Scholar] [CrossRef] [Green Version]
  16. Jafarian, H.R.; Sabzi, M.; Mousavi Anijdan, S.H.; Eivani, A.R.; Park, N. The influence of austenitization temperature on microstructural developments, mechanical properties, fracture mode and wear mechanism of Hadfield high manganese steel. J. Mater. Res. Technol. 2021, 10, 819–831. [Google Scholar] [CrossRef]
  17. Mousavi Anijdan, S.H.; Sabzi, M. The Effect of Heat Treatment Process Parameters on Mechanical Properties, Precipitation, Fatigue Life, and Fracture Mode of an Austenitic Mn Hadfield Steel. J. Mater. Eng. Perform. 2018, 27, 5246–5253. [Google Scholar] [CrossRef]
  18. Bandanadjaja, B.; Hidayat, E. The effect of two-step solution heat treatment on the impact properties of Hadfield austenitic manganese steel. J. Phys. Conf. Ser. 2020, 1450, 012125. [Google Scholar] [CrossRef]
  19. Ayadi, S.; Hadji, A. Effect of Chemical Composition and Heat Treatments on the Microstructure and Wear Behavior of Manganese Steel. Int. J. Met. 2021, 15, 510–519. [Google Scholar] [CrossRef]
  20. Zellagui, R.; Hemmouche, L.; Bouchafaa, H.; Belrechid, R.; Aitsadi, H.; Chelli, A.; Touil, M.; Djalleb, N. Effect of Heat Treatments on the Microstructure, Mechanical, Wear and Corrosion Resistance of Casted Hadfield Steel. Int. J. Met. 2022, 1–15. [Google Scholar] [CrossRef]
  21. El-Fawkhry, M.K.; Fathy, A.M.; Eissa, M.M.; El-Faramway, H. Eliminating heat treatment of hadfield steel in stress abrasion wear applications. Int. J. Met. 2014, 8, 29–36. [Google Scholar] [CrossRef]
  22. Volynova, T.F.; Medov, I.B.; Sidorova, I.B. Cold shortness and nature of failure of iron-manganese powder alloys. Sov. Powder Metall. Met. Ceram. 1987, 26, 1016–1021. [Google Scholar] [CrossRef]
  23. Volynova, T.F.; Emel’yanova, I.Z.; Sidorova, I.B. Special features of structurization in powdered iron-manganese alloys in deformation and recrystallization. I. Formation of the deformation structure in hot extrusion. Sov. Powder Metall. Met. Ceram. 1992, 31, 395–402. [Google Scholar] [CrossRef]
  24. Volynova, T.F.; Emel’yanova, I.Z.; Sidorova, I.B. Special traits of structure formation in powdered iron-manganese alloys in deformation and recrystallization. II. Formation of the recrystallization structure after cold deformation in dependence on the type of crystal lattice and the energy of stacking faults. Sov. Powder Metall. Met. Ceram. 1992, 31, 461–466. [Google Scholar] [CrossRef]
  25. Farayibi, P.K.; Blüm, M.; Theisen, W.; Weber, S. Development of Multilayer Sinter Cladding of Cold Work Tool Steel on Hadfield Steel Plates for Wear-Resistant Applications. J. Mater. Eng. Perform. 2019, 28, 1833–1847. [Google Scholar] [CrossRef]
  26. Šalak, A.; Selecká, M. Manganese in Powder Metallurgy Steels; Springer Science & Business Media: Berlin/Heidelberg, Germany, 2012; Volume 9781907343759, pp. 135–136. [Google Scholar] [CrossRef]
  27. Pelletier, J.M.; Oucherif, F.; Sallamand, P.; Vannes, A.B. Hadfield steel coatings on low carbon steel by laser cladding. Mater. Sci. Eng. A 1995, 202, 142–147. [Google Scholar] [CrossRef]
  28. Pelletier, J.M.; Sauger, E.; Gachon, Y.; Vannes, A.B. Mechanical and tribological properties of Hadfield steel coatings manufactured by laser processing. J. Mater. Sci. 1999, 34, 2955–2969. [Google Scholar] [CrossRef]
  29. Lindner, T.; Löbel, M.; Lampke, T. Phase Stability and Microstructure Evolution of Solution-Hardened 316L Powder Feedstock for Thermal Spraying. Metals 2018, 8, 1063. [Google Scholar] [CrossRef] [Green Version]
  30. Lindner, T.; Löbel, M.; Grimm, M.; Fiebig, J. Cold Gas Spraying of Solution-Hardened 316L Grade Stainless Steel Powder. Metals 2022, 12, 30. [Google Scholar] [CrossRef]
  31. Kutschmann, P.; Lindner, T.; Liborius, H.; Grund, T.; Schubert, A.; Lampke, T. Influence of Thermochemical Treatment on the Surface Properties of Finish Turned Wire Arc Sprayed 17Cr Steel Coatings. Appl. Sci. 2021, 11, 6520. [Google Scholar] [CrossRef]
  32. Clauß, B.; Liborius, H.; Lindner, T.; Löbel, M.; Schubert, A.; Lampke, T. Influence of the cutting parameters on the surface properties in turning of a thermally sprayed AlCoCrFeNiTi coating. Procedia CIRP 2020, 87, 19–24. [Google Scholar] [CrossRef]
  33. Liborius, H.; Nestler, A.; Löbel, M.; Lindner, T.; Uhlig, T.; Schubert, A.; Wagner, G.; Lampke, T. Influence of the composition of thermally sprayed (Al)CoCrFeNi(Mo) high-entropy alloy coatings in face turning and diamond smoothing. In Proceedings of the 21st EUSPEN 2021, Copenhagen, Denmark, 7–10 June 2021; pp. 347–350. [Google Scholar]
  34. Liborius, H.; Grund, T.; Nestler, A.; Paczkowski, G.; Schubert, A.; Lampke, T. Influence of the finish-machining by turning and diamond smoothing on the tribological properties of Fe17Cr2Ni0.2C thermally sprayed coatings. Surf. Coat. Technol. 2021, 405, 126731. [Google Scholar] [CrossRef]
  35. Kopac, J. Hardening phenomena of Mn-austenite steels in the cutting process. J. Mater. Process. Technol. 2001, 109, 96–104. [Google Scholar] [CrossRef]
  36. Cebron, M.; Kosal, F.; Kopac, J. Effect of cutting on surface hardness and residual stresses for 12Mn austenitic steel. J. Achiev. Mater. Manuf. Eng. 2012, 55, 80–89. [Google Scholar]
  37. Liborius, H.; Nestler, A.; Paczkowski, G.; Schubert, A.; Grund, T.; Lampke, T. Surface integrity in turning of Fe17Cr2Ni0.2C iron based thermally sprayed coatings with special respect to the influence of the feed. MM Sci. J. 2019, 3220–3227. [Google Scholar] [CrossRef]
  38. Grund, T.; Paczkowski, G.; Lampke, T.; Liborius, H.; Nestler, A.; Schubert, A. Finish Turning of FeCr17Ni2C0.2 Iron-based Sprayed Coatings: Influences of Substrate Preparation, Cutting Speed and Feed on the Coating and Surface Properties. J. Therm. Spray Technol. 2020, 29, 308–318. [Google Scholar] [CrossRef]
  39. Lindner, T.; Günen, A.; Töberling, G.; Vogt, S.; Karakas, M.S.; Löbel, M.; Lampke, T. Boriding of Laser-Clad Inconel 718 Coatings for Enhanced Wear Resistance. Appl. Sci. 2021, 11, 11935. [Google Scholar] [CrossRef]
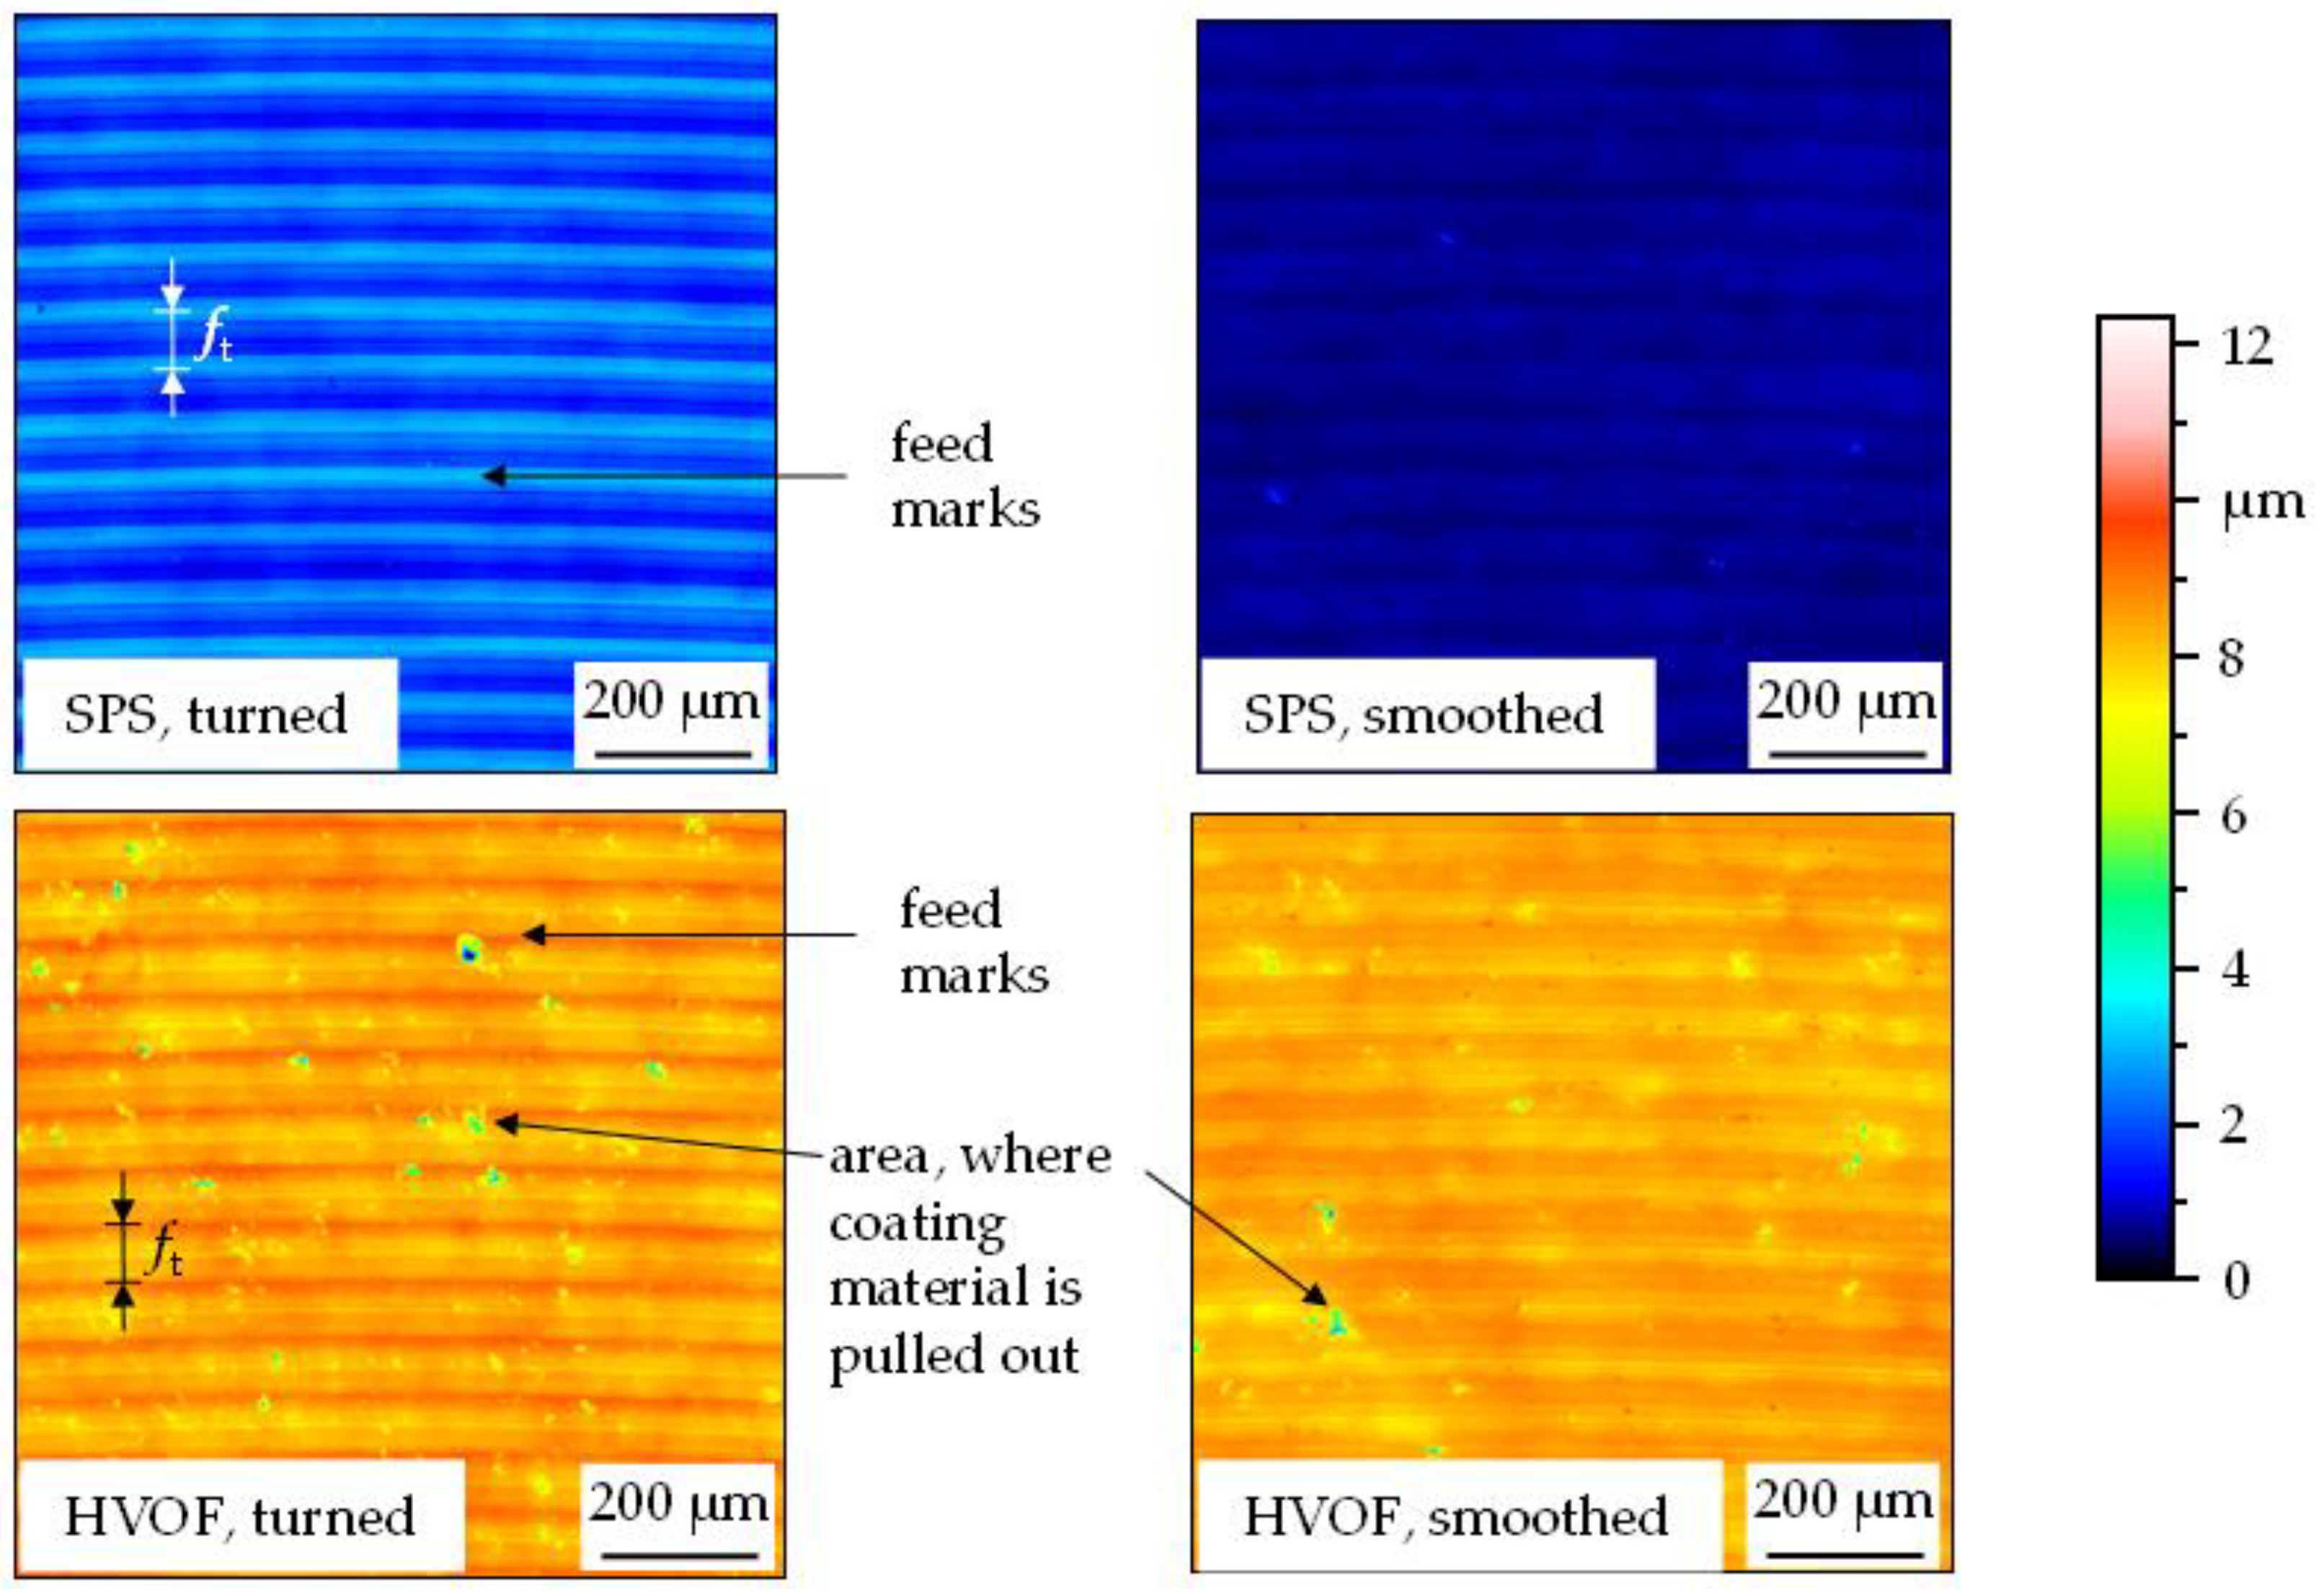
Figure 1. Surfaces after machining detected by 3D laser scanning microscopy.
Jmmp 06 00048 g001
Figure 2. Optical-microscopic image of X120Mn12 (a) SPS, (b) SPS diamond smoothed and etched, (c) HVOF and (d) HVOF diamond smoothed and etched cross-sections.
Jmmp 06 00048 g002
Figure 3. Surface microhardness of X120Mn12 SPS and HVOF specimen in relation to surface condition and the indention force.
Jmmp 06 00048 g003
Figure 4. Results of wear investigations of X120Mn12 SPS and HVOF specimen under (a) ball-on-disk test and (b) reciprocating wear test condition.
Jmmp 06 00048 g004
Figure 5. Scratch wear depth of X120Mn12 (a) SPS (b) HVOF specimen in relation to surface condition and the indention force.
Jmmp 06 00048 g005
Table 1. Chemical composition of X120Mn12 (EN 1.3401) HMnS powder.
ElementFeCSiMnCr
wt.%balance1.1–1.30.3–0.512–131.5
Table 2. HVOF thermal spray parameters for the deposition of HMnS EN 1.3401.
O2KeroseneλNozzlePowder Feed RateSpraying DistanceRelative Traverse SpeedSpray Path Offset
900 L/min26 L/h1.0150/142 × 50 g/min350 mm1.0 m/s5 mm
Table 3. Parameters for wear testing under different load conditions.
Ball-On-Disk TestReciprocating Wear TestScratch Wear Test
force20 Nforce26 Nmodeconstant
radius5 mmfrequency40 Hzforce25; 50; 75; 100 N
speed96 RPMtime900 sspeed2.5 mm/min
cycles15,916amplitude0.5 mmlength5 mm
counter-bodyAl2O3 (ø 6 mm)counter-bodyAl2O3 (ø 10 mm)tiptruncated diamond cone
Table 4. Mean values for the arithmetic mean surface roughness (Ra), the surface roughness depth (Rz), and the reduced valley depth (Rvk) of the specimens finished surfaces (in µm), errors represent standard deviation.
SPSHVOF
PolishedTurnedSmoothedPolishedTurnedSmoothed
Ra0.021 ± 0.0030.416 ± 0.0040.040 ± 0.0030.043 ± 0.0100.286 ± 0.0260.226 ± 0.017
Rz0.267 ± 0.0642.126 ± 0.0380.443 ± 0.0270.515 ± 0.2032.909 ± 0.8302.188 ± 0.992
Rvk0.051 ± 0.0230.236 ± 0.0420.067 ± 0.0010.115 ± 0.1310.536 ± 0.1080.413 ± 0.082
Publisher’s Note: MDPI stays neutral with regard to jurisdictional claims in published maps and institutional affiliations.