Article

Fundamental Investigations to Evaluate the Influence of Notching Processes on a Subsequent Cyclic Bending Process for the Production of Wire Cores

Institute of Manufacturing Technology, Friedrich-Alexander-Universität Erlangen-Nürnberg, Egerlandstraße 13, 91058 Erlangen, Germany
*
Author to whom correspondence should be addressed.
J. Manuf. Mater. Process. 2023, 7(1), 24; https://doi.org/10.3390/jmmp7010024
Submission received: 12 December 2022 / Revised: 12 January 2023 / Accepted: 12 January 2023 / Published: 17 January 2023
(This article belongs to the Special Issue Advances in Metal Forming and Thermomechanical Processing)

Abstract

:
The production of wire cores by notch rolling and cyclic bending promises an ecologically and economically efficient manufacturing option for steel fibers. The paper at hand evaluates the influence of wire strips on cyclic bending by applying rolled wire strips of DP600 sheet metal (t0 = 0.8 mm) and a new cyclic bending testing tool. Analysis of material separation with varying parameters, rolling gap d and bending angle β, proves the interdependency of both process step, but indicates reduced adjustability of the notch rolling process. To enable better adjustability of the wire strip’s characteristics and analysis of their effects, wire strip production in the laboratory by notch stamping instead of rolling is aspired. The prior interaction analysis states the web height b, the notch angle α, and the hardening distribution as relevant wire strip’s characteristics to be replicated. Based on experimental analysis, an equivalent of notch rolling by notch stamping is deduced by considering the web height b identical for stamping and rolling, by adjusting the tool’s notch angle αt based on an equation considering geometric evaluations of α, and by taking advantage of the asymmetric hardening distribution of the outer notch which is comparable to rolled wire strip.

1. Introduction

Steel fiber concrete is a composite material in which the brittle properties of concrete are counteracted by the ductile properties of steel. The reinforcement improves the post-peak behavior [1] and, depending on the filling quantity, improves its general strength [2]. The result is a reduction in wall thickness [3], which saves concrete mass and conserves resources. The composite’s application in Germany was further encouraged by the introduction of a guideline of the German Committee for Reinforced Concrete (DAfStb) in 2012 and its continuing revision [4]. To tap the full potential of the reinforcement, ecological and economical efficient production of the fibers themselves is required. Steel fibers are conventionally produced from wires which exhibit a high process complexity due to multi-stage wire drawing, a high energy effort due to intermediate annealing [5] and a more complex handling due to a bar shaped starting and ending product. To improve the production procedure, Stahl [6] introduced a continuous production method from sheet metal without intermediate annealing which enables higher productivity [7] and efficiency [8] than multi-staged wire drawing. The innovative process chain is basically composed of notch rolling and fulling/cyclic bending, as well as the subsequent finishing and separation [5]. It is shown in Figure 1, where its main process steps notch rolling, and cyclic bending are highlighted, and the continuous production characteristic is illustrated.
During the first process step, a notched rolling pair with defined notch geometry induces both-sided indentations on the metal strip so that so-called wire strip results [6]. Multiple wire cores are connected by webs of defined height.
The directly following second process step applies a cyclic bending load on the wire strip by fulling that causes crack initiation and growth within the notch tips [6]. Material failure is initiated but not finally performed. The controlled separation of the wire strip until a defined residual web height enables simplified handling of the wires for surface treatment and modification. For example, forming of multidimensional fiber design with hook-like sections is suitable for increasing the cohesion of the composite [9]. Moreover, the fracture surface of the separated wires can be designed for optimum anchoring in concrete [8]. Overall, the production chain promises efficient production of wire strips starting from sheet metal with lower energy consumption and improved handling compared to conventional production procedures based on the drawn wire.
In [8] and [5], Huss et al. analyze the use of a steel fiber type produced by the mentioned process chain from a civil engineering perspective, but do not evaluate its manufacturing process in detail. For evaluating the potential and feasibility of the process chain, fundamental knowledge not only of the application, but also of the manufacturing method and the interaction of its process steps has to be acquired. To enable process-like characteristics in a laboratory environment for further analysis, testing methods based on model processes are developed. Especially the multi-staged fulling process for applying a cyclic bending load has to be simplified for research purposes. Biallas and Merklein [10] derived a preliminary process window based on a first analysis of the process steps’ interactions by a notch stamping process and a modified cyclic bending test performed until final material separation. As testing material, a DP600 sheet metal (t0 = 0.8 mm) was used. They concluded that from a process engineer’s view, the number of load reversals during the second process step should reach a compromise of a short process layout and controlled crack propagation. The impact of the notch tip radius on the amount of cycles until failure turned out to be negligible, whereas the web height and the bending angle showed significant effects and interactions.
A holistic process investigation requires an analysis of the material separation of wire strips produced from notch rolling, complementary to the analyses of experiments with stamped wire strips described above. The paper at hand presents an experimental analysis of notch rolling and cyclic bending by applying a DP600 sheet metal (t0 = 0.8 mm). A new toolset for cyclic bending of wire strips by swivel bending fitting the desired dimensions and loading purpose and being compatible with a universal testing machine is applied. It allows a more detailed analysis of crack propagation. Based on the experimental results, the dependency of material separation on process settings and the relevant characteristics of wire strip that influences the subsequent process step can be derived.
Although an evaluation of the cyclic bending of rolled wire strip is necessary for fundamental process understanding, a substitution of the rolling process by a stamping process for laboratory purposes would improve the flexibility and adjustability of the notching process for future research. Moreover, it enables the use of a universal testing machine instead of a rolling stand. Thus, a method to map the wire strip’s properties by notch stamping instead of rolling for research purposes is desired. Eventual differences of rolled and stamped wire strips have to be analyzed to verify the substitution and to elaborate an approach. Based on the before derived relevant characteristics of the rolled wire strip, the study at hand analyzes and compares the cause-effect relationships of stamped wire strip to rolled wire strip by experimental tests for two different settings of the tool distance. The differences are evaluated and influencing parameters for targeted effects on the characteristics of stamped wire strips are analyzed. From this, an equivalent method for the use of notch stamping instead of rolling by representing the relevant features for further analysis of the crack propagation during cyclic bending can be derived.
In summary, the objective of the study is to derive a process understanding of the innovative production chain notch rolling and cyclic bending by experiments. Based on a profound analysis of the rolled wire strip before and after cyclic bending, relevant properties resulting from the rolling process are identified. Following the evaluation, an analysis of the substitution of rolled wire strips by stamped wire strips for future research is possible. The new testing method will improve flexibility and allows the use of a universal testing machine for further investigations on the process chain for laboratory purposes. Enhanced adjustability of notching parameters will enable a more detailed analysis of the process parameters’ interactions to deepen the understanding of the process and material behavior.

2. Materials and Methods

In the following paragraphs, the applied sheet metal is described and experimental setups and designs for the interaction study and the notch stamping are presented. Moreover, the evaluation methods are specified on which the further analysis is based.

2.1. Sheet Metal

For experimental trials, specimens of the size 20 × 80 mm of a DP600 sheet metal (t0 = 0.8 mm), which was also used in former studies [10], are applied. They exhibit a yield stress of 429 MPa and a tensile strength of 635 MPa in 0° rolling direction [11]. Conventionally, steel fibers exhibit a tensile strength of 800 to 2000 MPa, mostly 1000 MPa [12]. Considering the strain hardening during the notching process, the chosen material is in the lower range of the material strengths and is thus appropriate for a first analysis.
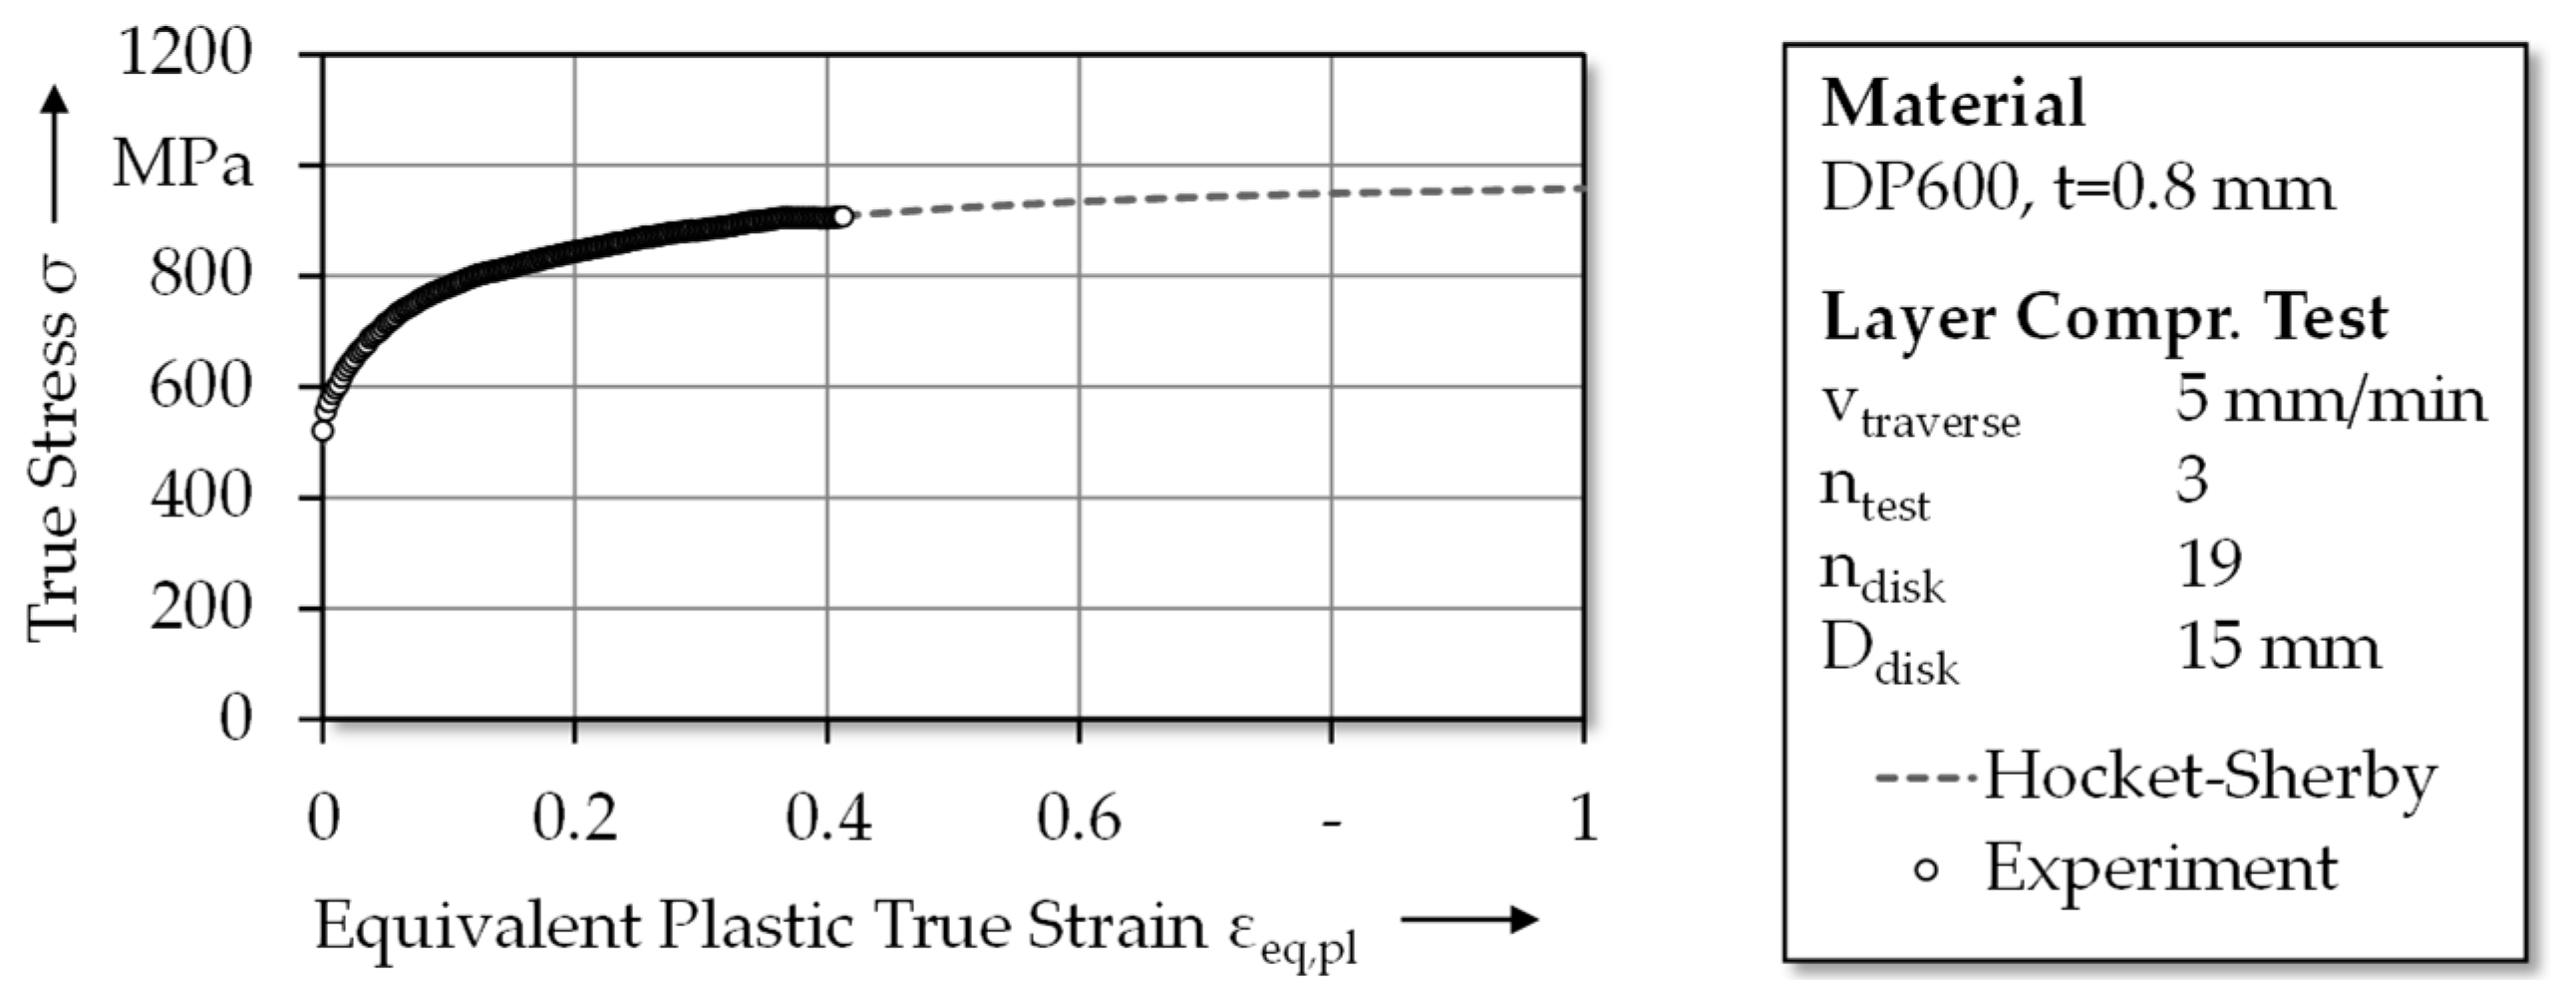
For describing the hardening behavior of the considered sheet metal, the flow curve under compressive loading is given in Figure 2 [11]. The true strain–stress curve of a layer compression test following [13] is extrapolated by the approach of Hockett and Sherby [14]. It represents the correlation of forming and strain hardening which is intended and relevant for the change of mechanical properties during the notching process. The remaining mechanical properties of the sheet metal are derived by tensile tests and may be found with further details on the plastic flow characteristics in [11].

2.2. Experimental Setup and Design

2.2.1. Interaction Study of Notch Rolling and Cyclic Bending

For the production of wire strip by a notch rolling process, a modular rolling pair with an exchangeable functional element is manufactured for use on the rolling stand EW 105 × 160 (Bühler Redex GmbH, Pforzheim, Germany) at the Institute of Manufacturing Technologies (LFT, Erlangen, Germany). The functional element is provided with a notched profile which is transferred on the workpiece during rolling. For notch rolling, two general process layouts exist: transversal and longitudinal, as presented in [11], whereas the patented process chain initially foresees transversal production [6]. It enables adjustment of fiber length based on the sheet’s width without following cutting and is thus considered in this study. Figure 3 pictures a detailed sketch of the used transversal functional element. As seen, only part of the perimeter is notched due to very small notch dimensions and high production costs for precise EDM. The geometry results in an unrolled notch distance w of 0.9 mm and a notch angle α of 90°. Four notches on each side with higher tip radii are considered for the infeed and outfeed. In the middle, 17 notches with constant notch tip radius are manufactured. The actual averaged tip radius rk,t was measured to 26 µm (target: 10, SD 3 µm) by the optical measuring system InfiniteFocusXL200 (Alicona Imaging GmbH, Raaba, Austria).
The rolling setup applying the transversally notched functional element is given in Figure 4. For monitoring the rolling forces, load cells are implemented in between the bearings of the upper roll and the feeding which is operated by a hand wheel (Figure 4a). The functional element, seen in Figure 4b for the upper roll, is clamped within the clamping rings on both rolls. For checking on the rolls’ position to minimize the offset of upper and lower notch tips, a camera system is added (Figure 4c) showing the rolling gap. The setup enables force and picture recording for further evaluation of the notch rolling process. For the determination of the rolling gap as precisely as possible, a tactile dial gauge of an accuracy of 1 µm measures the movement of the bearings of the upper roll. The reference point is identified based on the contact position of both rolls outside the notched region and the geometric characteristic of the notches.
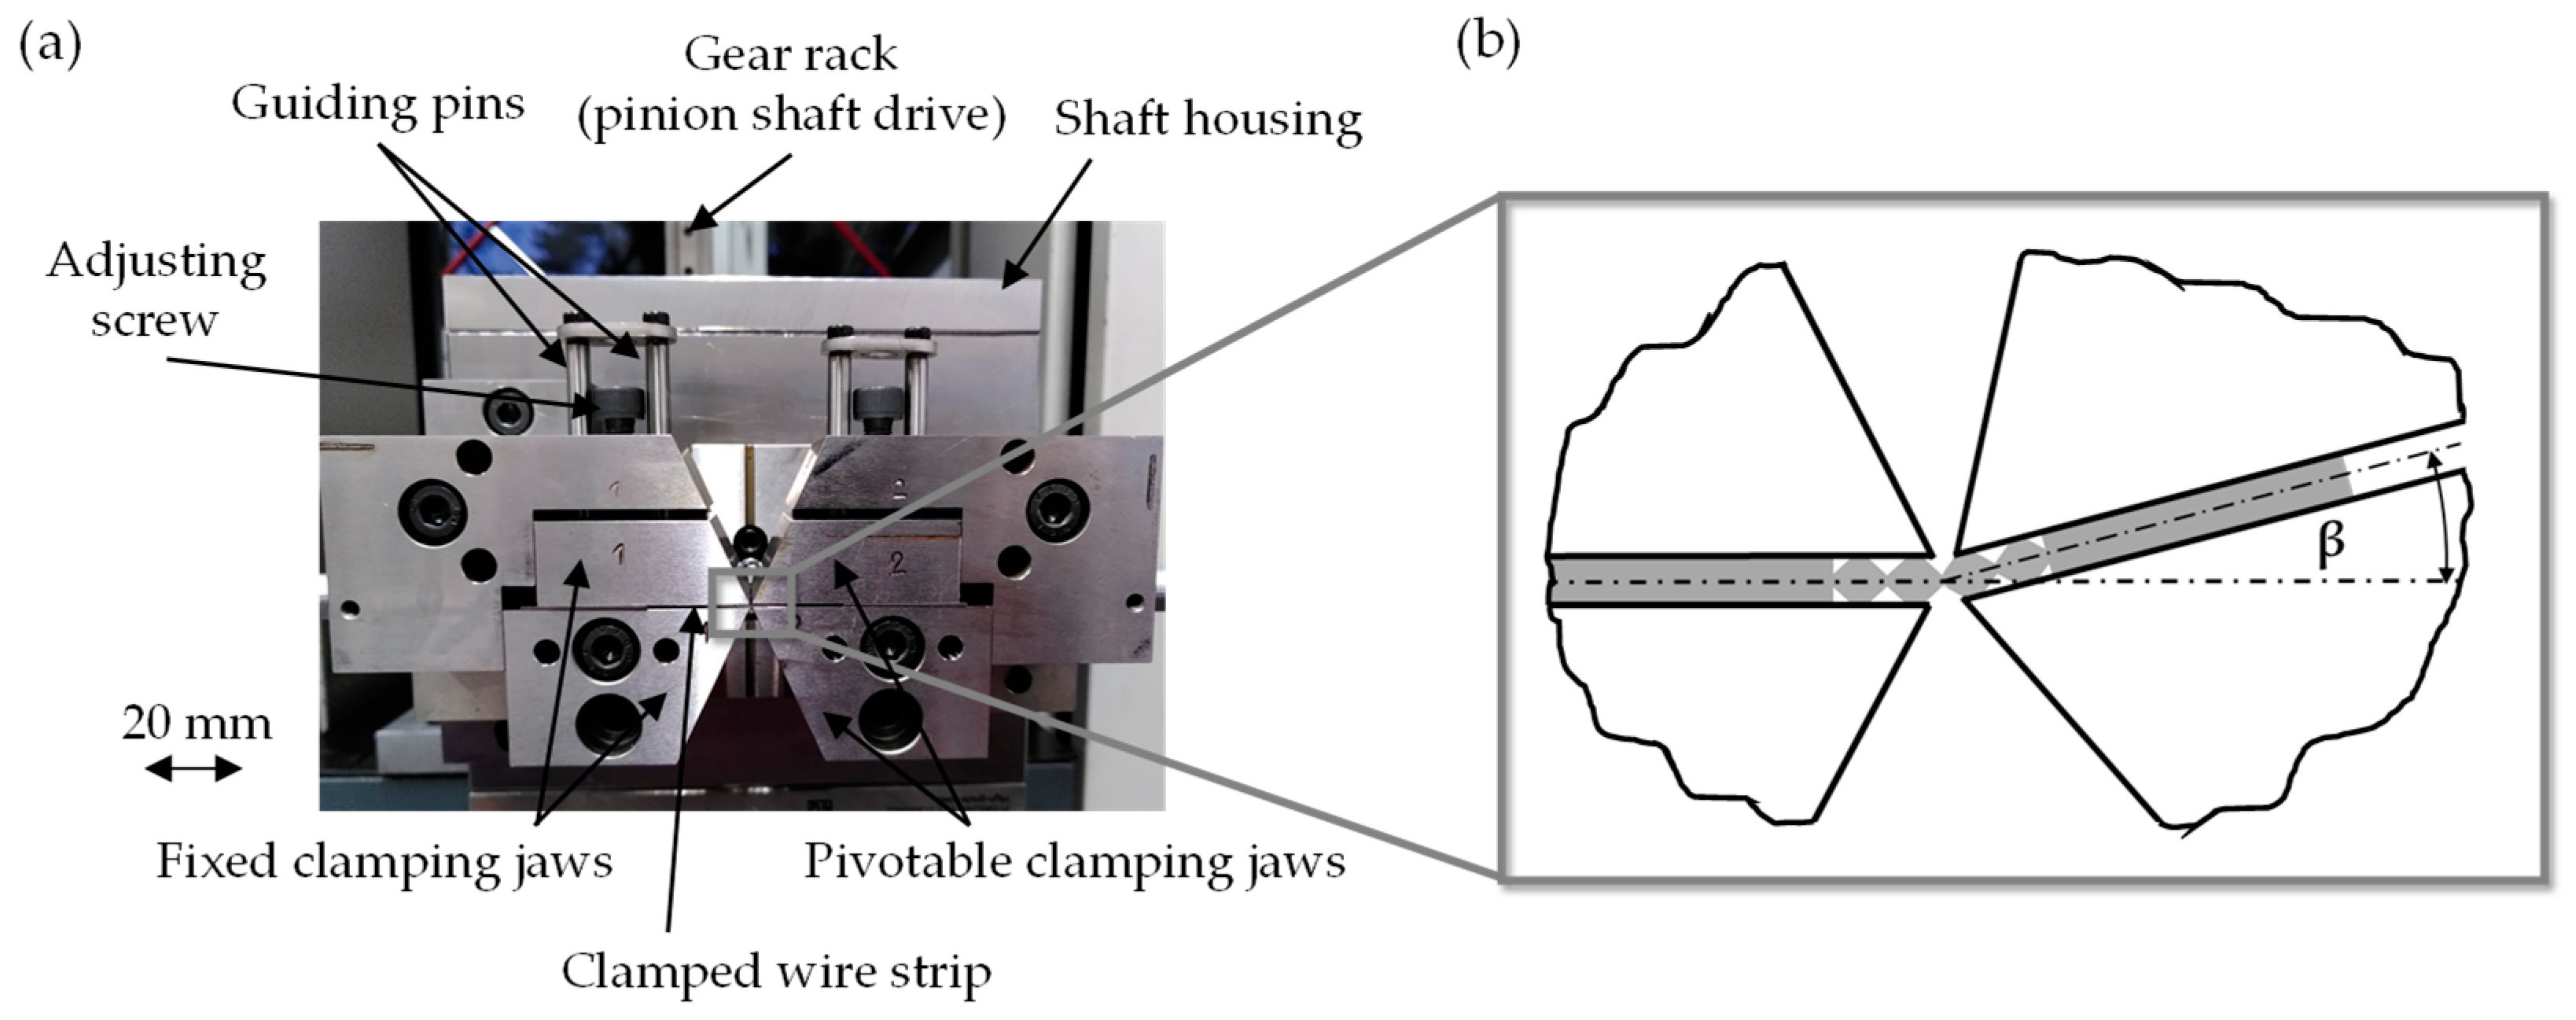
During the cyclic bending model process, the analysis of crack propagation of a single notch is intended. The notch should be loaded by pure bending load, so any shear load is to be prevented. This is to be solved via a swivel bending process, during which one side of the notched sheet is clamped by a fixed jaw pair and the other side by a moveable jaw pair. To allow installation on a universal testing machine, the swivel movement of the moveable pair is initiated by a shaft driven by an up-and-down moving gear rack. The setup of the resulting tool implemented on the universal testing machine 1445 (10 kN, ZwickRoell GmbH & Co. KG, Ulm, Germany) is given in Figure 5a. Positioning of the tested wire strip in the bending tool is flexible, so that no exact position of the notches has to be realized during the notching process. Positioning tools help to center the desired notch in the middle of the clamps so that the rotation center is as close as possible to the mid-point.
Via the movement of the gear rack, the rotation of the shaft causes a swiveling of the moveable clamping jaws. The principle of the bending movement can be seen in Figure 5b. The bending angle β in ° can be calculated from the stroke s of the gear rack and the pitch diameter D (60 mm) of the pinion shaft by Equation (1).
β = (s × 360)/(π × D)
The testing machine processes stroke and force analogue data to the control software testXpert (ZwickRoell GmbH & Co. KG, Ulm, Germany). The stroke values can be converted to bending angle by the given equation. To ensure measurement of low loads during the test with sufficient accuracy, a torque sensor, type HBM T22 (Hottinger Brüel & Kjaer GmbH, Darmstadt, Germany), is mounted on the shaft. It can detect torques of up to 10 Nm, whereas the starting load of the moveable clamping jaws’ weight has to be deducted. The torque data can be also processed as analog data, so that for each experiment, a torque-angle-diagram can be extracted.
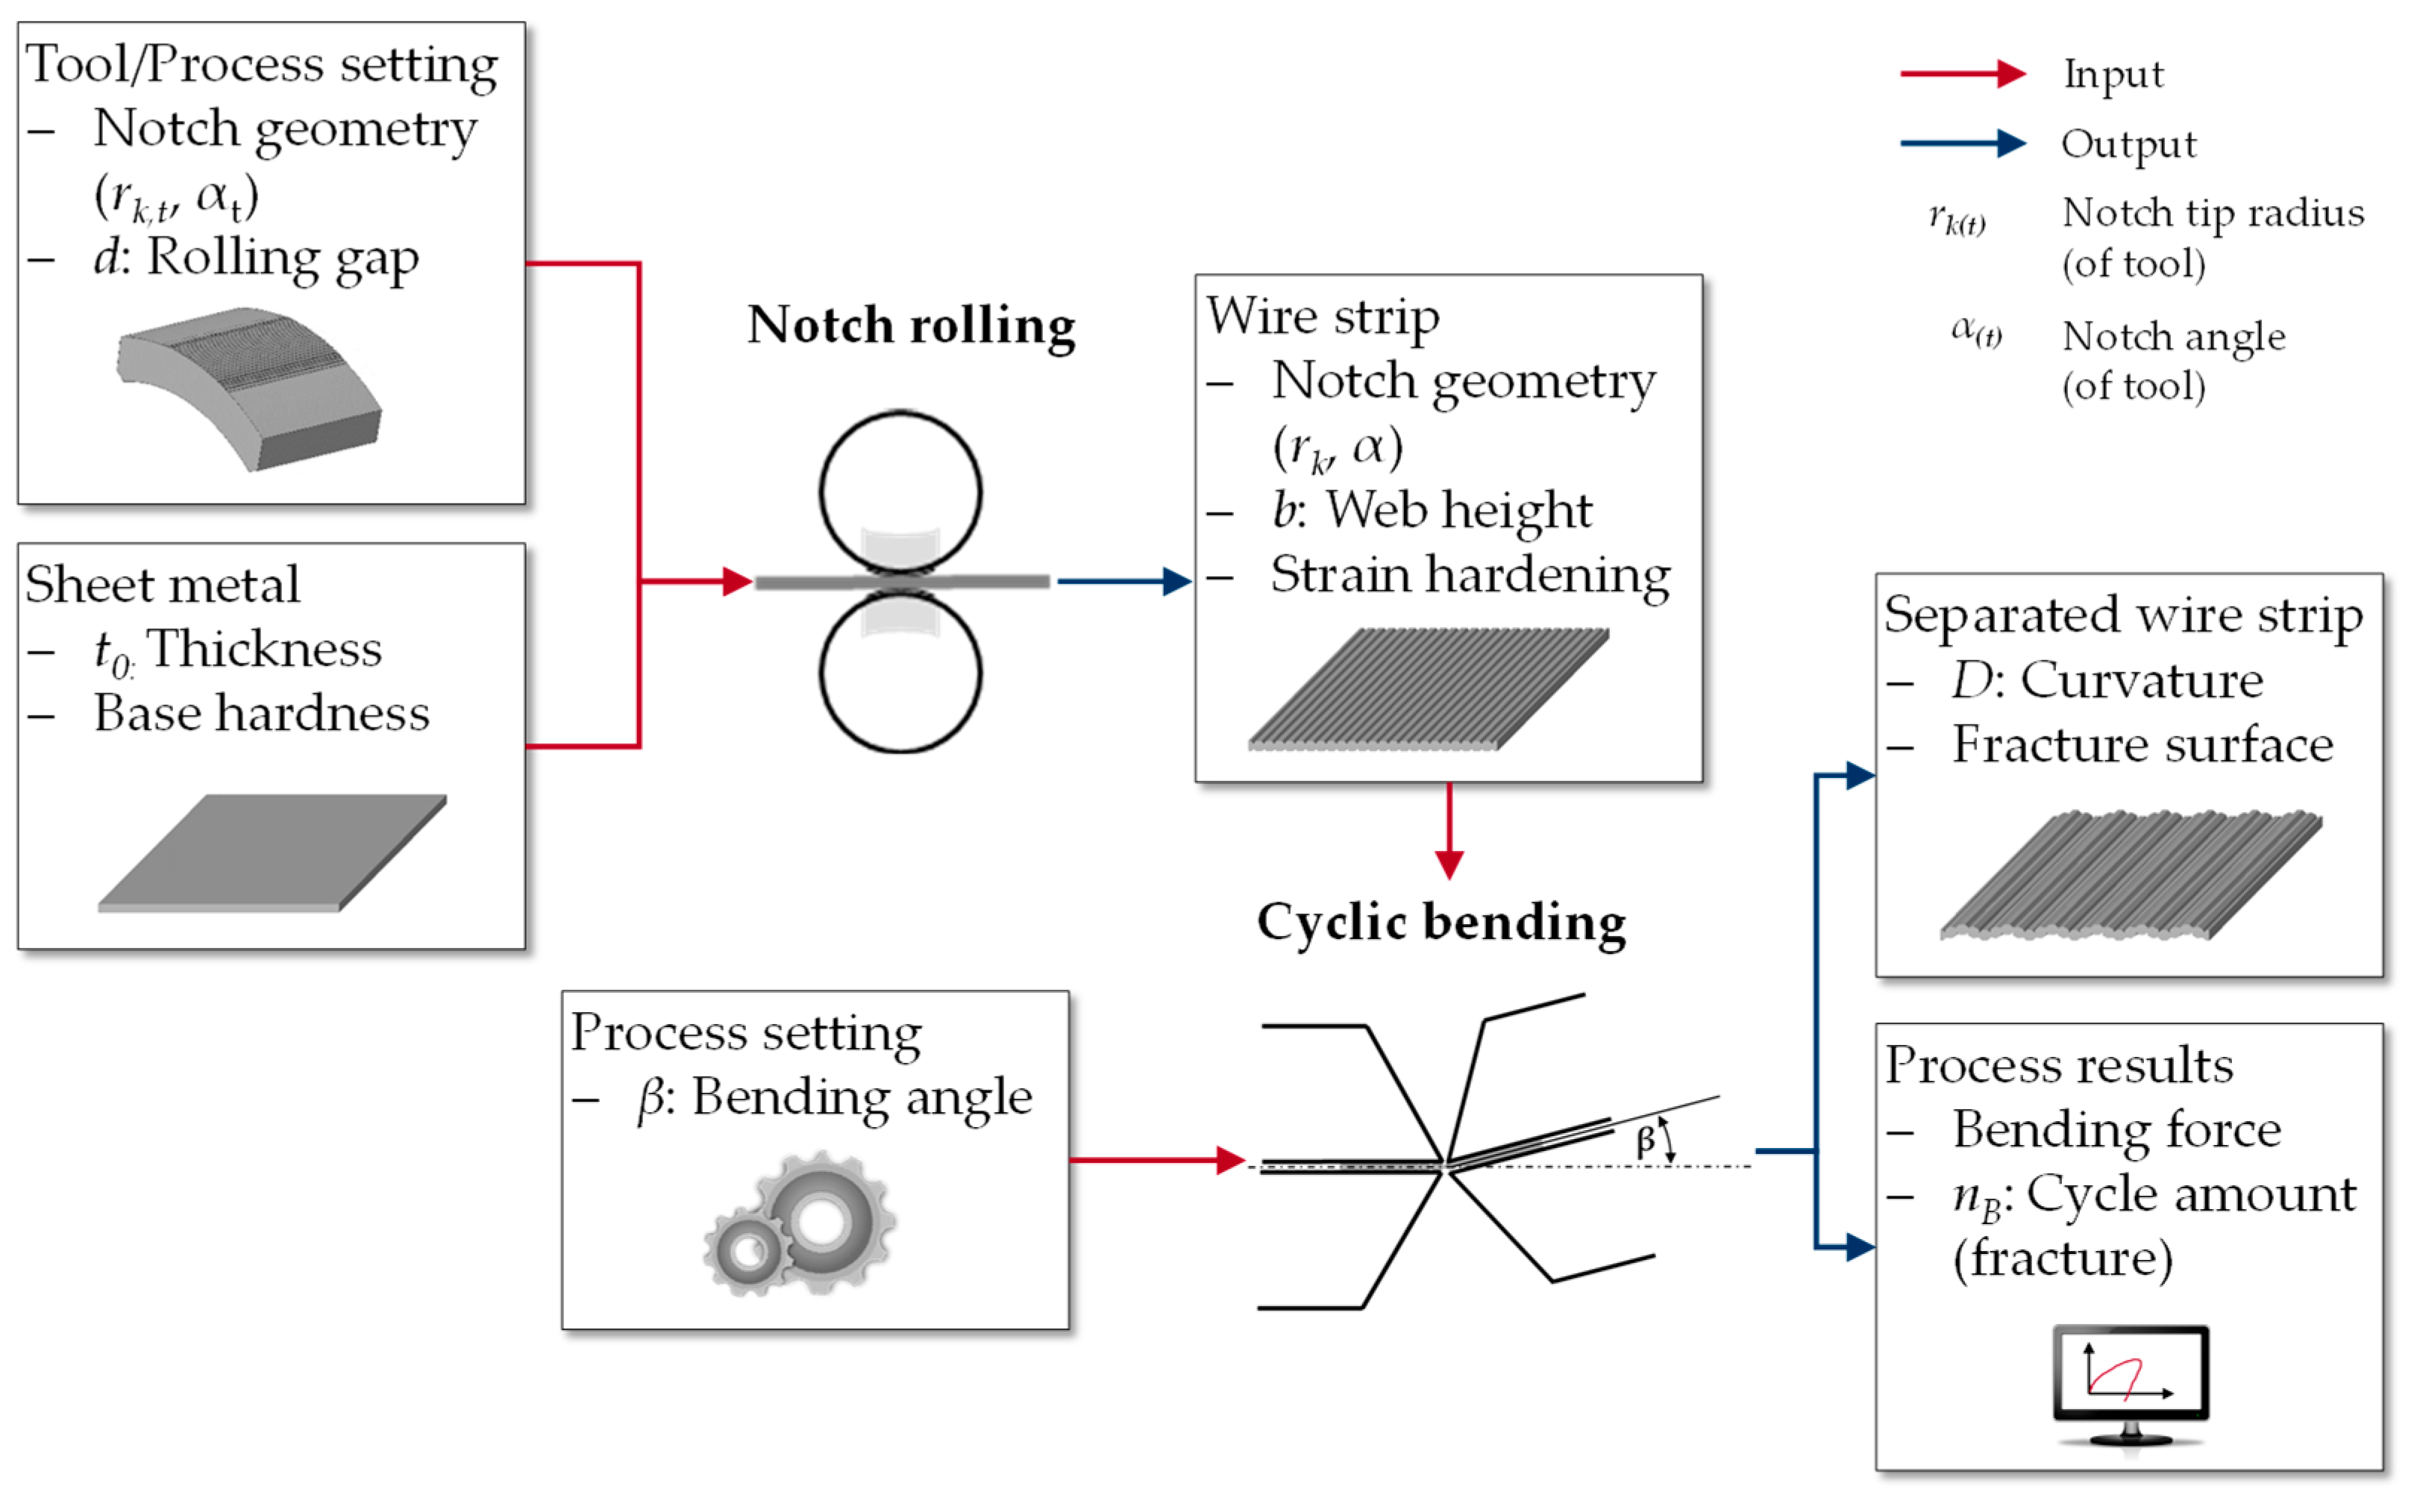
The experimental study evaluated cause–effect relationships for cyclic bending experiments of rolled wire strip until total material separation to enable comparison with results of [10]. For a target-oriented experimental design, the linkage of the process chain based on in- and output parameters during the process steps was elaborated. Due to the great number of parameters, a preselection was reasonable for better overview and useful analysis. Figure 6 presents a schematic listing of the considered parameters and tries to picture the interdependence of the process steps that add up to the final product, separated wire strip. The sheet metal was the input product for the notch rolling process. In addition, the notch geometry of the rolling tool (notch tip radius rk,t, notch angle αt) and the rolling gap d influence the process results. As output, the resulting wire strip can be characterized. Considered properties are the geometry of the notch (rk, α), the web height b and strain hardening. In turn, the wire strip’s characteristics resulting from the notch rolling process function as input parameters of cyclic bending. As further influencing parameter, the cyclic bending angle β is considered. Bending forces, the amount of cycles until fracture nB and the characteristics of the separated wire strip regarding fracture geometry are evaluated.
The rolling gap d is flexible since it is not linked to the tool’s geometry. The remaining rolling parameters are linked to the tool, the functional rolling element, which is only available in the version described above. The bending angle β is a process parameter that can also be set variably. As modifiable parameters for a study, the rolling gap d, and the bending angle β result. A comparable study setup for modified model processes was performed in [10], which considered the tool’s notch tip radius rk,t as an additional variable but determined its effect as negligible.
For a two-staged experimental plan to analyze the interrelations of the process steps, Table 1 lists the resulting settings. The rolling gap d is relatively low due to the detected spring-back of the rolling stand. The chosen range of the bending angle β corresponds with the concluded preliminary process window derived in [10]. Each setting combination is performed four times to compensate for scattering (n = 4).

2.2.2. Comparison Study of Notch Rolling and Notch Stamping

A notch stamping process for the production of wire strip is performed and analyzed to elaborate a target-oriented method as an alternative to the notch rolling process described above. For deriving a testing method with experiments on universal testing machines, a two-parted punch set is included to a stamping tool. The general layout of the notch stamping process is described in [15]. The characteristic parameters of the punches and the resulting, geometric parameters of the sheet metal are visualized in Figure 7.
The geometry is implemented by EDM. For the study at hand, stamping punches with seven notches are used. The dimensions are equivalent to the notch rolling process, e.g., the notch distance w is set to 0.9 mm. The actual notch tip radius rk,t was measured to 43 µm (target: 10 µm, SD 16 µm) and the notch angle αt to 90.7° (target: 90°, SD 0.7°) by an optical measuring system InfiniteFocusXL200 (Alicona Imaging GmbH, Raaba, Austria). The stamping pair is used in a tool set on the universal testing machine RM 250 (SCHENCK TREBEL GmbH, Ratingen, Germany) at the Institute of Manufacturing Technologies (LFT, Erlangen, Germany). The testXpert software (ZwickRoell GmbH & Co. KG, Ulm, Germany) controls the experiment and records the force-displacement curve.
An analysis of the wire strip’s characteristics produced by notch stamping was performed in the scope of the former study of Biallas and Merklein [10]. To allow a closer evaluation of the cause-effect relationships, a detailed analysis of the properties and their context to the input parameters of the notching process are elaborated and supplement the study. Again, the notch geometry of the toolset is constant (as described above), whereas the minimum tool distance dmin during notching can be modified. Comparable to the rolling settings (see Table 1), two tool distances are considered which are
  • dmin = 0.3 mm and
  • dmin = 0.5 mm.

2.3. Evaluation Methods

For all experiments, the force curves were extracted from the exported data of the testing machines. The geometric characteristics were evaluated based on microscopic pictures of the specimens and of micrographic samples by a light microscope (Olympus Europa SE & Co. KG, Hamburg, Germany) and by the optical measuring system InfiniteFocus XL (Alicnoa Imaging GmbH, Raaba, Austria). Further pictures by SEM KL 30 (Philips, Amsterdam, The Netherlands) support the analysis of the fracture surfaces. Strain hardening distribution was analyzed based on hardening measurements of micrographic samples by the Fischerscope HM2000 hardness testing machine (Helmut Fischer GmbH, Sindelfingen, Germany). Then, 150 mN was applied as a testing force for 10 s. From the measured diagonal, the penetration depth of the testing pyramid and the hardness of the material in HV0.05 were calculated. The measurement was performed for the middle part of the wire strip with a distance of the measuring points of 0.06 mm.

3. Results

The results of the above-described experimental interaction study are presented and interpreted to later allow discussion of the interrelationships of the process steps notch rolling and cyclic bending. For a fundamental understanding of the impact of the varying rolling gap on the wire strip, its characteristics are exposited first. Subsequently, the properties of wire strip resulting from the notch stamping experiments are derived to allow comparison to wire strip from notch rolling and to deduce a method for process analysis based on stamped wire strip during discussion.

3.1. Characteristics of Notch Rolling and Cyclic Bending (Interaction Study)

3.1.1. Characteristics of Rolled Wire Strip

The rolling process’ parameters directly influence the resulting wire strip and thus indirectly effect the specimen’s behavior during cyclic bending, as indicated in Figure 6. To describe such effects on the wire strip’s properties and to draw conclusions on the impact on cyclic bending, the varying geometric and metallographic characteristics of the wire strip depending on the different settings of d (0.1 and 0.2 mm) are presented. Figure 8 depicts the resulting geometric properties by comparing the resulting web height b, notch tip radius rk, and notch angle α. As already mentioned, the relatively low settings of d were chosen due to detect the spring-back of the rolling stand. Such behavior can be derived from the resulting web heights b which are about 0.43 (d = 0.1 mm) and 0.45 mm (d = 0.2 mm). b decreases when decreasing the rolling gap because of increasing the portion of plastic deformation, but the differences in the two settings are not as pronounced as expected, which indicates challenging roll gap adjustment.
The resulting notch tip radii are about 32 µm for both settings. The radius tends to be a few micrometers higher than the tool’s radius (26 µm), which can be explained by the spring back of the elastic deformation portion, considering the scattering indicated by the standard deviations. A relevant effect of the rolling gap on the indented notch tip radius rk cannot be detected within the measuring accuracy. The measured averaged notch angles α differ by a few tenths of a degree: 85.2° for d = 0.1 mm and 85.9° for d = 0.2 mm. Considering standard deviation, the different settings of the rolling gap slightly effects the notch angle which, together with the notch tip radius, characterizes the sharpness of the indented notch. The lower d, the smaller the resulting notch angle α.
The low effects of d on the notch angle and tip radius might correlate with the minor difference in the resulting web height relative to the set rolling gap values. The effective rolling gap d during roll engagement in the strip is higher than the set value due to the spring-back of the rolls. The resulting web heights indicate that the amount of spring back is not constant. An exact measurement of the roll bearings’ compliance did not succeed.
In addition to influencing the strip’s geometry and notch’s sharpness, variation of the rolling parameters influences grain structure and strain hardening. Varying levels of strain hardening impact the required stress for bending of the wire strip. Figure 9 shows the micrographs and hardness measurements of a middle notch of rolled wire strip with d = 0.1 and d = 0.2 mm. The rolling direction, indicated in the figure, is from left to right, so that the notch tip of the tool first forms the left flank of the strip’s notch. For both examples, an offset of upper and lower notch occurs, which could be minimized but not eliminated by control of the rolling gap picture and subsequent adaption.
Hardness distribution and grain elongation in the micrographs indicate higher deformation and strain hardening on the left flanks, facing away from the rolling direction. The tool’s tip first forms that flank and shoves material in rolling direction, as indicated by the arrows in Figure 9. The hardness level of the wire strip rolled with d = 0.1 is higher than with d = 0.2 mm. Especially towards the middle of the sheet, higher hardness values can be detected. Over the web height in-between upper and lower notch, hardness values of about 392 HV for d = 0.1 mm and about 20 HV lower (368 HV) for d = 0.2 mm were measured.

3.1.2. Characteristics of Cyclic Bending of Wire Strip Produced by Notch Rolling

The cyclic bending of rolled wire strips applying the described tool setup was performed and interpreted to evaluate the impact of the parameter settings on the crack propagation. The parameter study given in Table 1 considers the variation of the notch rolling parameter d (rolling gap), whose resulting wire strip’s properties were described above, and the cyclic bending parameter β (bending angle). Figure 10 shows pictures of a separated specimen for d = 0.1 mm and β = 10°. The frontal view B illustrates a characteristic curvature of the crack propagation. The resulting fracture geometry is defined by one arc (side clamped by moveable jaw pair) respectively two arcs (side clamped by fixed jaw pair). This identifies two-sided crack growth and coalescence of the two cracks in the middle. The distinctive line of coalescence can also be seen in the view of the fracture surface C. During crack initiation, more plane fracture surface results that becomes coarser during crack propagation towards the middle.
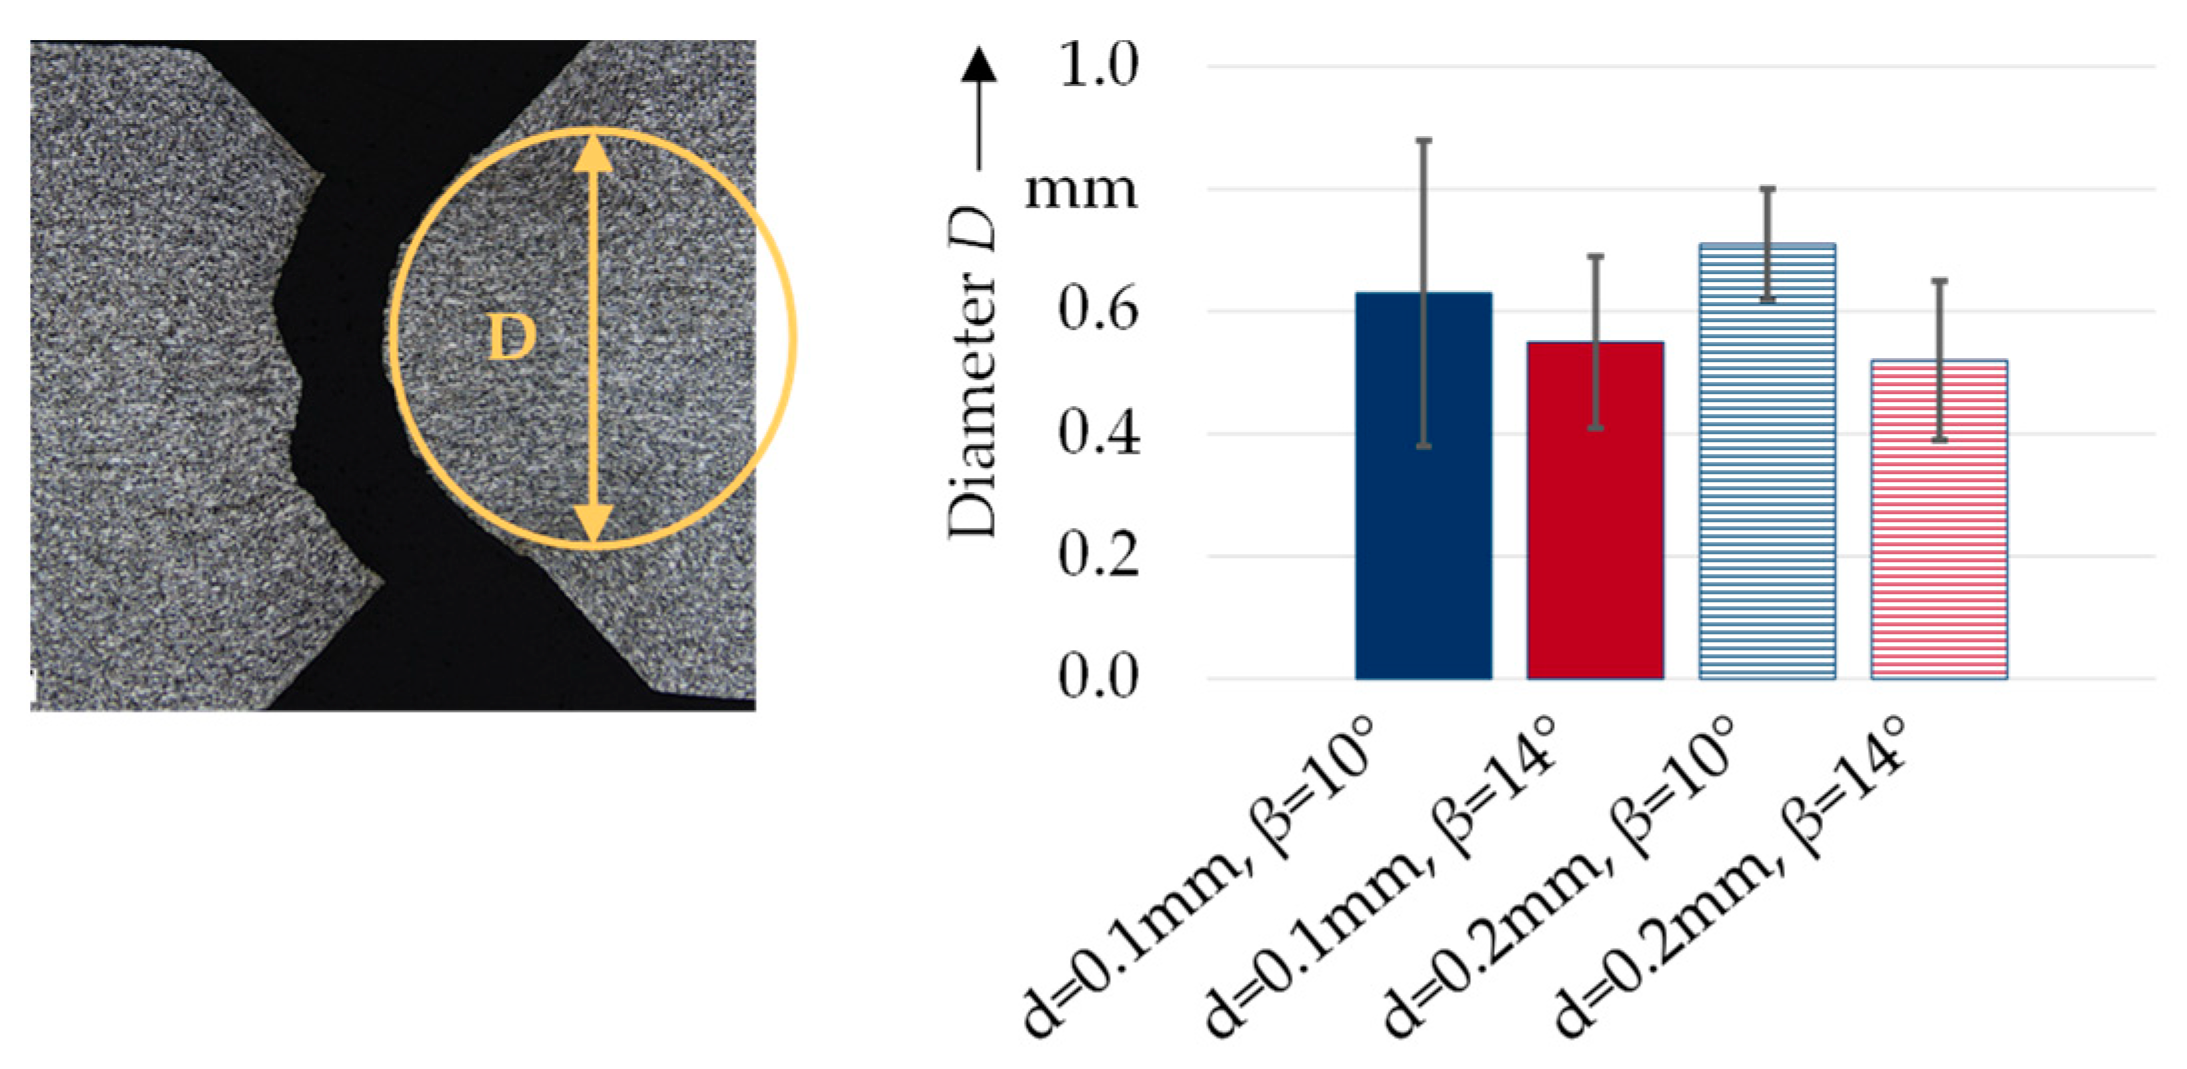
All bent wire strips exhibit a characteristic geometry as described above and seen in Figure 10, but differ in the pronouncement of curvature. To quantify the differences of various parameter settings, the curvature diameter D of the crack edge that was clamped by the moveable clamping pair is measured and compared as seen in Figure 11. The averaged diameter ranges from 0.52 (d = 0.2 mm, β = 14°) to 0.71 mm (d = 0.2 mm, β = 10°). The higher the bending angle, the more pronounced the resulting curvature. A direct effect of the rolling gap on D cannot be derived. It is debatable if the orientation of curvature (convex/concave) is caused by boundary conditions due to clamping or by the pre-deformation through the rolling process. However, the size of the curvature defines the geometric equality of both sides of the fracture. The higher D, the more uniform the crack growth direction, which would result later in wires/fibers with symmetric geometries.
Figure 12 presents the averaged torque-bending angle curves of all performed cyclic bending tests. The hysteresis reached maximum torques of about 1.6–1.8 Nm and show decreasing progress for all experiments, ending in a course with no more changes. During the first cycles, the curvature of a stroke is uniform. Later on, the curvature changes from negative acceleration to positive acceleration towards the torque maximum. This indicates damage evolution overlaying the typical elastic-plastic material behavior. Experiments with a bending angle of 14° reach about 0.1 Nm higher maximum torque than with a bending angle of 10°. The maximum torque of both considered bending angles hardly differentiated, since during the first cycle, the course showed no more significant rising after approximately 8°. The torque level of the first cycles of wire strip rolled with a lower rolling gap (d = 0.1 mm) is about one-tenth Nm lower than for a higher rolling gap (d = 0.2 mm). The higher the rolling gap, the higher the cross-section, and the more effort was required for bending the notch. The differences between the two settings of the rolling gap decrease with progressing cycle amount.
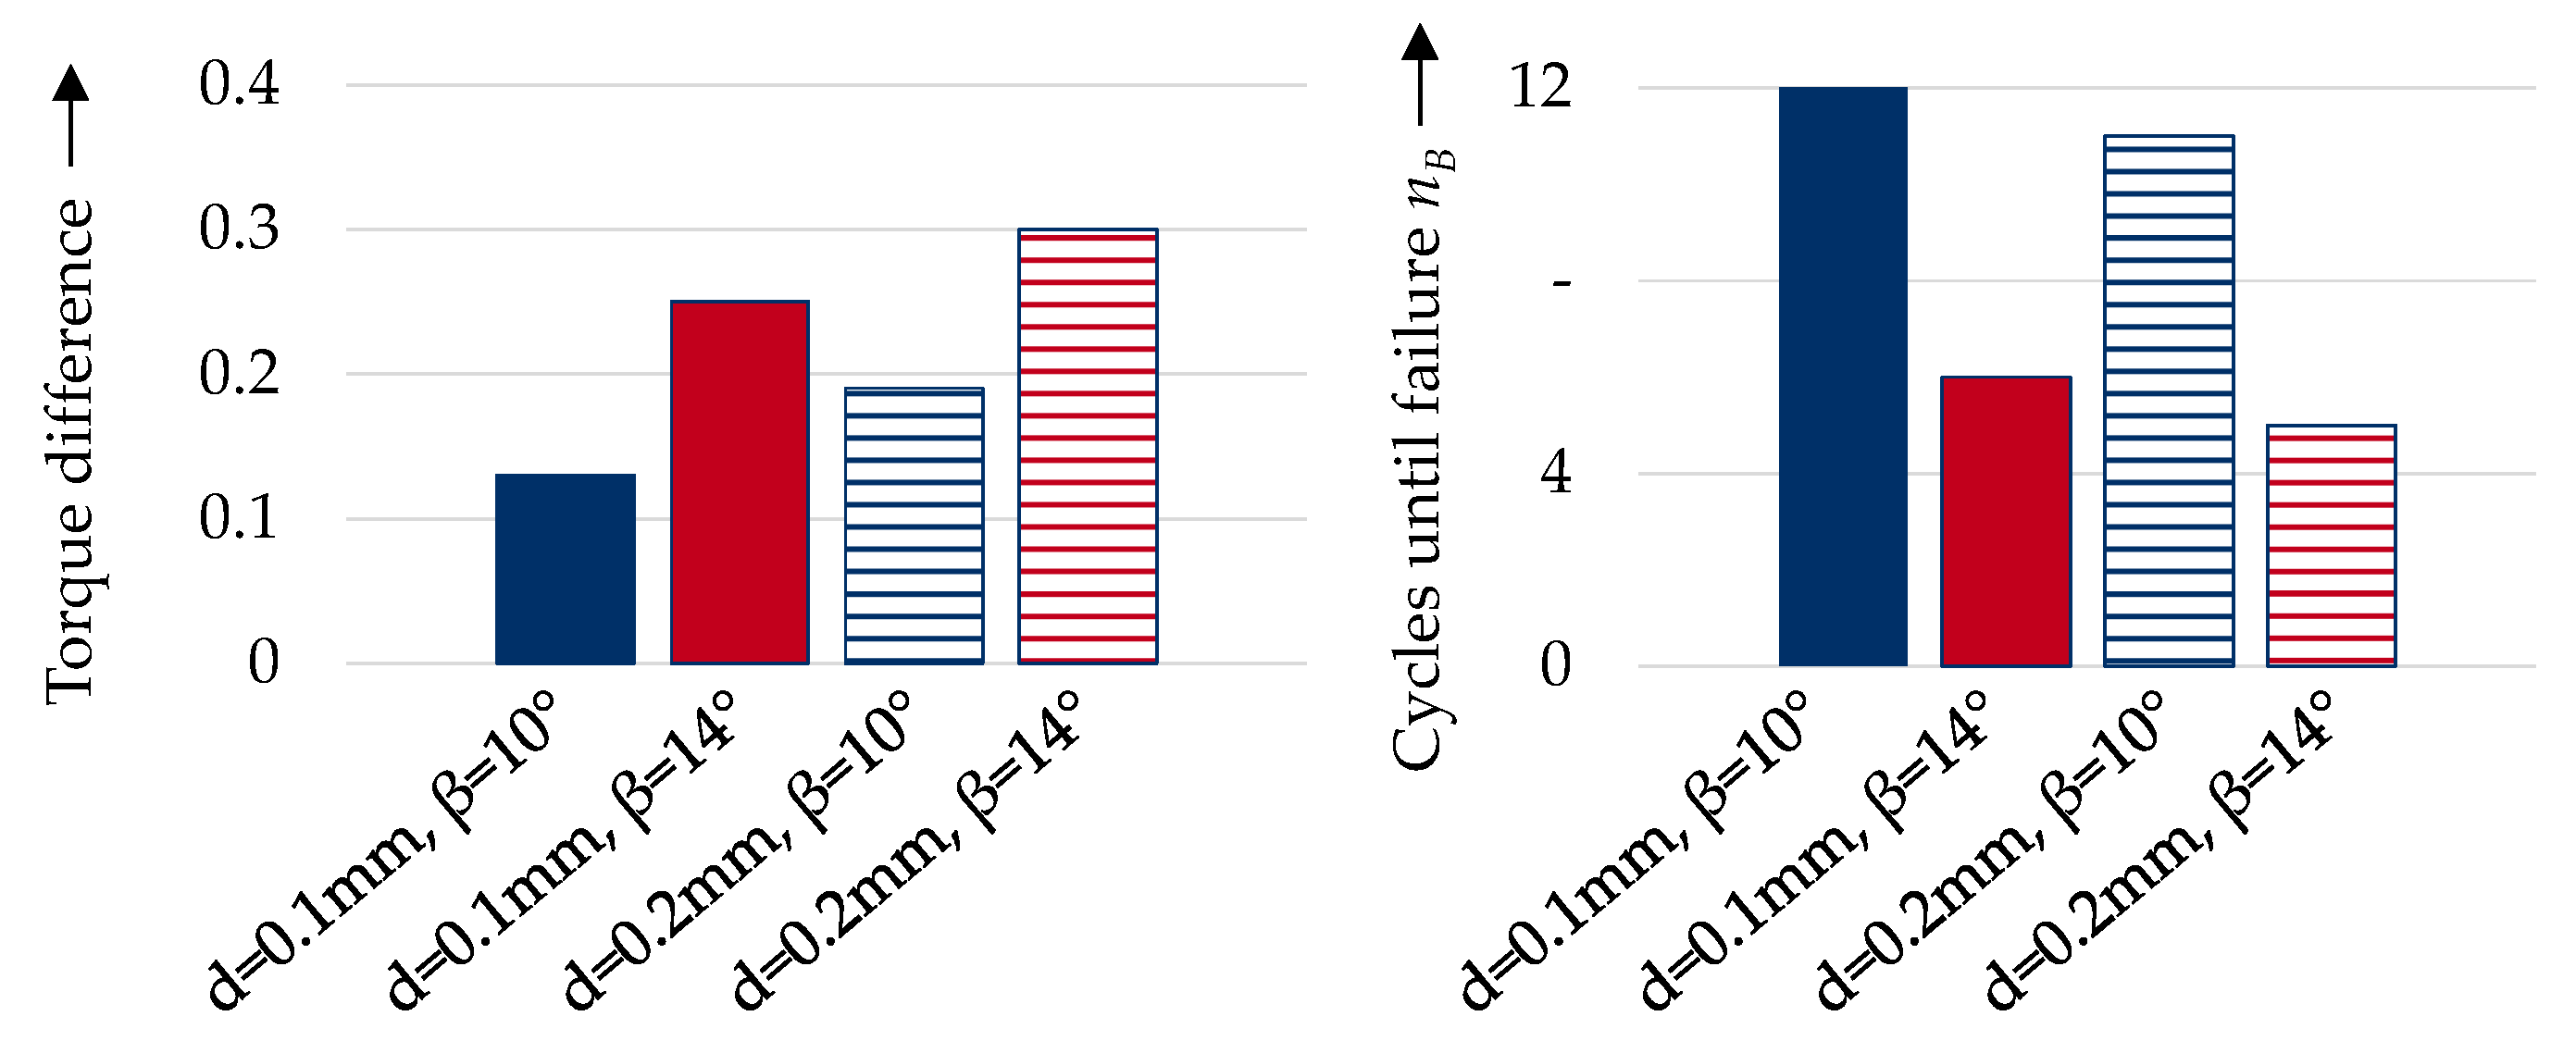
The torque curves indicate a difference of the level of decrease from one cycle to the next for the considered parameter sets. For quantifying the level of decrease, the difference of the torque maximum during the first cycle (Nmax,1) and the torque maximum during the second cycle (Nmax,2) is calculated and presented in Figure 13. Applying a bending angle of 14° results in a higher torque difference than applying a bending angle of 10°. Moreover, applying a rolling gap of 0.2 mm exhibits an increased torque reduction than applying a gap of 0.1 mm. The higher the bending angle and the higher the rolling gap, the more differentiate the torque level of the first and second cycle. Such behavior describes a less uniform decrease that might be caused by uncontrolled crack growth.
The definition of material failure according to the torque-angle curves is performed based on no more detected relevant change in the torque level. Although the determination method is subjective, it presents a reasonable base for evaluating the differences caused by the different considered parameter combinations. Figure 13 presents the amount of cycles until failure nB rounded to whole numbers. The lowest cycle amount result from experiments with a bending angle of 14°. Within the experiments of one bending angle setting, tests with wire strip produced with lower rolling gap (d = 0.1 mm) fail slightly later than with higher rolling gap (d = 0.2 mm). This might be caused by the different amount of penetration that results in different characteristics of rolled wire strip.

3.2. Characteristics of Stamped Wire Strip

For deriving an equivalent of notch rolling by notch stamping, relevant characteristics of wire strips have to be mapped. To do this, the properties of stamped wire strips must first be specified. The characteristics of experiments with dmin = 0.3 and 0.5 mm are presented and interpreted. The resulting wire strip’s geometries, web height b, notch tip radius rk, and notch angle α, can be read from the diagrams in Figure 14.
For higher tool distance, greater web height results. A possible spring-back of the tool setup has no great effect on the resulting web heights. For both settings of dmin, the web height is 0.06 mm higher than the set minimal tool distance. The deviation is composed of possible spring-back of the setup and elastic recovery of the wire strip. The final web heights differ by the same amount than the set tool distances, which indicates controllability of the process parameters.
The notch sharpness is defined by the notch tip radius rk and the notch angle α. From the considered experiments, notch tip radii of 0.045 mm (dmin = 0.3 mm), respectively, 0.044 mm (dmin = 0.5 mm) result. No effect of the tool distance on rk can be detected. The notch angle α was measured to 92.9° (dmin = 0.3 mm) and 96.7° (dmin = 0.5 mm). It shows dependence on dmin, correlating with the greater portion of plastic deformation when reducing the tool distance. The smaller dmin, the smaller α and the more the wire strip’s angles approaches the tool’s angle αt (90.7°).
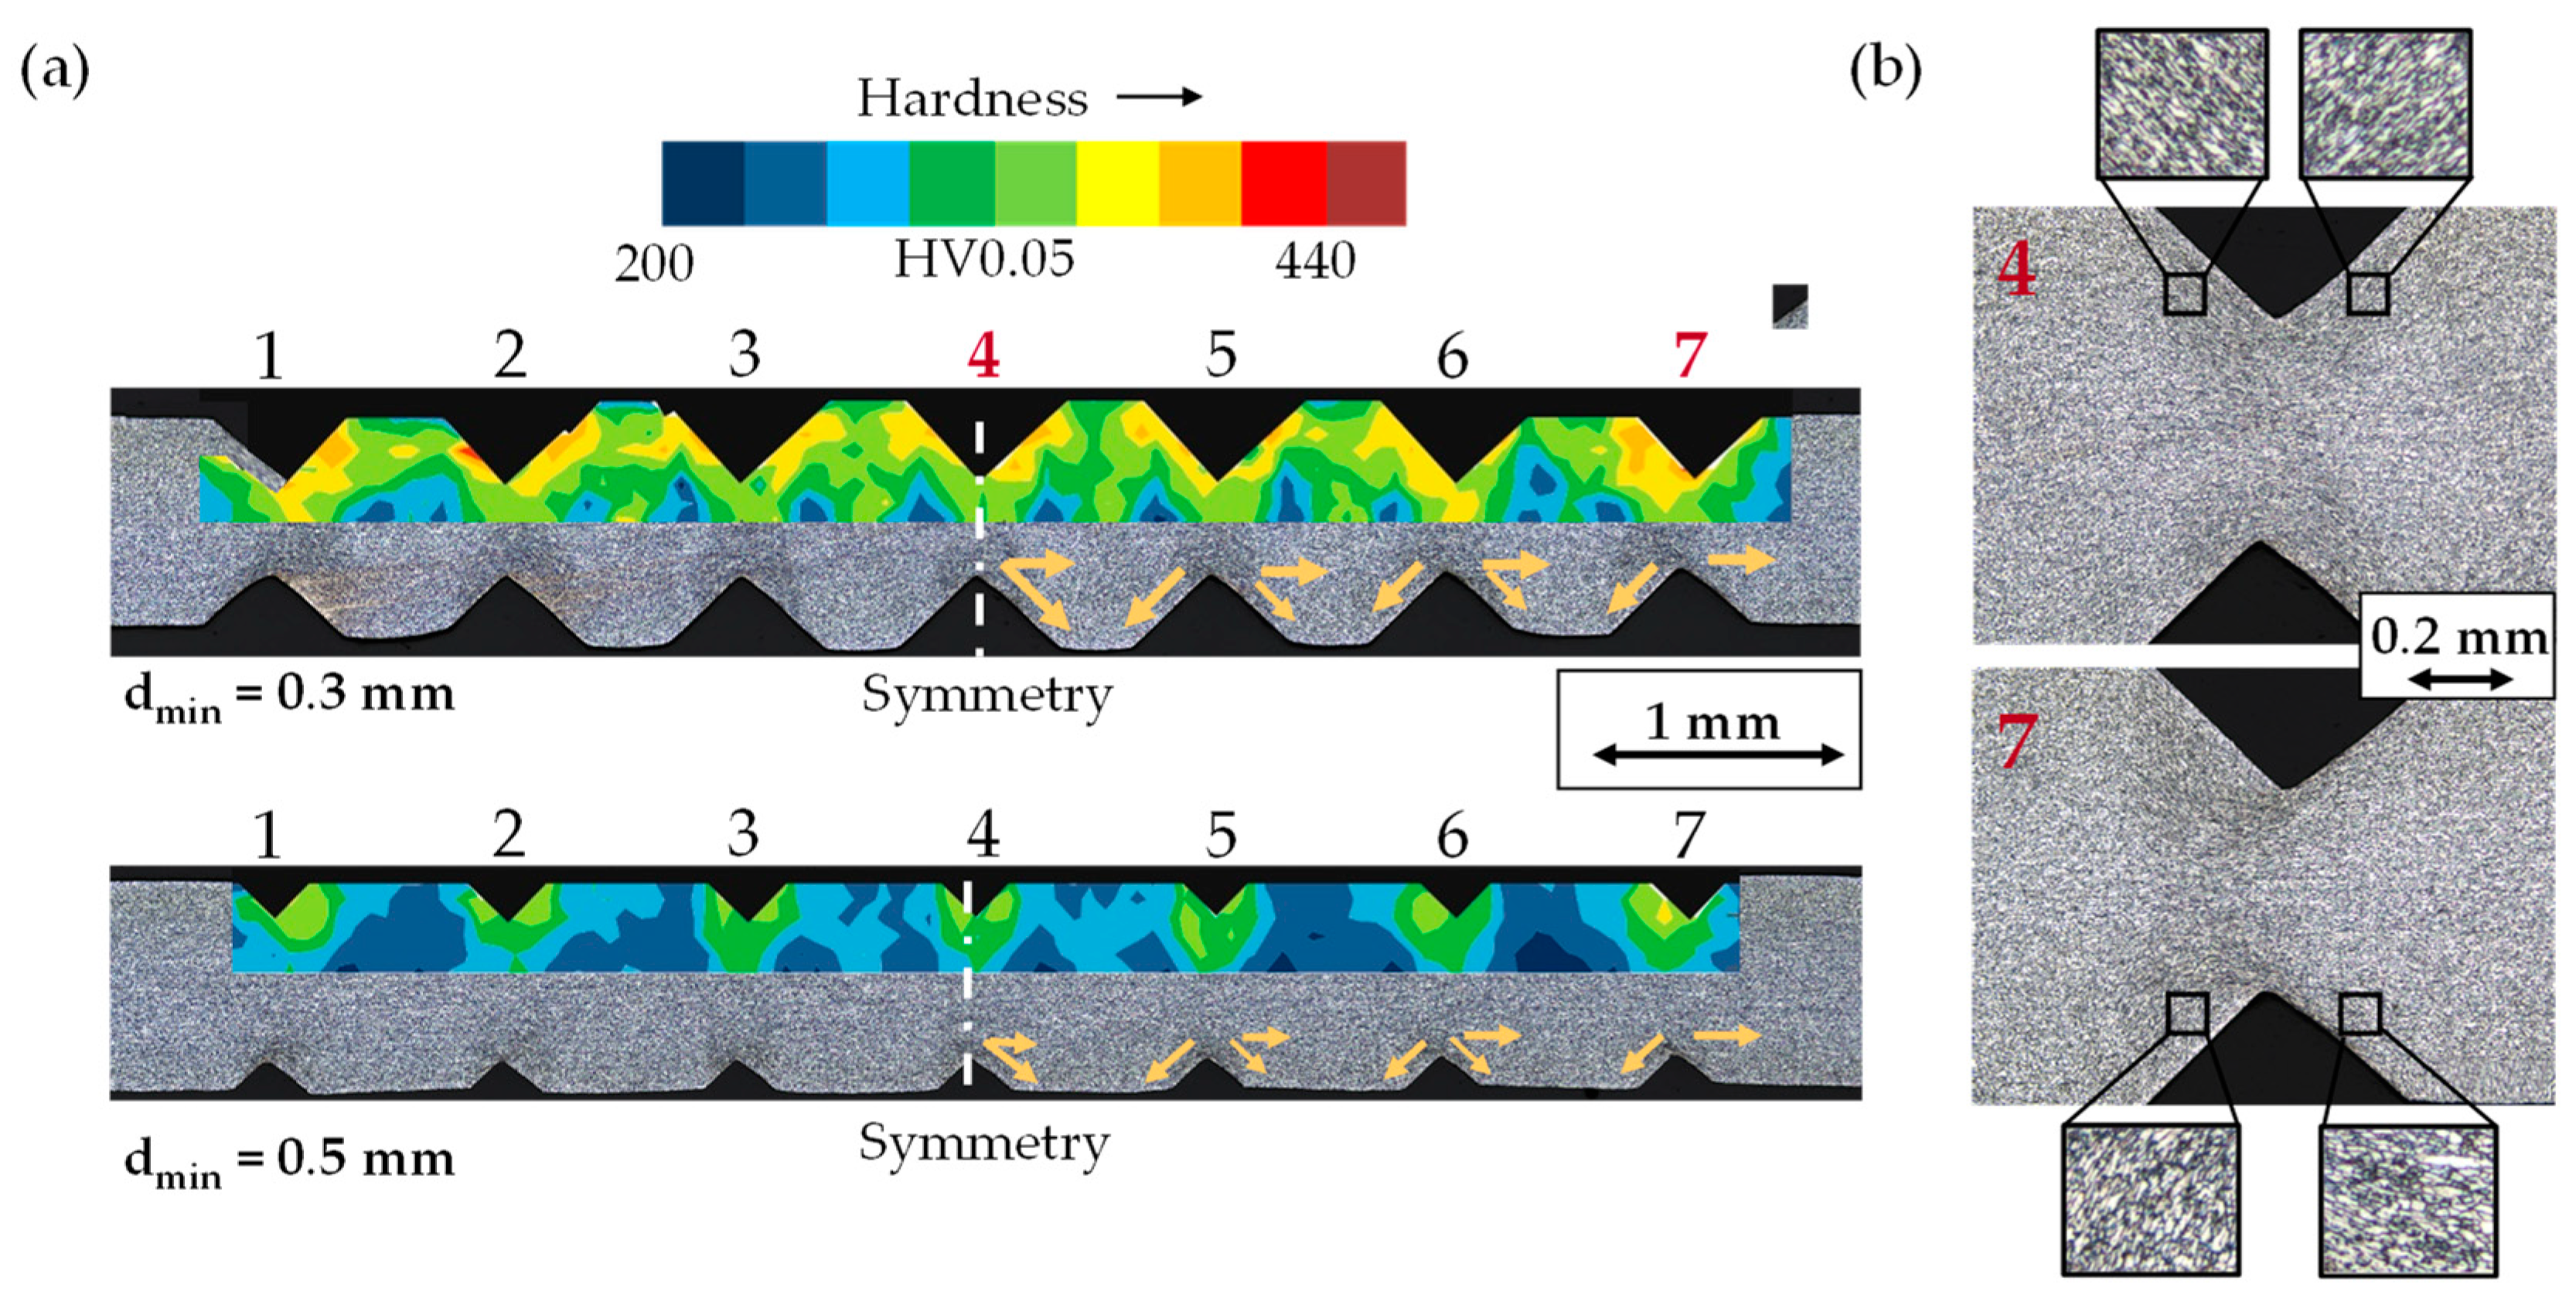
Figure 15a presents micrographs and hardness measurements for wire strip of each setting of dmin. They allow analysis of material flow, strain hardening and grain structure.
As concluded in [10], the thickening of the strip in-between neighboring notches is more uneven for small tool distances caused by the marked material flow. In the middle, the neighboring notches interfere elongation in horizontal direction and rising in vertical direction results, while material displaced from outer tool tips also flows horizontally. This leads to a symmetric distribution of thickening, hardening and grain deformation. The accumulated elongation towards the outside result in higher strain hardening on the inner flanks of the outer notches. Only the middle notch shows uniform distribution of strain hardening, which is also illustrated by the enhanced micrograph pictures of the middle and outer notch in Figure 15b.

4. Discussion

To exhibit the interrelationships of the process steps notch rolling and cyclic bending, the above-presented results of the interaction study are analyzed and discussed. The parameters’ effects on crack propagation and their interdependency are evaluated and relevant characteristics of rolled wire strips are deduced. Subsequently, the derived results of wire strips produced by notch rolling and notch stamping are compared and discussed. Following that evaluation, a method for further process analysis based on stamped wire strips possessing relevant characteristics of rolled wire strips is derived and evaluated.

4.1. Interaction of Notch Rolling and Cyclic Bending

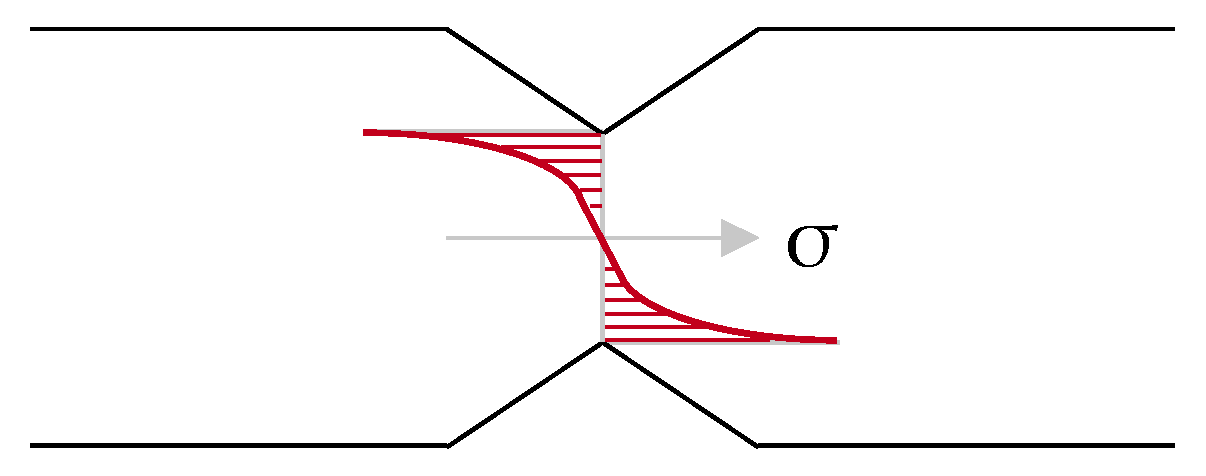
The separation behavior of wire strips during cyclic bending is greatly affected by the presence of notches, which represent discontinuities and lead to stress peaks in the notch roots during loading (Figure 16). Despite the usually undesired limiting of strength or lifetime [16], the notch effect is intentionally used in this case. The stress peak’s magnitude and its effects on the work piece’s strength depend on the notch geometry and loading conditions. For analyzing the impacts, the mentioned influencing factors were varied by different settings of d (modified notch geometry) and β (modified loading condition) in the above-described interaction study.
Based on the parameters’ effect on crack propagation during cyclic bending, the interaction of the process steps notch rolling and cyclic bending and their parameters can be derived. To allow the deduction of interdependencies, the above-presented results of cyclic bending and notch rolling are combined and discussed. For summing up effects and interactions, Figure 17 visually presents the impacts of the considered parameter sets on the process results by color-coding the identified effects. Table 2 gives a detailed overview of all variables and resulting parameters of the parameter study.
The analysis of the cyclic bending process revealed influences of the parameter settings of d and β on the bending torque (maximum torque and torque difference), the cycle amount until failure and the crack geometry. Figure 17a shows the interaction of both parameters’ effects on the characteristics of the separated wire strip. Raise of the bending angle β results in more pronounced curvature of the crack (higher D), a higher drop in torque from first to second cycle and an earlier material separation. The reduction of cycle amount for higher bending angle conforms to the outcome derived by prior interaction analysis applying stamped wire strip and a modified cyclic bending test [10]. A greater bending angle increases the stress peak and results in faster crack growth. Analogous to effect analysis in Minitab18, major effect of β on the cycle amount until failure occur compared to the impact of d. Moreover, β mainly effects the torque difference and the curvature of the crack geometry, whereas last named parameter also depends on the interaction of β and d. Comparing the results to derivations of [10], the effect of β on the curvature is contrary. This might be explained by the different cyclic bending setup and should be evaluated when applying the new setup on stamped wire strip.
Increasing the rolling gap d leads to a higher bending torque, a higher drop in torque from the first to the second cycle, and a slightly earlier material failure. The effect analysis states a main effect of d on the maximum torque and only minor effects on the remaining parameters. The prior interaction analysis based on stamped wire strips stated a more pronounced effect on the material failure [10] which can be explained by the higher differences of the effective tool distance.
Changes of d cause different characteristics of the indented notches and define the notch effect during loading. For understanding the interdependency of both process steps, the resulting characteristics of wire strips depending on the two considered settings of d were analyzed. Effectively, minor differences in the rolling gap result due to the spring back of the rolling stand. The small difference in the effective rolling gap might diminish the effect of the variation of d on the wire strip’s properties. Following this, even small differences in the resulting parameters are to be considered. From the evaluation of the notch rolling process, effects of the rolling gap d on the web height b, the notch angle α, and the material hardness result. They are visualized in Figure 17b. The increase in d leads to a higher web height, a higher notch angle, and a lower hardness level.
Although the material hardness is smaller, the effects of a higher web height causing a greater cross-section and a lower notch depth leading to a minor notch effect predominate and causing a higher torque during cyclic bending. For a higher notch angle, which characterizes a less sharp notch, more uncontrolled crack growth occurs, leading to a higher drop in torque and slightly earlier material failure than with smaller web heights. This coincides with the findings of Omiya et al. [17] who determined unstable crack growth for less sharp notches based on the variation of notch tip radius during cyclic bending of high-strength steel. A similar effect is expected from the notch tip radius, but is not significant for the here considered range of deviation sizes.

4.2. Differences in Rolled and Stamped Wire Strip

For deriving a method of process analysis based on stamped wire strips, the difference in the derived characteristics of the above-described notching experiments have to be discussed. Concluding the notch stamping results, Figure 18 color-codes the identified effects and Table 3 lists the geometry and hardening measurements for both considered settings of dmin. The averaged hardness value was determined for the middle notch (4) and represents the hardening level of the wire strip. The hardness of neighboring notches differs by max. 20 HV. The notch tip radius rk did not show any relevant changes. Higher dmin leads to greater notch angle α and greater web height b. The hardness decreases for higher dmin.
Comparison of wire strip produced by notch rolling and notch stamping shows similarities and discrepancies. The effects of the tool distance dmin on stamped wire strip presented in Figure 18 equal the effects of the rolling gap d on rolled wire strip given in Figure 17b. The effect of dmin on b is more pronounced for notch stamping than for notch rolling due to less spring-back of the tool setup. This verifies the higher effect of dmin on the amount of cycles until failure nB determined in [10]. The controlled adjustability of the tool distance for notch stamping represents an advantage over the rolling process for targeted analysis of the process chain under laboratory circumstances. The improved agreement of set and effective tool distance also enhances the other effects for further evaluation.
Although the identified effects resemble, there are some differences in the values of the measurements of rolled and stamped wire strips. Contrary to notch rolling (α < 90°), the measured notch angle α of stamped wire strip is higher than the tool’s notch angle αt (α > 90.7°). The deviation is caused by different kinematics of the processes. After notch stamping, elastic recovery of the wire strip in direction of the punch stroke leads to the lifting of the notch base and higher notch angles. Rolled shaping of the notches, on the other hand, leads to spring-back of the flanks in direction of contact and causes smaller notch angles. A testing method based on notch stamping may apply tools with smaller notch angles than those used in notch rolling to map the same characteristics and model its effects on the behavior during cyclic bending.
The general hardness of stamped wire strips is lower than that of rolled wire strips, although the effective tool distance for dmin = 0.3 mm is lower. The reason is again sought in the different process kinematics. Rolled forming of a notch leads to compressive stresses in multiple directions due to the successive change of contact direction. This induces more strain hardening of the surrounding material. Such behavior of rolled wire strips is desirable for the production of steel wire/fibers of high strength. However, the difference’s impact on the analysis of cyclic bending of stamped wire strip instead of rolled wire strip has to be evaluated. During the cyclic bending experiments of rolled wire strip described above, higher or lower hardness levels resulting from the different rolling distances did not affect the torque curve. A higher torque was required for less hard wire strips because of greater web height and smaller notch depth and vice versa. The not existing influence of the hardness level agrees with the findings of Ghosal et al. [18] who analyzed the notch fatigue of DP600 under pre-strain. Based on the testing plane and notched tensile specimens with and without pre-strain applied by rolling, they did not determine a significant effect of pre-straining on notch fatigue behavior. Founded on this knowledge, deviations of the hardness level can be neglected for a first approach.
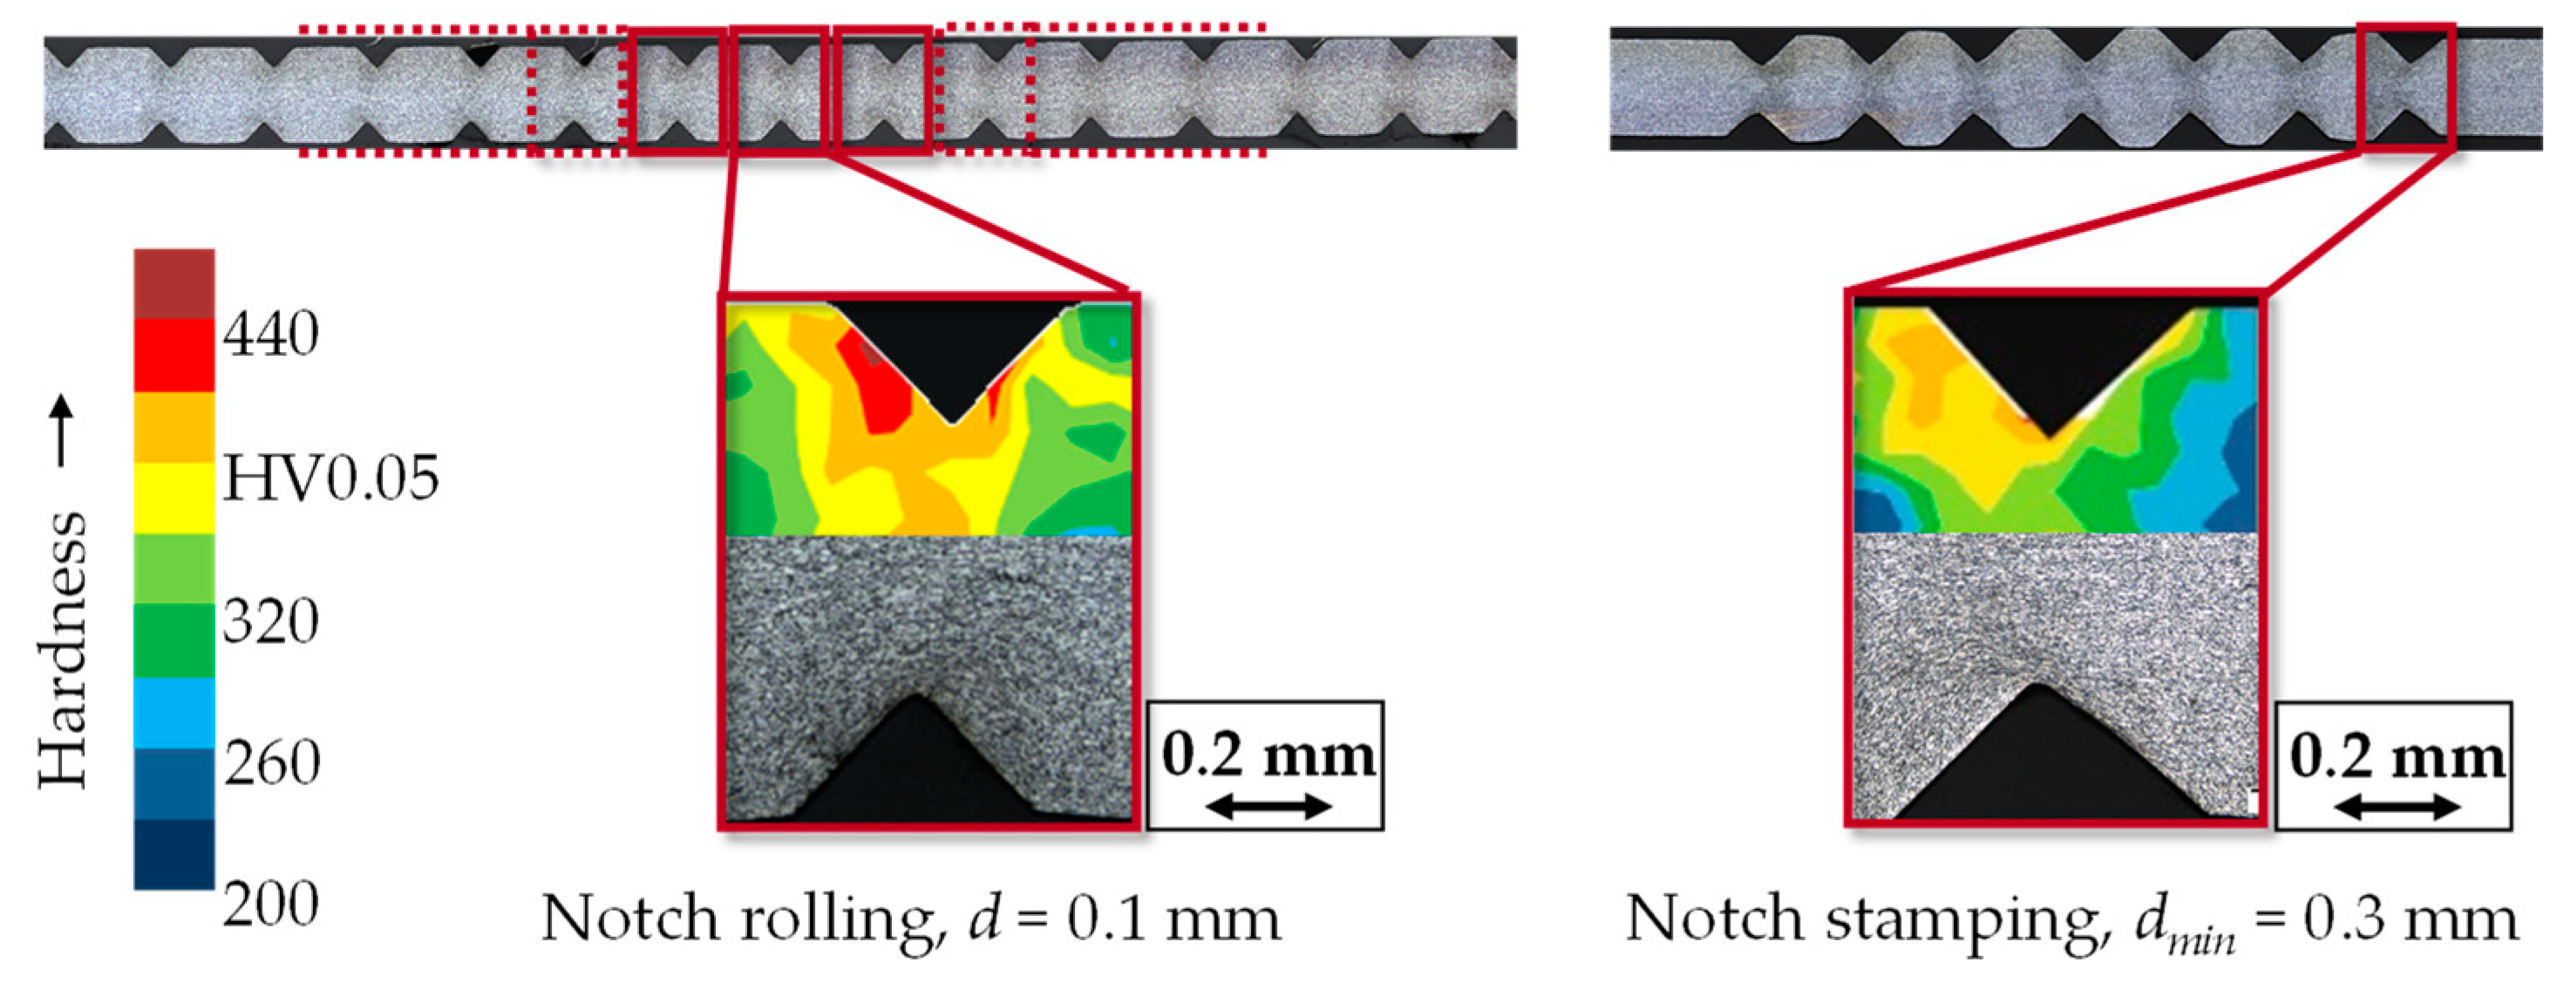
In addition to the general hardness level, the hardness distribution of wire strips affects the material failure during cyclic bending. Its effect on the direction of curvature could not be excluded during the interaction analysis. Strain hardening results from deformation dependent on the process kinematics. The different engagement conditions during notching—incrementally during notch rolling and collectively during notch stamping—lead to different hardening distribution. During notch rolling, the hardening of the flank facing away from the rolling direction is more pronounced than the hardening of the opposite flank (Figure 9). During notch stamping, the hardening of the outer notch flanks deviate from the inner ones (Figure 15a). The developed bending process analyzes the crack propagation of one notch. The properties of the neighboring notches are not significant for the analysis. In conclusion, the uneven hardness distribution around the outer notches of stamped wire strip can be utilized and a notch of this area can be specifically tested during cyclic bending. The similarity of the strain hardening distribution along the web height of a rolled notch and a stamped notch in the outer area (notch 7) is visualized in Figure 19. For both examples, one flank features higher hardening values than the other.

4.3. Equivalent of Rolled Wire Strip by Stamped Wire Strip

An equivalent method for future analysis of the bending behavior of wire strips produced from notch stamping is derived following the above-described comparisons of rolled and stamped wire strips. The hardness level will be neglected due to the conclusions above, as well as the notch tip radius, which shows only minor differences and does not affect the bending behavior according to [10]. The remaining properties to be mapped are:
  • Web height b;
  • Notch angle α; and
  • Hardening distribution.
Spring-back of the rolling stand complicates the derivation of correlation of the rolling gap d and the resulting web height b. Since the actual size of d during roll engagement could not be measured, no exact statement is possible. It is assumed that effective d during rolling and dmin of the stamping process coincide and that the resulting web height b is equivalent.
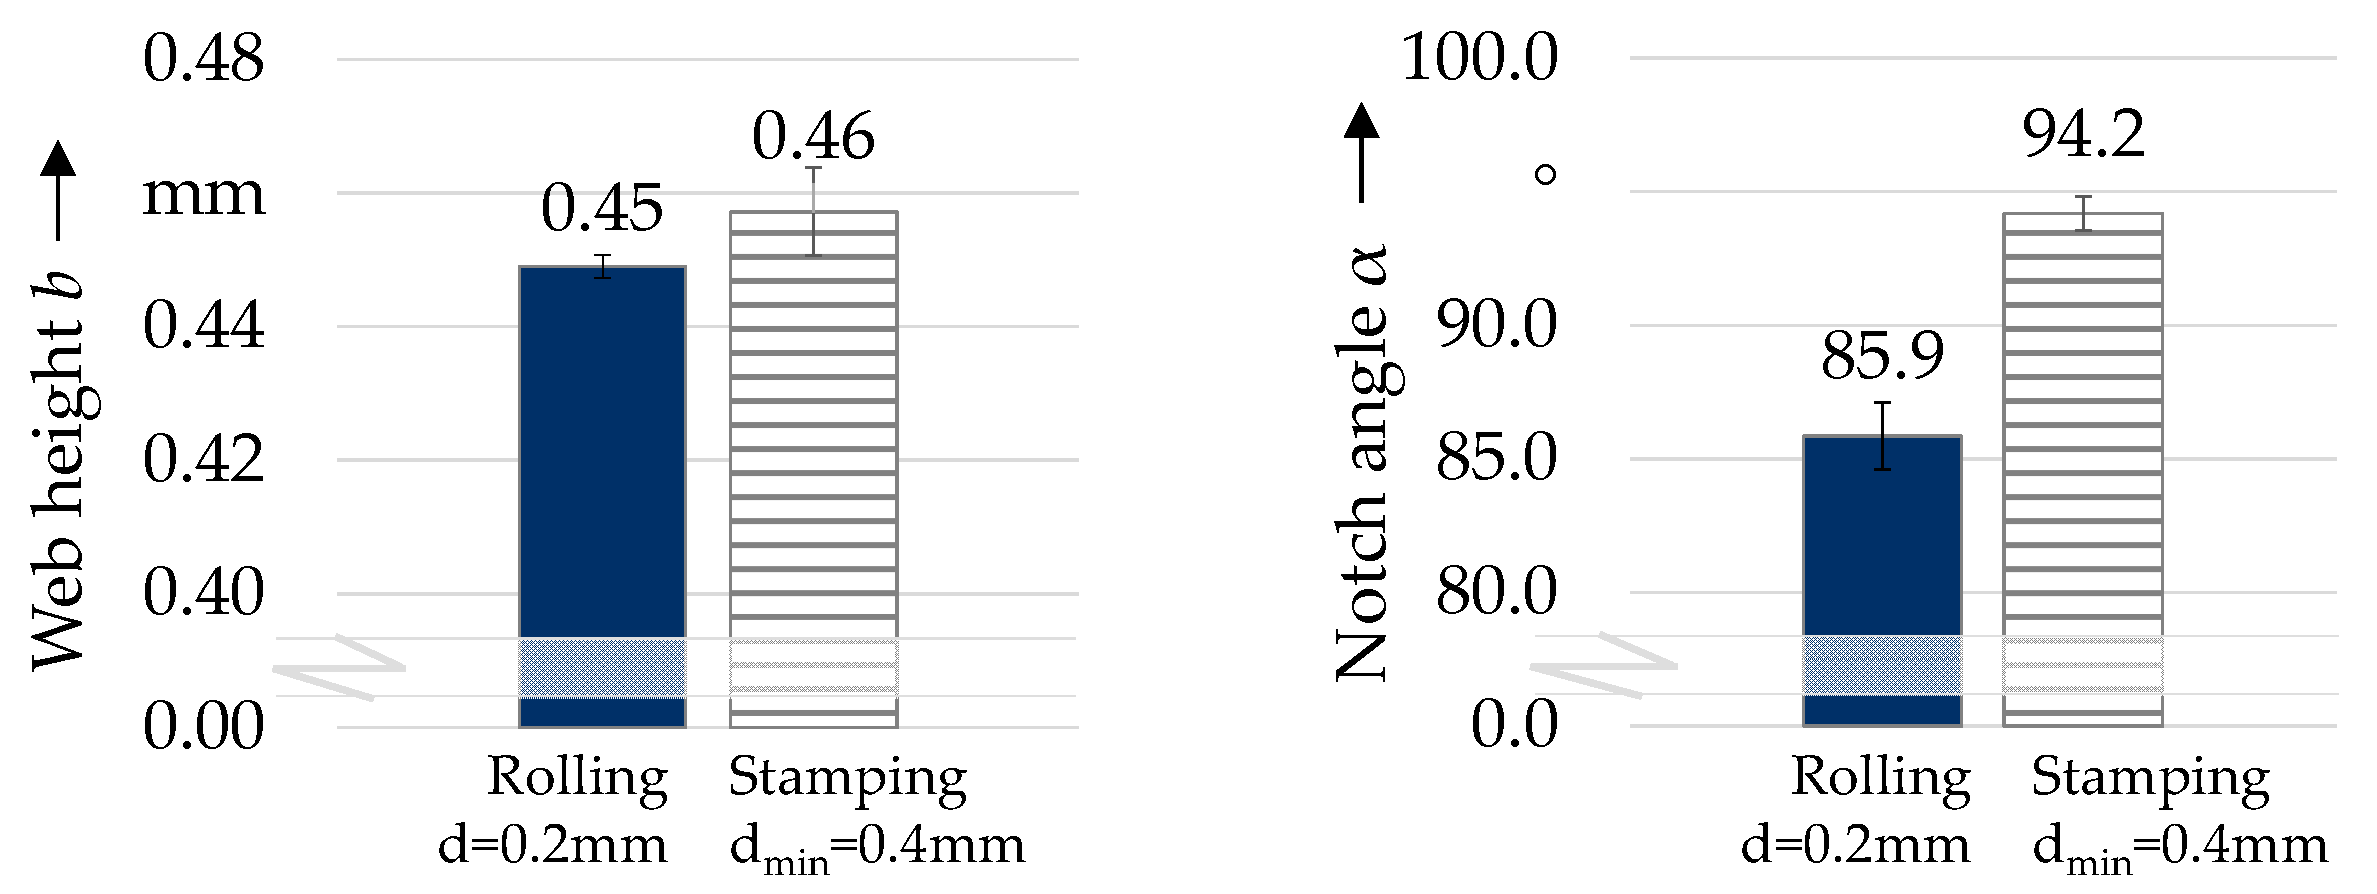
From that conclusion, an inference on actual d is possible starting from b by considering the difference of the set tool distance dmin and the resulting web height b of stamping (about 0.06 mm). A set rolling gap d of 0.2 mm would correspond to an effective rolling gap of 0.39 mm, since a web height of 0.45 mm results. A comparison of the relevant geometric sizes of the mentioned rolling experiment (d = 0.2 mm) and its corresponding stamping experiment with dmin rounded to 0.4 mm is given in Figure 20. A good agreement of the resulting web height is evident. The resulting notch angles α show a larger deviation of more than 8°.
The given experiment settings of notch stamping (dmin = 0.3 mm, 0.4 mm and 0.5 mm with αt = 90.7°) allow a simplified calculation of the dependence of the percentage deviation of the tools notch angle αt and the wire strip’s notch angle α—referred as Δα%—on dmin. Assuming a quadratic relationship, Equation (2) results as function.
Δα% = f(dmin) = x × dmin2 + y × dmin + z
Applying the boundary values of the present experiments, the constants x, y, and z can be determined to 66.50%/mm2, −32.25%/mm, and 6.12%. The derived function allows calculation of the angle divergence when assuming dmin = 0.39 mm as an equivalent setting to the considered rolling experiment according to Equation (3). To reach a notch angle α equivalent to the rolled angle with a roll notch angle αt of 90°, the measured α-value after rolling (85.7°) and the determined divergence Δα% lead to a required notch tip radius of the stamping tool of 82.7° following Equation (4).
Δα% = f(0.39 mm) = 3.66%
Δα% = (α − αt)/αt    <->   αt = α/(Δα% + 1)
The analysis of the hardening distribution of rolled wire strips showed an uneven hardening of the notch flanks due to the rolling kinematic. The flanks’ hardening of stamped wire strip strongly depends on the notch’s position in the middle or outer area. As discussed above and shown in Figure 19, this feature can be purposefully utilized to find a hardness distribution similar to that of rolled wire strip. From the above results, it is suggested to test the outer notch (7) during cyclic bending. When applying the proposed tool’s notch angle, an analysis of a possible effect of the angle change on the strain hardening should be performed first.
Based on the prior analysis, an equivalent of the rolling process by notch stamping is derived. The adaptation for mapping rolled wire strips regarding the relevant characteristics can be summarized as followed:
  • Web height b: The web height is considered identical for rolled and stamped wire strip. Inference from dmin to b is possible (difference of 0.6 mm);
  • Notch angle α: To reach similar results, the tool’s notch angle αt has to be adjusted based on derived Equations (2) and (4);
  • Hardening distribution: Outer notch is tested during cyclic bending due to similar hardness distribution.

5. Conclusions and Outlook

For fundamental investigations on the innovative process of chain notch rolling and cyclic bending, the study at hand performed an interaction analysis of both processes for a DP600 sheet metal (t0 = 0.8 mm). A new cyclic bending setup allows targeted testing of one selected notch and improves the loading situation compared to previously applied testing methods. Process results with varying rolling gap d and bending angle β show effects and interactions of the wire strip’s characteristics and cyclic bending. As major effects, a pronounced reduction of the cycle amount by increasing β and a rise of bending torque for increased d can be concluded. Minor differences in the resulting web heights from notch rolling with different rolling gaps complicate the effect analysis of d. The production of wire strips by the model rolling process can be concluded as not application-friendly for further investigations because of the spring-back of the tool. To determine a method to map relevant properties of rolled wire strip by notch stamping instead of rolling for future research, wire strip produced by notch stamping was investigated and compared. The production method features simple adjustability and a good agreement of set and actual tool distance. The lower hardness of stamped wire strips is considered as not relevant, but an effect of hardness distribution along the notch flanks cannot be excluded. A targeted choice of an outer notch allows testing of a notch with a hardness distribution similar to that of rolled notches. Adaption of the tool’s notch angle will improve the mapping of the resulting angles, which turn out higher during stamping because of different process kinematics. In summary, the general applicability of stamped wire strips is given when considering the analysis of the effects of the notch angle change and the different hardening distribution of outer notches. Its utilization for future investigation of the process chain under laboratory circumstances improves the testing’s flexibility and allows the use of a universal testing machine.
As outlook, it is recommended to evaluate the direction of curvature during cyclic bending tests applying the suggested tool setup, which differed from former analysis based on a modified cyclic bending test. An analysis of numeric simulation would offer knowledge of the present stress state and the resulting crack growth. Finally, transferability of the derived method’s applicability for the study of longitudinal rolled wire strip in addition to transversally rolled wire strip should be investigated.

Author Contributions

Conceptualization, A.B.; methodology, A.B.; software, S.O.; validation, A.B. and S.O.; formal analysis, S.O.; investigation, A.B.; resources, M.M.; data curation, A.B. and S.O.; writing—original draft preparation, A.B.; writing—review and editing, M.M.; visualization, A.B. and S.O.; supervision, M.M.; project administration, M.M.; funding acquisition, M.M. All authors have read and agreed to the published version of the manuscript.

Funding

This research was funded by the Deutsche Forschungsgemeinschaft (DFG, German Research Foundation), Project-ID 419390985.

Data Availability Statement

The data will be provided by the corresponding author upon request.

Acknowledgments

The authors wish to thank SSAB for providing the applied DP600 steel samples.

Conflicts of Interest

The authors declare no conflict of interest.

References

  1. Le Hoang, A.; Fehling, E. Influence of steel fiber content and aspect ratio on the uniaxial tensile and compressive behavior of ultra high performance concrete. Constr. Build. Mater. 2017, 153, 790–806. [Google Scholar] [CrossRef]
  2. Zheng, Y.; Wu, X.; He, G.; Shang, Q.; Xu, J.; Sun, Y. Mechanical Properties of Steel Fiber-Reinforced Concrete by Vibratory Mixing Technology. Adv. Civ. Eng. 2018, 11, 9025715. [Google Scholar] [CrossRef] [Green Version]
  3. Kusumawardaningsih, Y.; Fehling, E. Behavior of Ultra High Performance Concrete (UHPC) Confinement on Normal Strength Concrete (NSC) Columns. In Proceedings of the International Symposium on Ultra High Performance Concrete, Kassel, Germany, 13–15 September 2004. [Google Scholar]
  4. Mark, P.; Oettel, V.; Look, K.; Empelmann, M. Neuauflage DAfStb-Richtlinie Stahlfaserbeton. Beton Stahlbetonbau 2021, 1, 19–25. [Google Scholar] [CrossRef]
  5. Huss, M. Neuer Stahlfasertyp eröffnet vielfältige Möglichkeiten für die Betonindustrie. BetonWerk Int. 2018, 5, 72–76. [Google Scholar]
  6. Stahl, K.-H. Method for Producing Steel Fibers. U.S. Patent 9630226B2, 28 January 2010. [Google Scholar]
  7. Dehn, F.; König, G.; Marzahn, G. Konstruktionswerkstoffe im Bauwesen; Ernst & Sohn: Berlin, Germany, 2003. [Google Scholar]
  8. Huss, M.; Reichel, M.; Techen, H. Innovative Stahlfaser für die Beton- und Fertigteilindustrie. BetonWerk Int. 2018, 4, 50–52. [Google Scholar]
  9. Marcalíková, Z.; Procházka, L.; Pešata, M.; Boháčová, J.; Čajka, R. Comparison of Material Properties of Steel Fiber Reinforced Concrete with Two Types of Steel Fiber. IOP Conf. Ser. Mater. Sci. Eng. 2019, 549, 012039. [Google Scholar] [CrossRef]
  10. Biallas, A.; Merklein, M. Interaction analysis of a notching and cyclic bending process. Manuf. Lett. 2022, 33, 167–173. [Google Scholar] [CrossRef]
  11. Biallas, A.; Merklein, M. Material Model for the Production of Steel Fibers by Notch Rolling and Fulling. Key Eng. Mater. 2021, 883, 277–284. [Google Scholar] [CrossRef]
  12. Wietek, B. Faserbeton; Springer Fachmedien Wiesbaden: Wiesbaden, Germany, 2020. [Google Scholar]
  13. Merklein, M.; Kuppert, A. A method for the layer compression test considering the anisotropic material behavior. Int. J. Mater. Form. 2009, S1, 483–486. [Google Scholar] [CrossRef]
  14. Hockett, J.; Sherby, O. Large strain deformation of polycrystalline metals at low homologous temperatures. J. Mech. Phys. Solids 1975, 2, 87–98. [Google Scholar] [CrossRef]
  15. Biallas, A.; Merklein, M. Evaluation of Material Behavior of Wire Strips under Cyclic Bending Load and Preparation of An Experimental Test Method. In Proceedings of the 24th International Conference on Material Forming, Liège, Belgium, 14–16 April 2021; Available online: https://popups.uliege.be/esaform21/index.php?id=3826 (accessed on 1 December 2022).
  16. Liao, D.; Zhu, S.-P.; Correia, J.; de Jesus, A.M.P.; Berto, F. Recent advances on notch effects in metal fatigue: A review. Fatigue Fract. Eng. Mater. Struct. 2020, 4, 637–659. [Google Scholar] [CrossRef]
  17. Omiya, M.; Arakawa, S.; Yao, Z.; Muramatsu, M.; Nishi, S.; Takada, K.; Murata, M.; Okato, K.; Ogawa, K.; Oide, K.; et al. Influence of strength and notch shape on crack initiation and propagation behavior of advanced high strength steel sheets. Eng. Fract. Mech. 2022, 6, 108573. [Google Scholar] [CrossRef]
  18. Ghosal, P.; Paul, S.; Das, B.; Chinara, M.; Arora, K. Notch fatigue performance of DP600 steel under different pre-straining paths. Theor. Appl. Fract. Mech. 2020, 12, 102630. [Google Scholar] [CrossRef]
Figure 1. Process chain for steel fiber production based on notch rolling and cyclic bending, analogue to [6].
Jmmp 07 00024 g001
Figure 2. Experimental, extrapolated flow curve derived by layer compression test; data from [11].
Jmmp 07 00024 g002
Figure 3. Detailed sketch of the functional element for transversal notch rolling (target geometry).
Jmmp 07 00024 g003
Figure 4. Setup for notch rolling. (a) Rolling stand with upper roll, work piece inlet and loading cells. (b) Close-up of the upper roll with functional element (transversally notched). (c) Imaging of the rolling gap by a camera.
Jmmp 07 00024 g004
Figure 5. Testing method for the cyclic bending of wire strip. (a) Tool setup for cyclic swivel bending. (b) Principal sketch of the swiveling resulting in bending of the wire strip by bending angle β.
Jmmp 07 00024 g005
Figure 6. Overview of in- and output parameters of the model process chain notch rolling and cyclic bending.
Jmmp 07 00024 g006
Figure 7. Tool’s and specimen’s geometric parameters of the notch stamping process.
Jmmp 07 00024 g007
Figure 8. Resulting sizes of notch rolling (from n = 8 experiments): Web height b, notch tip radius rk, and notch angle α depending on rolling gap d, determined by optical measuring system.
Jmmp 07 00024 g008
Figure 9. Micrographs and hardness measurements of rolled wire strip.
Jmmp 07 00024 g009
Figure 10. Separated wire strip for d = 0.1 mm and β = 10°. (a) Overview with marked views. (b) SEM picture with schematic sketch of fracture curvature (B) and SEM picture of the fracture surface (C).
Jmmp 07 00024 g010
Figure 11. Diameter of fracture curvature for cyclic bending until failure of rolled wire strip determined by light microscope (from n = 4 experiments).
Jmmp 07 00024 g011
Figure 12. Averaged torque-bending angle course for cyclic bending of rolled wire strip until failure (from n = 4 experiments).
Jmmp 07 00024 g012
Figure 13. Torque difference (Nmax,1–Nmax,2) and amount of cycles until failure nB for the cyclic bending of rolled wire strip (from n = 4 experiments).
Jmmp 07 00024 g013
Figure 14. Resulting sizes of notch stamping (from n = 4 experiments): Web height b, notch tip radius rk and notch angle α depending on tool distance dmin, determined by optical measuring system; data from [10].
Jmmp 07 00024 g014
Figure 15. Cross-section analysis of stamped wire strip. (a) Micrographs and hardness measurements for dmin = 0.3 mm and 0.5 mm. (b) Micrographs of middle and outer notch for dmin = 0.3 mm.
Jmmp 07 00024 g015
Figure 16. Stress state for bending of notched specimen with stress peaks at notch roots.
Jmmp 07 00024 g016
Figure 17. Matrices of influence. (a) Effect of the rolling gap d and the bending angle β on the material separation during cyclic bending of rolled wire strip. (b) Partial effect of d on rolled wire strip.
Jmmp 07 00024 g017
Figure 18. Matrix of influence of dmin on stamped wire strip.
Jmmp 07 00024 g018
Figure 19. Strain hardening distribution of rolled notch and stamped notch in the outer area (7).
Jmmp 07 00024 g019
Figure 20. Resulting sizes of notch rolling and stamping (from n = 4 experiments): Web height b and notch angle α depending on rolling gap d/tool distance dmin [10], determined by optical measuring system.
Jmmp 07 00024 g020
Table 1. Parameter settings for the interaction analysis of notch rolling and cyclic bending.
Influencing ParametersRolling Gap dBending Angle β
Stage A0.1 mm10°
Stage B0.2 mm14°
Table 2. Overview of in- and output parameters of interaction analysis of the model processes notch rolling and cyclic bending for each parameter set according to Table 1.
ParameterSymbolUnitSet 1Set 2Set 3Set 4
Process variables—Input
Rolling gapdmm0.100.100.200.20
Bending angleβ°10141014
Wire strip—Output/Input
Notch tip radiusrkmm0.0320.0320.0320.032
Notch angleα°85.285.285.985.9
Web heightbmm0.430.430.450.45
Notch hardnesshrdHV392392368368
Separated wire strip—Output
Amount of cyclesnB-126115
Torque maximumNmax,1Nm1.571.571.641.64
Torque differenceNmax,1Nmax,2Nm0.130.250.190.30
Curvature diameterDmm0.630.550.710.52
Table 3. Overview of in- and output parameters of analysis of the model process notch stamping.
ParameterSymbolUnitSet 1Set 2
Process variable—Input
Min. tool distancedminmm0.300.50
Wire strip—Output
Notch tip radiusrkmm0.0450.044
Notch angleα°92.996.7
Web heightbmm0.360.56
Notch hardness (middle)hrdHV340305
Disclaimer/Publisher’s Note: The statements, opinions and data contained in all publications are solely those of the individual author(s) and contributor(s) and not of MDPI and/or the editor(s). MDPI and/or the editor(s) disclaim responsibility for any injury to people or property resulting from any ideas, methods, instructions or products referred to in the content.