Article

Fatigue Life and Residual Stress of Flat Stainless Steel Specimens Laser-Cladded with a Cobalt-Based Alloy and Postprocessed with Laser Shock Peening

by
Santiago Flores-García
1,
Carlos E. Martínez-Pérez
1,
Carlos Rubio-González
2,*,
J. Antonio Banderas-Hernández
1,
Christian Félix-Martínez
1 and
Salomón M. A. Jiménez
3
1
Centro de Ingeniería y Desarrollo Industrial, Pie de la Cuesta. 702, Desarrollo San Pablo, Querétaro 76125, Querétaro, Mexico
2
Tecnológico de Monterrey, Escuela de Ingeniería y Ciencias, Epigmenio González 500 Fracc. San Pablo, Querétaro 76130, Querétaro, Mexico
3
Independent Researcher, White Rock, NM 87547, USA
*
Author to whom correspondence should be addressed.
J. Manuf. Mater. Process. 2024, 8(2), 45; https://doi.org/10.3390/jmmp8020045
Submission received: 4 September 2023 / Revised: 15 October 2023 / Accepted: 14 January 2024 / Published: 28 February 2024

Abstract

:
Laser cladding (LC) is a versatile additive manufacturing process where strands of metallic material are deposited and melted by a laser. However, there are some limitations associated with this process that may affect the performance of the final manufactured parts. In the present work, the influence of laser shock peening (LSP) on the fatigue life of 304 stainless steel flat specimens with a cobalt-based alloy (Stellite 6) coating applied by LC was investigated. The analysis was carried out both experimentally and numerically. In the LSP simulation, the ABAQUS/Explicit code was used to determine the residual stress distribution of specimens with double central notches with a radius of curvature of 5, 10, 15, and 20 mm. From the numerical results, an improvement was found regarding fatigue life up to 48% in samples with LSP. Experimentally, 14% in fatigue life enhancement was observed. The residual stress, determined by the contour method, showed good agreement with the LSP simulation. The SEM images revealed that the fatigue failure started at the Stellite 6 coating and propagated towards the center of the specimen. LSP has been shown to be a suitable postprocessing alternative for laser-cladded parts that will be subjected to fatigue loading since it led to fatigue improvement through the introduction of compressive residual stresses on clad coatings.

1. Introduction

Laser shock peening (LSP) is a type of surface treatment applied to metallic elements to improve fatigue properties by the introduction of compressive residual stresses in the near-surface region. This compressive residual stress field is responsible for increasing the fatigue life, slowing the propagation of cracks, and therefore retarding the component final failure when it is subjected to cyclic loading [1]. Since LSP generates high-magnitude pressure waves (in the order of GPa) through a high-energy laser pulse (from 1 GW/cm2) and a transparent confining medium (water), the material deforms plastically in the superficial region [2,3]. This plastic deformation causes the generation of the compressive residual stress field. For the LSP treatment to be effective, it is commonly applied over a specific region (associated with high stress concentration). Because of this, the laser pulse must be applied successively across an area, in a zigzag or random scanning pattern and with some overlapping of pulses, depending on the desired level of compressive residual stresses in the workpiece [4].
Laser cladding (LC) is an additive manufacturing process, belonging to the branch of directed energy deposition (DED) processes. In this manufacturing process, strands of metallic material (in powder or filament form) are deposited and melted by a laser, adding successive layers of material [5]. Typically, an LC manufacturing cell consists of a robot whose end effector has a laser head and a material feeder, which supplies filler material in a shielding gas atmosphere (commonly argon) to a substrate where the filler material is deposited [6]. LC has different applications at industrial level, such as in parts repair, development of alloys, and surface coatings for abrasive and corrosive environments [7]. Stellite 6 is a cobalt-based alloy (with 28% chromium as an alloying component) widely used in applications that require high resistance to oxidation, corrosion, and abrasion. The use of this type of cobalt-based alloy is found in the coating of mechanical parts such as pump seals, bearings, blades in aircraft engines, or nozzles in internal combustion engines [8].
Austenitic stainless steel 304 (SS 304) is widely used due to its high resistance to corrosion and oxidation; however, it typically has poor resistance to sliding wear, which can cause oxidation due to material transfer between bodies [9,10]. Wear and corrosion are two of the most frequent failure modes in mechanical components that work in aggressive service conditions, and one example of materials that can improve corrosion and abrasion/wear resistance includes Co-based alloys. Although the laser cladding process offers several advantages, the application of dissimilar materials has its complexity since poor metallurgical adhesion can occur due to residual stresses and chemical composition.
The LSP treatment has been extensively studied by evaluating its effect on the fatigue properties of different types of metallic materials, and in recent years it has been positioned as a good alternative to other surface treatments [2]. These studies have focused primarily on components that have been produced using conventional manufacturing. Peyre et al. [9] compared the effectiveness of LSP over other types of surface treatments, such as shot peening, noting that LSP has some advantages. Rubio-González et al. [11,12] found that LSP treatment reduces the growth rate of fatigue cracks in stainless steels and aluminum alloys. Spadaro et al. [13] carried out a study on the low-cycle fatigue performance of 253 austenitic stainless steel to which LSP was applied with 2500 and 5000 pulses/cm2. In both cases, LSP was found to improve the fatigue properties. Recently, it has been shown that, with the use of finite element simulation software, it is possible to predict, with some accuracy, the residual stress distribution and the fatigue behavior of metallic mechanical components with LSP. Granados-Alejo et al. [14] studied the effect of LSP on flat 2205 duplex stainless steel specimens with different thicknesses, finding that the improvement in fatigue life depends on the compressive residual stress field induced by the LSP treatment. Finite element simulation is a useful tool to adequately predict the residual stress field when LSP surface treatment is used on components with different geometric characteristics, as in the research by Vasu et al. [15], where the effect of LSP on the distribution of compressive residual stresses was analyzed when applied to concave and convex surfaces. Similarly, research carried out by Xu et al. [16] involved samples with different radii of curvature. It was found that, as the radius of curvature increases, the stresses change their distribution and magnitude.
In the field of additive manufacturing, especially in the processes that involve manufacturing by DED and specifically for the laser cladding process, there are very few precedents that combine the manufacture of components using LC plus the application of a surface treatment to improve its mechanical properties. Recently, Luo et al. [17] investigated the effect of LSP on the tensile mechanical properties of a TC17 titanium alloy component repaired by LC, and Tong et al. [18] on a CrMnCoNi alloy, finding that properties such as yield stress and ultimate strength increase with LSP. Similarly, it has been evaluated whether LSP treatment induces compressive residual stresses on the surface of the material deposited by LC. Ge et al. [19] carried out an analogous study on Ni25 and Fe104 alloys, and Lu et al. [20] on the titanium alloy Ti6Al4V and on an AlSi10Mg alloy [21]. The LC process induces tensile residual stresses that can compromise the functionality of the components [22], so postprocessing with LSP turns out to be a viable alternative in the LC manufacturing of final components that will be subjected to fatigue loading.
In this research work, the effect of LSP on SS 304 components with a cobalt-based alloy Stellite 6 coating applied by the LC process was investigated. In the experimental phase, the effect of LSP on the fatigue life of double-notched components was examined. The results of the simulation phase were used to explain the effect of the LSP treatment on elements with coating and with different notch curvatures, comparing the results of residual stress and fatigue life recorded experimentally.

2. Materials and Methods

In the experimental phase, the Stellite 6 coating was deposited on SS 304 substrates by the LC process. Subsequently, the LSP treatment was applied to the center of the specimens on the coated surface. Afterwards, the specimens, with and without LSP were subjected to fatigue loading, recording the number of cycles to failure for each case. The residual stresses of the specimens with cladding, with and without LSP, were measured using the contour method. At the end, an analysis of the fracture zone was conducted by means of scanning electron microscopy (SEM) and a discussion regarding the failure mechanisms in the fracture surface were presented. In the simulation phase, a commercial finite element code was used to simulate the LSP process on the coated component, determine the residual stress field, and predict fatigue life using a multiaxial fatigue criterion. The estimation of the residual stresses due to LSP was performed by the ABAQUS CAE software v. 2020, while the fatigue life prediction was carried out by the Fe-safe software. Details of the experimental and simulation phases are provided below.

2.1. Materials

A cobalt-based alloy was used as cladding feedstock material; it is commercially available in the form of metal powder under the name of Stellite 6 (Metcoclad 6, manufacturer Oerlikon Metco, Westbury, NY, USA). Metal powder exhibited a particle size distribution of −106 to 45 µm. EDS X-ray spectroscopy analysis revealed a powder chemical composition provided in Table 1. The Stellite 6 powder was used as received. The substrate was a SS 304 plate, whose chemical composition was 17% Cr, 8% Ni, 1.32% Mn, 0.35% Si, 0.05% C, and Fe balance. The geometry of the specimens is shown in Figure 1a. The substrates were cut from a 6.25 mm thick plate. Once the laser cladding (1.5 mm thick) was applied to the stainless steel substrate (3 mm thick), the final geometry of the fatigue specimens (4.5 mm thick), including notches, was obtained by CNC machining.

2.2. Sample Preparation

The sample substrates were prepared as follows. First, rectangular preforms with 100 mm × 30 mm × 3 mm were cut from the stainless steel plate. Next, the application of the Stellite 6 on the SS 304 substrates was carried out using an automated additive manufacturing cell consisting of the following components. An optics swivel module with pivoting focusing capabilities (Trumpf BEO D70, Stuttgart, Germany) was paired with a laser source (TrumpF TruDisk 6002, Stuttgart, Germany). The cladding feedstock material was fed into the laser processing zone through a three-port coaxial nozzle and a Medicoat Flowmotion dual powder feeder. To reduce oxidation during the LC process, argon gas was used as an inert atmosphere. The coaxial nozzle and optics swivel module were mounted on a programmable 6 degrees of freedom robotic manipulator (ABB IRB6620-120, Magadino, Switzerland). With this manufacturing cell at hand, the substrates were cladded utilizing the following parameters. The laser source was set to continuous wave mode and a 1000 W power level. Given a standoff distance of 16 mm between the nozzle and the substrate, the laser beam was set to a 2.86 mm diameter. The robotic manipulator was programmed to move over an area of 30 mm × 90 mm over the substrate in a single pass and at a speed of 5 mm/s. In this manner, a 50% deposition overlap was achieved. Powder was fed to the coaxial nozzle at a rate of 12 g/min and argon gas (99.997% purity) was introduced at a rate of 12 l/min to create an inert atmosphere. After cladding application, and before the LSP treatment, the notches were cut by CNC machining. No further surface machining was applied on the Stellite 6 coating; specimens were used as built.

2.3. Laser Shock Peening

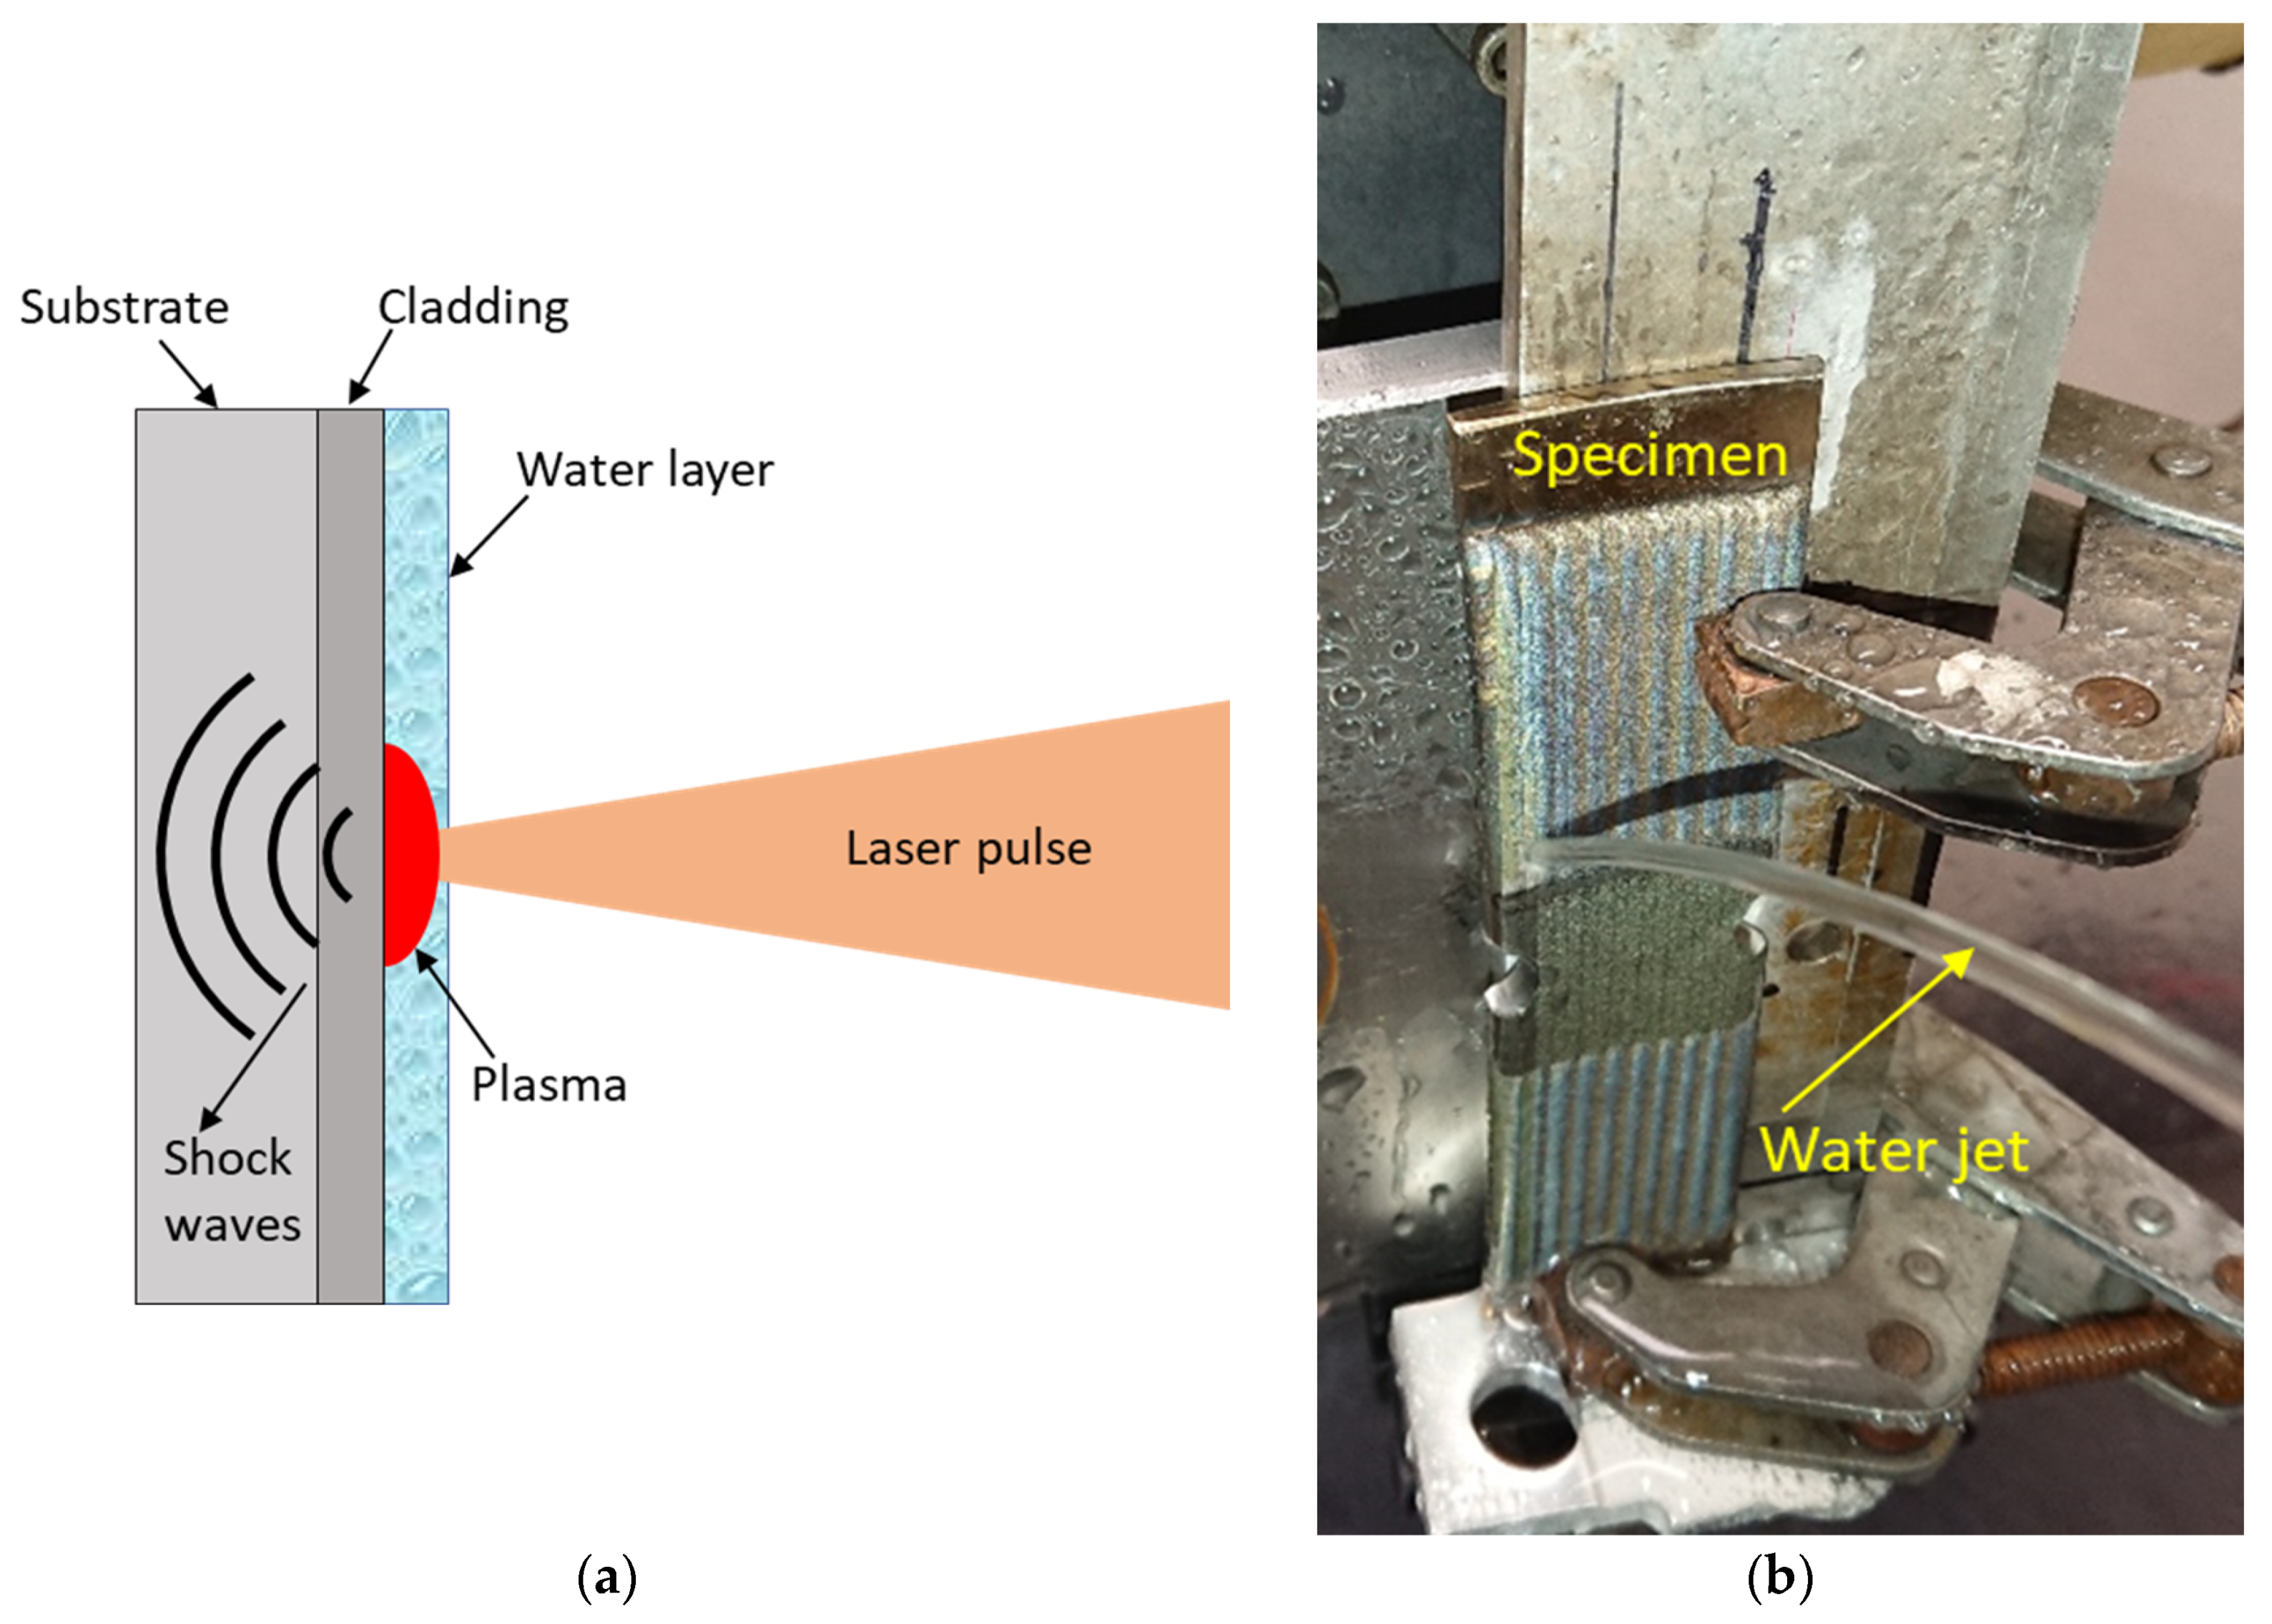
A schematic diagram of the LSP principle as well as a photograph of the specimen mounted for LSP treatment are shown in Figure 2a,b, respectively. Laser shock peening was performed using a Q-switch Nd:YAG laser, operated at a frequency of 10 Hz, wavelength 1064 nm. The FWHM of the laser pulses was 10 ns with a laser beam diameter of 1.3 mm and an energy of 1 J (7.5 GW/cm2). The pulse density was 2500 pulses/cm2, which is equivalent to an overlap between pulses of 83% [12,14]. The confining medium used for the laser treatment was water, supplied by a continuous jet, in such a way that the specimen surface was always covered with a thin layer of approximately 1 mm [23]. No protective coating was used for the treatment [24]. The LSP area was 25 × 25 mm2 (see Figure 1b), and the trajectory for the LSP swept was carried out by a FANUC LR Mate 200iB 6 degrees of freedom robot, which provided the zigzag movement of the specimen at a constant linear speed in such a way to cover the necessary treatment area and ensure the required pulse density. An illustration of the laser spots swept is shown in Figure 1c.

2.4. Residual Stress Estimation

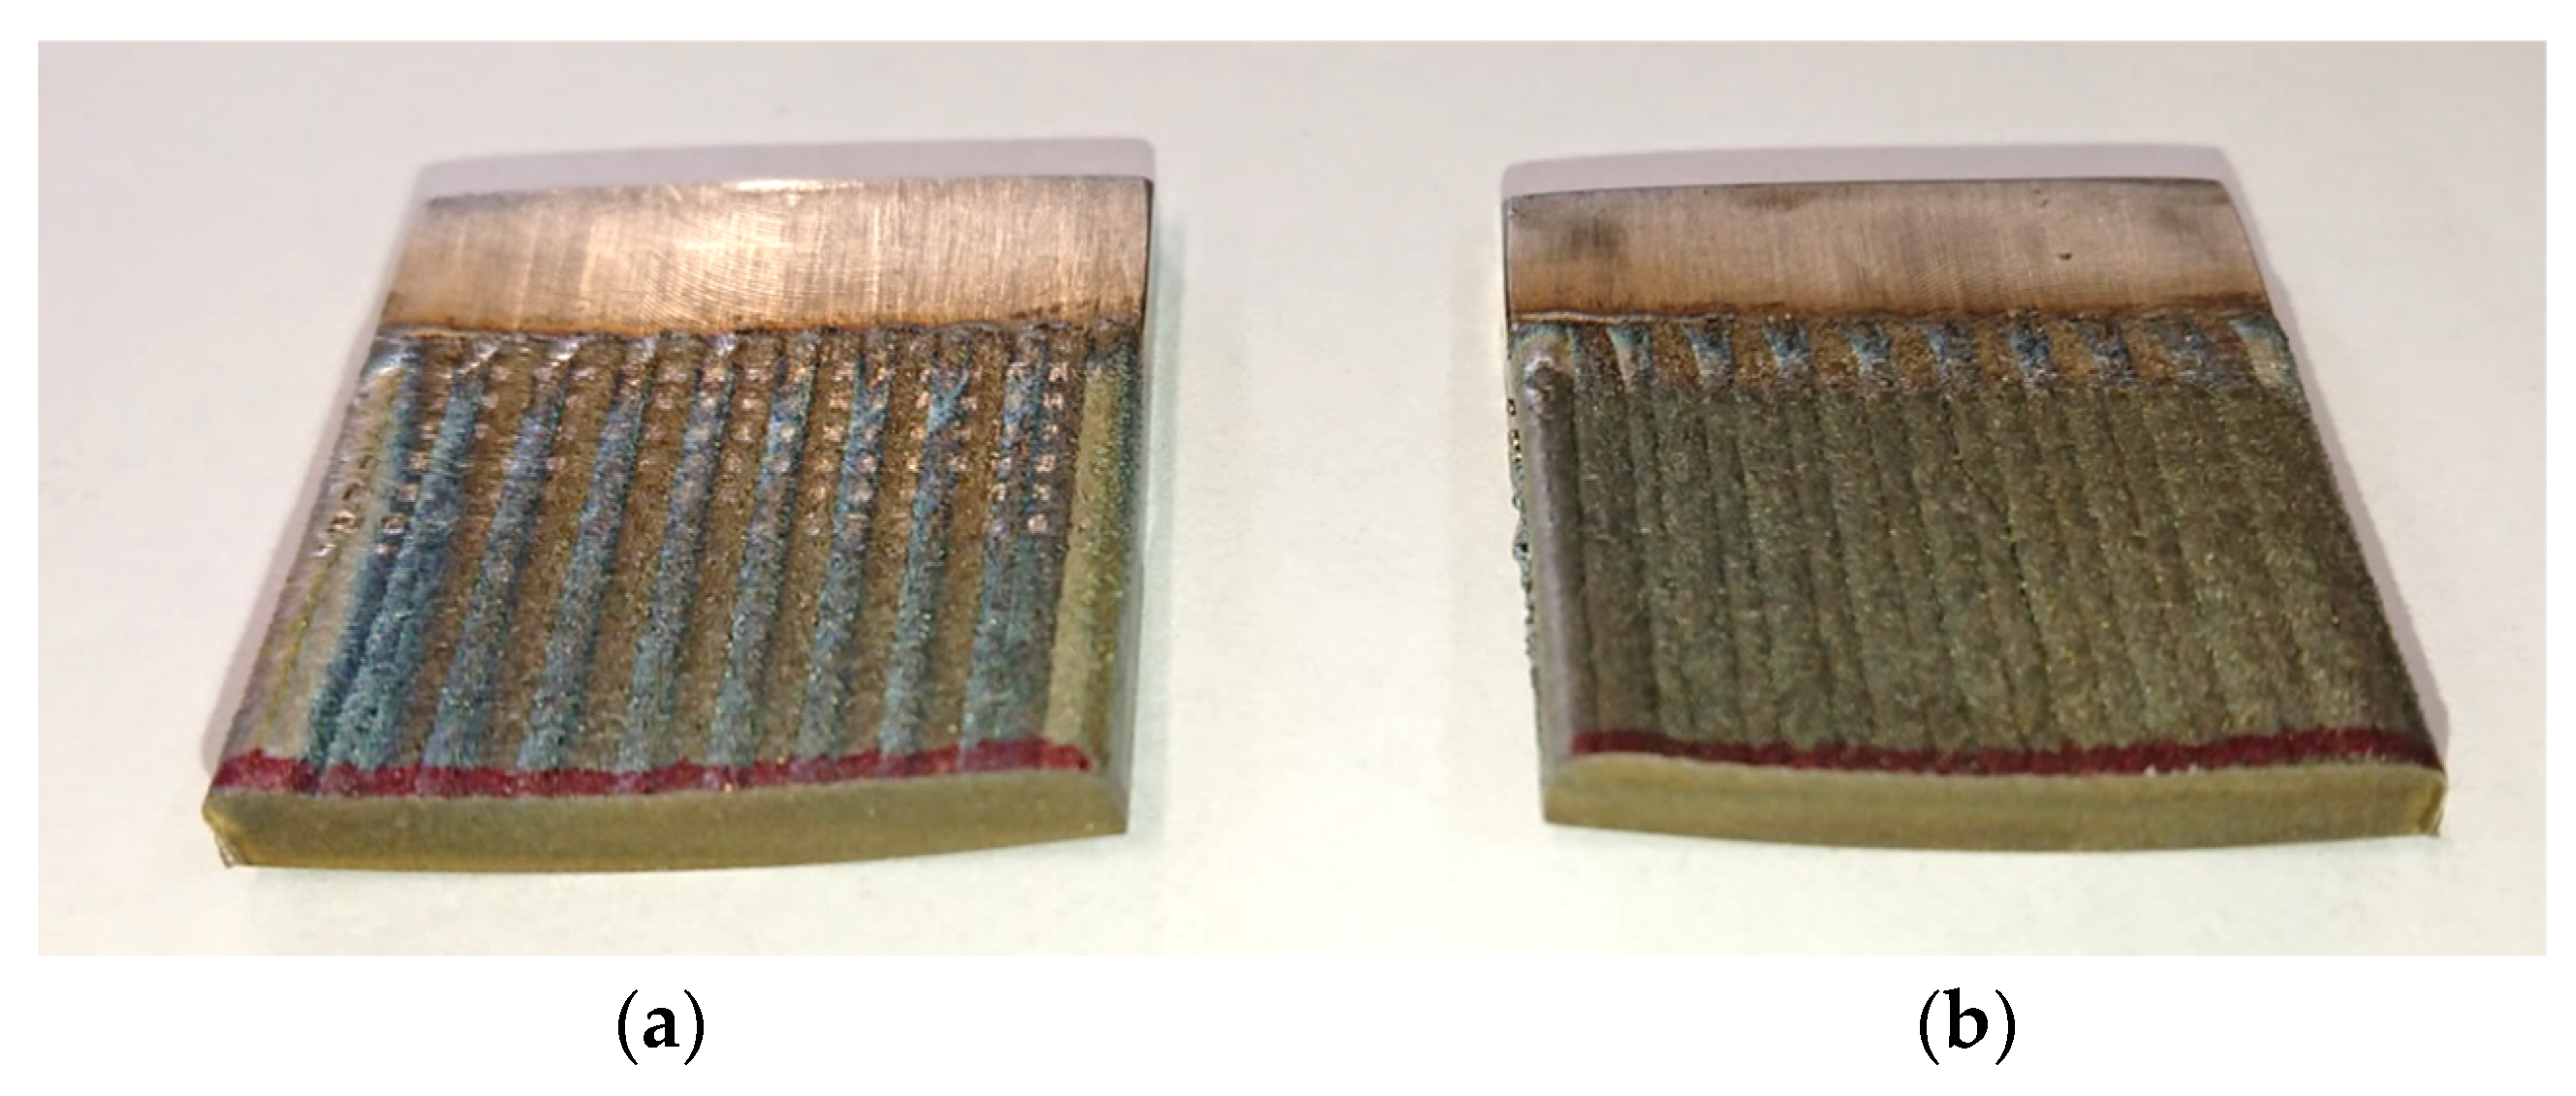
The estimation of the residual stress in the cladded specimens, with and without LSP treatment, was conducted using the contour method [25]. Two specimens were analyzed, one without LSP and the other with LSP, which were cut through the thickness by EDM so that the cut area was not thermally affected. Cut specimens are shown in Figure 3. For the cutting process, each of the samples was fixed on a rigid clamp at the back to restrict the specimen movement. Once the specimens were cut, a coordinate measuring machine, Mitutoyo BRT-707, with a resolution of 5 µm and a measurement error of ±(1.3 + 3.6 × L) µm was used to determine the surface relief. The data obtained from the coordinate measuring machine included a cloud of points with their xyz coordinates, where the z coordinate indicates the surface deformation due to the residual stress relaxation of the cut surface. Once the coordinates of the points were obtained, processing was carried out with Matlab software v. 2021 to obtain an analytical smooth surface [25], and then data were exported as an input to finite element software as displacement in the z-direction. As a result, the original residual stresses (residual stresses before cutting) were determined by finite element analysis, calculating the stress required to bring the deformed surface back towards a flat surface. For this finite element analysis, the elastic properties of SS 304 and Stellite 6 were used, which were obtained from [26,27].

2.5. Fatigue Crack Initiation Tests

The fatigue tests were carried out on an MTS 810 servo-hydraulic machine at room temperature. Flat clamps were used to hold the specimen during cyclic loading. The loading ratio was R = 0.1 (R = Pmin/Pmax), for tension–tension fatigue cyclic loading. A loading frequency of 20 Hz with a maximum load of Pmax = 25 kN was used. This load corresponds to a nominal stress of 277 MPa in the reduced cross section. This load was applied to both specimens, without and with LSP. The fatigue life was considered when a small crack of approximately 2 mm length appeared on the specimen surface at the notch region.

2.6. LSP Simulation

To predict the fatigue life of SS 304 specimens with Stellite 6 coating and different notch curvature radii, a finite element analysis was performed to simulate the LSP treatment. The purpose of this numerical analysis was to calculate the residual stress field in the specimen, and then use it as input data for the fatigue analysis in the Fe-safe software v. 2020. The commercial software ABAQUS/CAE was used to evaluate the transient response of the specimen when a pressure pulse was applied at one of the surfaces. This pressure pulse is the representation of the pressure actually generated during the laser treatment process. This type of analysis, with a pressure pulse covering a rectangular section of the treated area, instead of a train of individual pulses, has been successfully used in [14,28]. The geometry of the specimens, shown in Figure 1, was used with different radii of curvature of the notch: 5, 10, 15, and 20 mm. The Johnson–Cook constitutive model was used to simulate the transient response of the specimen,
σ = A + B ε e q n 1 + C ln ε ˙ ε 0 ˙ 1 T T 0 T m T 0 m
where ε e q , ε ˙ , and T are the equivalent plastic strain, plastic strain rate, and test temperature, respectively; parameter A is the initial yield stress; B and n are the power law strain hardening parameters; C and ε ˙ o strain rate hardening parameters; T m , T o , and m are the power law thermal softening parameters. Values for the Johnson–Cook parameters, for the substrate and cladding, are provided in references [26,27,28,29,30] and listed in Table 2.
The finite element meshes used for the LSP simulation are shown in Figure 4, where 218,118 elements of the C3D8R type, with reduced integration and hourglass control, were used for the 5 mm notch specimen. The models of the specimens with notch radii 10, 15, and 20 mm had 212,430, 206,256, and 203,412 elements, respectively. The stainless steel and Stellite 6 cladding, 3 and 1.5 mm thick, respectively, were assumed to be perfectly bonded. For the transient response analysis, a time of 0.0015 s was considered. At the end of this time interval, it was observed that the internal energy reached a constant level. As boundary conditions, the ends of each specimen were constrained. The pressure pulse was applied on a rectangular area 25 × 25 mm2 using the pressure vs. time profile shown in Table 3. The maximum pressure was 4.38 GPa. To calculate the pulse pressure distribution, and the maximum pressure, relationship (2) [31] was used.
P p e a k = 1.6 I

2.7. Fatigue Life Prediction

The fatigue simulation was performed in the Fe-safe software v. 2020 using as input information the results of the previous LSP simulation [32]. The loading conditions used in the analysis were load ratio R = 0.1, with a maximum load of Pmax = 25 kN. The fatigue life was calculated using the principal strain criterion, related to the Coffin–Manson life equation. This multiaxial fatigue criterion was used with the SWT model to include the effect of the mean stress in the fatigue life prediction. This criterion provided the most accurate results [33,34], and it was used for all specimens.
σ n , m a x ε 1 2 = σ f 2 E 2 N f 2 b   + σ f ε f 2 N f b + c
The values for the parameters of the above equation are shown in Table 4. To determine the values of these parameters, the Uniform Material Law correlation, proposed in the literature [35,36,37], was used. To calculate these parameters, the ultimate stress value of Stellite 6 and SS 304 [26,27] was used.

3. Results and Discussion

3.1. Fatigue Life

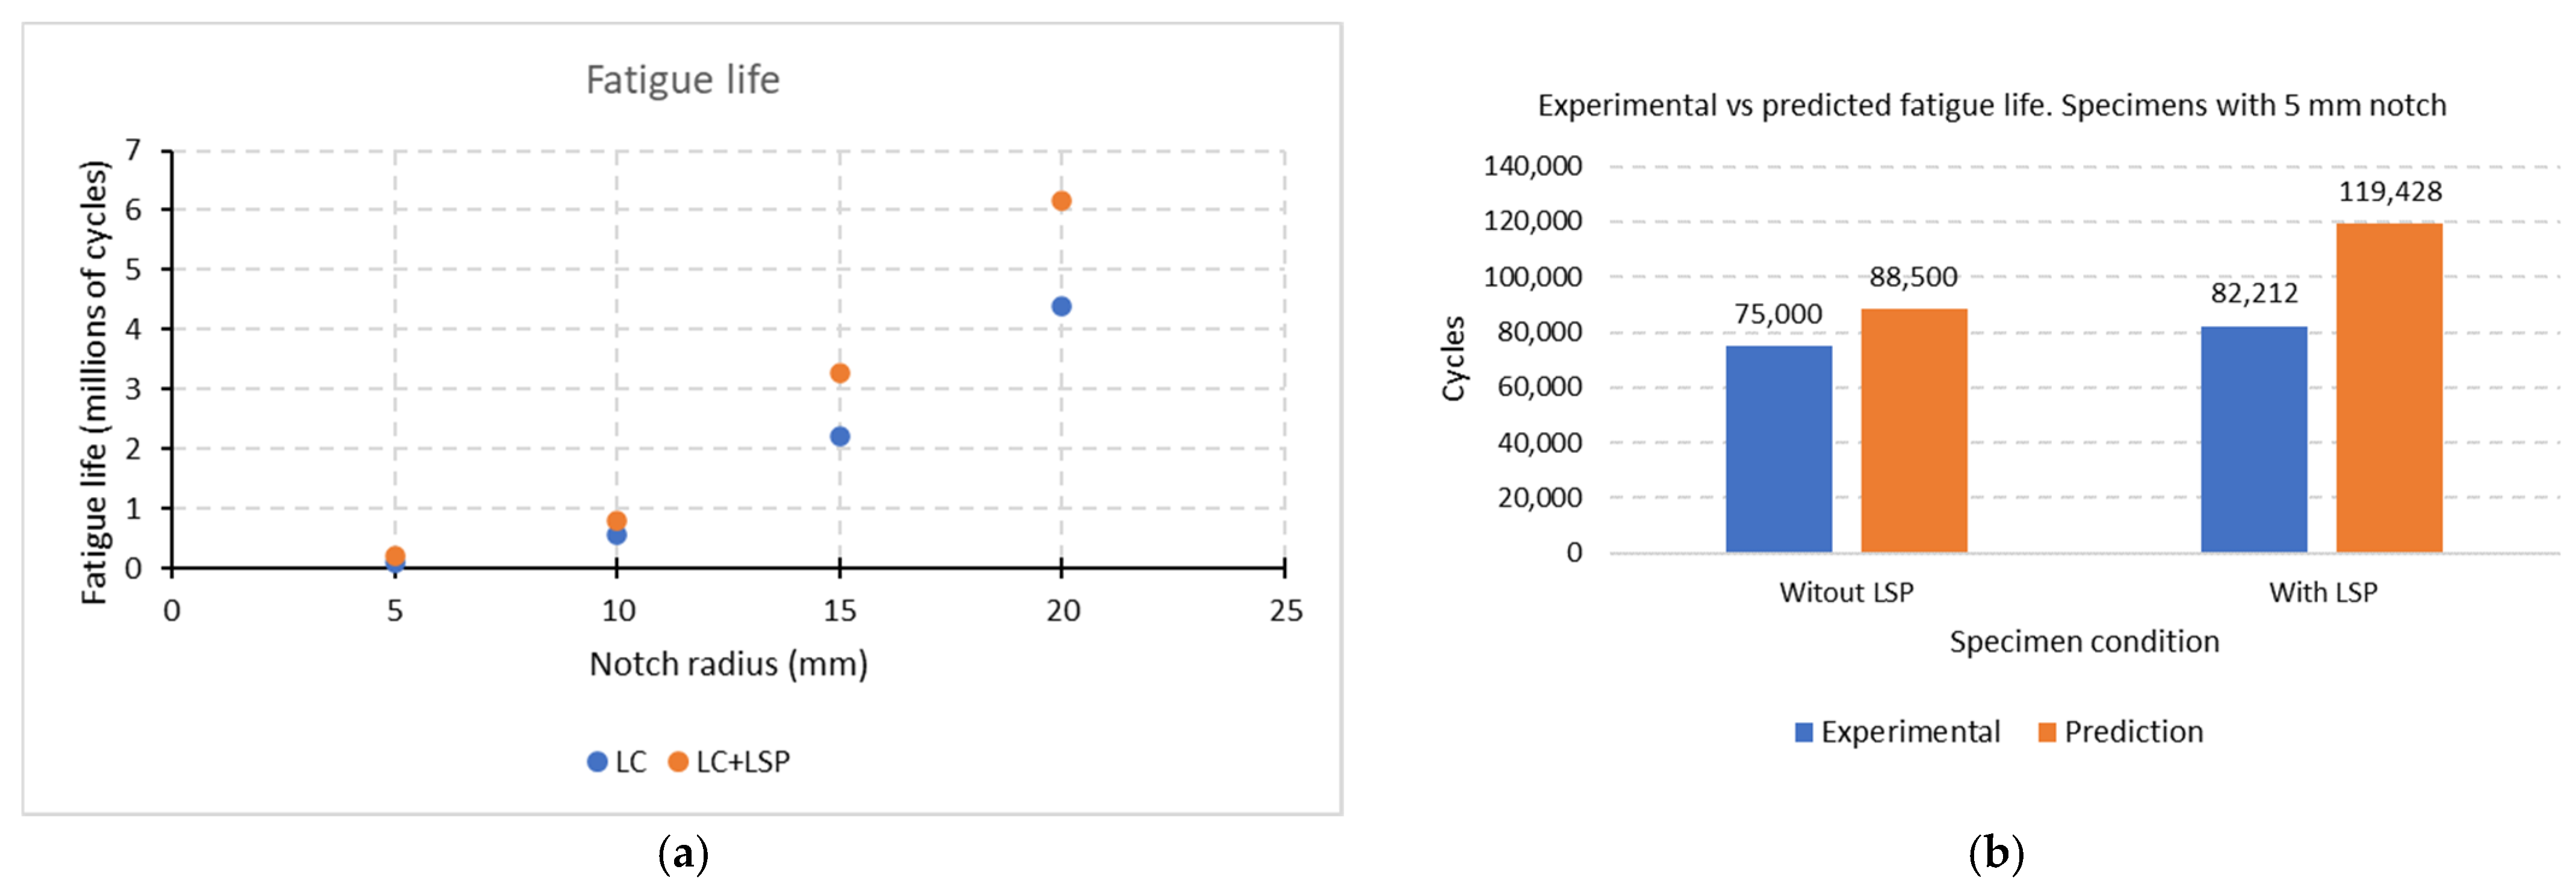
LSP had a positive effect on the number of cycles to failure for samples with 5 mm notches. The number of cycles to failure experimentally obtained for the cases without LSP and with LSP was 75,000 and 85,500, respectively, observing an improvement in fatigue life of 14% due to LSP. As has been observed in recent investigations, the thickness of the specimens influences the fatigue life: the smaller the thickness, the greater the improvement; this is because the residual compressive stresses reach a greater depth over the thickness of the specimen, reducing the effect of the notch stress concentrator [14]. This has been observed in specimens of a single material and processed with conventional manufacturing, that is, samples without coating and obtained with conventional machining [14,38]. It is worth noting that, in the case of Ti-6Al-4V alloy components remanufactured by a combination of LC and LSP, an enhancement in fatigue life up to 164% has been reported [18].
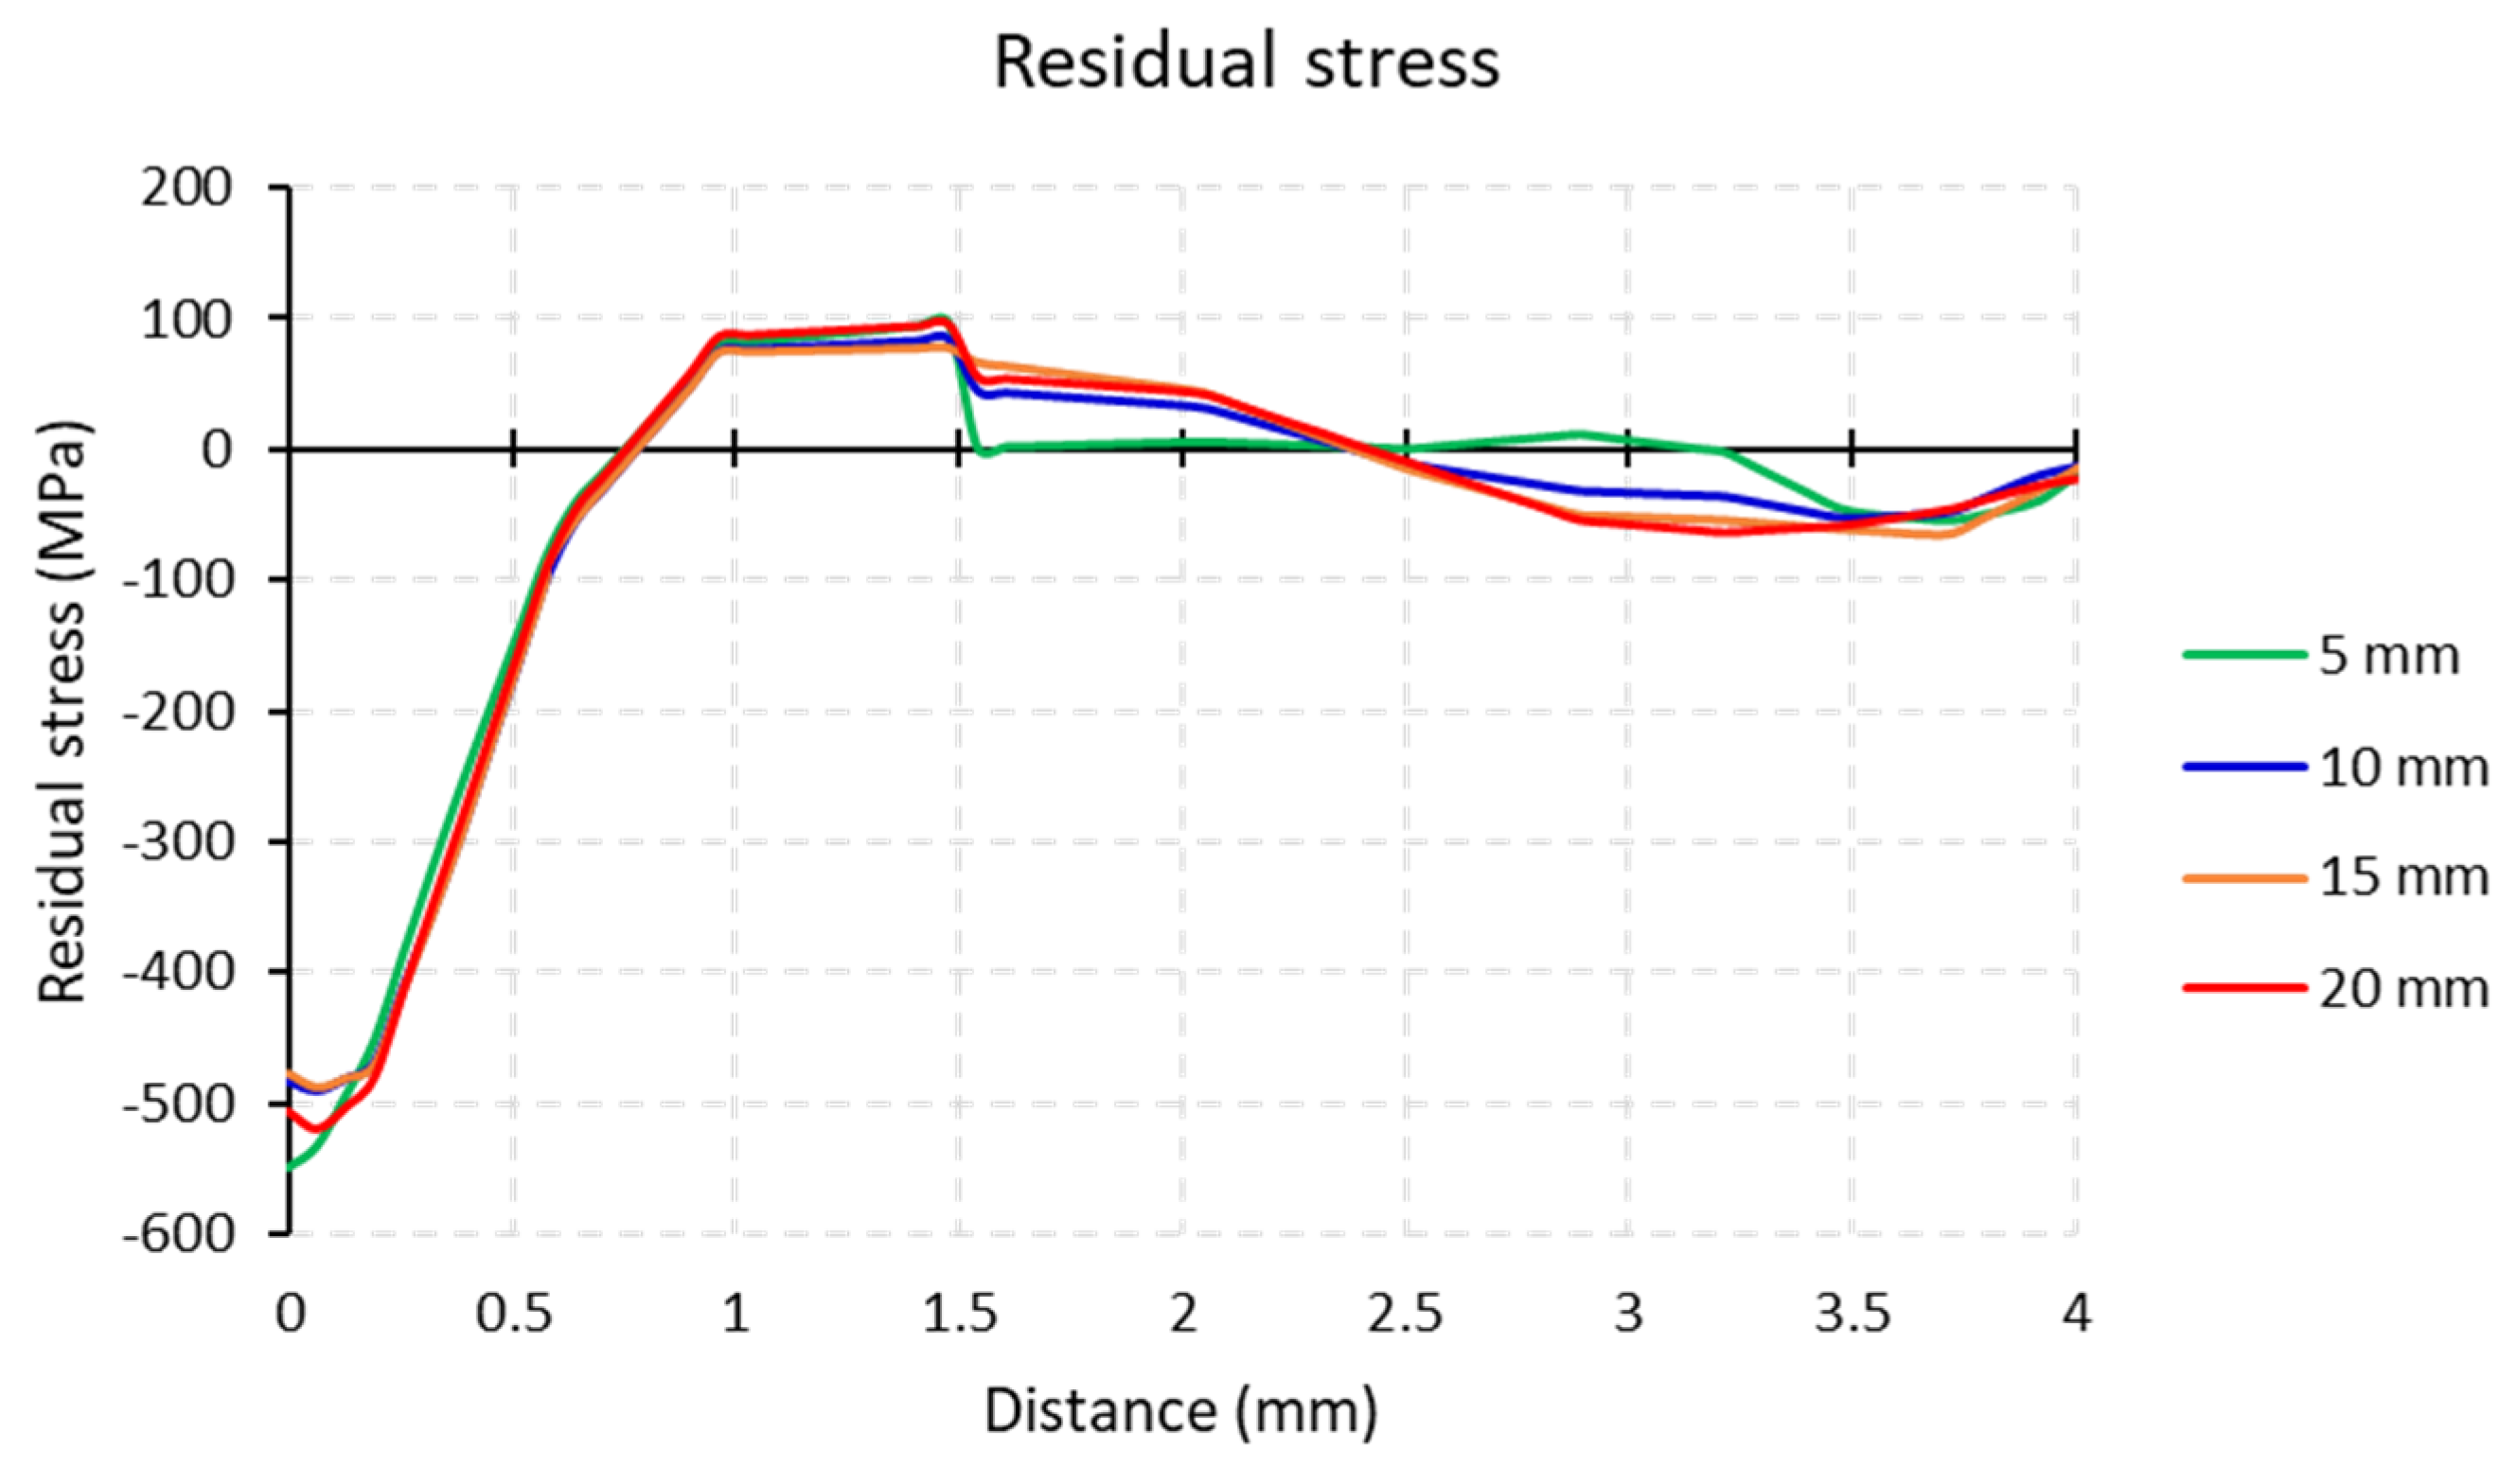
Figure 5 shows the predicted residual stress field obtained after the simulation of the LSP pressure pulse. As observed, LSP produces a particular stress distribution for each case of curvature radius, but, in all cases, compressive residual stresses are produced on the surface. The residual stress profiles along central paths on the specimen mid-plane obtained in the LSP simulation are shown in Figure 6; distance is measured from the LSP-treated surface. The compressive residual stresses are localized in the superficial region of the material, up to a depth of 0.75 mm. At a depth of 0.1 mm, they reach the maximum value, close to 520 MPa in compression. Note that the profile behavior is very similar for all specimens with different notch curvatures; only small differences are appreciated after reaching the peak values (about 100 MPa tensile residual stress). At 1.5 mm depth, a small discontinuity in the stress profiles is also observed; this is due to the change in material, going from Stellite 6 to SS 304.
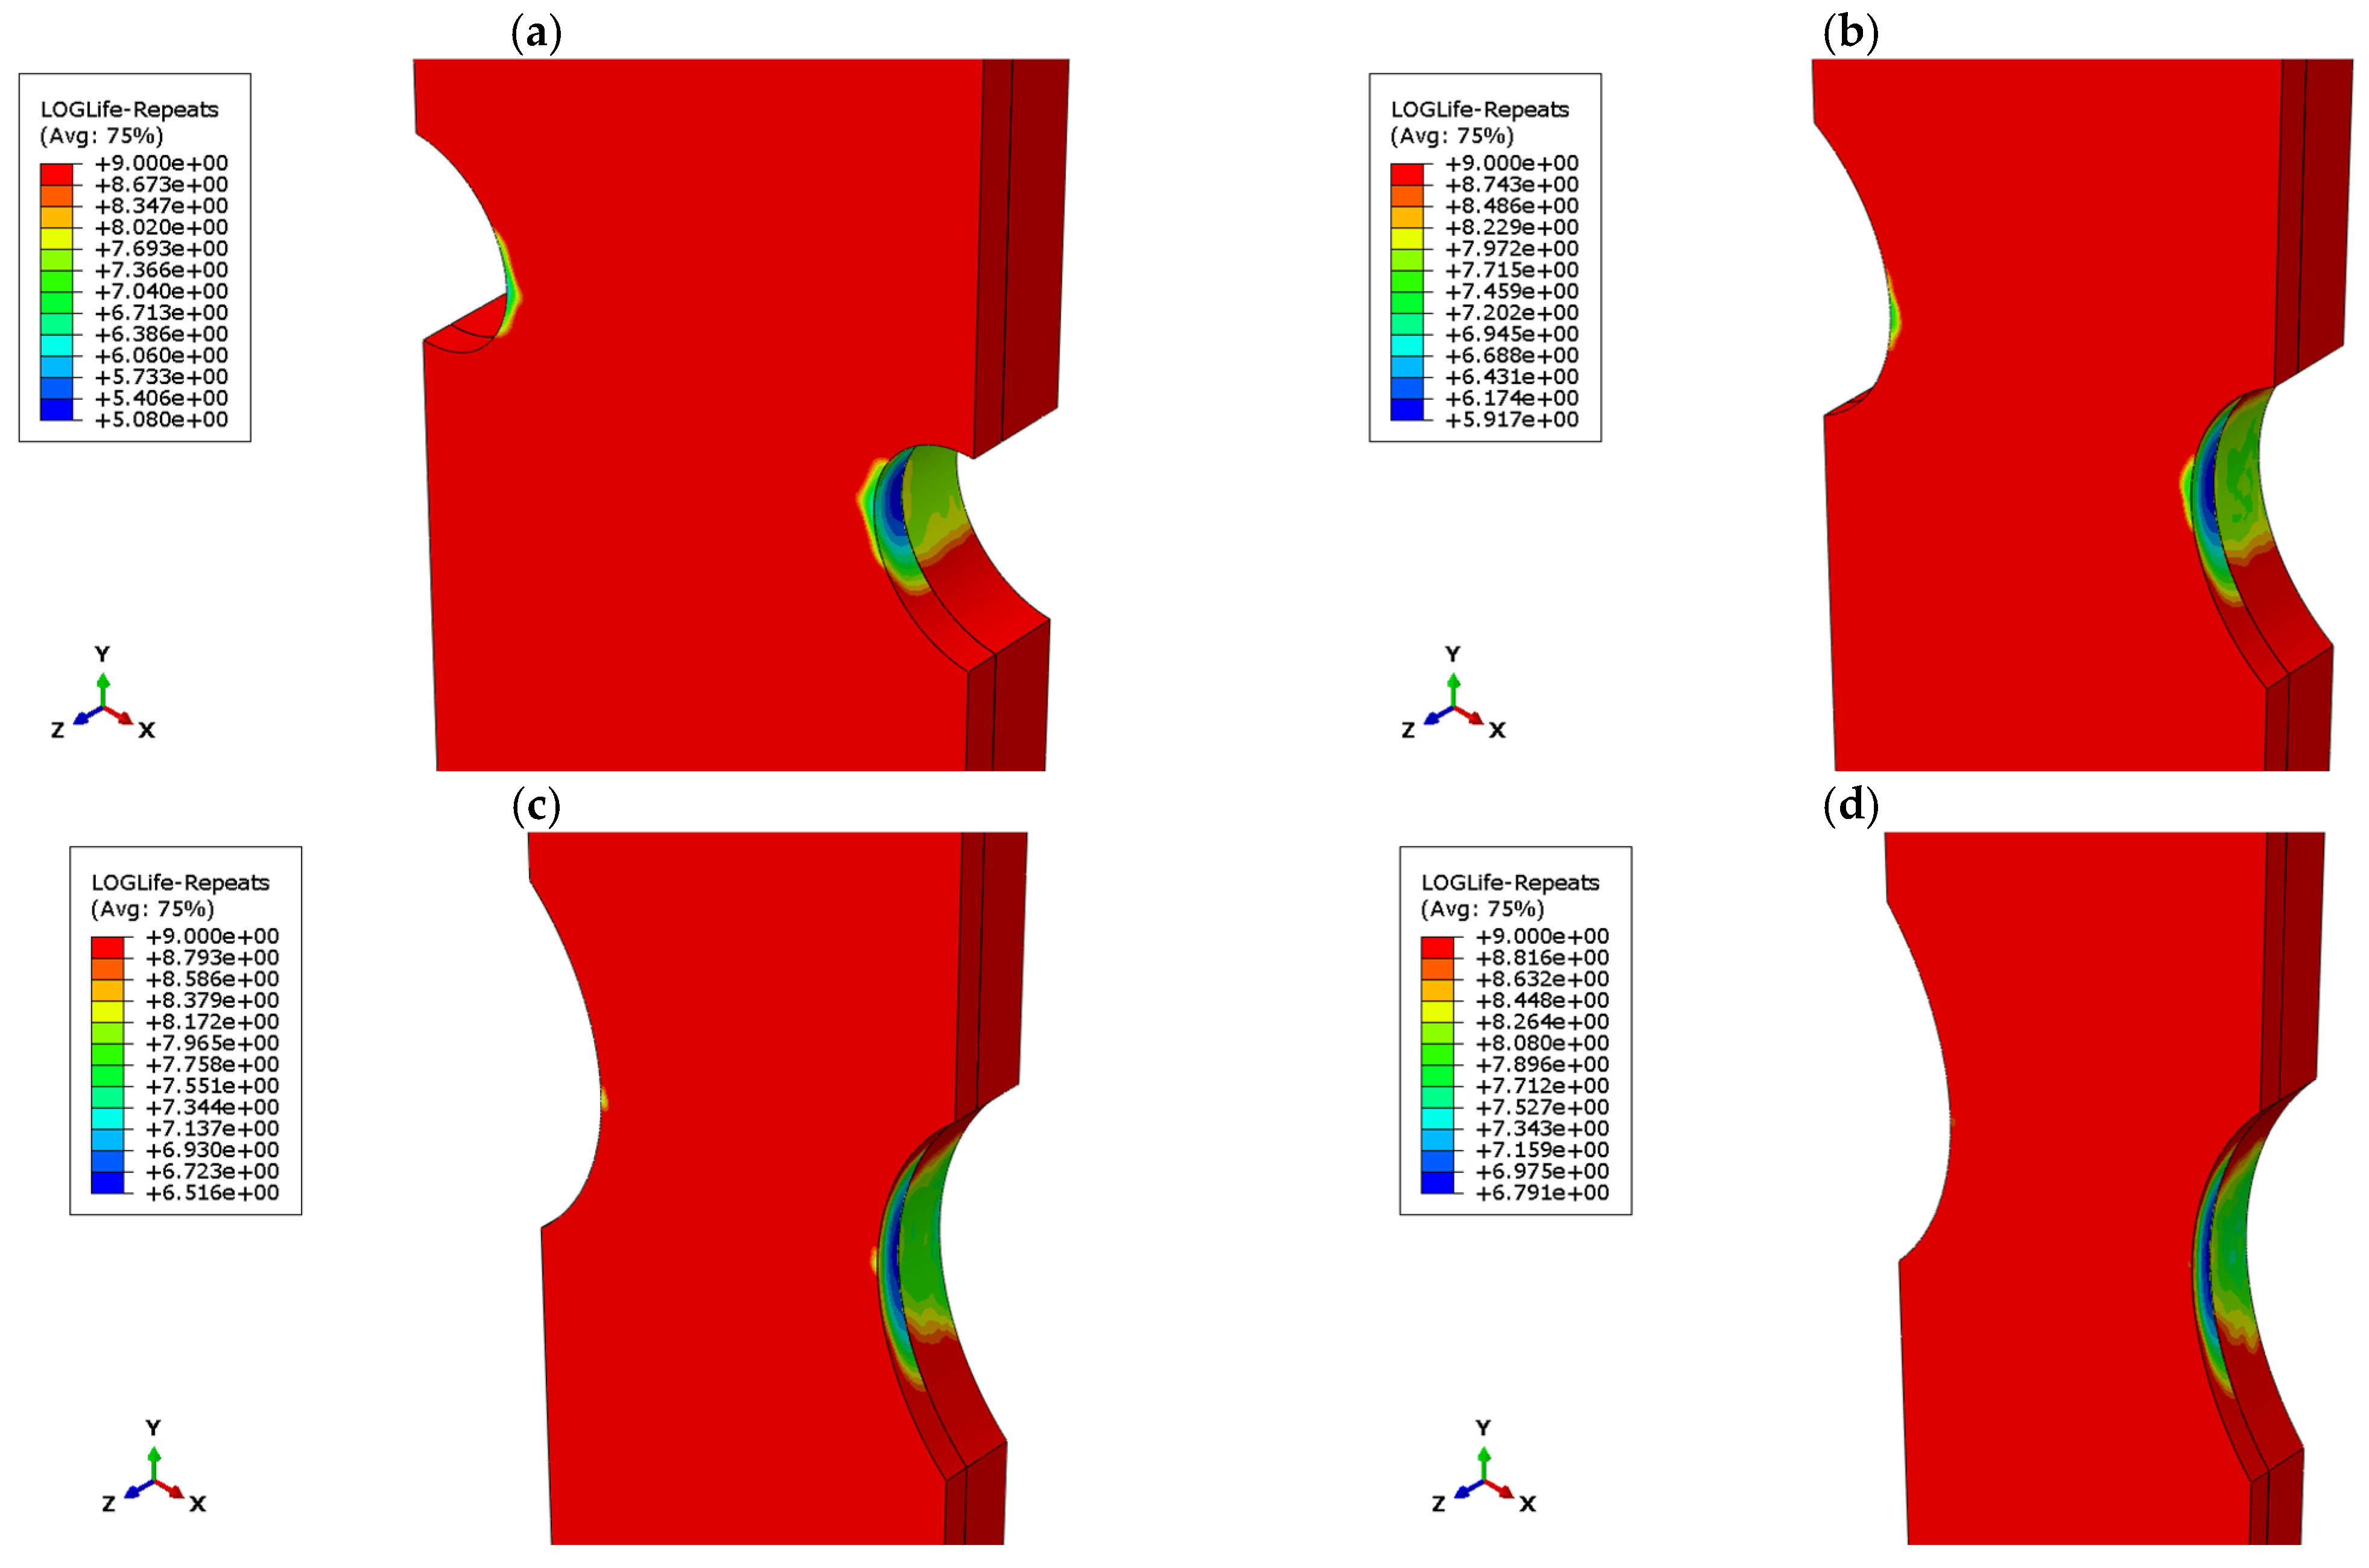
The fatigue life prediction results are shown in Figure 7a, where the fatigue behavior of specimens without LSP and with LSP are compared. The number of cycles to failure obtained for each case was 119,428, 820,470, 3,254,561, and 6,100,181 for the specimens with LSP and with notch radii of 5, 10, 15, and 20 mm, respectively. This implies a minimum improvement of 38% for the 20 mm case and a maximum improvement of 48% for the 10 mm notch specimen (see Table 5). The predicted fatigue life distribution obtained by Fe-safe of each specimen is shown in Figure 8. For all cases, the weakest region is located in the Stellite 6 material, in the area close to the junction with the stainless steel substrate. In this zone, the residual compressive stress produced by LSP exhibits reduced values compared to those observed on the treated surface; however, it still influences the fatigue life in the region close to the stress concentrator. A comparison of experimental and predicted fatigue lives for 5 mm notch specimens with and without LPS is presented in Figure 7b.

3.2. Residual Stresses Using the Contour Method

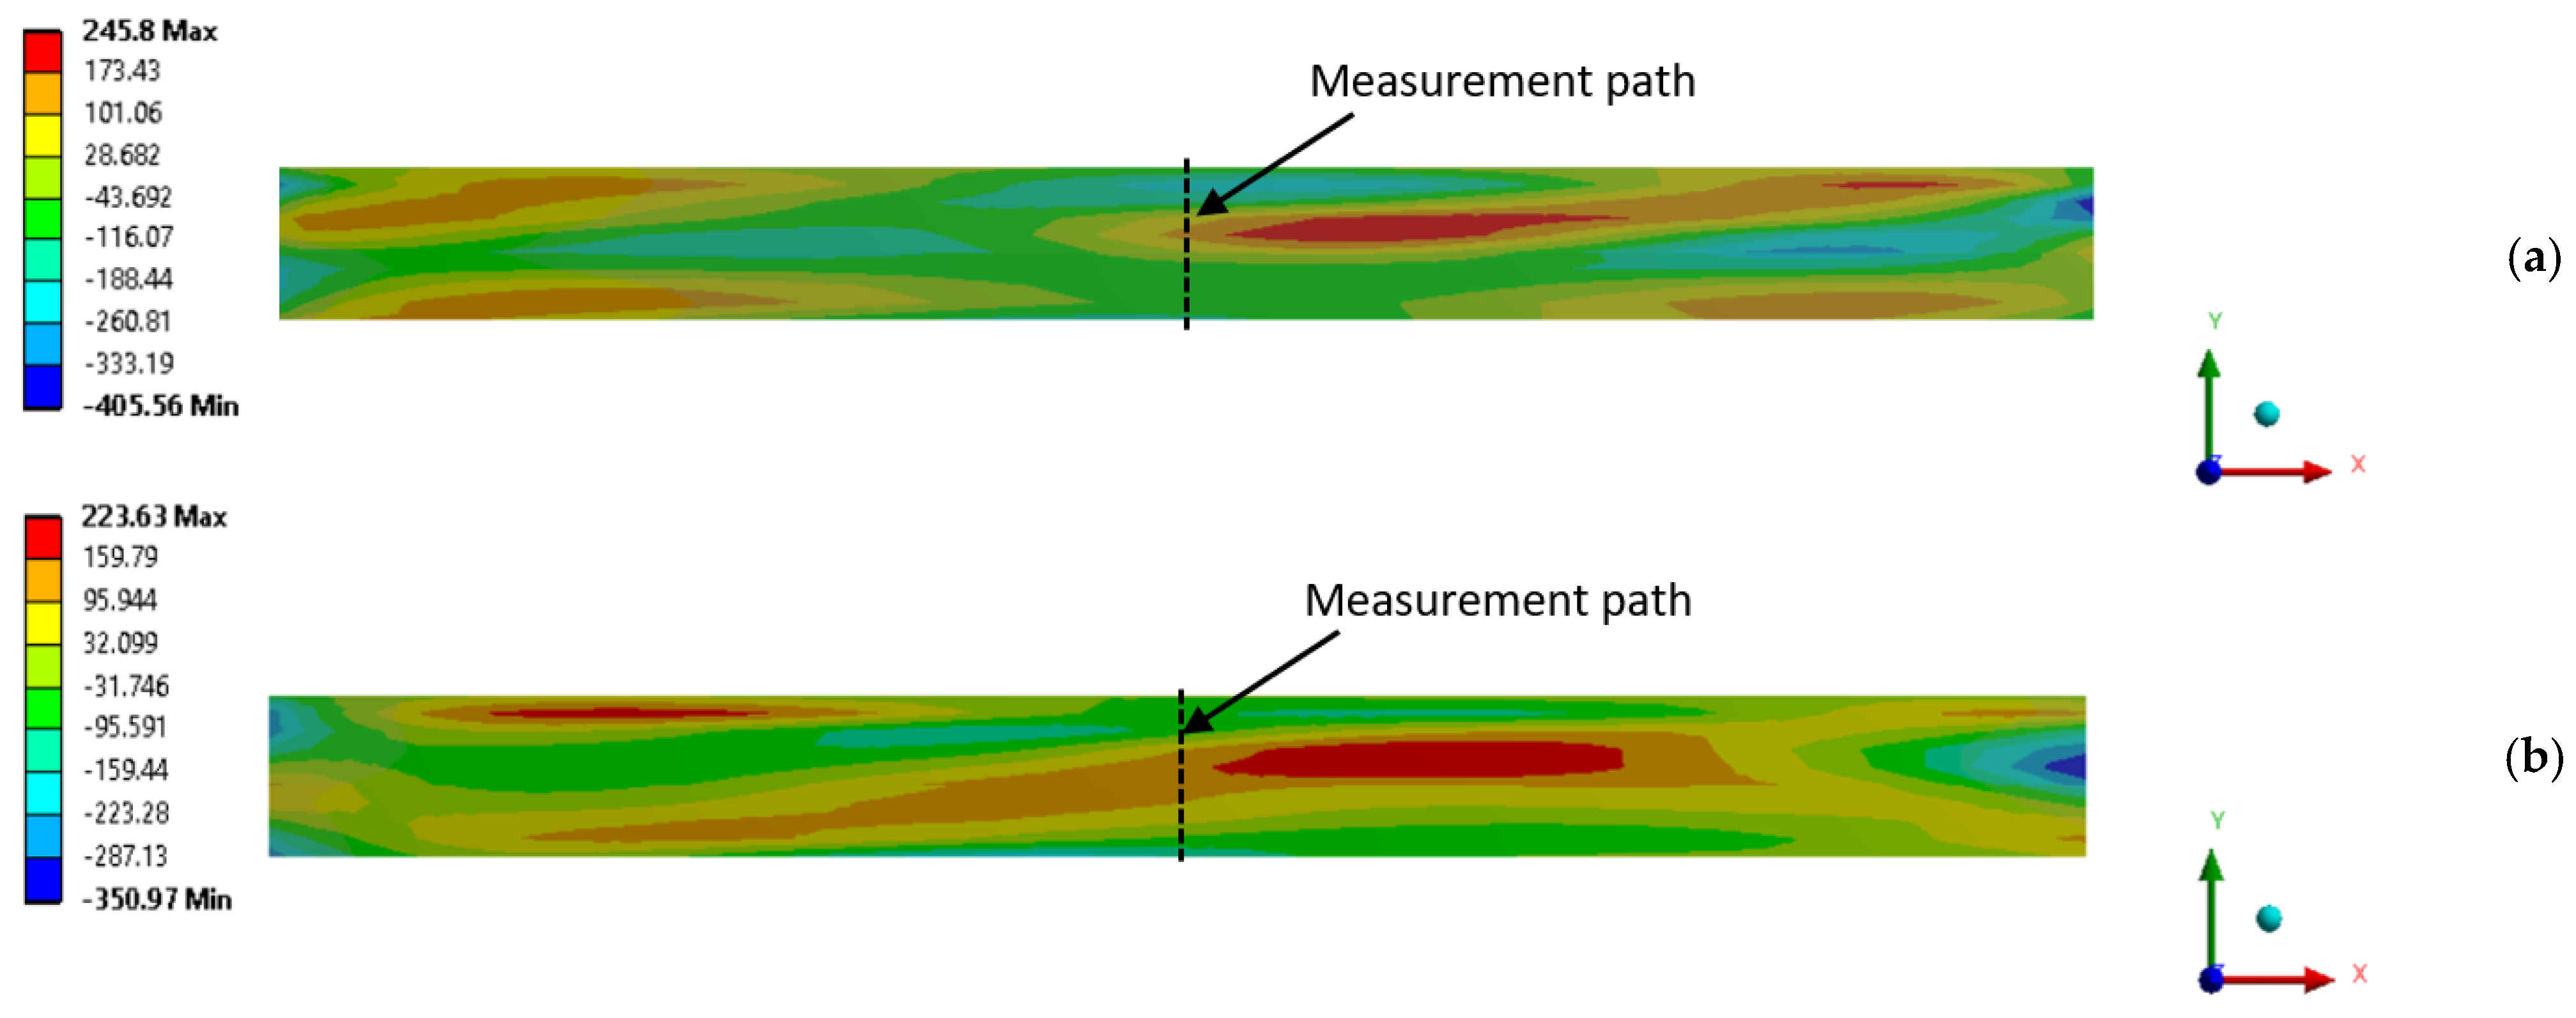
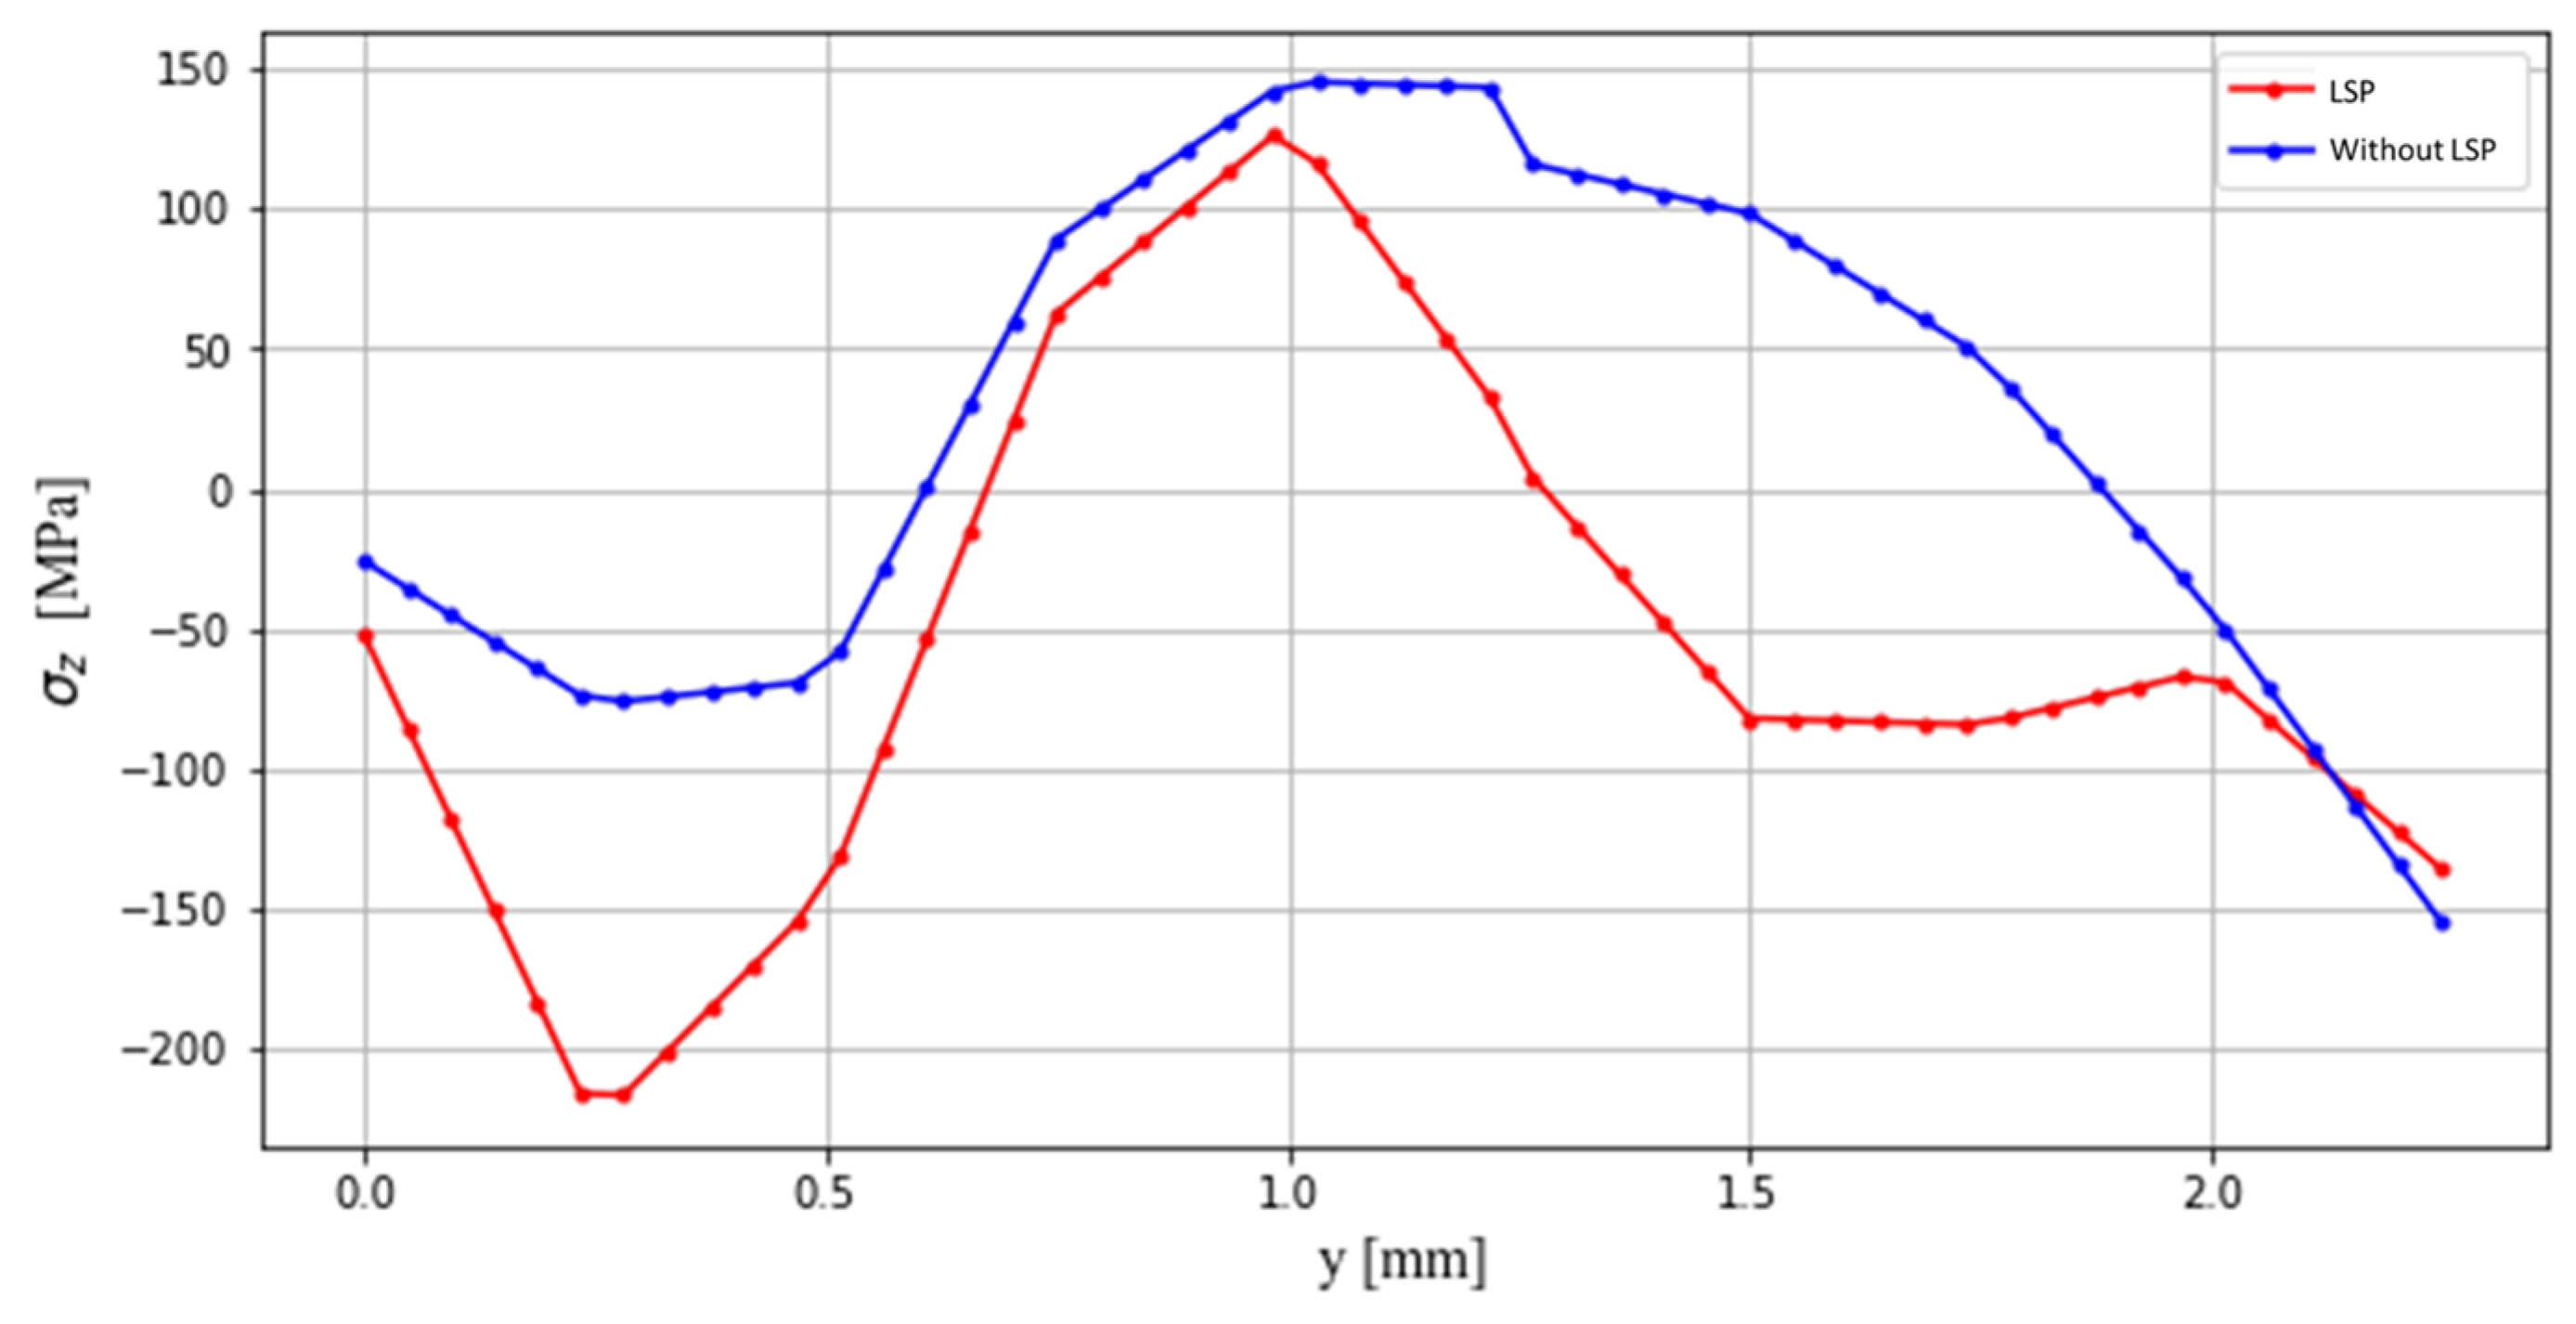
The residual stress fields, determined by the contour method, for the specimens without and with LSP, are shown in Figure 9. The residual stress profiles along a central trajectory on the cut surface are shown in Figure 10. The stress profile corresponding to the specimen without LSP exhibits a compressive stress close to 75 MPa, while that associated with the specimen with LSP shows a greater magnitude, around 250 MPa, both in the sub-surface region to a depth of 0.25 mm. This result demonstrates the positive effect of LSP on the LC samples. At greater depth, peak tensile residual stress values of 150 MPa and 125 MPa are observed on the specimens without and with LSP, respectively. Residual tensile stress values close to 100 MPa have already been reported for Co-based alloy plasma cladding layers [37]; in that research, the authors found that, due to the material deposition and cooling rate, residual tensile stresses up to 125 MPa were generated. A comparison between the experimental residual stress results obtained by the contour method and those predicted by the LSP finite element simulation is presented in Figure 11, where good agreement between the experimental and numerical predicted results is observed, especially in the region 0.5 mm–1.1 mm from the surface.

3.3. Fracture Analysis

The fracture surfaces of specimens with 5 mm notch radius were analyzed by optical (Figure 12) and scanning electron microscopy (Figure 13). Ultrasonic cleaning in alcohol was applied on the fractured specimens before the microscopy analyses. In Figure 12a (sample without LSP) and Figure 12b (samples with LSP), multiple stress concentrators can be observed as possible locations for the initiation of fatigue crack growth. These stress concentrators indicated by the white arrows are the spaces generated by the overlapping between track and track during the coating application. The fatigue life in materials fabricated by additive manufacturing is considered to be lower than that of materials manufactured by conventional methods; such reduction is due to defects generated during the manufacturing process, which can function as stress concentrators and therefore reduce fatigue life [39]. In this work, the images show good metallurgical adhesion between Stellite 6 and 304 SS, and no pores or cracks are observed in the coating. Figure 12c shows at higher magnification the red dotted box of Figure 12b, in which, in the orange dotted boxes, it shows the indications of the fracture of the surface of the Stellite 6 coating, and the crack growth propagates through the thickness of the coating until reaching the 304 stainless steel substrate, where the ductile fracture zone is located, for both cases: specimens with and without LSP.
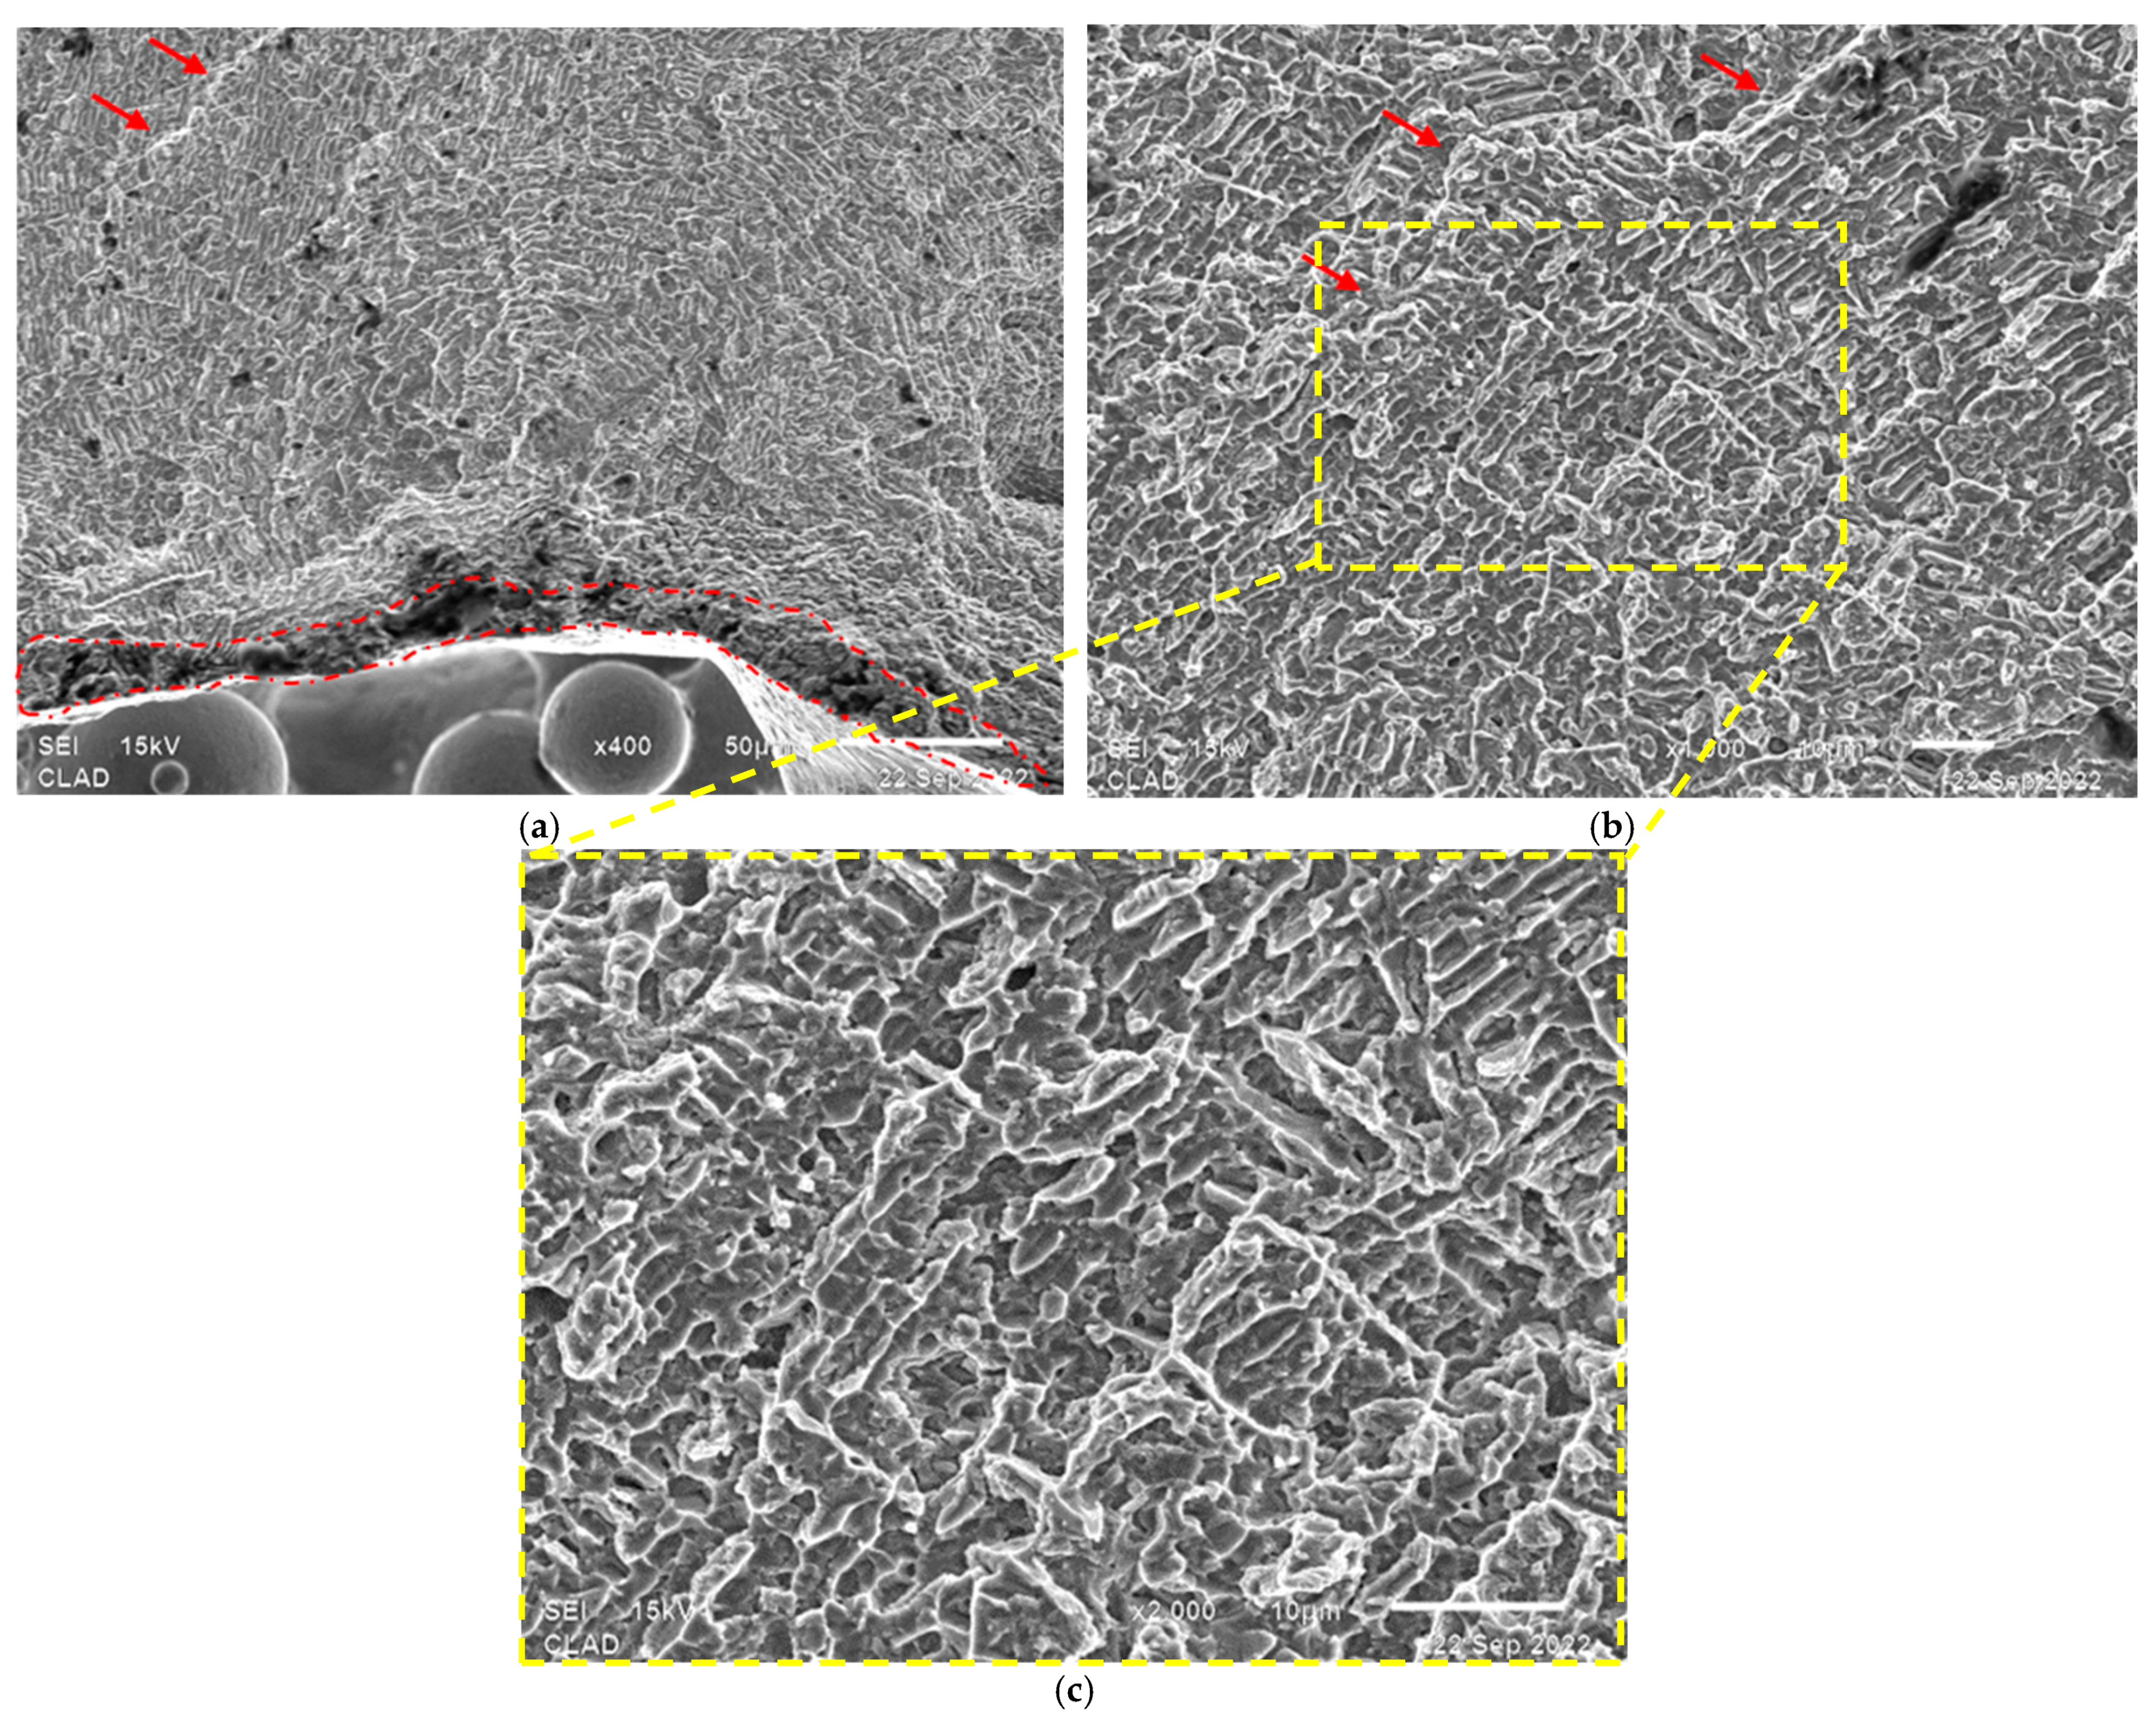
Figure 13a shows, in the red area, the beginning of the fracture on the surface of the coating, which began at the overlapping between track and track. The crack propagated through the coating where it can be seen that the fracture was transgranular; that is, the propagation did not occur at the grain boundaries; it grew through the grains of the coating, and, during the propagation, it presented intragranular fracture in some areas (red arrows). Barr C. et al. [39] reported intergranular fractures in the specimens subjected to fatigue due to the presence of micropores generated during the additive manufacturing process, which indicates that the parameters selected in this work for the manufacturing of the coatings enabled integral manufacturing without pores, which could affect the fatigue behavior due to faster growth of the crack along the grain boundaries. The intragranular fracture did not cause changes in the fracture [39], as shown in Figure 13, where the fractures retained cleavage in band shapes and not as flat surfaces.

4. Conclusions

The effect of laser shock peening (LSP) on the fatigue life of SS 304 specimens with Stellite 6 coating applied by laser cladding was investigated. Flat specimens with double notches were considered. The fatigue life obtained experimentally was compared with a finite element simulation using the software ABAQUS CAE v. 2020 (calculation of residual stresses by LSP) and Fe-safe (number of cycles to failure), observing good agreement.
The LSP treatment applied to the cladding surface showed that there is an improvement in fatigue life of 14% for the specimens with a 5 mm notch. The estimation of the residual stresses by finite element shows that compressive residual stresses are generated in the superficial region of the cladding layer (Stellite 6) and that these affect the stress concentrator area, achieving a benefit in fatigue life. Using the contour method, the generation of residual compressive stresses due to the LSP treatment was experimentally verified, observing a reduction in the tensile stresses generated by LC, which allows extending the number of cycles to failure in the case of specimens with LSP. The residual stress results calculated in the simulation are consistent with those obtained experimentally, so it is considered that the numerical analysis of the LSP process in this study is a reliable method for studying the mechanical behavior of metallic materials with laser cladding. The numerical fatigue analysis using the principal strain criterion is an effective tool for the prediction of the number of cycles to failure. The failure analysis demonstrates that the initiation of the fatigue cracks occurs in the Stellite 6 coating material, which is consistent with the failure prediction of the numerical analysis. LSP has been shown to be an effective postprocessing technique for laser-cladded parts that will be subjected to fatigue loading.

Author Contributions

Conceptualization, C.R.-G.; methodology, C.R.-G. and C.F.-M.; software, S.F.-G.; validation, S.F.-G.; formal analysis, C.R.-G.; investigation, S.F.-G. and C.E.M.-P.; resources, C.R.-G. and C.F.-M.; data curation, S.F.-G., C.E.M.-P. and J.A.B.-H.; writing—original draft preparation, C.R.-G.; writing—review and editing, C.R.-G. and S.M.A.J.; visualization, C.R.-G.; supervision, C.R.-G.; project administration, C.R.-G.; funding acquisition, C.R.-G. All authors have read and agreed to the published version of the manuscript.

Funding

This research received no external funding.

Data Availability Statement

Data are contained within the article.

Acknowledgments

The authors wish to thank CIDESI (Center of Engineering and Industrial Development) for the support during this study.

Conflicts of Interest

The authors declare no conflicts of interest.

References

  1. Ding, K.; Ye, L. Laser Shock Peening: Performance and Process Simulation; Woodhead Publishing: Sawston, UK, 2006. [Google Scholar]
  2. Zhang, Y.; Luo, K.; Lu, J. Laser Shock Processing of FCC Metals; Springer: Berlin, Germany, 2013. [Google Scholar]
  3. Yadav, M.; Jinoop, A.; Danduk, C.; Subbu, S. Laser Shock Processing: Process Physics, Parameters, and Applications. Mater. Today Proc. 2017, 4, 7921–7930. [Google Scholar] [CrossRef]
  4. Correa, C.; Peral, D.; Porro, J.A.; Díaz, M.; de Lara, L.R.; García-Beltrán, A.; Ocaña, J.L. Random-type scanning patterns in laser shock peening without absorbing coating in 2024-T351 Al alloy: A solution to reduce residual stress anisotropy. Opt. Laser Technol. 2015, 73, 179–187. [Google Scholar] [CrossRef]
  5. Silvello, A.; Perrone, A. Laser Cladding of Metals; Cavaliere, P., Ed.; Springer: Berlin/Heidelberg, Germany, 2021. [Google Scholar]
  6. Mazumder, J. Laser-aided direct metal deposition of metals and alloys. In Laser Additive Manufacturing; Woodhead Publishing: Sawston, UK, 2017; pp. 21–53. [Google Scholar]
  7. Lawrence, J.R.; Waugh, D. (Eds.) Laser Surface Engineering: Processes and Applications; Elsevier: Amsterdam, The Netherlands, 2014. [Google Scholar]
  8. Durejko, T.; Łazińska, M. Characterization of Cobalt-Based Stellite 6 Alloy Coating Fabricated by Laser-Engineered Net Shaping (LENS). Materials 2021, 14, 7442. [Google Scholar] [CrossRef] [PubMed]
  9. Peyre, P.; Fabbro, R.; Merrien, P.; Lieurade, H. Laser shock processing of aluminium alloys. Application to high cycle fatigue behaviour. Mater. Sci. Eng. A 1996, 210, 102–113. [Google Scholar]
  10. Xu, P.; Lin, C.; Zhou, C.; Yi, X. Wear and corrosion resistance of laser cladding AISI 304 stainless steel/Al2O3 composite coatings. Surf. Coat. Technol. 2014, 238, 9–14. [Google Scholar] [CrossRef]
  11. Hatamleh, O. Effects of peening on mechanical properties in friction stir welded 2195 aluminum alloy joints. Mater. Sci. Eng. A 2008, 492, 168–176. [Google Scholar] [CrossRef]
  12. Rubio-González, C.; Felix-Martinez, C.; Gomez-Rosas, G.; Ocaña, J.L.; Morales, M.; Porro, J.A. Effect of laser shock processing on fatigue crack growth of duplex stainless steel. Mater. Sci. Eng. A 2011, 528, 914–919. [Google Scholar] [CrossRef]
  13. Spadaro, L.; Gomez-Rosas, G.; Rubio-González, C.; Bolmaro, R.; Chavez-Chavez, A.; Hereñú, S. Fatigue behavior of superferritic stainless steel laser shock treated without protective coating. Opt. Laser Technol. 2017, 93, 208–215. [Google Scholar] [CrossRef]
  14. Granados-Alejo, V.; Rubio-González, C.; Vázquez-Jiménez, C.A.; Banderas, J.A.; Gómez-Rosas, G. Influence of specimen thickness on the fatigue behavior of notched steel plates subjected to laser shock peening. Opt. Laser Technol. 2018, 101, 531–544. [Google Scholar] [CrossRef]
  15. Vasu, A.; Grandhi, R.V. Effects of curved geometry on residual stress in laser peening. Surf. Coat. Technol. 2013, 218, 71–79. [Google Scholar] [CrossRef]
  16. Xu, G.; Lu, H.; Luo, K.; Dai, F.; Lu, J. Effects of surface curvature on residual stress field of 316L stainless steel subjected to laser shock peening. Opt. Laser Technol. 2021, 144, 107420. [Google Scholar] [CrossRef]
  17. Luo, S.; He, W.; Chen, K.; Nie, X.; Zhou, L.; Li, Y. Regain the fatigue strength of laser additive manufactured Ti alloy via laser shock peening. J. Alloys Compd. 2018, 750, 626–635. [Google Scholar] [CrossRef]
  18. Tong, Z.; Liu, H.; Jiao, J.; Zhou, W.; Yang, Y.; Ren, X. Improving the strength and ductility of laser directed energy deposited CrMnFeCoNi high-entropy alloy by laser shock peening. Addit. Manuf. 2020, 35, 101417. [Google Scholar] [CrossRef]
  19. Ge, M.Z.; Tang, Y.; Zhang, Y.K.; Wang, Y. Enhancement in fatigue property of Ti-6Al-4V alloy remanufactured by combined laser cladding and laser shock peening processes. Surf. Coat. Technol. 2022, 444, 128671. [Google Scholar] [CrossRef]
  20. Lu, H.; Wu, L.; Wei, H.; Cai, J.; Luo, K.; Xu, X.; Lu, J. Microstructural evolution and tensile property enhancement of remanufactured Ti6Al4V using hybrid manufacturing of laser directed energy deposition with laser shock peening. Addit. Manuf. 2022, 55, 102877. [Google Scholar] [CrossRef]
  21. Lu, H.F.; Xue, K.N.; Xu, X.; Luo, K.Y.; Xing, F.; Yao, J.H.; Lu, J.Z. Effects of laser shock peening on microstructural evolution and wear property of laser hybrid remanufactured Ni25/Fe104 coating on H13 tool steel. J. Mater. Process. Technol. 2021, 291, 117016. [Google Scholar] [CrossRef]
  22. Wang, Q.; Shi, J.; Zhang, L.; Tsutsumi, S.; Feng, J.; Ma, N. Impacts of laser cladding residual stress and material properties of functionally graded layers on titanium alloy sheet. Addit. Manuf. 2020, 35, 101303. [Google Scholar] [CrossRef]
  23. Nguyen, T.P.; Tanabe-Yamagishi, R.; Ito, Y. Impact of liquid layer thickness on the dynamics of nano-to sub-microsecond phenomena of nanosecond pulsed laser ablation in liquid. Appl. Surf. Sci. 2019, 470, 250–258. [Google Scholar] [CrossRef]
  24. Rubio-González, C.; Gomez-Rosas, G.; Ocaña, J.L.; Molpeceres, C.; Banderas, A.; Porro, J.; Morales, M. Effect of an absorbent overlay on the residual stress field induced by laser shock processing on aluminum samples. Appl. Surf. Sci. 2006, 252, 6201–6205. [Google Scholar] [CrossRef]
  25. Prime, M.B. Cross-sectional mapping of residual stresses by measuring the surface contour after a cut. J. Eng. Mater. Technol. 2001, 123, 162–168. [Google Scholar] [CrossRef]
  26. Kim, R.; Suh, J.; Shin, D.; Lee, K.-H.; Bae, S.-H.; Cho, D.-W.; Yi, W.-G. FE Analysis of Laser Shock Peening on STS304 and the Effect of Static Damping on the Solution. Metals 2021, 11, 1516. [Google Scholar] [CrossRef]
  27. Jalali, A.M.; Tolouei-Rad, M. Evaluation of residual stress in HVOF stellite-6 coatings using non-contact drilling. Mater. Res. Express 2019, 6, 066577. [Google Scholar] [CrossRef]
  28. Ivetic, G.; Meneghin, I.; Troiani, E.; Molinari, G.; Ocaña, J.L.; Morales, M.; Porro, J. Fatigue in laser shock peened open-hole thin aluminium specimens. Mater. Sci. Eng. A 2012, 534, 573–579. [Google Scholar] [CrossRef]
  29. Ren, C.X.; Wang, Q.; Zhang, Z.J.; Yang, H.J.; Zhang, Z.F. Enhanced tensile and bending yield strengths of 304 stainless steel and H62 brass by surface spinning strengthening. Mater. Sci. Eng. A 2019, 754, 593–601. [Google Scholar] [CrossRef]
  30. Roy, T.; Abrahams, R.; Paradowska, A.; Lai, Q.; Mutton, P.; Soodi, M.; Fasihi, P.; Yan, W. Evaluation of the mechanical properties of laser cladded hypereutectoid steel rails. Wear 2019, 432, 202930. [Google Scholar] [CrossRef]
  31. Peyre, P.; Chaieb, I.; Braham, C. FEM calculation of residual stresses induced by laser shock processing in stainless steels. Model. Simul. Mater. Sci. Eng. 2007, 15, 205. [Google Scholar]
  32. Granados-Alejo, V.; Rubio-González, C.; Banderas, J.A.; Flores, S. The Laser Shock Peening Effect on Fatigue Performance of Curved Components with and Without Stress Concentrators. J. Mater. Eng. Perform. 2022, 31, 1046–1057. [Google Scholar] [CrossRef]
  33. Fatigue Theory Reference Manual, Fe-safe Documentation. 2019. Available online: https://help.3ds.com/2019/English/DSSIMULIA_Established/FesafeFatigueTheoryPdf/FesafeFatigueTheory.pdf (accessed on 1 January 2024).
  34. Marquis, G.B.; Socie, D.F. Multiaxial Fatigue; SAE International: Valendale, PA, USA, 2003; pp. 221–252. [Google Scholar]
  35. Kim, K.S.; Chen, X.; Han, C.; Lee, H.W. Estimation methods for fatigue properties of steels under axial and torsional loading. Int. J. Fatigue 2002, 24, 783–793. [Google Scholar] [CrossRef]
  36. Troshchenko, V.T.; Khamaza, L.A. Strain–life curves of steels and methods for determining the curve parameters. Part 1. Conventional methods. Strength Mater. 2010, 42, 647–659. [Google Scholar] [CrossRef]
  37. Lai, Y.; Yue, X.; Yue, W. A Study on the Residual Stress of the Co-Based Alloy Plasma Cladding Layer. Materials 2022, 15, 5143. [Google Scholar] [CrossRef] [PubMed]
  38. Vázquez Jiménez, C.A.; Granados Alejo, V.; Rubio-González, C.; Gomez Rosas, G.; Llamas Zamorano, S. Fatigue life behavior of laser shock peened duplex stainless steel with different samples geometry. Adv. Mater. Sci. Eng. 2019, 2019, 8053248. [Google Scholar] [CrossRef]
  39. Barr, C.; Rashid, R.A.R.; Sun, S.D.; Easton, M.; Palanisamy, S.; Orchowski, N.; Matthews, N.; Walker, K.; Brandt, M. Role of deposition strategy and fill depth on the tensile and fatigue performance of 300 M repaired through laser directed energy deposition. Int. J. Fatigue 2021, 146, 106135. [Google Scholar] [CrossRef]
Figure 1. (a) Specimen geometry used in fatigue tests, dimensions in mm; (b) LSP-treated area on the double-notched specimens; (c) LSP swept direction.
Jmmp 08 00045 g001
Figure 2. (a) Illustration of the LSP principle; (b) sample mounted on the LSP station.
Jmmp 08 00045 g002
Figure 3. Cut specimens used for residual stress measurements by the contour method (a) without LSP, (b) with LSP.
Jmmp 08 00045 g003
Figure 4. ABAQUS CAE finite element model of the specimens with notch radii of 5, 10, 15, and 20 mm.
Jmmp 08 00045 g004
Figure 5. Finite element simulation residual stress distribution after LSP on samples with notch radii of (a) 5 mm, (b) 10 mm, (c) 15 mm, and (d) 20 mm.
Jmmp 08 00045 g005aJmmp 08 00045 g005b
Figure 6. Residual stress profiles from the finite element LSP simulation for specimens with different notch radii.
Jmmp 08 00045 g006
Figure 7. (a) Predicted fatigue life in LC specimens with and without LSP; (b) experimental and predicted lives for the specimens with 5 mm notch without and with LSP.
Jmmp 08 00045 g007
Figure 8. Predicted fatigue life distribution, obtained by Fe-safe on samples with notch radius: (a) 5 mm, (b) 10 mm, (c) 15 mm, and (d) 20 mm.
Jmmp 08 00045 g008
Figure 9. Residual stress distribution by the contour method: (a) without LSP, (b) with LSP.
Jmmp 08 00045 g009
Figure 10. Residual stress profiles estimated by the contour method. Results measured from the coating surface to 2.3 mm depth on specimens with and without LSP.
Jmmp 08 00045 g010
Figure 11. Comparison of residual stresses measured by the contour method and those obtained from LSP finite element simulation.
Jmmp 08 00045 g011
Figure 12. Optical images of the fracture surface of the 5 mm notch radius specimens (a) without LSP, (b,c) with LSP.
Jmmp 08 00045 g012
Figure 13. SEM images of the fracture surface of the 5 mm notch specimen. (a,b) transgranular fracture propagated through the coating, (c) close-up with a magnification of 2000×.
Jmmp 08 00045 g013
Table 1. Chemical composition of Stellite 6 powder.
ElementCrWNiSiCMoCo
(wt%)28431.511balance
Table 2. Johnson–Cook parameters for SS 304 [26,30] and Stellite 6 [27,31].
MaterialA (MPa)B (MPa)Cnm ε 0 ˙
SS 30433610000.070.6511
Stellite 692518000.010.570.11
Table 3. Distribution of the pressure pulse used to simulate LSP.
Time (ns)0357912151926335980120178200
Pressure (GPa)00.631.192.464.064.384.303.582.311.751.110.870.470.150
Table 4. Parameters of the Coffin–Manson model for the fatigue life estimation.
ParameterUniform Material Law: Stellite 6Uniform Material Law: SS 304
σ f 19531116
ε f 0.362540.52246
b−0.087−0.087
c−0.58−0.58
Table 5. Fatigue life predictions on specimens with and without LSP.
Notch Radius (mm)Without LSPWith LSPImprovement (%)
582,212119,42845.2
10551,829820,47048.6
152,218,3713,254,56146.7
204,389,2086,100,18138.9
Disclaimer/Publisher’s Note: The statements, opinions and data contained in all publications are solely those of the individual author(s) and contributor(s) and not of MDPI and/or the editor(s). MDPI and/or the editor(s) disclaim responsibility for any injury to people or property resulting from any ideas, methods, instructions or products referred to in the content.