Proceeding Paper

Texture and Mechanical Properties of Extruded AA6063 Aluminum Alloy †

1
Département de Génie Mécanique, École de Technologie Supérieure, 1100 Rue Notre-Dame Ouest, Montréal, QC H3C 1K3, Canada
2
Conseil National de Recherches Canada, 501 Boulevard de l’Université Est, Saguenay, QC G7H 8C3, Canada
*
Author to whom correspondence should be addressed.
Presented at the 15th International Aluminium Conference, Québec, QC, Canada, 11–13 October 2023.
Eng. Proc. 2023, 43(1), 25; https://doi.org/10.3390/engproc2023043025
Published: 18 September 2023
(This article belongs to the Proceedings of The 15th International Aluminium Conference)

Abstract

:
The extrusion process imposes a large amount of deformation on the material, resulting in complex changes in microstructure morphology and crystallographic texture, making the predictions of the final mechanical properties very challenging. In this research, the texture and the mechanical properties of AA6063 aluminum extruded profiles are investigated. This alloy adopts a recrystallized microstructure with equiaxed grains and a typical texture. The plastic anisotropy is compared with a calculation method considering only the texture effect. Some attempts were made to numerically reproduce specific experimental results by accounting for certain restauration mechanisms.

1. Introduction

Aluminum alloys are being widely used across various industry fields, including automotive, railway vehicles construction, numerous airplane parts, among others. A common objective in all these applications is the pursuit of materials with low density and high strength, which enables the creation of lightweight and strong assemblies. Fortunately, the aluminum extrusion process is well suited for achieving these goals, as the ductility of aluminum alloys makes them good candidates for that shaping process.
Due to the high amount of plastic deformation encountered by the material during extrusion, the microstructure of the extruded profiles is usually highly deformed or recrystallized [1], which typically leads to plastic anisotropy in the microstructural characteristics. The sources of anisotropy are not yet fully explained; some authors suggest that it only depends on texture, while others consider that it results from the interaction among texture, precipitates, grain shapes and dislocations, or some combination of these factors [2]. To describe the plastic anisotropy of materials, the Lankford coefficient, also known as R-value, has been a very useful tool [3], as it provides an indication of the primary deformation directions that a part experiences with specific types of loading.
The alloy investigated in this study is AA6063, a commercially available and widely used alloy in the extrusion industry. It is characterized by a recrystallized microstructure [4,5] with equiaxed grains and a typical texture that emerges as a result of this recovery process, such as the Cube texture and components derived from Goss and Brass. Previous studies have reported that extruded 6063 alloy profiles typically exhibit diverse texture characteristics, primarily influenced by their position along the normal direction (ND), indicating different thermo-mechanical histories based on their location within the material. It has been found that the edges are dominated by Brass, S and Brass-derived components, which are typical of recrystallized structures. In contrast, the center is richer in Cube and random components, indicating the occurrence of recovery processes. Additionally, a thin zone separates the center and edges, exhibiting a strong Goss component resulting from recrystallization [5].

2. Materials and Methods

2.1. Materials and Characterisation

This study focuses on AA6063, which is frequently used in the industry and formed with the extrusion process. The composition is provided in Table 1. After DC casting, 4-inch OD billets were homogenized with a standard cycle prior to extrusion, which produced rectangular tubes with an extrusion ratio of 25. The extrusion process was carried out at a speed of 8 mm·s−1, and an average exit temperature of 535 °C was reached. The samples were investigated in as-extruded condition.
Prior to measuring their textures, the samples were mirror-polished using SiC griding paper and then electropolished at 30 V for 60 s following the ASTM E1558 standard electrolyte for Al-alloys with the following composition: 800 mL of ethanol, 140 mL of distilled water and 60 mL of perchloric acid.
The textures were measured with the electron backscatter diffraction (EBSD) technique with a Hitachi SU-70 field emission gun scanning electron microscope. The obtained results were analyzed using ATEX [6] and in-house Python code developed for generating texture plots and performing calculations. The list of texture components used to characterize the crystallographic orientations is provided below in Table 2, and orientations are classified with a 12° misorientation angle.

2.2. Mechanical Characterisation

Microtensile tests were conducted using a 5000 N tensile/compression module from Kammrath & Weiss GmbH (Schwerte, Germany). The dimensions of the tensile specimens were selected according to the ASTM E8 standard and are illustrated in Figure 1. The samples were machined from the larger side of an extruded tube at various angles between the extrusion direction and the sample direction. Angles of 0, 22.5, 45, 67.5 and 90 degrees were tested, as shown in Figure 2, which displays the placement of the tensile samples within an extruded rectangular tube (5 and 10 degrees were not studied).
The deformation fields were calculated using a digital image correlation technique, implemented in open source software called OpenDIC [7].

3. Results

3.1. Microstructure of the Extruded Samples

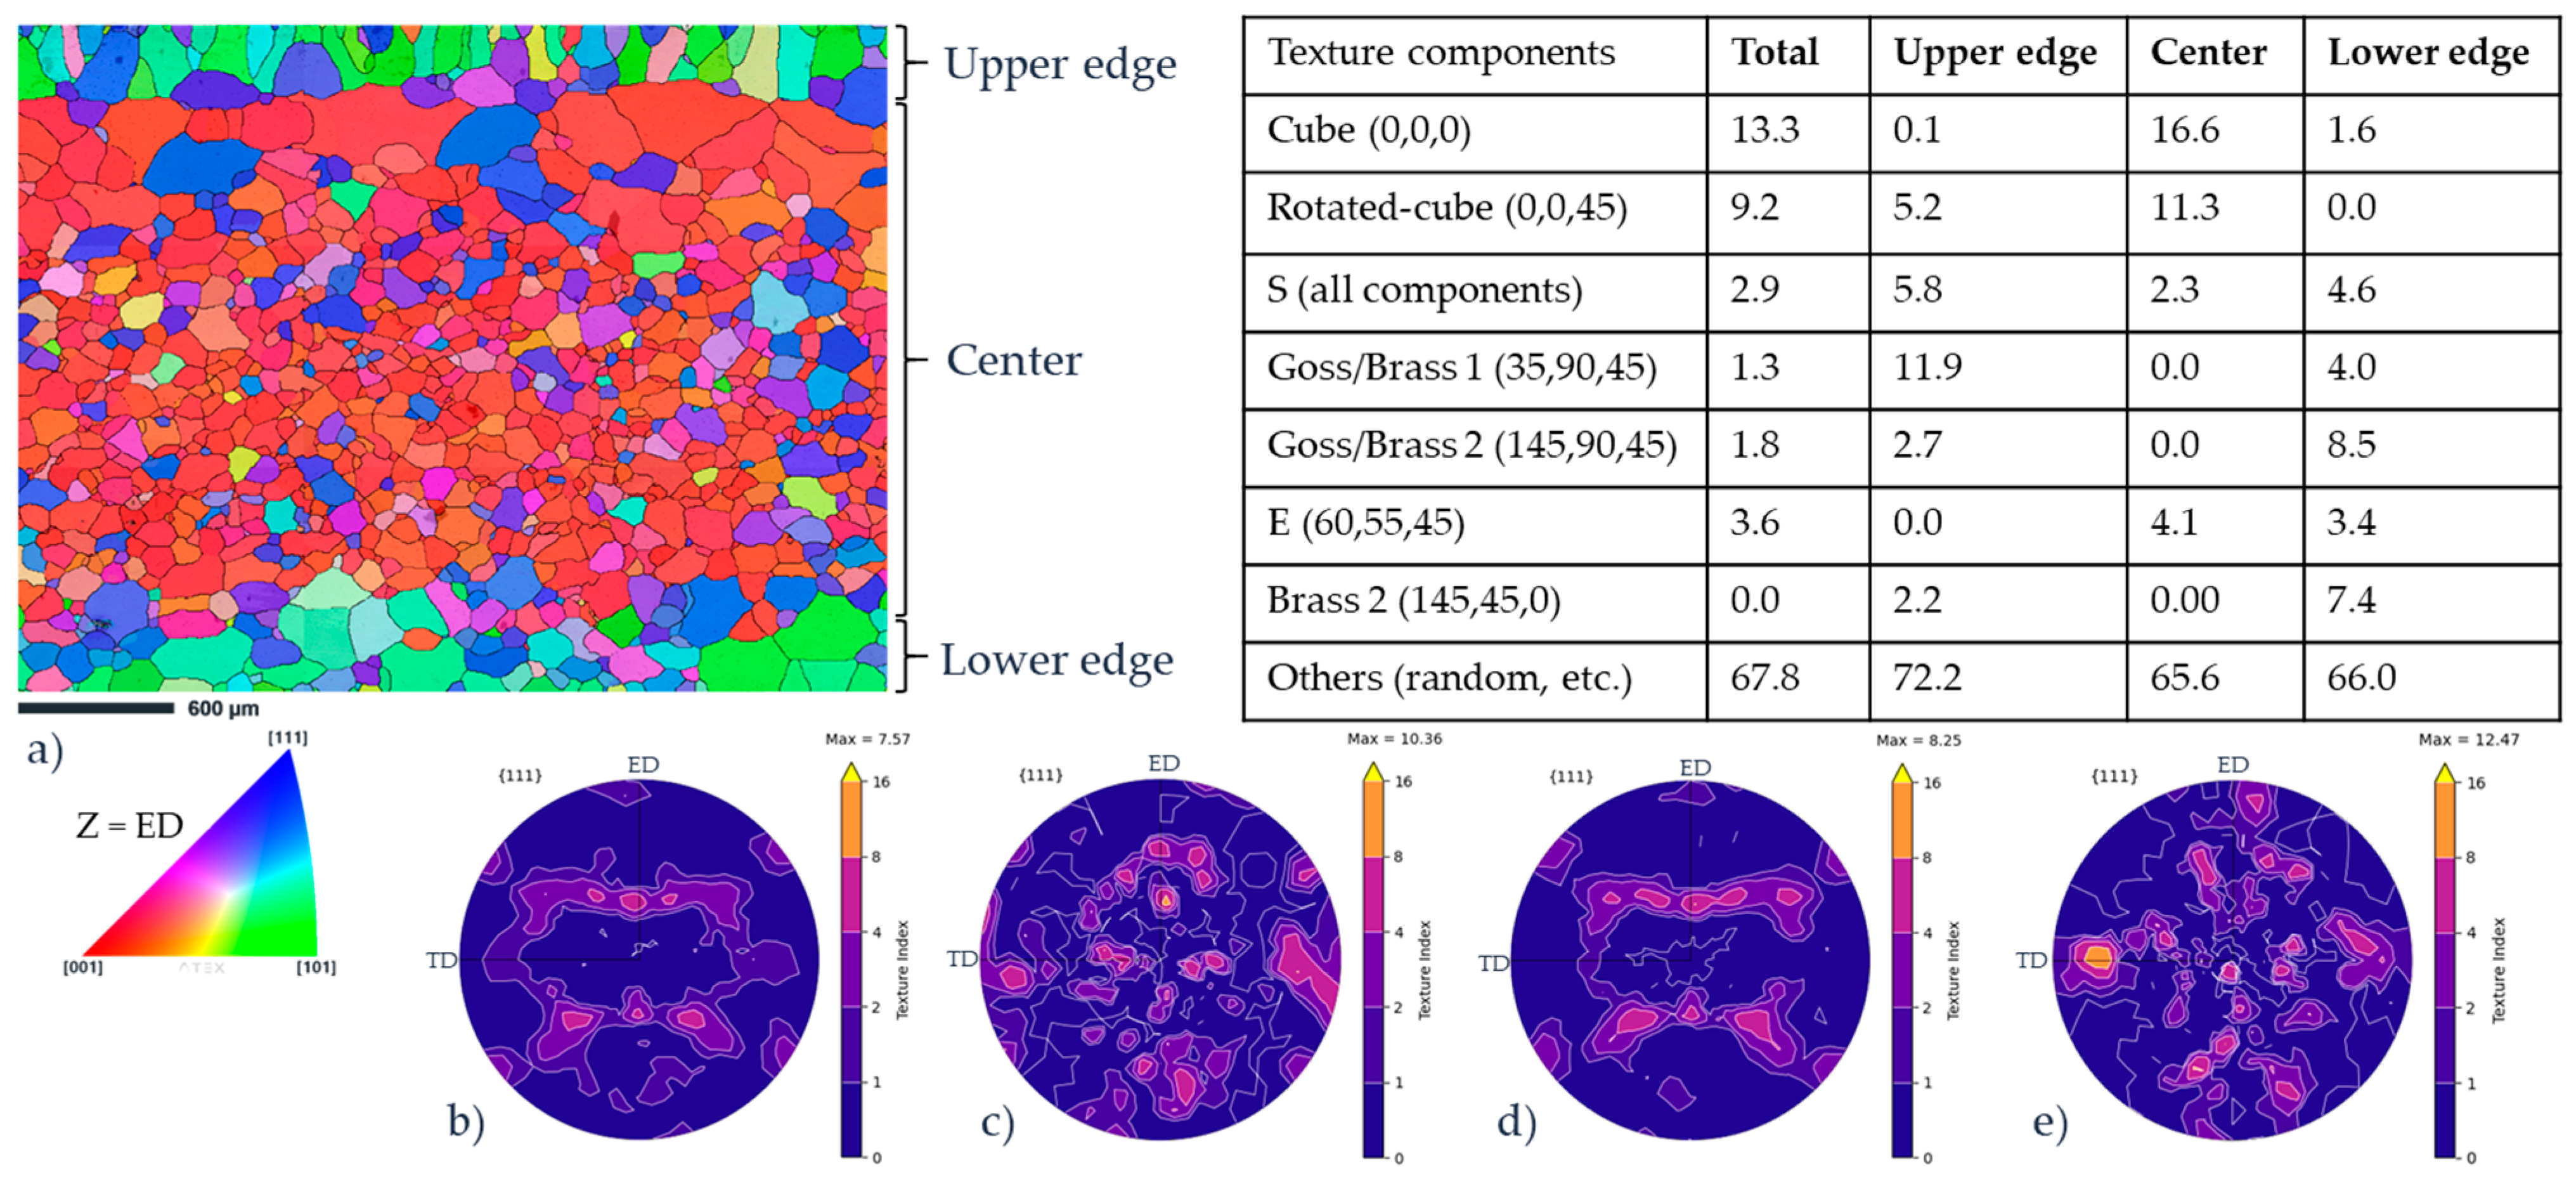
The microstructure of the AA6063 samples was investigated, and the results are shown in Figure 3. In Figure 3a, the EBSD map of the full thickness is presented, clearly showing that the grains at the upper and lower edges have different orientations compared with the center. The texture of the whole thickness is given in Figure 3b with the {111} pole figure. Additionally, Figure 3c displays the pole figure (PF) of the upper edge; Figure 3d shows the center PF; Figure 3e the lower-edge PF. They clearly show that the texture in the center of the sample is different compared with the edges. The whole thickness is dominated by Cube and Rotated Cube (13.3% and 9.2%, respectively) with small amounts of S, Goss/Brass and E components. This is related to the high proportion of Cube-related components at the center (16.6% for Cube and 11.3% for Rotated Cube). At the upper edge, the Goss/Brass 1 component is the most present, with 11.9%, followed by S, with 5.8%. At the lower edge, 4.0% and 8.5% of Goss/Brass components, 7.4% of Brass 2 and 4.6% of S can be found. A few remarks can be made regarding all these PFs. Firstly, it can be observed that the Cube orientations are clearly visible in Figure 3b,d, but there is no distinct pattern discernible in Figure 3c,e. Moreover, the texture index (TI) is not as high as for textured polycrystals, indicating that a significant proportion consists of randomly oriented grains, representing roughly 60% of the grains in all zones of the sample (the last row of the table in Figure 3 accounts for orientations that are not solely random orientations).
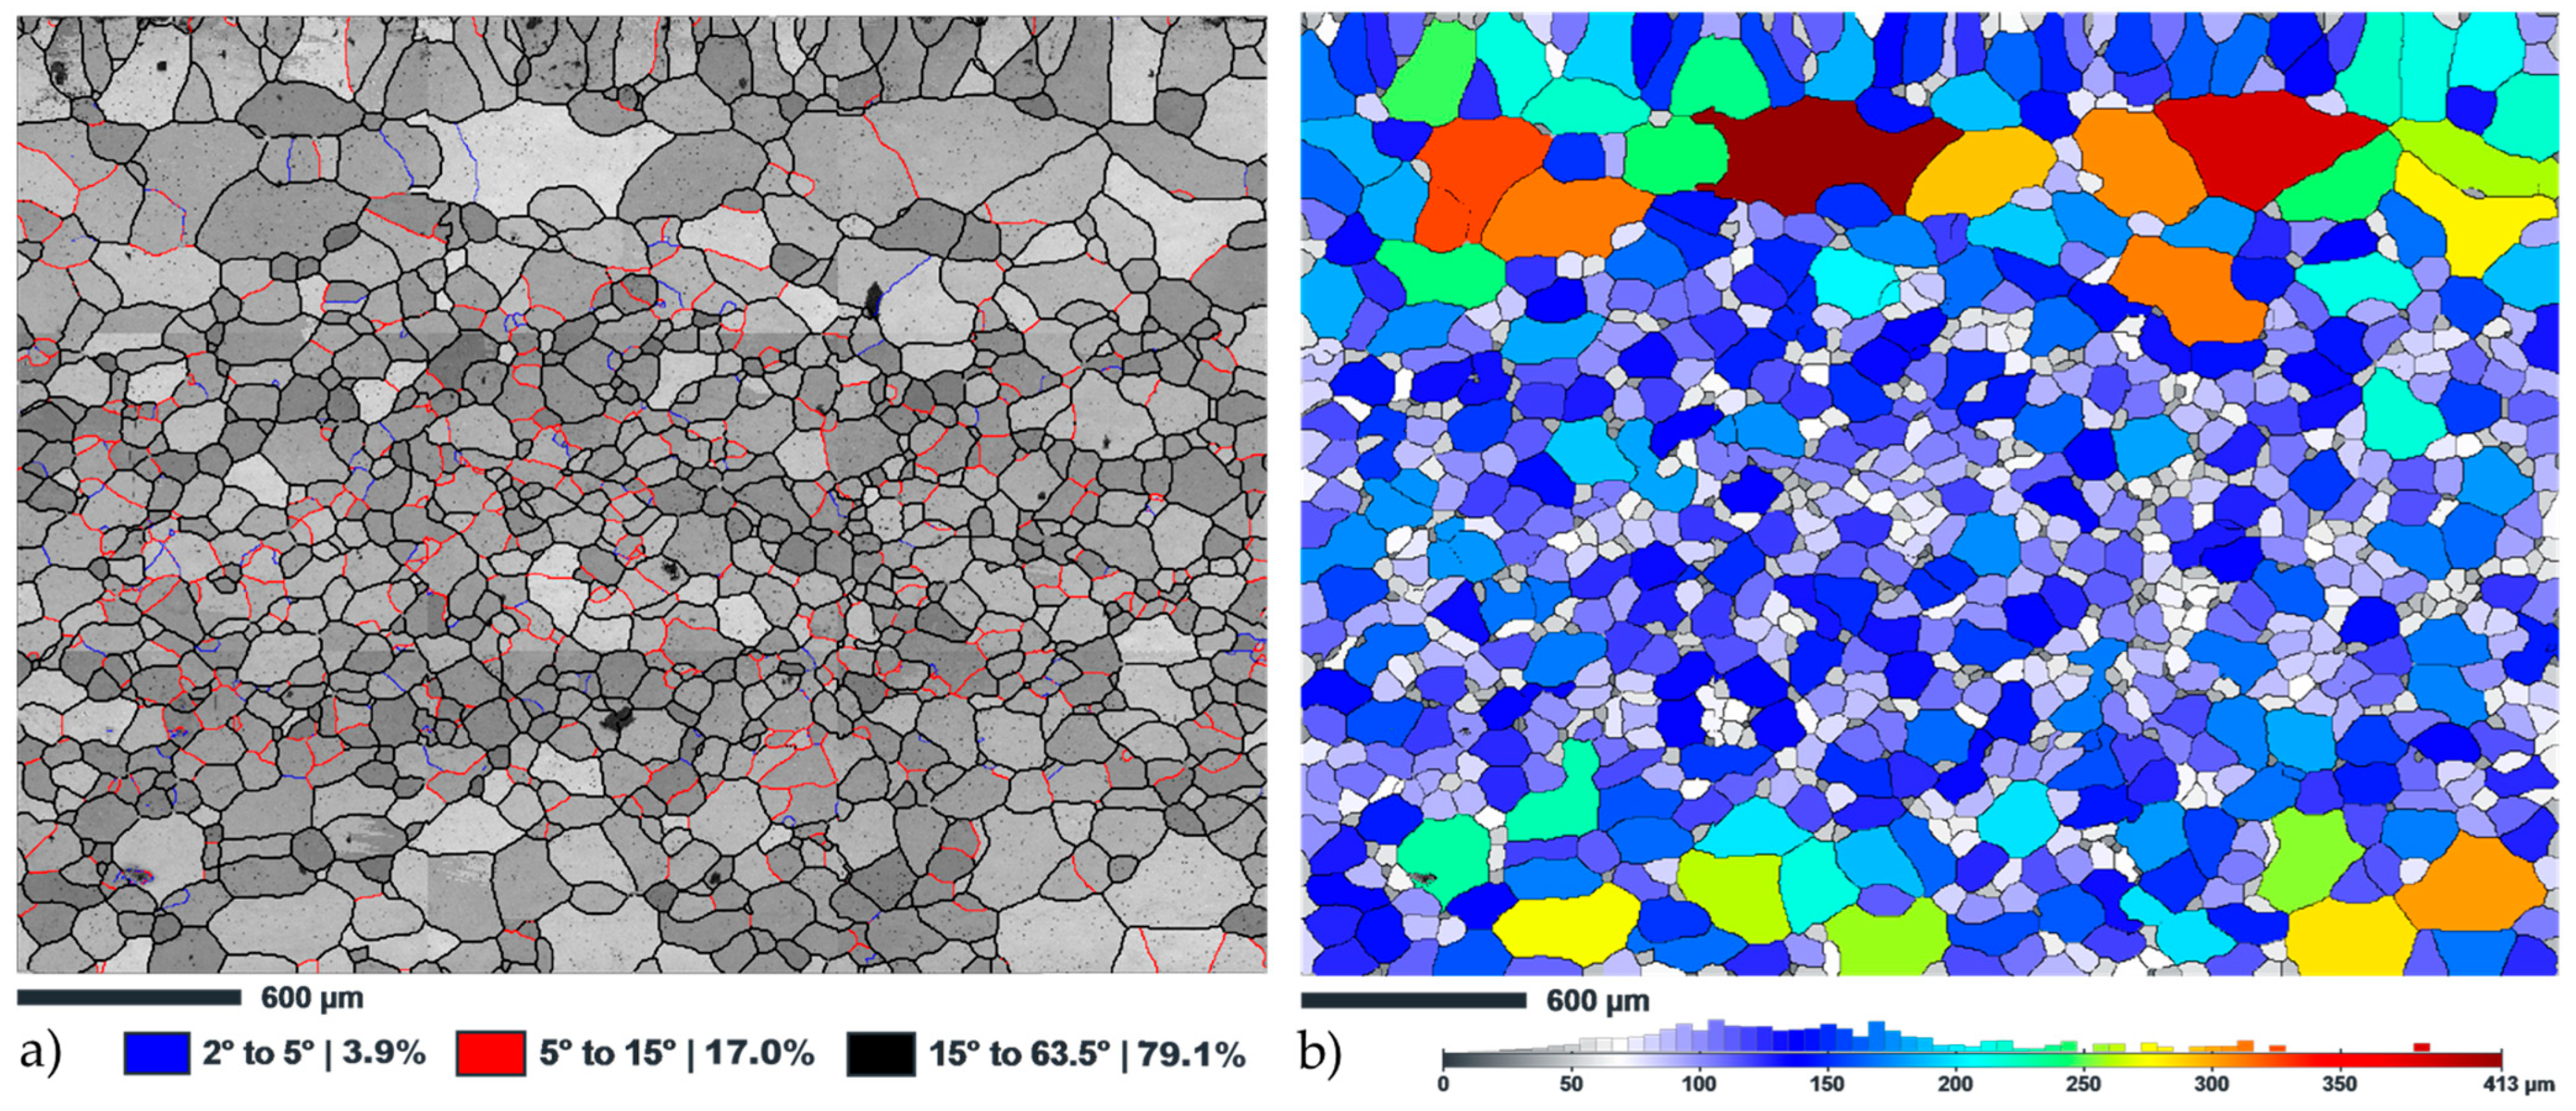
Figure 4 highlights different data: In Figure 4a, a map of the grain boundary angles is shown, revealing that the majority of the grain boundaries (79.1%) are classified as high-angle grain boundaries (HAGBs), with angles ranging from 15 to 63.5 degrees, in as-extruded condition, which is typical of a non-deformed or fully recovered state. In both Figure 4a,b, it is evident that most of the grains exhibit an equiaxed morphology, except at the upper edge, where they appear to be elongated in the ND (perpendicular to the edge). In Figure 4b, the grain size is depicted for a total of 1193 grains, showing smaller grains in the center compared with the edges. The grain size distribution is indicated below in Figure 4b, with an average size of 140 µm (160 µm at the upper and lower edges and 110 µm at the center).
The same analysis was conducted on a 25%-deformed sample that was elongated in the ED (necking had already occurred). This sample was extracted from a region nearby that of the previous sample illustrated in Figure 3. The results are presented in Figure 5, where an EBSD map once again reveals the presence of these distinct orientations at the upper and lower edges compared with the center. This information is further supported by the PFs given in Figure 5b (full thickness), Figure 5c (upper edge), Figure 5d (center) and Figure 5e (lower edge). This map also reveals the presence of several large grains, which are colored in various shades. The table indicates the continued presence of strong Cube-related textures in the deformed sample, since there are 12.8% of Cube and 5.7% of Rotated-Cube textures and the center exhibits higher Cube (16.5%) and Rotated-Cube (6.1%) textures. These components are less prevalent at the edges of this sample, with only 5.6% at the upper edge and 3.0% at the lower one. Instead, the most significant components are S and, particularly, E for the upper edge. Additionally, a few observations can be made about the PFs. Firstly, similarly to Figure 3, the Cube texture pattern is clearly visible in Figure 5b,d, while no clear pattern can be observed in Figure 5c,e. Secondly, the TI is also not as high as that of textured polycrystals, revealing a strong proportion of random orientations, as indicated in the last line of the table in Figure 4.
Two maps are displayed in Figure 6. In Figure 6a, the grain boundary angles are shown, revealing a significant presence of low-angle grain boundaries (LAGBs) in many grains. This is a characteristic feature of highly deformed aluminum alloys. This type of grain boundaries represents 68.4% of the total boundaries compared with only 20.3% of HAGBs. Additionally, there is a small number of grains that are not highly concentrated at LAGBs, particularly at the edges. In Figure 6b, the grain size distribution is represented over 893 grains, revealing that the majority of the grains are also equiaxed, with smaller grains at the center. It is also noticeable that the upper edge exhibits grain shapes similar to those described in Figure 4.

3.2. Mechanical Properties and Anisotropy

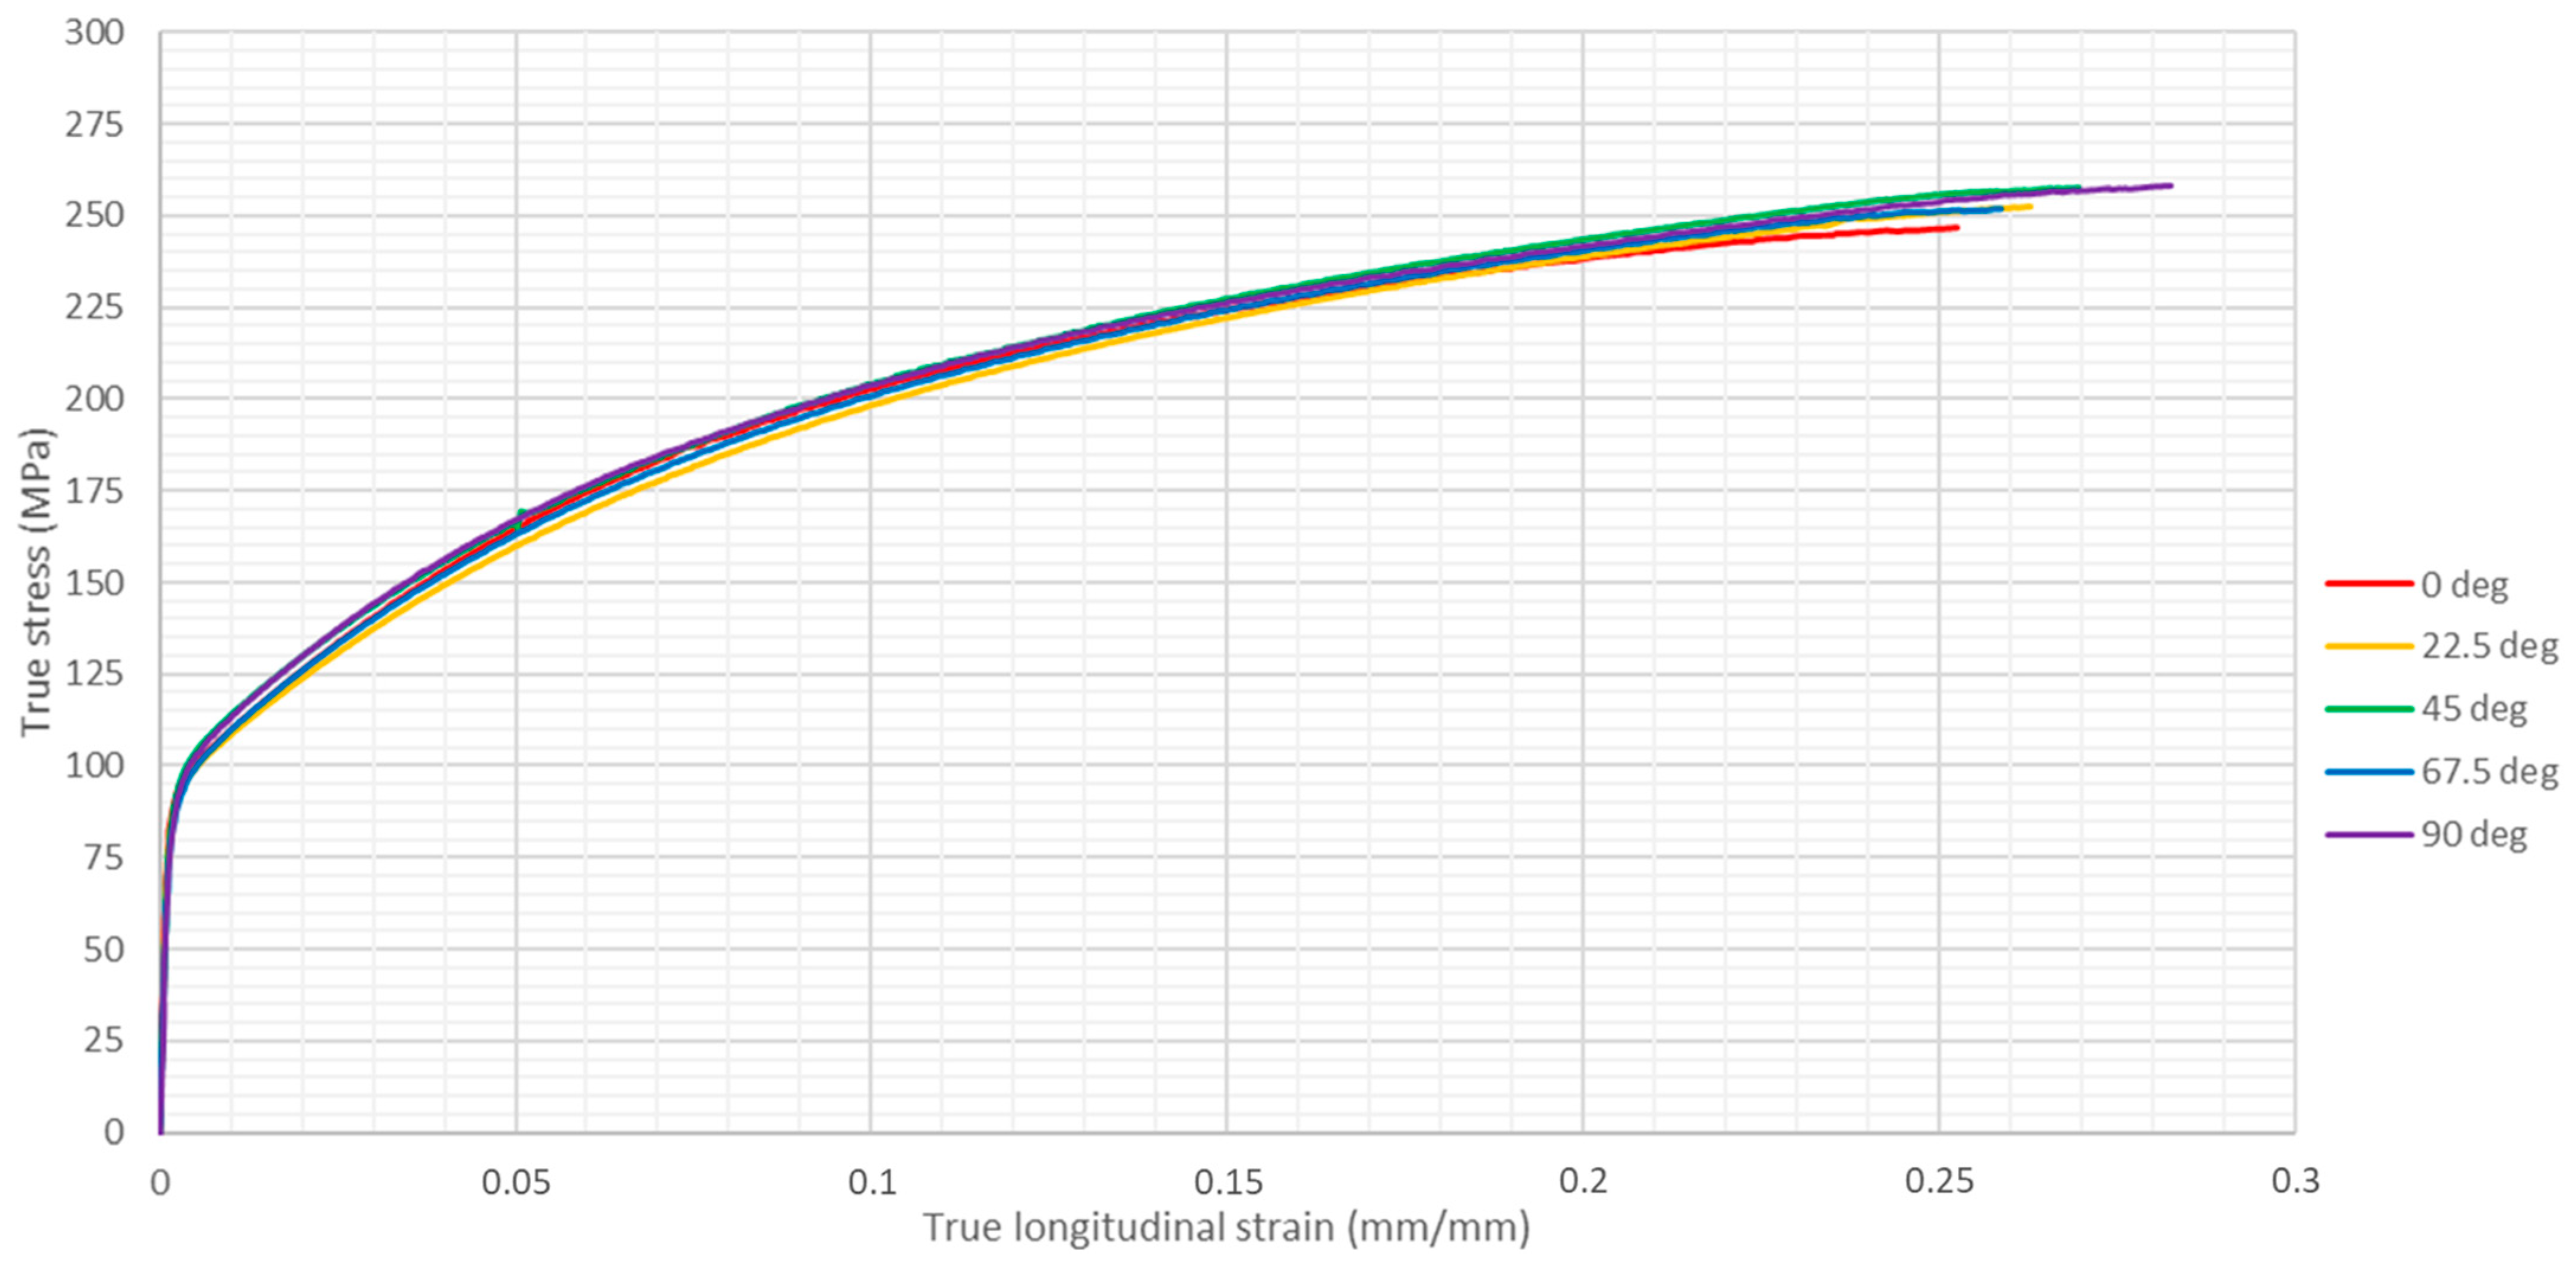
The tensile tests conducted on the samples clearly revealed the presence of anisotropy in the mechanical behavior. Figure 7 presents the resulting true stress/true strain curves for 0, 22.5, 45, 67.5 and 90° between the ED and the tensile direction. The 90°-oriented samples (parallel to the TD) presented higher ultimate strength and higher total strain at necking. It is interesting to see that all the curves have very close behaviors, with the highest ultimate strength for the 90° samples and the lowest value for the 0° samples. A synthesis of the mechanical properties is given below in Table 3, displaying the close yield and ultimate strength for all orientations.
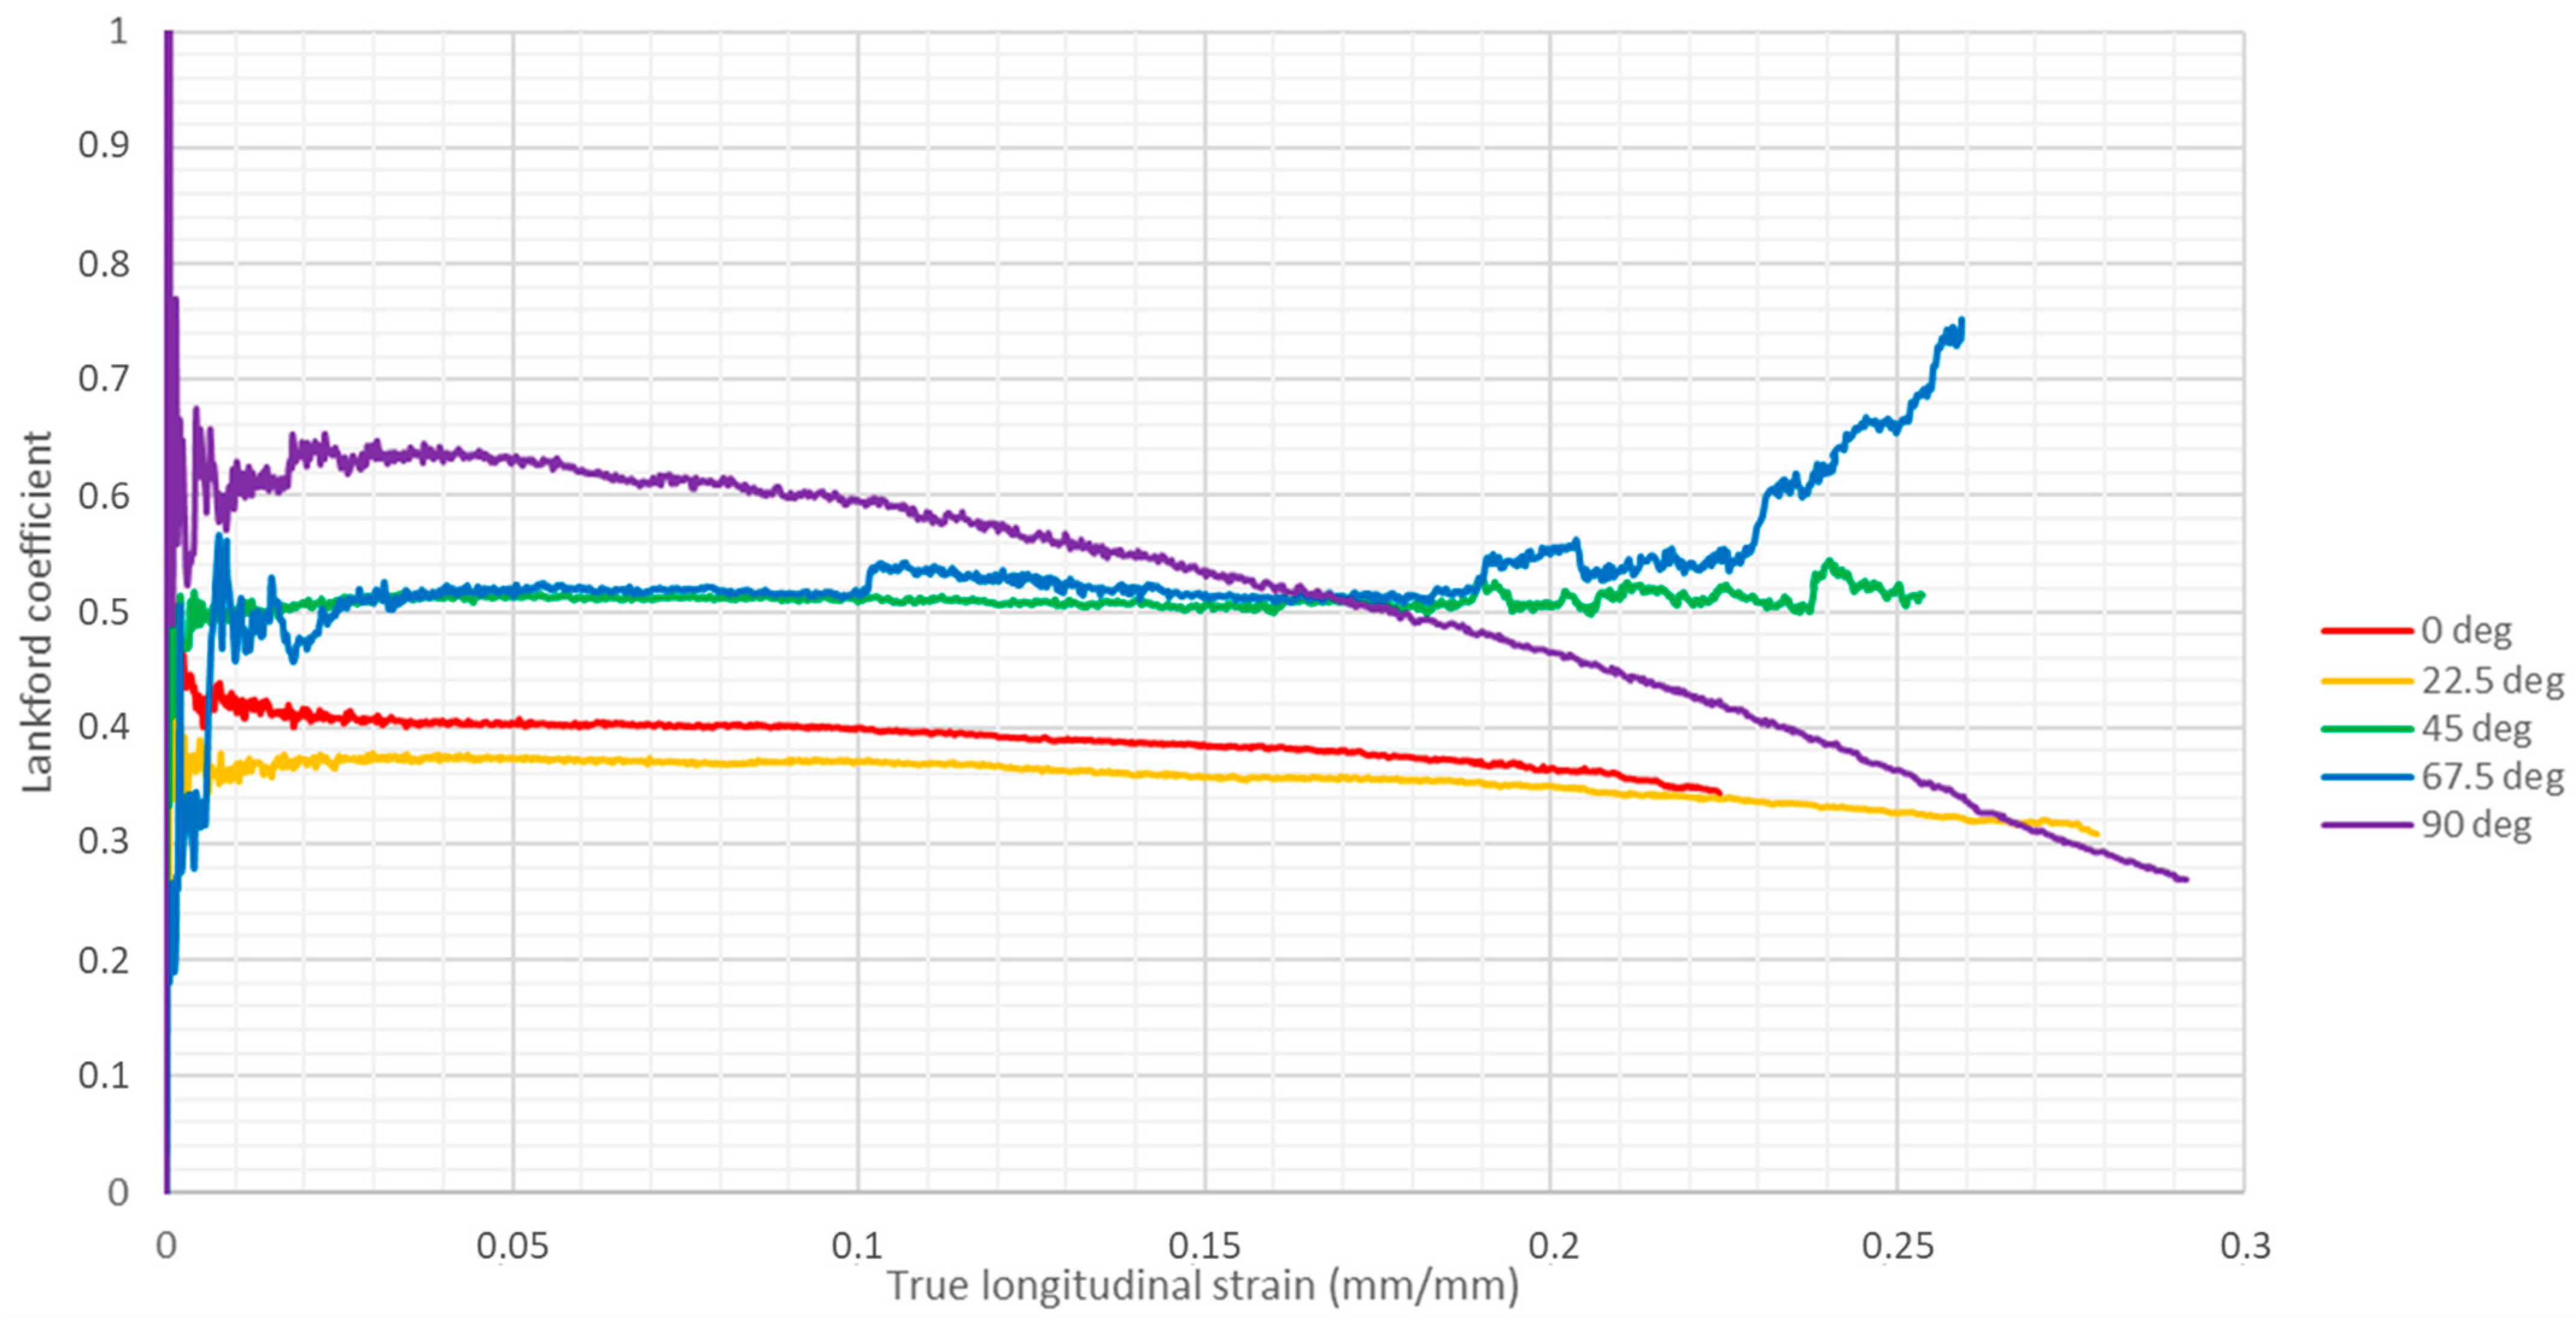
The Lankford coefficients as a function of tensile elongation are shown in Figure 8. Surprisingly, although the stress/strain curves exhibit similar behavior for most of the samples, the R-value measurements reveal significant variations among them. For most of the samples, the R-value undergoes a variable phase in the elastic region before reaching a relatively constant value during the strain-hardening phase, except for the 90°-oriented samples. These samples have the lowest anisotropy in the early stages of deformation (considering the R = 1 behavior to be perfectly isotropic), which gradually increases with the deformation level. The sample oriented at a 22.5° angle displays the highest degree of anisotropy among all the tested samples.

4. Discussion

4.1. Microstructure of the as-Extruded Samples

The as-extruded samples exhibit high proportions of Cube and Rotated Cube, accounting for 13.3% and 9.2%, respectively. These proportions are higher at the center, and a large fraction of S and Brass-derived components (Goss/Brass 1 and 2, and Brass 2) are observed at the upper and lower edges. These findings are consistent with the results reported by Araki et al. [4,5]. The results of their study show slight differences, since they found 20–30% of Cube, 9–13% of Goss and 4–6% of S textures in the whole section of the extruded profiles, in contrast with the 22.5% of various Cube, 3.1% of Brass-like and 2.9% of S textures observed in our profiles. These differences in texture composition can be attributed to variations in extrusion parameters and the dissimilar shape of the final product, resulting in different strain paths and levels experienced by the material, which in turn affect the recrystallisation and recovery capacities of the grains. The measured fractions of texture components in the as-extruded samples are typical of fully recrystallized material, particularly for Cube-related components, which is attributed to the forming process and the alloy itself, which possesses a high recrystallization capacity. In addition, the average grain size of the full thickness in our study is higher compared with the range of 75–98 microns reported by Araki et al. [4,5]. The particularly high grain sizes observed in our study further support the notion that the alloy is in a fully recrystallized/recovered state. Considering their shape in the upper-edge region, in Figure 4, suggests that the grains in this region have grown from the edge, indicating a different energy state compared with the center. This difference may have been induced by various deformation paths/levels and needs further investigations.
Nevertheless, the noticeable differences in the proportions of texture components between the edges and the center indicate that the recrystallization process may have occurred differently along the thickness of the sample. According to the literature [5], it is suggested that recovery processes primarily occur at the center of the sample, while recrystallization takes place at the edges [5]. This difference in thermal history along the sample thickness could come from the different strain paths encountered by the material during the extrusion process but could also be due to the high shear rate imposed on the edges when the material goes through the extrusion die. Considering the fact that recrystallization is driven by the stored energy inside the material, higher deformation and shear levels along the edges could induce high amounts of stored energy, locally modifying the texture compared with the center [8].

4.2. Microstructure of the Samples Deformed in the ED

The 25% deformation in the ED results in a change in the textures of the samples. According to Figure 3 and Figure 5, it appears that the fraction of Cube orientation is not significantly affected by deformation (changing from 13.3% to 12.8% for the whole sample, from 16.6% to 16.5% at the center, below 1% at the upper edge and from 1.6 to 2.1% at the lower edge). The slightly different fractions can be attributed to the fact that the studied samples were not extracted from the same place. Regarding the Rotated Cube texture, this texture component appears to be relatively unaffected by the deformation at the edges, as its fraction goes from 5.2% to 4.7% at the upper edge and from 0.0% to 0.9% at the lower edge. However, a decrease in the fraction of this component is observed at the center, dropping from 11.3% to 6.1%. This reduction is also evident for the Goss/Brass 1 and 2, and Brass 2 components for the whole sample. This decrease is in favor of an increase in the E component (rising from 3.6% to 6.0% in the overall sample), as well as Copper-related components (Copper and Copper 2, particularly present at the upper edge with fractions of 3.6% and 4.5%, respectively), and of the emergence of Inverse Brass, which is characteristic of deformed textured materials. This confirms the typical results observed in plastically deformed aluminum alloys. Furthermore, the EBSD map in Figure 5a reveals the presence of several large grains scattered throughout the entire thickness, exhibiting a diverse range of colors. These grains display a high density of LAGBs (2–5° and 5–15°), as shown in Figure 6a, which suggests that they have been divided into subgrains, which is characteristic of a strain-hardened microstructure.
Furthermore, the grains oriented in the [111]//ED (indicated by the blue color in Figure 5a), which is along the loading direction, exhibit the lowest density of LAGBs, as shown in Figure 6a. It highlights the fact that these grains are less favorably oriented to be deformed during a tensile test, since the preferred slip direction in FCC-structured alloys is [110]. These grains are mainly located at the upper edge, but they are also present at the center and lower edge with lower occurrence.
Therefore, it is important to note that a source of anisotropy could come from the different grain textures and shapes at the edges. This is supported by lower LAGB density in these regions, as observed in Figure 6a. As a result, this leads to distinct mechanical behaviors in different zones of the sample, resulting in different deformation states between the center and the edges, especially considering the variable angle between the loading direction and the ED.

4.3. Anisotropy of the Samples

The mechanical response of the ED-, 22.5°-, 45°-, 67.5°- and TD-oriented samples can be attributed to their fully recrystallized state. The results do align with the ones reported in the literature, which typically show similar behaviors for all orientations in a recrystallized state [3], which is attributed to the high fraction of randomly oriented grains.
The R-value curves also require further investigation, as they do not display the same trend that is commonly observed. Typically, a minimum value is encountered in the 45° orientation (around 5% deformation), and all the measured values are slightly lower compared with the expected values reported in the literature. However, it is important to note that the literature results usually involve alloys that do not exhibit various microstructural characteristics, with the presence of distinct textures near the edges of the samples. This may contribute to the observed divergences in the R-value. Further EBSD investigations in the 45° direction are required to study the grain orientations, which would likely provide valuable data on the orientations of slip plans in this direction.

5. Conclusions

This study investigated the microstructural characteristics of as-extruded AA6063 profiles. The material exhibited a fully recrystallized state, characterized by equiaxed grains, strong Cube and Rotated-Cube textures and significant density of HAGBs. Microstructural observations revealed that the grains at the edges displayed different shapes and textures compared with those at the center. This can be attributed to variations in the deformation path and level during extrusion, which contribute to the development of an anisotropic behavior during subsequent deformation processes. The tensile tests revealed similar mechanical response for all orientations. The calculation of the Lankford coefficients revealed a constant value in the strain-hardening region, with the 22.5°-oriented samples exhibiting the lowest coefficient and the TD-oriented ones having the highest coefficients. The tensile deformation resulted in a decrease in the fractions of Rotated-Cube and Brass-derived components, while there was an increase in the fractions of E and Copper-related components. However, this behavior varied depending on the zone investigated within the sample. The formation of LAGBs and variations in texture components did not occur in the same manner at the upper and lower edges compared with the center after a tensile test along the ED. The center region displayed higher density of LAGBs compared with the other regions, supporting the hypothesis that different zones of the material influence its macroscopic mechanical behavior.

Author Contributions

Conceptualization, C.P., M.Y., Q.B. and P.B.; methodology, C.P., M.Y., Q.B., J.-F.B. and P.B.; software, C.P. and Q.B.; validation, Q.B., P.B. and J.-F.B.; writing—review and editing, C.P., Q.B., M.Y. and P.B.; supervision, P.B.; funding acquisition, P.B. All authors have read and agreed to the published version of the manuscript.

Funding

The APC was funded by National Research Council and Natural Sciences and Engineering Research Council Canada.

Institutional Review Board Statement

Not applicable.

Informed Consent Statement

Not applicable.

Data Availability Statement

No new data were created or analyzed in this study. Data sharing is not applicable to this article.

Acknowledgments

The authors are grateful to NRC Canada and Rio Tinto for their technical support.

Conflicts of Interest

The authors declare no conflict of interest.

References

  1. Parson, N.; Maltais, A.; Jowett, C. The Influence of Die Bearing Geometry on Surface Recrystallisation of 6xxx Extrusions. In Proceedings of the Tenth International Aluminum Extrusion Technology Seminar ET2012, Miami, FL, USA, 15–18 May 2012; pp. 19–32. [Google Scholar]
  2. Dickson, J.M.; Sanders, T.H., Jr. Crystallographic Texture Development in Extruded AA 2195 and AA 7075. Mater. Charact. 2020, 160, 110121. [Google Scholar] [CrossRef]
  3. Engler, O.; Aegerter, J. Texture and Anisotropy in the Al-Mg Alloy AA 5005—Part II: Correlation of Texture and Anisotropic Properties. Mater. Sci. Eng. A 2014, 618, 663–671. [Google Scholar] [CrossRef]
  4. Araki, M.; Matsuda, K. Effect of Composition on Recrystallization Texture Formation of Aluminum Extrusions. Mater. Trans. 2020, 61, 104–110. [Google Scholar] [CrossRef]
  5. Araki, M.; Matsuda, K.; Lee, S.; Tsuchiya, T.; Ikeno, S. Texture Formation Process of 6063-Type Aluminium Alloy during Hot Extrusion. MATEC Web Conf. (ICAA17) 2020, 326, 05005. [Google Scholar] [CrossRef]
  6. Beausir, B.; Fundenberger, J.-J. Analysis Tools for Electron and X-Ray Diffraction. 2017. Available online: www.atex-software.eu (accessed on 15 September 2023).
  7. Vanderesse, N.; Lagacé, M.; Bidier, F.; Bocher, P. An Open Source Software for the Measurement of Deformation Fields by Means of Digital Image Correlation. Microsc. Microanal. 2013, 19, 820–821. [Google Scholar] [CrossRef]
  8. Mahmoodkhani, Y.; Chen, J.; Wells, M.A.; Poole, W.J.; Parson, N.C. The Effect of Die Bearing Geometry on Surface Recrystallization During Extrusion of an Al-Mg-Si-Mn Alloy. Metallurgical and Materials Transactions A: Physical Metallurgy and Materials. Science 2019, 50, 5324–5335. [Google Scholar] [CrossRef]
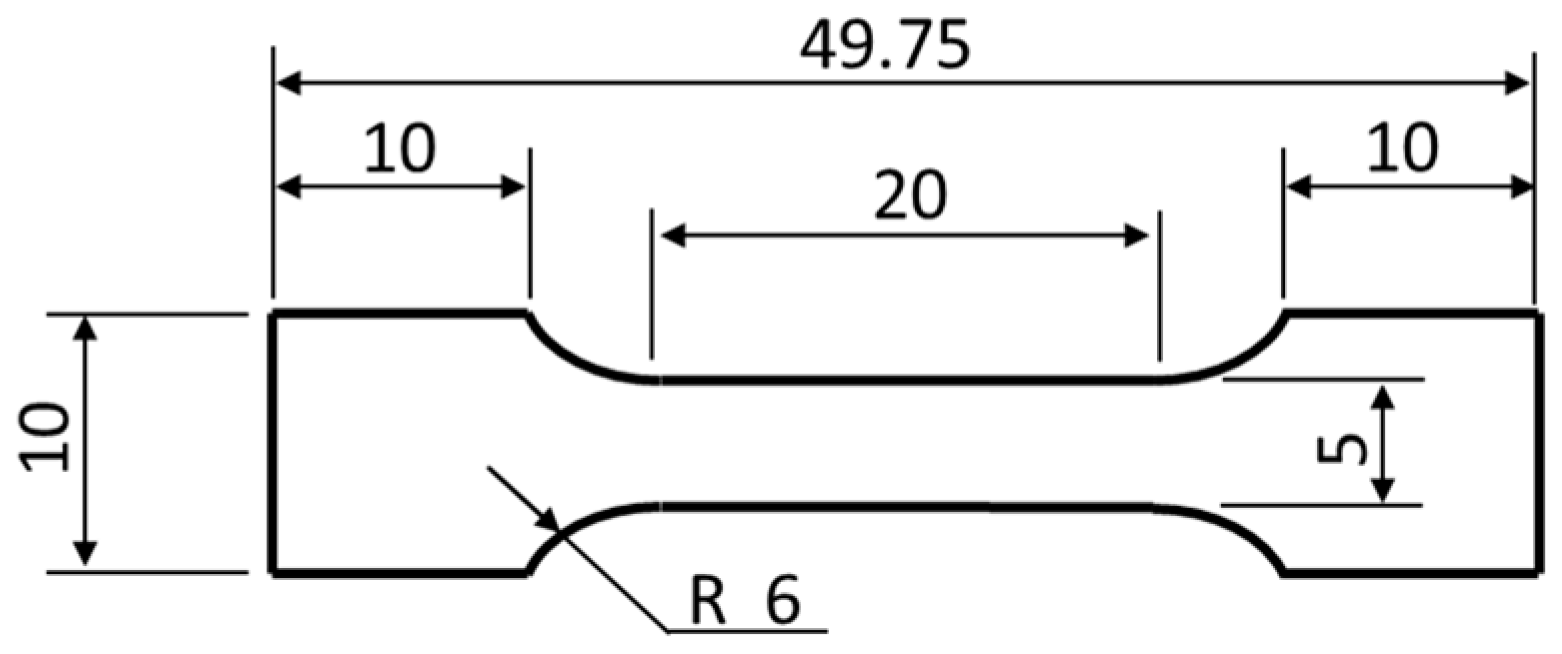
Figure 1. Microtensile specimen according to ASTM E8 standard, dimensions in millimeters.
Engproc 43 00025 g001
Figure 2. Machining plan of the microtensile specimens from an extruded tubular profile. ED: extrusion direction; TD: transverse direction. Recto and Verso are the larger sides of the extruded tubes.
Engproc 43 00025 g002
Figure 3. Microstructure of the full thickness of an AA6063 extruded tube on the larger side. The EBSD map is given in the ND-TD plane in (a), and pole figures are given as follows: (b) full thickness, (c) upper edge, (d) center, (e) lower edge. The table provides the volumetric fraction of each texture component (including only the most important ones).
Engproc 43 00025 g003
Figure 4. (a) Misorientation angle of the grain boundaries and (b) grain size distribution of an es-extruded sample, all seen in the ND-TD plane.
Engproc 43 00025 g004
Figure 5. Microstructure of the full thickness of a sample extracted from the larger side of a tube, after undergoing 25% of elongation in the ED. The EBSD map is given in the ND-TD plane in (a), and pole figures are given as follows: (b) full thickness, (c) upper edge, (d) center, (e) lower edge. The table provides the volumetric fraction of each texture component (including only the most important ones).
Engproc 43 00025 g005
Figure 6. (a) Misorientation angle of the grain boundaries and (b) grain size distribution after 25% of deformation in the ED, all given in the ND-TD plane.
Engproc 43 00025 g006
Figure 7. True stress/true strain curves for AA6063 as-extruded samples for several orientations.
Engproc 43 00025 g007
Figure 8. Lankford coefficient curves for as-extruded samples of AA6063 for different orientations.
Engproc 43 00025 g008
Table 1. Chemical composition of the tested alloy.
AlloyMgSiCuMnCrFeAl
AA60630.490.440.010.030.000.18Bal.
Table 2. List of the texture components used in this work.
Texture ComponentEuler Angles (φ1, ϕ, φ2)Miller Indices
Cube(0, 0, 0) { 001 } < 100 >
Rotated Cube(0, 0, 45) 001 < 1 1 ¯ 0 >
Brass(35, 45, 0) 011 < 2 1 ¯ 1 >
Brass 2(145, 45, 0) 011 < 2 ¯ 1 ¯ 1 >
Goss(0, 45, 0) 011 < 100 >
Rotated-Goss(90, 45, 0) 011 < 0 1 ¯ 1 >
Goss/Brass(35, 90, 45) 110 < 1 1 ¯ 1 >
Goss/Brass 2(145, 90, 45) 110 < 1 ¯ 11 >
Copper(90, 35, 45) 112 < 1 ¯ 1 ¯ 1 >
Copper 2(270, 35, 45) 112 < 11 1 ¯ >
A(0, 35, 45) 112 < 1 1 ¯ 0 >
A ¯ (180, 35, 45) 112 < 1 ¯ 10 >
Inverse Brass(0, 55, 45) 111 < 1 1 ¯ 0 >
Inverse Copper(30, 55, 45) 111 < 1 2 ¯ 1 >
Brass-R(90, 55, 45) 111 < 1 ¯ 1 ¯ 2 >
E(60, 55, 45) 111 < 0 1 ¯ 1 >
S1(61, 34, 64) 213 < 3 ¯ 6 ¯ 4 >
S2(241, 34, 64) 213 < 36 4 ¯ >
S3(299, 34, 26) 123 < 63 4 ¯ >
S4(119, 34, 26) 123 < 6 ¯ 3 ¯ 4 >
Table 3. Young’s modulus, yield strength and ultimate strength of representative samples from the test campaign.
Alloy22.5°4567.5°90
E (GPa)71.265.266.66259.2
Ys (MPa)7678777471
Us (MPa)247253257252258
Disclaimer/Publisher’s Note: The statements, opinions and data contained in all publications are solely those of the individual author(s) and contributor(s) and not of MDPI and/or the editor(s). MDPI and/or the editor(s) disclaim responsibility for any injury to people or property resulting from any ideas, methods, instructions or products referred to in the content.