Proceeding Paper

Determination of the Fracture Point for Inconel-718 Using Luder’s Band Method †

by
Arupratan Gupta
and
Raghavendra C. Kamath
*
Department of Mechanical and Manufacturing Engineering, Manipal Institute of Technology, Manipal Academy of Higher Education, Manipal 576104, Karnataka, India
*
Author to whom correspondence should be addressed.
Presented at the International Conference on Recent Advances in Science and Engineering, Dubai, United Arab Emirates, 4–5 October 2023.
Eng. Proc. 2023, 59(1), 4; https://doi.org/10.3390/engproc2023059004
Published: 11 December 2023
(This article belongs to the Proceedings of Eng. Proc., 2023, RAiSE-2023)

Abstract

:
The current scenario demands the usage of alternate materials with lower stress and stress–strain energy deformation for applications in gas turbines, chassis of automobiles, and biomedical instruments. The work on Inconel-718 can be carried out as it is a new material; it can be used for many applications in addition to its usage in automobiles. Inconel-718 is a superalloy of nickel (Ni) and chromium (Cr). Inconel-718 is corrosion resistant and oxidation resistant when subjected to extreme temperature conditions. But when applying tensile and compressive load, it bends, causing the formation of Luder’s band. The work analyses the formation of Luder’s band in Inconel-718. The methodology for detecting Luder’s band is based on the material structure. It also depends on the material’s rigidity modulus and the shear stress ratio to shear strain. The stress, harmonic, and thermal analyses were carried out using ANSYS to find the red-hot zone for the formation of Luder’s band. The results demonstrate that Luder’s band is mainly formed at the middle point of the frame. The stress for Inconel-718 is in the range of 0.064454 MPa to 81.514 MPa, whereas the frequency varies from 0.71157 to 475.87 Hz under vibration load. Conversely, while heating Inconel-718, the temperature varies from 1.6009 × 10⁵ to 112.83 °C. The analysis shows that Inconel-718 is a better material for designing automobile parts.

1. Introduction

The body of a machine part is made up of various kinds of materials. These materials are placed under various processes to form the machine part, making it challenging to find the point of the fracture and breakage of the materials. The materials have a slip formation at the middle of the points of the joint, causing a breakage. These breakages are extremely dangerous during the working conditions of the machines. The band formed before the fracture occurs at the point of breakage is typically called Luder’s band. Hence, the present study investigates the formation of Luder’s band. This band is caused by the cyclic load and the thermal stress–strain analysis, as shown in Figure 1.
In the case of turbines, all the parts in a turbine are alloys of some form, and during the start and braking of rotational motion, these parts undergo some form of stress and strain. Given external force to a body, the stress is the internal forces that each of the neighboring particles in a continuous material exert on one another. To a certain extent, they prevent deformation from occurring [2]. When the force exceeds the set limits, deformation occurs, and a measure of deformation representing the displacement between particles in the body relative to some reference length is strain. Symbolically, it is represented as  ε . If a material regains its shape after stress, it is elastic; if it does not, then it is plastic. On increasing external force, every material has stresses that turn elastic to plastic. This is called yield Luder’s line deformation [1], which is the typical manner of deformation near the yield point for numerous metals displaying a yield point. Inconel 718, an innovative coating material specially designed for machining, may improve surface properties at the cutting zone of carbide tools. More research should be conducted on customized cutting tool materials that incorporate composite reinforcement to increase the hardness of hard materials like CBN or ceramic tools. The hybrid process results in a heterogeneous microstructure. On the other hand, on the selective laser melting (SLM) side, the material has a cubic structure, columnar grains, a well-defined cell dislocation sub-structural, and very fine Laves phase and oxides. Conversely, the material develops a crude dendritic structure on the Directed energy deposition (DED) side, with significant, segmented Laves phase in inter-dendritic regions and (Nb, Ti) C carbide and oxides.
A limited stripe of strain is commenced at a particular location in a tensile workpiece, and it develops to a steady-state stripe that promulgates along the workpiece at low velocity until the entire workpiece is strained by the quantity proportional to the maximum strain in the band. Luder’s band is observed on the tensile curves of some metallic materials at the elastic-to-plastic transition ( Δ   plastic strain &  ϵ f  failure strain), as shown in Figure 1.
The primary work of the analysis involves detecting the band of failure under bending for specimens made of Inconel-718. Inconel-718 is considered due to its thermal properties, and even the strength of the material was much lesser than that of the aluminum and the structural steel. Inconel-718 is a superalloy and encompasses extensive configurations and mechanical characteristics. The presence of a significant percentage of Ni and Cr aids Inconel-718 to withstand many prominent wear mechanisms at high temperatures. Inconel-718 is used in heat treatment vessels, turbines, aviation, and nuclear power plants. A significant part of the work was conducted to find the strength and the breakage point as well as the point of formation of Luder’s band in Inconel-718 specimens.

2. Materials and Methods

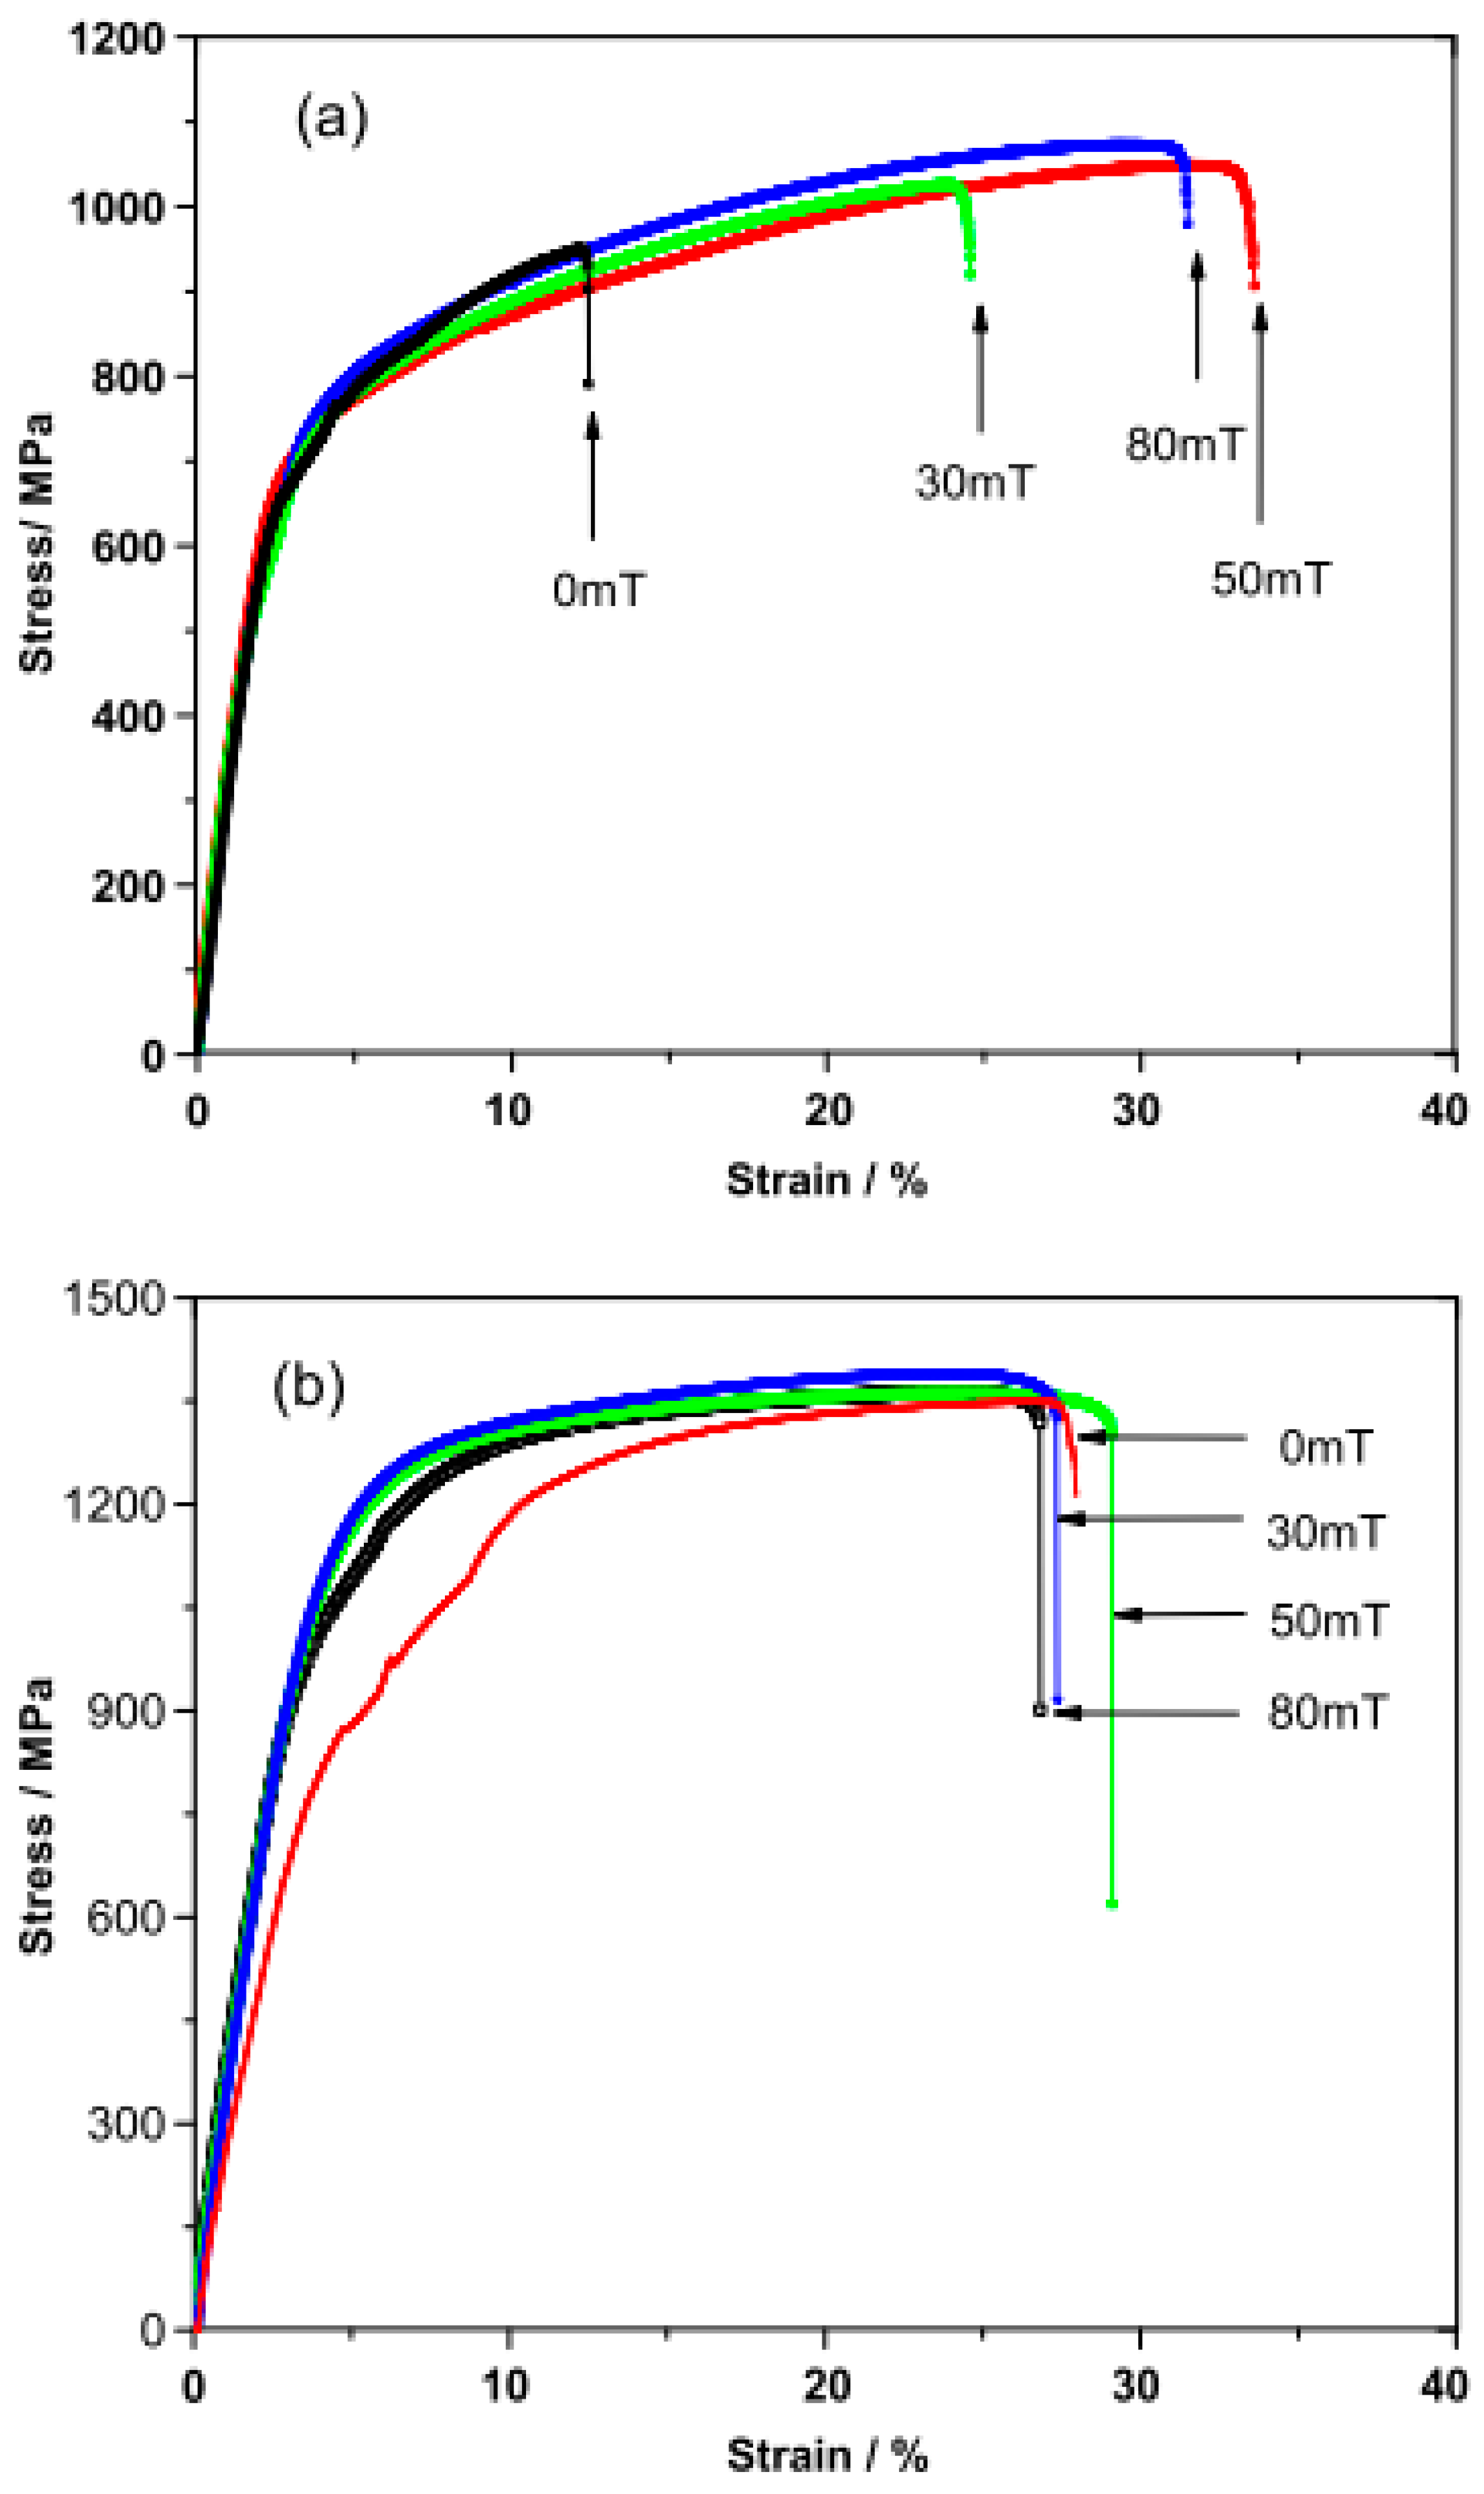
The materials used for the analysis were a composite material of precipitation hardenable nickel–chromium alloy containing significant amounts of iron, niobium, molybdenum, and lesser amounts of aluminum and titanium. The stress–strain graph of Inconel-718 is given below in Figure 2a,b.

Methodology

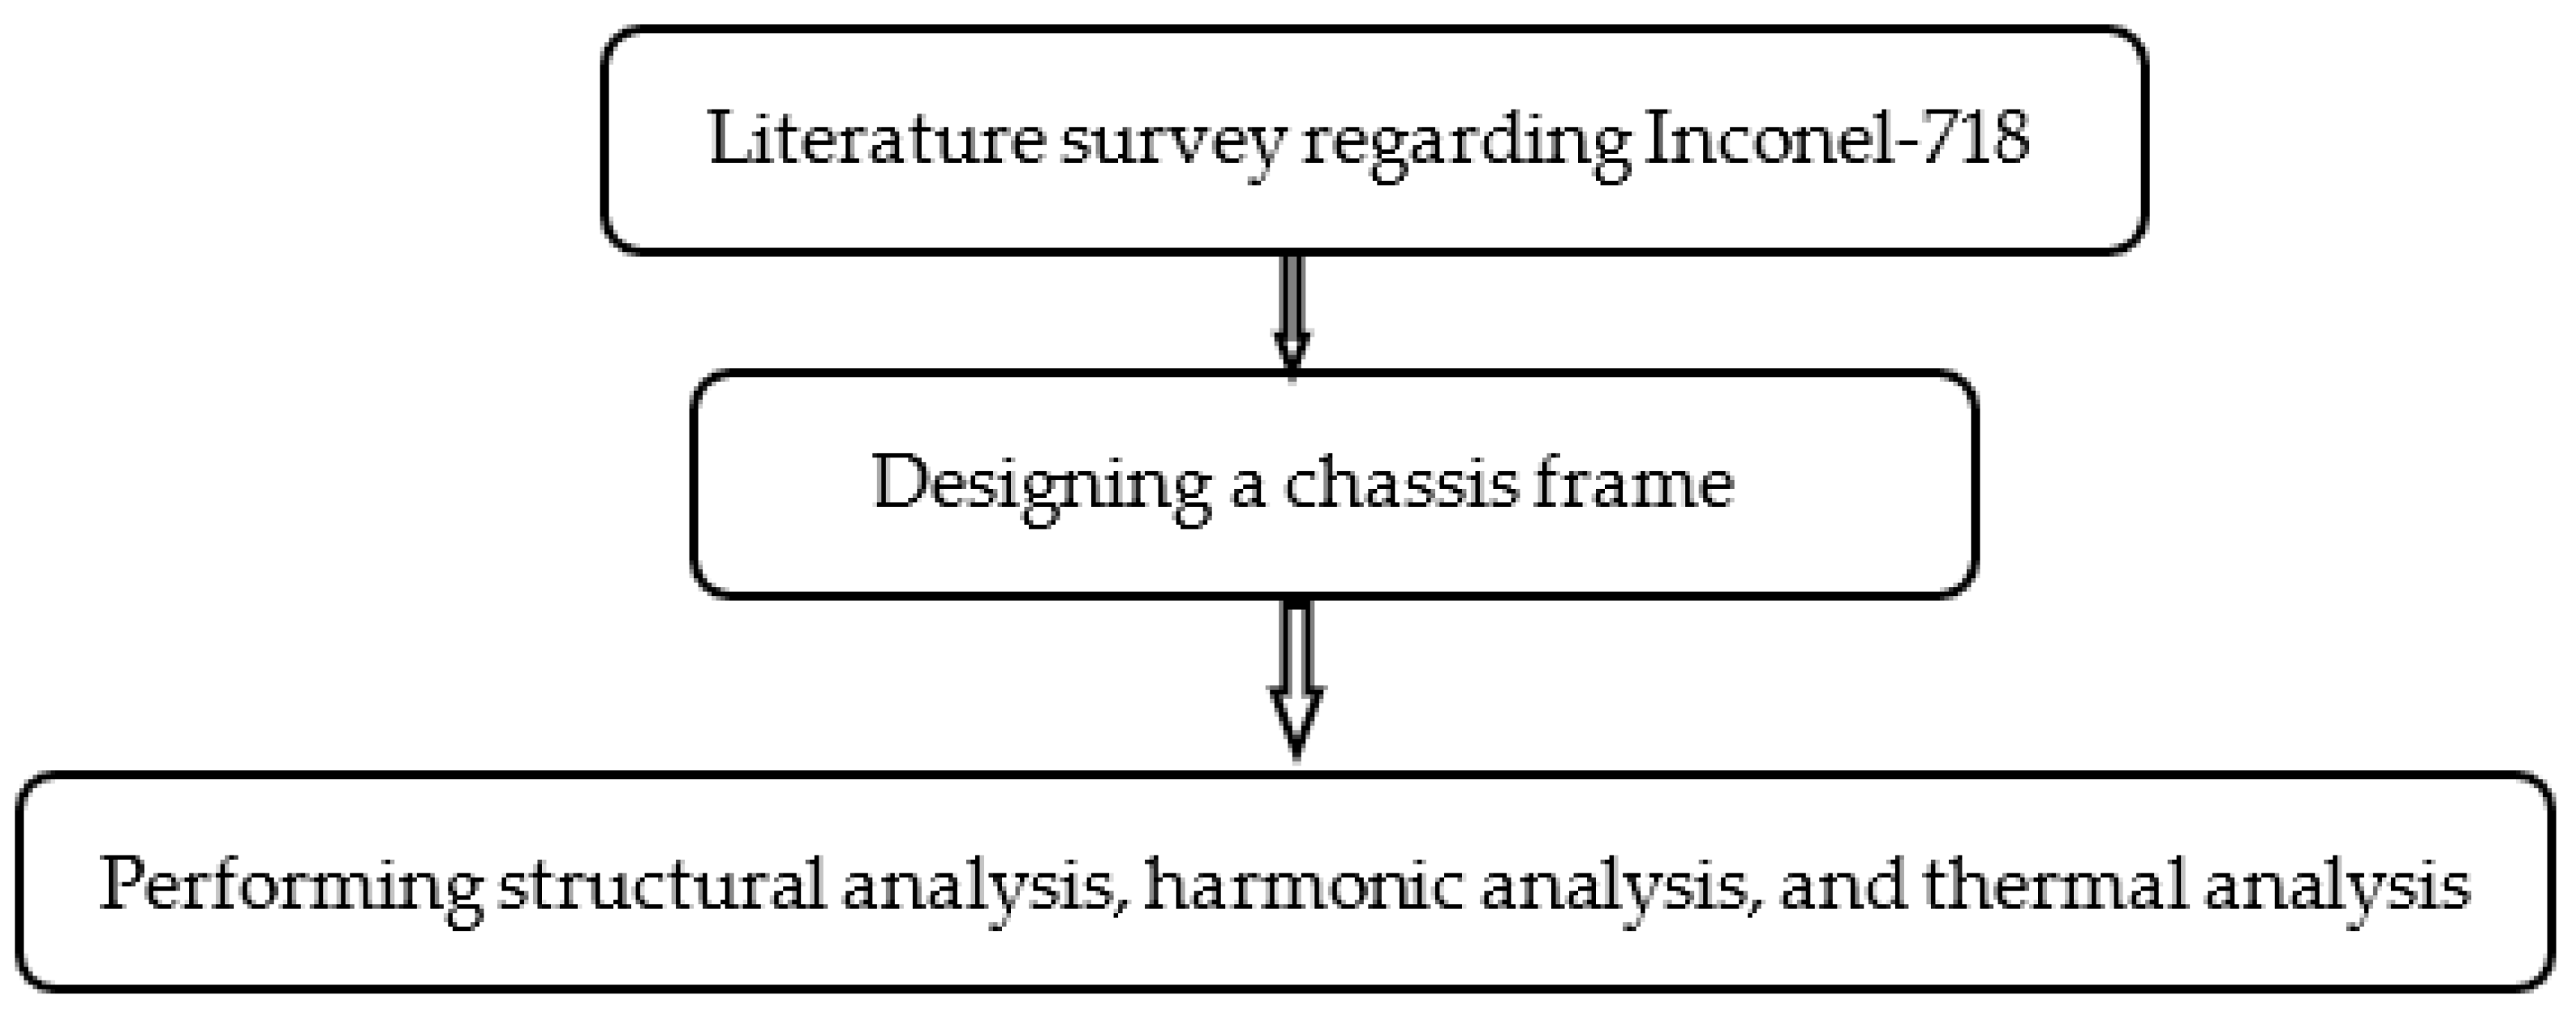
Figure 3 presents the overall methodology for detecting Luder’s band in Inconel-718. The stress–strain analysis provides the bending point and the band’s formation.
The significant impact of the load on the body causes bending and then the band’s formation. Since residual stresses are usually excessive at the shoulders of tensile specimens, the genesis of ligaments is advocated in these zones [4]. Conversely, the emergence of Luder’s bands depends essentially on the microscopic (i.e., average grain size and crystal structure, if any) and macroscopic geometry of the specimen. A tensile-tested steel bar with a square cross-section tends to develop comparatively more bands than a bar of the same composition with a circular cross-section. Further, ultrasonic vibrations can cause softening and hardening when metals are deformed; this concept has been widely used in micro-forming. Recently, it was found that low-frequency vibrations with micro amplitudes produce similar effects and vary with the direction of vibration. This study investigated the effects of vibrations in three directions (transverse, normal, and rolling, denoted as TD, ND, and RD, respectively) on the mechanical behavior and microstructure of an automobile chassis of Inconel-718 during tensile deformation. The results of the uniaxial tensile test showed that the superimposed vibration in TD caused a significant stress reduction, and the superimposed vibration in ND/RD resulted in a modest stress increase. In all three cases, residual softening was observed when the vibration was removed, and the tensile test continued. Estimation of the strain field and electron backscatter showed that vibration in TD caused localized plastic deformation and aggravated the deformation.

3. Results

The results show the deformation of the Inconel-718 frame under the action of distinct loads. These loads are mostly uniformly loaded, with thermal expansion and vibration. These loads have an action to cause the formation of Luder’s band on the frame.

3.1. Stress Analysis

The sample of the chassis of the car body is shown in Figure 4, which depicts the application of the tensile load. It leads to the breakage of the body in the middle of the shorter limbs of the framework. Table 1 ofers the boundary conditions for stress analysis.
Luder’s band is found by Equations (1)–(3) with the strain rate, stress tensor, and yield function, respectively, for the location of band formation [5].
Strain rate  ε ~ ˙  is split into elastic and plastic rates:
ε ˙ ~ = ε ˙ ~ e + ε ˙ ~ p .
The stress tensor is given by Hooke’s law involving fourth-order sensor  E ~  of elastic moduli:
σ ~ =   E ~   :   ε ~ e .
The yield function,  f ( σ ~ , R ) ,  involves the von Mises equivalent stress,
σ eq : ( σ ~ , R ) =   σ eq ( σ ~ )   σ M R ,   σ eq = 3 2 s ~ : s ~ .
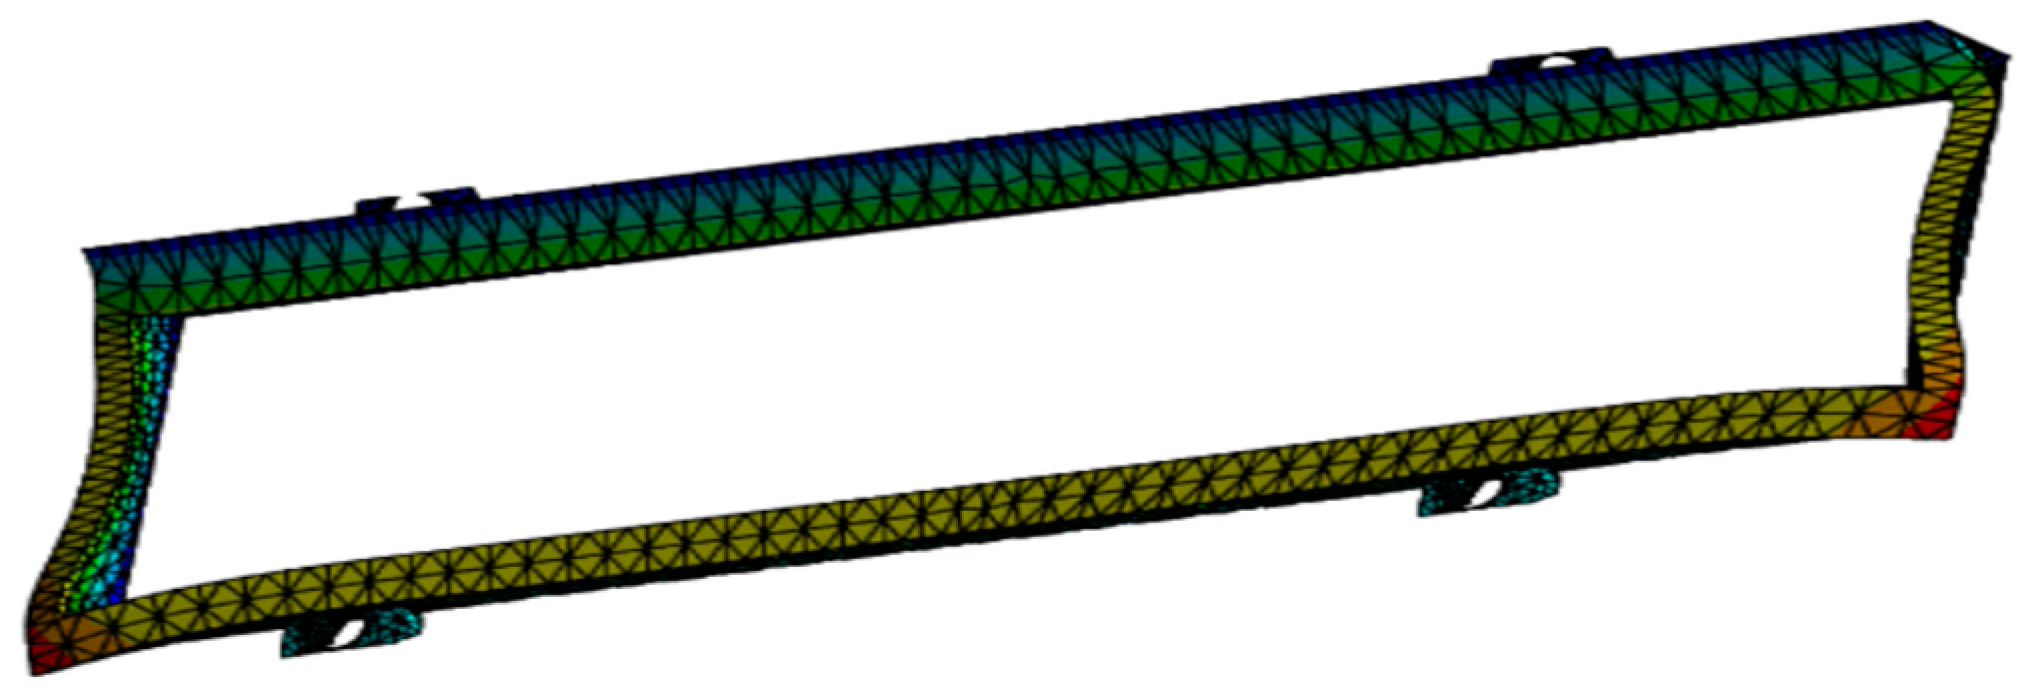
The red zone on the shorter limb shows that there is bending and breaking at the point. This zone also shows plastic deformation with a tensile load of 89 N/m uniform loading applied at the point, as shown in Figure 5.
Figure 5 shows the different modes of Luder’s band traversing across the frame of the car chassis. The middle column shows the values of the load and deflection caused by the frame at the middle point. Every increase in the load of Inconel-718 causes bending in the frame. But the results show that formation of Luder’s band occurs at the higher end [6,7,8].

3.2. Harmonic Analysis

Even though the car chassis frame is kept under the action of tensile loading, it constantly undergoes vibrational motion. Vibrational motion gives the body a bending motion and a uniform tensile loading. Table 2 presents the boundary conditions of harmonic analysis of the car chassis frame.
The function showing the thickness variation of the frame is given in Equation (4) [9],
h ( x ) = h 0 ( 1 x l ) ,
where
h ( x )   = thickness of the frame,
h 0   = original thickness of the frame,
L = frame length,
X = frame width.
The natural frequency of the frame is computed using Equation (5).
ω =   ω 0 L b h 12 ( 1 ϑ 2 ) ρ E .
The resonant frequency error is obtained using Equation (6) [10]. Equations (7) and (8) are used to find E,  l x   and   l y .
f a = α f ,
4 l x 2 f a ρ ( 1 υ n ) =   α 2 k x 2 E ,
l y 2 ρ ( 1 υ n ) = α 2 k y 2 E ,
where  l x   and   l y   are the length and width of the chassis frame.
The force is applied as a load throughout the shorter leg of the frame. The red-colored zone of the limb shows that the body breaks at the point and that there is a formation of Luder’s band. The analysis of the parts is also given in Figure 6. The bending of the frame shows that the frame is stable under the action of the load.
A suitable coupling coefficient helps to make the machining of ultrasound vibration plate devices easier. A coupling coefficient of 0.45–0.5 can create a single vibration area in the middle of the plate device’s surface. The best value for a coupling coefficient is around 0.47. This means a single vibration area in the center of the plate device, with a minimum standard deviation of 1.065 m, can be obtained. In addition, the correcting factor makes it easier to see the elastic method; as a result, the frequency error below 0.85 percent under the ultrasonic vibration mode is ruled out [11,12].

3.3. Thermal Analysis

Thermal analysis of the car chassis frame is performed using Equations (9)–(12). A major part of the analysis involves finding the fracture point of the car chassis frame by applying the boundary conditions given in Table 3.
To represent the application of heat to material in the analysis, a hyperbolic sine function, as given in Equation (9), is used [13],
ε ˙ = A [ sinh ( α σ ) ] n exp ( Q RT ) ,
where ‘A’ is the material constant, ‘n’ is the creep exponent, ‘Q’ is activation energy.
The thermal stress for the frame is computed using Equation (10) [14],
σ oth = σ G + σ s .  
The strain rate is computed using Equation (11),
ε ˙ = ε 0   e Δ G kt ˙ .
The external force of the field is obtained using Equation (12),
ε =   ε 0 e Δ F kT .
The energy balance is calculated using Equation (13) [15],
ρ C p δ T δ t + ρ C p u . T + q = Q .
The heat applied to the body causes a deformation in the car chassis frame. The deformation might lead to the formation of fracture and Luder’s band. The resulting change in the structural texture of the car chassis frame is depicted in Figure 7.
The subservience of Lüders elongation, εL, on grain size as well as repression of its processing control are examined on various AlMgMn alloys. Variation in the size of the grain stemmed from a Hall–Petch (HP) correlation. The rise in macroscopic flow stress on εL can be attributed to unsettled rise in stress of separations. This is taken care of by the extra term in the HP correlation, and it is based on the genesis of non-age separations [16,17,18,19].

4. Discussion

The results show that the steel might be a hard metal, but at the point of Luder’s band, it can easily break under the action of vibration as well as heat. In contrast, Inconel-718 does not bend at the band point under harmonic and thermal analyses [20].
The stress analysis highlighted that the car’s chassis, when loaded at the extreme points, gave rise to a bending moment, causing a deformation at the middle point, showing the formation of Luder’s band (Figure 5). Harmonic analysis determined that under any vibrational load, the chassis of the car display formation of Luders band at the longer legs of the car chassis frame (Figure 6). Thermal analysis pointed out the heat transfer from the hot zone to the colder zone, thereby showing the formation of Luder’s band (Figure 7) [21].

5. Conclusions

Inconel-718 is a better and lighter material for making car chassis frames than aluminum [7]. The stress in Inconel-718 varies from 0.064454 MPa to 81.514 MPa, whereas load frequency varies from 0.71157 to 475.87 Hz under vibration. On the other hand, due to the heating of Inconel-718, the temperature varies from 1.6009 × 10⁵ to 112.83 °C. From these results, it can be concluded that Inconel-718, which is corrosion-resistant, does not quickly oxidize under the action of heat and moisture. In contrast, the bending moment does not cause any deformation at the point of band formation.

Author Contributions

Conceptualization, methodology, validation, investigation, data curation, resources, A.G.; writing—original draft preparation, A.G.; writing—review and editing, R.C.K.; visualization, supervision, project administration, R.C.K. All authors have read and agreed to the published version of the manuscript.

Funding

This research received no external funding.

Institutional Review Board Statement

Not applicable.

Informed Consent Statement

Not applicable.

Data Availability Statement

The data can be obtained from the corresponding author on request.

Conflicts of Interest

The authors declare no conflict of interest.

References

  1. Luders, W. Über die aeußerung der elasticität an stahlartigen eisenstaben und stahlstäben. Dingler’s Polytecnisches J. 1860, 4, 18–22. [Google Scholar]
  2. Hallai, J.F.; Kyriakides, S. On the effect of lüders bands on the bending of steel tubes. Part I: Experiments. Int. J. Solids Struct. 2011, 48, 3275–3284. [Google Scholar] [CrossRef]
  3. Fencheng, F.; Hongmao, C.; Xiaobin, Y.; Guang, Y.; Chunping, H.; Xin, L.; Jing, C. Control of microstructure and mechanical properties of laser solid formed Inconel-718 superalloy by electromagnetic stirring. Opt. Laser Technol. 2017, 99, 342–350. [Google Scholar]
  4. Eichhubl, P.; John, N.; Hooker; Laubach, S.E. Pure and shear-enhanced compaction bands in Aztec Sandstone. J. Struct. Geol. 2010, 32, 1873–1886. [Google Scholar] [CrossRef]
  5. Beissel, S.; Belytschko, T. On patterns of deformation in phase transformations and Lüders bands. Int. J. Solids Struct. 1996, 33, 1689–1707. [Google Scholar] [CrossRef]
  6. Gustafsson, D.; Moverare, J.; Johansson, S.; Hörnqvist, M.; Simonsson, K.; Sjöström, S.; Sharifimajda, B. Fatigue crack growth behaviour of Inconel 718 with high-temperature hold times. Procedia Eng. 2010, 2, 1095–1104. [Google Scholar] [CrossRef]
  7. Tucho, W.M.; Cuvillier, P.; Sjolyst-Kverneland, A.; Hansen, V. Microstructure and hardness studies of Inconel 718 manufactured by selective laser melting before and after solution heat treatment. Mater. Sci. Eng. A 2017, 689, 220–232. [Google Scholar] [CrossRef]
  8. Schwab, R. Understanding the complete loss of uniform plastic deformation of some ultrafine-grained metallic materials in tensile straining. Int. J. Plast. 2019, 113, 218–235. [Google Scholar] [CrossRef]
  9. Chandran, P.A.; Kumar, C.S. Vibration analysis of rotating pre-twisted curved blades under thermal environment. Int. J. Dyn. Control 2023, 11, 919–927. [Google Scholar] [CrossRef]
  10. Cao, Y.; Zhu, Y.; Ding, W.; Qiu, Y.; Wang, L.; Xu, J. Vibration coupling effects and machining behavior of ultrasonic vibration plate device for creep-feed grinding of Inconel-718 nickel-based superalloy. Chin. J. Aeronaut. 2022, 35, 332–345. [Google Scholar] [CrossRef]
  11. Brlić, T. Mathematical modeling of the influence parameters during formation and propagation of the Lüders bands. Facta Univ. Ser. Mech. Eng. 2020, 184, 595–610. [Google Scholar] [CrossRef]
  12. Zuev, L.B.; Barannikova, S.A. Vibrational Kinetics of the Lüders Front. Russ. Phys. J. 2019, 62, 1338–1342. [Google Scholar] [CrossRef]
  13. Thomas, A.; El-Wahabi, M.; Cabrera, J.M.; Prado, J.M. High-temperature deformation of Inconel-718. J. Mater. Process. Technol. 2006, 177, 469–472. [Google Scholar] [CrossRef]
  14. Yan, J.; Zhao, R.; Wan, M.; Meng, B. Coupled effect of pulsed current and ultrasonic vibration on deformation behavior of Inconel-718 sheet: Phenomena and modeling. J. Mater. Res. Technol. 2023, 25, 5538–5560. [Google Scholar] [CrossRef]
  15. Andreotta, R.; Ladani, L.; Brindley, W. Finite element simulation of laser additive melting and solidification of Inconel-718 with experimentally tested thermal properties. Finite Elem. Anal. Des. 2017, 135, 36–43. [Google Scholar] [CrossRef]
  16. Döleker, K.M.; Erdogan, A.; Yener, T.; Karaoglanlı, A.C.; Uzun, O.; Gök, M.S.; Zeytin, S. Enhancing the wear and oxidation behaviors of the Inconel 718 by low-temperature aluminizing. Surf. Coat. Technol. 2021, 412, 127069. [Google Scholar] [CrossRef]
  17. Louche, H.; Chrysochoos, A. Thermal and dissipative effects accompanying Lüders band propagation. Mater. Sci. Eng. A 2001, 307, 15–22. [Google Scholar] [CrossRef]
  18. Agazhanov, A.; Samoshkin, D.A.; Kozlovskii, Y.M. Thermophysical properties of Inconel 718 alloy. J. Phys. Conf. Ser. 2019, 1382, 12175. [Google Scholar] [CrossRef]
  19. Sweet, J.N.; Roth, E.P.; Moss, M. Thermal conductivity of Inconel 718 and 304 stainless steel. Int. J. Thermophys. 1987, 8, 593–606. [Google Scholar] [CrossRef]
  20. Lin, Y.C.; Li, K.K.; Li, H.B.; Chen, J.; Chen, X.M.; Wen, D.X. New constitutive model for high-temperature deformation behavior of Inconel 718 superalloy. Mater. Des. 2015, 74, 108–118. [Google Scholar] [CrossRef]
  21. Schirra, J.J. Effect of heat treatment variations on the hardness and mechanical properties of wrought Inconel 718. Superalloys 1997, 718, 431–438. [Google Scholar]
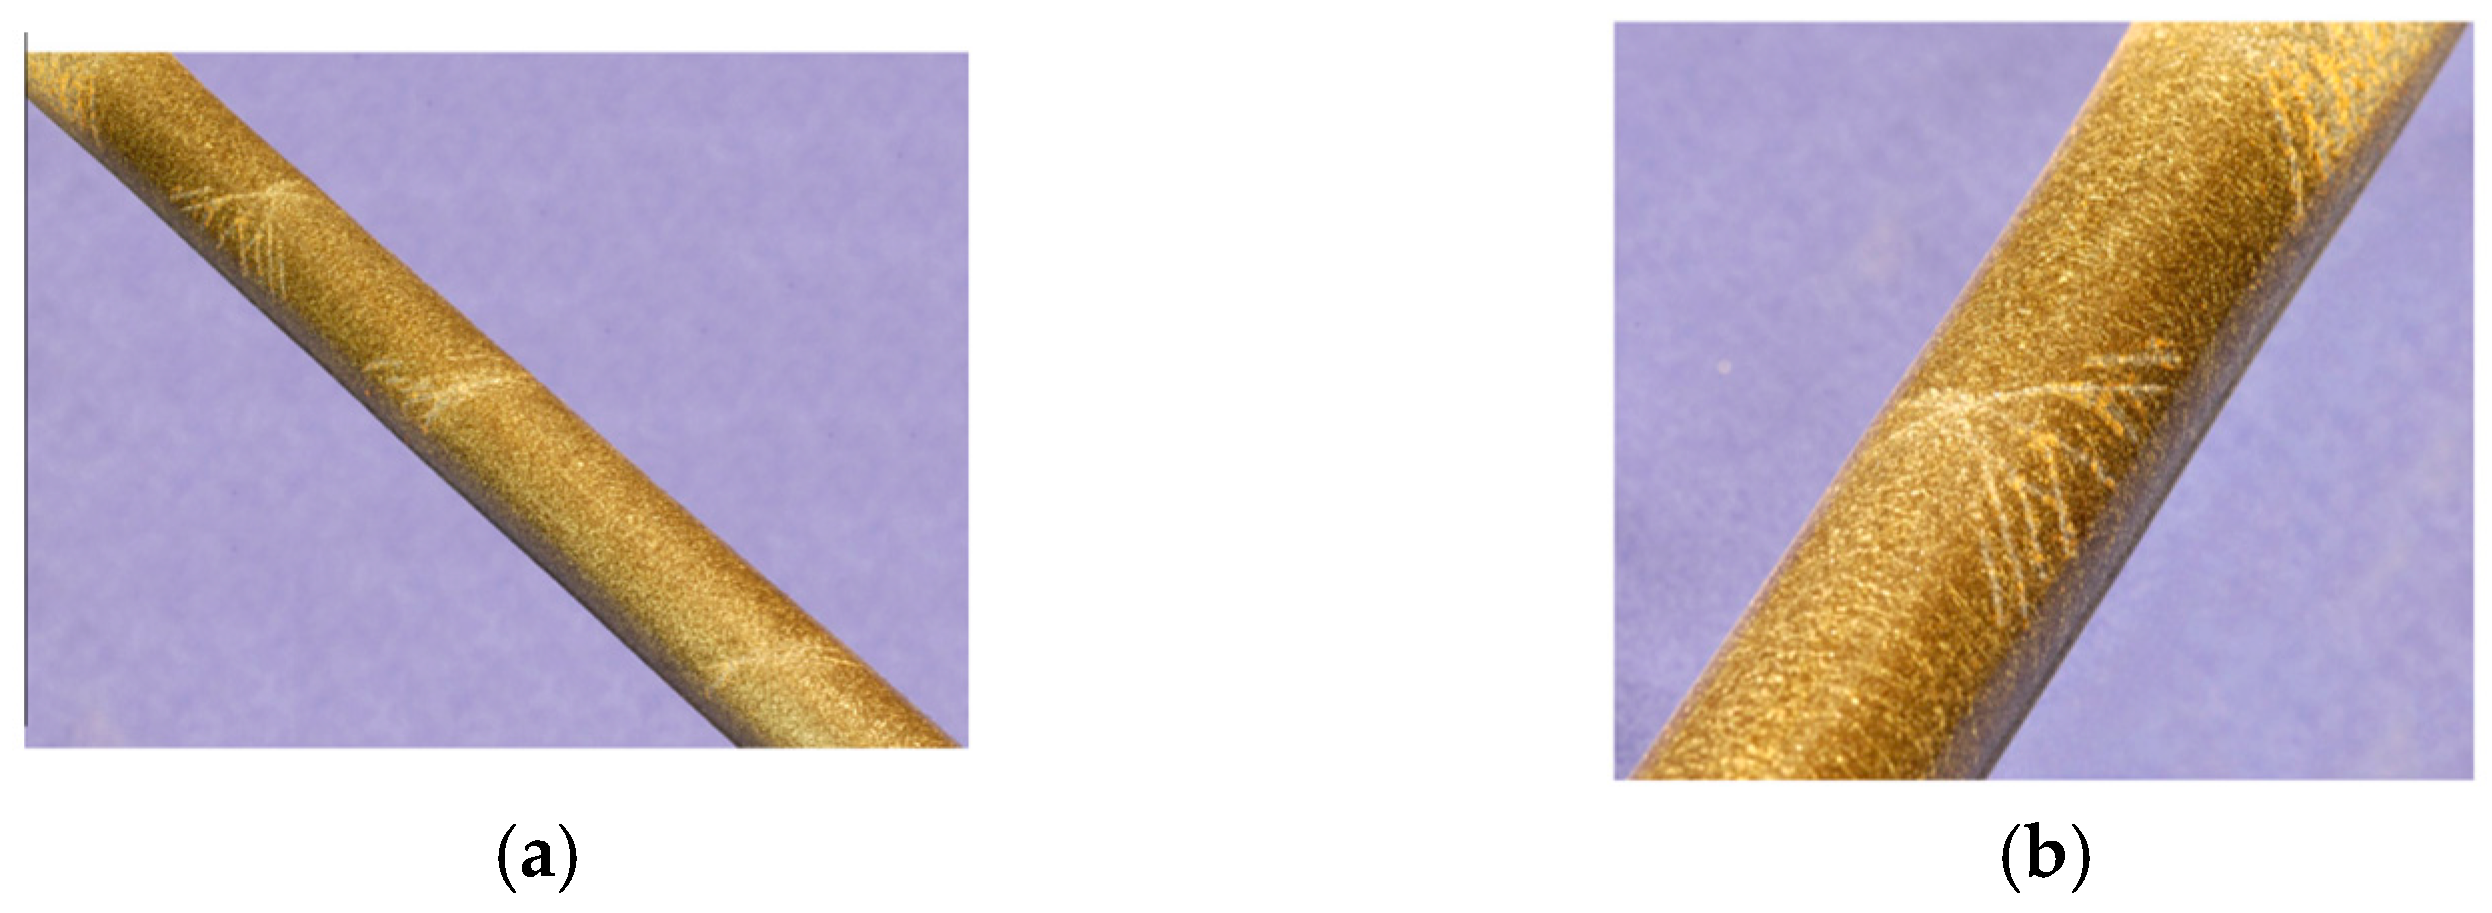
Figure 1. Luder’s band. (a) Cluster of Luder’s band. (b) Closed-up look on one of the clusters [1].
Engproc 59 00004 g001
Figure 2. Stress vs strain curve for Inconel-718 after the application of (a) heat treatment and (b) electromagnetic intensities [3].
Engproc 59 00004 g002
Figure 3. Flowchart of the methodology for detecting Luder’s band in Inconel-718.
Engproc 59 00004 g003
Figure 4. Geometry of the car chassis frame.
Engproc 59 00004 g004
Figure 5. Stress analysis of Inconel-718 car chassis frame subjected to boundary conditions given in Table 1.
Engproc 59 00004 g005
Figure 6. Harmonic analysis of Inconel-718 car chassis frame subjected to the boundary conditions specified in Table 2.
Engproc 59 00004 g006
Figure 7. Thermal analysis for Inconel-718 subjected to the boundary conditions specified in Table 3.
Engproc 59 00004 g007
Table 1. Boundary conditions for stress analysis.
ConditionsPosition and Values in MPa
Fixed support At the 4 extremes faced
Loads Applied at the 4 extreme corners
Pressure (uniformly distributed loading)81.5 MPa
Table 2. Boundary condition of harmonic analysis of car chassis frame.
ConditionType/Value
Environment temperature 25 °C
Fixed support Hinges
Pressure 7.895 MPa
Phase angle
Loaded areaDeformed
Table 3. Boundary conditions for thermal analysis of car chassis frame.
ConditionValue
Initial temperature25 °C
Heat flow89 W
Heat Flux9 W/mm^2 (ramped)
Disclaimer/Publisher’s Note: The statements, opinions and data contained in all publications are solely those of the individual author(s) and contributor(s) and not of MDPI and/or the editor(s). MDPI and/or the editor(s) disclaim responsibility for any injury to people or property resulting from any ideas, methods, instructions or products referred to in the content.