Abstract
In this paper, an assessment of the quantitative and qualitative defects involved in automotive veneer trim parts manufacturing has been presented. The comparative qualitative analyses were carried out using Poisson process capability estimation and a Pareto chart. The visual surface inspection of the veneer trims was aimed to identify the types of defects resulting from the manufacturing process. The results indicate that the percentage of defects for the first sample are between 2.1% and 4.4% and the values for the second category are situated between 1.2% and 2.2%. Using 95% confidence intervals (CIs), the main statistical parameters were estimated. Also, the inferential analysis highlights that the specified acceptable percentage of rejects was not exceeded.
1. Introduction
The usage of wood veneer for automotive industry components has always been a challenge. Skills are required to build, repair or customize ornaments according to the customer's requirements. Due to the high costs of veneer processing, ornaments were gradually replaced by plastic parts designed to look like wood. Fortunately, technological advances based on adhesive bonding and the usages of wood have resulted in more affordable trim for luxury cars.
Decorative wooden trim parts designated for car interiors are composed of a base support made of plastic and a thin veneer surface finished with a coating. The veneer surface is made of a veneer with a nonwoven backing. The textile reinforcement is applied to support the very thin and brittle wood veneer in order to improve its pliability and minimize cracking. Using metallic forming tools, the veneer laminate is formed into the required geometry. Afterwards, the plastic support structure is attached with an injection-molding process [1].
Regarding the forming process, there are various parameters that can influence the mechanical properties of veneer laminate [2]. The most influential factors are the moisture content and the forming temperature [1,3].
The quality of the veneer directly affects the quality and grade of the parts made of veneer [4,5]. The type of wood influences veneer processing because of the anisotropic and inhomogeneous material limitations. Due to these characteristics, the prediction of the formability of a designed geometry is difficult [1].
Considering the qualitative assessment of the automotive trim parts, two veneer categories can be highlighted:
- Veneers obtained naturally from wood: walnut, birch, ash, etc.;
- Veneers obtained artificially.
The wood veneers used in the automotive industry must be adequately dried before processing. Wet timber can cause serious problems in wood processing. The advantages of using dry wood include the following:
- Increased resistance;
- Greater durability, as wood below 20% moisture content does not decay and wet timber is more sensitive to insect attack;
- Improved dimensional stability;
- Low weight.
The veneer surface defects of automotive trim parts can be categorized into two major types: the defects that originate naturally from the raw material (knots, blemishes, discoloration, pinholes, shot holes, etc.) and manufacturing defects, which encompass the whole gamut of defects from all stages of production, including dimensional inaccuracies, surface checks, cutter chatter marks, rough surfaces, veneer knife marks, handling damage, glue spots and veneer delamination [6].
The objective of this study was to analyze quality defects in veneer manufacturing. The analysis of defects in the veneer coloring process was carried using both qualitative and quantitative points of view. The purpose of this study was to apply specific tools (i.e., the Poisson process capability and the Pareto chart) to evaluate and reduce/eliminate quality defects so that the client's requirements are fulfilled.
2. Materials and Methods
The process of manufacturing veneer is carried out both manually by the operators and with the help of machines in order to obtain the coloring of the ash wood veneer parts according to the imposed requirements. Ash wood veneer has many advantages over other alternatives used in the automotive industry: it is resistant to moisture and chemicals, has low cost, is durable and light, is safe and hygienic, is reusable, and has minimal impact on the environment. The layered material provides great homogeneity, which ensures a reduction in critical areas that can cause damage to the material under stress.
Quality control is performed by visual and tactile inspection for most operations. During the veneer coloring process, the thickness of the applied layer is measured visually using the sample. A control point is situated at an intermediate stage of the operation where it must be verified according to workplace catalogs and samples.
The analyzed data were collected during one week in three shifts. The conditions imposed regarding the acceptable percentage of rejects is a maximum of 5%. All parts resulting from the coloring processes are 100% checked.
The processed parts are analyzed from a qualitative point of view and they must comply with the technical conditions imposed by the customer. These technical conditions may refer to structure aspects, shape, size, color, etc.
3. Results and Discussion
3.1. Quantitative Defect Analysis for the Veneer Coloring Process
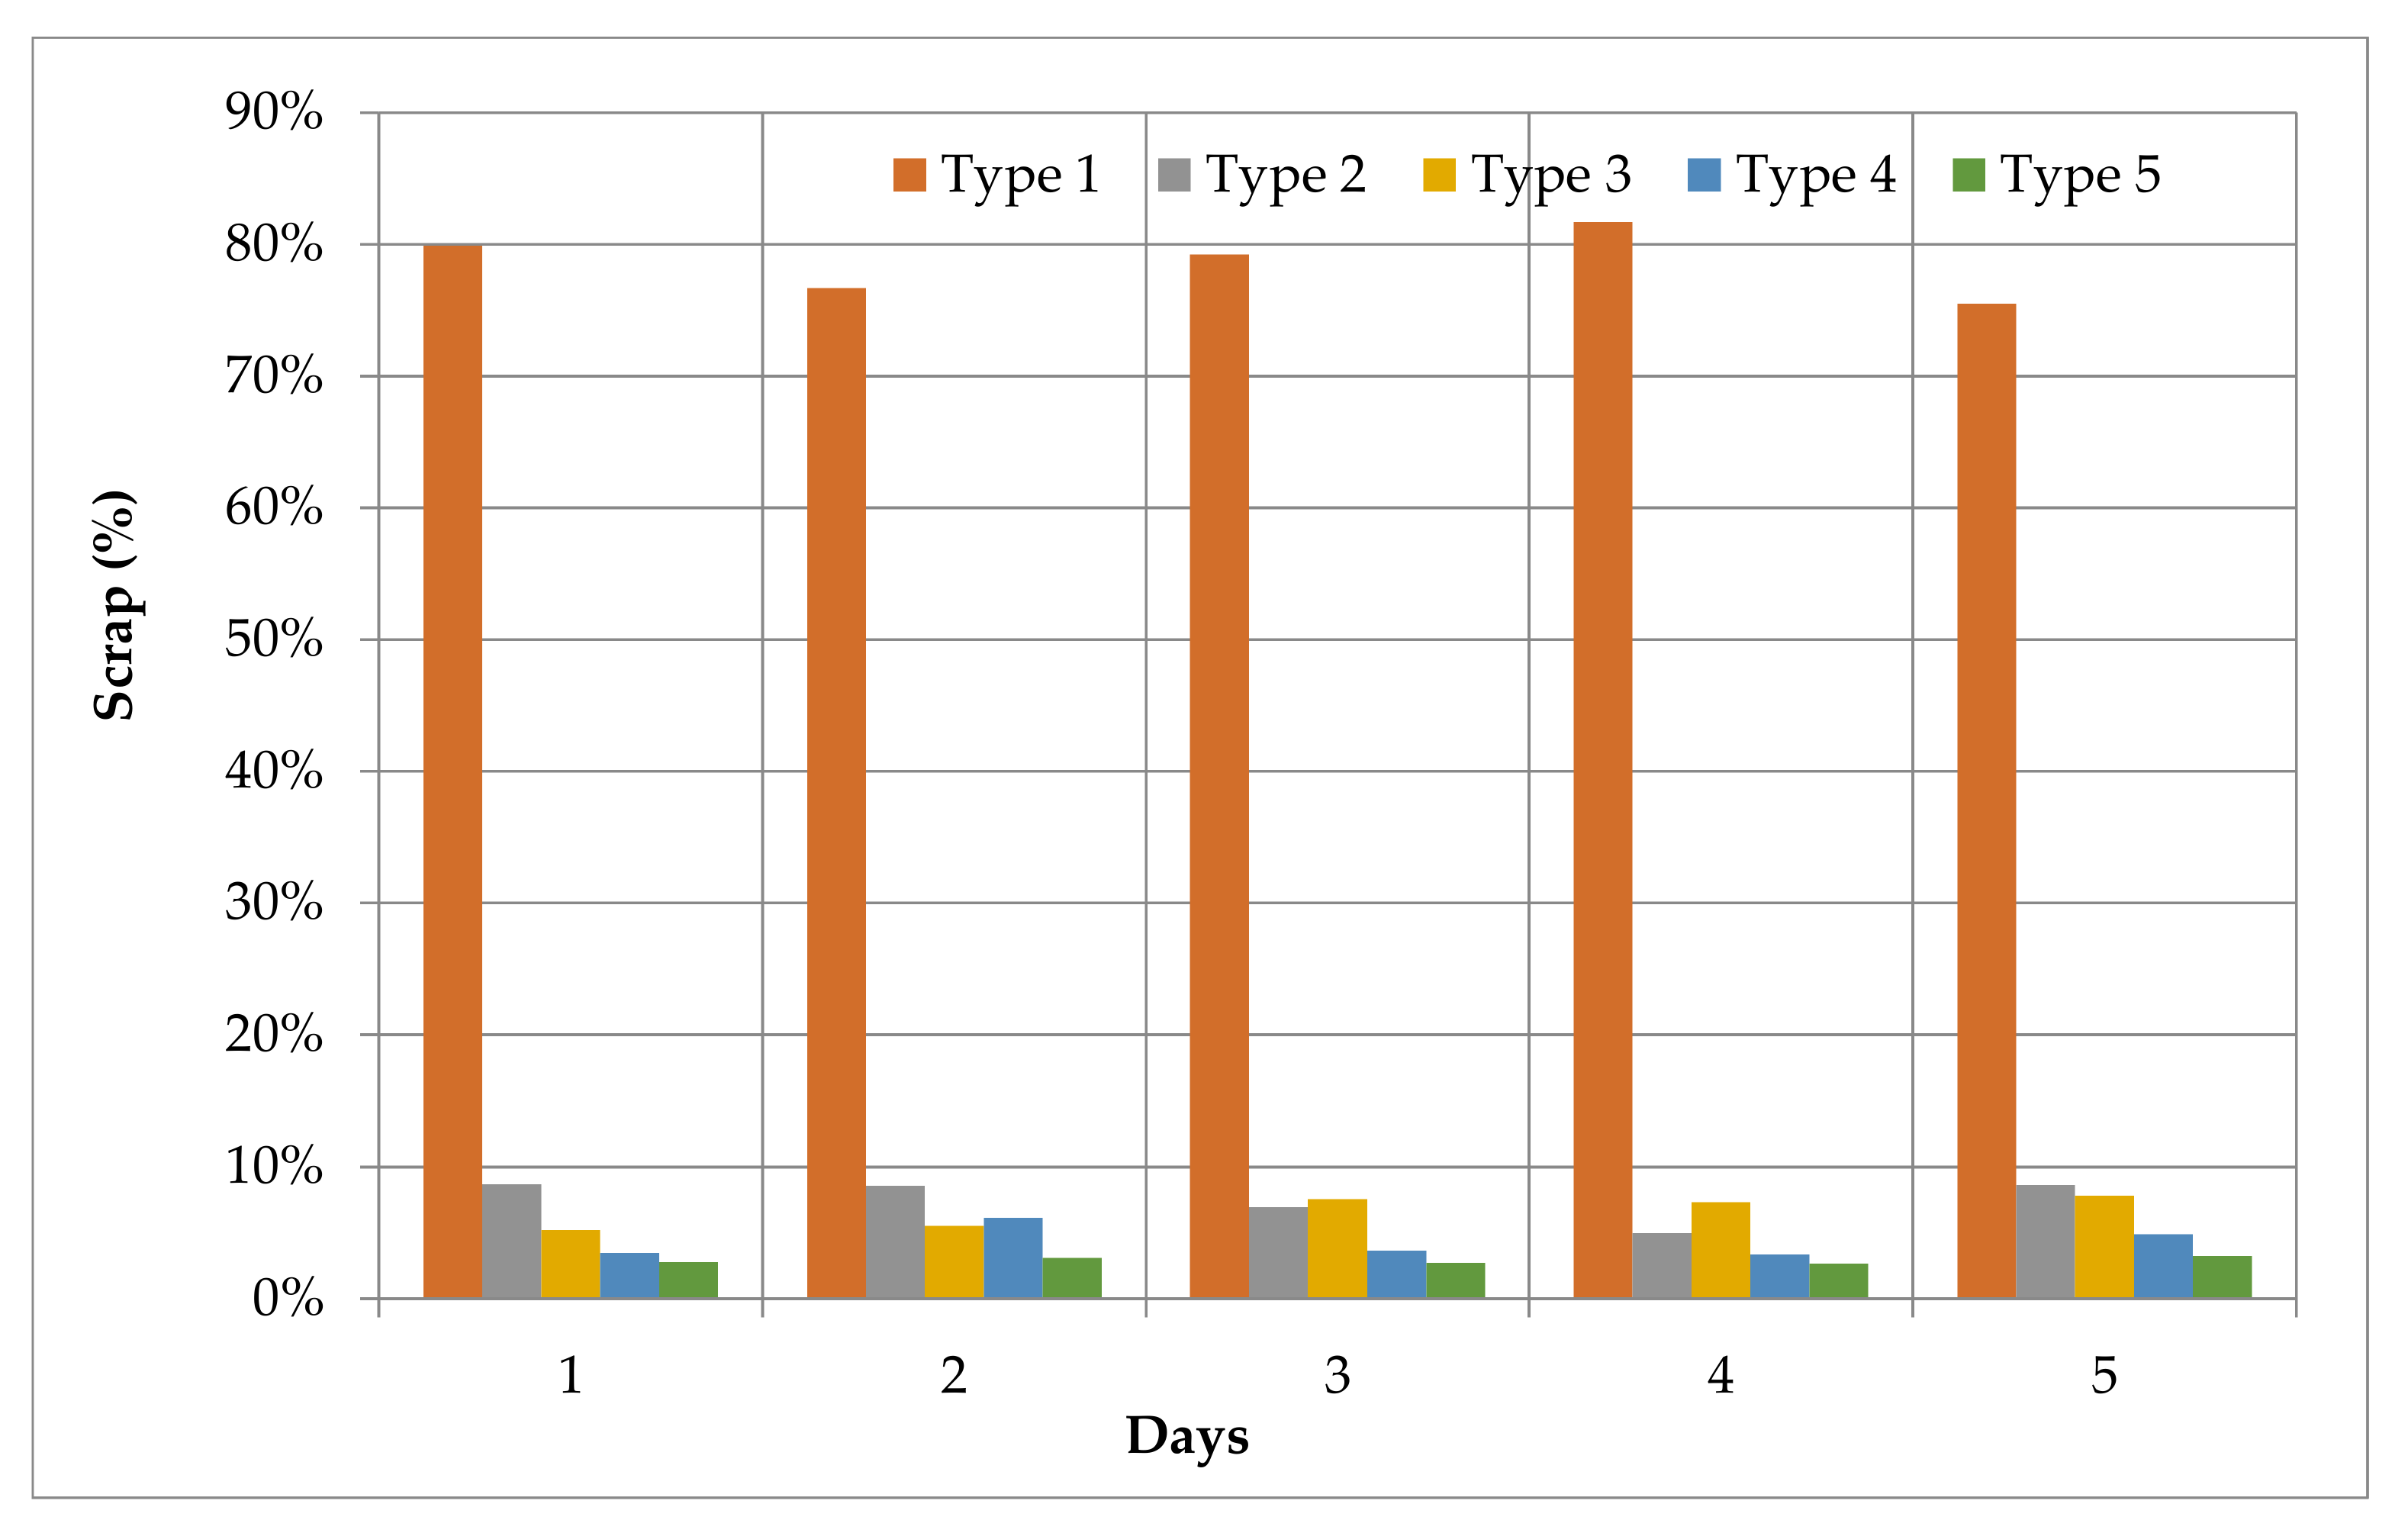
The analysis of the identified unacceptable defects for the inspected parts is presented synthetically in Figure 1. For the inspected parts, five types of unacceptable defects were identified.
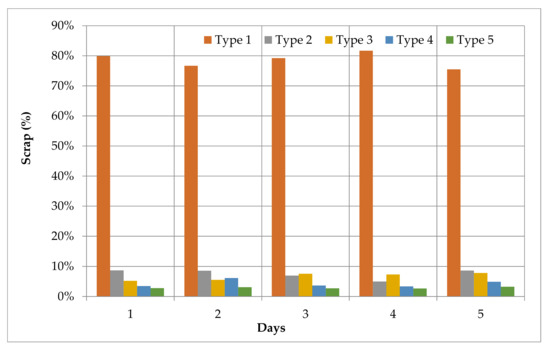
Figure 1.
Quantitative analysis of defects.
It can be notice that the percentage of scraps is the highest for the first type of identified defect. The main cause of the appearance of the defect is the equipment; respectively, the injection mold was not properly cleaned, so there were impurities/flakes that were later pressed into the surface of the part through injection.
3.2. Qualitative Analysis of Veneer Parts
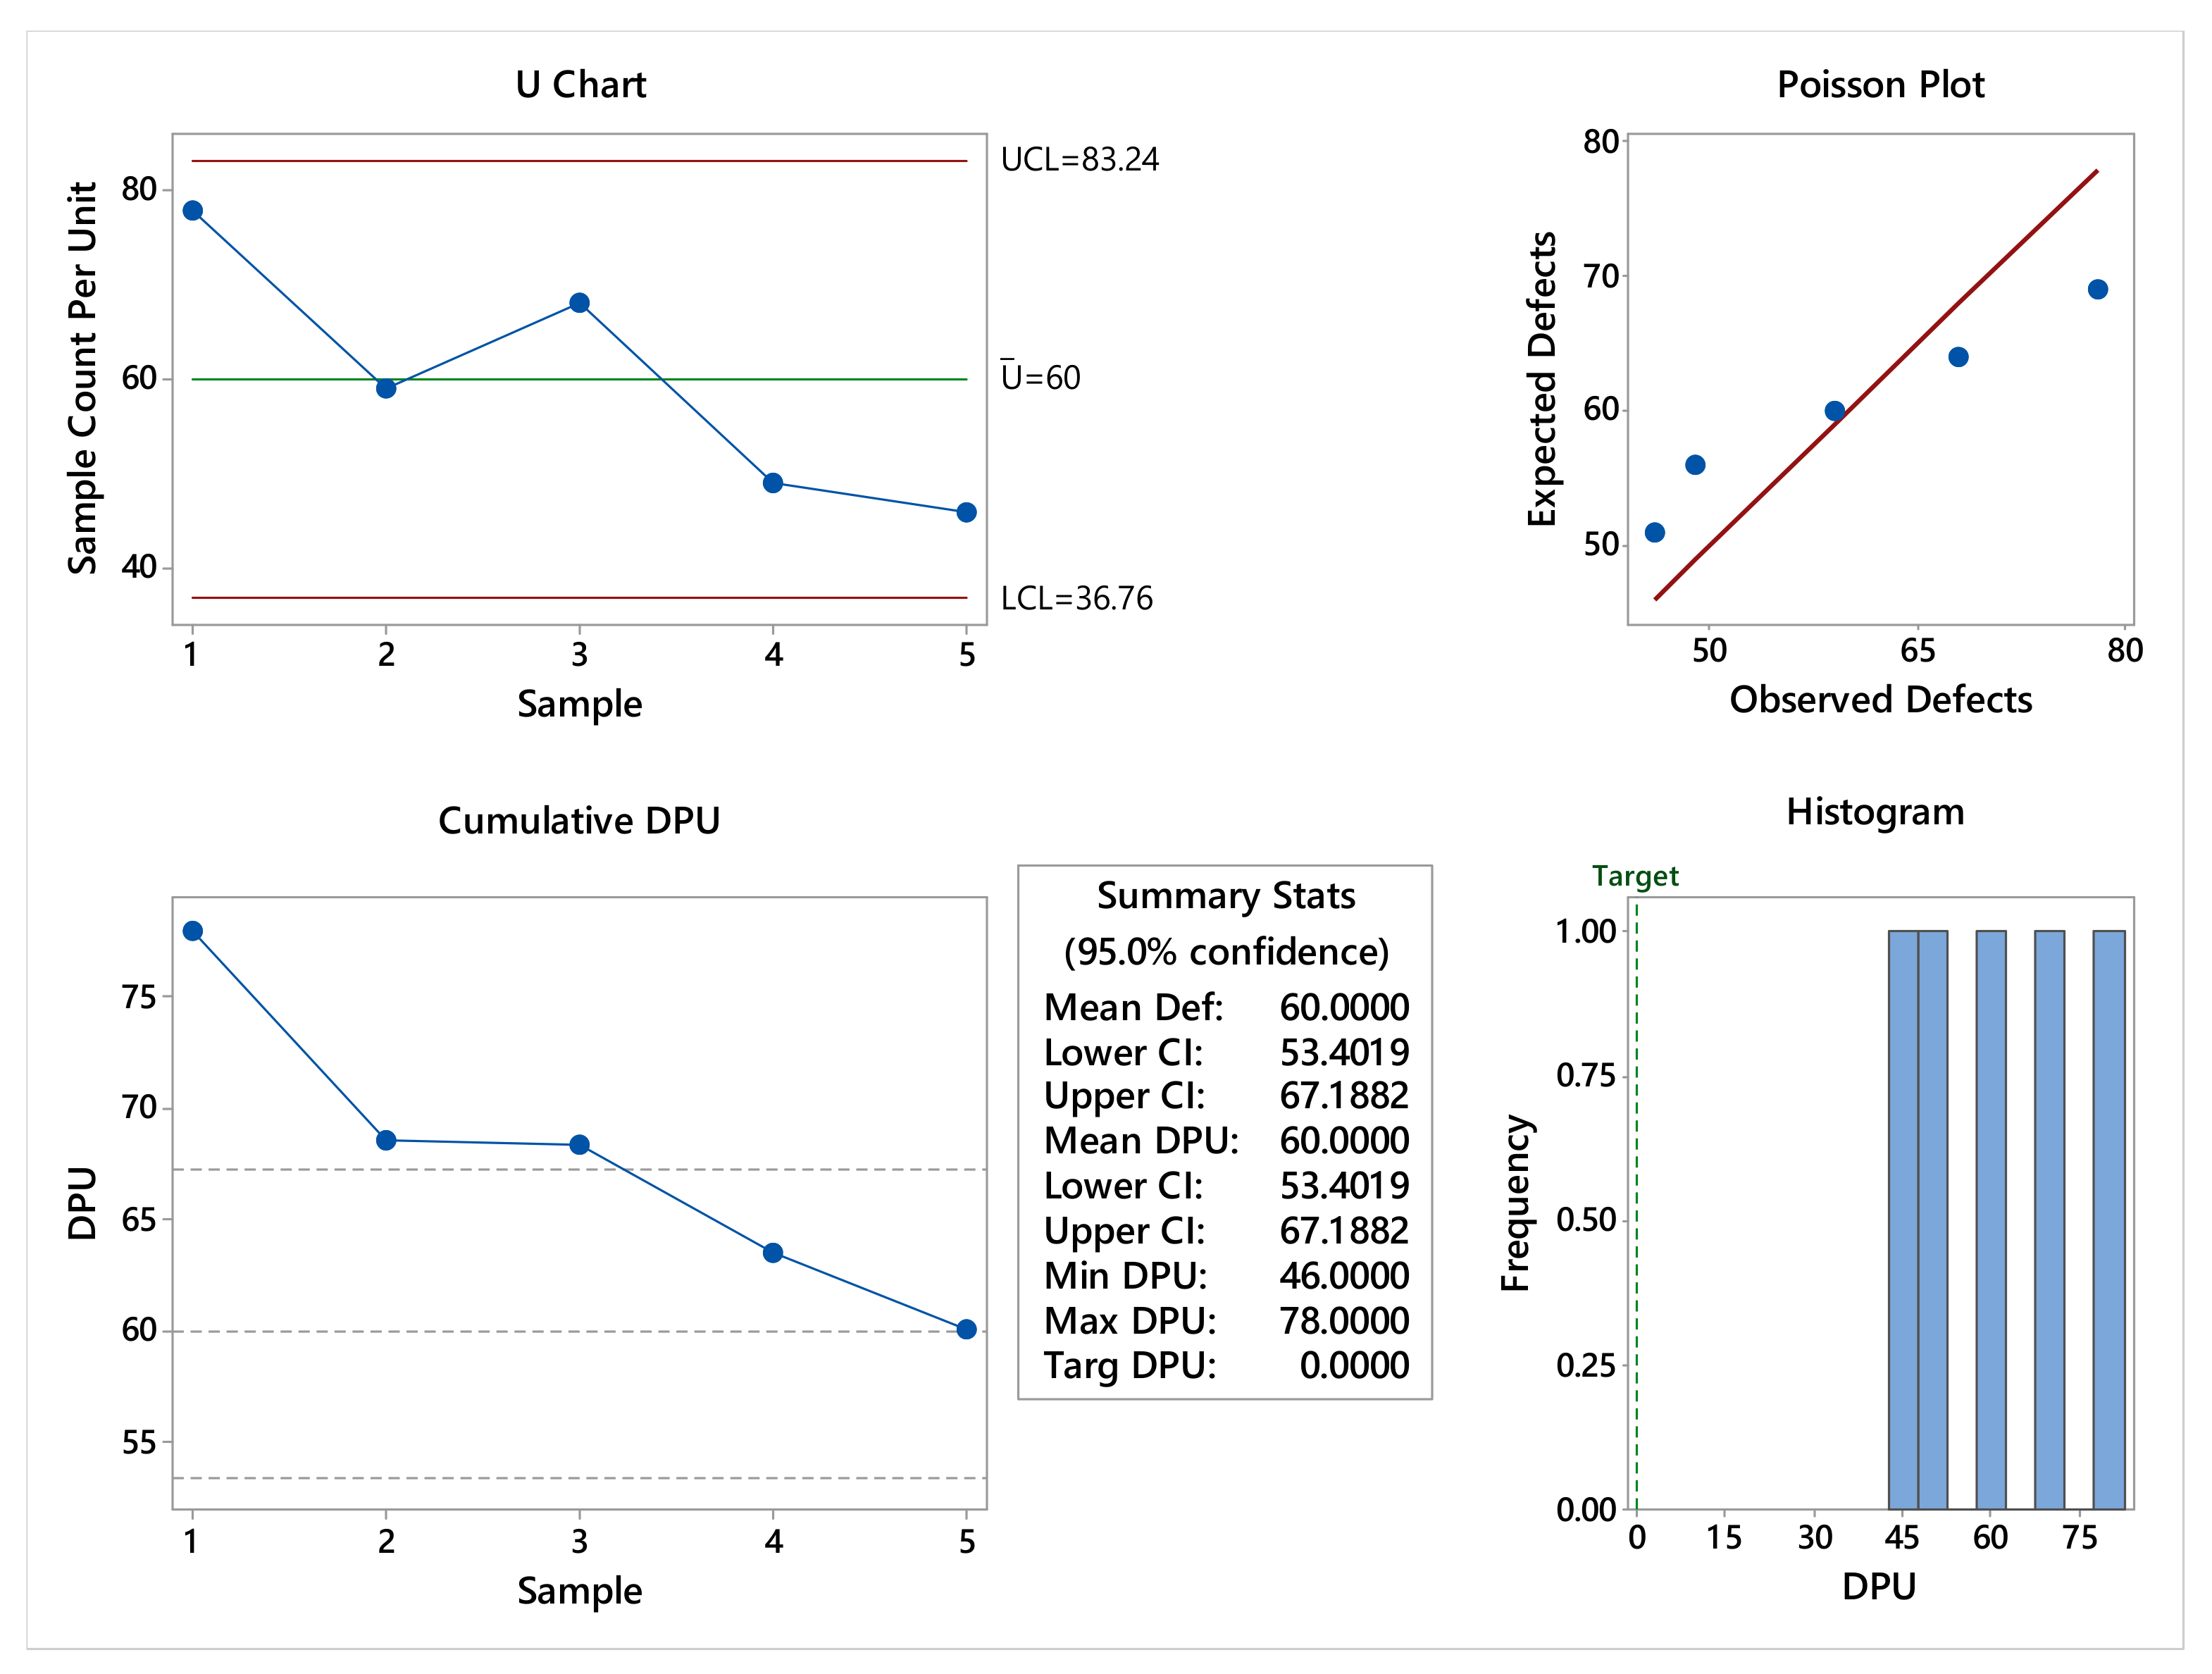
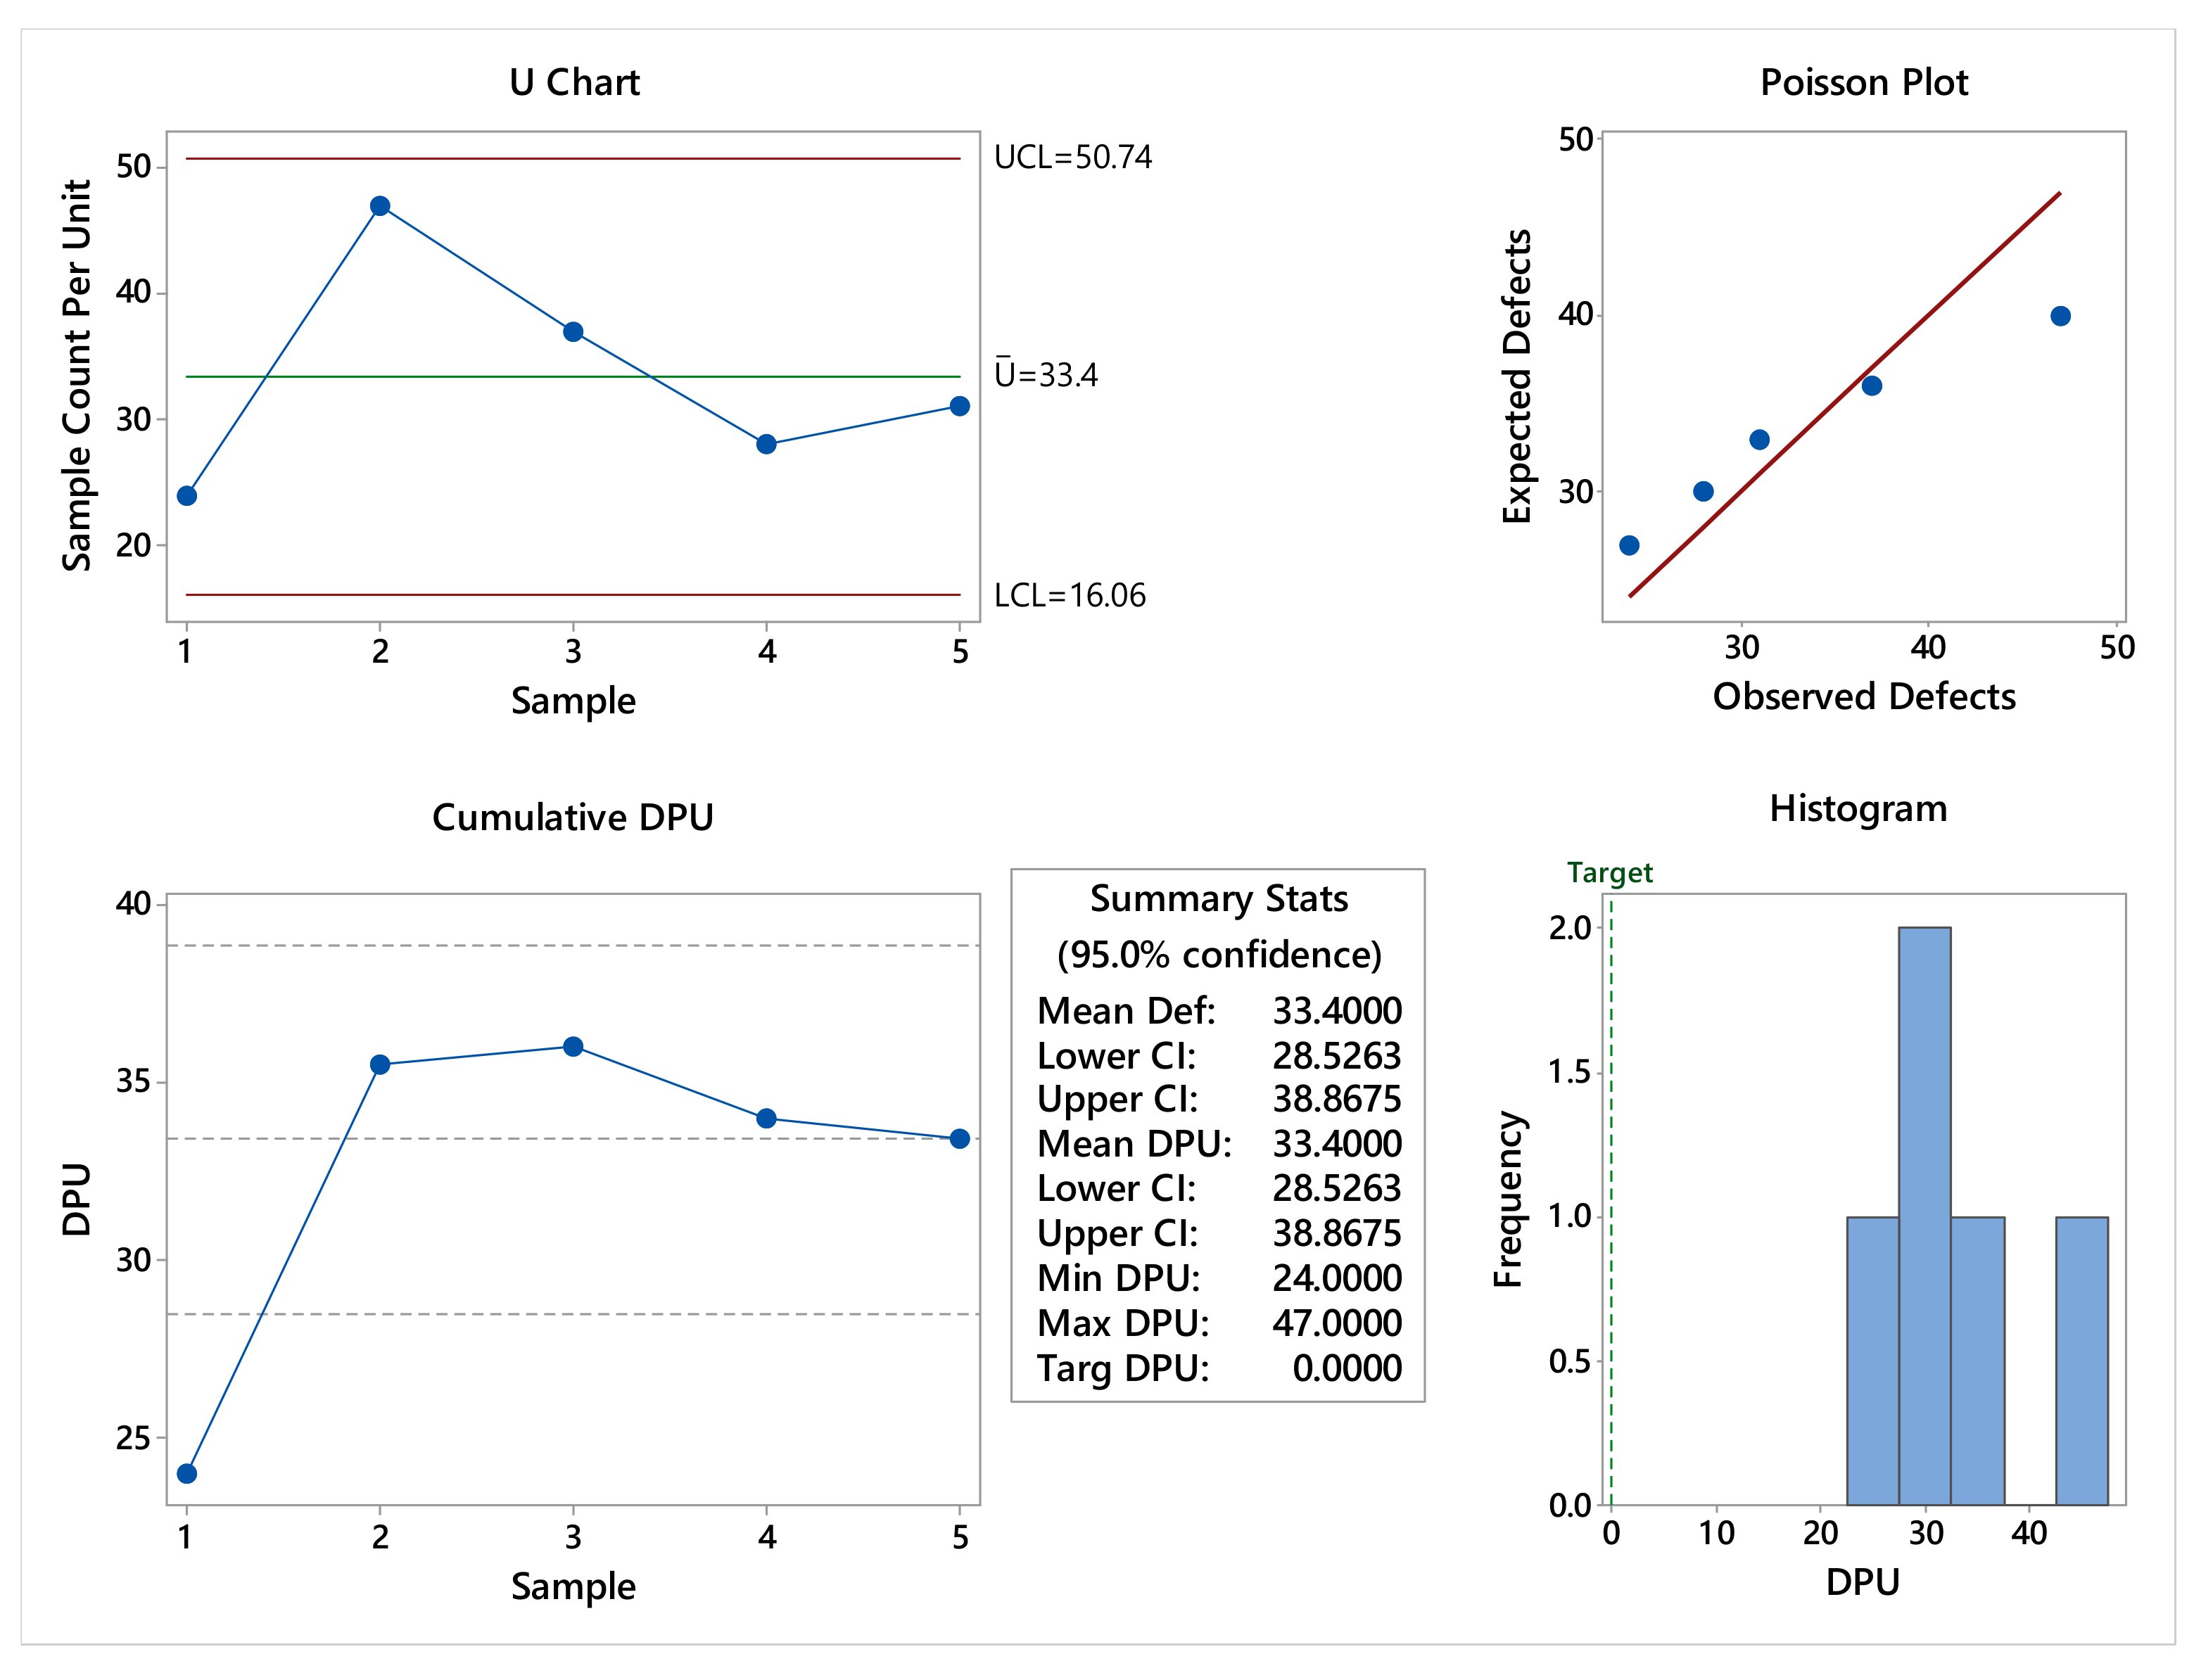
The comparison of specific defects was carried out using Poisson capability analysis. The Poisson process capability reports of defective parts are presented in Figure 2 and Figure 3.
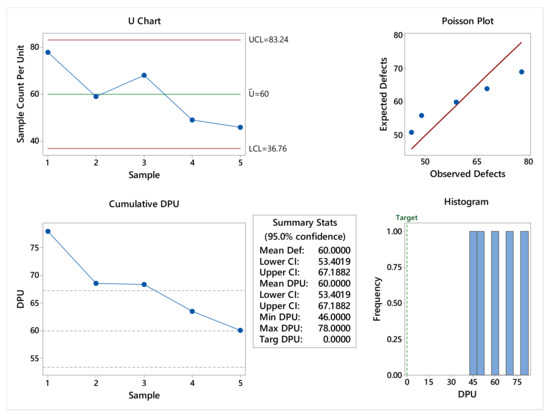
Figure 2.
Poisson process capability report for Sample I.
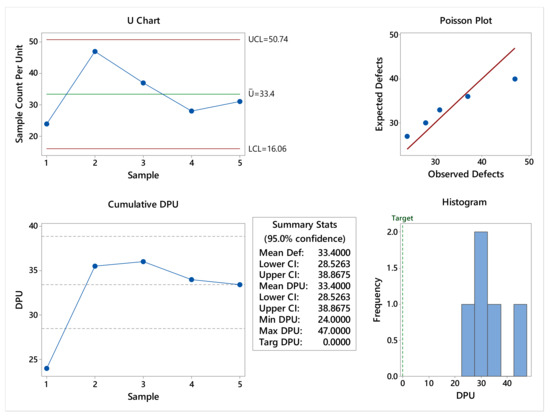
Figure 3.
Poisson process capability report for Sample II.
This comparative analysis using the Poisson process capability reports indicates that the scraps for the first sample are between 2.1% and 4.4%; for the second category, the scraps are situated between 1.2% and 2.2%. With 95% confidence intervals (CIs), the estimated mean indicates the presence of approximatively 60 defective parts for the first analyzed sample and 33 defective parts for the second sample. Also, the cumulative defects per unit (DPU) are highlighted. The inferential analysis highlights that the specified acceptable percentage of rejects was not exceeded.
The categories of defects encountered in the manufactured automotive trim parts are classified into the following:
- Unacceptable defects: cracked veneer, missing veneer, lack of structure, destroyed structure, debris, unacceptable knot, unevenness, injection marks, print/pattern, stains, inadequate deburring, scratches and lacquer drips.
- Acceptable defects: acceptable knot, sparse structure, dense structure, patchy structure, and vertically and horizontally arranged structure.
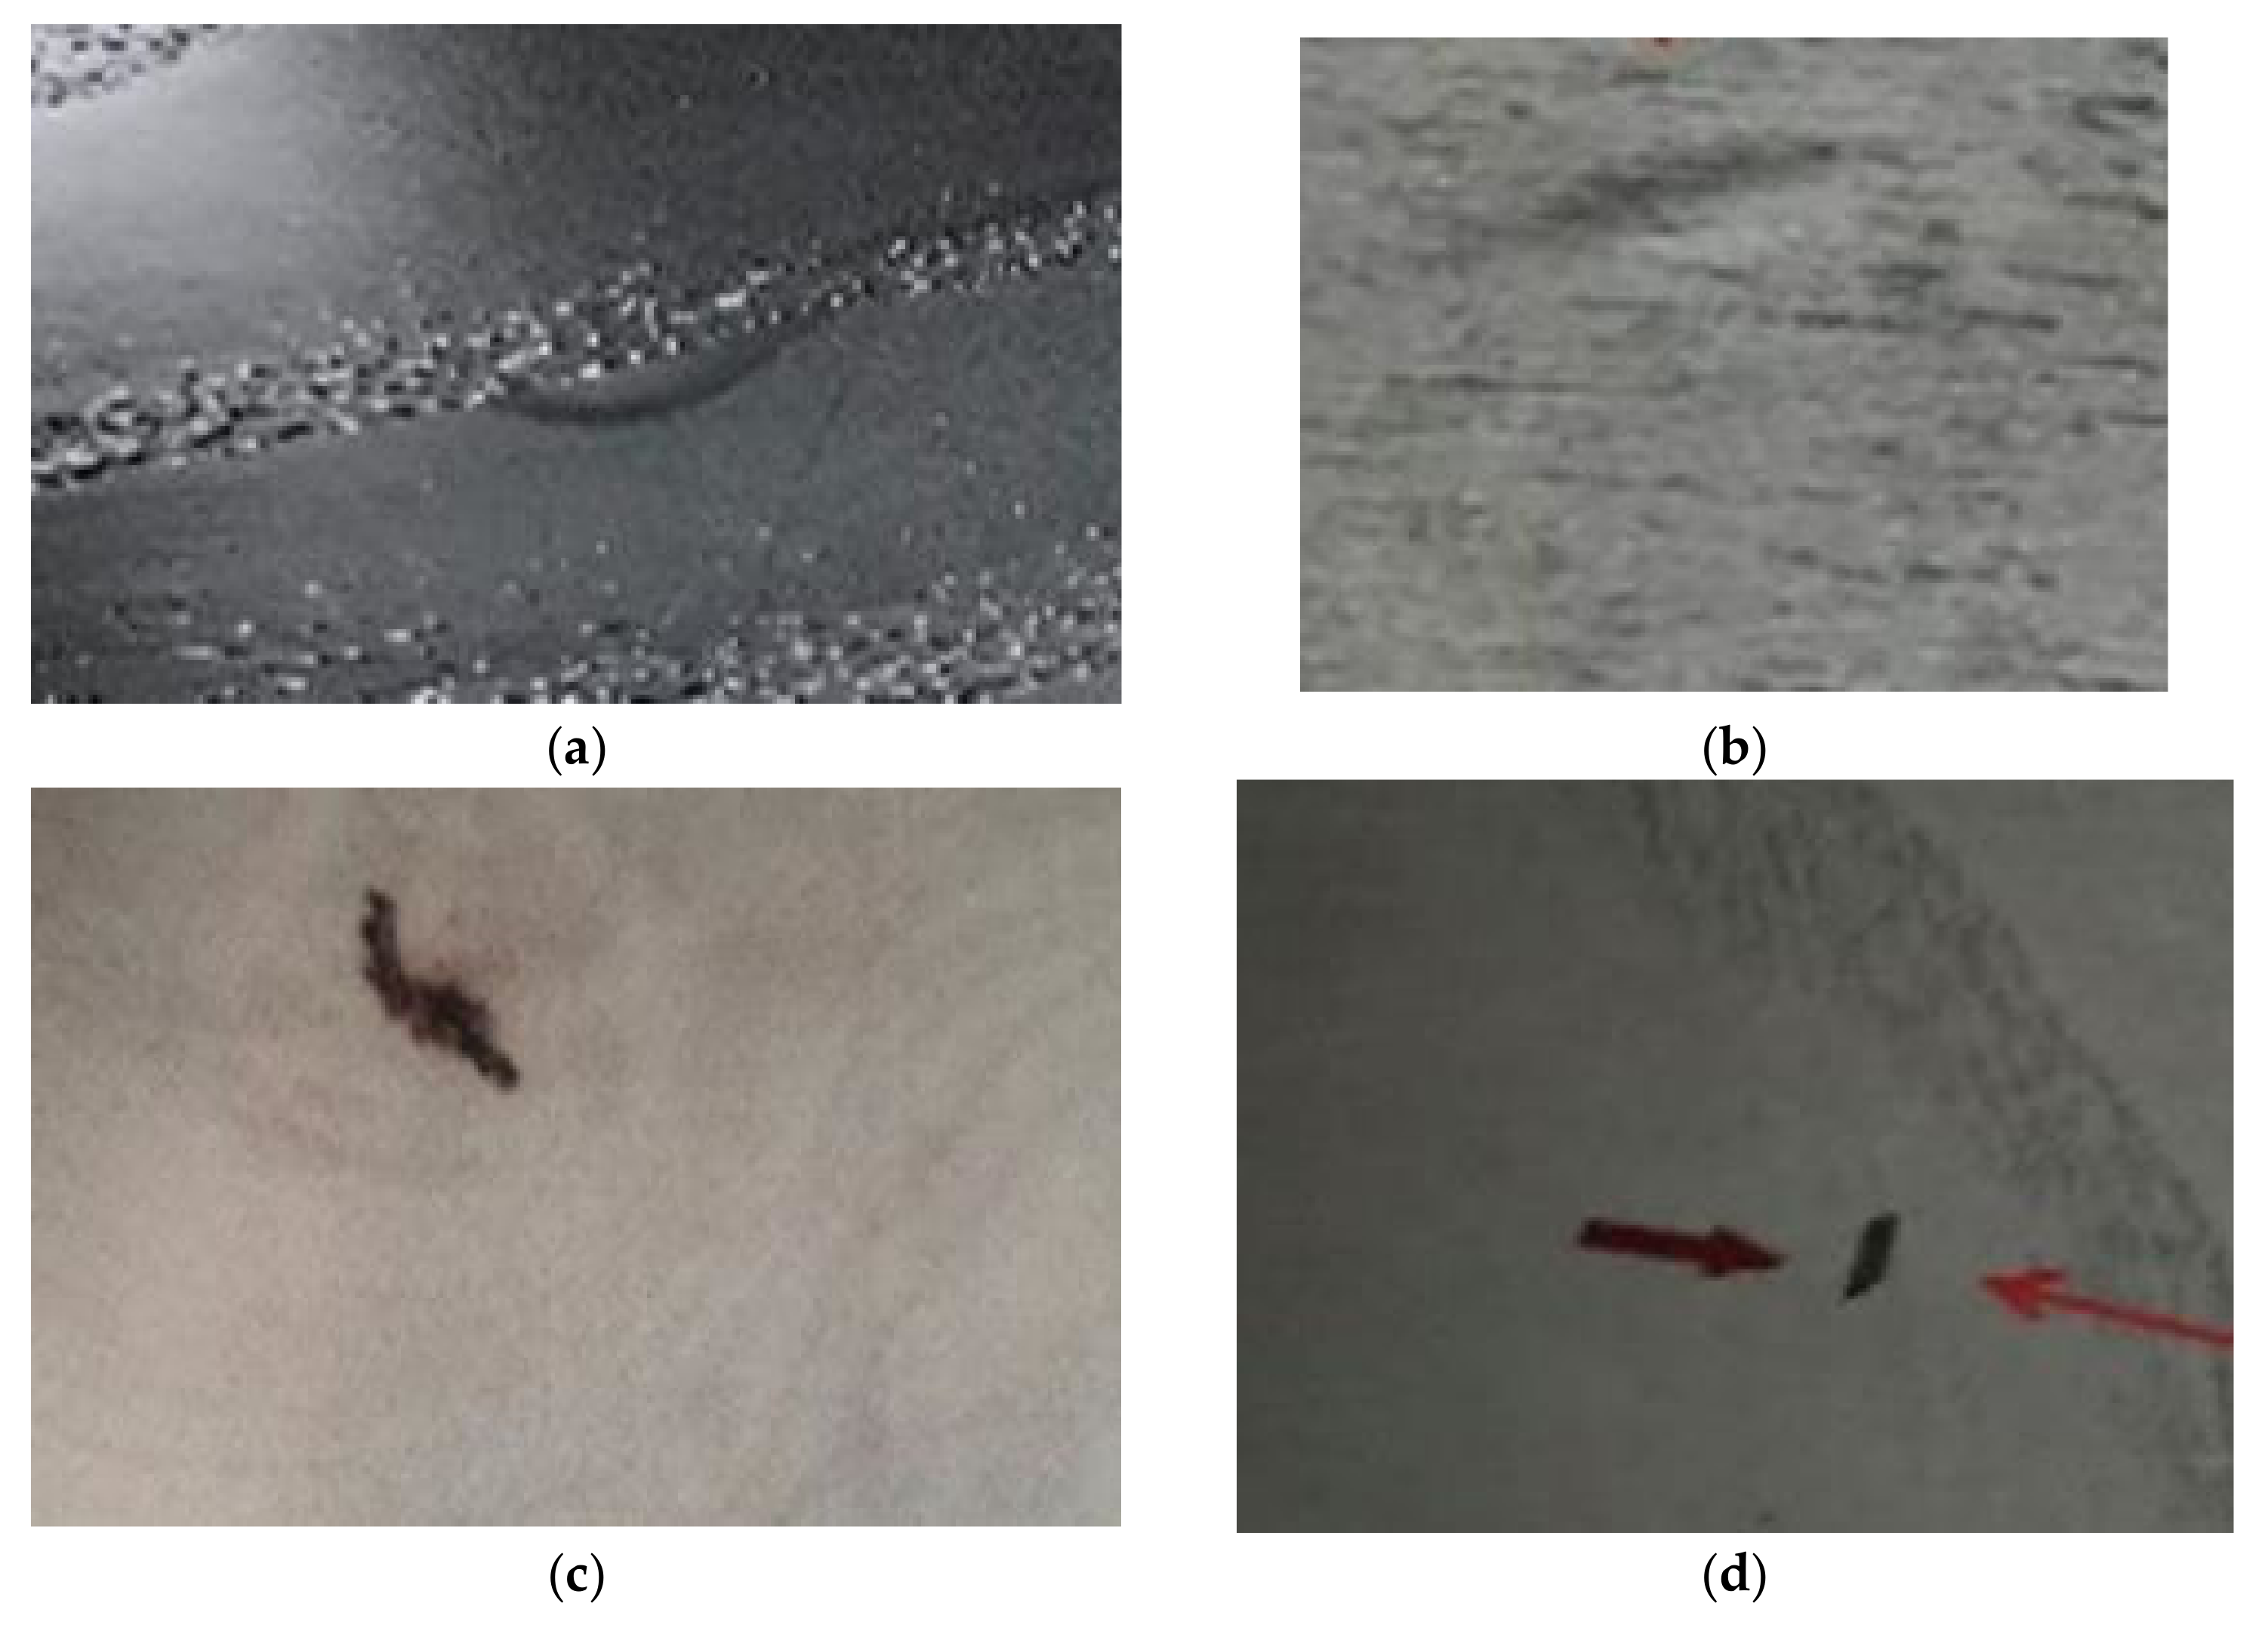
Additionally, other types of unacceptable defects refer to uneven varnishing of veneer, unevenness in veneer, swelling in veneer, blisters in veneer, air bubbles in veneer, fallout knots in veneer and porous structure with impurities in veneer (Figure 4).

Figure 4.
Types of unacceptable defects: (a) uneven varnishing of veneer; (b) blisters in veneer; (c) fallout knots in veneer; (d) impurities in the veneer structure.
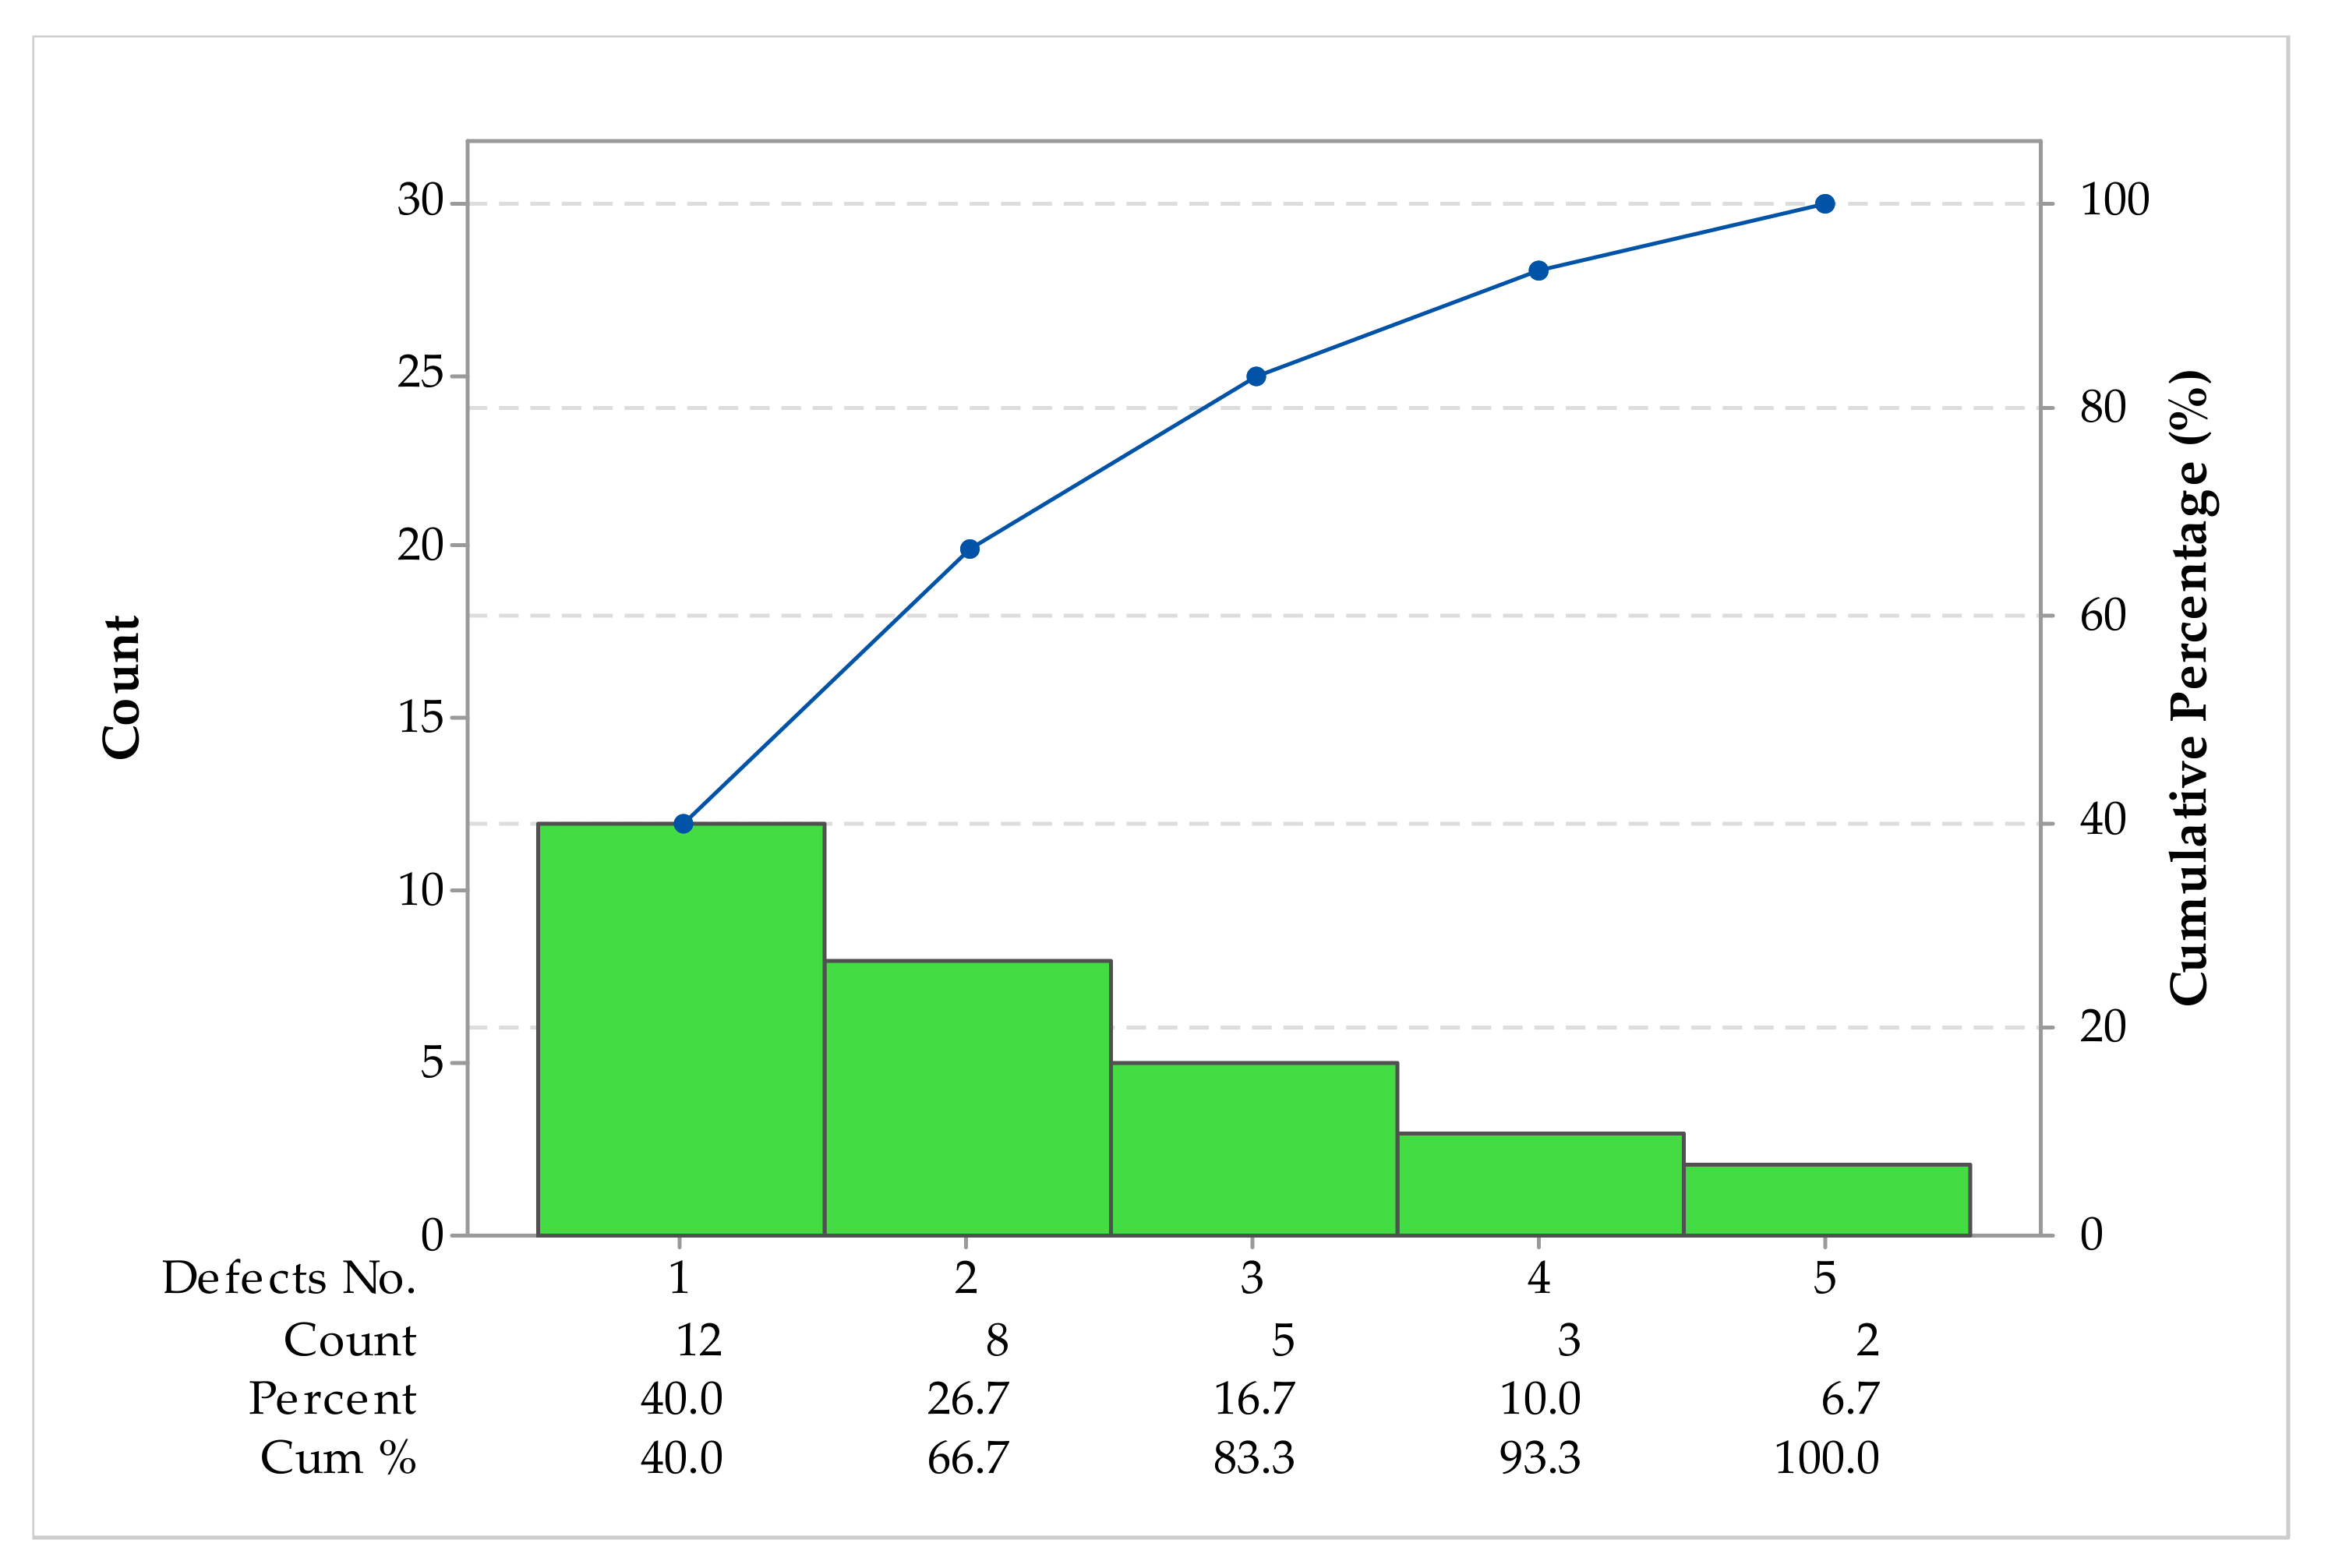
However, in order to reduce the number of non-compliant parts, an additional analysis of the occurred types of defects is required. With a priority of detecting defects, their cumulative frequency is exemplified in the Pareto diagram (Figure 5). Industrial random sampling to identify defects was classified into five defects categories.

Figure 5.
Pareto chart of defects.
From a qualitative point of view, the unacceptable defects with the highest weight (40%) are registered for improperly handled parts and damaged parts. This type of defect appears primarily during the transfer of the parts to be processed. All damaged parts are declared scrap. In order to improve the process, the main applied corrective actions were the periodic training and the proper application of the work instructions by the operators.
Due to the various structures of wooden materials, the main occurring defects of veneers are cracks, wrinkles and distortions [7]. Pareto analysis of various types of veneer wood showed that handling defects, particularly scratches/dents and knife marks, were the most prevalent, constituting 30% of all identified defects [6].
Considering the different wood species and sheet thicknesses under standard climate conditions [8], the deflection of the veneers until failure was compared. The highest deformation was obtained with sycamore maple. The lowest results were determined for American walnut, which was traced back to a high ratio of anisotropy. Fekiac et al. found an increasing deepening of circular veneer samples with increasing moisture content and steam pre-treatment [9]. Clauß et al. generally characterized common ash wood mechanics [10]. The best formability was found using birch veneer, whereas beech veneer and ash veneer showed lower but almost similar forming behavior.
4. Conclusions
- The limitations of this study refer to the qualitative requirements of the used veneer type. The type of manufactured parts, but also the wood veneer variety, may influence the establishment of the frequency and type of acceptable defects.
- The process of veneer coloring specific to automotive trim parts is a special manufacturing process. It involves practical skills and experiences of the workers but also high-performance processing equipment and an appropriate work environment (temperature, humidity, air currents and appropriate lighting). In this regard, the main causes of the appearance of the defect were the equipment and the production workers. A proportion of 40% unacceptable defects was due to improperly handled parts and damaged parts.
- The qualitative analysis of veneer parts indicates that the percentage of scraps for the first sample were between 2.1% and 4.4% and between 1.2% and 2.2% for the second sample.
- From the point of view of inferential statistical analysis, the Poisson process capability report for defects underlines that the cumulative defects per unit (DPU) should not exceed the specified acceptable percentage of rejects.
Author Contributions
Conceptualization, A.-N.R. and A.-E.D.; formal analysis, D.-I.D. and A.-E.D.; investigation, A.-N.R. and A.-E.D.; methodology, D.-I.D. and A.-E.D.; software, A.-E.D.; supervision, A.-E.D.; validation, D.-I.D., A.-N.R. and A.-E.D.; writing—original draft, D.-I.D., A.-N.R. and A.-E.D.; writing—review and editing, D.-I.D., A.-N.R. and A.-E.D. All authors have read and agreed to the published version of the manuscript.
Funding
This research received no external funding.
Institutional Review Board Statement
Not applicable.
Informed Consent Statement
Not applicable.
Data Availability Statement
Data are contained within the article.
Acknowledgments
The authors are grateful to the Transilvania University of Brasov for technical and financial support.
Conflicts of Interest
The authors declare no conflicts of interest.
References
- Zerbst, D.; Affronti, E.; Gereke, T.; Buchelt, B.; Clauß, S.; Merklein, M.; Cherif, C. Experimental analysis of the forming behavior of ash wood veneer with nonwoven backings. Eur. J. Wood Prod. 2020, 78, 321–331. [Google Scholar] [CrossRef]
- Dietzel, A.; Raßbach, H.; Krichenbauer, R. Material testing of decorative veneers and different approaches for structural-mechanical modelling: Walnut burl wood and multilaminar wood veneer. BioResources 2016, 11, 7431–7450. [Google Scholar] [CrossRef]
- Navi, P.; Sandberg, D. Thermo-Hydro-Mechanical Processing of Wood, 1st ed.; EPFL Press: Lausanne, Switzerland; CRC Press: Boca Raton, FL, USA, 2012. [Google Scholar]
- Ge, Y.; Chen, J.; Lou, Y.; Cui, M.; Zhou, H.; Zhou, H.; Sun, L. A Novel Image Inpainting Method Used for Veneer Defects Based on Region Normalization. Sensors 2022, 22, 4594. [Google Scholar] [CrossRef] [PubMed]
- Yu, H.; Liang, Y.; Liang, H.; Zhang, Y. Recognition of wood surface defects with near infrared spectroscopy and machine vision. J. For. Res. 2019, 30, 2379–2386. [Google Scholar] [CrossRef]
- Tan, C.O.; Ng, S.C. Wood veneer surface manufacturing defects—Prevalence in Malaysian industry and human baseline defect detection performance. J. Trop. For. Sci. 2019, 31, 384–397. [Google Scholar] [CrossRef]
- Grabner, M.; Wolf, A.; Schwabl, E.; Schickhofer, G. Methods of forming veneer structures. In Proceedings of the World conference on timber engineering, Vienna, Austria, 22–25 August 2016; pp. 849–858. [Google Scholar]
- Wagenführ, A.; Buchelt, B.; Pfriem, A. Material behaviour of veneer during multidimensional moulding. Holz Roh Werkst. 2006, 64, 83–89. [Google Scholar] [CrossRef]
- Fekiac, J.; Gáborík, J.; Smidriaková, M. 3D formability of moistened and steamed veneers. Acta Fac. Xylologiae Zvolen 2016, 58, 15–26. [Google Scholar] [CrossRef]
- Clauß, S.; Pescatore, C.; Niemz, P. Anisotropic elastic properties of common ash (Fraxinus excelsior L.). Holzforschung 2014, 68, 941–949. [Google Scholar] [CrossRef]
Disclaimer/Publisher’s Note: The statements, opinions and data contained in all publications are solely those of the individual author(s) and contributor(s) and not of MDPI and/or the editor(s). MDPI and/or the editor(s) disclaim responsibility for any injury to people or property resulting from any ideas, methods, instructions or products referred to in the content. |
© 2024 by the authors. Licensee MDPI, Basel, Switzerland. This article is an open access article distributed under the terms and conditions of the Creative Commons Attribution (CC BY) license (https://creativecommons.org/licenses/by/4.0/).

