Article

The Study on Feasibility and Welding Characteristics of GMAW Surfacing Remanufacturing of H13 Steel Cutter Ring of TBM Hob

1
School of Business, Xiangtan University, Xiangtan 411105, China
2
School of Mechanical Engineering, Xiangtan University, Xiangtan 411105, China
3
Engineering Research Center of Ministry of Education for Complex Track Processing Technology and Equipment, School of Mechanical Engineering of Xiangtan University, Xiangtan 411105, China
*
Author to whom correspondence should be addressed.
These authors contributed equally to the work.
Coatings 2021, 11(12), 1559; https://doi.org/10.3390/coatings11121559
Submission received: 9 November 2021 / Revised: 9 December 2021 / Accepted: 10 December 2021 / Published: 18 December 2021

Abstract

:
As H13 steel is a common material for cutters of Tunnel Boring Machine (TBM), the research on surfacing remanufacturing performance is of great value. In this paper, the phase composition of the surfacing layer of H13 steel after gas metal arc welding (GMAW) was analyzed by exploring the precipitation of hard phase in the molten pool, and the microstructure evolution of the surfacing layer was revealed. Then, we carried out simulation modeling analysis on H13 steel surfacing remanufacturing. Results show that: (1) the surfacing layer is combined with the base metal by physical metallurgy without obvious defects such as pores, inclusions and cracks in the surfacing layer; (2) the hardness of the surfacing layer is 60 HRC, which is about 1.5 times of that of the base metal; (3) the stress is mainly concentrated in the arc starting and ending points, followed by the external constraints on both sides of the surfacing layer; (4) the deformation of surfacing layer is slight, which does not affect the forming quality of base metal, while the deformation of base metal is relatively severe. This paper verifies the feasibility of H13 steel remanufacturing from experimental and simulation, providing theoretical basis for future engineering practice.

1. Introduction

During the tunneling process of the tunnel boring machine (hereinafter referred to as TBM), the blade ring of the disc-shaped hob (hereinafter referred to as the hob) directly cuts the rock, resulting in severe wear failure behavior of its edge. According to incomplete statistics, the construction cost caused by cutter ring failure accounts for more than 1/3 of the total construction cost [1]. In order to improve the comprehensive cutting performance of the hob and reduce the maintenance cost of the cutter ring, the industry has carried out a lot of research work from the aspects of material smelting of cutter ring, preparation and processing technology, wear-resistant coating protection, efficient auxiliary rock breaking technology, and cutting parameter optimization [2,3], etc. However, due to the current technological development level and the constraints of research methods, the above-mentioned research work is difficult to break through the life bottleneck of the cutter ring in a short time. In view of the fact that green remanufacturing technology has achieved good results in improving quality and prolonging life in military, automobile and other industrial fields [4], especially in TBM related cutterhead repair, main bearing repair and other subdivided fields [5], it is undoubtedly of great potential economic and academic value to carry out remanufacturing repair research on failed cutterheads.
At present, remanufacturing methods mainly include surfacing, plasma spray welding, laser cladding and brush plating repair [5]. Among them, surfacing technology is widely used in the field of parts remanufacturing and repair because of its earliest development and extremely economic reliability [6,7]. Surfacing technology can be divided into many kinds according to the different connection mechanism. Gas metal arc welding (referred to as GMAW surfacing) is widely used due to its advantages of less pores in the surfacing layer (weld seam), high metallurgical bonding strength with the base metal, high repair efficiency, simple equipment and strong practicability [8]. In view of the advantages of the above-mentioned surfacing welding and the actual radial wear volume of the cutter ring, complex working conditions and other factors; theoretically, GMAW surfacing welding is the most suitable remanufacturing method for hob cutter ring repair. However, because TBM hob cutters have extremely high and strict requirements for remanufacturing performance and the remanufacturing technology itself is quite difficult, current research on remanufacturing and repairing of hob cutter rings is still limited.
Among the existing reports of surfacing and remanufacturing of die steel materials, Ai et al. [9] studied 5CrNiMo material hot forging die surfacing repair technology and Zhen et al. [10] studied the structure and performance evolution of 42CrMo material continuous casting roll surfacing layer. The study by Zhen et al. indicates that the expected effect of surfacing remanufacturing on die steel can be achieved. Preciado et al. [11] investigated the better practices to repair by welding AISI P20 and VP50IM steels during the manufacturing of polymer injection molds. Singh and Kumar [12] investigated the effect of welding current and process of cooling on hardness and chemical composition of the weld. Zhao et al. [13] examined the thermal stress evolution, and the residual stress distribution in a single-pass multi-layer weld-based rapid prototyping. However, because TBM hob cutters have extremely high and strict requirements for remanufacturing performance, the remanufacturing technology itself is quite difficult. Most of the related studies are the wear prediction model or improvement of hobs (Wang et al. [14], Roby et al. [15]), and there are few reports on whether the worn hobs can be remanufactured. Is H13 steel, which is the main material of TBM hob and die steel, also feasible for surfacing and remanufacturing? This is an unavoidable problem in the research of TBM hob tool surfacing remanufacturing.
Based on the GMAW surfacing technology, this research conducts a series analysis including microstructure analysis, hardness analysis, phase analysis and morphology analysis. From the slices after the surfacing test, the researcher obtains the phase composition in the surfacing layer. The precipitation of the hard phase in the molten pool is also examined in this research. Integrated with the data obtained from the experiment, the relevant settings were performed in Sysweld to simulate and the surfacing process, revealing the evolution of the surfacing layer structure was analyzed. According to the simulation results, it is recommended to consider some technological problems in the actual surfacing repair process.

2. Methods and Procedures of Experiment

The experiment used H13 steel plate with a size of 50 mm × 40 mm × 8 mm as the base material, and 1.2 mm H13 flux-cored wire as the welding wire for surfacing repair. The surfacing parameters are shown in Table 1, and the alloy compositions of base metal and welding wire are shown in Table 2 and Table 3.
The welding method is GMAW, the distance between welding head and base metal is 12 mm, the flow rate of protective gas is 10 L/min (the distribution ratio of protective gas is 20% CO2 + 80% Ar), as shown in Figure 1.
Before surfacing, the oxidation layer on the surface of H13 steel plate was removed by grinding with angle grinder (Dongcheng, Qidong, China)and sandpaper; then the oil stain on the surface of base metal was cleaned with acetone solution and dried with electric dryer (Panasonic, Ōsaka, Japan) and placed in incubator (Wanyuan, Langfang, China) for drying. The thermocouple needs to be placed at the midpoint of the plate surfacing centerline and connected to the data acquisition recorder. The base metal was clamped and fixed on the worktable of Panasonic-TA1400 arc welding robot platform (Panasonic, Ōsaka, Japan). The two sides of the plate were clamped by the clamping device on the worktable. After the surfacing is over, the plate clamping device was released.
The microhardness of H13 steel plate was measured by MH-5L microhardness tester (Hengyi, Shanghai, China). According to the expected hardness range of H13 steel plate after heat treatment, the hardness of each specimen was measured loaded with a force of 200 N for 15 s. In hardness measurement, the selection of measuring points on the same sample section is from top to bottom, that is, the sample surfacing layer, bonding zone, heat affected zone and matrix of the sample are selected in turn for hardness dot test every 0.1 mm. The hardness test is terminated when the substrate is hit and the hardness no longer changes. In measurement, three lines should be tested at the same time to obtain the average value in order to ensure accuracy. The phase composition of surfacing layer was analyzed by Rigaku X-ray polycrystalline powder diffractometer (Rigaku, Tokyo, Japan). The LEO1520-INCA scanning electron microscope (LEO, Oberkochen, Germany) was used to detect the quality of the surfacing layer, mainly to detect whether the surfacing layer had defects such as pores and cracks; at the same time, energy dispersive spectrum (EDS) of the surfacing layer was analyzed.

3. Analysis of Experiment Results

3.1. Analysis of Temperature Field

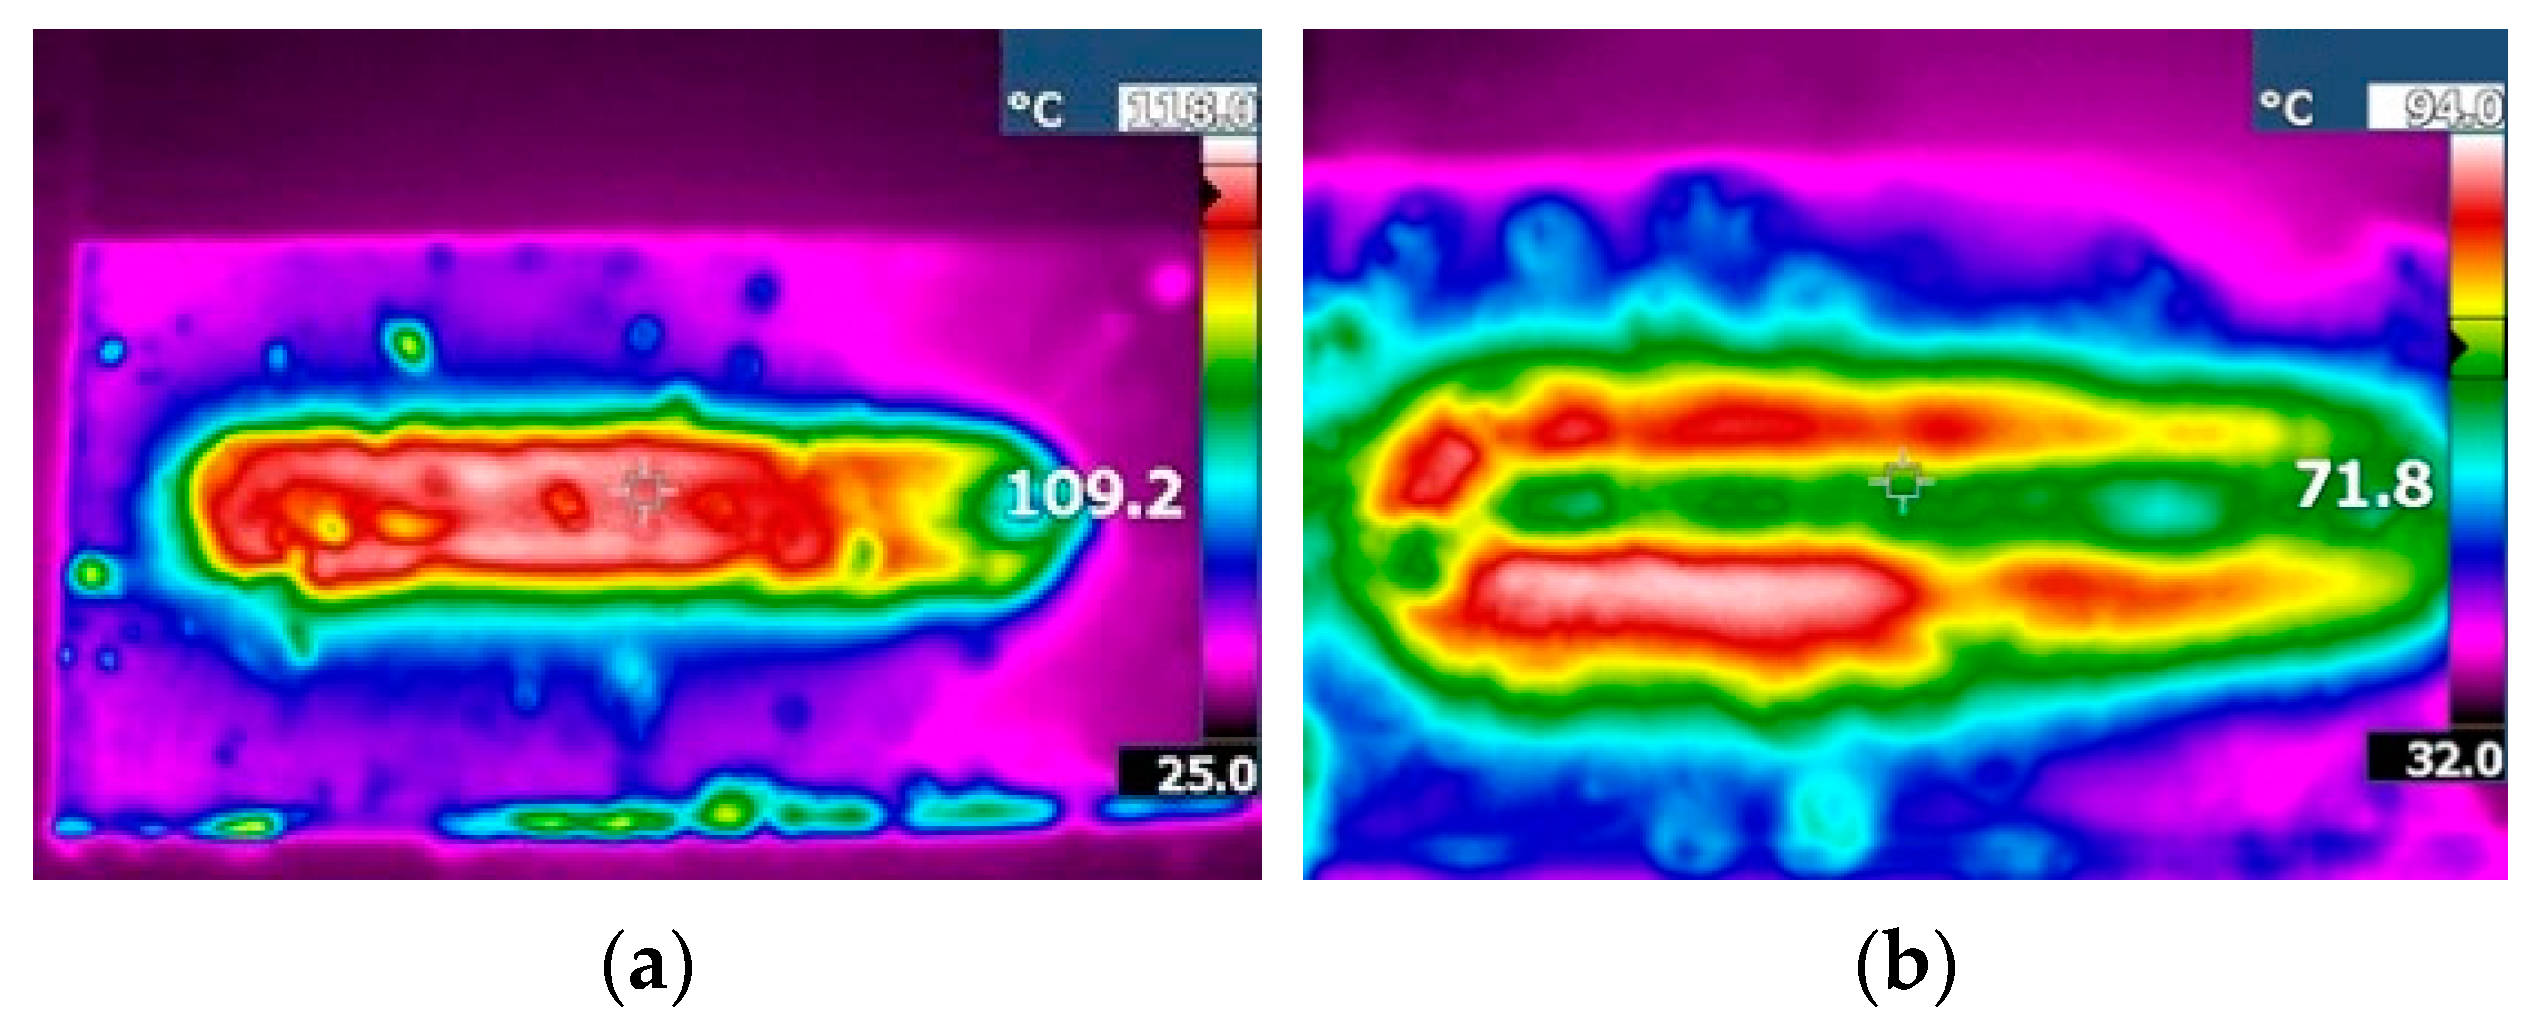
Figure 2 is a thermal image of the single-pass single-layer surfacing process on the substrate. It exhibits that the temperature in the surfacing area is the highest, and the temperature has a decreasing trend to the surrounding substrate. When cooled for 80 s, the temperature of the substrate on both sides of the surfacing layer is higher than that of the surfacing zone. This experimental phenomenon is basically consistent with the numerical simulation of Ying et al. [16] and Cho et al. [17], that is, the temperature in the welding zone is the highest and the surrounding temperature decreases in turn. The reason is that the heat transfer diffuses from the high temperature zone to the low temperature zone [18]. When the heat energy of the surfacing layer diffuses to the substrate, a new high temperature zone will be formed, and the temperature of the surfacing zone will drop sharply through heat transfer and heat exchange with air, thus the temperature of both sides of the surfacing layer in Figure 2b is higher than that of the surfacing zone.
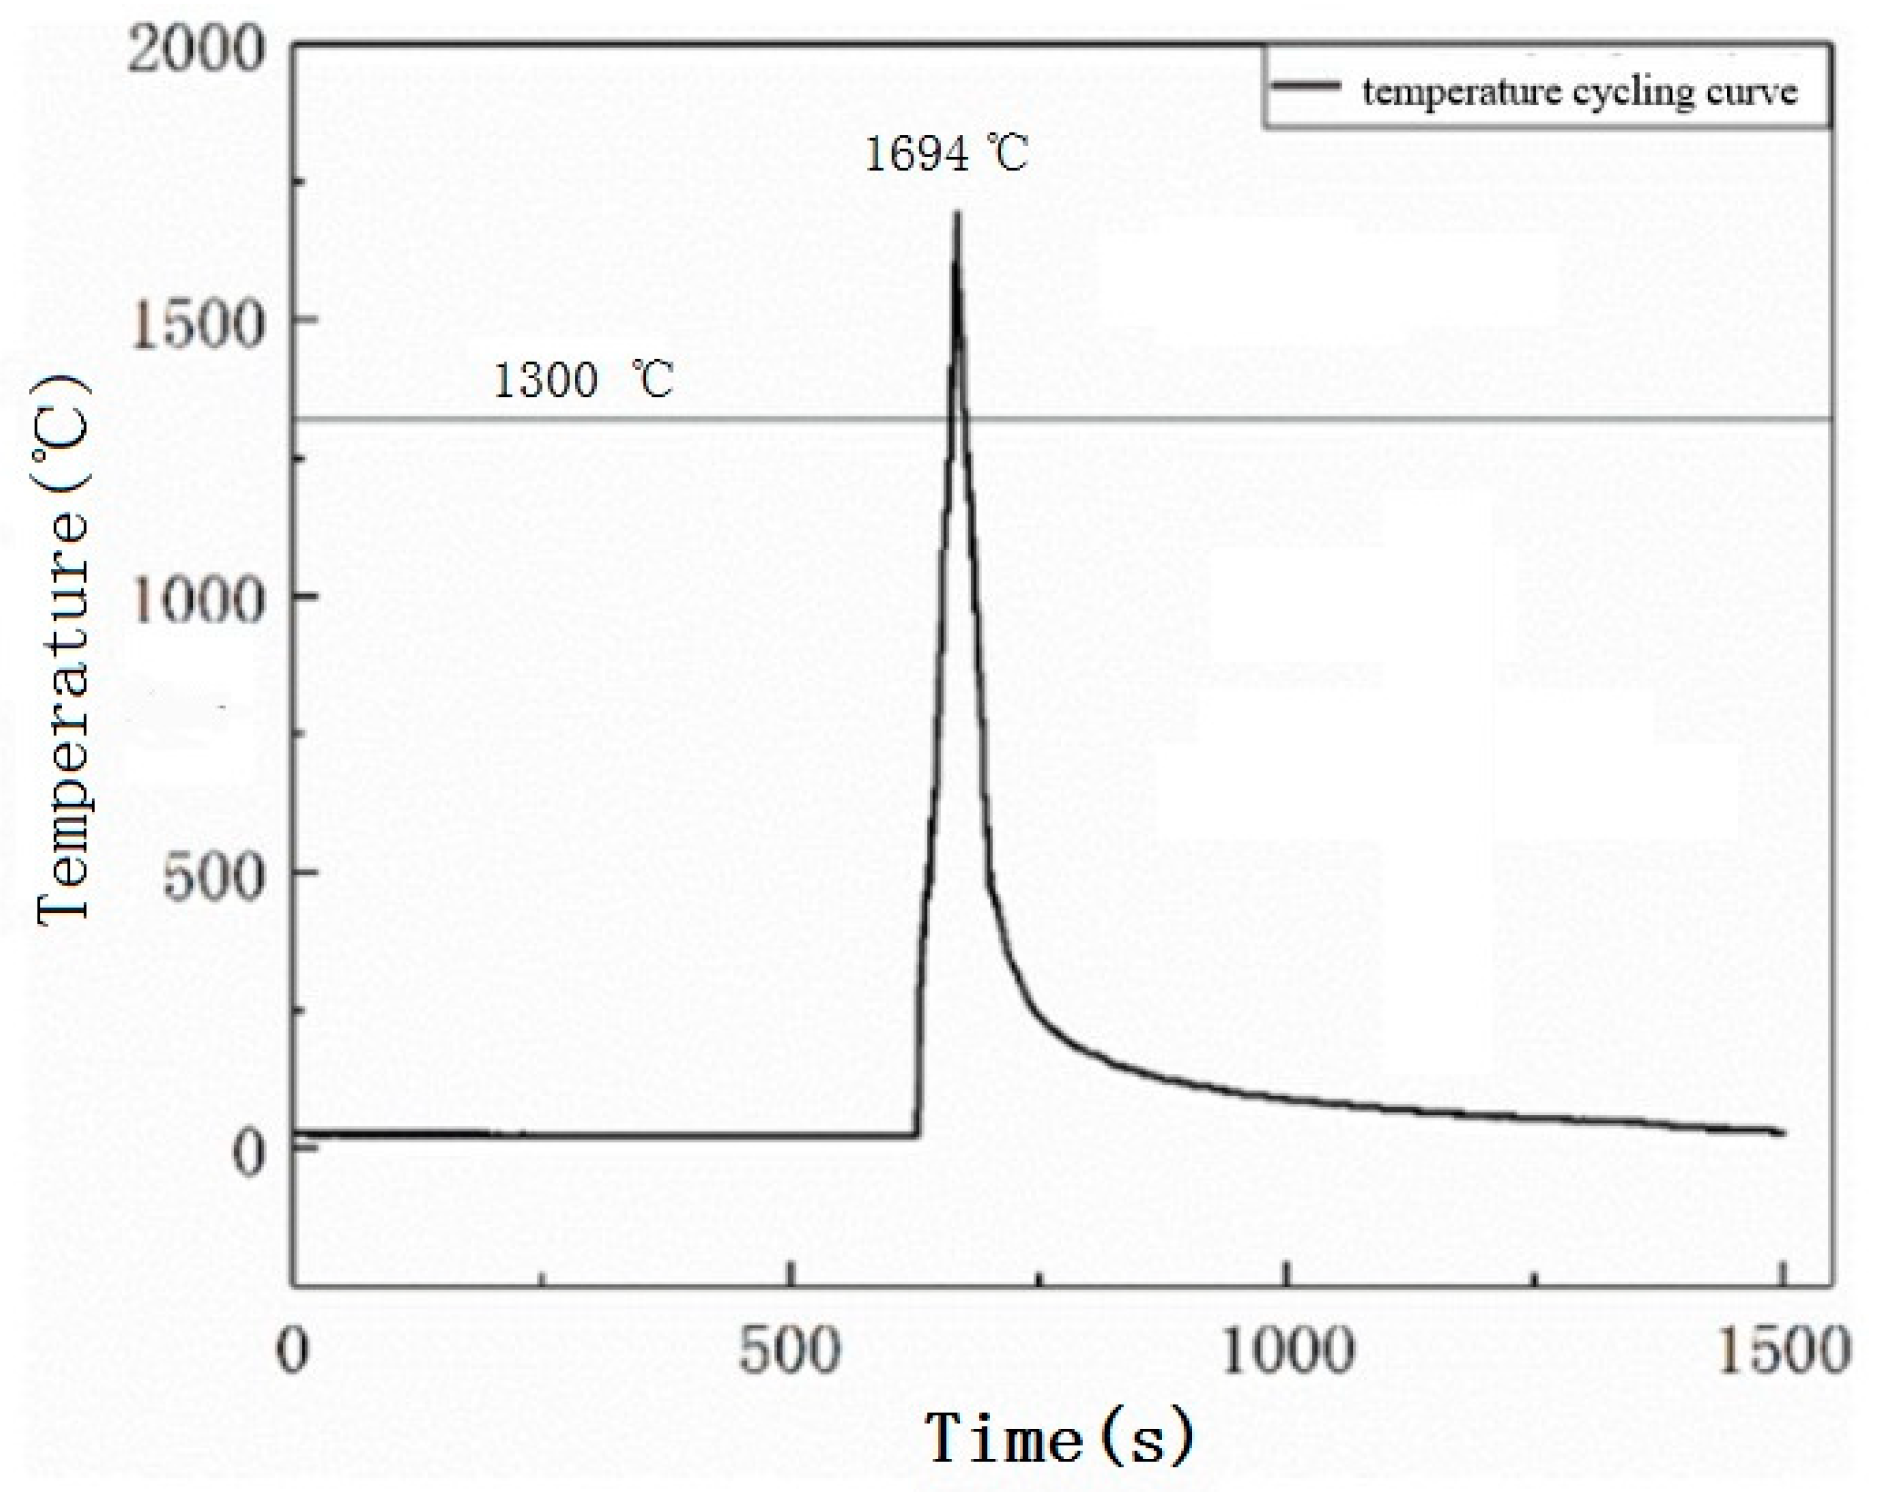
As shown in Figure 3, the thermal cycling curve at the midpoint of the centerline of the single-pass single-layer surfacing obtained from the experiment. The figure shows that the temperature of surfacing heat source reaches 1694 °C, higher than the melting point of H13 steel; the heating rate and cooling rate of surfacing layer are almost the same, but when the temperature reaches 300 °C, the cooling rate of surfacing layer decreases obviously.

3.2. Analysis of Stress Field

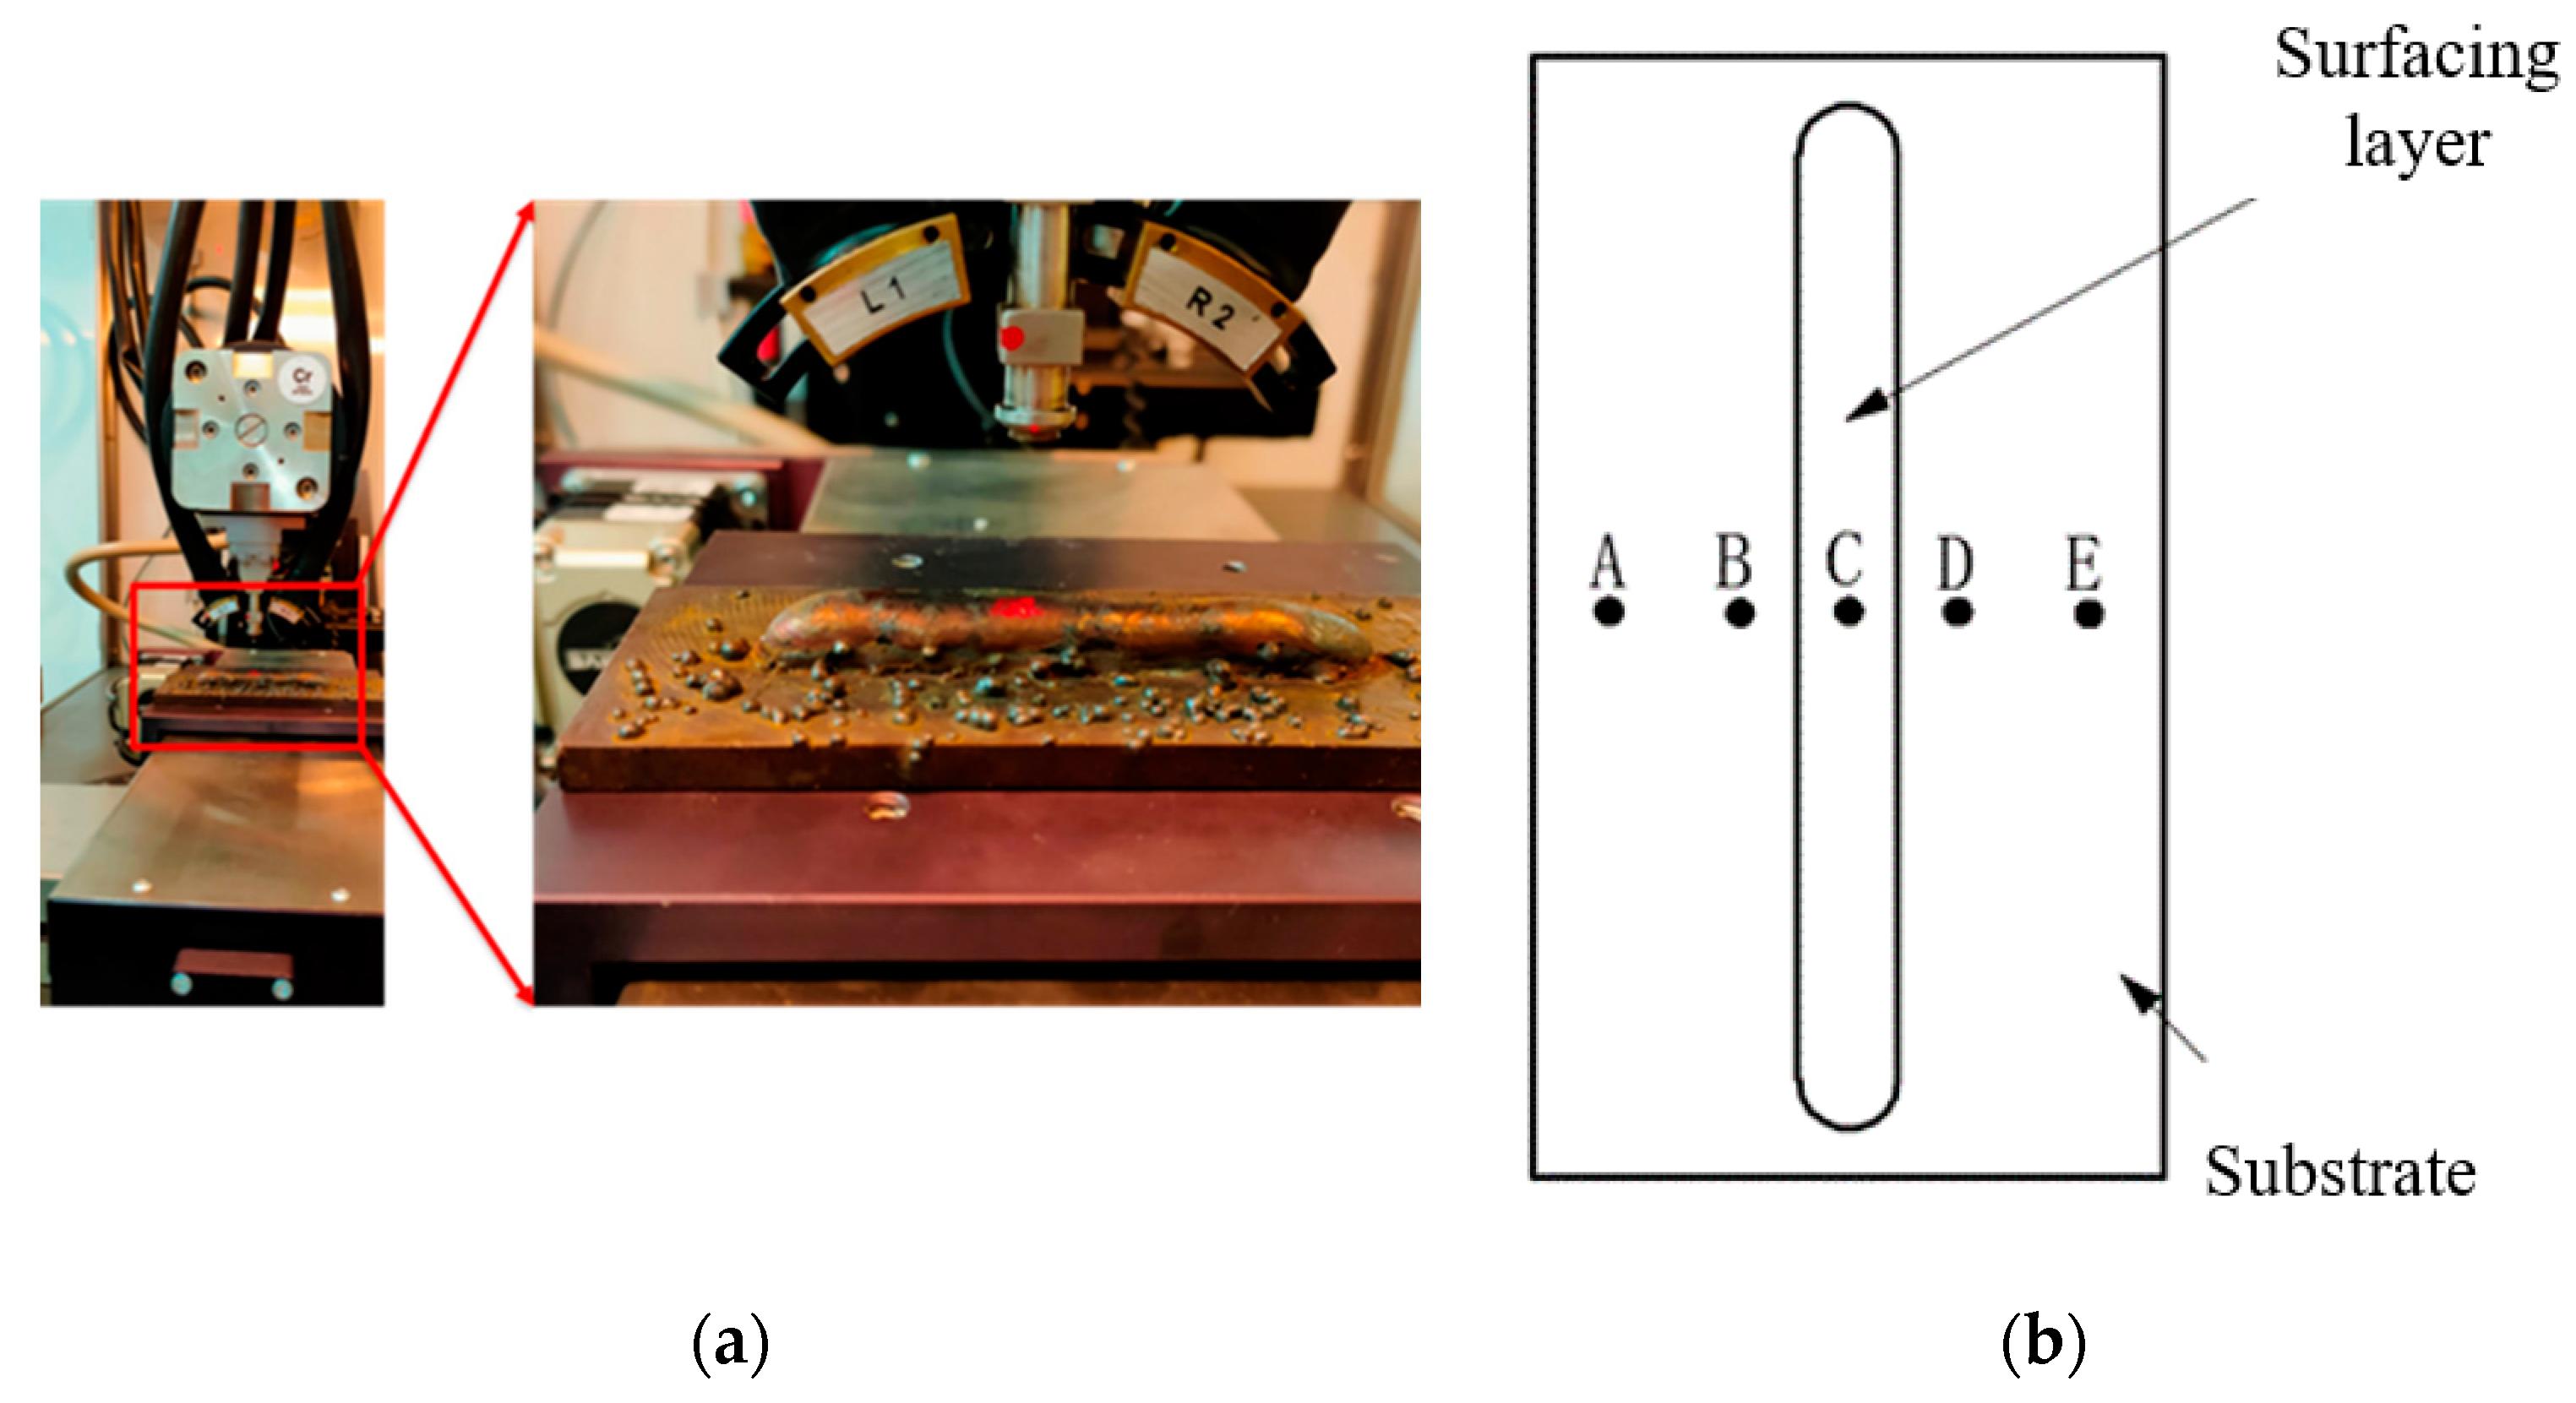
The residual stress values of the surfacing layer and the substrate are measured respectively. As shown in Figure 4, the residual stress values of points A, B, C, D and E are −72.57 ± 10.17, 56.55 ± 5.81, 23.15 ± 45.66, 55.42 ± 3.33, and −68.25 ± 4.58 Mpa, respectively. The residual stress is symmetrically distributed on the centerline of the surfacing welding A stress concentration, namely tensile stress, appears at the junction of the surfacing layer and the substrate and the substrate is at a state of compressive stress.

3.3. Analysis of Structure

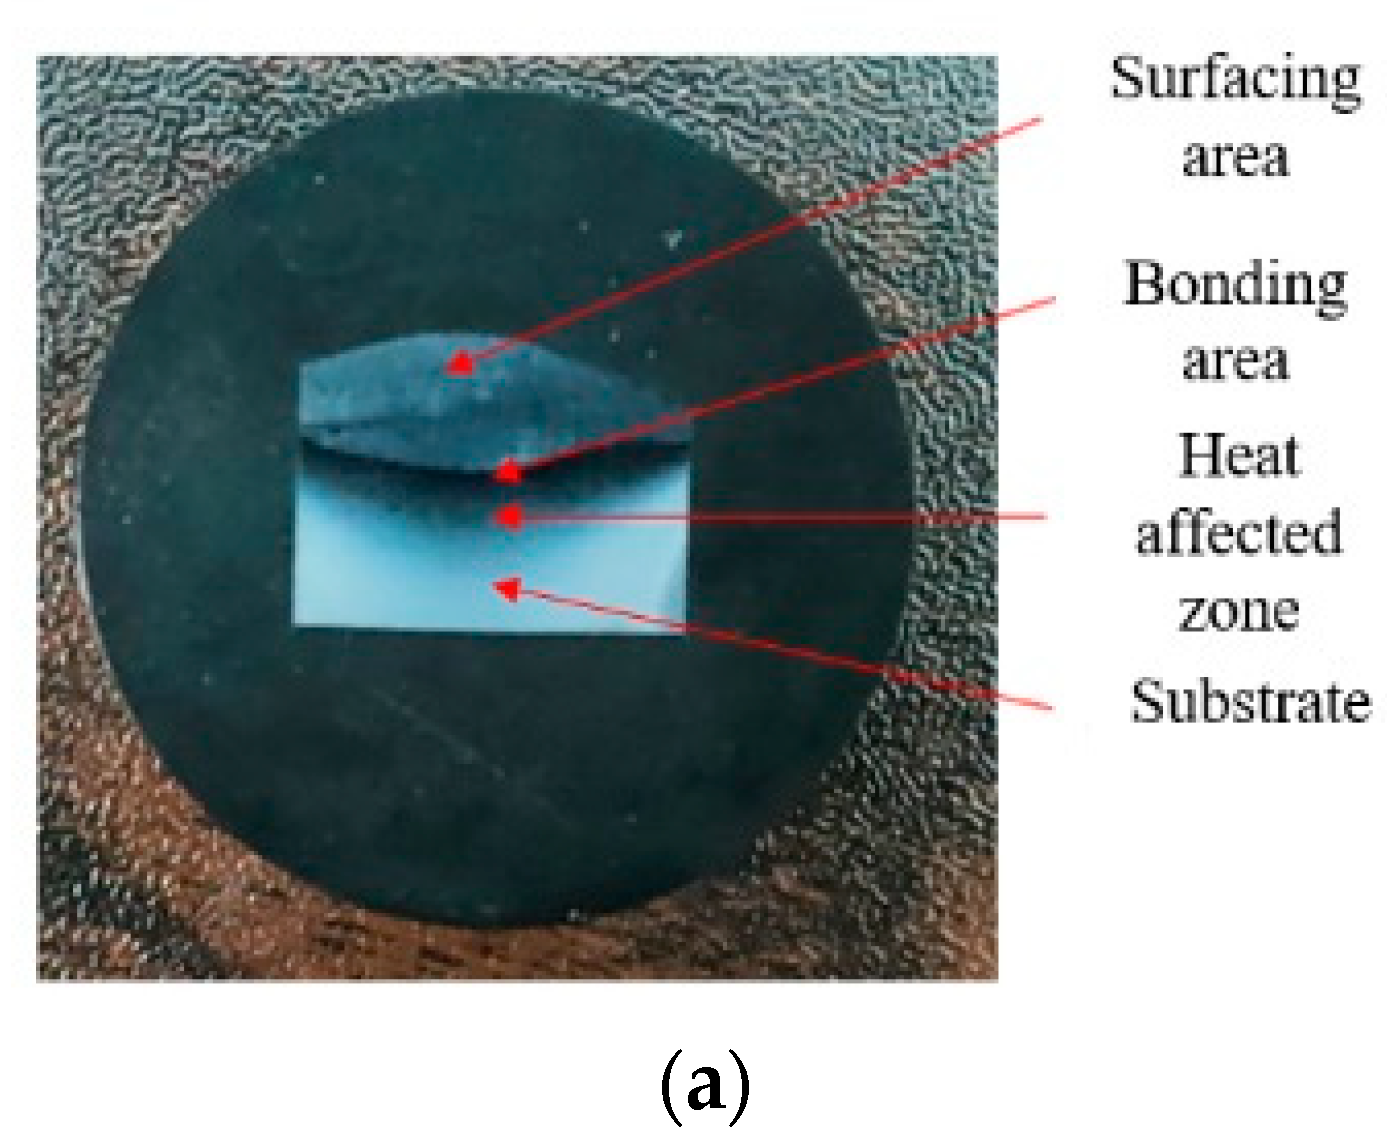
As shown in Figure 5, it is the morphology of the metallographic structure at different positions of the surfacing sample. It can be seen from the figure that the combination of the surfacing layer and the substrate is a physical metallurgical combination; the four areas from the top to the bottom of the sample are the surfacing area, the bonding area (also called the transition zone, the bonding area of the surfacing layer and the substrate), heat affected zone and substrate. As shown in Figure 2a, after the surfacing of the plate sample, the surfacing zone, the transition zone, the heat-affected zone and the matrix (i.e., the base material) will be formed in the surfacing zone from the outside to the inside. Among them: the surfacing zone is the surfacing cladding layer; in the transition zone, there is a bright white layer at the junction of the surfacing layer and the substrate, which is a high-alloy austenite with low carbon content at high temperature, and a mixed structure of alloy compound and martensite formed at room temperature; the size of heat affected zone is related to the input energy density of surfacing.
It can be seen from Figure 5b–f that the structural densities of different areas are different. Further analysis is as follows:
  • On the base metal shown in Figure 5b, because the base metal is less affected by heat, the structure produced is mainly tempered martensite and a small amount of sorbite.
  • In the heat affected zone shown in Figure 5c, due to the high surfacing speed and cooling speed produced by metal active gas (MAG)welding, it is conducive to the transformation of austenite into martensite. Therefore, the structure in the heat affected zone is mainly martensite, and there are some retained austenite, a small amount of ferrite and pearlite (the main structure of H13 steel in annealed state), etc. According to the top-down direction in Figure 5a, the heat affected zone is divided into overheating zone, normalizing zone and a small amount of microstructure transformation zone. Affected by the thermal cycle in the surfacing process, the temperature of heat affected zone increases gradually. When the austenite transformation temperature is reached, some grains will grow up and some structures will transform into austenite, from the end of surfacing to the beginning of cooling, due to the local heat dissipation of base material, the temperature of heat affected zone decreases and the microstructure changes again. This process is repeated during surfacing, resulting in this area being equivalent to multiple heat treatments of different degrees, so the structure will have obvious changes.
  • In the bonding zone shown in Figure 5d, the formed structure is mainly martensite, and there are also some carbides at the edges of the white ferrite grains; the bonding zone is located between the surfacing layer and the base metal, which is the transition zone, where the quality of the structure is generally poor. This is because the temperature of the bonding zone during the surfacing process is higher than the solidus line but lower than the liquidus line. The metal is in a molten state at this time. The uneven distribution of chemical composition in base metal and welding wire leads to the uneven distribution of microstructure, which makes the microstructure and properties of bonding area much worse than other areas; the existence of the bonding zone further indicates that there is atomic diffusion and migration between the surfacing layer and the base metal, and the liquid metal of the surfacing layer interacts with the solid base metal, resulting in metallurgical bonding. The main chemical elements C, Cr, Mo and V of H13 steel plate and H13 steel flux cored wire are the same, so the fusion among them is better. The bonding zone is mainly formed by the infiltration of carbon and alloy elements, and the diffusion speed is determined by the element concentration gradient, temperature, time and atomic mobility. Because the cooling rate of MAG surfacing process is very fast, the contact time between liquid phase and base metal solid phase is very short, which finally leads to the short diffusion time of elements and the narrow bonding zone.
  • In the surfacing area shown in Figure 5e, f, the main structures formed are petal-like dendrites, off-white equiaxed martensite, and white eutectic alloy carbides between dendrites, etc. Among them, the main forms of alloy carbides are M3C and M7C3 types; the alloy carbides containing Cr will increase the hardness of the surfacing layer after being dispersed and precipitated, and will also improve the hardenability of the material and promote the formation of martensite. The carbide formed by Mn element can maintain the plasticity and toughness of the material while increasing the strength of the material. Higher W content can significantly improve the red hardness and thermal strength of H13 steel.

3.4. Analysis of Hardness

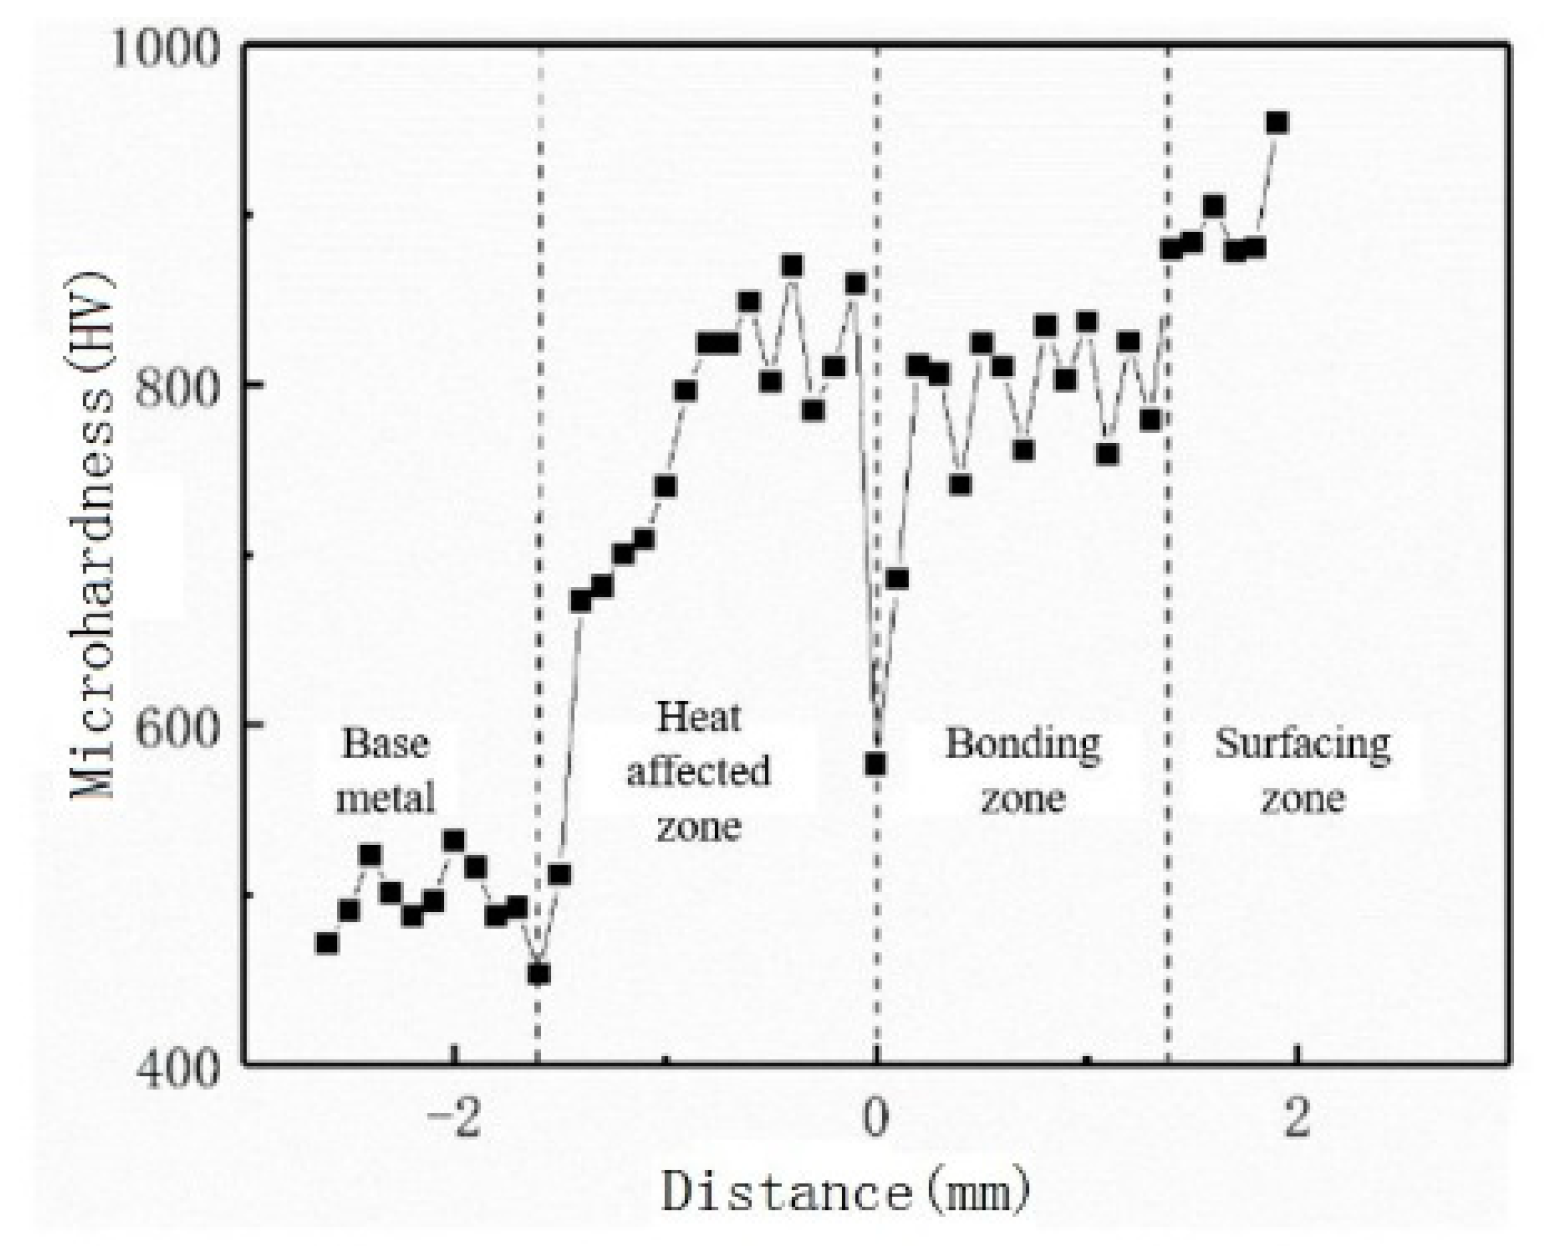
Combined with the analysis of the microstructure, it can be seen from Figure 6 that the surfacing area is mainly martensite with higher hardness. There are poor hardness points in the bonding area mainly because the cold and heat effects in this area are not obvious, and the surfacing layer and the base metal have given a buffer effect. The hardness gradually decreases from the heat-affected zone to the base metal. The base metal area is less affected by heat, its hardness value is basically stable, and the main structure is tempered martensite.
The average hardness of the surfacing layer is about 1.5 times the average hardness of the base material. The main reason is that the heating and cooling speed of the GMAW surfacing process is too fast, which causes the surfacing area to produce supersaturated solid solution strengthening and increase the hardness. The hardness of the surfacing layer reaches about 60 HRC, which is much higher than the hardness of the base metal. It is mainly because the surfacing area has a fine grain structure without defects such as holes and cracks. Therefore, the hardness and wear resistance of the area are significantly improved, which can meet the actual engineering requirements.

3.5. Analysis of Phase

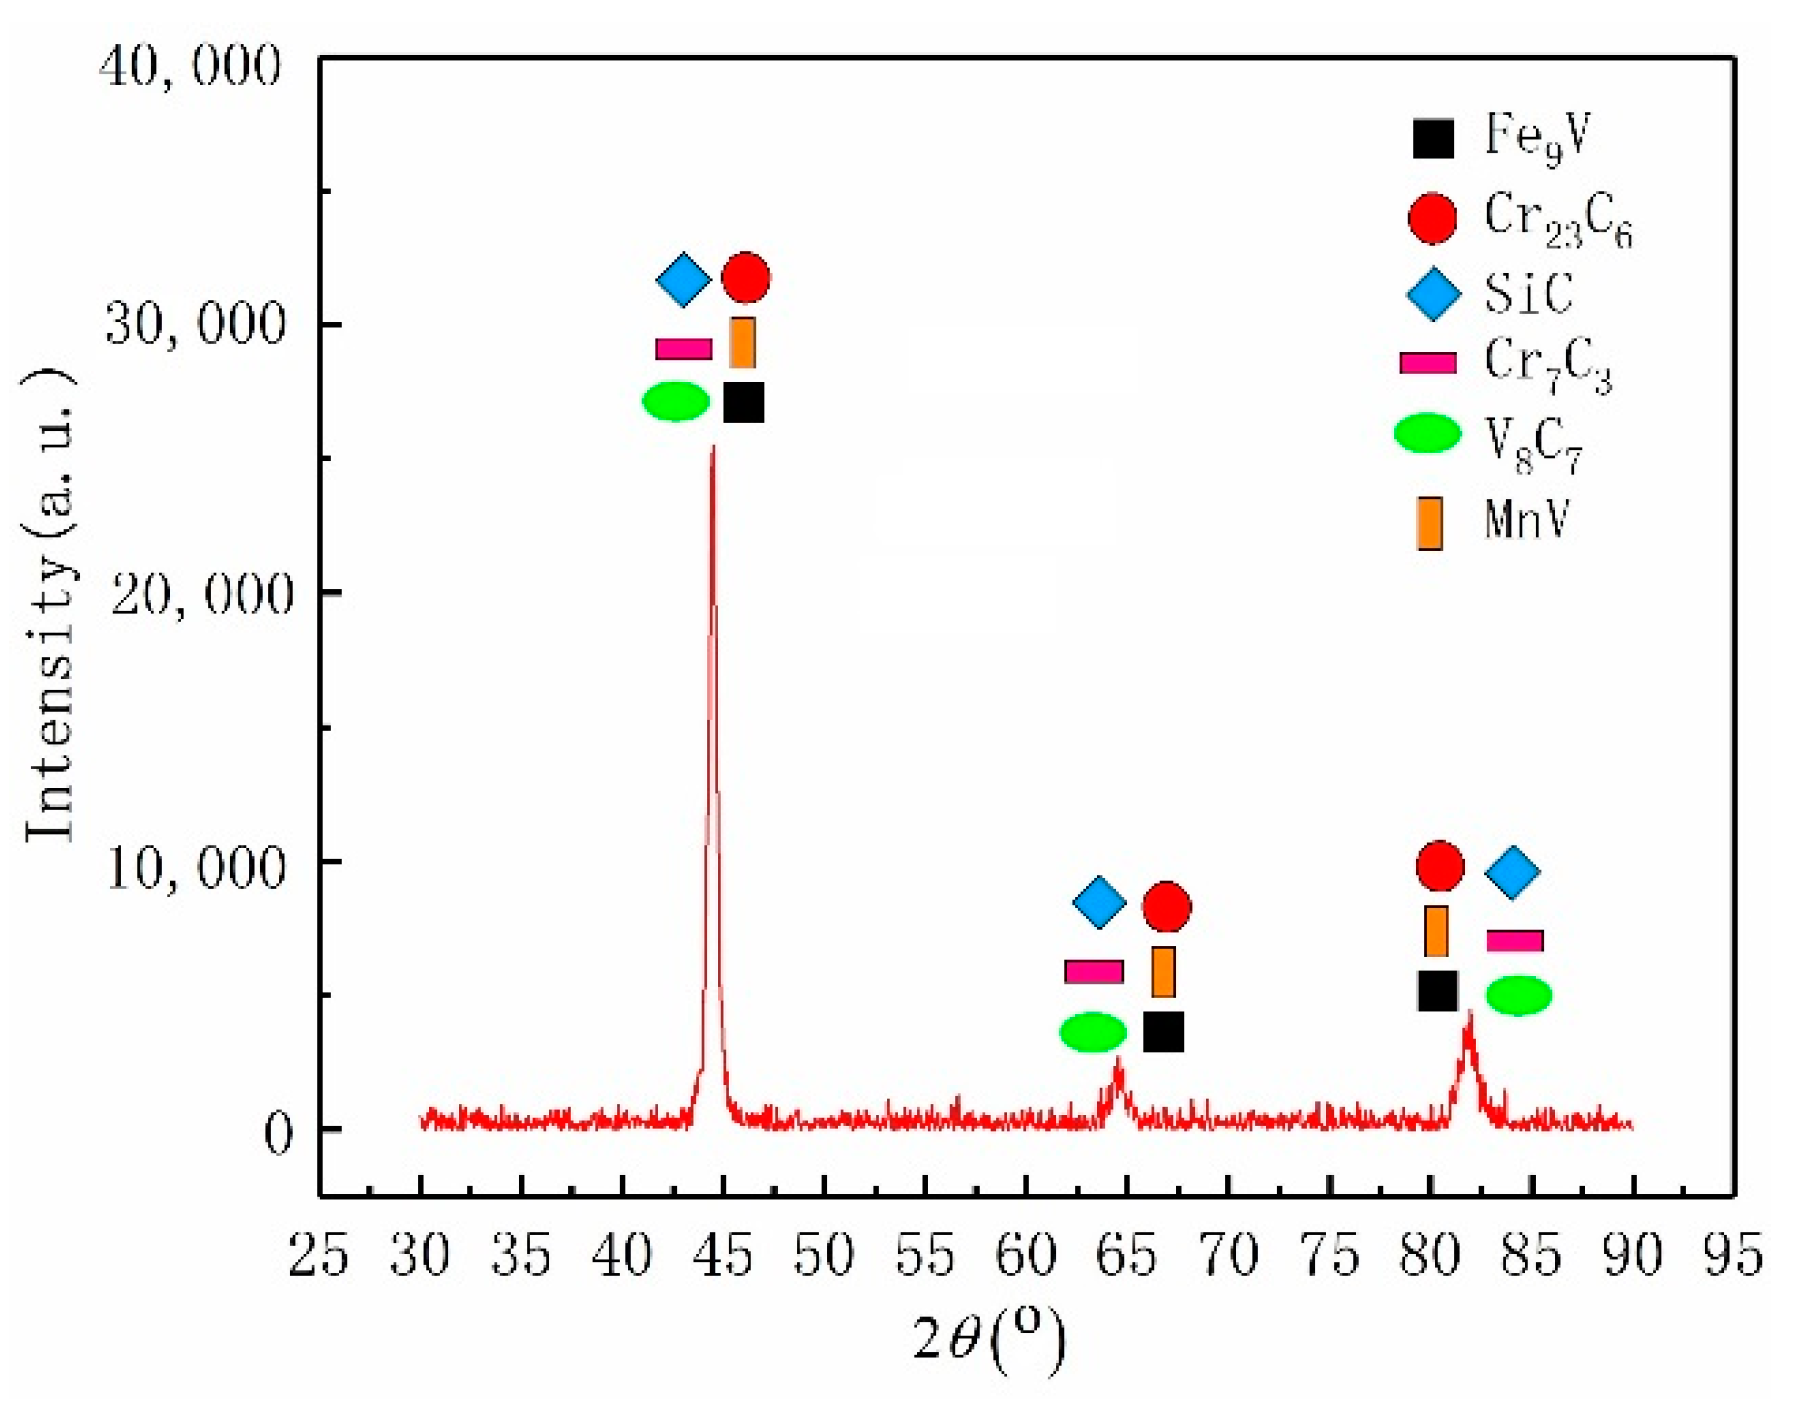
In order to investigate the effect of the phase composition on the quality of the surfacing layer, the phase composition of the surfacing layer was analyzed by XRD (X-ray diffraction). Due to the extremely fast heating and cooling rates of the MAG surfacing process, the phase of the surfacing layer after surfacing is often in a non-equilibrium state, which intensifies the difficulty of phase analysis of the surfacing layer. At the same time, the alloy elements in H13 steel flux cored wire often have complex physical metallurgical reaction in the surfacing process, and the phase is very complex, which also increases the difficulty of analysis. According to the XRD pattern of surfacing layer as shown in Figure 7, the main phases of surfacing layer are as follows: (1) chromium based solid solution (Cr, Fe), as the basic phase, mainly supports the surfacing layer. The diffraction peak consists the standard peak in the phase analysis, which indicates that the chromium based solid solution does not produce lattice distortion due to the addition of other metal elements in the surfacing process; (2) Cr carbides include M23C6, M7C3, Fe9V, V8C7, and a small amount of SiC and MnV; (3) intermetallic compounds.

3.6. Analysis of Morphology

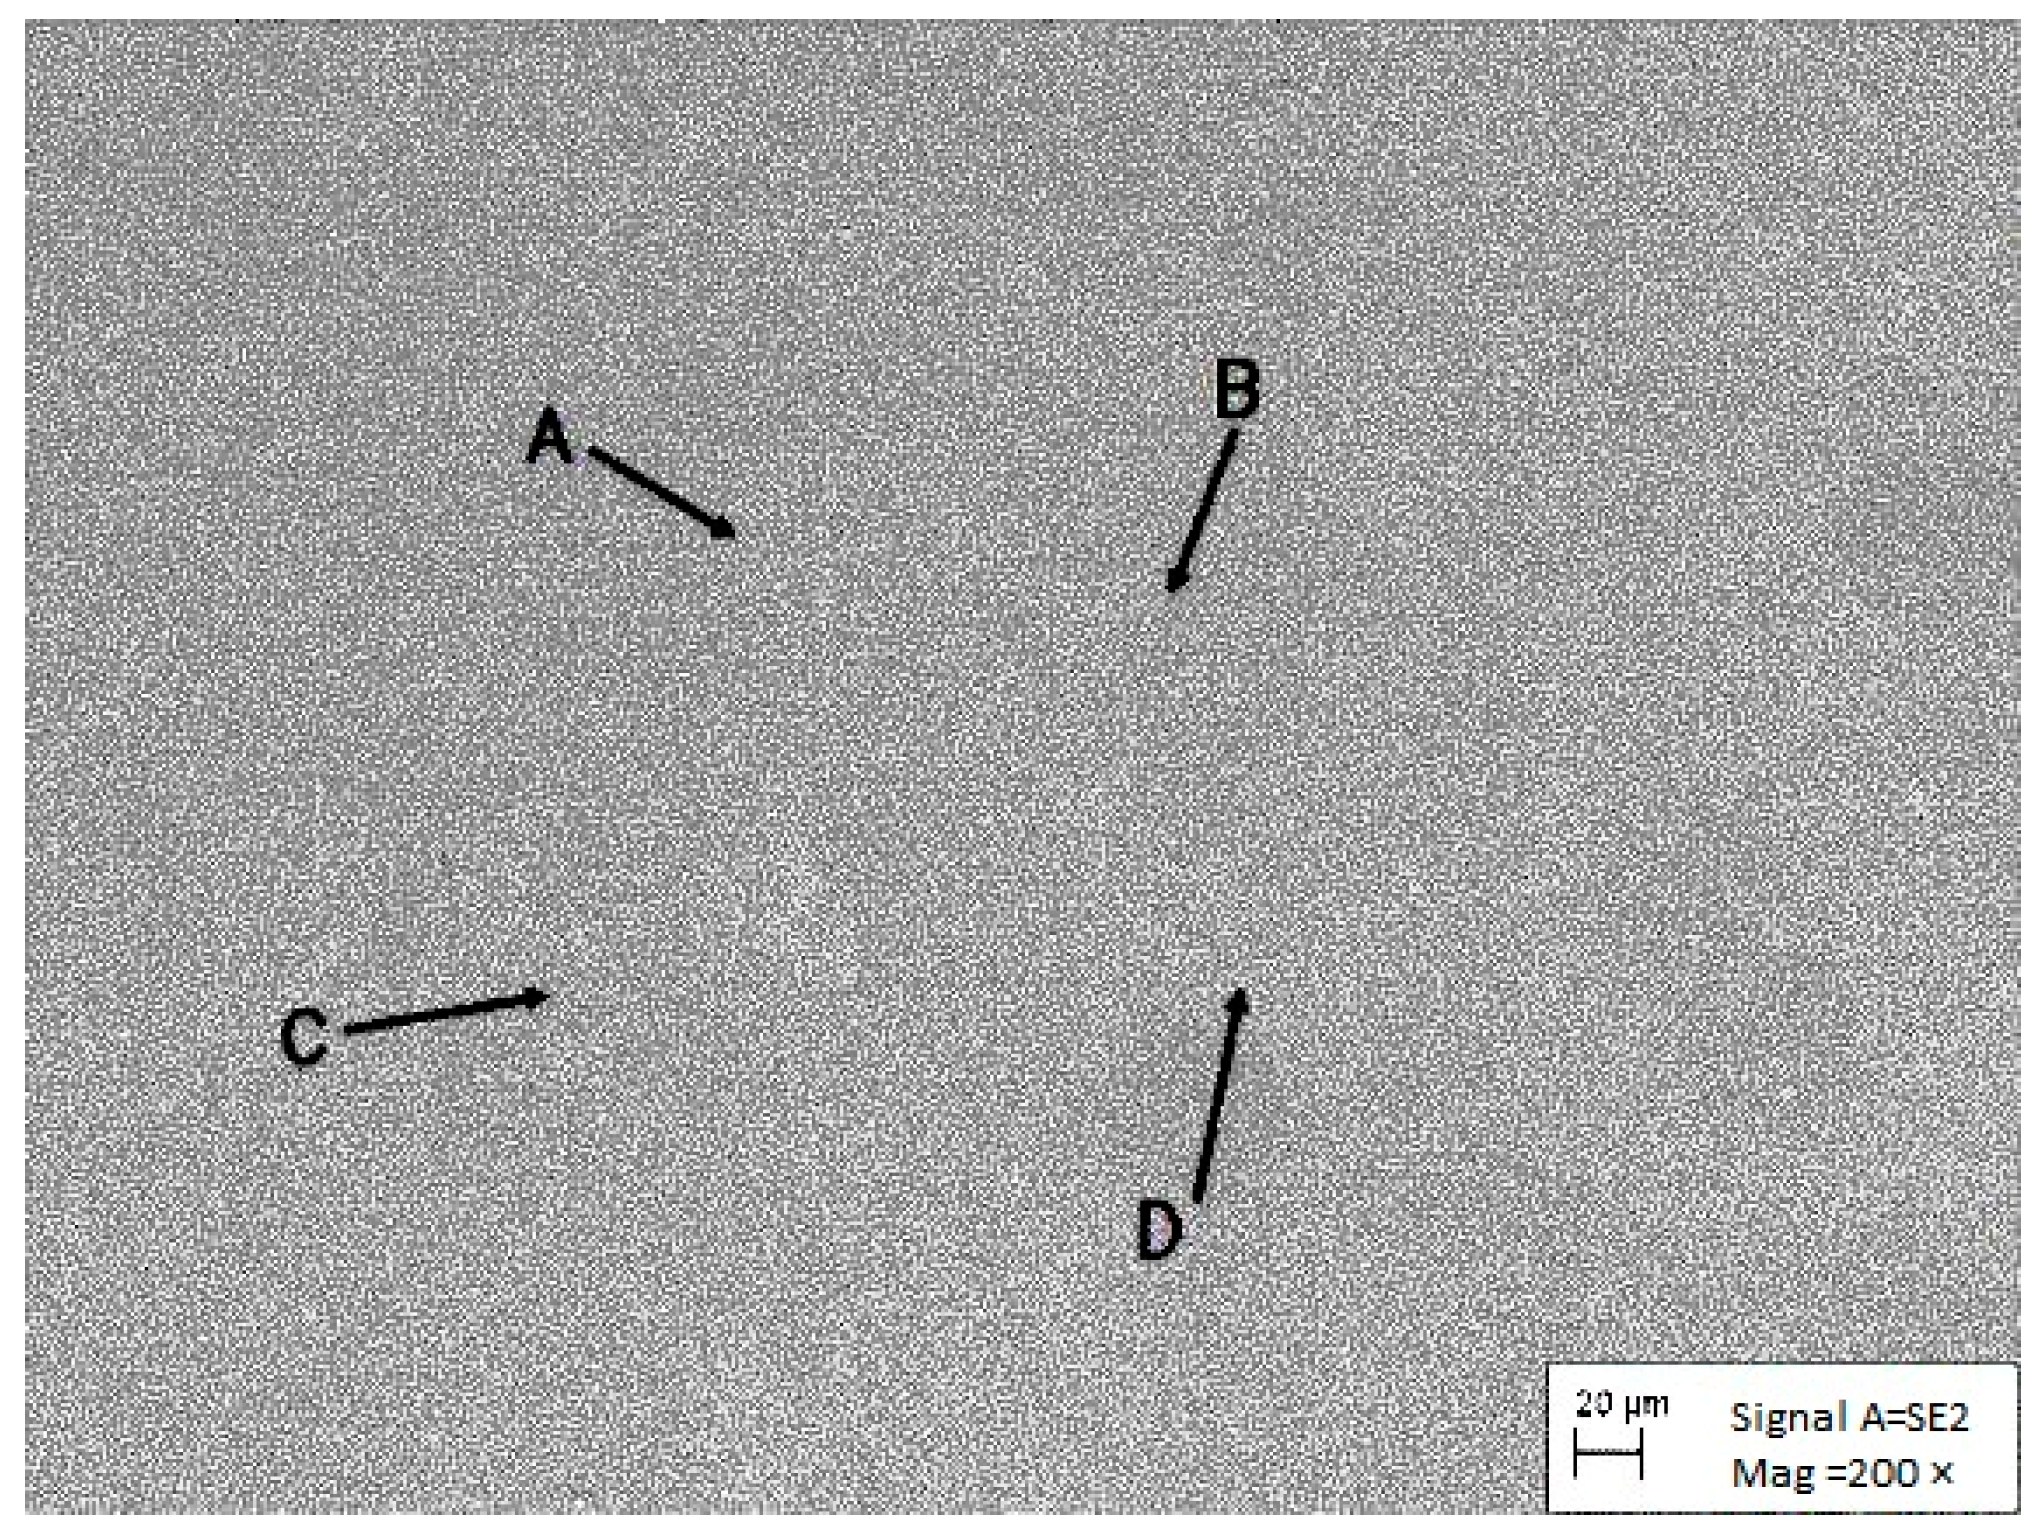
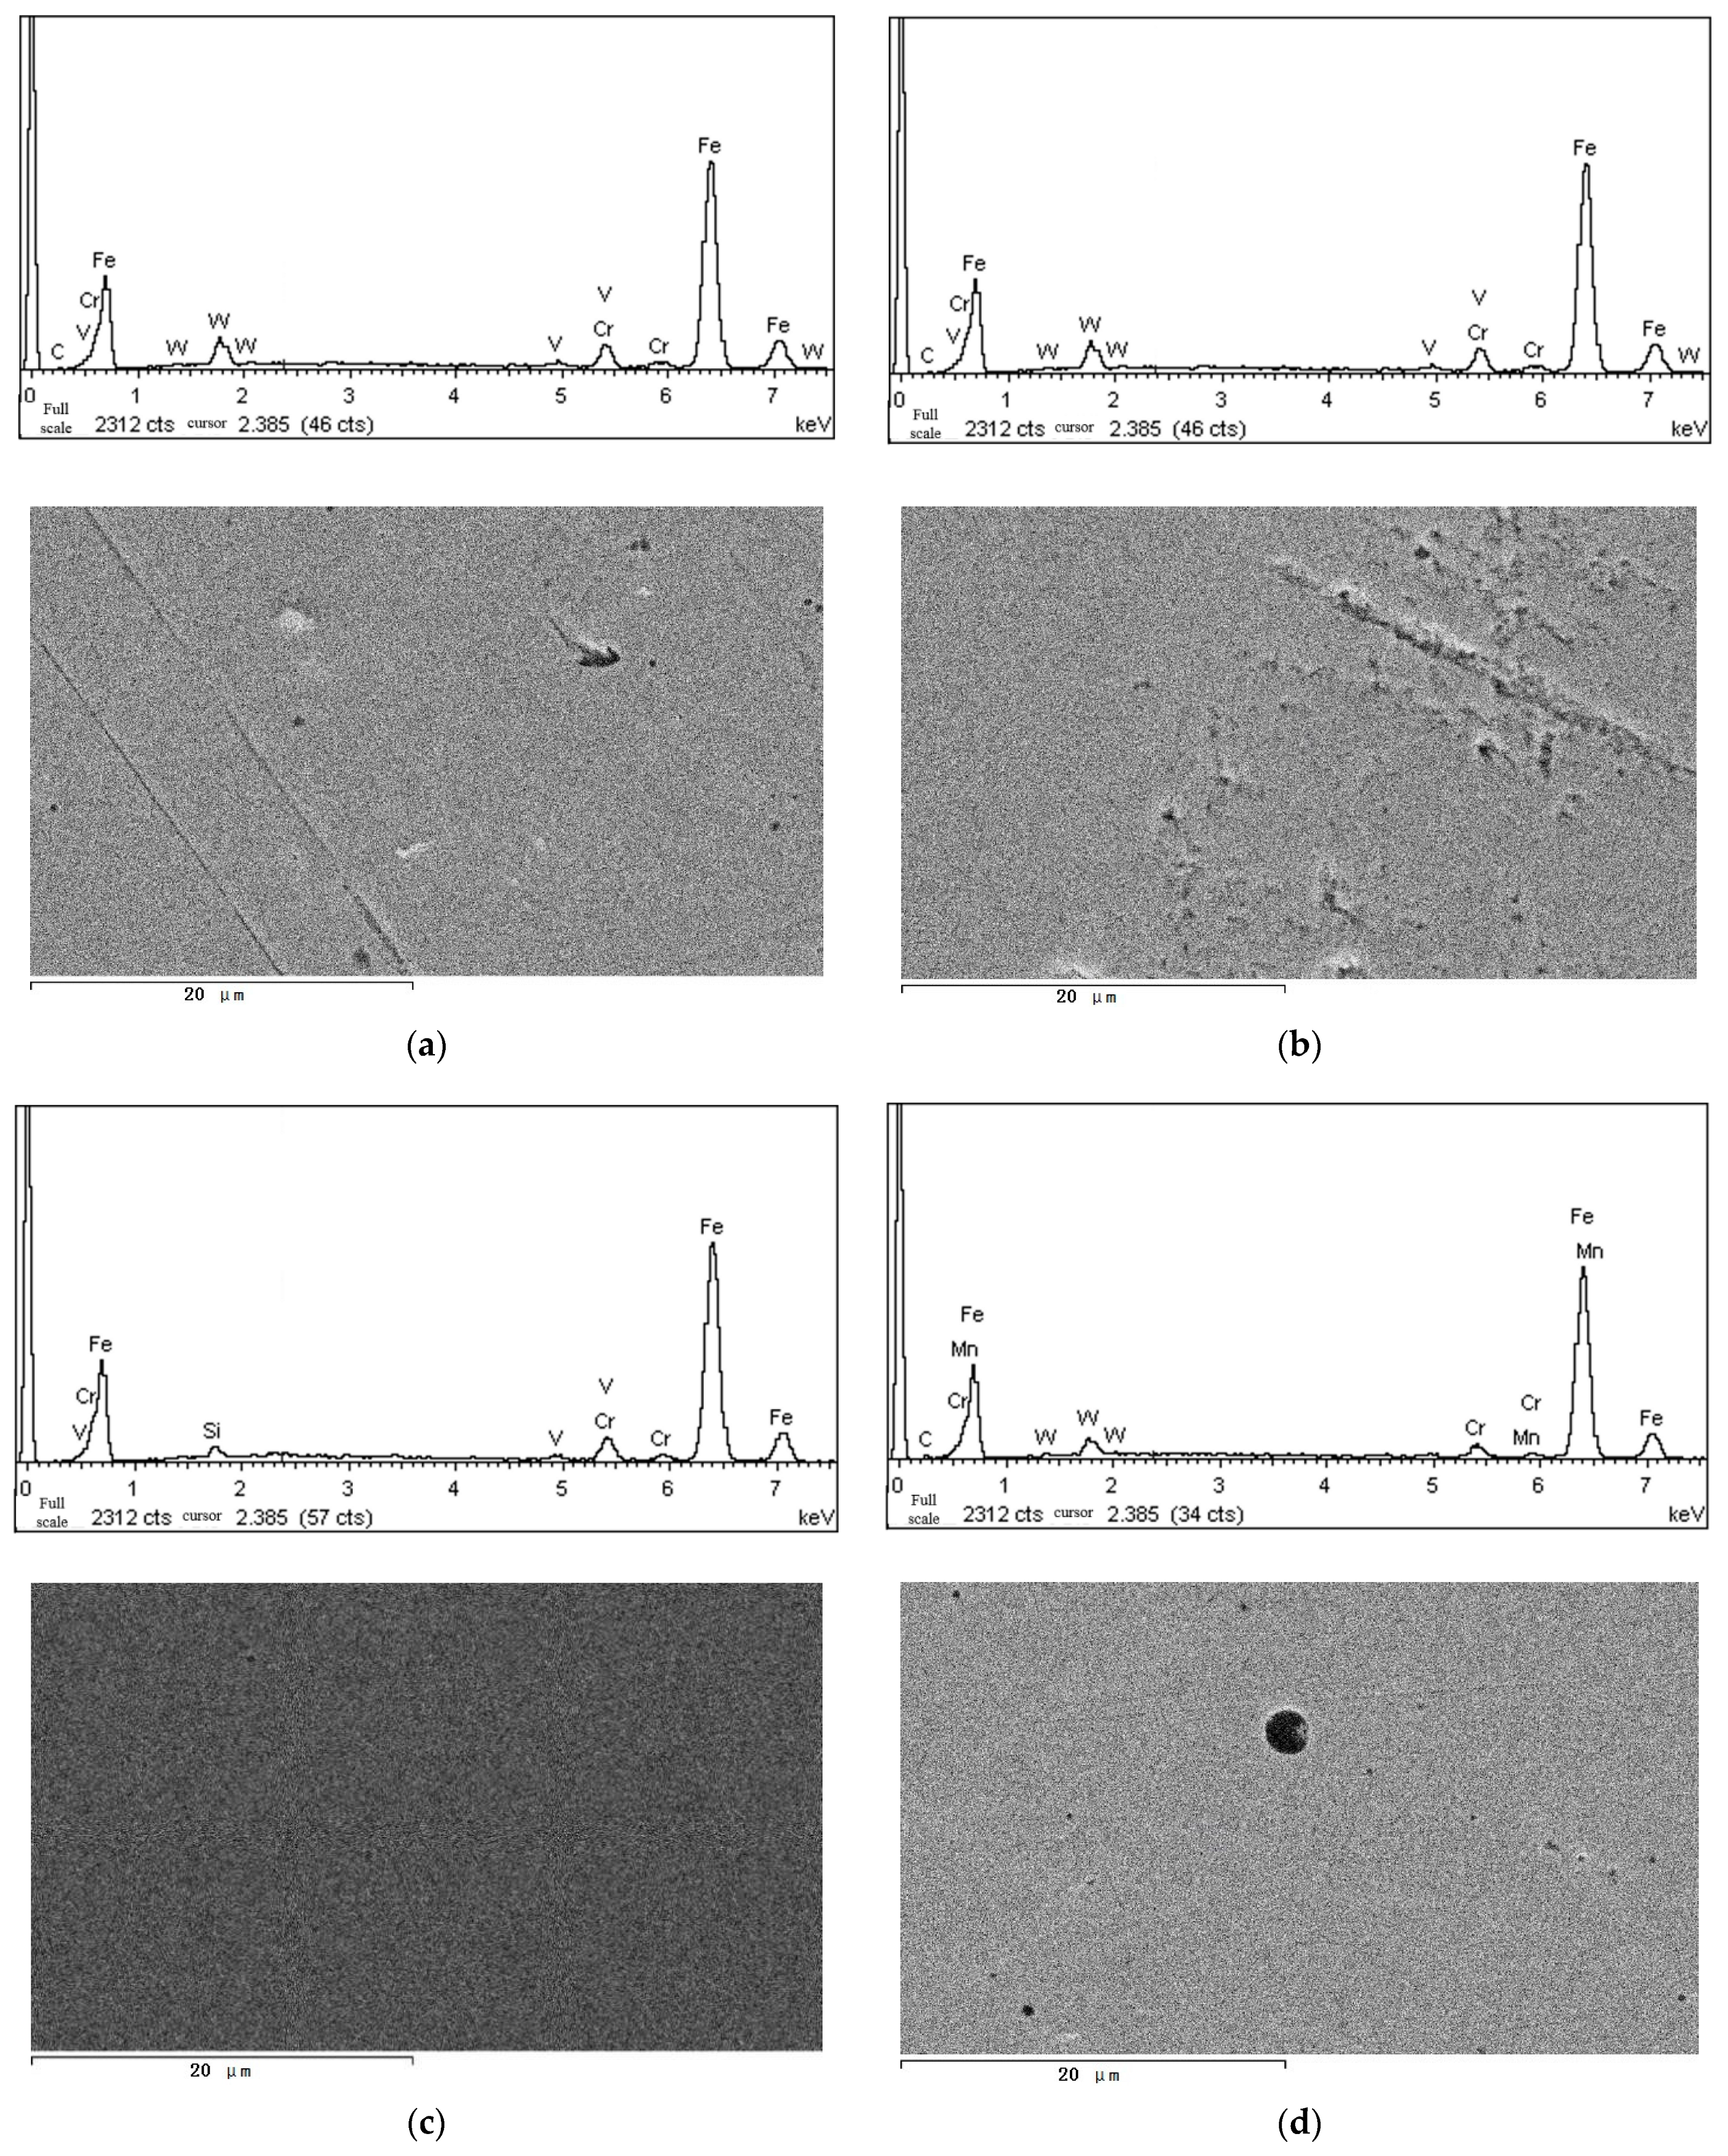
After analyzing the phase composition of the surfacing layer, the morphology scanning and EDS analysis were carried out. As shown in Figure 8, the cross-section morphology of EPMA (electron probe micro analysis) is enlarged 200 times. It can be seen from the figure that there are no defects such as pores and cracks in the surfacing layer, indicating that the surfacing quality is better, which is mainly related to the argon rich shielding gas isolating air. Through EDS analysis of points A, B, C and D in Figure 8, the EDS diagram as shown in Figure 9 and the EDS analysis results of different regions as shown in Table 4 are obtained. According to the composition of H13 steel flux cored wire shown in Table 4 the alloy elements of A, B, C and D are mainly Fe and a small amount of Cr, W, C, Si and Mn, and no new alloy elements are found. According to the energy spectrum analysis, the eutectic carbides in H13 steel may exist in the form of mixed coexistence of Cr and Si carbides. Combined with the results of XRD phase analysis, the eutectic carbides in H13 steel are mainly V8C7 and SiC, and the secondary carbides are Cr23C6 and Cr7C3.

4. Simulation Modeling Analysis of H13 Steel Surfacing Remanufacturing

4.1. Establishment of Finite Element Model

In order to further reveal the evolution law of temperature, stress and deformation in the process of surfacing, so as to better analyze the results of experiment, this research carries out simulation modeling analysis on H13 steel surfacing remanufacturing.
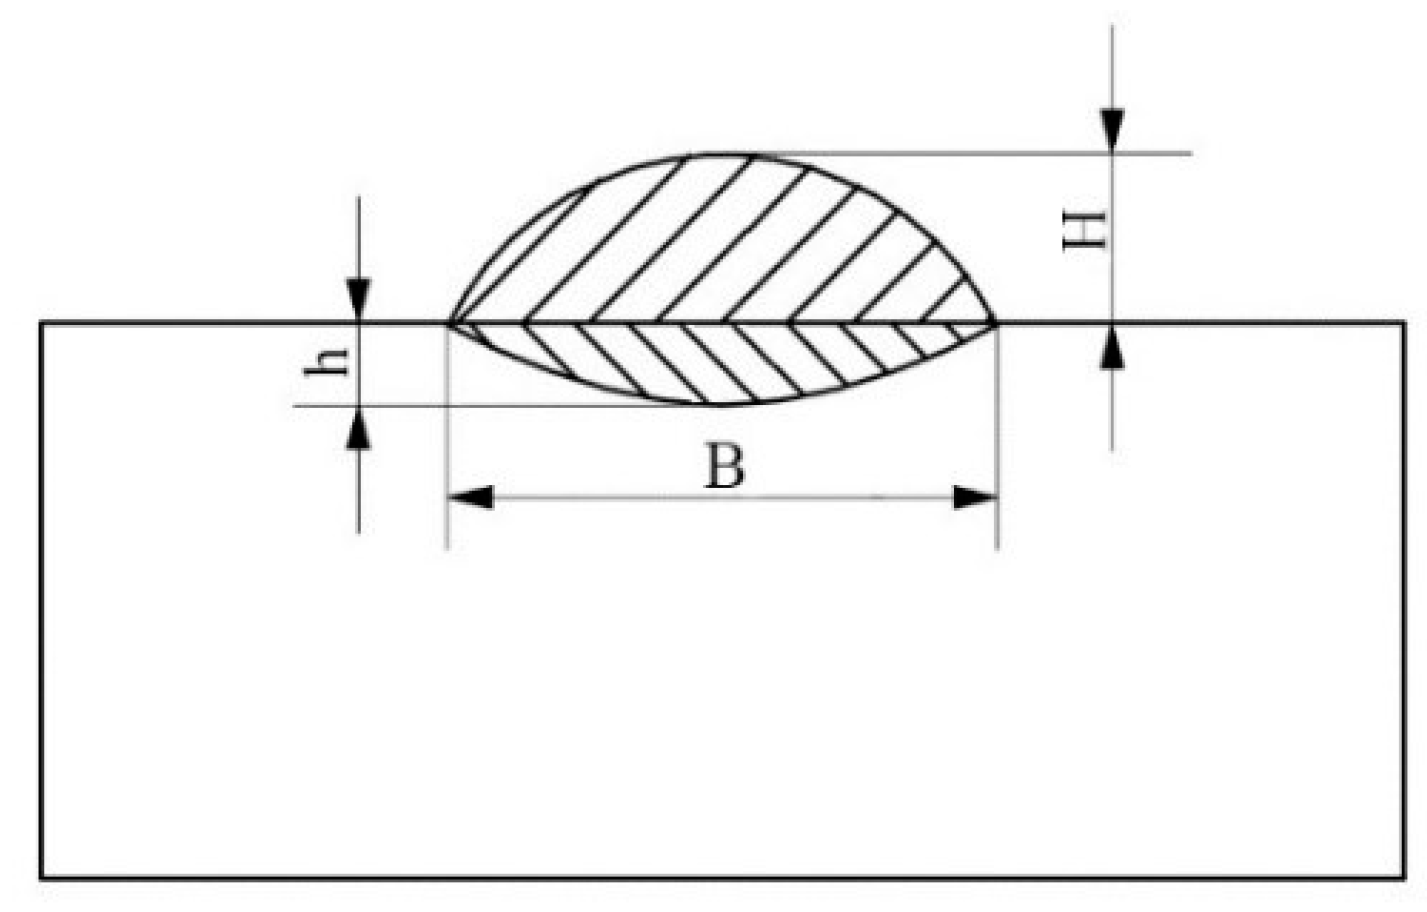
The sampling sections after surfacing are measured by Vernier calipers as shown in Figure 10. The measured depth of fusion H = 0.79 mm, width of fusion B = 10.08 mm and reinforcement H = 2.24 mm. Due to the large size of the surfacing model, in order to improve the calculation efficiency and accuracy, the grid form of alternate density is adopted, that is, the welding part adopts a denser grid, and the part far away from the weld adopts a thicker grid. The size of the substrate is the same as that of the base metal; use visual mesh module finite element model.
Both the substrate and welding wire materials are selected from AISI_H13 steel in the material library. The chemical composition of AISI_H13 steel material is shown in Table 2. In the process of surfacing, the fixed base plate is used to fix the X, Y and Z degrees of freedom on both sides of the clamp. At the end of the cooling stage, no restriction is imposed. The outer surface, except the contact surface between the surfacing layer and the substrate, is set as the heat transfer boundary condition, and the initial temperature is set at 20 °C. According to the results of experiment, set the simulation process parameters as shown in Table 5.

4.2. Analysis of Simulation Temperature Field

During the surfacing process, the temperature field is coupled with the stress field and the microstructure field. During the surfacing process, the temperature field undergoes a nonlinear transient change, which simultaneously promotes the change of the other two fields. The phase transformation of microstructure field will cause the change of temperature field. However, the effect of stress field on temperature field and microstructure field is negligible. The further research should also examine the temperature field of surfacing welding that the basis for the change of phase transformation, deformation, thermal stress and strain, and residual stress [19].
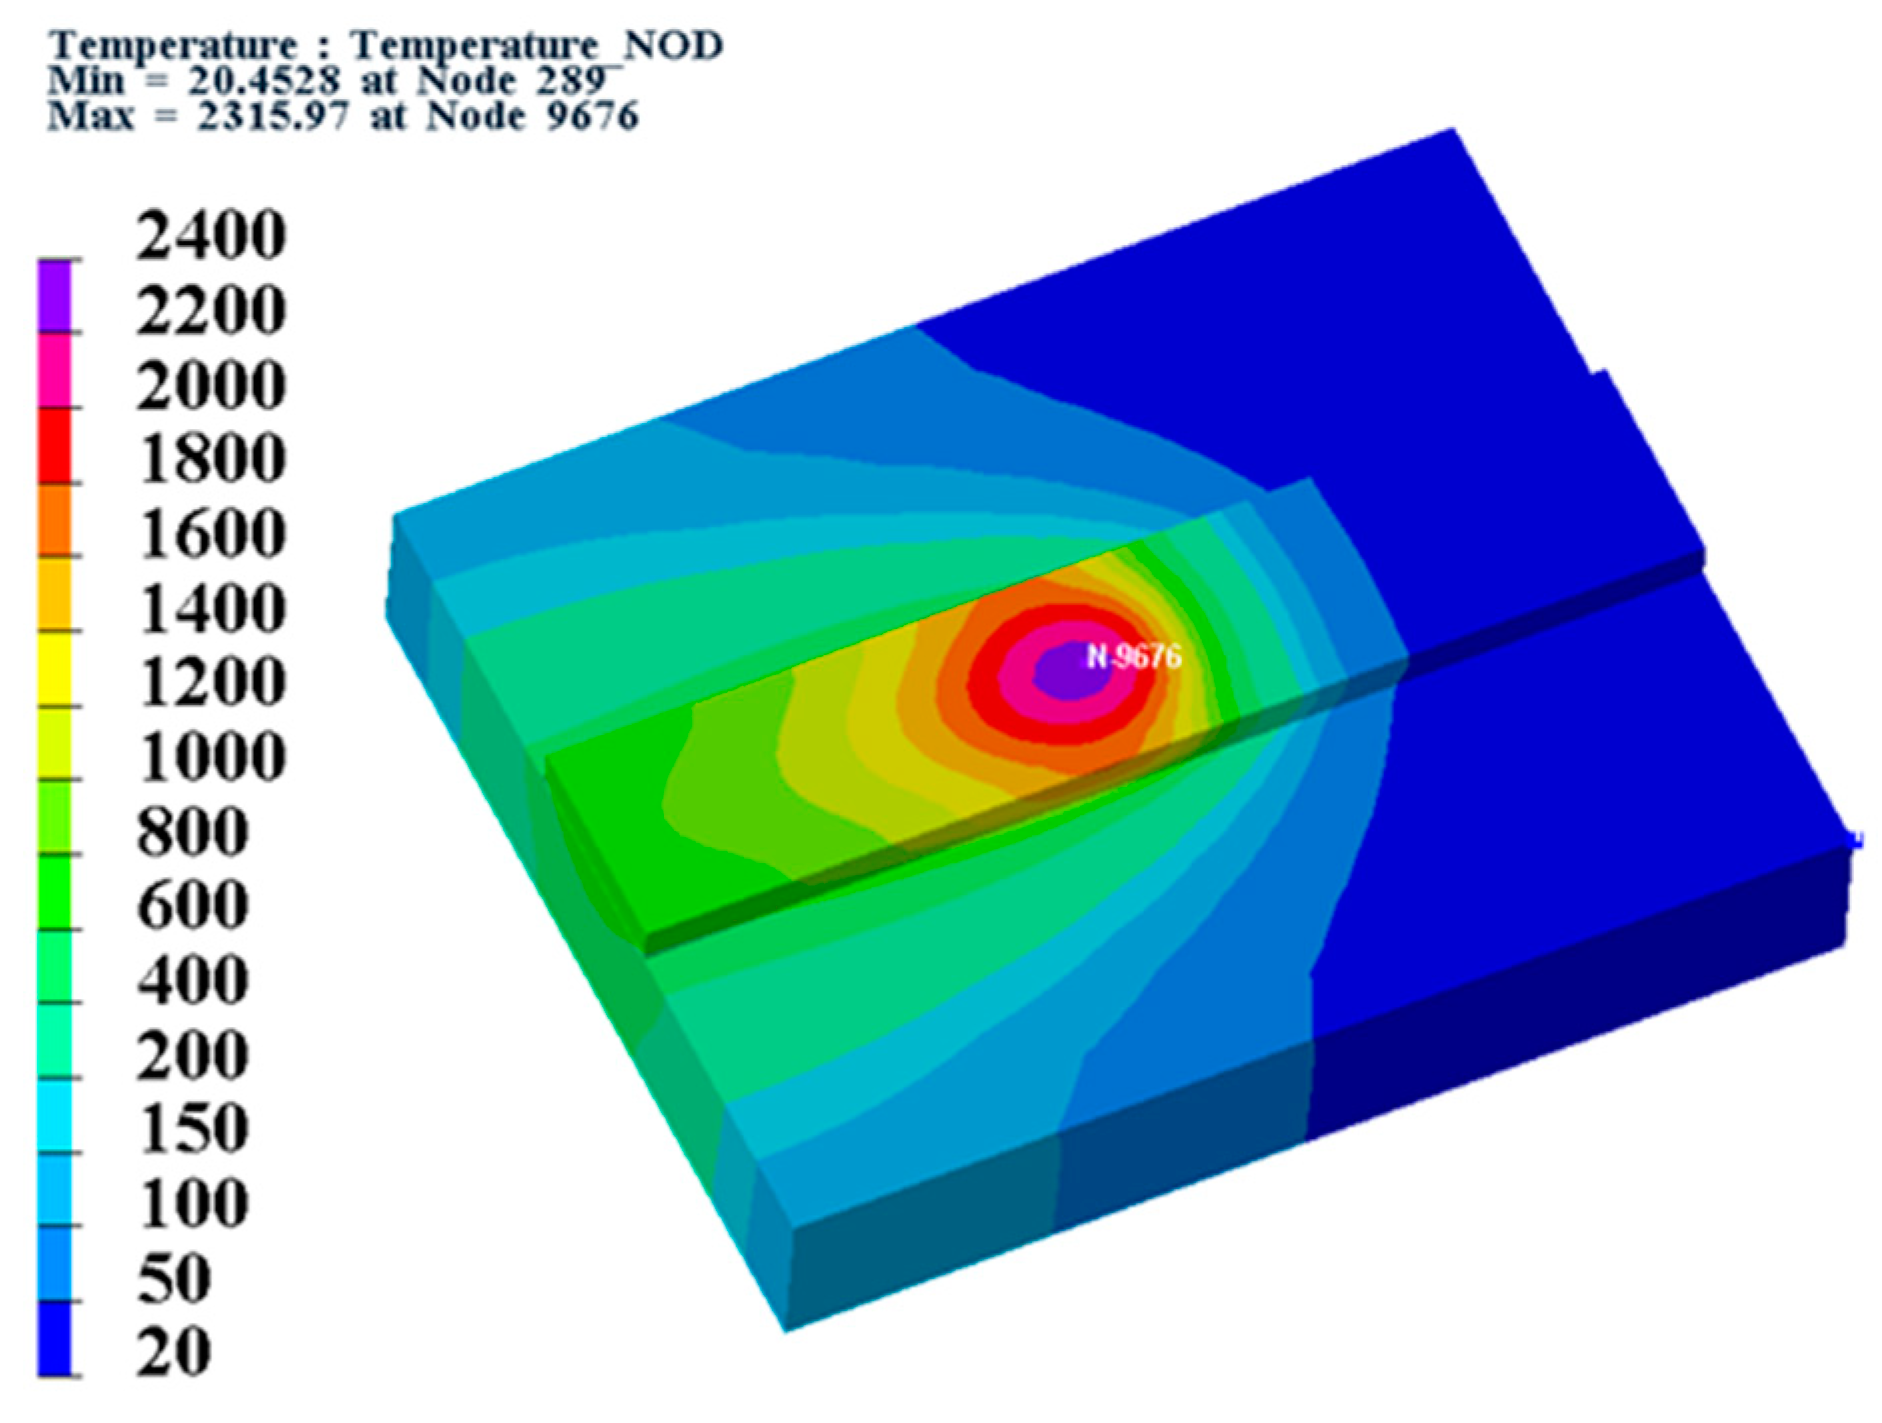
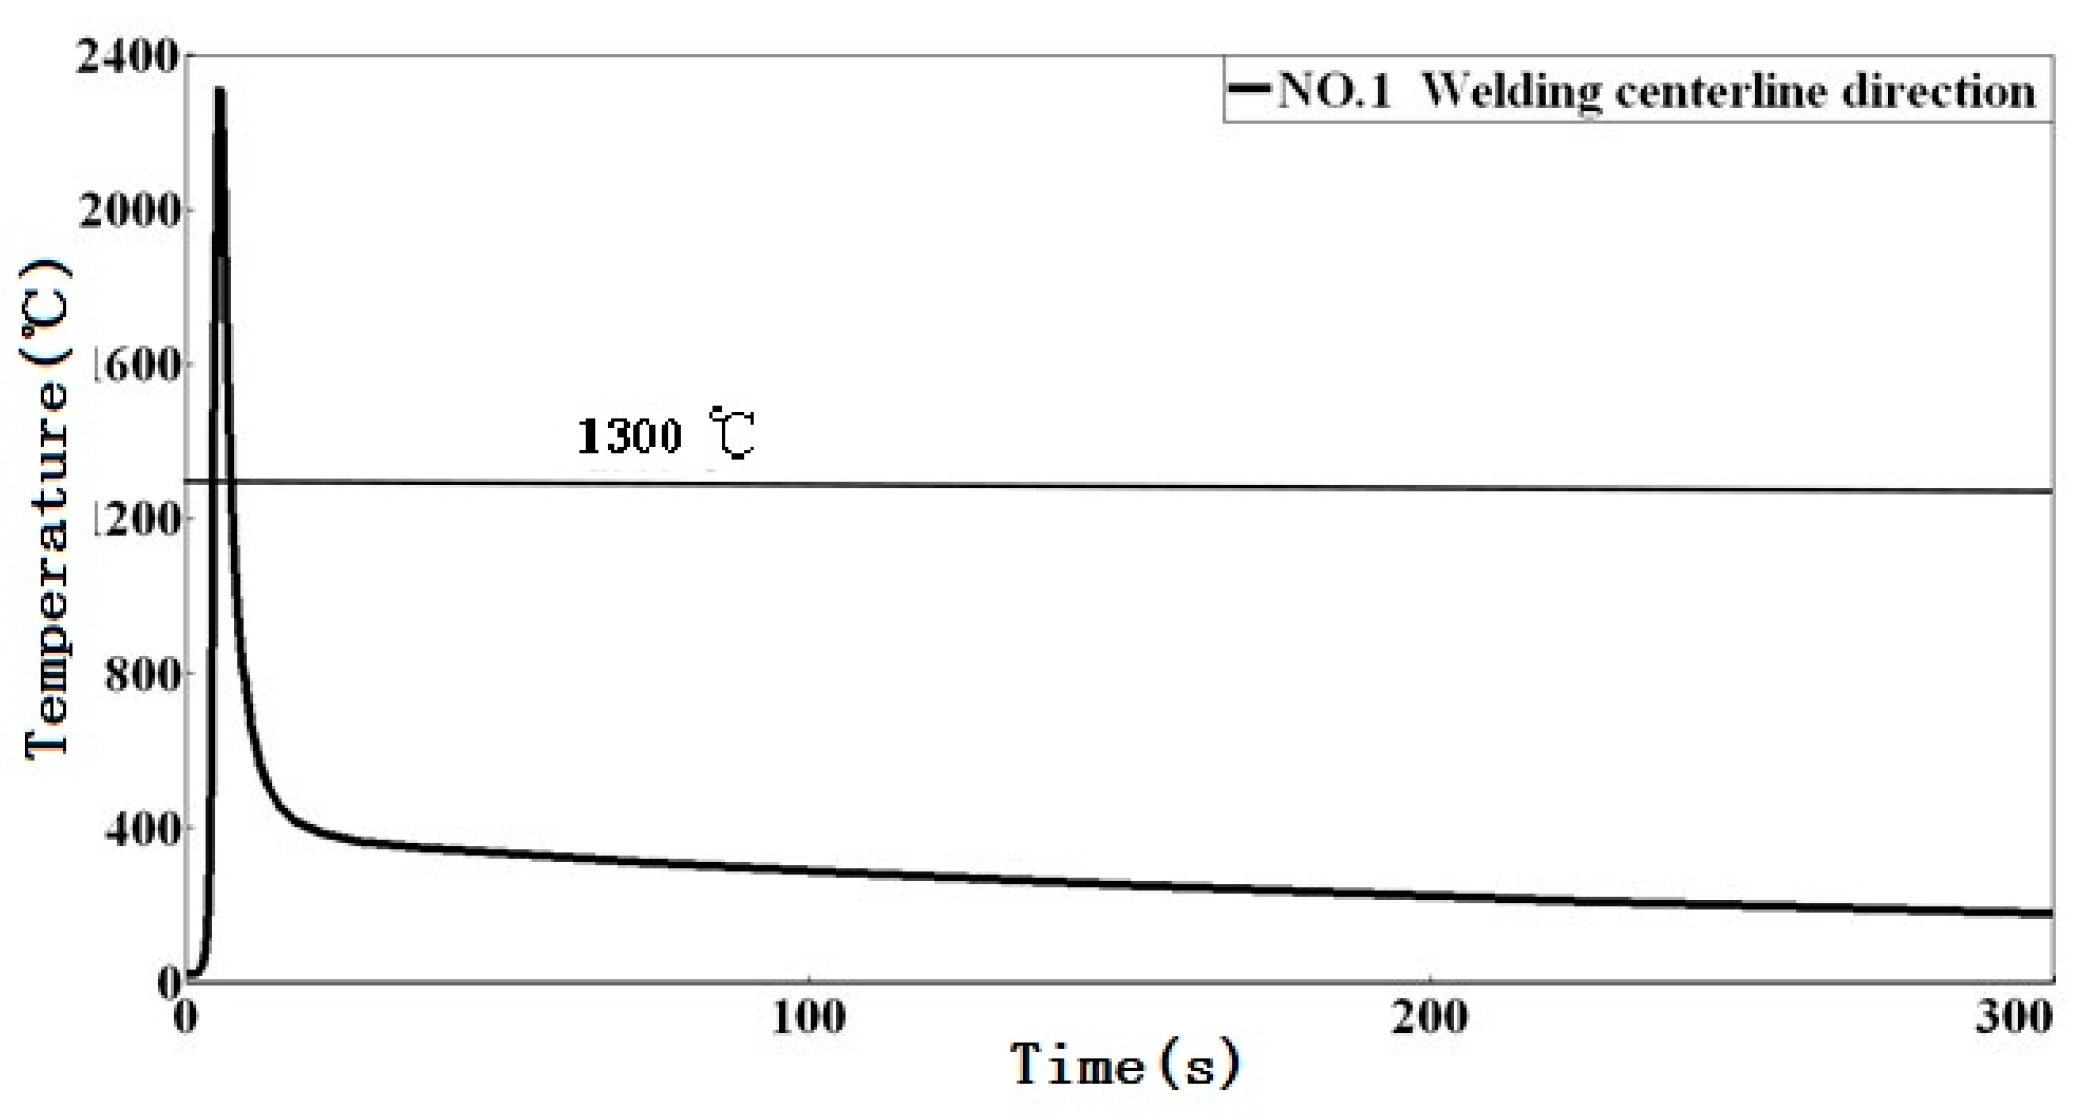
Through Sysweld (version 2019) simulation, the temperature field cloud picture when the surfacing welding heat source is located at the midpoint of the surfacing center line as shown in Figure 11 is obtained. It can be seen from the figure that the shape of molten pool is always double ellipsoid, which is consistent with the preset theoretical heat source model. As shown in Figure 12, it is the thermal cycle curve at the midpoint of the surfacing centerline. It can be seen from the figure that the temperature of surfacing heat source can reach 2300 °C within 1 s, which is higher than the melting point of H13 steel at 1300 °C, indicating the instantaneity of heat transfer during surfacing. The heating rate and cooling rate of surfacing layer are basically the same, but the cooling rate decreases obviously when the temperature reaches 400 °C, which is mainly because the substrate temperature is 400 °C in this period. Compared with Figure 2, the main heat transfer trend in the experiment is basically consistent with the simulation, that is, the heat is transferred from the surfacing layer to the bonding area between the surfacing layer and the substrate, then to the substrate, and finally to the atmospheric environment through the substrate. According to this conclusion, the heat treatment and cooling process can be developed for future research.

4.3. Analysis of Simulation Stress Field

During the surfacing welding process, multiple temperature gradient intervals are generated on the surfacing welding parts, and different surfacing residual stress fields and deformation fields are generated accordingly. Analyzing the stress field in the surfacing process is helpful to understand the quality of surfacing remanufacturing and effectively control the generation of harmful residual stress.
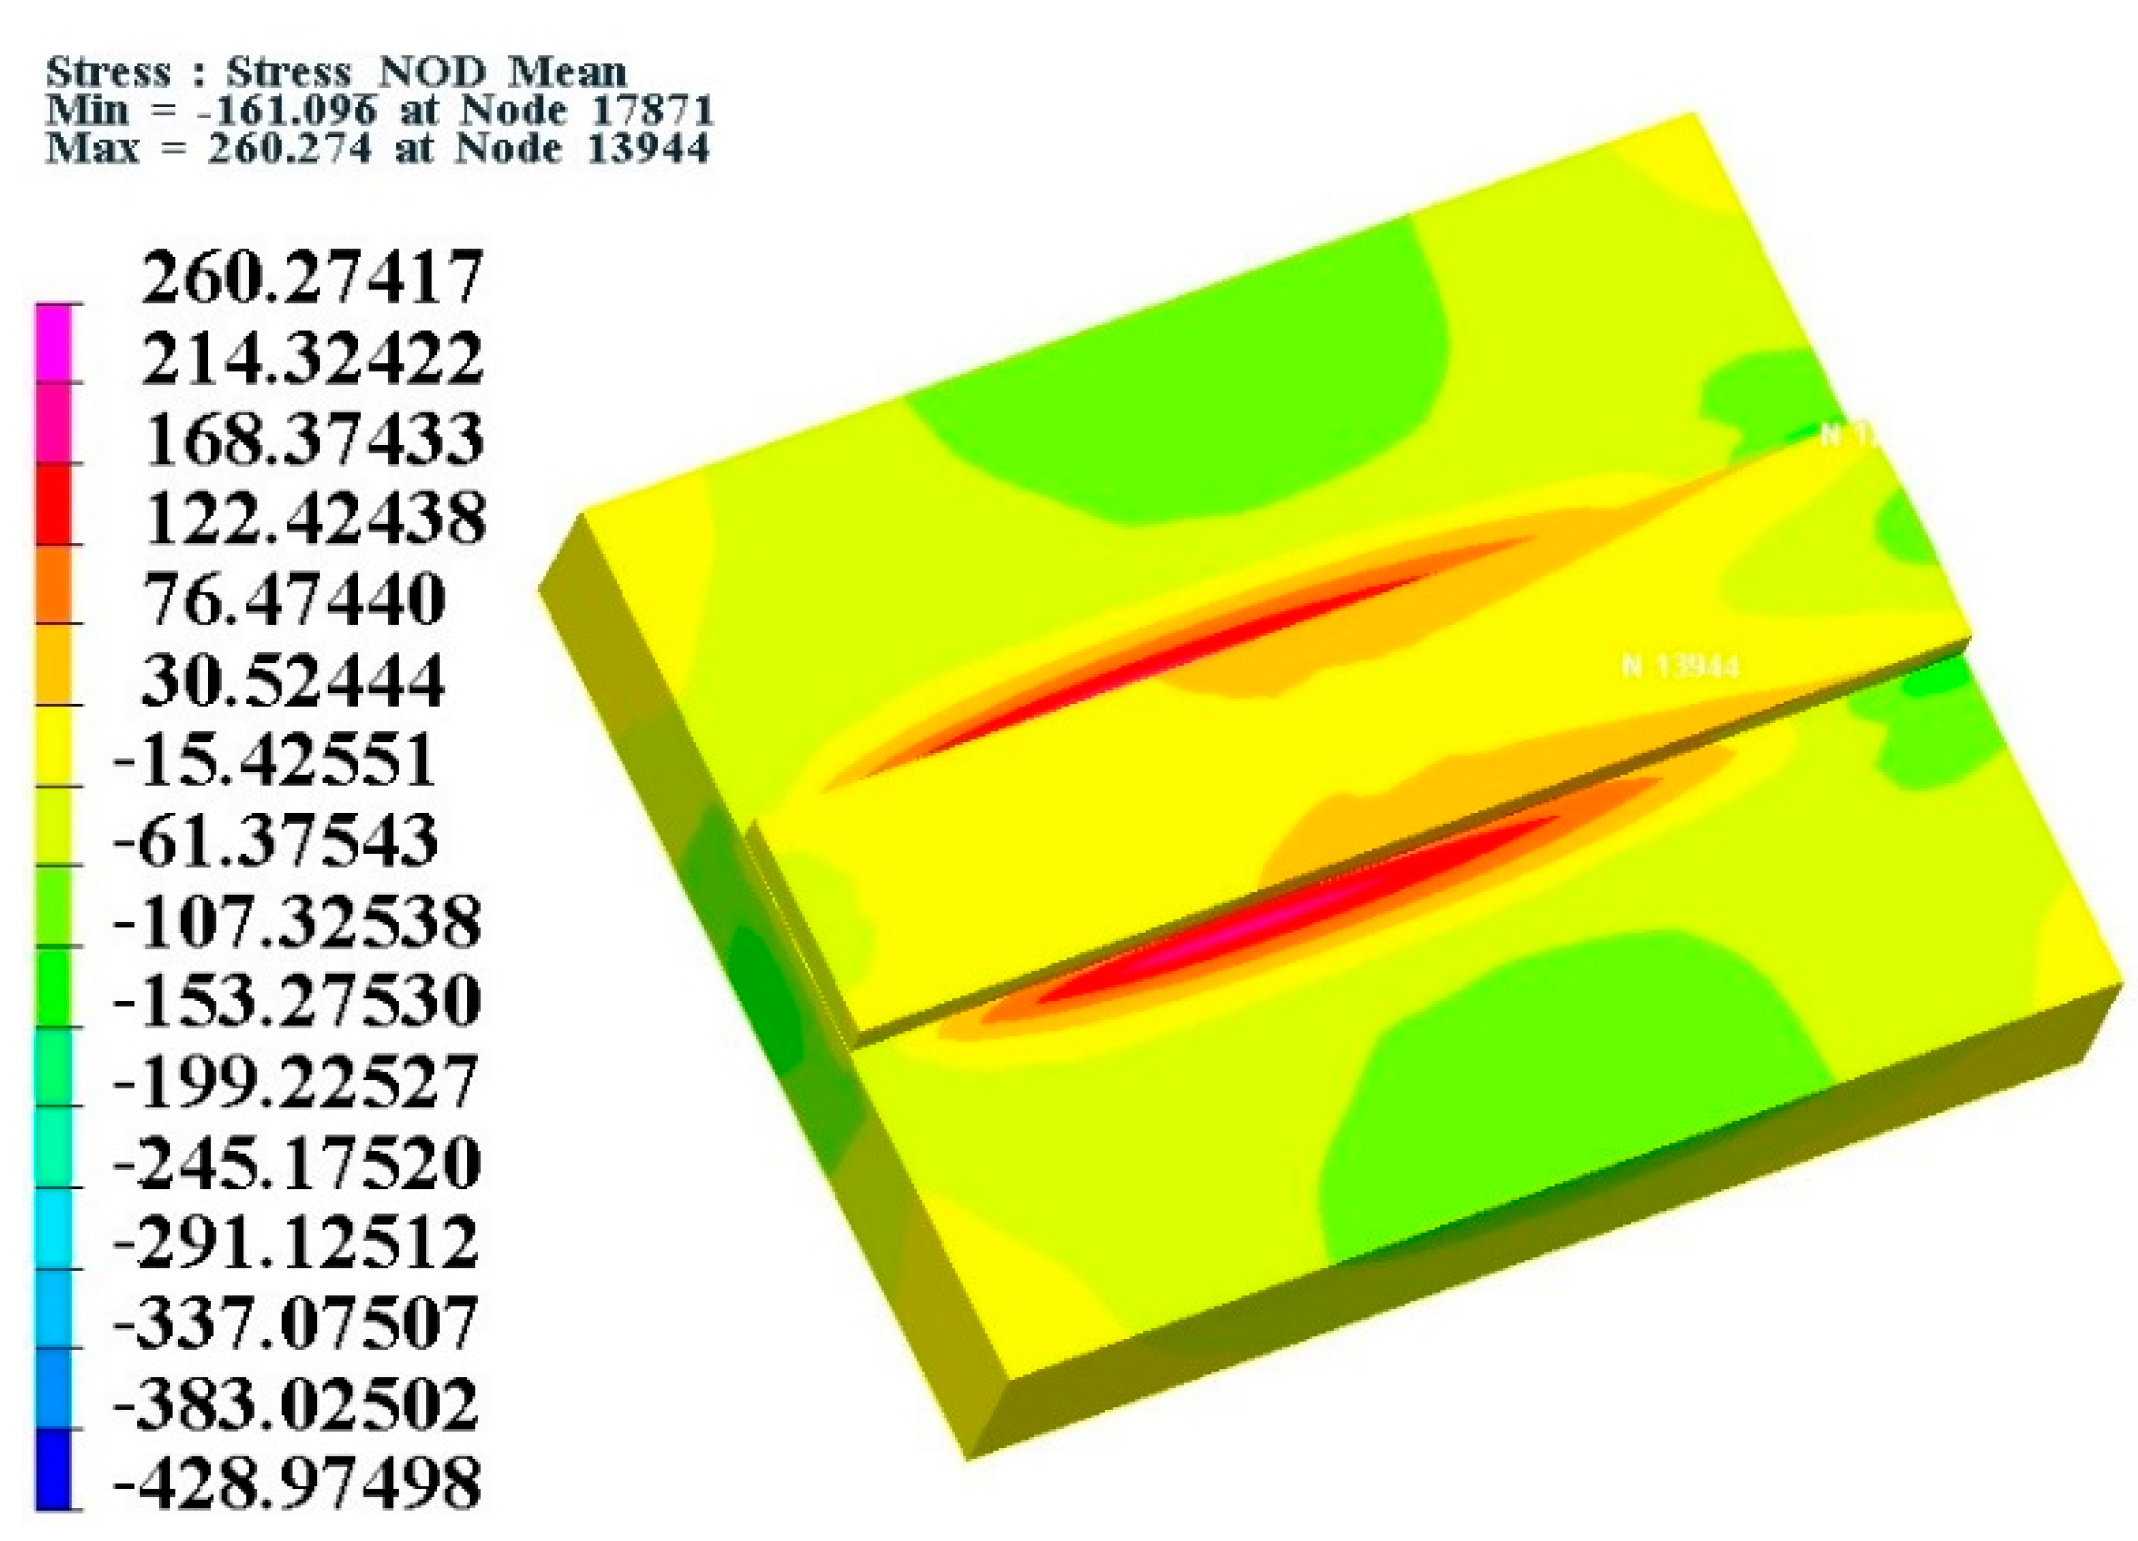
The residual stress distribution at the end of surfacing is shown in Figure 13. The stress is mainly concentrated in the arc starting and ending points, followed by the external constraints on the substrate on both sides of the surfacing layer. Thus, the above-mentioned areas are significant in multi-layer surfacing. For regular surfacing parts, the stress distribution is symmetrical with the center line of surfacing. When the whole surfacing part is cooled to room temperature, there is a lot of stress concentration on the substrate far away from the surfacing heat source. Therefore, in order to reduce the harm of stress concentration, the stress can be reduced by preheating the weldment before and after surfacing. However, the shape, size and property distribution range of residual stress are closely related to the heat treatment process, material and forming method of the engineering cutter ring. The size and shape of surfacing repair area also affect the generation of residual stress, so the follow-up studies should take the size and shape of surfacing repair area into account.
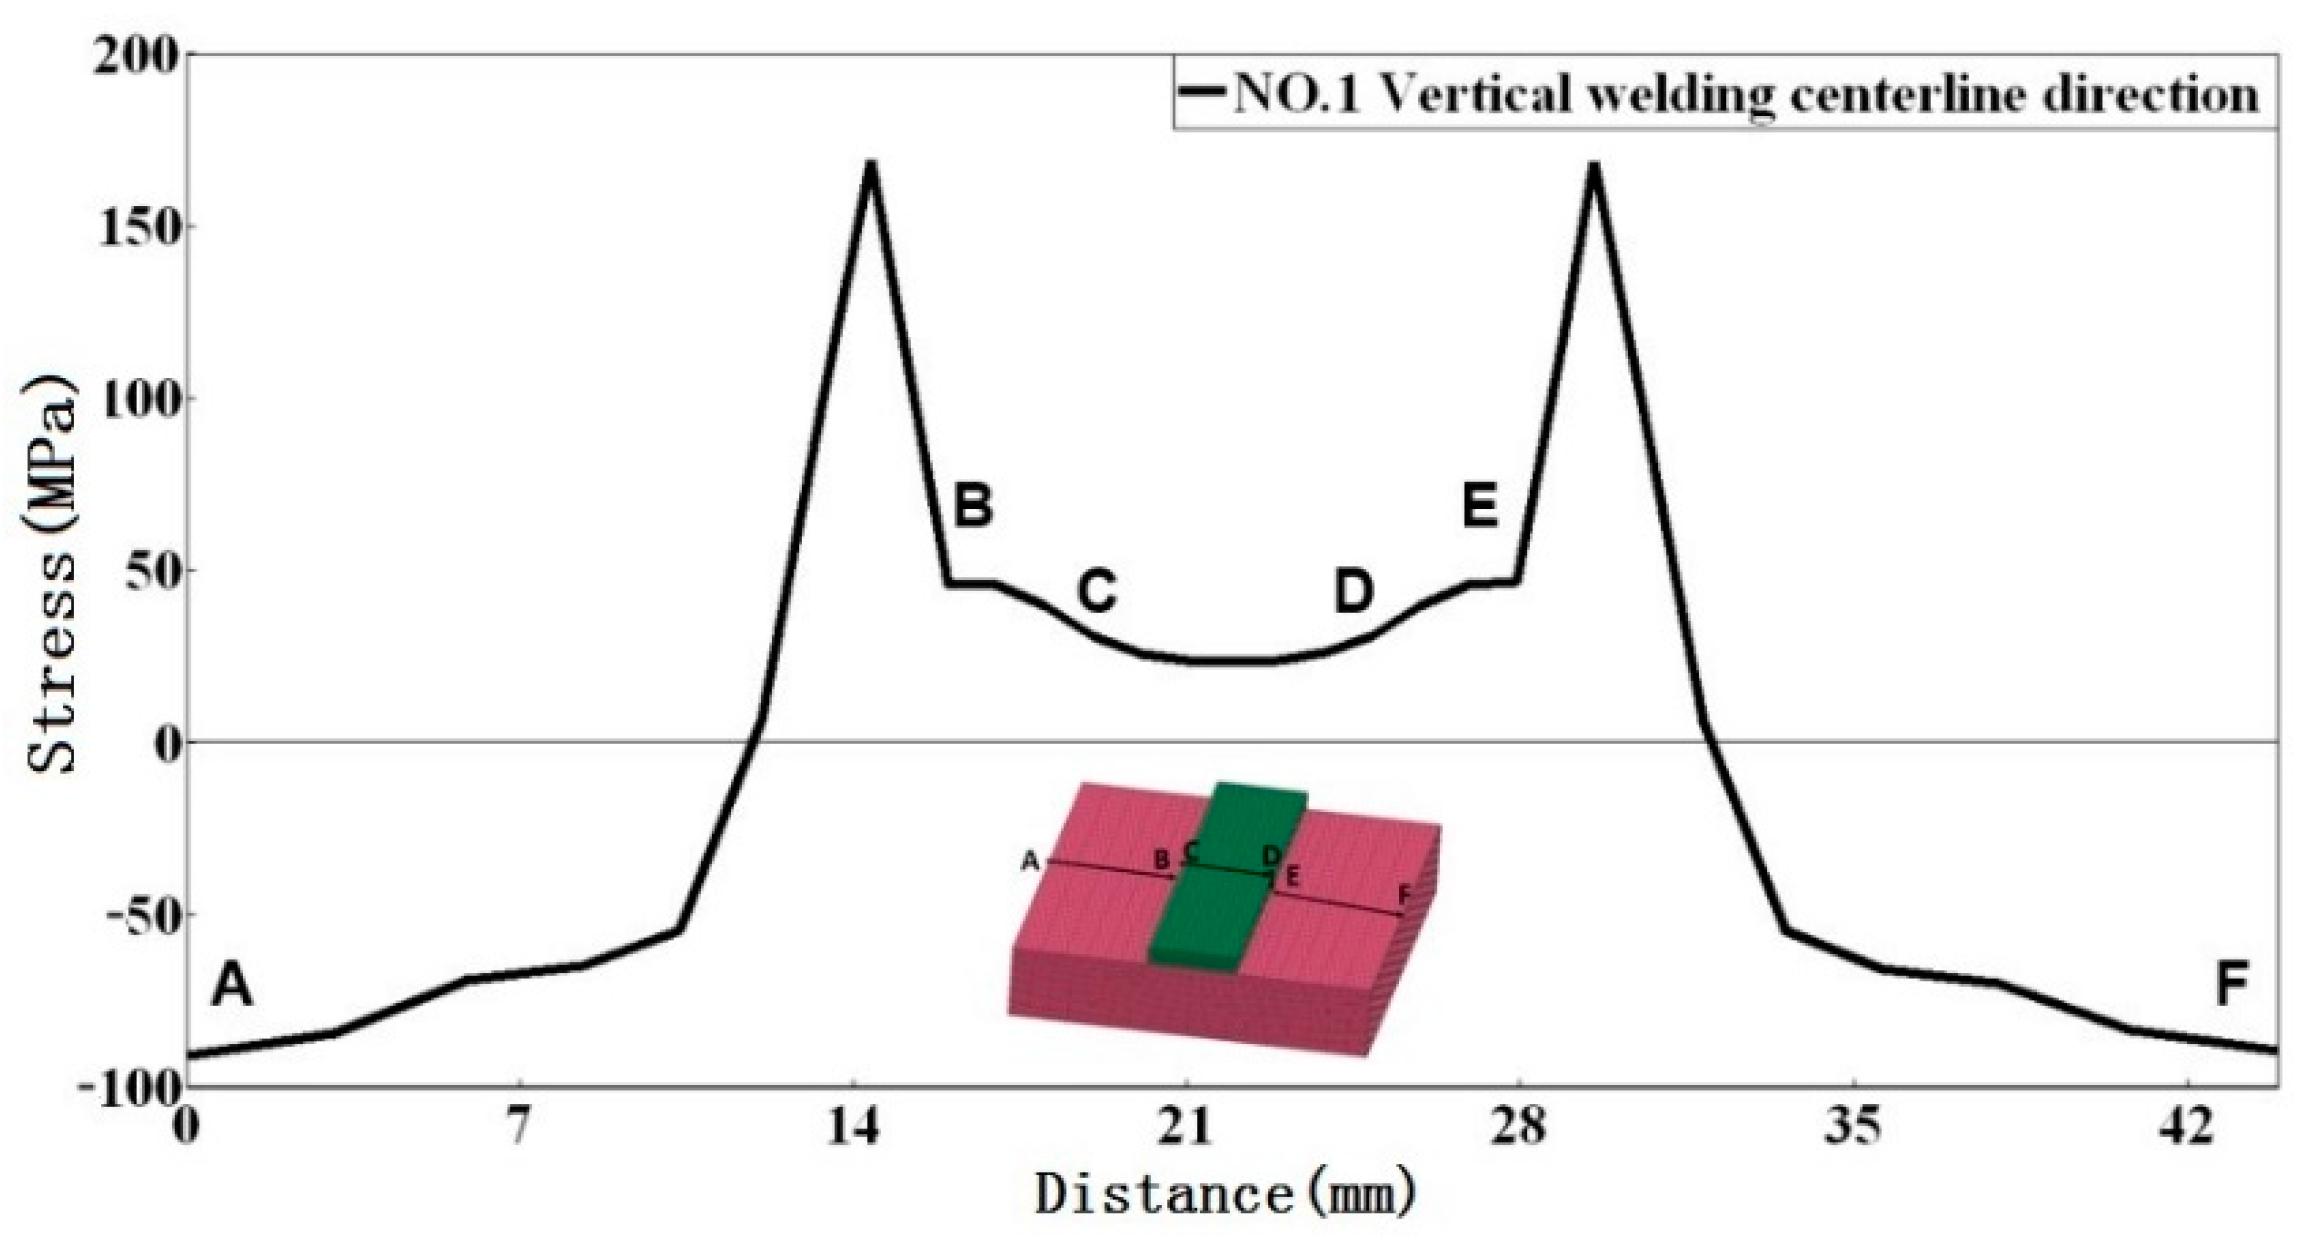
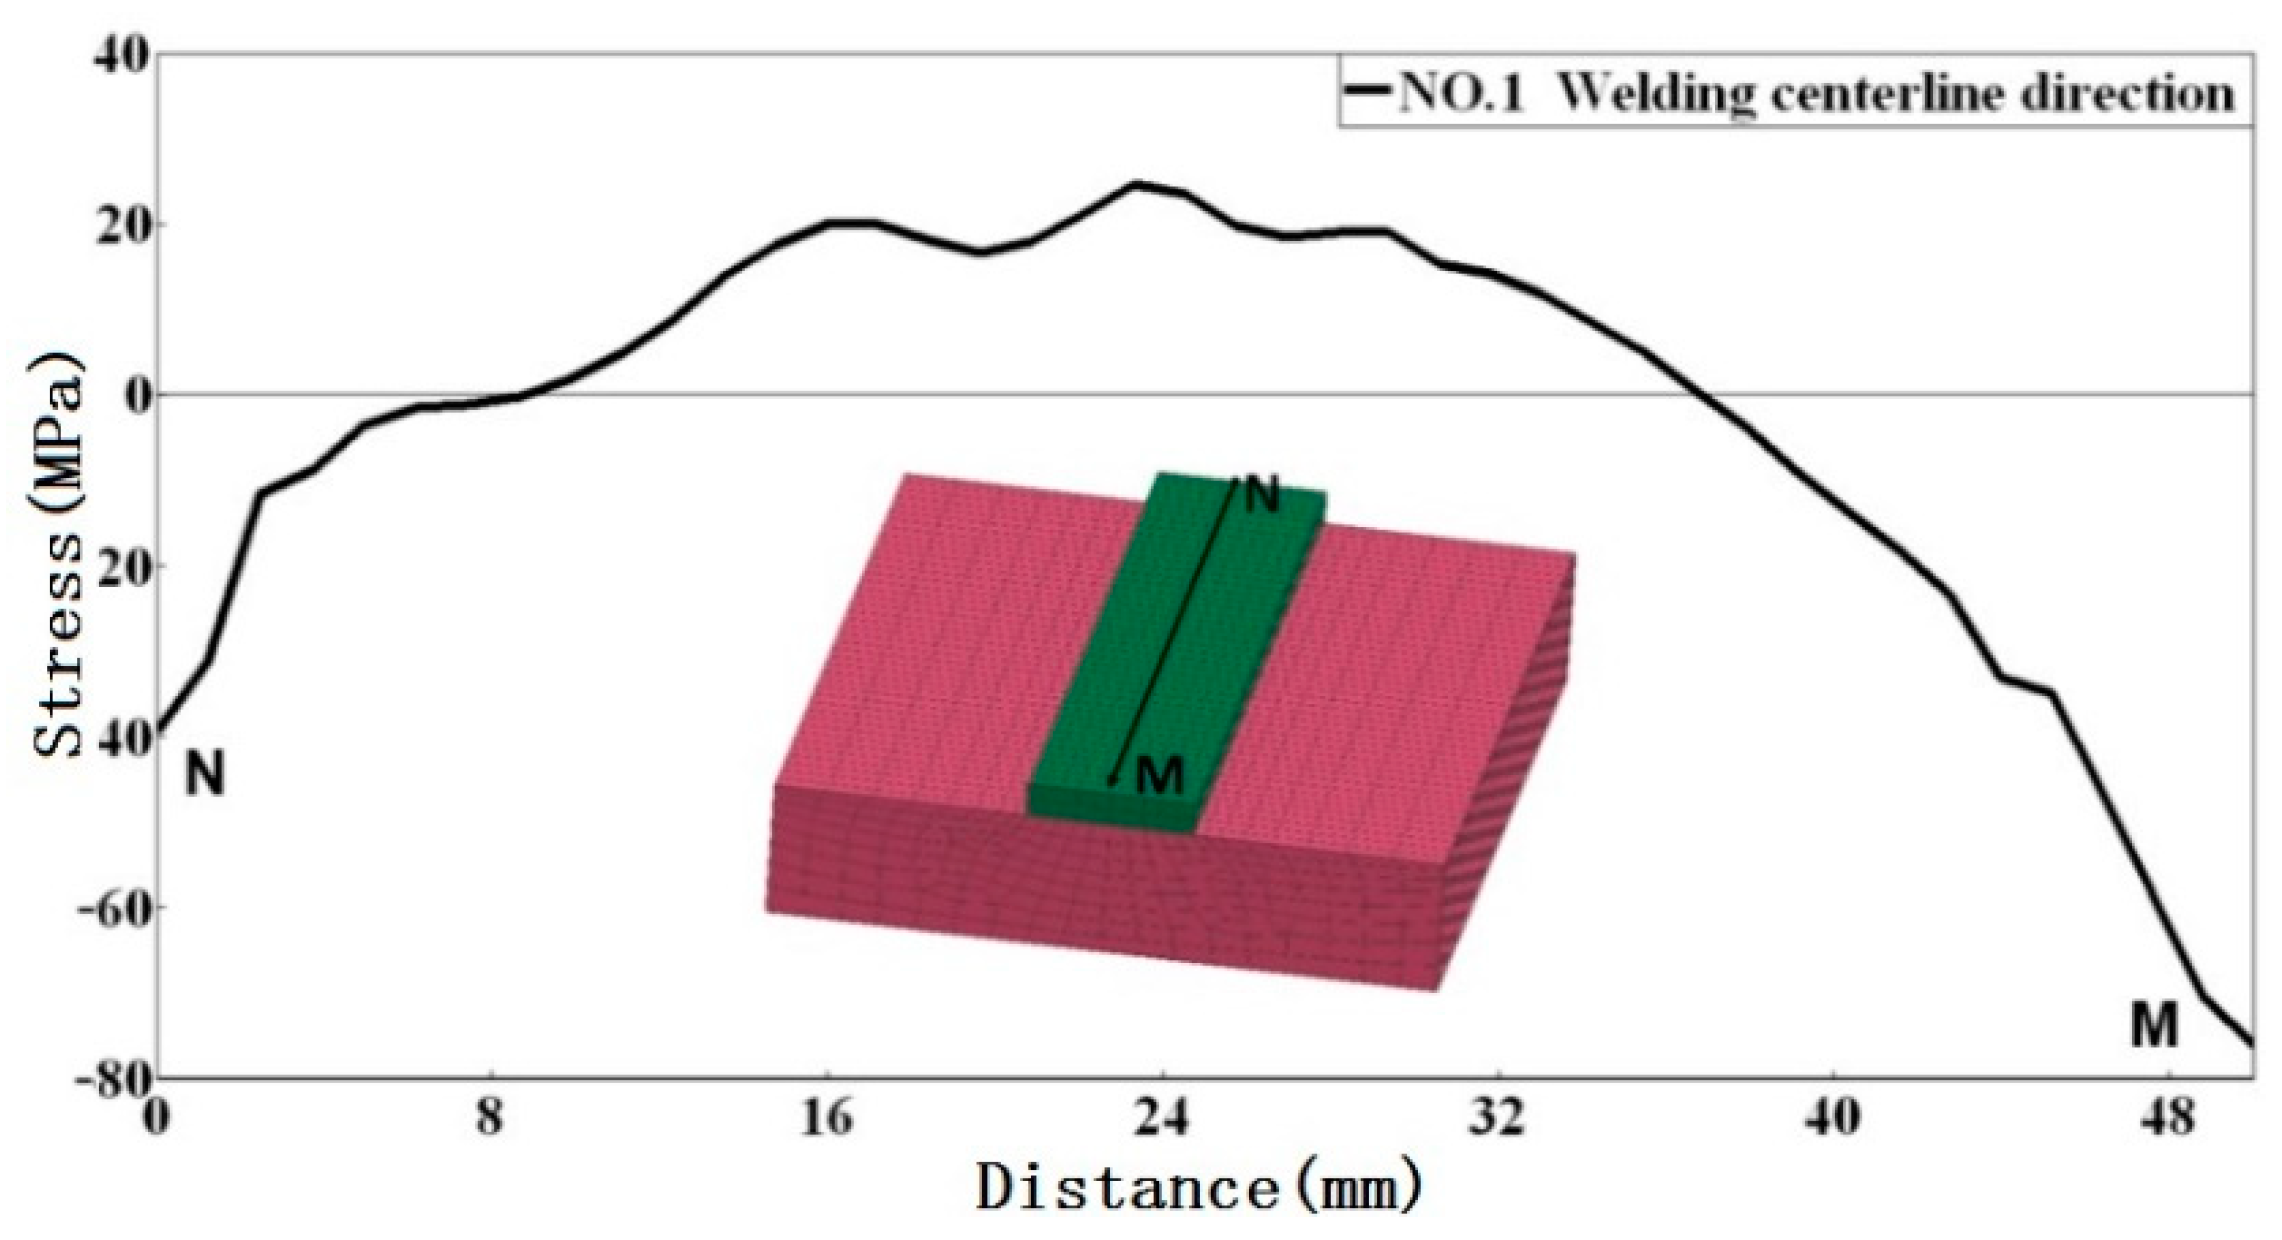
Figure 14 demonstrates the residual stress distribution curve of the surfacing layer at the line A–F on the middle surface of the surfacing welding. In this Figure, the residual stress is symmetrically distributed along the center line of surfacing. The stress concentration at the joint of surfacing layer and substrate, referred as tensile stress, is also shown in Figure 15; except from the tensile stress at the constraint of the base plate, the base plate at AB and EF sections of the curve is at the state of compressive stress. There is a great residual stress between AB and EF. Furthermore, in Figure 15 the residual stress distribution curve is on the welding center line, the compressive stress is in the middle of the first layer and the arc ending position, while the tensile stress is in the state from the middle position to the arc ending. This is because there is a temperature gradient between the surfacing layer and the substrate during the surfacing of the first layer, which leads to the local stress concentration.

4.4. Simulation Deformation Field

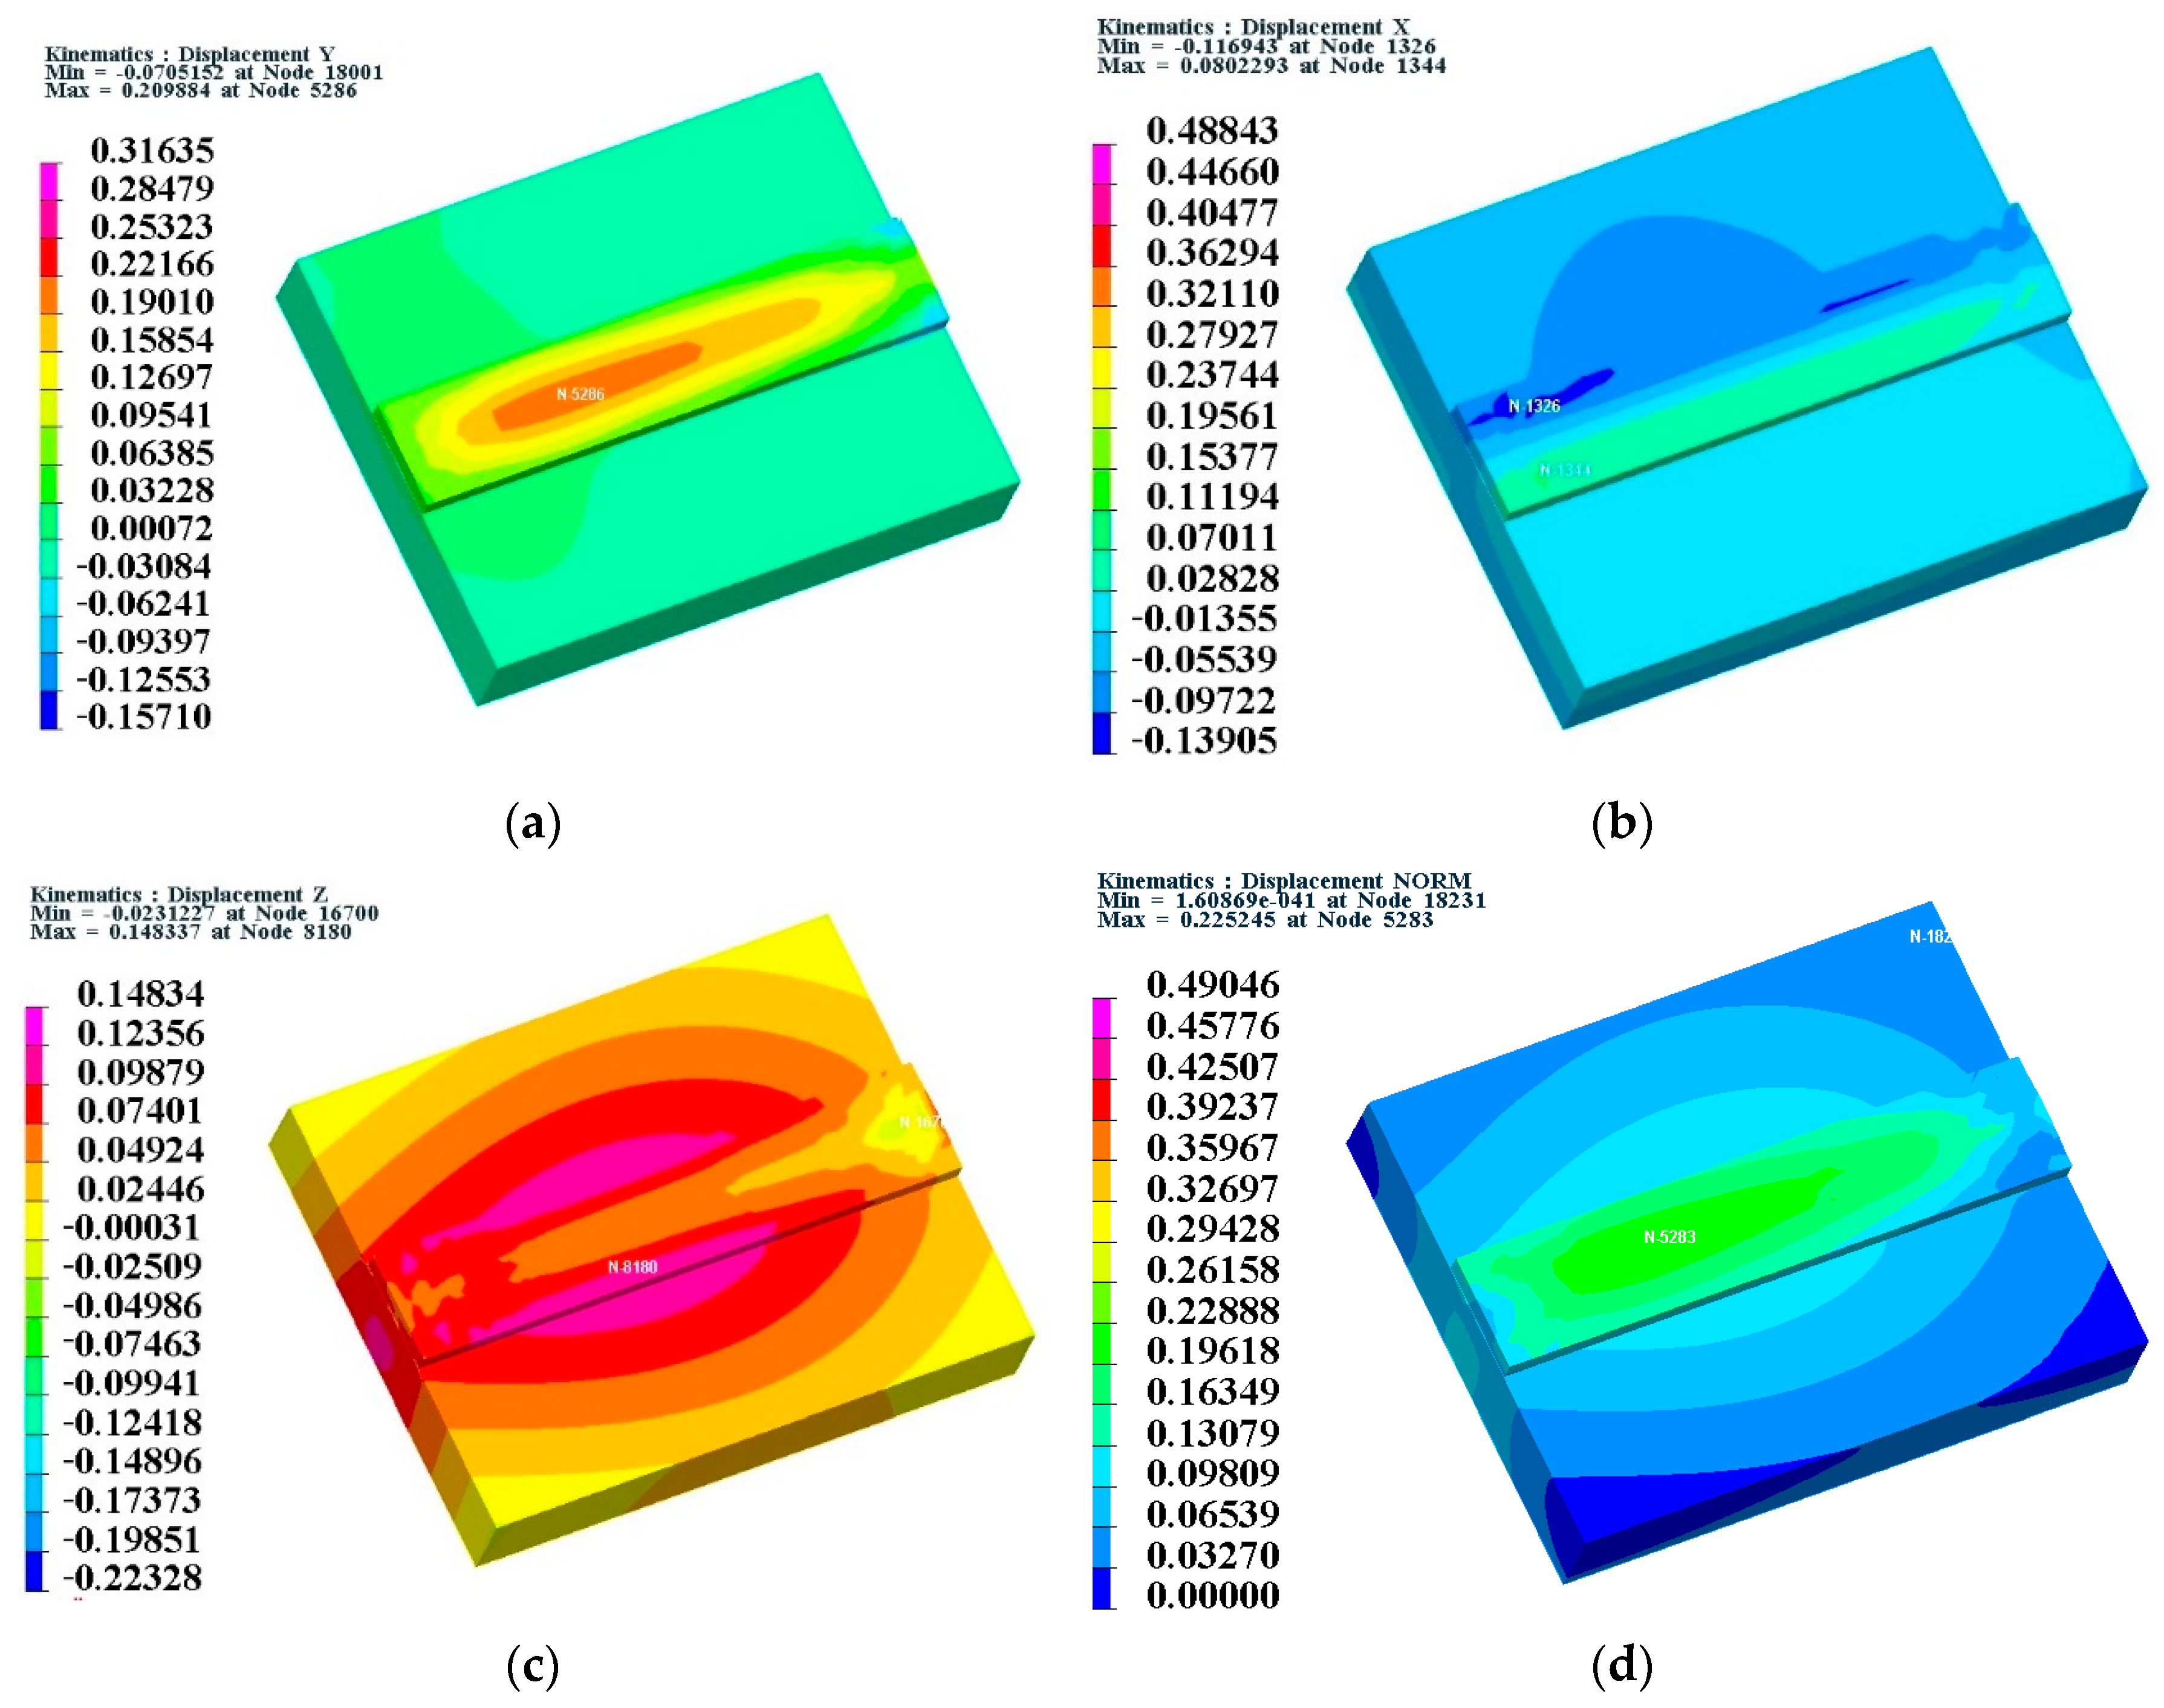
Welding deformation will not only reduce the bearing capacity of the base metal, but also affect the size accuracy of the base metal and then directly affect the welding quality. Figure 16 shows that the deformation in the surfacing direction (i.e., Y direction) is the largest relative to other directions, followed by the X direction, and the smallest in the Z direction, which is basically negligible. The maximum deformation in the middle of the surfacing centerline reaches 0.22 mm, which the overall change in the +Y direction. To sum up, the deformation of surfacing layer is small, which barely affects the forming quality of base metal; while the deformation of base metal is relatively large, which may affect the surfacing quality. Thus, the deformation of base metal should be paid attention to.

5. Conclusions and Discussions

Through simulation and experimental analysis, it is found that the main heat transfer trend is basically consistent with the simulation, that is, it is first transferred from the surfacing layer to the junction area of the surfacing layer and the substrate, then transferred to the substrate, and finally dissipated to the atmosphere through the substrate. Thus, the heat treatment and cooling process can be developed for the future research.
  • The simulation analysis shows that during the stress distribution of the H13 steel surfacing process, the surfacing layer has to undergo stress formation and release; the residual deformation of the surfacing welding is mainly in the surfacing layer, and the direction of large deformation occurs in the thickness direction of the surfacing layer. This phenomenon is basically the same as the test result carried out by Nie et al. [20], that is, the maximum residual stress is located in the junction between the deposit and substrate when the deposit is finished.
  • The deformation of the surfacing layer is small, which basically does not affect the forming quality of the base metal, while the deformation of the base metal is relatively large, which may affect the quality of the surfacing welding. In the follow-up surfacing repair, it is necessary to formulate corresponding processes to reduce the deformation of the base metal.
  • The surfacing layer and the base metal are physically and metallurgically combined, and the surfacing layer has no obvious defects such as pores, inclusions and cracks; the hardness of the surfacing layer is about 1.5 times the hardness of the parent material; the eutectic carbides in the surfacing layer of H13 steel are mainly V8C7 and SiC, the secondary carbides are Cr23C6 and Cr7C3.

Author Contributions

Conceptualization, M.Z. and K.Z.; data curation, M.Z.; formal analysis, M.Z.; funding acquisition, K.Z.; methodology, S.H.; project administration, M.Z.; resources, K.Z.; software, S.H.; writing—original draft preparation, M.Z. and S.H.; writing—review and editing, M.Z., B.J. and X.Y. All authors have read and agreed to the published version of the manuscript.

Funding

This project is supported by National Natural Science Foundation of China (Grant No. 51704256), the Science and Technology Innovation Program of Hunan Province (Grant No. 2021RC2094), Hunan Provincial Natural Science Foundation of China (2020JJ4583, 2017JJ3292) and Scientific Research Fund of Hunan Provincial Education Department (19C1756).

Institutional Review Board Statement

Not applicable.

Informed Consent Statement

Not applicable.

Data Availability Statement

Data sharing is not applicable to this article.

Conflicts of Interest

The authors declare no conflict of interest.

References

  1. Zhang, Z.H. Discussion on curve length wear coefficient of inner cutter on full face rock tunnel boring machine. J. Constr. Mach. 2008, 39, 20–22. [Google Scholar]
  2. Yan, Y.; Feng, S.L.; Liu, B.S.; Yue, C.C.; Liu, X.; Cai, Q. Study on mechanical properties of 6Cr5Mo2V steel for cutter ring of new type shield machine. J. Mold Manuf. 2019, 19, 86–89. [Google Scholar]
  3. Deng, M.J.; Tan, Z.S. Existing problems and construction technology development direction of super long tunnel cluster TBM trial driving stage. J. Mod. Tunn. Technol. 2019, 56, 1–12. [Google Scholar]
  4. Liu, Y.J. Discussion on common remanufacturing repair technology. J. Shanxi Coking Coal Technol. 2015, 39, 51–53. [Google Scholar]
  5. Luo, S.Y.; Ma, Z.H.; Wang, J.B.; Huang, W.R. Research on key problems of reusing old shield machine. J. Civ. Eng. Archit. 2020, 27, 101–105. [Google Scholar]
  6. Pawlowski, L. Thick laser coatings: A review. J. Therm. Spray Technol. 1999, 8, 279–295. [Google Scholar] [CrossRef]
  7. Zhang, T.S.; Dai, D.Q.; Xing, P.L. Manufacture and repair of forging dies by surfacing welding. J. Weld. 1957, 5, 10–16. [Google Scholar]
  8. Wang, X.Z.; Zhu, M.; Shi, Y.; Fan, D. Simulation and analysis of droplet transfer behavior in double wire bypass coupled arc GMAW. J. Mech. Eng. 2016, 52, 54–58. [Google Scholar] [CrossRef]
  9. Ai, M.P.; Lai, K.X. 5CrNiMo Study on surfacing repair process of hot forging die. J. Forg. Technol. 2009, 34, 114–116. [Google Scholar]
  10. Liu, Z.; Gao, A.Y.; Zhao, S.G.; Pan, A.S.; Jiang, J.; Xing, X.Q. 42CrMo Evolution of microstructure and properties of surfacing layer for continuous casting roll. J. Anhui Univ. Technol. 2020, 37, 223–228. [Google Scholar]
  11. Pi, Y.P.; Xiong, J.; Zhao, H.H.; Chen, H. GTAW Tracking algorithm of solid liquid boundary point at the end of molten pool in wire filling additive manufacturing. J. Weld. 2019, 40, 104–109. [Google Scholar]
  12. Tang, Q.; Chen, P.; Chen, J.Q.; Liang, Y. Numerical simulation of laser hybrid welding deformation based on SYSWELD. J. Weld. 2019, 40, 32–36. [Google Scholar]
  13. Zhang, L.; Guo, Z.; Zhou, W.; Bi, G.J.; Han, B. Influence of welding speed and welding current on hump weld of vertical high speed GMAW. J. Weld. 2020, 41, 56–61. [Google Scholar]
  14. Lv, X.Q.; Wang, X.; Xu, L.Y.; Jing, H.Y.; Han, Y.D. Multi objective optimization of MAG welding process parameters based on combination model. J. Weld. 2020, 41, 6–11. [Google Scholar]
  15. Yang, D.Q.; Wang, X.W.; Huang, Y.; Li, X.P.; Wang, K.H. Microstructure and properties of 18Ni martensitic steel produced by GMA. J. Weld. 2020, 41, 6–9. [Google Scholar]
  16. Pan, J.J.; He, X.X.; Zhao, P.C.; Hu, Y.T.; Liang, Y. Numerical analysis of molten pool fluctuation during droplet transfer in pulsed twin wire GMAW. J. Weld. 2020, 41, 90–96. [Google Scholar]
  17. Liu, L.J.; Liu, D.Y.; Wang, X.L.; Li, J.Q.; Cui, Y.B.; Jia, Z.X. Parameter optimization of laser cladding ceramic repair layer on H13 steel. J. Weld. 2020, 41, 65–70. [Google Scholar]
  18. Prado, T.; Pereira, A.; Fenollera, M.; Mathia, T.G. Simple discriminatory methodology for wear analysis of cutting tools: Impact on work piece surface morphology in case of differently milled kinetics steel H13. Materials 2020, 13, 215. [Google Scholar] [CrossRef] [PubMed] [Green Version]
  19. Wang, X.; Wang, J.; Gao, Z.; Hu, W. Fabrication of graded surfacing layer for the repair of failed H13 mandrel using submerged arc welding technology. J. Mater. Process. Technol. 2018, 262, 182–188. [Google Scholar] [CrossRef]
  20. Nie, Z.; Wang, G.; James, D.; Narayanan, B.; Zhang, S.; Schwam, D.; Kottman, M.; Rong, Y.K. Experimental study and modeling of H13 steel deposition using laser hot-wire additive manufacturing. J. Mater. Process. Technol. 2016, 235, 171–186. [Google Scholar] [CrossRef]
Figure 1. Schematic diagram of H13 steel surfacing.
Coatings 11 01559 g001
Figure 2. Thermal imaging of single-pass single-layer surfacing on the substrate. (a) 60 s after welding. (b) 80 s after welding.
Coatings 11 01559 g002
Figure 3. Thermal cycling curve at the midpoint of the center line of single-pass single-layer surfacing.
Coatings 11 01559 g003
Figure 4. The residual stress detection diagram of surfacing parts obtained by experiment. (a) Physical image of residual stress detection. (b) Residual stress detection points of surfacing parts.
Coatings 11 01559 g004
Figure 5. Optical morphology of surfacing samples at different positions. (a) Physical image of corrosion sample; (b) Base material (500 times); (c) heat affected zone (500 times); (d) bonding area (500 times); (e) surfacing area (500 times) (f) surfacing area (1000 times).
Coatings 11 01559 g005aCoatings 11 01559 g005b
Figure 6. Micro-hardness map from the surfacing layer of the sample to the base metal.
Coatings 11 01559 g006
Figure 7. XRD profile of surfacing layer.
Coatings 11 01559 g007
Figure 8. Cross-section morphology of surfacing layer (200 times).
Coatings 11 01559 g008
Figure 9. EDS analysis measured map. (a) Point A; (b) Point B; (c) Point C; (d) Point D.
Coatings 11 01559 g009
Figure 10. Schematic diagram of the surfacing layer cross section.
Coatings 11 01559 g010
Figure 11. Temperature field cloud diagram at the middle moment of single-pass single-layer surfacing process.
Coatings 11 01559 g011
Figure 12. The temperature cycle at the midpoint of the centerline of the surfacing layer.
Coatings 11 01559 g012
Figure 13. Residual stress cloud diagram after surfacing welding.
Coatings 11 01559 g013
Figure 14. The residual stress distribution curve in the direction perpendicular to the centerline of the surfacing welding.
Coatings 11 01559 g014
Figure 15. Residual stress distribution curve on the center line of the weld.
Coatings 11 01559 g015
Figure 16. Residual deformation diagram of all directions and the whole after welding. (a) Y direction (surfacing direction); (b) X direction (width direction); (c) Z direction (thickness direction of surfacing layer); (d) Overall deformation.
Coatings 11 01559 g016
Table 1. Surfacing parameters.
Surfacing CurrentSurfacing VoltageWire Feeding SpeedSurfacing SpeedWire Feeding Angle
23.5 A190 V10 mm/s5 mm/s90°
Table 2. The chemical composition of material H13 steel.
Chemical CompositionCMnCrMoSiVPSFe
wt.%0.40.35.11.60.91.10.030.02Bal.
Table 3. The chemical composition of cladding H13 steel.
Chemical CompositionCCrMnWVFe
wt.%0.505.501.502.001.00Bal.
Table 4. EDS results of each position (atomic fraction).
PositionFeCrVWSiCMn
Point A90.755.350.99.26
Point B92.654.610.761.98
Point C90.705.670.942.69
Point D77.582.821.683.961.26
Table 5. Welding simulation process parameters.
ParametersValuesParametersValues
Surfacing current23.5 ASurfacing current190 V
Surfacing speed5 mm/sSubstrate temperature20 °C
Surfacing distance50 mmMolten pool width10 mm
Molten pool depth3 mmAmbient temperature20 °C
Publisher’s Note: MDPI stays neutral with regard to jurisdictional claims in published maps and institutional affiliations.