Article

Abrasive Wear Resistance and Tribological Characteristics of Pulsed Hard Anodized Layers on Aluminum Alloy 1011 in Tribocontact with Steel and Ceramics in Various Lubricants

by
Mykhailo Student
1,*,
Iryna Pohrelyuk
1,
Juozas Padgurskas
2,
Raimundas Rukuiža
2,*,
Volodymyr Hvozdets’kyi
1,
Khrystyna Zadorozhna
1,
Halyna Veselivska
1,
Oleksandra Student
1 and
Oleh Tkachuk
1
1
Karpenko Physico-Mechanical Institute of the National Academy of Sciences of Ukraine, 5, Naukova Str., 79060 Lviv, Ukraine
2
Department of Mechanical Energy and Biotechnology Engineering, Vytautas Magnus University, Akademija, LT-53361 Kaunas, Lithuania
*
Authors to whom correspondence should be addressed.
Coatings 2023, 13(11), 1883; https://doi.org/10.3390/coatings13111883
Submission received: 29 September 2023 / Revised: 27 October 2023 / Accepted: 29 October 2023 / Published: 2 November 2023
(This article belongs to the Special Issue Friction and Wear Behaviors in Mechanical Engineering)

Abstract

:
Based on the analysis of known methods of surface hardening of aluminum alloys (chromium plating, plasma electrolytic oxidation, hard anodizing), the prospects for pulsed hard anodizing are shown both for improving the functional characteristics of alloys and for large-scale implementation of this method. The purpose of this work is to show the possibility of pulsed hard anodizing to improve the serviceability of low-strength aluminum alloy 1011 under conditions of abrasive and sliding wear. The influence of the pulsed anodizing temperature on the phase-structural state of the synthesized layers, their abrasive wear resistance, and tribological characteristics in various lubricants were established, and the mechanism of wear of these layers was proposed. It is shown that with an increase in the temperature of pulsed anodizing, the wear resistance of the synthesized layers increases, and their abrasive wear resistance decreases. The negative effect of lubricating media on the wear resistance of the synthesized layers compared to tests under dry conditions was shown, and an explanation for this phenomenon is proposed. A significant (up to 40 times) increase in wear resistance in dry friction of anodized low-strength aluminum alloy 1011 compared to high-strength aluminum alloy 1050 was shown.

1. Introduction

Despite the many advantages of aluminum alloys (simultaneously light and strong enough, resistant to weathering, easy to machine, etc.), their wider use in machine and aircraft building is limited by their low hardness and abrasive wear resistance. To eliminate the above-mentioned disadvantages of aluminum alloys, a number of technologies have been created that are already used in various industries. The most successful and widely used methods are galvanic chromium plating [1,2], thermal spraying [3,4,5], plasma electrolytic oxidation (PEO) [6,7,8,9,10], hard anodizing (HA) [11,12,13], and pulsed hard anodizing (PHA). However, all these methods have both advantages and disadvantages. In particular, chromium plating provides high hardness (up to 1000 HV) and corrosion resistance of the surface layer, but for its implementation, carcinogenic and environmentally harmful electrolytes are used, which do not comply with the REACH regulations [1,2,14,15]. The PEO method is used to harden the surface layers both on aluminum alloys [2,16,17] and on aluminum coatings deposited in various ways on steel [18,19,20,21,22] or other [23,24] substrates. PEO layers on aluminum alloys have high hardness (up to 2000 HV), adhesion to the substrate, and a low friction coefficient [25,26,27,28,29]. In addition, environmentally friendly electrolytes are used in the technology of their synthesis. The expansion of the use of PEO technology is limited by high energy costs, restrictions on the size of hardened elements, and the need for finishing machining by grinding the treated surfaces. The technology for the synthesis of hard anodized layers (HAL) is easier to implement and less energy-intensive compared to PEO technology, and most importantly, it complies with REACH requirements [2]. The requirements for the shape and size of the treated elements are also less stringent. In addition, the HAL technology is applicable for processing the internal surfaces of parts and does not require additional machining. This makes it possible to widely implement this technology in many branches of industrial production. In particular, anodizing is proposed for use in the marine and aerospace industries [30]. Moreover, filling the pores of HAL, synthesized on an aluminum alloy, with silver ions can effectively protect medical instruments from bacteria [31]. Such filling the pores in HAL synthesized on aluminum alloys also makes it possible to increase their wear resistance [32]. However, the low hardness (≤500 HV) and wear resistance of HAL [33,34,35,36,37]. Limit their use for surface hardening of machine parts operating under more severe loading conditions. But, as shown in our previous work, the use of heat treatment of synthesized HAL made it possible to further increase the hardness and abrasion resistance of anodized layers on 1011 aluminum alloy. Therefore, the possibility of improving the functional characteristics of aluminum alloys using a synthesis of HAL has not yet been exhausted.
Hard anodizing is usually implemented at a voltage between the electrodes of 80–100 V [38,39,40,41]. When it increases, the electric spark discharges occur on the surface of samples, which destroy the anodized layer. The method of high-voltage electrochemical oxidation is interpreted as a transitional process between classical hard anodizing and plasma electrolytic oxidation [42]. Recently, a significant number of studies have appeared devoted to the synthesis of pulsed hard anodized layers (PHAL) on the surface of aluminum alloys using the PHA method, which has significant advantages compared to conventional HA under direct current. In both versions, the anodized layers (HAL and PHAL) are synthesized on the surface of aluminum alloys in the electrolytes based on a 20% aqueous solution of sulfuric acid at a temperature of −5–+5 °C [40]. Synthesis at the PHA mode occurs under the periodic changes in the current density. The heat released in the surface layer in the process of anodizing a sample during the period with a low current density is effectively dissipated, while at a high current density, it intensifies the process of oxide formation [38,40]. The duty cycle (DC) is considered an important indicator that affects the quality of the synthesized PHAL. The duty cycle is determined by the duration of both periods of the synthesis process (with high ion and low ioff current densities). Quantitatively, the DC is characterized by the ratio of the duration of synthesis at high current density ton to the total duration of the synthesis period (ton + toff): DC = ton/(ton + toff). A high value of the duty cycle (DC > 90%) brings the efficiency of the synthesis process of PHAL closer to that of HAL. When the DC value is too low, the process of oxide dissolution begins to prevail over its formation. However, the hardness and wear resistance of the anodized layer deteriorates. It was established that the optimal value of the duty cycle is 70–80% [39,40].
Pulse anodizing makes it possible to increase the wear resistance and achieve a more even distribution of hardness throughout the thickness of the synthesized PHAL [42,43,44]. In addition, during the synthesis of PHAL, the voltage between the electrodes can be increased to more than 100 V (without the risk of spark discharges), thereby reducing power consumption during anodizing [38,39].
According to the literature, there are two main approaches regarding the frequency of change of periods of high and low current densities during the synthesis process: fast (at the frequency of change of periods with high and low current densities >101 Hz) [45,46,47,48,49,50,51] and slow (at the frequency of their change < 0.1 Hz) [38,43,52,53,54]. Studies of anodized layers synthesized at both frequencies show improved properties of PHAL compared to HAL obtained by classical hard anodizing at direct current. However, it is also noted that the change in the frequency of the change of periods with high and low current density during the operating cycle is in the range of 0.01–100 Hz did not affect almost the hardness of the anodized layer [55,56]. However, the use of higher current density (ion and ioff) during synthesis made it possible to increase the density of PHAL significantly [51]. In addition, it is possible that the cathodic current stimulates the local reduction of hydrogen ions H+ to its molecular state H2, thereby reducing the dissolution of the anodized layer in the electrolyte and, therefore, reducing losses in the thickness of the layer during the PHA process.
An analysis of the literature sources shows that the available information on the effect of pulsed anodizing on the structure and phase composition of the synthesized layers, their tribological characteristics, and abrasive wear resistance is insufficient for a reasonable choice of the temperature regime of synthesis. This narrows the scope and, accordingly, limits the further distribution of this method of surface hardening of aluminum alloys to improve the functional properties of machine parts for various purposes.
The purpose of the work is to establish the influence of the temperature regime of pulsed anodizing on the phase-structural state of the synthesized layers, their abrasive wear resistance and tribological characteristics under various lubrication conditions, to reveal the mechanism of their wear and to show the advantages of PHAL compared to HAL.

2. Materials and Methods

2.1. Technological Features of Pulsed Hard Anodizing of 1011 Aluminum Alloy

The synthesis of PHAL on the surface of aluminum alloy 1011 was carried out in the 20% aqueous solution of H2SO4 at a current density of 5.0 A/dm2 at a pulse frequency of 100 Hz and a duty cycle (DC) of 75%. The magnitudes and durations of voltage changes between electrodes and pulses with high and low current densities in the process of PHAL synthesis are shown in Figure 1. To select anodizing modes, the results of other studies were analyzed and taken into account [57,58].
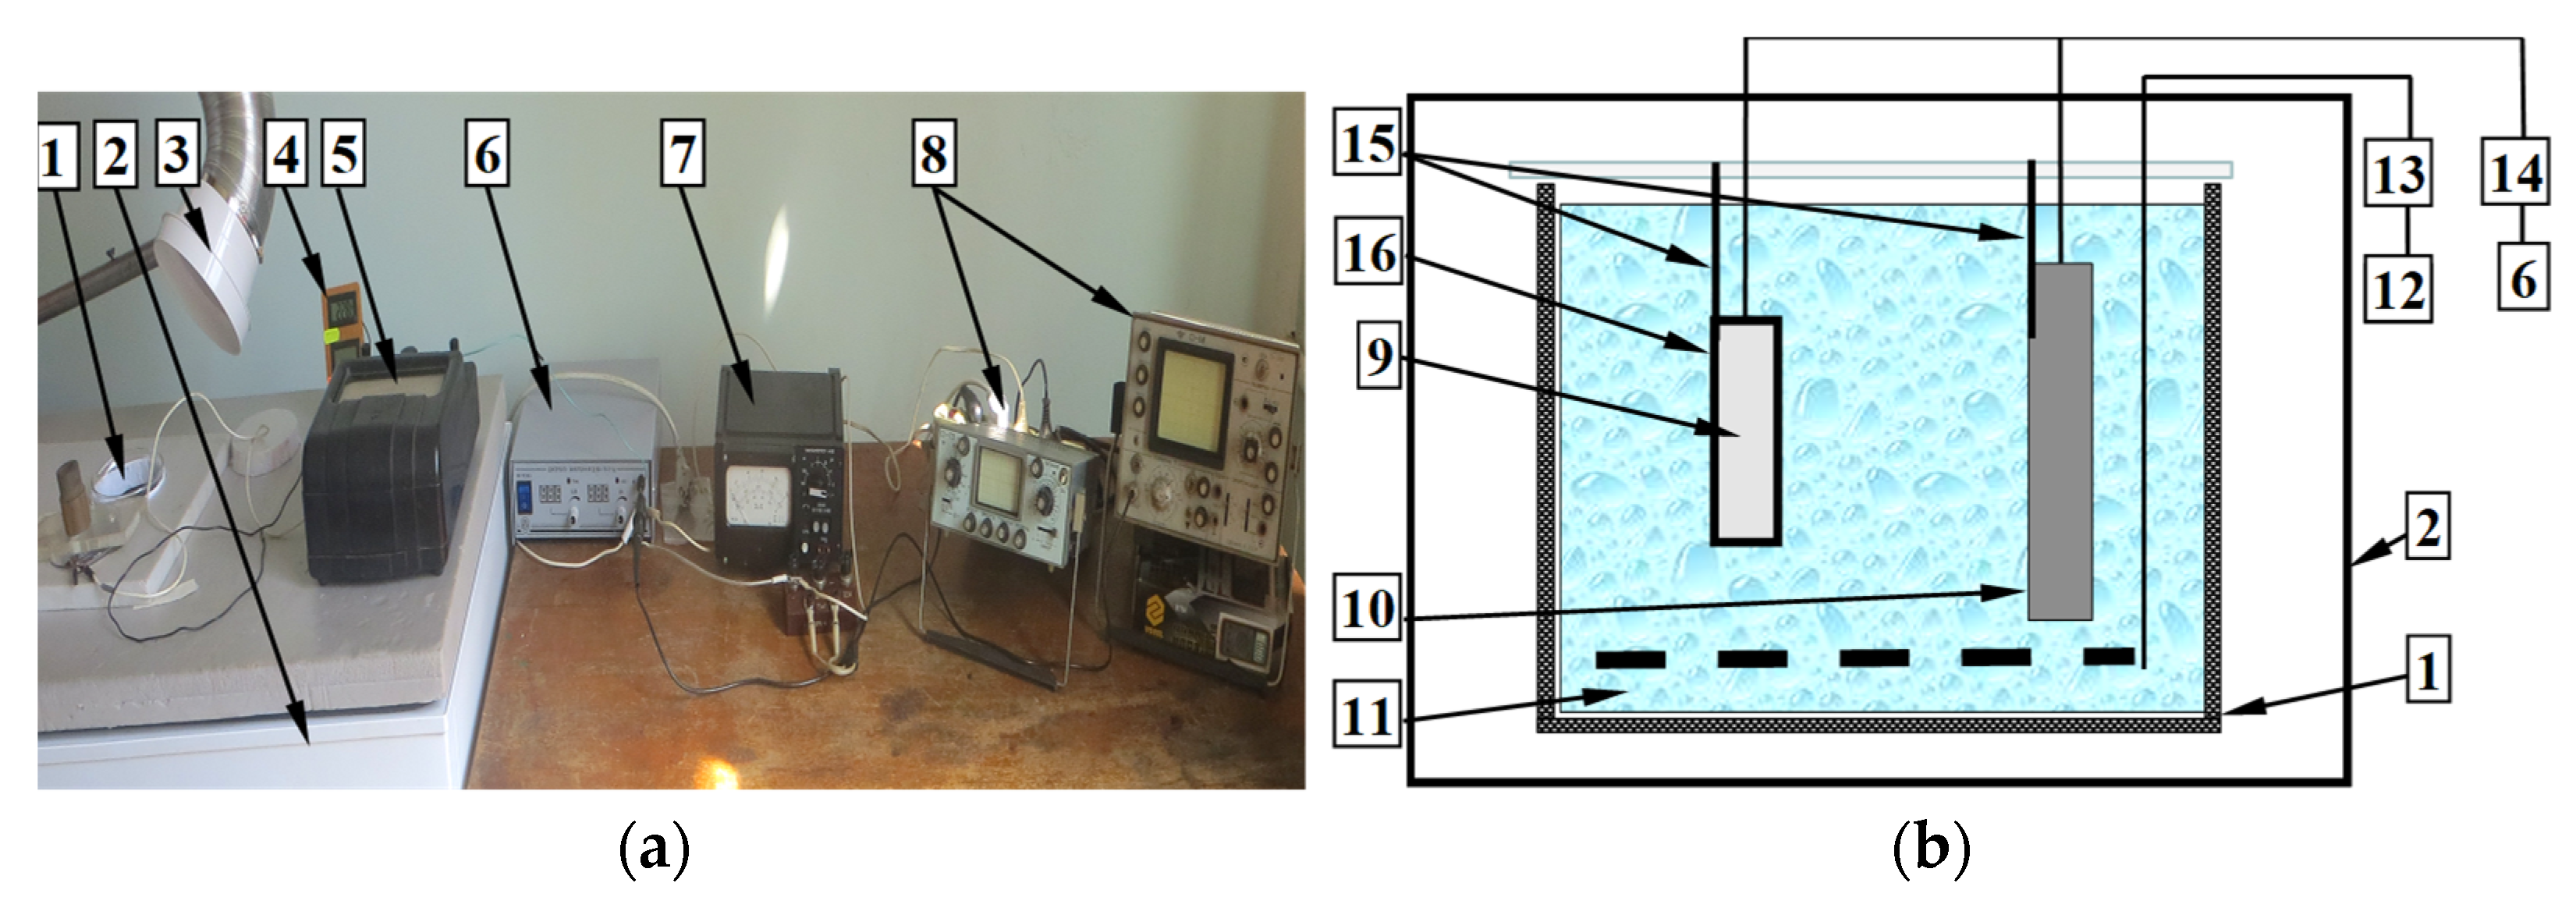
The electrolyte temperature in the synthesis process of PHAL was maintained with an accuracy of ±1 °C at the levels of −5, 0, +5, and +10 °C. The temperature of the electrolyte with a volume of 18 dm3 was controlled using a thermocouple installed inside a quartz tube with a diameter of 3 mm. The total duration of the PHAL formation was 60 min. Synthesis of PHAL on the surface of samples of aluminum alloys was carried out using a piece of equipment (its general view and schematic diagram are shown in Figure 2). For anodizing, the samples of technical aluminum 1011 (wt.%: 0.25 Si, 0.40 Fe, 0.05 Cu, 0.05 Mn, 0.05 Mg, 0.05 Ti, the rest Al) were used in the form of plates with sizes of 20 × 20 × 5 mm3. AA1050 aluminum alloy is similar to the used 1011 alloy. Before anodizing, the surface of the samples was polished to a roughness of Ra = 0.2–0.5 µm using AUTO-Paper PS8A sandpaper, successively reducing its grain size from P220 to P1200. All samples were also pre-degreased for 3 min. For degreasing, an aqueous solution of a mixture of calcium and magnesium oxides was used. Then, the samples were thoroughly washed in warm and cold water. At the final stage of the preparation of the samples for anodizing, they were clarified for 30 s in an aqueous solution of nitric acid (400 g/L HNO3).
To further improve the hardness of anodized aluminum alloy 1011, heat treatment was applied (tempering anodized samples for 1 h at a temperature of 350 °C). This tempering mode has been tested on anodized layers synthesized in direct current mode [59].

2.2. Test Method for Determination of Abrasive Wear Resistance of Hard Anodized Layers

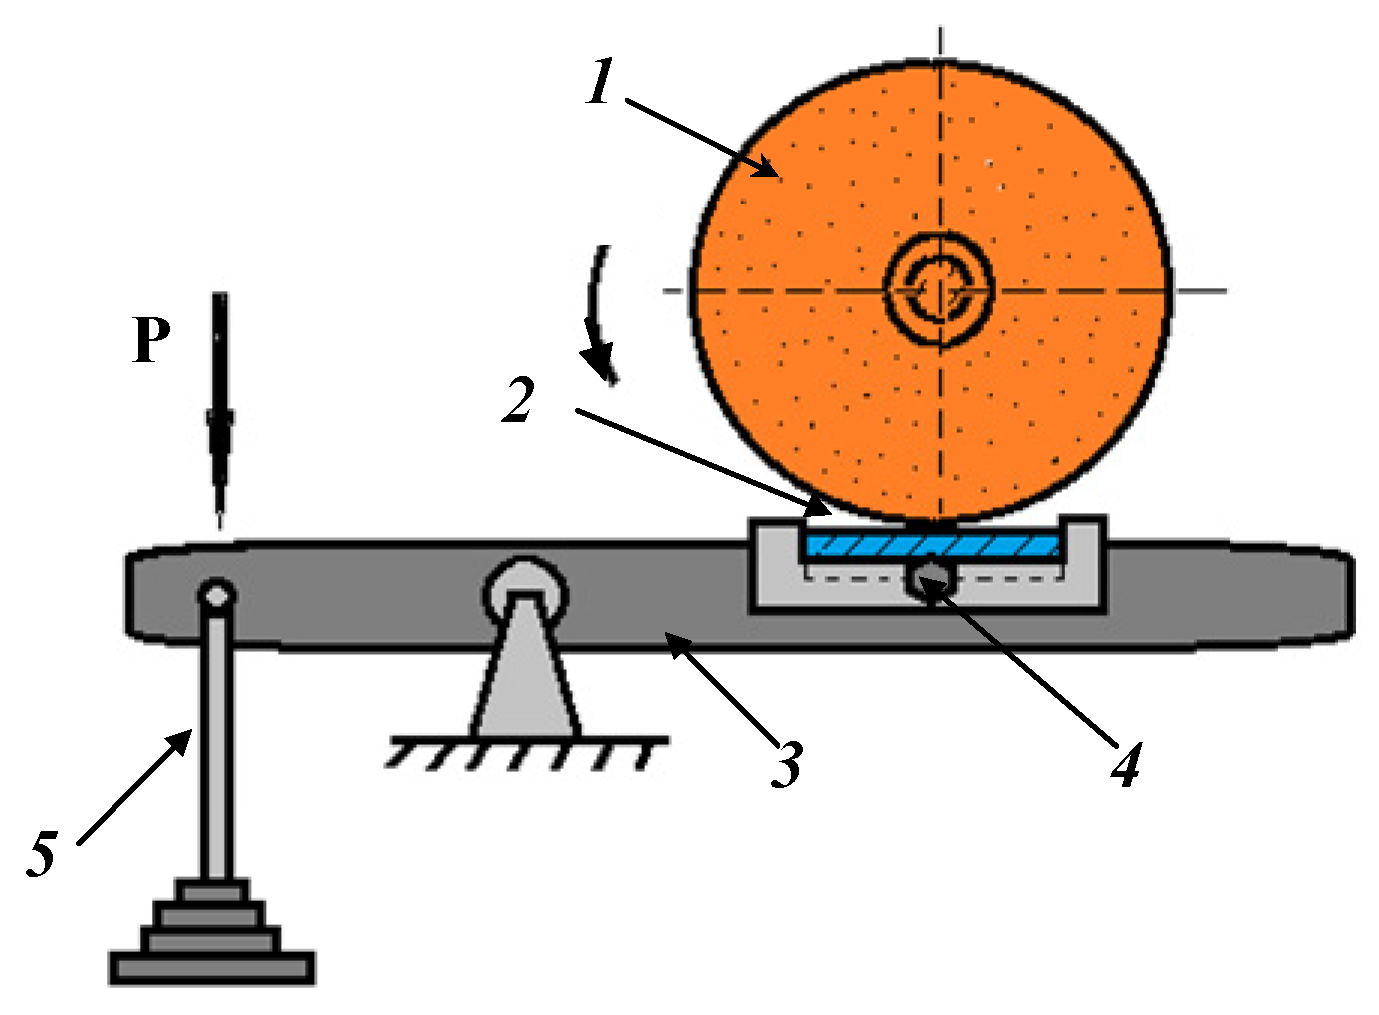
Tests on the abrasive wear resistance of samples with synthesized PHAL were carried out using a piece of equipment (its schematic diagram is shown in Figure 3). An electrocorundum disk with grain sizes of 250–315 μm, a hardness of 2000 HV0.3, a diameter of 150 mm, and a width of 8 mm was used. The frequency of its rotation was 2.7 s–1, and the load in the zone of linear contact of the disk with the surface of all samples was P = (14.7 ± 0.25) N.
During tests, the samples were in contact with the disk on a path equal to 1800 m. The abrasive wear resistance 1/W of the synthesized PHAL was determined by the weight loss W of the samples after their tests in contact with an electrocorundum disk (fixed abrasive mode). The value of W was calculated from the difference in the weight of the samples at the beginning and at the end of their tests. The samples were weighed using electronic analytical balances of the KERN ABJ 220 4M type. The measurement accuracy was 2 × 10⁻⁴ g. The amount of wear of samples with anodized layers during abrasive wear resistance tests was determined as the average value from 3 to 5 tests.

2.3. Test Method for Determining the Wear of Pulsed Hard Anodized Layers under Sliding Conditions

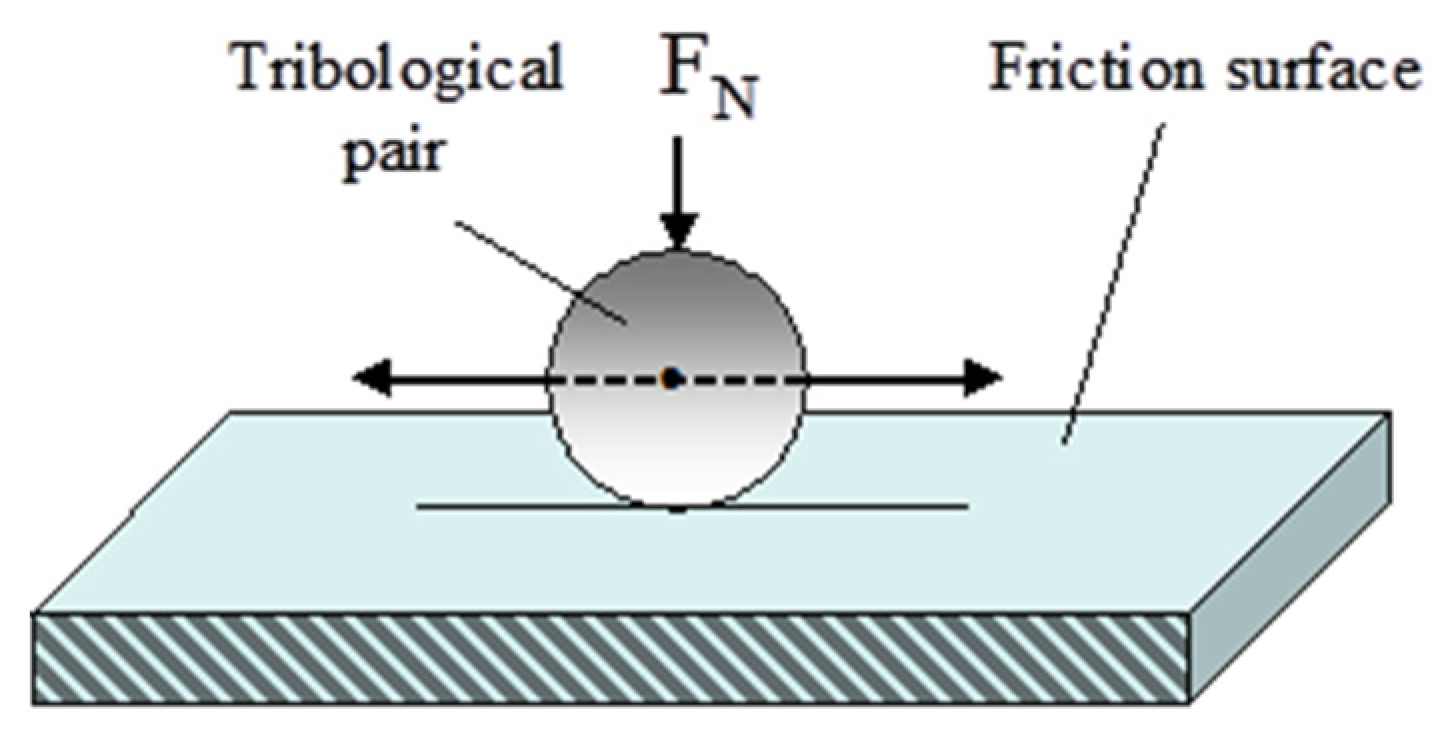
The tribological characteristics of PHAL on the surface of 1011 aluminum alloy were determined from the results of friction tests by reciprocating motion of steel (0.98C-1.25Cr steel with hardness 62 HRC) or ceramic (Al2O3) balls on the pre-anodized sample surface. For the sliding tests, a ball with a diameter of 9 mm was fixed at the end of the beam. The beam with a ball at the end was pressed against the surface of the sample due to the normally oriented load applied to it. The load level was controlled using strain gauges attached to the beam surfaces. All samples with PHAL were tested for wear under sliding conditions in continuous mode. The total length of the friction path was 2700 mm, the displacement was 15 mm, the sliding speed was 2 mm/s, the frequency of reciprocating sliding of the balls was 0.2 s−1, the applied load was 10 N. Ultrasonic cleaning (known in the practice of tribological tests to remove wear products from the contact zone [60]) was not used in our studies. The schematic diagram of the wear tests is shown in Figure 4.
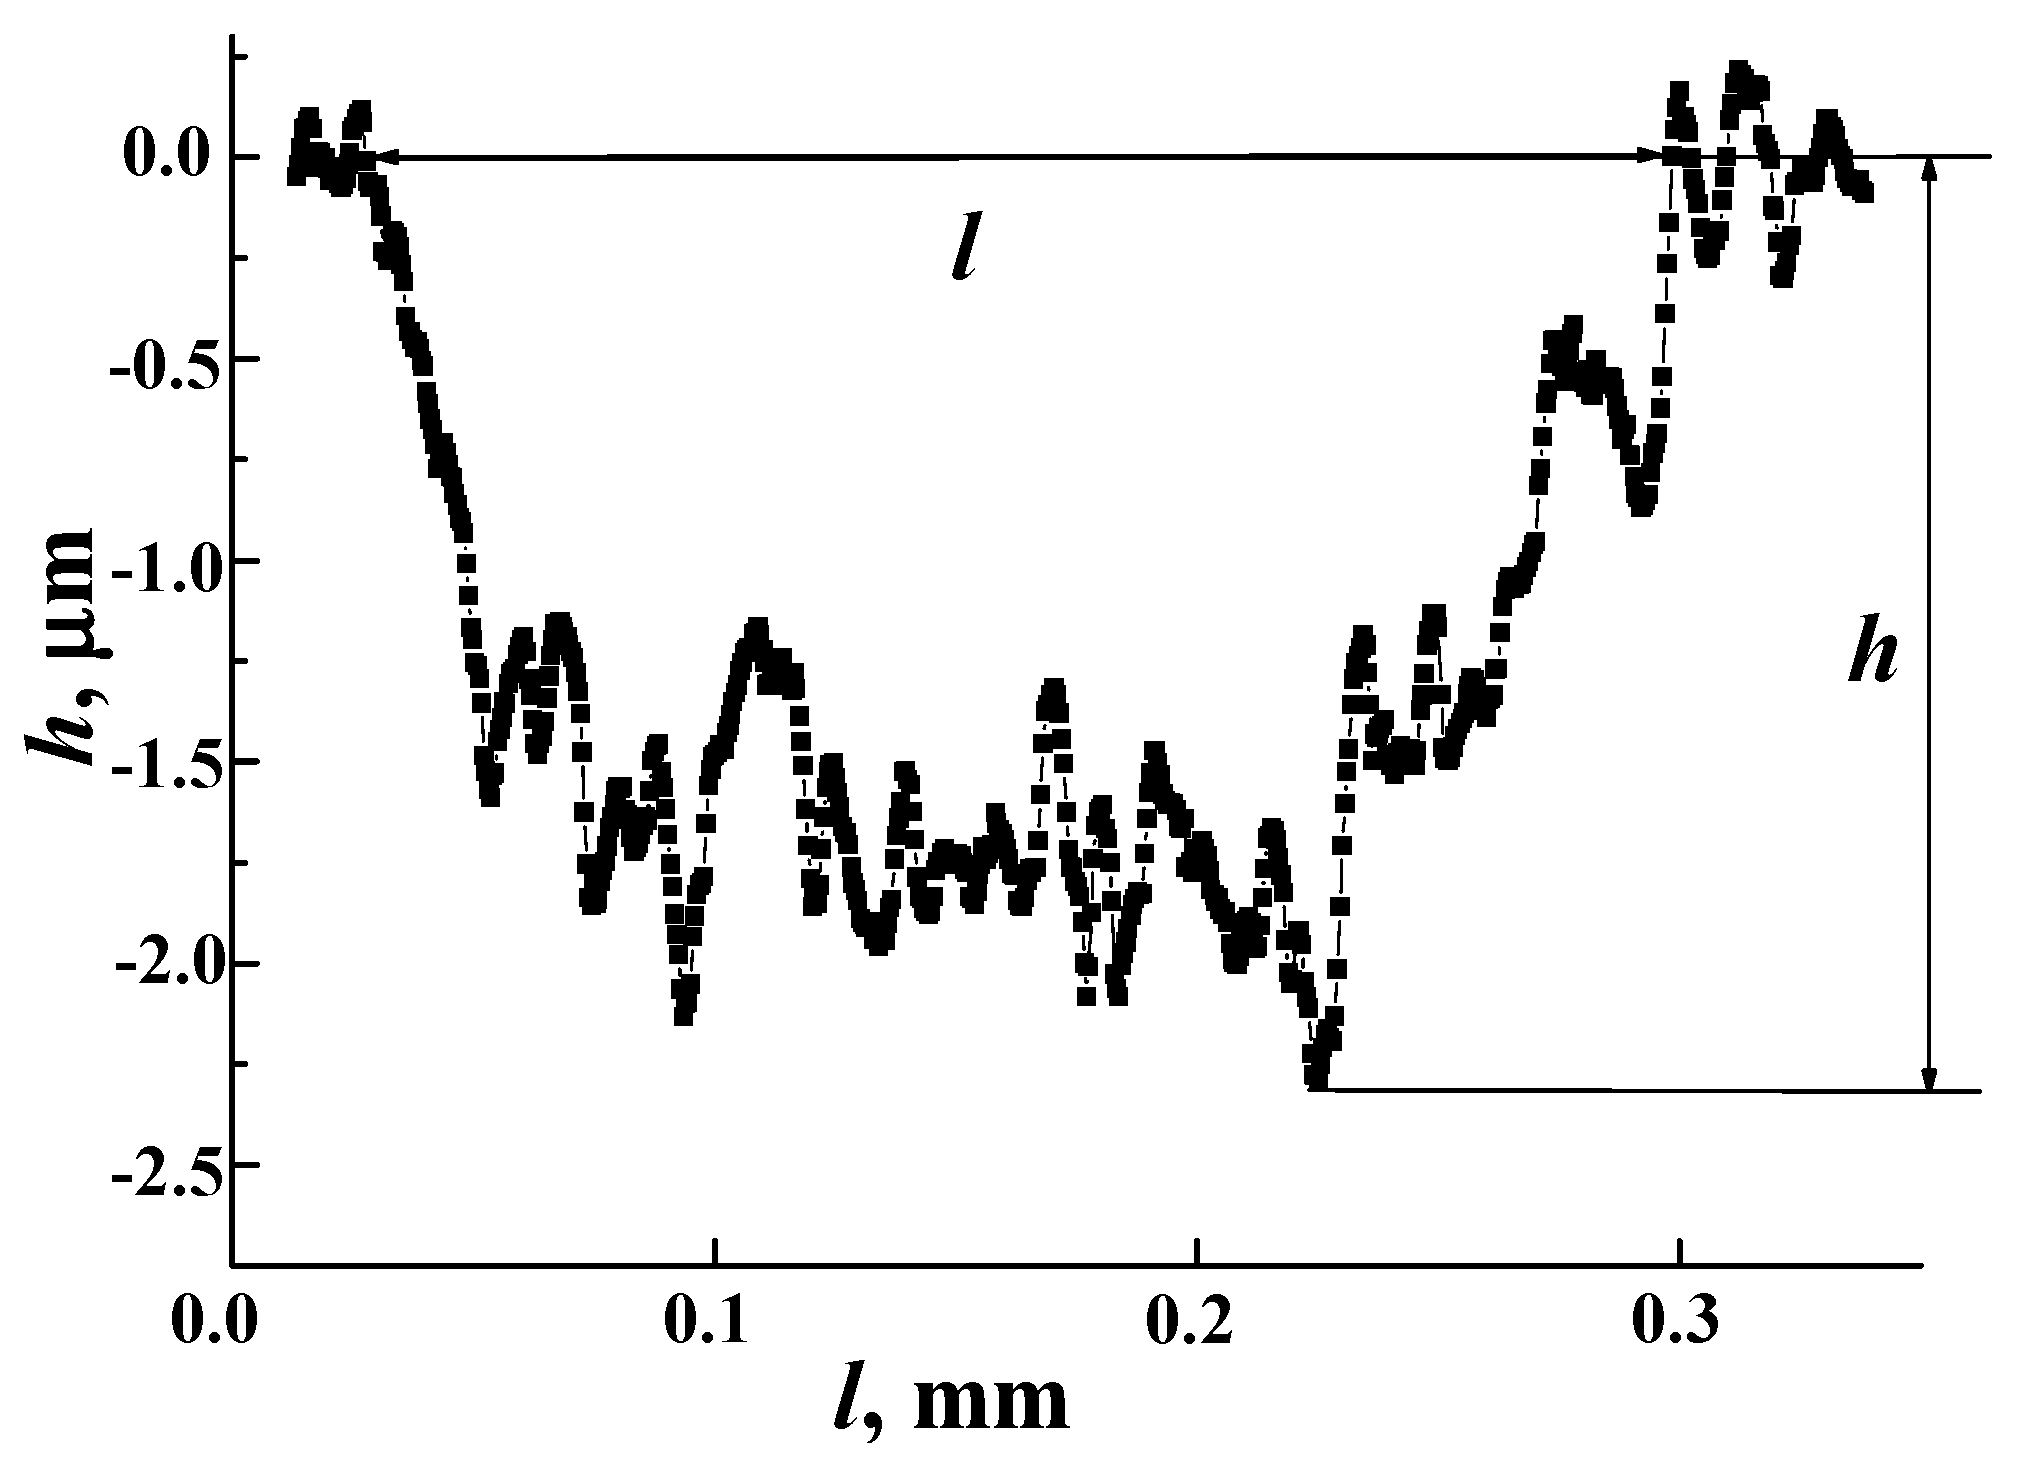
Taking into account the influence of surface roughness on tribological characteristics of samples under dry and oil-lubricated sliding conditions [61,62,63], before tribological tests, all samples with PHAL before tribological tests were repolished to the roughness of Ra = 0.3 μm since their surface roughness increased slightly after anodizing. PS8A P1200 sandpaper was used to polish their surfaces. The tribological tests of the samples were carried out under conditions without lubrication and using two oils (mineral type I-20 and synthetic type EDSE 5W-40) as a lubricant in the contact zone between the triboelements. The wear values of samples during reciprocating sliding tests were determined as the average value from 3 to 5 tests. The wear value of each sample was assessed using a profilogram of the wear trace on its surface, obtained using a Caliber S-265 profilometer. A typical view of one of these profilograms in the cross-section of the wear trace is shown in Figure 5.
The wear value was estimated as the average value of the cross-sectional area of the wear trace on the surface of the anodized layer. It was determined based on the results of measurements of the main dimensions of the wear groove in 7–10 sections in the central part of the length of the wear track.
The cross-sectional area S of the wear track in any of its sections was determined by the formula:
S = i = 0 l h ( x i ) Δ x i ,
where h is the depth of the wear groove formed during the reciprocating sliding of the ball over the surface of the anodized layer, measured along the width of the groove cross-section, µm; l is the width of this groove, mm; h(xi) is the current value of the groove depth at each point of the scan length, µm; ∆xi—step of measuring current values h along the width l of the cross-section of the friction trace, mm.

2.4. Other Test Methods Used for Investigations of Pulsed Hard Anodized Layers

The microhardness was measured using a PMT-3 device at a load of 0.49 N as an average level of the 10–20 measurements.
The structure and micro-X-ray spectral analysis of layers synthesized by the method of pulsed hard anodizing was studied using an EVO 40 XVP scanning electron microscope with an INCA Energy 350 microanalysis system. The phase analysis of the synthesized layers was examined by a BRUKER D8 DISCOVER X-ray diffractometer with monochromatic Cu-Kα X-ray radiation and Cu filter.

3. Results

3.1. X-ray Microspectral Analysis of Hard Anodized Layers Synthesized at Direct or Pulsed Current Modes

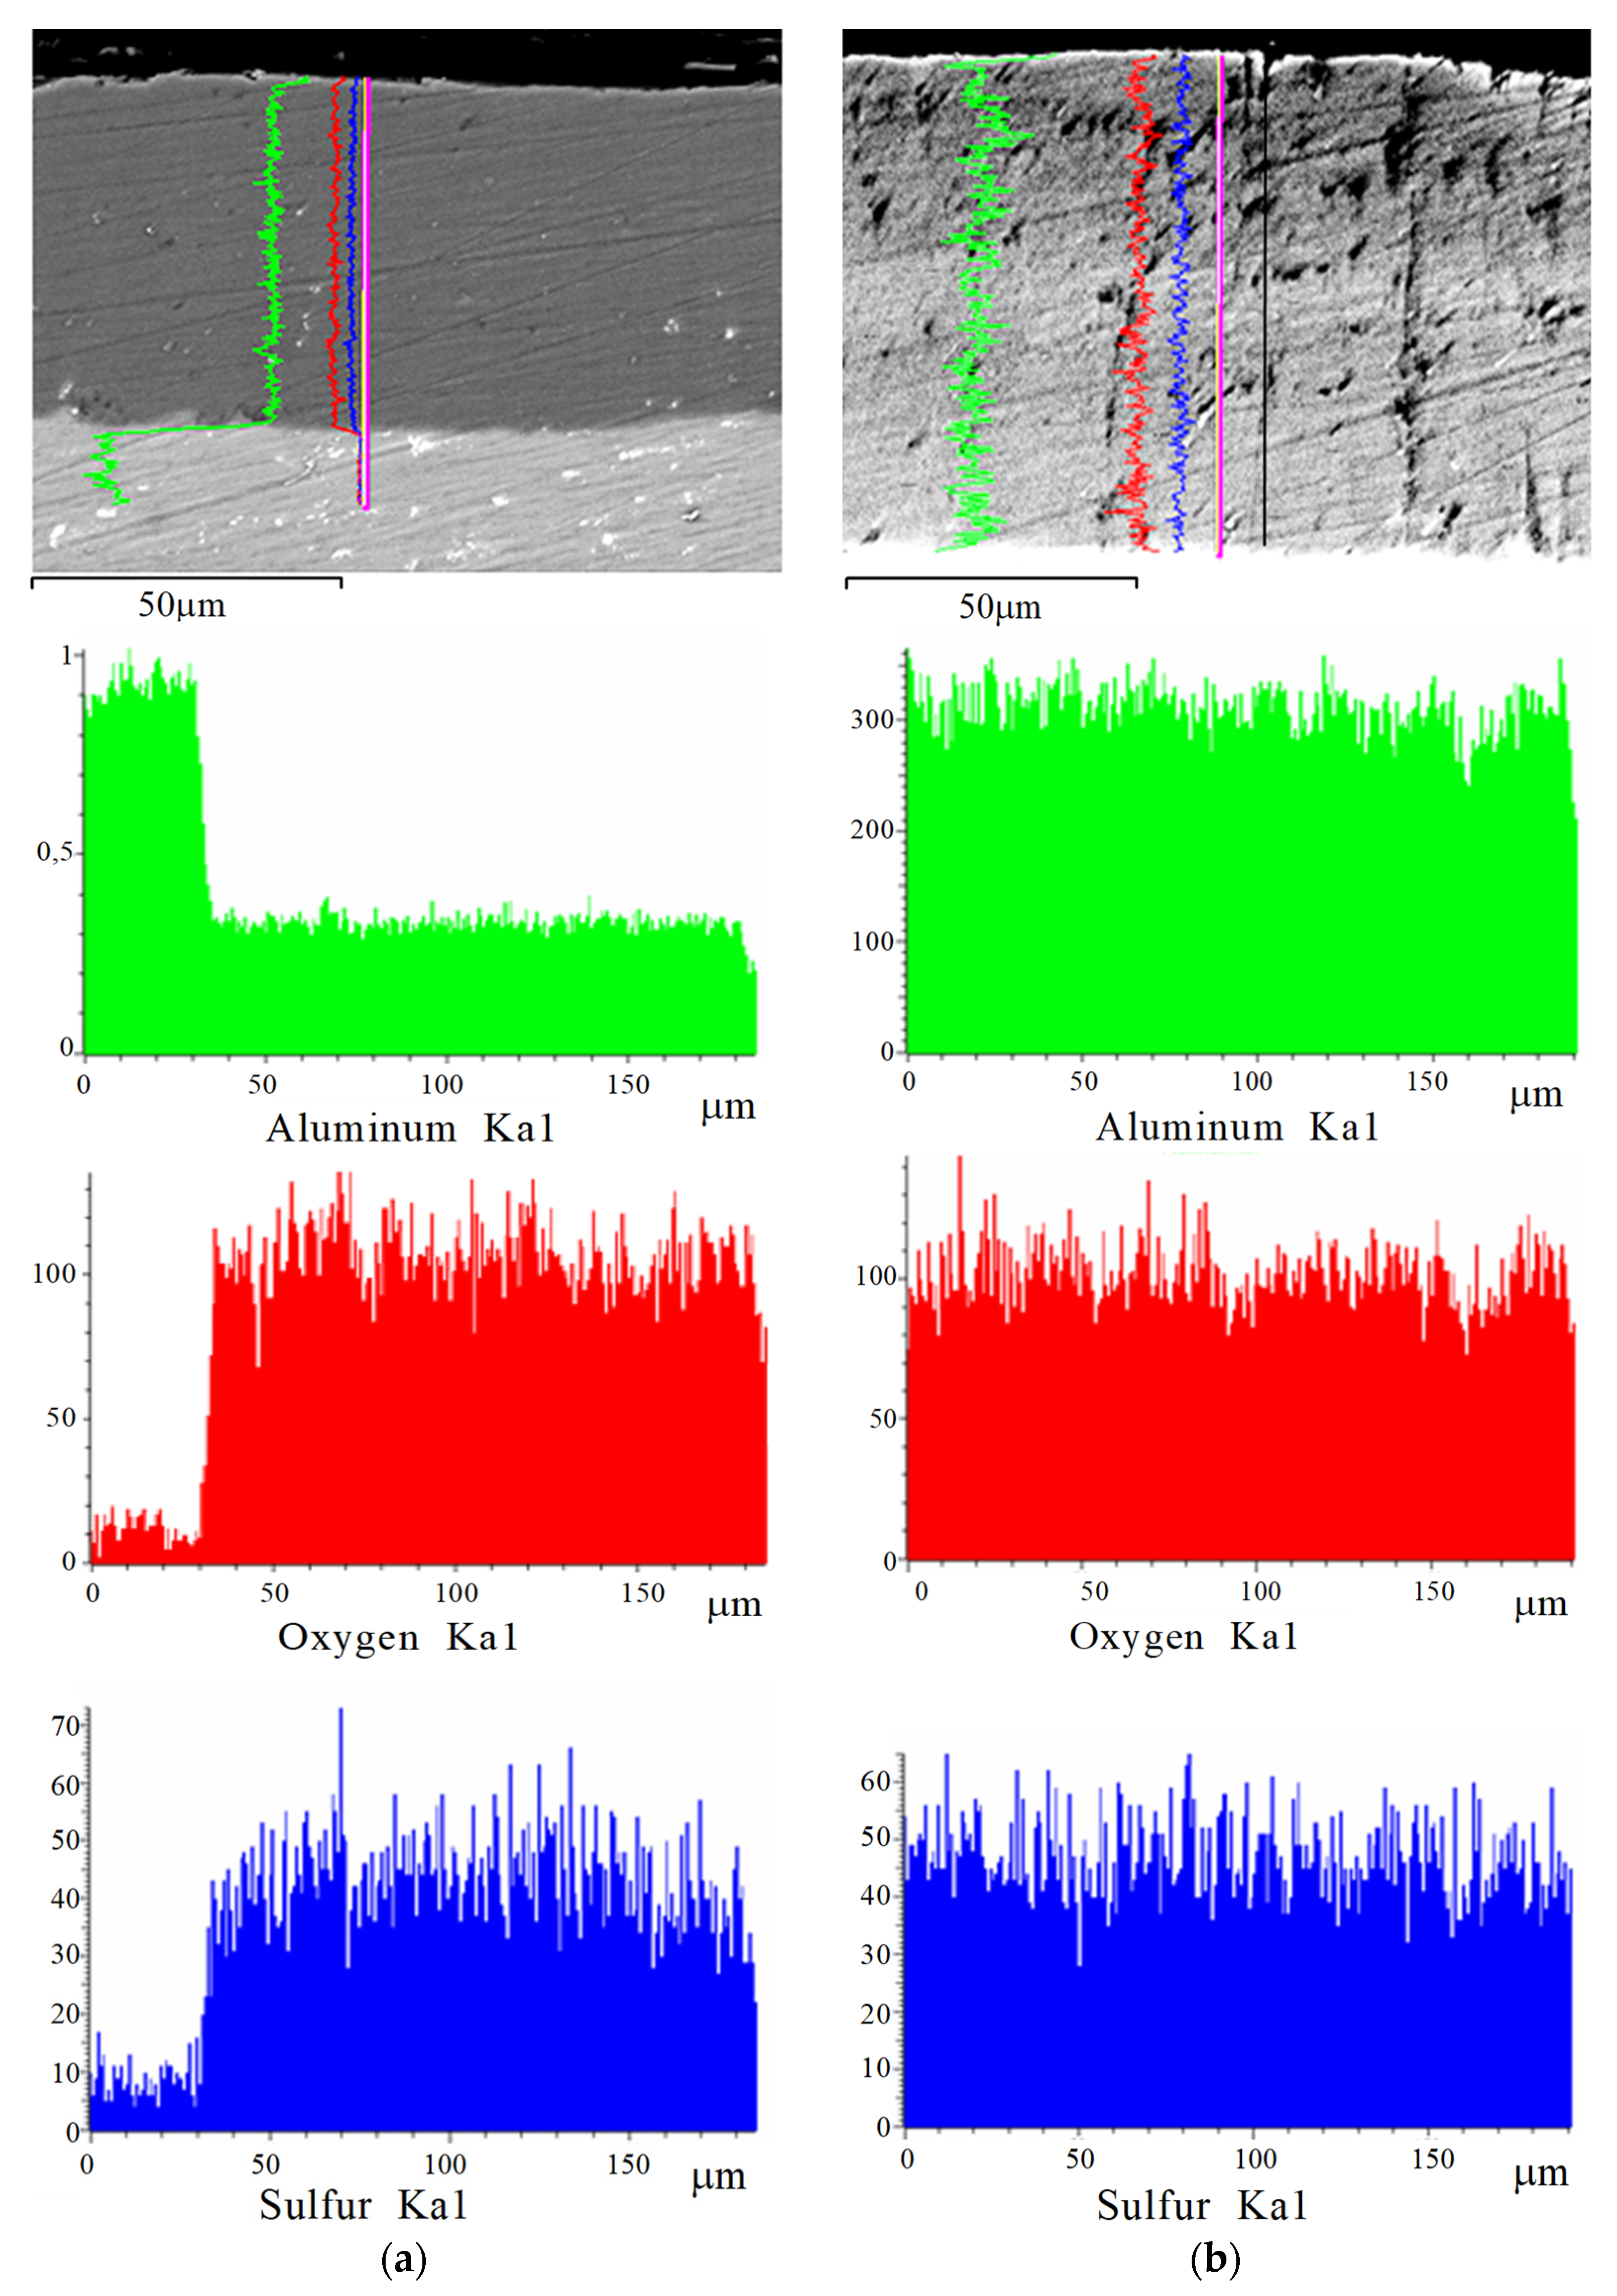
The SEM cross-sectional images of the anodized layers synthesized at pulsed or direct current modes and EDX depth profiles of the main elements along their thickness are shown in Figure 6. An analysis of these data allows us to assert that the Al and O content over the thickness of the layers synthesized at a temperature of +10 °C using the HA and PHA modes remains almost unchanged. Only a slight tendency to a decrease in the sulfur content with approaching the outer surface of the HAL was revealed.
SEM cross-sectional micrographs and EDX elemental mapping of the anodized layers synthesized using direct (a) and pulsed (b) currents are shown in Figure 7. Their analysis confirmed the conclusion of the uniform distribution of all main elements (Al, O, S) in the structure of the anodized layers of both types (HAL and PHAL).
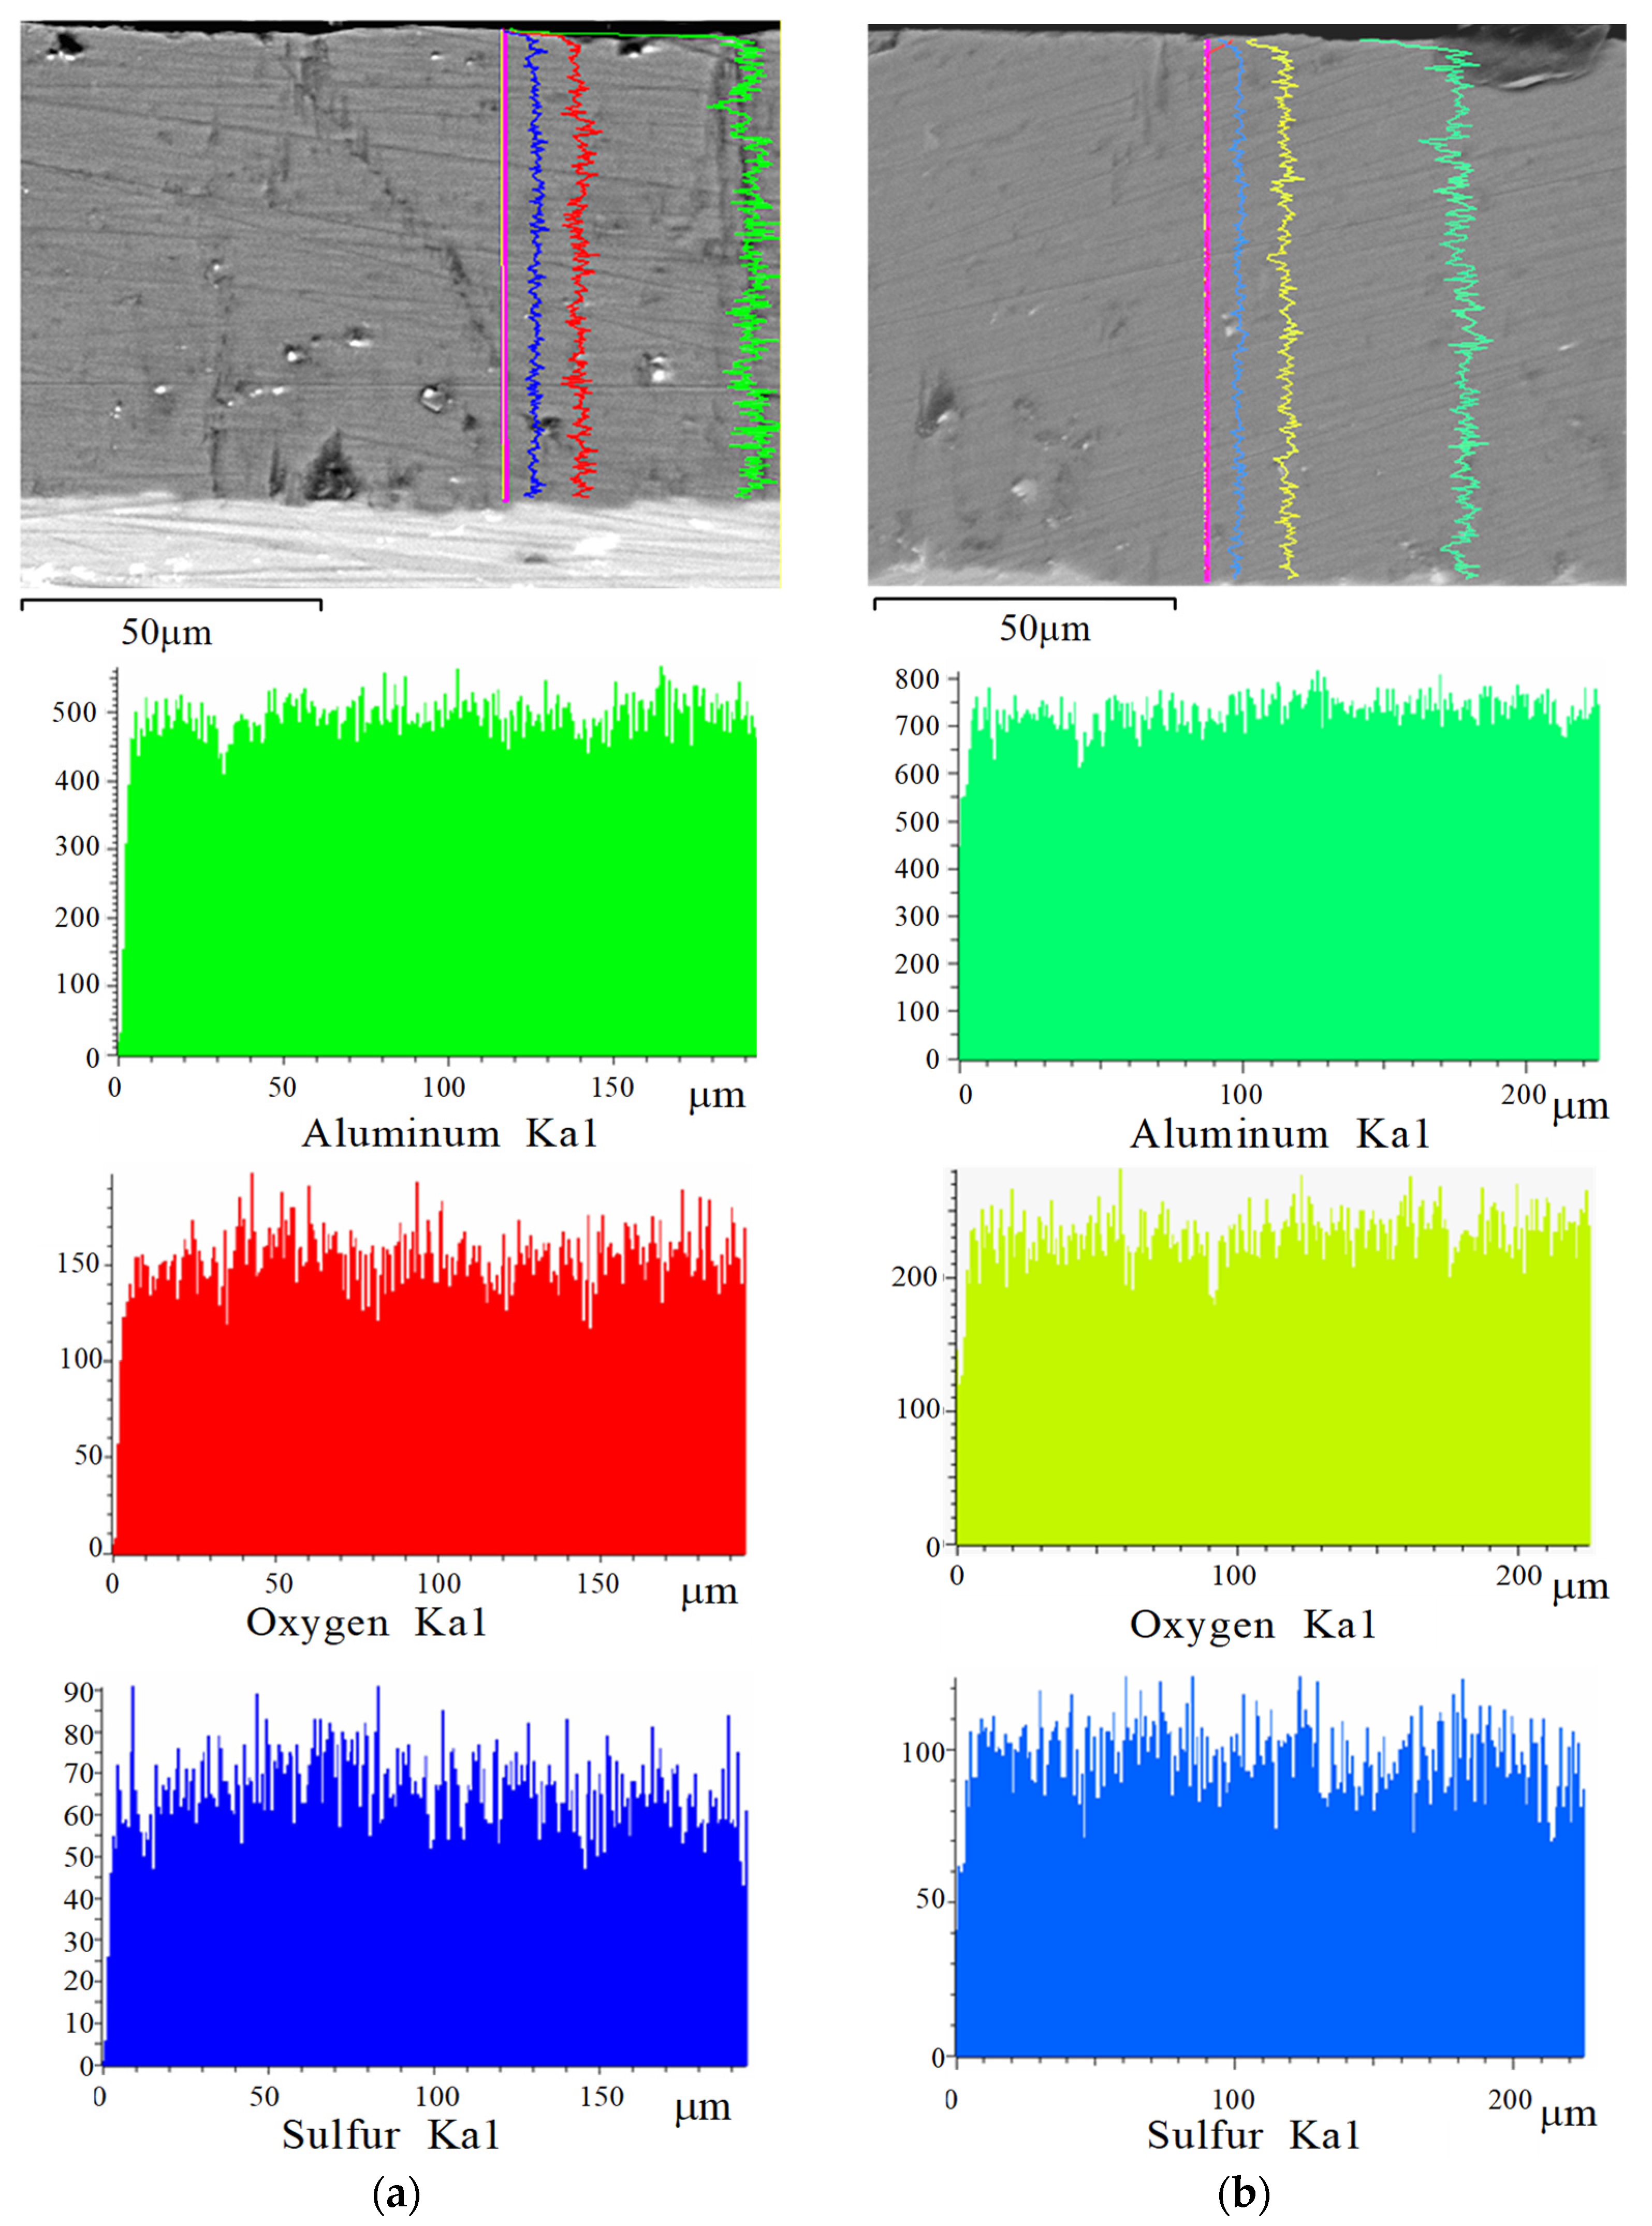
The uniformity of the distribution of Al, O, S in the structure of the anodized layers was also confirmed by the results of EDX depth profiles of HAL and PHAL (Figure 8) synthesized at a temperature of −5 °C and by EDX elemental mapping of the anodized layers (Figure 9).
Based on the results of studies by X-ray microspectral analysis, it was concluded that the distribution of key elements over the thickness of the anodized layers and over their area remained fairly uniform and did not depend on the anodizing mode (on direct or pulsed current).

3.2. Effect of Electrolyte Temperature during Pulsed Hard Anodizing on Thickness of Synthesized Layers

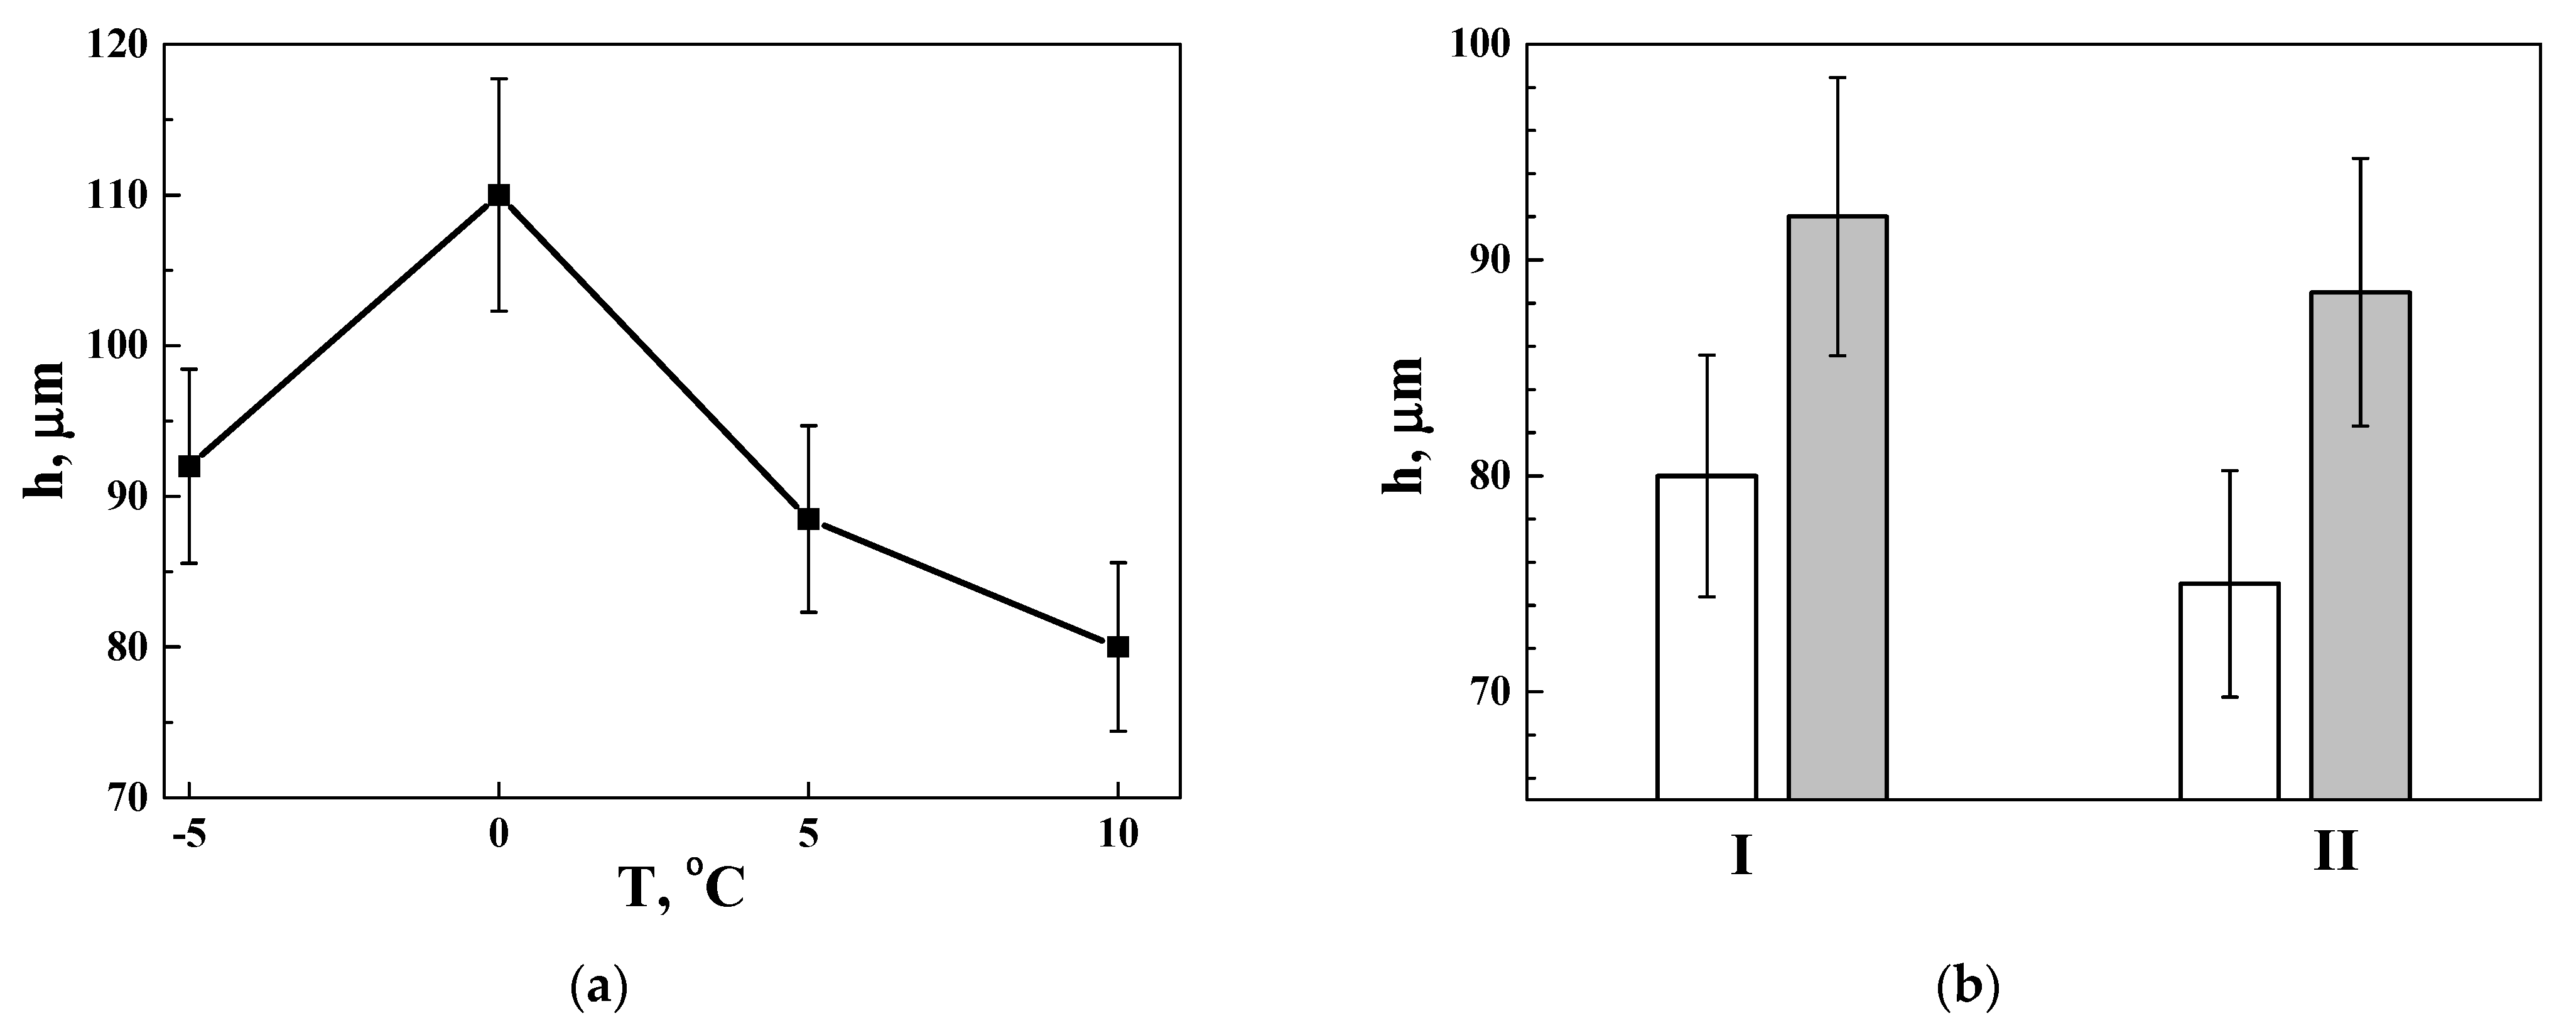
The results of evaluating the thickness of PHAL depending on the temperature of the electrolyte T during anodizing are shown in Figure 10a. The electrochemical reactions necessary for the synthesis of PHAL practically stop at temperatures below −10 °C since the electrolyte turns into a gel-like substance. Therefore, the synthesis of PHAL in our study was started at a temperature of −5 °C. The average value of the thickness of the synthesized PHAL was 92 µm at a temperature of −5 °C and increased up to 110 µm with its further increase to 0 °C. The PHAL thickness was decreased with a further increase in the electrolyte temperature, and after synthesis at a temperature of +10 °C, its thickness reached 80 µm. To explain the obtained trend in the change in the thickness of the anodized layer depending on the temperature of its synthesis, two opposing processes accompanying anodizing were involved. The process of PHAL synthesis is intensified with an increase in the electrolyte temperature. Consequently, the thickness of the synthesized layers must also constantly increase. However, with an increase in the synthesis temperature, the surface dissolution of the anodized layer is also intensified, which causes a decrease in its thickness. The thickness of the PHAL begins to decrease when the dissolution rate of the anodized layer begins to exceed the synthesis rate due to the increase in the electrolyte temperature.
The obtained regularity of the change in the PHAL thickness depending on the electrolyte temperature confirms an obvious decrease in the growth rate of the layer thickness with an increase in temperature above 0 °C (Figure 10a). This is due to the excess of the process rate of electrochemical dissolution of PHAL (due to the interaction of the layer with the acid-containing electrolyte) over the synthesis rate. Consequently, the intensity of dissolution of the anodized layers due to their interaction with the acid decreases with a decrease in the temperature of synthesis. Thus, both researchers and manufacturers favor a low-temperature anodizing process. The synthesis temperature is chosen based on the rule that the PHAL growth rate is still sufficiently high, and the harmful effect of the dissolution of the synthesized layer (due to the corrosive effect of the acid) remains minimal.
The use of the method of pulsed hard anodizing makes it possible to additionally increase the thickness of the synthesized layer h in comparison with the thickness obtained by conventional hard anodizing at direct current. As shown in Figure 10b, the PHAL thickness increased by about 15% and 17% (at temperatures of −5 °C and +5 °C, respectively) relative to the HAL thickness under the same synthesis conditions. At the same time, it also follows from Figure 10b that the average thickness of the anodized layers synthesized by both methods (HA and PHA) is slightly (by about 6%) decreased with an increase in the electrolyte temperature.
Thus, the data presented in Figure 10b clearly showed that the thickness of the anodized layer is decreased regardless of the synthesis mode (at direct or pulsed current) as the electrolyte temperature is increased from −5 °C to +5 °C. In both modes of synthesis, electrochemical processes (synthesis and dissolution of anodized layers) are intensified with an increase in the electrolyte temperature. Nevertheless, the lower thickness of both types of anodized layers at a temperature of +5 °C (compared to that obtained at −5 °C) was due to more favorable conditions for the dissolution of the layers than for their synthesis. However, it is also obvious that at the same electrolyte temperature in both synthesis modes, the negative effect of dissolution due to an increase in the synthesis temperature was largely leveled during the synthesis of PHAL. As a result, a greater PHAL thickness was obtained compared to the HAL thickness.

3.3. X-ray Phase Analysis of Pulsed Anodized Layers on 1011 Aluminum Alloy

The constituent anodized layers usually include water molecules. Moreover, their number is greater the higher the temperature of the anodizing process. PCALs usually contain more water molecules on their outer surface due to their longer contact with the electrolyte. Figure 11 shows the X-ray diffraction spectra of anodized layers synthesized on the surface of aluminum alloy 1011 in a pulsed mode.
Figure 11 shows that hydrated aluminum oxides of two types were formed in anodized layers synthesized at different electrolyte temperatures: Al2O3·H2O with one water molecule and a boehmite structure (a = 3.694 Å, b = 12.214 Å, c = 2.868 Å [64]), and Al2O3·3H2O with three water molecules with a gibbsite structure (a = 8.684 Å, b = 5.078 Å, c = 9.736 Å [65]). In the diffraction spectra obtained on PHAL synthesized at temperatures of −5 °C (Figure 11a) and 0 °C (Figure 11b), only reflections of aluminum oxide with one water molecule (boehmite Al2O3·H2O) were recorded, while on PHAL synthesized at temperature of electrolyte +5 °C (Figure 11c), the reflections of two phases were identified—Al2O3·3H2O (gibbsite) and Al2O3·H2O (boehmite). Only one phase (gibbsite) was again recorded in the X-ray diffraction pattern of PHAL synthesized at a temperature of +10 °C (Figure 11d).
Thus, the X-ray phase analysis revealed a change in the phase composition of PHAL depending on the electrolyte temperature where their synthesis took place. Taking into account the different crystallographic structures of the detected phases (boehmite has a close-packed crystal lattice, while gibbsite has a layered structure somewhat similar to the structure of graphite), we assumed the different ability of PHALs to resist abrasive and sliding wear in the presence of such phases in their structure.

3.4. Hardness and Abrasive Wear Resistance of PHAL Synthesized on Aluminum Alloy 1011

The results of experimental evaluations of HV microhardness and abrasive wear resistance 1/W of alloy 1011 samples with hardening layers synthesized on their surface in the PHA mode are shown in Figure 12. The highest microhardness and, accordingly, abrasive wear resistance 1/W were recorded for PHAL synthesized at an electrolyte temperature of −5 °C. The X-ray pattern shown in Figure 11a proved that in the layer hardened at this mode, the reflections of aluminum oxide with one molecule of water Al2O3·H2O (boehmite) appeared. The maximum effect of surface hardening of aluminum alloy by PHA treatment is associated with the appearance of boehmite in the PHAL structure. The microhardness and abrasive wear resistance of PHALs are decreased with an increase in the electrolyte temperature during pulsed anodizing (Figure 12). This is due to the appearance of Al2O3·3H2O (gibbsite with a large number of water molecules) in the surface layers of aluminum samples after their pulsed anodizing.
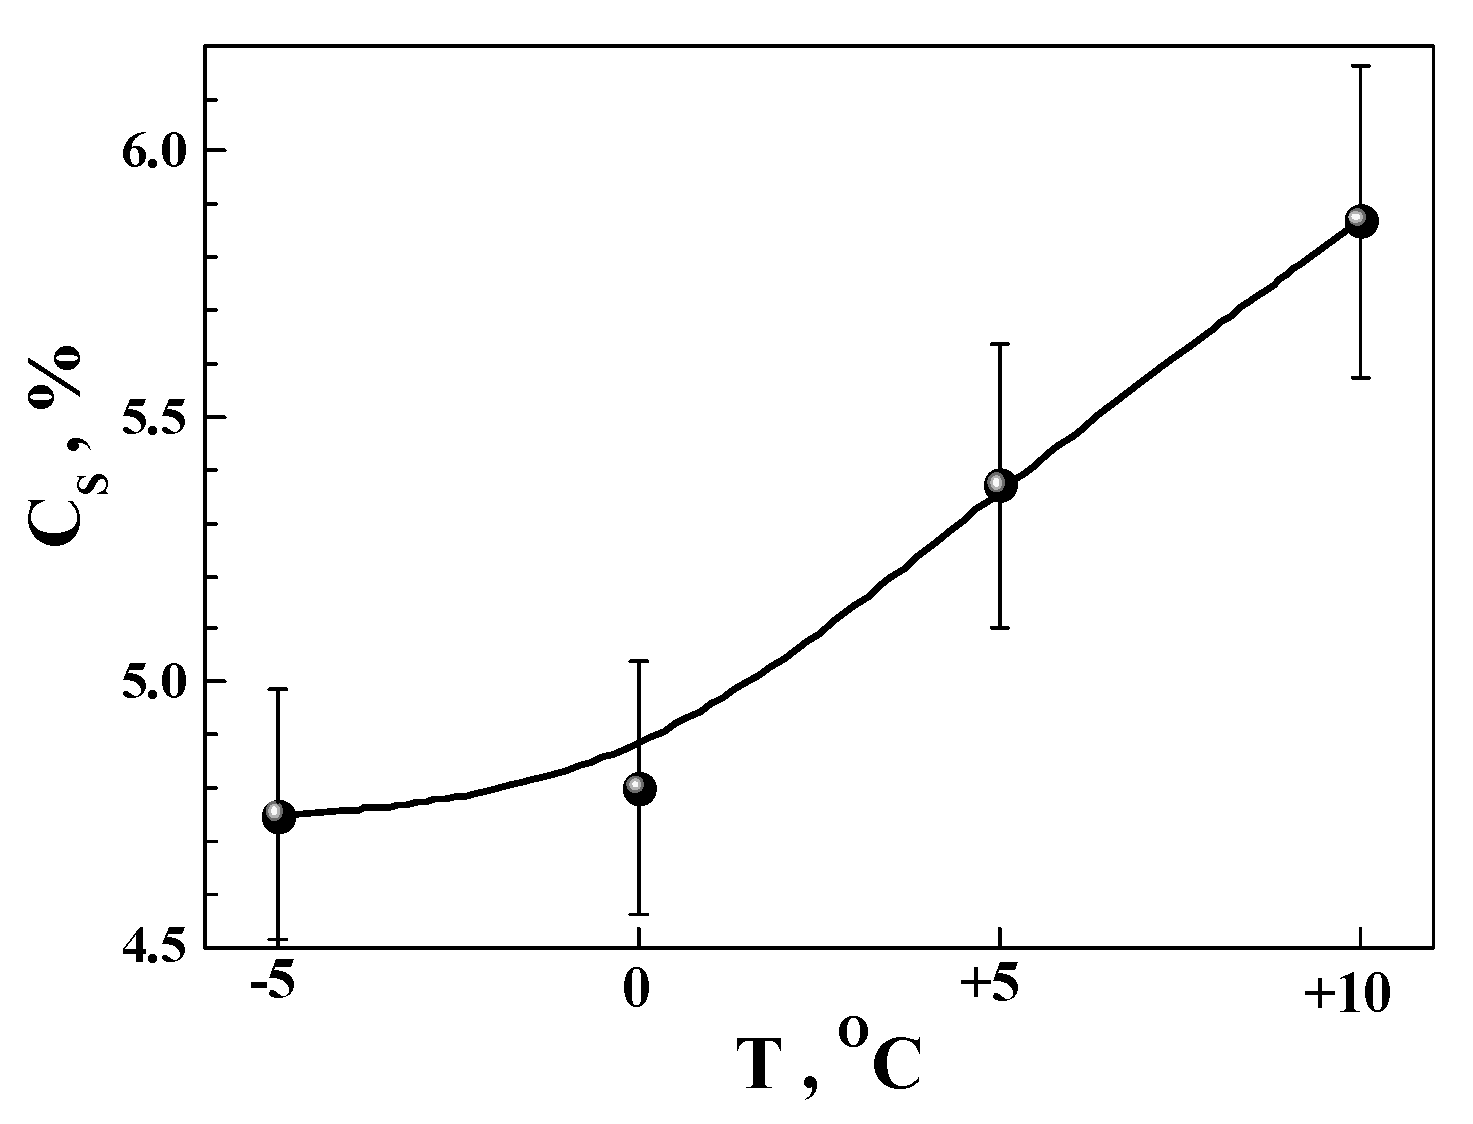
Based on the results presented in Figure 12, it was supposed that the established regularities of changes in microhardness and abrasive wear resistance of PHAL are related to the features of dehydration of anodized layers synthesized at different electrolyte temperatures. In addition, it was revealed that there is a correlation between the detected temperature dependences of HV and W and the sulfur content in the anodized layers. In particular, using X-ray diffraction analysis, a clear increase in the sulfur content in the composition of PHALs with an increase in the synthesis temperature was established (Figure 13). The maximum content of sulfur (5.85 wt.%) was found in the layer synthesized at a temperature of +10 °C and the lowest (4.75 wt.%)—at anodizing temperatures in the range from −5 to 0 °C.
Thus, the anodized layer synthesized at a temperature of −5 °C has the minimum wear and, accordingly, the highest wear resistance. This result correlates with the temperature dependence of the microhardness HV of the PHAL shown in Figure 12a. In particular, the microhardness of the PHAL synthesized at a temperature of −5 °C turned out to be the highest, and, accordingly, the amount of abrasive wear W of this layer was minimal. Summarizing the obtained results, it was concluded that higher microhardness HV and abrasion resistance 1/W PHAL can be obtained at a negative electrolyte temperature, which provides a lower content of water molecules in the composition of aluminum oxides and a lower sulfur content in the synthesized PHA layer.

3.5. Tribological Properties of Pulsed Hard Anodized Layers on 1011 Aluminum Alloy Surface

The tribological tests were carried out according to the scheme of reciprocating sliding of the ball (according to the scheme in Figure 4) on the surface of PHALs synthesized at different electrolyte temperatures. In the tests, two types of balls (steel or ceramic) were used, which were pressed onto the sample surface with a normally oriented force.
The results of tribological tests of PHALs (synthesized in an electrolyte of different temperatures) after their friction contact with a steel ball are shown in Figure 14a. It is obvious that during their frictional contact without lubrication (in dry sliding wear conditions) or in a medium of mineral or synthetic lubricants, the wear value S for PHALs synthesized at a temperature of −5 °C was maximum. As the PHAL synthesis temperature increased, the wear values of the obtained layers gradually decreased. It was revealed somewhat unexpectedly that, regardless of the PHAL synthesis temperature, the wear values S of the obtained layers after their contact with a steel ball were the smallest during tribological tests in the air (i.e., without lubrication) and significantly increased when tested in the medium of both lubricants. Moreover, regardless of the synthesis temperature, the wear values of PHALs in the synthetic lubricant EDGE 5W-40 were significantly higher than those determined in the mineral lubricant I-20 (Figure 14a).
Similar trends in the change in wear indicators S during tribological tests under various lubrication conditions for PHALs synthesized at different electrolyte temperatures were also revealed when they were tested in tribocontact with a ceramic ball, as shown in Figure 14b. As a feature of the tribological wear of PHALs in a pair with a ceramic ball, significantly higher values of wear were fixed compared to a pair with a steel ball. Moreover, this regularity was preserved regardless of the synthesis temperature of PHALs. In addition, it was revealed unexpectedly that in this case (as in the case of friction tests with a steel ball), during tests with lubrication, the wear values of the PHALs synthesized at the same electrolyte temperature significantly exceeded those obtained during tests in the air (without lubrication). This result is contrary to logic and common ideas about the role of lubricants.
Summarizing the obtained results of tribological studies of the PHALs synthesized at different electrolyte temperatures, it was suggested that the unusually high wear resistance of anodized layers under dry sliding wear conditions compared to friction in both lubricants could also be due to the presence of water-binding by aluminum oxides in anodized layers.

4. Discussion

4.1. Tribological Properties of HA and PHA Layers Synthesized on the Surface of 1011 Aluminum Alloy in Comparison with the Properties of High-Strength 1050 Aluminum Alloy

Figure 15 compares the data for two hard-anodized layers on a 1011 aluminum alloy (synthesized in an electrolyte at a temperature of −5 °C in the direct and pulsed current modes) and a high-strength 1050 aluminum alloy, obtained by testing the corresponding samples in conditions of their tribocontact with steel and ceramic balls. It was found that regardless of the lubrication conditions during friction tests (without lubrication or with lubrication with I-20 mineral lubricant or EDGE 5W-40 synthetic lubricant), the wear indicators S of the anodized layers synthesized in the pulsed mode were the lowest. Moreover, this was confirmed by the results of PHAL friction tests both in contact with a steel ball (as shown in Figure 15a) and with a ceramic ball (as shown in Figure 15b).
In addition, the comparison of the results presented in Figure 15 showed that the wear values S at tribocontact of all three analyzed materials (1050 aluminum alloy, HAL, and PHAL on 1011 aluminum alloy) in a pair with a ceramic ball was higher than in a pair with a steel ball. Moreover, this regularity was maintained regardless of lubrication conditions during tribological tests (both during tests in the air without lubrication and in both lubricants).
An anodized layer, synthesized at a temperature of −5 °C in a pulsed mode, showed that its wear resistance 1/S is 2.2–6.4 times (depending on the lubricant and ball type used in tribological tests) higher than the corresponding values for aluminum alloy 1050, which is consistent with the results of another research [66]. In addition, the wear resistance of the synthesized PHAL is 1.5–3.6 times higher than the values for HAL synthesized by conventional hard anodizing at a current density of 3 A/dm2.
The maximum positive effect of anodizing compared to alloy 1055 was obtained in dry sliding wear resistance tests. In particular, regardless of the type of ball used in sliding tests, the wear resistance of FAL was 40 times higher than the wear resistance of high-strength alloy 1055. Moreover, the increase in wear resistance of HAL relative to this alloy was 4.6 and 7.3 times when the samples were in tribocontact with a steel ball and ceramics, respectively.
To establish the causes of the revealed features of wear during tribological tests of synthesized HALs and PHALs, depending on the balls and lubricants used in the tests, it is necessary to study the wear mechanism of all elements of tribocouples involved in friction.

4.2. Friction Coefficient in Contact Zone of PHAL with Steel and Ceramic Balls under Different Lubrication Conditions

The coefficient of friction f is one of the defining tribological characteristics of materials. The regularities of its change under various lubrication conditions during tribocontact of PHAL with both types of balls were analyzed. PHAL synthesized on the surface of aluminum alloy 1011 at a temperature of −5 °C was used. According to the results of tribological tests, this PAL is characterized by a maximum wear resistance of 1/S. Figure 16 shows the change in the coefficient f during tribological tests of PHAL in a pair with a steel ball under different lubrication conditions (without lubrication and with lubrication in mineral and synthetic lubricants). In particular, during the friction of a steel ball on the surface of PHAL without lubrication, the friction coefficient initially (approximately to the middle of the test base) remained unchanged (Figure 16a). After that, the value of f first gradually and then more and more rapidly increased during the test time τ, stabilizing only at its final stage (after more than 78% of the entire test duration). A significant data scatter of the friction coefficient during its growth stage was observed. The reason for the observed scatter of data may be an increase in the number of obstacles to the reciprocating motion of the ball over the anodizing surface in the form of burrs, delaminations, etc. (surface topography effect), but also due to other surface interactions of the tribopair elements, in particular, such as their adhesion). At the final stage of tests without lubrication, the values of f were stabilized, and its maximum level reached 0.63. However, under the same force conditions of the tests, but in the presence of lubricant in the contact zone of the steel ball with the PHAL, the friction coefficient of the analyzed tribological pair remained unchanged throughout the test duration (Figure 16b,c). The friction coefficient remained unchanged at the level of 0.1 and 0.12 during tribological tests of PHAL in I-20 mineral lubricant and in EDGE 5W-40 synthetic lubricant, respectively. Approximately the same value of the coefficient f was also recorded at the beginning of the tribological tests during contact of PHAL with a steel ball without lubrication. Thus, the friction conditions in both lubricants used in the experiments remained stable throughout the entire test duration, while without lubrication, this stability was maintained only during a certain test time.
Similar trends in the change in the values of f during tribological tests were also recorded for a friction pair of PHAL with a ceramic ball. Figure 17 shows that the coefficient of friction between the ceramic ball and the pulsed anodized layer was increased from 0.15 to 0.8 and did not change further during tribological tests in air (without lubrication). The friction coefficient f remained stable throughout the entire test period in the presence of any of the lubricants in the contact zone of the elements of this pair. Its value was stabilized at 0.14–0.15 in tests with I-20 lubricant and at a slightly higher level (0.2) in tests with EDGE 5W-40 lubricant.
In our studies, complete wear of the anodized layer (down to the aluminum alloy) was not observed in any of the tests. An increase in friction coefficient to 0.6–0.8 and its stabilization at this level indicates the completion of the running-in period. This change in the friction coefficient f during tribological tests could be associated with the completion of the stage of eliminating the relief on the surface of the anodized layer, originally created by its polishing. In the break-in process of the PHAL with the ball, the predominant mechanism of their wear was stabilized.
It is obvious that the trends of the change of the friction coefficient during the tribological tests of PHAL are weakly dependent on the ball material. However, in general, in the tests of the PHAL paired with a ceramic ball, the f values were still slightly higher than those obtained using a steel ball. The general pattern of change in f from the duration of the tests was preserved regardless of the type of ball. The increase in the value of f during tests without lubrication began earlier in the tests of the PHAL in contact with a ceramic than with a steel ball. The invariance of the coefficient of friction during tribological tests in both lubricants is logical. However, its invariance at the first stage of dry sliding tests and the subsequent increase and stabilization at a higher level requires explanation. The mechanism of wear of the PHAL under various test conditions could explain the reasons for the appearance of such effects.

4.3. Peculiarities of the Wear Mechanism during Tribocontact of Pulsed Anodized Layer with Steel and Ceramic Balls

PHALs with the best and worst wear resistance were analyzed. They were synthesized on aluminum alloy 1011 at temperatures of −5 °C and +10 °C, respectively. Wear traces on the surfaces of synthesized PHALs after their tribocontact with a steel ball in an I-20 mineral lubricant medium are shown in Figure 18. Sufficiently deep wear marks in the form of clearly defined lines were found even at low resolution on the surface of the PHAL synthesized at a temperature of −5 °C (Figure 18a,b). Small burrs, ragged edges of wear tracks (which is also a sign of burrs), and signs of extrusion of metal along the wear tracks (due to plastic deformation) were often found at higher resolutions (Figure 18c). All these features are fractographic signs of the low wear resistance of the PHAL synthesized at a temperature of −5 °C. This result correlates with the results of mechanical testing of the tribocouple PHAL—steel ball (Figure 14a).
There were almost no obvious signs of wear in the zone of contact of the surface of the PHAL, synthesized at a temperature of +10 °C, with a steel ball during the analysis of wear signs at low resolution (Figure 18d). Only a slight smoothing of the surface relief of the anodized layer, which was caused by the previous mechanical treatment, was noted. X-ray microspectral analysis of the surface of PHAL over the area confirmed the presence in its composition of aluminum gidroxide in the form of gibbsite (which includes three water molecules) and sulfur. An analysis of wear marks on the surface of the anodized layer in the friction zone at a higher resolution showed that the steel ball left insignificant marks on the surface of the PHAL in the form of thin and shallow scratches (Figure 18d). This indicates a high wear resistance of the synthesized PHAL. It was supposed that during tribological contact, the steel ball smoothes the surface of the anodized layer and smears it over its surface. It was assumed that the gibbsite (with three water molecules (Al2O3·3H2O) and a layered structure) in the anodized layer synthesized at +10 °C could act as a solid lubricant. This would create favorable conditions for the formation of a tribolayer due to the adhesion of particles of the anodized layer to the surface of the steel ball and would facilitate mass transfer between the elements of this friction pair. In this case, the degree of wear of the PHAL of such a composition could decrease, and the wear resistance, respectively, could increase.
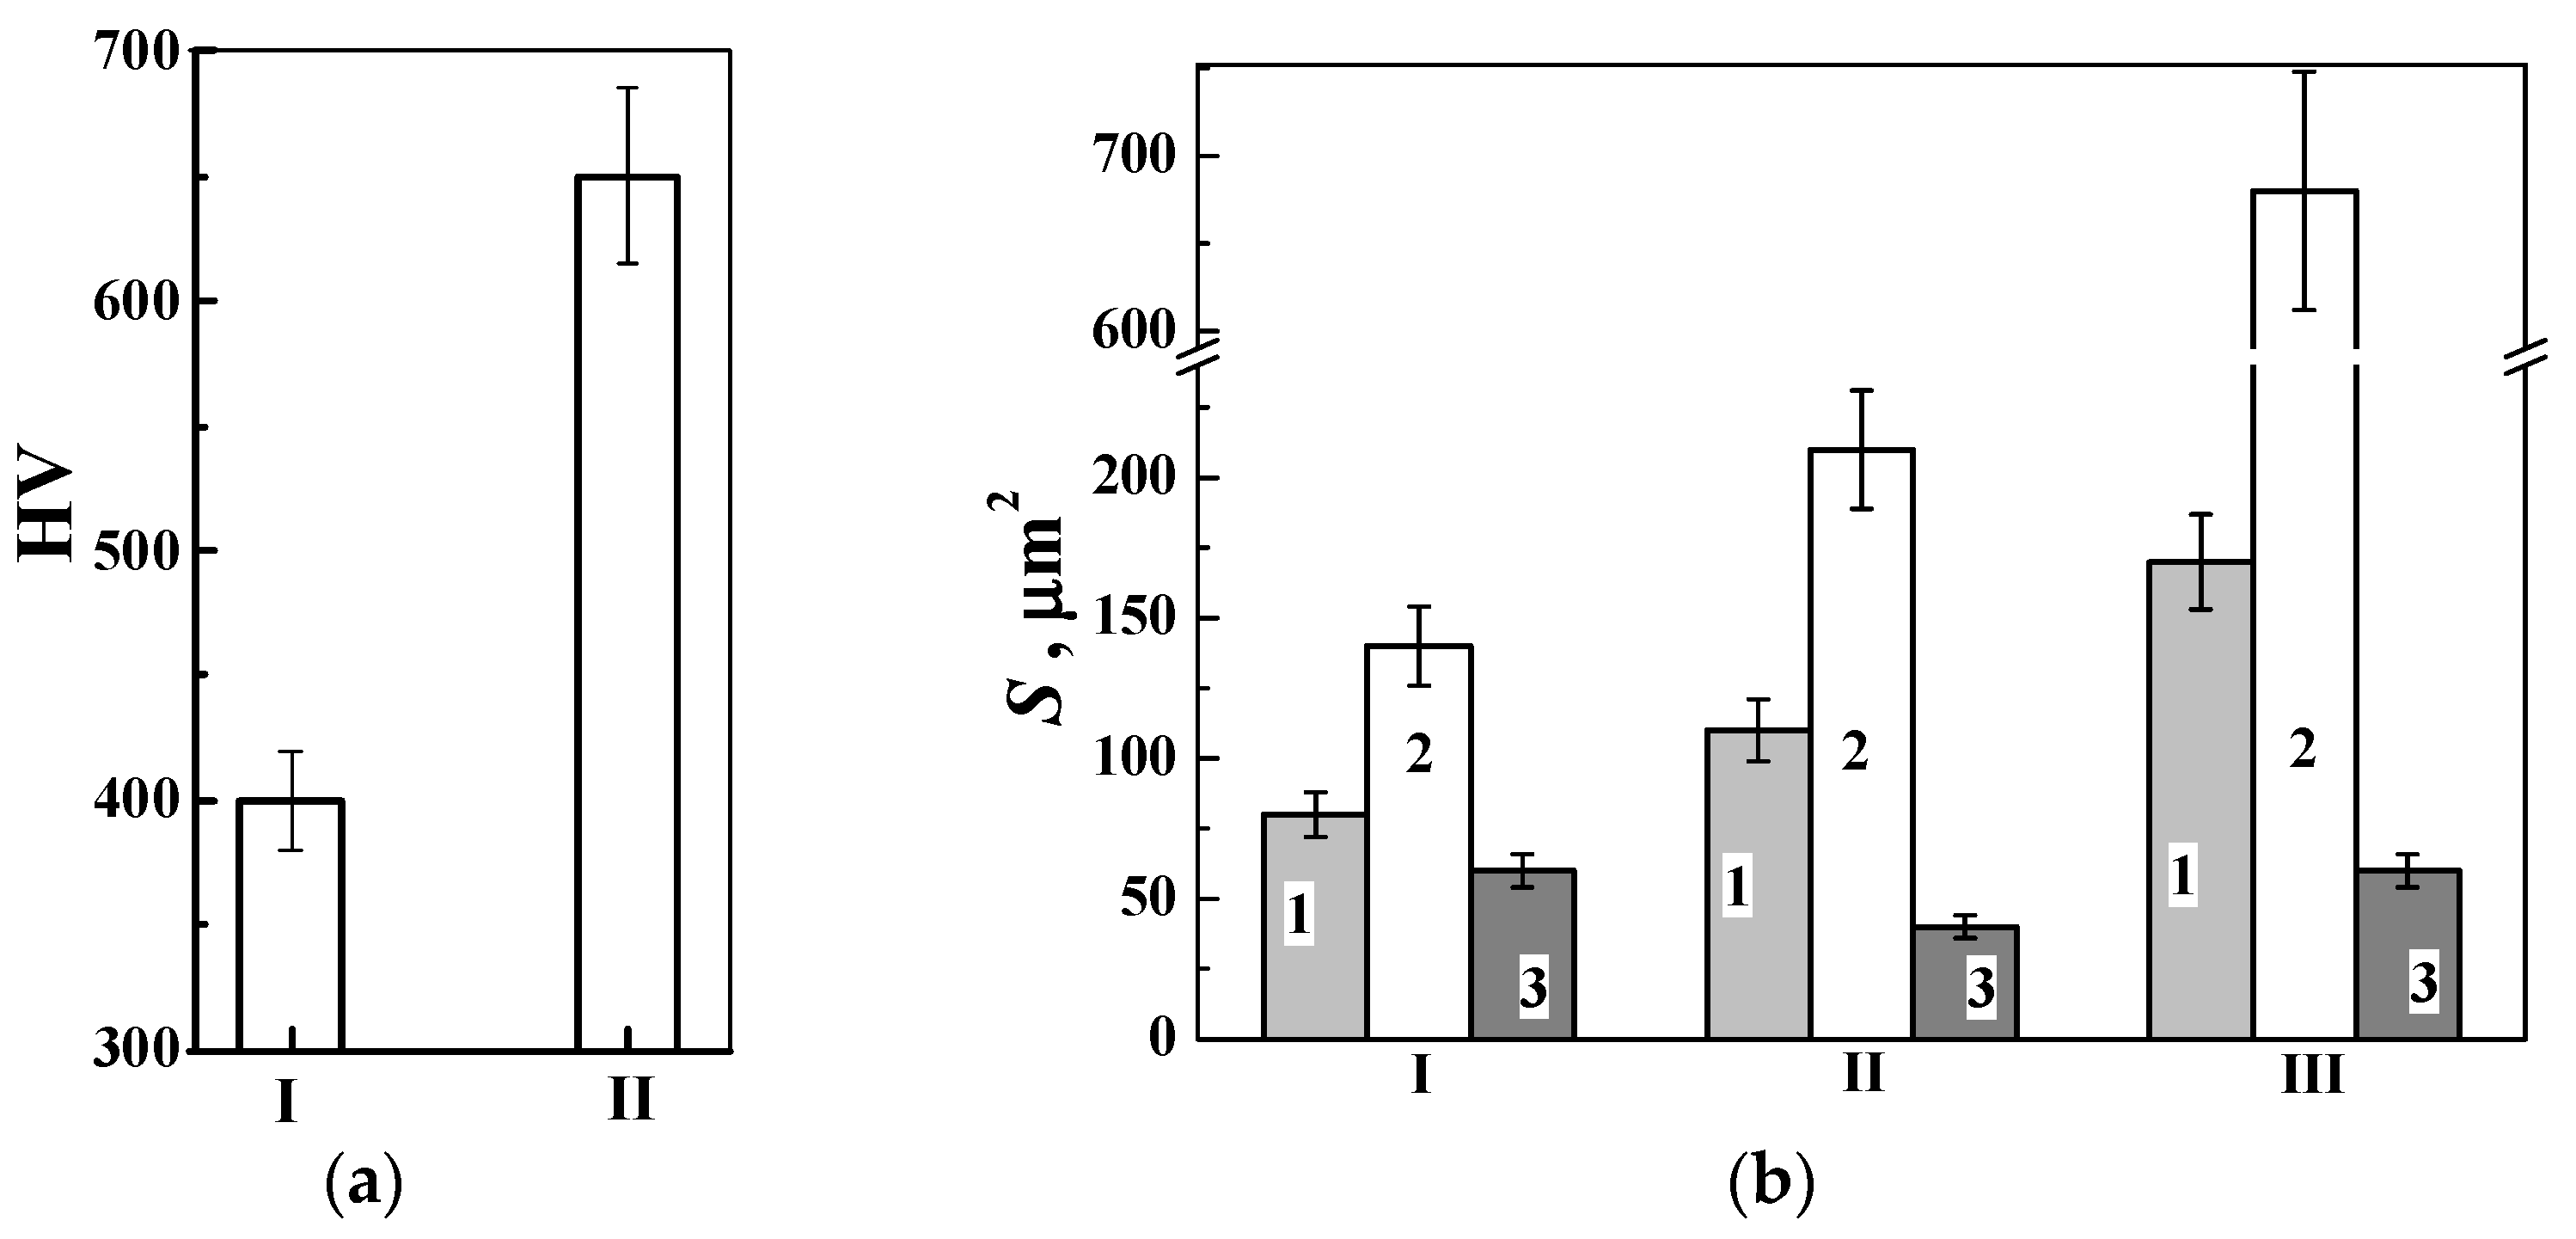
To test the validity of the assumption that not sulfur but water molecules embedded in the structure of the anodized layer in the form of Al2O3·nH2O activate the action of solid lubricant and increase wear resistance in dry sliding conditions, a sample was taken with PHAL (synthesized at a temperature of +10 °C) subjected to heat treatment at a temperature of 350 °C. As a result of such heating, the sulfur content in the anodized layer should not be changed, and the number of water molecules in its structure should be decreased (from three molecules to one). The presence of reflections of the corresponding phases in the X-ray diffraction patterns confirmed the validity of the assumption made (Figure 19). The microhardness of the anodized layer was increased from 400 to 650 HV after heat treatment of the samples with PHAL for 1 h at a temperature of 350 °C (Figure 20a). However, their friction wear resistance 1/S under tribocontact with steel ball was decreased from 2 to 4 times compared to that determined on specimens without heat treatment. Such an effect was observed during the friction of the samples both in the air (without lubrication in the contact zone) and in the medium of both lubricants (Figure 20b). To restore the high wear resistance of the anodized layer, samples with PHAL were boiled in water. This contributed to the saturation of the surface of the anodized layer with water molecules and, as a result, to a decrease in the ability of the samples to wear out during tribological tests. Thus, such a model experiment made it possible to prove that the increased wear resistance of PHAL synthesized at a temperature of +10 °C is due to a large number of water molecules that make up gibbsite and its layered structure.
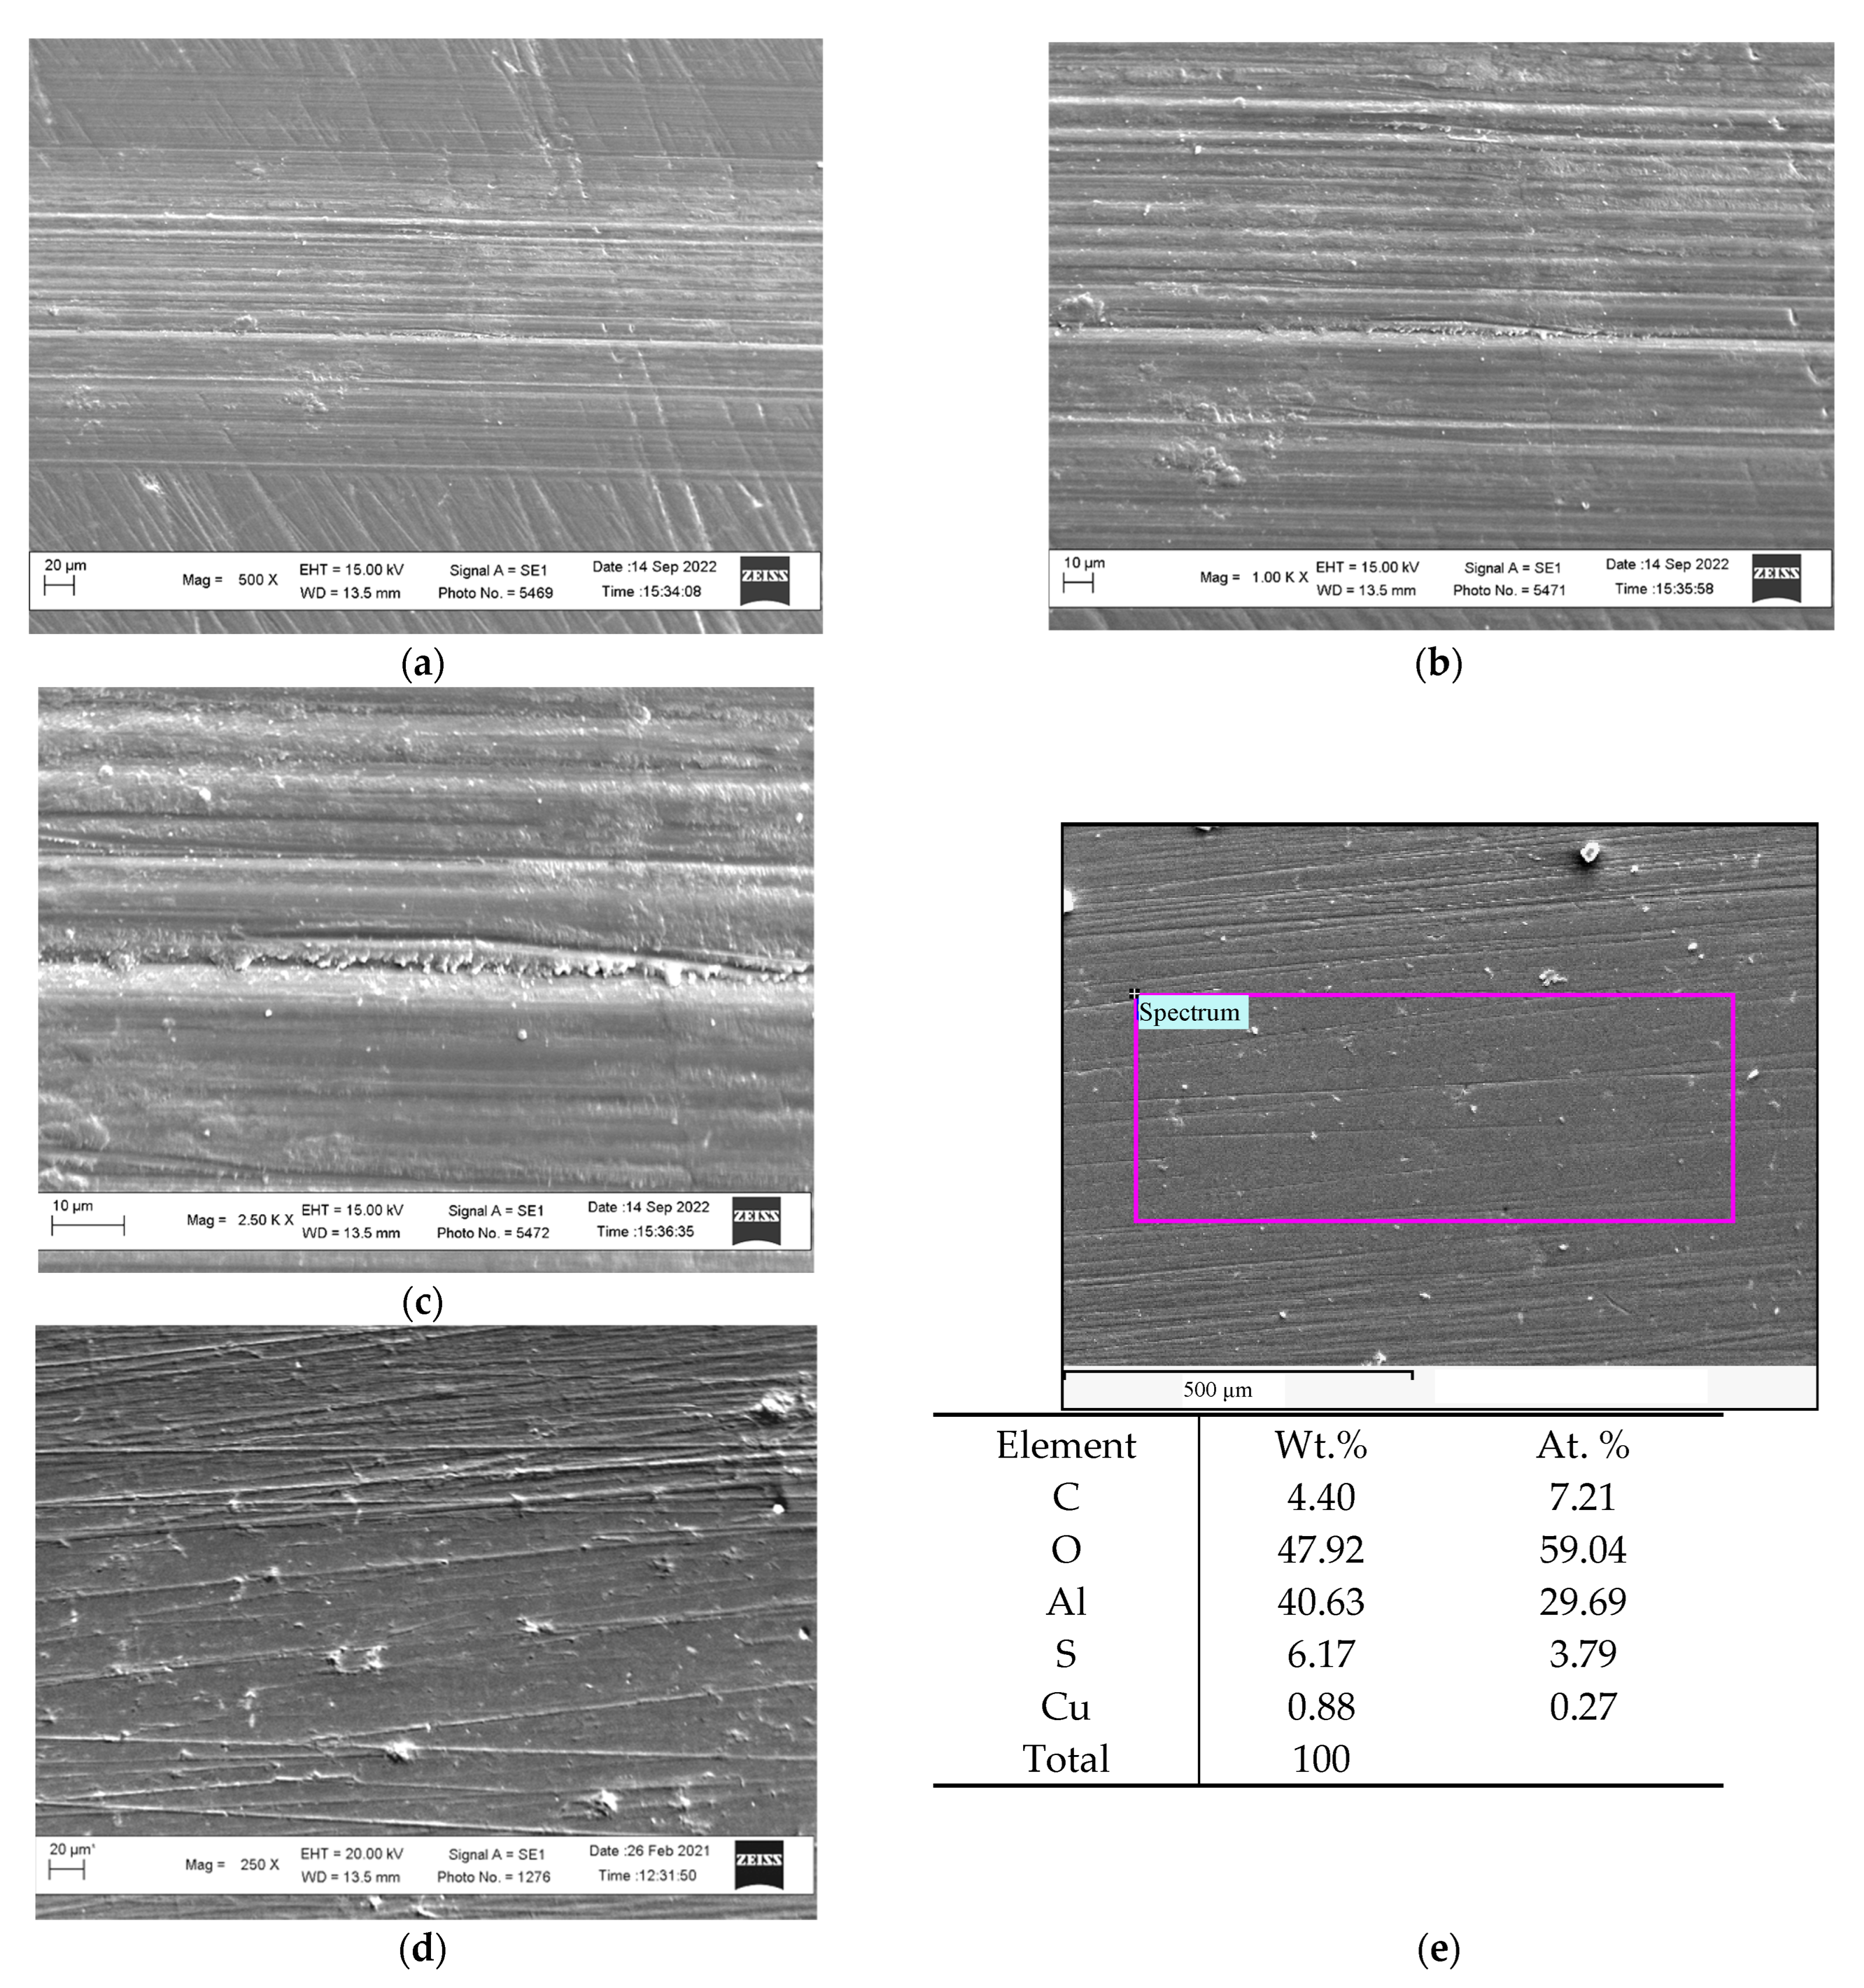
It was established that the least wear (and, accordingly, the highest wear resistance) is typical for PHAL on 1011 aluminum alloy, tested for friction without lubrication, in comparison with its wear in mineral I-20 and synthetic lubricant EDGE 5W-40 (Figure 20b). This was explained by the adhesion of a thin layer of gibbsite (Al2O3·3H2O), which is a part of the anodized layer, to the surface of the steel ball that was in contact with PHAL during tribological tests (Figure 21). As a result, the contact of the steel ball with the anodized layer occurred through this thin layer of gibbsite, which ensured constant mass transfer between both elements of the tribopair and, therefore, they could be constantly restored. The crystal structure of gibbsite Al2O3·3H2O is layered, similar to the structure of graphite. Each interlayer consists of two layers of densely packed hydroxyl ions, between which is a layer of Al3+ cations. The crystal structure of boehmite (Al2O3·H2O) is more densely packed and, therefore, less prone to adhesion and mass transfer to the surface of the steel ball in the process of its movement along the PHAL surface.
The presence of a gibbsite film (Al2O3·3H2O) on the surface of a steel ball after completion of tribological tests in pair with PHAL synthesized in an electrolyte at a temperature of +10 °C was confirmed by the results of X-ray microspectral analysis. It was revealed that both aluminum and oxygen were found on its surface (Figure 21a). It was supposed that, in this case, a special film was formed on the ball’s surface. This film did not harden during friction but was constantly regenerated. The traces of this film were more clearly distinguished in the contact zone of tribopair elements at higher resolution in the form of adhesion islands, which were considered to be parts of layered gibbsite (Figure 21b).
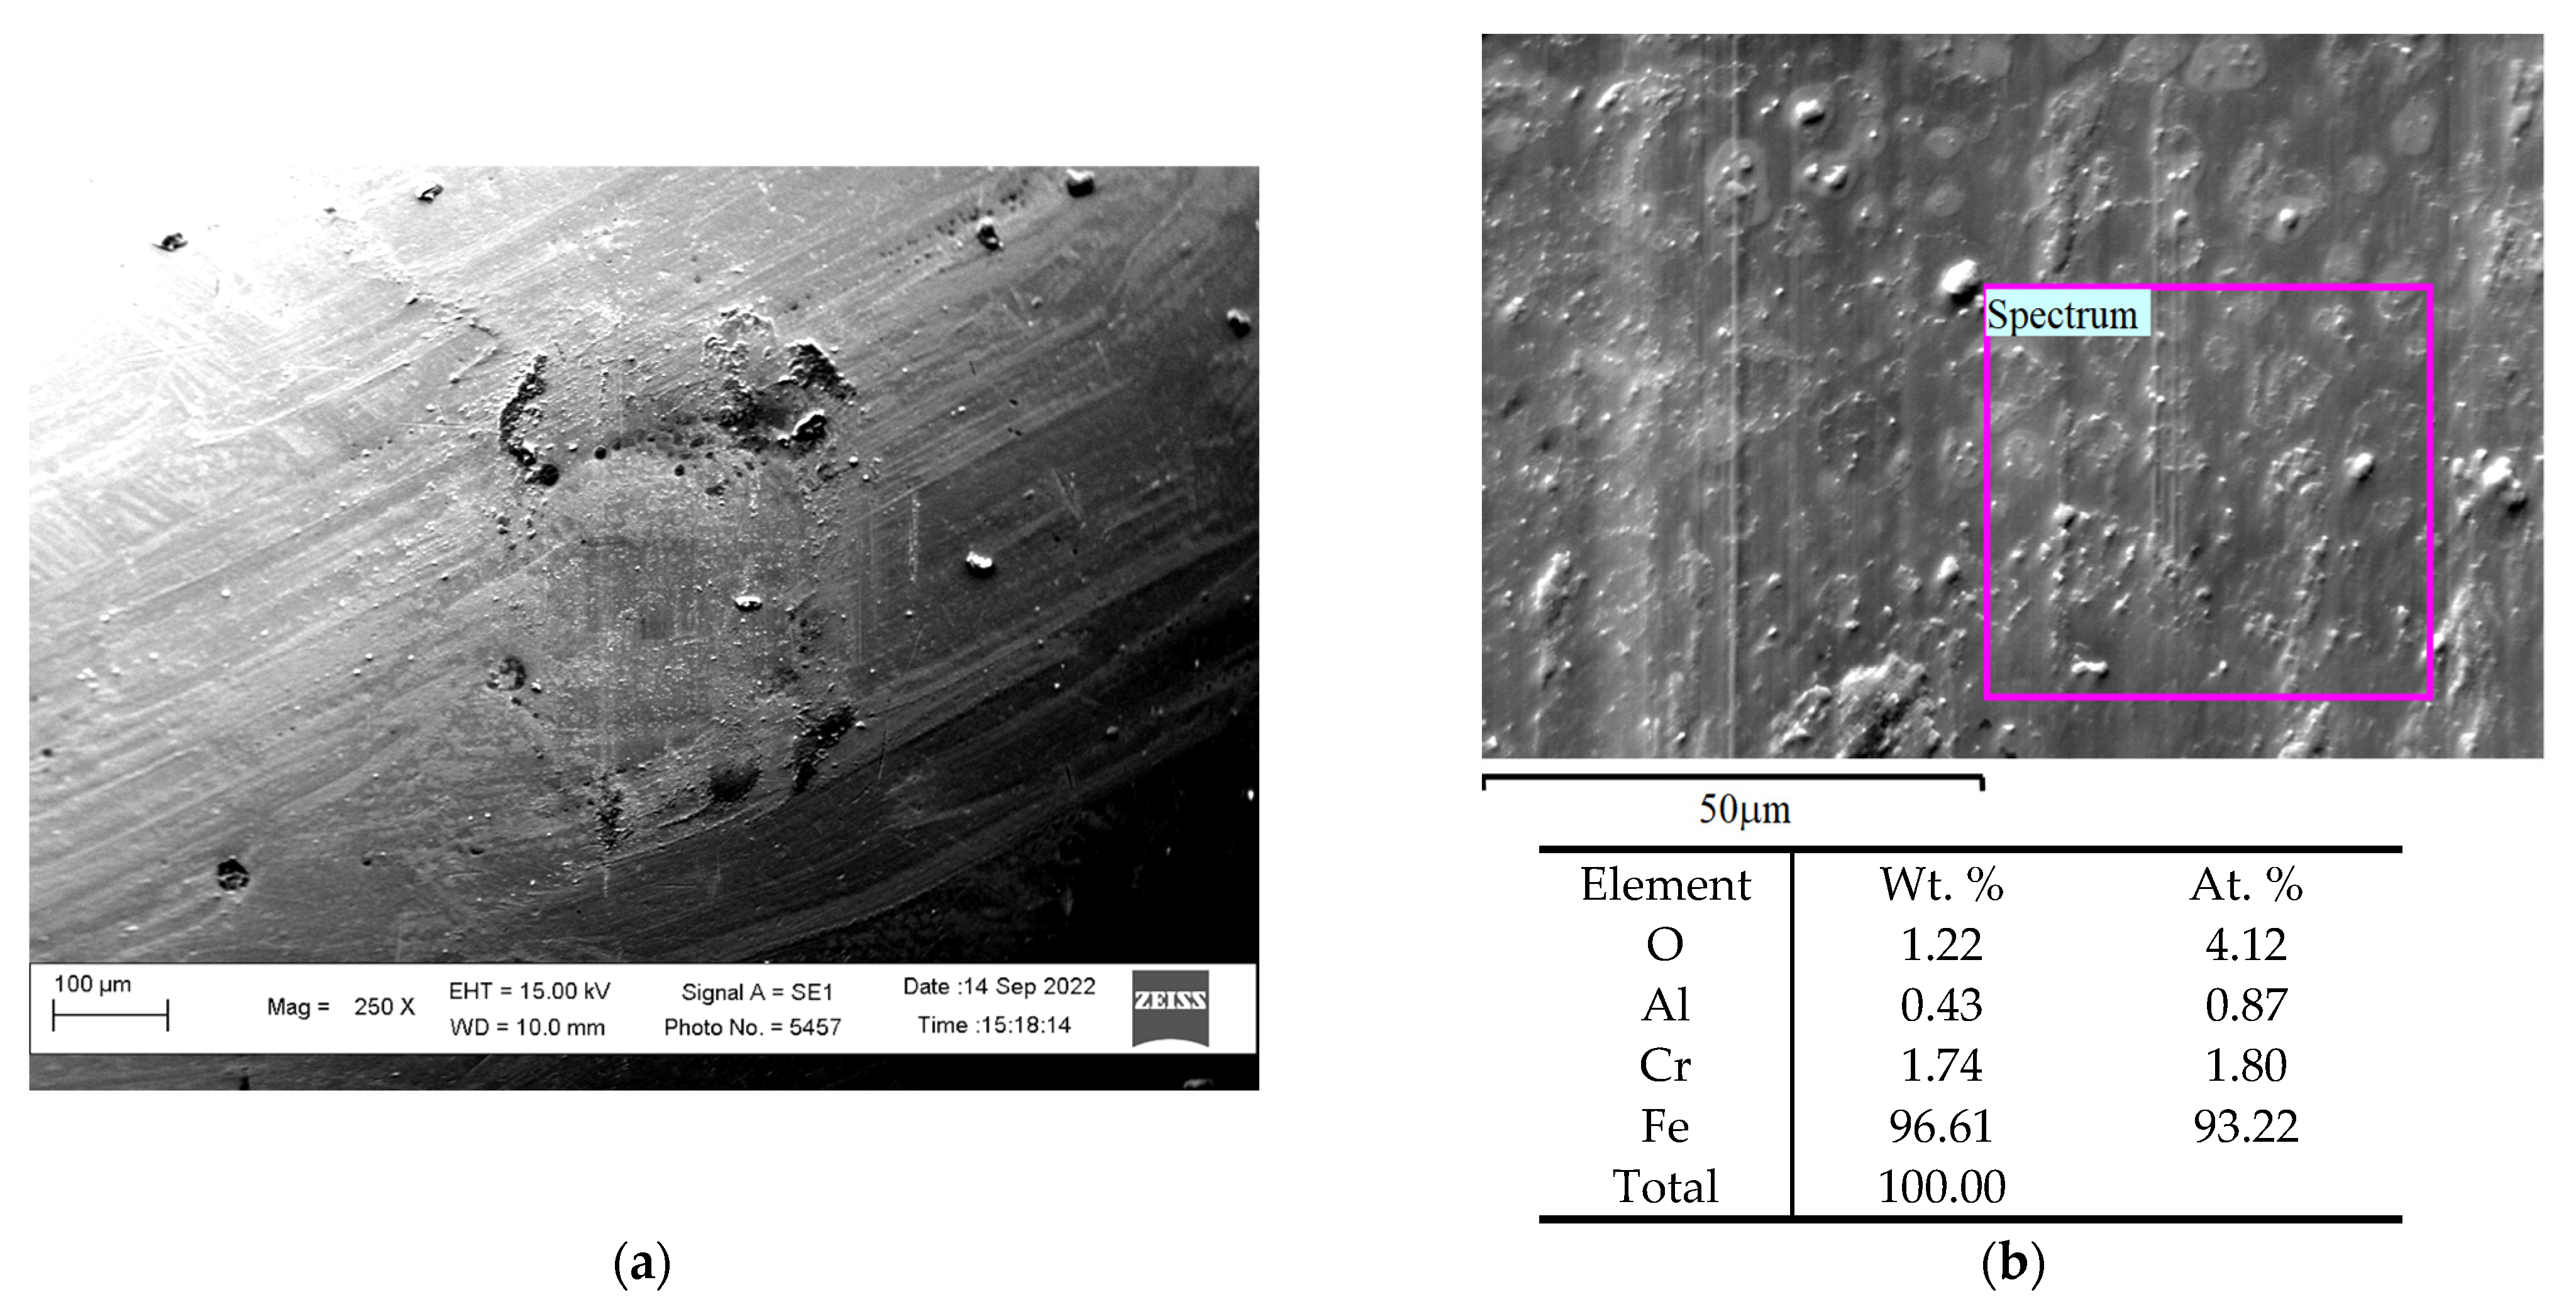
The gibbsite layer (Al2O3·3H2O) was not formed in the zone of tribocontact of the anodized layer with the steel ball during their friction in the lubrication medium. Lubricants in the contact zone of the tribopairs prevented the adhesion of gibbsite layers to the ball surface and, at the same time, facilitated its removal from this zone. Therefore, the friction process took place directly between the surfaces of the steel ball and the PHALs. The absence of a film of anodized layer material (gibbsite) on the surface of the steel ball was confirmed by X-ray microspectral analysis. Neither aluminum nor oxygen was found on its surface during tribological tests in a lubricant (Figure 22). In addition, traces of uneven wear in the form of protrusions with smoothed tops were found on the surface of the ball in the zone of contact with the tribopair. Harder phases in the structure of high-strength steel 100Cr1.5 with a lower tendency to wear could contribute to their appearance. These protrusions could play the role of particles of a bound abrasive, making an additional contribution to the wear of the PHAL. Consequently, the increased ability of PHAL to wear in a tribopair with a steel ball is due to the absence of a gibbsite film in the zone of their contact during tribological tests in lubricant (Figure 20b).
A comparison of the wear resistance of PHAL on the surface of a low-strength aluminum alloy 1011 during its tribocontact with a ceramic ball showed significantly increased wear resistance after pulsed anodizing compared to that for one of the strength aluminum alloys 1050. The friction wear resistance of PHAL was increased more than 40 times when tested in air, by a factor of 2.3 and 2.9 times when tested in mineral (I-20 type) and synthetic (EDGE 5W-40 type) lubricants, respectively (Figure 15b).
Thus, it is substantiated that the highest wear resistance (or the lowest wear resistance S) of anodized layers paired with a ceramic ball during their friction without lubrication compared to friction in I-20 or EDGE 5W-30 lubricants is due to adhesion and transfer of gibbsite particles to the ball surface. An analysis of the surface of PHAL synthesized at an electrolyte temperature of +10 °C revealed a topographically developed friction surface. This is caused, on the one hand, by the smearing of gibbsite over the surface of the anodized layer and, on the other hand, by the peeling off of sufficiently large sections of it with the formation of depressions in the friction zone (Figure 23a).
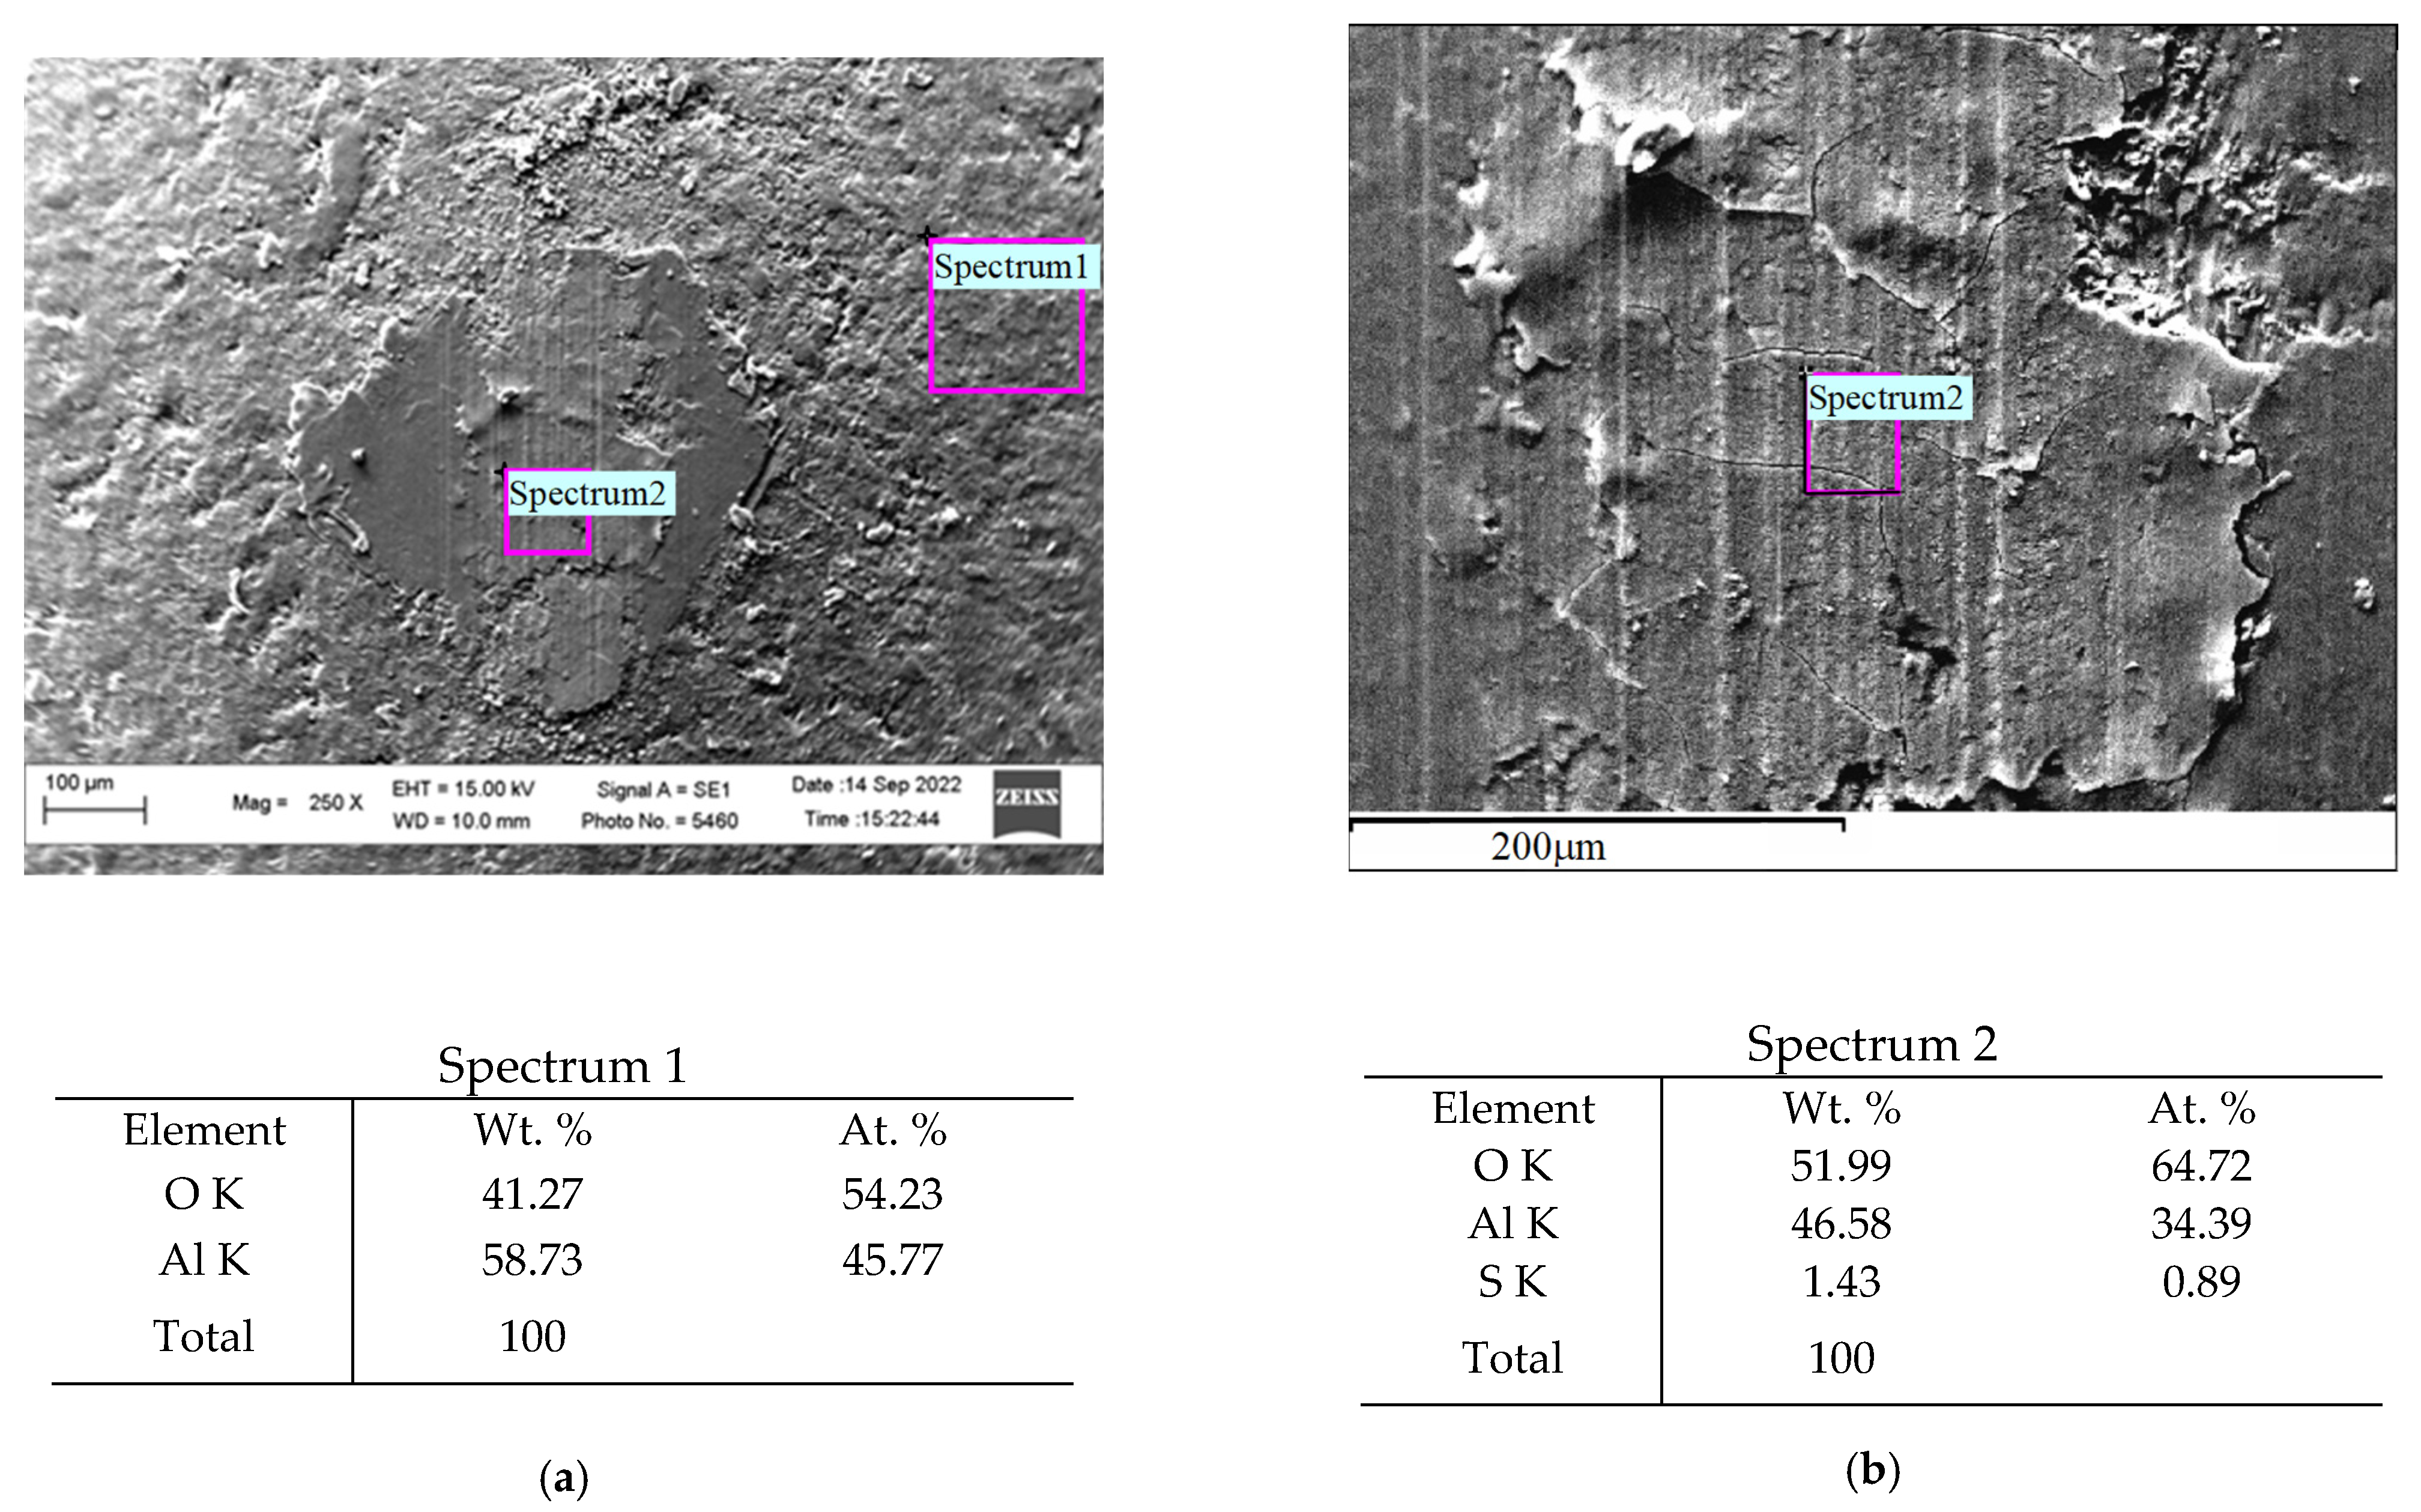
On the PHAL surface in the zone of contact of both elements with a higher resolution, smooth areas of the plastically deformed upper layer of gibbsite and areas after its peeling, where the inner gibbsite sublayer protruded outward, were observed (Figure 23b). This indicates weak adhesion between the layers of the gibbsite and low crack resistance of its upper layer, which cracks under the contact load. Both of these factors contributed to the separation of small areas of the PHAL surface from the inner sublayer, followed by the adhesion of gibbite particles to the surface of the ceramic ball. Similar wear patterns during friction tests of anodized layers were observed by other researchers [67,68]. The proposed mechanism of PHAL wear is also confirmed by the results of X-ray microspectral analysis of the surface layer on the ceramic ball after its contact in air with PHAL, synthesized at a temperature of +10 °C (Figure 24). The ceramic ball consisted of corundum (Al2O3), as evidenced by the spectrum in Figure 24a. The presence of sulfur on the contact surface of this ball with the PHAL layer (spectrum in Figure 24b) indicates the transfer of the surface layer of PHAL and its adhesion to the ceramic surface.
As a result, the friction of the ceramic ball over the anodized layer occurred through a thin layer of gibbsite (Al2O3·3H2O) separated from the anodized layer, with a constant transfer of its particles from one surface (PHAL) to another surface (ball). Thus, this thin tribolayer was preserved for a long time on the ball surface in the contact zone of friction surfaces, which ensured the high wear resistance of PHAL. It was assumed that due to the adhesion of the particles of the anodized layer to the surface of the ceramic ball, a special tribolayer is formed between them, which has the ability to continuously renew adhesion with one or another tribocontact element [68]. This intermediate tribolayer is characterized by reduced adhesion to both contacting surfaces. As a result, despite a significantly higher coefficient of friction during tribological tests without lubrication (especially in the second half of the tests, as shown in Figure 16 and Figure 17), the formation of such an intermediate tribolayer in the tribocontact zone provided lower PHAL wear values than during tests in lubricating media (Figure 20).
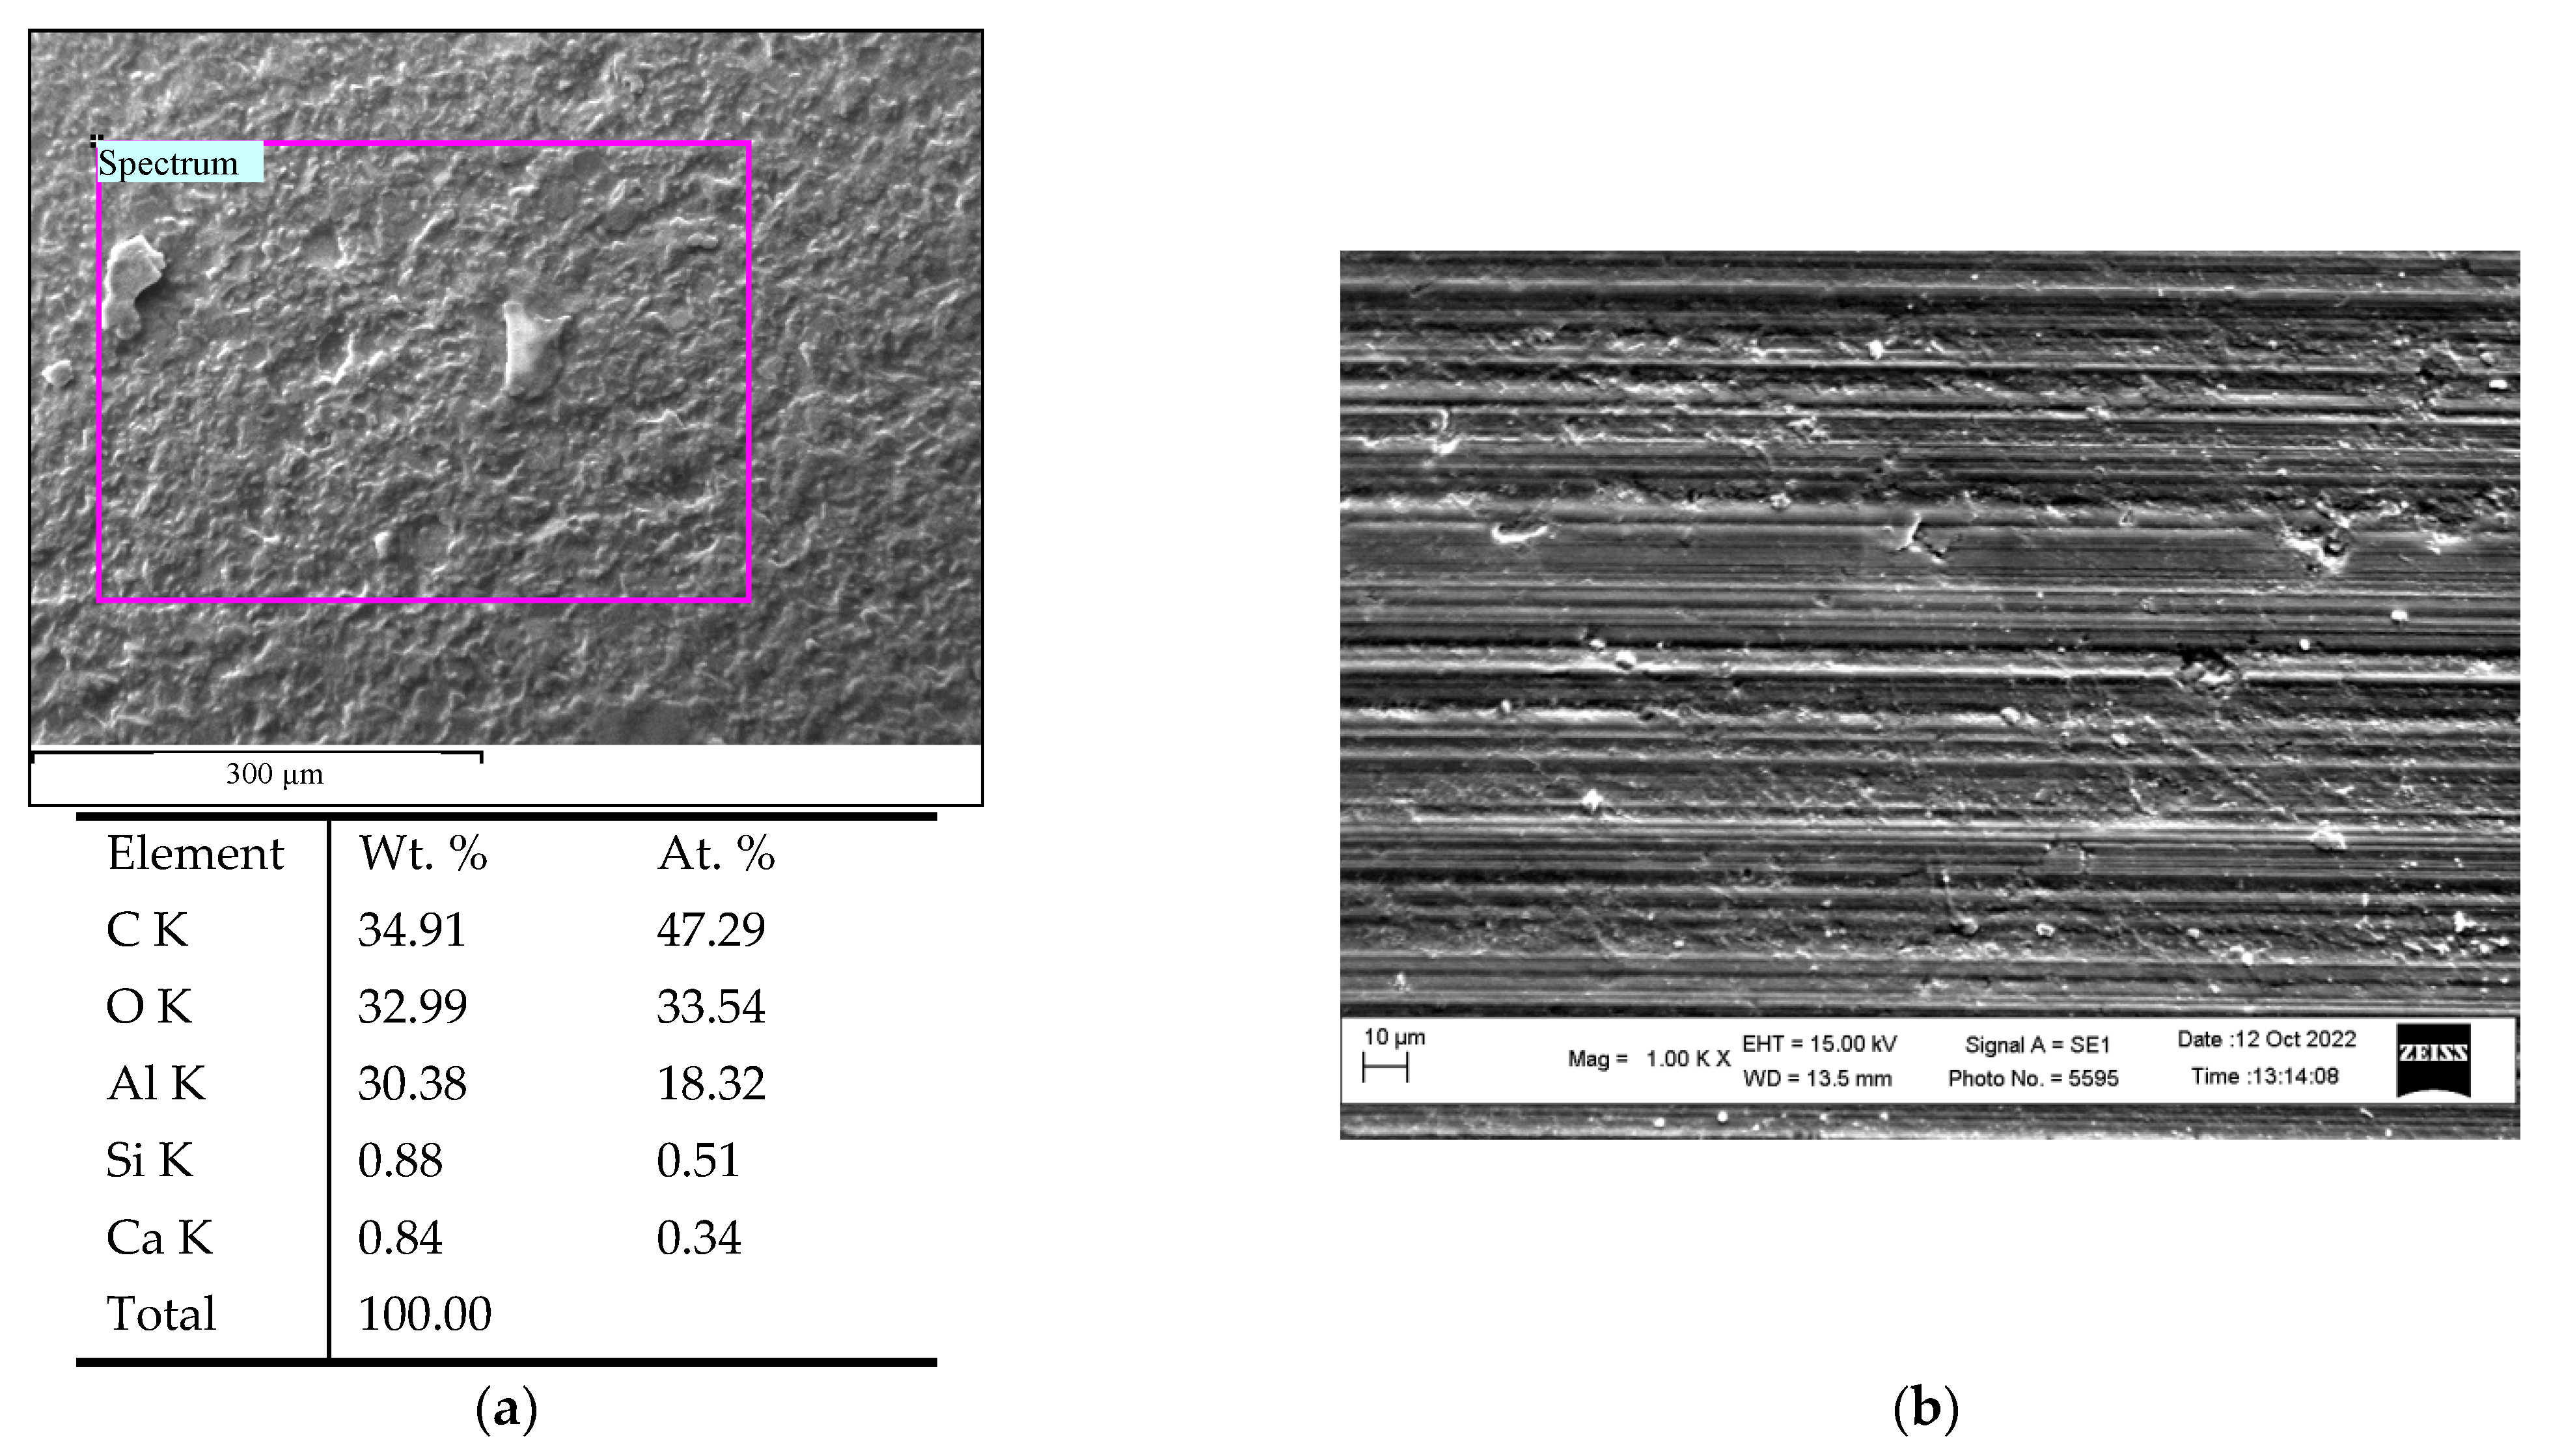
The presence of lubrication in the zone of tribological contact of the ceramic ball with PHAL, synthesized at a temperature of +10 °C, prevented the formation of a tribolayer on the surface of the ball. Therefore, the ball and the anodized layer were in direct contact with each other during friction (Figure 25). No traces of the tribolayer were found on the surfaces of both elements of the tribopair.
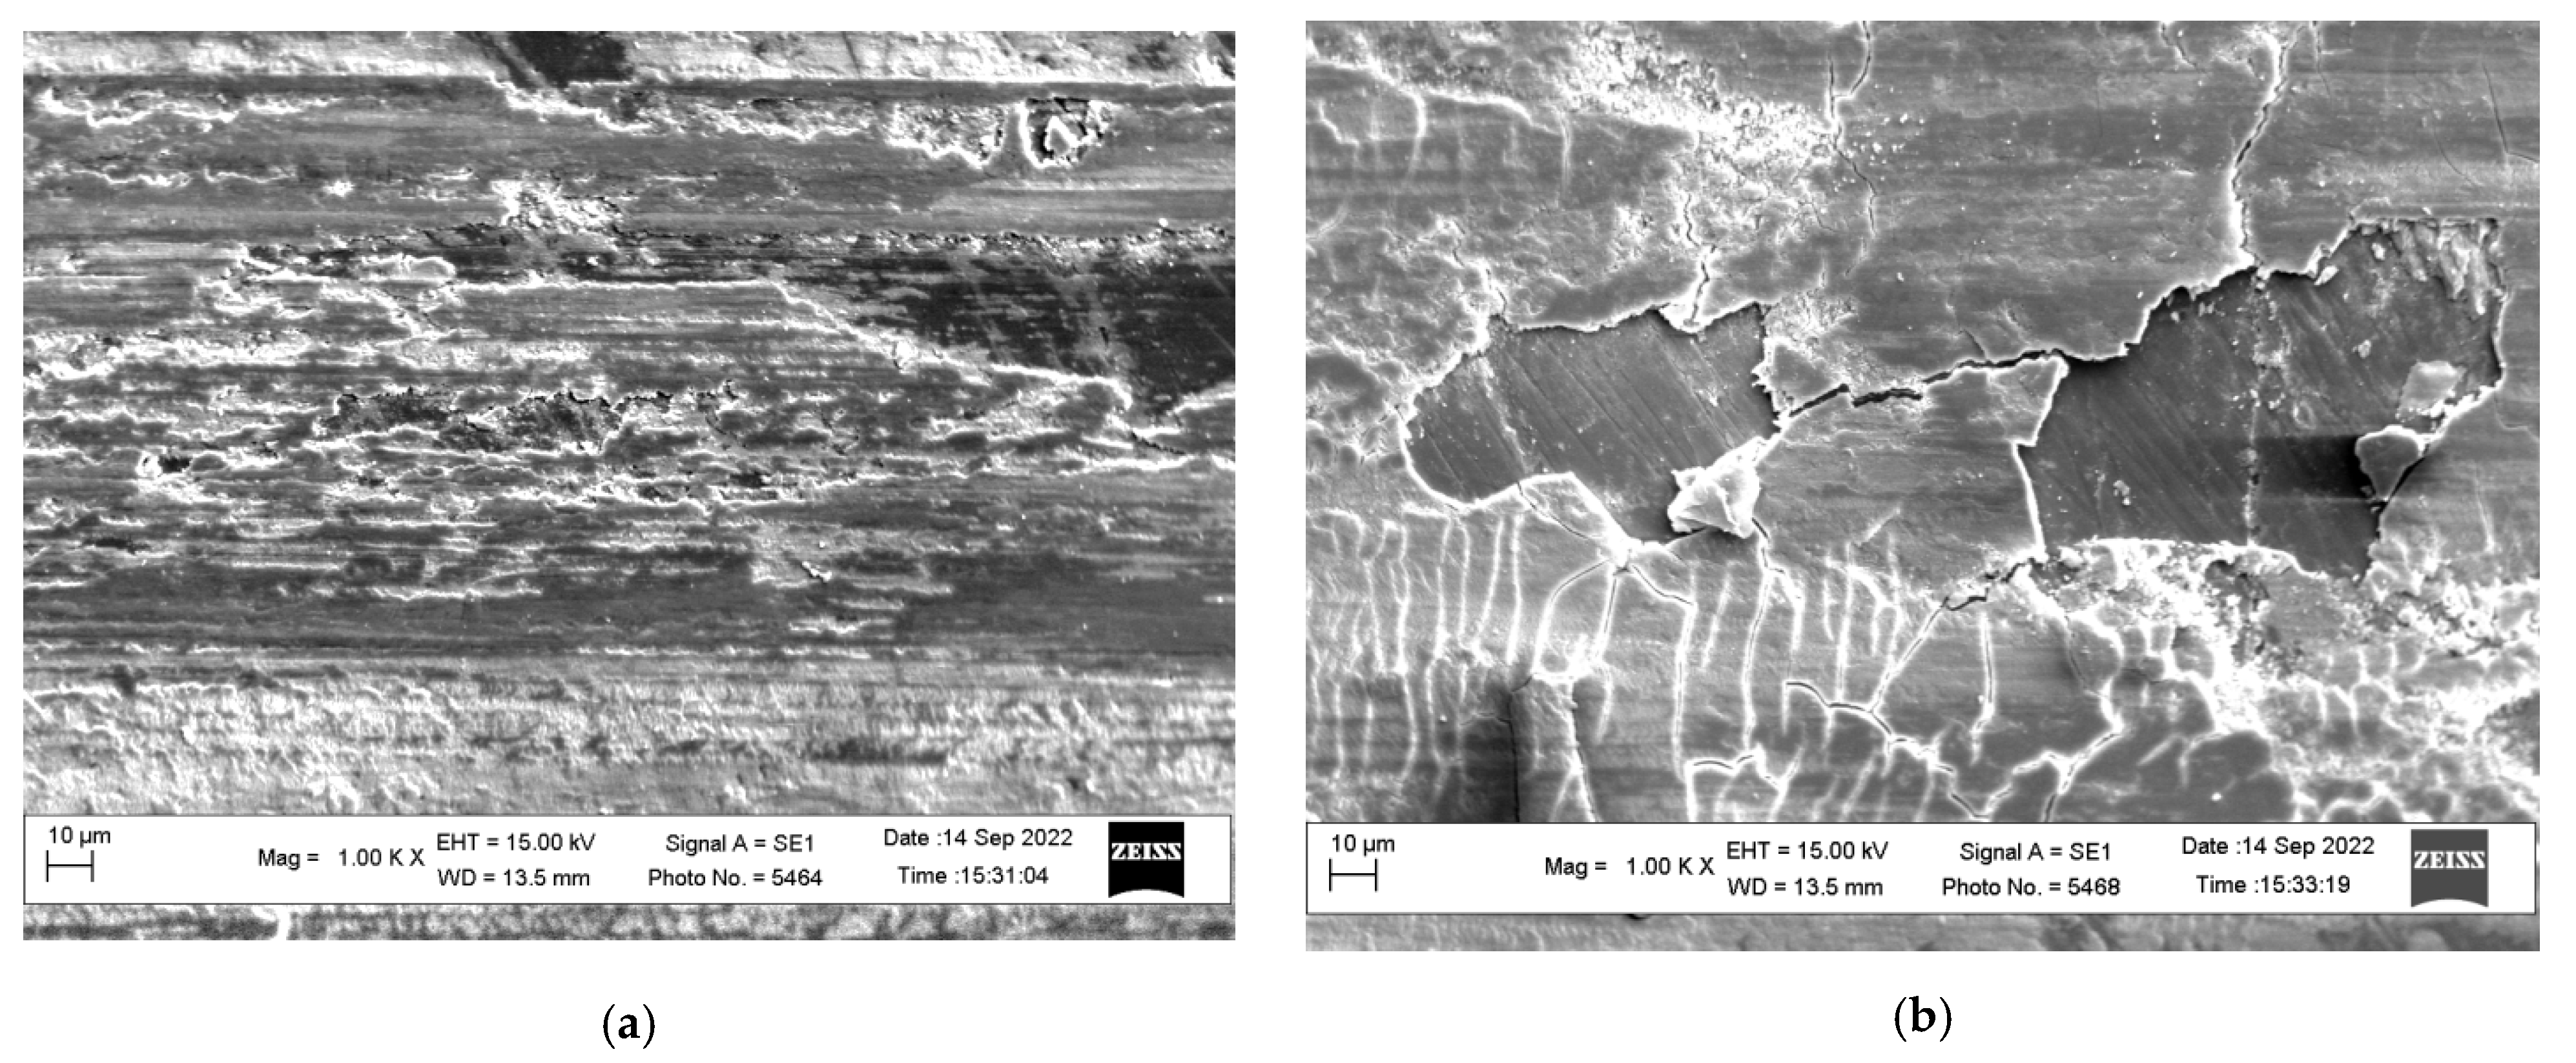
The wear process occurred due to the gradual (layer-by-layer) removal of thin layers from the PHAL surface. As a result, damage appeared on the PHAL surface in the form of scratches and traces of local areas of small thickness, torn from this surface during the reciprocating sliding of the ceramic ball (Figure 25b). At the same time, a relief in the form of small protrusions and pits (spall marks) also appeared on the surface of the ceramic ball, caused by the wear of its surface during sliding tests (Figure 25a). This relief further increased the wear of the anodized layer. The sharp edges of these small defects on the surface of the ceramic ball acted as cutting edges and thereby helped in removing the upper layers of PHAL. At the same time, the wear groove formed on the surface of the PHAL due to the contact of both elements of the tribopair gradually became deeper and wider.

5. Conclusions

It was shown that an increase in the synthesis temperature of pulsed hard anodized layers leads to (1) a change in their crystal structure (various numbers of water molecules in the composition of aluminum hydroxide) and the phase composition (gibsite and boehmite) of the anodized layers; (2) reducing their microhardness and abrasive wear resistance (wear using an abrasive disc); (3) increasing their wear resistance during tribocontact with both steel and ceramic balls under conditions of dry sliding and sliding in lubricating environments (mineral lubricant I-20 and synthetic EDGE 5W-40).
It was established that pulsed hard anodized layers synthesized at a temperature of −5 °C with a boehmite structure (Al2O3·H2O) have the maximum level of abrasive wear resistance. At the same time, the maximum wear resistance during reciprocating sliding tests is characteristic of anodized layers synthesized at a temperature of +10 °C with a gibsite structure (Al2O3·3H2O). The high wear resistance of anodized layers during dry sliding tests is associated with the formation of an intermediate tribolayer, which is constantly renewed due to the adhesion of particles of the anodized layer to the surface of ceramic or steel balls.
It was established that a higher wear resistance of pulsed hard anodized layers during dry sliding tests (compared to tests on I-20 or EDGE 5W-40 lubricants) paired with steel or ceramic balls is due to the transfer of a thin layer of anodized material to the surface of the balls. The tribolayer formed in the zone of their contact is constantly restored due to mass transfer between the elements of the tribopair.
It was shown that surface hardening of the low-strength aluminum alloy 1011 in the pulse anodizing mode made it possible to increase its wear resistance compared to the high-strength aluminum alloy 1050 by 40 times in dry sliding tests using steel and ceramic balls. The excess wear resistance of anodized layers over the corresponding values for alloy 1050 during sliding tests in mineral and synthetic lubricants reached from 2.2 to 5.9 times (depending on the type of ball used in the tribopair with an anodized layer).

Author Contributions

Conceptualization, M.S. and I.P.; methodology, V.H., R.R. and K.Z.; validation, V.H., O.T., K.Z. and H.V.; formal analysis, I.P. and J.P.; investigation, V.H., O.T., R.R., K.Z. and H.V.; interpretation of results, M.S., I.P., O.S., J.P. and V.H.; resources, J.P. and I.P.; data curation, M.S., I.P., J.P., O.S. and V.H.; writing—original draft preparation, M.S., V.H., O.S. and K.Z.; discussion, M.S., I.P., O.S., J.P. and V.H.; writing—review and editing, M.S., O.S. and J.P.; visualization, V.H., K.Z., O.T., R.R. and H.V.; supervision, I.P. and M.S.; project administration, J.P., I.P. and M.S.; funding acquisition, J.P. All authors have read and agreed to the published version of the manuscript.

Funding

These studies were carried out within the framework of project No. II-2-20 “Development of a high-voltage pulsed method for the synthesis of hard anode wear-resistant layers on structural aluminum alloys”, implemented within the framework of competitive directions of the National Academy of Sciences of Ukraine “Support for priority state scientific research and scientific and technical (experimental) developments of the Department of Physical and Technical Problems of Materials Science of the National Academy of Sciences of Ukraine”, according to the decision of the Bureau of the Department of Physical and Technical Problems of Materials Science of the National Academy of Sciences of Ukraine No. 419 dated 22 December 2021.

Institutional Review Board Statement

Not applicable.

Informed Consent Statement

Not applicable.

Data Availability Statement

The data presented in this study are available upon request from the corresponding authors.

Conflicts of Interest

The authors declare no conflict of interest.

References

  1. Peltier, F.; Thierry, D. Review of Cr-free coatings for the corrosion protection of aluminum aerospace alloys. Coatings 2022, 12, 518. [Google Scholar] [CrossRef]
  2. Rodriguez, L.; Vieu, A.; Balsarin, M.; Combes, P.; Alexis, J.; Esvan, J.; Lesko, S.; Denape, J.; Paris, J.-Y.; Delbé, K. Physico-chemical characterisation and tribological behaviour of micro-arc oxidation coating on aluminium alloy—Comparison with hard anodised oxidation. Wear 2023, 516–517, 204591. [Google Scholar] [CrossRef]
  3. Fang, L.; Huang, J.; Liu, Y.; Zhang, B.; Li, H. Cored-wire arc spray fabrication of novel aluminium-copper coatings for anti-corrosion/fouling hybrid performances. Surf. Coat. Technol. 2019, 357, 794–801. [Google Scholar] [CrossRef]
  4. Hutsaylyuk, V.; Student, M.; Zadorozhna, K.; Student, O.; Veselivska, H.; Gvosdetskii, V.; Maruschak, P.; Pokhmurska, H. Improvement of wear resistance of aluminum alloy by HVOF method. J. Mater. Res. Technol. 2020, 9, 16367. [Google Scholar] [CrossRef]
  5. Student, M.; Hvozdetskyi, V.; Stupnytskyi, T.; Student, O.; Maruschak, P.; Prentkovskis, O.; Skačkauskas, P. Mechanical properties of arc coatings sprayed with cored wires with different charge compositions. Coatings 2022, 12, 925. [Google Scholar] [CrossRef]
  6. Peng, Z.; Xu, H.; Liu, S.; Qi, Y.; Liang, J. Wear and corrosion resistance of plasma electrolytic oxidation coatings on 6061 Al alloy in electrolytes with aluminate and phosphate. Materials 2021, 14, 4037. [Google Scholar] [CrossRef]
  7. Huang, X.; Famiyeh, L. Plasma electrolytic oxidation coatings on aluminum alloys: Microstructures, properties, and applications. Mod. Concept Mater. Sci. 2019, 2, 000526. [Google Scholar] [CrossRef]
  8. Liu, W.; Pu, Y.; Liao, H.; Lin, Y.; He, W. Corrosion and wear behavior of PEO coatings on D16T aluminum alloy with different concentrations of graphene. Coatings 2020, 10, 249. [Google Scholar] [CrossRef]
  9. Student, M.; Pohrelyuk, I.; Padgurskas, J.; Posuvailo, V.; Hvozdets’kyi, V.; Zadorozhna, K.; Chumalo, H.; Veselivska, H.; Kovalchuk, I.; Kychma, A. Influence of plasma electrolytic oxidation of cast Al-Si alloys on their phase composition and abrasive wear resistance. Coatings 2023, 13, 637. [Google Scholar] [CrossRef]
  10. Sieber, M.; Simchen, F.; Morgenstern, R.; Scharf, I.; Lampke, T. Plasma electrolytic oxidation of high-strength aluminium alloys—Substrate effect on wear and corrosion performance. Metals 2018, 8, 356. [Google Scholar] [CrossRef]
  11. Scampone, G.; Timelli, G. Anodizing Al–Si foundry alloys: A critical review. Adv. Eng. Mater. 2022, 24, 2101480. [Google Scholar] [CrossRef]
  12. Ali, I.; Quazi, M.M.; Zalnezhad, E.; Sarhan, A.A.D.; Sukiman, N.L.; Ishak, M. Hard anodizing of aerospace AA7075-T6 aluminum alloy for improving surface properties. Trans. Indian Inst. Metals 2019, 72, 2773–2781. [Google Scholar] [CrossRef]
  13. Kwolek, P.; Krupa, K.; Obłój, A.; Kocurek, P.; Wierzbińska, M.; Sieniawski, J. Tribological properties of the oxide coatings produced onto 6061-T6 aluminum alloy in the hard anodizing process. J. Mater. Eng. Perform. 2018, 27, 3268–3275. [Google Scholar] [CrossRef]
  14. Bazaluk, O.; Dubei, O.; Ropyak, L.; Shovkoplias, M.; Pryhorovska, T.; Lozynskyi, V. Strategy of compatible use of jet and plunger pump with chrome parts in oil well. Energies 2022, 15, 83. [Google Scholar] [CrossRef]
  15. Dubei, O.Y.; Tutko, T.F.; Ropyak, L.Y.; Shovkoplias, M.V. Development of Analytical Model of Threaded Connection of Tubular Parts of Chrome-Plated Metal Structures. Metallofiz. Noveishie Tekhnol. 2022, 44, 251–272. [Google Scholar] [CrossRef]
  16. Simchen, F.; Sieber, M.; Kopp, A.; Lampke, T. Introduction to Plasma Electrolytic Oxidation—An Overview of the Process and Applications. Coatings 2020, 10, 628. [Google Scholar] [CrossRef]
  17. Sikdar, S.; Menezes, P.V.; Maccione, R.; Jacob, T.; Menezes, P.L. Plasma Electrolytic Oxidation (PEO) Process—Processing, Properties, and Applications. Nanomaterials 2021, 11, 1375. [Google Scholar] [CrossRef]
  18. Ropyak, L.Y.; Velychkovych, A.S.; Vytvytskyi, V.S.; Shovkoplias, M.V. Analytical study of “crosshead–slide rail” wear effect on pump rod stress state. J. Phys. Conf. Ser. 2021, 1741, 012039. [Google Scholar] [CrossRef]
  19. Wu, Z.; Xia, Y.; Li, G.; Xu, F. Structure and mechanical properties of ceramic coatings fabricated by plasma electrolytic oxidation on aluminized steel. Appl. Surf. Sci. 2007, 253, 8398–8403. [Google Scholar] [CrossRef]
  20. Wielage, B.; Meyer, D.; Pokhmurska, H.; Alisch, G.; Grund, T. Plasma electrolytic oxidation of arc sprayed aluminium coatings [Plasmaelektrolytische Oxidation Thermisch Gespritzter Aluminiumschichten]. Mater. Werkst. 2008, 39, 920–923. [Google Scholar] [CrossRef]
  21. Ropyak, L.; Shihab, T.; Velychkovych, A.; Dubei, O.; Tutko, T.; Bilinskyi, V. Design of a two-layer Al–Al2O3 coating with an oxide layer formed by the plasma electrolytic oxidation of Al for the corrosion and wear protections of steel. Prog. Phys. Met. 2023, 24, 319–365. [Google Scholar] [CrossRef]
  22. Durdu, S.; Aktuğ, S.L.; Korkmaz, K. Characterization and mechanical properties of the duplex coatings produced on steel by electro-spark deposition and micro-arc oxidation. Surf. Coat. Technol. 2013, 236, 303–308. [Google Scholar] [CrossRef]
  23. Yang, Z.; Guo, X.; Lu, S.; Zhang, Y.; Hu, H.; Lu, K.; Zhang, J. Investigation of Stray Radiation Suppression in Infrared Imaging System Using a Novel Broadband and High-Absorption Ceramic Coating. Appl. Sci. 2021, 11, 4952. [Google Scholar] [CrossRef]
  24. Bembenek, M.; Makoviichuk, M.; Shatskyi, I.; Ropyak, L.; Pritula, I.; Gryn, L.; Belyakovskyi, V. Optical and Mechanical Properties of Layered Infrared Interference Filters. Sensors 2022, 22, 8105. [Google Scholar] [CrossRef]
  25. Hutsaylyuk, V.; Student, M.; Posuvailo, V.; Student, O.; Sirak, Y.; Hvozdets’kyi, V.; Maruschak, P.; Veselivska, H. The properties of oxide-ceramic layers with Cu and Ni inclusions synthesizing by PEO method on top of the gas-spraying coatings on aluminium alloys. Vacuum 2020, 179, 109514. [Google Scholar] [CrossRef]
  26. Moshrefifar, M.; Ebrahimifar, H.; Hakimizad, A. Systematic investigation of silicon content effects on the PEO coatings’ properties on Al–Si binary alloys in silicate-based and tungstate-containing electrolytes. Coatings 2022, 12, 1438. [Google Scholar] [CrossRef]
  27. Student, M.M.; Dovhunyk, V.M.; Posuvailo, V.M.; Koval’chuk, I.V.; Hvozdets’kyi, V.M. Friction behavior of iron-carbon alloys in couples with plasma-electrolytic oxide-ceramic layers synthesized on D16T alloy. Mater. Sci. 2017, 53, 359–367. [Google Scholar] [CrossRef]
  28. Lu, X.; Mohedano, M.; Blawert, C.; Matykina, E.; Arrabal, R.; Kainer, K.U.; Zheludkevich, M.L. Plasma electrolytic oxidation coatings with particle additions—A review. Surf. Coat. Technol. 2016, 307, 1165–1182. [Google Scholar] [CrossRef]
  29. Ovundur, M.; Muhaffel, F.; Cimenoglu, H. Characterization and tribological properties of hard anodized and micro arc oxidized 5754 quality aluminum alloy. Tribol. Ind. 2015, 37, 55–59. [Google Scholar]
  30. Mohitfar, H.; Mahdavi, S.; Etminanfar, M.; Khalil-Allafi, J. Characteristics and tribological behavior of the hard anodized 6061-T6 Al alloy. J. Alloys Comp. 2020, 842, 155988. [Google Scholar] [CrossRef]
  31. Nastruzzi, A.; Cicerchia, F.; Fortini, A.; Nastruzzi, C. Gold hard anodized (GHA) materials with antimicrobial surface properties: Mechanical, tribological, and microbiological characterization. Emergent Mater. 2021, 4, 249–263. [Google Scholar] [CrossRef]
  32. Musza, A.; Windisch, M.; Török, M.; Molnár, T.; Kovács, S.; Sátán-Papp, S.; Szegedi, K.; Ugi, D.; Chinh, N.Q.; Vida, Á. Tribological examination of anodized Al-356 for automotive use. Coatings 2023, 13, 1642. [Google Scholar] [CrossRef]
  33. Student, M.M.; Pohrelyuk, I.M. Modification of the surfaces of aluminum and titanium alloys aimed at the improvement of their wear resistance and tribological characteristics. Mater. Sci. 2021, 57, 377–386. [Google Scholar] [CrossRef]
  34. Student, M.M.; Pohrelyuk, I.M.; Hvozdetskyi, V.M.; Veselivska, H.H.; Zadorozhna, K.R.; Mardarevych, R.S.; Dzioba, Y.V. Influence of the composition of electrolyte for hard anodizing of aluminum on the characteristics of oxide layer. Mater. Sci. 2021, 57, 240–247. [Google Scholar] [CrossRef]
  35. Remešová, M.; Tkachenko, S.; Kvarda, D.; Ročňáková, I.; Gollas, B.; Menelaou, M.; Čelko, L.; Kaiser, J. Effects of anodizing conditions and the addition of Al2O3/PTFE particles on the microstructure and the mechanical properties of porous anodic coatings on the AA1050 aluminium alloy. Appl. Surface Sci. 2020, 513, 145780. [Google Scholar] [CrossRef]
  36. Martínez-Viademonte, M.P.; Abrahami, S.T.; Hack, T.; Burchardt, M.; Terryn, H. A review on anodizing of aerospace aluminum alloys for corrosion protection. Coatings 2020, 10, 1106. [Google Scholar] [CrossRef]
  37. Student, M.M.; Pohrelyuk, I.M.; Chumalo, H.V.; Hvozdetskyi, V.M. Improvement of the functional characteristics of coatings obtained by the method of hard anodizing of aluminum alloys. Mater. Sci. 2021, 56, 820–829. [Google Scholar] [CrossRef]
  38. Juhl, A.D. Why it makes sense to upgrade to pulse anodizing: Mock finishing shop scenarios show how switching from conventional anodizing processes to newer methods can boost productivity while maximizing ROI. Met. Finish. 2009, 107, 24–27. [Google Scholar] [CrossRef]
  39. Raj, V.M.; Rajaram, P.; Balasubramanian, G.; Vincent, S.; Kanagaraj, D. Pulse anodizing—An overview. Int. J. Surf. Eng. Coat. 2003, 81, 114–121. [Google Scholar] [CrossRef]
  40. Kwolek, P.; Drapała, D.; Krupa, K.; Obłój, A.; Tokarski, T.; Sieniawski, J. Mechanical properties of a pulsed anodised 5005 aluminium alloy. Surf. Coat. Technol. 2020, 383, 125–233. [Google Scholar] [CrossRef]
  41. Mohammadi, I.; Afshar, A. Modification of nanostructured anodized aluminum coatings by pulse current mode. Surf. Coat. Technol. 2015, 278, 48–55. [Google Scholar] [CrossRef]
  42. Tomilo, V.A.; Sokolov, Y.V.; Parshuto, A.A. High-voltage electrochemical oxidation of an aluminum alloy with preliminary electrolytic-plasma surface treatment. News Nat. Acad. Sci. Belarus. Ser. Phys. Techn. Sci. 2013, 2, 25–28. (In Russian) [Google Scholar]
  43. Bozza, A.; Giovanardi, R.; Manfredini, T.; Mattioli, P. Pulsed current effect on hard anodizing process of 7075-T6 aluminium alloy. Surf. Coat. Technol. 2015, 270, 139–144. [Google Scholar] [CrossRef]
  44. Bensalah, W.; Elleuch, K.; Feki, M.; Wery, M.; Ayedi, H.F. Optimization of anodic layer properties on aluminium in mixed oxalic/sulphuric acid bath using statistical experimental methods. Surf. Coat. Technol. 2007, 201, 7855–7864. [Google Scholar] [CrossRef]
  45. Shih, H.H.; Tzou, S.L. Study of anodic oxidation of aluminum in mixed acid using a pulsed current. Surf. Coat. Technol. 2000, 124, 278–285. [Google Scholar] [CrossRef]
  46. Rajendra, A.; Parmar, B.J.; Sharma, A.K.; Bhojraj, H.; Nayak, M.M.; Rajanna, K. Hard anodisation of aluminium and its application to sensorics. Surf. Eng. 2005, 21, 193–197. [Google Scholar] [CrossRef]
  47. Aperador, W.; Delgado, A.; Bautista, J. Improved corrosion protection properties in anodic films type porous on 2024 T3 aluminium alloys obtained by pulse reverse plating. Int. J. Electrochem. Sci. 2013, 8, 9607–9617. [Google Scholar] [CrossRef]
  48. Qian, J.-G.; Wang, C.; Li, D.; Guo, B.-L.; Song, G.-L. Formation mechanism of pulse current anodized film on AZ91D Mg alloy. Trans. Nonferrous Met. Soc. China 2008, 18, 19–23. [Google Scholar] [CrossRef]
  49. Gudla, V.C.; Jensen, F.; Bordo, K.; Simar, A.; Ambat, R. Effect of high frequencypulsing on the interfacial structure of anodized Aluminium—TiO2. J. Electrochem. Soc. 2015, 162, C303–C310. [Google Scholar] [CrossRef]
  50. Gudla, V.C.; Bordo, K.; Engberg, S.; Rechendorff, K.; Ambat, R. High frequency pulse anodising of magnetron sputtered Al-Zr and Al-Ti coatings. Mater. Des. 2016, 95, 340–347. [Google Scholar] [CrossRef]
  51. Gudla, V.C.; Bordo, K.; Jensen, F.; Canulescu, S.; Yuksel, S.; Simar, A.; Ambat, R. High frequency anodising of aluminium—TiO2 surface composites: Anodising behaviour and optical appearance. Surf. Coat. Technol. 2015, 277, 67–73. [Google Scholar] [CrossRef]
  52. Fratila-Apachitei, L.; Duszczyk, J.; Katgerman, L. AlSi(Cu) anodic oxide layers formed in H2SO4 at low temperature using different current waveforms. Surf. Coat. Technol. 2003, 165, 232–240. [Google Scholar] [CrossRef]
  53. Bononi, M.; Giovanardi, R.; Bozza, A.; Mattioli, P. Pulsed current effect on hard anodizing process of 2024-T3 aluminium alloy. Surf. Coat. Technol. 2016, 289, 110–117. [Google Scholar] [CrossRef]
  54. Lee, W.; Schwirn, K.; Steinhart, M.; Pippel, E.; Scholz, R.; Gösele, U. Structural engineering of nanoporous anodic aluminium oxide by pulse anodization of aluminium. Nat. Nanotechnol. 2008, 3, 234–239. [Google Scholar] [CrossRef] [PubMed]
  55. Saenz de Miera, M.; Curioni, M.; Skeldon, P.; Thompson, G.E. The behaviour of second phase particles during anodizing of aluminium alloys. Corros. Sci. 2010, 52, 2489–2497. [Google Scholar] [CrossRef]
  56. Saenz de Miera, M.; Curioni, M.; Skeldon, P.; Thompson, G.E. Preferential anodic oxidation of second-phase constituents during anodising of AA2024-T3 and AA7075-T6 alloys. Surf. Interface Anal. 2010, 42, 241–246. [Google Scholar] [CrossRef]
  57. Raffin, F.; Echouard, J.; Volovitch, P. Influence of the anodizing time on the microstructure and immersion stability of tartaric-sulfuric acid anodized aluminum alloys. Metals 2023, 13, 993. [Google Scholar] [CrossRef]
  58. Safyari, M.; Mori, G.; Ucsnik, S.; Moshtaghi, M. Mechanisms of hydrogen absorption, trapping and release during galvanostatic anodization of high-strength aluminum alloys. J. Mater. Res. Technol. 2023, 22, 80–88. [Google Scholar] [CrossRef]
  59. Student, M.; Pohrelyuk, I.; Padgurskas, J.; Hvozdets’kyi, V.; Zadorozna, K.; Chumalo, H.; Student, O.; Kovalchuk, I. The effect of heat treatment on the structural-phase state and abrasive wear resistance of a hard-anodized layer on aluminum alloy 1011. Coatings 2023, 13, 391. [Google Scholar] [CrossRef]
  60. Ghassemi, M.H.; Abouei, V.; Moshtaghi, M.; Noghani, M.T. The effect of removing worn particles by ultrasonic cleaning on the wear characterization of LM13 alloy. Surf. Eng. Appl. Electrochem. 2015, 51, 382–388. [Google Scholar] [CrossRef]
  61. Korzekwa, J.; Fal, M.; Gandek-Moszchak, A. DOE application for anslysis of tribological properties of the Al2O3/IF-WS2 surface layers. Open Eng. 2020, 11, 171–181. [Google Scholar] [CrossRef]
  62. Chen, L.; Liu, Z.; Wang, B.; Song, Q.; Wan, Y.; Chen, L. Surface characterization and tribological performance of anodizing micro-textured aluminum-silicon alloys. Materials 2019, 12, 1862. [Google Scholar] [CrossRef] [PubMed]
  63. Dervishi, E.; McBride, M.; Edwards, R.; Gutierrez, M.; Li, N.; Buntyn, R.; Hooks, D.E. Mechanical and tribological properties of anodic Al coatings as a function of anodizing conditions. Surf. Coat. Technol. 2022, 444, 128652. [Google Scholar] [CrossRef]
  64. Christoph, G.G.; Corbató, C.E.; Hofmann, D.A.; Tettenhorst, R.T. The Crystal Structure of Boehmite. Clays Clay Min. 1979, 27, 81–86. [Google Scholar] [CrossRef]
  65. Saalfeld, H.; Wedde, M. Refinement of the crystal structure of gibbsite, Al(OH)3. Z. Krist. 1974, 139, 129–135. [Google Scholar] [CrossRef]
  66. Siddiqui, T.U. Experimental investigation on tribological behavior of hard anodized aluminum Tauseef. J. Emerg. Technol. Innov. Res. 2018, 5, 1565–1571. [Google Scholar]
  67. Soffritti, C.; Fortini, A.; Nastruzzi, A.; Sola, R.; Merlin, M.; Garagnani, G.L. Dry sliding behavior of an aluminum alloy after innovative hard anodizing treatment. Materials 2021, 14, 3281. [Google Scholar] [CrossRef]
  68. Santecchia, E.; Cabibbo, M.; Magid, A.; Hamouda, S.; Musharavati, F.; Popelka, A.; Spigarelli, S. Dry sliding tribological properties of a hard anodized AA6082 aluminum alloy. Metals 2020, 10, 207. [Google Scholar] [CrossRef]
Figure 1. Change in the value of (a) voltage pulses U and (b) current density pulses I/S during the time τ of the anodizing process.
Coatings 13 01883 g001
Figure 2. (a) General view of equipment for synthesis of pulsed hard anodized layers on surface of aluminum alloy samples; (b) and schematic representation of the cell for synthesis PHAL: 1—container with electrolyte; 2—chamber for stabilization of temperature regime of anodizing in range of −5–+10 °C; 3—bubbler; 4—electrolyte temperature control device; 5—ammeter; 6—power supply for maintaining current density of 5 A/dm2 between sample and electrode; 7—pulse frequency adjustment block; 8—voltage and pulse frequency control devices on sample; 9—sample for anodizing; 10—electrode; 11—bubbler; 12—compressor; 13—bubbler and compressor productivity control unit; 14—block for adjusting and controlling power of power source; 15—electrode and sample attachment; 16—anode layer.
Coatings 13 01883 g002
Figure 3. Schematic diagram of equipment for estimation of abrasive wear resistance (with a rigidly fixed abrasive) of aluminum samples with surface layers synthesized by the method of pulsed hard anodizing: 1—sample; 2—abrasive disc; 3—lever for transferring of the pressing force of the working surface of the abrasive disk to the anodized surface of the sample; 4—sample holder; 5—weight loading system to create the necessary force pressing the abrasive disk to the sample; P is the press load the disk to the sample surface.
Coatings 13 01883 g003
Figure 4. Schematic diagram of a device for determining the tribological characteristics of pulsed hard anodized layers in tribocontact with a steel (or ceramic) ball reciprocating sliding along the PHAL surface and pressed against the friction surface by a normally oriented force FN, which remains unchanged throughout the entire test.
Coatings 13 01883 g004
Figure 5. Typical cross-sectional view of wear trace occurred after reciprocating sliding of ball over surface of pulsed hard anodized layer: depth (h) and width (l) of groove profile recorded by profilometer in one of its sections.
Coatings 13 01883 g005
Figure 6. SEM cross-sectional images of anodized layers synthesized on the surface of 1011 aluminum alloy at an electrolyte temperature of +10 °C using (a) direct and (b) pulsed currents and EDX depth profiles of the main elements (Al, O, S).
Coatings 13 01883 g006
Figure 7. SEM cross-sectional micrographs and EDX elemental mapping of anodized layers on the surface of 1011 aluminum alloy, synthesized at an electrolyte temperature of +10 °C using (a) direct and (b) pulsed currents.
Coatings 13 01883 g007
Figure 8. SEM cross-sectional images of anodized layers synthesized on the surface of 1011 aluminum alloy, synthesized at an electrolyte temperature of −5 °C using (a) direct and (b) pulsed currents, and EDX depth profiles of the main elements (Al, O, S).
Coatings 13 01883 g008
Figure 9. SEM cross-sectional micrographs and EDX elemental mapping of anodized layers on the surface of 1011 aluminum alloy, synthesized at an electrolyte temperature of −5 °C using (a) direct and (b) pulsed current.
Coatings 13 01883 g009
Figure 10. (a) Effect of the electrolyte temperature T on the thickness h of the synthesized PHAL for 1 h and (b) the thickness of the anodized layers h synthesized at temperatures of −5 °C (I) and +5 °C (II) under the action of a direct (white columns) or pulsed (grey bars) current.
Coatings 13 01883 g010
Figure 11. X-ray diffraction spectra of anodizing layers on the surface of aluminum alloy 1011, synthesized for 1 h during pulsed anodizing in sulfate electrolyte at temperatures °C: (a) −5, (b) 0, (c) +5, (d) +10.
Coatings 13 01883 g011
Figure 12. Effect of electrolyte temperature during PHA of 1011 aluminum alloy specimens on their (a) microhardness HV and (b) weight loss W after abrasive wear resistance tests with a fixed abrasive.
Coatings 13 01883 g012
Figure 13. The effect of electrolyte temperature T during pulsed hard anodizing of 1011 aluminum alloy samples on the sulfur content CS was determined from the results of X-ray phase analysis on the surface of the synthesized PHA layers.
Coatings 13 01883 g013
Figure 14. Wear values S obtained during tribological tests of PHALs, synthesized at different electrolyte temperatures T, in frictional contact with steel (a) or (b) ceramic balls without lubrication (gray columns 1) and with lubrication in the form of mineral grease grade I-20 (white columns 2) and EDGE 5W-40 brand synthetic lubricant (black columns 3).
Coatings 13 01883 g014
Figure 15. Comparison of friction wear values S of high-strength aluminum alloy 1050 (1) and anodized layers on the surface of aluminum alloy 1011 synthesized in sulfate electrolyte at a temperature of −5 °C for 1 h by hard anodizing at a current density of 3 A/dm2 (2) and by the method of pulsed hard anodizing (3). These data were obtained after tribological tests of the corresponding samples in contact with (a) steel and (b) ceramic balls during friction (I) without lubrication (in air), (II) in mineral lubricant I-20, and (III) in EDGE 5W-40 synthetic lubricant.
Coatings 13 01883 g015
Figure 16. Change in time τ of the friction coefficient f during tribocontact (pressing force 10 N) of a steel ball and the surface of samples with PHAL (synthesized at an electrolyte temperature of −5 °C) during sliding wear tests (a) without lubrication (dry sliding), and in lubricating media (b) mineral I-20, and (c) synthetic EDGE 5W-40. The transition of the coefficient f to negative values should be perceived as conditional, indicating the invariance of the nature of the change in the coefficient f when the direction of the reciprocating sliding of the ball on the anodized surface changes.
Coatings 13 01883 g016
Figure 17. Change in time τ of the friction coefficient f during tribocontact (pressing force 10 N) of a ceramic ball and the surface of samples with PHAL (synthesized at an electrolyte temperature of −5 °C) during sliding wear tests (a) without lubrication (dry sliding), and in lubricating media (b) mineral I-20, and (c) synthetic EDGE 5W-40. The transition of the values of the coefficient f to negative values should be perceived as conditional, indicating the invariance of the nature of the change in the coefficient f when the direction of reciprocating sliding of the ball on the anodized surface changes.
Coatings 13 01883 g017
Figure 18. Wear traces recorded with different resolutions on the surface of PHALs synthesized at an electrolyte temperature of (ac) −5 °C and (d,e) +10 °C, and (e) deciphering the content of elements (according to the results of X-ray microspectral analysis) on the surface of wear tracks formed after tribological tests of both PHALs paired with a steel ball in the I-20 lubricating medium.
Coatings 13 01883 g018
Figure 19. X-ray diffraction patterns of PHAL synthesized on the surface of 1011 aluminum alloy in a 20% aqueous solution of sulfuric acid at an electrolyte temperature of +10 °C for 1 h, (a) without heat treatment and (b) after additional heat treatment for 1 h at a temperature of 350 °C.
Coatings 13 01883 g019
Figure 20. (a) Change of microhardness HV of pulsed hard anodized layers synthesized in sulfate electrolyte at a temperature of +10 °C for 1 h, (I) without and (II) after heat treatment at a temperature of 350 °C and (b) the wear values S of pulsed hard anodized layer in tribocontact with steel ball during friction (I) without lubrication, (II) in mineral lubricant I-20 and (III) synthetic lubricant EDGE 5W-40: (1) PHAL synthesized at temperature of +10 °C, (2) PHAL after additional heat treatment at temperature of 350 °C for 1 h, (3) PHAL after heat treatment and subsequent boiling for 1 h in water.
Coatings 13 01883 g020
Figure 21. (a) Morphology of friction marks on the surface of a steel ball in the zone of its contact with the surface of a pulsed hard anodized layer (synthesized at a temperature of +10 °C), recorded after tribological tests without lubrication with the corresponding results of X-ray microspectral analysis of the ball surface in this zone and (b) details of this zone in higher resolution.
Coatings 13 01883 g021
Figure 22. Morphology of friction marks on the surface of a steel ball in the zone of its tribocontact with the surface of a pulsed hard anodized layer (synthesized on aluminum alloy 1011 at a temperature of +10 °C) and X-ray spectral microanalysis of the ball surface after tribological tests in I-20 mineral lubricant.
Coatings 13 01883 g022
Figure 23. Morphology of the surface of the pulsed anodized layer synthesized at an electrolyte temperature of +10 °C after tribological tests without lubrication in a pair with a ceramic ball with traces of (a) smearing of the anodized layer over the surface and (b) cracking and detachment of parts of the surface film in the friction zone.
Coatings 13 01883 g023
Figure 24. Surface morphology of a ceramic ball in the zone of its contact with a pulsed hard anodized layer (synthesized at +10 °C on aluminum alloy 1011) after tribological tests in the air (without lubrication) at low (a) and higher (b) resolution with the data of X-ray spectral analysis of the layer sticking to the ceramic ball.
Coatings 13 01883 g024
Figure 25. Comparison of the morphological features of the surfaces of both friction elements in the zone of their contact during tribological tests in I-20 mineral lubricant: (a) a ceramic ball with the corresponding data of X-ray microspectral analysis and (b) a pulsed hard anodized layer, synthesized at a temperature of +10 °C.
Coatings 13 01883 g025
Disclaimer/Publisher’s Note: The statements, opinions and data contained in all publications are solely those of the individual author(s) and contributor(s) and not of MDPI and/or the editor(s). MDPI and/or the editor(s) disclaim responsibility for any injury to people or property resulting from any ideas, methods, instructions or products referred to in the content.