Article

Research on Parameter Design Method and Motion Characteristics of a Ball Cage Flexible Joint

College of Pipeline and Civil Engineering, China University of Petroleum (East China), Qingdao 266580, China
*
Authors to whom correspondence should be addressed.
Energies 2022, 15(20), 7591; https://doi.org/10.3390/en15207591
Submission received: 12 September 2022 / Revised: 9 October 2022 / Accepted: 11 October 2022 / Published: 14 October 2022
(This article belongs to the Special Issue Deep Oil and Gas Drilling and Production Technology)

Abstract

:
The flexible joint is an important part in ultra-short-radius drilling tools, and its structural parameters and motion characteristics are key factors affecting the success of drilling. In this work, a new type of ball cage flexible joint, which is applied in 5″ and 5.5″ cased wells, was proposed based on the working principle of the ball cage universal joint. A structural parameter design method for the ball cage flexible joint was established according to the geometric coordination relation and material strength theory. Using this new method, the length, diameter, and window size of the ball cage flexible joint were analyzed. The multi-body motion process was further analyzed using a multi-body dynamics method, and then the motion characteristics, such as impact contact force, isokinetic characteristics, transfer efficiency, deflection torque and so on, were studied. Based on the above analyses, the structural parameters of the designed joint were optimized by means of the orthogonal test method. Results demonstrate that the experimental ball cage flexible joint has excellent isokinetic transmission characteristic, which can effectively suppress vibration and shock caused by changes in rotational speed. The transmission efficiency of the structure was 89.8%, while the power loss rate was 0.102%. According to the orthogonal test analysis, the optimal structure of the flexible joint has a ball seat diameter of 80 mm, a ball head diameter of 62 mm, and a ball key diameter of 16 mm. It is important to note that the ball key diameter was the most influential factor on the flexible joint internal contact force. The ball key contact force varied periodically, and there was a significant phase difference between the contact forces of different balls. On the other hand, with an increase in the flexible joint working angle, the deflection torque increased gradually, and the vibration amplitude of the torque increased. This work can provide reference for the parameter optimization design of the new flexible joint.

1. Introduction

The ultra-short-radius horizontal well technology can be used to sidetrack the original wellbore to form a new well hole for exploiting the remaining oil. Compared with conventional horizontal well drilling technology, the advantages of this technology are small radius of curvature (the curvature radius is usually 1–4 m), fast construction speed, short drilling cycle, and low cost [1,2,3].
The flexible drilling tools are the key parts for ultra-short-radius drilling. It’s generally composed of a guide tube, flexible drill pipe, and drill bit, as shown in Figure 1. The guide tube can produce a certain degree of lateral bending under the action of axial force, so as to transmit the drilling pressure and guide the flexible drill pipe. The flexible drill pipe can deflect and bend at a large angle with the guide tube, thereby changing the direction of torque transmission [2]. In the ultra-short-radius build-up section, the guide tube plays the role of transmitting the weight-on-bit (WOB), and the flexible drill pipe plays the role of transmitting the torque. In the horizontal section, the flexible drill pipe plays the role of transmitting torque, and the guide tube and the flexible drill pipe together are used to transfer WOB to complete the drilling process.
The flexible drill pipe is the main component of the flexible drilling tool, which is composed of multiple flexible joints. According to the ultra-short-radius drilling mechanism, different types of flexible drill pipes have been developed. Hill G J [1] developed an improved drill string member, which can make bends in the well on radii as short as 25–50 feet. Luo M [2] established a model of a universally hinged flexible rod, and analyzed the dynamic characteristics of a flexible drill pipe and guide tube with different degrees of restriction. Warren T M [3] developed a short-radius drilling system consisting of a drill bit, flexible joint, sleeve, indicator, and flexible drill string, which greatly increased the production of the oilfield. At present, the cross shaft universal joint is mainly used in the flexible joint deflection structure, which has the advantages of simple structure and high mechanical efficiency. However, there are also some disadvantages, such as limited swing angle amplitude, an angle of less than 25°, high friction force, and energy loss when the swing angle is large.
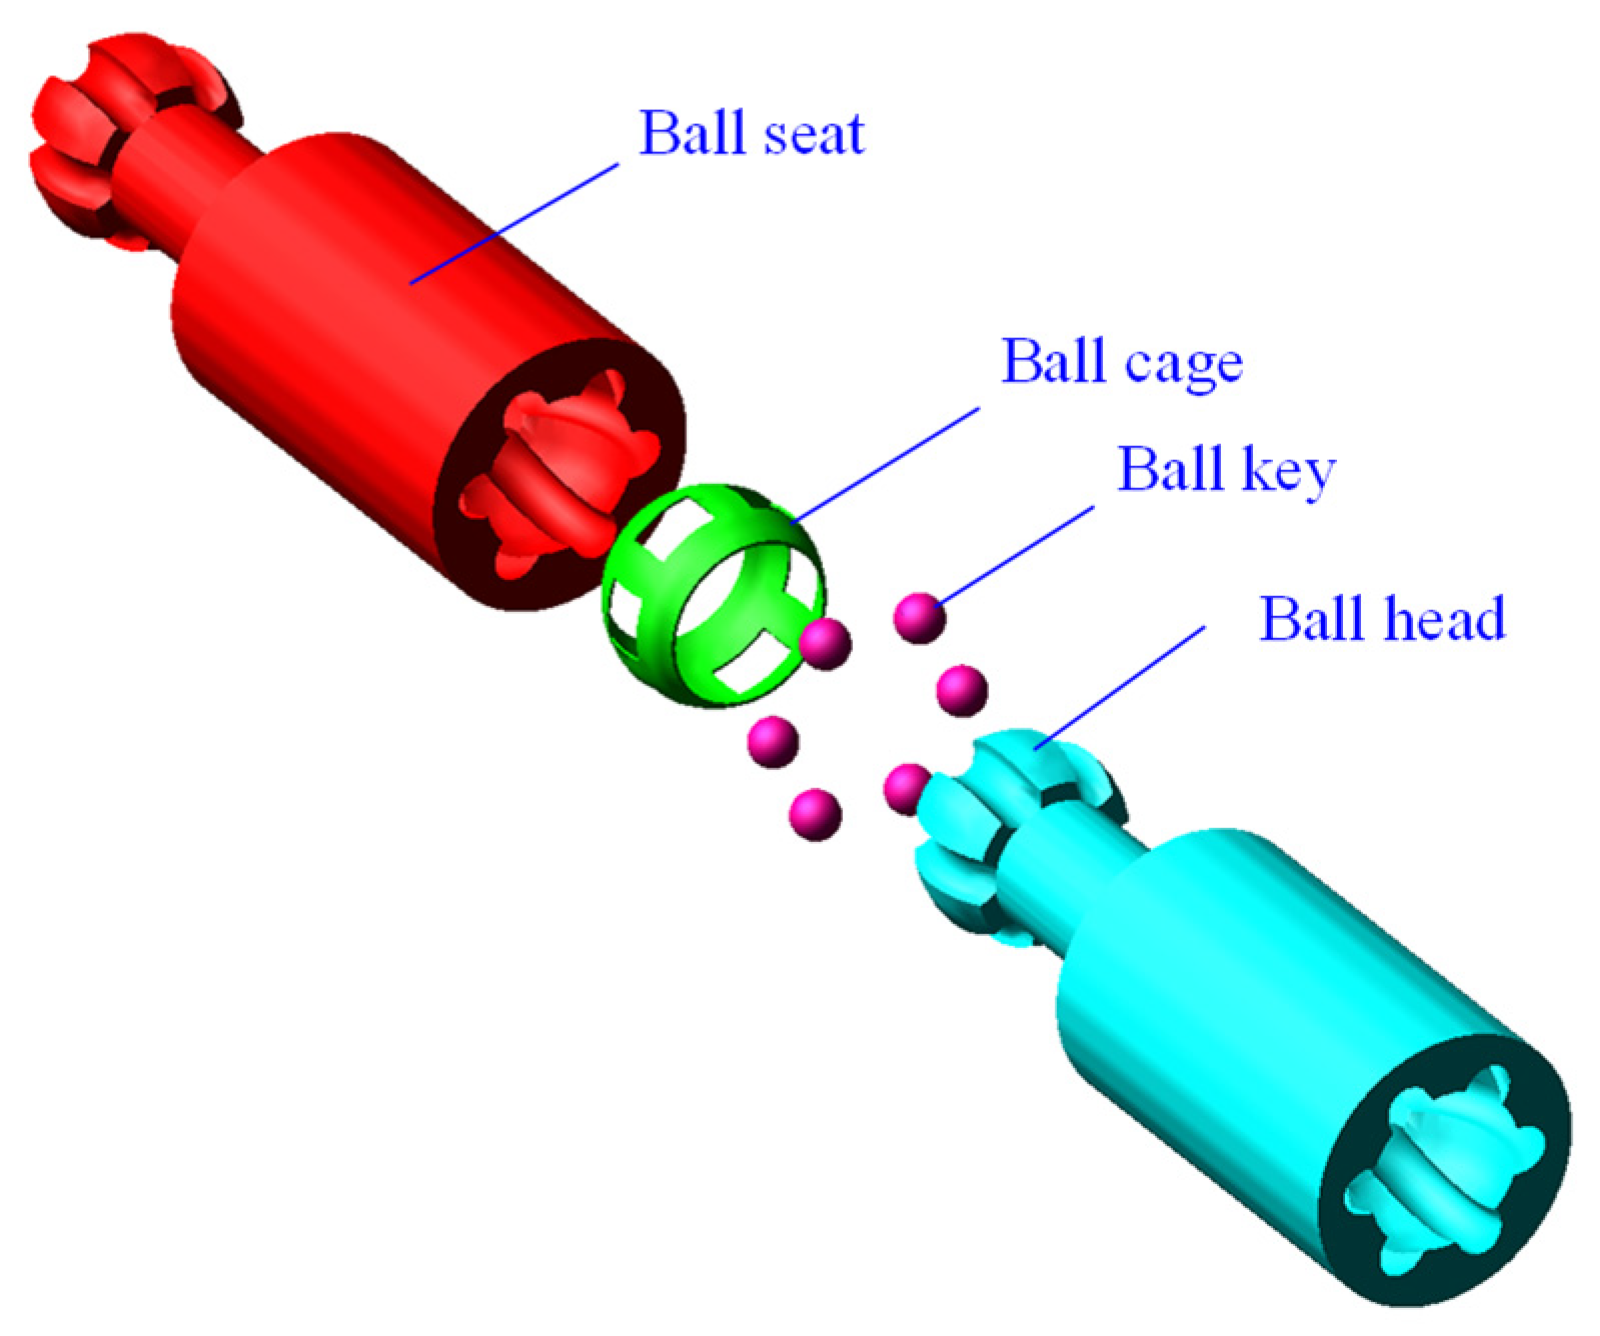
The ball cage universal joint is a superior structure to the cross shaft universal joint. It can realize complete constant speed transmission and effectively reduce the vibration and impact caused by torque changes. In addition, it has the advantages of swing angle range up to 75° and large curvature. Ball cage constant-velocity joints have been widely used in the automotive industry. Therefore, this work draws on the previous research results and designs for a ball cage flexible joint for ultra-short-radius drilling tools in oil and gas wells, as shown in Figure 2. The ball cage flexible joint is composed of a ball seat, ball cage, ball key, and ball head. The outer surface of the ball head has six arc-shaped grooves as the inner race of the ball key, and the six arc-shaped grooves corresponding to the inner surface of the ball seat connected with it are the outer race. The ball key in the race is installed in the square hole of the ball cage, constraining six ball keys in the same movement plane. The ultra-short drilling torque is input by the ball head and output through the ball key and the ball seat to drive the rotary drilling of the flexible drill pipe. In order to improve the working efficiency of ultra-short-radius drilling, it is necessary to study the structural design method and motion characteristics of the ball cage flexible joint to obtain the optimal structure, size, and working parameters.
To obtain more reasonable structural parameters of flexible joints, Bauchau O A [4] used a multi-objective genetic algorithm to optimize their structures, and verified the effectiveness of the method. Lara-Molina F A [5], Santos C [6], and Bachynski E E [7] designed a flexible joint and flexible pipe, then analyzed the performance by numerical simulation. Swaminathan P [8] proposed a ball cage constant-velocity assembly, and optimized the shape of the window, which improved the stability of the ball cage flexible joint. These research methods provide a reference for the parameter design of the ball cage flexible joint.
In order to study the motion characteristics of multi-body structures, Baiceanu [9], Hideki [10] and Kimata [11] established the contact models of a multi-body system, and researched the influencing factors of the contact force response. Berjoza D [12], Mondragon-Parra E [13] and Feng H [14] established the multi-body dynamics model of the automobile transmission system, and analyzed the influence of the hinge angle, the number of balls, and the track offset on the contact force. Nogi T [15], Choe B [16,17], Qi Z H [18], and Yamamoto T [19] analyzed the dynamic characteristics of the ball cage universal joint of the automobile drive shaft through multi-body dynamics simulation, and obtained the isokinetic characteristics of the universal joint and the variation law of the universal joint deflection torque. The above dynamic analysis methods of multi-body mechanisms can provide ideas for better research on the motion characteristics of a flexible joint. The orthogonal test method is useful for parameter optimization. Li [20], Xiong [21], and Wu [22] optimized the structural parameters of bearings, transmission shafts, and universal joints by that method. The above research ideas are helpful for optimizing the structural parameters of the flexible joint.
Based on the geometric coordination relationship and strength theory, the design method of the ball cage flexible joint was established, the dynamic motion characteristics were studied, and its key structural parameters were optimized. The research results support the development of ultra-short-radius flexible drilling tools.
The dimensions of the ball cage flexible joint, ball key, and ball cage were designed according to the relationship of geometry and strength in Section 2. The process of the flexible joint multi-body motion was simulated, and the motion characteristics of the ball cage flexible joint were analyzed in Section 3. The orthogonal test method was used to optimize the key structural parameters of the flexible joint with the objective of the contact force of the flexible joint in Section 4. Finally, some conclusions were drawn in Section 5.

2. Design Parameters of the Ball Cage Flexible Joint

2.1. The Length of the Flexible Joint

During the drilling process, the ball head and ball seat of the flexible joint can be regarded as a rigid body. Assuming that the drilling curvature radius is R, the inner diameter of the guide tube is d1, and the gap between the guide tube and the flexible joint is C, the geometrical relationship of the flexible joint in the wellbore is shown in Figure 3.
As shown in Figure 3, the geometric dimensions of the flexible joint in the right-angled triangle OAB were:
( l max 2 ) 2 + [ R + ( d 1 2 C ) ] 2 = ( R + d 1 2 ) 2
where, lmax is the maximum value of the flexible joint length and its unit is mm, R is the drilling curvature radius and its unit is mm, d1 is the inner diameter of the guide tube and its unit is mm, C is the gap between the guide tube and the flexible joint and its unit is mm.
Thus, the maximum value lmax of the flexible joint length can be obtained as:
l max = 2 2 R C + d 1 C C 2
If R is 1500 mm, d1 is 116 mm, and C is 4 mm, then the lmax can be calculated from Equation (2) to be 223 mm. In this experiment, the length of the flexible joint was 200 mm.

2.2. The Diameter of the Ball Key

Figure 4 shows the mechanical analysis model of the ball key and ball head. Six ball keys were designed in order to simplify the ball cage flexible joint structure. The basic parameters were determined according to the sidetrack casing size and the construction load, which include the ball head diameter (D) 62 mm, and the outer diameter of the ball head connecting rod (D1) 38 mm, the ball seat outer diameter (D2) 86 mm, and the flexible joint torque (M) 1.8 kN.m (the working load). The yield strength (σs) of the material 35 CrMo was 835 MPa, and the shear strength (τs) was 501 MPa.
As shown in Figure 4, flexible joint torque (M) from the equilibrium condition is shown as:
F × D 2 × 6 = M
where, F is the tangential force of each ball key and its unit is N.
Then the tangential force F can be derived as:
F = M 3 D
The diameter of the ball key (d) needs to meet the strength conditions and the geometric coordination relation, including the following three conditions.
(1)
Squeeze strength
The pressing surface area of the ball key is
A 1 = π ( d 2 ) 2 2 = π d 2 8
Then the extrusion stress is
σ j = F A 1 = 8 F π d 2 = 8 M 3 π D d 2 < σ s
To ensure its safety, the ball key should meet the requirements of extrusion strength. Its diameter can be obtained as:
d > 8 M 3 π D σ s = 5.4 mm
(2)
Shear strength
The area of the ball key embedded in the groove is
A 2 = π d 2 4
Then the shear stress is
τ = Q A 2 = F π 4 d 2 = 4 M 3 π D d 2 < τ s
The ball key should meet the requirements of shear strength. The diameter of ball key can be obtained as:
d > 4 M 3 π D τ s = 5.0 mm
(3)
Geometric coordination relation
The sum of the ball key diameter (d) and the ball key spacing (dj) should be less than the ball head circumference. Assuming that the diameter is equal to the spacing, from the interface dimension of the ball head shown in Figure 5, it can be determined that:
π D = 6 ( d + d j ) = 12 d
and
d = π D 12 = 16.2 mm
It can be determined from Equations (7), (10), and (12), that the diameter of the ball key, which meets the three conditions at the same time, should be greater than 5.4 mm and less than 16.2 mm. The diameter of the ball key was 15 mm in this experiment.

2.3. Ball Cage Size

The size of the ball cage includes its inner and outer spherical diameter, width, window width, and window length. According to machinery industry standards [23], the corresponding basic dimensions can be obtained by selecting the basic model of the isokinetic universal joint with an elliptical shape of the track cross-section, include the outer spherical diameter of the ball seat, the inner spherical diameter of the ball head, the ball key diameter, and the diameter of the ball group pitch circle, which is the radius of the spherical center distribution circle of the ball key. According to the literature [24], the eccentricity (e) of the elliptical orbit is
e = R tan δ = 4.5 mm
where, δ is the eccentric angle, whose values is between 7.5~8.5°.
(1)
Inner and outer spherical diameter of ball cage
As shown in Figure 6, the contact geometric relationship between the ball cage and ball key was established when the angle between axes was θ. In Figure 6, the outer end point of the ball cage window hole side wall is marked as A1. Its midpoint and inner endpoint are marked as A2 and A3, respectively. The tangent point between the ball cage outer spherical surface and the ball key is marked as A1, while the tangent point between the inner spherical surface and the ball key is marked as A3. When the angle between the shafts was not equal to 0, the corner between the ball cage and the ball group pitch circle was equal to θ/2.
From Figure 6, when the angle between shafts reached its maximum value, the thickness of ball cage was
A 2 A 1 = A 2 A 3 = e sin θ max 2 = 0.78 mm
In the right-angled triangle OAA1 of Figure 6, the geometric relation
A A 1 = A A 2 + A 2 A 1 = O C + A 2 A 1
is satisfied, where OC is the radius R of ball group pitch circle when the inter shaft angle θ = 0 and its unit is mm, A2A1 is the thickness of the ball cage and its unit is mm.
Thus, the outer diameter OA1 of the ball cage is
O A 1 = O A 2 + A A 1 2 = d 2 4 + ( R + e sin θ max 2 ) 2 = 32.65 mm
where, OA is the radius of the ball key and its unit is mm.
Similarly, the ball cage outer diameter OA3 can be obtained from the geometric relation of right triangle OAA3 as:
O A 3 = O A 2 + A A 3 2 = d 2 4 + ( R e sin θ max 2 ) 2 = 31.14 mm
(2)
Cage width
Figure 7 shows the structural parameters of the ball cage. In order to make the outer spherical surface of the ball cage and the inner spherical surface of the ball seat fully contact, the ball cage should be completely enclosed in the ball seat inner spherical surface when θ = 0, therefore,
B < B k
where, B is the width of the ball cage and its unit is mm, Bk is the axial length of the outer raceway of the ball seat and its unit is mm.
Therefore, the width of the ball cage can be rounded according to inequality (18) as:
B = K B B k = 40 mm
where, KB is the deformation coefficient, whose values is between 0.9~0.95.
(3)
Window width
Considering the interference fit between the cage window and the corresponding ball key, which is about 0.01~0.03 mm, the value of B2 as shown in Figure 7 should meet:
d 0.003 B 2 d 0.01
The punching width (B3) of the window should reserve a machining allowance on the basis of the window hole width (B2). Therefore, B3 can be rounded according to Equation (20) as:
B 3 = B 2 ε B
where, εB is the machining allowance, whose values is between 0.5~1 mm.
(4)
Window length
A cross-sectional profile of the ball cage passing through the center of the sphere is established as shown in Figure 8. Here the length of each window is marked as L, the width of the outer spherical beam is marked as Se, and the width of the inner spherical beam is marked as Si.
According to Equations (15) and (16), the outer spherical diameter (De) and the inner spherical diameter (Di) of the cage can be obtained. Then, the width of the outer spherical beam and the inner spherical beam can be solved as
S e = D e sin ( 30 arcsin L D e )
and
S i = D i sin ( 30 arcsin L D i )
respectively.
Because Si is the shortest and it is the weakest part of the entire cage, L is ultimately determined according to Equation (22). According to the empirical relationship, it can be obtained as:
S i = 0.3 d
Substituting Equation (23) into Equation (22) leads to
L = D i sin ( 30 arcsin 0.3 d D i ) = 11.44 mm

2.4. Parameters of the Ball Cage Flexible Joint

Using the parameter design method proposed in the paper, the structural parameters of the ball cage flexible joint were obtained, as shown in Figure 9.

3. Motion Characteristics of the Ball Cage Flexible Joint

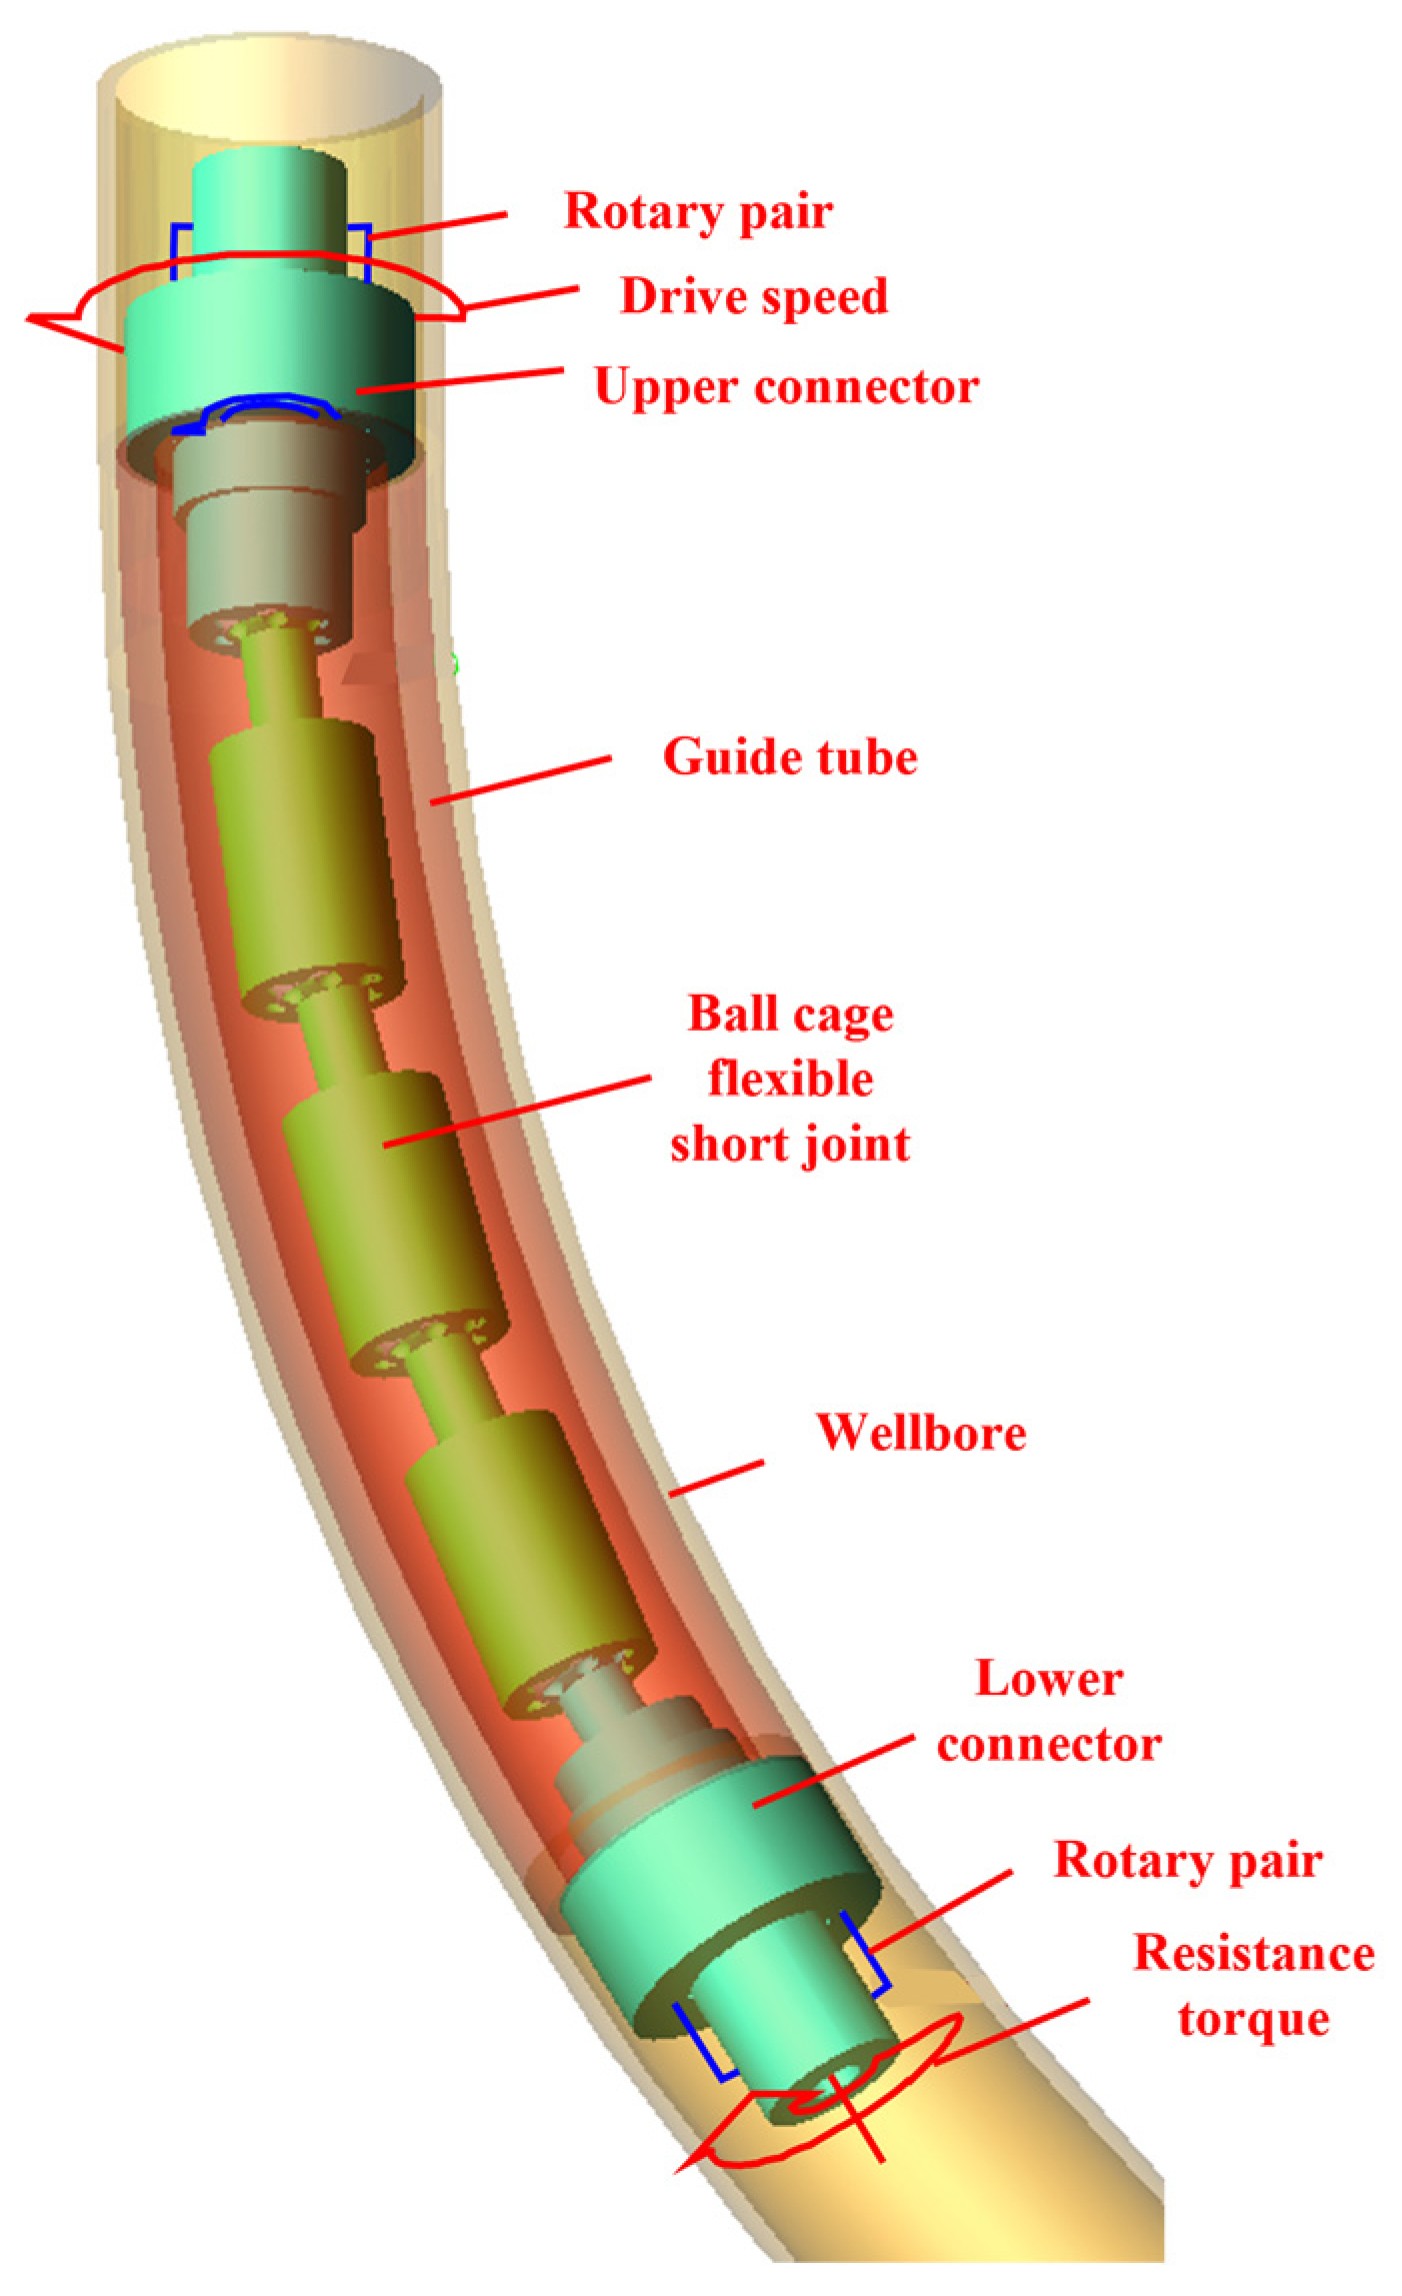
The motion characteristics of a flexible joint have an important influence on its reliability and safety. The multi-body dynamics model of the ball cage flexible joint was established as shown in Figure 10, and the dynamic analysis software ADAMS was used to study the impact contact force, isokinetic characteristics, deflection torque, and transmission efficiency.
The material of the flexible joint is 35 CrMo, the density is 7850 kg/m3, the Young’s modulus is 210 GPa, and the Poisson’s ratio is 0.3. According to the working principle of the flexible joint, the rotation pair constraint and the driving speed of 100 r/min were imposed on the ball seat, and the rotation pair constraint and the resistance torque of 1.8 kN.m were imposed on the ball head. The internal contact settings of each component of the flexible joint are shown in Table 1.

3.1. Contact Force of the Ball Key

The ball key is the main force-bearing part in the process of transmitting torque, and its contact force with the inner and outer race is the main impact force, which affects the strength and life of the flexible joint.
The variation of the contact force of the ball key within 3.0 s was obtained; time step was 0.001 s, as shown in Figure 11. It can be seen from Figure 11 that the contact force of the ball key changed periodically, and the period was 0.6 s, which was consistent with the rotation period of the flexible joint. During the rotation process, the contact forces of different ball keys have obvious phase differences, the magnitudes of which are equal to the angles between the ball keys. The flexible joint generates deflection torque during the rotation process, and the ball cage tilts, which would cause the contact force of the 3# and 4# ball keys on the inside of the bend to be significantly greater than the contact force of the 1# and 6# ball keys on the outside of the bend.

3.2. Isokinetic Characteristics

The isokinetic characteristics of the ball cage flexible joint is an important dynamic performance index. The input speed of the flexible joint is the speed of the ball seat, and the output speed is the speed of the ball head. Figure 12 plots the input and output speeds of flexible joint.
As shown in Figure 12, the input speed of the ball cage flexible joint was 600°/s, and the output speed maintained a fluctuation around the input speed, which implies that the ball cage flexible joint had better constant speed transmission characteristics, so it could effectively suppress vibration and shock due to rotational speed changes. Affected by the deflection of the ball cage and the collision, the rotational speed fluctuated periodically and the period was 0.6 s in the process of rotation. When t = 0.6 s, t = 1.2 s, t = 1.8 s and t = 2.4 s, the output speed fluctuated between 220°/s and 980°/s.

3.3. Transfer Efficiency

In order to measure the transmission performance of the flexible joint under specific working conditions, such as the working angle, load torque, and rotational speed, the average value of instantaneous transmission efficiency in a rotation period (T) was adopted as the transmission efficiency of the flexible joint. The calculation of transmission efficiency was as follows:
η ¯ = 0 T η ( t ) d t / T = 0 T T 2 ( t ) T 1 ( t ) d t / T × 100 % = 89.8 %
The transmission performance of the drive shaft system was measured by the transmission power loss rate, and the calculation equation was as follows:
η L = ( 1 η ¯ ) / 100 = 0.102 %
Figure 13 shows the torque variation between output shaft and input shaft of flexible joint. When the angle between the ball head and the ball seat was 0°, the transmission speed of the ball seat was 100 r/min, and the resistance moment of the ball head was 1.8 kN·m, the curve shapes of input torque and output torque were basically the same. The input and output torque were relatively small at the beginning of the rotation, and then changed abruptly and tended to be stable. The transmission efficiency of the flexible joint was 89.8% and the transmission power loss rate was 0.102%, so the output torque was slightly smaller than the input torque.

3.4. Deflection Torque

The direction of the input torque of the flexible joint was different from the direction of the output torque when the working angle was not 0°. The angular bisection plane of the input and output shafts of the ball key were at a certain angle to the input and output shafts, respectively, which was half the working angle of the flexible joint. As a result, a torque component along the direction perpendicular to the output shaft in the ball seat was produced because of the torque balance, as shown in Figure 14, which was the deflection moment of the ball cage.
The deflection torque mentioned above can be calculated by
M c = M t tan δ 2
where, Mc is the deflection torque and its unit is kN·m, Mt is the transmission torque of the flexible joint and its unit is kN·m, δ is the working angle of the flexible joint and its unit is °.
The variation of deflection moment with time at working angles of 0°, 3°, 6°, and 9° were obtained respectively, as shown in Figure 15. Because the deflection moment was positively correlated with the tangent value of the working angle, the deflection torque and its amplitude increased gradually with the increase of working angle.

4. Optimization of the Ball Cage Flexible Joint

The ball cage flexible joint developed in this experiment was applied in 5″ and 5.5″ cased wells. The dimensions were affected by the wellbore, and the variation range was within an order of magnitude. Setting the contact force of the flexible joint as the index parameter, the optimum dimensions of the ball seat diameter, ball head diameter, and ball key diameter were evaluated using the orthogonal test analysis method. Table 2 lists the orthogonal test scheme.
The dynamic model of the flexible drilling tool in the build-up section, which included 3 flexible joints, was established as shown in Figure 16. The contact force distribution of the flexible drilling tool under different combination conditions was analyzed according to the orthogonal test scheme shown in Table 2.
Table 3 lists the guide tube contact force and the ball key contact force under different conditions. It can be seen from the table that when the diameter of the ball seat was 80 mm, the diameter of the ball head was 62 mm, and the diameter of the ball key was 16 mm, the contact force was the smallest, indicating that these values were the best structural parameters for the flexible joint.
Through the optimization of structural parameters, the average contact force of the guide tube and the ball key was reduced by 37.1% and 12.3%, respectively, which reduced the energy loss in the collision process and improved the work efficiency.
Using the orthogonal test range analysis method, the influence of the ball seat, ball head, and ball key on the contact force was studied. Table 4 lists the range of values for the average ball key contact force. The results show that the ball key diameter had the largest influence on the contact force, followed by the ball head diameter, with the ball seat diameter having the least influence. Increasing the diameter of the ball key could reduce the contact force; however, the thickness of the cage also decreased, which affected the strength of the cage.

5. Conclusions

In this paper, a new ultra-short-radius flexible joint tool, which was applied in 5″ and 5.5″ cased wells, was developed. The motion characteristics of the flexible joint were analyzed, and the optimal structural parameters were obtained based on the orthogonal test method. The following conclusions could be drawn:
(1)
The new ball cage flexible joint has the characteristics of good constant velocity, large deflection angle, and low energy loss; therefore, it is suitable for field popularization.
(2)
The transfer efficiency of the flexible joint was 89.8%, and the power loss rate was only 0.102%, which indicates that the ball cage flexible joint has high working efficiency.
(3)
The diameters of the ball seat, ball head, and ball key are the main parameters that affect the ball cage flexible joint tool performance. Through orthogonal tests, the optimal values of the ball seat diameter, ball head diameter, and ball key diameter were 80 mm, 62 mm, and 16 mm, respectively.
(4)
The ball key diameter is the main factor determining the flexible joint internal contact force. In the process of rotary drilling, the contact force of the ball key changed periodically, and the contact force of the bending deflection of the inner ball key was greater than the contact force of outer.

Author Contributions

Writing—original draft, X.Z., Y.X., W.Z., G.Y. and B.Z.; writing—review and editing, X.Z., Y.X., W.Z., G.Y. and B.Z. All authors have read and agreed to the published version of the manuscript.

Funding

This work was supported by the National Key Research and Development Program of China (No. 2019YFC1509204), and the Independent Innovation Research Program of China University of Petroleum (East China) (No.27RA2215005).

Data Availability Statement

The data presented in this study are available in this article.

Conflicts of Interest

The authors declare no conflict of interest.

References

  1. Hill, G.J.; Smith, H., Jr.; Schnitker, M.W.; Beatty, G.E. Flexible Drill String Member Especially for Use in Directional Drilling. US Patent US07/111222, 14 March 1989. [Google Scholar]
  2. Luo, M.; Xu, T.T.; Jiang, J.; Chi, X.; Wang, J.; Xue, S. Two-layer Contact Nonlinear Mechanical Analysis of Flexible Drilling Tool in The Wellbore. Comput. Model. Eng. Sci. 2020, 123, 75–100. [Google Scholar] [CrossRef]
  3. Warren, T.M.; Winters, W.J.; Mount, H.B.; Mason, K.L. Short-Radius Lateral Drilling System. J. Pet. Technol. 1993, 45, 108–115. [Google Scholar] [CrossRef]
  4. Bauchau, O.A.; Han, S. Flexible joints in structural and multibody dynamics. Mech. Sci. 2013, 4, 65–77. [Google Scholar] [CrossRef]
  5. Lara-Molina, F.A.; Dumur, D.; Takano, K.A. Multi-objective optimal design of flexible-joint parallel robot. Eng. Comput. 2018, 35, 2775–2801. [Google Scholar] [CrossRef]
  6. Santos, C.; Pesce, C.P. An alternative strategy for offshore flexible pipes finite element analysis. Mar. Struct. 2019, 65, 376–416. [Google Scholar] [CrossRef]
  7. Bachynski, E.E.; Thys, M.; Dadmarzi, F.H. Observations from hydrodynamic testing of a flexible, large-diameter monopile in irregular waves. J. Phys. Conf. Ser. 2020, 1669, 1–10. [Google Scholar] [CrossRef]
  8. Swaminathan, P.; Narayana, G.K. Design and development of a gauging system for constant velocity ball-cage component of constant velocity joint assembly. Proc. Inst. Mech. Eng. Part B J. Eng. Manuf. 2016, 230, 1169–1174. [Google Scholar] [CrossRef]
  9. Baiceanu, M.; Flores, P.; Oprisan, C.; Olaru, D. Study of the Contact Force Model on the Dynamic Response of a Four-Bar Mechanism with Clearance Joints. In New Trends in Mechanism and Machine Science; Springer: Cham, Switzerland, 2013; Volume 7, pp. 541–548. [Google Scholar]
  10. Sugiura, H.; Matsunaga, T. Thrust Force Analysis of Tripod Constant Velocity Joint Using Multibody Model (D & D 2008). Trans. Jpn. Soc. Mech. Eng. Ser. C 2009, 75, 1457–1464. [Google Scholar]
  11. Kimata, K.; Nagatani, H.; Imoto, M.; Kohara, T. Numerical Analyses and Experiments on the Characteristics of Ball-Type Constant-Velocity Joints. JSME Int. J. 2005, 47, 746–754. [Google Scholar] [CrossRef] [Green Version]
  12. Berjoza, D.; Pirs, V.; Jurgena, I.; Laceklis-Bertmanis, J. Energy use efficiency of electric automobile depending on transmission gear ratio. In Proceedings of the 17th International Scientific Conference Engineering for Rural Development, Jelgava, Latvia, 23–25 June 2018; pp. 2023–2029. [Google Scholar]
  13. Mondragon-Parra, E.; Ambrose, G. Influence of Grease in Mechanical Efficiency of Constant Velocity Joints. In Proceedings of the Sae World Congress & Exhibition, Detroit, MI, USA, 12–14 April 2016; Volume 1, pp. 1132–1138. [Google Scholar]
  14. Feng, H.; Yin, Z.; Shangguan, W.B.; Li, X.; Luo, Y. Analysis and optimization for contact forces and transmission efficiency of an automotive ball joint. Proc. Inst. Mech. Eng. Part D J. Automob. Eng. 2020, 234, 3207–3223. [Google Scholar] [CrossRef]
  15. Nogi, T.; Maniwa, K.; Natsuoka, N. A Dynamic Analysis of Cage Instability in Ball Bearings. J. Tribol. Transsactions ASME 2017, 140, 1–23. [Google Scholar] [CrossRef]
  16. Choe, B.; Lee, J.; Jeon, D.; Lee, Y. Experimental study on dynamic behavior of ball bearing cage in cryogenic environments, Part I: Effects of cage guidance and pocket clearances. Mech. Syst. Signal Processing 2019, 115, 545–569. [Google Scholar] [CrossRef]
  17. Choe, B.; Lee, J.; Jeon, D.; Lee, Y. Numerical Study of Cage Dynamics Focused on Hydrodynamic Effects of Guidance Land Clearances for Different Ball-Pocket Clearances in Cryogenic Environments. J. Eng. Gas Turbines Power Trans. ASME 2018, 140, 1–11. [Google Scholar] [CrossRef]
  18. Qi, Z.H. Kinematic Analysis and Simulation of the Steel Balls for Rzeppa Constant Velocity Joint. J. Mech. Eng. 2012, 48, 147–153. [Google Scholar] [CrossRef]
  19. Yamamoto, T.; Matsuda, T.; Okano, N. Efficiency of Constant Velocity Universal Joints. In Proceedings of the International Congress and Exposition, Taejon, Korea, 7 August–7 November 1993; pp. 129–139. [Google Scholar]
  20. Tang, S.Q.; Yang, D.Y.; Bai, Q.Q. Orthogonal Testing Optimum Design in Radial Electrodynamic Magnetic Bearings. Appl. Mech. Mater. 2013, 397–400, 779–782. [Google Scholar] [CrossRef]
  21. Chang, Z.; Jia, Q.; Yuan, X.; Chen, Y. Optimization of the grinding process to improve the surface integrity of bearing raceways. Int. J. Adv. Manuf. Technol. 2017, 91, 4243–4352. [Google Scholar] [CrossRef]
  22. Wu, S.; Zhao, Y.; Li, W.; Liu, W.; Wu, Y.; Liu, F. Optimization of process parameters for thermal shock resistance and thermal barrier effects of 8YSZ thermal barrier coatings through orthogonal test. AIP Adv. 2021, 11, 1–11. [Google Scholar] [CrossRef]
  23. JB/T 10189-2010; Rolling Bearing-Constant Velocity Universal Joint and Assemblies for Automobiles. China Standard Press: Beijing, China, 2010.
  24. Wang, G.B. Design of offset of ball-cage constant velocity joint. Bearings 1996, 7, 136–138. [Google Scholar]
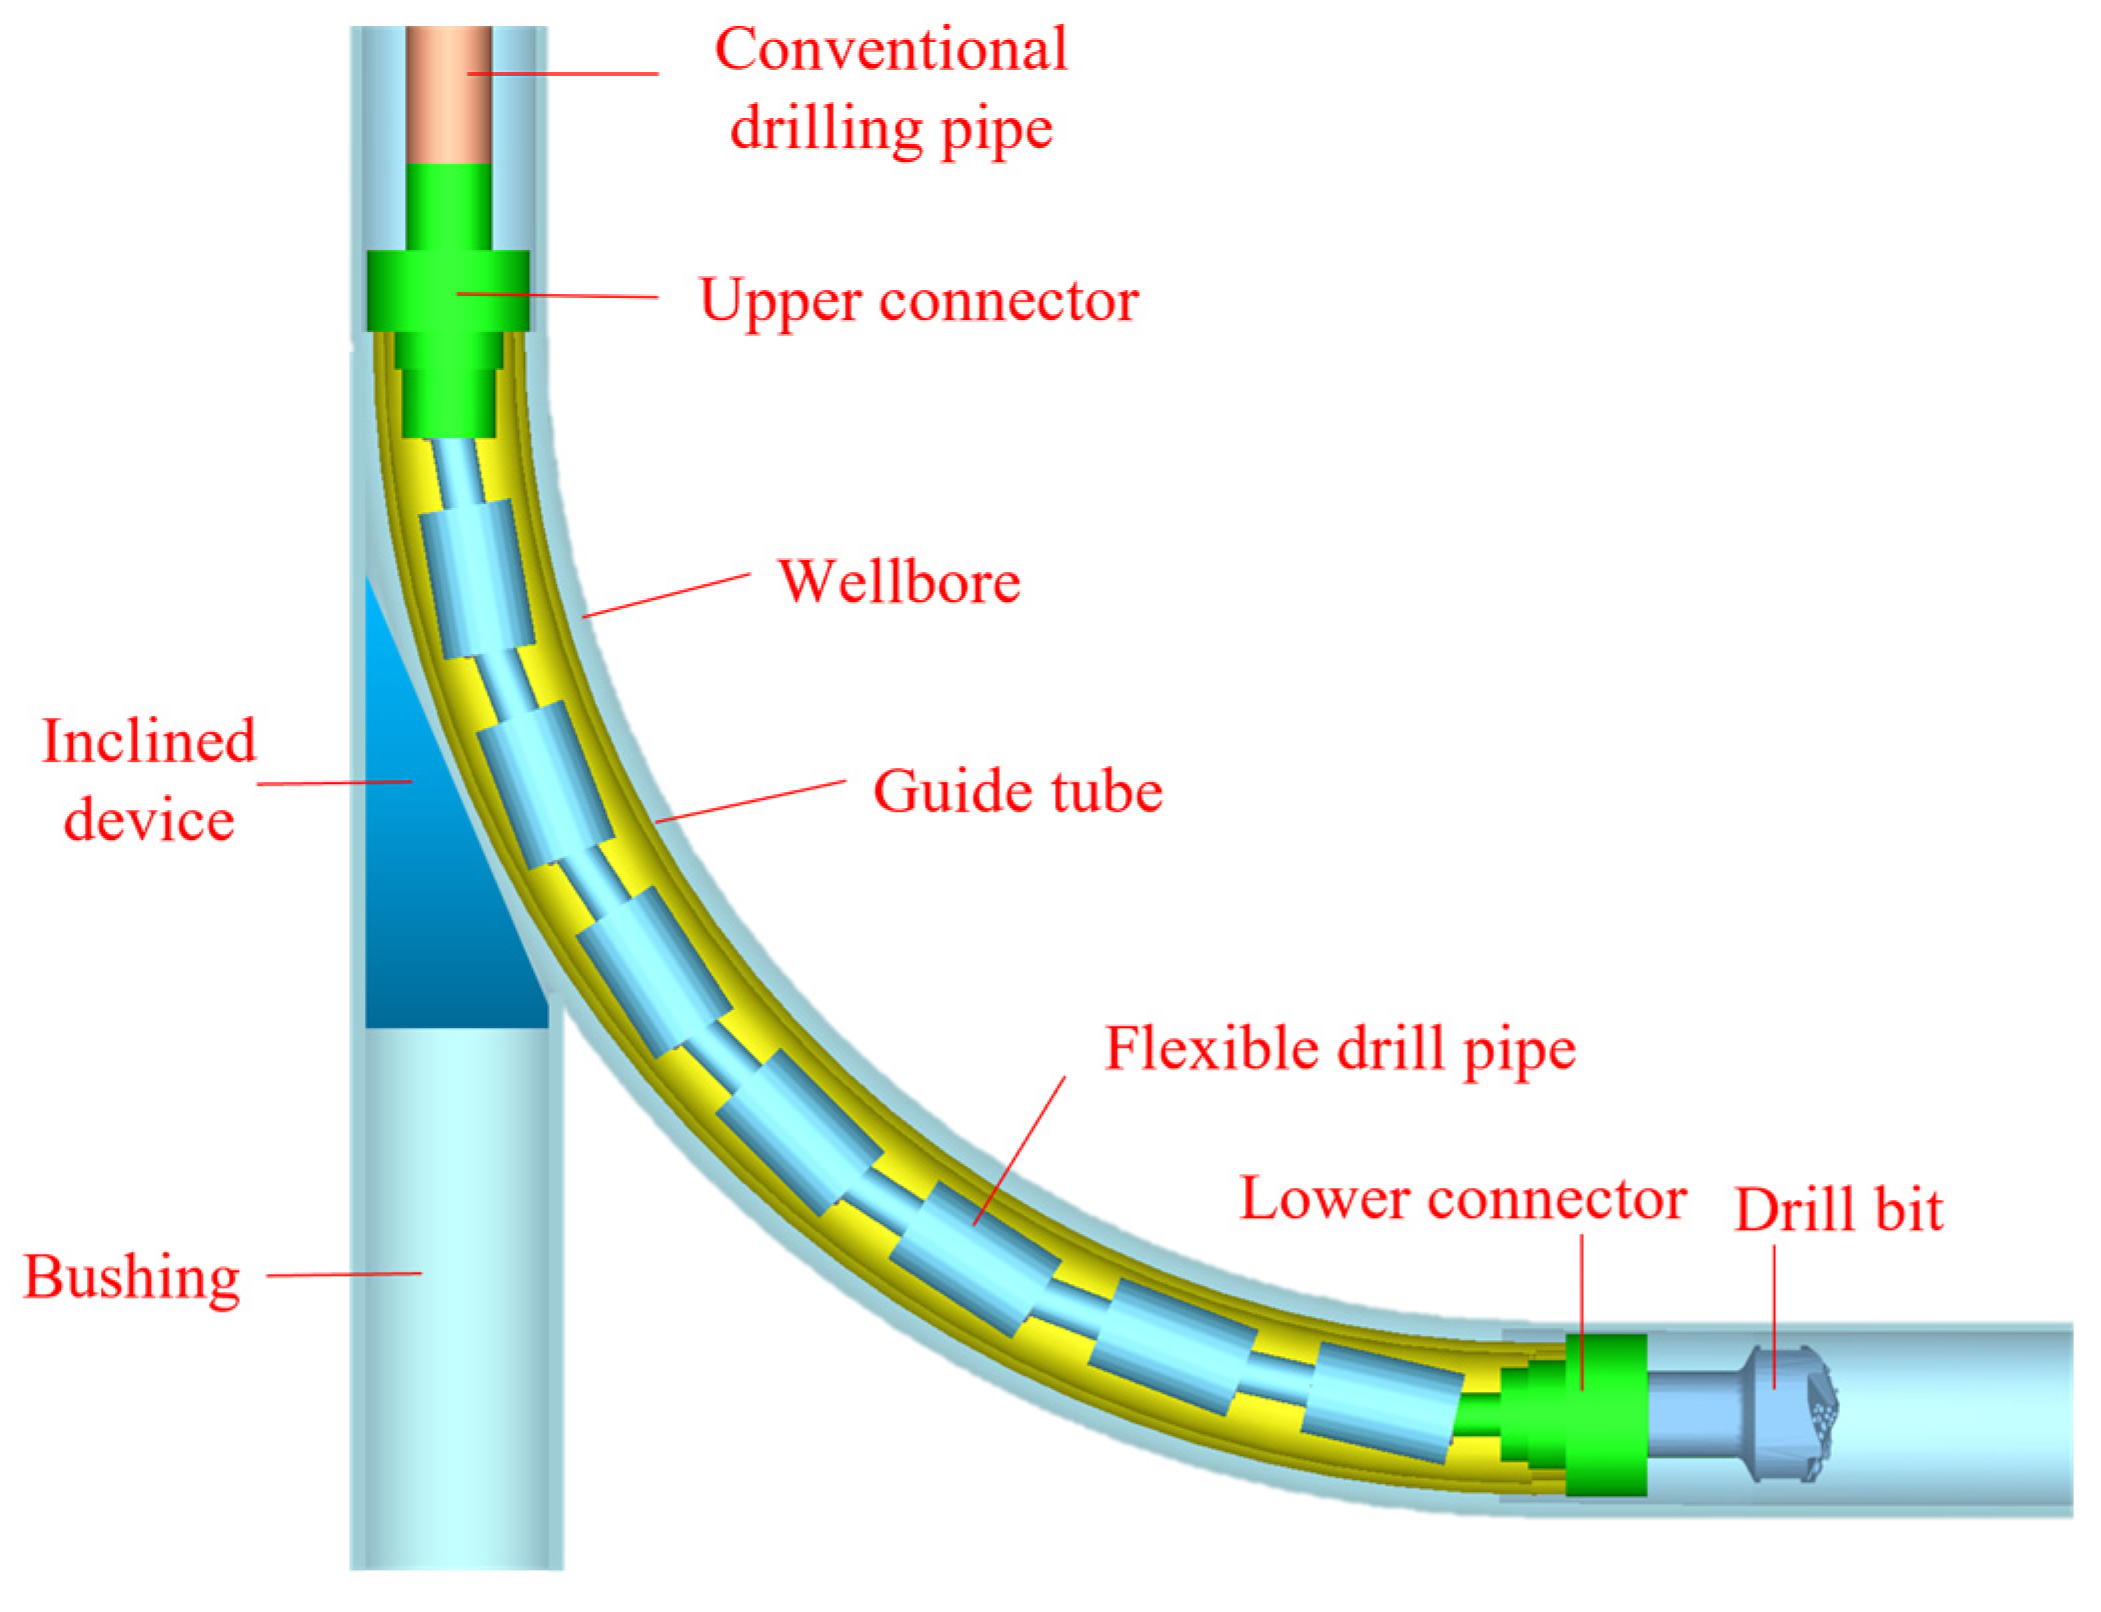
Figure 1. Schematic diagram of ultra-short-radius flexible drilling tool.
Energies 15 07591 g001
Figure 2. Schematic diagram of ball cage flexible joint.
Energies 15 07591 g002
Figure 3. The geometric dimensions of the flexible joint.
Energies 15 07591 g003
Figure 4. Mechanical analysis model of ball key and ball head.
Energies 15 07591 g004
Figure 5. Interface dimension of ball head.
Energies 15 07591 g005
Figure 6. The geometric relation between the ball cage and the ball key when the angle between the shafts is θ.
Energies 15 07591 g006
Figure 7. Structural parameter of ball cage.
Energies 15 07591 g007
Figure 8. The cross-section of ball cage passing through the center of the sphere.
Energies 15 07591 g008
Figure 9. Structural parameters of ball cage flexible joint.
Energies 15 07591 g009
Figure 10. Multi-body dynamics model of flexible joint.
Energies 15 07591 g010
Figure 11. Variation in the contact force on ball keys.
Energies 15 07591 g011
Figure 12. Input and output speeds of flexible joint.
Energies 15 07591 g012
Figure 13. Output torque and input torque of flexible joint.
Energies 15 07591 g013
Figure 14. Schematic diagram of deflection torque.
Energies 15 07591 g014
Figure 15. Curve of deflection moment with time at working angles of 0°, 3°, 6°, and 9°.
Energies 15 07591 g015
Figure 16. Multi-body dynamics model of flexible drilling tool.
Energies 15 07591 g016
Table 1. Contact relationship between components of flexible joint.
Ball SeatBall CageBall KeyBall Head
Ball cageCollision friction contact-Collision friction contactCollision friction contact
Ball keyCollision friction contactCollision friction contact-Collision friction contact
Table 2. Orthogonal test scheme design table.
Test NumberIndependent Variables
Ball Seat Diameter (mm)Ball Head Diameter (mm)Ball Key Diameter (mm)
1806216
2806015
3866214
4966416
5806414
6866016
7966014
8866415
9966215
Table 3. Contact force of flexible joint under different conditions.
Test NumberGuide Tube Contact Force (N)Ball Key Contact Force (N)
1654.312,941.8
2850.316,174.9
31137.214,474.1
41151.313,090.2
5760.914,760.9
6958.314,230.4
71518.817,236.4
8991.013,615.3
91361.115,484.8
Table 4. Range of values for the average ball key contact force.
Independent VariablesBall Seat Diameter (mm)Ball Head Diameter (mm)Ball Key Diameter (mm)
Average value 1 (N)14,625.915,880.615,490.5
Average value 2 (N)14,106.614,300.215,091.7
Average value 3 (N)15,270.513,822.113,420.8
Range value R (N)1163.92058.52069.7
Publisher’s Note: MDPI stays neutral with regard to jurisdictional claims in published maps and institutional affiliations.