Radial Error Motion Measurement and Its Uncertainty Estimation of Ultra Precision Axes of Rotation with Nanometer Level Precision
Abstract
1. Preface
2. Geometric Significance of Rotation Error and Its Measurement Evaluation
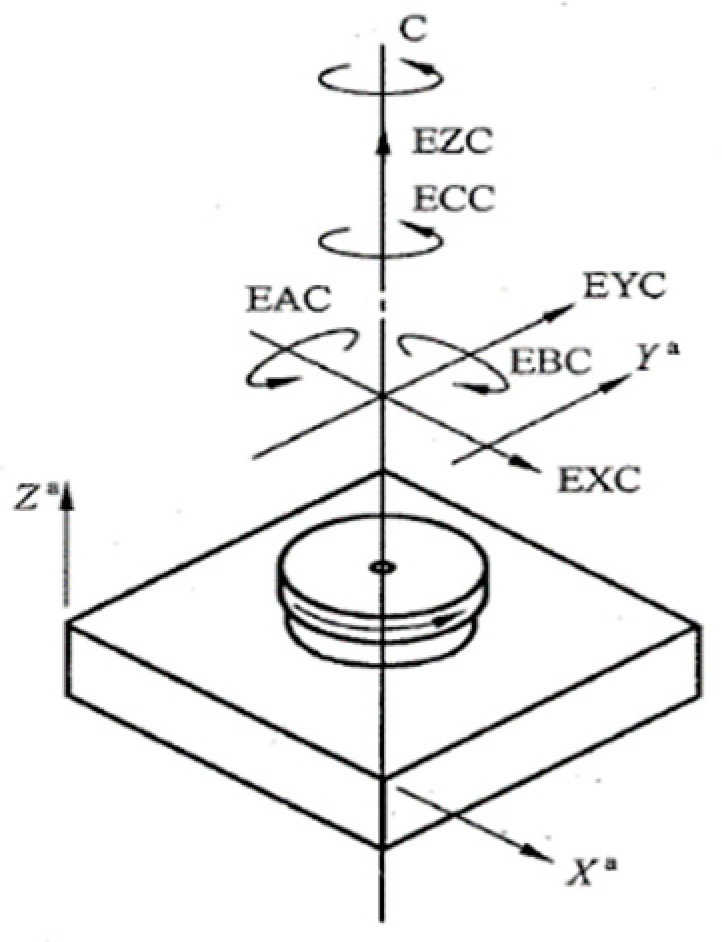
2.1. Motion Error of Rotary Axis
2.2. Measurement and Evaluation of Rotation Error of Ultra-Precision Rotation Axis
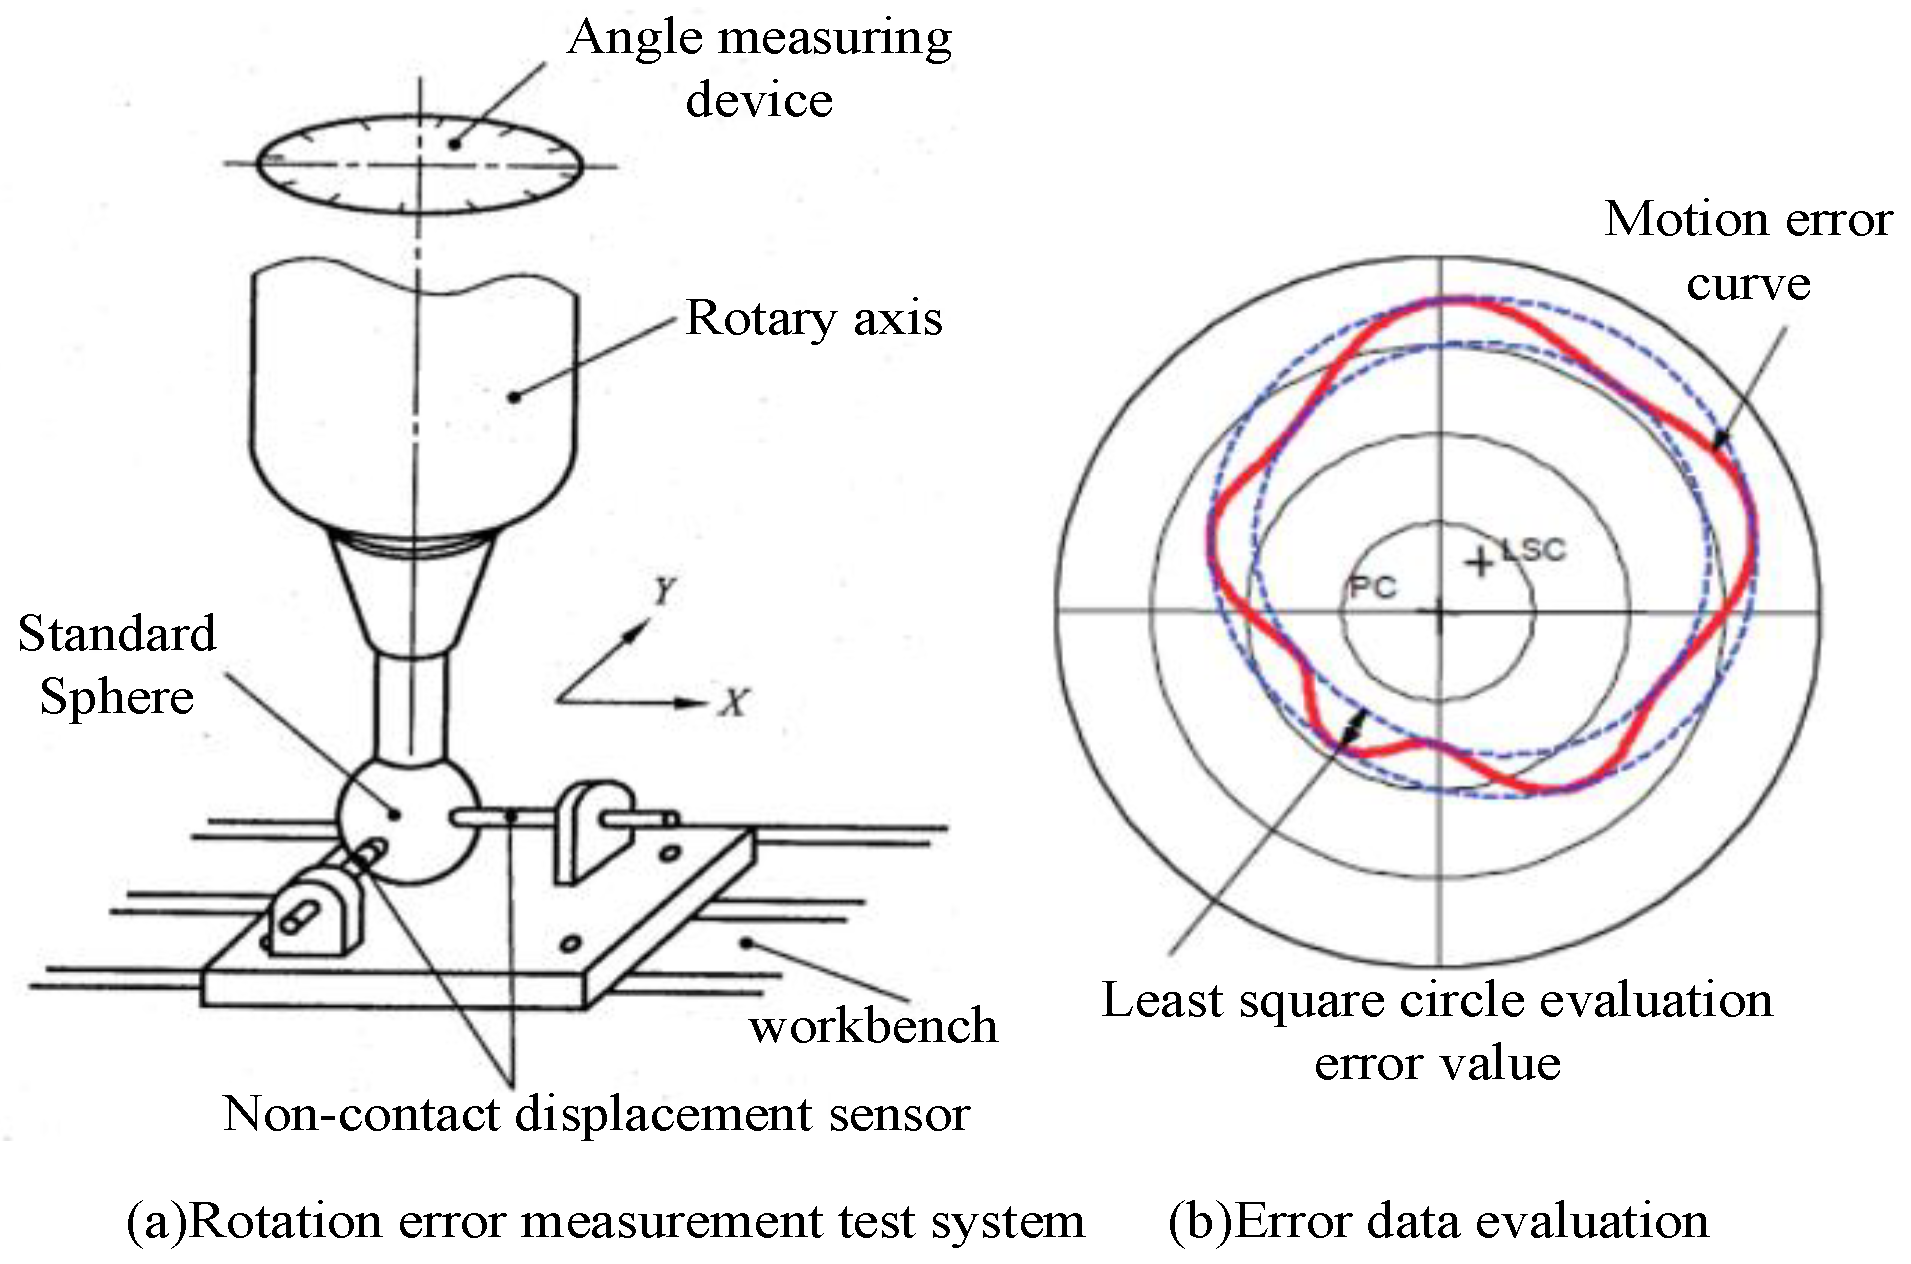
2.2.1. Rotation Error Measurement of Rotation Axis
2.2.2. Measurement of Rotation Error of Ultra-Precision Rotary Axis by Reversal Method
3. Measurement and Verification of Rotation Error of Ultra-Precision Shafting
3.1. Analysis of Influencing Factors of Ultra-Precision Rotary Shafting Test
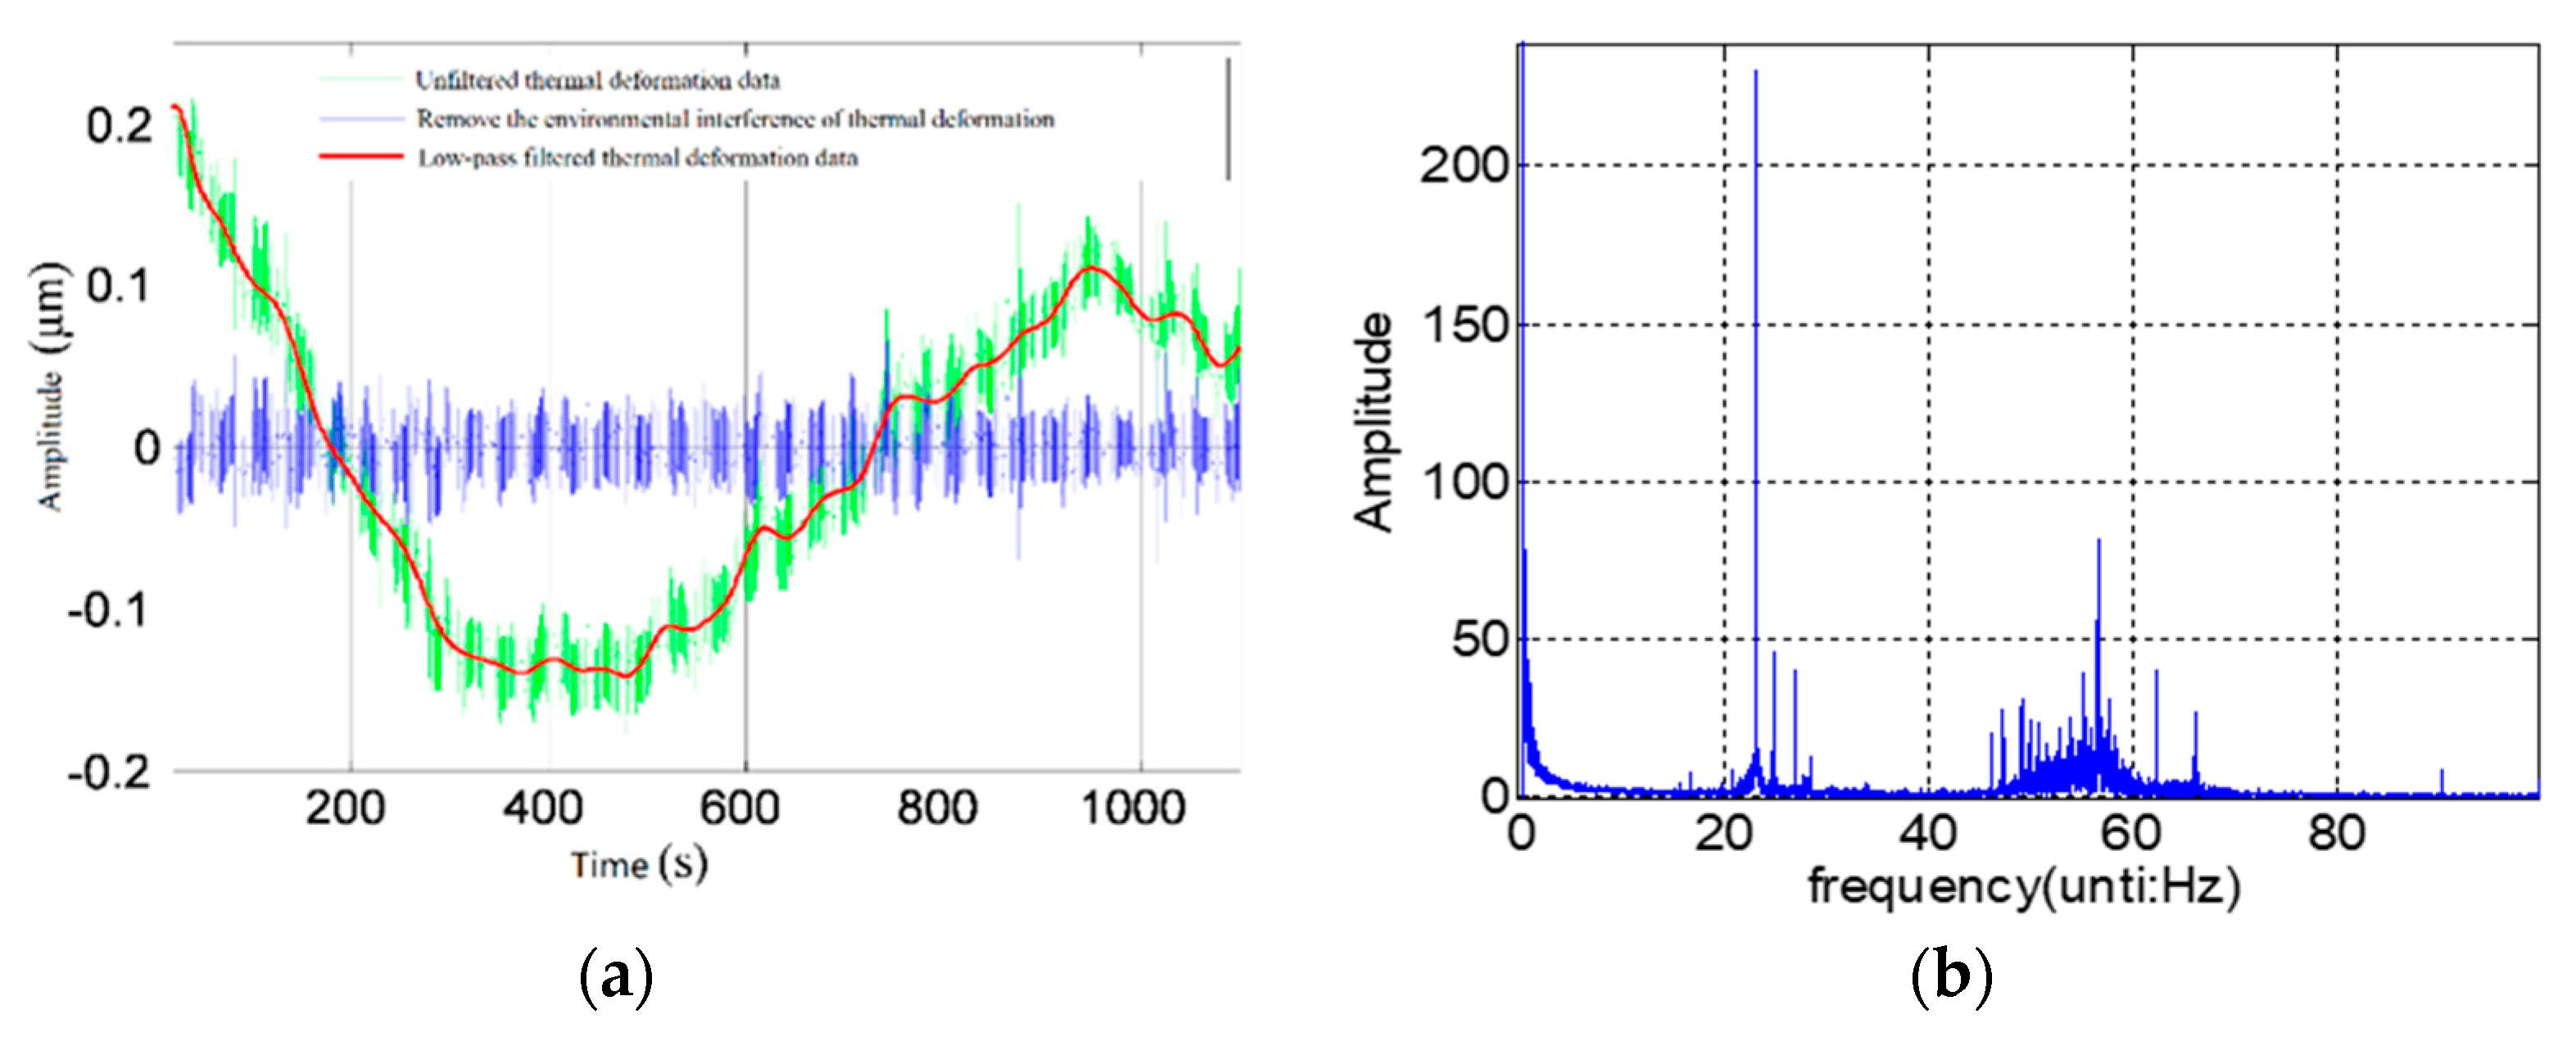
3.1.1. Environmental Impact Factors
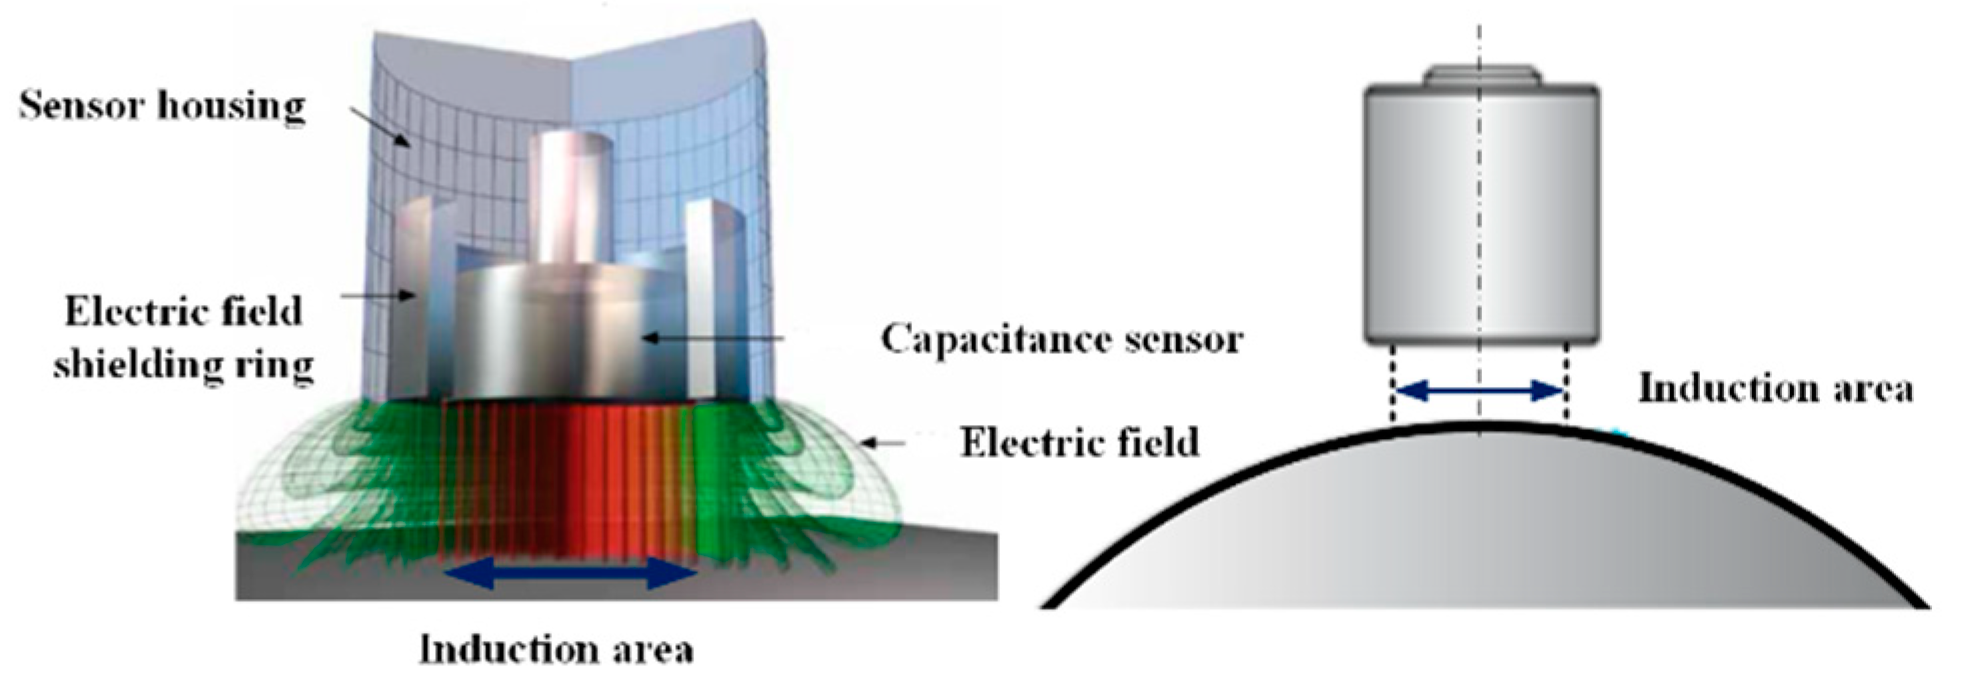
3.1.2. Nonlinear Error of Displacement Sensor Measurement
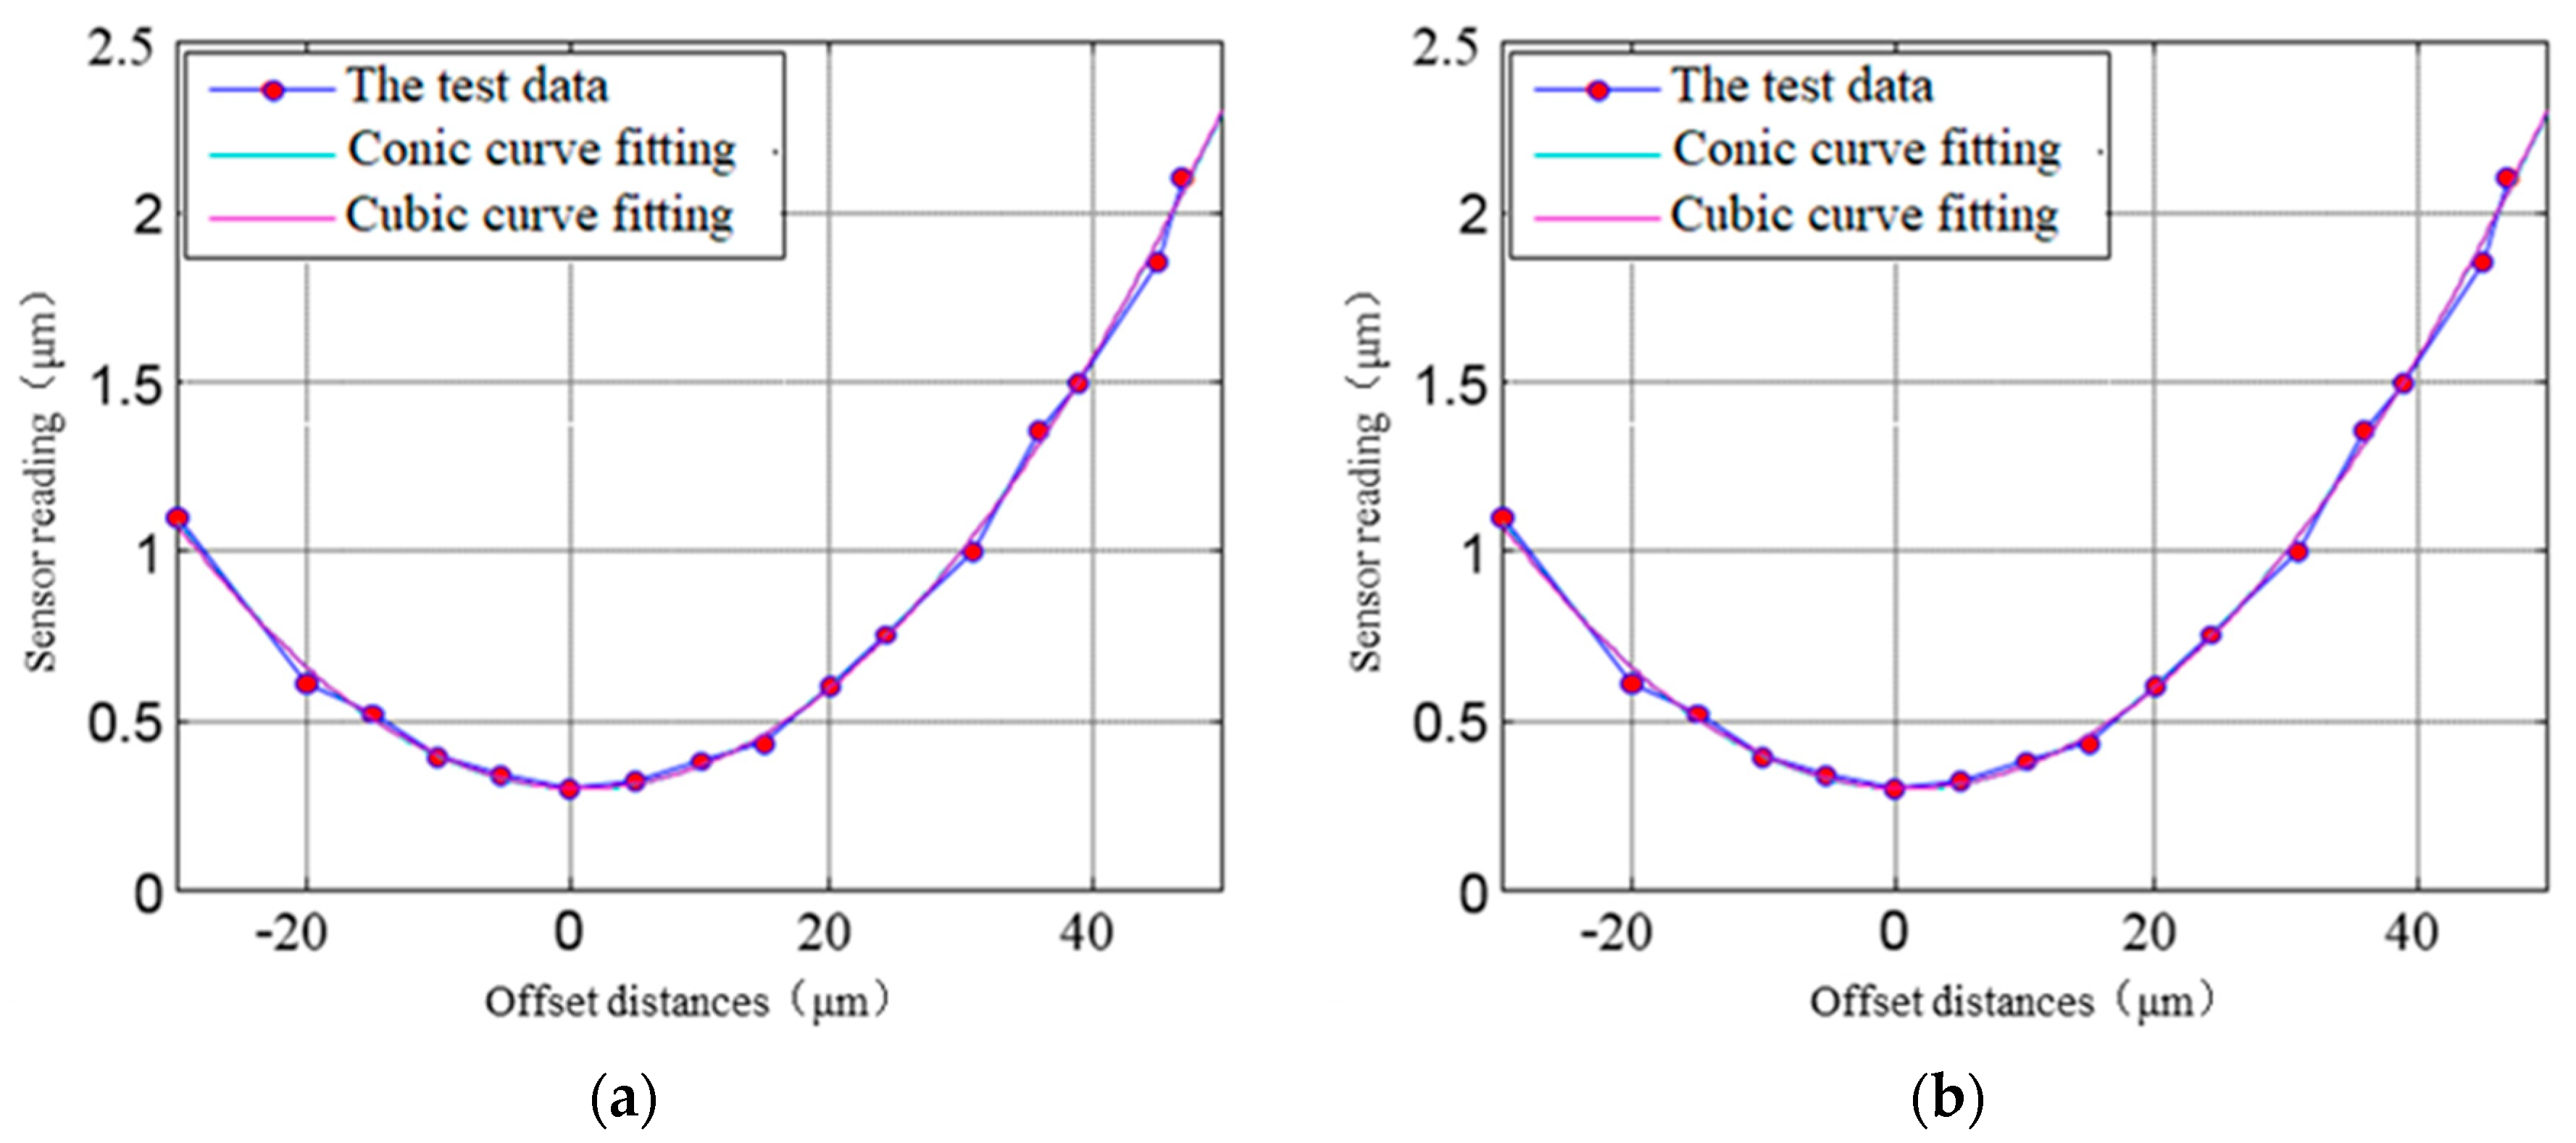
- (a)
- Nonlinear error measurement of spherical target by displacement sensor
- (b)
- Nonlinear error of lateral displacement of spherical target measured by sensor
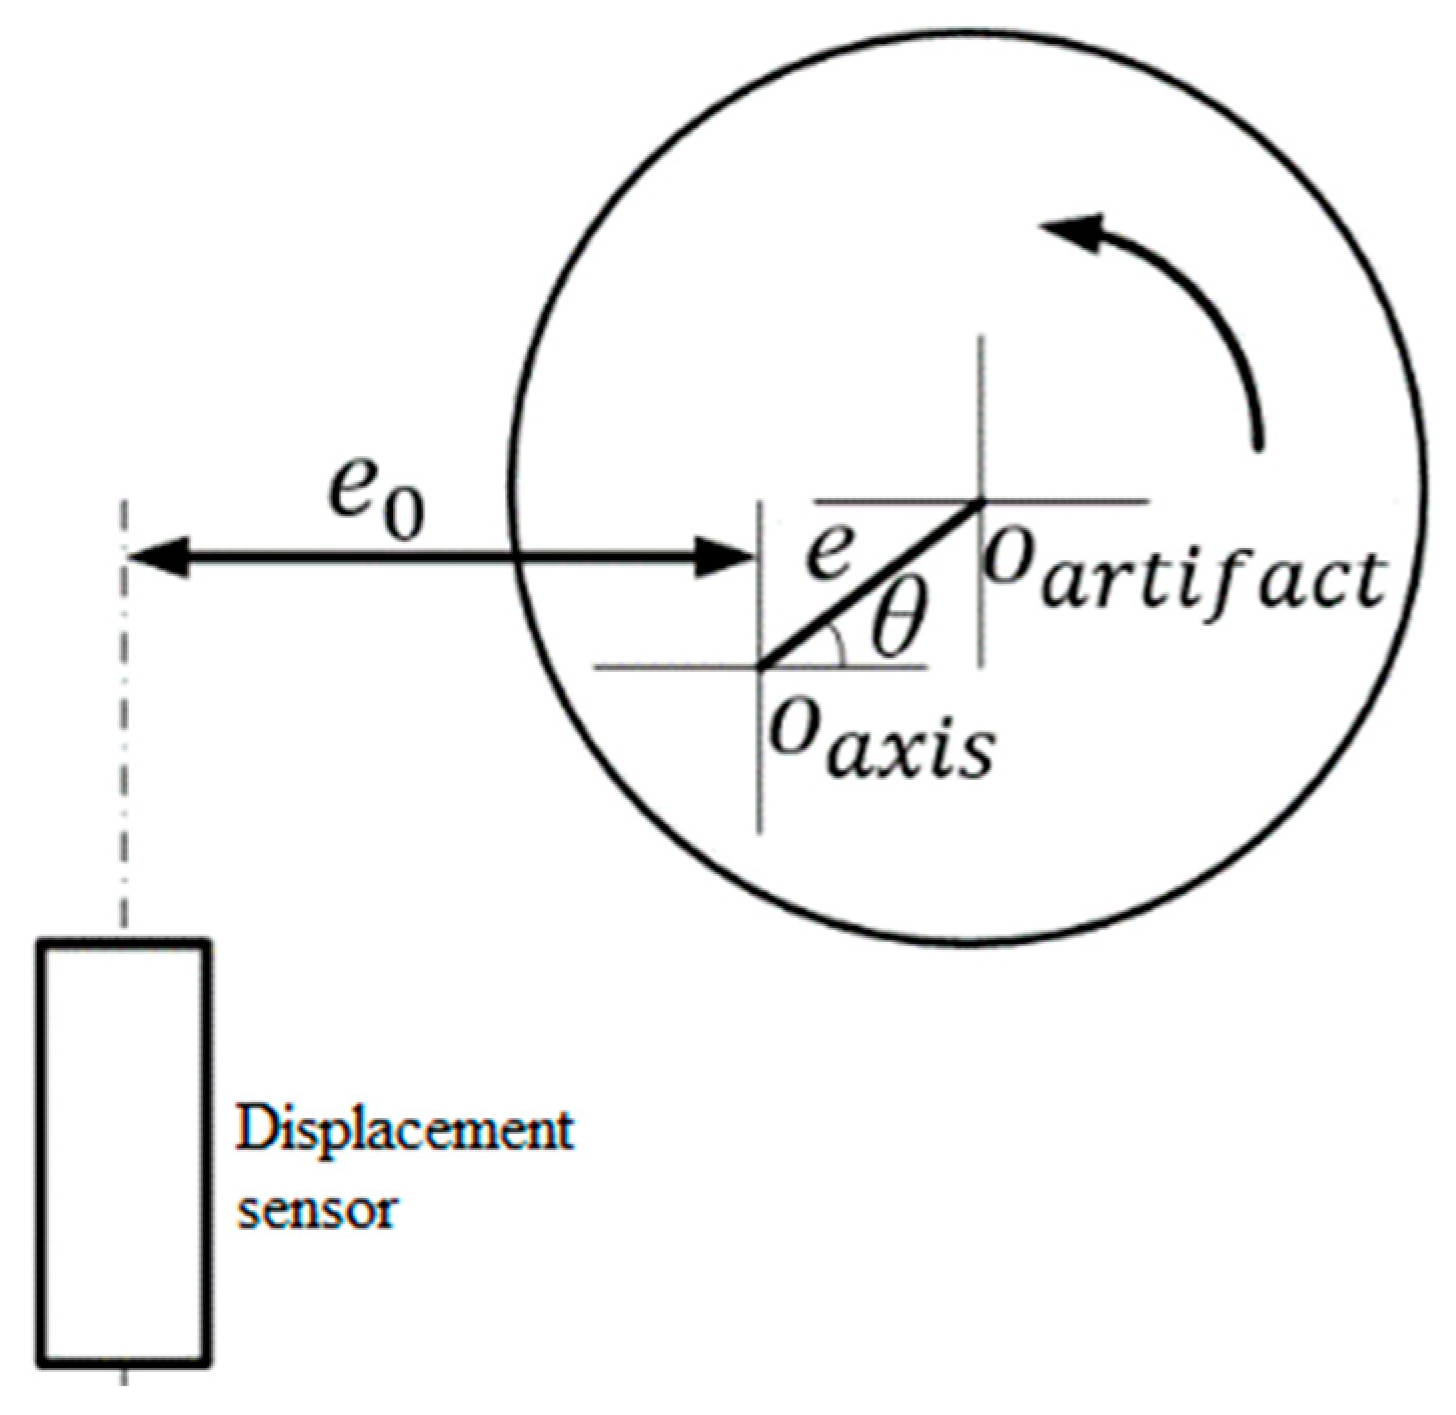
3.1.3. Influence of Eccentric Error of Standard Sphere Installation
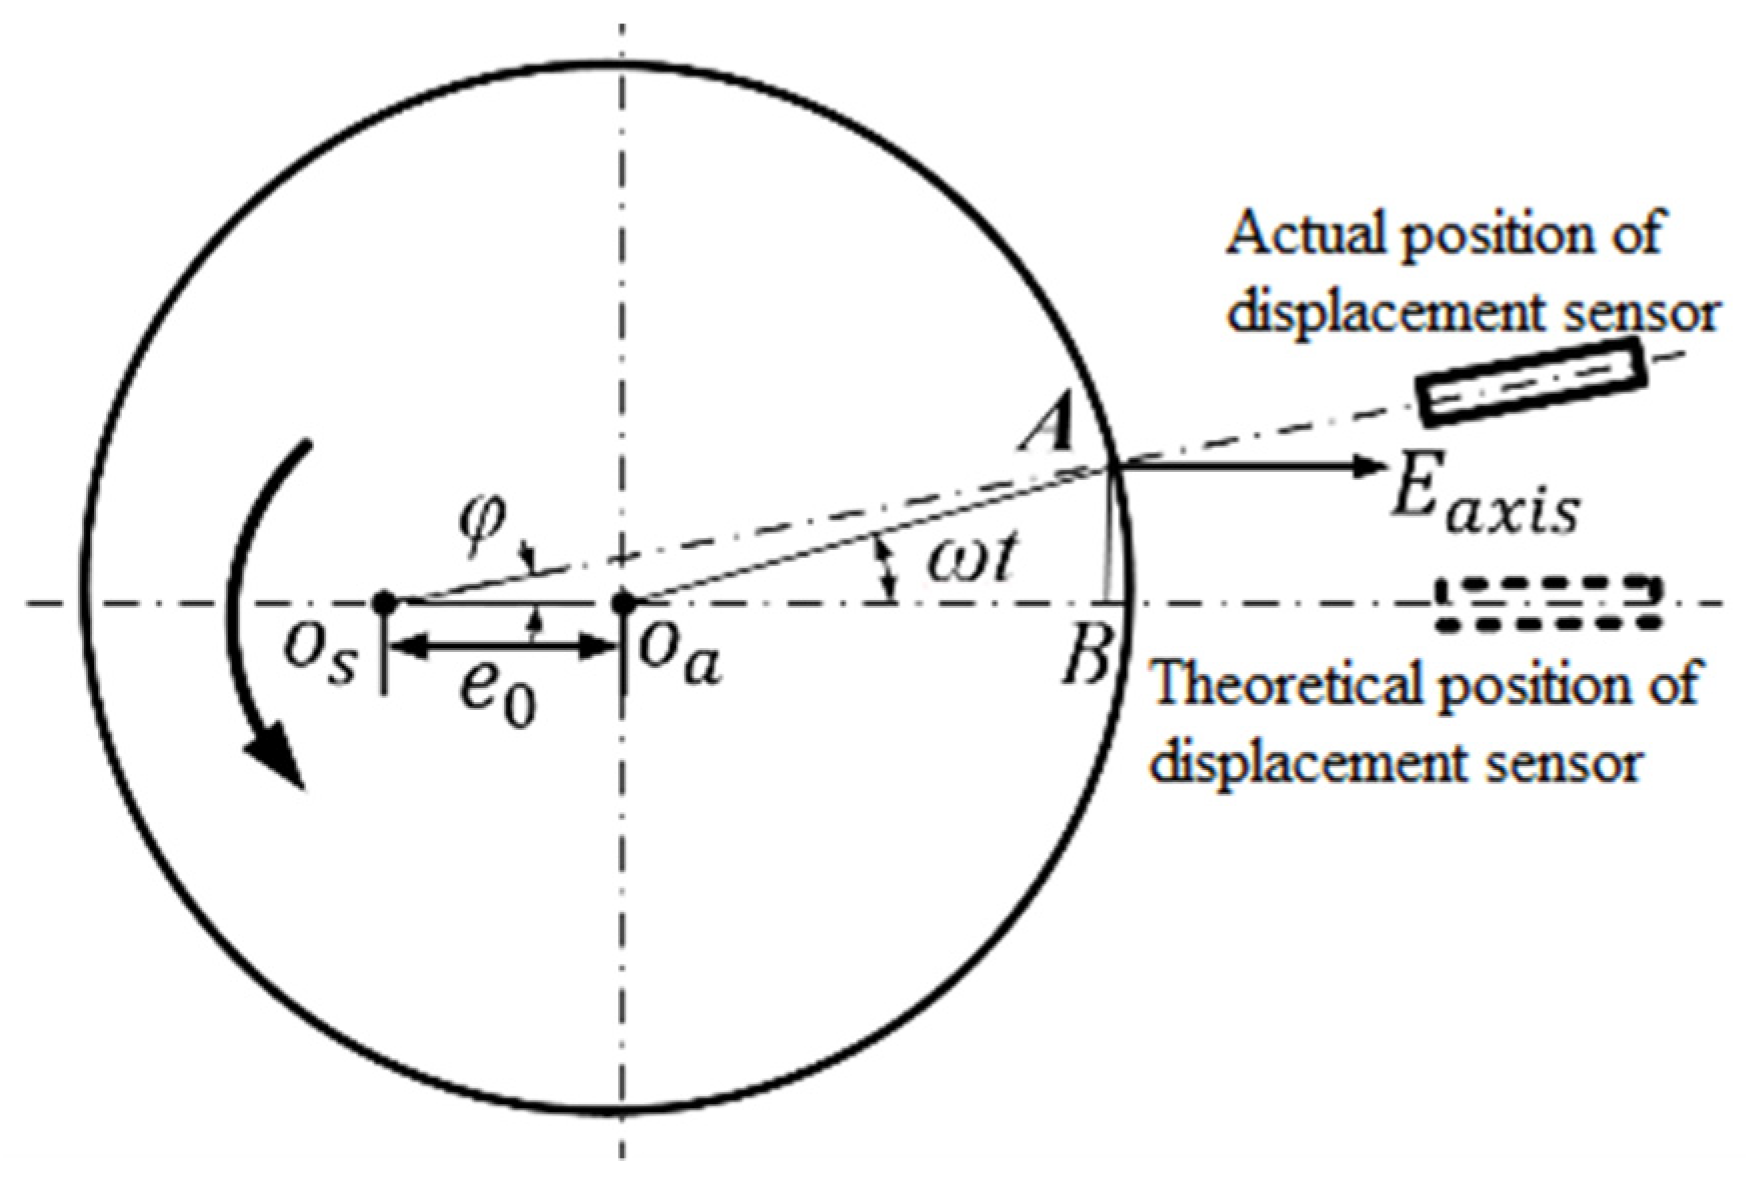
3.1.4. Influence of Misalignment Error of Displacement Sensor
3.1.5. Influence of Positioning Deviation of Inversion Method
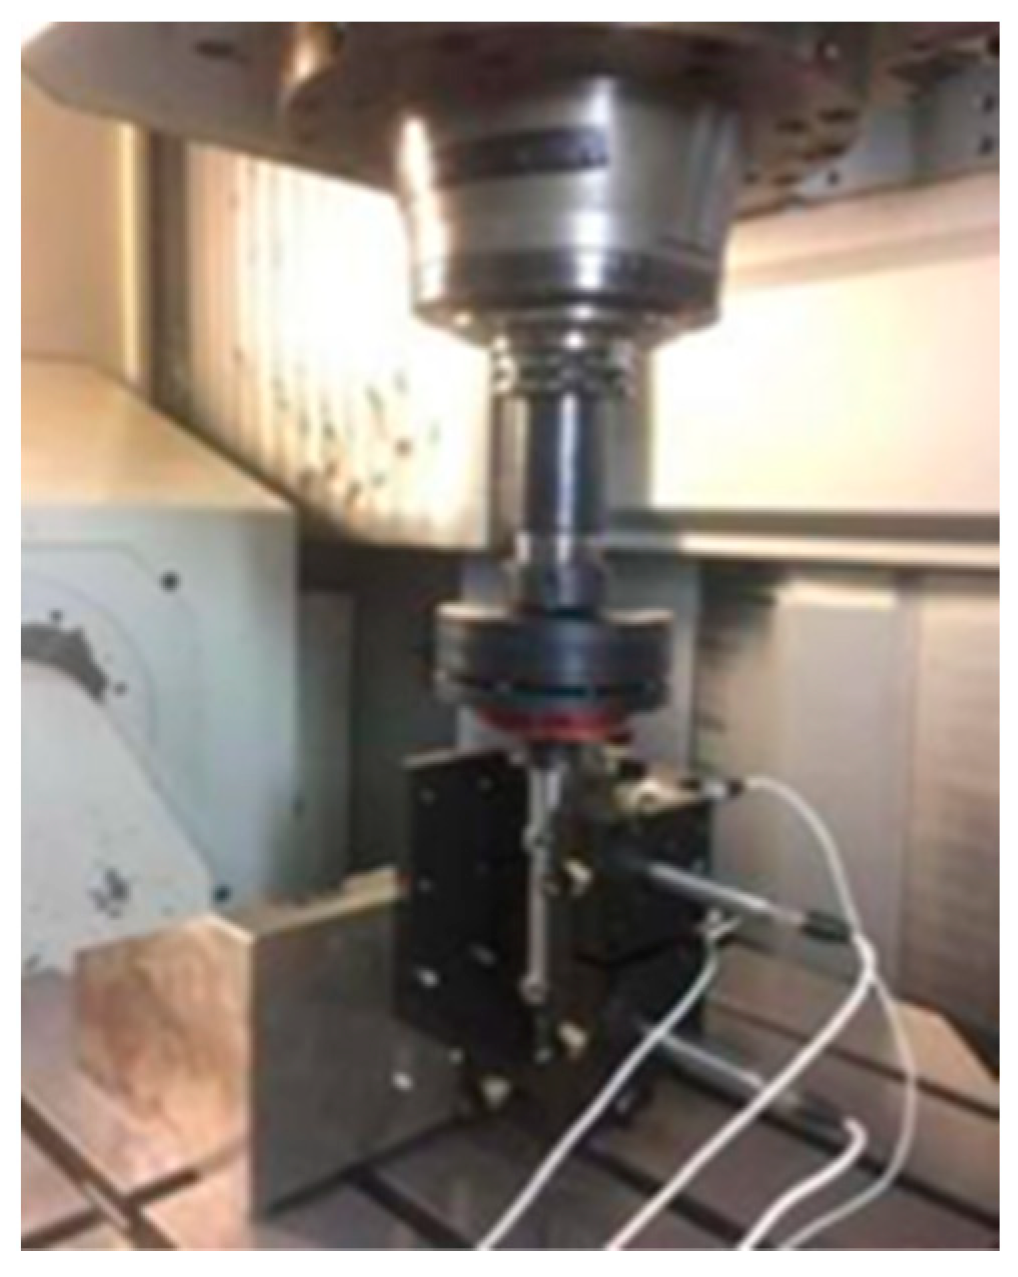
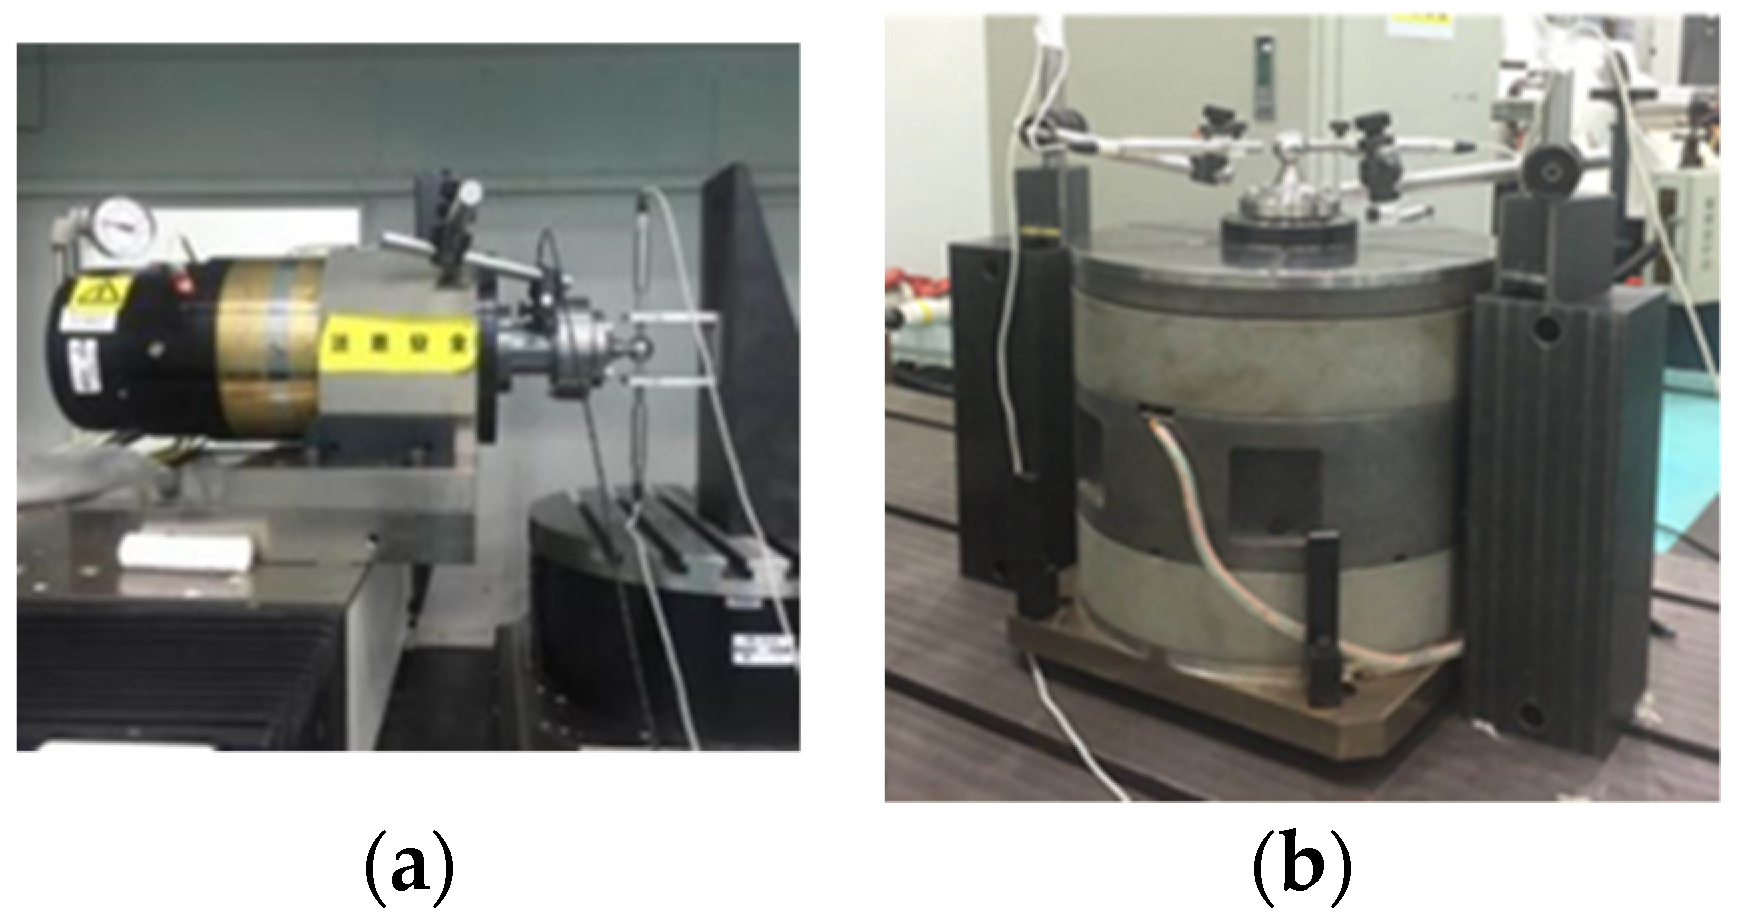
3.2. Rotation Error System and Measurement Test of Ultra-Precision Rotary Shaft System
3.2.1. Rotation Error System of Ultra-Precision Rotary Shaft System
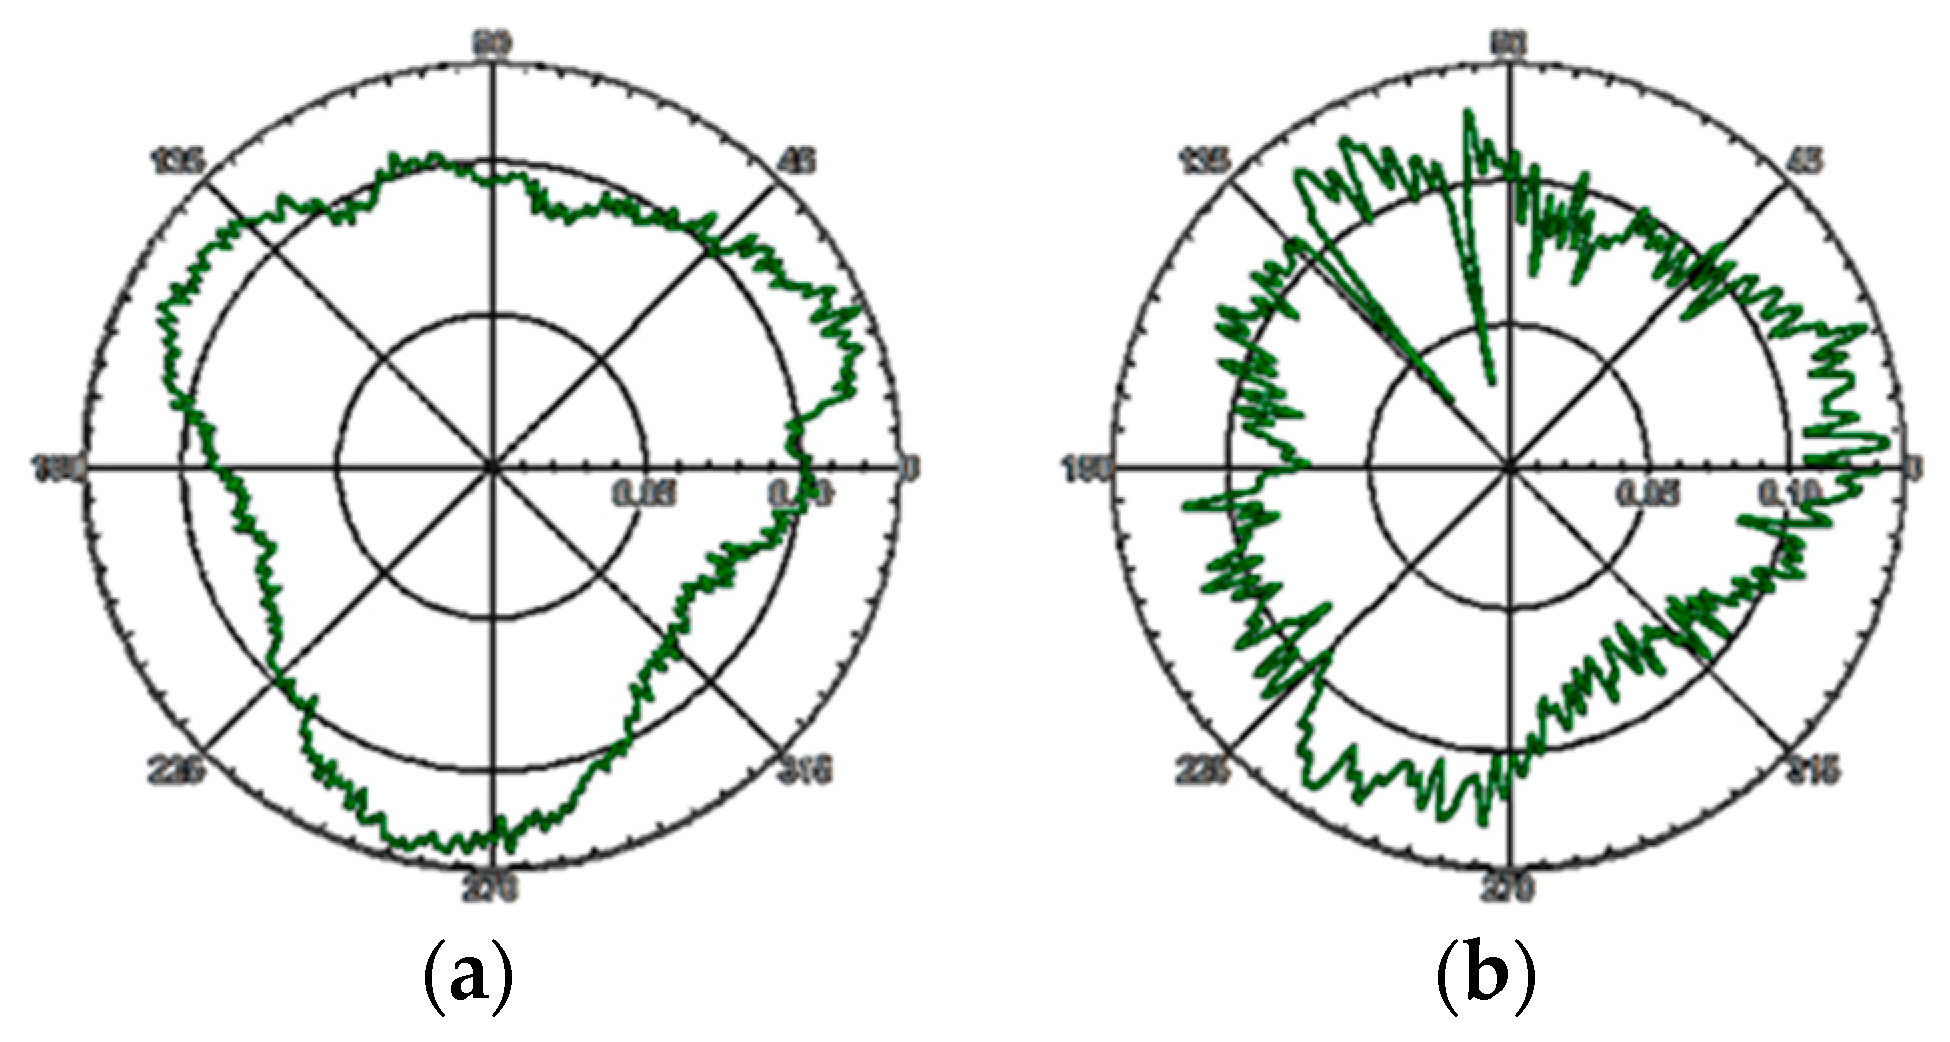
3.2.2. Measurement Repeatability
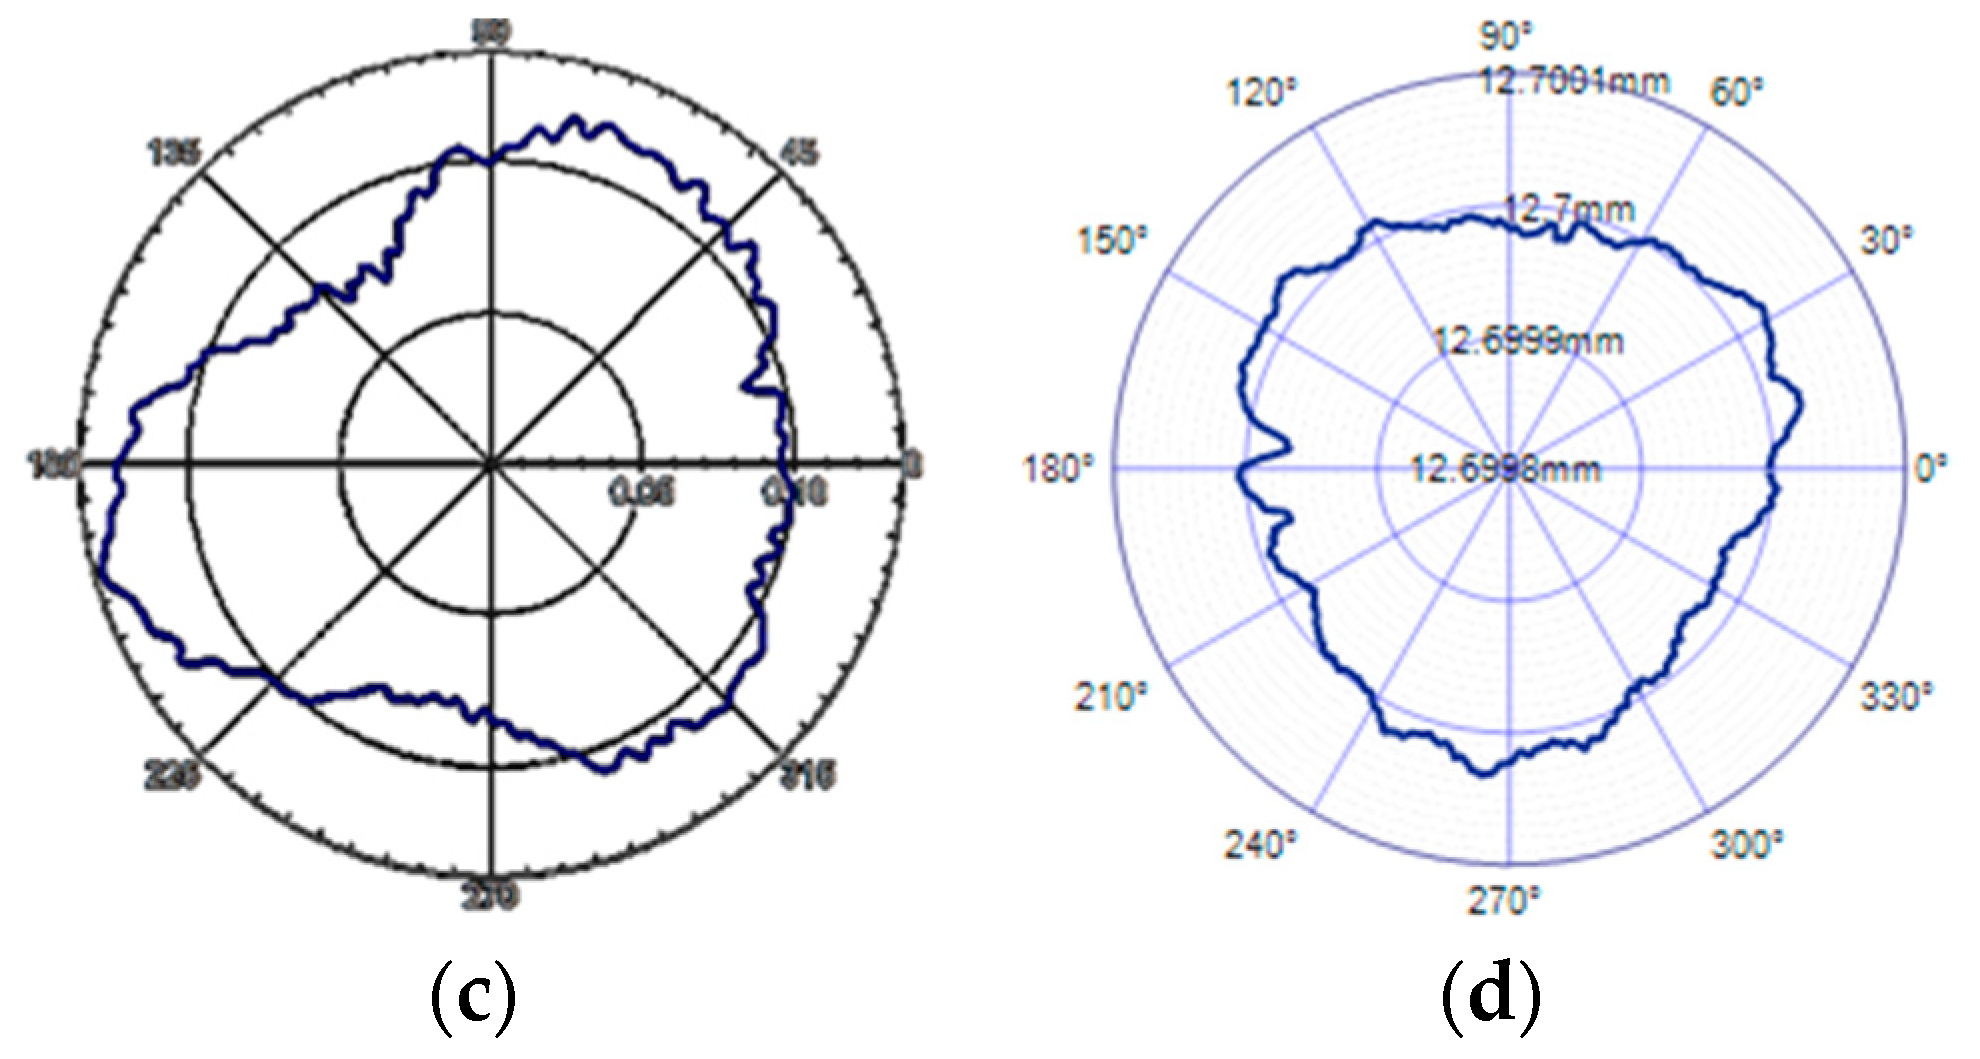
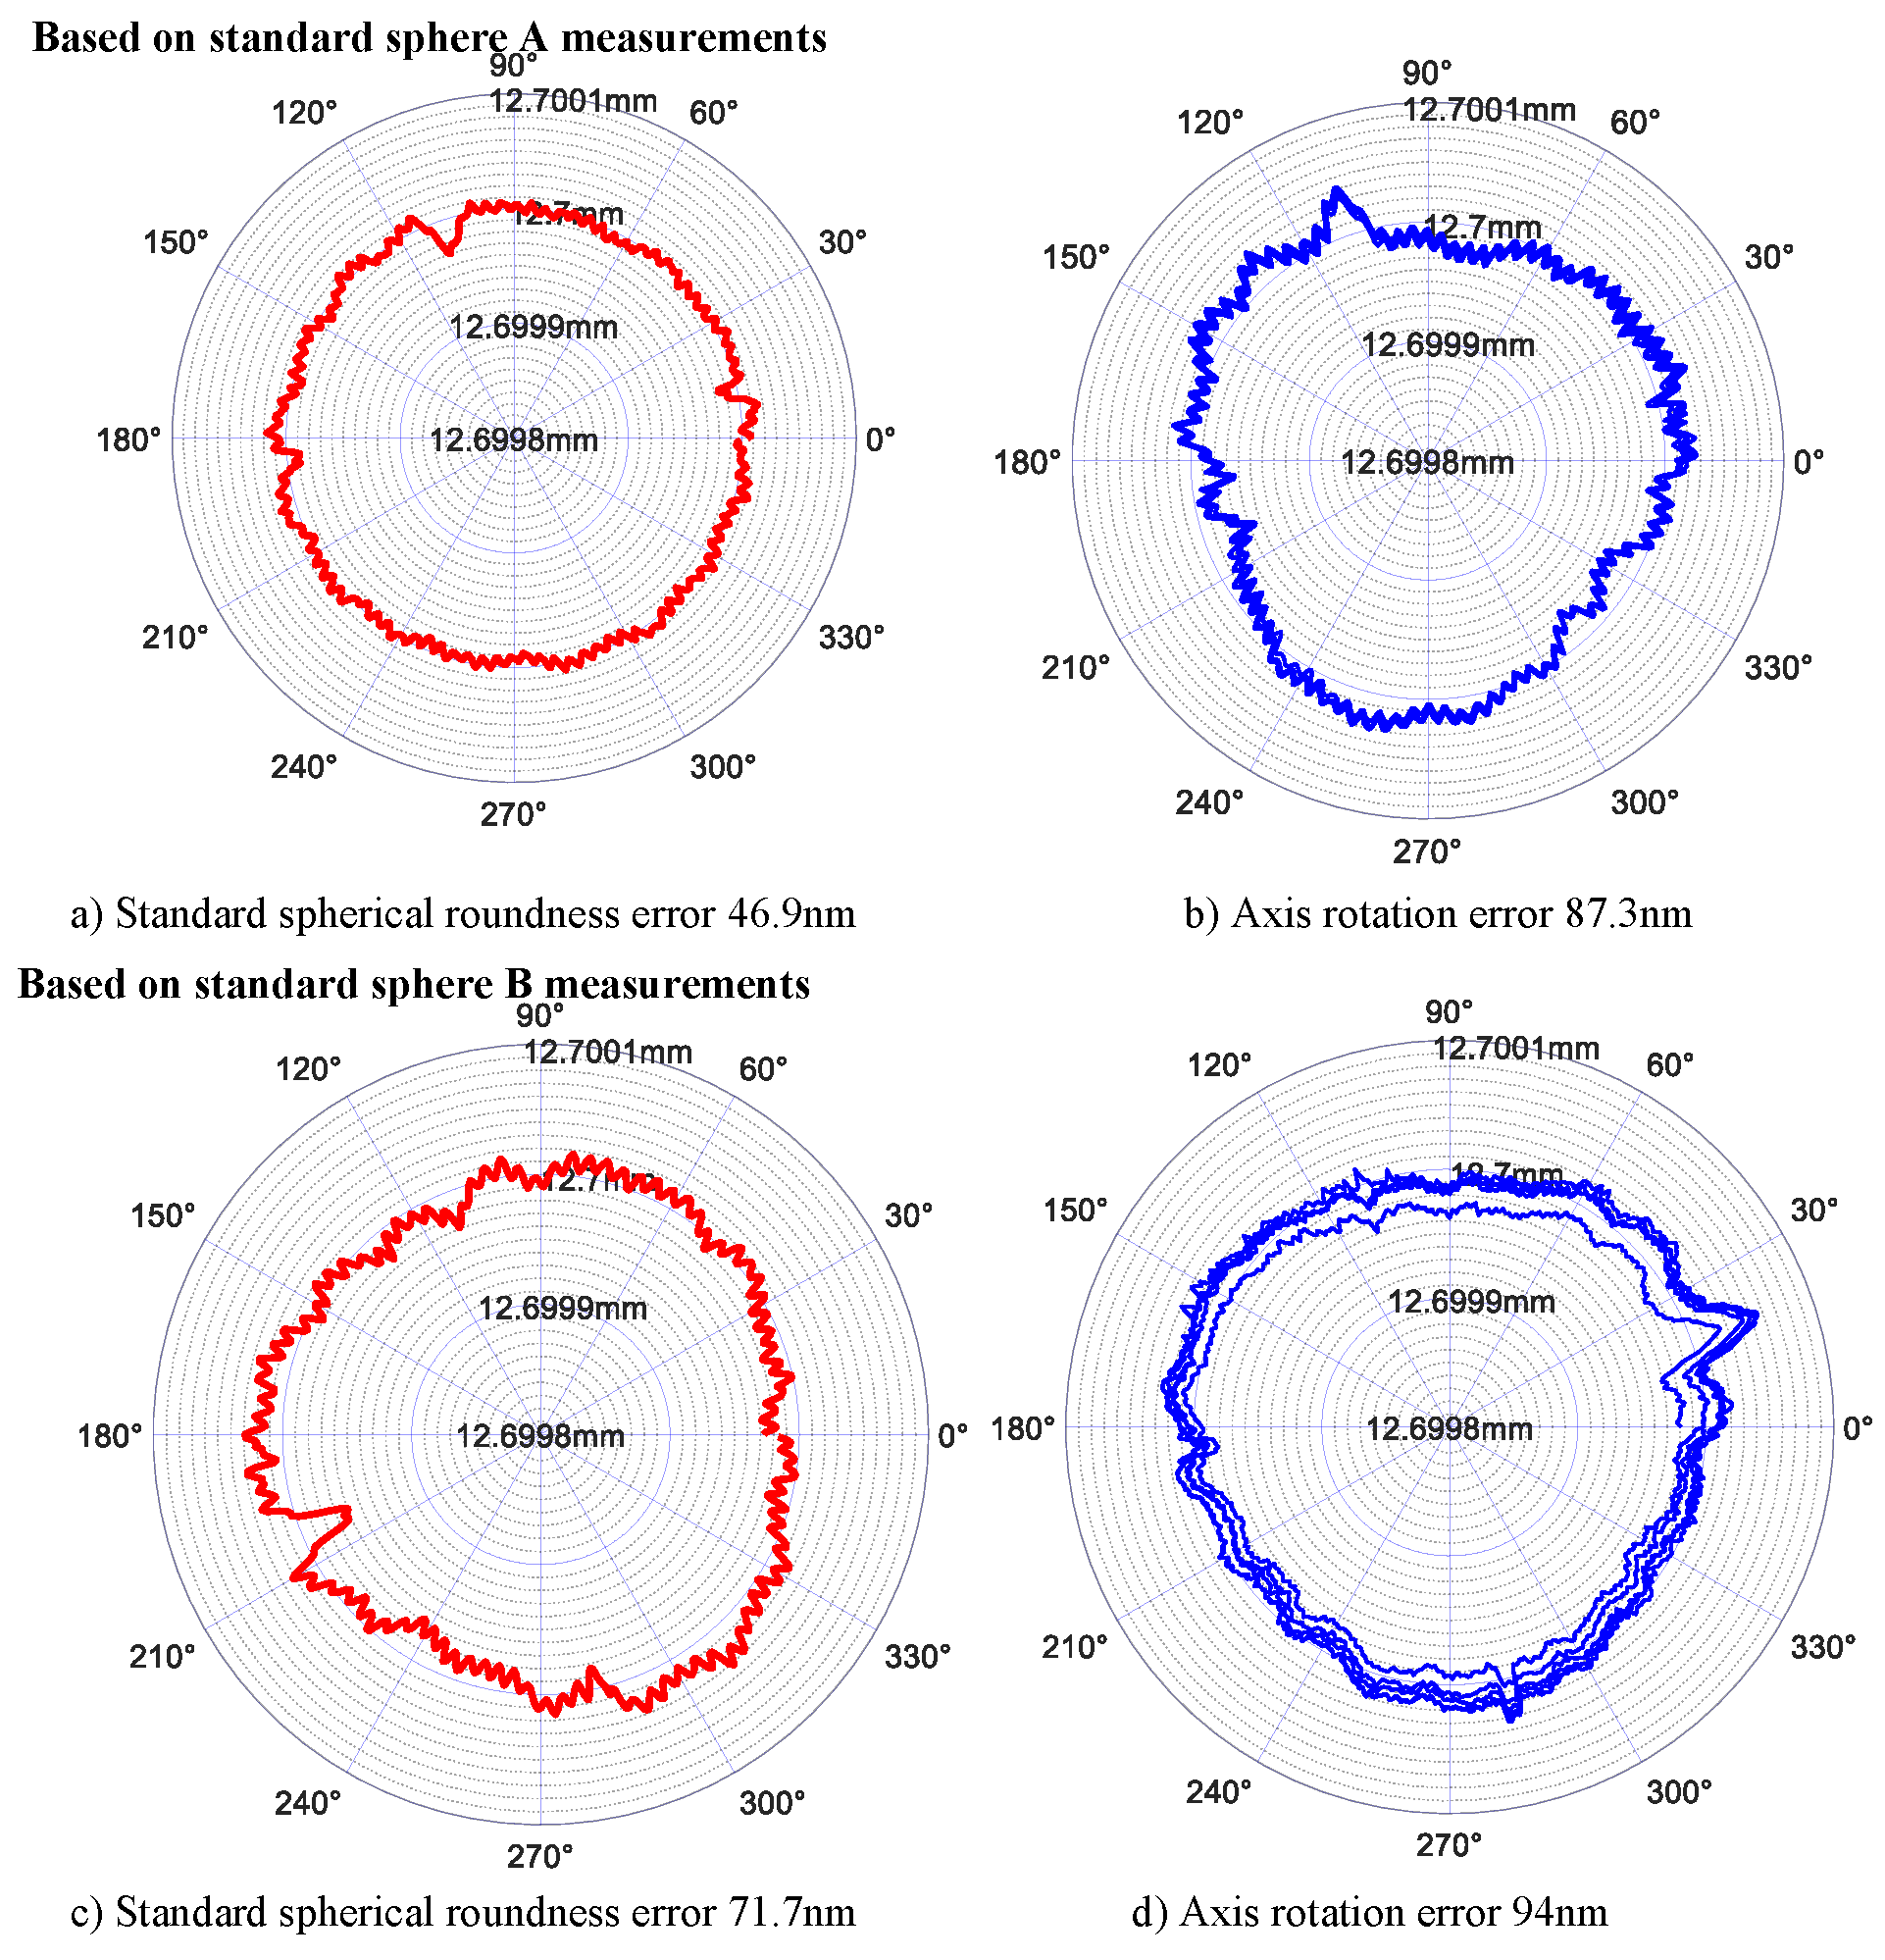
3.2.3. Measurement traceability
- ①
- The same standard sphere test for different detection objects
- ②
- Test of different standard spheres for the same test object
4. Evaluation of Uncertainty in Measurement of Rotation Error of Ultra-Precision Rotary Shafting
4.1. Source Identification and Main Components of Measurement Uncertainty
- The measurement uncertainty introduced by measurement environment mainly includes environmental vibration, environmental temperature change, and environmental electromagnetic interference factors.
- The measurement uncertainty introduced by the measuring instrument includes the non-linear error of the sensor measuring sphere, the measurement error of the sensor, the inclination error of the sensor installation, etc.
- Uncertainty of measurement method: data processing related factors, such as eliminating eccentricity, error separation algorithm, etc.
4.1.1. Measurement Uncertainty Component Introduced by Measurement Environment
- (1)
- The uncertainty is introduced by the temperature component of the measurement
- (2)
- Uncertainty component introduced by environmental vibration
4.1.2. Measurement Uncertainty Components Caused by Measuring Instruments
- (1)
- Uncertainty component introduced by sensor′s own measurement error
- (2)
- Uncertainty component introduced by standard sphere
- (3)
- Uncertainty components caused by nonlinearity of sensor spherical target measurement
- (4)
- Uncertainty component caused by sensor installation tilt error
- (5)
- The component of uncertainty caused by sensor reversal positioning deviation
- (6)
- The uncertainty component caused by the standard sphere reversal positioning error
4.1.3. Measurement Uncertainty Components due to Repeatability
4.2. Evaluation of Measurement Uncertainty
- (1)
- Evaluation of measurement uncertainty of original data
- (2)
- Evaluation of measurement uncertainty for eliminating eccentricity of original data
- (3)
- Evaluation of measurement uncertainty of rotation error based on inversion
5. Conclusions
- (1)
- In order to realize the measurement and evaluation of nanometer rotary error of ultra—precision rotary axis, this paper develops a rotation error detection system and method based on capacitive displacement sensor and standard sphere, and analyzes the factors of measuring ambient temperature, environmental vibration, non-linearity of spherical target of capacitive displacement sensor, eccentricity of standard sphere and sensor misalignment.
- (2)
- Based on the measurement system, the measurement repeatability and traceability of the system were analyzed. The repeatability standard deviation of the measurement system was 10.05 nm, and the standard deviation of the roundness error of the separation standard sphere was 4.03 nm.
- (3)
- In order to evaluate the dispersion of measurement results of ultra-precision rotary axis rotation error, the complete process and main uncertainty components of comprehensive evaluation of measurement uncertainty are proposed. The mathematical model of uncertainty evaluation is constructed, and the expanded measurement uncertainty (k = 2) is 31.64 nm.
Author Contributions
Funding
Institutional Review Board Statement
Informed Consent Statement
Data Availability Statement
Conflicts of Interest
Nomenclature
| Axis radial radius of motion | |
| Axis rotation error | |
| Standard sphere shape error | |
| Sensor reading before reverse | |
| Sensor reading after reverse | |
| Axis of rotation error motion | |
| The cosine component of the Fourier change | |
| The sine component of the Fourier change | |
| The constant term of the Fourier change | |
| The eccentric error | |
| The initial eccentricity error | |
| The tangent offset between sensor and standard sphere | |
| Displacement sensor error caused by eccentricity | |
| Displacement sensor reading | |
| Component of the axis of rotation motion error vector on the axis of OA | |
| Sensor reading affected by the tangential deviation caused by the axis of rotation motion error perpendicular to the component on the axis of OA | |
| The angle of tilt caused by alignment error | |
| Effect of transverse initial offset | |
| Error caused by misalignment |
References
- Wegener, K.; Mayr, J.; Merklein, M.; Behrens, B.-A.; Aoyama, T.; Sulitka, M.; Fleischer, J.; Groche, P.; Kaftanoglu, B.; Jochum, N.; et al. Fluid elements in machine tools. CIRP Ann. Manuf. Technol. 1917, 66, 611–634. [Google Scholar] [CrossRef]
- Can, H.; Wanli, X.; Wenbiao, S.; Shuai, Y. Research on the Mechanism of Improving Hydrostatic Spindle Rotating Accuracy with Controllable Restrictor. J. Mech. Eng. 2019, 55, 160–168. [Google Scholar]
- GB T 17421.1; National Standardization Administration of China General Rules for the Inspection of Machine Tools—Part 1: Geometrical Accuracy of Machine Tools Under No Load or Finish Machining Conditions. China Standard Press: Beijing, China, 1998.
- Min, L.; Julong, Y.; Zhe, W. Progress in Ultra-precision Machining Methods of Complex Curved Parts. J. Mech. Eng. 2015, 51, 178–191. [Google Scholar]
- Zhang, S.J.; To, S.; Zhu, Z.W.; Zhang, G.Q. A review of fly cutting applied to surface generation in ultra-precision machining. Int. J. Mach. Tools Manuf. 2016, 103, 13–27. [Google Scholar] [CrossRef]
- Shu, Q.; Zhu, M.; Liu, X.; Cheng, H. Radial Error Motion Measurement of Ultra-precision Axes of Rotation With Nanometer Level Precision. J. Manuf. Sci. Eng. 2017, 139, 071017. [Google Scholar] [CrossRef]
- Cui, H.; Lei, D.; Zhang, X.; Lan, H.; Jiang, Z.; Kong, L. Measurement and analysis of the radial motion error of aerostatic ultra-precision spindle. Measurement 2019, 137, 624–635. [Google Scholar] [CrossRef]
- Evans, C.J.; Hocken, R.J.; Estler, W.T. Self-calibration: Reversal, redundancy, error separation, and absolute testing. CIRP Ann.-Manuf. Technol. 1996, 45, 617–634. [Google Scholar] [CrossRef]
- Marsh, E.; Couey, J. Vallance R. Nanometer-level comparison of three spindle error motion separation techniques. J. Manuf. Sci. Eng. 2006, 128, 180–187. [Google Scholar] [CrossRef]
- Grejda, R.; Marsh, E.; Vallance, R. Technology for calibrating spindles with nanometer error motion. Precis. Eng. 2005, 29, 113–123. [Google Scholar] [CrossRef]
- Cappa, S.; Reynaerts, D.; Al-Bende, F. A sub-nanometre spindle error motion separation technique. Precis. Eng. 2014, 38, 458–471. [Google Scholar] [CrossRef]
- Zhang, G.X.; Zhang, Y.H.; Yang, S.M.; Li, Z. A Multipoint Method for Spindle Error Motion Measurement. CIRP Ann.-Manuf. Technol. 1997, 46, 441–445. [Google Scholar] [CrossRef]
- ISO 230-7 2015; Test Code for Machine Tools—Part 7: Geometric Accuracy of Axes of Rotation. International Organization for Standardization: Geneva, Switzerland, 2015.
- Donaldson, R.R. Simple Method for Separating Spindle Error From Test Ball Roundness Error. Ann. CIRP 1973, 21, 125–126. [Google Scholar]
- Kretschmar, M.; Welsby, S.; Precision, L. CHAPTER 8—Capacitive and Inductive Displacement Sensors. In Sensor Technology Handbook; Wilson Press: Seneca Falls, NY, USA, 2005; pp. 193–222. [Google Scholar]
- Micro-Epsilon. CatcapaNCDT–En. Available online: http://www.micro-epsilon.com/download/products/cat--capaNCDT--en.pdf (accessed on 6 April 2017).
- Smith, P.T., Jr. Capacitance Metrology of Curved Surfaces: Study and Characterization of a Novel Probe Design. Ph.D. Dissertation, University of Kentucky, Lexington, KY, USA, 2007. [Google Scholar]
- JJF 1001-2011; General Administration of quality supervision, inspection and Quarantine of the people’s Republic of China General Metrological Terms and definitions. China Standard Press: Beijing, China, 2012.





| Number of Measurement | 1 | 2 | 3 | 4 | 5 |
|---|---|---|---|---|---|
| Standard spherical roundness error | 67.9 | 62.4 | 71.3 | 72.8 | 67.4 |
| Axis rotation error | 69.9 | 79.8 | 97.5 | 85.8 | 75.8 |
| Measurement Object | Turntable | Main Shaft 1 | Main Shaft 2 | Main Shaft 3 |
|---|---|---|---|---|
| Sphericity separation result | 53 nm | 60 nm | 59 nm | 66.4 nm |
| Sphericity calibration value | 70 nm | |||
| Number of Measurements | 1 | 2 | 3 | 4 | 5 | Average Value |
|---|---|---|---|---|---|---|
| Using standard sphere A | 112.6 | 108.0 | 94.4 | 87.3 | 98.8 | 100.2 |
| Using standard sphere B | 99.7 | 86.1 | 94 | 85.6 | 115.9 | 96.2 |
Publisher’s Note: MDPI stays neutral with regard to jurisdictional claims in published maps and institutional affiliations. |
© 2022 by the authors. Licensee MDPI, Basel, Switzerland. This article is an open access article distributed under the terms and conditions of the Creative Commons Attribution (CC BY) license (https://creativecommons.org/licenses/by/4.0/).
Share and Cite
Liu, X.; Rui, X.; Mi, L.; Tang, Q.; Chen, H.; Xia, Y. Radial Error Motion Measurement and Its Uncertainty Estimation of Ultra Precision Axes of Rotation with Nanometer Level Precision. Micromachines 2022, 13, 2121. https://doi.org/10.3390/mi13122121
Liu X, Rui X, Mi L, Tang Q, Chen H, Xia Y. Radial Error Motion Measurement and Its Uncertainty Estimation of Ultra Precision Axes of Rotation with Nanometer Level Precision. Micromachines. 2022; 13(12):2121. https://doi.org/10.3390/mi13122121
Chicago/Turabian StyleLiu, Xingbao, Xiaoting Rui, Liang Mi, Qiang Tang, Heng Chen, and Yangqiu Xia. 2022. "Radial Error Motion Measurement and Its Uncertainty Estimation of Ultra Precision Axes of Rotation with Nanometer Level Precision" Micromachines 13, no. 12: 2121. https://doi.org/10.3390/mi13122121
APA StyleLiu, X., Rui, X., Mi, L., Tang, Q., Chen, H., & Xia, Y. (2022). Radial Error Motion Measurement and Its Uncertainty Estimation of Ultra Precision Axes of Rotation with Nanometer Level Precision. Micromachines, 13(12), 2121. https://doi.org/10.3390/mi13122121


