Article

Stiffness Characteristics and Analytical Model of a Flange Joint with a Spigot

1
School of Energy and Power Engineering, Beihang University, Beijing 100191, China
2
Key Lab of Advance Measurement and Test Technology for Aviation Propulsion System, Shenyang Aerospace University, Shenyang 110136, China
*
Author to whom correspondence should be addressed.
Symmetry 2023, 15(6), 1221; https://doi.org/10.3390/sym15061221
Submission received: 21 April 2023 / Revised: 30 May 2023 / Accepted: 6 June 2023 / Published: 7 June 2023

Abstract

:
Flange joints with spigots are widely used in aero-engines. The spigot will restrict the shear slipping between flanges, which, in turn, affects the stiffness characteristics of the joint. The current model and research on flange joints without spigots may not be suitable for the dynamic characteristics of aero-engines. Moreover, the complexity of contact pairs limits the application of the flange joint finite element (FE) model in aero-engine dynamics analysis. Therefore, a simplified analytical model of a flange joint with a spigot is proposed in this paper. First, the stiffness characteristic of the flange joint with a spigot is studied using the FE method. Second, a corresponding experiment is executed to verify the result of the FE analysis. Furthermore, based on the former FE and experimental analysis, one section of a flange joint is simulated by the Jenkins friction model and a spring. Then, a simplified analytical model of the entire flange joint is built according to the different statuses of each section. Finally, a simulation analysis of the stiffness characteristic is performed. The result shows that the simplified analytical model can be utilized to describe the bending stiffness characteristic of the flange joint with a spigot.

1. Introduction

As an important symmetrical joint structure, the flange joint has several advantages: easy installation, stable performance, and good centering. Thus, the flange joint is widely used in the rotor and stator of aero-engines [1,2,3]. Due to the non-negligible stiffness loss, the stiffness characteristic of the flange joint has a great influence on the dynamic characteristics of aero-engines.
The stiffness characteristic of a flange joint depends on many parameters, making it rather expensive to study experimentally [4]. FE analysis could provide good results [5,6,7] and is not as expensive as experiments, but it is still highly time-consuming. Furthermore, if the actual structure of a flange joint is taken into consideration, the numerical simulation would face serious difficulties due to the complex structures and the large number of contact surfaces. Therefore, scholars have begun to pay attention to the simplified modeling of flange joints and have carried out in-depth research on the stiffness characteristics of flange joints [8,9]. Some linear, simplified models were developed in order to be utilized in modal analysis [10,11,12]. Besides, a variety of nonlinear simplified models were also established to simulate the nonlinear characteristics of flange joints. Luan et al. [13] developed a simplified nonlinear model by using bilinear springs to simulate the axial stiffness of a flange joint. Based on the stiffness model of Luan, Wang et al. [14] introduced a bending stiffness model of a flange joint to simulate the influence of the stiffness loss on the rotor system. Bouzid et al. [15] studied fiber-reinforced plastic bolted flange joints integrity and bolt tightness. However, all of the above studies neglect friction behavior, which may lead to significant damping effects.
Because of the friction between the mating surfaces, micro/macro slip occurs in the tangential direction of the contact surface when a cyclic load is applied, resulting in hysteresis behavior [8]. Hysteresis has a significant impact on dynamic response, since the area of the hysteresis loop presents energy dissipation in one cycle. Thus, the friction behavior of the joint should be considered in the analytical model. Ahmadian and co-authors [16,17] considered the damping effects of friction, but their studies focused on a simple bolt joint rather than a flange joint. Bograd et al. [18] studied hysteresis by using the Jenkins friction model when the structure is under transverse load. Oldfield et al. [19,20] used the Jenkins friction model to simulate the hysteresis of the joint when the structure is under torsional load. These studies aimed at the simulation of the basic structure of a bolted joint. Nevertheless, the complex structure of the flange joint may have a direct impact on the stiffness characteristics. Hence, scholars further studied the hysteresis characteristics and the simulation of the flange joint. Van-Long et al. [21] experimentally attained the hysteresis of the flange joint without a spigot. Firrone et al. [22] studied the microslip, which leads to hysteresis occurring at the contact interface between two turbine disks in aero-engines. Shi and Zhang [23] proposed an improved contact parameter model for bolted joint interfaces and analyzed the flanged-bolted joints incorporating the proposed model. He and Li [24] established an axial double spring-bending beam model to simulate the bolted flange joint.
However, the spigot structure was not considered in the above studies. In fact, the shear slipping between the two pieces of flange is restricted due to the presence of the spigot. When the flange joint is under transverse load, one part of the flange plate is subject to tension and tends to be separated, and the other part is subject to compression [25]. Therefore, there is a noteworthy difference between the simulation of the flange joint with a spigot and the one without a spigot. Shuguo et al. [26] built an FE model of a flange joint with a spigot to study the stiffness characteristics under transverse load. It was found that the bending stiffness decreases suddenly once the load reaches a certain value in the process of loading, and the values of the bending stiffness before and after the decrease are both constant. Liu et al. [25] further studied the sudden decrease in the bending stiffness, and pointed out that the angle of the rotation–loading curve presents hysteresis characteristics when the joint with a spigot is under a certain transverse harmony load. However, the above studies are based on the FE method. Yu et al. [27] developed a simplified analytical model of the flange joint with a spigot; nevertheless, the simulation of the single sector model did not consider the deformation characteristic of flange closure. Due to the closure of the flange, the symmetrical deformation and sliding of the Jenkins friction model are limited, and the spigot can only undergo unidirectional deformation in the direction of opening. The influence of this feature on overall stiffness characteristics has not been studied. Moreover, these studies lack experimental validation.
The review of the literature above indicates that it is necessary to study the stiffness characteristic of the flange joint with a spigot using the FE method and experiments, and establish the corresponding simplified analytical model for convenience of use. For this reason, based on the authors’ previous finite element studies [25,28], an experimental instrument is built to study and verify the stiffness characteristics of the flange joint, and a simplified analytical model is proposed on this basis.
The remainder of this paper is as follows: Part 2 briefly introduces the FE model of a flange joint and the analysis of angular bending stiffness characteristics completed in reference [25]. In Part 3, the experimental instrument used in this paper is illustrated, and the stiffness characteristic mentioned in Part 2 is verified. In Part 4, a simplified analytical model of the flange joint is proposed based on the former analysis; numerical simulations are carried out to verify accuracy and suitability. Finally, Part 5 gives some brief conclusions.
The main contributions of this paper are summarized as follows:
  • We designed and built an experimental instrument to research the angular bending stiffness characteristics of a flange joint with a spigot.
  • Based on the experimental method, our previous FE model and study is validated.
  • From the viewpoint of convenient engineering applications, we proposed a simplified analytical model for the deformation and sliding of the flange contact interface. The accuracy and applicability are verified by comparison with the FE model and experimental test results. It can simulate the stiffness characteristics of a flange joint with a spigot well.

2. FE Modeling and Analysis of Flange Joint with a Spigot

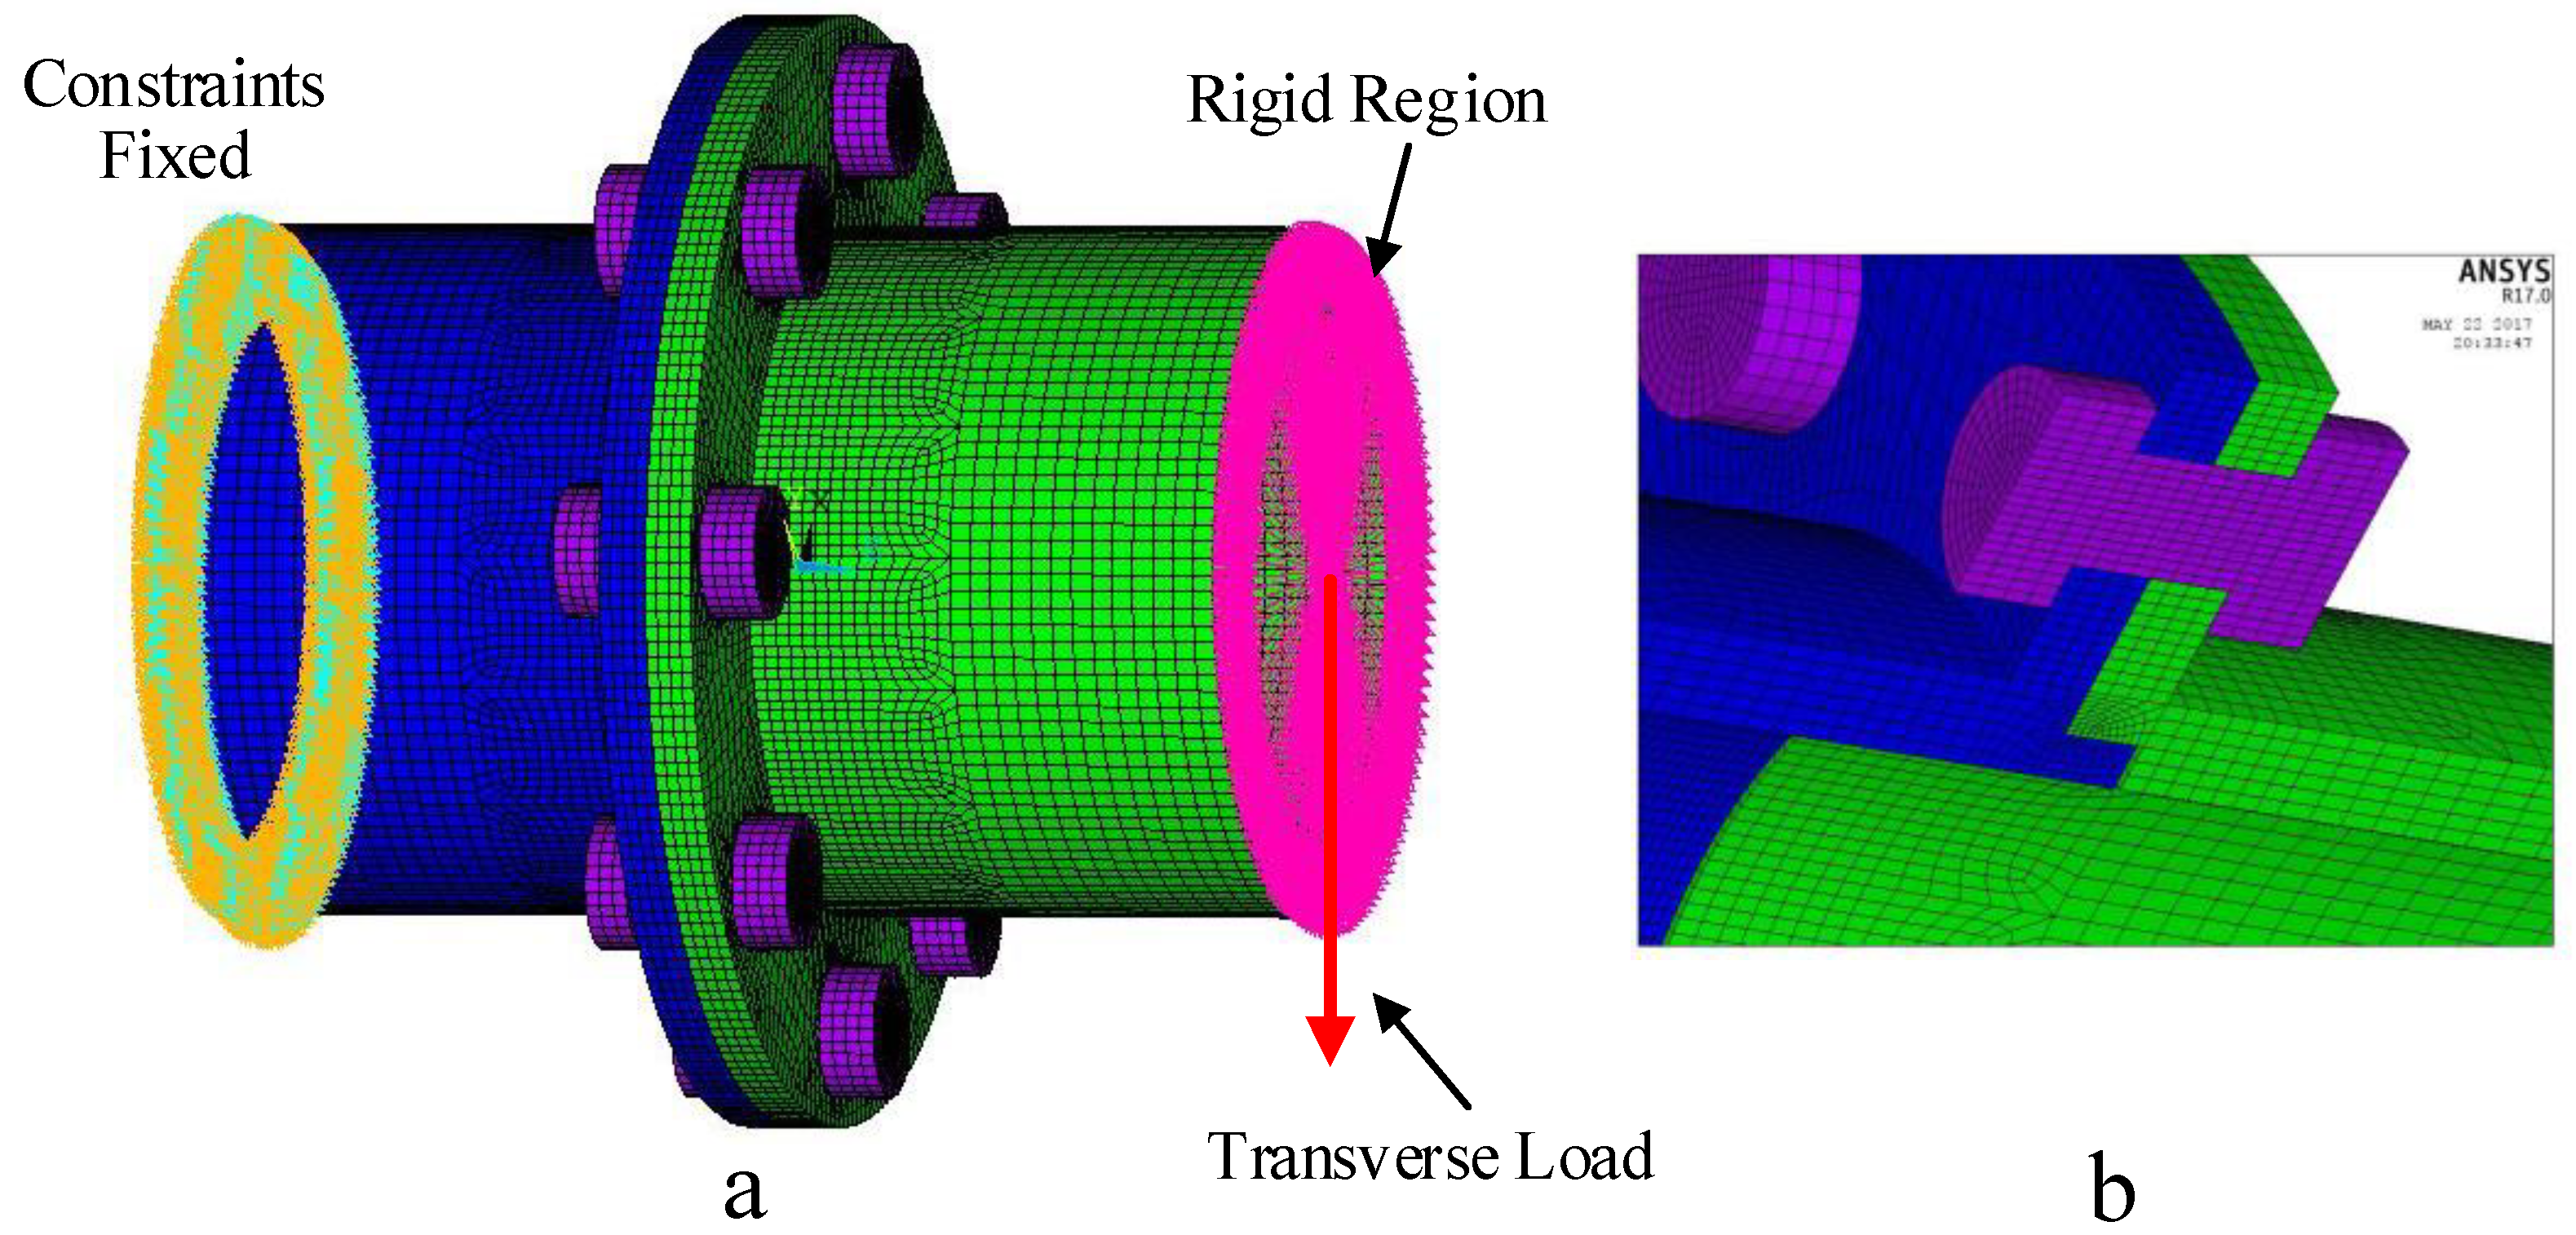
The analysis method in this section is the same as in our previous work [25]. The main structure parameters of the flange joint, including the cylinder, nut, head of bolt, contact interface, and spigot, are exactly the same as those in reference [25], as shown in Figure 1 and listed in Table 1. The corresponding FE model, composed of SOLID185 elements, is shown in Figure 2. The contact surfaces, which are signified by a yellow line in Figure 1, are modeled by CONTAC174 and TARGE170 in ANSYS. The contact interface of the spigot is set as interference fit for strict centering by setting KEYOPT CNOF to a positive value. PRETS179 is built into the bolt to simulate the preload. The FE model has 121,344 elements and 131,527 nodes. To guarantee the mesh quality, the flange, bolts, and accessories were divided into a large number of elements, and a coarse mesh was used far from the contact interface. The partial magnification in Figure 2 shows the details of the finite element mesh of the bolt and spigot. As shown in Figure 2, all nodes on the left edge of the cylinder are fixed constraints, and all nodes on the right edge of the cylinder are rigidly bound to a node in the axis of the cylinder. This node is built to apply transverse loads. This paper focuses on the angle-bending stiffness of the flange joint, which has an obvious influence on the transverse vibration of the structure. For simplicity, “stiffness” is used to represent “angle-bending stiffness” in the following text.
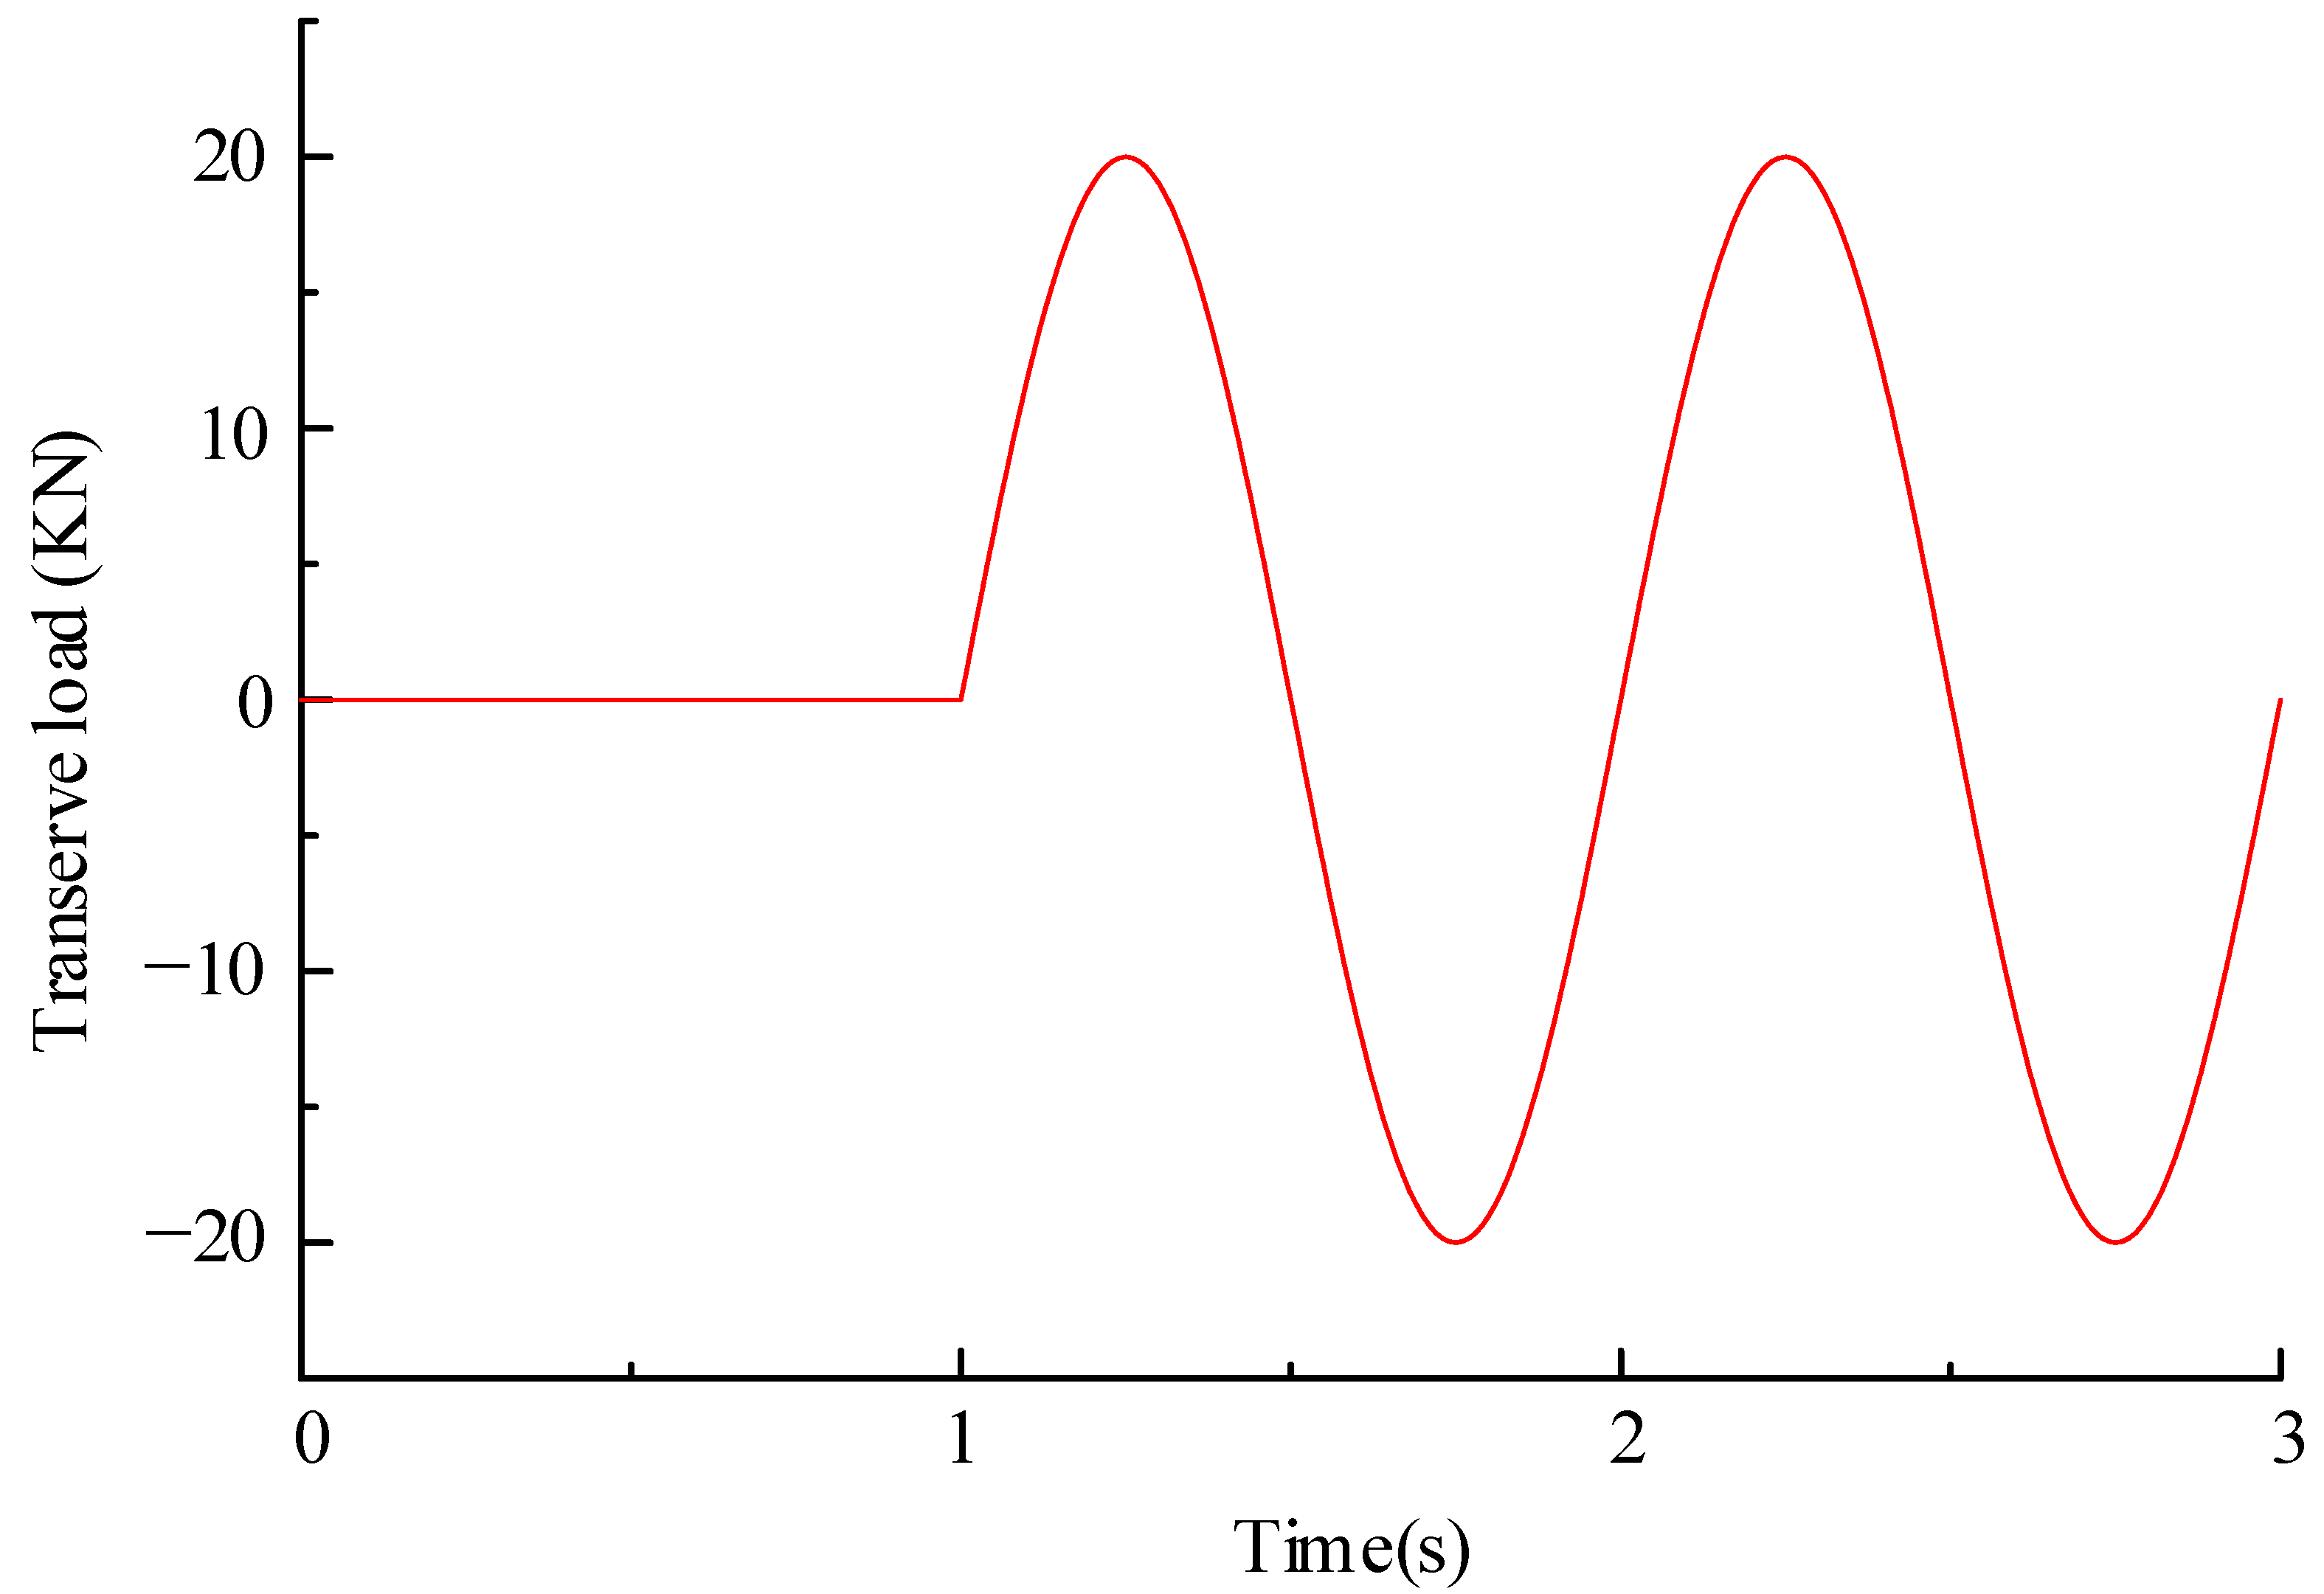
In order to study the spigot’s influence on the stiffness of the flange joint, a full transient dynamic analysis, which can take the nonlinear factors of the contact surfaces into consideration, is carried out. The transverse load applied to the FE model is shown in Figure 3. The entire loading procedure can be divided into two stages. In the first stage, which begins at 0 s and ends at 1 s, the load remains zero, and time integration of ANSYS is turned off so that the preload can be applied as prestressing of the structure. The second stage begins at 1 s and ends at 3 s, in which two cycles of harmonic transverse load are applied to the model. The frequency of the harmonic load is set at 1 Hz to avoid the influence of the inertial force of the model.
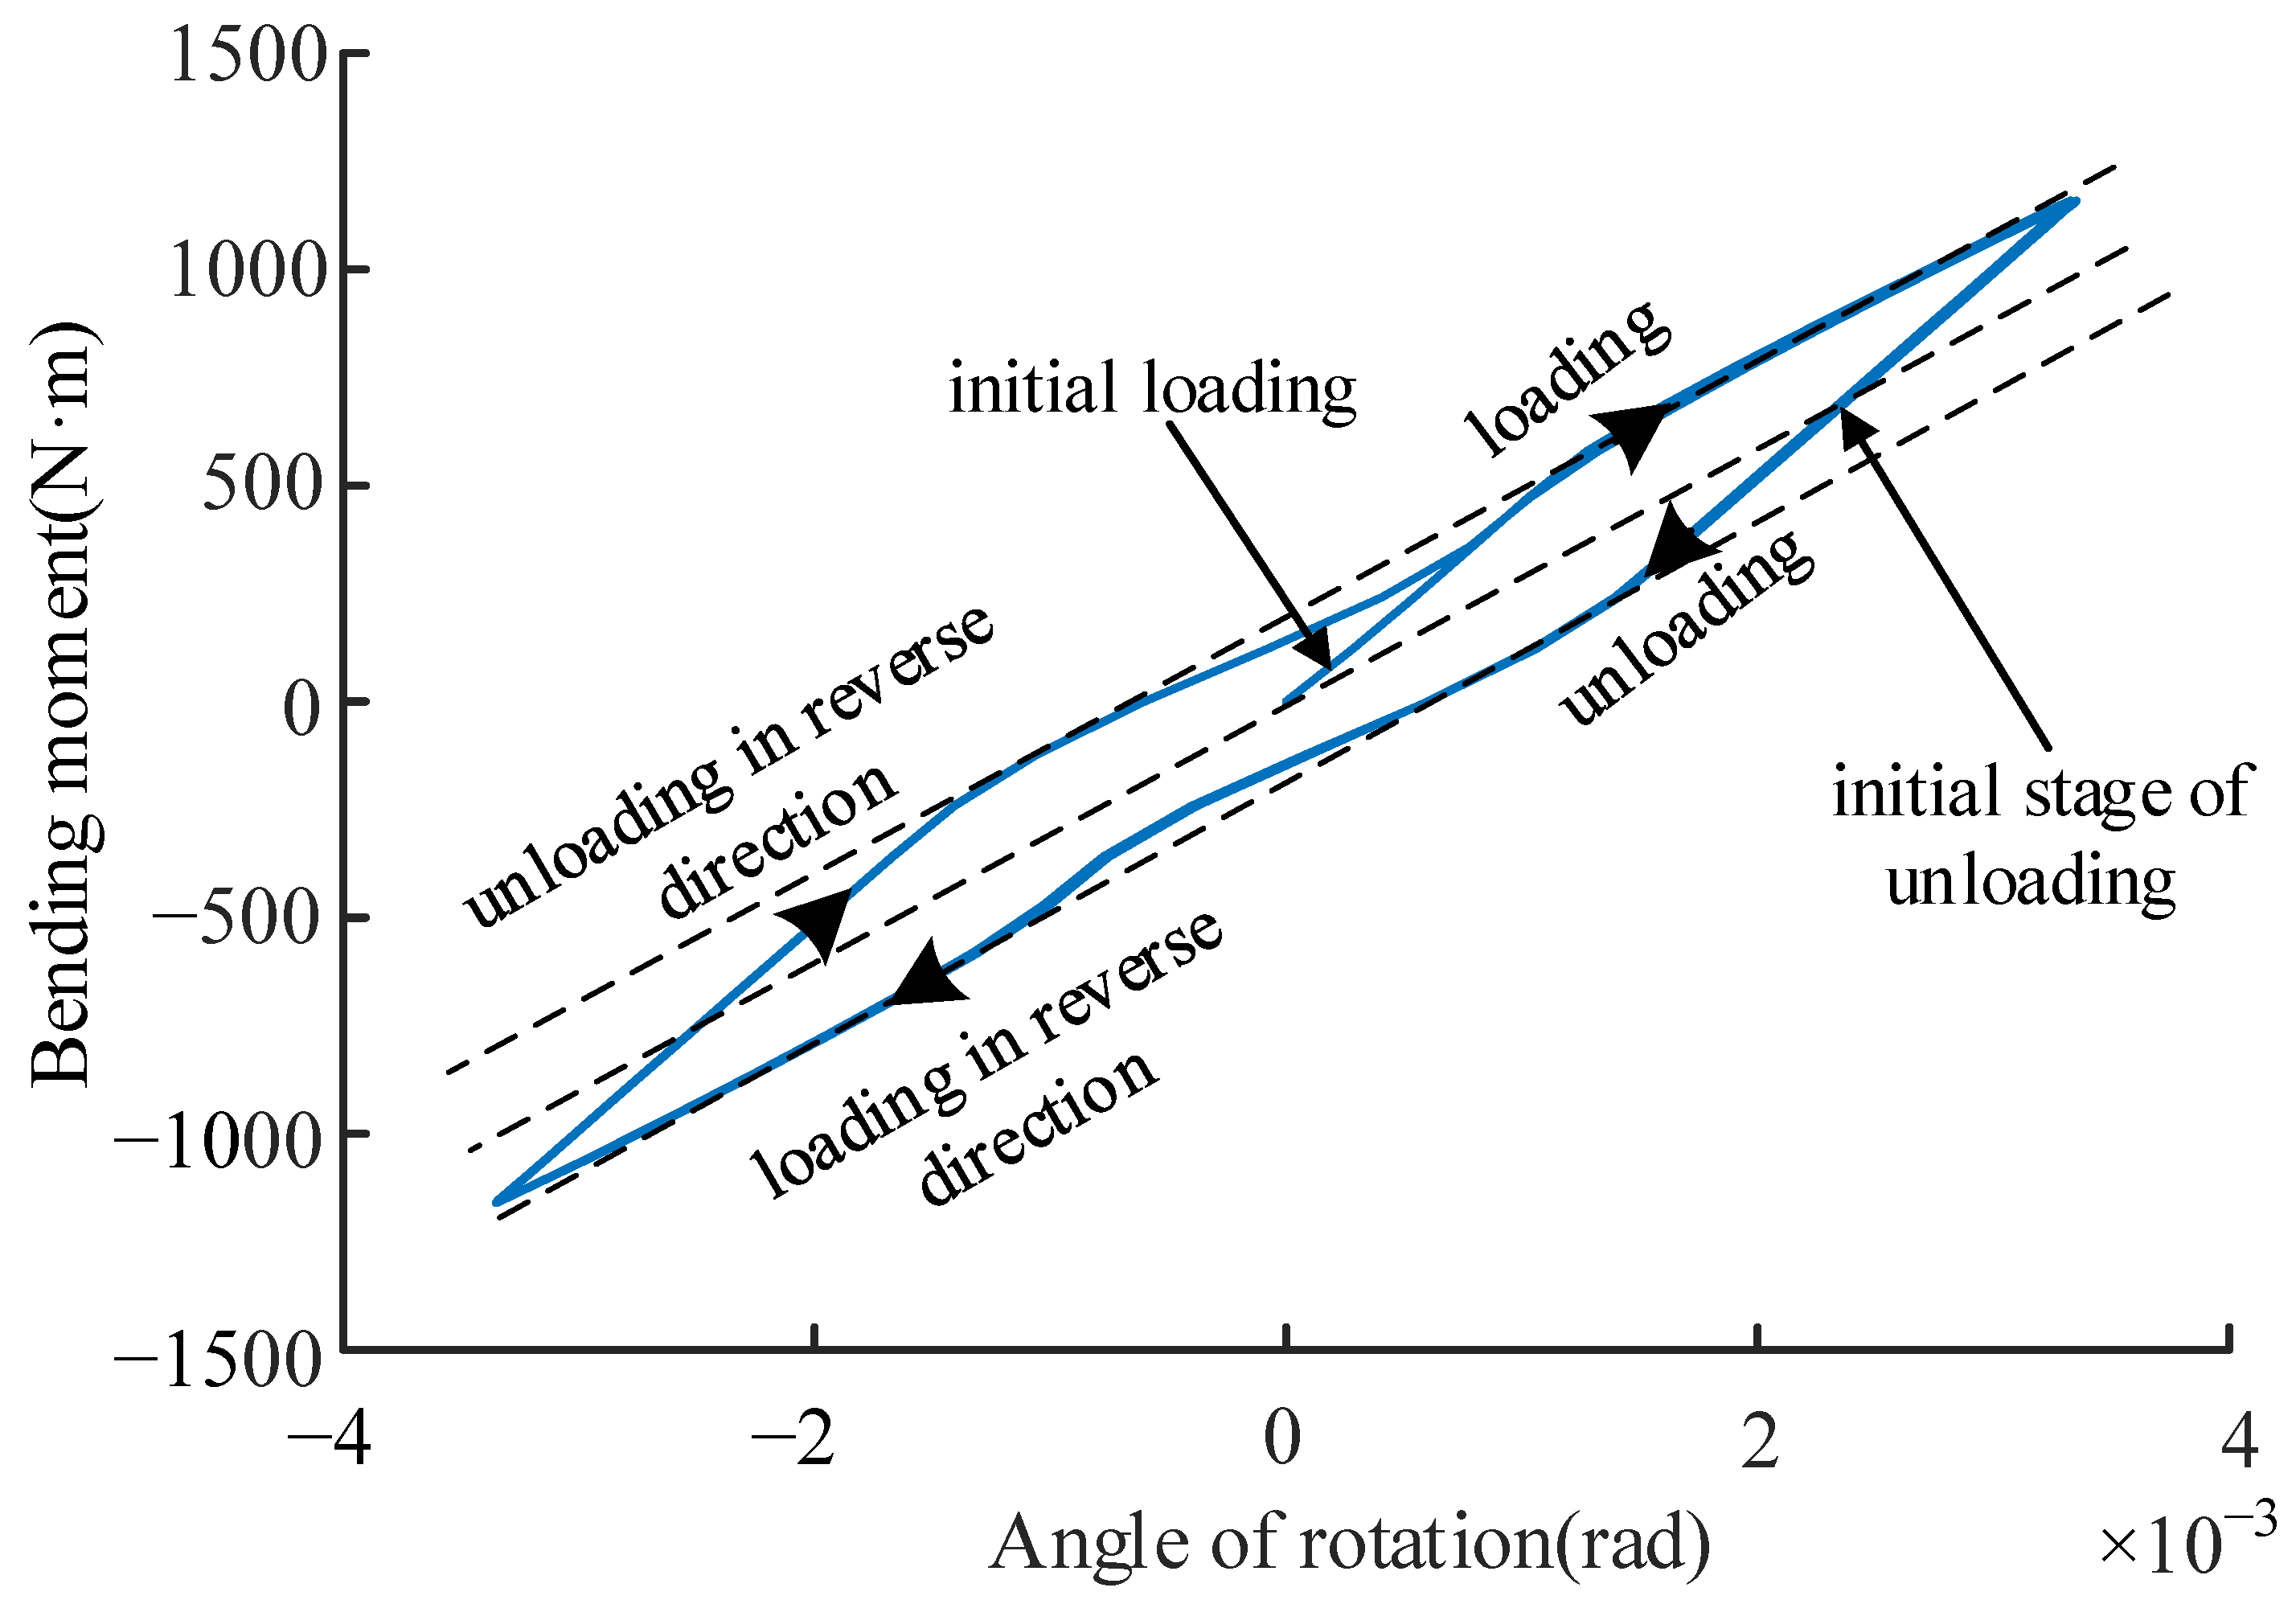
Considering the rigid region, the angle of rotation of the node on which the transverse load is applied can represent the rotation of the right edge of the cylinder, and it can be an object of the angle-bending stiffness analysis. The curve of angle of rotation-load under the transverse load shown in Figure 3 is performed in Figure 4. The stiffness is indicated by the slope of the curve. Initially, the angle of rotation increases linearly with the increase in load. This process is named “initial loading”. At the end of initial loading, the slope of the curve decreases suddenly, which means the bending stiffness decreases. k 1 indicates the stiffness before change, and k 2 presents the stiffness after change. When the load reaches its peak, the process of loading transforms into unloading. In the initial stage of the unloading process, the stiffness is equal to k 1 (the value of initial loading). The longitude of the curve of the initial stage of unloading is almost double that of the initial loading stage. When the initial stage of unloading process ends, the stiffness changes to k 2 again, and almost remains at this value until the end of the process of reverse loading. The curve of the process of reverse unloading is nearly symmetric to the one of unloading about the origin. After the process of reverse unloading comes the second cycle, which starts with the process of loading but not the process of initial loading. It can be distinguished that the processes of loading and unloading present different routes that form a cycle, which is usually called the hysteresis loop.
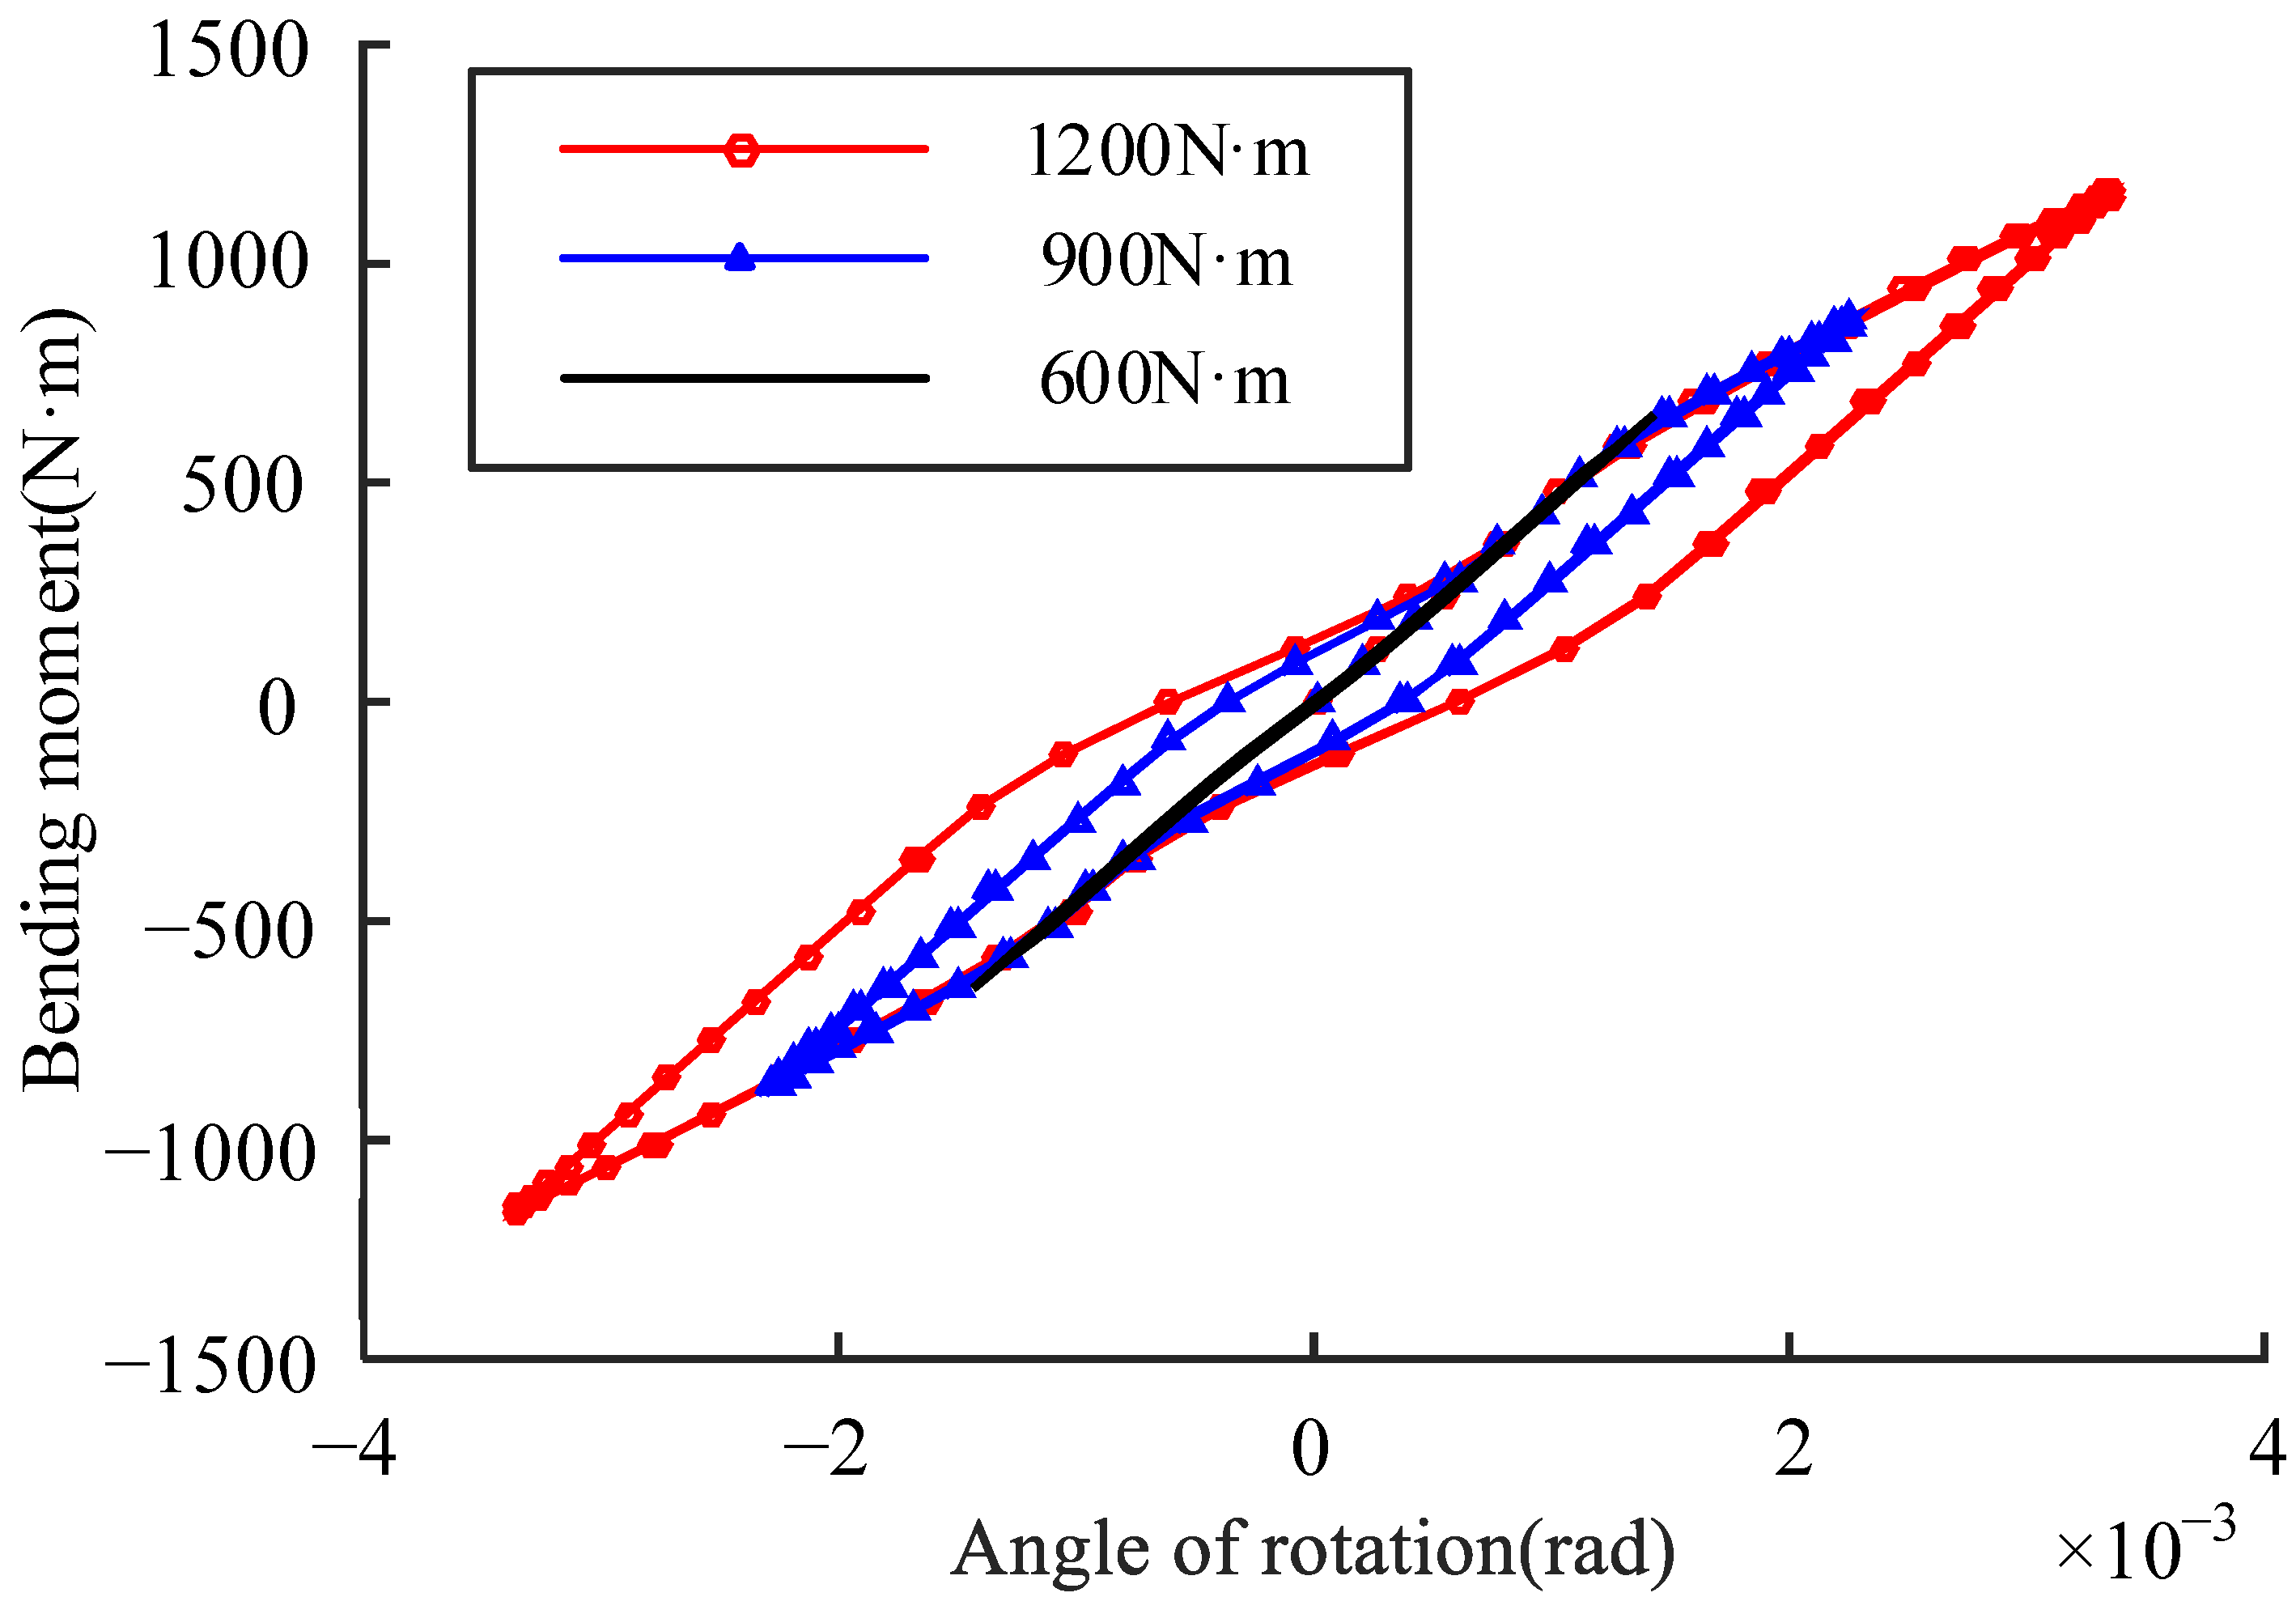
Figure 5 presents the angle of rotation–load curves under different amplitudes of harmonic load. The loading processes of the three curves have nearly the same route and are only different in longitude. The hysteresis loop can be clearly observed when the load amplitude is 900   N m or 1200   N m . The curve under a load of 600   N m amplitude is nearly a straight line. This is because the load is too small to reach the point where the stiffness changes, thus the routes of loading and unloading coincide. Up to now, research on the stiffness characteristics of the flange joint with a spigot based on the FE method has been completed.

3. Experimental Verification

In order to validate the result of the FE model, the stiffness of the flange joint is measured in this paper. The instrument setup of the experiment is shown in Figure 6. The constraint of the experimental sample is set the same as the FE model. The shape of the spigot is illustrated in Figure 6b. In order to impose the force both upward and downward and make the right end rotate freely, the force load is applied by a pin that is plugged through the cylinder, as shown in Figure 6c. Two dial indicators are utilized to measure the deformations on the upside and downside of the right end, through which the angle of rotation can be calculated.
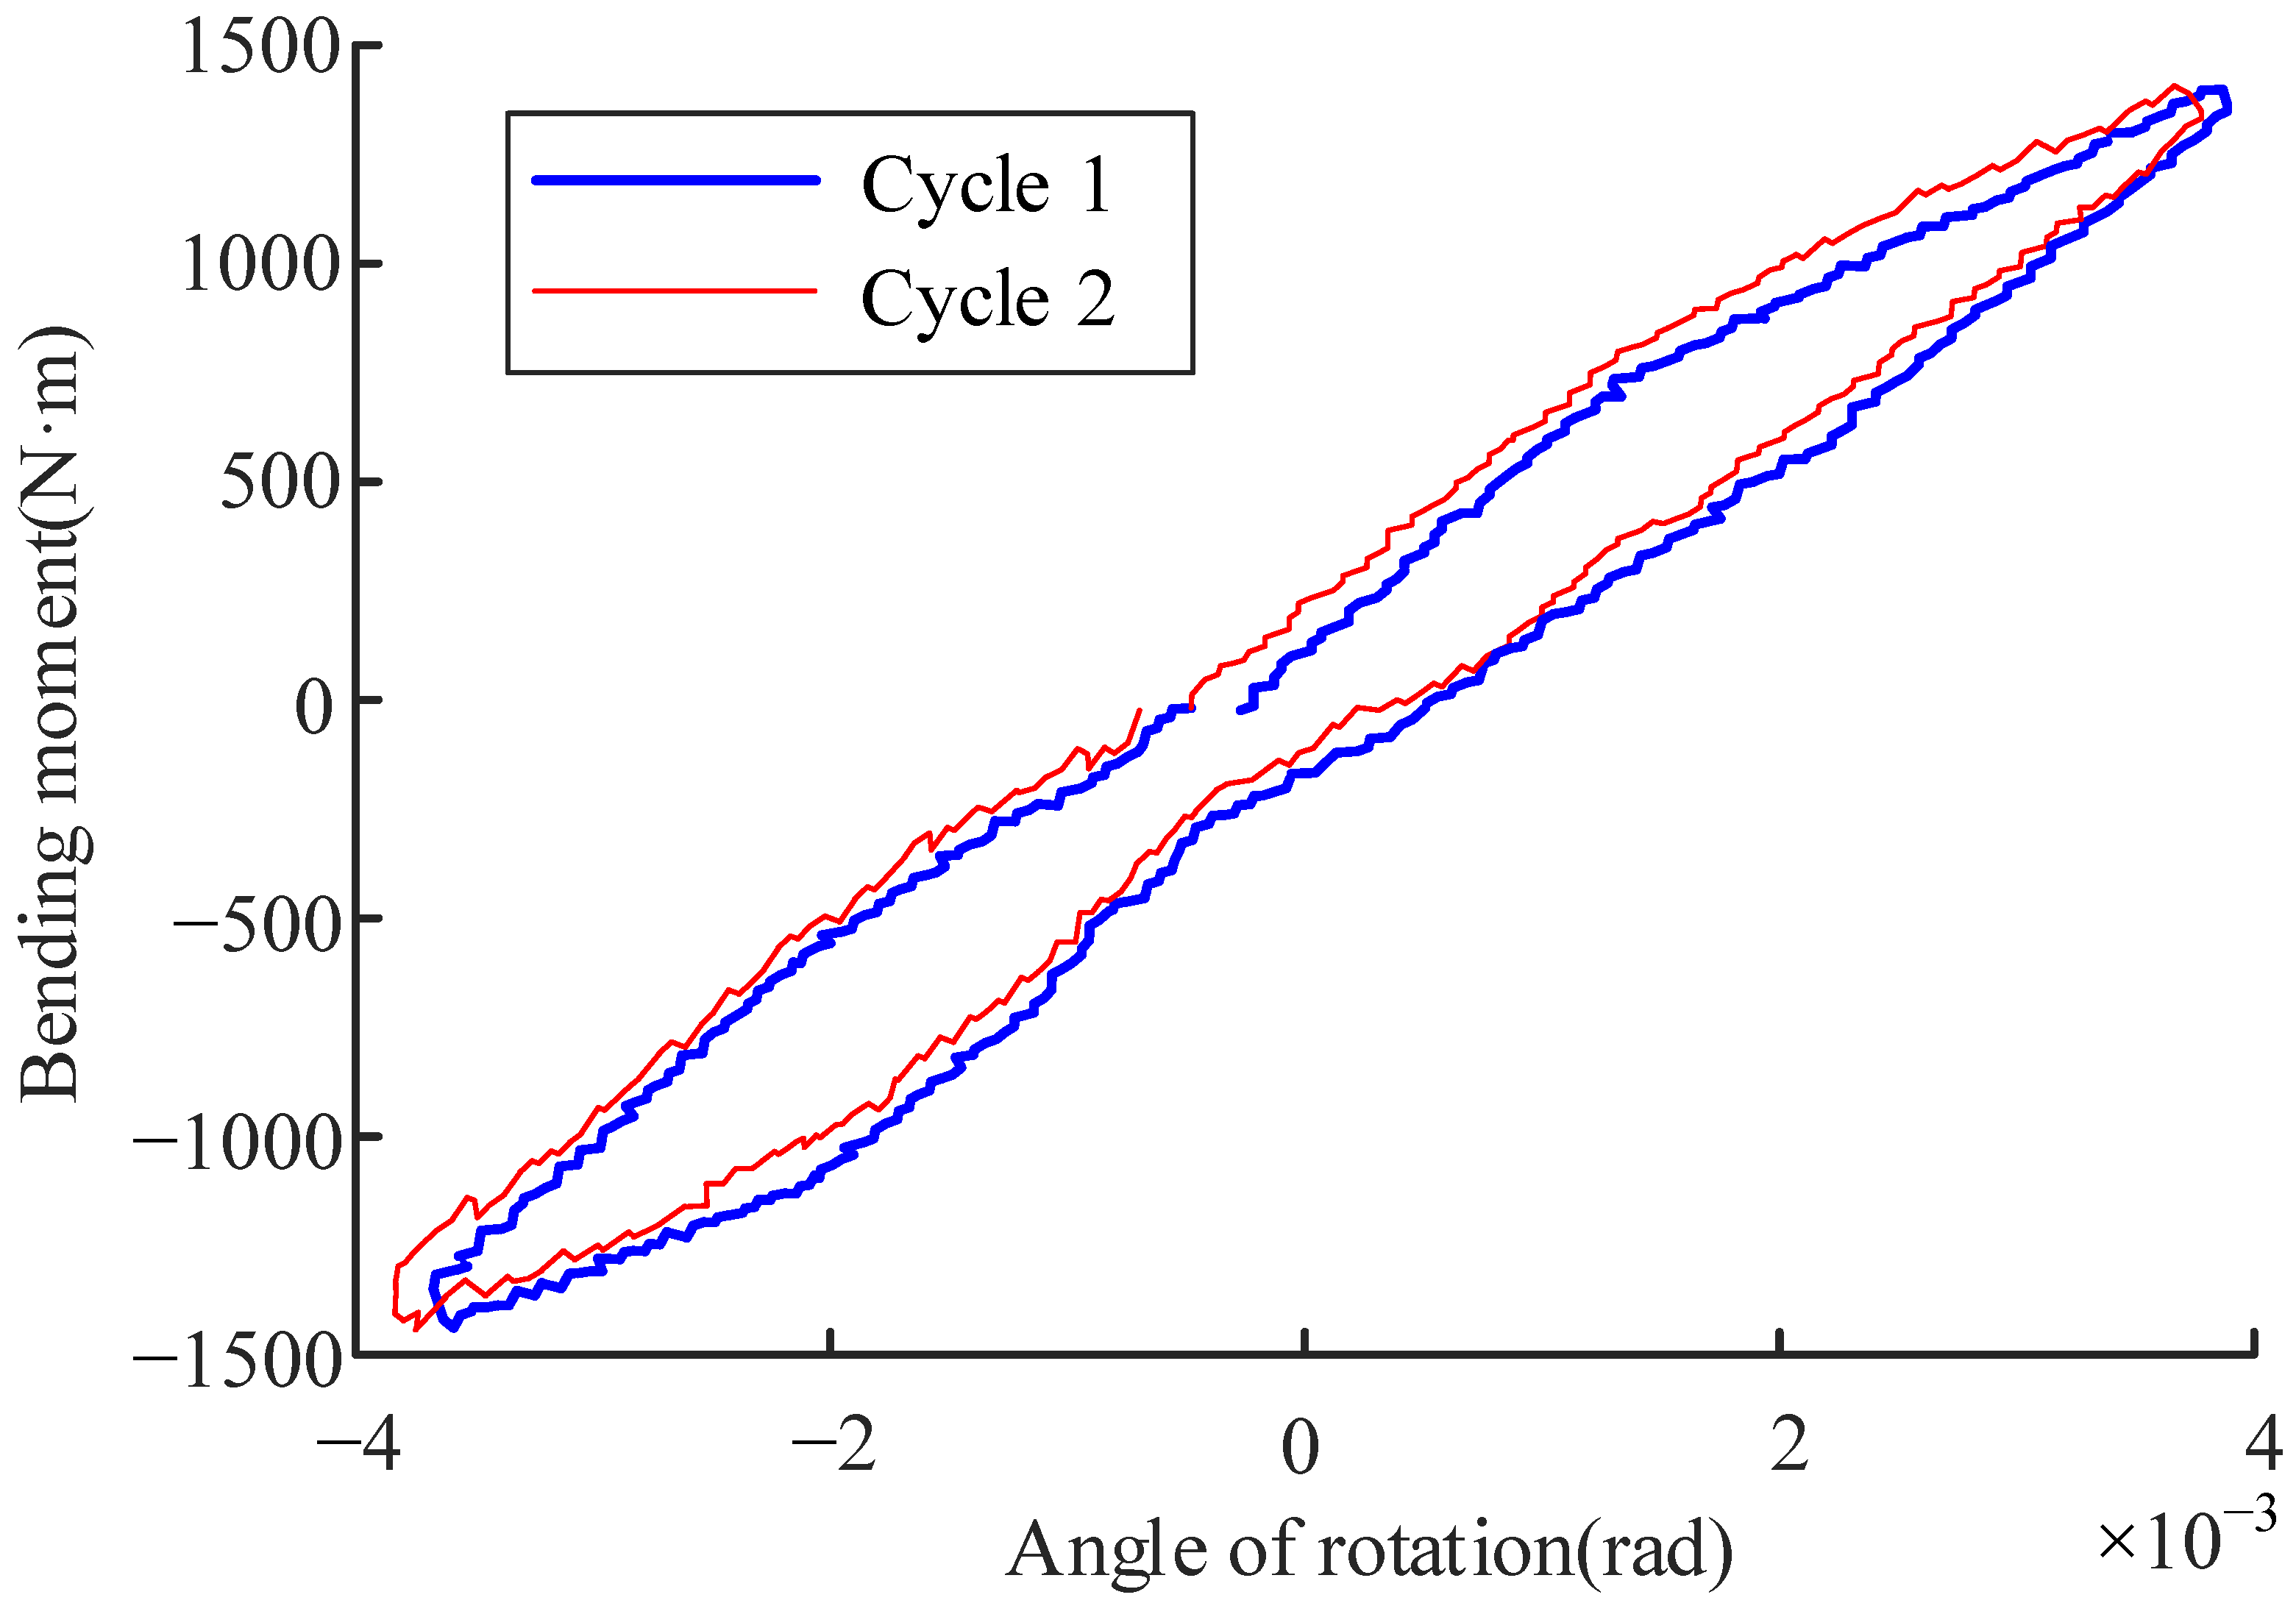
Considering the cyclic load of 1200   N m amplitude, the measurement result of the angle of rotation–load is presented in Figure 7. Compared with the results of the FE method, as shown in Figure 4 and Figure 5, the processes of loading and unloading and the reverse processes can be clearly observed. The difference is that the stage of initial loading is not obvious. This is because the stage of initial loading in the FE method is based on the condition that there is no prestress or pre-deformation on the contact surface of the spigot. However, this condition is hard to attain in the actual assembly of the flange joint. Besides, the hysteresis loop measured by experiment is thinner and longer than that of the FE method, as shown in Figure 5 and Figure 7. This means that the stiffness of the experiment example is smaller than that of the FE model. There are two main reasons for this difference. One is that the spigot interface of the experiment example is smaller than that of the FE model for reasons of machining due to interference control, and the other is that the support structure is not entirely rigid. By comparison, the validity of the FE analysis on the stiffness characteristic of the flange joint with a spigot is verified. The relationship between the angle of rotation and load provides the direction and foundation for the creation of the simplified analytical model.

4. Simplified Analytical Modeling and Analysis

Since the stiffness characteristic of the flange joint with a spigot is analyzed through the FE and experimental methods, simplified analytical modeling can be constructed. The processes for simplified analytical modeling and analysis are given below.

4.1. Division of the Sections of a Flange Joint

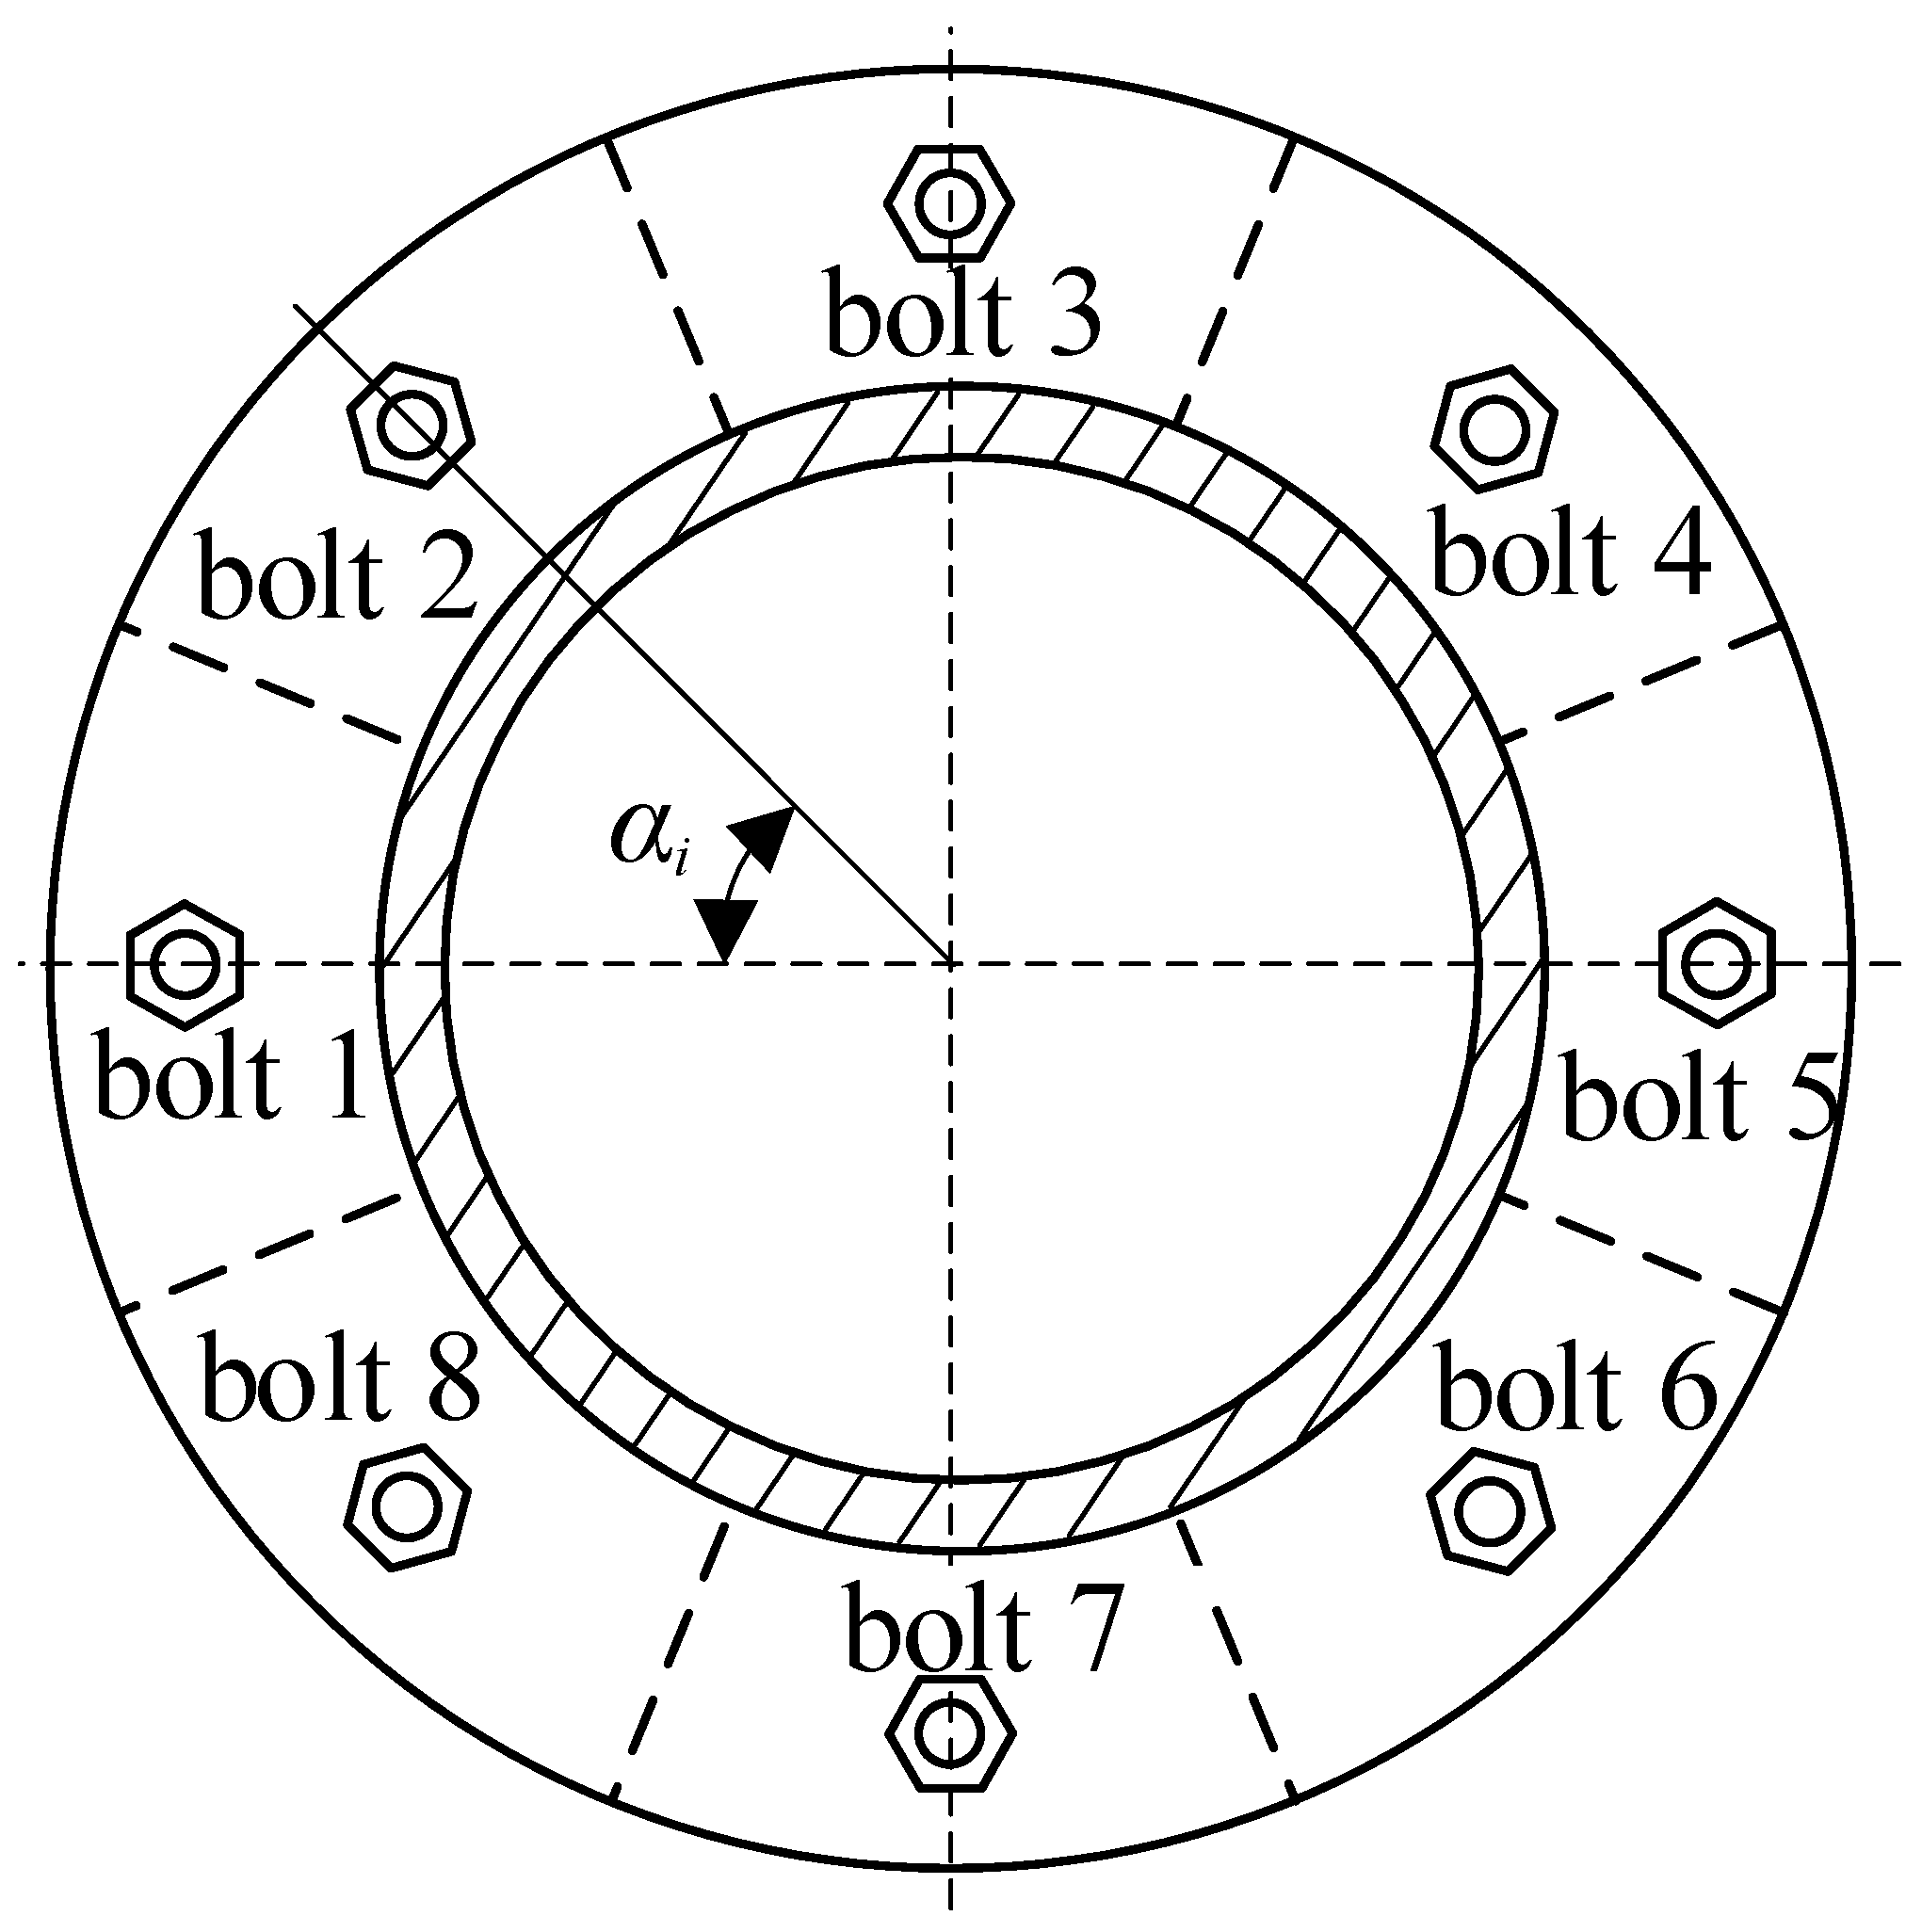
As a symmetrical structure, the entire flange joint can be divided into eight sections based on the number of bolts, as shown in Figure 8.
Some assumptions are made, as given below:
  • The flange, bolts, and spigot conform to the small deformation assumption;
  • The cylinder is assumed to be rigid;
  • The flange is assumed to be a plane when the joint is subject to a bending load;
  • Every section is independent, and there is no interaction between the two adjacent sections;
  • As the compression stiffness is much larger than the tension stiffness, the section’s deformation under compression force is ignored [6].
When the bending load is applied to the flange joint, a part of the section is under compression, and the other part is subjected to tension. The bending load can be converted to a tension force or compression force, which is applied to the section.
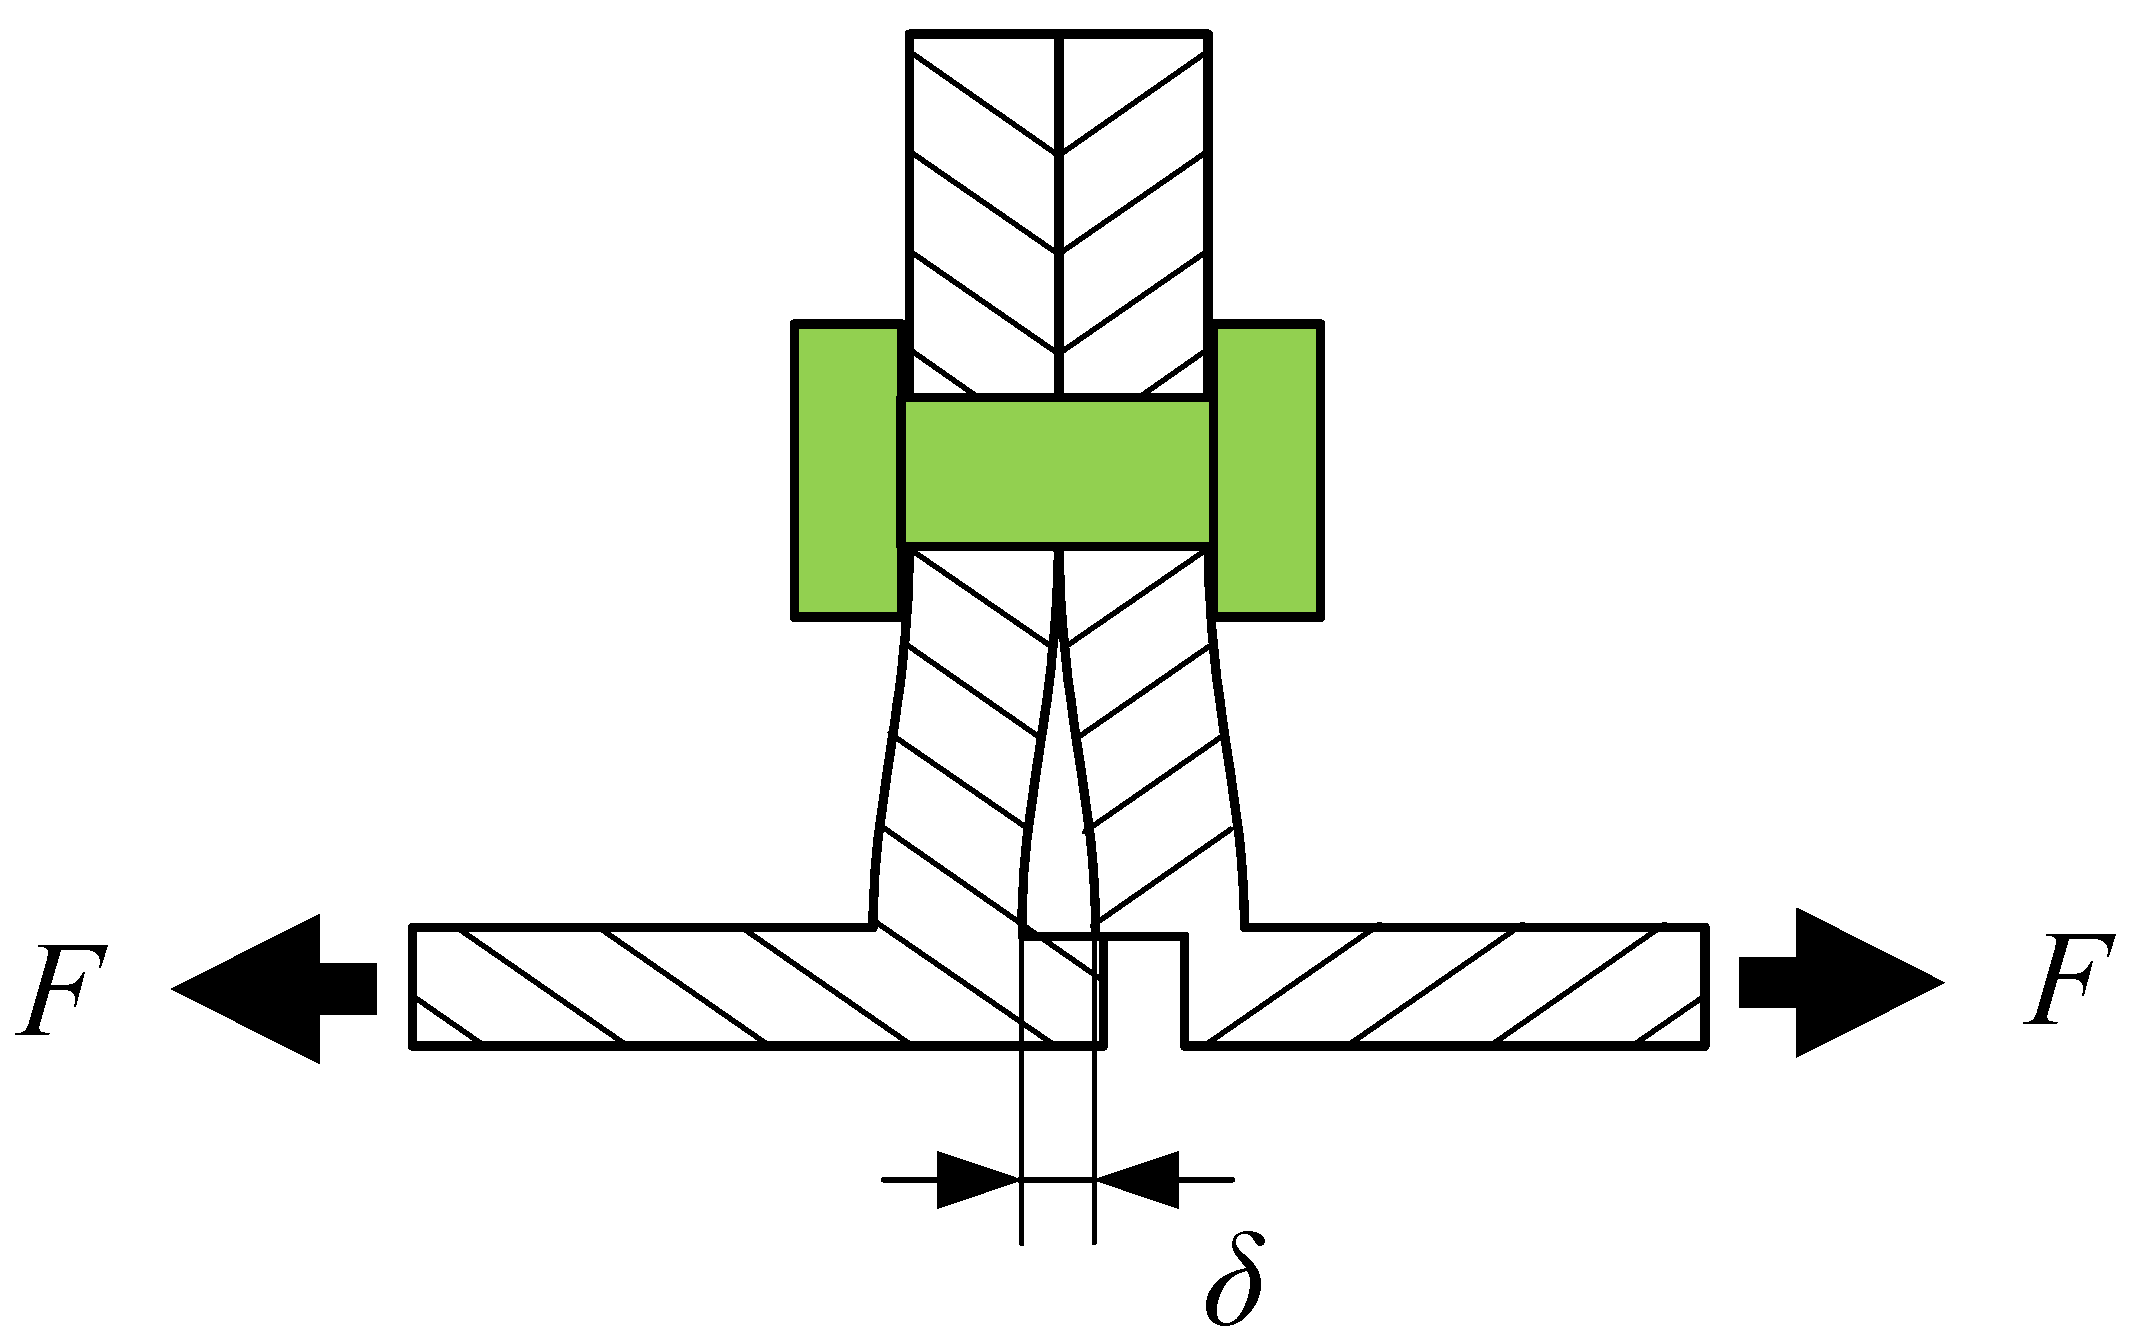
The section’s displacement δ under tension force F is illustrated in Figure 9. In the presence of a spigot, the tension force gives rise to displacements of both the flange and the spigot. The displacement of the spigot may be due to deformation or the sliding of the contact surface. Figure 10 presents the different conditions of the spigot’s contact surface. The tangential force F s is a component of the tension force F , which is acting on the spigot; P is the contact pressure caused by the interference of the spigot. If F s μ P ( μ is the sliding friction coefficient of the contact surface), the contact surface of the spigot will be in the sticking condition. In this condition, the section’s displacement δ is equal to the deformation of the spigot. According to the Coulomb friction law, the contact surface begins to slide if F s > μ P . Based on the analysis above, the contact surface of the spigot can be simplified into a Jenkins friction model [18], as shown in Figure 10b.

4.2. Force and Displacement of the Spigot

Considering the loading and unloading processes of the load, the contact status of the spigot can be divided into four stages according to the different statuses of deformation and sliding, as shown in Figure 11. Stage a is the elastic deformation, and stage b is the sliding. Stage c is the beginning of unloading. With the decreasing of the load, the elastic deformation that occurred in stage a is restored first, and the elastic deformation occurs subsequently in the opposite direction. In stage d , the spigot slips again until the two pieces of the flange plate are closed up.
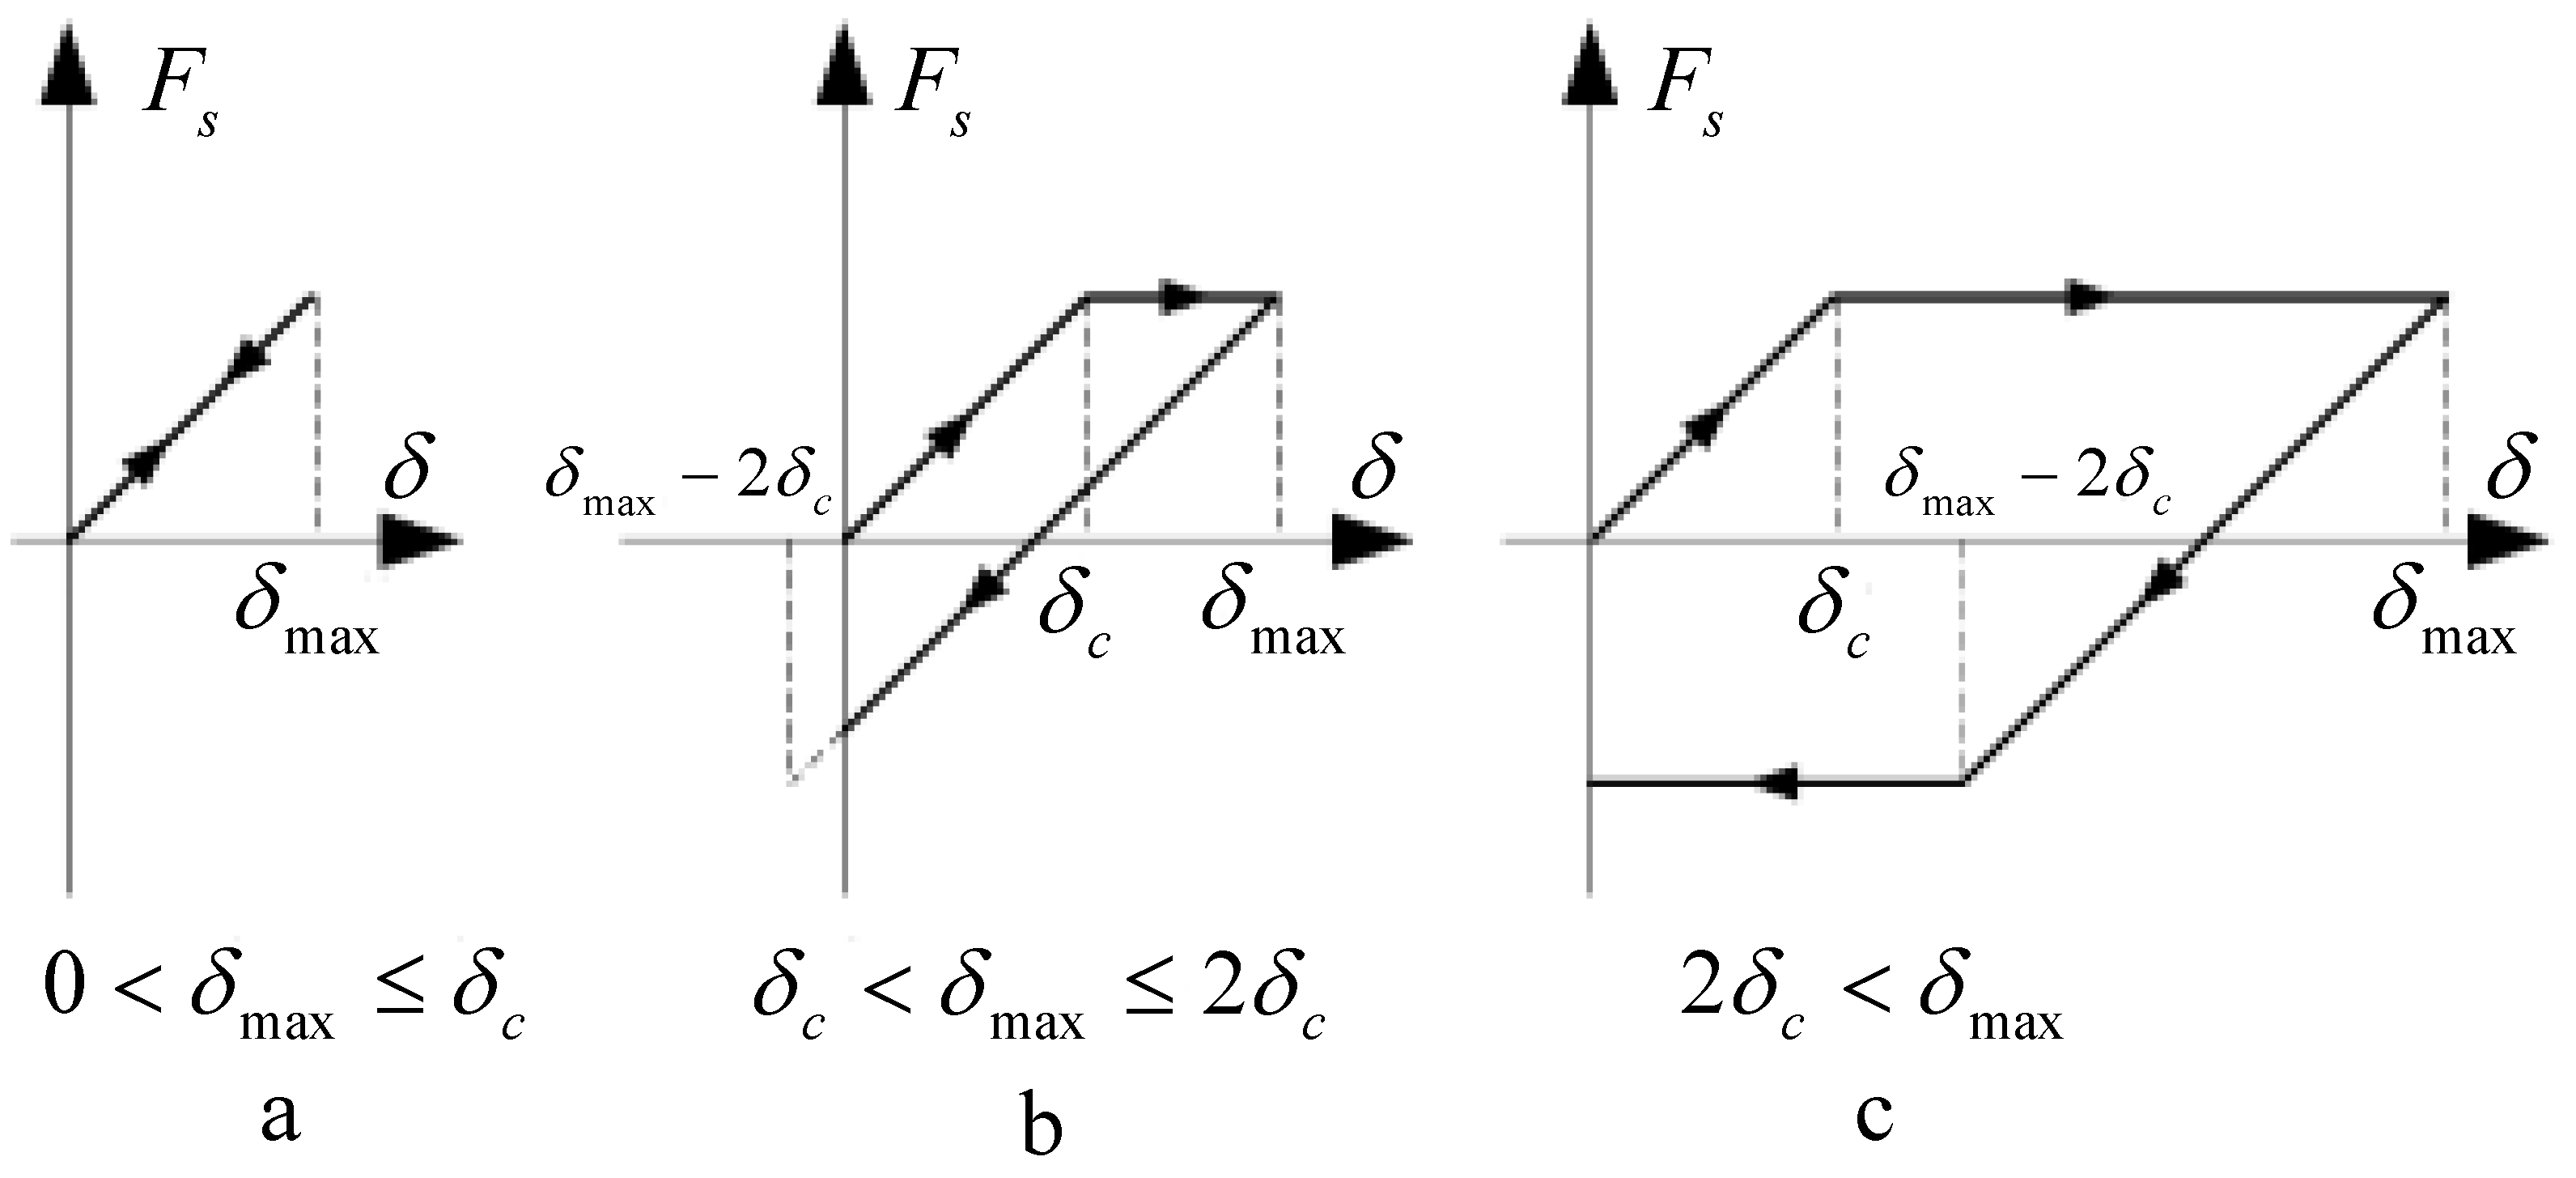
Take the case of a load of 600   N m amplitude as an example (as seen in Figure 5). The four stages will not all appear in the loading and unloading process because the load is not large enough. The load of displacement is regarded as the criterion to distinguish the contact status, as shown in Figure 12. From Figure 12, δ max is the peak value of displacement load; δ c is the critical value at which the spigot begins to slip. Moreover, the value of δ cannot be negative, based on assumption 5.
In Figure 12a, the spigot only experiences the stage of elastic deformation (stage a ) because of 0 < δ max δ c . The routes of loading and unloading coincide in the case.
In Figure 12b, the first stage is elastic deformation (stage a ), and the spigot begins to slip when the displacement load exceeds δ c (stage b ). In stage b , the tension force remains unchanged with the increase in δ . In the process of unloading, the elastic deformation is restored first, and elastic deformation occurs subsequently in the opposite direction (stage c ). Thus, the absolute value of displacement in stage c will be twice that of δ c . However, because of δ c < δ max 2 δ c , the absolute value of elastic deformation ( δ max δ min , where δ min = 0 ) will not reach 2 δ c only when δ max = 2 δ c .
In Figure 12c, δ max is large enough to make the absolute value of elastic deformation reach 2 δ c . After the end of stage c , the spigot begins to slip again (stage d ) until δ reduces to zero.
Based on the above analysis, different relationships between force and displacement in the three kinds of contact status are deduced.
If δ max matches 0 < δ max δ c , the relationship between the force and the displacement can be expressed as
F s = k s δ
where k s is the tangential contact stiffness of the spigot.
If δ max matches δ c < δ max 2 δ c , based on the different processes of loading and unloading, the relationships between the force and the displacement can be written as
F s = { k s δ δ ˙ > 0   &   0 δ < δ c k s δ c δ ˙ > 0   &   δ c δ < δ max k s δ + k s ( δ c δ max ) δ ˙ 0   &   0 δ δ max
where δ ˙ > 0 is the process of loading, and δ ˙ 0 is the process of unloading.
If δ max matches δ max > 2 δ c , the relationships between the force and the displacement can be described as
F s = { k s δ δ ˙ > 0   &   0 δ < δ c k s δ c δ ˙ > 0   &   δ c δ < δ max k s δ + k s ( δ c δ max ) δ ˙ 0   &   δ max 2 δ c < δ δ max k s δ c δ ˙ 0   &   0 δ δ max 2 δ c
Taking the stiffness of the flange plate into consideration, the section in Figure 9 can be simplified into the model in Figure 13. The Jenkins friction model is parallel with a spring, which reflects the stiffness of the flange plate k t , which can be obtained using the method in reference [13]. The stiffness of the spring in the Jenkins friction model k s , which is relevant to the contact status, the qualities of the contact surface, the shape of the spigot, and so on, is difficult to acquire with the analytical method. The preferable way to obtain k s may using the FE or experiment methods clarified above.
Thus, the total tension force F can be written as
F = F s + F t = F s + k t δ

4.3. Building of the Analytical Model

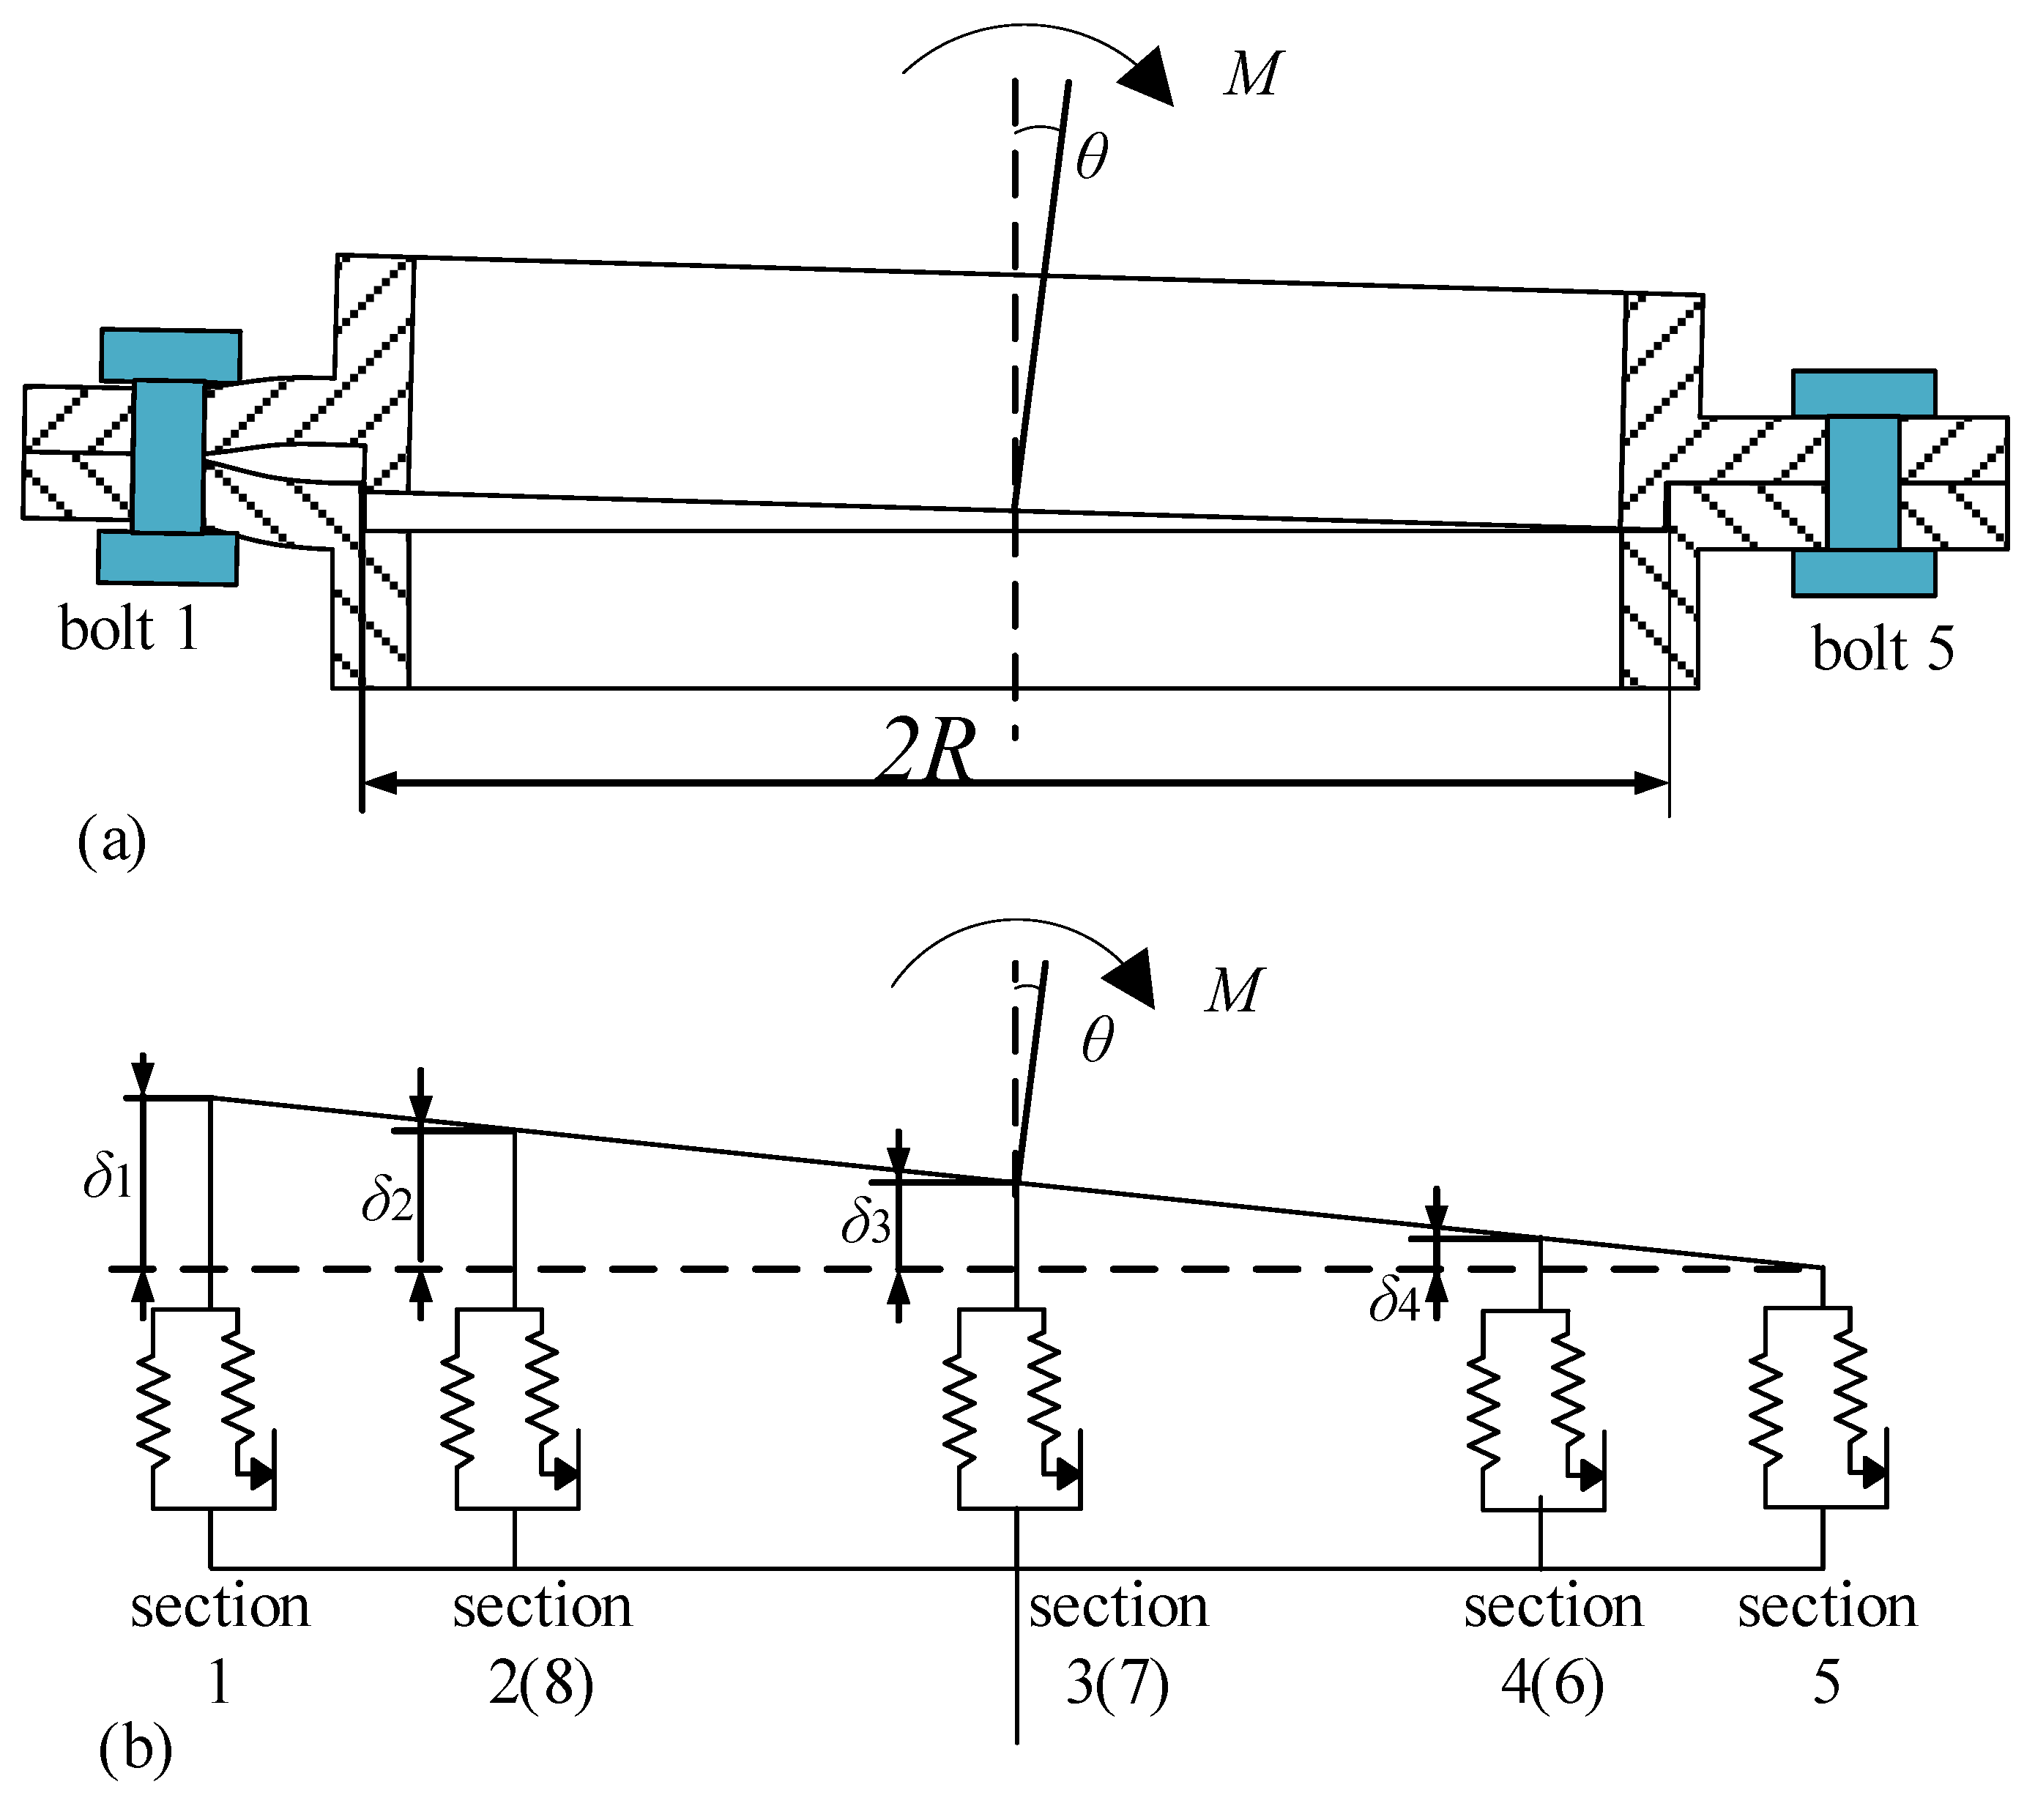
Figure 14 shows the sketch map of the deformation when the flange joint is under the load of a bending moment. Due to the turning of the flange plate, some sections are subject to tension, and others to compression. Based on the previous assumptions, only one section is subject to compression. The deformation of each section, which is simplified into a Jenkins friction model, is shown in Figure 14b (the obstacle is not shown in the figure). As the deformation under compression force is ignored (assumption 5), the deformation of section 5 is 0. θ is the angle of rotation, and clockwise is positive. The deformations of section 2 and that of section 8 are coincident, as are sections 3 and 7 (sections 4 and 6).
Considering the positive angle of rotation θ , the deformation δ i of the i th section or bolt can be calculated by
δ i = R sin θ ( 1 + cos α i ) R θ ( 1 + cos α i )
where R is the radius of the spigot. α i is the position angle of each bolt, as shown in Figure 8, which can be described as
α i = 2 π ( i 1 ) / n
where n is the number of bolts.
If the angle of rotation θ is negative, the corresponding deformation δ i can be expressed as
δ i = R sin θ ( cos α i 1 ) R θ ( cos α i 1 )
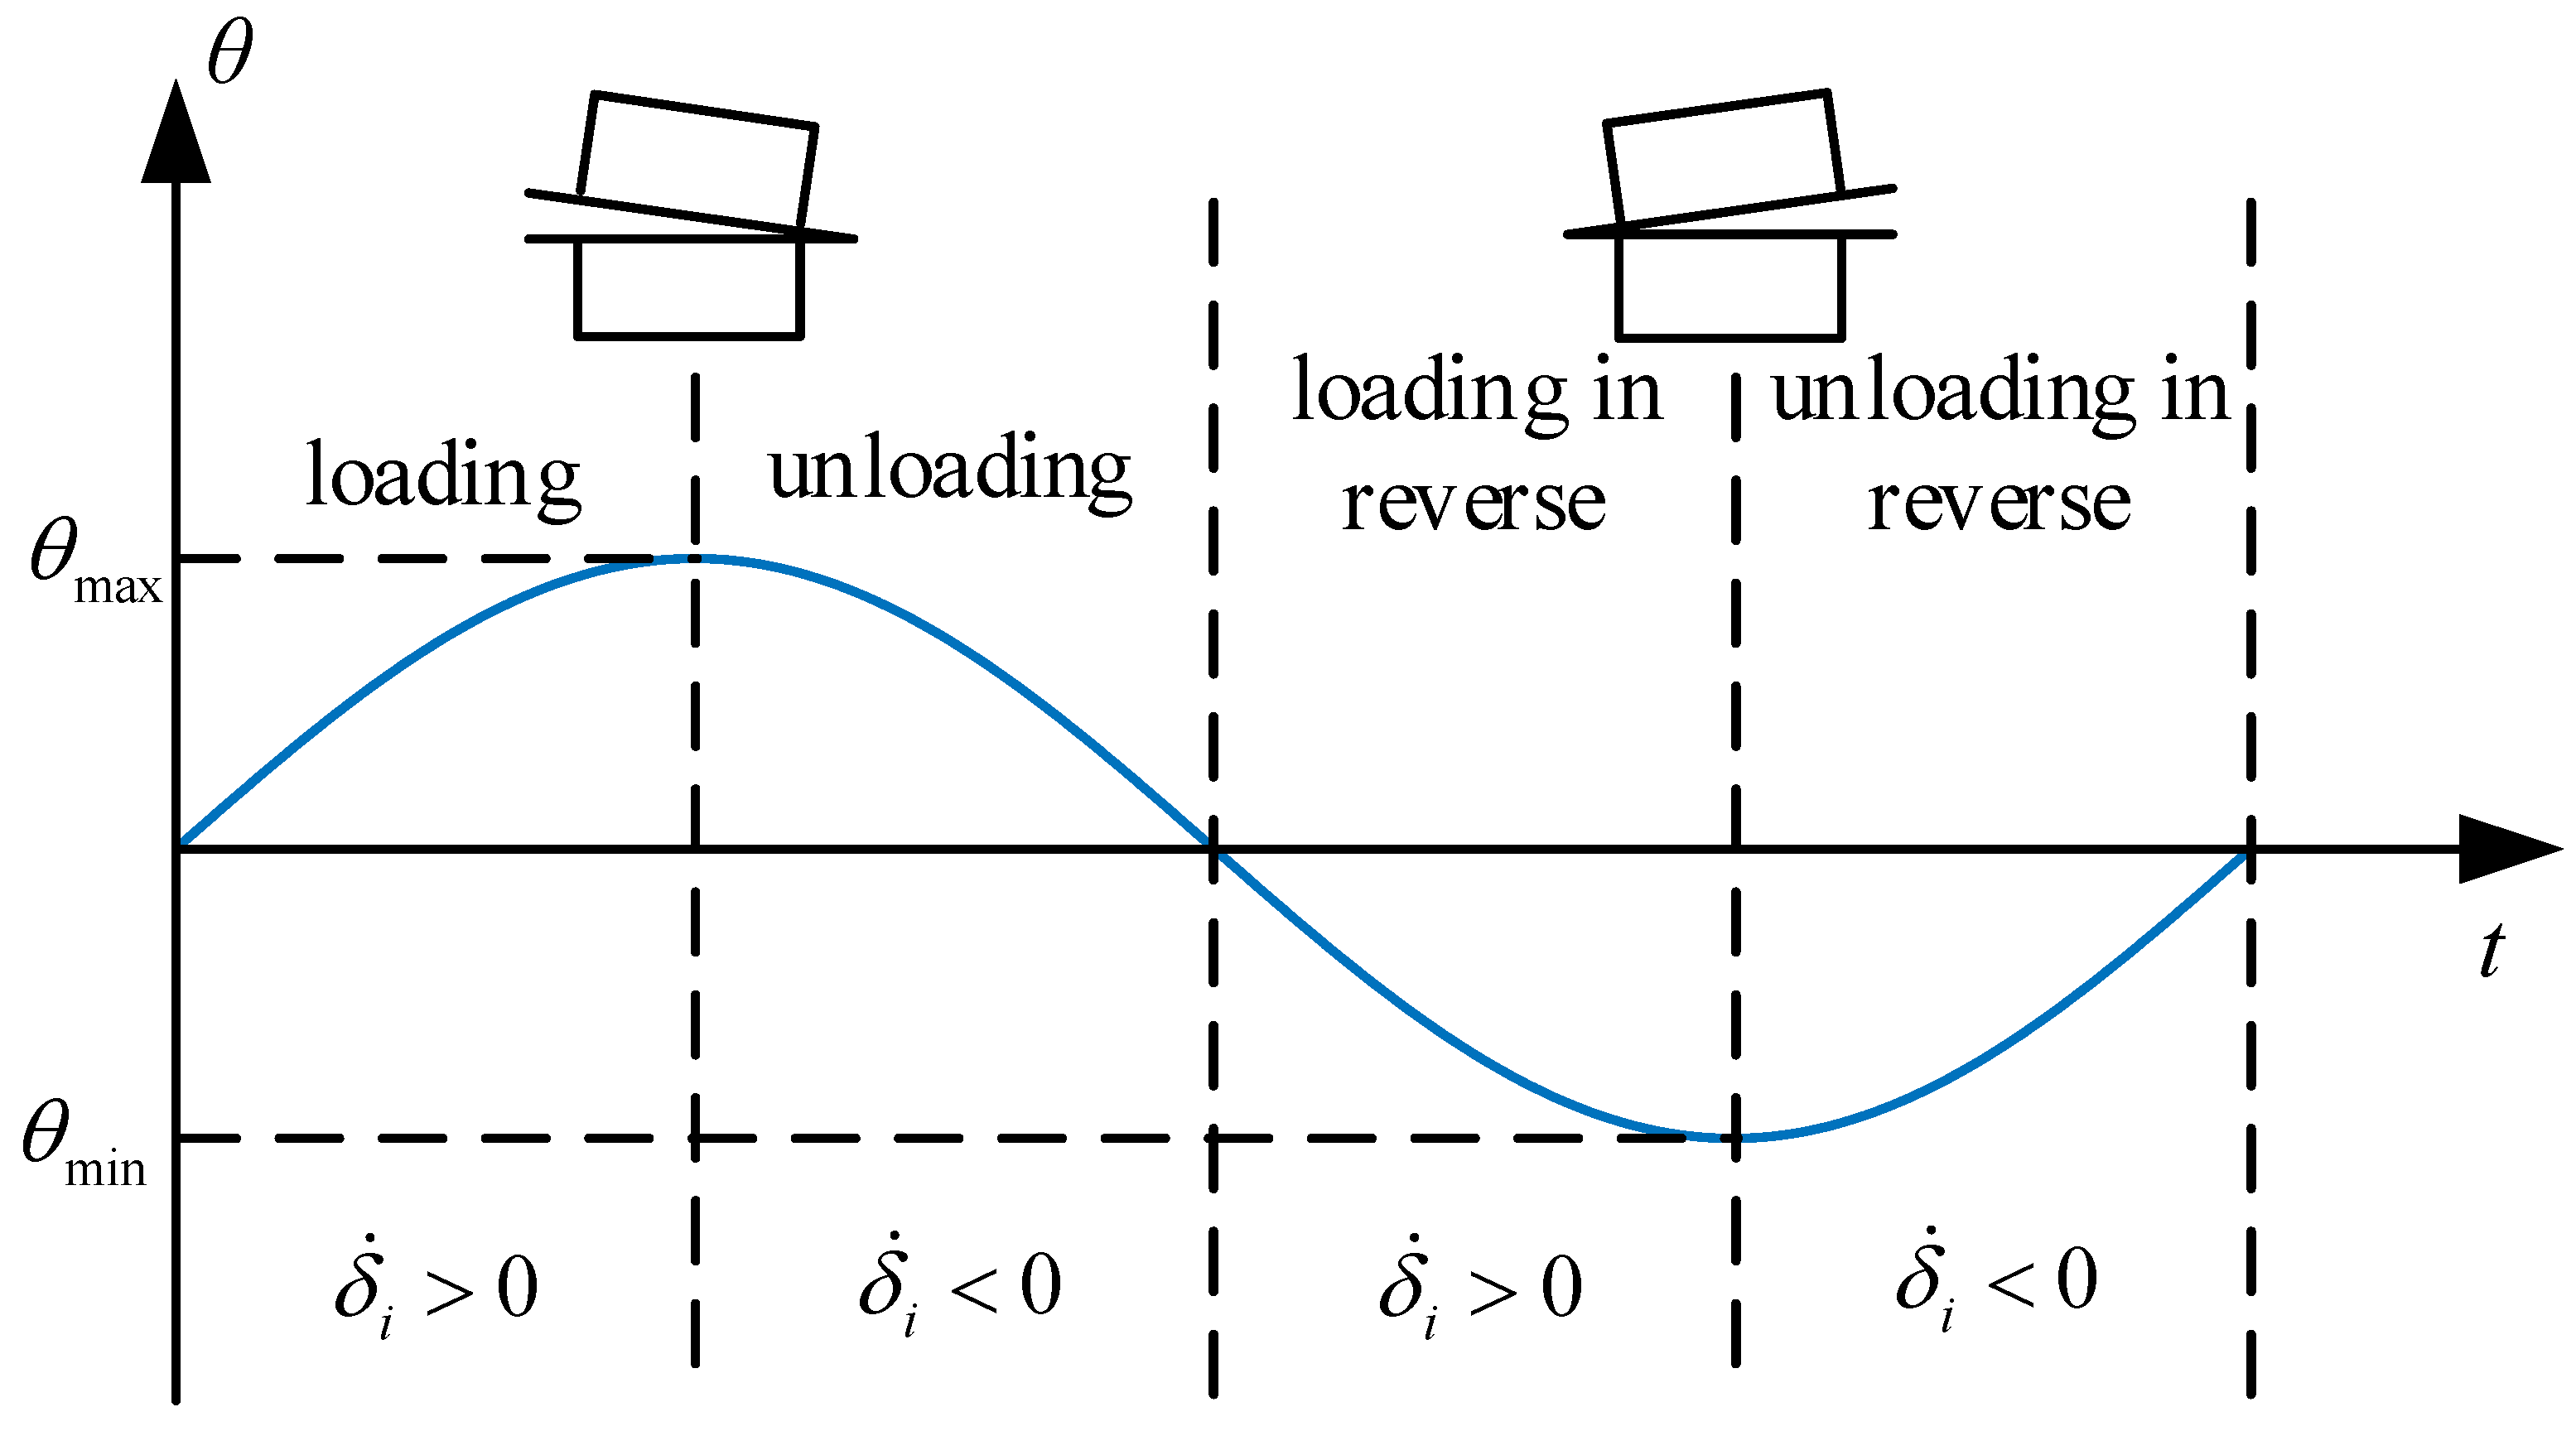
As shown by FE and experimental analysis, the angle of rotation in one cycle can be divided into four processes based on the different conditions of loading and unloading in Figure 15. The value of δ ˙ i in any process can be obtained by calculating the derivative of Equation (5) or Equation (7).
According to the different values of δ i and δ ˙ i in different process, the tension force of the i th section can be calculated by Equation (4). It is noteworthy that when θ is positive, the deformation of section 5 is ignored because it is subject to compression. Therefore, F 5 could not be obtained by Equation (4). For the reason of i = 1 n F i = 0 , F 5 can be written as
F 5 = 2 F 4 2 F 3 2 F 2 F 1
where the partial coefficient is 2 because F 4 = F 6 , F 3 = F 7 and F 2 = F 8 , based on symmetry.
Similarly, F 1 can be obtained by Equation (9) when θ is negative.
F 1 = F 5 2 F 4 2 F 3 2 F 2
The bending moment can be expressed as
M = i = 1 n F i R cos α i
A simplified analytical model of the flange joint with a spigot based on the characteristic analysis of the FE and experimental methods has been proposed above.

4.4. Simulation

With the variation of the axial deformation of each section, the tangential force F s of each section during the processes of loading and unloading is shown in Figure 16. If the tangential force of one section is positive, it means that the spigot is subject to tension; otherwise, it means compression. Due to the deformation of section 5 is 0 in these processes, the tangential force of section 5 is not present. The axial deformations of sections 1–4(6) decrease in sequence. It can be seen that sections 1, 2, and 8 experience the whole process, as shown in Figure 12c. Meanwhile, the curves of section 3(7) and section 4(6) coincide with those in Figure 12a,b, respectively. The different sections are in different contact statuses.
Figure 17 presents the tangential force F s of each section during the processes of loading and unloading with the angle of rotation. It can be observed that with the increase in the angle of rotation in the loading process, sections 1, 2(8), and 3(7) gradually enter the sliding condition from the sticking condition, and the corresponding tangential force first increases and then remains unchanged until entering the unloading process. In the unloading process, the switch between the sliding condition and the sticking condition occurs in the same sequence. These sections experience the process shown in Figure 12c. section 4(6) is close to section 5, and the deformation caused by the same angle of rotation is small. The tangential force cannot reach the condition of the stiffness decreasing suddenly, and no slip occurs in section 4(6), so the loading and unloading curves of section 4(6) coincide. It is noticeable that the tangential force of section 5 is large enough at the end of the unloading process that this section begins sliding. However, it is difficult to determine when section 5 begins sliding in the program; thus, the sliding of section 5 in the latter part of the unloading process is ignored. Since loading is reversed at the beginning of the next process, the spigot of section 5 is immediately set to the status of sliding. Due to the closure of the flange, section 5 cannot slip when subjected to a negative tangential force (compression direction). Only after the loading process is finished, section 5 begins to open and slip when subjected to a positive tangential force (tensile direction).
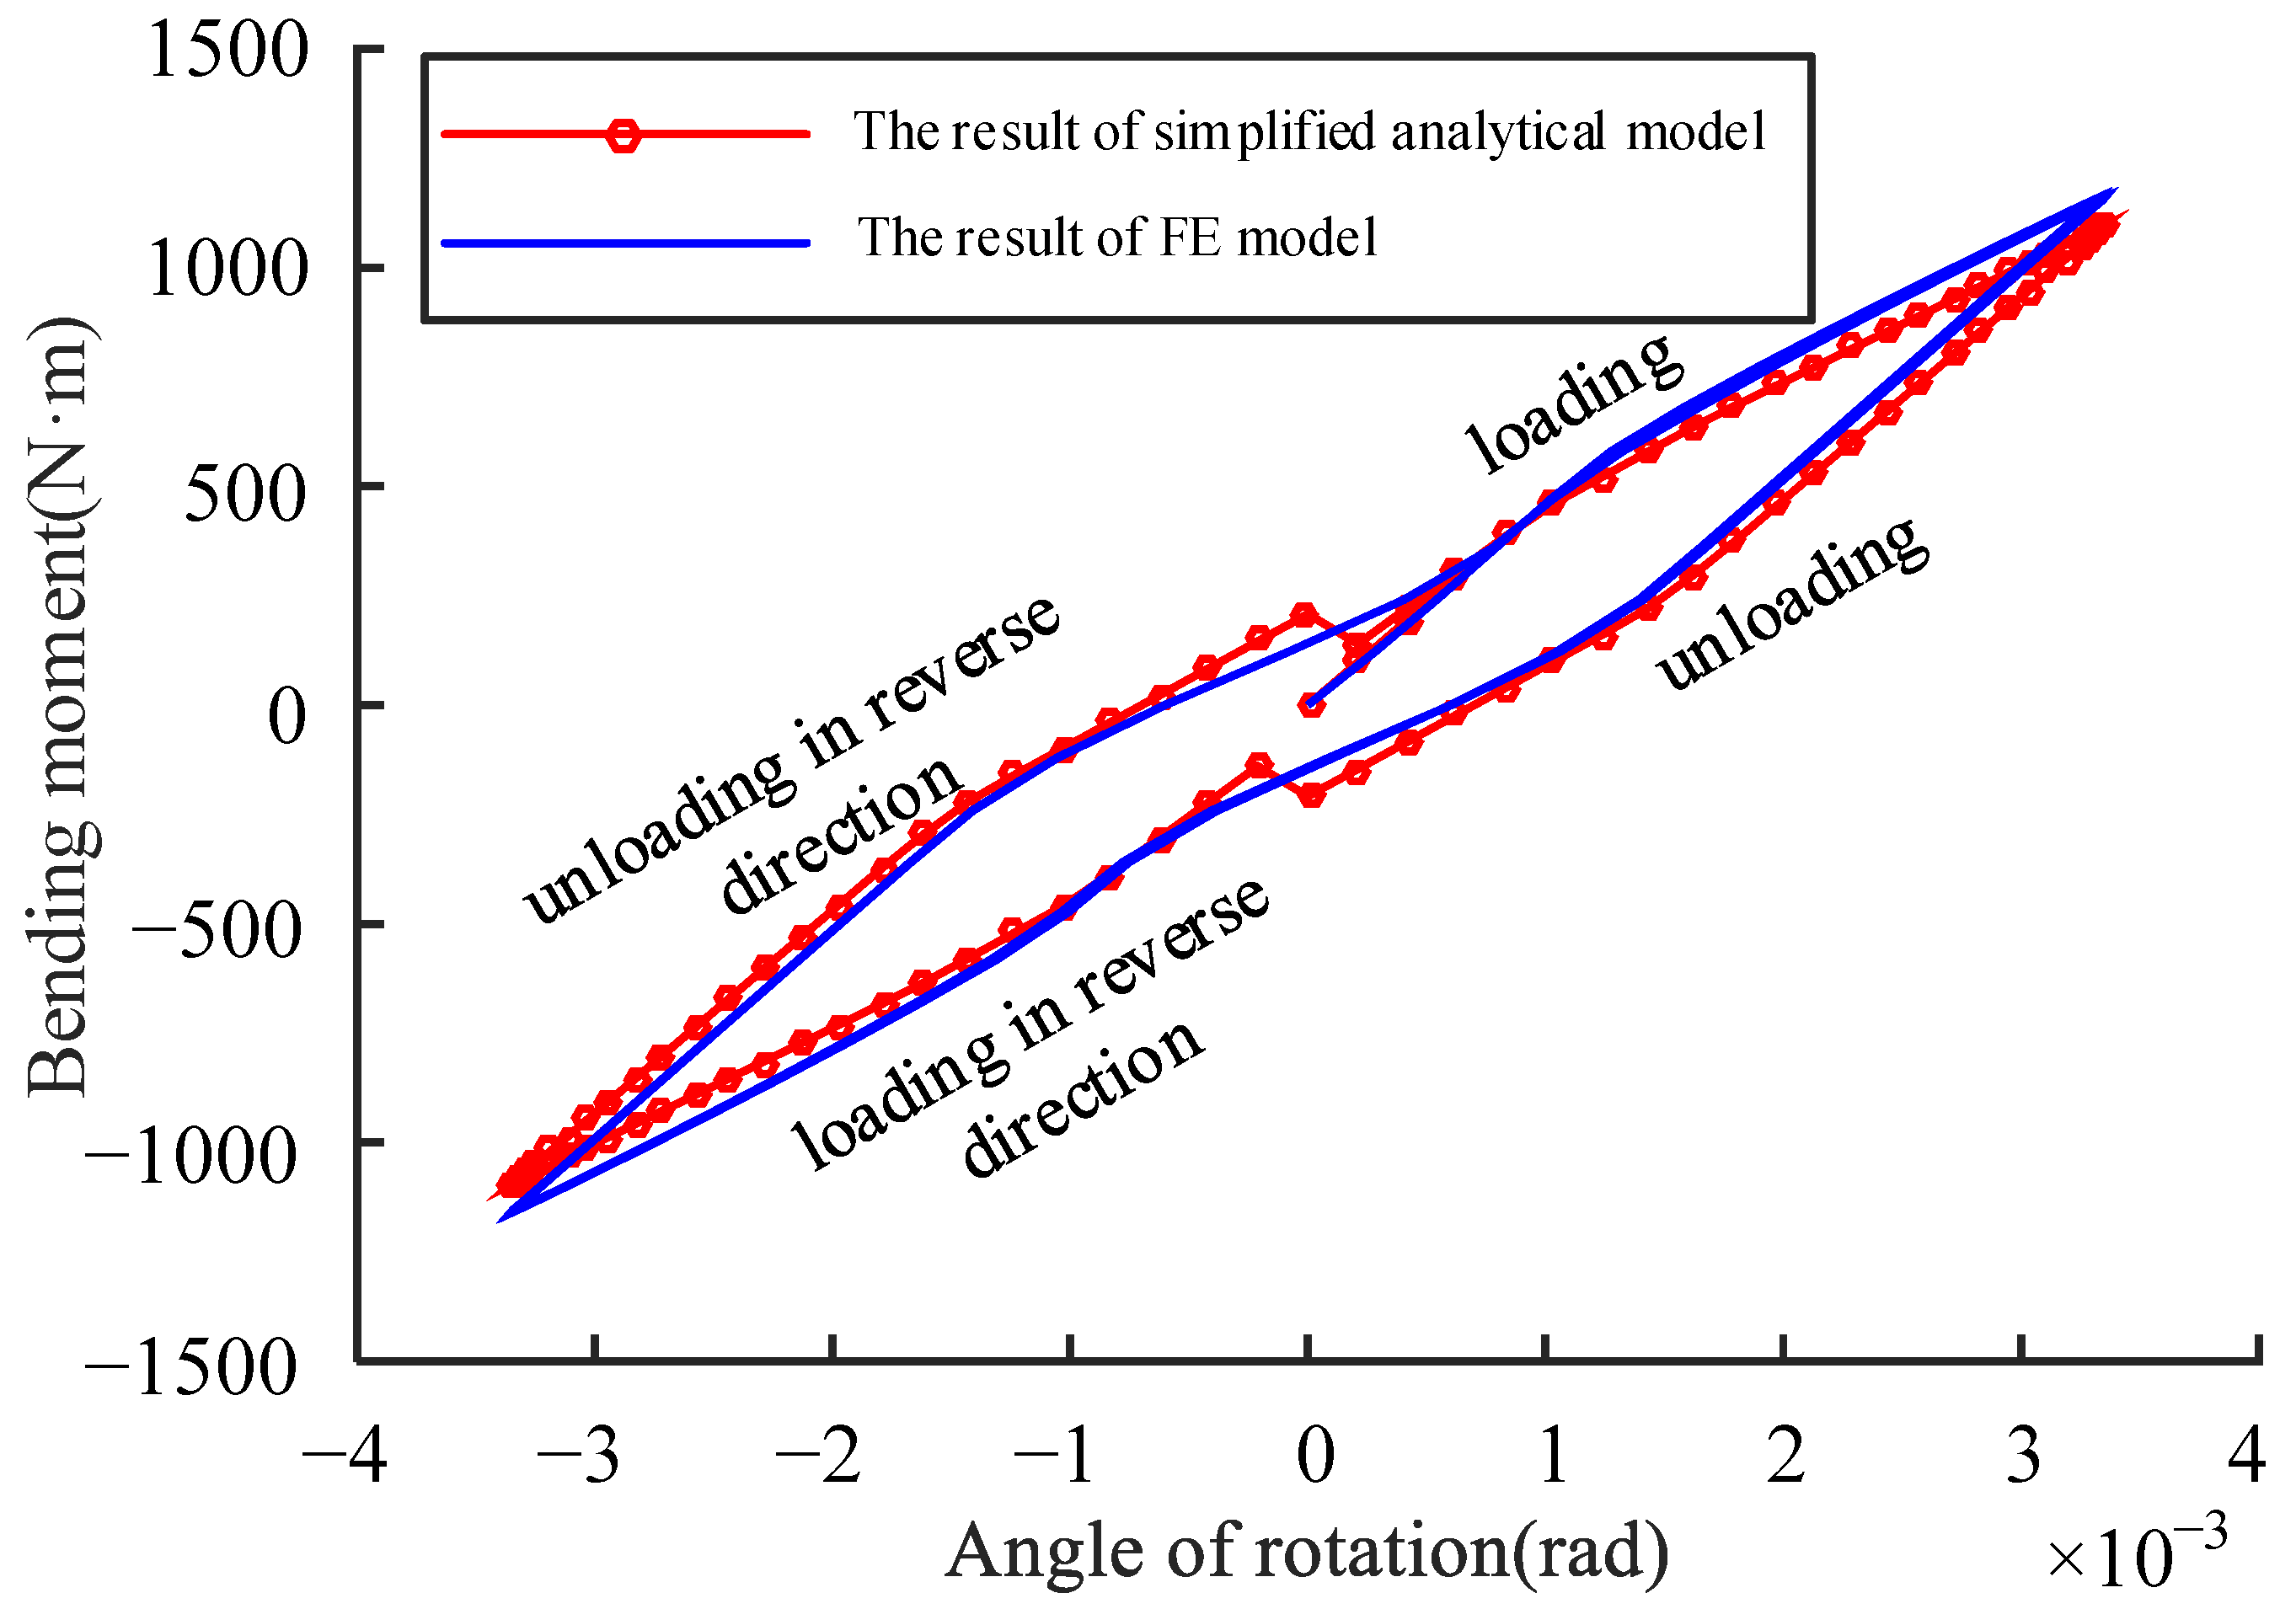
Figure 18 shows the comparison between the FE and simplified analytical models. The angle of rotation θ is taken as a variable in the calculation of the bending moment. The amplitude of θ is set as 0.0037 rad, which is equal to the angle of rotation caused by the bending moment of 1200   N m in the FE method. Very similar curves can be observed, except that there are obvious fluctuations in the simplified analytical model curve near the zero point. This is because the sliding of section 5 in the latter part of the unloading process is ignored in the simplified analytical model mentioned above. The consistency of the curves shows that the simplified analytical model can simulate the stiffness characteristics of the flange joint, such as the bending stiffness decreasing suddenly and the hysteresis loop.
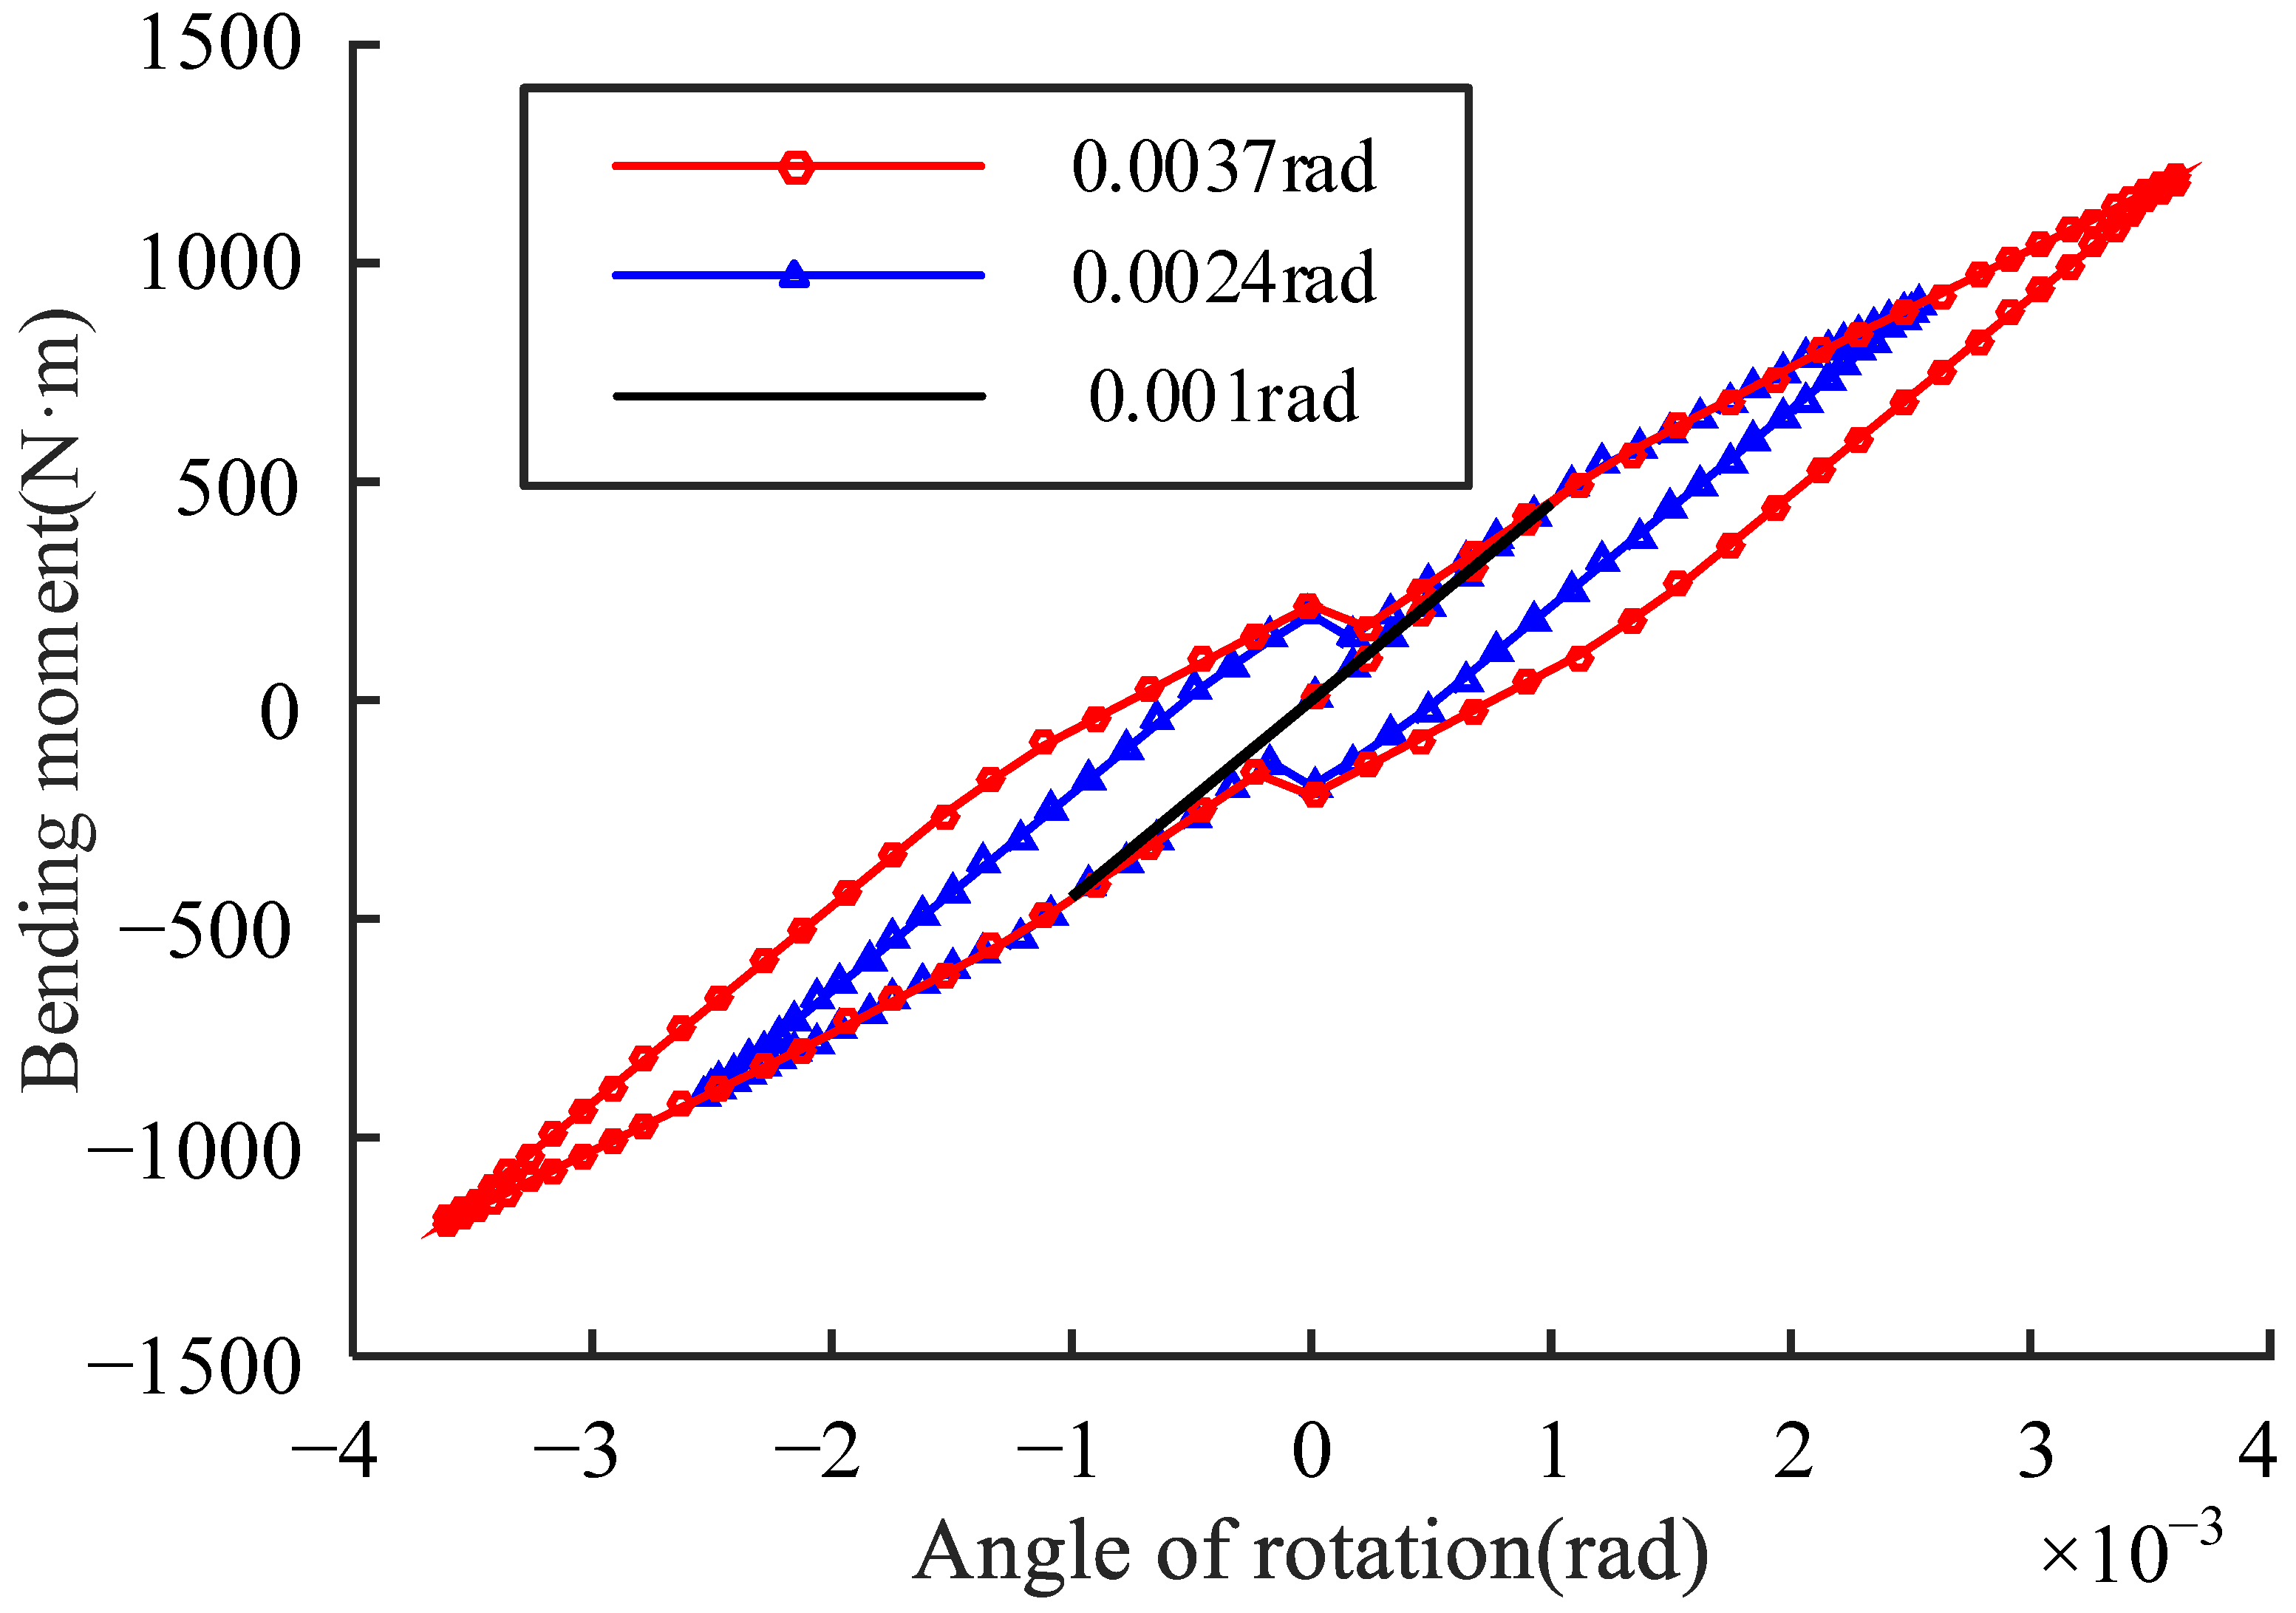
In order to verify the applicability of the simplified analytical model, several additional loading conditions are applied, and the resulting curves are shown in Figure 19. The amplitudes of the angle of rotation are also given by the FE method; 0.001 rad, 0.0024 rad, and 0.0037 rad correspond to 600   N m , 900   N m , and 1200   N m bending moments, respectively. All three curves in Figure 19 are consistent with the curves in Figure 5, except for the fluctuations near the zero point. Therefore, the proposed model’s applicability is verified.

5. Conclusions

The stiffness characteristics of a flange joint with a spigot are studied based on FE and experimental methods. On this basis, a simplified analytical model is proposed and simulated. Within the parameters covered in this paper, the main conclusions can be summarized as follows:
  • When the load applied on the flange joint is large enough to cause the sliding of the contact surface of the spigot, hysteresis characteristics of the flange joint appear.
  • The experiment established in this paper verifies the validity of the stiffness characteristics obtained by FE analysis.
  • The proposed simplified analytical model can be utilized to simulate the deformation and sliding status of the contact surface of the spigot.
  • The hysteresis stiffness characteristics of the flange joint with a spigot can be obtained through the analytical model.
The simplified analytical model will be used in steady dynamic analysis in the following research, which requires a large amount of simulation, or in aero-engine dynamic characteristics analysis. Compared with the FE model for a fixed model parameter, the simplified analytical model is more convenient to use. Besides, it could effectively reduce the degrees of freedom of the system model. Certainly, the purpose of this paper is to provide a foundation for the research on the flange joint with a spigot, and further comprehensive and in-depth research is needed in the future to get closer to the physical model.

Author Contributions

Conceptualization, H.L., J.W. and Y.L. (Yu Liu); methodology, H.L. and Y.L. (Yu Liu); software, H.L. and Y.L. (Yu Liu); validation, J.W. and Y.L. (Yu Liu); investigation, J.W. and Y.L. (Yu Liu); resources, H.L., Z.W. and Y.L. (Yifu Long); data curation, H.L., Y.L. (Yu Liu), Z.W. and Y.L. (Yifu Long); writing—original draft preparation, H.L., Y.L. (Yu Liu) and Y.L. (Yifu Long); writing—review and editing, Y.L. (Yu Liu), J.W. and Y.L. (Yifu Long); visualization, H.L. and Y.L. (Yu Liu); supervision, J.W. and Y.L. (Yu Liu); project administration, J.W., Y.L. (Yu Liu) and Z.W.; funding acquisition, J.W and Y.L. (Yu Liu). All authors have read and agreed to the published version of the manuscript.

Funding

This work is financially supported by the National Natural Science Foundation of China (NSFC) under Grant No. 52205115.

Institutional Review Board Statement

Not applicable.

Informed Consent Statement

Not applicable.

Data Availability Statement

Not applicable.

Conflicts of Interest

The authors declare no conflict of interest.

Nomenclature

Symbols
k 1 Bending stiffness before a change in the initial loading stage
k 2 Bending stiffness after a change in the initial loading stage
k s Tangential contact stiffness of the spigot
k t Contact stiffness of the flange plate
δ Displacement of the flange plate
F , F s , F t Total tension force, tangential force of the spigot, tangential force of the flange plate
P Contact pressure
μ Sliding friction coefficient
δ max Peak value of displacement load
δ c Critical value of displacement load
θ Angle of rotation for the flange plate
δ i Displacement of the i th section
δ ˙ i Velocity of the i th section
F i Tension force of the i th section
M Bending moment

References

  1. Sun, W.; Guan, Z.; Chen, Y.; Pan, J.; Zeng, Y. Modeling of Preload Bolted Flange Connection Structure for Loosening Analysis and Detection. Shock Vib. 2022, 2022, 7844875. [Google Scholar] [CrossRef]
  2. Marek, P.; Pawlicki, J.; Mościcki, A. Tightness Problems at the Flange Connection in Transient Temperature and High Pressure Condition. Eng. Fail. Anal. 2022, 133, 105986. [Google Scholar] [CrossRef]
  3. Zhu, L.; Bouzid, A.-H.; Hong, J. A Method to Reduce the Number of Assembly Tightening Passes in Bolted Flange Joints. J. Manuf. Sci. Eng. 2021, 143, 121006. [Google Scholar] [CrossRef]
  4. El Masnaoui, W.; DaidiÉ, A.; Lachaud, F.; Paleczny, C. Semi-Analytical Model Development for Preliminary Study of 3D Woven Composite/Metallic Flange Bolted Assemblies. Compos. Struct. 2021, 255, 112906. [Google Scholar] [CrossRef]
  5. Nassiraei, H. Local Joint Flexibility of CHS X-Joints Reinforced with Collar Plates in Jacket Structures Subjected to Axial Load. Appl. Ocean Res. 2019, 93, 101961. [Google Scholar] [CrossRef]
  6. Nassiraei, H. Geometrical Effects on the LJF of Tubular T/Y-Joints with Doubler Plate in Offshore Wind Turbines. Ships Offshore Struct. 2022, 17, 481–491. [Google Scholar] [CrossRef]
  7. Zacal, J.; Folta, Z.; Struz, J.; Trochta, M. Influence of Symmetry of Tightened Parts on the Force in a Bolted Joint. Symmetry 2023, 15, 276. [Google Scholar] [CrossRef]
  8. Jamia, N.; Jalali, H.; Taghipour, J.; Friswell, M.I.; Haddad Khodaparast, H. An Equivalent Model of a Nonlinear Bolted Flange Joint. Mech. Syst. Signal Process. 2021, 153, 107507. [Google Scholar] [CrossRef]
  9. Qin, Z.; Han, Q.; Chu, F. Bolt Loosening at Rotating Joint Interface and Its Influence on Rotor Dynamics. Eng. Fail. Anal. 2016, 59, 456–466. [Google Scholar] [CrossRef]
  10. Song, Y. Modeling, Identification and Simulation of Dynamics of Structures with Joints and Interfaces. Ph.D. Thesis, University of Illinois, Urbana-Champaign, IL, USA, 2004. [Google Scholar]
  11. He, K.; Zhu, W.D. Detecting Loosening of Bolted Connections in a Pipeline Using Changes in Natural Frequencies. J. Vib. Acoust. 2014, 136, 034503. [Google Scholar] [CrossRef]
  12. Yao, X.; Wang, J.; Zhai, X. Research and Application of Improved Thin-Layer Element Method of Aero-Engine Bolted Joints. Proc. Inst. Mech. Eng. Part G J. Aerosp. Eng. 2017, 231, 823–839. [Google Scholar] [CrossRef]
  13. Luan, Y.; Guan, Z.-Q.; Cheng, G.-D.; Liu, S. A Simplified Nonlinear Dynamic Model for the Analysis of Pipe Structures with Bolted Flange Joints. J. Sound Vib. 2012, 331, 325–344. [Google Scholar] [CrossRef]
  14. Wang, C.; Zhang, D.; Zhu, X.; Hong, J. Study on the Stiffness Loss and the Dynamic Influence on Rotor System of the Bolted Flange Joint. In Proceedings of the Volume 7A: Structures and Dynamics, Düsseldorf, Germany, 16 June 2014; American Society of Mechanical Engineers: Düsseldorf, Germany, 2014; p. V07AT31A020. [Google Scholar]
  15. Bouzid, A.-H.; Vafadar, A.K.; Ngô, A.D. On the Modeling of Anisotropic Fiber-Reinforced Polymer Flange Joints. J. Press. Vessel Technol. 2021, 143, 061506. [Google Scholar] [CrossRef]
  16. Ahmadian, H.; Jalali, H. Identification of Bolted Lap Joints Parameters in Assembled Structures. Mech. Syst. Signal Process. 2007, 21, 1041–1050. [Google Scholar] [CrossRef]
  17. Iranzad, M.; Ahmadian, H. Identification of Nonlinear Bolted Lap Joint Models. Comput. Struct. 2012, 96–97, 1–8. [Google Scholar] [CrossRef]
  18. Bograd, S.; Reuss, P.; Schmidt, A.; Gaul, L.; Mayer, M. Modeling the Dynamics of Mechanical Joints. Mech. Syst. Signal Process. 2011, 25, 2801–2826. [Google Scholar] [CrossRef]
  19. Oldfield, M.; Ouyang, H.; Mottershead, J.E. Simplified Models of Bolted Joints under Harmonic Loading. Comput. Struct. 2005, 84, 25–33. [Google Scholar] [CrossRef]
  20. Ouyang, H.; Oldfield, M.J.; Mottershead, J.E. Experimental and Theoretical Studies of a Bolted Joint Excited by a Torsional Dynamic Load. Int. J. Mech. Sci. 2006, 48, 1447–1455. [Google Scholar] [CrossRef]
  21. Van-Long, H.; Jean-Pierre, J.; Jean-François, D. Behaviour of Bolted Flange Joints in Tubular Structures under Monotonic, Repeated and Fatigue Loadings I: Experimental Tests. J. Constr. Steel Res. 2013, 85, 1–11. [Google Scholar] [CrossRef]
  22. Firrone, C.M.; Battiato, G.; Epureanu, B.I. Modelling the Microslip in the Flange Joint and Its Effect on the Dynamics of a Multi-Stage Bladed Disk Assembly. In Proceedings of the Volume 7A: Structures and Dynamics, Seoul, Republic of Korea, 13 June 2016; American Society of Mechanical Engineers: Seoul, Republic of Korea, 2016; p. V07AT32A032. [Google Scholar]
  23. Shi, W.; Zhang, Z. An Improved Contact Parameter Model with Elastoplastic Behavior for Bolted Joint Interfaces. Compos. Struct. 2022, 300, 116178. [Google Scholar] [CrossRef]
  24. He, L.; Li, T. Undamped Non-Linear Vibration Mechanism of Bolted Flange Joint under Transverse Load. J. Asian Archit. Build. Eng. 2023, 22, 1507–1532. [Google Scholar] [CrossRef]
  25. Liu, Y.; Wang, J.; Chen, L. Dynamic Characteristics of the Flange Joint with a Snap in Aero-Engine. Int. J. Acoust. Vib. 2018, 23, 168–174. [Google Scholar] [CrossRef]
  26. Shuguo, L.; Yanhong, M.; Dayi, Z.; Jie, H. Studies on Dynamic Characteristics of the Joint in the Aero-Engine Rotor System. Mech. Syst. Signal Process. 2012, 29, 120–136. [Google Scholar] [CrossRef]
  27. Yu, P.; Li, L.; Chen, G.; Yang, M. Dynamic Modelling and Vibration Characteristics Analysis for the Bolted Joint with Spigot in the Rotor System. Appl. Math. Model. 2021, 94, 306–331. [Google Scholar] [CrossRef]
  28. Liu, Y.; Zhao, D.; Guo, X.; Ai, Y. Stiffness and Geometry Characteristics of Flange Connection with Bolt Failure and Its Influence on Rotor Dynamics. Proc. Inst. Mech. Eng. Part C J. Mech. Eng. Sci. 2023, 095440622211474. [Google Scholar] [CrossRef]
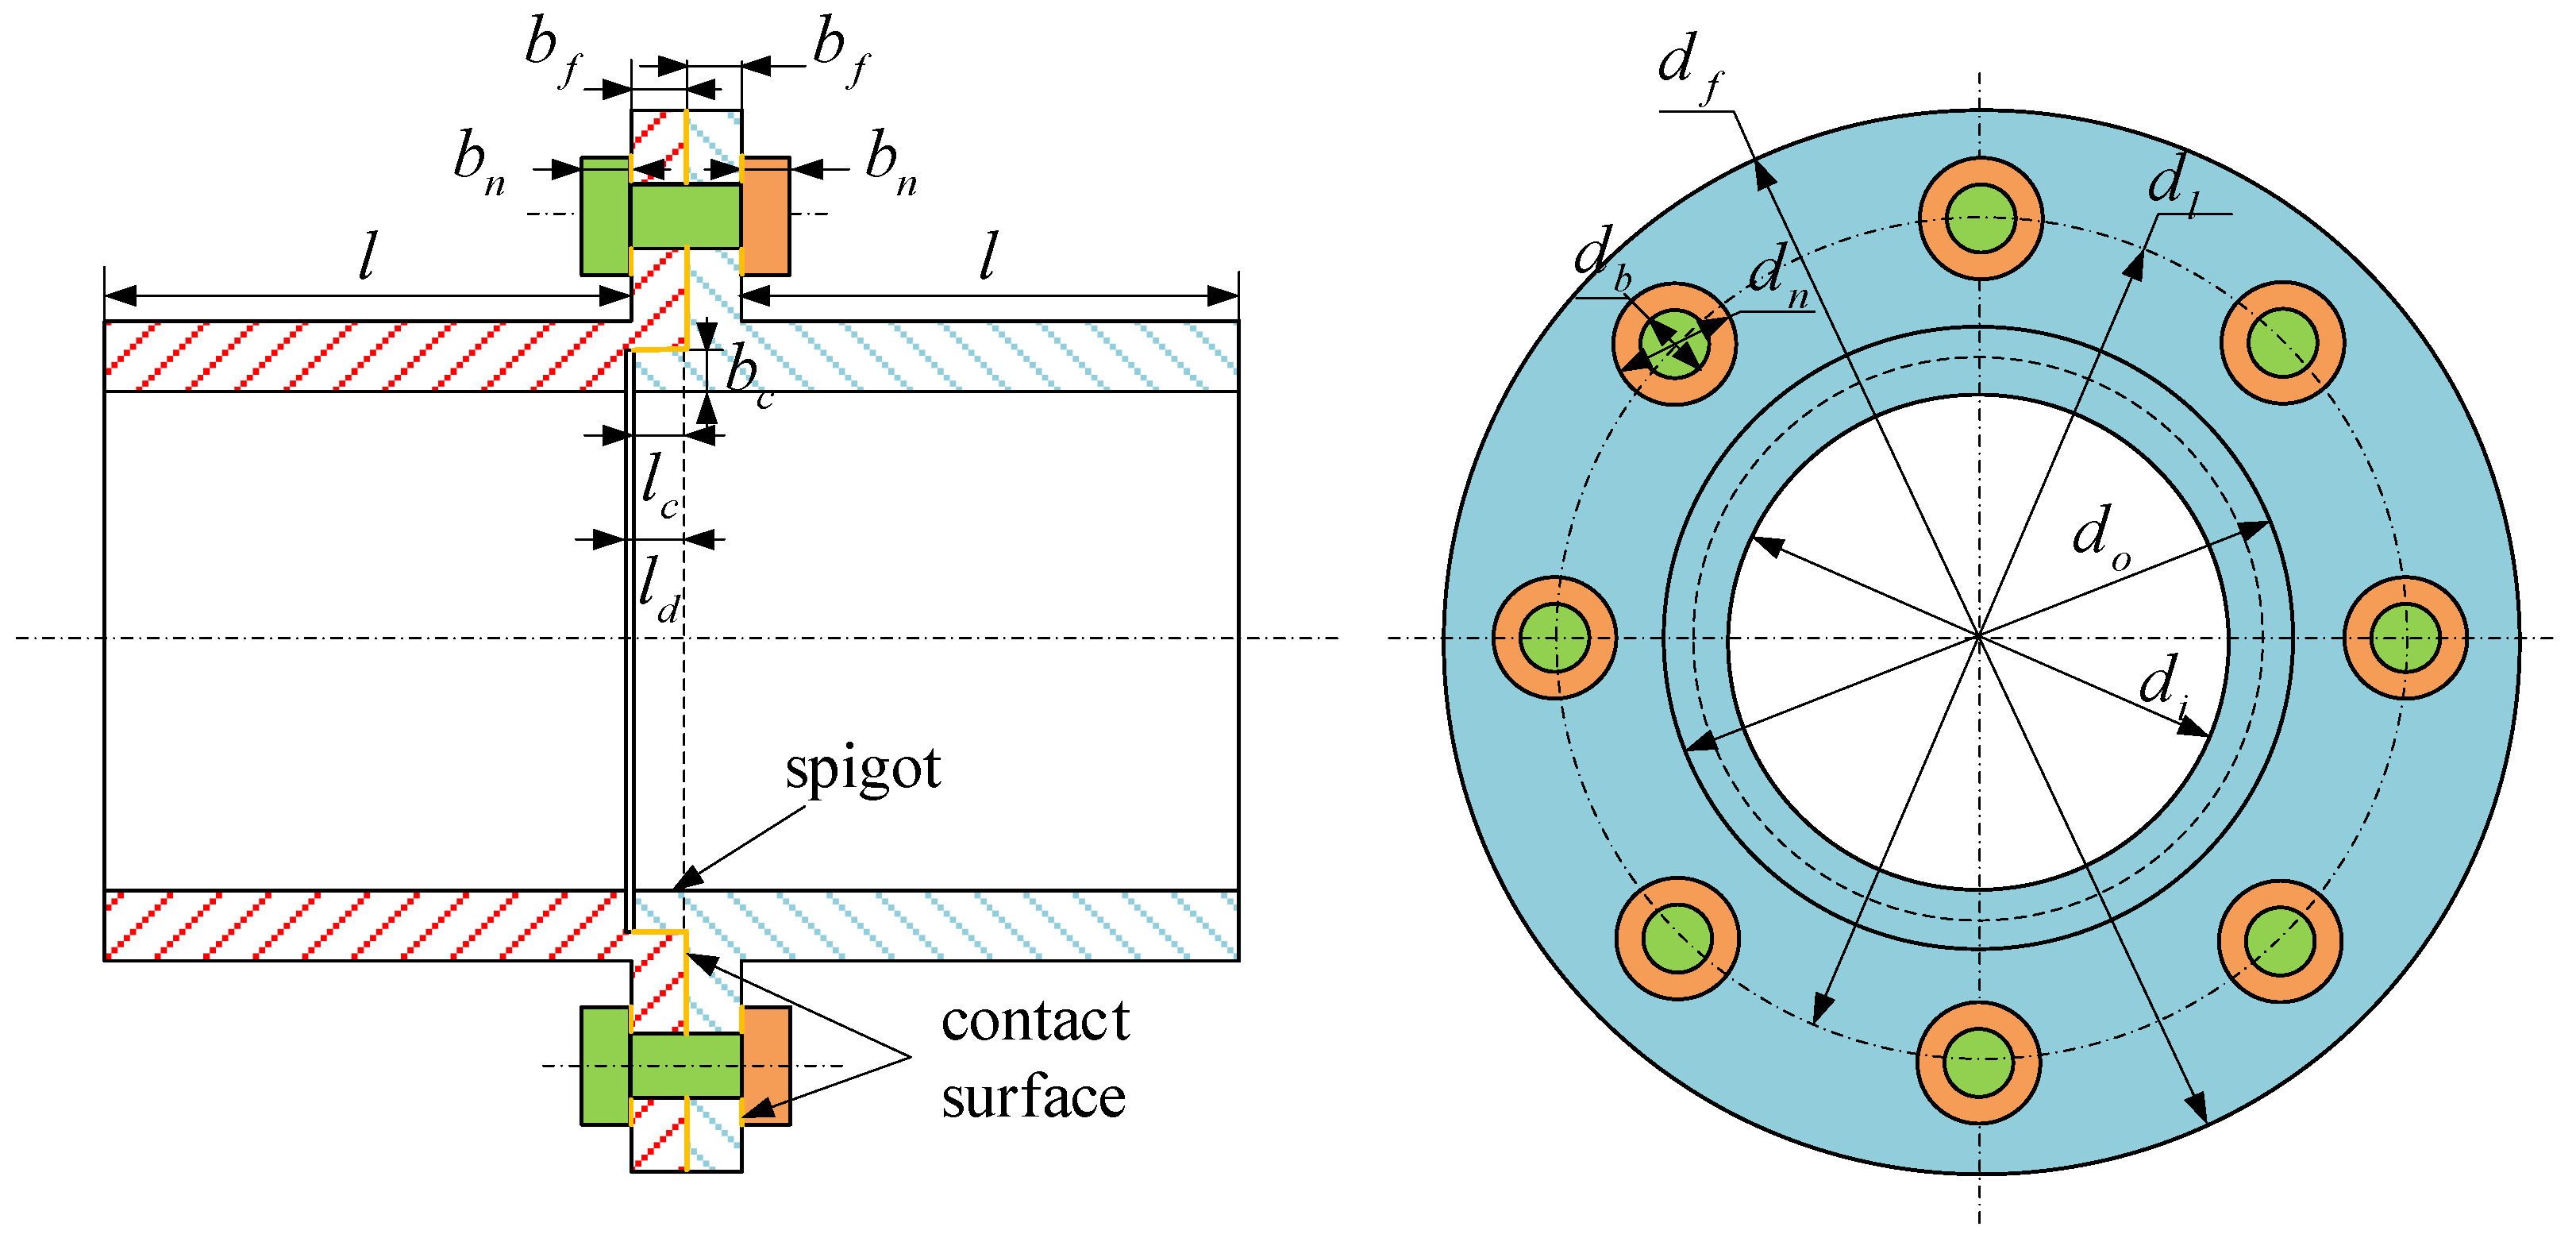
Figure 1. Sketch of the model for the flange joint.
Symmetry 15 01221 g001
Figure 2. FE model of the flange joint: (a) the structural integral FE model, (b) the partial magnification of the bolt and spigot.
Symmetry 15 01221 g002
Figure 3. Time–domain curve of the transverse harmonic load.
Symmetry 15 01221 g003
Figure 4. Angle of rotation–load curve under transverse harmonic load.
Symmetry 15 01221 g004
Figure 5. Angle of rotation–load curves under different amplitudes of harmonic load.
Symmetry 15 01221 g005
Figure 6. Stiffness measurement experiment: (a) the instrument setup of the experiment, (b) the spigot, (c) the application of load and points of measure.
Symmetry 15 01221 g006
Figure 7. Curves of the experimental result of the angle of rotation–load.
Symmetry 15 01221 g007
Figure 8. Division of the flange joint.
Symmetry 15 01221 g008
Figure 9. Deformation of one section under tension force.
Symmetry 15 01221 g009
Figure 10. Displacement of the spigot: (a) the sticking and sliding conditions of the contact surface, (b) the simplified model of the contact surface.
Symmetry 15 01221 g010
Figure 11. Different stages in the processes of loading and unloading.
Symmetry 15 01221 g011
Figure 12. Relationship between displacement load and tension force: (a) the stage of elastic deformation, (b) the stage of partial slip, (c) the stage of complete slip.
Symmetry 15 01221 g012
Figure 13. Simplified model of a section of the flange joint.
Symmetry 15 01221 g013
Figure 14. Deformation of the flange joint: (a) sketch of the deformation; (b) simplified model.
Symmetry 15 01221 g014
Figure 15. Diagram of the angle of rotation variation in one cycle.
Symmetry 15 01221 g015
Figure 16. Tangential force variation with the deformation of each section.
Symmetry 15 01221 g016
Figure 17. Tangential force variation with the angle of rotation.
Symmetry 15 01221 g017
Figure 18. Angle of rotation curves of the FE and simplified analytical models.
Symmetry 15 01221 g018
Figure 19. Angle of rotation–loading curve of the analytical model under different loads.
Symmetry 15 01221 g019
Table 1. Main parameters of the flange joint.
ParametersValuesParametersValues
b f 2.5 mm d f 58 mm
b n 3 mm d o 40 mm
l 27.5 mm d i 30 mm
b c 2.5 mm d l 49 mm
l c 1.7 mm d n 7 mm
l d 2 mm d b 5 mm
Disclaimer/Publisher’s Note: The statements, opinions and data contained in all publications are solely those of the individual author(s) and contributor(s) and not of MDPI and/or the editor(s). MDPI and/or the editor(s) disclaim responsibility for any injury to people or property resulting from any ideas, methods, instructions or products referred to in the content.