Article

Influence of Processing Conditions on the Mechanical Properties of 17-4PH Specimens Produced by Additive Manufacturing

by
Enrique Ariza-Galván
1,
Isabel Montealegre-Meléndez
2,*,
Eva María Pérez-Soriano
2,
Erich Neubauer
1,
Michael Kitzmantel
1 and
Cristina Arévalo
2
1
RHP Technology GmbH, 2444 Seibersdorf, Austria
2
Escuela Politécnica Superior, Universidad de Sevilla, Calle Virgen de África, 7, 41011 Seville, Spain
*
Author to whom correspondence should be addressed.
Machines 2022, 10(11), 976; https://doi.org/10.3390/machines10110976
Submission received: 27 September 2022 / Revised: 19 October 2022 / Accepted: 20 October 2022 / Published: 26 October 2022
(This article belongs to the Special Issue Advance in Additive Manufacturing)

Abstract

:
The purpose of this research is to study the influence of the processing conditions that affect the final behaviour of specimens made from a 17-4PH composition powder without the necessary thermal treatment to be considered 17-4PH, which is manufactured using the additive technique known as plasma metal deposition (PMD). To that end, two walls manufactured from the prealloyed powder were built under two distinct atmospheric conditions, i.e., air and argon, with previously optimized manufacturing parameters. The additional effect of two applied thermal treatments (TT) was studied by means of property and microstructural analyses of the extracted specimens from each consolidated wall. The two thermal treatments consisted of a heating rate of 10 °C/min to 482 °C (TT1) and 620 °C (TT2), with the temperatures for 1 and 4 h, respectively; the cooling rate was 5 °C/min for both treatments. According to the findings, the presence of an argon atmosphere during manufacturing promoted the presence of an austenite phase, reducing the deformation of the samples and enhancing their Young’s modulus. The TT1 treatment positively contributed, improving the mechanical properties in general, and TT2 substantially improved the elongation in both sets of specimens.

1. Introduction

In this article, it will be discussed the steel alloy known as 17-4PH, which is commonly used in industry owing to its well-known mechanical properties. This alloy is formed as a result of a precipitation hardening process applied to a martensitic stainless steel, the properties of which arise when applied a post treatment after conformation.
Recently, new manufacturing methods have been developed that could affect the intrinsic properties of the material, specifically the plasma metal deposition conformation process, which is the procedure studied in this article, hereafter referred to as PMD.
The properties of the material that are affected by this method must be analysed and compared with those of the raw material to establishing the severity of the modification enclosed in the internal microstructure of the alloy with respect to post-processing treatments, such as thermal treatments and the surrounding conditions under which they were applied. The literature shows that the nature of the initial condition of the 17-4PH powder feedstock has a direct impact on the final properties of the additive-manufactured deposited material [1].
The initial focus must be on the raw material itself; a general idea of its composition and mechanical properties will be presented so the reader can get an idea of its multiple uses and properties, and then they will be compared to those obtained from the PMD process.
The raw material used in this process is steel powder with the same composition as 17-4PH steel. However, because it does not undergo the required heat treatment associated with this specific type of steel, the powder cannot be considered 17-4PH steel. Although not the identical type of steel, it has the same composition. Consequently, it will be henceforth cited as such so that the reader can approximate the raw powder to the most similar alloy.
To present the alloy used in this manufacturing system, it is necessary to acknowledge that 17-4PH is a martensitic precipitation hardening stainless steel characterized by high tensile and yield strength obtained as a result of solution annealing. It is a chromium–nickel–copper-based steel alloy with the addition of niobium. What marks the key factor for this type of steel is its excellent corrosion resistance, which assimilates the aforementioned powder to 304 austenitic steels without losing the strength properties cited above.
This combination of martensitic and austenitic steel facilitates a wide range of applications in industry, such as offshore, marine, food, paper mill, oil field, and aerospace applications. 17-4PH is specifically used for components such as bushings, couplings, fasteners, fittings, roller, screws, studs, valve stems, wear rings, etc.
On the downside, the utmost difficulty of the machining process for this type of steel mainly results from its hardness, which is where the PMD conformation process comes in. This procedure virtually eliminates the necessary machining processes to obtain manufactured pieces, representing a novel approach to the mechanization of certain types of components with easier implementation than traditional procedures.
In recent years, advanced processing technologies based on powder metallurgy have been developed and researched [2]. The main goal is to develop new materials and produce specimens with complex shapes, which are constantly demanded in modern industry, especially in the aerospace sector. Among these technologies, additive manufacturing (AM) is considerably valued owing to its multiple advantages in the production of specimens with challenging geometries that could impede their development, in addition to its capability of cost-effectively manufacturing large specimens. Moreover, in AM, the use of powders as raw materials and the possibility of making parts with near-net shapes encourage the use of this technique as a promising alternative to conventional manufacturing routes, improving the fabrication of final components in terms of sustainability and reducing the environmental impact [3,4,5].
As several authors have described, these additive techniques can be classified into two categories considering their starting feed: powder bed processes [6,7,8,9,10,11] and blown powder/wire feed techniques [12,13,14,15,16,17]. In this research, a manufacturing process based on plasma metal deposition (PMD) technology is explored, for which the energy source is generated plasma and with a blown-powder rotating metering wheel as a feeder. This equipment was developed by RHP-Technology GmbH (Austria).
The PMD method is an additive manufacturing process that can be used to build, repair, and reconstruct metallic parts layer by layer. The aim of the present study is to establish the decisive conditions and/or treatments under which the obtained material complies with the imperative requirements expected of such an alloy. This technique can facilitate a wide range of applications in the field of engineering, as it allows extremely complex patterns to be obtained in a single piece that would be inconceivable in traditional machining proceedings, such as conformal cooling channels [18].
For this technique to produce suitable results, a number of factors must be taken into account to build parts according to the necessary demands of the alloy. In this article, these factors will be explored, as well as the differences in the material properties of the produced alloys.
In this work, it has been suggested that the behaviour of specimens made from the well-known 17-4PH steel alloy may vary depending on the processing conditions. The flexibility of the PMD equipment facilitated the study of samples produced varying environmental conditions; both walls were constructed with similar parameters. Although the additive process poses many challenges, it should also be seen as an opportunity to determine the degree of influence of the atmospheric conditions (air and argon) on the manufacture of 17-4PH specimens.
Furthermore, two thermal treatments were conducted with the intention of testing the possible improvements obtained in the specimens, which underwent changes during post-processing treatments. These thermal treatments were selected according to standards [19]. Although 17-4PH alloy is commonly used in industrial applications and the mentioned thermal treatments generally improve its mechanical properties [20,21], no comparisons have been reported to date among specimens produced by PMD under varying environmental conditions (air and argon) or post-production treatments. Therefore, it is important to understand the research findings regarding the correlation between microstructural developments upon processing and post processing, as well as the mechanical and tribological properties of the specimens, which are essential with respect to the results described in the previous paragraph.
The aim of this research was the development of specimens made from starting powders with a chemical composition similar to that of 17-4PH steel produced under varying manufacturing conditions via PMD to determine the influence of their operational parameters and thermal treatments on their final properties.

2. Materials and Methods

2.1. Materials

Water-atomized 17-4PH steel powder was used as the basis material for this research. It was supplied as a manufactured feedstock by Hoeganaes Corporation (Radevorwald, Germany). This starting material is an experimental powder with a particle size of between 75 and 150 µm. In order to verify the powder information provided by the supplier, the feedstock was chemically analysed by a scanning electron microscope (SEM) equipped with a Hitachi TM1000 energy-dispersive x-ray spectroscope (EDS) (Tokyo, Japan), and its morphology was inspected by optical microscopy (OM) on a Zeiss ICM 405 (ZEISS Invers LM, Germany). Table 1 shows a comparison between the standard composition of the 17-4PH powder and the experimental results obtained after chemical analysis. As can be inferred from this table, the composition of the Hoeganaes Corporation powder is close to the standard specific ranges for the 17-4PH alloy.
According to the composition difference between the employed powder and the standard composition of 17-4PH, it can be discerned that the most important elements in this type of steel fall within the parameters, whereas other elements, such as manganese and phosphorus, are not present in the powder used in the present study.
Despite not being accounted for in the raw material, the negligible percentages of these elements are not expected to be decisive in the present investigation.
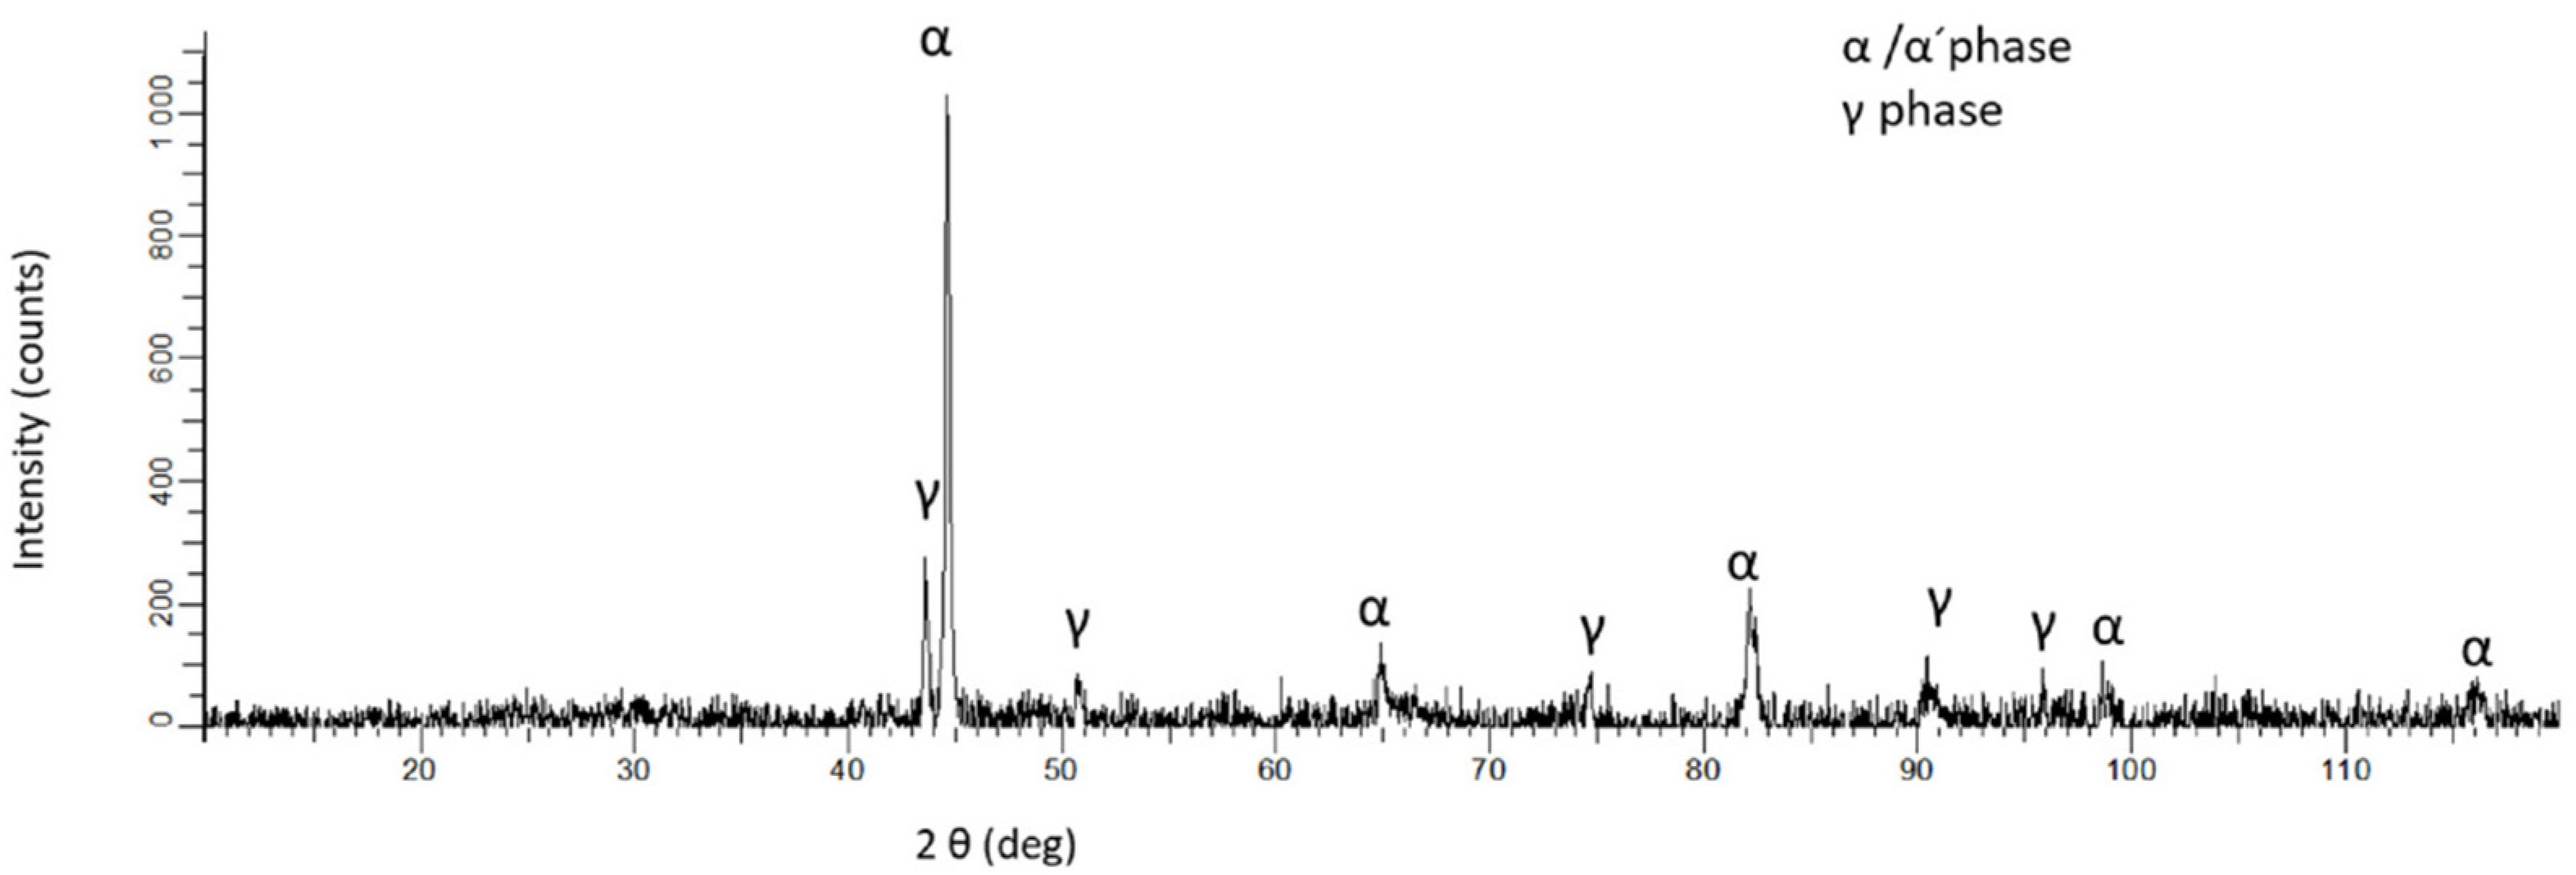
Figure 1 shows the morphology of the 17-4PH steel powder, with irregularly shaped particles with round edges, as well as cavities and hook-shaped protuberances. An X-ray diffraction (XRD) analysis of the powder was performed using a Bruker D8 Advance A25 (Bruker, Billerica, MA, USA) with Cu-Kα radiation at a wavelength of 1.5418 Å and a scanning angle (2θ) in the range of 0° to 120°; the results of this analysis are shown in Figure 2. The X-ray pattern shows that the significant peaks of the phases of the 17-4PH alloy match the theoretical peaks [22], with corresponding peaks of the martensite BCC α/α’ and austenite γ crystalline phases. Austenite is retained and favoured by the presence of nitrogen during atomization [23].

2.2. Manufacturing

In this research, an AM technique based on PMD technology was employed, whereby the energy source was a generated plasma. The energy was focused on a specific area, with the metallic powder simultaneously injected through a nozzle in the plasma focus; then, a melted zone was formed on the substrate, building the metallic components layer by layer. The aforementioned procedure was completed under two types of atmospheric conditions: in air and under an argon atmosphere with a noble and inert gas, used to protect the formed walls, preventing their oxidation [17,24].
Later in this paper, these two AM environments will be compared, alongside the respective as-built or thermal treatments applied to the samples with respect to their mechanical properties.
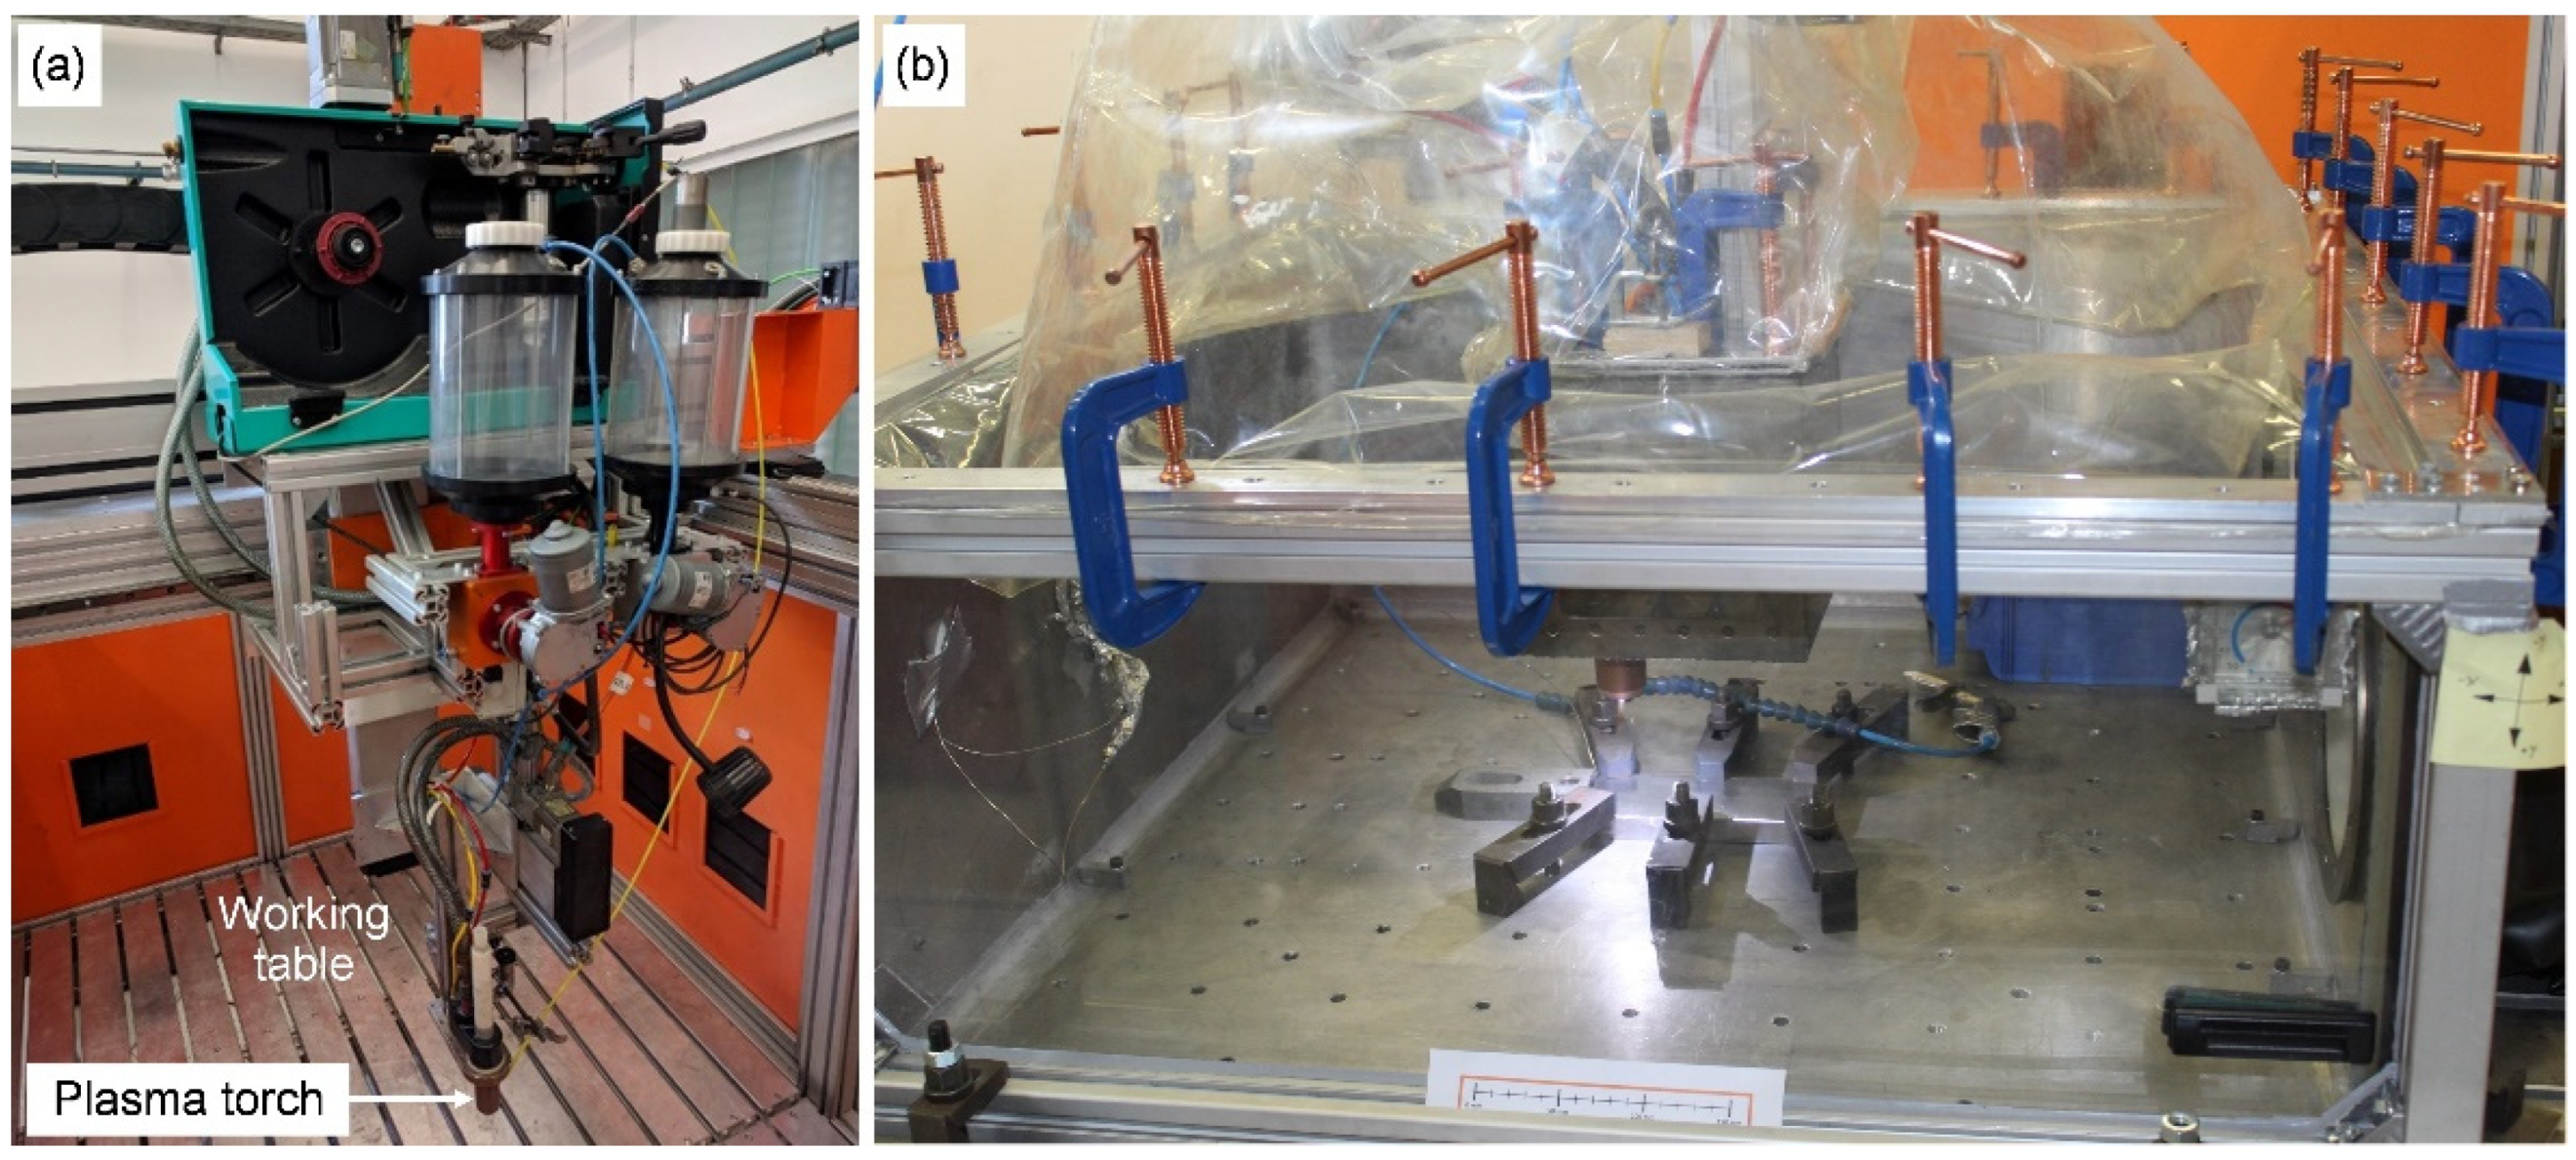
The PMD device and the chamber made by RHP-Technology GmbH (Seibersdorf, Austria) are shown in Figure 3. Before the deposition process, an AISI 1015 steel substrate was placed on an aluminium working table at a prefixed standoff distance according to the manufacturing parameters. The torch and the feeders are displayed in Figure 3a. Based on previous results of the processing conditions test, the argon atmosphere was implemented in a special setup with an argon-purged processing chamber, as illustrated in Figure 3b.
The manufacturing parameters were selected according to the results of previously performed powder feeding tests and weldability studies [17,24].
The tungsten electrode acts as the cathode and controls the flux of the current, whereas the copper cylinder acts as the anode and withholds the pilot arch.
This cylinder also provides the plasma gas and the powder via two different apertures. The main function of the cited gas, which is conducted by a nozzle, is to prevent the mixture of the melted material and ambient air.
The welding arch energy is mainly produced by the described pilot arch, which melts the powder; the powder is then transferred to the nozzle by a transporting gas.
The shielding gas is one of the most critical elements of the procedure, as it protects the atmosphere, the melting mass, and the arch, all of which are fundamental for the research. For example, a breach in the argon atmosphere would introduce ambient air, tainting the results. The same is true of the welding pool; the introduction of foreign contaminants could result in significant variation in the compositions of the formed walls, consequently diminishing the obtained mechanical properties.
The cooling system is contained between the electrode and the powder feeder system; it generally uses water to prevent excessively high temperatures in the torch, which could eventually melt the nozzle and obstruct the exit conduit.
In this research, the PMD procedure was conducted under a potential of 20 V applied between the internal copper cylinder and the electrode (using argon as the pilot gas), resulting in plasma production. This pilot enables the plasma arc to be originated between the electrode and the substrate connected to the ground.
Preliminary range-finding tests were conducted to determine key processing parameters for this investigation [24]. Therefore, the arc current, the welding speed, and the material feed rate were 140 A, 550 mm/min, and 23.3 g/min, respectively.
In addition to the processing parameters, the AM atmosphere could be considered a significant influence on the final behaviour of the samples [25]; however, this influence has not previously been explored in samples produced by PMD, representing the main objective of the present research. The novelty of this investigation is a thorough comparative study of samples processed in air and argon atmospheres.
Therefore, two straight walls were produced in air and argon atmospheres, respectively. The first manufactured wall (W1) was built under ambient air conditions, whereas the second wall (W2) was produced in an argon-purged processing chamber. Under an argon atmosphere, the protective atmosphere is assumed to contribute to the reduction in possible oxide formation during the manufacturing procedure [25]; therefore, the performance of the final specimens may vary. The aspect of both walls is revealed in Figure 4. The as-fabricated walls additively manufactured on an AISI 1015 steel substrate have dimensions of 40 mm height, 130 mm length, and 15 mm width.
Following a close examination, a total of nine samples were extracted from each wall. They were wire-cut with an Accutom-50 cutting device (Struers, Cleveland, OH, USA), considering the ASTM geometrical standard recommendations in order to measure their mechanical properties, as shown in Figure 5 [26].
The samples were divided into three groups of three samples each. Their location and orientation on the wall are illustrated in Figure 5a, achieving a fundamental objective of the comparative study. One set of samples was studied as-built (marked in red), and the other two sets were thermally treated under determined parameters, marked in yellow and blue, respectively.
Three clearly differentiated zones were obtained in the specimens of each wall type and processing condition with respect to the conformation zone from which they were extracted: “X.1” is the closest to the AISI 1015 substrate, whereas “X.3” is the last layer to be deposited. “X” is related to postprocessing, as explained in the following subsection.
These samples were the starting point of the subsequent field work, including a series of experiments, tests, and inspections to acquire the necessary data parameters for the corresponding calculations in order to fulfil the proposed objectives. These tests and corresponding data will be thoroughly divulged and explained in the following subsections in other to maximize the understanding of the procedure and the obtained results.

2.3. Thermal Treatments

Two thermal treatments (TT) were performed with the intention of studying possible variations in the microstructure and properties of the samples. Both treatments were carried out under vacuum conditions, with similar heating and cooling rates of 10 °C/min and 5 °C/min, respectively. The main differences between the thermal treatments were the holding time and the temperature reached. In thermal treatment TT1, the temperature increased to 480 °C and withheld for 1 h; whereas in thermal treatment TT2, a maximum temperature of 620 °C was reached and withheld for 4 h. These two thermal treatments were selected as the most suitable to improve the targeted mechanical properties, based on information provided by the standard [19]. The main goal was to determine whether TT1 induced an increase in mechanical properties, such as precipitation hardening, and relative to TT2 with a higher temperature, to determine whether increased deformation occurred as a result of stress relief.

2.4. Properties and Microstructural Characterization

The Archimedes method was employed to determine the densification of both walls. Nine measurements were carried out on each wall in order to obtain an average value of their density, which is directly related to the overall mechanical properties; the higher the density, the better the mechanical properties [27].
Uniaxial tensile tests were carried out at room temperature using an Instron 5505 load unit (Norwood, MA, USA) with a strain rate of 0.5 mm·min−1. The following mechanical properties were measured: ultimate tensile strength (UTS), yield strength (σy), Young’s modulus (E), and elongation (ε). The final values were obtained by averaging the results of three tensile specimens from each group of samples processed in air and argon after thermal treatments (TT1, TT2, and as-built).
Before tensile tests were conducted, the hardness of all samples was measured; six indentations were made on the cut surface of each sample. Previously, the samples were prepared metallographically. In this context, the Vickers hardness of the as-built thermally treated specimens was determined using a load of 1 kg on a Qness Q10M (Obergäu, Austria) instrument. The hardness of the substrate was also determined. These indentations were made on the paddle of the test sample. The location for the hardness test was chosen to avoid possible interferences with the data obtained from the tensile tests, which could provoke the early fracture of the sample as a result of weakening.
After mechanical characterization, the tribological properties of the samples were analysed by a Microtest MT/30/NI ball-on-disc tribometer (Madrid, Spain) with a 6 mm diameter alumina ball under a normal load of 5 N, sliding on a 2 mm radius track at 200 rpm for 15 min. Before the tests were performed, the specimens were grounded, polished, cleaned with acetone in an ultrasonic bath, and dried. A Leica Zeiss DMV6 (Leica Microsystems, Heerbrugg, Switzerland) was used to study the surface morphology by optical microscopy (OM).
Microstructures and elemental compositions were examined using an SEM microscope (FEI Teneo, Hillsboro, OR, USA) coupled with EDS. XRD analysis was carried out on a Bruker D8 Advance A25 instrument (Billerica, MA, USA) with Cu-Kα radiation at a wavelength of 1.5418 Å and a scanning angle (2θ) in the range of 20° to 80°.

3. Results

3.1. Mechanical and Physical Properties

Archimedes density results for both walls confirmed that the achieved densification was close to 99.40%, representing an average value of density measurements with a standard deviation of ±0.11.
In the context of mechanical properties, it is generally accepted that there might be a significant degree of anisotropy in the behaviour of the 17-4PH walls caused by layer-by-layer fabrication; therefore, a study of mechanical properties was carried out in specimens oriented in the same direction. Significant comparisons among the tensile properties of the as-built and TT1- and TT2- treated specimens are plotted in Figure 6a, b, and c, respectively. The graphics shown below were used to analyse the performance of each specimen according to the environmental conditions under which the conformation process took place (air or argon atmosphere), satisfying one of the objectives of the research, in addition to evaluating possible variations in the final properties of the 17-4PH specimens caused by the thermal treatments. As shown in Figure 6, there were appreciable differences in the properties of the as-built specimens with respect to the TT1- and TT2-treated specimens. To ensure the orderly interpretation of the results, each of the measured mechanical properties were analysed separately: (i) UTS, (ii) yield strength (MPa), (iii) deformation (%), and (iv) Young’s modulus (GPa).
Figure 6a shows a slight but general increase in the mechanical properties for the as-built specimens in air with respect to those manufactured in an argon atmosphere. These data suggest that air as-built specimens fabricated from powder through the PMD process are not only easier and cheaper to manufacture but also have better mechanical properties.
Figure 6b (TT1) shows that whereas the elongation and Young’s modulus remained almost unchanged, a substantial increase in UTS and the yield strength occurred, confirming that TT1 increased the hardness of the steel, as well as its ability to resist loads before entering the plasticization phase, in accordance with the initial theory.
According to Figure 6c (TT2), the Young’s modulus was slightly reduced under air-built conditions compared to that of as-built specimens, indicating that this set of test tubes is more flexible, whereas the Young’s modulus was not affected in argon-processed specimens, with insignificant variation. Additionally, the yield strength was almost unaffected affected under argon conditions in the as-built specimens and the TT2 specimens but significantly reduced in air-built specimens. The primary reason to apply of this treatment is to substantially increase the percentage of elongation, which is consistent with the initial hypothesis.
The cyphers of the mechanical properties shown in the graphics and conducted in each sample are shown in Table 2, including possible deviations with respect to the conformation zone from which they were extracted: “X.1” is the closest to the AISI 1015 substrate, and “X.3” is the farthest. The divergence produced in each set of samples can be evaluated according to the values shown in Table 2.
To ensure an orderly interpretation of the obtained results shown in Table 2, each of the measured mechanical properties below will be discussed.
Regarding the UTS, it can be asserted that in the as-built specimens, both under air manufacturing conditions and in argon, the layers in the centre exhibit higher values as a result of the longer time taken to cool such a zone, as it is affected by the heat of the upper layer.
In TT1 and TT2, the UTS is higher in the first layer as a result of the thermal treatment itself, as all of the samples underwent thermal treatment at a homogeneous temperature, and cooling occurred from the top to the bottom of the wall.
Young’s modulus, yield strength, and elongation are intrinsic properties of the material are therefore not affected by the position of the layer but by the microstructure of the sample. Processing conditions are responsible for any variation in the conduct of each specimen, as explained in the next section.
With respect to the comparison of the mechanical properties of specimens produced under each of the tested atmospheric conditions, it is worth mentioning that the data revealed an upward trend of UTS in specimens processed in air relative to those processed in argon. This phenomenon was more singular when the specimens were treated with TT1—59% less than the value of the UTS when manufactured in an argon atmosphere. This phenomenon is mainly the result of impurities in the surrounding air.
However, in the as-built samples, this difference was around 7%. All percentages were calculated considering the average value of the UTS. The aim of TT1 is to improve the UTS, and this objective is achieved only if the specimens were previously assembled in an air environment. In that case, a 20.6% strengthening was archived in specimens treated under TT1 conditions. In the framework of the standards presented in the bibliography, achieved UTS value of 1379.8 MPa (average value) meets the requirements specified for TT2, the main objective of which was to improve the elongation of the specimens; therefore, the UTS values in those samples are the lowest of all tested specimens [19,28,29].
The yield strength results were also compared, which also correlated with the processing conditions and the UTS tendency; in general, the yield strength values showed similar trends to the UTS values, with higher values associated with the specimens processed in air.
Regarding the standards, the yield strength value also fulfilled the standards after TT1 (205.74 MPa). As shown in Figure 6b, there was no error bar in the value of the yield strength of the specimen processed in argon and treated with TT1; during the tensile test, the low deformability of these specimens caused cracks before their yield strength could be measured, as previously noted.
With respect to the measured deformation in the as-built specimens (see Figure 6a), there was a slight increase in elongation in the specimens produced in air (4.06%) compared to those produced in argon (3.85%). Figure 6c shows the maximum elongation values after TT2. As expected, TT2 promoted fluctuation in elongation of the specimens, complying with the objectives set in an effort to improve the ductility of 17-4PH parts [19,29].
In this case, the differences in deformation values with respect to the manufacturing conditions, i.e., air and argon, were almost unnoticeable—11.23% (±1.01%) and 10.32% (±1.83), respectively. Furthermore, after TT2, the elongation values homogenized along the wall height, in contrast to the as-built condition, with a clear trend of lower elongation values closer to the substrate.
A slight increasing trend in the Young’s modulus was observed in the argon-processed specimens (see Table 2). This phenomenon was observed regardless of whether the specimens were as-built or thermally treated. On the other hand, in samples manufactured under air conditions, a decreasing trend in Young’s modulus was observed after both thermal treatments.
Following the performance tests and evaluation of the measured mechanical properties, hardness measurements were performed. As previously mentioned, a set of microindentations was made to evaluate the hardness of the resulting alloy, as shown in Figure 7. Significant differences were observed between the values of the as-built specimens and TT1-treated specimens; however, the hardness results suggested that the effect was negligible in TT2-treated specimens, regardless of the ambient conditions.
It is important to note that the plotted hardness values were calculated based on the average results obtained from the individual specimens. The low standard deviation indicates that the samples presented with homogenous properties. Furthermore, these hardness values were similar to the results previously obtained in specimens produced by different AM techniques [30].
As shown in Figure 7, a significant increase in the hardness values was observed in specimens fabricated with TT1 compared as-built specimens due to the larger size of the grains formed as a result of the thermal treatment; this topic will be further discussed in the following sections.
The detailed quantities and their possible deviations obtained from the Vickers hardness evaluation are listed in Table 3, with a detailed explanation presented below.
According to the Vickers hardness values of the specimens, a 27.73% increase in hardness was achieved following TT1 in an air environment, whereas a 31.16% increase in hardness was achieved under argon conditions. These are significant variations relative to those measured following TT2 in both air and argon atmospheres, which were negligible.
Regarding the environment in which the AM process took place, according to analysis of the obtained results, processing in an air environment will always produce specimens with higher hardness values, although the percentage increase following TT1 treatment was slightly higher in argon- than in air-conformed specimens.

3.2. Tribological Behaviour

As shown in Figure 8, the tribological behaviour of the specimens revealed differences between the specimens produced in air and in argon atmospheres. Our analysis was focused on both the dimensions of the produced grooves, as well as the friction coefficient and weathering of each tested sample, specifically the correlation between them.
In general, specimens fabricated under argon conditions manifested less surface penetration than specimens built in air, regardless of the thermal treatment applied. Moreover, the specimens treated with TT1 presented a higher friction coefficient than as-built specimens, in agreement with the results of the hardness measurement, for which higher values were associated with TT1-treated specimens. The friction coefficients showed values of approximately 0.75 and 0.85 in specimens TT1 and TT2, respectively; in this regard, the thermal treatment effect was negligible. Furthermore, the obtained experimental results before the plateau show that argon samples, in the time period from the initiation phase until the stabilization point, had a higher friction coefficient than those constructed in air.

3.3. Microstructure and XRD Analysis

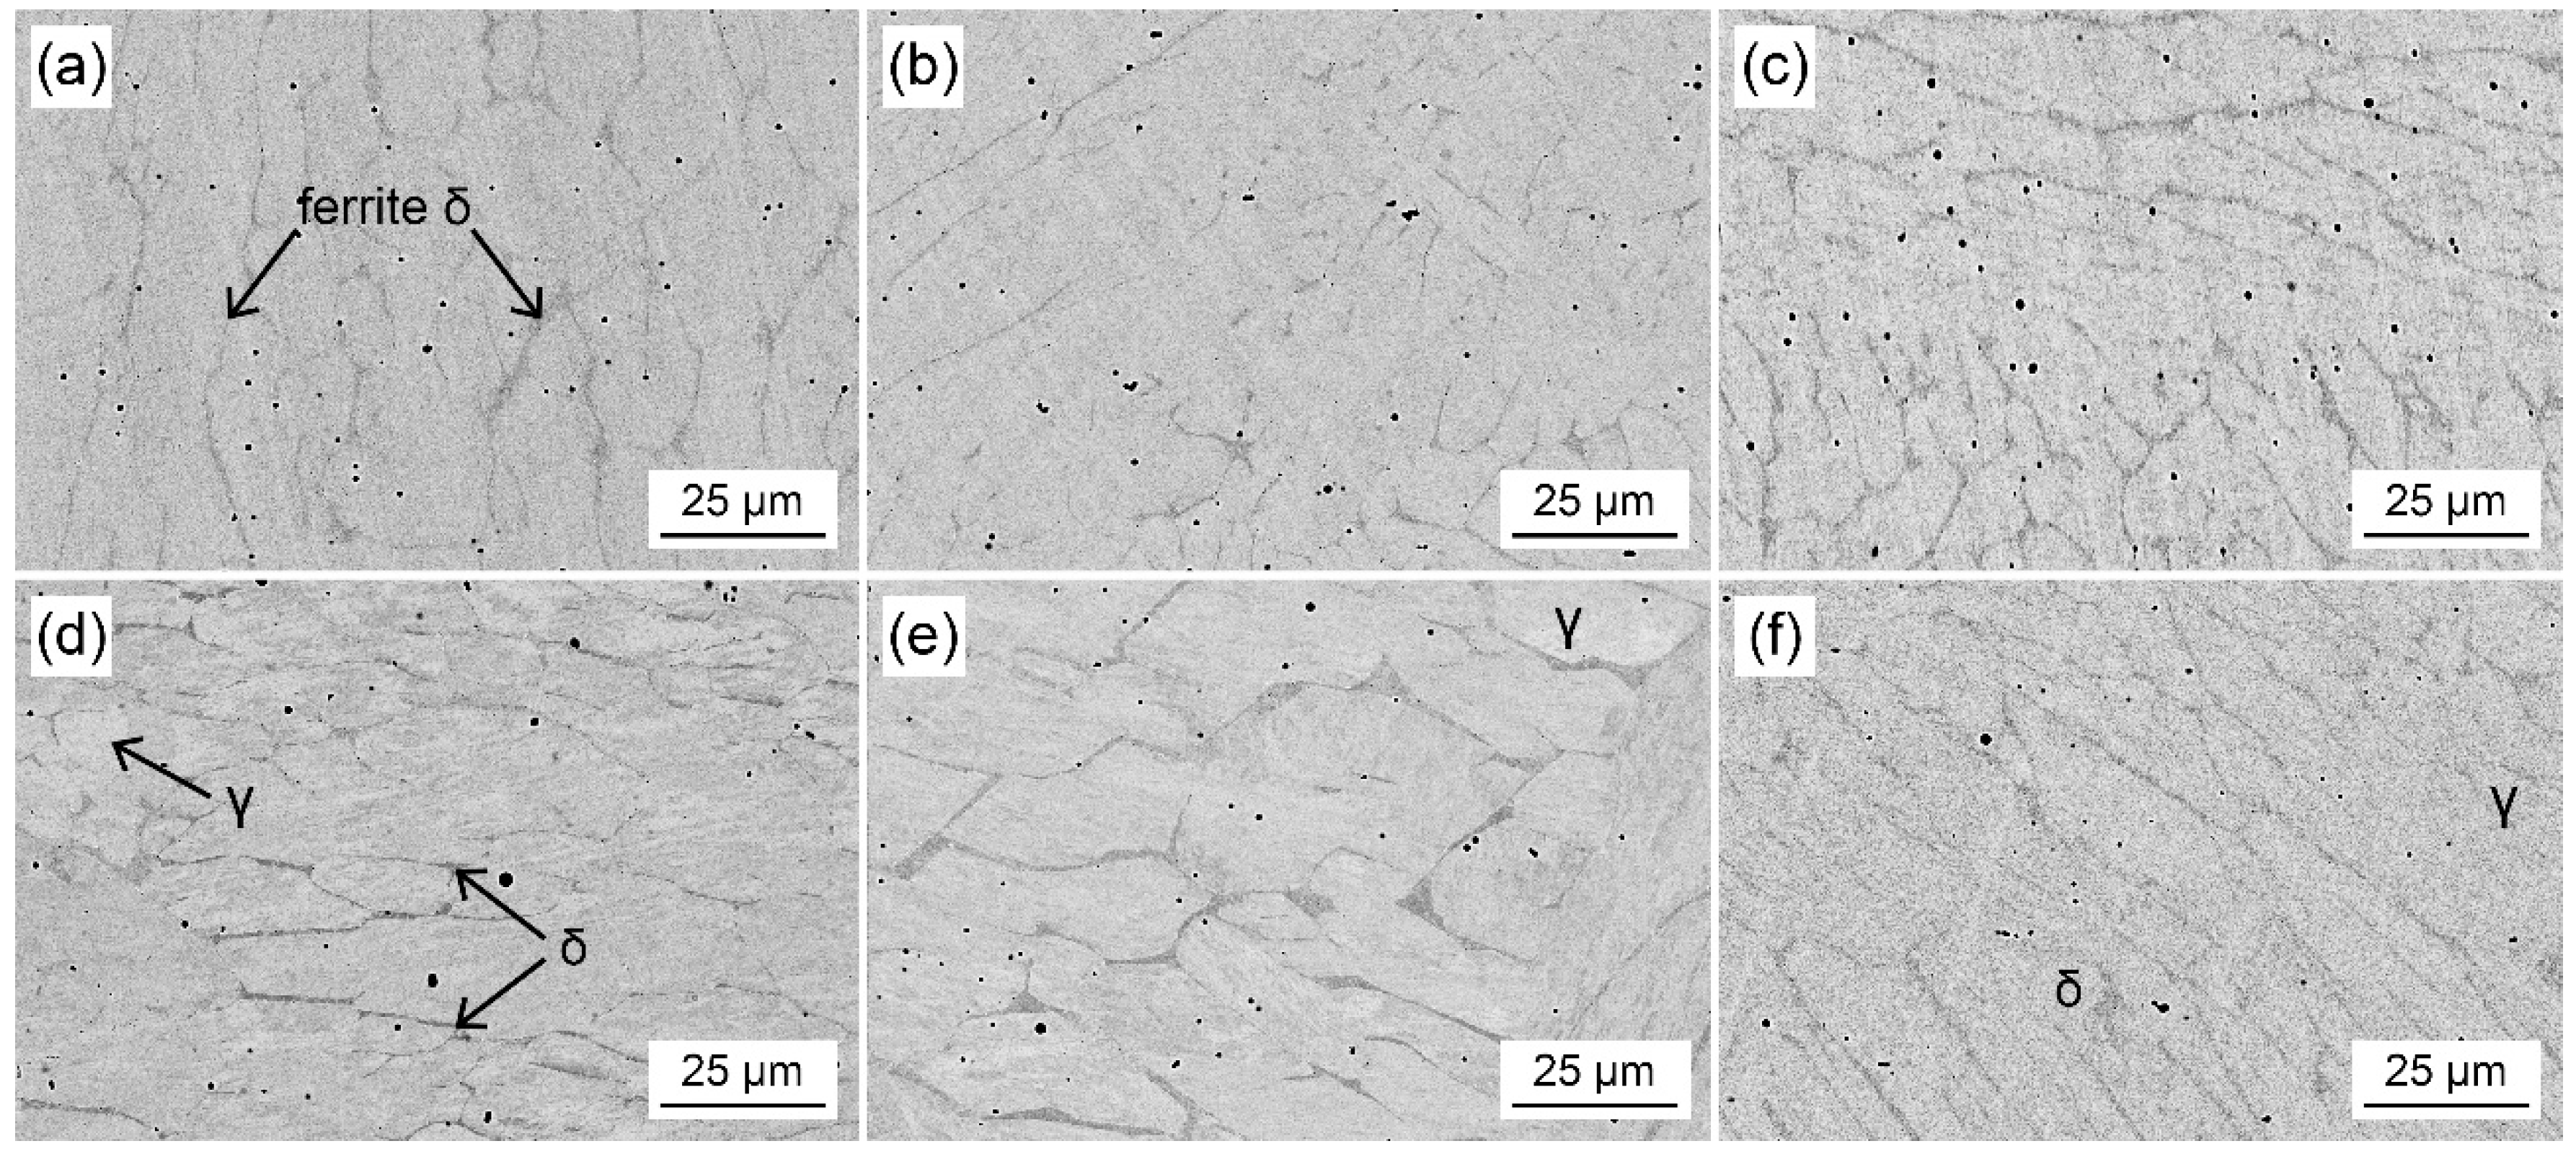
Microstructure characterization of the as-built specimens revealed how the homogenous microstructure was achieved in general, as shown in Figure 9. Furthermore, according to the previously discussed density results, small and isolated pores were observed in the microstructure. The segregation phenomenon was nearly undetectable; therefore, the employed processing conditions can be assumed to be suitable for the development of 17-4PH steel via PMD. Furthermore, the resulting microstructure of the as-built specimens resembles that of specimens produced by AM through different techniques [19,28,31].
The SEM images presented in Figure 9 show an overview of the effect produced by the thermal treatments and the influence of the processing conditions. In comparison with the as-built specimens without thermal treatment (see Figure 9a,d), the distribution of the retained austenitic phase in the martensitic matrix, as well as the presence of δ ferrite as an interdendritic phase, can be observed. In the specimen fabricated in air, the retained austenitic phase appeared to be homogeneous with limited distribution in the martensitic matrix, making its visual detection difficult, whereas in PMD specimens produced in an argon atmosphere, this phase was easily observed.
This phenomenon is in agreement with the previously discussed property results; in general, the specimens produced in air showed better properties than those produced in argon, possibly as a result of the retained austenitic phase distribution in the argon-built specimen.
Additionally, δ ferrite in all specimens. In the case of PMD specimens built in air, the width of interdendritic δ ferrite was finer than that of PMD specimens built in argon, corresponding to the properties reduction in the case of specimens processed in argon, in which larger regions of δ ferrite were observed. As described by other authors, the presence of this interdendritic phase caused embrittlement in the specimens, especially those treated with TT1.
Microstructural comparison of these samples revealed slight variations in the size of the dendrites, in addition to the δ ferrite as the interdendritic phase. As shown in Figure 9b, the microstructure of the specimen built in air conditions after TT1 exhibits a slight decrease in the δ interdendritic phase, whereas the dendritic morphology of the TT1-treated argon-manufactured specimen was caused by a major appearance of a δ interdendritic phase, as shown in the SEM image presented in Figure 9e. Both differences are in concordance with the behaviour presented in the mechanical properties table; the greater the presence of an δ interdendritic phase, the less elongation and therefore the lower the Young’s modulus.
In 17-4PH specimens thermally treated by TT2, a general grain refinement was observed. The influence of TT2 similarly affects specimens manufactured both in air and in argon. The presence of the interdendritic phase can be observed in the SEM images presented in Figure 9c,f and is possibly related to the increased elongation obtained after TT2 treatment, with the microstructures of the specimens consisting of a martensitic matrix with a reduced and finer interdendritic phase.
The martensite laths were generally too thin to be clearly revealed in the SEM images presented Figure 9; the dominant features were blocks of parallel martensite laths within a prior austenite grain. A similar microstructure was observed in research in which AM techniques were used [19,30,32,33,34]. The increased presence of martensite in all air-produced specimens compared to argon-produced specimens is undeniable proof that specimens developed in an air atmosphere are substantially harder than those developed in an argon atmosphere.
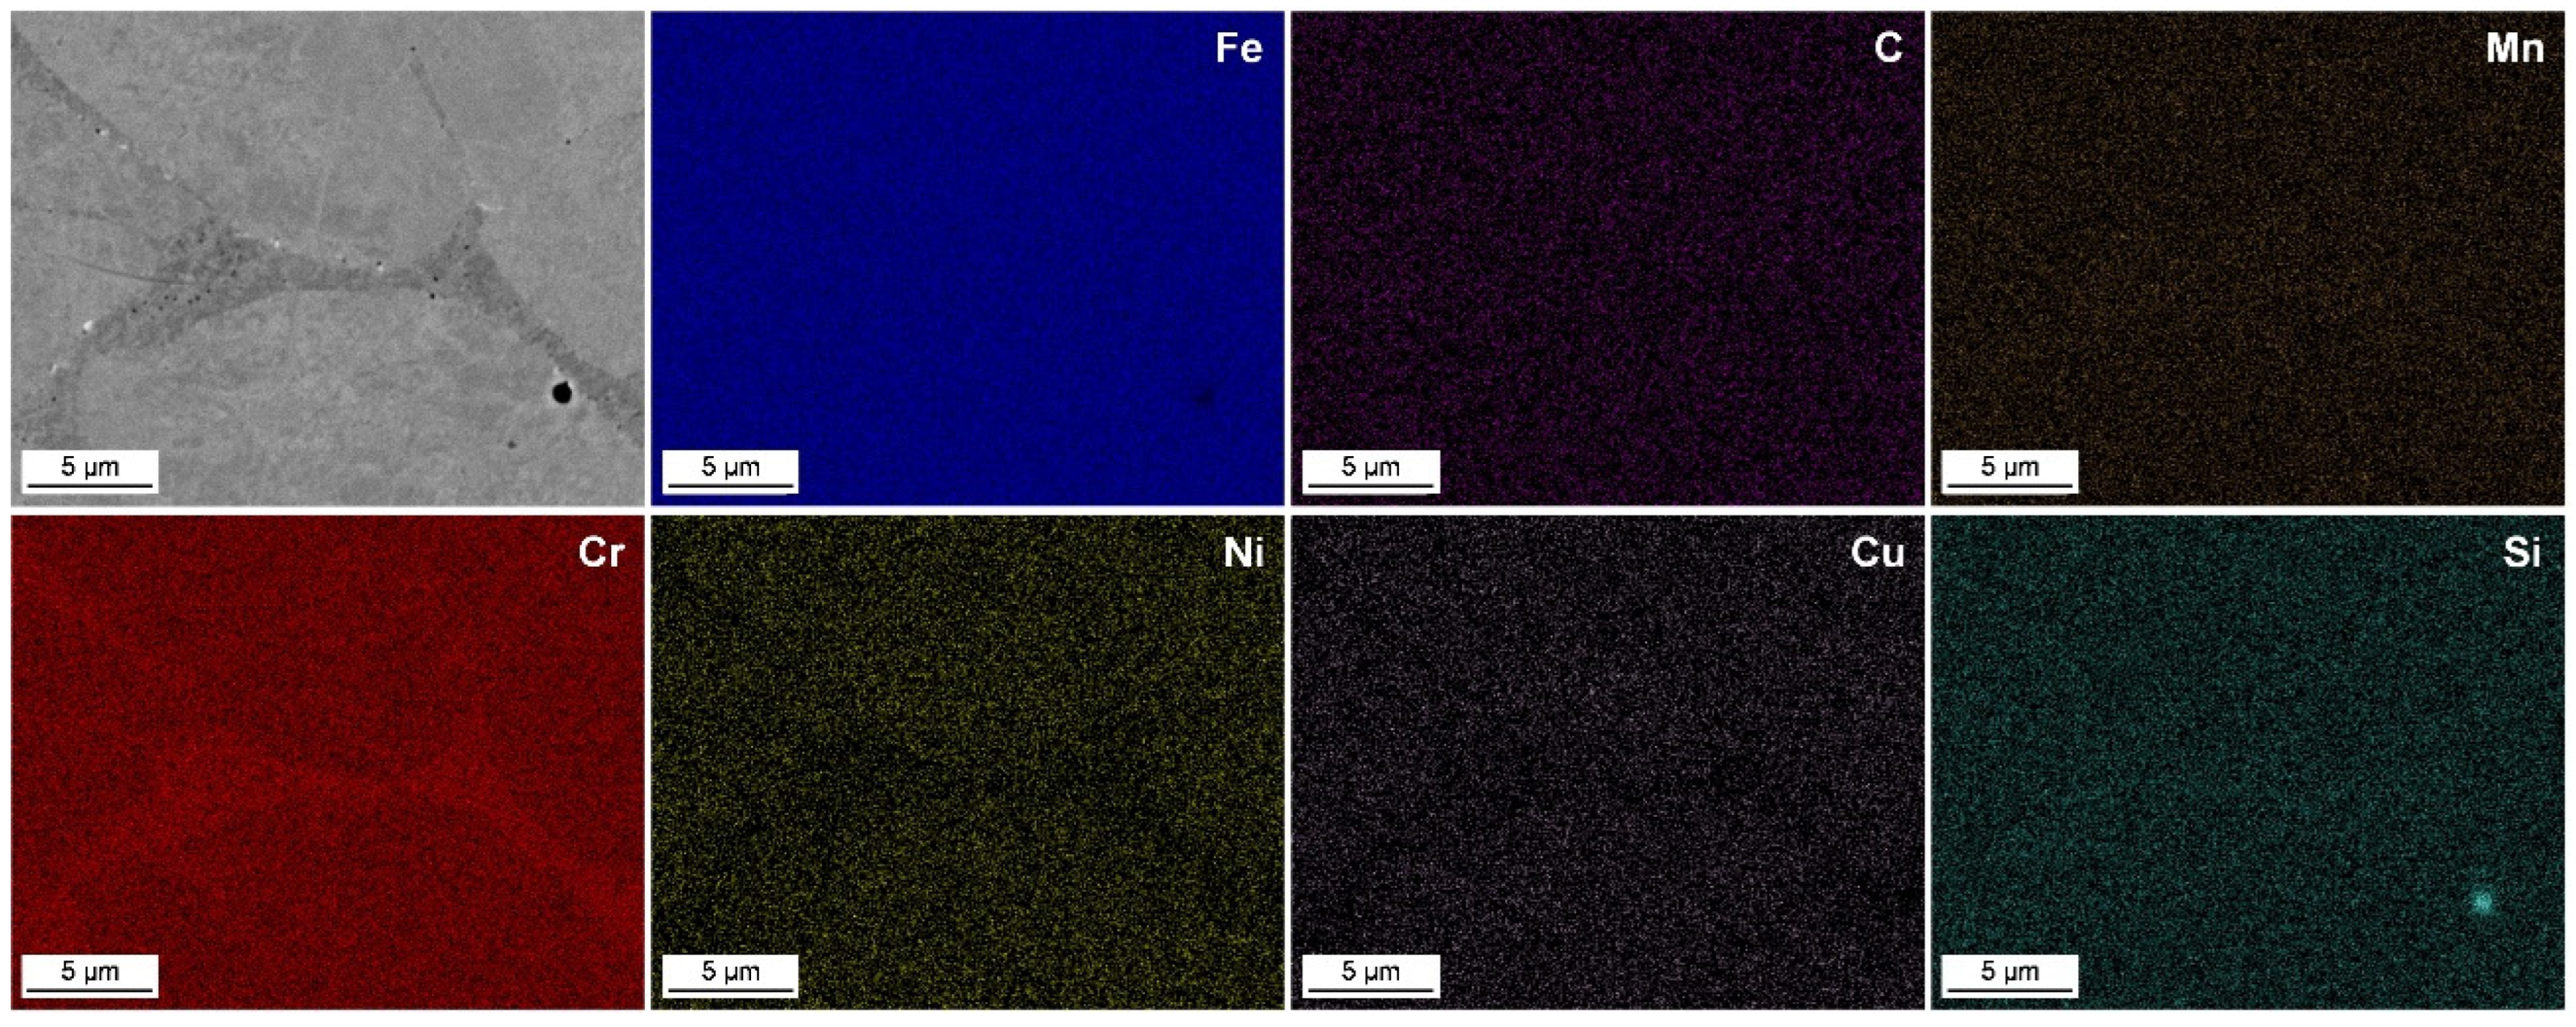
In order to verify and confirm the homogeneous distribution of the elements in the produced 17-4PH specimens, compositional mapping analysis was performed, as shown in Figure 10. In particular, it has been investigated the interdendritic region and analysed the main chemical elements of the alloy. As expected, these were areas chromium-rich, with less nickel and copper than in the martensitic matrix [35].
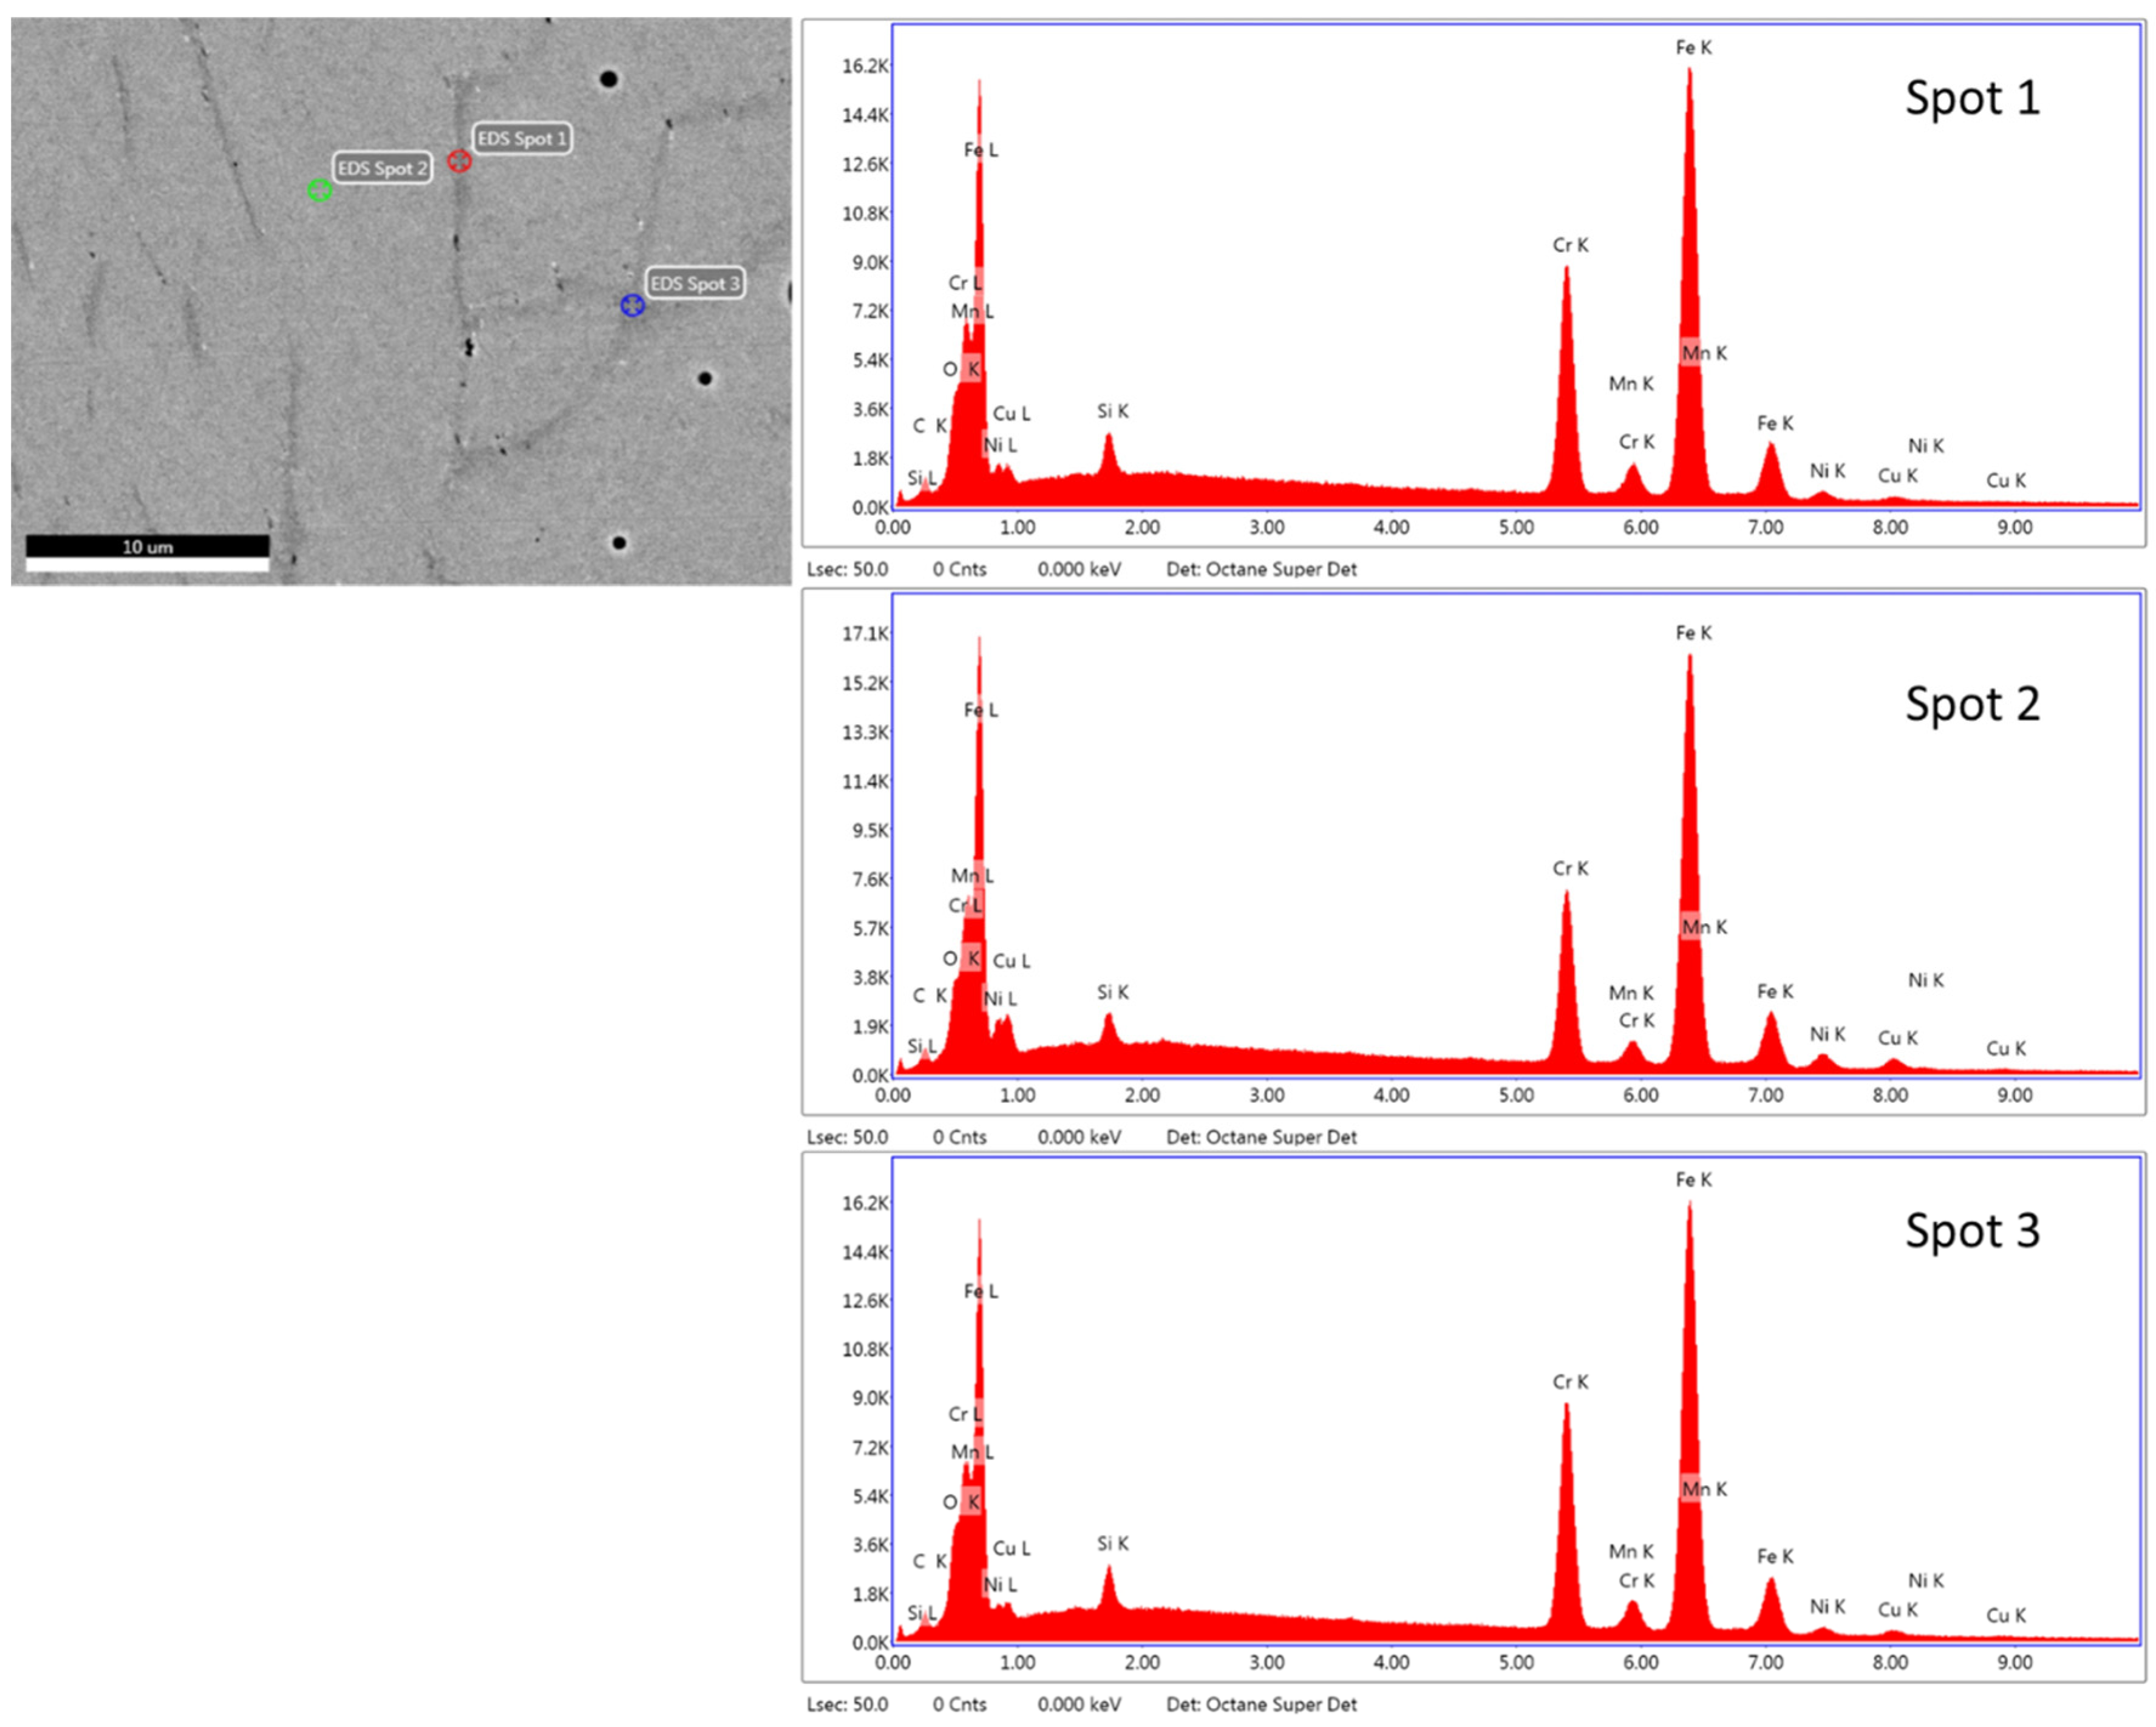
Based on the microstructure observed in Figure 11, three spots were also analysed. Spots 1 and 3 were selected due to their interdendritic location; spot 2 was in the interdendritic phase. The highest chromium content was detected in these interdendritic regions, with EDS analysis indicating a lower nickel content, in agreement with the mapping shown in Figure 10.
Chromium-rich precipitates at grain boundaries fundamentally lose copper and nickel, as shown in Figure 11. In the SEM image of Figure 11, a series of white spots can be observed, corresponding to NbC-rich areas, which are common in white precipitates.
The results of the XRD analysis (Figure 12) indicate slight differences in the phases of specimens processed in air with respect to the specimens produced in argon, as expected. Compared with the results of the as-built specimens, the soft peak of the austenite phase appeared to be more detectable in specimens processed in argon. These findings might verify the microstructural results. The XRD study patterns show main peaks resembling those reported in previous research [19].
In terms of the influence of the thermal treatment, the TT1-treated specimen showed a higher ferrite phase content than the TT2-treated specimens. A higher ferrite phase content in TT1-treated samples, in the appropriate proportion, results in an increased resistance to hot cracking, which explains the substantial improvement in both Young’s modulus and yield strength, in agreement with the microstructural results.

4. Discussion

The investigated manufacturing parameters were suitable to produce specimens that exhibited both an appropriate densification and an imperceptible segregation phenomenon, as demonstrated by the agreement between the measured hardness in the as-built specimens and the reference values. Moreover, the XRD patterns of the as-built specimens resembled those reported in previous studies, confirming the validity of the proposed PMD parameters.
The behaviour of the as-built specimens was similar to that of specimens manufactured by traditional techniques. Therefore, the PMD technique can be used to improve the manufacturing procedure with respect to traditional techniques, with a favourable cost–benefit ratio.
Microstructural study and XRD analysis confirmed the presence of a martensitic phase, delta ferrite, and austenite, which affected the final properties of the specimens. Austenite was primarily encountered in argon-processed samples, confirming the initial results indicating that argon-processed specimens are less hard than built in an air atmosphere, regardless of subsequent thermal treatment. Regarding the ferrite phase, a comparison of the content in each set of samples reveals a clear pattern, in accordance with result obtained with respect to the mechanical properties; the larger the ferrite phase, the less bending behaviour. In as-built and TT1 samples, a decrease in elongation was observed in argon walls compared to specimens manufactured in air; the opposite was observed in the TT2 samples, with greater elongation in the argon samples corresponding with a decrease in the ferrite phase. The presence and amount of the retained austenite phase may significantly influence the strength, toughness, strain hardening, and elongation to failure of the specimen, as previously reported [21].
The presence of austenite could result in cracks due to a phase transformation provoked by the shift in volume. Copper precipitates were not observed after hardening induced by the TT1 thermal treatment.
Regarding TT2, as mentioned earlier, a significant increase in the percentage of elongation was observed in both air- and argon-manufactured walls. Such an improvement in elongation can be useful when thermally treatment specimens are placed in a critical or sensitive position. Before breaking, misshaping will occur as a warning signal of a nearby failure, in contrast to hard materials, which can break without notice.
The abovementioned phenomenon is of considerable importance in the aerospace sector with high safety standards and the requirement for a certain level of flexibility. The proposed method, alongside other method that are currently under study, can prove invaluable in the development of new material and composites, which are constantly demanded for engineering research and industrial applications.

5. Conclusions

In this research, two walls were produced using a powder with the same composition as that of 17-4PH steel. Specimens were produced using novel advanced additive manufacturing technique known as PMD in both air and argon atmospheres. Furthermore, two thermal treatments (TT1 and TT2) were applied to the specimens with the aim of improving targeted mechanical properties. Detailed characterization and analysis of the measured properties and microstructures resulted in the following conclusions:
  • The specimens processed in air showed less content of the retained austenitic phase, resulting in improved mechanical properties relative to those of the specimens produced in argon. Furthermore, an embrittlement effect of interdendritic δ ferrite was detected in specimens treated with TT1.
  • Due to variations in phases during processing and thermal treatments, the mechanical properties of the specimens were subject to treatment effects as follows: (i) TT1 improved the Young’s modulus and yield strength values of the specimens at the cost of the elongation decrement, and (ii) TT2 improved the elongation, contributing to the maintenance of acceptable UTS values.
  • Consistent with the mechanical and physical properties, the tribological behaviour of TT1-treated samples was in agreement with the obtained hardness values.

Author Contributions

All authors collaborated to produce a high-quality research study. E.A.-G. manufactured the specimens and wrote the original draft of the manuscript. I.M.-M. reviewed and edited the manuscript, designed the structure of the paper, and was responsible for material selection. E.M.P.-S. was responsible for metallographic preparation, tested the mechanical properties, and selected the references. E.N. optimized the equipment and applications. M.K. supervised and controlled the manufacturing process. C.A. performed microstructural characterization of the samples using optical and electron microscopy, as well as the relationship between processing parameters and material properties. All authors have read and agreed to the published version of the manuscript.

Funding

This research was funded by the European Union Horizon 2020 Programme (H2020), grant number 768612.

Acknowledgments

The authors would like to thank Jorge Esteban Ramirez, mechanical engineering student in the Polytechnic School of Engineering of the University of Sevilla.

Conflicts of Interest

The authors declare no conflict of interest.

References

  1. Giganto, S.; Martínez-Pellitero, S.; Barreiro, J.; Zapico, P. Influence of 17-4 PH stainless steel powder recycling on properties of SLM additive manufactured parts. J. Mater. Sci. Technol. 2022, 16, 1647–1658. [Google Scholar] [CrossRef]
  2. Ding, H.; Bao, X.; Jamili-Shirvan, J.; Jin, J.; Deng, L.; Yao, K.; Gong, P.; Wang, X. Enhancing strength-ductility synergy in an ex situ Zr-based metallic glass composite via nanocrystal formation within high-entropy alloy particles. Mater. Des. 2021, 210, 110108. [Google Scholar] [CrossRef]
  3. Ford, S.; Despeisse, M. Additive manufacturing and sustainability: An exploratory study of the advantages and challenges. J. Clean. Prod. 2016, 137, 1573–1587. [Google Scholar] [CrossRef]
  4. Paris, H.; Mokhtarian, H.; Coatanéa, E.; Museau, M.; Flores Ituarte, I. Comparative environmental impacts of additive and substractive manufacturing technologies. CIRP Ann. Manuf. Technol. 2015, 65, 29–32. [Google Scholar] [CrossRef]
  5. Thawon, I.; Fongsamootr, T.; Mona, Y.; Suttakul, P. Investigation of the Mechanical Properties of Additively Manufactured Metal Parts with Different Relative Densities. Appl. Sci. 2022, 12, 9915. [Google Scholar] [CrossRef]
  6. Lou, N.; Scheitler, C.; Ciftci, N.; Galgon, F.; Fu, Z.; Uhlenwinkel, V.; Schmidt, M.; Körner, C. Preparation of Fe-Co-B-Si-Nb bulk metallic glasses by laser powder bed fusion: Microstructure and properties. Mater. Charact. 2020, 162, 110206. [Google Scholar] [CrossRef]
  7. Ronneberg, T.; Davies, C.M.; Hooper, P.A. Revealing relationships between porosity, microstructure and mechanical properties of laser powder bed fusion 316L stainless steel through heat treatment. Mater. Des. 2020, 189, 108481. [Google Scholar] [CrossRef]
  8. Reijonen, J.; Revuelta, A.; Riipinen, T.; Ruusuvuori, K.; Puukko, P. On the effect of shielding gas flow on porosity and melt pool geometry in laser powder bed fusion additive manufacturing. Addit. Manuf. 2020, 32, 101030. [Google Scholar] [CrossRef]
  9. Jessy Michla, J.R.; Ravikumar, B.; Ram Prabhu, T.; Siengchin, S.; Arul Kumar, M.; Rajini, N. Effect of nitriding on mechanical and microstructural properties of Direct Metal Laser Sintered 17-4PH stainless steel. J. Mater. Res. Technol. 2022, 19, 2810–2821. [Google Scholar] [CrossRef]
  10. Yang, K.T.; Kim, M.K.; Kim, D.; Suhr, J. Investigation of laser powder bed fusion manufacturing and post-processing for surface quality of as-built 17-4PH stainless steel. Surf. Coat. Technol. 2021, 422, 127492. [Google Scholar] [CrossRef]
  11. Guennouni, N.; Maisonnette, D.; Grosjean, C.; Poquillon, D.; Blanc, C. Susceptibility to Pitting and Environmentally Assisted Cracking of 17-4PH Martensitic Stainless Steel Produced by Laser Beam Melting. Materials 2022, 15, 7121. [Google Scholar] [CrossRef]
  12. Hayes, B.J.; Martin, B.W.; Welk, B.; Kuhr, S.J.; Ales, T.K.; Brice, D.A.; Ghamarian, I.; Baker, A.H.; Haden, C.V.; Harlow, D.G.; et al. Predicting tensile properties of Ti-6Al-4V produced via directed energy deposition. Acta Mater. 2017, 133, 120–133. [Google Scholar] [CrossRef]
  13. Edwards, P.; Ramulu, M.; O’Conner, A. Electron Beam Additive Manufacturing of Titanium Components, Properties and Performance. J. Manuf. Sci. Eng. 2013, 135, 061016-1. [Google Scholar] [CrossRef]
  14. McAndrew, A.R.; Alvarez Rosales, M.; Colegrove, P.A.; Hönnige, J.R.; Ho, A.; Fayolle, R.; Eyitayo, K.; Stan, I.; Sukrongpang, P.; Crochemore, A.; et al. Interpass rolling of Ti-6Al-4V wire + arc additively manufacturing features for microstructural refinement. Addit. Manuf. 2018, 21, 340–349. [Google Scholar] [CrossRef]
  15. Hönnige, J.R.; Colegrove, P.A.; Ahmed, B.; Fitzpatrick, M.E.; Ganguly, S.; Lee, T.L.; Williams, S.W. Residual stress and texture control in Ti-6Al-4V wire+arc additively manufactured intersections by stress relief and rolling. Mater. Des. 2018, 150, 193–205. [Google Scholar] [CrossRef] [Green Version]
  16. Pérez-Soriano, E.M.; Ariza, E.; Arévalo, C.; Montealegre-Melendez, I.; Kitzmantel, M.; Neubauer, E. Processing by Additive Manufacturing Based on Plasma Transferred Arc of Hastelloy in Air and Argon Atmosphere. Metals 2020, 10, 200. [Google Scholar] [CrossRef] [Green Version]
  17. Bouaziz, M.A.; Djouda, J.M.; Chemkhi, M.; Rambaudon, M.; Kauffmann, J.; Hild, F. Heat treatment effect on 17-4PH stainless steel manufactured by Atomic Diffusion Additive Manufacturing (ADAM). Procedia CIRP 2021, 104, 935–938. [Google Scholar] [CrossRef]
  18. Pragana, J.P.M.; Braganca, I.M.F.; Silva, C.M.A.; Martins, P.A.F. Hybrid Wire-Arc Additive Manufacturing od Conformal Cooling Channels: A Feasibility Study. Int. J. Precis. Eng. Manuf.-Green Technol. 2022, 1–13. [Google Scholar] [CrossRef]
  19. ASTM A693-16; Standard Specification for Precipitation-Hardening Stainless and Heat-Resisting Steel Plate, Sheet, and Strip. ASTM International: West Conshohocken, PA, USA, 2016.
  20. Meredith, S.D.; Zuback, J.S.; Keist, J.S.; Palmer, T.A. Impact of Composition on the Heat Treatment Response of Additively Manufactured 17-4 PH Grade Stainless Steel. Mater. Sci. Eng. A 2018, 738, 44–56. [Google Scholar] [CrossRef]
  21. Yadollahi, A.; Shamsaei, N.; Thompson, S.M.; Elwany, A.; Bian, L. Effects of building orientation and heat treatment on fatigue behavior of selective laser melted 17-4PH stainless steel. Int. J. Fatigue 2017, 94, 218–235. [Google Scholar] [CrossRef]
  22. Zapico, P.; Giganto, S.; Barreiro, J.; Martínez-Pellitero, S. Characterization of 17-4PH metallic powder recycling to optimize the performance of the selective laser melting process. J. Mater. Res. Technol. 2020, 9, 1273–1285. [Google Scholar] [CrossRef]
  23. Murr, L.E.; Martinez, E.; Hernandez, J.; Collins, S.; Amato, K.N.; Gaytan, S.M.; Shindo, P.W. Microstructures and Properties of 17-4 PH Stainless Steel Fabricated by Selective Laser Melting. J. Mater. Res. Technol. 2012, 1, 167–177. [Google Scholar] [CrossRef] [Green Version]
  24. Ariza-Galván, E.; Montealegre-Meléndez, I.; Pérez-Soriano, E.M.; Arévalo Mora, C.; Meuthen, J.; Neubauer, E.; Kitzmantel, M. Processing Of 17-4PH By Additive Manufacturing Using A Plasma Metal Deposition (PMD) Technique. In Proceedings of the Euro PM2019, Maastricht, The Netherlands, 13–16 October 2019; European Powder Metallurgy Association (EPMA): Shrewsbury, UK, 2019. 4348497. [Google Scholar]
  25. Chen, X.; Li, J.; Cheng, X.; Wang, H.; Huang, Z. Effect of heat treatment on microstructure, mechanical and corrosion properties of austenitic stainless steel 316L using arc additive manufacturing. Mater. Sci. Eng. A 2018, 715, 307–314. [Google Scholar] [CrossRef]
  26. ASTM E-8; Standard Test Methods for Tension Testing of Metallic Materials. ASTM International: West Conshohocken, PA, USA, 2016.
  27. ASTM C373-88; Standard Test Method for Water Absorption, Bulk Density, Apparent Porosity, and Apparent Specific Gravity of Fired Whiteware Products. ASTM International: West Conshohocken, PA, USA, 2006.
  28. ASTM A 564/A 564M-02a; Standard Specification for Hot-Rolled and Cold-Finished Age-Hardening Stainless Steel Bars and Shapes. ASTM International: West Conshohocken, PA, USA, 2017.
  29. Yoo, W.D.; Lee, J.H.; Youn, K.T.; Rhyim, Y.M. Study on the Microstructure and Mechanical Properties of 17-4 PH Stainless Steel Depending on Heat Treatment and Aging Time. Solid State Phenom. 2006, 118, 15–20. [Google Scholar] [CrossRef]
  30. Sun, Y.; Hebert, R.J.; Aindow, M. Effect of heat treatments on microstructural evolution of additively manufactured and wrought 17-4PH stainless steel. Mater. Des. 2018, 156, 429–440. [Google Scholar] [CrossRef]
  31. Oliver, W.C.; Pharr, G.M. An improved technique for determining hardness and elastic modulus using load and displacement sensing indentation experiments. Mater. Res. 1992, 7, 1564–1583. [Google Scholar] [CrossRef]
  32. Caballero, A.; Ding, J.; Ganguly, S.; Williams, S. Wire + Arc Additive Manufacture of 17-4 PH stainless steel: Effect of different processing conditions on microstructure, hardness, and tensile strength. J. Mater. Process. Technol. 2019, 268, 54–62. [Google Scholar] [CrossRef]
  33. Bahrami Balajaddeh, M.; Naffakh-Moosavy, H. Pulsed Nd:YAG laser welding of 17-4 PH stainless steel: Microstructure, mechanical properties, and weldability investigation. Opt. Laser Technol. 2019, 119, 105651. [Google Scholar] [CrossRef]
  34. Ziewiec, A.; ZieliŃska-Lipiec, A.; Tasak, E. Microstructure of Welded Joints of X5CrNiCuNb16-4 (17-4PH) Martensitic Stainless Steel After Heat Treatment. Arch. Metall. Mater. 2014, 59, 965–970. [Google Scholar] [CrossRef]
  35. Cheruvathur, S.; Lass, E.A.; Campbell, C.E. Additive Manufacturing of 17-4 PH Stainless Steel: Post-processing Heat Treatment to Achieve Uniform Reproducible Microstructure. JOM 2016, 68, 930–942. [Google Scholar] [CrossRef]
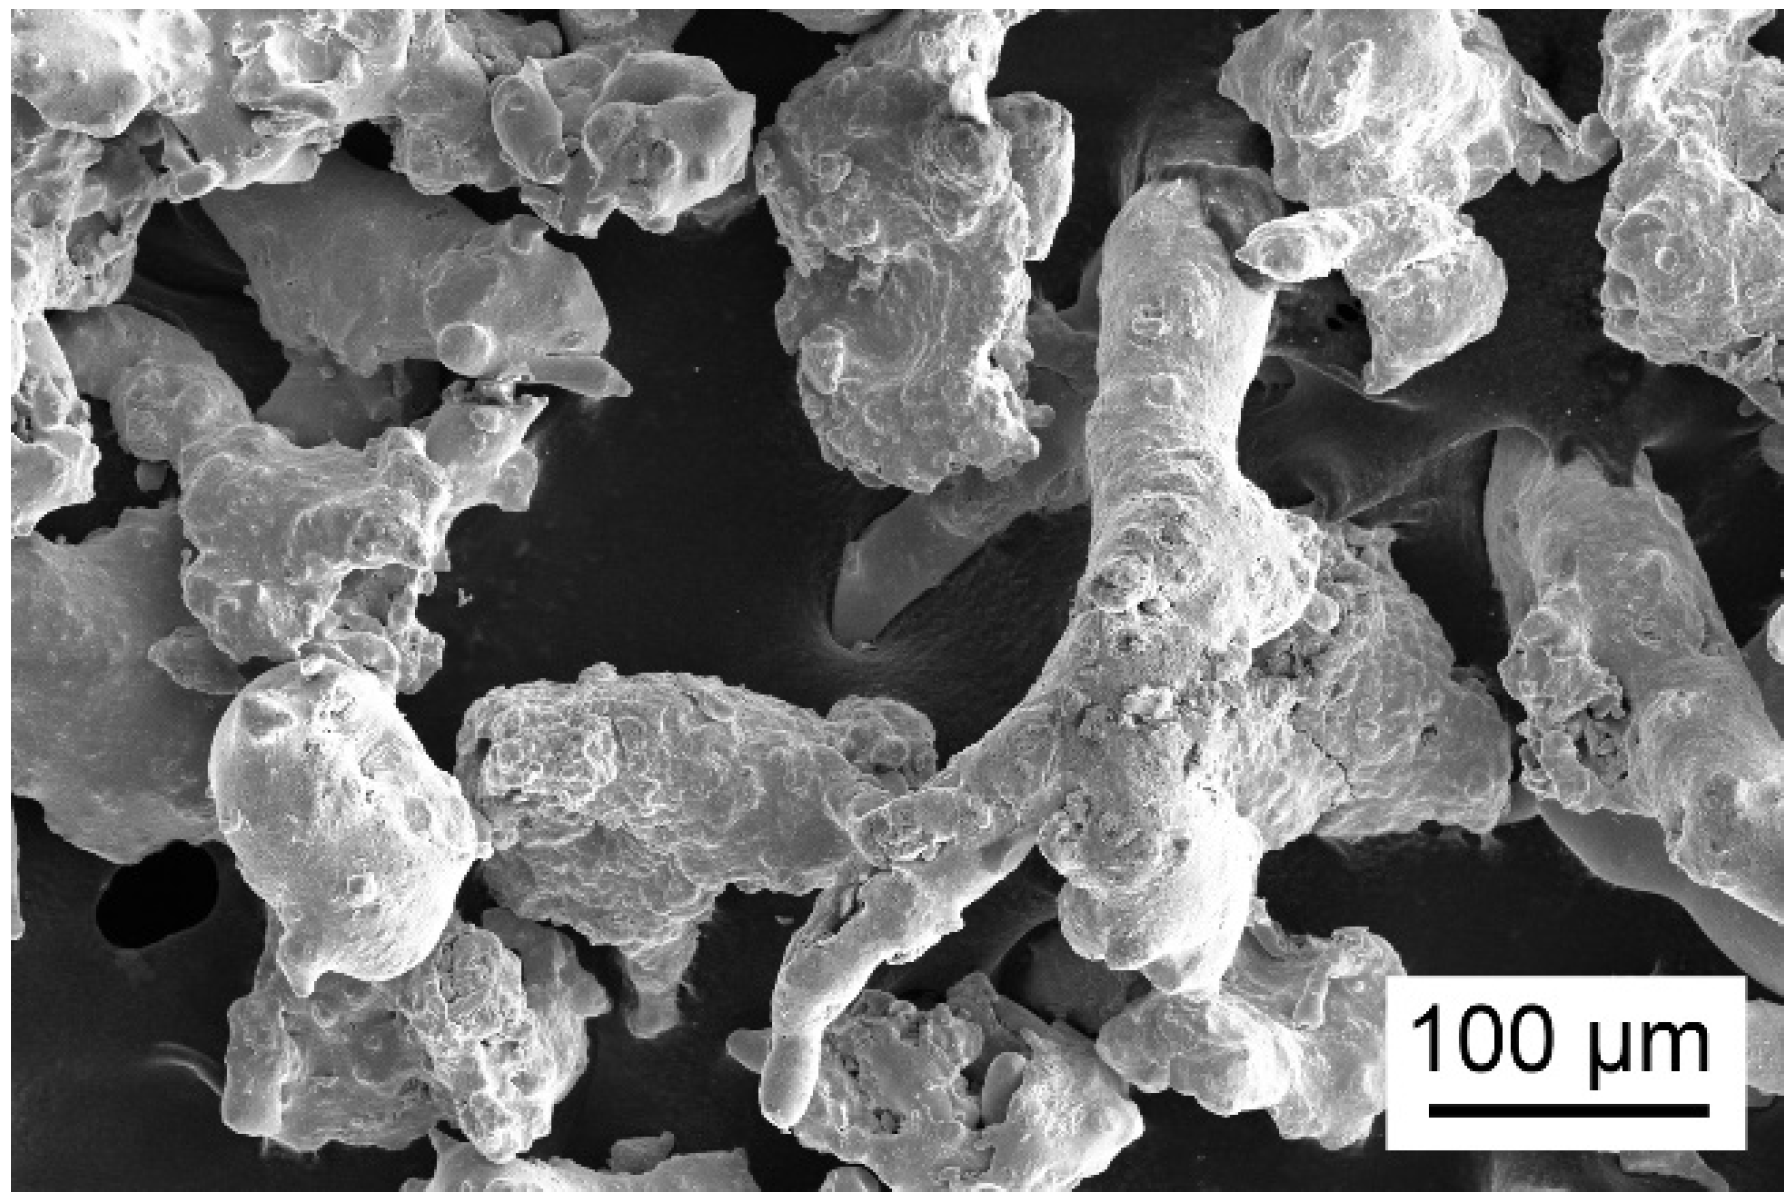
Figure 1. ETD (secondary electrons) SEM images of the starting particles of 17-4PH.
Machines 10 00976 g001
Figure 2. X-ray diffraction pattern of the 17-4PH starting powder.
Machines 10 00976 g002
Figure 3. Setup of the PMD: (a) torch and feeder devices and (b) argon-purged processing chamber.
Machines 10 00976 g003
Figure 4. Images of as-fabricated wall specimens: (a) W1 produced in air; (b) W2 produced in an argon-purged processing chamber.
Machines 10 00976 g004
Figure 5. (a) Schematic illustration of the locations of the specimens in each wall, oriented on the Y-axis; (b) illustration of the tensile test samples cut from the walls.
Machines 10 00976 g005
Figure 6. Mechanical property values of specimens manufactured in air and in an argon atmosphere: (a) as-built specimen; (b) after TT1 treatment; and (c) after TT2 treatment.
Machines 10 00976 g006aMachines 10 00976 g006b
Figure 7. Average hardness values of the as-built and TT1- and TT2-treated specimens.
Machines 10 00976 g007
Figure 8. Tribological results: (a) wear vs. time; (b) coefficient of friction vs. time.
Machines 10 00976 g008
Figure 9. CBS-SEM images obtained at 1000x from W1 and W2: (a) as built in air; (b) built in air with TT1; (c) built in air with TT2; (d) as built in argon; (e) built in argon with TT1; (f) built in argon with TT2.
Machines 10 00976 g009
Figure 10. Compositional mapping analysis of the PMD specimen built in an argon atmosphere.
Machines 10 00976 g010
Figure 11. SEM image and EDS analysis of the PMD specimen built in air and thermally treated with TT1.
Machines 10 00976 g011
Figure 12. XRD patterns of 17-4PH specimens fabricated via PMD in air and argon analysed as built and after thermal treatment with TT1 and TT2.
Machines 10 00976 g012
Table 1. Chemical compositions of the 17-4PH powder employed as feedstock.
Composition in Mass%
FeedstockFeCrNiCuSiPCMnSNb
Hoeganaes CorporationBal.16.74.13.90.9-0.02-0.010.3
StandardBal.15–17.53-53-510.040.0710.030.15–0.45
Table 2. Mechanical property values of the tested specimens.
W1 (Built in Air)W2 (Built in Ar)
SampleUTS (MPa)Elongation (%)UTS (MPa)Elongation (%)
1.1 As built1107.121.581007.531.37
1.2 As built1161.593.311108.645.14
1.3 As built1144.617.291070.995.04
As-built Average 1137.77 ± 22.764.06 ± 2.921062.39 ± 51.103.85 ± 2.15
2.1 TT11421.712.091074.513.47
2.2 TT11364.691.18899.180.54
2.3 TT11353.071.17614.530.35
TT1 Average1379.82 ± 29.991.48 ± 0.53* NR11.45 ± 1.74
3.1 TT21140.978.651001.8912.35
3.2 TT21126.9310.03938.3210.40
3.3 TT21078.5012.27928.8410.93
TT2 Average1115.47 ± 26.7610.32 ± 1.83956.35 ± 39.7311.23 ± 1.01
W1 (Built in Air)W2 (Built in Ar)
SampleYoung’s modulus (GPa)Yield strength (MPa)Young’s modulus (GPa)Yield strength (MPa)
1.1 As built198.02935.29161.34806.18
1.2 As built-758.23133.68853.09
1.3 As built196.5912.45183.53743.42
As-built Average197.04 ± 0.99868.66 ± 78.64159.52 ± 24.98800.90 ± 55.03
2.1 TT1199.511187.08163.29903.29
2.2 TT1214.141230.66215.14899.18
2.3 TT1203.561248.50183.56614.53
TT1 Average205.74 ± 6.191222.08 ± 25.79187.33 ± 26.13* NR1
3.1 TT2158.791071.29166.23678.21
3.2 TT2226.501023.02152.35854.70
3.3 TT2186.73995.93162.79855.11
TT2 Average190.67 ± 27.781030.08 ± 31.08160.46 ± 7.23796.01 ± 102.02
(* NR1), non-representative as the TT1 in an argon atmosphere; the specimens do not plasticize and are therefore subject to fragile failure.
Table 3. Hardness values of the as-built and TT1- and TT2-treated specimens under both tested atmospheric conditions.
Hardness HV1
SampleW1 (Built in Air)W2 (Built in Ar)
1.1 As built414.20 ± 4.55367.00 ± 2.83
1.2 As built414.60 ± 7.67361.50 ± 3.58
1.3 As built408.00 ± 4.90368.70 ± 6.59
As-built Average412.27 ± 6.27365.73 ± 4.33
2.1 TT1525.20 ± 11.46482.60 ± 6.58
2.2 TT1523.80 ± 11.54481.20 ± 7.85
2.3 TT1530.60 ± 15.66475.30 ± 8.49
TT1 Average526.60 ± 12.44479.70 ± 7.64
3.1 TT2405.20 ± 2.95370.60 ± 6.11
3.2 TT2416.00 ± 4.69373.80 ± 3.18
3.3 TT2406.20 ± 6.53368.20 ± 5.29
TT2 Average409.13 ± 6.81370.87 ± 4.86
Publisher’s Note: MDPI stays neutral with regard to jurisdictional claims in published maps and institutional affiliations.