Abstract
Sliding friction is an important excitation for the vibration and noise of a transmission system. However, in cases where the helix angle of the helical gear is large, the dynamic characteristics of the transmission system in an electric vehicle caused by friction excitation have not been explored explicitly. In this study, the helix angle of helical gears is 30.5 degrees. A mesh stiffness calculation algorithm is derived. A dynamic model of a Motor Two-Stage helical gear transmission system in an electric vehicle at a constant speed is established. A bench test is carried out to verify the model. A friction model is employed. The dynamic characteristics are analysed after considering the friction and the axial stiffness component. The friction makes the vibration in the x direction increase. The vibration in the y direction is suppressed by friction. The vibration in the z direction has a small change. The components in the frequency domain also change. The axial stiffness components only make the vibration and the meshing force increase in the time domain. This indicates that friction needs to be considered when dynamic characteristics are analysed. The study is good for the reduction of vibration and noise. This may provide a theoretical base for the condition monitoring of the gear system in electric vehicles.
1. Introduction
Helical gears can work at fast speeds and bear large loads. They have been extensively applied in aerospace, shipbuilding, transportation, and other industries. Accurate dynamic analysis of the helical gear transmission system of a pure vehicle system with a large helix angle is very important to improve the comfort and safety of electric vehicles. Therefore, calculating the stiffness of helical gear with a large helix angle and analysing the dynamic characteristics of a pure vehicle transmission system is crucial.
Dogan calculated the stiffness of gears with crack faults using the finite element method [1]. Song calculated the stiffness of planetary gears using the finite method [2]. Wu proposed a novel analytical FE method to calculate the stiffness of cracked gears [3]. Chang combined analytical and FE methods to establish a model of the mesh stiffness of cylindrical gears [4]. Jiang calculated the stiffness of helical gears with crack faults [5]. Raghuwanshi calculated the stiffness of spur gears using the experimental method [6]. Dai verified the improved analytical method using the experimental method [7].
The analytical method has the advantage of saving time. The energy method is typically used. Yang and Lin [8] calculated stiffness first using the energy method. Gears were taken as a taper cantilever beam. In 2004, Tian [9] considered shear deformation and improved the stiffness calculation method. Sainsot [10] deduced the fillet-foundation deformation formula and added this deformation to the total deformation. Stiffness calculation formulas were deduced by Wan Zhiguo [11], considering the part from the base circle to the tooth root. Chen calculated the stiffness of spur gears with crack faults with an improved method [12] and also calculated the stiffness of spur gears based on the energy method [13]. Jiang established the stiffness model of the spur gears with crack faults [14]. Wu calculated the stiffness of spur gears with crack faults [15]. Meng calculated the stiffness of spur gears with crack faults and spalling faults [16]. Xie considered coupling tooth and body flexibility into the stiffness of spur gears based on the energy method [17]. Shen [18] adopted an innovative calculation method for planetary gears.
The above methods were applied to spur gears. While there is an axial force component in helical gears, this is not reflected in the calculation of spur gears. Wan [19] proposed calculating the stiffness of helical gears using the integral potential energy method, but the axial force was not considered. Yang considered the backlash and proposed an improved method of mesh stiffness [20]. In the literature [19,21], the axial force on the helical gears’ stiffness was considered. The stiffness of helical gears with a large helix angle has only been studied in an ideal situation. However, accurate stiffness is very important to analyse the characteristics of the transmission system in electric vehicles. The application of stiffness to the transmission system in electric vehicles and the change in the dynamic characteristics after considering the axial components of the stiffness have not been studied specifically.
There is much research on gear systems that consider friction action [22,23]. Some scholars have studied the dynamic characteristics of the helical gear transmission system [24,25,26,27], while others have also analysed the dynamic characteristics of transmission systems in electric vehicles [26,27,28,29].
There are several forms of transmission system construction used in electric vehicles. An electric motor architecture system includes an electric motor, a clutch, a gearbox, a differential, and a single electric motor architecture with a fixed gear. In this system, the weight is reduced. The architecture includes an EM with rear-wheel-drive architecture with fixed gearing and a differential integrated into a single assembly. In dual-motor architecture, the differential action can be electronically controlled by two electric motors that operate at different speeds. An in-wheel drive system and the planetary gearing in this system offer the advantages of high-speed reduction. For EV architecture without a mechanical gear system, a low-speed outer-rotor electric motor is installed inside the wheels. The commonly used driving modes include a single-motor drive, hub motor distributed drive, multi-motor independent drive, and dual-motor coupling [30]. However, the dynamic characteristics of a motor two-stage helical gear transmission system for electric vehicles must be studied further. Some studies showed that friction caused the vibration to be perpendicular to the line of engagement [31]. This means that the vibration amplitude was damped by friction. The literature [32] offers the same conclusion, but in some studies [33], the vibration was found to increase due to friction. However, when the helix angle was as large as 30.5 degrees, the direction of the comprehensive friction was always positive, making the dynamic characteristics of the motor's two-stage helical gear transmission system different. Thus, it is of great significance to study the influence of friction on the dynamic characteristics of the system at a certain speed.
The main goal of this study was to analyse the dynamic characteristics of the Motor Two-Stage helical gear transmission system for electric vehicles. A dynamic model of a Motor Two-Stage transmission system in an electric vehicle was established, and a corresponding bench test was built. The influence of friction on the dynamic characteristics was analysed, and the difference in the dynamic characteristics after considering the axial stiffness components was also analysed. As a result, the change in the vibration and meshing force is presented after considering the friction and the axial stiffness components. This study provides a theoretical basis for analysing the dynamic characteristics of drivelines in electric vehicles.
2. Meshing Stiffness Calculation of Helical Gear
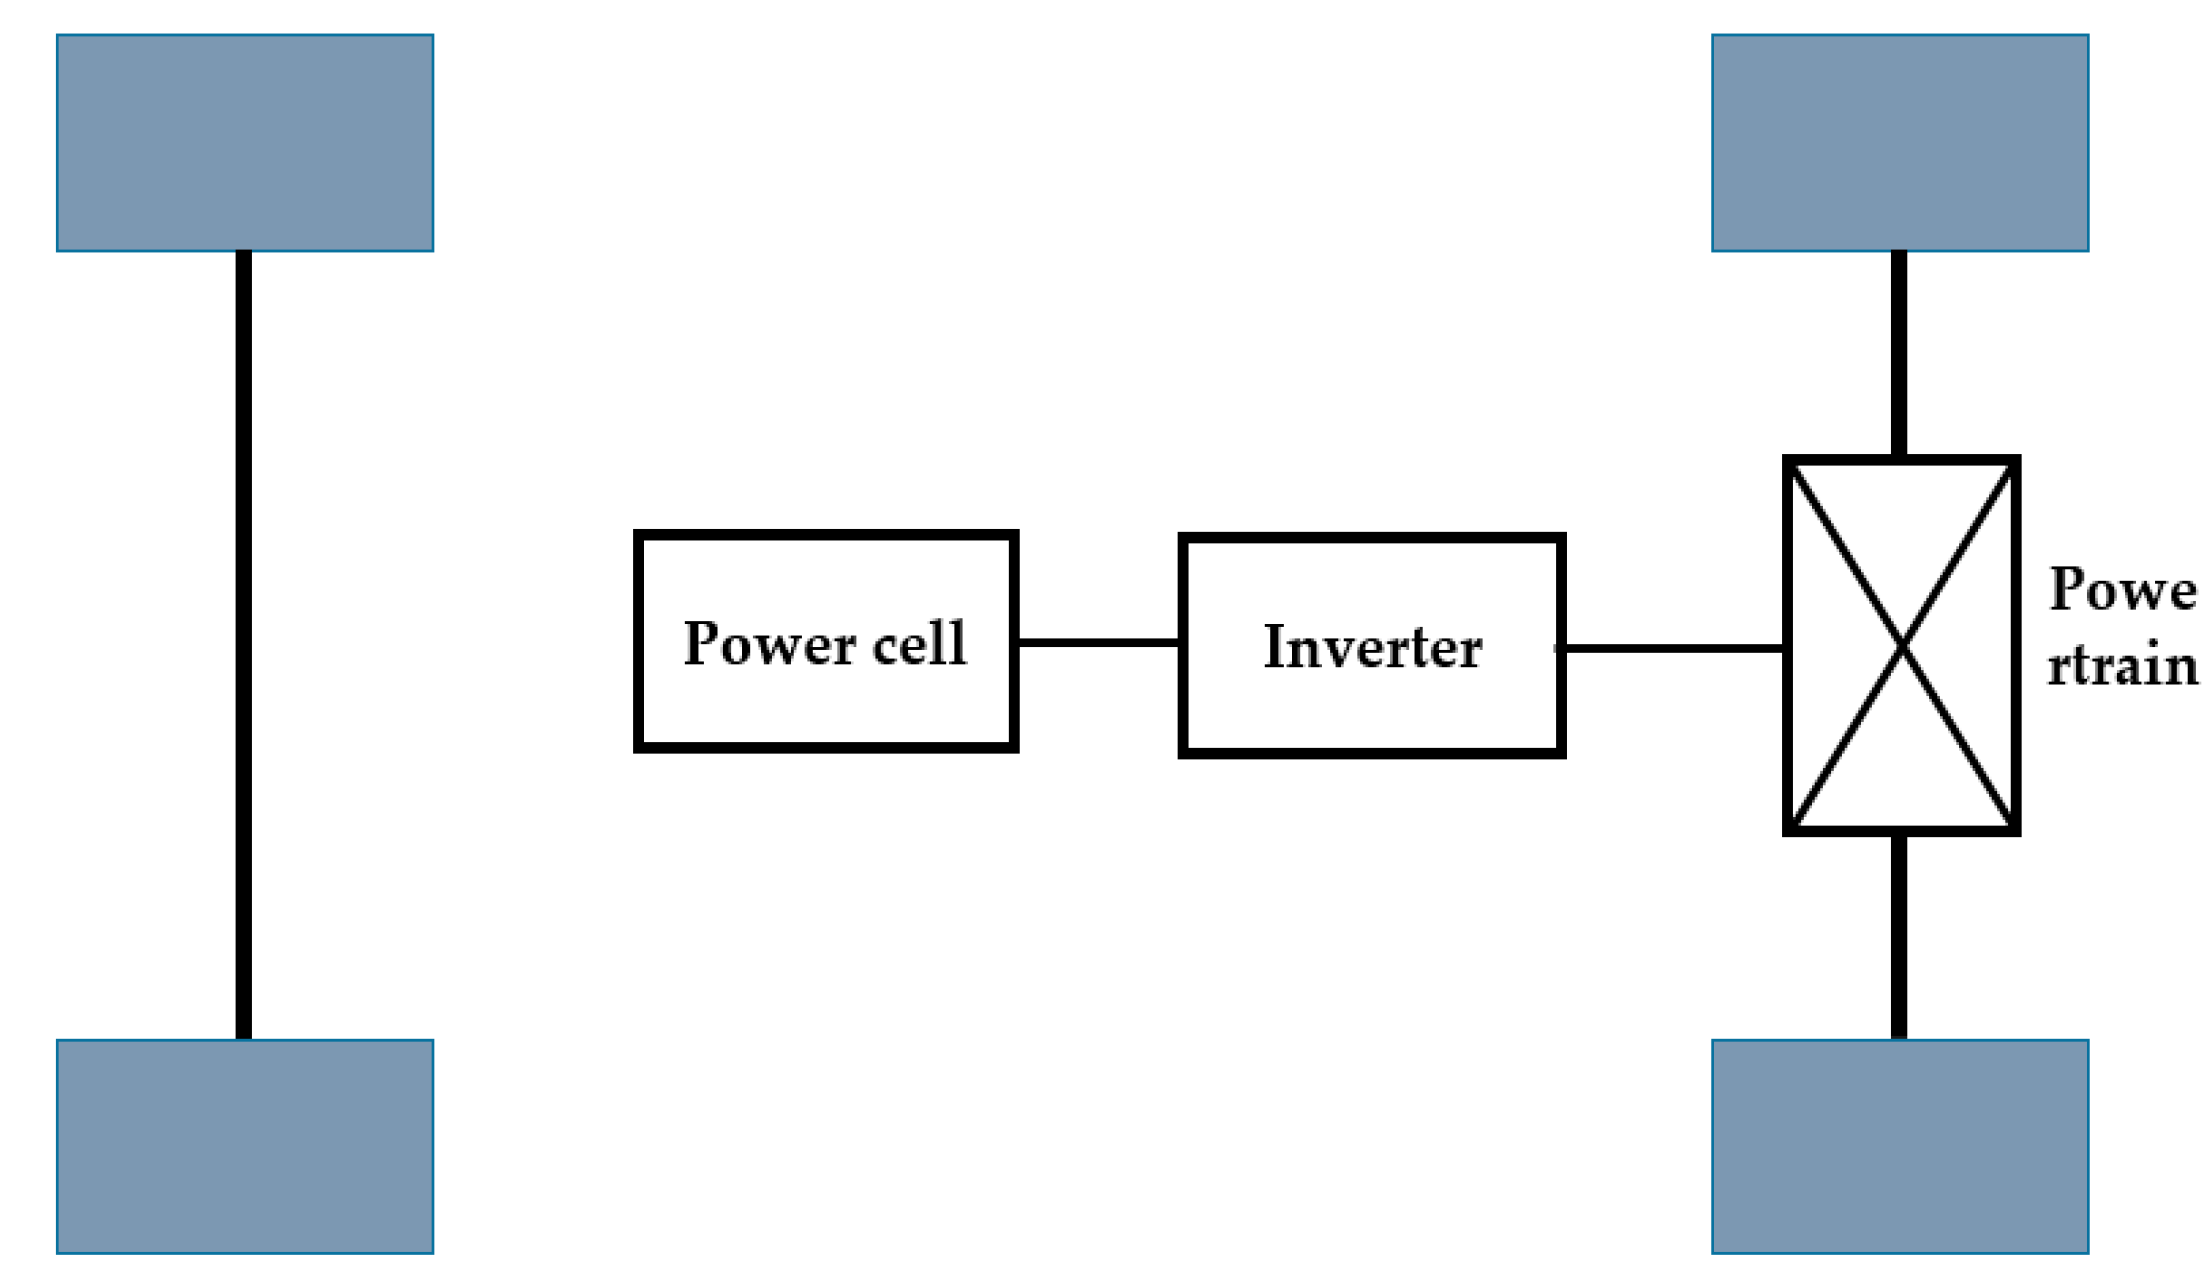
Figure 1 is the architecture of the electric vehicle used in this study. It consists of the tires, the power cell, the inverter, and the powertrain. The powertrain includes the driving motor, the fixed-speed ratio reducer, and the differential. The mechanical differential is used, and the turning process is similar to that in a conventional car. This means the control is relatively simple. The integration is improved, and the cost is reduced.
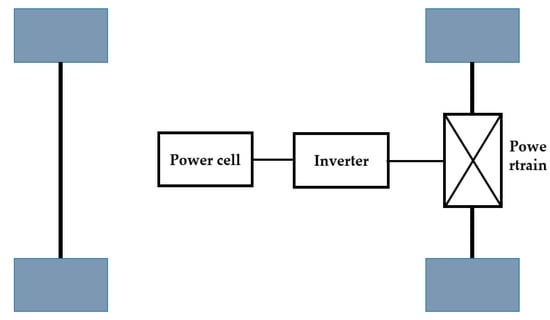
Figure 1.
The architecture of the electric vehicle.
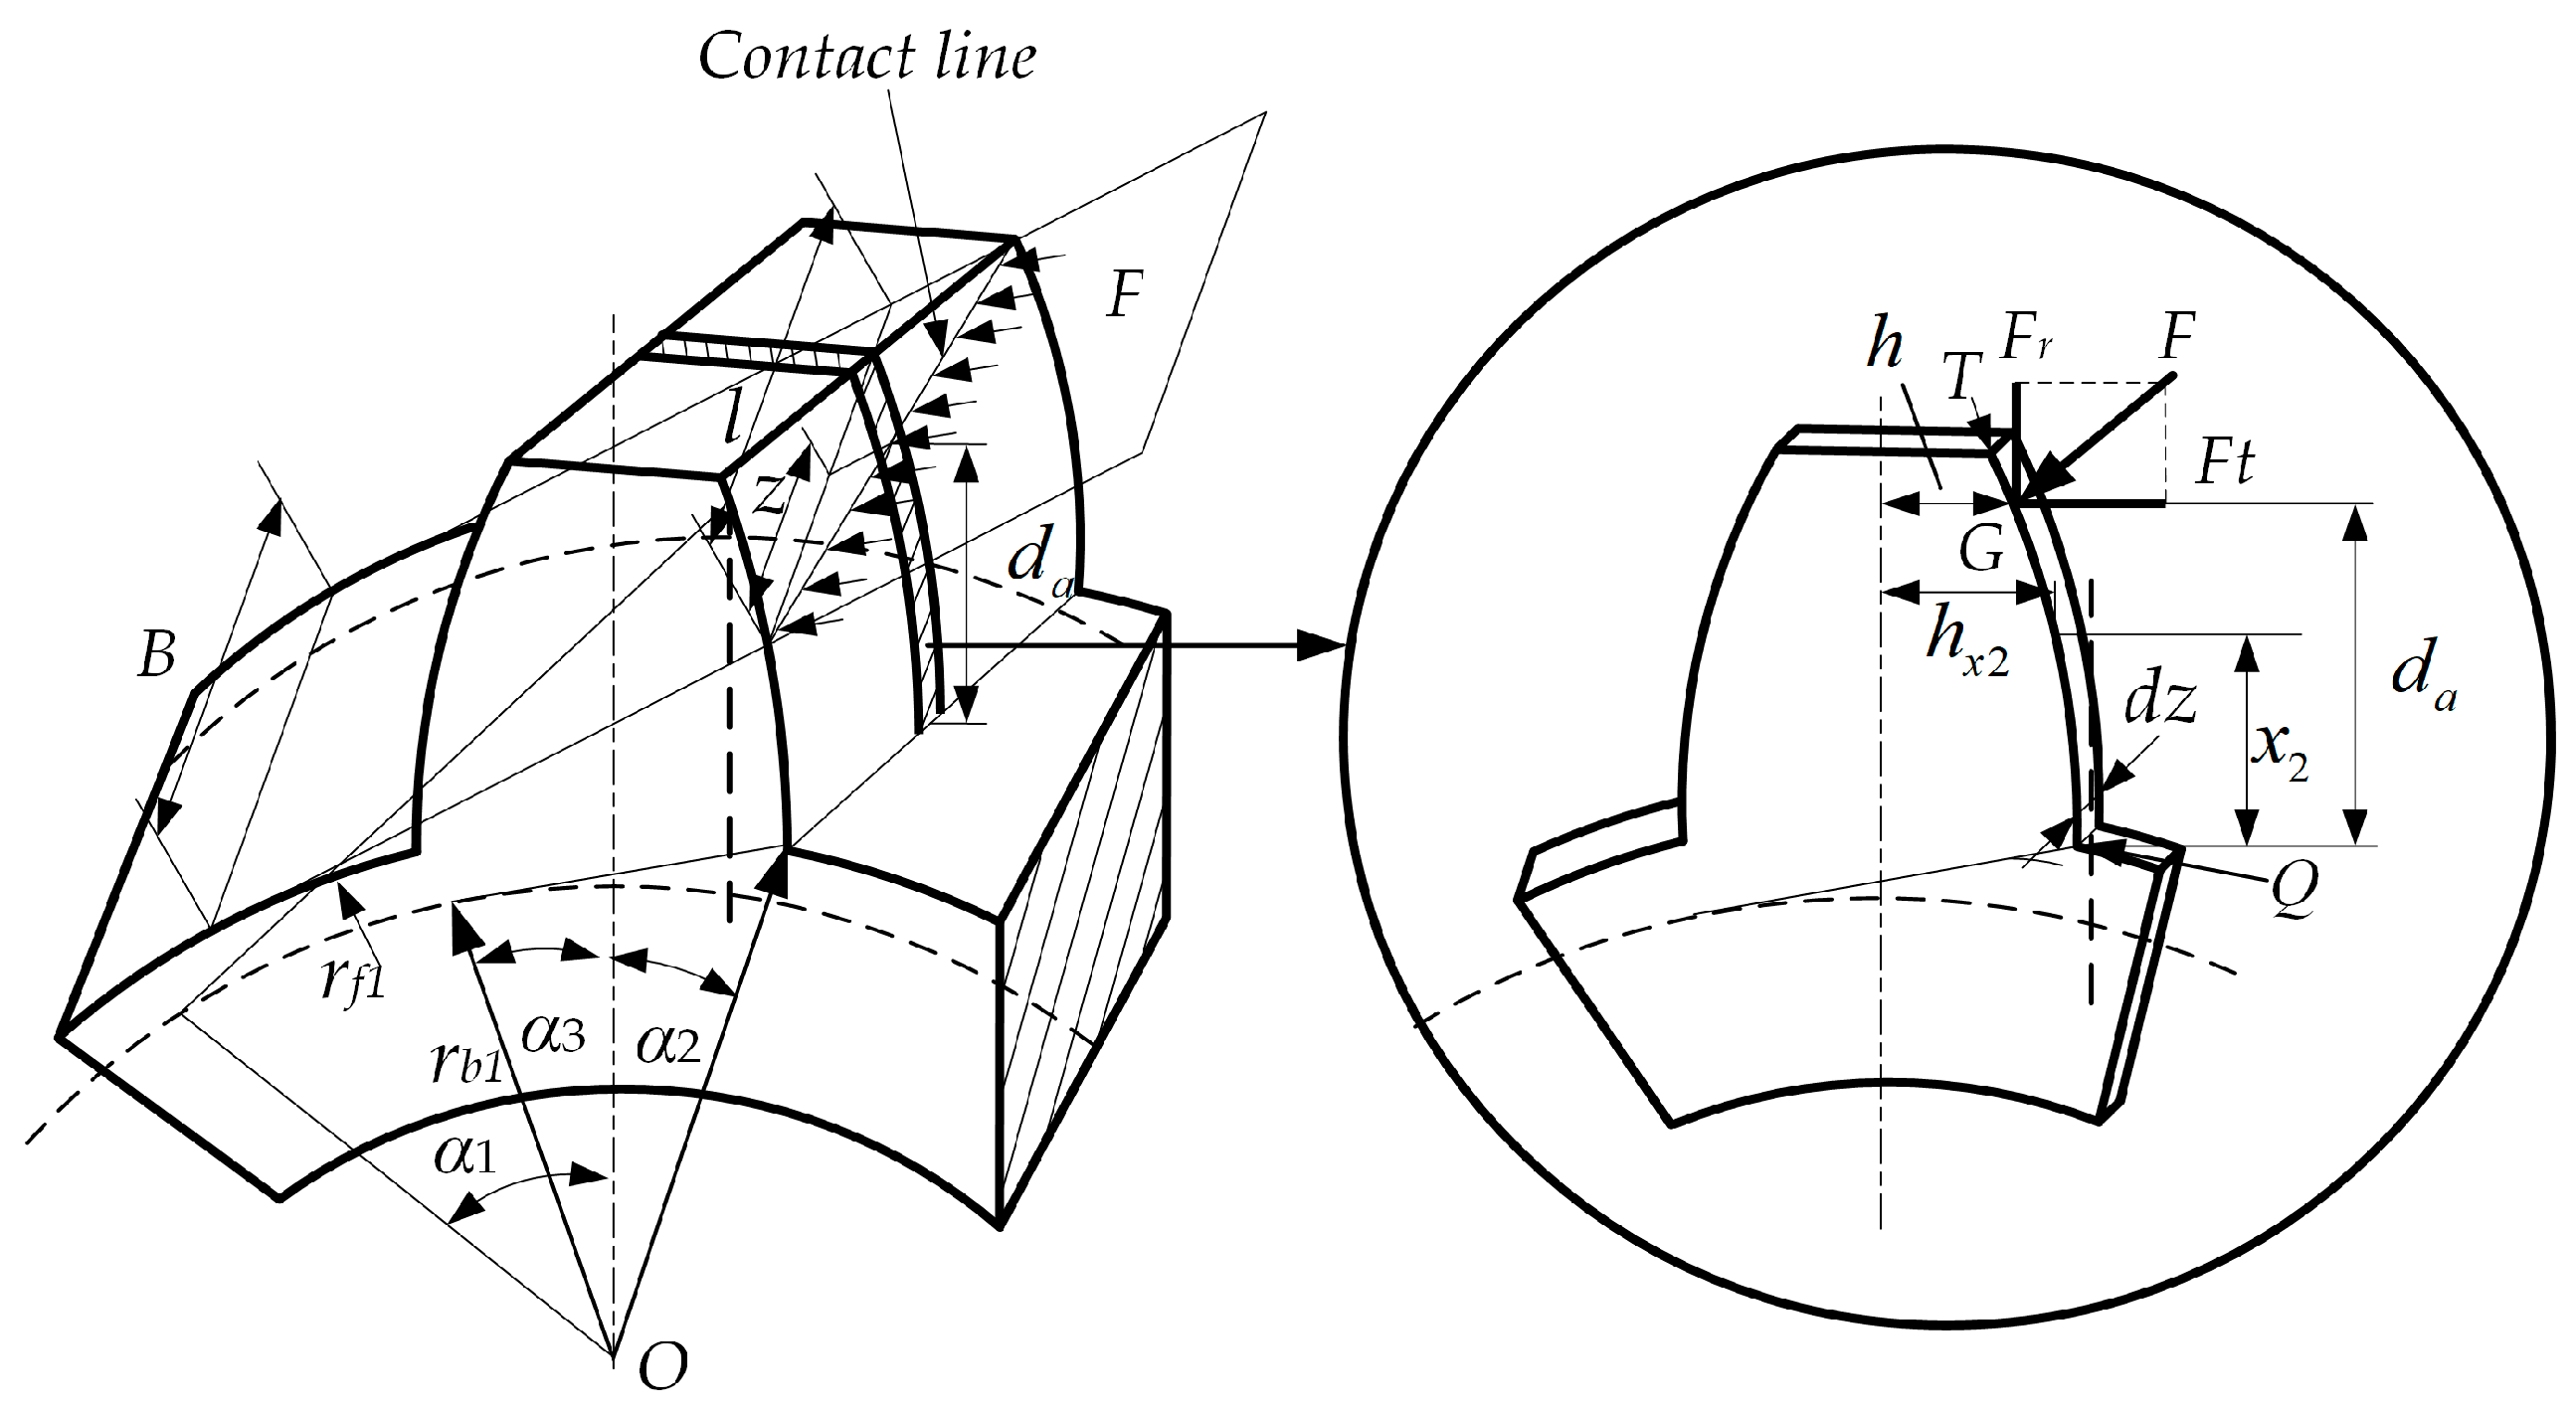
Helical gear load is usually decomposed into the axial force component , the radial force component , and the tangent force component . As shown in Figure 2, the force can be expressed as:
where is the reference diameter, is the torque, is the normal pressure angle, is the helix angle, and is the helix angle on the base circle.
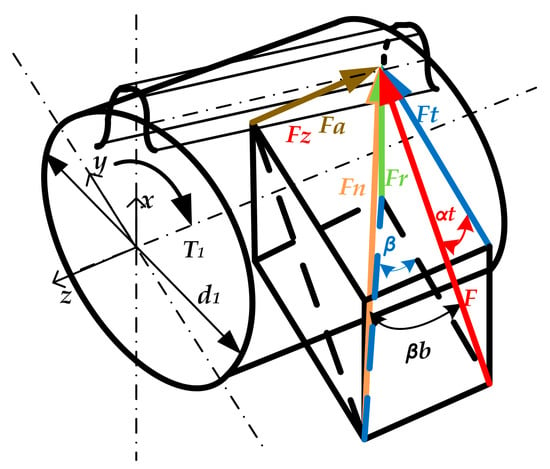
Figure 2.
Force analysis of the helical gear.
2.1. Transverse Stiffness Calculation
The stiffness is calculated by the sliced method. The tooth is divided into slices along the tooth width. Every piece is thought of as a thin spur gear. The total stiffness can be obtained by accumulating the stiffness of every slice.
In the previous energy method, the energy caused by contact deformation, bending deflection, shear deflection, and radial compression deflection was included. Radial compression deflection refers to the compression deformation caused by the radial force. The cantilever beam started from the base circle in the literature [8], but the cantilever started at the gear root in the literature [34]. Two cases appear where the radius of the root circle is larger than the radius of the base circle, and the radius of the root circle is smaller than the radius of the base circle. Considering these two cases, the cantilever starts at the tooth root in this paper.
On the basis of the theory of mechanics of materials and elasticity, the transverse force stiffness component of every slice is calculated as [5]:
where represents engaging load, and , , and are, respectively, the energy from bending deflection, shear deflection, and radial compression deflection of each slice, , , are, respectively, the equivalent bending, shear, and radial compression stiffness, and dz is the thickness of every slice.
2.2. Calculation of Axial Stiffness
The stiffness component caused by the axial force is calculated as [5]:
where , represent, respectively, the energy from the axial bending deflection, and the axial shear deflection of each slice caused by the axial force, , represent, respectively, the axial bending and the axial shear stiffness.
2.3. Calculation of Comprehensive Stiffness
Figure 3 is the abridged general view of mesh stiffness calculated by the slice method.
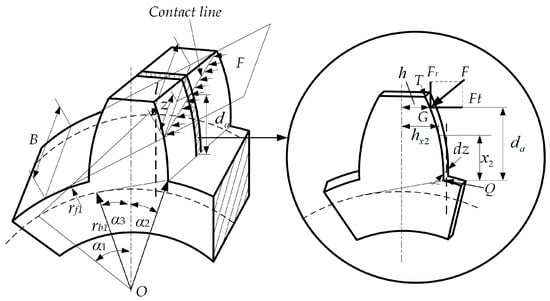
Figure 3.
Cutting the tooth into slices.
The Hertz contact stiffness can be expressed as:
where is the Hertz contact stiffness, represents the shear modulus, is the elastic modulus, is the Poisson’s ratio, and is the contact length.
Except for the tooth stiffness, the fillet-foundation stiffness should likewise be concluded. The fillet-foundation stiffness formula and parameter selection have been introduced in detail in the literature [18], so they will not be expanded here.
In summary, the total stiffness expression of a gear pair is written as [5]:
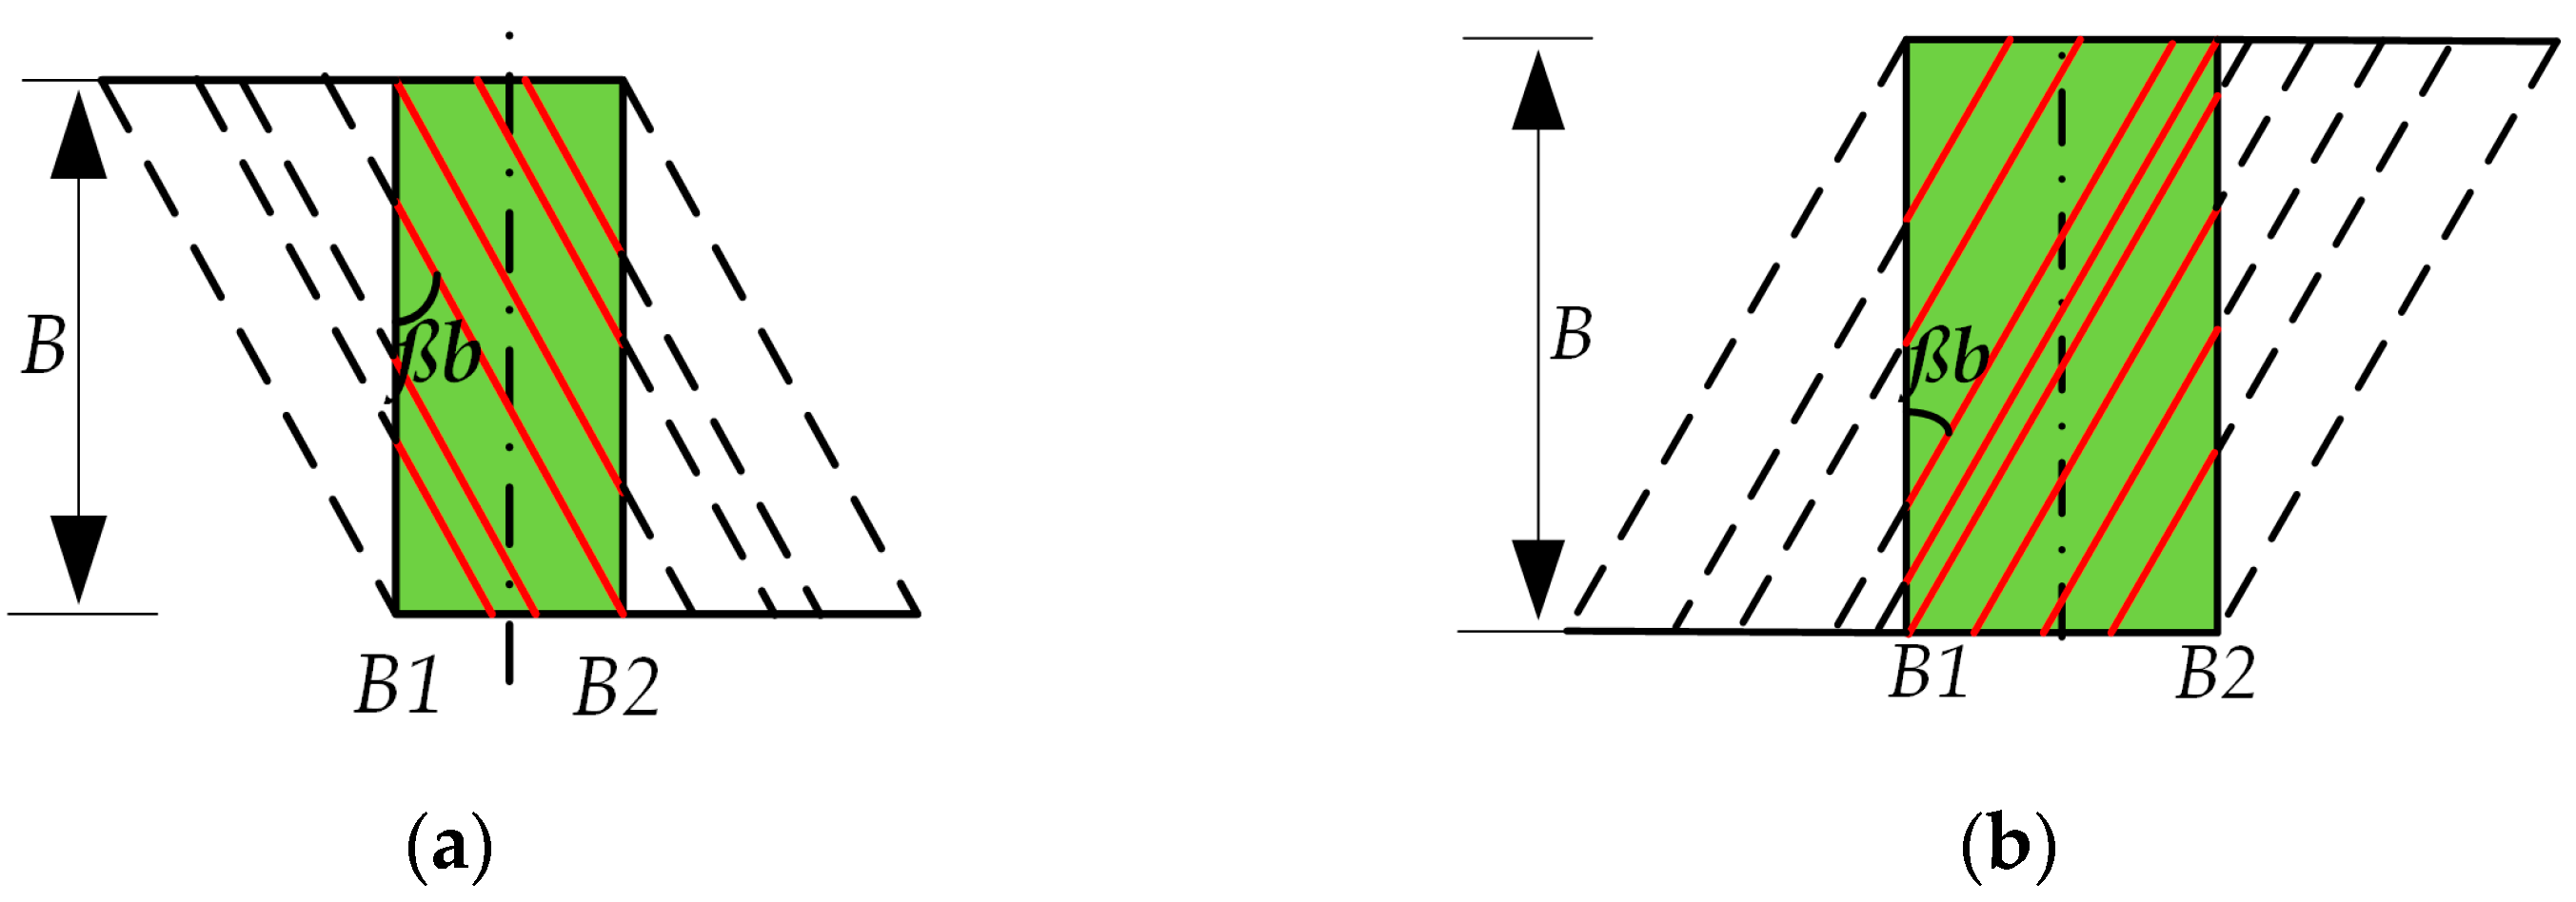
where kbp, ksp, krcp, kabp, kasp and kfp are the bending stiffness, the shear stiffness, the radial compression stiffness, the axial bending stiffness, the axial shearing stiffness, and the fillet-foundation stiffness of the positive gear. Accordingly, the kbg, ksg, krcg, kabg, kasg, and kfg represent the bending stiffness, the shear stiffness, the radial compression stiffness, the axial bending stiffness, the axial shearing stiffness, and the fillet-foundation stiffness of the negative gear. The kh is the Herz contact stiffness. These stiffness components are obtained by integrating the stiffness of each slice, and the integration is done according to the parameters of the gears. The parameters of gears are shown in Table 1 and Table 2. Moreover, the kfpi and kfgi are obtained by the formulas in the literature [18], and the parameters used in the formulas are also referred to in the literature [18]. For the helical gear pairs with a large helix angle, there are several pairs of gears meshing simultaneously. Figure 4 is the schematic diagram of the contact line length during the meshing progress. Figure 4a shows the variation of the contact line during the working progress of gear pair 1. Figure 4b shows gear pair 2.

Table 1.
Parameters used in finite element gear model.

Table 2.
Parameters of the two-stage driveline.
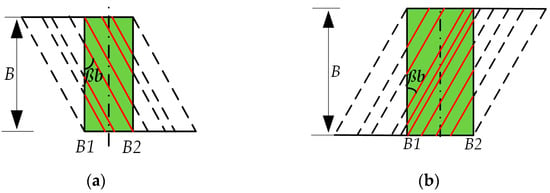
Figure 4.
Schematic diagram of gear meshing contact line. (a) Gear pair 1; (b) gear pair 2.
When multiple pairs of teeth engage simultaneously, the meshing stiffness is [5]:
In the above expression, is the pinion, represents the driven gear, represents that there are pairs of teeth in meshing simultaneously, and i is the ist pair of gears engaged. The kbpi, kspi, krcpi, kabpi, kaspi, kfpi, kbgi, ksgi, krcgii, kabgi, kasgi, and kfgi are the bending stiffness, the shearing stiffness, the radial compressional stiffness, the axial bending stiffness, the axial shearing stiffness, and the fillet-foundation stiffness of the ist driving gear and the driven gear in engagement. The khi is the Hertz contact stiffness of the ist gear pair in meshing.
3. Stiffness Calculation with Different Radius Relationships Considering the Part from the Tooth Root to the Base Circle
The cantilever is supposed to start at the tooth root in this paper. Based on the radius relationship between the dedendum circle and the base circle, the stiffness calculation method is discussed in two cases.
3.1. Base Radius Is Bigger than the Root Radius
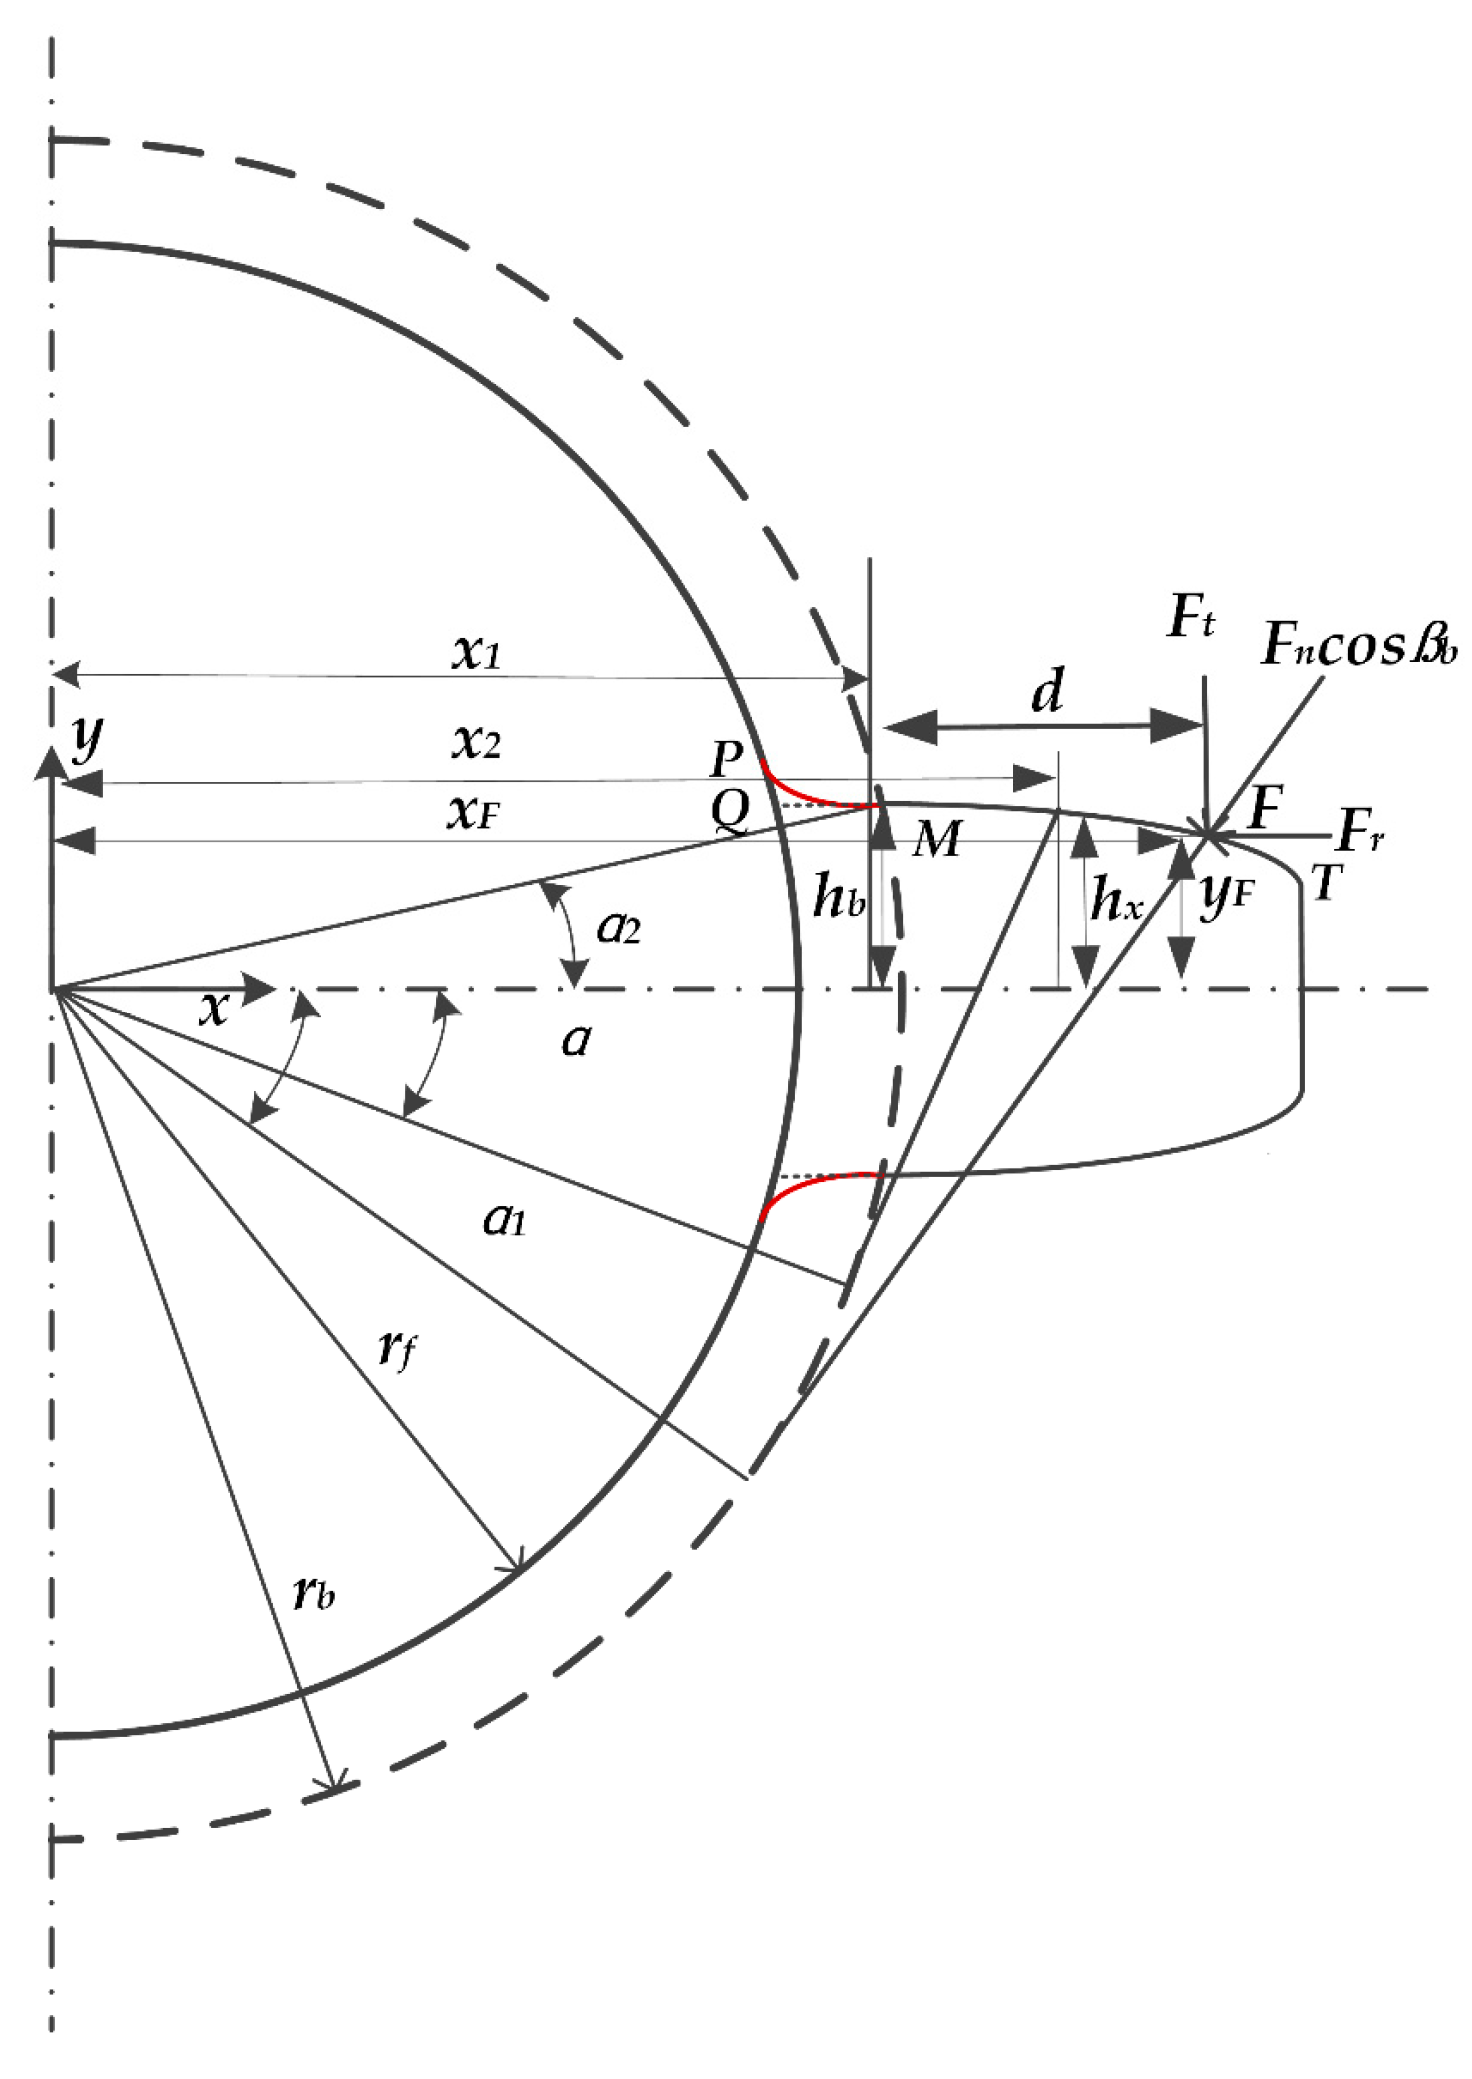
As illustrated in Figure 5, the tooth profile TM above the base circle is involute. In order to simplify the calculation, the profile curve from the base circle to the dedendum is simplified as a straight-line QM. Then, the bending stiffness can be expressed as:
where represents the abscissa of the intersection point; is the abscissa of the intersection point of the tooth root and the profile; is the abscissa of the intersection point of the base circle and the involute, is the abscissa of the intersection point when the force is at QM; is the abscissa of the intersection point when the force is at TM. represents the inertia at the position and is the inertia at position .
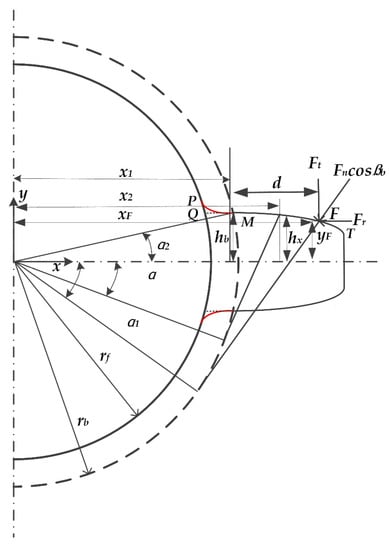
Figure 5.
The transverse profile of a helical gear.
When ,
In the equations,
where is the ordinate of the intersection point between the base circle and the involute tooth profile, is the height at position away from the centre. and are the moment of inertia of the section, respectively. and are, respectively, the horizontal and vertical coordinates of the stress point in the x and y directions. is the cross-sectional area at away from the centre. is the moment of inertia of the section. When placing the Formulas (15)–(24) into the stiffness Equation (10), we can write the stiffness component as:
Similarly, the shear stiffness, radial compressive stiffness, axial bending stiffness, and axial shear stiffness can be expressed as:
3.2. The Base Radius Is Smaller than the Dedendum Circle
Figure 6 is the transverse diagram when the base radius is smaller than that of the dedendum circle.
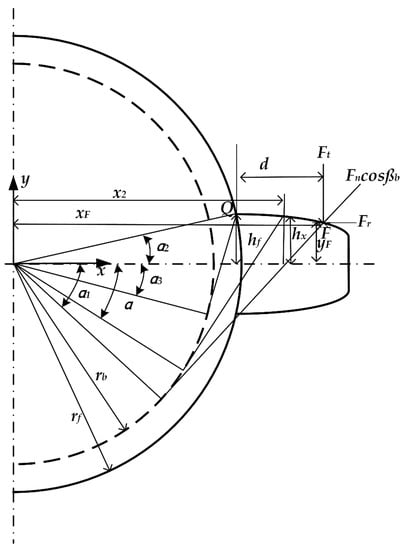
Figure 6.
The transverse diagram.
When , and if
where . is the pressure angle of the indexing circle, and is the pressure angle of the root circle.
Using the same method, by introducing Equations (15)–(24) into (30)–(34), the stiffness components can be written as:
If , then the stiffness components are expressed as:
where .
The stiffness of Hertz contact and the fillet foundation of the helical gear can be calculated in Section 2.3.
3.3. Stiffness Calculation and Verification
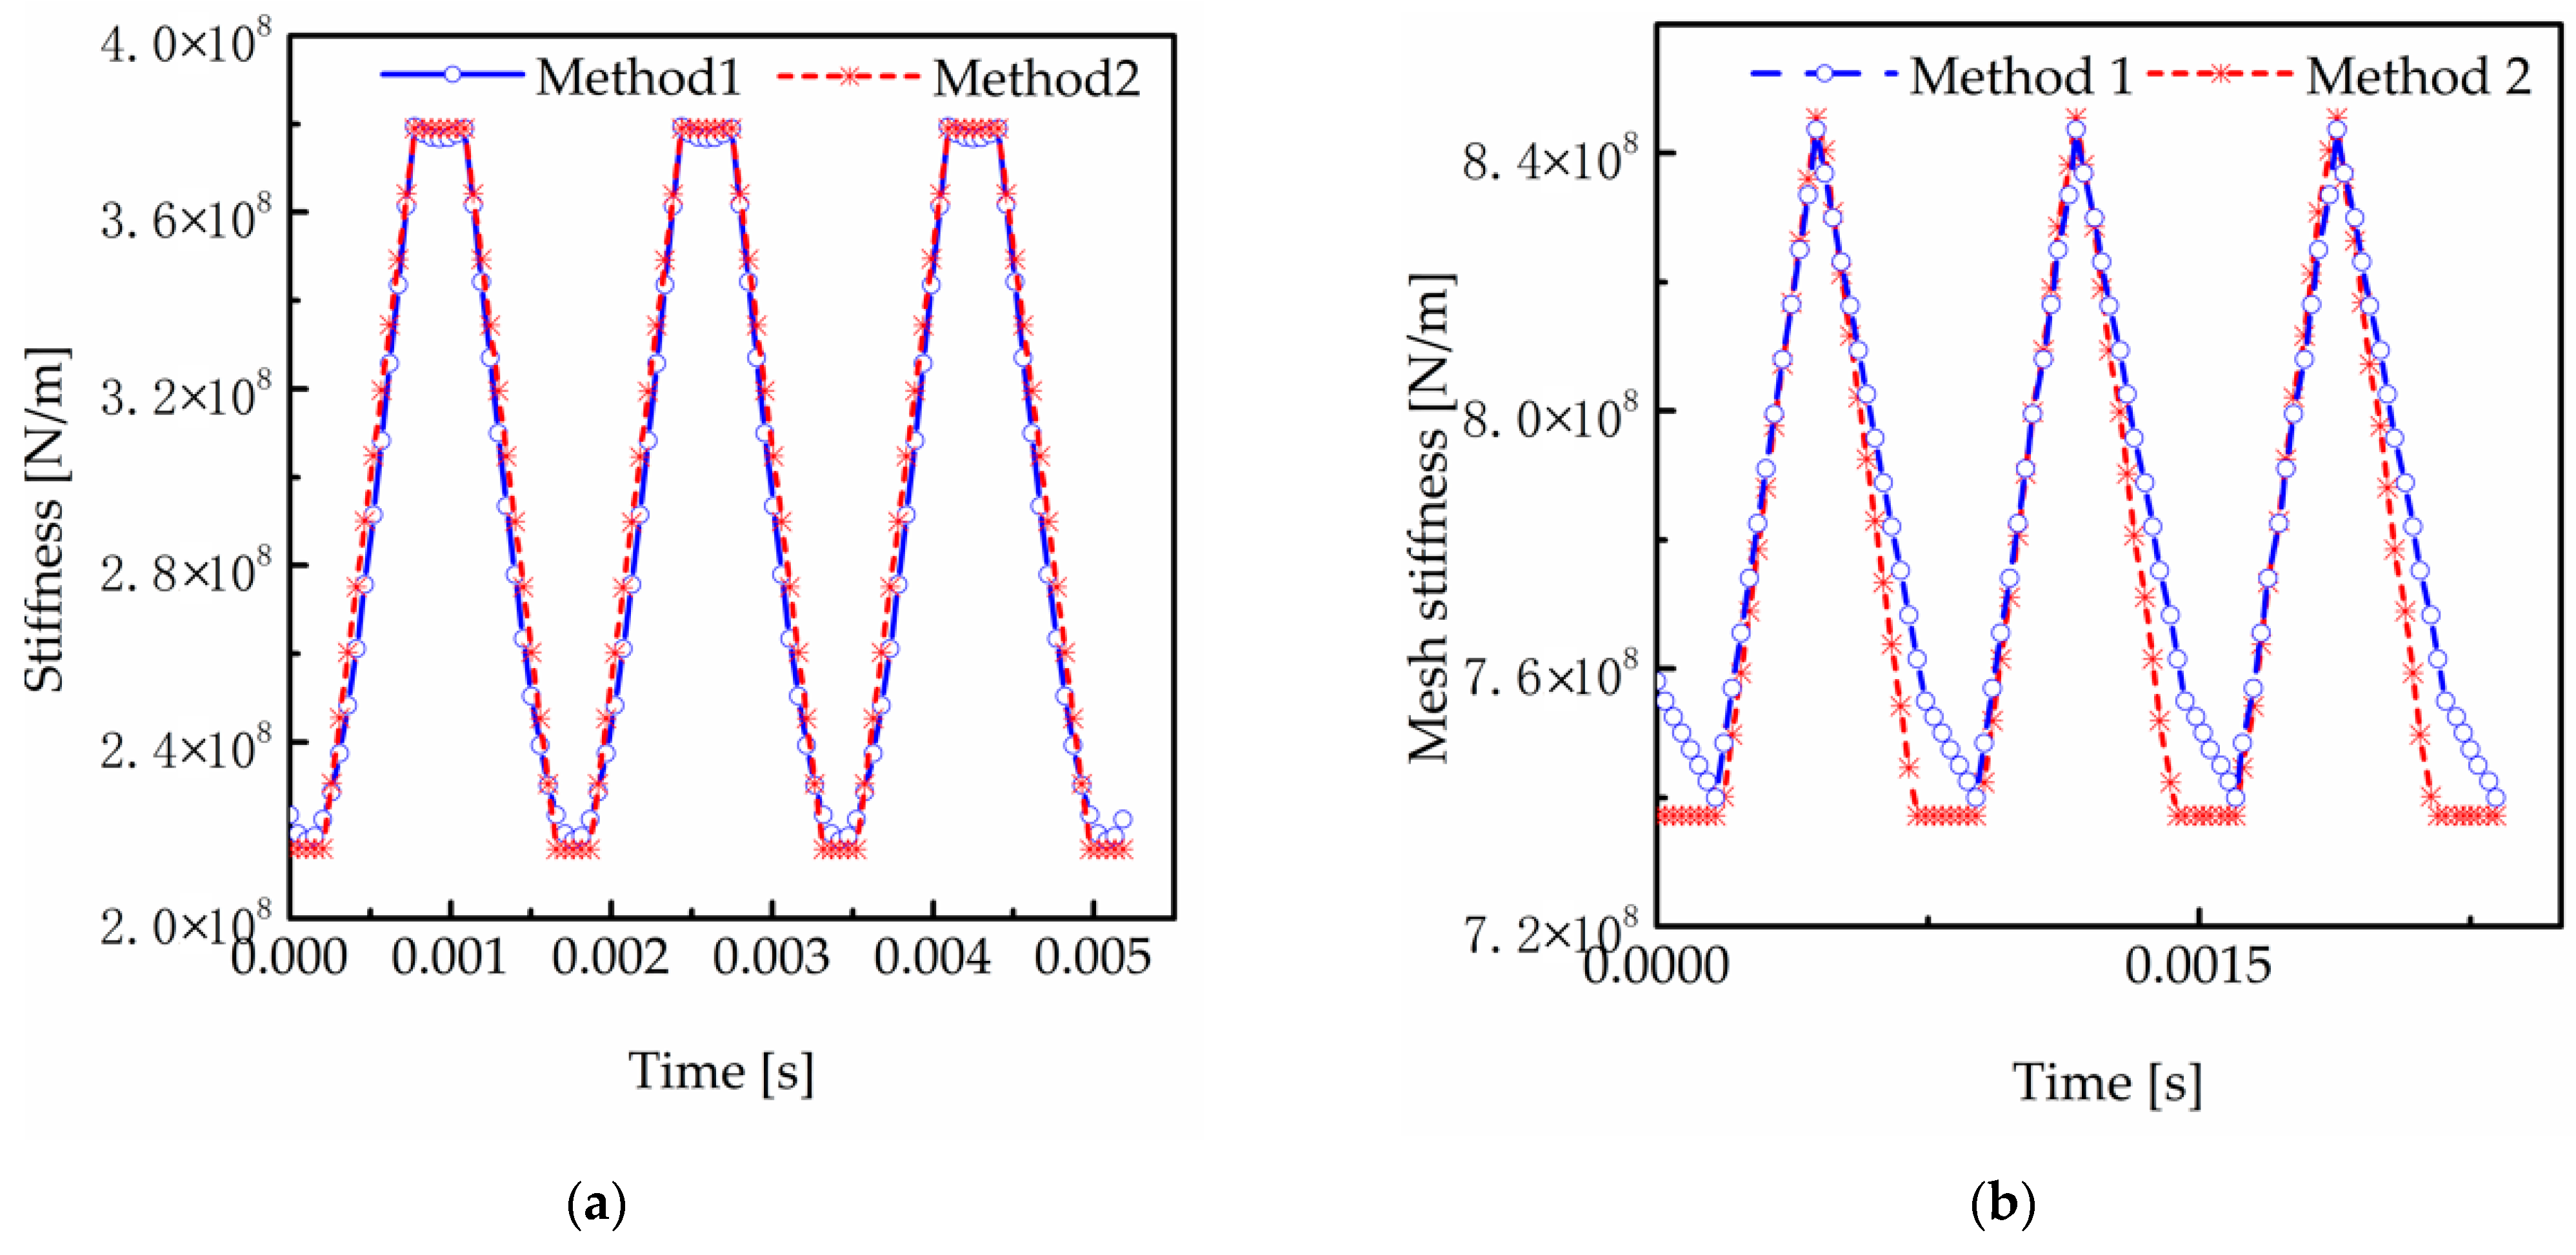
The calculation method is verified in ABAQUS. In order to successfully compare the two methods, the load and speed of the method used are all the same. A 20 Nm torque is added, and the rotation speed is 1500 r/min. The calculation results are compared and analysed. The parameters employed are illustrated in Table 1.
Figure 7 shows the results of the two calculation methods. The red curve represents the stiffness using method 1, the finite element method. The blue curve is the result using method 2, the analytical method. Figure 7a shows the stiffness when , and Figure 7b shows when . The trend of the two methods is agreeable, but there is a deviation between the results. This might be because the foundation stiffness caused by the axial force component is ignored in the analytical method.
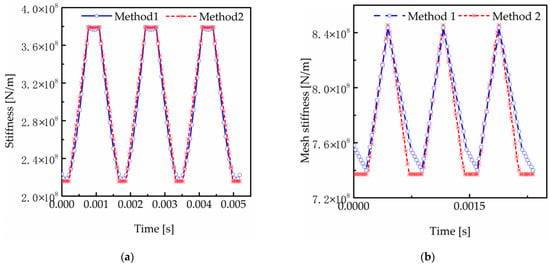
Figure 7.
The stiffness comparison of the two methods. (a) . (b) .
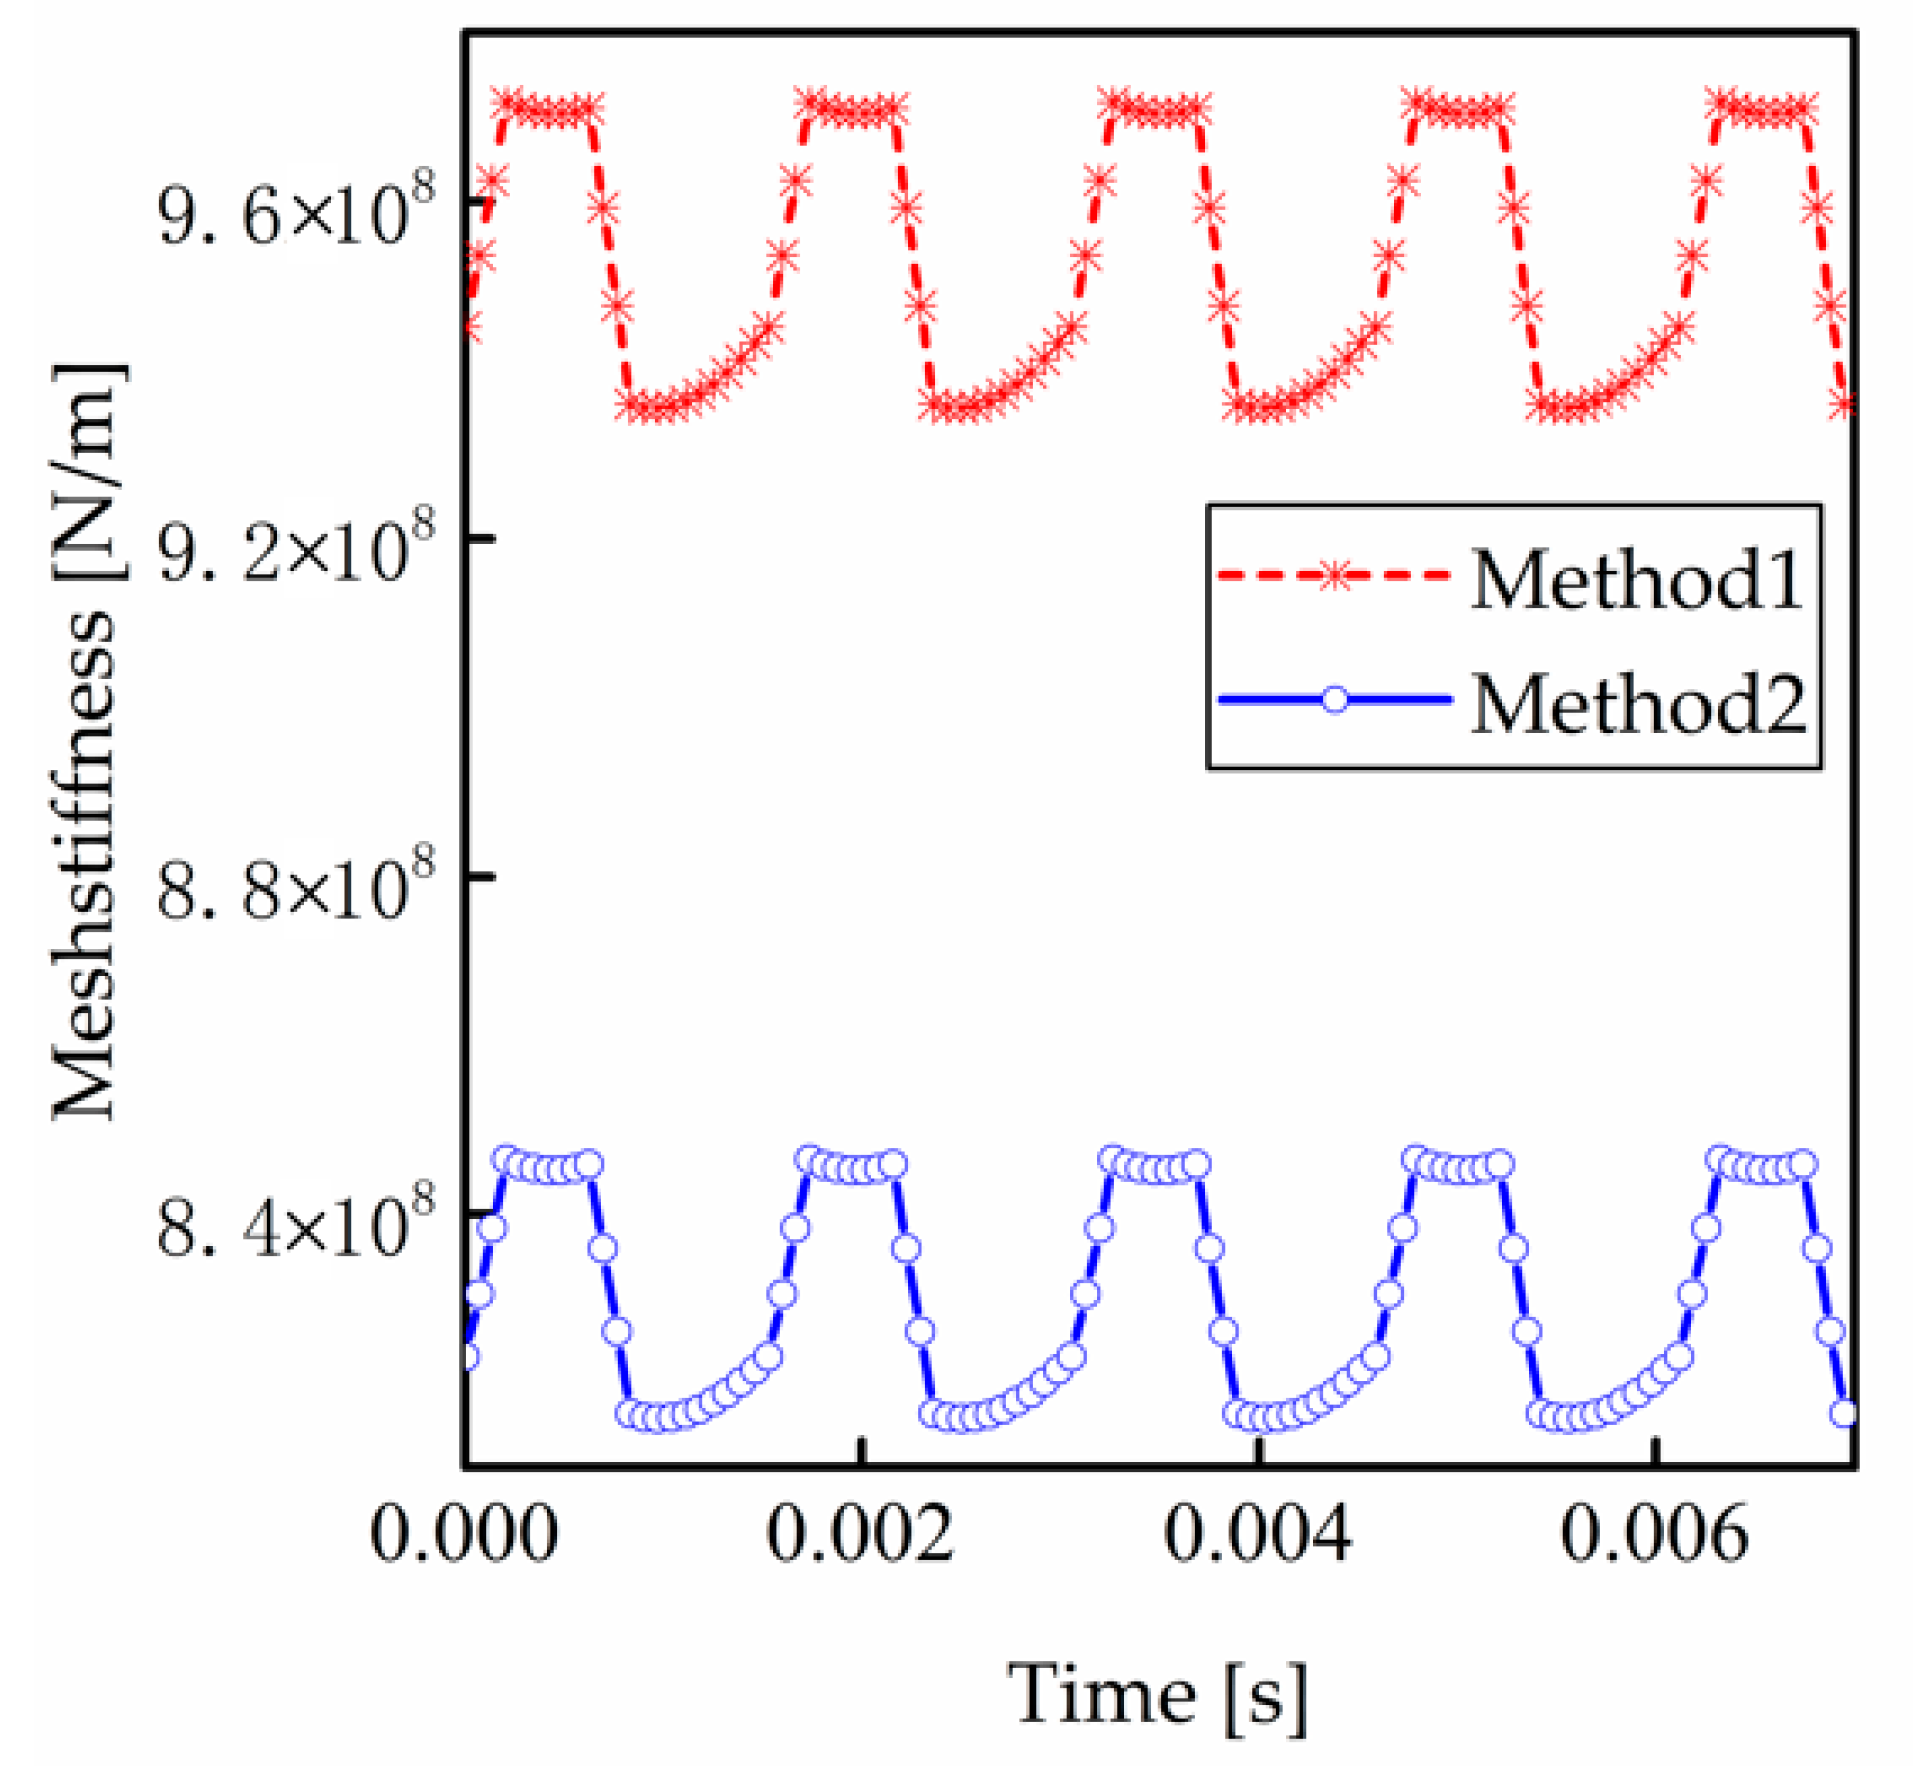
Figure 8 shows the stiffness of gear pair 1 in the electric vehicle calculated by two methods. The parameters of the first-stage gear used are shown in Table 2. Method 1 is the calculation result neglecting axial force in stiffness, and method 2 is stiffness considering the axial force component. The stiffness is 13% decreased after the axial force component is considered. This is because, under the same contact force, the deflection contains not only the deflections caused by transverse force but also the axial force, making the stiffness smaller.

Figure 8.
Calculation results of two methods using parameters in the first stage.
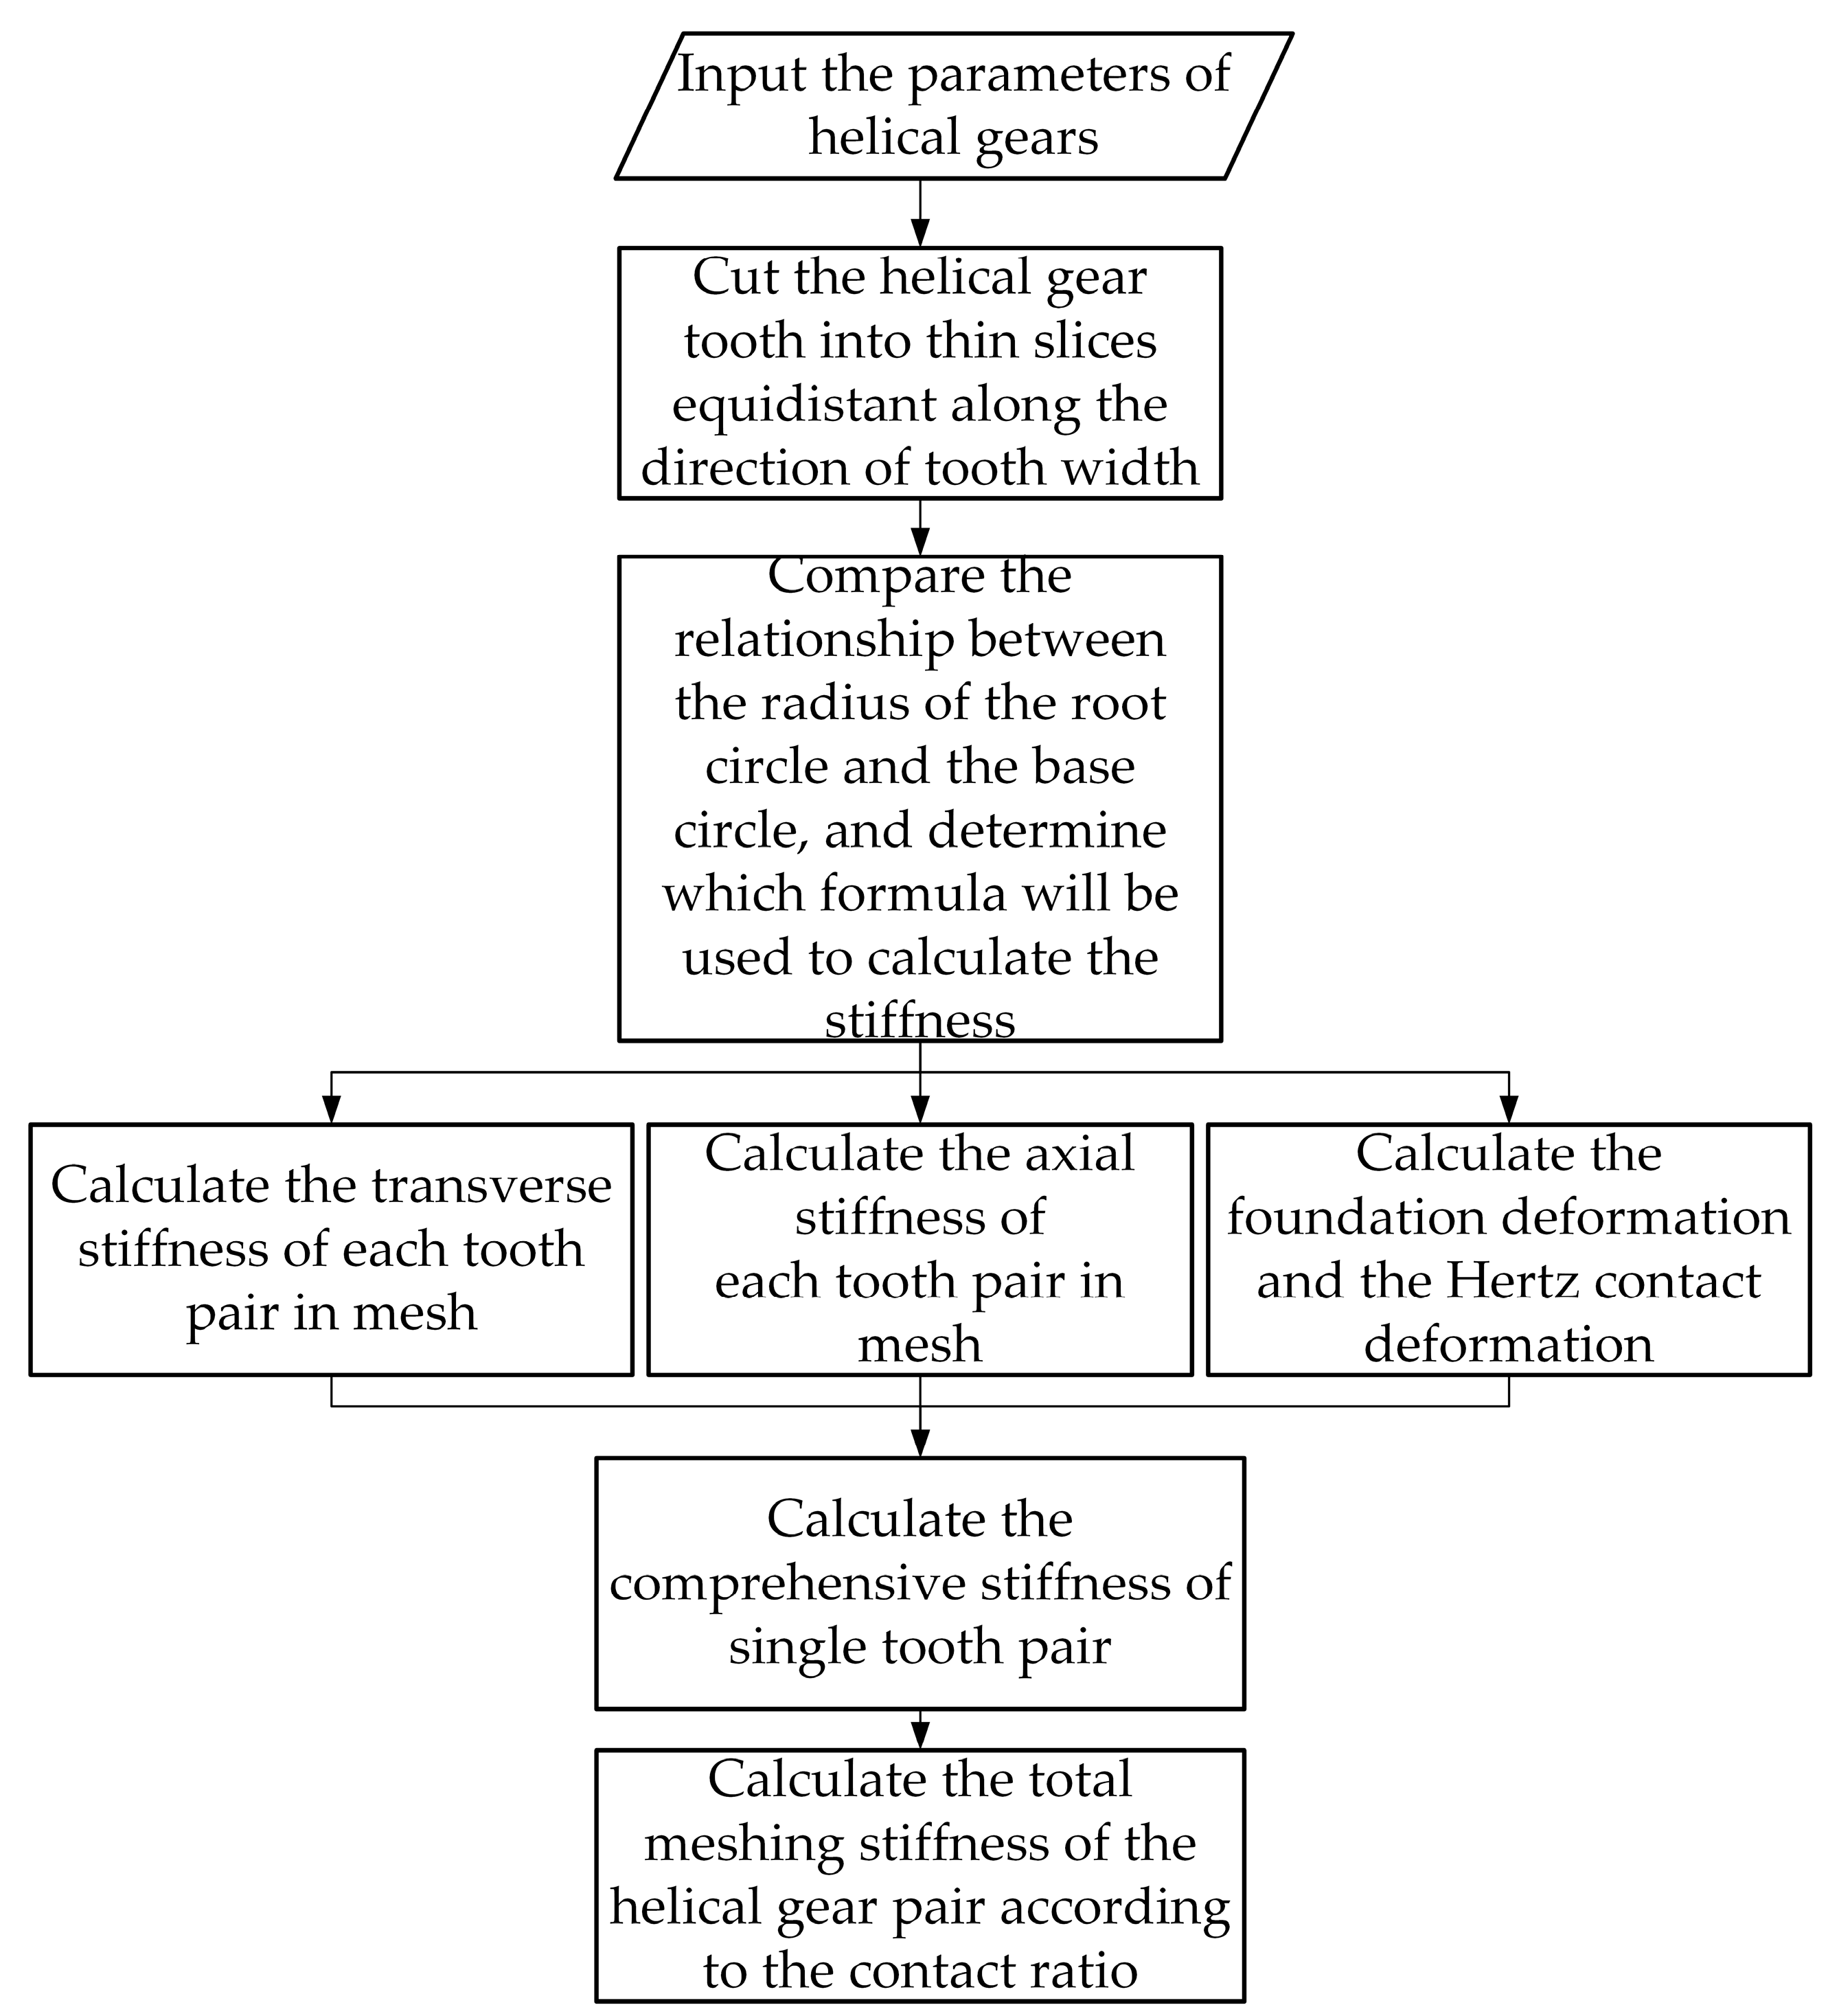
The calculation algorithm of the meshing stiffness is shown in Figure 9.
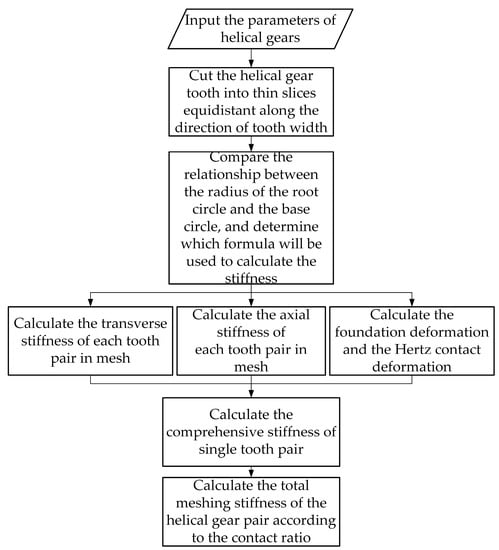
Figure 9.
The flow chart for calculating the stiffness of helical gears.
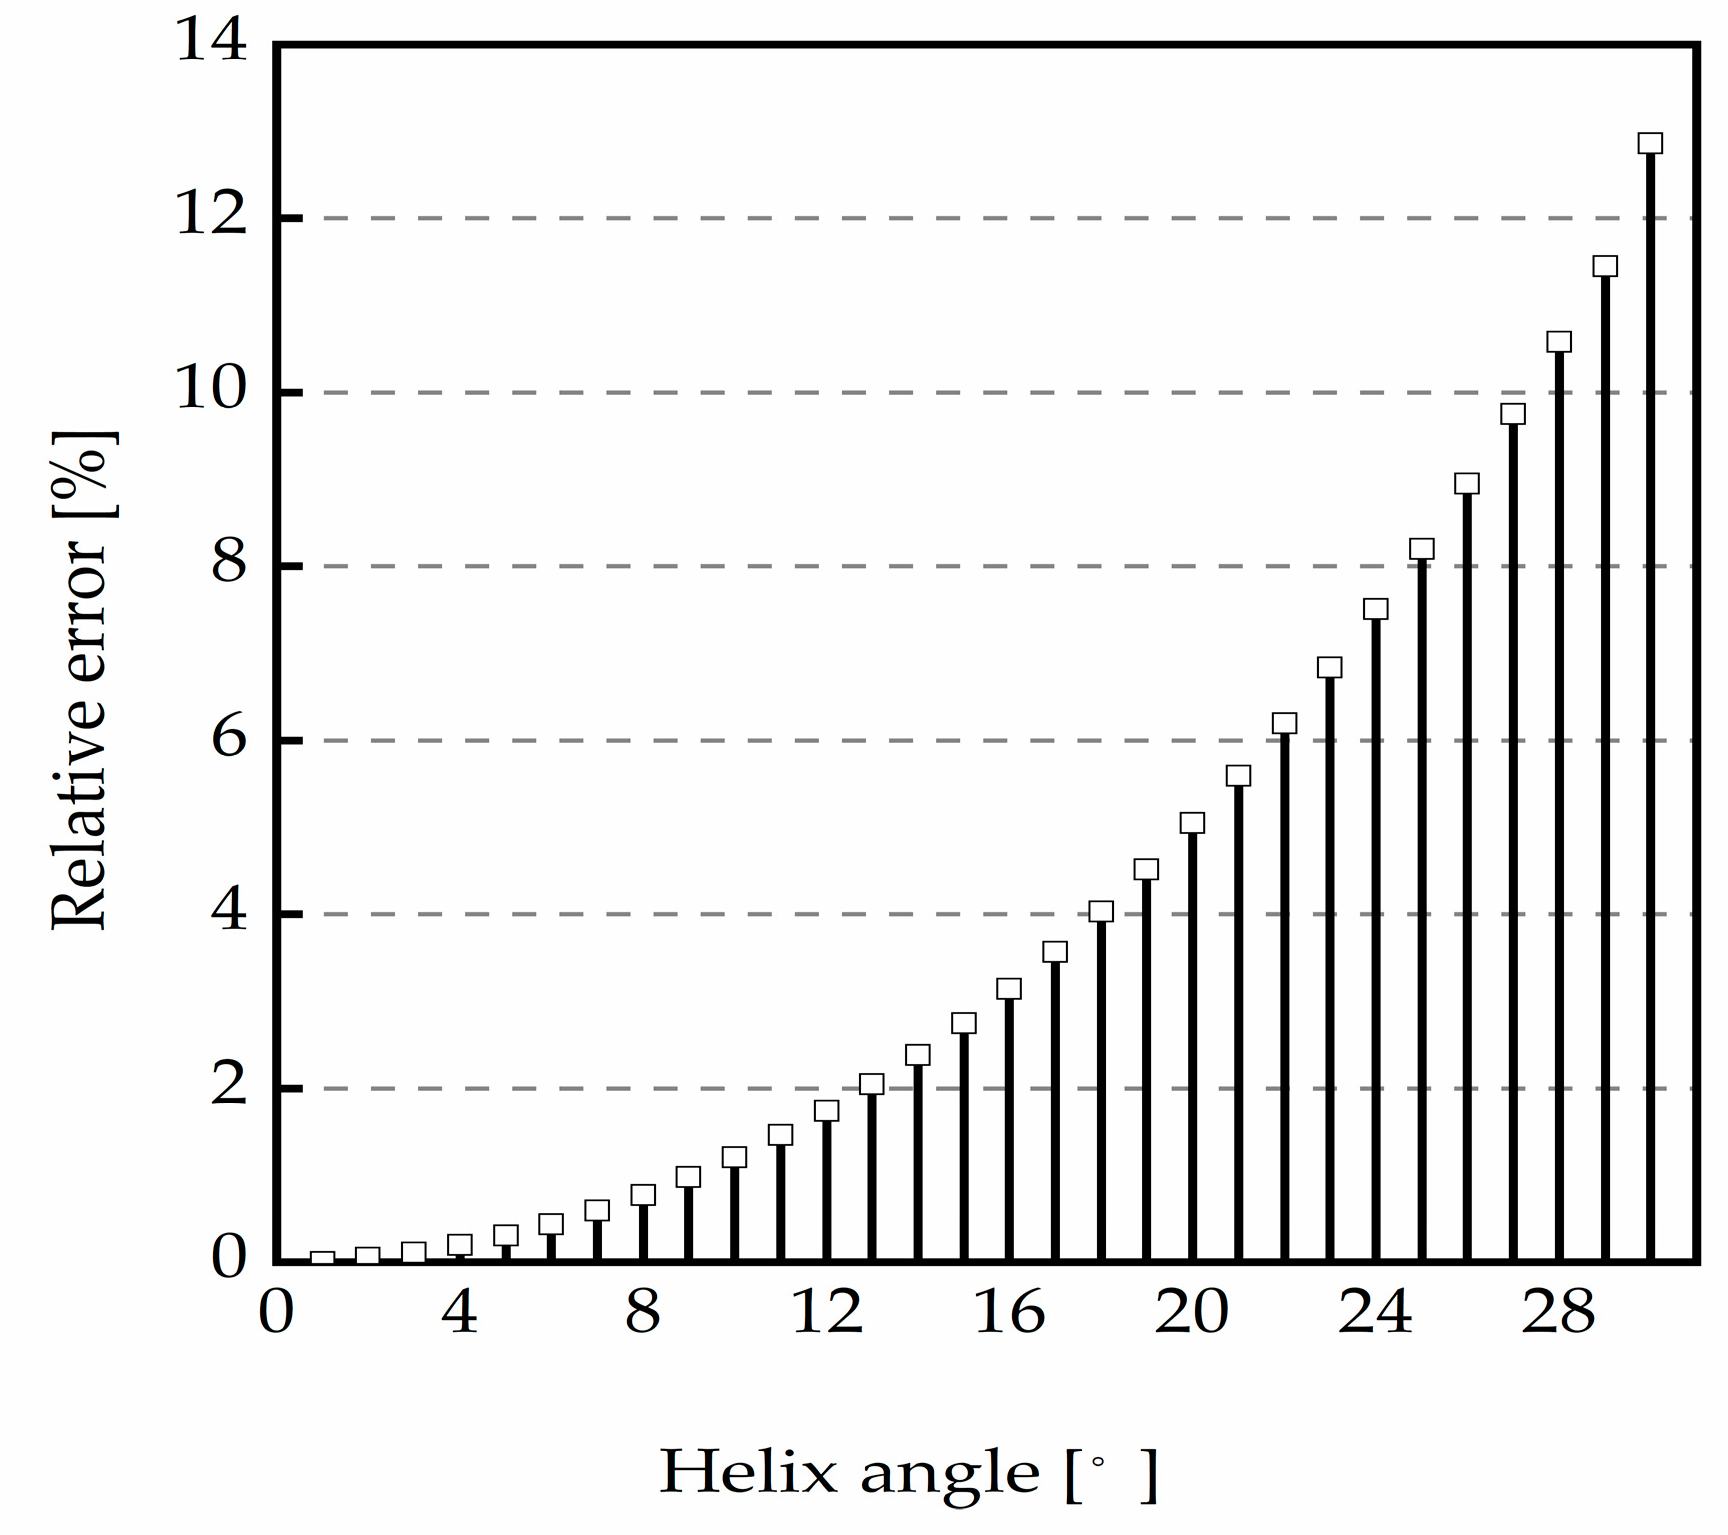
To better explore the stiffness variation with the helix angle, the relative error is calculated. The ratio of the absolute deviation of mean stiffness to the mean value of an original method is defined as the relative error.
The gear parameters of the transmission system on a pure electric vehicle used are illustrated in Table 2.
Figure 10 shows that the relative error gets bigger with the increase in the helix angle. When the helix angle is 20°, the relative error is more than 5%, and it is more than 10% when the helix angle is bigger than 27°. When the helix angle is up to 30.5°, the stiffness is 13% decreased. Thus, the axial force component in the mesh stiffness should be considered in the transmission system of electric vehicles.
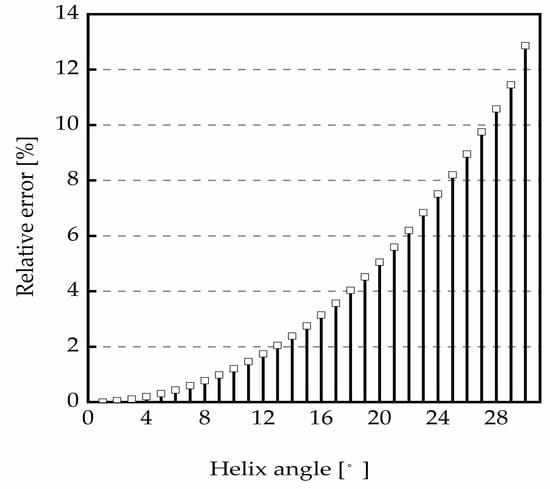
Figure 10.
Relative error variation at different helix angles.
4. Dynamic Model of a Motor Two-Stage Driveline System
4.1. Dynamic Model of the Motor Two-Stage Driveline in an Electric Vehicle
The built-in permanent magnet synchronous motor is used in this study. The motor is assumed to work in the ideal situation, and the following conditions are satisfied:
- The saturation of the motor core is ignored;
- The eddy current and hysteresis loss in the motor is ignored;
- The current in the motor is a symmetrical phase sine wave current.
In the model, the vector control strategy is adopted, the PI regulator is used to control the speed in the model, and the PI regulator is also used for current loop control.
The model of the permanent magnet synchronous motor is established as follows.
The voltage Equation is written as [35]:
The electromagnetic torque Equation is [35]:
where ud and uq are the components of the voltage vector in the d-axial and q-axial. R is the armature phase resistance, id and iq are components of the armature current vector in d-axial and q-axial. is the electrical rotational speed, Pn is the number of magnetic pole pairs of the motor, Ld and Lq is the armature inductances of the motor in d and q axis, and is the permanent magnet flux linkage. The parameters used in this motor model are shown in Table 3. is the moment of the motor and is the electromagnetic torque.

Table 3.
Parameters of the two-stage driveline.
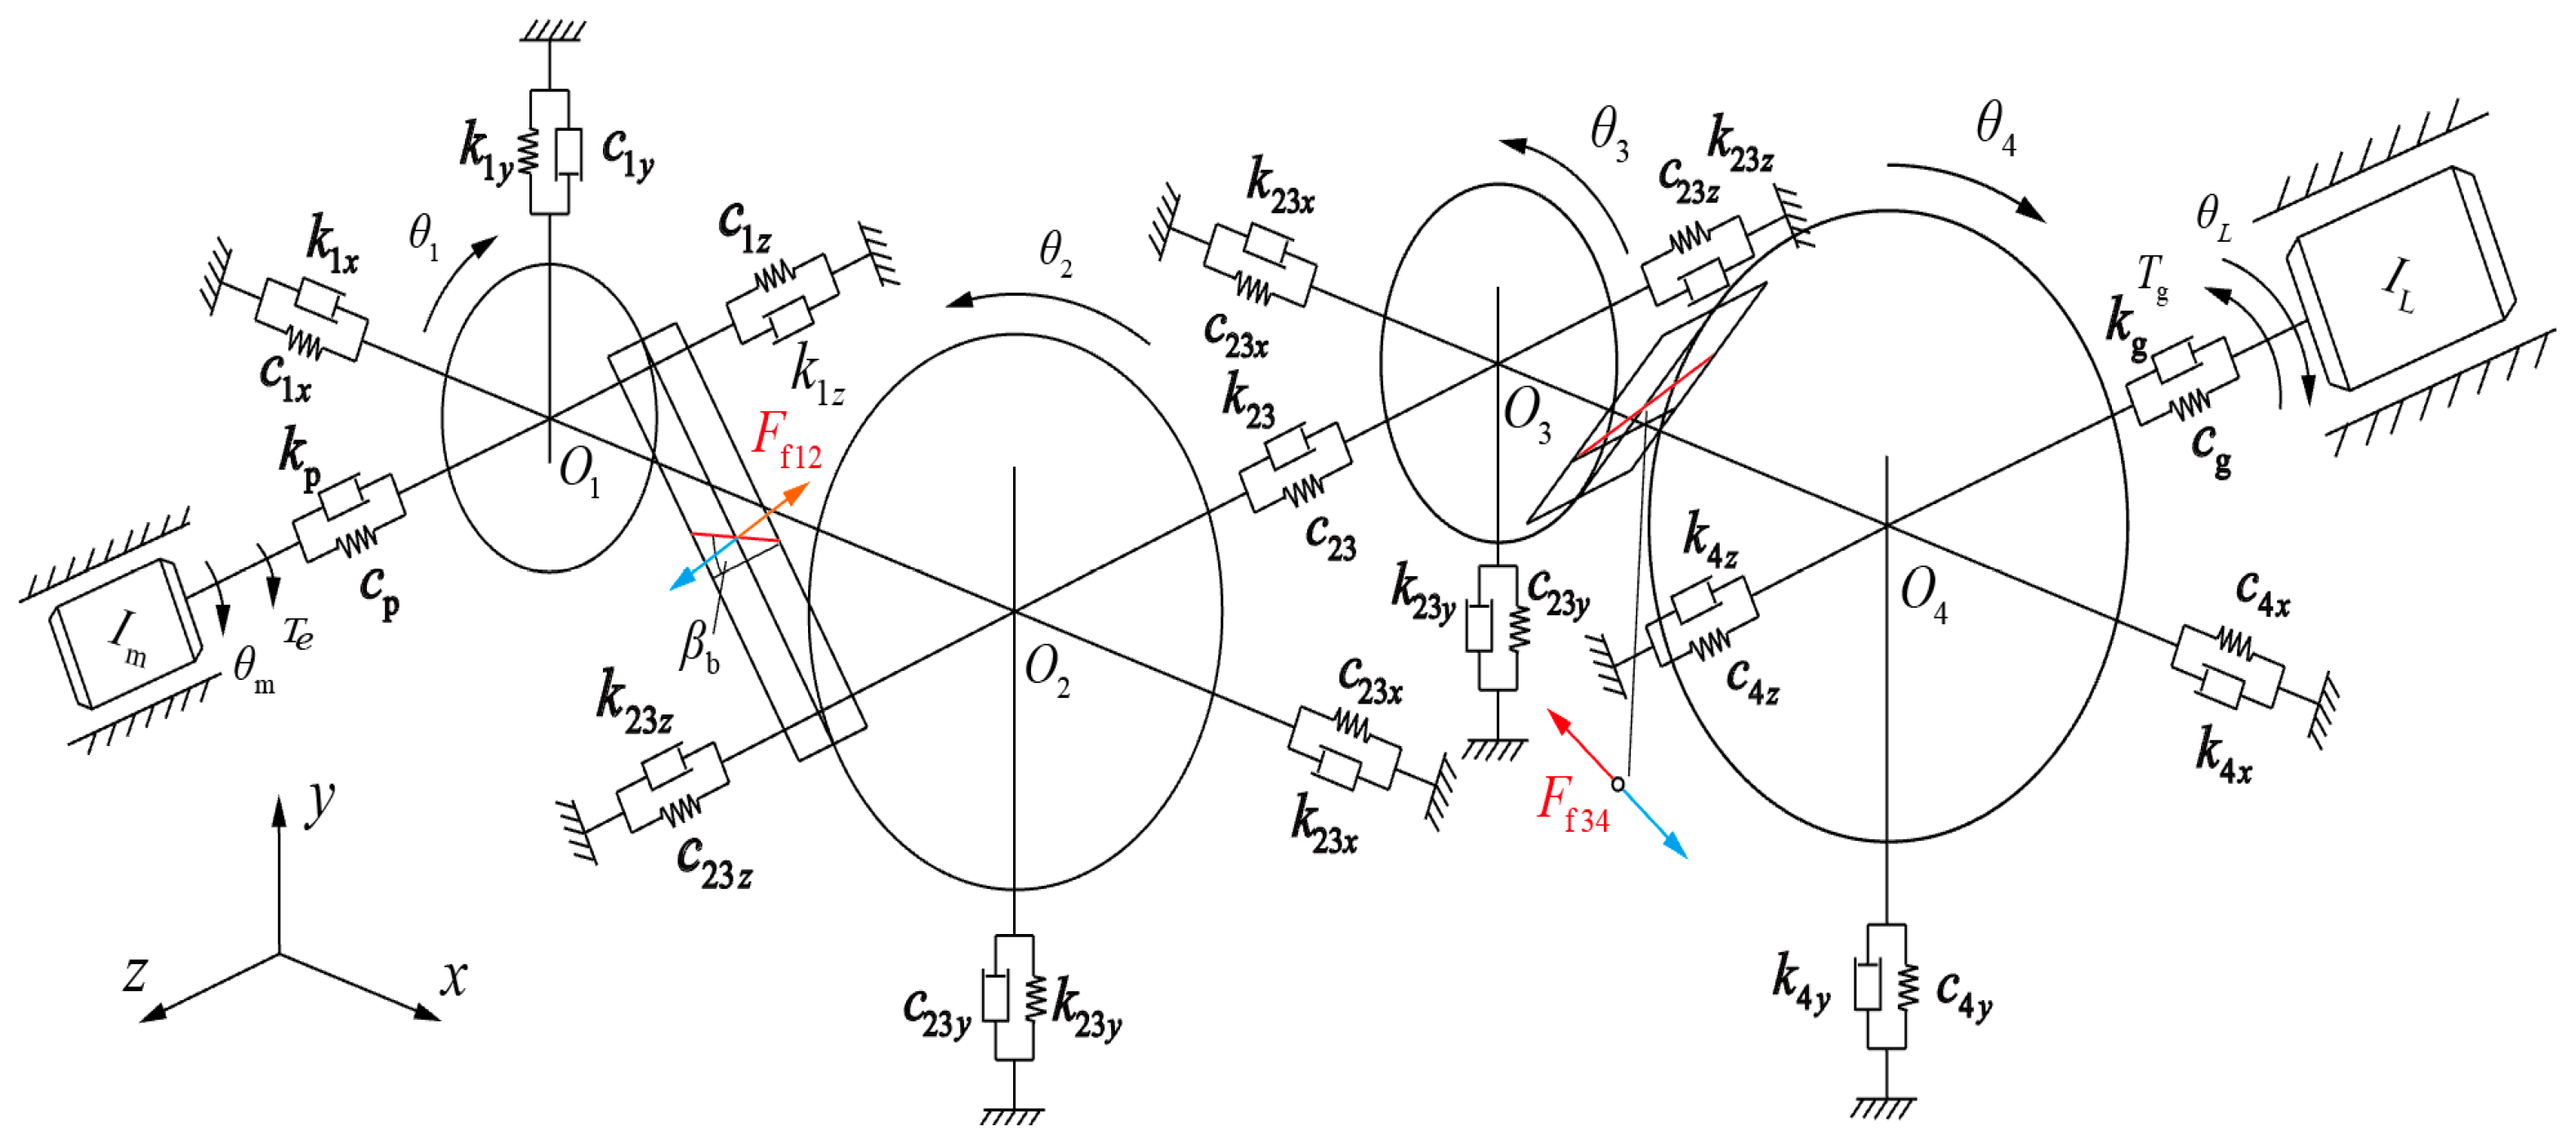
Figure 11 is the physical model of a two-stage driveline. A four-degree-of-freedom model is established for every gear (, , , and ). Two gears on the intermediate shaft are linked with an elastic shaft, and gears 2 and 3 are assumed to have the same vibration in the , , and directions. For the motor, one rotation freedom model is established, and for the load on the output shaft, the rotation freedom is established. Therefore a two-stage driveline model with 15 degrees of freedom is established.
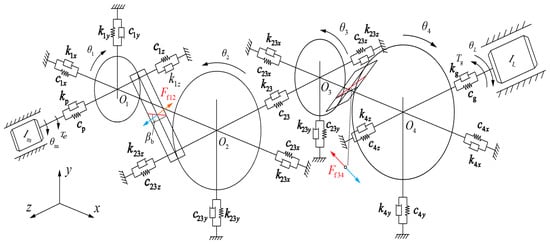
Figure 11.
A two-stage driveline dynamic model.
For the pinion at the first stage, the model is established as
For the two gears at the middle shaft, the model is
where
For gear 4 and the output shaft, the dynamic model is
In the above equations, is the moment of inertia of the motor, and are the torsional stiffness and damping of the input shaft. mi, i = 1, 2, 3, 4 is the mass of the ist gear. Ii, i = 1, 2, 3, 4 is the moment of inertia of the ist gear. is the moment of inertia of the load. and are the torsional stiffness and damping of the output shaft. , , and are the supporting stiffness of the bearing for gear 1 in the three directions. , , and are the damping of the bearing for gear 1 in the three directions. The parameters of gear 2, gear 3, and gear 4 have the same meanings. The parameters used in the dynamic model of the two-stage helical gear transmission system are shown in Table 4.

Table 4.
Parameters of the two-stage driveline.
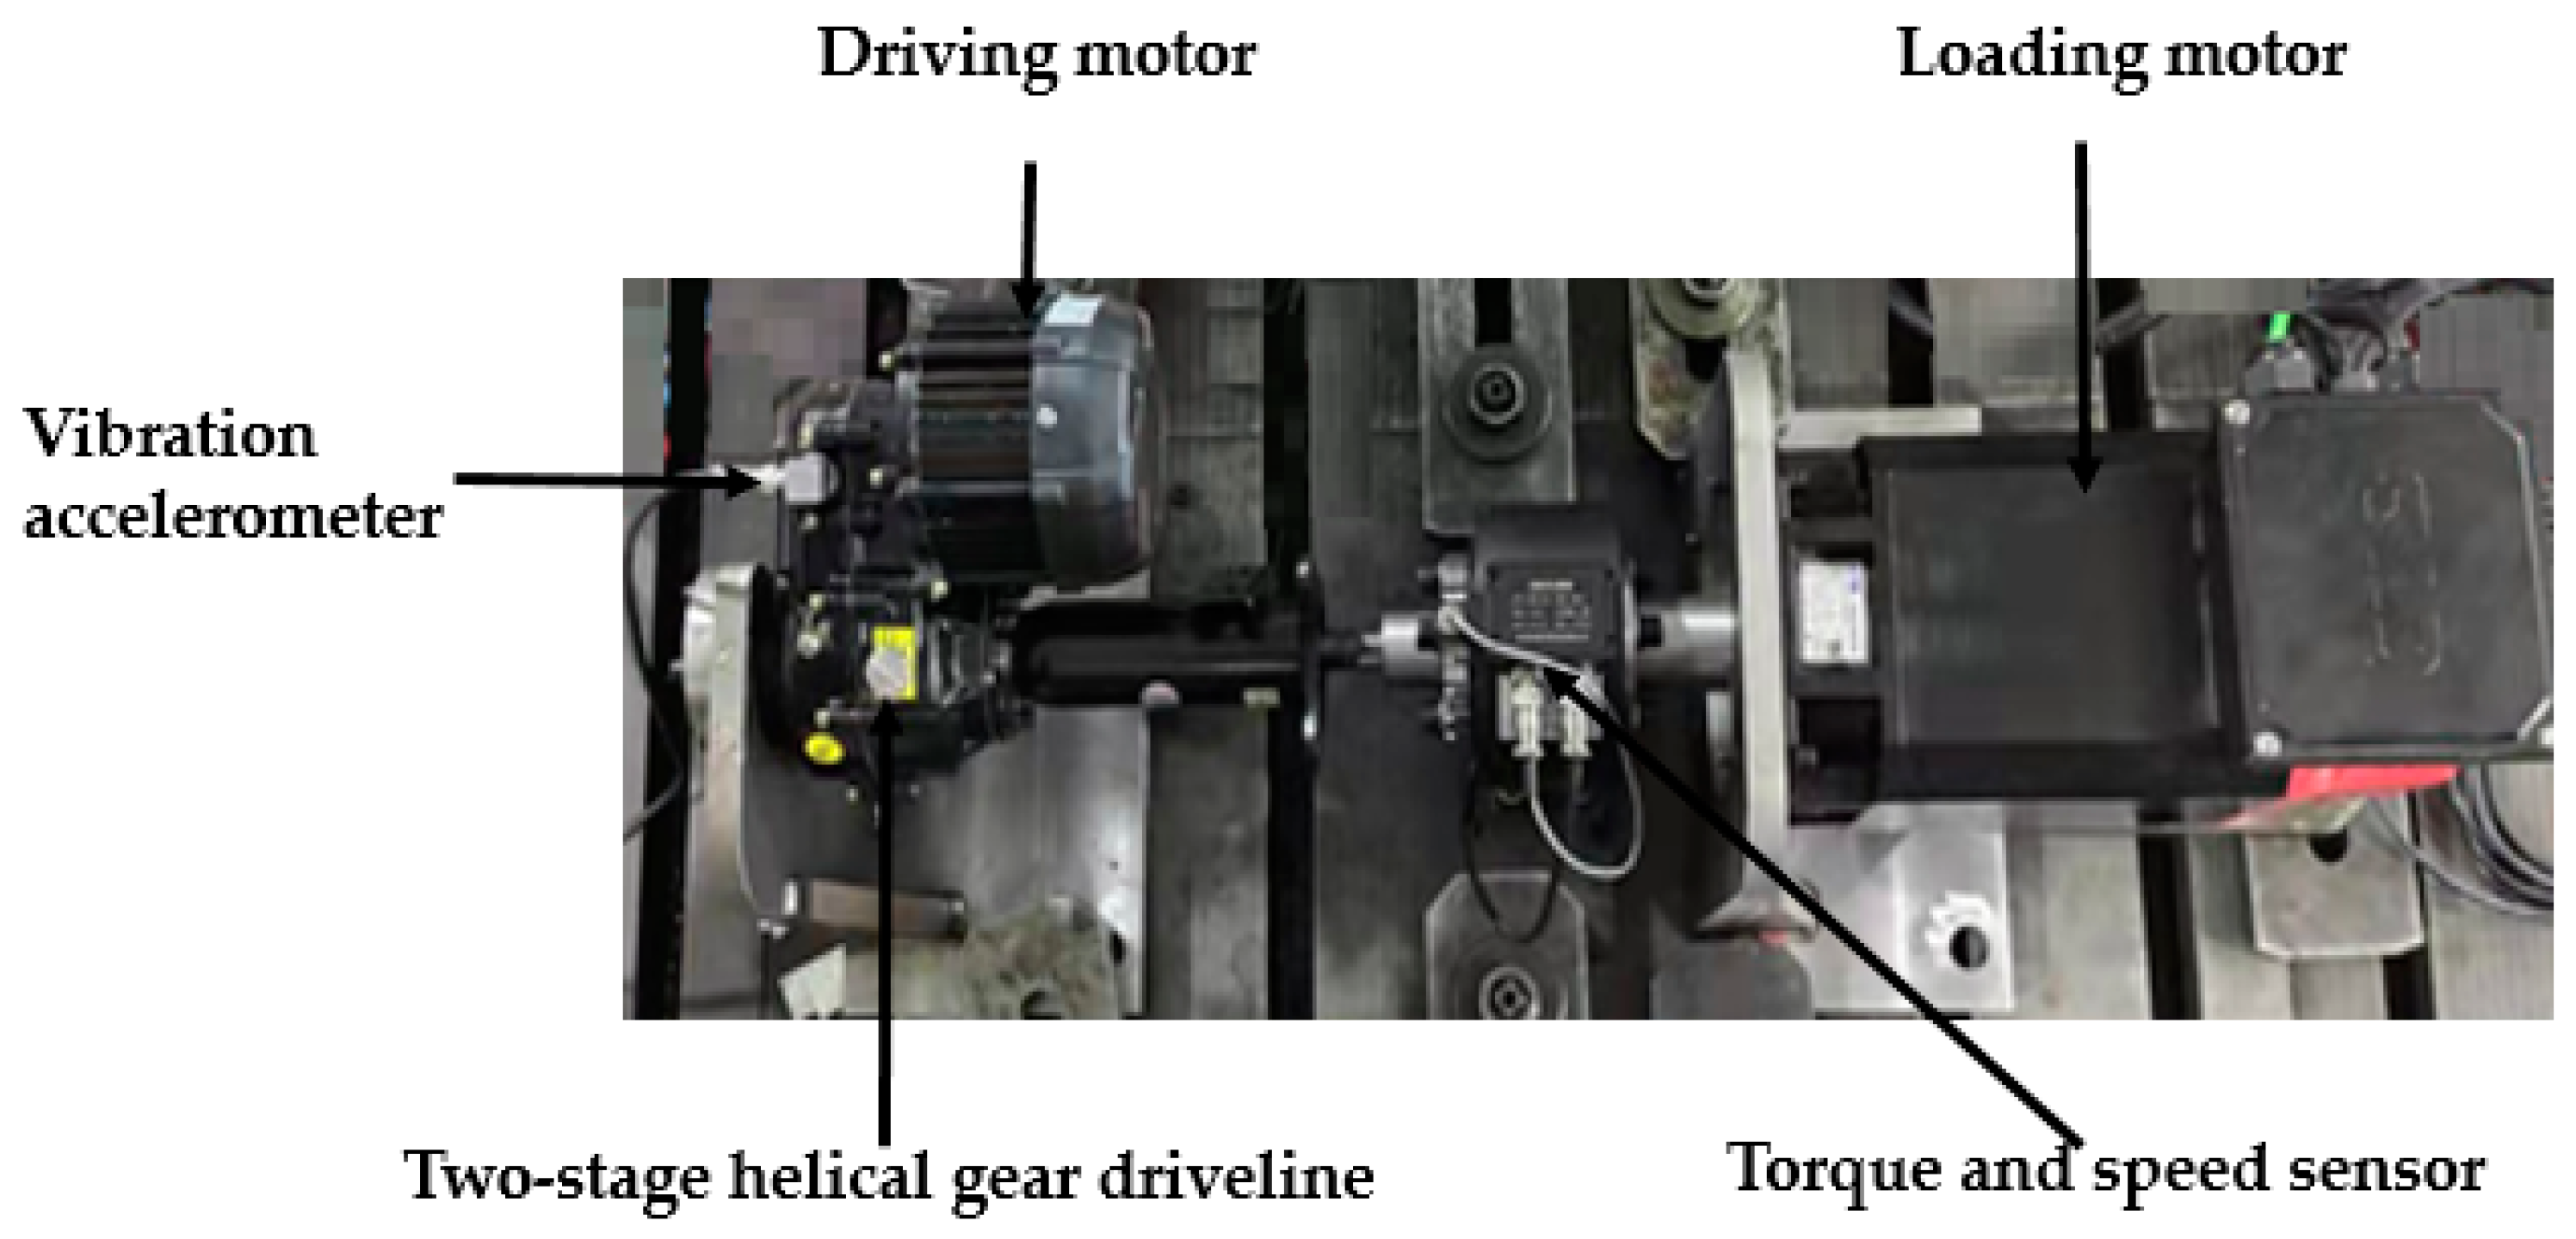
A test of a two-stage helical gear driveline is built, as shown in Figure 12. The system consists of the driving motor, the gearbox assembly, a drive axial shaft, a torque-speed sensor, and a loading motor. A total of 10 Nm is loaded on the system, and the motor rotation speed is controlled at 3000 rpm. The number of teeth of the gears used to verify the model is 16, 52, 23, and 71, respectively.

Figure 12.
The testbed of the two-stage driveline.
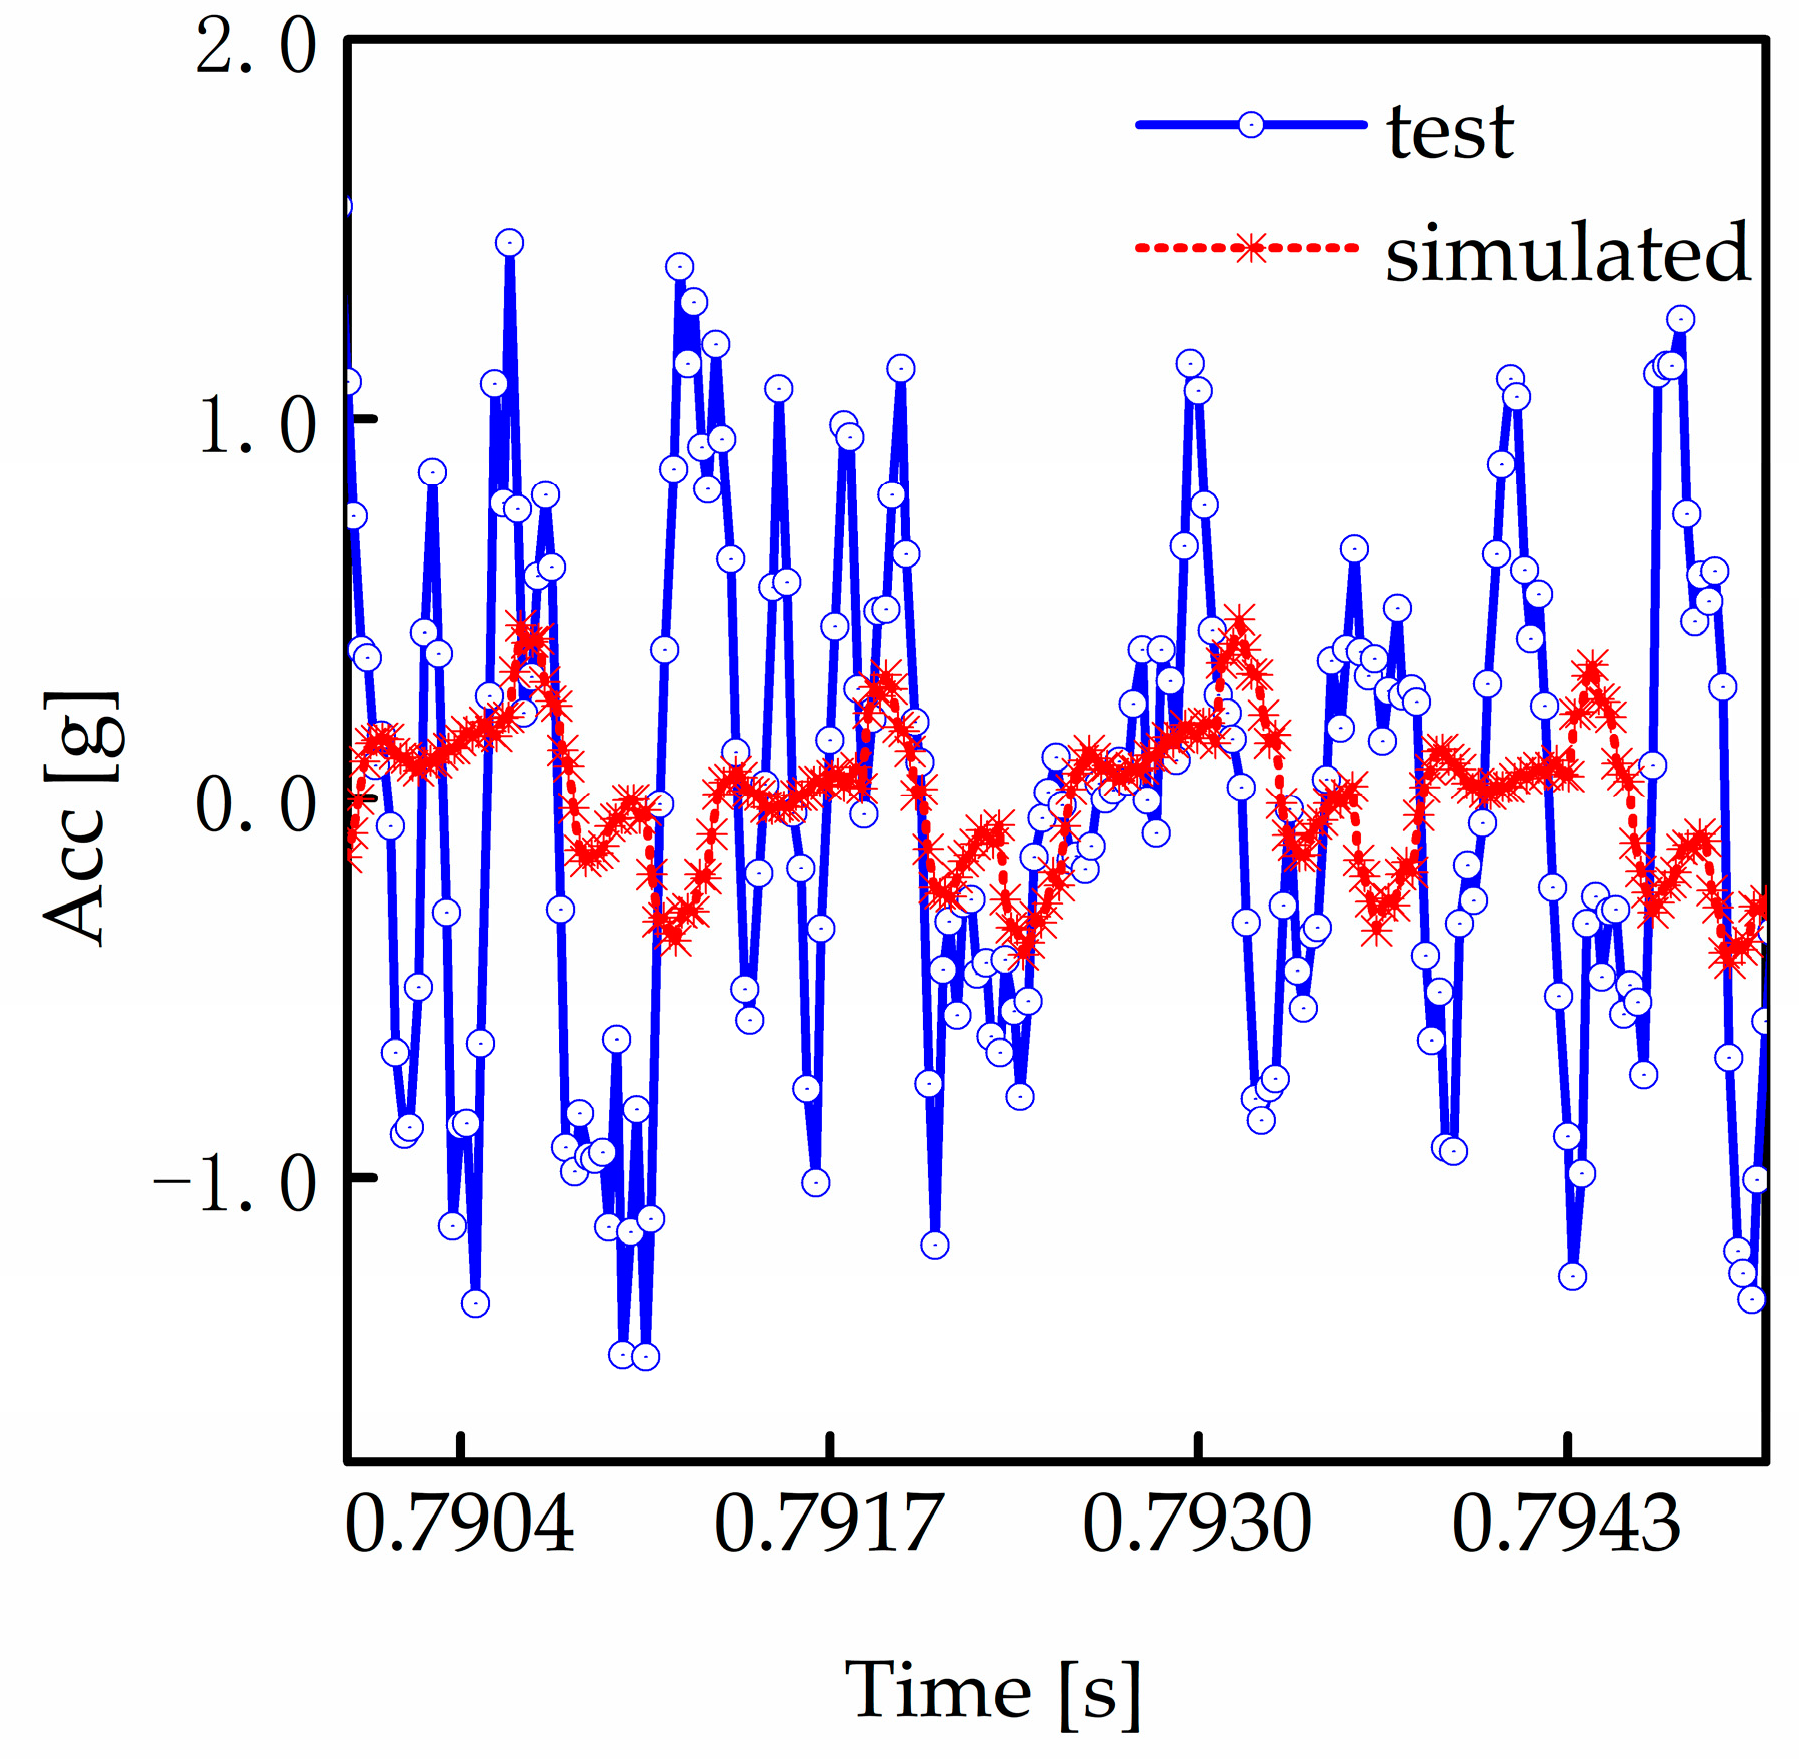
Figure 13 shows the simulated and test vibration acceleration of driving gear 1 in the x direction. The fluctuation of the test value is bigger than the simulated. This is caused by transmission errors and vibrations of other parts, such as bearings.

Figure 13.
The test and simulated vibration acceleration of driving gear 1 in x over time.
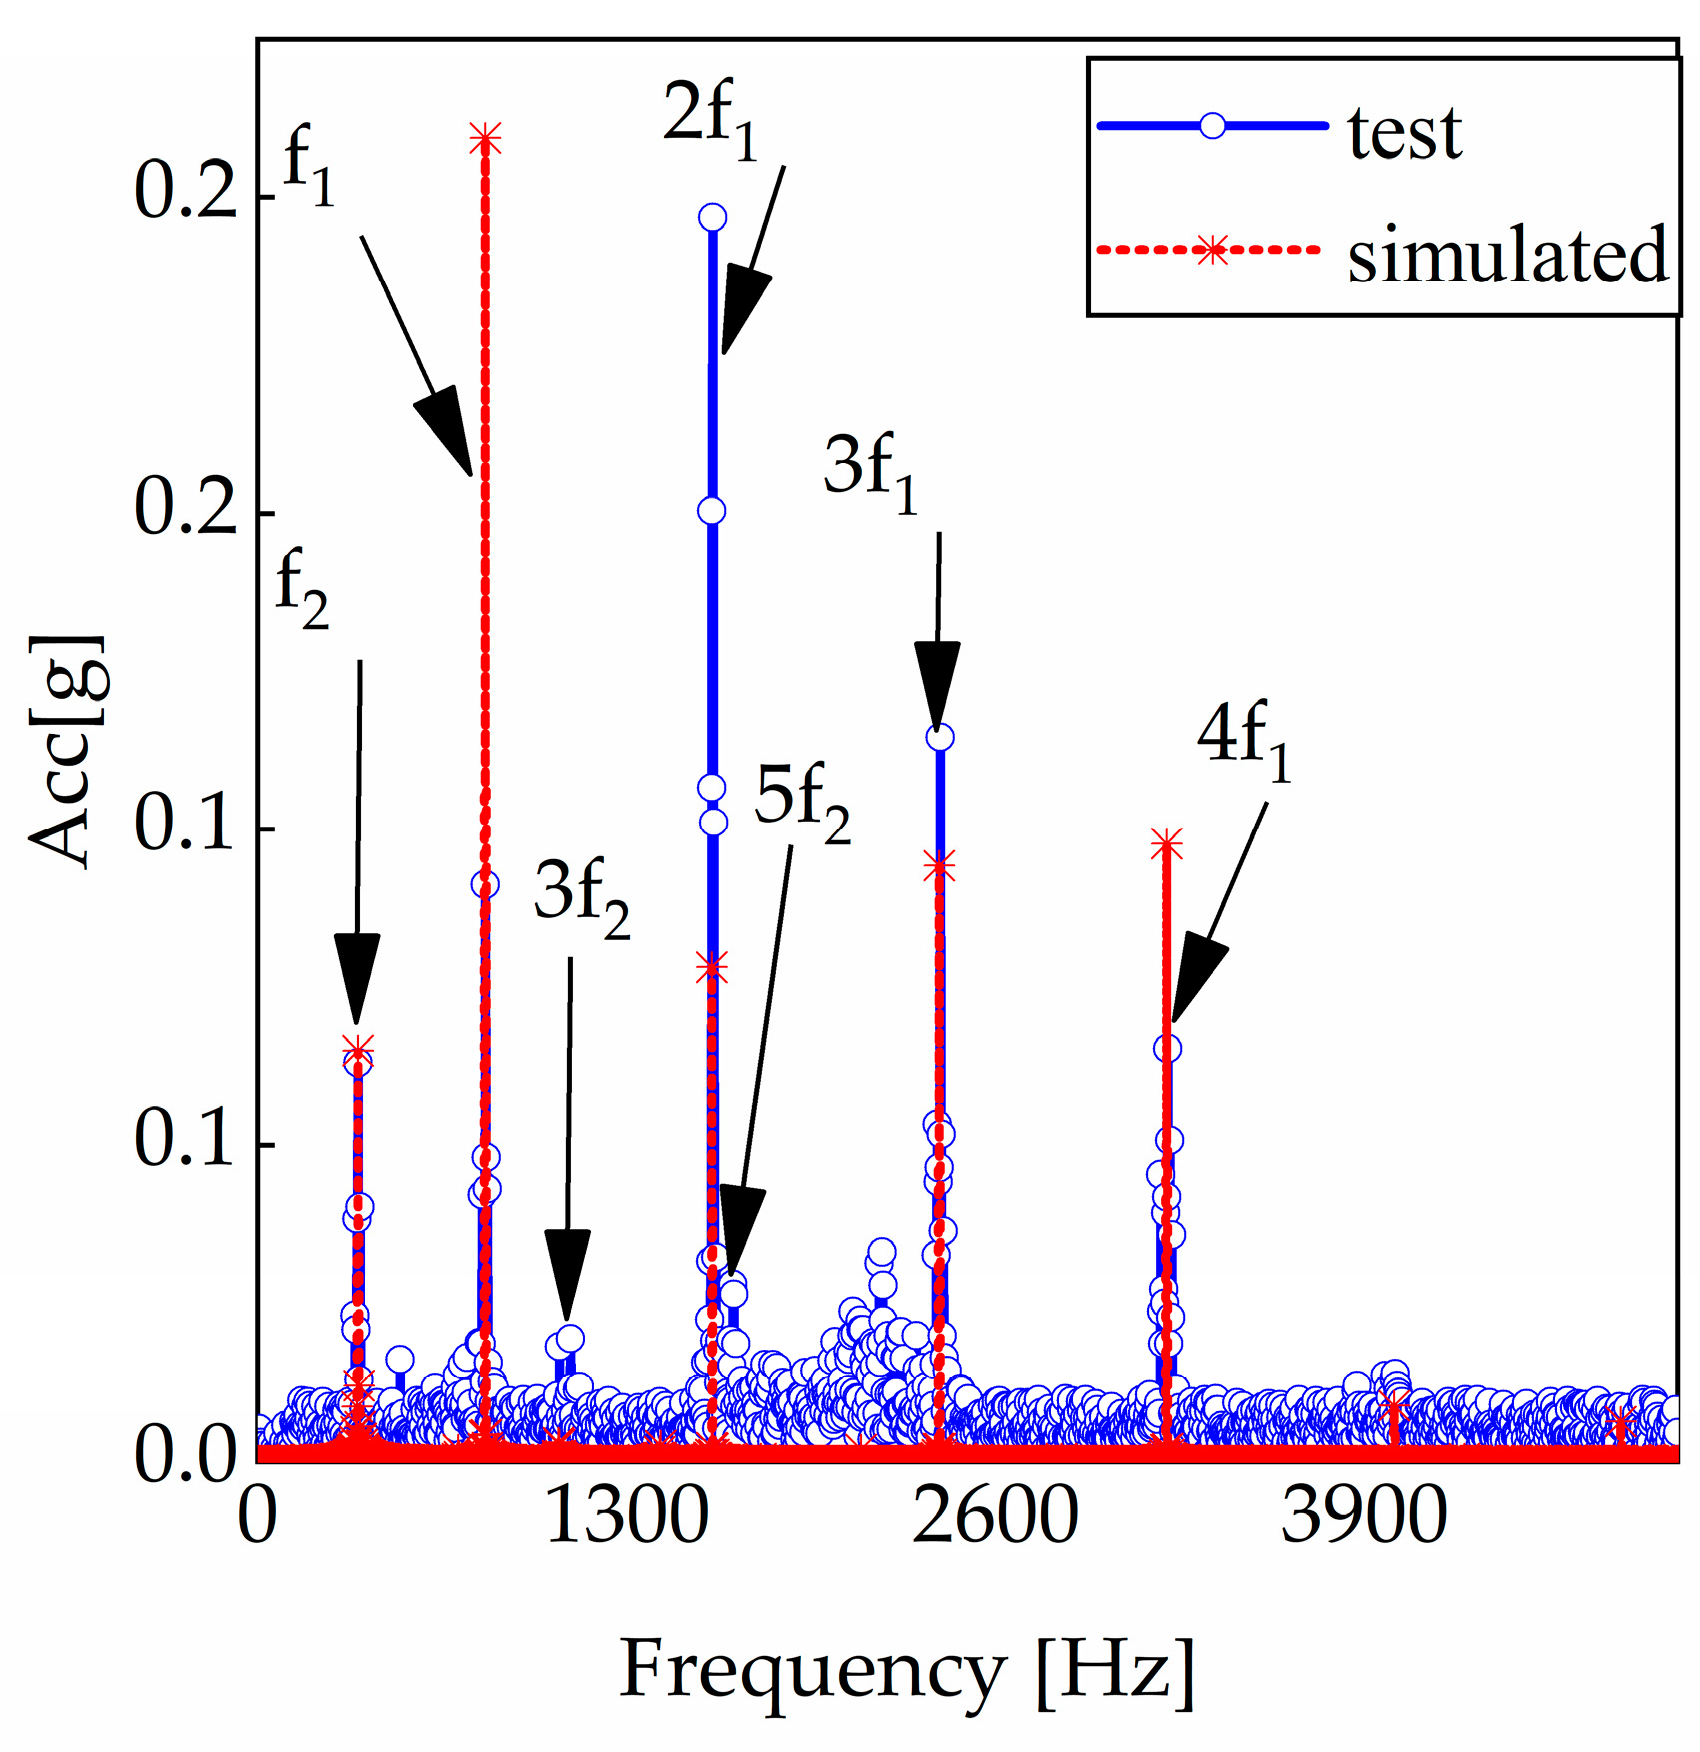
Figure 14 is the test and simulated acceleration of driving gear 1’s vibration in x in the frequency domain. At the mesh frequency f2 and f1, the trend of the test result agrees well with that of the simulated. This shows that the method and model established are right. There are amplitude deviations at the mesh frequency and multiples. This might be because of the vibration of bearings, the coupling, and the random error that are contained in the test result.
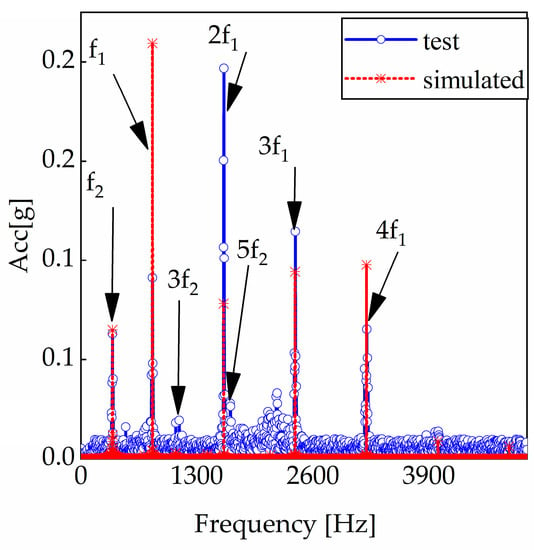
Figure 14.
The experimental and simulation vibration acceleration of pinion at stage 1 in x in the frequency domain.
4.2. Calculation of Electric Vehicle Driving Resistance
The method is used to establish the dynamic model of the transmission system in an electric vehicle. In an electric vehicle transmission system, the number of teeth is 26, 75, 25, and 79; the helix angle is 30.5°, as in Table 2. The electric vehicle is set to run at a constant speed of 26.5 km/h on asphalt pavement with a certain slope. The driving resistance can be calculated by the driving equation [36].
where , [36].
- where is the rolling resistance, is the rolling resistance coefficient, and is the angle of slope of the road. The road slope is set as 5%. is the coefficient of air resistance, is the windward area, and is the speed of the vehicle at 26.5 km/h.
Here, is calculated by when the slope angle is relatively small.
According to the above formula, the driving resistance of an electric vehicle is 1.0329 × 10³ N and the corresponding output torque TL = Ff × Rt = 330.528 Nm. Rt is the wheel radius. The corresponding motor output speed is 2000 rpm, and the motor load is 36.26 Nm.
According to the load, the friction force and the friction torque of gear pair 1 and gear pair 2 are calculated.
4.3. Calculation of Friction Force and Friction Torque
The effect of friction is considered in the model.
The friction factor and the parameter can be calculated with the empirical formulas in the literature [37].
After obtaining the friction factor, we can deduce the friction force and friction torque using Equation (55).
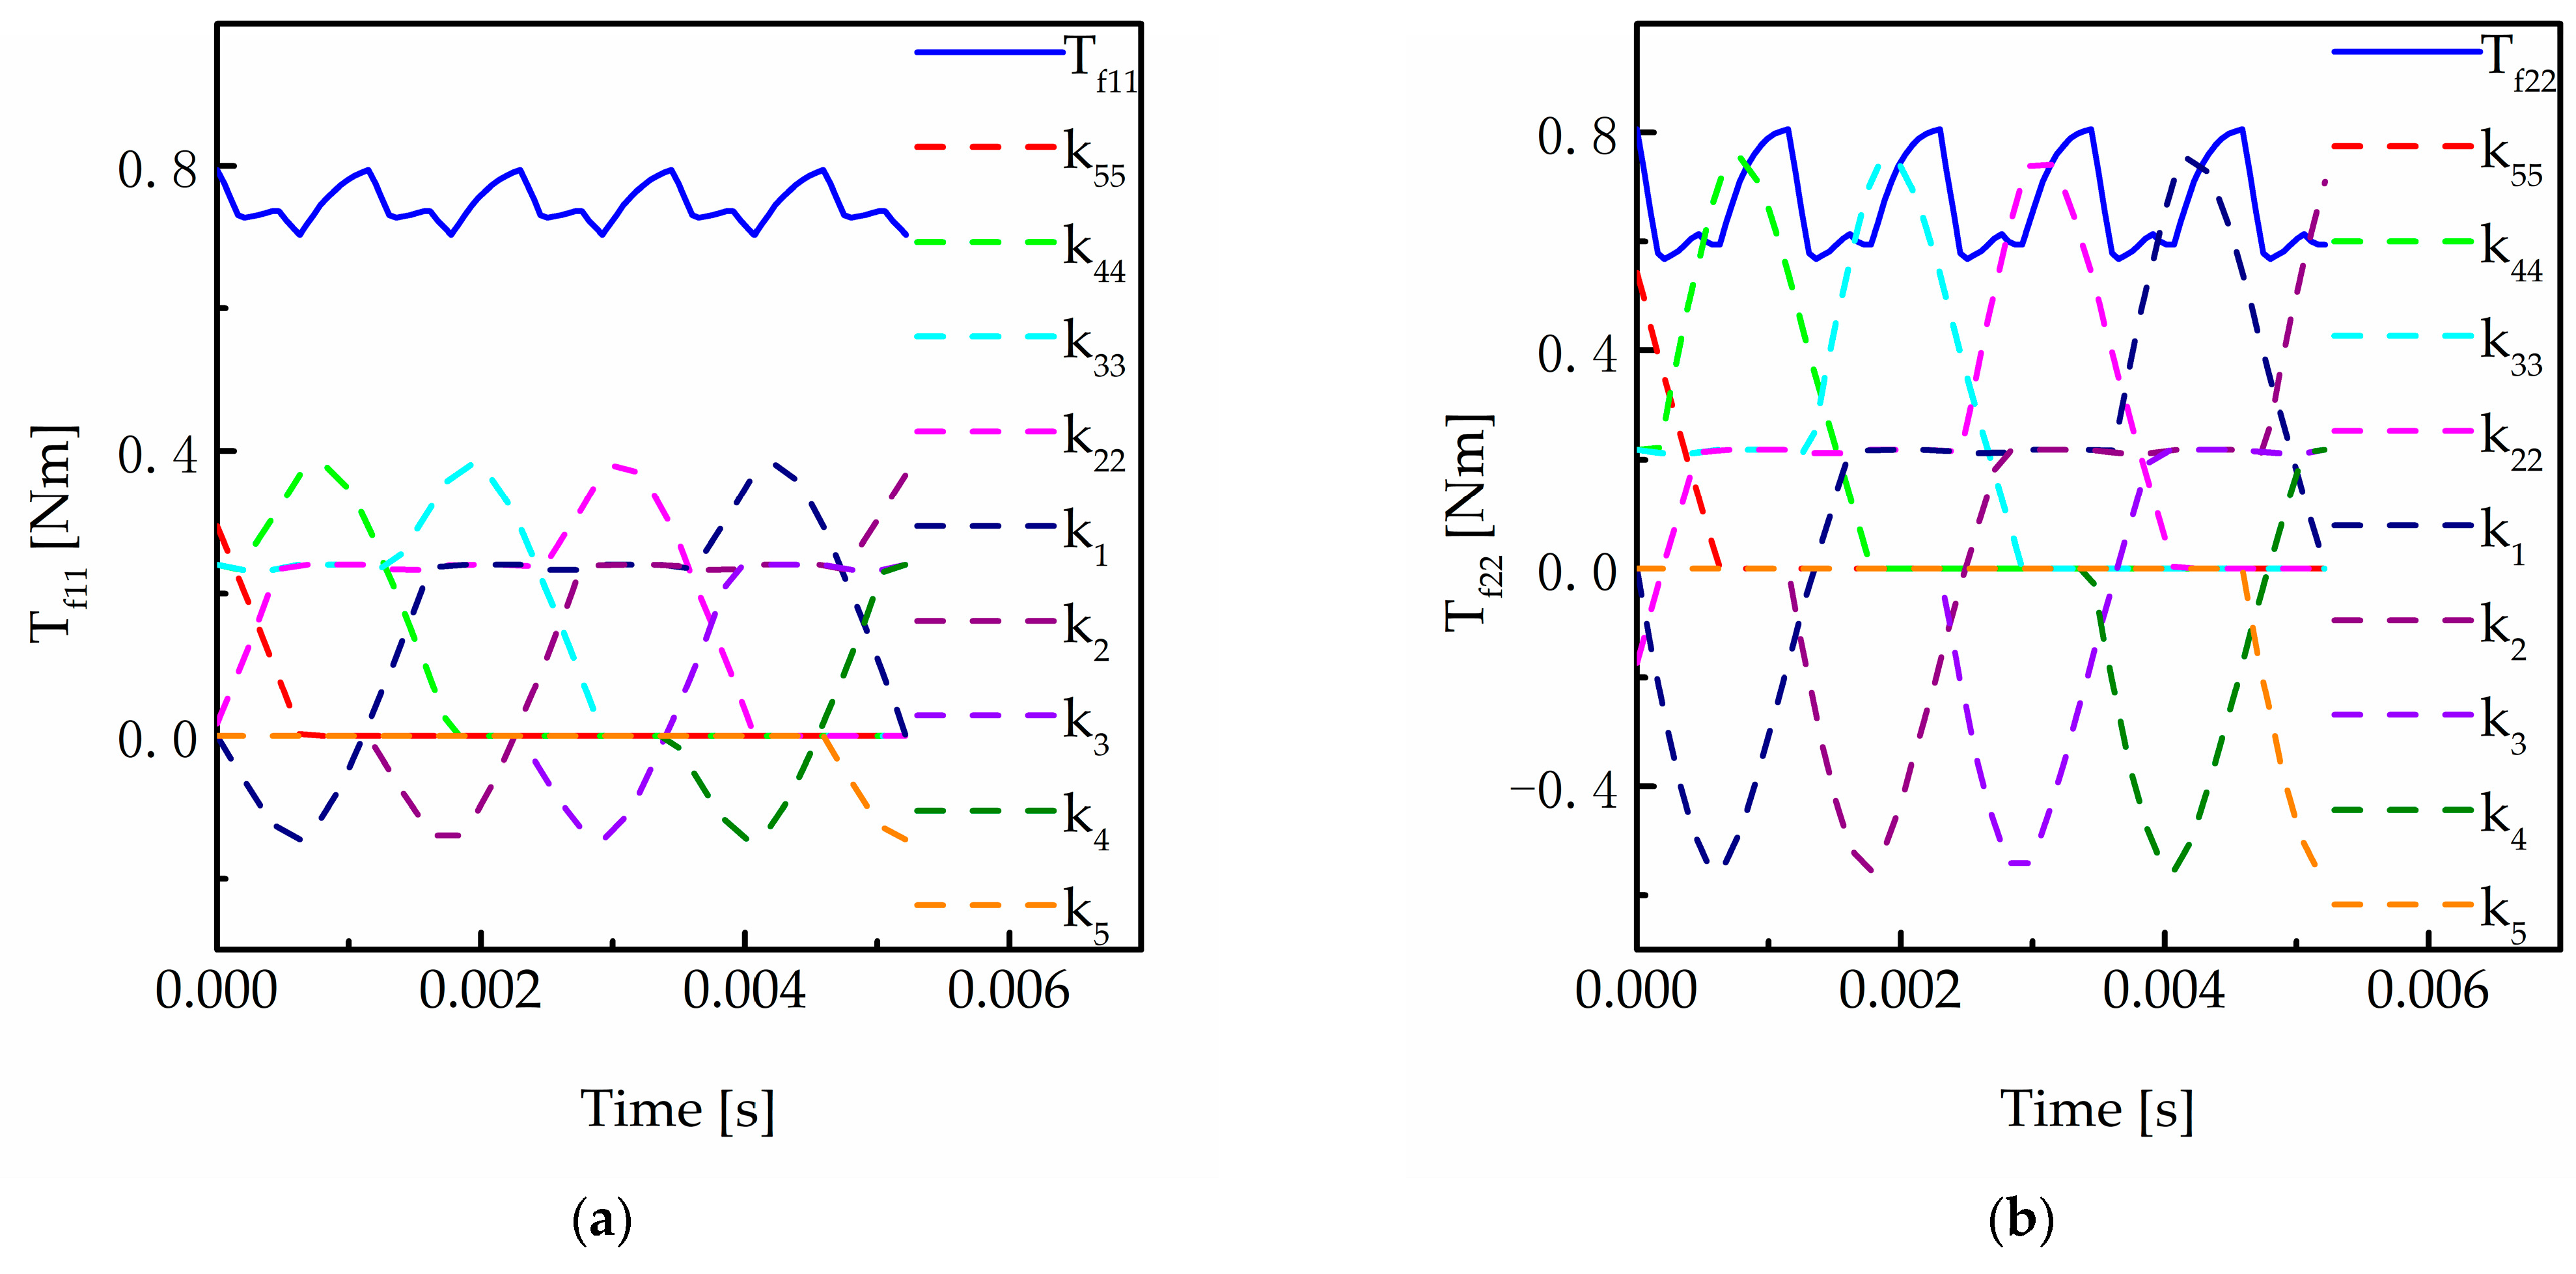
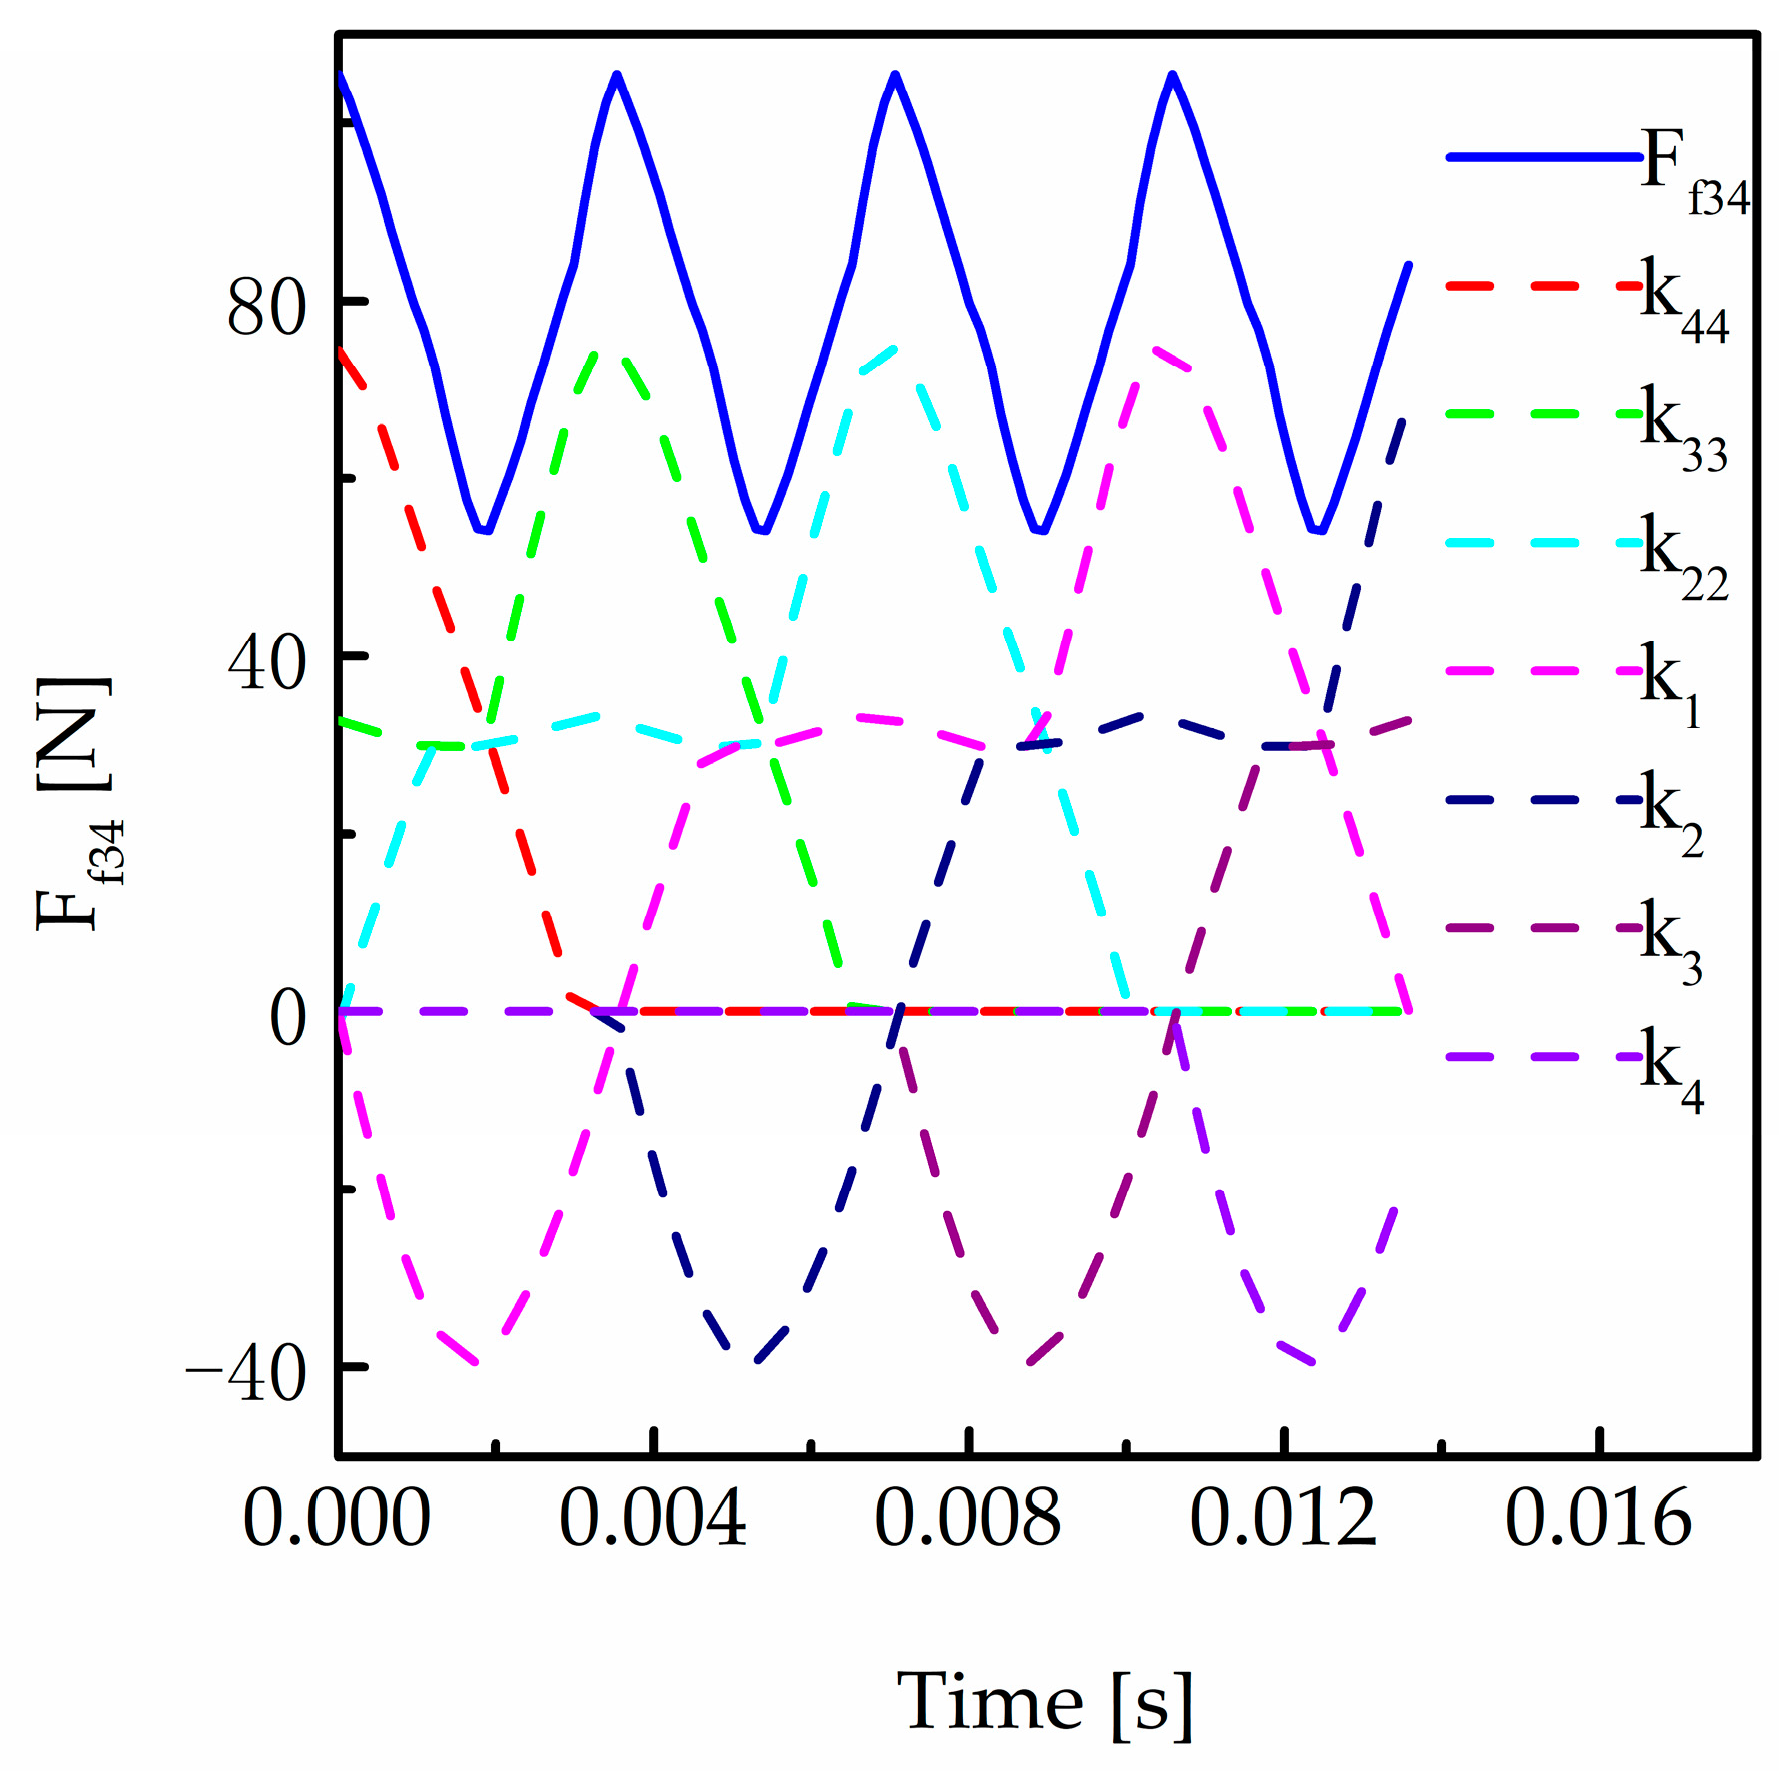
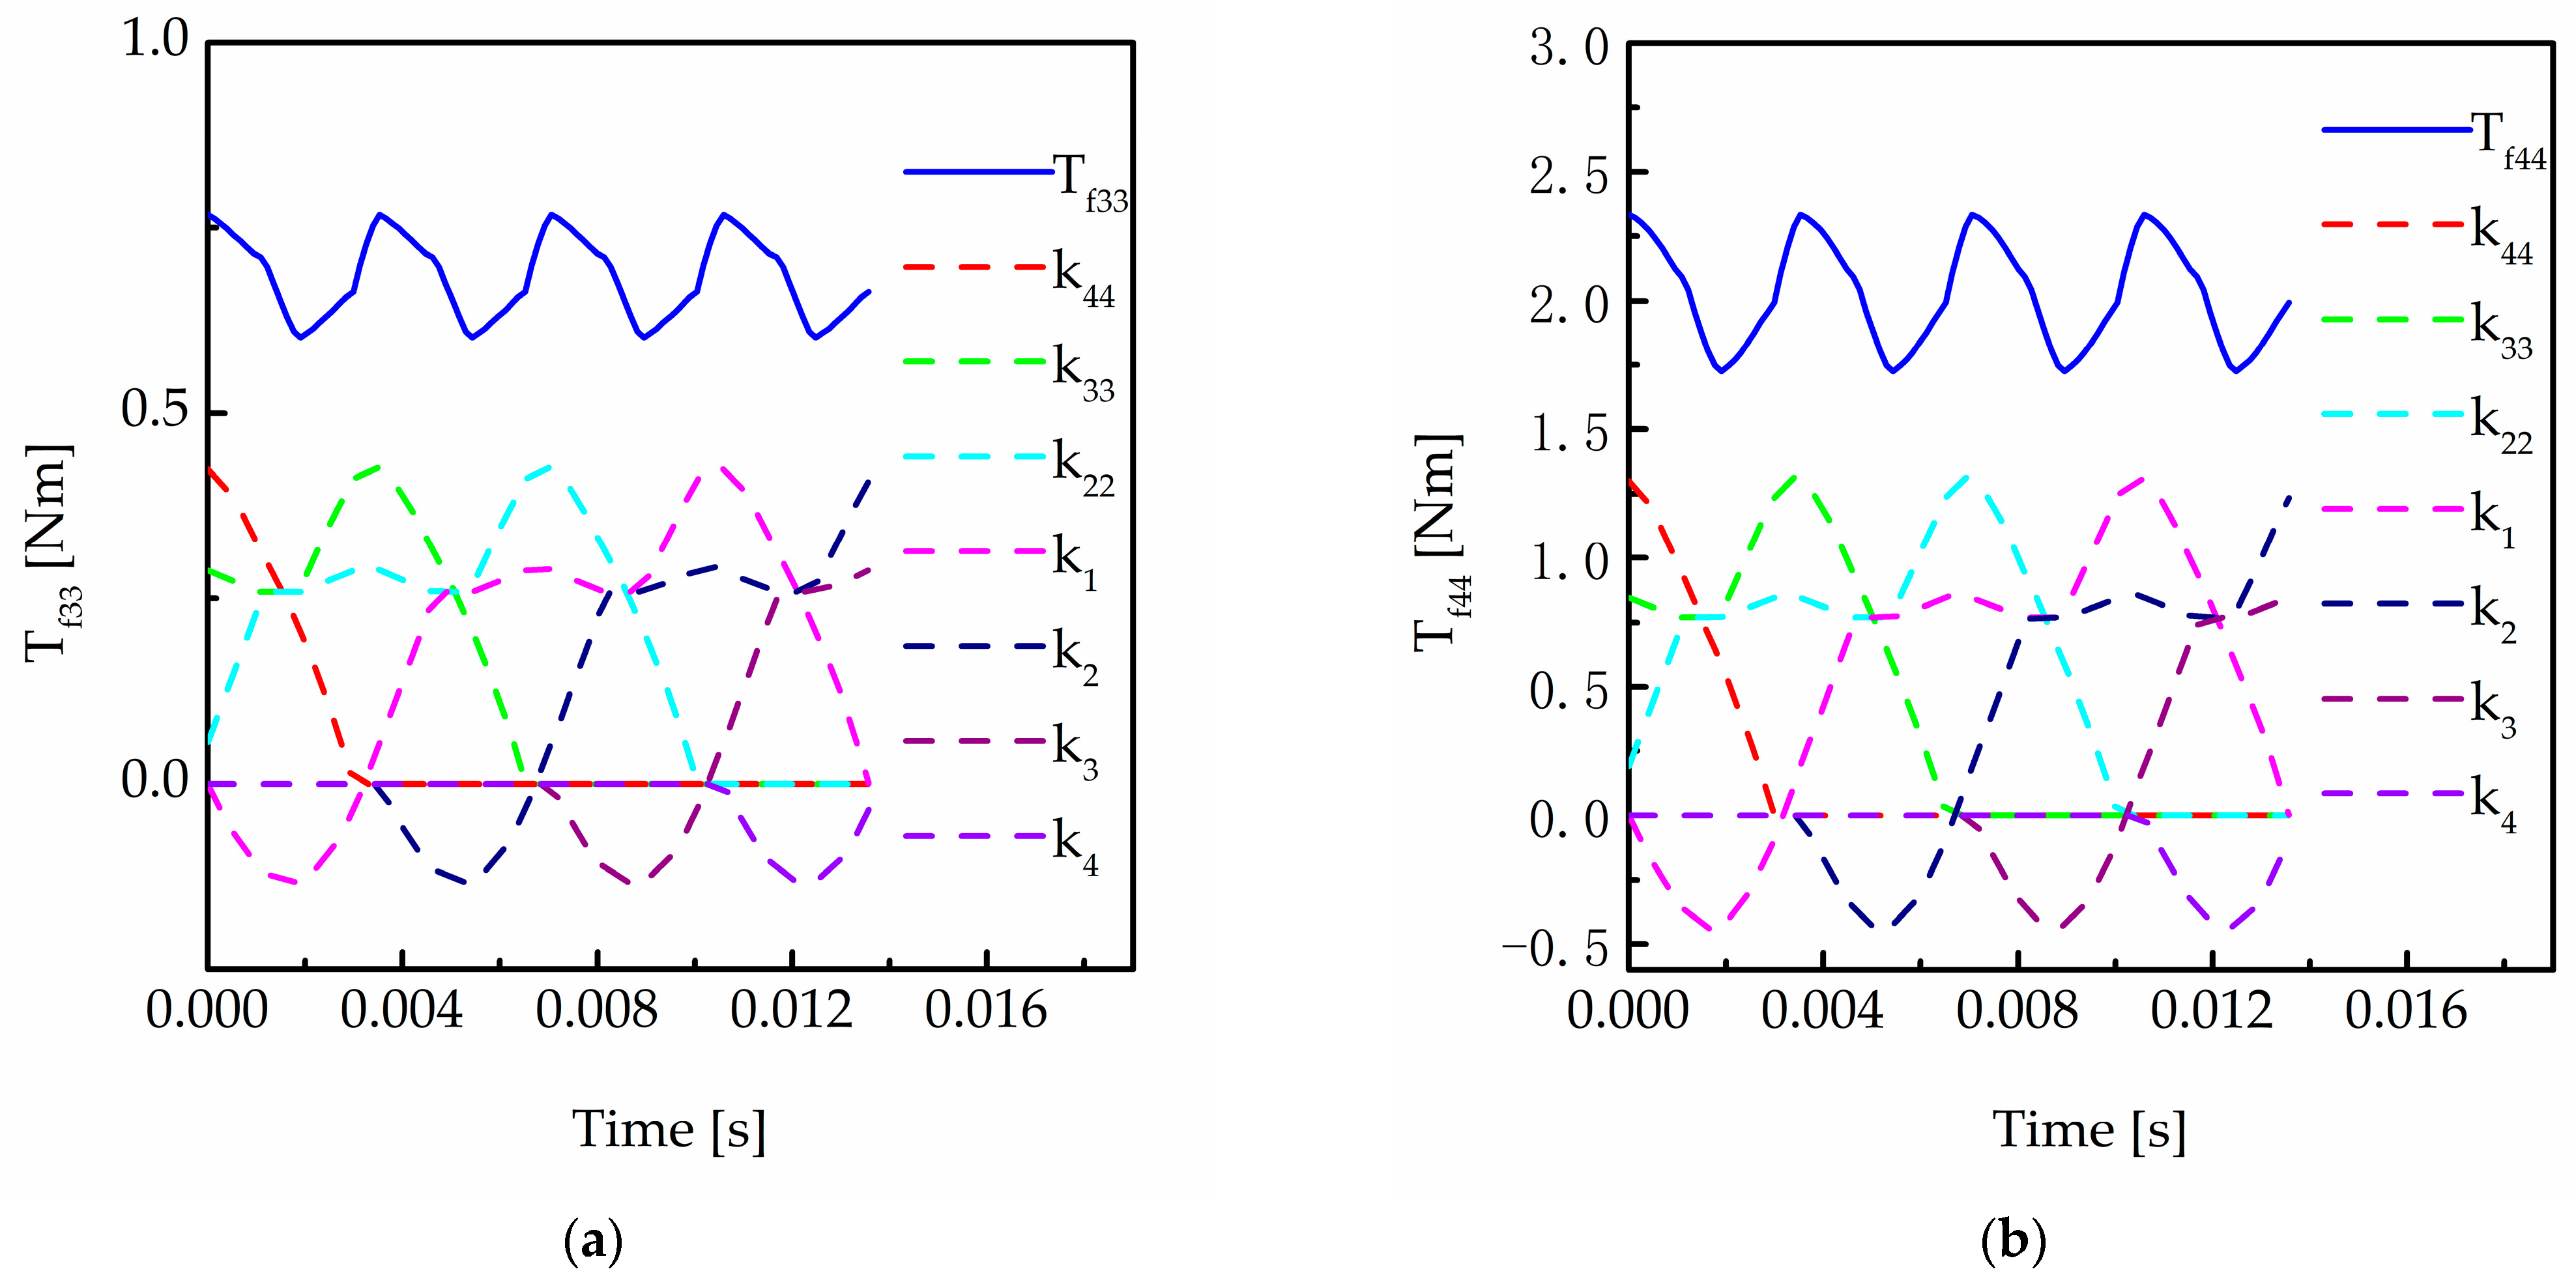
Figure 15, Figure 16, Figure 17 and Figure 18 are the friction force and frictional torque. After calculating the friction factor using the empirical formulas in the literature [37], we can calculate the contact force according to the load distribution ratio. Then, the friction force and friction torque can be obtained according to the friction direction, the friction factor, and the contact load. In Figure 10, Ff12 is the friction force, k1 is the friction force of the meshing teeth, and kii (i = 2, 3, 4, 5) is the friction force between the teeth in front of the meshing tooth. The ki (i = 2, 3, 4, 5) is the friction force of teeth after the meshing tooth. For a single tooth, the direction of friction is opposite to the relative sliding speed. The direction of the friction force and friction torque are opposite at the two sides of the pitch point. However, with a contact ratio of 4.521, the friction force is always positive, even at the pitch point.
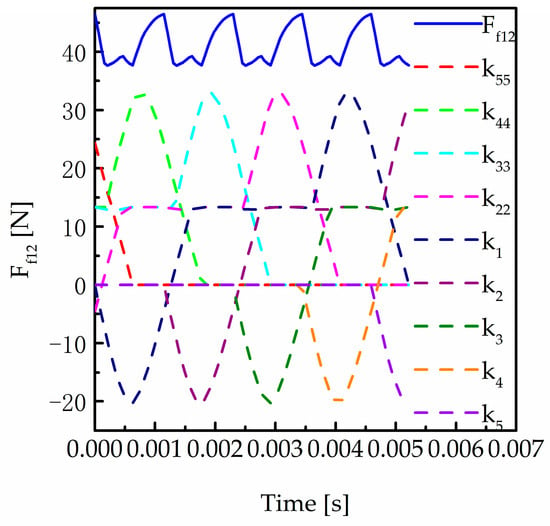
Figure 15.
Friction force of teeth at first stage.
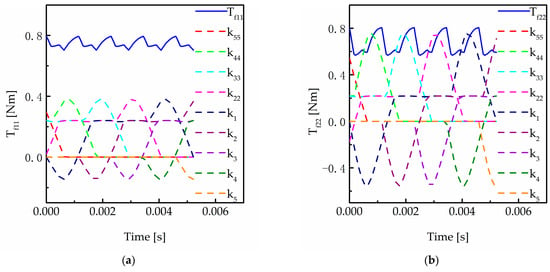
Figure 16.
The friction torque. (a) The torque of the pinion. (b) The torque of the driven gear.

Figure 17.
Friction force of gear pair in the second stage.
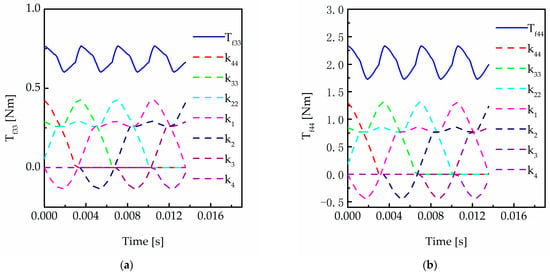
Figure 18.
The friction torque of the pinion at stage 2. (a) The torque of the pinion. (b) The torque of the driven gear.
Figure 16 is the friction torque of the pinion. k1 is the friction torque of the meshing teeth, kii (i = 2, 3, 4, 5) is the friction torque of the tooth in front of the meshing tooth. The ki (i = 2, 3, 4, 5) means the friction torque of the teeth after the meshing tooth. Accordingly, Figure 15b shows the friction torque variation of the driven gear of stage 1 over time. The meaning of kii (i = 2, 3, 4, 5) and ki (i = 2, 3, 4, 5) is the same as the friction moment of the pinion. For a single tooth, the direction of the friction torque is opposite at the two sides of the pitch point, while with the large contact ratio, the total friction torque is always positive.
5. Analysis of Dynamic Characteristics for a Two-Stage Driveline
5.1. Influence of Friction on a Two-Stage Transmission System
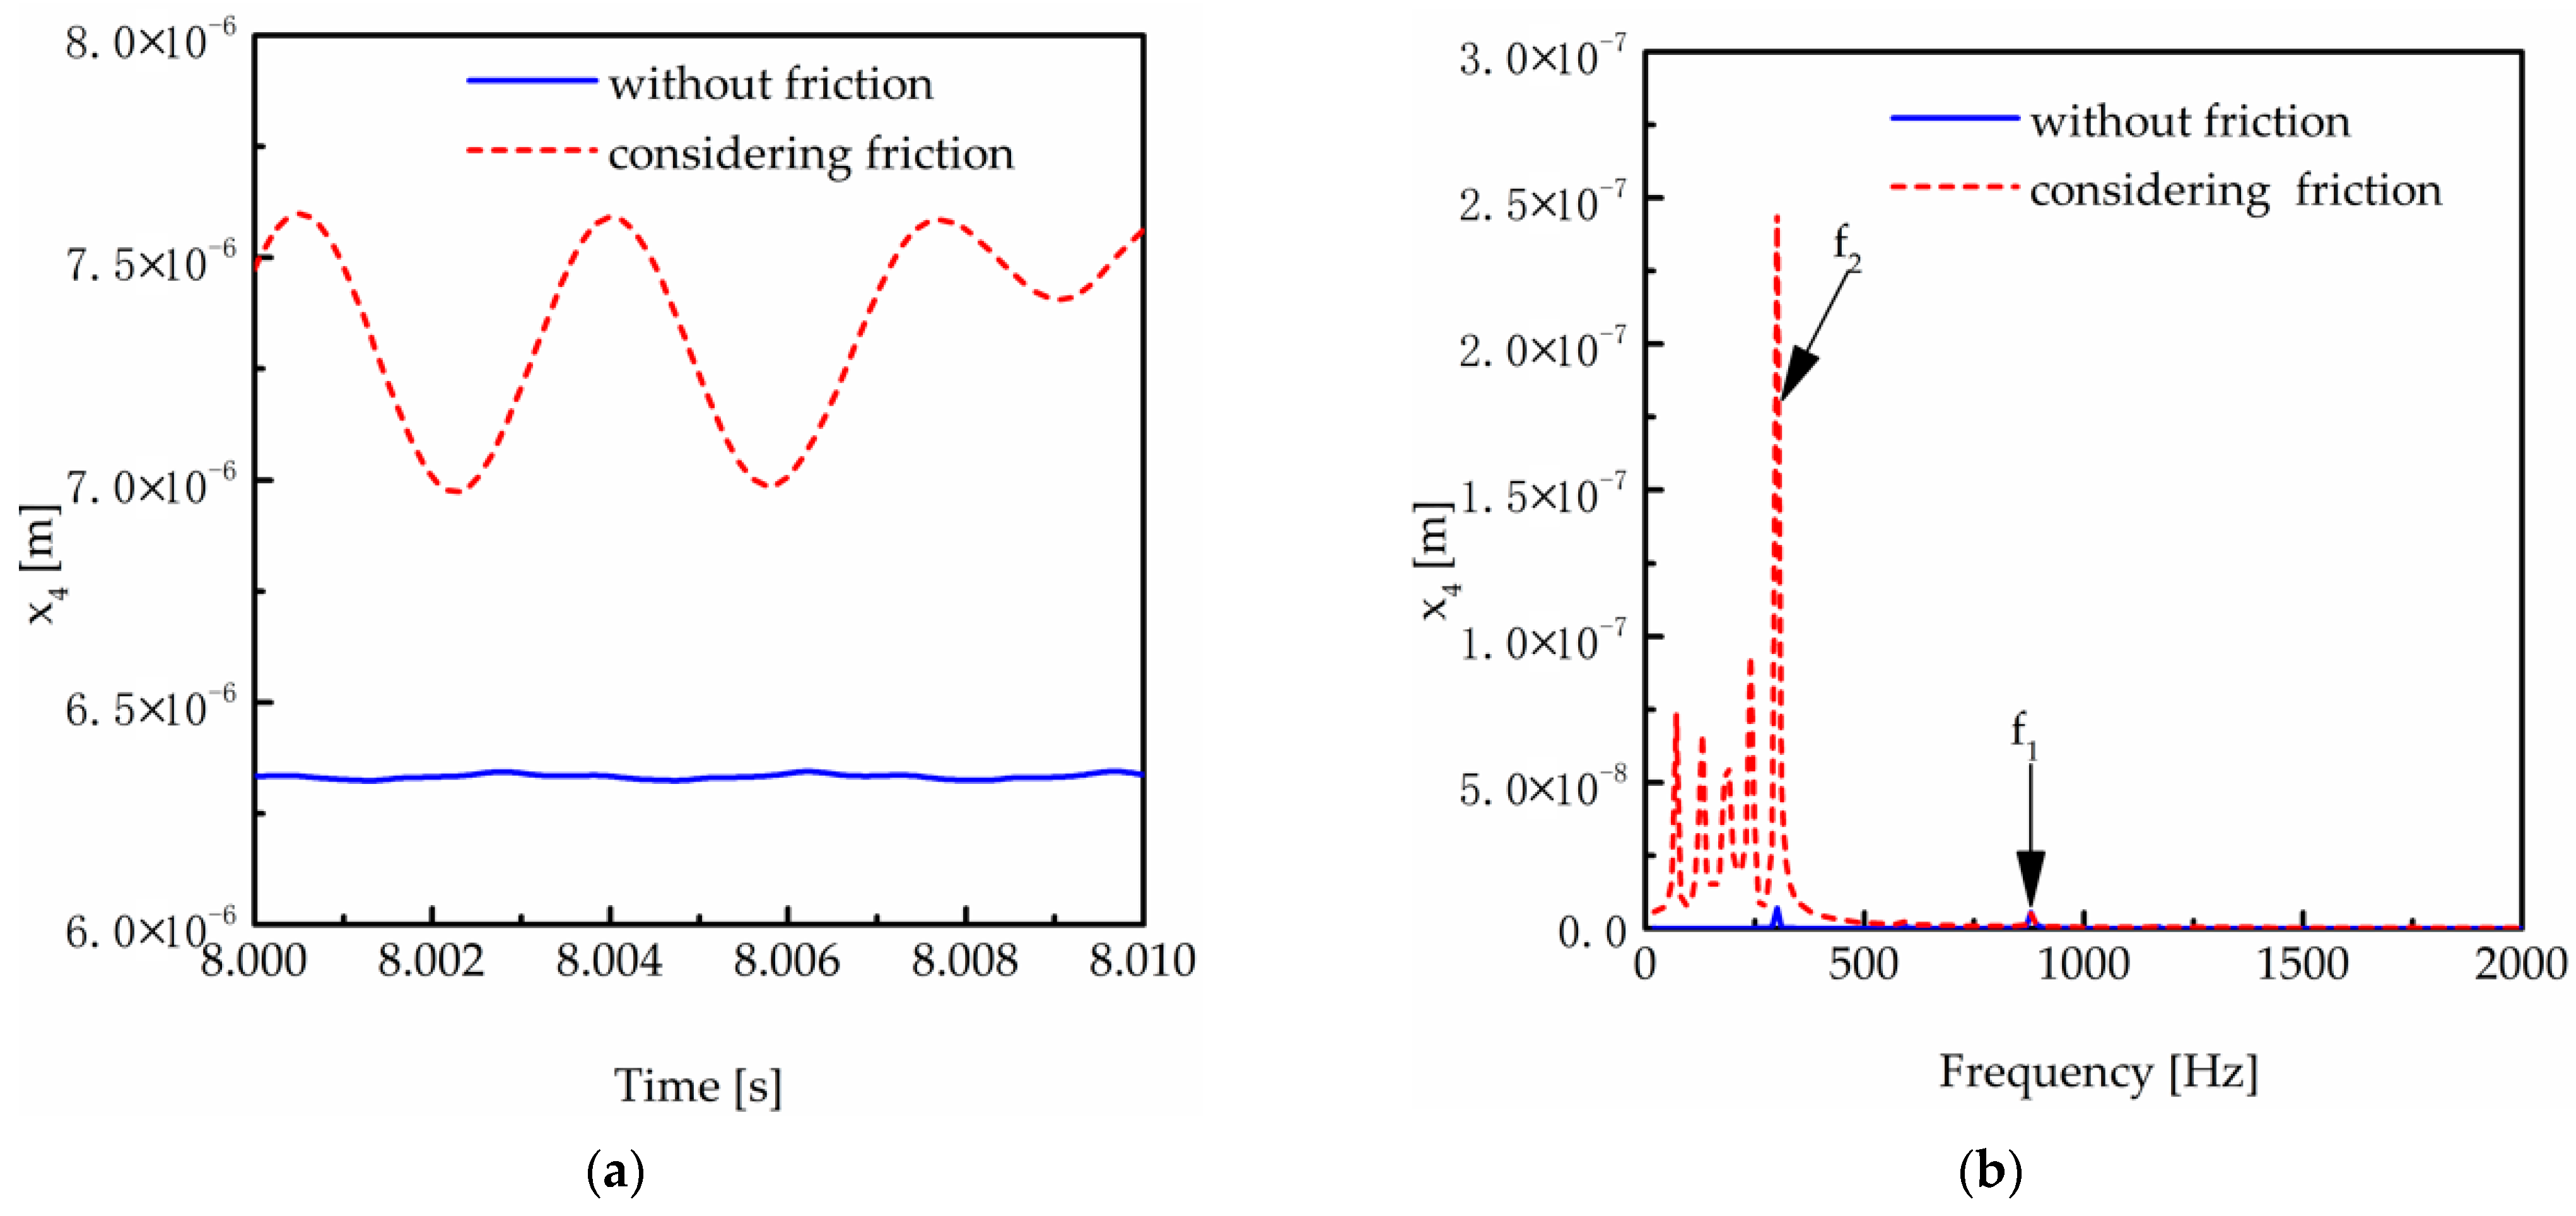
Figure 18 shows the vibration displacement of the driven gear 4 in the x direction in the time domain and the frequency domain. It is shown in Figure 19a that the vibration displacement increases when friction is considered. It is shown in Figure 19b that the amplitude increases at the mesh frequency f2. This is because there is a large component of friction force in the x direction. As a periodic excitation on a dynamic model, friction makes the vibration intensify. The amplitude has almost no change at frequency f1. Low-frequency components with equal intervals appear. This is caused by the alternate mesh progress of three or four pairs of teeth.
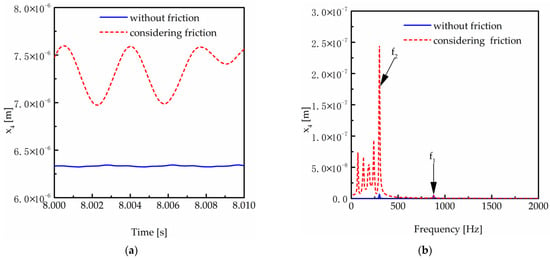
Figure 19.
Gear 4’s vibration displacement in the x direction with friction considered or neglected. (a) In the time domain. (b) In the frequency domain.
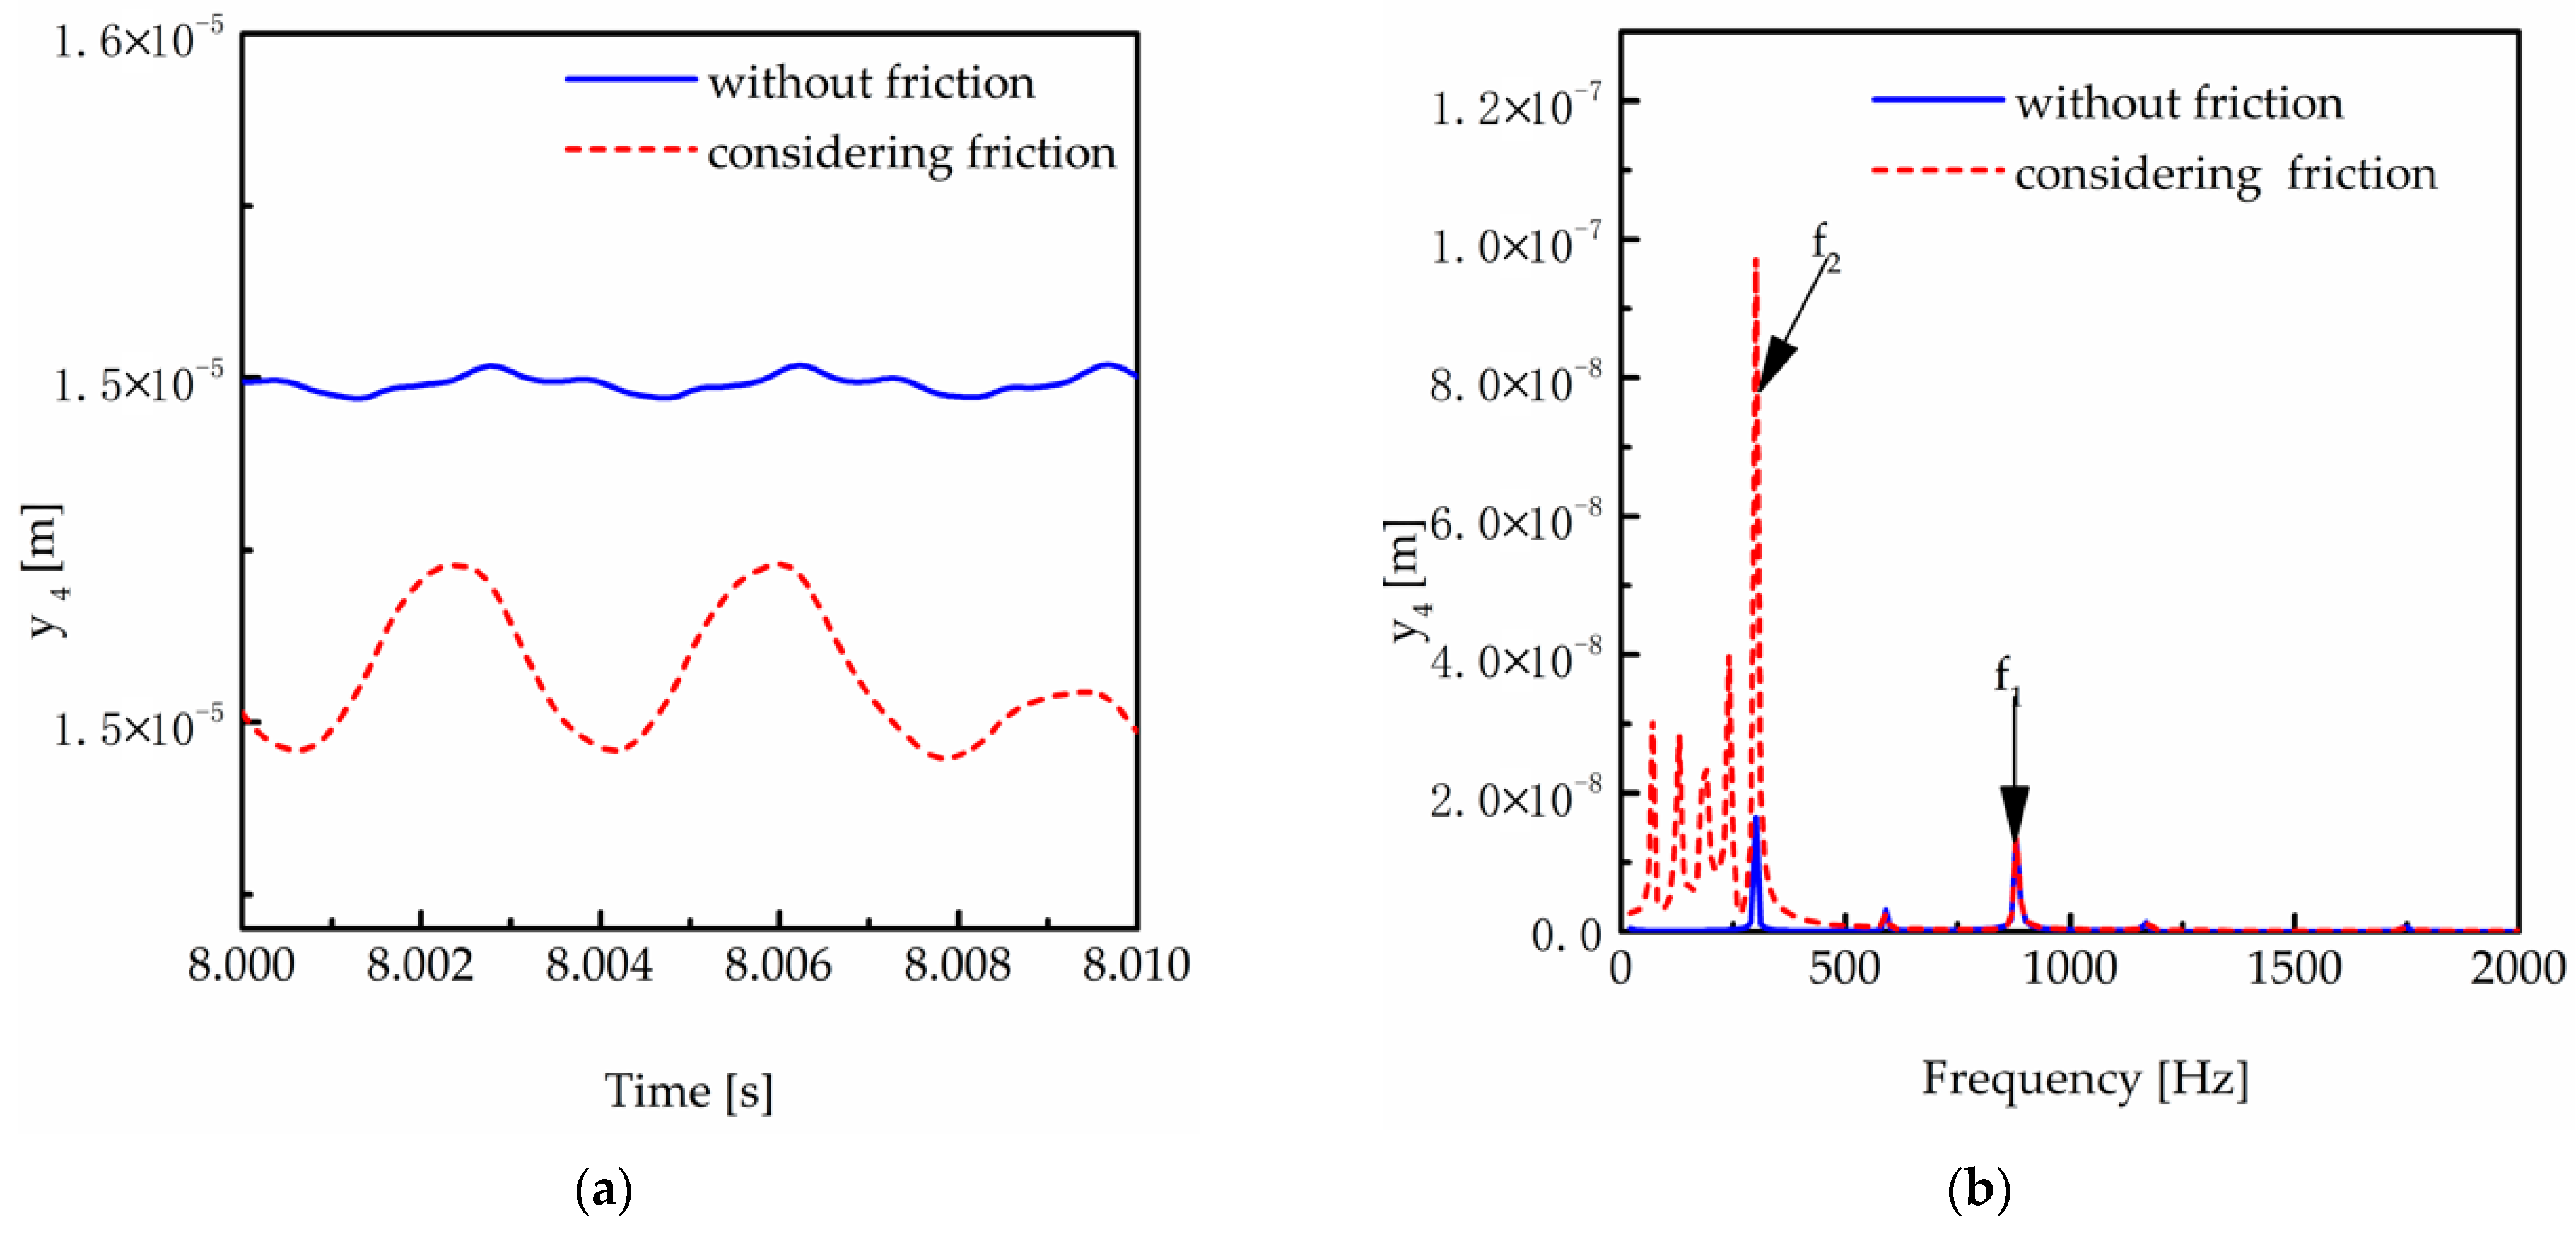
Figure 20 shows the vibration displacement of the follower gear at the second stage in the y direction with friction considered or neglected in the time domain and the frequency domain. In the y direction, the vibration displacement of the second pair of gears is smaller after considering friction. This indicates that friction has a damping effect on vibration displacement. For the comprehensive friction force and friction torque, the direction is always positive; accordingly, the friction component in the y direction is always negative, leading to a decrease in vibration. There are also lower components in the frequency domain. This is caused by the alternating meshing process. The vibration displacement amplitude at f2 increases. This is because, similar to mesh stiffness, friction is also an excitation, making the vibration intensify. The amplitude at the mesh frequency of gear pair 1 f1 has not changed much. This is because gear 4 is mainly affected by the force between the second gear pair.
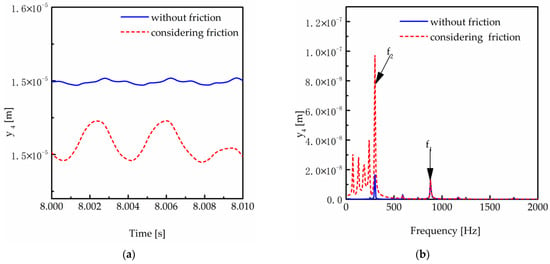
Figure 20.
Vibration displacement of the follower gear at stage 2 in the y direction with friction considered or neglected. (a) In the time domain. (b) In the frequency domain.
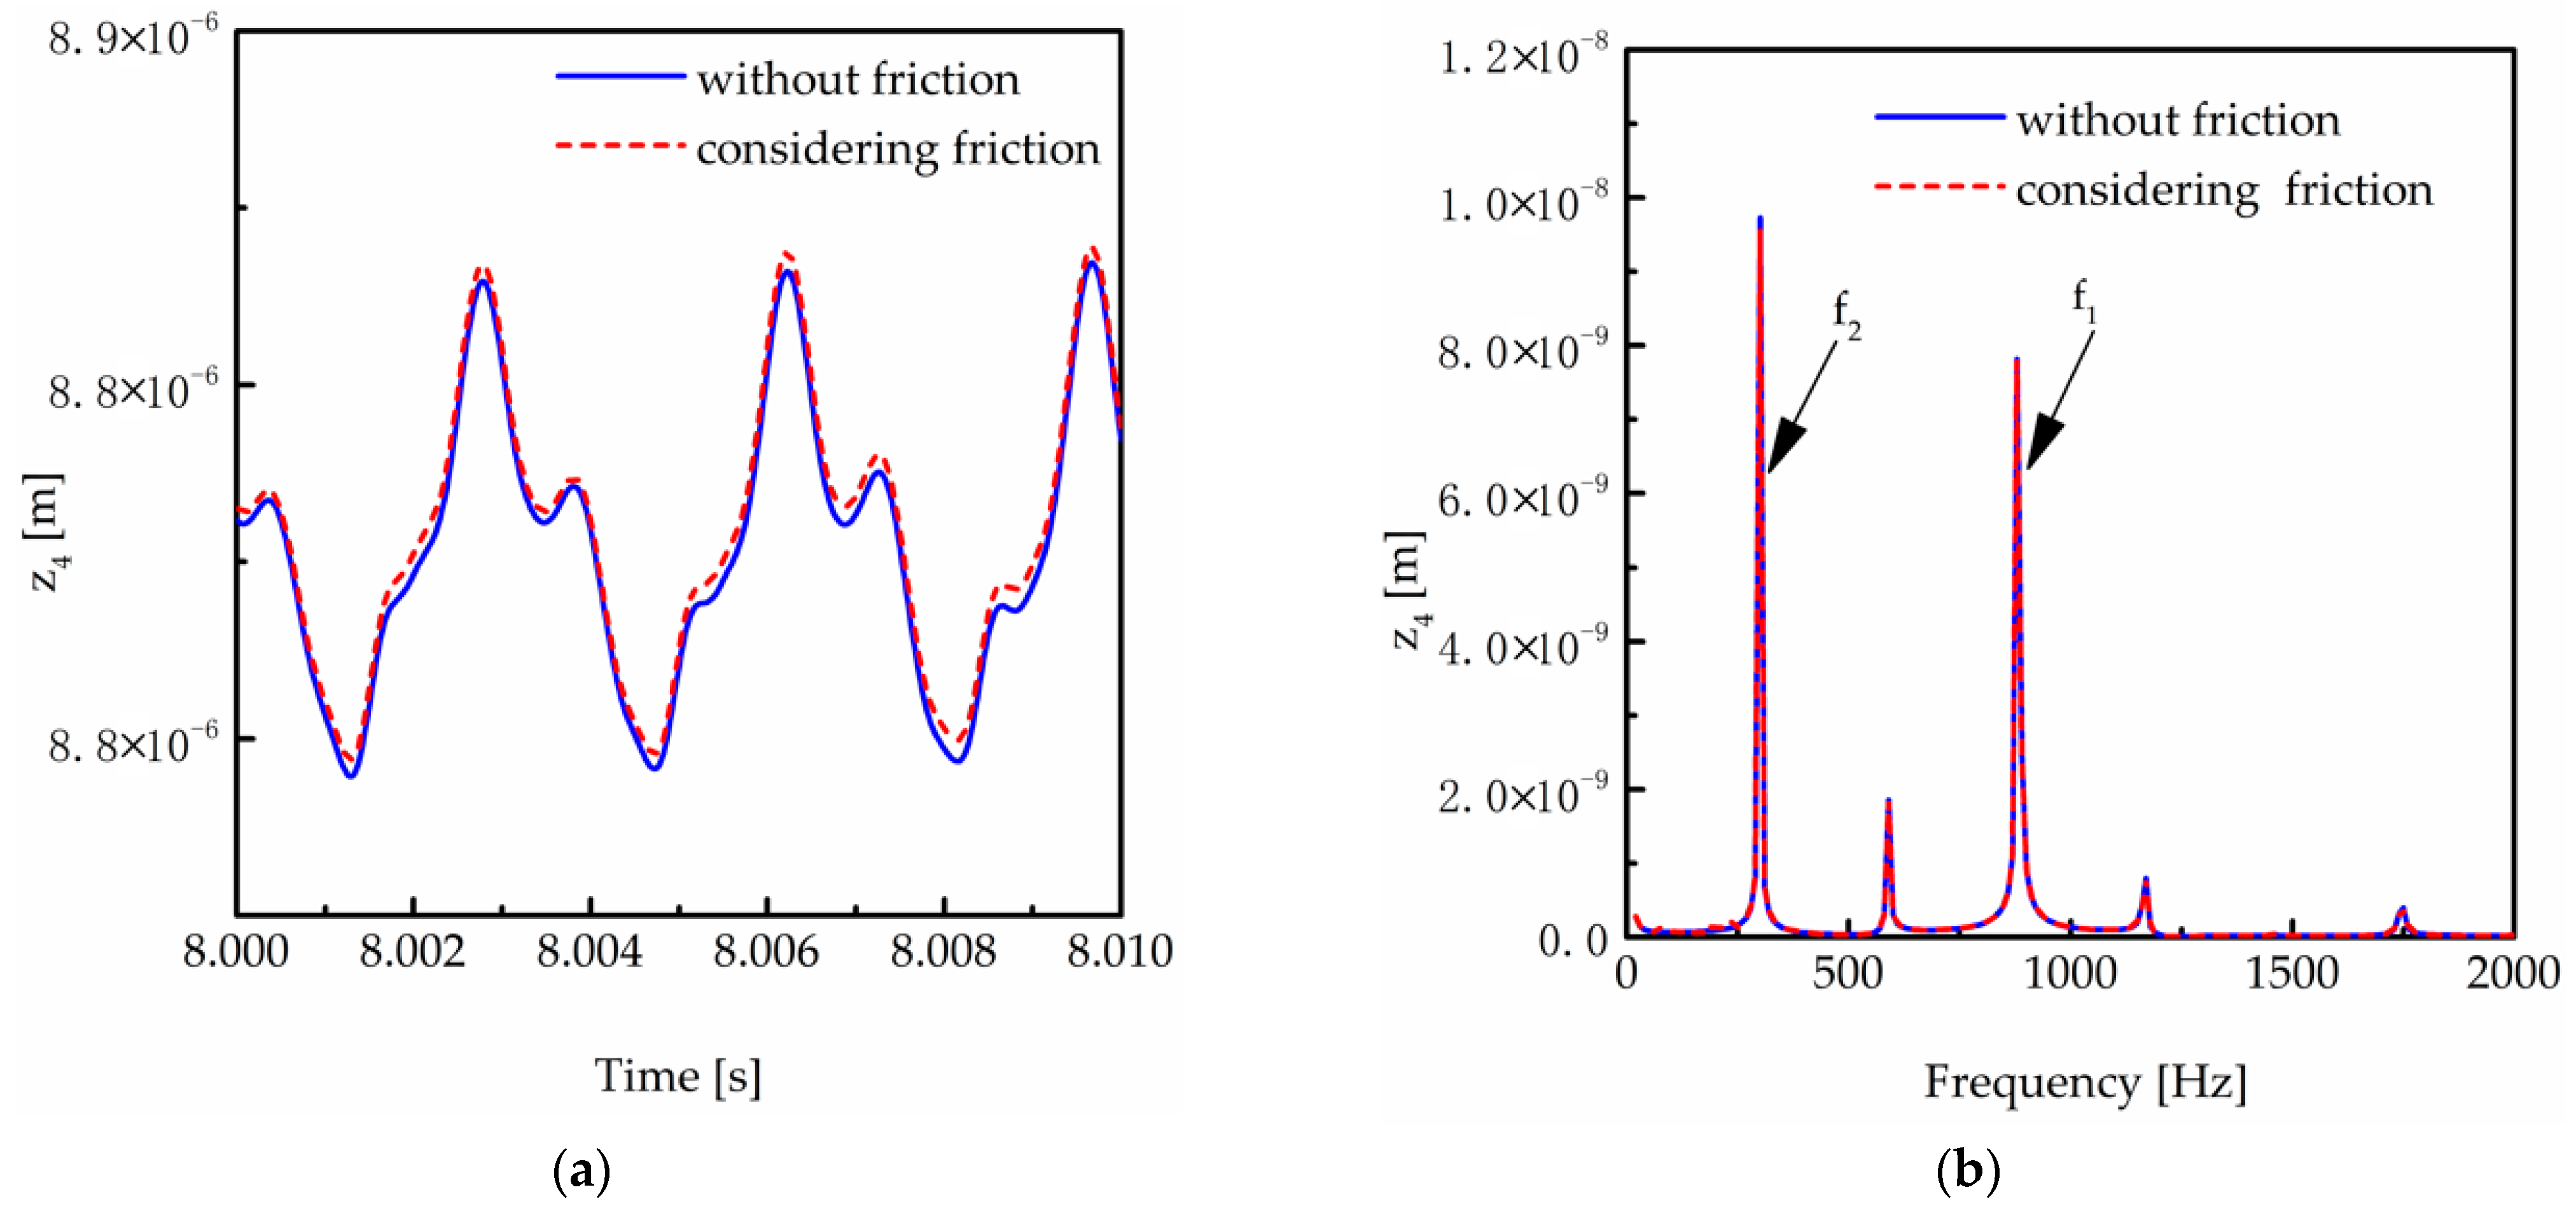
Figure 21 shows the vibration displacement of gear 4 in the z direction with friction considered and neglected in the time domain and the frequency domain. The amplitude barely increases, and the frequency components have no change. This is because there is no force component in the z direction. The only change in the vibration amplitude is caused by the coupling effect of the three directions.
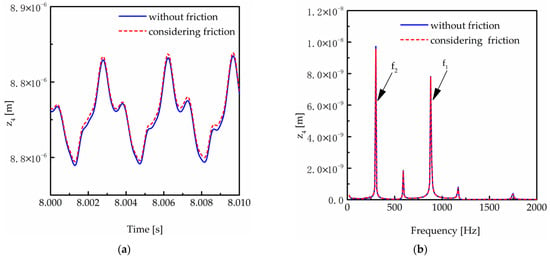
Figure 21.
Vibration displacement of the follower gear of stage 2 in the z direction with friction considered or neglected. (a) In the time domain. (b) In the frequency domain.
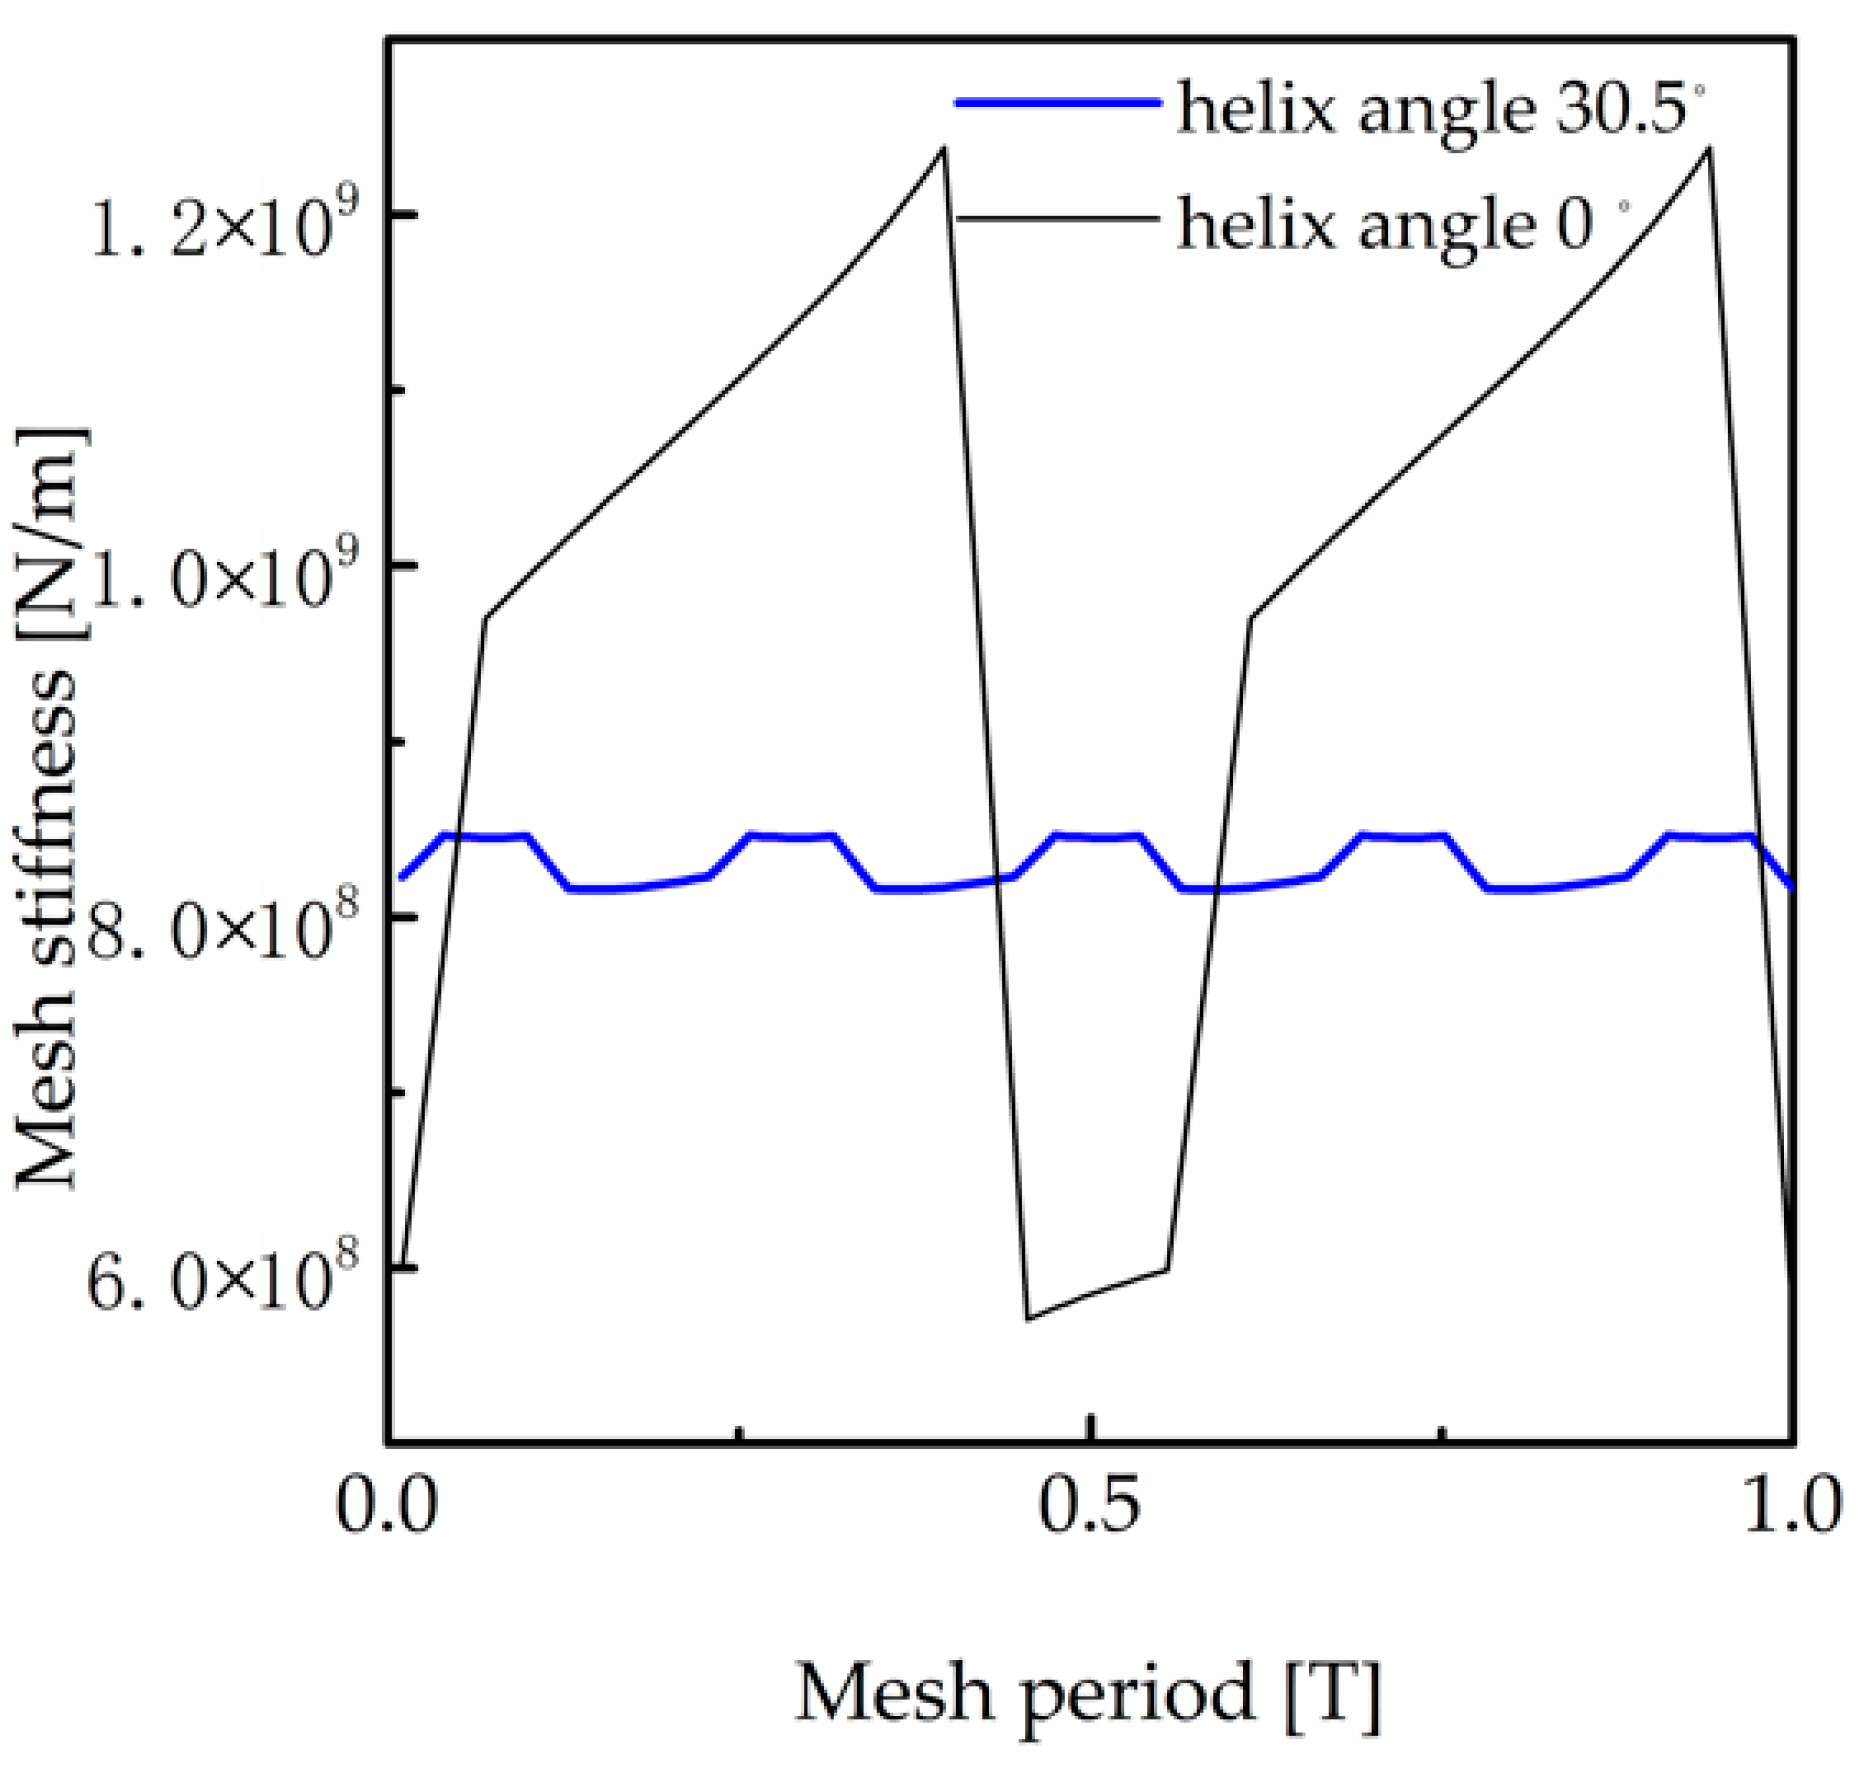
The change in the vibration after considering the friction action can be explained using Figure 22. For the spur gear system, with the same parameters of gears, only the helix angle is different. The fluctuation of the stiffness is as large as 5 × 10⁸ N/m, while for the helical gears, the fluctuation is only 0.4 × 10⁸ N/m, which is much less than that of spur gears. That means, for spur gear systems or helical gear systems with a small helix angle, the influence of mesh stiffness is relatively important, while for a helical gear system with a large helix angle, the influence of friction excitation is more obvious than that of mesh stiffness. This is why the vibration amplitude seems to increase to such an extent.

Figure 22.
The mesh stiffness with different helix angles.
In general, the vibration displacement will increase with the friction considered when the direction of the friction force component is consistent with the meshing force component and vice versa. This conclusion is consistent with that in the literature [38,39].
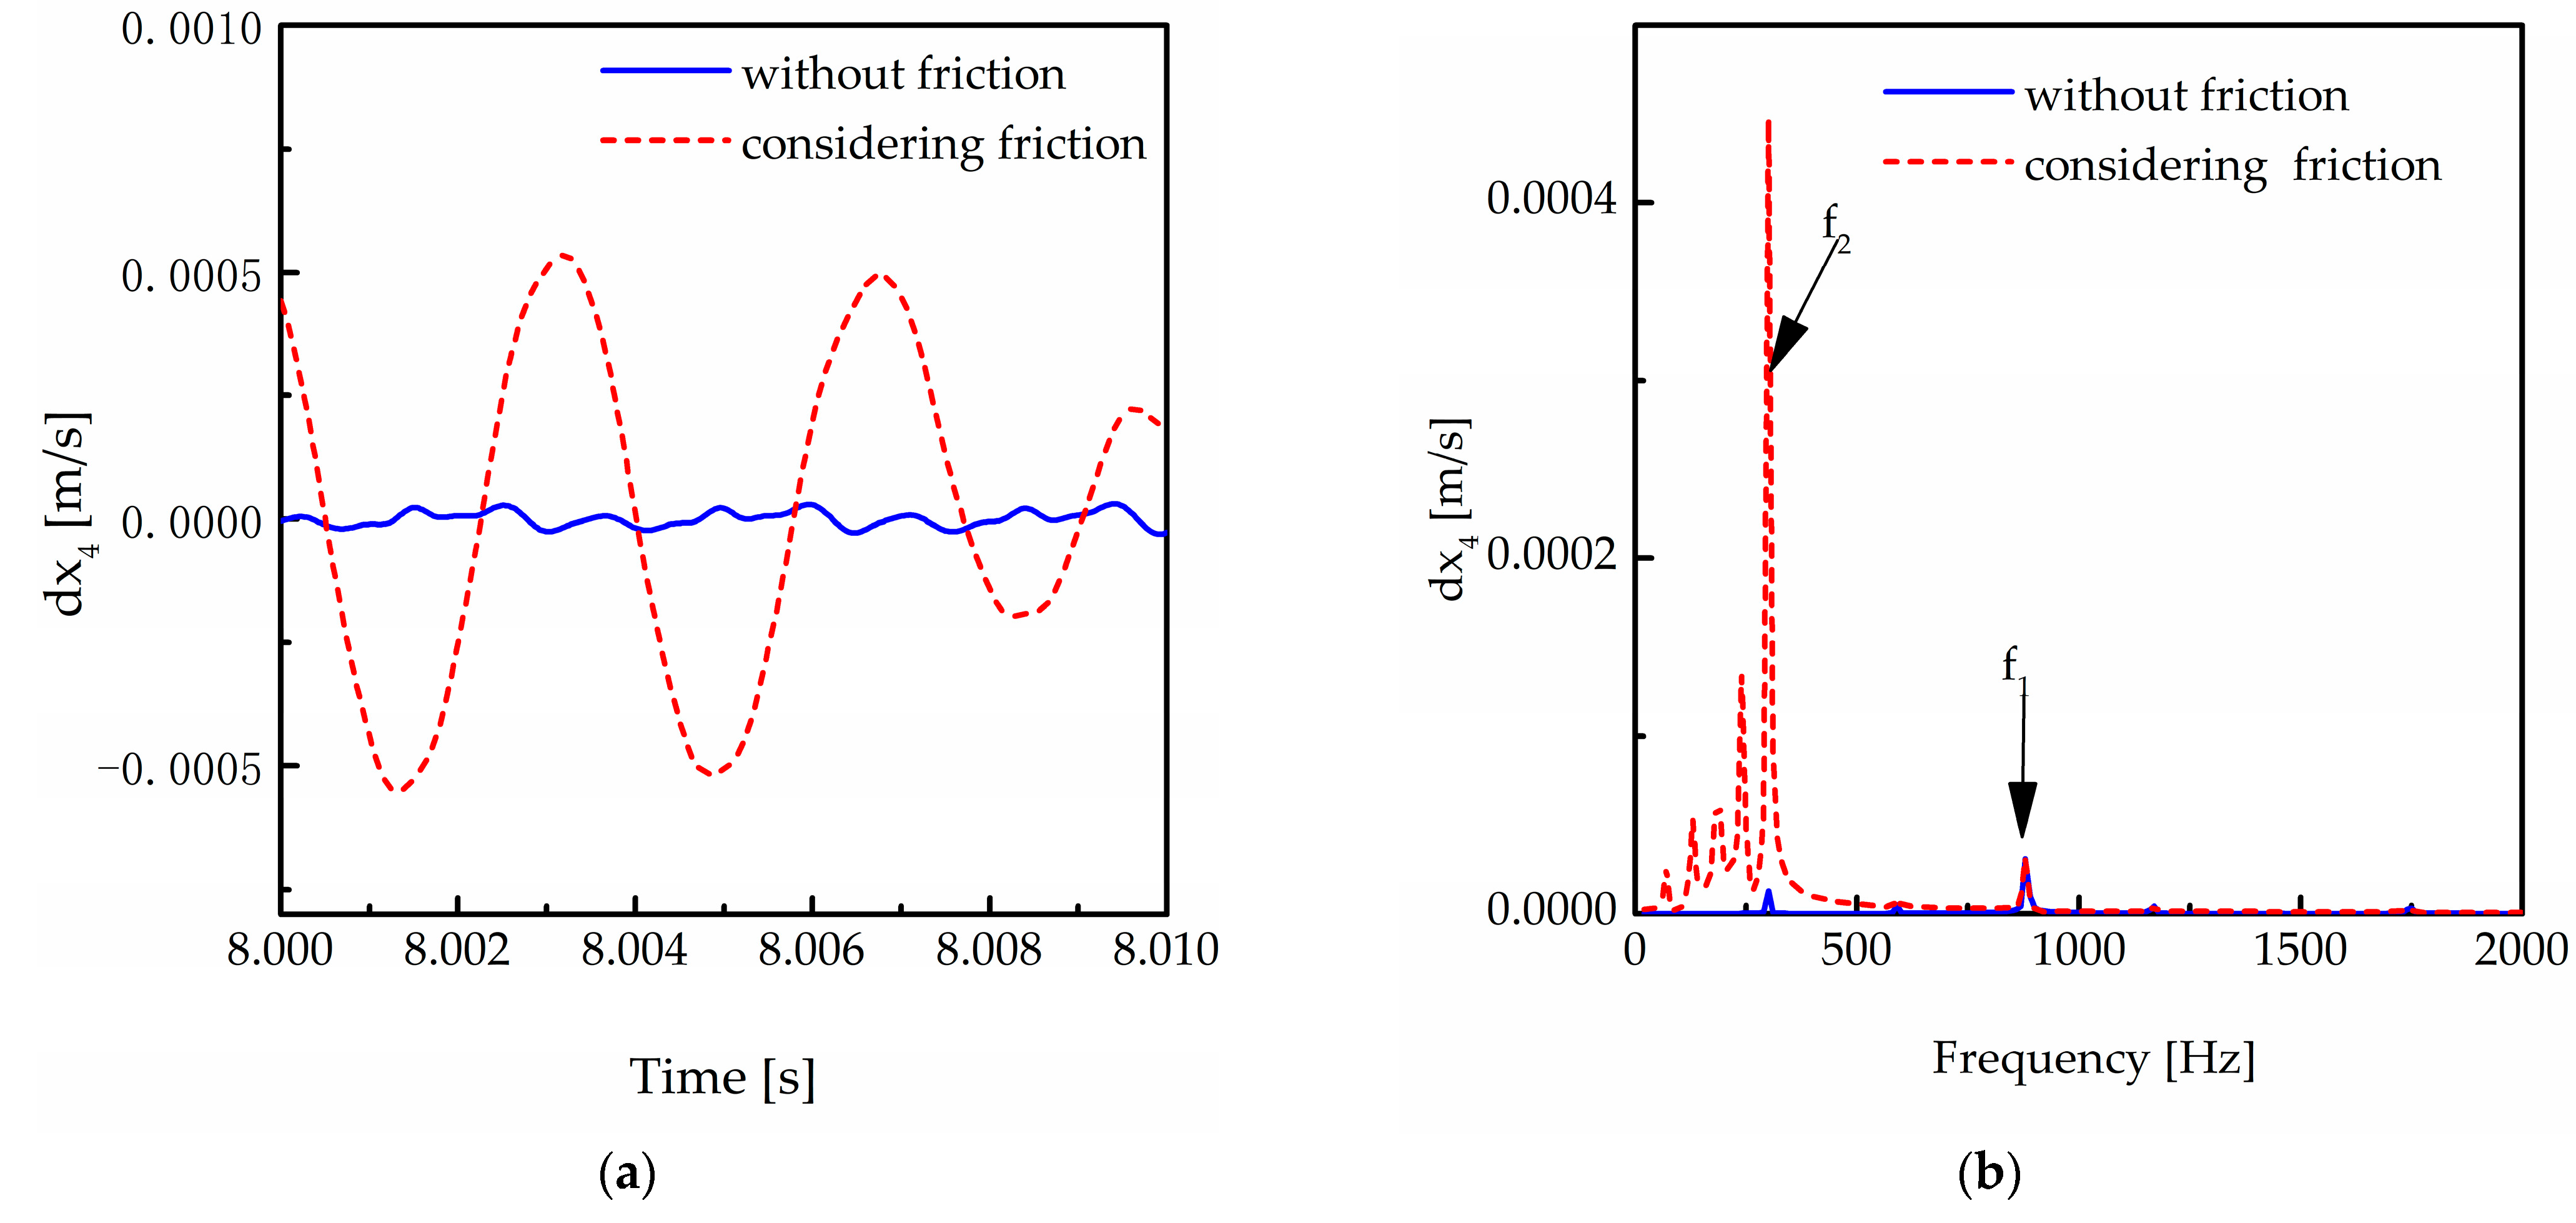
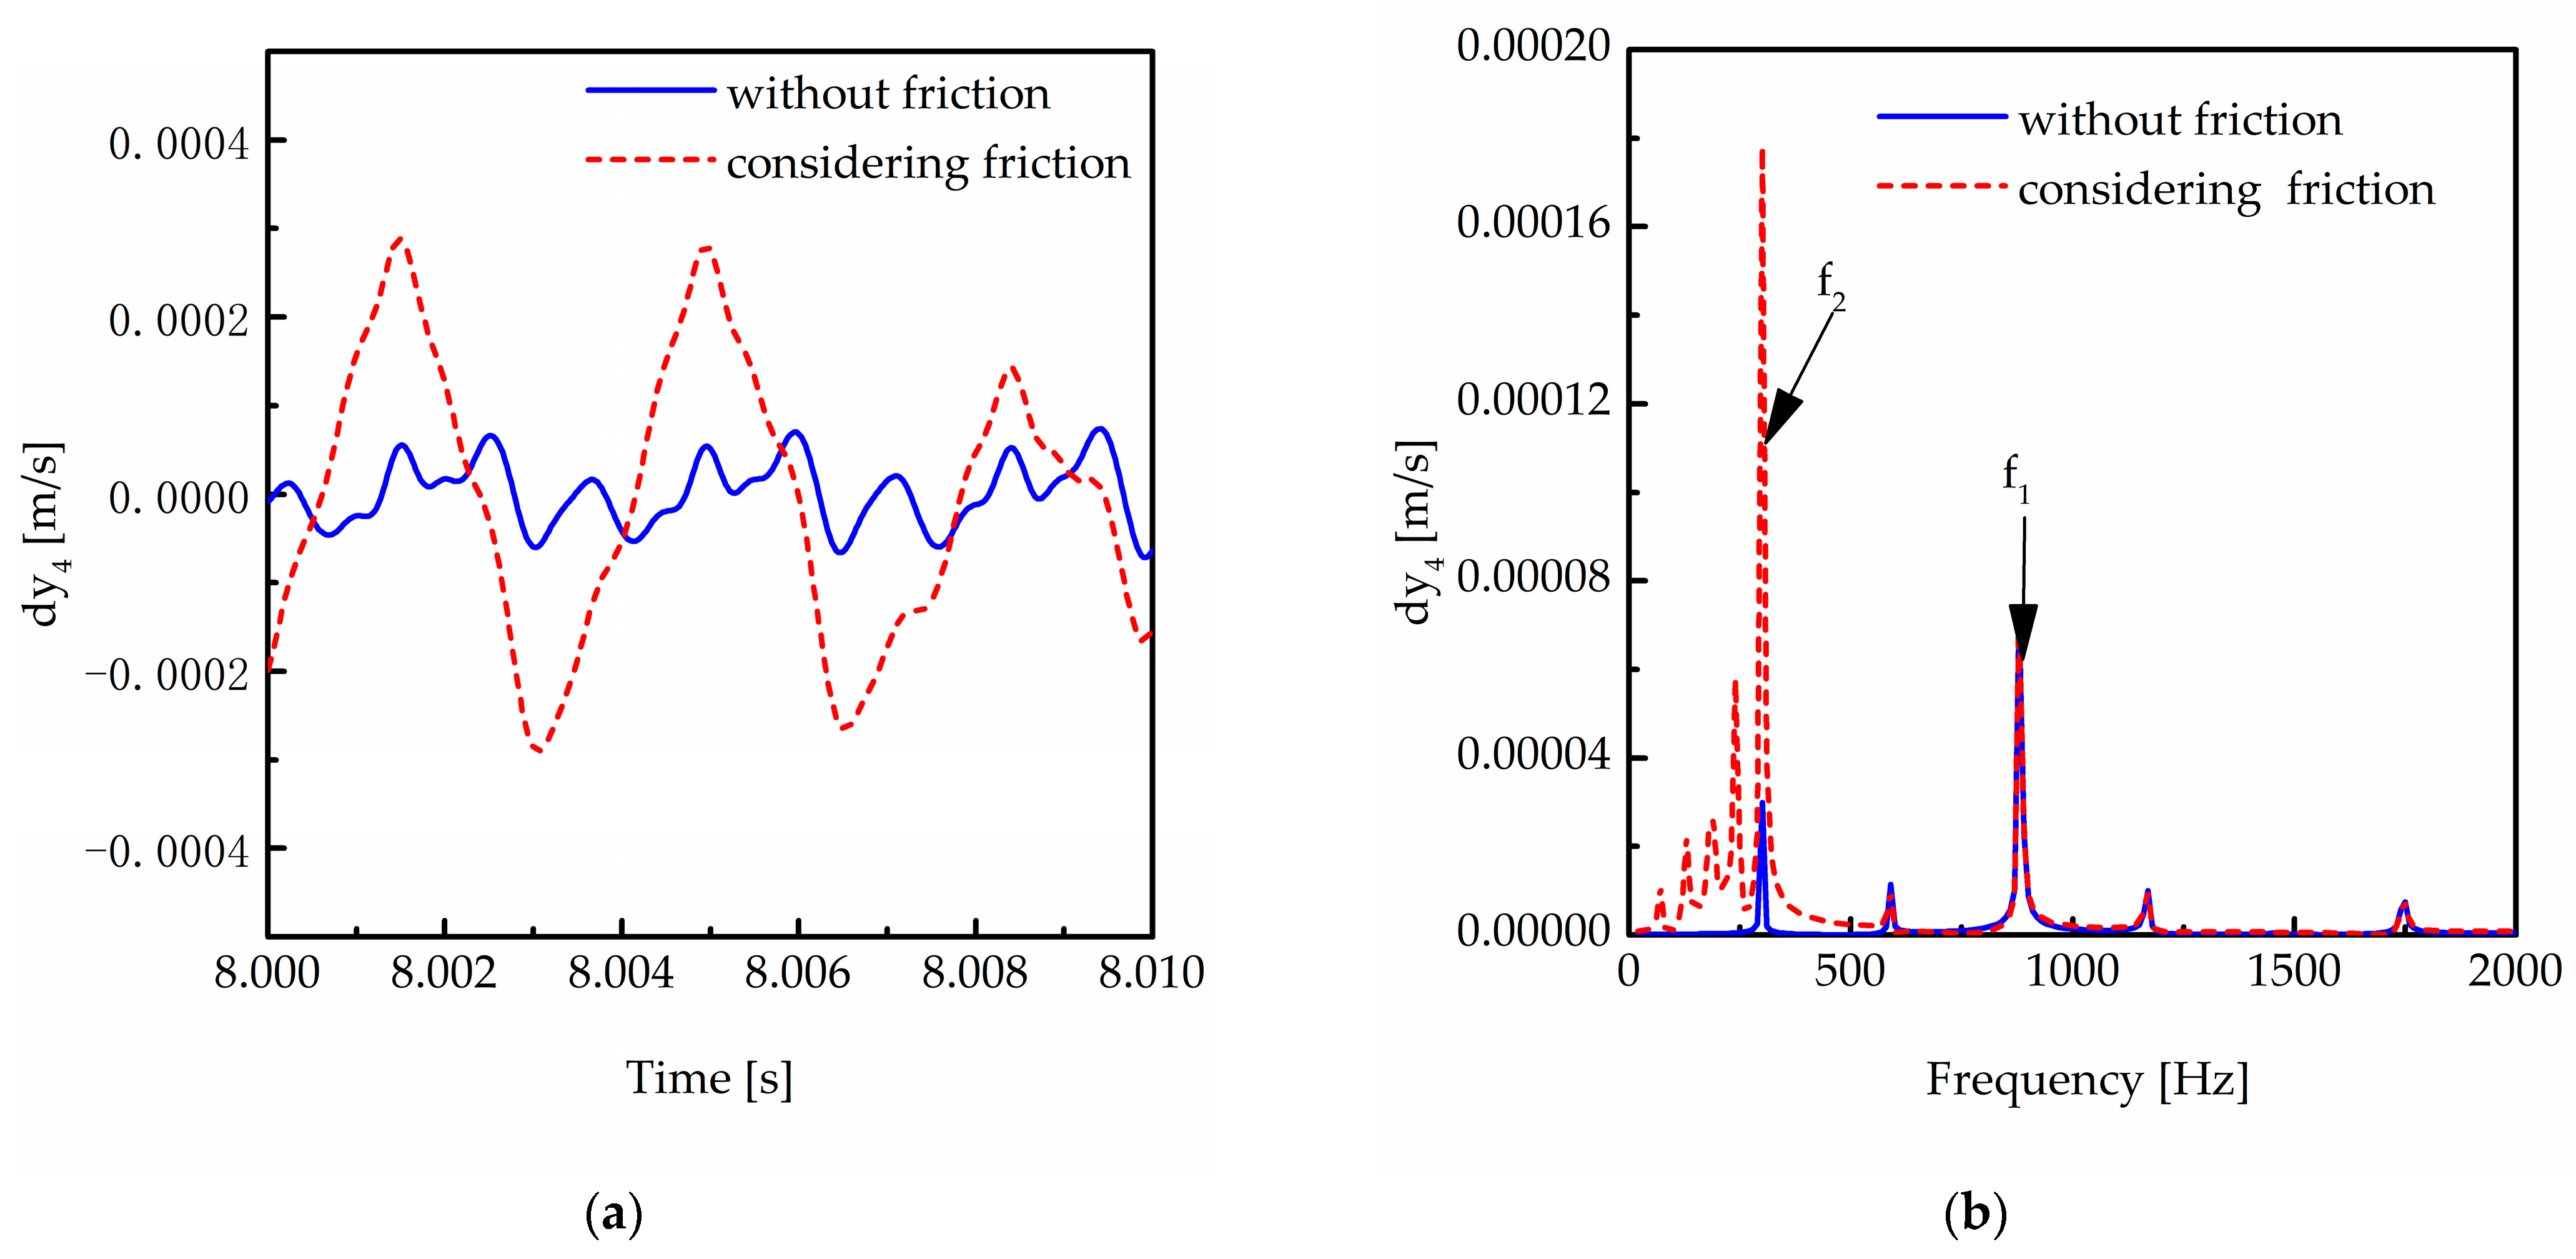
Figure 23 shows the vibration velocity in the x direction in the time domain and the frequency domain. The friction makes the vibration velocity in the x direction increase, and small low-frequency components appear in the frequency domain. In Figure 23b, the amplitude at the mesh frequency of gear pair 2 increases the most. This is because, for the driven gear of gear pair 2, the friction component in the x direction is large. The amplitude at the mesh frequency of gear pair 1 has nearly no change. This indicates that gear 4 is affected by the friction between gear pair 2, and it is impervious to the friction between the gear.
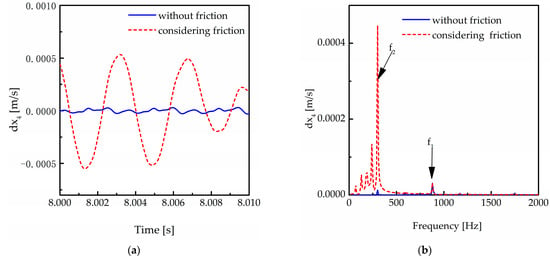
Figure 23.
Vibration velocity of gear 4 in the x direction with friction considered or neglected. (a) In the time domain. (b) In the frequency domain.
Figure 24 shows the vibration velocity in the y direction in the time domain and the frequency domain. With the friction considered, the vibration velocity in the y direction is slightly reduced. This is due to the inhibitory effect of friction, which is caused by the opposite direction of the meshing force. The amplitude of vibration velocity increases, especially at f2, the mesh frequency of the second-stage gears. This is caused by friction excitation, while it has nearly no change at the frequency f1. This is because gear 4 is mainly affected by the friction from gear pair 2. There are frequency components lower than the mesh frequency f2, which is caused by the alternating meshing process.
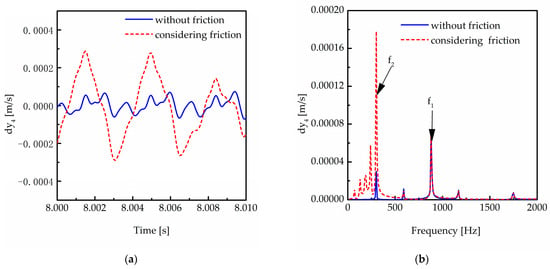
Figure 24.
Vibration velocity of gear 4 in y direction with friction considered or neglected. (a) In time domain. (b) In the frequency domain.
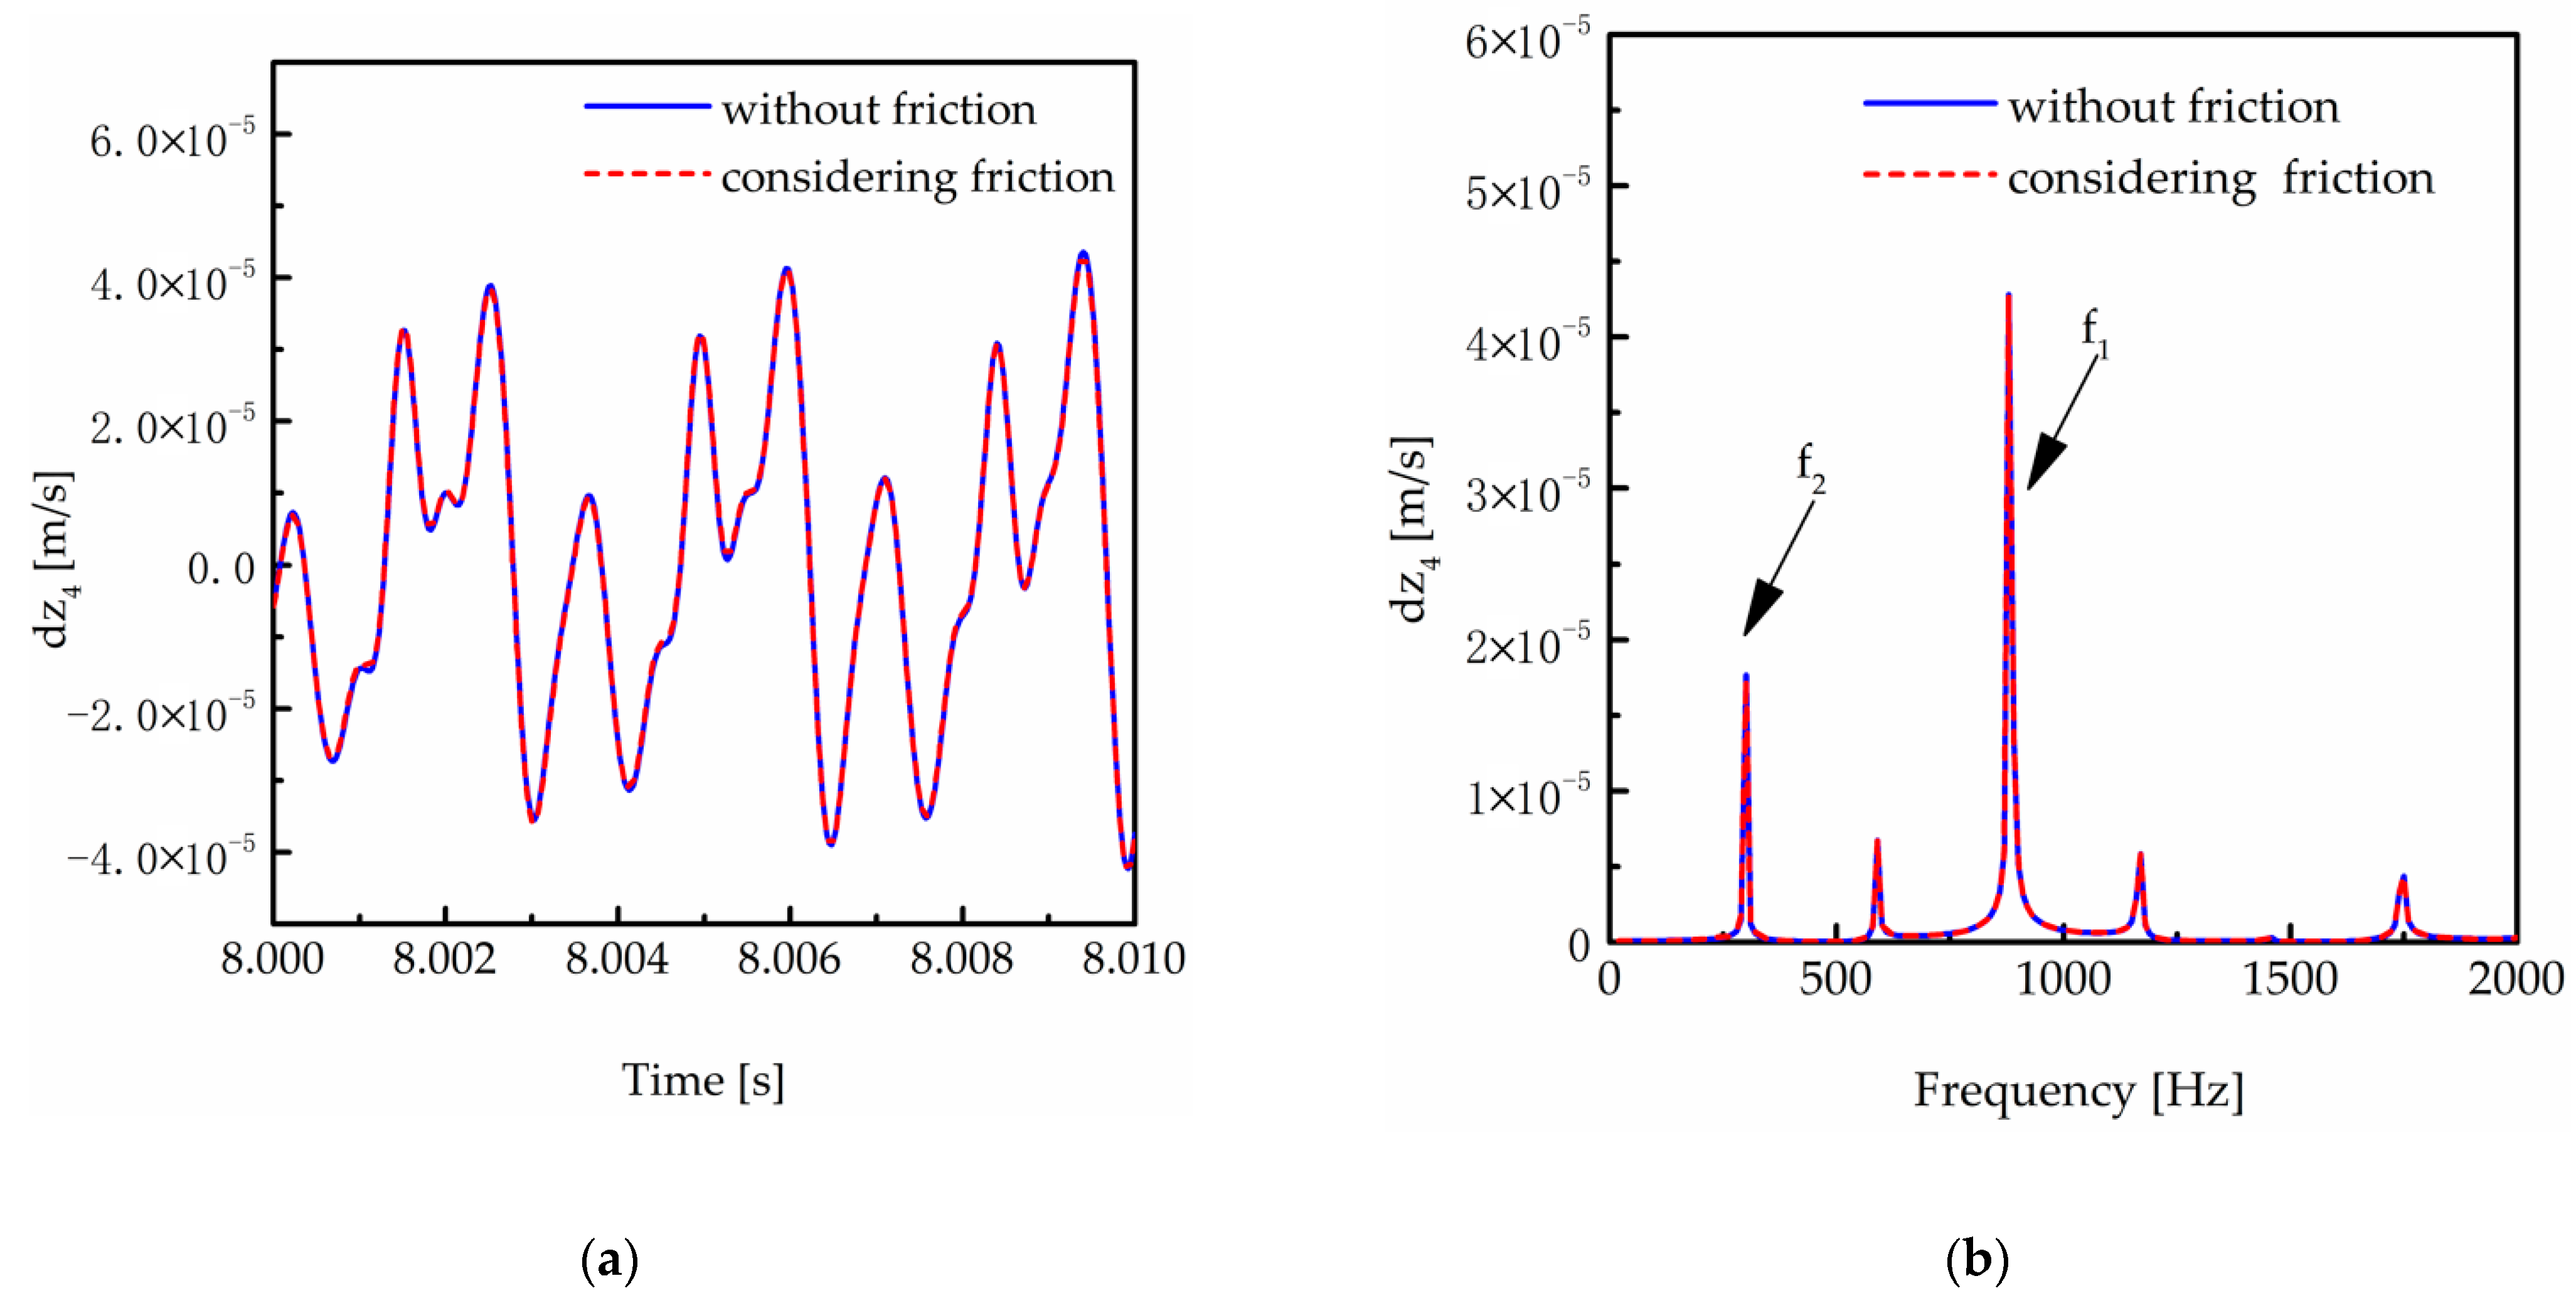
Figure 25 shows the vibration velocity in the z direction in the time domain and the frequency domain. The vibration velocity has almost no change after considering the friction. There is also no change in the frequency domain. This indicates that the coupling effect of the three directions is not obvious for the vibration velocity.
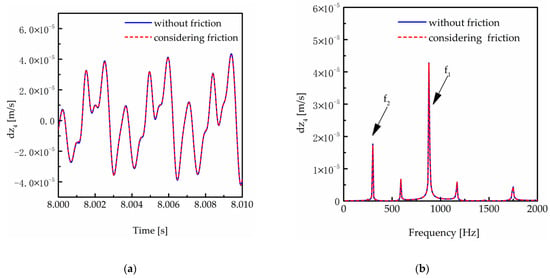
Figure 25.
Vibration velocity of gear 4 in the z direction with friction considered or neglected. (a) In the time domain. (b) In frequency domain.
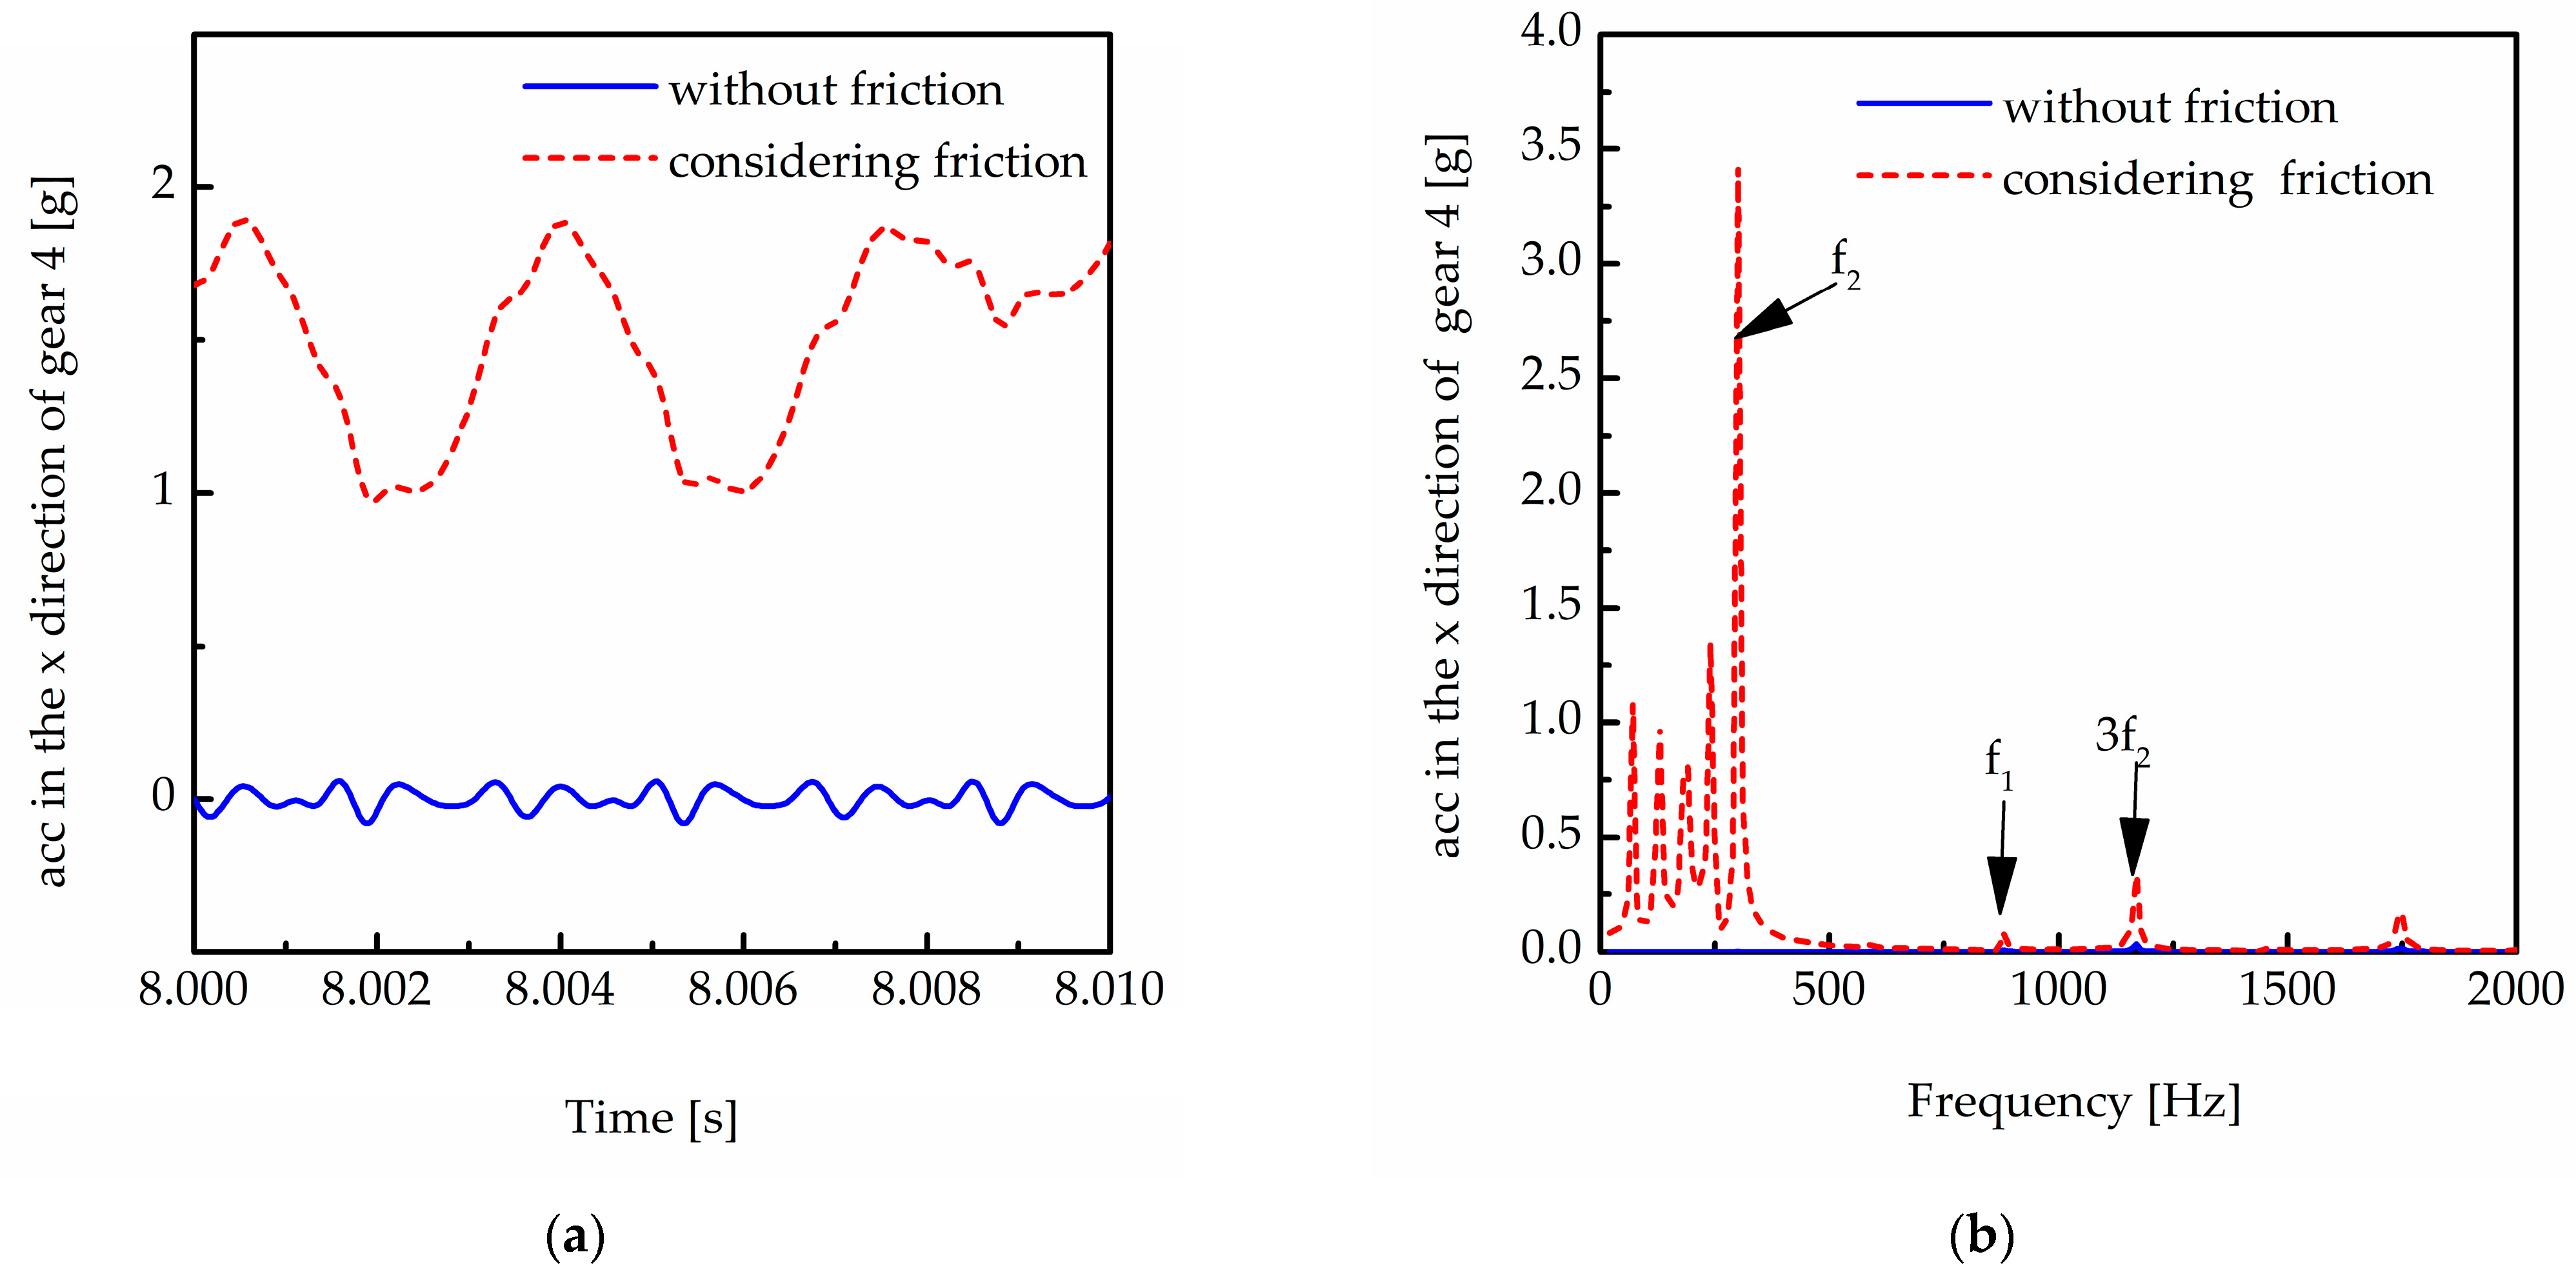
Figure 26 shows the vibration acceleration of gear 4 in the x direction in the time domain and the frequency domain. The acceleration increases mainly at the mesh frequency of second-stage gears, and the amplitude at the first stage follows. This is because the friction force and friction torque at the second stage are larger than that at the first stage, and the vibration of the driven gear at the second stage is mainly affected by the force between the stage-two gears. There is also a superimposed effect caused by the same frequency of the mesh frequency of the first gear and the triple mesh frequency of the second gear. This causes the vibration to accelerate at the frequency of f1 increase. Low-frequency components with small amplitudes appear. This is caused by friction during the mesh progress of engaging alternatively.
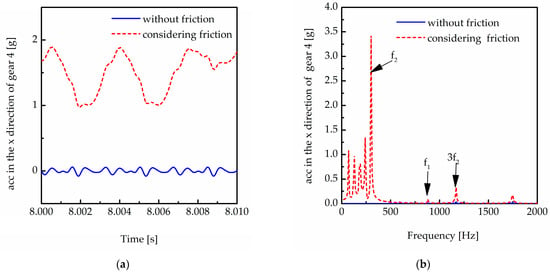
Figure 26.
Vibration acceleration of the follower gear at second gear in the x direction with friction considered or neglected. (a) In the time domain. (b) In the frequency domain.
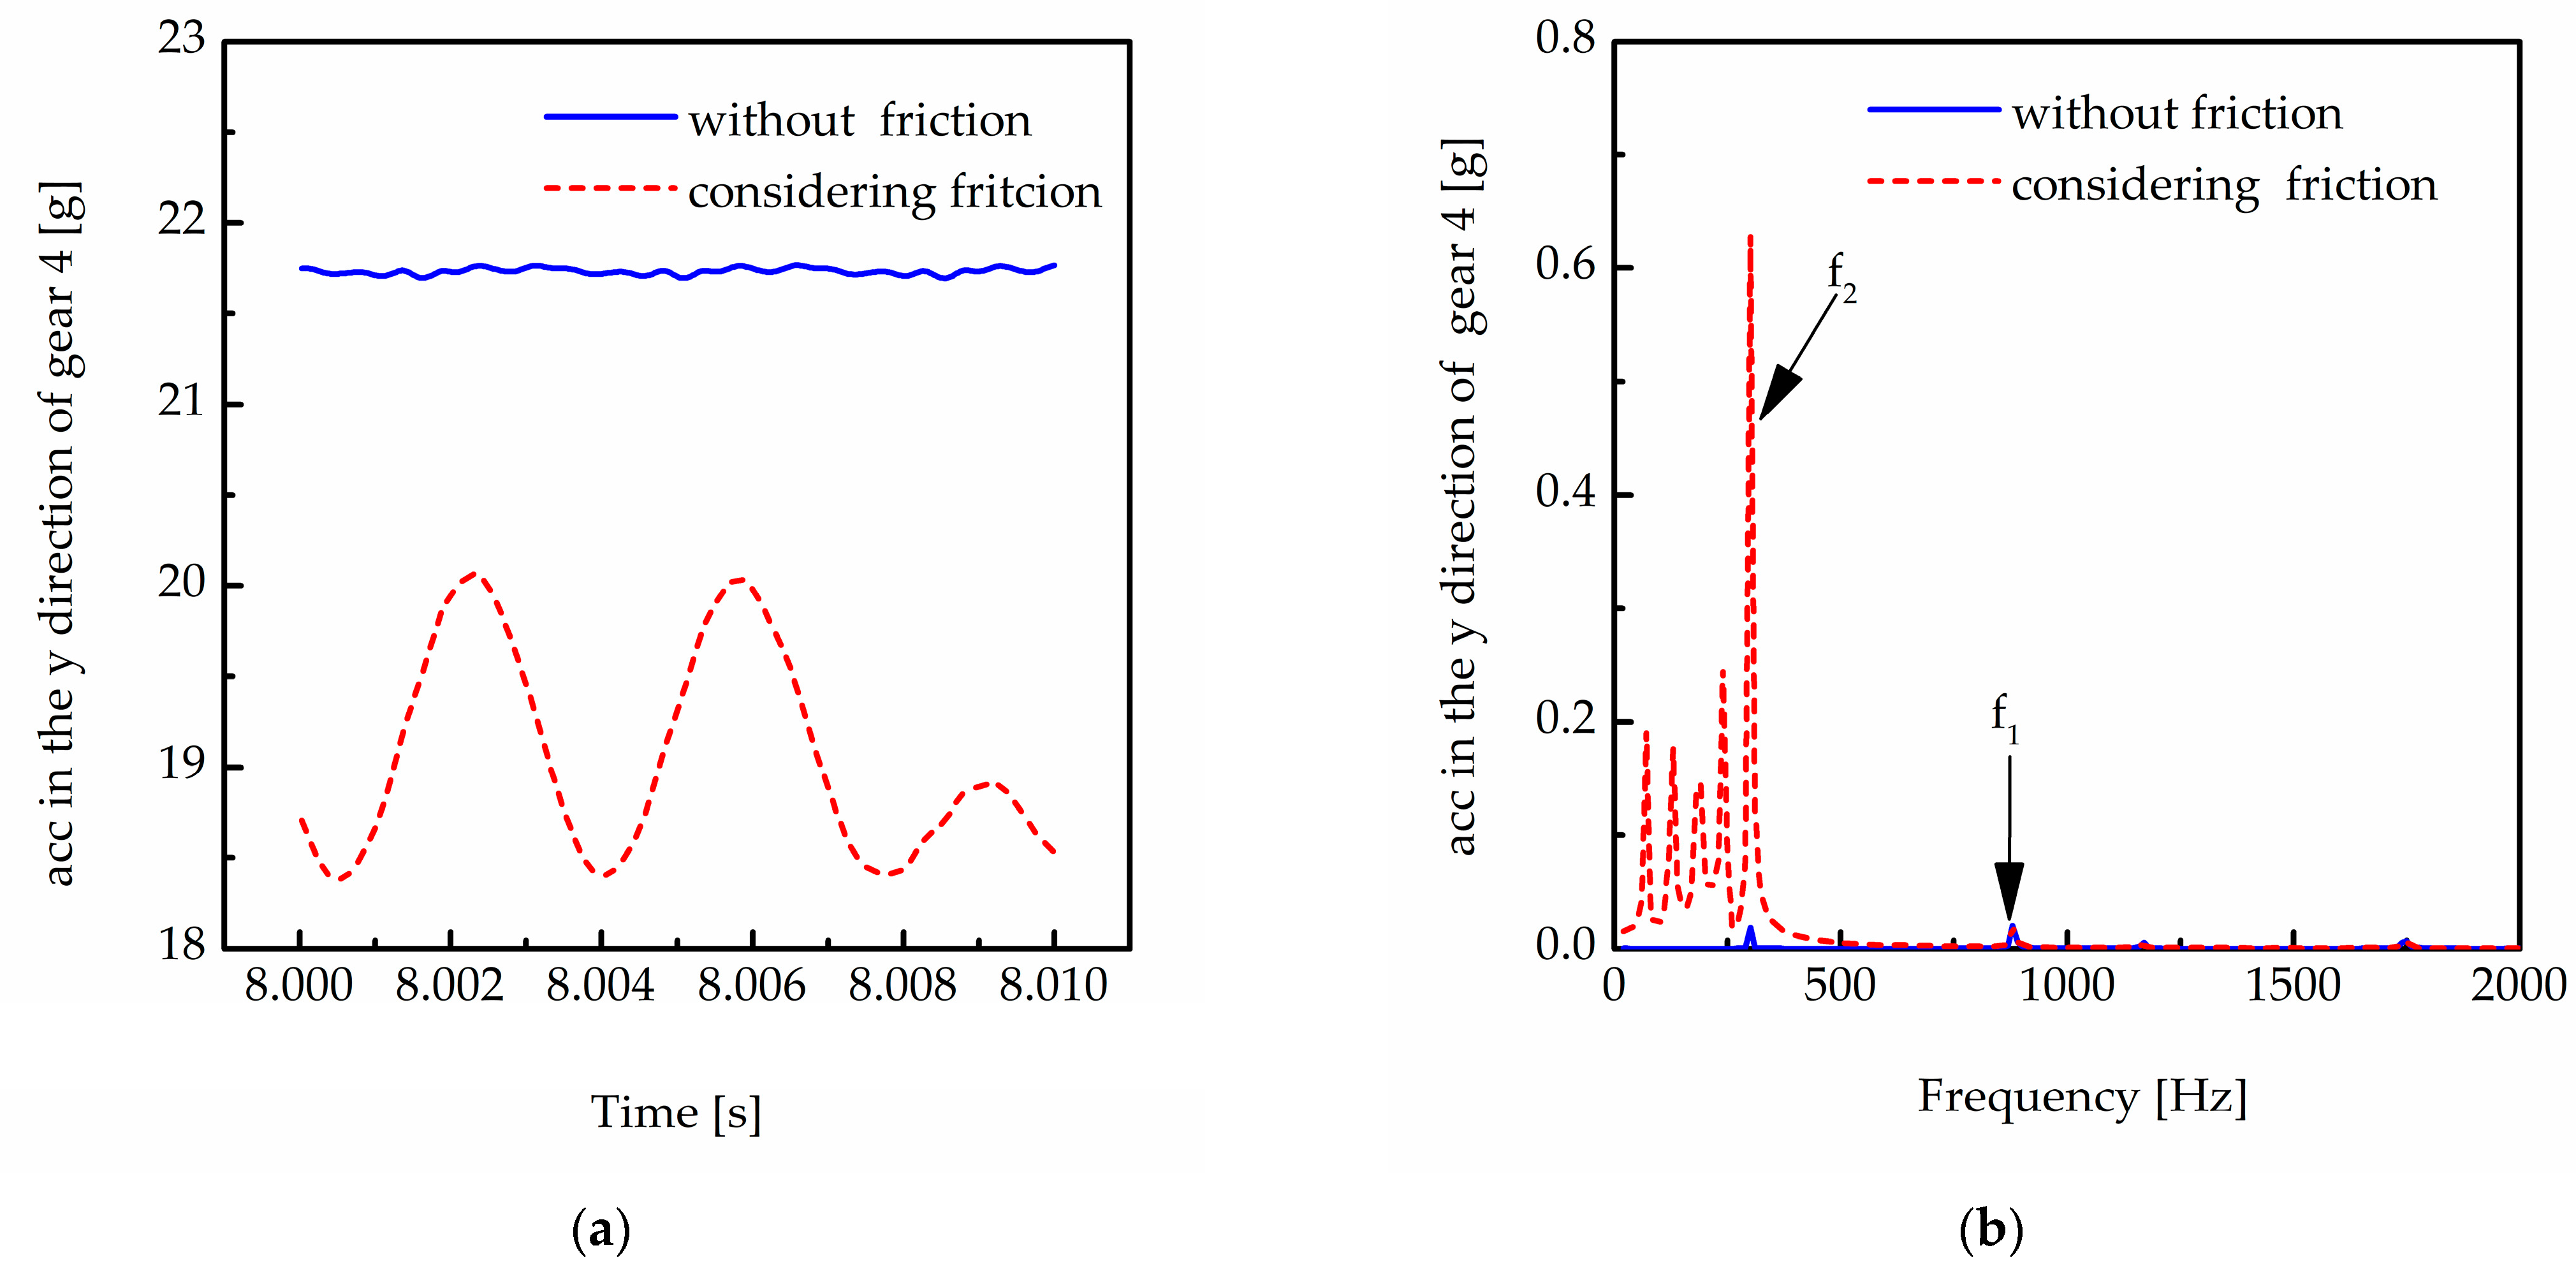
Figure 27 shows the vibration acceleration in the y direction with friction considered or neglected in the time domain and the frequency domain. The average vibration acceleration decreases. This is because the friction force component in the y direction is always negative while the vibration acceleration amplitude increases. This is because the friction has an excitation effect as the mesh stiffness, making the vibration accelerate fluctuation increase. There are also frequency components lower than the mesh frequency f2. This is because the complex friction makes the acceleration modulate the signal.
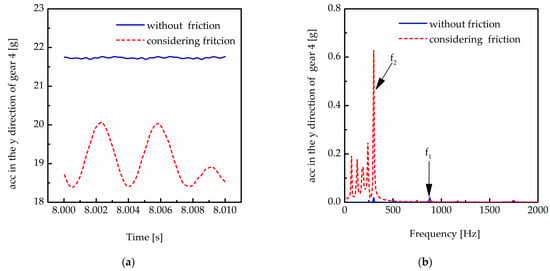
Figure 27.
Vibration acceleration of the follower gear at second gear in the y direction with friction considered or neglected. (a) In the time domain. (b) In the frequency domain.
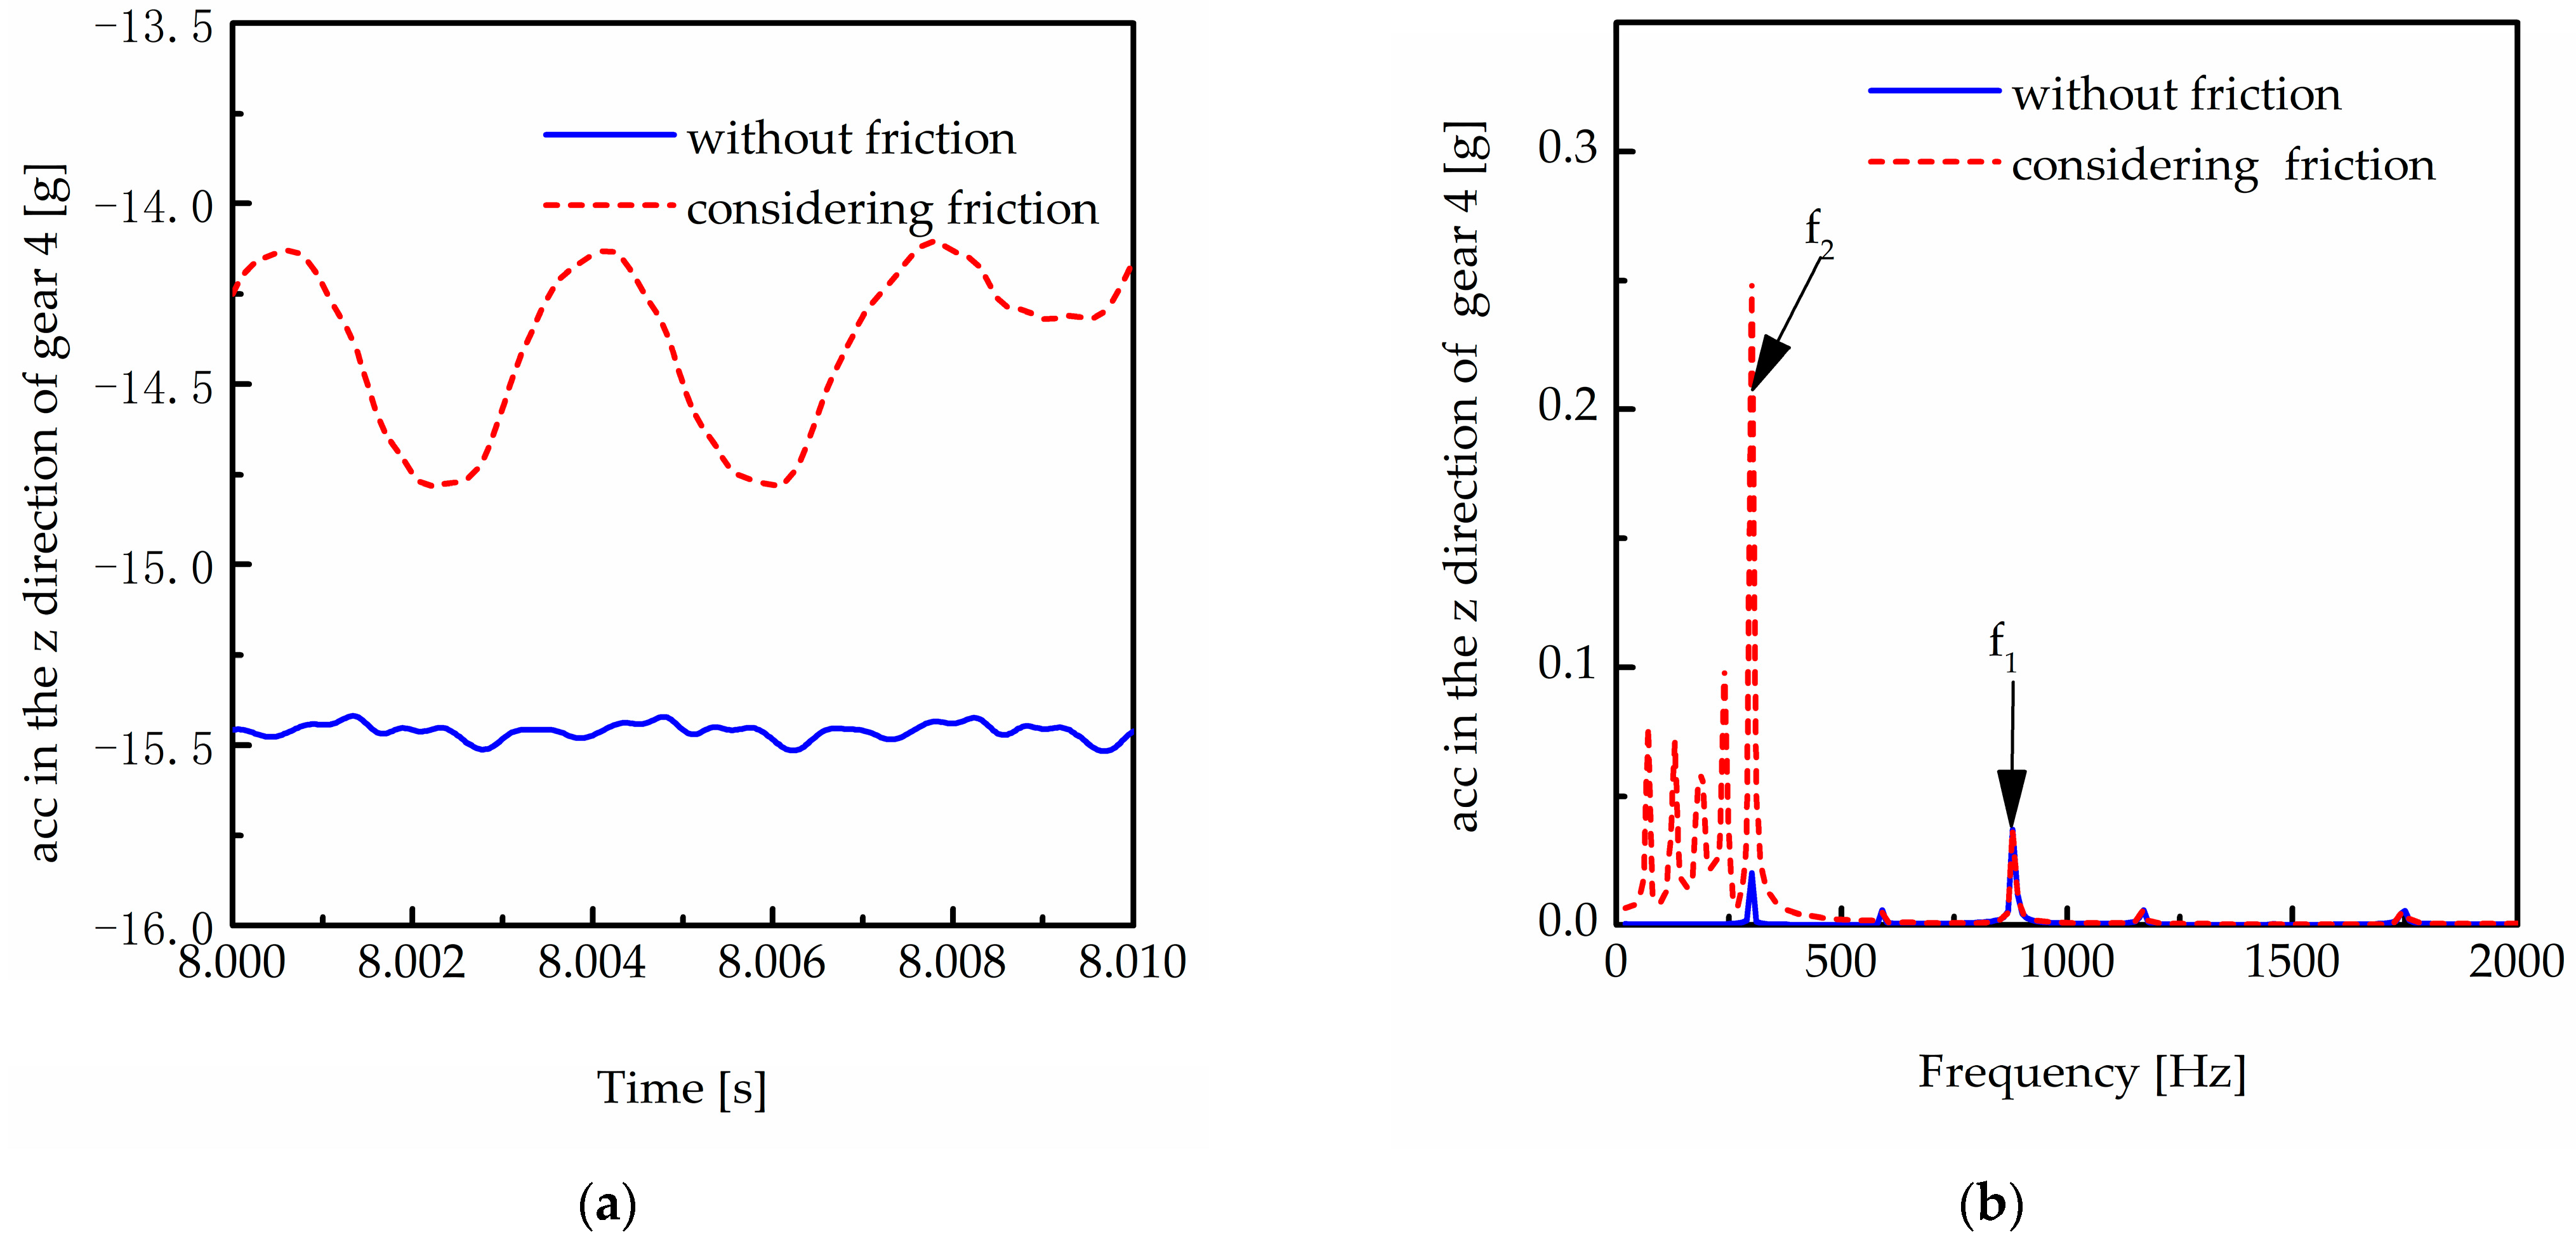
Figure 28a,b are the vibration acceleration of gear 4 in the z direction in the time domain and the frequency domain, respectively; the vibration acceleration increases. The amplitude at the mesh frequency of the second-stage gears increases. This is due to the coupling effect of the three directions. Lower-frequency components appear. This is because the coupling effect of the friction modulates the amplitude frequency of the vibration acceleration.
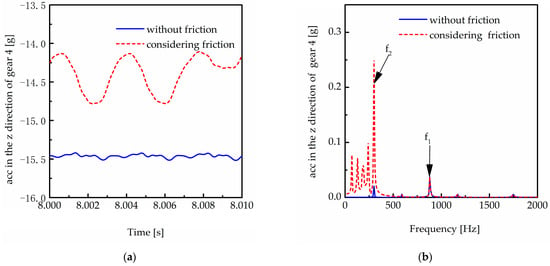
Figure 28.
Vibration acceleration of the follower gear at second gear in the z direction with friction considered or neglected. (a) In the time domain. (b) In the frequency domain.
From the above analysis, the impact in the x direction is significant compared to that in the y direction and the z direction. This is because the component force caused by friction force is the largest in the x direction, and the direction is always positive. Not only does the amplitude increase but there appear to be several components lower than the mesh frequency of the second-stage gears. This is due to the complexity of the friction. In the y direction, the vibration average is reduced because the friction force in the y direction is always negative, making the vibration suppressed. The amplitude at the mesh frequency of the two-stage gears increases. This is due to the friction excitation in the y direction as the mesh stiffness. There is no friction force component in the z direction, but the vibration acceleration is changed. This is caused by the coupling effect of the three directions in the driveline. The vibration displacement and velocity in the z direction are nearly not affected by friction. This study offers theoretical foundations for the research of the dynamic characteristics of electric vehicles.
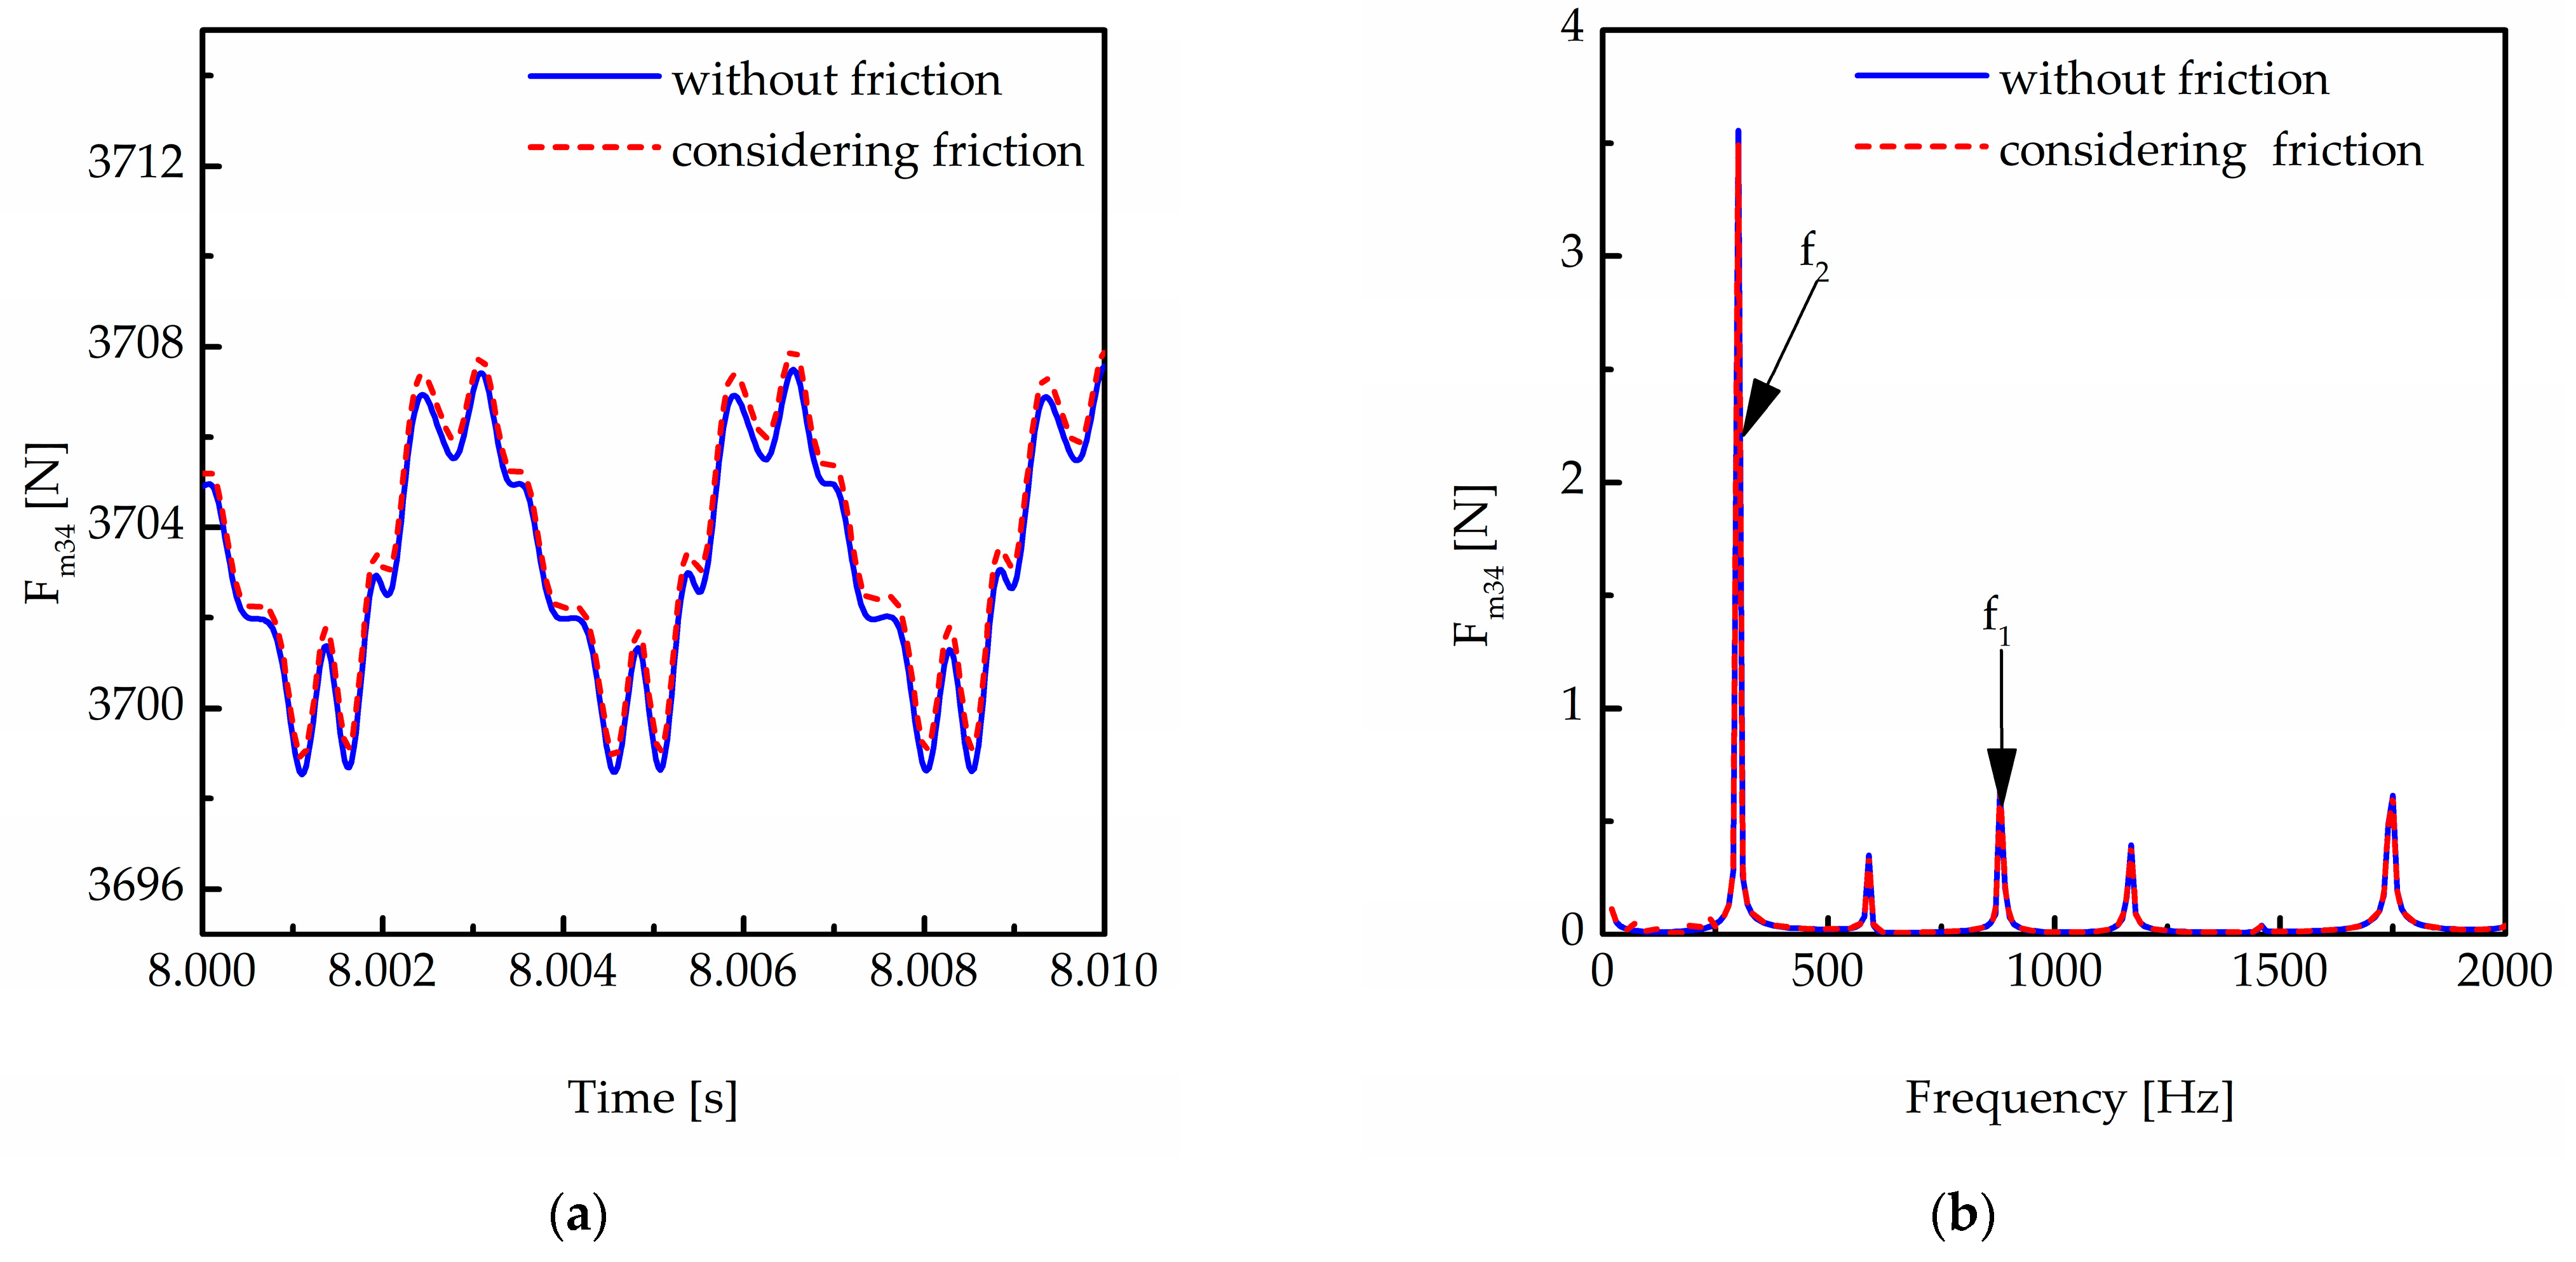
Figure 29a shows the dynamic meshing force of the second gear in the two-stage driveline with friction considered and neglected in the time domain. The calculated theoretical meshing force using Formula (56) is 3688 N, which is very close to the average of Fm34 3702 N. This indicates that the motor two-stage transmission system model established is correct [40].
where T is the torque, d4 is the radius of gear 4’s indexing circle, is the helix angle, and is the normal pressure angle. Figure 28 shows that the meshing force has a very slight increase because of the friction. This is consistent with the result in the literature [41]. This can be explained by the dynamic Equations (48)–(50). Considering the friction action, a bigger meshing force is needed to realize the stress balance. Figure 28b reflects gear pair 2’s dynamic meshing force in the frequency domain. It is shown that the amplitude has nearly no increase, and the frequency components have no change. This indicates that the friction does not cause the meshing force to produce frequency modulation.
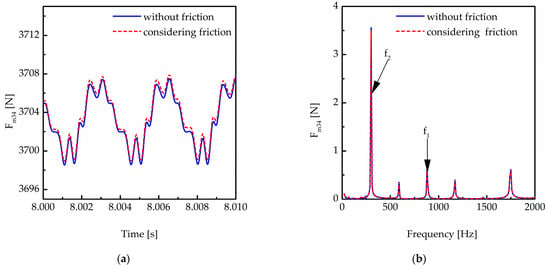
Figure 29.
The meshing force with friction considered or neglected. (a) In the time domain. (b) In the frequency domain.
5.2. Influence of Axial Force Component of Stiffness on the Two-Stage Transmission System
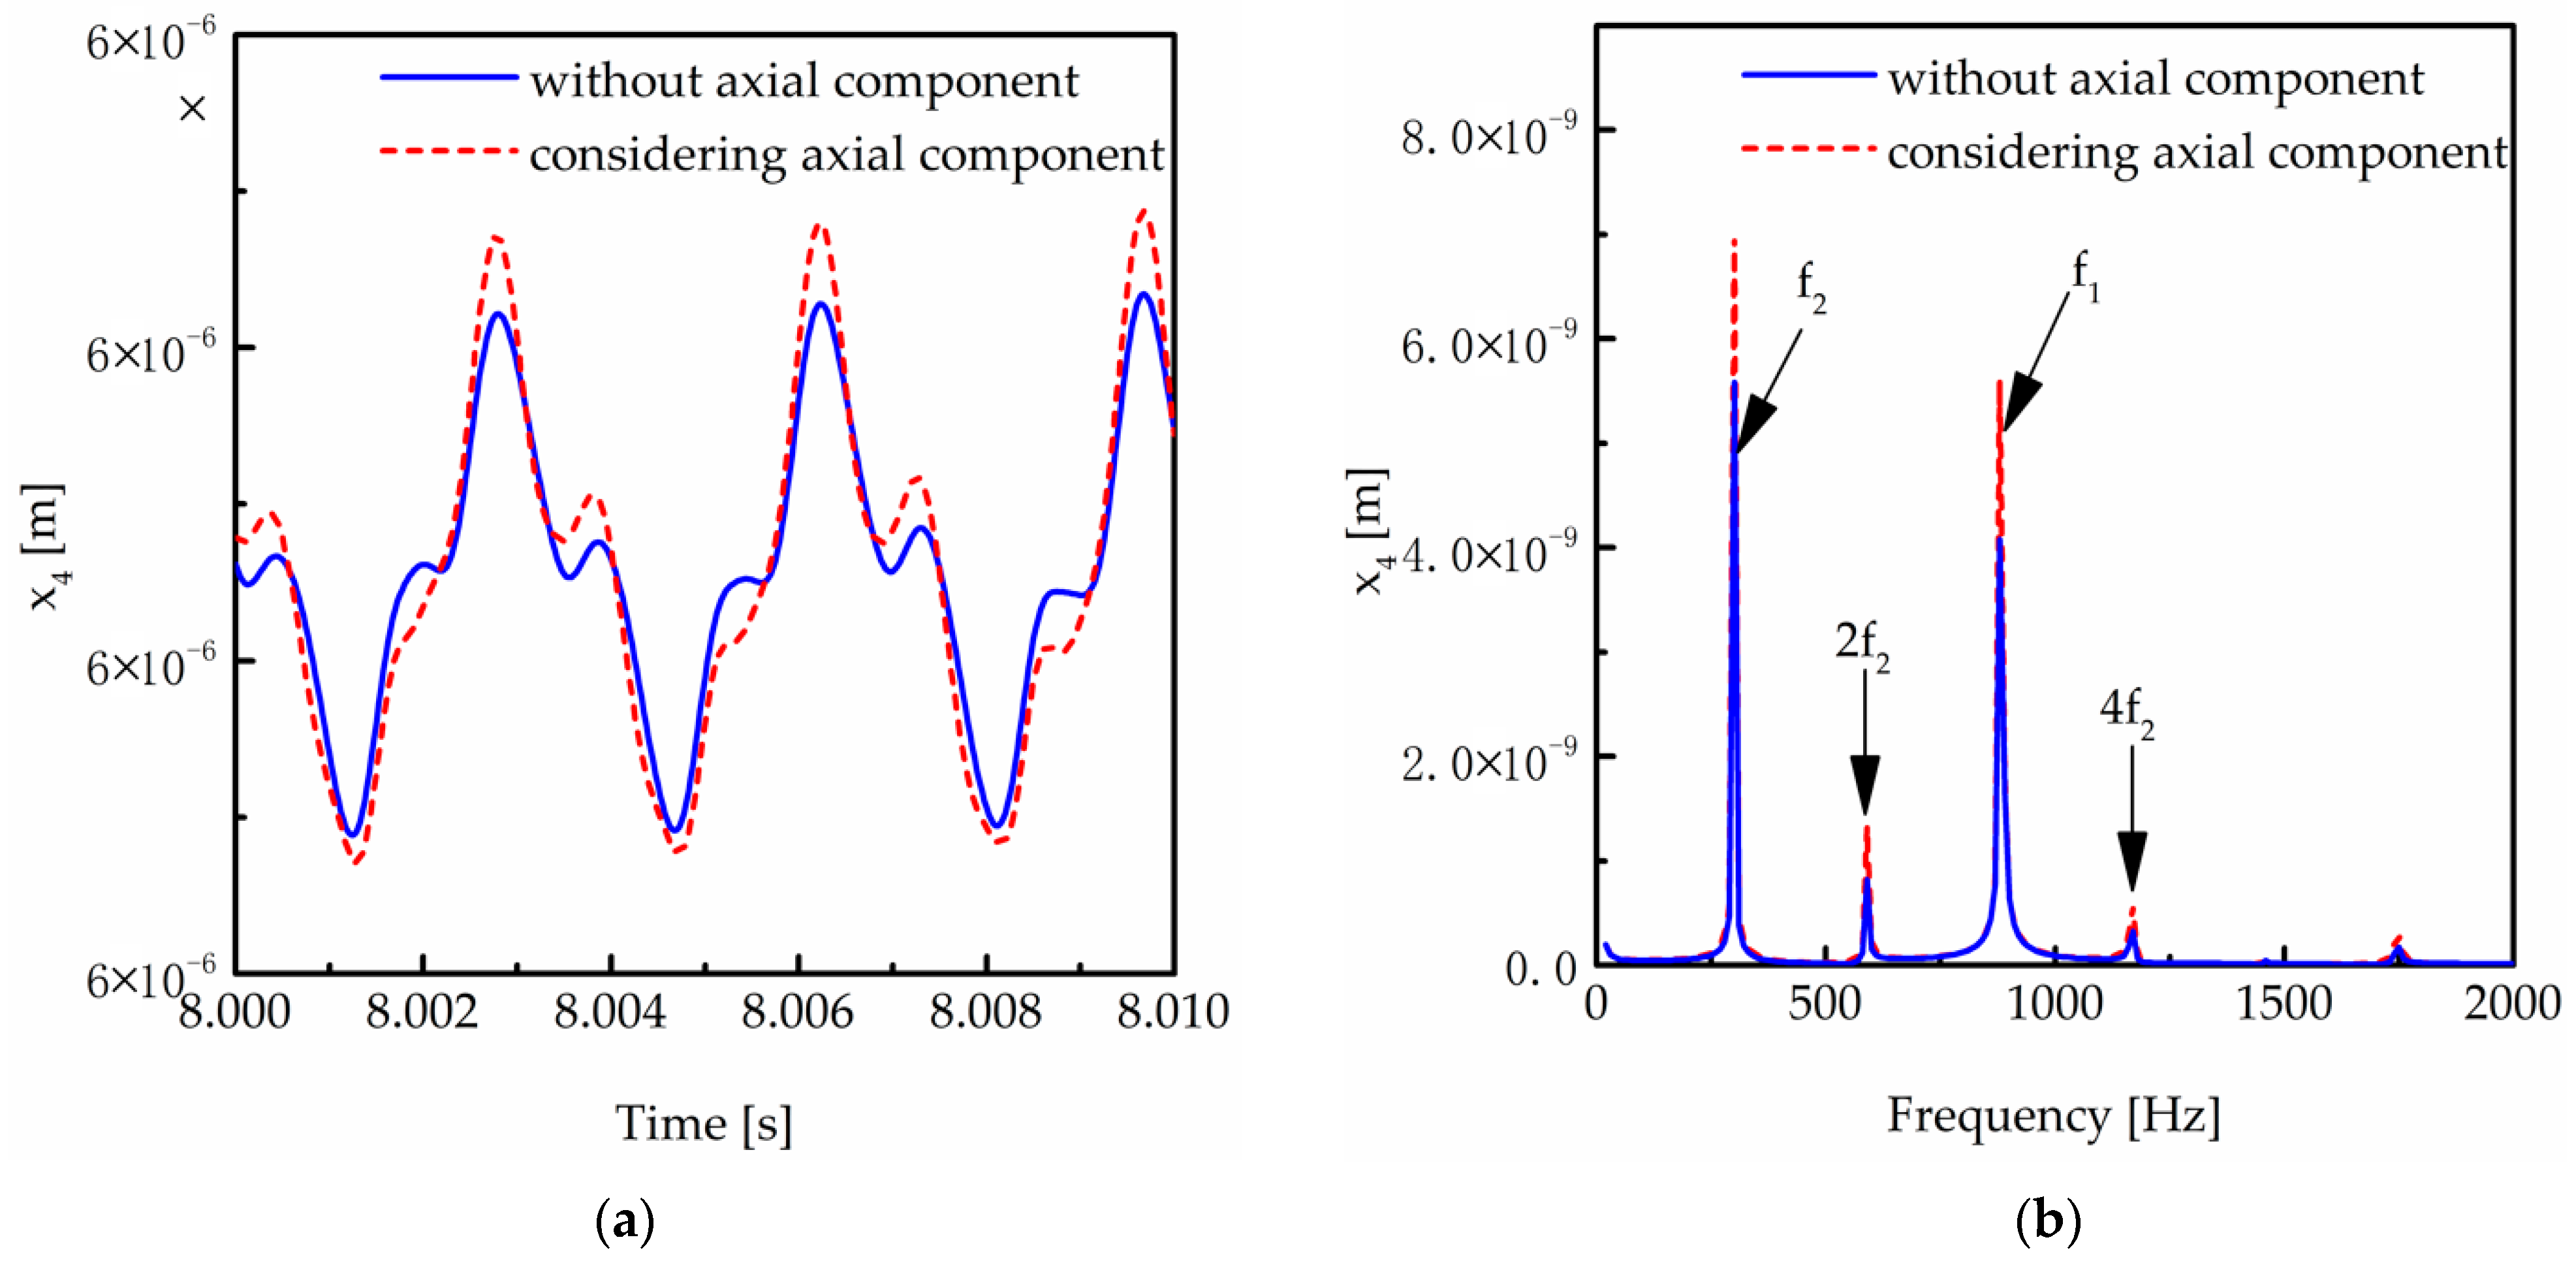
Figure 30a shows the vibration displacement of the driven gear of the second gear in the x direction over time. The vibration displacement amplitude increases after considering the axial force stiffness component. This is because, under the same meshing force, the deflection caused by the axial force component is also concluded, leading to a reduction in stiffness and an increase in the vibration. As shown in the frequency domain diagram Figure 30b, the vibration amplitude increases by 20% at the second gear pair’s mesh frequency. The vibration amplitude also increases at harmonics such as 2f2 and 4f2.
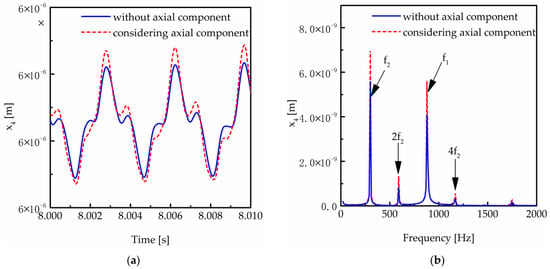
Figure 30.
The vibration displacement of gear 4 in the x direction considering axial force into stiffness. (a) In the time domain. (b) In the frequency domain.
This indicates that the axial force component should be considered in the stiffness calculation in a helical gear transmission system with a large helix angle in electric vehicles. This provides a fundamental basis for the dynamic characteristics analysis of the transmission system in electric vehicles.
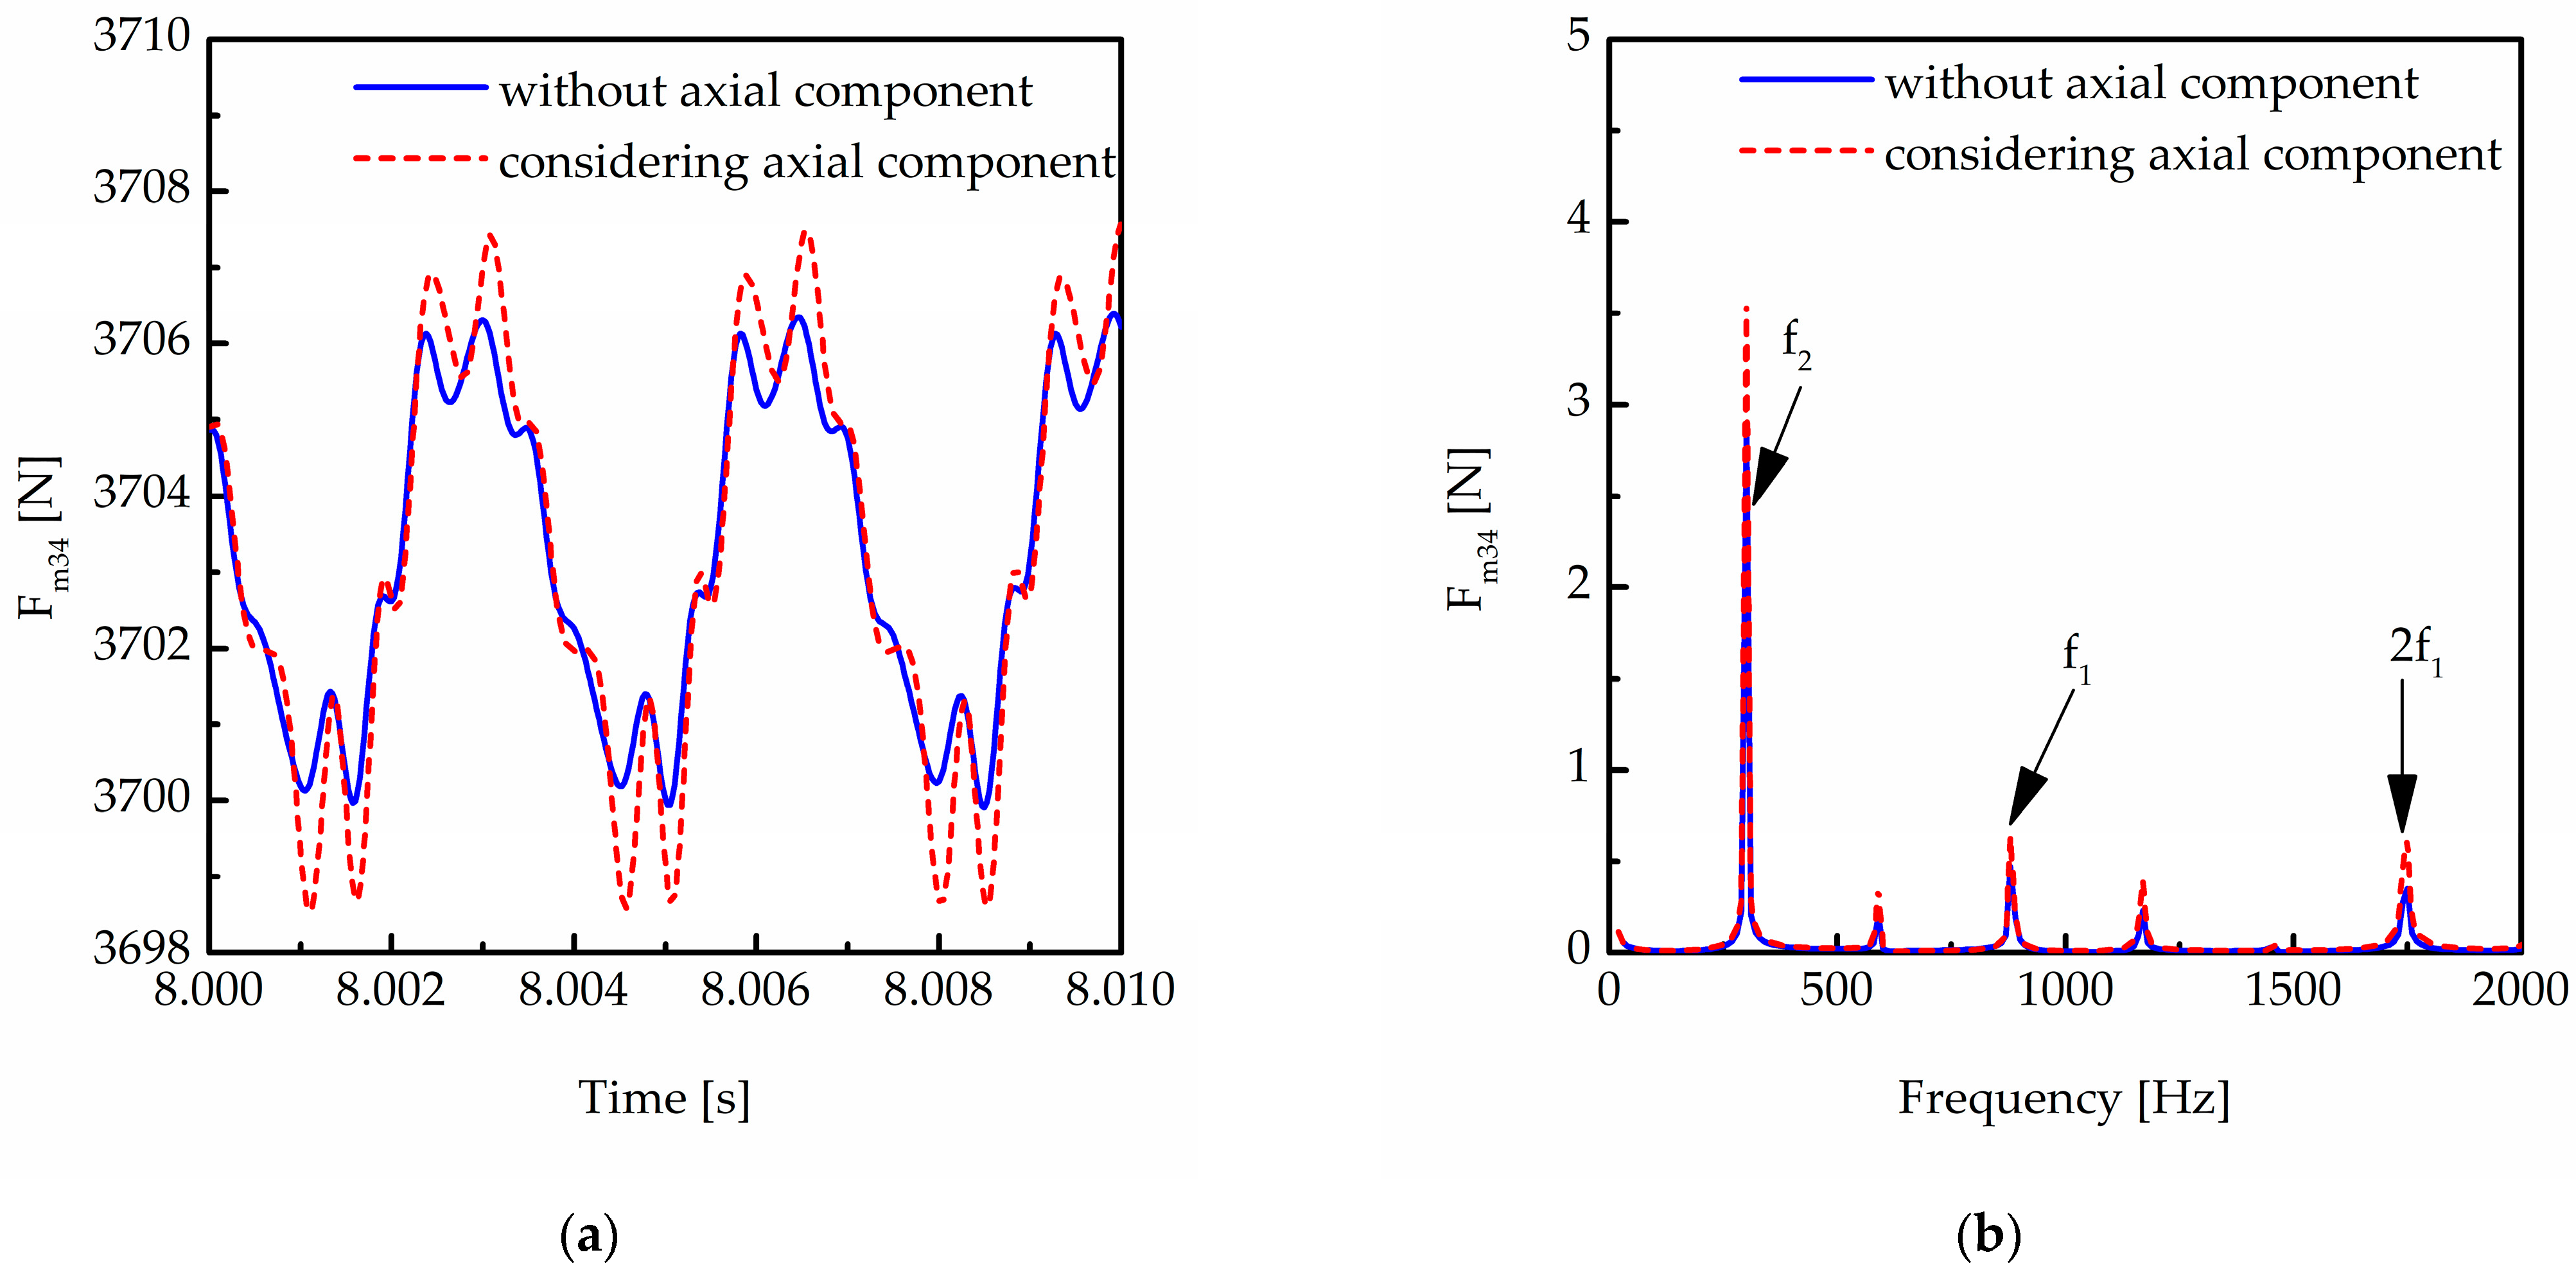
Figure 31 shows the dynamic meshing force variation of gears at the second stage, considering the axial force stiffness component in the time domain and the frequency domain. It is shown that the fluctuation of dynamic, engaging force increases when the axial force stiffness component is considered. It is illustrated in Figure 31b that the amplitude at the mesh frequency f2 increases by 21.8%. The amplitude at the harmonics also increases.

Figure 31.
The meshing force considering the axial force component in stiffness. (a) In the time domain. (b) In the frequency domain.
This can be explained by the damping Equation (57) [26]. When the mesh stiffness average is reduced, the damping is accordingly smaller, causing the meshing force fluctuation to increase.
6. Conclusions and Future Work
Based on the energy method, a calculation model was derived considering the axial force and verified by the finite element method. The application of the stiffness, considering the axial force component of helical gears with large helix angles, to the dynamic model of the transmission system in an electric vehicle was explored. A dynamic model of a motor two-stage driveline was established and verified by a test bench. The influence of friction and axial force components in mesh stiffness was analysed separately.
When employing the first-stage gear’s parameters, the relative stiffness error is more than 10% when the helix angle is bigger than 27°. When the helix angle is up to 30.5°, the relative stiffness error is more than 13%. The method can be used in transmission systems in electric vehicles with a large helix angle.
The direction of the comprehensive friction force and the friction torque is always positive due to the large helix angle. For the second follower gear, when the direction of the friction component is consistent with that of the meshing force component, the vibration will increase. When the direction of the friction component is opposite to that of the meshing force component, the vibration will be suppressed, but the fluctuation amplitude will still be increased. The vibration in the x direction increases the most, especially the vibration displacement.
There is no friction force component in the z direction, but the vibration in the z direction is also influenced, and the meshing force between the second-stage gears has a slight increase. The calculated stiffness of the helical gear with a 30.5-degree helix angle was applied to the transmission system in an electric vehicle, and the influence of the stiffness components caused by the axial force was analysed; the vibration amplitude increased by 20%. The meshing force amplitude at the mesh frequency f2 increases by 21.8%. The influence of the axial force should be considered in the stiffness calculation for a dynamic transmission system with a large helix angle in electric vehicles. The study offers a theoretical foundation for the dynamic characteristics of helical gears with large helix angles in transmission systems of electric vehicles.
Author Contributions
Conceptualization, S.Y., W.W. and Y.L.; methodology, Y.L. and X.S.; software, Y.L.; validation, Y.L., K.L. and C.L.; formal analysis, Y.L.; investigation, Y.L. and X.S.; resources, S.Y. and W.W.; data curation, Y.L. and X.S.; writing, Y.L.; writing—review and editing, W.W. and Y.L.; visualization, Y.L.; supervision, W.W. and K.L.; project administration, W.W.; funding acquisition, S.Y. and W.W. All authors have read and agreed to the published version of the manuscript.
Funding
This research was funded by the National Natural Science Foundation of China, grant number U1864210, and the APC was funded by the foundation.
Data Availability Statement
Not applicable.
Conflicts of Interest
The authors declare no conflict of interest.
References
- Dogan, O.; Karpat, F. Crack detection for spur gears with asymmetric teeth based on the dynamic transmission error. Mech. Mach. Theory 2019, 133, 417–431. [Google Scholar] [CrossRef]
- Song, X.; Howard, I. Torsional vibration signal analysis as a diagnostic tool for planetary gear fault detection. Mech. Syst. Signal Process. 2018, 100, 706–728. [Google Scholar]
- Wu, J.; Yang, Y.; Wang, P.; Wang, J.; Cheng, J. A novel method for gear crack fault diagnosis using improved analytical-FE and strain measurement. Meas. J. Int. Meas. Confed. 2020, 15, 107936. [Google Scholar] [CrossRef]
- Chang, L.; Liu, G.; Wu, L. A robust model for determining the mesh stiffness of cylindrical gears. Mech. Mach. Theory 2015, 87, 93–114. [Google Scholar] [CrossRef]
- Jiang, H.; Liu, F. Mesh stiffness modelling and dynamic simulation of helical gears with tooth crack propagation. Meccanica 2020, 55, 1215–1236. [Google Scholar] [CrossRef]
- Raghuwanshi, N.K.; Parey, A. Experimental measurement of gear mesh stiffness of cracked spur gear by strain gauge technique. Measurement 2016, 86, 266–275. [Google Scholar] [CrossRef]
- Dai, H.; Long, X.; Chen, F.; Xun, C. An improved analytical model for gear mesh stiffness calculation. Mech. Mach. Theory 2021, 159, 104262. [Google Scholar] [CrossRef]
- Yang, D.C.H.; Lin, J.Y. Hertzian damping, tooth friction and bending elasticity in gear impact dynamics. J. Mech. Transm. Autom. Des. 1987, 109, 189–196. [Google Scholar] [CrossRef]
- Tian, X. Dynamic Simulation for System Response of Gearbox Including Localized Gear Faults. Ph.D. Thesis, Albert University, Edmonton, AB, Canada, 2004. [Google Scholar]
- Sainsot, P.; Velex, P. Contribution of gear body to tooth deflections—A new bidimensional analytical formula. Trans. ASME 2004, 126, 748–752. [Google Scholar] [CrossRef]
- Wan, Z.; Cao, H.; Zi, Y.; He, W.; He, Z. An improved time-varying mesh stiffness algorithm and dynamic modeling of gear-rotor system with tooth root crack. Eng. Fail. Anal. 2014, 42, 157–177. [Google Scholar] [CrossRef]
- Chen, Z.; Zhang, J.; Zhai, W.; Wang, Y.; Liu, J. Improved analytical methods for calculation of gear tooth fillet-foundation stiffness with tooth root crack. Eng. Fail. Anal. 2017, 82, 72–81. [Google Scholar] [CrossRef]
- Chen, Y.; Zhu, R.; Jin, G.; Xiong, Y. Infuence of Crack Depth on Dynamic Characteristics of Spur Gear System. J. Vib. Eng. Technol. 2019, 7, 227–233. [Google Scholar] [CrossRef]
- Jiang, J.; Chen, Z.; Zhai, W.; Zhang, T.; Li, Y. Vibration characteristics of railway locomotive induced by gear tooth root crack fault under transient conditions. Eng. Fail. Anal. 2020, 108, 104285. [Google Scholar] [CrossRef]
- Wu, S. Gearbox Dynamic Simulation and Estimation of Fault Growth. Ph.D. Thesis, University of Alberta, Edmonton, AB, Canada, 2007. [Google Scholar]
- Meng, Z.; Shi, G.; Wang, F. Vibration response and fault characteristics analysis of gear based on time-varying mesh stiffness. Mech. Mach. Theory 2020, 148, 103786–103801. [Google Scholar] [CrossRef]
- Xie, C.; Shu, X. A new mesh stiffness model for modified spur gears with coupling tooth and body flexibility effects. Appl. Math. Model. 2021, 91, 1194–1210. [Google Scholar] [CrossRef]
- Shen, J.; Hu, N.; Zhang, L.; Luo, P. Dynamic Analysis of Planetary Gear with Root Crack in Sun Gear Based on Improved Time-Varying Mesh Stiffness. Appl. Sci. 2020, 10, 8379. [Google Scholar] [CrossRef]
- Wan, Z.; Cao, H.; Zi, Y.; He, W.; Chen, Y. Mesh stiffness calculation using an accumulated integral potential energy method and dynamic analysis of helical gears. Mech. Mach. Theory 2015, 92, 447–463. [Google Scholar] [CrossRef]
- Yang, H.; Shi, W.; Chen, Z.; Guo, N. An improved analytical method for mesh stiffness calculation of helical gear pair considering time-varying backlash. Mech. Syst. Signal Process. 2022, 170, 108882. [Google Scholar] [CrossRef]
- Wang, Q.; Zhao, B.; Fu, Y.; Kong, X.; Ma, H. An improved time-varying mesh stiffness model for helical gear pairs considering axial mesh force component. Mech. Syst. Signal Process. 2018, 106, 413–429. [Google Scholar] [CrossRef]
- Jiang, H.; Shao, Y.; Mechefske, C.K. Dynamic characteristics of helical gears under sliding friction with spalling defect. Eng. Fail. Anal. 2014, 39, 92–107. [Google Scholar] [CrossRef]
- Ning, J.; Chen, Z.; Zhai, W. Improved analytical model for mesh stiffness calculation of cracked helical gear considering interactions between neighboring teeth. Sci. China Tech. Sci. 2023, 66, 706–720. [Google Scholar] [CrossRef]
- Li, Y.; Yuan, S.; Wu, W.; Liu, K.; Lian, C.; Song, X. Vibration Analysis of Two-Stage Helical Gear Transmission with Cracked Fault Based on an Improved Mesh Stiffness Model. Machines 2022, 10, 1052. [Google Scholar] [CrossRef]
- Wei, P.; Deng, S. Time-varying Mesh Stiffness Calculation and Research on Dynamic Characteristic of Two-stage Helical Gear System based on Potential Energy Method. J. Mech. Transm. 2020, 45, 51–57. [Google Scholar]
- Duan, Y. Dynamic Characteristics and Vibration Analysis of Electric Vehicle Transmission Gear Transmission. Master Thesis, Harbin University of Science and Technology, Harbin, China, 2018. [Google Scholar]
- Wen, J.; Du, J.; Liu, K.; Wang, Z. Analysis of dynamic characteristics of high speed helical gear for ship considering time-varying meshing stiffness. J. Xi'an Univ. Technol. 2019, 35, 80–85. [Google Scholar]
- Bogdevičius, M.; Karpenko, M.; Bogdevičius, P. Determination of rheological model coefficients of pipeline composite material layers based on spectrum analysis and optimization. J. Theor. Appl. Mech. 2021, 59, 265–278. [Google Scholar] [CrossRef]
- Wei, C.; Wu, W.; Hou, X.; Nelias, D.; Yuan, S. Research on flow pattern of low temperature lubrication flow field of rotating disk based on MPS method. Tribol. Int. 2023, 180, 108221. [Google Scholar] [CrossRef]
- Karki, A.; Phuyal, S.; Tuladhar, D.; Basnet, S.; Shrestha, B.P. Status of Pure Electric Vehicle Power Train Technology and Future Prospects. Appl. Syst. Innov. 2020, 3, 35. [Google Scholar] [CrossRef]
- Zou, Y.; Pang, F.; Fan, Z. Coupling Research on Dynamical Behavior and Elastohydrodynamic Lubrication Property of Helical Gear. J. Mech. Eng. 2019, 55, 109–119. [Google Scholar] [CrossRef]
- Jiang, H.; Liu, F. Dynamic features of three-dimensional helical gears under sliding friction with tooth breakage. Eng. Fail. Anal. 2016, 70, 305–322. [Google Scholar] [CrossRef]
- Jiang, H.; Shao, Y.; Mechefske, C.K.; Chen, X. The influence of mesh misalignment on the dynamic characteristics of helical gears including sliding friction. J. Mech. Sci. Technol. 2015, 29, 4563–4573. [Google Scholar] [CrossRef]
- Liang, X.; Zuo, M.J.; Pandey, M. Analytically evaluating the influence of crack on the mesh stiffness of a planetary gear set. Mech. Mach. Theory 2014, 76, 20. [Google Scholar] [CrossRef]
- Lei, Y.; Hu, B.; Wei, K.; Chen, S. Control Principle of Modern Permanent Magnet Synchronous Motor and MATLAB Simulation; Beihang University Press: Beijing, China, 2016. [Google Scholar]
- Wang, Z.; Zhang, C. Diandong Qiche Dianqudong Lilun Yu Sheji; China Machine Press: Beijing, China, 2012. [Google Scholar]
- Xu, H.; Kahraman, A.; Anderson, N.E.; Maddock, D.G. Prediction of mechanical efficiency of parallel-axial gear pairs. Trans. ASME 2007, 129, 58–68. [Google Scholar] [CrossRef]
- Wang, H. Dynamic Analysis of the Double Helical Planetary Gear Trains considering Tooth Friction. Master’s Thesis, Nanjing University of Aeronautics and Astronautics, Nanjing, China, 2015. [Google Scholar]
- Luo, W.; Qiao, B.; Shen, Z.; Yang, Z.; Cao, H.; Chen, X. Influence of Sliding Friction on the Dynamic Characteristics of a Planetary Gear Set With the Improved Time-Varying Mesh Stiffness. J. Mech. Des. 2020, 142, 73301–73302. [Google Scholar] [CrossRef]
- Pu, L.; Chen, G.; Wu, L. Jixie Shji; High Education Press: Beijing, China, 2018. [Google Scholar]
- Xu, X.; Jiang, G.; Wang, H.; Liang, X. Investigation on dynamic characteristics of herringbone planetarygear system considering tooth surface friction. Meccanica 2022, 57, 1677–1699. [Google Scholar] [CrossRef]
Disclaimer/Publisher’s Note: The statements, opinions and data contained in all publications are solely those of the individual author(s) and contributor(s) and not of MDPI and/or the editor(s). MDPI and/or the editor(s) disclaim responsibility for any injury to people or property resulting from any ideas, methods, instructions or products referred to in the content. |
© 2023 by the authors. Licensee MDPI, Basel, Switzerland. This article is an open access article distributed under the terms and conditions of the Creative Commons Attribution (CC BY) license (https://creativecommons.org/licenses/by/4.0/).

