A Novel Classification Method for Pores in Laser Powder Bed Fusion
Abstract
:1. Introduction
- To develop a pore classification method using computed tomography (CT) to classify the pores according to their morphology and location;
- To identify killer pores as the origin of component failure;
- To clarify the influence of pore shape, size, and location on crack initiation.
Pore Types in AlSi10Mg Components Using Laser Powder Bed Fusion
2. Methods
2.1. Details of Manufacturing Process and X-ray Scan
2.2. Classification Method Using X-ray Data
2.3. Crack Initiation at Stress Concentration Sites
2.4. Finite Element Analysis
3. Results and Discussion
3.1. Influence of Pore Shape on Stress Concentration
3.2. Influence of Pore Size and Location on Stress Concentration
4. Conclusions
Author Contributions
Funding
Data Availability Statement
Acknowledgments
Conflicts of Interest
References
- Du Plessis, A.; Yadroitsava, I.; le Roux, S.; Yadroitsev, I.; Fieres, J.; Reinhart, C.; Rossouw, P. Prediction of mechanical performance of Ti6Al4V cast alloy based on microCT-based load simulation. J. Alloy. Compd. 2017, 724, 267–274. [Google Scholar] [CrossRef]
- Tang, M.; Pistorius, P.C. Oxides, porosity and fatigue performance of AlSi10Mg parts produced by selective laser melting. Int. J. Fatigue 2017, 94, 192–201. [Google Scholar] [CrossRef]
- Weingarten, C.; Buchbinder, D.; Pirch, N.; Meiners, W.; Wissenbach, K.; Poprawe, R. Formation and reduction of hydrogen porosity during selective laser melting of AlSi10Mg. J. Mater. Process. Technol. 2015, 221, 112–120. [Google Scholar] [CrossRef]
- Aboulkhair, N.T.; Everitt, N.; Ashcroft, I.; Tuck, C. Reducing porosity in AlSi10Mg parts processed by selective laser melting. Addit. Manuf. 2014, 1–4, 77–86. [Google Scholar] [CrossRef]
- King, W.E.; Barth, H.D.; Castillo, V.M.; Gallegos, G.F.; Gibbs, J.; Hahn, D.E.; Kamath, C.; Rubenchik, A.M. Observation of keyhole-mode laser melting in laser powder-bed fusion additive manufacturing. J. Mater. Process. Technol. 2014, 214, 2915–2925. [Google Scholar] [CrossRef]
- Haeckel, F.; Meixlsperger, M.; Burkert, T. Technological challenges for automotive series production in laser beam melting. In Proceedings of the 28th Annual International Solid Freeform Fabrication Symposium, Austin, TX, USA, 7–9 August 2017. [Google Scholar]
- Louvis, E.; Fox, P.; Sutcliffe, C.J. Selective laser melting of aluminium components. J. Mater. Process. Technol. 2011, 211, 275–284. [Google Scholar] [CrossRef]
- Livings, R.A.; Biedermann, E.J.; Wang, C.; Chung, T.; James, S.; Waller, J.M.; Volk, S.; Krishnan, A.; Collins, S. Nondestructive Evaluation of Additive Manufactured Parts Using Process Compensated Resonance Testing. Struct. Integr. Addit. Manuf. Parts 2020, 165–205. [Google Scholar] [CrossRef]
- Du Plessis, A.; Yadroitsava, I.; Yadroitsev, I. Effects of defects on mechanical properties in metal additive manufacturing: A review focusing on X-ray tomography insights. Mater. Des. 2020, 187, 108385. [Google Scholar] [CrossRef]
- Romano, S.; Abel, A.; Gumpinger, J.; Brandão, A.; Beretta, S. Quality control of AlSi10Mg produced by SLM: Metallography versus CT scans for critical defect size assessment. Addit. Manuf. 2019, 28, 394–405. [Google Scholar] [CrossRef]
- Cai, X.; Malcolm, A.A.; Wong, B.S.; Fan, Z. Measurement and characterization of porosity in aluminium selective laser melting parts using X-ray CT. Virtual Phys. Prototyp. 2015, 10, 195–206. [Google Scholar] [CrossRef]
- Taute, C.; Möller, H.; du Plessis, A.; Tshibalanganda, M.; Leary, M. Characterization of additively manufacturing AlSi10Mg cubes with different porosities. J. South. Afr. Inst. Min. Metall. 2021, 121, 143–150. [Google Scholar] [CrossRef]
- Maskery, I.; Aboulkhair, N.T.; Corfield, M.R.; Tuck, C.; Clare, A.T.; Leach, R.K.; Wildman, R.D.; Ashcroft, I.A.; Hague, R.J. Quantification and characterisation of porosity in selectively laser melted Al–Si10–Mg using X-ray computed tomography. Mater. Charact. 2016, 111, 193–204. [Google Scholar] [CrossRef] [Green Version]
- Hastie, J.C.; Kartal, M.E.; Carter, L.N.; Attallah, M.M.; Mulvihill, D.M. Classifying shape of internal pores within AlSi10Mg alloy manufactured by laser powder bed fusion using 3D X-ray micro computed tomography: Influence of processing parameters and heat treatment. Mater. Charact. 2020, 163, 110225. [Google Scholar] [CrossRef]
- Snell, R.; Tammas-Williams, S.; Chechik, L.; Lyle, A.; Hernández-Nava, E.; Boig, C.; Panoutsos, G.; Todd, I. Methods for Rapid Pore Classification in Metal Additive Manufacturing. JOM 2019, 72, 101–109. [Google Scholar] [CrossRef] [Green Version]
- Siddique, S.; Imran, M.; Rauer, M.; Kaloudis, M.; Wycisk, E.; Emmelmann, C.; Walther, F. Computed tomography for characterization of fatigue performance of selective laser melted parts. Mater. Des. 2015, 83, 661–669. [Google Scholar] [CrossRef]
- Romano, S.; Brückner-Foit, A.; Brandão, A.; Gumpinger, J.; Ghidini, T.; Beretta, S. Fatigue properties of AlSi10Mg obtained by additive manufacturing: Defect-based modelling and prediction of fatigue strength. Eng. Fract. Mech. 2018, 187, 165–189. [Google Scholar] [CrossRef]
- Yadollahi, A.; Mahtabi, M.; Khalili, A.; Doude, H.; Newman, J. Fatigue life prediction of additively manufactured material: Effects of surface roughness, defect size, and shape. Fatigue Fract. Eng. Mater. Struct. 2018, 41, 1602–1614. [Google Scholar] [CrossRef]
- Murakami, Y. Metal Fatigue: Effects of Small Defects and Nonmetallic Inclusions; Elsevier: Amsterdam, The Netherlands, 2002. [Google Scholar]
- Murakami, Y. Material defects as the basis of fatigue design. Int. J. Fatigue 2012, 41, 2–10. [Google Scholar] [CrossRef]
- Sert, E.; Schuch, E.; Öchsner, A.; Hitzler, L.; Werner, E.; Merkel, M. Tensile strength performance with determination of the Poisson‘s ratio of additively manufactured AlSi10Mg samples. Mater. Werkst. 2019, 50, 539–545. [Google Scholar] [CrossRef]




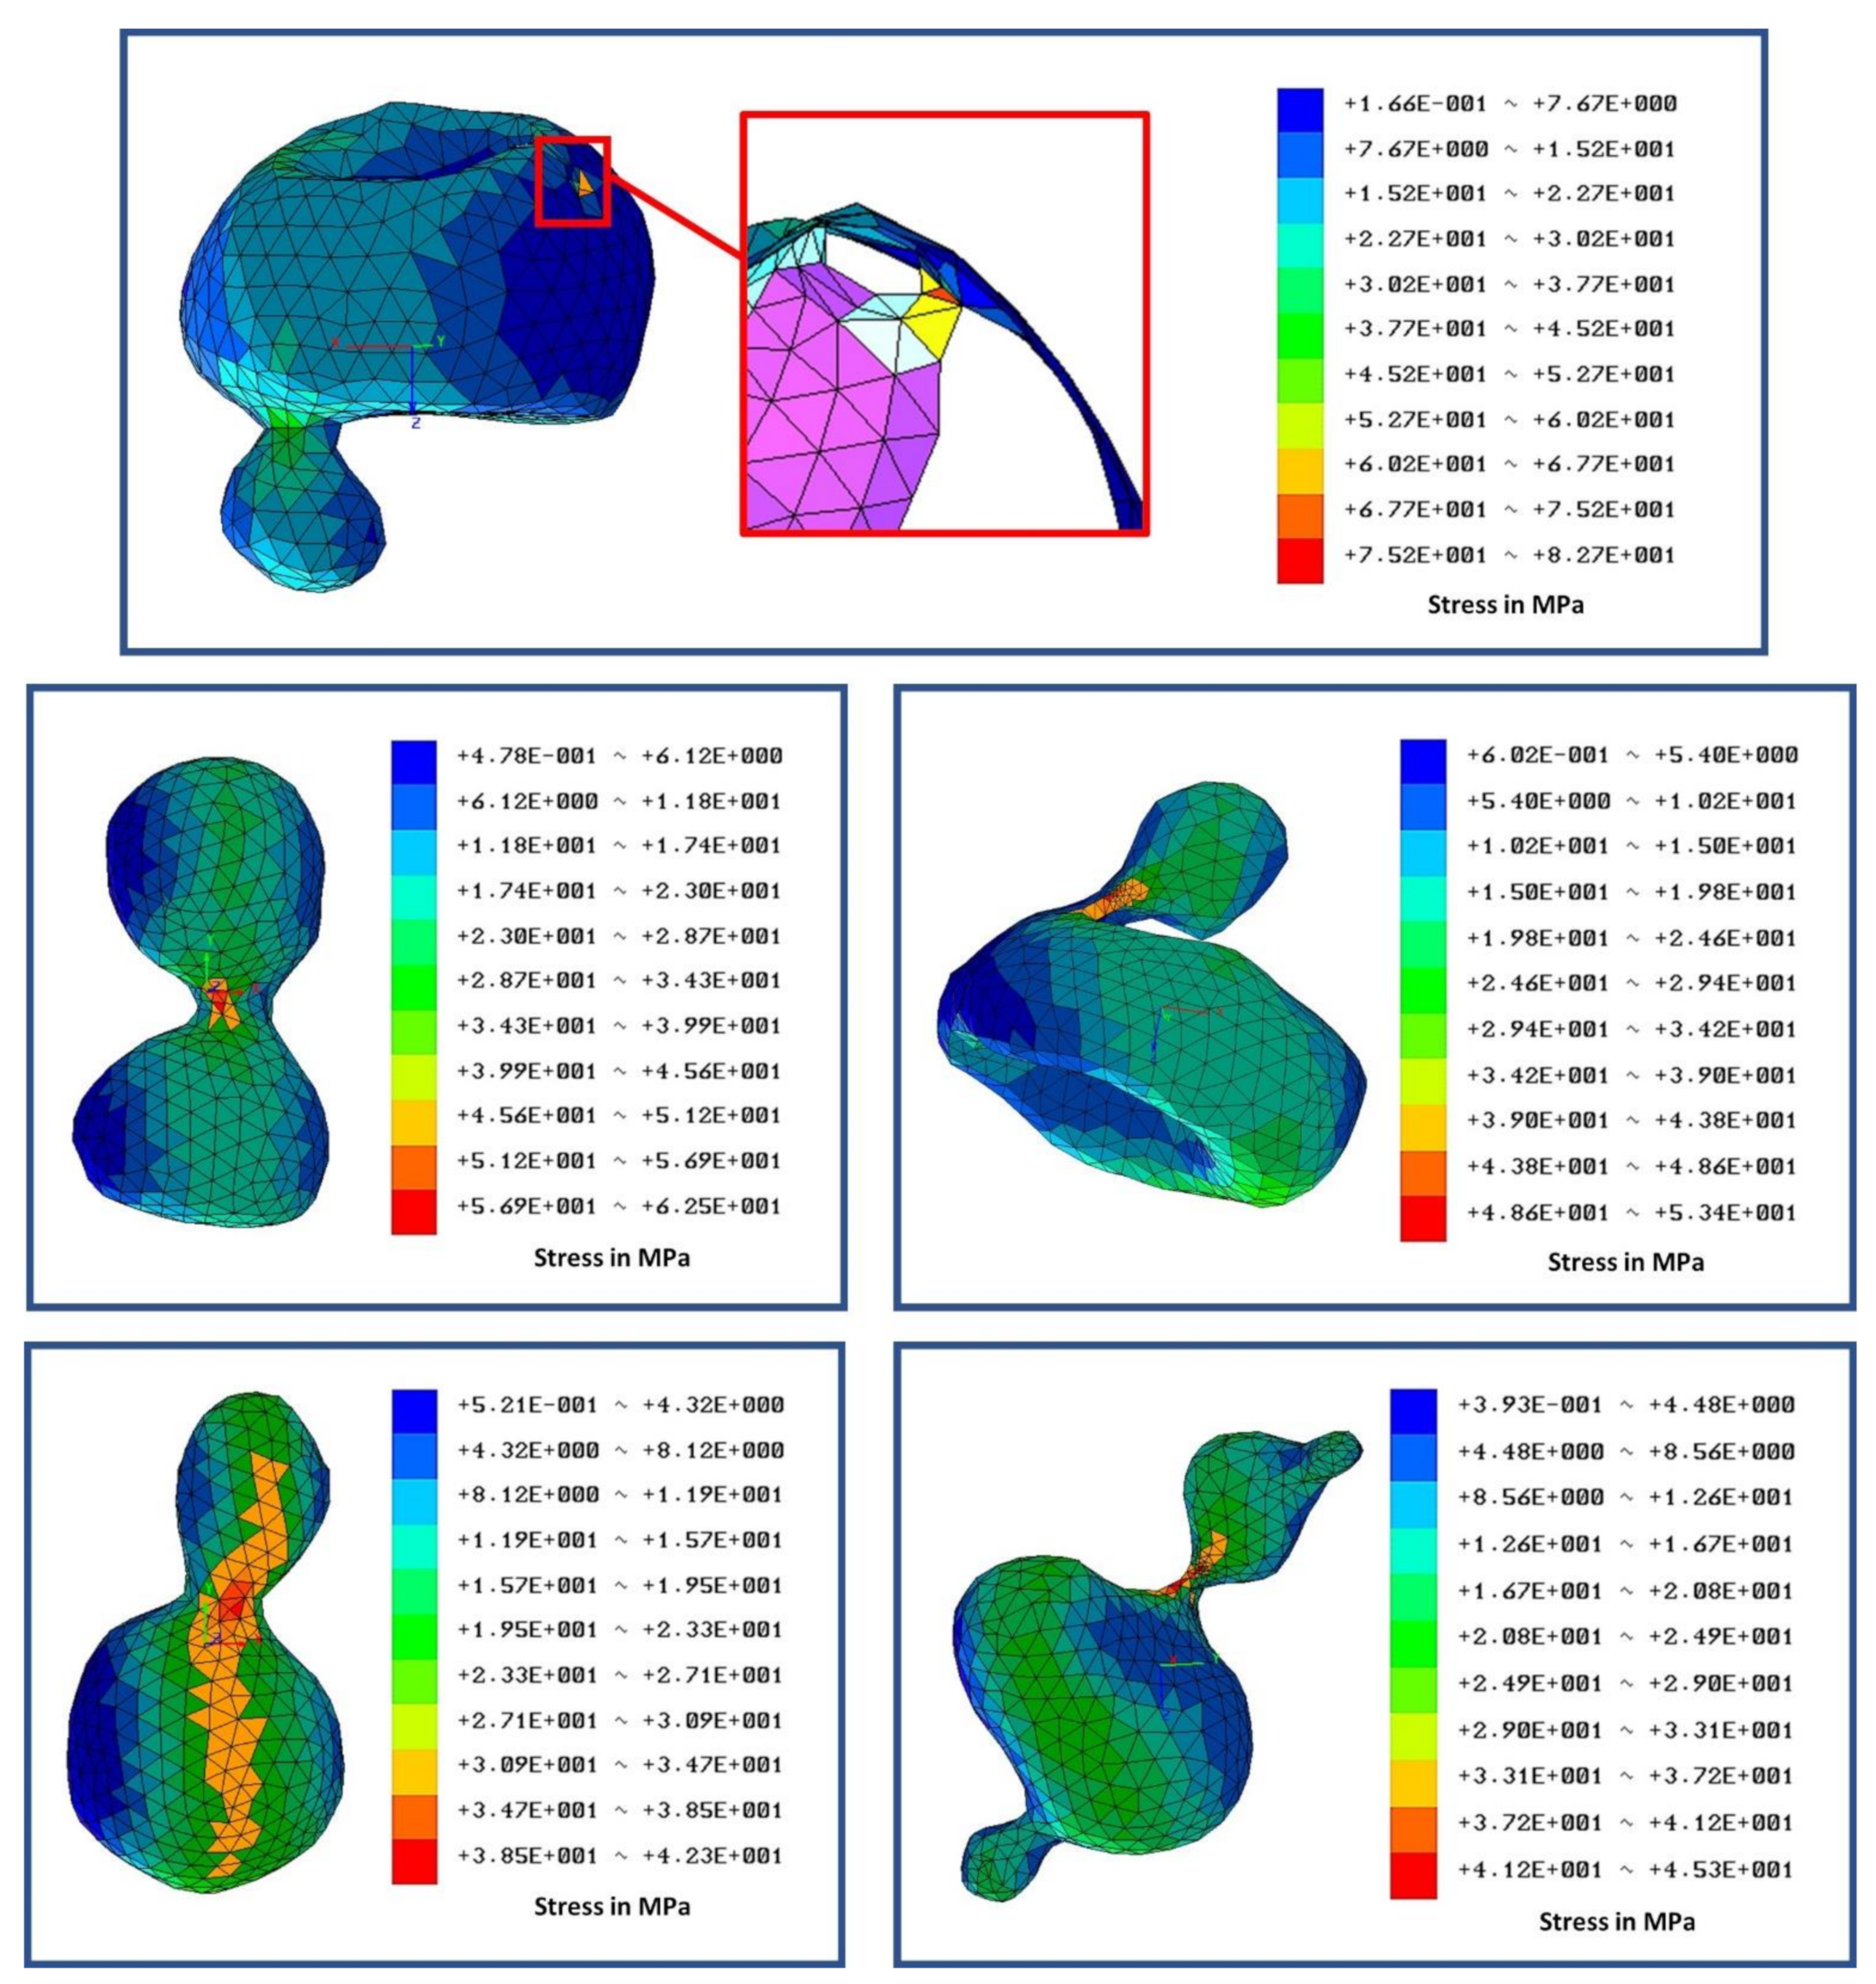
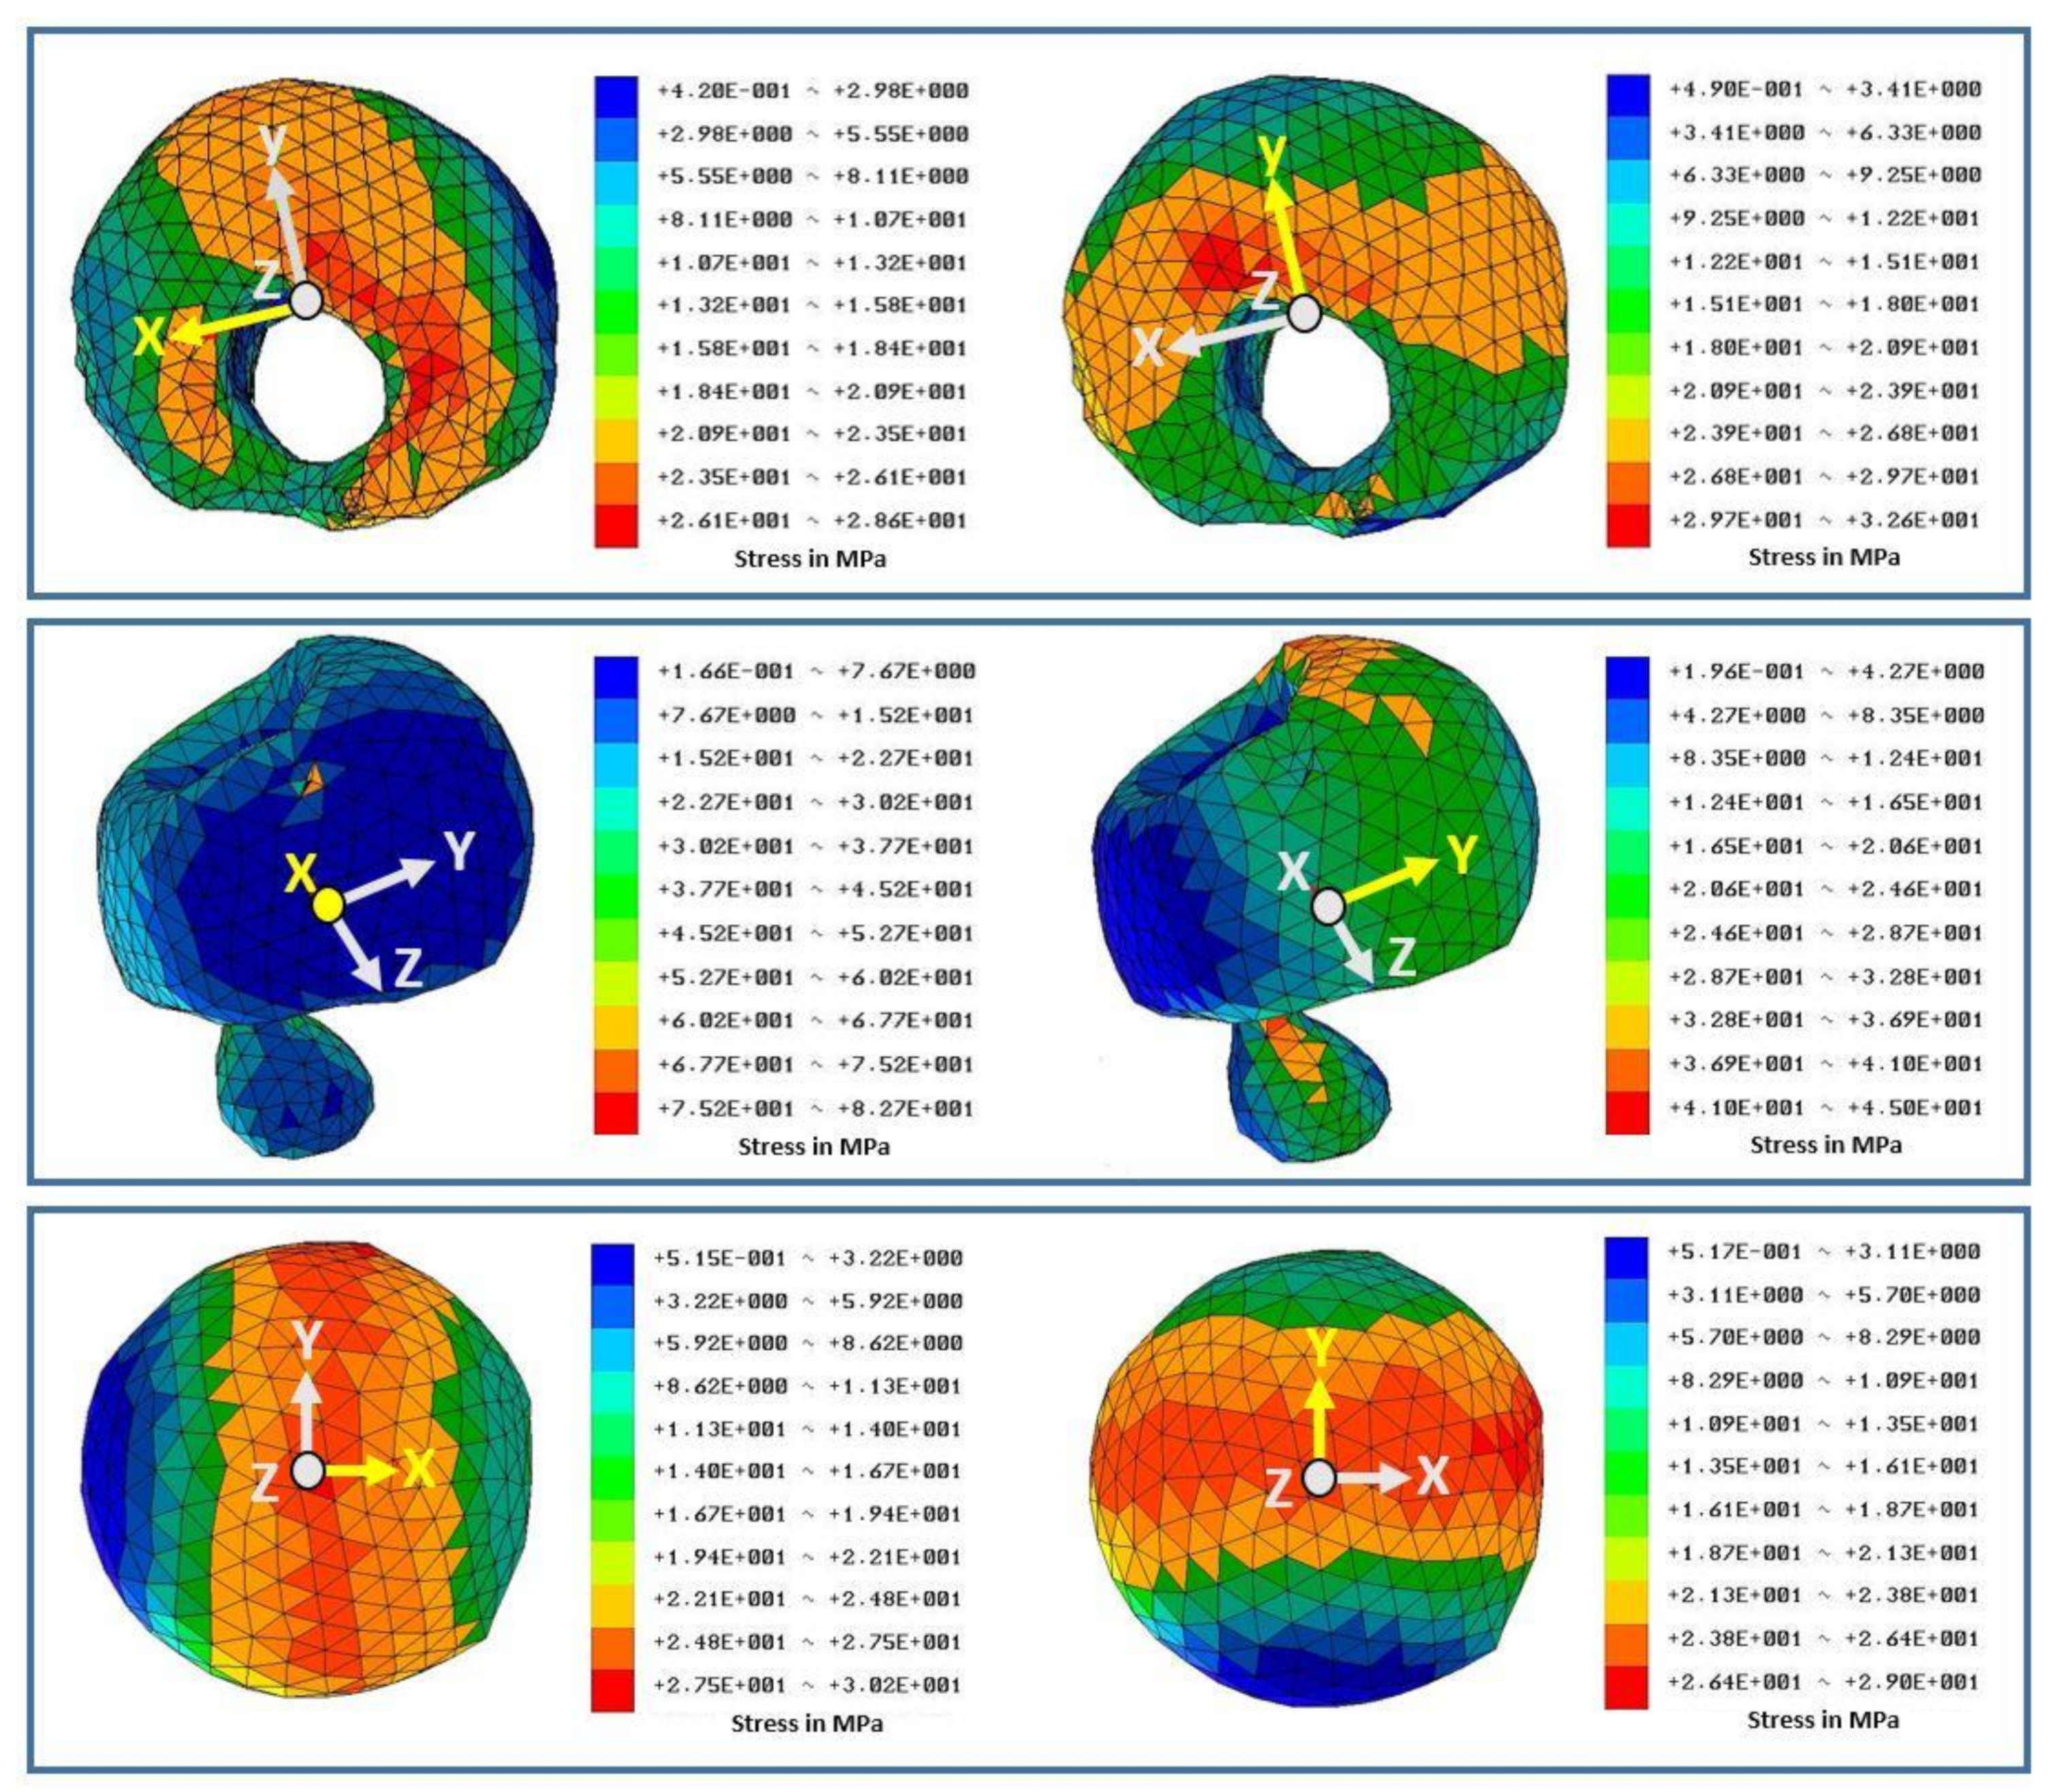
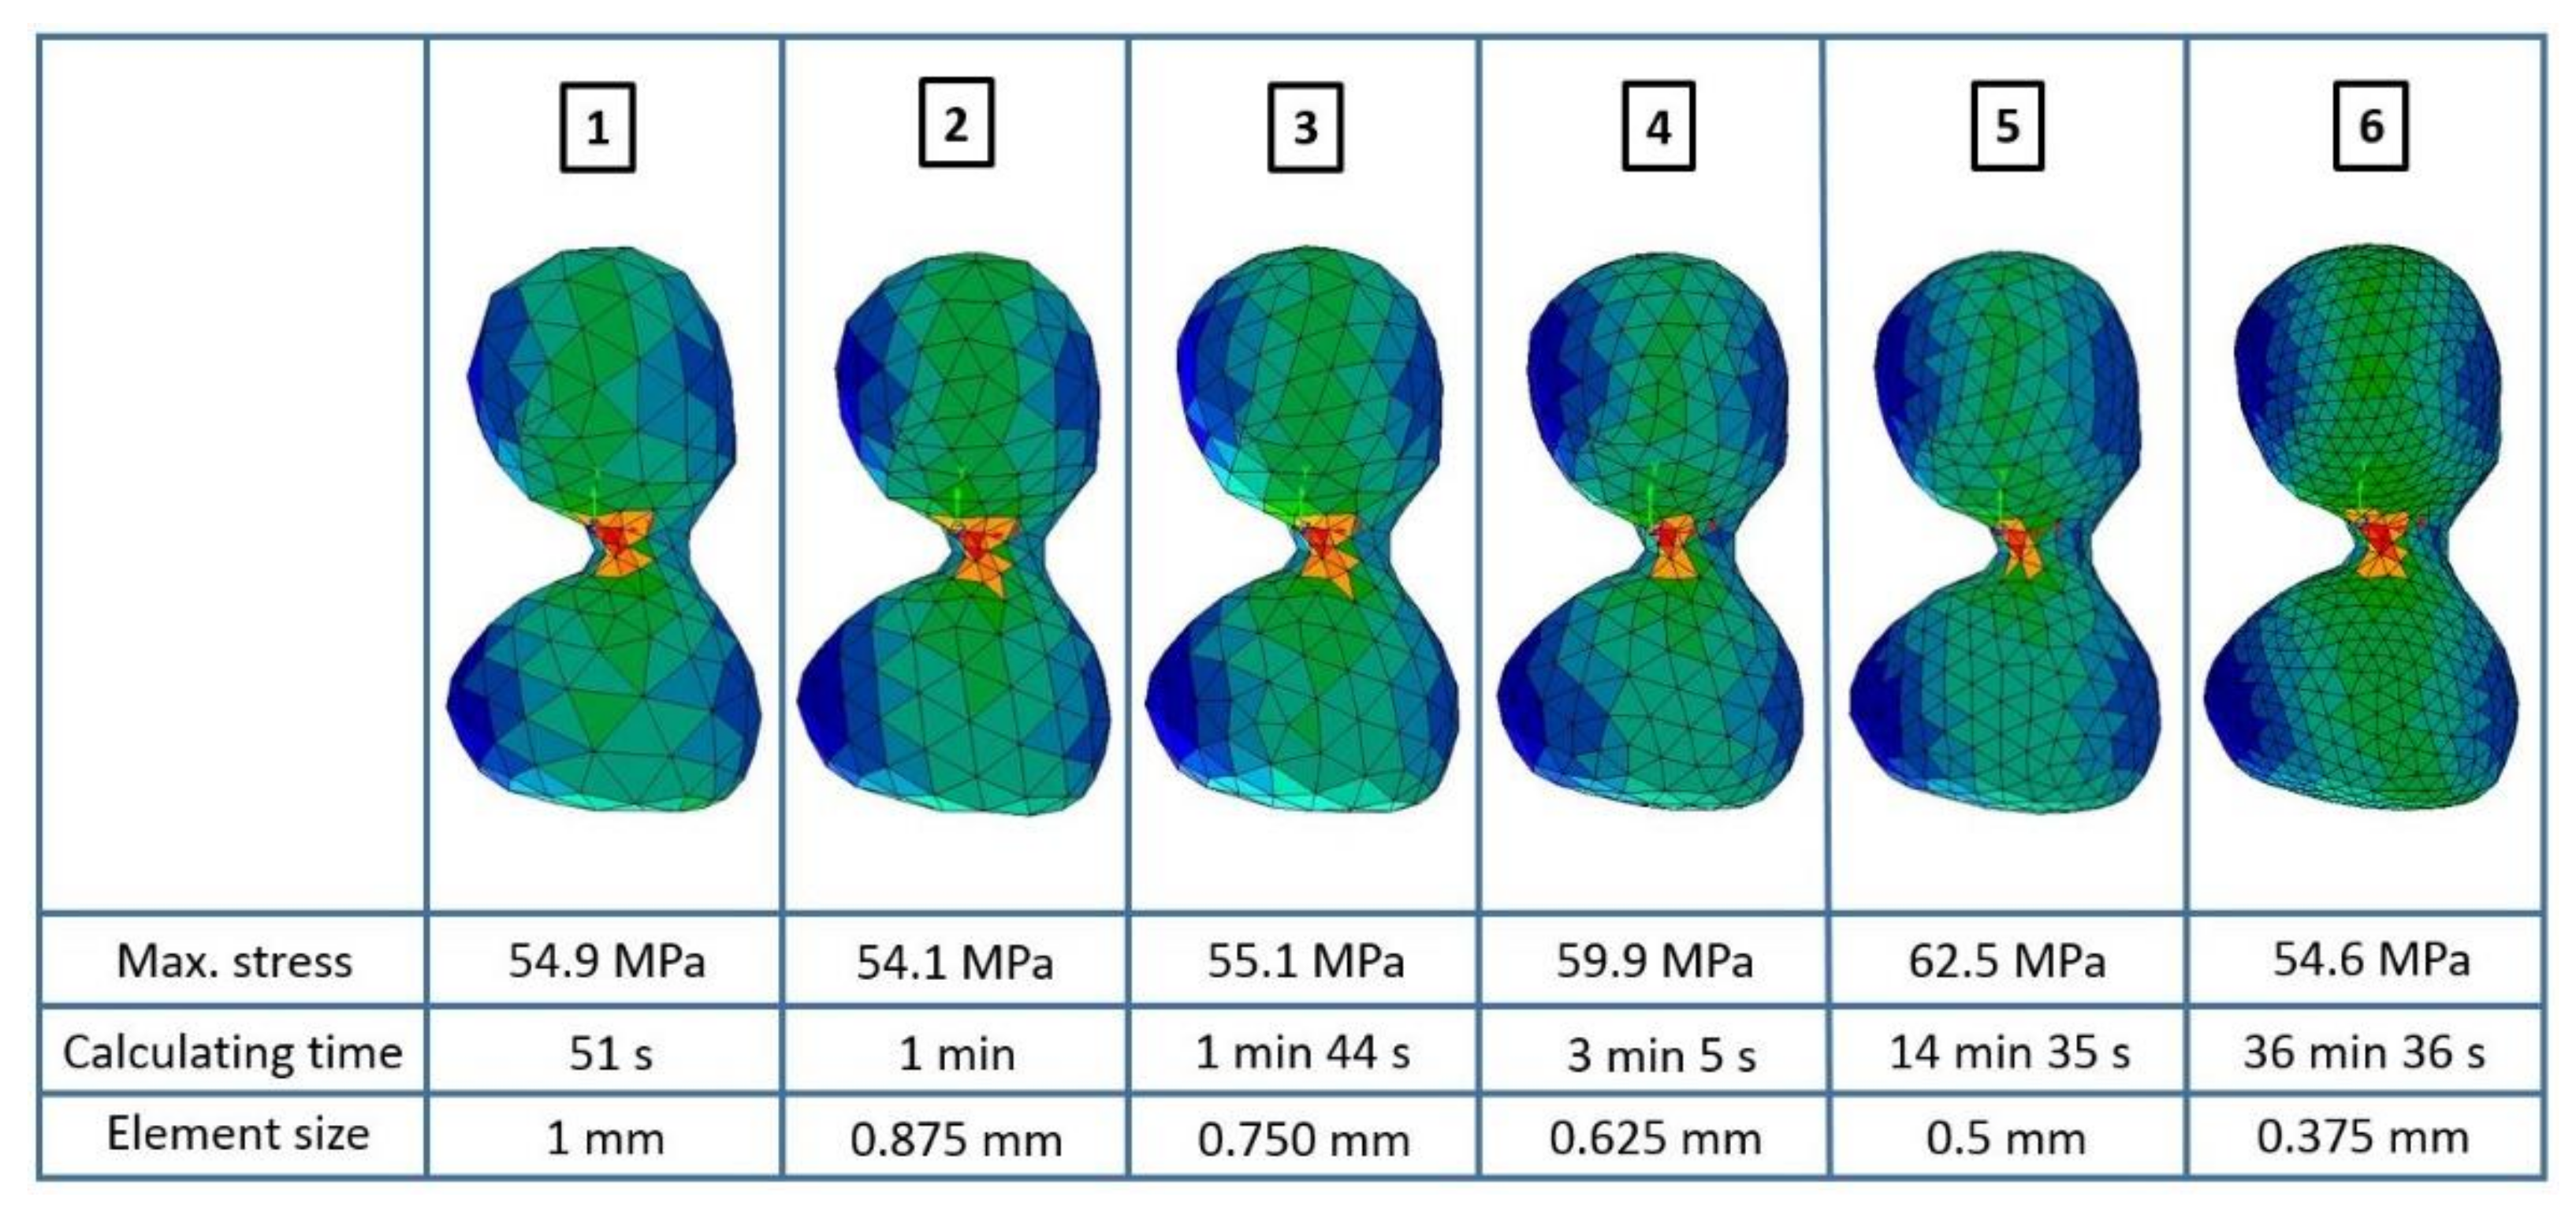
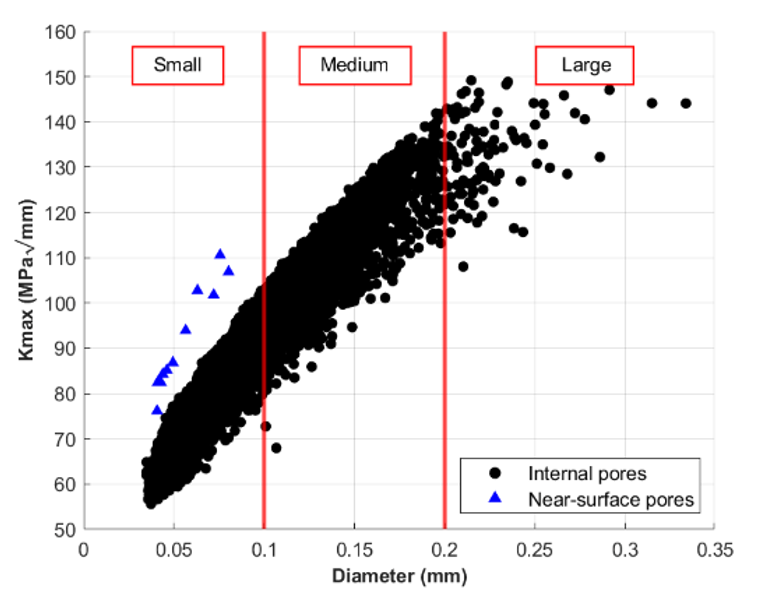
| Parameter | Value |
|---|---|
| Laser power | 350 W |
| Laser scanning speed | 1000 mm/s |
| Hatch spacing | 0.17 mm |
| Spot size diameter | 0.08 mm |
| Layer thickness | 50 µm |
| Pore Class | Diameter | Compactness | Sphericity | BB-Factor | Location | |
|---|---|---|---|---|---|---|
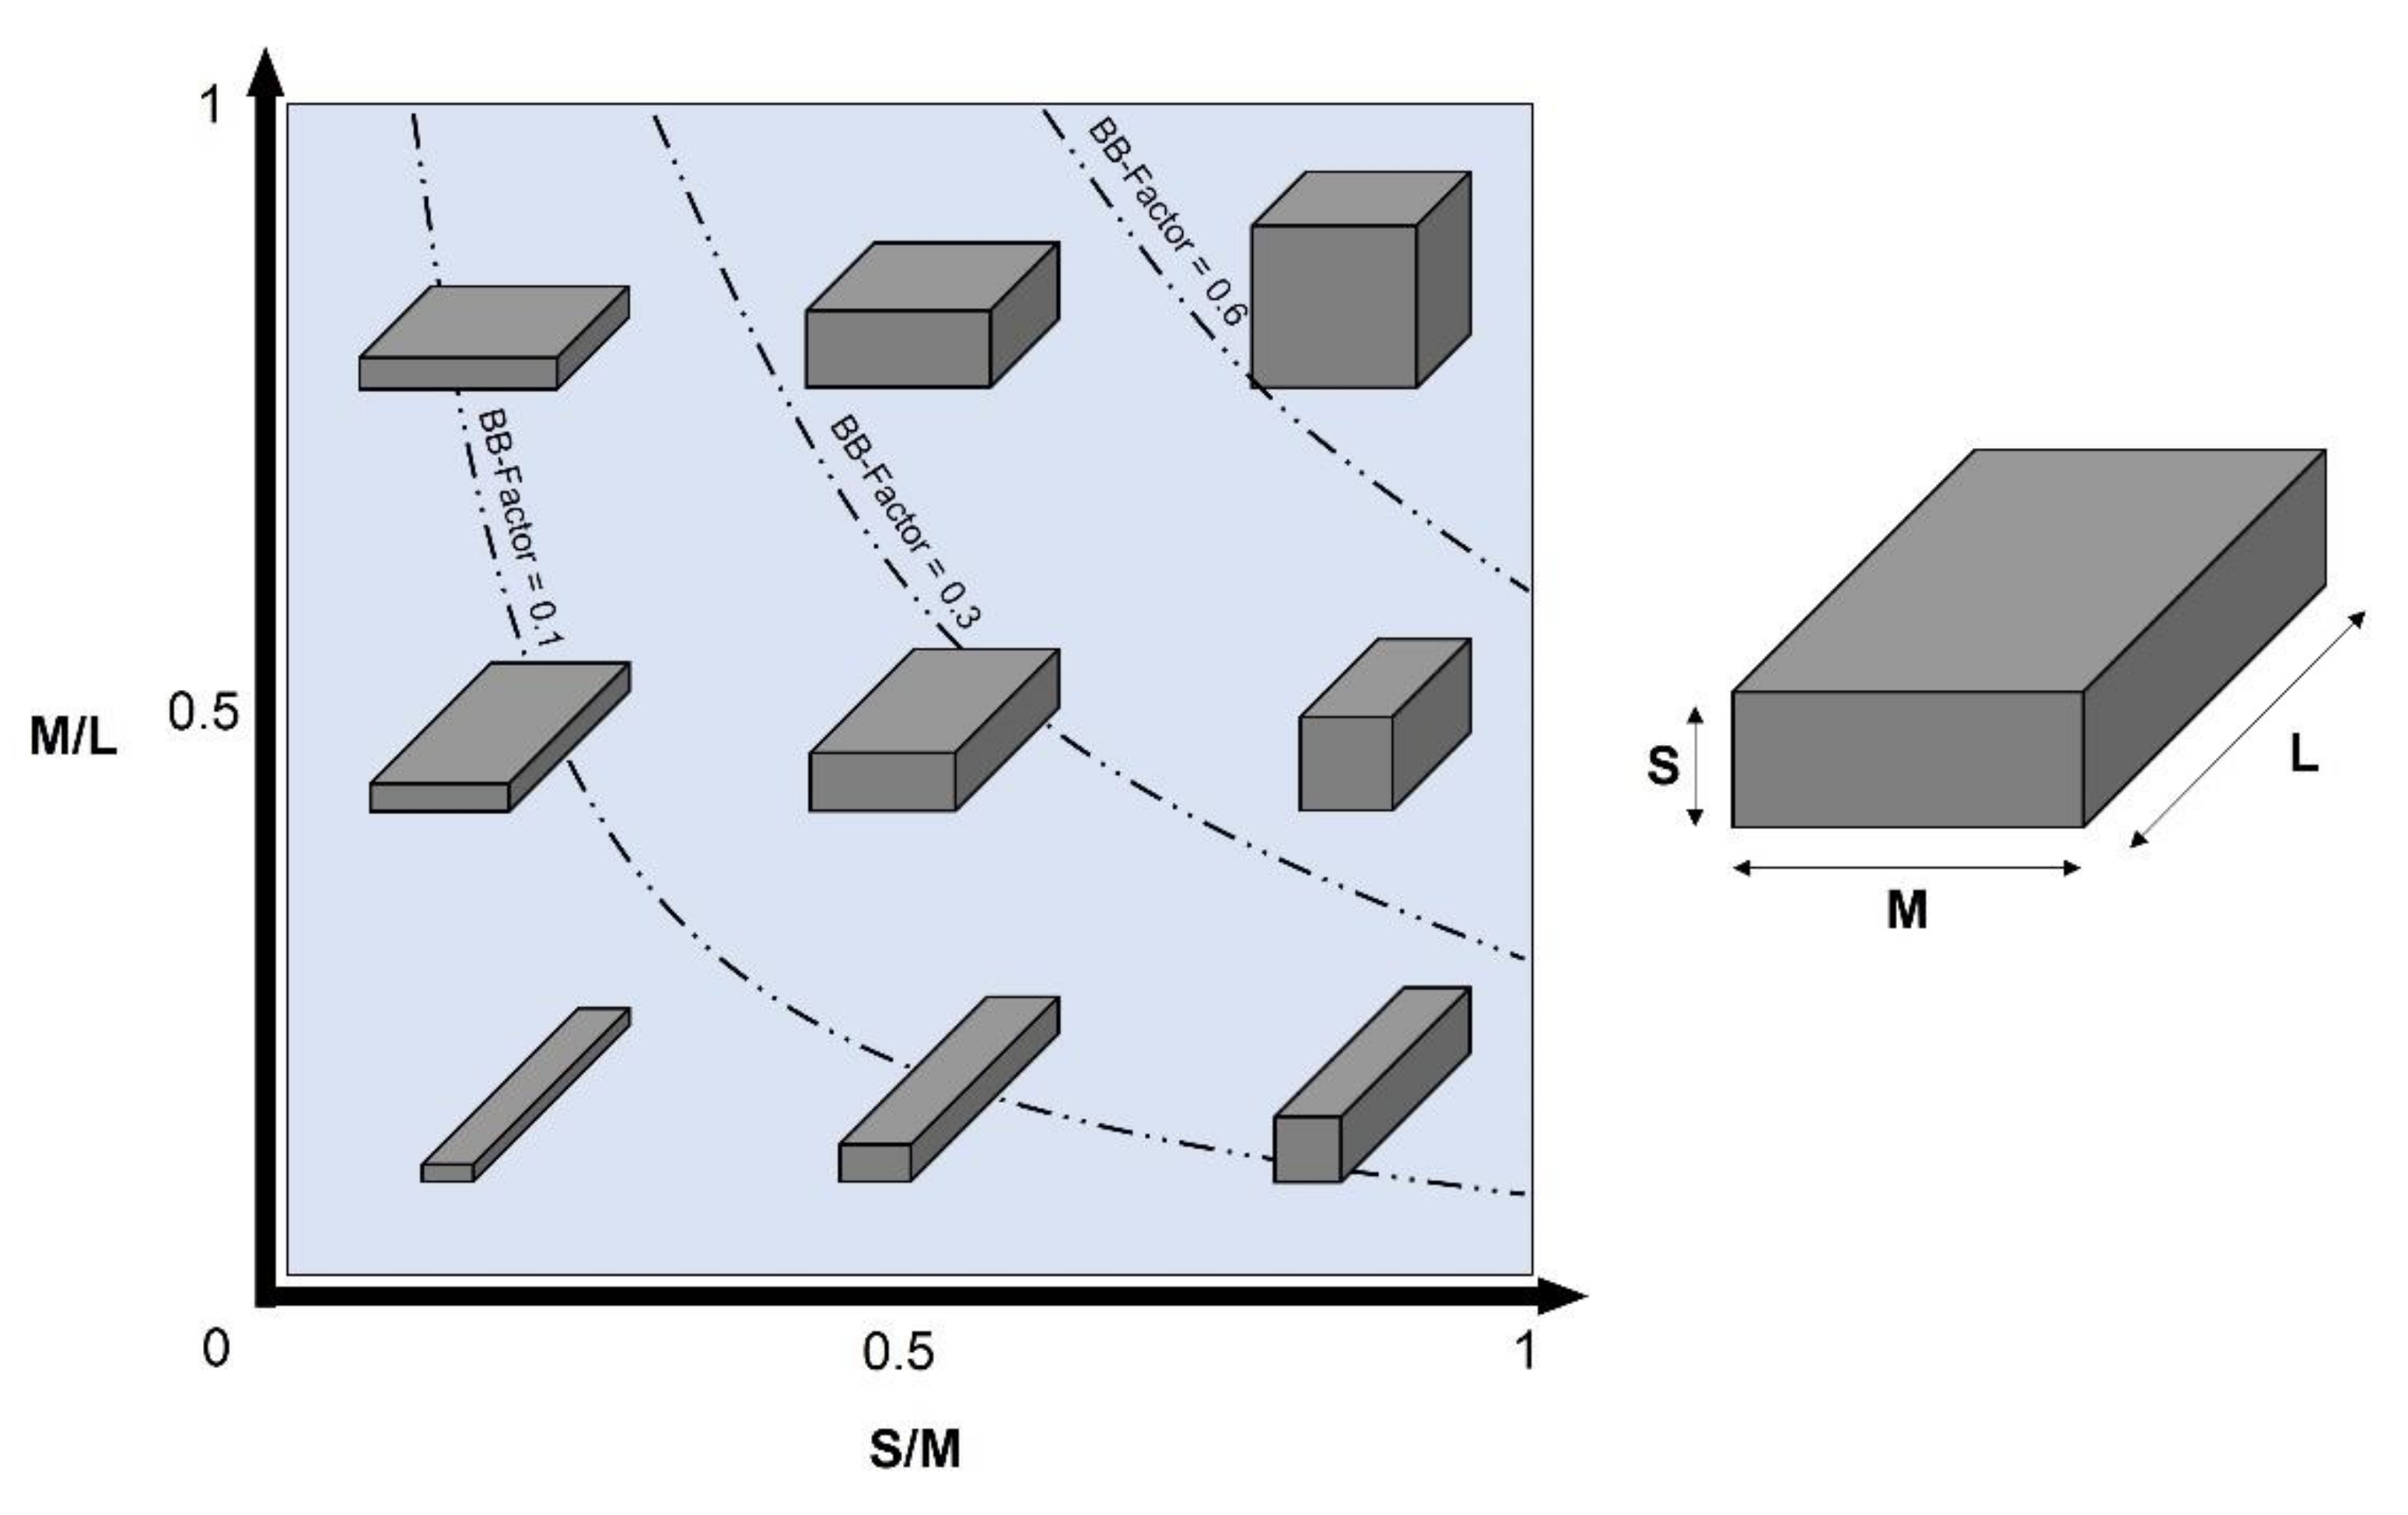
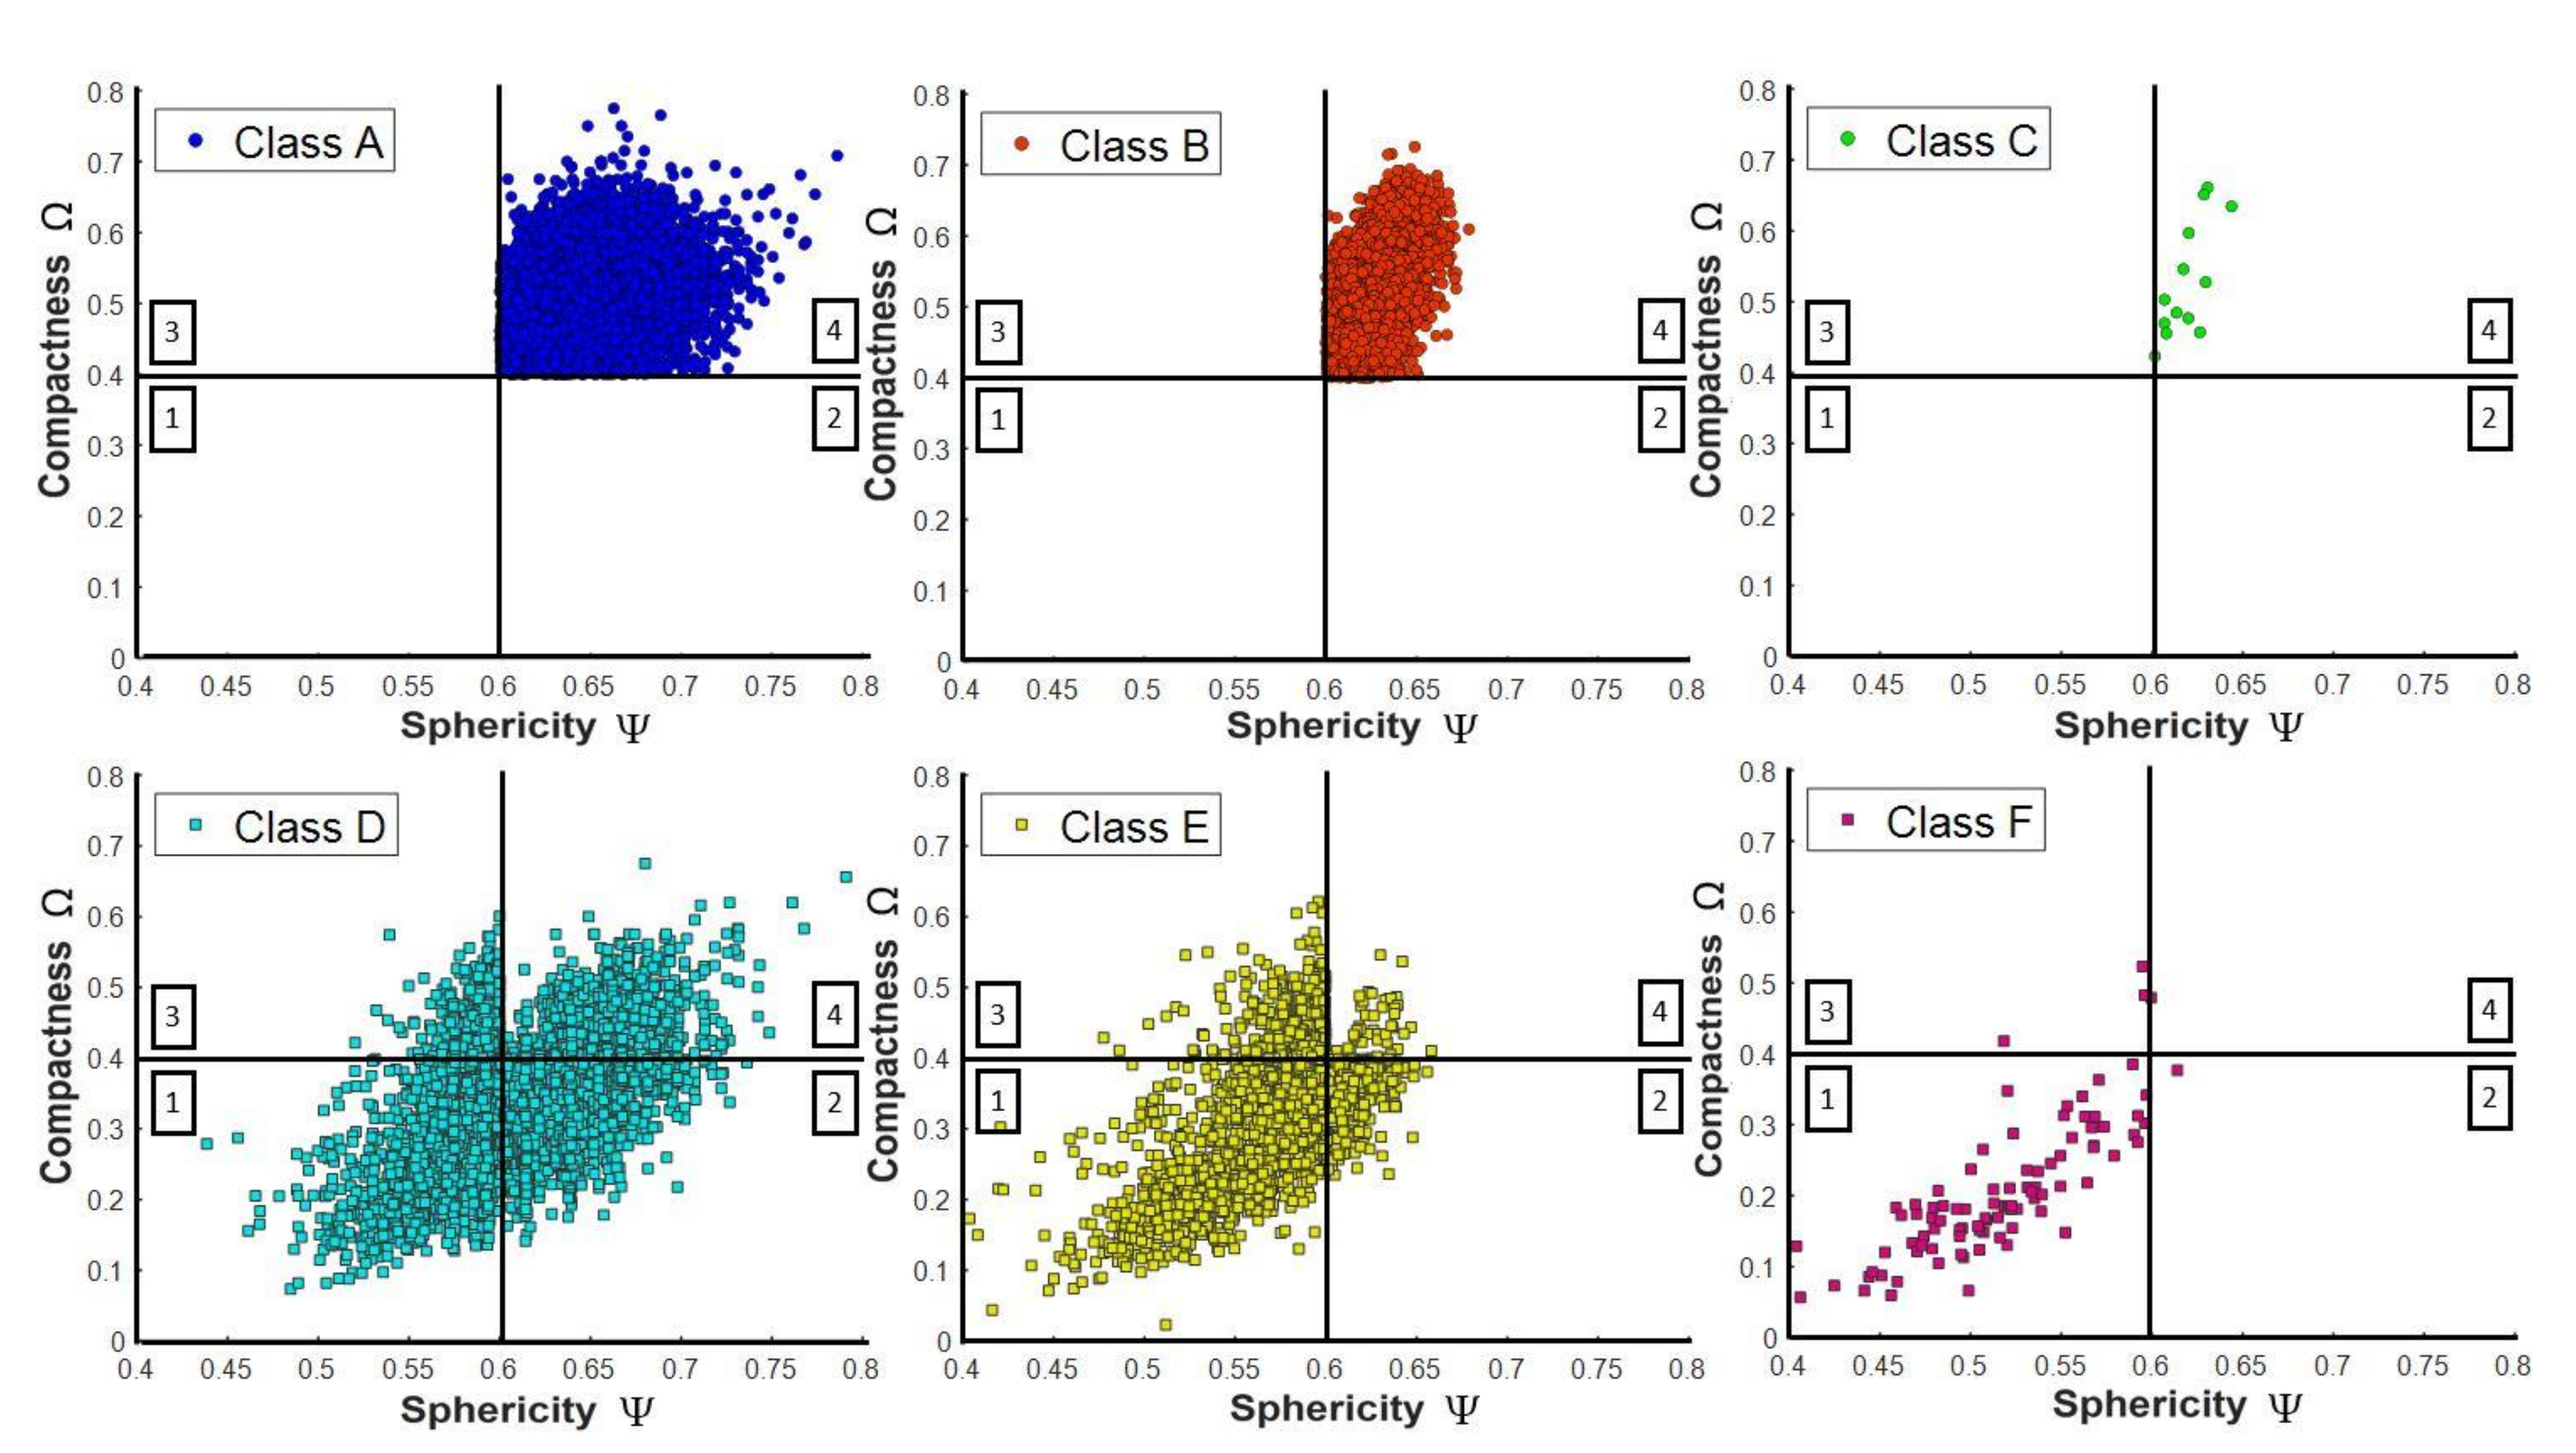
| Spherical | A | Dpore ≤ 100 µm | Ω ≥ 0.4 | Ψ ≥ 0.6 | BBF ≥ 0.6 | Internal pore “1” (a/h < 0.8) Near-surface pore “2” (a/h > 0.8) |
| B | 100 µm < Dpore ≤ 200 µm | |||||
| C | Dpore > 200 µm | |||||
| Irregular-shaped | D | Dpore ≤ 100 µm | Ω < 0.4 | Ψ < 0.6 | BBF = [0, 1] | |
| E | 100 µm < Dpore ≤ 200 µm | |||||
| F | Dpore > 200 µm | |||||
Publisher’s Note: MDPI stays neutral with regard to jurisdictional claims in published maps and institutional affiliations. |
© 2021 by the authors. Licensee MDPI, Basel, Switzerland. This article is an open access article distributed under the terms and conditions of the Creative Commons Attribution (CC BY) license (https://creativecommons.org/licenses/by/4.0/).
Share and Cite
Nudelis, N.; Mayr, P. A Novel Classification Method for Pores in Laser Powder Bed Fusion. Metals 2021, 11, 1912. https://doi.org/10.3390/met11121912
Nudelis N, Mayr P. A Novel Classification Method for Pores in Laser Powder Bed Fusion. Metals. 2021; 11(12):1912. https://doi.org/10.3390/met11121912
Chicago/Turabian StyleNudelis, Natan, and Peter Mayr. 2021. "A Novel Classification Method for Pores in Laser Powder Bed Fusion" Metals 11, no. 12: 1912. https://doi.org/10.3390/met11121912
APA StyleNudelis, N., & Mayr, P. (2021). A Novel Classification Method for Pores in Laser Powder Bed Fusion. Metals, 11(12), 1912. https://doi.org/10.3390/met11121912


