Article

Accelerated Spheroidization of Cementite in Sintered Ultrahigh Carbon Steel by Warm Deformation

1
Faculty of Metals Engineering and Industrial Computer Science, AGH University of Science and Technology, Av. Mickiewicza 30, 30-059 Kraków, Poland
2
Institut für Metallformung, Technische Universität Bergakademie Freiberg, Bernhard-Von-Cotta Str. 4, 09-599 Freiberg, Germany
*
Author to whom correspondence should be addressed.
Metals 2021, 11(2), 328; https://doi.org/10.3390/met11020328
Submission received: 22 December 2020 / Revised: 3 February 2021 / Accepted: 10 February 2021 / Published: 13 February 2021
(This article belongs to the Special Issue Advances in Powder Metallurgy)

Abstract

:
Evolution of microstructure and hardness in quenched ultrahigh carbon steel Fe-0.85Mo-0.6Si-1.4C by warm compression on a Bähr plastometer-dilatometer at 775 °C and at 0.001 to 1 s−1 strain rate range is reported. The material was prepared via powder metallurgy: cold pressing and liquid phase sintering. Independent of strain rate, the initial martenstic microstructure was transformed to ferrite and spheroidized cementite. Strain rate had an effect on size and shape of spheroidized Fe3C precipitates: the higher the strain rate, the smaller the precipitates. Morphology of the spheroidized carbides influenced hardness, with the highest hardness, 362 HV10, for strain rate 1 s−1 and the lowest, 295 HV10, for the lowest strain rate 0.001 s−1. Resultant microstructure and ambient temperature mechanical properties were comparable to those of the material that had undergone a fully spheroidizing treatment with increased time and energy consumption, indicating that it can be dispensed with in industrial processing. All our results are consistent with the Hall–Petch relation developed for spheroidized steels.

1. Introduction

The equilibrium microstructure of ultrahigh carbon steels, i.e., with C in the range of 1.0–2.1%, comprises pearlite and a grain boundary cementite network, which results in low ductility [1]. Plasticity can be achieved, e.g., by spheroidizing annealing at a temperature close to A1 [2]. Methods that increase strength and plasticity and cause grain refinement and spheroidization of cementite include warm working [3,4,5,6,7,8,9], combined hot and warm working [1,10], cold or warm working combined with heat treatment [11], and combined heat treatment [12]. Ultrahigh carbon steels (UHCS) with fine microstructure of ferrite with spheroidized cementite can have high ambient-temperature strength, hardness and ductility, and excellent high-temperature formability, even via superplasticity [1,10,11,12,13,14,15,16,17,18,19,20].
Superplastic forming would be extremely advantageous for powder metallurgy technology, which has the advantage of being a near net shape manufacturing process. Sinter forging, warm forging of powder preforms, is particularly employed to manufacture near fully dense automotive gear parts such as helical pinion gears and connecting rods. Powder metallurgy processing of Fe-0.85Mo-0.65Si-1.4C steel was developed at the University of Bradford [14,15,16]. The specimens were slowly cooled from the sintering temperature, austenitized at 950 °C for 1 h, then quenched into a warm fan assisted oven at ~130 °C, followed by air cooling and refrigeration, then spheroidized at 750 °C and slow cooled to room temperature.
Spheroidizing annealing after warm working of steel promotes faster and enhanced cementite spheroidization. The higher the warm deformation, the higher the degree of spheroidization after annealing. Warm deformation leads also to ferrite grain size refinement after annealing. Grain refinement takes place via a continuous recrystallization process, which is controlled by cementite spheroidization and coarsening [8]. Supersaturation of solid solution and high density of vacancies and dislocations of quenched steel increase the speed of carbon diffusion and accelerate the spheroidizing of cementite. Crystal defects are also sites of cementite nucleation. On the other hand, these defects are constantly generated during warm deformation, providing energy for diffusion and consequently acceleration of cementite coagulation [6,21].
Achieved in spheroidized PM Fe-0.85Mo-0.65Si-1.4C steel were: density ~7.2 g/cm3, grain size ~30 μm, yield strength 410 MPa, and elongation 16% [14]. Searching for conditions for superplastic behavior, two types of experiments were subsequently carried out. In one, the rings were forged on a screw press between flat plates at 700–750 °C. In the second set of experiments, carried out on a Gleeble HDV-40 machine at Technische Universität Bergakademie Freiberg, discs were compressed at strain rates of 10−3, 10−2, 10−1, and 1 s−1 to ~1.15 natural strain [22,23,24]. Superplastic behavior was not observed. Grain size decreased to ~7 μm, and yield strength increased to 740 Mpa.
An alternative way of warm working the steel is in a quenched state. The critical strain needed for transformation of microstructure via dynamic recrystallization is smaller for the initial martensite microstructure than for initial pearlite microstructure, which is associated with a high density of dislocations after quenching [8,21,23]. Investigation of warm deformation of quenched Fe-0.85Mo-0.65Si-1.4C, including the search for superplastic behavior, is the subject of this communication.

2. Materials and Methods

Procedures of processing powder metallurgy Fe-0.85Mo-0.65Si-1.4C steel are described in detail in Refs. [14,15,16]. Mix of powders Hogänas Astaloy 85Mo, graphite, and silicon carbide were compacted at 600 Mpa. Liquid phase sintering was carried out at 1295 °C to produce cylindrical specimens of h ~ 11 mm and diameter d ~ 18 mm and density above 7.4 g/cm3. Heat treatment comprised austenitizing at 970 °C and quenching by a stream of hot air at ~130 °C. The heat treatment diagram and microstructure of martensite and retained austenite after quenching are presented in Figure 1.
The quenched specimens were Electrical Discharge Machining (EDM) machined to cylinders of height h ~ 11 mm and diameter d 7 mm for thermo-mechanical compression on a Bähr MDS 830 plastometer-dilatometer at strain rates of 0.001, 0.01, 0.1, and 1 s−1 at 775 °C. This temperature corresponds to the austenitization end temperature. Changes in diameter were measured with a laser dilatometer and are presented as a function of temperature in Figure 2.
The measurement of the strain rate sensitivity (SRS) m-value relevant to conditions of superplasticity [25] was calculated by:
m = σ ε ˙ ln σ 1 σ 2 ln ε ˙ 1 ε ˙ 2
where σ 1 and σ 2 stresses at strain rate ε ˙ 1 and ε ˙ 2 , respectively.
As a result of testing, the density of specimens was increased to above 7.75 g/cm3. Specimens, deformed to total strain ε ~ 0.85, were cut in halves and on their cross-sections microstructure and hardness investigations were carried out. For these, a Leica DM4000M light microscope and Hitachi-3500N scanning electron microscope were used. Metallographic specimens were etched by 4% Picral. Investigations of microstructural parameters were carried out using ImageJ program. Generally, 5 areas from individual microstructures of 5 μm × 5 μm were selected for the analysis, and for ε ˙ = 0.001 s−1, due to the much larger precipitates, a larger area 10 μm × 10 μm was analyzed.
Additionally, halves of specimens were fractured by bending to investigate fractography using a Hitachi-3500N microscope.
Vickers hardness testing was on a Zwick tester on randomly selected parts of the cross-section with the indenter load 98.1 N.

3. Results

3.1. Stress-Strain Relationships

Stress-strain curves, Figure 3a, indicate that the flow stress increases significantly with increasing strain rate. It also affects the peak strain εp corresponding to the maximum stress σp; the higher the strain rate, the greater the strain at peak stress. The subsequent decrease in stress is associated with dynamic recrystallization (DRX). Critical strain above which the dynamic recrystallization process began, εr, was determined on the basis of Refs. [26,27]. Relations of strain rate to peak and critical strains are shown in Figure 3b. The critical strain during deformation of UHCS with high density of dislocations accumulated inside the martensite was significantly smaller than for the as-sintered state [23].

3.2. Microstructure

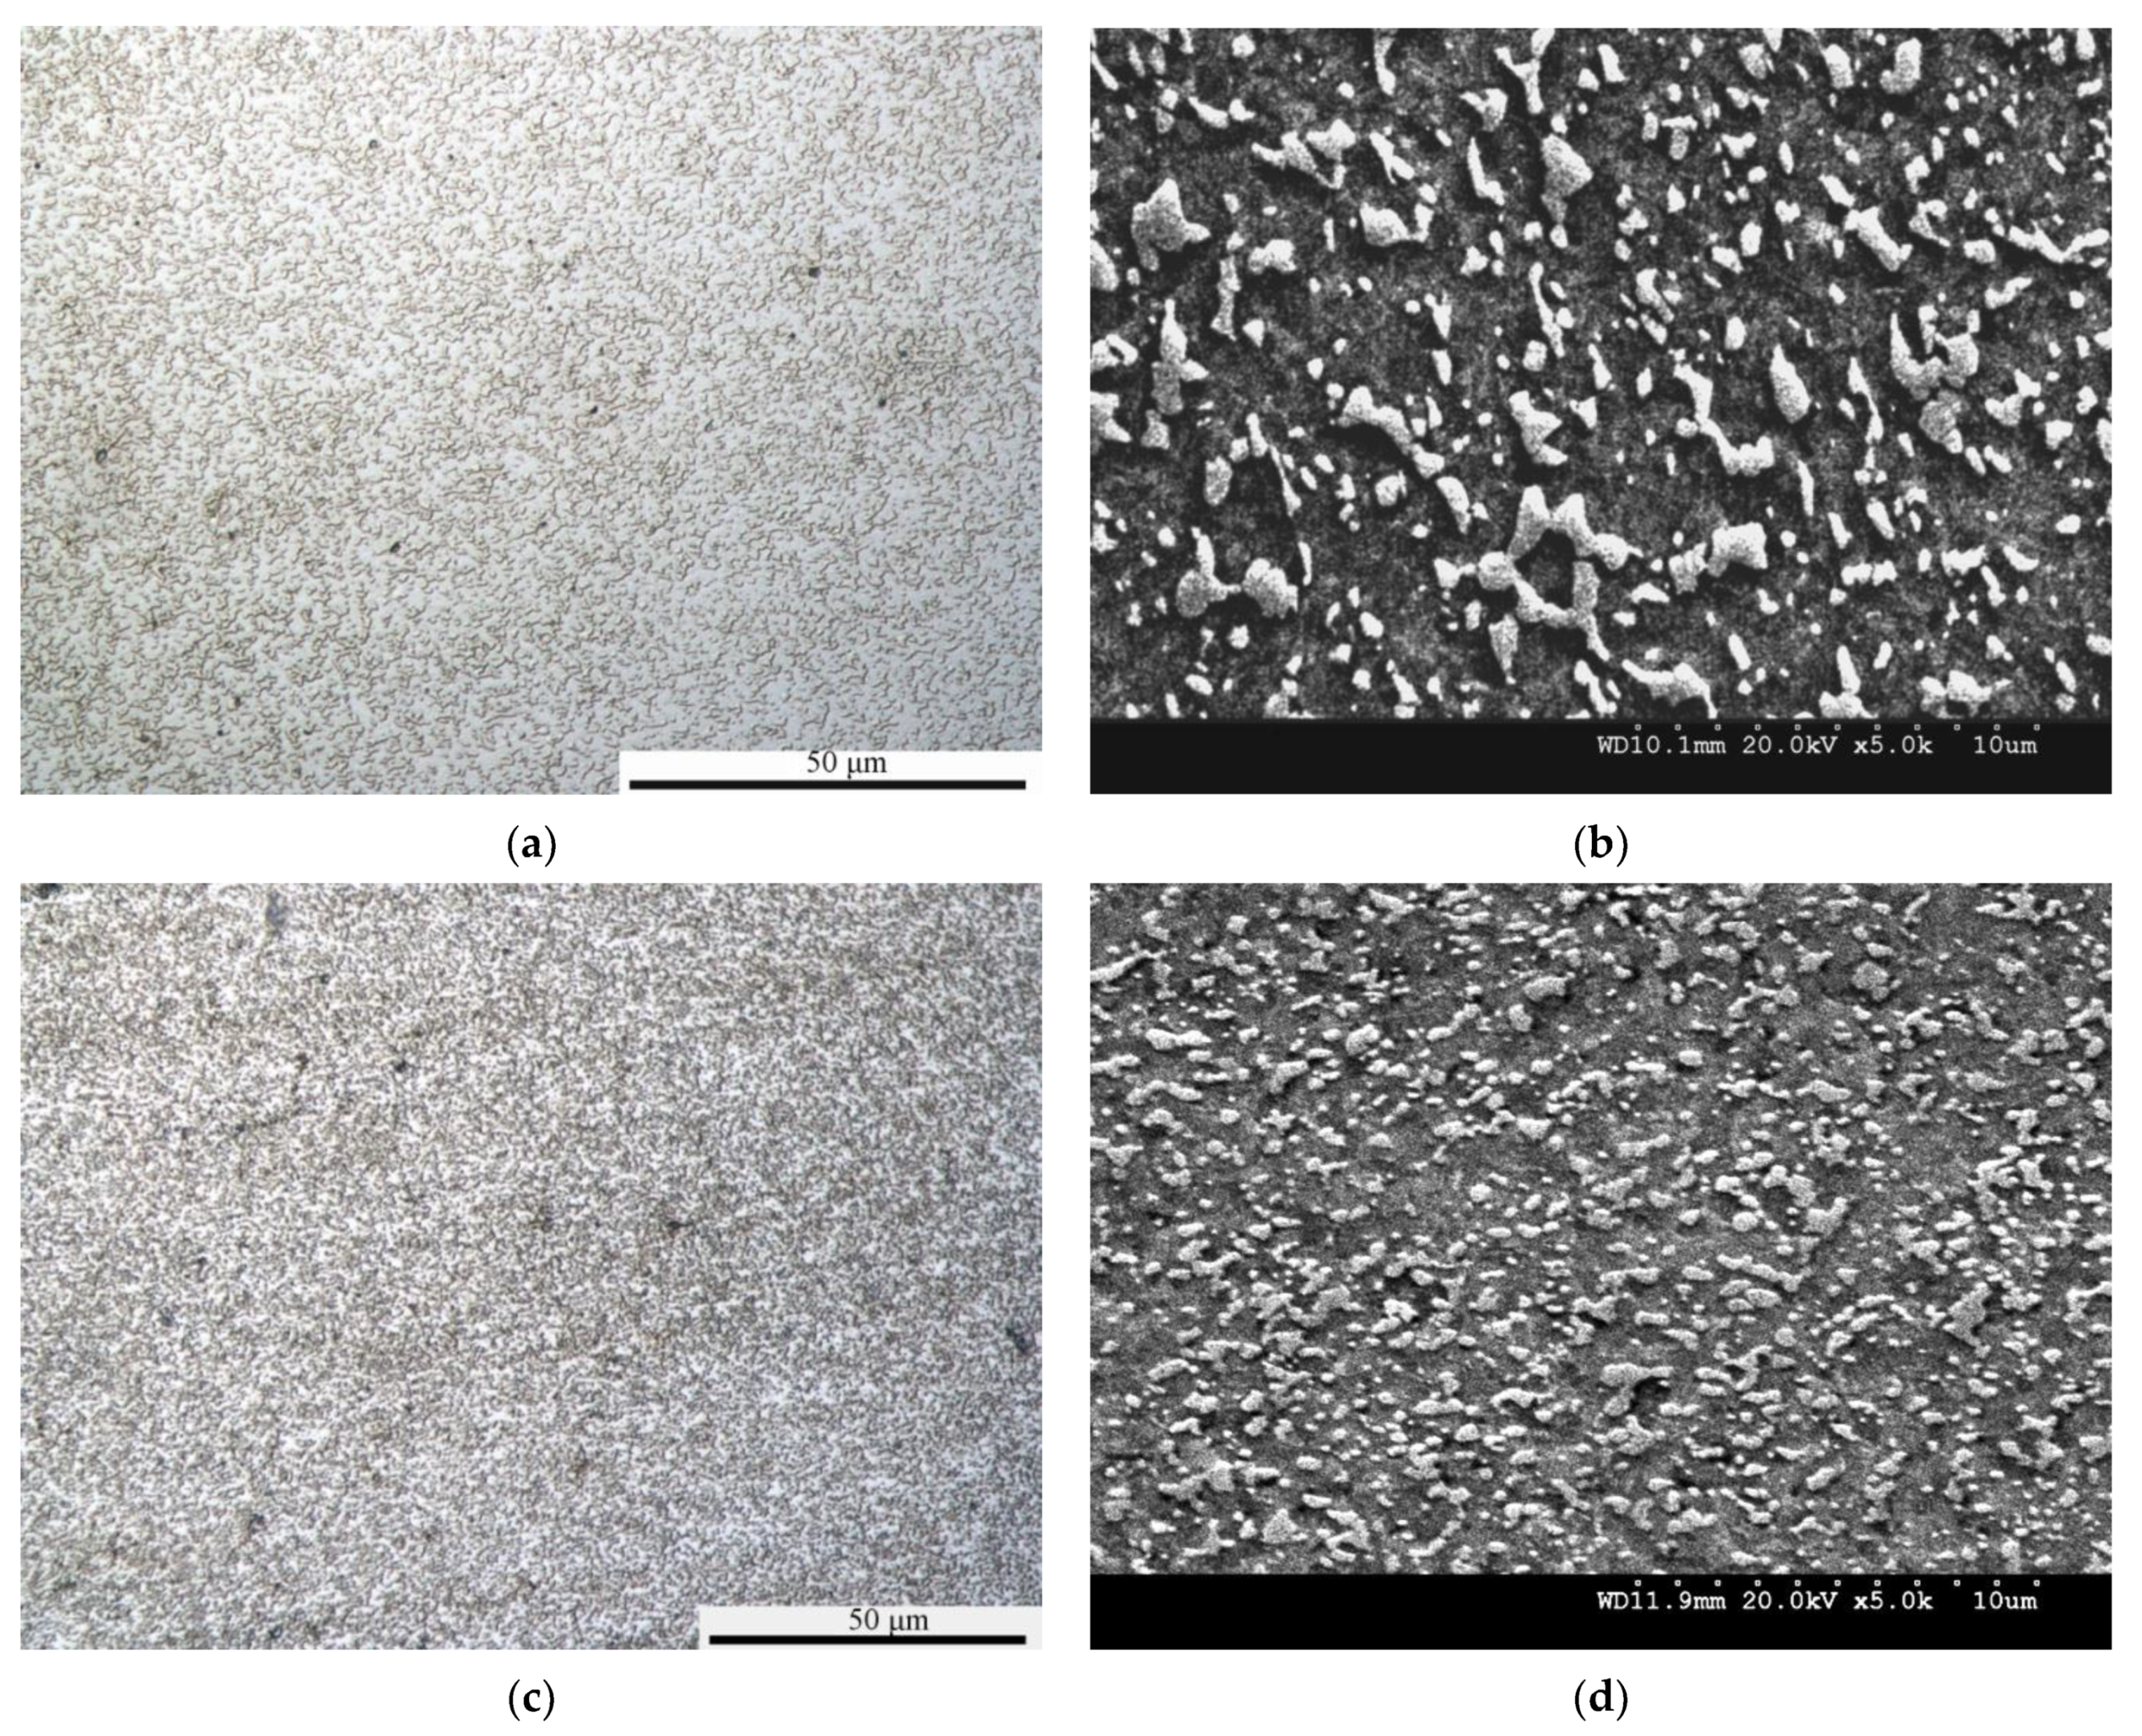
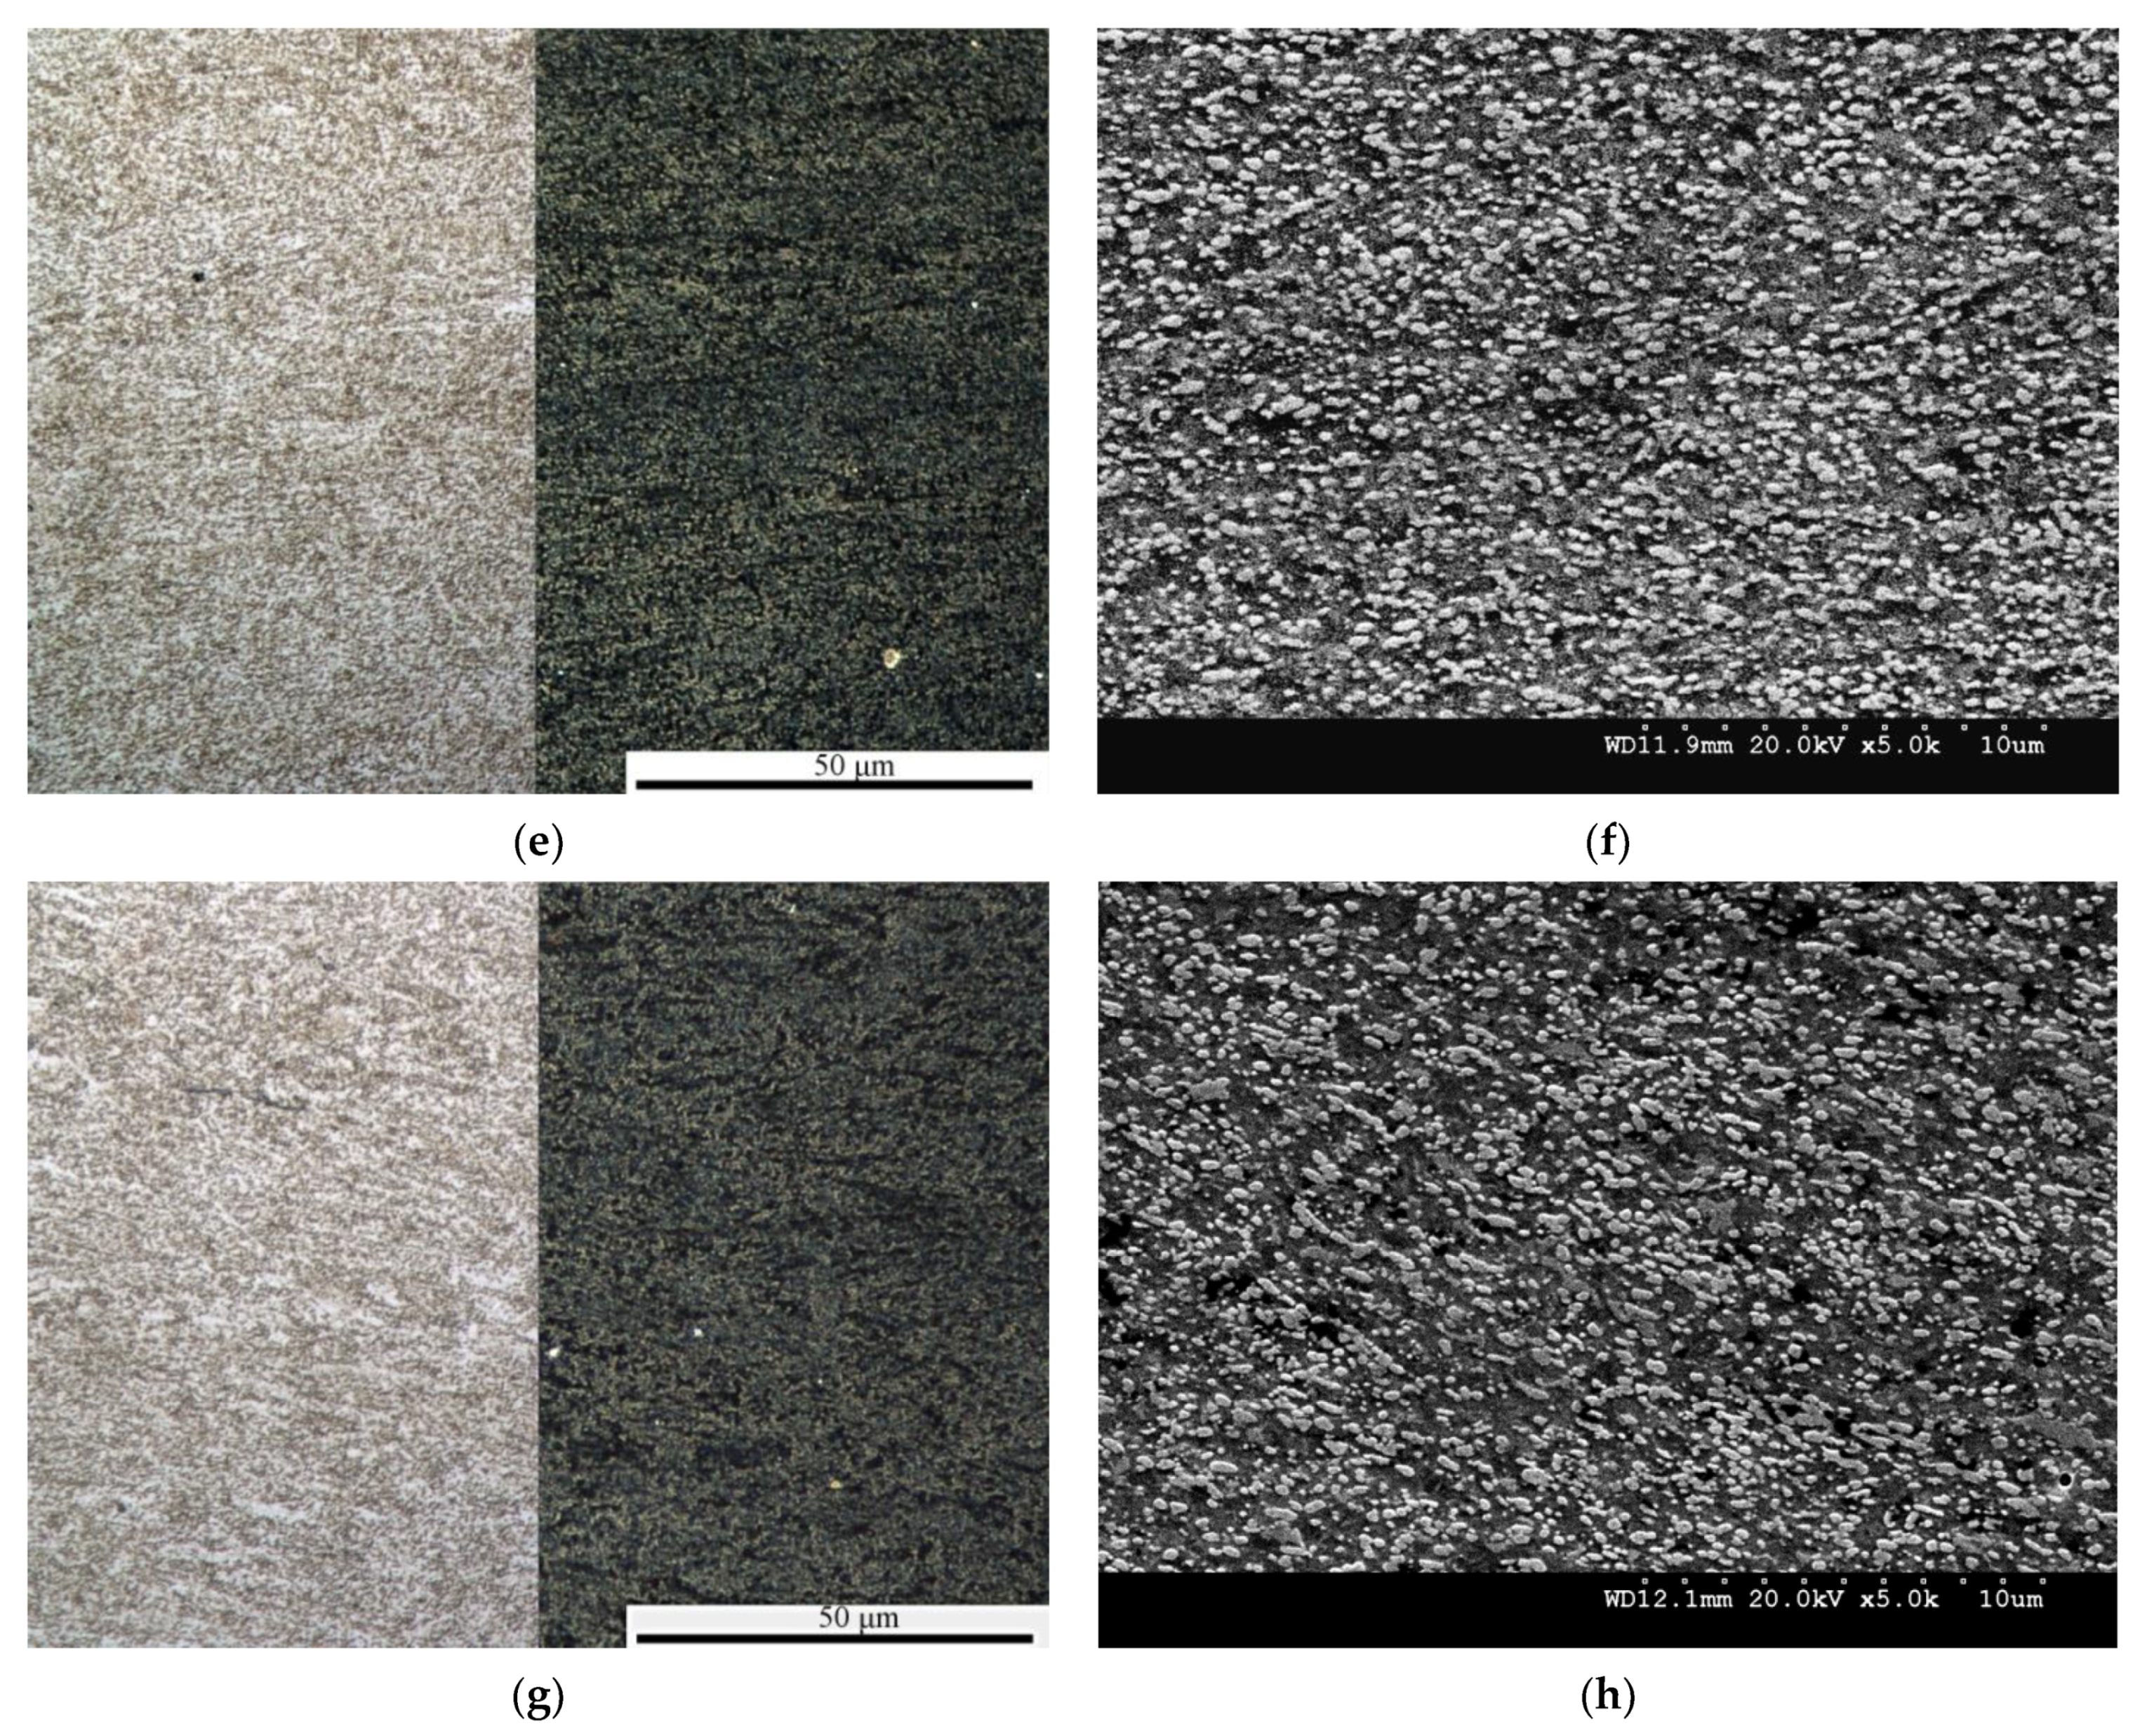
The microstructure after deformation with strain rates 0.001, 0.01, 0.1, and 1 s−1 is presented in Figure 4.
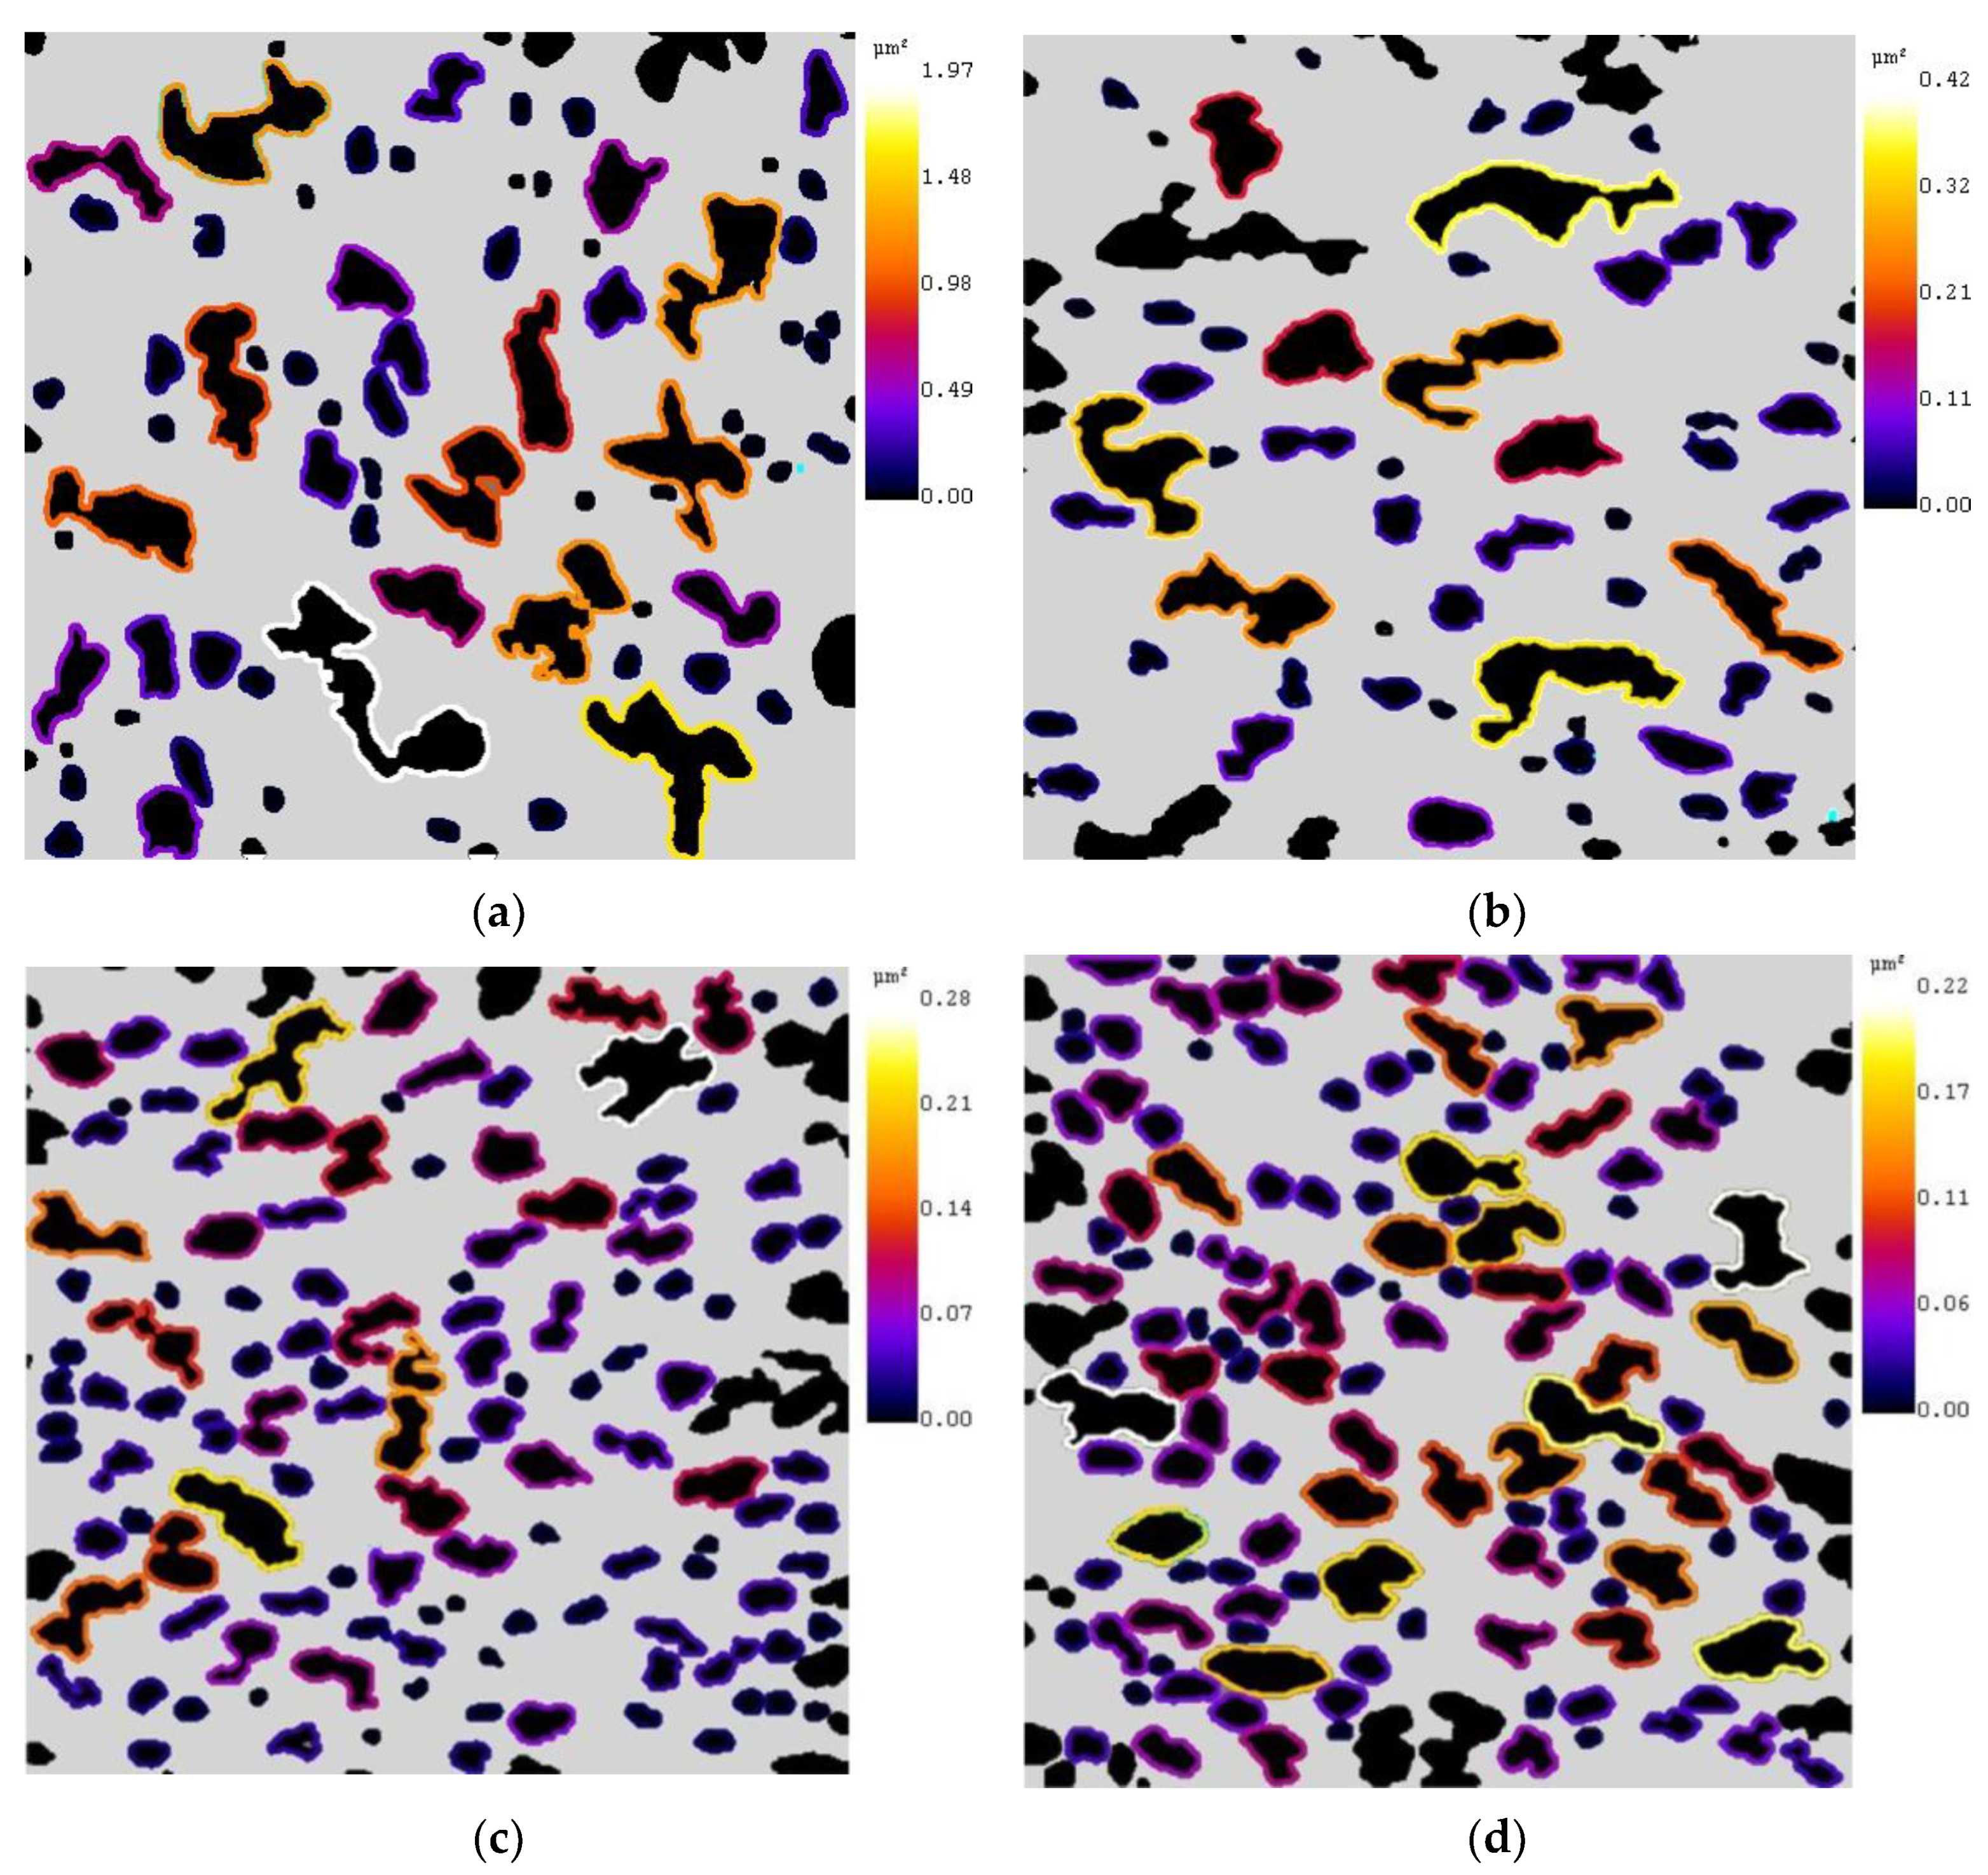
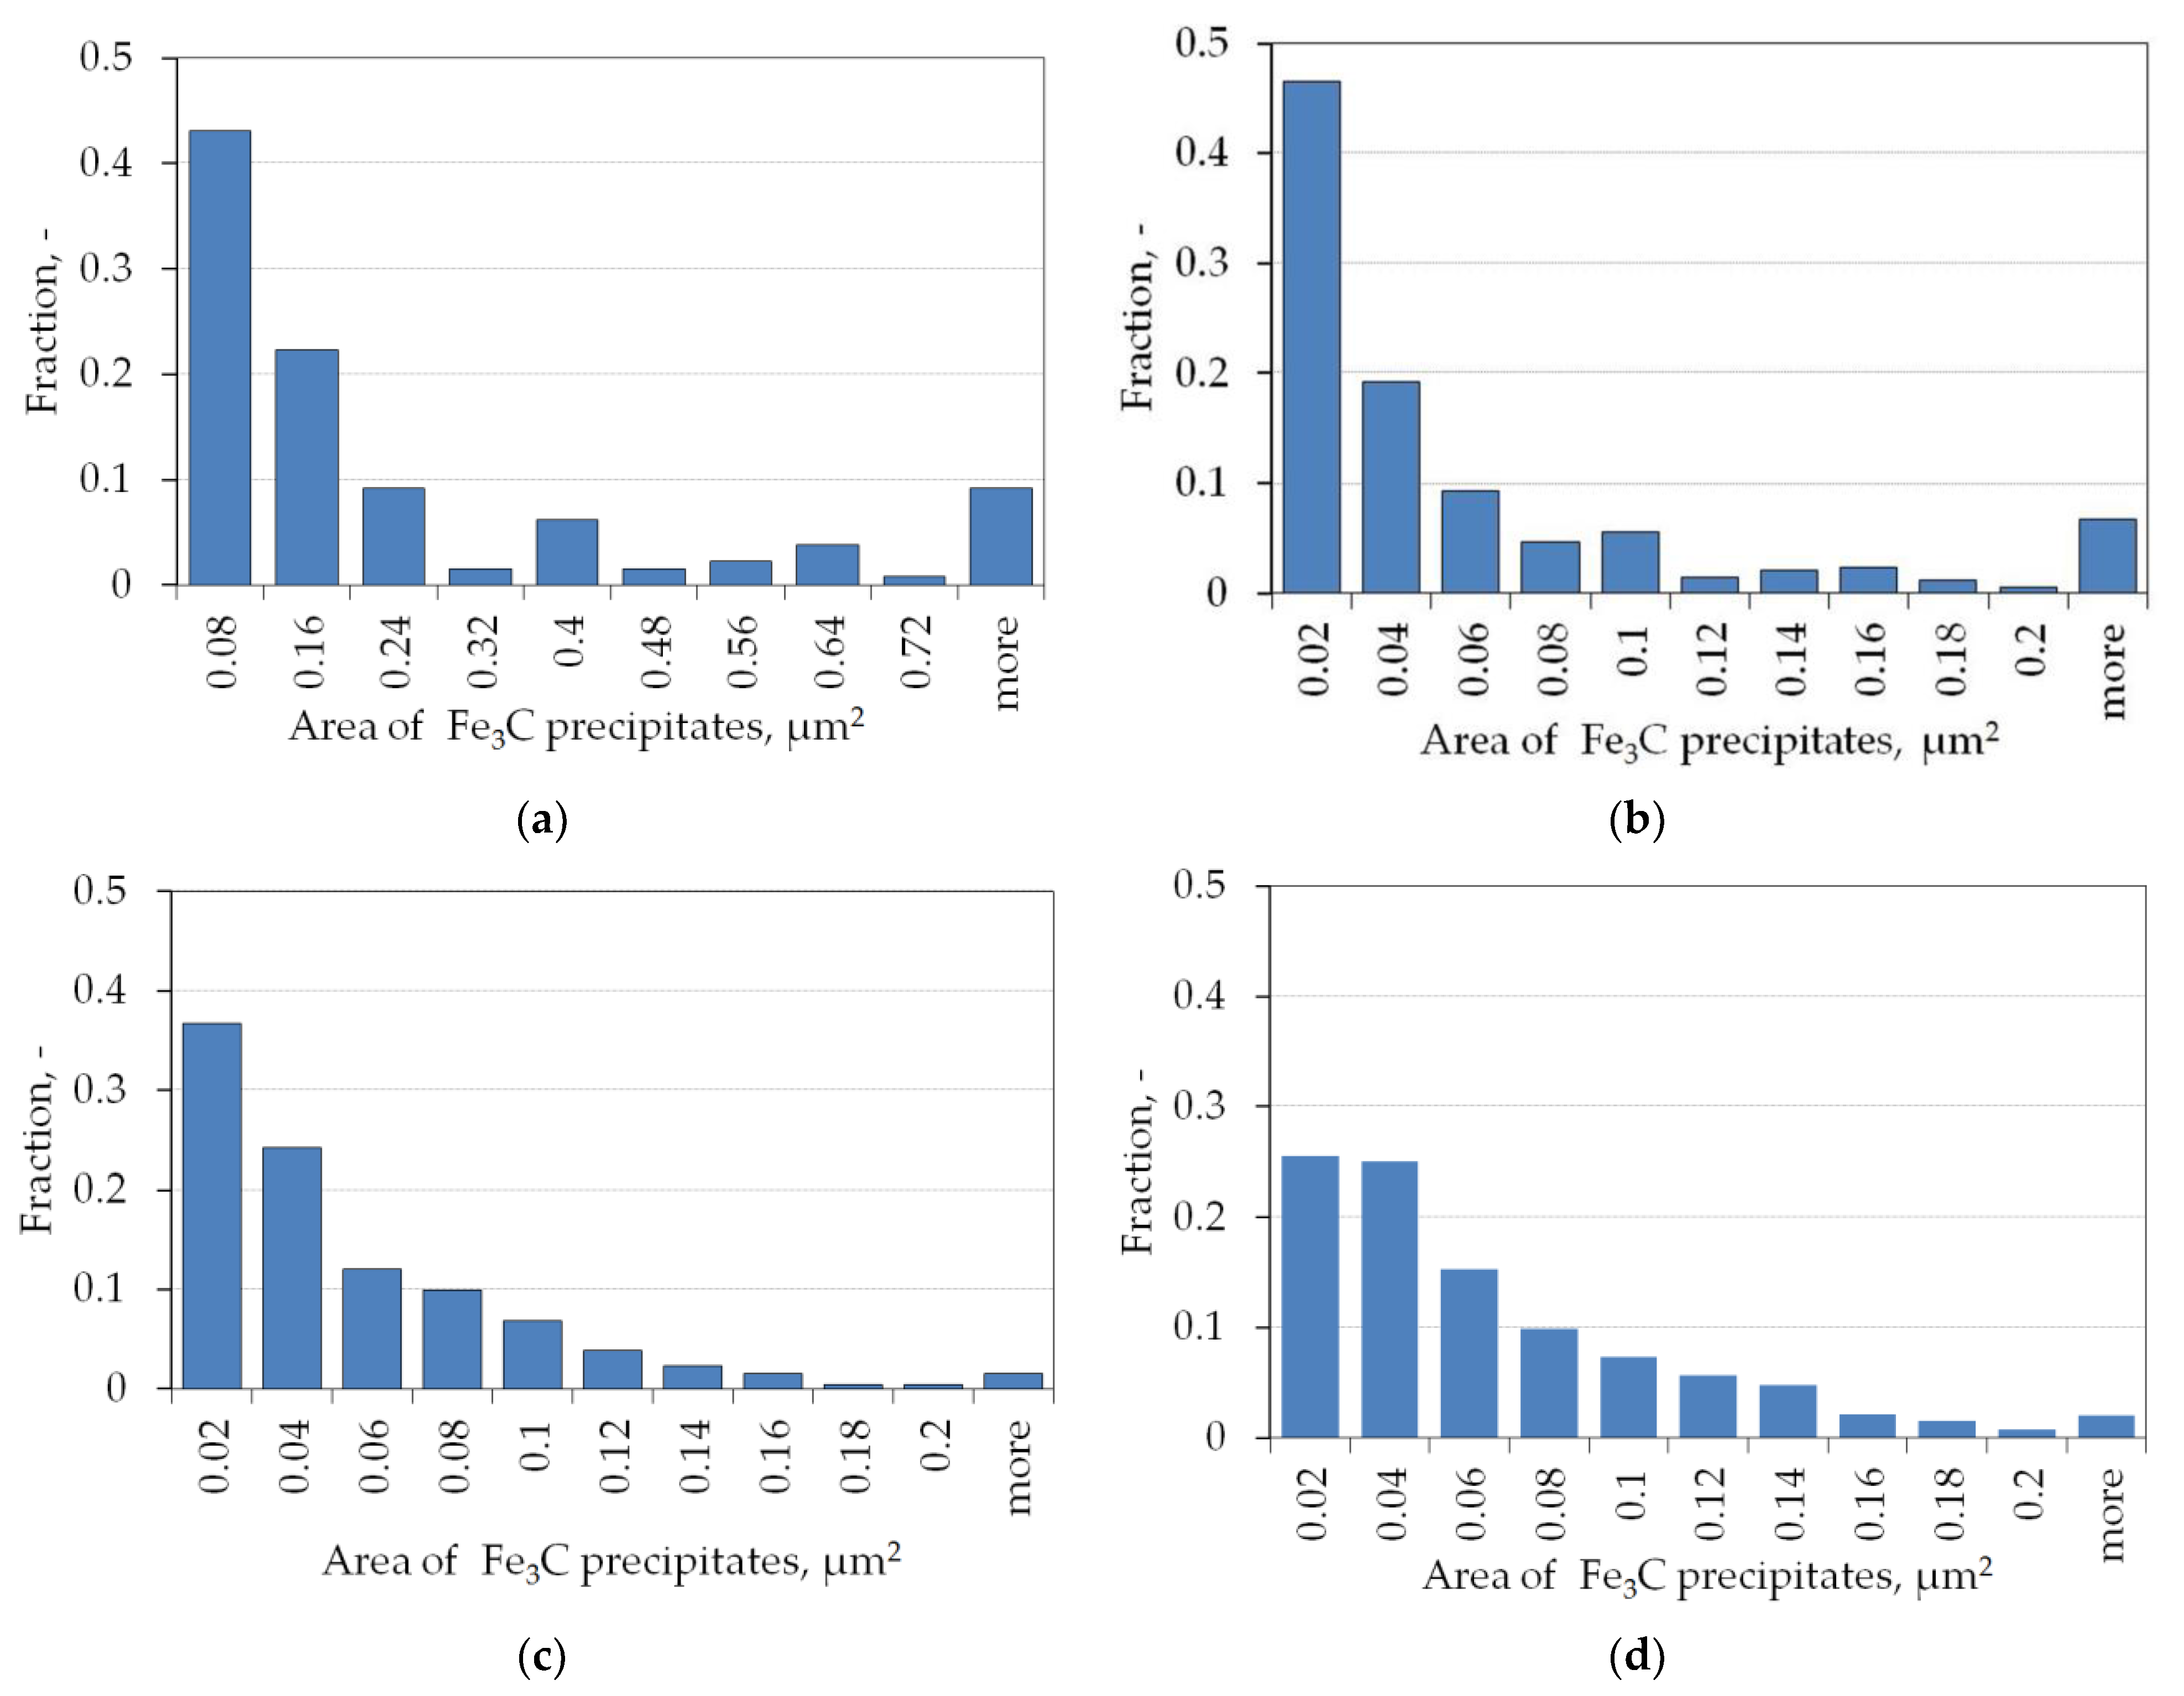
The initial martensitic microstructure was transformed during testing to fully ferritic with spheroidal cementite, whereas in the as-sintered state it caused only partial spheroidization of Fe3C [21]. Different strain rates produced different sizes and shapes of the Fe3C precipitates (Figure 5, Figure 6 and Figure 7 and Table 1). Specimens deformed at the lowest strain rate are characterized by the largest average surface area 0.27 µm2 of flat sections of Fe3C precipitates. Testing at higher strain rates 0.01, 0.1 and 1 s−1 resulted in smaller precipitates with an average surface area 0.08, 0.05, and 0.05 µm2, respectively. Longer deformation time at strain rate of 0.001 s−1 affected the coagulation during which large particles grew at the expense of the smaller, which also affected the shape of the particles. Precipitates of Fe3C formed during deformation with the lowest strain rate 0.001 s−1 had shapes which most differed from circular, f = 0.69, when f = 1 is related to the round shape. The shape factor for higher strain rates 0.1 and 1 s−1 was f = 0.77.
Analysis of regions with flat sections of Fe3C precipitates showed that at the strain rate of 0.001 s−1, the largest fraction, 65%, consisted of carbides with surface areas up to 0.16 μm2. A large fraction, over 9%, were precipitates with areas exceeding 0.8 μm2. For strain rate of 0.01 s−1, 65% were precipitates with surface areas up to 0.4 μm2, and about 7% with areas exceeding 22 μm2. For strain rates of 0.1 and 1 s−1, surface areas up to 0.4 μm2 had a 58% and 51% share, and small fractions of particles with areas greater than 0.22 μm2. Due to the short deformation times, no coagulation process occurred.

3.3. Fractography

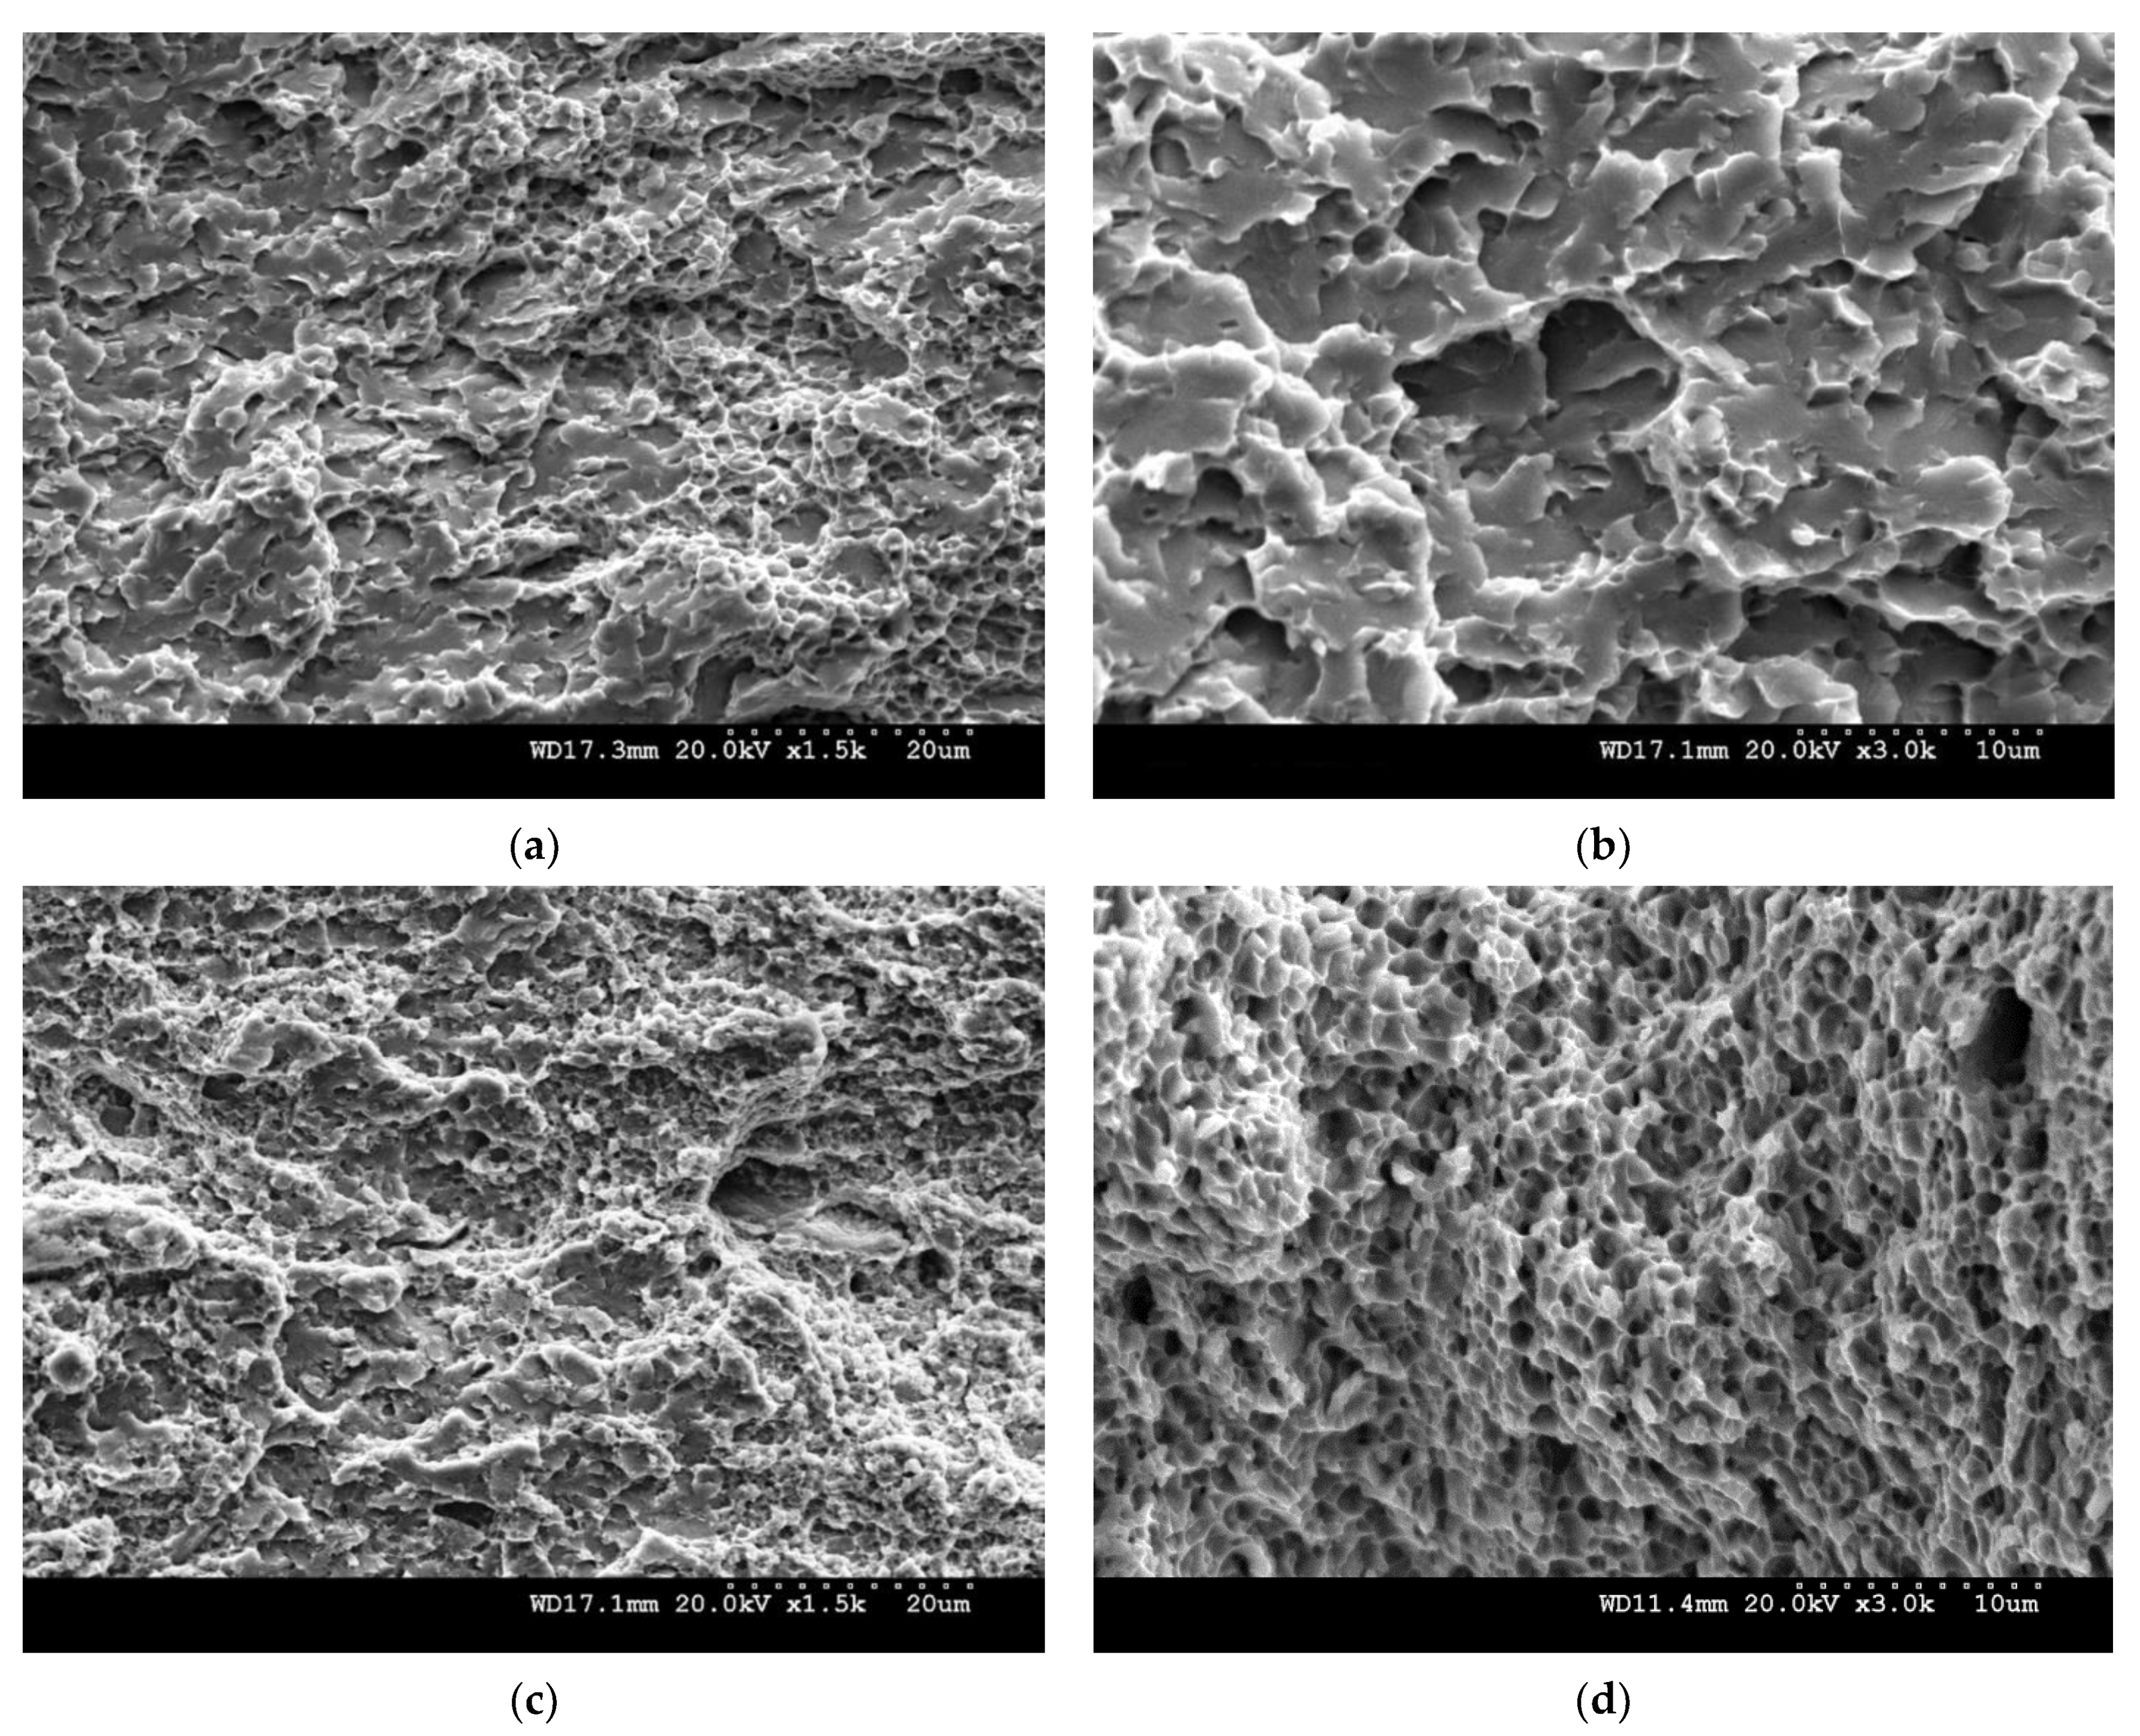
Fracture surfaces of specimens that were broken after testing are shown in Figure 8.
The fracture surface of a specimen deformed at strain rate 1 s−1 (Figure 8c,d) had very small dimples, about 1–2 μm in size, and for strain rate 0.001 s−1, the fracture area contained flat surfaces and larger dimples. These features are typical of ductile rupture.

3.4. Hardness

Mean hardness HV10 measured in randomly selected sites on cross-sections of deformed specimens is reported in Table 2.
The lowest hardness of 295 HV10 was after deformation with strain rate 0.001 s−1. Hardness increased with increasing strain rate, after deformation with strain rate 1 s−1 hardness was 362 HV10. Hardness HV2 maps are presented in Figure 9.
Hardness of the specimen deformed with strain rate 0.001 s−1 was smallest in the central zone, the place of the highest strain intensity. The reverse was the case for specimens deformed with a strain rate 0.01, 0.1, and 1 s−1, where in the central zone and diagonally the greatest hardness was located.

4. Discussion

The flow curves at 775 °C and strain rate of 0.001−1 s−1 exhibited strain hardening to pronounced stress peak and dynamic softening and recrystallization followed by steady state deformation. Peak and critical strains for both warm tested materials are summarized in Table 3.
Superplastic flow has these fundamental requirements: the grain size of the material must be very small (typically less than 10 μm), deformation temperature greater than about 0.4–0.5 Tm (where Tm is the absolute melting temperature [25]), and strain rate in the range 10−4–10−2 s−1. The strain rate sensitivities from compression tests were: 0.17–0.30 at 700 °C for Gleeble and 0.22–0.37 at 775 °C for Bähr. Although the strain rates were similar, the starting microstructures were different for those of quenched (Bähr tests) and quenched and already spheroidized (Gleeble tests) steels.
Superplasticity is generally first found in tensile tests, which were not carried out on our material due to the shape and size of the sintered specimens. Only compression and warm forging [22,24] tests were conducted, and it is quite possible that tensile superplasticity existed. For engineering applications, warm working such as forging is more relevant, and superplastic deformation did not occur in our spheroidized material [22,24], though it cannot be excluded in similar processing conditions.
The quenched-only steel is compared with the fully spheroidized material of the same composition in Table 4.
The Moon [28] relation, YS = (HB − 97)/0.27, for sintered steels was used to estimate yield strength from hardness.
The Hall–Petch relation for the yield strength is:
σy = σ0 + kyd−1/2
where σy is yield strength, σ0 the friction stress, and ky the Hall–Petch strengthening coefficient, was extended to spheroidized steels by Syn et al. [13]:
σy = 310 Ds* −1/2 +460 L−1/2
where L is the grain size and Ds* the inter-carbide spacing.
They reported that the prediction is good, within 20%, when compared to previous experimental data. Calculations for this relation for spheroidized Fe-0.85Mo-0.65Si-1.4C are presented in Table 5.
Additionally, it is seen that for these data the correspondence between experimental and theoretical results is equally good. The results further indicate that conventional forging should be as successful for quenched as for spheroidized material.

5. Conclusions

Thermo-mechanical treatment at all strain rates investigated of quenched Fe-0.85Mo-0.65Si-1.4C steel by warm testing at austenite start temperature 775 °C led to rapid spheroidization of cementite. The (compressive) strain rate sensitivity was 0.24.
During testing at lower strain rates of 0.001 and 0.01 s−1, coagulation of the carbides took place, which affected the size and shape of the Fe3C precipitates. After deformation with higher strain rates, the distribution of Fe3C carbides was more homogeneous and their shape was more circular.
The smallest hardness, 295 HV10, was for strain rate of 0.001 s−1 and the highest, 359 and 362 HV10, were in specimens after deformation with strain rates of 0.1 and 1 s−1, when ultrafine cementite precipitates were formed.
These and previous results on spheroidized Fe-0.85Mo-0.65Si-1.4C are consistent with the yield stress Hall–Petch relation developed by Syn et al. [13] for spheroidized UHCSs.
The results indicate that conventional forging should be as successful for quenched as for spheroidized material.

Author Contributions

Conceptualization, P.N. and S.S.; methodology, S.S.; software P.N.; validation, P.N., S.S., and G.K.; formal analysis, S.S.; investigation P.N., S.S., and G.K.; data curation, P.N.; writing—original draft preparation, P.N. and S.S.; writing—review and editing, P.N. and S.S.; visualization, P.N.; supervision, S.S.; project administration, P.N.; funding acquisition, AGH Krakow and TUBA Freiberg. All authors have read and agreed to the published version of the manuscript.

Funding

This research received no external funding.

Institutional Review Board Statement

Not applicable.

Informed Consent Statement

Not applicable.

Data Availability Statement

Not applicable.

Acknowledgments

The work described forms part of the cooperative program between the Institute of Metal Forming TU BA Freiberg, Germany, and AGH University of Science and Technology, Krakow, Poland. Authors thank Andrew Wronski (Emeritus, UOB, England) for constructive comments on the draft and S.C. Mitchell for producing test samples.

Conflicts of Interest

The authors declare no conflict of interest.

References

  1. Lesuer, D.R.; Syn, C.K.; Goldberg, A.; Wadsworth, J.; Sherby, O.D. The case for ultrahigh carbon steel as structural materials. JOM 1993, 45, 40–46. [Google Scholar] [CrossRef]
  2. Verhoeven, J.D.; Gibson, E.D. The divorced eutectoid transformation in steel. Metall. Mater. Trans. A 1998, 29, 1181–1189. [Google Scholar] [CrossRef]
  3. Storojeva, L.; Ponge, D.; Kaspar, R.; Raabe, D. Development of microstructure and texture of medium carbon steel during heavy warm deformation. Acta Mater. 2004, 52, 2209–2220. [Google Scholar] [CrossRef] [Green Version]
  4. Furuhara, T.; Poorganji, B. Formation of ultrafine grained ferrite + cementite duplex structure by warm deformation. In Advanced Steels; Weng, Y., Dong, H., Gan, Y., Eds.; Springer: Berlin/Heidelberg, Germany, 2011; pp. 495–500. [Google Scholar] [CrossRef]
  5. Wu, T.; Gao, Y.; Wang, M.; Li, X.; Zhao, Y.; Zou, Q. Influence of initial microstructure on warm deformation processability and microstructure of an ultrahigh carbon steel. J. Iron Steel Res. Int. 2014, 21, 52–59. [Google Scholar] [CrossRef]
  6. Furuhara, T.; Yamaguchi, T.; Furimoto, S.; Maki, T. Formation of (ferrite + cementite) microduplex structure by warm deformation in high carbon steels. Mater. Sci. Forum 2007, 539–543, 155–160. [Google Scholar] [CrossRef]
  7. Zhao, X.; Jing, T.F. Warm deformation behavior of medium carbon steel with different initial microstructures. Mater. Sci. Eng. A 2012, 543, 267–270. [Google Scholar] [CrossRef]
  8. Arruabarrena, J.; Lopez, B.; Rodriguez-Ibabe, J.M. Influence of prior warm deformation on cementite spheroidization process in a low-alloy medium carbon steel. Metall. Mater. Trans. A 2014, 45, 1470–1484. [Google Scholar] [CrossRef]
  9. Chen, W.; Li, L.; Yang, W.; Sun, Z.; He, J. Microstructure evolution of hypereutectoid steels during warm deformation. Acta Metall. Sin. 2009, 45, 151–155. [Google Scholar]
  10. Sherby, O.D.; Oyama, T.; Kum, D.W.; Walser, B.; Wadsworth, J. Ultrahigh carbon steel. JOM 1985, 37, 50–56. [Google Scholar] [CrossRef]
  11. Maki, T.; Furuhara, T. Microstructure and mechanical properties of ultra-fine (ferrite + cementite) duplex structure in high carbon steel. Mater. Sci. Forum 2003, 426–432, 19–26. [Google Scholar] [CrossRef]
  12. Tsuzaki, K.; Sato, E.; Furimoto, S.; Furuhara, T.; Maki, T. Formation of an (α + θ) microduplex structure without thermomechanical processing in superplastic ultrahigh carbon steels. Scr. Mater. 1999, 40, 675–681. [Google Scholar] [CrossRef]
  13. Syn, C.K.; Lesuer, D.R.; Sherby, O.D. Influence of microstructure on tensile properties of spheroidized ultrahigh-carbon (1.8 pct C) steel. Metall. Mater. Trans. A 1994, 25, 1481–1493. [Google Scholar] [CrossRef]
  14. Abosbaia, A.A.S. Design and Processing Low Alloy High Carbon Steel by Powder Metallurgy. Ph.D. Thesis, University of Bradford, Bradford, UK, 2010. [Google Scholar]
  15. Mitchell, S.C.; Youseffi, M.; Abosbaia, A.A.S.; Ernest, J. Processing and heat treatment of high carbon liquid phase sintering steels. Powder Metall. Prog. 2008, 8, 91–100. [Google Scholar]
  16. Abosbaia, A.A.S.; Mitchell, S.C.; Youseffi, M.; Wronski, A.S. Liquid phase sintering, heat treatment and properties of ultrahigh carbon steels. Powder Metall. 2011, 54, 592–598. [Google Scholar] [CrossRef]
  17. Fan, Y.; Cao, J.; Wang, W.; Liu, Y. Microstructure and mechanical properties of a 1.6C (pct) ultra-fine grained ultra-high carbon steel. Mater. Sci. Forum 2011, 682, 131–137. [Google Scholar] [CrossRef]
  18. Sherby, O.D.; Walser, B.; Young, C.M.; Cady, E.M. Superplastic UHCSs. Scripta Met. 1975, 9, 569–574. [Google Scholar] [CrossRef]
  19. Zhang, H.; Bai, B.; Raabe, D. Superplastic martensitic Mn–Si–Cr–C steel with 900% elongation. Acta Mater. 2011, 59, 5787–5802. [Google Scholar] [CrossRef]
  20. Szczepanik, S.; Sińczak, J. Determination of the conditions for heavy deformations of sintered steel containing 1.4%C. Metall. Foundry Eng. 1994, 20, 441–448. [Google Scholar]
  21. Nikiel, P.; Szczepanik, S.; Skrzypek, S.J.; Rogal, Ł. The effect of thermo-mechanical treatment on structure of ultrahigh carbon PM steel. J. Mater. Eng. Perform. 2017, 26, 1562–1568. [Google Scholar] [CrossRef]
  22. Szczepanik, S.; Mitchell, S.C.; Abosobia, A.A.S.; Wroński, A.S. Warm forging of spheroidised ultra high carbon steel. Powder Metall. Prog. 2010, 101, 59–65. [Google Scholar]
  23. Szczepanik, S.; Nikiel, P.; Mitchell, S.C.; Kawalla, R. Microstructure evolution in warm forged sintered ultrahigh carbon steel. Arch. Civ. Mech. Eng. 2015, 15, 301–307. [Google Scholar] [CrossRef]
  24. Szczepanik, S.; Mitchell, S.C.; Wronski, A.S.; Abosbaia, A.A.S.; Nikiel, P.; Krawiarz, J. Microstructure evolution in fully dense warm forged sintered ultrahigh carbon steel. Powder Metall. Prog. 2011, 11, 78–84. [Google Scholar]
  25. Kawasaki, M.; Langdon, T.G. Developing superplasticity in ultrafne-grained metals. Acta Phys. Pol. A 2015, 128, 470–478. [Google Scholar] [CrossRef]
  26. Najafizadeh, A.; Jonas, J.J. Predicting the critical stress for initiation of dynamic recrystallization. ISIJ Int. 2006, 46, 1679–1684. [Google Scholar] [CrossRef] [Green Version]
  27. Polliak, E.I.; Jonas, J.J. A one-parameter approach to determining the critical conditions for the initiation of dynamic recrystallization. Acta Mater. 1996, 44, 127–136. [Google Scholar] [CrossRef]
  28. Moon, J.R. Hardness and the properties of PM materials measured in tension. Powder Metall. Prog. 2015, 15, 234–244. [Google Scholar]
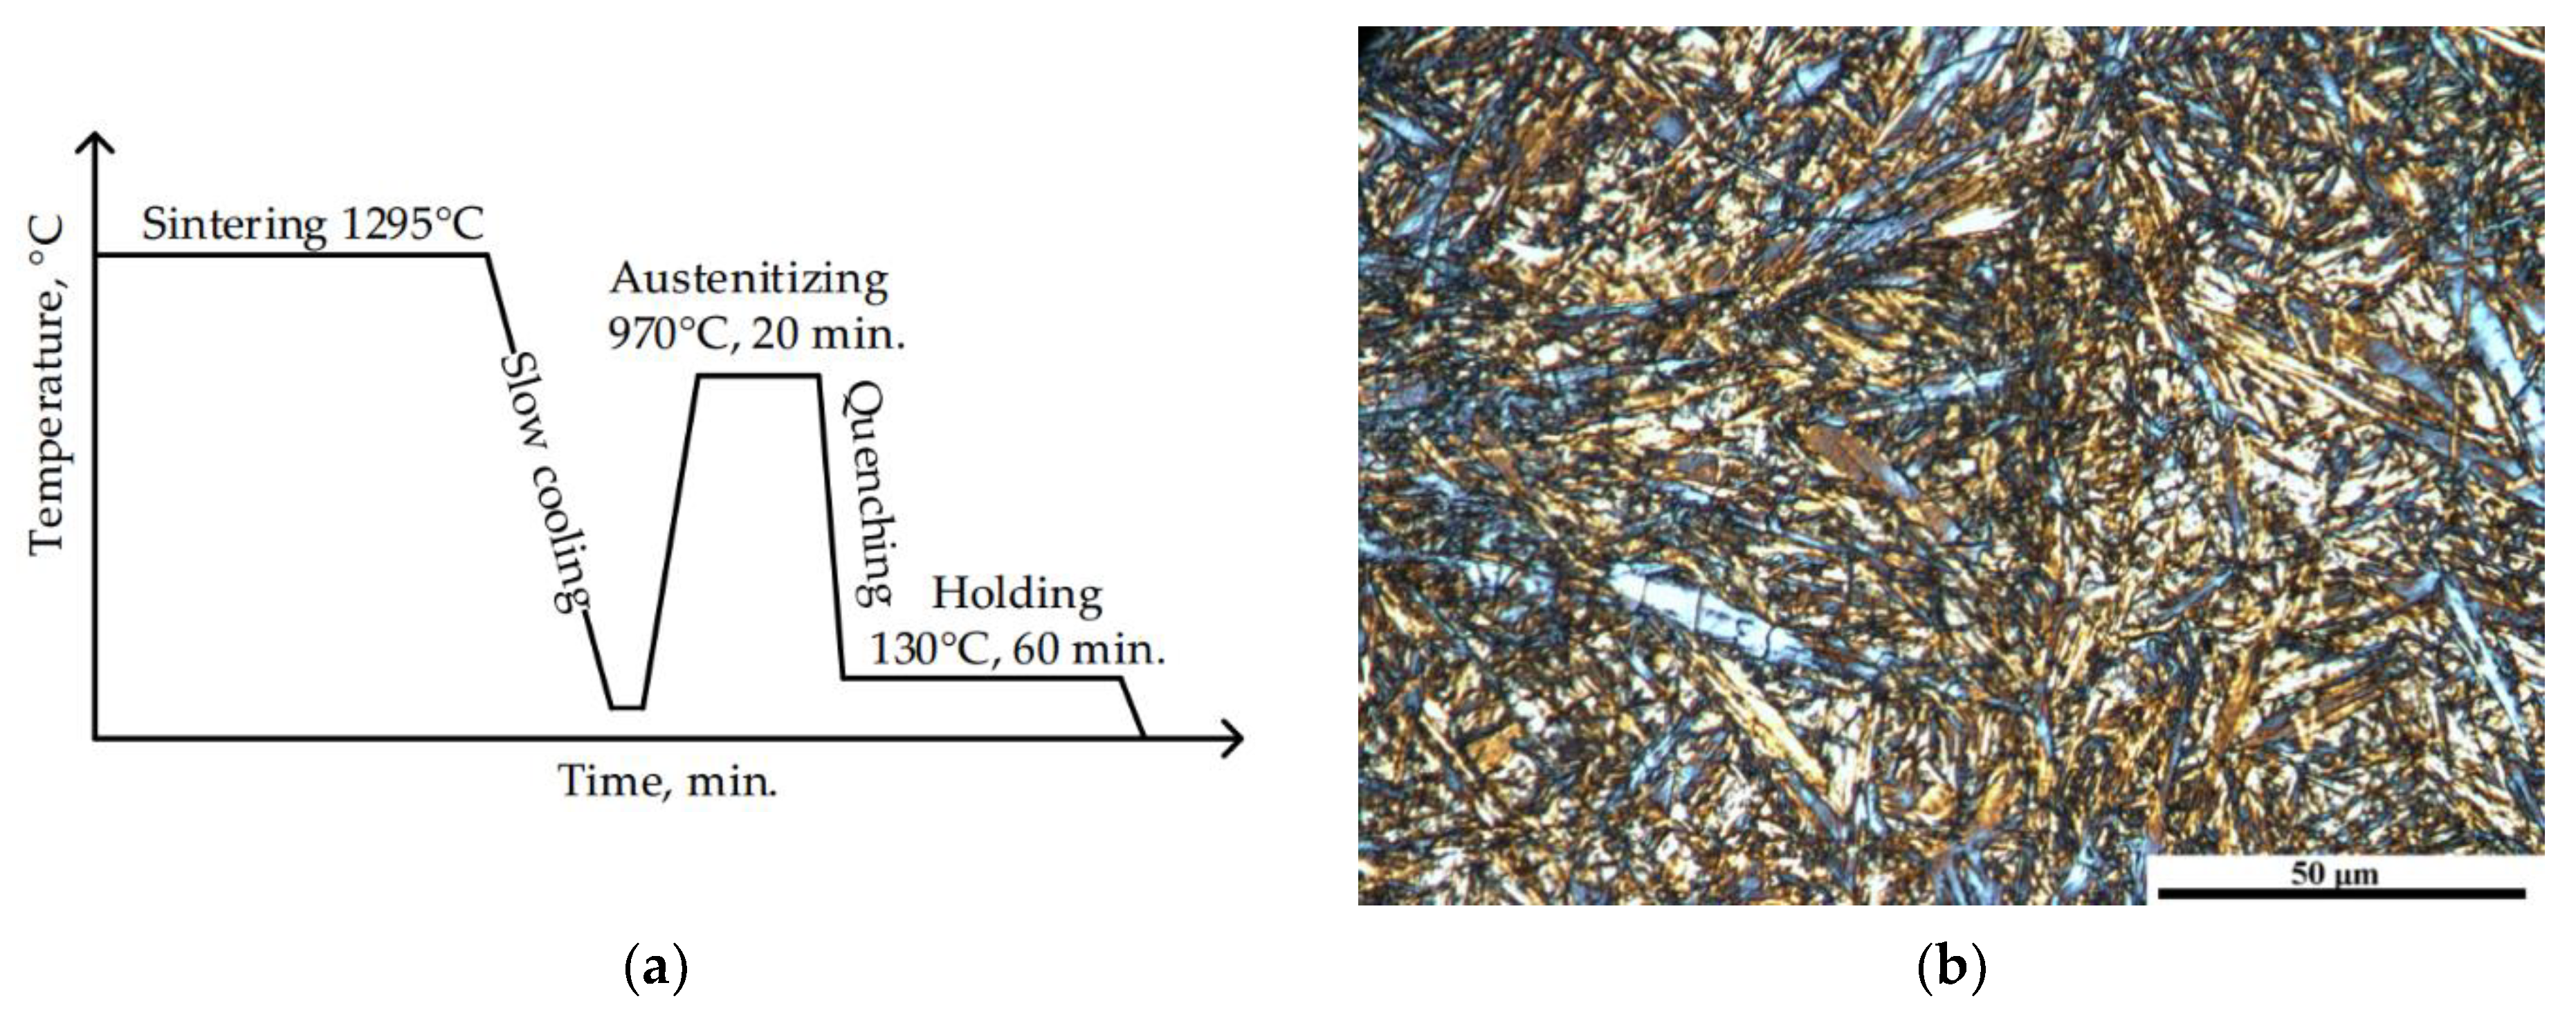
Figure 1. Heat treatment diagram (a) and microstructure of quenched steel (b).
Metals 11 00328 g001
Figure 2. Dilatometric curve obtained during heating and soaking a specimen to the deformation temperature on a Bähr MDS 830 machine.
Metals 11 00328 g002
Figure 3. Flow curves (a) and influence of strain rate on value of peak strain and critical strain below which was the beginning of dynamic recrystalization (DRX) (b).
Metals 11 00328 g003
Figure 4. Microstructure of Fe-0,85Mo-0.65Si-1.4C steel after testing with strain rate (a,b) 0.001 s−1, (c,d) 0.01 s−1, (e,f) 0.1 s−1, and (g,h) 1 s−1. Light microscopy (LM) for (a,c,e,g) and SEM for (b,d,f,h).
Metals 11 00328 g004aMetals 11 00328 g004b
Figure 5. Surface area of flat sections of Fe3C after deformation with strain rate: (a) 0.001, (b) 0.01, (c) 0.1, (d) 1 s−1.
Metals 11 00328 g005
Figure 6. Mean surface area of Fe3C precipitates as a function of time of deformation.
Metals 11 00328 g006
Figure 7. Distribution of the surface area of a flat section of Fe3C precipitates after deformation at 775 °C with a strain rate: (a) 0.001, (b) 0.01, (c) 0.1, (d) 1 s−1.
Metals 11 00328 g007
Figure 8. Fracture surfaces of ambient temperature deformed specimens which had been previously warm tested at strain rate 0.001 (a,b) and 1 s−1 (c,d).
Metals 11 00328 g008
Figure 9. Hardness HV2 maps of specimens after testing at strain rate: (a) 0.001, (b) 0.01, (c) 0.1, (d) 1 s−1.
Metals 11 00328 g009
Table 1. Characteristic of selected parameters of Fe3C particles.
No.Strain Rate, s−1Number of Analyzed Particles, -Average Surface Area A, μm2Average Feret Diameter D, μm1 Shape Factor (Circularity) f, -
10.0011300.270.710.69
20.013440.080.360.73
30.16260.050.330.77
416550.050.350.77
1 f = 4πA/P2 where A—area and P—perimeter of particles.
Table 2. Average hardness HV10 of Fe-0.85Mo-0.65Si-1.4C steel after testing.
No.Strain Rate, s−1Hardness HV10
10.001295 ± 18.8
20.01339 ± 13.8
30.1359 ± 6.9
41362 ± 2.9
Table 3. Comparative data for warm testing quenched and spheroidized quenched Fe-0.85Mo-0.65Si-1.4C.
Bähr at 775 °C—QuenchedGleeble Quenched and Spheroidised at 750 °C [22]
ε ˙ εp, -εc, -σp, MPaσc, MPaεp, -σp, MPa
0.0010.160.04110970.05150
0.010.28-243-0.16250
0.10.280.093042700.2330
10.470.245424580.22460
Table 4. Microstructure, yield strength, and hardness of Fe-0.85Mo-0.65Si-1.4C.
StateProcessing/
Testing
MicrostructureFerrite Grain Size
µm
Yield Strength MPaHardness HV10Reference
Sintered1300 °C, cooled slowly to room temperaturefine pearlite and grain boundary Fe3C 400 *196–325[15,16]
Quenchedaustenitized at 970 °C, isothermally quenched, Bähr tested at 775 °Cferrite matrix and dispersed spheroidal carbides1–3715–1030 *295–362Current report
Spheroidized at
750 °C
room temperature deformationferrite matrix and dispersed spheroidal carbides30350–410150–230[15,24]
Gleeble tested at 700 °Cfine-grained ferrite and homogeneously distributed carbides6–7769310[22]
twice forged: 700 °C and 750 °Cfine-grained ferrite and homogeneously distributed carbides6–7769–744-[22]
* Estimated.
Table 5. Yield strengths of spheroidized Fe-0.85Mo-0.65Si-1.4C measured and according to Syn et al. [13] formula.
StateGrain Size, L, µmInter-Carbide
Spacing, Ds*, µm
310 Ds* −1/2,
MPa
460 L−1/2,
MPa
Calculated Yield Strength, MPaYield Strength, MPa
Quenched, spheroidised during Bӓhr testing1–30.628–0.298378–549265–460643–1009715–1030 *
Spheroidized at 750 °C300.7833983422350–410
Spheroidized and forged70.826–0.59403–520187667769–744
* Estimated.
Publisher’s Note: MDPI stays neutral with regard to jurisdictional claims in published maps and institutional affiliations.