Article

Study on Microstructure and In Situ Tensile Deformation Behavior of Fe-25Mn-xAl-8Ni-C Alloy Prepared by Vacuum Arc Melting

School of Materials and Chemical Engineering, Xi’an Technological University, Xi’an 710021, China
*
Author to whom correspondence should be addressed.
Metals 2021, 11(5), 814; https://doi.org/10.3390/met11050814
Submission received: 19 April 2021 / Revised: 13 May 2021 / Accepted: 14 May 2021 / Published: 17 May 2021

Abstract

:
In this study, Fe-25Mn-xAl-8Ni-C alloys (x = 10 wt.%, 11 wt.%, 12 wt.%, 13 wt.%) were prepared by a vacuum arc melting method, and the microstructure of this series of alloys and the in situ tensile deformation behavior were studied. The results showed that Fe-25Mn-xAl-8Ni-C alloys mainly contained austenite phase with a small amount of NiAl compound. With the content of Al increasing, the amount of austenite decreased while the amount of NiAl compound increased. When the Al content increased to 12 wt.%, the interface between austenite and NiAl compound and austenitic internal started to precipitate k-carbide phase. In situ tensile results also showed that as the content of Al increased, the alloy elongation decreased gradually, and the tensile strength first increased and then decreased. When the Al content was up to 11 wt.%, the elongation and tensile strength were 2.6% and 702.5 MPa, respectively; the results of in situ tensile dynamic observations show that during the process of stretching, austenite deformed first, and crack initiation mainly occurred at the interface between austenite and NiAl compound, and propagated along the interface, resulting in fracture of the alloy.

1. Introduction

Low-carbon steels are widely used in transportation, infrastructure, and defense industries due to their high strength, ductility, and excellent weldability [1,2]. Fe-Mn-Al-C steel is a new type of high-strength alloy steel which is based on high-manganese steel with increased Al and C elements. Al element can not only reduce the density of steel and increase the corrosion resistance of steel, but can also act as a buffer in the event of a violent collision. Therefore, under the condition of vehicle structure weight loss and complex working conditions, the steel has great application prospects. Although the presence of Al element has a positive effect on the Fe-Mn-Al-C steel, a higher Al content easily forms k-carbide, which can worsen the performance of the materials [3,4,5]. In addition, Ni and Al elements delay the separation and coarsening of the Cu-rich phase by forming the B2-Ni (AlMn) intermetallic phase, thereby reducing the average particle size and volume fraction [2]. Researchers from Hanbat National University [6,7,8] studied the Fe-Mn-Al-C alloy system and found that in high-manganese steel, the alloy had excellent plasticity and strength (the product of strength and elongation is a comprehensive performance index to characterize the strength and toughness level of steel, and its value is up to 60,000 MPa%) with low density (6.87 g/cm3). This was mainly due to the increase in stacking fault energy with the increase in Al content, and the transformation of the deformation mechanism from a TWIP effect to a dislocation slip mechanism. Related studies [9] showed that when the Al content in Fe-Mn-Al-C steel increased to more than 5 wt.% and Mn content was reduced to below 5 wt.%, the main microstructure was single-phase ferrite. In addition, Al element can also turn the strengthening mechanism of steel from the TRIP effect into the TWIP effect. Al element had an obvious influence on the distribution of Mn, C elements in the matrix, and phase transition process of the residual austenite. Additionally, the addition of Al element can increase the alloy lattice constant, and it had great influence on the thermodynamic stability of its allotrope [10]. At present, vacuum arc melting technology is widely used in the preparation of low-carbon steel or alloy steel, and has made great progress [11,12,13,14].
Our previous study showed the preparation of Fe–xMn–14Al–8Ni–C alloy by vacuum arc melting, and its microstructure and oxidation resistance were studied. The results showed that an alloy with 25% Mn content had the best oxidation resistance. [15]. Our research group also found that in the Fe-25Mn-xAl-8Ni-C alloy system, when the Al content increased from 9 wt.% to 14 wt.%, the microstructure of the alloy changed greatly, and more NiAl compounds were found in the alloy. The content of k-carbide phase was higher at the interface between austenite and NiAl compound, and stripe k-carbides also precipitated in austenite simultaneously. The mechanical properties were greatly reduced (when Al content increased to 14 wt.%, the tensile strength at room temperature decreased by 86.6% compared with the alloy with 9 wt.% Al content) [16]. Maruschak et al. systematically studied the strength, plasticity, and crack resistance of materials with and without defects [17,18]. Khalaj et al. developed a model to predict the toughness of high-strength low-alloy steel. The training and testing results in gene expression programming models have shown a strong potential for correlating the ultimate tensile strength to the yield strength and chemical composition of steels [19,20]. The corresponding conclusions can play a significant guiding role in the improvement of material properties.
An in situ tensile test is often used to observe the deformation and failure process of composites and multiphase alloys. The mechanism of deformation and failure is clarified by observing the microstructure evolution in different stages of the tensile process. It can explore the mechanism of crack initiation, propagation, and fracture, and provide a good theoretical basis for the improvement of material properties [21,22]. In situ scanning electron microscope (SEM) observation is an effective method to observe the tensile deformation and fracture process of materials [23].
Therefore, in this paper, in order to further explore the influence of Al content on the microstructure and properties of the alloy system, the effect of trace Al variation (10 wt.%, 11 wt.%, 12 wt.%, 13 wt.%) on the microstructure and properties of Fe-25Mn-xAl-8Ni-C alloy was studied. Additionally, the in situ tensile test in SEM was used to explore the crack propagation mechanism in the fracture process of the alloy, which can provide a significant theoretical foundation for the development and application of the alloy series.

2. Experimental Procedures

The raw materials used in this research were industrial pure iron (purity ≥ 99.99), electrolytic manganese tablets (purity ≥ 99.99), high-purity aluminum granules (purity ≥ 99.99), high-purity nickel granules (purity ≥ 99.99), and Fe-5C alloy (purity ≥ 99.99) provided by Beijing Yanbang New Materials Co. Ltd. (Beijing, China). The non-consumable vacuum arc melting equipment produced by Shenyang Jinyan New Material Preparation Technology Co. Ltd. (Shenyang, China) was used for smelting.
The melting process includes a vacuuming process and a melting process. During the vacuuming process, a mechanical pump was used to pump a low vacuum first, and then a molecular pump was used to pump a high vacuum. When the true space was 3 × 10⁻³ Pa, argon filling started. When the pressure indication reached 0.06 Pa, the charging valve was closed and smelting started. For the smelting process, before melting the alloy, pure titanium was melted in the furnace, so that the residual oxygen in the furnace was completely exhausted, and the iron-based alloy was melted in a copper crucible. During the melting process, the current of the arc gun increased gradually from the minimum value to 350 A, and the electromagnetic stirring switch was turned on at the same time. Each ingot was melted three times. The mold used in this experiment was a water-cooled copper crucible. Its shape is a hemispherical shell with a diameter of about 50 mm. There was cooling circulating water in the bottom and side wall of the copper crucible. After melting, the round cake-shaped ingot was removed after 20 min. The weight of each ingot was about 60–70 g.
The microstructure and elemental distribution of the Fe-xMn-14Al-8Ni-C alloys were investigated using a VEGA II XMU scanning electron microscope (SEM, TESCAN ORSAY HOLDING, Brno, Czech Republic). The phase of the composite was identified by X-ray diffraction with an XRD-6000 (Shimadzu, Japan), in which the scanning speed was 4 °/min, the range was 20°–90°, and the step length was 0.02 using Cu Ka radiation, and a JEOL JEM-2010 transmission electron microscope (TEM, JEOL, Tokyo Metropolitan, Japan). In situ tensile test requires a scanning electron microscope (QUANTAFEI 450) and a supporting in situ tensile table. The tensile rate was 1 mm/min, and the in situ tensile test bench and sample size are shown in Figure 1. The size of the in situ tensile sample was determined by referring to China Standard GB/T 228-2002 and the relevant research literature [24,25]. The in situ tensile samples obtained by wire cutting were polished with coarse sandpaper until the surface of the samples showed metallic luster, and were finely ground with 2000 mesh fine sandpaper until the surface of the sample had no obvious scratches. The sample was bonded with the metal block with hot melt adhesive. According to the metallographic sample preparation method, the in situ tensile sample was polished to show mirror luster, and heated again after being corroded by 10 v.% HNO3-distilled water reagent. Then, the residual hot melt adhesive on the surface of the sample was cleaned with acetone and alcohol. During in situ tension, the stress loading was stopped immediately and photos were taken. At the same time, the stress and strain were recorded.

3. Results

3.1. Microstructure

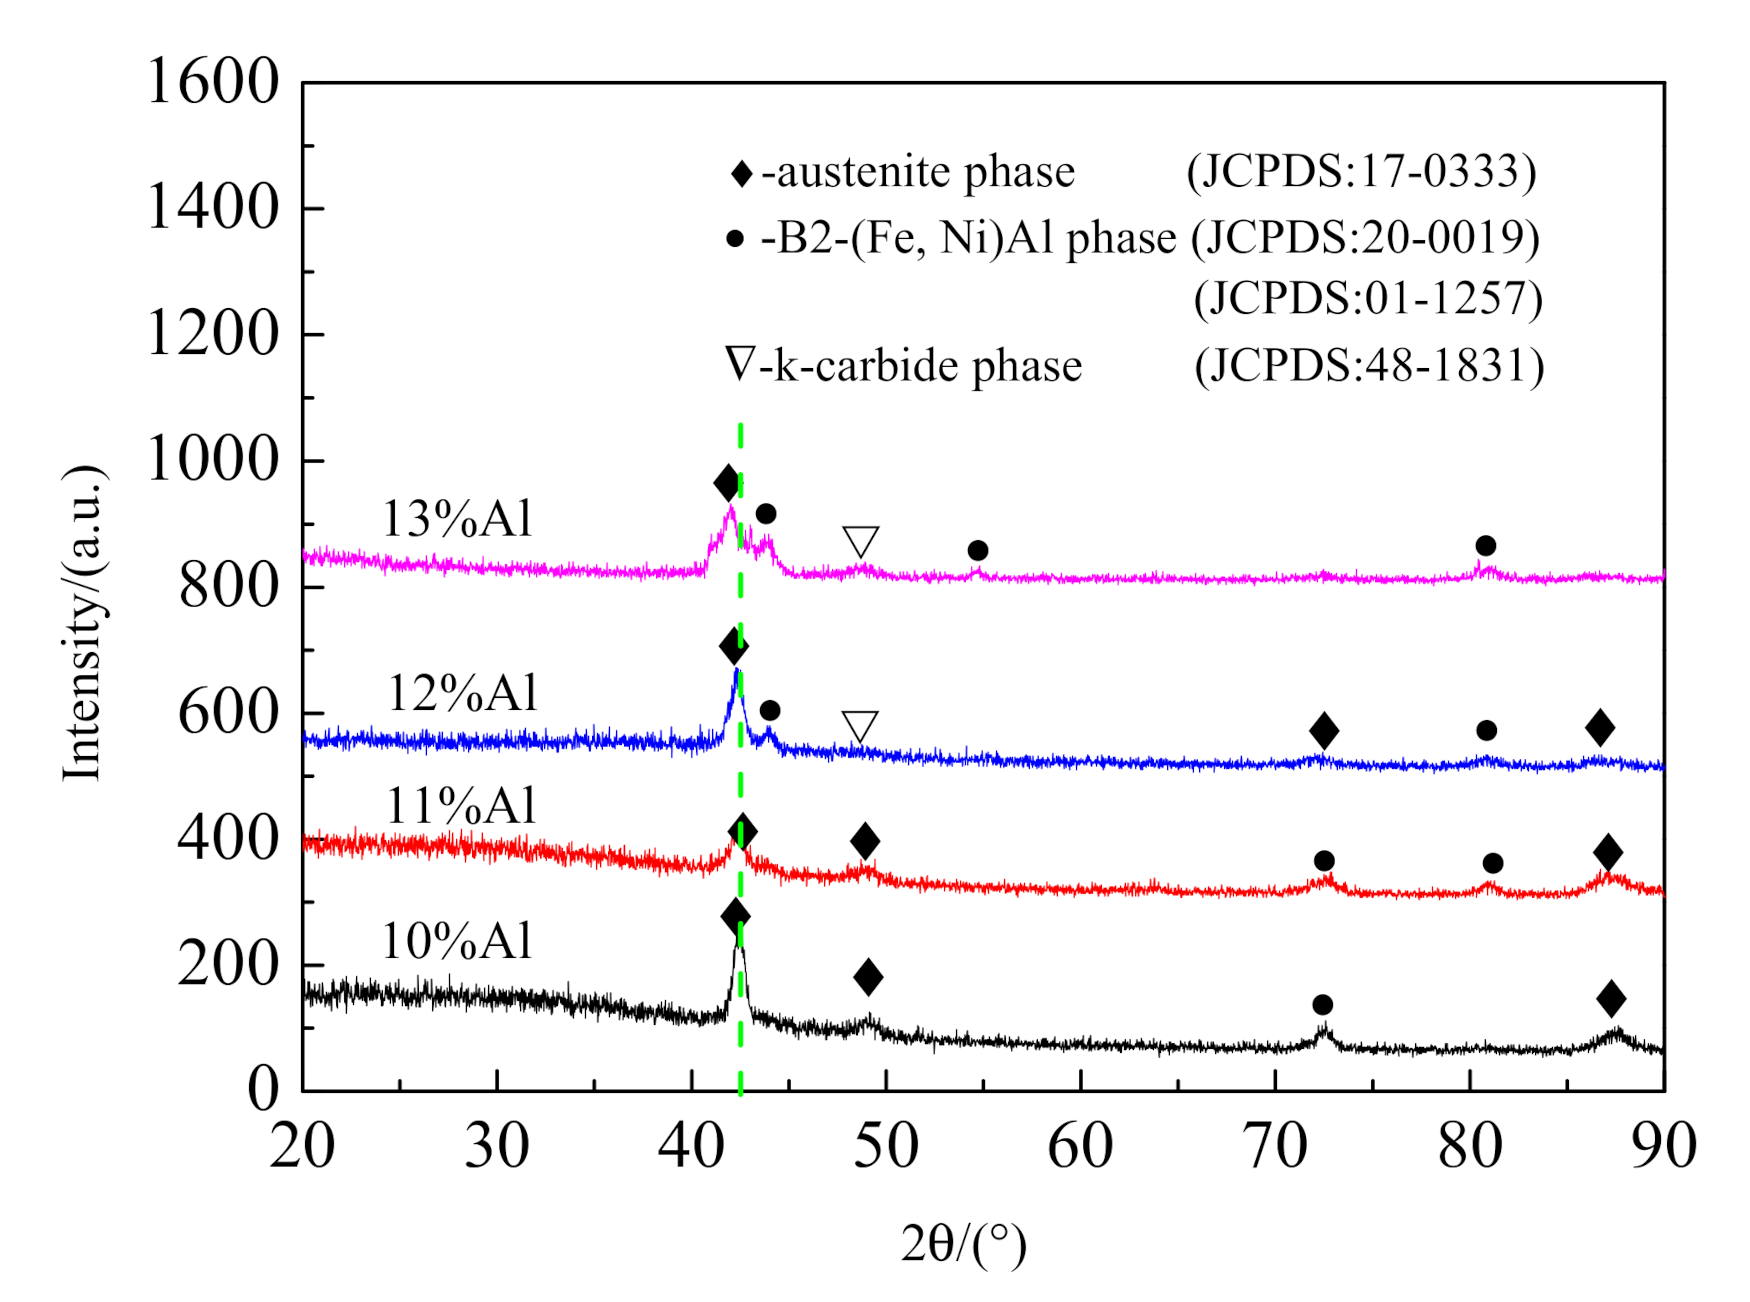
XRD analysis of Fe-25Mn-xAl-8Ni-C alloy was carried out and the results are shown in Figure 2. It can be seen from Figure 2 that the alloy mainly contains austenite (JCPDS: 17-0333), B2-(Fe,Ni)Al phase (JCPDS: 20-0019) (JCPDS: 01-1257). When the Al content reached 12 wt.%, the diffraction peak of k-carbide (JCPDS: 48-1831) appeared. With the increase in Al content, the intensity of the austenite diffraction peak corresponding to 42.1° and the B2-(Fe,Ni)Al phase diffraction peak corresponding to 80.9° increased. When Al content was 13 wt.%, the diffraction peak increased most obviously. It can be seen from Figure 2 that with Al content increasing, the diffraction peak of austenite shifted to the low-angle direction (as shown by the green dotted line), which proves that more Al elements were solidly dissolved in the austenite phase.
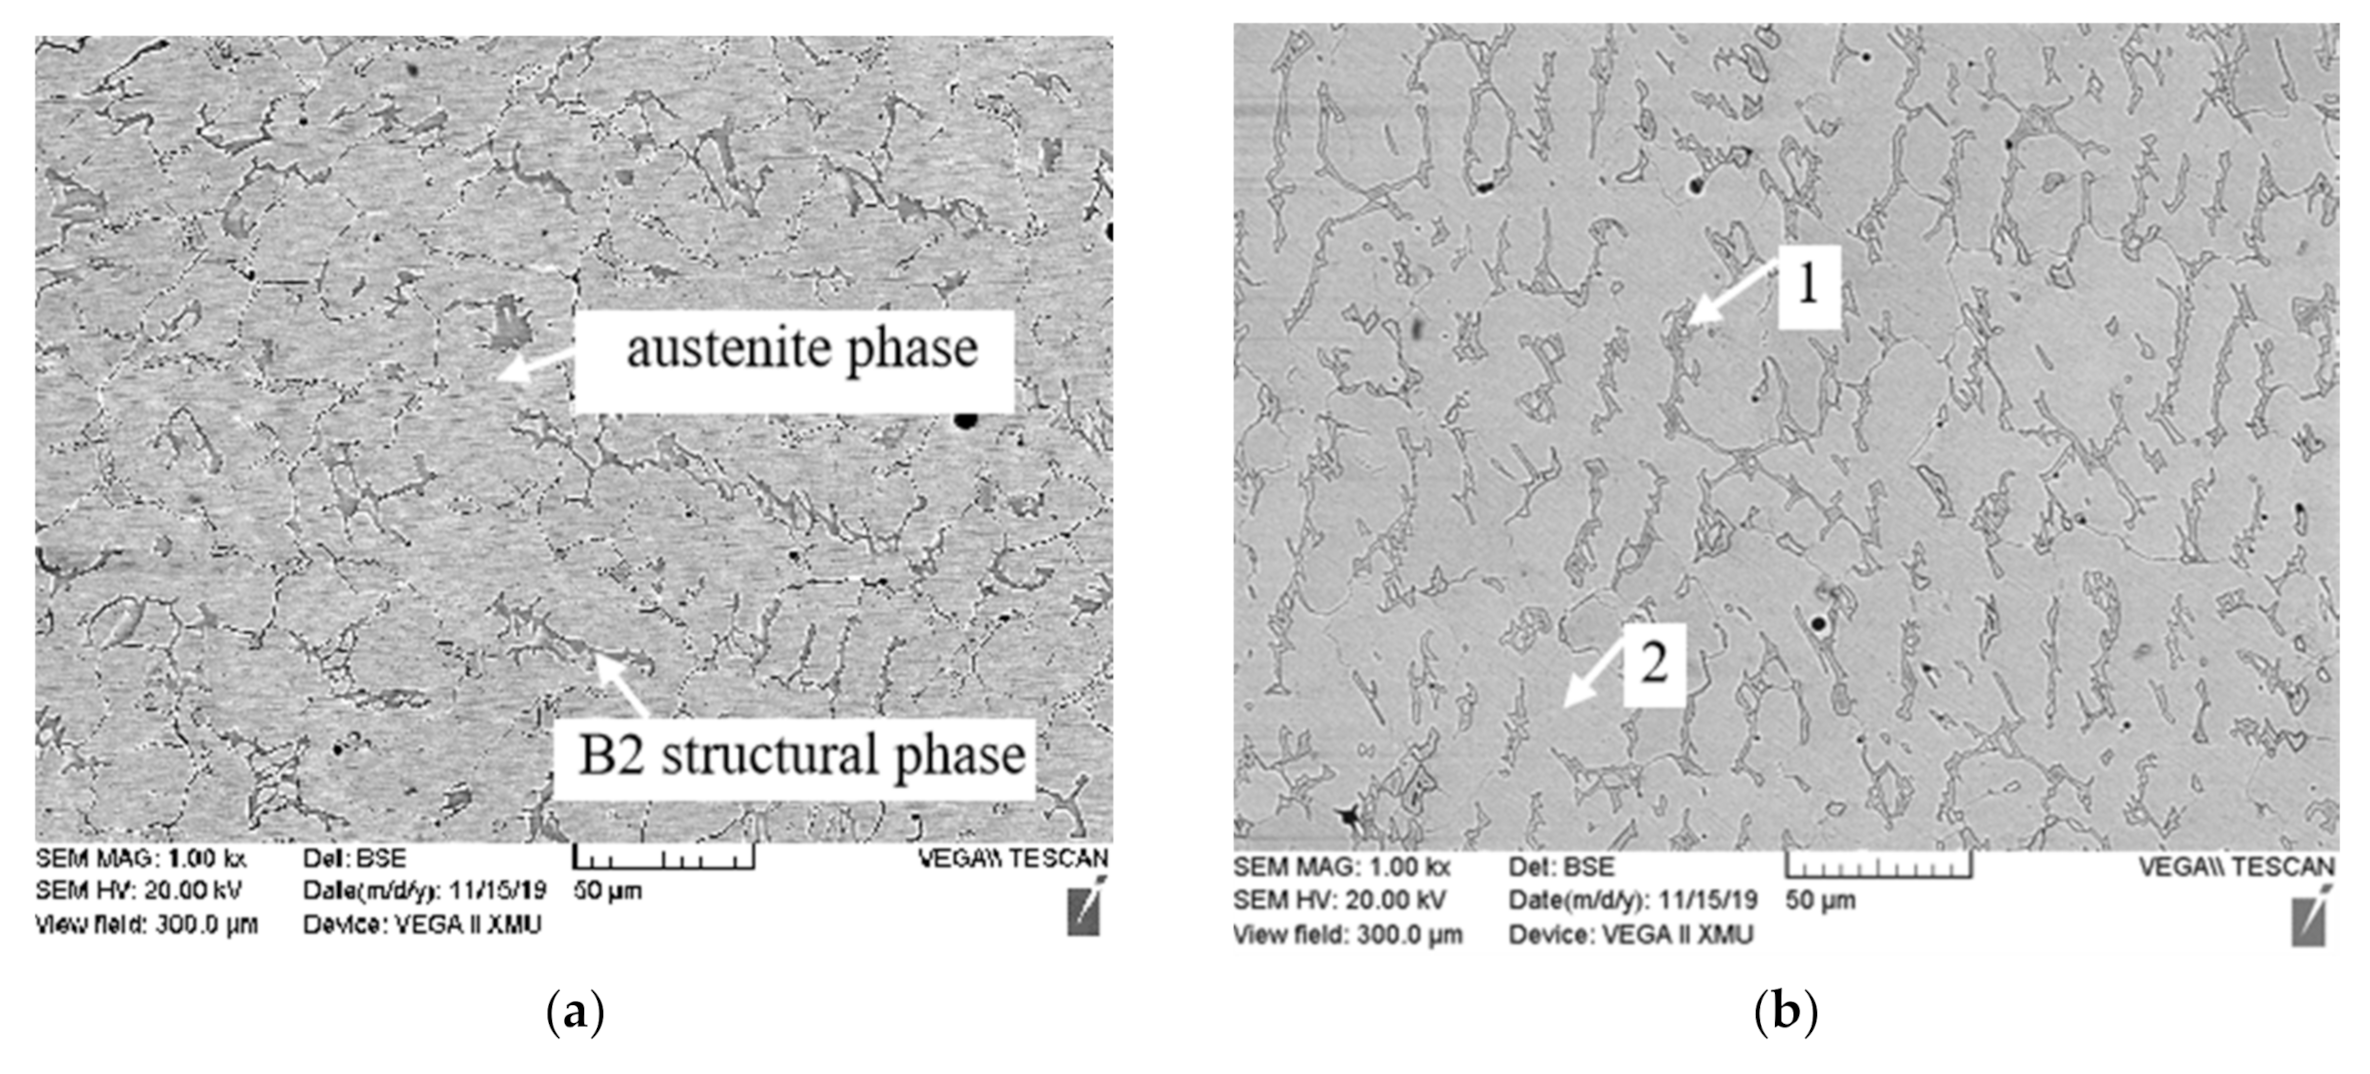
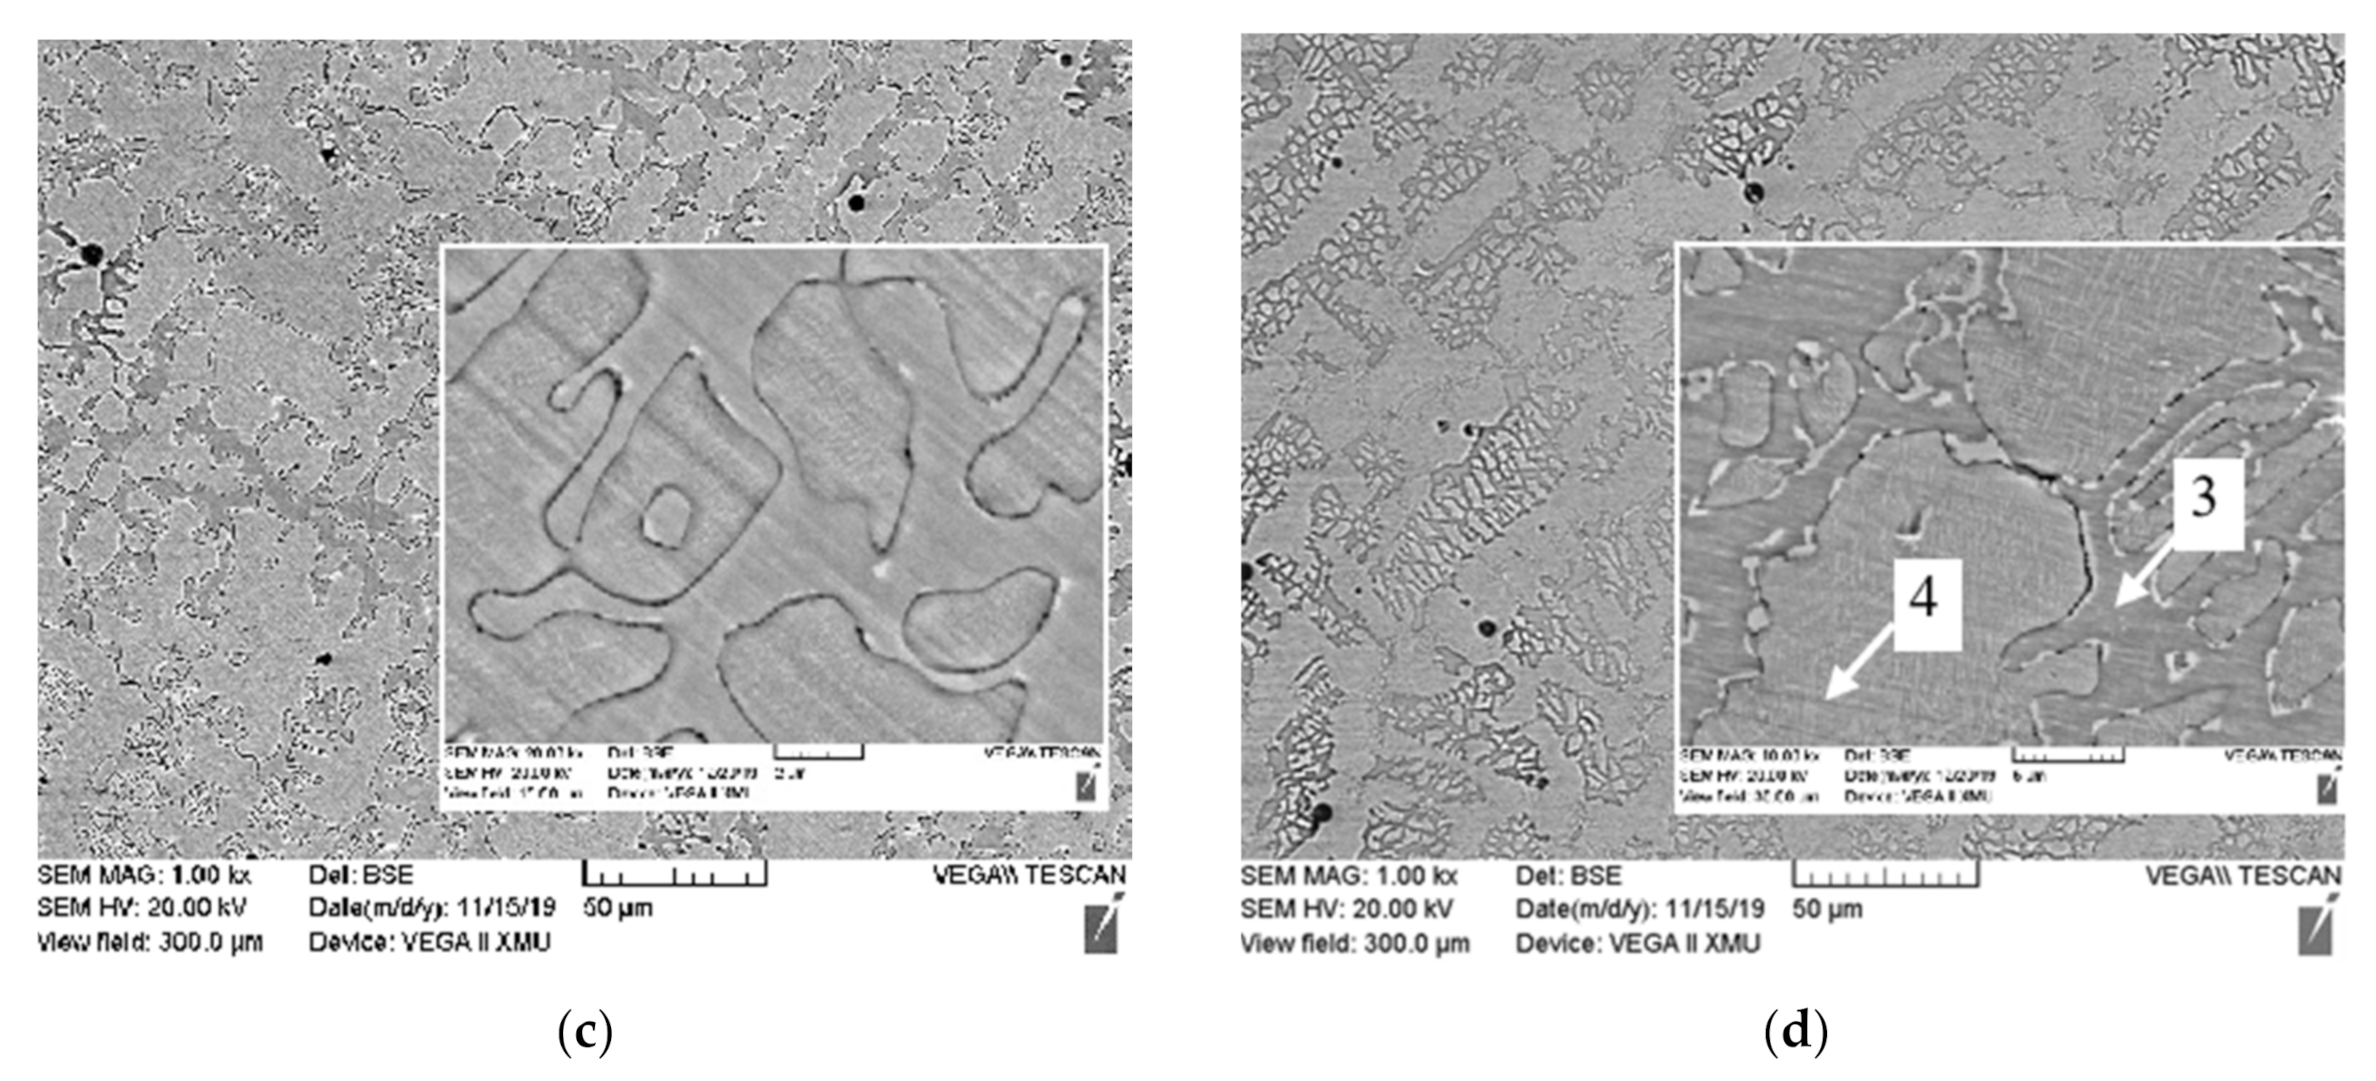
Figure 3 shows the microstructure of Fe-25Mn-xAl-8Ni-C alloy with Al contents of 10 wt.%, 11 wt.%, 12 wt.%, and 13 wt.%. It can be seen from Figure 3 that the microstructure of the alloy has mainly three phases: a dark gray phase, light gray phase, and white phase. With the increase in Al content, the amount of dark gray phase increases. When the Al content reaches 12 wt.%, a small amount of white phase precipitates. When the Al content increases to 13 wt.%, the amount of white phase increases obviously, and is mainly distributed at the interface between the dark gray phase and light gray phase. Table 1 shows the EDS analysis of the Fe-25Mn-xAl-8Ni-C alloy in Figure 3. Combined with EDS analysis in Figure 3b,d, the Ni and Al contents of points 1 and 3 are higher than those of points 2 and 4, and with the increase in Al content, the diffraction peak of B2-(Fe,Ni)Al increases (as shown in Figure 2), and it is inferred that the dark gray phase is a B2 structural phase (rich in B2-NiAl/B2-FeAl). In addition, the contents of Fe and Mn in point 2 and point 4 are higher than those in point 1 and point 3, suggesting that the light gray phase is austenite matrix. Combined with the results of XRD analysis, the diffraction peak of k-carbide appears when the Al content reaches 12 wt.%. Therefore, it can be inferred that the white phase in Figure 3c,d is k-carbide. The precipitation of k-carbide can seriously affect the overall mechanical properties of high-aluminum light steel [26].
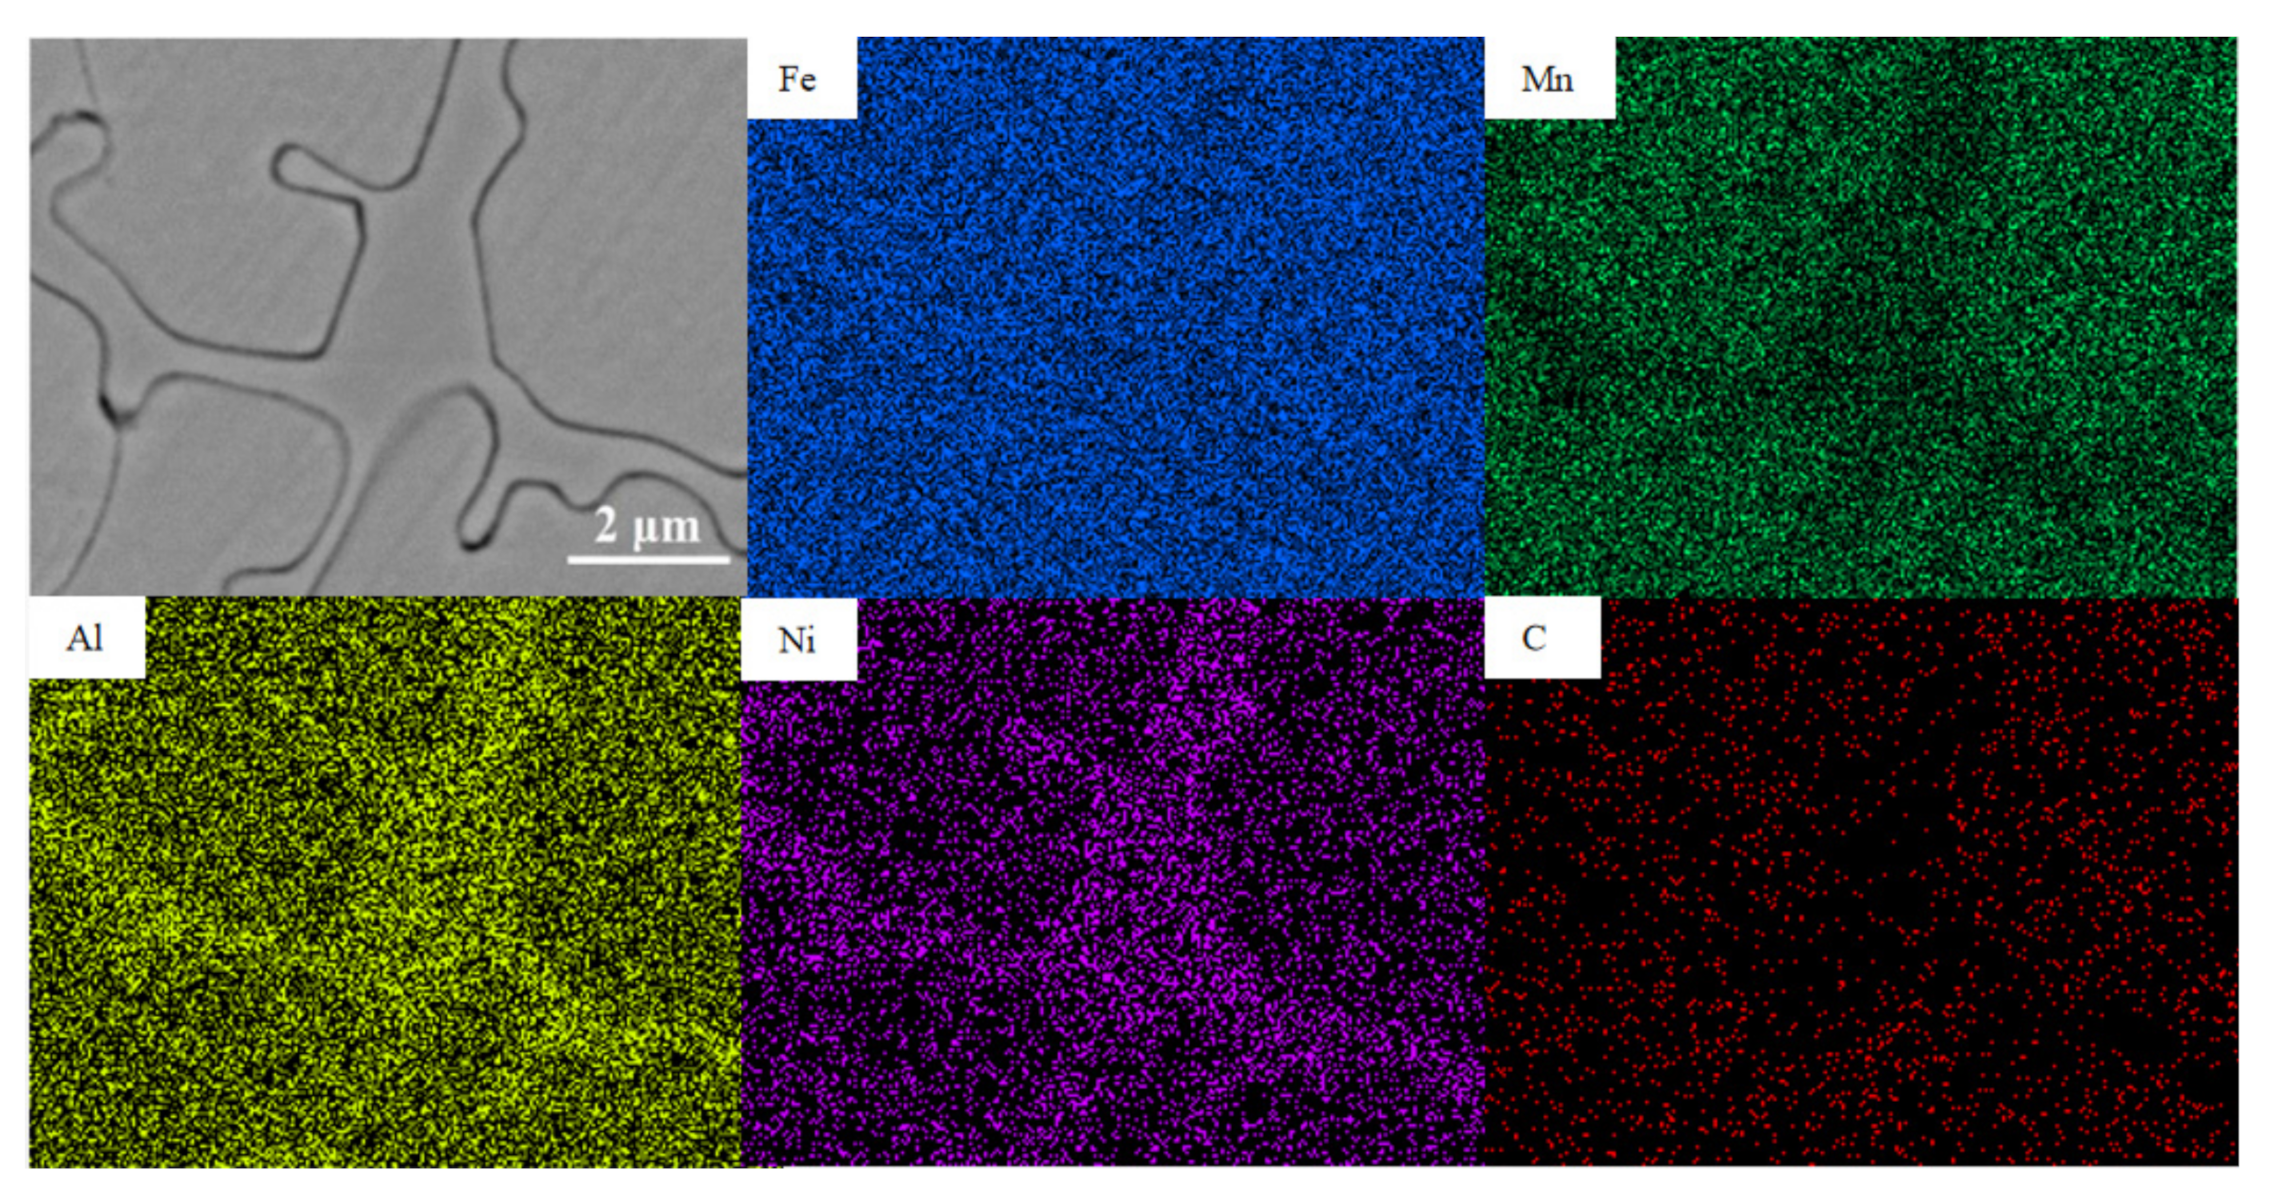
In order to further observe the distribution of each phase in Fe-25Mn-12Al-8Ni-C, the element surface scanning results of Figure 3c are shown in Figure 4. It can be concluded that the distribution of Fe elements is relatively uniform, and the distribution of Ni and Al in dendrite is relatively high, which is NiAl compound phase, corresponding to points 1 and 3 in Figure 3. The content of Mn and C in matrix phase is higher, which is austenite phase, corresponding to points 2 and 4 in Figure 3, which is consistent with the EDS test results.
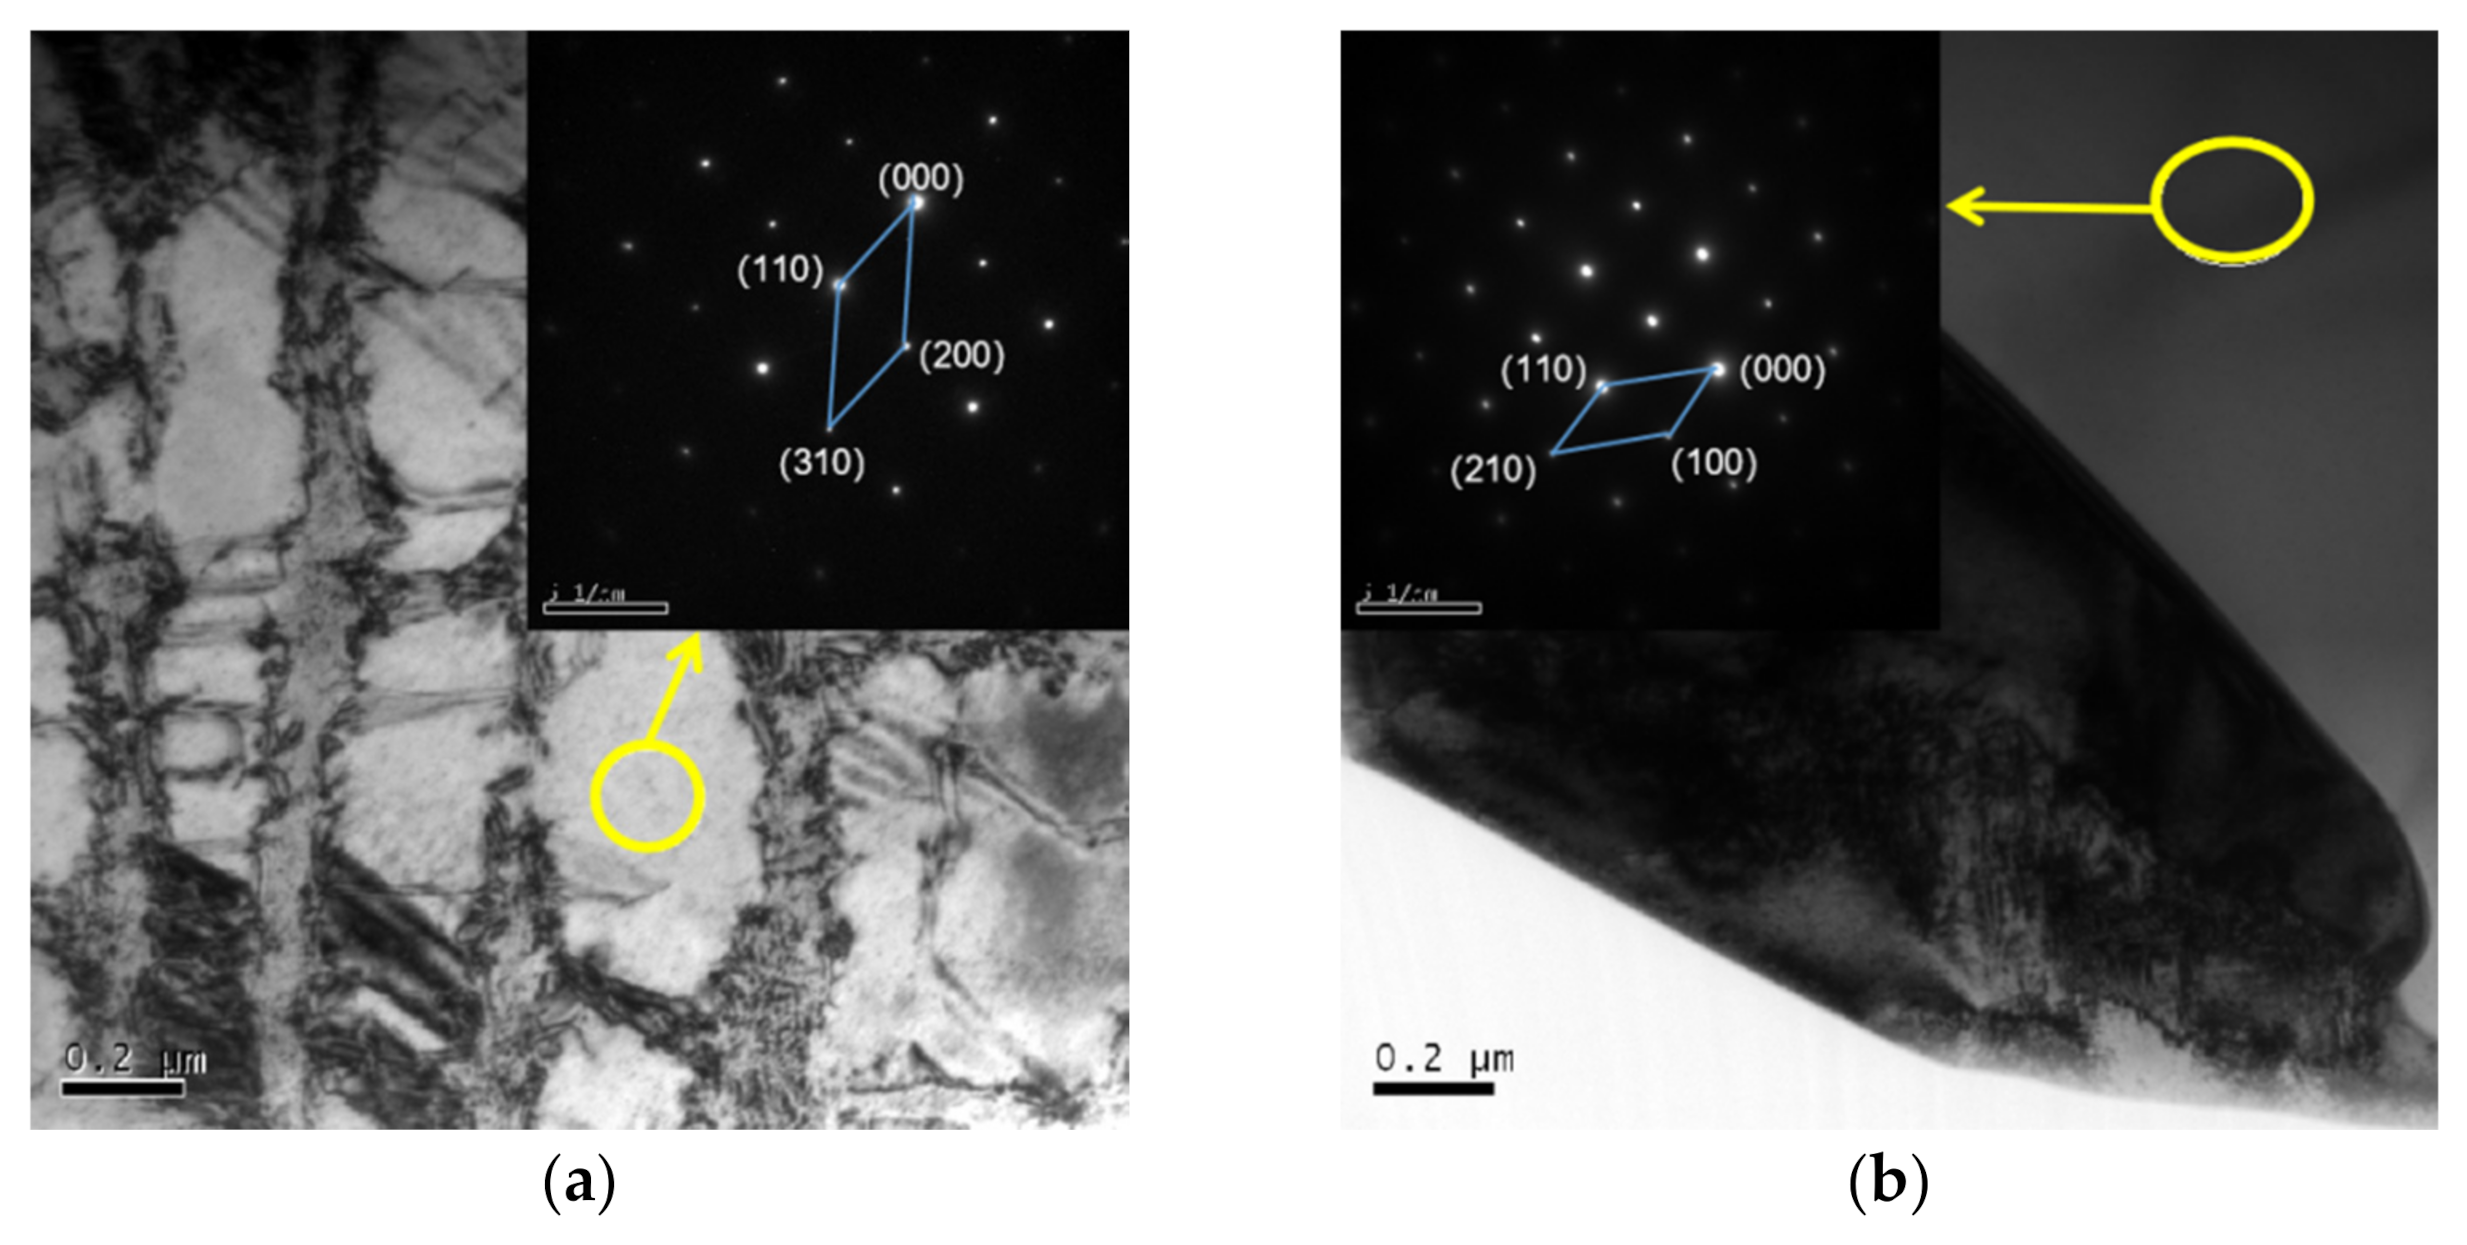
The phase in Fe-25Mn-10Al-8Ni-C alloy was analyzed by TEM, and the microstructure photos and diffraction spots were obtained, as shown in Figure 5. It can be seen from Figure 5 that there is austenite phase and NiAl phase in Fe-25Mn-10Al-8Ni-C, which indicate that austenite has an ordered transformation, and the two phases are closely combined. Figure 5a shows the microstructure and diffraction spots of austenite phase, and Figure 5b shows the microstructure and diffraction spots of NiAl phase.
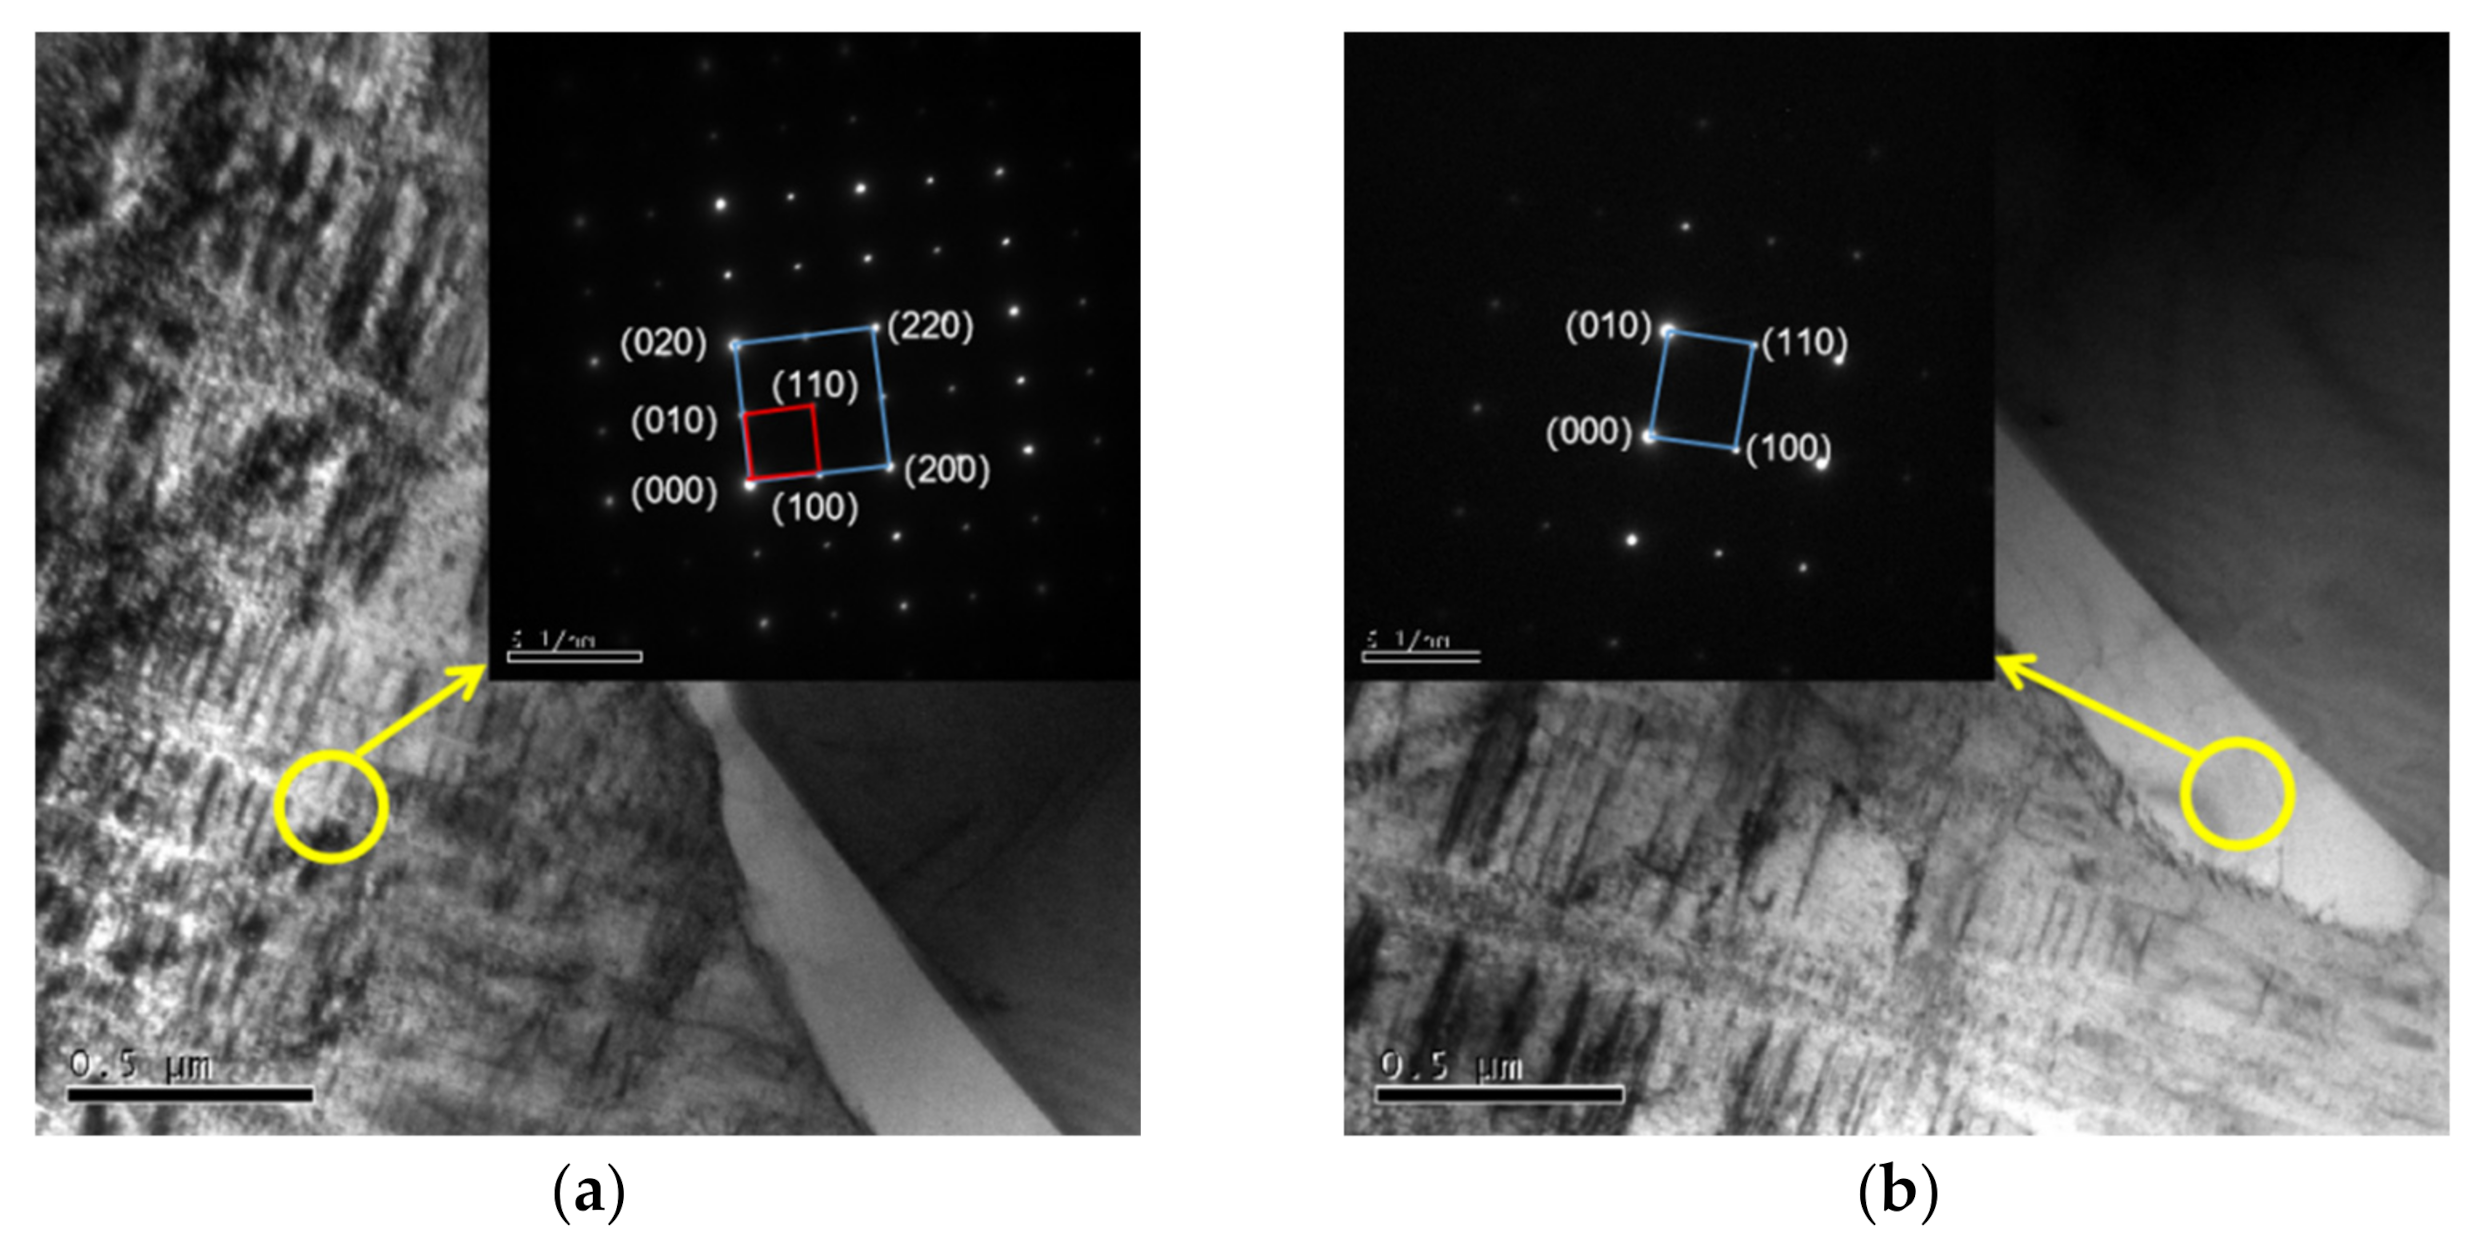
The phase in Fe-25Mn-13Al-8Ni-C alloy was analyzed by TEM, and the microstructure photos and diffraction spots were obtained, as shown in Figure 6. It can be seen from Figure that there is austenite phase, NiAl compound phase, and k-carbide phase in Fe-25Mn-13Al-8Ni-C. The k-carbide is precipitated at the interface between austenite and NiAl compound. The results show that the interface between cemented carbide and the adjacent two phases is obvious and the bonding is good. It can be seen from Figure 6a that the diffraction spots are a superlattice structure, with bright spots corresponding to ordered austenite phase and dark spots corresponding to k-carbide phase. Figure 6b shows the microstructure and diffraction spots of k-carbide. The results show that when the content of Al is 13 wt.%, the austenite gradually becomes ordered, and a small amount of k-carbide precipitates in austenite.
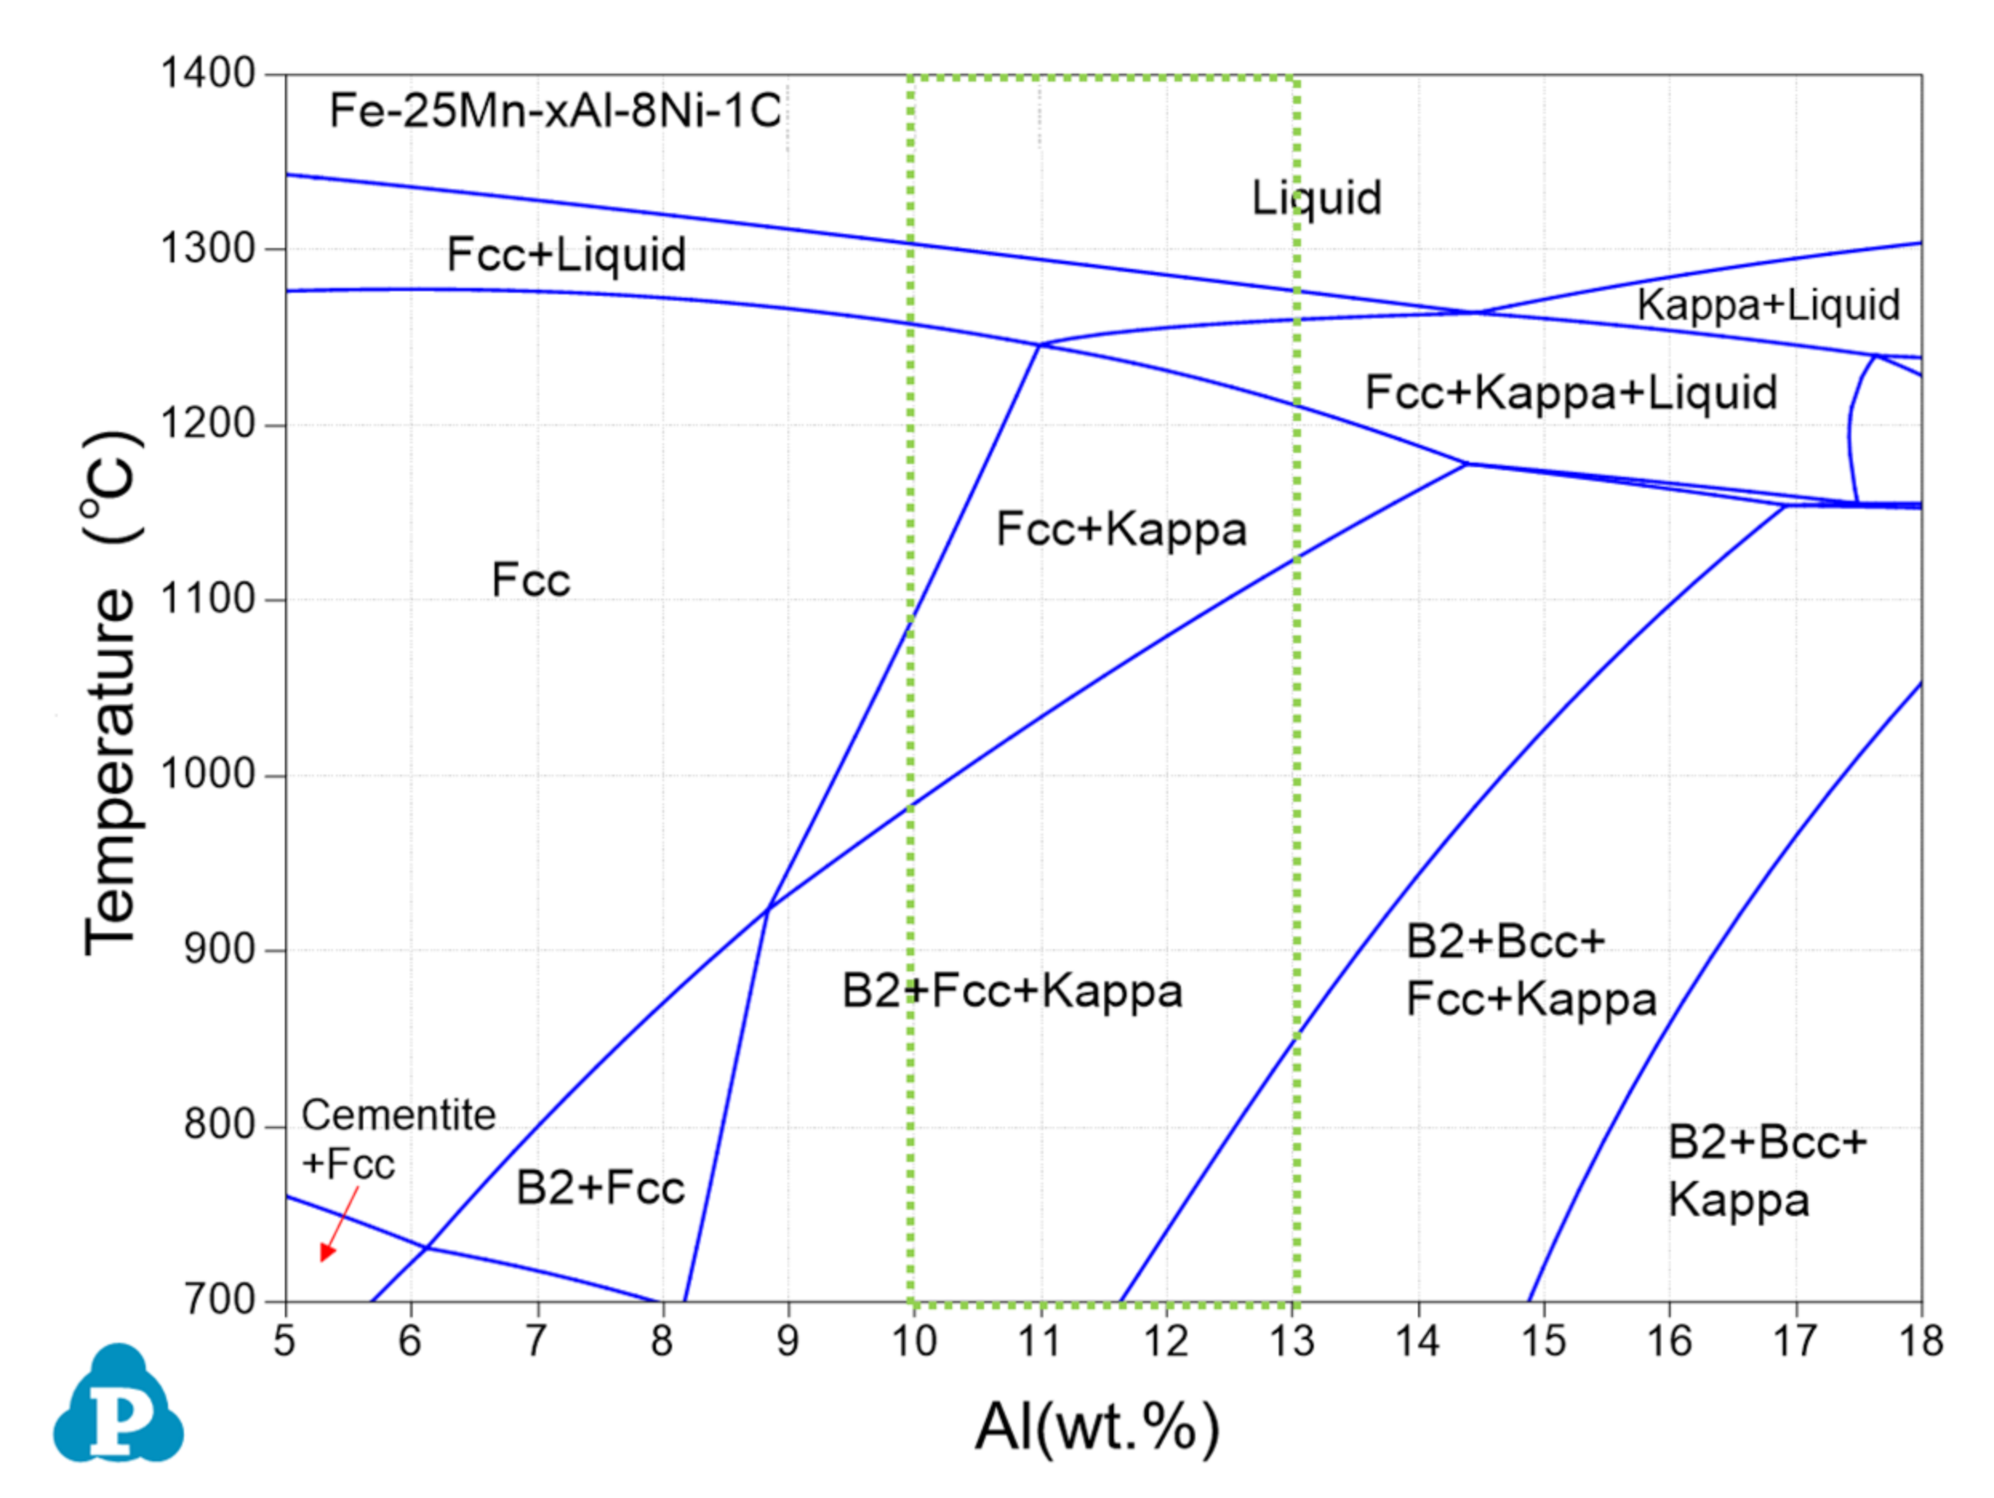
Figure 7 shows the binary phase diagram of Fe-25Mn-xAl-8Ni-C alloy simulated by Pandat software. In the process of vacuum arc melting, the element Mn is volatilized (it is verified preliminarily that the amount of Mn volatilization is nearly 20 wt.%.), making the actual value of Al content higher than the theoretical value, so the mass percentage range of Al in Figure 7 (the area shown by the dotted line in the phase diagram) moves to the right. In addition, during the cooling process, the alloy solution retains the high-temperature structure. Therefore, it can be seen from Figure 7 that in Fe-25Mn-xAl-8Ni-C alloy, when the Al content reaches a certain level, k-carbides precipitate, which affects the mechanical properties of the alloy. This is consistent with the conclusion of this experiment.

3.2. Mechanical Properties

Table 2 shows density and Rockwell hardness of Fe-25Mn-xAl-8Ni-C alloy with different Al contents. With the increase in Al content, the density of the alloy decreases and the hardness gradually increases. The reason is that Al is a light element, which reduces the alloy density when added to the alloy. With the increase in Al content, the NiAl composite phase in the alloy increases, and the hardness of the alloy further increases.
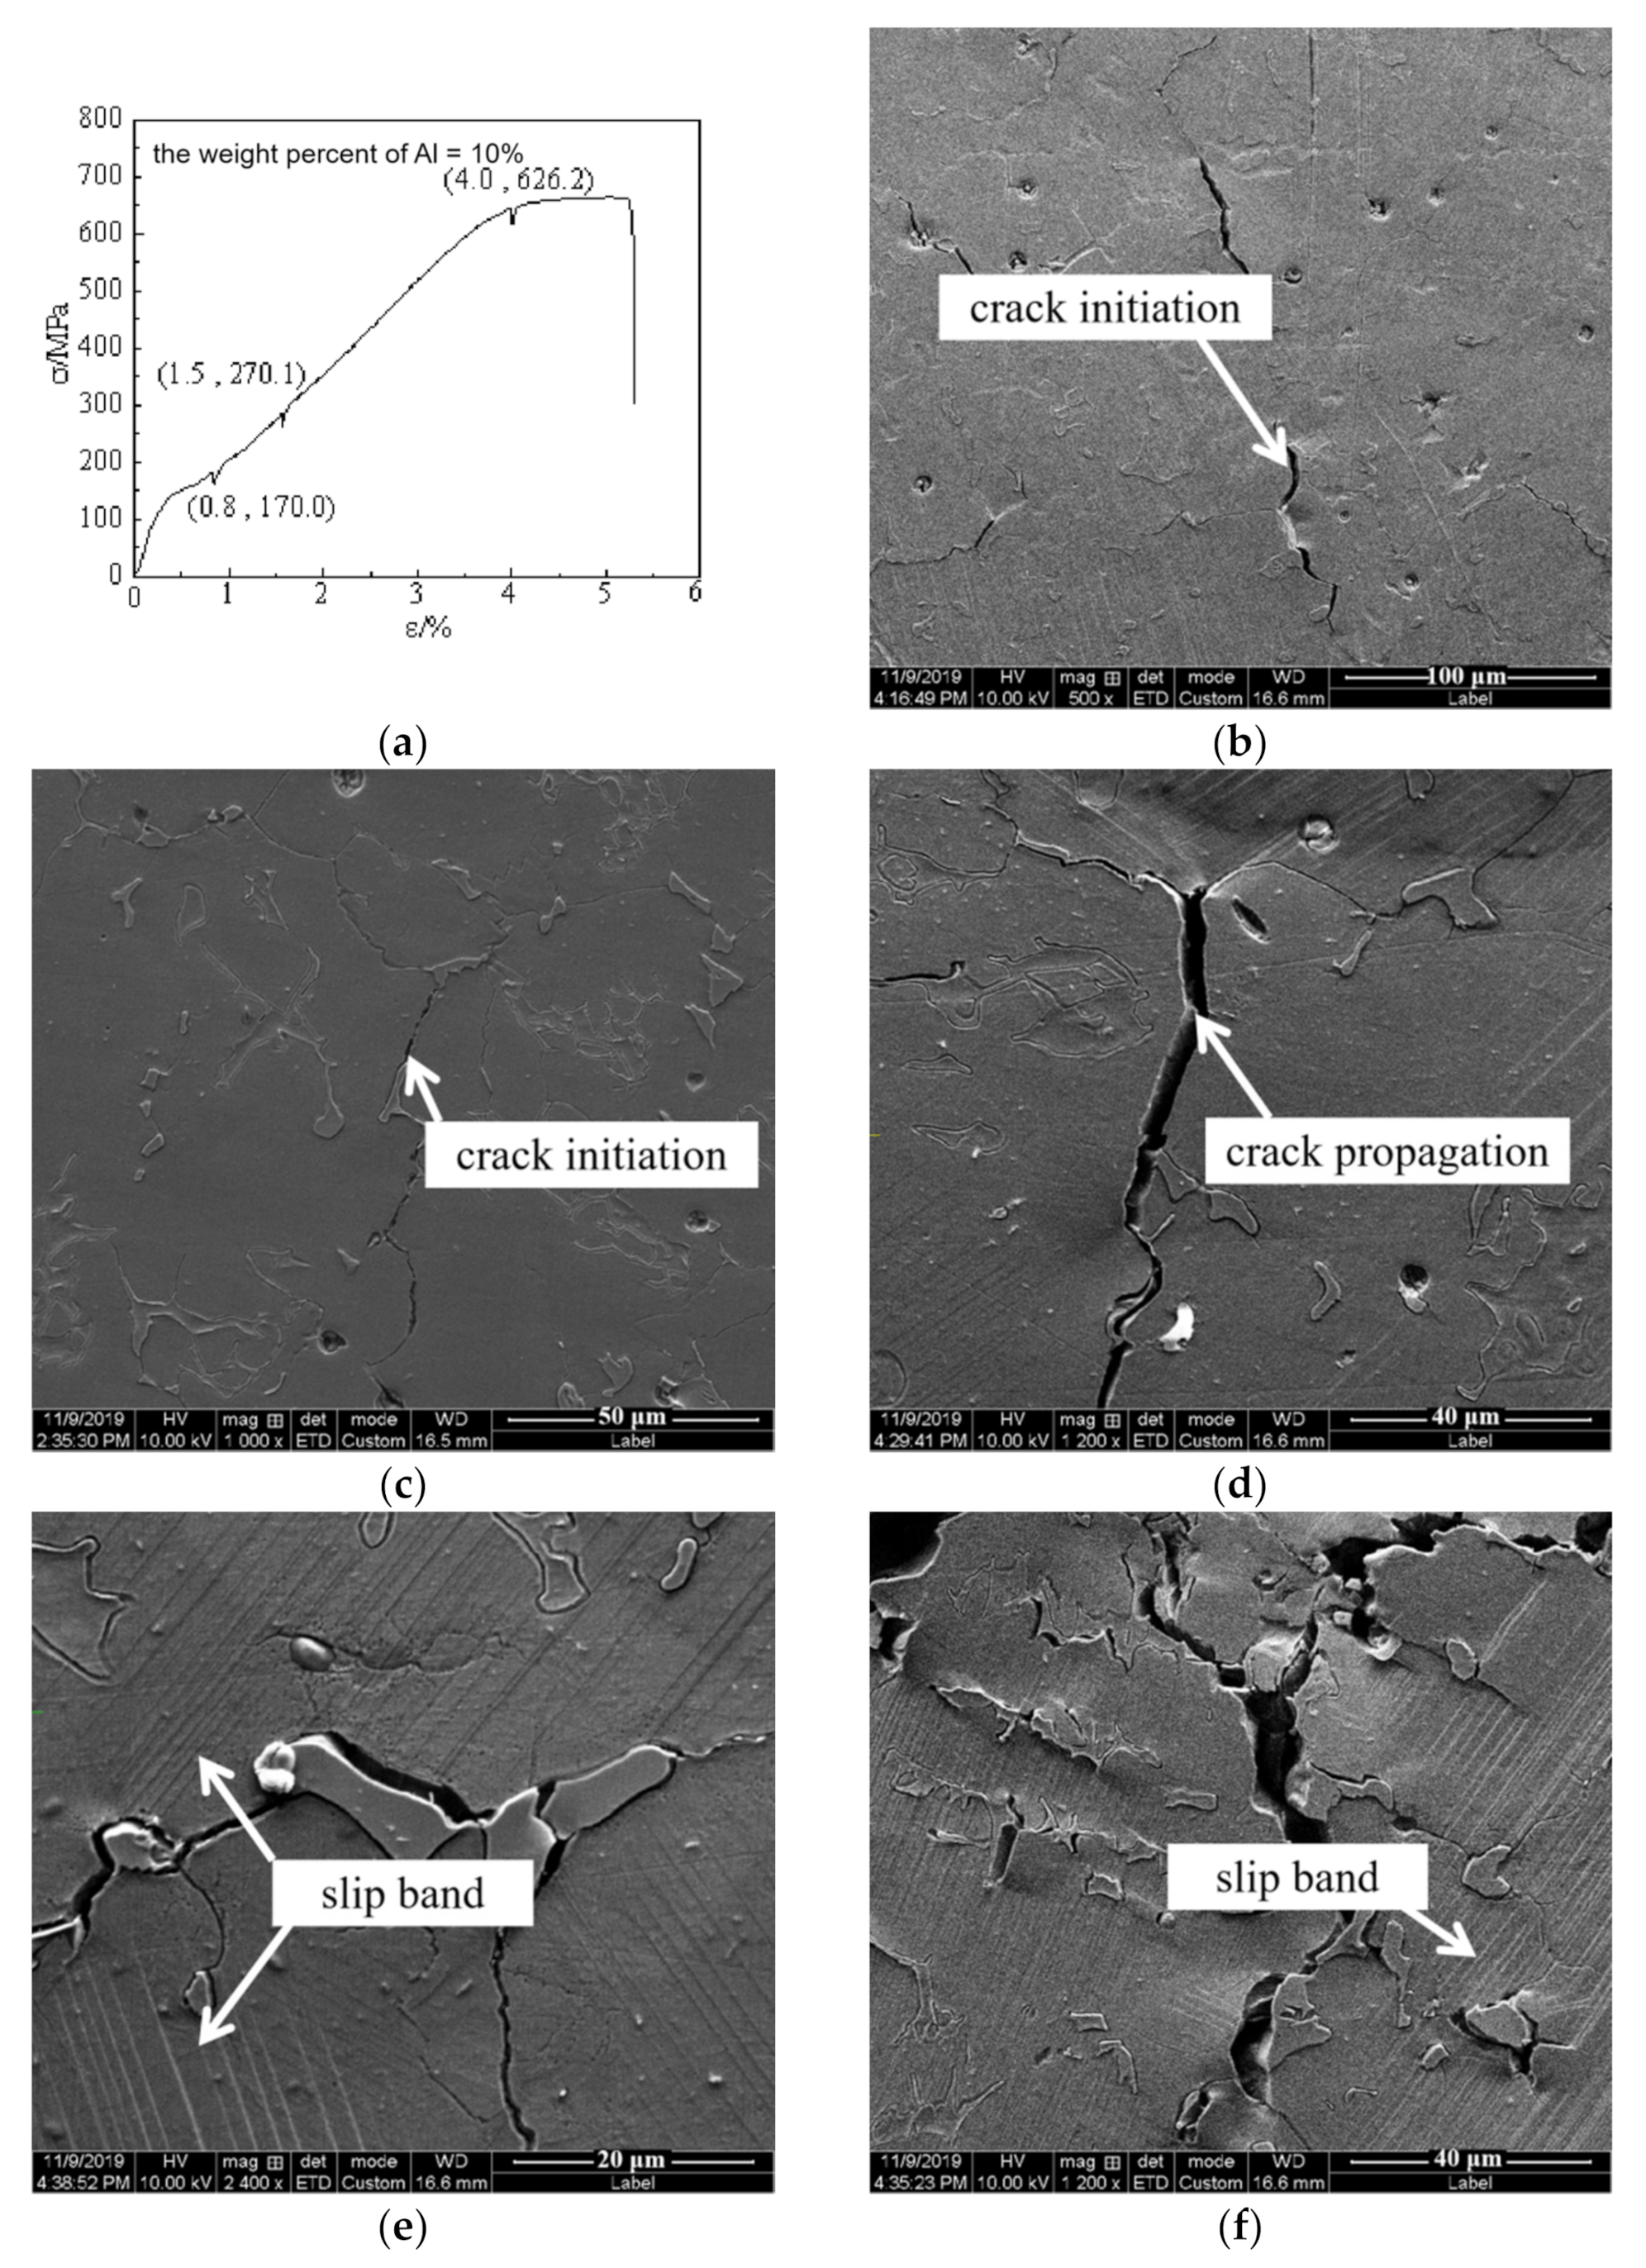
Figure 8 shows the dynamic evolution process of the crack evolution process in Fe-25Mn-10Al-8Ni-C alloy under in situ tensile load. Figure 8a shows the stress–strain curve during the tensile process. The strain of the alloy is 4.1% and the tensile strength is 664.4 MPa. Figure 8b,c correspond to the microstructure morphology when the strain is ε = 0.8% and the stress is σ = 170.0 MPa. It can be seen from the figure that there are many microcracks, which mainly occur at the interface between NiAl compound and austenite, and also at the interface between austenite and austenite grain, and the slip line in austenite is not obvious. When the strain increases to ε = 1.5% and the stress increases to σ = 270.1 MPa, the result is shown in Figure 8d,e, as cracks further propagate along the grain boundaries, and microcracks develop into larger intergranular cracks. In Figure 8e, NiAl compound separates from austenite to form a gap at the crack. At the same time, there are many groups of slip bands along the direction of 45° with the tensile axis, and the slip lines are parallel to each other, only existing in austenite. This indicates that dislocations in austenite grains begin to slip. According to the relevant data, it is determined to be basal slip [27,28]. When the strain increases to 4.0%, the stress increases to 626.2 MPa. It can be seen in Figure 8f that the cracks of austenite and NiAl compounds become wider and more microcracks are generated near the main cracks. This is because the austenite phase in the alloy has good plasticity, and the deformation of austenite is more obvious in the tensile process. NiAl compound has higher strength and is not easy to deform. Therefore, cracks appear between austenite and NiAl compound phase, which finally lead to the fracture of the alloy.
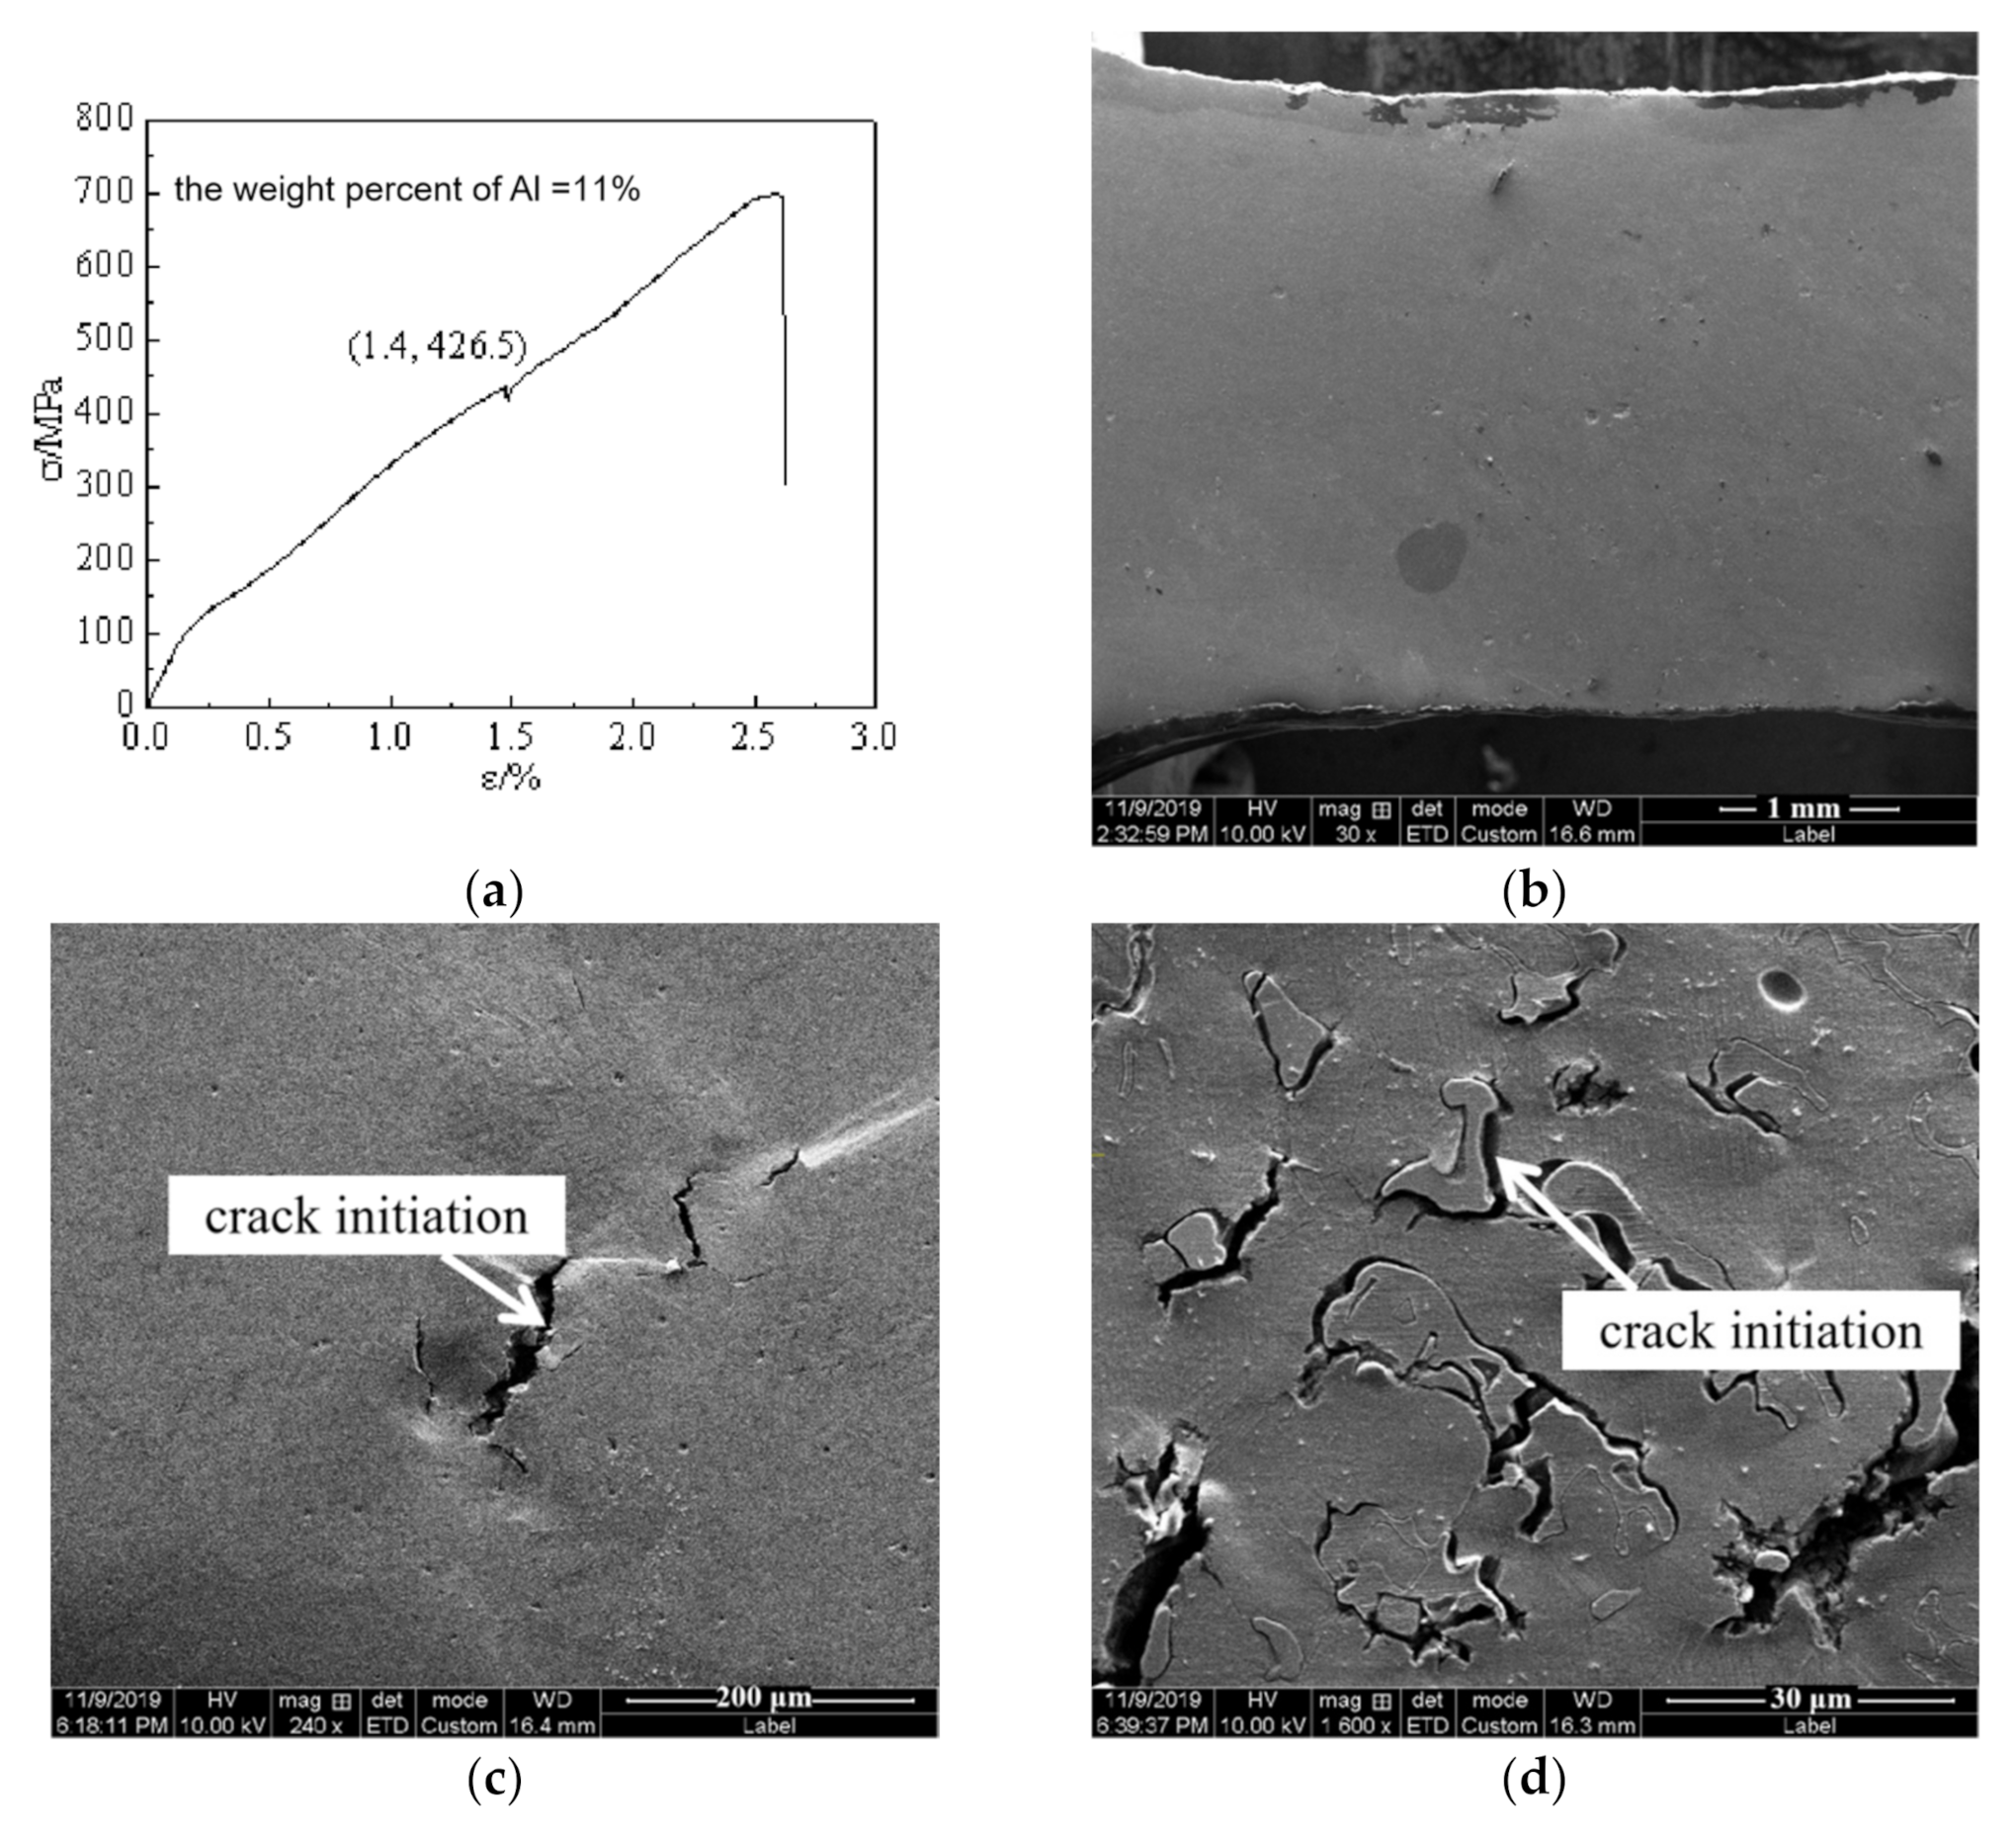
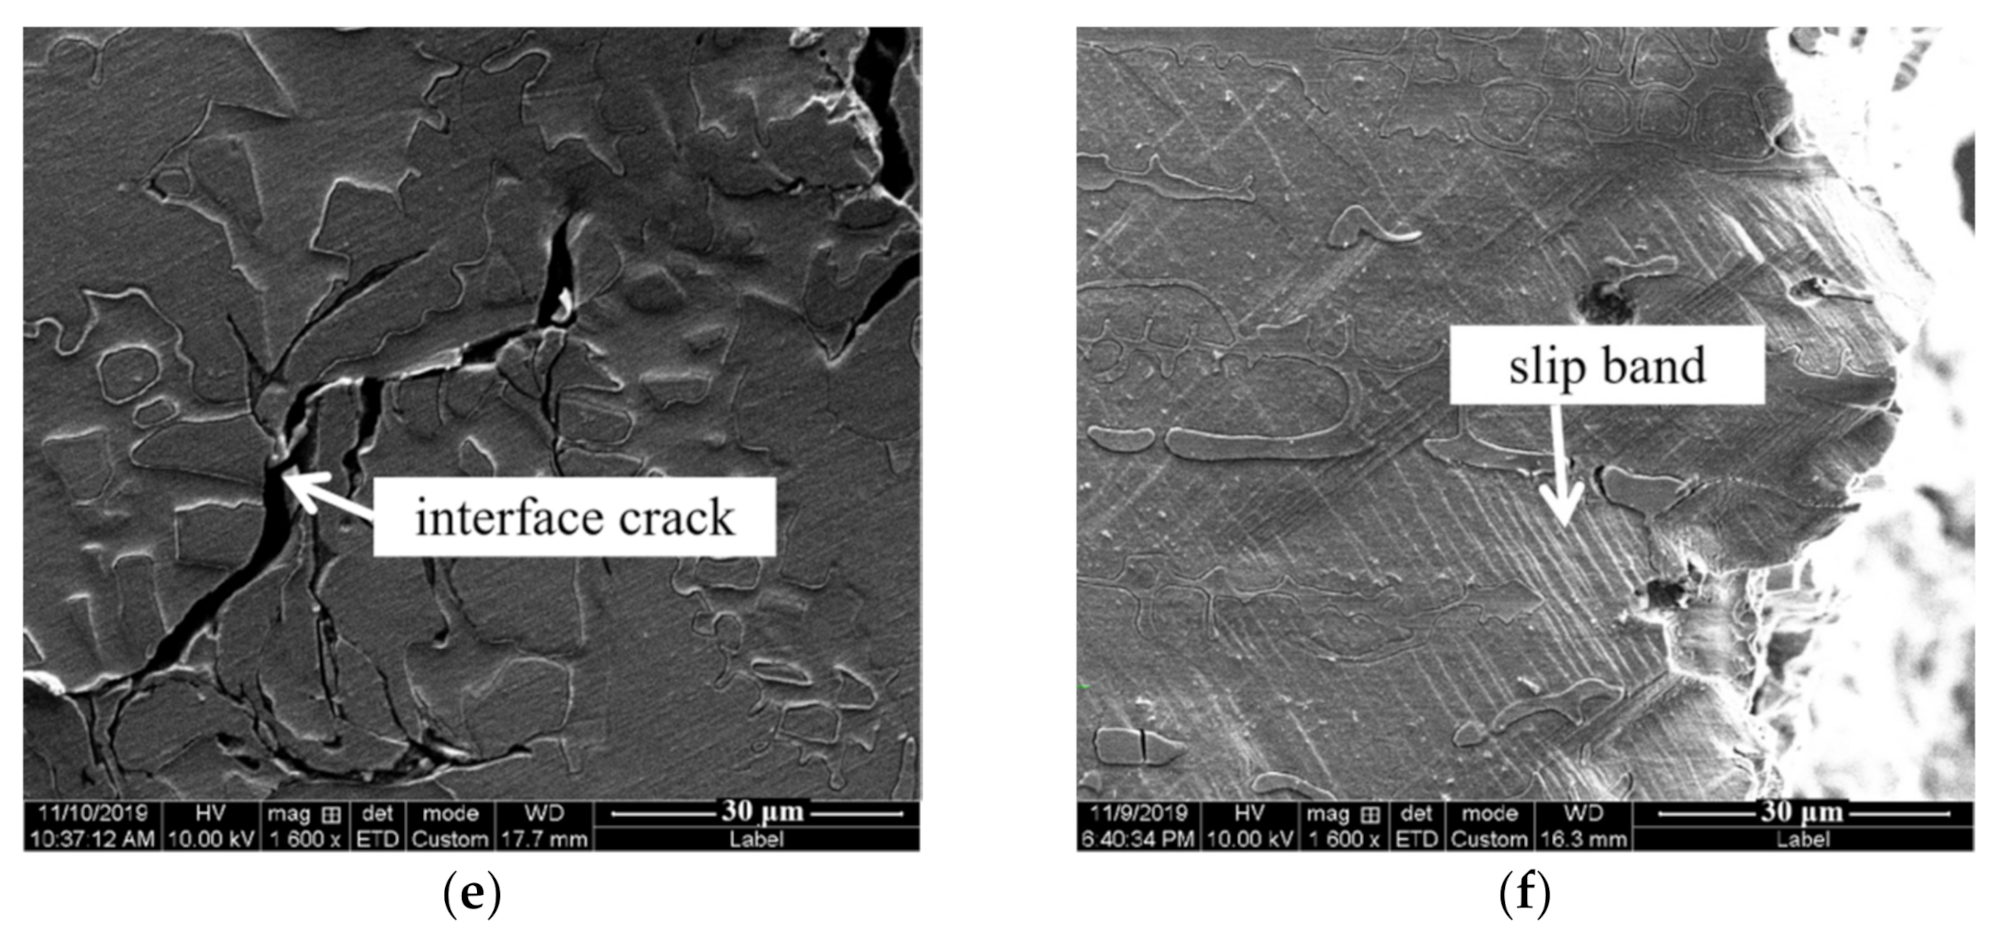
The crack evolution of Fe-25Mn-11Al-8Ni-C alloy is studied, and the results are shown in Figure 9. Figure 9a shows the stress–strain curve of the alloy, with an elongation of 2.6% and a tensile strength of 702.5 MPa. Compared with the alloy with 10 wt.% Al content, the elongation is reduced by 1.5%, and the tensile strength is increased by 58.1 MPa. With the increase in Al content, the amount of NiAl compound increases gradually, the elongation decreases, and the tensile strength increases. Figure 9b shows the surface morphology of stress-free tensile specimens, and the treated specimen surface is smooth and free from defects. Figure 9c shows that cracks appear in the specimen when the strain is σ = 426.5 MPa and the stress is ε = 1.4%. The cracks are observed with a scanning electron microscope at high magnification. Figure 9d,e show that cracks first occur at the interface between austenite and NiAl compound, and gradually expand and widen under the action of increasing stress, so that the NiAl compound is separated from the austenite matrix. When the stress reaches a certain value, all cracks pass through austenite and connect, which eventually leads to alloy fracture. Figure 9f shows the micro-morphology near the fracture surface of the alloy, and some NiAl compound phases near the fracture surface break in the middle. This is due to the good plasticity of austenite and low energy required for crack propagation, so it is beneficial to crack propagation, however, the NiAl compound has high hardness and high strength. When the crack propagates to the interface between two phases, the energy accumulates with the continuous increase in stress, which eventually leads to NiAl compound phase fracture. At the same time, there is a double slip phenomenon near the fracture, perpendicular to each other and oriented 45° to the tensile axis. There are many parallel slip lines in each slip system. Most of these slip lines are distributed in austenite, indicating that more slip systems are started in austenite. Compared with the alloy content of 10 wt.% Al, the slip lines on the surface of the sample are smaller, which indicates that the plasticity of the alloy decreases with the increase in Al content.
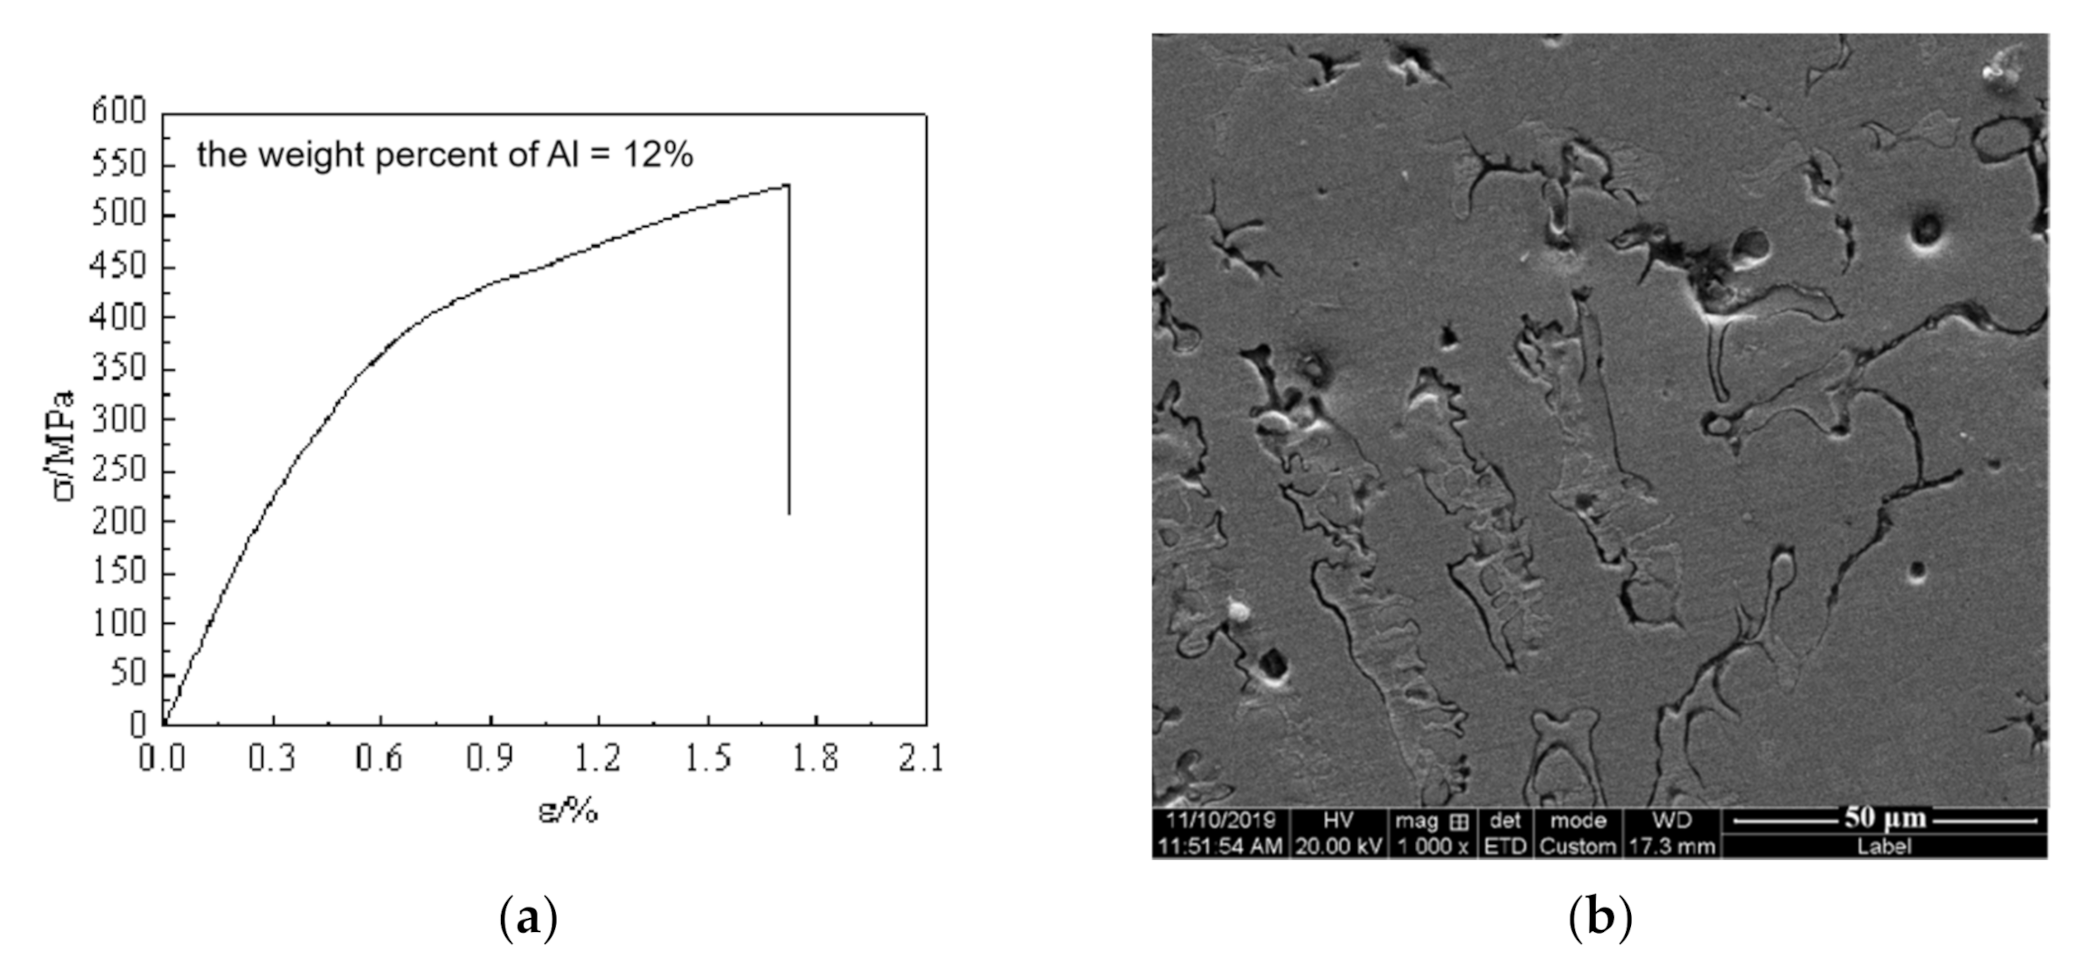
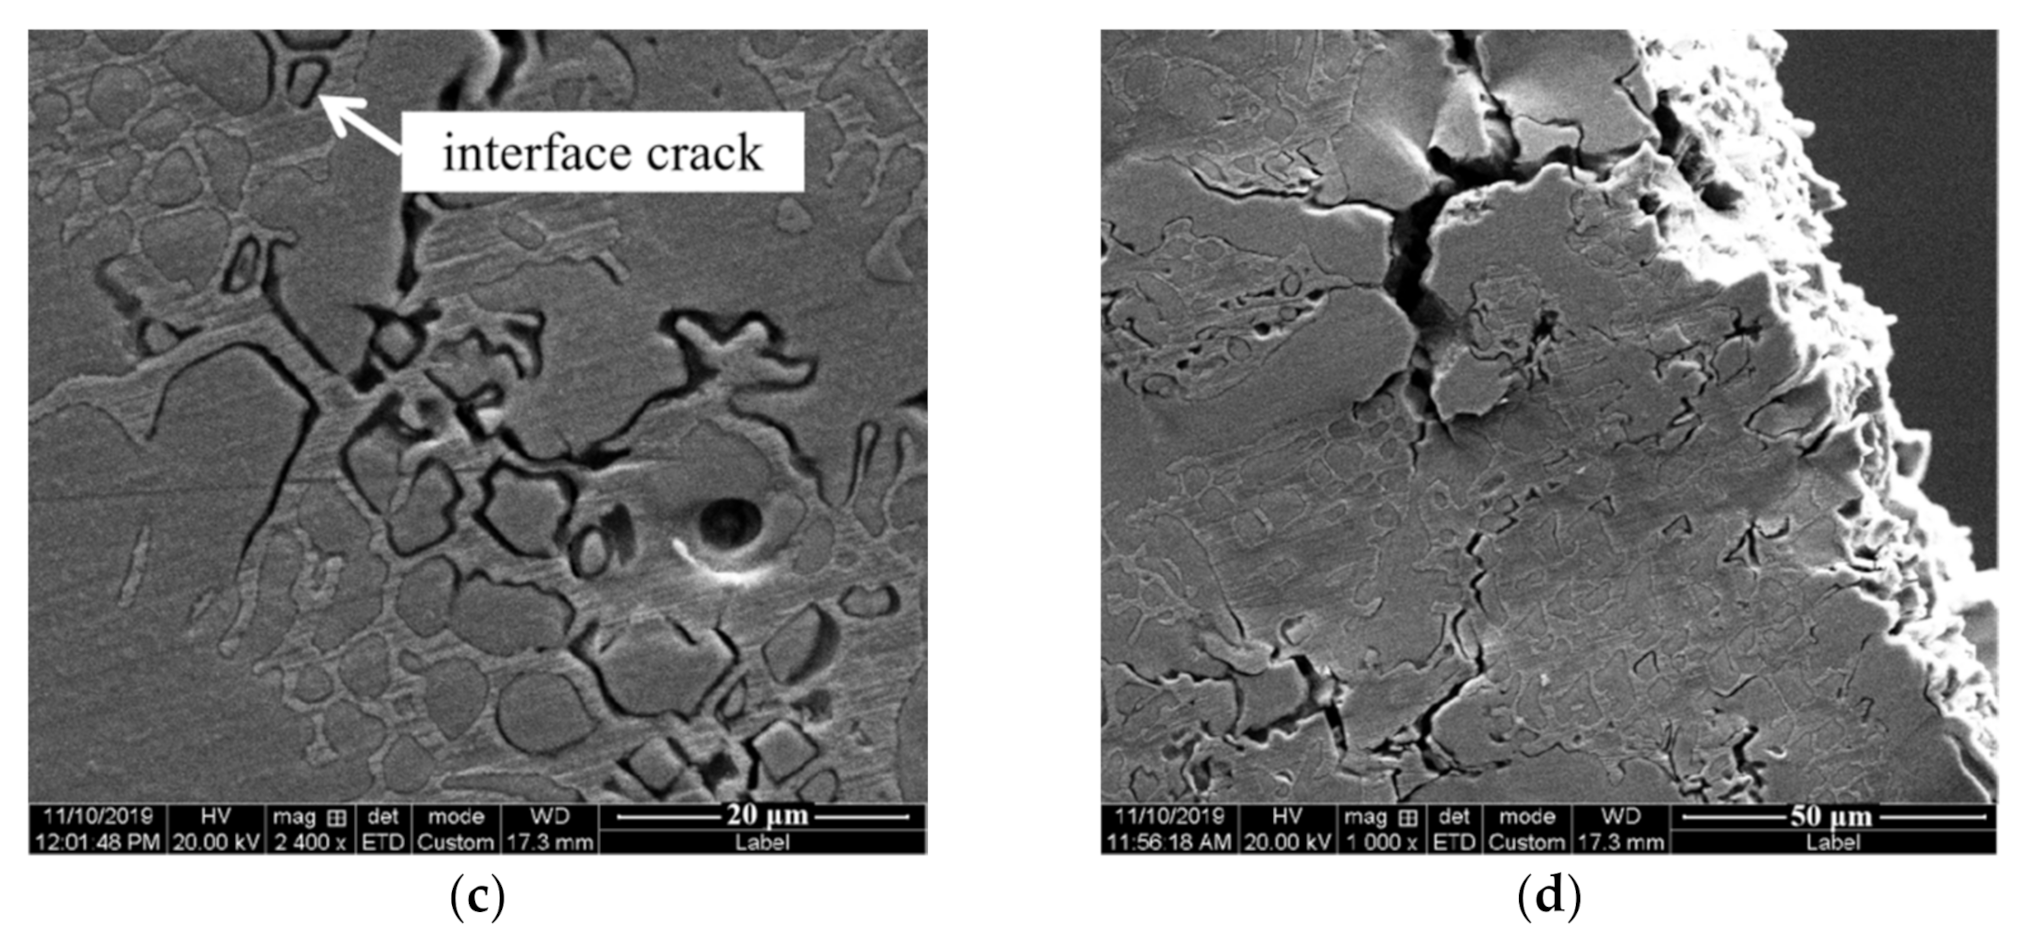
Figure 10 shows the crack evolution process of Fe-25Mn-12Al-8Ni-C alloy. It can be seen from Figure 10a that when the Al content is 12 wt.%, the elongation is 1.7% and the tensile strength is 529.7 MPa. Compared with the alloy with an aluminum content of 11 wt.%, the elongation decreases by 34.6% and the tensile strength decreases by 172.8 MPa. The reason is that, with the addition of Al, the content of NiAl compounds increases and the interface between the two phases increases. However, the interface is easily cracked during the tensile process, which leads to the decrease in elongation and tensile strength of the alloy. At the same time, with the increase in Al content, austenite gradually becomes ordered, and a small amount of k-carbide that precipitates in austenite is also a factor that leads to the decrease in alloy elongation. The fracture process of the alloy is very fast. The surface morphology of the specimen after fracture is shown in Figure 10b–d. There are many cracks at the interface between the two phases of the specimen after fracture. In Figure 10c,d, the interface between austenite and NiAl compound is seriously cracked, and there is no slip band near the fracture surface, indicating that the brittleness of the alloy is enhanced.
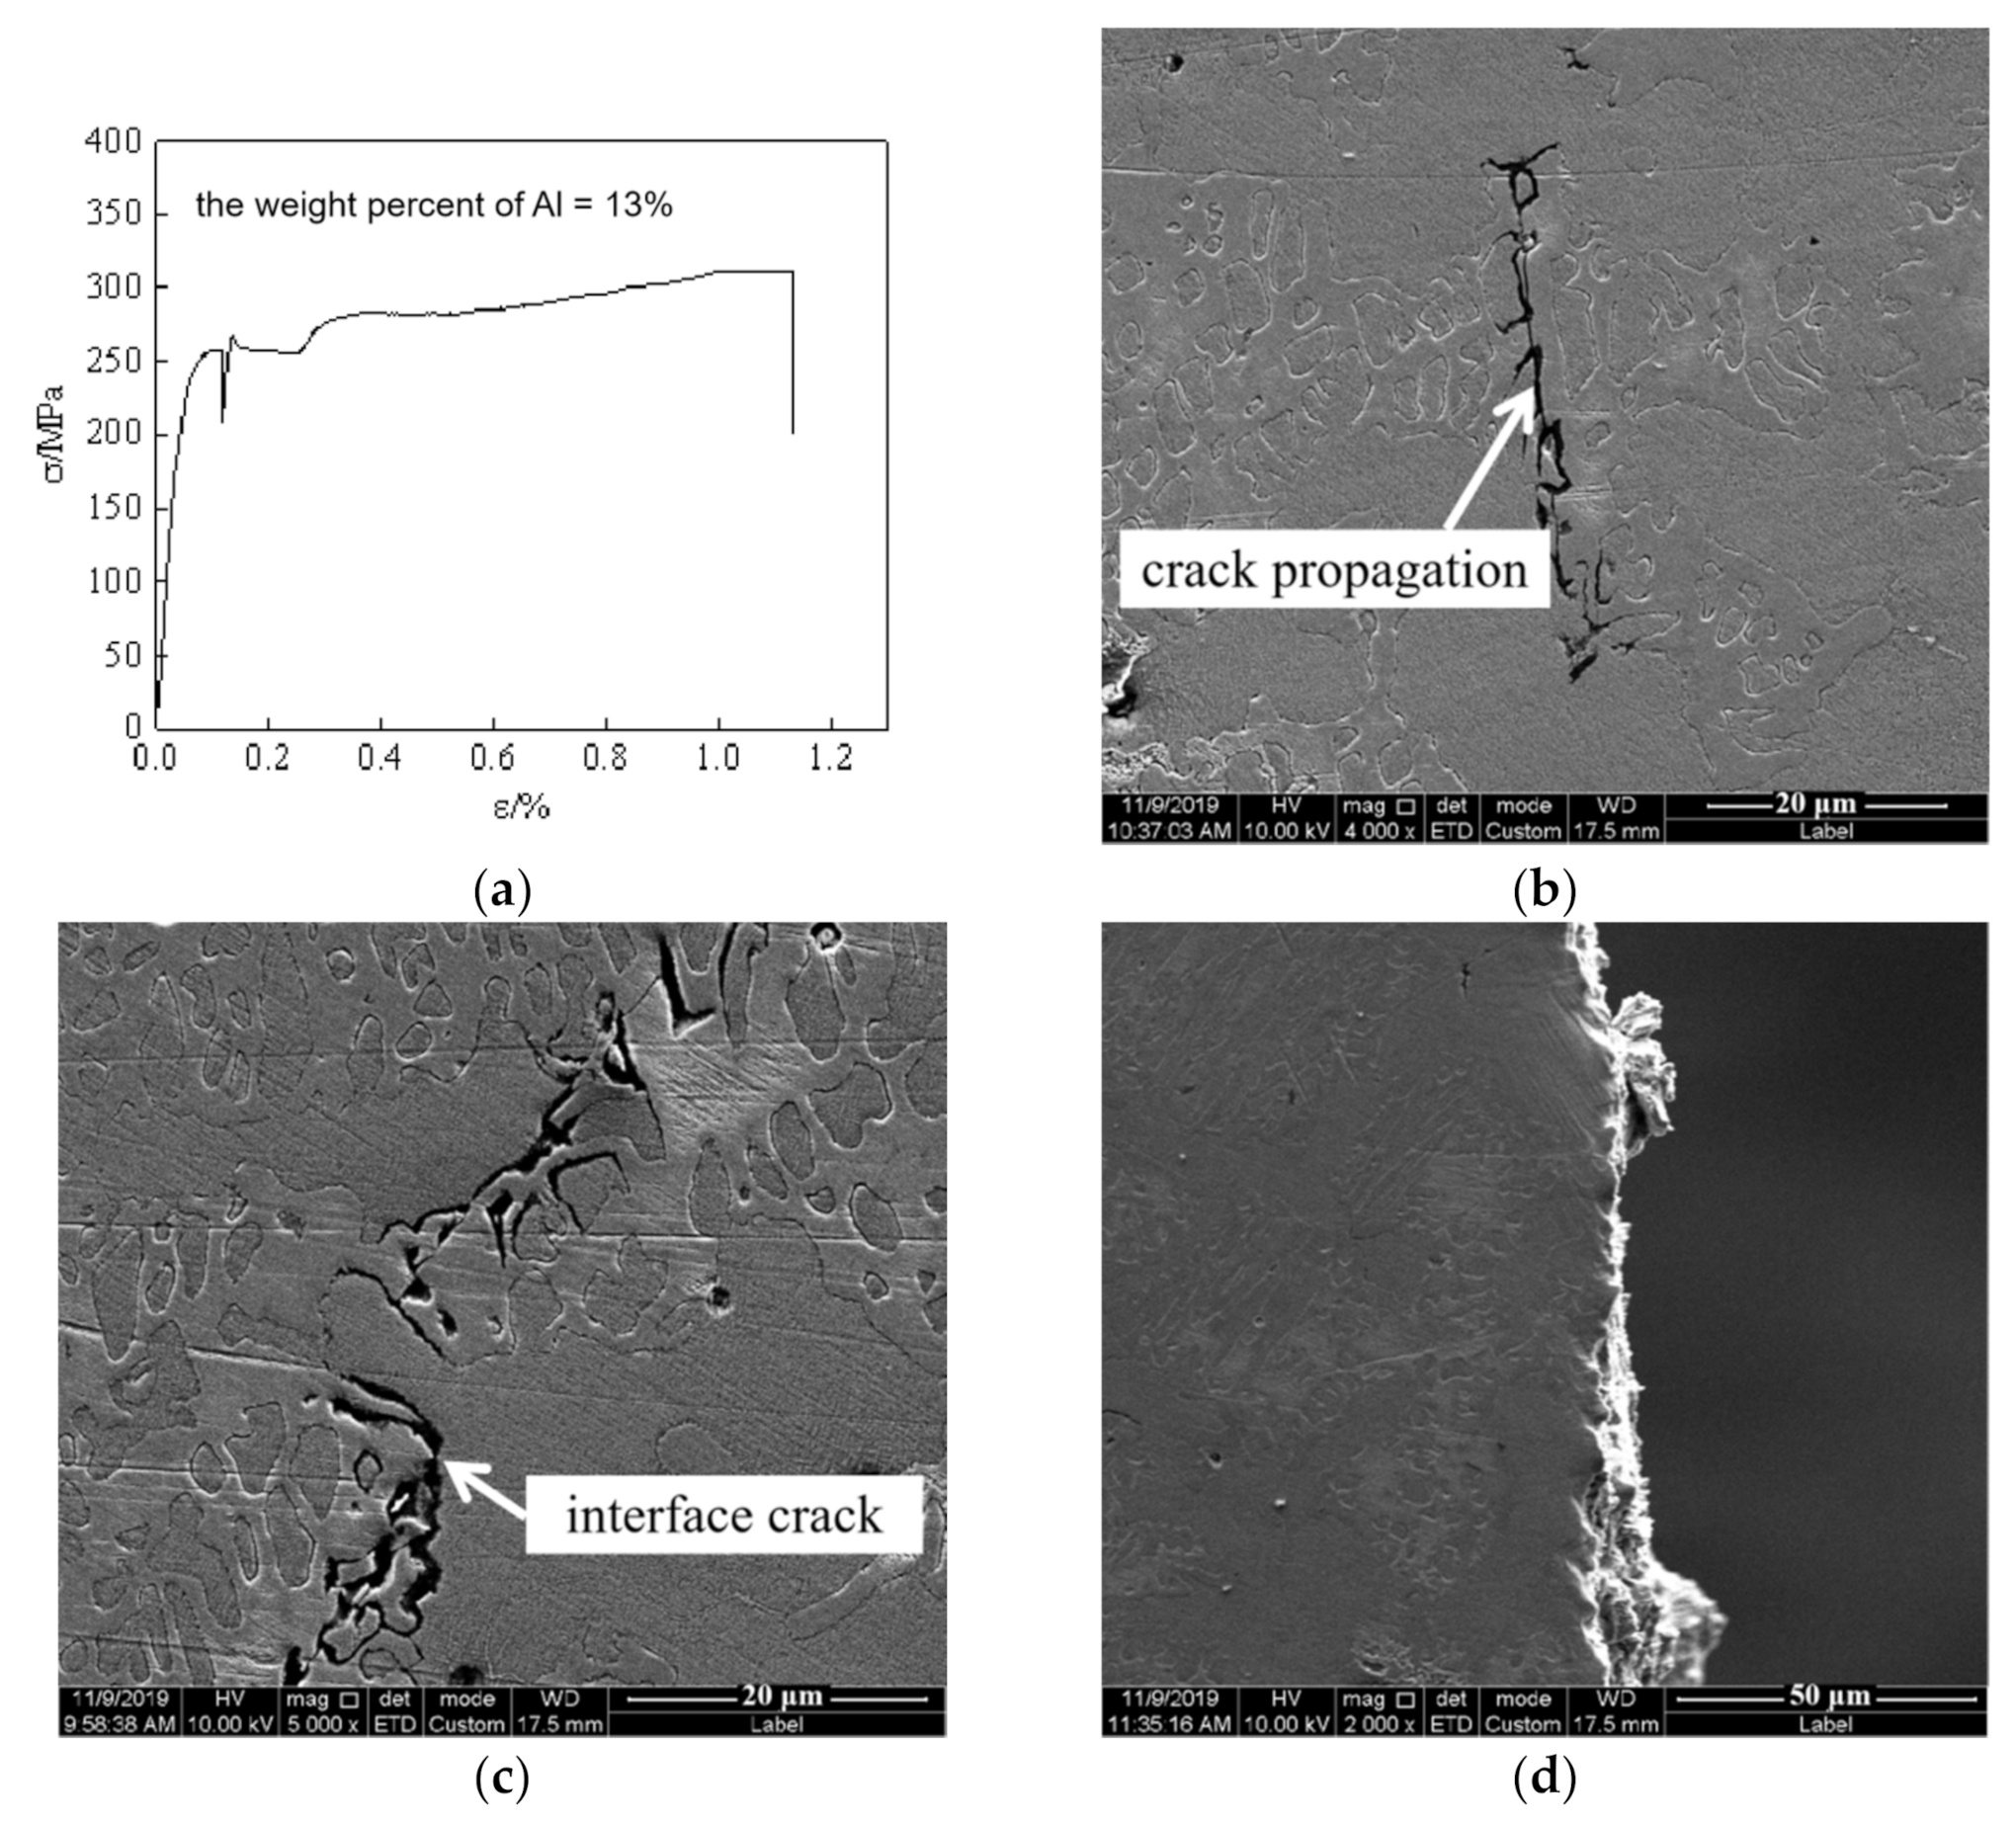
Figure 11 shows the crack evolution process of Fe-25Mn-13Al-8Ni-C alloy. It can be seen from Figure 11a that when the Al content is 13 wt.%, the elongation is 1.1% and the tensile strength is 310.8 MPa. Compared with the alloy containing 12 wt.% Al, the tensile strength is almost the same, but the elongation is greatly reduced by 35.3%. The reason is that with the increasing Al content, the content of NiAl compound increases, the interface between two phases increases, and a small amount of k-carbide precipitates in austenite. Therefore, the interface and k-carbides are the weak links in the tensile process, which are easily cracked, leading to the decrease in the elongation of the alloy [29]. As the fracture process of the alloy is fast, it can be clearly seen in Figure 11d that the surface morphology of the sample after fracture is a brittle fracture.
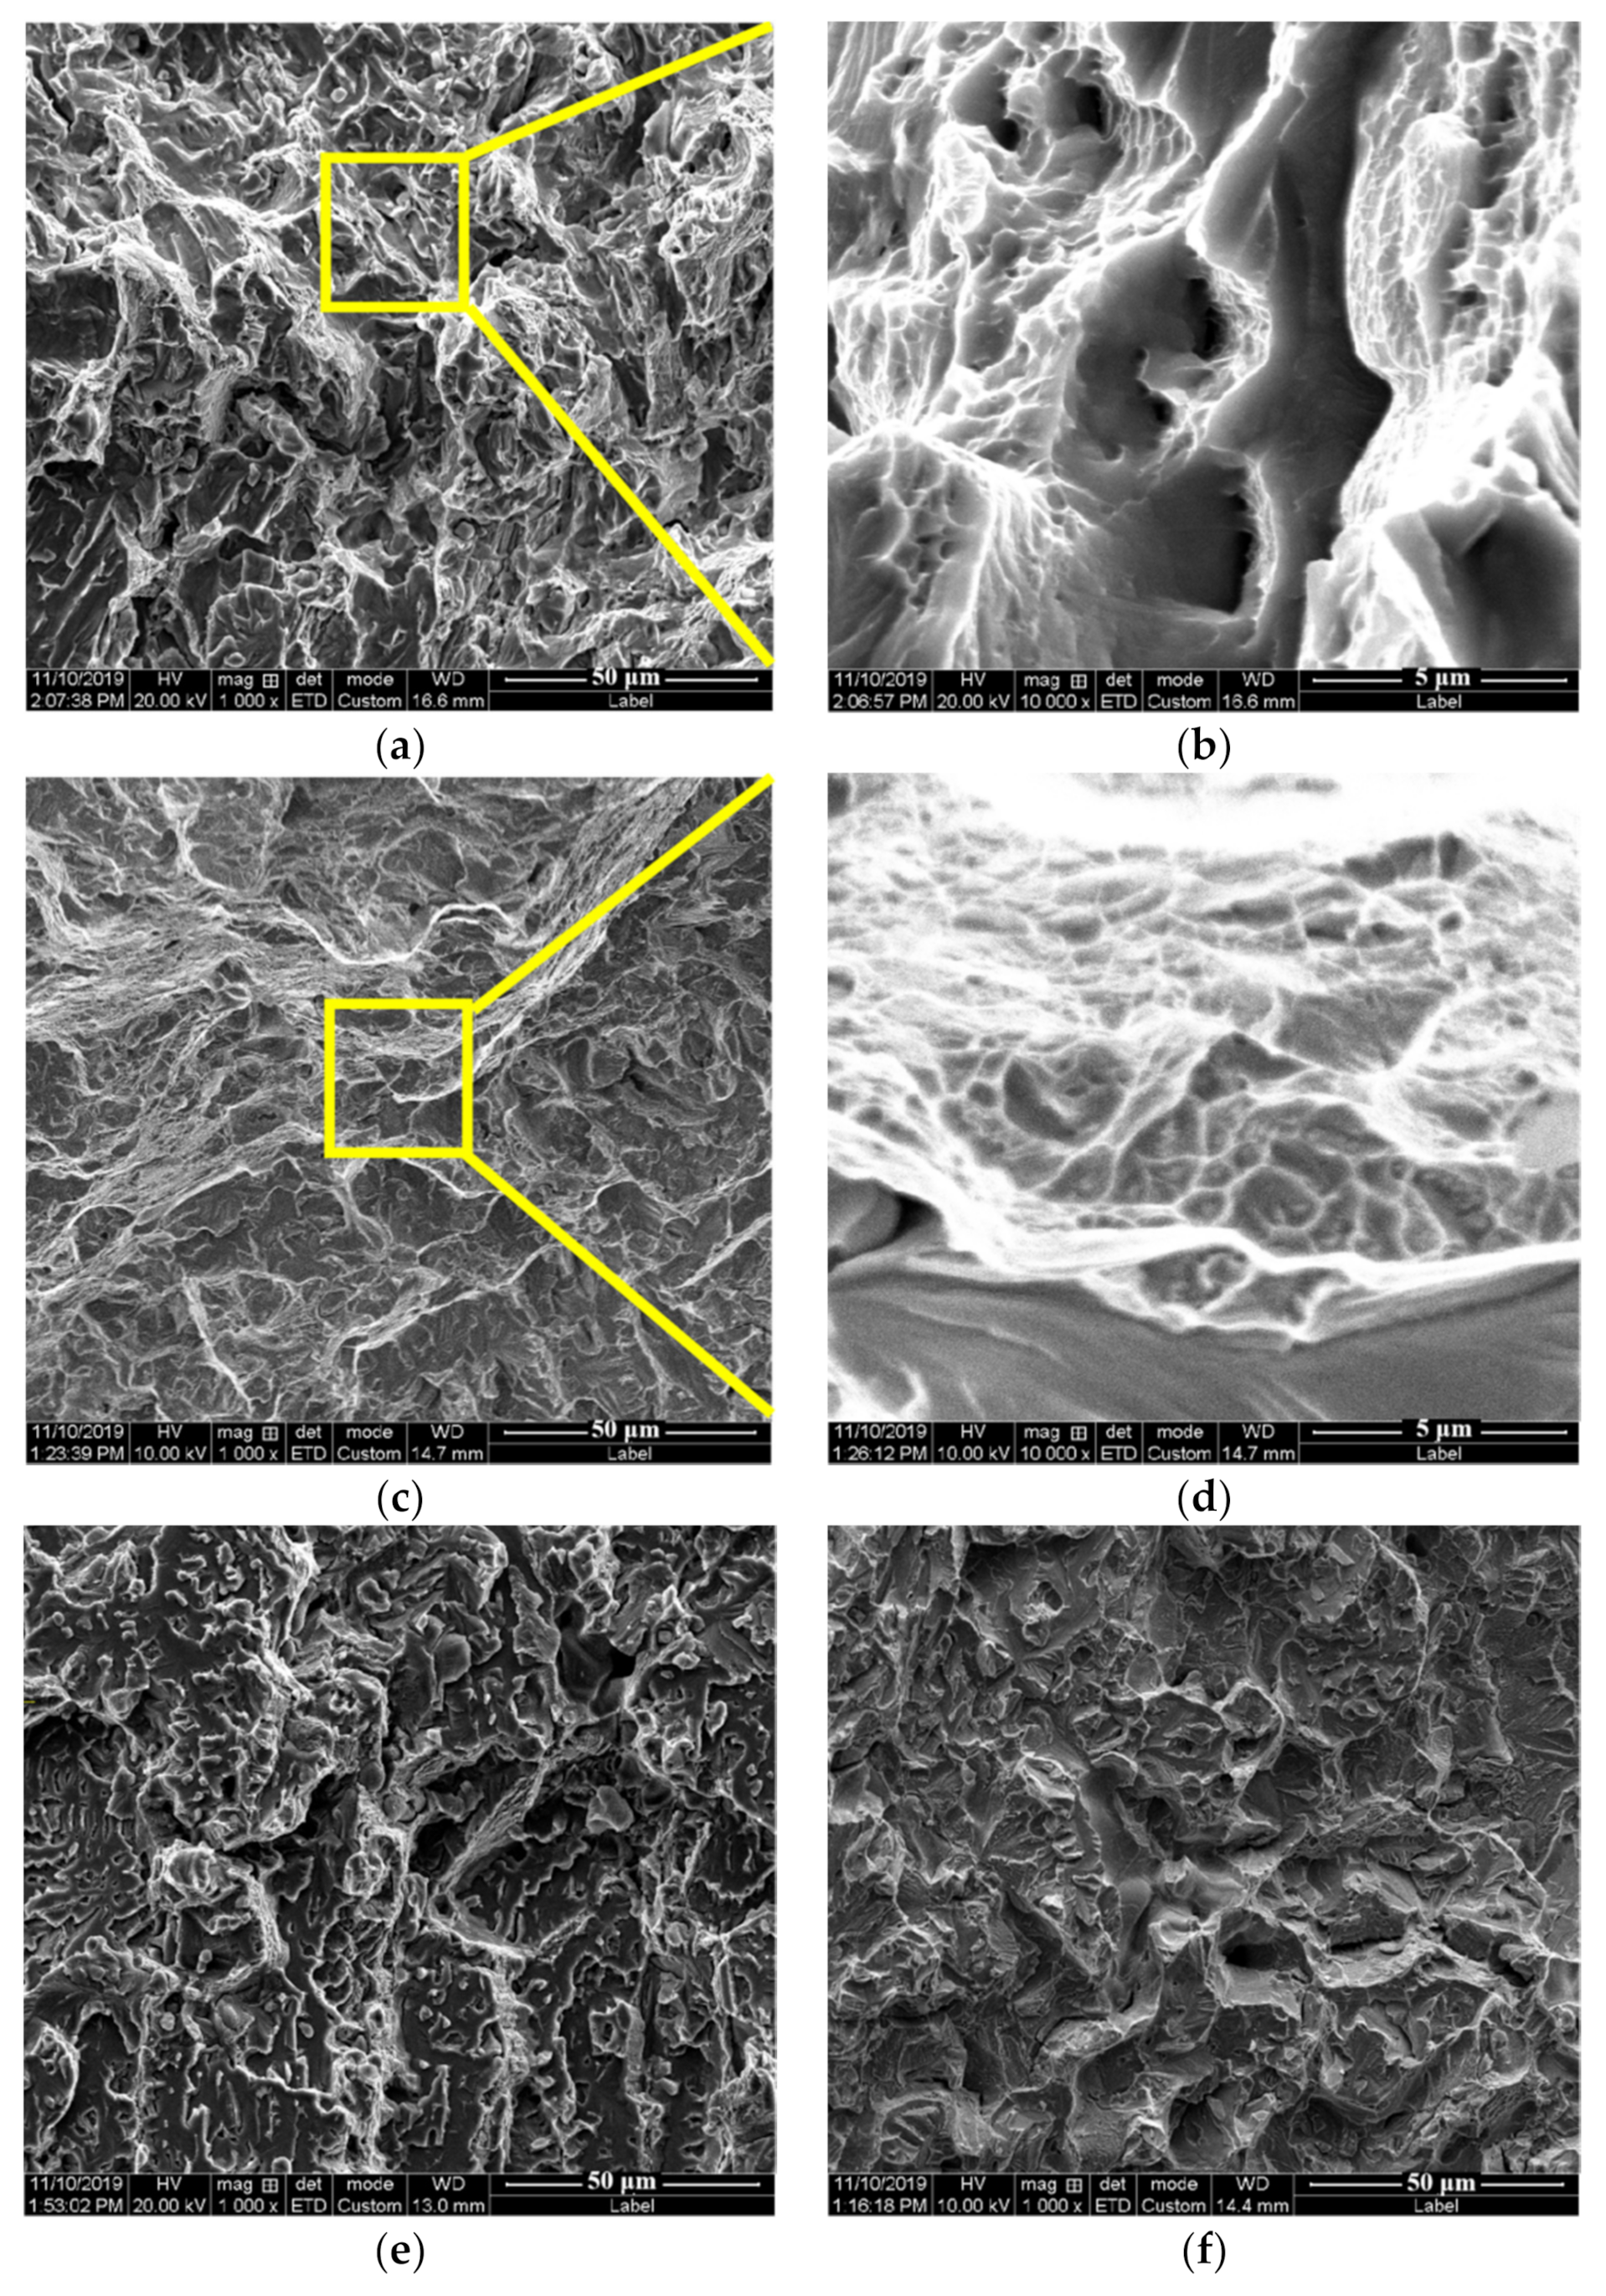
The fracture in the central region of the in situ tensile specimen surface was observed by a scanning electron microscope (SEM), and the results are shown in Figure 12. Figure 12a,b show an alloy containing 10 wt.% Al. The uneven fracture surface can be seen in Figure 12a and many small dimples are observed at high magnification in Figure 12b–d for alloys with Al content of 11 wt.%. Figure 12d is the enlarged local area of Figure 12c, and it can also be seen that there are many tiny dimples in the fracture. Figure 12e,f show alloy fractures with Al content of 12 wt.% and 13 wt.%, respectively. There are cleavage steps and traces of transcrystalline fracture in the fractures. This indicates that the alloy gradually transforms to become brittle with the increase in Al content.
Table 3 shows elongation and tensile strength of the Fe-25Mn-xAl-8Ni-C alloy with 10 wt.%, 11 wt.%, 12 wt.%, and 13 wt.% Al. The elongation and tensile strength in the table are only relative references to reflect the material properties in the process of tensile fracture, not absolute values. It can be seen from the table that with the increase in Al content, the elongation decreases, and the tensile strength increases first and then decreases. When the content of Al is 10 wt.%, the elongation of the alloy is the largest, at 4.1%, and the tensile strength is 664.4 MPa. It is concluded from Table 3 that the comprehensive properties of the alloy are excellent when the content of Al is 10 wt.%. Compared with the alloy containing 13 wt.% Al content, the elongation and tensile strength of the alloy with 10 wt.% Al content increase by 272.73% and 113.77%, respectively.

4. Discussion

The results show that with the increase in Al content, the amount of NiAl phase increases. NiAl is a brittle phase, which reduces the elongation of the alloy. Compared with the alloy containing 10 wt.% Al and 11 wt.% Al, the tensile strength of the alloy is improved, which is because NiAl enhances the mechanical properties of Fe-25Mn-xAl-8Ni-C alloy. However, when Al content reaches 12 wt.%, k-carbide begins to precipitate at the interface between austenite and NiAl, as well as in austenite. Both k-carbide and NiAl are hard brittle phases, therefore, the boundary between k-carbide and NiAl is the weak point of bonding, which leads to the decrease in the tensile strength of the alloy [30]. When Al content is 13 wt.%, the tensile strength of the alloy decreases further with the precipitation of k-carbides. The results show that the alloy can maintain good elongation and high tensile strength in the range of 10 wt.% to 11 wt.% Al content, which is the best composition range of the alloy. In the future, researchers can further explore Fe-25Mn-xAl-8Ni-C alloy in this composition range.
Figure 13 shows the crack distribution and proportion of cracks in Fe-25Mn-xAl-8Ni-C alloys with different Al contents at the moment of fracture during in situ tension. The cracks are colored in yellow. Material failure usually occurs at internal weakness or defects [31]. A crack is a kind of defect that destroys the continuity of the material. This kind of defect usually occurs in weak connections of the material. The larger the proportional area of the crack is, the weaker the links of the material are, which indirectly indicates the low strength of the material. On the contrary, the smaller the crack area, the higher the strength of the material. It can be seen from Figure 13b,d that the material with 11 wt.% Al content has the smallest crack area, and the material with 13 wt.% Al content has the largest crack area. This is consistent with the trend of tensile strength shown in Table 3. The tensile strength of the material with 11 wt.% Al content is the highest, at 702.5 MPa. The tensile strength of the material with 13 wt.% Al content is the lowest, at 310.8 MPa.
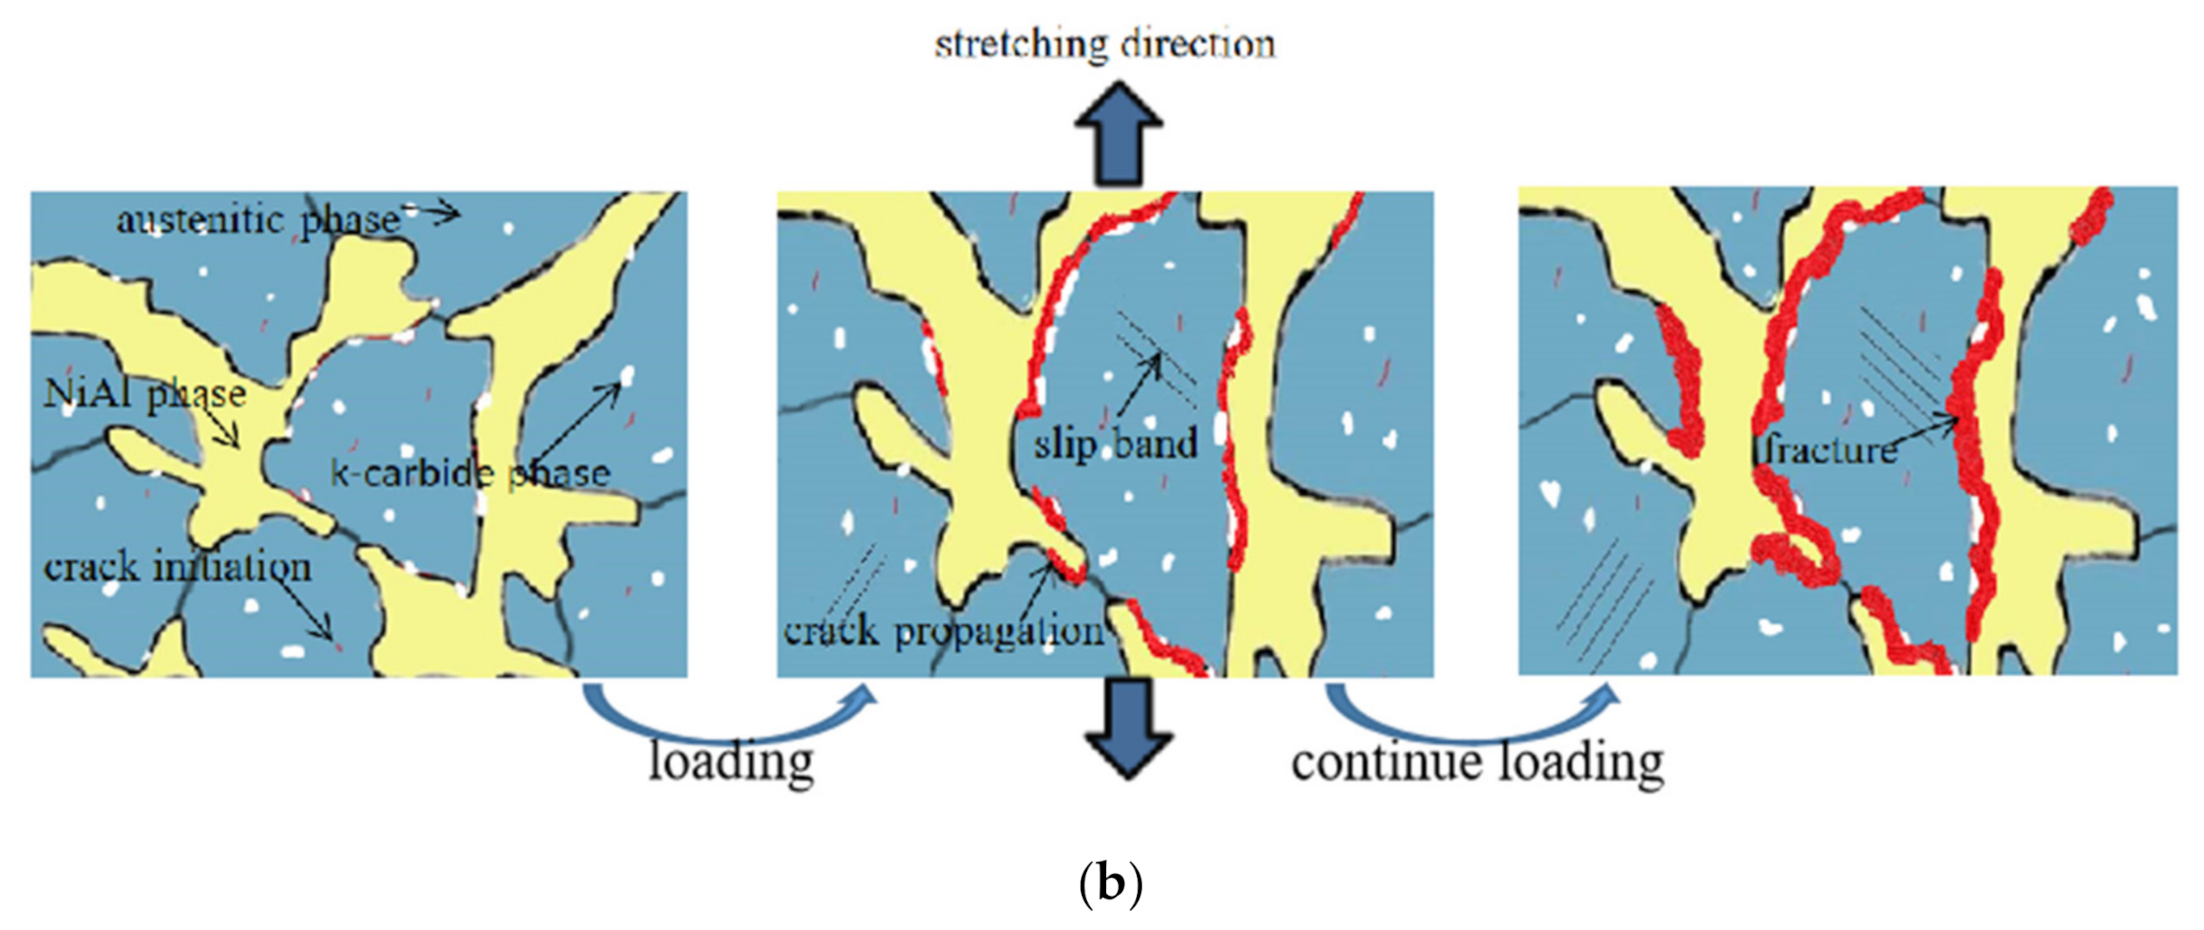
In order to further discuss the performance difference of the alloy with aluminum content of 10 wt.% and 13 wt.%, the dynamic crack propagation mechanism of Fe-25Mn-10Al-8Ni-C alloy and Fe-25Mn-13Al-8Ni-C alloy is shown in Figure 14a,b, respectively. It can be concluded from Figure 14a that when the content of Al is 10 wt.%, almost no k-carbide appears. Cracks initiate between NiAl phase and austenite, as well as in austenite. With the increase in strain, cracks gradually expand, and a few slip bands appear in the austenite matrix, which eventually lead to alloy fracture. In Figure 14b, a small amount of k-carbide precipitates (the white area shown in Figure 14) when the Al content is 13 wt.%. The k-carbide and interface are weak links, and easily cracked. With the increasing strain in the tensile process, the alloy finally breaks. Surface morphology parameters are usually used to characterize the surface morphology characteristics of materials, which are direct parameters for studying the local irreversibility of materials, and the number of slip bands can reflect the plasticity of materials [32,33,34,35]. With the increase in Al content, the brittleness of Fe-25Mn-xAl-8Ni-C alloy increases and the plasticity decreases. Therefore, when the aluminum content is 13 wt.%, the slip band in austenite matrix decreases compared with the alloy with 10 wt.% aluminum content.

5. Conclusions

In this study, Fe-25Mn-xAl-8Ni-C alloys with Al contents of 10 wt.%, 11 wt.%, 12 wt.%, and 13 wt.% were prepared by vacuum arc melting, and the microstructure and in situ tensile deformation behavior of these alloys were studied. The conclusions are as follows:
In Fe-25Mn-xAl-8Ni-C alloy, the matrix is austenite phase and a small amount of NiAl compound. With the increase in Al content, the austenite content in the alloy gradually decreases and the content of NiAl intermetallic compound gradually increases. When Al content increases to 12 wt.%, k-carbides precipitate at the interface between austenite and NiAl compound, as well as in austenite.
In situ tensile results show that with the increase in Al content, the elongation of the alloy decreases gradually, and the tensile strength first increases and then decreases. When the Al content is 10 wt.%, the comprehensive mechanical properties of the alloys are excellent. Compared with the alloy with 13 wt.% Al content, the elongation and tensile strength of the alloy with 10 wt.% Al content increase by 272.73% and 113.77%, respectively.
Austenite deforms first during the tensile process. The cracks mainly originate at the interface between austenite and NiAl compound, and propagate along the interface, resulting in the fracture of the alloy. When the aluminum content is 12 wt.%, due to the appearance of k-carbides, the interfacial adhesion is reduced, and the tensile strength and elongation are greatly reduced.

Author Contributions

Author contributions are listed as: Data analysis, Y.B., J.L., Y.G. and Z.Y.; manuscript writing, Y.B. and M.L.; literature search, Y.B., M.L., C.C., Y.G. and Z.Y.; figures, M.L. and C.C.; data collection, C.C.; date interpretation, J.L.; study design, Y.B.; research design, J.L., Y.G. and Z.Y. All authors have read and agreed to the published version of the manuscript.

Funding

This research is funded by Natural Science Basic Research Program of Shaanxi Province (2021JM-429), Project of equipment pre-research field fund (6140922010301), National Natural Science Foundation of China (Grant No. 51705391).

Data Availability Statement

Data is contained within the article.

Acknowledgments

The authors acknowledge to all the authors who contributed to this article and the teachers who provided the test analysis.

Conflicts of Interest

The authors declare no conflict of interest.

References

  1. Xia, J.; Omori, T.; Kainuma, R. Abnormal grain growth in Fe–Mn–Al–Ni shape memory alloy with higher Al content. Scr. Mater. 2020, 187, 355–359. [Google Scholar] [CrossRef]
  2. Sun, Y.; Zhao, Y.; Zhao, B.; Guo, Z.; Tian, X.; Yang, W.; Hou, H. Multi-component phase-field simulation of microstructural evolution and elemental distribution in Fe–Cu–Mn–Ni–Al alloy. Calphad 2020, 69, 101759. [Google Scholar] [CrossRef]
  3. Chang, S.C.; Hsiau, Y.H.; Jahn, M.T. Tensile and fatigue properties of Fe-Mn-Al-C alloys. J. Mat. Sci. 1989, 24, 1117–1120. [Google Scholar] [CrossRef]
  4. Sutou, Y.; Kamiya, N.; Umino, R.; Ohnuma, I.; Ishida, K. High-strength Fe–20Mn–Al–C-based Alloys with Low Density. ISIJ Int. 2010, 50, 893–899. [Google Scholar] [CrossRef] [Green Version]
  5. Guo, Q.Q.; Yang, Z.; Guo, D.; Tao, D.; Guo, Y.; Li, J.; Bai, Y. Research on the Oxidation Mechanism of Vermicular Graphite Cast Iron. Materials 2019, 12, 3130. [Google Scholar] [CrossRef] [PubMed] [Green Version]
  6. Yoo, J.D.; Hwang, S.W.; Park, K.T. Factors influencing the tensile behavior of a Fe–28Mn–9Al–0.8C steel. Mater. Sci. Eng. A 2008, 508, 234–240. [Google Scholar] [CrossRef]
  7. Hwang, S.W.; Ji, J.H.; Lee, E.G.; Park, K.T. Tensile deformation of a duplex Fe–20Mn–9Al–0.6C steel having the reduced specific weight. Mater. Sci. Eng. A 2011, 528, 5196–5203. [Google Scholar] [CrossRef]
  8. Lee, C.Y.; Jeong, J.; Han, J.; Lee, S.-J.; Lee, S.; Lee, Y.-K. Coupled strengthening in a medium manganese lightweight steel with an inhomogeneously grained structure of austenite. Acta Mater. 2015, 84, 1–8. [Google Scholar] [CrossRef]
  9. Zhang, X.F.; Yang, H.; Li, J.X.; Kan, Z.W.; Huang, S.Q. Calculation model of stacking fault energy of Fe-Mn-Al-C low density steel based on thermodynamic theory. Mater. Rev. 2018, 032, 2859–2864. [Google Scholar]
  10. Gutierrez-Urrutia, I.; Raabe, D. Influence of Al content and precipitation state on the mechanical behavior of austenitic high-Mn low-density steels. Scr. Mater. 2013, 68, 343–347. [Google Scholar] [CrossRef]
  11. Hou, L.L.; Hui, J.T.; Yao, Y.H.; Chen, J.; Liu, J.N. Effects of Boron Content on microstructure and mechanical properties of AlFeCoNiBx High Entropy Alloy Prepared by vacuum arc melting. Vacuum 2019, 164, 212–218. [Google Scholar] [CrossRef]
  12. Koutsky, J.; Kletečka, Z. Vacuum arc re-melting and its influence on mechanical properties of steels. Vacuum 1969, 19, 187–189. [Google Scholar] [CrossRef]
  13. Karantzalis, A.E.; Lekatou, A.; Georgatis, E.; Arni, Z.; Dracopoulos, V. Solidification observations of vacuum arc melting processed Fe–Al–TiC composites: TiC precipitation mechanisms. Mater. Charact. 2011, 62, 1196–1204. [Google Scholar] [CrossRef]
  14. Liu, E.Y.; Zhang, J.H.; Chen, S.; Du, S.M.; Du, H.L.; Cai, H.; Wang, L.L. High temperature negative wear behaviour of VN/Ag composites induced by expansive oxidation reaction. Ceram. Int. 2021, 47, 15901–15909. [Google Scholar] [CrossRef]
  15. Bai, Y.P.; Li, J.P.; Cheng, C.; Yang, Z. Study on microstructure and oxidation behavior of Fe–xMn–14Al–8Ni–C alloy prepared by vacuum arc melting. Mater. Res. Express. 2020, 7, 096521. [Google Scholar] [CrossRef]
  16. Cheng, C. Study on Fabrication Processing and Properties of Fe-Mn-Al Alloy with Low Density and High Performance. Xi’an Technol. Univ. 2020, 82, 13–25. (In Chinese) [Google Scholar]
  17. Chausov, M.G.; Maruschak, P.O.; Hutsaylyuk, V.; Sniezek, L.; Pylypenko, A.P. Effect of complex combined loading mode on the fracture toughness of titanium alloys. Vacuum 2018, 147, 51–57. [Google Scholar] [CrossRef]
  18. Maruschak, P.O.; Konovalenko, I.V.; Bishchak, R.T. Effect of thermal fatigue cracks on brittle-ductile deformation and failure of cbcm roller surface layers. Metallurgist 2012, 56, 30–36. [Google Scholar] [CrossRef]
  19. Pouraliakbar, H.; Khalaj, G.; Jandaghi, M.R.; Khalaj, M.J. Study on Correlation of Toughness with chemical composition and tensile test results in microalloyed API pipeline steels. J. Min. Metall. Sect. B Metall. 2015, 51, 173–178. [Google Scholar] [CrossRef]
  20. Khalaj, G.; Khalaj, M.J. Modeling the correlation between yield strength, chemical composition and ultimate tensile strength of X70 pipeline steels by means of gene expression programming. Int. J. Mater. Res. 2013, 104, 697–702. [Google Scholar] [CrossRef]
  21. Pei, Y.B.; Huang, T.; Chen, F.X.; Zhan, M.; Gao, J.Q.; Song, Z.; Bai, L.G. In-situ observation of crack evolution in Ti/Al laminated composite. Compos. Interfaces 2020, 27, 435–448. [Google Scholar] [CrossRef]
  22. Qin, L.; Wang, J.; Wu, Q.; Guo, X.Z.; Tao, J. In-situ observation of crack initiation and propagation in Ti/Al composite laminates during tensile test. J. Alloy. Compd. 2017, 712, 69–75. [Google Scholar] [CrossRef]
  23. Chen, Z.W.; Hao, X.L.; Wang, Y.; Zhao, K. In-Situ Observation of Tensile Fracture in A357 Casting Alloys. J. Mater. Sci. Technol. 2014, 30, 139–145. [Google Scholar] [CrossRef]
  24. GB/T 228-2002. General Administration of Quality Supervision, Inspection and Quarantine of the People’s Republic of China. Metallic Materials-Tensile Testing at Ambient Temperature (China Standard GB/T 228-2002). 2002. Available online: https://www.chinesestandard.net/PDF.aspx/GBT228-2002 (accessed on 19 April 2021).
  25. Li, P.B.; Chen, T.J.; Qin, H. Effects of mold temperature on the microstructure and tensile properties of SiCp/2024 Al-based composites fabricated via powder thixoforming. Mater. Des. 2016, 112, 34–35. [Google Scholar] [CrossRef]
  26. Liu, D.G.; Ding, H.; Hu, X.; Han, D.; Cai, M.H. Dynamic recrystallization and precipitation behaviors during hot deformation of a κ-carbide-bearing multiphase Fe–11Mn–10Al–0.9C lightweight steel. Mater. Sci. Eng. A 2020, 772, 138682. [Google Scholar] [CrossRef]
  27. Della Ventura, N.M.; Kalácska, S.; Casari, D.; Edwards, T.E.J.; Sharma, A.; Michler, J.; Logé, R.; Maeder, X. {10ī2} twinning mechanism during in situ micro-tensile loading of pure mg: Role of basal slip and twin-twin interactions. Mater. Des. 2020, 197, 109206. [Google Scholar] [CrossRef]
  28. Lu, X.; Dunne, F.P.E.; Xu, Y. A crystal plasticity investigation of slip system interaction, GND density and stored energy in non-proportional fatigue in Nickel-based superalloy. Int. J. Fatigue 2020, 139, 105782. [Google Scholar] [CrossRef]
  29. Seol, J.B.; Park, H.S.; Park, C.G. Direct In situ Observation of Tempering-induced Austenite Decomposition and Atom Probe Analyses of k-Carbide Precipitates in Lightweight Fe-Mn-Al-C Steels. Microsc. Microanal. 2016, 22, 704–705. [Google Scholar] [CrossRef] [Green Version]
  30. Song, W.; Wang, X.G.; Li, J.G. The formation and evolution of NiAl phase in a fourth generation nickel-based single crystal superalloy. J. Alloy. Compd. 2020, 848, 156584. [Google Scholar] [CrossRef]
  31. Zhang, S.F.; Kim, D.U.; Jiang, W.; Tonk, M.R. A phase field model of crack propagation in anisotropic brittle materials with preferred fracture planes. Comput. Mater. Sci. 2021, 193, 110400. [Google Scholar] [CrossRef]
  32. Antolovich, S.D.; Armstrong, R.W.P. Lastic Strain Localization in Metals: Origins and Consequences. Progress Mater. Sci. 2014, 59, 1–160. [Google Scholar] [CrossRef]
  33. Höppel, H.W.; Goik, P.; Krechel, C.; Göken, M. Ex and in situ investigations on the role of persistent slip bands and grain boundaries in fatigue crack initiation. J. Mater. Res. Technol. 2017, 32, 4276–4286. [Google Scholar] [CrossRef]
  34. Man, J.; Petrenec, M.; Obrtlik, K. AFM and TEM Study of Cyclic Slip Localization in Fatigued Ferritic X10CrAl24 Stainless Steel. Acta Mater. 2004, 52, 5551–5561. [Google Scholar] [CrossRef]
  35. Risbet, M.; Feaugas, X. Some Comments about Fatigue Crack Initiation in Relation to Cyclic Slip Irreversibility. Eng. Fract. Mech. 2008, 75, 3511–3519. [Google Scholar] [CrossRef]
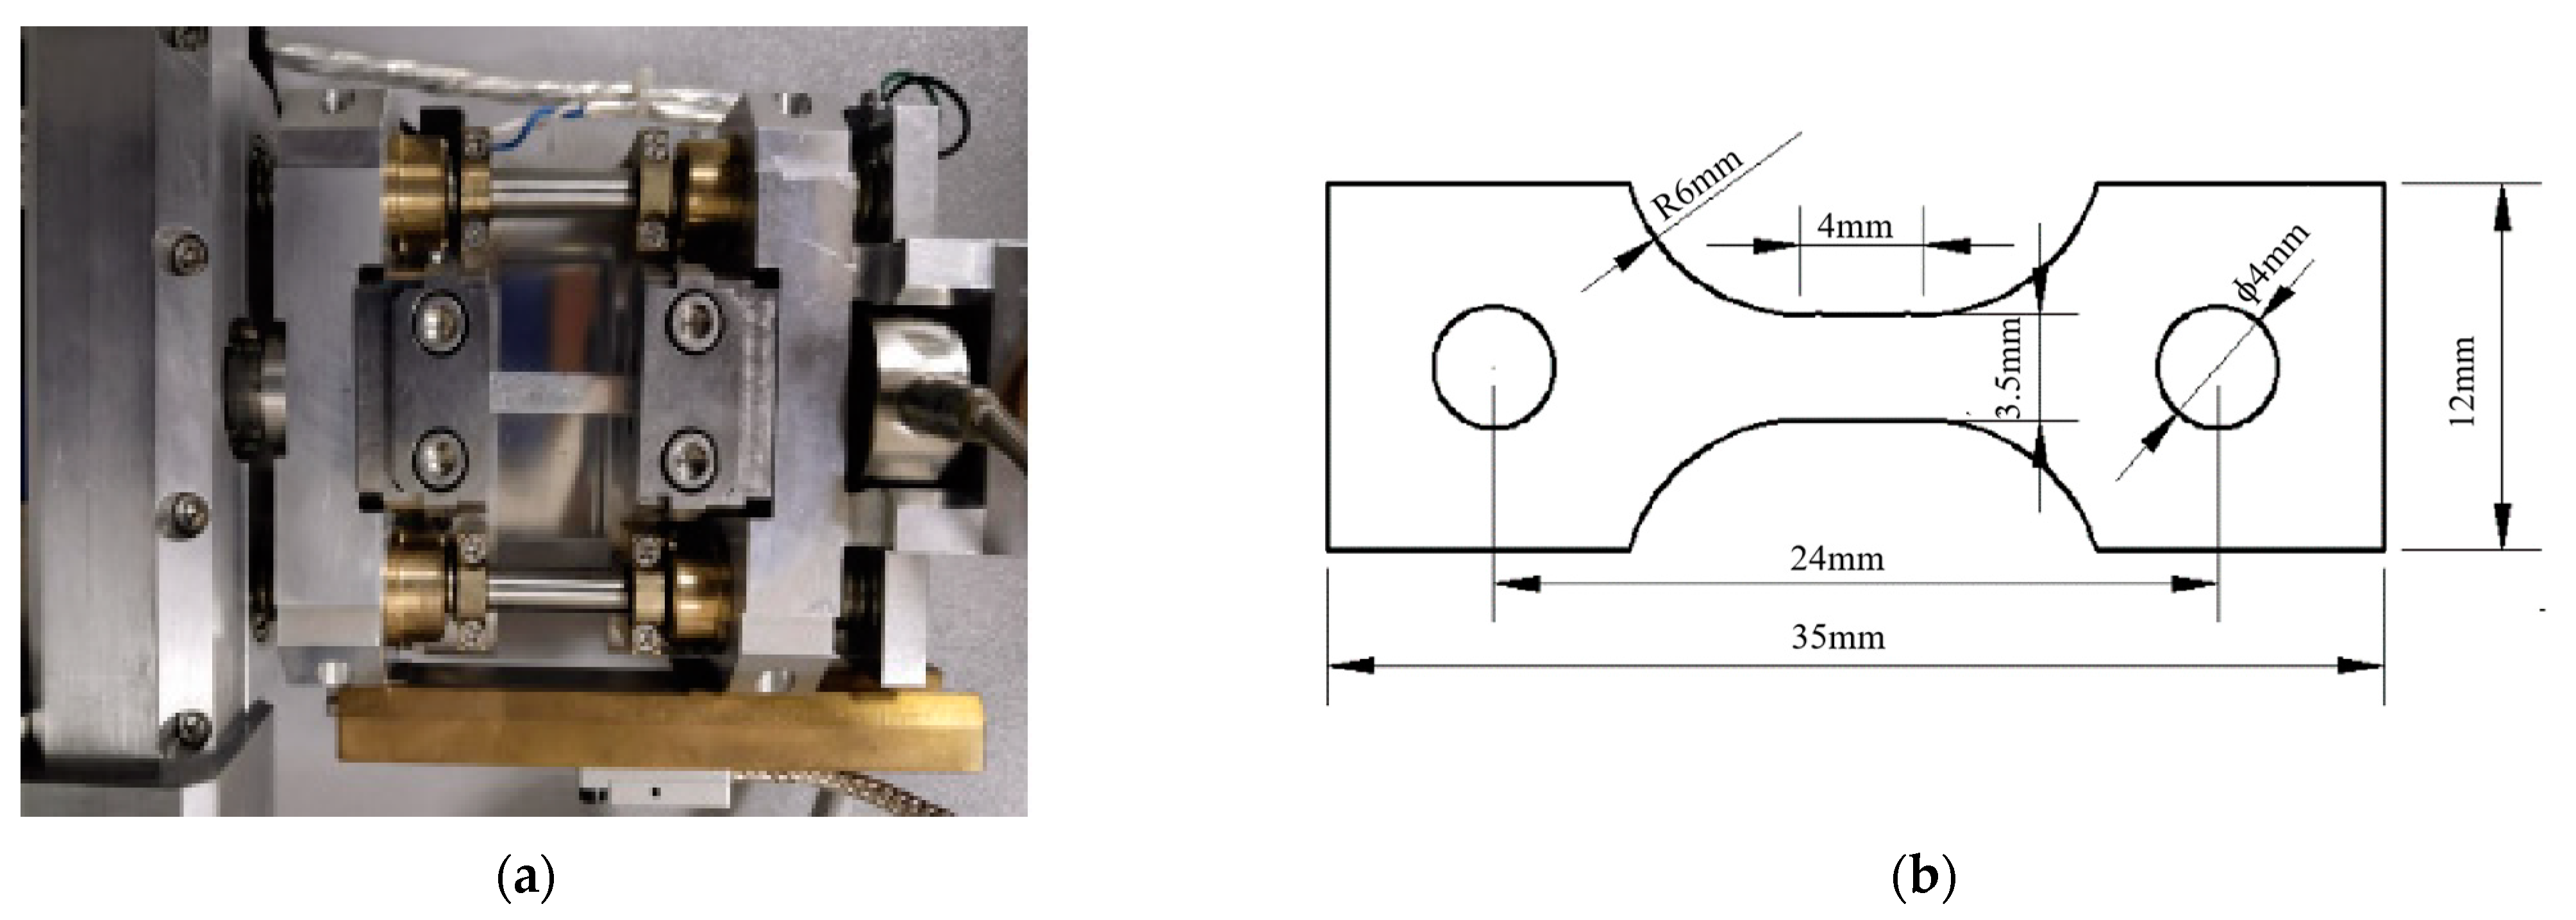
Figure 1. In situ stretching table and sample size. (a) In situ tensile test bench; (b) size of in situ tensile sample.
Metals 11 00814 g001
Figure 2. XRD diffraction pattern of Fe-25Mn-xAl-8Ni-C alloy.
Metals 11 00814 g002
Figure 3. SEM photograph of Fe-25Mn-xAl-8Ni-C alloy (a) 10 wt.% Al; (b) 11 wt.% Al; (c) 12 wt.% Al; (d) 13 wt.% Al.
Metals 11 00814 g003aMetals 11 00814 g003b
Figure 4. Element surface scanning analysis of Fe-25Mn-12Al-8Ni-C alloy.
Metals 11 00814 g004
Figure 5. TEM analysis of Fe-25Mn-10Al-8Ni-C (a) austenite phase; (b) B2 phase (B2-NiAl).
Metals 11 00814 g005
Figure 6. TEM analysis of Fe-25Mn-13Al-8Ni-C alloy, (a) austenite phase; (b) k-carbide phase.
Metals 11 00814 g006
Figure 7. Binary phase diagram of Fe-25Mn-xAl-8Ni-C alloy.
Metals 11 00814 g007
Figure 8. Crack evolution process of Fe-25Mn-10Al-8Ni-C alloy, (a) stress–strain curve; (b) ε = 0.8%, σ = 170.0MPa, 500×; (c) ε = 0.8%, σ = 170.0 MPa,1000×; (d) ε = 1.5%, σ = 270.1 MPa, 1200×; (e) ε = 1.5%, σ = 270.1 MPa, 2400×; (f) ε = 4.0%, σ = 626.2 MPa, 1200×.
Metals 11 00814 g008
Figure 9. Crack evolution process of Fe-25Mn-11Al-8Ni-C alloy, (a) stress–strain curve; (b) ε = 0%, σ = 0.0MPa, 30×; (c) ε = 1.4%, σ = 426.5 MPa, 240×; (d) ε = 1.4%, σ = 426.5 MPa, 1600×; (e) ε = 1.4%, σ = 426.5 MPa, 1600×; (f) ε = 2.6%, σ = 702.5 MPa, 1600×.
Metals 11 00814 g009aMetals 11 00814 g009b
Figure 10. Crack evolution process of Fe-25Mn-12Al-8Ni-C alloy, (a) stress–strain curve; (b) ε = 1.7%, σ = 529.7 MPa, 1000×. (c) ε = 1.7%, σ = 529.7 MPa, 2400×; (d) ε = 1.7%, σ = 529.7 MPa, 1000×.
Metals 11 00814 g010aMetals 11 00814 g010b
Figure 11. Crack evolution process of Fe-25Mn-13Al-8Ni-C alloy, (a) stress–strain curve; (b) ε = 0.1%, σ = 256.1 MPa, 4000×; (c) ε = 1.1%, σ = 310.8 MPa, 5000×; (d) ε = 1.1%, σ = 310.8 MPa, 2000×.
Metals 11 00814 g011
Figure 12. SEM photograph of Fe-25Mn-xAl-8Ni-C alloy in situ tensile fracture, (a) 10 wt.% Al, 1000×; (b) 10 wt.% Al—local enlarged, 10,000×; (c) 11 wt.% Al, 1000×; (d) 11 wt.% Al—local enlarged, 10,000×; (e) 12 wt.% Al, 1000×; (f) 13 wt.% Al, 1000×.
Metals 11 00814 g012
Figure 13. The crack distribution and proportion of cracks in Fe-25Mn-xAl-8Ni-C alloys with different Al contents at the moment of fracture during in situ tension, (a) 10 wt.% Al; (b) 11 wt.% Al; (c) 12 wt.% Al; (d) 13 wt.% Al.
Metals 11 00814 g013
Figure 14. Dynamic crack propagation mechanism of Fe-25Mn-xAl-8Ni-C alloy, (a) 10 wt.% Al; (b) 13 wt.% Al.
Metals 11 00814 g014aMetals 11 00814 g014b
Table 1. EDS analysis of Fe-25Mn-xAl-8Ni-C alloy in Figure 3.
Al ContentsPointElement/wt.%
FeMnAlNiC
x = 11139.014.116.417.612.8
250.121.59.05.713.7
x = 13347.015.317.018.02.8
457.526.810.11.74.0
Table 2. Density and hardness of Fe-25Mn-xAl-8Ni-C alloy with different Al contents.
Al Contents (wt.%)Density (g/cm3)Hardness (HRC)
x = 106.7440.55
x = 116.6741.53
x = 126.5943.95
x = 136.5344.75
Table 3. Elongation and tensile strength of Fe-25Mn-xAl-8Ni-C alloy with different Al contents.
Al Contents (wt.%)Elongation (%)Tensile Strength (MPa)
104.1664.4
112.6702.5
121.7529.7
131.1310.8
Publisher’s Note: MDPI stays neutral with regard to jurisdictional claims in published maps and institutional affiliations.