Article

Study on High-Strain-Rate Deformation of Magnesium Alloy Using Underwater Shock Waves Generated by High-Voltage Electric Discharge of Thin Wire

1
Department of Mechanical and Intelligent Systems Engineering, National Institute of Technology, Kumamoto College, Kumamoto 866-8501, Japan
2
Production Systems Engineering Course, National Institute of Technology, Kumamoto College, Kumamoto 866-8501, Japan
3
Department of Mechanical Systems Engineering, National Institute of Technology, Okinawa College, Okinawa 905-2192, Japan
*
Author to whom correspondence should be addressed.
Metals 2022, 12(11), 1939; https://doi.org/10.3390/met12111939
Submission received: 30 August 2022 / Revised: 24 October 2022 / Accepted: 2 November 2022 / Published: 12 November 2022
(This article belongs to the Special Issue Explosive Welding and Impact Mechanics of Metal and Alloys)

Abstract

:
Magnesium is an abundant material with high specific strength, and its use as a structural metal is increasing. However, its properties cause difficulty in its formation at room temperature. Therefore, the objective of this study was to form a magnesium alloy at room temperature using an underwater shock wave generated by the discharge of an aluminum wire. Forming was conducted using an auxiliary plate composed of aluminum instead of magnesium alloy alone. In addition, hyperbolic and parabolic pressure vessels were employed. Numerical simulations were performed to measure the pressure values, propagation of underwater shock waves, and deformation of the magnesium alloy. Large deformation was observed when an auxiliary aluminum plate was placed on the upper surface of an AZ31 magnesium alloy plate inside the hyperbolic pressure vessel.

1. Introduction

Magnesium alloys have been widely used as structural metal materials because of their low specific gravity. They are employed in the automobile, aviation, and aerospace industries and in portable devices such as mobile phone cases and tablet personal computers (PCs) [1,2,3,4]. Magnesium alloy has several advantages, such as a large strength-to-specific-gravity ratio, good machinability, excellent vibration absorption, good electromagnetic-wave shielding performance, and abundant magnesium sources [5,6,7]. However, the plastic deformation and extrusion of magnesium alloy sheets present certain difficulties. Casting and high-temperature processing has been proposed as a solution; however, this approach is still under development because of the high cost incurred in device development and energy consumption. Therefore, to expand the utilization of magnesium alloy, its quality must be improved, and the metal processing costs must be reduced. In addition, forming techniques for the development of magnesium alloy sheet materials are required. The mechanical properties of magnesium alloys are highly dependent on the grain size [8]. By refining the grains, the strength at room temperature [9,10,11] and ductility [12] are improved, whereas the workability is improved by enhancing the superplasticity [13]. The application of this processing method to magnesium alloys is expected to increase in the future.
The impact forming of a metal plate using an underwater shock wave is widely employed in high-energy-rate processing in plastic working and has been studied since the 1950s [14]. Many studies on technologies involving such high-strain-rate forming of metal plates have focused on deformation and bonding due to the impact loading of magnesium and aluminum alloys. Technologies for the explosive welding of AZ31 to aluminum alloy, steel, copper, and titanium by the application of shock waves are expected to have practical applications in industry [15,16,17,18,19,20,21,22,23,24].
In addition, impact forming can be achieved by utilizing shock waves generated by the melting vaporization of a fine metal wire through high-voltage underwater discharge [25,26,27]. Another method employs shock waves and a similar power supply device and exploits a gap discharge phenomenon [28,29]. High-speed metal forming utilizing shock waves generated by discharge in liquid has also been developed [30,31]. This process enables aluminum alloy sheets to be accelerated to a speed of ≥100 m/s and subjected to a high strain rate of 100 s−1. Corresponding numerical simulations have also been conducted [32,33]. Electromagnetic seam welding has also been studied, in which aluminum sheets are joined using powerful electromagnetic pulse technology [34,35] and then joined to magnesium alloys heated to 200–300 °C [36,37]. The method that uses explosives to generate shock waves creates a high impact pressure. However, the approach that employs electric energy is considered optimal for industrial production because it does not present problems such as handling issues, excessive noise, and limited implementation locations. The objective of this study was to establish a magnesium alloy forming method using underwater shock waves generated by the high-voltage, underwater melting, and vaporization of a thin aluminum wire.
The findings of this study are expected to contribute to the development of explosive welding and forming processes, which involve high-speed deformation in metal forming techniques utilizing impact loads. In addition, no joining technology employs electrohydraulic forming, which uses shock waves from underwater electrical discharges. When performing the explosive joining of magnesium alloys, it is important to establish a deformation method that does not result in cracks at room temperature. Hence, evaluating the magnesium forming performance is required. In this study, experimental investigations were conducted under various conditions to form magnesium alloys at room temperature using shock waves generated by an underwater electrical discharge of metal wires. The results are reported herein.

2. Experimental Methods

2.1. Shock Wave Generator and Pressure Measurement Method

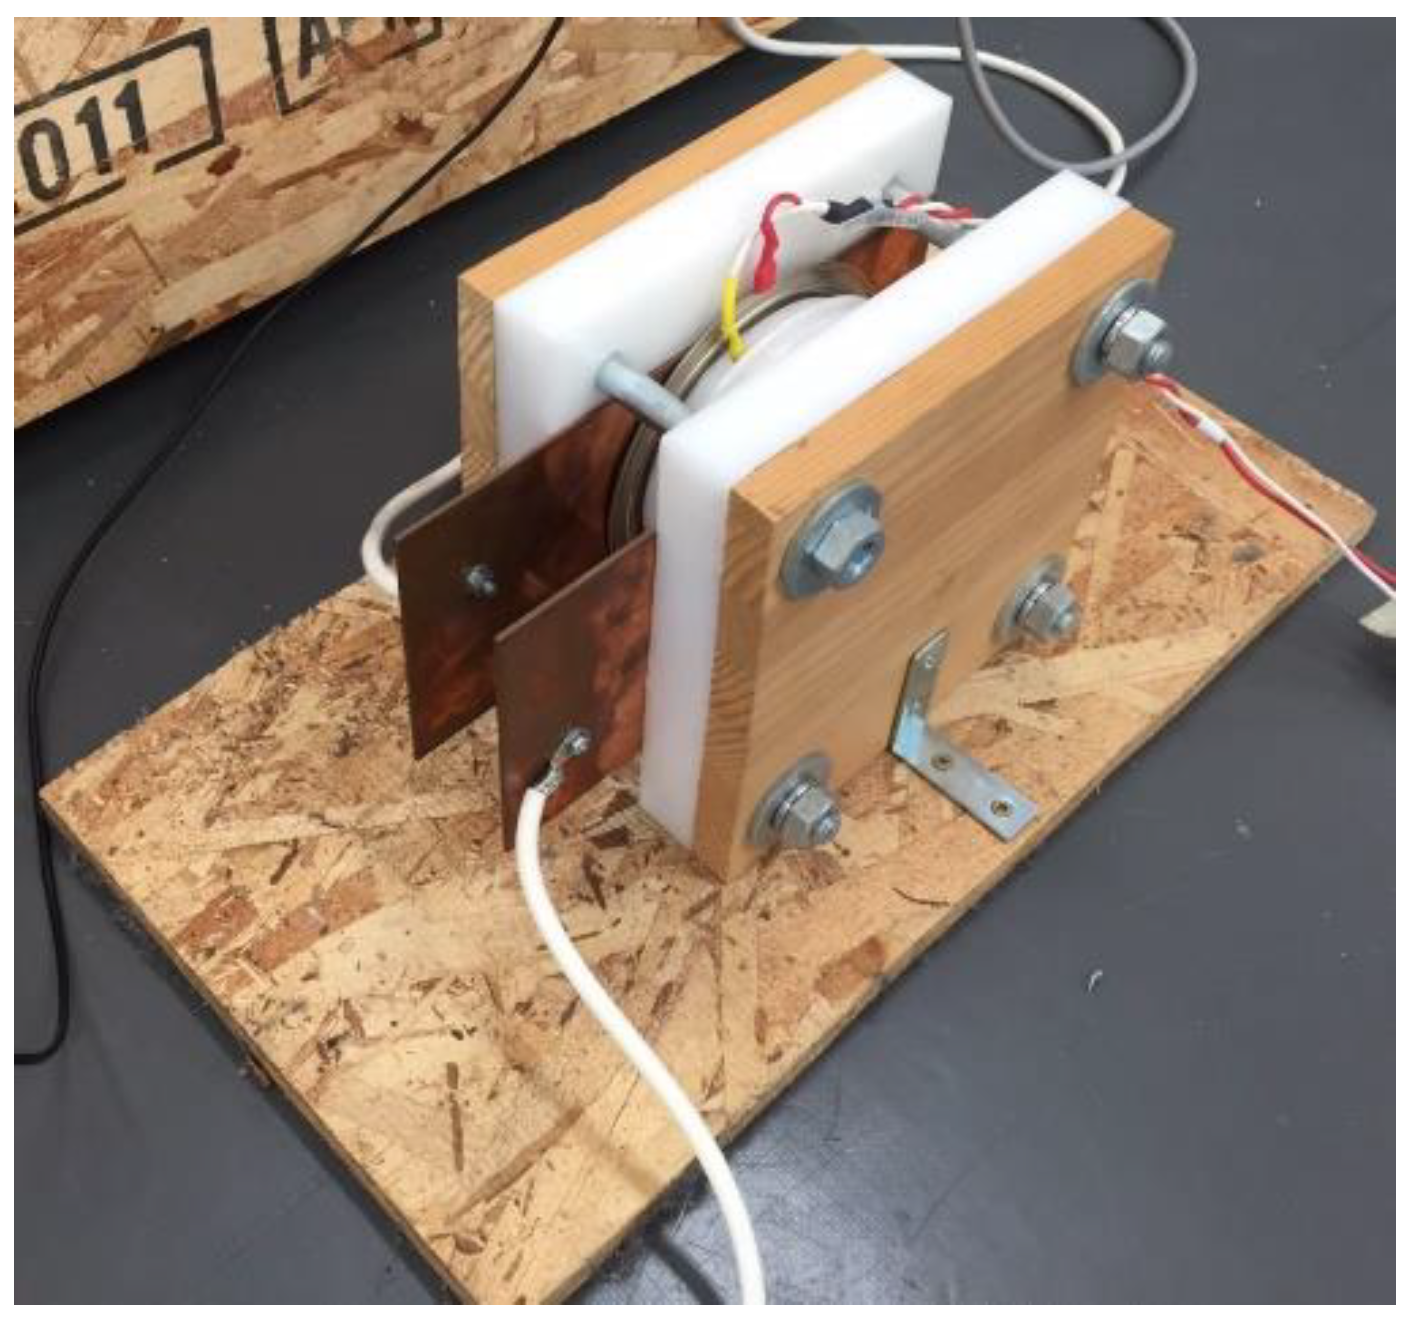
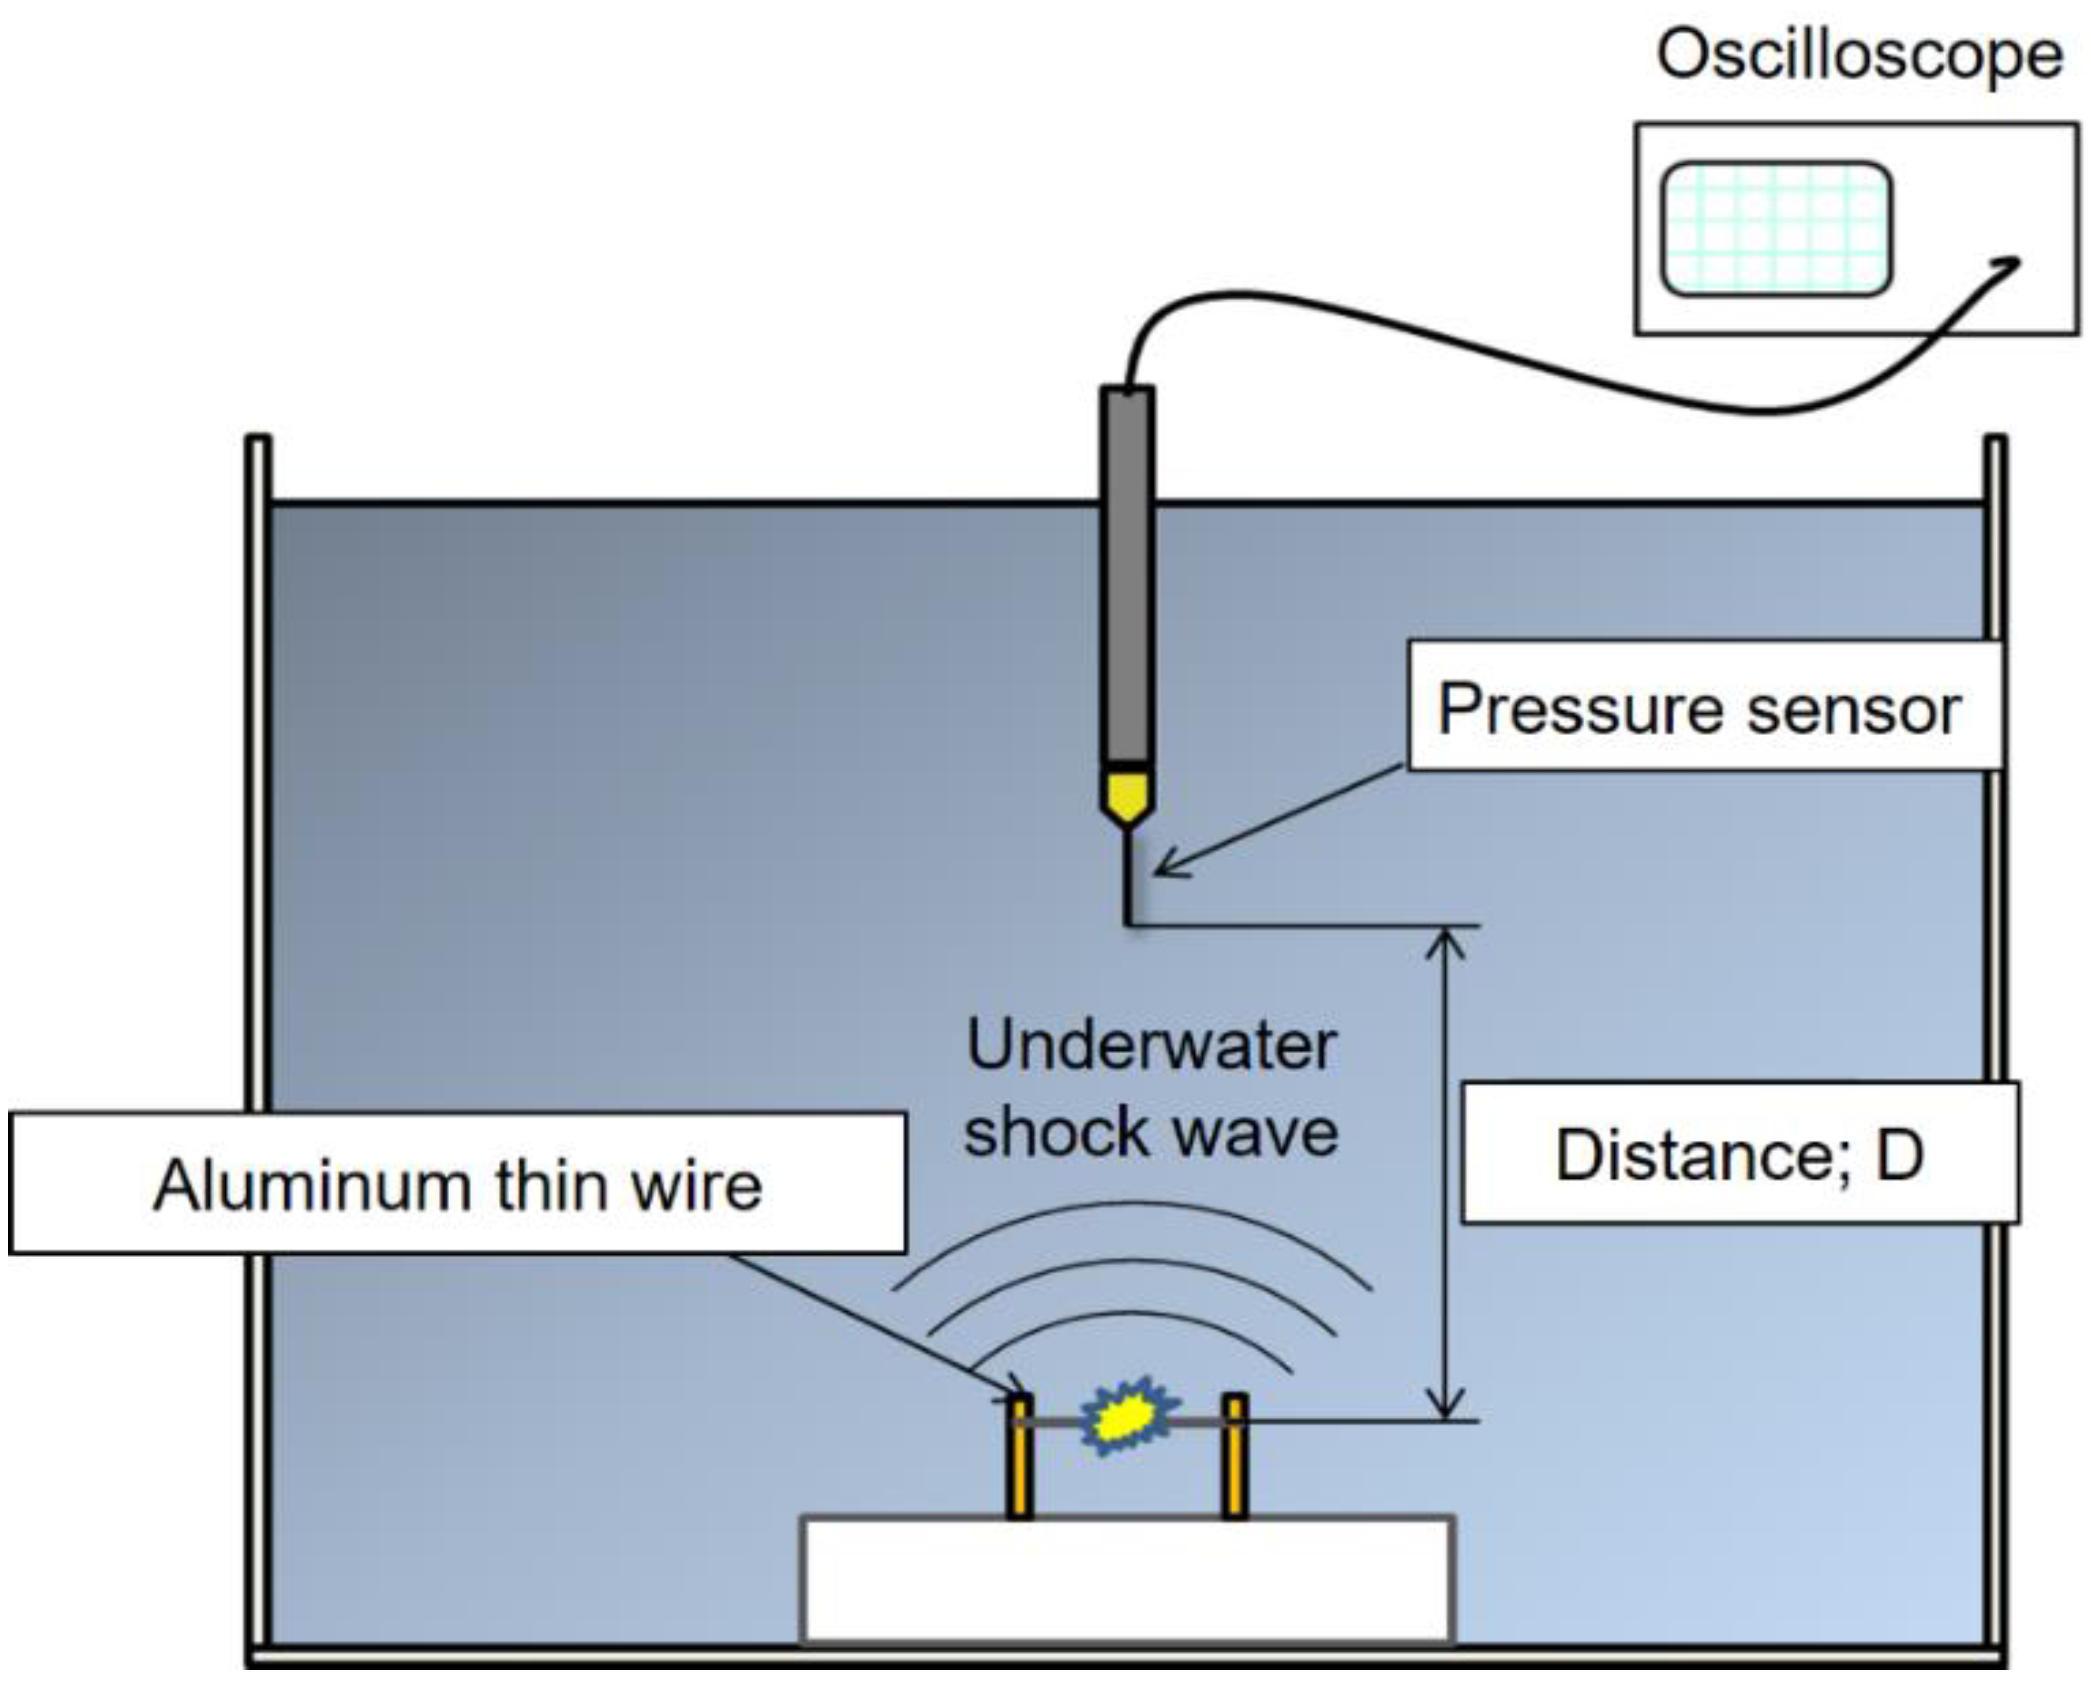
Figure 1 provides the circuit diagram of the shock wave generator. A Cockcroft-Walton circuit is used in the power supply. Electric energy is stored in the power supply circuit, and a high-voltage current flows to the electrodes via switching with the thyristor (R2620ZC25, IXYS Corp., Milpitas, CA, USA) depicted in Figure 2. Figure 3 shows a device for measuring the pressure of a shock wave generated by an underwater discharge. A thin aluminum wire is set on an electrode installed at the bottom of a container filled with water. A pressure sensor (ICP® 109C11, PCB Piezotronics, Depew, NY, USA) is placed at a distance “D” from the aluminum wire. When electrical energy is supplied to the aluminum wires by the power circuit, the aluminum wires instantly melt and vaporize, generating an underwater shock wave. When the pressure of this shock wave reaches the pressure sensor, the pressure is converted into a voltage, which is output to an oscilloscope (DS-5634A, Iwatsu Electric Co., Ltd., Suginami-Ku, Tokyo, Japan) as a waveform. The current is measured simultaneously with the pressure using a Rogowski coil (SS-629M, Iwatsu Electric Co., Ltd., Suginami-Ku, Tokyo, Japan).

2.2. Materials and Numerical Simulation

The compositions and mechanical properties of the magnesium alloys employed as target materials in this study are shown in Table 1 [38]. Numerical simulations were performed using Altair® HyperWorks® 2019. Generally, on explosive forming, a sealed pressure vessel is utilized to apply the pressure of the shock wave to the metal plate. It is known that the internal shape of this pressure vessel changes the pressure distribution acting on the metal plate [39]. Therefore, in this study, we assumed hyperbolic and parabolic types of pressure vessel geometries and investigated the effects of the shock pressure distribution inside the vessel.
Figure 4 shows a schematic diagram of the pressure vessel, part of the simulation model, and the entire simulation model. The pressure vessel was assumed to be hyperbolic (Figure 4a) and parabolic (Figure 4b). In addition, the target metal plate was sandwiched between the pressure vessel and the die, as depicted in Figure 4c. Numerical simulation was performed using the domain shown in the figure as the computational field, divided into quadrilateral meshes.
The shock wave is generated by the melting and vaporization of the thin aluminum wire because of electrical discharge. However, as there is no analytical model for mathematically evaluating the physical phenomena from the discharge phenomenon in the generation of underwater shock waves, in this numerical simulation, the shock wave was generated by the explosion of an explosive. It is necessary to identify the amount of this explosive. The numerical simulation was based on the assumption that Safety Explosives (SEP, Kayaku Japan Co., Ltd., Sumida-ku, Tokyo, Japan) would be used. Based on pressure measurements from underwater discharges, pressure conversions were performed for the use of SEP. The detonation velocity of SEP explosives is approximately 7000 m/s, and the detonation pressure is approximately 15.9 GPa [40]. The results are described in Section 3.2. The pressure of the SEP explosive can be calculated using the Jones–Wilkins–Lee equation of state [41]. As depicted in the schematic diagram (Figure 4c), the explosive was set at the top of the pressure vessel filled with water. In this numerical simulation, the target metal plate was AZ31. Because the analysis was performed using an axisymmetric model, half of the model on one side of the central axis was analyzed and the numerical simulations were conducted using an arbitrary Lagrangian–Eulerian method [42].

2.3. Magnesium Alloy Forming Method

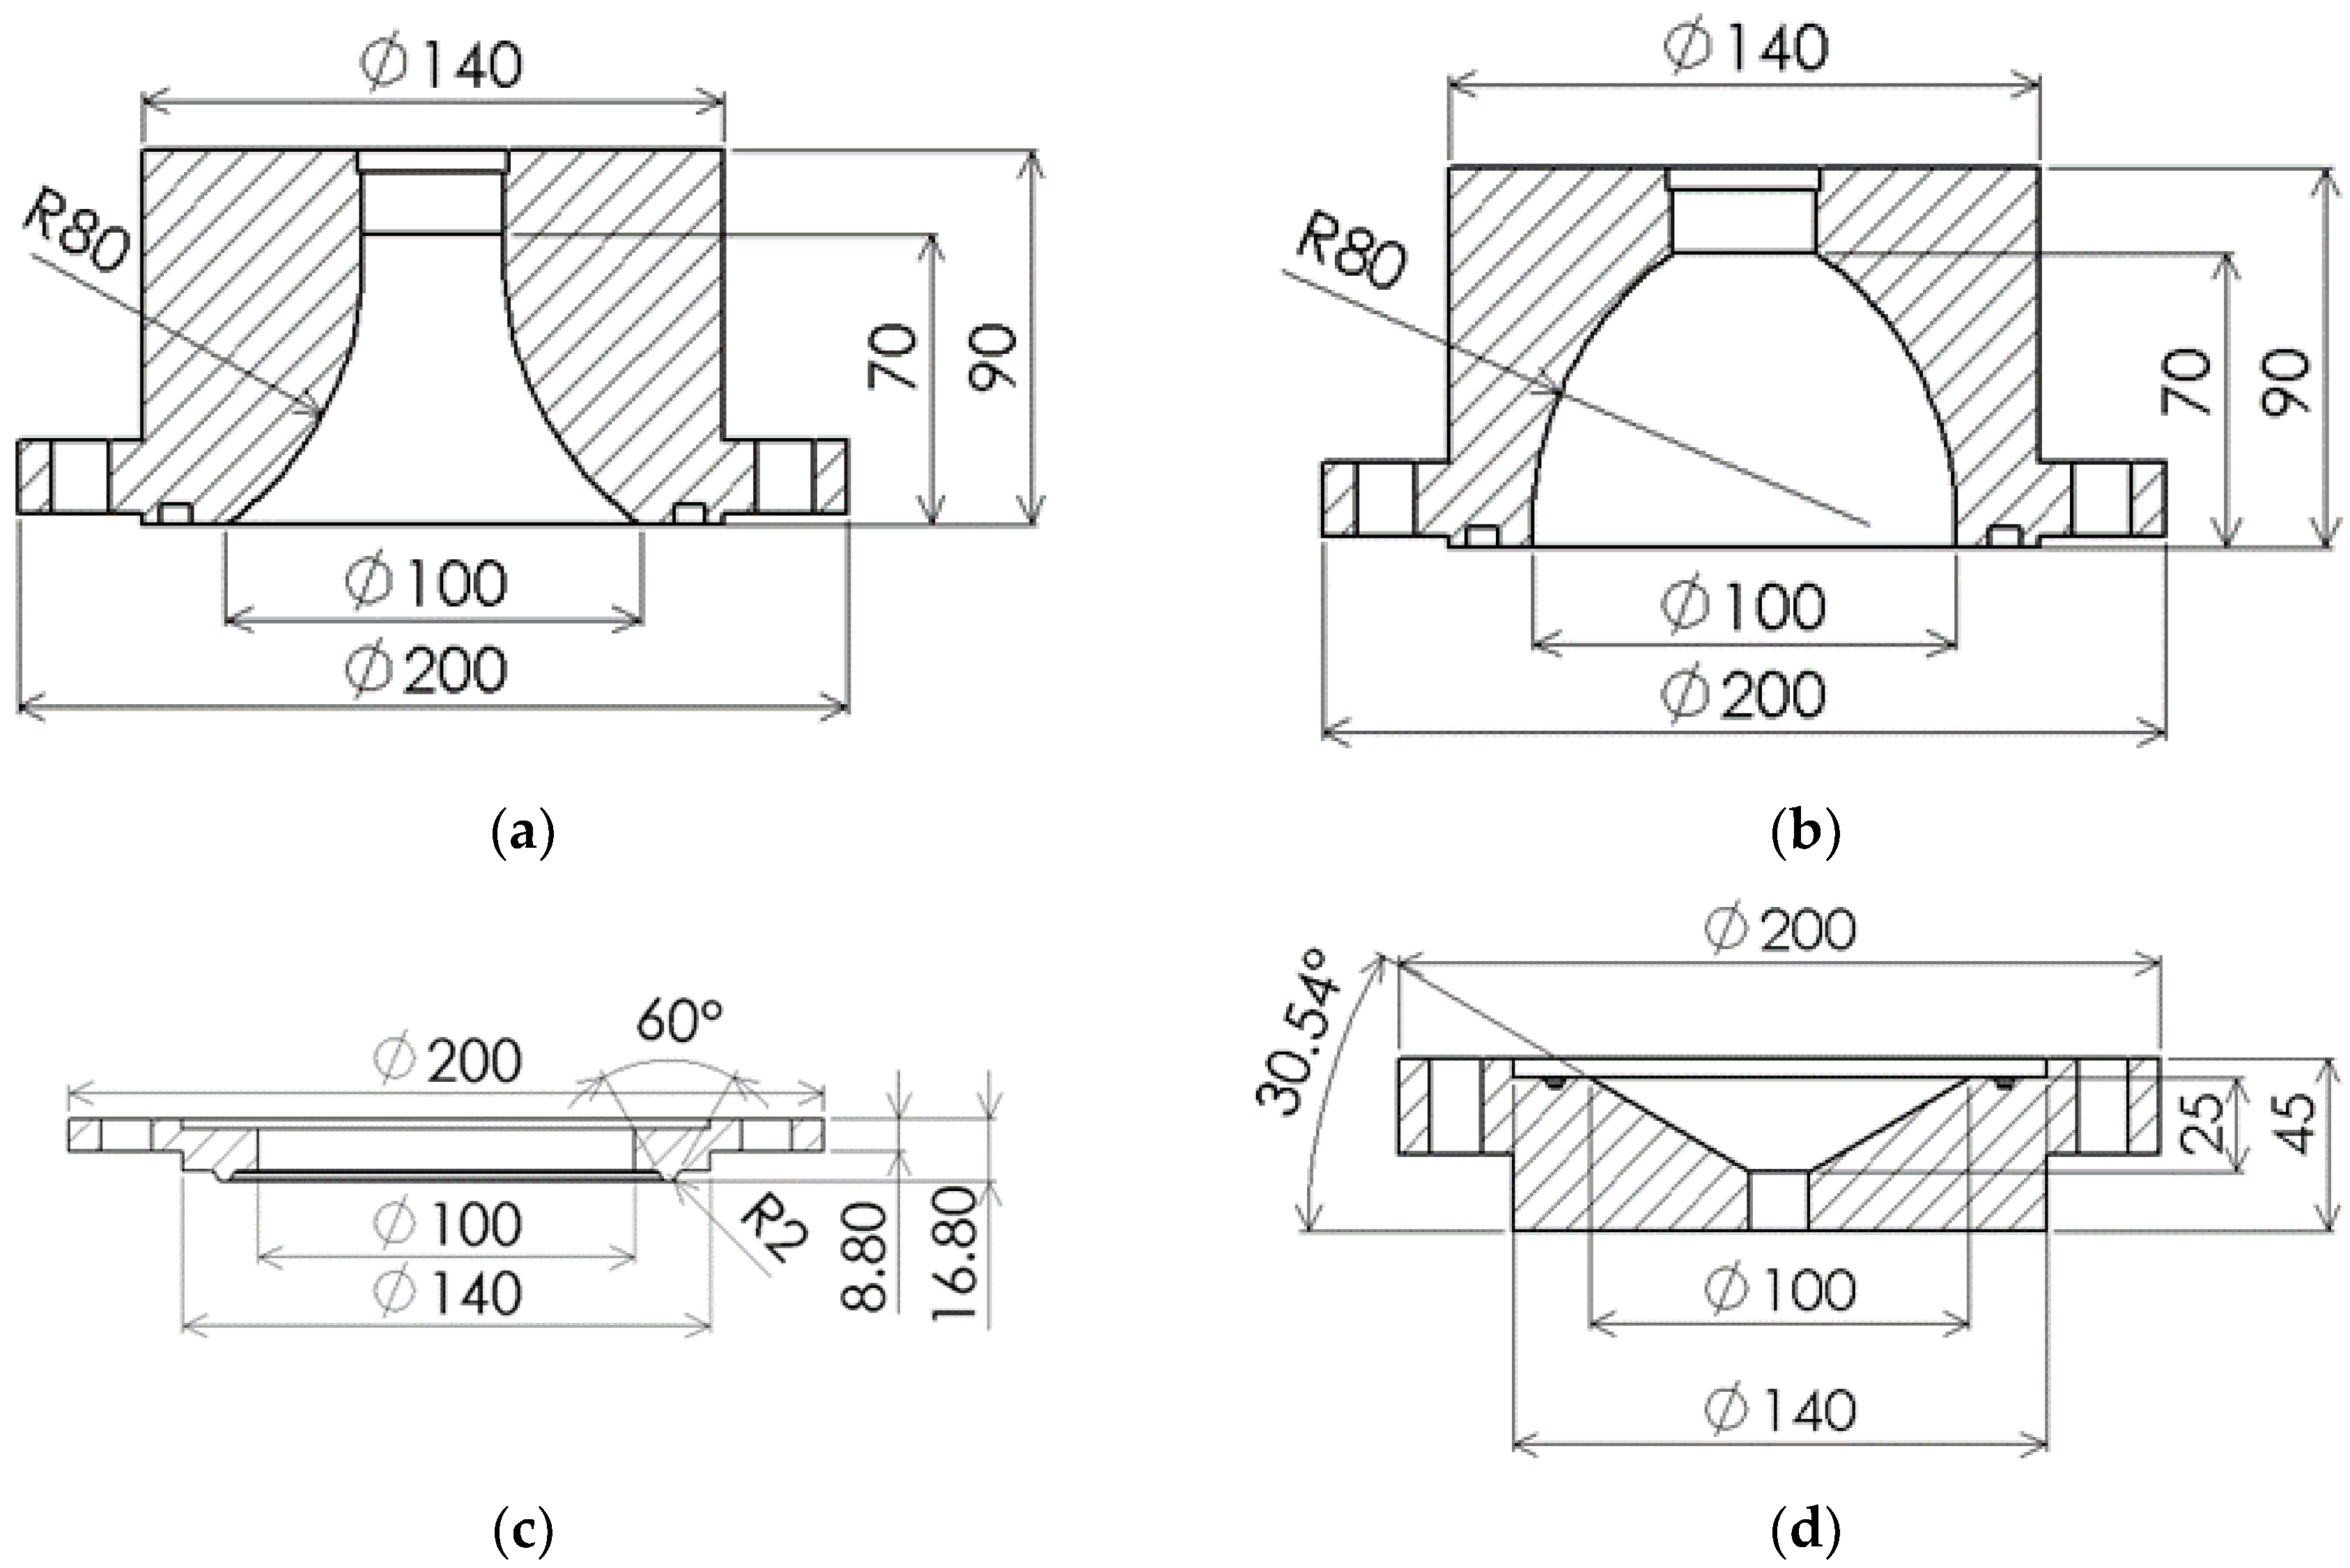
Figure 5 shows schematics of the pressure vessel, plate holder, and mold used in the experiment. Figure 5a shows a hyperbolic pressure vessel with a hole at the top where an electrode is set. The plate holder depicted in Figure 5c is set 70 mm downward from the electrode. The interior of the vessel between the electrode and plate holder is a hyperbolic cavity with a radius of 80 mm, which is filled with water. The target metal plate is placed under the plate holder, and the mold (Figure 5d) and metal plate are sandwiched between the mold and plate holder. The other pressure vessel has a parabolic cavity, as shown in Figure 5b. As with the hyperbolic pressure vessel, the cavity is parabolic from the hole in which the electrode is set to a position 70 mm downward. The diameter of the opening is 100 mm for both the hyperbolic and parabolic pressure vessels.
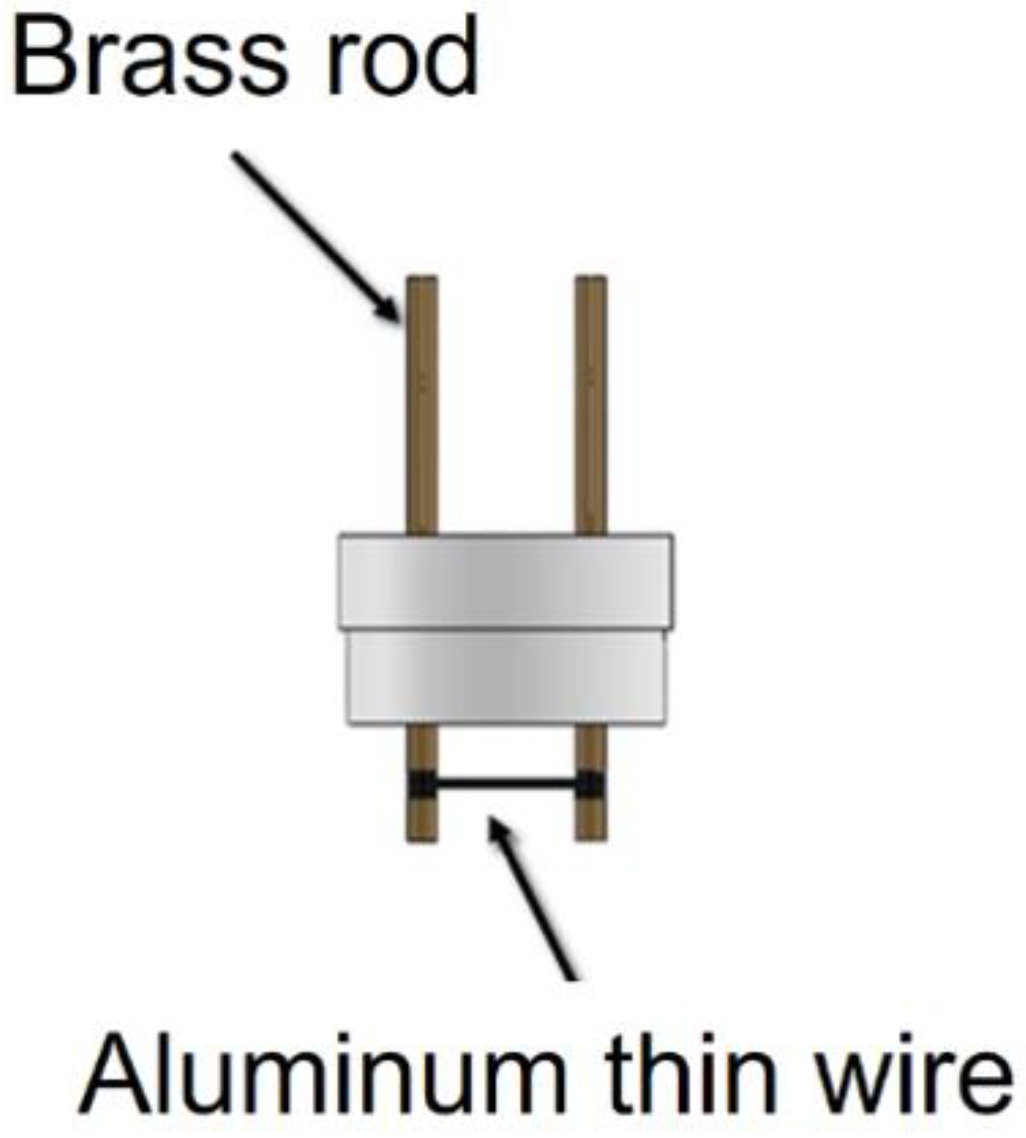
Figure 6 shows the assembly diagram for the aforementioned configuration. When the auxiliary plate was provided during the trial forming experiment, the deformation of the magnesium alloy plate was not transient, cracks did not occur, and the magnesium alloy plate deformed along with the auxiliary plate, even though the magnesium plate was sandwiched between the plate holder and the die. To determine the formability improvement, we examined (a) the aluminum alloy auxiliary plate placed on the upper side of the magnesium alloy plate and (b) the auxiliary plate placed on the opposite side. A sandwich method in which (a) and (b) were set was also considered. A schematic diagram of the electrodes installed on the top of the pressure vessel is provided in Figure 7. The electrode was fabricated by inserting a brass rod with a diameter of 3 mm into a cylindrical polyoxymethylene material, and then, a fine pure aluminum wire was wound between the brass rods. The current flowing from the power supply circuit melted and vaporized the thin aluminum wire, generating an underwater shock wave. A non-contact three-dimensional shape measuring machine (NAZCA-3D, Mitani Corporation, Chiyoda-ku, Tokyo, Japan) was used to measure the forming shape with a laser displacement gauge. The configuration is illustrated in Figure 8.

3. Results and Discussion

3.1. Pressure Measurement Results for the Underwater Shock Wave

Figure 9 shows the pressure and current measurements obtained at a charging voltage of 1000 V, charging energy of 5 kJ, fine aluminum wire diameter of 0.5 mm, and distance from the electrode of 40 mm. The resulting maximum pressure is approximately 5.2 MPa. As the maximum current is 42.8 kA, the current from the power supply circuit was supplied to the electrode for only one cycle because the thyristor was used. In addition, this electrical energy caused the thin wire to melt and vaporize, transforming it into plasma. When the maximum current value was reached, the thin aluminum wire melted and vaporized, generating the pressure peak of the underwater shock wave approximately 60 µs later than when the current was maximized. Figure 10 presents the pressure and current measurements obtained with a distance between the electrode and the pressure sensor of 50 mm. Increasing the distance, D, from 40 mm to 50 mm reduces the pressure by approximately 30%, whereas the time taken to reach maximum peak pressure does not change significantly.

3.2. Numerical Simulation Results

First, the pressure distribution inside the pressure vessel was obtained. It is important to identify the amount of explosive at the source of the shock wave. When identifying the pressure, the pressure vessel was assumed to be of the hyperbolic type. In addition, the charging voltage was set to 1000 V, and the diameter of the fine metal wire of the electrode used was 0.5 mm. The results of the forming experiment and numerical simulation of aluminum alloy plates with a thickness of 0.5 mm were compared under these conditions. The amount of SEP explosive was approximately 0.11 g. The simulation results were easily identified because they were similar. The pressure contour map inside the pressure vessel was obtained when the explosive was used. In addition, the forming amount of the magnesium alloy plate when each container was employed was determined.
Figure 11 shows the pressure contour maps inside the pressure vessel when the explosive amount was 0.11 g. Figure 11a,b present the pressure contour maps of the hyperbolic and parabolic pressure vessels, respectively. In the case of the hyperbolic type, a pressure rise of the shock wave at the center of the vessel is observed, which gradually expands to the outer circumference. In the case of the parabolic type, the reflected pressure from the wall surface is large, and the pressure trend is such that the reflected pressure gradually affects the central part of the vessel.
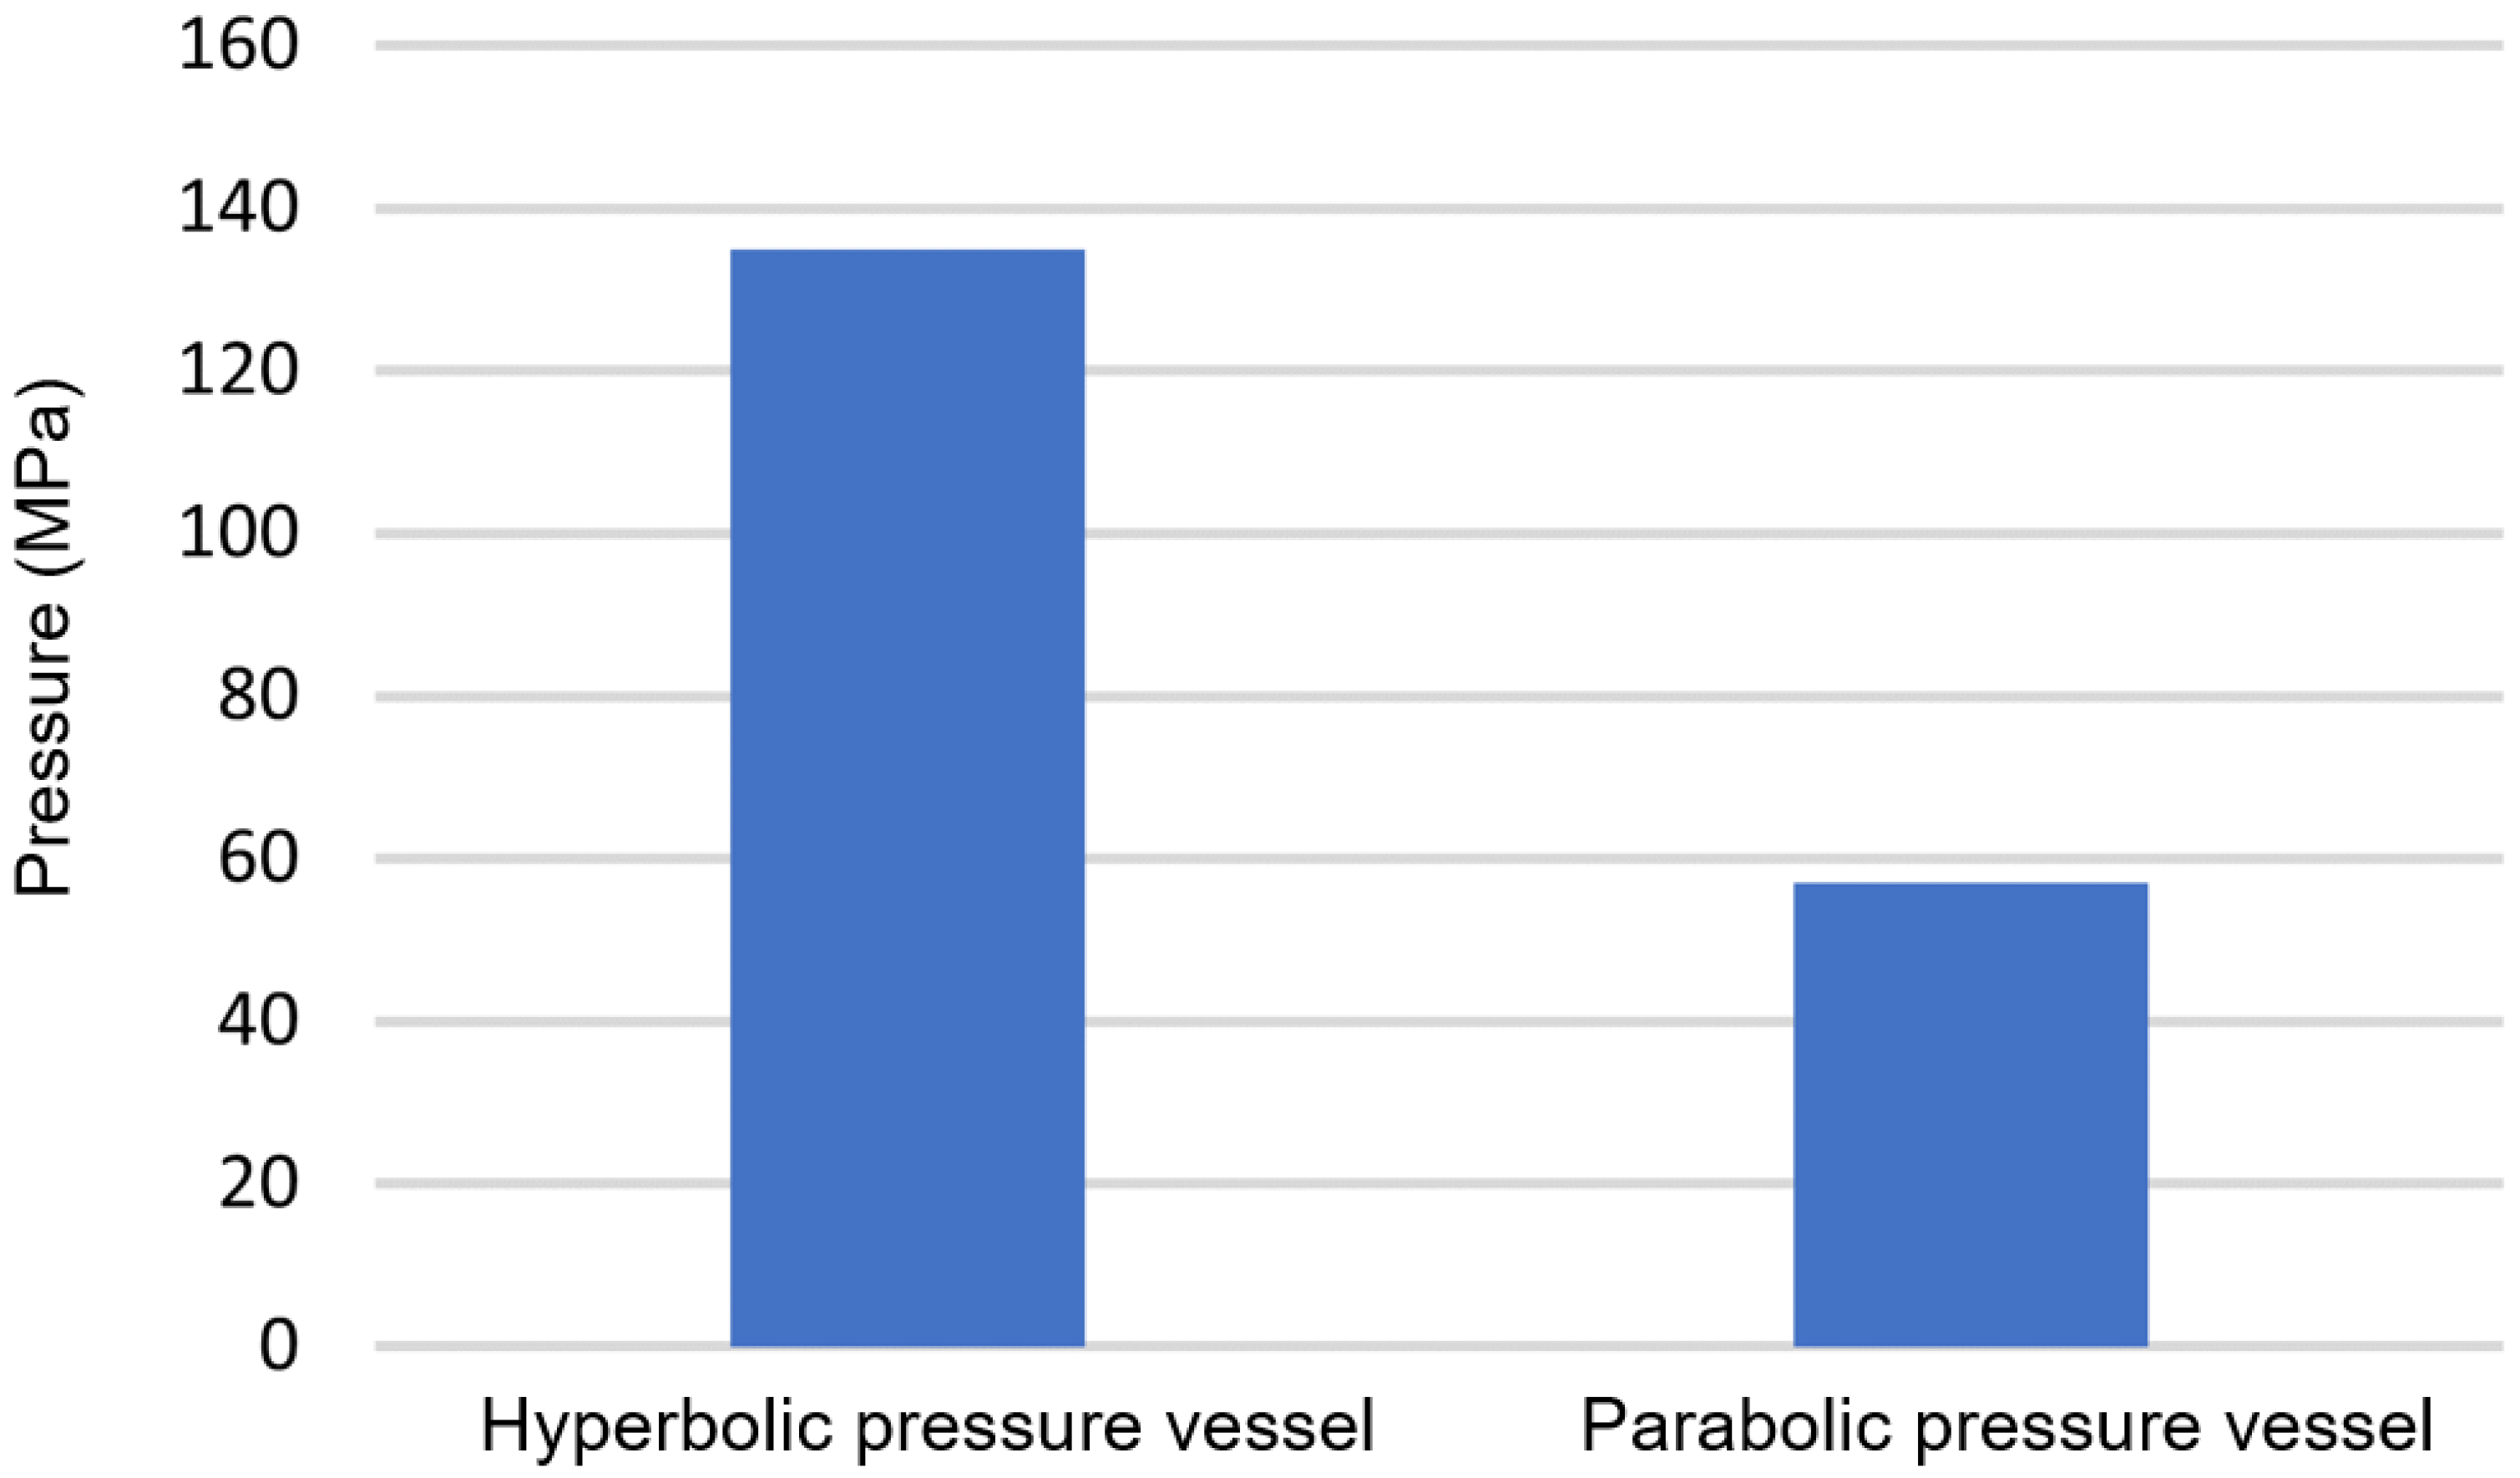
Figure 12 compares the maximum values of the pressure of the water element facing the central part of the magnesium alloy plate. The maximum pressures for the parabolic and hyperbolic pressure vessels are approximately 57.7 and 136 MPa, respectively. The high pressure for the hyperbolic type is observed at the center of the metal plate. Figure 13 illustrates the deformation simulation of AZ31 with a plate thickness of 1.0 mm when a hyperbolic pressure vessel is used. In addition, a contour diagram of the velocity component in the vertical downward direction is shown. At approximately 350 µs, the plate maintains a speed of approximately 20–25 m/s, which gradually decreases. Forming is completed at approximately 650 µs. The plate has a substantially rounded shape.
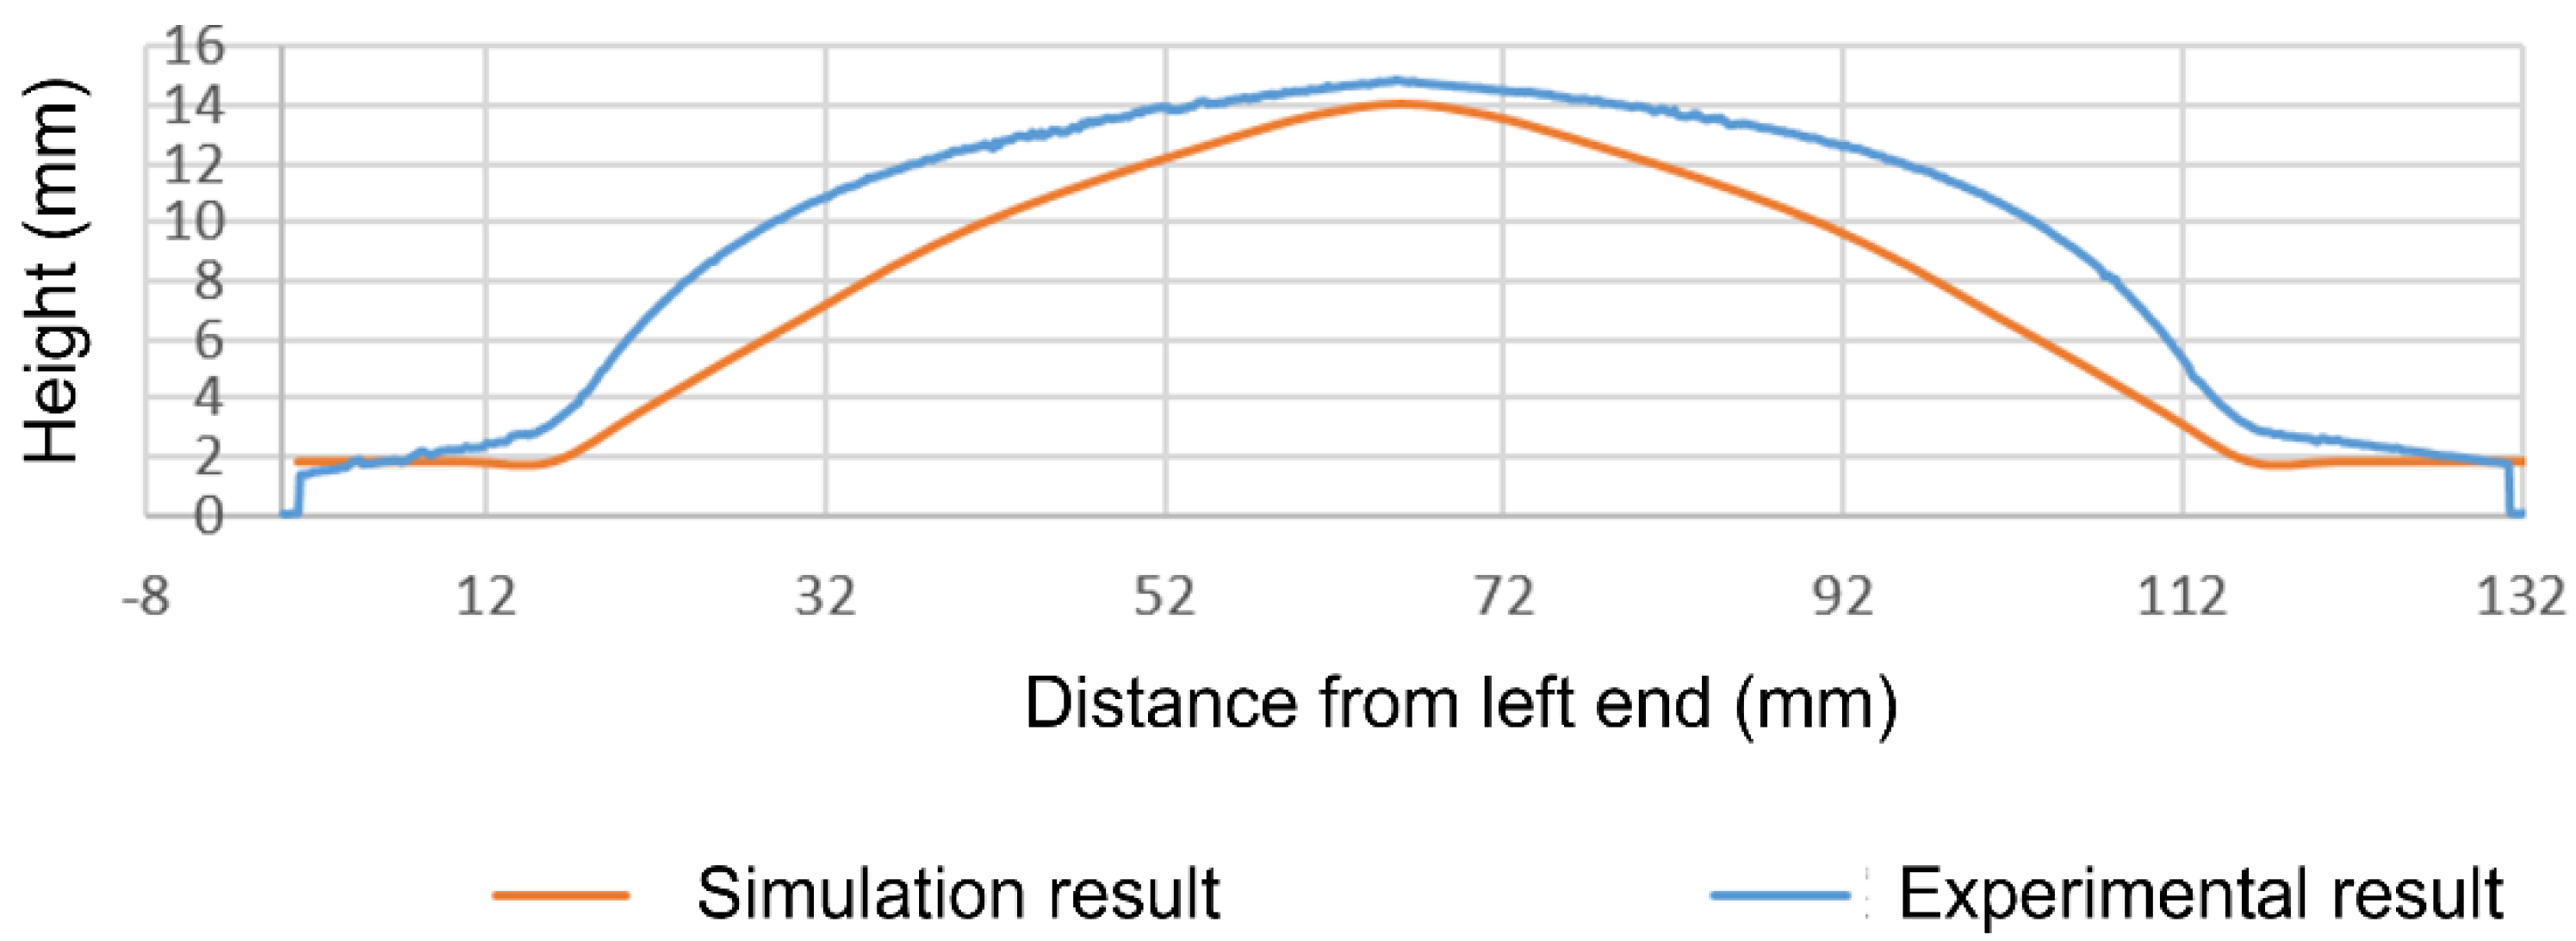
Figure 14 compares the forming simulation and experimental results obtained under the same conditions. The amount of forming in the central part of the magnesium plate is similar in shape. However, in the experimental results, the peripheral part bulges, whereas in the simulation results, the shape is not observed, because the boundary conditions in the numerical simulation were set to restrict radial movement of the outer peripheral portion of the magnesium alloy plate. Removing this condition may result in an unstable solution, and it is considered that an unstable strain element exists in the circumferential direction.

3.3. Magnesium Alloy Forming Experiment Results

When the charging voltages were 1900 and 2000 V, the charging energies obtained were 18.05 and 20.0 kJ, respectively. Forming experiments were conducted under these conditions using (a) only the auxiliary plate, (b) only the auxiliary plate, and both plates. An AZ31 magnesium alloy with 1.0 mm thickness and 140 mm diameter was employed.
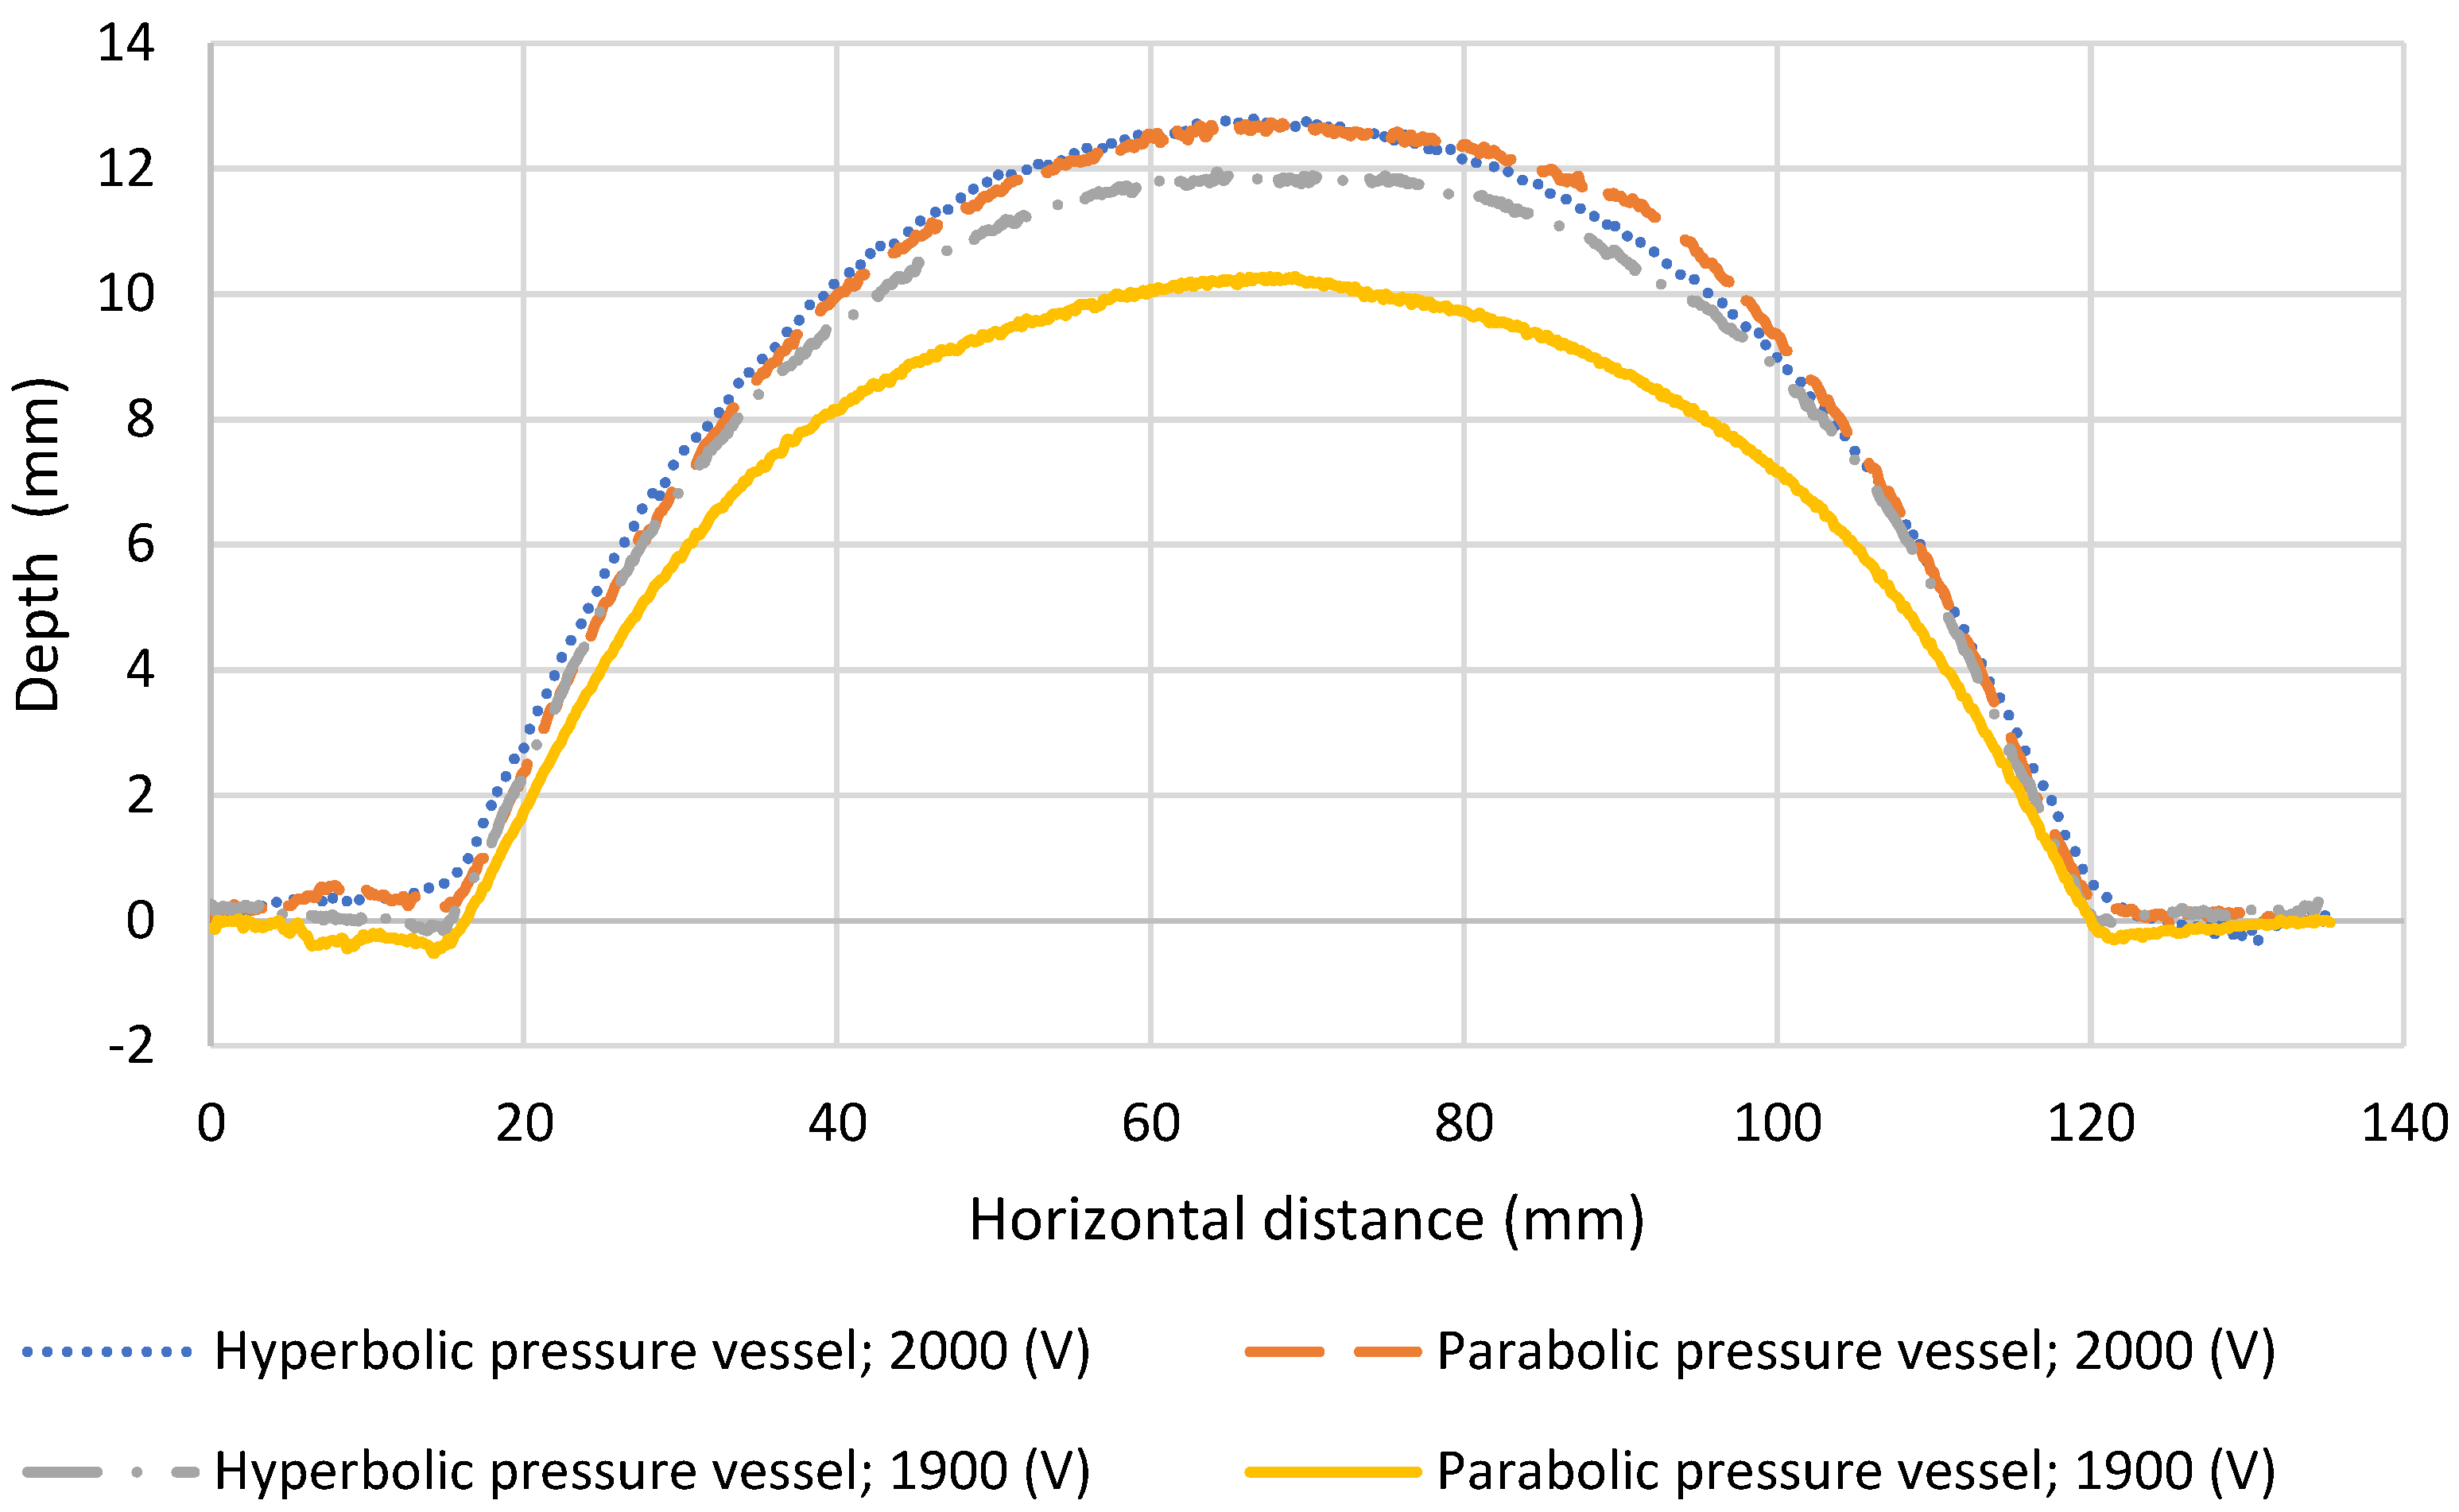
Figure 15 shows the results obtained using (a), where an aluminum plate was placed on the AZ31 top surface, and impact pressure acted on the aluminum plate once, deforming it concurrently with the AZ31 plate. In addition, the figure shows the results obtained when using the two pressure vessels. According to these findings, the hyperbolic type has a larger forming amount than the parabolic type. The higher the charging voltage, the larger the forming amount. Defects such as cracks are not observed in the deformed AZ31 material.
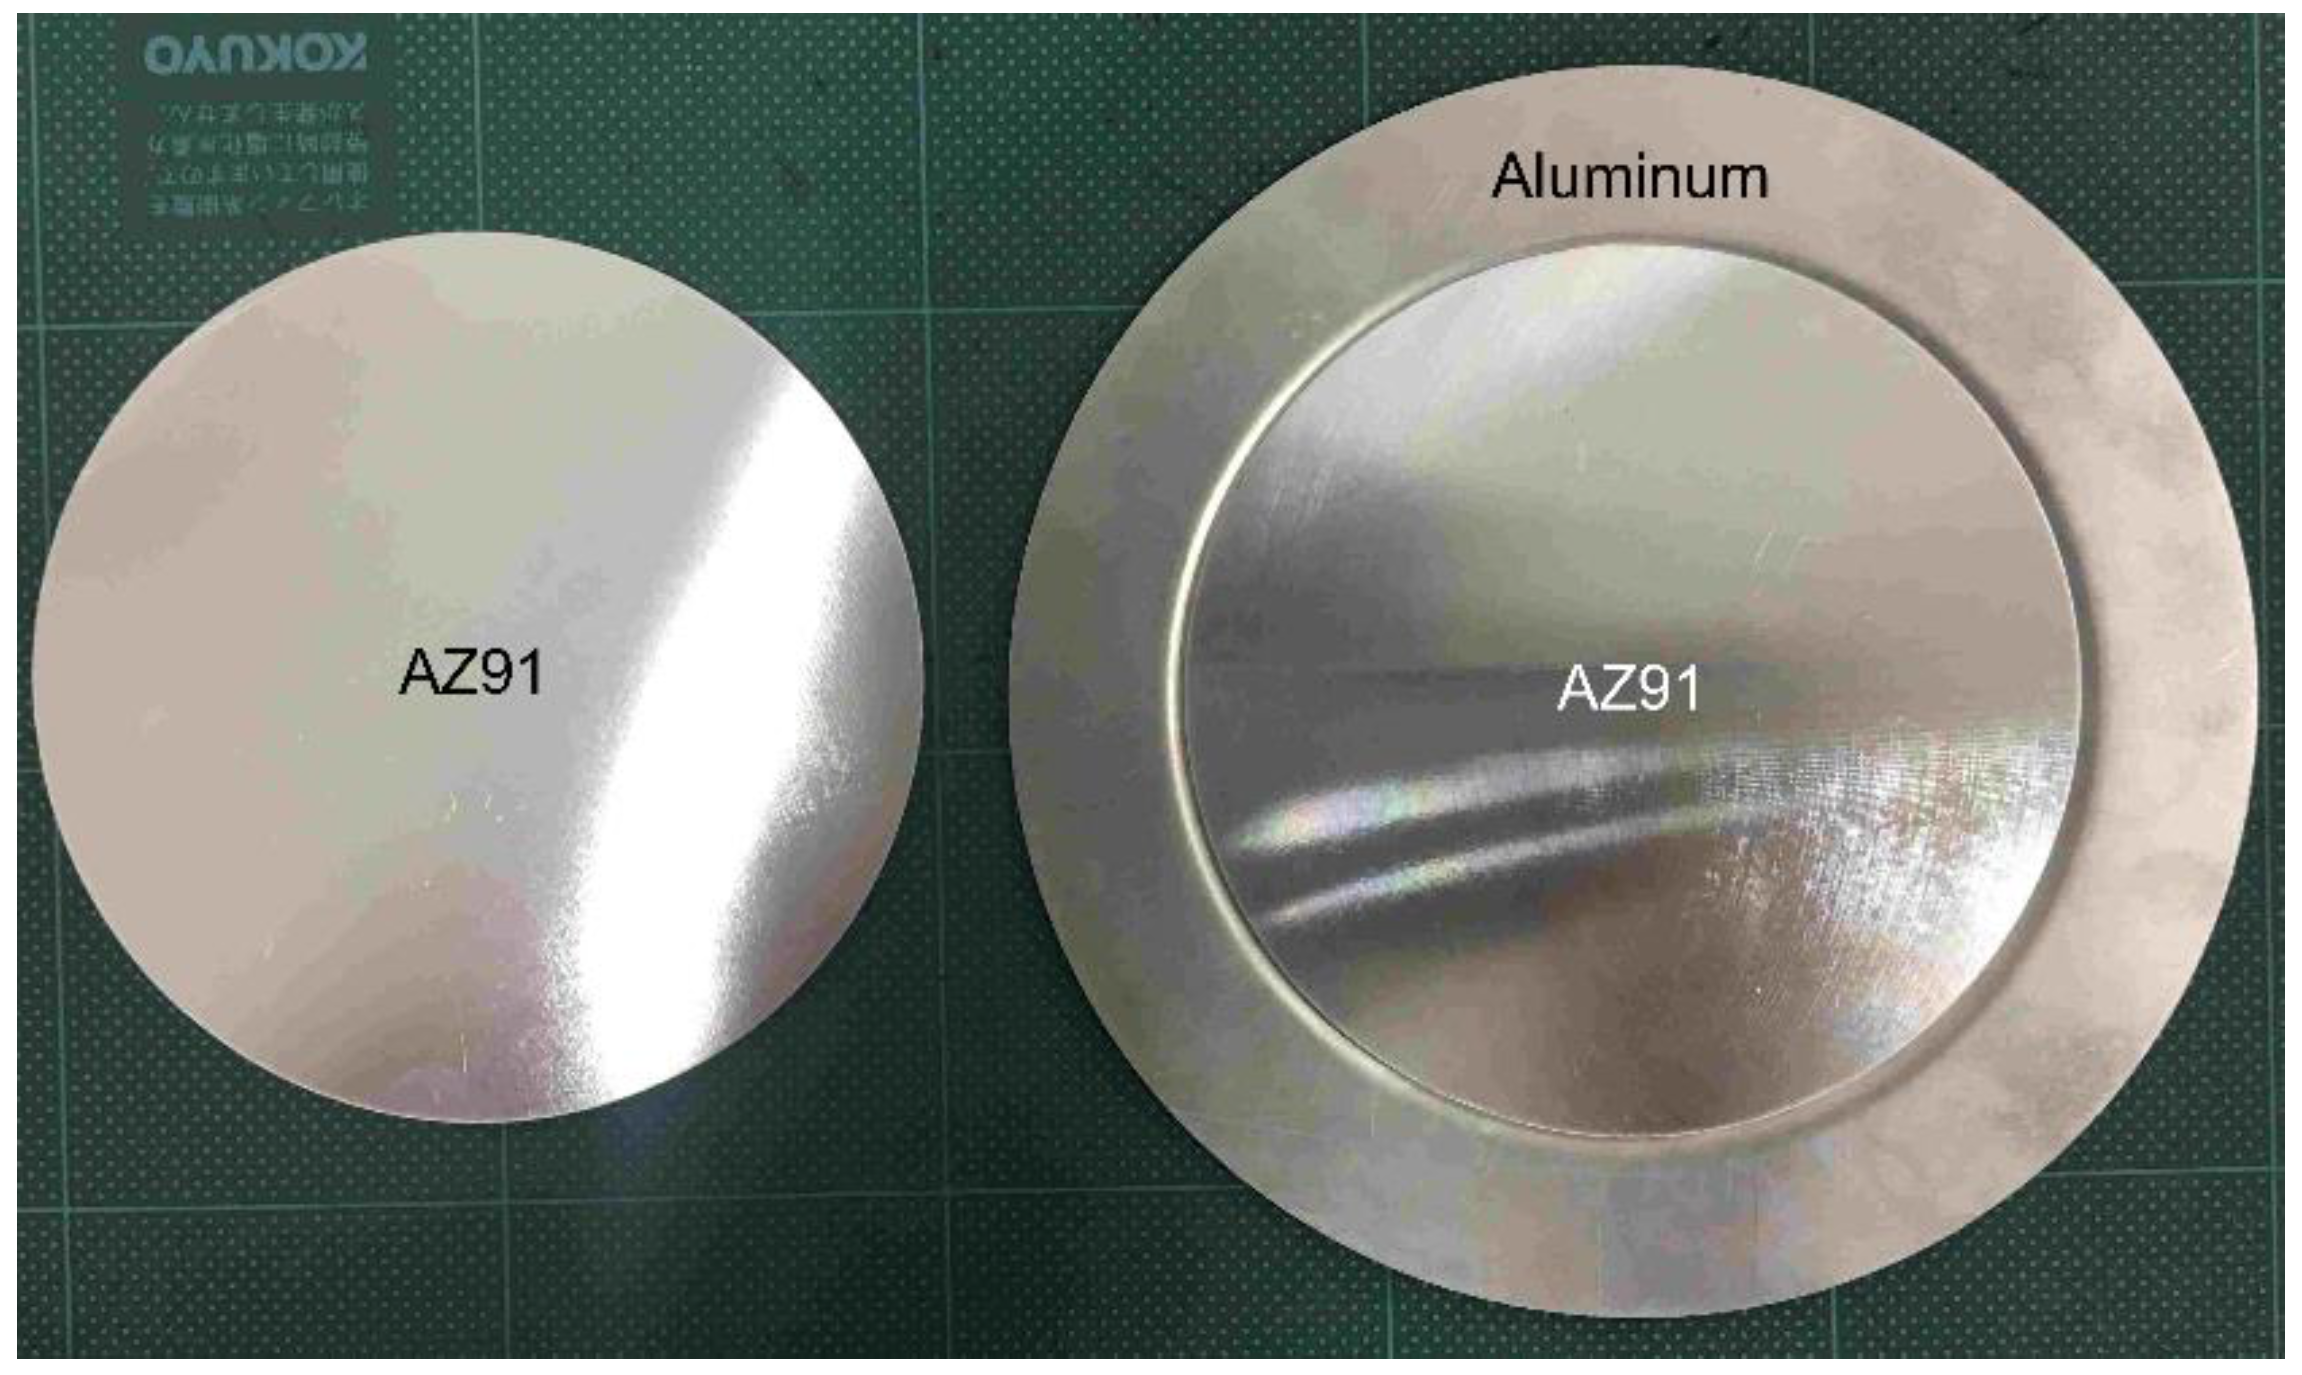
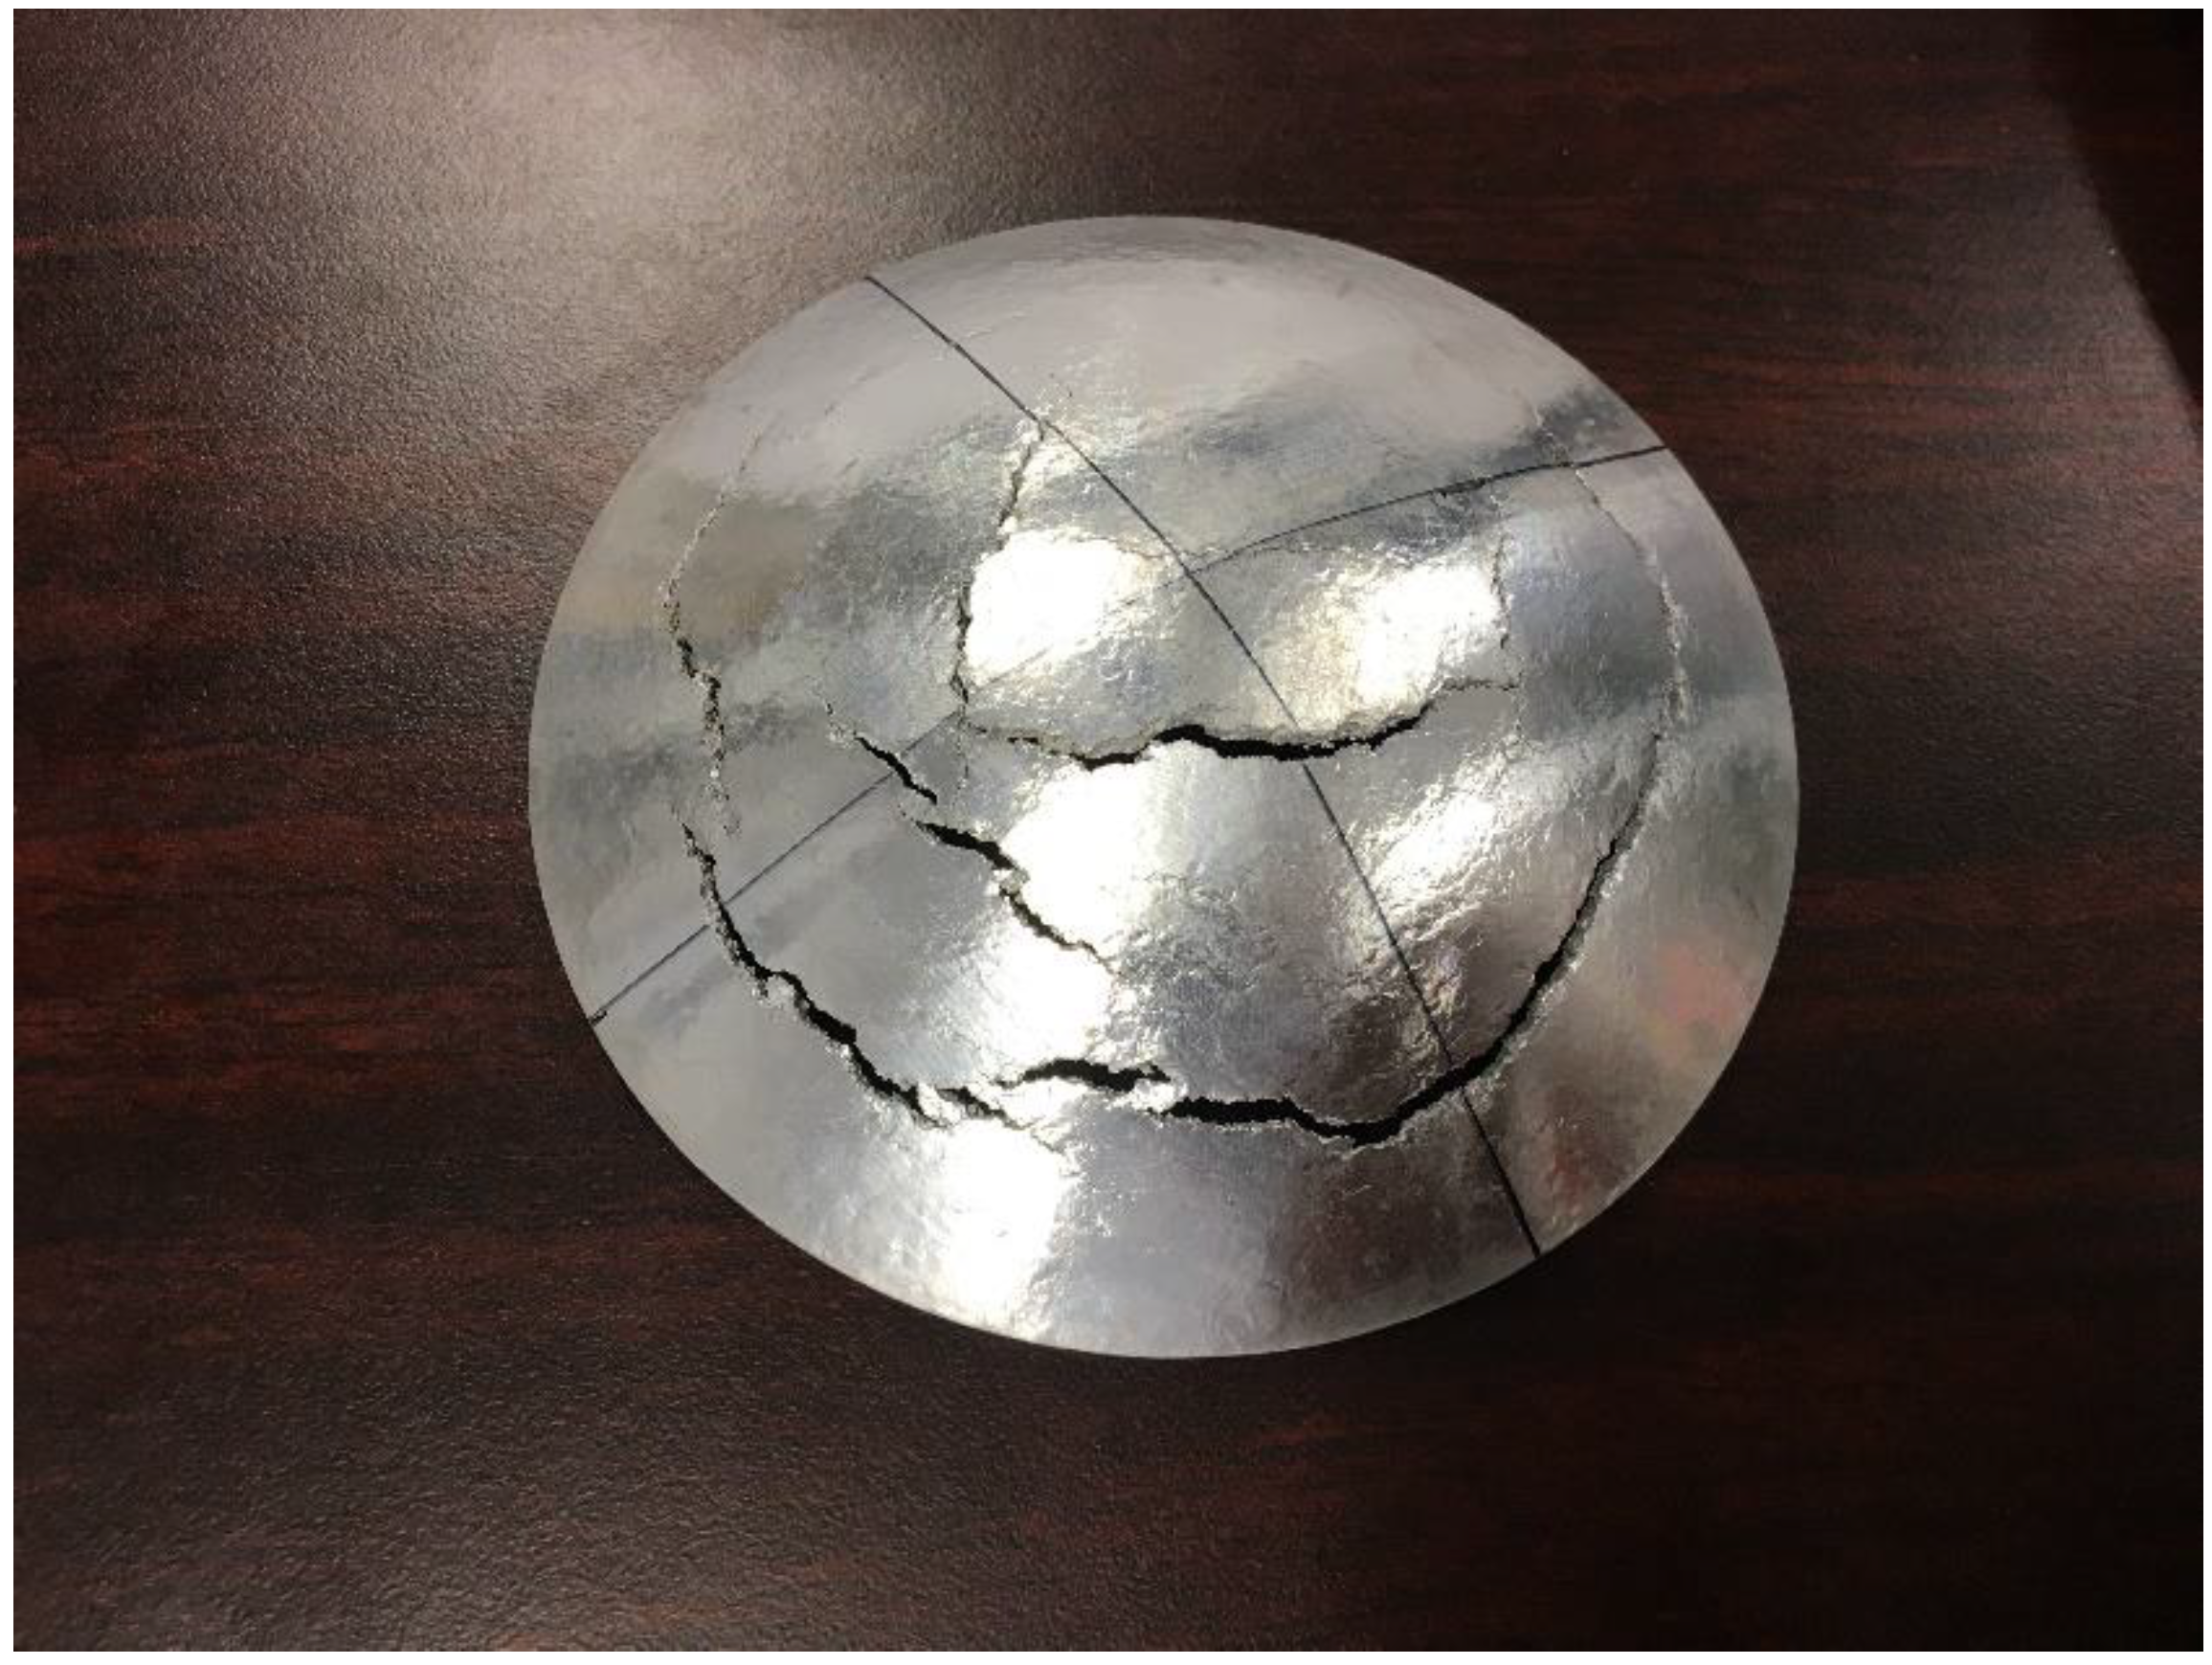
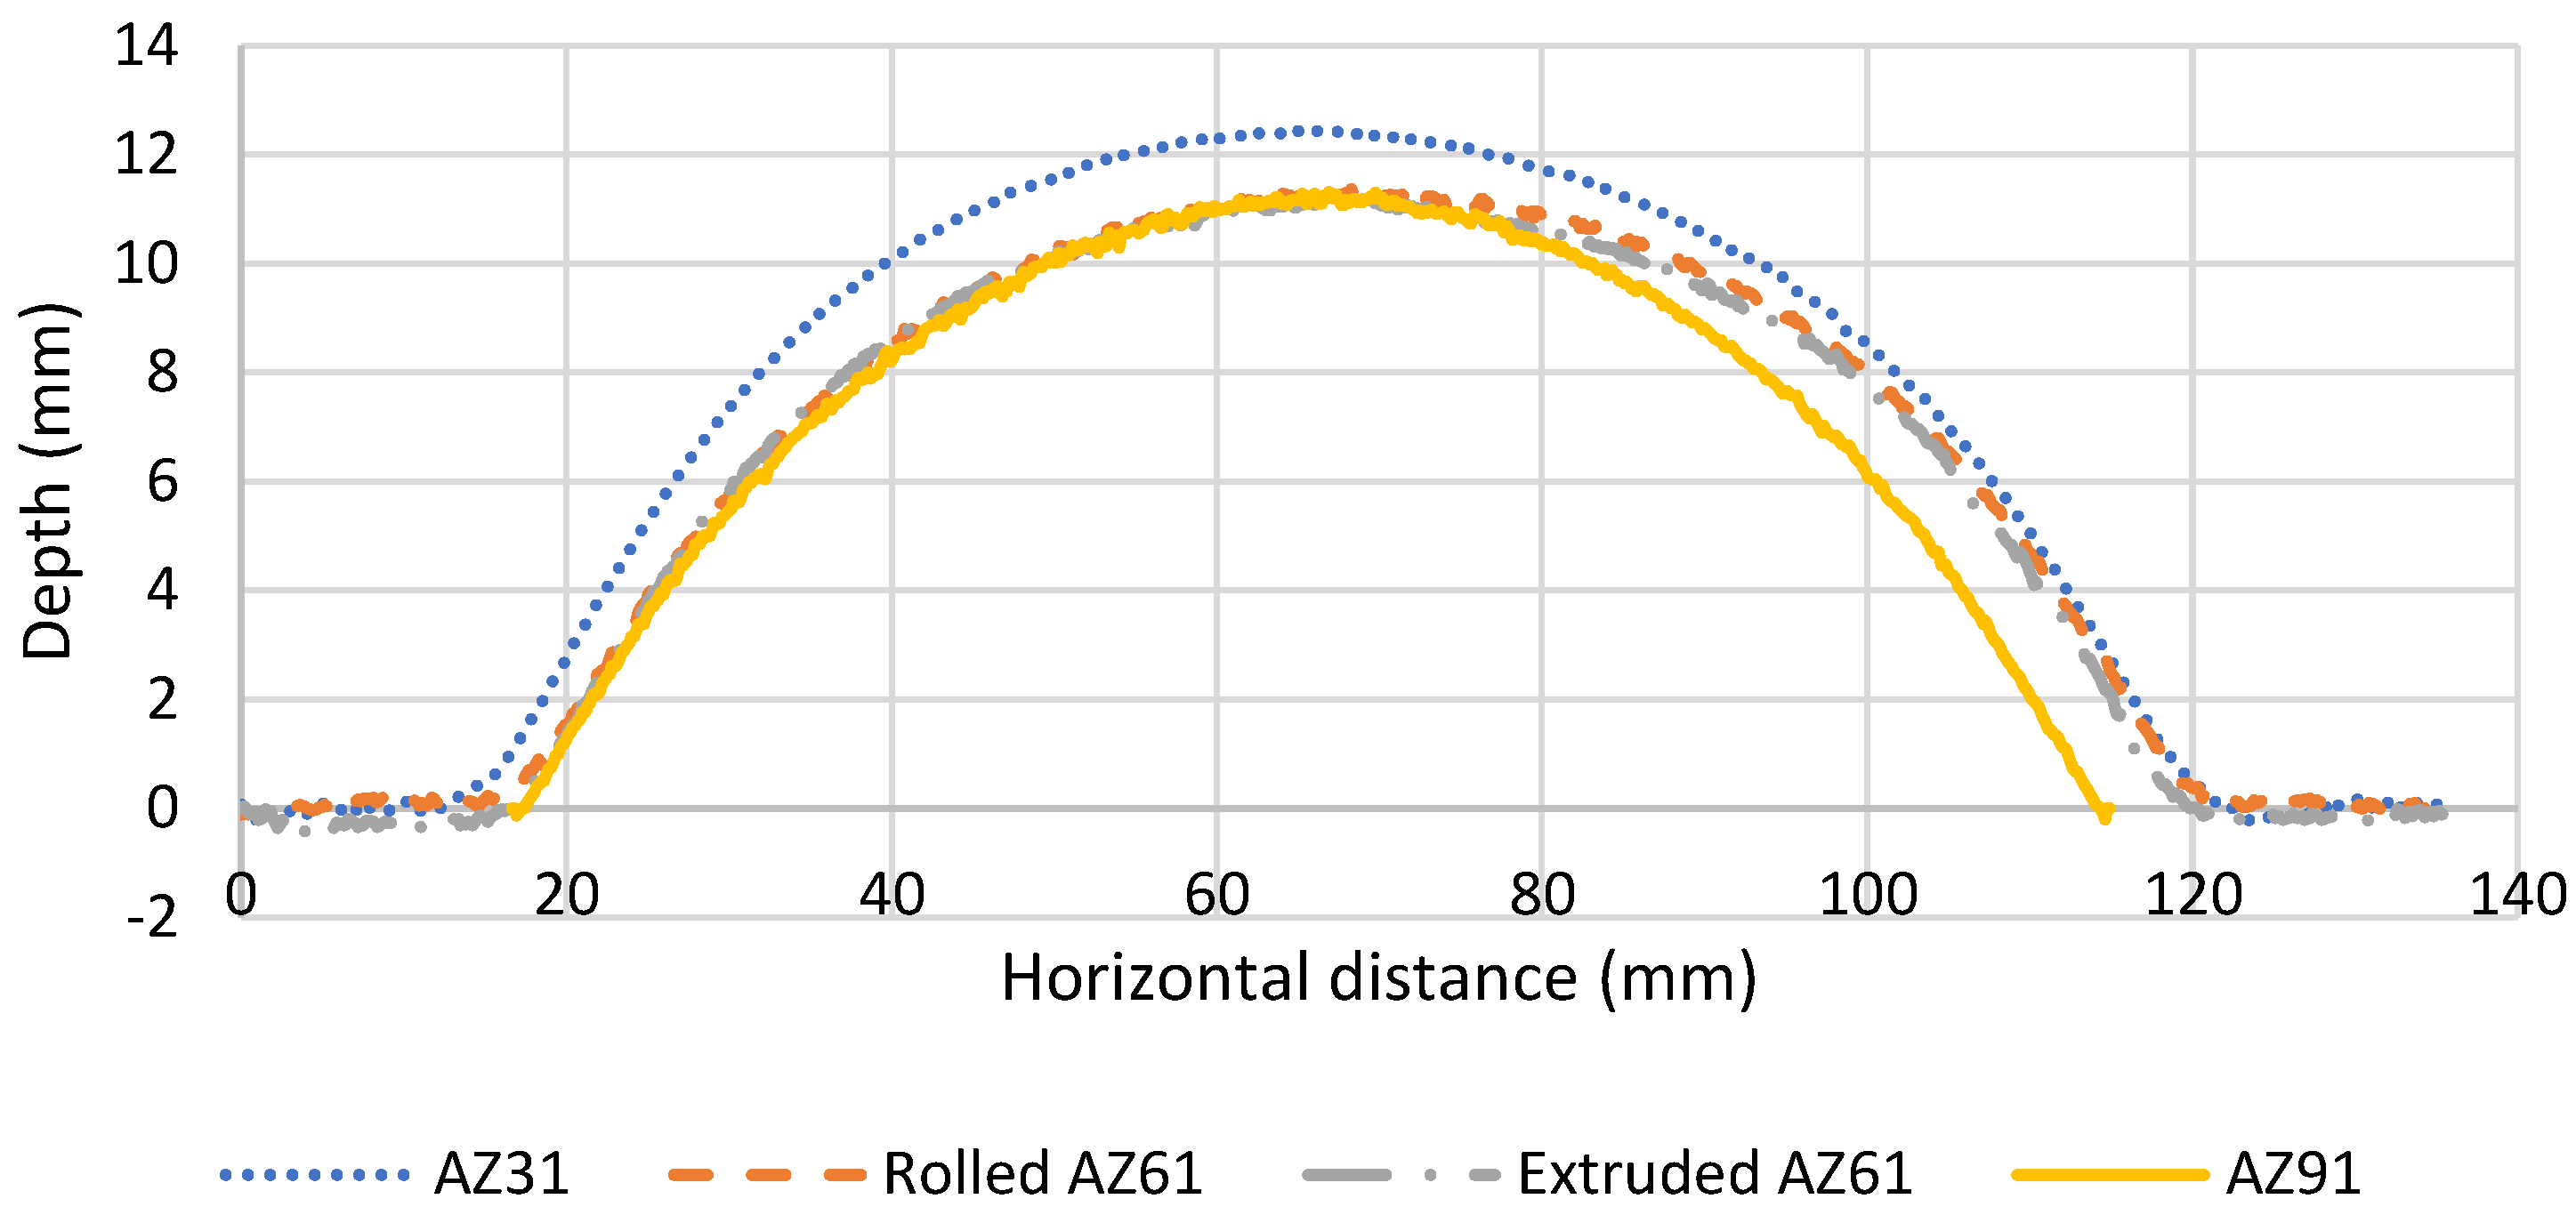
Figure 16 depicts the forming shape of (b), where an aluminum plate was stacked on the bottom surface of the AZ31 plate from the opposite side. The larger the charging voltage, the larger the forming amount; however, at 2000 V, the effect on the pressure vessel is hardly noticeable. Figure 17 presents the formed shape when the AZ31 plate was sandwiched between the aluminum plates using auxiliary plates placed on each side. Owing to the increased mass, the deformation amount is reduced. However, when the charging voltage is 2000 V, the use of the hyperbolic pressure vessel yields the same amount of forming as in the other cases. Because only AZ91 material with a diameter of 100 mm was available, a forming experiment was conducted after attaching the AZ91 material to the center of the aluminum plate, which was an auxiliary plate, as shown in Figure 18. This approach resulted in the occurrence of cracks, as depicted in Figure 19. Therefore, the experiment was conducted after lowering the charging voltage to 1600 V. The AZ31 and AZ61 materials were deformed at a charging voltage of 2000 V, and the deformed shapes of the three magnesium alloys were compared. For the AZ61 material, we conducted forming experiments on two types of rolled material and extruded material and assessed whether there was any influence of the manufacturing process on these magnesium alloys. Figure 20 compares the formed shapes. The deformation amount of the AZ31 material is the largest. In the forming experiment results for the AZ61 material, no effects of the extrusion or rolling working processes are observed. Therefore, a similar forming shape is obtained. The AZ91 material has a small diameter and is difficult to compare; however, the shape is similar to that of the AZ61 material.

4. Conclusions

In this study, we investigated the forming performance of magnesium alloys at room temperature using underwater shock waves generated by the underwater discharge of fine aluminum wires. The results can be summarized as follows.
  • When a thin aluminum wire with a diameter of 0.5 mm, charging voltage of 1000 V, and charging energy of 5 kJ were used, a maximum pressure of approximately 52 MPa was obtained at a position 40 mm from the electrode.
  • Numerical simulations showed that the maximum peak pressure was higher with a hyperbolic pressure vessel than with a parabolic pressure vessel.
  • Because it is difficult to form magnesium alloy plates at room temperature, an auxiliary plate was added, which enabled forming without breakage.

Author Contributions

Conceptualization, H.I. and H.Y.; methodology, H.I. and H.Y.; validation, M.N. and Y.H.; investigation, H.I. and H.Y.; resources, Y.H.; data evaluation, M.N. and Y.H.; writing—original draft preparation, H.I.; writing—review and editing, H.I and H.Y.; supervision, Y.H.; project administration, H.I. All authors have read and agreed to the published version of the manuscript.

Funding

The authors acknowledge the financial support from Japan Keirin Auto Race Foundation (2021M-160) and JSPS KAKENHI (20K04220 and 19K12393).

Conflicts of Interest

The authors declare no conflict of interest.

References

  1. Dziubińska, A.; Gontarz, A.; Dziubiński, M.; Barszcz, M. The forming of magnesium alloy forming for aircraft and automotive applications. Adv. Sci. Technol. 2016, 10, 158–168. [Google Scholar] [CrossRef]
  2. Kaczyński, P.; Gronostajski, Z.; Polak, S. Progressive crushing as a new mechanism of energy absorption. The crushing study of magnesium alloy crash-boxes. Int. J. Impact Eng. 2019, 124, 1–8. [Google Scholar] [CrossRef]
  3. Monteiro, W.A. The Influence of Alloy Element on Magnesium for Electronic Devices Applications. In Light Metal Alloys Applications; IntechOpen Limited: London, UK, 2014; pp. 229–241. [Google Scholar]
  4. Ueda, S. Engineering materials. Nikkan Kogyo Shinbun Sha 1998, 45, 118–121. [Google Scholar]
  5. Sano, T.; de Winter, A.; Saiki, T.; Horikoshi, S.; Fuchizawa, S.; Sado, S. Reduction of Environmental Impact Attained by Magnesium Alloys for Automotive Components. In Proceedings of the 6th International Conference on Technology of Pasticity (ICTP 1999), Nuremberg, Germany, 19–24 September 1999; pp. 589–594. [Google Scholar]
  6. Ogawa, N.; Shiomi, M.; Osakada, K. Forming limit of magnesium alloy at elevated temperatures for precision forging. Int. J. Mach. Tools Manuf. 2002, 42, 607–614. [Google Scholar] [CrossRef]
  7. Chino, Y.; Mabuchi, M. Plastic-forming processes for magnesium alloys. J. Jpn. Inst. Light Met. 2001, 51, 498–502. [Google Scholar] [CrossRef] [Green Version]
  8. Alaneme, K.K.; Okotete, E.A. Enhancing plastic deformability of Mg and its alloys-A review of traditional and nascent developments. J. Magnes. Alloy. 2017, 5, 460–475. [Google Scholar] [CrossRef]
  9. Nussbaum, G.; Sainfor, P.; Reggazzoni, G.; Gjestland, H. Scr. Strenthening mechanisms in the rapidly solidified AZ91 magnesium alloy. Scr. Metall. 1989, 23, 1079–1084. [Google Scholar] [CrossRef]
  10. Lahaie, D.; Embury, J.D.; Chadwich, M.M.; Gray, G.T. A note on the deformation of fine grained magnesium alloys. Scr. Metall. Et Mater. 1992, 27, 139–142. [Google Scholar] [CrossRef]
  11. Mabuchi, M.; Higashi, K. Strengthening mechanisms of Mg-Si alloys. Acta Mater. 1996, 44, 4611–4618. [Google Scholar] [CrossRef]
  12. Chaudry, U.M.; Hamad, K.; Kim, J.G. On the ductility of magnesium based materials: A mini review. J. Alloy. Compd. 2019, 792, 652–664. [Google Scholar] [CrossRef]
  13. Kubota, K.; Mabuchi, M.; Higashi, K. Review processing and mechanical properties of fine-grained magnesium alloys. J. Meterial Sci. 1999, 34, 2255–2262. [Google Scholar] [CrossRef]
  14. Hirofumi, I.; Masatoshi, N.; Shigeru, T. Explosive forming. In Explosion, Shock Wave and High-Strain-Rate Phenomena of Advanced Materials; Hokamoto, K., Ed.; Elsevier Science and Technology: Amsterdam, The Netherlands, 2021; pp. 17–33. [Google Scholar]
  15. Ghaderi, S.H.; Mori, A.; Hokamoto, K. Analysis of explosively welded aluminum–AZ31 magnesium alloy joints. Mater. Trans. 2008, 49, 1142–1147. [Google Scholar] [CrossRef] [Green Version]
  16. Inao, D.; Mori, A.; Tanaka, S.; Hokamoto, K. Explosive welding of thin aluminum plate onto magnesium alloy plate using a gelatin layer as a pressure-transmitting medium. Metals 2020, 10, 106. [Google Scholar] [CrossRef] [Green Version]
  17. Ghaderi, S.H.; Mori, A.; Hokamoto, K. Explosion joining of magnesium alloy AZ31 and aluminum. Mater. Sci. Forum 2007, 566, 291–296. [Google Scholar] [CrossRef]
  18. Manikandan, P.; Lee, J.N.; Mizumachi, K.; Ghaderi, S.H.; Mori, A.; Hokamoto, K. Transition joints of aluminum and magnesium alloy made by underwater explosive welding technique. Mater. Sci. Forum 2012, 706–709, 757–762. [Google Scholar] [CrossRef]
  19. Chen, P.; Feng, J.; Zhou, Q.; An, E.; Li, J.; Yuan, Y.; Ou, S. Investigation on the explosive welding of 1100 aluminum alloy and AZ31 magnesium alloy. J. Mater. Eng. Perform. 2016, 25, 2635–2641. [Google Scholar] [CrossRef]
  20. Zhang, T.; Wang, W.; Yan, Z.; Zhang, J. Interfacial morphology and bonding mechanism of explosive weld joints. Chin. J. Mech. Eng. 2021, 34, 8. [Google Scholar] [CrossRef]
  21. Rouzbeh, A.; Sedighi, M.; Hashemi, R. Comparison between explosive welding and roll-bonding processes of AA1050/Mg AZ31B bilayer composite sheets considering microstructure and mechanical properties. J. Mater. Eng. Perform. 2020, 29, 6322–6332. [Google Scholar] [CrossRef]
  22. Manikandan, P.; Lee, J.O.; Mizumachi, K.; Mori, A.; Raghukandan, K.; Hokamoto, K. Underwater explosive welding of thin tungsten foils and copper. J. Nucl. Mater. 2011, 418, 281–285. [Google Scholar] [CrossRef]
  23. Mori, A.; Tamaru, K.; Hokamoto, K.; Fujita, M. Underwater Explosive Welding, Discussion Based on Weldable Window. The American Institute of Physics Conf. Proc. 2006, 845, 1543. [Google Scholar]
  24. Tatukawa, I. Interfacial phenomena in explosive welding of Al-Mg alloy/steel and Al-Mg alloy/titanium/steel. Trans. Jpn. Weld. Soc. 1986, 17, 110–116. [Google Scholar]
  25. Yan, D.; Bian, D.; Zhao, J.; Niu, S. Study of the electrical characteristics, shock-wave pressure characteristics, and attenuation law based on pulse discharge in water. Shock Vib. 2016, 6412309. [Google Scholar] [CrossRef] [Green Version]
  26. Higa, O.; Yasuda, A.; Higa, Y.; Shimojima, K.; Hokamoto, K.; Itoh, S. Optical examination of shockwave propagation induced by an underwater wire explosion. Int. J. Multiphysics 2016, 10, 343–353. [Google Scholar]
  27. Shimojima, K.; Higa, Y.; Higa, O.; Takemoto, A.; Iyama, H.; Watanabe, T.; Kawai, H.; Hokamoto, K.; Itoh, S. Design and production of pressure vessel for food processing machine using underwater shock using measurement of particle velocity and results of numerical analysis. Int. J. Multiphysics 2019, 13, 283–293. [Google Scholar]
  28. Shimojima, K.; Higa, O.; Higa, K.; Itoh, S. Development of milling flour machine of rice powder using instantaneous high pressure 1st report, Development of continuous driving device and componential analysis of rice powder. Jpn. J. Food Eng. 2016, 16, 297–302. [Google Scholar] [CrossRef]
  29. Ide, M.; Shibuta, M.; Wada, N.; Tanaka, S.; Hamashima, H.; Itoh, S. The basic research for pulverization of rice using underwater shock wave by electric discharge. Int. J. Multiphysics 2011, 5, 115–129. [Google Scholar] [CrossRef]
  30. Heggemann, T.; Psyk, V.; Oesterwinter, A.; Linnemann, M.; Kräusel, V.; Homberg, W. Comparative analysis of electrohydraulic and electromagnetic sheet metal forming against the background of the application as an incremental processing technology. Metals 2022, 12, 660. [Google Scholar] [CrossRef]
  31. Avrillaud, G.; Mazars, G.; Cantergiani, E.; Beguet, F.; Cuq-Lelandais, J.P.; Deroy, J. Examples of how increased formability through high strain rates can be used in electro-hydraulic forming and electromagnetic forming industrial applications. J. Manuf. Mater. Processing 2021, 5, 96. [Google Scholar] [CrossRef]
  32. Woo, M.A.; Moon, Y.H.; Song, W.J.; Kang, B.S.; Kim, J. Acquisition of dynamic material properties in the electrohydraulic forming process using artificial neural network. Materials 2019, 12, 3544. [Google Scholar] [CrossRef] [Green Version]
  33. Woo, M.A.; Song, W.J.; Kang, B.S.; Kim, J. Acquisition and evaluation of theoretical forming limit diagram of Al 6061-T6 in electrohydraulic forming process. Metals 2019, 9, 401. [Google Scholar] [CrossRef] [Green Version]
  34. Drehmann, R.; Scheffler, C.; Winter, S.; Psyk, V.; Kräusel, V.; Lampke, T. Experimental and numerical investigations into magnetic pulse welding of aluminum alloy 6016 to hardened steel 22MnB5. J. Manuf. Mater. Processing 2021, 5, 66. [Google Scholar] [CrossRef]
  35. Zhang, S.; Kinsey, B.L. Influence of material properties on interfacial morphology during magnetic pulse welding of Al1100 to copper alloys and commercially pure titanium. J. Manuf. Mater. Processing 2021, 5, 64. [Google Scholar] [CrossRef]
  36. Li, Y.; Dezhi Yang, D.; Yang, W.; Wu, Z.; Liu, C. Mechanism of the shock wave generation and energy efficiency by underwater discharge. Materials 2022, 15, 5519. [Google Scholar] [CrossRef]
  37. Li, Y.; Dezhi Yang, D.; Yang, W.; Wu, Z.; Liu, C. Multiphysics numerical simulation of the transient forming mechanism of magnetic pulse welding. Metals 2022, 12, 1149. [Google Scholar] [CrossRef]
  38. The Japan Magensium Association. Available online: http://magnesium.or.jp/property/standard/ (accessed on 10 July 2022).
  39. Iyama, H.; Nishi, M.; Higa, Y. Influence of Pressure Vessel Shape on Explosive Forming. In Proceedings of the American Society of Mechanical Engineering (ASME) Pressure Vessel and Piping (PVP 2018), Prague, Czech Republic, 15–20 July 2018. CD-ROM. [Google Scholar]
  40. Itoh, S.; Nadamitsu, Y.; Kira, A.; Nagano, S.; Fujita, M.; Honda, T. Fundamental characteristics of underwater shock wave due to underwater explosion of high explosives. Trans. Jpn. Soc. Mech. Eng. Ser. 1996, 62, 3278–3283. [Google Scholar] [CrossRef]
  41. Hamashima, H.; Kato, Y.; Itoh, S. Determination of JWL parameters for Non-Ideal Explosive. The American Institute of Physics Conf. Proc. 2004, 706, 331–334. [Google Scholar]
  42. Aquelet, N.; Souli, M.; Olovsson, L. Euler-Lagrange coupling with damping effects: Application to slamming problems. Comput. Methods Appl. Mech. Eng. 2006, 195, 110–132. [Google Scholar] [CrossRef]
Figure 1. Power supply circuit diagram for shock wave generation.
Metals 12 01939 g001
Figure 2. Thyristor for switching.
Metals 12 01939 g002
Figure 3. Apparatus for pressure measurement.
Metals 12 01939 g003
Figure 4. Numerical simulation models. (a) Hyperbolic pressure vessel. (b) Parabolic pressure vessel. (c) Overview of analysis target.
Metals 12 01939 g004
Figure 5. Cross-sectional view of the forming equipment. (a) Hyperbolic pressure vessel. (b) Parabolic pressure vessel. (c) Plate holder. (d) Die.
Metals 12 01939 g005
Figure 6. Cross-sectional view of the assembled forming equipment.
Metals 12 01939 g006
Figure 7. Schematic diagram of the electrodes.
Metals 12 01939 g007
Figure 8. Three-dimensional shape measuring device.
Metals 12 01939 g008
Figure 9. Underwater shock pressure at a position 40 mm from the electrode, and measurements of current flowing to the electrode.
Metals 12 01939 g009
Figure 10. Underwater shock pressure at a position 50 mm from the electrode, and measurements of current flowing to the electrode.
Metals 12 01939 g010
Figure 11. Pressure contour diagrams obtained by numerical simulation of the (a) hyperbolic pressure vessel and (b) parabolic pressure vessel.
Metals 12 01939 g011
Figure 12. Comparison of the maximum pressure values of the water element in the center of the AZ31 plate due to the differences in pressure vessel shape calculated by numerical simulation.
Metals 12 01939 g012
Figure 13. Numerical simulation results for the deformation process of an AZ31 plate using a hyperbolic pressure vessel.
Metals 12 01939 g013
Figure 14. Comparison of numerical simulation and forming experiment results for the AZ31 forming shape.
Metals 12 01939 g014
Figure 15. Comparison of pressure vessel shape to charging voltage when an auxiliary plate is overlaid on top of an AZ31 plate.
Metals 12 01939 g015
Figure 16. Comparison of pressure vessel shape to charging voltage when an auxiliary plate is placed under an AZ31 plate.
Metals 12 01939 g016
Figure 17. Comparison of pressure vessel shape and charging voltage when an AZ31 plate is sandwiched between auxiliary plates.
Metals 12 01939 g017
Figure 18. AZ91 plate and an auxiliary plate composed of aluminum alloy.
Metals 12 01939 g018
Figure 19. Cracked AZ91 plate obtained when using a hyperbolic pressure vessel with a charging voltage of 2000 V and sandwiched between auxiliary plates.
Metals 12 01939 g019
Figure 20. Comparison of forming shapes of AZ31, AZ61, and AZ91.
Metals 12 01939 g020
Table 1. Major composition and mechanical properties of each magnesium alloy material [20].
Major Components Other than Magnesium (mass %)Major Mechanical Properties
MaterialAluminumZincTensile strength (MPa)0.2% proof stressElongation (%)
AZ3131220–260105–2004–11
AZ6161240–260140–1604–11
AZ91911909020
Publisher’s Note: MDPI stays neutral with regard to jurisdictional claims in published maps and institutional affiliations.