Article

Microstructure and Mechanical Properties of High-Strength, Low-Alloy Steel Thin-Wall Fabricated with Wire and Arc Additive Manufacturing

1
School of Materials Science & Engineering, Beijing Institute of Technology, Beijing 100081, China
2
Beijing Institute of Technology Chongqing Innovation Center, Chongqing 401120, China
3
RAMLAB BV, Scheepsbouwweg 8 F6, 3089 JW Rotterdam, The Netherlands
*
Author to whom correspondence should be addressed.
Metals 2023, 13(4), 764; https://doi.org/10.3390/met13040764
Submission received: 27 February 2023 / Revised: 31 March 2023 / Accepted: 9 April 2023 / Published: 14 April 2023
(This article belongs to the Special Issue Advances in Additive Manufacturing and Their Applications)

Abstract

:
High-strength, low-alloy (HSLA) steel has attracted much attention in the manufacturing industry because of its good combination of high strength and toughness, low cost, and good formability. Wire and arc additive manufacturing (WAAM) technology can realize the rapid prototyping of HSLA steel parts. This study investigated a 26-layer HSLA steel component fabricated with the WAAM technique. The microstructure of the deposited wall of ER120S-G is mainly acicular ferrite, and there are longitudinal, preferentially growing dendrites along the deposition direction. With the deposition height accumulation, the top sample’s interlayer temperature increases and the amount of acicular ferrite in the microstructure decreases, while the amount of quasi-polygonal ferrite, Widmanstatten ferrite increases. The changes in microhardness were consistent with the corresponding microstructure gradients: the microhardness of the top sample showed a decreasing trend along the deposition direction, while the microhardness of the middle sample was uniform and stable. The present work shows that the mechanical properties of HSLA steel parts deposited using WAAM technology have good strength and toughness. The microstructure gradient of the sample along the deposition direction did not lead to a significant difference in the tensile strength of the sample at different heights. On the contrary, the ductility of the longitudinal sample is slightly lower than that of the transverse sample, indicating some anisotropy in the deposited sample, which is related to the directional growth of grains along the direction of heat flow. From the current work, the thin wall of HSLA steel prepared with the WAAM process has good mechanical properties, which indicates that it is feasible to replace the traditional processing method with the WAAM process to rapidly manufacture an HSLA steel structure meeting the performance requirements.

1. Introduction

High-strength, low-alloy (HSLA) steel has attracted much attention in the manufacturing industry because of its good high strength/toughness combination, low cost, and good formability. Large-scale, high-performance monolithic HSLA steel structures are increasingly used in key technology fields such as automotive applications and the defense industry, which puts forward urgent requirements for high-efficiency and low-cost material rapid prototyping technology [1,2,3,4]. However, preparing large and complex structural parts using conventional subtractive and deformation machining methods has many drawbacks, such as long production cycles, high manufacturing equipment requirements, and molding difficulties [5,6,7,8]. Moreover, shrinkage, oxide chipping, and other defects often appear in the products, which may lead to long-term and expensive repairs or scrap.
Wire and Arc Additive Manufacturing (WAAM), a type of 3D printing, is a technique for manufacturing solid parts by gradually accumulating materials [6]. It melts the metal wire with an electric arc or plasma arc and deposits metal layer by layer according to a mathematical model to form a three-dimensional physical entity close to the shape and size of the product. Additive manufacturing provides unparalleled flexibility regarding integral material shaping, cost savings, and delivery time [9,10]. It is driving the revolution in the manufacturing industry by producing highly complex, lightweight parts and reducing material waste [11,12].
Although WAAM is considered to have some advantages, the mechanical properties of the deposited materials will be mainly controlled by the wire composition and WAAM process, which is quite different from traditional manufacturing and molding processes. Moreover, the disadvantages of this technique, such as high heat input, may lead to severe heat accumulation, which may affect the microstructure and mechanical properties of the deposited samples [13,14,15]. This phenomenon is also widely found in the welding field of HSLA steel [16]. Therefore, improving the performance of deposited HSLA steel parts using the WAAM process is still challenging. For example, Rodrigues et al. [17] studied the effect of thermal cycling on the microstructure and mechanical properties of HSLA steel during WAAM, and the experimental results surfaced: parts with high heat input have higher tensile strength and ductility. In addition, due to the unique thermal cycling treatment and thermal accumulation of WAAM, the grain size will become coarse along the building direction of the sample, which will lead to a decrease in hardness. Yildiz et al. [18] found that within a specific range of parameters, the heat input is linearly related to the characteristic weld size including weld width, height, penetration, penetration area, and reinforcement area. While the ratio of wire feeding speed (WFS) and traveling speed (TS) is the main parameter controlling the heat input, increasing the WFS/TS ratio will increase the characteristic size of the weld bead but reduce the hardness. Rodideal et al. [19] additively manufactured thin-walled HSLA steel parts using ER110S-G wires and evaluated the mechanical properties along the height of the part for two different fabrication heat input conditions. They concluded that the effect of different manufacturing conditions on the mechanical properties of the samples was more pronounced than the difference in the properties of the samples along the deposition direction caused by the complex thermal cycling during the WAAM process. In addition to the significant influence of heat input conditions on the microstructure and mechanical properties of the samples, the repeated heating and heat accumulation during the WAAM process can also lead to microstructure changes and directional growth of grains, resulting in anisotropic mechanical properties of the samples. Sun et al. [20] used digital image correlation (DIC) techniques to study strain evolution in WAAM-fabricated, low-carbon, high-strength steel members in transverse and longitudinal tensile tests, which showed that the anisotropy is due to the presence of a microstructure gradient in the deposition direction of the sample. The longitudinal specimens have a higher density of interlayer zones regarded as temperate regions, which are more likely to produce strain concentration during the tensile process and, therefore, have inferior mechanical properties relative to the transverse specimens. Panchenko et al. [21] similarly observed differences in mechanical properties between horizontal and vertical specimens of HSLA steel deposition samples. The relative elongation in the vertical samples significantly exceeded that in the horizontal samples. They attributed the anisotropy in the WAAM part to the directional growth of grains along the heat flow direction leading to primary grain boundaries parallel to the direction of the specimen tensile test.
In this study, a traditional, commercial high-strength steel wire ER120S-G was deposited using WAAM technology. The morphology, microstructure, and mechanical properties of the samples at different positions in the deposition wall were discussed and compared. The influence of thermal cycling on the microstructure evolution and mechanical properties of the samples along the construction direction was analyzed.

2. Materials and Methods

2.1. Experiment Setup

The WAAM system uses the gas-protected metal arc welding (GMAW) welding technique, which consists of a GTAW power supply, a metal inert gas welding (MIG) torch connected to a 6-axis FANUC robotic arm, and a horizontal table. A low-carbon HSLA ER120S-G welding wire with a diameter of 1.2 mm was fed through an automatic wire-feeding nozzle. To prevent oxidation in the deposited material, a mixture of 98% argon and 2% carbon dioxide was used as a protective gas at a gas flow rate of 20 L/min. A schematic of the experimental setup is shown in Figure 1. Thin walls were deposited on a low-carbon steel Q235-B substrate of 200 × 200 × 5.5 mm3, polished, cleaned with industrial-grade ethanol, and dried for deposition experiments. The chemical composition of the wires and substrates used is shown in Table 1.
A thin wall was prepared using the welding wire described above, and single bead tracks were deposited for a length of 180 mm up to a height of 120 mm which, consisted of 26 layers. It is worth noting that the thickness and width of the beginning and end parts of the weld are different from the width and thickness of the central part of the weld. To avoid this geometric irregularity, a head-to-tail deposition strategy was used to provide a uniform layer height for the deposition wall, which meant that the deposition direction of each thin wall layer was alternated. At the same time, in this experiment, the welding speed at the arc starting point was increased to reduce the amount of molten metal that can accumulate. There was a 0.3 s increase in the dwell time at the arc ending point to compensate for the lack of molten metal due to the end of the welding arc. The specific deposition parameters are shown in Table 2.

2.2. Characterization of Deposited Walls

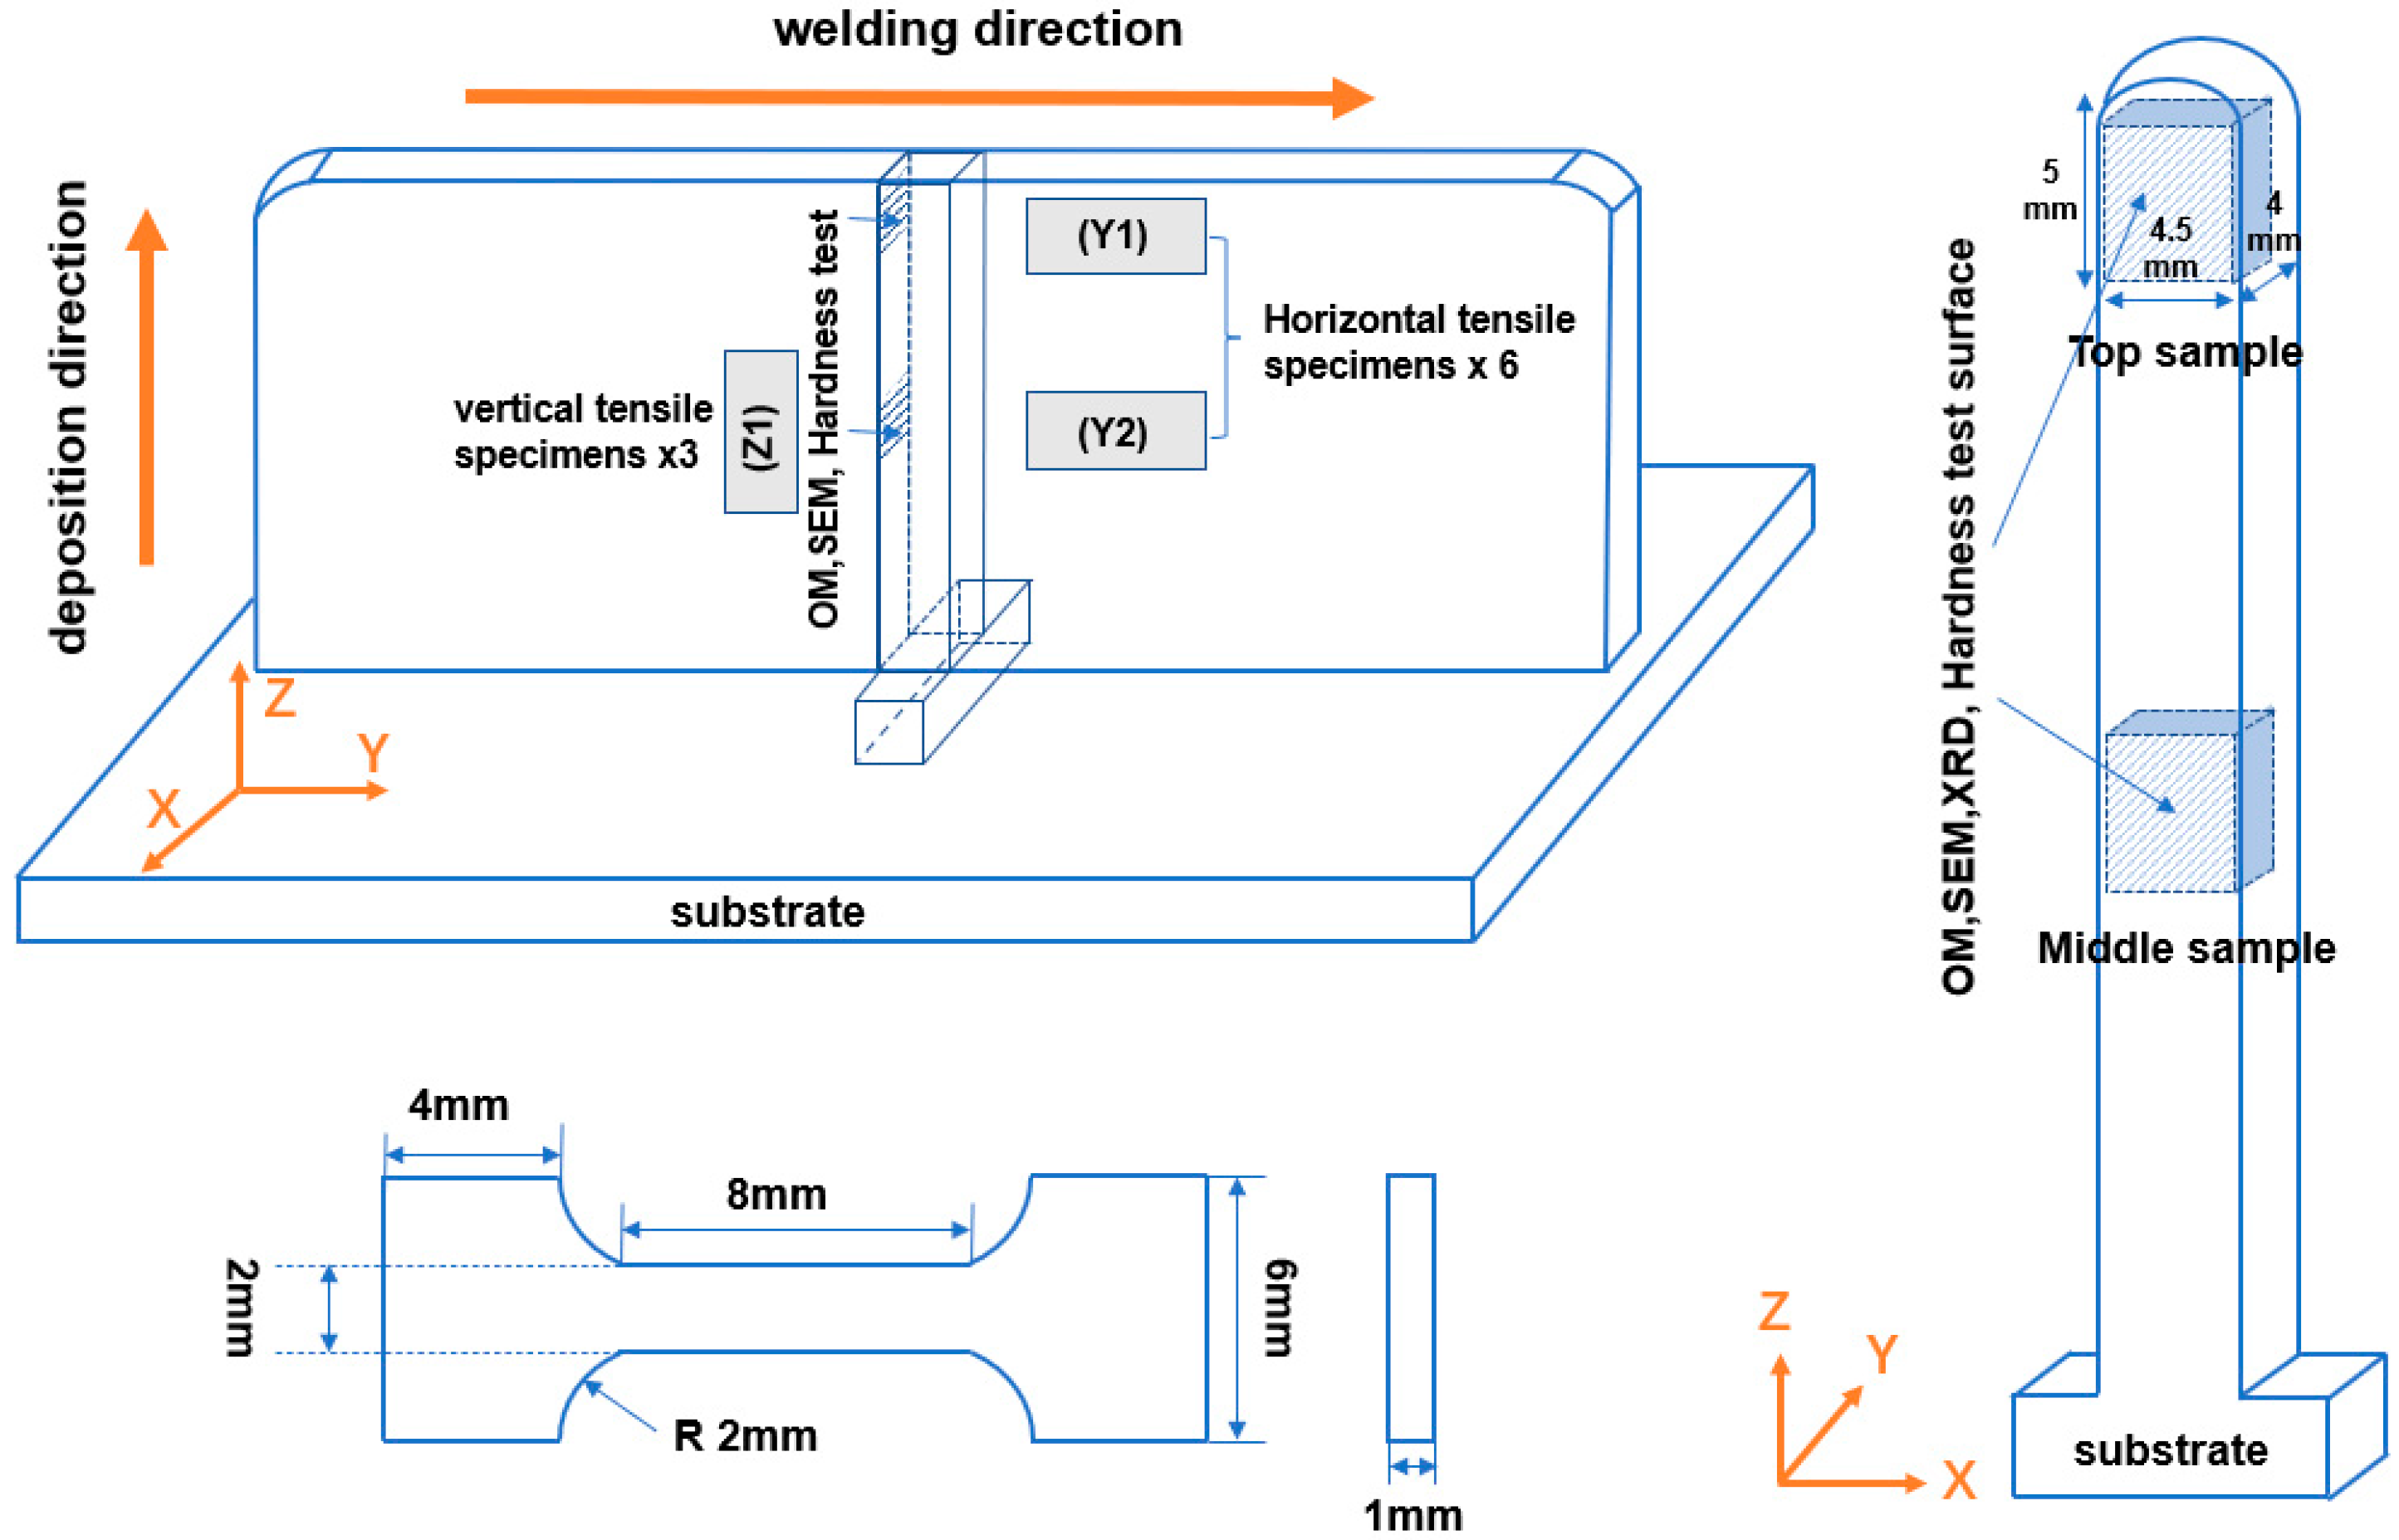
The samples used for experimental analysis and testing were all extracted with Electrical Discharge Machining (EDM). To characterize the microstructure, two samples were obtained from two different positions at the middle and top layers in the deposited wall. The locations and dimensions of the metallographic samples are shown in Figure 2. Before metallographic observation, these samples were cleaned, ground polished to a mirror finish, and etched with hydrofluoric acid–nitric acid. The microstructure was observed using a Keyence VHX-5000 inverted optical microscope and Bruker Merlin scanning electron microscope, and the elemental composition of the deposited materials was measured using an energy disperse-spectrometer (EDS). Three groups of tensile specimens were removed from the welding (Y-axis) and deposition (Z-axis) directions, and then uniaxial tensile tests were performed using an Instron-5565 tensile testing machine. The geometry and position of the sample used for uniaxial tensile testing are shown in Figure 2. After the tensile test, the fracture morphology of the specimen was observed using a scanning electron microscope. The microhardness was measured using a Struers DuraScan-70 hardness tester with a 300 g load force and a 10 s dwelling time, and 11 indentation marks were formed along the deposition direction in the top sample and middle sample to obtain their respective microhardness curves. All the above measurements allow us to analyze the effects of WAAM’s thermal cycling on the mechanical properties of the deposited materials.

3. Results and Discussions

3.1. Macroscopic Characterization

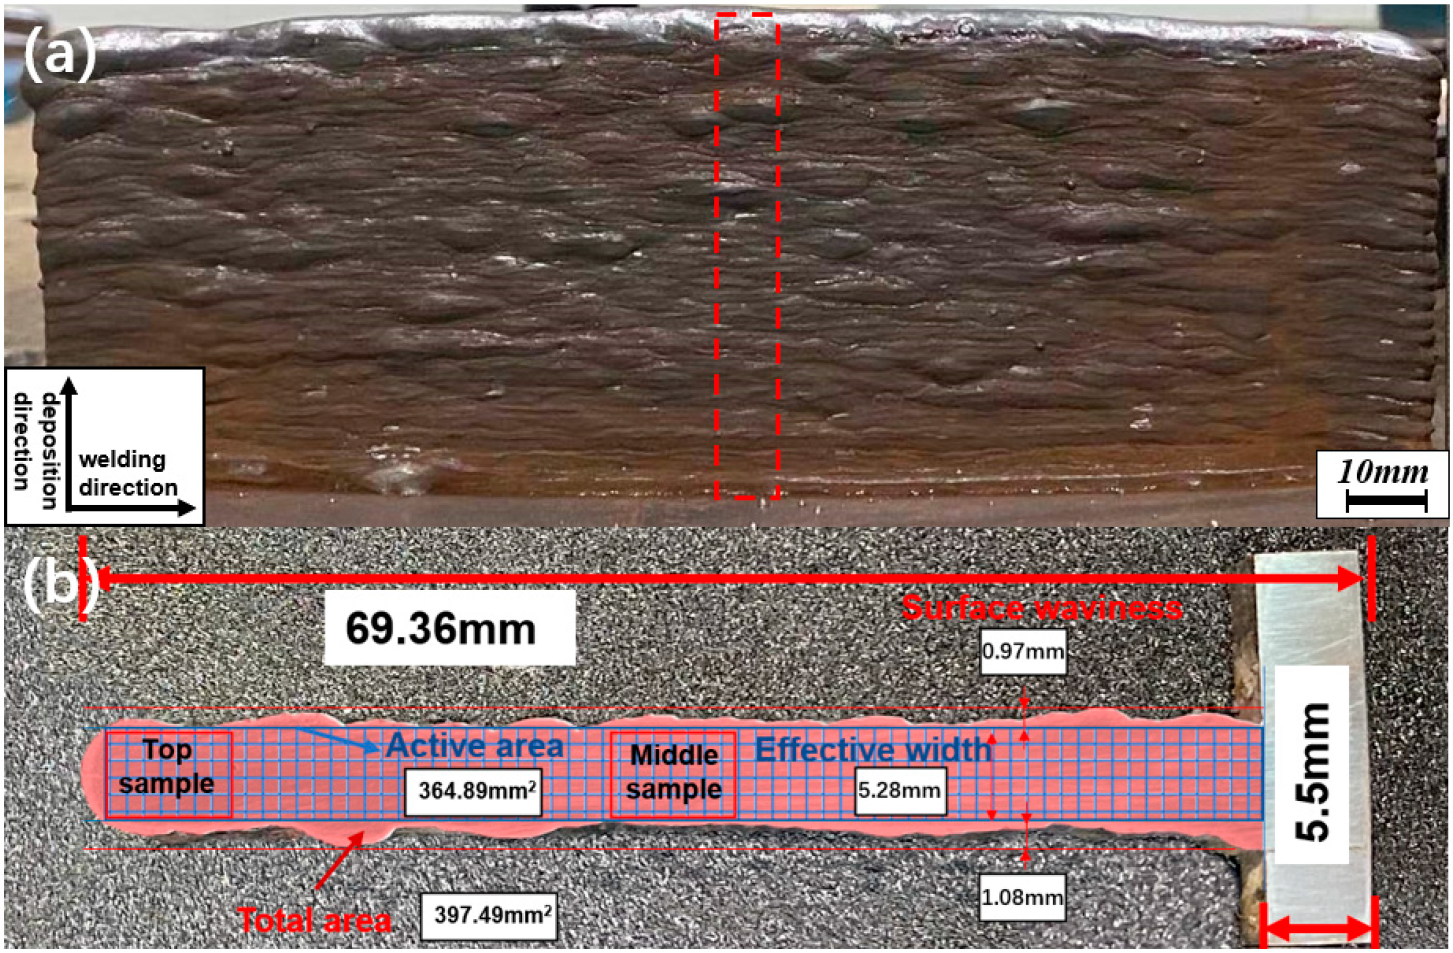
The macroscopic morphology and final dimensions of the WAAM thin-walled sample are shown in Figure 3, indicating a fully compact part with no cracks, pores, or insufficient fusion. The red dotted line box in Figure 3a shows the selected position of the longitudinal cross-section in Figure 3b. Meanwhile, image J software was used to measure the size of the longitudinal cross-section of the thin-walled sample. The results showed that the height was 69.36 mm, the thickness was 5.3 mm, and the total area of deposited metal was 397.487 mm2.
Surface waviness is an inherent characteristic of WAAM and reflects the cross-sectional geometric shape of each layer. Fine and periodic surface waviness is considered to have a good surface quality, and a good surface finishing can help reduce the post-process time and cost [22,23]. The surface waviness (the distance between the highest and lowest points of the surface) and the effective width of the sample were measured using ImageJ software, and the measurement results are shown in Figure 3b. It can be seen that both the highest and lowest points on the surface are found in the top part of the sample. This indicates overheating in the top part of the sample: excessive heat accumulation will continuously reduce the surface tension and destabilize the molten pool, resulting in uneven surface ripples and increased surface ripples [24].
The effectiveness of WAAM deposition can be quantified using the effective area ratio, which is calculated as follows:
R = S e S t
where S e is the effective area, which is the useful amount of material deposited to reach the target part size, as shown with the blue grid area in Figure 3b.   S t is the total area, which is the total amount of deposited material reaching the effective area, as shown with the red area in Figure 3b. The higher the effective area ratio, the higher the material utilization rate, proving that the process has good deposition efficiency. The HSLA sample’s effective area ratio (91.8%) is measured, which indicates that the sample has good Geometric regularity and indirectly indicates that the WAAM process has a high material utilization rate. Of course, using profile and areal surface texture analysis to characterize the surface roughness of as-built AM components can more intuitively and accurately evaluate the macroscopic morphology of samples [25], but it is out of the scope of this article.

3.2. Microstructure

Depending on the alloy composition and process parameters, the final microstructure of low-alloy, high-strength steels may be composed of polyhedral ferrite, pearlite, granular bainite, acicular ferrite, and martensite [26].
The steep thermal gradient in the welded metal results in the directional solidification of the austenite grain structure and, consequently, during solidification, a high degree of segregation in the alloying elements and impurities occurs, and this segregation persists during further cooling. Once the temperature is below the transition temperature (Ar3), the austenite decomposes into different ferrite shapes from the grain boundary. At high temperatures, the polygonal ferrite begins to nucleate on the austenite grain boundaries and extends to the untransformed austenite grain by a diffusion mechanism. As the temperature decreases, diffusion becomes slow, the ferrite nucleates by a displacement mechanism, the grains lose their regular shape, and the boundaries become jagged and heterogeneous. This irregular shape is called a quasi-polygonal ferrite [27].
With further cooling during solidification, acicular ferrite forms in the intermediate temperature range above the martensite start temperature but below temperatures where polygonal ferrite form [28,29,30]. Upon final cooling to room temperature, the residual austenite may be entirely or partially converted into martensite, depending on the effect of the carbon content in carbon steel on the Ms and Mf transition temperatures. In the latter case, the so-called M-A(martensite–austenite) is formed [31].
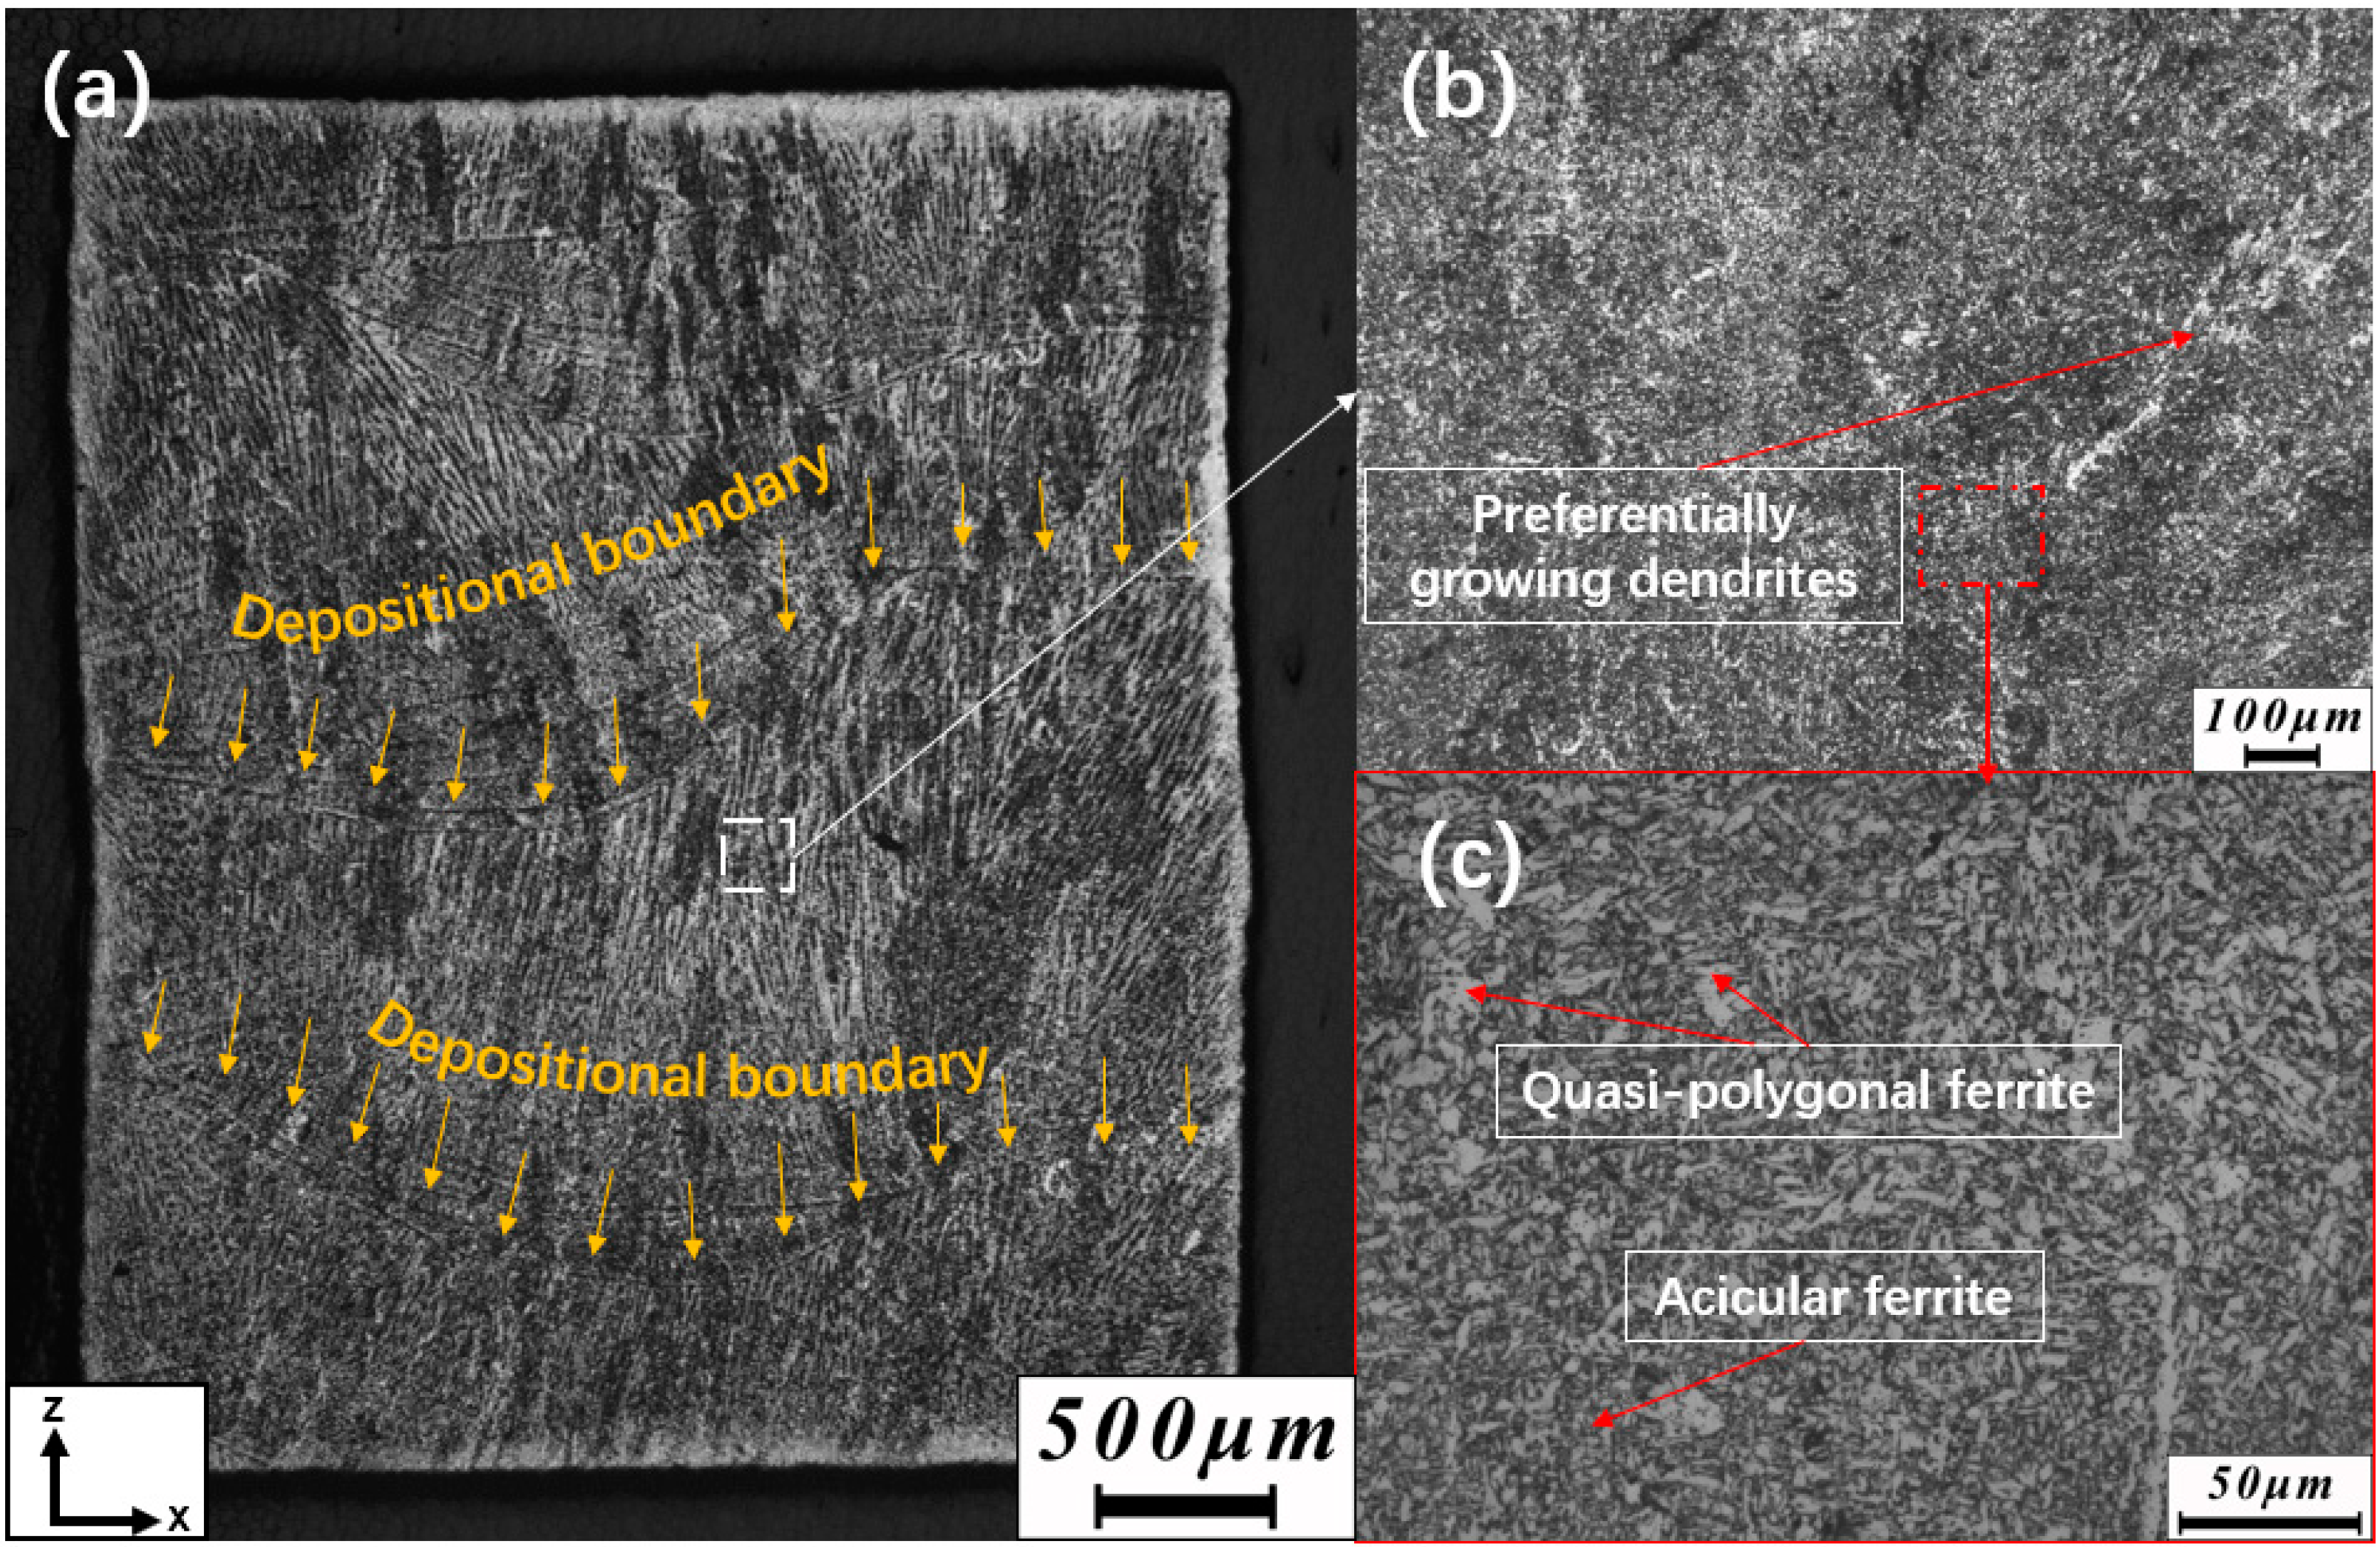
Etching provided the ferrite microstructure of the HSLA sample, as shown in Figure 4 and Figure 5. The WAAM specimen showed dendritic grain growth. Due to the moderate cooling rate, the high-temperature austenite had enough time to transform into ferrite, and the alloying elements such as Mo, Mn, and Si in the wire inhibited the pre-eutectoid ferrite nucleation. The specimens were mainly composed of needle-like ferrite and quasi-polygonal ferrite. The grain sizes of the samples were in the range of 5~25 μm. The microstructure of needle ferrite shows different spatial orientations and disorderly arrangement, which is the most critical organization to prevent the emergence and expansion of cold cracks in the weld metal. The needle-rich ferrite organization in the welded parts is advantageous in achieving a strength–toughness combination [26,27].
The macroscopic structure of the sedimentary state in the HSLA sample shows parallel layered structure characteristics. That is, there are depositional boundaries between the layers. At the same time, there are preferentially growing dendrites along the deposition direction in the HSLA sample. In the WAAM process, during the deposition of each layer, the top part of the previously deposited layer is remelted. The rest is subjected to varying degrees of heat, the equivalent of heat treatment. Therefore, the overall structure of the deposited wall is not uniform, and the grain morphology in each layer has a certain degree of heterogeneity.
By comparing the optical microscopic images of the top sample and the middle sample, it can be found that the deposition wall metal structure is mainly needle-like ferrite. With the increase in layer stacking height and the increase in interlayer temperature of the top sample, the amount of needle-like ferrite in the tissue decreases, while the amount of quasi-polygonal ferrite and Widmanstatten ferrite increases. This is because the formation temperature range of acicular ferrite is lower than that of Widmanstatten and quasi-polygonal ferrite. The same heat input conditions reduce the cooling rate, which increases the probability of forming high-temperature transition products such as quasi-polygonal ferrite. In addition, coarsening of phases and compounds in the tissue was observed with increasing sample height.
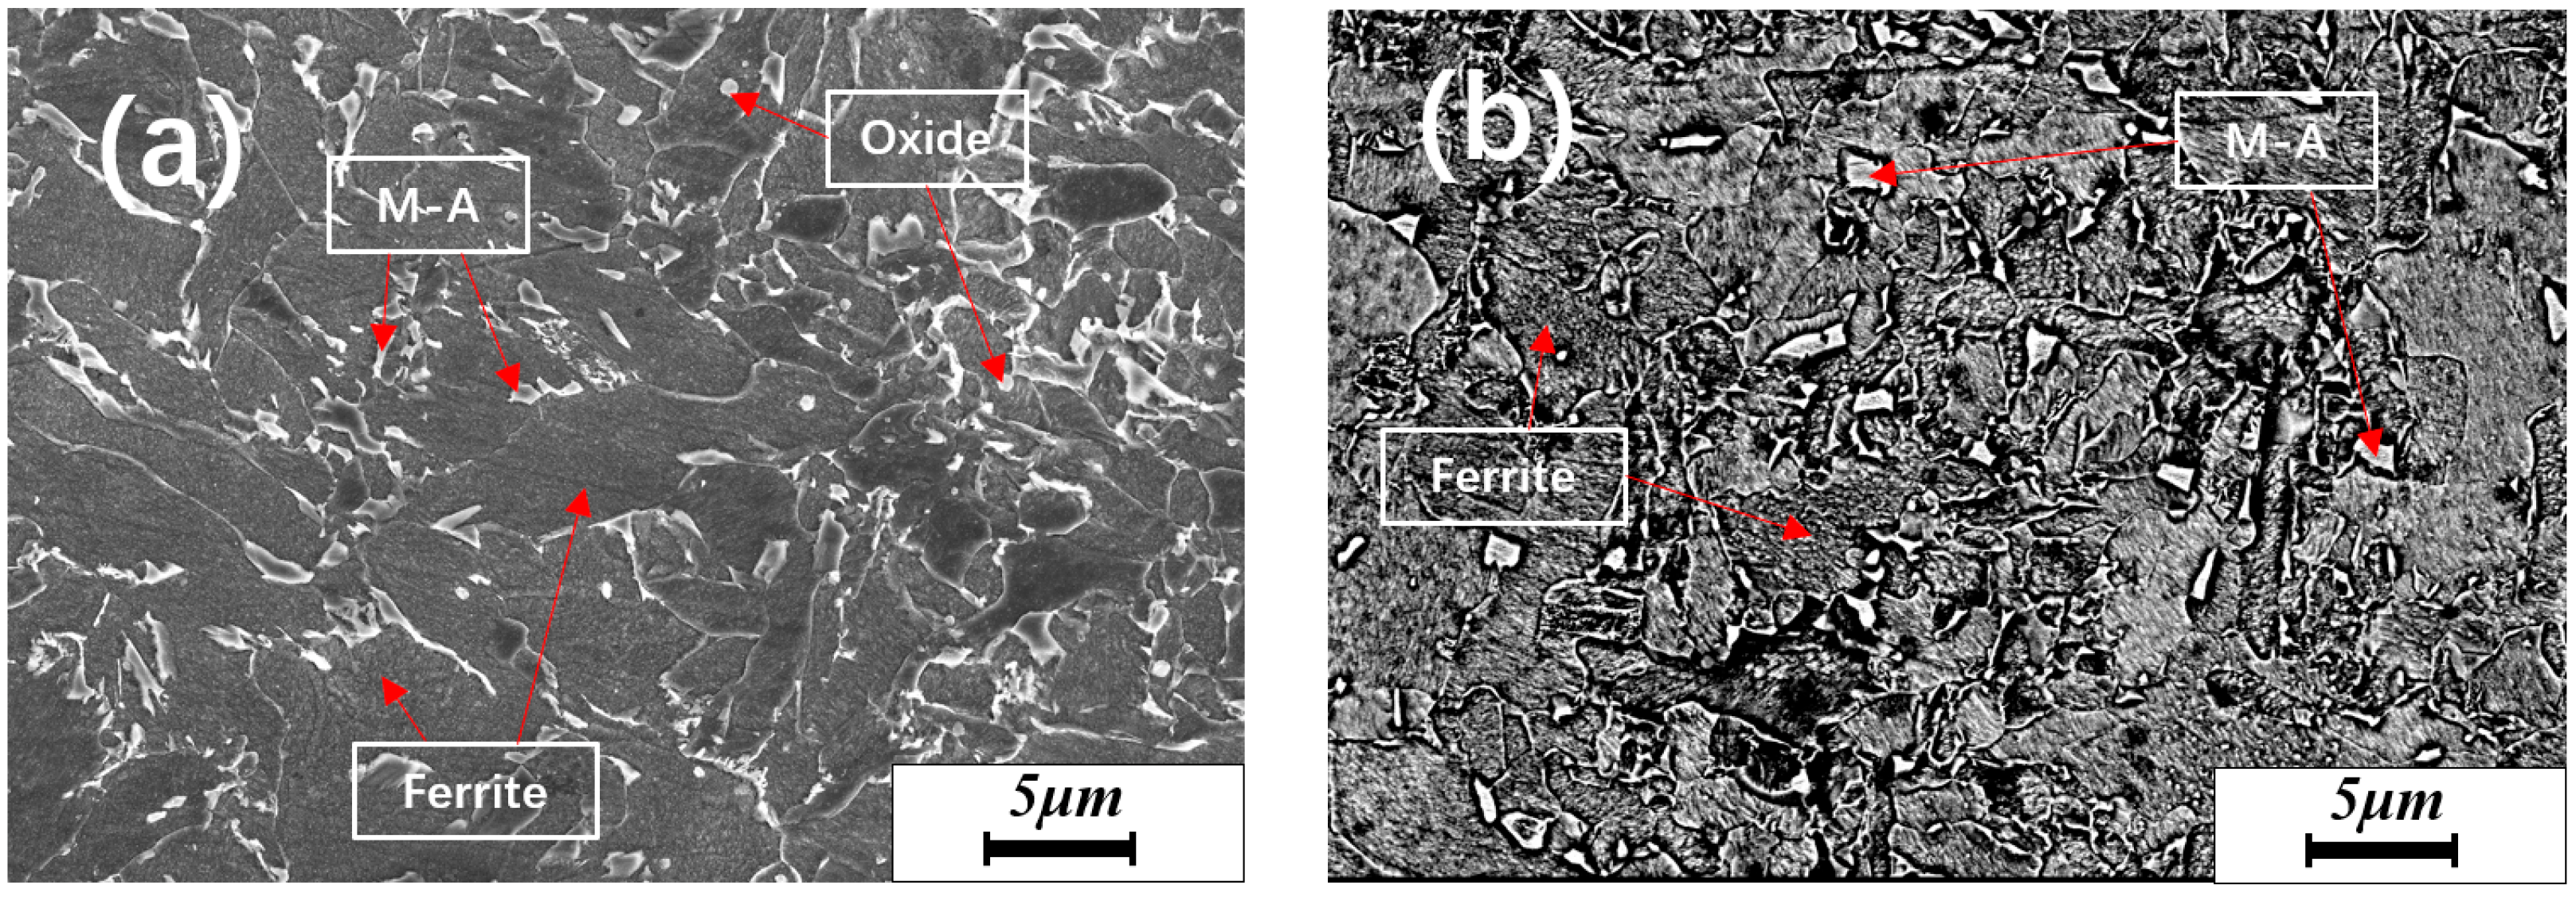
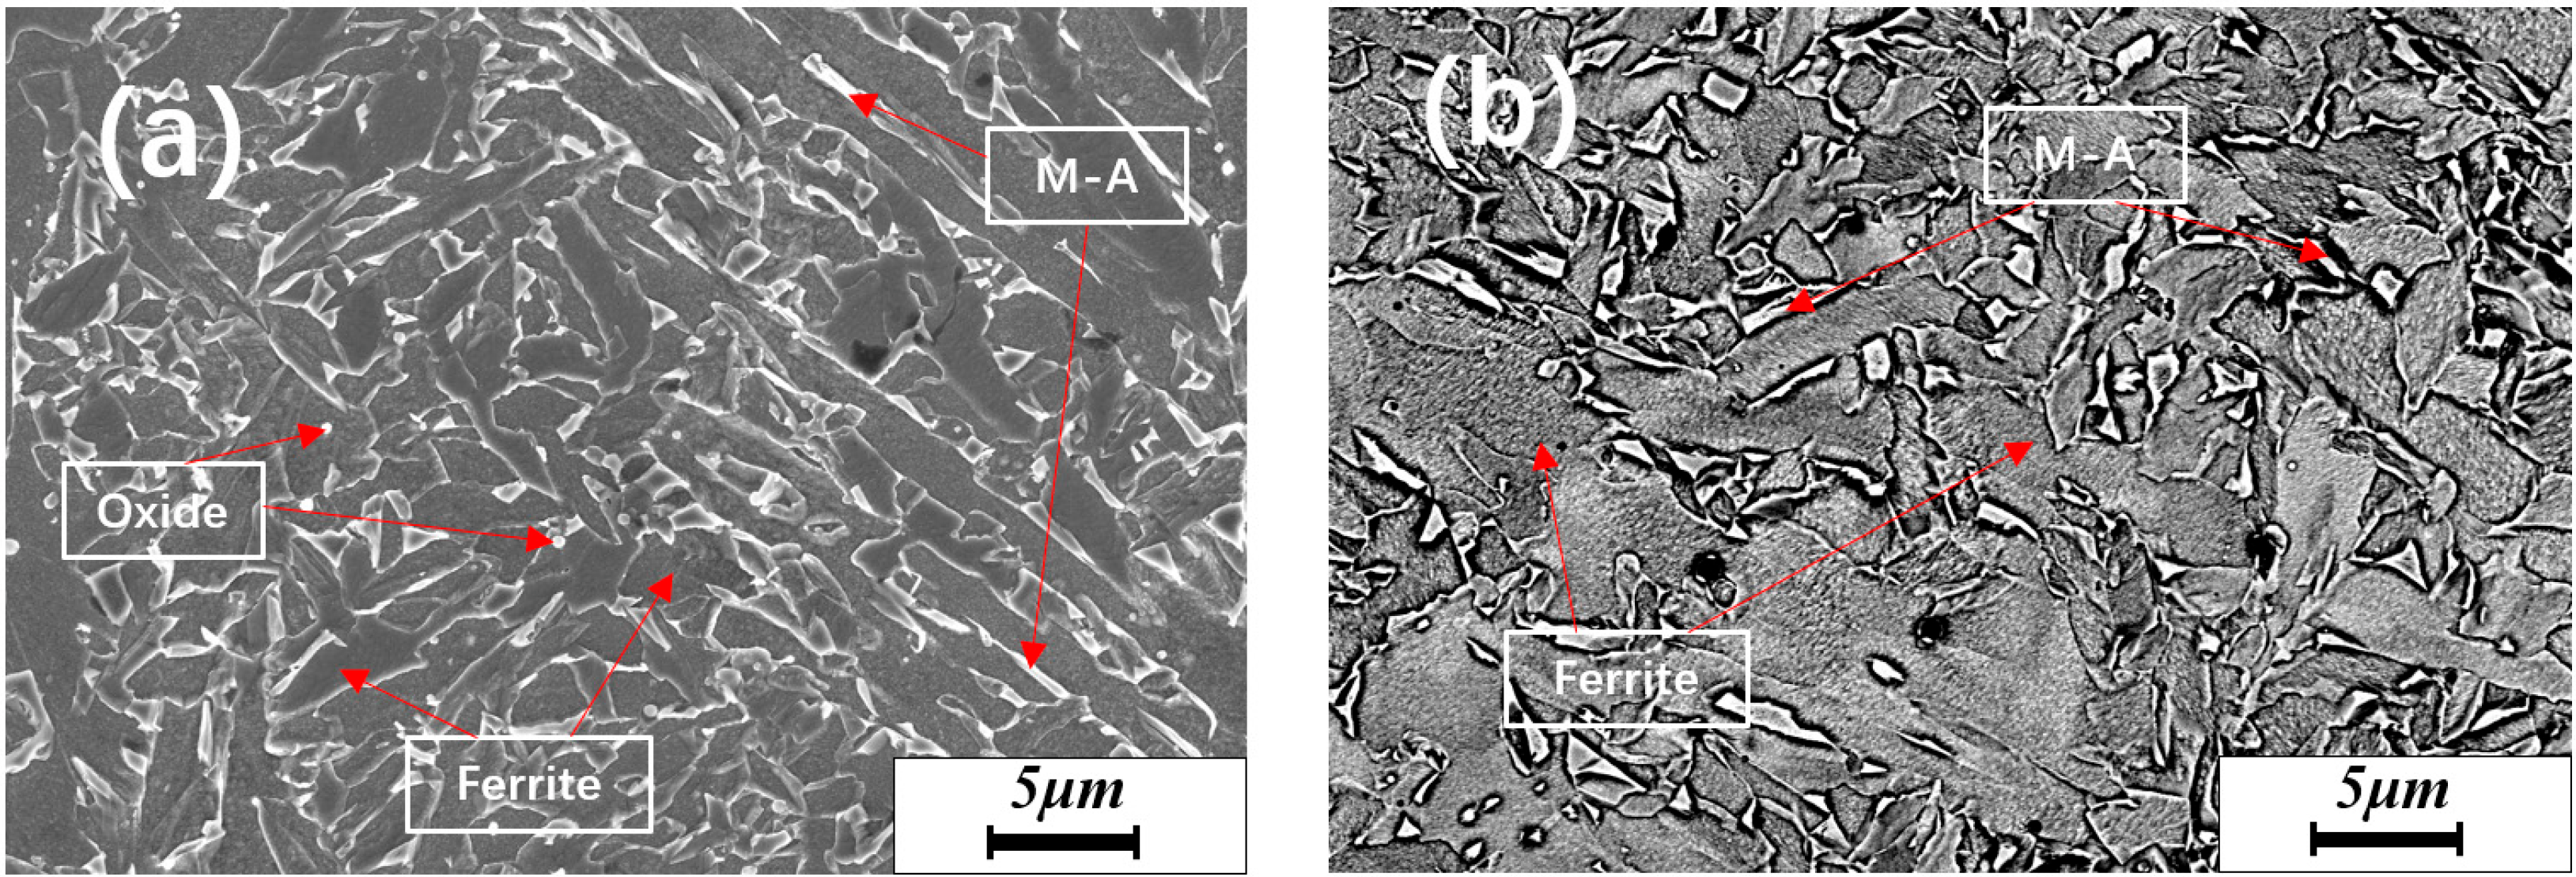
The limited resolution of light microscopy has hindered further identification and analysis of delicate microscopic structures. Therefore, the samples were observed using scanning electron microscopy. In the Figure 6 and Figure 7, many MA elements are distributed on the ferrite matrix in the WAAM sample, and there are relatively uniformly distributed bulk and elongated morphologies. Studies have shown that the formation of MA structure in low-alloy steel is due to the incomplete transformation of austenite to martensite in the heat-affected zone after reheating to the critical temperature [32]. Thus, in the additive manufacturing process, each layer induces reheating at a lower temperature during the subsequent thermal cycling and allows the element to stabilize the new bulk M-A. On closer inspection, most of the M-A components in the middle sample show an elongated morphology, while the M-A components in the top sample show a lumpy morphology. This is due to the shear-diffusion mechanism of acicular ferrite formation, where M-A fractions often form carbon-rich regions on the boundary of acicular ferrite [28]. Thus, most formed M-A is distributed along the acicular ferrite boundary with neighboring phases. The M-A morphology in the matrix is mainly longitudinal due to the presence of more acicular ferrite in the central region, where the cooling rate is faster. In addition, the increase in the number of polygonal and quasi-polygonal ferrites in the top region of slow cooling, the formation of both phases associated with carbon diffusion, which allows bulk M-A components to form within the grain and at the boundary of polygonal and quasi-polygonal ferrites. In the top sample, the volume fraction of the M-A component was reduced in the microstructure. This can be attributed to coarsening of acicular ferrite due to increased heat input. The smaller the acicular ferrite size, the more grain boundaries, and the greater the surrounding residual austenite. However, due to the increased heat input in the top sample, the amount of residual austenite decreases, and A smaller M-A component is formed.

3.3. Phase Composition and Elemental Analysis

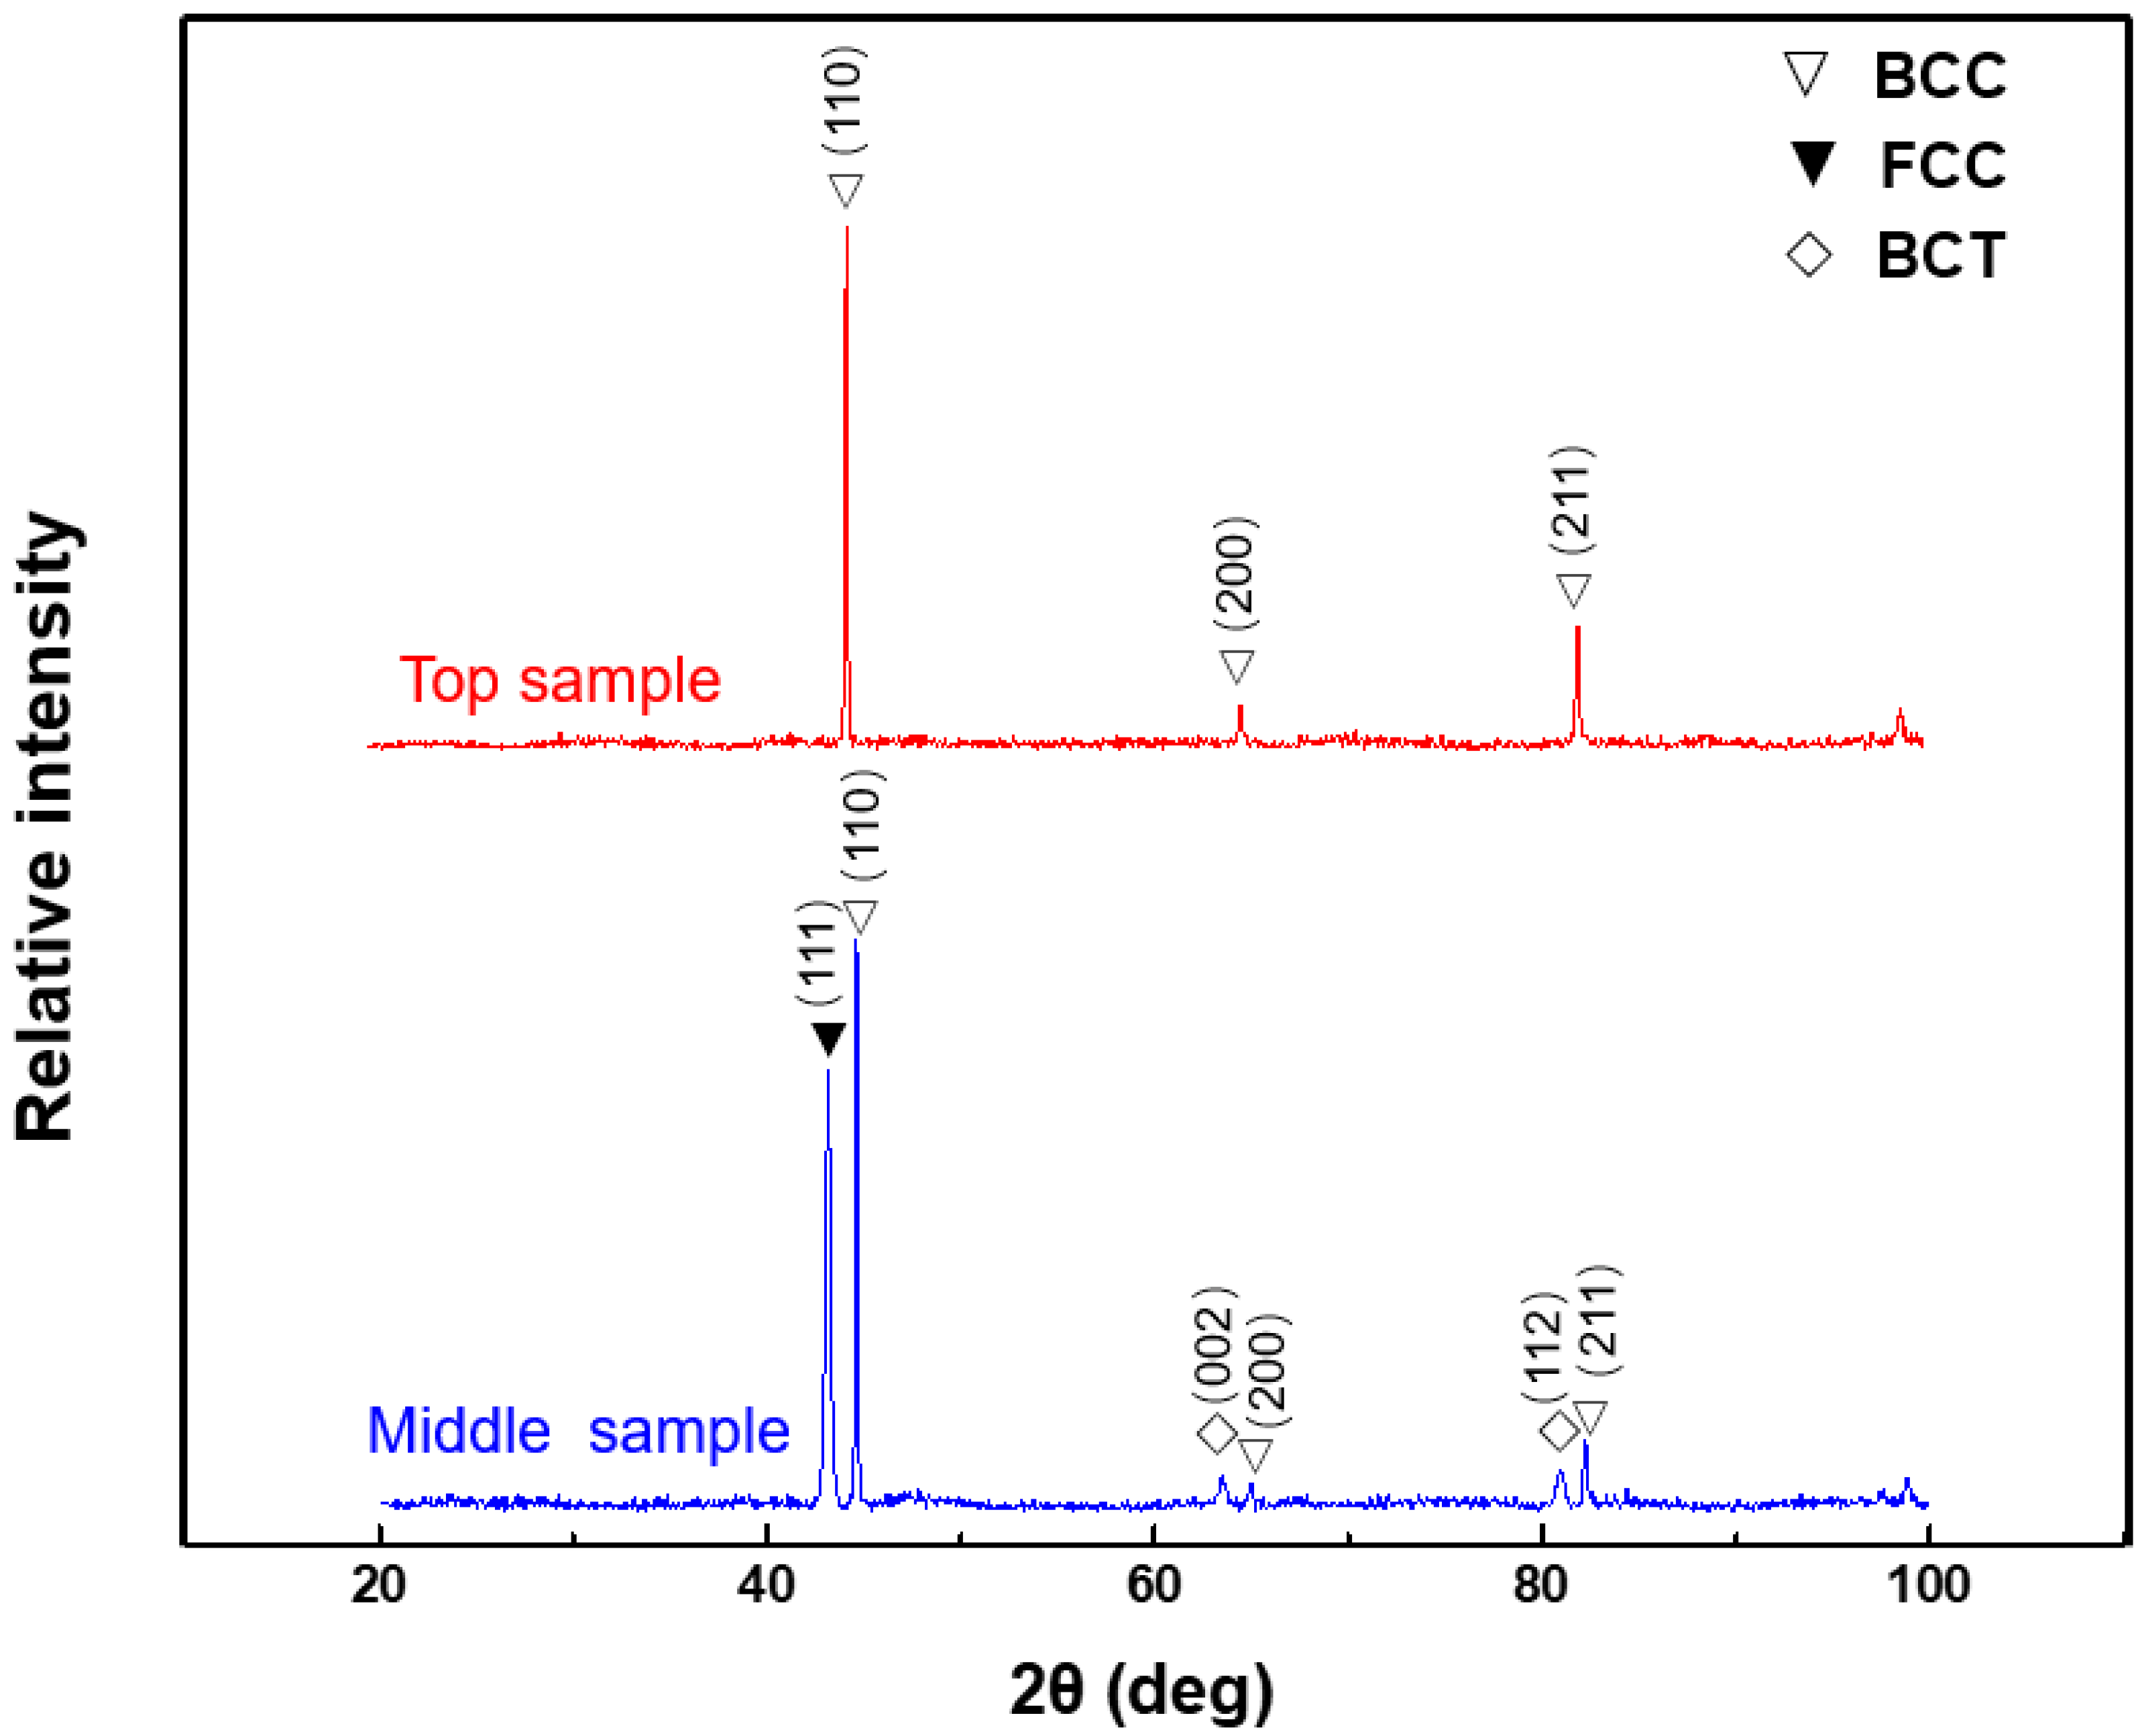
To qualitatively analyze the effect of the number of thermal cycles on the phase com-position, the XRD technique was used to determine the phase composition in the HSLA sample. The Figure 8 shows the XRD patterns in the HSLA-deposited metals at different sites. The diffraction spectrum of the top sample contains only the BCC diffraction peak, while the middle sample has a prominent FCC diffraction peak and weak BCT diffraction peak in addition to the BCC diffraction peak. This indicates that the thermal history of the repeated melt–solidification cycle has an effect on the phase composition. The middle sample has undergone multiple sequential heating and cooling cycles. When the heating temperature in the initial thermal cycle is higher than Af, the previously deposited layers undergo reaustenization and phase transitions during subsequent cooling, which may lead to the retention of residual austenite [33]. However, the top sample did not undergo thermal cycling, and the prior austenite was directly transformed into ferrite, bainite, or martensite during the cooling process, according to the cooling rate.
XRD results show that there is a large amount of residual austenite and some high-carbon martensite in the M-A component of the middle sample, while all the austenite in the M-A component of the top sample is converted into low-carbon martensite or ferrite. Based on the electron microscopic observations, it can be inferred that austenite is converted into low-carbon martensite in the M-A component of the top sample. This indicates that in addition to the difference in M-A components between the middle and top samples, thermal cycling also promotes the transformation of austenite into martensite.
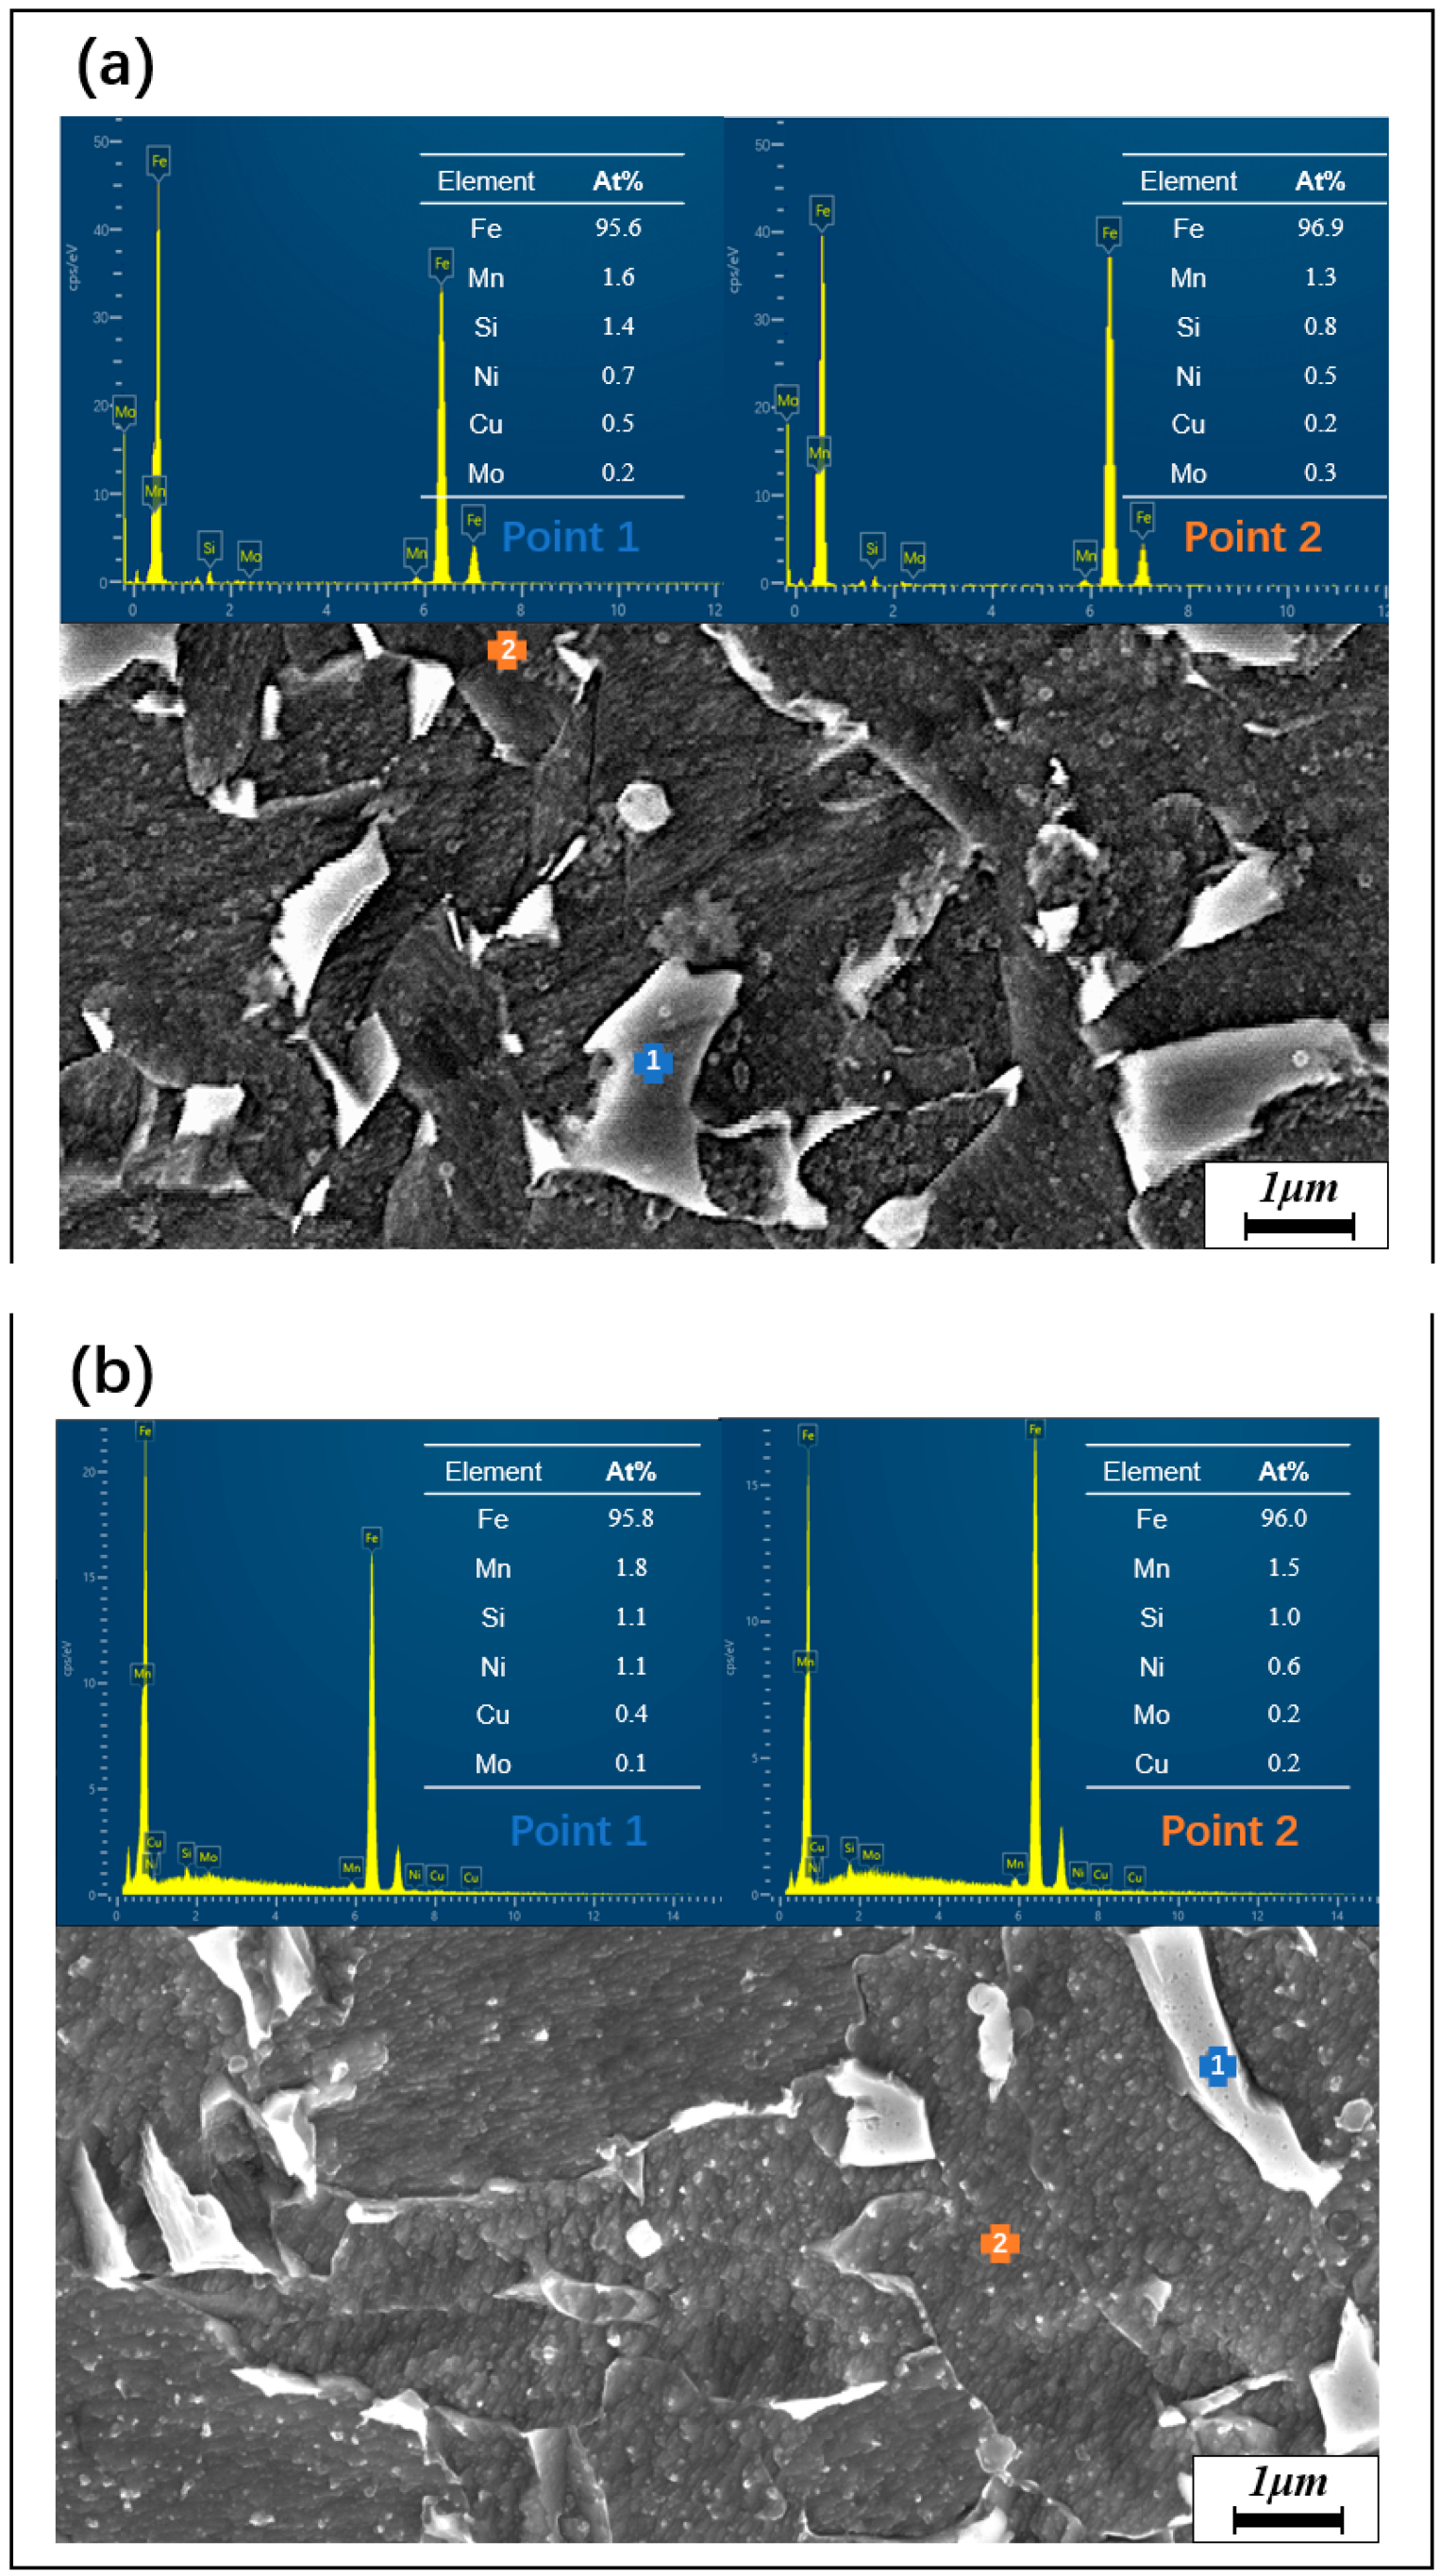
SEM point analysis was performed on the LTT samples. Due to the highly inaccurate C content in the actual test, element C was excluded from the test elements. The SEM results of HSLA samples are shown in Figure 9, and the results show that the content of alloying elements such as Mn and Ni in the M-A component was significantly higher than that of the ferrite matrix because the alloy solidified in a dendritic manner and eventually formed a grain structure. The interface between the grains was where the final solidification occurred. The interdendritic enrichment of elements Ni and Mn may have resulted in large amounts of austenite remaining in the sample. Similarly, since the middle sample underwent a thermal cycling treatment, the content of solute elements in the M-A component was significantly increased compared to the upper sample. This indicates that an increase in the number of thermal cycles will promote the segregation of stable austenitic elements at the grain boundaries, thus affecting the austenite phase transition.
As a brittle phase, the M-A component often acts as the origin of crack initiation during stress. Changes in the M-A component content, morphology, and distribution are thought to alter the final result of material properties. These properties include changes in elongation, impact strength, yield strength, etc. Based on the experimental results, it is speculated that the difference in phase composition of different M-A components in the middle and top samples may be related to elemental segregation caused by thermal cycling [34,35]. The in situ thermal history experienced by the middle sample is similar to the quenching and partitioning heat treatment cycle, where the sample is quenched to temperatures between AC1 and AC3, and the incomplete austenitic transition forms an inhomogeneous microstructure. Because austenite can dissolve carbon in this temperature range, the carbon atoms are redistributed from ferrite to austenite, and the carbon-rich austenite phase is formed. Upon subsequent cooling, these carbon-rich austenitic phases form martensite with a high tetragonality level. As the number of thermal cycles increases, the thermal stability of the residual austenite increases, and it does not transform into martensite during the subsequent cooling process and is retained at room temperature [36].

3.4. Mechanical Properties

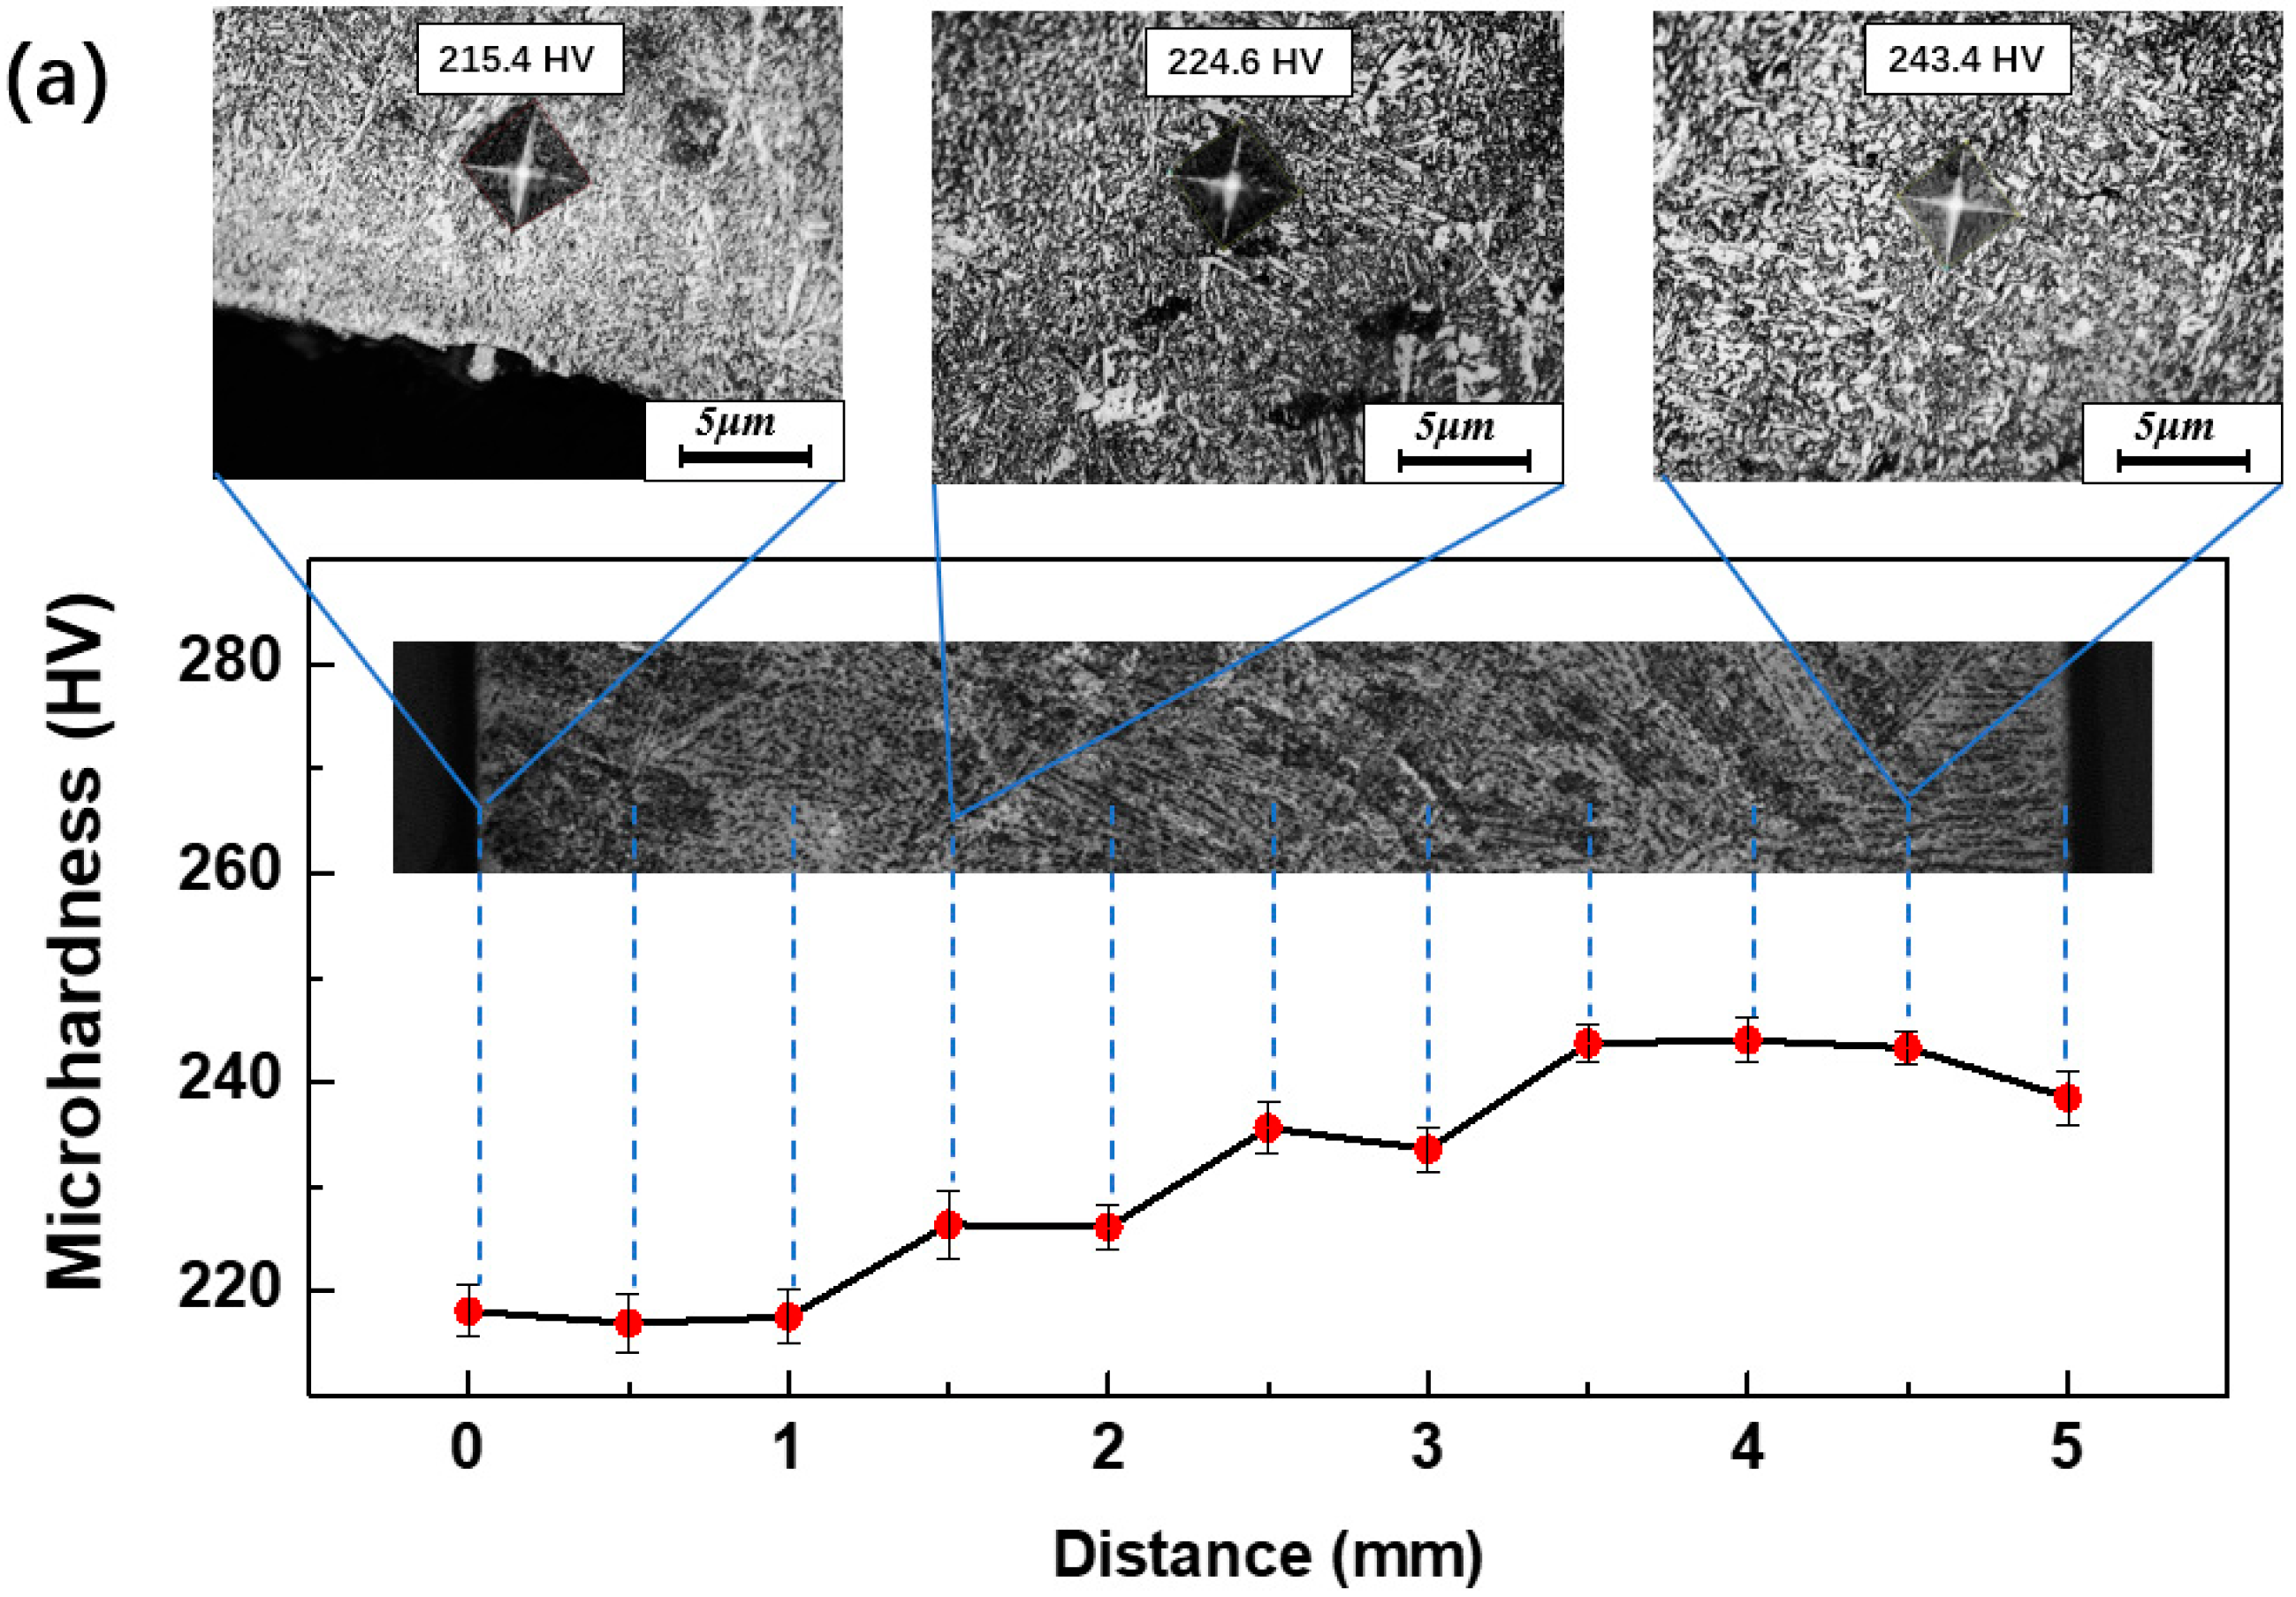
The microhardness distribution of the HSLA samples is given in Figure 10.
The microhardness of the top and middle samples of the as-built thin wall and the position of the marked indentation are shown to establish the relationship between the microhardness properties and the microstructure characteristics. Since the grain size in the ferrite matrix of this sample is very small and does not show periodic grain size fluctuation, the microhardness value does not show alternating changes [37]. With the increase in deposition height, repeated reheating, and heat accumulation, the number of acicular ferrite decreases, the soft phase, such as Widmanstatten ferrite and quasi-polygonal ferrite, increases, and the grain size becomes thicker. Hence, the maximum sample hardness decreases from bottom to top along the deposition direction. However, the microstructure of the middle sample was stable, the grain distribution was relatively uniform, and the microhardness varied between 230 and 250 HV.
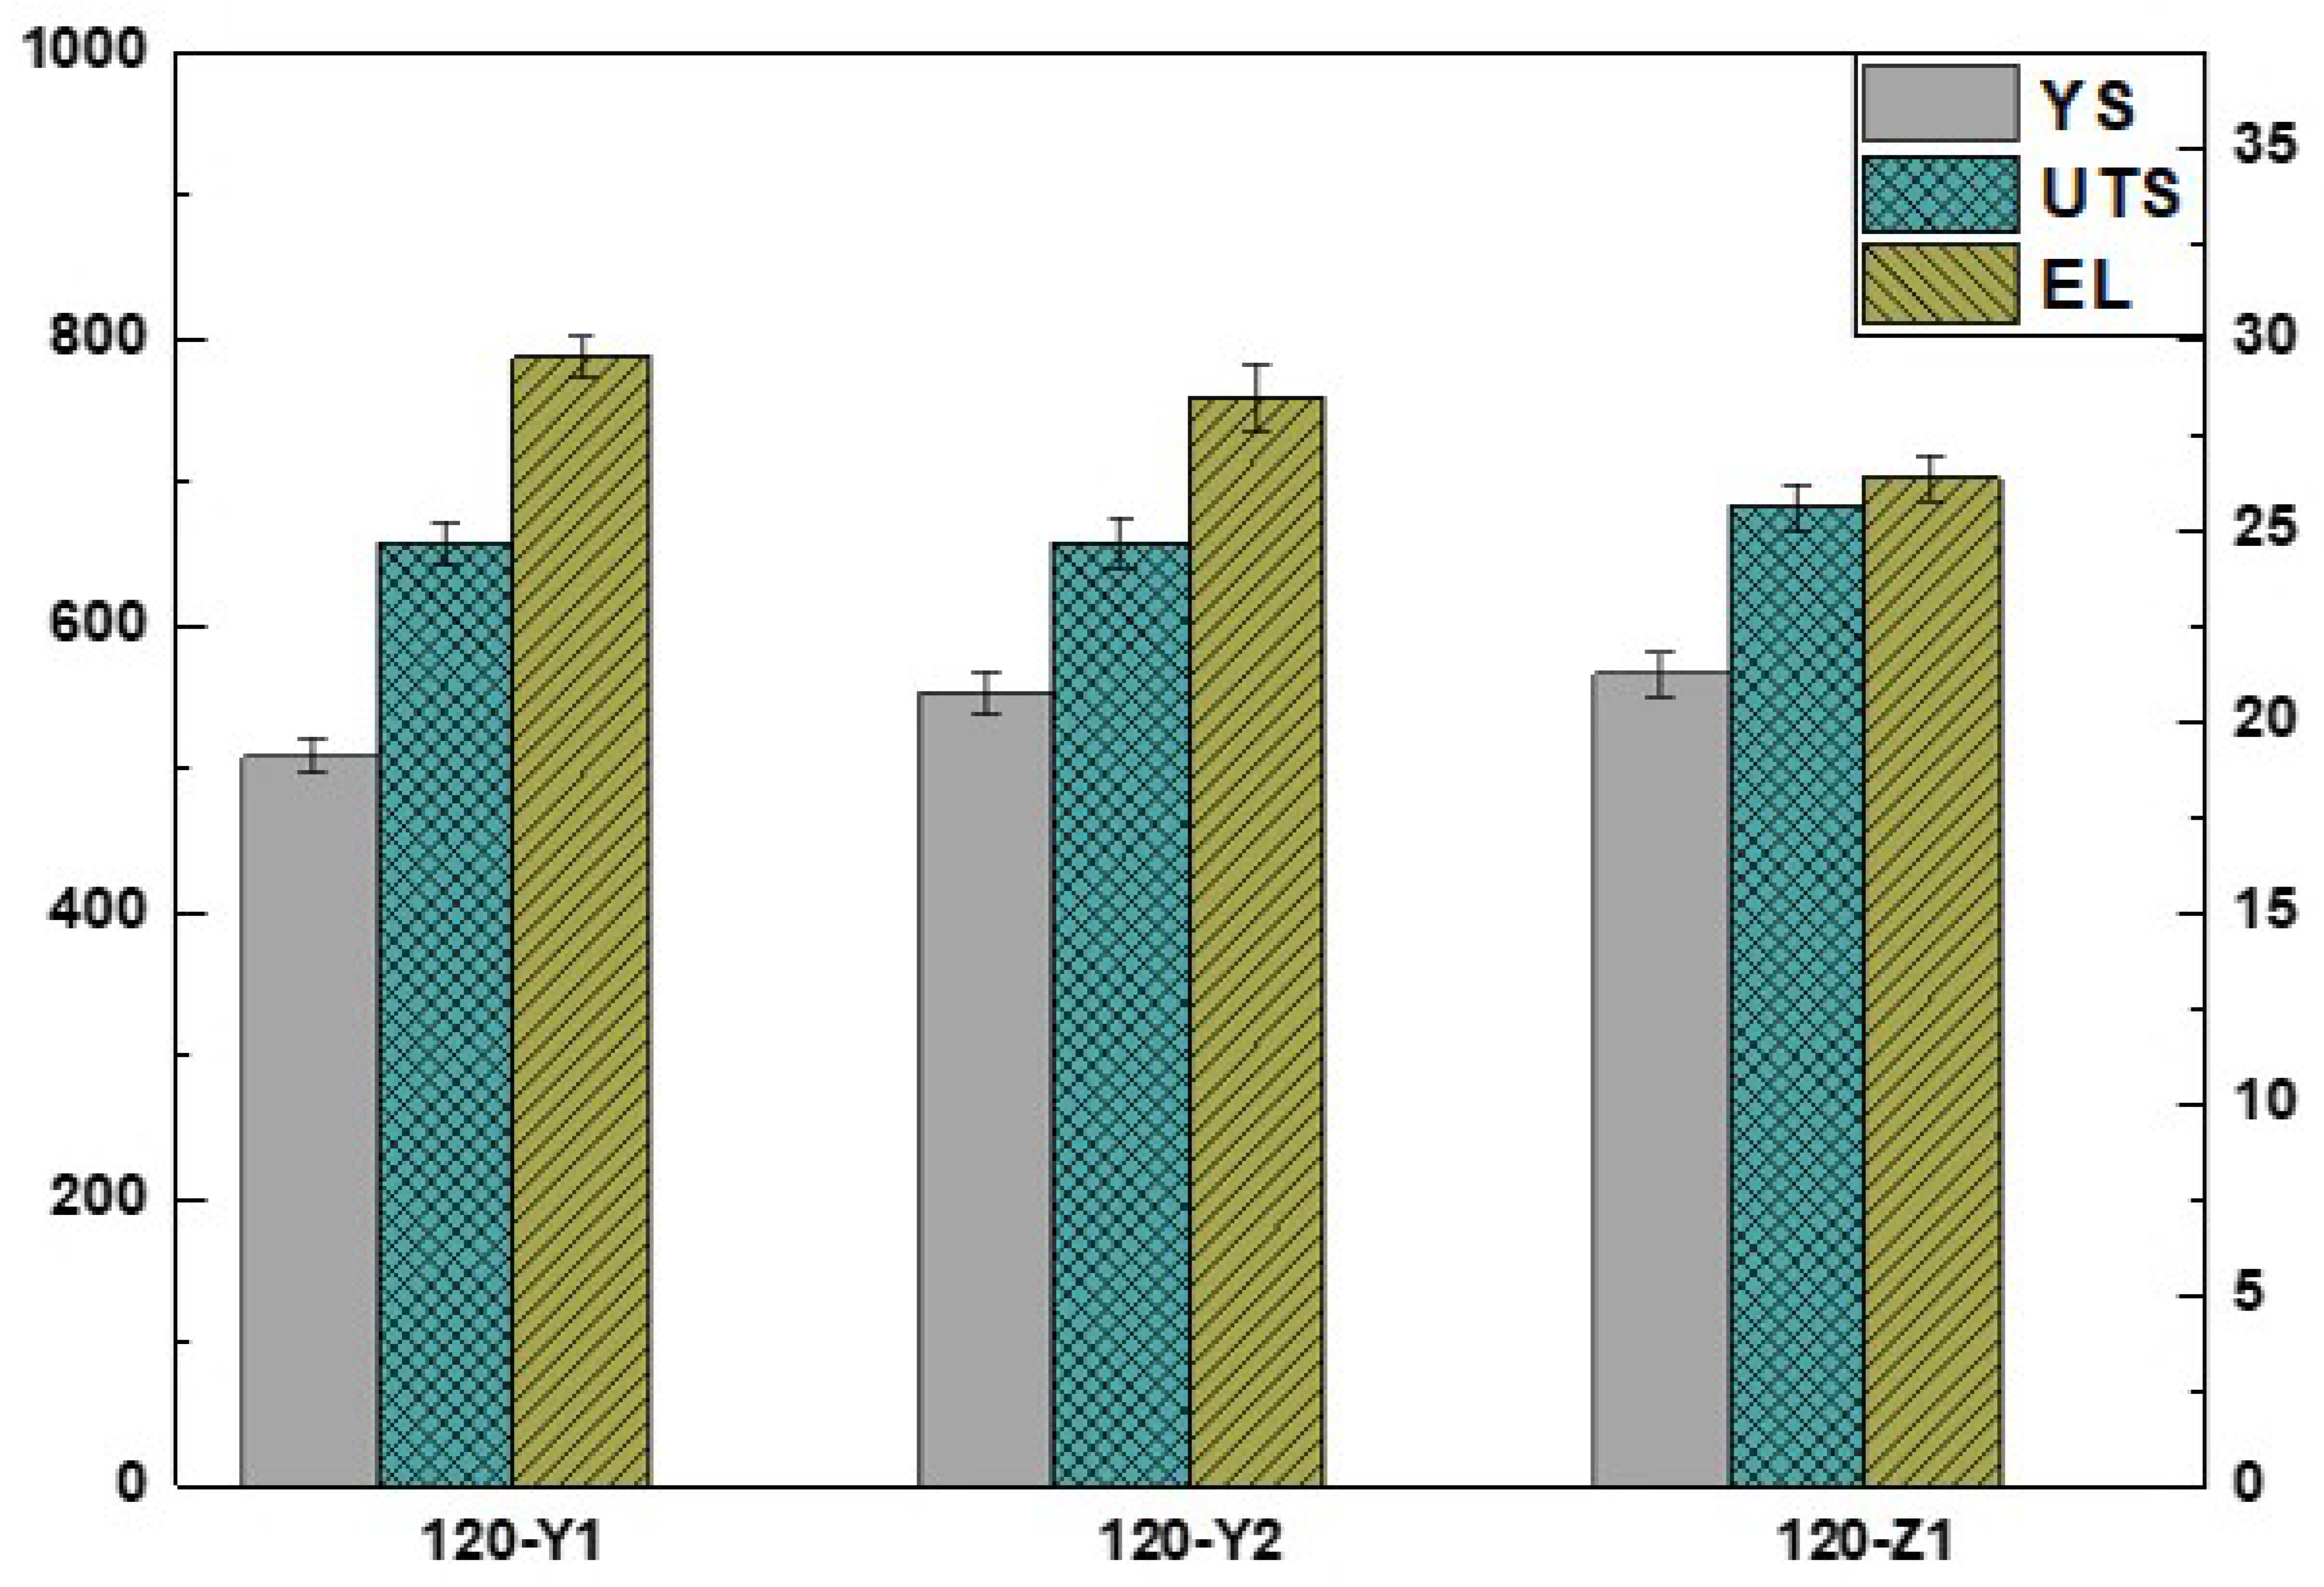
To evaluate the mechanical properties of the fabricated parts, tensile tests were performed along the deposition direction (Y) and welding directions (Z) of the obtained samples (as shown in Figure 11). The specimens showed good mechanical properties. These results correlated well with the microstructure. The microstructure of the HSLA sample is mainly acicular ferrite. The acicular ferrite microstructure shows different spatial orientations and disordered arrangements, which are essential to prevent the sample’s cold crack initiation and propagation. The acicular ferrite structure has advantages in achieving strength–toughness bonds in welding. It is worth noting that the selection of higher heat input parameters makes the experimental sample coarse-grained. Compared with the experimental results of other scholars [18,38], there is a decrease in tensile strength and an increase in ductility.
The differences among all tensile samples of the deposited wall were minor for the yield strength and tensile strength values. Therefore, these tensile properties of the deposited wall can be considered isotropic. This indicates that the microstructure gradient in the sample along the deposition direction does not lead to a significant difference in the tensile strength of the sample at different heights. For post-break elongation, the HSLA wall showed some difference in post-break elongation values in the deposition and welding directions, indicating an anisotropic ductility attributed to the directional dendrite growth along the heat flow direction.
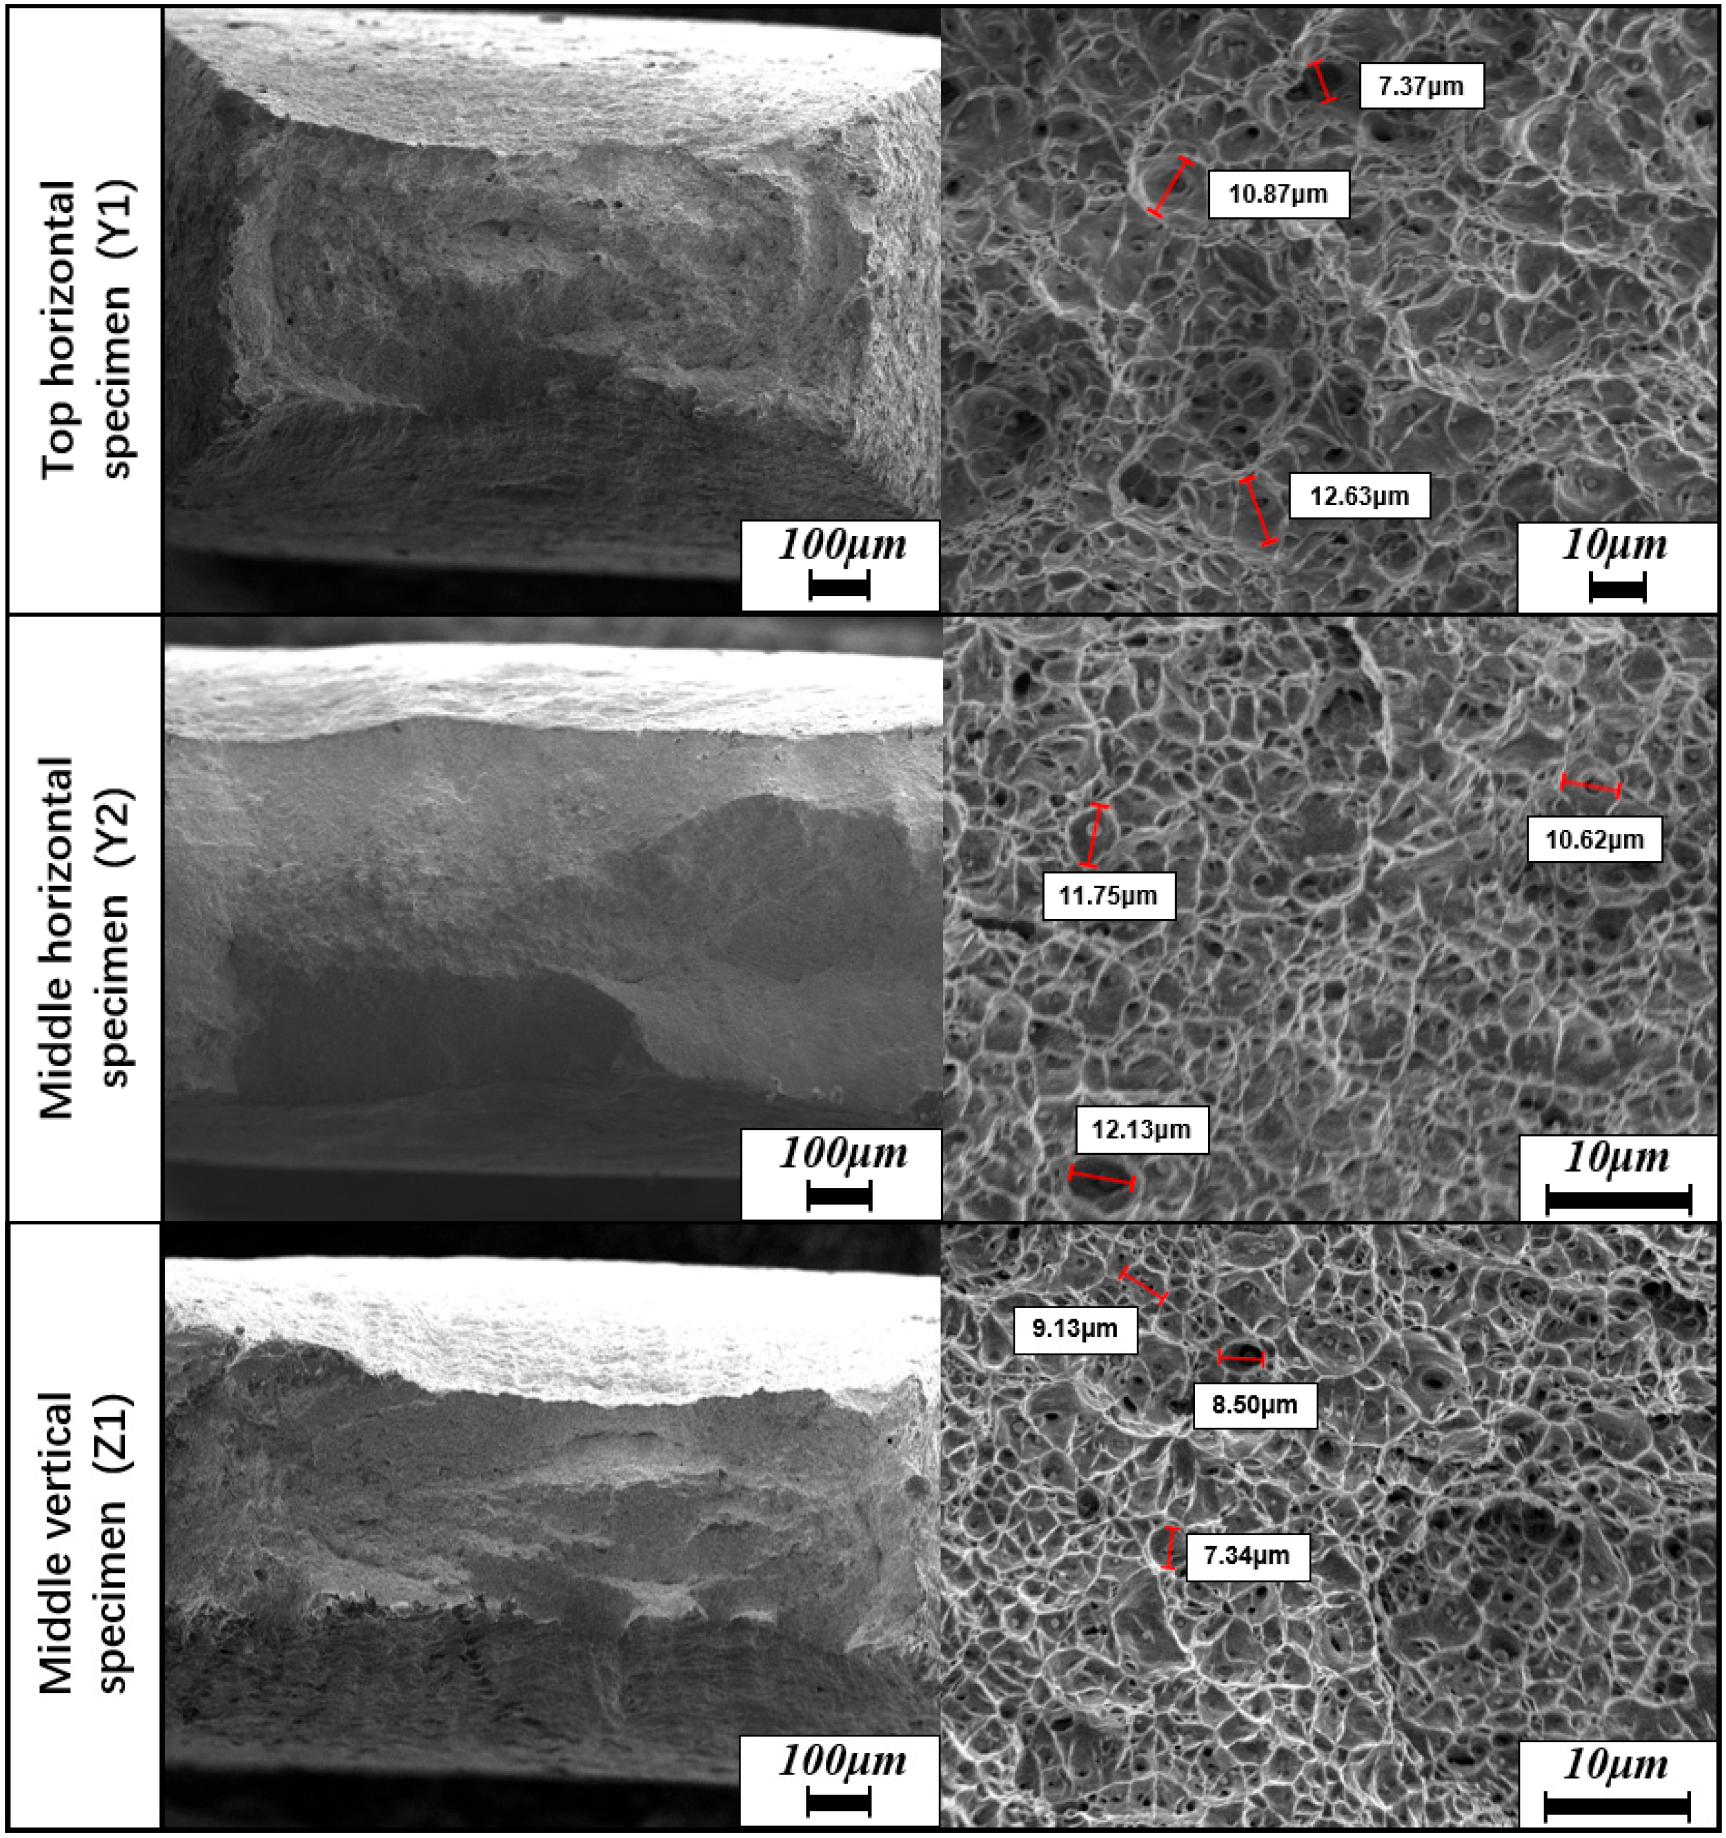
The microscopic fracture morphology of these deposited samples was analyzed by scanning electron microscopy, as shown in Figure 12. For the deposited samples, the great dimples and high elongation prove that the fractures in the three different samples exhibit the same ductile fracture characteristics. Nevertheless, the dimples at the fracture in the horizontal samples are large and deep, and the dimples in the vertical sample are small and shallow. This result indicates that the fracture performance of the vertical sample could be better than that of the horizontal samples, which is consistent with the previous analysis.

4. Conclusions

The WAAM process fabricated the high-strength, low-alloy steel parts. The microstructure evolution mode and mechanical properties of the parts along the height direction were analyzed with the experimental characterization of samples at different positions. The following conclusions were drawn:
(a)
The microstructure of the deposited wall of HSLA is mainly acicular ferrite, and there are longitudinal preferentially growing dendrites along the deposition direction. With the deposition height accumulation, the top sample’s interlayer temperature increases, and the amount of acicular ferrite in the tissue decreases, while the amount of quasi-polygonal ferrite, Widmanstatten ferrite, increases.
(b)
Since the deposited samples do not show periodic grain size changes, the microhardness values do not show alternating changes. The hardness of the top sample showed a decreasing trend from bottom to top along the deposition direction, while the hardness of the middle sample was uniform and stable, and the microhardness change was consistent with the corresponding microstructure evolution.
(c)
The microstructure gradient in the sample along the deposition direction does not lead to a significant difference in the tensile strength of the sample at different heights. On the contrary, the ductility of the longitudinal sample is less than that of the transverse sample, indicating anisotropy in the deposited sample, which is related to the directional growth of grains along the direction of heat flow.

Author Contributions

K.S.: methodology, conceptualization, data analysis, and writing—original draft. Z.L., Y.F., Z.Z., X.Z. and Z.S.: writing—review and editing. W.Y. and X.Y.: supervision, conceptualization, and writing—review and editing. All authors have read and agreed to the published version of the manuscript.

Funding

This research was partially funded by the National Natural Science Foundation of China (NSFC No. U2141216) and the China Scholarship Council (CSC No: 202106030118).

Data Availability Statement

The data that support the findings of this study are available from the corresponding author upon reasonable request.

Acknowledgments

This work is partially sponsored by the NSFC and the Beijing Institute of Technology. The authors gratefully acknowledge support from the Experimental Center of Advanced Materials (ECAM) of Beijing Institute of Technology and the National Key Laboratory of Science and Technology on Materials under Shock and Impact.

Conflicts of Interest

The authors declare no conflict of interest.

References

  1. Skobir, D.A. High-strength low-alloy (HSLA) steels. Mater. Tehnol. 2011, 45, 295–301. [Google Scholar]
  2. Liu, Y.; Shi, L.; Liu, C.; Yu, L.; Yan, Z.; Li, H. Effect of step quenching on microstructures and mechanical properties of HSLA steel. Mater. Sci. Eng. A 2016, 675, 371–378. [Google Scholar] [CrossRef]
  3. Ricks, R.; Howell, P.; Barritte, G. The nature of acicular ferrite in HSLA steel weld metals. J. Mater. Sci. 1982, 17, 732–740. [Google Scholar] [CrossRef]
  4. Kvackaj, T.; Bidulská, J.; Bidulský, R.J.M. Overview of HSS steel grades development and study of reheating condition effects on austenite grain size changes. Materials 2021, 14, 1988. [Google Scholar] [CrossRef] [PubMed]
  5. Lin, Z.; Song, K.; Di Castri, B.; Ya, W.; Yu, X. Microstructure-gradient approach for effective determination of post-heat treatment temperature of an additive manufactured Ti-6Al-4V sample. J. Alloys Compd. 2022, 921, 165630. [Google Scholar] [CrossRef]
  6. Rodrigues, T.A.; Duarte, V.; Miranda, R.; Santos, T.G.; Oliveira, J. Current status and perspectives on wire and arc additive manufacturing (WAAM). Materials 2019, 12, 1121. [Google Scholar] [CrossRef] [Green Version]
  7. Williams, S.W.; Martina, F.; Addison, A.C.; Ding, J.; Pardal, G.; Colegrove, P. Wire+ arc additive manufacturing. Mater. Sci. Technol. 2016, 32, 641–647. [Google Scholar] [CrossRef] [Green Version]
  8. Yang, J.; Zhao, W.; Lin, P.; Zhang, Q.; Zhang, X.; Lin, T.; He, P.; Zhuang, Y. An efficient method to engage oxide ceramics in low-temperature interfacial reactions: Microstructure evolution and kinetics behaviors based on supercooling in a transient liquid phase bonding joint. J. Mater. Sci. Technol. 2023, 151, 234–244. [Google Scholar] [CrossRef]
  9. Cunningham, C.; Flynn, J.; Shokrani, A.; Dhokia, V.; Newman, S. Invited review article: Strategies and processes for high quality wire arc additive manufacturing. Addit. Manuf. 2018, 22, 672–686. [Google Scholar] [CrossRef]
  10. Lin, Z.; Liu, P.; Yu, X. A Literature Review on the Wire and Arc Additive Manufacturing—Welding Systems and Software. Sci. Adv. Mater. 2021, 13, 1391–1400. [Google Scholar] [CrossRef]
  11. Jafari, D.; Vaneker, T.H.; Gibson, I. Wire and arc additive manufacturing: Opportunities and challenges to control the quality and accuracy of manufactured parts. Mater. Des. 2021, 202, 109471. [Google Scholar] [CrossRef]
  12. Monteiro, H.; Carmona-Aparicio, G.; Lei, I.; Despeisse, M. Energy and material efficiency strategies enabled by metal additive manufacturing–A review for the aeronautic and aerospace sectors. Energy Rep. 2022, 8, 298–305. [Google Scholar] [CrossRef]
  13. Aldalur, E.; Veiga, F.; Suárez, A.; Bilbao, J.; Lamikiz, A. High deposition wire arc additive manufacturing of mild steel: Strategies and heat input effect on microstructure and mechanical properties. J. Manuf. Process. 2020, 58, 615–626. [Google Scholar] [CrossRef]
  14. Jiang, F.; Sun, L.; Huang, R.; Jiang, H.; Bai, G.; Qi, X.; Liu, C.; Su, Y.; Guo, C.; Wang, J. Effects of Heat Input on Morphology of Thin-Wall Components Fabricated by Wire and Arc Additive Manufacturing. Adv. Eng. Mater. 2021, 23, 2001443. [Google Scholar] [CrossRef]
  15. Rosli, N.A.; Alkahari, M.R.; bin Abdollah, M.F.; Maidin, S.; Ramli, F.R.; Herawan, S.G. Review on effect of heat input for wire arc additive manufacturing process. J. Mater. Res. Technol. 2021, 11, 2127–2145. [Google Scholar] [CrossRef]
  16. Kornokar, K.; Nematzadeh, F.; Mostaan, H.; Sadeghian, A.; Moradi, M.; Waugh, D.G.; Bodaghi, M.J.M. Influence of heat input on microstructure and mechanical properties of gas tungsten arc welded HSLA S500MC steel joints. Metals 2022, 12, 565. [Google Scholar] [CrossRef]
  17. Rodrigues, T.A.; Duarte, V.; Avila, J.A.; Santos, T.G.; Miranda, R.; Oliveira, J. Wire and arc additive manufacturing of HSLA steel: Effect of thermal cycles on microstructure and mechanical properties. Addit. Manuf. 2019, 27, 440–450. [Google Scholar] [CrossRef]
  18. Yildiz, A.S.; Davut, K.; Koc, B.; Yilmaz, O. Wire arc additive manufacturing of high-strength low alloy steels: Study of process parameters and their influence on the bead geometry and mechanical characteristics. Int. J. Adv. Manuf. Technol. 2020, 108, 3391–3404. [Google Scholar] [CrossRef]
  19. Rodideal, N.; Machado, C.M.; Infante, V.; Braga, D.F.; Santos, T.G.; Vidal, C. Mechanical characterization and fatigue assessment of wire and arc additively manufactured HSLA steel parts. Int. J. Fatigue 2022, 164, 107146. [Google Scholar] [CrossRef]
  20. Sun, L.; Jiang, F.; Huang, R.; Yuan, D.; Guo, C.; Wang, J. Anisotropic mechanical properties and deformation behavior of low-carbon high-strength steel component fabricated by wire and arc additive manufacturing. Mater. Sci. Eng. A 2020, 787, 139514. [Google Scholar] [CrossRef]
  21. Panchenko, O.; Kladov, I.; Kurushkin, D.; Zhabrev, L.; Ryl’kov, E.; Zamozdra, M. Effect of thermal history on microstructure evolution and mechanical properties in wire arc additive manufacturing of HSLA steel functionally graded components. Mater. Sci. Eng. A 2022, 851, 143569. [Google Scholar] [CrossRef]
  22. Geng, H.; Li, J.; Xiong, J.; Lin, X.; Huang, D.; Zhang, F. Formation and improvement of surface waviness for additive manufacturing 5A06 aluminium alloy component with GTAW system. Rapid Prototyp. J. 2018. [Google Scholar] [CrossRef]
  23. Bidulsky, R.; Gobber, F.S.; Bidulska, J.; Ceroni, M.; Kvackaj, T.; Grande, M.A.J.M. Coated metal powders for laser powder bed fusion (L-PBF) processing: A review. Metals 2021, 11, 1831. [Google Scholar] [CrossRef]
  24. Nogi, K.; Ogino, K.; McLean, A.; Miller, W. The temperature coefficient of the surface tension of pure liquid metals. Metall. Trans. B 1986, 17, 163–170. [Google Scholar] [CrossRef]
  25. Nagalingam, A.P.; Vohra, M.S.; Kapur, P.; Yeo, S.H.J.A.S. Effect of cut-off, evaluation length, and measurement area in profile and areal surface texture characterization of as-built metal additive manufactured components. Appl. Sci. 2021, 11, 5089. [Google Scholar] [CrossRef]
  26. Zhao, H.; Palmiere, E.J. Effect of austenite grain size on acicular ferrite transformation in a HSLA steel. Mater. Charact. 2018, 145, 479–489. [Google Scholar] [CrossRef]
  27. Shao, Y.; Liu, C.; Yan, Z.; Li, H.; Liu, Y. Formation mechanism and control methods of acicular ferrite in HSLA steels: A review. J. Mater. Sci. Technol. 2018, 34, 737–744. [Google Scholar] [CrossRef]
  28. Darivandpour, M.; Dehmolaei, R.; Ranjbar, K. Investigating the heat input effect of the GTAW process upon the microstructure and HAZ extension of HSLA-100 steel weld joints using thermal cycles. Int. J. Iron Steel Soc. Iran 2021, 17, 57–69. [Google Scholar]
  29. Cho, L.; Tselikova, A.; Holtgrewe, K.; De Moor, E.; Schmidt, R.; Findley, K.O. Critical assessment 42: Acicular ferrite formation and its influence on weld metal and heat-affected zone properties of steels. Mater. Sci. Technol. 2022, 38, 1425–1433. [Google Scholar] [CrossRef]
  30. Zuo, Z.; Haowei, M.; Yarigarravesh, M.; Assari, A.H.; Tayyebi, M.; Tayebi, M.; Hamawandi, B.J.M. Microstructure, Fractography, and Mechanical Properties of Hardox 500 Steel TIG-Welded Joints by Using Different Filler Weld Wires. Materials 2022, 15, 8196. [Google Scholar] [CrossRef]
  31. John, M.; Kumar, P.A.; Bhat, K.U. Effect of filler wire strength on high strength low alloy steels. Mater. Today Proc. 2022, 49, 1286–1293. [Google Scholar] [CrossRef]
  32. Li, X.; Shang, C.; Ma, X.; Gault, B.; Subramanian, S.; Sun, J.; Misra, R.D.K. Elemental distribution in the martensite–austenite constituent in intercritically reheated coarse-grained heat-affected zone of a high-strength pipeline steel. Scr. Mater. 2017, 139, 67–70. [Google Scholar] [CrossRef]
  33. Rafieazad, M.; Ghaffari, M.; Vahedi Nemani, A.; Nasiri, A. Microstructural evolution and mechanical properties of a low-carbon low-alloy steel produced by wire arc additive manufacturing. Int. J. Adv. Manuf. Technol. 2019, 105, 2121–2134. [Google Scholar] [CrossRef]
  34. Ghaffari, M.; Nemani, A.V.; Nasiri, A. Microstructure and mechanical behavior of PH 13–8Mo martensitic stainless steel fabricated by wire arc additive manufacturing. Addit. Manuf. 2022, 49, 102374. [Google Scholar] [CrossRef]
  35. Nemani, A.V.; Ghaffari, M.; Salahi, S.; Lunde, J.; Nasiri, A. Effect of interpass temperature on the formation of retained austenite in a wire arc additive manufactured ER420 martensitic stainless steel. Mater. Chem. Phys. 2021, 266, 124555. [Google Scholar] [CrossRef]
  36. Wang, Y.; Tomota, Y.; Ohmura, T.; Morooka, S.; Gong, W.; Harjo, S. Real time observation of martensite transformation for a 0.4 C low alloyed steel by neutron diffraction. Acta Mater. 2020, 184, 30–40. [Google Scholar] [CrossRef]
  37. Ge, J.; Lin, J.; Fu, H.; Lei, Y.; Xiao, R.J.M. A spatial periodicity of microstructural evolution and anti-indentation properties of wire-arc additive manufacturing 2Cr13 thin-wall part. Mater. Des. 2018, 160, 218–228. [Google Scholar] [CrossRef]
  38. Dirisu, P.; Ganguly, S.; Mehmanparast, A.; Martina, F.; Williams, S. Analysis of fracture toughness properties of wire+ arc additive manufactured high strength low alloy structural steel components. Mater. Sci. Eng. A 2019, 765, 138285. [Google Scholar] [CrossRef]
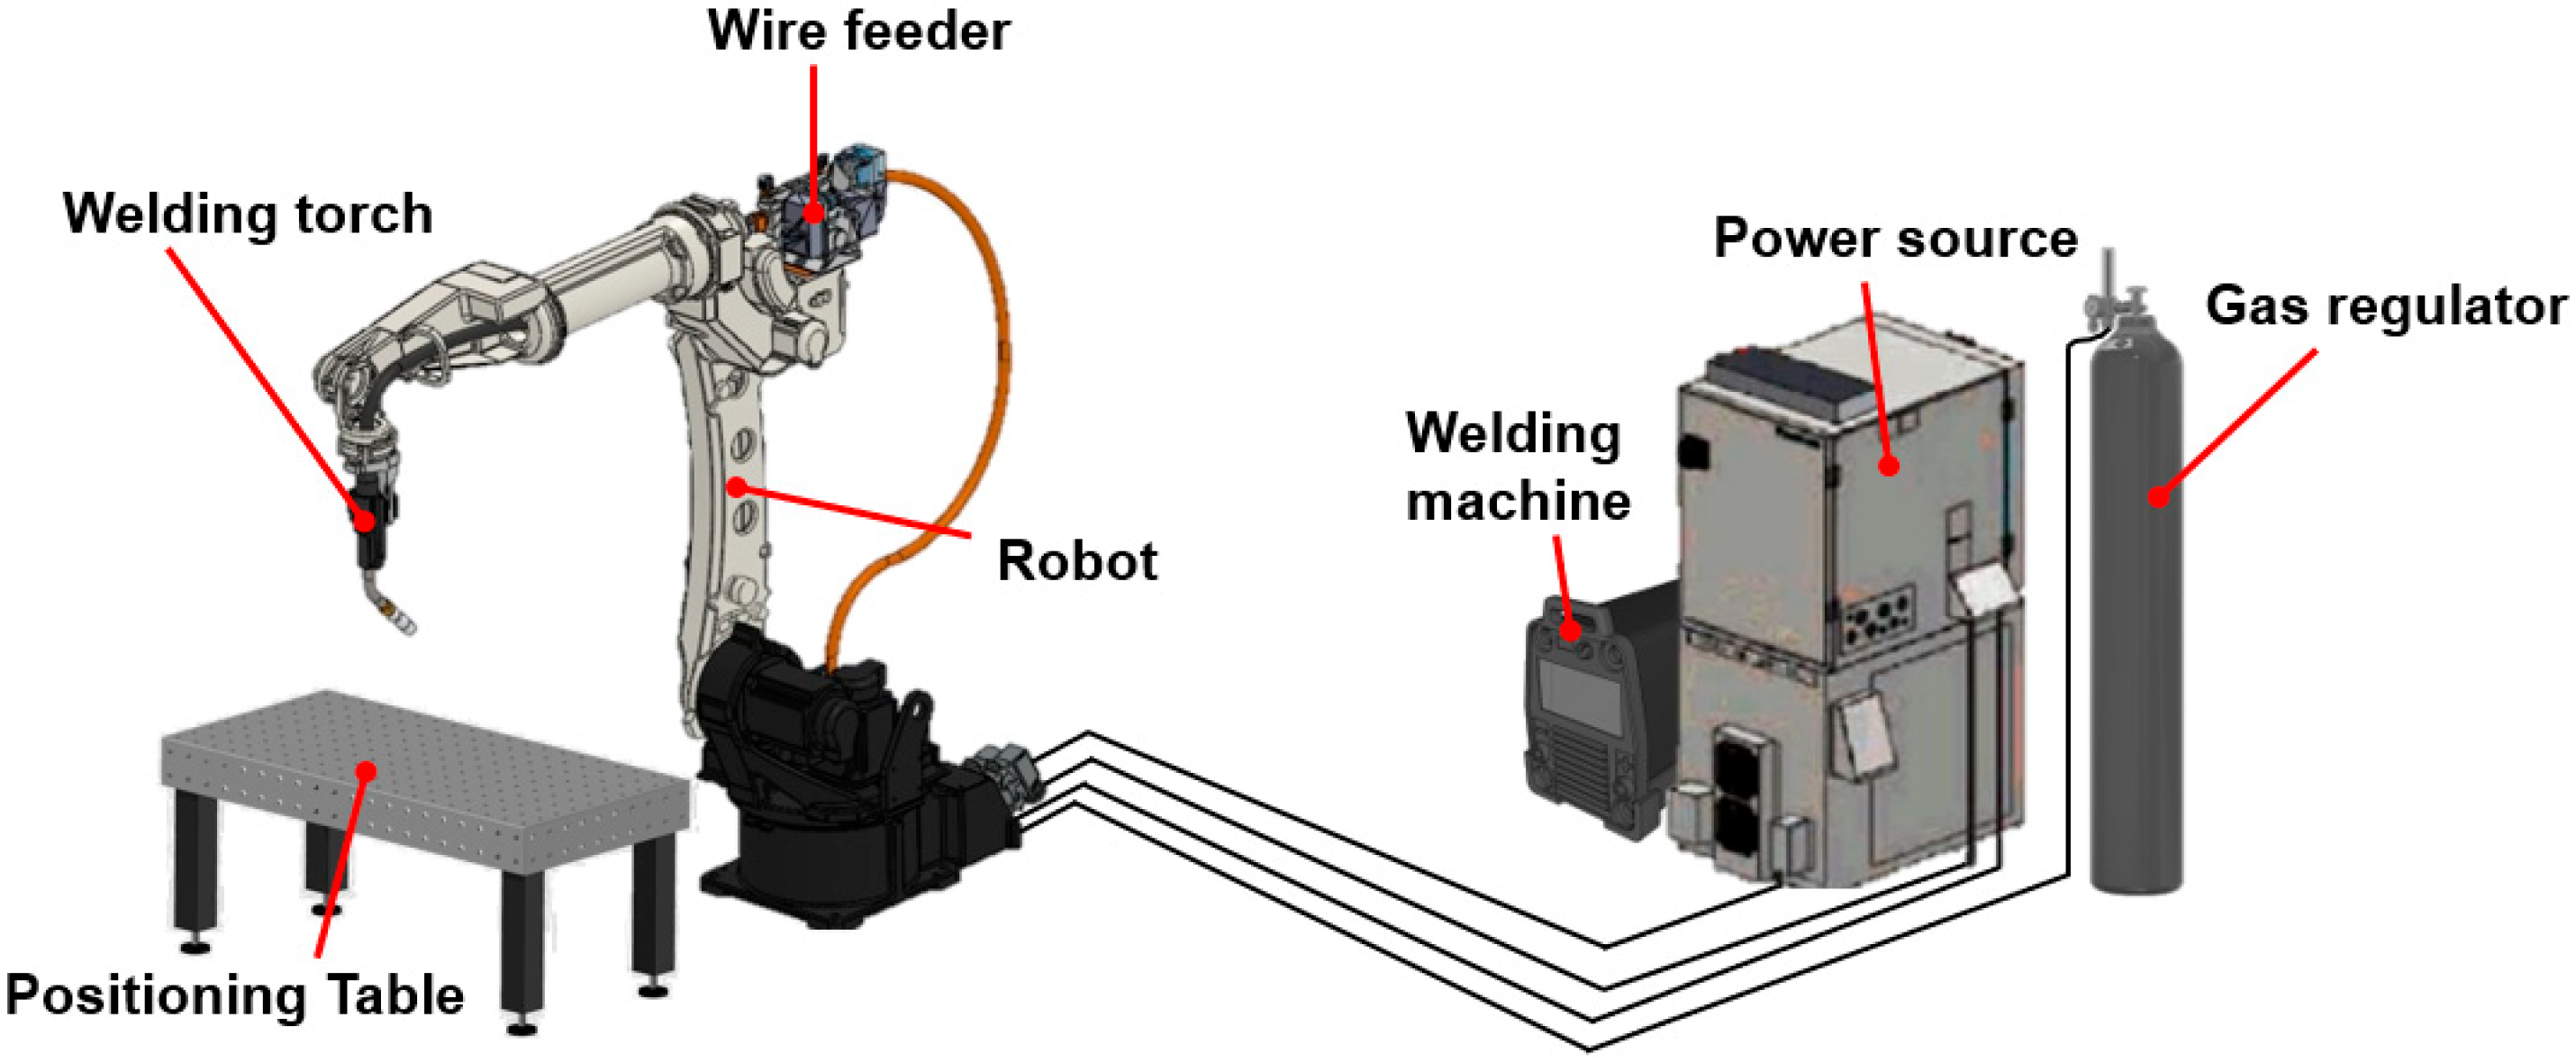
Figure 1. Physical map of the welding robot.
Metals 13 00764 g001
Figure 2. Schematic diagram of the sampling position and size of metallographic and performance samples.
Metals 13 00764 g002
Figure 3. Aspects of the produced part: (a) HSLA sample and (b) corresponding transverse sections.
Metals 13 00764 g003
Figure 4. Optical microscopy images of the HSLA thin-walled top sample: (a) Full view of the sample, (b) 50 magnification microstructures, (c) 500 magnification microstructures.
Metals 13 00764 g004
Figure 5. Optical microscopy images of the HSLA thin-walled middle sample: (a) Full view of the sample, (b) 50 magnification microstructures, (c) 500 magnification microstructures.
Metals 13 00764 g005
Figure 6. Scanning electron microscopy (SEM) image of the HSLA thin-walled top sample: (a) scattered electron (SE) mode and (b) backscattered electron (BSD) mode.
Metals 13 00764 g006
Figure 7. Scanning electron microscopy (SEM) image of the HSLA thin-walled middle sample: (a) scattered electron (SE) mode and (b) backscattered electron (BSD) mode.
Metals 13 00764 g007
Figure 8. The XRD results of the WAAM HLSA steel. BCC: body-centered cubic; FCC: face-centered cubic; BCT: Body-centered tetragonal structure.
Metals 13 00764 g008
Figure 9. EDS analysis results for points in the as-built samples: (a) top sample and (b) middle sample.
Metals 13 00764 g009
Figure 10. Schematic representation of indentations made on the cross sections of the HSLA samples. Microhardness profiles along the height of the samples: (a) top sample and (b) middle sample.
Metals 13 00764 g010aMetals 13 00764 g010b
Figure 11. The yield strength (YS), ultimate tensile strength (UTS), and elongation (EL) in the sample.
Metals 13 00764 g011
Figure 12. SEM morphology of tensile fractures at different locations in the LTT deposited walls.
Metals 13 00764 g012
Table 1. Chemical composition of the steel base and wire (wt.%).
GradeCMnSiSPCrNiCuMoFe
ER120S-G0.091.600.800.010.010.21.6/0.3Bal.
Q235-B0.160.530.210.030.020.30.30.3/Bal.
Table 2. Process parameters for thin walls.
ParametersValues
Welding current (A)170
Welding voltage (V)~16
Wire feeding speed (m/min)3
Travel speed (m/min)0.7
Residence time at the arc extinction (s)0.3
Cooling time between layers (S)240
Melt drop transition modePulse
Disclaimer/Publisher’s Note: The statements, opinions and data contained in all publications are solely those of the individual author(s) and contributor(s) and not of MDPI and/or the editor(s). MDPI and/or the editor(s) disclaim responsibility for any injury to people or property resulting from any ideas, methods, instructions or products referred to in the content.