Article

A Uniformed Calculation Criterion on Heat Band Width of Local PWHT on Welded Joint with Dissimilar Thickness

1
College of New Energy, China University of Petroleum (East China), Qingdao 266580, China
2
State Key Laboratory of Heavy Oil Processing, China University of Petroleum (East China), Qingdao 266580, China
*
Author to whom correspondence should be addressed.
Metals 2023, 13(6), 1100; https://doi.org/10.3390/met13061100
Submission received: 5 May 2023 / Revised: 31 May 2023 / Accepted: 2 June 2023 / Published: 10 June 2023
(This article belongs to the Special Issue Residual Stress and Fatigue of Metals)

Abstract

:
Local post-weld heat treatment is used to reduce welding residual stresses. The existing standards have great differences in the selection of the width of the heated band, and the heating width, as an important control parameter of the local heat treatment, will directly affect the quality of the heat treatment. In this paper, the numerical simulation method is used to simulate the welding and heat treatment process of unequal-thickness joints. The stress and deformation of the joint with different thickness ratios under different heating widths are studied by finite element simulation, focusing on the influence of the width of the heated band on the residual stress relief of the joint. Based on these studies, the criteria for determining the optimal width of the heating zone are consistent. Finally, the formula H B = H B 1 + H B 2 = 3 R T + 1 + k 2 R T for calculating local heat treatment heating width based on the thickness of welded joint for SA738Gr.B steel is established. Among them, H B 1 is the width of the main heating zone, H B 2 is the width of the auxiliary heating zone, k is the thickness ratio of the thick plate to the thin plate, and t is the wall thickness of the thin plate.

1. Introduction

Welding is the most important connection technology in the manufacturing industry, especially for pressure vessels and pipes. Suresh Gain et al. [1] studied that friction stir welding can produce high-quality joints in AISI316L and P91 steel tubes. S. Mohan Kumar et al. [2] mentioned a new type of double-sided tungsten inert gas (DS-TIG) welding for SS321 nuclear-grade stainless steel for the pressure vessel industry. Huang et al. [3] proposed a tempering surfacing repair method to repair the damage to stud holes with threads in flanges. Due to the uniform heating and cooling during welding, the welding residual stresses are generated unavoidably. Welding residual stresses are the main reason resulting in stress corrosion cracking (SCC) [4,5]. Reducing residual stresses can depress the risk to occur SCC, and even enhance the creep [6,7] and fatigue lives [8,9,10]. Post-weld heat treatment (PWHT) is a common method to reduce residual stresses of welded structures. Yu et al. [11] studied the mechanical properties and residual stress elimination mechanism of two different post-weld heat treatment schemes. Rajiv Kumar et al. [12] studied the welding residual stress of pipeline joints and concluded that post-weld heat treatment has a suitable effect on reducing residual stress. Sukhwinder Singh Sekhon et al. [13] studied the influence of process parameters on welding performance and concluded that the pin profile is the most important factor. For larger pressure vessels and ultra-longer pipes, furnace-based heat treatment is impractical indeed, and local heat treatment is an available method [14]. Heat band width is an important parameter to determine the heat treatment process, which is defined as different widths for different criteria, generating different elimination results of residual stresses [15]. Therefore, defining an appropriate heat band width is key to performing the local PWHT.
Before defining the heat band width, it needs to clarify the effects of heat band width on residual stress reduction. Up to now, some researchers have investigated the influences of band width [16,17,18,19,20]. The heat zone width is an important parameter because improper temperature gradients are harmful to the structure integrity [16]. Rajamurugan et al. [17] proved that the compressive stress in the weld zone after PWHT is significantly lower than that before welding. Dong et al. [18] proposed an alternative approach for achieving effective control of thermal stresses caused by local PWHT by introducing a secondary heat band (SHB). Jin et al. [19] proposed a new local post-weld heat treatment technology based on primary and secondary heating. It can significantly reduce the residual stress caused by welding and even produce a certain degree of compressive residual stress in the welding area of the container. The high thermal stresses produced by temperature gradients can be reduced to the compressive stresses due to the presence of SHB. Zhao et al. [15] discussed the influences of local PWHT from different criteria at home and abroad on the weld residual stress and found that the local PWHT method of ASME-Ⅷ is recommended. Geng et al. [20] studied the residual stress distributions as welded and after local PWHT of butted weld joint of a huge cylinder with ultra-thick wall and proposed the optimum heated band width is 3 R t . The regulations on the width of the heating zone in the local post-weld heat treatment standards of various countries cannot be unified, and there is no reference standard for the width of the heating zone in the local post-weld heat treatment of unequal-thickness joints. It is important to establish a uniform calculation criterion on the heat band width of local PWHT on welded joints with dissimilar thicknesses.
In this paper, the large-scale finite element analysis software ABAQUS is used to study the determination of local post-weld heat treatment heating width based on the welding residual stress elimination criterion. The distribution of residual stress was studied. The influence of heating width on residual stress is analyzed. The effect and law of welding residual stress elimination of joints with different thickness ratios are compared. Finally, a calculation formula of local heat treatment heating width based on the thickness of the welded joint is proposed.

2. Finite Element Details

2.1. Geometric Model

The parent material is SA738Gr.B. The chemical compositions of SA738Gr.B steel are listed in Table 1. Three geometric models with three thicknesses were built based on the software ABAQUS 6.14. Figure 1 shows the geometric dimension of the welded joint with dissimilar wall thickness. Two cylinders with different wall thicknesses were welded together, generating a girth weld joint. The welded joint with dissimilar wall thickness in this paper is based on the background of nuclear power containment. Here, the inner diameter of the steel containment vessel of the nuclear power plant is 43 m. The thickness of the thinner wall of all models is 52 mm. The thickness of the thicker wall for models I, II, and III are 100 mm, 130 mm, and 80 mm, respectively. So, the thickness ratio (k) of the thicker wall to the thinner wall for models I, II, and III are 2, 2.5, and 1.5, respectively. The groove gap and angle are 2 mm and 60°. X-type groove was used. After one side of the groove is welded, the other side of the groove shall be welded. The specific welding process parameters are shown in Table 2. The filler material is E9018-G-H4, and its chemical composition is also listed in Table 1.
All welding technologies are the same for three models. A total of 13 layers and 48 passes were conducted. The minimum preheating temperature for welding is 100 °C, and the maximum interlayer temperature is 150 °C.

2.2. Finite Element Model

In the 1970s, Ueda Yukio [21] proposed the thermal elastic-plastic finite element analysis theory to solve the welding residual stress. Since then, scholars from various countries have carried out research on finite element simulation and achieved certain results. Wu et al. [7] proposed a semi-discrete and fully discrete mixed finite element method. Graßmann et al. [22] verified the accuracy of the finite element analysis method. Dung Nguyen KIEN et al. [23] proposed a hybrid method of radial basis function and finite element method (RBF-FEM), which can quickly produce better results. In this paper, the finite element theory is used to study. According to the geometric size welded joint, as shown in Figure 1, the two-dimensional (2D) axisymmetric finite element models were built in order to save calculation time. Figure 2 shows the finite element mesh of models I, II, and III. Point A, B and C were fixed to limit the movement of the model in the simulation. In order to understand the residual stress distribution of welded joints more clearly, three typical paths shown in Figure 2a are selected to study the residual stress distribution. Path-1, Path-2, and Path-3 are the paths from top to bottom along the inner and outer surfaces of the cylinder and from the inner surface to the outer surface along the weld center line, respectively. The path direction will no longer be marked in the figure below. In order to improve calculation accuracy and efficiency simultaneously, the finite model in welding, HAZ, and heat treatment zone is carefully meshed densely, and it becomes coarse by reducing the meshing density through the transition mesh. The simulation on local PWHT contains two steps: (1) temperature field simulation and (2) stress field simulation. The mesh type used in the temperature field and stress field simulation is DCAX4 and CAX4R, respectively. The stress analysis uses the same elements and nodes as the thermal analysis. Before the simulation, the mesh sensitivity was checked. In total, 7414 nodes and 7016 elements were divided for model I.

2.3. Thermal Analysis

The thermal analysis contains welding temperature analysis and heat treatment analysis. In the welding temperature analysis, the birth and death element method is adopted to simulate the welding process. Before welding, the element representing weld metal is deactive (death element), and then it is reactive once each welding pass is conducted. The heat source model is the key to accurately simulating the welding temperature field. Smith et al. [24] compared the merits and demerits of current heat source models and pointed out that the heat flux distribution of the double ellipsoidal heat source model proposed by Goladk et al. [25] is closer to the heat input distribution of manual arc welding because the heat source is closer to the shape of the real molten pool than the relatively uniform spherical heat source or 2D surface heat source.
The Goldak equation is expressed in the following form:
For the front heat source:
q ( x , y , z ) = 6 3 Q f f π π a b c f exp 3 x 2 a 2 3 y 2 b 2 3 ( z v t ) 2 c f 2 ,
For the rear heat source:
q ( x , y , z ) = 6 3 Q f r π π a b c r exp 3 x 2 a 2 3 y 2 b 2 3 ( z v t ) 2 c r 2 ,
where ff and fr are parameters that give the fractions of the heat deposited in the front and the rear parts, respectively. Note that ff + fr = 2.0. Here it is assumed that ff is 1.5 and fr is 0.5, which is based on the fact that the temperature gradient in the front leading part is steeper than in the tailing edge. a and b represent the height and width of the heat source, respectively. cf and cr represent the length in the front and the rear part of the ellipsoid. v and t represent welding speed and time. Q is the power of the welding heat source, which is related to the welding process, and can be calculated by following equations:
Q = η U I ,
where η is welding efficiency, U is welding voltage, and I is welding current. The heat source of double ellipsoidal distribution for the moving welding arc is modeled by a user subroutine DFLUX in ABAQUS compiled by the FORTRAN program.
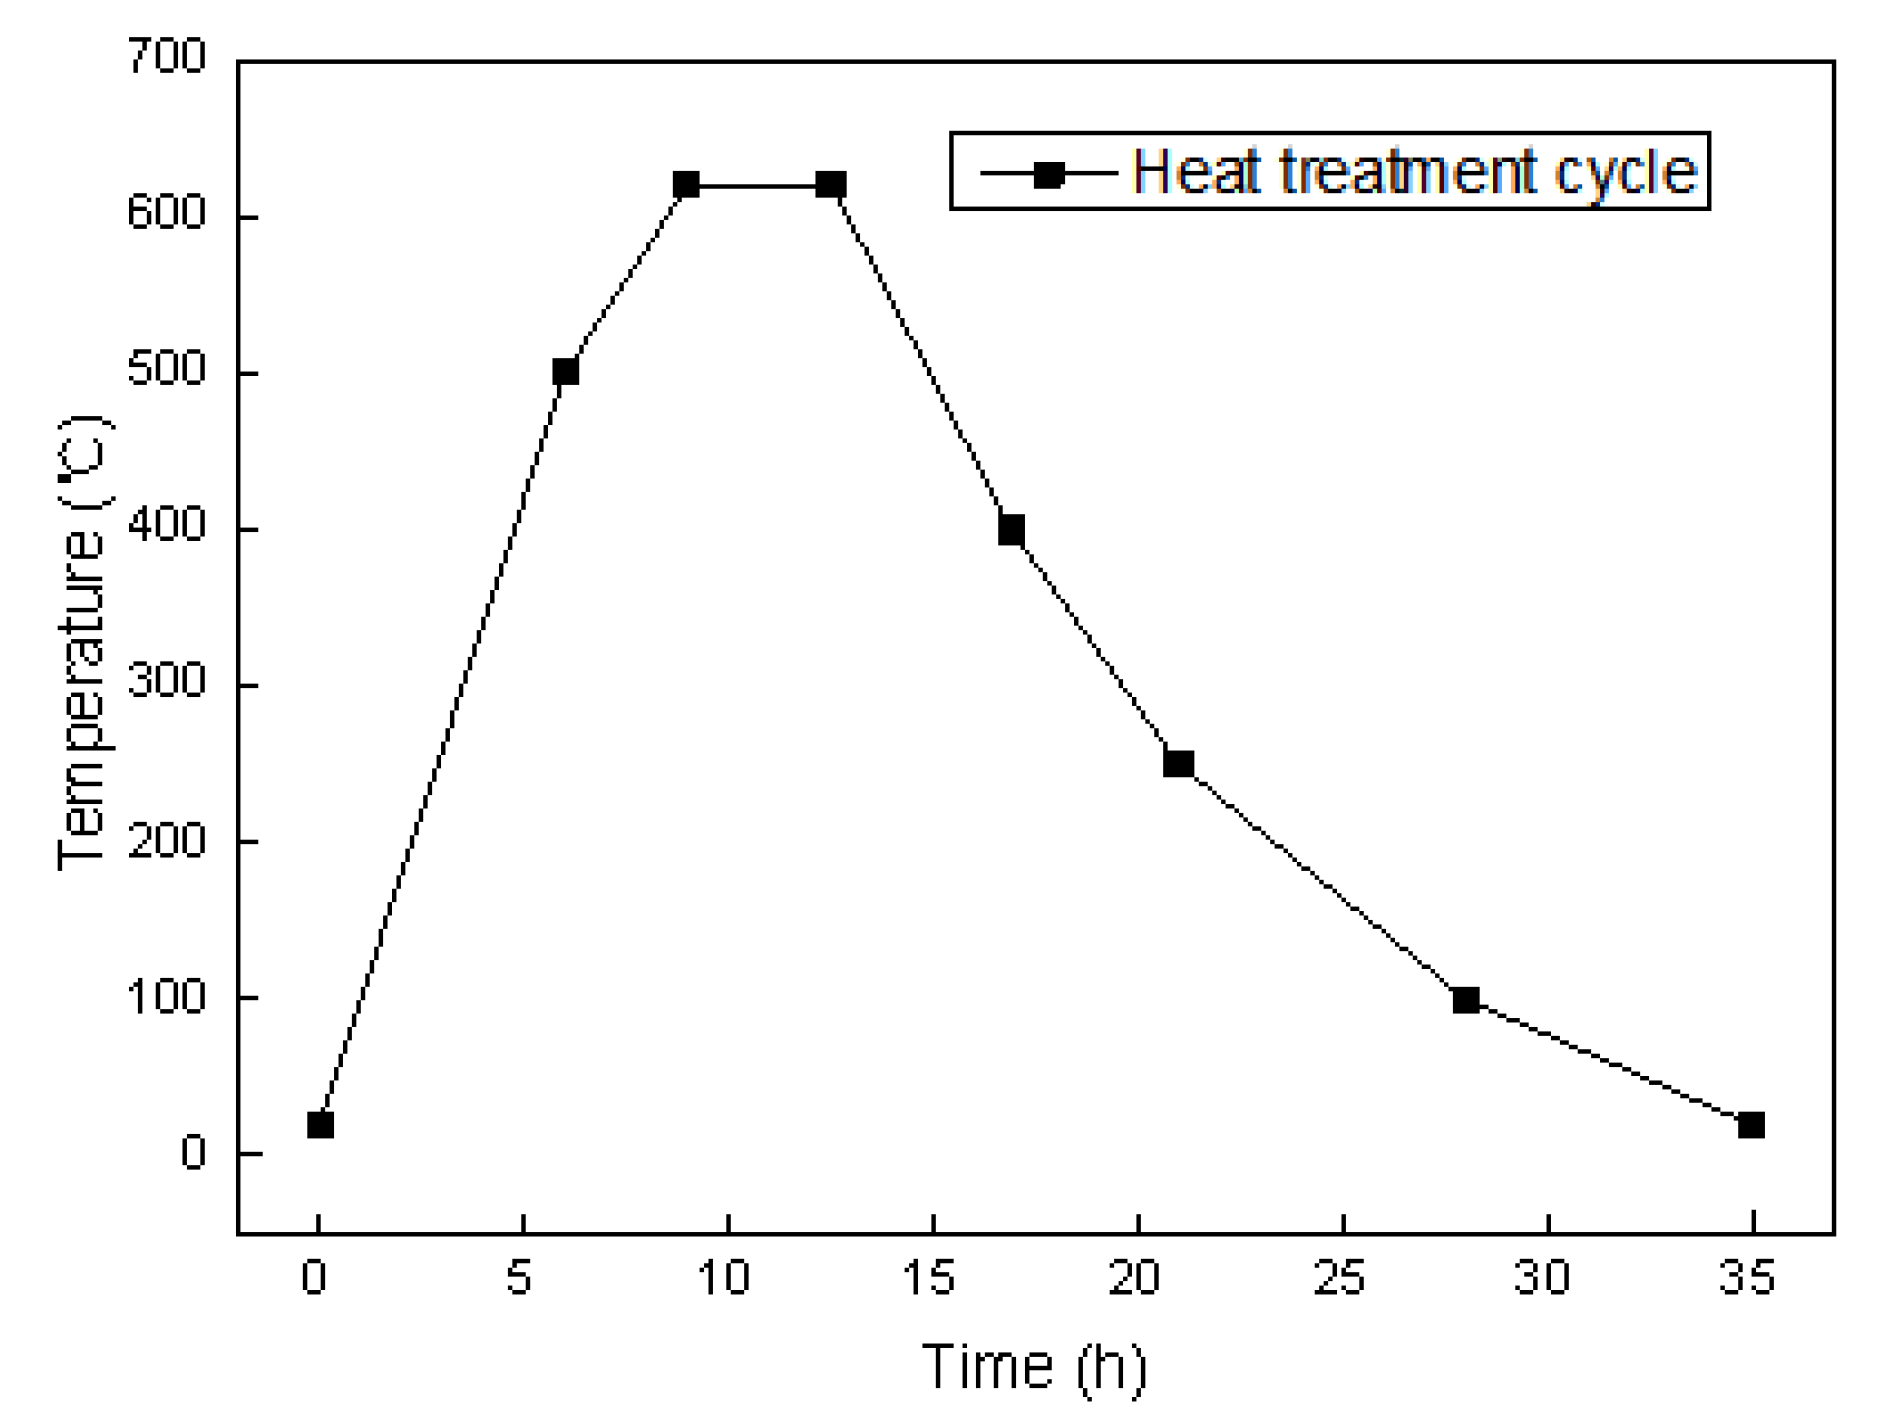
During the simulation of local PWHT, the thermal cycle was applied to the heated zone of local PWHT, as shown in Figure 3. The heating bands were heated to 600 °C with two steps. The holding time is 2.5 h. ASME stipulates that the maximum heating rate and cooling rate can be calculated according to the material thickness of the welded joint, above 425 °C, and can not exceed 222 °C or less than 56 °C at any interval of hours [26]. The heating rates before and after 425 °C are 150 °C/h and 56 °C/h, respectively. The cooling rate before 425 °C is 56 °C/h, and then natural cooling to room temperature. The traditional width of the heat band is set as 3000 mm according to ASME standards [27]. The heat band width of the thicker wall side is the same as that of the thinner wall side. The temperature-dependent thermal properties of SA738Gr.B stainless steel are listed in Table 3.

2.4. Stress Analysis

The residual stress is calculated by using the temperature distribution obtained from thermal analysis as input data. During the welding of SA738Gr.B stainless steel, the effect of solid phase transformation can be negligible in this calculation. Therefore, the solid-state phase transformation was ignored in the welding simulation, and the total strain can be decomposed into three components, as follows:
ε = ε e + ε p + ε ts ,
where ε e , ε p , and ε ts stands for elastic strain, plastic strain, and thermal strain, respectively. Elastic strain is modeled using the isotropic Hooke’s law with temperature-dependent Young’s modulus and Poisson’s ratio. The thermal strain is calculated using the temperature-dependent coefficient of thermal expansion. For the plastic strain, a rate-independent plastic model is employed with von Mises yield surface, temperature-dependent mechanical properties, and isotropic hardening model.
For temperature and stress analysis, temperature-dependent, thermo-physical, and mechanical properties of the materials are incorporated, as shown in Figure 4 and Figure 5. During the residual stress analysis, four end nodes on each end of the model are constrained to avoid rigid body motion.
For the local PWHT simulation, the distribution of stress and other variables obtained in the welding simulation were set as initial conditions. The total strain rate can be decomposed into four components as follows:
ε = ε e + ε p + ε t h + ε c ,
where ε c and ε t h , stand for creep strain and thermal strain. The creep strain is calculated by Norton’s steady-state creep model:
ε ˙ = B σ n ,
where ε ˙ is the creep strain rate; σ is stress (MPa); and B and n are material constants for creep. Here, only the creep strain at the insulation stage is considered. The creep parameters B and n at 620 °C are 2.3 × 10⁻²³ and 8.3, respectively. The radial and axial displacement of the bottom surface was constrained in order to prevent rigid body translation of the model.
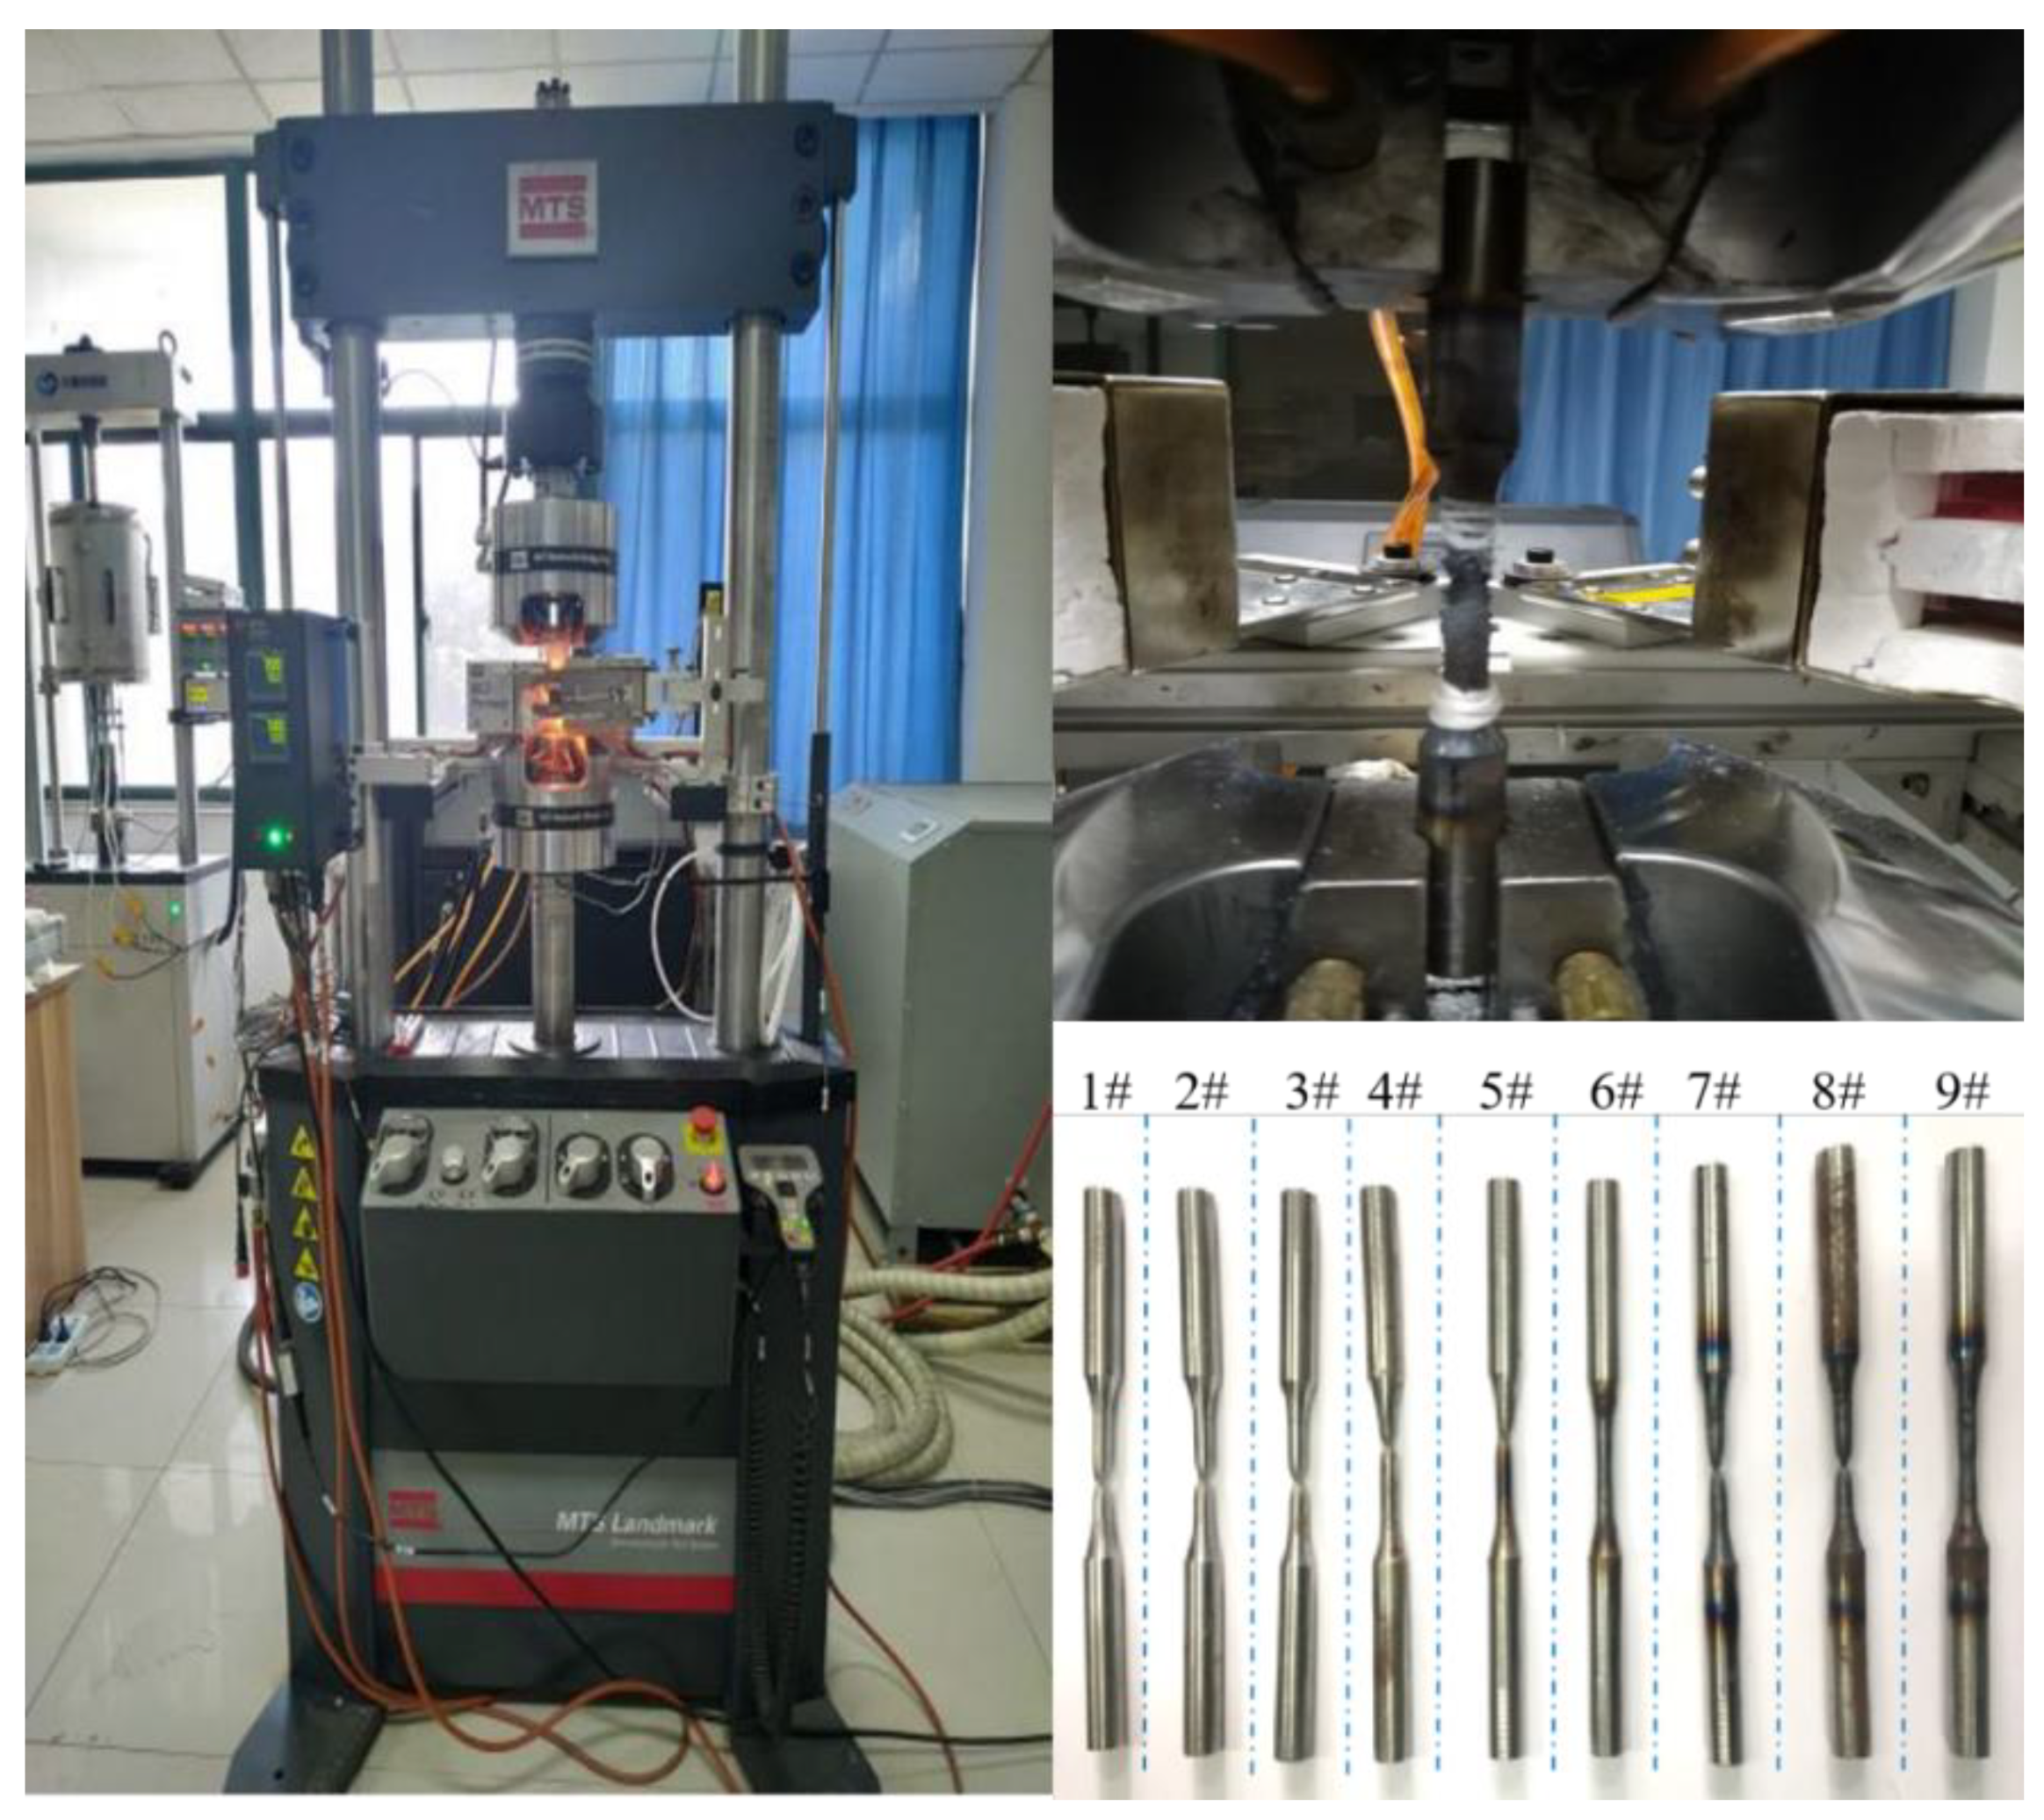
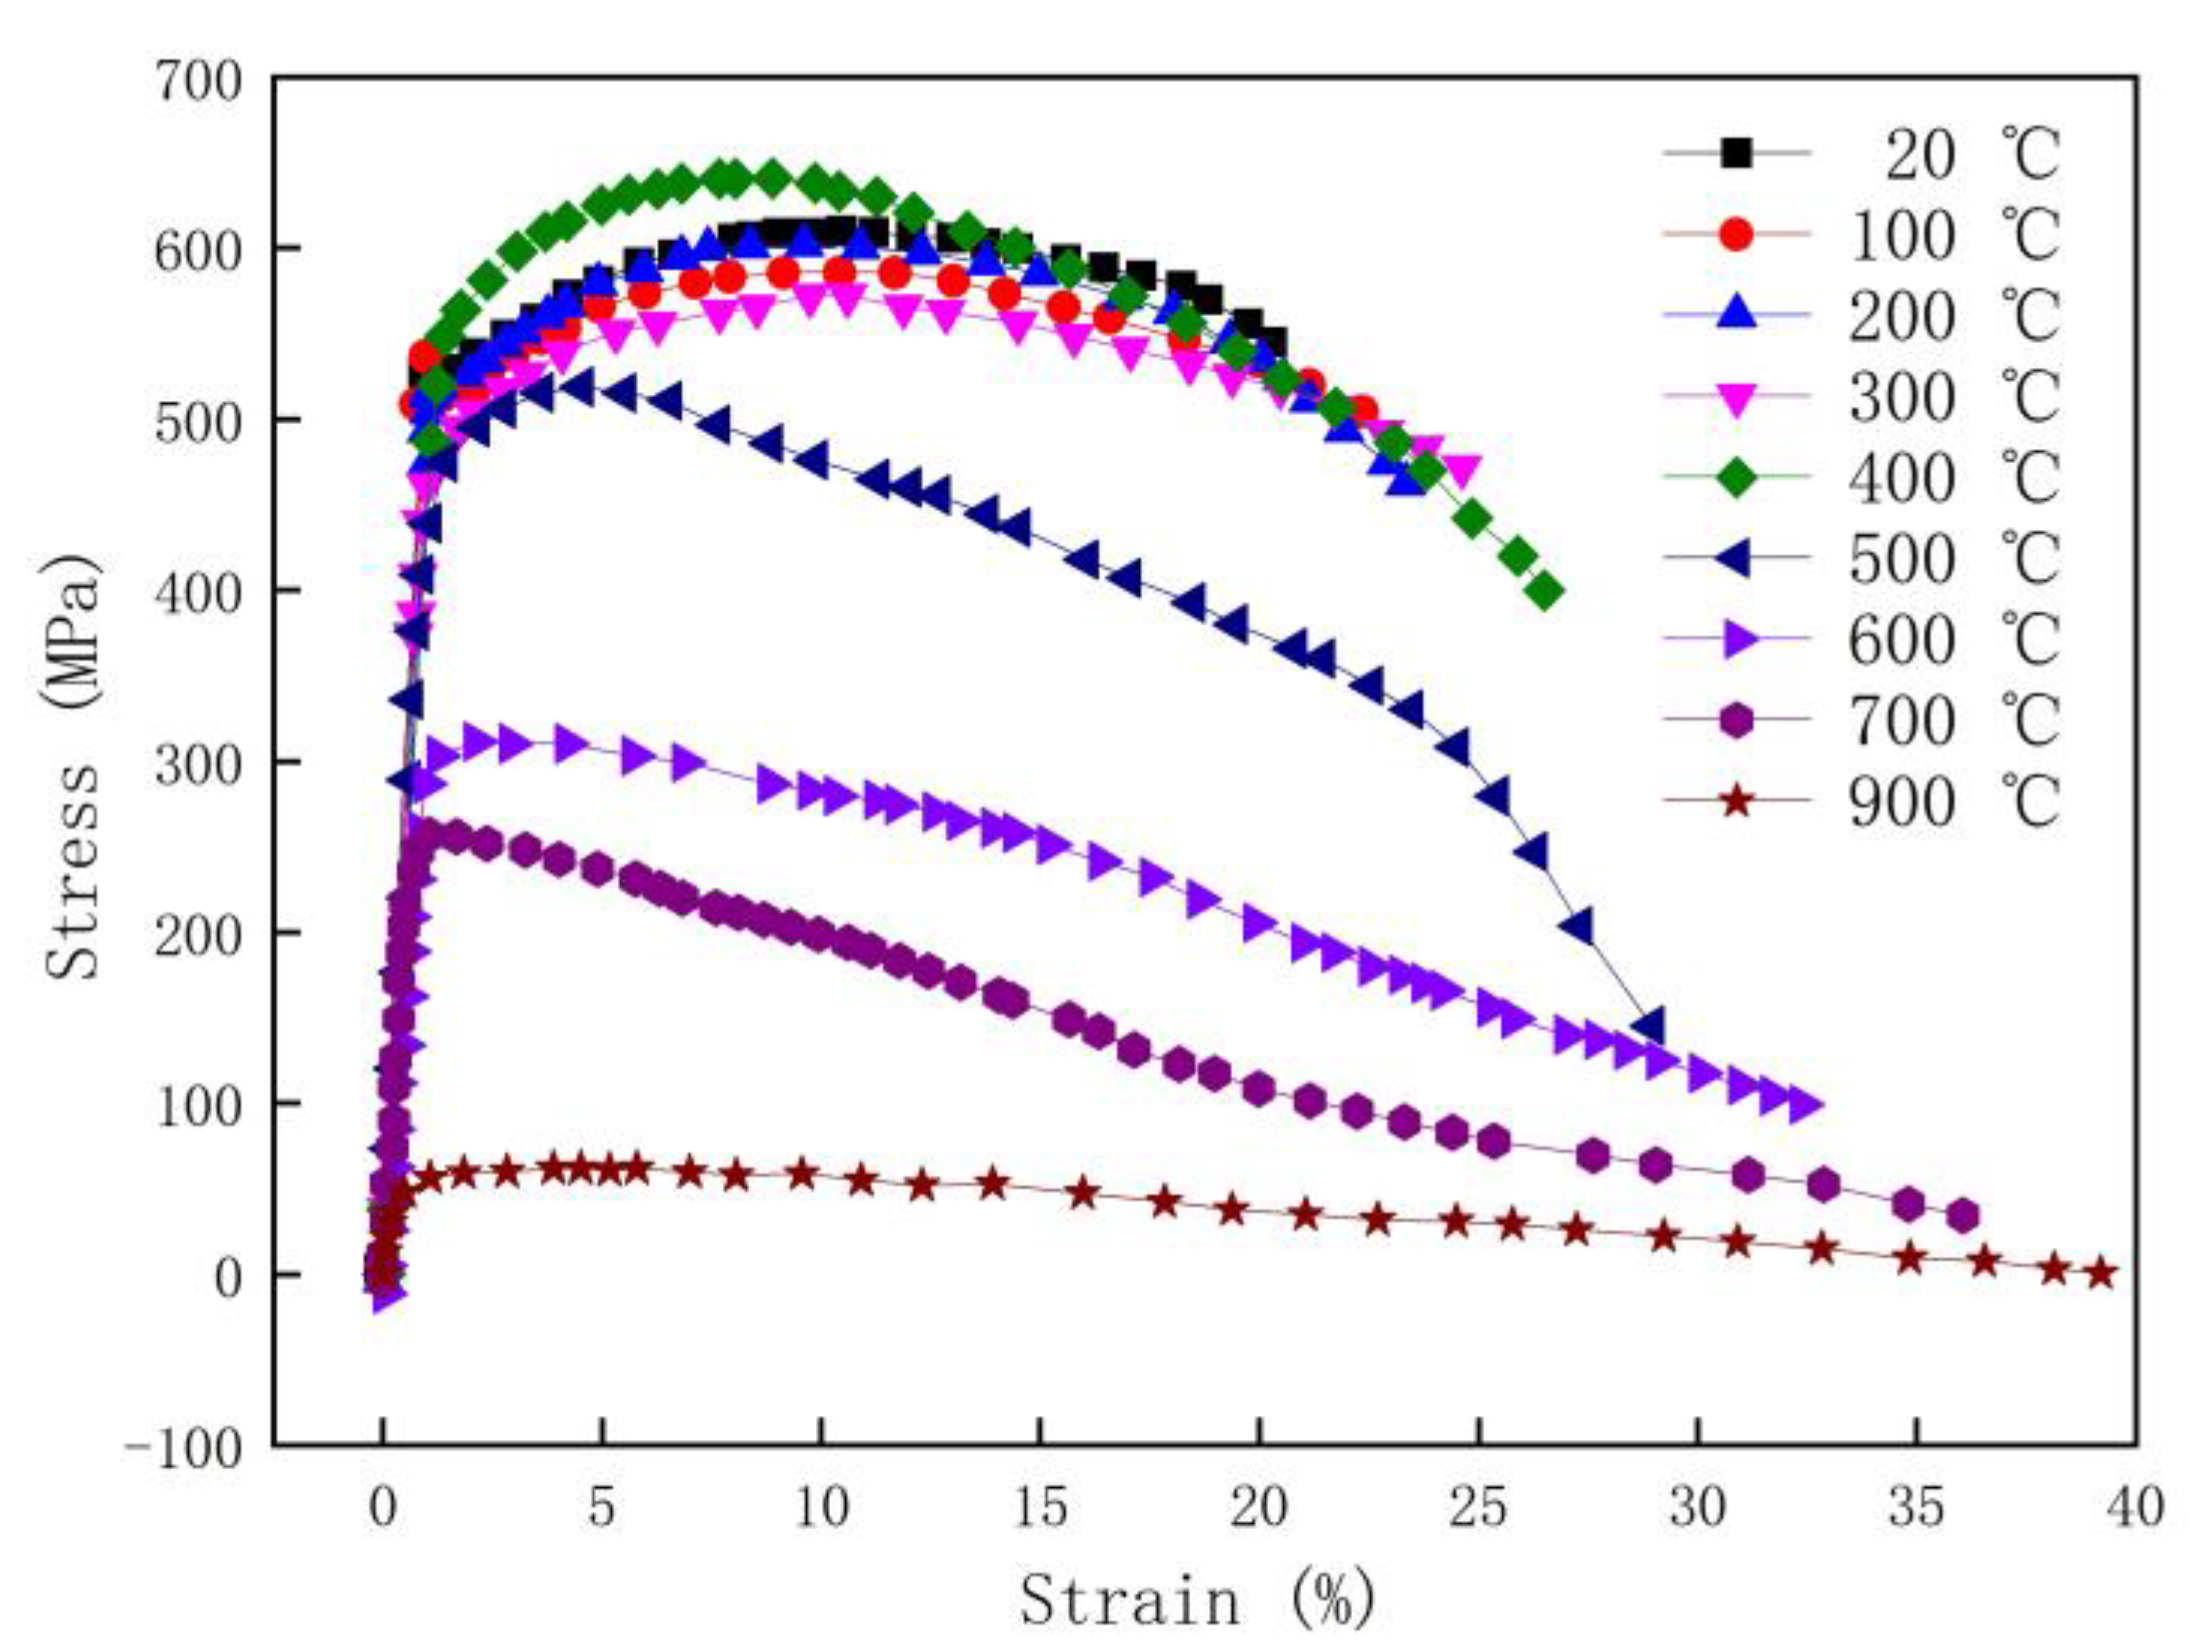
The tensile properties of SA738Gr.B steel are measured by a high-temperature tensile test machine at nine different temperatures (20 °C, 100 °C, 200 °C, 300 °C, 400 °C, 500 °C, 600 °C, 700 °C, and 900 °C). Figure 4 shows tensile specimens and experimental apparatus at different temperatures. The samples with serial number 1–9 were obtained at 20 °C, 100 °C, 200 °C, 300 °C, 400 °C, 500 °C, 600 °C, 700 °C and 900 °C, respectively. The tensile rate is 1 mm/min. By recording the load and displacement during the tensile process, the engineering stress–strain curves of SA738Gr.B steel at different temperatures were obtained in Figure 5. During the whole measurement process, the extensometer was used to record the deformation in the range section of the tensile specimen. According to Figure 5, the mechanical properties (elastic modulus, tensile strength, yield strength) of SA738Gr.B steel at different temperatures are listed in Table 4.

3. Results and Discussion

3.1. Welding Residual Stress Analysis

Figure 6 shows the contour of the welding residual stress with a thickness ratio of 2. In the figure, Mises is Mises stress; S11 is radial stress; S22 is axial stress, and S33 is circumferential stress. The following will no longer be mentioned. Because of the symmetry of the welding groove, the stress distribution is approximately symmetric about the centerline of plate thickness. The von Mises and hoop residual stress in weld and HAZ are greatly larger than in other zones. The welding pass can be clearly distinguished from the contour distribution of von Mises and hoop residual stress. The maximum axial and hoop residual stress is 536 MPa and 793 MPa, respectively. Those are all located in the weld toe of the outer and inner surfaces. The residual stresses inside the welded joint are relatively small. Compared to axial and hoop residual stress, the residual stresses is small, and it will not be discussed in the following.
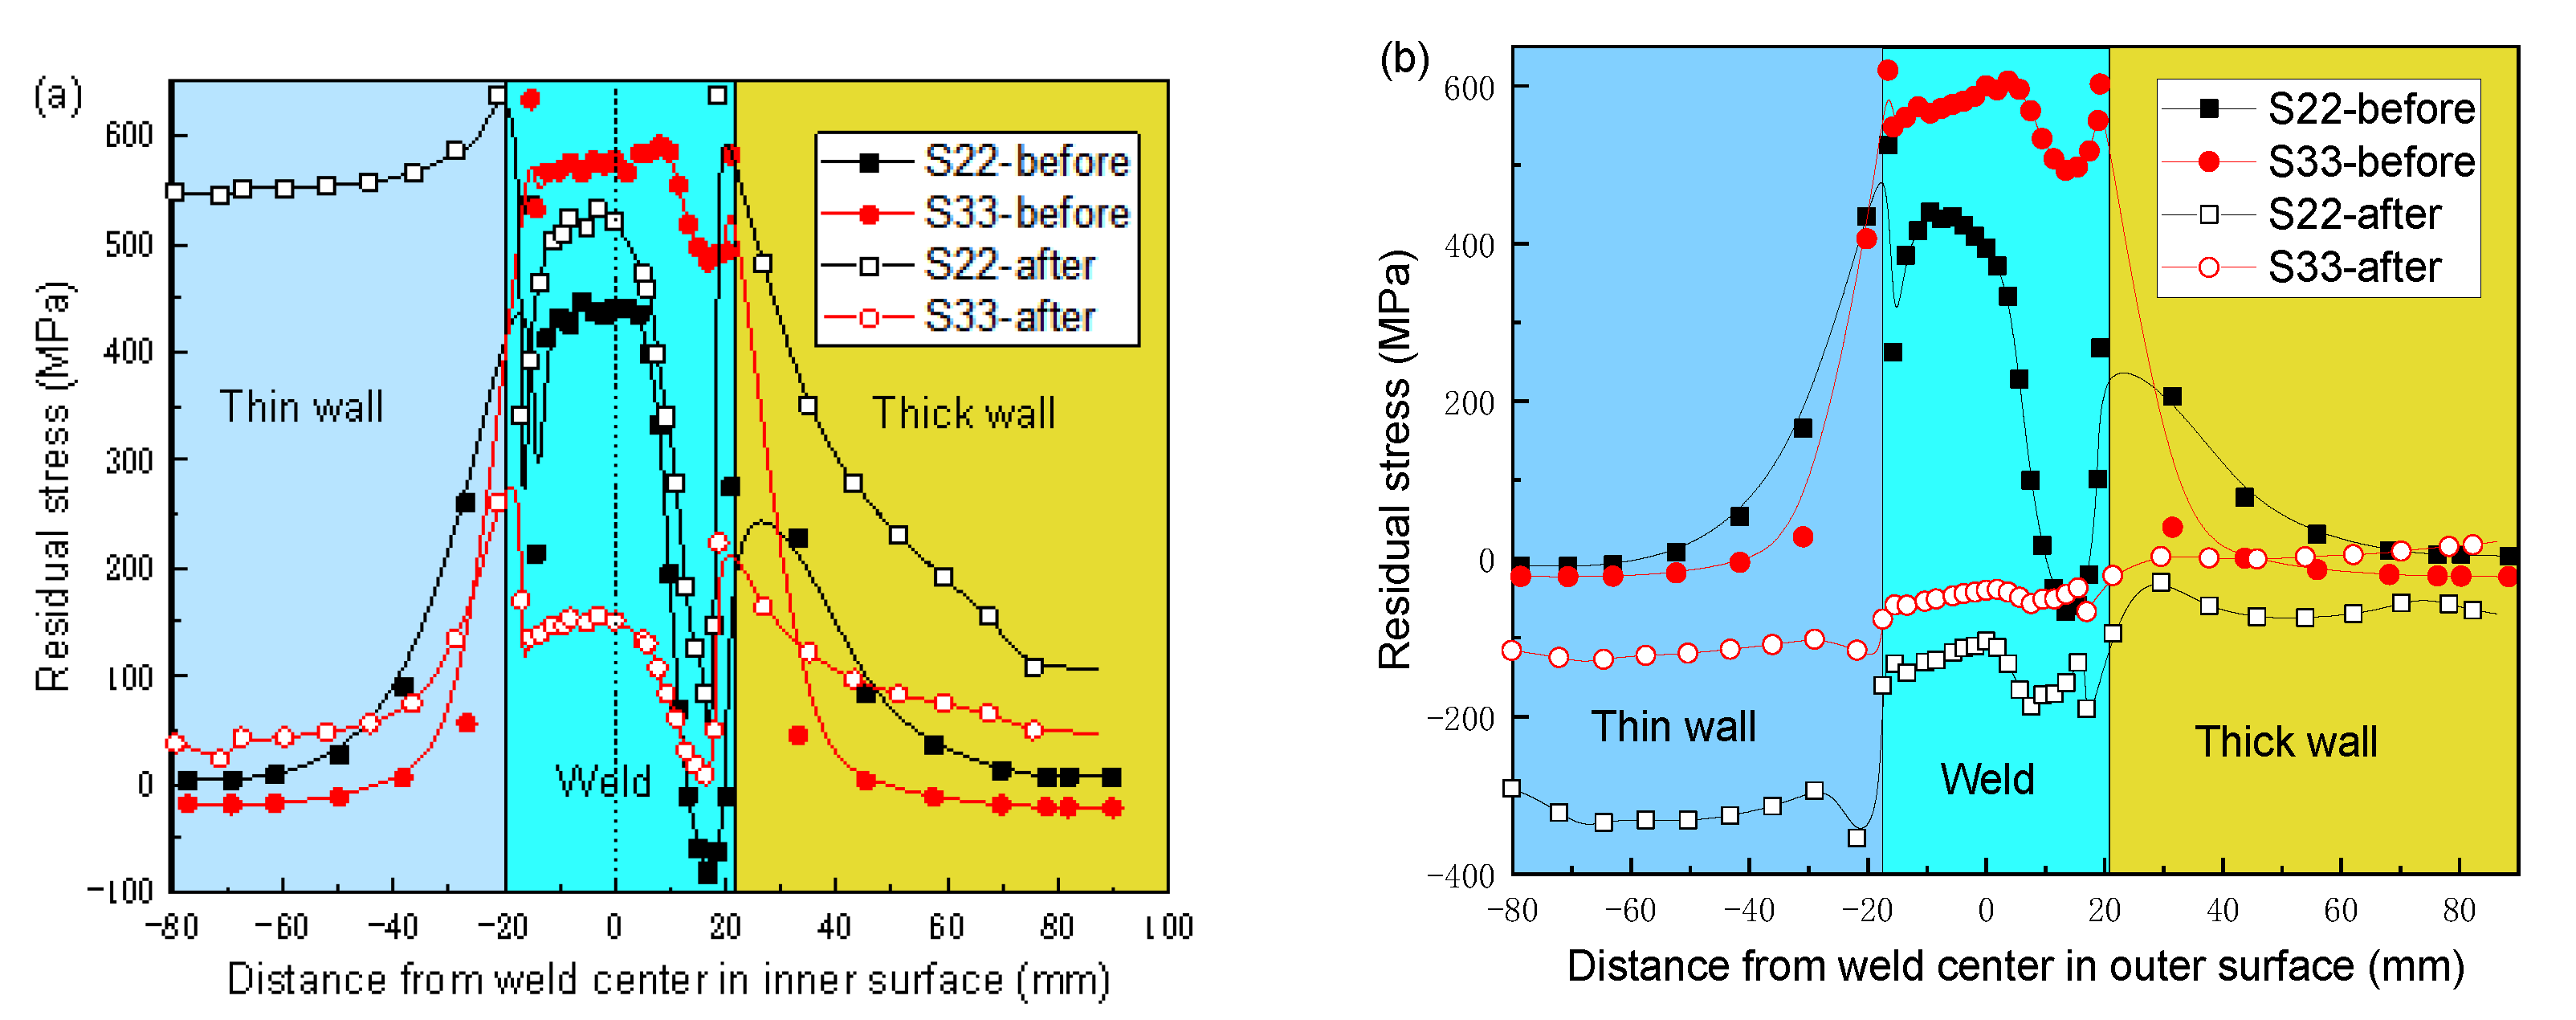
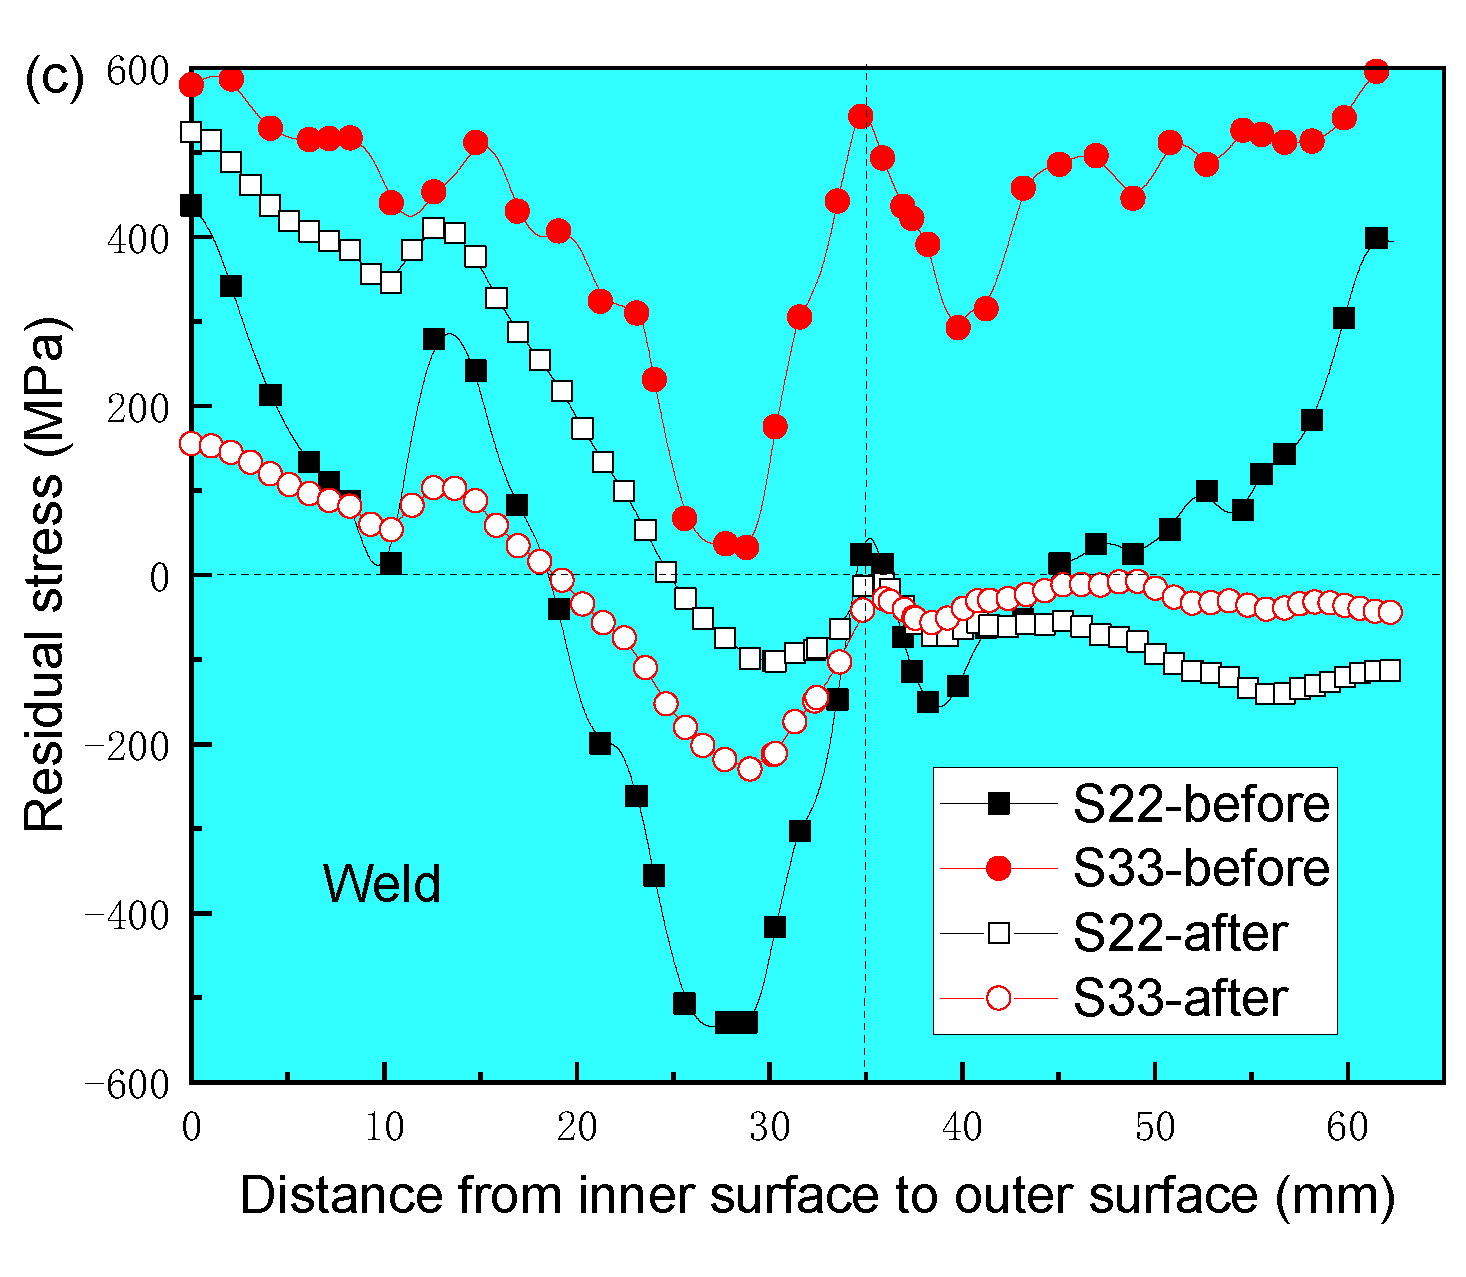
Figure 7 shows the distribution of welding residual stress for thickness ratio 2 along Path-1, Path-2, and Path-3. It can be seen from Figure 7a,b that the distribution of residual stress components on the inner and outer surfaces is very similar: the circumferential stress S33 obtains the maximum tensile stress at the weld toe of the thin plate, which is 634 MPa and 620 MPa, respectively. The tensile stress on the surface of each end welding is reduced, and the minimum tensile stress of the weld is 484 MPa and 493 MPa, respectively. The maximum axial stress S22 of the inner and outer surfaces also occurs at the weld toe of the thin plate, which is 536 MPa and 525 MPa tensile stress, respectively. The stress value on the surface of the respective final welding is greatly reduced, and the center of the final welding surface is transformed into a compressive stress of about −50 MPa. In general, the distribution of welding residual stress on the inner and outer surfaces of unequal-thickness joints is similar, and the stress values are slightly different, but the difference is not significant. It can be seen from Figure 7c that the axial and circumferential stress trends along the weld center line are similar, and the minimum stress values appear in the middle of the plate thickness, which are −539 MPa and 33 MPa, respectively. The circumferential stress is tensile stress along the whole path, and the axial stress is compressive stress in the range of 1/3 wall thickness from the inner surface to 1/6 wall thickness from the outer surface. The maximum compressive stress is −539 MPa. The radial stress along the weld centerline fluctuates around zero.
And the hoop and axial stresses before and after local PWHT were also measured by the impact indentation method [28], as shown in Figure 7a. It can be seen that the residual stress distribution by simulation has a suitable agreement with the experiment, verifying the simulation method is right. The local heat treatment of an unequal-thickness plate will cause asymmetric temperature field distribution due to the asymmetry of the structure, which will affect the residual stress field. The width of the heating zone on both sides of the weld is equal, that is, the same total heat input will lead to asymmetric deformation of the thick and thin plate, and the deformation of the thin plate is too large, which will lead to the restriction of the thin plate and the extrusion of the thick plate when the cylinder plate and the reinforcing plate are naturally cooled. On the other hand, the weld surface is multi-pass welding, and the front and rear welding affects the symmetrical distribution of welding residual stress on the surface. The hoop residual stresses in the weld of the inner surface are larger than the axial residual stresses. There is a larger stress gradient in the weld toe from the weld to the thick wall because of the effect of the last welding pass. Similar to the inner surface, the hoop residual stresses on the outer surface is also larger than the axial stresses. In addition, the average hoop and axial residual stresses of the inner surface are close to those of the outer surface. From the inner surface to the outer surface, both hoop and axial residual stresses are decreased first and then increased. The compressive stresses were generated in the center of the weld joint.

3.2. Residual Stress and Deformation Analysis by Conventional HB Width

For the local PWHT of the welded joint with dissimilar thickness, neither the ASME nor the Chinese standard has detailed rules on the HB width. In standard GB/T 30583 [29], the thickness of the weld joint with dissimilar thickness is the thickness of a thin wall. The distribution of residual stress for thickness ratio 2 after local PWHT by conventional HB width along Path-1, Path-2, and Path-3 was also shown in Figure 7. The hoop stresses were decreased greatly both on the inner surface and the outer surface, as well as on the inside of the weld joint. The hoop stresses on the inner surface were average, decreased by about 82%, and were transformed into compressive stresses on the outer surface. For the axial stresses, the variation law in the inner wall is different from the outer wall. From the outer surface to the depth of 27 mm, axial stresses were decreased after PWHT. Especially on the outer surface, the maximum axial stresses in the weld decrease from 420 MPa to −20 MPa. However, the axial stresses from the inner surface to the depth of 35 mm were increased after PWHT. The maximum axial stresses in the inner weld surface were increased by 120 MPa. The axial stresses in the weld toe of the inner surface reached more than 600 MPa, which has a great influence on the safety service of pressure vessels. After a long time of service, the stress corrosion cracking is easily generated in weld toe under high tensile stresses and a corrosive environment. The inner tensile residual stresses can not be reduced by the PWHT method to the conventional HB width. A new and more suitable HB width should be defined.
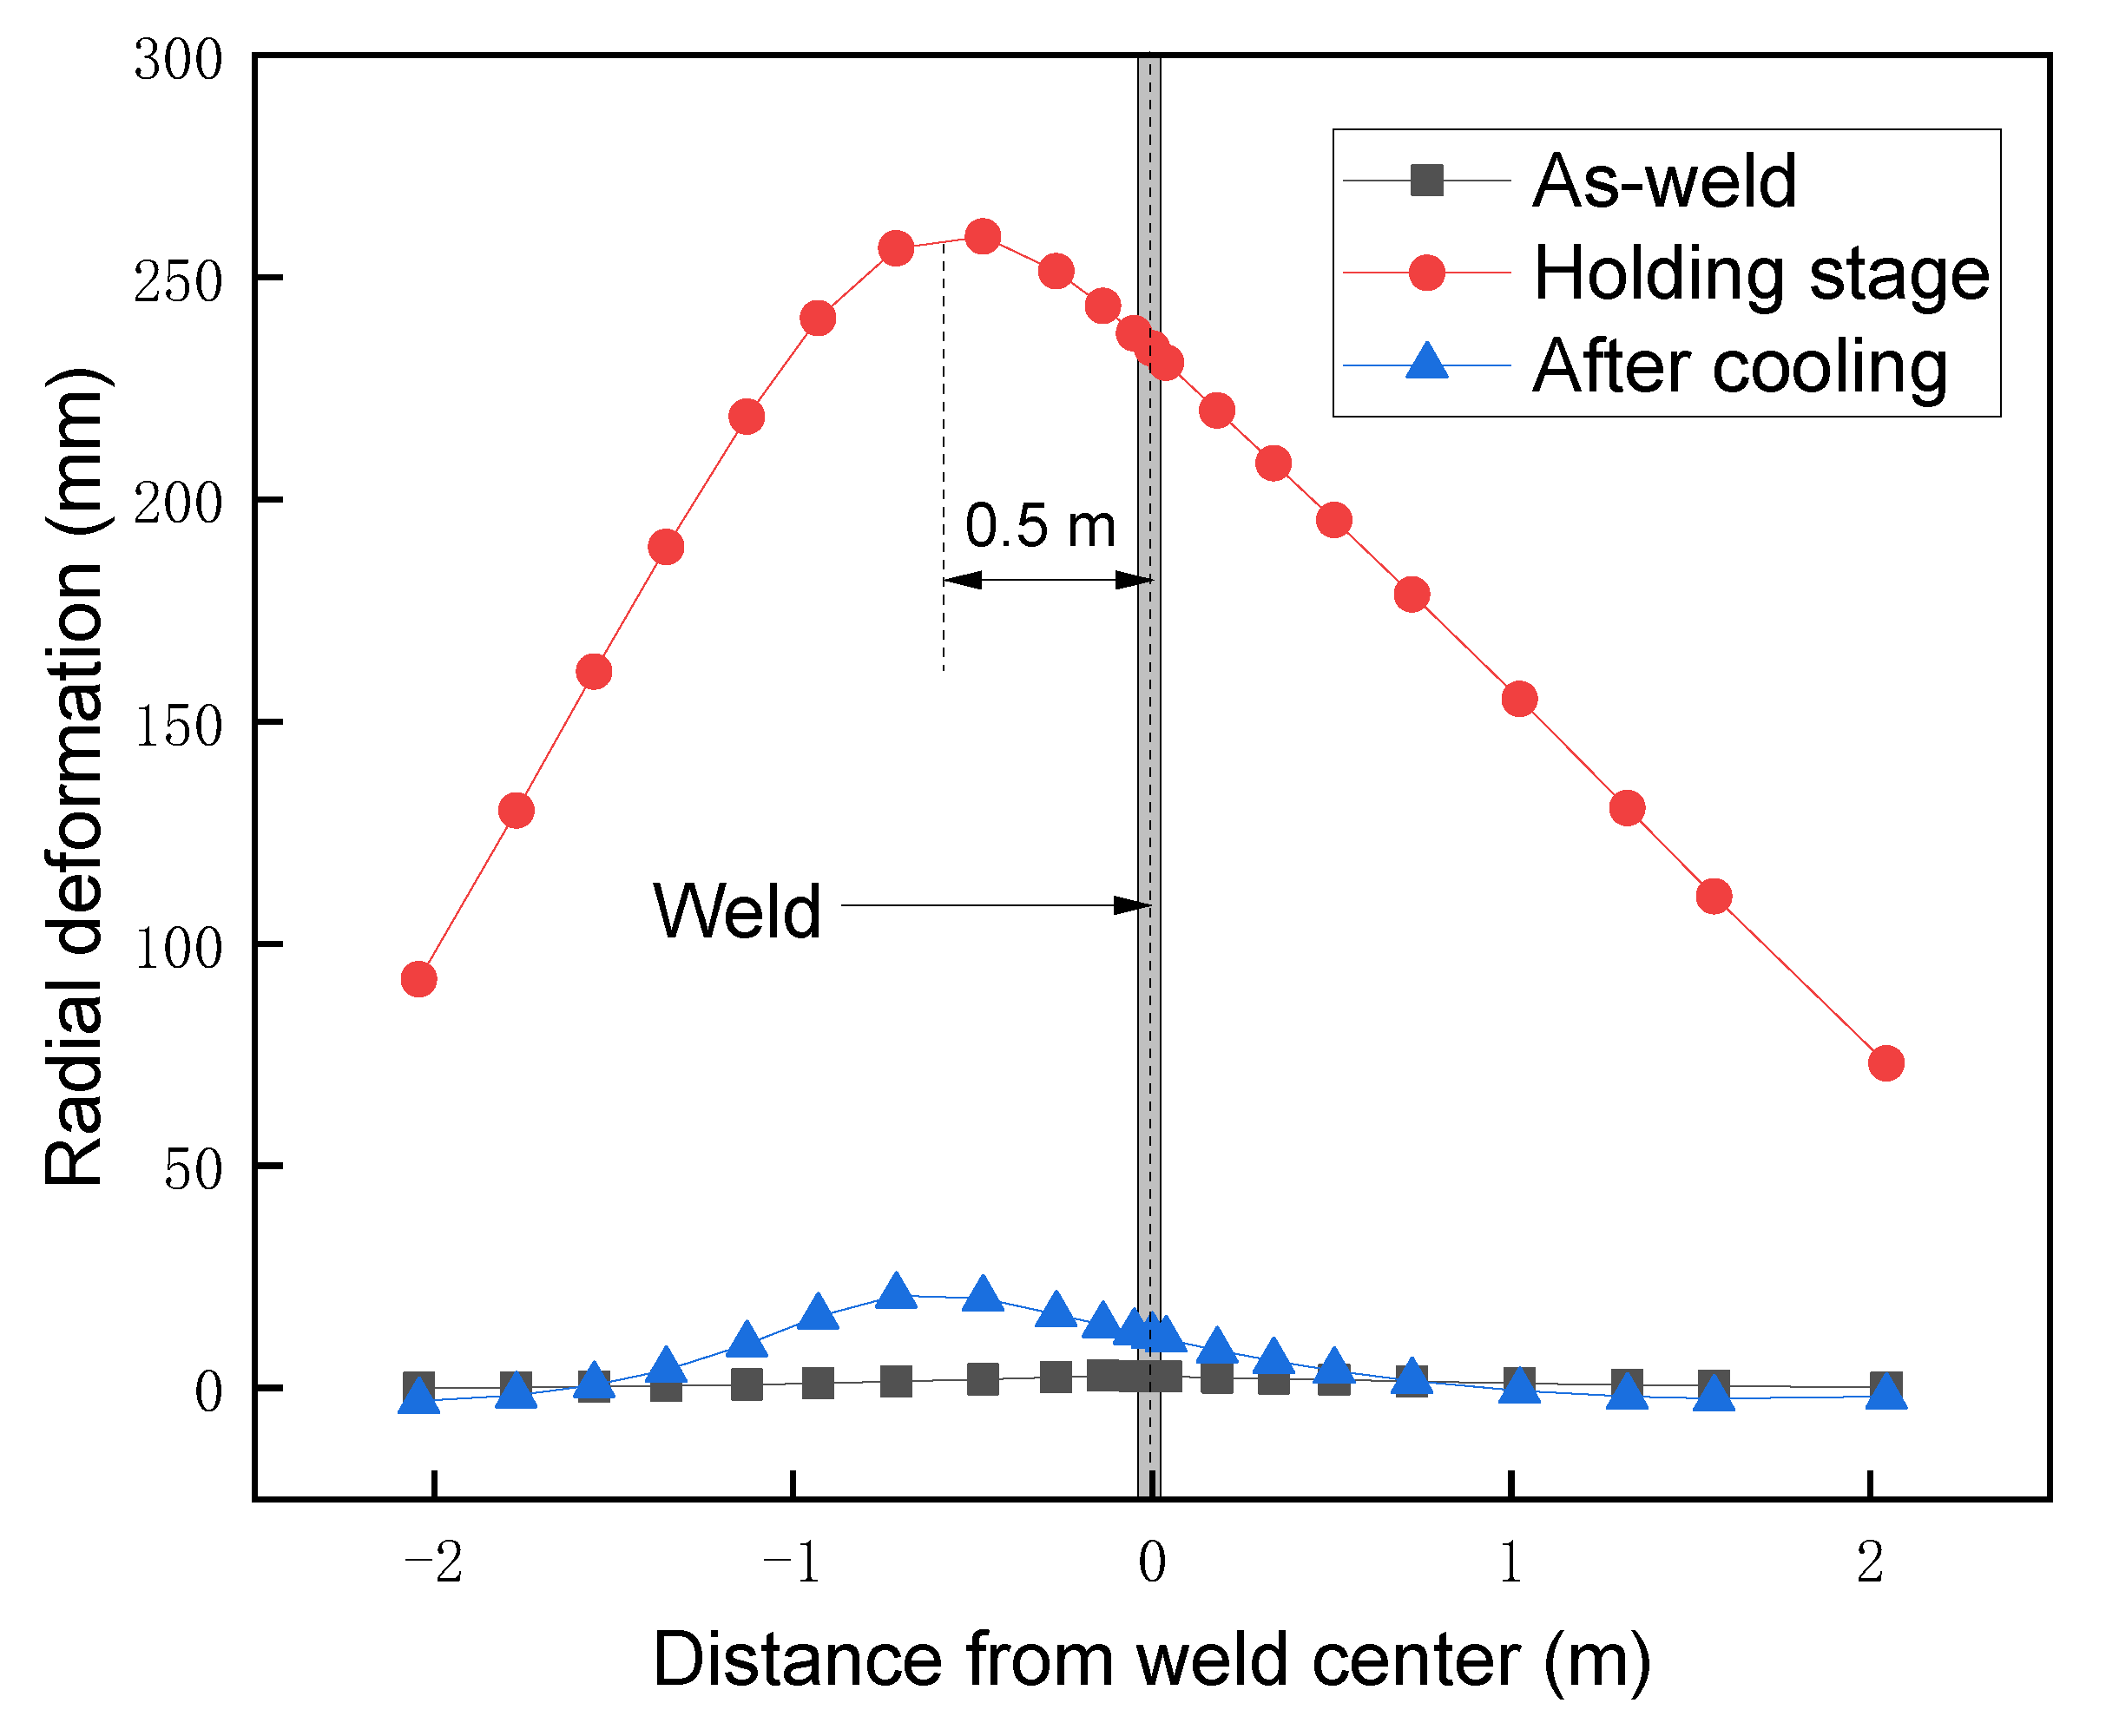
What is more, the axial stresses of the inner surface in the thin wall side and thick wall side are asymmetric. The axial stress in the thin wall is larger than that in the thick wall, which may be caused by the asymmetric deformation from the thin wall to the thick wall during local PWHT. Figure 8 shows the distribution of radial deformation in the inner surface for thickness ratio 2 during PWHT. It can be seen that larger radial deformation was generated at the holding stage. The maximum radial deformation at the holding stage reached 259 mm, which is located in the thin wall side 0.5 m from the weld center. After the cooling stage of PWHT, there is residual radial deformation (~22 mm) generated in the thin wall side. The inconsistent deformation is unfavorable to the manufacturing quality and structural integrity of pressure vessels.

3.3. Effects of Heat Band Width on Residual Stress and Deformation

Based on the above analysis, for the conventional local PWHT method, the width of the heat band on both sides of the welding seam is equal. The same total amount of heat input on both sides will cause the deformation of the thin and thick walls to be asymmetric. The radical deformation of the thin wall is greatly larger than that of the thick wall, leading to larger axial stress during the holding stage in the weld toe between the thin wall and the weld seam. In addition, during the natural cooling process, the deformation of the thin plate is restricted by the thick plate, and greater axial stress is formed at the toe of the thin plate.
In order to improve the inconsistent deformation caused by the traditional heat treatment method, the scheme of increasing the heat band width of the thick wall side can be adopted. In order to adapt to the thermal expansion process of the thin plate, the thick plate will be deformed more due to more heat input so as to avoid the excessive axial stress at the welding toe of the thin plate. In order to adapt to the thermal expansion process of the thin wall, the thick wall will be deformed more due to more heat input so as to avoid the excessive axial stress at the welding toe of the thin plate.
The schematic diagram of the heat band arrangement for local PWHT of the welded joint with dissimilar thicknesses is shown in Figure 9. The heat band width for the local PWHT of welded joints with dissimilar thickness is the sum of the HB width of the conventional heat treatment method and the HB width of the thick wall side.
HB = HB1 + HB2,
where HB1 is the main heating zone based on conventional local PWHT standards, and HB2 is the auxiliary heating zone, which will be determined by simulation. In order to obtain the optimized width of the auxiliary heating zone, nine widths (250, 500, 750, 1000, 1250, 1500, 1750, 2000, and 2250 mm) were employed in the simulation.
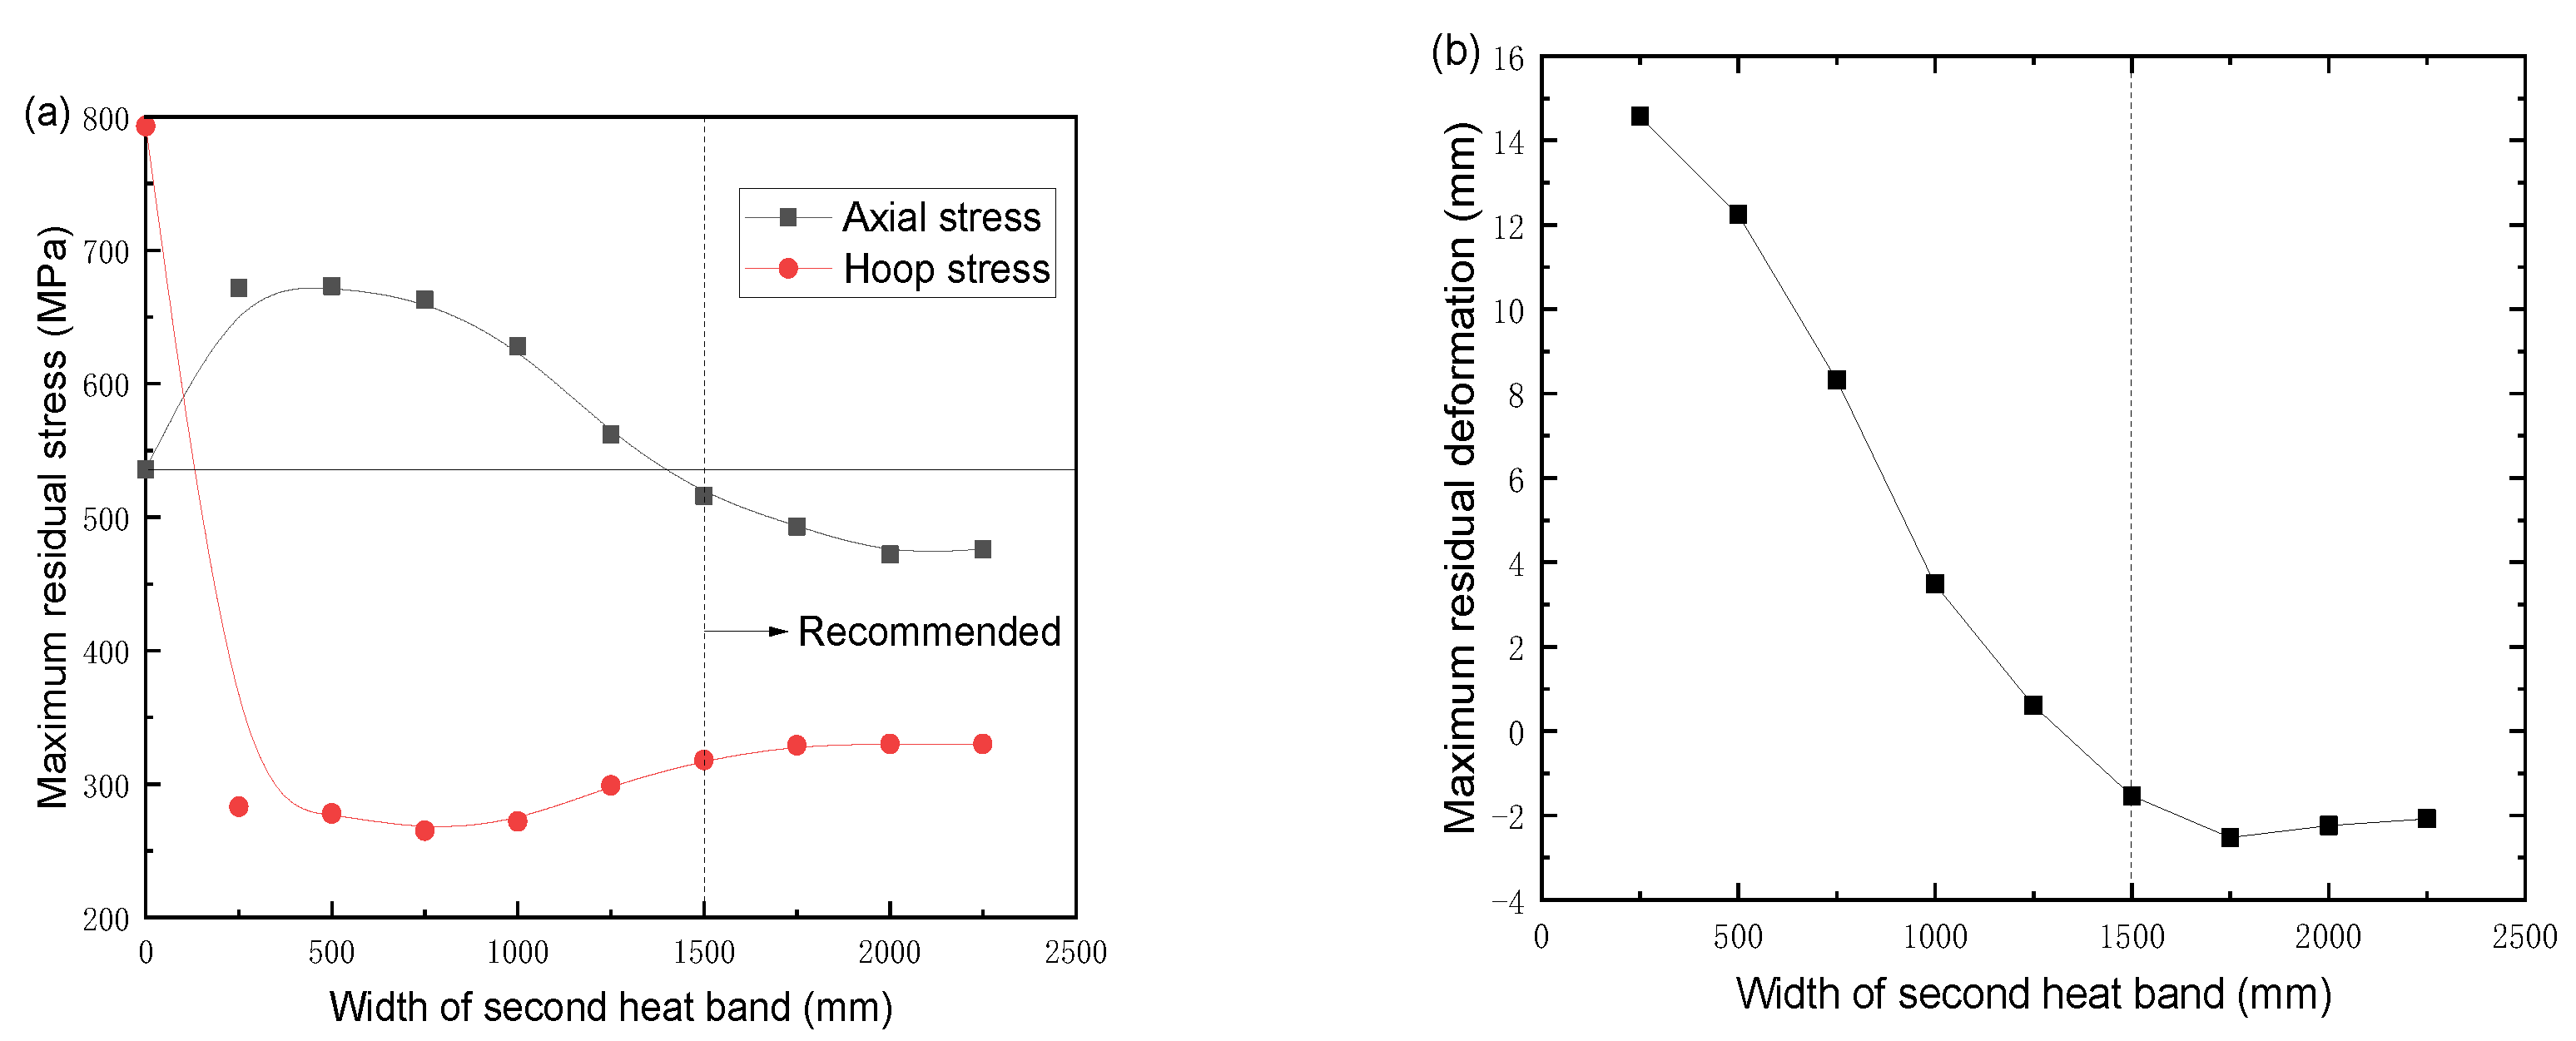
Figure 10a shows the maximum axial and hoop residual stress in the inner surface of welded joints with dissimilar thicknesses after PWHT with different auxiliary heating widths. It can be seen that with the increases in auxiliary heating width, the axial stress and hoop stress are decreased gradually. When the heat band reaches 1500 mm, the axial stress is smaller than that in the original as-weld axial residual stress. The axial and hoop residual stresses become stable when the auxiliary heating width exceeds 1500 mm. With the heating process of heat treatment, the maximum radial displacement position of the local heat treatment model of the unequal-thickness plate after welding is transferred from the welding joint to the heating zone of the thin plate base metal, and the radial displacement of the model reaches the maximum at the end of heat preservation. Figure 10b shows the effects of auxiliary heating width on the maximum radical residual deformation after PWHT. Similarly, the maximum radical residual deformation decreases with increases in auxiliary heating width. When the auxiliary heating width is between 1500 and 2250 mm, the radial deformation of residual stress is maintained at the level of −2 mm.
Figure 11 shows the maximum residual stress and radical deformation at the end of the insulation stage with different auxiliary heating widths. With the increases in auxiliary heating width, both the axial stress and hoop stress at the holding stage were increased, as shown in Figure 11a. When the auxiliary heating width reaches 1250 mm, the axial stress and hoop stress are maintained at levels of 400 MPa and 360 MPa, respectively. As shown in Figure 11b, as the auxiliary heating width increases from 250 to 1750 mm, the radical deformation at the holding stage decreases gradually. The maximum radial deformation is about 210 mm. Through the comprehensive analysis of the influence of the auxiliary HB width of the thick wall side on the stress and deformation, it can be concluded that the minimum auxiliary HB should be no less than 1400 mm, and the range of the optimal HB width is 1500~1750 mm. The larger the auxiliary HB width of heat treatment, the higher the cost of heat treatment and the greater the difficulty of site construction. Therefore, the optimized auxiliary HB width is recommended as 1500 mm for the weld joint with a thickness ratio of 2.
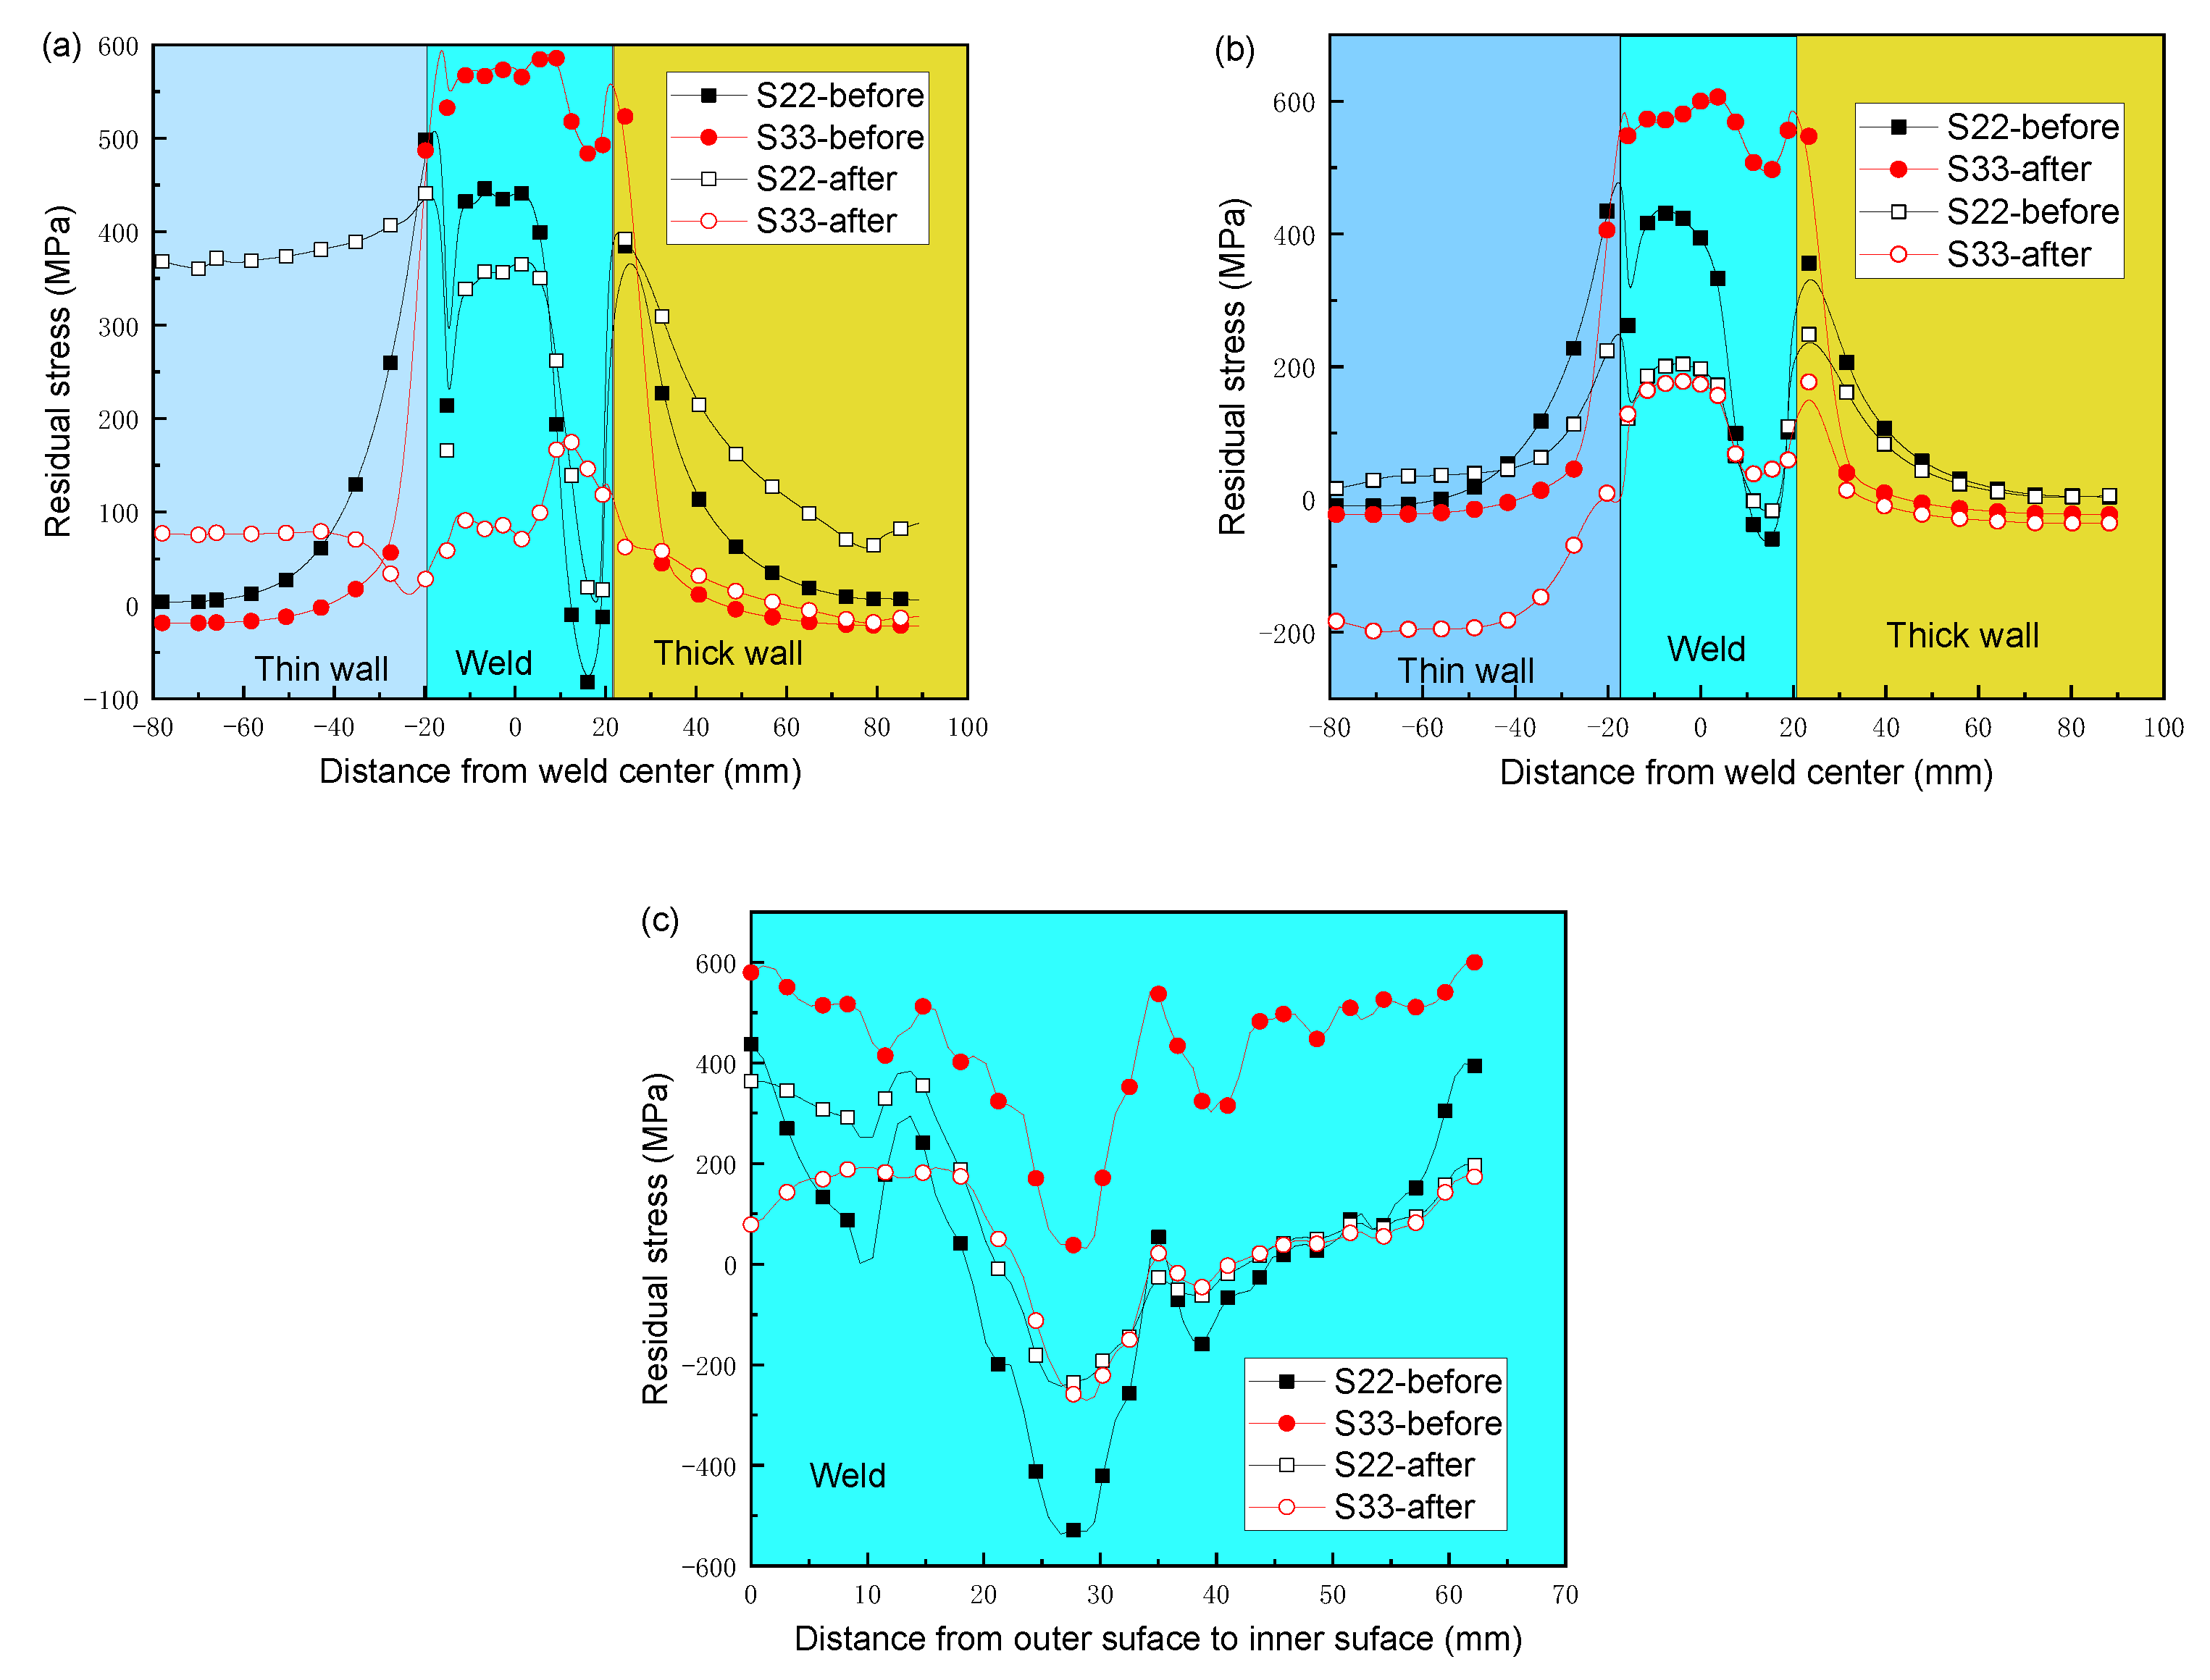
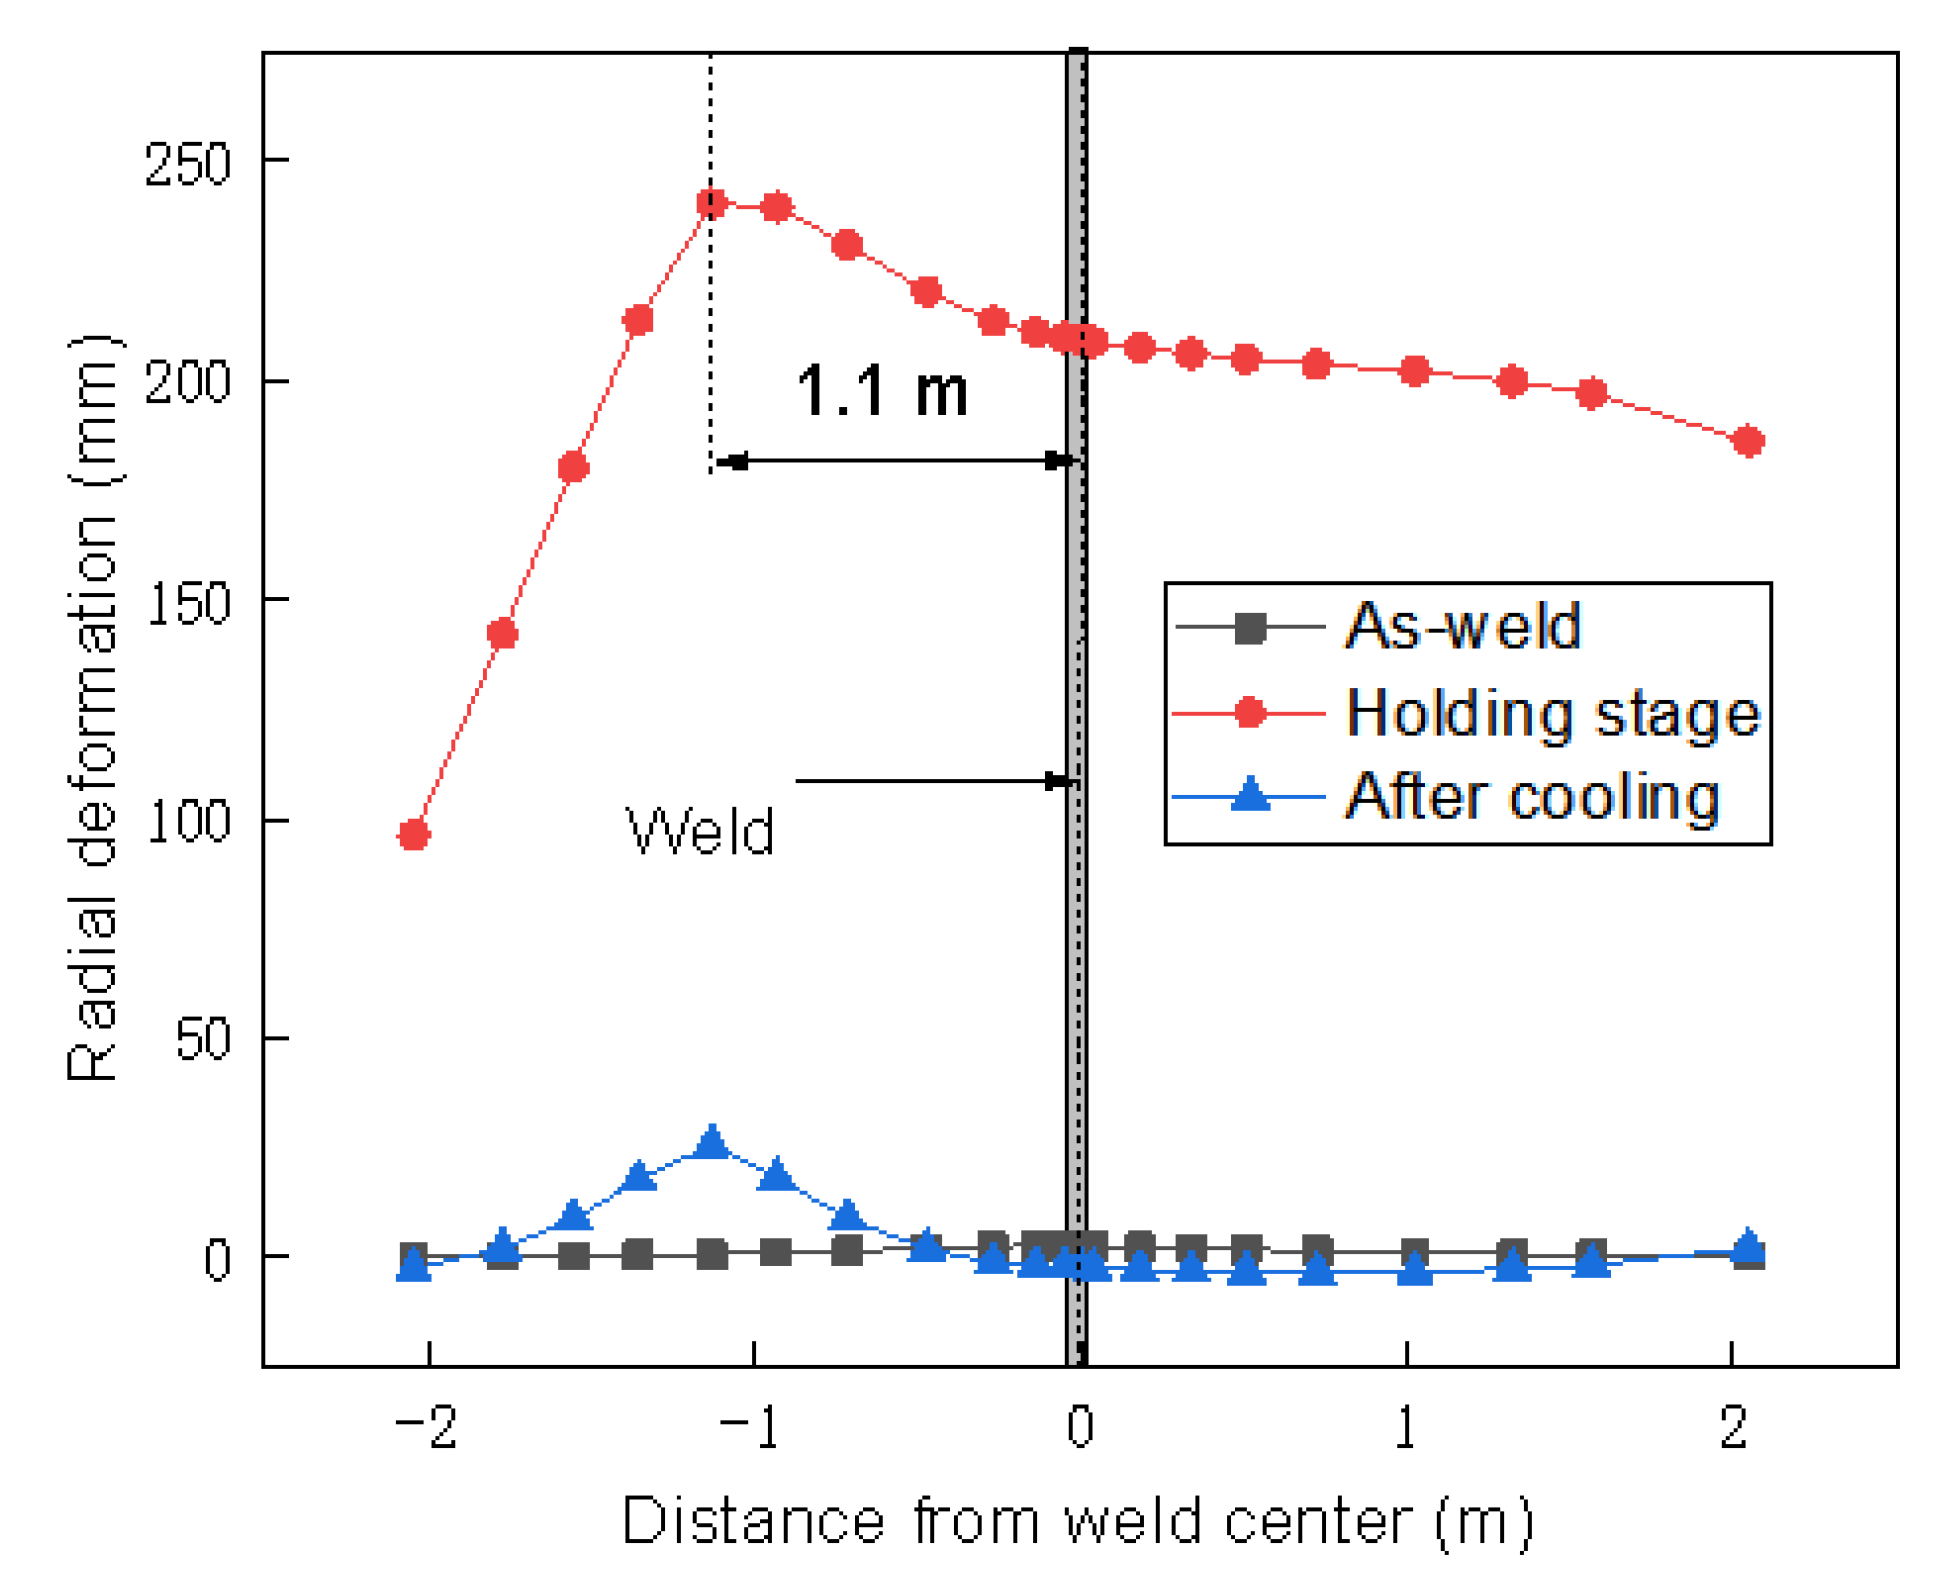
Figure 12 shows the distribution of residual stress before and after PWHT with newly defined HB width along Path-1, Path-2, and Path-3. It can be seen from Figure 12a,b that the distribution of welding residual stress of unequal-thickness joints on the inner and outer surfaces is similar, and the numerical difference is not large, but after heat treatment, there will be a big difference: the axial stress S22 and the circumferential stress S33 are higher than the outer surface stress as a whole. This is because the inner surface of the cylinder and the reinforcing plate is more obviously squeezed during the recovery process. Figure 12a shows that the axial stress of the thin plate side is higher than that of the thick plate side after local heat treatment. Compared with the high level of welding residual circumferential stress, the circumferential residual distribution of the inner surface after heat treatment is greatly reduced, which changes in the range of −19~178 MPa. Figure 12b shows that the axial and circumferential stresses are significantly reduced along the outer surface path 2 after heat treatment, and the circumferential stress S33 on the side of the thin plate is transformed into a compressive stress of up to −200 MPa. The axial and circumferential stress distribution of the weld surface is similar, which is reduced on the surface of the final weld, and the maximum value is about 200 MPa. Figure 12c shows the distribution of axial and circumferential stress along the weld centerline. Overall, the stress distribution along the weld centerline is more uniform after heat treatment. Similar to the conventional HB width, the hoop stresses in the inner and outer surfaces are all decreased by the newly defined HB width. Different from the conventional HB width, the axial stresses in the inner and outer surfaces are also all decreased. Compared to the axial residual stresses by conventional HB width, the axial residual stresses were decreased by new defined HB width. At the same time, the asymmetric distribution of axial stresses still existed. Figure 13 shows the distribution of radial deformation in the inner surface for thickness ratio 2 during PWHT with a newly defined HB width. The maximum radial deformation during the holding stage is 240 mm, located 1.1 m from the weld center. Then, it decreases to 25 mm after PWHT. The position of maximum radial deformation from the weld center for the newly defined HB width is larger than that for the conventional HB width because the heat input in the thick wall side is increased. Though the radial deformation from thin wall to thick wall is also non-uniform, the radial deformation around the welded joint during the holding stage is almost the same. Therefore, the additional bending stress in the weld toe induced by inconsistent deformation is eliminated, enhancing the ability to SCC of the weld joint.

3.4. Optimization of HB Width for Different Thickness Ratios

In this section, the same simulation method as 2.2 welding-local heat treatment is used to simulate the post-weld heat treatment of unequal-thickness joints with thickness ratios k of 1.5 and 2.5, respectively. According to the analysis method described above, the effect of auxiliary HB width on residual stress and radial deformation for other different thickness ratios was also discussed. Figure 14 shows the effects of auxiliary HB width on the maximum residual stress after local PWHT for the welded joint with thickness ratio k = 2.5 and k = 1.5. For the thickness ratio k = 2.5, both the hoop and axial stress are decreased with the increases in auxiliary HB width. For the thickness ratio k = 1.5, with the increases of auxiliary HB width, the axial stresses are decreased while the hoop stresses are increased. The variation of the maximum residual stress with the increase in the width of the auxiliary heating strip after the local heat treatment of the k = 2.5 unequal-thickness joint and the k = 1.5 unequal-thickness joint is more consistent: the axial stress decreases first and then stabilizes with the increase in the width of the auxiliary heating strip. The hoop stress shows a trend of decreasing first and then rising slightly and finally remaining stable with the increase in the auxiliary heating zone width.
The joint heating optimization method with thickness ratio k = 1.5 and k = 2.5 is the same as the joint with k = 2 mentioned above. We determine the optimal auxiliary heating width by analyzing the variation trend of maximum residual stress, maximum residual deformation, maximum stress at the end of heat preservation, and maximum radial displacement with the auxiliary heating width. The minimum value of the heating width that makes these four quantities basically stable is obtained. Through comparative analysis, the most suitable heating width value is selected. The optimized auxiliary HB width for the thickness ratio k = 2.5 and 1.5 are recommended as 1750 mm and 1250 mm, respectively.
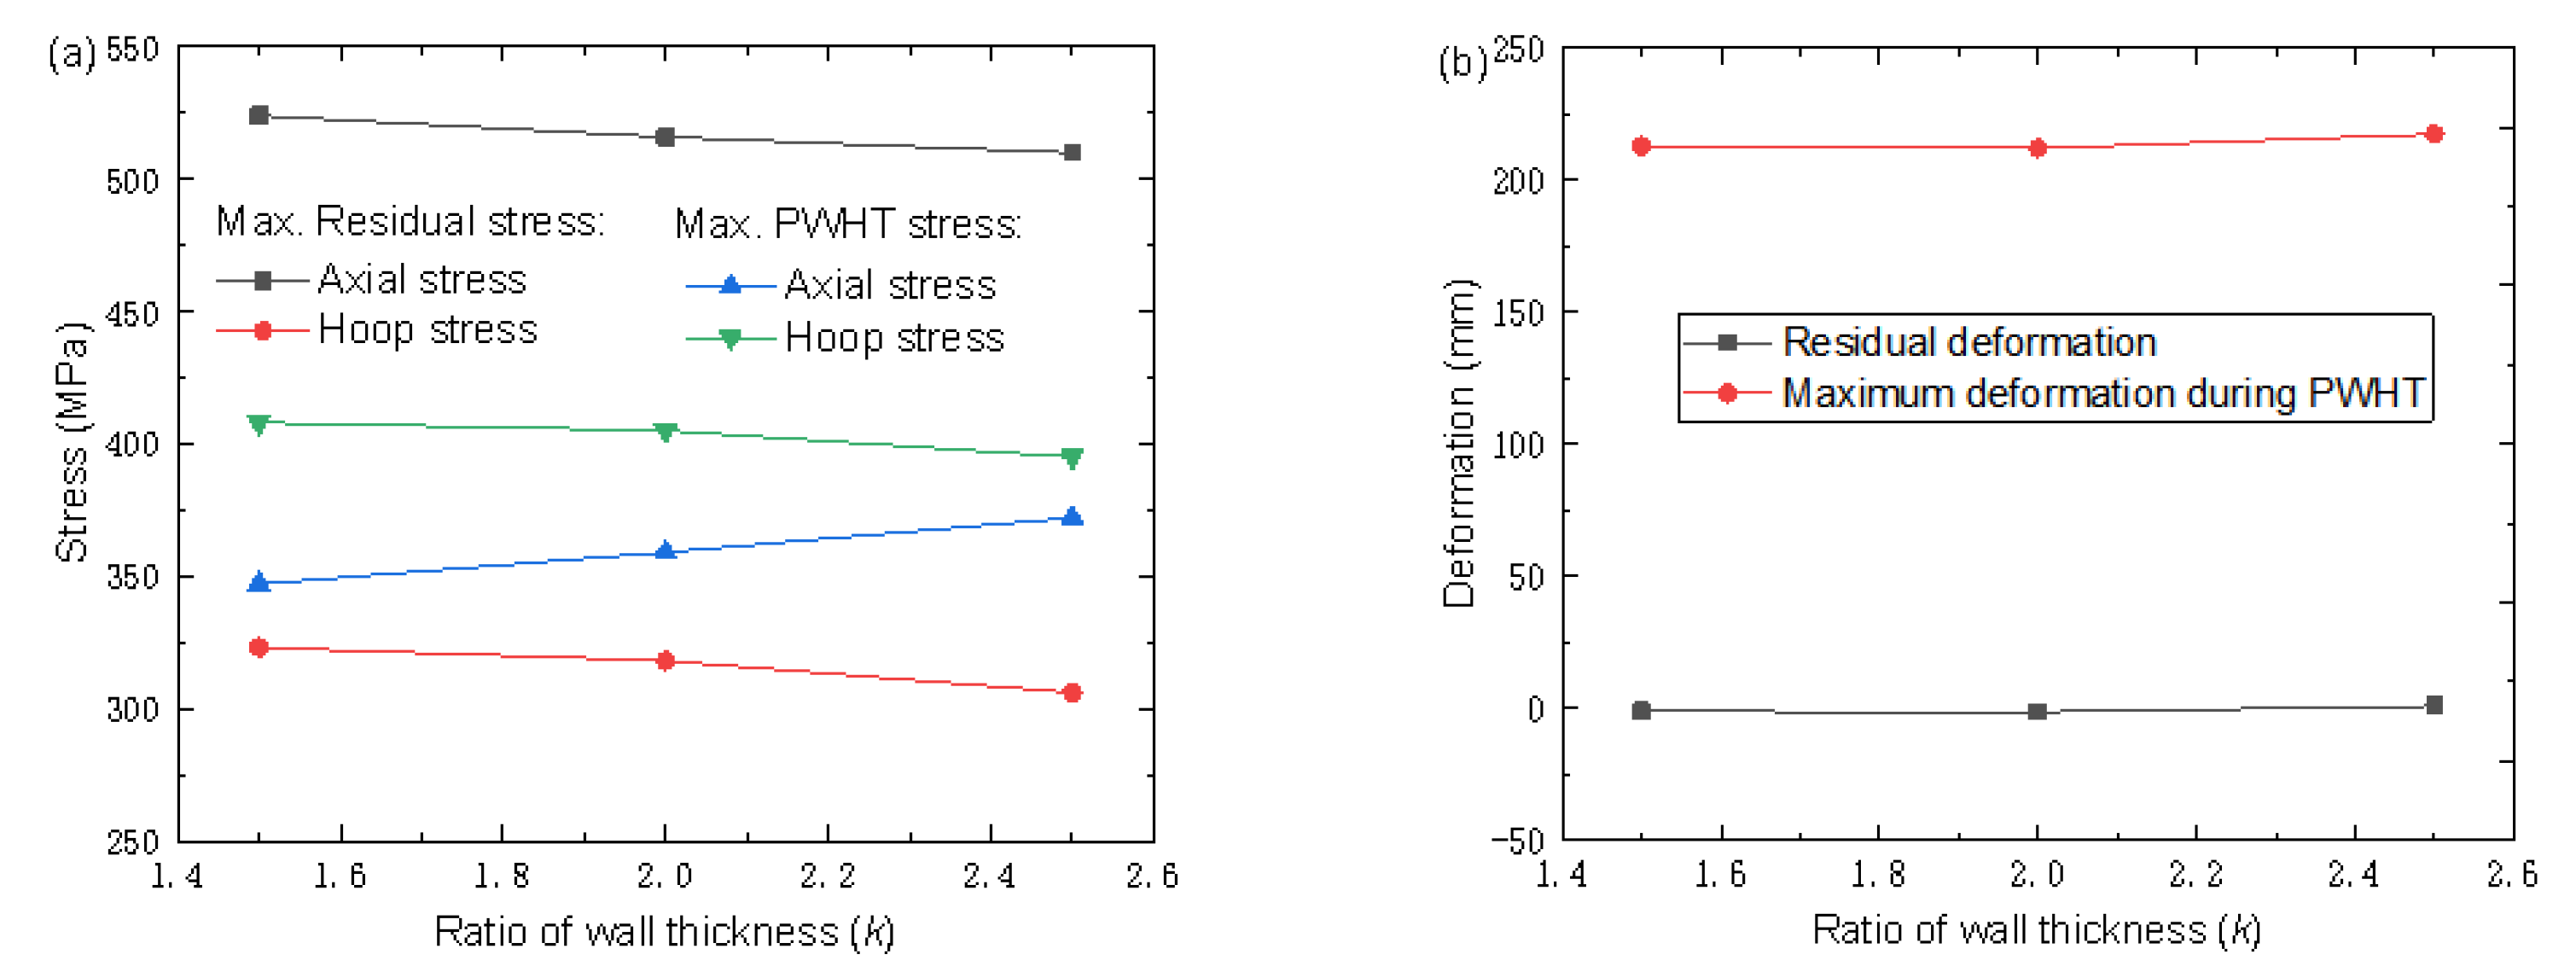
In order to verify the reduction effect of the proposed auxiliary HB width, the maximum residual stress and radical deformation after local PWHT under recommended HB width for different thickness ratios were compared, as shown in Figure 15. It can be seen that the axial stress and hoop stress during the holding stage is maintained at levels of about 400 MPa and 350 MPa, respectively. Moreover, the axial stress and hoop stress after the cooling stage is maintained at levels of about 526 MPa and 315 MPa, respectively. It indicates that the residual stress reduction effect by the proposed auxiliary HB width is the same. The average maximum radial deformation and residual deformation for three thickness ratios are 210 mm and −2 mm, respectively. However, on the whole, the values of stress and deformation in the heat treatment process with different thickness ratios under the optimum heating width are not different. It can be seen that the standard for determining the optimal width of the heating band is consistent, and the local post-welding heat treatment of the joints with different thickness ratios under their respective optimal heating band width has achieved a very suitable stress-relieving effect. Therefore, it is reasonable to choose the optimum width of the heat band for the joint with different thickness ratios based on the residual stress relief effect.

3.5. Establish Uniformed Calculation Criterion of HB Width

Based on the above analysis, the auxiliary heating width for the thickness ratio 1.5, 2.0, and 2.5 are 1250, 1500, and 1750 mm, respectively. In this case, R T 1000   m m . Summarizing this variation rule, the auxiliary heating width can be described as a function of the radius (R), wall thickness (T), and thickness ratio (k), defined as follows:
H B 2 = R T + k 1 2 R T = k + 1 2 R T ,
Therefore, the total HB width is determined by:
HB = H B 1 + H B 2 = 3 R T + 1 + k 2 R T ,

4. Conclusions

In this study, research on unequal-thickness joints is carried out. The finite element model is established according to its size and local heat treatment process. The two-dimensional endogenous heat source algorithm and thermal stress coupling method are used to simulate the local heat treatment process of unequal-thickness joints. Based on the residual stress elimination criterion, combined with the evolution law of stress and deformation and residual deformation during local heat treatment, the optimal heating zone size of unequal-thickness joints was studied, and the following conclusions could be drawn:
(1)
The maximum axial and circumferential residual stresses are 536 MPa and 793 MPa, respectively, which are located in the weld toes on the outer and inner surfaces. The residual stresses inside the welded joint are relatively small. The hoop residual stresses in the weld of the inner and outer surfaces are larger than the axial residual stresses. From the inner surface to the outer surface, both hoop and axial residual stresses are decreased first and then increased.
(2)
The hoop stresses were decreased greatly both on the inner surface and the outer surface, as well as on the inside of the weld joint after PWHT. For the axial stresses, the variation law in the inner wall is different from the outer wall. From the outer surface to the depth of 27 mm, axial stresses were decreased after PWHT. However, the axial stresses from the inner surface to the depth of 35 mm were increased after PWHT. The axial stress in the thin wall is larger than that in the thick wall.
(3)
By comparing the local heat treatment results under the width of the auxiliary heating zone, it is suggested that the width of the auxiliary heating zone of the post-weld heat treatment of the joint with a thickness ratio of 2 is 1500 mm. After heat treatment at the recommended auxiliary heating width, the circumferential stress is reduced by 60% compared with the as-welded state. The radial and axial reductions were 25.2% and 3.7%, respectively. The radial deformation around the welded joint during the holding stage is almost the same. Therefore, the additional bending stress in the weld toe induced by inconsistent deformation is eliminated, enhancing the ability to SCC of the weld joint.
(4)
The optimized auxiliary HB width for the thickness ratio k = 2.5, k = 2, and 1.5 are recommended as 1750 mm, 1500 mm, and 1250 mm. On the whole, the values of stress and deformation in the heat treatment process with different thickness ratios under the optimum heating width are not different. The standard for determining the optimal width of the heating band is consistent.
(5)
Comparing the heat treatment results of joints with different thickness ratios under the optimal heating width, it can be seen that the larger the thickness ratio, the larger the auxiliary heating width required to achieve the same heat treatment effect, and the two are positively correlated. The local heat treatment heating formula of unequal-thickness joints based on thickness ratio is further derived: H B = H B 1 + H B 2 = 3 R T + 1 + k 2 R T for SA738Gr.B steel.

Author Contributions

Conceptualization, Y.Z. and J.X.; data curation, Y.Z. and J.X.; formal analysis, Y.Z. and J.X.; funding acquisition, Y.L.; investigation, Y.Z. and J.X.; methodology, J.X.; project administration, Y.L.; resources validation, Y.L.; software, Y.Z. and J.X.; supervision, Y.Z. and J.X.; visualization, Y.Z. and J.X.; writing—original draft preparation, Y.Z.; writing—review and editing, Y.L. All authors have read and agreed to the published version of the manuscript.

Funding

This research was funded by the National Natural Science Foundation of China, grant number 51905545.

Data Availability Statement

The data presented in this study are available in this article.

Conflicts of Interest

The authors declare no conflict of interest.

References

  1. Gain, S.; Das, S.K.; Acharyya, S.K.; Sanyal, D. Friction stir welding of industrial grade AISI 316L and P91 steel pipes: A comparative investigation based on mechanical and metallurgical properties. Int. J. Press. Vessel. Pip. 2023, 201, 104865. [Google Scholar] [CrossRef]
  2. Mohan Kumar, S.; Rajesh Kannan, A.; Pramod, R.; Siva Shanmugam, N.; Dhinakaran, V. Testing, characterization and numerical prediction (uni-axial tension and bend test) of Double-side TIG welded SS321 plate for pressure vessel application. Int. J. Press. Vessel. Pip. 2022, 197, 104648. [Google Scholar] [CrossRef]
  3. Huang, T.; Jin, L.; Chen, T.; Qiu, Z. Development and evaluation of welding repair for threaded hole of Reactor Pressure Vessel flange. Int. J. Press. Vessel. Pip. 2021, 197, 104341. [Google Scholar] [CrossRef]
  4. Zhang, W.; Fang, K.; Hu, Y.; Wang, S.; Wang, X. Effect of machining-induced surface residual stress on initiation of stress corrosion cracking in 316 austenitic stainless steel. Corros. Sci. 2016, 108, 173–184. [Google Scholar] [CrossRef]
  5. Shen, K.; Zhang, Z.; Jiang, W.; Luo, Y.; Su, H.; Zhang, Y. Generation of compressive residual stress at the root of tube-to-tubesheet welded joints in a heat exchanger. Int. J. Press. Vessel. Pip. 2022, 200, 104848. [Google Scholar] [CrossRef]
  6. Puliyaneth, M.; Chen, H. Study on the effect of welding residual stress on creep-cyclic plasticity behaviour. Int. J. Press. Vessel. Pip. 2021, 193, 104444. [Google Scholar] [CrossRef]
  7. Huang, J.; He, Z.; Guo, P.; Lv, S.; Song, J.; Liu, H.; Li, Z.; Fu, Z.; Lv, Y.; Sun, Y.; et al. Experimental investigation on creep strengthening phenomenon of a Ni-based single crystal superalloy under cyclic loading and unloading conditions. J. Alloy. Compd. 2023, 953, 170111. [Google Scholar]
  8. Fan, K.; Liu, D.; Liu, Y.; Wu, J.; Shi, H.; Zhang, X.; Zhou, K.; Xiang, J.; Magd Abdel Wahab. Competitive effect of residual stress and surface roughness on the fatigue life of shot peened S42200 steel at room and elevated temperature. Tribol. Int. 2023, 183, 108422. [Google Scholar] [CrossRef]
  9. Samadi, F.; Mourya, J.; Wheatley, G.; Khan, M.N.; Nejad, R.M.; Branco, R.; Macek, W. An investigation on residual stress and fatigue life assessment of T-shape welded joints. Eng. Fail. Anal. 2022, 141, 108422. [Google Scholar] [CrossRef]
  10. You, S.; Tang, J.; Zhou, W.; Zhao, J.; Chen, H. Research on calculation of contact fatigue life of rough tooth surface considering residual stress. Eng. Fail. Anal. 2022, 140, 106459. [Google Scholar] [CrossRef]
  11. Yu, B.; Wang, P.; Song, X.; Huo, S. The residual stress relief of post weld heat treatment in SMA490BW welded joints: Simulation and experiment. Int. J. Press. Vessel. Pip. 2022, 200, 104852. [Google Scholar] [CrossRef]
  12. Kumar, R.; Dey, H.C.; Pradhan, A.K.; Albert, S.K.; Thakre, J.G.; Mahapatra, M.M.; Pandey, C. Numerical and experimental investigation on distribution of residual stress and the influence of heat treatment in multi-pass dissimilar welded rotor joint of alloy 617/10Cr steel. Int. J. Press. Vessel. Pip. 2022, 199, 104715. [Google Scholar] [CrossRef]
  13. Sekhon, S.S.; Kumar, H.; Sehgal, S. Effect of tool pin profile on performance of friction stir welding of brass-copper-based butt welded joint. Int. J. Mater. Eng. Innov. 2016, 7, 236. [Google Scholar] [CrossRef]
  14. Luo, Y.; Jiang, W.; Yang, Z.; Wang, C.; Jin, Q.; Gao, T.; Yan, G.; Tu, S.; He, Y. Using reinforce plate to control the residual stresses and deformation during local post-welding heat treatment for ultra-large pressure vessels. Int. J. Press. Vessel. Pip. 2021, 191, 104332. [Google Scholar] [CrossRef]
  15. Qian, Y.; Zhao, J. Influences of local PWHT from different criteria at home and abroad on the residual stress of the under-matching welded joint. Int. J. Press. Vessel. Pip. 2017, 154, 11–16. [Google Scholar] [CrossRef]
  16. Citarella, R.; Cricrì, G.; Lepore, M.; Perrella, M. Thermo-mechanical crack propagation in aircraft engine vane by coupled FEM–DBEM approach. Adv. Eng. Softw. 2014, 67, 57–69. [Google Scholar] [CrossRef]
  17. Rajamurugan, G.; Suresh, S.; Krishnasamy, P. Influence of local post-weld heat treatment and its thermal analysis on thick wall carbon steel pipe. Mater. Today Proc. 2021, 46, 7076–7081. [Google Scholar] [CrossRef]
  18. Nie, C.; Dong, P. A Thermal stress mitigation technique for local postweld heat treatment of welds in pressure vessels. J. Press. Vessel Technol. 2015, 137, 051404. [Google Scholar] [CrossRef]
  19. Jin, Q.; Jiang, W.; Gu, W.; Wang, J.; Li, G.; Pan, X.; Song, M.; Zhang, K.; Wu, A.; Tu, S. A primary plus secondary local PWHT method for mitigating weld residual stresses in pressure vessels. Int. J. Press. Vessel. Pip. 2021, 192, 104431. [Google Scholar] [CrossRef]
  20. Geng, L.; Tu, S.; Gong, J.; Jiang, W.; Zhang, W. On Residual Stress and Relief for an Ultra-Thick Cylinder Weld Joint Based on Mixed Hardening Model: Numerical and Experimental Studies. J. Press. Vessel. Technol. 2018, 140, 041405. [Google Scholar] [CrossRef]
  21. Ueda, Y.; Yamakawa, T. Analysis of thermal elastic-plastic stress and strain during welding by finite element method. Trans. Jpn. Weld. Soc. 1971, 22, 186–196. [Google Scholar]
  22. Graßmann, M.; Schleich, F.; Stammler, M. Validation of a finite-element model of a wind turbine blade bearing. Finite Elem. Anal. Des. 2023, 221, 103957. [Google Scholar] [CrossRef]
  23. Kien, D.N.; Zhuang, X. Radial basis function based finite element method: Formulation and applications. Eng. Anal. Bound. Elem. 2023, 152, 455–472. [Google Scholar] [CrossRef]
  24. Smith, A.C.; Smith, M. NeT bead on plate round robin: Comparison of transient thermal predictions and measurements. Int. J. Press. Vessel. Pip. 2009, 86, 79–95. [Google Scholar] [CrossRef]
  25. Goldak, K.; Chakaravarti, A.; Bibby, M. A New Finite Element Model for Welding Heat Sources. Metall. Trans. B 1984, 15, 299–305. [Google Scholar] [CrossRef]
  26. Boiler and Pressure Vessel Code, Section Ⅲ, Rules for Construction of Nuclear Facility Components, Division 1, Subsection NE-4623. Class MC Components. ASME: New York, NY, USA, 2007; edition with 2008 Addenda. ASME BPVC.Ⅲ.1-2008. Available online: https://www.asme.org/codes-standards/find-codes-standards/bpvc-iii-ncd-bpvc-section-iii-rules-construction-nuclear-facility-components-division-1-subsection-ncd-class-2-class-3-components (accessed on 12 May 2023).
  27. ASME Boiler and Pressure Vessel Code Section Ⅷ, Division 1 Rules for Construction of Vessels. ASME: New York, NY, USA, 2019. ASME BPVC.Ⅷ.1-2019. Available online: https://www.asme.org/codes-standards/find-codes-standards/bpvc-viii-1-bpvc-section-viii-rules-construction-pressure-vessels-division-1/2023/print-book (accessed on 12 May 2023).
  28. Peng, W.; Jiang, W.; Sun, G.; Yang, B.; Shao, X.; Tu, S. Biaxial residual stress measurement by indentation energy difference method: Theoretical and experimental study. Int. J. Press. Vessel. Pip. 2022, 195, 104573. [Google Scholar] [CrossRef]
  29. GB/T 30583.4-2014; Specification for Post Weld Heat Treatment of Pressure Equipment. General Administration of Quality Supervision, Inspection and Quarantine of the People’s Republic of China. Standardization Administration: Beijing, China, 2014.
Figure 1. Geometric model and dimensional details of models I (a), II (b), and III (c), (unit: mm).
Metals 13 01100 g001
Figure 2. Finite element mesh of models I (a), II (b), and III (c). (A, B, C represent the end point).
Metals 13 01100 g002
Figure 3. The temperature cycle curve of heating.
Metals 13 01100 g003
Figure 4. MTS Landmark 370.10 testing solution and tensile specimens.
Metals 13 01100 g004
Figure 5. Stress–strain curve of SA738Gr.B steel at different temperatures.
Metals 13 01100 g005
Figure 6. Contour of the welding residual stress with thickness ratio 2: (a) von Mises stress, (b) radial stress, (c) axial stress, and (d) hoop stress.
Metals 13 01100 g006
Figure 7. Distribution of residual stress for thickness ratio 2 before and after local PWHT along (a) Path-1, (b) Path-2, and (c) Path-3.
Metals 13 01100 g007aMetals 13 01100 g007b
Figure 8. Distribution of radial deformation in inner surface for thickness ratio 2 during PWHT.
Metals 13 01100 g008
Figure 9. Layout of heat band for PWHT of welded joint with dissimilar thicknesses.
Metals 13 01100 g009
Figure 10. Residual stress (a) and radial residual deformation (b) after local PWHT with different auxiliary heating widths.
Metals 13 01100 g010
Figure 11. The maximum residual stress (a) and radical deformation (b) at the end of the insulation stage with different auxiliary heating widths.
Metals 13 01100 g011
Figure 12. Distribution of residual stress before and after PWHT with newly defined HB width along (a) Path-1, (b) Path-2, and (c) Path-3.
Metals 13 01100 g012
Figure 13. Distribution of radial deformation in inner surface for thickness ratio 2 during PWHT with newly defined HB width.
Metals 13 01100 g013
Figure 14. Effects of auxiliary heating width on the maximum residual stress after local PWHT for the welded joint with thickness ratio (a) k = 2.5 and (b) k = 1.5.
Metals 13 01100 g014
Figure 15. The maximum residual stress (a) and radical deformation (b) after local PWHT under recommended HB width for different thickness ratios.
Metals 13 01100 g015
Table 1. Main chemical component of SA738Gr.B steel and E9018-G-H4 (wt.%).
MaterialFeAlCrCuMnMoNbNiSiVCPS
Base97.1430.0280.180.021.440.20.510.30.30.040.110.00700.0020
FillerBal.-≤0.20≤0.050.6~1.95≤0.50-0.8~1.8≤0.80≤0.05≤0.12≤0.03≤0.03
Table 2. Welding parameters deployed for reinforcing plate and cylinder.
Welding LayerWelding PassesWelding Current
(A)
Welding Voltage
(V)
Welding Speed
(cm/min)
Max Heat Input
(KJ/mm)
Backing layer1140~15519~306.6~1238
Filling layer2–6/16–24110~12020~255.5~10
Filling layer7–15/25–3590~13018~295.3~1137
Covering layer36–48140~15519~306.6~1238
Table 3. Temperature-dependent thermal properties.
Temperature
(°C)
Density
ρ × 10−3/(kg/m3)
Thermal Conductivity
λ × 10−1/(W/m·°C)
Specific Heat
c × 10−2/(J/kg·°C)
Average Expansion Coefficient
α × 10−5/°C
207.8466.304554.541.30827
2007.7885.152215.281.36773
4007.7174.044496.81.45132
6007.6433.413358.81.53162
8007.6172.767729.991.19212
10007.5382.87066.261.39518
12007.433.112676.561.58768
14007.3213.355386.881.73079
Table 4. Mechanical properties of SA738Gr.B steel.
Temperature (°C)20100200300400500600700900
Elastic modulus (GPa)194206180206179186141135123
Tensile strength (MPa)674652651654692617318250175
Yield strength (MPa)590580536539501495298203153
Young’s modulus (GPa)20920519618618217515714638
Poisson’s ratio0.290.290.290.300.300.310.310.320.34
Disclaimer/Publisher’s Note: The statements, opinions and data contained in all publications are solely those of the individual author(s) and contributor(s) and not of MDPI and/or the editor(s). MDPI and/or the editor(s) disclaim responsibility for any injury to people or property resulting from any ideas, methods, instructions or products referred to in the content.