Article

Mechanical Response of Zr51.9Cu23.3Ni10.5Al14.3 Metallic Glass Ribbon under Varying Strain Rates

1
School of Mechanical Engineering, University of Science and Technology Beijing, Beijing 100083, China
2
State Key Laboratory for Advanced Metals and Materials, University of Science and Technology Beijing, Beijing 100083, China
*
Authors to whom correspondence should be addressed.
Metals 2024, 14(2), 220; https://doi.org/10.3390/met14020220
Submission received: 11 January 2024 / Revised: 2 February 2024 / Accepted: 8 February 2024 / Published: 10 February 2024
(This article belongs to the Section Entropic Alloys and Meta-Metals)

Abstract

:
In this work, we investigated the mechanical behavior of a low-cost Zr51.9Cu23.3Ni10.5Al14.3 (at. %) metallic glass ribbon prepared with industrial-grade material through the melt-spinning method. The ribbons have good appearances and almost no defects. The mechanical behavior associated with the corresponding microstructure of the ribbon was tested at different strain rates. Striation and veining patterns were observed in the crack propagation zone and the fast fracture zone. The results show that the tensile strength of the ribbons exceeds 1 GPa. Therefore, they are considered to have good potential for industrial applications. This study could contribute to the preparation of low-cost bulk metallic glass.

1. Introduction

Bulk metallic glasses (BMGs) have captivated the scientific and engineering communities for over six decades, primarily due to their distinctive properties like high hardness and favorable magnetic characteristics. This prolonged interest has catalyzed the development of various types of BMGs, each with unique attributes tailored to specific applications [1,2,3]. The spectrum of BMGs includes Fe-based [4,5,6], Ti-based [7], Mg-based [8], Cu-based [9], and Zr-based [10] BMGs. To facilitate the wider application of amorphous alloys in various industries, several manufacturing techniques have been developed and refined. Prominent among these are water quenching, suction casting, and spray casting, each with its own specific advantages and suitability for different applications. Additionally, the melt-spinning method has emerged as a mature and reliable technology for the preparation of amorphous ribbons. This method is particularly favored for its ability to produce high-quality amorphous structures efficiently. The melt-spinning method is also a mature preparation technology for amorphous ribbons [11,12,13]. Induction heating is usually used to melt an ingot placed in a quartz tube, then the liquid metal is sprayed onto the surface of a high-speed rotating copper roller by differential pressure, and the metal liquid is quickly cooled through the heat conduction of the copper roller to obtain an amorphous ribbon.
Initially, the focus of research in this area was centered on rapidly quenching thin foils and ribbons of metallic glass. Particularly, scientific curiosity and interest focused on how deeply undercooled liquids could avoid nucleation and the growth of crystals when cooled below their glass transition temperature. Most amorphous alloys, ribbons, or wires must be fabricated at a high cooling rate with high-purity raw materials, which greatly increases the processing cost [14,15,16,17]. Thus, this is a bottleneck in their industrial application, and amorphous alloys are not yet widely applied in engineering fields.
Zr-based amorphous alloys have strong glass-forming ability, which has attracted extensive attention from researchers in recent years [18,19,20]. It was established that Zr-base amorphous alloys could be fabricated at low cooling rates due to their improved amorphous-forming ability [21,22,23]. Moreover, Zr-based bulk amorphous alloys have a series of excellent properties, for example, high hardness, good wear resistance and corrosion resistance, low thermal expansion coefficient, etc. Therefore, the Zr-based amorphous alloy is one of the most studied bulk amorphous alloy systems. However, room-temperature brittleness and strain softening have always been weaknesses in the mechanical properties of Zr-based amorphous alloys [24,25,26]. Thus, the application of this material in the engineering field is seriously limited. To further improve the mechanical properties of amorphous alloys, their toughening mechanism and crystallization mechanism need to be systemically studied.
Single-roller smelting is a commonly used method for preparing industrial metal ribbons. Due to its high production efficiency and low cost, it has been previously attempted for the purpose of fabricating ribbon products made from Al-based or Fe-based amorphous alloys [27,28,29,30]. These alloys are known for their unique properties, such as high strength and corrosion resistance, which make them ideal for various applications in the aerospace, automotive, and construction industries. The process of single-roller smelting involves the rapid solidification of molten metal on a rotating, cooled drum, which allows for the creation of ribbons with smooth surfaces. The rapid cooling involved in this process is crucial for the formation of an amorphous structure in the alloys, which is characterized by the lack of a long-range atomic order. This structure contributes to the unique mechanical and physical properties of the ribbons. Furthermore, the versatility of single-roller smelting allows for the production of ribbons with a wide range of compositions and properties by adjusting the alloying elements and processing parameters. This adaptability makes it an attractive method for customizing materials to meet specific requirements for various industrial applications.
Therefore, the emphasis of this study is on the mechanical properties of Zr-based amorphous ribbons, which possess scientific importance and practical engineering value. These ribbons, with their unique blend of properties, stand at the forefront of advancing material science and engineering applications. Our paper delves into the intricate process of preparing Zr-based amorphous ribbons through the single-roller melt-spinning quenching technique, a method known for its efficiency and effectiveness in producing high-quality amorphous materials.
The single-roller melt-spinning quenching method is particularly noteworthy for its ability to rapidly cool molten metal, a critical factor in achieving an amorphous state. This rapid cooling prevents the formation of crystalline structures, resulting in a material that exhibits a unique combination of strength, ductility, and corrosion resistance. Our study examines this process, highlighting its potential for creating advanced materials for a wide range of industrial applications.
Moreover, this research provides a comprehensive analysis of how different strain rates affect the mechanical behavior of Zr-based amorphous ribbons. Understanding the relationship between strain rate and the mechanical properties of these materials is crucial for their application in real-world scenarios. The strain rate can influence the performance of amorphous ribbons in various conditions, impacting factors such as tensile strength, ductility, and overall structural integrity. By investigating these aspects, our study aims to contribute to the broader understanding of Zr-based amorphous alloys and their potential applications. The findings could open up new avenues in material science, leading to the development of more efficient, cost-effective, and high-performance materials.

2. Experiment

In this study, Zr51.9Cu23.3Ni10.5Al14.3 metallic glass was selected as the model alloy due to its desirable glass-forming ability and high thermal stability [31]. The alloy ingots, composed of Cu (99.9%), Zr (99.9%), Ni (99.9%), Al (99.9%), and other elements with an oxygen content less than 1000 ppm, were first prepared using the arc-melting method. This method ensured uniformity in the chemical composition, as all samples were remelted at least thrice. Subsequently, master alloys were prepared using single-roller melting and copper mold suction casting techniques. The ribbon form of Zr51.9Cu23.3Ni10.5Al14.3 MG was then prepared through conventional single-roller melt-spinning quenching in a pure argon atmosphere, achieving an estimated cooling rate of 106 K·s−1.
The phase structure of the Zr51.9Cu23.3Ni10.5Al14.3 alloy was analyzed by X-ray diffraction (XRD) using Cu Kα radiation in the 10–100° range, with a step-size of 10°/min. Scanning electron microscopy (SEM) was utilized to observe the microstructure and failure surfaces of the tensile specimens and to identify fracture mechanisms. The SEM was equipped with energy-dispersive X-ray spectroscopy (EDS) for compositional examinations. The thermal properties of the Zr51.9Cu23.3Ni10.5Al14.3 metallic glass were analyzed by differential scanning calorimetry (DSC) using a Perkin Eimer DSC8000 (PERKINELMER, Waltham, MA, USA) in an argon atmosphere at a heating rate of 10 °C/min. A dynamic mechanical analysis was conducted to investigate the mechanical behavior of the material as a function of strain rate, with strain rates of 1 × 10⁻⁵ s−1, 1 × 10⁻⁴ s−1, and 1 × 10⁻³ s−1 at room temperature used to measure the tensile strengths and ductility of the Zr51.9Cu23.3Ni10.5Al14.3 metallic glass ribbon. Tensile tests were performed on ribbon gage sections that were 40 mm in length, with three specimens tested in each group to obtain the average value. The fracture surface of the fractured bulk metallic glass specimen was examined using SEM and EDS techniques.

3. Results and Discussion

The surface morphology of the Zr51.9Cu23.3Ni10.5Al14.3 metallic glass ribbon, as depicted in Figure 1, demonstrates a distinct smoothness and continuity. This characteristic is not only aesthetically pleasing but also indicative of the material’s suitability for large-scale industrial applications. The uniform surface suggests a high level of control during the manufacturing process, which is crucial for applications that demand precision and consistency.
Moreover, the ribbon’s favorable weaving properties are particularly intriguing. This attribute opens up potential avenues for innovative applications, such as the development of novel functional clothing and advanced filtering materials. The ability to weave this metallic glass into fabrics could revolutionize industries like fashion and industrial filtration, offering new functionalities combined with the inherent benefits of metallic glasses, such as durability, resistance to wear and corrosion, and unique aesthetic appeal.
In the area of functional clothing, garments crafted from Zr51.9Cu23.3Ni10.5Al14.3 metallic glass ribbons may have the potential to modestly enhance protection against environmental factors and might show improved durability [32]. Furthermore, if combined with electronic sensors, these materials could contribute to basic health monitoring capabilities [33,34,35]. The comprehensive study of the Zr51.9Cu23.3Ni10.5Al14.3 metallic glass reveals it to be a material with good properties and diverse applications. Its smooth surface morphology, favorable weaving properties, high strength, moderate ductility, corrosion resistance, and scalability highlight its potential as a material in sectors ranging from functional clothing to filtration and beyond.
Figure 2 provides a detailed cross-sectional view of the Zr51.9Cu23.3Ni10.5Al14.3 amorphous ribbon, showcasing its remarkable uniformity with a width of approximately 1400 μm. Its uniformity and lack of defects like holes or impurities demonstrate the precision of our manufacturing process. The absence of defects within the cross-sectional area not only reflects the high quality of the raw materials used but also the efficacy of the melting and casting processes in maintaining the purity of the material. The optimization of various parameters in the melt-spinning process, including the cooling rate, melt temperature, and roller speed, is important in achieving such uniformity. These parameters are critical in determining the final properties of the ribbon. The controlled cooling rate, for instance, is essential in avoiding the formation of crystalline structures, thereby ensuring the amorphous nature of the ribbon. Similarly, the precise regulation of the melt temperature and roller speed is crucial to achieving a smooth surface free from physical irregularities.
In the context of metallic glasses, the presence of impurities or defects can have a profound impact on their glass-forming ability and overall physical properties. Impurities can act as nucleation sites for crystallization, thereby compromising the amorphous nature of the material. Similarly, defects such as holes or cracks can significantly weaken the mechanical integrity of the ribbon. Therefore, the absence of such flaws in the Zr51.9Cu23.3Ni10.5Al14.3 metallic glass ribbon is a strong indicator of its superior quality and reliability.
This high level of quality control in the manufacturing process is critical for ensuring the desired properties in the final product, especially in applications where material performance is of utmost importance. The absence of defects and impurities in the Zr51.9Cu23.3Ni10.5Al14.3 metallic glass ribbon thus not only demonstrates the effectiveness of the production process but also enhances its potential for a wide range of industrial applications.
The XRD pattern of the Zr51.9Cu23.3Ni10.5Al14.3 metallic glass ribbon, as depicted in Figure 3, prominently features a broad diffraction peak, which is a hallmark of amorphous materials. This broad peak is indicative of the material’s lack of a long-range atomic order, a key characteristic that sets amorphous materials apart from crystalline ones. In crystalline materials, the ordered atomic arrangement results in sharp, well-defined diffraction peaks. The absence of such sharp peaks in the XRD pattern of the Zr51.9Cu23.3Ni10.5Al14.3 ribbon therefore confirms its entirely amorphous nature. XRD analysis is a widely recognized and direct method for verifying the amorphous state of metallic glasses. It provides definitive evidence regarding the atomic structure of the material being studied. In the case of the Zr51.9Cu23.3Ni10.5Al14.3 metallic glass ribbon, the observed XRD pattern closely aligns with what is typically expected from metallic glasses. The absence of narrow, sharp peaks that are characteristic of crystalline structures further corroborates that the Zr51.9Cu23.3Ni10.5Al14.3 ribbon has successfully retained its amorphous structure during the manufacturing process. This analysis not only confirms the amorphous nature of the ribbon but also underscores the effectiveness of the production method used in preserving the desired atomic arrangement.
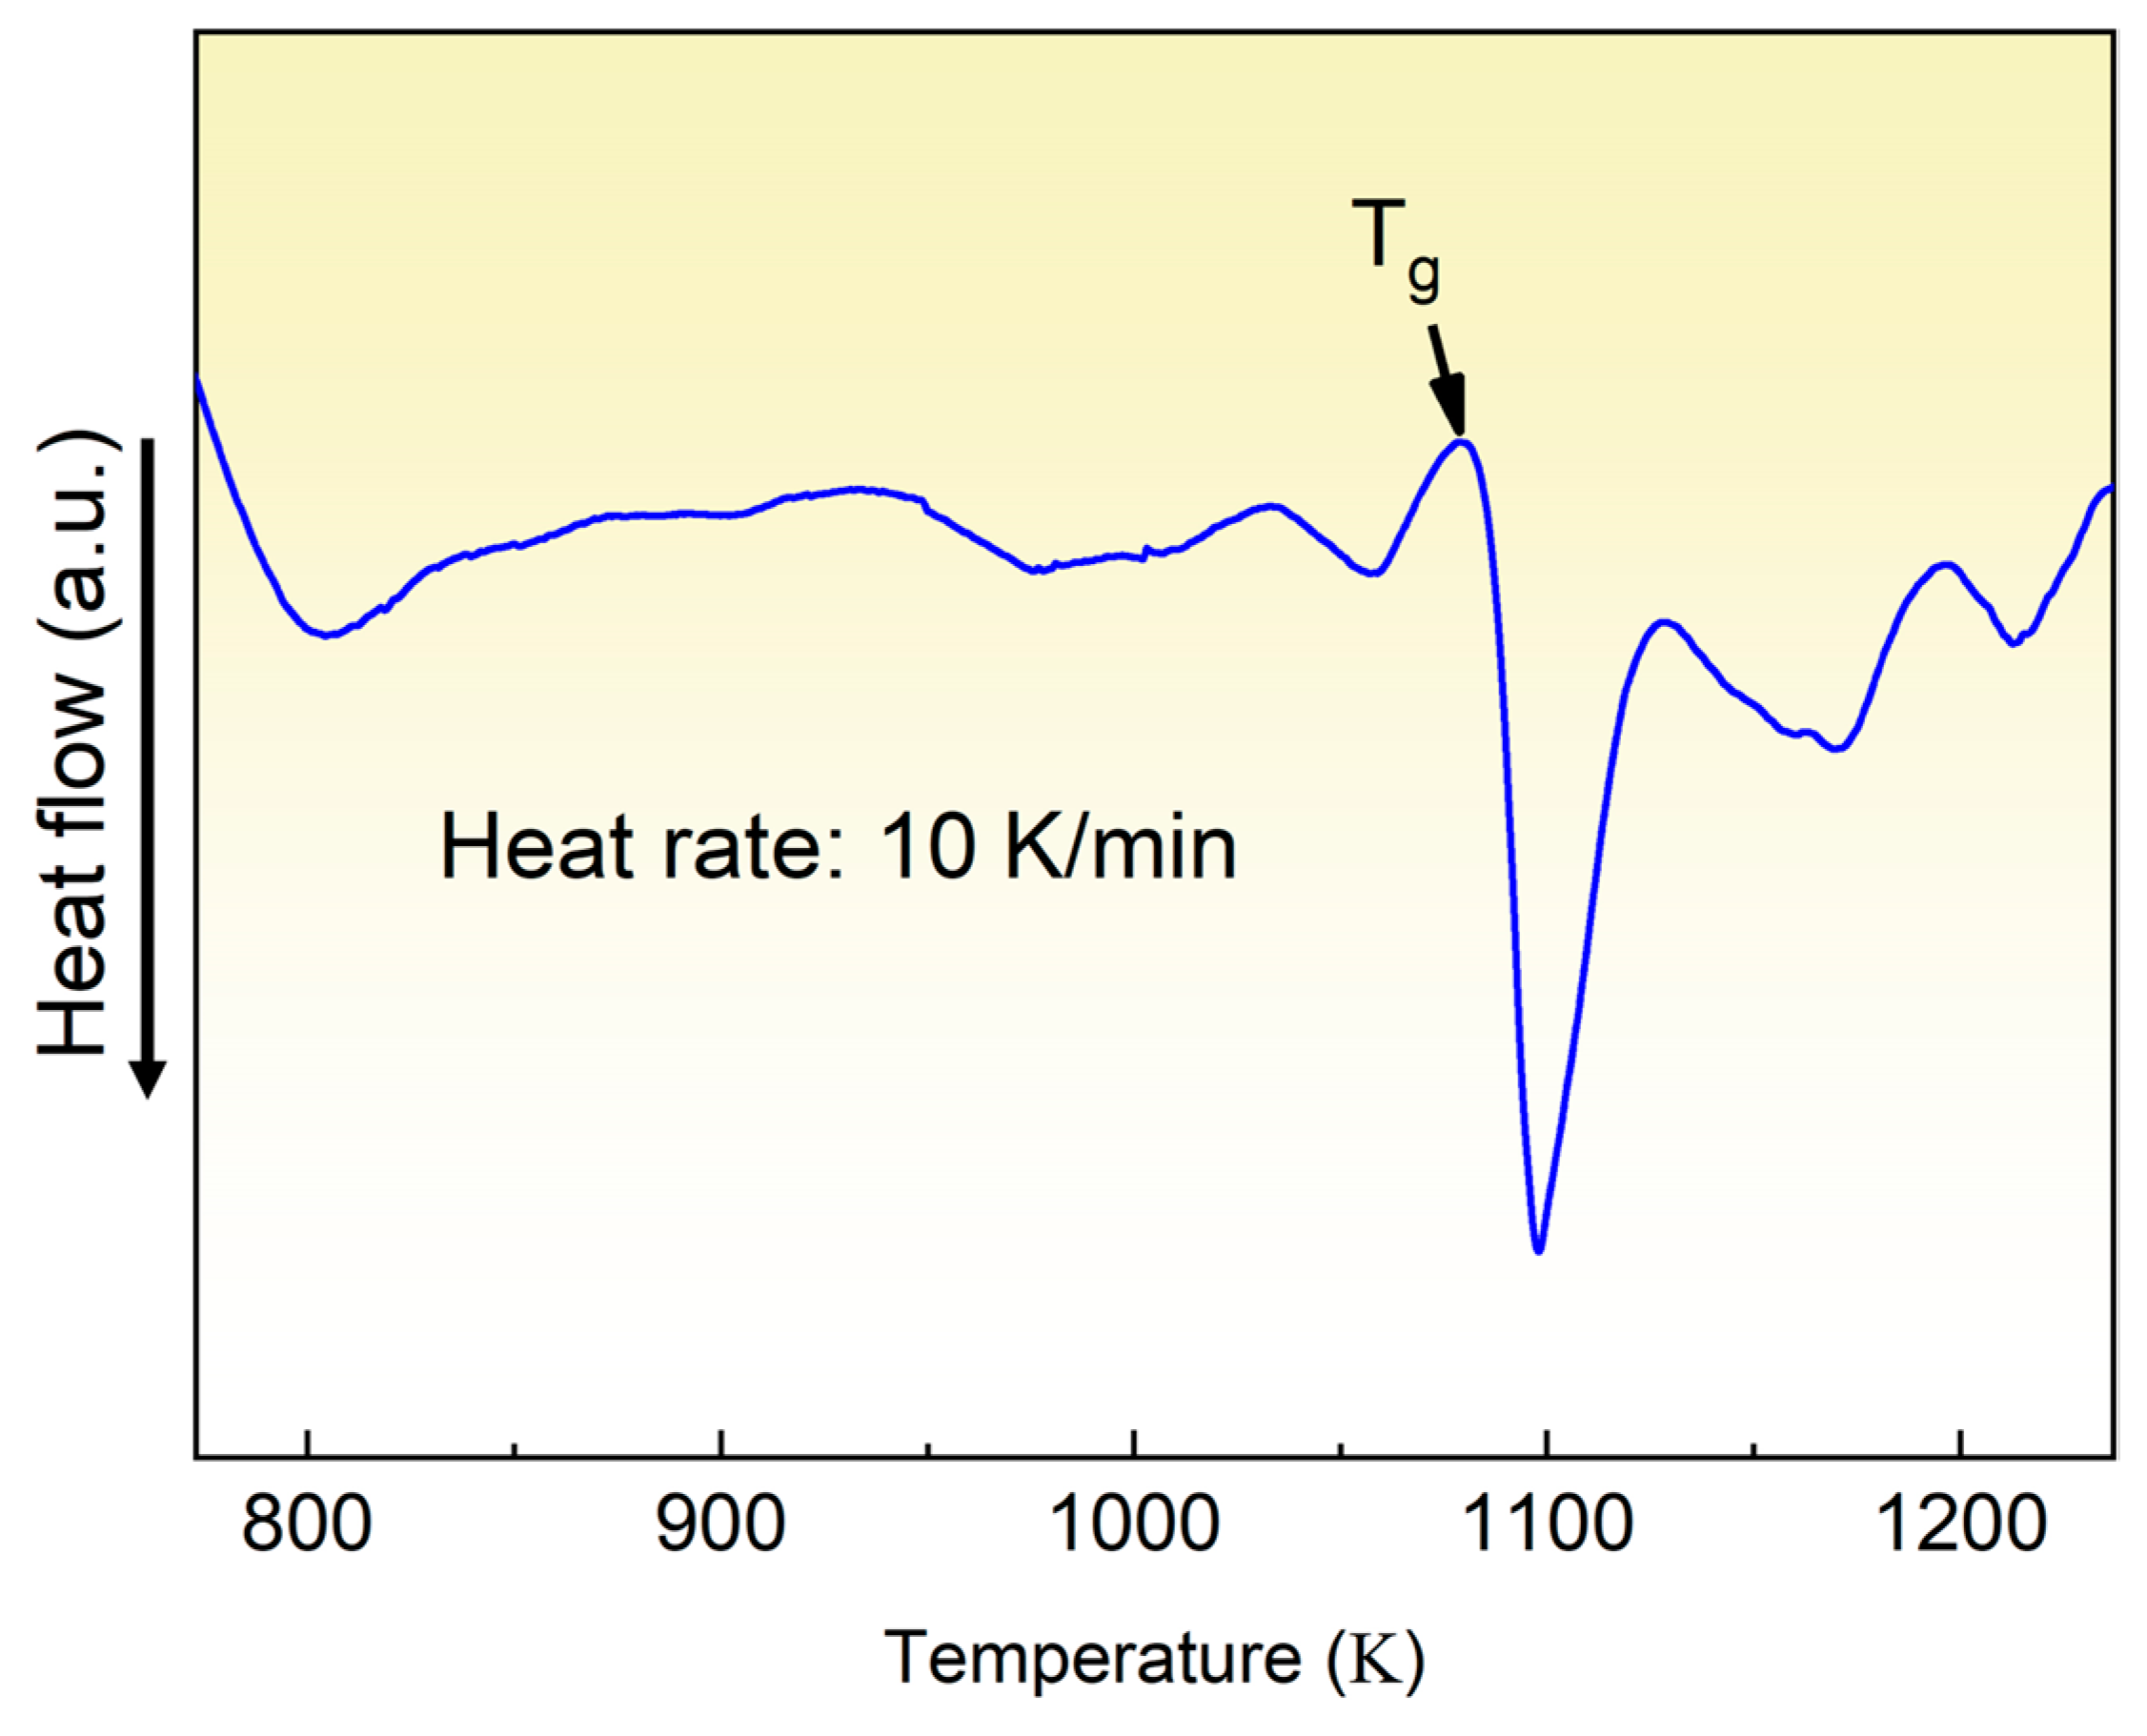
In Figure 4, the DSC curve provides specific quantitative data on the thermal behavior of the Zr51.9Cu23.3Ni10.5Al14.3 metallic glass ribbon. The glass transition region is shown as a subtle endothermic event, confirming the amorphous nature of the material. The onset of this transition, marked by an inflection point designated as Tg on the curve, occurs at approximately 1063 K. This specific value is crucial as it defines the temperature above which the material loses its glassy rigidity and transforms into a supercooled liquid.
The curve’s baseline before reaching Tg appears stable and flat, with no significant exothermic or endothermic peaks, indicating that the ribbon maintains its amorphous state without undergoing crystallization or phase separation prior to reaching the glass transition temperature. This behavior is consistent with a pure amorphous phase and is typical for well-manufactured metallic glasses. If, after Tg, the DSC curve displayed a sharp exothermic peak at 1100 K, this would be indicative of crystallization. Instead, the progression of the curve is smooth, suggesting that the supercooled liquid is stable and resists crystallization over the measured temperature range up to approximately 1200 K. This stability is important for potential applications that may require heating the material near or above Tg without initiating crystallization, which could detrimentally alter the material’s properties. The heating rate is maintained at a constant 10 K/min throughout the scan, providing a uniform rate of temperature increase to ensure consistent conditions for the analysis of the glass transition and any subsequent relaxation or crystallization behaviors.
Figure 5 shows the tensile stress–strain curves of the Zr51.9Cu23.3Ni10.5Al14.3 metallic glass ribbon tested at ambient temperature with varying strain rates of 1 × 10⁻⁵ s−1, 1 × 10⁻⁴ s−1, and 1 × 10⁻³ s−1. The maximum tensile strength (σmax), elastic strain (εp), and elastic modulus (E) of the metallic glass ribbon tested at 1 × 10⁻⁵ s−1 were 1200 MPa, 2.8%, and 42.8 GPa, respectively. In contrast, the ribbons tested at higher strain rates exhibited inferior mechanical properties, with lower tensile strength and plasticity, whereas for those samples tested at 1 × 10⁻⁴ s−1 and 1 × 10⁻³ s−1, these values were 1030 MPa, 2.5%, 41.2 GPa, and 980 MPa, 2.4%, 40.0 GPa, respectively.
At a strain rate of 1 × 10⁻⁴ s−1, it demonstrated a tensile strength of 1030 MPa, an elastic strain of 2.5%, and an elastic modulus of 41.2 GPa. Meanwhile, at strain rates of 1 × 10⁻³ s−1, it displayed a tensile strength of 980 MPa, an elastic strain of 2.4%, and an elastic modulus of 40.0 GPa, as shown in Table 1. These observed trends align with previous research on Zr-based [26,36] and Mg-based [37] amorphous and composite materials [38]. However, it is noteworthy that this behavior contradicts the mechanical characteristics typically observed in conventional metals and brittle materials.
In the results presented in Figure 5, an intriguing trend is observed for the Zr51.9Cu23.3Ni10.5Al14.3 metallic glass ribbon, wherein both the elastic strain and tensile strength exhibit a negative correlation with strain rate, a phenomenon that remains consistent when the alloy composition is kept constant. This trend is in agreement with findings reported for some zirconium-based [39,40,41,42] and magnesium-based [43,44,45] amorphous and composite materials, but contrary to the rules of most traditional metals and brittle materials [46,47,48]. Unlike crystalline materials, where deformation is primarily governed by dislocation movements, amorphous materials such as metallic glasses deform through shear transformation zones (STZs), which are highly sensitive to the strain rate. This sensitivity can be quantified using the strain rate sensitivity formula, m = d ln ( σ ) d ln ( ε ˙ ) , where σ represents the stress and ε ˙ represents the strain rate. The parameter m measures how the stress responds to changes in the strain rate. A negative value of m suggests that the material becomes weaker as the strain rate increases. Additionally, the empirical Johnson–Cook model [49,50], which describes the relationship between stress, strain, strain rate, and temperature, offers a framework for understanding this behavior. According to this model, the stress in a material is a function of the strain, strain rate, and temperature, and the unique constants for a particular material dictate how these variables interact. Furthermore, in traditional metals, increased strain rates usually lead to strain hardening due to increased dislocation density. However, in the case of the Zr51.9Cu23.3Ni10.5Al14.3 metallic glass ribbon, the absence of a crystalline structure leads to a different mechanical response under varying strain rates. This highlights the distinctive nature of amorphous materials and underscores the need for specialized models and theoretical approaches to accurately predict their behavior.
This observation has implications for the application of amorphous materials in various fields. Understanding the strain rate dependence of the mechanical properties of these materials is crucial for designing and developing new materials with tailored properties for specific applications, ranging from structural components to biomedical devices. The negative correlation between elastic strain and tensile strength with strain rate in this particular metallic glass ribbon opens up avenues for further research to explore the underlying mechanisms and develop strategies to optimize the mechanical performance of amorphous materials under different loading conditions.
The observed decrease in elastic strain and tensile strength with increasing strain rate in the Zr51.9Cu23.3Ni10.5Al14.3 metallic glass ribbon can be attributed to several factors. Specifically, as the deformation rate increases, the number of atoms involved in the flow per unit volume also increases, resulting in a greater demand for free volume. However, when the supply of free volume cannot meet this demand, the amount of free volume will increase rapidly, leading to the formation of cracks and resulting in the shearing and fracturing of the alloy. Moreover, at higher strain rates, the speed of crack propagation may exceed the loading speed, leading to the failure of the alloy before the deformation reaches its true strength. As a result, the mechanical properties of the alloy, including its elastic strain and tensile strength, are negatively impacted by an increasing strain rate. This phenomenon is in contrast to the behavior of most traditional metals and brittle materials, which typically exhibit higher strength at higher strain rates [51].
Indeed, the results have implications for the design and development of high-performance amorphous materials. As the strain rate has a significant impact on the mechanical properties of amorphous materials, understanding the relationship between the two is crucial for developing new materials with improved properties. Further research is needed to investigate the underlying mechanisms and to develop strategies to mitigate the negative effects of an increased strain rate on the mechanical properties of amorphous materials. Such efforts may help in the development of new materials for various applications, including structural materials, biomedical devices, and microelectromechanical systems.
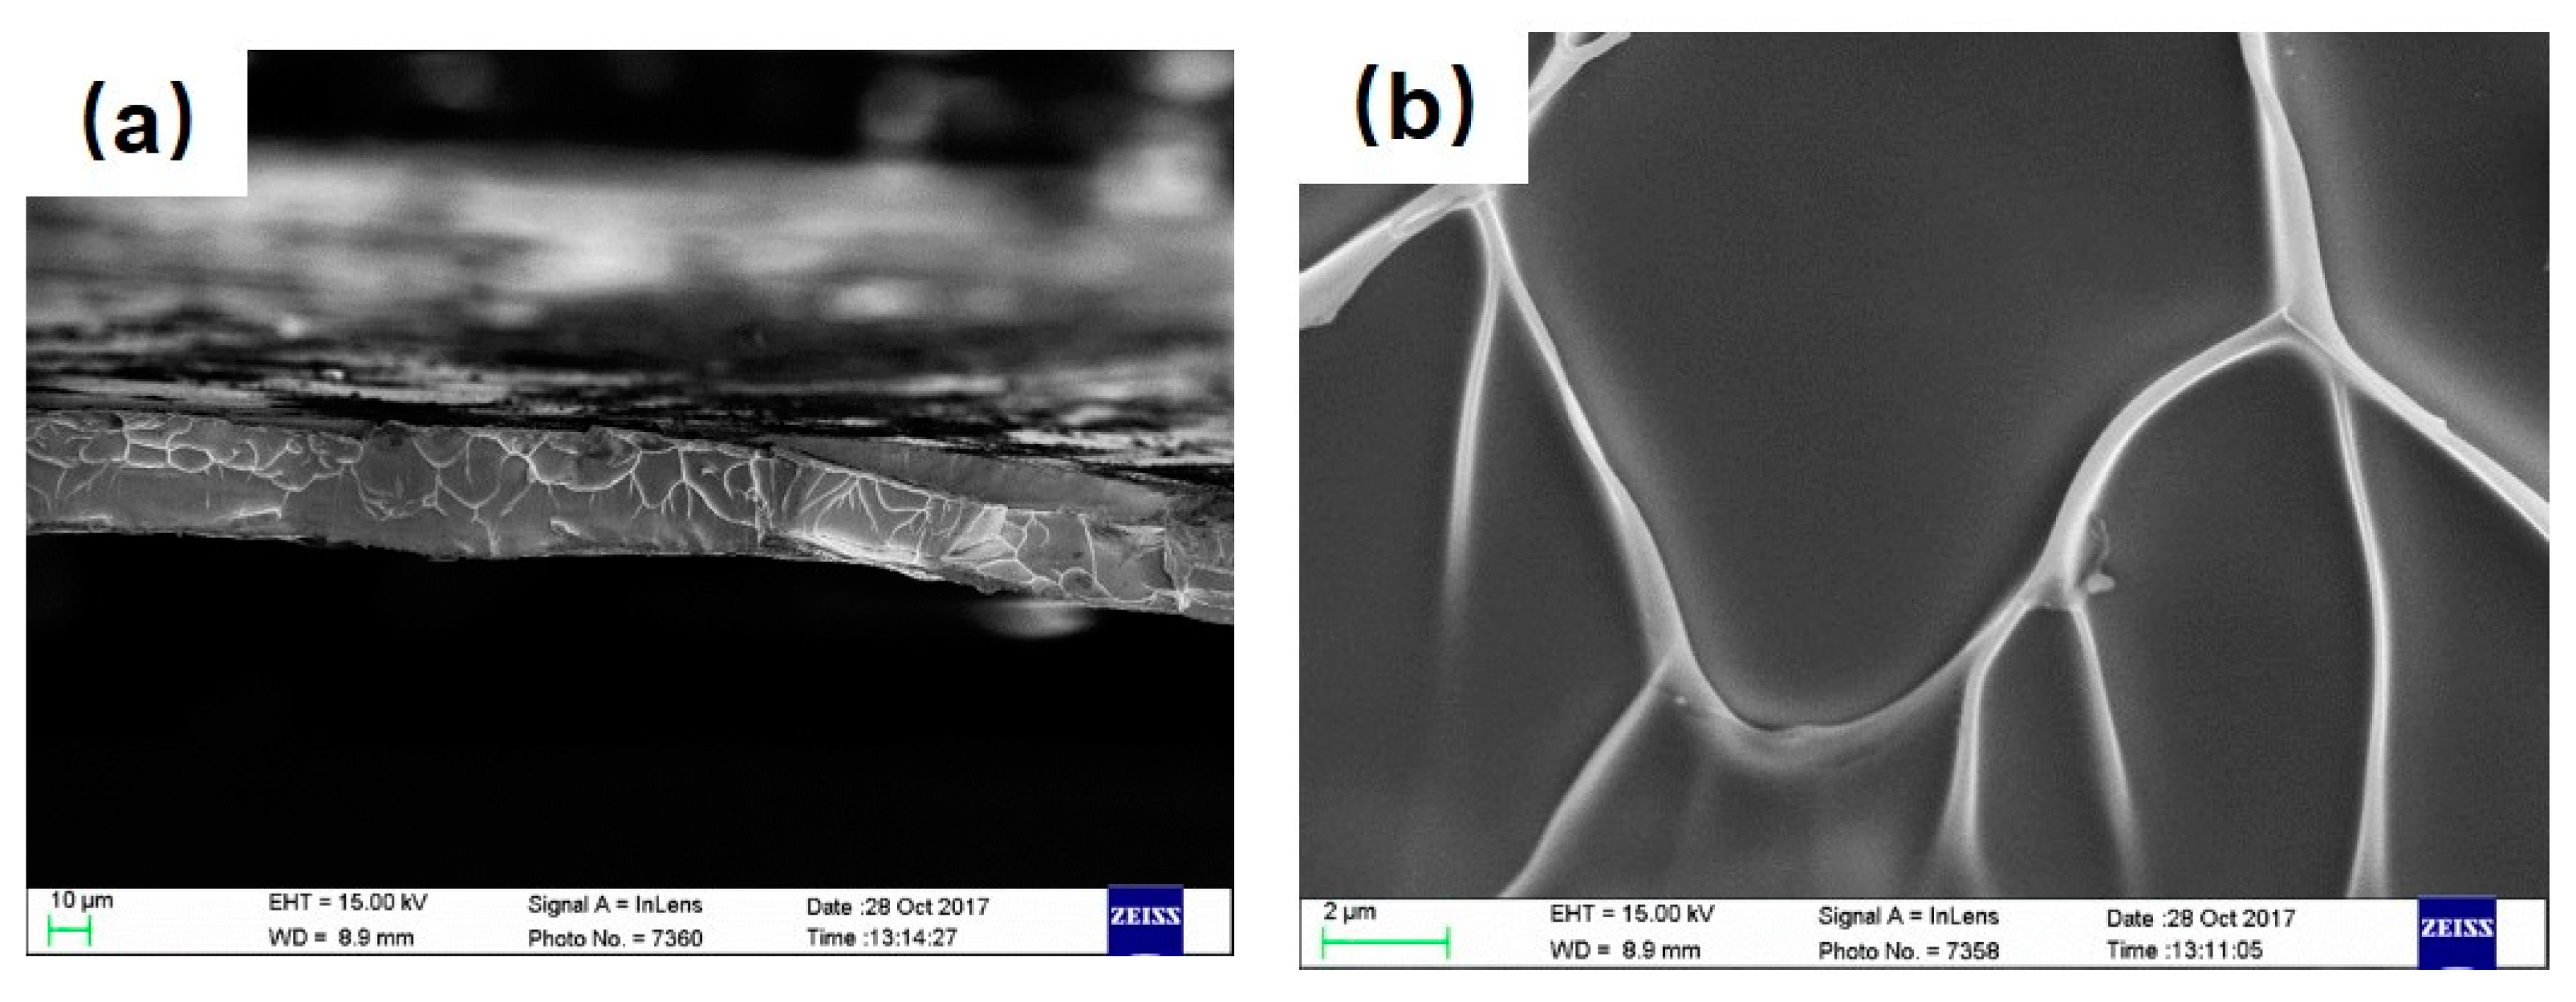
Figure 6 presents a detailed SEM examination of the tensile fracture surfaces of the Zr51.9Cu23.3Ni10.5Al14.3 metallic glass ribbon, tested under a strain rate of 1 × 10⁻⁵ s−1. The SEM images reveal a striking morphology, characterized by numerous, uniformly distributed, and dense vein-like patterns. These patterns amalgamate to form a distinctive root-like structure across the fracture surface, accompanied by a clearly demarcated brittle smooth zone. The appearance of such vein-like patterns is a characteristic feature of the fracture surface of metallic glasses and is indicative of the material’s response to the applied stress.
A notable aspect of this morphology is the extended shear zone, which implies that the material requires a longer duration to transmit local stress and accommodate deformation under static loading conditions. This phenomenon is crucial in inhibiting the preferential growth of the amorphous alloy along a specific main shear band. As a result, it leads to more distributed plastic deformation across the specimen as opposed to localized deformation. The root-like pattern observed grows parallel to the section direction, and these patterns do not intertwine, which is a significant factor in the low plasticity observed in these specimens. The vein-like pattern observed on the main fracture surface primarily serves as evidence of the material’s glassy nature. It is an indication of the amorphous structure of the material but does not inherently provide information about its macroscopic plasticity. Further analysis is required to assess the material’s mechanical behavior and its relation to plasticity, which may involve examining other microstructural features such as shear bands.
Furthermore, the application of energy-dispersive spectroscopy (EDS) mapping at the fracture surface of the ribbon provides insightful details about the elemental distribution. The EDS analysis shows a relatively uniform distribution of nickel (Ni) and copper (Cu) elements across the fracture surface. Interestingly, there is an enrichment of aluminum (Al) and zirconium (Zr) elements specifically within the vein-like patterns. This differential elemental distribution within the fracture surface could play a role in the overall mechanical behavior and fracture characteristics of the Zr51.9Cu23.3Ni10.5Al14.3 metallic glass ribbon, providing valuable insights for understanding the fracture mechanisms of amorphous alloys.

4. Conclusions

In conclusion, we successfully fabricated a Zr51.9Cu23.3Ni10.5Al14.3 metallic glass ribbon using the single-roller melt-spinning quenching method. A key finding of this research is the observation that the elastic strain and tensile strength of the ribbon decrease progressively with an increase in strain rate. Notably, the samples tested at a strain rate of 1 × 10⁻⁵ s−1 demonstrated superior strength and ductility compared to those tested at higher strain rates of 1 × 10⁻⁴ s−1 and 1 × 10⁻³ s−1. This variation in mechanical properties with strain rate underscores the importance of strain rate control in the processing of such materials.
The detailed analysis of the fracture surfaces of these samples, particularly through SEM and EDS mapping, revealed a characteristic venation pattern. This pattern correlates well with the mechanical properties of the ribbon, providing insights into the relationship between the microstructure and the macroscopic mechanical behavior of the ribbon. The presence of vein-like patterns and their influence on the material’s plasticity is a significant aspect of this study.
The Zr51.9Cu23.3Ni10.5Al14.3 metallic glass ribbon, with its excellent glass-forming ability, thermal stability, and high tensile strength, shows immense potential for various industrial applications. Its unique combination of properties makes it a promising candidate for use in areas where high strength and ductility are paramount. Moreover, this research contributes valuable knowledge to the field of materials science, particularly in the design and preparation of low-cost Zr-based BMGs. The insights gained from this study about the effects of strain rate on mechanical properties and fracture mechanisms can guide future research and development efforts in creating more efficient and cost-effective amorphous alloys. The potential industrial applications of such materials are vast, ranging from structural components to high-performance parts in the aerospace and automotive industries, making this study a step forward in the development of advanced materials.

Author Contributions

Conceptualization, D.L.; validation, C.W., Y.S. and W.W.; formal analysis, W.W.; investigation, D.L.; data curation, C.W., Y.S. and W.W.; writing—original draft, D.L.; writing—review and editing, L.X. and Y.Z.; visualization, C.W. and Y.S.; supervision, D.L. All authors have read and agreed to the published version of the manuscript.

Funding

This research was funded by the National Natural Science Foundation of China, grant number 52101189; the Chinese Postdoctoral Science Foundation, grant number 2020M680343; and the Fundamental Research Funds for the Central Universities, grant number FRF-TP-20-050A1.

Data Availability Statement

The original contributions presented in the study are included in the article, further inquiries can be directed to the corresponding authors.

Conflicts of Interest

The authors declare that they have no known competing financial interests or personal relationships that could have appeared to influence the work reported in this paper.

References

  1. Schuh, C.A.; Hufnagel, T.C.; Ramamurty, U. Mechanical behavior of amorphous alloys. Acta Mater. 2007, 55, 4067–4109. [Google Scholar] [CrossRef]
  2. Qiao, J.; Wang, Q.; Pelletier, J.; Kato, H.; Casalini, R.; Crespo, D.; Pineda, E.; Yao, Y.; Yang, Y. Structural heterogeneities and mechanical behavior of amorphous alloys. Prog. Mater. Sci. 2019, 104, 250–329. [Google Scholar] [CrossRef]
  3. Ming, W.; Guo, X.; Xu, Y.; Zhang, G.; Jiang, Z.; Li, Y.; Li, X. Progress in non-traditional machining of amorphous alloys. Ceram. Int. 2023, 49, 1585–1604. [Google Scholar] [CrossRef]
  4. Wang, A.; Zhao, C.; He, A.; Men, H.; Chang, C.; Wang, X. Composition design of high bs fe-based amorphous alloys with good amorphous-forming ability. J. Alloys Compd. 2016, 656, 729–734. [Google Scholar] [CrossRef]
  5. Wang, A.; Zhao, C.; Men, H.; He, A.; Chang, C.; Wang, X.; Li, R.W. Fe-based amorphous alloys for wide ribbon production with high bs and outstanding amorphous forming ability. J. Alloys Compd. 2015, 630, 209–213. [Google Scholar] [CrossRef]
  6. Parra, C.; Bolivar, F. Effect of cobalt addition on the microstructural evolution, thermal stability and magnetic properties of fe-based amorphous alloys. Vacuum 2019, 169, 108911. [Google Scholar] [CrossRef]
  7. Abrosimova, G.; Aronin, A. Nanocrystal formation in al-and ti-based amorphous alloys at deformation. J. Alloys Compd. 2018, 747, 26–30. [Google Scholar] [CrossRef]
  8. Chen, Q.; Yan, Z.; Guo, L.; Zhang, H.; Zhang, L.; Kim, K.B.; Li, X.; Wang, W. Enhancing the acid orange dye degradation efficiency of mg-based glassy alloys with introducing porous structure and zinc oxide. J. Alloys Compd. 2020, 831, 154817. [Google Scholar] [CrossRef]
  9. Martínez, C.; Briones, F.; Rojas, P.; Aguilar, C.; Guzmán, D.; Ordoñez, S. Microstructural and mechanical characterization of copper, nickel, and cu-based alloys obtained by mechanical alloying and hot pressing. Mater. Lett. 2017, 209, 509–512. [Google Scholar] [CrossRef]
  10. Xing, W.; Ouyang, D.; Li, N.; Liu, L. Estimation of residual stress in selective laser melting of a zr-based amorphous alloy. Materials 2018, 11, 1480. [Google Scholar] [CrossRef]
  11. Wang, X.; Zeng, M.; Nollmann, N.; Wilde, G.; Wang, J.; Tang, C. Thermal stability and non-isothermal crystallization kinetics of pd82si18 amorphous ribbon. AIP Adv. 2017, 7, 065206. [Google Scholar] [CrossRef]
  12. Chen, Q.; Yan, Z.; Zhang, H.; Zhang, L.; Ma, H.; Wang, W.; Wang, W. High mb solution degradation efficiency of fesibzr amorphous ribbon with surface tunnels. Materials 2020, 13, 3694. [Google Scholar] [CrossRef]
  13. Li, X.; Wu, J.; Pan, Y. Preparation of nanostructured cu/zr metal mixed oxides via self-sustained oxidation of a cuzr binary amorphous alloy. J. Mater. Sci. Technol. 2019, 35, 1601–1606. [Google Scholar] [CrossRef]
  14. Thorsson, L.; Unosson, M.; Pérez-Prado, M.T.; Jin, X.; Tiberto, P.; Barrera, G.; Adam, B.; Neuber, N.; Ghavimi, A.; Frey, M.; et al. Selective laser melting of a fe-si-cr-bc-based complex-shaped amorphous soft-magnetic electric motor rotor with record dimensions. Mater. Des. 2022, 215, 110483. [Google Scholar] [CrossRef]
  15. Zhou, S.; Zhang, T.; Li, L.; Yang, J.; Zhang, M.; Chengyong, W. Fatigue behavior of zr58cu15. 46ni12. 74al10. 34nb2. 76y0. 5 bulk metallic glass fabricated by industrial-grade zirconium raw material. Metals 2021, 11, 187. [Google Scholar] [CrossRef]
  16. Lin, J.; Wang, Z.; Cheng, J.; Kang, M.; Fu, X.; Hong, S. Evaluation of cavitation erosion resistance of arc-sprayed fe-based amorphous/nanocrystalline coatings in nacl solution. Results Phys. 2019, 12, 597–602. [Google Scholar] [CrossRef]
  17. Lamichhane, T.N.; Sethuraman, L.; Dalagan, A.; Wang, H.; Keller, J.; Paranthaman, M. Additive manufacturing of soft magnets for electrical machines—A review. Mater. Today Phys. 2020, 15, 100255. [Google Scholar] [CrossRef]
  18. Zhang, M.; Wang, Y.; Li, F.; Jiang, S.Q.; Li, M.; Liu, L. Mechanical relaxation-to-rejuvenation transition in a zr-based bulk metallic glass. Sci. Rep. 2017, 7, 1–12. [Google Scholar] [CrossRef] [PubMed]
  19. Khan, M.M.; Deen, K.M.; Haider, W. Combinatorial development and assessment of a zr-based metallic glass for prospective biomedical applications. J. Non-Cryst. Solids 2019, 523, 119544. [Google Scholar] [CrossRef]
  20. Su, X.; Hu, H.; Kong, X. The research progress of zr based amorphous composite materials. IOP Conf. Ser. Mater. Sci. Eng. 2017, 275, 012002. [Google Scholar] [CrossRef]
  21. Liu, L.; Ma, J.; Yu, C.; Huang, X.; He, L.; Zhang, L.; Li, P.; Liu, Z. Determination of forming ability of high pressure die casting for zr-based metallic glass. J. Mater. Process. Technol. 2017, 244, 87–96. [Google Scholar] [CrossRef]
  22. Marattukalam, J.J.; Pacheco, V.; Karlsson, D.; Riekehr, L.; Lindwall, J.; Forsberg, F.; Jansson, U.; Sahlberg, M.; Hjörvarsson, B. Development of process parameters for selective laser melting of a zr-based bulk metallic glass. Addit. Manuf. 2020, 33, 101124. [Google Scholar] [CrossRef]
  23. Zhou, W.; Meng, Y.; Duan, F.; Huang, W.; Yao, J.; Pan, J.; Wang, Y.; Li, Y. The effect of oxygen on phase formation in an industrial zr based bulk metallic glass. Intermetallics 2021, 129, 107055. [Google Scholar] [CrossRef]
  24. Dong, F.; Chu, Y.; He, M.; Zhang, Y.; Li, W.; Liaw, P.; Wang, B.; Luo, L.; Su, Y.; Ritchie, R. Manipulating internal flow units toward favorable plasticity in zr-based bulk-metallic glasses by hydrogenation. J. Mater. Sci. Technol. 2021, 102, 36–45. [Google Scholar] [CrossRef]
  25. Li, M.; Jiang, M.; Ding, G.; Peng, Z.; Jiang, F.; He, L.; Sun, J. The correlation between weakest configurations and yield strength of zr-based metallic glasses. J. Non-Cryst. Solids 2017, 468, 52–57. [Google Scholar] [CrossRef]
  26. Li, M.; Jiang, M.; Li, G.; Sun, J.; Jiang, F. Ductile to brittle transition of fracture of a zr-based bulk metallic glass: Strain rate effect. Intermetallics 2016, 77, 34–40. [Google Scholar] [CrossRef]
  27. Yu, W.; Zeng, H.; Sun, Y.; Sun, Y.; Hua, Z. Effect of heating rates on the crystallization process of fe64co16zr10b10 amorphous alloy. Phys. Lett. A 2017, 381, 1573–1576. [Google Scholar] [CrossRef]
  28. Bian, X.; Sun, M. Thermal-rate treatment and critical thickness for formation of amorphous al85ni10ce5 alloy. Mater. Lett. 2003, 57, 2460–2465. [Google Scholar] [CrossRef]
  29. Lin, S.; Chen, S.; Chen, J.; Lin, Y. Formation and magnetic properties of fe–si–b–dy amorphous alloy. Intermetallics 2010, 18, 1826–1828. [Google Scholar] [CrossRef]
  30. Zhang, J.; Teng, X.; Xu, S.; Xingjing, G.; Leng, J. Temperature dependence of resistivity and crystallization behaviors of amorphous melt-spun ribbon of mg66zn30gd4 alloy. Mater. Lett. 2017, 189, 17–20. [Google Scholar] [CrossRef]
  31. Sun, Y.; Qu, D.; Huang, Y.; Liss, K.; Wei, X.S.; Xing, D.W.; Shen, J. Zr–cu–ni–al bulk metallic glasses with superhigh glass-forming ability. Acta Mater. 2009, 57, 1290–1299. [Google Scholar] [CrossRef]
  32. Gu, J.; Duan, F.; Liu, S.; Cha, W.; Lu, J. Phase engineering of nanostructural metallic materials: Classification, structures, and applications. Chem. Rev. 2024; Online ahead of print. [Google Scholar] [CrossRef]
  33. Hossain, T. Mechanical Testing of Metallic Glass Ribbons. Master’s Programme in Mechanical Engineering (MEC). Master’s Thesis, Aalto University, Helsinki, Finland, 2021. [Google Scholar]
  34. Yüce, E.; Zarazúa-Villalobos, L.; Ter-Ovanessian, B.; Sharifikolouei, E.; Najmi, Z.; Spieckermann, F.; Eckert, J.; Sarac, B. New-generation biocompatible ti-based metallic glass ribbons for flexible implants. Mater. Des. 2022, 223, 111139. [Google Scholar] [CrossRef]
  35. Kouzoudis, D.; Samourgkanidis, G.; Tapeinos, C.I. Contactless detection of natural bending frequencies using embedded metallic-glass ribbons inside plastic beams made of 3-d printing. Recent Prog. Mater. 2021, 3, 1–12. [Google Scholar] [CrossRef]
  36. Tabbakh, T.; Kurdi, A.; Basak, A.K. Effect of strain rate and extrinsic size effect on micro-mechanical properties of zr-based bulk metallic glass. Metals 2021, 11, 1611. [Google Scholar] [CrossRef]
  37. Burgess, T.; Laws, K.; Ferry, M. Effect of loading rate on the serrated flow of a bulk metallic glass during nanoindentation. Acta Mater. 2008, 56, 4829–4835. [Google Scholar] [CrossRef]
  38. Fu, X.; Li, Y.; Schuh, C. Temperature, strain rate and reinforcement volume fraction dependence of plastic deformation in metallic glass matrix composites. Acta Mater. 2007, 55, 3059–3071. [Google Scholar] [CrossRef]
  39. Boltynjuk, E.; Gunderov, D.; Ubyivovk, E.; Monclús, M.; Yang, L.; Molina-Aldareguia, J.; Tyurin, A.; Kilmametov, A.; Churakova, A.; Churyumov, A. Enhanced strain rate sensitivity of zr-based bulk metallic glasses subjected to high pressure torsion. J. Alloys Compd. 2018, 747, 595–602. [Google Scholar] [CrossRef]
  40. Chen, T.-H.; Tsai, C.-K. The microstructural evolution and mechanical properties of zr-based metallic glass under different strain rate compressions. Materials 2015, 8, 1831–1840. [Google Scholar] [CrossRef]
  41. Zhang, J.; Park, J.M.; Kim, D.H.; Kim, H.S. Effect of strain rate on compressive behavior of ti45zr16ni9cu10be20 bulk metallic glass. Mater. Sci. Eng. A 2007, 449, 290–294. [Google Scholar] [CrossRef]
  42. Zhao, S.; Wang, H.; Gu, J.; Guo, N.; Shao, L.; Zhang, Y.; Yao, K.; Chen, N. High strain rate sensitivity of hardness in ti-zr-hf-be-(cu/ni) high entropy bulk metallic glasses. J. Alloys Compd. 2018, 742, 312–317. [Google Scholar] [CrossRef]
  43. Qin, F.; Xie, G.; Dan, Z.; Zhu, S.; Seki, I. Corrosion behavior and mechanical properties of mg–zn–ca amorphous alloys. Intermetallics 2013, 42, 9–13. [Google Scholar] [CrossRef]
  44. Wolff, U.; Pryds, N.; Johnson, E.; Wert, J. The effect of partial crystallization on elevated temperature flow stress and room temperature hardness of a bulk amorphous mg60cu30y10 alloy. Acta Mater. 2004, 52, 1989–1995. [Google Scholar] [CrossRef]
  45. Jayalakshmi, S.; Sahu, S.; Sankaranarayanan, S.; Gupta, S.; Gupta, M. Development of novel mg–ni60nb40 amorphous particle reinforced composites with enhanced hardness and compressive response. Mater. Des. 2014, 53, 849–855. [Google Scholar] [CrossRef]
  46. Pandya, K.S.; Roth, C.C.; Mohr, D. Strain rate and temperature dependent fracture of aluminum alloy 7075: Experiments and neural network modeling. Int. J. Plast. 2020, 135, 102788. [Google Scholar] [CrossRef]
  47. Yang, X.; Zhang, B. Material embrittlement in high strain-rate loading. Int. J. Extrem. Manuf. 2019, 1, 022003. [Google Scholar] [CrossRef]
  48. Ran, C.; Chen, P.; Li, L.; Zhang, W.; Liu, Y.; Zhang, X. High-strain-rate plastic deformation and fracture behaviour of ti-5al-5mo-5v-1cr-1fe titanium alloy at room temperature. Mech. Mater. 2018, 116, 3–10. [Google Scholar] [CrossRef]
  49. Sirigiri, V.K.R.; Gudiga, V.Y.; Gattu, U.S.; Suneesh, G.; Buddaraju, K.M. A review on johnson cook material model. Mater. Today Proc. 2022, 62, 3450–3456. [Google Scholar] [CrossRef]
  50. Shi, J.; Huang, Z.; Zu, X.; Xiao, Q.; Wang, Y. Research on non-cohesive jet formed by zr-based amorphous alloys. Sci. Rep. 2023, 13, 4149. [Google Scholar] [CrossRef]
  51. Nieh, T.; Schuh, C.; Wadsworth, J.; Li, Y. Strain rate-dependent deformation in bulk metallic glasses. Intermetallics 2002, 10, 1177–1182. [Google Scholar] [CrossRef]
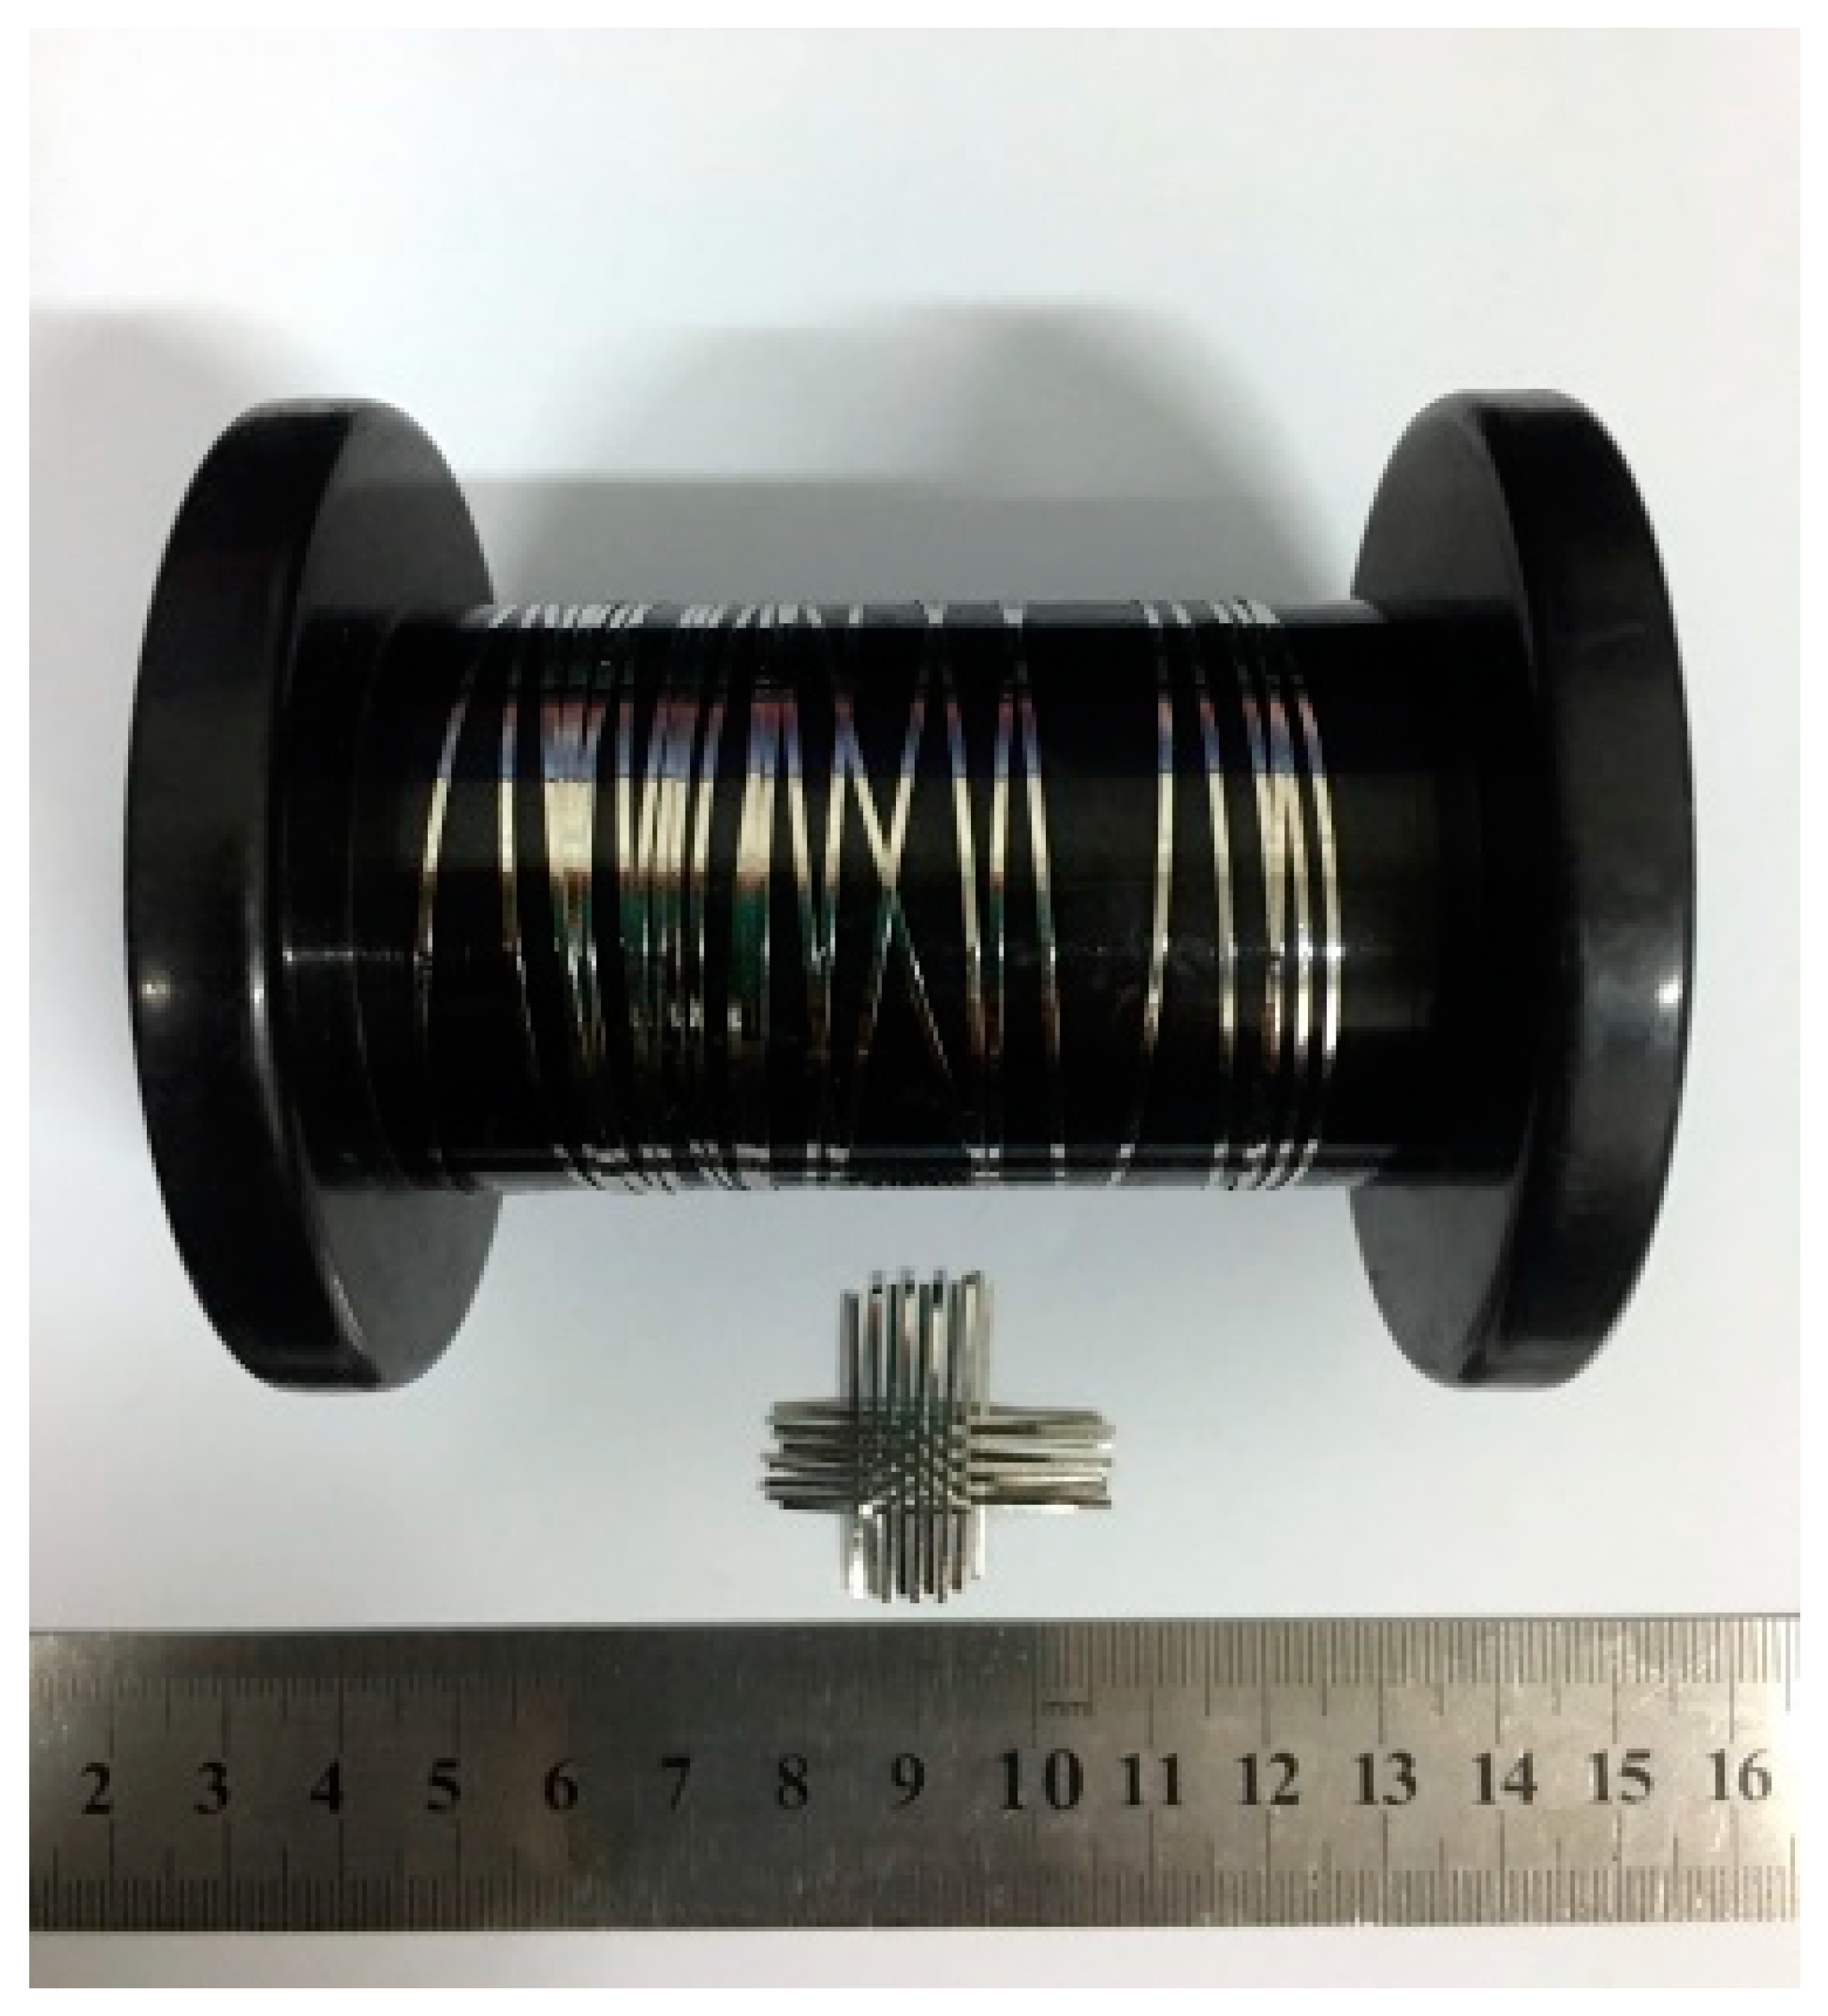
Figure 1. Macromorphology of commercially available Zr51.9Cu23.3Ni10.5Al14.3 metallic glass ribbons.
Metals 14 00220 g001
Figure 2. SEM of the cross-section of amorphous ribbon.
Metals 14 00220 g002
Figure 3. XRD of the Zr52.1Ti5Cu17.9Ni14.6Al10Y0.4 amorphous samples.
Metals 14 00220 g003
Figure 4. DSC result for tested samples at a constant heating rate of 10 K/min.
Metals 14 00220 g004
Figure 5. Tensile engineering stress–strain curves of the Zr51.9Cu23.3Ni10.5Al14.3 metallic glass ribbon.
Metals 14 00220 g005
Figure 6. SEM images of the fracture morphology of the amorphous ribbon: (a) fracture morphology; (a,b) detailed characteristics of the inner I zone.
Metals 14 00220 g006
Table 1. Tensile strength, elongation, and elastic modulus with different strain rates.
Strain RateTensile Strength (MPa)ElongationModulus
1 × 10⁻³ s−19802.440.0
1 × 10⁻⁴ s−110302.541.2
1 × 10⁻⁵ s−112002.842.8
Disclaimer/Publisher’s Note: The statements, opinions and data contained in all publications are solely those of the individual author(s) and contributor(s) and not of MDPI and/or the editor(s). MDPI and/or the editor(s) disclaim responsibility for any injury to people or property resulting from any ideas, methods, instructions or products referred to in the content.