Abstract
This article discusses recent advancements in the Laser Surface Transformation Hardening (LSTH) process applied to industrial metals. It focuses on examining the microstructure of the metal surface layer and explores different methods of performing LSTH to evaluate mechanical and surface properties. The study also investigates the utilization of various industrial lasers and simulation software for the LSTH process. The careful analysis of heat transfer and temperature control during LSTH aims to prevent the generation of surface defects like micro-cracks and surface melting. Finite element method (FEM) software effectively simulates the LSTH process. The research provides a comprehensive overview of recent developments in LSTH, categorized based on different metals and subsequent testing, highlighting its applications in the automotive industry. Electrochemical, wear, and microhardness tests are investigated to assess the potential applications of automotive metals.
1. Introduction
Laser Material Processing (LMP) plays a pivotal role in various industry applications, prompting a closer examination by contemporary scientists [1,2,3,4,5]. The controlled wavelength generated by lasers offers diverse applications across sectors [6,7,8]. While substantial progress has been made, establishing a coherent connection between LMP advancements and potential metal flaws due to inadequate supervision of input and environmental factors could optimize these procedures [9,10,11,12,13,14,15]. Laser Surface Transformation Hardening (LSTH), a specific LMP process, emerges as a game-changer capable of rapidly enhancing surface hardness [16,17,18,19]. Unlike traditional methods necessitating volumetric temperature creation, LSTH operates in a narrow area (Figure 1a,b), controlling the depth and width of the hardened zone and adapting to service requirements [20,21,22,23,24].
Notably, LSTH not only manages the heat-affected zone (HAZ) created by the laser beam but also allows adjustment through optimizing laser input parameters to modify surface hardness levels [25,26,27,28]. This technology holds great potential for the automotive industry, where materials like aluminum, prized for their strength-to-weight ratio, face limitations due to low hardness and wear resistance [29,30]. Apart from its medical applications [31,32,33,34,35,36], it is worth noting that the precise functionality of LSTH finds valuable use in treating narrow components, particularly in the automotive industry, where such precision is essential [37,38,39,40,41,42].
Applying laser alloying to the aluminum surface with pre-placed copper and aluminum elements, a technique demonstrated to enhance microhardness, microstructure uniformity, and eliminate porosity [43], showcases the potential of LSTH to address these limitations. In the automotive sector, LSTH could revolutionize manufacturing processes, allowing precise control over surface hardness tailored to specific component requirements. The ability to operate in localized areas aligns with automotive needs, offering enhanced durability and wear resistance. As the industry pivots towards lightweight materials for improved performance and fuel efficiency, LSTH’s capacity to optimize surface characteristics makes it a strategic tool for automotive engineers. Moreover, the eco-friendly nature of LSTH aligns with the broader industry trend towards sustainable and green manufacturing practices, positioning it as a key technology in the automotive industry’s pursuit of cleaner and greener processes. The interconnectedness between LSTH advancements and automotive applications underscores its potential for transforming and improving manufacturing practices within the automotive sector. The thermal stability of the surface nanostructure was investigated by in situ TEM observation. The nanostructure has good thermal stability, and then the stability mechanism was discussed in detail. A nanocrystalline layer with a grain size of about 20–200 nm in a Ni-based superalloy was fabricated by means of a laser process. The microstructure characterization of the nanocrystalline layer was systematically investigated by transmission electron microscopy (TEM) and nanoindentation. The thermal stability of the surface nanocrystalline layer was studied by in situ TEM annealing with different temperatures and duration times [44,45].
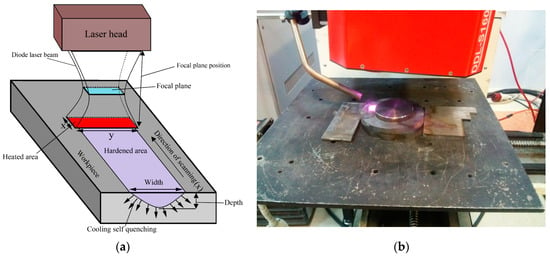
Figure 1.
LSTH process with diode laser (a) schematic of LSTH with diode laser; (b) diode laser setup for LSTH (reproduced from Ref. [27], with permission from Elsevier, Philadelphia, USA, 2019).
In this study, by categorizing the metals used in the LSTH process of the automotive industry, the progress made in LSTH is presented in detail. Also, the microstructure, mechanical, and chemical properties of the samples produced by the LSTH have been investigated according to their application type for the automotive industry and control parameters for optimization and accurate simulation of the hardening process. The main goal of this review article is to give a description of a logical course for a more correct understanding of the LSTH process in automotive industry applications, creating a picture of the future of the process in manufacturing and production. By putting together the research that has been conducted in the field of LSTH, it is possible to have a correct view of the process parameters to prevent or minimize surface defects during and after the laser operation.
2. Applications LSTH in the Automotive Industry
LSTH is a valuable tool in the automobile industry, offering a range of benefits that can help improve component performance, reduce maintenance costs, and enhance overall productivity [46]. This technique has several applications in the automobile industry; for example, it can be used to create a hard, wear-resistant surface on critical components such as engine parts, gears, and bearings [47]. This can extend the lifespan of these components and reduce their maintenance operations. LSTH can also be used to improve the fatigue strength of components that are subject to mechanical fatigue, such as crankshafts and camshafts [48,49]. By hardening the surface of these components, their resistance to fatigue failure can be increased. Compared to traditional surface heat treatment methods, LSTH can produce less distortion in the parts being treated. This can be particularly beneficial in the production of high-precision components, such as gears and shafts. LSTH can be performed quickly and accurately, allowing for high throughput and reduced cycle times. This can help improve overall productivity in the automobile manufacturing process [50,51]. Figure 2 shows the LSTH rotating cylindrical, which can be used in many parts of the automobile industry.
The LSTH process can also be applied to cylinder liners in diesel engines. Cylinder liners are cylindrical structures that fit inside the engine block and provide a surface for the piston to move up and down on. LSTH can be used to create a hard, wear-resistant surface on the cylinder liner, which reduces friction and wear between the piston rings and the cylinder wall [52]. In diesel engines, the cylinder liners are subjected to high levels of thermal and mechanical stresses, as well as corrosive wear. LSTH can help mitigate these issues by creating a surface that is more resistant to wear, heat, and corrosion. In addition to increasing wear resistance, LSTH can also help improve the tribological properties of the cylinder liner. Tribology is the study of friction, wear, and lubrication and is particularly important in the development of high-performance diesel engines. By using LSTH to modify the surface of the cylinder liner, diesel engine manufacturers can improve the tribological properties of the component, leading to improved engine efficiency and performance. The application of LSTH to cylinder liners in diesel engines can offer a range of benefits, including improved wear resistance, enhanced tribological properties, and longer component life [53].
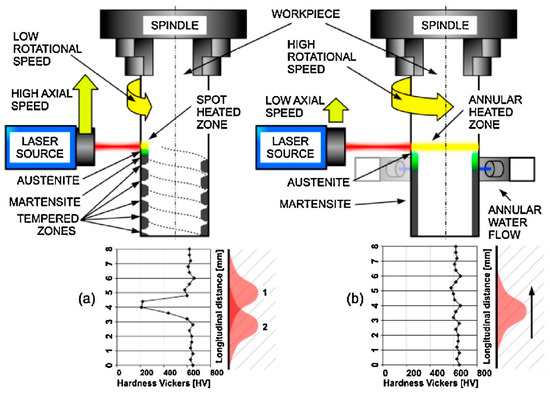
Figure 2.
Schematic of the application of LSTH in a rotating cylindrical sample (reproduced from Ref. [54], with permission from Elsevier, 2014). (a) Classical LSTH (b)New approach LSTH.
LSTH can also be used in aerospace and aviation applications, particularly for components such as cylinder liners in aircraft engines. Aircraft engines are subjected to extreme operating conditions, including high temperatures, high pressures, and high levels of vibration. Cylinder liners in aircraft engines must be able to withstand these conditions while maintaining optimal performance and reliability [55]. By using LSTH to modify the surface of the cylinder liner, aerospace manufacturers can improve its resistance to wear, corrosion, and thermal stress. This can help extend the lifespan of the component and reduce maintenance costs [56,57]. By creating a harder, smoother surface on the cylinder liner, the engine can operate more efficiently, resulting in improved fuel economy and reduced emissions. LSTH can also be used to modify the surface of other components in aerospace and aviation applications, such as turbine blades and bearings. By improving the wear resistance and thermal stability of these components, manufacturers can improve their performance and reliability [58,59].
3. Laser Hardening Characterization
3.1. Microstructural Characterization
3.1.1. Carbon Steels
The microstructure and grain size of S45C medium carbon steel subjected to LSTH can vary depending on the type of laser used and the processing parameters. Two commonly used lasers for the LSTH of S45C are Nd:YAG and fiber lasers [4]. Nd:YAG lasers typically have a shorter wavelength and higher pulse duration than fiber lasers, which can affect the heat input and cooling rate during the process. The resulting microstructure and grain size can also be influenced by the processing parameters, such as laser power, scanning speed, and preheating temperature [60]. In general, LSTH of medium carbon steels using fiber lasers results in a hardened surface layer with a fine-grained structure. The microstructure of this surface layer typically consists of martensite with a high density of dislocations, while the HAZ can contain tempered martensite, bainite, and ferrite [61]. Fiber lasers, on the other hand, have a longer wavelength and higher peak power than Nd:YAG lasers. This produces a different thermal profile during LSTH, which leads to a finer and more uniform microstructure than using an Nd:YAG laser [62].
3.1.2. Alloyed Steels
AISI 4130 and AISI 4140, popular low-alloy steels, boast high strength, toughness, and wear resistance. Their microstructure and grain size post-LSTH are influenced by factors like laser parameters and cooling rate. In the LSTH process, a laser rapidly heats the steel surface, followed by quick quenching, creating a hardened layer with a refined microstructure and fine grain size. Typically, both steels exhibit a post-LSTH microstructure comprising a fine-grained martensitic structure due to the high cooling rate during quenching [63,64].
The refinement of the microstructure increases surface hardness and improves wear resistance to abrasive wear and contact fatigue. The grain size of 4130 and 4140 steels after LSTH can be significantly reduced, typically to the submicron range. This reduction in grain size results in increased strength and improved fatigue resistance. The grain size and microstructure of AISI 4130 and AISI 4140 steels after LSTH are also affected by the laser parameters used, such as laser power, scanning speed, and beam diameter. Figure 3 shows the LSTH samples of 50CrMo4 steel, which were hardened by pulsed lasers with different pulse duration. In this regard, the study compares continuous-wave and pulsed lasers for surface hardening of 50CrMo4 steel. A ms laser, with significantly lower power, is found to be as effective as the continuous-wave laser, achieving a surface hardness of ~719 HV and ~200 μm depth. The ns lasers induce both hardening and material removal with a shallower depth (~80 μm). The fs and ps lasers result in direct surface ablation without observable hardening. This research provides insights into diverse laser methods for achieving specific steel surface properties.
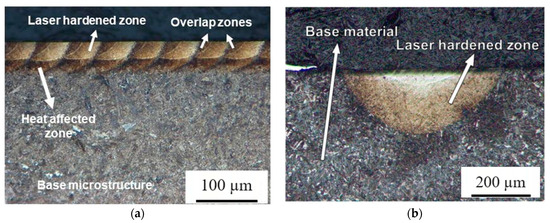
Figure 3.
Hardened sample of 50CrMo4 steel sample after LSTH (a) LSTH by ns laser; (b) LSTH cw laser (P = 250 W, laser speed: 10 mm/s) (reproduced from Ref. [63], with permission from Elsevier, 2019).
3.1.3. Tool Steels
The microstructure and grain size of AISI H13 tool steel after LSTH are influenced by various factors, such as laser inputs and preheating temperatures [65]. Generally, LSTH of H13 steel results in a refined and hardened surface layer with a different microstructure from the base material [66]. The typical microstructure of the LSTH of H13 consists of a thin, homogeneous martensitic layer on top of the base material. This layer has a high density of dislocations and a fine-grained structure, which improves the hardness and wear resistance [67]. Below the martensitic layer, there is a HAZ with a different microstructure, typically consisting of tempered martensite, bainite, or a combination of both. The grain size of the martensitic layer is generally smaller than that of the base material due to the rapid cooling rate during the process. The grain size can be further reduced by increasing the cooling rate, which results in higher hardness and wear resistance. The size and shape of the grains in the HAZ depend on the preheating temperature and cooling rate during the process. The microstructural changes induced by LSTH can be controlled by adjusting the processing parameters, allowing for customized surface properties. Figure 4 depicts the microstructure and hardened area of AISI H13 tool steel after LSTH, in which zone 1 is harder than zone 2 because the laser beam cannot heat the deeper part of the bulk of the sample.
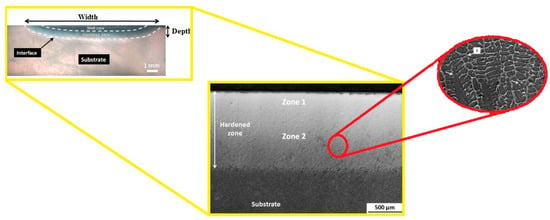
Figure 4.
The cross-section of AISI H13 tool steel after LSTH (reproduced from Ref. [68], with permission from Elsevier, 2014).
3.1.4. Stainless Steels
The microstructure and grain size of AISI 410 and AISI 420 stainless steels after LSTH can be affected by several factors, including the composition of the material, the processing parameters used during LSTH, and the cooling rate [69]. LSTH of those martensitic stainless steels typically leads to a fine-grained microstructure with a high density of dislocations and high hardness [70,71]. The precise microstructure and grain size are subject to variation based on the specific processing conditions employed. For instance, elevating the laser power or reducing the scanning speed yields a coarser grain structure and diminished hardness. Conversely, diminishing the laser power or increasing the scanning speed results in a finer grain structure with enhanced hardness. Regarding distinct microstructural alterations, the LSTH of AISI 410 and 420 typically leads to the creation of martensite [72]. Figure 5 depicts the SEM microstructures of AISI 420 stainless steel. Besides the martensitic phase, some retained austenite and carbides can be seen [73]. The proportion of martensite formed is affected by the cooling rate as well as the carbon content of the steel. Overall, LSTH can be an effective way to improve the surface hardness and wear resistance of martensitic stainless steels while also modifying the microstructure and grain size to achieve specific performance characteristics.
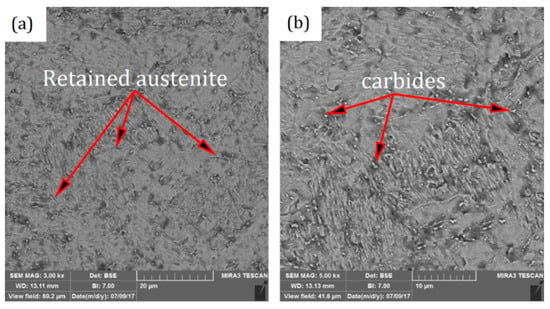
Figure 5.
Retained austenite of hardened zone of LSTH AISI 420 sample (a) retained austenite after the process; (b) carbides into the martensite phase (reproduced from Ref. [73], with permission from Elsevier, 2020).
3.1.5. Cast Irons
Gray and nodular cast irons, prevalent in diverse industries, vary in microstructure and grain size due to distinct production methods and chemical compositions. Gray cast iron, created by melting iron with carbon, silicon, and other elements, features a microstructure comprising graphite flakes in a ferrite and pearlite matrix. These flakes, serving as stress concentrators, render gray iron brittle and susceptible to tension-induced cracking [74]. Nodular cast iron, on the other hand, is a type of ductile iron that is produced by adding a small amount of magnesium to the melt of gray iron. This results in the formation of spheroidal graphite nodules instead of graphite flakes, giving the material increased ductility and toughness. The microstructure of nodular cast iron consists of nodules of graphite surrounded by a matrix of ferrite and pearlite. The grain size of nodular cast iron is typically finer than that of gray cast iron due to the addition of magnesium and the subsequent control of the cooling rate during solidification. The microstructure of gray cast iron consists of graphite flakes embedded in a matrix of ferrite and pearlite, with a coarse grain size, while nodular cast iron has a microstructure consisting of nodules of graphite surrounded by a matrix of ferrite and pearlite, with a finer grain size. For gray cast iron, LSTH can produce a microstructure consisting of a refined pearlite/ferrite matrix with a reduced amount of graphite flakes. The grain size can also be refined, with a more uniform distribution of smaller grains. The hardness of the surface layer can be significantly increased, providing improved wear resistance. For nodular cast iron, LSTH produces a refined pearlite/ferrite matrix with a reduced number of graphite nodules. The grain size can also be refined, with a more uniform distribution of smaller grains. The hardness of the surface layer can be significantly increased, providing improved wear resistance and fatigue strength [75]. Figure 6 shows the LSTH of a gray cast iron sample.
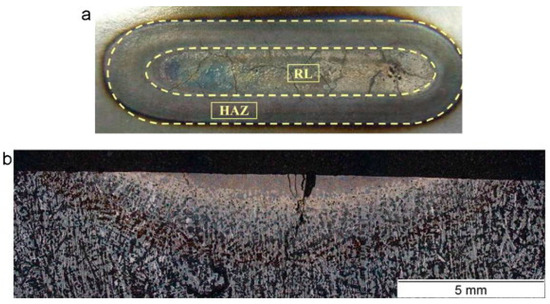
Figure 6.
LSTH of cast iron: (a) top view of the hardening line; (b) cross-section of the sample (reproduced from Ref. [75], with permission from Elsevier, 2012).
3.1.6. Aluminum
The study on enhancing aluminum’s surface through laser alloying, employing binary mixes of molybdenum and zirconium metallic powders, was investigated [43]. The 4.4 kW Rofin Sinar Nd:YAG laser facilitated the process, and the resulting surfaces were characterized using standard techniques. Findings indicate that laser alloying aluminum with molybdenum and zirconium powders significantly improves hardness, wear, and corrosion resistance. Under optimal conditions (4 kW laser power and 1.4 m/min laser speed), hardness values increased sixfold, and wear resistance rose sixteen-fold over the substrate. This research establishes the efficacy of binary molybdenum-zirconium combinations in augmenting laser-alloyed aluminum properties, particularly noting enhanced corrosion resistance and a substantial microhardness increase from 24 hv (substrate) to 148 hv (alloyed surface) [44]. The resulting Al-Cu alloys demonstrated homogeneity, with microhardness ranging from 60 to 250 hv for 6–40 wt.% Cu. Nanoindentation measurements revealed increased elastic modulus and plasticity index, indicating enhanced wear resistance compared to pure aluminum. A pin-on-disk device validated improved mechanical properties, with up to a 15-fold decrease in mass loss between a virgin specimen and a 40 wt.% Cu alloy. As the copper ratio increased, a transition from severe to mild wear occurred, manifesting in homogeneous wear tracks and reduced wear rates. Laser-induced remelting of pre-placed Cu powder on the Al substrate resulted in fine microstructures, with mechanical behavior contingent on the Cu ratio. Alloys with less than 27 wt.% Cu exhibited a weakened microhardness, decreasing after annealing, while those with ratios above this value maintained high microhardness and stable mechanical properties post-annealing at 480 °C for 24 h [45]. The study [76] explored the alteration of the precipitate microstructure induced by LSTH on AA7449 aluminum alloy in T7651 temper. Microhardness maps beneath the laser lines and precipitate size/volume fraction maps reveal significant dissolution and coarsening due to laser treatment. Integrated modeling, including thermal finite element, size class precipitation, and precipitation hardening models, quantifies this effect. The laser treatment results in substantial precipitate dissolution and size modification within the first 500 μm below the surface. While small late-stage precipitates mitigate mechanical loss, the impact on aerospace component properties such as buckling, fracture toughness, and corrosion resistance requires assessment [76]. The study investigated the optimal parameters for aluminum specimens to achieve the desired residual stress variation and enhanced corrosion resistance [77]. Laser treatment employed a Q-switched Nd:YAG laser (1064 nm). A factorial design, considering pulse density (900 and 2500 pulses/cm2), material type (AlMgSiPb and AlSi1MgMn), and laser surface treatment sweep direction (longitudinal and transversal), confirmed the significant influence of pulse density. Higher pulse density (2500 pulses/cm2) resulted in the highest compressive residual stresses and increased corrosion resistance, as indicated by dynamic corrosion testing. Rogachev et al. [78] explore the impact of laser radiation on eutectic aluminum alloys Al–Ca, Al–Ce, Al–La, and Al–Ni, crucial for additive technologies due to their excellent casting properties. Laser modification of their surfaces was performed to assess hardening effects, with microhardness measurements revealing increased hardness. Al–8% Ca exhibited the highest strengthening effect (2.6 times) but induced embrittlement under tension. Despite embrittlement, the modified Al–8% Ca alloy remains interesting for its heightened hardness and potential wear resistance. In contrast, Al–10% Ce, Al–10% La, and Al–6% Ni samples showed lower hardening effects (1.5–2.2 times) but increased tensile strength with ductile or mixed ductile and brittle fracture formation, affirming the alloys’ potential in additive manufacturing.
3.2. Mechanical Characterization
3.2.1. Microhardness
As has been shown in the previous sections, LSTH is a process that can increase the hardness of steels and other metallic alloys [79]. LSTH creates a surface layer significantly harder than the underlying material, resulting in improved mechanical properties such as increased wear resistance and fatigue strength [80]. The hardness improvement achieved through LSTH depends on several factors, including the specific material or alloy, the processing parameters, and the depth of the hardened layer. Moreover, the process involves rapid heating and cooling, which can induce residual stresses and microstructural changes. Particularly in the case of low-alloy steels, the hardness can be increased several times. Stainless steels can also be hardened through LSTH, although the effect can vary depending on the specific stainless type and composition [81]. In the case of titanium, LSTH can also increase the surface hardness, particularly for alpha and near-alpha alloys. However, the effect on other titanium alloys strongly depends on the specific alloy composition and processing parameters used [82]. In Figure 7, the hardness profile of EN31 steel (a high-carbon, chromium-containing low-alloy steel considered a standard high-speed steel grade) shows that the hardness increased from 200 HV up to 850 HV after LSTH.
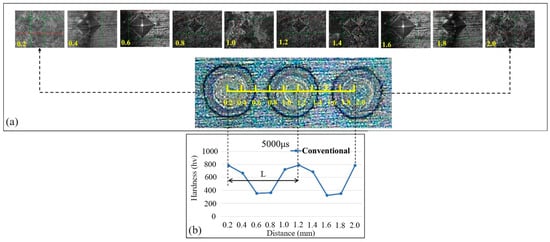
Figure 7.
(a) The direction of measuring the microhardness; (b) microhardness profile (reproduced from Ref. [83], with permission from Elsevier, 2024).
3.2.2. Wear Behavior
LSTH can improve the wear resistance of metals by creating a hardened surface layer that is more resistant to wear than the underlying material [59,84]. As shown in the previous sections, the process increases the surface hardness, which results in a reduction in the amount of material removed during wear and service. However, the effect can vary depending on the specific material, alloy composition, and processing parameters used. Careful control of the LSTH process is important to ensure that the desired improvements in wear resistance are achieved.
3.2.3. Corrosion Resistance
LSTH can improve the corrosion resistance of carbon steels and low alloy steels so that the hardened surface layer is more resistant to corrosion than the underlying material. However, the effect of LSTH on the corrosion resistance of stainless steels is more complex and depends on the specific alloy composition and the processing parameters used. Stainless steels contain chromium, which forms a passive oxide layer on the surface that provides corrosion resistance [85]. LSTH can disrupt this oxide layer, potentially reducing the corrosion resistance. Nevertheless, if the LSTH process is carefully controlled, it can create a new and improved oxide layer with higher resistance to corrosion than the original layer [86]. Figure 8 is an overview of the corrosion installation of the AISI 410 sample after LSTH, which the Nd:YAG laser used for the single-track process, and then the samples for the corrosion test were examined in a 2% NaCl solution.
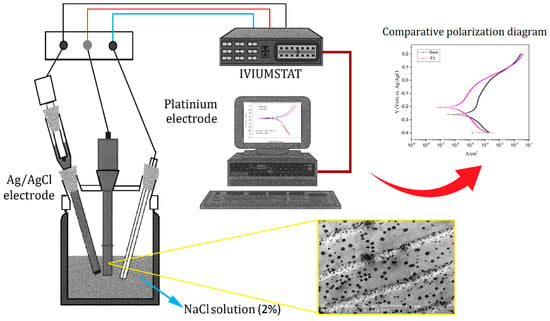
Figure 8.
Schematic of the setup for the corrosion test of AISI 410 stainless steel after LSTH by considering a 2% NaCl solution (reproduced from Ref. [71], with permission from Elsevier, 2019).
3.2.4. Fatigue Behavior
The LSTH process can also have some negative effects on the material properties, such as fatigue strength, if the parameters are not optimized for the process. The fatigue effect refers to the fact that the LSTH process can lead to a reduction in the fatigue strength of the material, particularly if the hardening depth is too shallow or if the residual stresses induced during the process are not properly managed [87]. Defects can also occur during the LSTH process, particularly if the laser power or duration is not properly controlled. Common defects include cracking, porosity, and distortion. These defects can have a negative impact on the mechanical properties of the material, as well as its overall quality and reliability. To minimize the negative effects of LSTH, it is important to carefully control the process parameters, including laser power, duration, and scanning speed. Additionally, post-processing treatments such as shot peening or stress relief annealing can help reduce residual stresses and improve the fatigue strength of the material [51].
3.2.5. Residual Stresses and Micro-Cracks
Residual stresses can have a significant impact on the microstructure of steel and titanium after LSTH. LSTH is a process that involves melting the surface layer of a metal using a high-energy laser beam, followed by rapid solidification to create a hardened layer. Residual stresses can develop during the LSTH process due to non-uniform heating and cooling rates, thermal expansion mismatches between the surface layer and the underlying material, and other factors [88,89]. These residual stresses can cause distortion, cracking, and even failure of the component if not properly managed. In the case of steel, residual stresses can result in changes to the microstructure, such as the formation of martensite or the precipitation of carbides, depending on the composition of the steel and the processing parameters used [5]. These changes can affect the mechanical properties of the steel, including its strength, ductility, and toughness. Similarly, in titanium, residual stresses can cause changes in the microstructure, such as the formation of alpha or beta phases, depending on the processing conditions. To mitigate the effects of residual stresses, post-processing treatments such as stress relief annealing or shot peening may be used. These treatments can help redistribute and reduce the residual stresses in the material, improving its overall mechanical performance [64].
Micro-cracks can sometimes occur after the LSTH of tool steel and stainless steel. This can be due to several factors, including the composition of the material, the processing parameters used, and the thermal history of the material during the LSTH process [90]. One possible cause of micro-cracks is the presence of residual stresses in the material. As mentioned, residual stresses can develop during LSTH due to non-uniform heating and cooling rates. These residual stresses can cause the material to crack if they exceed the material’s strength. Another possible cause of micro-cracks is the formation of martensite, which is a hard, brittle phase that can form in steel during rapid cooling (Figure 9). If the cooling rate is too high or the material is not properly tempered after LSTH, the formation of martensite can lead to micro-cracking. In stainless steel, micro-cracks can also occur due to the formation of chromium carbides, which can form at high temperatures during the LSTH process [73]. These carbides can reduce the material’s corrosion resistance and lead to cracking if they are not properly controlled. To minimize the risk of micro-cracking, it is important to carefully control the processing parameters used during LSTH, including the laser power, scan speed, and preheating temperature [91]. Table 1 shows the most recent studies of the LSTH of different metals.
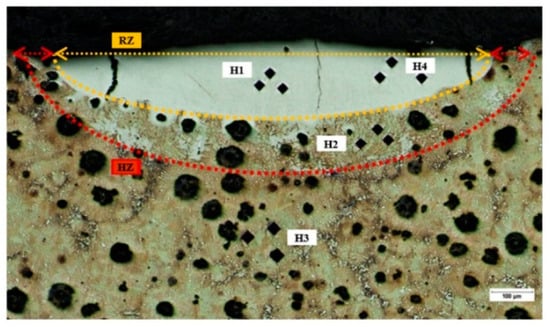
Figure 9.
Crack after LSTH on ductile iron (Reprinted from ref. [91]).

Table 1.
The progress of the LSTH over the last fifteen years.
4. Simulation and Optimization
4.1. Simulation
The utilization of the finite element method (FEM) in COMSOL enables the simulation of LSTH, offering valuable insights into the material’s thermal and mechanical behavior throughout the process. COMSOL, a versatile multiphysics simulation software, provides a comprehensive platform for modeling and simulating various physical phenomena encompassing heat transfer, structural mechanics, and fluid flow. Through the FEM approach, COMSOL facilitates the accurate prediction and analysis of the intricate interplay between these phenomena during LSTH. By incorporating FEM within COMSOL, researchers and engineers gain the ability to explore and understand the complex thermal and mechanical dynamics that occur in the material subjected to LSTH. This simulation tool serves as an indispensable resource for optimizing process parameters, enhancing material performance, and ensuring the integrity of the treated surfaces. The computational capabilities of COMSOL, combined with the fidelity of the FEM method, enable researchers to virtually study and evaluate the impact of different laser settings, cooling conditions, and material properties on the final outcome of the LSTH process. Overall, the integration of FEM in COMSOL empowers engineers to make informed decisions and advancements in the field of LSTH by providing a robust platform for simulating and analyzing the complex interactions within this thermal and mechanical treatment technique [106,107,108]. The finite element method is a numerical technique used to solve partial differential equations and is well-suited for simulating complex physical systems [109]. To simulate LSTH using FEM in COMSOL, the process can be modeled as a heat transfer problem with a moving heat source. The laser beam is treated as a heat source that moves across the surface of the material, heating and melting the surface layer. The distribution of power density can be modified by Equation (1):
where and are considered heat sources and the maximum intensity, respectively. is defined as the lower and upper radius. Equation (2) defines the radius r:
The thermal and mechanical properties of the material are input into the model, including thermal conductivity, specific heat capacity, and density (Figure 10a). The simulation can be used to predict the temperature distribution within the material during the LSTH process, as well as the resulting changes in the material’s mechanical properties, such as hardness and residual stress (Figure 10b,c). This can be useful for optimizing the process parameters, such as laser power and scanning speed, to achieve the desired surface properties [110]. Additionally, the simulation can be used to investigate the effects of various process parameters on the resulting surface properties, such as the depth and extent of the hardened layer. This can help to improve the overall efficiency and effectiveness of the LSTH process. By considering the cooling rate on the LSTH, it can be effective to apply this information to the software because the mesh size can be modified based on the rate of heating and cooling (Figure 10d). In conclusion, the simulation of LSTH using FEM in COMSOL is a valuable tool for predicting the thermal and mechanical response of the material during the process, optimizing process parameters, and improving the efficiency and effectiveness of the process [111].
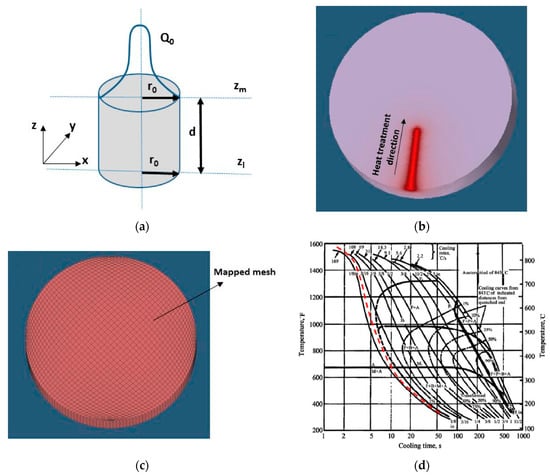
Figure 10.
(a) The model of cylindrical heat source; (b) the hardening direction temperature distribution; (c) the mesh of AISI 4130 steel; (d) the diagram of continuous cooling transformation (CCT) for AISI 4130 and the cooling rate (Reprinted from ref. [110]).
Like COMSOL, Abaqus (2022 HF4, Dassault Systèmes, Waltham, MA, USA) is also a powerful finite element analysis software that can be used for simulating LSTH processes. Abaqus has advanced thermal capabilities that can accurately simulate the heat transfer in the material during the LSTH process. The simulation can predict the temperature distribution, phase transformation, and residual stress in the material [90,112]. The material properties can be updated based on the change in temperature and phase transformation [113]. Thermal–mechanical coupling can also be considered in the simulation to accurately predict the distortion and residual stress in the material. One of the advantages of using Abaqus for LSTH simulation is its ability to incorporate more complex material models, such as anisotropic materials and materials with temperature-dependent properties. Abaqus can also perform optimization studies and parameter sweeps to determine the optimal process parameters for achieving the desired surface properties. The phase transformation kinetics Equations (3) and (4) describe the hypoeutectoid steel solid phase transformations during the surface heating of AISI H13 steel [114].
The fractions of -carbide () and ferrite () that form the fraction of martensite that was tempered () are calculated and is the carbon concentration of H13. The relevant thermal and phase strain increments can be added to the elastic and plastic strain increments according to Equation (5). Figure 11 shows the simulation of the hardened area and residual stress simulation design of H13 steel.
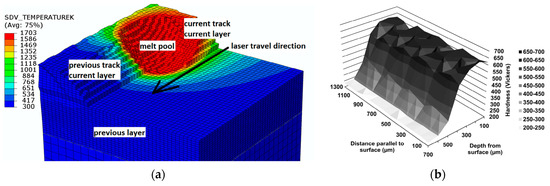
Figure 11.
(a) Phase fraction of martensite during the third track; (b) cross-section of a single-layer LDD sample showing the hardness (reproduced from Ref. [113], with permission from Elsevier, 2013).
4.2. Optimization
Taguchi methods and Minitab software Version 21.4.2 are often used in conjunction with Design of Experiments (DOE) techniques to optimize the LSTH process for steel and stainless steel [76,115]. These tools allow researchers to systematically investigate the effects of different processing parameters on the quality of the surface hardening and identify the optimal combination of parameters to achieve effective results [116]. Taguchi's methods involve using statistical techniques to design experiments and analyze the results. The method aims to identify the factors that have the greatest impact on the process outcome and optimize these factors to improve the quality of the process [117]. Minitab software is a powerful statistical analysis tool that can be used to analyze experimental results and identify the optimal parameter settings. DOE is another statistical technique that is commonly used to optimize the LSTH of steel and stainless steel, and it involves systematically varying multiple process parameters simultaneously to identify the optimal combination of parameters that will produce the desired outcome [118]. DOE techniques can help to understand the interactions between different process parameters and how they affect the quality of the surface hardening. Together, Taguchi methods, Minitab software, and DOE techniques can help to optimize the LSTH process for steel and stainless steel by identifying the optimal processing parameters that will produce high-quality surface hardening with minimal defects or micro-cracking [118]. In Figure 12, some plots belong to the response surface method technique depicted. Figure 12a shows the 3D response plot by considering two effective factors, laser power and scanning speed, of LSTH on the AISI 4130 steel width sample, which used a high-power laser to make a hardening process. Regarding the interaction of each parameter with each other and the influence of input parameters, a perturbation plot can show the effect of each parameter on the hardened area. Figure 12b depicts the three inputs of the laser at the angle of the hardened zone on its perturbation plot [27].
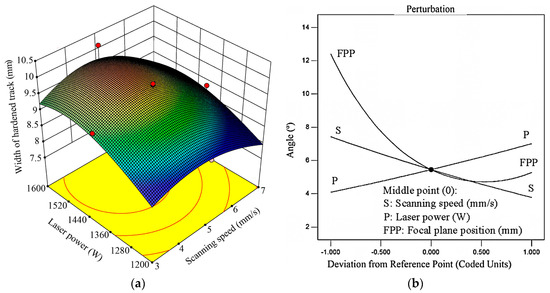
Figure 12.
(a) The response surface graph of the width of the hardened layer in terms of the scanning speed and the laser power; The red and blue colors show the highest and lowest amount of the response, respectively (b) perturbation plot of the angle of entry hardened profile (reproduced from Ref. [27], with permission from Elsevier, 2019).
5. Future Prospective of LSTH for Industrial Sectors
The promising future development of LSTH for metals holds significant implications for the automotive industry, offering an invaluable tool to enhance the performance and durability of diverse components. Already proven effective in improving surface hardness and wear resistance for steel, aluminum, and titanium components, LSTH is poised for wider adoption in various industries, with the automotive sector standing out as a key beneficiary. Anticipated advancements in laser systems, marked by increased power and enhanced beam quality, are set to elevate efficiency and quality in LSTH applications. The integration of sophisticated sensors and monitoring techniques is expected to revolutionize process control during LSTH, providing real-time feedback for precision and efficacy. A notable innovation lies in combining LSTH with 3D printing technology, showcasing the potential to create intricate, high-performance automotive components characterized by superior surface hardness and wear resistance. This integration aligns with the industry’s growing demand for lightweight materials with advanced performance characteristics, positioning LSTH as a technology of choice for automotive applications. Moreover, LSTH’s alignment with the global trend toward sustainable and green manufacturing processes makes it particularly relevant in the automotive sector’s pursuit of eco-friendly practices. As industries pivot towards sustainability, LSTH emerges as a pivotal player, contributing significantly to the development of cleaner and greener manufacturing processes within the automotive industry. By leveraging LSTH’s advancements, automotive manufacturers can enhance the durability, performance, and sustainability of their components, addressing the evolving needs of the industry and meeting consumer expectations for environmentally conscious practices.
6. Conclusions
In summary, LSTH is a valuable technique that enhances the surface properties of different materials like cast iron, titanium, aluminum, and low-alloy steel. Diverse microstructures played a crucial role in these property enhancements. It refines the microstructure and grain size, resulting in improved mechanical properties like surface hardness, wear resistance, and fatigue resistance. However, the process may also lead to the formation of defects, such as cracks and surface melting, limiting the material’s performance. To optimize LSTH, numerical simulations can be employed to predict and model microstructure changes and defect formation, allowing for adjustments to laser parameters and cooling conditions to achieve the desired results. Advances in computational methods and materials science will likely enhance the accuracy and reliability of these simulations, facilitating the development of improved LSTH techniques. Looking ahead, LSTH will continue to play a critical role in surface engineering for various materials, including emerging ones like composites and additive manufacturing alloys. The ability to control the microstructure and grain size through LSTH will remain essential for enhancing the performance and durability of components in the automotive industry.
Author Contributions
Conceptualization, M.K. and M.M.; methodology, M.K.; software, M.K.; validation, M.K., M.M., G.C. and A.M.; formal analysis, M.K. and M.R.; investigation, M.K. and M.M.; resources, M.K.; data curation, M.K.; writing—original draft preparation, M.K., M.R., M.M., A.M. and G.C. writing—review and editing, M.K. and M.R.; visualization, M.K.; supervision, M.M. and G.C.; project administration, G.C. All authors have read and agreed to the published version of the manuscript.
Funding
This research received no external funding.
Data Availability Statement
No new data were created or analyzed in this study. Data sharing is not applicable to this article.
Conflicts of Interest
The authors have no relevant financial or non-financial interests to disclose.
References
- Sghaier, T.A.; Sahlaoui, H.; Mabrouki, T.; Sallem, H.; Rech, J. Selective laser melting of stainless-steel: A review of process, microstructure, mechanical properties and post-processing treatments. Int. J. Mater. Form. 2023, 16, 41. [Google Scholar] [CrossRef]
- Steen, W.M. Laser material processing—An overview. J. Opt. A Pure Appl. Opt. 2003, 5, S3–S7. [Google Scholar] [CrossRef]
- Sohail, M.T.; Wang, M.; Shareef, M.; Yan, P. A Review of Ultrafast Photonics Enabled by Metal-Based Nanomaterials: Fabrication, Integration, Applications and Future Perspective. Infrared Phys. Technol. 2024, 137, 105127. [Google Scholar] [CrossRef]
- Sadaf, M.; Bragaglia, M.; Perše, L.S.; Nanni, F. Advancements in Metal Additive Manufacturing: A Comprehensive Review of Material Extrusion with Highly Filled Polymers. J. Manuf. Mater. Process. 2024, 8, 14. [Google Scholar] [CrossRef]
- Mishra, Y.K.; Gupta, S.K.; Mishra, S.; Singh, D.P. Laser beam drilling of fiber reinforced composites using Nd: YAG and CO2 Laser: A review. Mater. Today Proc. 2023. [Google Scholar] [CrossRef]
- Legall, H.; Bonse, J.; Krüger, J. Review of X-ray exposure and safety issues arising from ultra-short pulse laser material processing. J. Radiol. Prot. 2021, 26, 41. [Google Scholar] [CrossRef]
- Lupone, F.; Padovano, E.; Casamento, F.; Badini, C. Process phenomena and material properties in selective laser sintering of polymers: A Review. Materials 2021, 15, 183. [Google Scholar] [CrossRef]
- Siddiqui, A.A.; Dubey, A.K. Recent trends in laser cladding and surface alloying. Opt. Laser Technol. 2021, 134, 106619. [Google Scholar] [CrossRef]
- Casalino, G.; Giorleo, L.; Capello, E.; Segui, V.J. Post Treatment Laser Irradiation for Recovery of Deformation Induced by Surface Laser Hardening. In Proceedings of the Third Manufacturing Engineering Society International Conference: MESIC-09, Alcoy, Spain, 17–19 June 2009. [Google Scholar]
- Kennedy, E.; Byrne, G.; Collins, D.N. A review of the use of high power diode lasers in surface hardening. J. Mater. Process. Technol. 2004, 155–156, 1855–1860. [Google Scholar] [CrossRef]
- Tan, C.Y.; Wen, C.; Ang, H.Q. Influence of laser parameters on the microstructures and surface properties in laser surface modification of biomedical magnesium alloys. J. Magnes. Alloy 2024, 12, 72–97. [Google Scholar] [CrossRef]
- Tan, C.; Weng, F.; Sui, S.; Chew, Y.; Bi, G. Progress and perspectives in laser additive manufacturing of key aeroengine materials. Int. J. Mach. Tools Manuf. 2021, 170, 103804. [Google Scholar] [CrossRef]
- Homberg, D.; Weiss, W. PID control of laser surface hardening of steel. IEEE Trans. Control Syst. Technol. 2006, 14, 896–904. [Google Scholar] [CrossRef]
- Lasota, I.; Protsenko, V.; Matyushkin, A.; Kuznetsov, M.; Gook, S. Laser surface hardening of engine camshaft cams. Mater. Today Proc. 2020, 30, 478–482. [Google Scholar] [CrossRef]
- Wang, X.; Lu, Q.; Zhang, P.; Yan, H.; Shi, H.; Sun, T.; Zhou, K.; Chen, K. A review on the simulation of selective laser melting AlSi10Mg. Opt. Laser Technol. 2024, 174, 110500. [Google Scholar] [CrossRef]
- Solina, A.; De Sanctis, M.; Paganini, L.; Blarasin, A.; Quaranta, S. Origin and development of residual stresses induced by laser surface-hardening treatments. J. Heat Treat. 1984, 3, 193–204. [Google Scholar] [CrossRef]
- Shin, H.J.; Yoo, Y.; Ahn, D.G.; Im, K. Laser surface hardening of S45C medium carbon steel using ND:YAG laser with a continuous wave. J. Mater. Process. Technol. 2007, 187–188, 467–470. [Google Scholar] [CrossRef]
- Tani, G.; Fortunato, A.; Ascari, A.; Campana, G. Laser surface hardening of martensitic stainless steel hollow parts. CIRP Ann. 2010, 59, 207–210. [Google Scholar] [CrossRef]
- Lv, Y.; Cui, B.; Sun, Z. Investigation on wear behavior for SUS420 steel gear based on discrete laser surface melting. Opt. Laser Technol. 2024, 170, 110251. [Google Scholar] [CrossRef]
- Schneider, M.J.; Chatterjee, M.S. Introduction to Surface Hardening of Steels. In Steel Heat Treating Fundamentals and Processes; ASM International: Almere, The Netherlands, 2013; pp. 389–398. [Google Scholar]
- Manco, E.; Cozzolino, E.; Astarita, A. Laser polishing of additively manufactured metal parts: A review. Surf. Eng. 2022, 38, 217–233. [Google Scholar] [CrossRef]
- Majumdar, J.D.; Kumar, A.; Pityana, S.; Manna, I. Laser Surface Melting of AISI 316L Stainless Steel for Bio-implant Application. Proc. Natl. Acad. Sci. India Sect. A Phys. Sci. 2018, 88, 387–403. [Google Scholar] [CrossRef]
- Jeyaprakash, N.; Yang, C.H.; Raj Kumar, D. Laser Surface Modification of Materials. In Practical Applications of Laser Ablation; IntechOpen: London, UK, 2021. [Google Scholar]
- Shariff, S.M.; Tak, M.; Padmanabham, G.; Shanmugam, S. Laser Surface Hardening of Crankshaft. In Proceedings of the International Mobility Engineering Congress and Exposition, Chennai, India, 13–15 December 2009. [Google Scholar]
- Claus, G. Transformation hardening with high power diode laser systems using single and multiple tracks. In Proceedings of the International Congress on Applications of Lasers & Electro-Optics, Orlando, FL, USA, 14–18 October 2018; Volume 2004, p. 1203. [Google Scholar]
- Sidashov, A.V.; Kozakov, A.T.; Yares’Ko, S.; Kakovkina, N.G.; Manturov, D.S. Study of the phase composition and tribological properties of carbon tool steels after laser surface hardening by quasi—CW fiber laser. Surf. Coat. Technol. 2020, 385, 125427. [Google Scholar] [CrossRef]
- Moradi, M.; KaramiMoghadam, M. High power diode laser surface hardening of AISI 4130; statistical modelling and optimization. Opt. Laser Technol. 2019, 111, 554–570. [Google Scholar] [CrossRef]
- Fang, X.; Gong, J.; Yu, Y.; Yu, S.; Zhou, L.; Zhang, Z.; Cai, Z. Study on the fretting wear performance and mechanism of GH4169 superalloy after various laser shock peening treatments. Opt. Laser Technol. 2024, 170, 110301. [Google Scholar] [CrossRef]
- Rajesh, P.; Muraleedharan, C.V.; Komath, M.; Varma, H. Laser surface modification of titanium substrate for pulsed laser deposition of highly adherent hydroxyapatite. J. Mater. Sci. Mater. Med. 2011, 22, 1671–1679. [Google Scholar] [CrossRef]
- Rezayat, M.; Karamimoghadam, M.; Moradi, M.; Casalino, G.; Rovira, J.J.R.; Mateo, A. Overview of Surface Modification Strategies for Improving the Properties of Metastable Austenitic Stainless Steels. Metals 2023, 13, 1268. [Google Scholar] [CrossRef]
- Ghate, N.D.; Shrivastava, A. Laser processing of multiple surface characteristics for Ti6Al4V biomedical implants. Mater. Manuf. Process. 2020, 36, 308–315. [Google Scholar] [CrossRef]
- Yang, Y.S.; Na, S.J. Effect of transformation plasticity on residual stress fields in laser surface hardening treatment. J. Heat Treat. 1991, 9, 49–56. [Google Scholar] [CrossRef]
- Yin, Y.; Xu, J.; Chen, M. A review on surface texturing of zirconia ceramics for dental applications. Int. J. Adv. Manuf. Technol. 2024, 130, 5109–5135. [Google Scholar] [CrossRef]
- Li, W.; Yao, Y.L. Laser forming with constant line energy. Int. J. Adv. Manuf. Technol. 2001, 17, 196–203. [Google Scholar] [CrossRef]
- Edwardson, S.P.; Abed, E.; Bartkowiak, K.; Dearden, G.; Watkins, K.G. Geometrical influences on multi-pass laser forming. J. Phys. D Appl. Phys. 2006, 39, 382–389. [Google Scholar] [CrossRef]
- Cheng, J.; Yao, Y.L. Cooling Effects in Multiscan Laser Forming. J. Manuf. Process. 2001, 3, 60–72. [Google Scholar] [CrossRef]
- Watkins, K.G.; Edwardson, S.P.; Magee, J.; Dearden, G.; French, P.; Cooke, R.L.; Sidhu, J.; Calder, N.J. Laser Forming of Aerospace Alloys; SAE Technical Paper; SAE International: Warrendale, PA, USA, 2001. [Google Scholar] [CrossRef]
- Hennige, T. Development of irradiation strategies for 3D-laser forming. J. Mater. Process. Technol. 2000, 103, 102–108. [Google Scholar] [CrossRef]
- Lücke, H.U.; Hartl, C.; Abbey, T. Laser forming of aluminium and aluminium alloys—Microstructural investigation. J. Mater. Process. Technol. 2001, 115, 159–165. [Google Scholar]
- Laoui, T.; Santos, E.; Osakada, K.; Shiomi, M.; Morita, M.; Shaik, S.K.; Tolochko, N.K.; Abe, F.; Takahashi, M. Properties of Titanium Dental Implant Models Made by Laser Processing. Proc. Inst. Mech. Eng. Part C J. Mech. Eng. Sci. 2006, 220, 857–863. [Google Scholar] [CrossRef]
- Griepentrog, M.; Haustein, I.; Briedigkeit, H.; Göbel, U.B.; Größner-Schreiber, B.; Müller, W.D.; Lange, K.P. Plaque formation on surface modified dental implants. Clin. Oral Implant. Res. 2001, 12, 543–551. [Google Scholar] [CrossRef]
- Mukherjee, S.; Dhara, S.; Saha, P. Laser surface remelting of Ti and its alloys for improving surface biocompatibility of orthopaedic implants. Mater. Technol. 2017, 33, 106–118. [Google Scholar] [CrossRef]
- Popoola, A.P.I.; Fatoba, O.S.; Nkosi, H.W.; Aigbodion, V.S. Surface Hardening of Aluminium by Laser alloying with Molybdenum and Zirconium powder. Int. J. Electrochem. Sci. 2016, 11, 126–139. [Google Scholar] [CrossRef]
- Dubourg, L.; Pelletier, H.; Vaissiere, D.; Hlawka, F.; Cornet, A. Mechanical characterisation of laser surface alloyed aluminium–copper systems. Wear 2002, 253, 1077–1085. [Google Scholar] [CrossRef]
- Luo, S.; Nie, X.; Zhou, L.; You, X.; He, W.; Li, Y. Thermal stability of surface nanostructure produced by laser shock peening in a Ni-based superalloy. Surf. Coat. Technol. 2017, 311, 337–343. [Google Scholar] [CrossRef]
- Yang, Q.; Zhang, P.; Lu, Q.; Yan, H.; Shi, H.; Yu, Z.; Sun, T.; Li, R.; Wang, Q.; Wu, Y.; et al. Application and development of blue and green laser in industrial manufacturing: A review. Opt. Laser Technol. 2024, 170, 110202. [Google Scholar] [CrossRef]
- Shin, H.J.; Yoo, Y.T. Microstructural and hardness investigation of hot-work tool steels by laser surface treatment. J. Mater. Process. Technol. 2008, 201, 342–347. [Google Scholar] [CrossRef]
- Zhang, Z.; Wei, S.; Wang, P.; Qiu, W.; Zhang, G. Progress in applications of laser induced cavitation on surface processing. Opt. Laser Technol. 2024, 170, 110212. [Google Scholar] [CrossRef]
- Hu, X.; Qu, S.; Chen, Z.; Zhang, P.; Lu, Z.; Lai, F.; Duan, C.; Li, X. Rolling contact fatigue behaviors of 25CrNi2MoV steel combined treated by discrete laser surface hardening and ultrasonic surface rolling. Opt. Laser Technol. 2022, 155, 108370. [Google Scholar] [CrossRef]
- Babu, P.D.; Balasubramanian, K.R.; Buvanashekaran, G. Laser surface hardening: A review. Int. J. Surf. Sci. Eng. 2011, 5, 131. [Google Scholar] [CrossRef]
- Bukhari, S.M.A.; Husnain, N.; Siddiqui, F.A.; Anwar, M.T.; Khosa, A.A.; Imran, M.; Qureshi, T.H.; Ahmad, R. Effect of laser surface remelting on Microstructure, mechanical properties and tribological properties of metals and alloys: A review. Opt. Laser Technol. 2023, 165, 109588. [Google Scholar] [CrossRef]
- Jegadheesan, C.; Somasundaram, P.; Kumar, P.; Singh, A.P.; Jeyaprakash, N. State of art: Review on laser surface hardening of alloy metals. Mater. Today Proc. 2023. [Google Scholar] [CrossRef]
- Pantsar, H. Relationship between processing parameters, alloy atom diffusion distance and surface hardness in laser hardening of tool steel. J. Mater. Process. Technol. 2007, 189, 435–440. [Google Scholar] [CrossRef]
- Orazi, L.; Liverani, E.; Ascari, A.; Fortunato, A.; Tomesani, L. Laser surface hardening of large cylindrical components utilizing ring spot geometry. CIRP Ann. 2014, 63, 233–236. [Google Scholar] [CrossRef]
- Dutta Majumdar, J.; Manna, I. Laser material processing. Int. Mater. Rev. 2011, 56, 341–388. [Google Scholar] [CrossRef]
- Selvan, J.S.; Subramanian, K.; Nath, A.K. Effect of laser surface hardening on En18 (AISI 5135) steel. J. Mater. Process. Technol. 1999, 91, 29–36. [Google Scholar] [CrossRef]
- Mioković, T.; Schulze, V.; Vöhringer, O.; Löhe, D. Prediction of phase transformations during laser surface hardening of AISI 4140 including the effects of inhomogeneous austenite formation. Mater. Sci. Eng. A 2006, 435–436, 547–555. [Google Scholar] [CrossRef]
- Adebiyi, D.I.; Popoola, A.P.I. Mitigation of abrasive wear damage of Ti–6Al–4V by laser surface alloying. Mater Des. 2015, 74, 67–75. [Google Scholar] [CrossRef]
- Abbas, G.; Li, L.; Ghazanfar, U.; Liu, Z. Effect of high power diode laser surface melting on wear resistance of magnesium alloys. Wear 2006, 260, 175–180. [Google Scholar] [CrossRef]
- Dinesh, B.; Marimuthu, P. Status of laser transformation hardening of steel and its alloys: A review. Emerg. Mater. Res. 2019, 8, 188–205. [Google Scholar] [CrossRef]
- Lesyk, D.A.; Martinez, S.; Mordyuk, B.; Dzhemelinskyi, V.; Lamikiz, A.; Prokopenko, G. Effects of laser heat treatment combined with ultrasonic impact treatment on the surface topography and hardness of carbon steel AISI 1045. Opt. Laser Technol. 2019, 111, 424–438. [Google Scholar] [CrossRef]
- Sibillano, T.; Rizzi, D.; Ancona, A.; Saludes-Rodil, S.; Nieto, J.R.; Chmelíčková, H.; Šebestová, H. Spectroscopic monitoring of penetration depth in CO2 Nd:YAG and fiber laser welding processes. J. Mater. Process. Technol. 2012, 212, 910–916. [Google Scholar] [CrossRef]
- Maharjan, N.; Zhou, W.; Zhou, Y.; Guan, Y.; Wu, N. Comparative study of laser surface hardening of 50CrMo4 steel using continuous-wave laser and pulsed lasers with ms, ns, ps and fs pulse duration. Surf. Coat. Technol. 2019, 366, 311–320. [Google Scholar] [CrossRef]
- Kostov, V.; Gibmeier, J.; Wanner, A. Local Residual Stress Distributions Induced by Repeated Austenite-Martensite Transformation via Laser Surface Hardening of Steel AISI 4140. Mater. Sci. Forum 2011, 681, 321–326. [Google Scholar] [CrossRef]
- Lee, J.H.; Jang, J.H.; Joo, B.D.; Son, Y.M.; Moon, Y.H. Laser surface hardening of AISI H13 tool steel. Trans. Nonferrous Met. Soc. China 2009, 19, 917–920. [Google Scholar] [CrossRef]
- Chiang, K.-A.; Chen, Y.-C. Laser surface hardening of H13 steel in the melt case. Mater. Lett. 2005, 59, 1919–1923. [Google Scholar] [CrossRef]
- Shim, D.-S.; Baek, G.-Y.; Lee, S.-B.; Yu, J.-H.; Choi, Y.-S.; Park, S.-H. Influence of heat treatment on wear behavior and impact toughness of AISI M4 coated by laser melting deposition. Surf. Coat. Technol. 2017, 328, 219–230. [Google Scholar] [CrossRef]
- Telasang, G.; Majumdar, J.D.; Padmanabham, G.; Manna, I. Structure–property correlation in laser surface treated AISI H13 tool steel for improved mechanical properties. Mater. Sci. Eng. A 2014, 599, 255–267. [Google Scholar] [CrossRef]
- Mahmoudi, B.; Torkamany, M.J.; Aghdam, A.R.S.; Sabbaghzadeh, J. Effect of laser surface hardening on the hydrogen embrittlement of AISI 420: Martensitic stainless steel. Mater. Des. 2011, 32, 2621–2627. [Google Scholar] [CrossRef]
- Park, H.; Yoo, H.J.; Park, C. Wear and corrosion behaviors of high-power laser surface-cleaned 304L stainless steel. Opt. Laser Technol. 2024, 168, 109640. [Google Scholar] [CrossRef]
- Moradi, M.; Ghorbani, D.; Moghadam, M.K.; Kazazi, M.; Rouzbahani, F.; Karazi, S. Nd:YAG laser hardening of AISI 410 stainless steel: Microstructural evaluation, mechanical properties, and corrosion behavior. J. Alloys Compd. 2019, 795, 213–222. [Google Scholar] [CrossRef]
- Jakob, S.; Hörnqvist Colliander, M.; Kawser, J.; Rashidi, S.; Ooi, S.W.; Thuvander, M. Concomitant Precipitation of Intermetallic β-NiAl and Carbides in a Precipitation Hardened Steel. Metall. Mater. Trans. A 2024, 55, 870–879. [Google Scholar] [CrossRef]
- Moradi, M.; Sharif, S.; Nasab, S.J.; Moghadam, M.K. Laser surface hardening of AISI 420 steel: Parametric evaluation, statistical modeling and optimization. Optik 2020, 224, 165666. [Google Scholar] [CrossRef]
- Katiyar, J.K.; Rani, A.M.A.; Sulaiman, M.H.; Barman, U.; Masset, P.J.; Rao, T.V.V.L.N. Recent Advances of Tribology in Sustainable Manufacturing. In Tribology in Sustainable Manufacturing; CRC Press: Boca Raton, FL, USA, 2024; pp. 1–28. [Google Scholar]
- Fernández-Vicente, A.; Pellizzari, M.; Arias, J. Feasibility of laser surface treatment of pearlitic and bainitic ductile irons for hot rolls. J. Mater. Process. Technol. 2012, 212, 989–1002. [Google Scholar] [CrossRef]
- Fribourg, G.; Deschamps, A.; Bréchet, Y.; Mylonas, G.; Labeas, G.; Heckenberger, U.; Perez, M. Microstructure modifications induced by a laser surface treatment in an AA7449 aluminium alloy. Mater. Sci. Eng. A 2011, 528, 2736–2747. [Google Scholar] [CrossRef]
- Trdan, U.; Ocaña, J.L.; Grum, J. Surface modification of aluminium alloys with laser shock processing. Stroj. Vestn.-J. Mech. Eng. 2011, 57, 385–393. [Google Scholar]
- Rogachev, S.O.; Naumova, E.A.; Komissarov, A.A.; Vasina, M.A.; Pavlov, M.D.; Tokar’, A.A. Effect of Laser Surface Modification on the Structure and Mechanical Properties of Al–8% Ca, Al–10% La, Al–10% Ce, and Al–6% Ni Eutectic Aluminum Alloys. Russ. J. Non-Ferr. Met. 2022, 63, 671–680. [Google Scholar] [CrossRef]
- Haley, J.; Karandikar, J.; Herberger, C.; MacDonald, E.; Feldhausen, T.; Lee, Y. Review of in situ process monitoring for metal hybrid directed energy deposition. J. Manuf. Process. 2024, 109, 128–139. [Google Scholar] [CrossRef]
- Zhang, Y.; Jian, X.; Xia, F.; Shi, D.; Wu, L.; Liu, L.; Ji, V. Effect of laser shock peening on surface integrity and tensile fatigue behavior of TB8 bolts. Eng. Fail. Anal. 2024, 157, 107968. [Google Scholar] [CrossRef]
- Moradi, M.; Moghadam, M.K.; Shamsborhan, M. How the laser beam energy distribution effect on laser surface transformation hardening process; Diode and Nd:YAG lasers. Optik 2020, 204, 163991. [Google Scholar] [CrossRef]
- Chandrasekar, P.; Balusamy, V.; Chandran, K.S.R.; Kumar, H. Laser surface hardening of titanium–titanium boride (Ti–TiB) metal matrix composite. Scr. Mater. 2007, 56, 641–644. [Google Scholar] [CrossRef]
- He, Y.; Gu, Z.; Ji, J.; Zhang, T.; Fu, Y. How to improve surface integrity in discrete laser spot hardening of AISI 4140 when using a fiber laser with the Gaussian beam: A dynamic multi-pass approach based on time-domain energy modulation. Opt. Laser Technol. 2024, 170, 110322. [Google Scholar] [CrossRef]
- Pantelis, D.I.; Bouyiouri, E.; Kouloumbi, N.; Vassiliou, P.; Koutsomichalis, A. Wear and corrosion resistance of laser surface hardened structural steel. Surf. Coat. Technol. 2002, 161, 125–134. [Google Scholar] [CrossRef]
- Khalfallah, I.Y.; Rahoma, M.N.; Abboud, J.H.; Benyounis, K.Y. Microstructure and corrosion behavior of austenitic stainless steel treated with laser. Opt. Laser Technol. 2011, 43, 806–813. [Google Scholar] [CrossRef]
- Conde, A.; Colaço, R.; Vilar, R.; De Damborenea, J. Corrosion behaviour of steels after laser surface melting. Mater. Des. 2000, 21, 441–445. [Google Scholar] [CrossRef]
- Germann, H.; Starke, P.; Kerscher, E.; Eifler, D. Fatigue behaviour and lifetime calculation of the cast irons EN-GJL-250, EN-GJS-600 and EN-GJV-400. Procedia Eng. 2010, 2, 1087–1094. [Google Scholar] [CrossRef][Green Version]
- Liverani, E.; Lutey, A.H.A.; Ascari, A.; Fortunato, A.; Tomesani, L. A complete residual stress model for laser surface hardening of complex medium carbon steel components. Surf. Coat. Technol. 2016, 302, 100–106. [Google Scholar] [CrossRef]
- Soria-Biurrun, T.; Dorronsoro-Larbide, A.; Navarrete-Cuadrado, J.; Lozada-Cabezas, L.; Pan-Cabo, A.; Castaño-Carmona, E.; Alkorta, J.; Sánchez-Moreno, J.M. Surface texturing, residual stresses and edge treatment of hardmetal tools by means of femtosecond pulsed laser. Int. J. Refract. Met. Hard Mater. 2024, 118, 106442. [Google Scholar] [CrossRef]
- Teng, C.; Pal, D.; Gong, H.; Zeng, K.; Briggs, K.; Patil, N.; Stucker, B. A review of defect modeling in laser material processing. Addit. Manuf. 2017, 14, 137–147. [Google Scholar] [CrossRef]
- Hurtado-Delgado, E.; Huerta-Larumbe, L.; Miranda-Pérez, A.; Aguirre-Sánchez, Á. Microcracks Reduction in Laser Hardened Layers of Ductile Iron. Coatings 2021, 11, 368. [Google Scholar] [CrossRef]
- Akhter, R.; Hussain, A.; Farooq, W.A.; Aslam, M. Laser Surface Hardening of GCr15 Bearing Steel Ring. Key Eng. Mater. 2010, 442, 130–136. [Google Scholar] [CrossRef]
- Orazi, L.; Fortunato, A.; Cuccolini, G.; Tani, G. An efficient model for laser surface hardening of hypo-eutectoid steels. Appl. Surf. Sci. 2010, 256, 1913–1919. [Google Scholar] [CrossRef]
- Yao, C.; Xu, B.; Huang, J.; Zhang, P.; Wu, Y. Study on the softening in overlapping zone by laser-overlapping scanning surface hardening for carbon and alloyed steel. Opt. Lasers Eng. 2010, 48, 20–26. [Google Scholar] [CrossRef]
- Mahmoudi, B.; Torkamany, M.J.; Aghdam, A.R.S.R.; Sabbaghzade, J. Laser surface hardening of AISI 420 stainless steel treated by pulsed Nd:YAG laser. Mater. Des. 2010, 31, 2553–2560. [Google Scholar] [CrossRef]
- Soriano, C.; Leunda, J.; Lambarri, J.; García Navas, V.; Sanz, C. Effect of laser surface hardening on the microstructure, hardness and residual stresses of austempered ductile iron grades. Appl. Surf. Sci. 2011, 257, 7101–7106. [Google Scholar] [CrossRef]
- Babu, P.D.; Buvanashekaran, G.; Balasubramanian, K.R. Experimental studies on the microstructure and hardness of laser transformation hardening of low alloy steel. Trans. Can. Soc. Mech. Eng. 2012, 36, 241–258. [Google Scholar] [CrossRef]
- Nath, A.K.; Gupta, A.; Benny, F. Theoretical and experimental study on laser surface hardening by repetitive laser pulses. Surf. Coat. Technol. 2012, 206, 2602–2615. [Google Scholar] [CrossRef]
- Zhang, P.L.; Yan, H.; Xu, P.Q.; Yu, Z.S.; Li, C.G.; Lu, Q.H. Effect of Laser Surface Hardening on the Microstructure, Hardness, Wear Resistance and Softening of a Low Carbon Steel. Lasers in Engineering; Old City Publishing: Philadelphia, PA, USA, 2014. [Google Scholar]
- Li, R.; Jin, Y.; Li, Z.; Qi, K. A Comparative Study of High-Power Diode Laser and CO2 Laser Surface Hardening of AISI 1045 Steel. J. Mater. Eng. Perform. 2014, 23, 3085–3091. [Google Scholar] [CrossRef]
- Telasang, G.; Majumdar, J.D.; Padmanabham, G.; Manna, I. Wear and corrosion behavior of laser surface engineered AISI H13 hot working tool steel. Surf. Coat. Technol. 2015, 261, 69–78. [Google Scholar] [CrossRef]
- Cordovilla, F.; García-Beltrán, Á.; Sancho, P.; Domínguez, J.; Ruiz-de-Lara, L.; Ocaña, J.L. Numerical/experimental analysis of the laser surface hardening with overlapped tracks to design the configuration of the process for Cr-Mo steels. Mater. Des. 2016, 102, 225–237. [Google Scholar] [CrossRef]
- Guarino, S.; Barletta, M.; Afilal, A. High Power Diode Laser (HPDL) surface hardening of low carbon steel: Fatigue life improvement analysis. J. Manuf. Process. 2017, 28, 266–271. [Google Scholar] [CrossRef]
- Dongre, G.; Rajurkar, A.; Gondil, R.; Jaju, N. Laser surface hardening of SS316L. IOP Conf. Series Mater. Sci. Eng. 2021, 1070, 012107. [Google Scholar] [CrossRef]
- Aprilia, A.; Maharjan, N.; Zhou, W. Decarburization in Laser Surface Hardening of AISI 420 Martensitic Stainless Steel. Materials 2023, 16, 939. [Google Scholar] [CrossRef] [PubMed]
- Bhatt, S.C.; Ghetiya, N.D. 3D Multiphysics simulation of microwave heating of bulk metals with parametric variations. Chem. Eng. Process. Process Intensif. 2023, 184, 109271. [Google Scholar] [CrossRef]
- Machado, Y.D.; Germano, G.C.; Pecoraro, E.; Costa, A.M.L.; Carvalho, I.C. Impact of SiO2 nanoparticle morphology on scattering efficiency for random lasers. Opt. Mater. 2024, 148, 114775. [Google Scholar] [CrossRef]
- Hou, L.; Yin, F.; Wang, S.; Sun, J.; Yin, H. A review of thermal effects and substrate damage control in laser cleaning. Opt. Laser Technol. 2024, 174, 110613. [Google Scholar] [CrossRef]
- Tang, J.; Shi, Y.; Zhao, J.; Chen, L.; Wu, Z. Numerical modeling considering initial gradient mechanical properties and experiment verification of residual stress distribution evolution of 12Cr2Ni4A steel generated by ultrasonic surface rolling. Surf. Coat. Technol. 2023, 452, 129127. [Google Scholar] [CrossRef]
- Casalino, G.; Moradi, M.; Moghadam, M.K.; Khorram, A.; Perulli, P. Experimental and Numerical Study of AISI 4130 Steel Surface Hardening by Pulsed Nd:YAG Laser. Materials 2019, 12, 3136. [Google Scholar] [CrossRef]
- Han, X.; Li, C.; Chen, X.; Jia, S. Numerical simulation and experimental study on the composite process of submerged arc cladding and laser cladding. Surf. Coat. Technol. 2022, 439, 128432. [Google Scholar] [CrossRef]
- Domański, T.; Sapietová, A.; Sága, M. Application of Abaqus Software for the Modeling of Surface Progressive Hardening. Procedia Eng. 2017, 177, 64–69. [Google Scholar] [CrossRef]
- Yaakoubi, M.; Kchaou, M.; Dammak, F. Simulation of the thermomechanical and metallurgical behavior of steels by using ABAQUS software. Comput. Mater. Sci. 2013, 68, 297–306. [Google Scholar] [CrossRef]
- Bailey, N.S.; Katinas, C.; Shin, Y.C. Laser direct deposition of AISI H13 tool steel powder with numerical modeling of solid phase transformation, hardness, and residual stresses. J. Mater. Process. Technol. 2017, 247, 223–233. [Google Scholar] [CrossRef]
- Zhang, T.; Li, L.; Liang, F.; Yang, B. Parameter optimization of laser die-surface hardening using the particle swarm optimization technique. Int. J. Adv. Manuf. Technol. 2008, 36, 1104–1112. [Google Scholar] [CrossRef]
- Meijer, J.; van Sprang, I. Optimization of Laser Beam Transformation Hardening by One Single Parameter. CIRP Ann. 1991, 40, 183–186. [Google Scholar] [CrossRef]
- Badkar, D.S.; Pandey, K.S.; Buvanashekaran, G. Parameter optimization of laser transformation hardening by using Taguchi method and utility concept. Int. J. Adv. Manuf. Technol. 2011, 52, 1067–1077. Available online: https://link.springer.com/article/10.1007/s00170-010-2787-z (accessed on 1 January 2020). [CrossRef]
- Chen, C.; Zeng, X.; Wang, Q.; Lian, G.; Huang, X.; Wang, Y. Statistical modelling and optimization of microhardness transition through depth of laser surface hardened AISI 1045 carbon steel. Opt. Laser Technol. 2020, 124, 105976. [Google Scholar] [CrossRef]
Disclaimer/Publisher’s Note: The statements, opinions and data contained in all publications are solely those of the individual author(s) and contributor(s) and not of MDPI and/or the editor(s). MDPI and/or the editor(s) disclaim responsibility for any injury to people or property resulting from any ideas, methods, instructions or products referred to in the content. |
© 2024 by the authors. Licensee MDPI, Basel, Switzerland. This article is an open access article distributed under the terms and conditions of the Creative Commons Attribution (CC BY) license (https://creativecommons.org/licenses/by/4.0/).