Review

Additive Manufacturing of Metal Materials for Construction Engineering: An Overview on Technologies and Applications

by
Ilaria Capasso
1,2,*,
Francesca Romana Andreacola
1 and
Giuseppe Brando
1,2
1
Department of Engineering and Geology, University “G. d’Annunzio” of Chieti-Pescara, 65127 Pescara, Italy
2
UdA-TechLab, Research Center, University “G. d’Annunzio” of Chieti-Pescara, 66100 Chieti, Italy
*
Author to whom correspondence should be addressed.
Metals 2024, 14(9), 1033; https://doi.org/10.3390/met14091033
Submission received: 12 July 2024 / Revised: 6 September 2024 / Accepted: 8 September 2024 / Published: 11 September 2024

Abstract

:
Additive manufacturing, better known as 3D printing, is an innovative manufacturing technique which allows the production of parts, with complex and challenging shapes, layer by layer mainly through melting powder particles (metallic, polymeric, or composite) or extruding material in the form of wire, depending on the specific technique. Three-dimensional printing is already widely employed in several sectors, especially aerospace and automotive, although its large-scale use still requires the gain of know-how and to overcome certain limitations related to the production process and high costs. In particular, this innovative technology aims to overtake some of the shortcomings of conventional production methods and to obtain many additional advantages, such as reduction in material consumption and waste production, high level of customisation and automation, environmental sustainability, great design freedom, and reduction in stockpiles. This article aims to give a detailed review of the state of scientific research and progress in the industrial field of metal additive manufacturing, with a detailed view to its potential use in civil engineering and construction. After a comprehensive overview of the current most adopted additive manufacturing techniques, the fundamental printing process parameters to achieve successful results in terms of quality, precision, and strength are debated. Then, the already existing applications of metal 3D printing in the field of construction and civil engineering are widely discussed. Moreover, the strategic potentiality of the use of additive manufacturing both combined with topological optimisation and for the eventual repair of existing structures is presented. It can be stated that the discussed findings led us to conclude that the use of metal additive manufacturing in the building sector is very promising because of the several benefits that this technology is able to offer.

1. Introduction

Metal 3D printing is already widely adopted in a variety of engineering fields, including biomedical, aerospace, and automotive. However, there are still very few applications in the fields of structural and construction engineering, despite the numerous benefits that this technology can offer, such as raw materials and waste savings, ability to produce complex and optimised shapes and geometries impossible to achieve with conventional methods, possibility of producing multiple parts in the same batch reducing time to market, and minimization of warehouse stocks [1].
Large-scale application is not yet possible due to a lack of in-depth knowledge about, e.g., the mechanical properties of the materials and printed parts, short- and long-term performance, geometric accuracy and quality, lead times and costs, and a gap in certification and standards. Safety, cost-effectiveness, and environmental sustainability of metal additive methods represent other key aspects to be analysed.
Despite their wide diffusion in the last decades, the first application of printing methodologies can be dated back to 1979, when the first patent concerning a technology ancestor of modern 3D printing (US4247508A) was filed by Ross Housholder [2]. The patent proposed, for the first time, the creation of objects using the approach of overlapping consecutive layers, anticipating the methodology typical of the modern three-dimensional printing process and rapid prototyping (RP) [2]. In fact, RP, which was developed in the 1980s to create models and prototype parts, can be considered the first form of creating a 3D object using computer-aided design (CAD) layer by layer, and the origins of the current additive manufacturing (AM) processes can be dated back to it [3,4].
The first machines for 3D printing processes appeared in the late 1970s, when Alan Herbert and Charles Hull in America and Hideo Kodama in Japan developed, at the same time, a system for selective solidification of a photopolymer, capable of creating an object by successive layers.
The fundamental historical milestones for the development of 3D printing machines are listed below and schematically summarized in Figure 1 [5,6,7,8,9]:
1984: Stereolithography (SLA) was invented and patented.
1987: The world’s first 3D printing machine for stereolithography was produced.
1988: Selective laser sintering (SLS) was patented.
1989: The patent for fused deposition modelling (FDM) technique was filed.
1992: Printers for SLS and FDM were developed.
1995: Selective laser melting (SLM) machines were marketed as an alternative technologies to stereolithography.
1997: Electron beam melting (EBM) was firstly introduced.
2000: A growing number of companies and specialists became interested in the possibilities and benefits of 3D printing, leading to a considerable development of printers and technologies.
2011: The world’s first additive manufactured aircraft and prototype car were released.
2020 to date: Worldwide spread of advanced 3D printing techniques due to significantly reduced printer equipment costs and production times combined with the wide range of currently available filaments and materials [10,11].
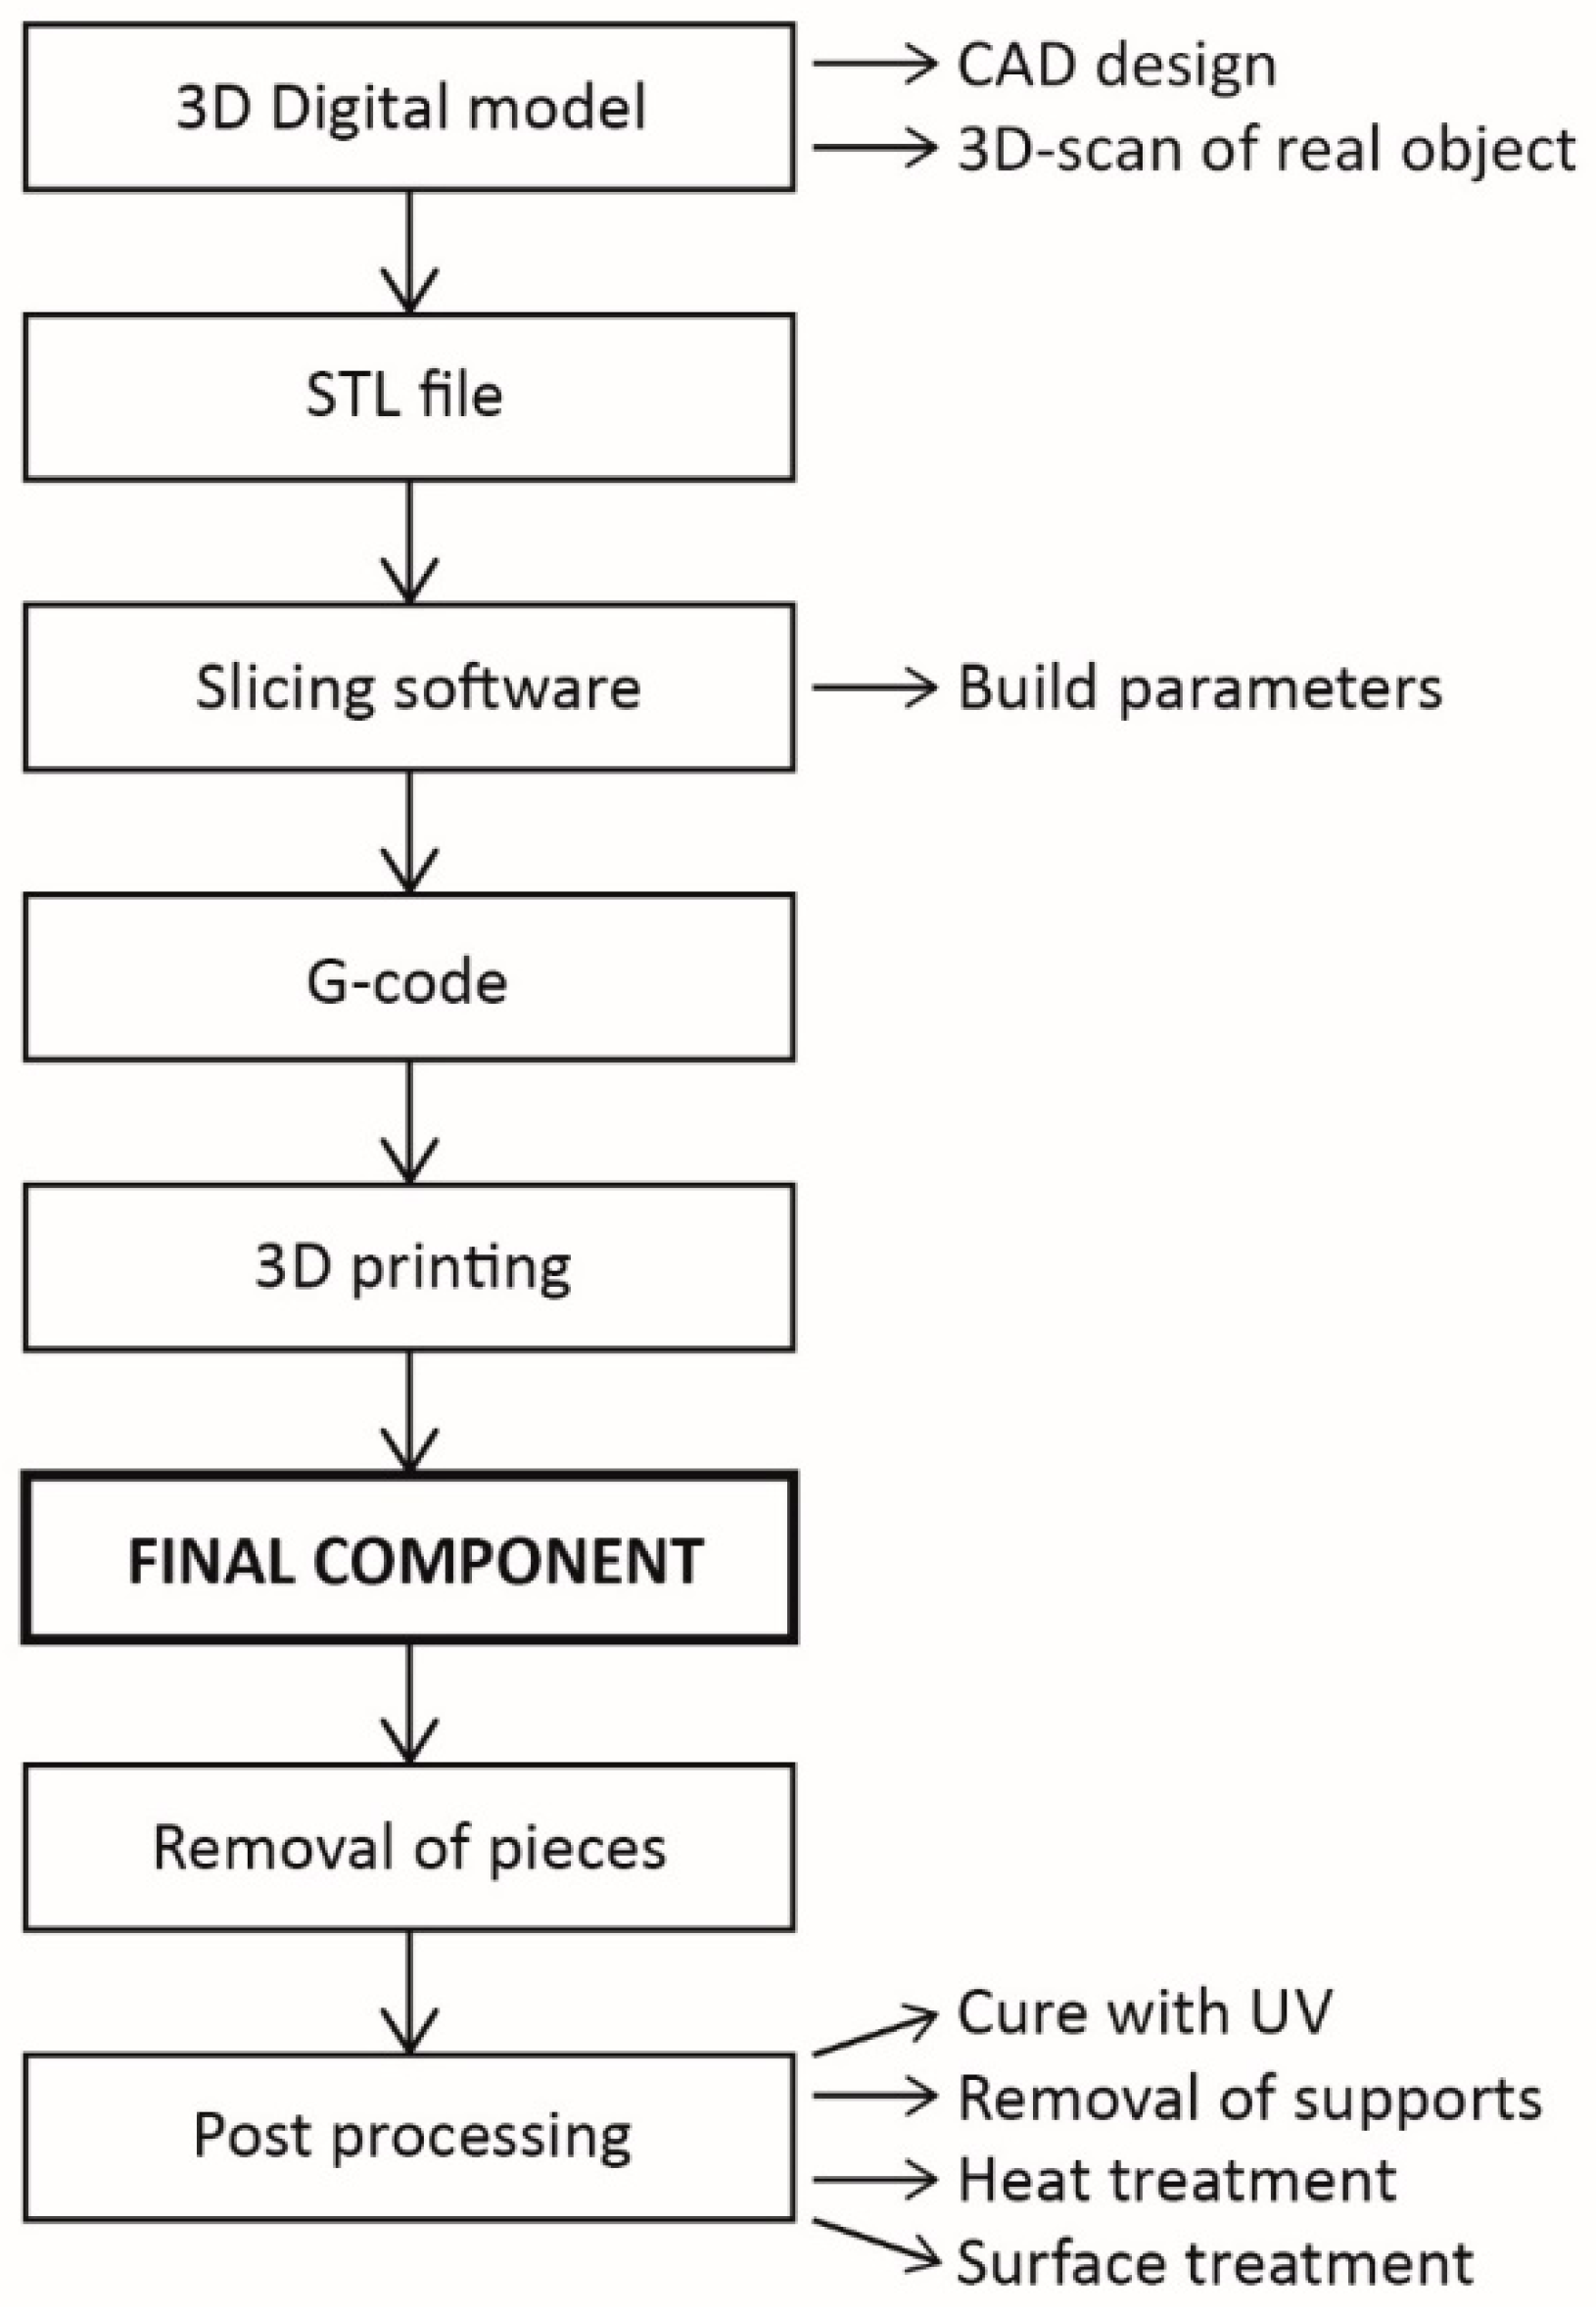
It is possible to identify a general sequence of eight fundamental steps, schematically summarized in Figure 2 [12], for the production of a component using AM technology from design to final part, regardless of the additive manufacturing technique selected.
The production of a digital model of the object is the starting point for any AM process. The digital model can be created through CAD or by 3D scanning of a real object, and its quality directly affects the final product, so an accurate virtual representation is essential for a good result. Many parameters must be taken into account, including geometrical limitations, support material, and escape hole requirements. Once the CAD file is available, the following step is to convert the file into a printer-readable format. The first step is to transform the CAD model into an STL (the acronym can stand for stereo lithography interface format, standard triangle language or standard tessellation language) file, that describes the surface of an object using triangles, simplifying the CAD model. The STL file just created is imported into a slicer software, which converts it into a G-Code file. G-Code is a numerical control programming language to monitor and manage CNC (computer numerical control) machines and 3D printers [13]. The slicer programme splits the design into the several layers that will be required to manufacture the object. It defines also the building parameters of the 3D printer by specifying the support layout, layer height, and orientation of the workpiece.
At this point, the three-dimensional object is ready to be printed, according to the specific printing technology selected. When the additive manufacturing process is complete, there is the stage of supports removal, which for some methods (mainly the polymer-based ones) consists only of “detaching” the printed part from the building plate, while for some others can involve high complex processes for extracting the supports from the printed part [14].
Several post-processes may be necessary at the end of additive manufacturing, and they mainly concern the improvement of surface characteristics or the modification of the mechanical properties of the material [15].
With regard to 3D printing techniques, there are many different types of 3D printers available, with unique features and capabilities that characterise the main additive manufacturing technologies. In 2015, ISO/ASTM Standard 52900 was introduced to define a technical terminology and to qualify the various 3D printing methods [13,16]. Seven macro-categories of production processes were established, each of them characterised by the possibility to use different materials and to obtain different final features of the printed element [17,18]. The seven macro-categories include vat polymerization, material extrusion, material jetting, binder jetting, powder bed fusion, sheet lamination and direct energy deposition. Each of them includes one or more production techniques [16,19].
Additive manufacturing methods can be classified using several criteria [20]. All the printing processes presented and analysed below are the most widespread in the industry, even if there are many other techniques that are still in the development phase or have limited presence on the market [6,7,15,21,22].
Vat polymerisation comprises all resin-based 3D printing techniques, in which a liquid photopolymer contained in a vat is selectively cured by a heat source, instead of being injected by a nozzle. The main technologies belonging to this category are stereolithography (SLA) and digital light processing (DLP) [22].
SLA was the first 3D printing method to be developed and marketed. This technology exploits the photo-polymerisation of light-sensitive resins using a low-power laser [3].
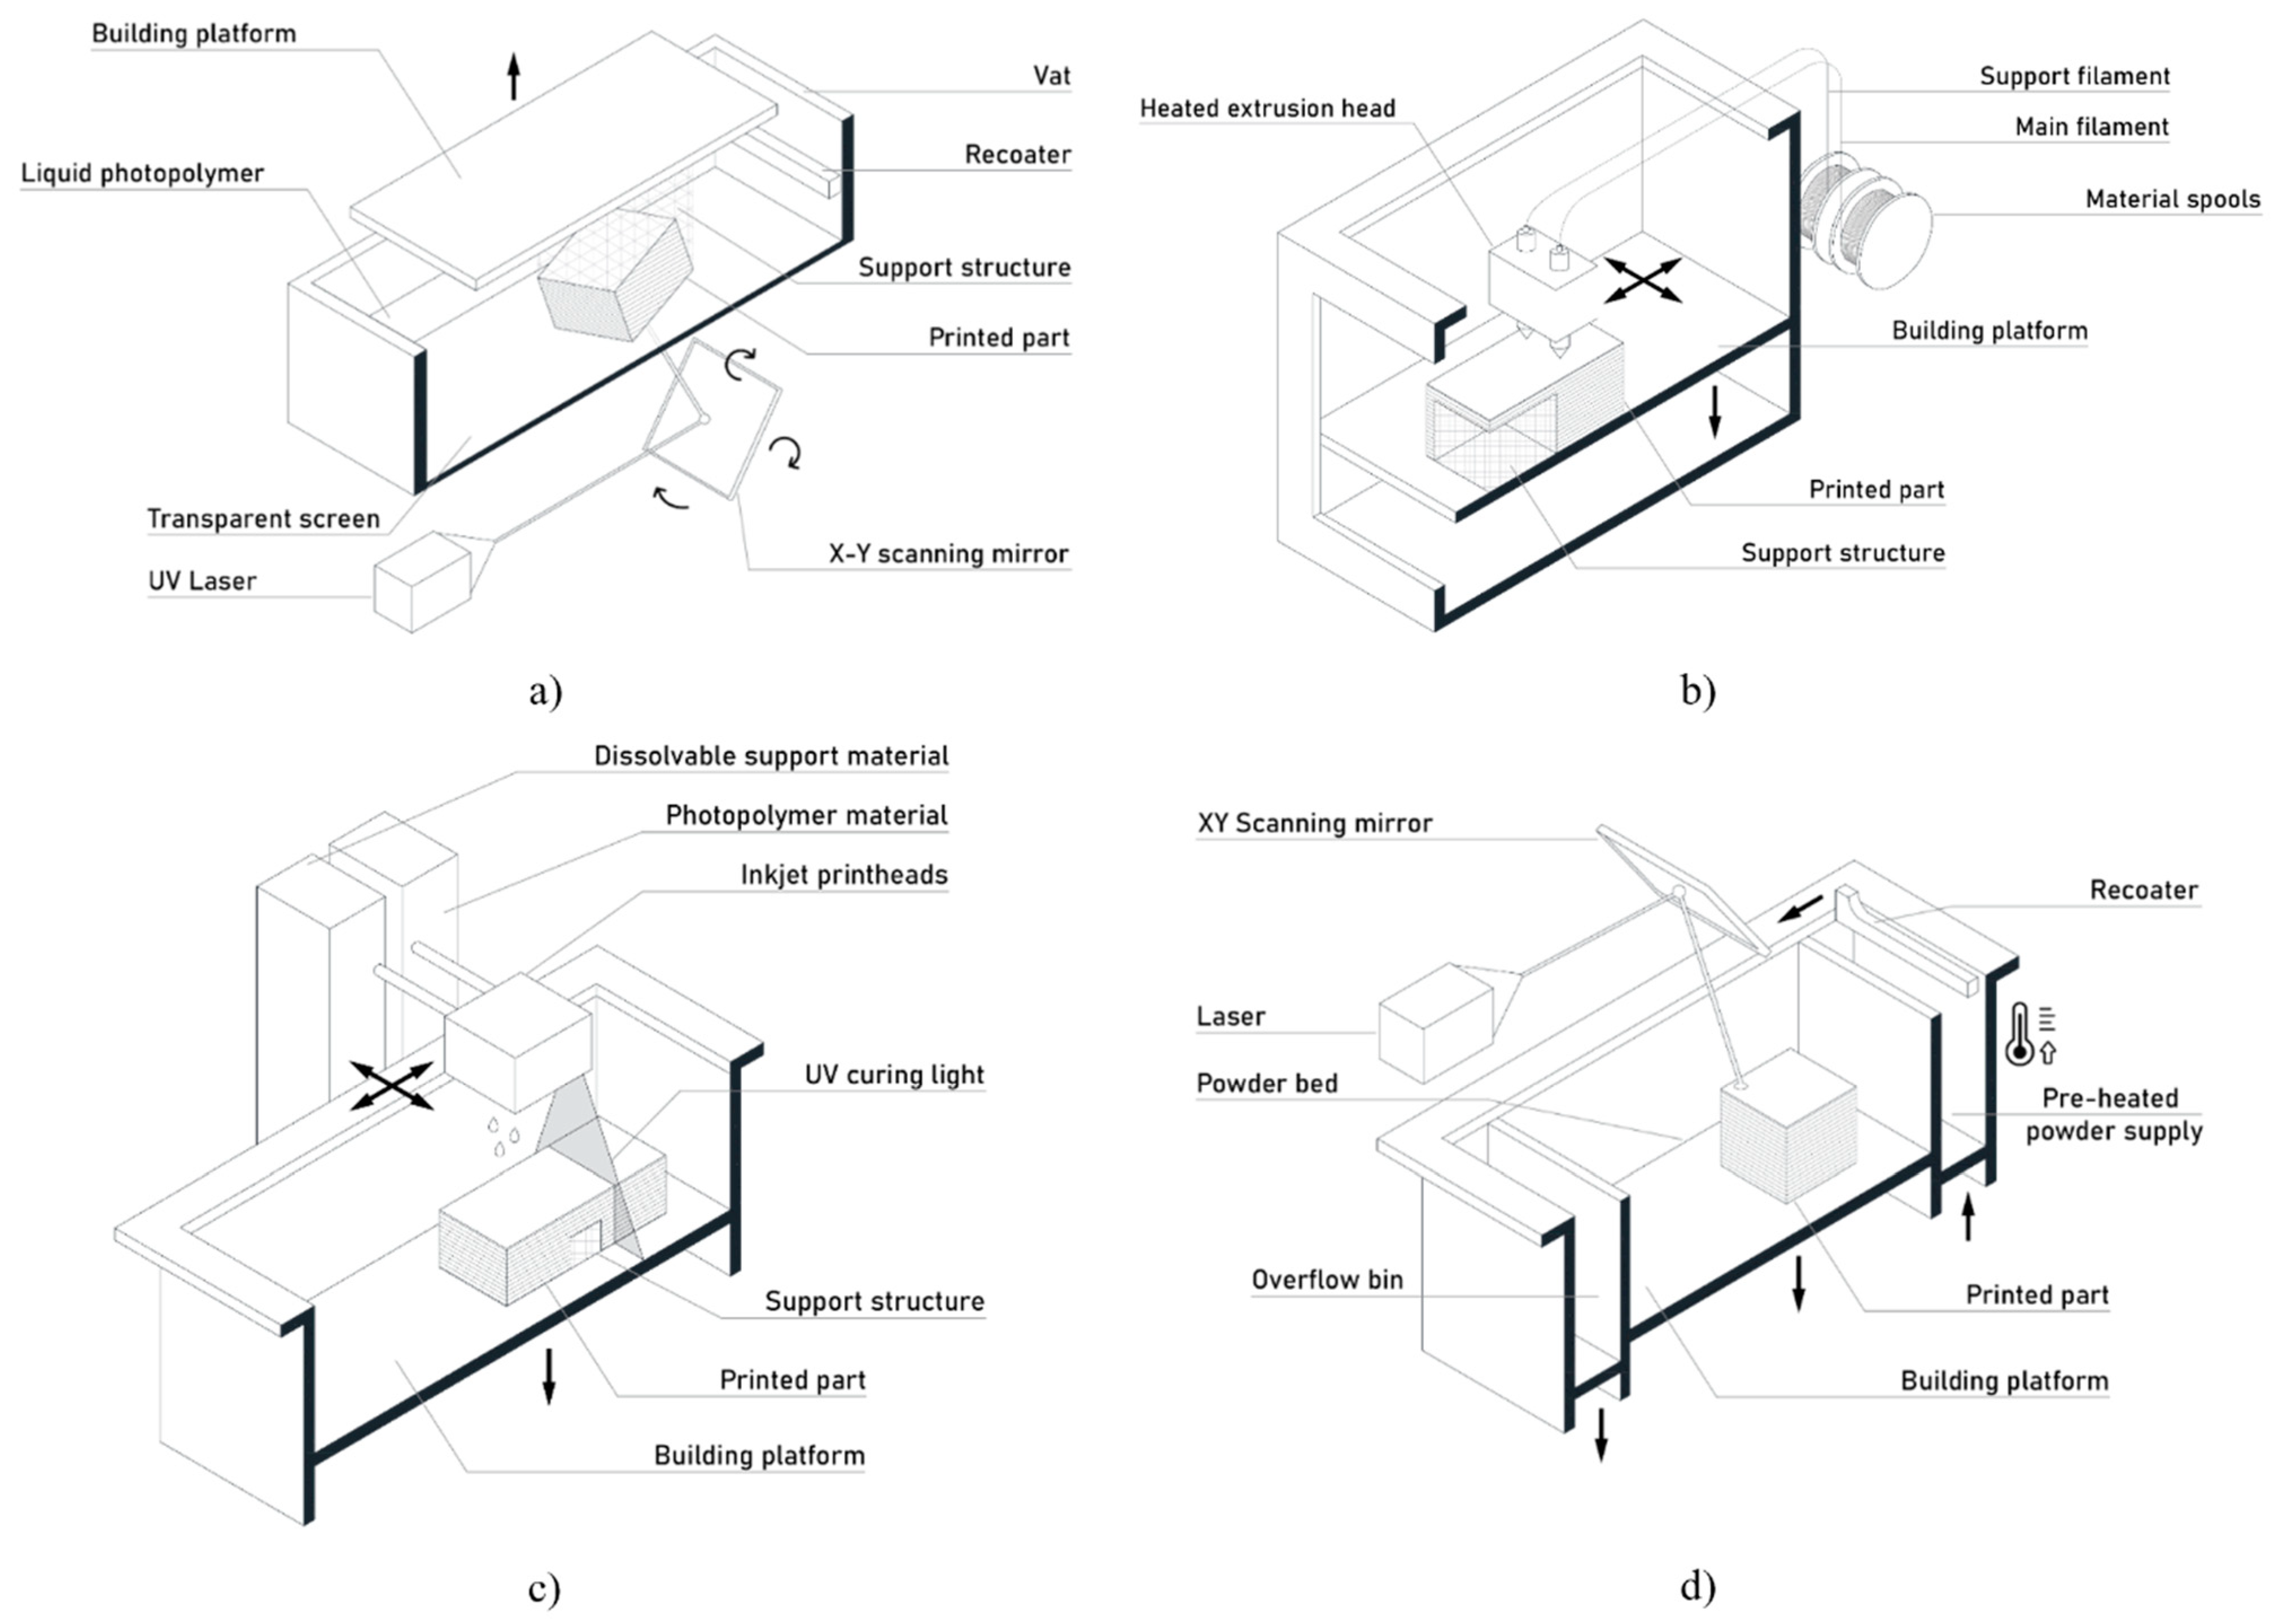
The SLA system consists of a vat, containing the liquid resin, and the printing surface at the base of it (see Figure 3) [23]. The part of liquid hit by the light polymerizes and solidifies and, when one layer has solidified, the plate is lowered and the process continues until the part is completed [24]. The laser is moved over the printing area by a system of mirrors controlled by galvanometers.
Three-dimensional printing technology based on material extrusion uses a continuous filament of thermoplastic polymer as starting material, which acts as a tool for rapid and cost-effective prototyping.
The most widespread material extrusion method is the fused filament fabrication (FFF), more commonly known as fused deposition modelling, a term coined in the late 1980s and registered in 1990 by the company Stratasys [22,25].
FDM is a process based on the extrusion of remelted material to generate the subsequent layers of the three-dimensional object [22,26]. The materials used in this type of technology are mainly polymers, but there are also some variants that use other materials such as ceramic pastes. The polymers are supplied as wire spools, continuously bringing material to the extruder (moved by computer control), which allows the extrusion of filaments through the nozzle, heating the material to melting. The nozzle moves according to the layout of the final object to be produced, releasing melted material that cools and solidifies generating each layer. After finishing a layer, the build plate is lowered and the process is continued layer by layer until the 3D part is built [27,28].
The 3D printing production technique of material jetting (MJ) is often compared to the 2D inkjet process that print ink on paper.
Using photopolymers, metals, or wax that solidify when exposed to light or heat (similar to stereolithography), MJ releases material in the form of very small droplets from hundreds of small nozzles in the printhead to build the part layer by layer. When the drops are deposited on the building platform, they are directly polymerised and solidified using UV light [29]. After a layer is produced, the printing platform is lowered by one layer of thickness and the process is repeated until the three-dimensional part is built [22]. MJ processes require support structures, which are often 3D-printed simultaneously during construction from a dissolvable material and then removed during post-processing. This manufacturing process allows different materials to be 3D-printed within the same component.
MJ is one of the most refined additive manufacturing techniques, which allows the production of very smooth surfaces and printed objects with layer thicknesses of about 16 microns [28]. Moreover, it is considered the most precise method of 3D printing because deformation and shrinkage are rare due to the absence of heat treatments during the manufacturing process.
The most popular techniques are material jetting (MJ) and drop on demand (DOD) [25].
Among the powder bed fusion technologies, the technique most commonly used is SLS, which produces parts starting from polymeric powders [30]. The process begins heating the container of polymer powder to a temperature just below the melting point of the material, to minimise both the energy required by the laser and the effects of phase change. The recoater then deposits a layer of powder on the building plate and the laser beam, moving through a system of mirrors, begins to scan the working surface according to the shape of the section, resulting in the solidification of a cross-section of the object through selective sintering. Following the completion of a layer, the printing platform lowers to allow the deposition of a new layer of powder and the sintering of the next section. In this way, the process is repeated until the workpiece is finished [31]. In order to ensure better bonding between the layers, an initial heating of the powder takes place before the exposure to laser sintering. In SLS machines, 50% of the non-sintered powder can be recovered and reused.
Figure 3 shows the schematic representation of the production process of the abovementioned non-metallic additive manufacturing methods.
After describing non-metallic additive manufacturing methods, Figure 4 gives an overview of metallic 3D printing techniques, which will be discussed in detail in the following sections.
It is important to emphasise, however, that 3D printing in the civil engineering and construction sector is revolutionizing the way buildings are designed and built [32]. By using additive manufacturing techniques, architects and engineers can create complex and customized structures with greater efficiency [33]. Common methods include extrusion-based 3D printing, where material is deposited layer by layer, and binder jetting, which uses a binder to solidify powdered materials. A wide range of materials can be used, including concrete, mortar, and even specialized geopolymers [34]. Applications span from small-scale components like architectural models to full-scale buildings and infrastructure projects. For instance, 3D-printed houses have been constructed in various parts of the world, demonstrating the potential of this technology to address housing shortages and create sustainable communities [35].
In this paper, several of the abovementioned challenges will be investigated, with a specific focus on metal 3d printing methods and more in detail on selective laser melting (SLM).
In particular, a detailed overview of metal additive manufacturing technologies is given in Section 2, focusing on a description of the currently most widely used processes, especially in the construction engineering sector. Then, the main process parameters inherent to metal 3D printing methods are discussed in Section 3. Real examples of metal 3D printing in the construction sector and the potential of metal additive technologies, with a focus on topological optimisation procedures, are presented, respectively, in Section 4 and Section 5.
The aim of this review paper was to collect together the works related to 3D printing in order to provide readers, both experts and nonexperts, with a comprehensive overview, divided by topic, that is able to offer a complete knowledge on the topic of metal additive manufacturing. Of course, the results of the cited studies are also discussed in a general approach, as they are not the results of the authors’ own research.

2. Metal Additive Manufacturing Technologies

This section will discuss more in detail the metal 3D printing technologies, with a special focus on selective laser melting.
Powder bed fusion (PBF) 3D printing technologies result in geometrically complex products with an excellent level of precision, using a heat source to melt the powder particles layer by layer, producing a solid part. The main difference between the various processes, lies in the use of different energy sources, mainly laser or electron beams [36].
Within this category, the most popular methods are selective laser melting (SLM) and electron beam melting (EBM) [7].
The selective laser melting process is very similar to SLS, but it is used for metal parts fabrication. The range of metals available includes aluminium alloys, steel, titanium, cobalt, chrome, and nickel [37].
An alternative method to SLM is direct metal laser sintering (DMLS), which sinters metal powders instead of completely melting them. This method is limited to metal alloys only and cannot be used for pure metals [38].
SLM involves the complete melting of metal powder, layer after layer, within an inert environment. This process produces a much more compact and homogenous element than sintering. A high-power laser beam melts the deposited powder layer according to the desired geometry. Once a layer is completed, new powder is deposited and the process continues until the 3D part is created [37,39].
Support structures are essential to limit the effects of possible distortions and the occurrence of warping and buckling caused by residual stresses developed because of the high operating temperatures. In addition, supports are required to allow the printing of projecting parts and to dissipate heat.
The performance of SLM technology printers is strongly influenced by a wide number of factors, which must be considered during production [40]. Specifically, the quality of the finished part depends on the diameter of the laser beam, the geometry of the particles, and the thickness of the layers. For these reasons, SLM printers need to be properly configured, as they need severe operating, calibration, material management, post-processing, and maintenance protocols. These specifications result in the demand for highly qualified operators [41].
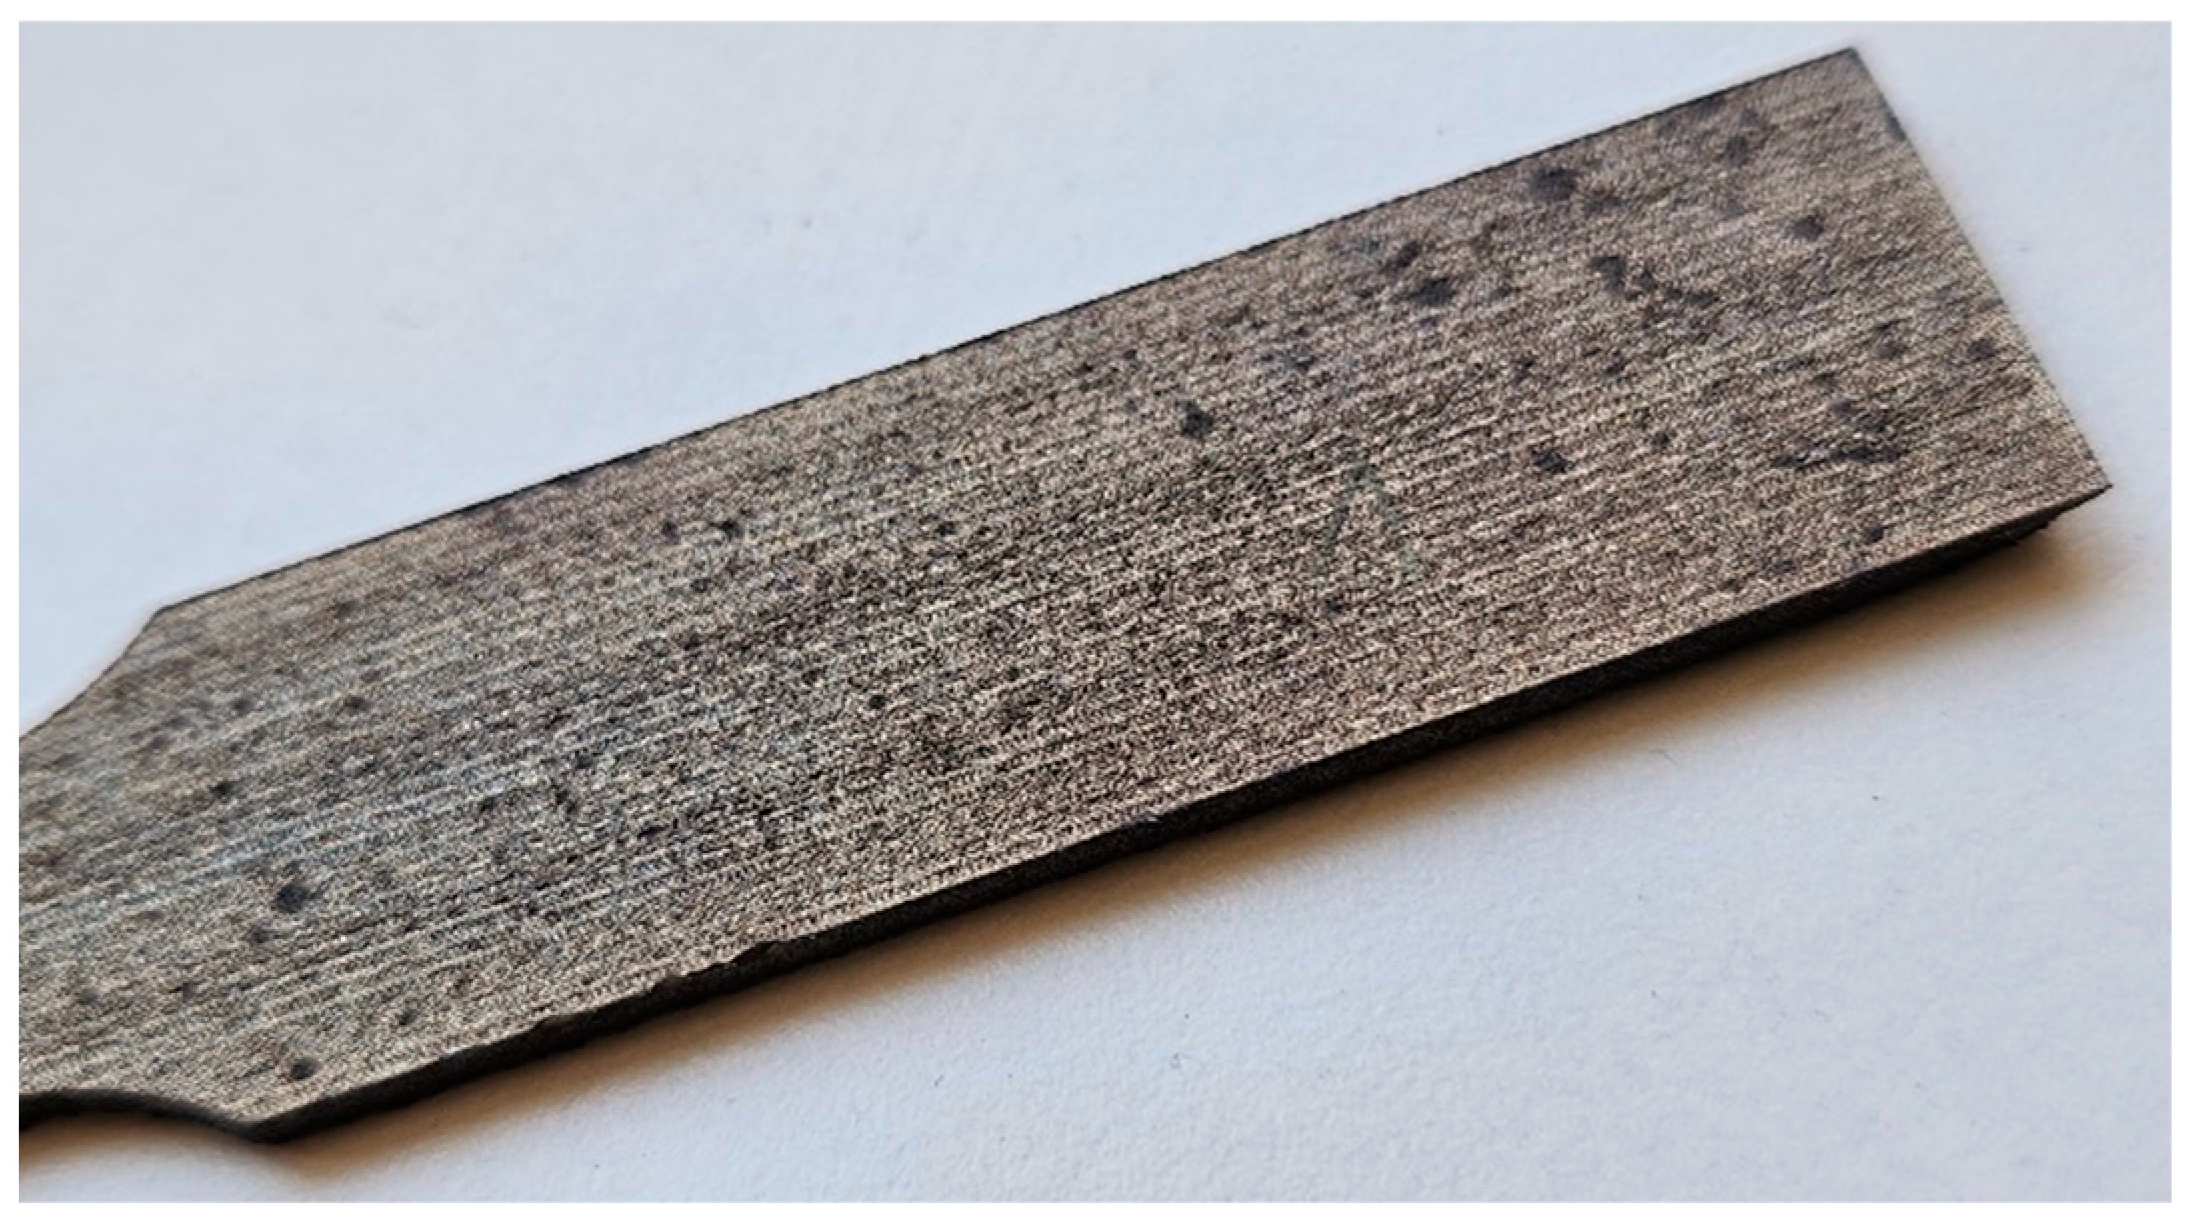
The quality of the surfaces largely depends on the orientation of the part; in fact, the upper surfaces have a better quality than the lower ones, which are directly in contact with the printing plate. Anyway, without any surface treatment, a “stepped” appearance due to overlapping layers is always observable, even in components produced with SLM where the quality is very high, as can be seen in Figure 5.
Despite the considerable thermal gradients due to the high temperatures developed during printing, which generate residual stresses in the parts, the dimensional accuracy achieved is still high.
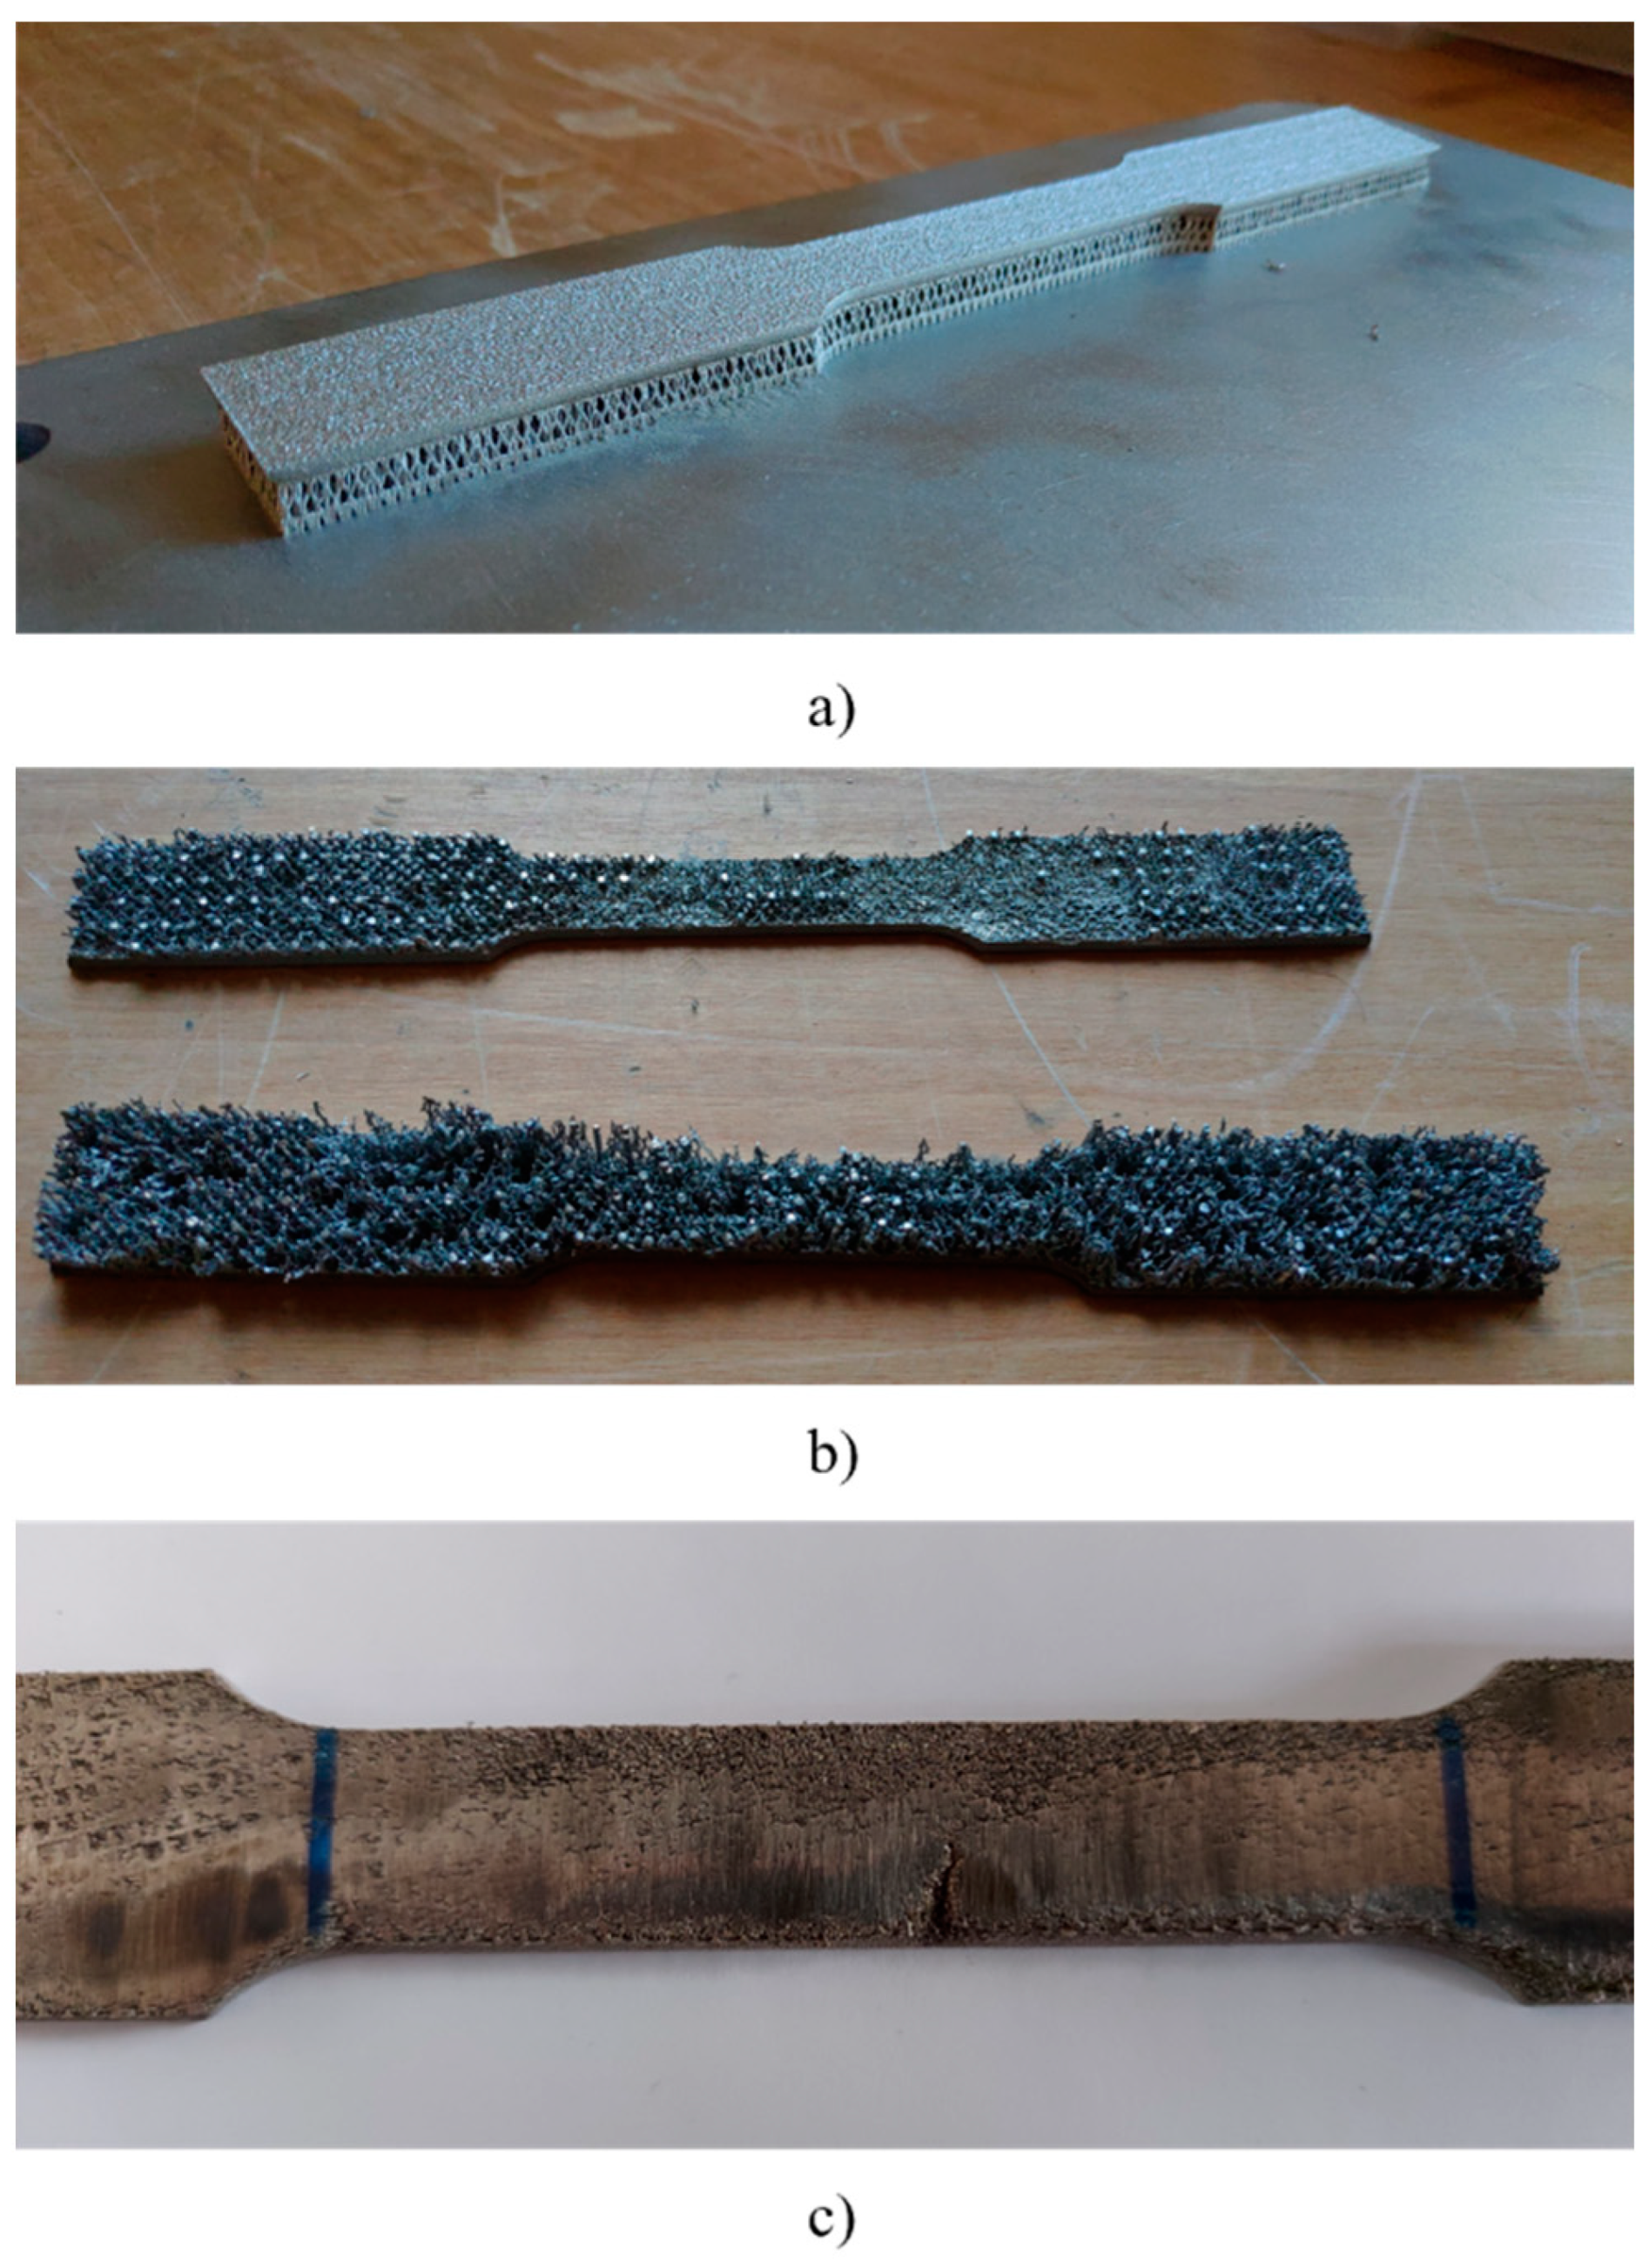
After the printing of the part, there are several post-processing possibilities. Among them, there are the removal of supports and residual powder from the build chamber and heat treatments. The supports, which increase the cost of the component, require mechanical removal, and the contact surfaces need treatment with files or grinders to smooth out imperfections (see Figure 6). Heat treatments are essential to relax internal stresses developed during production or to modify specific mechanical characteristics. Some heat treatments are useful to change the microscopic structure [40].
In addition, further post treatments can be applied to upgrade the surface finish, including machining, media blasting, polishing, and micromachining. Finally, metal plating can be applied to enhance part performance (corrosion, strength, and hardness).
The main applications of SLM involve the production of parts where high accuracy and high customisation are required. SLM is widely employed in the medical and dental industry, as well as in the aerospace and automotive sectors [44]. A schematic representation of the SLM process is shown in Figure 7.
The operating principle of the electron beam melting is similar to that of SLM. In fact, EBM is based on the fusion of powder metallic material by means of an electron beam instead of a laser beam. The electron beam scans a layer of powder, producing local melting and solidification of a cross-section of the workpiece. Compared to the other powder bed fusion methods, EBM can guarantee a higher building rate due to the higher energy density involved. In addition, the minimum elements and particles sizes, the layer thickness, and the surface finish quality are usually better. Most of the specifications of the SLM method are equally valid for EBM [44,45]. For the operating scheme, please also refer to Figure 7, which is indicative of the SLM technique.
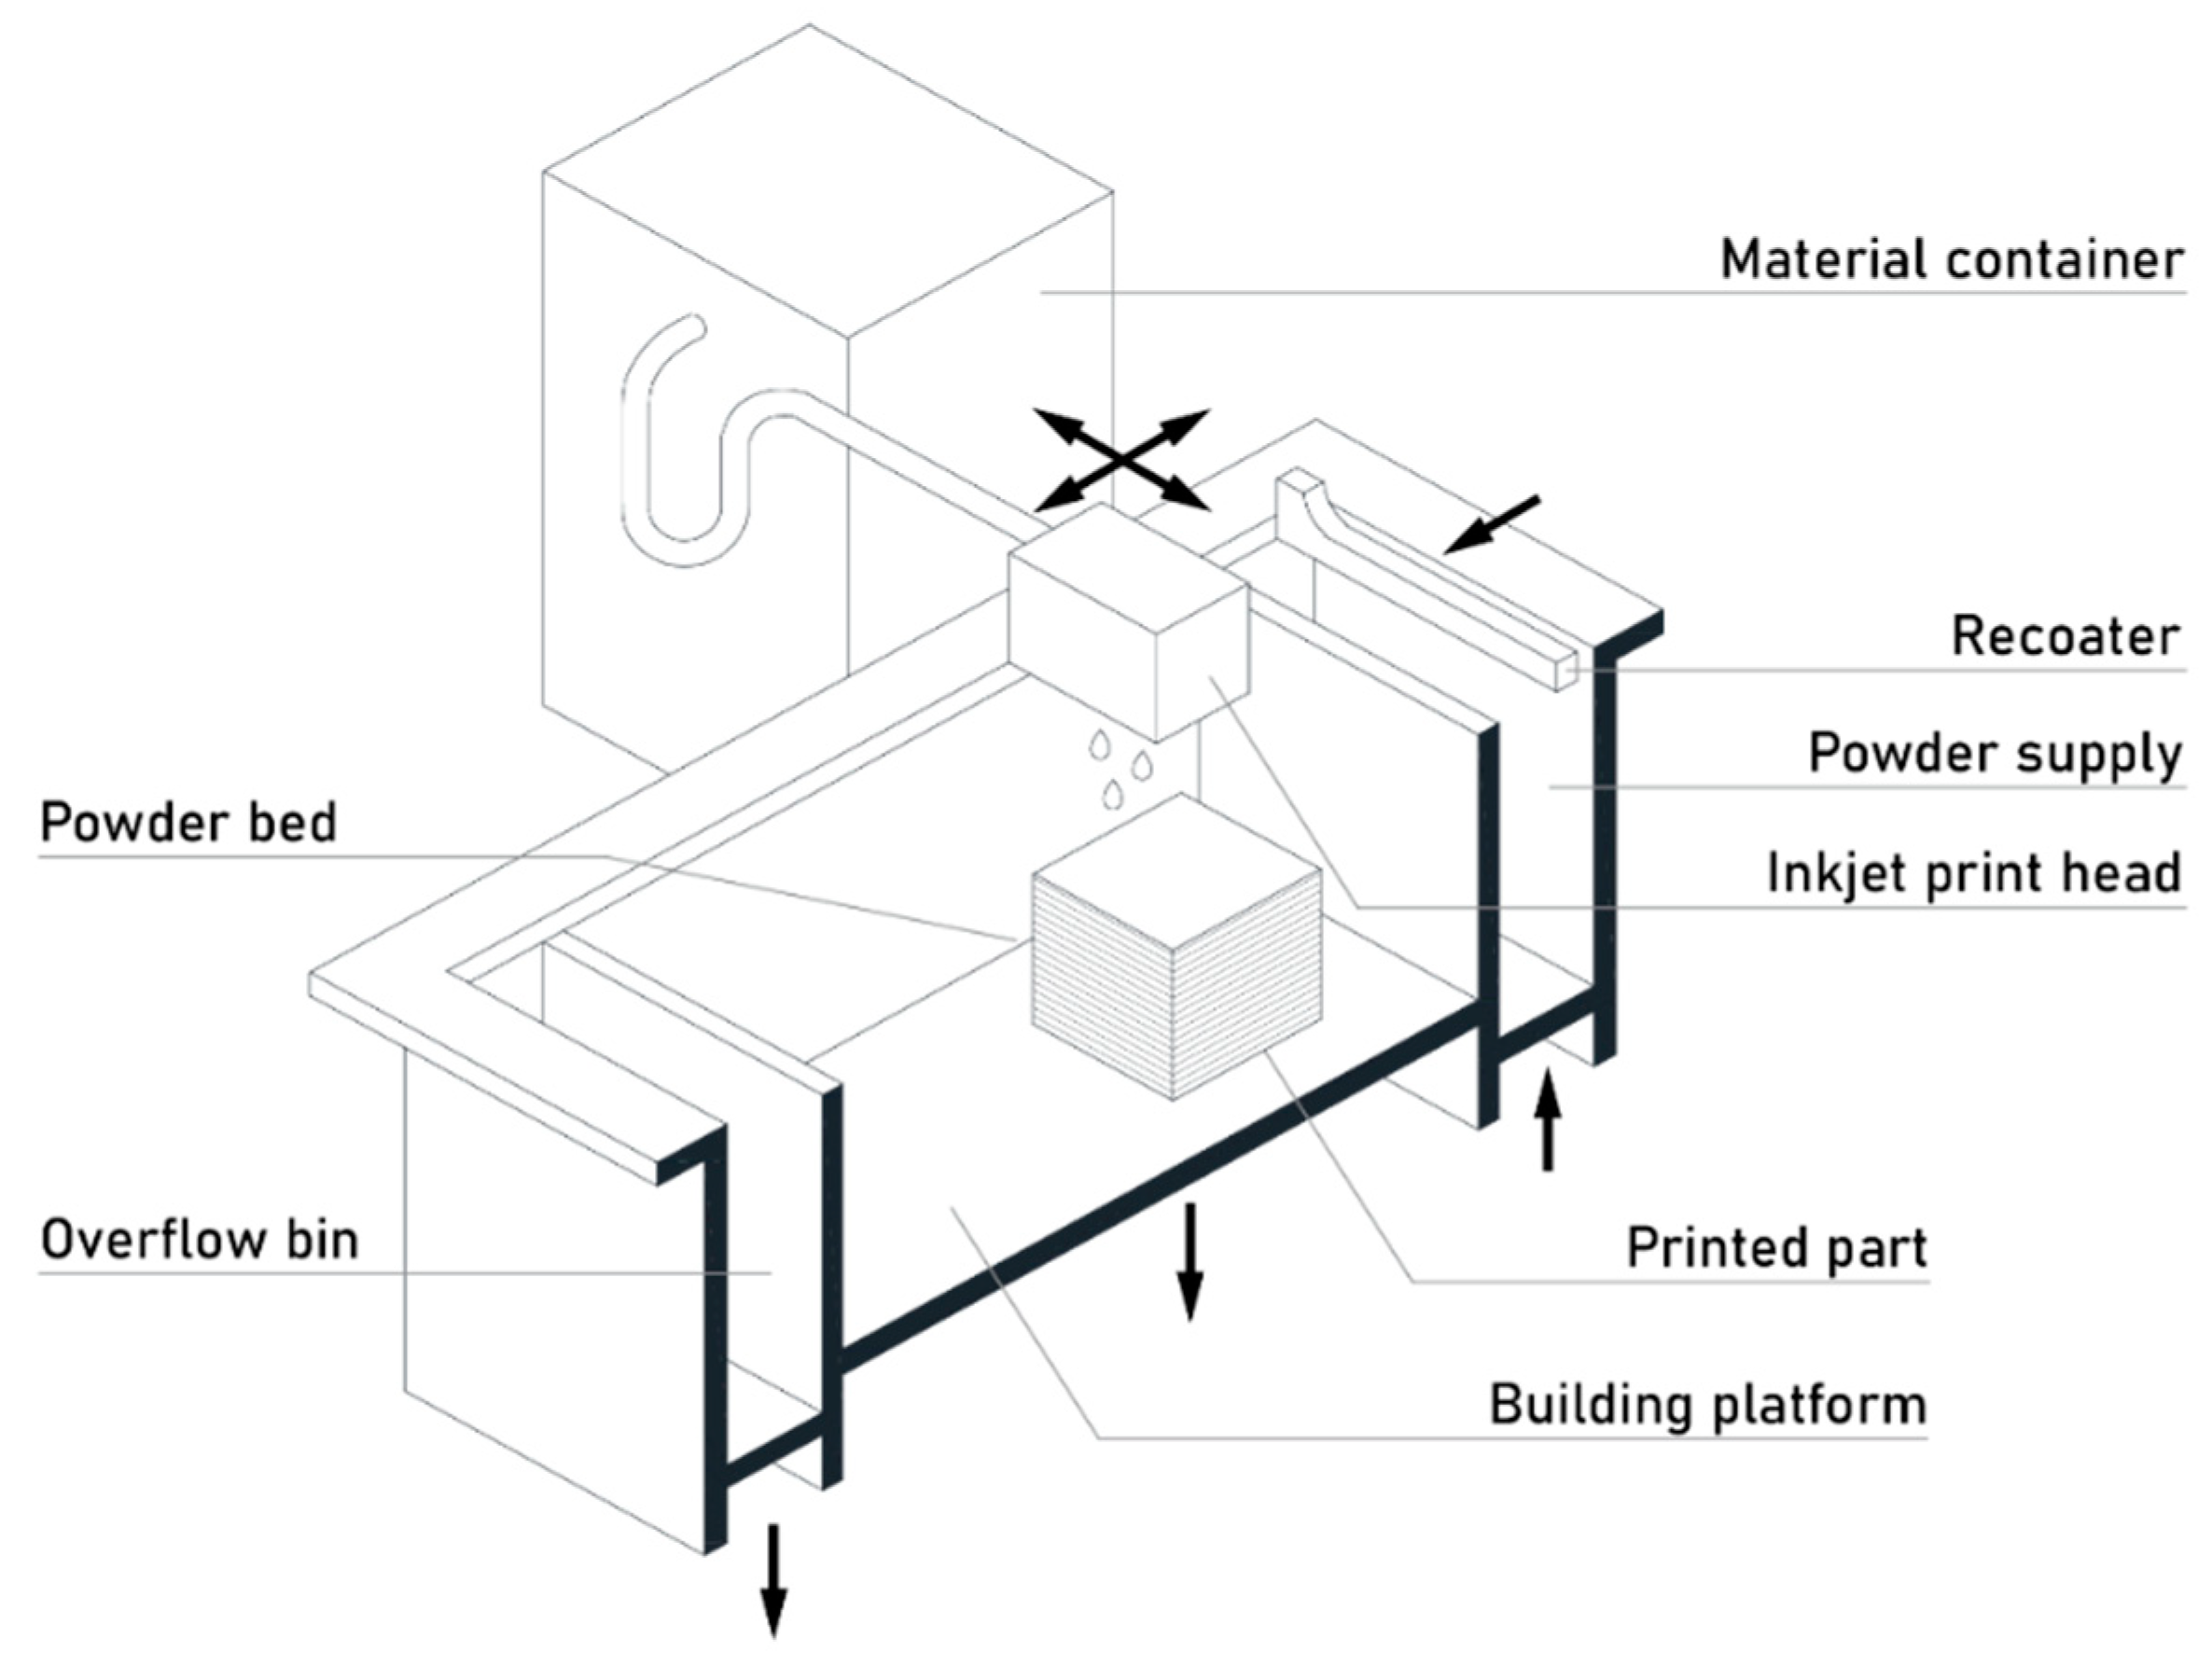
Binder jetting (BJ) can be considered as a merger of SLS and MJ as it involves powdered material and a nozzle that deposits a binding agent to produce three-dimensional objects. The BJ process operates with metals but also with other materials, including sands and ceramics [46].
This technology uses nozzles, moving over the building plate, which deposit drops (approximately 80 μm of diameter) of a binding agent in liquid form on top of the predeposited thin layer of powder. In this way, the powder particles are bonded together to obtain every layer of the part [47]. When the layer is complete, the powder bed moves downwards and a new layer of powder is placed on top of the one already formed to restart the process. The process is repeated until the whole workpiece is completed [48,49]. After printing, the part remains in the powder to cure and strengthen. Then, the component is cleared from the powder bed and the unbound excess powder is removed with compressed air. In BJ, 100% of the unbonded powder can be reused. After printing, parts are in a “green”, or unfinished, state with weak mechanical properties and may require two further post-processing sessions before they are ready for use [48].
The printed parts must then be placed in a furnace where the binder is burnt out, creating voids in the piece. Subsequently, the voids are filled by capillary effect with bronze, producing parts with both high density and good strength. The last step consists of sintering in an oven until a high density is reached [50,51]. However, the mechanical performance offered by metal parts produced with powder bed fusion cannot be achieved [44]. The main post processes consist of the elimination of excess powder from the workpiece. Metal components can be post-processed in the same way as traditionally produced metals, and heat treatments can be applied to improve mechanical properties. The secondary processes of infiltration and sintering enable the manufacturing of functional metal parts, thanks to the wide variety of materials available and the potential to design challenging geometries that are extremely expensive and difficult to produce conventionally [25].
The quality of the final product is mainly affected by the thickness of the layers, the size of the droplets dispensed, and the size and geometry of the powder particles. As with SLS, BJ binder jetting does not require support structures, because the part is sustained during printing by the surrounding powder. This helps to save both time needed for post-processing and material waste [50]. Unlike SLS, however, the parts are manufactured in the absence of heat, which reduces the problems related to temperature differences that can cause distortions and deformations. Shrinkage may only occur during the sintering phase [49].
The limited cost and production rate make BJ ideal for the development of casting models that would be hard to achieve with traditional methods. The principles of the binder jetting BJ printing process can be seen in Figure 8.
Sheet lamination (SL) and direct energy deposition (DED) are reported in order to provide a complete overview of additive manufacturing methods, even if they are methods not widely adopted yet and of minor relevance to the 3D printing industry [19].
The SL manufacturing technique, also known as laminated object manufacturing (LOM), is based on the deposition of sheets of solid-state material, mainly aluminium foil, supplied in the form of rollers, which are bonded to each other. They are then cut by a laser to fit the cross-section of the object and form the object layer after layer. This technique allows one to obtain very small thicknesses for each individual layer, thus increasing the resolution of the final product. The most commonly used material is paper sheets with a thermoplastic coating on one of the two sides [21,52].
Laminated objects are frequently employed for both aesthetic and visual purposes and are not intended for structural application [21,52].
DED printing technology creates parts by directly melting materials and depositing them on the part, layer by layer. The operating principle is that of metal welding, so any material that can be welded could be employed. This additive manufacturing technique is mostly used with metal powders or wire source materials. In addition to the ability to build parts from scratch, DED is also capable of repairing complex damaged parts, such as turbine blades or propellers. The term direct energy deposition can cover several technologies which can be categorized according to the way the material is fused. The most popular are laser engineering net shaping (LENS), laser metal deposition (LMD), and wire and arc additive manufacturing (WAAM) [21,22].
Among these, the most widely adopted technique is WAAM, in which most printers are very large industrial machines that require a closed, controlled environment to operate. The typical WAAM equipment consists of a nozzle mounted on a multiaxis arm (theoretically without size limits) within a closed frame, which deposits the molten material onto the surface of the part, where it solidifies [53]. The process is similar in principle to the material extrusion printing technique, but with DED, a nozzle can move in multiple directions, with up to five different axes compared to only three on most FDM printers [54].
LENS is a type of additive manufacturing process specifically designed for metals. It is a highly precise and versatile technique in which a fine metal powder is continuously fed into the build chamber and a high-power laser beam is focused onto the powder bed. The laser beam melts the powder, creating a small molten pool, and a nozzle directs a stream of inert gas onto the molten pool, preventing oxidation and promoting rapid solidification. As the building platform moves, the laser beam melts the next layer of powder, fusing it to the previous one. As with other 3D printing technologies, this process is repeated layer by layer until the entire 3D part is built [55]. Briefly, the key advantages of LENS are the possibility to produce parts with very fine feature sizes and excellent mechanical properties, such as high strength and durability. Also, a wide range of metals can be processed using LENS, including titanium, stainless steel, and nickel alloys. However, it must be considered that there may be some drawbacks, such as the need for post-processing, poor surface finish of the components, and distortion of the components due to residual stresses [48].
LMD is an additive manufacturing process, closely related to LENS, that utilizes a high-power laser to melt and deposit a metal wire onto a substrate, for the creation of complex metal components layer by layer. Unlike LENS, which uses metal powder, LMD employs a continuous metal wire as its source material, with a high-power laser beam focused on the metal wire. The laser melts the wire, creating a molten droplet that is deposited on the surface. The molten droplet quickly solidifies, bonding to the previous layer. The metal wire and laser beam move in a coordinated way to create the desired component shape. Moreover, a broad range of metal materials can be used, both in wire and powder form [56].
LMD typically offers a faster deposition rate compared to LENS, making it suitable for producing larger components, and the surface finish of components produced with LMD is generally smoother than those produced with LENS. In summary, LMD is another powerful additive manufacturing technique for metals, offering specific advantages in terms of deposition rate and surface finish [57,58].
A little-known variant of the LMD is the shaped metal deposition (SMD) method. It differs from LMD only in the use of a metal wire of circular or profiled cross-section as the base material. In addition, it offers a higher deposition rate and better component surface quality than LMD [59,60].

2.1. Materials

When selecting a metal for 3D printing, it is crucial to consider a number of interrelated factors, including the physical and mechanical properties of the material, the peculiarities of the AM process, the final application, and the cost of the material, which is an important economic factor, especially for mass production [61].
Among the material characteristics, it is important to consider:
-
The mechanical strength, as yield stress, ductility, wear, and fatigue resistance are key properties in determining whether the metal can withstand the expected stresses.
-
The density of the material, which affects the weight of the finished component and can be a critical factor in many applications.
-
Thermal and electrical conductivity, important properties for electronic and thermal applications.
-
Corrosion resistance, since if the component will be exposed to corrosive environments, a resistant metal must be chosen.
-
The microstructure of the 3D-printed metal, considering its features, imperfections, and defects, which can influence the properties of the finished part.
-
Biocompatibility, since, for example, for medical applications, the material must be biocompatible and nontoxic.
As far as the 3D printing process is concerned, it is important to consider compatibility with the technology, as not all metals are suitable for all metal 3D printing technologies, layer thickness, which affects the resolution and surface quality of the component, and the melting speed of the metal, which affects the printing rate and quality of the component.
Then another important aspect is the final application. Assessments must be made on the type of load the component will have to withstand during its life, the environment in which the component will be used, and aesthetic requirements, as surface finish and appearance are important in some areas of application. It must also be considered that specific certifications and compliance with particular standards are required in certain sectors or for certain applications.
There are also other factors that must be taken into account, including material availability, as not all metals are readily available in powder or wire form for 3D printing, and the type and cost of post-processing, as some metals require post-print heat or surface treatment. Finally, the environmental impact of the production process and material use must be considered, as this is an increasingly important factor nowadays [62].
In light of these general remarks, the most commonly used metals in 3D printing are stainless steels, due to their high corrosion resistance and good mechanical strength; titanium, because of its high specific strength, biocompatibility, and corrosion resistance; aluminium for its lightness and good thermal and electrical conductivity; nickel, due to its high strength and good corrosion resistance; and cobalt-based alloys because of their high resistance to high temperatures [61].
The world of metallic 3D printing is continuously growing, and with it, also the range of metallic materials used. Therefore, in addition to the traditional materials, innovative materials are becoming increasingly attractive and popular. Nickel-based superalloys offer excellent resistance to high temperatures and corrosion, making them ideal for aerospace applications, gas turbines, and engine components [63,64]. One of the most widely adopted is Inconel [65], which is known for its resistance to fatigue and oxidation; it is used in sectors such as aerospace and automotive. Aluminium alloys include high-strength aluminium, which offers an excellent strength-to-weight ratio, making them ideal for lightweight structural components in sectors such as automotive and aerospace [66,67]. Then there are shape memory alloys (SMAs), among them Nitinol, which are able to change their shape in response to thermal or mechanical inputs, finding applications in sensors, actuators, and medical devices, and conductive metals such as copper, silver, and gold, which are used to create electronic circuits and sensors directly through 3D printing [68,69,70]. Finally, there would be high-entropy alloys (HEAs), the use of which in additive manufacturing, despite their potential, still presents some challenges related to cost, optimisation of printing parameters, and characterisation of the materials themselves [71,72].

2.2. Overview Remarks

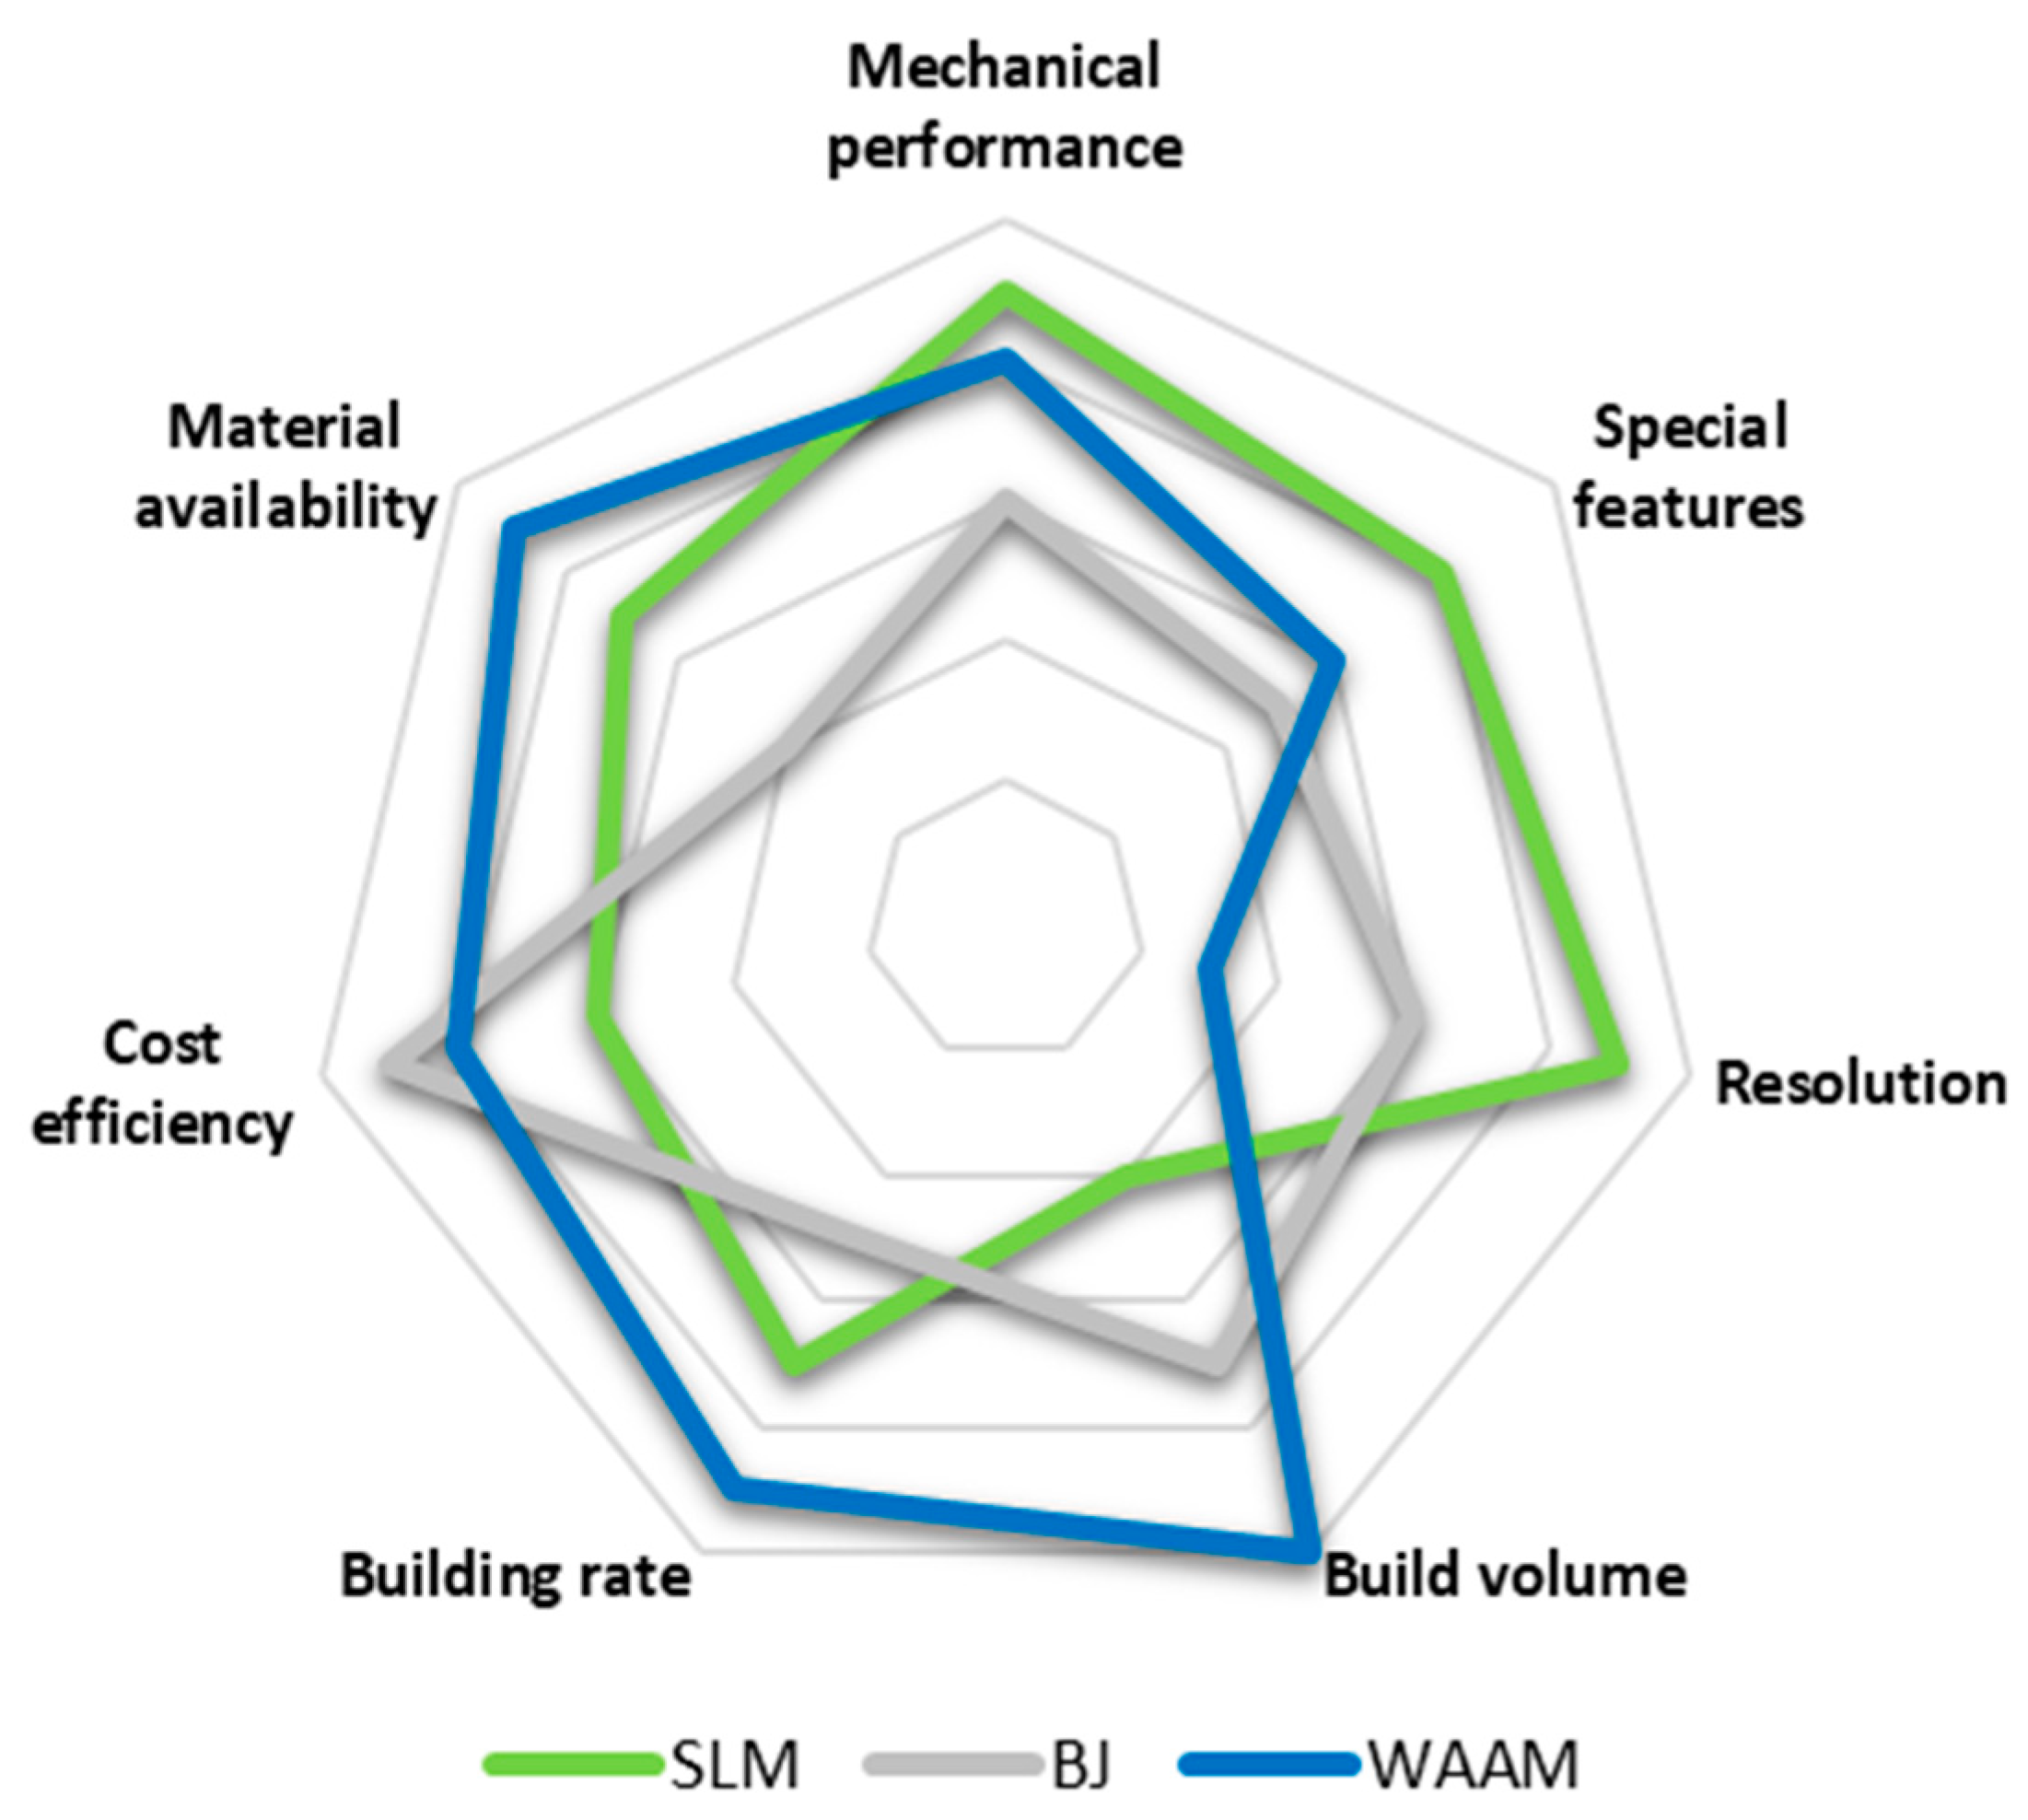
In order to compare the operating principles and the production features of the different metal printing techniques, the benefits and drawbacks of the main AM methods (SLM, BJ, and WAAM), widely examined in the previous section, are summarized in Table 1.
In terms of surface finish and level of accuracy, it emerges that, among the printing methods analysed, good results can be obtained through SLM, allowing the production of smooth surfaces. Surface roughness is a key parameter in assessing the quality of a 3D-printed component, as it affects aspects such as aesthetics, functionality, and corrosion resistance. The average roughness range can vary significantly depending on the metal 3D printing technology used. SLM generally offers a lower surface roughness than EBM and WAAM due to the use of a focused laser that precisely fuses the metal powders [73]. However, the roughness can vary significantly depending on the process parameters. For EBM, the surface roughness is slightly higher than for SLM, mainly due to the higher heat diffusion of the electron beam [74]. Finally, the surface roughness of WAAM is typically the highest of the three technologies, due to the nature of the deposition process and the larger size of the traces left by the wire [75]. However, there are some factors influencing roughness. These include process parameters, such as laser power/electron beam, scanning speed, layer thickness, and scanning pattern; material properties, such as the fluidity of the molten metal; and post-processing, as treatments such as sandblasting or sanding can significantly reduce roughness. The average roughness of parts produced with metal BJ technology is a parameter that depends on several factors and can vary significantly from one component to another. Roughness is highly dependent on the particle size of the metal powder and the density of the binder, as the metal powder particles are joined by a liquid binder, forming a porous structure that requires a subsequent sintering process to achieve the desired density. Therefore, it is hard to give a precise range for the average roughness of metal BJ-printed parts, as it depends on the factors mentioned above. However, in general, it can be stated that the average roughness of parts produced with metal BJ is usually higher than that achievable with technologies such as SLM or EBM [76].
In terms of mechanical properties, the only processes capable of assuring good performances are the powder bed fusion methods, i.e., SLM. However, the great disadvantage of these technologies is the high costs of machines and materials, as well as the need for highly specialised operators. The WAAM method, which can produce very large components, can also provide excellent mechanical strength, but at the cost of poor quality. Also, BJ is a very expensive method due to the elevated costs of raw materials. The widest variety of materials is available for SLM for metallic materials, although the WAAM method can ideally use any metal suitable for welding. Finally, considering that the size of the workpieces that can be printed is one of the most limiting factors for large-scale use of additive manufacturing, the only method that allows the production of larger parts are BJ and WAAM.
Furthermore, a comparison of the specifications of the main metal additive technologies under investigation is shown in Table 2. It displays the main characteristics in terms of operating principles, energy source employed, available materials, print sizes, resolution, and layer thickness, and fields of application of the most important additive technologies reviewed.
From Table 2, it is possible to deduce that there is a further criterion to classify the printing techniques, the physical state of the raw materials, so there are three categories, namely, solid-, liquid-, and powder-based. Metal 3D printing techniques all involve material in powder form. The powder-based methods are SLM, EBM, and BJ. The only solid-based process is the WAAM, which involves the deposition layer after layer of metallic wires in the form of weld bead combined with an electric arc used as the heat source, for the production of components that do not demand any particular aesthetic properties. Wire and arc additive manufacturing, as we will discuss in Section 4, is the most widely diffused technology in the field of construction engineering due to the possibility of producing large elements with excellent mechanical properties.
In addition to Table 1 and Table 2, all the characteristics discussed in this section are graphically summarised in Figure 9.

2.3. Features of 3D Printing Methods

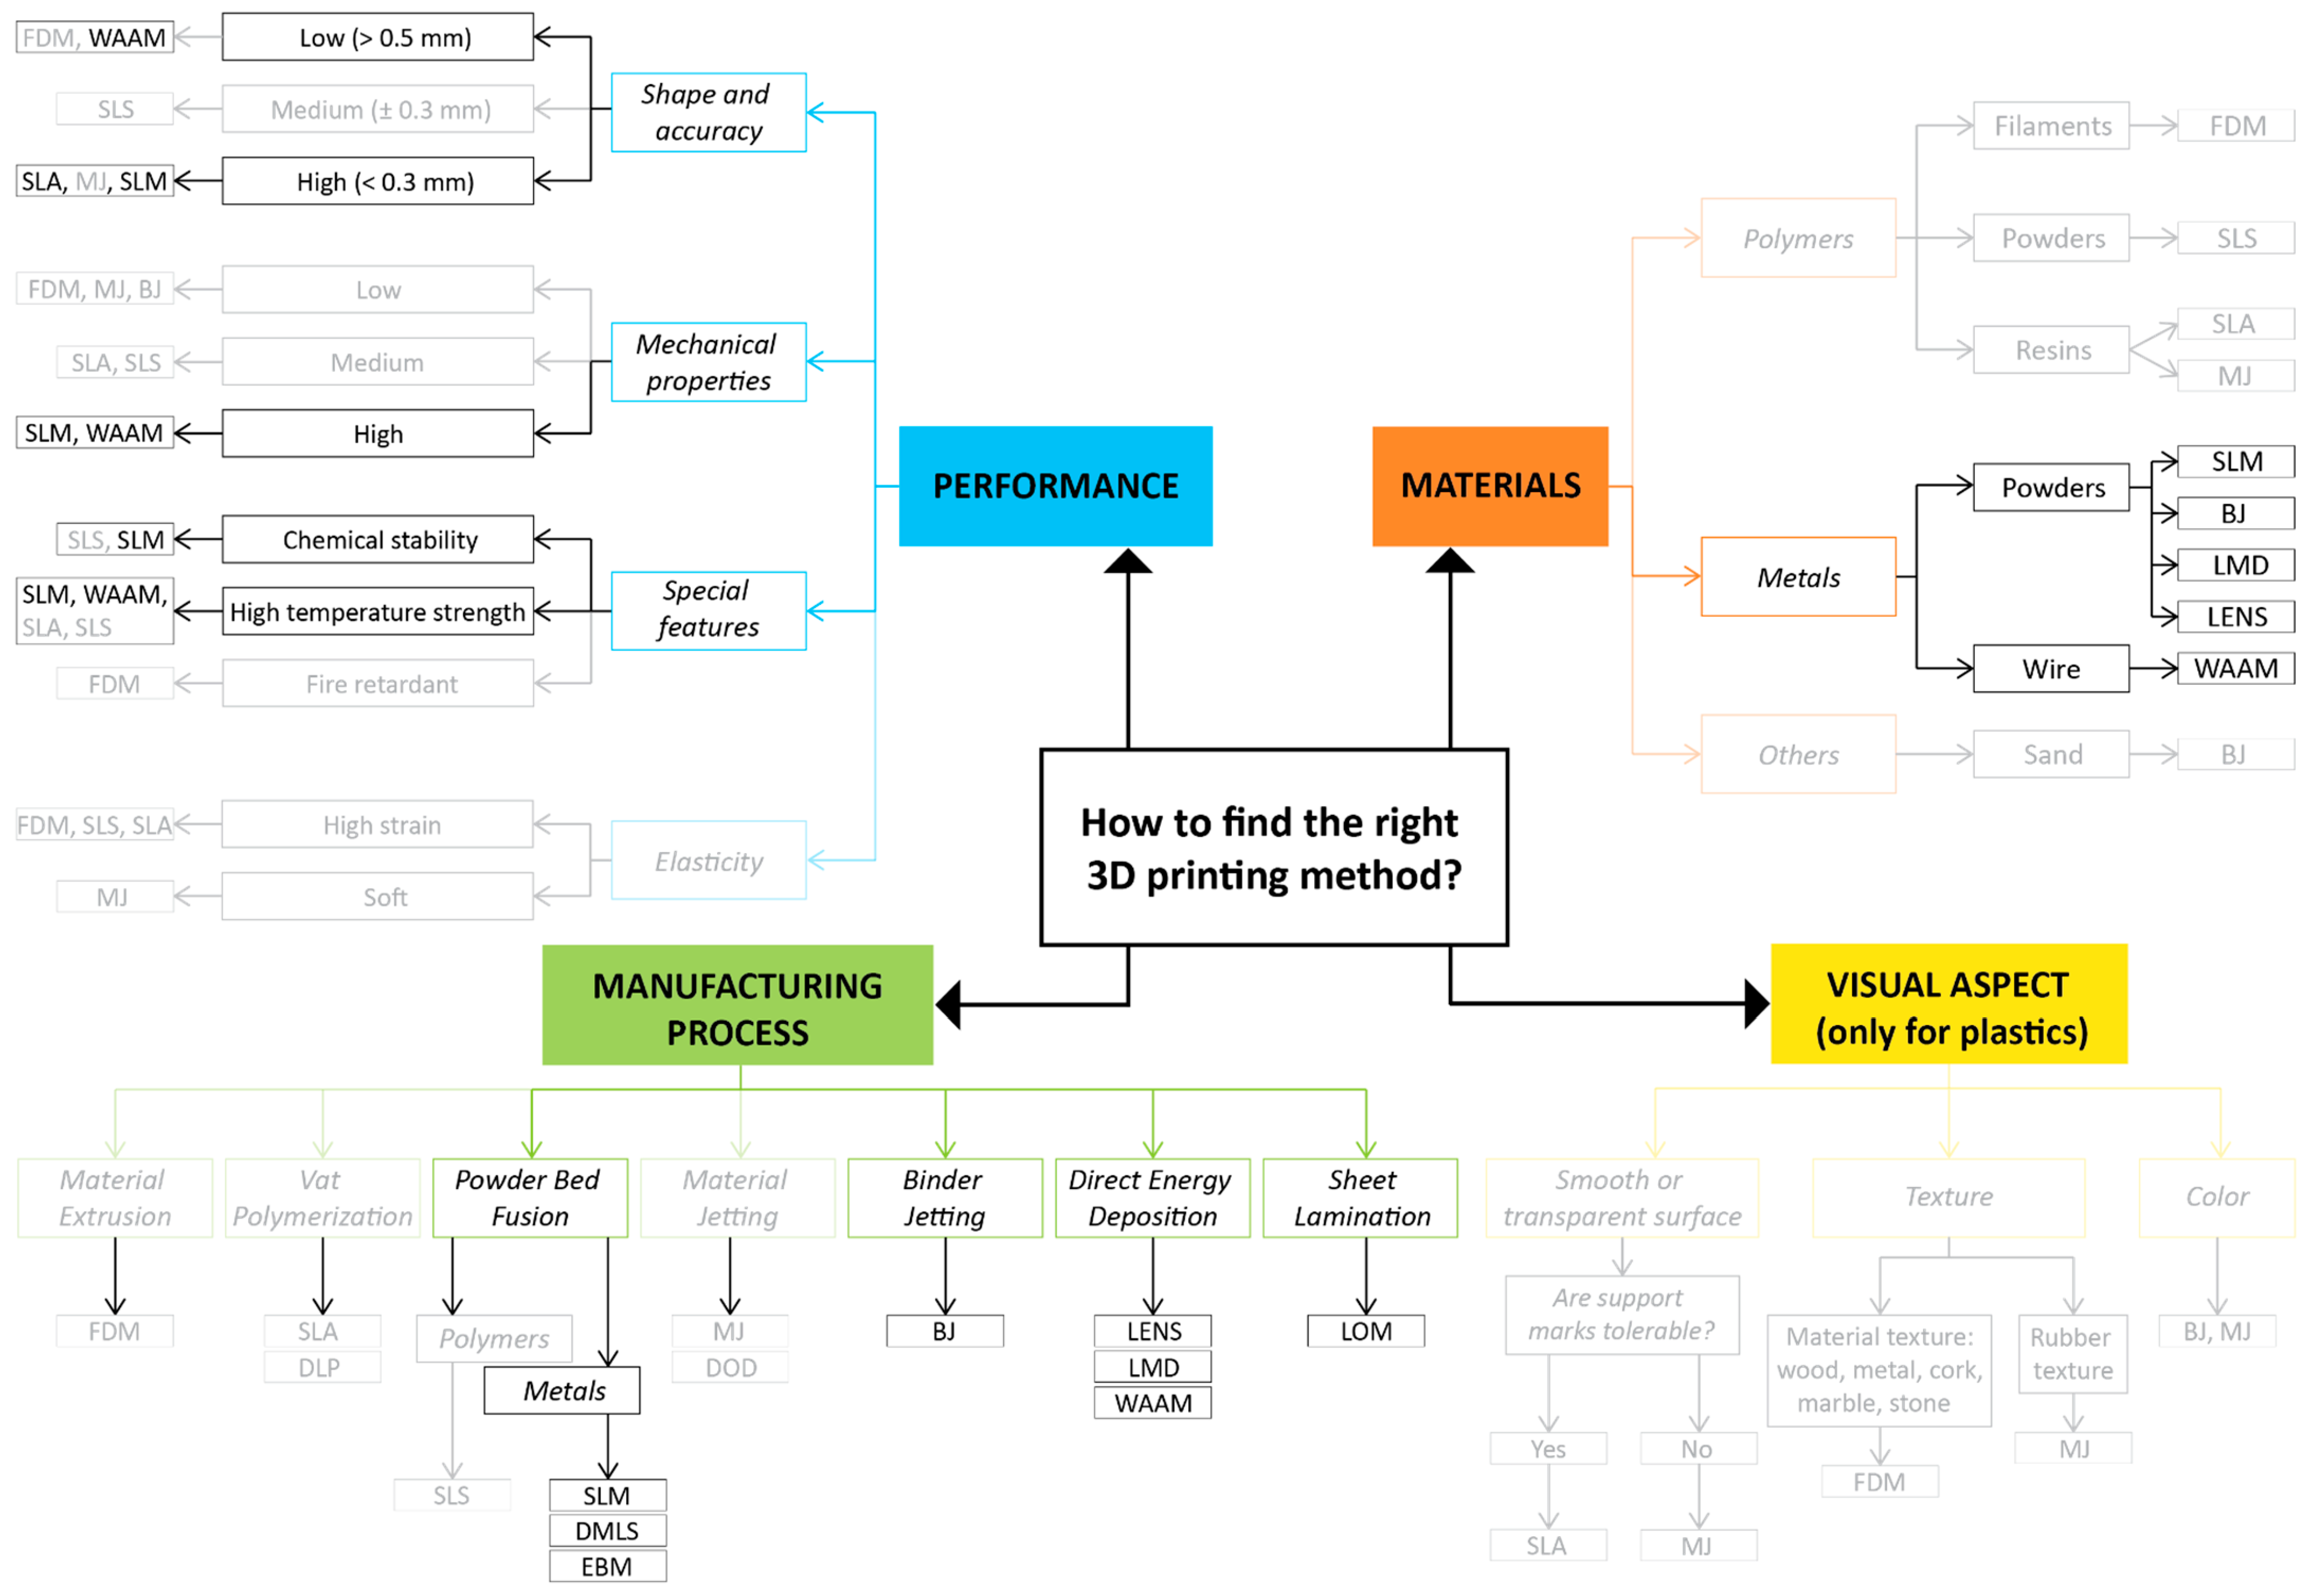
Figure 10 aims to provide a useful tool to select the most adequate technique, according to the requirements for a particular application, classifying the additive technologies as a function of several parameters, such as the target performance, the raw materials employed, the specific production process, and the visual appearance of the final product. An overview of all additive technologies is given, with a focus on metal-based methods.
The selection of the production process may be influenced by the processing principles or the energy source involved. However, the different technologies have already been extensively discussed in the previous sections.
Considering the raw materials, the possible options may be polymers, metals, or, more rarely, sands. Polymers can be found in the form of filaments, as with FDM, powder, as with SLS, or resin, as with SLA and MJ. Metals can be found in the form of powder, as in the case of SLM, BJ, LMD, and LENS, or wire, as in the case of WAAM [19]. The only method that allows the manufacture of materials different from polymers and metals is BJ, which also allows the 3D printing of sand and silica [21].
Moreover, if the final performance is the main goal of the specific application, it is worth noting that if precision of the shape and a high level of detail are demanded, SLA for polymer-based methods, and MJ and SLM for metal-based technologies, have to be selected. If, on the other hand, no special features in terms of accuracy are required, metallic technologies should not be considered, except for WAAM, where mechanical performance is not matched by adequate performance in terms of detail precision, and, together with SLS and FDM, could be a proper choice. SLM and WAAM are the only appropriate techniques if excellent mechanical behaviour is desired, even if good strength can be also guaranteed by SLA and SLS printed components, always bearing in mind, however, that this involves plastic materials. If mechanical performance is the main target, in fact, FDM, MJ, and BJ should not be taken into account [6]. With regard to the size limits of printable objects, only the WAAM allows for no constraints, as there are no build chambers, but only robotic arms with potentially any dimension required for the purpose.
Finally, referring to more specific features, products deriving from SLS and SLM are considered chemically stable, parts from FDM as fire-retardant, and components from SLS, SLM, WAAM, and SLA as resistant to high temperatures.
It can, therefore, be summarised that in terms of mechanical and structural performance, and of accuracy and precision in finishing, metal 3D printing methods are unrivalled.
The last parameter that can be analysed is the visual appearance of the printed product. Considering only plastic materials, smooth or transparent parts can be obtained, with textured or coloured effects and, depending on whether the marks left by the supports removal on the surface are acceptable or not, SLA or MJ can be selected, respectively. If components with a texture similar to other materials are desired, FDM results as the best choice. A rubber-like finish is offered by MJ products. Finally, if fully coloured parts are required, MJ and BJ are the leading techniques [15].

3. Printing Process Parameters for Metal AM

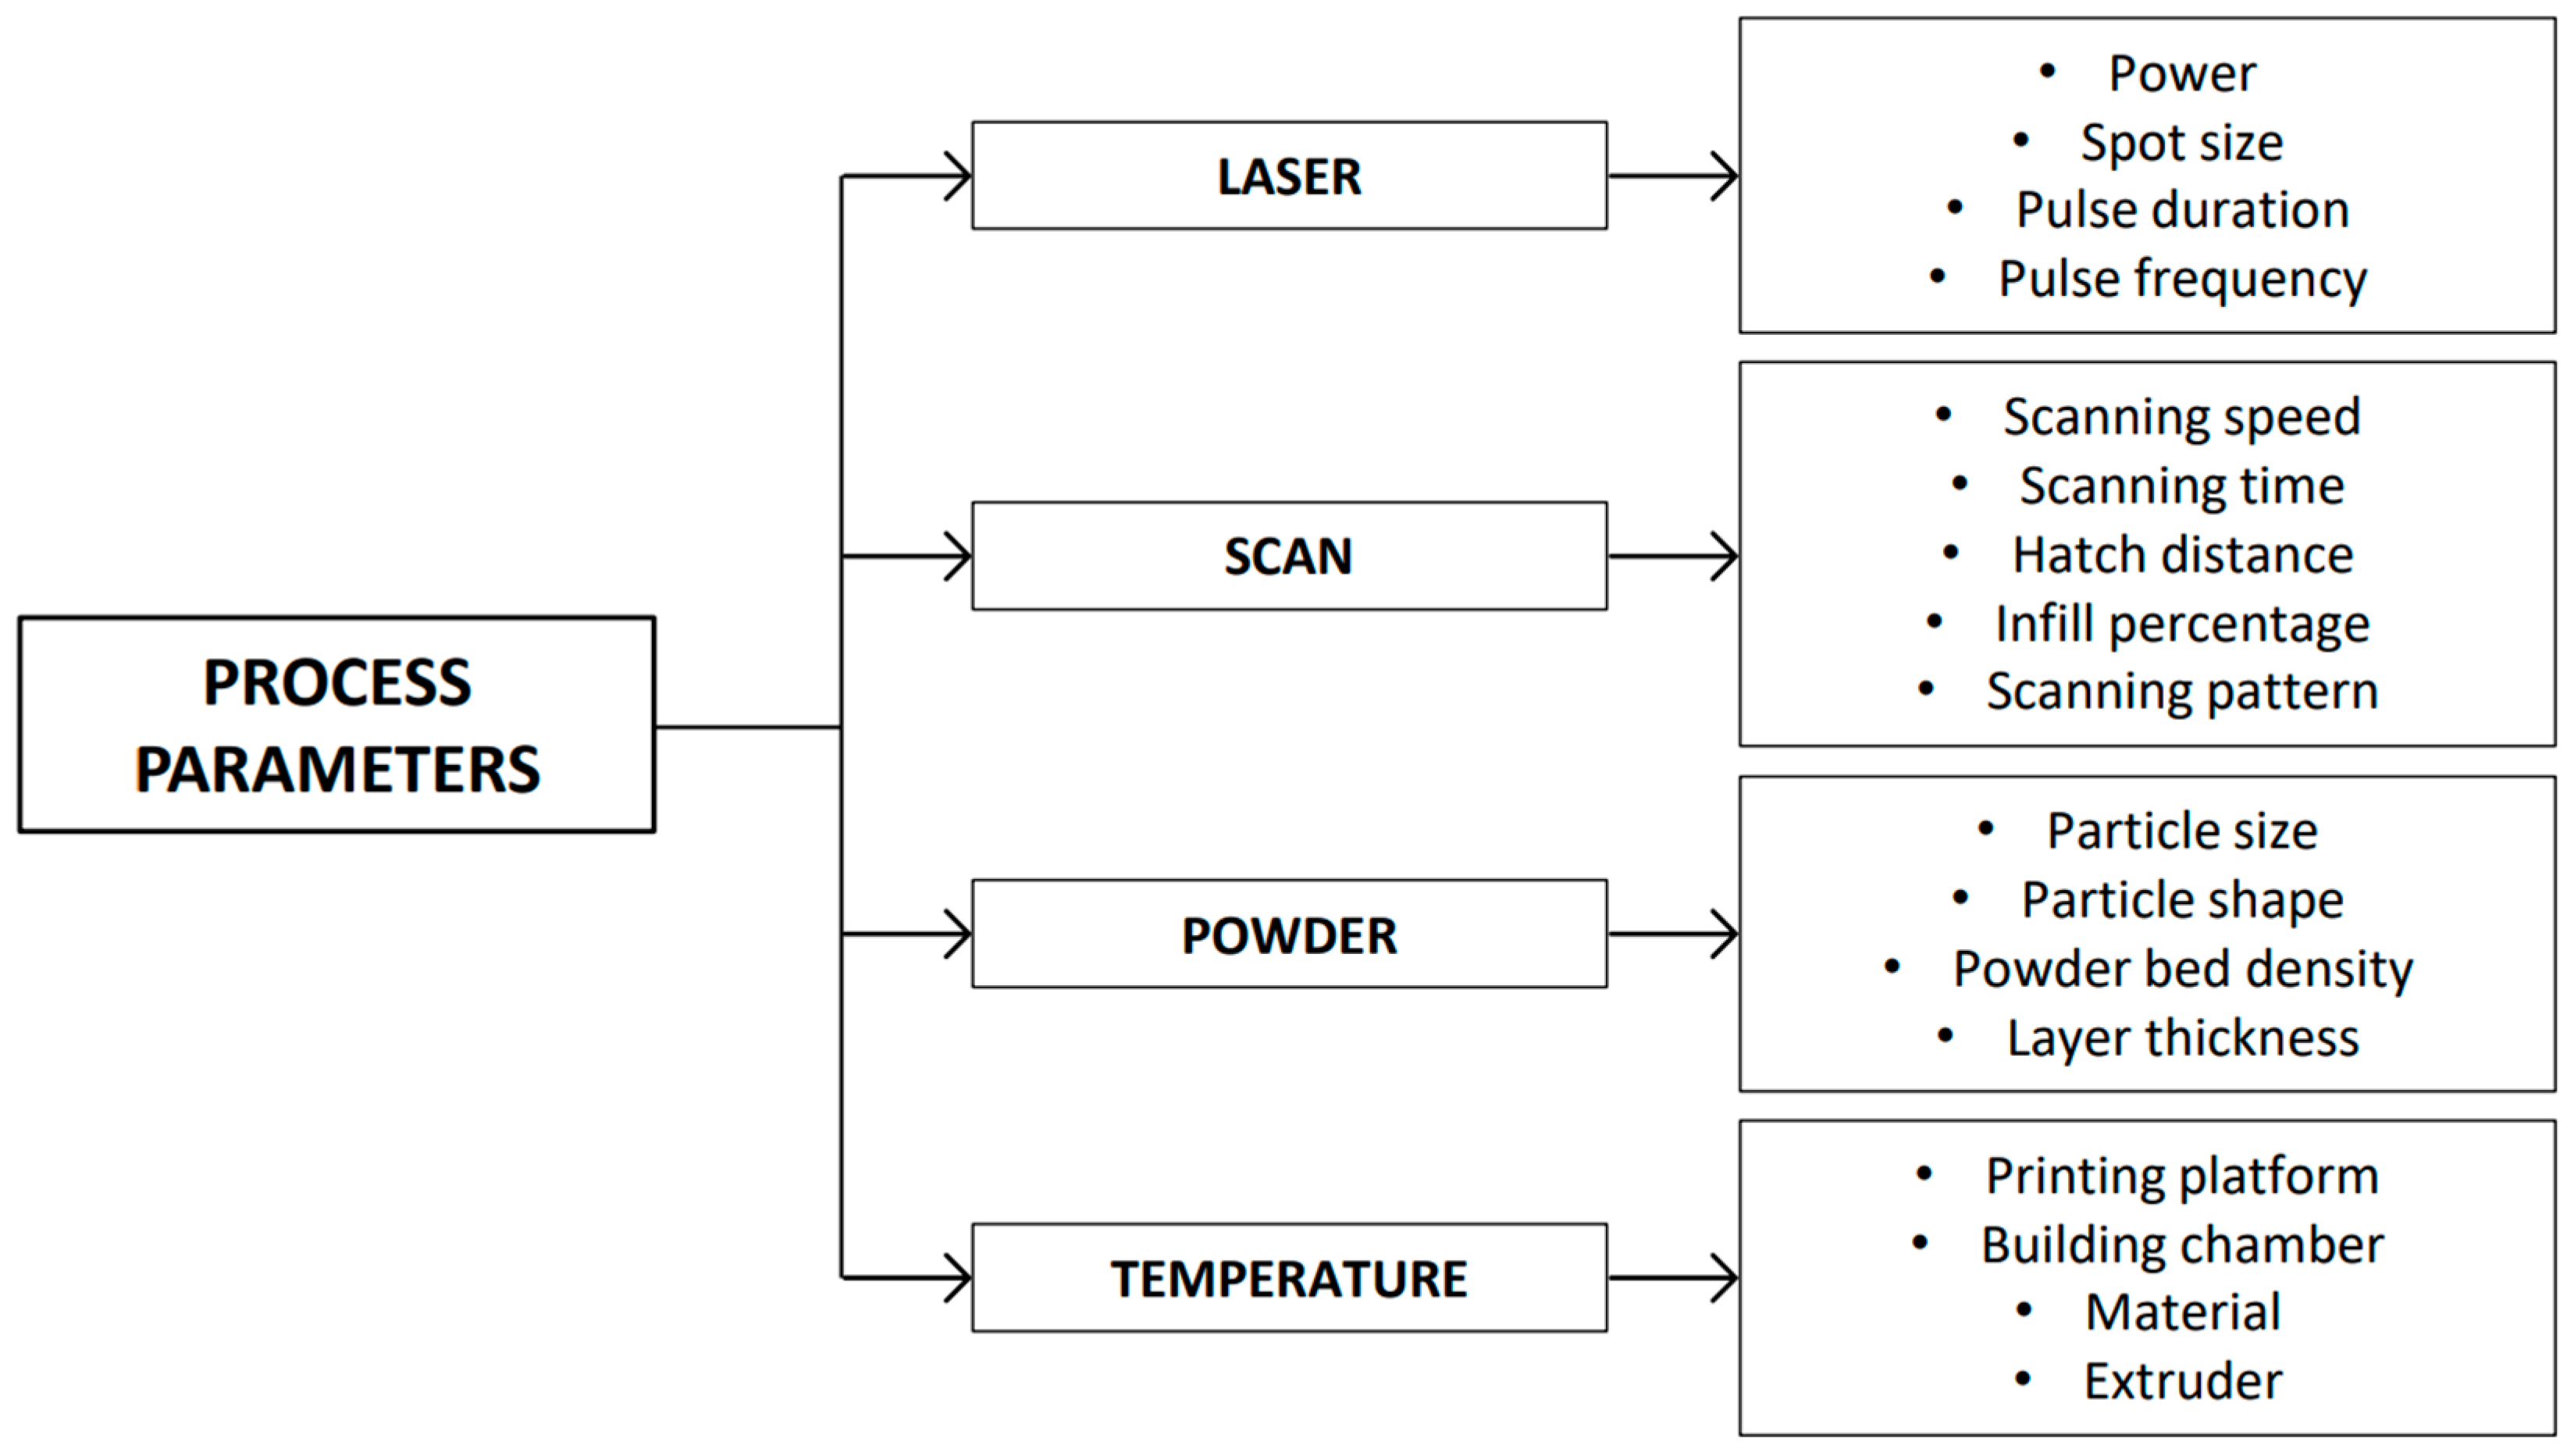
The quality of the printed part, both from the surface finish and mechanical points of view, can depend on several factors, known as process parameters. The presence of a very large number of process parameters in AM technologies makes it very complex to find the perfect combination to obtain the optimal result. In fact, specific properties can be achieved by proper modifications of these parameters, which can be printer-related or raw-material-related, and they can introduce changes in microstructure, porosity, and mechanical features. Some process parameters are manageable by the operator, while others are predefined by the printer manufacturer or powder supplier but, in general, they mainly concern the laser beam, the scanning process, the feedstock in powder form, and the operating temperature, as illustrated in Figure 11. Figure 10 shows the process parameters of the PBF methods, the focus of this review, which are discussed in detail in the following sections.
In addition, there are different directions and orientations that can be adopted during the printing process, and they can affect the mechanical behaviour of the printed part, due to the anisotropy generated by the additive manufacturing process. All the parameters involved in the printing process contribute to define the so-called “scanning strategy” [77,78].
As far as the WAAM method is concerned, the main process parameters to be considered for a successful result are current, arc voltage, and welding speed as far as the welding process is involved, and deposition rate and wire feed rate as far as the material side is considered [79].

3.1. Laser-Related Parameters

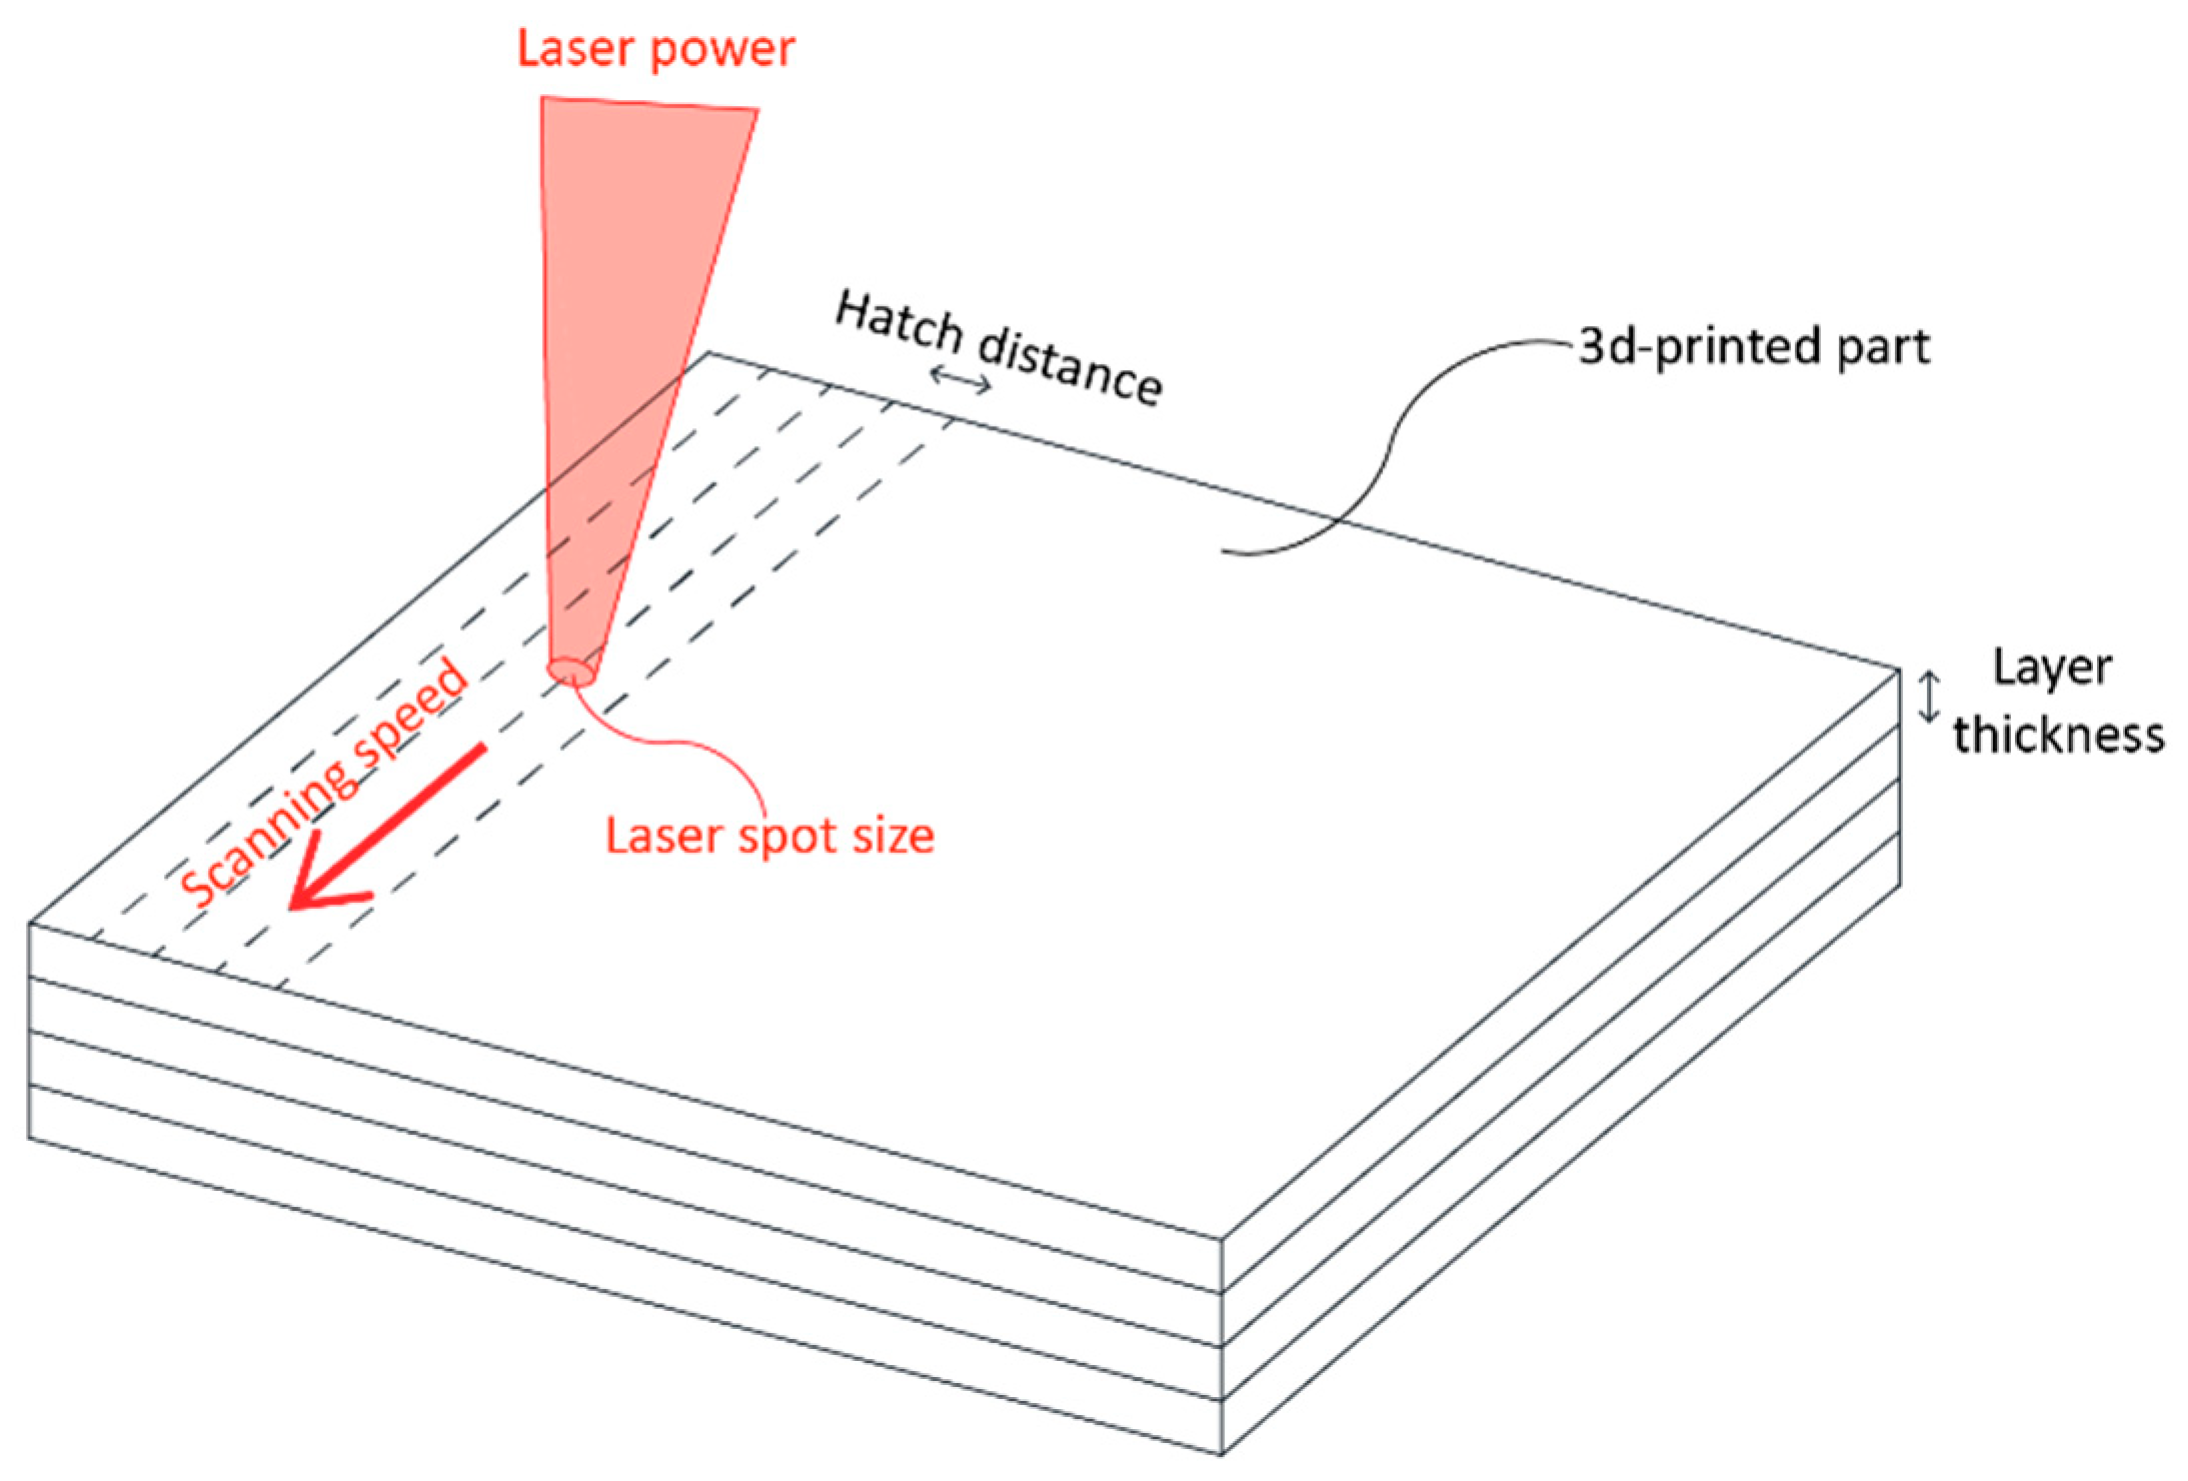
The main parameters related to the laser beam are the output power, the diameter of the laser spot, the duration of the laser pulse, and its frequency. More specifically, the power of the laser (see Figure 12) represents the power of the beam directed onto the powder bed required to melt it to obtain the desired geometry. It indicates the amount of energy per unit of time and it is, therefore, essential to set the correct speed value in order to assess the amount of energy affecting a certain area. Thus, a right power value must always be coupled with a proper scanning speed [80], which depends on the type of printer. It is worth noting that, when setting the laser power, it should also be taken into consideration that insufficient power does not ensure the proper heating and fusion of the powder bed, resulting in a failed remelting of the previous layer and, consequently, in a nonadhesion of the layers. In addition, higher power increases the degree of particle fusion, reducing porosity [81,82]. The laser power contributes, together with the spot diameter, scanning speed and distance between scan track spacing to define the laser energy [83].
As 3D printers produce parts in three dimensions, it is necessary to consider the minimum element size of the XY-plane and the Z-axis resolution. The reason for the best printing quality lies in the resolution of the XY plane, which is defined by the diameter of the laser beam. The smaller the diameter, the greater the reproducible detail and accuracy.
The laser spot size contributes (see Figure 12), together with the thickness of the layers, to define the resolution of the printed part. When the laser beam hits the construction platform, it projects a surface, called a spot, where the powder melting phenomena occur. The geometric shape is idealised as a perfect circle, although in practice it turns out to be an ellipse of varying size. In fact, during the printing process, the angle of incidence between the laser beam and the surface of the powder bed changes continuously. More generally, it is possible to state that larger spot sizes ensure higher build speeds but result in lower accuracy and dimensional tolerance of the components produced [78].
Finally, the duration and frequency of the laser pulse are quantities that contribute to define the laser output energy.

3.2. Scan-Related Parameters

The parameters related to the scanning process of the single two-dimensional element layer are scanning speed, scanning time, hatch distance, and scanning pattern (see Figure 12).
The scanning speed expresses the speed of the laser beam movement and it changes depending on the material used. It is an important factor as it influences the heating and cooling rate of each layer and, consequently, the microstructure of the printed product [80].
The scanning time defines the minimum time for scanning a single layer, measured in seconds. When the scanning of the desired geometry is completed earlier, the machine waits for the set time to produce the next layer. It can significantly influence the mechanical properties as it represents the time to ensure cooling of the layer manufactured.
The hatch distance, also called hatch spacing or scan spacing, is the distance between two consecutive passes of the laser beam (see Figure 12). It is also known as infill percentage, as it represents the scan density of the geometry to be produced. It is a parameter directly proportional to the production rate. Obviously, the shorter the hatch distance, the higher the level of detail and the time required to build the component. On the contrary, if the scan tracks are too far apart, the powder between them will not be melted and, at the end of the process, high-porosity zones will result due to lack of fusion. Bremen et al. [84] and Sefene et al. [78] highlighted that the hatch distance is defined by the diameter of the laser and proposed an optimal hatch spacing value of 70% of the diameter.
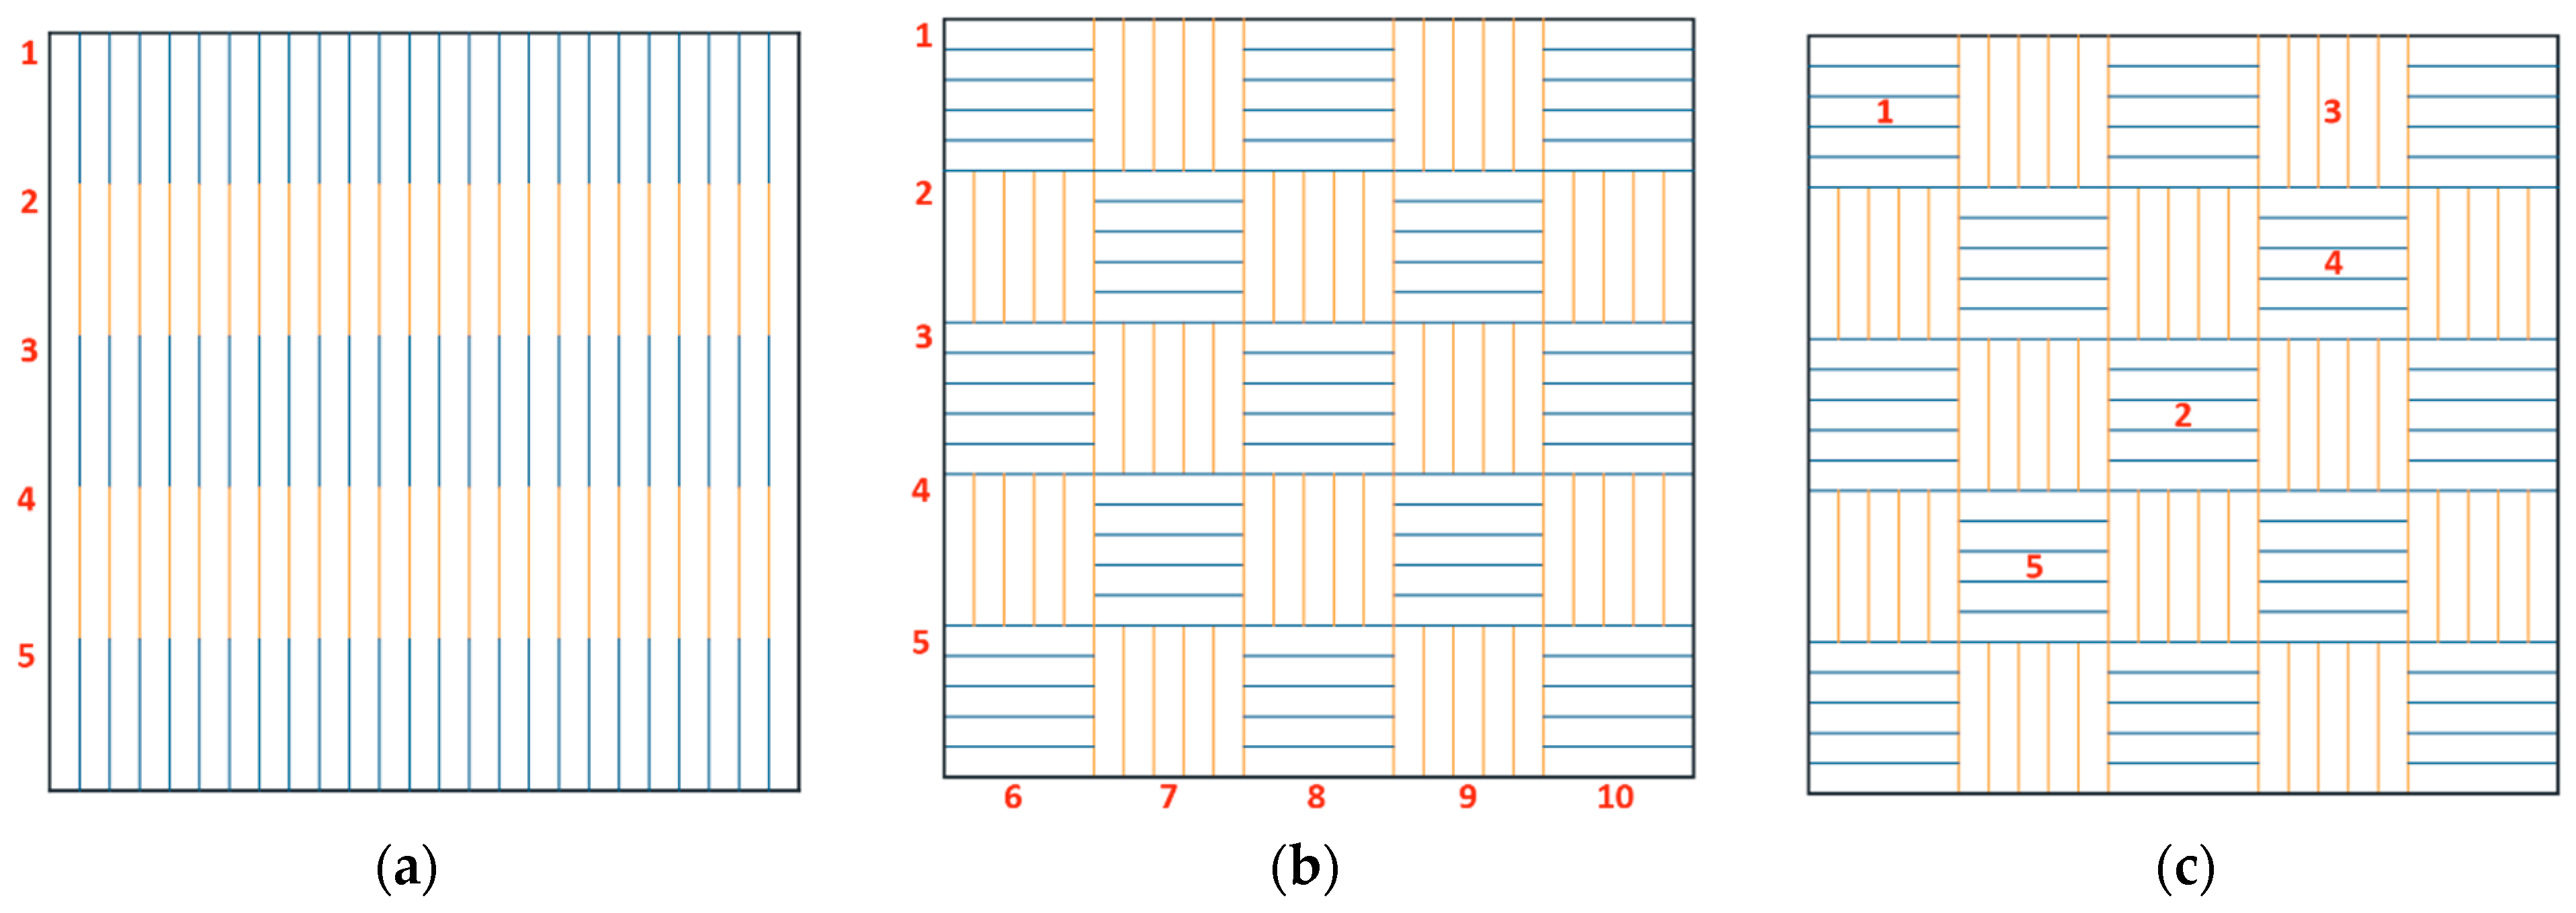
Finally, the scanning pattern defines the path where the laser selectively fuses the section on the powder bed and plays a significant role in limiting the presence of defects [78]. The selection of the appropriate scanning pattern influences not only the final density of the parts, but also the residual stresses occurring [77,85,86]. There are three main possible configurations of scanning patterns, namely, stripes, chessboard or islands, as illustrated in Figure 13. In the stripe pattern (Figure 13a), the laser builds the product by scanning the geometry through horizontal or vertical bands, progressively fused. The chessboard pattern (Figure 13b) divides the geometry into a series of squares and the white squares are printed first and then the black ones, as in the scheme of a chessboard. Finally, the island pattern (Figure 13c) is a random form of chessboard pattern, in which each square is printed randomly over the whole level, without any particular sequence, until there is no more not-melted powder remaining. Miao et al. [87] and Sefene et al. [78] showed that the use of the chessboard pattern, compared to the striped pattern, develops lower thermal gradients and reduces the number of defects and amount of surface roughness. Zai et al. [77] confirmed that the scanning pattern can change the thermal history of each layer, also modifying its porosity and microstructure.

3.3. Powder-Related Parameters

The parameters concerning the characteristics of the powder are the size and shape of the particles, the powder bed density, and the thickness of the layers. The particle size represents the size of a single grain of metal powder (in the range of microns), while the shape represents the final shape of the single grain as a function of the production technique of the metal powder (most of the powders used in the SLM process are mainly obtained from gas or water atomisation methods) [88]. It is important to bear in mind that powders produced by gas atomisation have a higher sphericity. Both size and shape are considered two key material properties and depend on the nature of the metal alloy. In fact, smaller particles perform better from the point of view of microstructure compactness but are prone to have a low flowability; thus, the deposition of a homogenous layer is harder. Granulometry and morphology of the particles affect the density of the powder bed, which represents the packing density of the individual layer [81,89,90,91]. Furthermore, these characteristics have a significant influence on the final component density, on the mechanical properties, on the microstructure, and on the surface roughness [78,92,93].
Finally, the layer thickness (Figure 12) represents the thickness of the individual layer deposited in the z-direction, which can strongly influence the quality and accuracy of the printed part. Optimal and recommended values are provided by the metal powder manufacturers. Lower thicknesses guarantee better part quality, but at a lower production speed. Furthermore, layer thickness has an effect on the mechanical properties of additively manufactured components [94].

3.4. Temperature-Related Parameters

The temperature-related parameters include the temperature of the powder bed and the temperature of the feeding system. The temperature of the powder bed is a function of the temperature of the building plate, which can vary from room temperature up to 200 °C, to reduce the thermal gradient as much as possible in the post-melting cooling phase; while the build chamber temperature can reach very high values depending on the material, the final intended application of the printed component, and the type of printer. Indeed, the high temperature gradients that can develop during the SLM process can lead to high levels of residual stress within the additively manufactured metal structure [86]. For this reason, the temperature within the feeder can also be modified to preheat the powder [95].

3.5. Printing Directions and Orientations

One of the most important aspects to consider in the 3D printing process, often underestimated by designers, is the orientation of the printing parts (or build orientation). The way the components are positioned on the build plate, in fact, plays a significant role in achieving the desired final quality. Part orientation can affect accuracy, production time, strength, and even surface finish [96,97].
To comprehend how part orientation impacts the accuracy of 3D-printed parts, a hollow cylinder is examined (see Figure 14). Figure 14 shows the example of a part produced using FDM, as the layers are thicker and the critical aspects are more visible. When the workpiece is oriented in the vertical direction, the final cylinder will have a fairly smooth external surface as the part will consist of a series of overlapping concentric circles. If the cylinder is oriented horizontally, the part will be built from a series of overlapping rectangles (of slightly different widths) and the surface of the cylinder that contacts the build platform will be flat. Therefore, it is evident how different production directions lead to significant differences in quality of printed products.
Building direction can also impact strongly on production speed, in particular in case of parts of large dimensions. The horizontally printed components usually require shorter printing time than those produced vertically, as the number of layers is reduced [78,95].
Several studies demonstrated the anisotropy of elements produced through 3D printing in terms of mechanical strengths. In fact, as highlighted in Figure 15, parts are usually stronger in the XY-direction than in the Z-direction, due to the production process of adding layers, resulting as being much more vulnerable to loads applied perpendicularly to the production direction than to the longitudinal. Therefore, for functional parts, it is important to consider the application and direction of the loads [25].
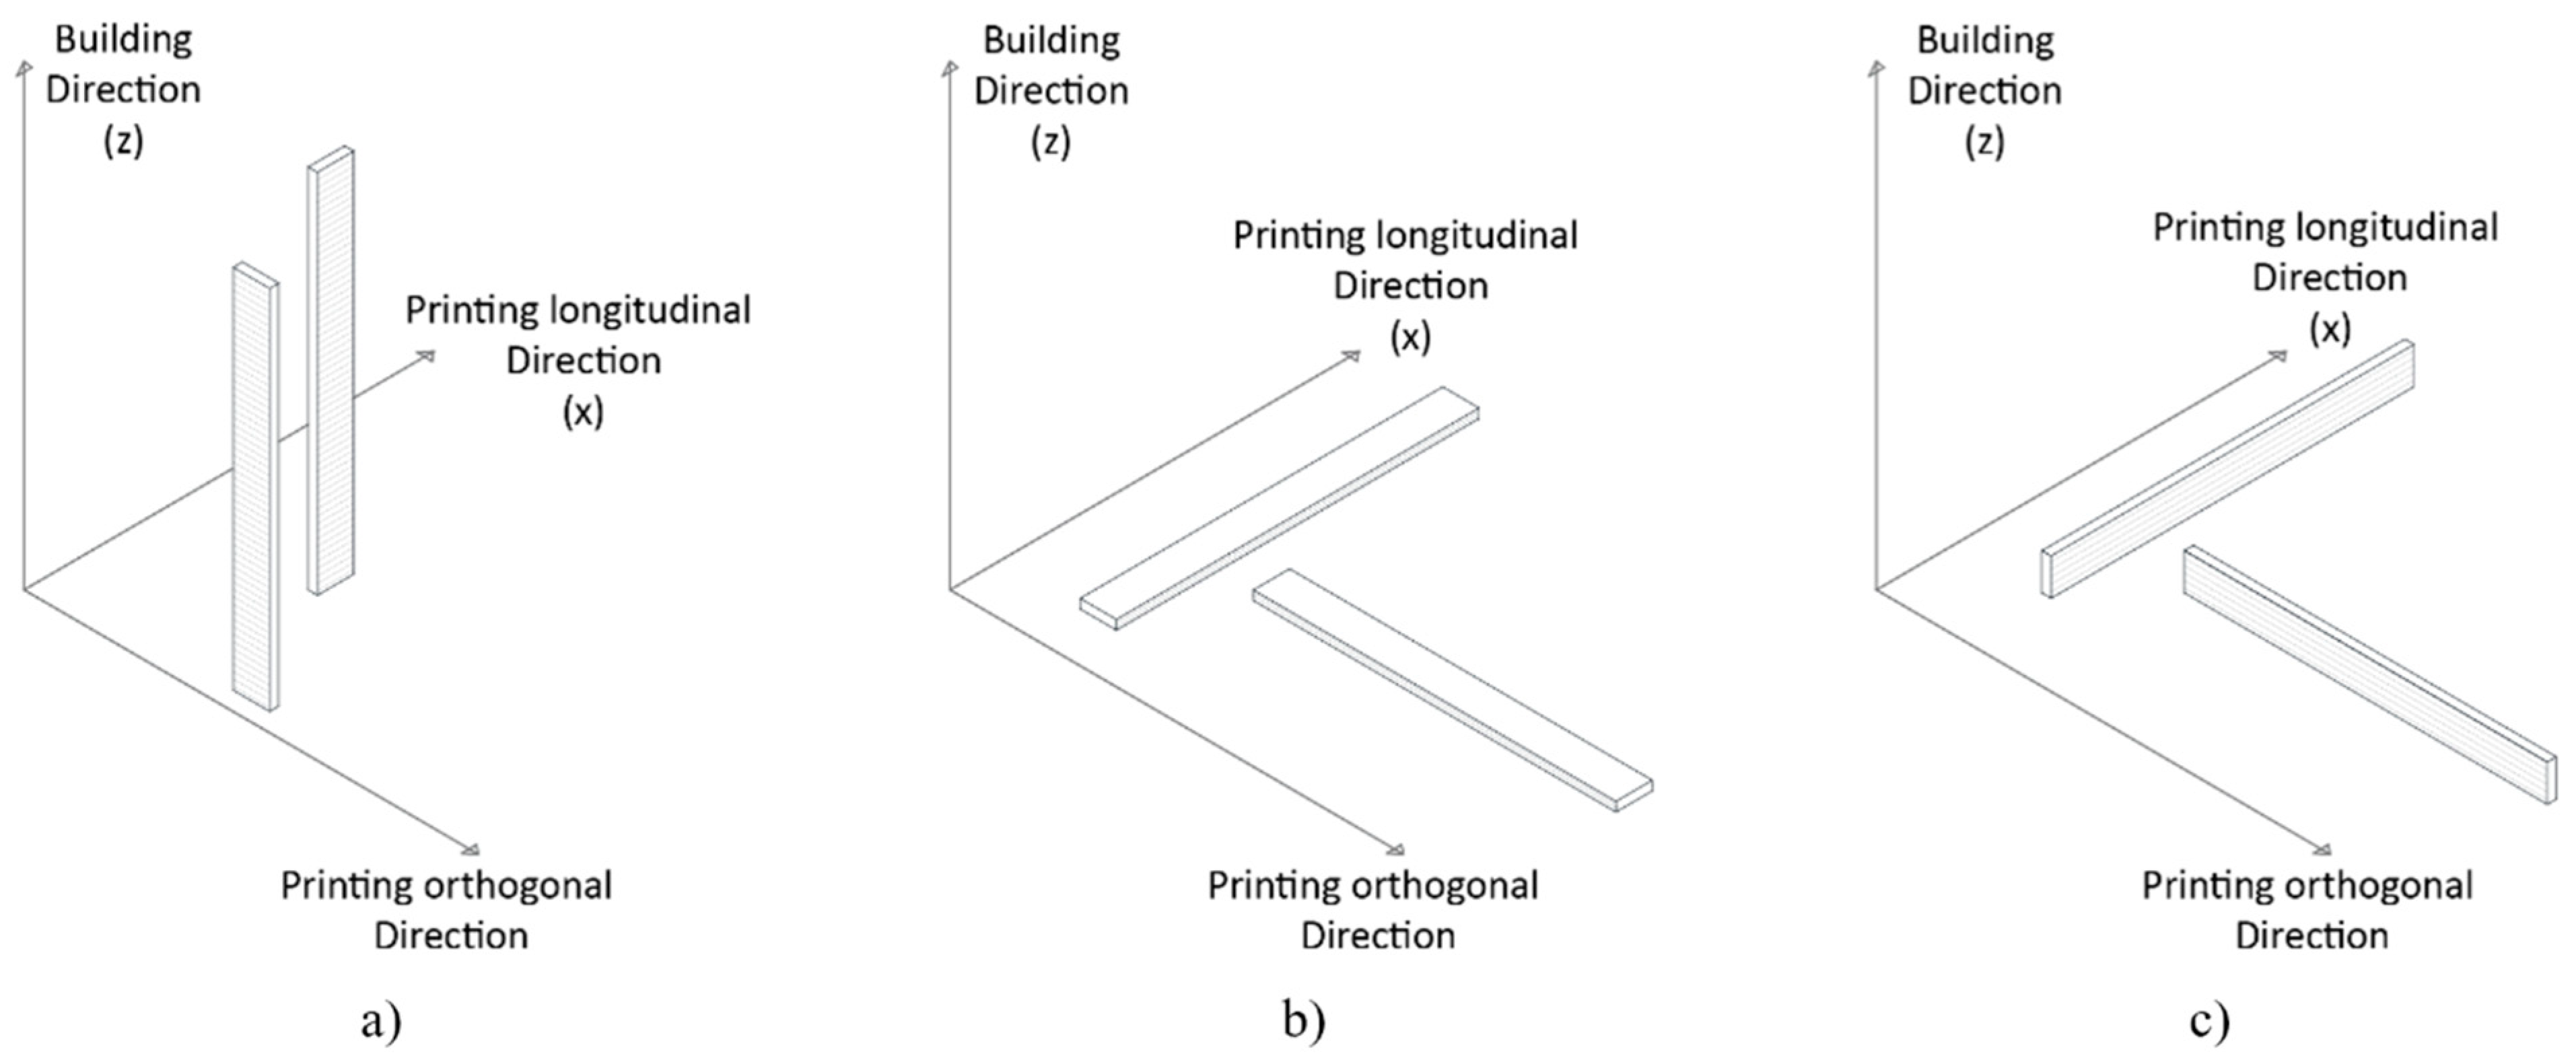
Figure 16 shows the most commonly applied printing directions, namely, a vertical layout with the longitudinal axis perpendicular to the construction plane, and two horizontal layouts with the longitudinal axis parallel to the building plane, flat (xy) and on edge (xz).
The orientation of the parts affects the thermal history, as it influences the final microstructure and, consequently, the mechanical behaviour [77,99].

3.6. Effects of Process Parameters on the Properties of 3D-Printed Metals

There are a number of studies in the literature that have examined the effects of the printing process parameters on the mechanical performance of different metal alloys produced with SLM. Among the most frequently investigated parameters, there are printing direction and orientation [43,100,101], scanning time [42], layer thickness [102], and scanning strategy [82,103,104].
However, there are still some aspects that need to be further explored in order to have a complete knowledge of additively manufactured metals, especially if the material is intended for structural purposes. Among these aspects is certainly the sensitivity of the material to certain ranges of strain rates, as knowledge of the mechanical performance of the material under dynamic conditions may be very important when designing specific devices (for example, dampers or in general seismic energy dissipation devices) or structural components (for example, joints or structural members).
Indeed, the influence of strain rate on 3D-printed metals has been little studied: as far as we know, the only research works on the effects of strain rate on metals produced by additive manufacturing are by Mazzucato et al. [65] and Forni et al. [105] concerning the nickel-based alloy Inconel 718 produced via LMD, and by Brando et al. [106] regarding the 17-4PH alloy steel produced through selective laser melting.
The selection and use of adequate process parameters strongly reduce the formation of defects such as excessive porosity, presence of incompletely fused areas, and cracks. In fact, it is important to consider that many problems in PBF techniques in general, and SLM in particular, are related to the choice of wrong printing parameters.
The number of defects increases as the scanning speed increases. This can be attributed to the effect of the scanning speed on the energy of the laser beam, as the higher the speed, the shorter the time for energy transfer. Melting failure occurs because the energy emitted is not sufficient to completely melt the powder. This leads to the formation of not-melted particles trapped in the pores (lack of fusion). Other negative consequences can be delamination (separation of adjacent layers due to incomplete fusion of neighbouring layers) and balling (loss of continuity of the fusion bed). Therefore, the presence of these defects can be controlled by reducing the scanning speed and increasing the laser power [83].
Residual stresses are another factor closely related to the production process. As pointed out by Michla et al. [107] and Haghdadi et al. [95], the preheating of the powder bed or the building plate and, in smaller measure, the type of scanning pattern, can help to mitigate the temperature gradient and, consequently, the residual stresses. According to Zhu et al. [108], an energy density increase, which can occur by either enhancing the power of the laser or reducing the scanning speed, raises the possibility of part shrinkage, resulting in higher residual stresses in the printed part [82,108]. Furthermore, according to the studies of Ramos et al. [109], the adjustment of laser power and speed can also influence residual stresses. In fact, in the spot where the laser melts the powder, a strong temperature gradient is produced, leading to the development of a localised melt pool in the powder bed. When the laser moves, the instantaneous heating results in the thermal expansion of the heated area, which is confined by the already cooled layer below. This phenomena has been referred to as the “temperature gradient mechanism” by Mercelis and Kruth [85] and is responsible for residual stresses that can compromise the quality of the finished part and its mechanical properties. The achievement of fully dense and functional parts is one of the main challenges in additive manufacturing, especially for applications where adequate resistance to actions and loads is required. In this regard, Zai et al. [77] point out that the process parameters to be monitored are laser energy density, scanning pattern, and powder bed preheating. The volumetric laser energy density E (J/mm3), as also reported by other studies [78,81], is determined through the following Equation (1):
E = P v · h · t
It depends on the laser power P (W), the scanning speed v (mm/s), the hatch spacing h (mm), and the layer thickness t (mm).
Enneti et al. [110] confirmed that density is a parameter inversely proportional to scanning speed and hatch distance. According to studies by Klocke et al. [111] and Larimian et al. [82], a higher energy density is able to increase the density of the final element. Furthermore, Sefene [78] found that also laser power and scanning speed, which are parameters useful for achieving complete melting of the powder and high density of the printed part, as well as a good surface finish, are always inversely proportional. In conclusion, laser power is the principal energy parameter that strongly influences the final density of the component. Density increases as the power used in the process rises if no defects occur during manufacture [82,112].

4. Metal Additive Manufacturing in Construction

Small metal components are usually produced by AM. Due to their high precision, they are widely used, especially in the aerospace, automotive, and healthcare industries [21,113]. Up to now, there are few examples in the context of large-scale applications, either in the literature or in industrial applications [21,33,114,115]. The reason is that, when extending the scale of the component to be created, there is a loss in the quality of the final parts (which forces an additional post-processing step), and both costs and production times increase considerably [6].
The main advantages of using metal AM are the possibility to create elements with complex geometries and optimised performance related to a more efficient use of material [116,117]. This section will review the main examples and applications of metal AM in the construction field.

4.1. Optimized Structural Node by Arup

An interesting application of metal AM in construction [114,118,119,120] was realised by ARUP, a global engineering and design company. To explore the benefits of the combined use of AM techniques and topological optimisation (TO) processes, the ARUP team redesigned the structural node of a tensegrity structure used for street lighting.
Considering the variability of the inclination and cable attachment points of the original structure, the integrated use of AM and TO proved extremely efficient in rationalising the original geometry.
Starting from the original geometry, a first topological optimization process was conducted (AM Node 1.0). The optimization analysis was carried out by defining as an objective function the minimization of the structural weight. Then, the maximum Von Mises stress and geometric restrictions were imposed as constraints. The result of the optimization process is shown in detail in the paper [120]. The element was produced by DMLS with ultra-high-strength steel powders (Maraging steel grade 1.2709). During the fabrication phase, in order to respect production constraints, changes were applied to the optimised node (AM Node 1.0) by introducing appropriate self-supporting elements.
After the first TO process, the AM 1.0 node showed a significant weight reduction, 30% less than the original node. The resulting shape fulfils all functional requirements, providing a better flow of internal forces and a more rational material distribution.
A second version of the optimised structural node (AM 2.0 node) [118] was created to obtain a more compact and lighter element, maintaining the same functional requirements.
The objective function of the optimisation process was to minimise structural weight. While Von Mises stresses were set as a constraint and limited to a maximum value of 80% of the material maximum tensile strength, the AM 2.0 node was produced with the DMLS technique using 316L stainless steel powder. Although the structural behaviour remained similar to previous versions, the AM 2.0 node showed a weight reduction of 75% compared to the initial node. This result highlights how significant savings are possible, both in terms of material uses and production time, keeping the functional requirements constant.

4.2. MX3D Pedestrian Bridge

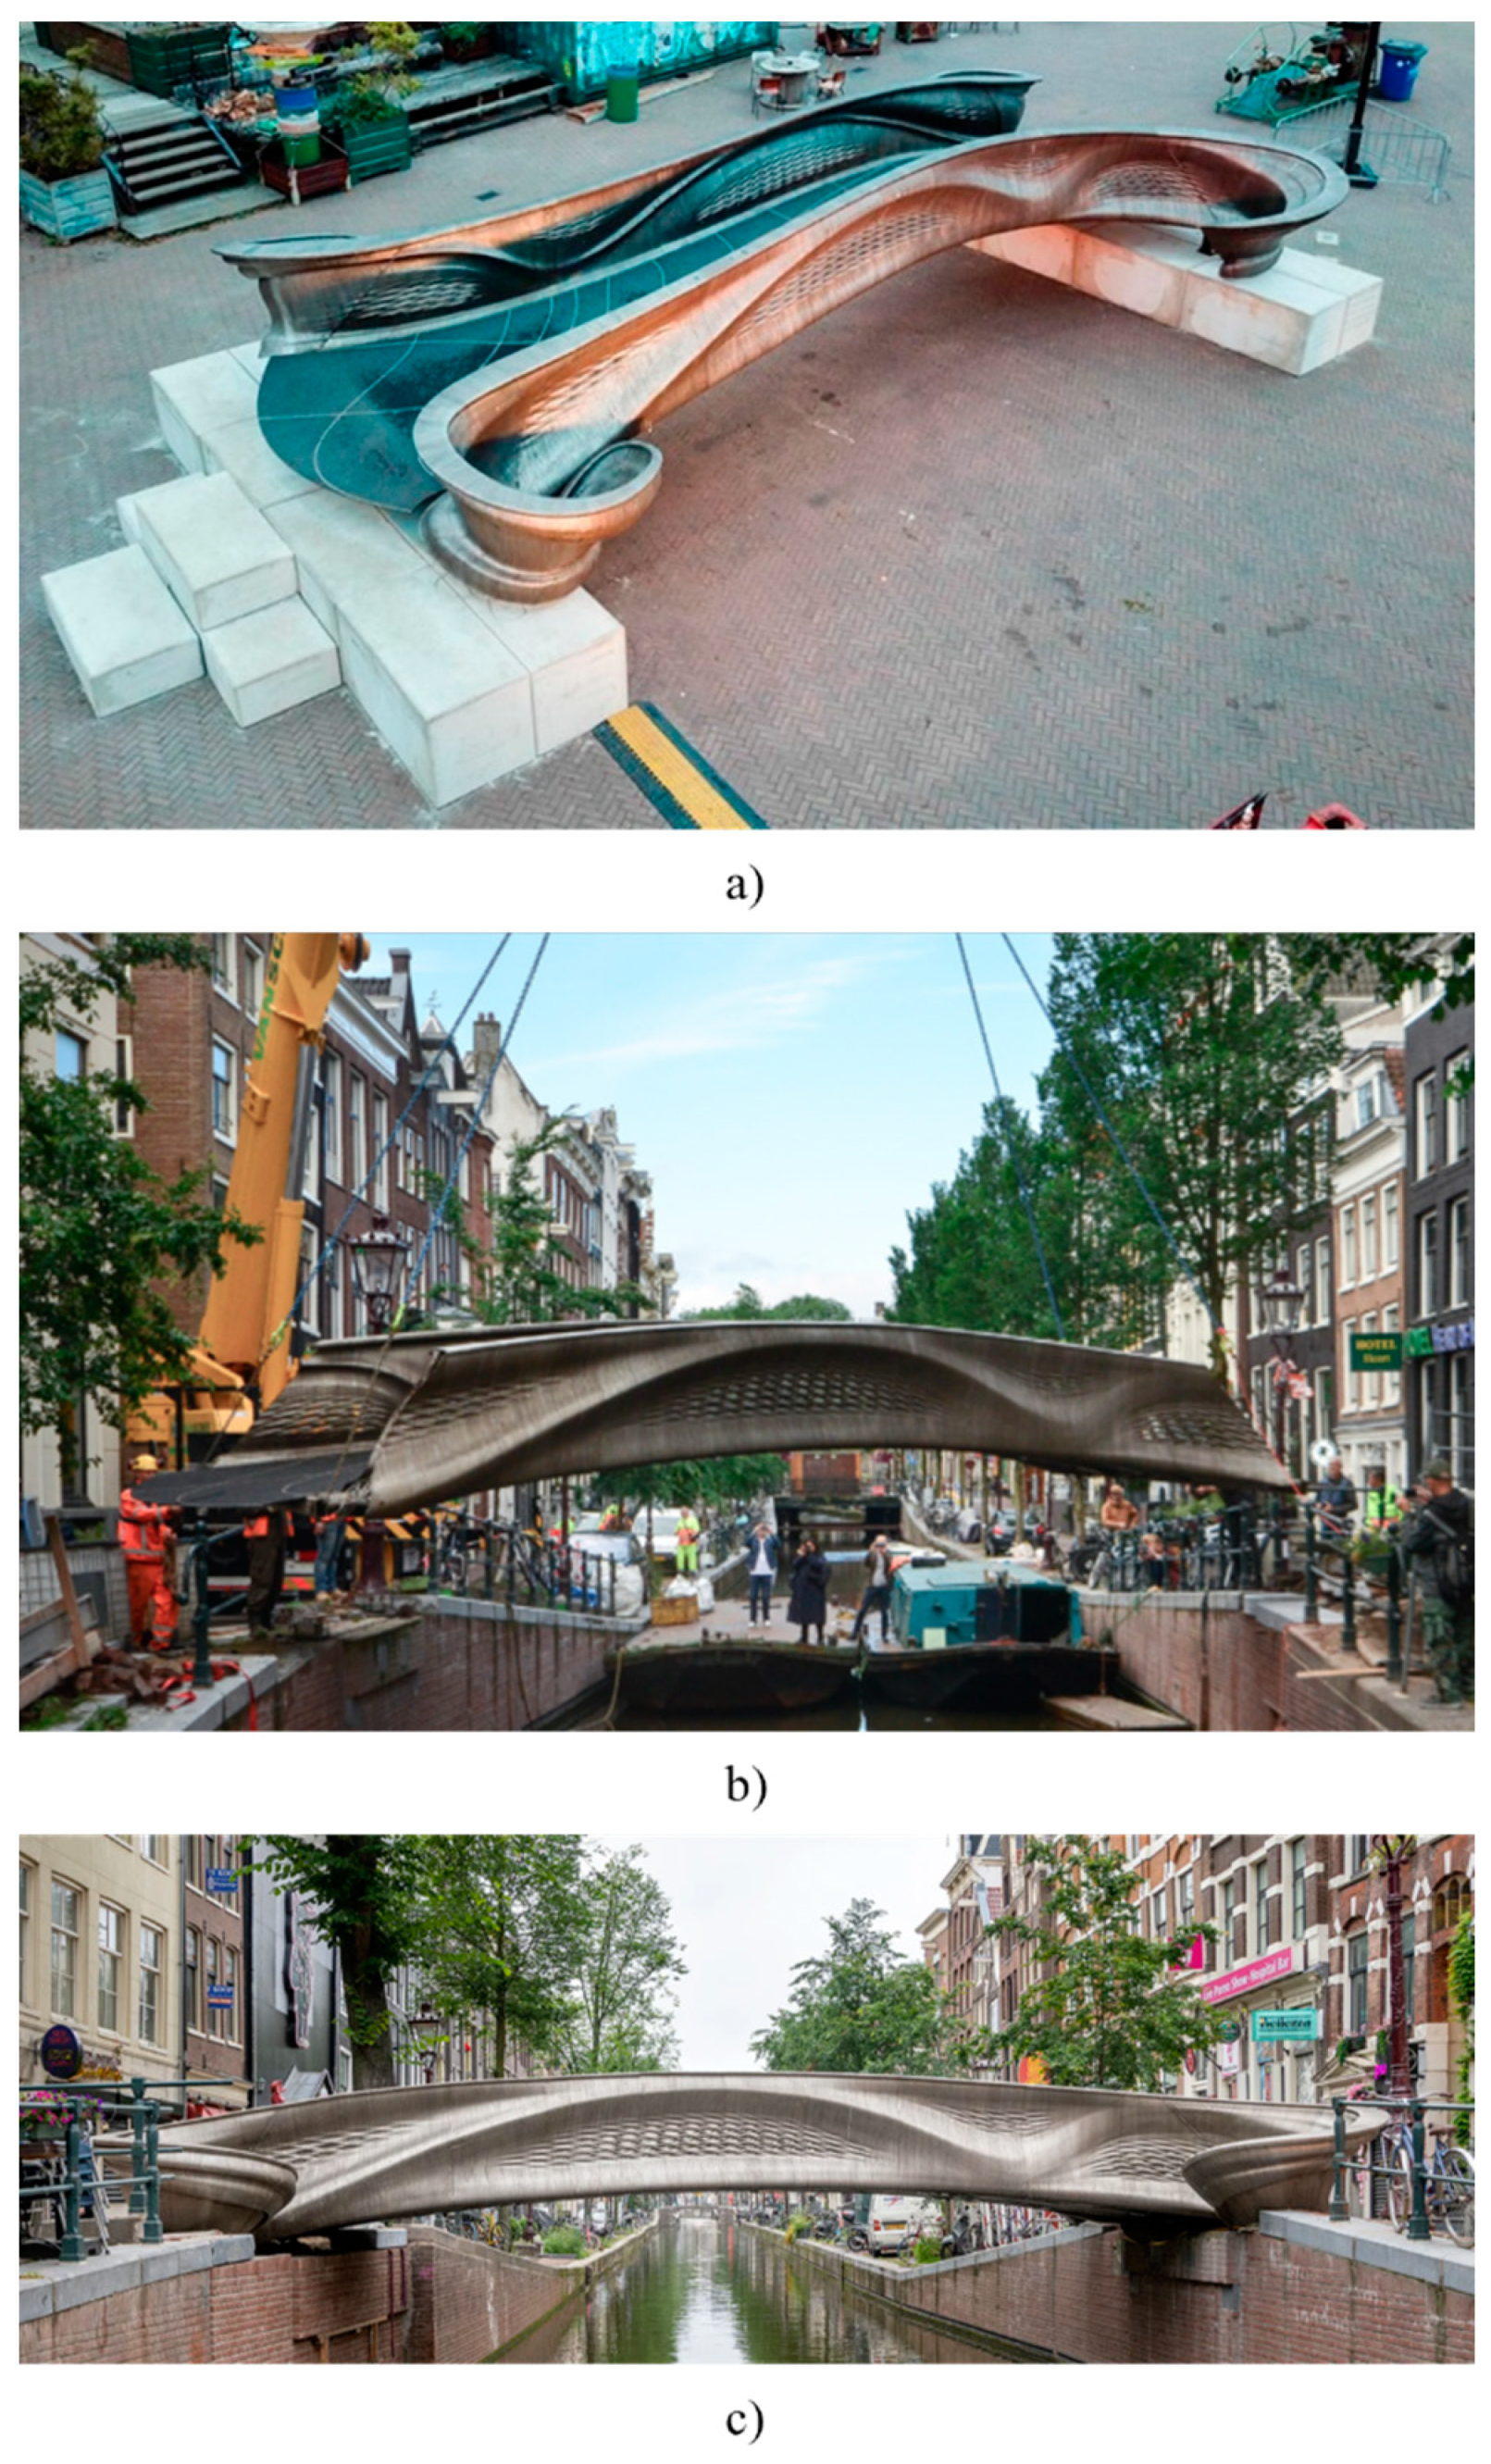
The first large-scale application of AM in the field of structural engineering was the completely functional pedestrian bridge by MX3D (Figure 17), a Dutch company specialising in robotic metal 3D printing [79,114,116].
For the production of the bridge, manufactured from 308 L grade austenitic stainless-steel wire, 6-axis robotic welding arms using the WAAM technique were employed. This demonstrates the enormous potential of the application of multiaxis 3D printing technology. In the project, the MX3D company worked with various partners such as Arup, Autodesk, ArcelorMittal, the University of Twente, and Imperial College London.
The bridge, which measures 12 m in length and was built from a single metal part weighing 4.5 tonnes, required six years from the design to the final construction. It was inaugurated in Amsterdam on 21 July 2021, after capacity tests with a 20-tonne load had been successfully completed (Figure 18). In addition, the partners were involved in the design, development, and testing of a smart sensor network to monitor the bridge conditions in real time.

4.3. Takenaka Connector

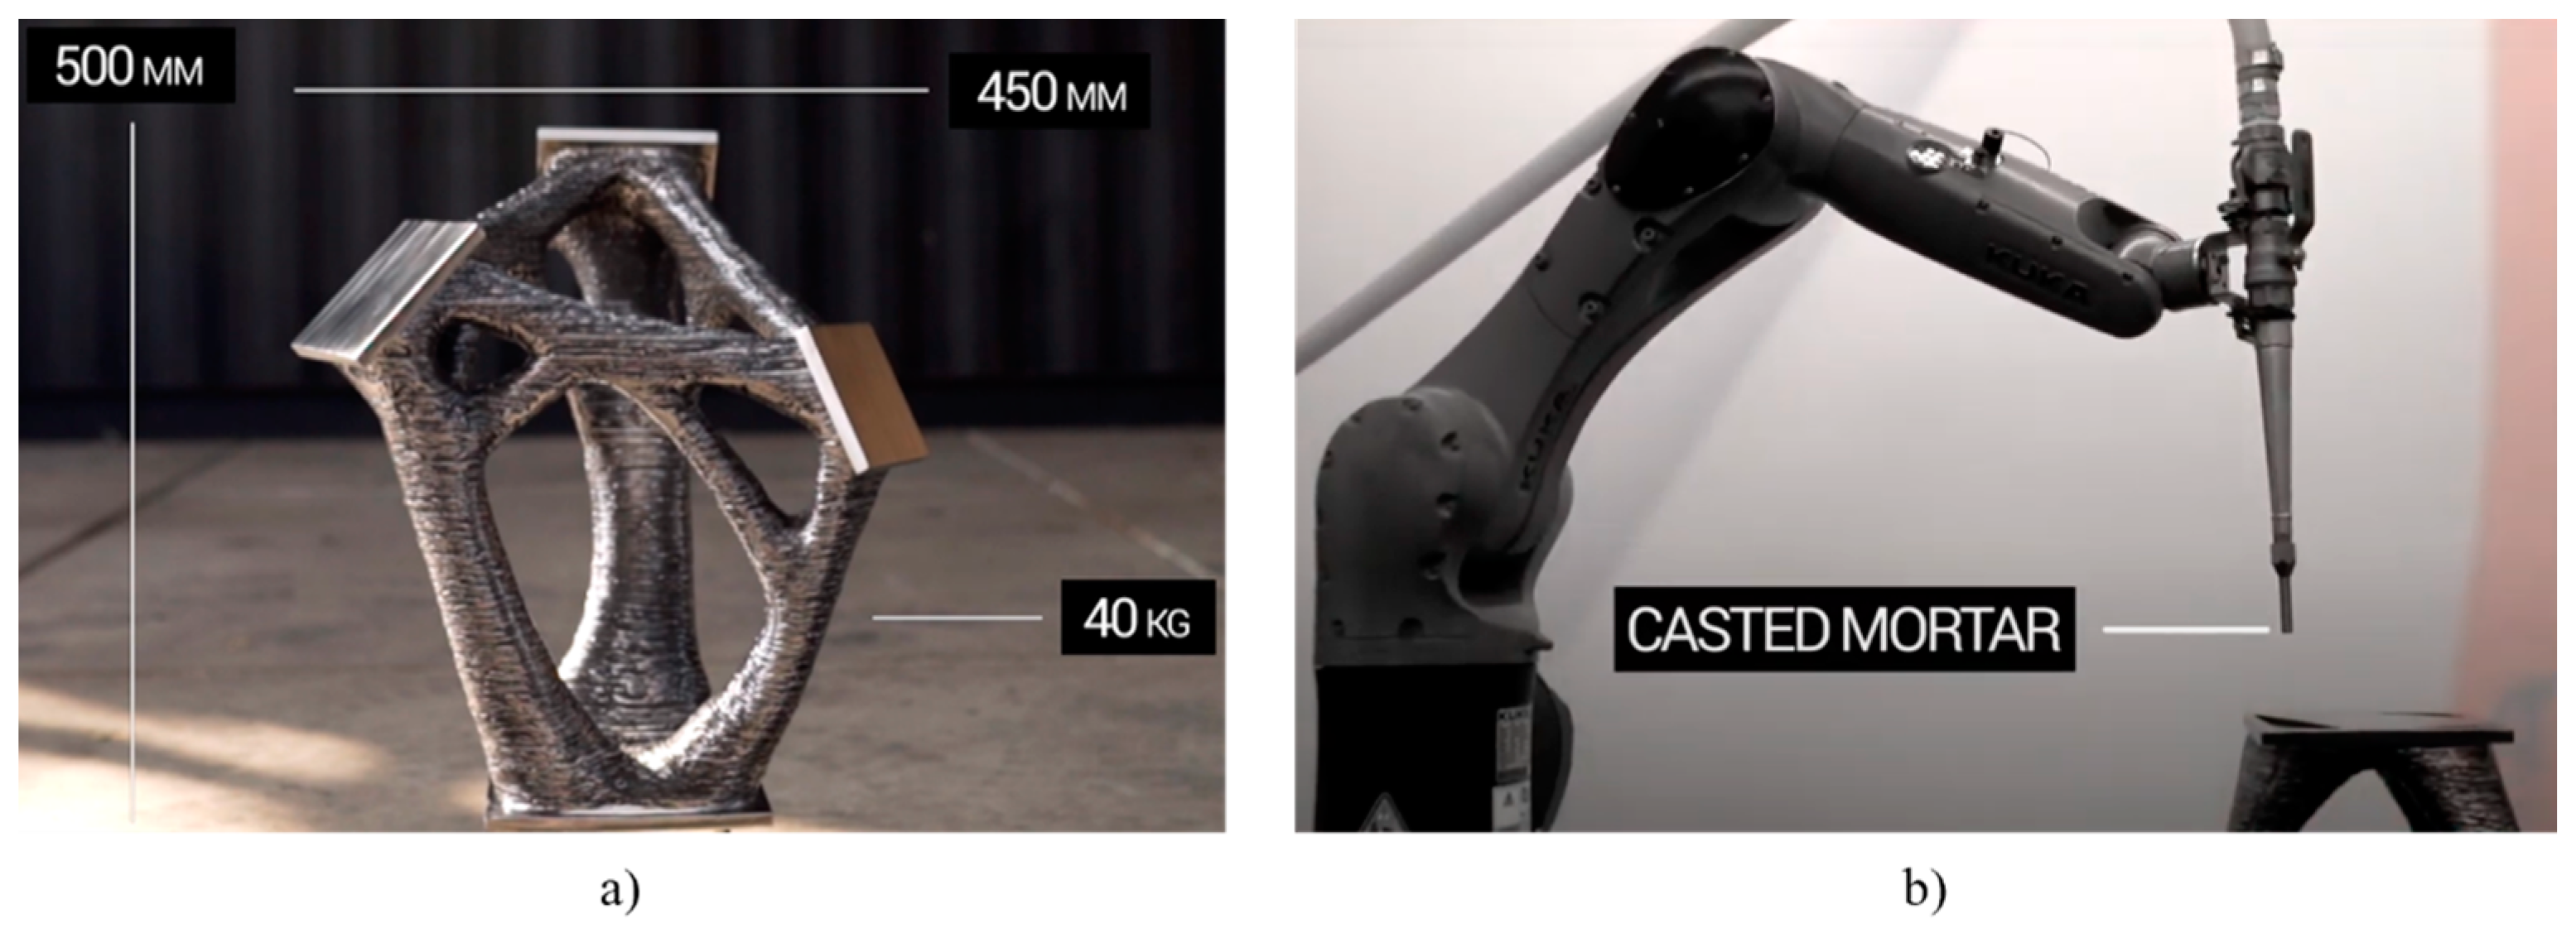
The Takenaka connector was recently created by the collaboration between the Takenaka corporation and MX3D. The structural steel connector (Figure 19) was designed by MX3D and Takenaka to overcome the limitations of conventional processes and produce complex components for large structures in the construction industry. The element has a hollow structure, which is filled with cast mortar through the use of robotic arms (Figure 19b). The metal part is produced from Duplex stainless steel using the WAAM technique. The solution of filling the inner core with mortar is to prevent local buckling of the steel, while the outer steel offers high resistance to bending and tensile forces. The net weight of the structure is 40 kg, which increases to 45 kg when the inner cavities are filled with mortar.
The final shape is the result of an optimisation process that led to a very efficient configuration (Figure 20). The entire process was guided by design constraints as the position of the element in the structure was known in advance and was taken into account in the optimisation process.

4.4. AM Steel Reinforcement for Concrete

Early studies on the production of AM steel reinforcements for concrete [124,125,126] show encouraging results. However, their application in the construction industry is still limited. At this stage, it is essential to continue the research, in particular by investigating the quality of bars produced with AM, their fatigue behaviour, and their durability in concrete environments.
In fact, AM research involving the construction sector has mainly focused on the production techniques of cement-based materials. Despite the growing interest in the topic, few indications on the use of reinforcements with concrete 3D-printed elements have been provided [127].
Recently, some studies [124,125] have explored the potential of AM steel reinforcements as a supplement to 3D-printed concrete. Mechtcherine et al. [124] studied the mechanical behaviour of bars made using the GMAW (gas metal arc welding) technique. The samples were subjected to a series of experimental tests to compare their performance with that of conventional bars. In particular, uniaxial tensile tests were carried out to determine the tensile behaviour of bars with a diameter of 8 mm at the loaded ends and 7.5 mm in the middle. Pull-out tests were performed with two different bonded lengths (16 and 32 mm) to determine the interface adhesion forces between 8 mm diameter bars and fine-grained concrete. Both tests were also conducted on conventional B500B steel bars with a diameter of 8 mm.
The results obtained from the tensile tests showed that the performance of 3D-printed bars was significantly lower in terms of yield stress and tensile strength. In terms of strain capacity, the 3D-printed reinforcement showed significantly higher values than conventional bars. This result highlights the extremely ductile behaviour of 3D-printed bars, which can also be observed from the visual aspect of the fracture surfaces.
The results of the pull-out tests showed lower shear stress values for the 3D-printed bars for both bond lengths than for conventional steel bars. However, in the case of the bond length of 32 mm, the shear stress–displacement curve exhibited, after the peak, an approximately constant trend for the 3D-printed samples. A more pronounced softening phase is observed for conventional bars. For a bond length of 16 mm, no significant differences in the behaviour after the peak were visible.
The pull-out results did not provide a complete description of the behaviour of the 3D-printed samples, so further investigations are necessary. The low shear stress values resulting from the pull-out tests for the 3D-printed bars can find partial justification in the lack of “ribs” on the outer surface. In fact, solutions capable of improving the adhesion between bars and concrete matrix, such as ribs that prevent mutual sliding between the two materials, were not considered in this study. Please refer to the paper for details of all the results described [124].

4.5. Joining Aluminium Profiles

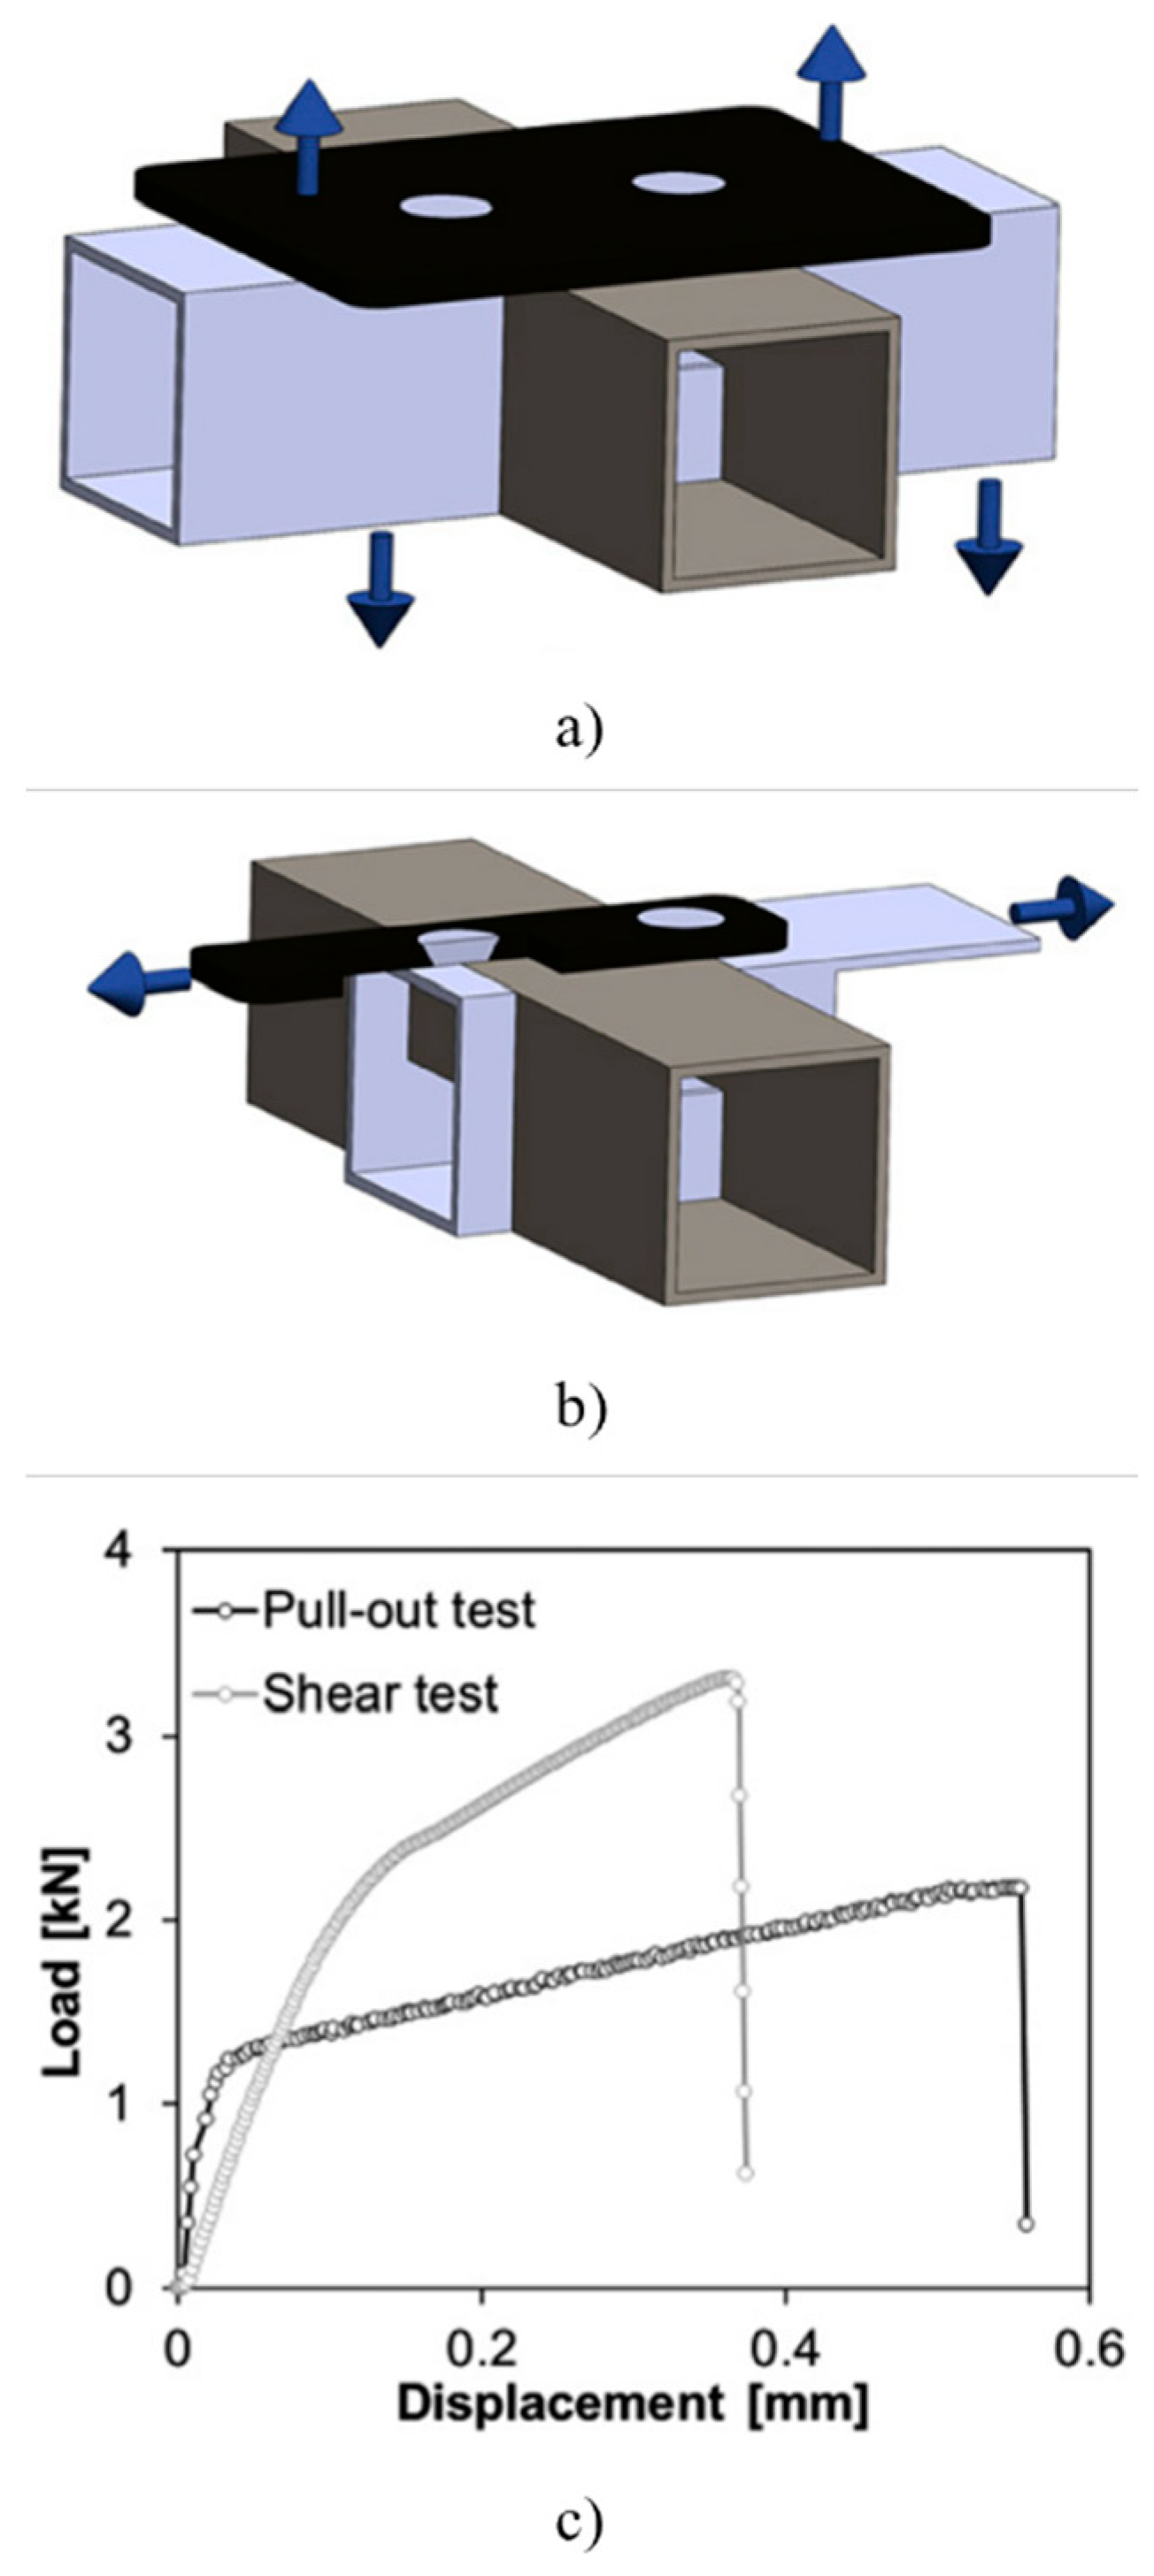
The variety of production allowed by AM also lies in the possibility of using many different types of materials. In sectors where the use of metal AM is widespread, several applications use aluminium alloys [128], titanium alloys [129,130], and nickel-based superalloys [131]. Regarding the construction field, Baptista et al. [132] proposed the combined use of WAAM and joining by forming to connect hollow aluminium profiles and fix them to composite sheets. The connection is realised through a “mortise and tenon” joint (Figure 21).
Concerning the connection assembly, initially, the hollow aluminium profiles were coupled, then tenons were made directly on the profiles using WAAM. Finally, through the compression of the tenons against the mortises, a mechanical joint was generated. To determine the mechanical performance of the connection system, two destructive tests were performed: pull-out and shear tests (Figure 22). The results showed the failure due to a pull-out force of 2 kN recorded after the detachment of the individual components for a displacement of approximately 0.6 mm. With regard to shear strength, a value of approximately 3.2 kN was recorded.

4.6. Future Applications

One of the main innovations introduced with additive manufacturing, which overcomes most of the limits imposed by traditional production methods, concerns the possibility of creating innovative types of structures and components [133,134,135]. Future applications in the field of structural engineering could involve steel connections and stiffening elements for steelwork; some interesting examples are shown below [136,137].
A beam-to-column connection, where the suggested solution involves welding a hook obtained by topological optimisation, printed directly onto the column and connected to a bolt, is showed in the works of Feucht and Lange [136] and Lange et al. [137]. The main advantage of this system is the simplicity of construction and the elimination of bolted connections. The first tests carried out in the laboratory on small components showed that direct welding on metal elements, using the WAAM technique, is possible without observing significant distortions in the welds.
With the aim of ensuring better load transfer within a double-T profile and to avoid the occurrence of flange buckling phenomena, topologically optimised and additively manufactured reinforcing elements can be introduced to replace stiffeners. In this case, the main advantages consist of (1) reduction in material used, (2) reduction in printing time, as unstressed areas are removed, and (3) possibility of printing directly on the element to be reinforced, in contrast to conventional production, where unloaded regions are hard to eliminate, as this requires extra effort and the production of nonreusable waste.
Destructive compressive tests, performed after the production of complete stiffeners on a double-T beam, showed that, despite the evident distortions of the weld, the stiffeners produced with 3D printing can withstand stress levels equal to those of stiffeners manufactured using traditional techniques.
When rigid connections with an end plate are employed, the moment and tensile force are transmitted with an eccentricity, as the joint lies outside the flange. The tensile force is transferred from the flange to the bolt through the bending of the end plate, which often has large thicknesses to transfer this bending moment. Considering the potential of additive manufacturing, the geometry can be modified in a way that improves its efficiency: the use of topology optimisation to find the shape led to a first hypothesis which was also produced using WAAM. Furthermore, it was proven that only 40% of the mass of the initial element is required to achieve the same load capacity: this is due to the formation of the lever arms, for which the greater the length, the higher the eccentric stress transferred. Further details are provided in the papers [136,137].
In light of the applications just reviewed, it is clear that 3D printing technologies can be applied directly on metal components and can potentially provide numerous benefits in the fields of structural engineering and construction. Further developments could concern the introduction of automated processes for monitoring and maintenance, as the use of additive manufacturing in the repair of existing structures could introduce several advantages, which, however, require further research to assess their potential in real applications. In fact, in the field of construction, one of the greatest opportunities of additive technology may lie in the repair of existing structures: in some cases, considering the production costs of high-performance components, it may be cost-effective to repair worn parts rather than replace them with new ones.
However, studies on the subject are still in their beginnings and are still not significant, so further investigations are needed to confirm the encouraging results obtained so far.

5. The Potentials of Metal AM in Topological Optimization

5.1. Nonconventional Geometries

Conventional manufacturing techniques have encouraged the development of simple geometries. In contrast, as was already said in the previous sections, AM allows higher freedom in designing complex geometries with unique features that difficult or impossible to achieve with conventional manufacturing methods. Although AM offers greater flexibility in the design of new shapes and geometries, an adequate level of performance and safety must be ensured in each application. Several studies in the aerospace [129] and automotive [138] sectors demonstrated that topological optimisation (TO) processes can guarantee high levels of performance for projects realised with additive techniques.
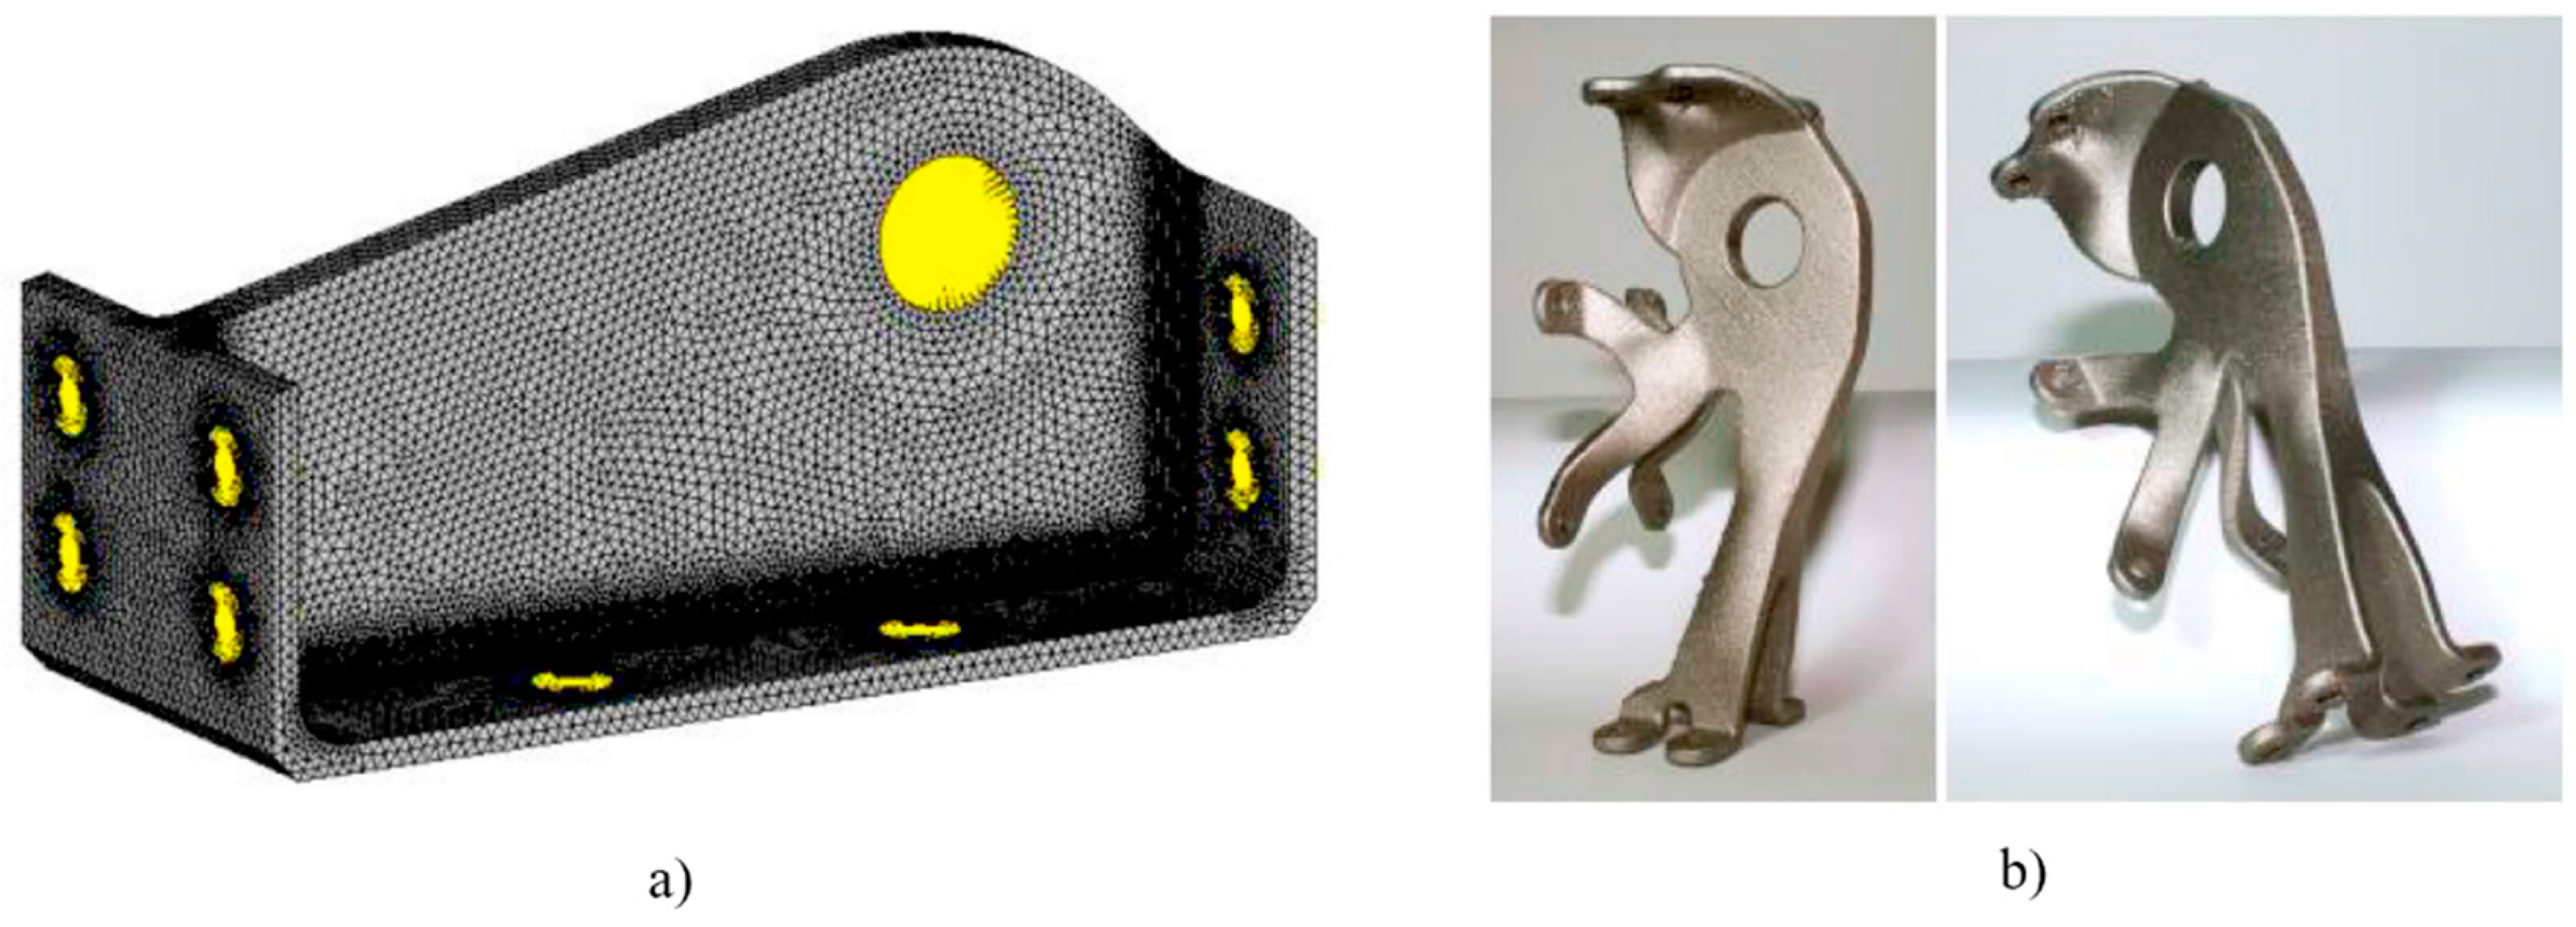
In Seabra et al. [129], the complete process (from optimisation to production and testing) for an aircraft bracket was described (Figure 23). SLM was used to produce the component, and to improve performance, the printed part underwent hot-isostatic pressing (HIP) heat treatment and surface treatment.
Thanks to its manufacturing skills, SLM is adopted for the production of high-precision end-use parts. Topology optimisation is used to achieve a final design with high stiffness against an initial volume reduction. In addition, the optimised design is analysed with FEM to verify the compliance with requirements. Once the previous steps are completed, the component is created using SLM. However, before construction, an intermediate step is necessary to consider the limits of the production process adopted (overhangs, support structures, dimensional limits) to prevent possible problems in the parts destined for final use.
The final optimised aircraft bracket reduces the material volume by 50% compared to the original part. Furthermore, tests show a good match between the FE model and the manufactured part.
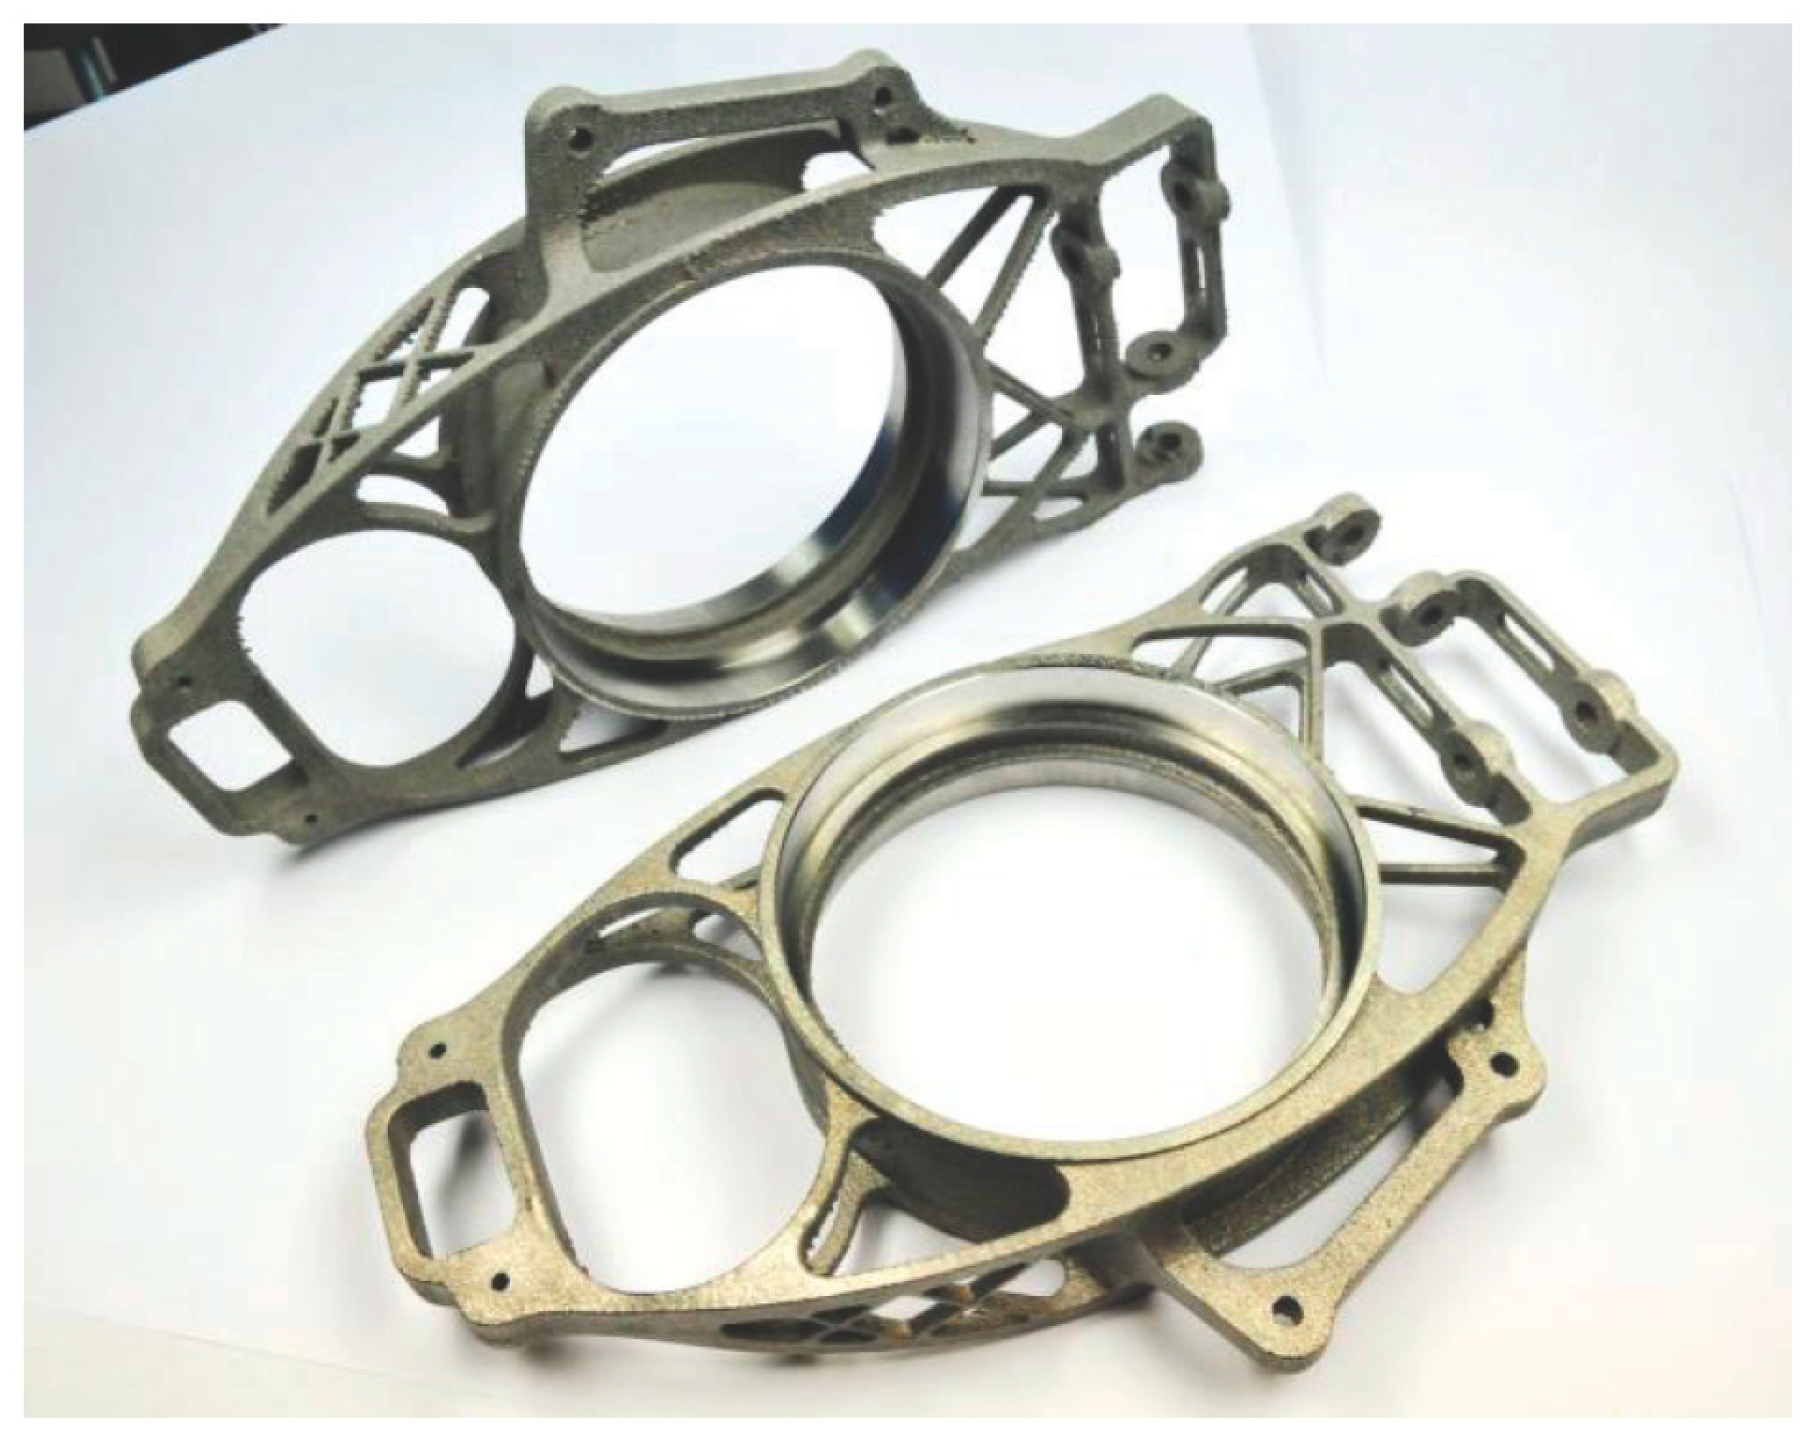
In the automotive sector, an interesting example was provided by Walton et al. [138]. The study proposed to redesign a pair of suspension uprights with a view to reducing mass. Indeed, the final component, manufactured in Ti6Al4V ELI by EBM without additional surface finishing or heat treatments, exhibited a significant decrease in structural weight with an improvement in the safety factor (Figure 24).
Critical considerations about manufacturing cost and raw material use suggested that the use of TO components via AM is limited to high-performance designs. Indeed, in these applications, function prevails over production costs. Despite its great potential, the ongoing growth of AM requires the evolution of design practices to take into account production limitations and cost considerations [139].
Design methods for AM can be divided into process-driven shape and designer-driven shape [139]. The former allows the creation of customised parts using TO processes, while the designer-guided design method uses lattice structures to achieve the required performance and reduce support structures. TO and lattice structures are the main strategies for exploring the potential of AM [140]. Further details are provided in the following sections.

5.1.1. Topology Optimization

In general, optimisation problems can be mainly divided into the following:
-
Size optimisation, which considers the variation in size of the elements. In order to find the optimal solution (weight, stress, etc.), the cross-sectional areas of the beams, etc., are adjusted (Figure 25a).
-
Shape optimisation, which concerns the changing of the structural form. It allows one to remodel holes in the model, but not to eliminate them (Figure 25b).
-
Topological optimisation, which is the general form of structural optimisation. It allows specific parts to be added or removed in the design domain (Figure 25c).
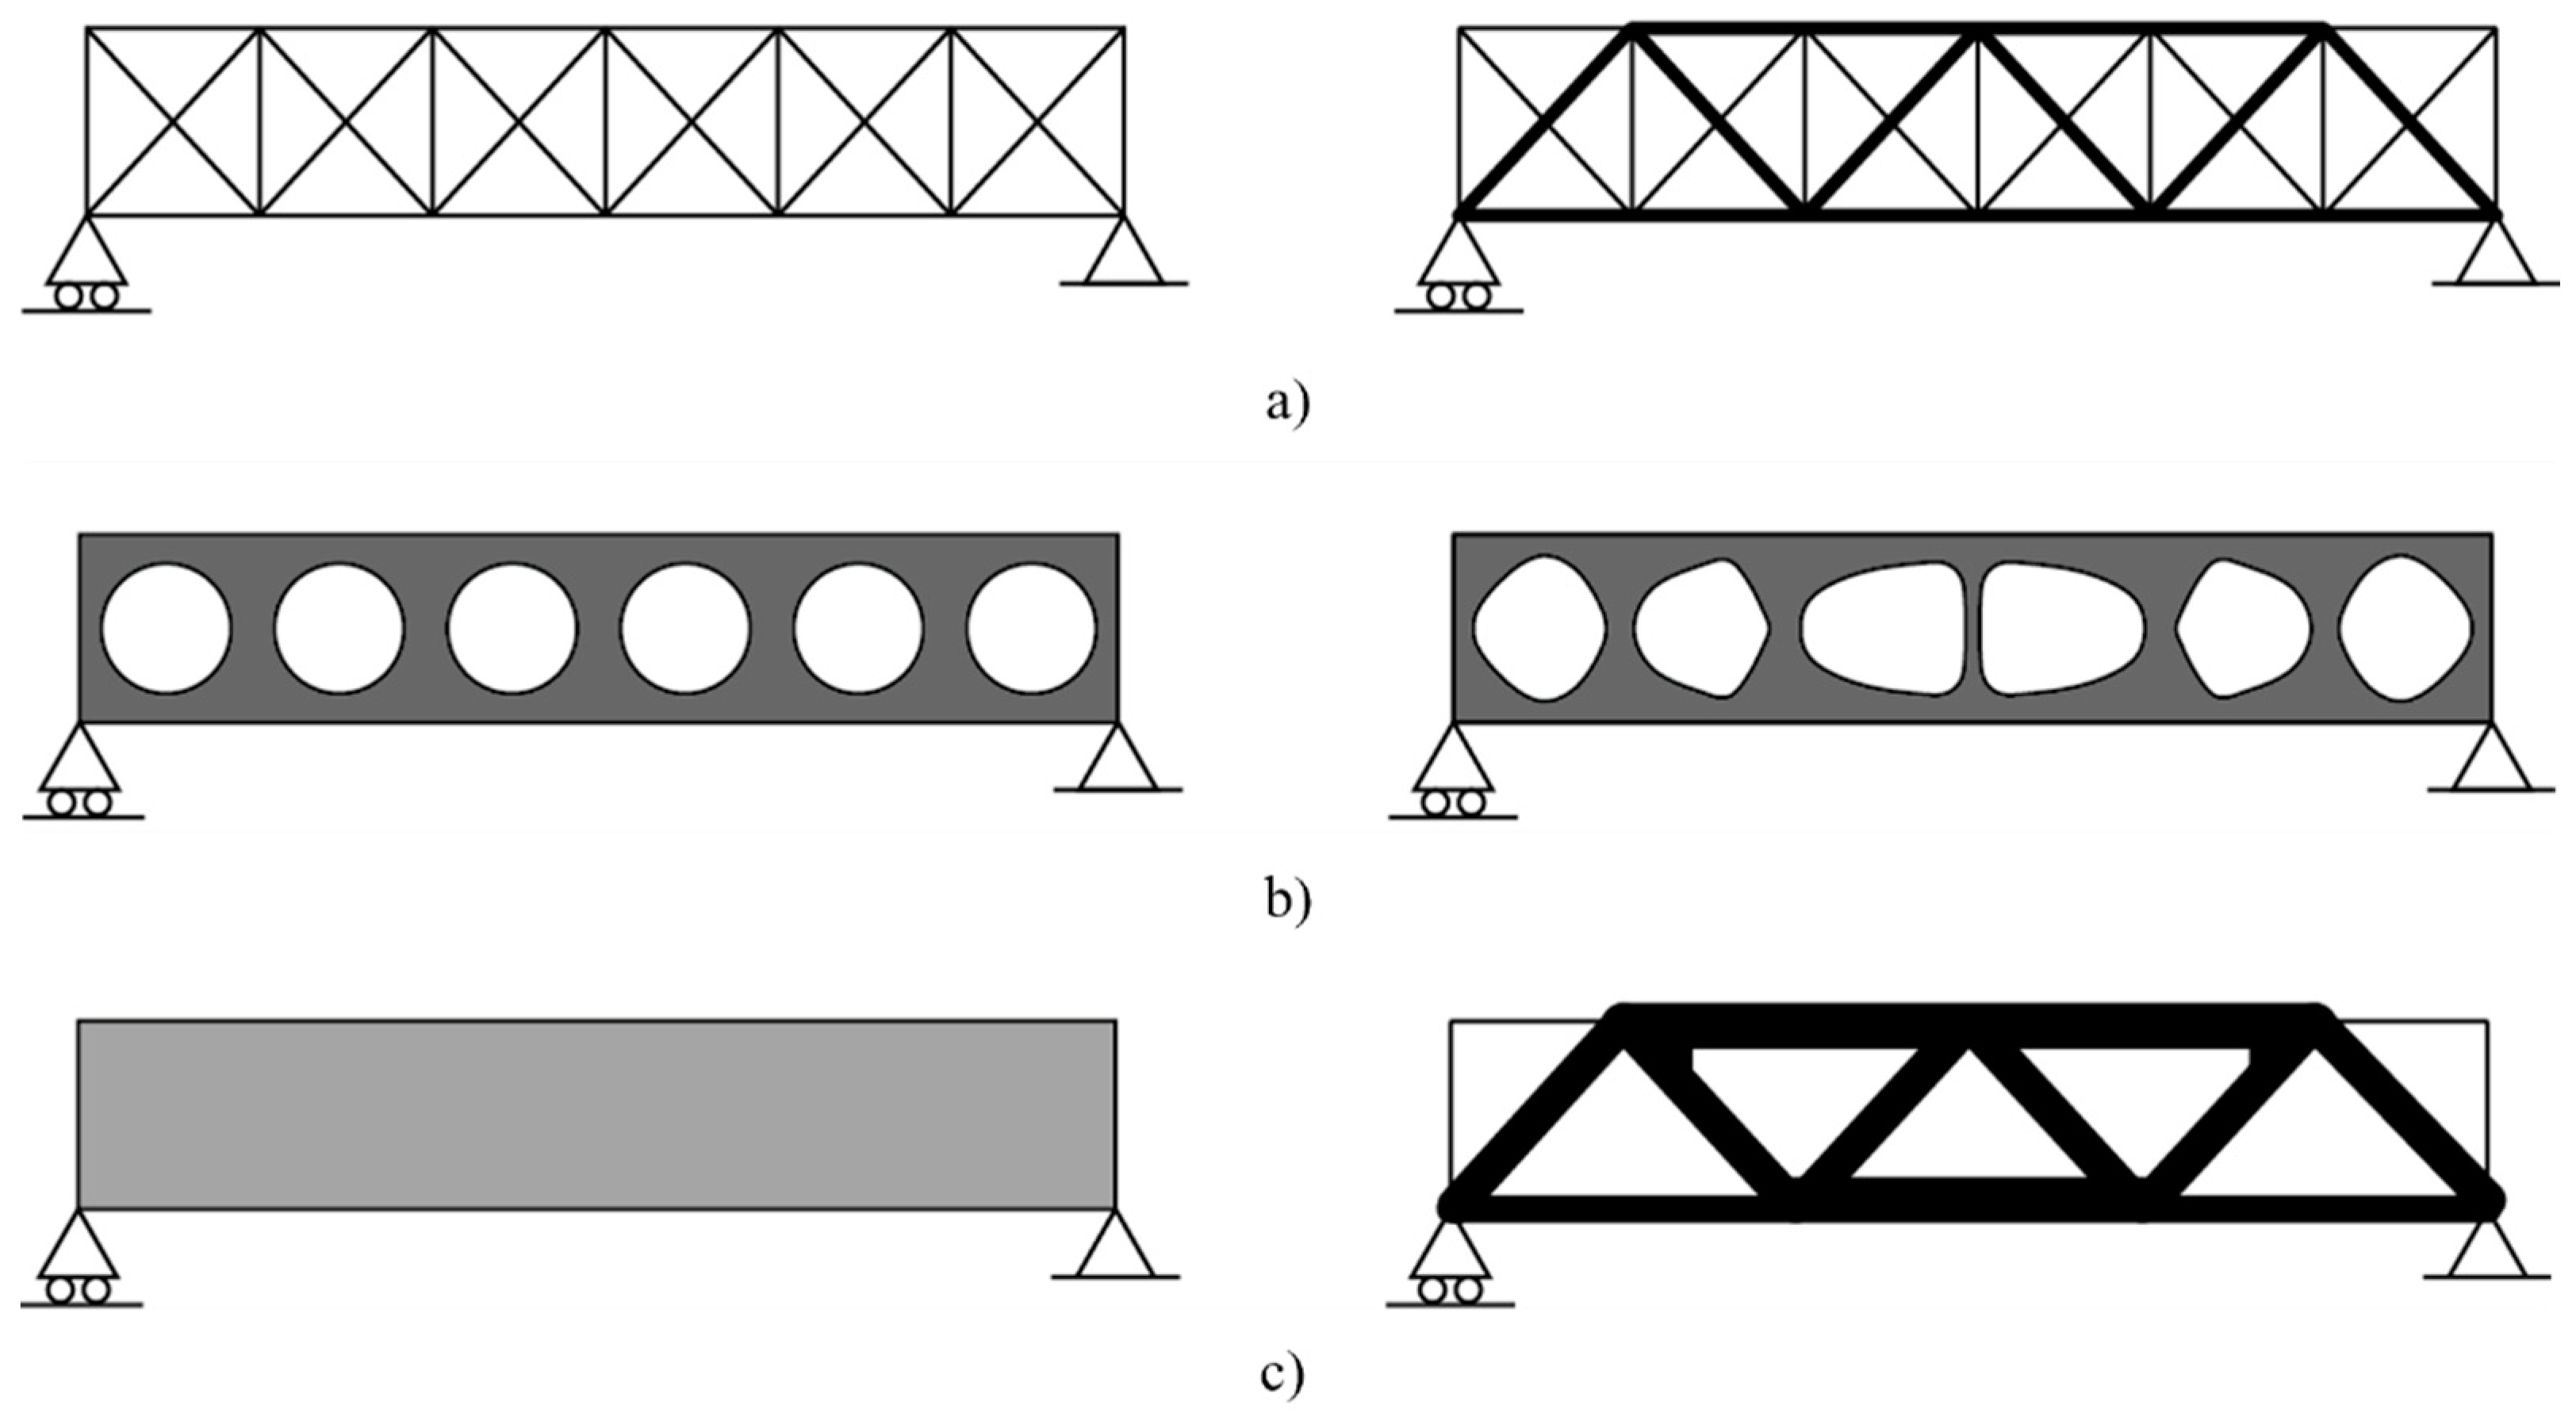
Figure 25. Types of optimization processes: (a) Size optimization; (b) shape optimization; (c) topology optimization. Reprinted with permission from ref. [131]. Copyright 2017 Elsevier Ltd.
Metals 14 01033 g025
Topological optimisation (TO) is an iterative process to find the best distribution of material in a design domain subject to a specific set of constraints. The definition of “best distribution” takes on different meanings depending on the target of the optimisation. Usually, with optimisation processes, the lightest or stiffest solution is found by subjecting the design domain to constraints such as stresses, displacements, or frozen areas.
Mathematically, the problem can be expressed like this [141,142,143]:
-
Minimise/maximise f(x,y).
The function f(x,y) is subject to
-
Behaviour constraints on y.
-
Design constraints on x.
-
Equilibrium constraints.
In which
-
f is the objective function of the optimisation problem, i.e., the target of the process; typically, it represents the parameter subject to constraints in the design domain.
-
x represents the design variables, which describe the geometry and material. Constraints can also be set as geometric restrictions on parts of the domain to be constrained or on dimensions.
-
y represents the state variables, which describe the structural response. They can be expressed in terms of stresses, displacements or forces.
  • SIMP method
The most popular numerical FE-based topology optimization method is the solid isotropic material with penalization (SIMP) [144]. The SIMP method is a density-based TO method which can be expressed by the following Equation (2):
E h = ρ p · E 0
where
-
Eh is the Young’s modulus of the optimized element.
-
ρ is the pseudo-density.
-
p is the penalization factor (p > 1).
-
E0 is the initial Young’s modulus.
Through an appropriate choice of p, the SIMP approach allows intermediate densities to be penalised. Therefore, a binary solid/void solution is promoted, which guarantees high efficiency and easy integration with production processes. The choice of p > 1 ensures that intermediate densities are penalised. In fact, values of ≥3 provide good results in both the 2D and 3D cases [145].
Initially, in the SIMP method, densities are uniformly distributed over all elements in the design domain. Once the iterative analysis is started, the equilibrium equations are solved in the first step, and then, with a sensitivity analysis, the derivatives of the design variables are calculated. Before updating the element densities in the domain, filtering techniques are employed to ensure numerical stability. Subsequently, a new FE analysis is performed until convergence.
  • Level-Set method
Recently, the use of level-set method (LSM) has been increasing for the topological optimisation of components and structures. The main advantages of LSM lie both in leading to efficient computational schemes and in managing topological changes such as the union and division of connected components. Well-defined boundaries enable the creation of geometries that also consider production and digitalisation issues. Interesting examples of using the LSM in optimisation problems can be found in Allaire et al. [146] and Wang et al. [147].
  • The application of topological optimization
Thanks to its considerable advantages in many industrial areas, topological optimisation is applied in the production of high-performance components. Nowadays, several commercial software packages are able to solve specific problems common to a wide range of industrial applications [140].
Figure 26 shows the distribution of the most common topological optimisation methods used in commercial software. The density-based method (50% of the total) is the most widespread. Furthermore, if hybrid approaches (which consider the density-based approach with the level-set method) are also evaluated, the coverage reaches over 80%.
To evaluate the advantages of the combined use of AM and topological optimisation, Saadlaoui et al. [131] compared the performance provided by different formulations of the optimisation problem. The investigations were carried out by assessing the numerical and experimental performance of a cube subjected to uniaxial compression. The commercial software used in the study were Abaqus and Optistruct.
In detail, the formulations used in [131] are the following:
-
Stress-constrained optimisation (SCO). According to this approach, the goal is to minimise the structural weight for a stress constraint. In this case, stresses are required to be less than the elastic limit of the material (Inconel 718) divided by a factor of safety.
-
Continuous compliance optimisation (CCO). In most optimisation problems, the structural compliance parameter (to be understood as the inverse of stiffness) is used as the objective function to be minimised. Usually, in this formulation, the constraint is represented by an arbitrary value on the volume of the material.
-
Discrete compliance optimisation (DCO). The terms of the optimisation problem follow those of the CCO approach. However, it considers discrete variables that return the problem to a binary solution: 1 (solid), 0 (void).
No significant discrepancies in terms of displacement and stress were found in the three formulations examined. However, noteworthy differences were obtained in terms of reduction in the original volume. The SCO approach resulted in a reduction of approximately 74%, while CCO was 69% and DCO 61%.
Once the numerical analyses were completed, the optimised geometries were produced using the SLM technique (Figure 27).
The stress-constrained optimisation (SCO) approach is the formulation with the highest computational cost, but the results show the best mechanical performance for the greatest reduction in structural weight.

5.1.2. Lightweight Components

AM offers great opportunities in the production of lightweight components such as lattice structures. The term “lattice structures” refers to 3D open-cell structures resulting from the repetition of a unit cell.
Due to their versatility and mechanical properties, these structures are widely used, particularly in the aerospace and biomedical sectors [148].
Based on their mechanical behaviour [149], lattice structures are classified into the following:
-
Bending-dominated structures: The design elements are mainly subject to bending moment. Therefore, these structures exhibit compliant behaviour.
-
Stretch-dominated structures: The structures are mainly subject to axial loads. Generally, this type is stronger and stiffer than the previous one.
The unit cell can be generated from strut-based elements or from surface-based elements. The former is characterised by constructive simplicity, and several examples are shown in Figure 28a. The latter have several advantages, especially with regard to production problems (Figure 28b).
For more details on lattice structures, the contribution by Maconachie et al. [148] is recommended.
In order to also provide insight on manufacturing issues, Panesar et al. [150] compared different design strategies. In their paper, lattice solutions are generated using discrete solid/void or greyscale topology optimisation results (Figure 29).
The design strategies considered in [150] were the following:
-
Solid: This strategy shows a topologically optimised result using the SIMP method (Figure 29a).
-
Intersected lattice: According to this strategy, the solution is obtained by intersecting a topologically optimised discrete solid/vacuum result with a uniform lattice structure consisting of unit cells with constant volume fraction (Figure 29b).
-
Graded lattice: The greyscale TO solution is the basis for mapping a lattice with variable volume fraction (Figure 29c).
-
Scaled lattice: The rescaled greyscale TO solution is the basis for mapping a lattice with variable volume fraction (Figure 29d).
-
Uniform lattice: The design domain is filled with a uniform lattice (Figure 29e).
To evaluate the performance of the proposed design strategies, the cantilever beam scheme shown in Figure 30 was used for the numerical investigation. The strategies presented were compared according to their mechanical performance in terms of total strain energy (SE). In addition, the study evaluated the designs, taking into account different manufacturing issues. The criteria analysed were support structure requirements, processing efforts, and design-to-production discrepancy.
The numerical results, in terms of total SE, for the different design strategies applied to the cantilever beam are shown in Figure 31. The highest value of strain energy is attributed to the uniform lattice structure, which shows low stiffness.
The solid (SIMP) solution has the lowest SE. While the intersected and graded structures exhibit the same behaviour and the SE values are about 50% lower than the uniform lattice structure. The scaled lattice has a lower SE value and a better solution than the uniform lattice structures.
Regarding the production issues, Figure 32 shows a comparison of different design strategies. One of the main manufacturing considerations is related to support structures. These are essential elements to reduce the possibility of failures during the production process. However, the use of support structures affects production time, material consumption, and production efforts.
The solid solution is the strategy that requires the widest use of support structures. In contrast, lattice structures require less support because they make the structure self-supporting. In particular, both the uniform and scaled strategies require about 40% less support than the solid solution.
With regard to production efforts, in terms of time and geometric complexity, lattice structures are less cost-effective than the solid strategy.
Further considerations must be made about the discrepancy between design and production. For AM components, these deviations may relate to distortion due to residual stresses, and surface roughness. In particular, the latter is more common in lattice structures. This defect can lead to a decline in mechanical properties.

5.2. Use of AM in Repair of Existing Structures

One of the greatest potential of AM in construction lies in its use for the repair of existing structures [121]. In the aerospace industry, the repair of worn parts is of great interest [151,152,153]. Indeed, because of the production cost of high-performance components, it is cost-effective to repair worn parts rather than replace them with new ones.
The repair process consists of three phases [151]:
  • Preparation stage. In the first step, considerations concern the cost-effectiveness of the repair/reinforcement of the degraded component. Next, a geometric check is performed between the worn elements and the nominal model. This comparison generates an error map, which highlights the errors between the two models. Finally, the repair area can be identified and judgements made on the extent of the damage.
  • Production stage. In this stage, the previously identified area is repaired/reinforced through AM or hybrid manufacturing processes.
  • Post-repair stage. In the final step, a geometric inspection is performed to verify the correct execution. In addition, the restored element can be mechanically characterised by means of material strength tests.
The same methodology can also be used in construction. Particular attention must be given to the preparatory stage. Both the choice of the appropriate process for acquiring geometric data and the judgement of the effectiveness of the repair/reinforcement are fundamental aspects. The use of objective data makes it possible to highlight the real demand for intervention. Visual inspections, which are strongly influenced by the subjective judgements of the technician, should, therefore, be avoided.
The use of noncontact digitising systems allows accurate 3D scan data to be obtained. These can be compared with the nominal model to generate an error map [152]. Therefore, through the geometry reconstruction method based on reverse engineering, structural deformations and material defects can be monitored. Subsequently, on the basis of the measurements, repair or reinforcement processes can be carried out through AM techniques.
AM technologies allow products to be printed directly onto metal components [136]. Therefore, the development of in situ stiffeners will be attractive. For example, stiffeners and components can be printed in areas where the need arises during the preparation stage. Furthermore, additional developments could concern the implementation of automated processes for monitoring and repair.
The use of AM in the repair of existing structures can have several advantages. However, to date, this is an unexplored topic. Therefore, further studies are needed to assess its potential in real applications.
In fact, compared to other sectors, construction is still lagging in the field of AM. A fundamental problem lies in the excessive fragmentation of the sector and its production processes. In the future, through the digitalisation of information related to the entire process, it will be important to aim at a design oriented towards complex components that combine several functions. One of the great potentials of AM lies in its ability to produce customised components and complex geometries without increasing costs and production efforts. Therefore, simplification consists of the production of complex components that are optimised to meet multiple functional requirements in order to enable an overall improvement in performance while reducing manufacturing errors, time, and costs.

6. Conclusions

As already discussed in the introduction, the idea of the authors was to provide a tool suitable for everyone in which all the studies were divided by topic, in order to find their way in the world of 3D printing, specifically metal.
Additive manufacturing is an innovative production technique that has been significantly developed in recent years, especially in specific sectors of engineering. Starting with rapid prototyping, the advancement of techniques led to encouraging results in terms of accuracy, precision, and mechanical performance. However, there are still limits to the large-scale application of 3D printing. They concern the production of large parts, the time and cost of making parts, the still very high costs of materials and printers, and the lack of in-depth expertise and knowledge.
Numerous studies have been recently added to the literature concerning metal additive manufacturing, which aims to provide a valid alternative to traditional manufacturing techniques. In this review article, a state-of-the-art of research and literature review on metal additive manufacturing and an overview of the main examples in the field of structural engineering were presented. Furthermore, the currently most widespread techniques were analysed in detail, as well as the process parameters and the factors influencing the quality and characteristics of the printed components. In this regard, this review referred to articles dealing with technology from a qualitative and quantitative point of view, investigating the aforementioned aspects. The performance of printed metal parts, which can have highly articulate and complex shapes, thanks also to the advanced optimisation algorithms available to date, also allows for their favourable employment in the construction sector. Several examples can already be found around the world, including bridges, joints, and nodes. However, there are still many aspects to be investigated, such as durability in the long term, defects due to the particular production process, and the real cost-effectiveness and environmental sustainability of the process. The printing process parameters to be set in the design and manufacturing stages are also both numerous and complex. The correct settings ensure the success of the printing process and, consequently, the achievement of the desired performance.
In conclusion, although there are still many aspects to be studied and explored for a large-scale application of additive manufacturing of metals in construction and beyond, the results obtained so far are remarkable and the advantages are clear. Only time and experience will allow existing limitations to be overcome, making 3D printing a commonly adopted technology in industry.

Author Contributions

Conceptualization, I.C. and G.B.; methodology, I.C. and G.B.; validation, I.C. and F.R.A.; data curation, F.R.A.; writing—original draft preparation, I.C. and F.R.A.; writing—review and editing, I.C., F.R.A. and G.B.; visualization, I.C., F.R.A. and G.B.; supervision, G.B. All authors have read and agreed to the published version of the manuscript.

Funding

This research received no external funding.

Data Availability Statement

Data sharing is not applicable.

Conflicts of Interest

The authors declare no conflict of interest.

References

  1. Xiang, H.; Zhou, Y.; Zhang, X.; Li, J.; Huang, Y.; Mou, G.; Wu, C. Supportfree Printing in Laser Powder Bed Fusion: Formation Mechanisms of Discontinuity, Dross and Surface Roughness. Opt. Laser Technol. 2024, 177, 111201. [Google Scholar] [CrossRef]
  2. Housholder, R.F. Molding Process. U.S. Patent 4247508, 27 January 1981. [Google Scholar]
  3. Wong, K.V.; Hernandez, A. A Review of Additive Manufacturing. ISRN Mech. Eng. 2012, 2012, 208760. [Google Scholar] [CrossRef]
  4. Chen, L.-Y.; Qin, P.; Zhang, L.; Zhang, L.-C. An Overview of Additively Manufactured Metal Matrix Composites: Preparation, Performance, and Challenge. Int. J. Extrem. Manuf. 2024, 6, 052006. [Google Scholar] [CrossRef]
  5. Coon, C.; Pretzel, B.; Lomax, T.; Strlič, M. Preserving Rapid Prototypes: A Review. Herit. Sci. 2016, 4, 40. [Google Scholar] [CrossRef]
  6. Abdulhameed, O.; Al-Ahmari, A.; Ameen, W.; Mian, S.H. Additive Manufacturing: Challenges, Trends, and Applications. Adv. Mech. Eng. 2019, 11, 1–27. [Google Scholar] [CrossRef]
  7. Singh, R.; Gupta, A.; Tripathi, O.; Srivastava, S.; Singh, B.; Awasthi, A.; Rajput, S.K.; Sonia, P.; Singhal, P.; Saxena, K.K. Powder Bed Fusion Process in Additive Manufacturing: An Overview. Mater. Today Proc. 2019, 26, 3058–3070. [Google Scholar] [CrossRef]
  8. Ligon, S.C.; Liska, R.; Stampfl, J.; Gurr, M.; Mülhaupt, R. Polymers for 3D Printing and Customized Additive Manufacturing. Chem. Rev. 2017, 117, 10212–10290. [Google Scholar] [CrossRef]
  9. Herzog, D.; Seyda, V.; Wycisk, E.; Emmelmann, C. Additive Manufacturing of Metals. Acta Mater. 2016, 117, 371–392. [Google Scholar] [CrossRef]
  10. Bhatia, A.; Sehgal, A.K. Additive Manufacturing Materials, Methods and Applications: A Review. Mater. Today Proc. 2021, 81, 1060–1067. [Google Scholar] [CrossRef]
  11. Pratheesh Kumar, S.; Elangovan, S.; Mohanraj, R.; Ramakrishna, J.R. Review on the Evolution and Technology of State-of-the-Art Metal Additive Manufacturing Processes. Mater. Today Proc. 2021, 46, 7907–7920. [Google Scholar] [CrossRef]
  12. Wang, Y.; Zhou, Y.; Lin, L.; Corker, J.; Fan, M. Overview of 3D Additive Manufacturing (AM) and Corresponding AM Composites. Compos. Part A Appl. Sci. Manuf. 2020, 139, 106114. [Google Scholar] [CrossRef]
  13. Fijoł, N.; Aguilar-Sánchez, A.; Mathew, A.P. 3D-Printable Biopolymer-Based Materials for Water Treatment: A Review. Chem. Eng. J. 2022, 430, 132964. [Google Scholar] [CrossRef]
  14. Jiang, J.; Xu, X.; Stringer, J. Support Structures for Additive Manufacturing: A Review. J. Manuf. Mater. Process. 2018, 2, 64. [Google Scholar] [CrossRef]
  15. Karar, G.C.; Kumar, R.; Chattopadhyaya, S. An Analysis on the Advanced Research in Additive Manufacturing. In Advances in Production and Industrial Engineering. Part of the Lecture Notes in Mechanical Engineering Book Series; Springer: Singapore, 2021; pp. 229–277. ISBN 9789811555183. [Google Scholar]
  16. ISO/ASTM 52900; Additive Manufacturing—General Principles—Terminology. ASTM—American Society for Testing and Materials: West Conshohocken, PA, USA, 2015.
  17. Durai Murugan, P.; Vijayananth, S.; Natarajan, M.P.; Jayabalakrishnan, D.; Arul, K.; Jayaseelan, V.; Elanchezhian, J. A Current State of Metal Additive Manufacturing Methods: A Review. Mater. Today Proc. 2021, 59, 1277–1283. [Google Scholar] [CrossRef]
  18. Shrinivas Mahale, R.; Shamanth, V.; Hemanth, K.; Nithin, S.K.; Sharath, P.C.; Shashanka, R.; Patil, A.; Shetty, D. Processes and Applications of Metal Additive Manufacturing. Mater. Today Proc. 2021, 54, 228–233. [Google Scholar] [CrossRef]
  19. Badoniya, P.; Srivastava, M.; Jain, P.K.; Rathee, S. A State-of-the-Art Review on Metal Additive Manufacturing: Milestones, Trends, Challenges and Perspectives; Springer: Berlin/Heidelberg, Germany, 2024; Volume 46, ISBN 0123456789. [Google Scholar]
  20. Lee, J.Y.; An, J.; Chua, C.K. Fundamentals and Applications of 3D Printing for Novel Materials. Appl. Mater. Today 2017, 7, 120–133. [Google Scholar] [CrossRef]
  21. Ngo, T.D.; Kashani, A.; Imbalzano, G.; Nguyen, K.T.Q.; Hui, D. Additive Manufacturing (3D Printing): A Review of Materials, Methods, Applications and Challenges. Compos. Part B Eng. 2018, 143, 172–196. [Google Scholar] [CrossRef]
  22. Wang, J.C.; Dommati, H.; Hsieh, S.J. Review of Additive Manufacturing Methods for High-Performance Ceramic Materials. Int. J. Adv. Manuf. Technol. 2019, 103, 2627–2647. [Google Scholar] [CrossRef]
  23. Wang, Y.; Chen, R.; Liu, Y. A Double Mask Projection Exposure Method for Stereolithography. Sens. Actuators A Phys. 2020, 314, 112228. [Google Scholar] [CrossRef]
  24. Mazzoli, A. Selective Laser Sintering in Biomedical Engineering. Med. Biol. Eng. Comput. 2013, 51, 245–256. [Google Scholar] [CrossRef]
  25. Redwood, B.; Schoffer, F.; Garret, B. The 3D Printing Handbook. Technologies, Design and Applications; 3D Hubs B.V.: Amsterdam, The Netherlands, 2020. [Google Scholar]
  26. Giri, J.; Sunheriya, N.; Sathish, T.; Kadu, Y.; Chadge, R.; Giri, P.; Parthiban, A.; Mahatme, C. Optimization of Process Parameters to Improve Mechanical Properties of Fused Deposition Method Using Taguchi Method. Interactions 2024, 245, 87. [Google Scholar] [CrossRef]
  27. Alafaghani, A.; Qattawi, A.; Alrawi, B.; Guzman, A. Experimental Optimization of Fused Deposition Modelling Processing Parameters: A Design-for-Manufacturing Approach. Procedia Manuf. 2017, 10, 791–803. [Google Scholar] [CrossRef]
  28. Hafsa, M.N.; Kassim, N.; Ismail, S.; Kamaruddin, S.A.; Hafeez, T.M.; Ibrahim, M.; Samsudin, Z.H. Study on Surface Roughness Quality of FDM and MJM Additive Manufacturing Model for Implementation as Investment Casting Sacrificial Pattern. J. Mech. Eng. 2018, 5, 25–34. [Google Scholar]
  29. Emiliani, N.; Porcaro, R.; Pisaneschi, G.; Bortolani, B.; Ferretti, F.; Fontana, F.; Campana, G.; Fiorini, M.; Marcelli, E.; Cercenelli, L. Post-Printing Processing and Aging Effects on Polyjet Materials Intended for the Fabrication of Advanced Surgical Simulators. J. Mech. Behav. Biomed. Mater. 2024, 156, 106598. [Google Scholar] [CrossRef]
  30. Yang, Y.; Bharech, S.; Finger, N.; Zhou, X.; Schröder, J.; Xu, B.X. Elasto-Plastic Residual Stress Analysis of Selective Laser Sintered Porous Materials Based on 3D-Multilayer Thermo-Structural Phase-Field Simulations. npj Comput. Mater. 2024, 10, 117. [Google Scholar] [CrossRef]
  31. Rajesh, R.; Sudheer, S.; Kulkarni, M.V. Selective Laser Sintering Process—A Review. Int. J. Curr. Eng. Sci. Res. (IJCESR) 2015, 2, 91–100. [Google Scholar]
  32. Paolini, A.; Kollmannsberger, S.; Rank, E. Additive Manufacturing in Construction: A Review on Processes, Applications, and Digital Planning Methods. Addit. Manuf. 2019, 30, 100894. [Google Scholar] [CrossRef]
  33. Volpe, S.; Sangiorgio, V.; Fiorito, F.; Varum, H. Overview of 3D Construction Printing and Future Perspectives: A Review of Technology, Companies and Research Progression. Archit. Sci. Rev. 2022, 67, 1–22. [Google Scholar] [CrossRef]
  34. Placzek, G.; Schwerdtner, P. Concrete Additive Manufacturing in Construction: Integration Based on Component-Related Fabrication Strategies. Buildings 2023, 13, 1769. [Google Scholar] [CrossRef]
  35. Pacillo, G.A.; Ranocchiai, G.; Loccarini, F.; Fagone, M. Additive Manufacturing in Construction: A Review on Technologies, Processes, Materials, and Their Applications of 3D and 4D Printing. Mater. Des. Process. Commun. 2021, 3, e253. [Google Scholar] [CrossRef]
  36. Scheel, P.; Wrobel, R.; Rheingans, B.; Mayer, T.; Leinenbach, C.; Mazza, E.; Hosseini, E. Advancing Efficiency and Reliability in Thermal Analysis of Laser Powder-Bed Fusion. Int. J. Mech. Sci. 2023, 260, 108583. [Google Scholar] [CrossRef]
  37. Yap, C.Y.; Chua, C.K.; Dong, Z.L.; Liu, Z.H.; Zhang, D.Q.; Loh, L.E.; Sing, S.L. Review of Selective Laser Melting: Materials and Applications. Appl. Phys. Rev. 2015, 2, 041101. [Google Scholar] [CrossRef]
  38. Song, B.; Zhao, X.; Li, S.; Han, C.; Wei, Q.; Wen, S.; Liu, J.; Shi, Y. Differences in Microstructure and Properties between Selective Laser Melting and Traditional Manufacturing for Fabrication of Metal Parts: A Review. Front. Mech. Eng. 2015, 10, 111–125. [Google Scholar] [CrossRef]
  39. Du, X.; Chen, J.; She, Y.; Liu, Y.; Yang, Y.; Yang, J.; Dong, S. Effect of Process Parameter Optimization on Morphology and Mechanical Properties of Ti6Al4V Alloy Produced by Selective Laser Melting. Prog. Nat. Sci. Mater. Int. 2023, 33, 911–917. [Google Scholar] [CrossRef]
  40. Fette, M.; Sander, P.; Wulfsberg, J.; Zierk, H.; Herrmann, A.; Stoess, N. Optimized and Cost-Efficient Compression Molds Manufactured by Selective Laser Melting for the Production of Thermoset Fiber Reinforced Plastic Aircraft Components. Procedia CIRP 2015, 35, 25–30. [Google Scholar] [CrossRef]
  41. Liu, B.; Bai, P.; Li, Y. Post Treatment Process and Selective Laser Sintering Mechanism of Polymer-Coated Mo Powder. Open Mater. Sci. J. 2011, 5, 194–198. [Google Scholar] [CrossRef]
  42. Andreacola, F.R.; Capasso, I.; Pilotti, L.; Brando, G. Influence of 3D-Printing Parameters on the Mechanical Properties of 17-4PH Stainless Steel Produced through Selective Laser Melting. Frat. Intregrità Strutt. 2021, 58, 282–295. [Google Scholar] [CrossRef]
  43. Andreacola, F.R.; Capasso, I.; Langella, A.; Brando, G. 3D-Printed Metals: Process Parameters Effects on Mechanical Properties of 17-4PH Stainless Steel. Heliyon 2023, 9, e17698. [Google Scholar] [CrossRef]
  44. Gokuldoss, P.K.; Kolla, S.; Eckert, J. Additive Manufacturing Processes: Selective Laser Melting, Electron Beam Melting and Binder Jetting-Selection Guidelines. Materials 2017, 10, 672. [Google Scholar] [CrossRef]
  45. Murr, L.E.; Gaytan, S.M.; Ramirez, D.A.; Martinez, E.; Hernandez, J.; Amato, K.N.; Shindo, P.W.; Medina, F.R.; Wicker, R.B. Metal Fabrication by Additive Manufacturing Using Laser and Electron Beam Melting Technologies. J. Mater. Sci. Technol. 2012, 28, 167–177. [Google Scholar] [CrossRef]
  46. Huang, N.; Cook, O.J.; Argüelles, A.P.; Beese, A.M. Review of Process–Structure–Property Relationships in Metals Fabricated Using Binder Jet Additive Manufacturing. Metallogr. Microstruct. Anal. 2023, 12, 883–905. [Google Scholar] [CrossRef]
  47. Tischel, F.; Reineke, L.; Alrashdan, J.; Ploshikhin, V. Experimental Investigation and Modeling of Densification during Sintering of Binder Jetted Ti–6Al–4V. Powder Technol. 2024, 444, 119958. [Google Scholar] [CrossRef]
  48. Aramian, A.; Razavi, S.M.J.; Sadeghian, Z.; Berto, F. A Review of Additive Manufacturing of Cermets. Addit. Manuf. 2020, 33, 101130. [Google Scholar] [CrossRef]
  49. Mostafaei, A.; Elliott, A.M.; Barnes, J.E.; Li, F.; Tan, W.; Cramer, C.L.; Nandwana, P.; Chmielus, M. Binder Jet 3D Printing-Process Parameters, Materials, Properties, Modeling, and Challenges. Prog. Mater. Sci. 2021, 119, 100707. [Google Scholar] [CrossRef]
  50. Blunk, H.; Seibel, A. Design Guidelines for Metal Binder Jetting. Prog. Addit. Manuf. 2024, 9, 725–732. [Google Scholar] [CrossRef]
  51. Dwivedi, S.; Dixit, A.R.; Das, A.K.; Nag, A. A Novel Additive Texturing of Stainless Steel 316L Through Binder Jetting Additive Manufacturing. Int. J. Precis. Eng. Manuf. Green Technol. 2023, 10, 1605–1613. [Google Scholar] [CrossRef]
  52. Mueller, B.; Kochan, D. Laminated Object Manufacturing for Rapid Tooling and Patternmaking in Foundry Industry. Comput. Ind. 1999, 39, 47–53. [Google Scholar] [CrossRef]
  53. Kan, C.; Zhao, L.; Cao, Y.; Ma, C.; Peng, Y.; Tian, Z. Microstructure Evolution and Strengthening Behavior of Maraging Steel Fabricated by Wire Arc Additive Manufacturing at Different Heat Treatment Processes. Mater. Sci. Eng. A 2024, 909, 146804. [Google Scholar] [CrossRef]
  54. Srivastava, M.; Rathee, S.; Tiwari, A.; Dongre, M. Wire Arc Additive Manufacturing of Metals: A Review on Processes, Materials and Their Behaviour. Mater. Chem. Phys. 2023, 294, 126988. [Google Scholar] [CrossRef]
  55. Ahmed, N. Direct Metal Fabrication in Rapid Prototyping: A Review. J. Manuf. Process. 2019, 42, 167–191. [Google Scholar] [CrossRef]
  56. Alami, A.H.; Ghani Olabi, A.; Alashkar, A.; Alasad, S.; Aljaghoub, H.; Rezk, H.; Abdelkareem, M.A. Additive Manufacturing in the Aerospace and Automotive Industries: Recent Trends and Role in Achieving Sustainable Development Goals. Ain Shams Eng. J. 2023, 14, 102516. [Google Scholar] [CrossRef]
  57. Arrizubieta, J.I.; Martínez, S.; Lamikiz, A.; Ukar, E.; Arntz, K.; Klocke, F. Instantaneous Powder Flux Regulation System for Laser Metal Deposition. J. Manuf. Process. 2017, 29, 242–251. [Google Scholar] [CrossRef]
  58. Pirch, N.; Linnenbrink, S.; Gasser, A.; Schleifenbaum, H. Laser-Aided Directed Energy Deposition of Metal Powder along Edges. Int. J. Heat Mass Transf. 2019, 143, 118464. [Google Scholar] [CrossRef]
  59. Yilmaz, O.; Ugla, A.A. Shaped Metal Deposition Technique in Additive Manufacturing: A Review. Proc. Inst. Mech. Eng. Part B J. Eng. Manuf. 2016, 230, 1781–1798. [Google Scholar] [CrossRef]
  60. Agelet de Saracibar, C.; Lundbäck, A.; Chiumenti, M.; Cervera, M. Shaped Metal Deposition Processes. In Encyclopedia of Thermal Stresses; Springer: Dordrecht, The Netherlands, 2014; pp. 4346–4355. [Google Scholar] [CrossRef]
  61. Cooke, S.; Ahmadi, K.; Willerth, S.; Herring, R. Metal Additive Manufacturing: Technology, Metallurgy and Modelling. J. Manuf. Process. 2020, 57, 978–1003. [Google Scholar] [CrossRef]
  62. Zhang, D.; Sun, S.; Qiu, D.; Gibson, M.A.; Dargusch, M.S.; Brandt, M.; Qian, M.; Easton, M. Metal Alloys for Fusion-Based Additive Manufacturing. Adv. Eng. Mater. 2018, 20, 1700952. [Google Scholar] [CrossRef]
  63. Li, Y.; Liang, X.; Yu, Y.; Wang, D.; Lin, F. Review on Additive Manufacturing of Single-Crystal Nickel-Based Superalloys. Chin. J. Mech. Eng. Addit. Manuf. Front. 2022, 1, 100019. [Google Scholar] [CrossRef]
  64. Mostafaei, A.; Ghiaasiaan, R.; Ho, I.T.; Strayer, S.; Chang, K.C.; Shamsaei, N.; Shao, S.; Paul, S.; Yeh, A.C.; Tin, S.; et al. Additive Manufacturing of Nickel-Based Superalloys: A State-of-the-Art Review on Process-Structure-Defect-Property Relationship. Prog. Mater. Sci. 2023, 136, 101108. [Google Scholar] [CrossRef]
  65. Mazzucato, F.; Forni, D.; Valente, A.; Cadoni, E. Laser Metal Deposition of Inconel 718 Alloy and As-Built Mechanical Properties Compared to Casting. Materials 2021, 14, 437. [Google Scholar] [CrossRef]
  66. Dixit, S.; Liu, S. Laser Additive Manufacturing of High-Strength Aluminum Alloys: Challenges and Strategies. J. Manuf. Mater. Process. 2022, 6, 156. [Google Scholar] [CrossRef]
  67. Rometsch, P.A.; Zhu, Y.; Wu, X.; Huang, A. Review of High-Strength Aluminium Alloys for Additive Manufacturing by Laser Powder Bed Fusion. Mater. Des. 2022, 219, 110779. [Google Scholar] [CrossRef]
  68. Farber, E.; Zhu, J.N.; Popovich, A.; Popovich, V. A Review of NiTi Shape Memory Alloy as a Smart Material Produced by Additive Manufacturing. Mater. Today Proc. 2019, 30, 761–767. [Google Scholar] [CrossRef]
  69. Felice, I.O.; Shen, J.; Barragan, A.F.C.; Moura, I.A.B.; Li, B.; Wang, B.; Khodaverdi, H.; Mohri, M.; Schell, N.; Ghafoori, E.; et al. Wire and Arc Additive Manufacturing of Fe-Based Shape Memory Alloys: Microstructure, Mechanical and Functional Behavior. Mater. Des. 2023, 231, 112004. [Google Scholar] [CrossRef]
  70. Wei, S.; Zhang, J.; Zhang, L.; Zhang, Y.; Song, B.; Wang, X.; Fan, J.; Liu, Q.; Shi, Y. Laser Powder Bed Fusion Additive Manufacturing of NiTi Shape Memory Alloys: A Review. Int. J. Extrem. Manuf. 2023, 5, 032001. [Google Scholar] [CrossRef]
  71. Ostovari Moghaddam, A.; Shaburova, N.A.; Samodurova, M.N.; Abdollahzadeh, A.; Trofimov, E.A. Additive Manufacturing of High Entropy Alloys: A Practical Review. J. Mater. Sci. Technol. 2021, 77, 131–162. [Google Scholar] [CrossRef]
  72. Ron, T.; Shirizly, A.; Aghion, E. Additive Manufacturing Technologies of High Entropy Alloys (HEA): Review and Prospects. Materials 2023, 16, 2454. [Google Scholar] [CrossRef]
  73. Cao, L.; Li, J.; Hu, J.; Liu, H.; Wu, Y.; Zhou, Q. Optimization of Surface Roughness and Dimensional Accuracy in LPBF Additive Manufacturing. Opt. Laser Technol. 2021, 142, 107246. [Google Scholar] [CrossRef]
  74. Nandhakumar, R.; Venkatesan, K. A Process Parameters Review on Selective Laser Melting-Based Additive Manufacturing of Single and Multi-Material: Microstructure, Physical Properties, Tribological, and Surface Roughness; Elsevier Ltd.: Amsterdam, The Netherlands, 2023; Volume 35, ISBN 5465151392629. [Google Scholar]
  75. Xia, C.; Pan, Z.; Polden, J.; Li, H.; Xu, Y.; Chen, S. Modelling and Prediction of Surface Roughness in Wire Arc Additive Manufacturing Using Machine Learning. J. Intell. Manuf. 2022, 33, 1467–1482. [Google Scholar] [CrossRef]
  76. Obilanade, D.; Dordlofva, C.; Törlind, P. Surface Roughness Considerations in Design for Additive Manufacturing—A Literature Review. Proc. Des. Soc. 2021, 1, 2841–2850. [Google Scholar] [CrossRef]
  77. Zai, L.; Zhang, C.; Wang, Y.; Guo, W.; Wellmann, D.; Tong, X.; Tian, Y. Laser Powder Bed Fusion of Precipitation-Hardened Martensitic Stainless Steels: A Review. Metals 2020, 10, 255. [Google Scholar] [CrossRef]
  78. Sefene, E.M. State-of-the-Art of Selective Laser Melting Process: A Comprehensive Review. J. Manuf. Syst. 2022, 63, 250–274. [Google Scholar] [CrossRef]
  79. Gardner, L.; Kyvelou, P.; Herbert, G.; Buchanan, C. Testing and Initial Verification of the World’s First Metal 3D Printed Bridge. J. Constr. Steel Res. 2020, 172, 106233. [Google Scholar] [CrossRef]
  80. Anant Pidge, P.; Kumar, H. Additive Manufacturing: A Review on 3 D Printing of Metals and Study of Residual Stress, Buckling Load Capacity of Strut Members. Mater. Today Proc. 2020, 21, 1689–1694. [Google Scholar] [CrossRef]
  81. Tan, J.H.; Wong, W.L.E.; Dalgarno, K.W. An Overview of Powder Granulometry on Feedstock and Part Performance in the Selective Laser Melting Process. Addit. Manuf. 2017, 18, 228–255. [Google Scholar] [CrossRef]
  82. Larimian, T.; Kannan, M.; Grzesiak, D.; AlMangour, B.; Borkar, T. Effect of Energy Density and Scanning Strategy on Densification, Microstructure and Mechanical Properties of 316L Stainless Steel Processed via Selective Laser Melting. Mater. Sci. Eng. A 2020, 770, 138455. [Google Scholar] [CrossRef]
  83. Chen, J.; Wang, X.; Pan, Y. Influence of Laser Power and Scan Speed on the Microstructure and Properties of GH4169 Alloy Prepared by Selective Laser Melting. IOP Conf. Series Mater. Sci. Eng. 2019, 688, 033064. [Google Scholar] [CrossRef]
  84. Bremen, S.; Meiners, W.; Diatlov, A. Selective Laser Melting: A Manufacturing Technology for the Future? Laser Tech J 2012, 9, 33–38. [Google Scholar] [CrossRef]
  85. Mercelis, P.; Kruth, J.P. Residual Stresses in Selective Laser Sintering and Selective Laser Melting. Rapid Prototyp. J 2006, 12, 254–265. [Google Scholar] [CrossRef]
  86. Zhang, W.; Tong, M.; Harrison, N.M. Scanning Strategies Effect on Temperature, Residual Stress and Deformation by Multi-Laser Beam Powder Bed Fusion Manufacturing. Addit. Manuf. 2020, 36, 101507. [Google Scholar] [CrossRef]
  87. Miao, X.; Liu, X.; Lu, P.; Han, J.; Duan, W.; Wu, M. Influence of Scanning Strategy on the Performances of GO-Reinforced Ti6Al4V Nanocomposites Manufactured by SLM. Metals 2020, 10, 1379. [Google Scholar] [CrossRef]
  88. Haferkamp, L.; Haudenschild, L.; Spierings, A.; Wegener, K.; Riener, K.; Ziegelmeier, S.; Leichtfried, G.J. The Influence of Particle Shape, Powder Flowability, and Powder Layer Density on Part Density in Laser Powder Bed Fusion. Metals 2021, 11, 418. [Google Scholar] [CrossRef]
  89. Spierings, A.B.; Herres, N.; Levy, G. Influence of the Particle Size Distribution on Surface Quality and Mechanical Properties in Additive Manufactured Stainless Steel Parts. Rapid Prototyp. J. 2010, 17, 195–202. [Google Scholar] [CrossRef]
  90. Huck-Jones, D.; Langley, C. Beyond Particle Size: Exploring the Influence of Particle Shape on Metal Powder Performance. Met. Addit. Manuf. 2017, 3, 99–103. [Google Scholar]
  91. Eddine, S.; Letenneur, M.; Alex, C.; Brailovski, V. Influence of Particle Morphology and Size Distribution on the Powder Flowability and Laser Powder Bed Fusion Manufacturability of Ti-6Al-4V Alloy. Addit. Manuf. 2020, 31, 100929. [Google Scholar] [CrossRef]
  92. Irrinki, H.; Dexter, M.; Barmore, B.; Enneti, R.; Pasebani, S.; Badwe, S.; Stitzel, J.; Malhotra, R.; Atre, S.V. Effects of Powder Attributes and Laser Powder Bed Fusion (L-PBF) Process Conditions on the Densification and Mechanical Properties of 17-4 PH Stainless Steel. JOM J. Miner. Met. Mater. Soc. 2016, 68, 860–868. [Google Scholar] [CrossRef]
  93. Rashid, R.; Masood, S.H.; Ruan, D.; Palanisamy, S.; Rahman Rashid, R.A.; Brandt, M. Effect of Scan Strategy on Density and Metallurgical Properties of 17-4PH Parts Printed by Selective Laser Melting (SLM). J. Mater. Process. Technol. 2017, 249, 502–511. [Google Scholar] [CrossRef]
  94. Nguyen, Q.B.; Luu, D.N.; Nai, S.M.L.; Zhu, Z.; Chen, Z.; Wei, J. The Role of Powder Layer Thickness on the Quality of SLM Printed Parts. Arch. Civ. Mech. Eng. 2018, 18, 948–955. [Google Scholar] [CrossRef]
  95. Haghdadi, N.; Laleh, M.; Moyle, M.; Primig, S. Additive Manufacturing of Steels: A Review of Achievements and Challenges. J. Mater. Sci. 2021, 56, 64–107. [Google Scholar] [CrossRef]
  96. Simonelli, M.; Tse, Y.Y.; Tuck, C. Effect of the Build Orientation on the Mechanical Properties and Fracture Modes of SLM Ti–6Al–4V. Mater. Sci. Eng. A 2014, 616, 1–11. [Google Scholar] [CrossRef]
  97. Guan, K.; Wang, Z.; Gao, M.; Li, X.; Zeng, X. Effects of Processing Parameters on Tensile Properties of Selective Laser Melted 304 Stainless Steel. Mater. Des. 2013, 50, 581–586. [Google Scholar] [CrossRef]
  98. How Does Part Orientation Affect a 3D Print? Practical Design Tips for Additive Manufacturing. 2024. Available online: https://www.hubs.com/knowledge-base/how-does-part-orientation-affect-3d-print/ (accessed on 7 June 2024).
  99. Yadollahi, A.; Shamsaei, N.; Thompson, S.M.; Elwany, A.; Bian, L. Effects of Building Orientation and Heat Treatment on Fatigue Behavior of Selective Laser Melted 17-4 PH Stainless Steel. Int. J. Fatigue 2017, 94, 218–235. [Google Scholar] [CrossRef]
  100. Hitzler, L.; Janousch, C.; Schanz, J.; Merkel, M.; Heine, B.; Mack, F.; Hall, W.; Öchsner, A. Direction and Location Dependency of Selective Laser Melted AlSi10Mg Specimens. J. Mater. Process. Technol. 2017, 243, 48–61. [Google Scholar] [CrossRef]
  101. Wang, C.G.; Zhu, J.X.; Wang, G.W.; Qin, Y.; Sun, M.Y.; Yang, J.L.; Shen, X.F.; Huang, S.K. Effect of Building Orientation and Heat Treatment on the Anisotropic Tensile Properties of AlSi10Mg Fabricated by Selective Laser Melting. J. Alloys Compd. 2022, 895, 162665. [Google Scholar] [CrossRef]
  102. Sufiiarov, V.S.; Popovich, A.A.; Borisov, E.V.; Polozov, I.A.; Masaylo, D.V.; Orlov, A.V. The Effect of Layer Thickness at Selective Laser Melting. Procedia Eng. 2017, 174, 126–134. [Google Scholar] [CrossRef]
  103. Wan, H.Y.; Zhou, Z.J.; Li, C.P.; Chen, G.F.; Zhang, G.P. Effect of Scanning Strategy on Mechanical Properties of Selective Laser Melted Inconel 718. Mater. Sci. Eng. A 2019, 753, 42–48. [Google Scholar] [CrossRef]
  104. Giganto, S.; Zapico, P.; Castro-Sastre, M.Á.; Martínez-Pellitero, S.; Leo, P.; Perulli, P. Influence of the Scanning Strategy Parameters upon the Quality of the SLM Parts. Procedia Manuf. 2019, 41, 698–705. [Google Scholar] [CrossRef]
  105. Forni, D.; Mazzucato, F.; Valente, A.; Cadoni, E. High Strain-Rate Behaviour of as-Cast and as-Build Inconel 718 Alloys at Elevated Temperatures. Mech. Mater. 2021, 159, 103859. [Google Scholar] [CrossRef]
  106. Brando, G.; Andreacola, F.R.; Capasso, I.; Forni, D.; Cadoni, E. Strain-Rate Response of 3D Printed 17-4PH Stainless Steel Manufactured via Selective Laser Melting. Constr. Build. Mater. 2023, 409, 133971. [Google Scholar] [CrossRef]
  107. Michla, J.R.J.; Nagarajan, R.; Krishnasamy, S.; Siengchin, S.; Ismail, S.O.; Prabhu, T.R. Conventional and Additively Manufactured Stainless Steels: A Review. Trans. Indian Inst. Met. 2021, 74, 1261–1278. [Google Scholar] [CrossRef]
  108. Zhu, H.H.; Lu, L.; Fuh, J.Y.H. Study on Shrinkage Behaviour of Direct Laser Sintering Metallic Powder. Proc. Inst. Mech. Eng. B J. Eng. Manuf. 2006, 220, 183–190. [Google Scholar] [CrossRef]
  109. Ramos, D.; Belblidia, F.; Sienz, J. New Scanning Strategy to Reduce Warpage in Additive Manufacturing. Addit. Manuf. 2019, 28, 554–564. [Google Scholar] [CrossRef]
  110. Enneti, R.K.; Morgan, R.; Atre, S.V. Effect of Process Parameters on the Selective Laser Melting (SLM) of Tungsten. Int. J. Refract. Met. Hard. Mater. 2018, 71, 315–319. [Google Scholar] [CrossRef]
  111. Klocke, F.; Wagner, C. Coalescence Behaviour of Two Metallic Particles as Base Mechanism of Selective Laser Sintering. CIRP Ann. 2003, 52, 117–180. [Google Scholar] [CrossRef]
  112. Simchi, A.; Pohl, H. Effects of Laser Sintering Processing Parameters on the Microstructure and Densification of Iron Powder. Mater. Sci. Eng. A 2003, 359, 119–128. [Google Scholar] [CrossRef]
  113. Attaran, M. The Rise of 3-D Printing: The Advantages of Additive Manufacturing over Traditional Manufacturing. Bus. Horiz. 2017, 60, 677–688. [Google Scholar] [CrossRef]
  114. Ali, M.H.; Issayev, G.; Shehab, E.; Sarfraz, S. A Critical Review of 3D Printing and Digital Manufacturing in Construction Engineering. Rapid Prototyp. J. 2022, 28, 1312–1324. [Google Scholar] [CrossRef]
  115. Hossain, M.A.; Zhumabekova, A.; Paul, S.C.; Kim, J.R. A Review of 3D Printing in Construction and Its Impact on the Labor Market. Sustainability 2020, 12, 8492. [Google Scholar] [CrossRef]
  116. Buchanan, C.; Gardner, L. Metal 3D Printing in Construction: A Review of Methods, Research, Applications, Opportunities and Challenges. Eng. Struct. 2019, 180, 332–348. [Google Scholar] [CrossRef]
  117. Riegger, F.; Wenzler, D.L.; Zaeh, M.F. Stud and Wire Arc Additive Manufacturing—Development of a Combined Process for the High-Productivity Additive Manufacturing of Large-Scale Lattice Structures. J. Adv. Join. Process. 2024, 9, 100189. [Google Scholar] [CrossRef]
  118. Ren, S.; Galjaard, S. ; Arup Topology Optimisation for Steel Structural Design with Additive Manufacturing. Modelling Behaviour; Springer: Cham, Swizterland, 2015. [Google Scholar] [CrossRef]
  119. Galjaard, S.; Hofman, S.; Ren, S. Optimizing Structural Building Elements in Metal by Using Additive Manufacturing. Proc. Int. Assoc. Shell Spat. Struct. 2015, 2, 1–12. [Google Scholar]
  120. Galjaard, S.; Hofman, S.; Ren, S. New Opportunities to Optimize Structural Designs in Metal by Using Additive Manufacturing. In Advances in Architectural Geometry 2014; Springer: Cham, Swizterland, 2015. [Google Scholar] [CrossRef]
  121. Gardner, L. Metal Additive Manufacturing in Structural Engineering—Review, Advances, Opportunities and Outlook. Structures 2023, 47, 2178–2193. [Google Scholar] [CrossRef]
  122. MX3D Bridge. 2024. Available online: https://mx3d.com/industries/mx3d-bridge/ (accessed on 5 July 2024).
  123. Connector for Takenaka. Available online: https://mx3d.com/projects/takenaka-connector/ (accessed on 5 July 2024).
  124. Mechtcherine, V.; Grafe, J.; Nerella, V.N.; Spaniol, E.; Hertel, M.; Füssel, U. 3D-Printed Steel Reinforcement for Digital Concrete Construction—Manufacture, Mechanical Properties and Bond Behaviour. Constr. Build. Mater. 2018, 179, 125–137. [Google Scholar] [CrossRef]
  125. Müller, J.; Grabowski, M.; Müller, C.; Hensel, J.; Unglaub, J.; Thiele, K.; Kloft, H.; Dilger, K. Design and Parameter Identification of Wire and Arc Additively Manufactured (WAAM) Steel Bars for Use in Construction. Metals 2019, 9, 725. [Google Scholar] [CrossRef]
  126. Silvestru, V.A.; Ariza, I.; Taras, A. Structural Behaviour of Point-by-Point Wire Arc Additively Manufactured Steel Bars under Compressive Loading. J. Constr. Steel Res. 2023, 207, 107982. [Google Scholar] [CrossRef]
  127. Silvestru, V.A.; Ariza, I.; Vienne, J.; Michel, L.; Aguilar Sanchez, A.M.; Angst, U.; Rust, R.; Gramazio, F.; Kohler, M.; Taras, A. Performance under Tensile Loading of Point-by-Point Wire and Arc Additively Manufactured Steel Bars for Structural Components. Mater. Des. 2021, 205, 109740. [Google Scholar] [CrossRef]
  128. Aboulkhair, N.T.; Simonelli, M.; Parry, L.; Ashcroft, I.; Tuck, C.; Hague, R. 3D Printing of Aluminium Alloys: Additive Manufacturing of Aluminium Alloys Using Selective Laser Melting. Prog. Mater. Sci. 2019, 106, 100578. [Google Scholar] [CrossRef]
  129. Seabra, M.; Azevedo, J.; Araújo, A.; Reis, L.; Pinto, E.; Alves, N.; Santos, R.; Pedro Mortágua, J. Selective Laser Melting (SLM) and Topology Optimization for Lighter Aerospace Componentes. Procedia Struct. Integr. 2016, 1, 289–296. [Google Scholar] [CrossRef]
  130. Dimitrov, D.; Uheida, E.; Oosthuizen, G.; Blaine, D.; Laubscher, R.; Sterzing, A.; Blau, P.; Gerber, W.; Damm, O.F.R.A. Manufacturing of High Added Value Titanium Components. A South African Perspective. IOP Conf. Ser. Mater. Sci. Eng. 2018, 430, 012009. [Google Scholar] [CrossRef]
  131. Saadlaoui, Y.; Milan, J.L.; Rossi, J.M.; Chabrand, P. Topology Optimization and Additive Manufacturing: Comparison of Conception Methods Using Industrial Codes. J. Manuf. Syst. 2017, 43, 178–186. [Google Scholar] [CrossRef]
  132. Baptista, R.J.S.; Pragana, J.P.M.; Bragança, I.M.F.; Silva, C.M.A.; Alves, L.M.; Martins, P.A.F. Joining Aluminium Profiles to Composite Sheets by Additive Manufacturing and Forming. J. Mater. Process. Technol. 2020, 279, 116587. [Google Scholar] [CrossRef]
  133. Guo, X.; Kyvelou, P.; Ye, J.; Teh, L.H.; Gardner, L. Experimental Study of DED-Arc Additively Manufactured Steel Double-Lap Shear Bolted Connections. Eng. Struct. 2023, 281, 115736. [Google Scholar] [CrossRef]
  134. Meng, X.; Zhi, J.; Xu, F.; Gardner, L. Novel Hybrid Sleeve Connections between 3D Printed and Conventional Tubular Steel Elements. Eng. Struct. 2024, 302, 117269. [Google Scholar] [CrossRef]
  135. Guo, X.; Kyvelou, P.; Ye, J.; Gardner, L. Experimental Investigation of Wire Arc Additively Manufactured Steel T-Stub Connections. J. Constr. Steel Res. 2023, 211, 108106. [Google Scholar] [CrossRef]
  136. Feucht, T.; Lange, J. 3-D-Printing with Steel: Additive Manufacturing of Connection Elements and Beam Reinforcements. ce/papers 2019, 3, 343–348. [Google Scholar] [CrossRef]
  137. Lange, J.; Feucht, T.; Erven, M. 3D Printing with Steel: Additive Manufacturing for Connections and Structures. Steel Constr. 2020, 13, 144–153. [Google Scholar] [CrossRef]
  138. Walton, D.; Moztarzadeh, H. Design and Development of an Additive Manufactured Component by Topology Optimisation. Procedia CIRP 2017, 60, 205–210. [Google Scholar] [CrossRef]
  139. Hällgren, S.; Pejryd, L.; Ekengren, J. (Re)Design for Additive Manufacturing. Procedia CIRP 2016, 50, 246–251. [Google Scholar] [CrossRef]
  140. Plocher, J.; Panesar, A. Review on Design and Structural Optimisation in Additive Manufacturing: Towards next-Generation Lightweight Structures. Mater. Des. 2019, 183, 108164. [Google Scholar] [CrossRef]
  141. Gebisa, A.W.; Lemu, H.G. A Case Study on Topology Optimized Design for Additive Manufacturing. IOP Conf. Ser. Mater. Sci. Eng. 2017, 276, 012026. [Google Scholar] [CrossRef]
  142. Tyflopoulos, E.; Flem, D.T.; Steinert, M.; Olsen, A. State of the Art of Generative Design and Topology Optimization and Potential Research Needs. In Proceedings of the NordDesign 2018, Linköping, Sweden, 14–17 August 2018. [Google Scholar]
  143. Christensen, P.; Klarbring, A. An Introduction to Structural Optimization; Springer: Dordrecht, The Netherlands, 2008; Volume 153. [Google Scholar]
  144. Rozvany, G.I.N. A Critical Review of Established Methods of Structural Topology Optimization. Struct. Multidiscip. Optim. 2009, 37, 217–237. [Google Scholar] [CrossRef]
  145. Bendsøe, M.P.; Sigmund, O. Material Interpolation Schemes in Topology Optimization. Arch. Appl. Mech. 1999, 69, 635–654. [Google Scholar] [CrossRef]
  146. Allaire, G.; Jouve, F.; Toader, A.M. Structural Optimization Using Sensitivity Analysis and a Level-Set Method. J. Comput. Phys. 2004, 194, 363–393. [Google Scholar] [CrossRef]
  147. Wang, M.Y.; Wang, X.; Guo, D. A Level Set Method for Structural Topology Optimization. Comput. Methods Appl. Mech. Eng. 2003, 192, 227–246. [Google Scholar] [CrossRef]
  148. Maconachie, T.; Leary, M.; Lozanovski, B.; Zhang, X.; Qian, M.; Faruque, O.; Brandt, M. SLM Lattice Structures: Properties, Performance, Applications and Challenges. Mater. Des. 2019, 183, 108137. [Google Scholar] [CrossRef]
  149. Leary, M.; Mazur, M.; Williams, H.; Yang, E.; Alghamdi, A.; Lozanovski, B.; Zhang, X.; Shidid, D.; Farahbod-Sternahl, L.; Witt, G.; et al. Inconel 625 Lattice Structures Manufactured by Selective Laser Melting (SLM): Mechanical Properties, Deformation and Failure Modes. Mater. Des. 2018, 157, 179–199. [Google Scholar] [CrossRef]
  150. Panesar, A.; Abdi, M.; Hickman, D.; Ashcroft, I. Strategies for Functionally Graded Lattice Structures Derived Using Topology Optimisation for Additive Manufacturing. Addit. Manuf. 2018, 19, 81–94. [Google Scholar] [CrossRef]
  151. Liu, R.; Wang, Z.; Sparks, T.; Liou, F.; Newkirk, J. Aerospace Applications of Laser Additive Manufacturing. In Laser Additive Manufacturing: Materials, Design, Technologies, and Applications; Woodhead Publishing: Sawston, UK, 2017; pp. 351–371. ISBN 9780081004333. [Google Scholar]
  152. Gao, J.; Folkes, J.; Yilmaz, O.; Gindy, N. Investigation of a 3D Non-Contact Measurement Based Blade Repair Integration System. Aircr. Eng. Aerosp. Technol. 2005, 77, 34–41. [Google Scholar] [CrossRef]
  153. Leino, M.; Pekkarinen, J.; Soukka, R. The Role of Laser Additive Manufacturing Methods of Metals in Repair, Refurbishment and Remanufacturing—Enabling Circular Economy. Phys. Procedia 2016, 83, 752–760. [Google Scholar] [CrossRef]
Figure 1. Historical evolution of additive manufacturing technology.
Metals 14 01033 g001
Figure 2. Process sequence for producing an AM component.
Metals 14 01033 g002
Figure 3. Schematic representations of different types of printers: (a) SLA printer; (b) FDM printer; (c) MJ printer; (d) SLS printer.
Metals 14 01033 g003
Figure 4. Overview of the metal AM methods.
Metals 14 01033 g004
Figure 5. Specimen manufactured with SLM, in which the stepped surface due to the different overlapping layers is visible (layer thickness: 50 microns).
Metals 14 01033 g005
Figure 6. The supports in SLM: (a) The printed component on the construction plate with its supports. (b) Detail of the supports at the bottom of the component. (c) Defects due to nonperfect removal of supports. Reprinted with permission from refs. [42,43]. Copyright 2023 Elsevier Ltd.
Metals 14 01033 g006
Figure 7. Schematic representation of an SLM printer.
Metals 14 01033 g007
Figure 8. Schematic representation of a BJ printer.
Metals 14 01033 g008
Figure 9. Graphical outline of the main features of metal 3D printing methods.
Metals 14 01033 g009
Figure 10. Outline of additive technologies according to different parameters.
Metals 14 01033 g010
Figure 11. The main process parameters involved in AM processes.
Metals 14 01033 g011
Figure 12. The printing process parameters.
Metals 14 01033 g012
Figure 13. The three most widely used scanning patterns: (a) stripes, (b) chessboard, (c) islands.
Metals 14 01033 g013
Figure 14. Two identical pieces printed in vertical (left) and horizontal (right) direction. Reprinted from ref. [98].
Metals 14 01033 g014
Figure 15. Effects of a tensile load applied in the perpendicular (a) and parallel direction of layer deposition (b).
Metals 14 01033 g015
Figure 16. The main printing directions and orientations of the parts: (a) vertical, (b) horizontal flat, (c) horizontal on edge.
Metals 14 01033 g016
Figure 17. The MX3D bridge: (a) The finished 3D-printed bridge, before installation; (b) the bridge during installation; (c) the bridge after the inauguration on the Oudezijds Achterburgwal canal in Amsterdam. Reprinted with permission from refs. [79,121]. Copyright 2020 Elsevier Ltd.
Metals 14 01033 g017
Figure 18. Load tests of MX3D bridge at the University of Twente. Reprinted with permission from ref. [79]. Copyright 2020 Elsevier Ltd. Reprinted from ref. [122].
Metals 14 01033 g018
Figure 19. The Takenaka connector: (a) Geometry; (b) robotic arm filling the connector with casted mortar. Reprinted from ref. [123].
Metals 14 01033 g019
Figure 20. Optimization processes of the Takenaka connector. Reprinted from ref. [123].
Metals 14 01033 g020
Figure 21. Schematic representation of the proposed joining process. Reprinted with permission from ref. [132]. Copyright 2019 Elsevier Ltd.
Metals 14 01033 g021
Figure 22. The mechanical tests on the connection: (a) Scheme of the pull-out test; (b) scheme of the shear test; (c) results. Reprinted with permission from ref. [132]. Copyright 2019 Elsevier Ltd.
Metals 14 01033 g022
Figure 23. Aircraft bracket: (a) Mesh of the original component; (b) 3D-printed optimized shape. Reprinted with permission from ref. [129]. Copyright 2015 Elsevier Ltd.
Metals 14 01033 g023
Figure 24. Optimized suspension uprights. Reprinted with permission from ref. [138]. Copyright 2017 Elsevier Ltd.
Metals 14 01033 g024
Figure 26. The most common methods adopted by topological optimisation software. Reprinted from ref. [140].
Metals 14 01033 g026
Figure 27. Optimized structures: (a) Sample based on DCO; (b) sample based on SCO; (c) sample based on CCO. Reprinted with permission from ref. [131]. Copyright 2017 Elsevier Ltd.
Metals 14 01033 g027
Figure 28. Examples of lattice structures: (a) Strut-based unit cells; (b) surface-based unit cells. Reprinted from ref. [150].
Metals 14 01033 g028aMetals 14 01033 g028b
Figure 29. Overview of different lattice strategies considered in [150]: (a) Solid (SIMP) solution; (b) intersected lattice; (c) graded lattice; (d) scaled lattice; (e) uniform lattice. Reprinted from ref. [150].
Metals 14 01033 g029aMetals 14 01033 g029b
Figure 30. The models employed for the numerical investigation: (a) Solid (SIMP) solution; (b) intersected lattice of D-P; (c) intersected lattice of BCC; (d) graded lattice of D-P; (e) scaled lattice of D-P; (f) uniform lattice of D-P. Reprinted from ref. [150].
Metals 14 01033 g030
Figure 31. The total strain energy values for different design strategies. Reprinted from ref. [150].
Metals 14 01033 g031
Figure 32. Manufacturing issues: comparison between different design strategies. Reprinted from ref. [150].
Metals 14 01033 g032
Table 1. Main advantages and disadvantages of the different AM methods.
3D Printing TechniqueAdvantagesDisadvantages
SLM-EBM-DMLS
  • Production of complex parts with high level of customization
  • Production of geometries impossible to achieve with traditional methods
  • Very high costs of materials and printers
  • Build size
  • No large-scale production
  • High degree of expertise of operators
BJ
  • Absence of residual stresses
  • Low operating costs
  • Ability to print large parts
  • Inexpensive binder agents
  • Cheaper than PBF methods
  • Costs of metal powder
  • Poor mechanical properties
  • Secondary process always required for functional parts
  • Grainy surface finish
WAAM
  • Possibility to print large size components
  • Wide range of materials
  • Design flexibility
  • Stand-alone or integrated solution
  • Wide tolerances and low accuracy
  • Surface roughness
  • Requirement of skilled operators
Table 2. Comparison of the features of the main 3D printing methods.
Solid BasedPowder Based
TechnologyWAAMSLM-DMLSEBMBJ
Working PrinciplesMaterial extrusion + weldingMeltingMeltingBinding
SourceElectric arcLaser beamElectron beamBonding agent
Material GroupMetal wiresMetal powdersMetal powdersMetal powders
Main
Available Materials
Titanium
Steel
Nickel
Aluminium
(or any weldable metal)
Stainless steel
Aluminium alloys
Titanium alloys
Nickel alloys
Stainless steel
Titanium alloys
Nickel alloys
Cobalt chrome
Stainless steel
Bronze
Supports RequirementNoYesYesNo
Build VolumeUnlimited build volumeFrom 100 × 100 × 100 mm3 (small sizes)
to
800 × 500 × 400 mm3
(large sizes)
350 × 350 × 450 mm3Up to 800 × 500 × 400 mm3
Resolution1 mm0.1 mm0.1 mm0.2 mm
Roughness50–250 µm10–50 µm15–75 µmvariable
Layer Thicknessmin 1–2 mm30–50 µm30–50 µm100 µm
ApplicationsAerospace, energy sector, research and development, cladding and repair componentsMedical and dental industry, aerospace and automotive sectorsRealistic models, coloured components, casting models with complex shapes
Disclaimer/Publisher’s Note: The statements, opinions and data contained in all publications are solely those of the individual author(s) and contributor(s) and not of MDPI and/or the editor(s). MDPI and/or the editor(s) disclaim responsibility for any injury to people or property resulting from any ideas, methods, instructions or products referred to in the content.