Article

Geometric Error Identification and Analysis of Rotary Axes on Five-Axis Machine Tool Based on Precision Balls

The Key Lab of National and Local United Engineering for “High-Efficiency Cutting & Tools”, Harbin University of Science and Technology, Harbin 150080, China
*
Author to whom correspondence should be addressed.
Appl. Sci. 2020, 10(1), 100; https://doi.org/10.3390/app10010100
Submission received: 10 November 2019 / Revised: 15 December 2019 / Accepted: 16 December 2019 / Published: 20 December 2019
(This article belongs to the Section Mechanical Engineering)

Abstract

:
This paper presents the design of a precise “ball-column” device to efficiently and accurately measure the geometric error terms of both rotary axes of the five-axis machine tool. A geometric error measurement method of spherical contact was proposed based on the influence of the geometric error term from a five-axis machine tool rotating axis on the integrated geometric error of the machine tool. A multiple degree of freedom, step-by-step contact method based on on-machine measure for measuring the spherical center point is proposed, and the solution formula of each geometric error term of the rotating axis is established, respectively. This method can identify 12 geometric errors based on the influence of one rotating axis on another rotating axis after long term operation. The spatial error field of the five-axis machine tool was constructed by analyzing the error law of the two rotating axes of machine tools based on various positions and postures. Finally, after the comparison of the experiment, the results showed that the accuracy of the developed error measurement device reached 91.8% and the detection time was as short as 30–40 min.

1. Introduction

In the processes of curved surface milling of complex parts and thin-walled parts, the machining accuracy directly affects the production quality of the parts [1]. The machining accuracy of machine tools is affected by various factors such as the dimensional accuracy of machine components, motion accuracy, deformations, and distortions generated by cutting force and cutting heat [2,3,4].
Due to the uncertainty of machine error, it is very difficult but valuable to identify and quantify its error source. Error budget provides a method to determine the source of machining error and predict the repeatable and unrepeatable errors of a machine [5]. The main error sources of machine tools can be divided into geometric, kinematic, thermal, rigidity, and radial errors of cutting tools [6,7]. Among them, geometric and thermal errors account for most of the total errors of machine tools. At present, the geometric error of rotary axis is difficult to determine by direct measurement, and the measurement standards are not yet unified. Moreover, there are shortcomings and deficiencies in the identification model. Therefore, the efficient and accurate detection of the geometric error of the five-axis machine tool rotating axis is of particular importance.
The geometrical error of machine tools is caused by imperfections of components and the imperfect assembly of parts, such as the straightness errors of the guideways, joint misalignments, angular offset and rotary axes separation errors [8,9]. The geometric error modeling of CNC machine tools is based on the mathematical relationship between the geometric errors and machining errors of each component. At present, many researchers are studying geometric error modeling methods of machine tools. For example, Kiridena and Ferreira [10] used the Denavit–Hartenberg (D–H) method to study the influence of relative position error between the coordinate axes of moving parts in five-axis machine tool kinematics on the comprehensive error of tool tip point. These studies are applicable to machine tool error estimation and accuracy optimization. Srivastava et al. [11] proposed that the angular and displacement errors of the moving parts of the machine were independent from each other, and the model of the geometric and thermal errors of the five-axis machine tool was established. Lin and Shen [12] proposed a new method, which used matrix summation to establish a geometric error model for five-axis machine tools. This method decomposed the kinematic equation into six motion components, which were easy to understand and had a clear physical meaning. Lamikiz et al., [13] developed a methodology for the estimation of the tool tip position accuracy of five-axis milling centers based on the D–H formulation. Chen et al., [14] proposed a method for modeling and compensating the geometric error of large grinders based on the D–H method. Diaz-Tena et al. [15] presented a method to estimate the geometrical accuracy of a multi-axis machines by using a homogenous matrix. Fu [16] considered the geometric meaning of perpendicularity error and improved the accuracy of five-axis machine tool geometric error by improving the D–H modeling method. However, the applicability of the model required further verification. Lee K et al. [17] classified the geometric error of rotating axis into position dependent geometric errors (PDGEs) and position independent geometric errors (PIGEs). The two types of geometric error models were represented as polynomial equations with first-order continuity and n-order polynomial equations with constant terms, but the installation error of the measuring instrument was high, which affected the accuracy of the model. Xiang et al. [18] used the theory of rotational motion to establish a model for the comprehensive error of five-axis machine tools with 41 errors. However, these models did not consider the influence of the motion of one rotating axis on the position error of another rotating axis after the long-term operation of five-axis machines.
In the study of the geometric error measurement and identification methods of five-axis machine tools, the positioning error of each linear axis, two straightness errors, three corner errors, and the perpendicularity between the two axes can be directly measured by a laser interferometer or other optical measuring systems [19,20,21]. Laser tracer technology is used for the volumetric error mapping and compensation of geometric errors of machine tools [22]. LINARES et al. [23] used a tracking interferometer to measure and compensate the geometric error of a small CNC machine. IBARAKI et al. [24] proposed a novel concept of an ‘‘open-loop’’ tracking interferometer for machine tool volumetric error measurement. Gomez-Acedo et al. [25] proposed a new methodology to measure thermal distortion in large machine tools using a single tracking interferometer and designed a thermal distortion compensation system [26]. However, the direct measurement of the geometric error of a rotating axis is difficult and measurement standards has not yet been unified. In a study of the geometric error detection of rotating axis, Lei and Hsu [27] developed a measuring instrument called the “3D probe-ball”, which could be used to measure the overall position error of a five-axis machine tool. Lee et al. [28] used the two measuring paths of double ball bar (DBB) along the rotating axis to determine the structural error of rotating axis, including two perpendicularity errors and two position errors. Zhang et al., [29] also introduced a set of DDBs to calibrate the measurement mode of the rotary axis position error. The measurement capabilities of DBB are limited because of the limited adjustment range of DBB rod length, which necessitates multiple switching cycles in the measurement mode of a system when decoupling linear and angular errors. In order to solve the problem that the measuring instruments such as laser interferometer and DBB only detect the comprehensive error of single direction at a time. Weikert [30] developed a contact type measuring device named the R-test for the geometric error of a rotating axis. The device could simultaneously detect combined displacement errors along three directions, which greatly improved measurement efficiency. However, in order to avoid collision between the three displacement sensors and the precision ball, the measuring requirements of R-test are relatively high. Operators who use such measuring instruments for the identification of position errors must be experienced, so it cannot be widely used. Hong et al. [31] improved the measurement equipment of the contact R-test and developed rotating axis position error detection equipment using a laser displacement sensor instead of a contact displacement sensor, avoiding the occurrence of collision, but did not solve the problem of high preset accuracy. For the first time, an automatic error calibration scheme was adapted by Ibaraki [32], which used the trigger probe installed on the spindle of the machine tool to measure the space position of four standard blocks which were clamped on the C-axis worktable, and then the geometric error of the rotary axis was calibrated. Jiang [33] proposed a location error identification method using a touch-trigger probe and a test-piece on a five-axis machine tool with a tilting head. In their nature, all of these methods involve the contact detection of block standard parts. When the rotating attitude changes, the detection position and range are limited by the influence of sample geometry. Touch-trigger probes have become popular because they can improve detection quality and efficiency [34,35]. However, current research results are not comprehensive. For example, the commercial software AxiSet Check-Up provided by Renishaw can only identify two linear offset errors for each rotary axis. Japan’s Otsuka Machine Tool developed a “5-Axis Auto Tuning System” that uses a contact detector and standard ball to measure geometric error compensation in order to reduce the difference in the working surface of the table. However, this system only adjusts the geometric error of the rotating axis and does not accurately identify all 13 geometric errors.
In this paper, a measurement method based on the on-machine measurement of spherical contact geometric error is proposed. Based on the design of ball-column detection device and the improvement of the D–H identification model, the spatial error field of the five-axis machine tool is constructed. The method can identify all location errors defined by ISO 230-7 [36], does not need to change the position of the precision ball column detecting device, and does not introduce installation errors. The developed device is easy to install and debug, has high detection efficiency, and does not need too high an installation accuracy. Compared with instruments such as DBB and R-test, the developed device has the advantages of low cost, simple and efficient operation, and good communication capability with numerical control systems.

2. Geometric Error of Five-axis CNC Machine Tool

2.1. Structure Analysis of Five-axis NC Machine Tool

The structure of TOPNC VMC-C50 five-axis machine tool is consisted of three straight axes X, Y, and Z and two rotating axes A and C. All five-axis machine tools mentioned in this work were of this type. Compared with other five-axis CNC machine tools, cradle five-axis machine tools have higher structural stiffness and can be used to process high-quality parts, as shown in Figure 1. In these machine tools, the A-axis is subjected to greater gravity and is affected by acceleration and inertial force during rotation. In this paper, the error analysis model and identification method of the rotating axis were investigated. The detection and identification methods of geometric error of rotary axes proposed in this paper can be extended to other types of machine tools.

2.2. Definition of Average Position Error of Rotary Axis

As shown on the left side of Figure 1, machine tool was divided into two systems. One was error detection system, which consisted of the X, Y, Z axes, and the contact trigger probe. The other one was a double turntable system for detected objects. The system was composed of a swing axle a-axis and rotary table c-axis, which had large errors and were difficult to identify. Addressing this problem was the main aim of this paper.
The geometric error kinematic chain of two motion systems of the TOPNC VMC-C50 five-axis machine tool was established. The error kinematic chain was composed of coordinate systems of each kinematic unit of the machine tool. This chain clearly and intuitively reflected the relationship between the movement of each axis and various errors of the machine tool. The error of the linear axis was smaller than that of the rotary axis and could be compensated for by conventional technical methods [32]. The linear axis detection system and the double turntable system of the TOPNC VMC-C50 five-axis machine tool are independent of each other. Therefore, in the process of geometric error identification of the rotating axis, if the influence of the linear axis error is considered, the measured spherical coordinate value can be directly subtracted from the linear axis error.
The position error of the rotation axis is the error of the actual rotation axis deviating from theoretical axis [37]. In this section, 12 average position errors were determined on rotary axes for calibration, as shown in Table 1, and the source of each error was defined.

2.3. Establishment of Geometric Error Model of Rotary Axis

Using the coordinate transformation relationship among the motion axes of the machine tool, X, Y, and Z were used to represent the position coordinates of the tool tip along the three directions in the workpiece coordinate system (WCS), and I, J, and K were used to represent the posture vectors of the tool in WCS. Position expressions p = ( X , Y , Z , 1 ) T of the tool tip and posture v = ( I , J , K , 0 ) T of the tool in an ideal state were established, as stated in Equations (1) and (2):
p 1 = [ T ( x ) T ( y ) T ( z ) ] 1 R ( a ) R ( c ) p 2
v 1 =   R ( a ) R ( c ) v 2
where
T ( x ) T ( y ) T ( z ) = [ 1 0 0 x 0 1 0 y 0 0 1 z 0 0 0 1 ] , R ( a ) = [ 1 0 0 0 0 c o s ( a ) s i n ( a ) 0 0 s i n ( a ) c o s ( a ) 0 0 0 0 1 ] , R ( c ) = [ c o s ( c ) s i n ( c ) 0 0 s i n ( c ) c o s ( c ) 0 0 0 0 1 0 0 0 0 1 ] .
When the starting position of tool tip was p1 = (0,0,0,1)T, and the starting posture of the tool was v1 = (0,0,1,0)T. The tool position and posture under ideal conditions could be obtained through coordinate transformation, as expressed in Equations (3) and (4):
p = R ( c ) R ( a ) T ( x ) T ( y )   T ( z ) p 1
v = R ( c )   R ( a ) v 1 .
Equations (3) and (4) were expanded to obtain Equation (5):
{ X = x cos ( c ) + y sin ( c ) cos ( a ) + z sin ( c ) sin ( a ) Y = x sin ( c ) + y cos ( c ) cos ( a ) + z cos ( c ) sin ( a ) Z = y sin ( a ) + z cos ( a ) I = sin ( c ) sin ( a ) J = cos ( c ) sin ( a ) K = cos ( a )
Equation (5) gave the tool position and posture in ideal or error-free states in the established WCS. Equation (5) showed that the position of the tool tip (X, Y, and Z) and posture of tool (I, J, and K) were functions of translations of straight axes x, y, and z and the rotations a and c of the rotary axis.
Under special situations, X′, Y′, and Z′ were used to represent the actual position coordinates of the tool tip along the three directions in WCS, and I′, J′ and K′ were employed to represent the actual posture vectors of tool. Due to the geometric error of the rotary axis, error transformation matrices E A and E C of two rotating axes were brought into the solution of the transformation matrix of actual position and posture of tool in WCS, as stated in Equations (6) and (7):
p 1 = [ T ( x ) T ( y ) T ( z ) ] 1 T E A R E A R ( a ) T E C ( A i ) R E C ( A i ) R ( c ) p 2
v 1 = R E A   R ( a ) R E C ( A i ) R ( c ) v 2
where E A and E C were obtained by assuming small errors and ignoring higher order terms.
E A = T E A R E A [ 1 ε γ A ε β A δ x A ε γ A 1 ε α A δ y A ε β A ε α A 1 δ z A 0 0 0 1 ] ,   E C = T E C ( A i ) R E C ( A i ) [ 1 ε γ c ( A i ) ε β c ( A i ) δ x C ( A i ) ε γ c ( A i ) 1 ε α c ( A i ) δ y C ( A i ) ε β c ( A i ) ε α c ( A i ) 1 δ z C ( A i ) 0 0 0 1 ]
When the starting position of tool tip was p1 = (0,0,0,1)T, and the starting posture of the tool was v1=(0,0,1,0)T. Using coordinate transformation, the position and posture of the tool were obtained in the presence of errors.
p = R ( c ) [ f x ( x , y , z , a ) f y ( x , y , z , a ) f z ( x , y , z , a ) 1 ] T v = R ( c ) [ f i ( a ) f j ( a ) f k ( a ) 1 ] T
For position p = ( X , Y , Z , 1 ) T and posture v = ( I , J , K , 0 ) T , we obtained Equations (9) and (10) as:
{ X = cos c f x ( x , y , z , a ) + sin c f y ( x , y , z , a ) Y = sin c f x ( x , y , z , a ) + cos c f y ( x , y , z , a ) Z = f z ( x , y , z , a ) I = cos c f i ( a ) + sin c f j ( a ) J = sin c f i ( a ) + cos c f j ( a ) K = f k ( a )
{ f x ( x , y , z , a ) = x + y ε γ A z ε β A δ x A + ε γ C ( y cos a + z sin a ) + ε β C ( y sin a z cos a ) δ x C f y ( x , y , z , a ) = x ε γ C + ( y x ε γ A + z ε α A δ y A + z ε α C ) cos a + ( z + x ε β A y ε α A δ z A y ε α C ) sin a δ y C f z ( x , y , z , a ) = x ε β C + ( x ε γ A z ε α C y z ε α A + δ y A ) sin a + ( x ε β A y ε α C y ε α A + z δ z A ) cos a δ z C f i ( a ) = ε β A + sin a ε γ C cos a ε β C f j ( a ) = cos a ε α A + sin a + cos a ε α C f k ( a ) = sin a ε α C sin a ε α A + cos a
Equations (9) and (10) were mathematical expressions of the tool tip position and tool posture obtained by homogeneous coordinate transformations after introducing the position error parameters of the rotary axis. When the position error parameters of two rotary axes tended to zero, error Equations (9) and (10) became equal to Equation (5) of the position and posture of the tool in an ideal state.
Spatial geometric errors of machine tools were obtained by subtracting the theoretical position and posture of the tool from its actual position and posture, as stated in Equation (11):
{ E p = p p E v = v v
where E p denotes spatial position error of tool tip and E v denotes spatial posture error of tool. The comprehensive error of space point Δ E was obtained as Equation (12):
Δ E = ( X X ) 2 + ( Y Y ) 2 + ( Z Z ) 2

3. Identification of Position Error of Rotary Axis

3.1. Identification of Average Position Error of A-Axis

Six position-independent geometric errors of the A-axis were established in this paper, which were the average errors of the A-axis deviating from the ideal space position. An on-machine identification method was developed for the calibration of average position error by measuring spherical center coordinates before and after rotation. Finally, five equations were obtained for calculating average position error.
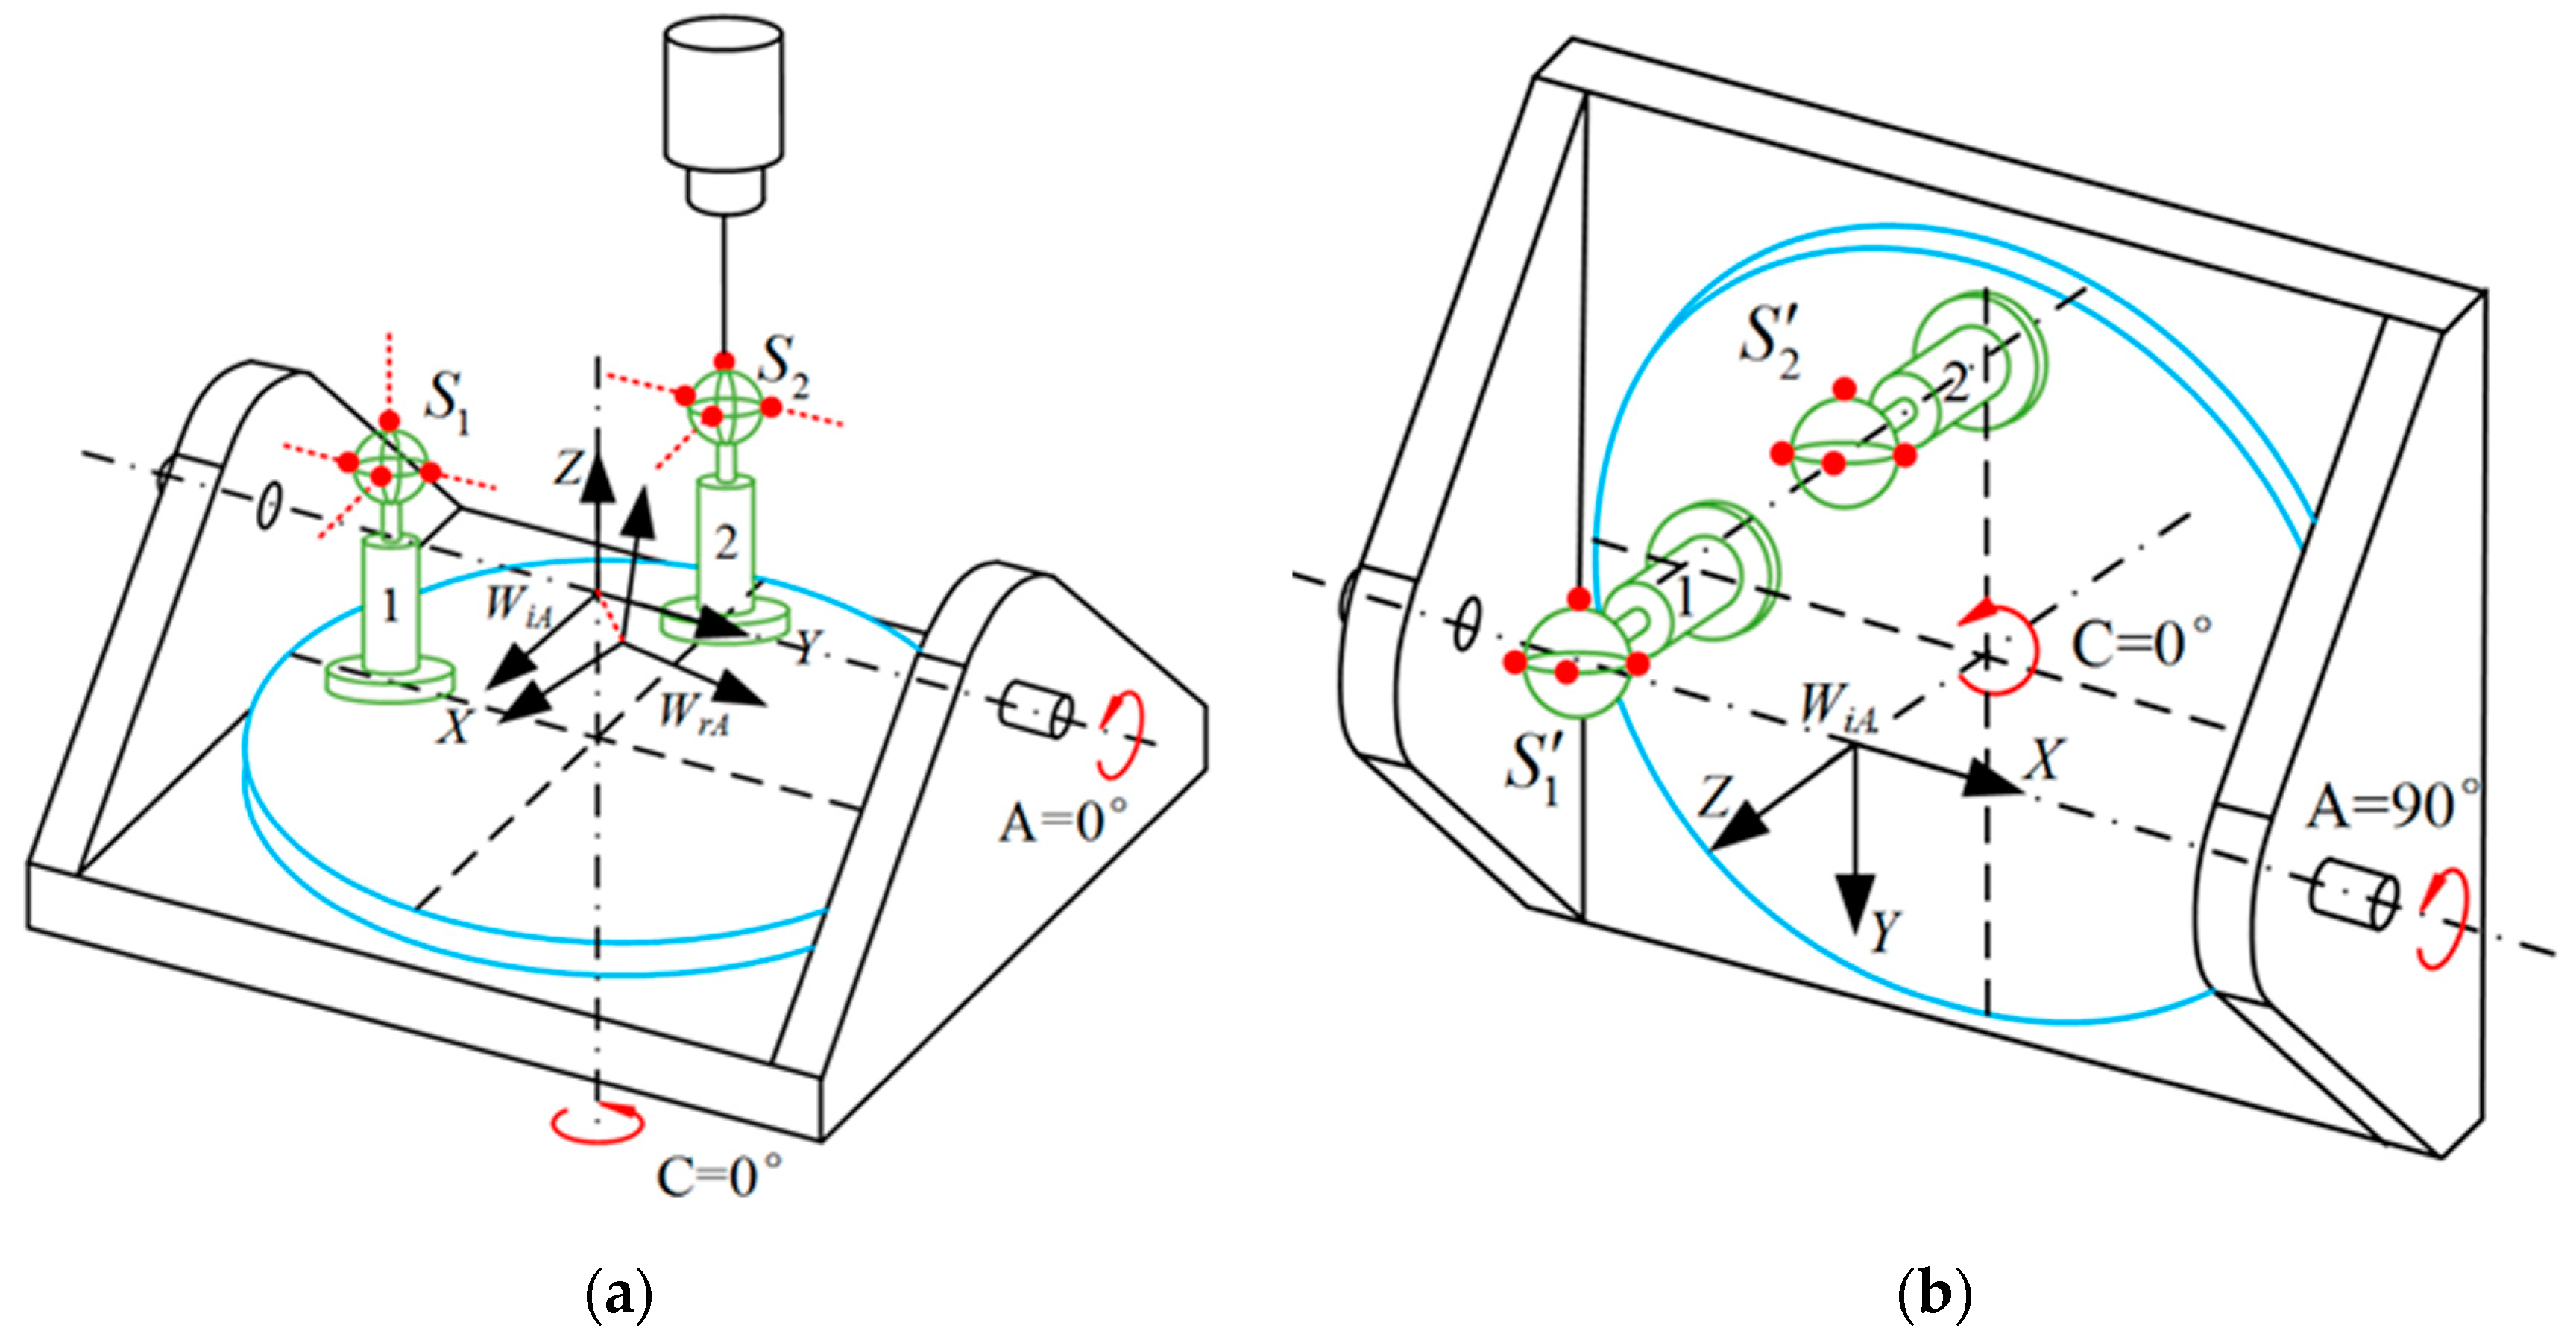
As shown in Figure 2, W i A is the established the A-axis theoretical coordinate system, W r A is the actual coordinate system of the A-axis in the presence of errors, and its coordinate origin is located at the theoretical intersection of the A- and C-axes. As shown in Figure 2, precision ball columns 1 and 2 were mounted on rotary table. These two ball columns did not need very high positioning accuracy and they could be quickly installed and positioned. It was necessary to ensure uniform dispersion of the positions of the two ball columns to avoid ball column interference after the rotation of the A-axis. Detection plane, consisting of four detection points for detecting the center of sphere, was ideally a horizontal plane passing through the center of sphere and probing needle was detected along the X and Y directions.
By assuming a point P 1 = [ x p y p z p 1 ] T in the actual coordinate system W r A in the presence of A-axis error, after the A-axis was rotated by 90°, its theoretical position was changed from S 1 = [ x 1 y 1 z 1 1 ] T to S 1 = [ x 1 y 1 z 1 1 ] T . S 1 and S 1 were two points in W i A , obtained by the center coordinate transformate of measured ball through matrix T A C between MCS and WiA. The mathematical relationship between P 1 and S 1 , S 1 was as follows:
{ S 1 = T A C T E A R E A P 1 S 1 = T A C T E A R E A R ( a ) P 1
where T A C = [ 1 0 0 m x 0 1 0 m y 0 0 1 m z 0 0 0 1 ] , a = 90 ° , was further simplified to obtain position error solution Equation (14):
R ( a ) R E A 1 T E A 1 T A C 1 S 1 R E A 1 T E A 1 T A C 1 S 1 = 0
This equation described the relationship between the spatial position coordinates of measuring points before and after 90-degree rotation of the A-axis and geometric error elements at each position. The first set of Equation (15) used to solve the A-axis average position error was obtained by matrix operation from Equation (14) as follows:
{ Δ x 1 + Δ y 1 ε γ A Δ z 1 ε β A = 0 ε γ A ( z 1 m z + y 1 m y ) = δ y A δ z A + C 1 ε α A ( z 1 m z y 1 + m y ) = δ y A + δ z A + C 2
where Δ x 1 = x 1 x 1 , Δ y 1 = y 1 y 1 , and Δ z 1 = z 1 z 1 . The second set of spherical coordinates S 2 and S 2 of ball column 2 were introduced by the same method as expressed in Equation (16)
{ Δ x 2 + Δ y 2 ε γ A Δ z 2 ε β A = 0 ε γ A ( z 2 m z + y 2 m y ) = δ y A δ z A + C 3 ε α A ( z 2 m z y 2 + m y ) = δ y A + δ z A + C 4
where S 2 = [ x 2 y 2 z 2 1 ] T , S 2 = [ x 2 y 2 z 2 1 ] T , Δ x 2 = x 2 x 2 , Δ y 2 = y 2 y 2 , and Δ z 2 = z 2 z 2 . By combining Equations (15) and (16), the expression of the geometric error for A-axis position was obtained, as expressed in Equation (17):
{ ε β A = ( Δ y 1 Δ x 2 Δ x 1 Δ y 2 ) / ( Δ y 1 Δ z 2 Δ z 1 Δ y 2 ) ε γ A = ( Δ z 1 Δ x 2 Δ x 1 Δ z 2 ) / ( Δ y 1 Δ z 2 Δ z 1 Δ y 2 ) ε α A = ( z 1 z 2 + y 1 y 2 ) / ( C 1 C 3 ) δ y A = ( z 1 + z 1 2 m z + Δ y 1 ) ( z 1 z 2 + y 1 y 2 ) / ( 2 C 1 2 C 3 ) ( C 1 + C 2 ) / 2 δ z A = ( y 1 + y 1 2 m y Δ z 1 ) ( z 1 z 2 + y 1 y 2 ) / ( 2 C 3 2 C 1 ) ( C 2 C 1 ) / 2
The constant terms C1~C4 consisted of error parameter ε β A , ε γ A obtained in the first step, and the spatial coordinates of the two sets of spherical points, which were used to further simplify obtained position error equations, as shown in Equation (18):
{ C 1 = ( x 1 m x ) ε β A + ( x 1 m x ) ε γ A y 1 + z 1 + m y m z C 2 = ( m x x 1 ) ε β A + ( x 1 m x ) ε γ A y 1 z 1 + m y + m z C 3 = ( x 2 m x ) ε β A + ( x 2 m x ) ε γ A y 2 + z 2 + m y m z C 4 = ( m x x 2 ) ε β A + ( x 2 m x ) ε γ A y 2 z 2 + m y + m z
Position error δ x A was obtained by substituting the obtained 5 position error elements in Equation (14).

3.2. Identification of Average Position Error of C-Axis

The identification method of C-axis position error was almost similar to that of A-axis and the only difference lied in the need to solve various position errors of C-axis under different A-axis rotation angles Ai, and divide Ai (I = 1~3) into three angles.: A1 = 0°, A2 = 45°, A3 = 90°. In previous section, the six average position errors of the A-axis were identified. Since the C-axis was connected to the A-axis, the position error of A-axis needed to be added when identifying the position error of C-axis.
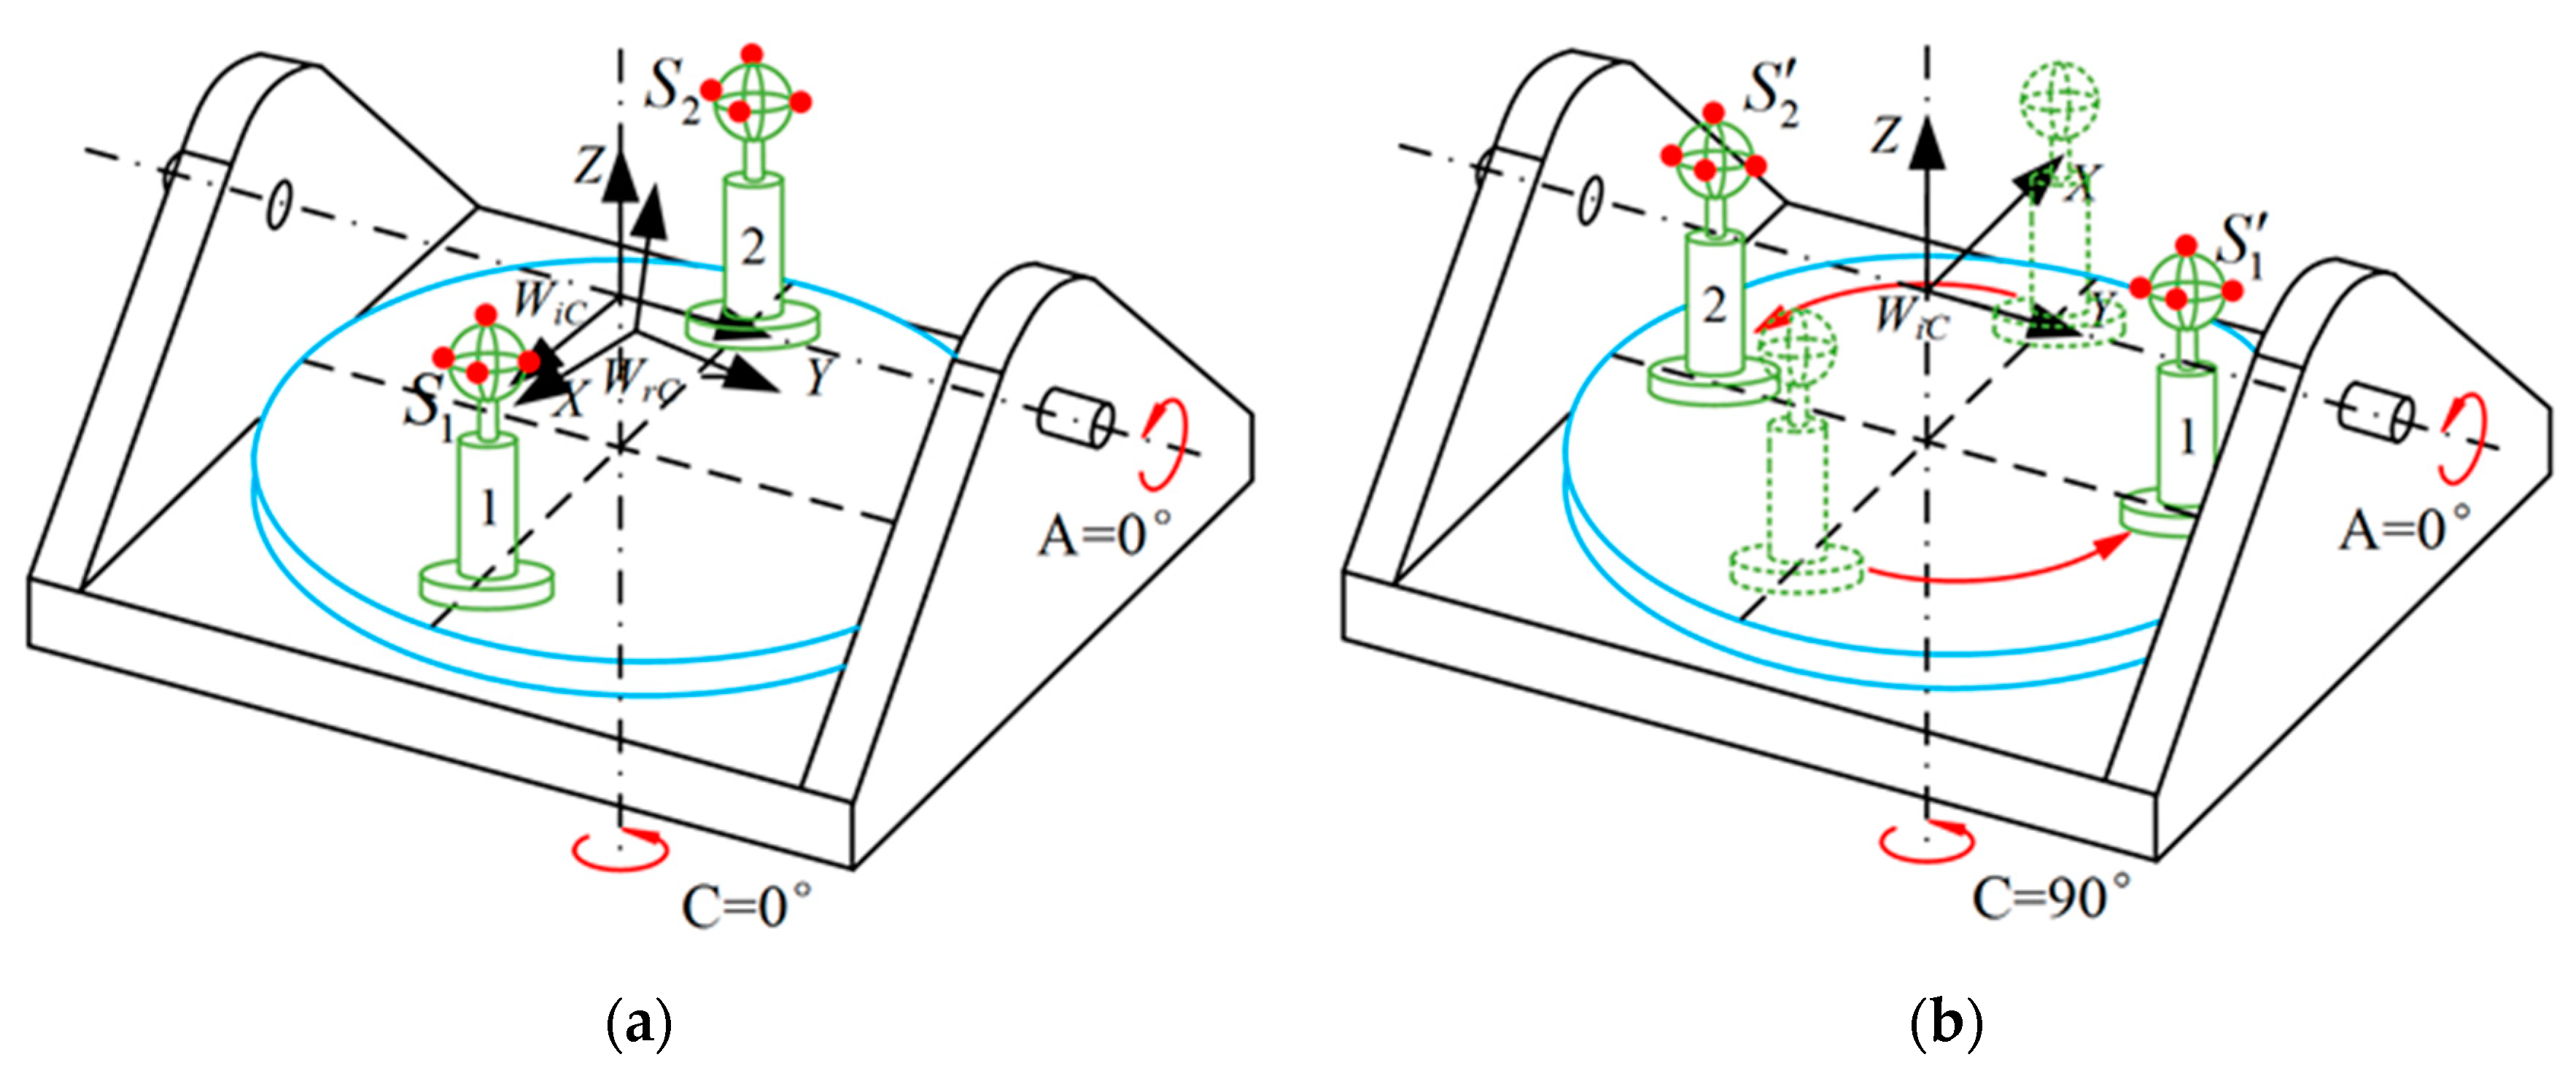
Figure 3 shows the installation arrangement of precision ball columns 1 and 2 and on-line measurement processes before and after rotation where W i C is the theoretical coordinate system of C axis coinciding with WiA, The actual coordinate system in the presence of C-axis error was assumed to be WiC. The spherical point O = [ x y z 1 ] T O = [ x y z 1 ] T was obtained by measuring the probe in MCS. The coordinate of the spherical point coordinate O was S in coordinate WiC, and the coordinate transformation relationship between them was: O = T A C 1 S where T A C is the transform matrix between the two coordinate systems.
Equation (19) was obtained based on the coordinate transformation relationship between actual spherical point coordinate P 1 in W r C and two sets of spherical points S 1 , S 1 , S 2 , S 2 in W i C as:
{ S 1 = T E A R E A R ( a ) T E C R E C P 1 S 1 = T E A R E A R ( a ) T E C R E C R ( c ) P 1
Equation (20) was obtained to solve C-axis position error after the subtraction of the two equations in Equation (19),
R ( c ) R E C 1 T E C 1 R ( a ) R E A 1 T E A 1 T A C 1 S 1 R E C 1 T E C 1 R ( a ) R E A 1 T E A 1 T A C 1 S 1 = 0
After matrix operations, the two tilt error sums ε α C and ε β C of C-axis were obtained as stated in Equations (21) and (22), in which the position error of A-axis was taken as a known constant.
ε α C = ε α A + ( Δ x 1 Δ z 2 Δ z 1 Δ x 2 ) / ( Δ x 1 Δ y 2 Δ y 1 Δ x 2 )
ε β C = ε β A + ( Δ y 1 Δ z 2 Δ z 1 Δ y 2 ) / ( Δ x 1 Δ y 2 Δ y 1 Δ x 2 )
ε γ C = [ ( z 1 + z 1 z 2 z 2 ) ε β C + ( Δ z 1 Δ z 2 ) ε α C + C 5 C 6 ] / ( y 1 + y 1 + Δ x 1 y 2 y 2 Δ x 2 )
It was seen from Equation (23) that the tilt error of C-axis about Z-axis was related to the other two tilt errors of C-axis. The two key linear errors of C-axis δ x C and δ y C were obtained by Equations (24) and (25), respectively, as:
δ x C = [ ( y 1 + y 1 + Δ x 1 ) ε γ C ( z 1 + z 1 ) ε β C Δ z 1 ε α C C 5 ] / 2
δ y C = [ ( y 1 y 1 x 1 x 1 ) ε γ C Δ z 1 ε β C + Δ z 1 ε α C + C 7 ] / 2
A series of constant terms were represented by C 5 , C 6 and C 7 , in which were defined by Equation (26) as:
{ C 5 = Δ z 1 ε α A + ( z 1 + z 1 ) ε β A ( y 1 + y 1 + Δ x 1 ) ε γ A + 2 δ x A x 1 x 1 + Δ y 1 C 6 = Δ z 2 ε α A + ( z 2 + z 2 ) ε β A ( y 2 + y 2 + Δ x 2 ) ε γ A + 2 δ x A x 2 x 2 + Δ y 2 C 7 = ( z 1 + z 1 ) ε α A Δ z 1 ε β A ( x 1 + x 1 Δ y 1 ) ε γ A 2 δ y A + Δ x 1 + y 2 + y 1

4. Calibration and Analysis of Rotation Axis Position Error

4.1. In-Machine Measurement of the Center Point of Precision Ball Column

4.1.1. Multi-Degree of Freedom Step-by-Step Contact Scheme

The on-machine measurement of the spherical coordinates of precision spherical column was performed in three steps: 1) Measurement of the coordinates of a set of spherical contact points of precision spherical column 1 before and after 90° rotation of A and C axes, 2) same measurements for precision spherical column contact point of two, and 3) solving the coordinates of the center of sphere based on the coordinates of the two sets of measuring points.
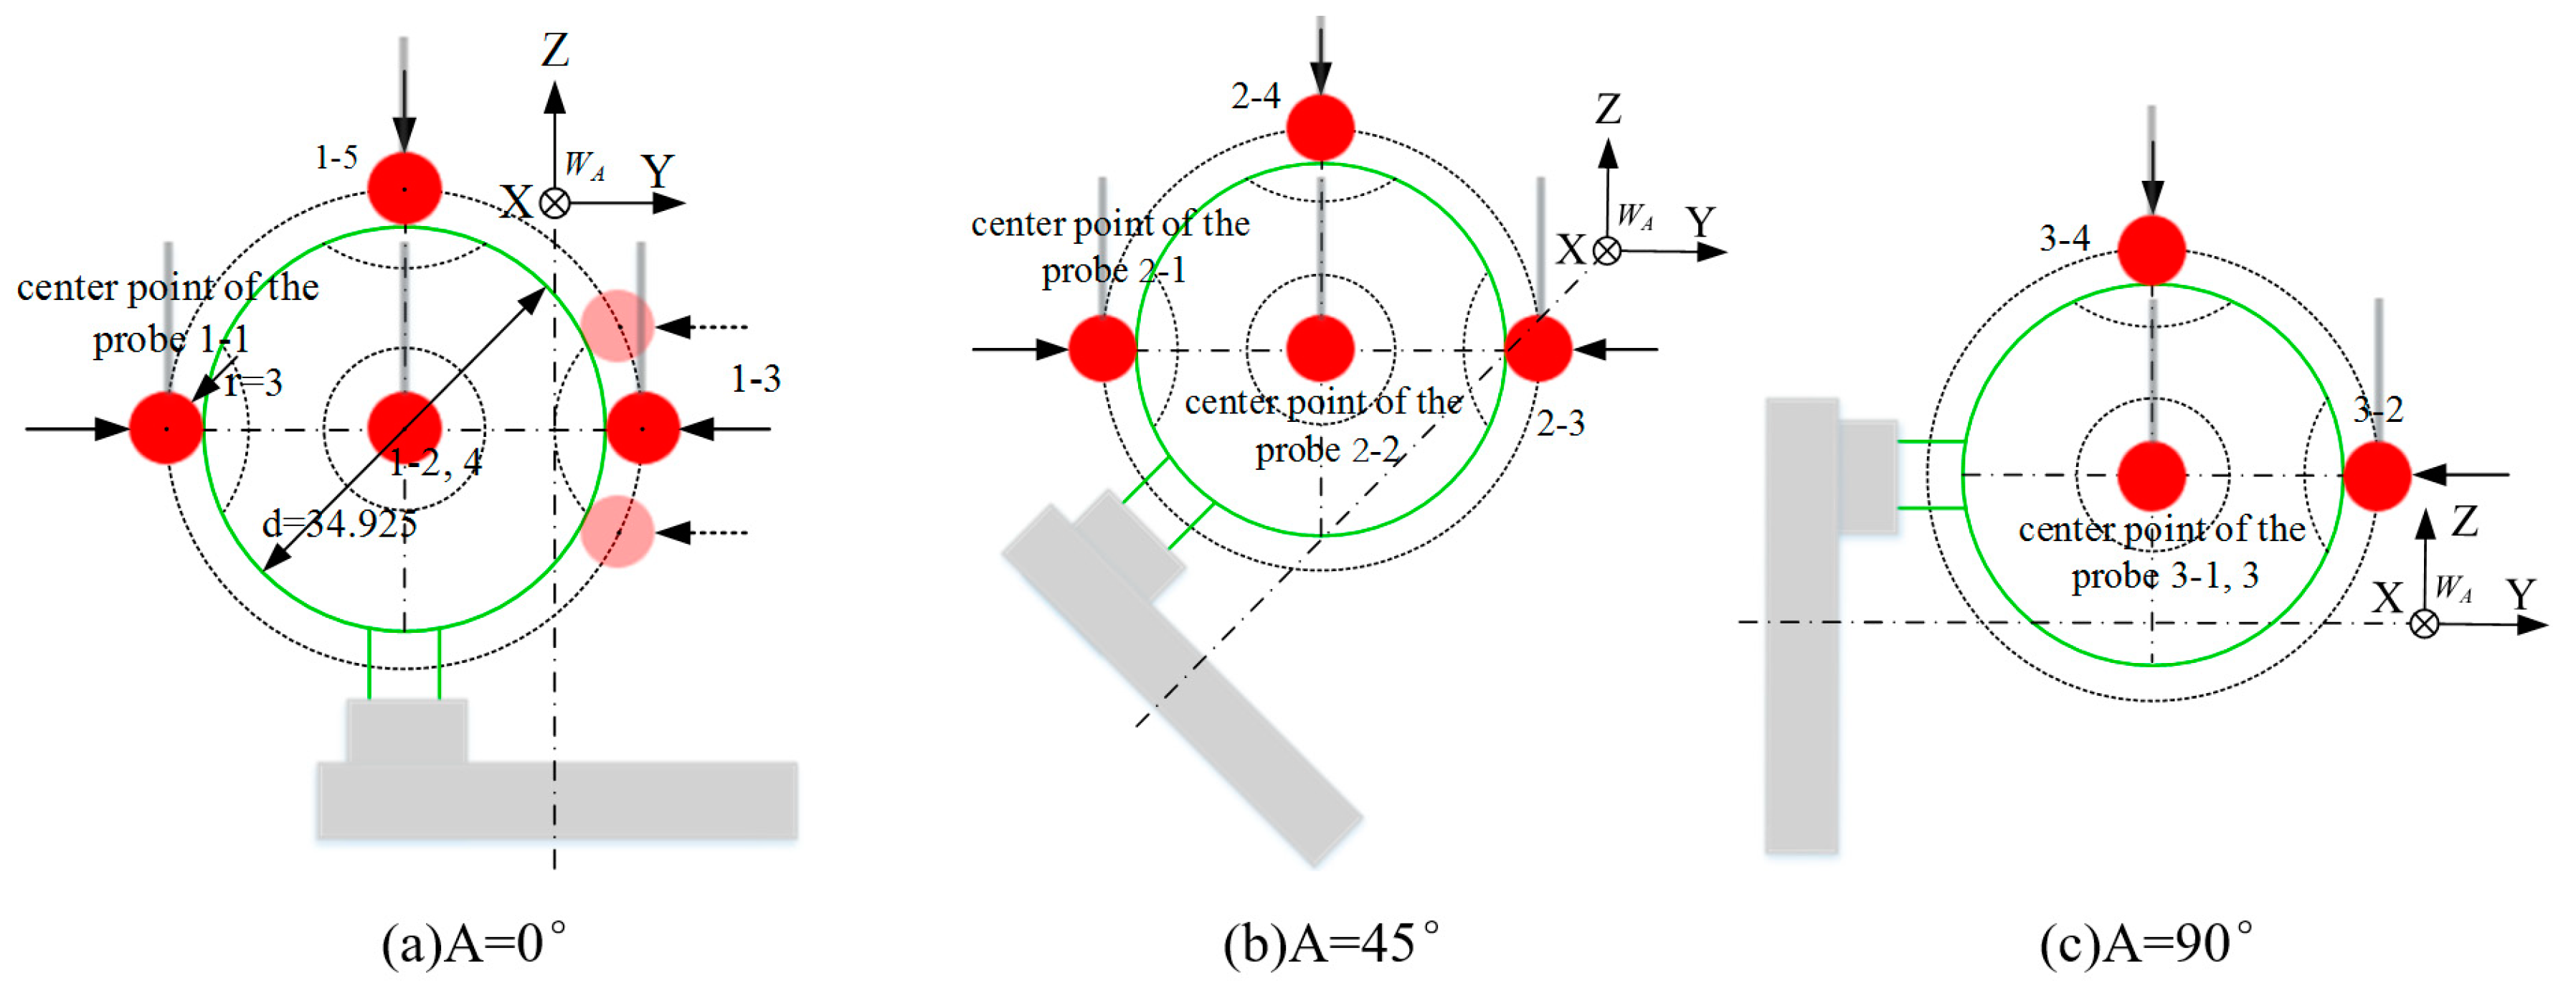
Steps 1 and 2 involved a precise spherical measurement method, namely a multi-degree of freedom, step-by-step contact scheme. The main advantage of this scheme was that the number of contact points required for complete the detection of the center point of a sphere could be changed according to actual detection situations. To identify the center of standard sphere in this work, step-by-step detection of five points on five degrees of freedom was required. We labeled the center points of the probe as 1–1, 2, 3, 4, and 5 according to the order of detection. The position of detection points on the sphere did not need to be accurate and it was only enough to ensure that they fell within the dotted circle with one third of the diameter of the standard sphere. As shown in Figure 4a, when a = 0°, each time the coordinates of four points on the same cross section on the precision spherical column were measured, in the counterclockwise order of +Y, +X, −Y, −X, then the coordinates of any point on the ball column were measured, which were not on the cross section determined by the other four points. In Figure 4b, the number of measurement points of the same cross section was reduced to adapt to position change, improving measurement efficiency and preventing probe collision. As seen in the Figure 4c, when a = 90°, at least one detection had to be carried out along each direction of X, Y, and Z. Detection was carried out on the X–Y plane, and finally along the direction of the Z axis.
The calculation method of the coordinates of spherical centers based on the coordinates of five measurement points in step 3 was as follows: Three of the five measurement points were selected for the one-time solution using Equation (27). Then, the mean values of four solutions were calculated to improve measurement accuracy.
{ ( x 1 x ) 2 + ( y 1 y ) 2 + ( z 1 z ) 2 = ( r + d / 2 ) 2 ( x 2 x ) 2 + ( y 2 y ) 2 + ( z 2 z ) 2 = ( r + d / 2 ) 2 ( x 5 x ) 2 + ( y 5 y ) 2 + ( z 5 z ) 2 = ( r + d / 2 ) 2
where 1 - 1 ( x 1 , y 1 , z 1 ) , 1 - 2 ( x 2 , y 2 , z 2 ) , and 1 - 5 ( x 5 , y 5 , z 5 ) are the coordinates of measurement points, and x, y, and z are the coordinates of the center of the sphere to be determined.

4.1.2. On-Line Measurement of Spherical Detection Points

The diameter of the contact trigger probe used in the experiments was 6 mm. The experimental set up and the relevant parameters of infrared probe are summarized in Table 2.
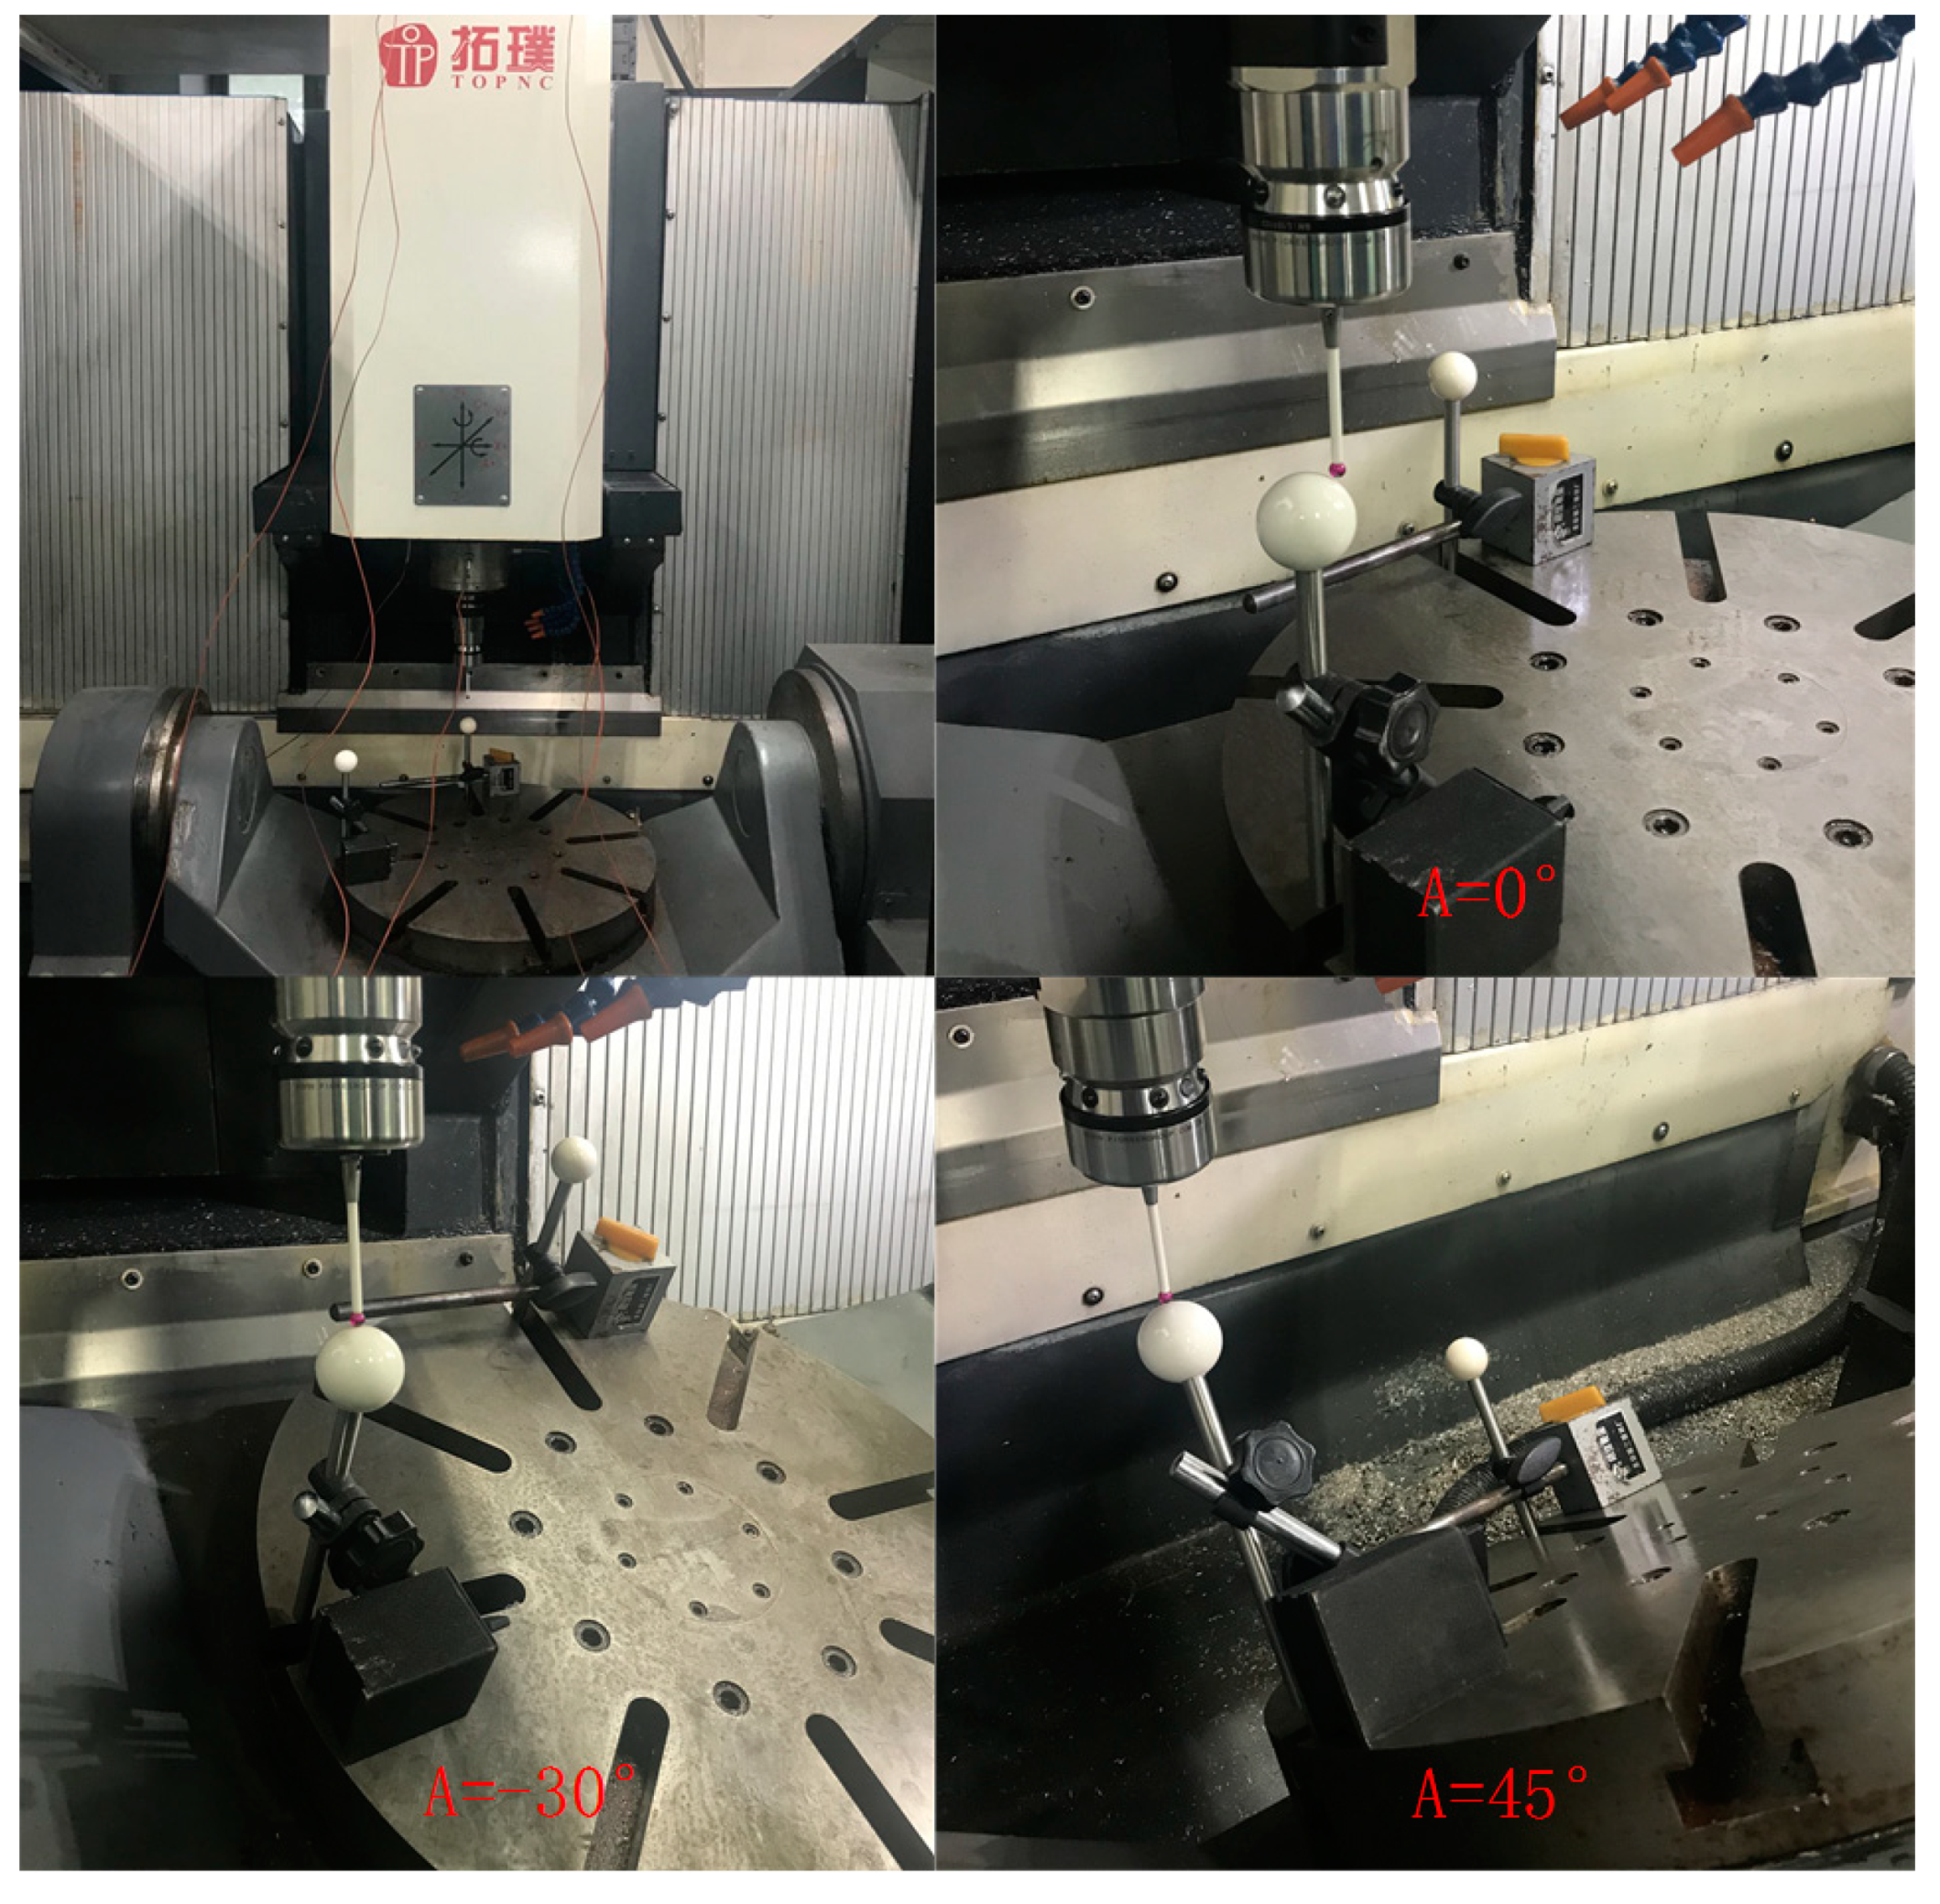
Ceramic material Al2O3 was used as the material of precision balls with diameter 34.925 mm. The diameter tolerance of the sphere was 0.5 microns and the surface roughness was 0.04, which met the requirements of measurement accuracy. The experiments were carried out on TOPNC VMC-C50 five-axis machine tool, as shown in Figure 5. Some of the measured data are summarized in Table 3.

4.2. Analysis of Average Position Error of A and C Axes

Based on the error identification model of rotary axes established in Section 2 of this paper, the average position error of the two rotation axes was calibrated using multi-degree of freedom, step-by-step contact scheme and measurement data obtained in Section 4.1. As shown in Figure 6, five key position errors of the A-axis were identified. It was found that the value of δ x A was small and negligible, and that the average angular positioning error ε α A of A-axis was the largest. The deviations of the five position errors were about 0.002 mm in both positive and negative directions.
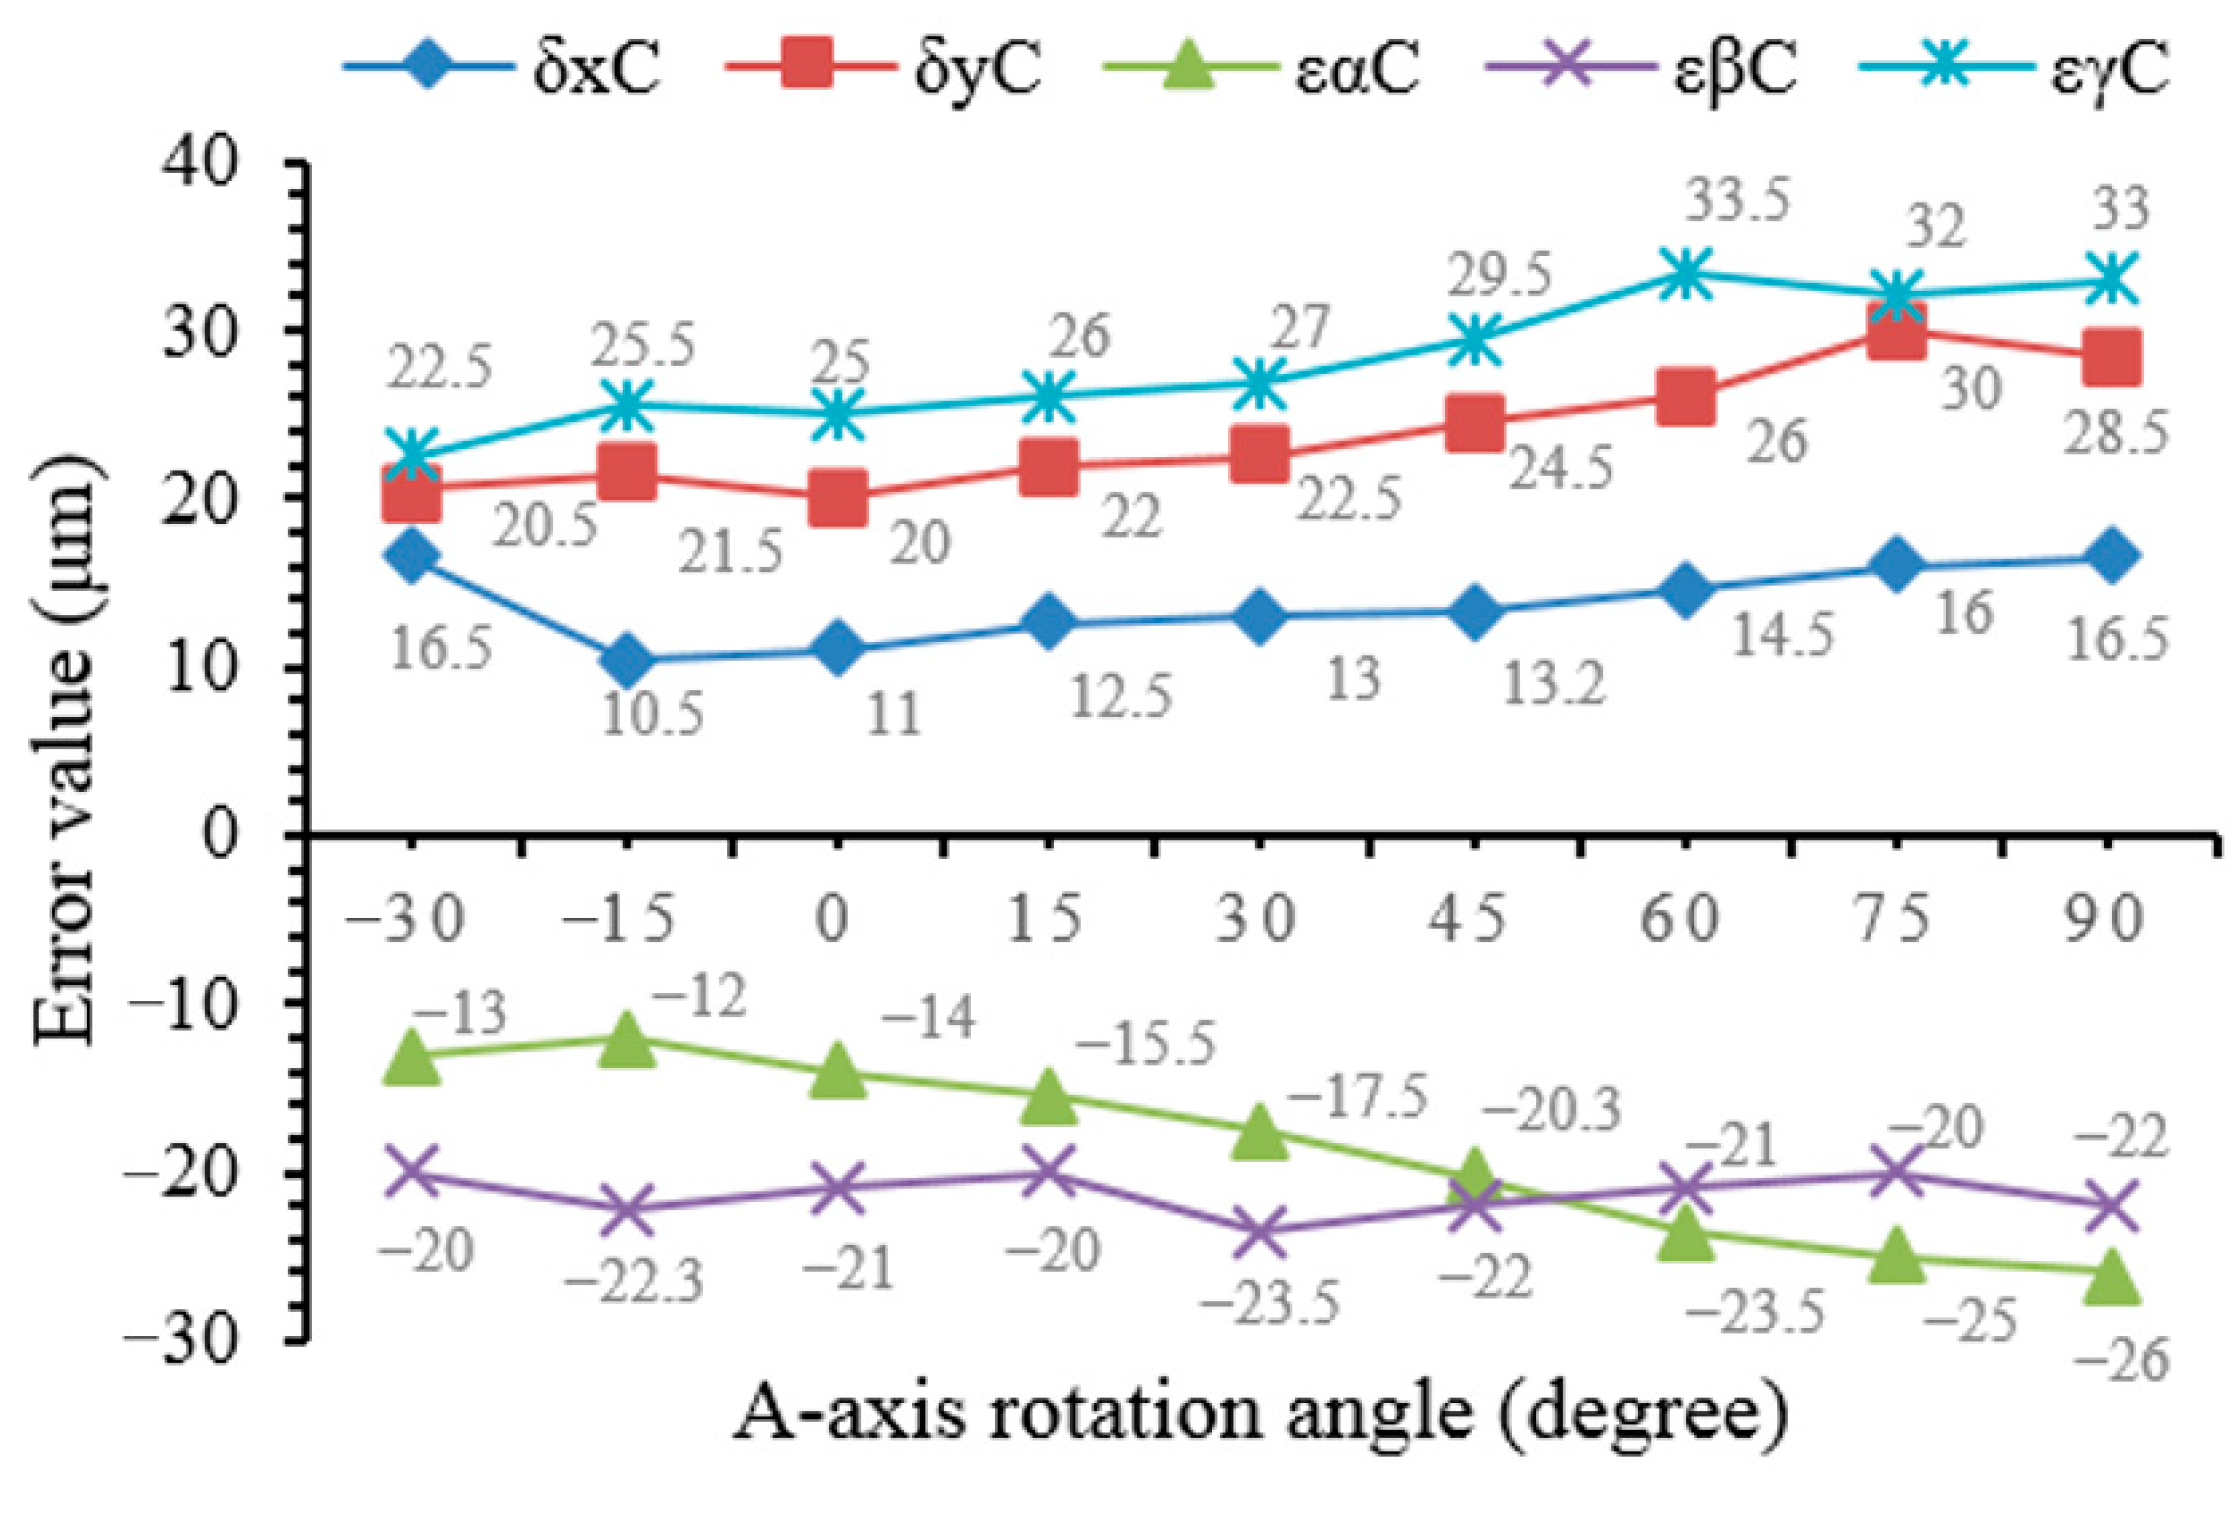
In this section, the average linear errors δ x C and δ y C along the X and Y directions of the C-axis were calibrated, and the average angular errors ε α C , ε β C and ε γ C around the X, Y and Z directions were calibrated. As shown in Figure 7, the average positioning error ε γ C of C-axis was the largest among the five position errors, reaching 0.033 mm at A = 60, which was one of the key factors affecting rotation axis error. The five average position errors of C-axis were increased by increasing the rotation angle of the A-axis. This revealed that the position error of the C-axis was affected by the rotation angle of A-axis under actual situations. The reason for this could be the manufacturing accuracy of the two rotating axis components and the assembly clearance between them. The reason for this also could be that during the long-term operation of the machine tool, the A-axis was geometrically displaced due to uncertainty factors such as the weight of machine itself and the inertia of workpiece under high-speed motions [33]. Displacements indirectly affected the position error of the C-axis.

4.3. Spatial Error Field Analysis of Five-Axis CNC Machine Tools

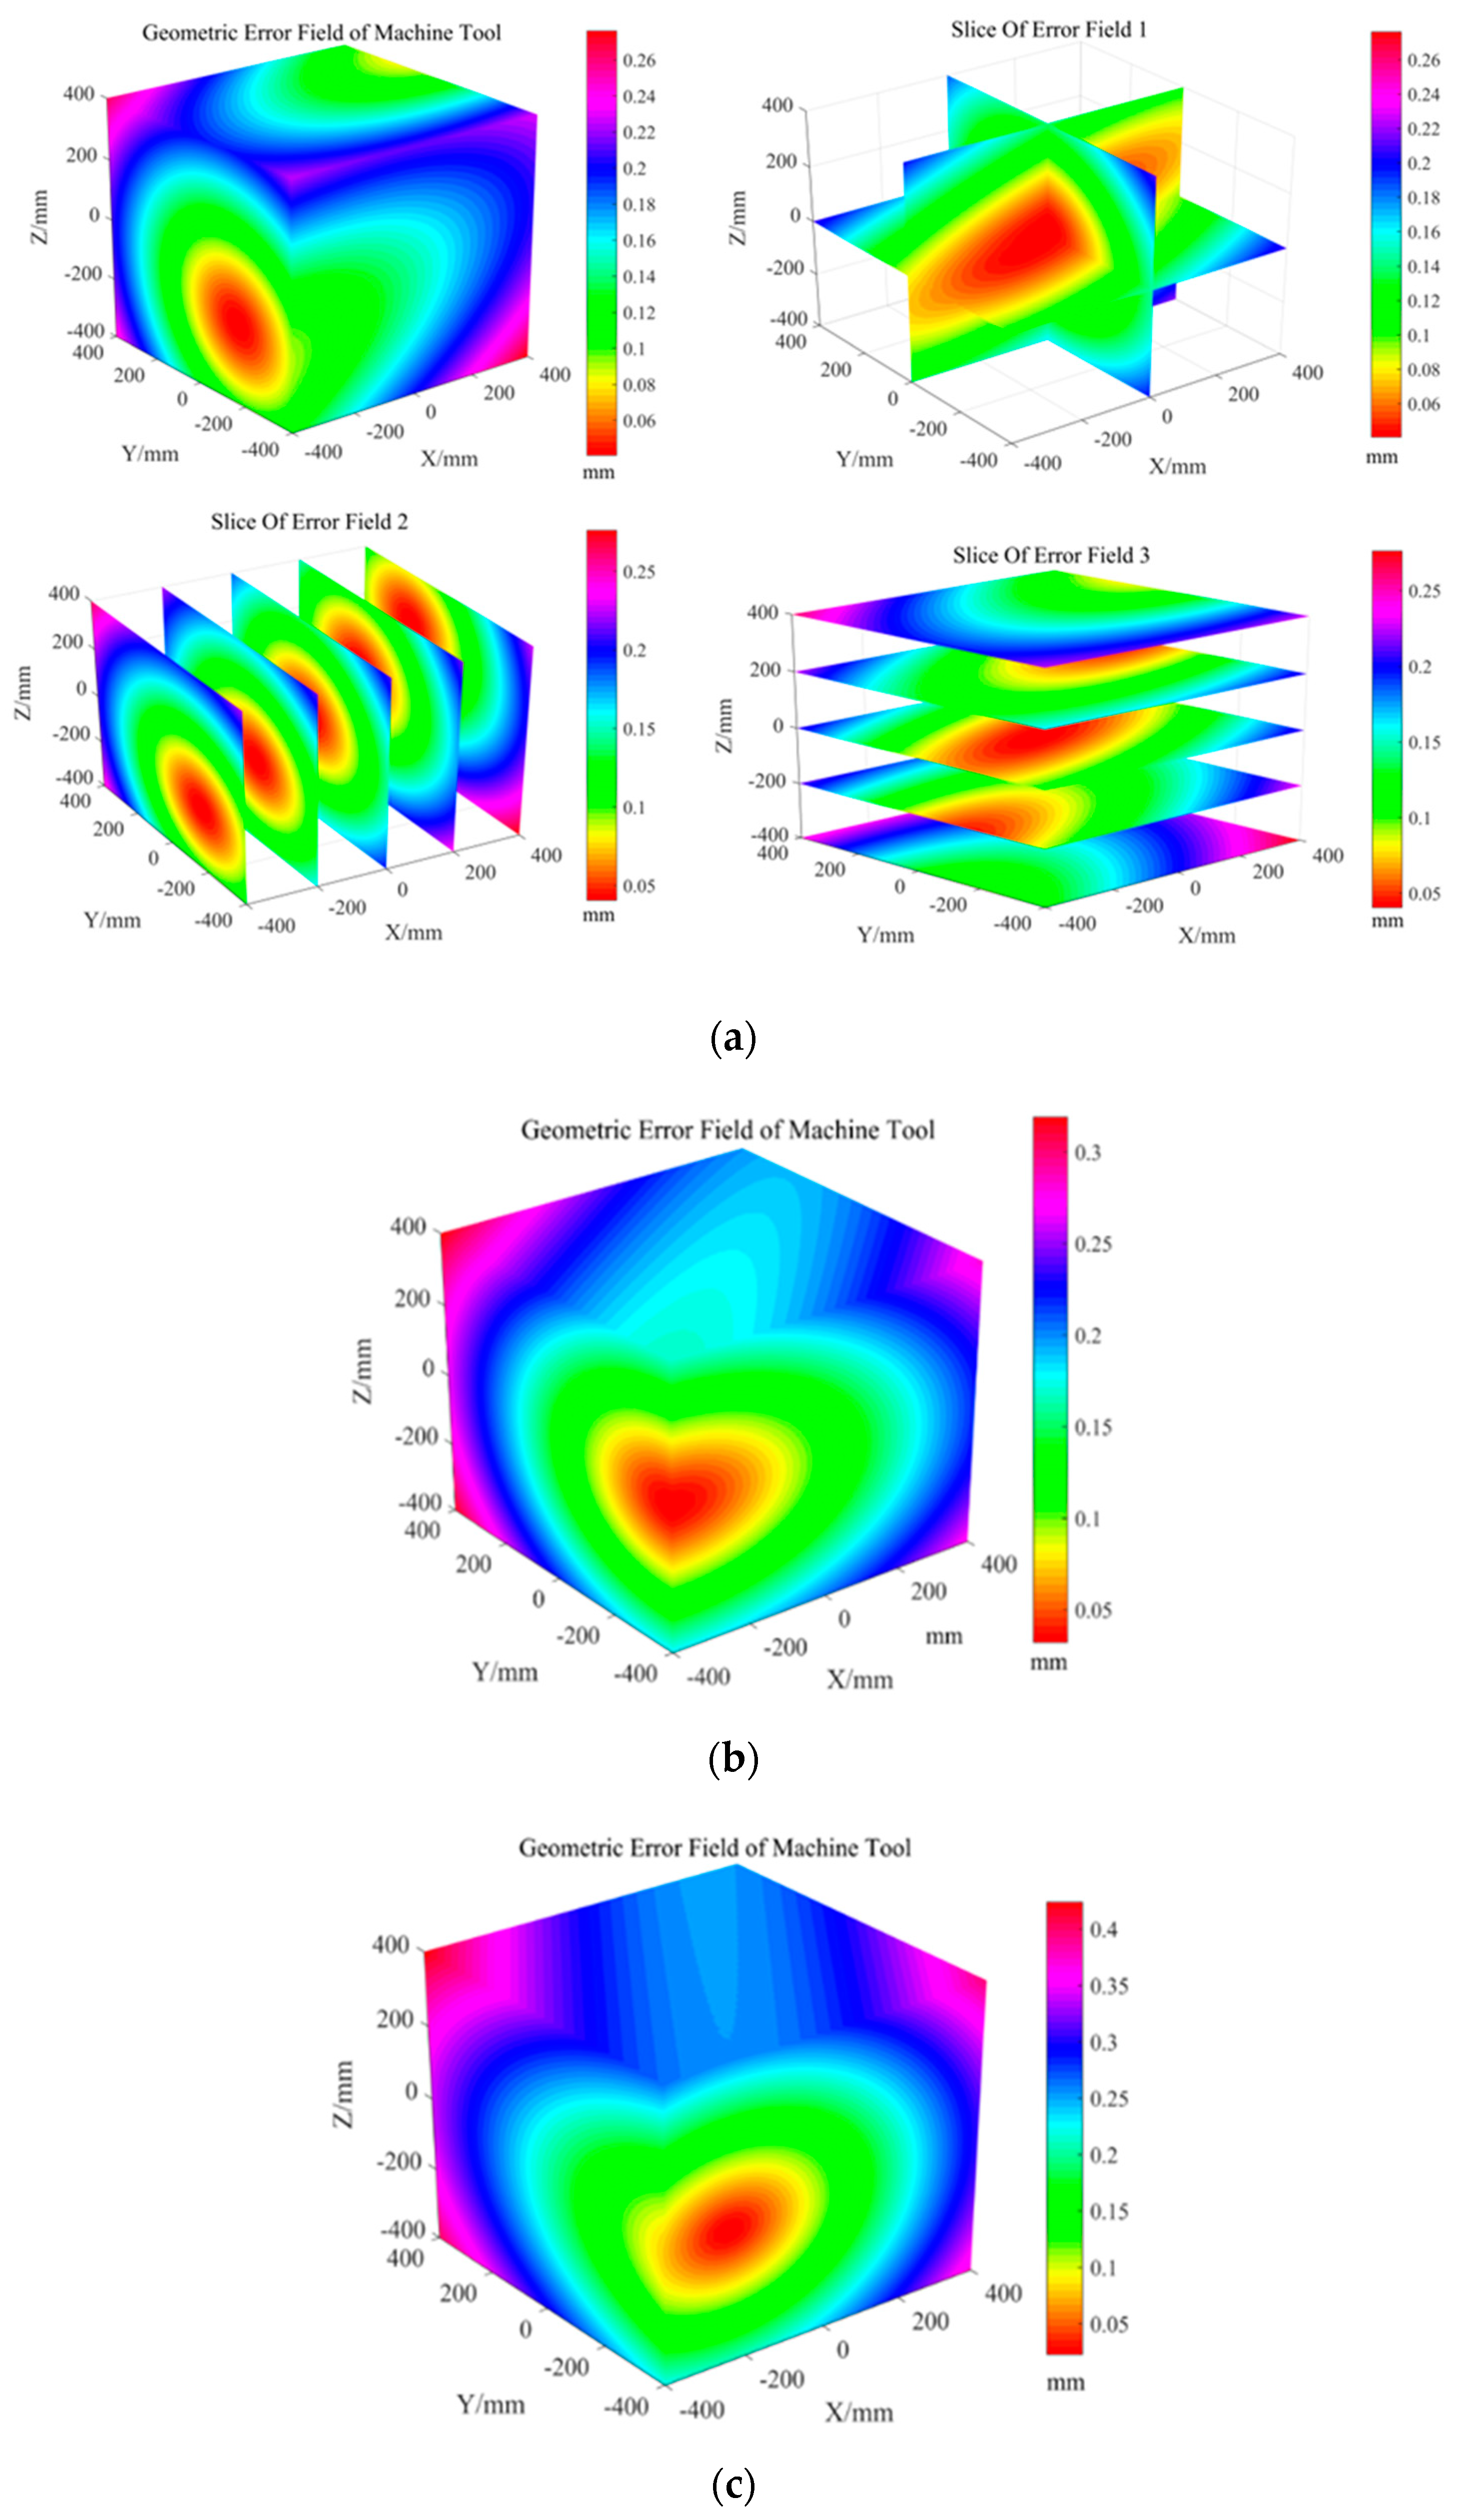
Using the geometric error model expressed in Equations (11) and (12), the geometric error fields of the five-axis machine tool workspace under three A-axis rotating angles A = 0°, A = 45°, A = 90° were established to obtain the variation law of the spatial error field during the swing of the A-axis, as shown in Figure 8.
As shown in Figure 8a, when A = 0°, the spatial comprehensive error Δ E of five-axis CNC machine tools tended to increase from inside out. When the workspace was around the origin of the ideal coordinate system of A and C axes established in this paper, Δ E was less than 0.06 mm. When the outward expansion of workspace, Δ E was continuously expanded. The maximum value of Δ E was obtained at the edge of the workspace to be 0.26 mm. As shown in Figure 8b,c, by increasing the rotation angle of A-axis, the maximum value of comprehensive error was also increased, which indicated that the error caused by large-angle rotation was also larger. Therefore, the prevention of large-angle rotation of the A-axis in the cutting process could effectively reduce the influence of geometric error of the machine tool on machining accuracy.

5. Validation Experiment

In order to verify the accuracy and feasibility of the A and C axes error identification models and methods developed in this work, the position error identification method proposed by Chen et al., [35] for identifying the position error of rotating axes and average position errors of calibration, was used in this section. By comparison, it was estimated that the accuracy of the proposed rotation axis error identification method was higher than that of the traditional measurement method.
Chen suggested that the position errors of rotating axes were due to positional deviation of the actual rotating axes from ideal axes. Position error was first determined by measuring the position of the actual axis of the rotating axis. In this section, the method of measuring the two centers of precision balls at different positions was employed. A and C axes were detected once every 15° and 45° of a rotation, respectively. The position of the actual axis of the rotating axis was obtained by fitting the positions of two spherical points at each rotation angle and the position of spherical points was obtained by fitting spherical detection coordinates along +X, +Y, −X, and −Z directions. In verification test, 167 spherical probe point coordinates were collected, among which 78 were used to verify A-axis position error and 89 were employed in the verification of the C-axis. Verification results are summarized in Table 4.

6. Conclusions

In this paper, the influence of gravity, acceleration, inertia, and other factors existing in the operation of the A-axis on the average position error of the C-axis were considered, and 10 key average position error elements for the two rotating axes were determined. According to the error transfer chain relationship between machine tool axes and the principle of homogeneous coordinate transformation, the mathematical model of ideal and actual positions of the tool tip and tool posture of a five-axis CNC machine tool TOPNC VMC-C50 were determined. The main conclusions of this paper were as follows:
(1)
A model was developed for solving the average position errors of rotation A and C axes. Further, 10 average position errors of two rotating axes were obtained by bringing the coordinates of the center of spheres before and after 90° of rotation into the model.
(2)
An on-machine detection method was developed for average position errors of rotating axes based on the precision spherical column and a multi-degree of freedom, step-by-step contact scheme. The measurement accuracy obtained by this method was about 91.8% of traditional measurement equipment, such as laser interferometers and double-ball-bar measuring systems. However, the cost of the proposed method was about one tenth of the traditional methods and each test took about 20–30 min.
(3)
The spatial geometric error field of the five-axis CNC machine tool was determined based on the position errors of two identified rotating axes. By analyzing comprehensive error fields obtained by simulations, the following conclusions were drawn: (a) the comprehensive error of rotating spaces of A and C presented an increasing trend from inside to outside, (b) comprehensive error increased with the increase of the rotation angle of the A-axis, and therefore the large rotation angles of the A-axis had to be avoided, and (c) there was a machining space with less error in work center. By changing the A-axis angle of the table, the axis change of the optimal machining space had a certain offset law. These laws could provide guidance for error compensation, machining path, and parameter optimization, etc.

Author Contributions

Data curation, S.W.; Funding acquisition, X.L.; Investigation, R.L.; Methodology, H.S.; Writing—original draft, C.L. and H.S. All authors have read and agreed to the published version of the manuscript.

Funding

The authors express their gratitude to the National Natural Science Foundation of China (NSFC) (Nos. 51720105009) for it support.

Conflicts of Interest

The authors declare no conflict of interest.

References

  1. De Lacalle, L.N.L.; Lamikiz, A.; Munoa, J.; Salgado, M.A.; Sánchez, J.A. Improving the high-speed finishing of forming tools for advanced high-strength steels (ahss). Int. J. Adv. Manuf. Technol. 2006, 29, 49–63. [Google Scholar] [CrossRef]
  2. De Lacalle, L.N.L.; Lamikiz, A.; Sánchez, J.A.; de Bustos, I.F. Recording of real cutting forces along the milling of complex parts. Mechatronics 2006, 16, 21–32. [Google Scholar] [CrossRef]
  3. Guangming, S.; Gaiyun, H.; Dawei, Z.; Yicun, S.; Xiaolei, Z.; Bohui, D. Effects of geometrical errors of guideways on the repeatability of positioning of linear axes of machine tools. Int. J. Adv. Manuf. Technol. 2018, 98, 2319–2333. [Google Scholar]
  4. Lamikiz, A.; Lopez de Lacalle, L.N.; Sanchez, J.A.; Bravo, U. Calculation of the specific cutting coefficients and geometrical aspects in sculptured surface machining. Mach. Sci. Technol. 2006, 9, 411–436. [Google Scholar] [CrossRef]
  5. Hale, L.C. Principles and techniques for designing precision machines. Ph.D. Thesis, Massachusetts Institute of Technology, Ann Arbor, MA, USA, 1999. [Google Scholar]
  6. Mayr, J.; Jedrzejewski, J.; Uhlmann, E.; Donmez, M.A.; Knapp, W.; Hartig, F.; Wendt, K.; Moriwaki, T.; Shore, P.; Schmitt, R. Thermal issues in machine tools. CIRP Ann. Manuf. Tech. 2012, 61, 771–791. [Google Scholar] [CrossRef] [Green Version]
  7. Olvera, D.; de Lacalle, L.N.L.; Compeán, F.I.; Fz-Valdivielso, A.; Lamikiz, A.; Campa, F.J. Analysis of the tool tip radial stiffness of turn-milling centers. Int. J. Adv. Manuf. Technol. 2012, 60, 883–891. [Google Scholar] [CrossRef]
  8. Hsieh, T.; Chen, P.; Jywe, W.; Chen, G.; Wang, M. A Geometric Error Measurement System for Linear Guideway Assembly and Calibration. Appl. Sci. 2019, 9, 574. [Google Scholar] [CrossRef] [Green Version]
  9. Li, X.; Yang, X.; Gao, L.; Su, Z.; Wei, X.; Lv, Z. Rapid Measurement and Identification Method for the Geometric Errors of CNC Machine Tools. Appl. Sci. 2019, 9, 2701. [Google Scholar] [CrossRef] [Green Version]
  10. Kiridena, V.; Ferreira, P.M. Mapping the effects of positioning errors on the volumetric accuracy of five-axis cnc machine tools. Int. J. Mach. Tools Manuf. 1993, 33, 417–437. [Google Scholar] [CrossRef]
  11. Srivastava, A.K.; Veldhuis, S.C.; Elbestawit, M.A. Modelling geometric and thermal error in a five-axis cnc machine tool. Int. J. Mach. Tools Manuf. 1995, 35, 1321–1337. [Google Scholar] [CrossRef]
  12. Lin, Y.; Shen, Y. Modelling of five-axis machine tool metrology models using the matrix summation approach. Int. J. Adv. Manuf. Technol. 2003, 21, 243–248. [Google Scholar]
  13. Lamikiz, A.; López de Lacalle, L.N.; Ocerin, O.; Díez, D.; Maidagan, E. The Denavit and Hartenberg approach applied to evaluate the consequences in the tool tip position of geometrical errors in five-axis milling centres. Int. J. Adv. Manuf. Technol. 2008, 37, 122–139. [Google Scholar] [CrossRef]
  14. Chen, G.S.; Mei, X.S.; Li, H.L. Geometric error modeling and compensation for large-scale grinding machine tools with multi-axes. Int. J. Adv. Manuf. Technol. 2013, 69, 2583–2592. [Google Scholar] [CrossRef]
  15. Díaz-Tena, E.; Ugalde, U.; López de Lacalle, L.N.; de la Iglesia, A.; Calleja, A.; Campa, F.J. Propagation of assembly errors in multitasking machines by the homogenous matrix method. Int. J. Adv. Manuf. Technol. 2013, 68, 149–164. [Google Scholar] [CrossRef]
  16. Fu, G.; Fu, J.; Gao, H.; Yao, X. Squareness error modeling for multi-axis machine tools via synthesizing the motion of the axes. Int. J. Adv. Manuf. Technol. 2017, 89, 1–16. [Google Scholar] [CrossRef]
  17. Lee, K.; Lee, D.M.; Yang, S.H. Parametric modeling and estimation of geometric errors for a rotary axis using double ball-bar. Int. J. Adv. Manuf. Technol. 2012, 62, 741–750. [Google Scholar] [CrossRef]
  18. Xiang, S.T.; Yusuf, A. Modeling and compensation of volumetric errors for five-axis machine tools. Int. J. Mach. Tools Manuf. 2016, 101, 65–78. [Google Scholar] [CrossRef]
  19. Chen, Y.T.; Lin, W.C.; Liu, C.S. Design and experimental verification of novel six-degree-of freedom geometric error measurement system for linear stage. Opt. Lasers Eng. 2017, 92, 94–104. [Google Scholar] [CrossRef]
  20. Qibo, F.; Bin, Z.; Cunxing, C.; Cuifang, K.; Yusheng, Z.; Fenglin, Y. Development of a simple system for simultaneously measuring 6DOF geometric motion errors of a linear guide. Opt. Express. 2013, 21, 25805. [Google Scholar] [CrossRef]
  21. Liu, H.; Xiang, H.; Chen, J.; Yang, R. Measurement and compensation of machine tool geometry error based on Abbe principle. Int. J. Adv. Manuf. Technol 2008. published online. [Google Scholar] [CrossRef]
  22. Mutilba, U.; Gomez-Acedo, E.; Sandá, A.; Vega, I.; Yagüe-Fabra, J.A. Uncertainty assessment for on-machine tool measurement: An alternative approach to the ISO 15530-3 technical specification. Precis. Eng. 2019, 57, 45–53. [Google Scholar] [CrossRef] [Green Version]
  23. Linares, J.; Chaves-Jacob, J.; Schwenke, H.; Longstaff, A.; Fletcher, J.; Uhlmann, E.; Wintering, J. Impact of measurement procedure when error mapping and compensating a small CNC machine using a multilateration laser interferometer. Precis. Eng. 2014, 38, 578–588. [Google Scholar] [CrossRef]
  24. Ibaraki, S.; Nagae, K.; Sato, G. “open-loop” tracking interferometer for machine tool volumetric error measurement. CIRP Ann.-Manuf. Technol 2014, 63, 501–504. [Google Scholar] [CrossRef] [Green Version]
  25. GGomez-Acedo, E.; Olarra, A.; Zubieta, M.; Kortaberria, G.; Ariznabarreta, E.; López de Lacalle, L.N. Method for measuring thermal distortion in large machine tools by means of laser multilateration. Int. J. Adv. Manuf. Technol. 2015, 80, 523–534. [Google Scholar] [CrossRef]
  26. GGomez-Acedo, E.; Olarra, A.; Orive, J.; Lopez de la Calle, L.N. Methodology for the design of a thermal distortion compensation for large machine tools based in state-space representation with Kalman filter. Int. J. Mach. Tools Manuf. 2013, 75, 100–108. [Google Scholar] [CrossRef]
  27. Lei, W.T.; Hsu, Y.Y. Error measurement of five-axis cnc machines with 3d probe–ball. J. Mater. Process. Tech. 2003, 139, 127–133. [Google Scholar] [CrossRef]
  28. Lee, K.I.; Yang, S.H. Measurement and verification of position-independent geometric errors of a five-axis machine tool using a double ball-bar. Int. J. Mach. Tools Manuf. 2013, 70, 45–52. [Google Scholar] [CrossRef]
  29. Zhang, Y.; Yang, J.; Zhang, K. Geometric error measurement and compensation for the rotary table of five-axis machine tool with double ball bar. Int. J. Adv. Manuf. Technol. 2013, 65, 275–281. [Google Scholar] [CrossRef]
  30. Weikert, S. R-test a new device for accuracy measurements on five axis machine tools. CIRP Ann. Manuf. Technol. 2004, 53, 429–432. [Google Scholar] [CrossRef]
  31. Hong, C.; Ibaraki, S.; Oyama, C. Graphical presentation of error motions of rotary axes on a five-axis machine tool by static R-test with separating the influence of squareness errors of linear axes. Int. J. Mach. Tools Manuf. 2012, 59, 24–33. [Google Scholar] [CrossRef]
  32. Ibaraki, S.; Iritani, T.; Matsushita, T. Error map construction for rotary axes on five-axis machine tools by on-the-machine measurement using a touch-trigger probe. Int. J. Mach. Tools Manuf. 2013, 68, 21–29. [Google Scholar] [CrossRef] [Green Version]
  33. Jiang, Z.; Song, B.; Zhou, X.; Tang, X.; Zheng, S. On-machine measurement of location errors on five-axis machine tools by machining tests and a laser displacement sensor. Int. J. Mach. Tools Manuf. 2015, 95, 1–12. [Google Scholar] [CrossRef]
  34. Jeong, J.H.; Khim, G.; Oh, J.S.; Chung, S.C. Method for measuring location errors using a touch trigger probe on four-axis machine tools. Int. J. Adv. Manuf. Technol. 2018, 99, 1003–1012. [Google Scholar] [CrossRef]
  35. Chen, Y.T.; More, P.; Liu, C.S. Identification and verification of location errors of rotary axes on five-axis machine tools by using a touch-trigger probe and a sphere. Int. J. Adv. Manuf. Technol. 2019, 100, 2653–2667. [Google Scholar] [CrossRef]
  36. International Organization for Standardization. ISO 230-7: 2006. Test Code for Machine Tools-Part 7: Geometric Accuracy of Axes of Rotation; ISO: Geneva, Switzerland, 2006. [Google Scholar]
  37. Ibaraki, S.; Knapp, W. Indirect measurement of volumetric accuracy for three-axis and five-axis machine tools: A review. Int. J. Autom. Technol. 2012, 6, 110–124. [Google Scholar] [CrossRef] [Green Version]
Figure 1. Schematic diagram of spatial structure and error kinematic chain of five-axis CNC machine tool.
Applsci 10 00100 g001
Figure 2. A-axis position error detection method. (a) Measuring positions of two precision spheres at A = 0°; (b) Measuring positions of two precision spheres at A = 90°.
Applsci 10 00100 g002
Figure 3. C-axis position error detection method. (a) Measuring positions of two precision spheres at C = 0°; (b) Measuring positions of two precision spheres at C = 90°.
Applsci 10 00100 g003
Figure 4. Detection process of multi-degree of freedom step-by-step contact scheme.
Applsci 10 00100 g004
Figure 5. On-machine detection of precision balls.
Applsci 10 00100 g005
Figure 6. Calibration of A-axis average position errors.
Applsci 10 00100 g006
Figure 7. Calibration of C-axis average position errors.
Applsci 10 00100 g007
Figure 8. Spatial error field distribution of five-axis machine tool. (a) Comprehensive error field distribution of machine tool when A = 0°; (b) Comprehensive error field distribution of machine tool when A = 45°; (c) Comprehensive error field distribution of machine tool when A = 90°.
Applsci 10 00100 g008
Table 1. Definition of average position error of rotary axis.
Error SymbolDefinition
ε α A Average angle positioning error of A-axis
ε β A Average angle error of A-axis rotating around Y-axis
ε γ A Average angle error of A-axis rotating around Z-axis
δ x A Average line error of A-axis along X direction
δ y A Average line error of A-axis along Y direction
δ z A Average line error of A-axis along Z direction
ε α C ( A i ) Average angle error of C-axis around X direction at A i
ε β C ( A i ) Average angle error of C-axis around Y direction at A i
ε γ C ( A i ) Average angle error of C-axis around Z direction at A i
δ x C ( A i ) Average line error of C-axis along X direction at A i
δ y C ( A i ) Average line error of C-axis along Y direction at A i
δ z C ( A i ) Average line error of C-axis along Z direction at A i
Table 2. The parameters of the Pioneer OP550 Probe.
The Technical RequirementsParameters
External dimension of the ProbeDiameter: Φ55 mm, length:95 mm
Standard probe length60 mm
Direction of measurement±X, ±Y, −Z
Unidirectional repeat accuracy of the Probe0.001 mm (2σ)
The maximum Angle of swing of the probe in the XY plane15°
Table 3. Spherical measurement data of A and C axes.
Position of A/C AxesA = −30°A = 0°A = 45°A = 90°C = 0°C = 90°C = 180°C = 270°
Precision ball column 1+X directionX−542.852−542.558−542.838−543.228−542.558−349.362−82.458−276.223
Y279.061−248.368−194.373−151.346−248.36814.301−178.918−445.515
Z−152.402−124.420−117.968−155.992−124.420−127.283−125.500−126.748
+Y directionX−522.888−522.478−522.650−522.478−329.562−63.072
Y−297.603−270.640−215.393−270.640−4.267−197.653
Z−152.402−124.419−117.968−124.419−127.283−125.500
−X directionX−502.606−502.948−502.627−502.706−502.948−308.803−42.241−235.750
Y−276.389−253.204−195.493−151.723−253.20416.877−176.624−446.369
Z−152.403−124.419−117.968−155.992−124.419−127.283−125.500−126.748
−Z directionX−523.182−522.553−521.928−523.408−522.553−329.052−62.126−255.644
Y−278.313−249.902−193.589−151.722−249.90215.898−176.594−446.370
Z−135.031−108.214−101.017−137.995−108.214−108.300−108.273−108.225
Precision ball column 2+X directionX−356.170−356.154−356.159−356.154−92.175−264.277−528.390
Y−35.6444.713−42.5914.713−167.813−430.469−259.742
Z−61.554−167.678−328.667−167.678−166.801−167.099−168.327
+Y directionX−338.678−338.865−339.574−338.865−75.173−247.467−510.274
Y−53.944−13.060−62.417−13.060−185.877−449.819−277.854
Z−61.554−164.275−328.668−164.275−166.801−167.098−168.327
−Z directionX−338.456−338.329−338.167−338.329−74.133−245.692−510.694
Y−36.6744.939−42.4014.939−168.983−413.539−261.123
Z−46.147−152.235−312.895−152.235−152.182−152.071−152.152
Table 4. Comparison of measurement accuracy.
Position Error (μm) δ y A δ z A ε α A ε β A ε γ A δ x C δ y C ε α C ε β C ε γ C
Precision balls method10.6−19.429.825.7−15.113.723.9−18.5−21.328.2
Chen’s method12.7−20.127.624.0−12.315.622.4−18.4−19.827.2
A and C axis Accuracy Comparison89.5%94.1%