Abstract
Pocket milling has been regarded as one of the most widely used operations in machining. The surface quality of the machined pockets is an essential aspect of any engineering and medical applications. In the current study, rotary ultrasonic machining (RUM) was applied for milling micro-pockets on alumina (Al2O3) ceramic. The objective of this research was to analyze the effect of the tool overlapping parameters on the surface roughness, surface morphology and the profiles of the machined pockets. Subsequently, the effect of different tool path strategies was analyzed on the surface quality and the material removal rate (MRR) of the machined pockets. A scanning electron microscope is used for analyzing the tool wear mechanisms. The experimental results provide evidence that the surface roughness, surface morphology and the MRR have been significantly affected by the considered tool overlapping and the tool path strategies. Furthermore, among the selected tool overlapping parameters (5–25%) and the tool path strategies, the best surface roughness (Ra = 0.155 μm and Rt = 1.432 µm) of the machined pockets can be found at 20% of the tool overlapping with a mix of uni-directional and zigzag tool path strategy.
1. Introduction
The applications of advanced ceramics such as alumina and zirconia are increasing gradually in the medical and engineering fields due to the significant advancements in the fabrication techniques [1]. Moreover, advanced ceramics offer excellent properties such as high-temperature resistance, high strength to weight ratio and anti-corrosive properties comparing to their competitor materials such as titanium and Inconel alloys. Recently, advanced ceramics were used in the manufacturing of microcomponents such as micro-molds, micro-dies, micro-fluidics and micro-nozzles [1]. Micro-features such as microchannels and micro-pockets with sound surface integrity and high dimensional accuracy are often required in the miniaturized/micro-components for their functioning with ever-increasing stringent specifications [2]. Alumina (Al2O3) is mostly employed material in biomedical applications due to its high conformance to biocompatibility standards [3]. Like other advanced ceramics, Al2O3 is classified as difficult to fabricate material due to its poor thermal and electrical conductivities and high hardness [4]. The traditional machining processes such as turning, milling and drilling are not desirable for the economical machining of the Al2O3 due to excessive tool wear, poor surface integrity and high edge chipping of the machined parts [5]. Non-traditional processes such as chemical machining and electric discharge machining have their own limitation in the machining of ceramic materials as these processes depend on the chemical and electrical properties of the processed materials. On the other hand, advanced machining processes such as ultrasonic machining (USM), laser machining and waterjet machining have the potential to machine the Al2O3 ceramic components. Several attempts have been reported on machining micro/macro features in Al2O3 by using laser machining. For example, the fabricating of pockets in Al2O3 by using laser ablation was performed by Umer et al. [6]. The authors applied the multi-objective optimization tool in order to optimize the MRR and the surface roughness (Ra) of the fabricated pockets. Results showed that the optimal values of Ra and MRR of the produced pockets were 4.1 μm and 0.7 mm3/min respectively. Laser milling was also applied by Loen et al. [7] for fabricating square pockets (5 × 5 mm2) in Al2O3. The effects of fiber laser process parameters and scanning strategy on surface roughness (Ra) and MRR were analyzed. Results indicated that the best value of Ra = 3 μm was achieved under a certain range of the selected parameters. Many limitations such as high heat-affected zones, poor surfaces, a lack of geometrical accuracy, etc., that can be associated with laser ablation [5,8,9,10]. Therefore, the machining of microchannel on advanced ceramics, like Al2O3, ZrO2, etc., is a difficult task as documented in earlier the studies. As a result, there is an essential need for a new machining technique, which can efficiently fabricate the ceramic components.
Rotary ultrasonic machining (RUM) is a non-traditional hybrid process, which combines the mechanisms of diamond grinding and USM [11]. It can machine brittle and hard materials regardless of their mechanical, electrical and thermal properties. Moreover, RUM can be used to produce components with high surface quality and high dimensional accuracy without altering their physical properties [11,12,13]. It can be used for micro/macro machining both brittle materials such as glass and hard to machine materials [14,15,16]. For example, Jain and Pandey [14] applied RUM for drilling micro-holes (300 µm dia.) in borosilicate glass. Results revealed that in addition to the tool vibration frequency, the thickness and grain size, the used RUM tool had a significant effect on tool wear. RUM was also applied for micro-drilling and milling of BK7 and Zerodur glasses in the research documented in [15]. Results found that, by using RUM the cutting forces, the edge chipping and the holes taper can be minimized by using RUM comparing to the results of micro grinding for the drilling operation. Recently, RUM was applied for milling microchannels and drilling microholes in Al2O3 materials. For example, Abdo et al. [17,18] used RUM to fabricate microchannels on Al2O3. The authors investigated the significance of RUM input parameters on the surface roughness, edge chipping, and dimensional accuracy of the fabricated microchannels. Results revealed that high dimensional accuracy (width and depth error ≥ 5%) with smooth surface roughness (Ra = 0.27 µm) of the machined microchannels could be obtained under optimal conditions of RUM parameters. RUM was also applied for drilling of Al2O3 to investigate the effects of the parameters on cutting force, MRR and chipping size of the drilled holes [19,20]. Tool wear and MRR were the outputs investigated while side milling of Al2O3 by using RUM in the research documented in [21]. Another study was documented on studying tool wear [22] and surface roughness [23] while grinding of Al2O3 by using RUM. Mathematical models were also developed for predicting cutting force [24] and tool wear [21] while processing Al2O3 by using RUM. Other research studies were also investigated in applying RUM for machining other types of advanced ceramics such as zirconia [25,26,27] and silicon carbide [28] and silicon nitride [29]. For instance, an experimental investigation had been carried out for fabricating stepped hole on zirconia bioceramics in the study documented in [25]. Results indicated that the maximum MRR could be achieved at coarser grain sizes, higher feed rates and power ratings. Churi et al. [28] studied the effects of RUM input parameters on the surface roughness, edge chipping and cutting force of the fabricated holes in silicon carbide materials. The authors found that the spindle speed and the feed rate have the most significant effect on all the outputs.
It can be concluded from the above literature review that very few research studies have been conducted on the micro-milling of Al2O3. According to the author’s knowledge, no research has been found on milling pockets in Al2O3 by using RUM. Moreover, the most of available studies have been limited to investigate the effects of RUM input parameters such as feed rate, spindle speed, depth of cut, frequency, amplitude and coolant pressure on the cutting force, edge chipping and tool wear of the fabricated holes and/or channels. Furthermore, the effect of tool overlapping and tool path strategies on the surface quality and dimensional accuracy of the machined parts have never been investigated in all studies conducted for the RUM of Al2O3 ceramic. Moreover, the effect of the tool overlap and tool path were not considered in the studies documented on the fabrication of the microchannels through RUM [17,18]. This is because, in those investigations, the selected sizes (widths) of the fabricated channels were equal to the diameter of the used RUM tools. On the contrary, the tool overlap and the tool path strategy are important parameters while machining the pocket. In contrast to the existing literature, the current study is aimed to analyze the significance of tool overlapping and tool path strategies on the surface roughness, the profiles, surface morphology and the MRR of the fabricated pockets. Scanning electron microscopy (SEM) is used to investigate the types of RUM tools wear.
2. Materials and Method
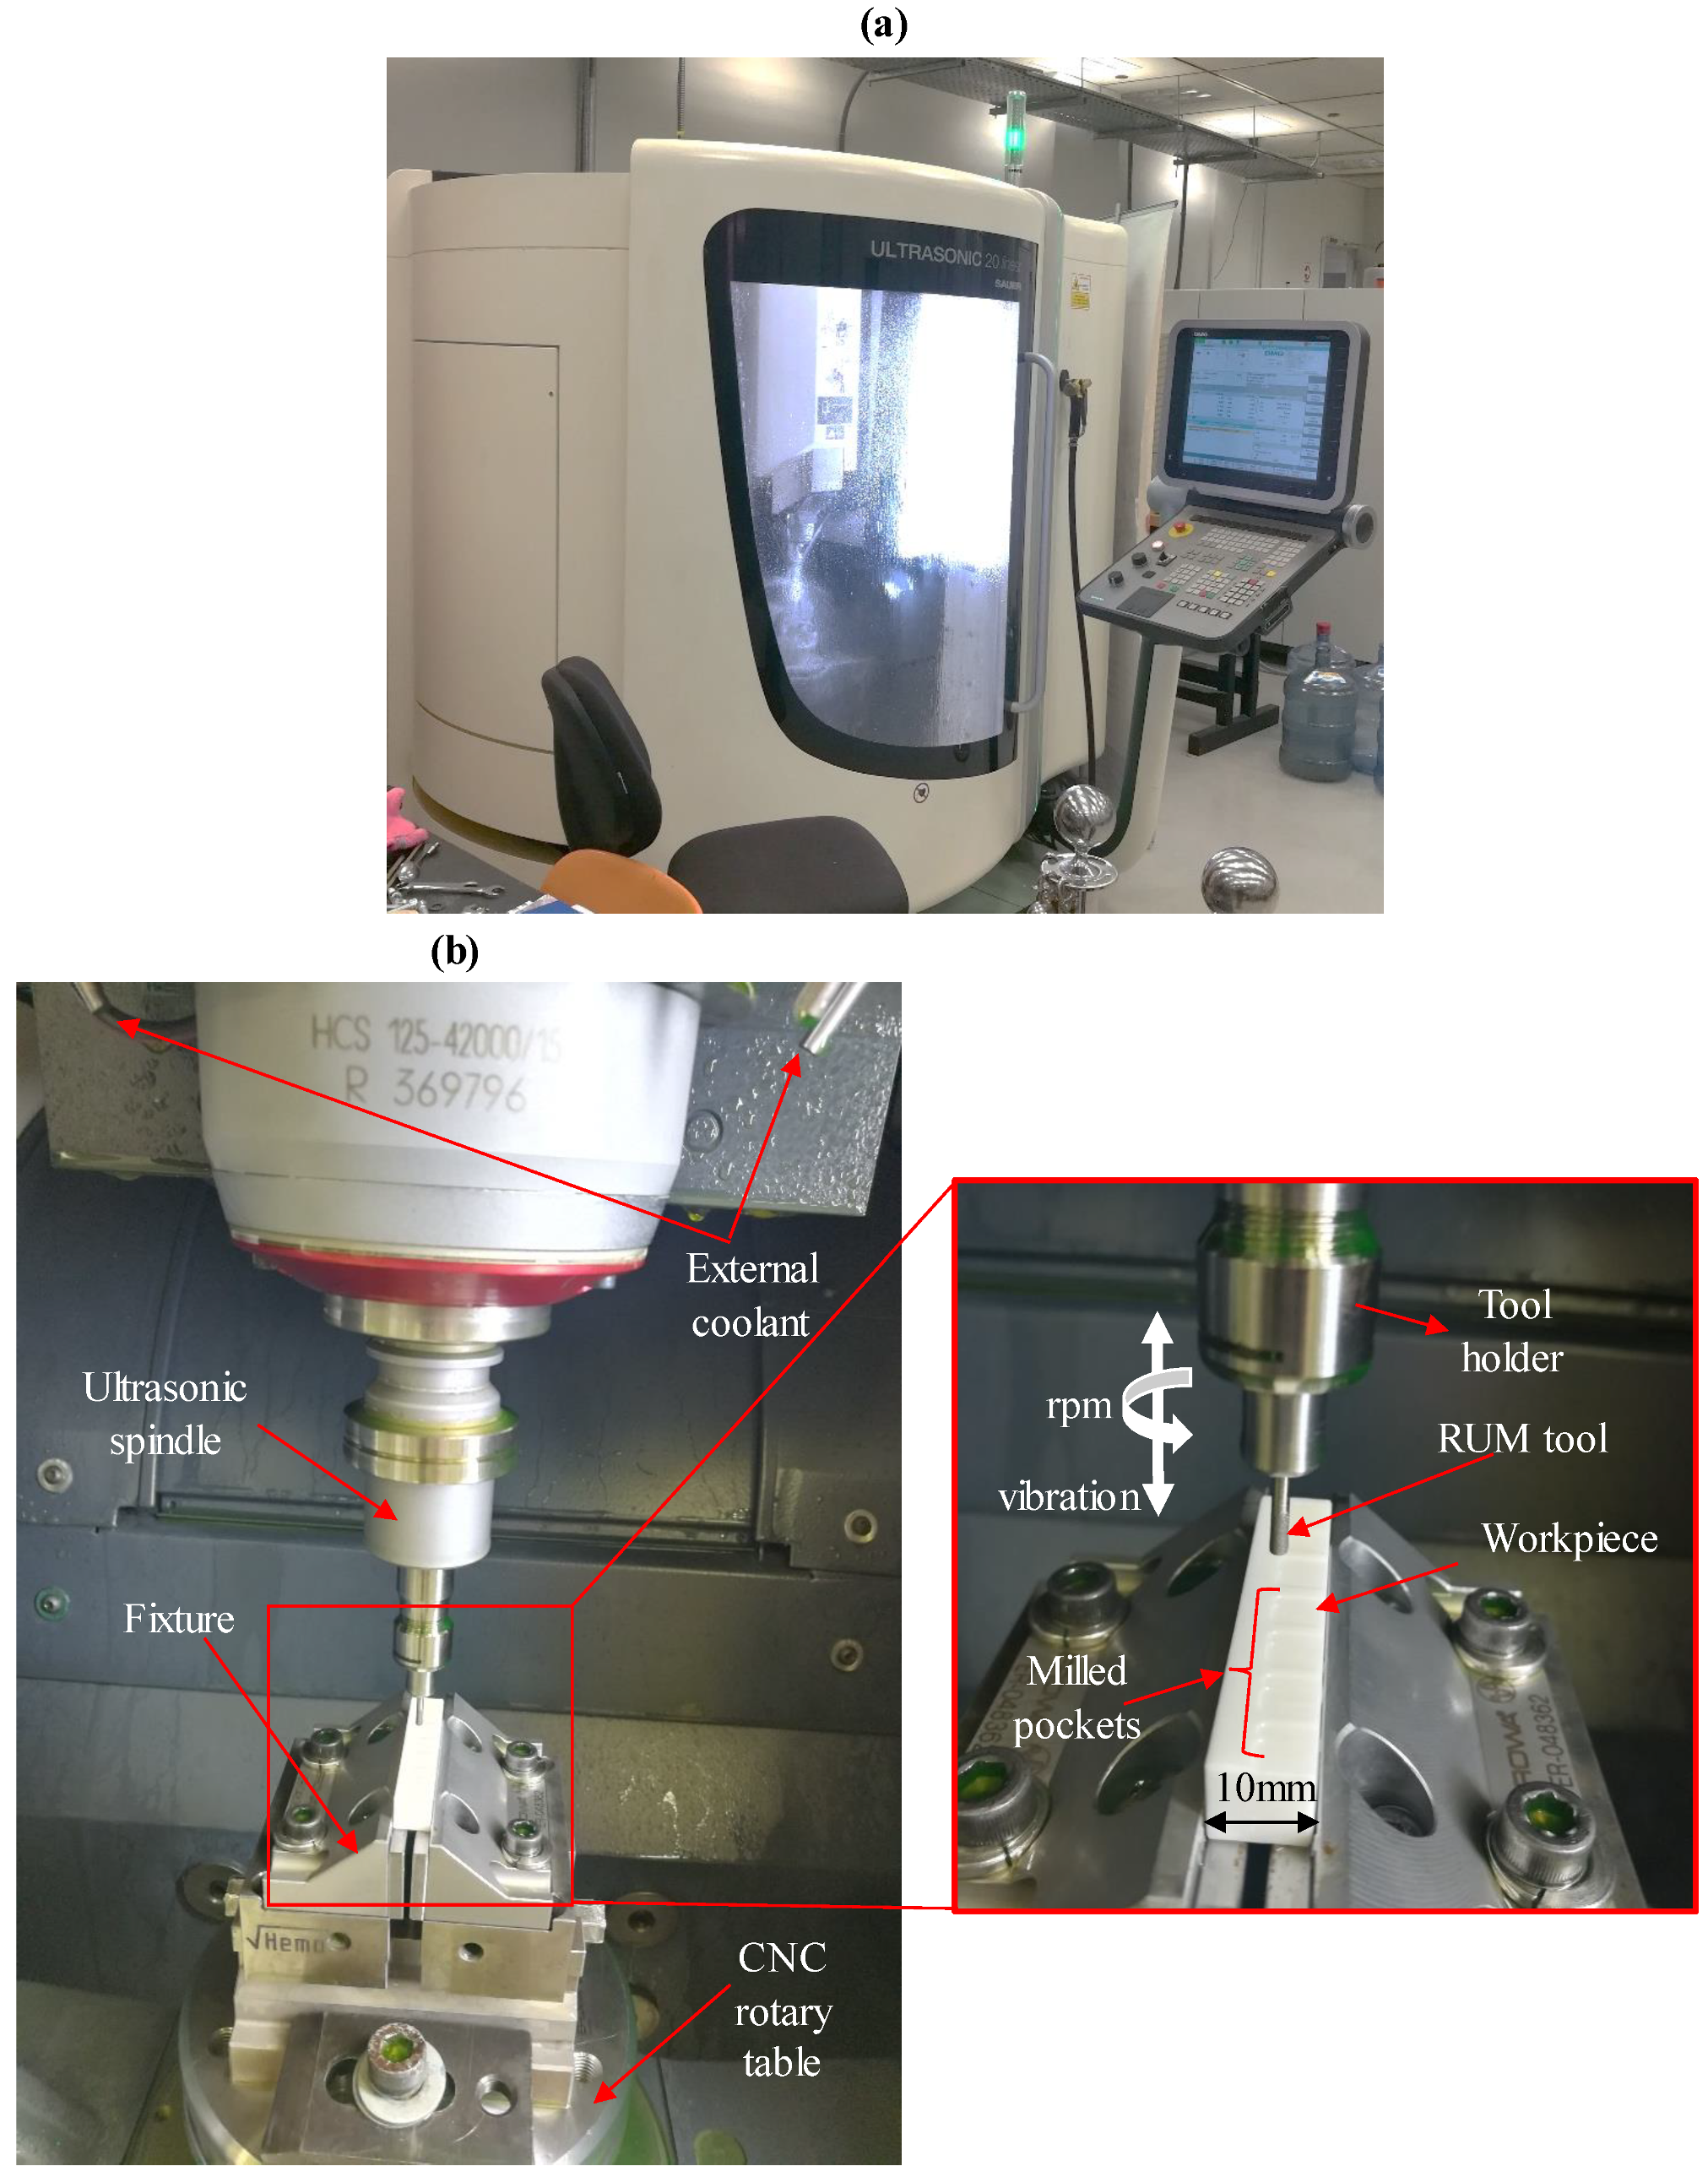
DMG ultrasonic 20 linear is employed in this study to conduct the experiments. It is a five-axis process in which both precision milling and RUM can be achieved (see Figure 1a). The main characteristics of the used machine are listed in Table 1. The schematic diagram of the used RUM is shown in Figure 1b.

Figure 1.
(a) DMG ultrasonic machine used in this study and (b) experimental setup.

Table 1.
Rotary ultrasonic machining (RUM) characteristics.
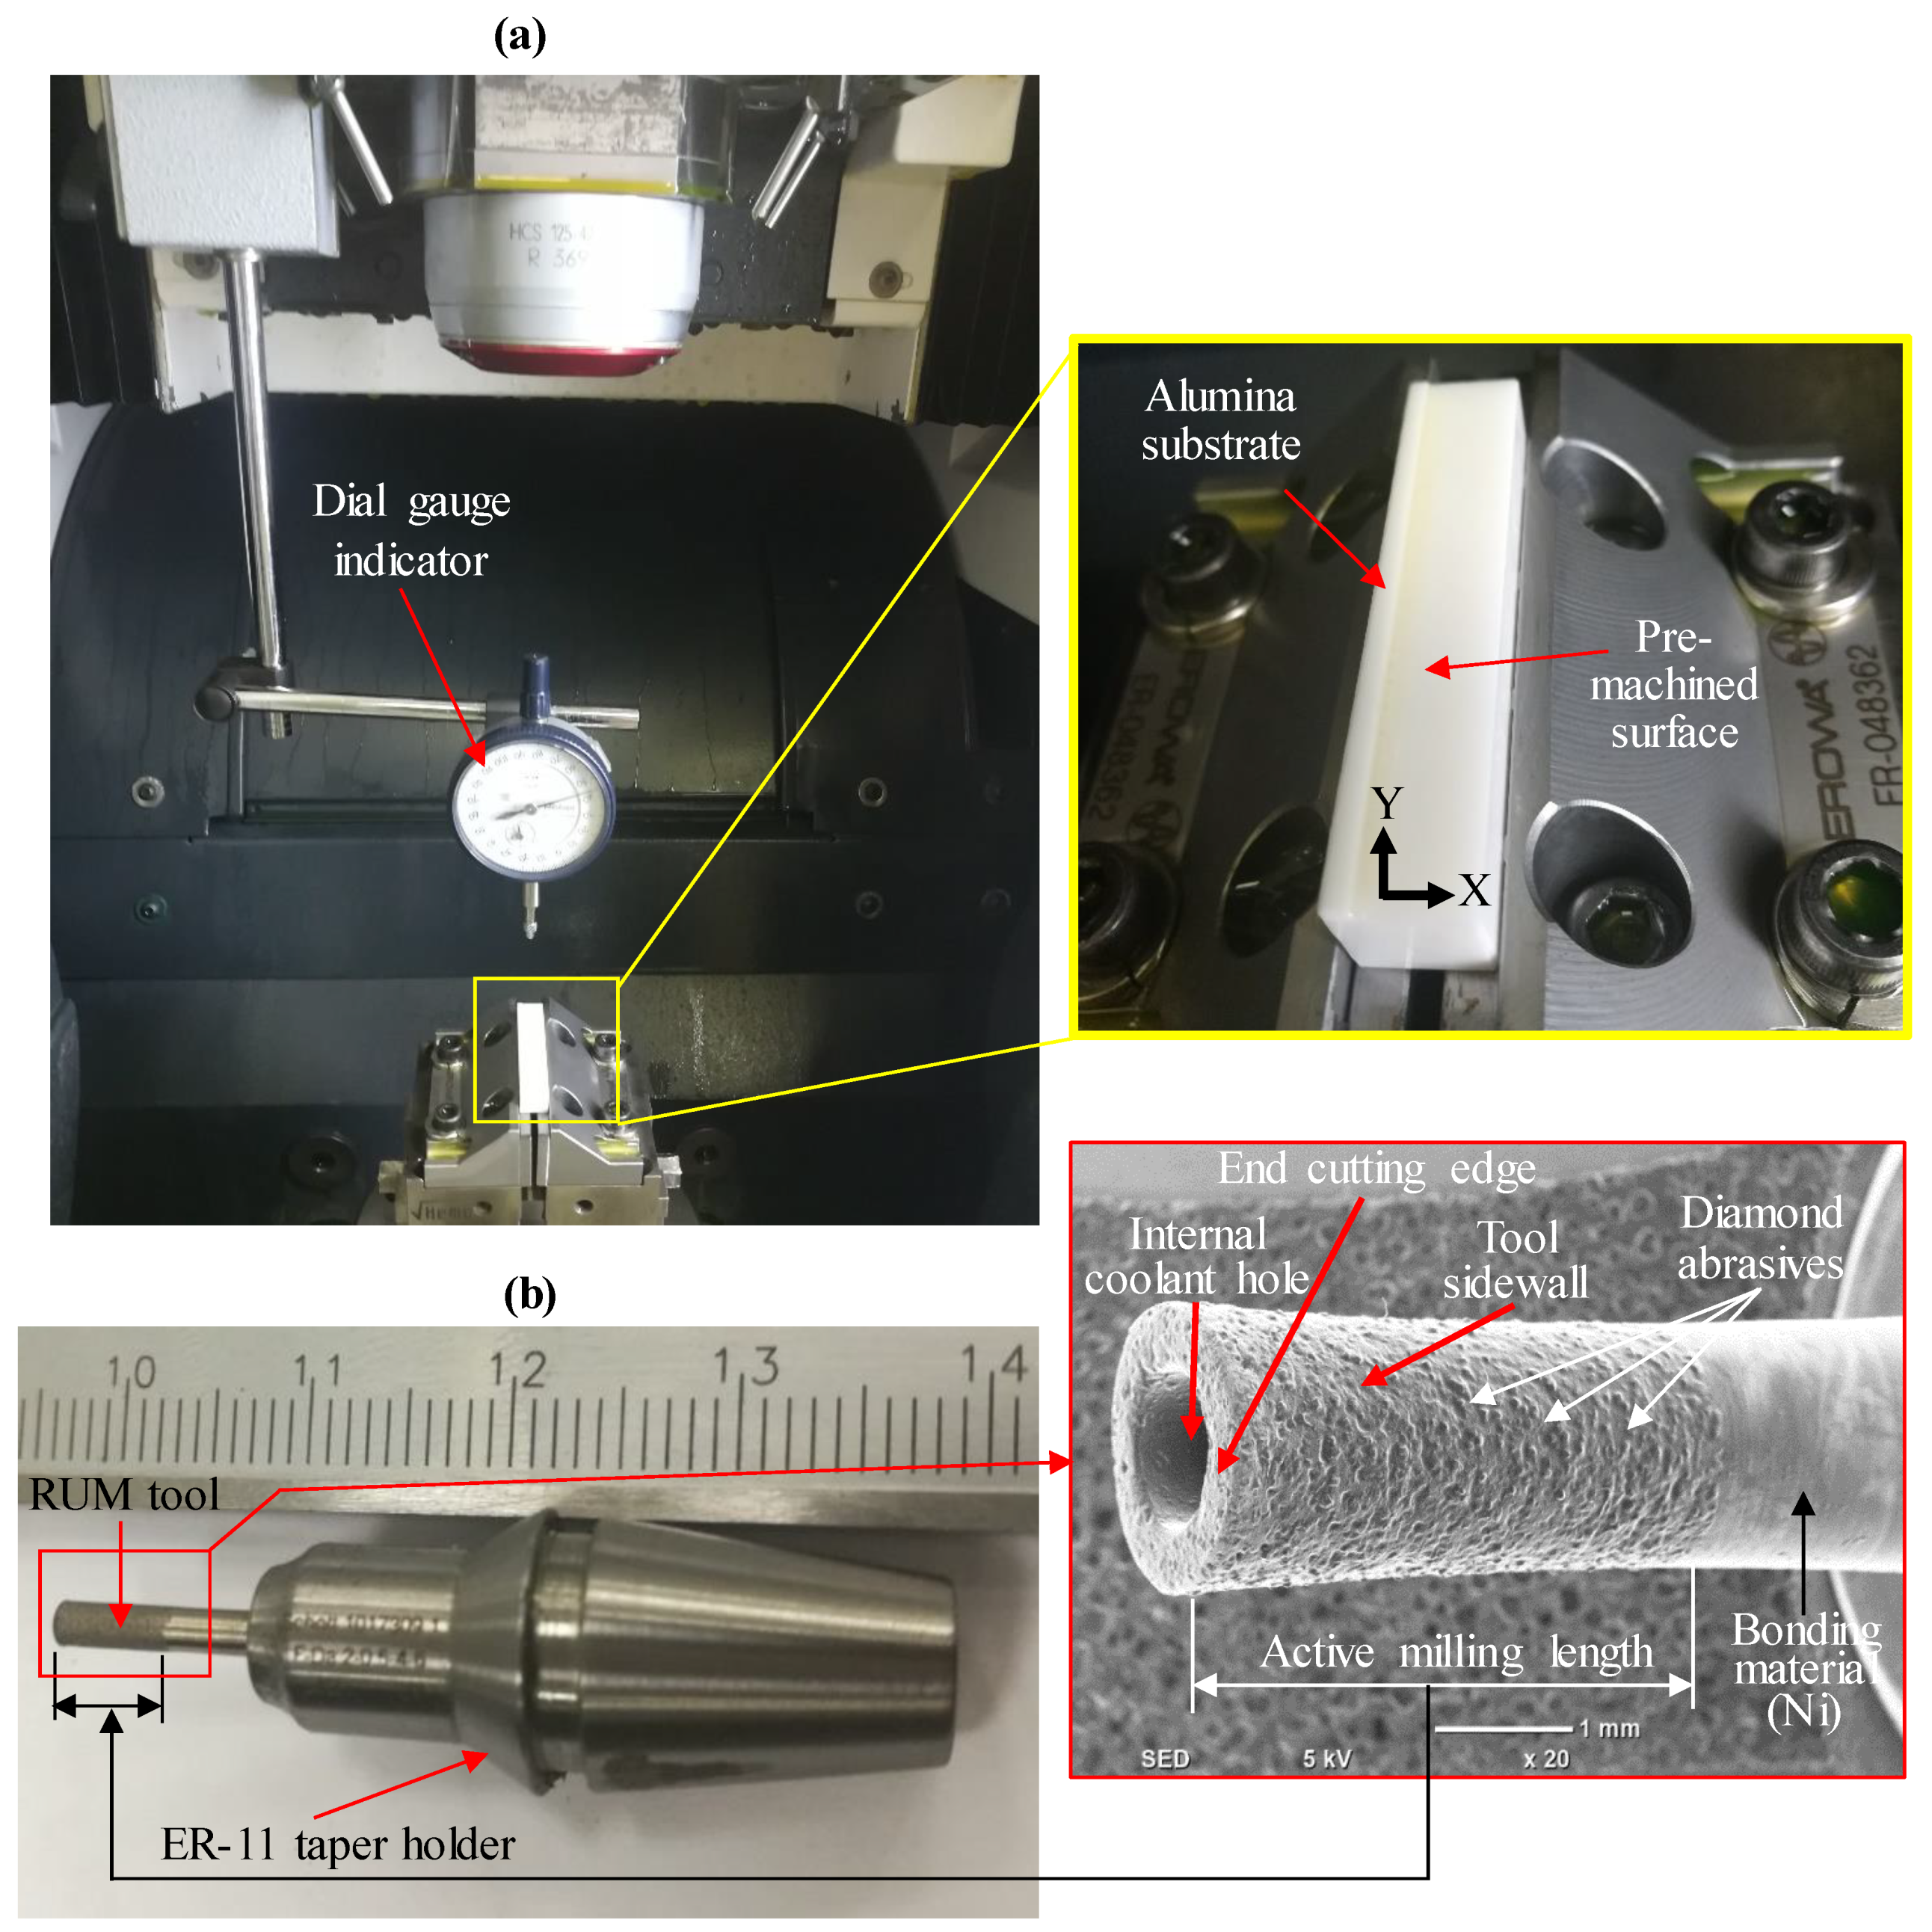
In order to remove the chamfer edges from the workpiece, face milling was previously conducted the surface flatness was measured by the dial gauge indicator (see Figure 2a). RUM tools provided by Schott Company, Germany are applied in the experiments as shown in Figure 2b. The used tools are nickel-based materials bonded with diamond abrasives with a mean diameter size of ≈44 µm (D46, mesh size of 325/400), which are recommended by the Schott Company for machining smooth surfaces on ceramic-based materials. All specifications of the used tools can be found in Table 2. The size of the micro-pockets milled in this research was 6 mm (length) × 6 mm (width) × 0.3 mm (depth), as shown in Figure 1b. The material adopted in the current study was alumina (Al2O3 99.99%) from CeramTec, Germany. It is a polycrystalline high purity alumina, which is mainly used in medical applications [30]. Other applications of the used alumina ceramic can include hybrid circuits, high-strength ceramic tools, wear-resistant, corrosion-resistant parts, etc. [31]. Each of the alumina samples was under the form of block dimension 50 × 50 × 10 mm3 in size. The specifications of the used Al2O3 material are listed in Table 3.
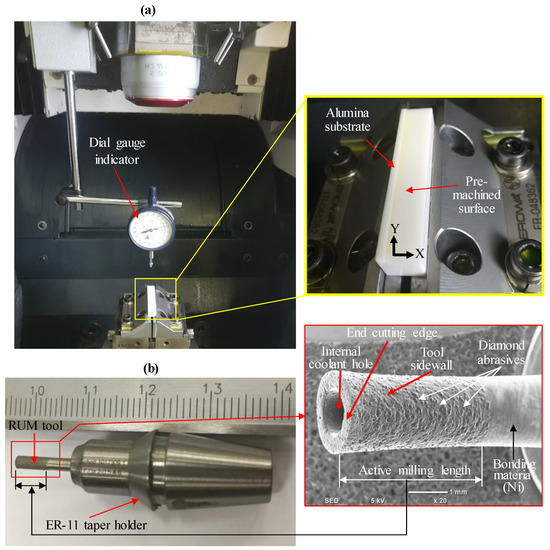
Figure 2.
(a) Measuring the workpiece flatness by using dial gauge and (b) RUM tool used for pocketing.

Table 2.
Specifications of the RUM tool used in this study.

Table 3.
Mechanical and thermal properties of Al2O3.
2.1. Experimental Procedure
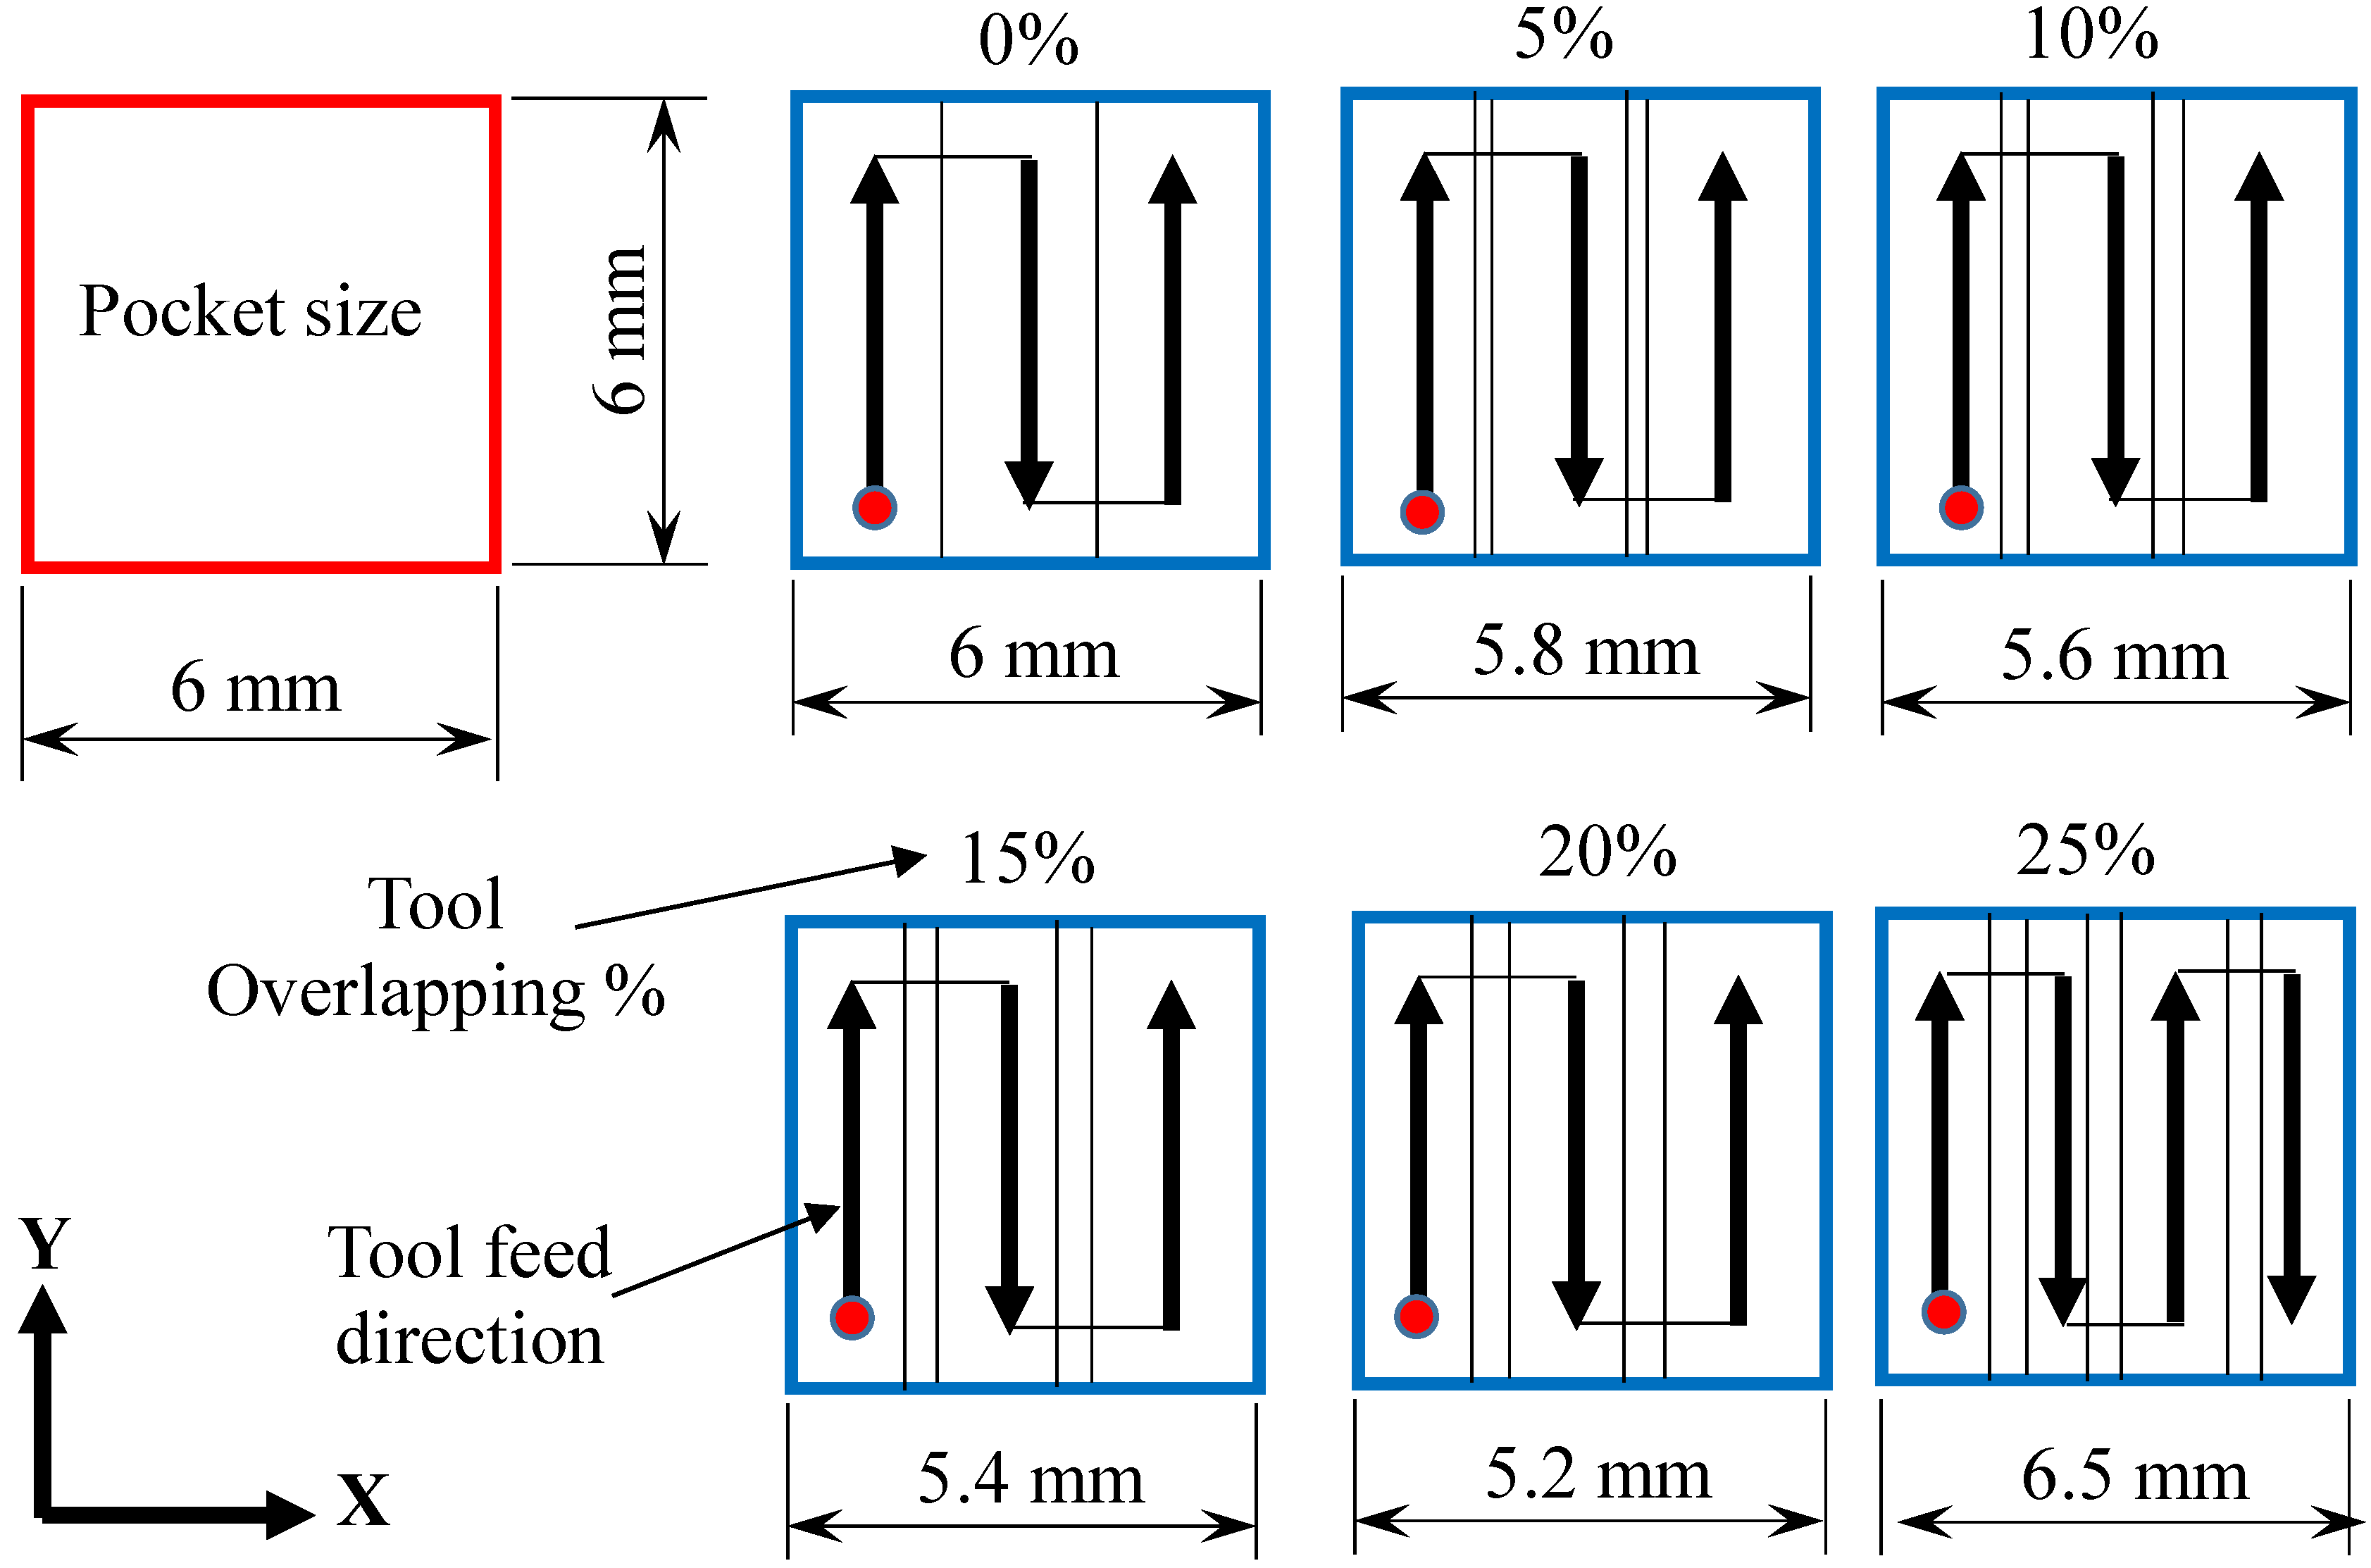
The experiments performed on the alumina (Al2O3) substrate were divided into two main tests, (i) tool overlapping test and (ii) tool path strategies test. In the tool overlapping test, the effect of several tool overlapping percentages (0%, 5%, 10%, 15%, 20% and 25%) on the surface quality and profile accuracy of the milled micro-pockets were examined. The tool overlapping was calculated as a percentage of the RUM tool diameter (2 mm). For example, the 10% overlap was equal to 0.2 mm ((10% × 2 mm)/100). Figure 3 shows the schematic diagram of the tool overlaps used in this test. It should be noted that surface roughness in terms of Ra and Rt, surface morphology and pockets profiles were the three outputs considered during the overlapping test because all the three outputs play a vital role in the micro-pockets functioning [32,33].
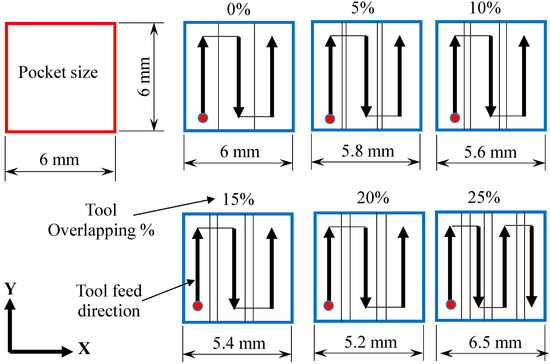
Figure 3.
Schematic of tool overlapping (0–25%).
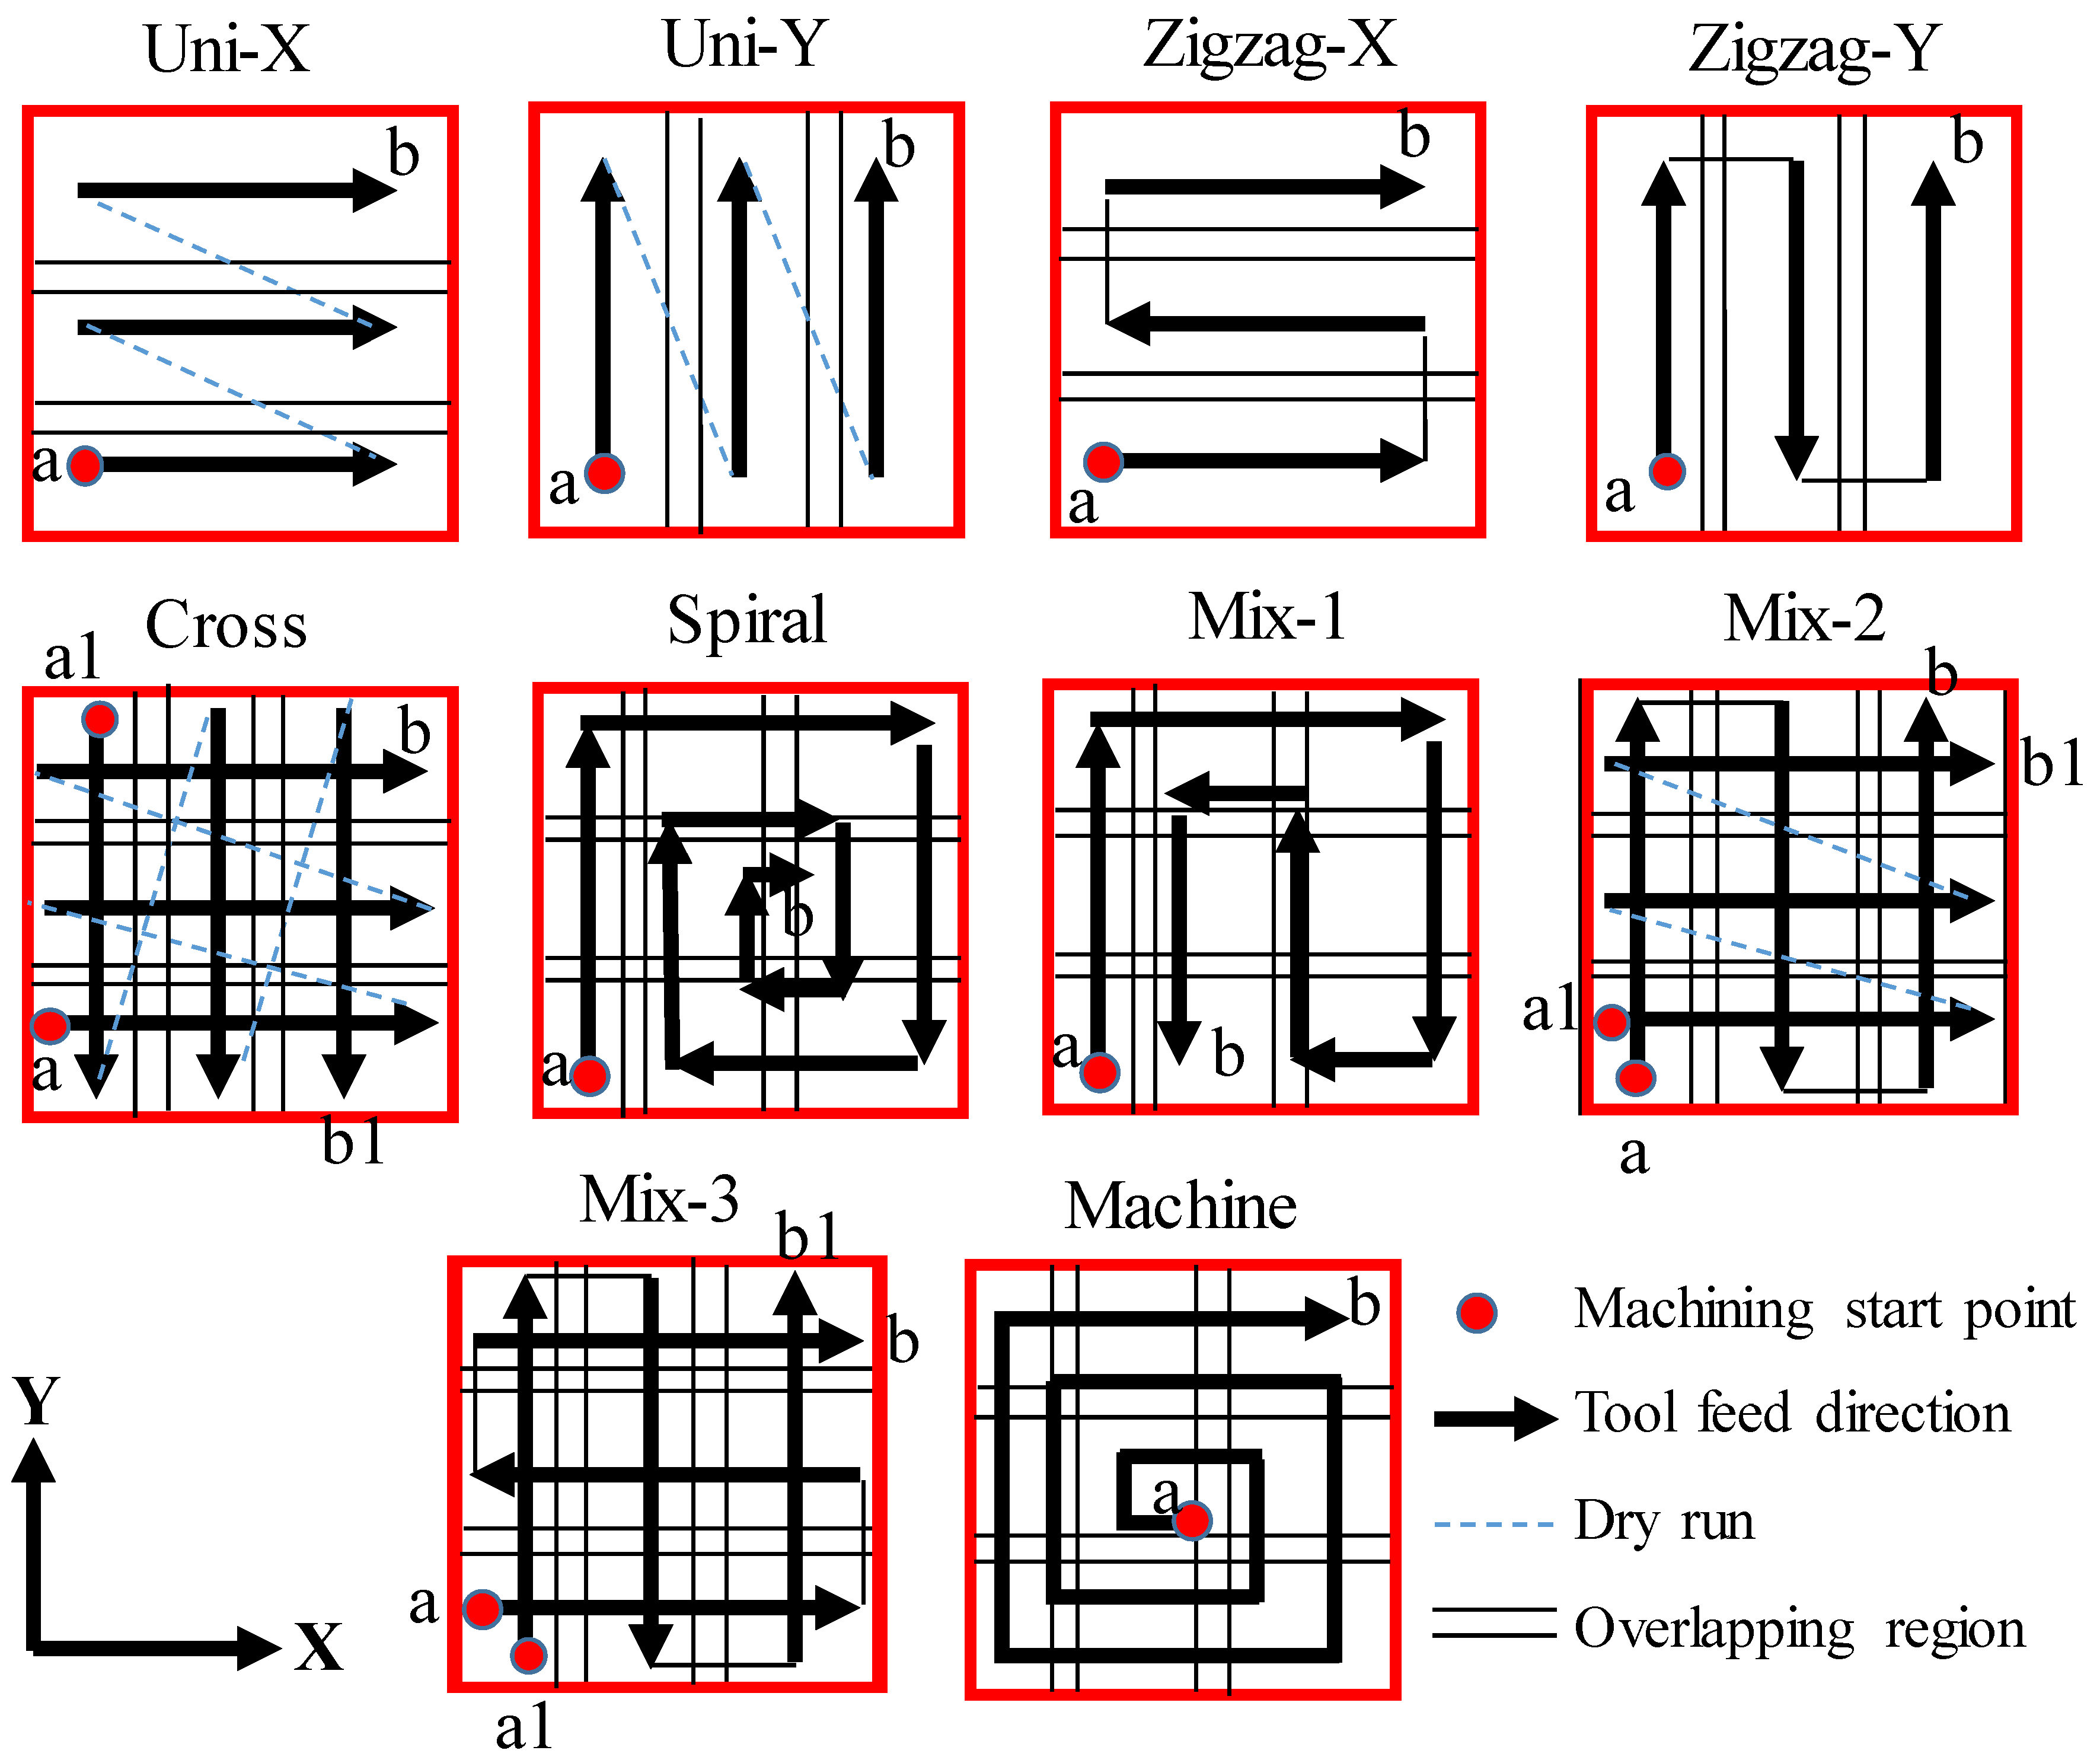
Based on the results of the overlapping test, the experiments of the tool strategies test were carried out by fixing the tool overlapping at 20%, which results in the best surface roughness and morphology as will be explained in the results and discussion section. In this test, the effects of tool path strategies on the surface quality, tool wear and material removal rate (MRR) of the milled pockets were analyzed. The tool path strategies considered in this study are illustrated in Figure 4. As mentioned earlier, the pocket’s depth = 0.3 mm can be achieved by removing two passes of 0.15 mm each (depth of cut = 0.15 mm). In Uni-X and Uni-Y strategies, the tool always moves in one direction (X-axis or Y-axis) from point a to point b for the first pass and repeat the same path movement for the second pass. Zigzag strategy means the tool moves in bi-direction (both X and Y-axes). In cross strategy, the tool moves in the X-axis direction for the first pass (from point a to point b) and then moves in the Y-axis direction for the second pass (from a1 to b1). In the Mix2 strategy, the first pass of the tool follows the zigzag path (from a to b) while the second pass follows a uni-x strategy (from a1 to b1). The tool movement in the Mix3 strategy follows zigzag X for the first pass (from a to b) and Zigzag Y for the second pass (from a1 to b1). Machine strategy is the strategy built in the RUM Siemens controller for milling the pocket feature. The tool paths of the remaining strategies (Spiral and Mix-1) can be observed by following the direction of the arrow in schematic diagrams in Figure 4. The range of the machining conditions (see Table 4) was selected based on trial experiments and guidance taken from previous studies reported in the machining of alumina materials by using RUM [14,15,17].

Figure 4.
Schematic of the RUM tool path strategies.

Table 4.
Machining conditions adopted in this study.
2.2. Measurement Procedure
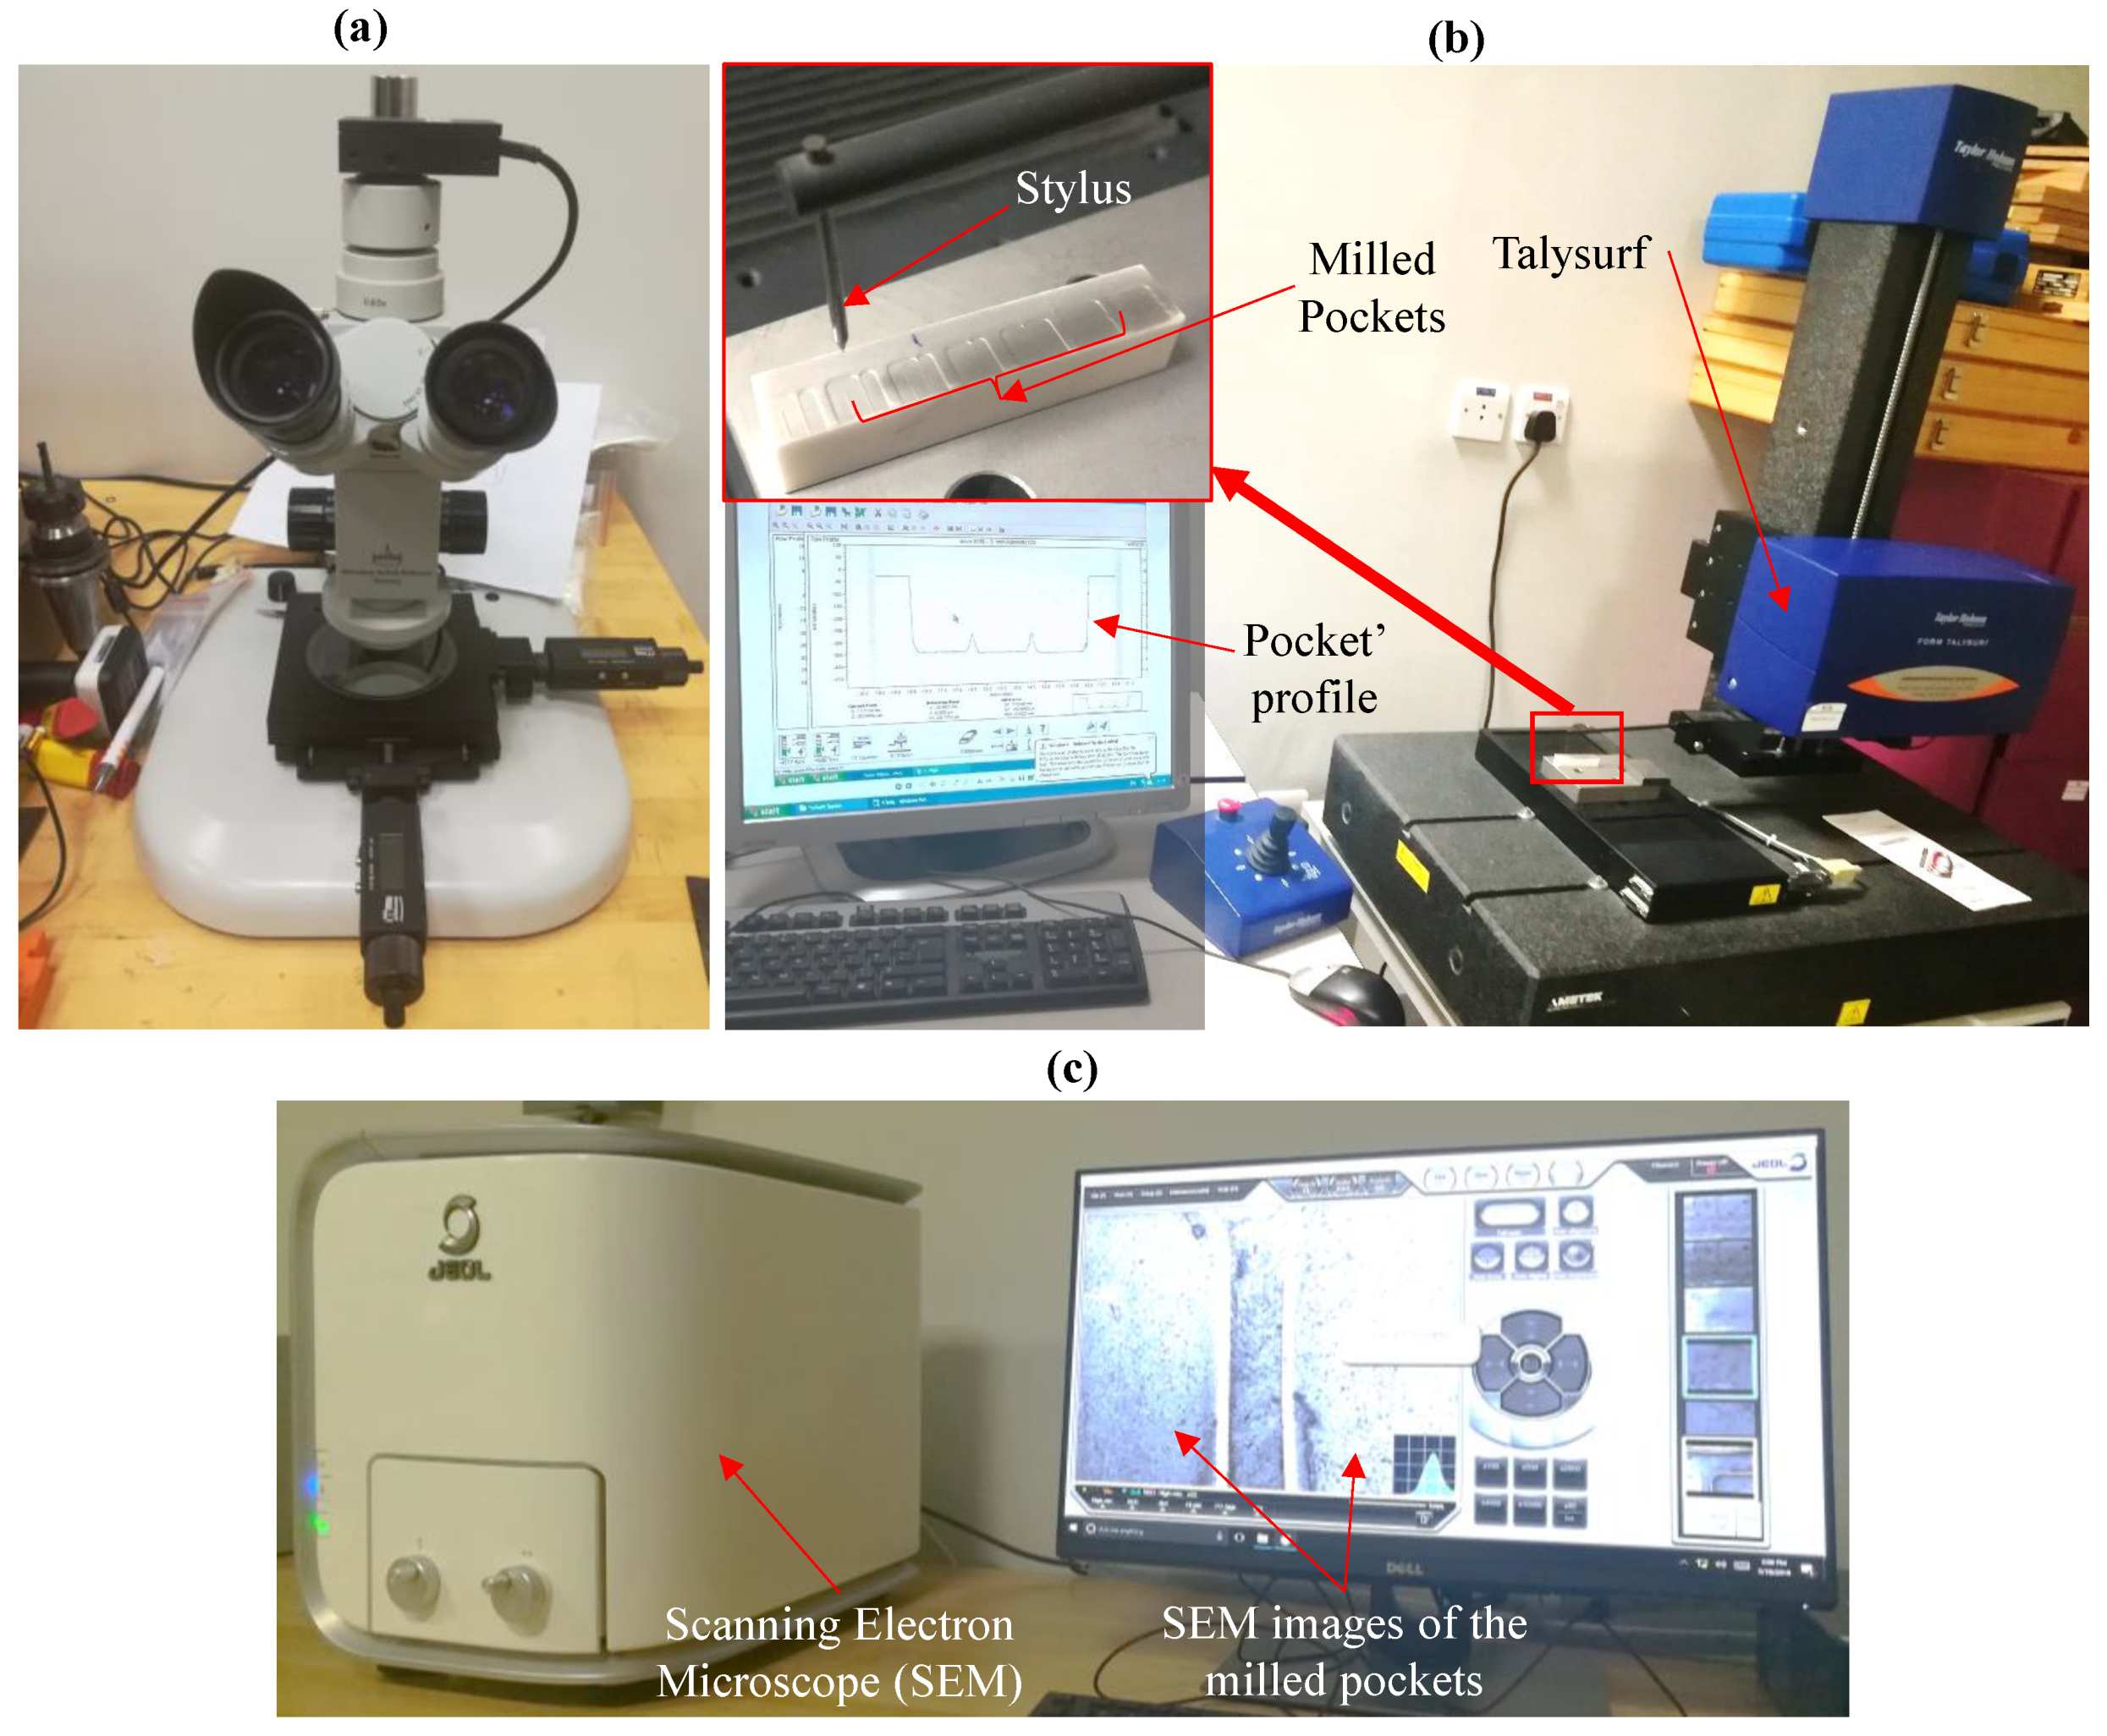
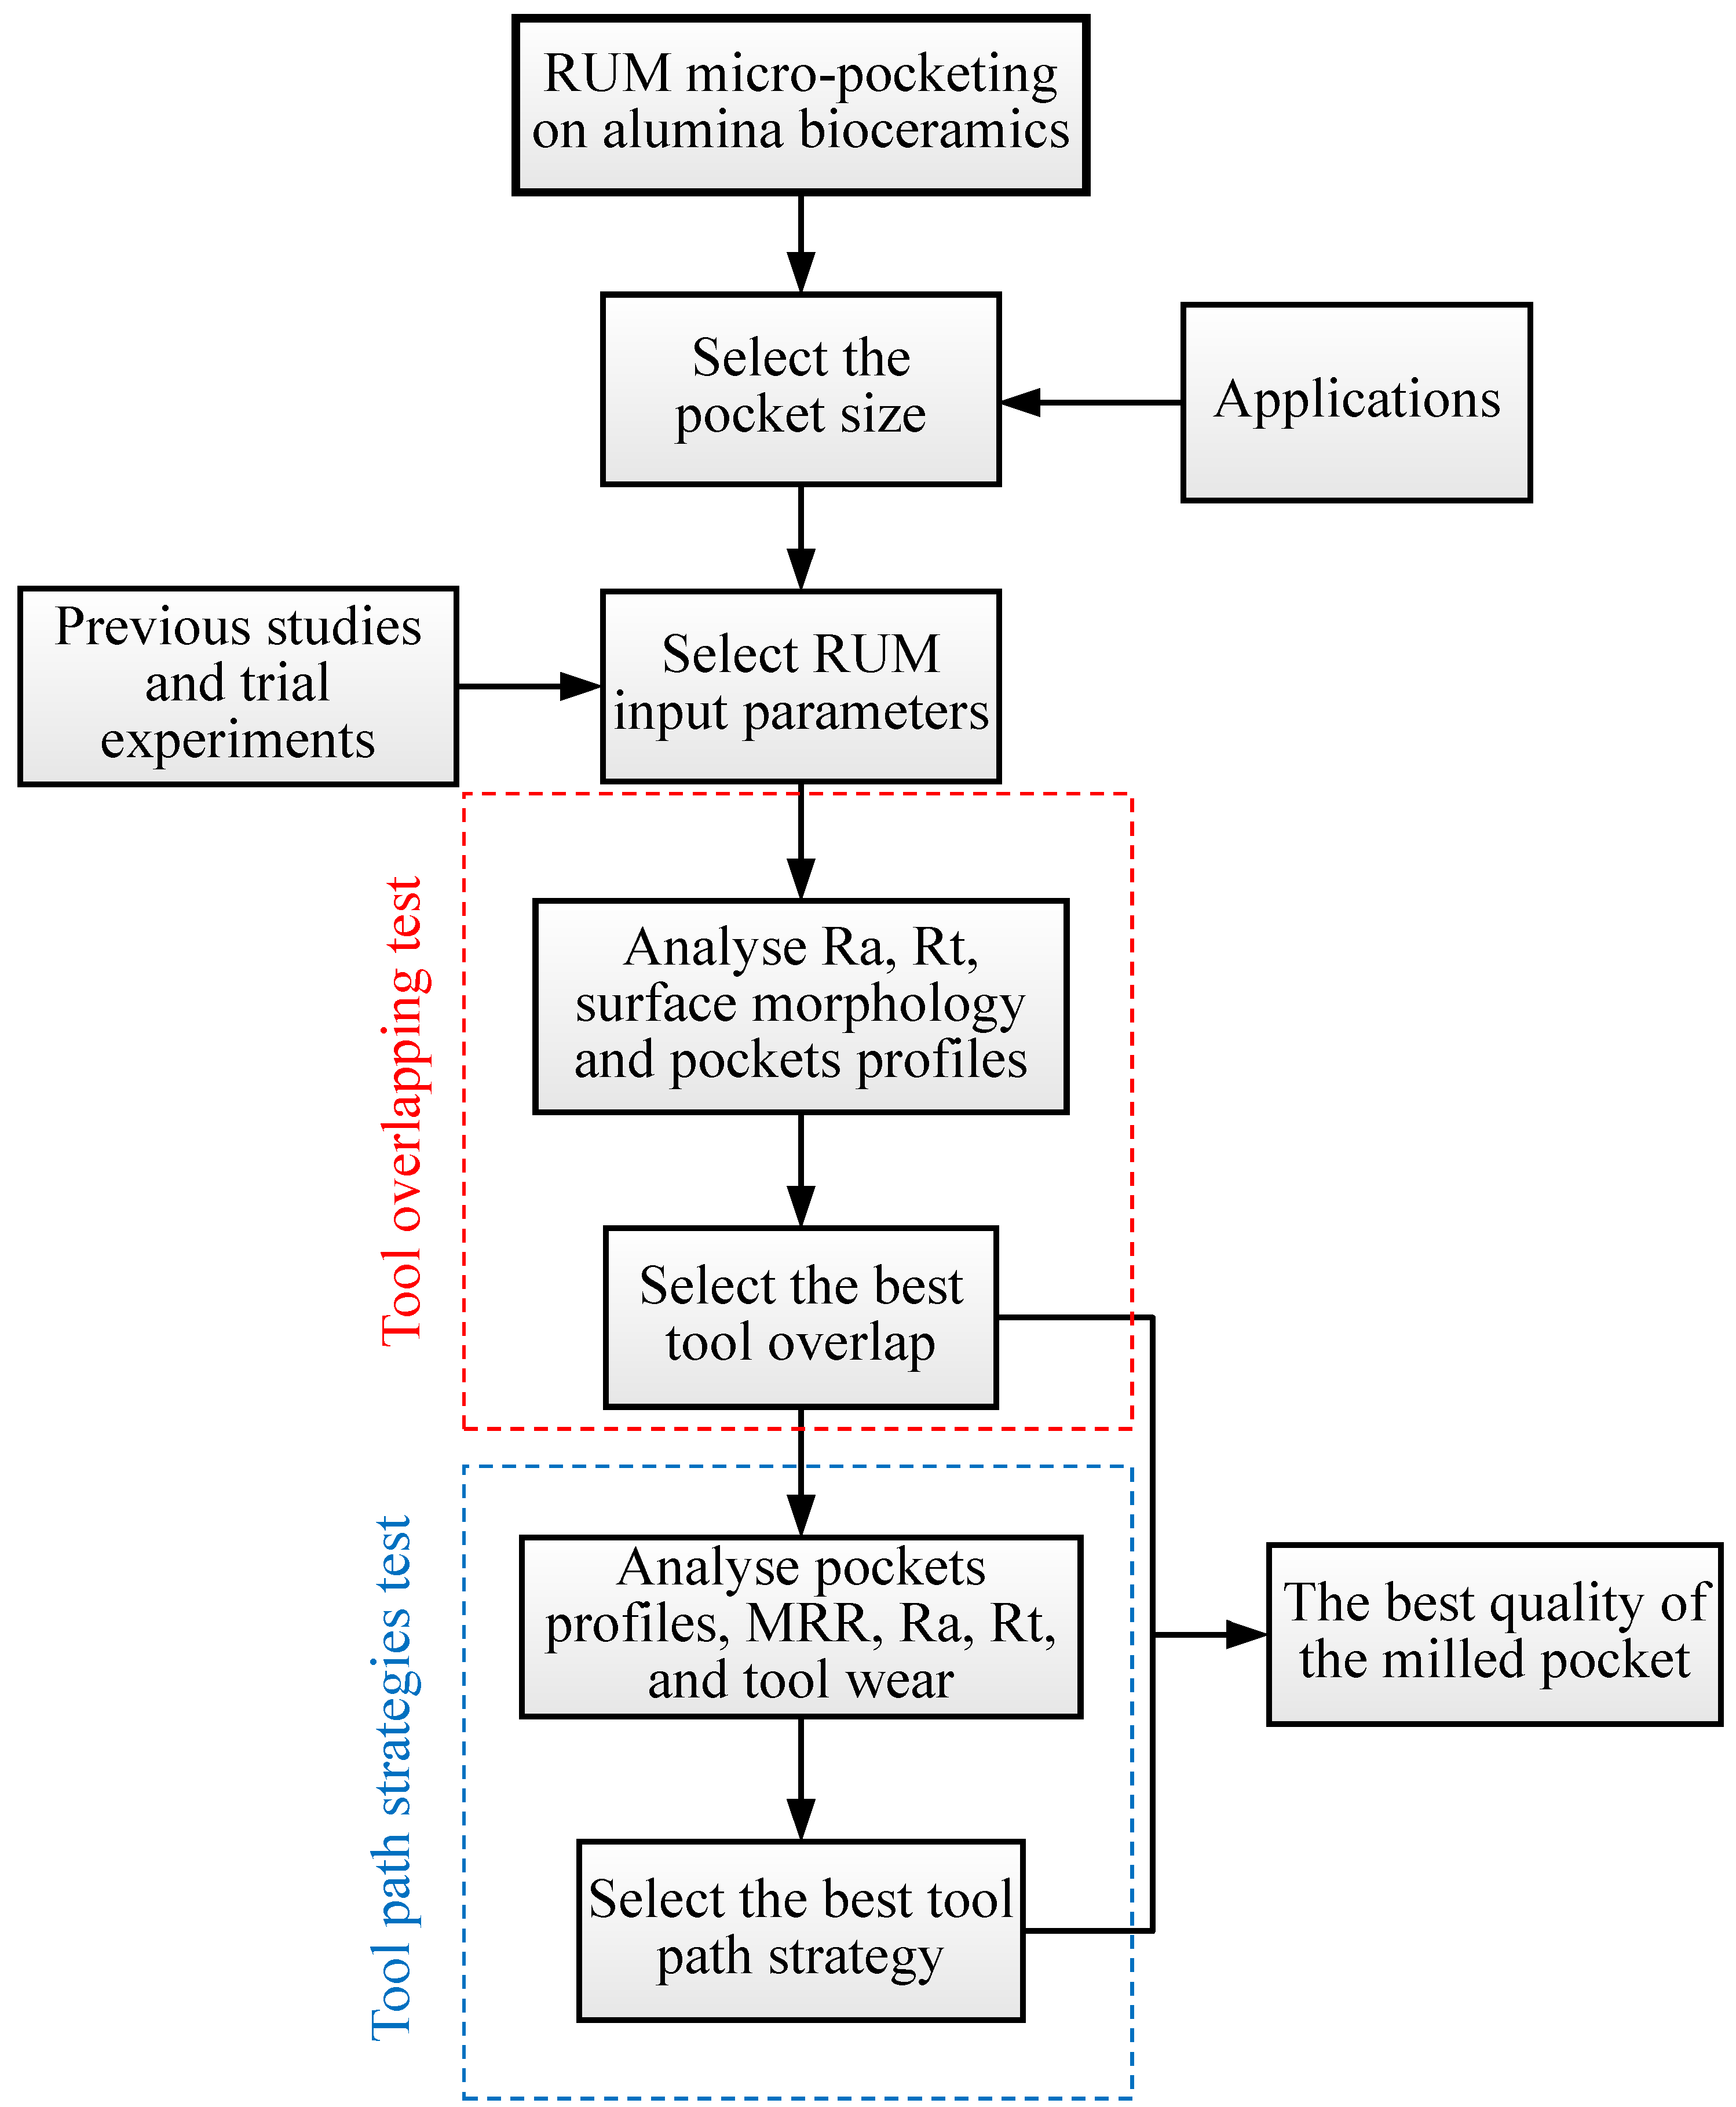
In order to measure the dimensions of the fabricated pockets, optical microscopic images of the milled pockets were captured by using mikroskop technik rathenow from ASKANIA company- Germany (see Figure 5a). The pockets profiles and surface roughness were measured by using Talysurf 120 from Taylor-Hobson, Japan. Surface roughness (Ra and Rt) was measured across the tool feed direction of each pocket surface at six different locations with 4mm tracing length and cut–off 0.8 mm according to the ISO 4287:1997. The average of the six readings was used for analysis. Figure 5b depicts the measuring setup of the pockets profiles and the surface roughness. The surface morphology of the pockets was observed using SEM as shown in Figure 5c. SEM images were also taken for the new and used RUM tools to investigate the mechanisms of the tool wear. The MRR was measured by calculating the volume of the material removed divided by the actual machining time. Figure 6 shows the research methodology followed in the current study.

Figure 5.
Outputs measurement procedure: (a) optical microscope, (b) pockets profiles and surface roughness measuring set up, and (c) surface morphology measuring set up.
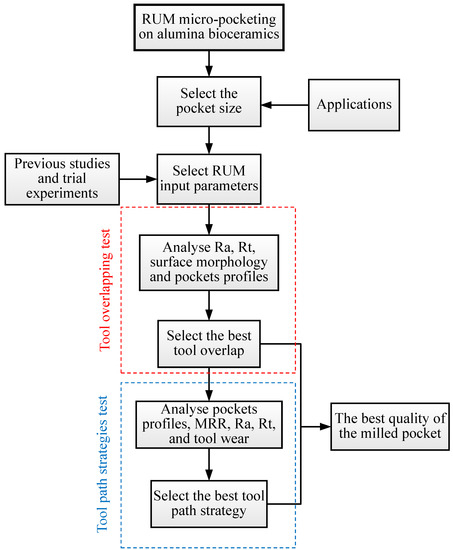
Figure 6.
Research methodology.
3. Results and Analysis
3.1. Tool Overlapping Results
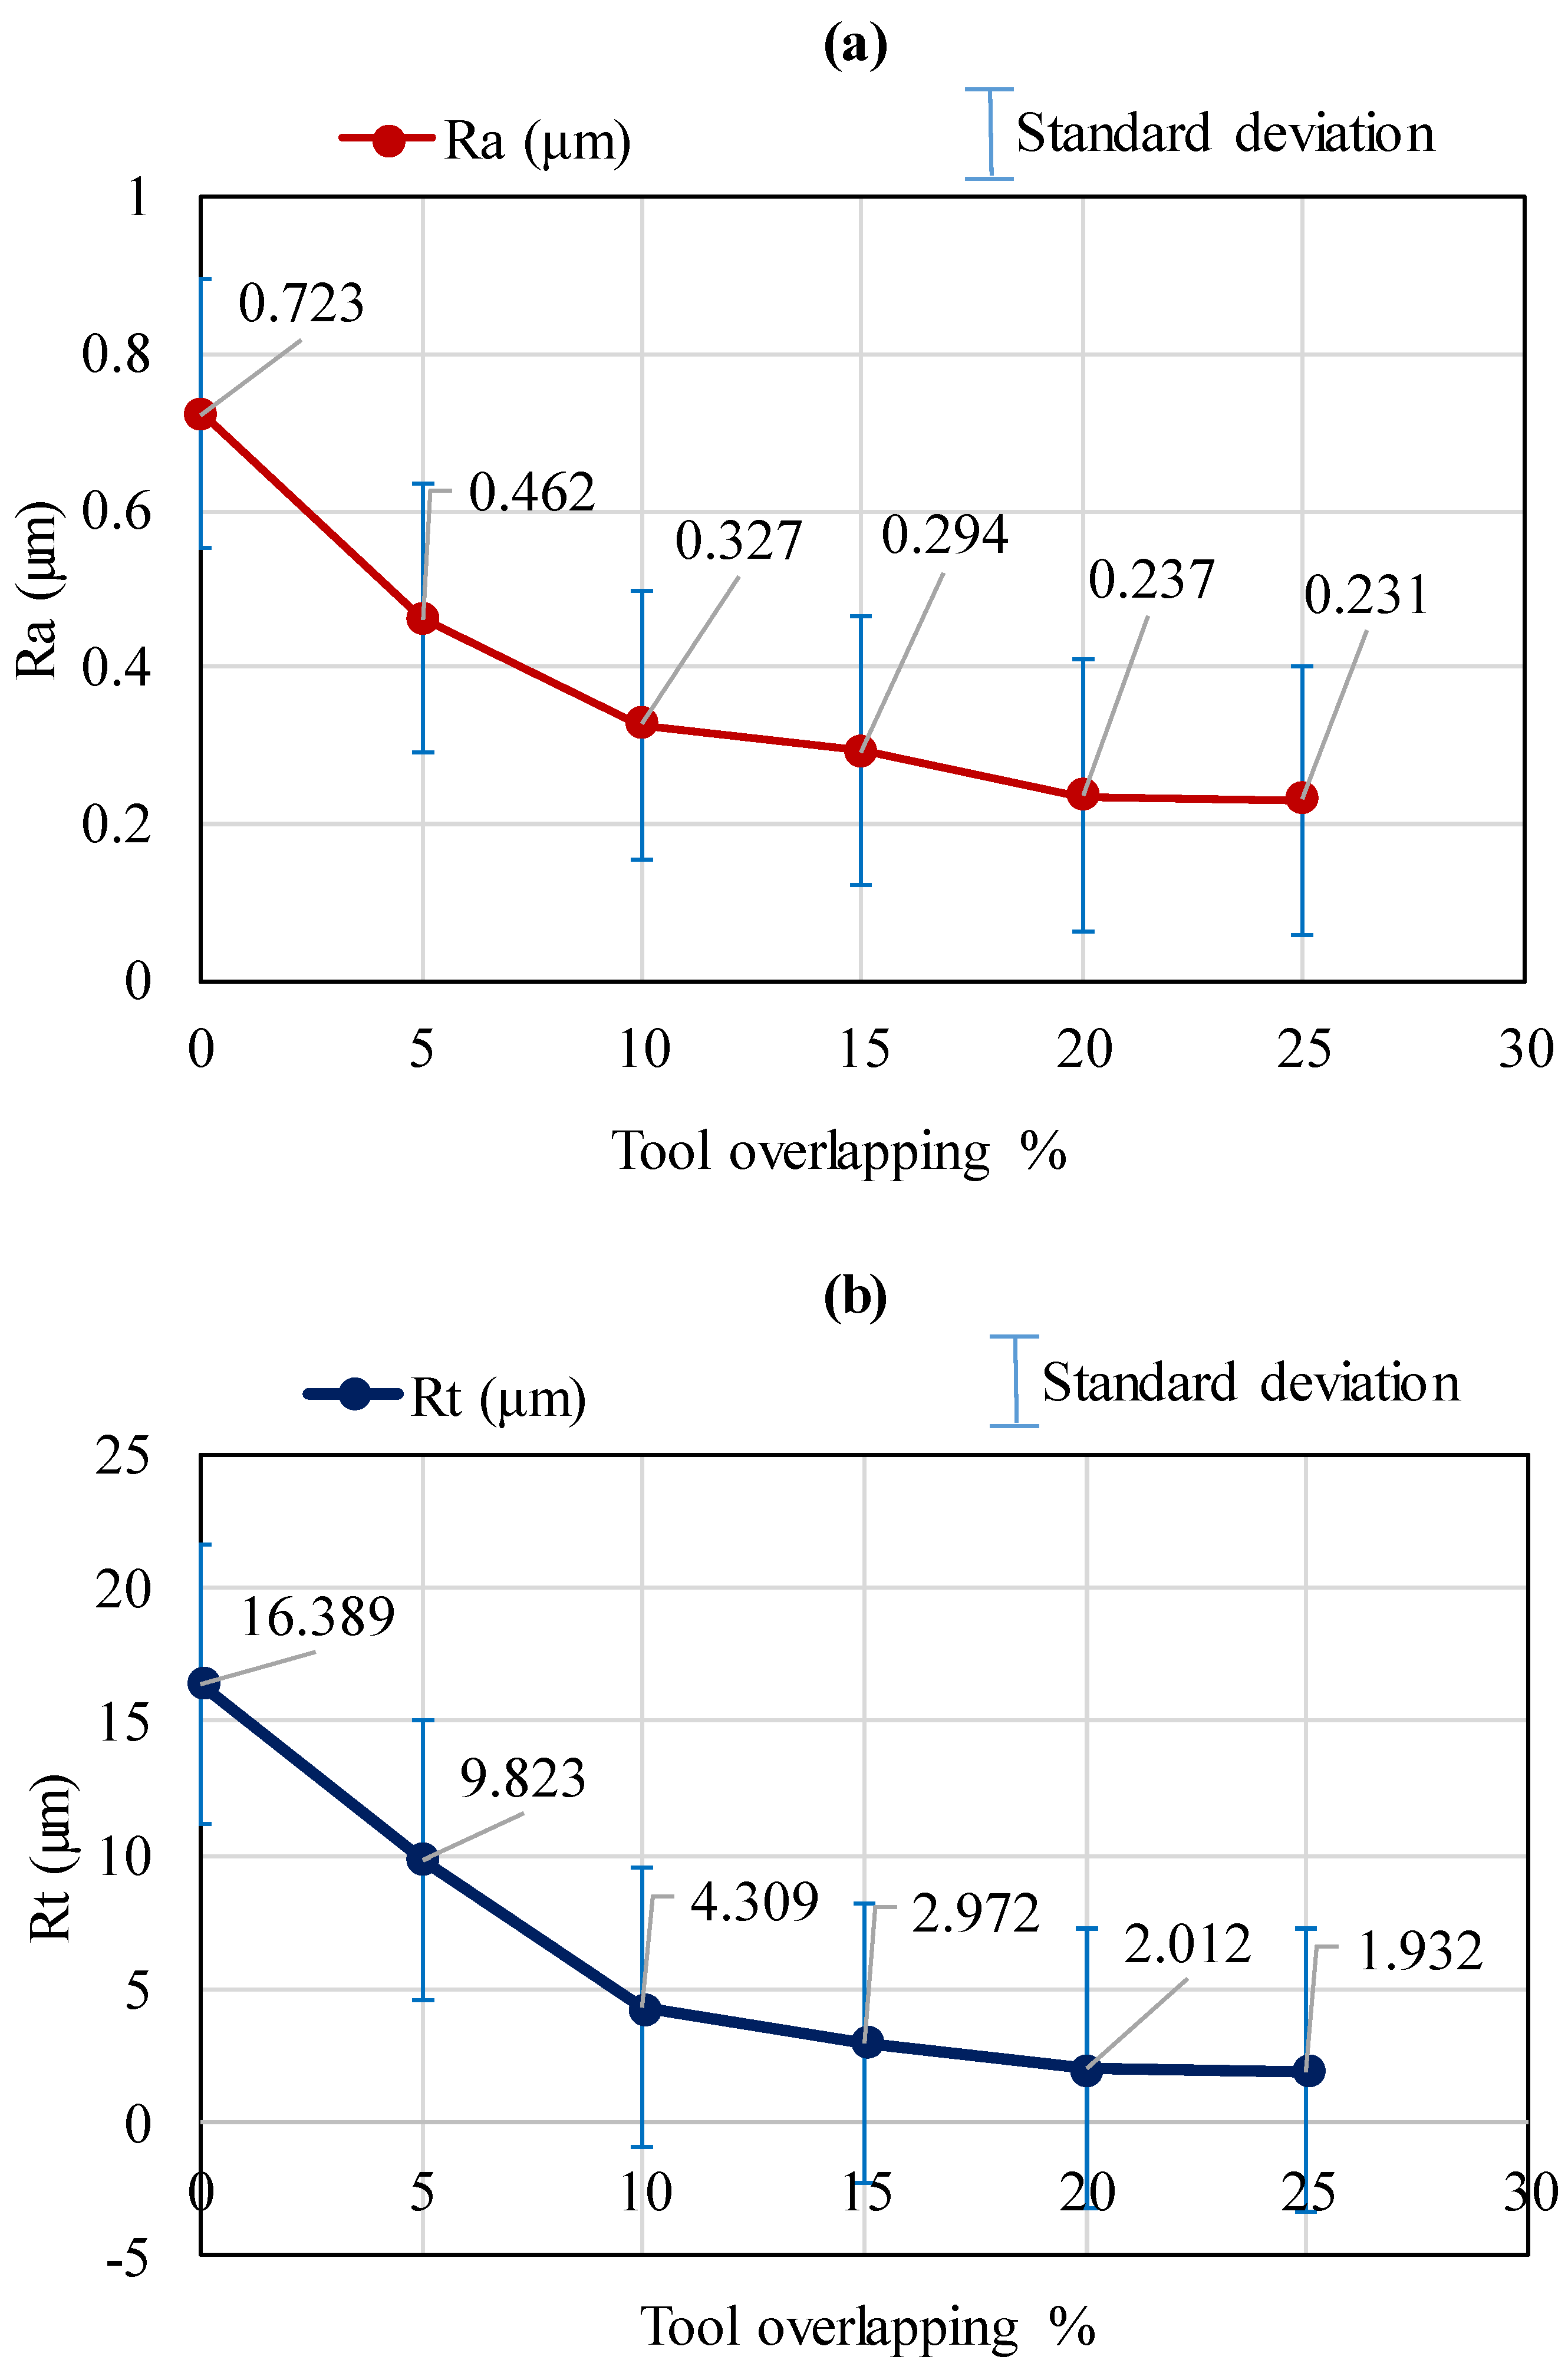
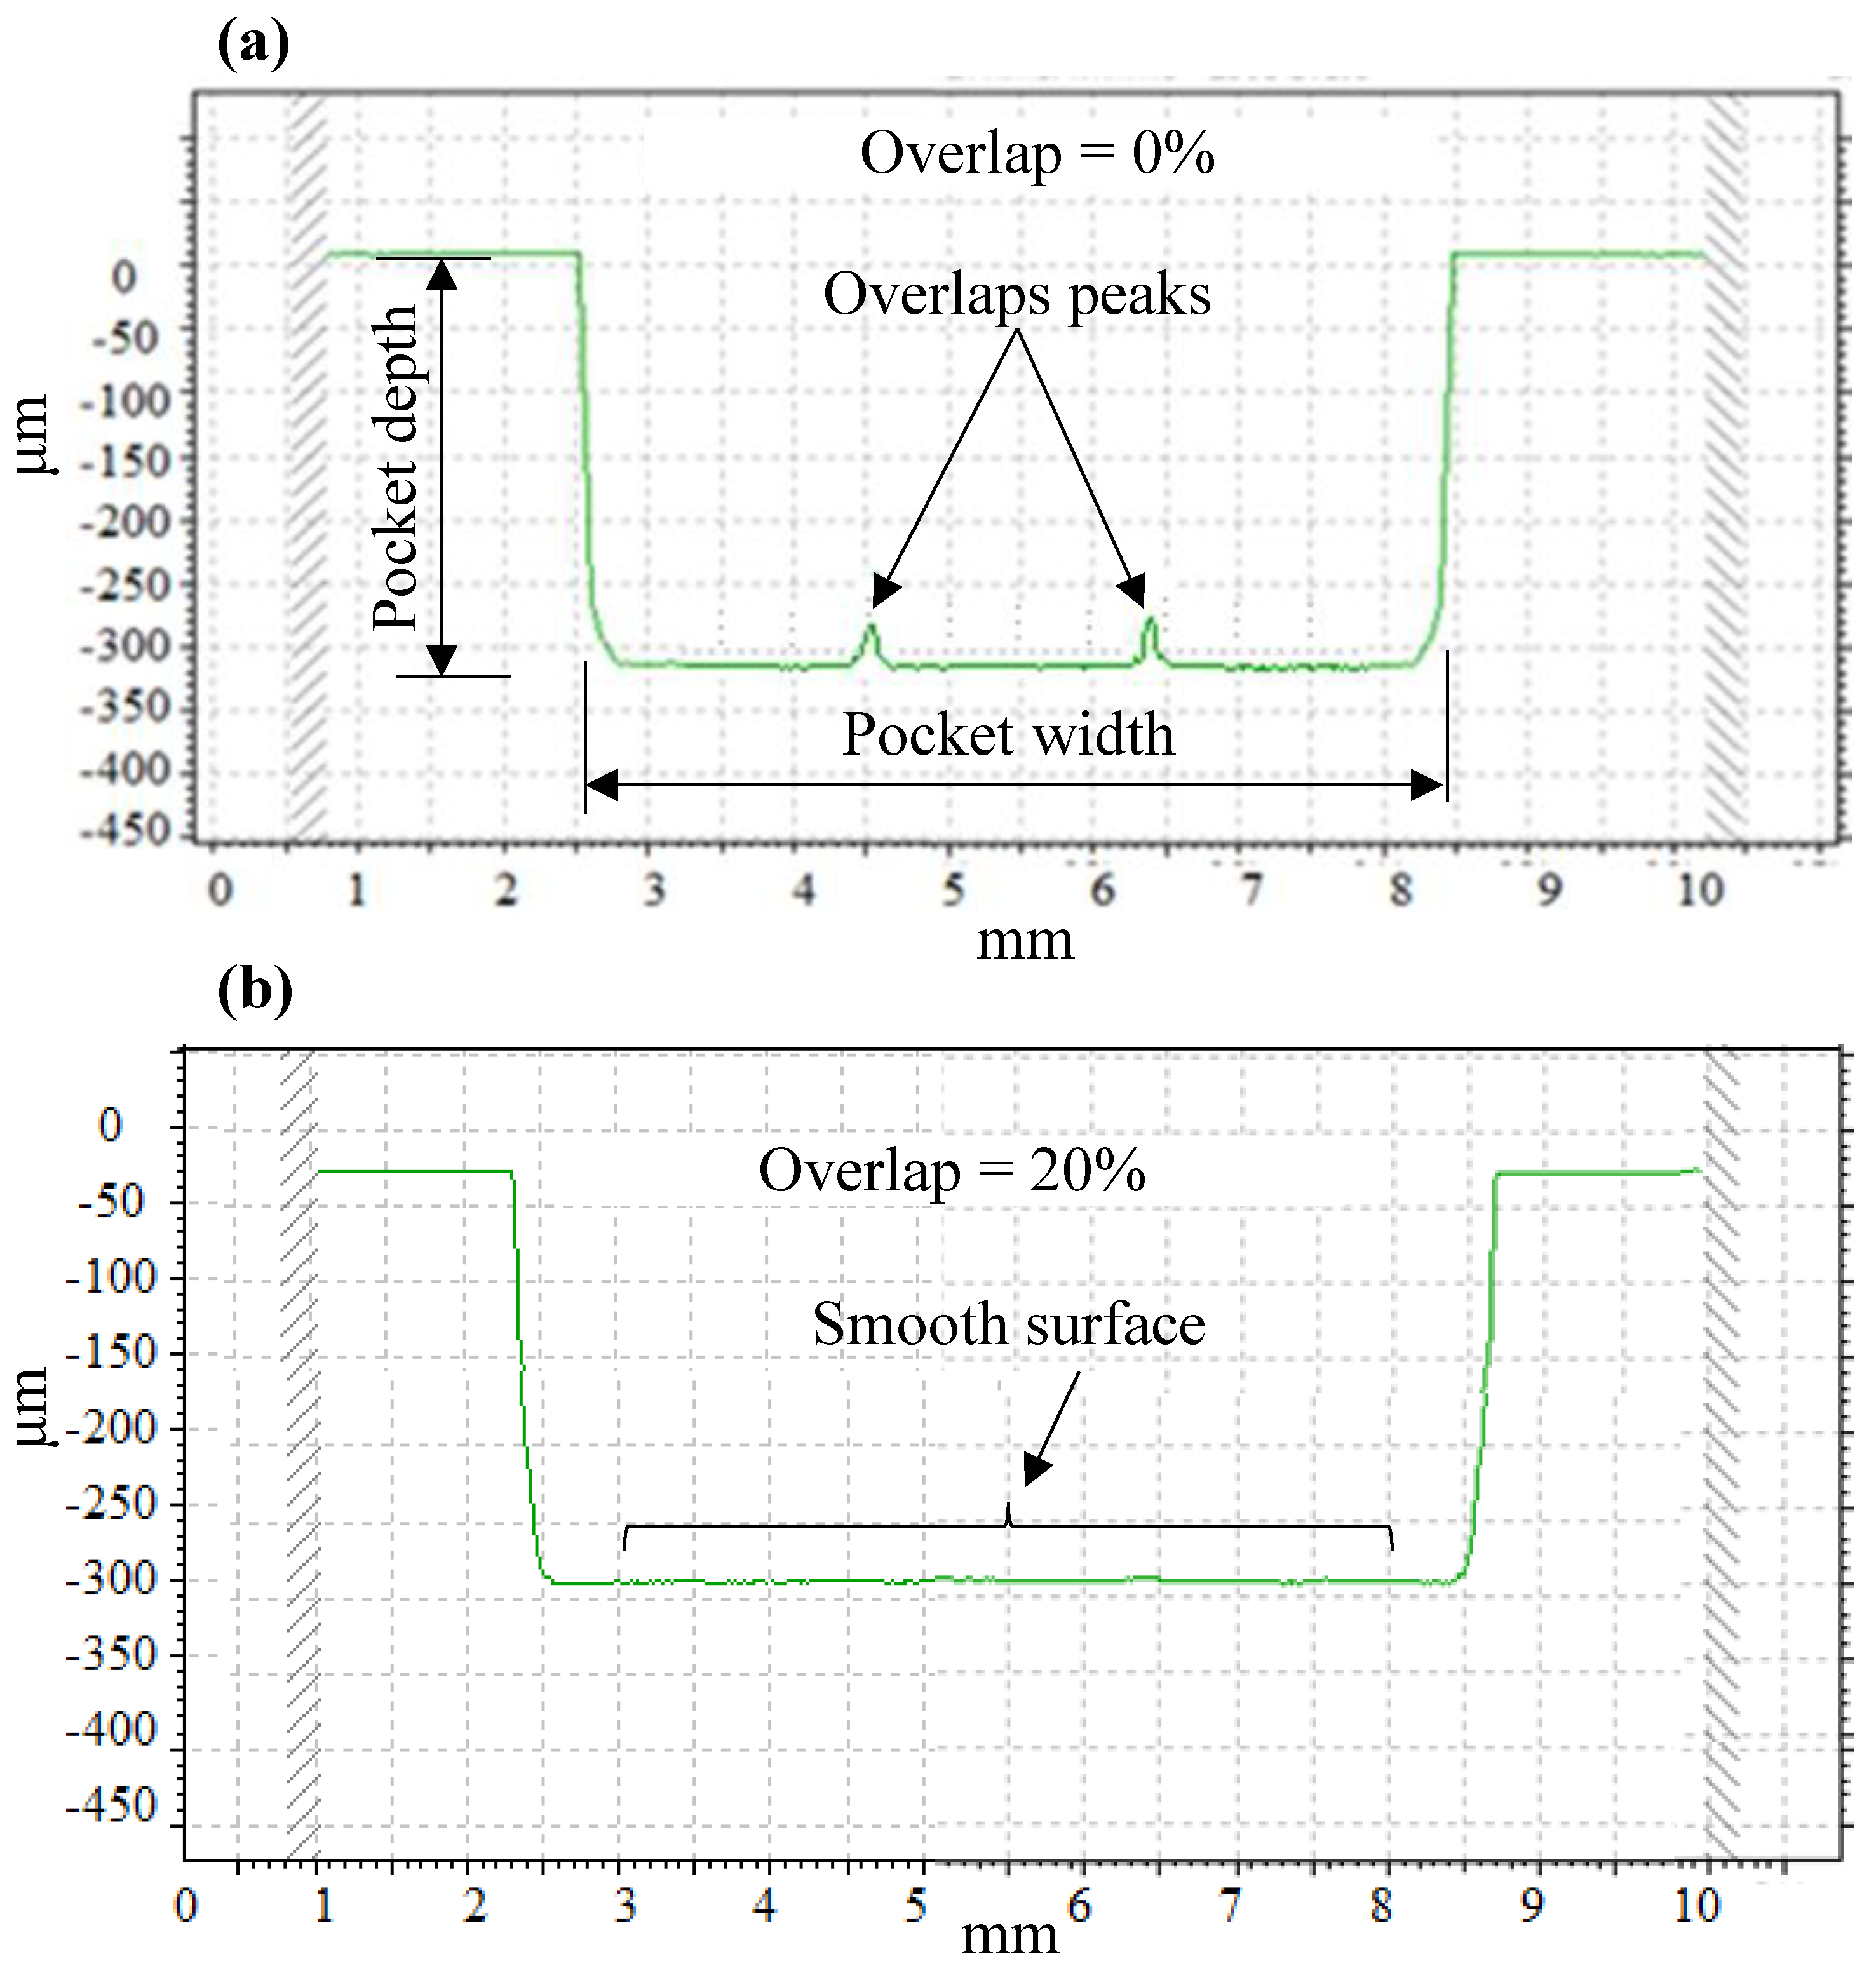
Six pockets have been machined on alumina (Al2O3) material under various tool overlapping percentages (0%, 5%, 10%, 15%, 20% and 25%). Figure 7 and Figure 8 represent the results of roughness (Ra and Rt) and the morphology of the fabricated pockets surfaces respectively. As mentioned in the previous section, Ra and Rt were measured at six random locations across the feed direction. The results of the Ra and Rt revealed in Figure 7 are the average of these six readings. As shown in Figure 7, the values of Ra and Rt decreased with the increasing of the tool overlaps. The standard deviations among the values of Ra and Rt were 0.1718 µm and 5.2707 µm respectively. The values of Ra and Rt decreased by 70% (from 0.723 to 0.21 µm as shown in Figure 7a) and 0.87% (from 13.1 to 1.73 µm as shown in Figure 7b) while increasing the tool overlaps from 0% to 20%. This is due to the reason that the number of passes in the same surface increased at a higher value of overlapping (20–25%). This results in a smooth surface of the machined pockets. In contrast, at a low value of overlapping (0–10%), a single-pass took place at the same surface with the un-machined line between the two passes, which make the surface of the pocket rougher. Figure 8 shows the typical examples of the surface roughness profiles of the pockets machined at 0% and 20% of tool overlaps. Duo to un-machined regions produced as a result of the machining under low level of tool overlapping (0%), the rough surface with peaks can be clearly observed at the pocket’s bed (see Figure 8a).
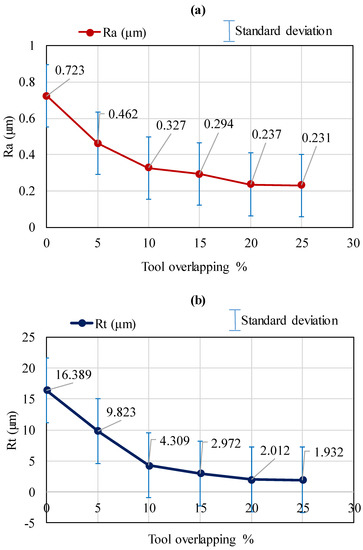
Figure 7.
Effects of tool overlapping on (a) Ra and (b) Rt.
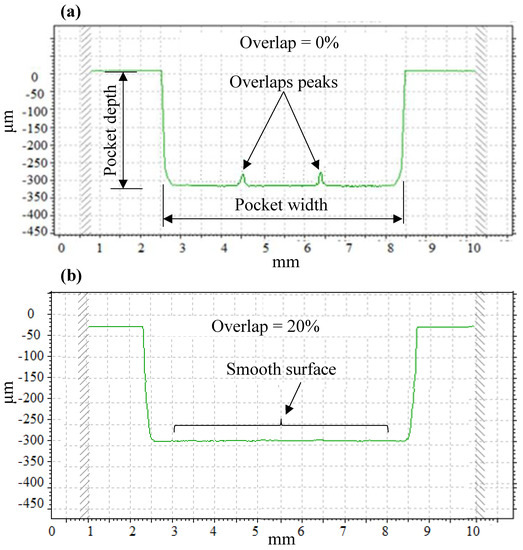
Figure 8.
Typical example of the pocket’s profiles machined at (a) 0% tool overlapping and (b) 20% of the tool overlapping.
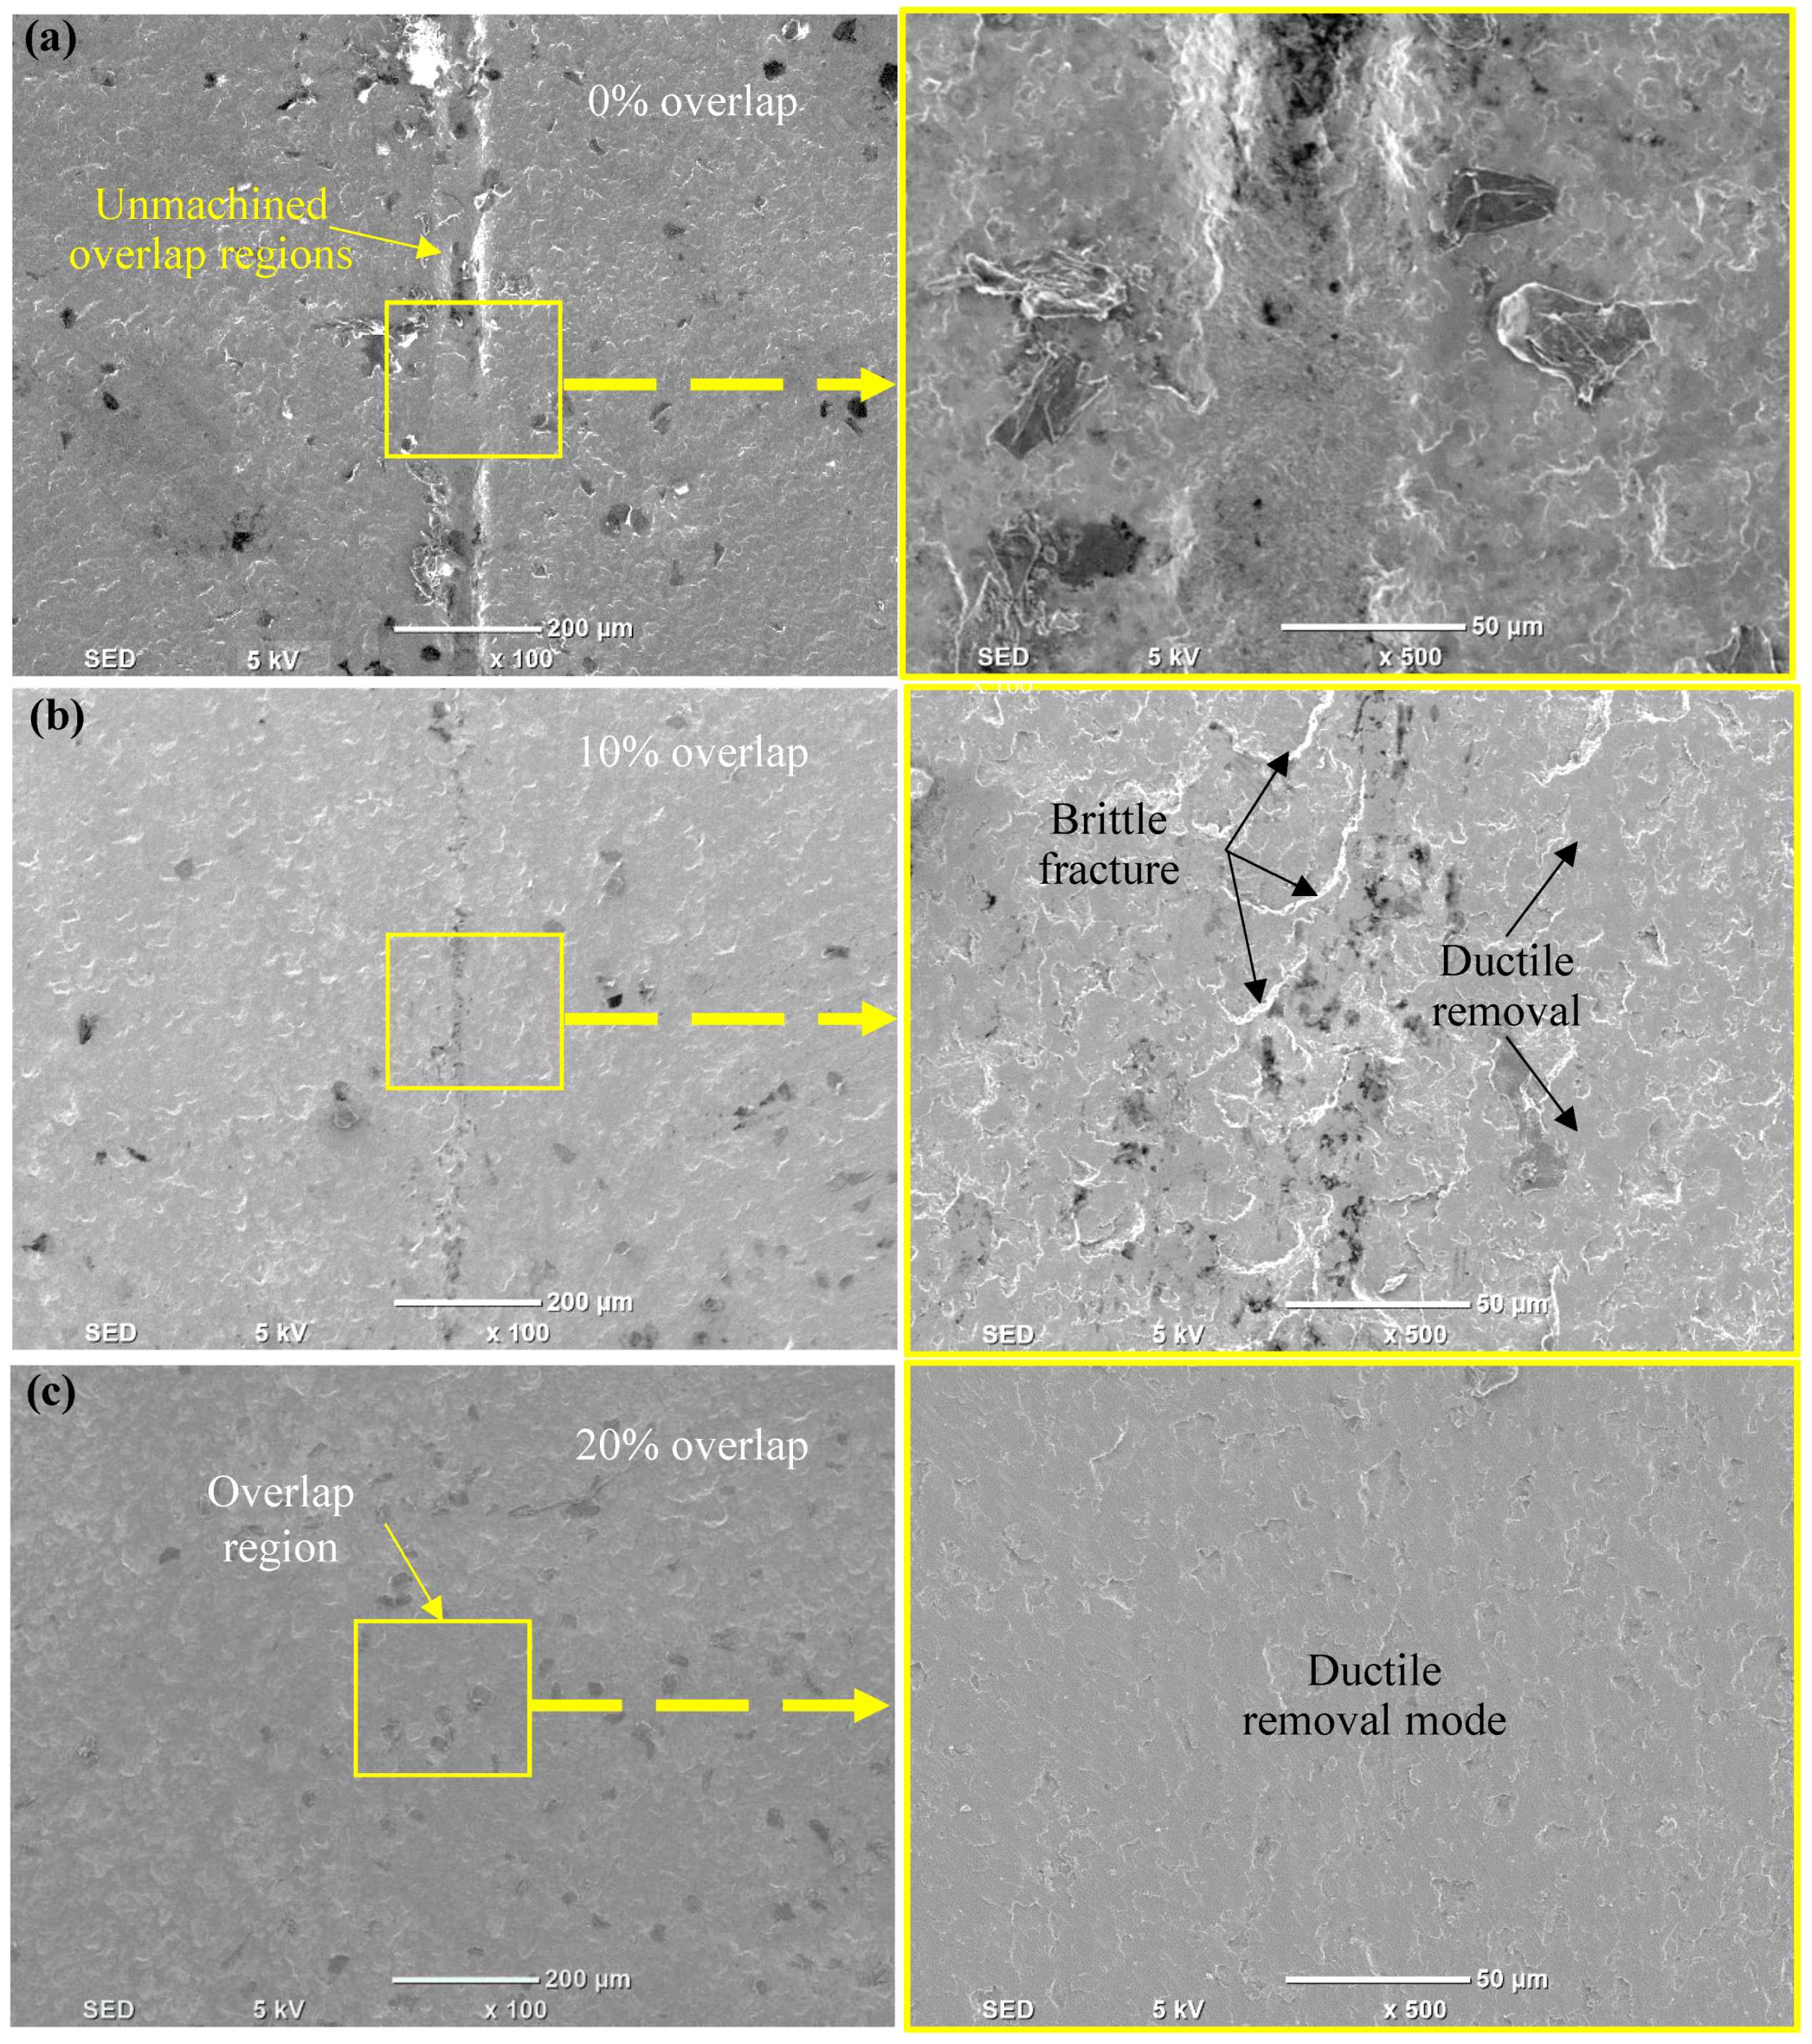
The SEM images shown in Figure 9 present the surface morphology of the pockets machined on the alumina bio-ceramic material at a different percentage of the tool overlapping. It can be observed from Figure 9 that the surface morphology of the machined pockets changes with varying the percentage of the tool overlapping. The SEM images indicate that, in agreement with observations documented in [1,17] whereas in RUM of ceramics, two material removal modes exist: brittle fracture and ductile fracture. Brittle fracture is observed as tear-outs forming on the pockets surfaces machined at a low percentage of overlapping (0–10%) as shown in Figure 9a,b. The presence of smooth areas where the ductile fracture mode seems to be dominant resulting in a smooth surface of the machined pockets at a higher percentage (20%) of the tool overlapping (see Figure 9c). It should be noted that, since there is no difference between the values of Ra and Rt obtained from the overlapping of 20% and 25%, and in order to reduce the machining time, the overlapping of 20% was selected and kept constant in the tool path strategy test.
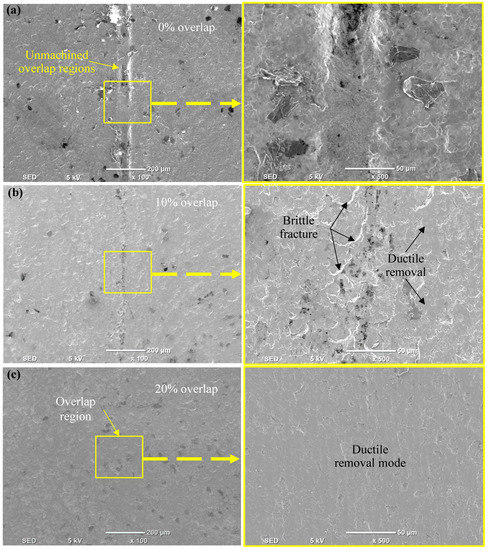
Figure 9.
Pockets surface morphology machined at (a) 0% tool overlapping, (b) 10% tool overlapping and (c) 20% tool overlapping.
3.2. Tool Path Strategies Results
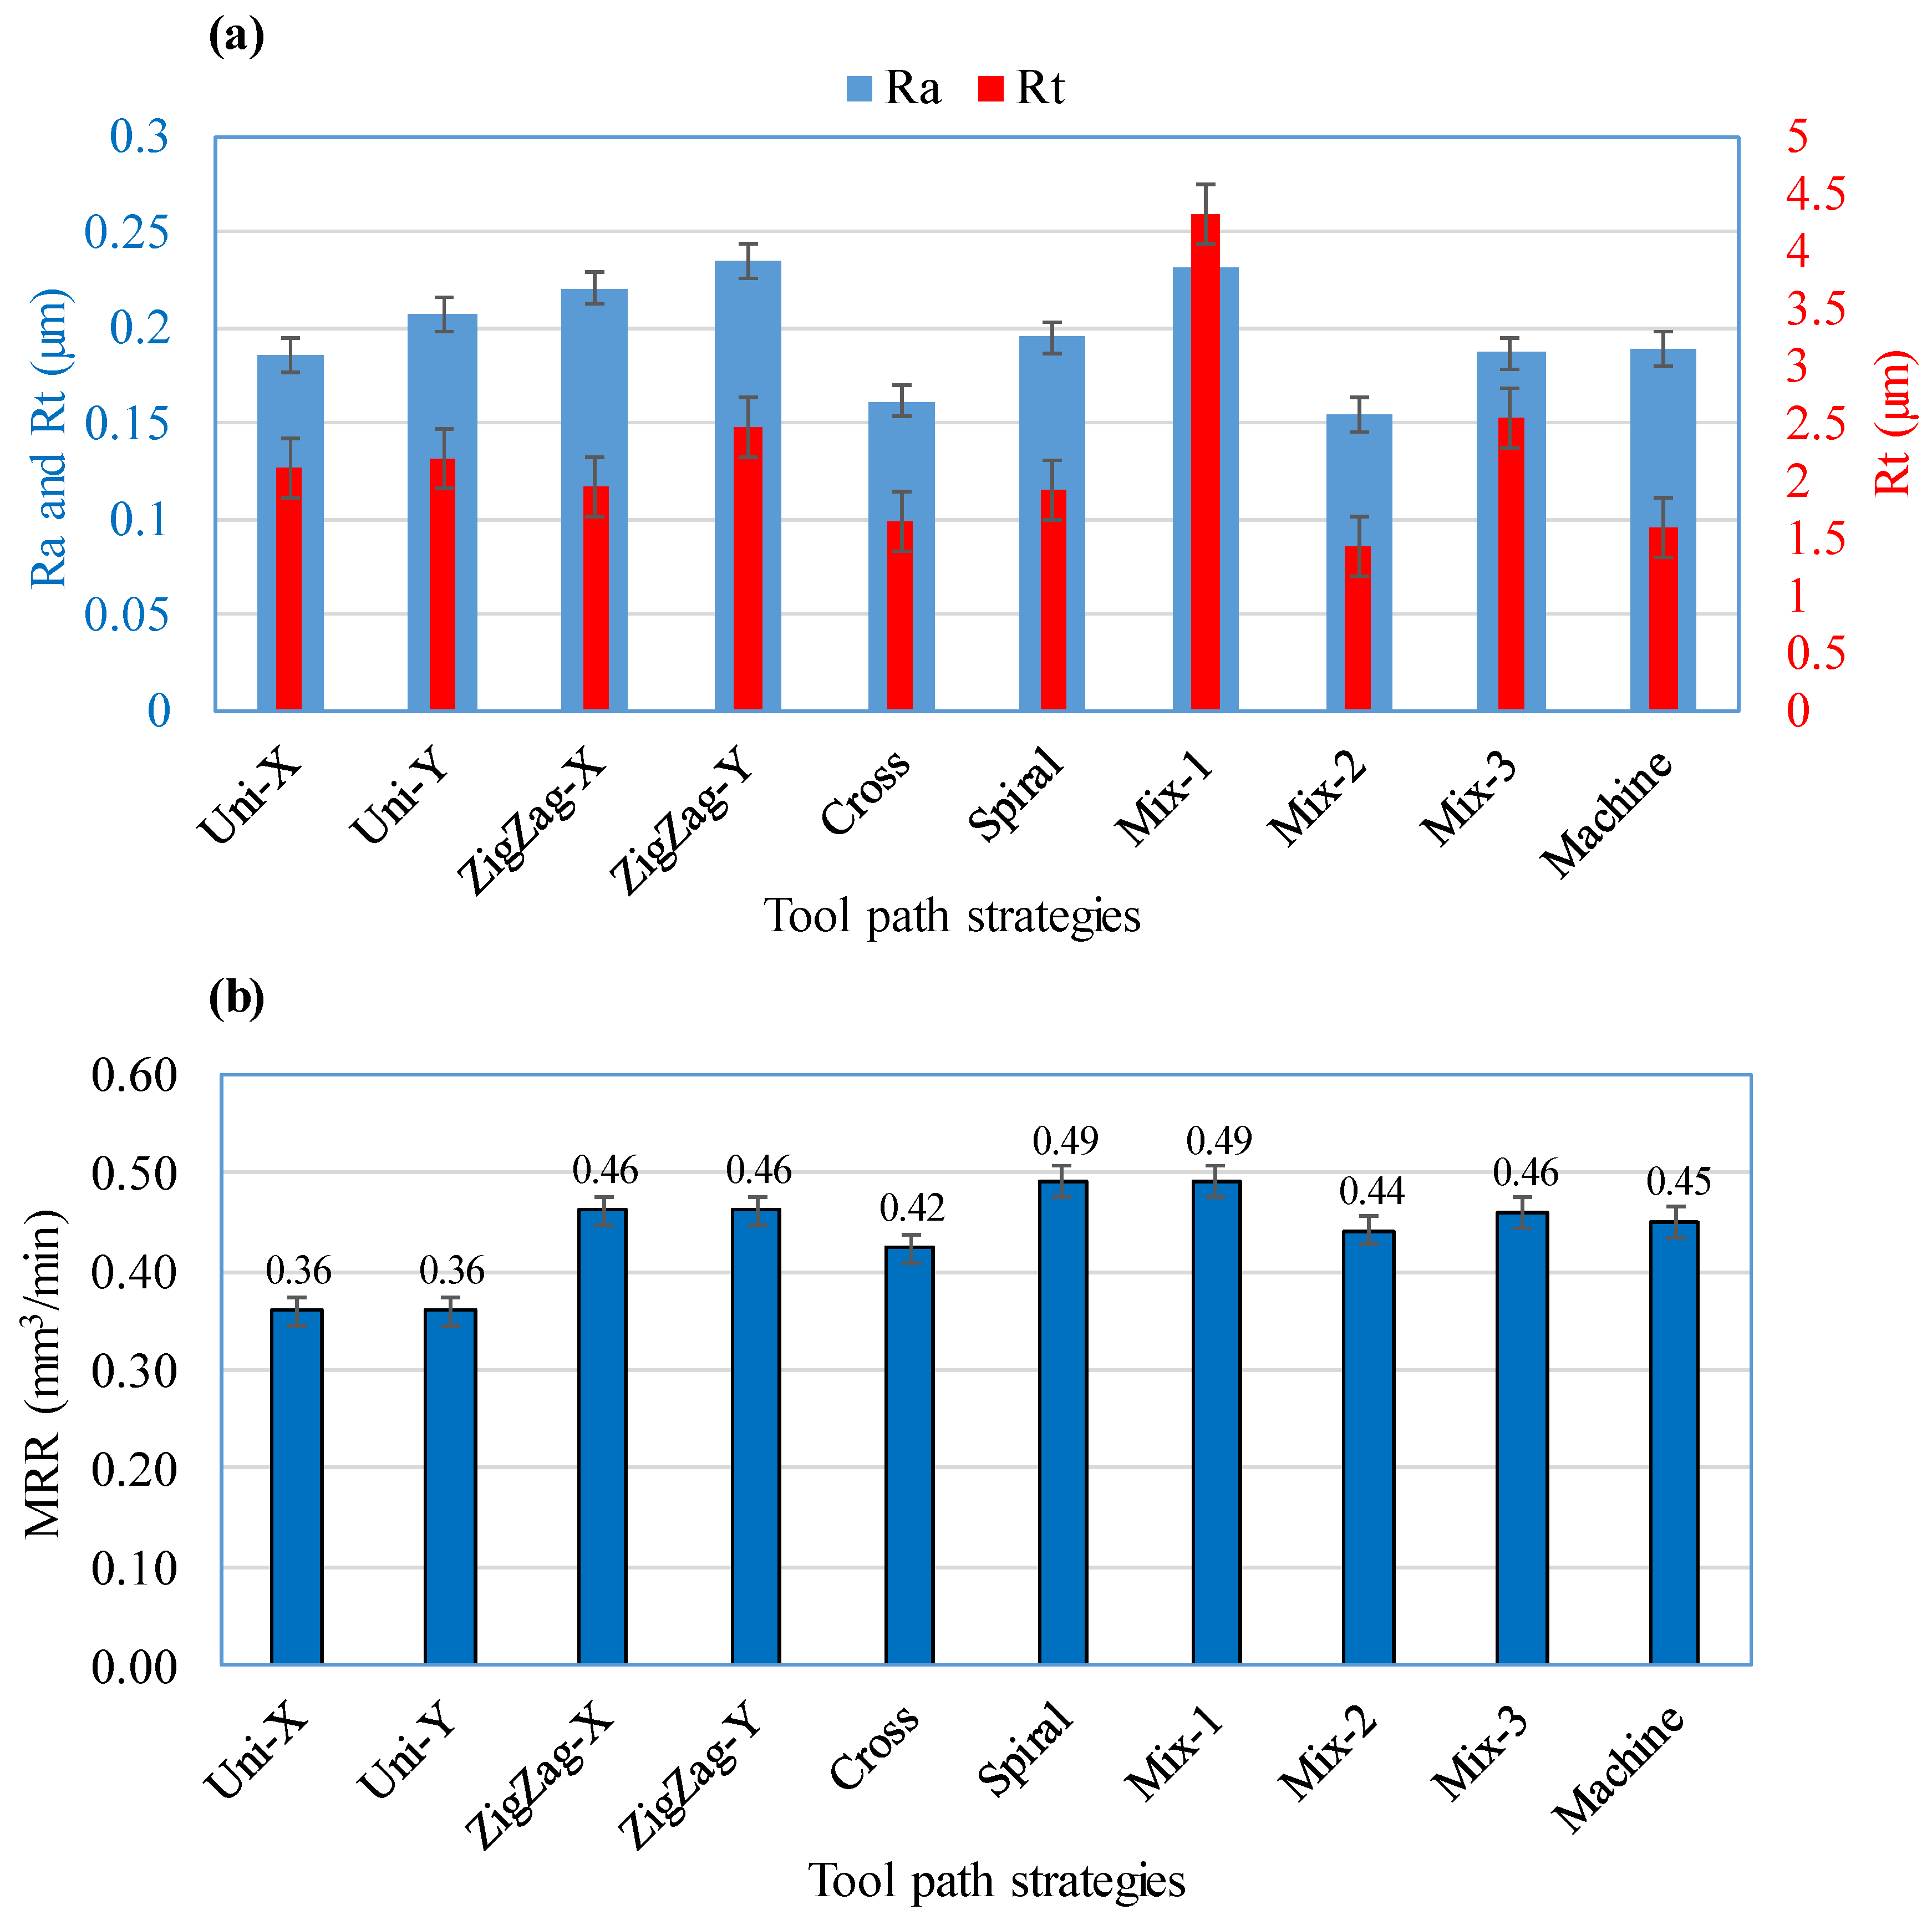
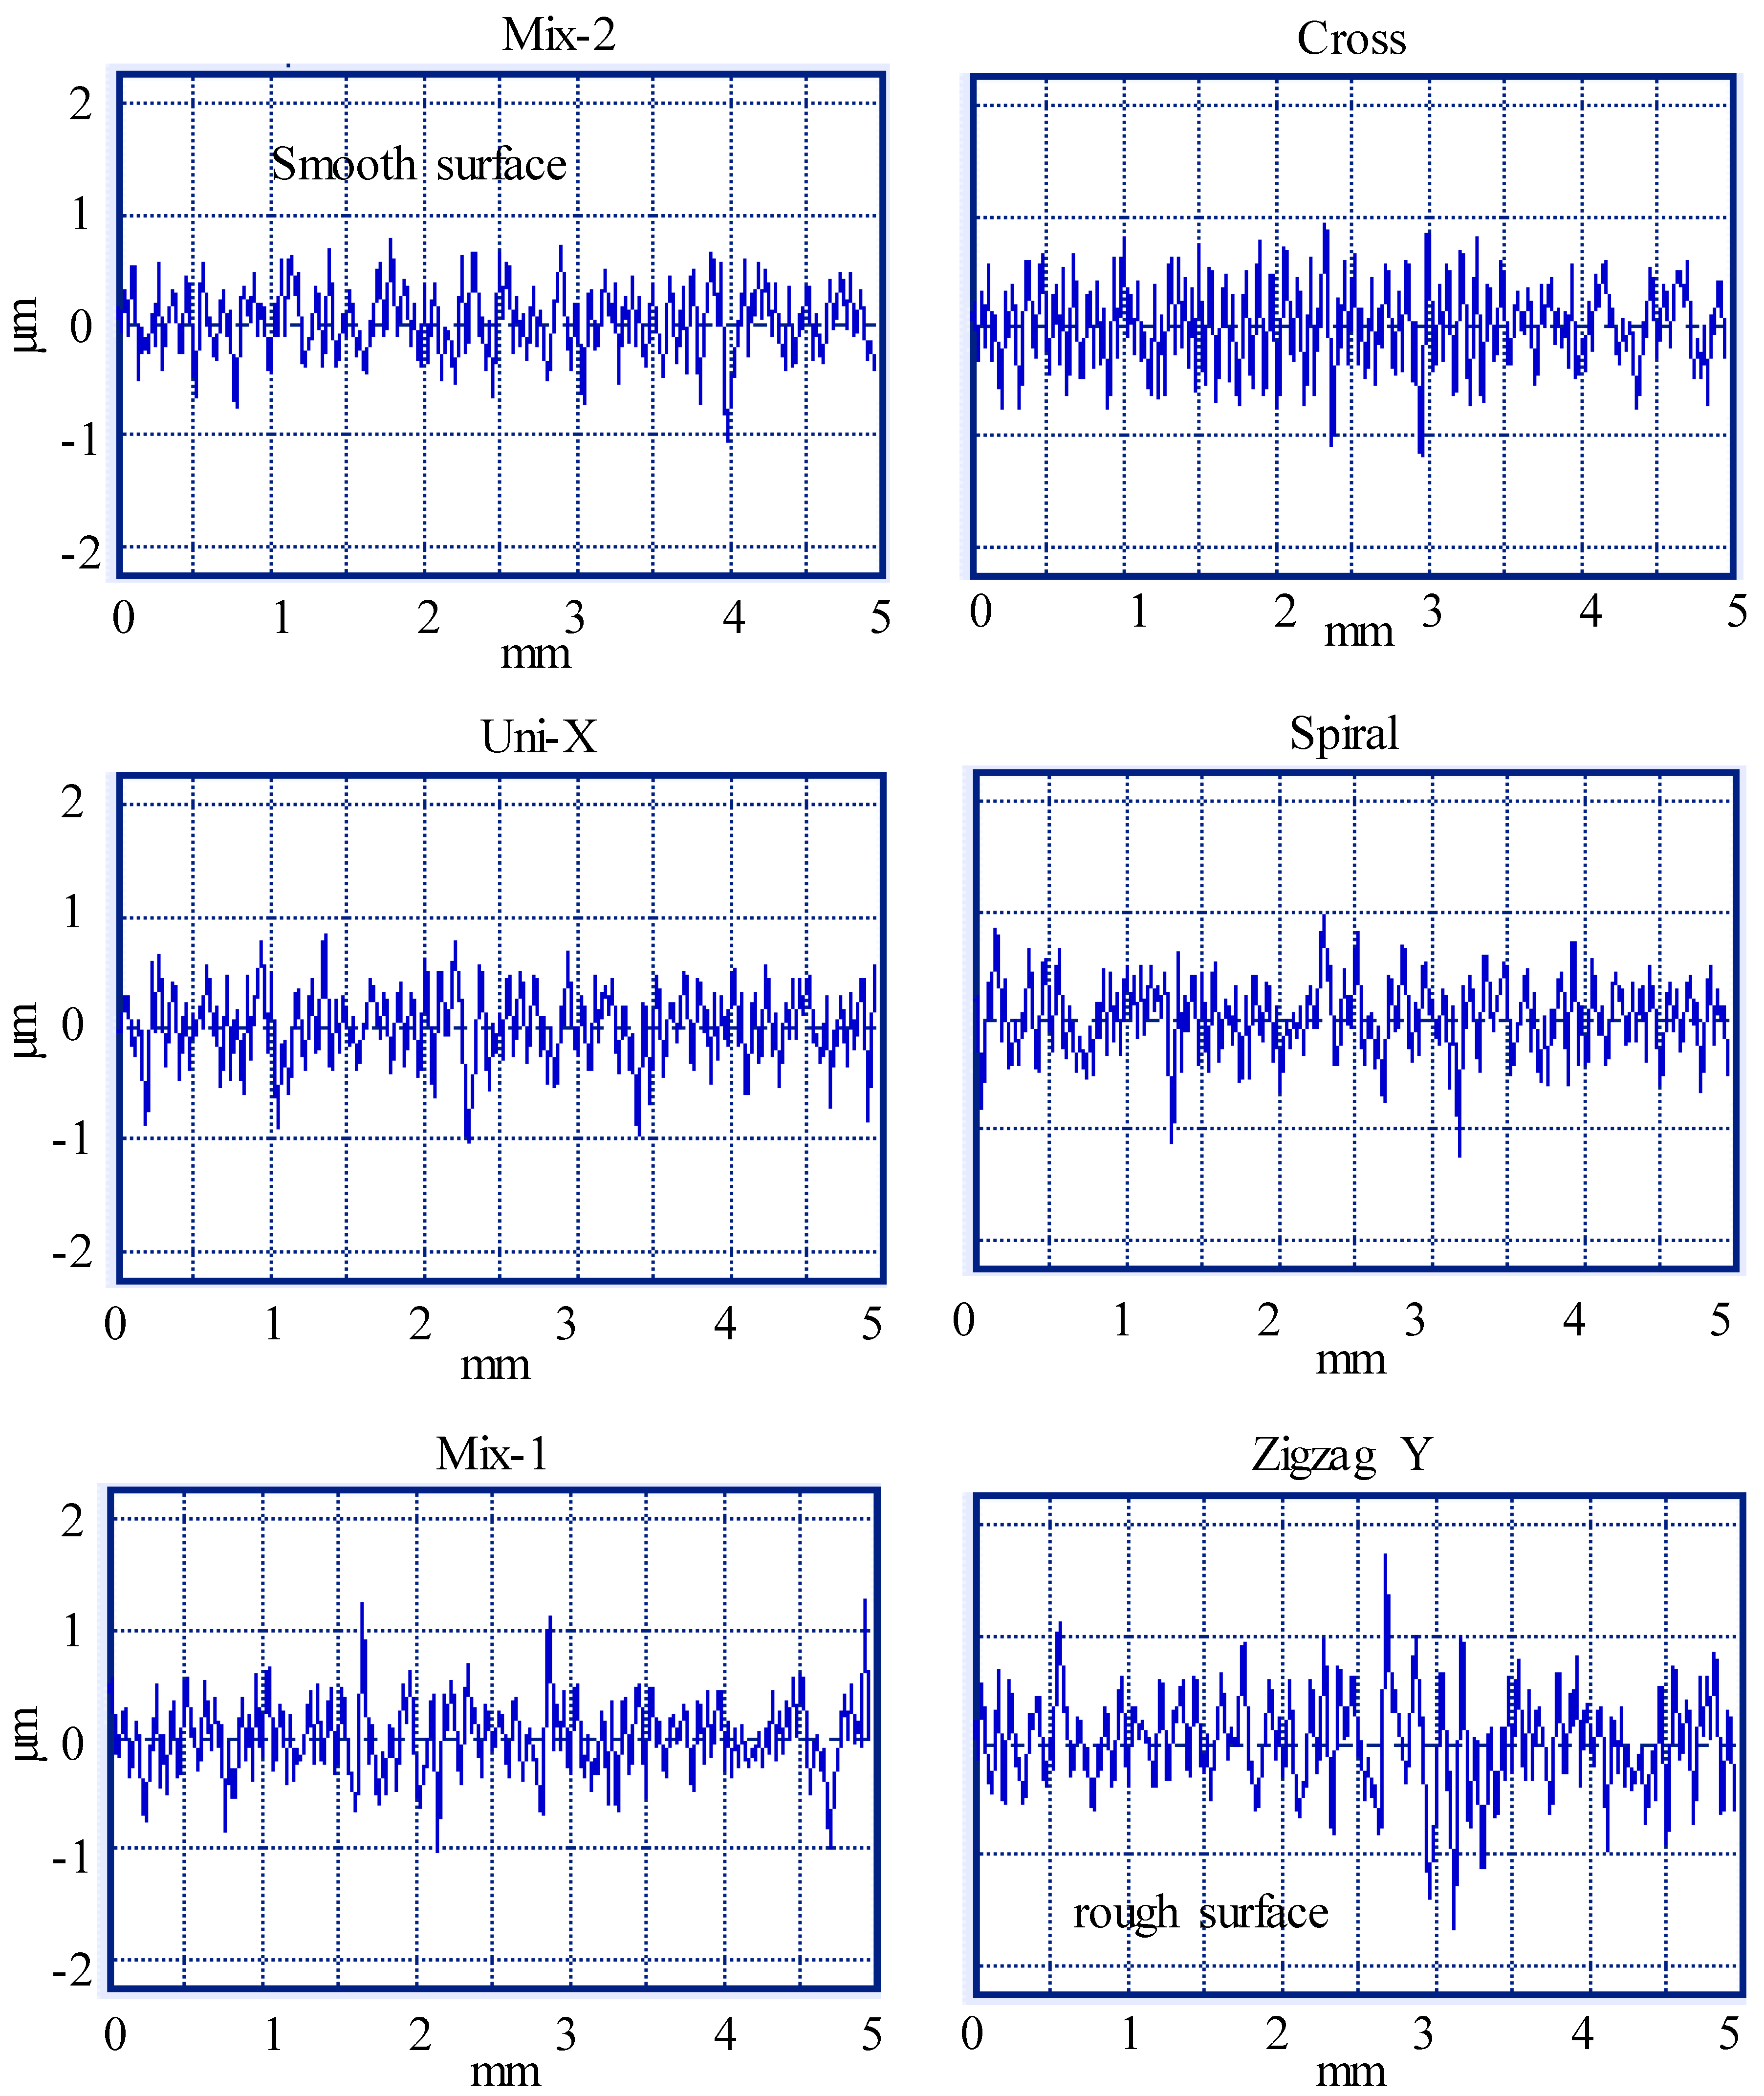
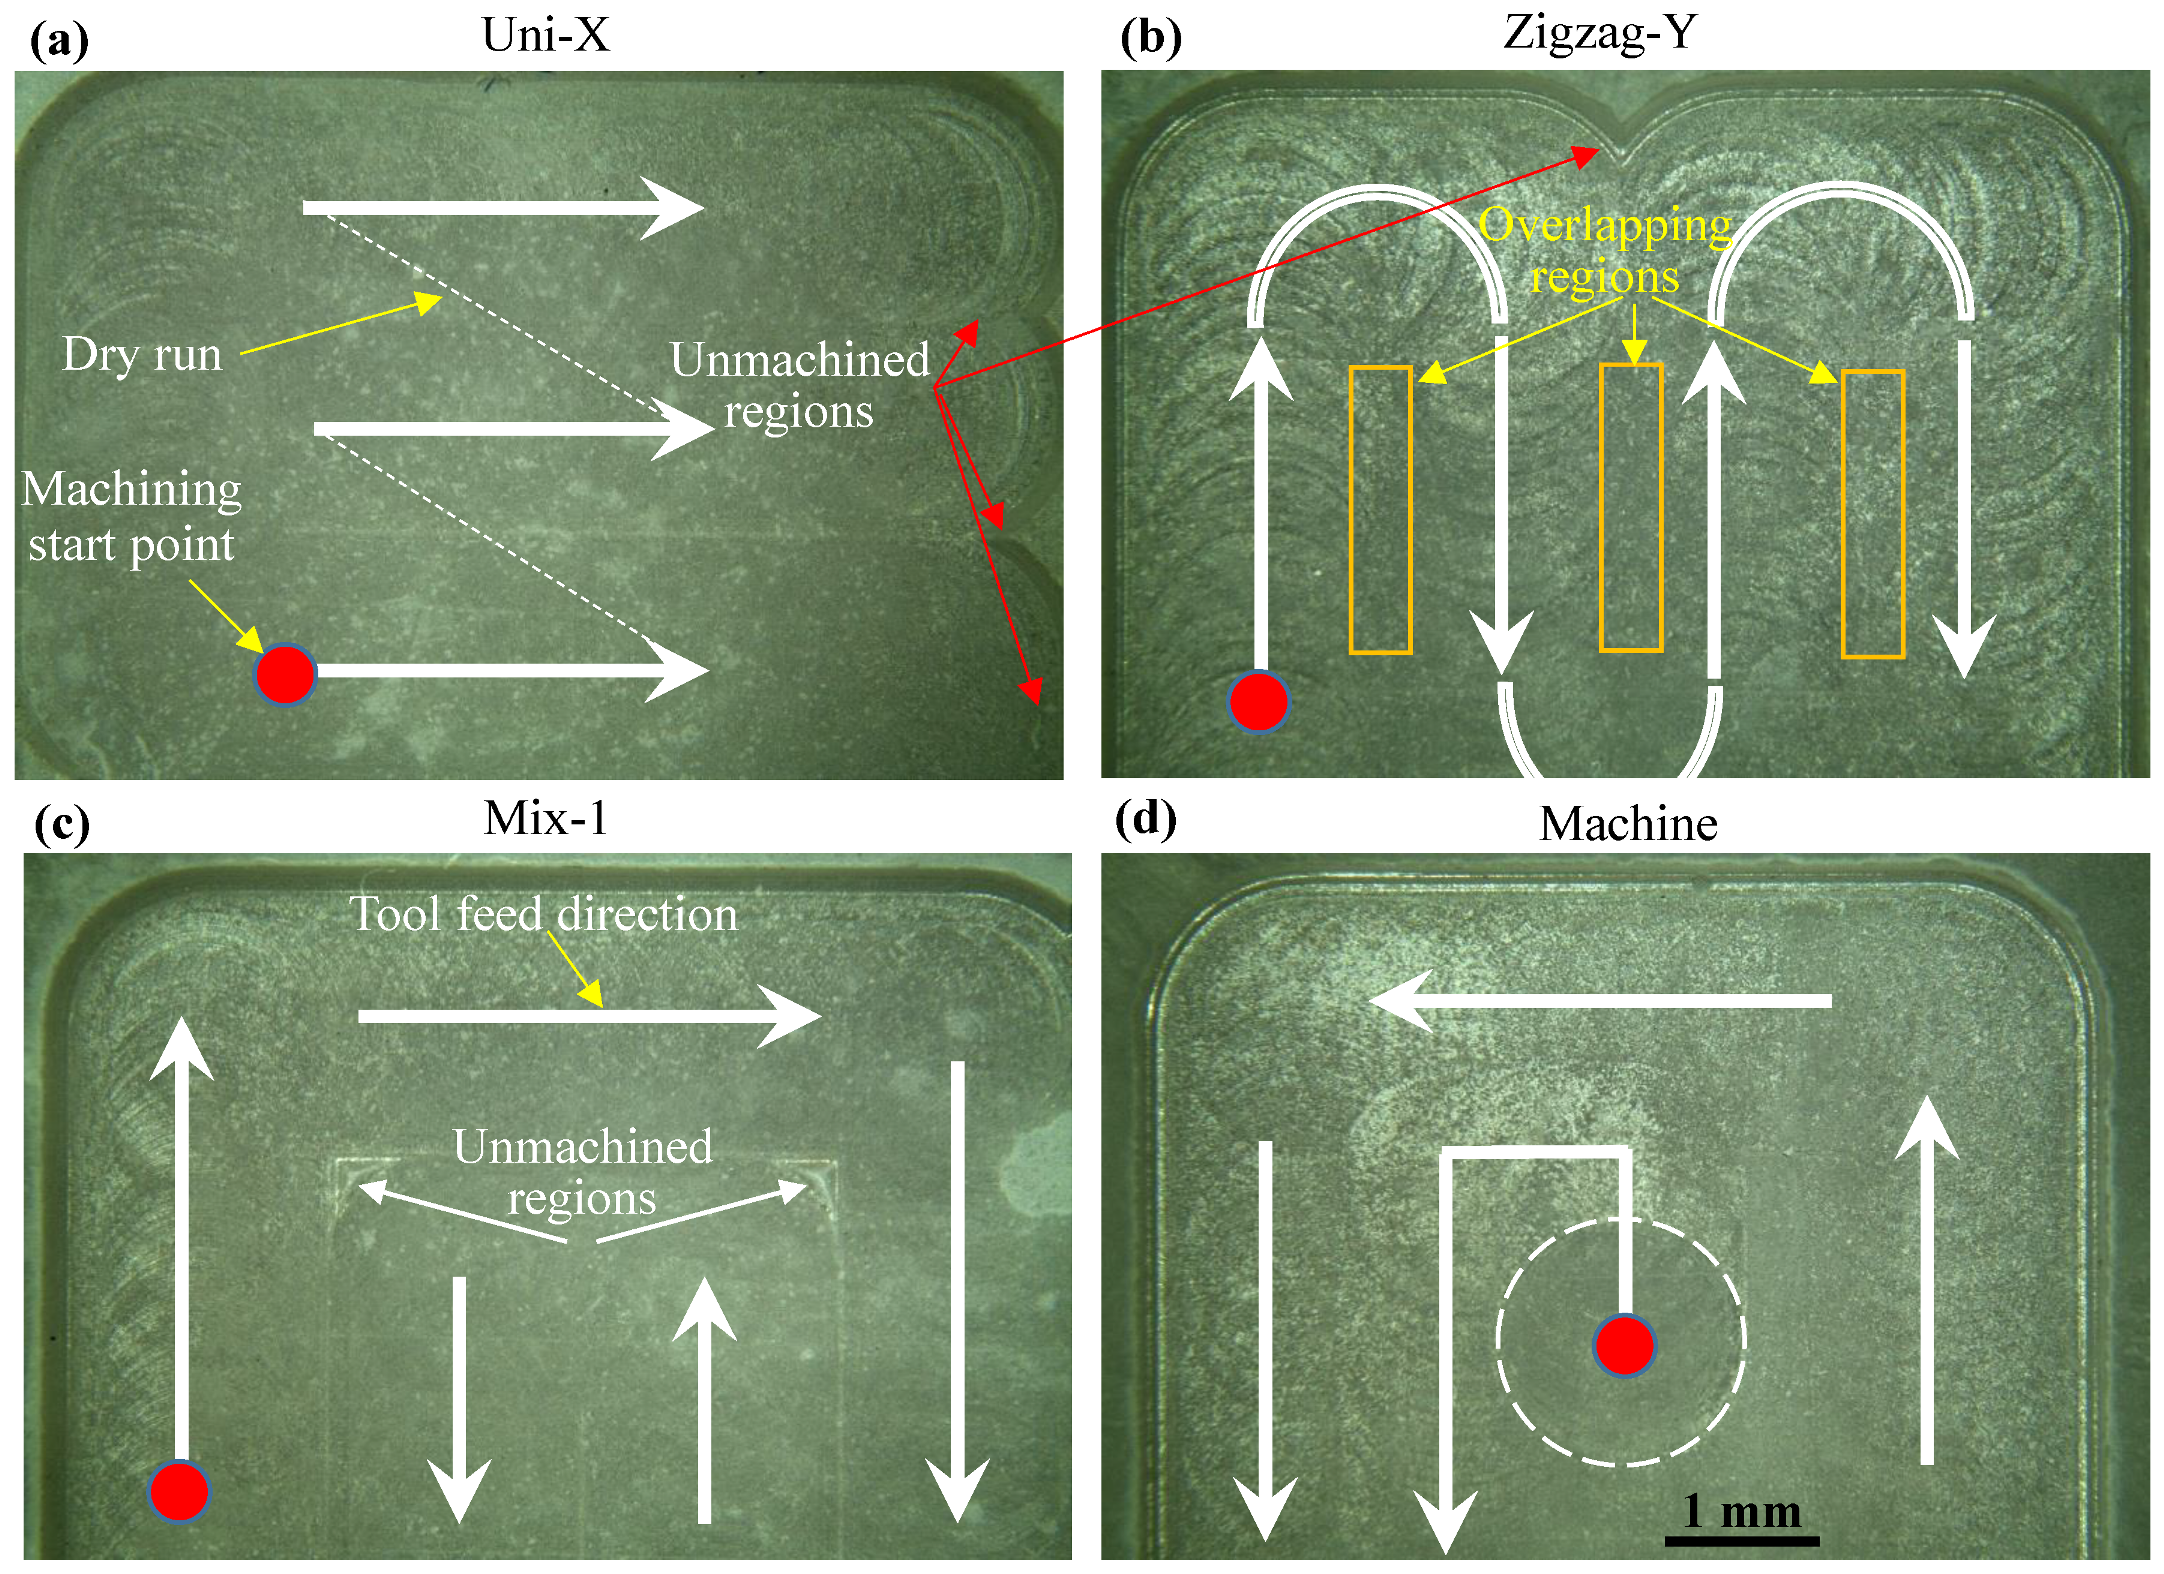
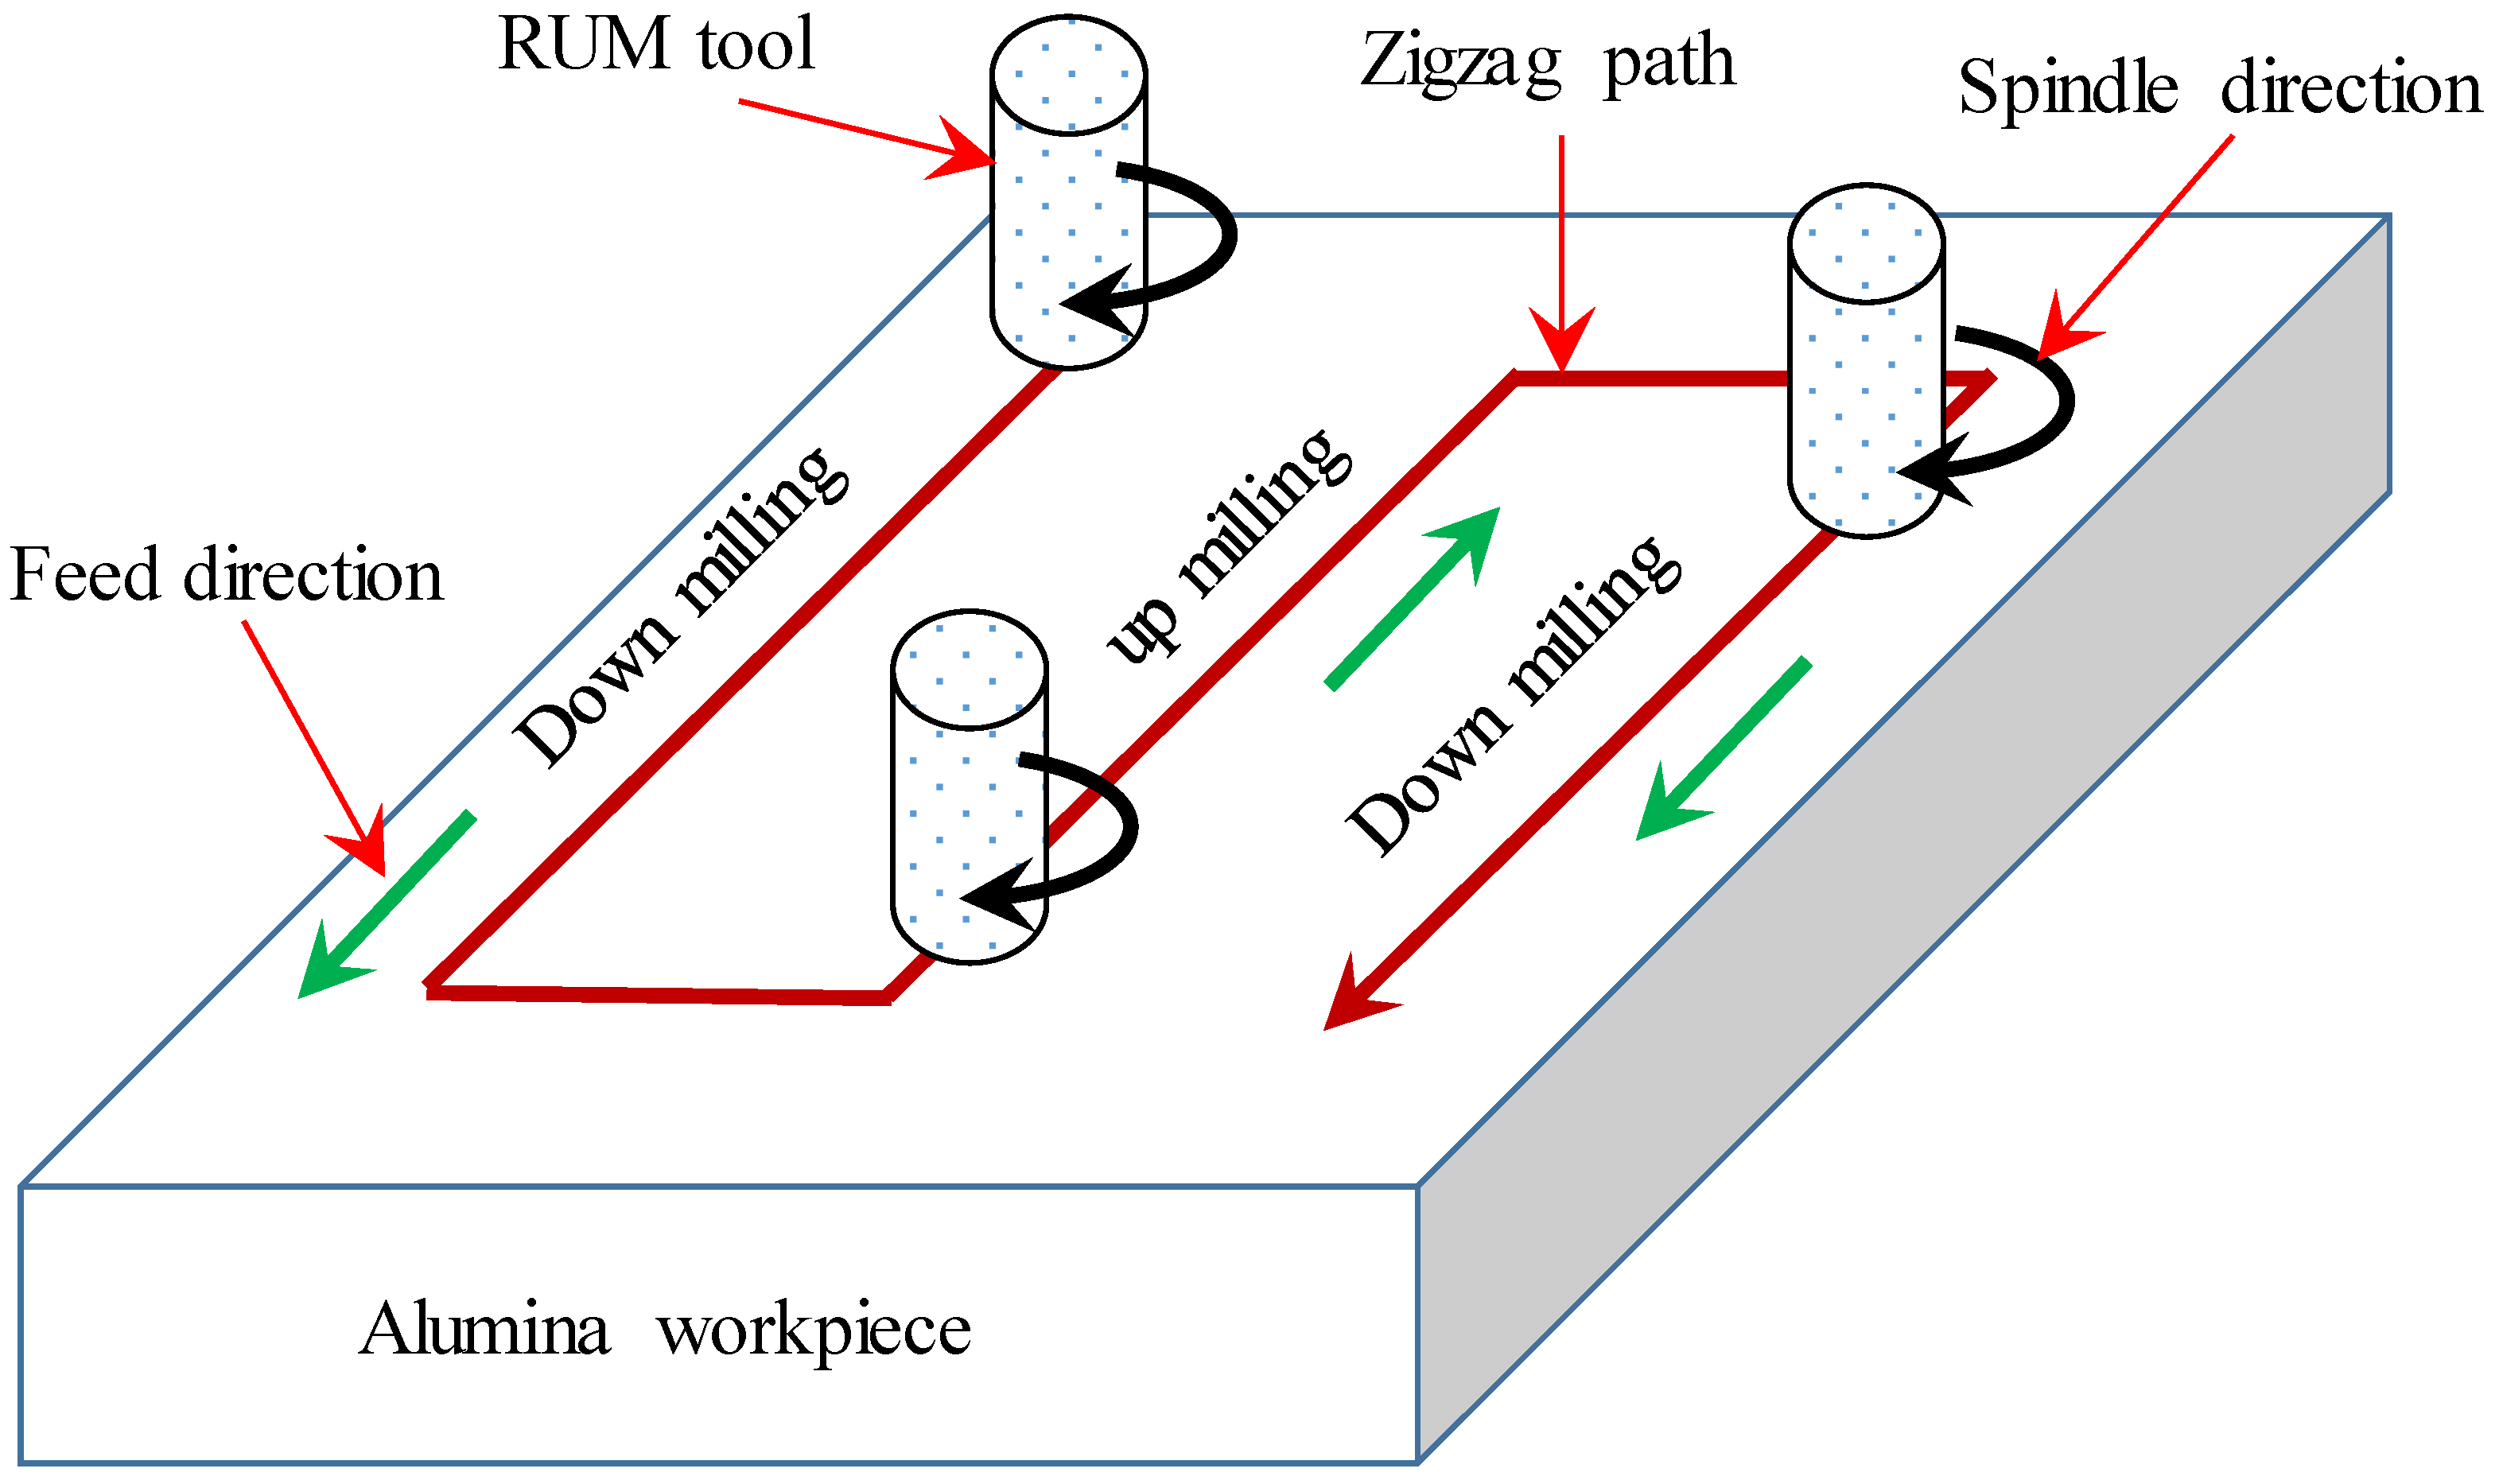
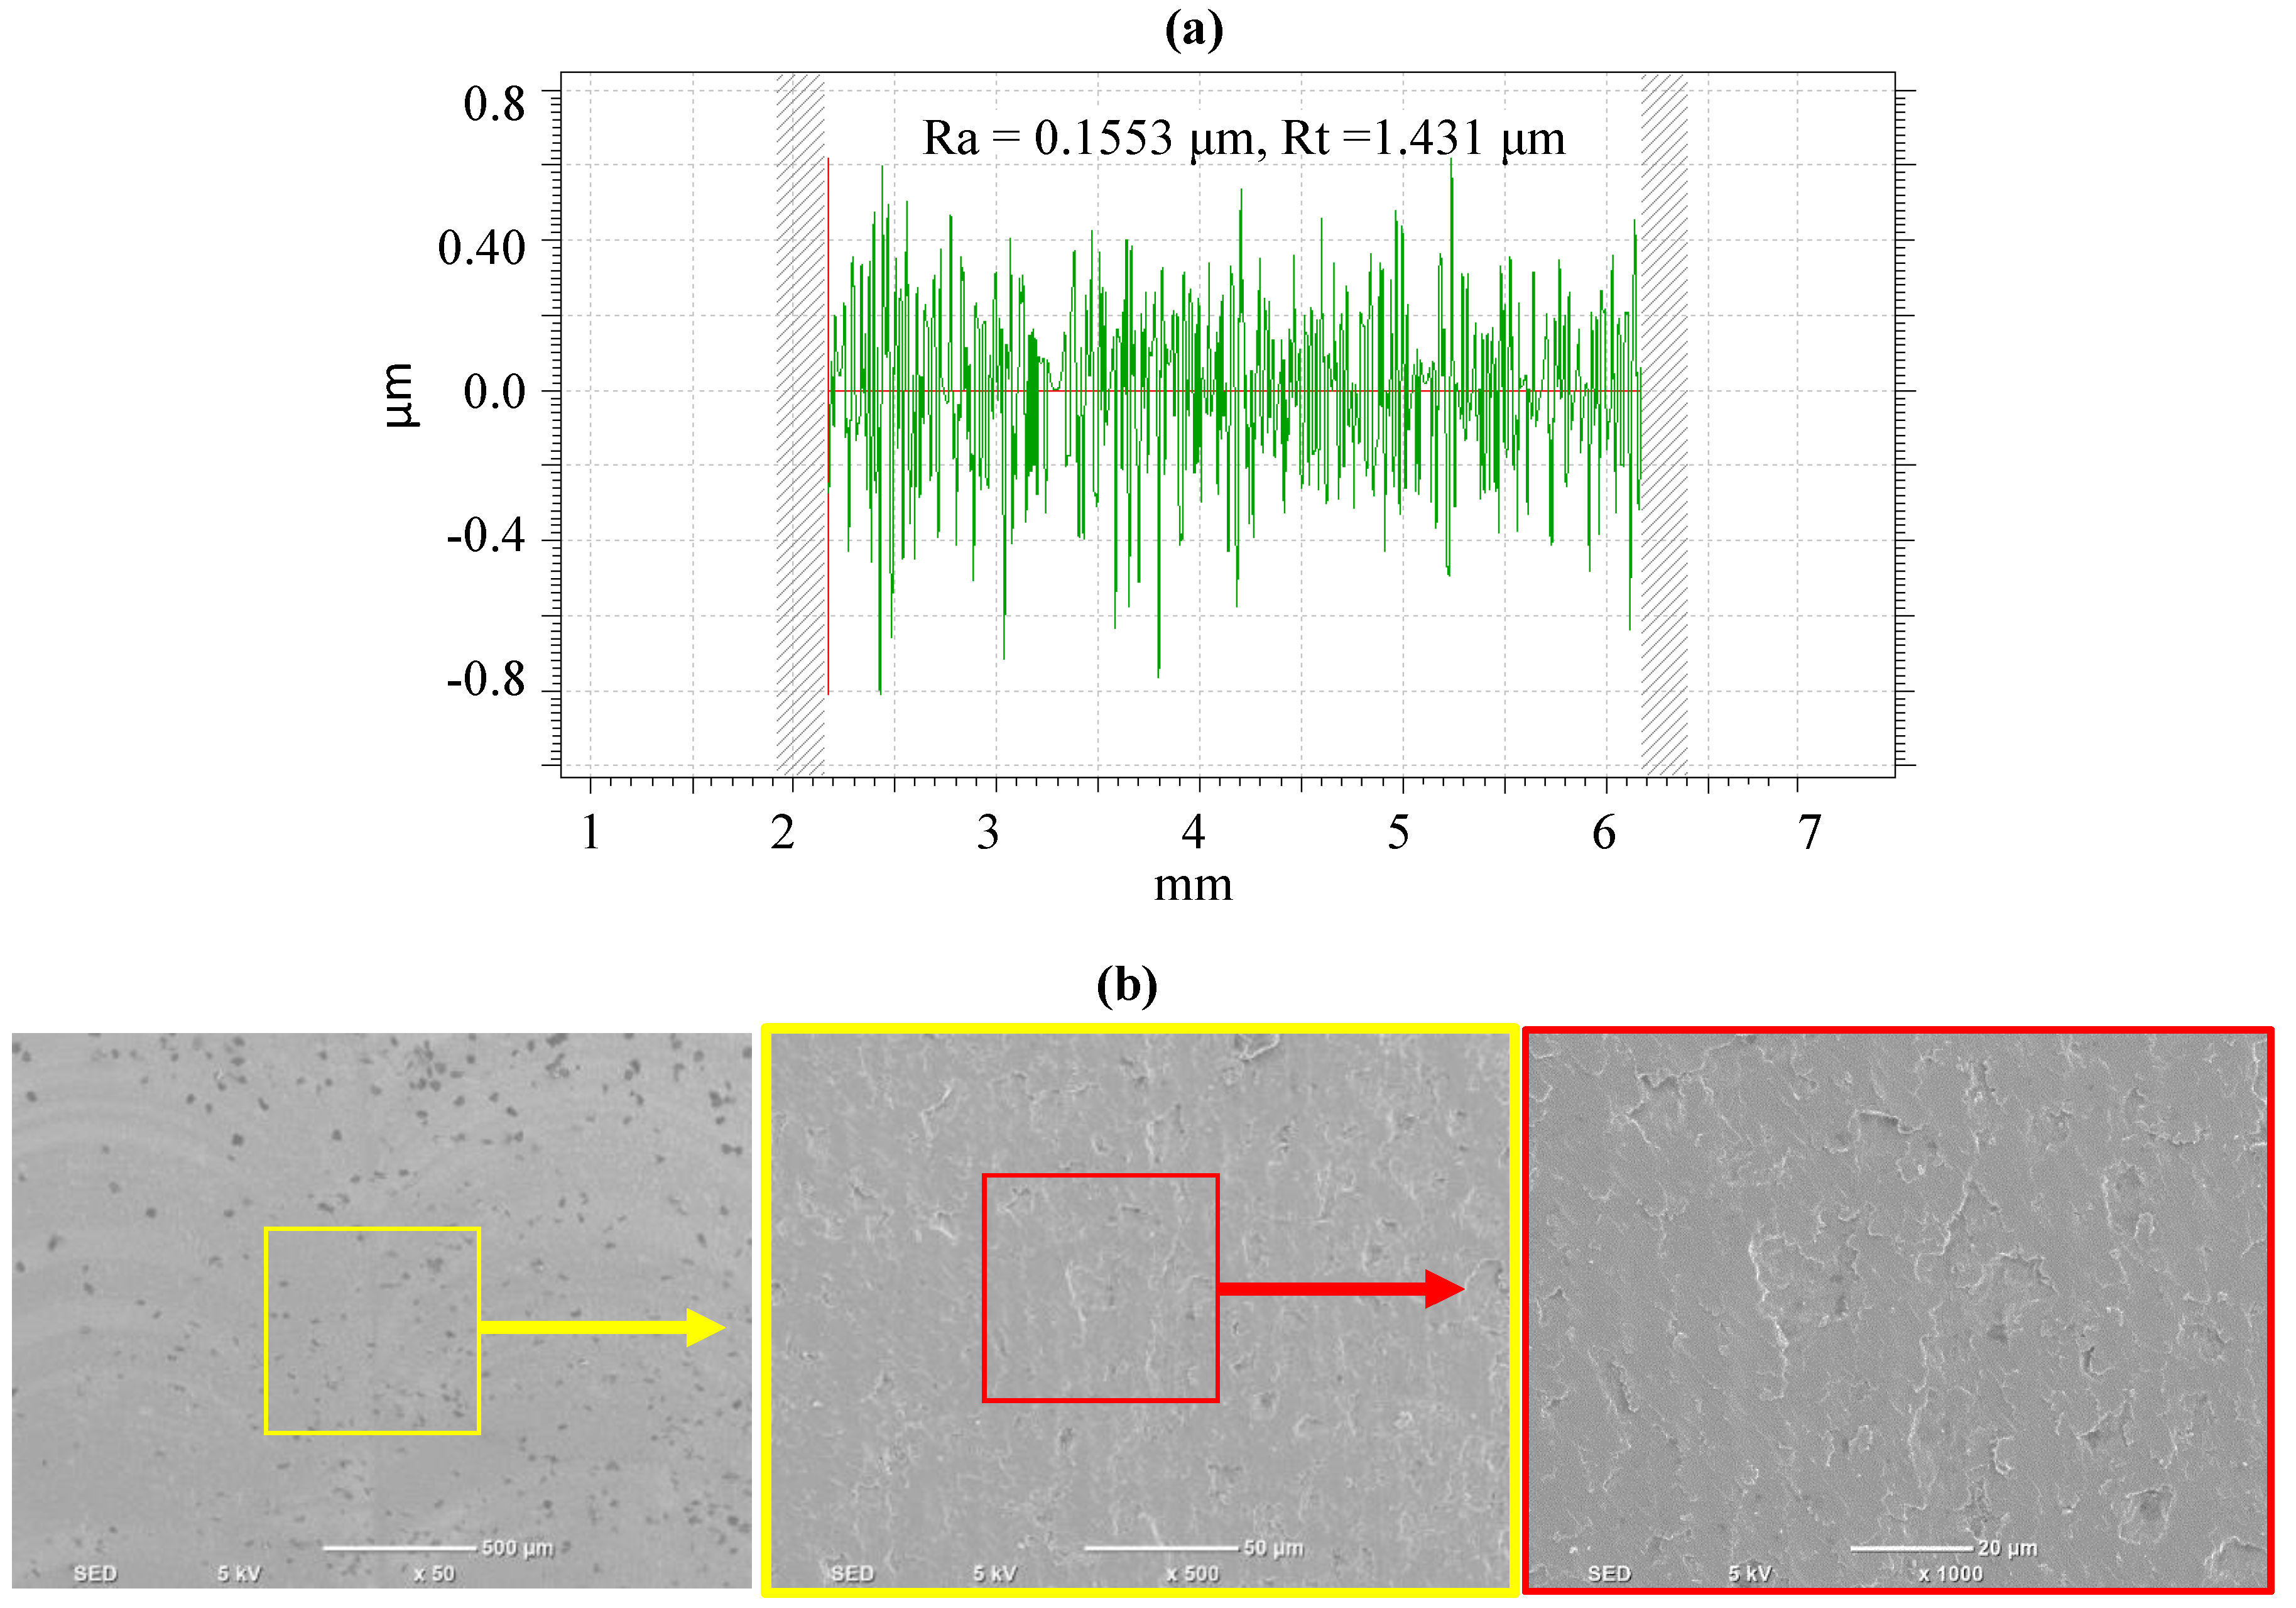
To further improve the roughness values obtained in the overlapping test, different tool path strategies have been tested. Table 5 presents the experimental results of the significance of tool path strategies on the surface roughness and MRR of the milled pockets. Again, the machining conditions (see Table 4) were kept constant in this test. The three outputs (Ra, Rt and MRR) of the pockets milled at ten tool path strategies can be also shown in the form of bar charts in Figure 10. Again, in this test, the values of Ra and Rt have been taken across the tool feed for all the machined pockets. Figure 11 presents the 2D profiles of the surface roughness for six pockets machined by using six different tool path strategies. The selected profiles in Figure 11 were arranged to start from a smooth pocket surface machined with the cross path strategy to the final with rough surface machined under the Zigzag-Y strategy. Figure 12 shows the microscopic images of the machined pockets. It can be seen that pockets machined at the zigzag milling strategy have a rough surface (higher values of Ra and Rt) comparing to the pockets milled at either Uni-X or Uni-Y strategies in which smooth surfaces can be obtained (see Figure 12a,b). This is because in the zigzag milling strategy two types of milling modes take place; (i) up milling in which the tool rotates at the opposite direction of the feed and (ii) down milling in which the tool rotates along with the feed direction (see Figure 13). The alternate change of cutting mode, which is along with the spindle direction and then versus it, resulted in a deviation in cutting speed and accordingly produces a rougher surface. This observation also matches with the results documented in [32]. Due to the aforementioned reason, the uniform surface quality can be observed at the spiral and cross path strategies in which the cutting speed was kept uniform and results in a more homogeneous surface by using only one direction cutting. In contrast, a rough surface with un-machined regions (high value of Rt = 4.31 µm) was observed on the surface of the pockets machined at Mix-1 strategy, which was a mix between the spiral and zigzag strategy (see Figure 12c). The second pass of the Mix-2 strategy was carried out in one direction (see Figure 4), this results in a smooth surface comparing to rough surface obtained at Mix-3 and Machine strategies in which the cutting was carried out at different modes. Although the smooth surface of the milled pockets can be produced at Uni-X and Uni- Y strategies, they have the lowest MRR. This is because of more time consumed in dry runs (the tool always moves up and goes to the beginning of the line, see Figure 4). Moreover, the un-machined regions (see Figure 12a) were excluded from the volume of the machined materials. The maximum MRR (0.49 mm3/min) can be achieved at the spiral and Mix-1 strategies. It can be found that the values of Ra and Rt in both cross strategy (0.162 µm and 1.643 µm) and Mix-2 strategy (0.155 and 1.432 µm) were close to each other. This is because both strategies had the same finishing path (second pass). Among all tool path strategies, the minimum value of Ra and Rt can be achieved at the Mix-2 strategy, in which the zigzag path was applied to the first pass, while the second pass was carried out by using Uni-X strategy. Figure 14a,b show samples of the surface profile and the surface morphology of the pockets machined at the Mix-2 strategy.

Table 5.
Results of tool path strategies.

Figure 10.
(a) Effects of tool path strategies on Ra and Rt and (b) effects of tool path strategies on MRR.
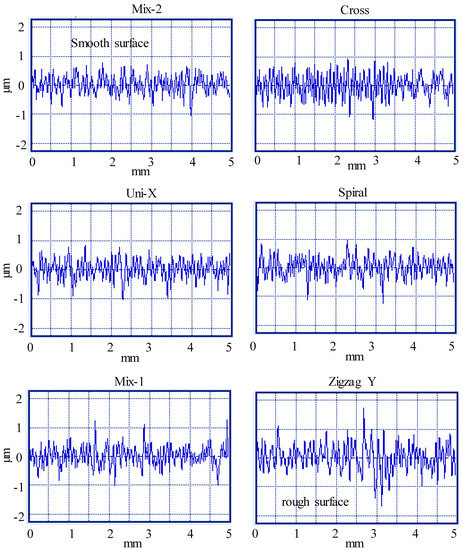
Figure 11.
2D surface roughness profiles of the machined pockets.
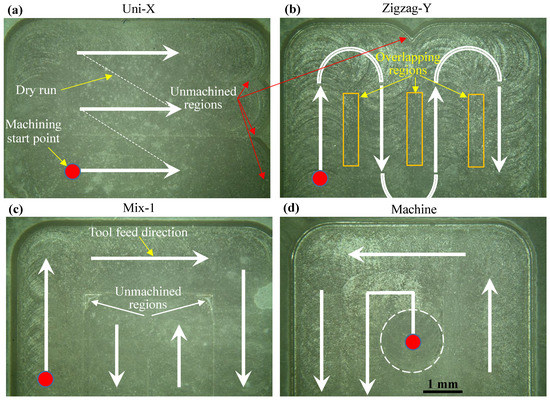
Figure 12.
Microscopic images of the pockets machined at (a) Uni-X strategy, (b) Zigzag-Y strategy, (c) Mix-1 strategy and (d) Machine strategy.
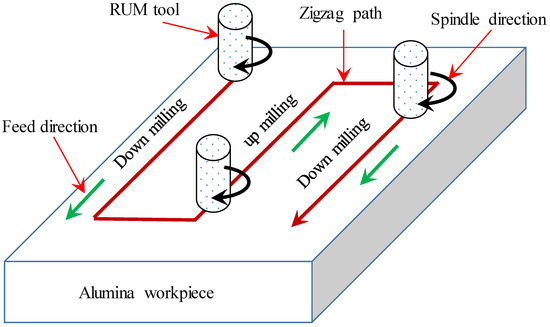
Figure 13.
Schematic diagram of the Zigzag path strategy.

Figure 14.
(a) Typical example of surface roughness profile and (b) surface morphology of the pocket machined with Mix-2 strategy.
3.3. Dimensional Accuracy
The percentage of the dimensional errors including depth error and width error of the fabricated pocket were calculated by using Equations (1) and (2), respectively.
where AD is the actual depth after machining, DD is the desired depth, AW is the actual width after machining and DW is the desired width. Table 6 listed the results of the depth and width errors of all machined pockets. It can be found from Table 5 that the maximum the depth and the width errors of the machined pockets are less than +5% under all milling strategies considered in this study. This shows that the RUM can be used for fabricating accurate pockets. The positive error percentage could be due to (i) the rounded edge due to the tool wear (see Section 3.4), (ii) variation in the diamond abrasive sizes, which make the actual tool diameter/length greater than the nominal diameter/length. Moreover, it can be seen from Table 6 that the average width tolerance (0.2604 mm) is greater than the average depth tolerance (0.01191 mm) for all the fabricated pockets. It could be due to (i) the machine tolerance increases with increasing the size of the machined part/feature and (ii) more numbers of active diamond abrasives around the tool side, which will reversely affect the width size compared with less diamond abrasives at the end cutting edge because of the internal hole (see SEM image of Figure 2b).

Table 6.
Results of dimensional accuracy of the machined pockets.
3.4. Tool Wear
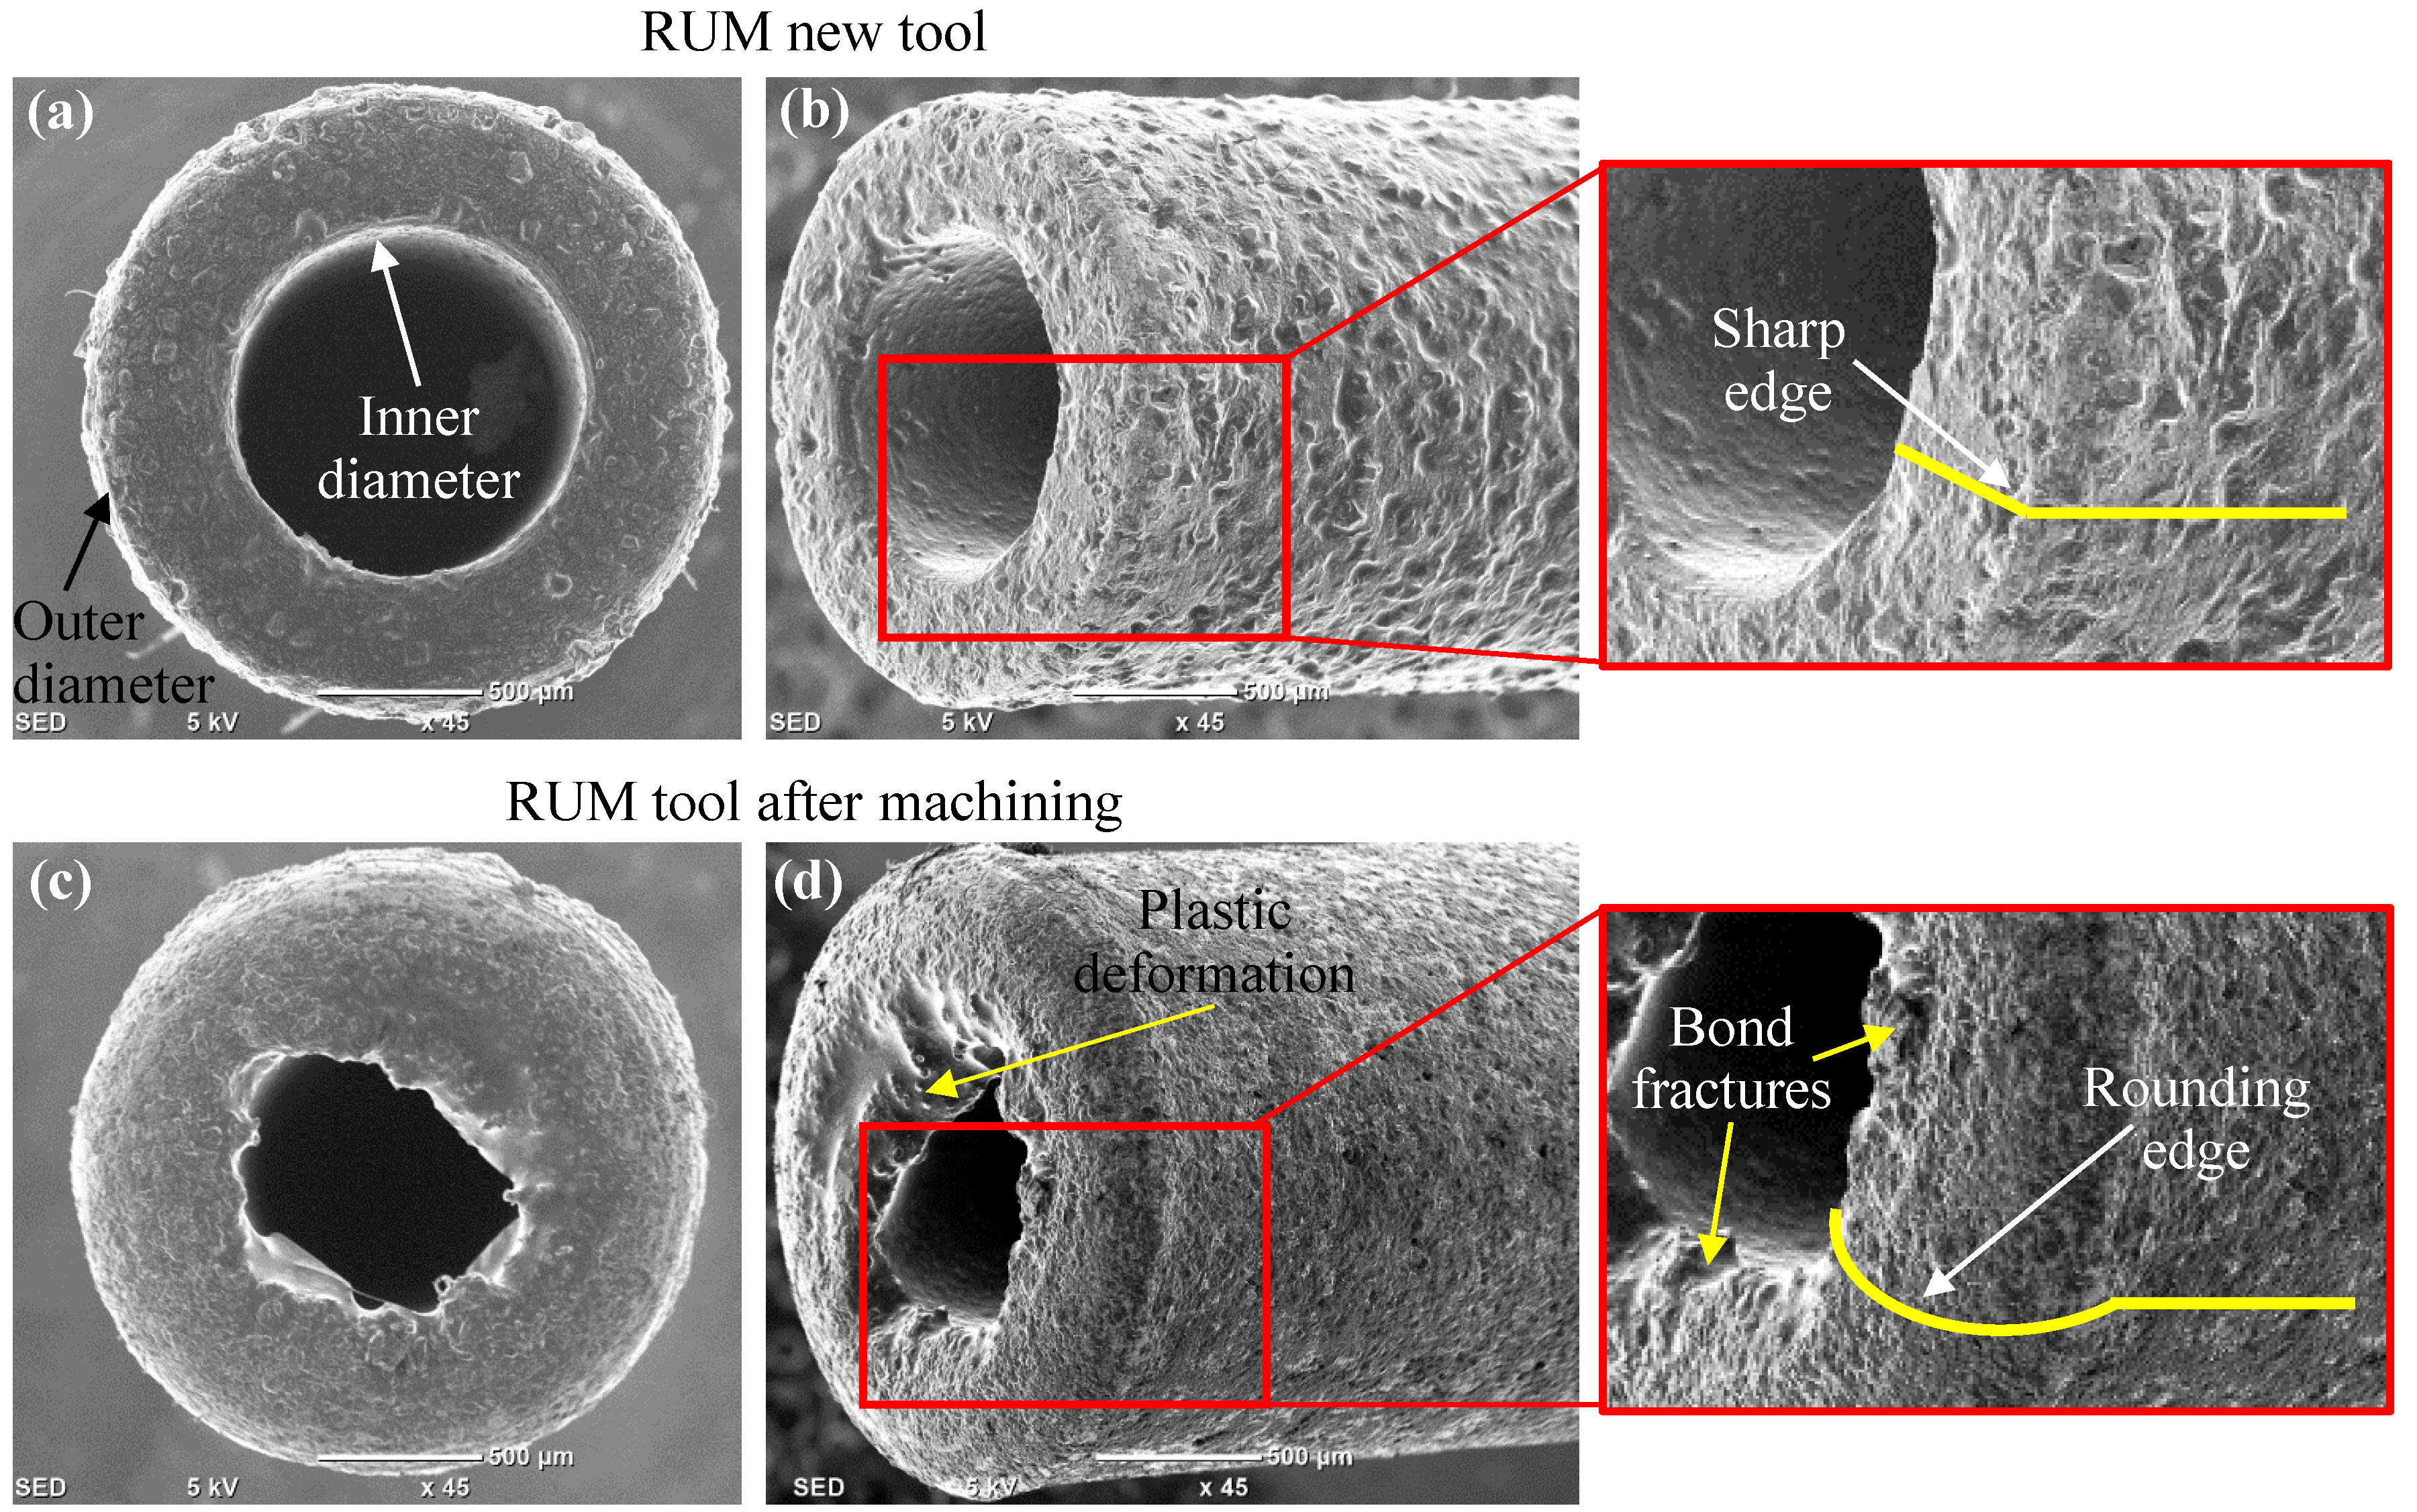
In this study, two RUM tools were used to machine all pockets. The first tool is used until the dimensional errors of the machined pockets reach 5%. Figure 15 shows a comparison between the new and the used tool. Sharp cutting edge along with uniform inner and outer radii can be easily observed in the new tool in Figure 15a,b. On the other hand, as depicted in Figure 15c,d bond fractures, tool edge rounding, and plastic deformation can be detected, these types of tool wear were also documented in [34,35]. The plastic deformation, which happened due to the high pressure applied to the tool end face (see Figure 15d), can partially block the internal coolant. It should be noted that the calibration system built in the DMG was used to measure the tool length after fabricating each pocket. Moreover, the tool rounded edge can affect the pocket’s geometry. Therefore, in this study, the dimensional accuracy of the machined pockets was taken into consideration.
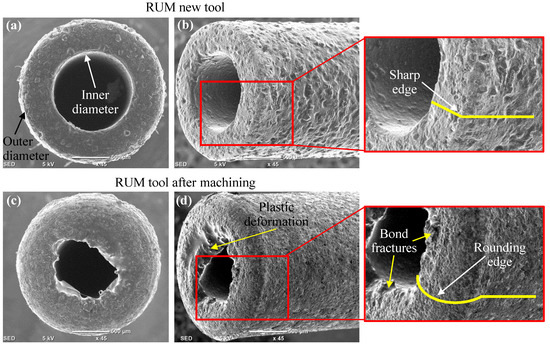
Figure 15.
Comparison of the RUM new tool and the tool after machining. (a,b) End cutting face and a 3D view of the new RUM tool and (c,d) end cutting face and a 3D view of the RUM tool after machining.
4. Conclusions
In this research, the effects of the tool overlapping and the tool path strategies were experimentally investigated on the surface roughness, surface morphology, MRR and profiles of the pockets machined on alumina (Al2O3) ceramic by using RUM. The conclusions were as follows:
- The tool overlapping had significant effects on the surface roughness of the milled pockets. The surface roughness decreased with the increasing of tool overlapping percentage.
- Like roughness, the surface morphology varied considerably with the change of the tool overlapping. SEM images show that the smooth surface morphology was found at the higher levels of tool overlapping percentage (20–25%).
- The tool path strategies played an important role in surface Ra, Rt and MRR. The best values of Ra = 0.155 µm and Rt = 1.432 µm could be achieved by employing a mix of uni-directional and zigzag tool path strategy (Mix-2), along with the tool overlapping of 20%.
- The maximum MRR (0.49 mm3/min) could be attained at the spiral and Mix-1 milling strategies. This was because the surface area of the machined pockets was fully machined (with no un-machined regions) while applying these two path strategies.
- In general, it was inferred that RUM could be used for fabricating pockets in Al2O3 with smooth surface finish and high dimensional accuracy.
- Several tool wear types were observed during RUM including bond fracture, rounding of the tool edge and plastic deformation.
Author Contributions
B.M.A.A. conceived the idea, designed and performed the experiments, analyzed the data and wrote the paper; A.E.-T. edited the paper and provided critical advices on the research strategy; A.E.-T. and E.A.N. supervised the project. All authors have read and agreed to the published version of the manuscript.
Funding
This research was funded by the Deanship of Scientific Research at King Saud University through research group no. RG-1439-009.
Acknowledgments
The authors extend their appreciation to the Deanship of Scientific Research at King Saud University for funding this work through research group no. RG-1439-009.
Conflicts of Interest
The authors declare no conflict of interest.
References
- Navas, V.G.; Sandá, A.; Sanz, C.; Fernández, D.; Vleugels, J.; Vanmeensel, K. Surface integrity of rotary ultrasonic machined ZrO2—TiN and Al2O3—TiC—SiC ceramics. J. Eur. Ceram. Soc. 2015, 35, 3927–3941. [Google Scholar] [CrossRef]
- Ruggeri, S.; Fontana, G.; Fassi, I. Micro-Manufacturing Technologies and Their Applications. C Hapter-Micro-Assembly; Springer: Cham, Switzerland, 2017. [Google Scholar] [CrossRef]
- Finch, D.S.; Oreskovic, T.; Ramadurai, K.; Herrmann, C.F.; George, S.M.; Mahajan, R.L. Biocompatibility of atomic layer-deposited alumina thin films. J. Biomed. Mater. Res. Part A 2008, 87, 100–106. [Google Scholar] [CrossRef] [PubMed]
- Pawar, P.; Ballav, R.; Kumar, A. An Overview of Machining Process of Alumina and Alumina Ceramic Composites. Manuf. Sci. Technol. 2015, 3, 10–15. [Google Scholar] [CrossRef]
- Mohammed, M.; Umer, U.; Rehman, A.; Al-Ahmari, A.; El-Tamimi, A. Microchannels Fabrication in Alumina Ceramic Using Direct Nd:YAG Laser Writing. Micromachines 2018, 9, 371. [Google Scholar] [CrossRef]
- Umer, U.; Khan, M.; Al-ahmari, A. Multi-response optimization of machining parameters in micro milling of alumina ceramics using Nd: YAG laser. Measurement 2017, 95, 181–192. [Google Scholar] [CrossRef]
- Leone, C.; Genna, S.; Tagliaferri, F.; Palumbo, B.; Dix, M. Experimental investigation on laser milling of aluminium oxide using a 30 W Q-switched Yb: YAG fi ber laser. Opt. Laser Technol. 2016, 76, 127–137. [Google Scholar] [CrossRef]
- Abdo, B.M.A.; Anwar, S.; El-Tamimi, A.M.; Alahmari, A.M.; Abouel Nasr, E. Laser micro-milling of bio-lox forte ceramic: An experimental analysis. Precis. Eng. 2018, 53, 179–193. [Google Scholar] [CrossRef]
- Abdo, B.M.A.; El-Tamimi, A.M.; Anwar, S.; Umer, U.; Alahmari, A.M.; Ghaleb, M.A. Experimental investigation and multi-objective optimization of Nd: YAG laser micro-channeling process of zirconia dental ceramic. Int. J. Adv. Manuf. Technol. 2018, 98, 1–18. [Google Scholar] [CrossRef]
- Abdo, B.M.A.; Ahmed, N.; El-tamimi, A.M.; Anwar, S.; Alkhalefah, H.; Nasr, E.A. Laser beam machining of zirconia ceramic: An investigation of micro-machining geometry and surface roughness. J. Mech. Sci. Technol. 2019, 33, 1817–1831. [Google Scholar] [CrossRef]
- Singh, R.P.; Singhal, S.; Singh, R.P.; Singhal, S. Rotary Ultrasonic Machining: A Review. Mater. Manuf. Process. 2017, 31, 1795–1824. [Google Scholar] [CrossRef]
- Kataria, R.; Kumar, J. Ultrasonic Machining: A Review. Adv. Mater. Res. 2016, 1137, 61–78. [Google Scholar] [CrossRef]
- Geng, D.; Teng, Y.; Liu, Y.; Shao, Z.; Jiang, X.; Zhang, D. Experimental study on drilling load and hole quality during rotary ultrasonic helical machining of small-diameter CFRP holes. J. Mater. Process. Technol. 2019, 270, 195–205. [Google Scholar] [CrossRef]
- Jain, A.K.; Pandey, P.M. Experimental studies on tool wear in μ-RUM process. Int. J. Adv. Manuf. Technol. 2016, 85, 2125–2138. [Google Scholar] [CrossRef]
- Kumar, A.; Pandey, P.M. Experimental investigations of ceramic machining using µ-grinding and µ-rotary ultrasonic machining processes: A comparative study. Mater. Manuf. Process. 2017, 32, 598–607. [Google Scholar]
- Lakhdari, F.; Bouzid, D.; Belkhir, N.; Herold, V. Surface and subsurface damage in Zerodur® glass ceramic during ultrasonic assisted grinding. Int. J. Adv. Manuf. Technol. 2017, 90, 1993–2000. [Google Scholar] [CrossRef]
- Abdo, B.M.A.; Anwar, S.; El-tamimi, A.M.; Nasr, E.A. Experimental Analysis on the Influence and Optimization of µ-RUM Parameters in Machining Alumina Bioceramic. Materials 2019, 12, 616. [Google Scholar] [CrossRef]
- Abdo, B.M.A.; Anwar, S.; El-tamimi, A. Machinability study of biolox forte ceramic by milling microchannels using rotary ultrasonic machining. J. Manuf. Process. 2019, 43, 175–191. [Google Scholar] [CrossRef]
- Singh, R.P.; Singhal, S. Investigation of Machining Characteristics in Rotary Ultrasonic Machining of Alumina Ceramic. Mater. Manuf. Process. 2016, 32, 309–326. [Google Scholar] [CrossRef]
- Jiao, Y.; Liu, W.J.; Pei, Z.J.; Xin, X.J.; Treadwell, C. Study on Edge Chipping in Rotary Ultrasonic Machining of Ceramics: An Integration of Designed Experiments and Finite Element Method Analysis. J. Manuf. Sci. Eng. 2005, 127, 752. [Google Scholar] [CrossRef]
- Gong, H.; Fang, F.Z.; Hu, X.T. Kinematic view of tool life in rotary ultrasonic side milling of hard and brittle materials. Int. J. Mach. Tools Manuf. 2010, 50, 303–307. [Google Scholar] [CrossRef]
- Shen, J.Y.; Wang, J.Q.; Jiang, B.; Xu, X.P. Study on wear of diamond wheel in ultrasonic vibration-assisted grinding ceramic. Wear 2015, 332–333, 788–793. [Google Scholar] [CrossRef]
- Wei, S.; Zhao, H.; Jing, J. Investigation on three-dimensional surface roughness evaluation of engineering ceramic for rotary ultrasonic grinding machining. Appl. Surf. Sci. 2015, 357, 139–146. [Google Scholar] [CrossRef]
- Liu, D.; Cong, W.L.; Pei, Z.J.; Tang, Y. A cutting force model for rotary ultrasonic machining of brittle materials. Int. J. Mach. Tools Manuf. 2012, 52, 77–84. [Google Scholar] [CrossRef]
- Das, S.; Doloi, B.; Bhattacharyya, B. Fabrication of stepped hole on zirconia bioceramics by ultrasonic machining. Mach. Sci. Technol. 2016, 20, 681–700. [Google Scholar] [CrossRef]
- Abdo, B.M.A.; El-Tamimi, A.; Alkhalefah, H. Parametric Analysis and Optimization of Rotary Ultrasonic Machining of Zirconia (ZrO2) Ceramics. IOP Conf. Ser. Mater. Sci. Eng. 2020, 727, 012009. [Google Scholar] [CrossRef]
- Xiao, X.; Zheng, K.; Liao, W. Theoretical model for cutting force in rotary ultrasonic milling of dental zirconia ceramics. Int. J. Adv. Manuf. Technol. 2014, 75, 1263–1277. [Google Scholar] [CrossRef]
- Churi, N.J.; Pei, Z.J.; Shorter, D.C.; Treadwell, C. Rotary ultrasonic machining of silicon carbide: Designed experiments. Int. J. Manuf. Technol. Manag. 2007, 12, 284–298. [Google Scholar] [CrossRef]
- Baraheni, M.; Amini, S. Investigation on rotary ultrasonic assisted end grinding of silicon nitride ceramics. SN Appl. Sci. 2019, 1, 1–14. [Google Scholar] [CrossRef]
- Sokolov, A.S.; Harris, V.G. 3D crystallographic alignment of alumina ceramics by application of low magnetic fields. J. Eur. Ceram. Soc. 2018, 38, 5257–5263. [Google Scholar] [CrossRef]
- Maccauro, G.; Iommetti, P.R.; Manicone, P.F.; Raffaelli, L. Zirconia and Alumina Bioceramic Biocompatibility; Nova Science Publishers, Inc.: Hauppauge, NY, USA, 2012. [Google Scholar]
- Gologlu, C.; Sakarya, N. The effects of cutter path strategies on surface roughness of pocket milling of 1.2738 steel based on Taguchi method. J. Mater. Process. Technol. 2007, 6, 7–15. [Google Scholar] [CrossRef]
- Heo, E.; Kim, D.; Lee, J.; Lee, C.; Chen, F.F. High speed pocket milling planning by feature-based machining area partitioning $. Robot. Comput. Integr. Manuf. 2011, 27, 706–713. [Google Scholar] [CrossRef]
- Kuriakose, S.; Patowari, P.K.; Bhatt, J. Machinability study of Zr-Cu-Ti metallic glass by micro hole drilling using micro-USM. J. Mater. Process. Technol. 2017, 240, 42–51. [Google Scholar] [CrossRef]
- Cheema, M.S.; Singh, P.K.; Tyagi, O.; Dvivedi, A.; Sharma, A.K. Tool wear and form accuracy in ultrasonically machined microchannels. Meas. J. Int. Meas. Confed. 2016, 81, 85–94. [Google Scholar] [CrossRef]
© 2020 by the authors. Licensee MDPI, Basel, Switzerland. This article is an open access article distributed under the terms and conditions of the Creative Commons Attribution (CC BY) license (http://creativecommons.org/licenses/by/4.0/).

