Article

Comparison of Wear Performance of Austempered and Quench-Tempered Gray Cast Irons Enhanced by Laser Hardening Treatment

1
Faculty of Mechanical Engineering and Automation, Zhejiang Sci-Tech University, #928 No.2 Street, High Education Zone, Hangzhou 310018, China
2
Department of Mechanical Engineering, School of Engineering and Computer Science, Oakland University, Rochester, MI 48309, USA
3
College of Modern Science and Technology, China Jiliang University, Hangzhou 310018, China
*
Author to whom correspondence should be addressed.
Appl. Sci. 2020, 10(9), 3049; https://doi.org/10.3390/app10093049
Submission received: 30 March 2020 / Revised: 23 April 2020 / Accepted: 26 April 2020 / Published: 27 April 2020
(This article belongs to the Section Materials Science and Engineering)

Abstract

:
The current research studied the effects of laser surface hardening treatment on the phase transformation and wear properties of gray cast irons heat treated by austempering or quench-tempering, respectively. Three austempering temperatures of 232 °C, 288 °C, and 343 °C with a constant holding duration of 120 min and three tempering temperatures of 316 °C, 399 °C, and 482 °C with a constant holding duration of 60 min were utilized to prepare austempered and quench-tempered gray cast iron specimens with equivalent macro-hardness values. A ball-on-flat reciprocating wear test configuration was used to investigate the wear resistance of austempered and quench-tempered gray cast iron specimens before and after applying laser surface-hardening treatment. The phase transformation, hardness, mass loss, and worn surfaces were evaluated. There were four zones in the matrix of the laser-hardened austempered gray cast iron. Zone 1 contained ledeburite without the presence of graphite flakes. Zone 2 contained martensite and had a high hardness, which was greater than 67 HRC. Zone 4 was the substrate containing the acicular ferrite and carbon-saturated austenite with a hardness of 41–27 HRC. In Zone 3, the substrate was tempered by the low thermal radiation. For the laser-hardened quench-tempered gray cast iron specimens, three zones were observed beneath the laser-hardened surface. Zone 1 also contained ledeburite, and Zone 2 was full martensite. Zone 3 was the substrate containing the tempered martensite. The tempered martensite became coarse with increasing tempering temperature due to the decomposition of the as-quenched martensite and precipitation of cementite particles. In the wear tests, the gray cast iron specimens without heat treatment had the highest wear loss. The wear performance was improved by applying quench-tempering heat treatment and further enhanced by applying austempering heat treatment. Austempered gray cast iron specimens had lower mass loss than the quench-tempered gray cast iron specimens, which was attributed to the high fracture toughness of acicular ferrite and stable austenite. After utilizing the laser surface hardening treatment, both austempered and quench-tempered gray cast iron specimens had decreased wear loss due to the high surface protection provided by the ledeburitic and martensitic structures with high hardness. In the worn surfaces, it was found that cracks were the dominant wear mechanism. The results of this work have significant value in the future applications of gray cast iron engineering components and provide valuable references for future studies on laser-hardened gray cast iron.

1. Introduction

Gray cast iron (GI) is a common ferrous material with the presence of graphite flakes in the matrix. It has been reported that GI has high machinability, high vibration adsorption, and high castability. In industry, GI has been widely utilized in the production of gears, guide rails, and cylinder liners for diesel engines [1,2,3]. These GI engineering parts frequently are required to withstand direct surface contacts with applied pressure and relative movement. Superior wear resistance is required to ensure good working performance and long service life. Thus far, surface-hardening treatments and heat treatments are considered as the common strengthening methods to improve the anti-wear performance of ferrous mechanical components [4,5,6].
Austempering heat treatment has received considerable attention in the past two decades due to the formation of a unique ausferritic structure with high strength–weight ratio, fracture toughness, ductility, and good tribological performance [7,8,9,10]. In the austempering heat treatment, fully austenitized cast iron is quickly transferred to a salt bath furnace and maintained for a certain time period. The austempering temperatures should be controlled within the range between the temperatures at which pearlite and martensite form. Quench-tempering heat treatment is a conventional heat treatment to increase the strength and hardness of cast irons and steels. During the quench-tempering process, the as-quenched martensite decomposes to tempered martensite with the precipitation of cementite particles or islands. Additional tempering can decrease the amount of retained austenite and release the internal residual stress caused by the rapid cooling rate in the quenching step [11,12].
The wear properties of GI have been significantly improved by the use of austempering and quench-tempering heat treatments. Balachandran et al. [8] investigated the wear resistance of hypereutectic gray cast iron after receiving austempering and quench-tempering heat treatments. The austempered gray cast iron (AGI) had the best wear performance, which was related to the Transformation induced plasticity (TRIP) effect, and the quench-tempered gray cast iron (QTGI) had moderate wear resistance, which was attributed to fine carbides. Sarkar et al. [10] determined the effects of austempering heat treatment on the microstructure, wear, and mechanical properties of AGI alloyed with copper. The amount of retained austenite increased, the hardness and tensile strength decreased, and the ductility and wear depth increased with higher austempering temperature.
Laser surface hardening treatment is an effective approach to lower the wear loss and extend the fatigue life of cast iron and steel components. During the laser-hardening process, the top surface of cast irons or steels is heated above Acm or the eutectic critical temperature to transform the original microstructure into an unstable austenite or liquid state. Then, the top surface in the fully austenitized or liquid state is cooled by air and self-quenches to the adjacent cold substrate. Currently, laser surface hardening treatment is often applied to small components with complicated geometry [13,14,15,16]. Joshi et al. [17] applied laser glazing treatment to GI. The surface hardness was significantly improved due to the far-from equilibrium phase transformation. It was experimentally observed that the central fusion regions containing dendritic structure and cementite plates, and the heat-affected region containing bainite with graphite flakes was formed after laser glazing. Liu et al. [18] investigated the effects of surface temperature and scanning speed on the characteristics of the hardened layers of gray cast iron such as microstructure and hardness profile by using a high-power diode laser. It was found that a homogeneous microstructure with hardness ranging from 700 HV to 800 HV was formed in the laser-hardened zone, which was not dependent on the temperature and scanning speed. In addition, a deep hardened zone was produced when using high temperature and low scanning speed. In addition, they pointed out that overlapping areas around 16.7%–20.8% of the hardened track width was found, which would degrade the surface hardness because the martensite was tempered.
Since the austempering, quench-tempering, and laser surface hardening treatments were frequently utilized to strengthen the cast irons and steels, it is vital to understand the coupling influence of traditional heat treatment and surface treatment on the phase transformation and wear properties of GI specimens. In the present study, the roles of laser surface-hardening treatment on the microstructure and wear resistance of AGI and QTGI specimens were investigated. A reciprocating sliding wear test configuration was utilized to determine the wear performance. The wear performance of AGI and QTGI with and without laser-hardening treatment was compared under equivalent macro-hardness values. The phase transformations in the laser-hardened regions and heat-affected regions were determined using an optical microscope. The macro-hardness and micro-hardness profiles were measured by using a Rockwell hardness tester and a Vickers hardness tester. The worn surfaces were analyzed by utilizing a scanning electron microscope (SEM) to find possible wear mechanisms. The phase transformations in the matrix of AGI and QTGI after receiving laser hardening treatment can be utilized as useful references for other related GI research studies. In addition, a comparison of wear resistance between AGI and QTGI with and without laser surface-hardening treatment has importance in developing future GI engineering components with better operational performance and longer service life.

2. Materials and Methods

2.1. As-Received Gray Cast Iron

The percentage of chemical elements of the GI was analyzed by a carbon–sulfur analyzer and an optical spectrometer, as presented in Table 1. The microstructure of the original GI consisted of graphite flakes, ferrite, and pearlite; see Figure 1.

2.2. Heat Treatment Designs

2.2.1. Austempering Heat Treatment

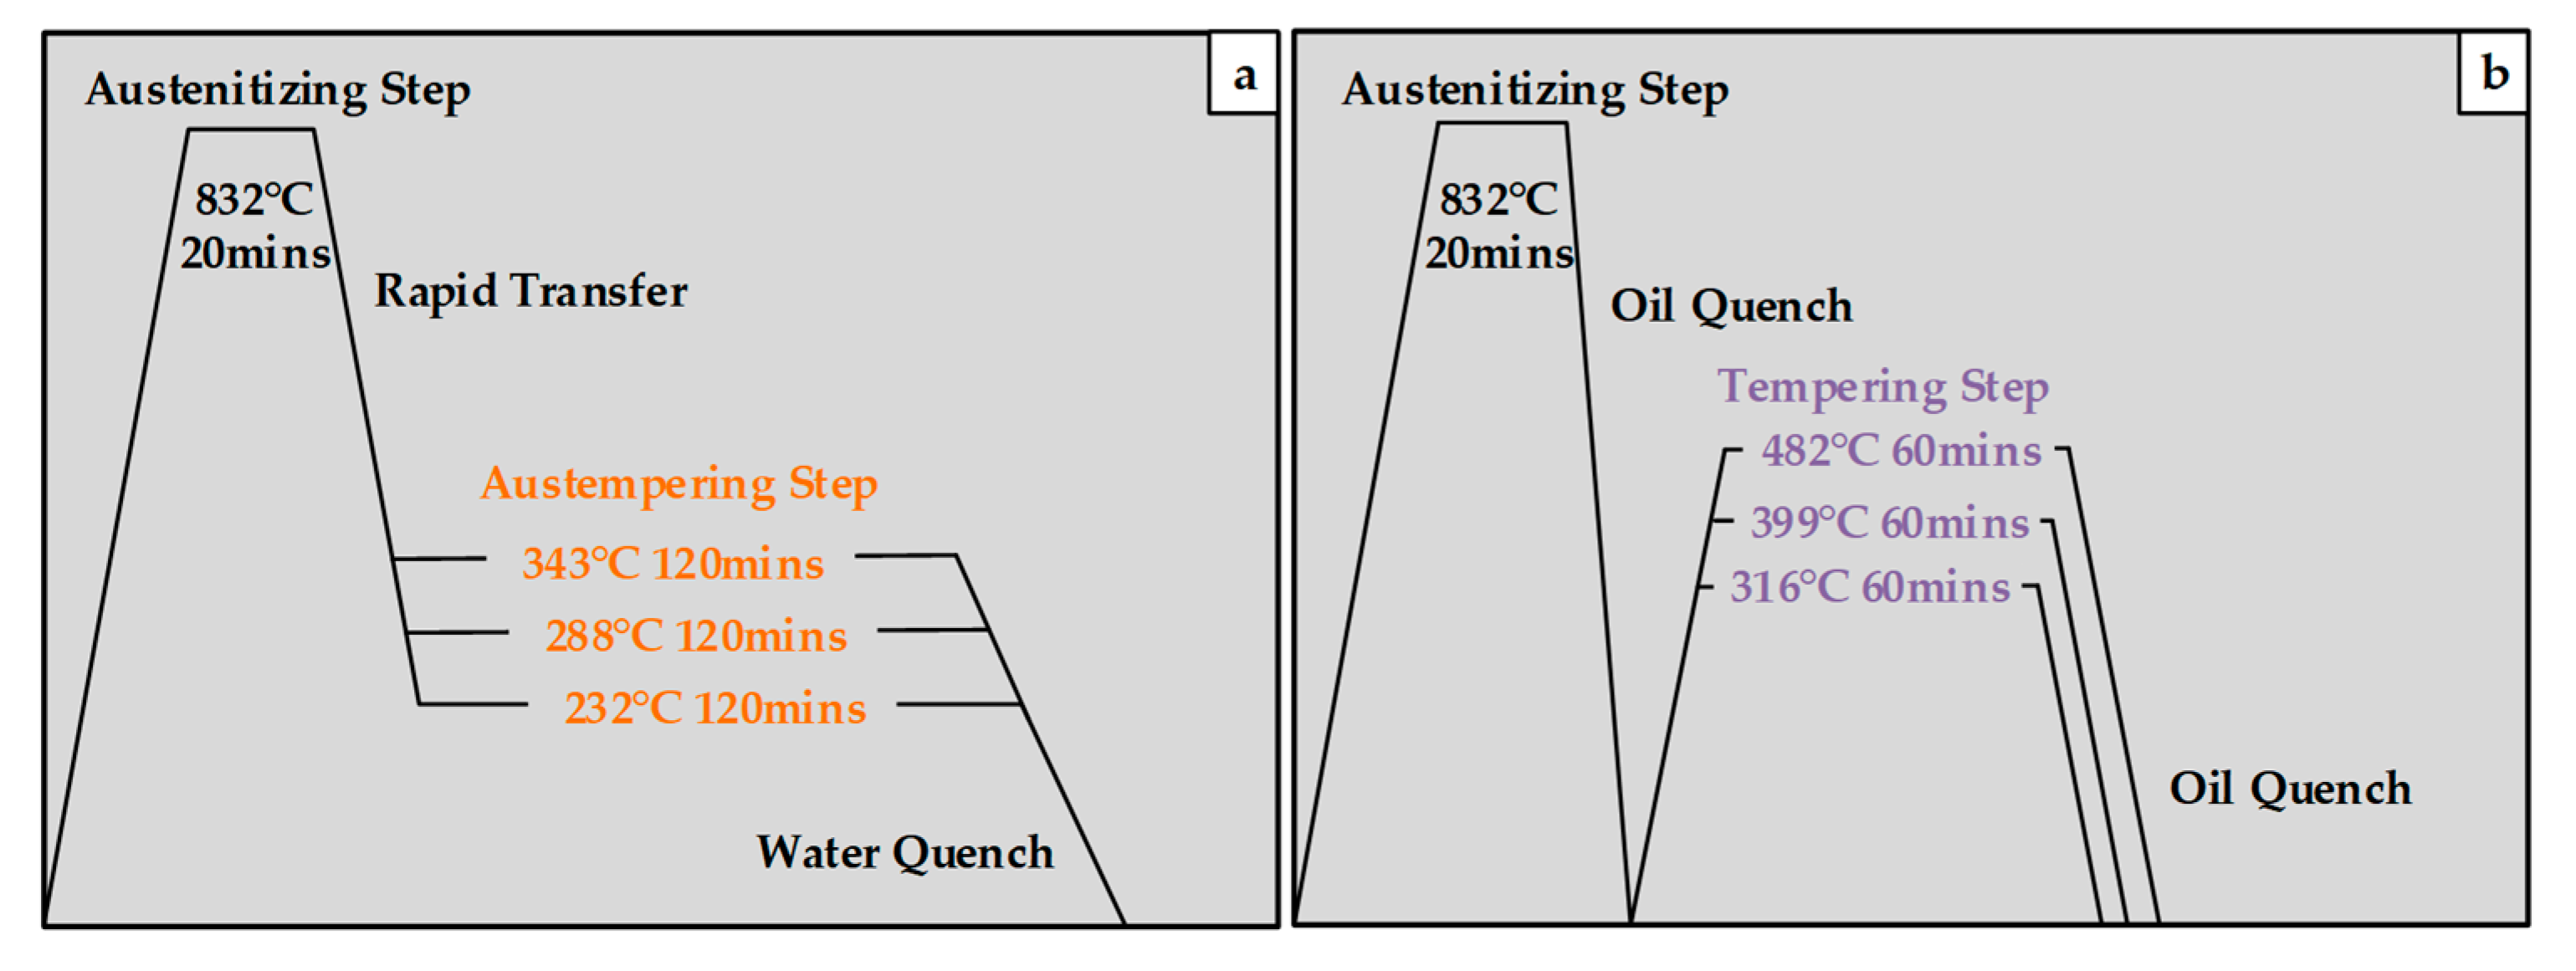
The original GI specimens were first austenitized at a temperature of 832 °C (1530 °F) with a holding duration of 20 min in a high-temperature salt-bath furnace. The initial pearlite was converted to unstable austenite, and the alloy elements were distributed uniformly in the matrix. Next, the austenitized GI specimens were quickly transferred to another pre-heated medium temperature salt bath furnace for the austempering step. Austempering temperatures of 232 °C (450 °F), 288 °C (550 °F), and 343 °C (650 °F) with a constant holding duration of 120 min were used in this study. Then, the AGI specimens were quenched to room temperature by water. The austempering heat treatment is sketched in Figure 2a.

2.2.2. Quench-Tempering Heat Treatment

First, the austenitizing temperature of 832 °C (1530 °F) with a holding duration of 20 min was used to fully transform the pearlite into unstable austenite in the matrix of the as-received GI specimens. Then, oil quenching was applied to cool the austenitized GI specimens to room temperature to minimize internal stresses and avoid internal cracks due to the quick cooling rate. Afterwards, tempering temperatures of 316 °C (600 °F), 399 °C (750 °F), and 482 °C (900 °F) were applied for 60 min to duplicate the macro-hardness of the above AGI specimens. The tempering step was completed using electric furnaces. Finally, the tempered GI specimens were quenched again by oil to room temperature. The quench-tempering heat treatment is sketched in Figure 2b.

2.3. Metallurgical Evaluation

Specimen cubes (10 mm × 10 mm × 10 mm) were used in the metallurgical evaluation using an optical microscope. The surfaces of specimen cubes were ground and polished using sandpapers of 240–1200 grit and polishing pads with 0.05 µm Al2O3-deagglomerated suspension. Then, the polished surfaces were etched with a 3% nital solution for a time period of 2 s or 3 s.

2.4. Hardness Measurement

The macro-hardness was determined using a Rockwell hardness tester. The micro-hardness was determined using a Vickers hardness tester. The normal load was 9.8 N, and testing time was 10 s in the micro-hardness measurements. The test surfaces of GI specimens were ground and polished prior to the hardness measurement. The macro and micro-hardness measurements were repeated three times on each GI specimen, and the average values were included.

2.5. Ball-On-Flat Reciprocating Wear Tests

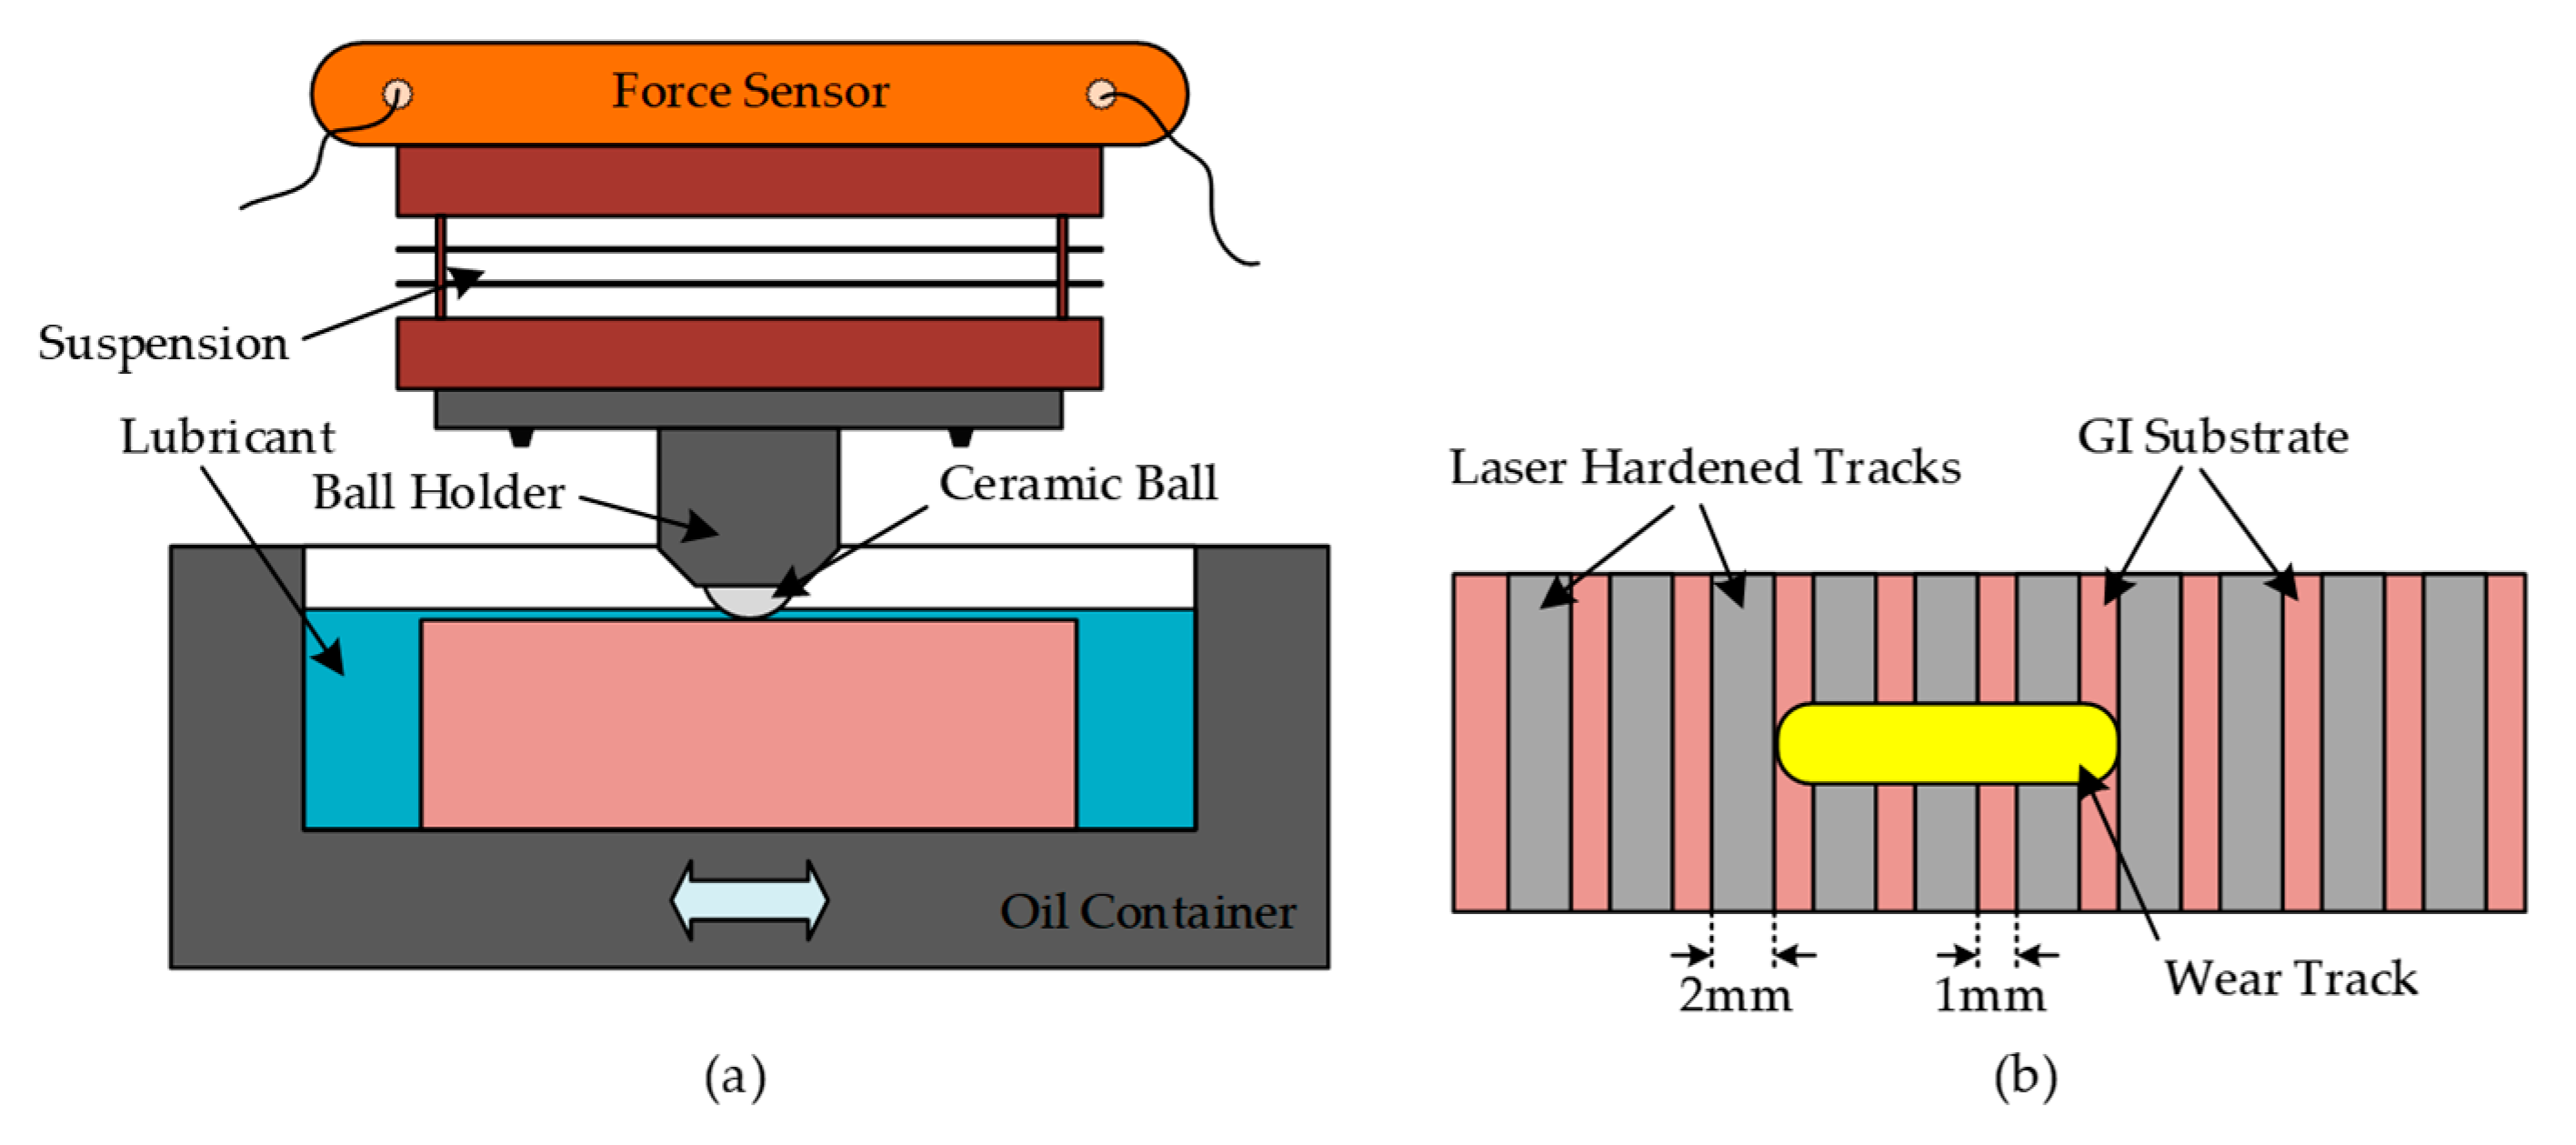
The reciprocating sliding wear tests were conducted using a mechanical tribometer with a ball-on-flat configuration. The upper specimen was a ceramic ball with a 4 mm diameter and a surface finish (Ra) of 10 nm. The hardness of the ceramic ball was approximately 75 HRC, which was significantly higher than that of the GI specimens. Using hard ceramic balls eliminated the possibility of any wear scars on the upper specimens. The dimensions of the GI plates were 45 mm × 20 mm × 10 mm (length × width × height). The tests were conducted with a submerged lubricating condition with PAO4, which is a common base oil with no additives. The parameters in the wear tests are shown in Table 2, which were selected based on our preliminary experiments and previous studies. The orientation of sliding motion was 90 degrees to the laser-hardened tracks, and the starting point for the wear test was at the side of the laser-hardened track, as shown in Figure 3. Before and after each wear test, the lubricant container and upper and lower specimens were submerged in acetone and cleaned using an ultrasonic cleaner for 5 min. After each wear test, the upper specimen and lubricant were changed in each wear test in case of the presence of wear debris. After the wear test, the mass loss of GI specimens was measured using a precise analytical scale. Additionally, the worn areas were analyzed using SEM to obtain the possible wear mechanisms. Each wear test was carried out three times, and the averages were calculated.

2.6. Laser Surface-Hardening Process

Grinding and polishing processes were applied on the surfaces of AGI and QTIGI specimens to achieve a surface roughness (Ra) within a range of 200–400 nm before applying the laser-hardening treatment. The surface topography was determined using a 3D surface tracer. The parameters in the laser-hardening treatment are shown in Table 3. A thin graphite coating was applied to the test surface of GI specimens to improve the absorptivity. Since some researchers have reported that the back-tempering issue in the overlapped laser-hardened tracks would significantly degrade the wear resistance [19,20,21], a 1-mm distribution spacing interval between two adjacent laser-hardened tracks was utilized in this study (see Figure 3).

3. Results

3.1. Microstructure

3.1.1. Laser-Hardened Austempered Gray Cast Iron (LHAGI)

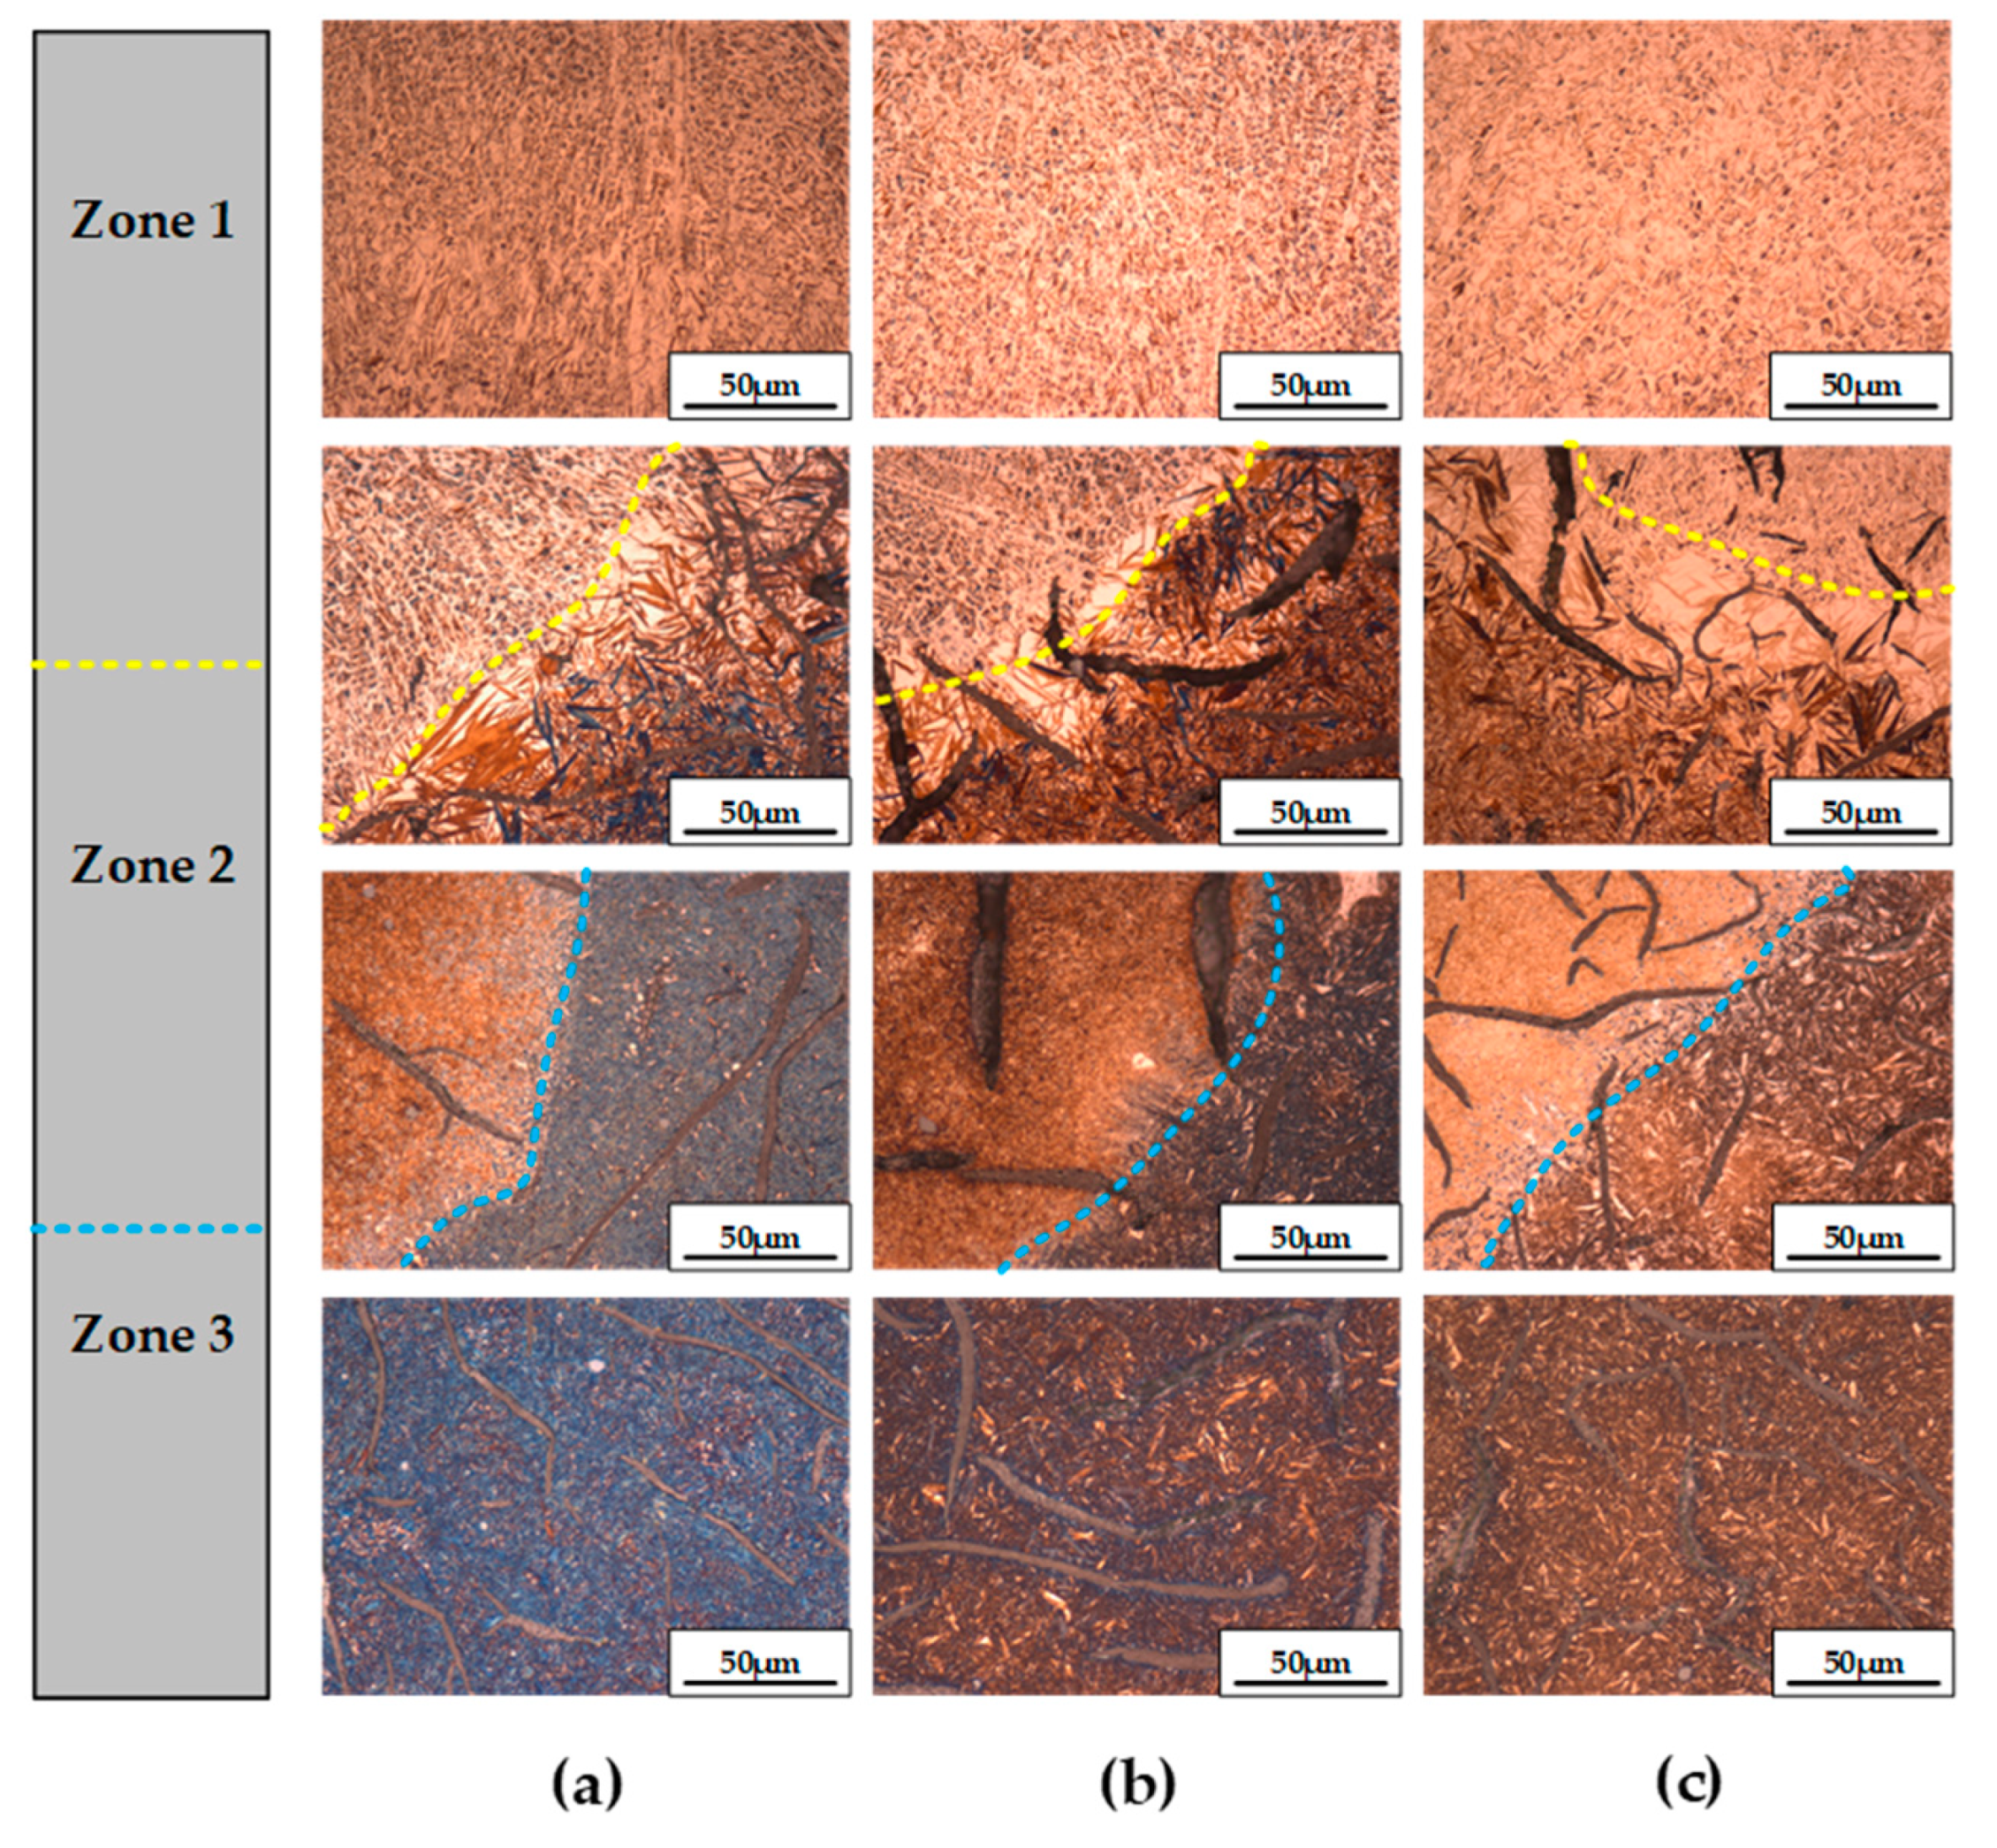
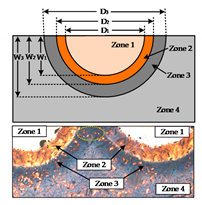
Figure 4 shows the microstructure of LHAGI with various austempering temperatures. There were four diverse zones produced under the laser-hardened surface. First, Zone 4 was the substrate of AGI, which indicates that the original pearlitic structure has been converted into acicular ferrite and stable austenite with high carbon content after receiving the austempering heat treatment and is called ausferrite when produced in austempered ductile iron (ADI) [22,23,24]. The ferrite plates grew from needle-like into feather-like with increasing austempering temperature from 232 °C to 343 °C, since more carbon atoms diffused with a high diffusion rate [25]. Then, Zone 1 was the central laser-hardened region, which contained the ledeburite. In Zone 1, the graphite flakes were dissolved during the laser-hardening process due to the high local temperature. The morphology of ledeburite had no differences among LHAGI specimens with various austempering temperatures. In addition to Zone 1, there were two heat-affected zones, which were caused by the thermal radiation from the central laser-hardened region. In the matrix of the upper heat-affected zone (Zone 2), because the heating temperature was above the eutectoid temperature during the laser-hardening process, pearlite was transformed into unstable austenite, and austenitized regions were quickly cooled by air and the neighboring substrate. Therefore, the main component in Zone 2 was martensite, which was coarse near Zone 1 and thin near Zone 3 due to the decrease in temperature. In addition, the heating temperature in the lower heat-affected zone (Zone 3) was much lower than that in Zone 2, which resulted in tempering of acicular ferrite and the carbon saturated austenite. Table 4 displays the dimensions of laser-hardened regions and heat-affected regions of LHAGI with various austempering temperatures. The width and depth of Zone 1, Zone 2, and Zone 3 were independent of the austempering temperature.

3.1.2. Laser-Hardened Quench-Tempered Gray Cast Iron (LHQTGI)

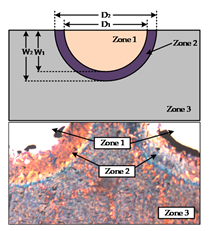
Figure 5 shows the microstructure of LHQTGI specimens with various tempering temperatures. Three different regions were found beneath the laser-hardened surface in the matrix of LHQTGI. Zone 3 was the substrate containing the tempered martensite, which is a typical phase component for QTGI. The tempered martensite became coarse when increasing tempering temperature from 316 °C to 482 °C. Similar to the LHAGI specimens, the laser-hardened region (Zone 1) was also full of ledeburitic structures without the presence of graphite flakes, which indicates that Zone 1 experienced a solid–liquid–solid phase transformation during the laser-hardening process. Zone 2 was a heat-affected zone, which contained martensite due to the effects of self-quenching. The graphite flakes remained with no changes in morphology or size. The martensite around Zone 1 was coarser than that around Zone 3 due to the different temperature distributions. Table 5 displays the dimensions of the laser-hardened areas and heat-affected regions in the matrix of LHQTGI specimens with various tempering temperatures. The width and depth of Zone 1 and Zone 2 in LHQTGI specimens were similar to those in LHAGI specimens due to the same parameters being used in the laser-hardening treatment. The lower heat-affected zone was not produced in the matrix of LHQTGI specimens due to the higher thermal stability of tempered martensite as compared with acicular ferrite and high carbon content austenite.

3.2. Hardness

The macro-hardness values in HRC are given in Table 6. The AGI and QTGI specimens had similar macro-hardness in each test group. For AGI specimens, the macro-hardness decreased with increasing austempering temperature because there was more acicular ferrite and stable austenite with high carbon content produced in the matrix than martensite. Likewise, the macro-hardness of QTGI specimens decreased when the tempering temperature was increased due to the decomposition of martensite and growth of cementite phases. In Table 7, the micro-hardness of different regions in the matrix of LHAGI and LHQTGI specimens is reported. For LHAGI specimens, ledeburite in Zone 1 and martensite in Zone 2 had high hardness above 67 HRC. Since the acicular ferrite and stable austenite with high carbon content were tempered in Zone 3, it has a lower hardness than that of the substrate. For LHQTGI specimens, Zone 1 and Zone 2 were similar in hardness with the LHAGI specimens because of the formation of ledeburite and martensite. Since the solid–liquid–solid phase transformation in Zone 1 and solid–solid phase transformation in Zone 2 occurred during the laser-hardening process, the hardness of these two regions did not depend on the original heat treatment designs.

3.3. Wear Properties

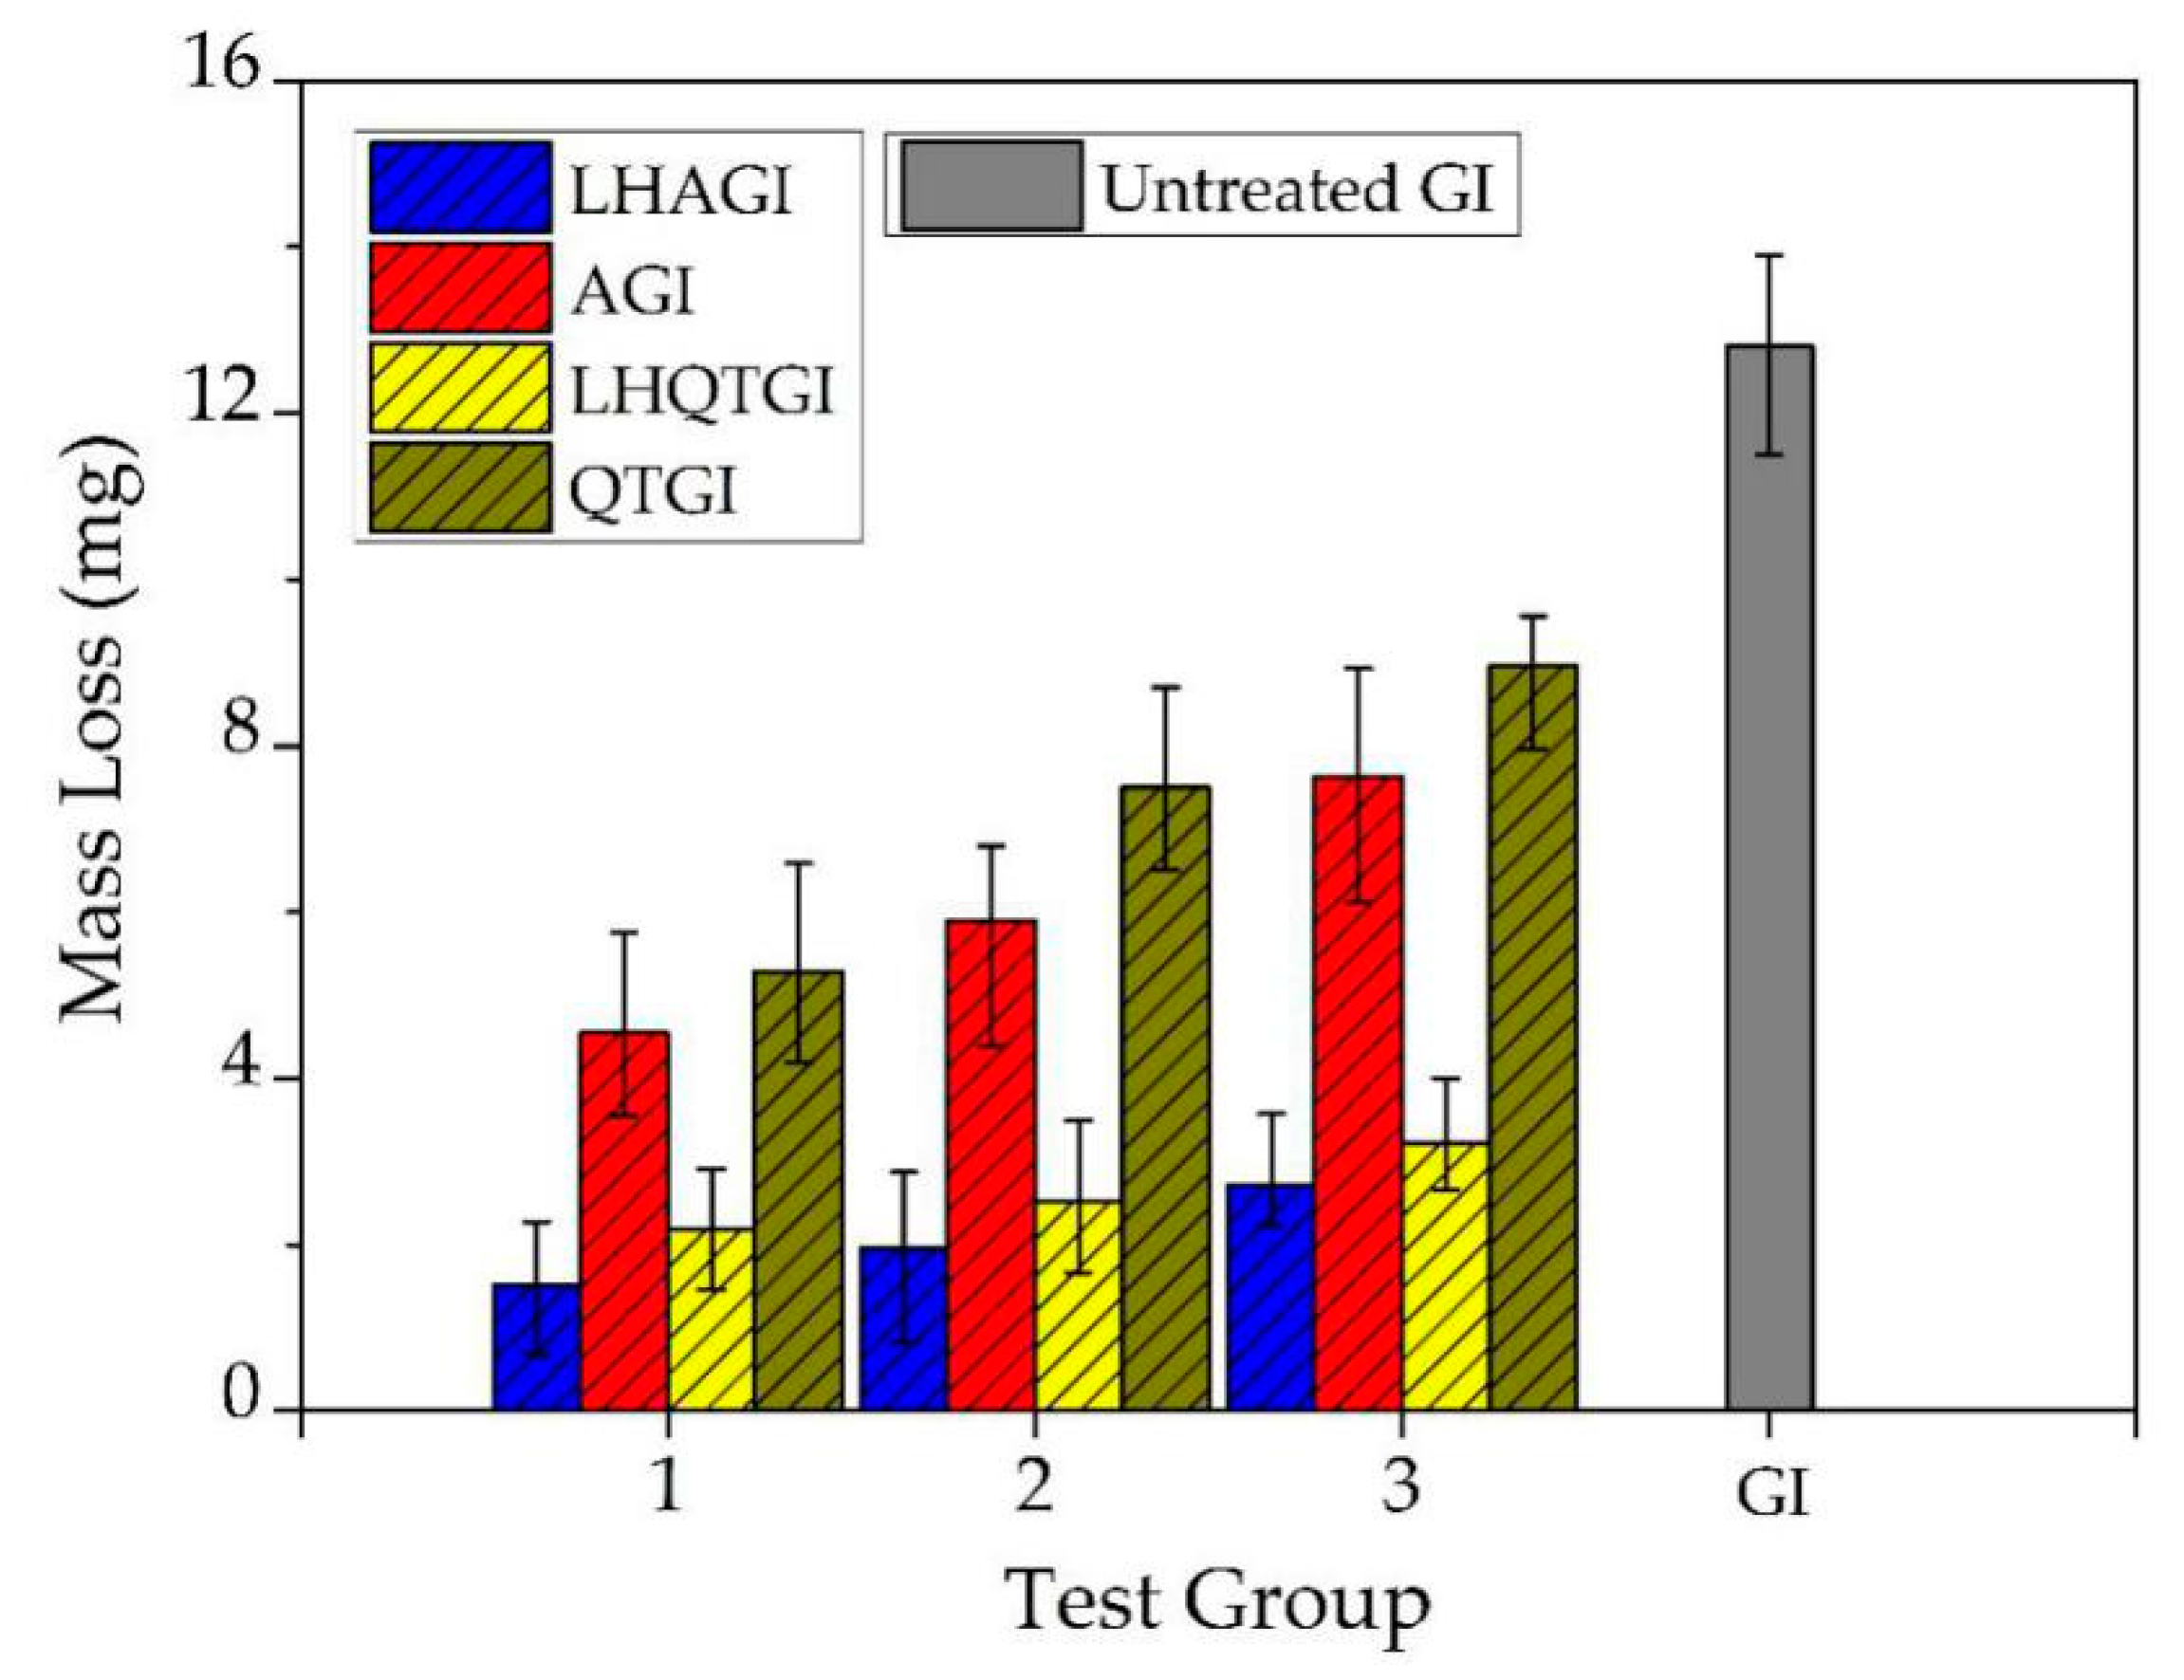
The mass loss due to wear of LHAGI, AGI, LHQTGI, QTGI, and untreated GI specimens is shown in Figure 6. The untreated GI specimens had the highest wear loss due to the low surface hardness of approximately 215 HB. After receiving quench-tempering, the wear resistance was improved. The wear resistance decreased when raising the tempering temperature due to the lower hardness of the specimens. The wear performance of GI specimens was further enhanced by applying the austempering heat treatment. It is well known that the existence of acicular ferrite and stable austenite with high carbon content provides improved wear protection on surfaces. The metastable austenite can be converted into martensite to increase the surface hardness by the high localized strain and plastic deformation [26,27]. The wear resistance of AGI specimens also decreased when raising austempering temperature because of the lower hardness of the specimens. When the laser surface hardening treatment was utilized on AGI and QTGI specimens, the mass loss was significantly reduced because high hardness ledeburitic and martensitic structures were formed in the matrix. The LHAGI specimens had higher wear resistance than LHQTGI specimens, although the microstructure and hardness of Zone 1 and Zone 2 were quite similar, which can be attributed to two reasons. (1) The acicular ferrite and stable austenite with high carbon percentage between two adjacent laser-hardened tracks had higher wear resistance than tempered martensite under equivalent macro-hardness. (2) The combined structures of tempered acicular ferrite and tempered austenite had higher fracture toughness than tempered martensite. Similar findings were reported in a previous study on the tribological properties of ADI and tempered ADI [28].

3.4. Worn Surfaces

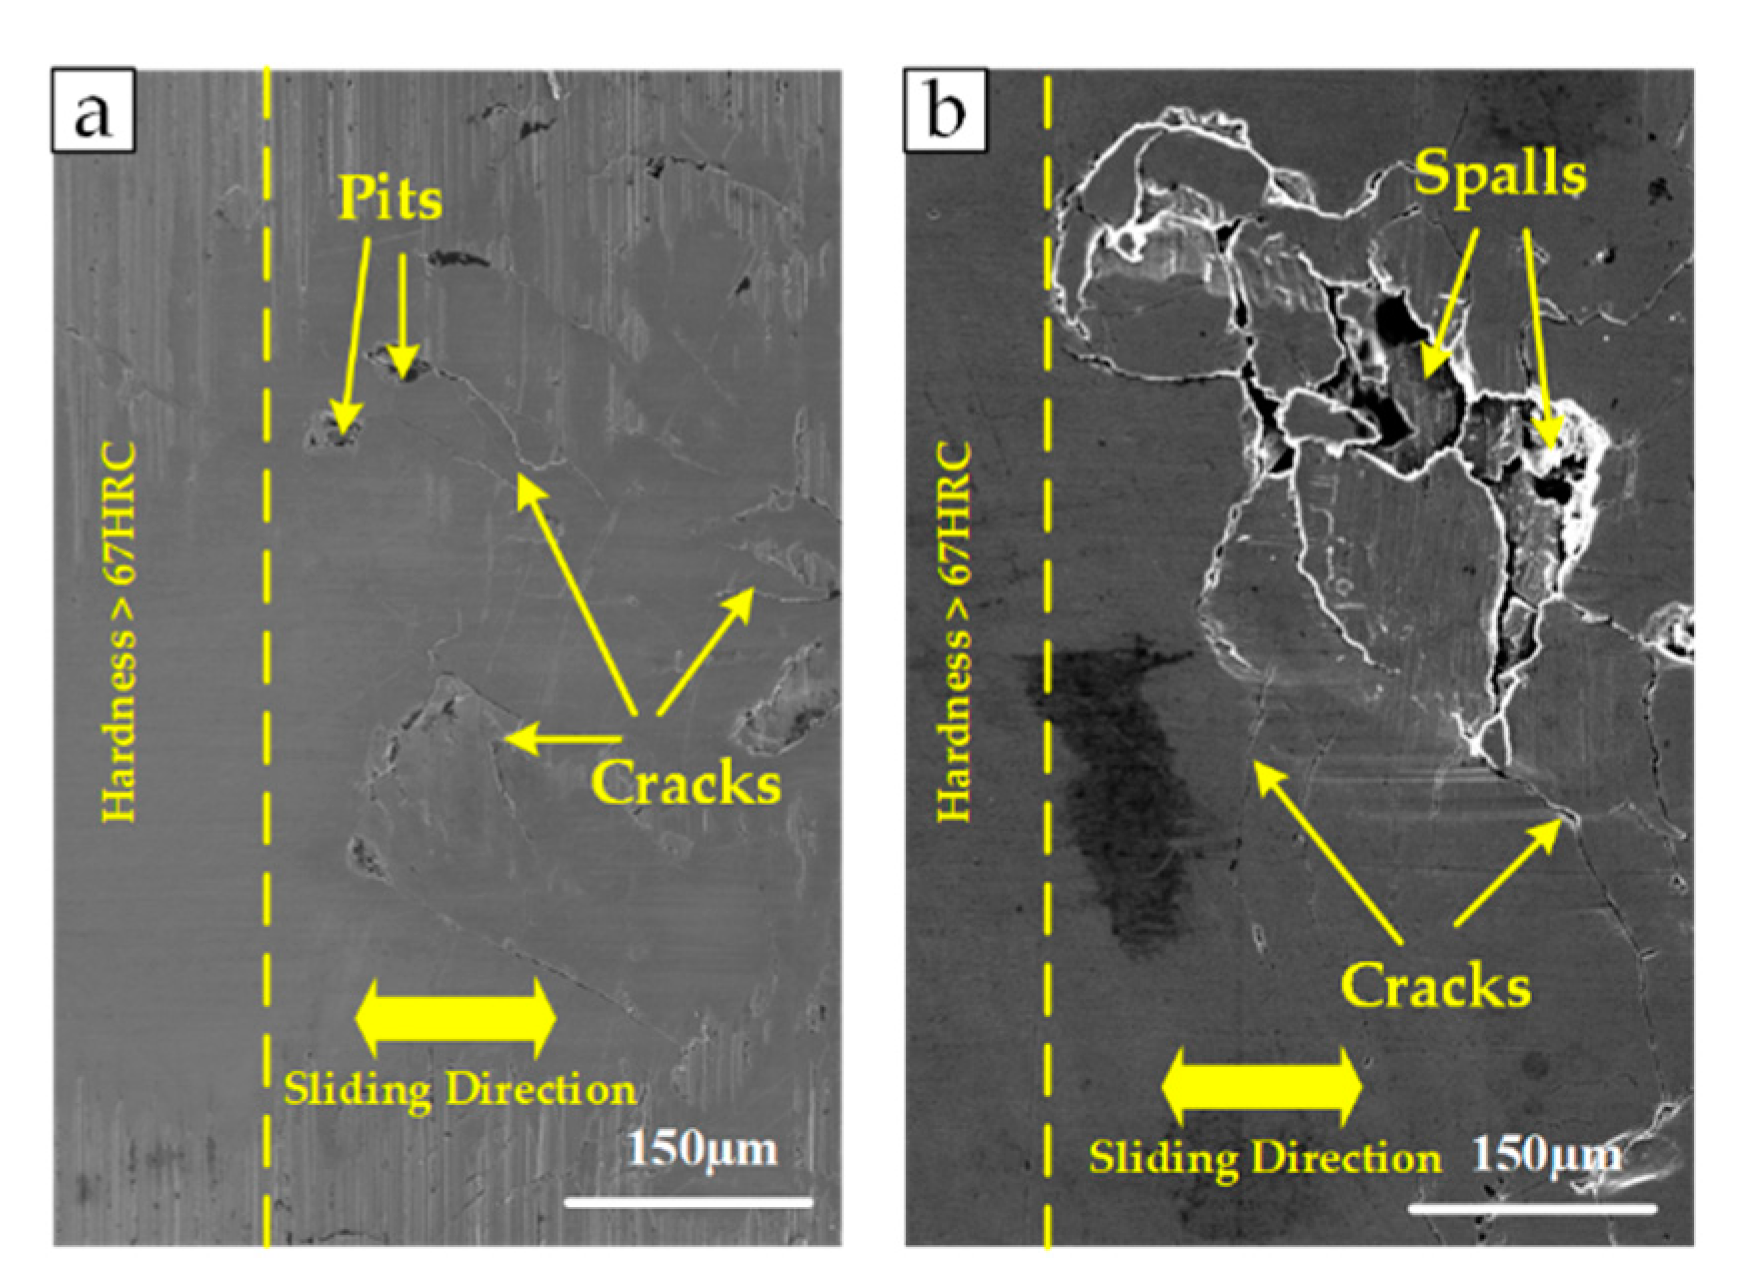
The worn surfaces of representative LHAGI and LHQTGI specimens were analyzed by SEM, as shown in Figure 7. The main wear mechanism was crack formation. Under the external load in reciprocating sliding wear tests, cracks easily formed around the edge of graphite flakes on the surface or subsurface due to the high stress concentration. Then, the cracks propagated along the graphite flakes. These cracks were linked together to produce small-scale pits or large-scale spalls [29,30]. However, the graphite flakes in the laser-hardened region (Zone 1) dissolved during the laser-hardening process, and the high hardness ledeburitic and martensitic structures provided more resistance against surface fracture.

4. Conclusions

In the present research, the roles of laser surface-hardening treatment on the anti-wear performance of AGI and QTGI specimens were examined under equivalent macro-hardness. The microstructure, macro-harness, and micro-hardness values and wear tracks were evaluated to understand the phase transformations and possible wear mechanisms. Taken together, several conclusions can be drawn:
  • Four regions were found under the laser-hardened surface of LHAGI specimens. Zone 1 was the laser-hardened region containing the ledeburite and had a hardness of approximately 67 HRC. Zone 2 was an upper heat-affected zone containing martensite with a hardness of approximately 67 HRC. Zone 4 was the substrate containing the acicular ferrite and stable austenite with high carbon content and had a hardness of 41–27 HRC with austempering temperatures from 232 to 399 °C. Due to the tempering effect in Zone 3, the hardness decreased accordingly. The acicular ferrite became thick with the increasing austempering temperature.
  • Three regions were found under the laser-hardened surface of LHQTGI specimens. Zone 1 was the laser-hardened region containing the ledeburite and had a hardness of approximately 68 HRC. Zone 2 was the heat-affected zone containing the martensite and had a hardness of approximately 66 HRC. Zone 3 was the substrate containing the tempered martensite with a hardness ranging from 41 to 26 HRC with varying tempering temperatures from 316 to 482 °C.
  • In reciprocating sliding wear tests, GI specimens without heat treatment had the lowest wear resistance due to the low surface hardness. The wear resistance was improved by applying the quench-tempering heat treatment and further improved by applying the austempering heat treatment. Both AGI and QTGI specimens had lower wear resistance when raising the austempering temperature or tempering temperature as a result of the reduction in hardness. After introducing the laser-hardening treatment, the wear performance of LHAGI and LHQTGI specimens was significantly enhanced because of the formation of high hardness ledeburitic and martensitic structures. The LHAGI specimens had higher wear resistance than the LHQTGI specimens. After analyzing the worn areas of the LHAGI and LHQTIGI specimens, it was found that cracks were the main wear mechanism.
  • Overall, the use of LHQTGI to replace AGI in some GI parts can be considered since LHQTGI had higher wear resistance than that of AGI. However, the substitution of AGI by LHQTGI needs to be further studied in regard to the other details in manufacturing and production processes and the specific mechanical properties. In addition, the wear loss of AGI could be reduced significantly after receiving laser surface-hardening treatment. The findings obtained in the present research provide value in the future designs of GI engineering components.

Author Contributions

Conceptualization, B.W. and G.C.B.; methodology, B.W., Y.P. and R.W.; validation, B.W., Y.P. and R.W.; formal analysis, B.W. and Y.P.; investigation, B.W. and Y.P.; resources, G.C.B.; data curation, B.W., Y.P. and R.W.; writing—original draft preparation, B.W. and R.W.; writing—review and editing, B.W. and G.C.B.; supervision, G.C.B.; project administration, G.C.B.; funding acquisition, B.W. and G.C.B. All authors have read and agreed to the published version of the manuscript.

Funding

This research was supported by the ACADEMIC AND RESEARCH DEVELOPMENT FUNDINGS at Zhejiang Sci-Tech University, grant number 11130131741904, grant number 11130231711923 and grant number 19022140-Y.

Acknowledgments

This research was supported by the Tribology Laboratory, Department of Mechanical Engineering, Oakland University, Michigan, 48326, USA.

Conflicts of Interest

The authors declare no conflict of interest.

References

  1. Keller, J.; Fridrici, V.; Kapsa, P.; Vidaller, S.; Huard, J. Influence of chemical composition and microstructure of gray cast iron on wear of heavy duty diesel engines cylinder liners. Wear 2007, 263, 1158–1164. [Google Scholar] [CrossRef]
  2. Lombardi, A.; Ravindran, C.; Sediako, D.; Mackay, R. Determining the mechanisms of In-service cylinder distortion in aluminum engine blocks with cast-in gray iron liners. Met. Mater. Trans. A 2014, 45, 6291–6303. [Google Scholar] [CrossRef]
  3. Truhan, J.; Qu, J.; Blau, P. A rig test to measure friction and wear of heavy duty diesel engine piston rings and cylinder liners using realistic lubricants. Tribo. Int. 2005, 38, 211–218. [Google Scholar] [CrossRef]
  4. Chen, R.; Iwabuchi, A.; Shimizu, T. The effect of a T6 heat treatment on the fretting wear of a SiC particle-reinforced A356 aluminum alloy matrix composite. Wear 2000, 238, 110–119. [Google Scholar] [CrossRef]
  5. Fu, H.; Xiao, Q.; Fu, H. Heat treatment of multi-element low alloy wear-resistant steel. Mater. Sci. Eng. A 2005, 396, 206–212. [Google Scholar] [CrossRef]
  6. Wang, B.; Han, X.; Barber, G.; Pan, Y. Wear Behavior of Austempered and Quenched and Tempered Gray Cast Irons under Similar Hardness. Metal 2019, 9, 1329. [Google Scholar] [CrossRef] [Green Version]
  7. Hsu, C.; Shy, Y.; Yu, Y.; Lee, S. Effect of austempering heat treatment on fracture toughness of copper alloyed gray iron. Mater. Chem. Phys. 2000, 63, 75–81. [Google Scholar] [CrossRef]
  8. Balachandran, G.; Vadiraj, A.; Kamaraj, M.; Kazuya, E. Mechanical and wear behavior of alloyed gray cast iron in the quenched and tempered and austemepred conditions. Mater. Des. 2011, 32, 4042–4049. [Google Scholar] [CrossRef]
  9. Sarkar, T.; Bose, P.; Sutradhar, G. Mechanical and tribological characteristics of copper alloyed austempered gray cast iron (AGI). Mater. Today Proc. 2018, 5, 3664–3673. [Google Scholar] [CrossRef]
  10. Sarkar, T.; Sutradhar, G. Investigation on mechanical properties and wear behavior of Cu-alloyed austempered gray cast iron (AGI). Sadhana 2018, 43, 161. [Google Scholar] [CrossRef] [Green Version]
  11. Zhang, Y.; Butler, D.; Wang, J.; Li, X.; Yui, A.; Zhou, L. Experimental investigation on grinding surface condition of 9Mn2V under different tempering processes. Adv. Mater. Res. 2012, 565, 88–93. [Google Scholar] [CrossRef]
  12. Wang, B.; Barber, G.C.; Sun, X.; Shaw, M.; Seaton, P. Characteristics of the transformation of retained austenite in tempered austempered ductile iron. J. Mater. Eng. Perf. 2017, 26, 2095–2101. [Google Scholar] [CrossRef]
  13. Khan, S.; Salam, L.; Ahmed, K. Lasering surface hardening of GCr15 bearing steel ring. Key Eng. Mater. 2010, 442, 130–136. [Google Scholar] [CrossRef]
  14. Tani, G.; Fortunato, A.; Ascari, A.; Campana, G. Laser surface hardening of martensite stainless steel hollow parts. Cirp. Annu. Manuf. Technol. 2010, 59, 207–210. [Google Scholar] [CrossRef]
  15. Oliveira, F.; Rossi, W.; Rossi, J. Laser modified thin layers in piston rings. Mater. Sci. Forum. 2012, 727–728, 1931–1937. [Google Scholar] [CrossRef]
  16. Zhan, J.; Yang, M. Investigation on the applications of YAG laser texturing technology to the cylinder wall of auto engine. Ind. Lubr. Tribol. 2014, 66, 387–392. [Google Scholar] [CrossRef] [Green Version]
  17. Joshi, S.; Choudhuri, D.; Mantri, S.; Banerjee, R.; Dahotre, N.; Banerjee, S. Rationalizing surface hardening of laser glazed grey cast iron via an integrated experimental and computational approach. Mater. Des. 2018, 156, 570–585. [Google Scholar] [CrossRef]
  18. Liu, A.; Previtali, B. Laser surface treatment of grey cast iron by high power diode laser. Phys. Procedia 2010, 5, 439–448. [Google Scholar] [CrossRef] [Green Version]
  19. Giorleo, L.; Liu, A.; Previtali, B. Apparent spot in circular laser hardening: Effect of process para. Int. J. Mater. 2010, 3, 1119–1122. [Google Scholar] [CrossRef]
  20. Su, W.; Zhou, T.; Zhang, P.; Zhou, H.; Li, H. Effect of distribution of striated laser hardening tracks on dry sliding wear resistance of biomimetic surface. Opt. Laser. Technol. 2018, 98, 281–290. [Google Scholar] [CrossRef]
  21. Selvan, J.; Subramanian, K.; Nath, A. Effect of laser surface hardening on En18(AISI 5135) steel. J. Mater. Proc. Technol. 1999, 91, 29–36. [Google Scholar] [CrossRef]
  22. Boccardo, A.; Dardati, P.; Celentano, D.; Godoy, L. Austempering heat treatment of ductile iron: Computational simulation and experimental validation. Finite. Elem. Anal. Des. 2017, 134, 82–91. [Google Scholar] [CrossRef]
  23. Cui, J.; Chen, L. Microstructure and mechanical properties of a wear-resistant alloyed ductile iron austempered at various temperatures. Met. Mater. Trans. A 2015, 46, 3627–3634. [Google Scholar] [CrossRef]
  24. Kim, Y.; Shin, H.; Park, H.; Lim, J. Investigation into mechanical properties of austempered ductile cast iron (ADI) in accordance with austempering temperature. Mater. Lett. 2008, 62, 357–360. [Google Scholar] [CrossRef]
  25. Nam, W.; Kim, D. Effects of alloying elements on microstructural evolution and mechanical properties of induction quenched-and-tempered steels. J. Mater. Sci. 2003, 38, 3611–3617. [Google Scholar] [CrossRef]
  26. Daber, S.; Rao, P. Formation of strain-induced martensite in austempered ductile iron. J. Mater. Sci. 2008, 43, 357–367. [Google Scholar] [CrossRef]
  27. Li, X.; Saal, P.; Gan, W.; Hoelzel, M.; Volk, W.; Petry, W.; Hofmann, M. Strain-induced martensitic transformation kinetic in austempered ductile iron (ADI). Met. Mater. Trans. A 2018, 49, 94–104. [Google Scholar] [CrossRef]
  28. Wang, B.; Barber, G.C.; Tao, C.; Han, X.; Sun, X. Tribological performance of austempered and tempered ductile iron. Met. Mater. Trans. B 2018, 49, 2261–2269. [Google Scholar] [CrossRef]
  29. Chandra, H.; Nukman; Sianturi, B. Analysis of fatigue life and crack propagation characterization of gray cast iron under normalizing process. J. Phys. 2019, 1198, 032006. [Google Scholar] [CrossRef]
  30. Marahleh, G.; Khede, A.; Al-Goussous, S. Fatigue crack propagation in SGI and CGI. J. Appl. Sci. 2005, 5, 1004–1011. [Google Scholar]
Figure 1. Microstructure of the As-Received Gray Cast Iron (Graphite Flake + Pearlite).
Applsci 10 03049 g001
Figure 2. Heat Treatment Processes: (a) Austempering; (b) Quench-Tempering.
Applsci 10 03049 g002
Figure 3. (a) Ball-on-Plate Reciprocating Sliding Wear Test Configuration; (b) Laser-Hardened Track Distribution.
Applsci 10 03049 g003
Figure 4. Microstructure of Difference Zones in the Matrix of Laser-Hardened Austempered Gray Cast Iron (LHAGI) Specimens with Various Austempering Temperatures (a) 232 °C; (b) 288 °C; (c) 343 °C.
Applsci 10 03049 g004
Figure 5. Microstructure of Difference Zones in the Matrix of Laser-Hardened Quench-Tempered Gray Cast Iron (LHQTGI) Specimens with Various Tempering Temperatures (a) 316 °C; (b) 399 °C; (c) 482 °C.
Applsci 10 03049 g005
Figure 6. Mass Loss in the LHAGI, AGI, LHQTGI, and QTGI Specimens.
Applsci 10 03049 g006
Figure 7. Worn Surfaces of LHAGI and LHQTGI Specimens: (a) 232 °C; (b) 316 °C.
Applsci 10 03049 g007
Table 1. Chemical Percentage of Gray Cast Iron.
ElementsPercentage (%)
Carbon, C3.53
Silicon, Si2.71
Copper, Cu0.94
Manganese, Mn0.74
Chromium, Cr0.12
Phosphorous, P0.08
Sulfur, S0.03
Iron, FeRemainder
Table 2. Parameters in the Ball-on-Plate Reciprocating Sliding Wear Tests. GI: Gray Cast Iron.
Frictional PairCeramic Ball—GI Plate
LubricantPAO4
Normal Load400 N
Frequency2 Hz
Displacement10 mm
Total Sliding Distance120 m
Table 3. Parameters in the Nd: YAG Laser Surface-Hardening Process.
Wavelength1064 nm
Power DistributionGaussian-like Profile
Laser Power800W
Laser Spot Diameter2 mm
Scanning Speed2 mm/s
Frequency6 Hz
Pulse Time8 ms
Table 4. Width and Depth of the Laser-Hardened, Upper Heat-Affected, and Lower Heat-Affected Zones for LHAGI Specimens with Various Austempering Temperatures.
Austempering TemperatureW1 (mm)D1 (mm)W2 (mm)D2 (mm)W3 (mm)D3 (mm)
232 °C2.1710.7552.8231.0853.5551.529 Applsci 10 03049 i001
288 °C2.1680.7162.7261.0713.4451.613
343 °C2.1870.7452.8511.0583.4831.575
Table 5. Width and Depth of Laser-Hardened and Heat-Affected Zones for LHQTGI Specimens with Various Tempering Temperatures.
Tempering TemperatureW1 (mm)D1 (mm)W2 (mm)D2 (mm)
316 °C2.2370.7513.0221.118 Applsci 10 03049 i002
399 °C2.2160.7353.0621.089
482 °C2.2190.7282.9471.082
Table 6. Macro-Hardness of AGI and QTGI Specimens with Various Heat Treatment Designs.
Group 1Group 2Group 3
Austempering Temperature232 °C288 °C343 °C
Macro-Hardness (HRC)AVESDAVESDAVESD
41.60.637.50.327.70.5
Tempering Temperature316 °C399 °C482 °C
Macro-Hardness (HRC)AVESDAVESDAVESD
41.20.338.90.526.10.7
AVE: Average Hardness, SD: Standard Deviation.
Table 7. Micro-Hardness Profiles of the LHAGI and LHQTGI Specimens with Various Heat Treatment Designs.
Group 1Group 2Group 3
Austempering Temperature232 °C288 °C343 °C
Micro-Hardness Profile (HRC)Zone 1AVESDAVESDAVESD
67.50.467.80.568.20.2
Zone 2AVESDAVESDAVESD
67.80.768.40.767.70.6
Zone 3AVESDAVESDAVESD
38.30.433.50.424.60.5
Tempering Temperature316 °C399 °C482 °C
Micro-Hardness Profile (HRC)Zone 1AVESDAVESDAVESD
68.10.468.60.668.40.2
Zone 2AVESDAVESDAVESD
66.50.666.20.366.70.8
AVE: Average Hardness, SD: Standard Deviation.