Article

Experimental-Numerical Investigation of a Steel Pipe Repaired with a Composite Sleeve

by
Saeid Ansari Sadrabadi
1,2,3,*,
Amin Dadashi
1,
Sichen Yuan
3,
Venanzio Giannella
4 and
Roberto Citarella
4,*
1
Department of Mechanical Engineering, Tarbiat Modares University, Tehran 1411713116, Iran
2
Department of Mechanical Engineering, Meybod University, Yazd 8961699557, Iran
3
A. Leon Linton Department of Mechanical, Robotics and Industrial Engineering, Lawrence Technological University, Southfield, MI 48075, USA
4
Department of Industrial Engineering, University of Salerno, Via G. Paolo II, 132, 84084 Fisciano, SA, Italy
*
Authors to whom correspondence should be addressed.
Appl. Sci. 2022, 12(15), 7536; https://doi.org/10.3390/app12157536
Submission received: 17 May 2022 / Revised: 19 July 2022 / Accepted: 25 July 2022 / Published: 27 July 2022
(This article belongs to the Special Issue Advanced Numerical Approaches for Crack Growth Simulation)

Abstract

:
Pressure vessels are subjected to deterioration and damage, which can significantly reduce their strength and loading capabilities. Among several procedures nowadays available to repair damaged steel pipelines, composite-repairing systems have become popular over the past few years to restore the loading capacity of damaged pipelines. This study reports a numerical-experimental investigation performed for a composite-repaired pipeline made of API 5L X60 steel. An experimental burst test was carried out on a 4 m long pipe section, closed by two lateral caps, and tested up to failure by means of high-pressure water. In parallel, the test was numerically replicated through a FEM model of the composite-repaired steel tank, allowing for a cross-comparison of results. It was found that the composite repairing system has almost eliminated both the noteworthy thickness reduction of 80% and the related stress concentrations in the pipe body. These outcomes allow for a better understanding of these repairing procedures in order to drive their subsequent optimization.

1. Introduction

The main goal of high-pressure vessel maintenance is to avoid leaks and ruptures that may result in substantial environmental consequences, as well as potential risks of fire of flammable gas clouds, not to mention the enormous risks of injuries and human fatalities. To reduce the failure probability and at the same time keep the system design capacity, the technical conditions of pipelines are periodically controlled by in-line inspections, which are scheduled in order to detect potential damages or defects that can endanger the system loading capacity [1,2,3,4,5]. Part-wall metal loss and defects of buried pipelines are mostly a consequence of electrochemical corrosion caused by oxidation. In these cases, repairing of damages is performed when exceeding threshold damage sizes according to the codes [6]. According to [7], more than 60% of the world’s oil and gas transmission pipelines are over 40 years old. Most of these pipelines are in urgent need of rehabilitation in order to work at the desired, and continuously increasing, operating capacity. Within this scenario, the failures due to corrosion and their associated repairing techniques have recently attracted intense research interest [8,9,10,11,12,13].
Replacements of the pipe segments are especially complicated when the pipeline maintenance operations require a pause in the fluid transport and distribution, which can generate substantial expenditures or income losses. When areas of corrosion or other damages to operating pipelines are identified, there are often significant economic and environmental incentives for repairing without removing the pipeline from service. From an economic standpoint, a shutdown also involves revenue loss from the loss of pipeline throughput. Besides, for gas transmission pipelines, a temporary shutdown typically involves a significant quantity of gas that is lost in the atmosphere. Since methane is one of the so-called “greenhouse gases”, there are also environmental incentives for avoiding the venting of large quantities of gas into the atmosphere.
When faced with the need to repair an operating pipeline, there are often a variety of in-service repairing strategies available to pipeline operators for a given repairing situation [14]. While the use of metallic materials to repair damages is nowadays a mature technology (the use of full-encirclement steel sleeves for pipeline repair was developed in the early 1970s [15,16]), the use of non-metallic composite for pipeline repairs has only recently attracted considerable interest [17,18,19,20,21,22]. The first commercially available system was Clock Spring®, which consisted of an E-glass/polyester resin-based composite material preformed into a multilayer coil installed using an adhesive. The mechanism by which composite materials reinforce the damaged areas on operating pipelines is more complicated than that of steel sleeves because the tensile properties of composite materials are much different from those of metals. Because of the reduced stiffness of composites compared to steel, composite materials must experience a considerably higher amount of strain (i.e., elongation) before a load equivalent to that of steel can be carried. For these reasons, when installed over steel, the composite is constrained by the steel and cannot carry a significant portion of the load until the steel begins to yield. For these reasons, the defect must typically plastically deform in the process of the load being transferred to the composite material and, to this aim, a high-compressive strength filler material is used to fill defect areas so that load is effectively transferred to the repairing material. Different kinds of these fibre-based reinforcements can be found in the literature [21], even though the basic idea of these reinforcement techniques is always to transfer the hoop stress, caused by the internal fluid pressure, from the defected area of the steel pipe to the reinforcing sleeve. Few similar investigations can be found in literature [22,23,24,25,26,27].
Many researchers studied the structural integrity in pressurized pipes with and without defects, analytically [28,29,30,31,32] or using numerical algorithms based on the Finite Element Method (FEM) [33,34]. The primary purpose of this study was to investigate the mechanical behaviour of a steel pipe repaired with a composite sleeve. Comparable investigations can be found in literature [35,36,37]. In order to achieve this objective, an experimental burst test was carried out to understand the failure conditions of a composite-repaired pipe. When it was necessary to obtain detailed solutions in localized regions, also FEM-DBEM coupled approaches [38] or sub-modelling techniques were employed [39,40]. To this aim, the burst test was replicated through a global-local FEM approach so as to support the experimental investigation with its numerical replication.
The rest of the document is organized as it follows.
In Section 2, the experimental test performed on a 4 m long steel pipe with two semi-elliptical ending caps is detailed. A defect was machined in the middle of the pipe so as to simulate the presence of in-service damage caused by corrosion. Such area was subsequently repaired through the usage of an E-glass composite sleeve and an adhesive filler. The experimental test was conducted considering a monotonically increasing internal pressure until a burst was reached. In parallel, the experimental test was numerically simulated by means of FEM in order to evaluate the distributions of stresses and strains in the healthy and repaired pipeline sections. A sub-modelling technique was used in such a way to evaluate with high accuracy the parameters of interest in the relevant parts of the structure, i.e., the damaged and repaired sections.
Section 3 comprises a discussion of both numerical and experimental outcomes. A discussion is provided in terms of displacement and stresses obtained with the experimental test and through the global and local FEM models. Guidelines of general validity were presented accordingly.
In final, Section 4 concludes with the remarks of this document.

2. Materials and Methods

2.1. Experimental Test

An experimental test was carried out on a steel tank obtained by cutting a 4 m long pipeline section and by using two semi-elliptical end caps welded to the pipe ending sections (Figure 1). The material of the pipe was the API 5L X60 steel. Mean diameter and average thickness were equal to 510 mm and 8.8 mm respectively. The damage was simulated in the middle of the pipe by machining a localized area so as to achieve a considerable local wall loss (nearly 80%), in such a way as to simulate the effects of corrosion. The so-obtained defect presented sizes of 254 mm × 128 mm × 7.1 mm, see Figure 1. The machining process was carried out in a controlled manner using a milling machine in order to obtain a defect uniform in size. This is a common practice in simulating external corrosion effects on a pipeline [16].
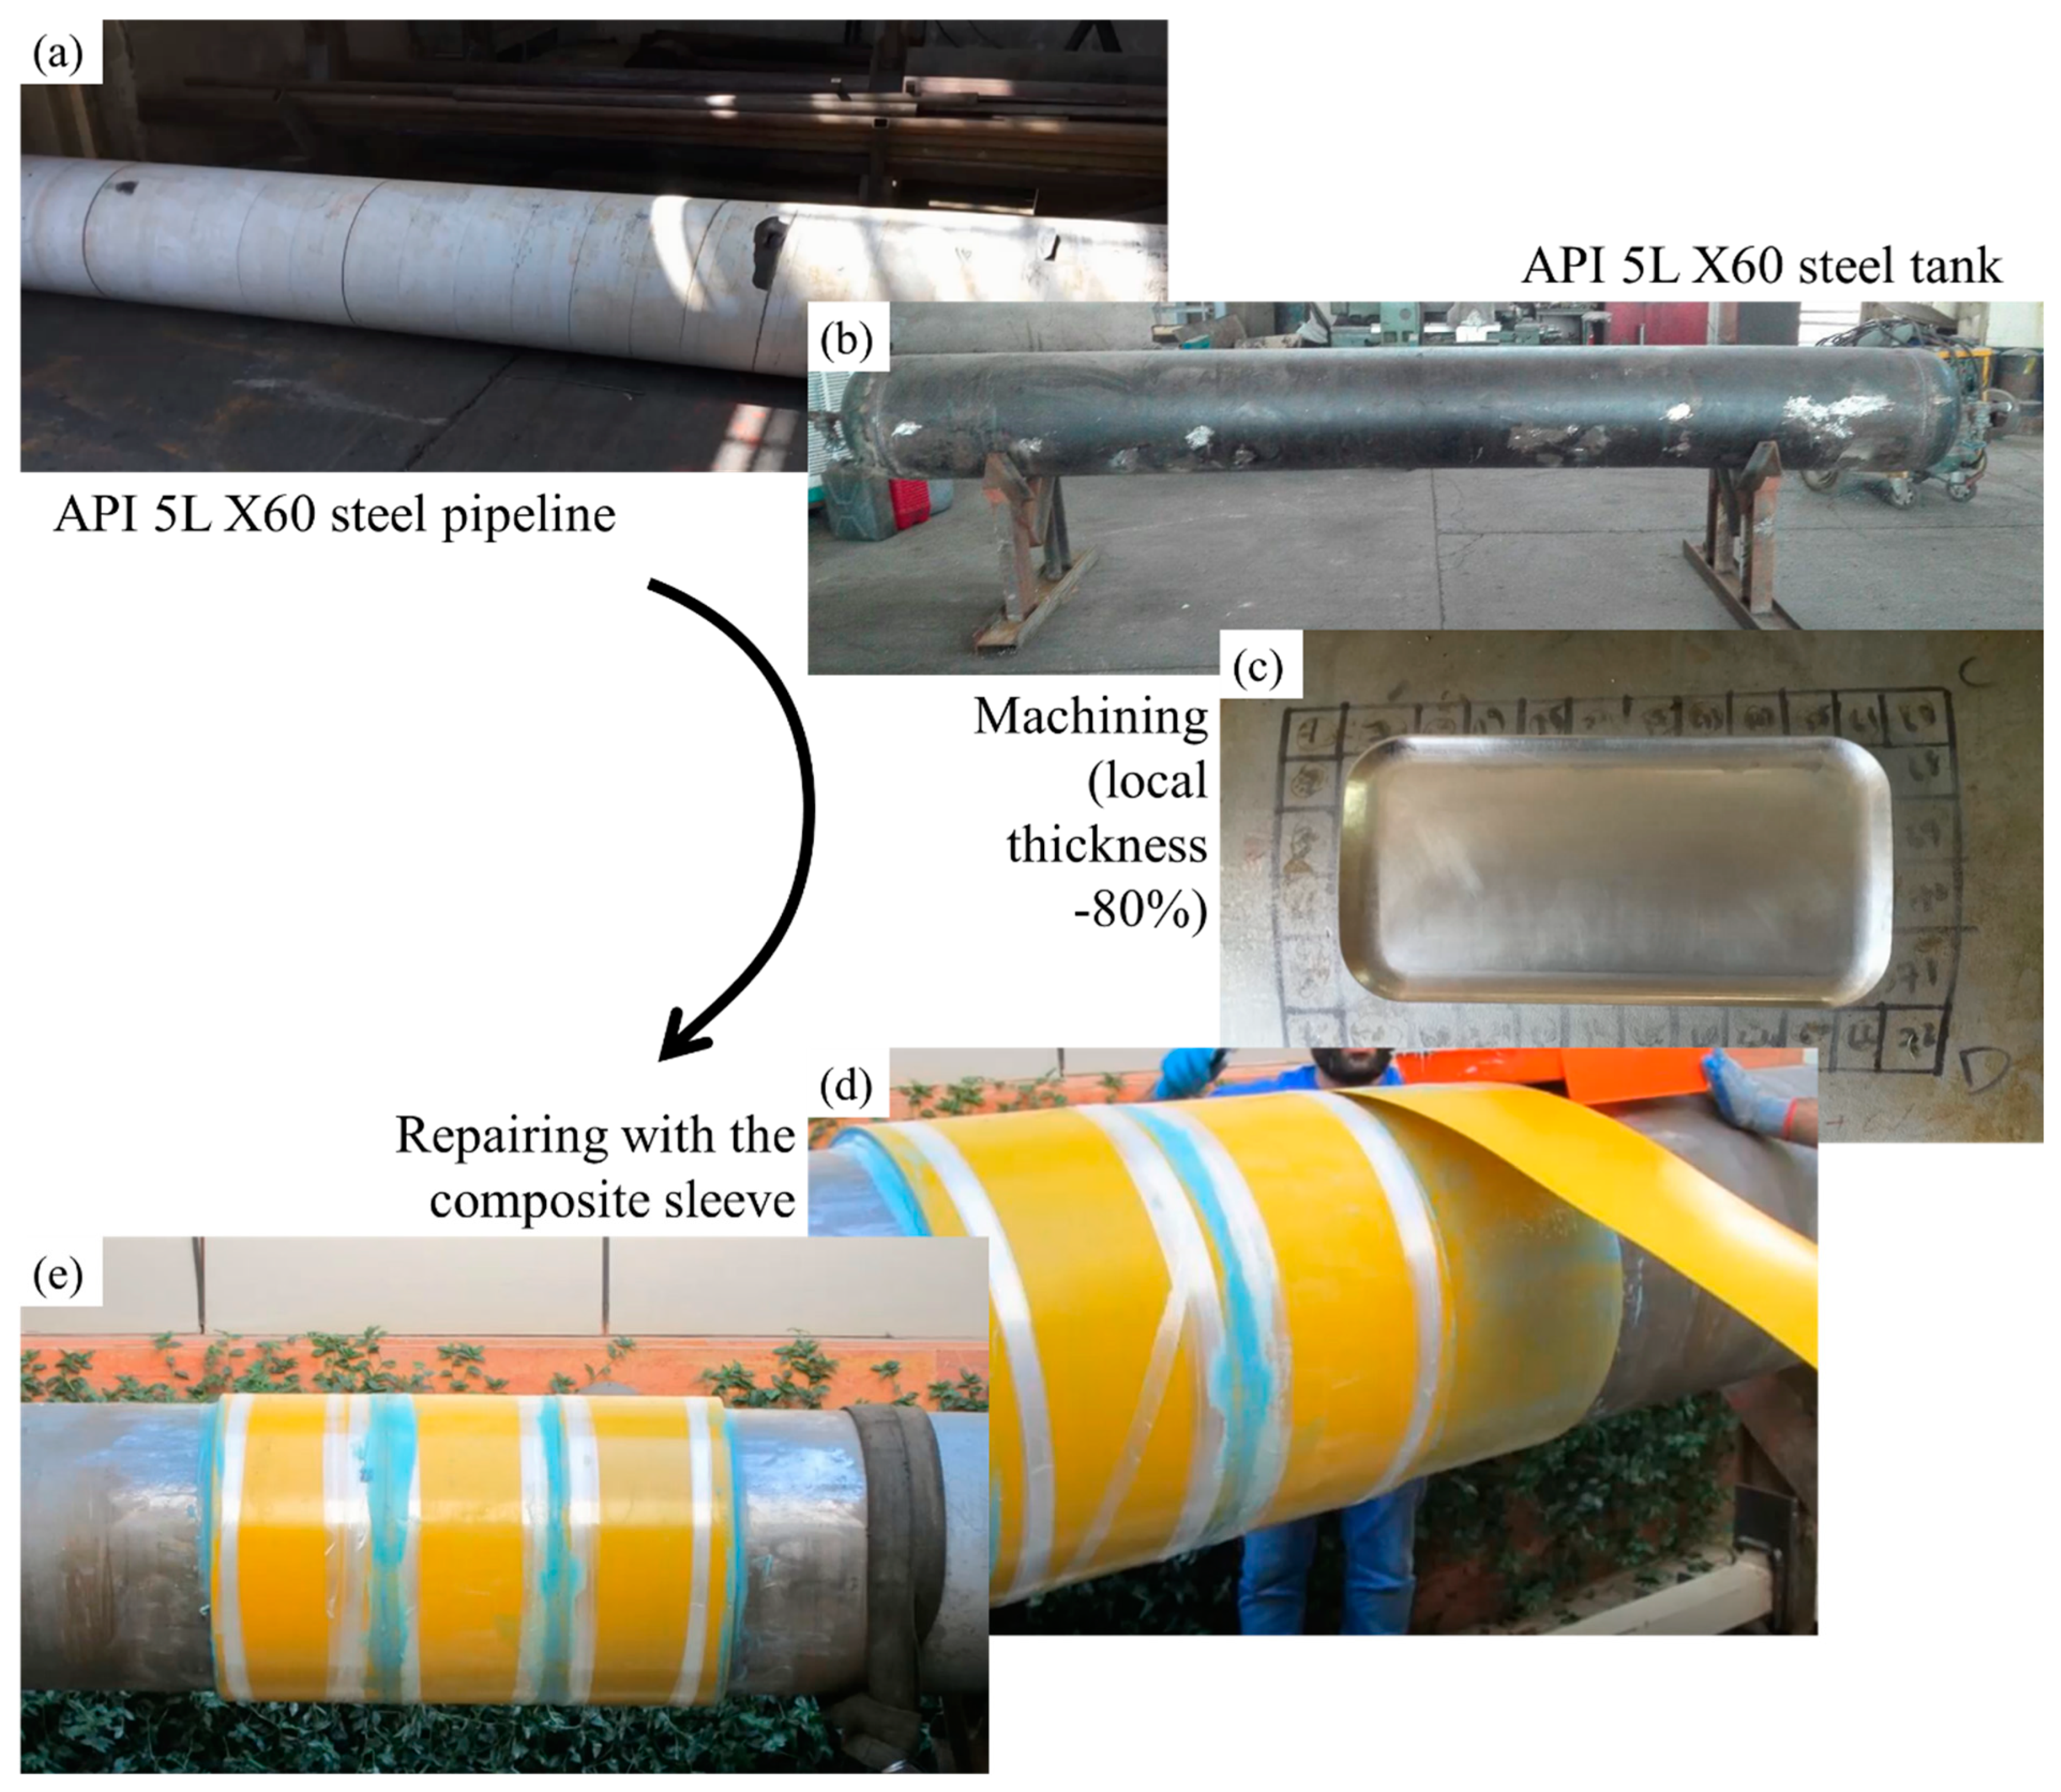
The overall procedure to obtain the repaired tank is shown in Figure 2. The repairing procedure with the composite sleeve consisted of the following steps:
  • measuring the defect;
  • improving the pipe surface finish (SA 2 ½);
  • cleaning the spool with acetone;
  • applying dry composite on the pipe and marking the edge of the sleeve;
  • removing the composite sleeve and attaching the starter pad;
  • increasing the pipe surface temperature to achieve the number of activators;
  • mixing filler and the related activator;
  • mixing adhesive and the related activator;
  • applying the filler on the defect and the starter pad edge;
  • applying adhesive to the entire pipe between the marked lines;
  • removing the backing of the starter pad and applying the composite sleeve from the starter pad;
  • applying the adhesive on each layer of composite and wrapping the eight layers of the composite sleeve;
  • securing the cinch bar strap to the dual lock and applying a steady pressure (of 110–140 Pa);
  • wrapping filament tape around the composite sleeve.
A burst-test was performed for the so obtained composite-repaired pipeline section. Water was considered an internal fluid, continuously monitored with a manometer during the whole test. Readings of the manometer were recorded in a video format to enable the analysis of pressure over time. A monotonically increasing internal fluid pressure was applied up to the burst of the tank.

2.2. Numerical Simulations

A numerical replication of the experimental burst test was performed for validation and to improve the understanding of the failure mechanisms. ABAQUS [41] was used as FEM package software to create the CAD model for the global and local models, generate the finite element meshes, perform the global-local FEM calculations, and post-process the results.
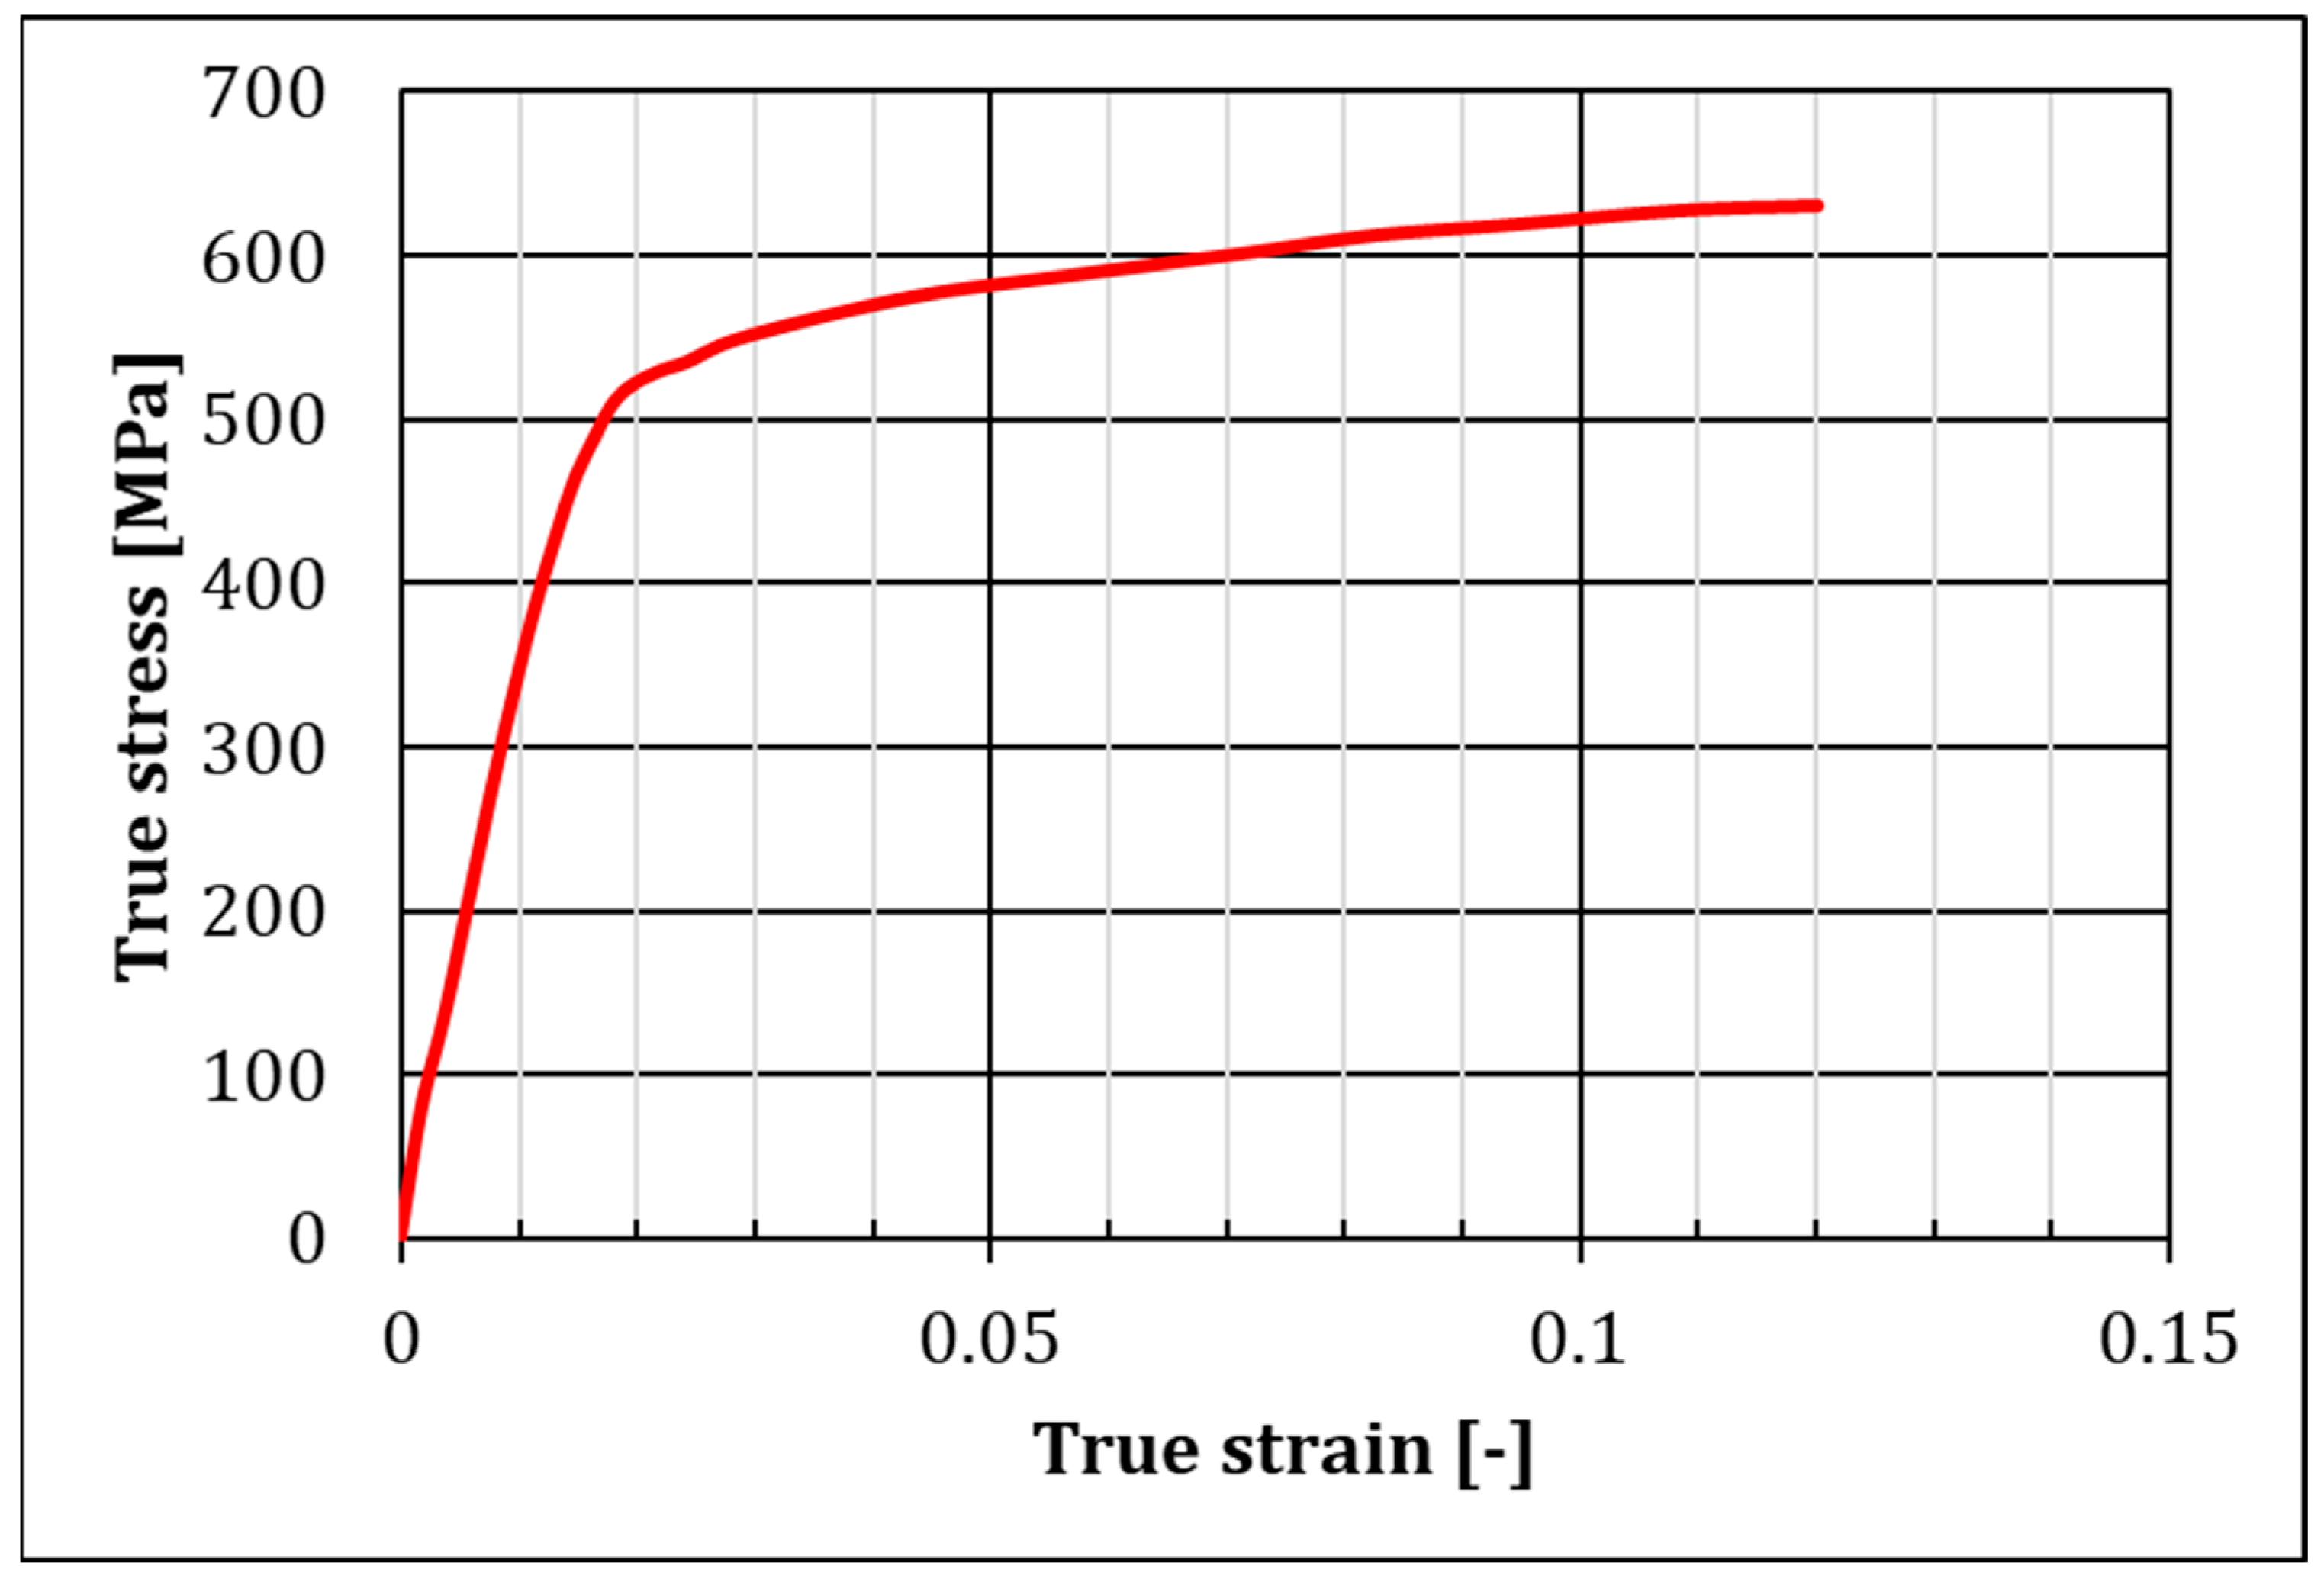
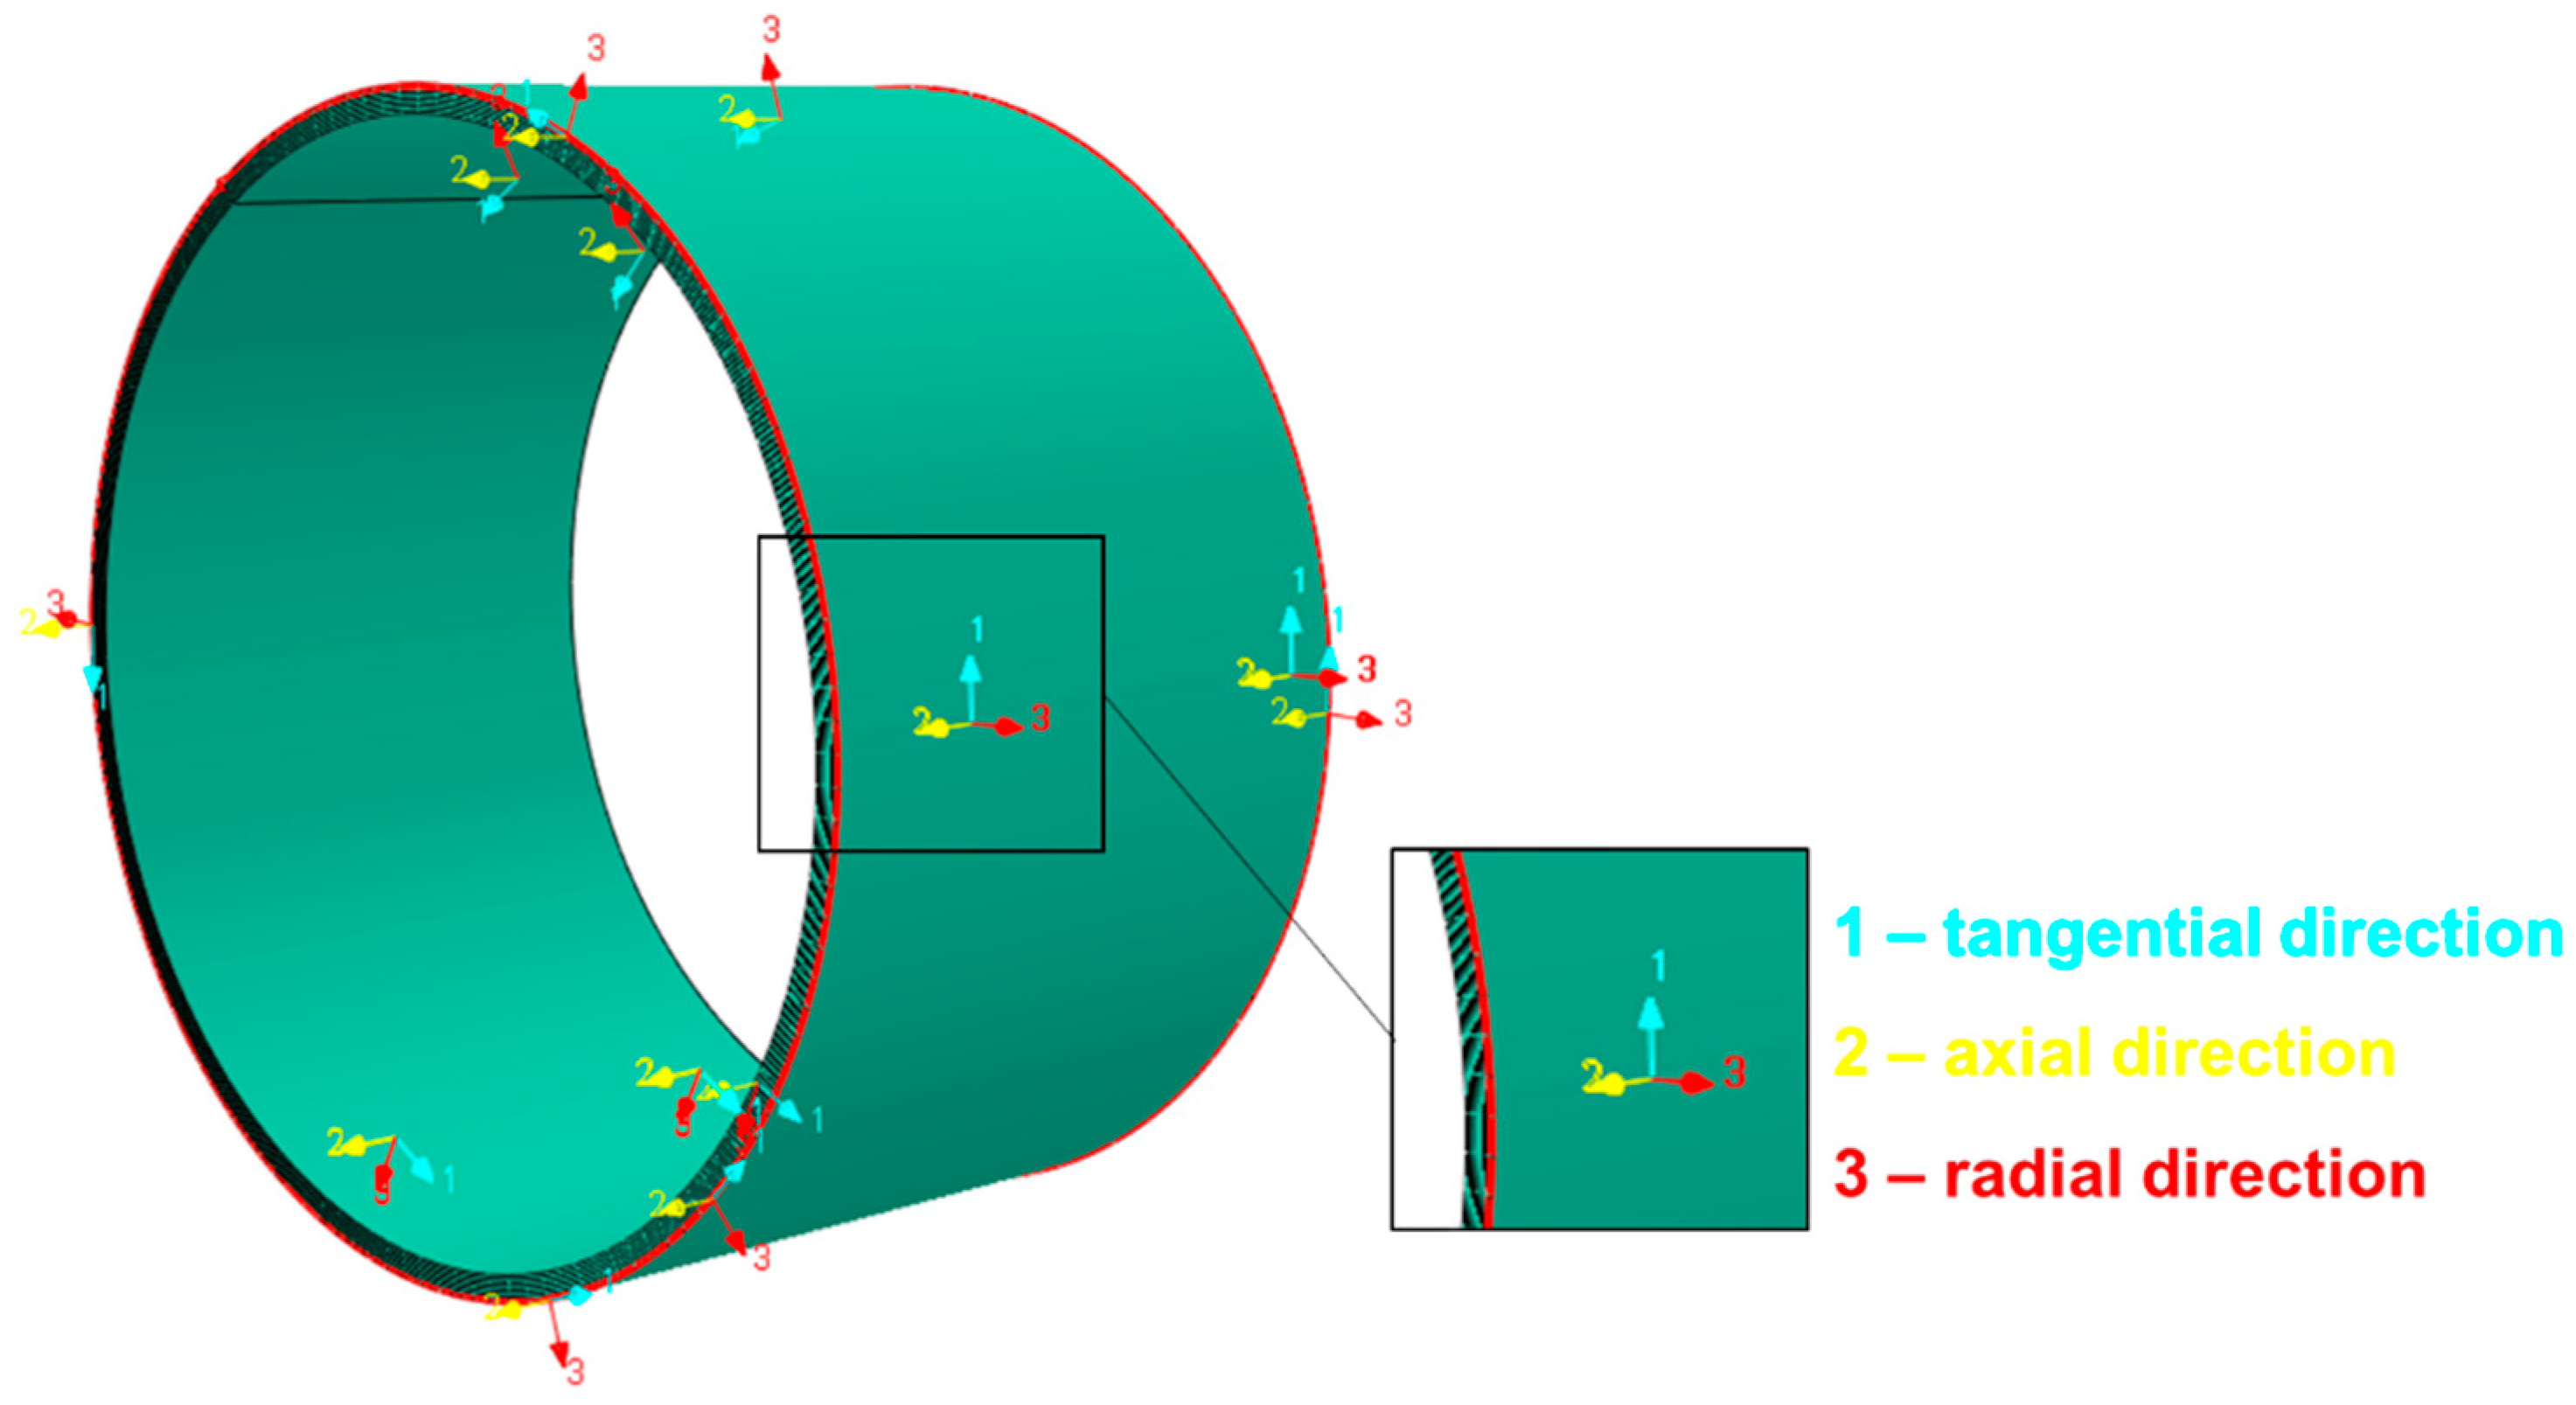
The CAD model of the repaired pipe according to the burst test was reported in Figure 3 and in Figure 1 with some highlights of the defect position and size. The considered material was the API 5L X60 steel used for the seamless pipe shown in Figure 2. The main mechanical properties considered here are listed in Table 1, whereas the true stress true strain diagram is reported in Figure 4. With reference to the repairing materials, Table 2 and Table 3 comprise the main mechanical properties of the composite sleeve and the adhesive filler (Methyl Methacrylate Monomer), respectively. The sleeve was made up of multiple E-glass fibre composite layers with the direction of fibres in the tangential direction to the pipe (direction of the hoop stress). Since the composite sleeve presented orthotropic mechanical properties (Table 2), a local cylindrical coordinate system was adopted, see Figure 5.
3D CAD and FEM models were set up. The final assembled CAD model is shown in Figure 6, whereas the corresponding FEM model is shown in Figure 7. The machined volume was considered as completely filled with the adhesive material. Due to the insignificance of the stress distribution in the filler material, only its elastic behaviour was considered (material data listed in Table 3). A total of 8 composite reinforcing layers were 3D modelled around the damaged section. The orientation of the fibres was assigned by defining local coordinates for each layer, as shown in Figure 5. The direction of axis 1 represents the (tangential) direction of fibres that were directed in such a way to reinforce the sleeve against the highest stresses (hoop stress). Axes 2 and 3 represent the directions perpendicular to the fibres inside and outside the layer planes, respectively.
A coarse mesh was produced for the global FEM model, see Figure 7a. Consequently, the sub-modelling technique was used to improve the accuracy of the FEM results. This sub-modelling consisted of the modelling of smaller parts of the overall CAD model, thus allowing for much finer meshes and more detailed modelling in these localized regions. Displacement boundary conditions, calculated by means of the global FEM model, were applied to the cut sections of submodels in order to replicate the displacement fields within these localized regions of interest. Once the displacement fields were replicated locally, highly accurate local stresses and strains were calculated accordingly. For these reasons, sub-modelling represents a widely applied technique when there is the need to obtain the local fields of interest with high accuracy, e.g., for fracture [42,43,44,45,46] or fatigue [47] assessments.
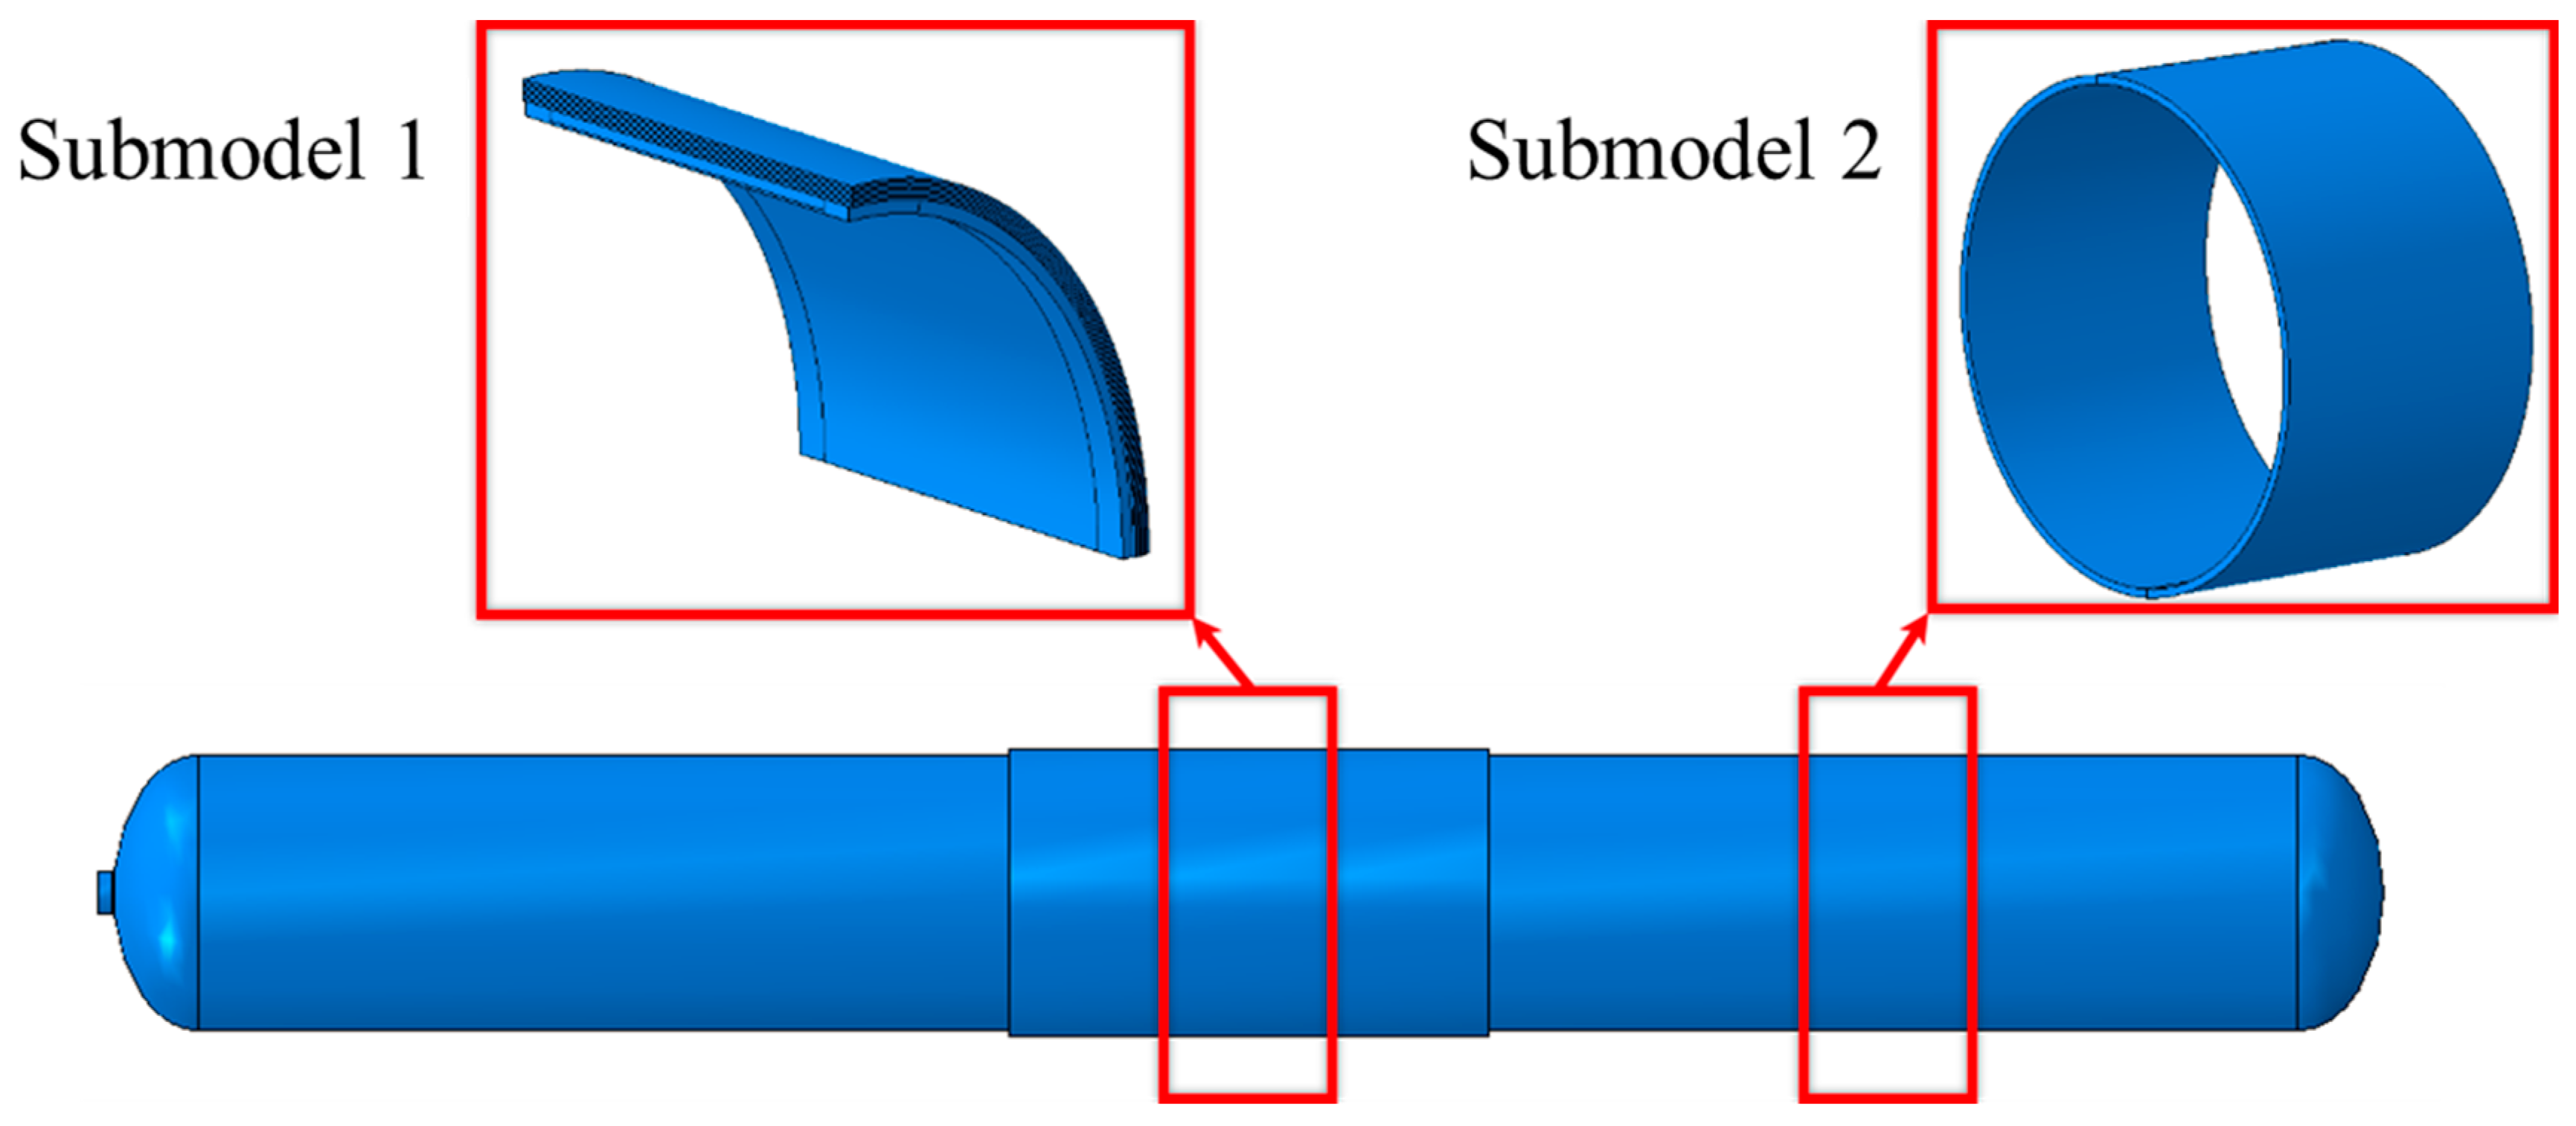
Two submodels were created so as to calculate the data for the repaired and the healthy pipe sections, see Figure 6 and Figure 7. With submodel 1 (SM1), the stress distribution in the defective section, filled with the adhesive and reinforced with the composite layers was examined. With submodel 2 (SM2), the stress distribution was examined in an undamaged section. The number and type of elements used in each model are listed in Table 4.
A non-linear quasi-static analysis was performed with a constantly increasing internal pressure applied to the entire internal surface reaching up to 204 bar. Such pressure value was set up according to the maximum pressure value recorded during the burst test.

3. Results and Discussion

The failure occurred for an unrepaired section, demonstrating that the repairing technique was able to carry a pressure value even higher than the undamaged part. This can be observed in Figure 8, in which the deformations obtained during the experimental test and from the FEM global model are compared. It is worth noticing that the repaired part presents a deformation much smaller than the undamaged part.
Two pictures of the pipe after failure are shown in Figure 9. It can be noticed from Figure 9a that the failure occurred for an integer part of the pipe with a fracture direction perpendicular to the hoop stress, i.e., the maximum stress. This is rather typical for pipelines, pressure vessels as well as rotating components [42,43,46,47]. Moreover, Figure 9b shows that the machined defect did not present any further damage after the test, thus highlighting again the load-carrying capacity of this composite-repairing technique.
Figure 10 shows stress and plastic strains calculated numerically for the overall pipe (i.e., for the global FEM model). It is worth noting that the composite sleeve allowed to significantly reduce the deformation of the steel in the repaired section, i.e., a null plastic strain was calculated, in turn, corresponding to a behaviour of the material within the linear-elastic range. On the contrary, the integer parts present stresses having much higher values, corresponding to significant plastic deformations. This added structural loading capacity was allowed by the filler material that transferred the pressure from the steel to the outer composite layers.
The distribution of results in the global FEM model was calculated in order to have a general understanding of the overall stress-strain distribution. More accurate results were calculated by means of the two sub-models shown in Figure 6, for which further geometric details and much finer meshes were adopted. Stresses and strains were extracted from the submodels’ results along the two paths shown in Figure 11. Namely, Path1 (Figure 11a) included all the nodes for the inner surface along one-quarter of the repaired pipe section starting from the middle of the damage. Path2 (Figure 11b) was similar to Path1 but considered the inner surface of the composite sleeve. Finally, Path3 was simply defined along the radial direction (i.e., through-the-thickness) of an unrepaired part of SM2.
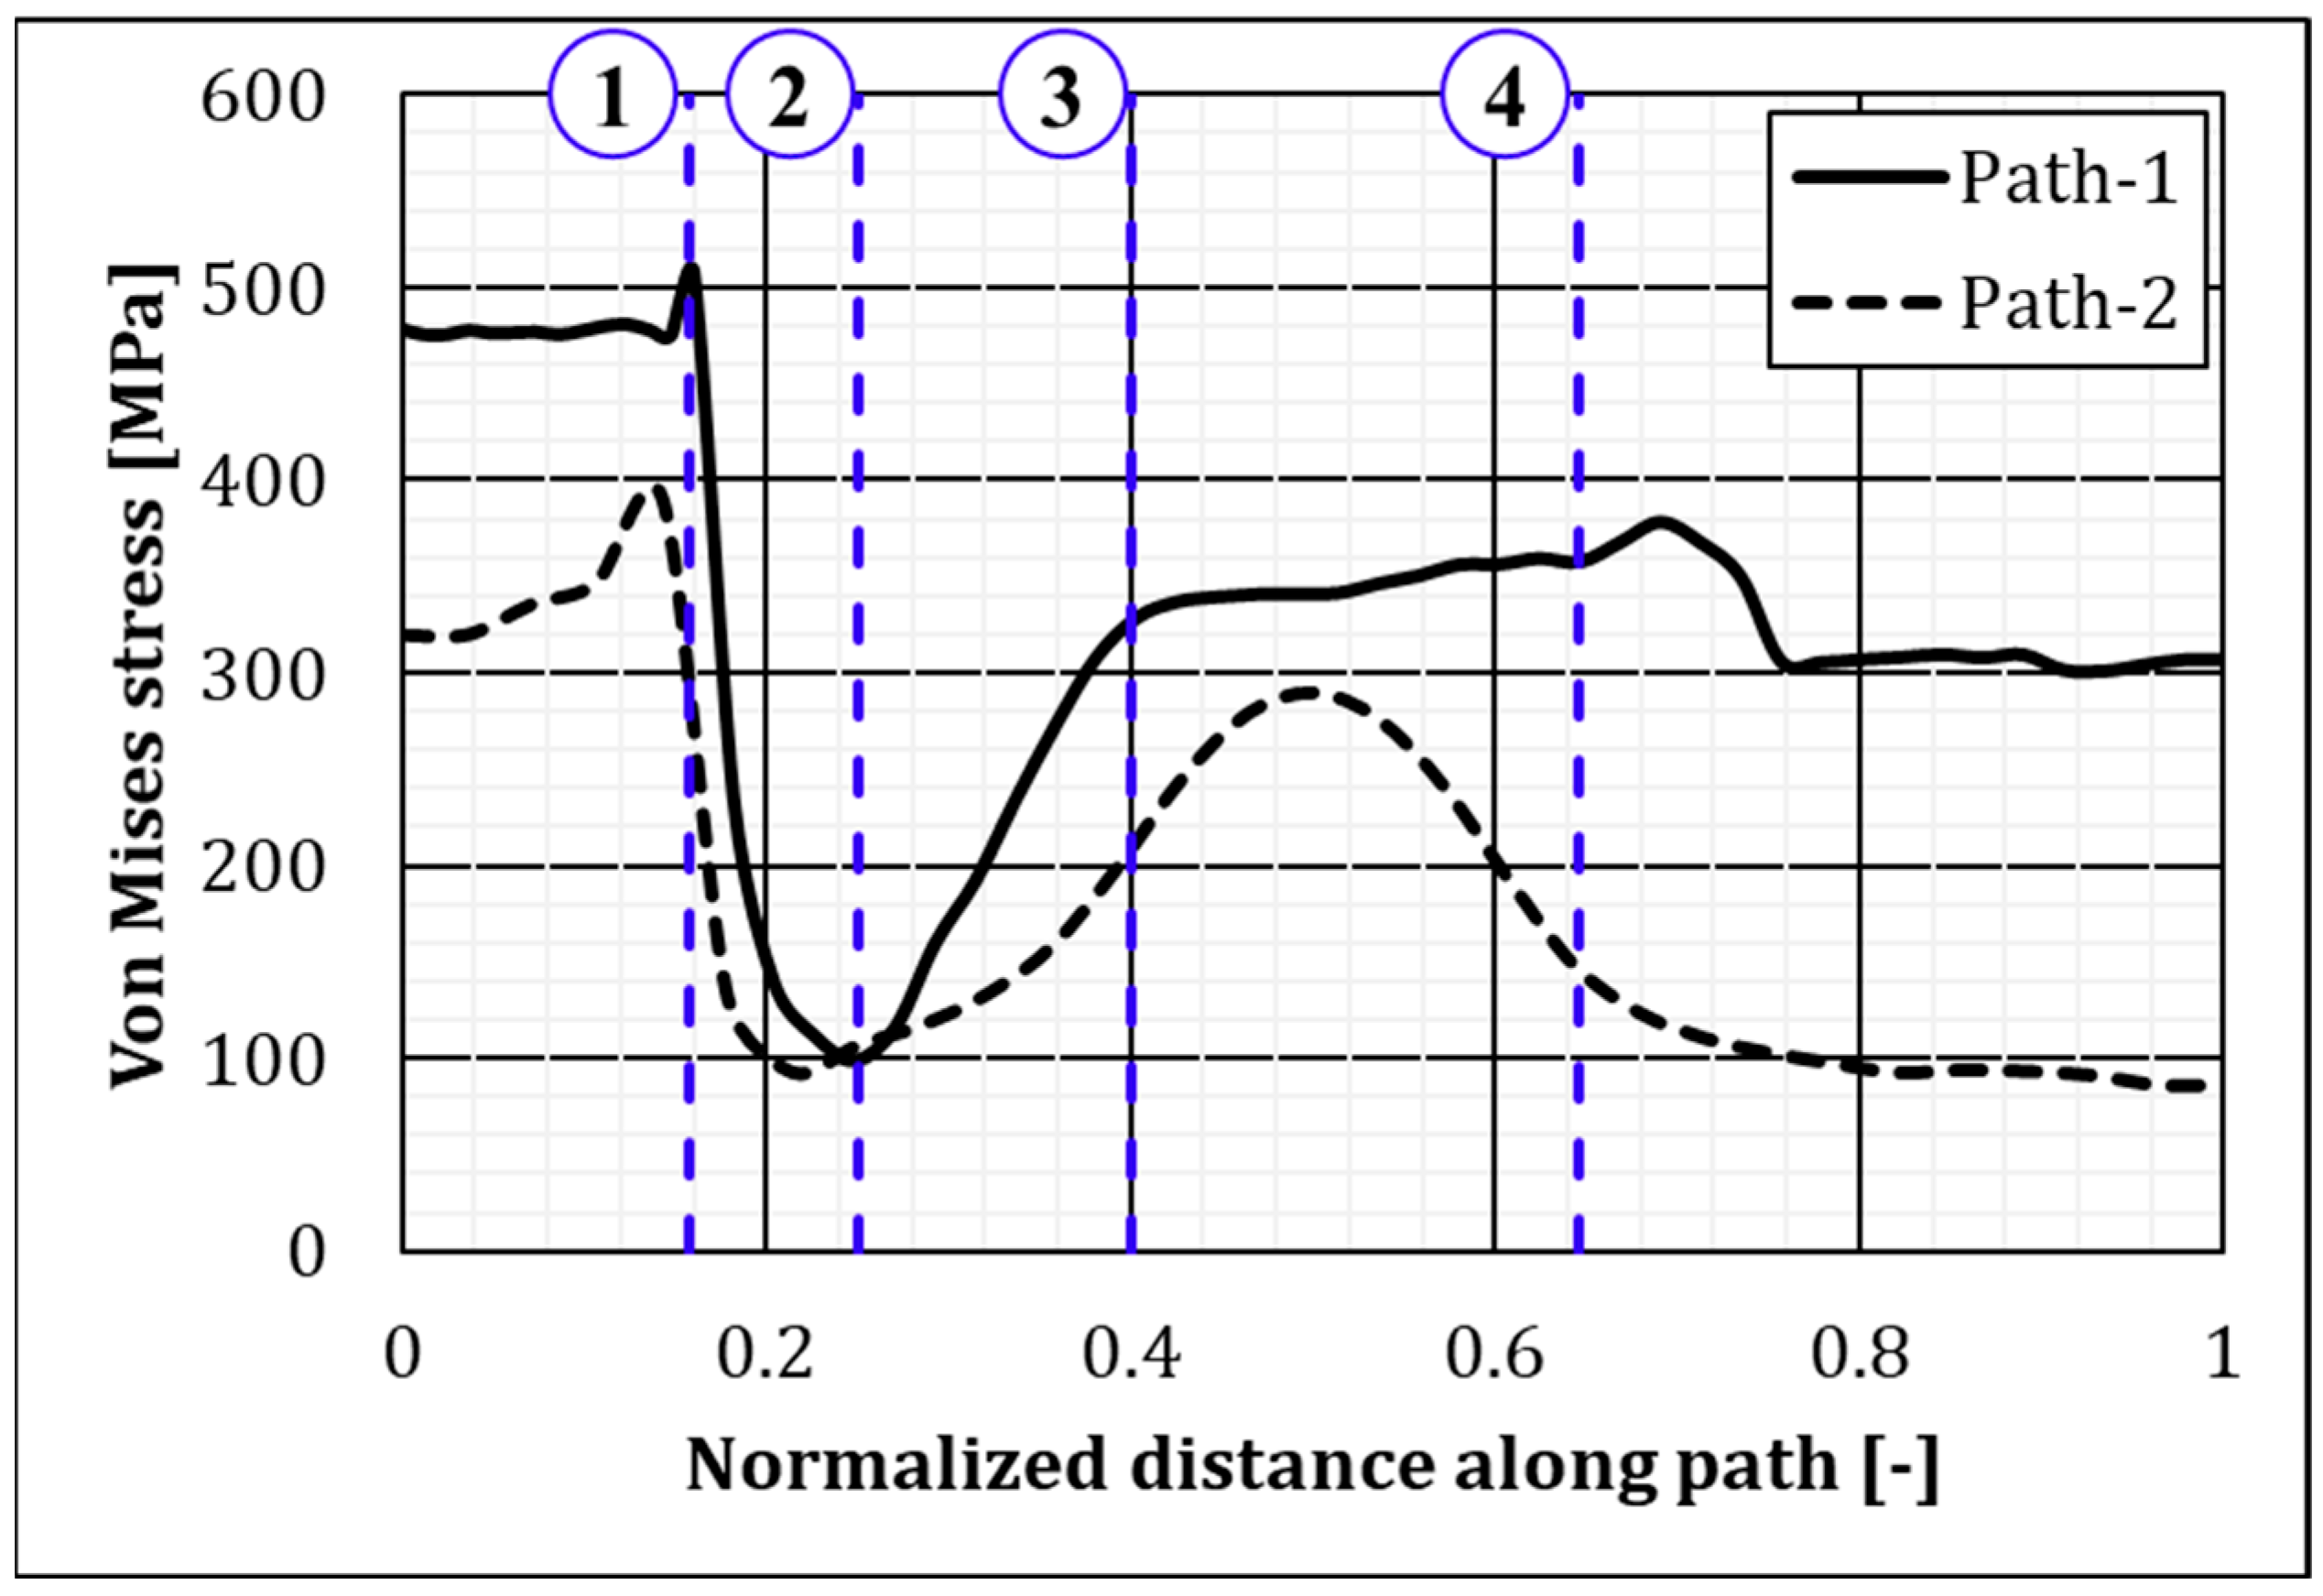
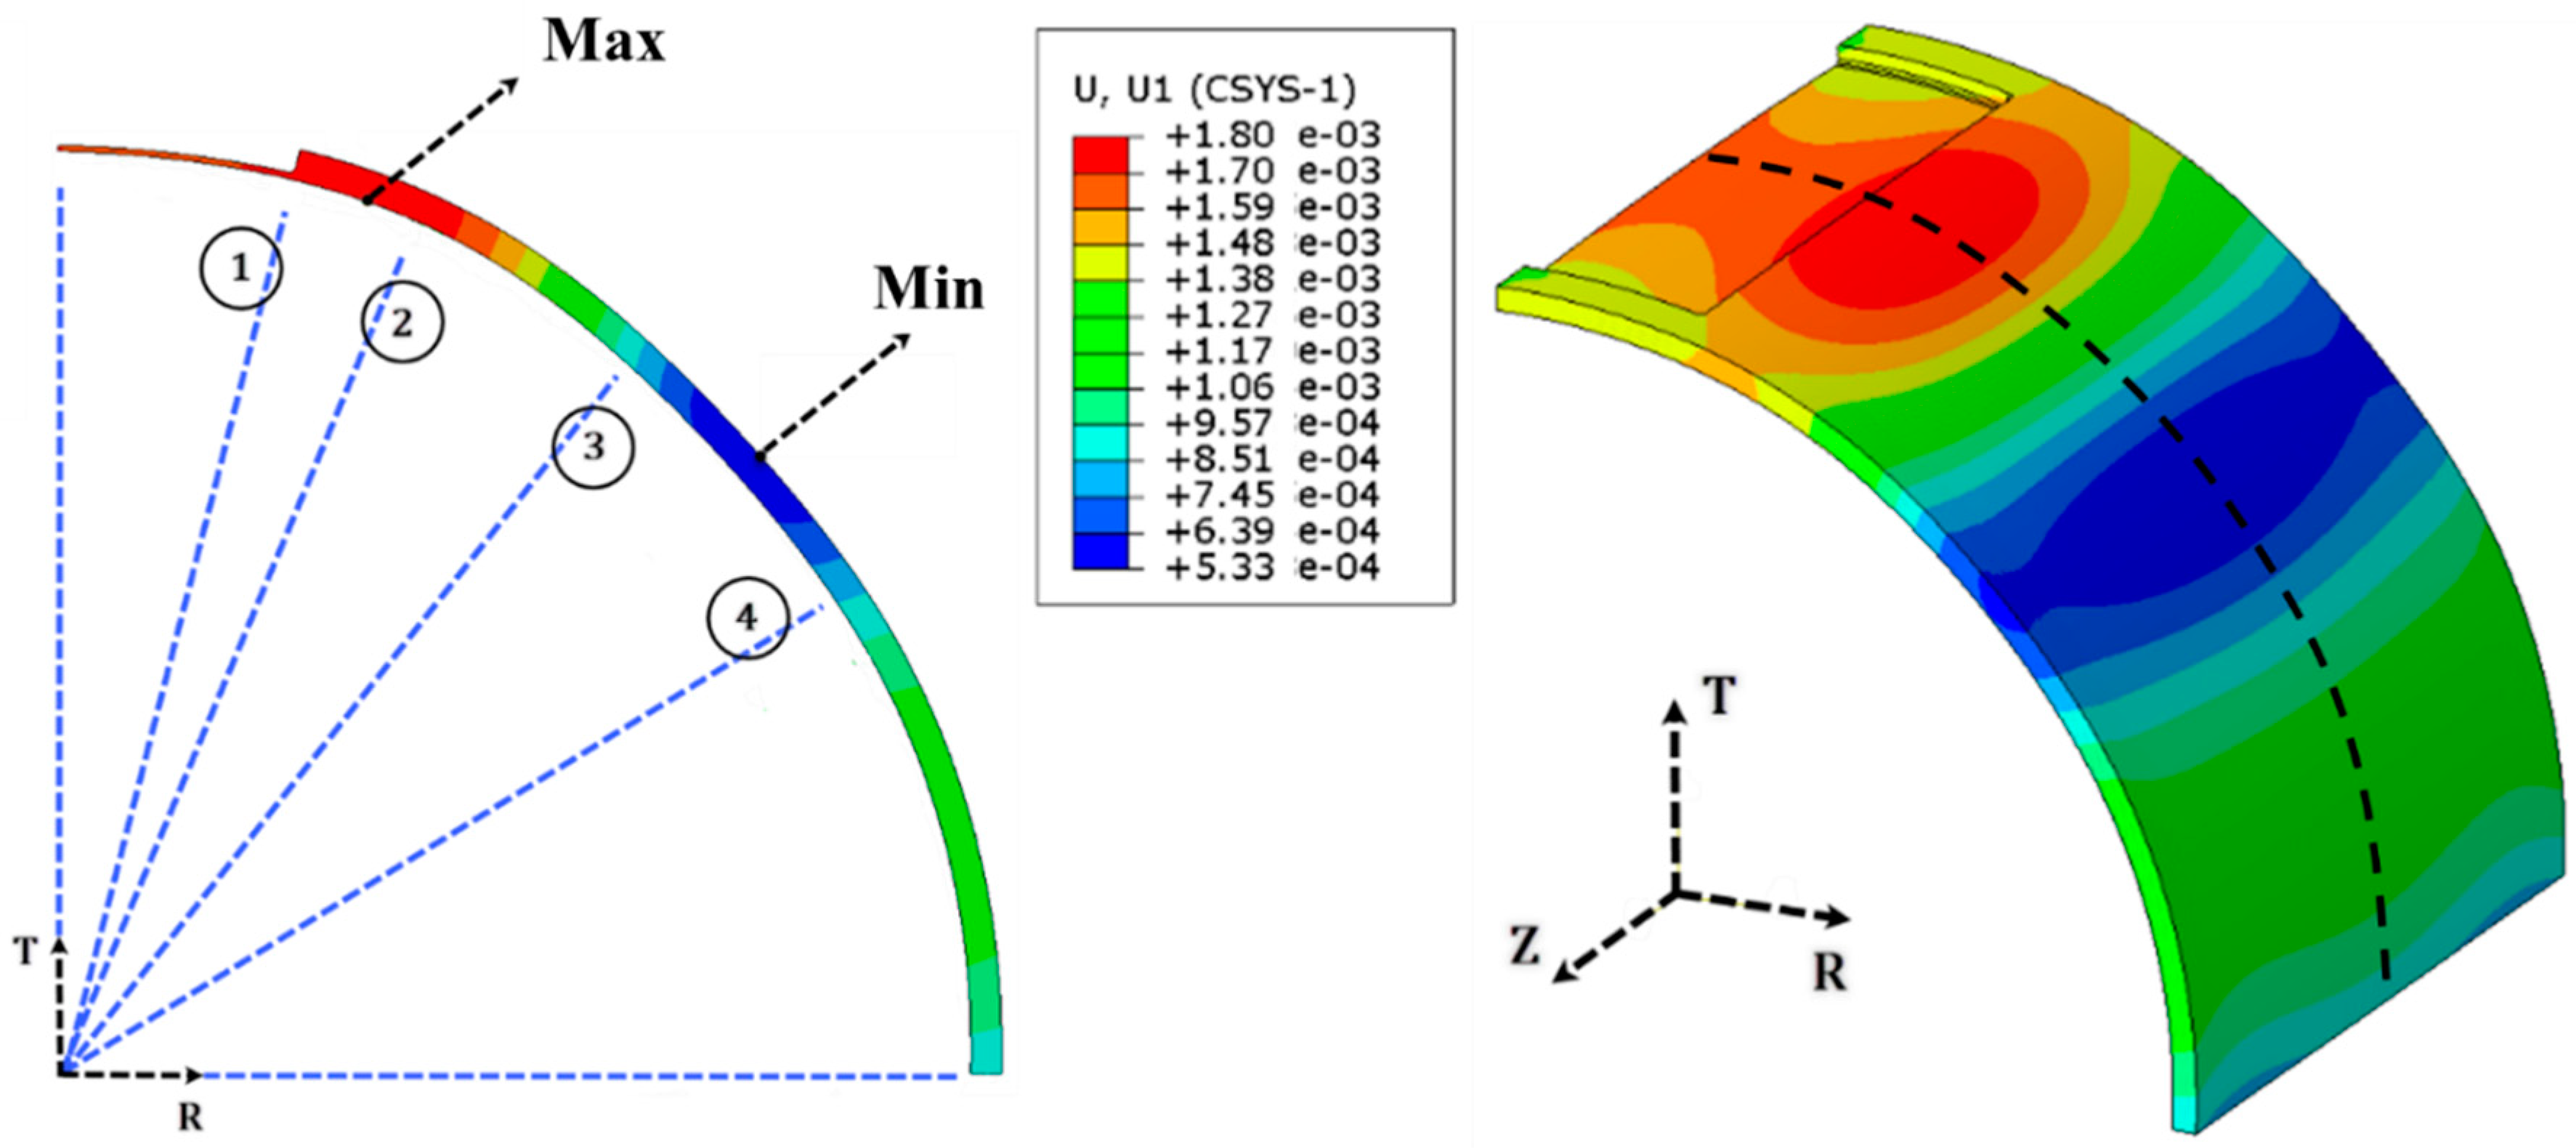
The variations of von Mises stresses along Paths1–2 are plotted against the related normalized distances in Figure 12. Radial displacement on the deformed shape of the steel part in the damaged section is shown in Figure 13. To better understand the related stress variations, some markers were added in Figure 12 corresponding to the positions shown in Figure 13. Vertical and horizontal axes in Figure 13 were selected as the starting and ending point of the normalized distance, respectively, whereas the latter increased in a clockwise direction. The size of the defect along the normalized distance was equal to 0.16 (Point 1 in Figure 12 and Figure 13).
Considering the results of Figure 12 and Figure 13, the maximum value of von Mises stresses occurred between the range 0 (T direction) to 0.16 (Point 1), thus along the damaged area. Such a result is consistent with the fact that a reduced thickness induces a steep increment of stresses. At Point 1, further stress concentrations were expected due to the sharp changes in the thickness of the pipe, whereas between Points 1 and 2, the increment of the pipe wall resulted in a considerable reduction of stresses. According to these explanations, also the radial displacements presented a similar trend (Figure 13), and the highest displacement was observed between Points 1 and 2. Even though the lowest thickness was in the damaged area, the presence of the filler material allowed to transfer pressure stresses from the thin layer of steel to the outer sleeve, in turn resulting in high but not excessive magnitudes for displacement and stresses. As a matter of fact, maximum displacement occurred just outside the damaged part between Points 1 and 2. Further, stress and displacement variations between Points 2 to 4 can be explained by looking at the plastic hinge generated between positions 3 and 4, see also Figure 14. Such plastic hinge occurred in the position where the minimum displacement was calculated. This represents also the reason why the increase in stress in the composite layers in this geometric position was observed (Figure 12). After Point 4, the plastic zone vanished and small changes in stress and displacements were noticed, with the stress distribution becoming uniform moving away from the damaged area.
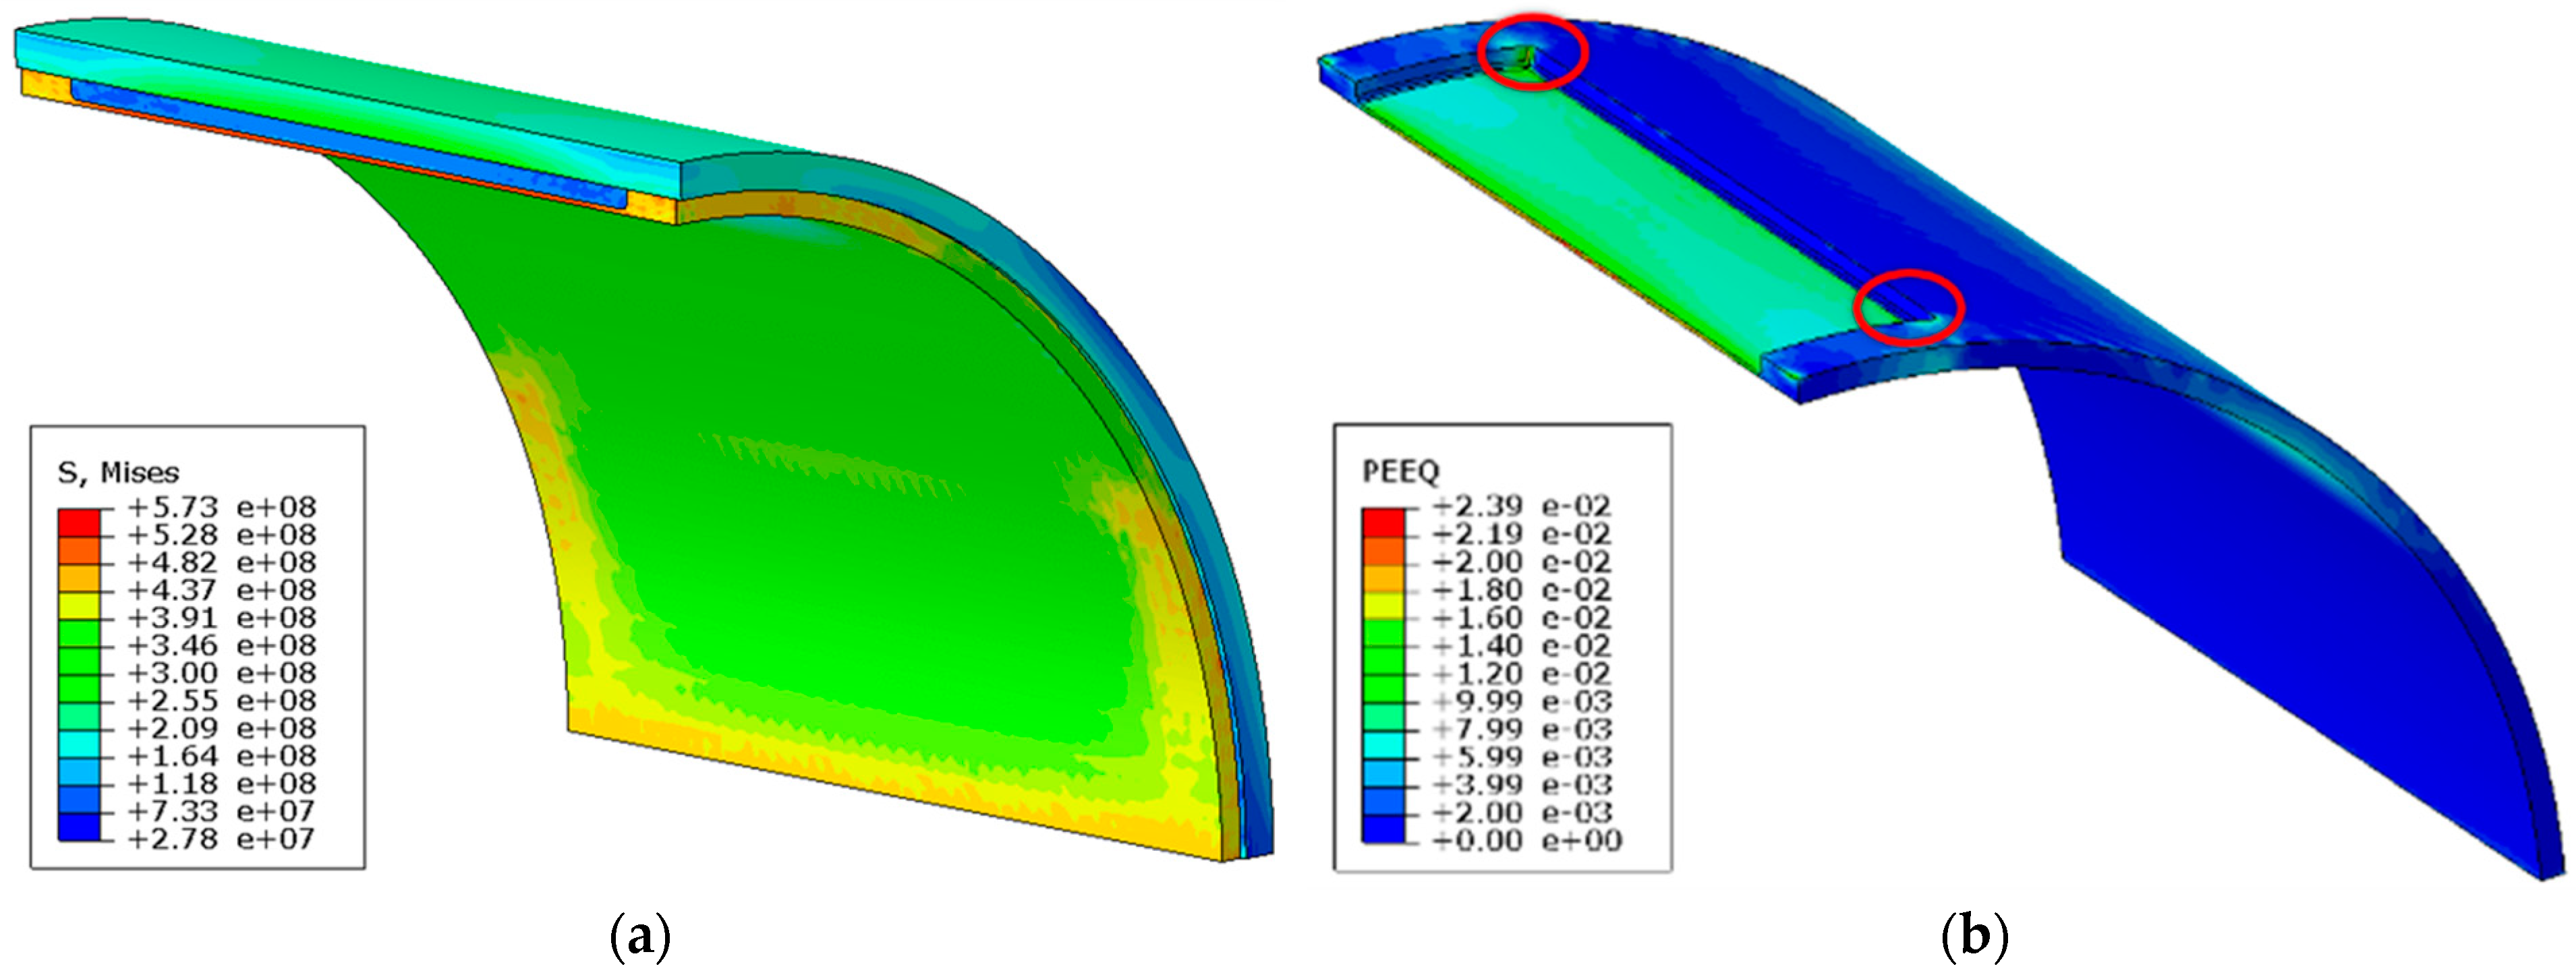
The trend of von Mises stresses for Path2 were similar to those for Path1. Considering that the radius and thickness of the composite layers were larger than those of the pipe, the magnitude of stresses were slightly lower but presented a comparable behaviour. Further contour plots of von Mises stresses and plastic strains for SM1 are reported in Figure 15. It can be observed that the maximum values of stress and plastic strains were reduced if compared to the global model ones. This is due to the addition of the fillet radii to the defect that was not explicitly modelled for the global model. In addition, an appropriate density of elements in this zone was also considered for the SMs, thus improving the accuracy of the analyses.
Considering SM1, the von Mises stress distribution through the thickness (Path3) was also extracted, see Figure 16. The maximum von Mises stress values measured along the paths in the repaired section, in the composite layer, and for an undamaged section were 506.5, 390, and 554.5 MPa respectively. For the undamaged section (SM1), the maximum stress value was measured as 9% higher than the maximum value for the repaired part (SM1), thus demonstrating that the repairing technique was able to increase the maximum loading capacity of the repaired structure.
Additionally, if looking at the overall maximum stress values (Figure 15a and Figure 16), the highest stresses in the damaged part and in the healthy part are nearly 3% different from each other. This clearly indicates that repairing has almost eliminated both the noteworthy thickness reduction of 80% and the related stress concentration in the pipe body.

4. Conclusions

This study reported an experimental and numerical investigation of a composite-repaired steel pipeline.
A burst test was performed on an API 5L X60 steel pipeline section, for which corrosion damage was replicated by machining 80% of the local wall thickness. Such damage was repaired by means of a Methyl Methacrylate Monomer adhesive filler enclosed by a sleeve of E-glass composite layers. Numerical FEM simulations were then aimed at replicating the experimental burst test, providing a good agreement with the experimental observations.
The conclusions of this investigation can be summarized as follows:
  • inspections of pipelines are scheduled to detect potential damages or defects, but their complete understanding must be provided upfront in order to be effective during quick maintenance actions. The understanding of the stress-strain distributions in the surroundings of the damaged and repaired area proposed here provide useful data for engineers on such advanced repairing techniques.
  • a plastic hinge is generated by the internal pressure in the composite repaired section of the pipe. Few explanations of such phenomenon are currently available in similar studies, whereas an accurate description of the mechanical behaviour of the plastic hinge on the repaired pipe was here provided.
  • the values of the highest stresses in the damaged part and in the healthy part are nearly 3% different from each other. This result indicates that repairing has almost eliminated both the noteworthy thickness reduction of 80% and the related stress concentration in the pipe body.

Author Contributions

Conceptualization, S.A.S. and A.D.; methodology, S.A.S. and A.D.; software, S.A.S. and A.D.; validation, S.A.S., A.D. and V.G.; formal analysis, S.A.S. and A.D.; investigation, S.A.S., A.D. and S.Y.; resources, S.A.S. and S.Y.; data curation, V.G., R.C. and S.Y.; writing—original draft preparation, V.G.; writing—review and editing, V.G. and R.C.; visualization, S.A.S., S.Y. and V.G.; supervision, R.C.; project administration, S.A.S. All authors have read and agreed to the published version of the manuscript.

Funding

This research received no external funding.

Conflicts of Interest

The authors declare no conflict of interest.

References

  1. Pridmore, A.B.; Ojdrovic, R.P. Trenchless Repair of Concrete Pipelines Using Fiber-Reinforced Polymer Composites. In Rehabilitation of Pipelines Using Fiber-Reinforced Polymer (FRP) Composites; Woodhead Publishing: Sawston, UK, 2015; pp. 17–38. ISBN 978-0-85709-684-5. [Google Scholar]
  2. Witek, M. An assessment of the effect of steel pipeline wall losses on the maximum allowable operating pressure of a gas pipeline. J. Pipeline Eng. 2014, 13, 37–47. [Google Scholar]
  3. Witek, M.; Szalega, M. EMAT technology applied to high pressure gas pipelines diagnostic, SIGMA NOT Publishing House. Gaz Woda Tech. Sanit. 2015, 11, 387–392. (In Polish) [Google Scholar]
  4. Shamsuddoha, M.; Manalo, A.; Aravinthan, T.; Islam, M.M.; Djukic, L. Failure analysis and design of grouted fibre-composite repair system for corroded steel pipes. Eng. Fail. Anal. 2020, 119, 104979. [Google Scholar] [CrossRef]
  5. Köpple, M.F.; Lauterbach, S.; Wagner, W. Composite repair of through-wall defects in pipework—Analytical and numerical models with respect to ISO/TS 24817. Compos. Struct. 2012, 95, 173–178. [Google Scholar] [CrossRef] [Green Version]
  6. Sahraoui, Y.; Khelif, R.; Chateauneuf, A. Maintenance planning under imperfect inspections of corroded pipelines. Int. J. Press. Vessel. Pip. 2013, 104, 76–82. [Google Scholar] [CrossRef]
  7. Saeed, N.; Ronagh, H.; Virk, A. Composite repair of pipelines, considering the effect of live pressure—Analytical and numerical models with respect to ISO/TS 24817 and ASME PCC-2. Compos. Part B 2014, 58, 605–610. [Google Scholar] [CrossRef]
  8. Shamsuddoha, M.; Islam, M.; Aravinthan, T.; Manalo, A.; Lau, K.-T. Effectiveness of using fibre-reinforced polymer composites for underwater steel pipeline repairs. Compos. Struct. 2013, 100, 40–54. [Google Scholar] [CrossRef]
  9. Alexander, C. The Role of Composite Repair Technology in Rehabilitating Piping and Pipelines. In Proceedings of the ASME 2014 Pressure Vessels and Piping Conference (PVP 2014), Anaheim, CA, USA, 20–24 July 2014. [Google Scholar] [CrossRef]
  10. Chan, P.H.; Tshai, K.Y.; Johnson, M.; Choo, H.L.; Li, S.; Zakaria, K. Burst strength of carbon fibre reinforced polyethylene strip pipeline repair system—A numerical and experimental approach. J. Compos. Mater. 2014, 49, 749–756. [Google Scholar] [CrossRef]
  11. Shamsuddoha, M.; Islam, M.M.; Aravinthan, T.; Manalo, A.; Djukic, L.P. Effect of hygrothermal conditioning on the mechanical and thermal properties of epoxy grouts for offshore pipeline rehabilitation. AIMS Mater. Sci. 2016, 3, 832–850. [Google Scholar] [CrossRef]
  12. Sepe, R.; Bollino, F.; Caiazzo, F.; Berto, F. Stress corrosion cracking behavior of welding joint of high strength steel. IOP Conf. Ser. Mater. Sci. Eng. 2021, 1038, 012055. [Google Scholar] [CrossRef]
  13. Kiefner, J.F.; Duffy, A.R. A Study of Two Methods for Repairing Defects in Line Pipe; AGA Cat. No. L22275; American Gas Association: Washington, DC, USA, 1975. [Google Scholar]
  14. Kiefner, J.F.; Whitacre, G.R. Further Studies of Two Methods for Repairing Defects in Line Pipe; AGA Cat No. L22279; American Gas Association: Washington, DC, USA, 1978. [Google Scholar]
  15. Mazurkiewicz, Ł.; Małachowski, J.; Tomaszewski, M.; Baranowski, P.; Yukhymets, P. Performance of steel pipe reinforced with composite sleave. Compos. Struct. 2018, 183, 199–211. [Google Scholar] [CrossRef]
  16. Lim, K.S.; Azraai, S.N.A.; Yahaya, N.; Noor, N.M.; Zardastib, L.; Kim, J.H.J. Behaviour of steel pipelines with composite repairs analyzed using experimental and numerical approaches. Thin-Walled Struct. 2019, 139, 321–333. [Google Scholar] [CrossRef]
  17. Alexander, C. Overview and recent advances in application of composite materials for repair of transmission pipelines: Evaluation of test results and ongoing research. In Proceedings of the Evaluation and Rehabilitation of Pipelines Conference, Pittsburgh, PA, USA, 21–22 October 2009. [Google Scholar]
  18. Alexander, C.; Bedoya, J. Repair of dents subjected to cyclic pressure service using composite materials. In Proceedings of the 8th International Pipeline Conference IPC2010, Calgary, AB, Canada, 27 September–1 October 2010. [Google Scholar]
  19. Bruce, W.A. Comparison of fiber-reinforced polymer wrapping versus steel sleeves for repair of pipelines. In Rehabilitation of Pipelines Using Fiber-Reinforced Polymer (FRP) Composites; Karbhari, V.M., Ed.; Woodhead Publishing: Sawston, UK, 2015. [Google Scholar] [CrossRef]
  20. Deaton, L. Fiber wrapped steel pipes for high-pressure pipelines. In Rehabilitation of Pipelines Using Fiber-Reinforced Polymer (FRP) Composites; Karbhari, V.M., Ed.; Woodhead Publishing: Sawston, UK, 2015. [Google Scholar] [CrossRef]
  21. Da Costa-Mattos, H.S.; Reis, J.M.L.; Sampaio, R.F.; Perrut, V.A. An alternative methodology to repair localized corrosion damage in metallic pipelines with epoxy resins. Mater. Des. 2009, 30, 3581–3591. [Google Scholar] [CrossRef]
  22. Mazurkiewicz, Ł.; Małachowski, J.; Damaziak, K.; Tomaszewski, M. Evaluation of the response of fibre reinforced composite repair of steel pipeline subjected to puncture from excavator tooth. Compos. Struct. 2018, 202, 1126–1135. [Google Scholar] [CrossRef]
  23. Mazurkiewicz, L.; Tomaszewski, M.; Malachowski, J.; Sybilski, K.; Chebakov, M.; Witek, M.; Yukhymets, P.; Dmitrienko, R. Experimental and numerical study of steel pipe with part-wall defect reinforced with fibre glass sleeve. Int. J. Press. Vessel. Pip. 2017, 149, 108–119. [Google Scholar] [CrossRef]
  24. Sadrabadi, S.A.; Rahimi, G.; Citarella, R.; Karami, J.S.; Sepe, R.; Esposito, R. Analytical solutions for yield onset achievement in FGM thick walled cylindrical tubes undergoing thermomechanical loads. Compos. Part B Eng. 2017, 116, 211–223. [Google Scholar] [CrossRef]
  25. Sadrabadi, S.A.; Rahimi, G.H. Yield Onset of Thermo-Mechanical Loading of FGM Thick Walled Cylindrical Pressure Vessels. Int. J. Mech. Aerosp. Ind. Mechatron. Eng. 2014, 8, 1317–1321. [Google Scholar]
  26. Mehditabar, A.; Sadrabadi, S.A.; Sepe, R.; Armentani, E.; Walker, J.; Citarella, R.; Sadrabadi, S.A. Influences of Material Variations of Functionally Graded Pipe on the Bree Diagram. Appl. Sci. 2020, 10, 2936. [Google Scholar] [CrossRef]
  27. Mehditabar, A.; Rahimi, G.H.; Sadrabadi, S.A. Three-dimensional magneto-thermo-elastic analysis of functionally graded cylindrical shell. Appl. Math. Mech. 2017, 38, 479–494. [Google Scholar] [CrossRef]
  28. Junior, M.M.; Reis, J.M.L.; da Costa Mattos, H.S. Polymer-based composite repair system for severely corroded circumferential welds in steel pipes. Eng. Fail. Anal. 2017, 81, 135–144. [Google Scholar] [CrossRef]
  29. Mehditabar, A.; Sadrabadi, S.A.; Walker, J. Thermal buckling analysis of a functionally graded microshell based on higher-order shear deformation and modified couple stress theories. Mech. Based Des. Struct. Mach. 2021, 1–19. [Google Scholar] [CrossRef]
  30. Ansari Sadrabadi, S.; Rahimi, G.H. Elasto-Plastic Behavior Analysis and Yield Onset in FG Cylindrical Tubes under Mechanical and Thermal Loads. Modares Mech. Eng. 2016, 16, 159–166. [Google Scholar]
  31. Ansari Sadrabadi, S.; Nayebi, A.; Rahimi, G. Behavior of Fgm Spherical Vessels under Internal Pressure and Temperature Difference. J. Mech. Eng. Amirkabir. 2016, 47, 43–50. [Google Scholar]
  32. Nayebi, A.; Sadrabadi, S.A. FGM elastoplastic analysis under thermomechanical loading. Int. J. Press. Vessel. Pip. 2013, 111–112, 12–20. [Google Scholar] [CrossRef]
  33. Moustabchir, H.; Azari, Z.; Hariri, S.; Dmytrakh, I. Experimental and numerical study of stress-strain state of pressurized cylindrical shells with external defects. Eng. Fail. Anal. 2010, 17, 506–514. [Google Scholar] [CrossRef]
  34. Li, X.; Bai, Y.; Su, C.; Li, M. Effect of interaction between corrosion defects on failure pressure of thin wall steel pipeline. Int. J. Press. Vessel. Pip. 2016, 138, 8–18. [Google Scholar] [CrossRef]
  35. Khalajestani, M.K.; Bahaari, M.R. Investigation of pressurized elbows containing interacting corrosion defects. Int. J. Press. Vessel. Pip. 2014, 123–124, 77–85. [Google Scholar] [CrossRef]
  36. Xu, L.; Cheng, Y. Reliability and failure pressure prediction of various grades of pipeline steel in the presence of corrosion defects and pre-strain. Int. J. Press. Vessel. Pip. 2012, 89, 75–84. [Google Scholar] [CrossRef]
  37. Meriem-Benziane, M.; Abdul-Wahab, S.A.; Zahloul, H.; Babaziane, B.; Hadj-Meliani, M.; Pluvinage, G. Finite element analysis of the integrity of an API X65 pipeline with a longitudinal crack repaired with single- and double-bonded composites. Compos. Part B Eng. 2015, 77, 431–439. [Google Scholar] [CrossRef]
  38. Giannella, V.; Perrella, M.; Citarella, R. Efficient FEM-DBEM coupled approach for crack propagation simulations. Theor. Appl. Fract. Mech. 2017, 91, 76–85. [Google Scholar] [CrossRef]
  39. Giannella, V.; Fellinger, J.; Perrella, M.; Citarella, R. Fatigue life assessment in lateral support element of a magnet for nuclear fusion experiment “Wendelstein 7-X”. Eng. Fract. Mech. 2017, 178, 243–257. [Google Scholar] [CrossRef] [Green Version]
  40. Giannella, V.; Citarella, R.; Fellinger, J.; Esposito, R. LCF assessment on heat shield components of nuclear fusion experiment “Wendelstein 7-X” by critical plane criteria. Procedia Struct. Integr. 2018, 8, 318–331. [Google Scholar] [CrossRef]
  41. Dassault Systemes. ABAQUS User’s and Theory Manuals; Version 6.14; HKS Inc.: Villepinte, France, 2014. [Google Scholar]
  42. Citarella, R.; Giannella, V.; Vivo, E.; Mazzeo, M. FEM-DBEM approach for crack propagation in a low pressure aeroengine turbine vane segment. Theor. Appl. Fract. Mech. 2016, 86, 143–152. [Google Scholar] [CrossRef]
  43. Giannella, V.; Vivo, E.; Mazzeo, M.; Citarella, R. FEM-DBEM approach to simulate crack propagation in a turbine vane segment undergoing a fatigue load spectrum. Procedia Struct. Integr. 2018, 12, 479–491. [Google Scholar] [CrossRef]
  44. Citarella, R.G.; Cricrì, G.; Armentani, E. Multiple Crack Propagation with Dual Boundary Element Method in Stiffened and Reinforced Full Scale Aeronautic Panels. Key Eng. Mater. 2013, 560, 129–155. [Google Scholar] [CrossRef]
  45. Giannella, V. Stochastic approach to fatigue crack-growth simulation for a railway axle under input data variability. Int. J. Fatigue 2020, 144, 106044. [Google Scholar] [CrossRef]
  46. Shlyannikov, V.; Yarullin, R.; Yakovlev, M.; Giannella, V.; Citarella, R. Mixed-mode crack growth simulation in aviation engine compressor disk. Eng. Fract. Mech. 2021, 246, 107617. [Google Scholar] [CrossRef]
  47. Giannella, V.; Sepe, R.; Borrelli, A.; De Michele, G.; Armentani, E. Numerical investigation on the fracture failure of a railway axle. Eng. Fail. Anal. 2021, 129, 105680. [Google Scholar] [CrossRef]
Figure 1. (a,b) CAD model showing size and shape of the machined defect; (c) CAD model of the whole pipe showing the defect positioning.
Applsci 12 07536 g001
Figure 2. Flow of operations to produce the test article: (a) API 5L X60 steel pipeline, (b) cut and closed with lateral caps to obtain a tank; (c) machined defect and corresponding (d,e) repairing process through the composite sleeve.
Applsci 12 07536 g002
Figure 3. CAD model of the steel pipe rapired with a composite sleeve.
Applsci 12 07536 g003
Figure 4. True stress true strain curve for steel API 5L X60.
Applsci 12 07536 g004
Figure 5. CAD model of the different layers of the composite sleeve with a highlight of the local coordinate systems.
Applsci 12 07536 g005
Figure 6. Submodelled positions of the global CAD model.
Applsci 12 07536 g006
Figure 7. Meshes generated for the different models: (a) global model, (b) SM1, (c) SM2.
Applsci 12 07536 g007aApplsci 12 07536 g007b
Figure 8. Deformation of experimental and numerical pipes; units in m.
Applsci 12 07536 g008
Figure 9. Pipe after the burst test: (a) highlight of the fracture direction; (b) highlight of the defect after the test.
Applsci 12 07536 g009
Figure 10. Von Mises stress [Pa] and plastic strain distributions in the FEM global model.
Applsci 12 07536 g010
Figure 11. Definition of the three paths along which results were extracted: (a) Path1 used for the steel in a repaired section; (b) Path2 used for the composite sleeve; (c) Path3 along the radial direction through the thickness of an unrepaired section of the pipe.
Applsci 12 07536 g011
Figure 12. Distributions of von Mises stresses along Path1 and Path2.
Applsci 12 07536 g012
Figure 13. Radial displacement [m] on the deformed shape (magnification 5×) of the pipe section in the damaged part; highlights of the geometric Points considered in Figure 12.
Applsci 12 07536 g013
Figure 14. Plastic strain distribution through the mid-side section of SM1.
Applsci 12 07536 g014
Figure 15. (a,b) Von Mises stress [Pa] and equivalent plastic strain distributions for SM1; red circles in (b) to highlight the stress concentration positions.
Applsci 12 07536 g015
Figure 16. Distribution of von Misses stress in the radial direction along the thickness in the SM1.
Applsci 12 07536 g016
Table 1. Main mechanical properties of API 5L X60 steel.
Young’s ModulusPoisson’s RatioYield StrengthTensile Strength
207 GPa0.3300 MPa630 MPa
Table 2. Main mechanical properties of the composite sleeve material; local coordinate systems highlighted in Figure 5.
Mass density ρ 1925 kg / m 3
Young’s modulus E 11 41.225 GPa
Young’s moduli E 22 = E 33 11.542 GPa
shear moduli G 12 = G 13 3.509 GPa
shear moduli G 23 4.674 GPa
Poisson’s ratios υ 12 = υ 13 0.243
Poisson’s ratio υ 23 0.235
Table 3. Main mechanical properties of the adhesive filler.
Young’s ModulusPoisson’s Ratio
10 GPa0.34
Table 4. The number and type of elements used in each model.
Global model11,568 quadratic hexahedral elements, type: C3D20
Submodel 1 (SM1)23,934 quadratic tetrahedral elements type: C3D10M;
4480 quadratic hexahedral elements, type: C3D20.
Submodel 2 (SM2)10,800 quadratic hexahedral elements, type: C3D20.
Publisher’s Note: MDPI stays neutral with regard to jurisdictional claims in published maps and institutional affiliations.