Article

Microstructural Variation and Evaluation of Formability According to High-Temperature Compression Conditions of AMS4928 Alloy

1
Department of Materials Science and Engineering, Sunchon National University, Suncheon 57922, Korea
2
Institute of Technology, Felix Tech, Busan 46744, Korea
*
Author to whom correspondence should be addressed.
Appl. Sci. 2022, 12(15), 7621; https://doi.org/10.3390/app12157621
Submission received: 30 June 2022 / Revised: 22 July 2022 / Accepted: 26 July 2022 / Published: 28 July 2022
(This article belongs to the Special Issue Selected Papers from ICAMSME 2022)

Abstract

:
Ti-6Al-4V alloys are used in various industrial fields such as aircraft parts due to its excellent specific strength and mechanical properties. A high-temperature forming technology has been applied because it is difficult to process complex shapes. During the high-temperature forming process, the microstructure changes significantly due to temperature, strain rate, reduction ratio, and other process variables, and mechanical properties of high-temperature molded products are changed accordingly. Therefore, in this study, a high-temperature compression test was performed on AMS4928, which is one of Ti-6Al-4V alloys used as a material for aircraft parts, and the severe plastic deformation and dead zone were confirmed in connection with the processing map. The changes in microstructure were comparatively analyzed. In addition, it was confirmed that there was a difference in formability due to grain refinement by dynamic recrystallization, and optimal high-temperature forming conditions were derived by linking and analyzing the formability and microstructural factors.

1. Introduction

AMS4928, one of Ti-6Al-4V alloys, is an α + β type alloy and is the most frequently used alloy among Ti alloys due to its high specific strength, excellent corrosion resistance, and excellent mechanical properties at high temperatures [1,2,3,4]. High-temperature materials such as titanium alloy and nickel superalloy have been applied in various industries such as power generation facilities, chemical plants, gas turbines, and jet engines [5,6,7,8], but it is not easy to machine complex shapes. For this reason, many high-temperature processing methods such as hot rolling, hot forging, and hot forming are applied. In particular, it is known that a ring-rolling process is generally used in the manufacture of Ti alloys for aircraft engines [9,10].
This ring-rolling process is greatly related to the microstructure change of Ti alloys, and shows a difference in mechanical properties. In addition, defects or inhomogeneity of materials according to process variables such as temperature, strain rate, and reduction rate in the process cause an increase in production unit costs. It is important to determine the optimal process conditions and clearly identify the high-temperature deformation behavior of the material in order to solve this problem [11,12,13,14,15,16]. Accordingly, research has been conducted steadily to optimize the forming process at minimal cost and to improve the quality of the product through considering forming defects and microstructure changes according to the recent development of the finite element analysis technology [17,18,19,20]. To date, there is a dynamic material model proposed by Prasad et al. [21] in order to predict forming defects during a hot forming process. In addition, different methods such as criteria for plastic unstable and stable regions proposed by Ziegler [22], Malas [23], and Murty [24] have been studied, and their reliabilities have been proven by practical applications [25]. Although many studies have been conducted according to the importance of the high-temperature forming, there are not many research results obtained based on the understanding of microstructures by deriving a process map through a polynomial regression analysis method according to the proposed dynamic material model. In addition, it is difficult to apply it to a practical ring-rolling process of Φ500 bulk material even if it is based on the microstructure [26,27,28].
Therefore, in this study, reliable process maps were derived by comparing dynamic material models according to changes in the temperature and strain rate of AMS4928, which is one of Ti-6Al-4V alloys, and the process conditions of unstable and stable regions during the plastic deformation process were analyzed. In addition, microstructural changes were compared and analyzed through the consideration of the Dead Zone and Severe Plastic Deformation region according to each condition for the high-temperature formability evaluation. The optimal process conditions obtained through the analysis of plastic instability and energy dispersion efficiency were applied to a practical ring-rolling process to evaluate the formability.

2. Materials and Methods

The Ti-6Al-4V alloy used in this study is an AMS4928 grade Ti alloy, and its composition is Ti-5.50~6.75Al-3.5~4.5V-0.30Fe, which is a bulk material forged to Φ500 with a forging ratio of 1.5~2 after performing VAR (Vacuum Arc Remelting) twice. For observing the initial microstructure, the as-received material of Φ500 was divided into four parts, and high-temperature compression specimens of Φ10 × 15 mm were machined in the circumferential direction at an intermediate point of its radius, as shown in Figure 1. Then, one of them was divided into XY, YZ, and XZ planes, cut, and hot-mounted. Then, macropolishing was performed using abrasives of #200~#2000, and micropolishing was performed using abrasives of 6~0.04 μm. After polishing, 2 mL of HNO3 and 2 mL of HF were mixed with 100 mL of H2O to perform an etching process. The microstructure of the etched specimen was observed at ×50~×1000 magnification through an optical microscope.
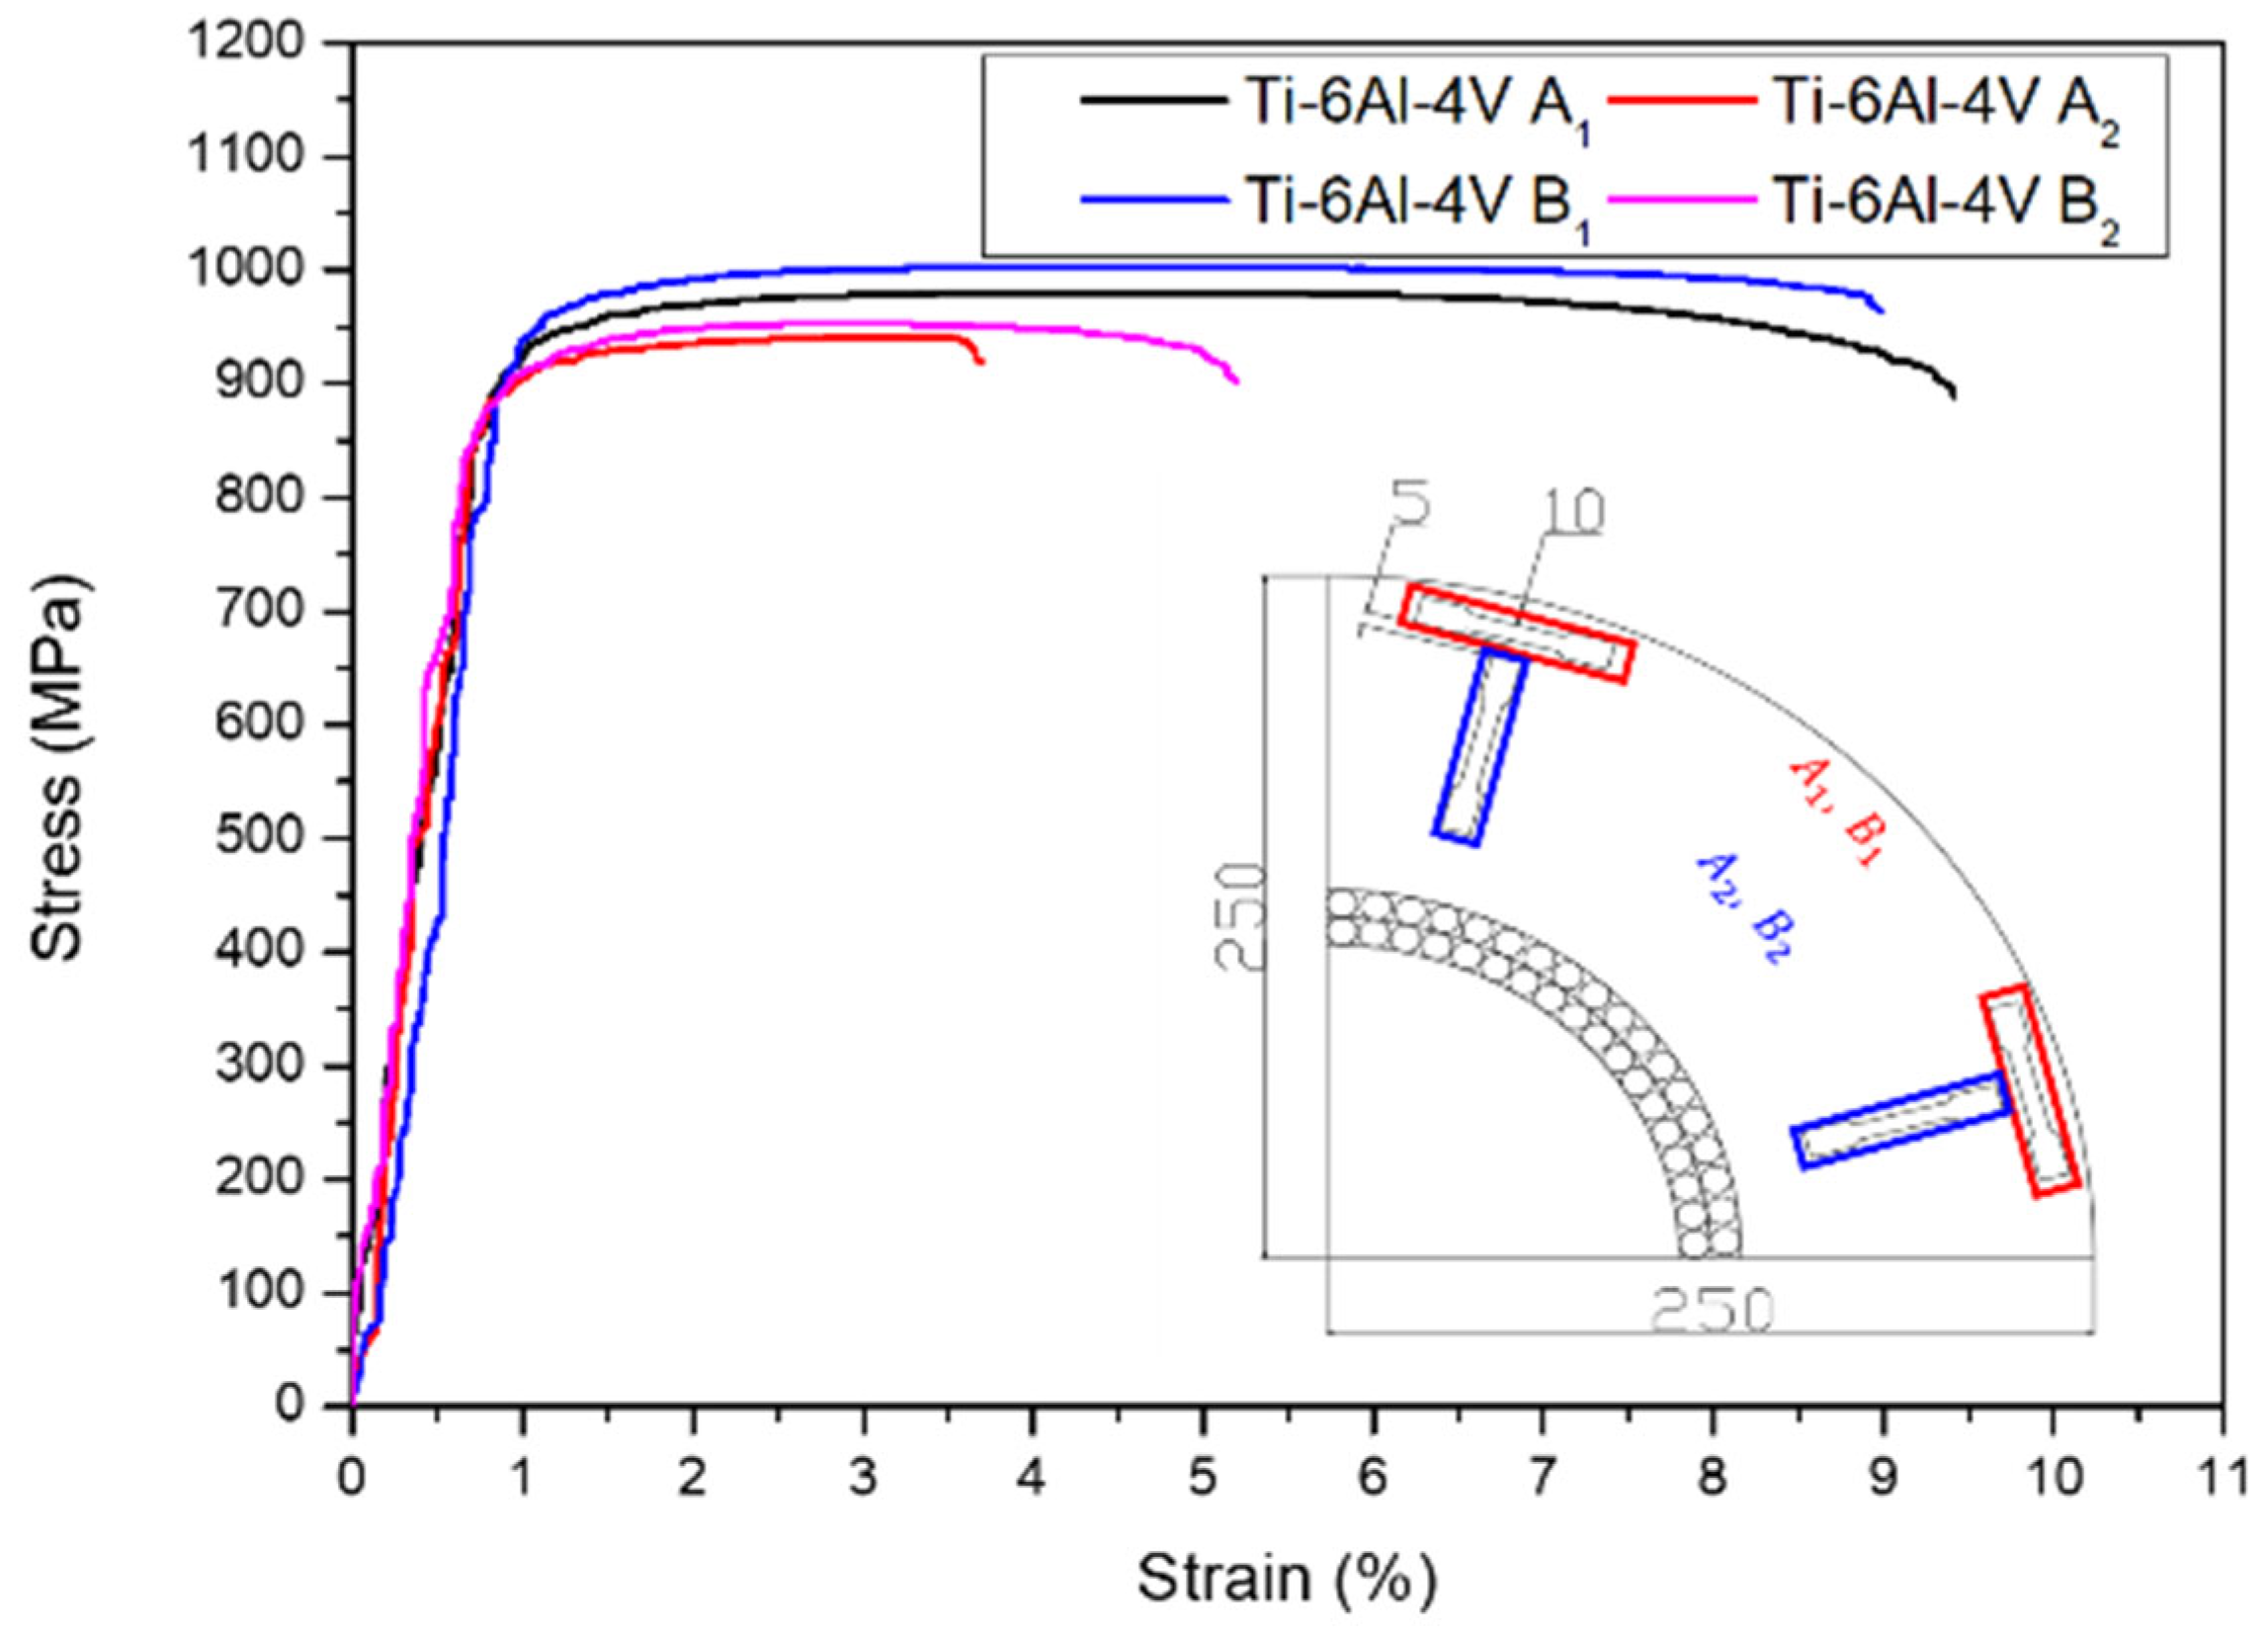
In addition, Vickers hardness was measured using a Vickers hardness tester (HM-200, Mitutoyo, Japan) in order to evaluate the mechanical properties at room temperature, and a room temperature tensile test was conducted using a universal material tester (UTM, BESTUM-10MD, Ssaul Bestech, Seoul, Korea). The Vickers hardness test measured 12 points in the direction of crossing the specimen by applying a load of 0.5 kgf for a holding time of 15 s at 0.25 mm intervals, and calculated the average hardness and standard deviation excluding the maximum and minimum values. The room temperature tensile test was conducted at a strain rate of 1 × 10 3 / s after processing the specimen in the circumferential direction (A1, B1) and the center direction (A2, B2) according to the rod-shaped tensile specimen standard with a grip part of Φ10, a marking distance of 24 mm, and a diameter of Φ6 for the measurement section based on the ASTM E8M-16a standard.
To determine the physical properties and deformation behavior of the Ti-6Al-4V alloy at high temperature, a Φ0.5 × 1 mm hole for mounting a thermocouple on the high-temperature compressed specimen was additionally processed in the center of the specimen. The high-temperature compression test was conducted using a Gleeble 3500 equipment in the temperature range of 800~1100 °C with a heating rate of 10 °C/min, a holding time of 60 s, and air cooling at a reduction rate of 70% maximum according to a total of 7 temperature conditions (800 °C, 850 °C, 900 °C, 950 °C, 1000 °C, 1050 °C, and 1100 °C) and 3 strain rate conditions ( 1 × 10 0 / s , 1 × 10 1 / s , and 1 × 10 2 / s ) with 50 °C intervals. Then, the strain rate sensitivity was presented as a gradient by deriving the flow stress, and a polynomial regression analysis was performed on the plastic instability and stability criteria.
Macrostructures and microstructures were observed after cutting the high-temperature compressed specimen in two parts according to each condition in order to observe these structures in each zone after applying high-temperature compressing to the specimen. In addition, an SEM-EBSD analysis was conducted to determine the difference in the formability caused by the grain refinement according to the dynamic recrystallization.
The ring-rolling process was performed by applying the optimal process conditions derived from the analysis of the above high-temperature compressive deformation behavior, and the macrostructure and microstructure of a practical ring-rolling forming product were observed.

3. Results and Discussion

3.1. Room Temperature Properties

Figure 2 shows the observation of the initial microstructure of the AMS4928 bulk alloy obtained through a forging process. In all XY, YZ, and XZ planes, a uniform α + β Widmanstätten structure was observed throughout the specimen, and no differences in microstructures according to directionality were observed. During VAR, a number of spherical fine grains of 5~10 μm were observed due to the grain growth after its recrystallization.
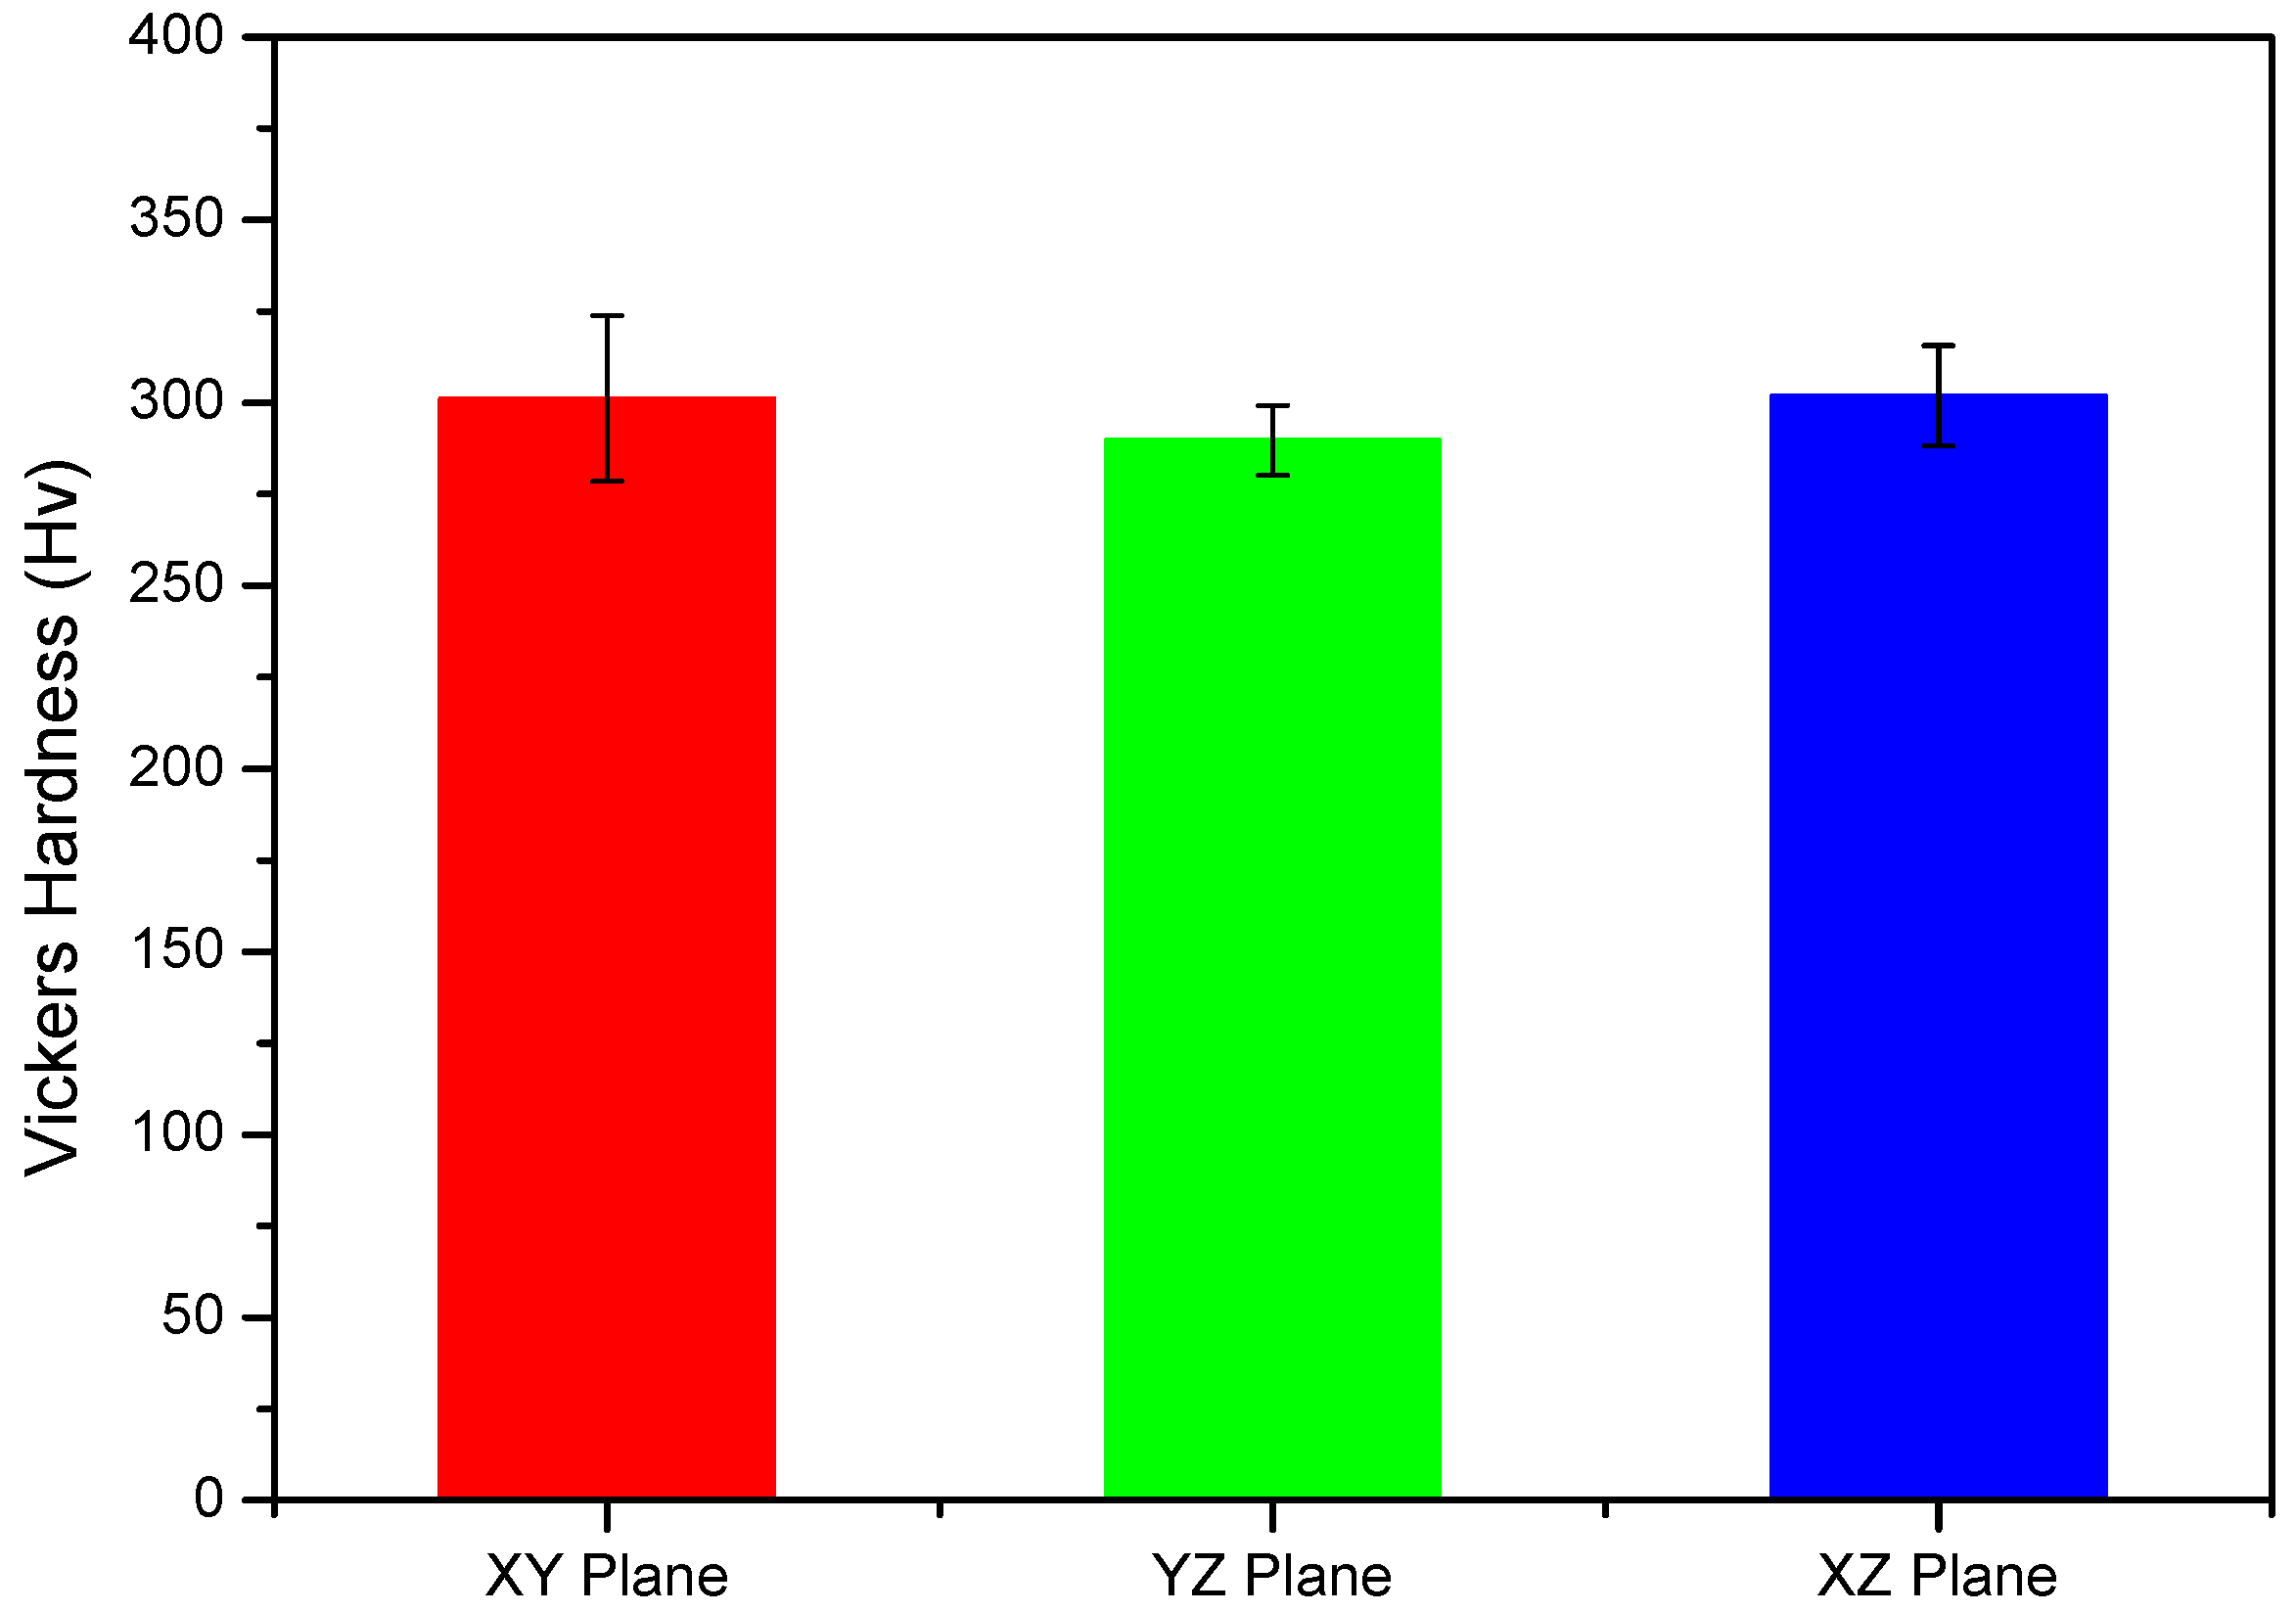
For verifying the hardness difference according to the directionality of the AMS4928 alloy, the Vickers Hardness was measured in the direction crossing the specimen, and the result is shown in Figure 3. Based on the measured values where the average hardness of the XY Plane was 301.29 Hv, the standard deviation was 22.6 Hv, the average hardness of the YZ Plane was 289.76 Hv, the standard deviation was 9.58 Hv, the average hardness of the XZ Plane was 301.88 Hv, and the standard deviation was 13.75 Hv, the hardness values were uniform without significant differences according to directionality considering the standard deviation.
In order to evaluate the internal and external strength properties of the AMS4928 bulk alloy in the as-received state, the room temperature tensile strengths in the circumferential and central directions of the specimen were measured, and the resulting stress–strain curve is shown in Figure 4. As a result of the tensile test, the average yield strength, tensile strength, and elongation in the circumferential direction (A1, B1) were 933 MPa, 990 MPa, and 9.5%, respectively, and the average yield strength, tensile strength, and elongation in the central direction (A2, B2) were 890 MPa, 945 MPa, and 5%, respectively. There were differences of the yield strength and tensile strength of about 50 MPa, respectively, and elongation of about 5% according to the direction. This result is because the microstructure of the external has a narrower lath spacing than the internal due to the difference in cooling rates between the internal and external after VAR processing of the Φ500 bulk material.

3.2. High Temperature Properties

3.2.1. Hot Compression Test

Figure 5 shows the stress–strain curve according to the high-temperature compression test. As shown in Figure 5, the strain rate hardening effect and the flow softening curve, which increase in strength according to increases in the strain rate, and the strength tend to decrease as the temperature increases. The high-temperature compression strength represented the lowest value of 14 MPa at 1100 °C and 1 × 10 2 / s , and the highest strength value of 232 MPa at 800 °C and 1 × 10 0 / s . In addition, rapid stress reduction and vibration are observed under low temperature conditions in the early high-temperature compression stage. It is known to occur when the plastic deformation of materials is unstable or locally concentrated [29]. The change in microstructures that occurs during a high-temperature forming process directly affects the behavior of high-temperature deformation, and optimal forming conditions can be derived by presenting a process capable of controlling the final microstructure.

3.2.2. Processing Map

The model considered for the evaluation of the formability of the AMS4928 alloy in this study is a dynamic material model, which was proposed by Prasad and Gegle [21]. This is based on the energy (G) used by the material plastic deformation and the energy (J) used to generate a change in microstructures when the plastic deformation is performed according to temperatures and strain rates given to the material. In order to express this model quantitatively, the energy dispersion efficiency (η) is presented as shown in Equation (1).
η = 2m/(m + 1)
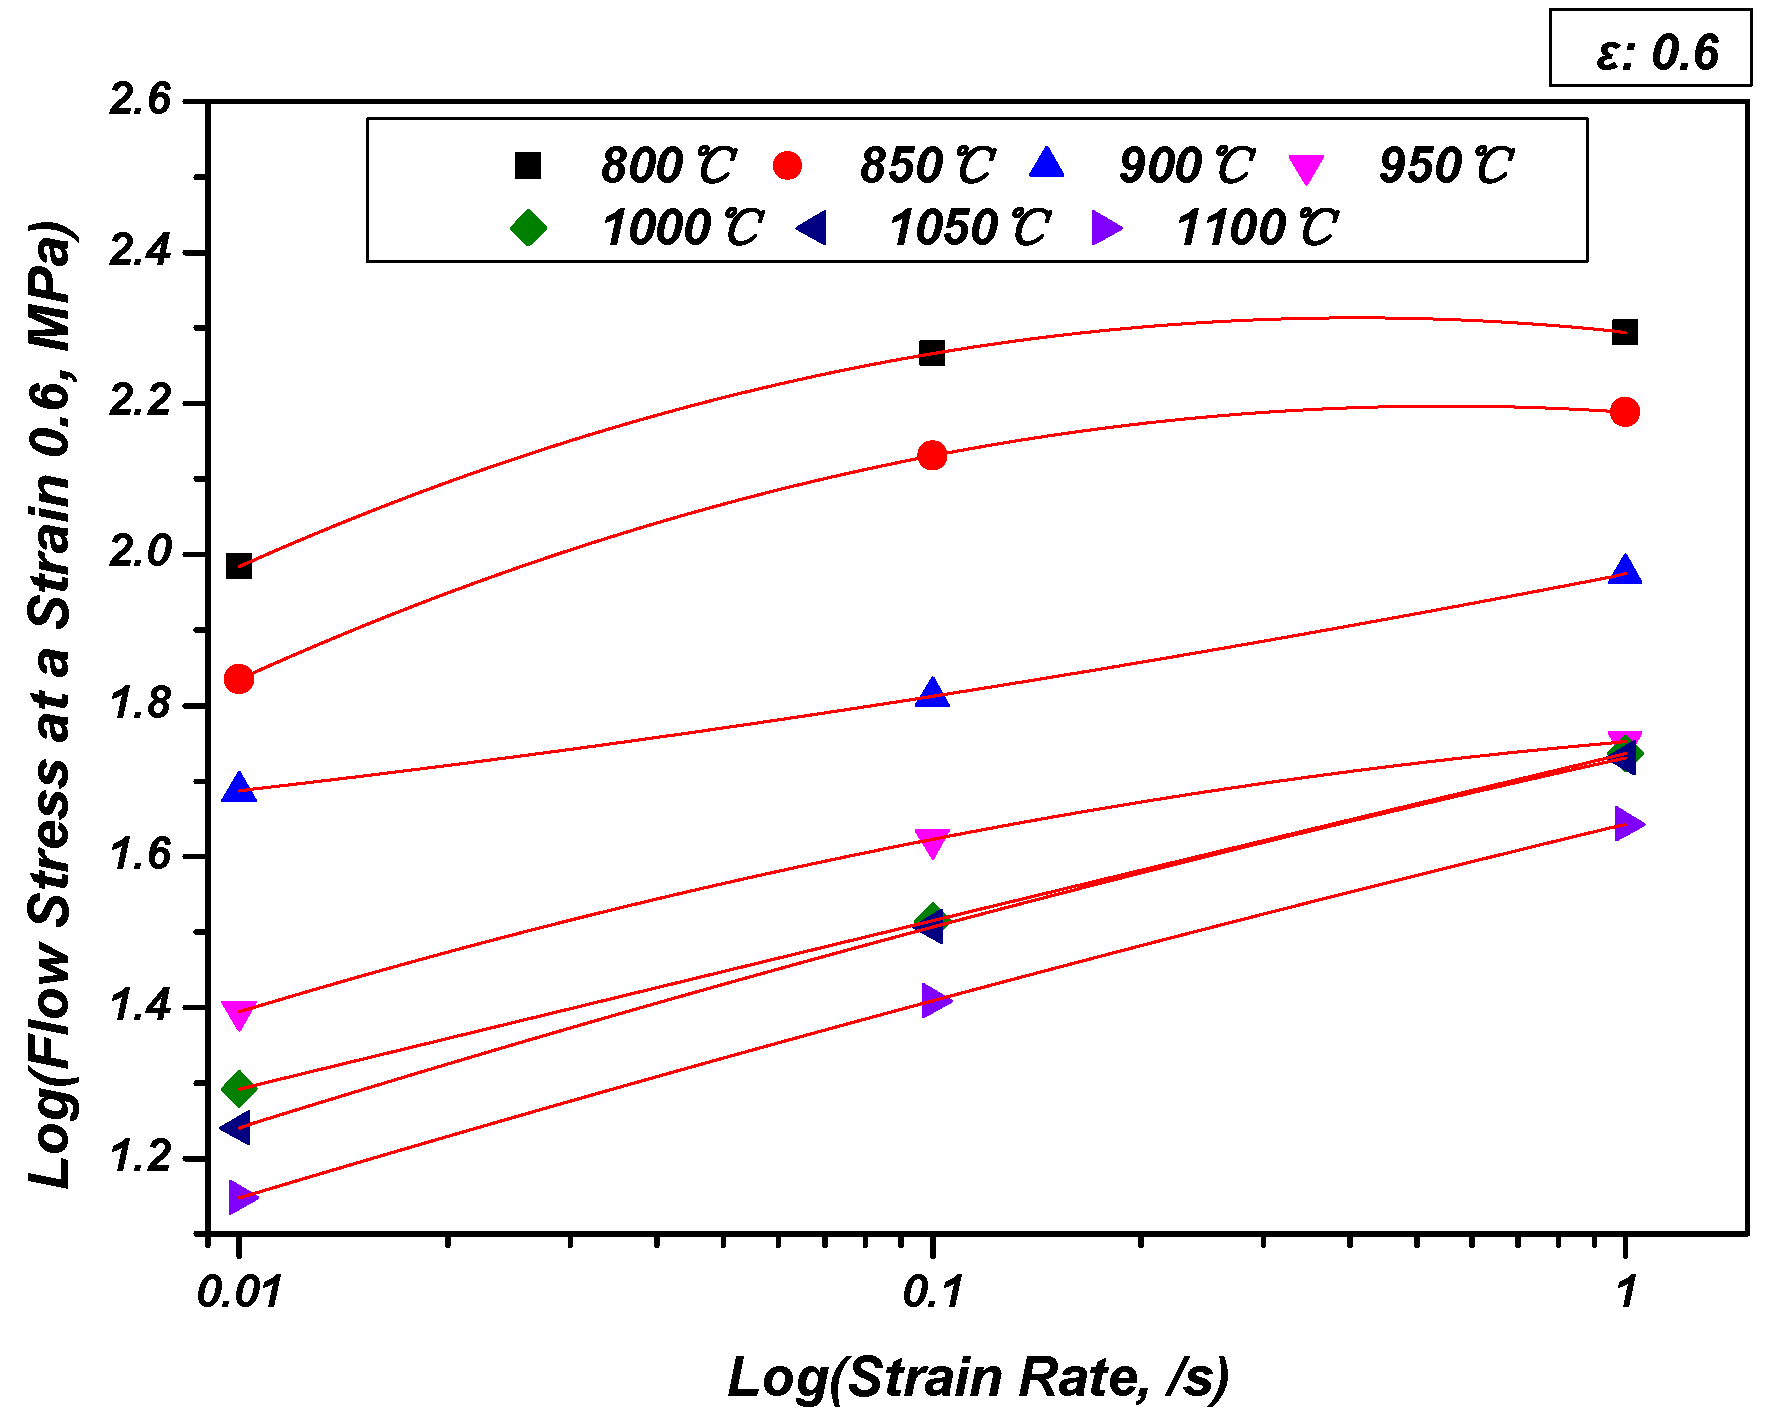
In order to increase the reliability of the strain rate sensitivity coefficient (m), it is expressed in Equation (2) as a polynomial regression equation through the polynomial fit, and accordingly, the newly defined strain rate sensitivity coefficient is shown in Equation (3). Then, the flow stress at a reduction rate of 60% is shown in Figure 6.
ln ( σ ) =   a   +   bln   ε ˙ + c ( ln   ε ˙ ) 2
m   =   b   + 2 cln ε ˙
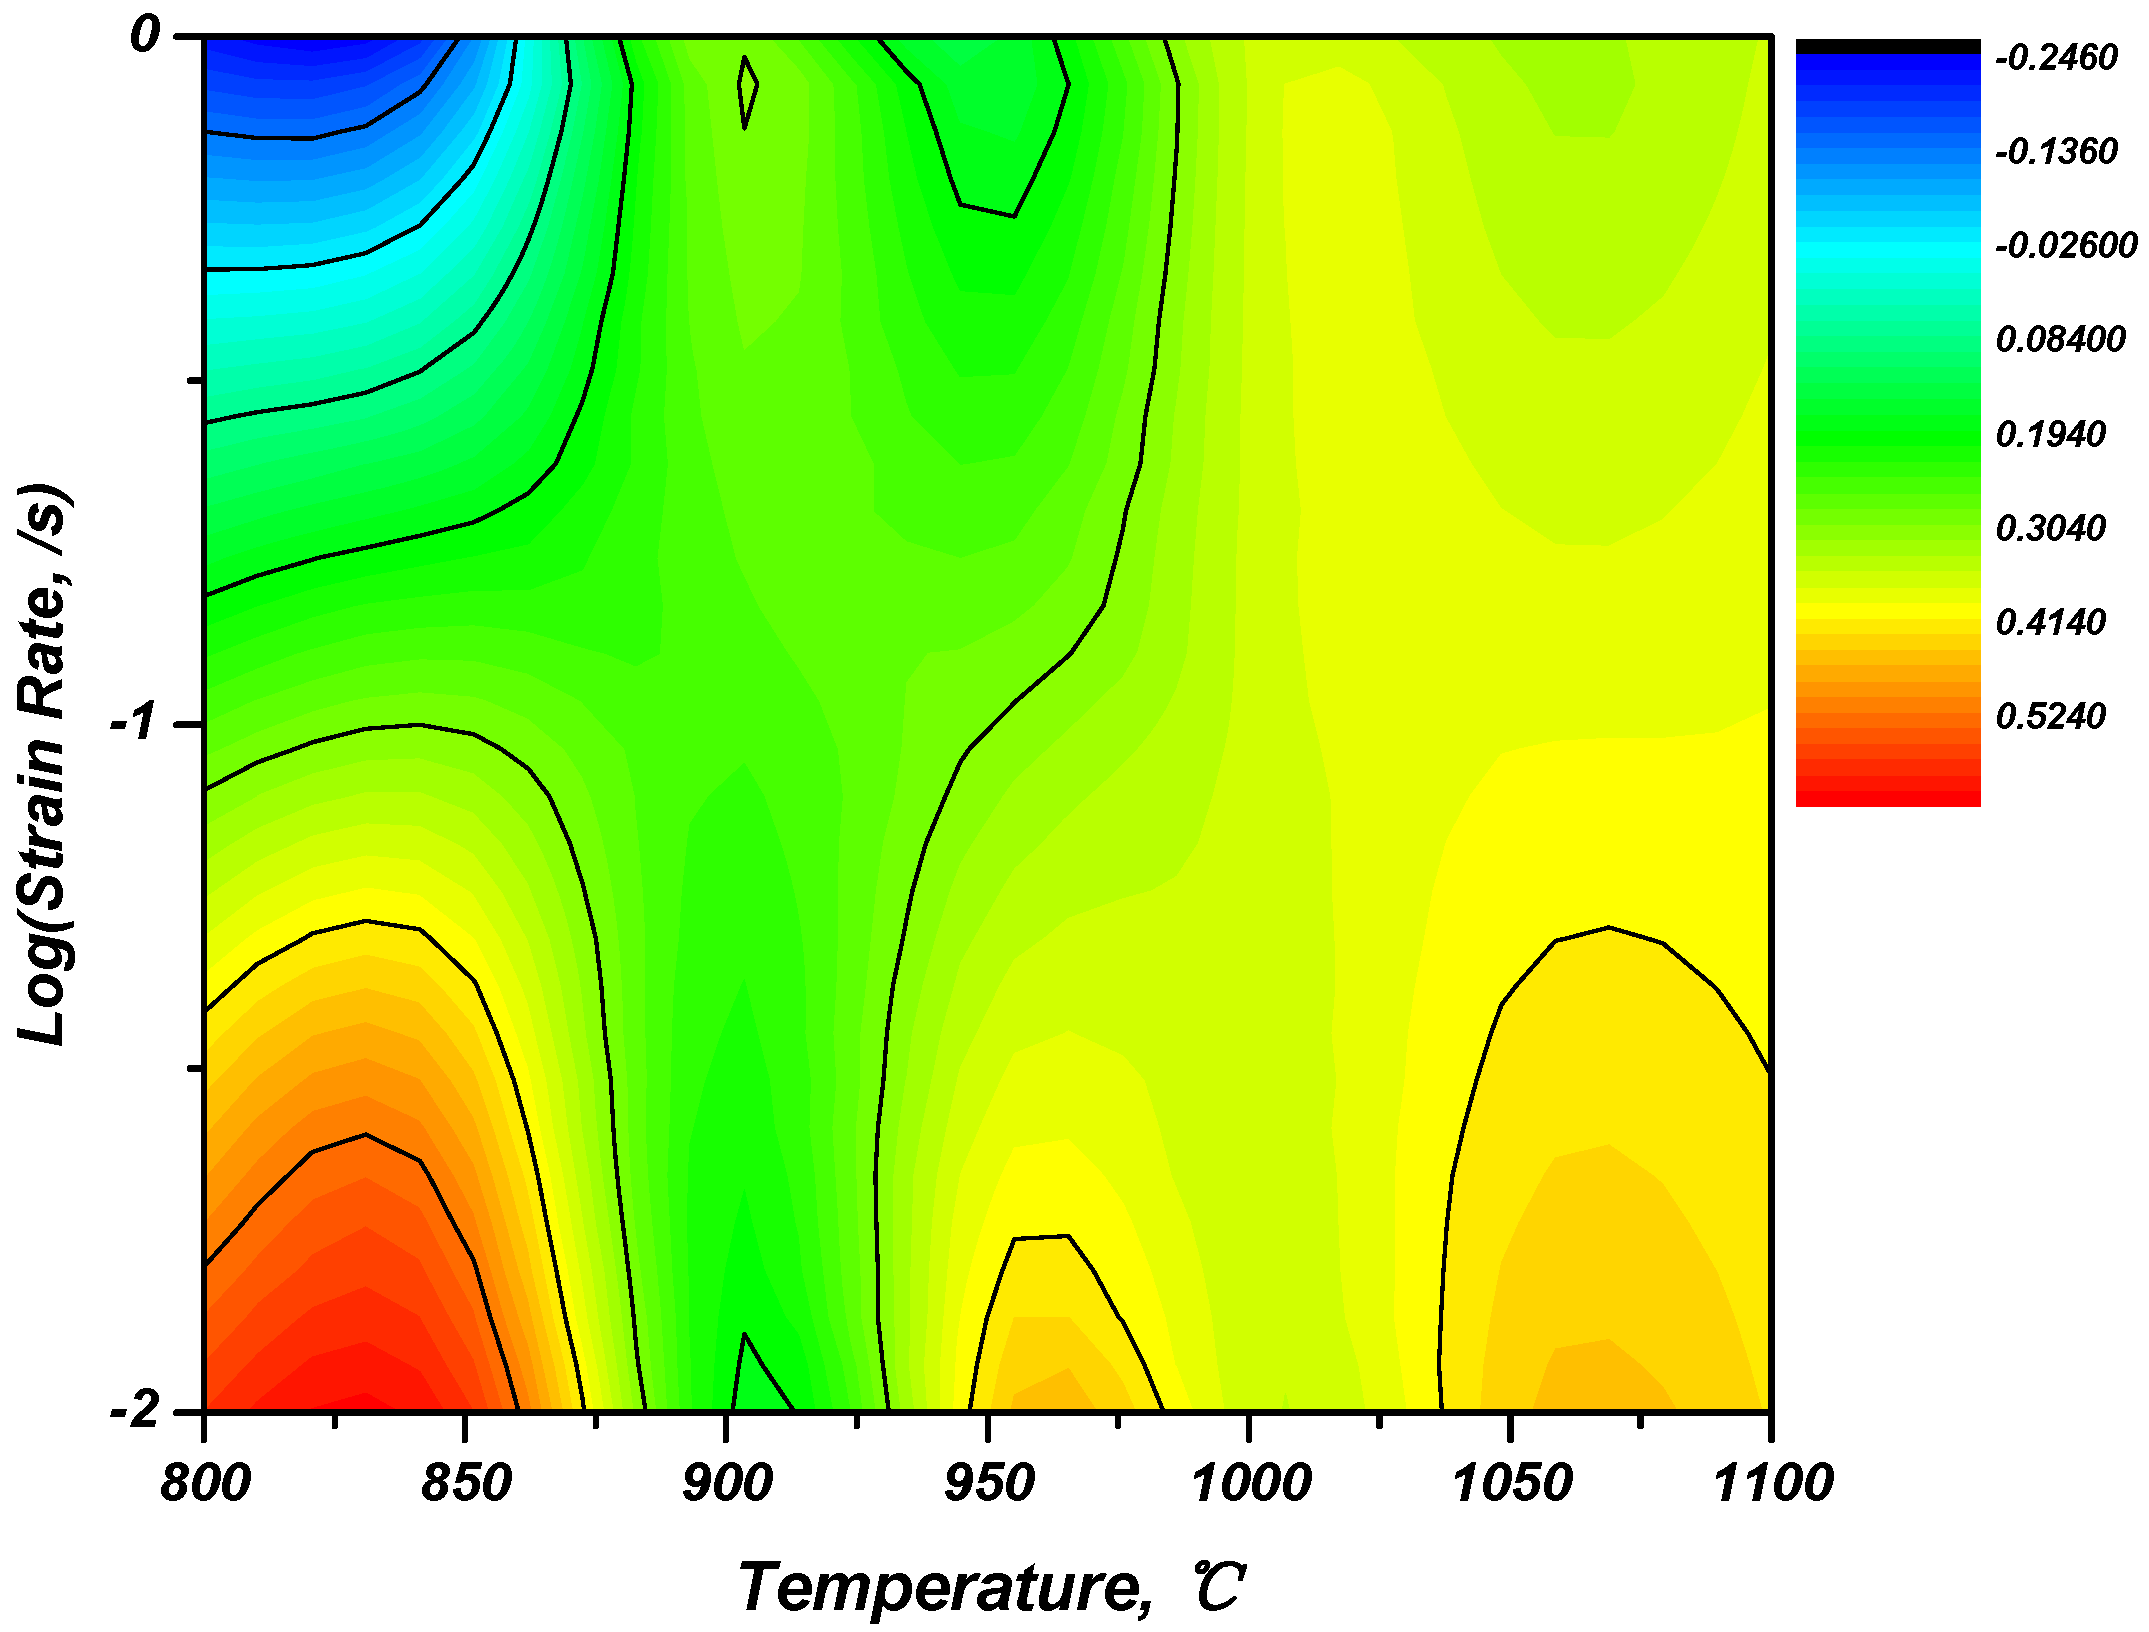
The strain rate sensitivity coefficient (m) obtained through this process is an indicator that this is the criterion for the stability and instability in its plastic deformation, and the contour map for the energy dispersion efficiency (η) is shown in Figure 7. The energy dispersion efficiency tends to increase as the strain rate is lower, and the energy dispersion efficiency (η) is relatively high under the strain rate of 1 × 10 2 / s at temperatures of 800~850 °C and 1050~1100 °C, which means that microstructural changes in the material are active. The contour map through the energy dispersion efficiency may be used to derive optimal forming conditions, but it is difficult to use the contour map as a criterion for evaluating the stability during the high-temperature forming process [25]. Therefore, the methods proposed by Ziegler [22], Malas [23], and Murty and Rao [24] were used to predict the possible forming defects during the high-temperature forming process.
First, the criterion for plastic instability proposed by Ziegler [22] is shown in Equation (4).
ξ (   ε ˙ ) = ln [ m / ( m   + 1 ) ] ln   ε ˙ +   m   < 0
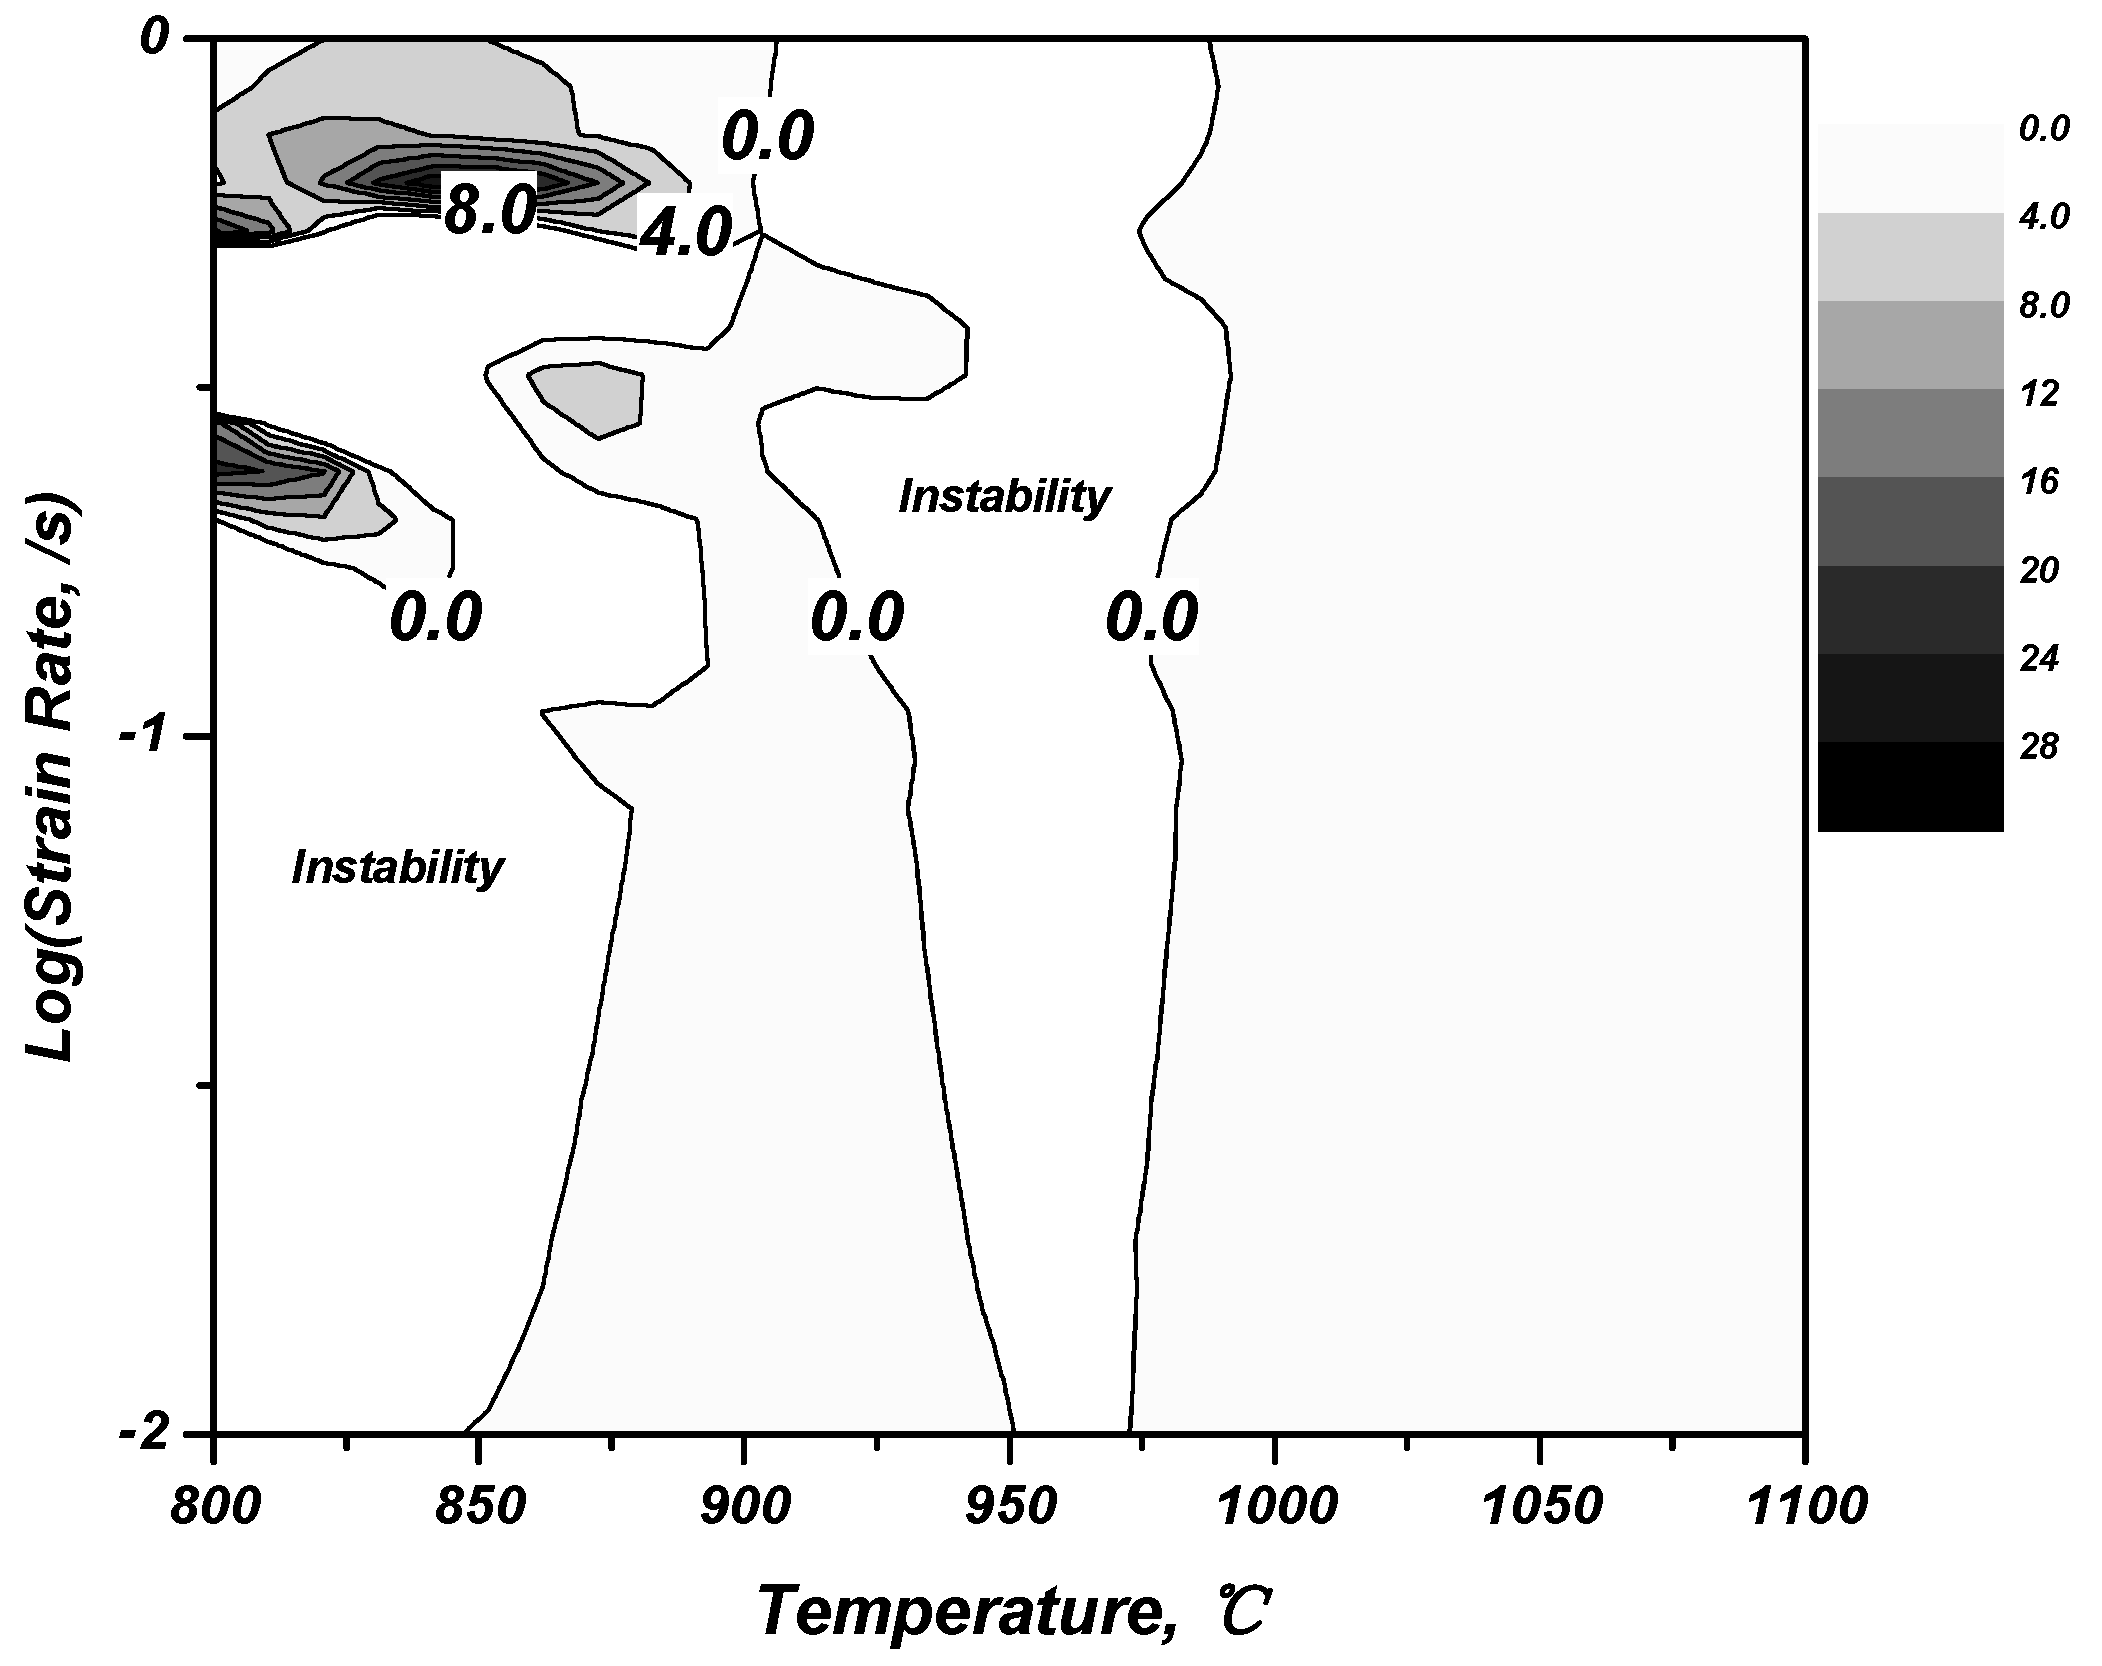
where ξ is an index of flow instability and is a dimensionless value. If it represents a negative value as a function of temperature and strain rate, it is defined as an unstable region during the plastic processing. If it is defined through a polynomial regression equation, it can be expressed as Equation (5). Then, the following unstable region is shown in Figure 8. This showed a value of ξ( ε ˙ ) < 0 under the strain rate conditions of 1 × 10 2 / s and 1 × 10 1 / s at 800~850 °C and all strain rate conditions at 950 °C. It is expected to result in unstable plastic processing in this region.
ξ ( ε ˙ ) = 2 c m ( m + 1 ) +   m < 0
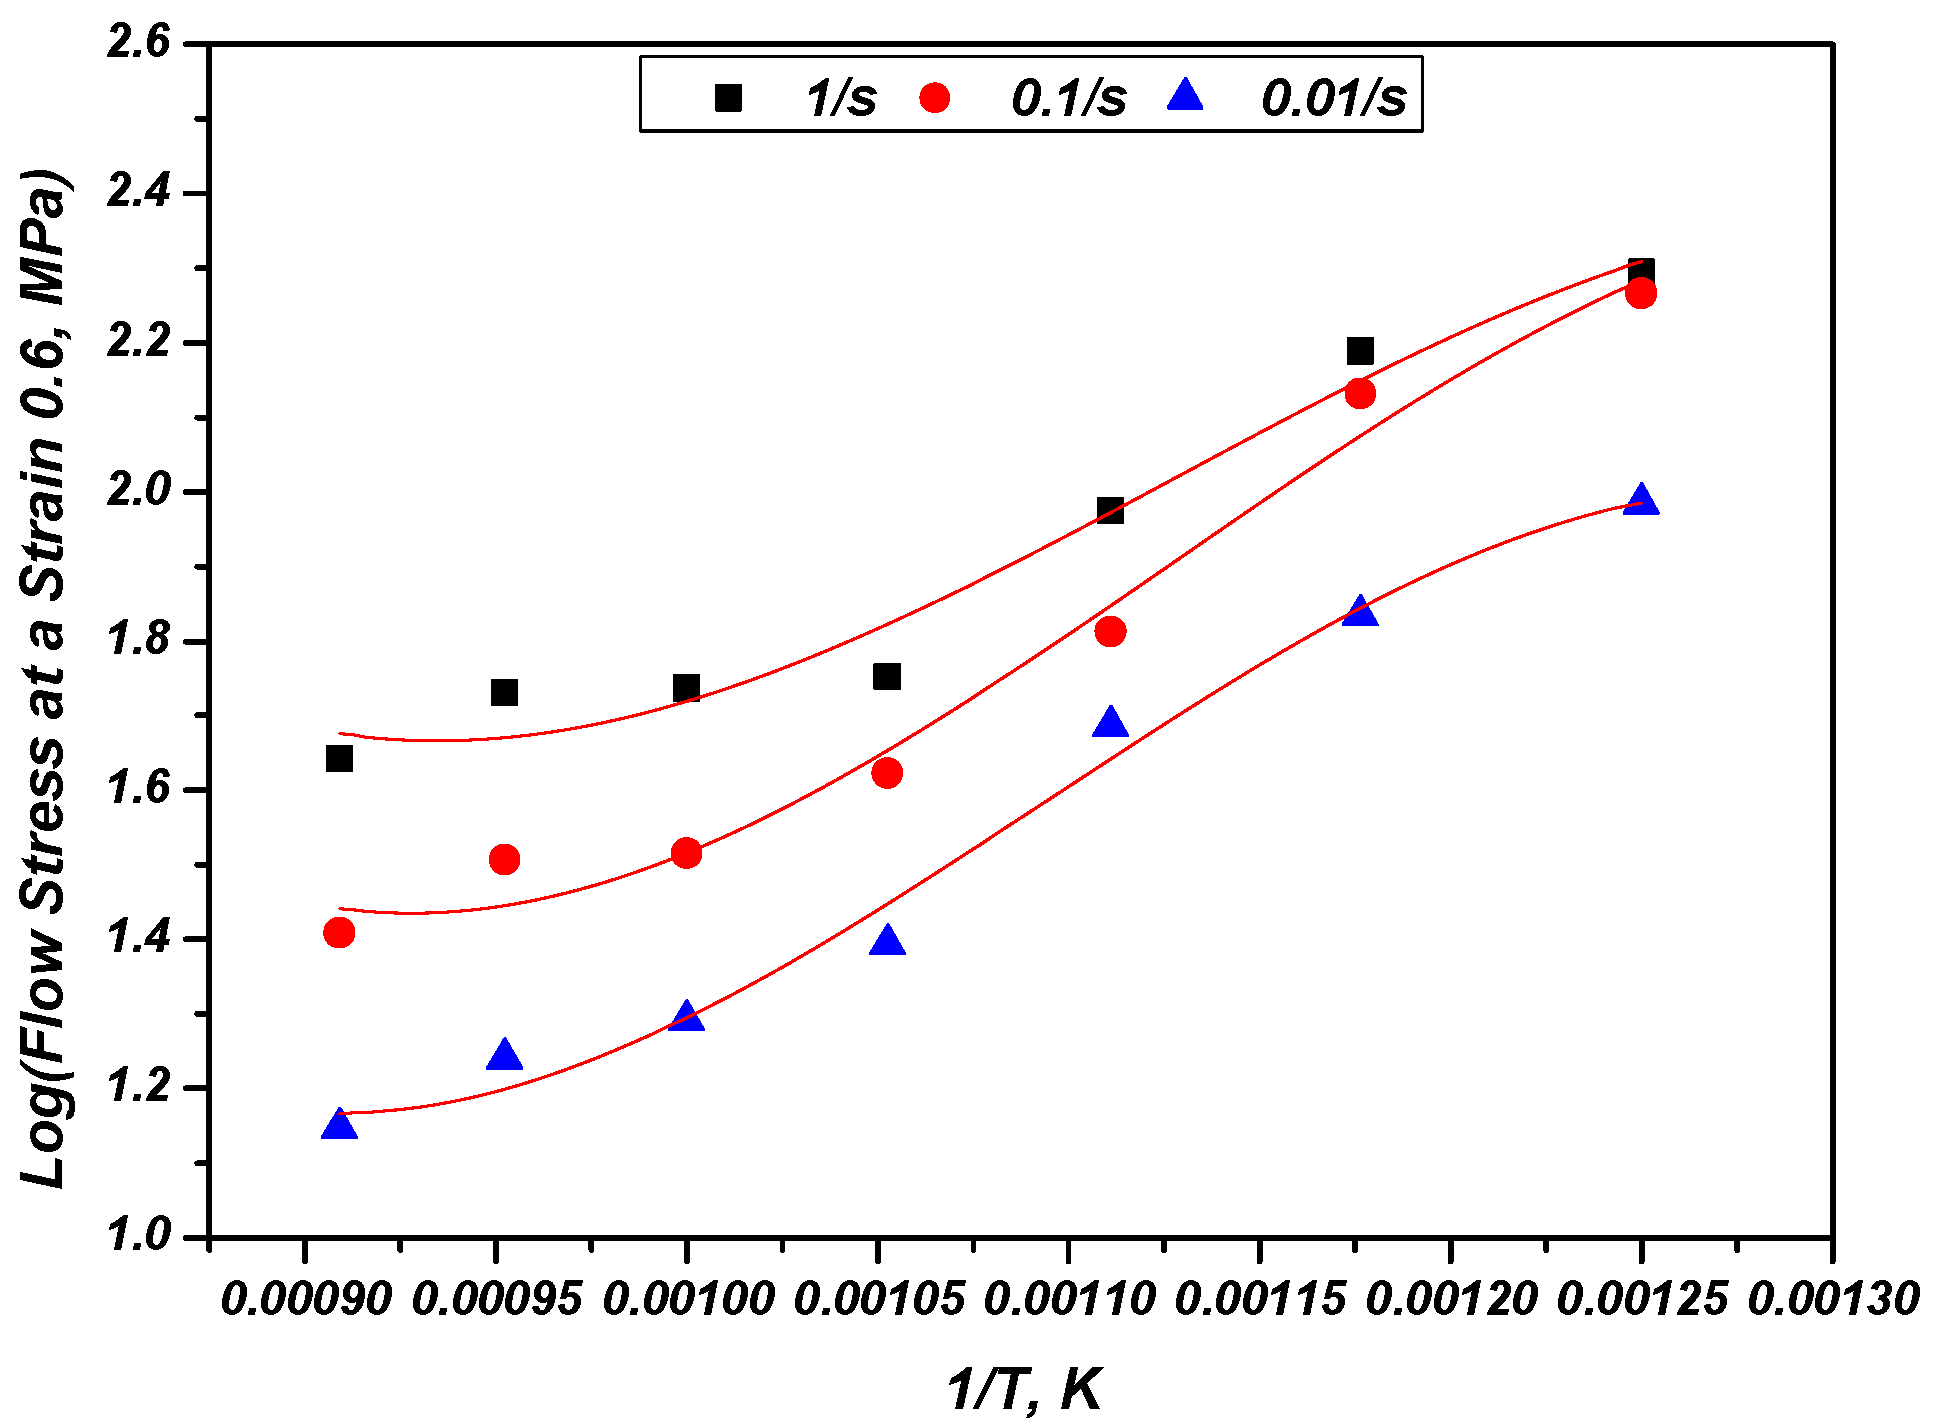
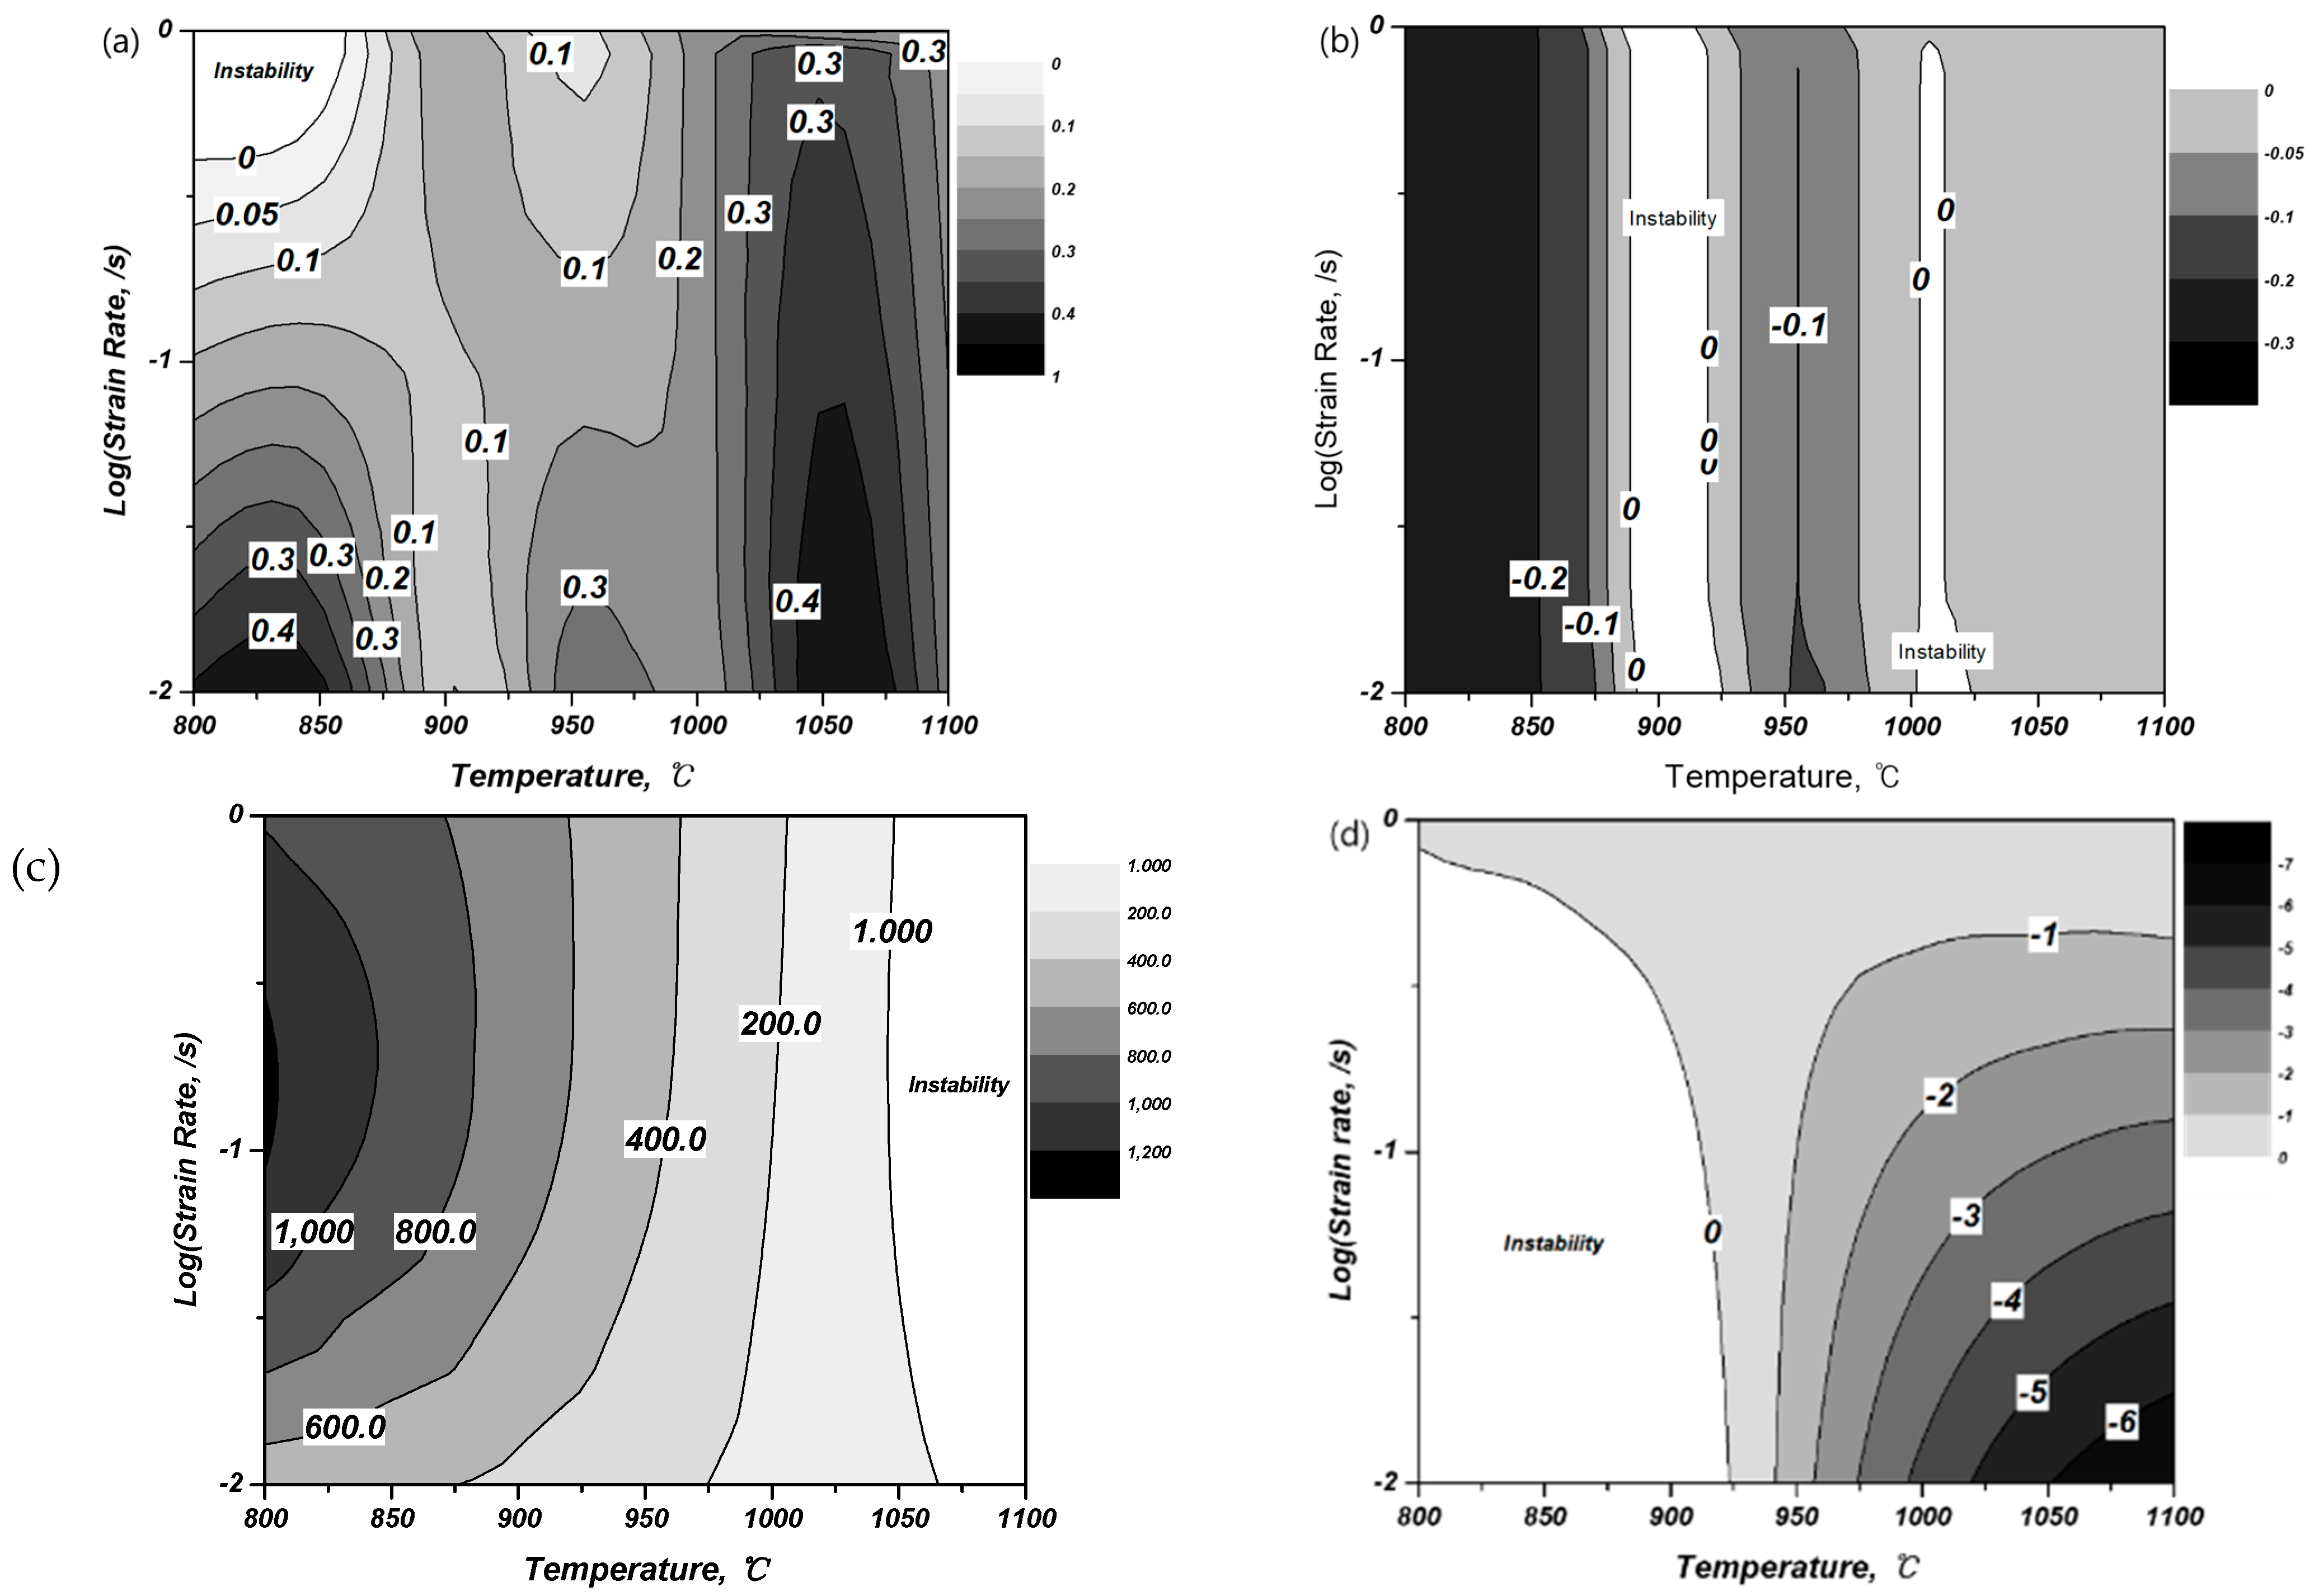
Meanwhile, Malas [23] introduced the criteria for the strain rate sensitivity coefficient (m) and temperature sensitivity coefficient (s) based on the Lyapunov function, and expressed it as a function for 1/T as shown in Equation (6) in order to interpret the relationship to the temperature sensitivity coefficient. Figure 9 shows the result of fitting, and the plastic stable region is expressed in four different conditions, as shown in Equations (7)–(10). Here, each region means whether energy is consumed as a stable or an unstable mechanism, and the contour map of each condition is shown in Figure 10.
ln ( σ ) = a + b ( 1 / T ) + c ( 1 / T ) 2
0 <   m     1
  m = m / ( ln ε ˙ ) < 0  
s   = b T + 2 c T 2 > 1  
  s = s / ( ln ε ˙ ) < 0  
Accordingly, the plastic unstable region defined by Malas [19] showed unstable regions under strain rate conditions of 1 × 10 0 / s at 800 °C according to the strain rate sensitivity coefficient (m), and all the conditions at 900 °C and 1000 °C according to the value of m’. In addition, it showed unstable regions under the temperature conditions of 1050~1100 °C according to the temperature sensitivity coefficient (s) and the temperature conditions of 800~925 °C according to the value of s’.
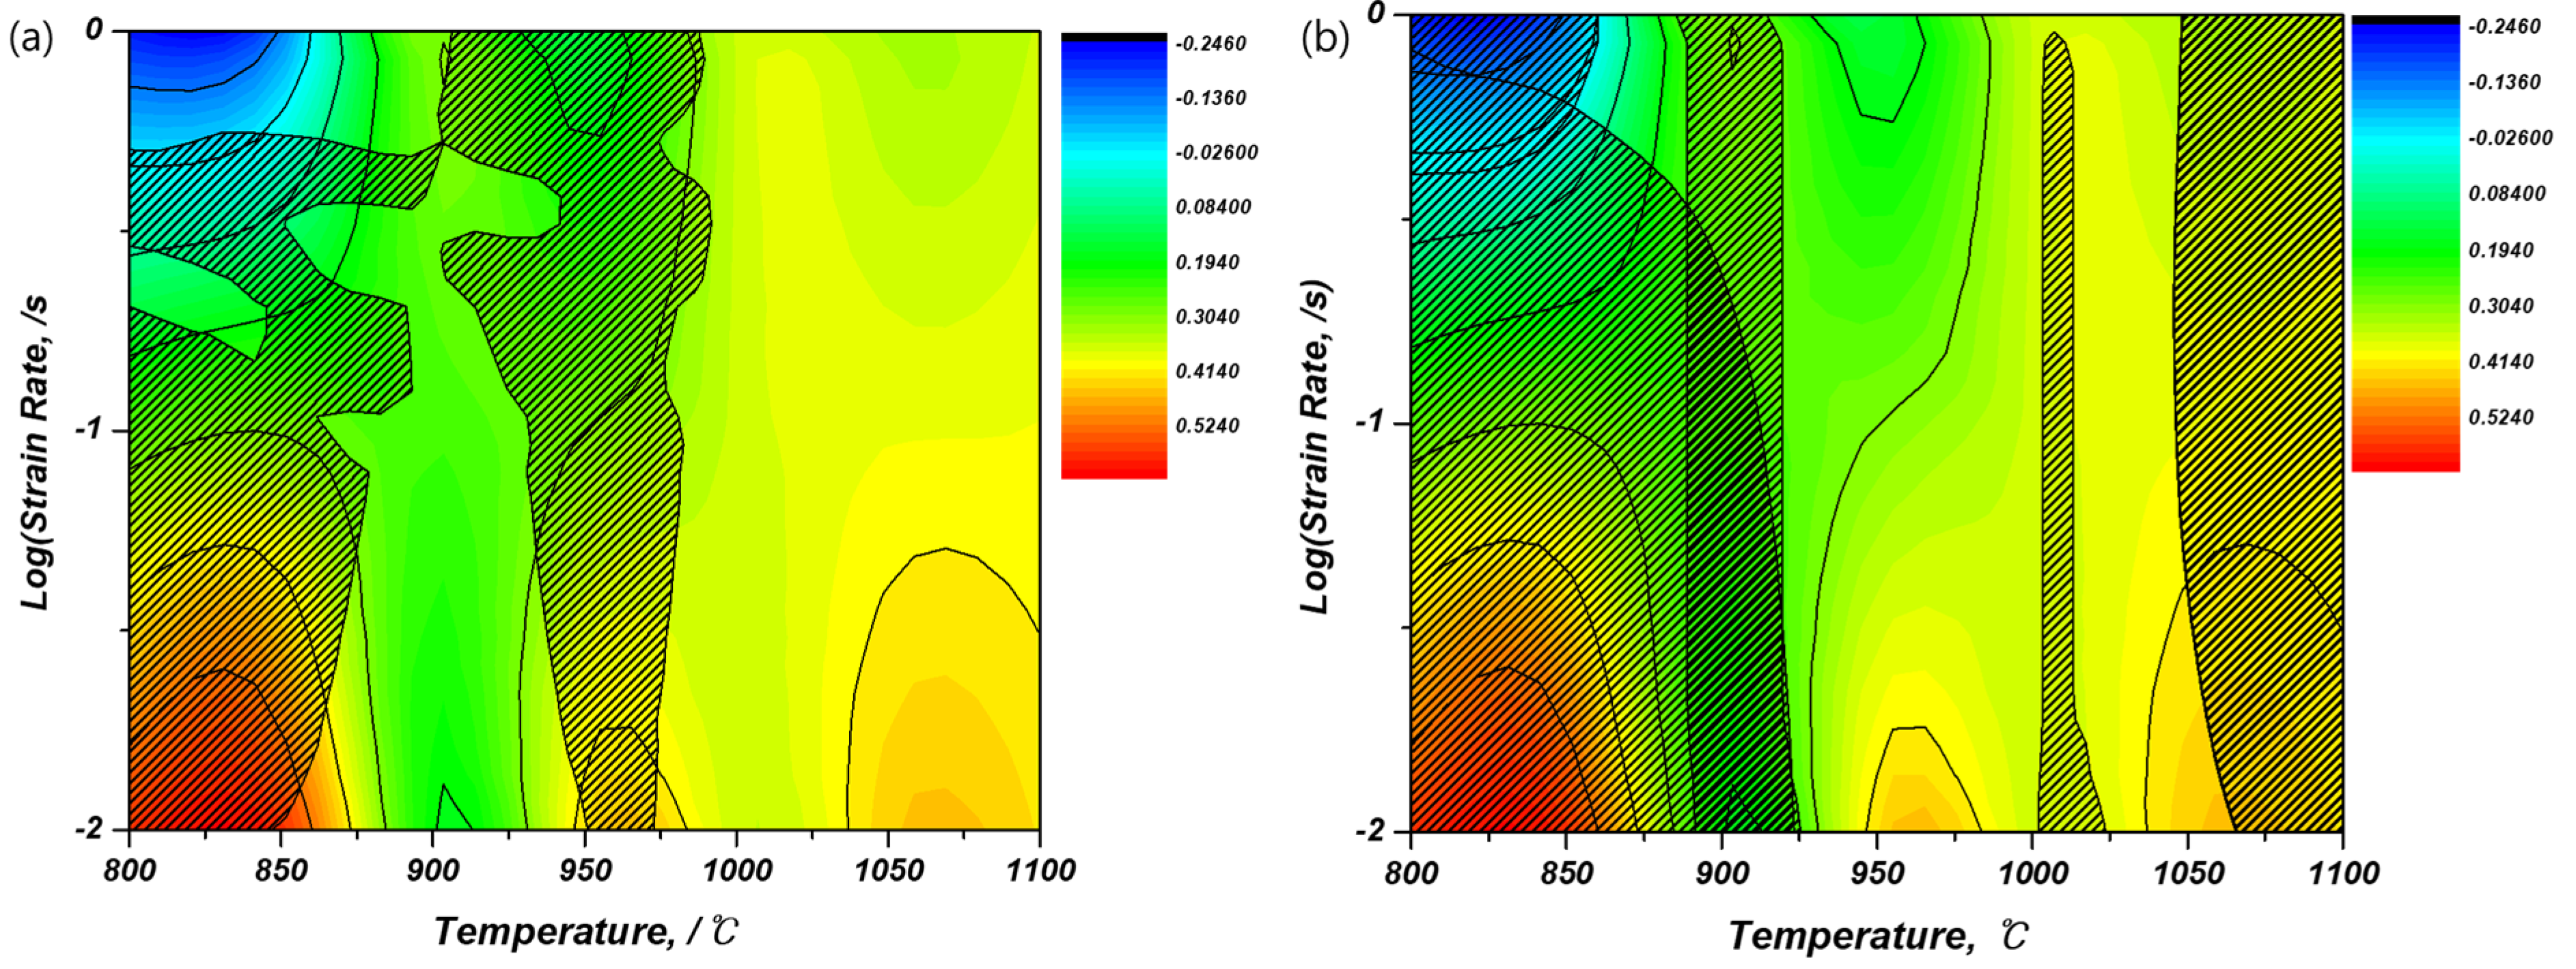
Figure 11 shows the plastic unstable contour map proposed by Ziegler [22], and Malas [23] calculated one processing map through the polynomial regression equation and the contour map of the energy dispersion efficiency of the strain rate sensitivity coefficient. In the finally derived processing map, the hatched area represents a plastic unstable region, which can cause the formation of defects such as local shear band generation and internal and external cracks. It is expected that the most stable forming can be performed uniformly under the conditions of 1050 °C and 1 × 10 2 / s , which do not belong to any unstable region.

3.2.3. Macrostructure and Microstructure

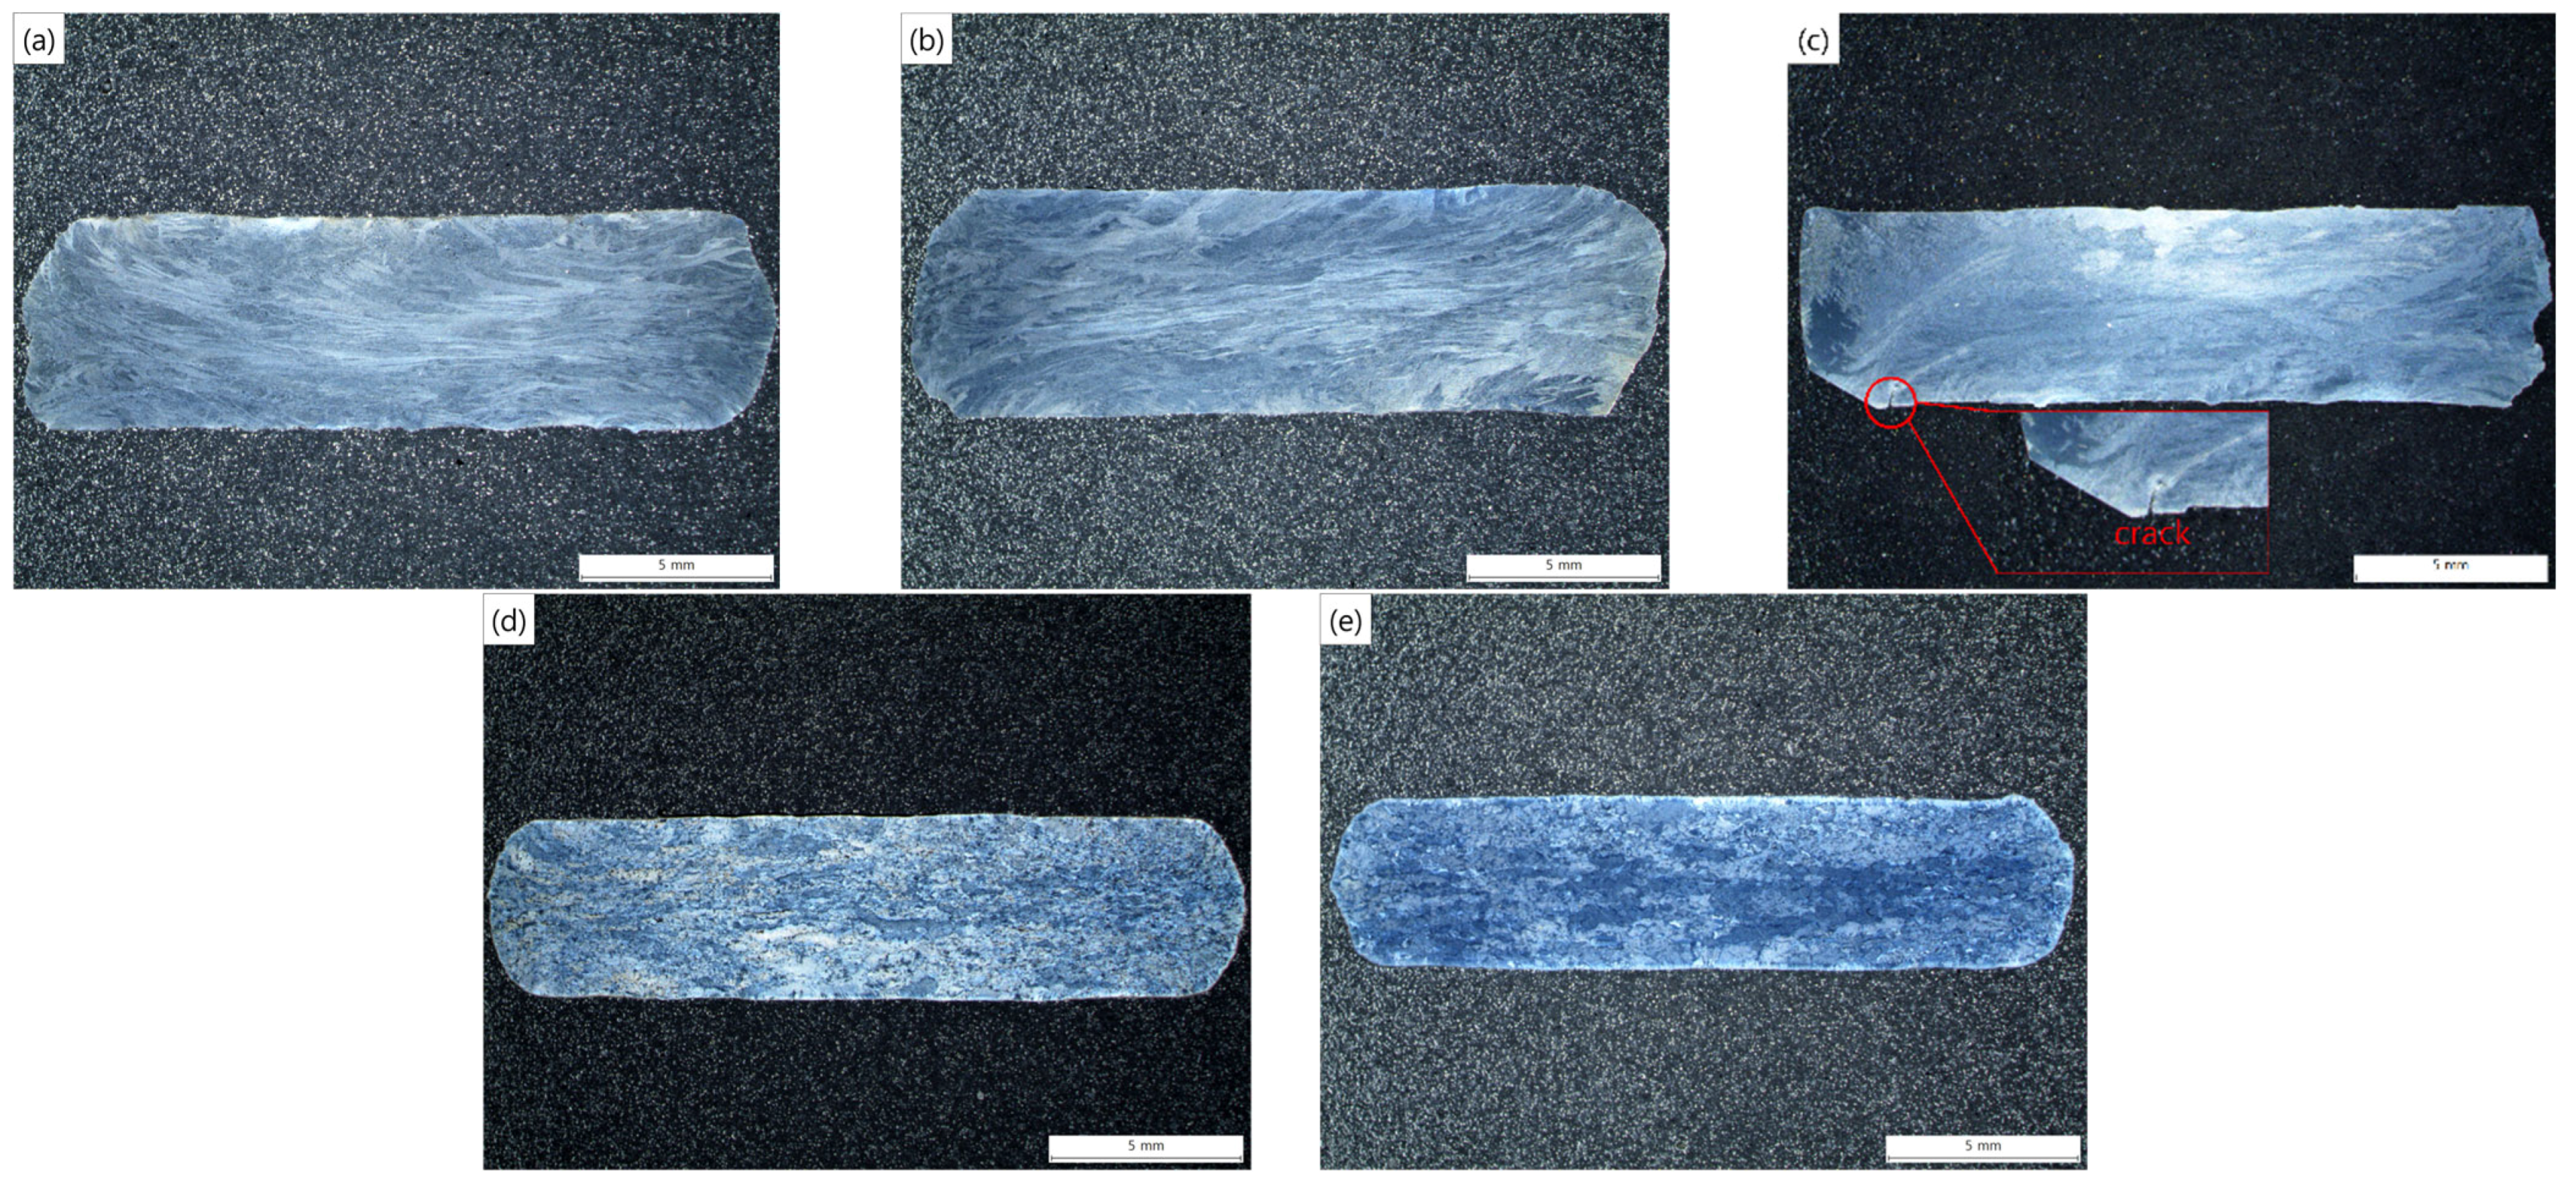
Figure 12 shows the macrostructures of unstable and stable regions of the cross-sectioned areas under the process conditions identified in the processing map. Figure 12a–c represents the plastic unstable regions, and it can be seen that the compression of the unstable shapes appeared as looking at the shape of the specimen. During the compression, friction with the die and heat exchange caused a barreling phenomenon, and the Dead Zone was observed on the top and bottom of the specimen and the Severe Plastic Deformation region was observed in the center. In addition, it can be seen that the flow localization band was created at an angle of 45°, and the flow localization band was generated by the insulation conditions caused by the deformation of the high-temperature compression and the local reduction of flow stress due to the low thermal conductivity of the Ti-6Al-4V alloy. As the temperature increases and the strain rate decreases, the strength of the band decreases, and cracks are likely to occur at an angle of up to 45° [30]. In practice, cracks occurred along the flow localization band as shown in Figure 12c, and the unstable regions defined in Figure 5 and Figure 11 can be confirmed. In Figure 12d,e, however, it can be seen that a relatively uniform deformation occurred in the Dead Zone and Severe Plastic Deformation region in a macrostructural manner at a temperature above the β-transus of the AMS4928 alloy used in this study.
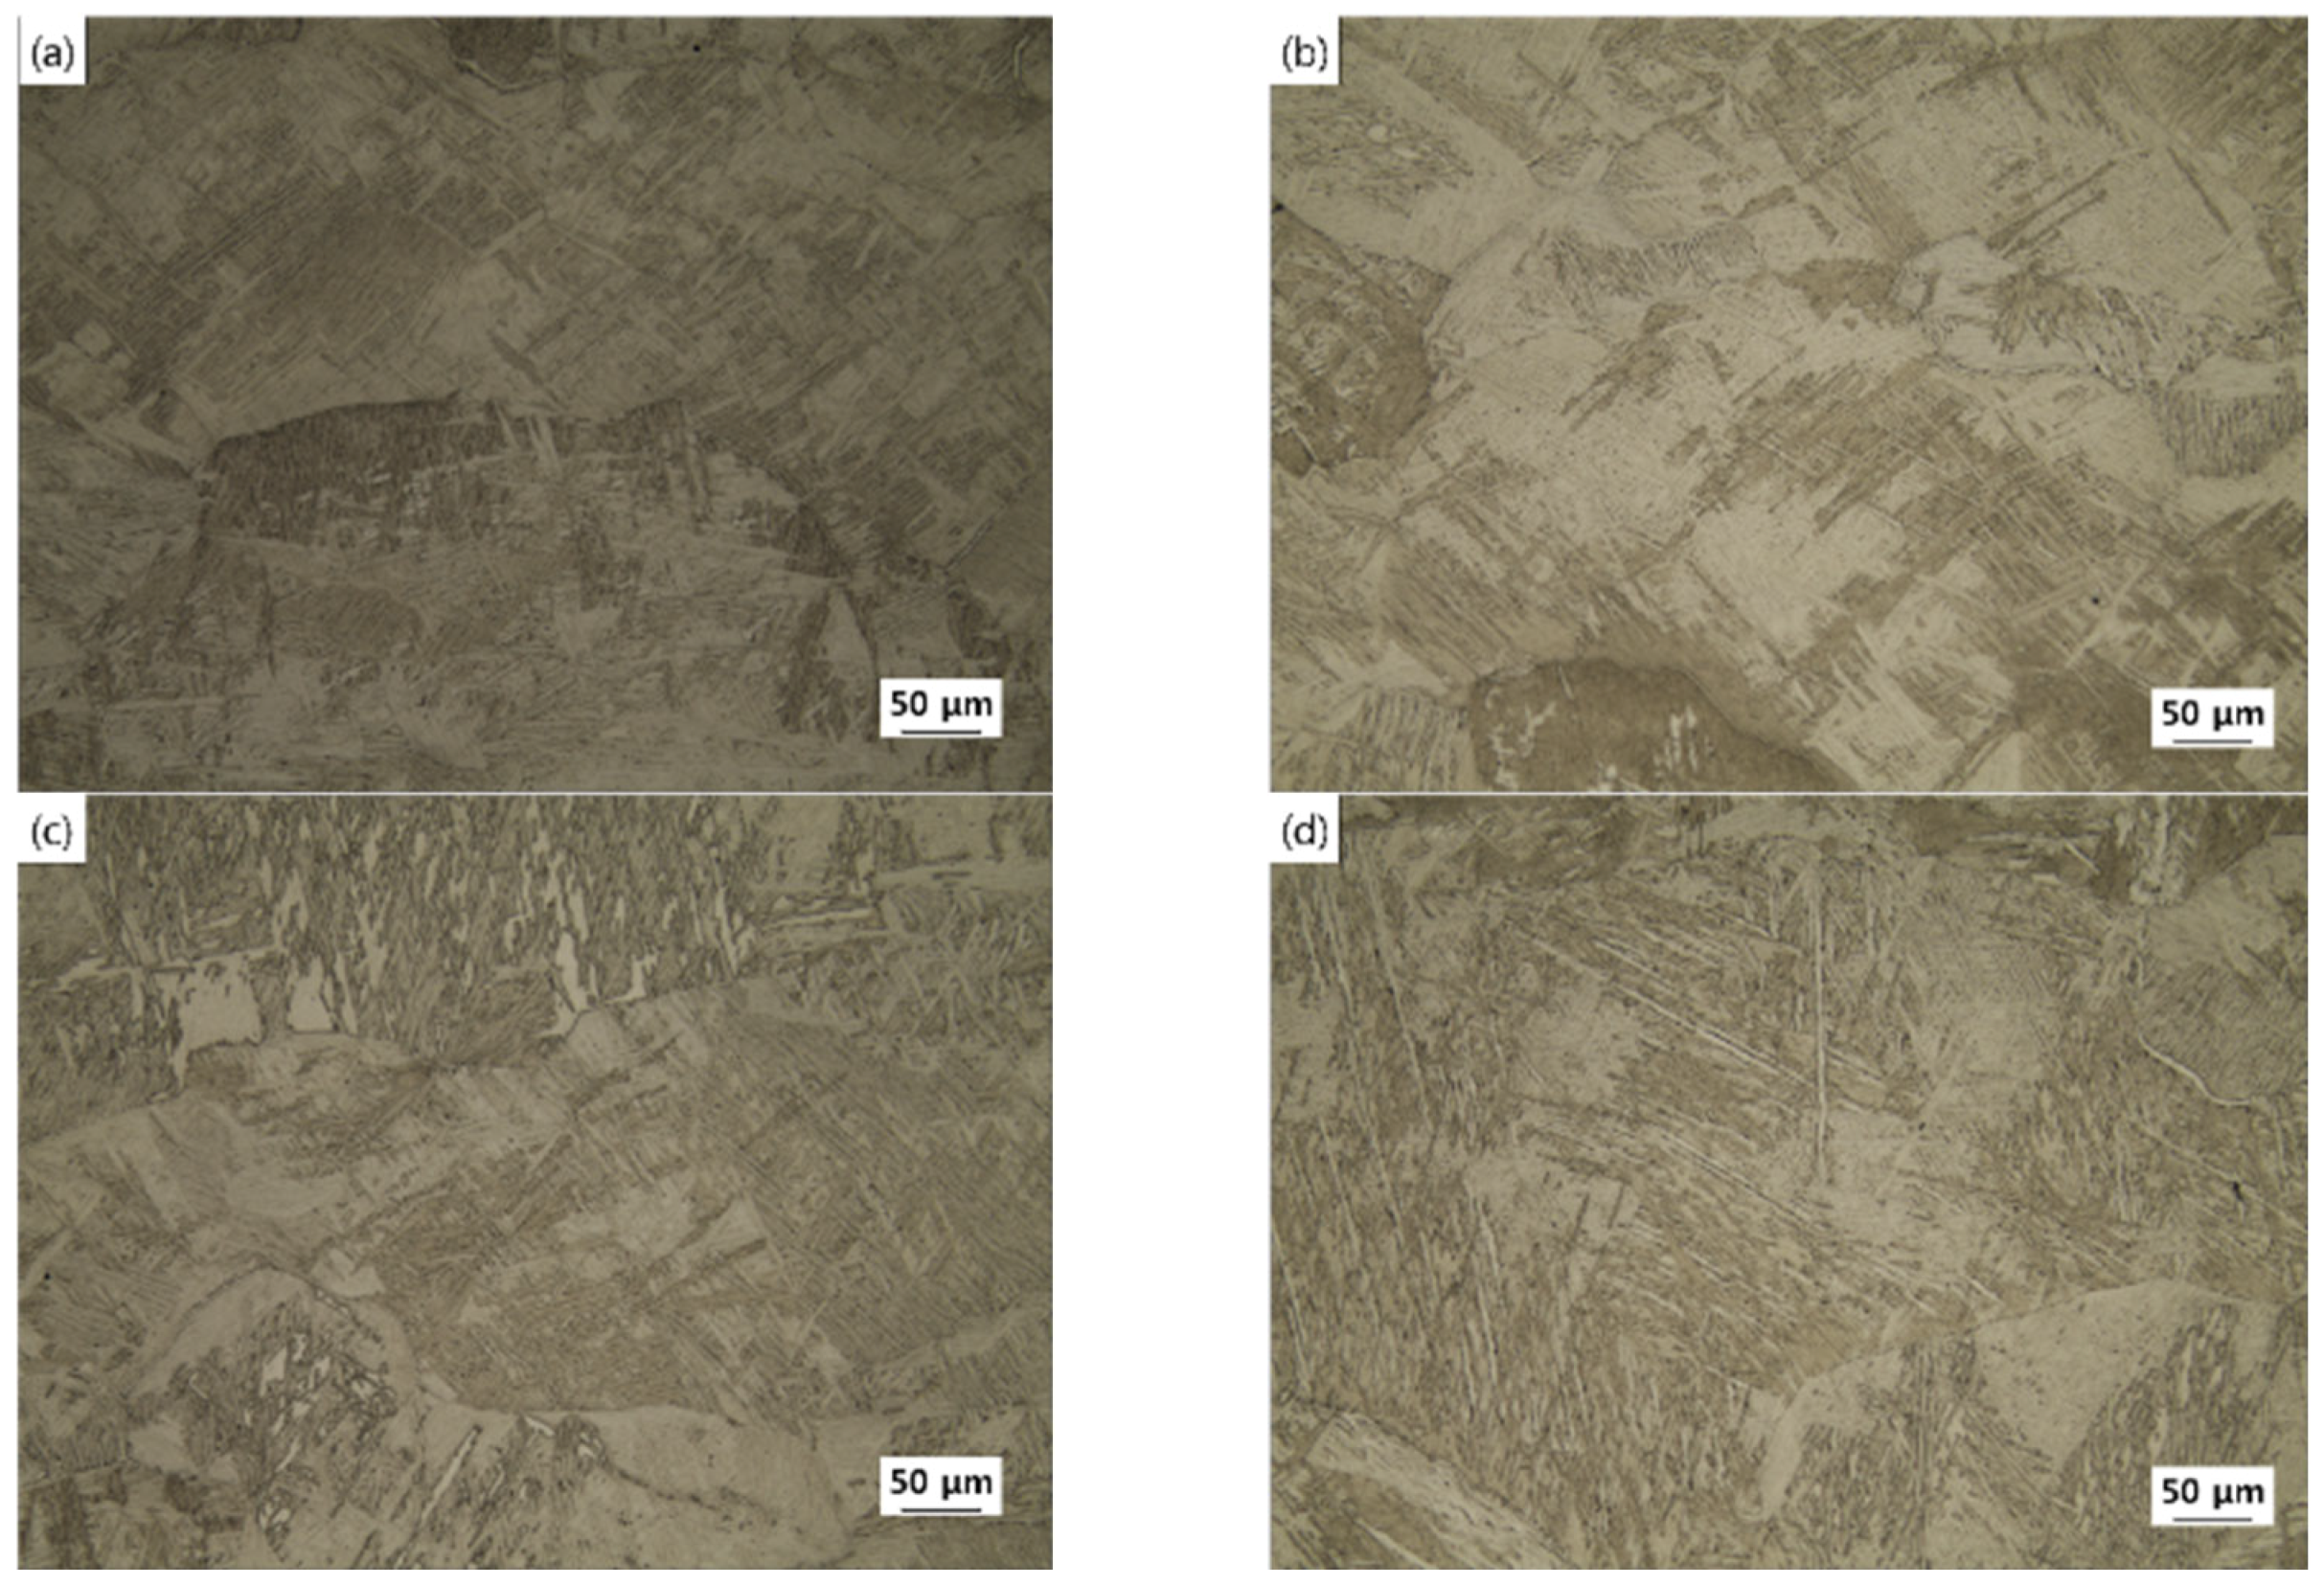
To observe this in detail, the microstructures under the same conditions are shown in Figure 13 and Figure 14. First, Figure 13 shows the same Widmanstätten structure as the initial structure by compressing it at a high-temperature under the temperature below the β-transus. Figure 13a–c represents the regions belonging to the Dead Zone, and about 10 μm of recrystallized grains that could be observed in the initial structure were observed. In addition, in the case of Figure 13c, it can be seen that the β phase fraction increased because it was compressed at a high-temperature of 850 °C and was relatively close to the β phase transformation region. In Figure 13d–f, it is possible to observe long elongated microstructures at the Severe Plastic Deformation region. Figure 6 represents that the flow stress has opposite values depending on the conditions of the fast strain rate and temperature, even though the layered interval becomes thinner and the grains become more elongated. In Figure 13d,e with the same temperature conditions, the flow caused by diffusion under the slow strain rate determines the overall strain rate. As the space between layers in the α-phase is thin, the area of the α/β interface is widened. Then, the diffusion through the interface is advantageous, and accordingly, it is confirmed that the deformation is easily performed even under low stress. In accordance with this principle, it can be found that the stress required for the deformation is further reduced because the grain of Figure 13f has a thinner layered space. In addition, as the lamellae kink is observed, there is a possibility of plastic instability [31].
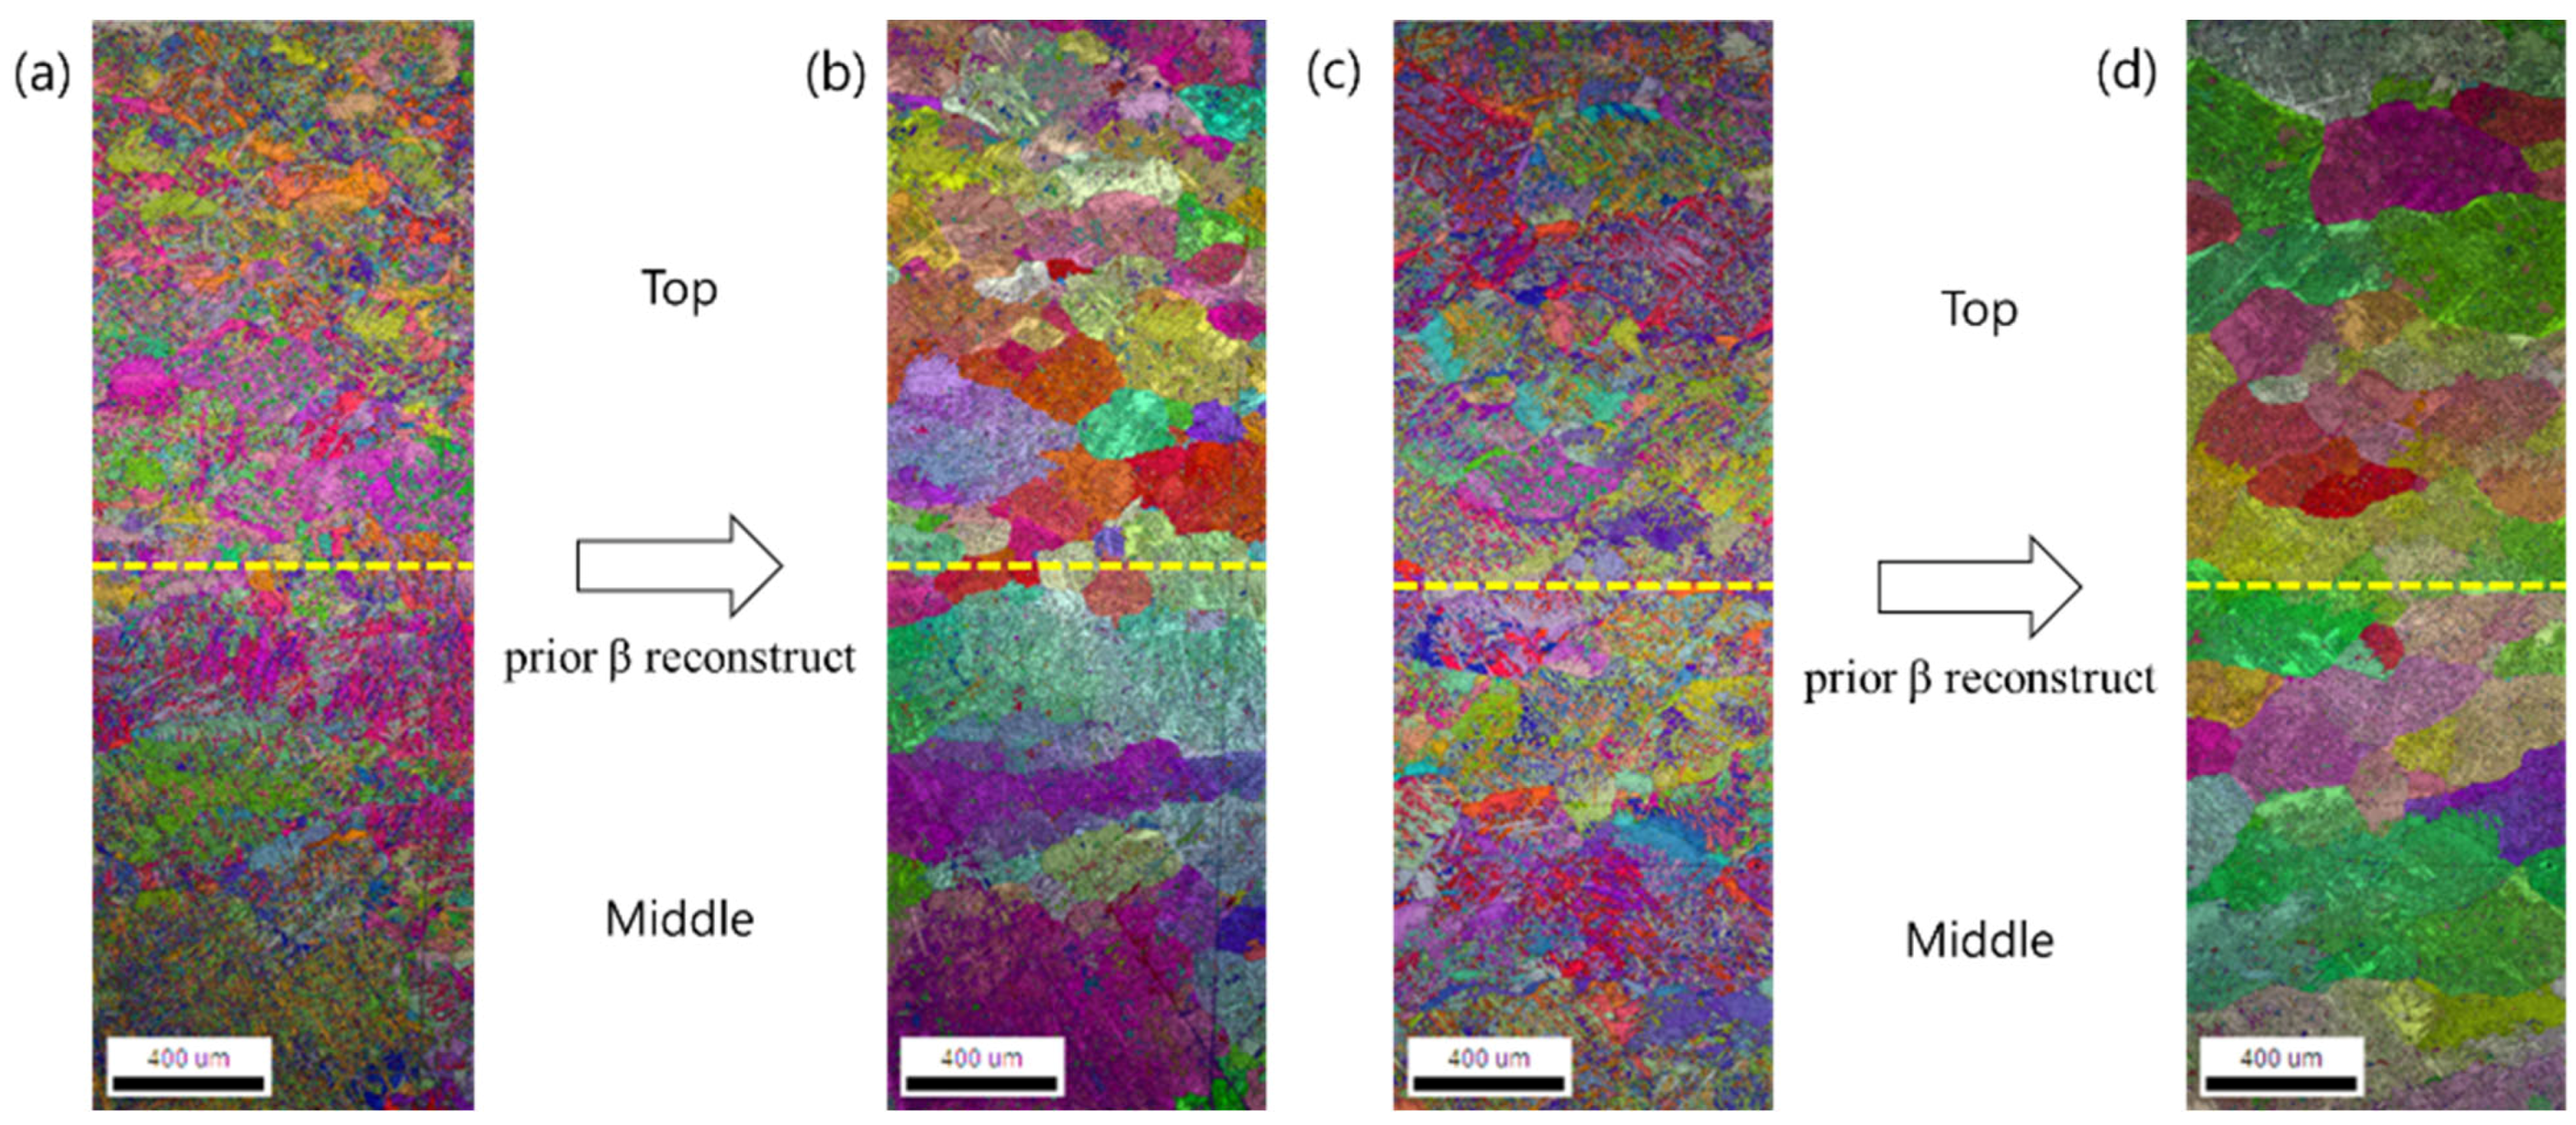
Figure 14 shows the α′ martensite structure throughout the specimen by compressing it at a temperature above the β-transus. This shows that when Ti-6Al-4V alloy with α + β microstructure is heated to a temperature higher than the β-transus, it changes to a fully β phase, and an α′ martensite structure grown at the β grain boundary was revealed by the rapid cooling rate. In the EBSD data presented in Figure 15a,c, it was confirmed that fine grains were observed by dynamic recrystallization. Due to the structure with a thinly layered space, it may be seen that the stress required for the deformation is reduced due to the advantageous diffusion described above, and thus, low flow stress is occupied, as shown in Figure 6. Then, Figure 15b,d shows the reconfiguration of the prior β grain based on Figure 15a,c. In the results of the reconfiguration of the prior β grain, small-sized prior β grains were observed in the upper part of the specimen, as shown in Figure 15b, due to a relatively fast cooling rate and a small deformation energy because of the contact with the die. On the other hand, in Figure 15d, it was confirmed that the uniform microstructure deformation occurred without significant differences in the size of the prior β grains. After the ring-rolling process, however, it is expected that the difference in the grain size for fabricating actual products will not be significantly affected according to the cutting and processing of the final dimension and shape calibration. Thus, it is determined that AMS4928, which is one of Ti-6Al-4V alloys, used in aircraft parts through applying a high-temperature compression test is suitable for the ring-rolling process under the conditions of 1050 °C and 1 × 10 2 / s without the plastic unstable region proposed in Figure 11.

3.3. Ring-Rolling Process

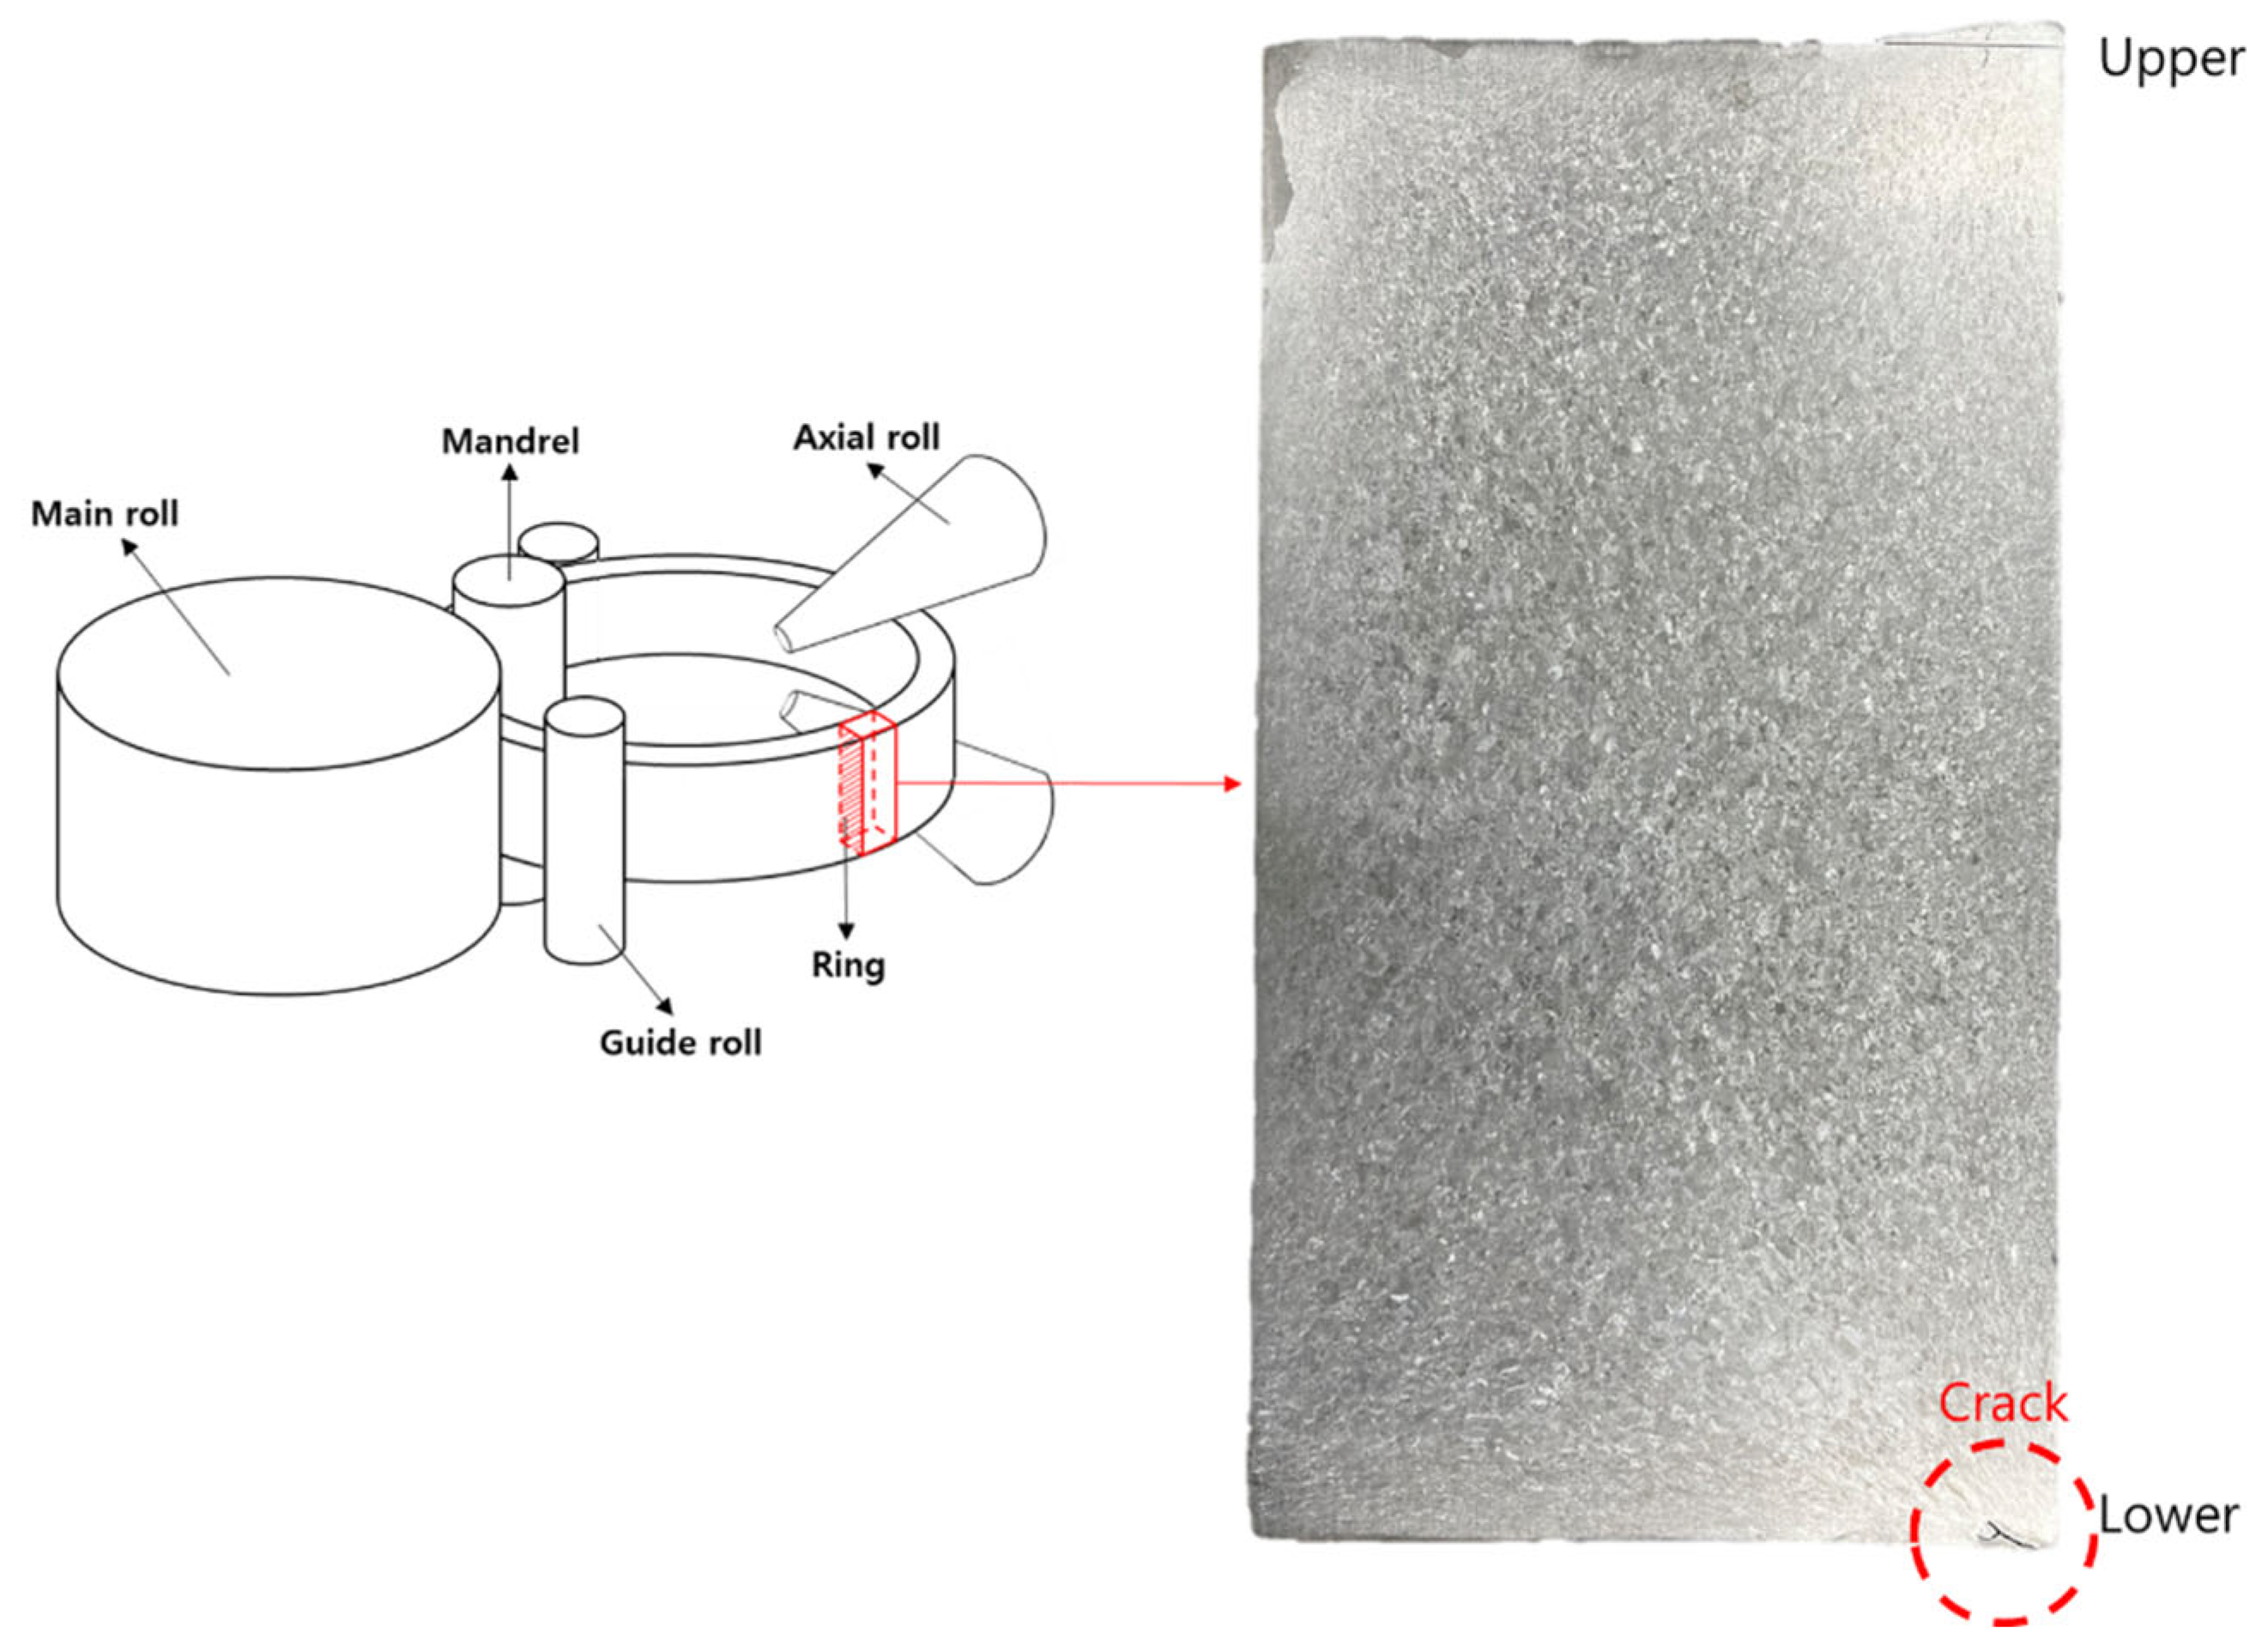
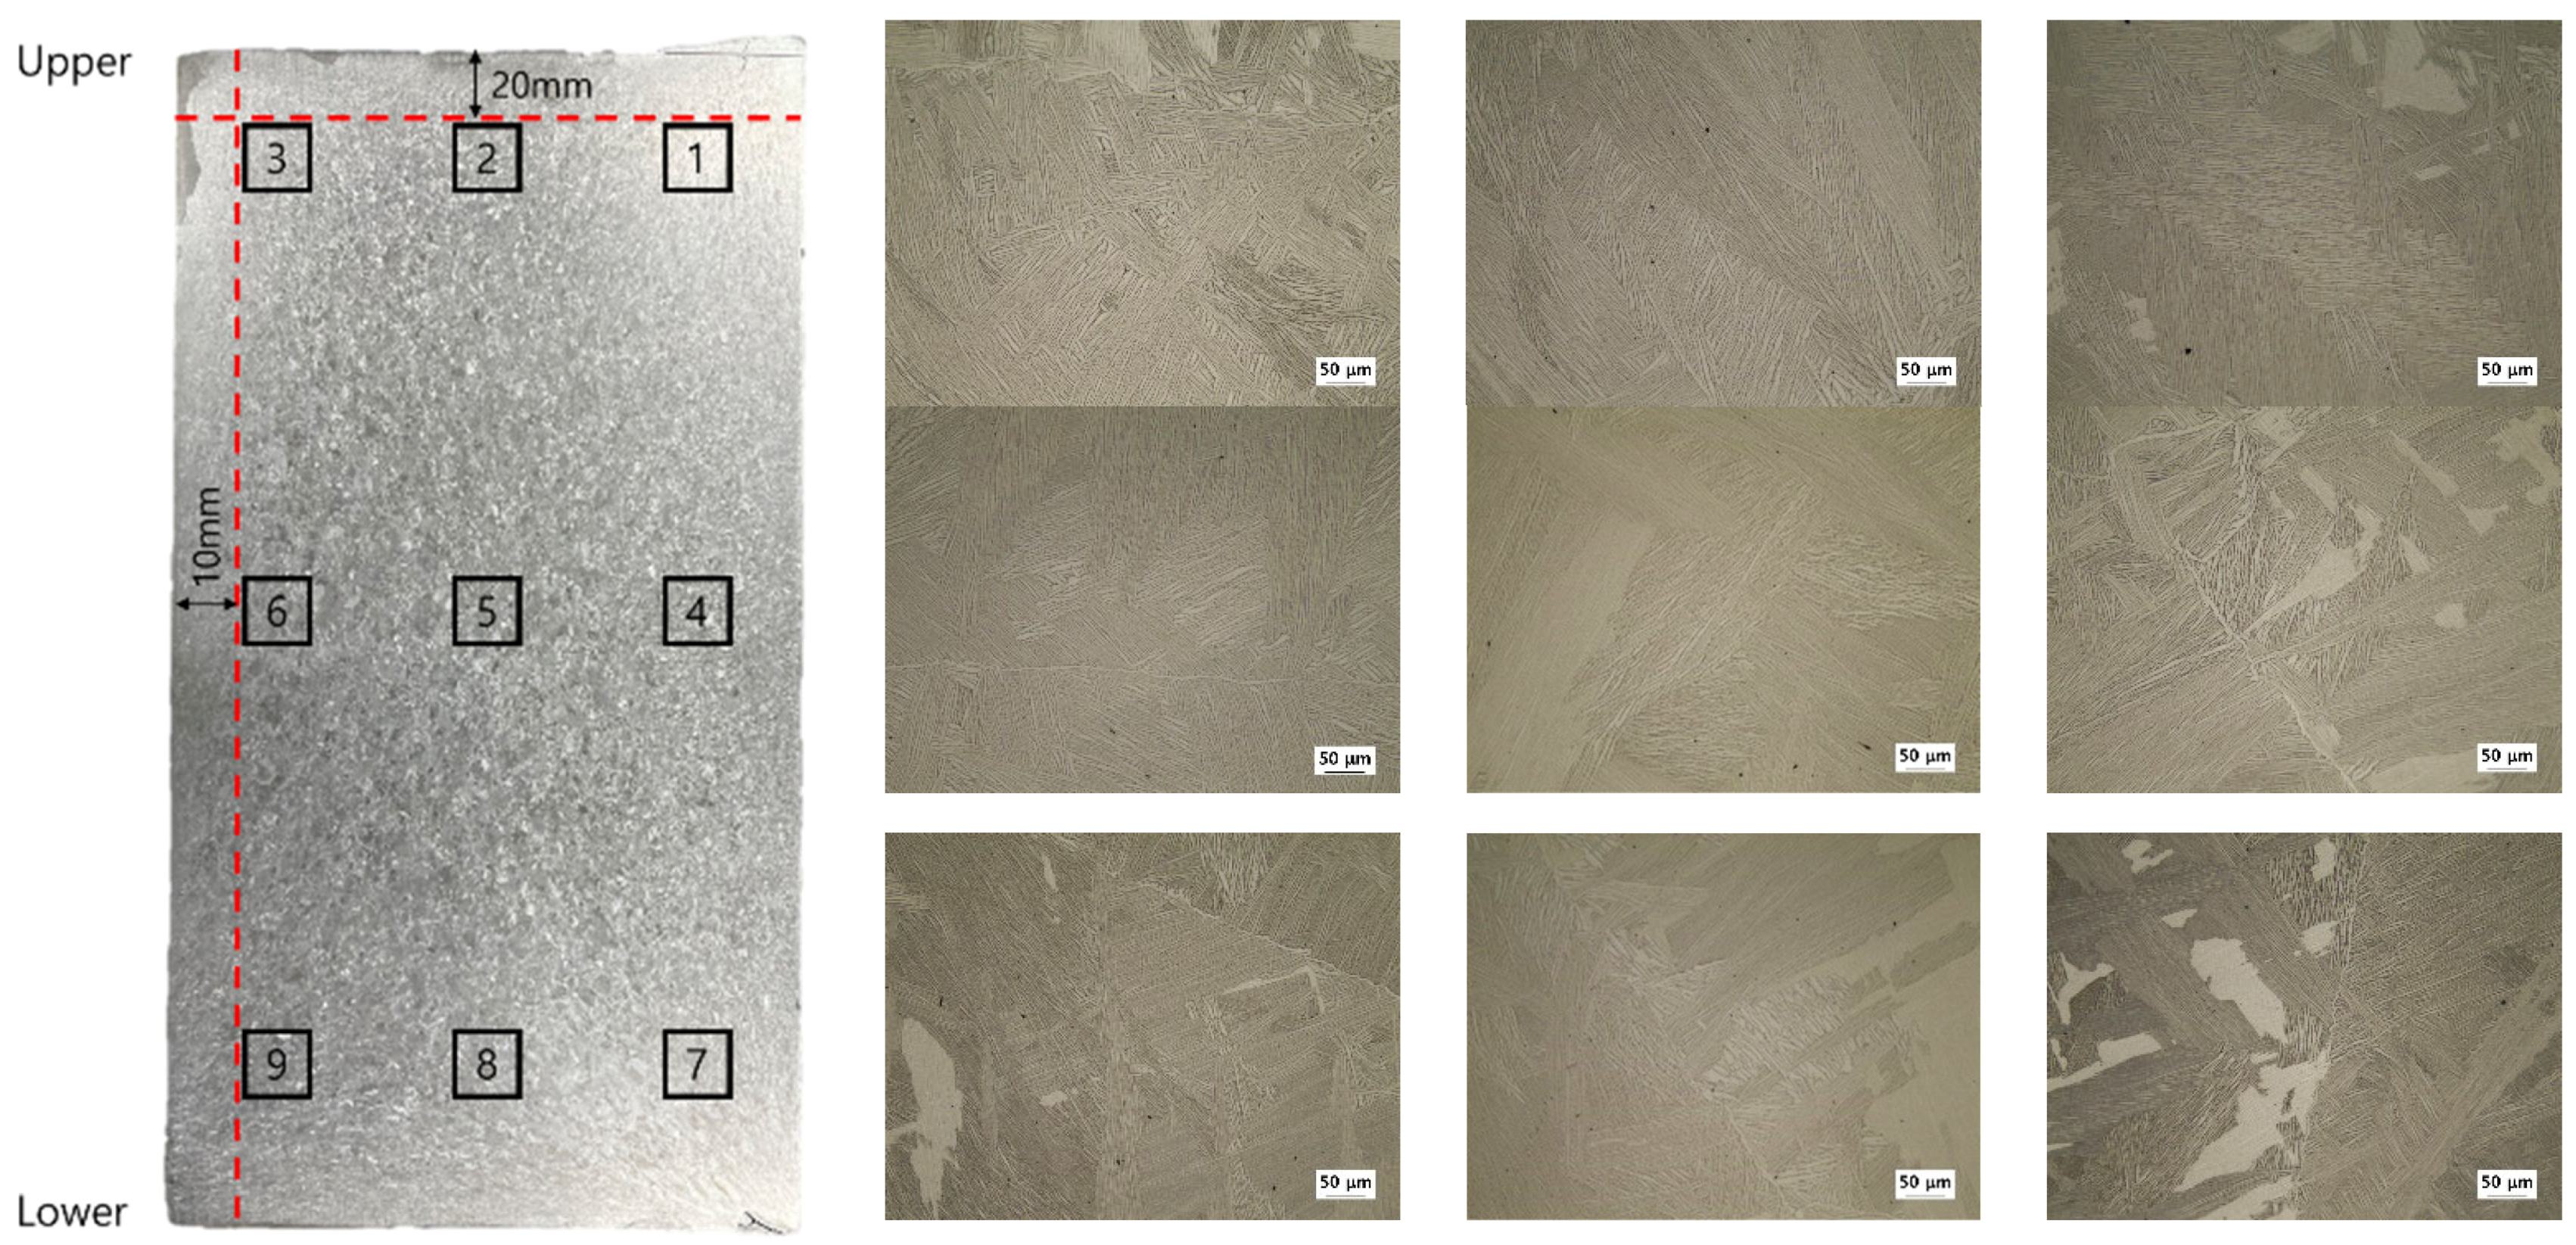
In the ring-rolling process, a Ti-6Al-4V alloy with an initial dimension, outer diameter Φ640, inner diameter Φ500, and height 205 mm was rolled to an outer diameter Φ700, inner diameter Φ457, and height 259 mm. Figure 16 shows the macrostructure of the cross-sectioned area after applying the ring-rolling process under the conditions of 1050 °C and 1 × 10 2 / s , which are the optimal process conditions based on the results obtained by the high-temperature compression test. In the results of observing the macrostructure, fine cracks of about 7 mm occurred in the lower right part of the cross-sectioned corner, but as described above, it is expected that for the actual product to meet the final dimension, it will not be largely affected by cutting and processing. In addition, the observed microstructure is presented in Figure 17 by dividing it into nine areas in order to observe it in more detail, excluding about 20 × 10 mm of the processing unit. In all nine regions, Widmanstätten microstructure was observed, and uniform microstructures were observed throughout the specimens.

4. Conclusions

In this study, the high-temperature compression deformation behavior of AMS4928, which is one of Ti-6Al-4V alloys, used as aircraft parts was analyzed in connection with microstructural changes. This led to the following conclusions.
  • In the stress–strain curve obtained after the high-temperature compression, a rapid decrease in stress and vibration with the possibility for unstable plastic deformation at a relatively low temperature were observed. When substituting it into the energy dispersion efficiency and the proposed plastic unstable region, it was confirmed to be consistent.
  • Although 800 °C and 850 °C show a high energy dispersion efficiency, a flow localization band that can lead to 45° cracks and a kink that is likely to be plastically unstable in the Severe Plastic Deformation region were observed as plastic unstable regions according to the results of observing macrostructures and microstructures. In fact, cracks were observed and were found to be inappropriate for the high-temperature forming.
  • Both samples at 1050 °C and 1100 °C showed uniform deformations without distinction between the Dead Zone and the Severe Plastic Deformation region, but did not belong to any plastic unstable region. In the results of the EBSD analysis, except for the processing part to meet the final dimension of the actual product, it was confirmed that the 1050 °C and 1 × 10 2 / s conditions representing the uniform size of the prior β grain are the most suitable conditions for applying the high-temperature forming of the ring-rolling process.

Author Contributions

Conceptualization, D.-G.L.; methodology, J.-G.L., P.-S.J., C.-Y.C. and D.-G.L.; validation, J.-G.L., H.-S.P. and D.-G.L.; formal analysis, J.-G.L. and P.-S.J.; investigation, J.-G.L., P.-S.J., C.-Y.C. and D.-G.L.; writing—original draft preparation, J.-G.L.; writing—review and editing, D.-G.L.; supervision, D.-G.L.; funding acquisition, D.-G.L. and H.-S.P. All authors have read and agreed to the published version of the manuscript.

Funding

This work was supported by the Korean government MOTIE (the Ministry of Trade, Industry and Energy), the Korea Evaluation Institute of Industrial Technology (KEIT) (No. 20013208) and the Korea Institute for Advancement of Technology (KIAT) (No. P0002019).

Institutional Review Board Statement

Not applicable.

Informed Consent Statement

Not applicable.

Data Availability Statement

All data are available within the manuscript.

Conflicts of Interest

The authors declare no conflict of interest.

References

  1. Pan, X.; Wang, X.; Tian, Z.; He, W.; Shi, X.; Chen, P.; Zhou, L. Effect of Dynamic Recrystallization on Texture Orientation and Grain Refinement of Ti6Al4V Titanium Alloy Subjected to Laser Shock Peening. J. Alloy. Compd. 2021, 850, 156672. [Google Scholar] [CrossRef]
  2. Chun, C.K.; Kim, S.W. The Effect of Heat Treatment on Mircrostructure and Mechanical Behaviors of Laser Direct Energy Deposited Ti-6Al-4V Plate. J. Weld. Join. 2018, 36, 75–80. [Google Scholar] [CrossRef] [Green Version]
  3. Lee, D.G.; Lee, S.H.; Lee, C.S. Dynamic Deformation Behavior of Ti-6Al-4V Alloy Having Fine—α2-Ti3Al Precipitates. Korean J. Met. Mater. 2003, 41, 36–44. [Google Scholar]
  4. Lee, D.G.; Kim, S.H.; Lee, S.H.; Lee, C.S. Correlation of Microstructure with Quasi-Static and Dynamic Deformation Behavior of Ti-6Al-4V Alloy. J. Met. Mater. 2003, 38, 757–765. [Google Scholar]
  5. Ateekh, U.R.; Nagumothu, K.B.; Mahesh, K.T.; Yusuf, U.; Hisham, A. Characterisation of Microstructure and Mechanical Properties of Linear Friction Welded α+β Titanium Alloy to Nitinol. Appl. Sci. 2021, 11, 10680. [Google Scholar]
  6. Yeshanew, S.K.; Bai, C.; Jia, Q.; Xi, T.; Zhang, Z.; Li, D.; Xia, Z.; Yang, R.; Yang, K. Microstructure Evolution and Deformation Mecahnisms of As-Cast Antibacterial Ti6Al4V-5Cu Alloy for Isothermal Forging Process. Materials 2022, 15, 3349. [Google Scholar] [CrossRef]
  7. Pan, D.; Liu, B.; Xu, R.; Qiu, J.; Liu, C. Predicting Workability of a Low-Cost Powder Metallurgical Ti-5Al-2Fe-3Mo Alloy Using Constitutive Modeling and Processing Map. Materials 2021, 14, 836. [Google Scholar] [CrossRef]
  8. Ozgurluk, Y.; Doleker, K.M.; Ozkan, D.; Ahlatci, H.; Karaoglanli, A.C. Cyclic Hot Corrosion Failure Behaviors of EB-PVD TBC Systems in the Presence of Sulfate and Vanadate Molten Salts. Coatings 2019, 9, 166. [Google Scholar] [CrossRef] [Green Version]
  9. Lee, H.W.; Kong, B.O.; Kim, S.E. Microstructure and Mechanical Properties of Vacuum Centrifugal Casted Ti-6Al-4V Alloy by Casting and Heat Treatment. J. Met. Mater. 2022, 60, 282–290. [Google Scholar] [CrossRef]
  10. Yeom, J.T.; Kim, J.H.; Park, N.K. Ring-rolling design for a large-scale ring product of Ti-6Al-4V alloy. J. Mater. Process. Technol. 2007, 187–188, 747–751. [Google Scholar] [CrossRef]
  11. Song, J.; Han, Y.; Fang, M.; Hu, F.; Ke, L.; Li, Y.; Lei, L.; Lu, W. Temperature Sensitivity of Mechanical Properties and Microstructure during Moderate Temperature Deformation of Selective Laser Melted Ti-6Al-4V Alloy. Mater. Charact. 2020, 19, 110342. [Google Scholar] [CrossRef]
  12. Deng, T.; Li, S.; Liang, Y.; Sun, L.; Zhang, Y. Effects of Scandium and Silicon Addition on the Microstructure and Mechanical Properties of Ti-6Al-4V Alloy. J. Mater. Res. Technol. 2020, 9, 5676–5688. [Google Scholar] [CrossRef]
  13. Bhardwaj, A.; Gohil, N.; Gupta, A.K.; Satheesh Kumar, S.S. An Experimental Investigation on the Influence of Elevated-Temperature Constrained Groove Pressing on the Microstructure, Mechanical Properties and Hardening Behaviour of Ti6Al4V Alloy. Mater. Sci. Eng. A 2020, 802, 140651. [Google Scholar] [CrossRef]
  14. Szabo, Z.J.; Bittrich, E. Manufacturing Systems for the Production of Seamless-Rolled Rings. J. Mater. Process. Technol. 1996, 60, 67–72. [Google Scholar] [CrossRef]
  15. Liu, Z.; He, B.; Lyu, T.; Zou, Y. A Review on Additive Manufacturing of Titanium Alloys for Aerospace Applications: Directed Energy Deposition and Beyond Ti-6Al-4V. JOM 2021, 73, 1804–1818. [Google Scholar] [CrossRef]
  16. Quan, G.Z.; Zhang, Z.H.; Zhang, L.; Liu, Q. Numerical Descriptions of Hot Flow Behaviors across β Transus for as-Forged Ti-10V-2Fe-3Al Alloy by LHS-SVR and GA-SVR and Improvement in Forming Simulation Accuracy. Appl. Sci. 2016, 6, 210. [Google Scholar] [CrossRef] [Green Version]
  17. Mosleh, A.O.; Mikhaylovskaya, A.V.; Kotov, A.D.; Sitkina, M.; Mestre-Rinn, P.; Kwame, J.S. Superplastic Deformation Behavior of Ultra-Fine-Grained Ti-1V-4Al-3Mo Alloy: Constitutive Modeling and Processing Map. Mater. Res. Express 2019, 6, 096584. [Google Scholar] [CrossRef]
  18. Sun, Y.; Cao, Z.; Wan, Z.; Hu, L.; Ye, W.; Li, N. 3D Processing Map and Hot Deformation Behavior of 6A02 Aluminum Alloy. J. Alloy. Compd. 2018, 742, 356–368. [Google Scholar] [CrossRef]
  19. Khomutov, M.G.; Pozdniakov, A.V.; Churyumov, A.Y.; Barkov, R.Y.; Solonin, A.N.; Glavatskikh, M.V. Flow Stress Modelling and 3D Processing Maps of Al4.5Zn4.5Mg1Cu0.12Zr Alloy with Different Scandium Contents. Appl. Sci. 2021, 11, 4587. [Google Scholar] [CrossRef]
  20. Peng, P.W.; Yang, J.C.; Lee, W.F.; Fang, C.Y.; Chang, C.M.; Chen, I.J.; Hsu, C.; Yang, T.S. Effects of Heat Treatment of Selective Laser Melting Printed Ti-6Al-4V Specimens on Surface Texture Parameters and Cell Attachment. Appl. Sci. 2021, 11, 2234. [Google Scholar] [CrossRef]
  21. Prasad, Y.; Gegel, H.L. Modeling of Dynamic Material Behavior in Hot Deformation: Forging of Ti-6242. Metall. Trans. 1984, 15, 1883. [Google Scholar] [CrossRef]
  22. Ziegler, H. Some Extremum Principles in Irreversible Thermodynamics with Application to Continuum Mechanics; Swiss Federal Institute of Technology: Zürich, Switzerland, 1962; Volume 4, p. 93. [Google Scholar]
  23. Malas, J.C.; Seetharaman, V. Using Material Behavior Models to Develop Process Control Strategies. JOM 1992, 44, 8–13. [Google Scholar] [CrossRef]
  24. Narayana Murty, S.V.S.; Rao, B.N. Hot Woking Characteristics of Zr-2.5Nb Using Processing Maps. Mater. Sci. Technol. 1998, 14, 835–837. [Google Scholar] [CrossRef]
  25. Yeom, J.T.; Park, N.K.; Hong, S.S. Investigation of Forming Stabilities Criteria in Hot Backward Extrusion of Ti-6Al-4V. J. KIMST 2004, 7, 84–92. [Google Scholar]
  26. Lukaszek-Solek, A.; Krawczyk, J.; Sleboda, T.; Grelowski, J. Optimization of the Hot Forging Parameters for 4340 Steel by Processing Maps. J. Mater. Res. Technol. 2019, 8, 3281–3290. [Google Scholar] [CrossRef]
  27. Omoniyi, P.O.; Akinlabi, E.T.; Mahamood, R.M. Heat Treatments of Ti6Al4V Alloys for Industrial Applications: An Overview. Mater. Sci. Eng. 2021, 1107, 012094. [Google Scholar] [CrossRef]
  28. Weiss, I.; Froes, F.H.; Eylon, D.; Welsch, G.E. Modification of Alpha Morphology in Ti-6Al-4V by Thermomechanical Processing. Metall. Trans. A 1986, 17, 1935–1947. [Google Scholar] [CrossRef]
  29. Kim, J.S.; Kim, J.H.; Lee, Y.T.; Park, C.G.; Lee, C.S. Microstructural Analysis on Boundary Sliding and its Accommodation Mode during Superplastic Deformation of Ti-6Al-4V. Mater. Sci. Eng. Struct. Mater. 1999, 263, 272–280. [Google Scholar] [CrossRef]
  30. Seshacharyulu, T.; Medeiros, S.C.; Frazier, W.G.; Prasad, Y.V.R.K. Microstructural Mechanisms during Hot Working of Commercial Grade Ti-6Al-4V with Lamellar Starting Structure. Mater. Sci. Eng. 2022, 325, 112–125. [Google Scholar] [CrossRef]
  31. Miller, R.M.; Bieler, T.R.; Semiatin, S.L. Flow Softening during Hot Working of Ti-6Al-4V with a Lamellar Colony Microstructure. Scr. Mater. 1999, 40, 1387–1393. [Google Scholar] [CrossRef]
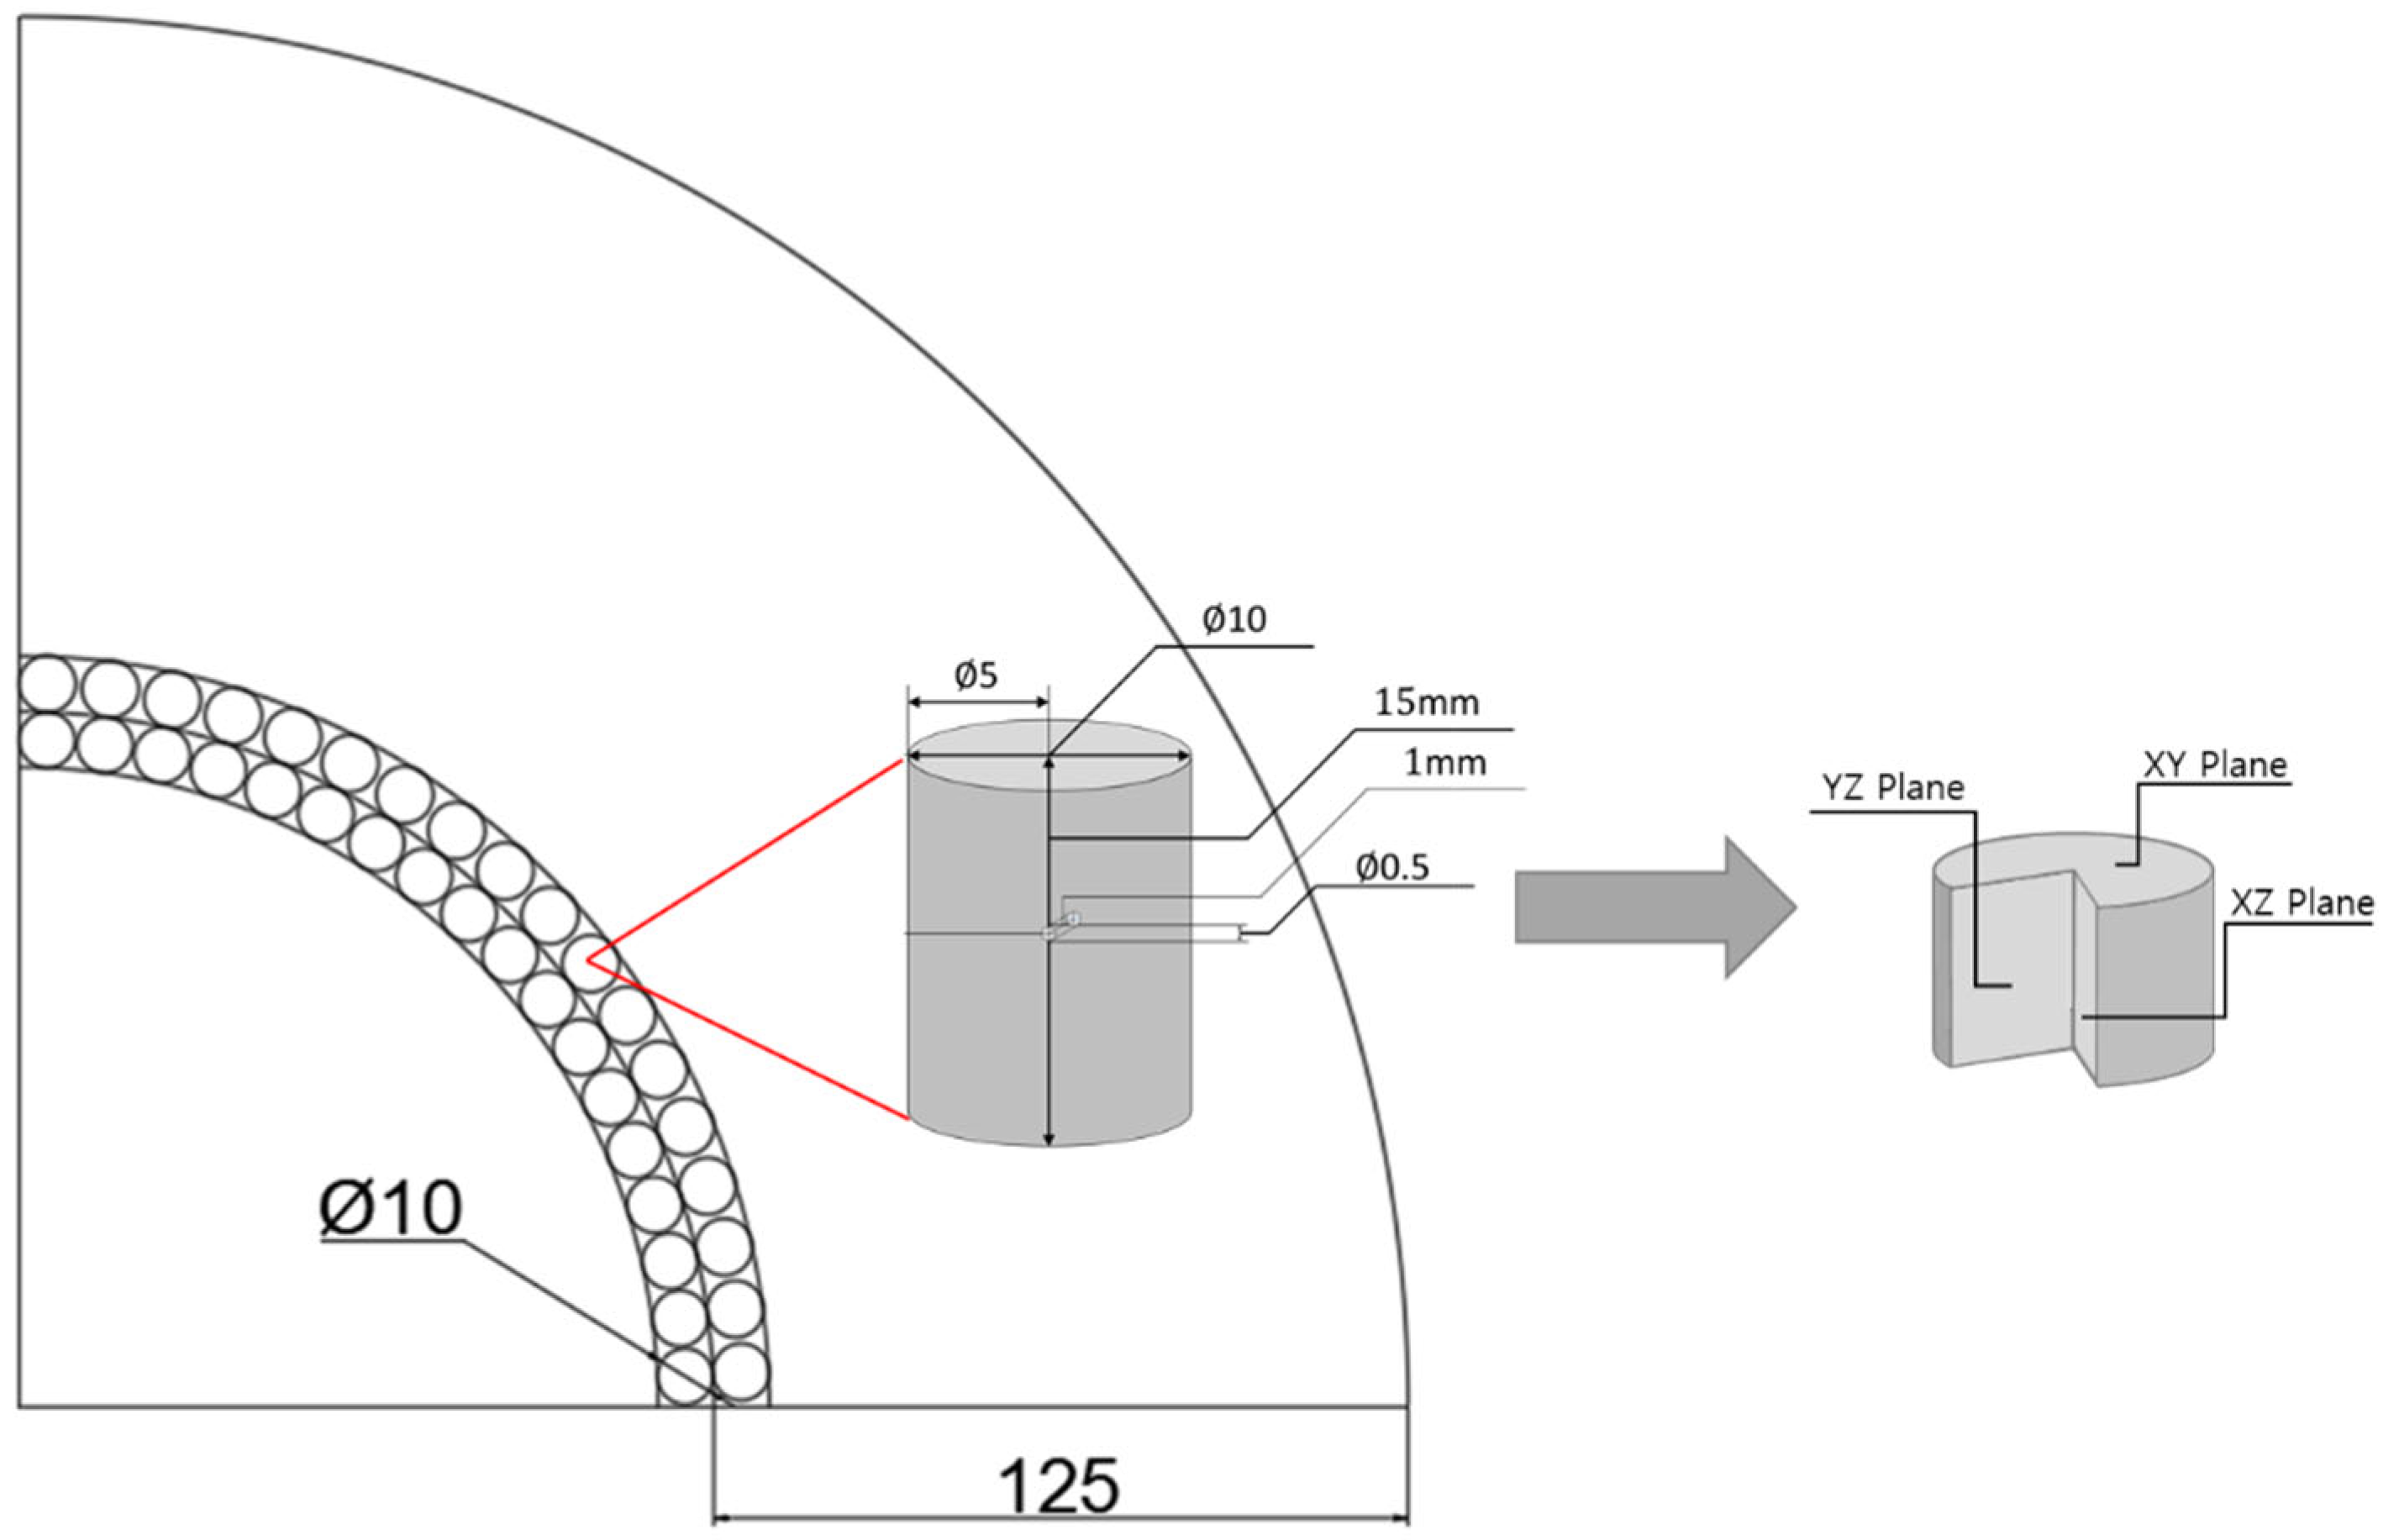
Figure 1. Schematic position diagram for the high-temperature compression samples in the as-received Ti-6Al-4V alloy.
Applsci 12 07621 g001
Figure 2. Optical micrographs of the as-received Ti-6Al-4V alloy; (a) XY Plane, (b) YZ Plane, (c) XZ Plane.
Applsci 12 07621 g002
Figure 3. Average Vickers hardness of the as-received Ti-6Al-4V alloy.
Applsci 12 07621 g003
Figure 4. Tensile stress–strain curves circumferential and central directions of as-received Ti-6Al-4V alloy.
Applsci 12 07621 g004
Figure 5. True stress–strain curves of Ti-6Al-4V alloy at various temperatures and strain rates; (a) strain rate 1 × 10 2 / s , (b) strain rate 1 × 10 1 / s , (c) strain rate 1 × 10 0 / s .
Applsci 12 07621 g005
Figure 6. Flow stress curves at different temperatures as a function of strain rate (ε = 0.6).
Applsci 12 07621 g006
Figure 7. Deformation contour map shown by temperature-log(strain rate) relation of Ti-6Al-4V alloy (ε = 0.6) indicating the efficiency of power dissipation.
Applsci 12 07621 g007
Figure 8. Deformation contour map shown by temperature-log(strain rate) relation of Ti-6Al-4V alloy (ε = 0.6) by Ziegler’s instability criterion (ξ).
Applsci 12 07621 g008
Figure 9. ln(strain rate) variation as a function of inverse temperature.
Applsci 12 07621 g009
Figure 10. Deformation contour map shown by temperature-log(strain rate) relation of Ti-6Al-4V alloy (ε = 0.6) by Malas’s instability criterion (ξ); (a) strain rate sensitivity (m), (b) m′, (c) deformation temperature sensitivity (s), (d) s’.
Applsci 12 07621 g010
Figure 11. Complex processing map showing the stable and unstable deformation region (ε = 0.6); (a) Ziegler’s instability criterion, (b) Malas’s instability criterion. Shaded area means the unstable region.
Applsci 12 07621 g011
Figure 12. Macrostructures of the cross-sectioned areas according to each condition after high-temperature compression of Ti-6Al-4V alloy; (a) 800 °C, 1 × 10 2 / s , (b) 800 °C, 1 × 10 0 / s , (c) 850 °C, 1 × 10 2 / s , (d) 1050 °C, 1 × 10 2 / s , (e) 1100 °C, 1 × 10 2 / s .
Applsci 12 07621 g012
Figure 13. Microstructures of the cross-sectioned areas according to each condition after high-temperature compression of Ti-6Al-4V alloy; (a,d) 800 °C, 1 × 10 2 / s , (b,e) 800 °C, 1 × 10 0 / s , (c,f) 850 °C, 1 × 10 2 / s ; (ac) Dead Zone, (df) Severe Plastic Deformation region.
Applsci 12 07621 g013
Figure 14. Microstructures of the cross-sectioned areas according to each condition after high-temperature compression of Ti-6Al-4V alloy; (a,c) 1050 °C, 1 × 10 2 / s , (b,d) 1100 °C, 1 × 10 2 / s ; (a,b) Dead Zone, (c,d) Severe Plastic Deformation region.
Applsci 12 07621 g014
Figure 15. Inverse pole figure map showing (a,c) Dynamic Recrystallization, (b,d) prior beta reconstructed by EBSD data at (a,b) 1050 °C, 1 × 10 2 / s , (c,d) 1100 °C,   1 × 10 2 / s .
Applsci 12 07621 g015
Figure 16. Macrostructure after ring-rolling process of Ti-6Al-4V alloy at 1050 °C, 1 × 10 2 / s .
Applsci 12 07621 g016
Figure 17. Microstructures after ring-rolling process of Ti-6Al-4V alloy at 1050 °C, 1 × 10 2 / s .
Applsci 12 07621 g017
Publisher’s Note: MDPI stays neutral with regard to jurisdictional claims in published maps and institutional affiliations.