Article

A Smart Handheld Welding Torch Device for Manual Spot Laser Welding

1
Department of Mechanical Engineering, Faculty of Engineering, Bursa Uludağ University, 16059 Bursa, Turkey
2
Evinoks Servis Ekipmanlari San. ve Tic. A.S., 16245 Bursa, Turkey
*
Author to whom correspondence should be addressed.
Appl. Sci. 2022, 12(21), 11137; https://doi.org/10.3390/app122111137
Submission received: 6 October 2022 / Revised: 20 October 2022 / Accepted: 26 October 2022 / Published: 2 November 2022
(This article belongs to the Special Issue Smart Manufacturing and Materials Ⅱ)

Abstract

:
In producing custom-made systems, using a robotic welding line that can fine-tune welding parameters is not economical, and laser welding is usually done manually. The most common operator error in manual welding operations is the angular positioning error between the laser beam and the plate surface. This study introduces a smart handheld welding torch device that assists the welding operator with visual warnings. It measures the sheet surface angle to eliminate angular positioning errors, calculates the appropriate torch holding angles accordingly, and helps the laser welding process with the right angle. For this purpose, this study focused on micro-laser spot welding applications of stainless (inox) kitchen and hotel equipment, and the effect of angular positioning errors on the welding quality was investigated experimentally. Experiments show that when the angle between the surface normal and the welding torch is smaller than the critical welding angle, heat-induced traces or micro-deformations occur on the visible surface of the thin stainless material. In addition, there is a significant decrease in the weld quality, since a large enough weld area cannot be created at large values of this angle. The optimum torch angle range was determined using experimental results for the available laser welding parameters. With a standard welding torch and the smart torch, the welding operator was allowed to repeat the same task, and the payloads of the samples prepared in this way were measured. Test results show that using a smart welding torch with an angular positioning assist system significantly improves welding quality. Breaking force values vary in a wide range of welds made with a standard welding torch, and visual problems such as burning, puncture, and swelling are encountered on the visible surfaces of many samples with high strength values. When the developed smart torch was used, the breaking force remained within the desired reference range, and no visual defects were found in any sample.

1. Introduction

High-energy laser welding is frequently used for joining thin-walled stainless surfaces due to the heat exposure of a narrow region, low residual stresses, uniform grain structure, high efficiency, and low operating costs compared to conventional welding processes. It is a complex process to determine the welding parameters for joining thin stainless materials in a way that does not create visual defects. This is because, although it is desired that the welding process is delicate enough not to have visible defects, the connection is also expected to be strong enough to last for the life of the device. Laser welding has advantages such as minimum thermal degradation, good mechanical properties, and excellent reproducibility due to precise temperature control [1,2]. Although it can be used successfully for thin sheet metal welding, it also has deep penetration capability [3]. As a result of these advantages, laser welding offers higher welding speed and efficiency than conventional arc welding. In addition to these criteria in the production of inox kitchen and hotel equipment, where visuality is at the forefront, the welding process must be done so delicately that it does not leave a heat trace on the visible surface of the thin plate. However, unique welding methods are required to laser thin bond sheets of stainless metal with no heat marks on their visible surfaces. Otherwise, small thicknesses of thin metal sheets with the effect of excessive heat can cause visible heat traces, even in micro-welding. Therefore, the minimum heat input to the light sheet is technically and economically practical. Technically, micro-laser welding is applied so that a melting volume in the form of a pyramid is formed from the invisible surface to the visible surface. In this way, the visible thin stainless sheet is less affected by heat. This application economically requires lower laser power associated with less heat input, less equipment investment, and lower operating costs. In industries, welding of modern engineering materials, including stainless steel and titanium alloys, finds various applications due to the need to tailor the location of materials where a transition in mechanical properties, temperature, pressure, and/or performance in service is required. Due to the numerous advantages and wide range of uses of laser welding, it is important to update, understand, and model industrial application processes [4].
Studies in the literature focusing on laser micro-welding of austenitic stainless steels have analyzed the effect of laser welding parameters on weld width and weld penetration depth. Porosity, which deteriorates the strength of the welded part, is often observed in deep-penetration laser welds [5,6,7,8]. In order to optimize the laser welding process and ensure high weld quality and strength, it is necessary to understand how porosity occurs in the welding process and to find methods to reduce or eliminate pore defects. Zhou and Tsai used mathematical models to investigate transport events leading to pore formation and explored possible solutions to reduce or eliminate pore formation in laser welding [9]. The results show that pore formation in pulsed laser welding is due to two competing factors: the solidification rate of molten metal and the molten metal’s backfilling during precipitation. Sun et al. investigated the effect of different shielding gases on forming pores in laser seam welds of 20 mm thick AISI 304 plates [10]. The results showed that shielding gas had a significant effect on the pore formation, and few pores were present in the seam welds when Ar was used, but almost no pores were present in the seam welds when N2 or gas was not used. Kumar et al. compared laser seam welding of AISI 304 and AISI 316 stainless steel alloys [11]. The results showed that higher linear heat input is required for the AISI 304 alloy compared to the AISI 316 alloy to achieve the maximum ultimate strength of the seam weld. Few studies have been conducted on laser micro-spot welding of stainless-steel alloys [12,13]. Siva Shanmugam et al. presented a finite element model (FEM) comparing simulation with experimental tests for laser micro-spot welding of 2.5 mm thick austenitic AISI 304 stainless steel sheets in a bead-on-plate configuration [12]. Cedeno-Viveros et al. investigated the effect of laser power and focal distances in laser micro-spot welds on 0.254 mm thick austenitic AISI 302 stainless steel sheets in an overlapping joint configuration [13]. Kumar et al. investigated various aspects of replacing existing micro-resistance spot welding (micro-RSW) with micro-laser spot welding to join Inconel 718 thin foils to a thick 410 steel stack. They evaluated the results based on weld quality, mechanical strength, microstructural properties, and high-temperature weld strength [14].
Especially for micro-laser spot welding of ultra-thin foils, pulsed laser welding is the preferred method over continuous wave laser welding because the former method offers precise temperature control, reducing the heat-affected zone, residual stresses, and heat input [15]. Pulsed laser welding is used in various micro-welding applications, including medical device manufacturing, sensors with thin membranes, welding of markers to stents, and fabrication of microturbines using ultra-thin foils [16,17,18,19]. In general, pulsed laser welding involves an intermittent supply of a high-intensity energy beam that periodically focuses on melting and solidifying the material in succession. Process parameters in pulsed laser welding include pulse energy/laser power, pulse width, pulse frequency, laser spot size, and welding speed used to achieve satisfactory weld quality [20,21]. After the first study that successfully welded Inconel 600 tubular components (1.0 to 1.2 mm Inconel stack) for nuclear power plants using a pulsed laser, joining materials with high-temperature resistance, such as Inconel to stainless steel, by the micro-laser welding method has been a popular research topic of recent years [22,23,24,25].
As a result of the laser-based additive manufacturing technology, the ability to manufacture the metal has dramatically increased. In this way, products that cannot be obtained with conventional methods can be produced, and more economical and simple solutions can be produced by combining different materials with desired properties, as in the production of composite materials [26]. Recycled nickel alloy powder was applied to the 3D printing obtained by selective laser melting by Sukhov et al. They investigated the effects of the chemical composition of the alloy’s main elements on the products’ mechanical properties. They proved they could be used in other selective laser melting methods without side effects [27]. Although the product obtained by additive manufacturing in the laser sintering method is the same, Sezer et al. examined the effects of the production method (with differences in the laser scanning direction) on the material structure [28]. Ullah et al. investigated the causes of various structural part defects frequently encountered in additive manufacturing products created by selective laser melting at different laser powers and scanning speeds [29]. Khorasani et al. investigated the effect of the absorption rate of IN718, one of the most widely used nickel alloys, at different laser powers and scanning speeds, on the melt pool properties [30]. These studies show that additive manufacturing technology can offer a wide range of solutions for very different materials due to the laser welding method.
Similarly, there are studies on combining Inconel alloys with different steels [14,31,32,33,34]. Ventrella et al. investigated the effect of laser energy in micro-laser welding of 100 m thick AISI 316L stainless steel foil. They concluded that microstructural and mechanical reliability could be achieved by precise control of laser pulse energy [15]. In contrast, Lertora et al. investigated the CO2 laser lap joints between 0.4 to 1.6 mm Inconel 718 sheets. They reported that the lap welds’ fatigue behavior suits aircraft engines’ requirements despite microcracks [35]. High-irradiance lasers hitting metal surfaces create a complex, dynamic process in which metal can change rapidly from being highly reflective to a strong absorber. This effect was found by Simonds et al. It was discussed in an experimental study by [36]. Duplex stainless steels (DSSs) are a category of stainless steels used in any application where both high strength and excellent corrosion resistance are required. This favorable combination of properties is provided by their biphasic microstructure, consisting of ferrite and austenite in approximately equal volume fractions. DSSs, just like thin materials, are sensitive to heat treatments, welding processes, or thermal cycles. Therefore, micro-laser welding applications are also widely used in DSSs [37].
Although welding technology has matured, defects may occur due to improper manual operation, unstable environments, and welding equipment problems [38]. In manual micro-spot laser welding, the gap between the mating surfaces of sheet materials and the torch–surface angle (the angle between the laser beam and the weld surface) are critical variables to achieving sufficient weld strength without creating heat marks on the visible surface. While the effects on weld bead geometry in laser welding are already well understood, the detailed characteristics of visual micro-laser welding have not been adequately clarified. In examinations, it has been seen that the variable most prone to error in manual micro-laser applications is the torch–surface angle. Therefore, this study investigated the effect of angular positioning errors between the laser beam and the weld surface on the weld quality. The torch–surface angle is considered the most error-prone variable in manual micro-laser applications. Experimental results show that the laser welding angle is one of the most critical parameters affecting the formation of the desired weld cross section on thin stainless sheet surfaces. It would not be appropriate to perform visual micro-welding without providing angular positioning precision. The processes applied to the surface to eliminate these visual defects in production increase the costs by reducing the production speed. The high temperature and methods used to remove traces on the surface reduce the corrosion resistance of the stainless surface.
Welding test samples were prepared by combining stainless steel sheets, frequently used in the production of inox kitchen equipment, with different laser welding angles (laser beam-surface angle). Test sample production was carried out on a welding stand equipped with a digital protractor (UNI-T LM320B), keeping all other parameters constant only by changing the angular position of the welding torch. The weld strength of the test specimens obtained was determined by tensile tests; thus, the best weld angle range that would not create a heat trace on the visible surface was determined. The device, which guides the welding operator with visual signals and ensures welding occurs in the correct angular position, was programmed according to these angle values. With the smart and standard welding torch, the operator was asked to prepare test samples manually by welding sheets in random angular directions. In this paper, the effect of the smart welding torch on the manual welding quality is discussed by comparing the tensile test results of the prepared samples and the microscope images.
With the discovery of micro-laser application, it has been possible to weld thin inox sheet surfaces without creating defects on the surfaces where the main structures can be seen. In this way, thin inox sheets began to be used as an aesthetic element on the visible surfaces of machines and devices. However, micro-laser welding applications are a very sensitive process that is affected by many variables, such as the gap between the sheet metal sheets, laser–surface angle, and surface light reflection, in addition to the laser signal parameters. It has been observed that in industrial areas where welding is done manually, even the same operator cannot weld to the same standard, and the most obvious error in manual welding is the grip angle of the welding torch. The smart welding torch introduced in the study is a design that emerged as a result of these observations. In searches of the market, literature, and patents, no similar device was found equipped with any system that assists in the angular positioning of the manual welding torch.

2. Materials and Methods

A Turcwel LP300 series, Nd: Yag type laser welding machine was used together with the manual hand torch shown in Figure 1a for individual micro-laser welding of stainless test specimens. In this system, the graphite inserts were specially designed for the weld piece, and the operation is very economical as it does not require fixtures. With its ergonomic design, it facilitates welding in hard-to-reach areas. The standard laser welding torch shown in Figure 1d was developed with the angular positioning assistant device as shown in Figure 1c. The circuit diagram of the device created using an Arduino pro micro-board and MPU6050 angular position sensor is given in Figure 1d. The angular position of the welding torch is continuously measured with the help of the angle sensor placed on the top of the torch. It warns the operator at specified intervals with the use of an RGB LED.
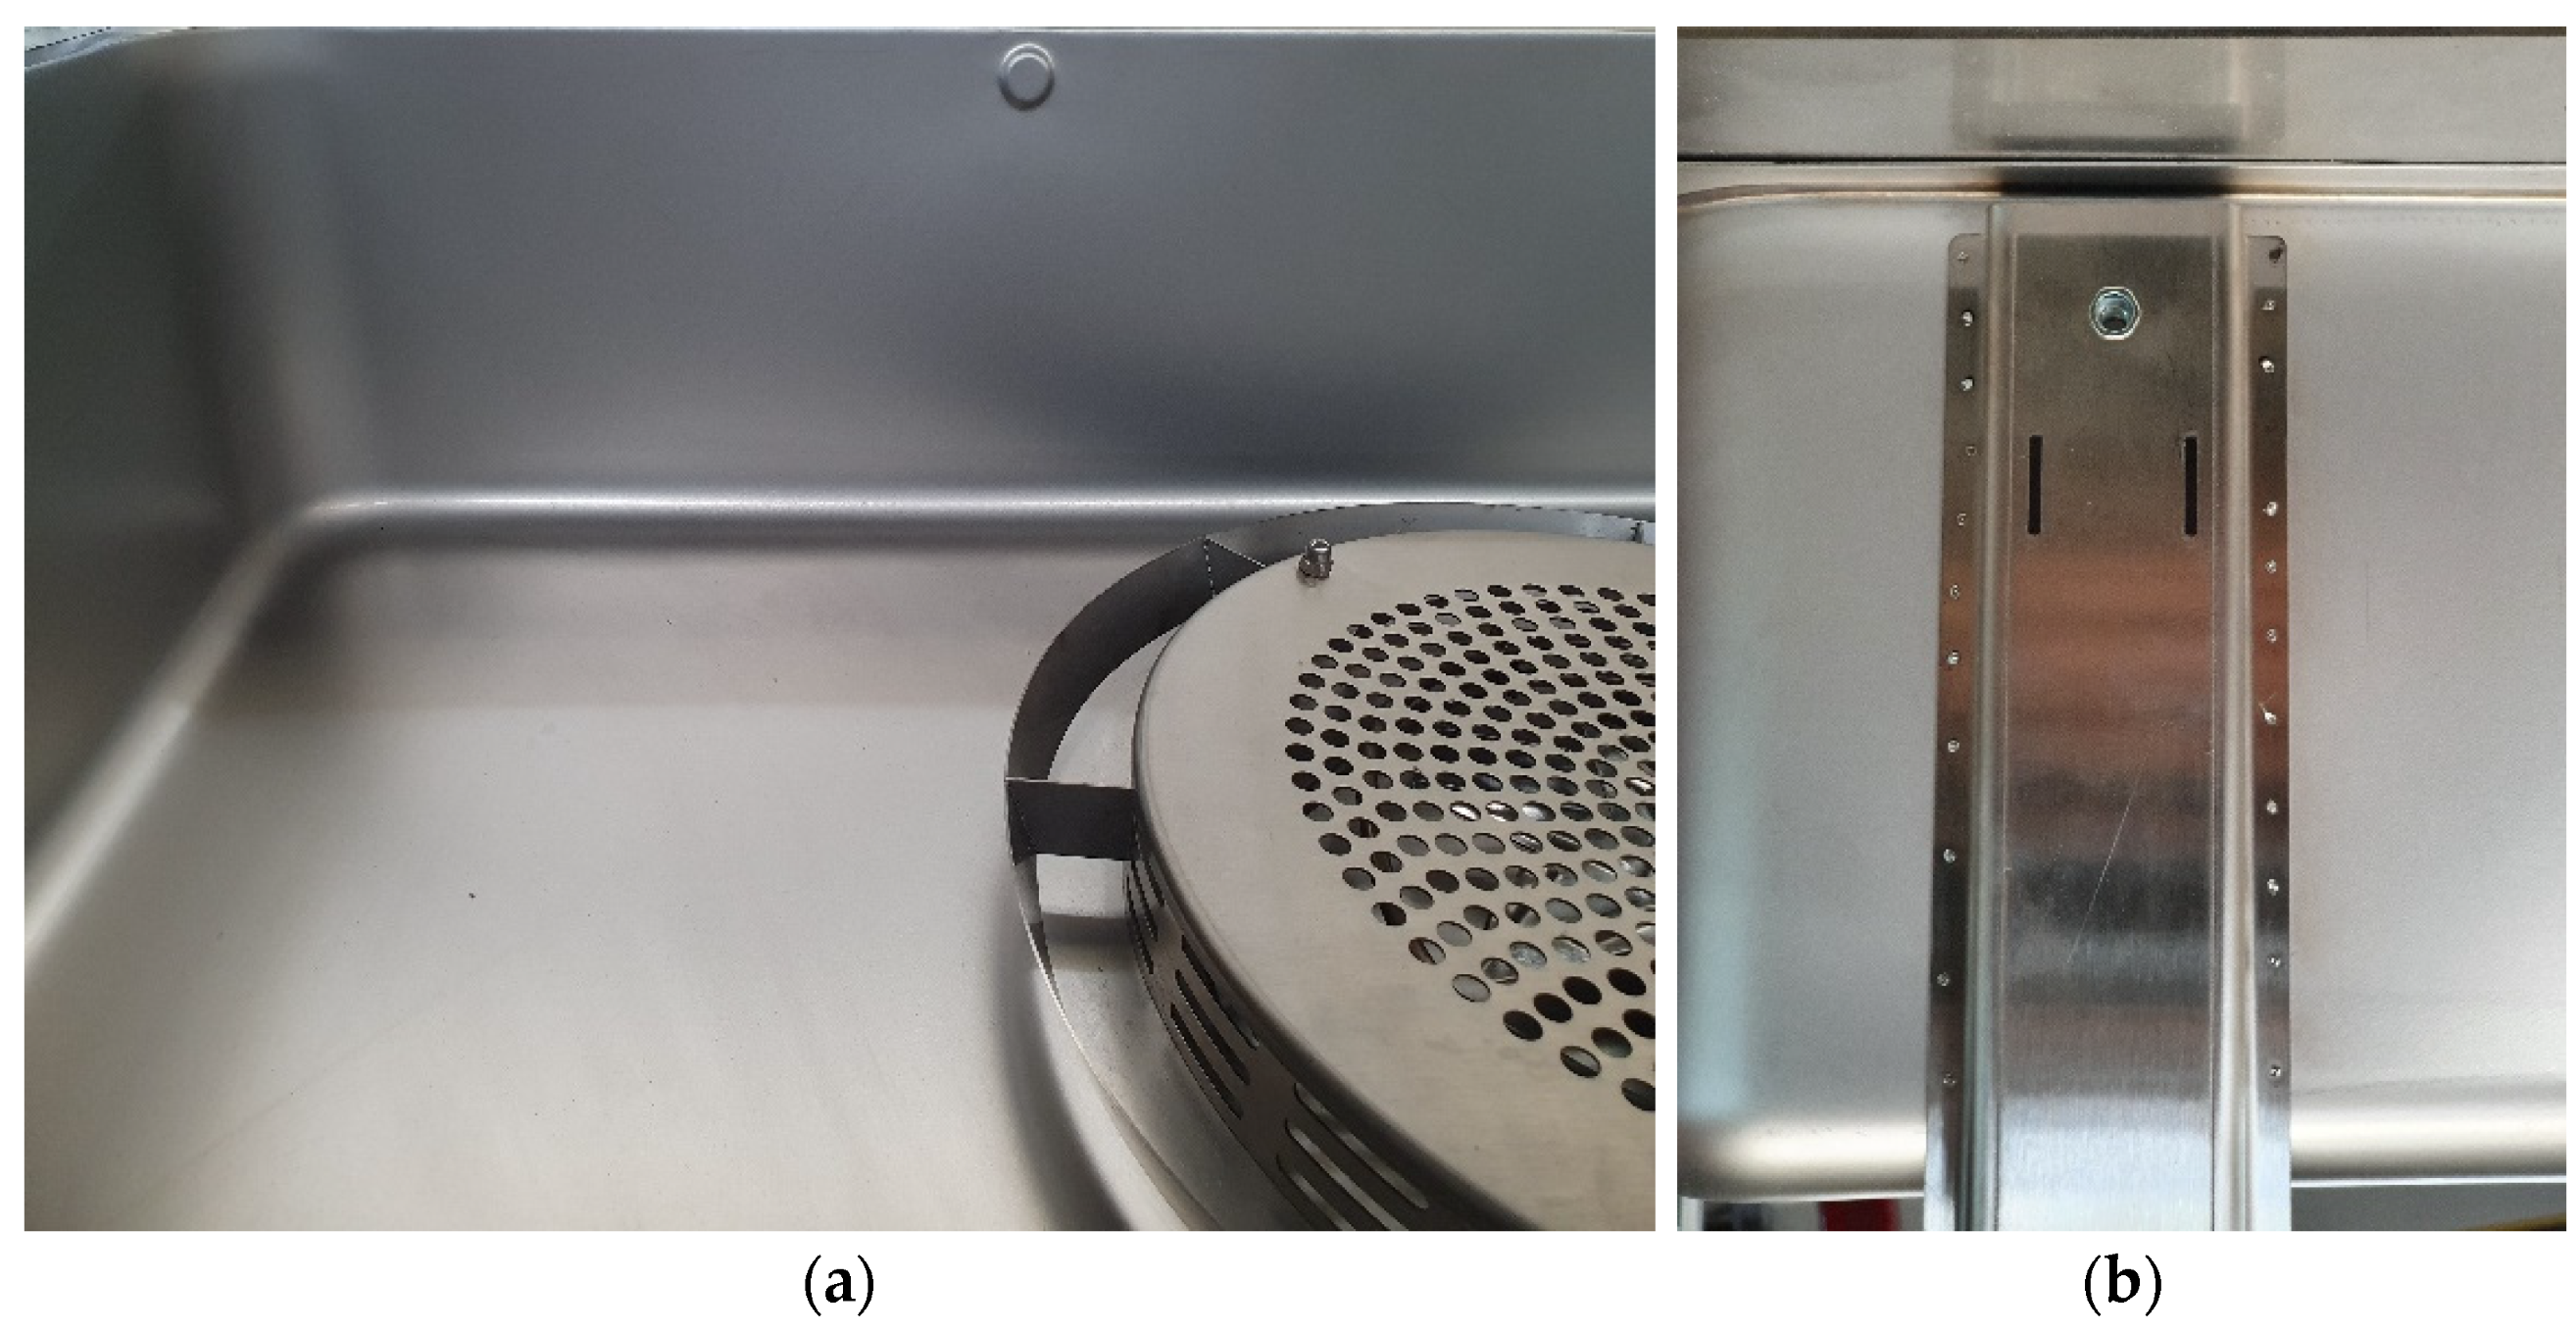
Stainless steel sheets (304 series) are widely used in the production of industrial kitchen equipment due to their beautiful appearance, corrosion resistance, and anti-fingerprint properties. Manual micro-point laser welding is frequently used for fixing the visible surfaces of industrial kitchen equipment. An industrial application example of visual micro-laser spot welding is shown in Figure 2a,b. This application provides sufficient welding area on the invisible surface of the 0.8 mm thick, thin sheet. This welding process is expected to be performed with a sensitivity that will not create a heat trace on the visible front surface of the sheet, due to a very short-term temperature increase.
Weld test samples of 2 mm and 0.8 mm 304 series stainless steel sheets, the mechanical and chemical properties of which are given in Table 1, were fixed on top of each other from two points (Figure 3a) with the laser signal and parameters shown in Figure 3b. The size of each of the samples, which are joined at a single point to each other, is 80 mm long and 14 mm wide. The length of the welded pieces to be subjected to the tensile test after joining is 110 mm. Each weld sample was fixed with the same compressive force for gap-free contact of the weld surfaces of the two sheets. In order to measure the weld strength of the lap weld samples, the samples were subjected to tensile tests using a 0.4 N precision micro-tensile device produced in Bursa Uludağ University Laboratories (Figure 3c). Weld joints are torn under shear stress. During the tests, the head speed was set to 10 mm/min, and the tensile-shear force was slowly increased until the specimen broke from the welding points.

3. Results

3.1. Determination of the Effect of Torch-Surface Angle on Weld Quality in Manual Laser Spot Welding

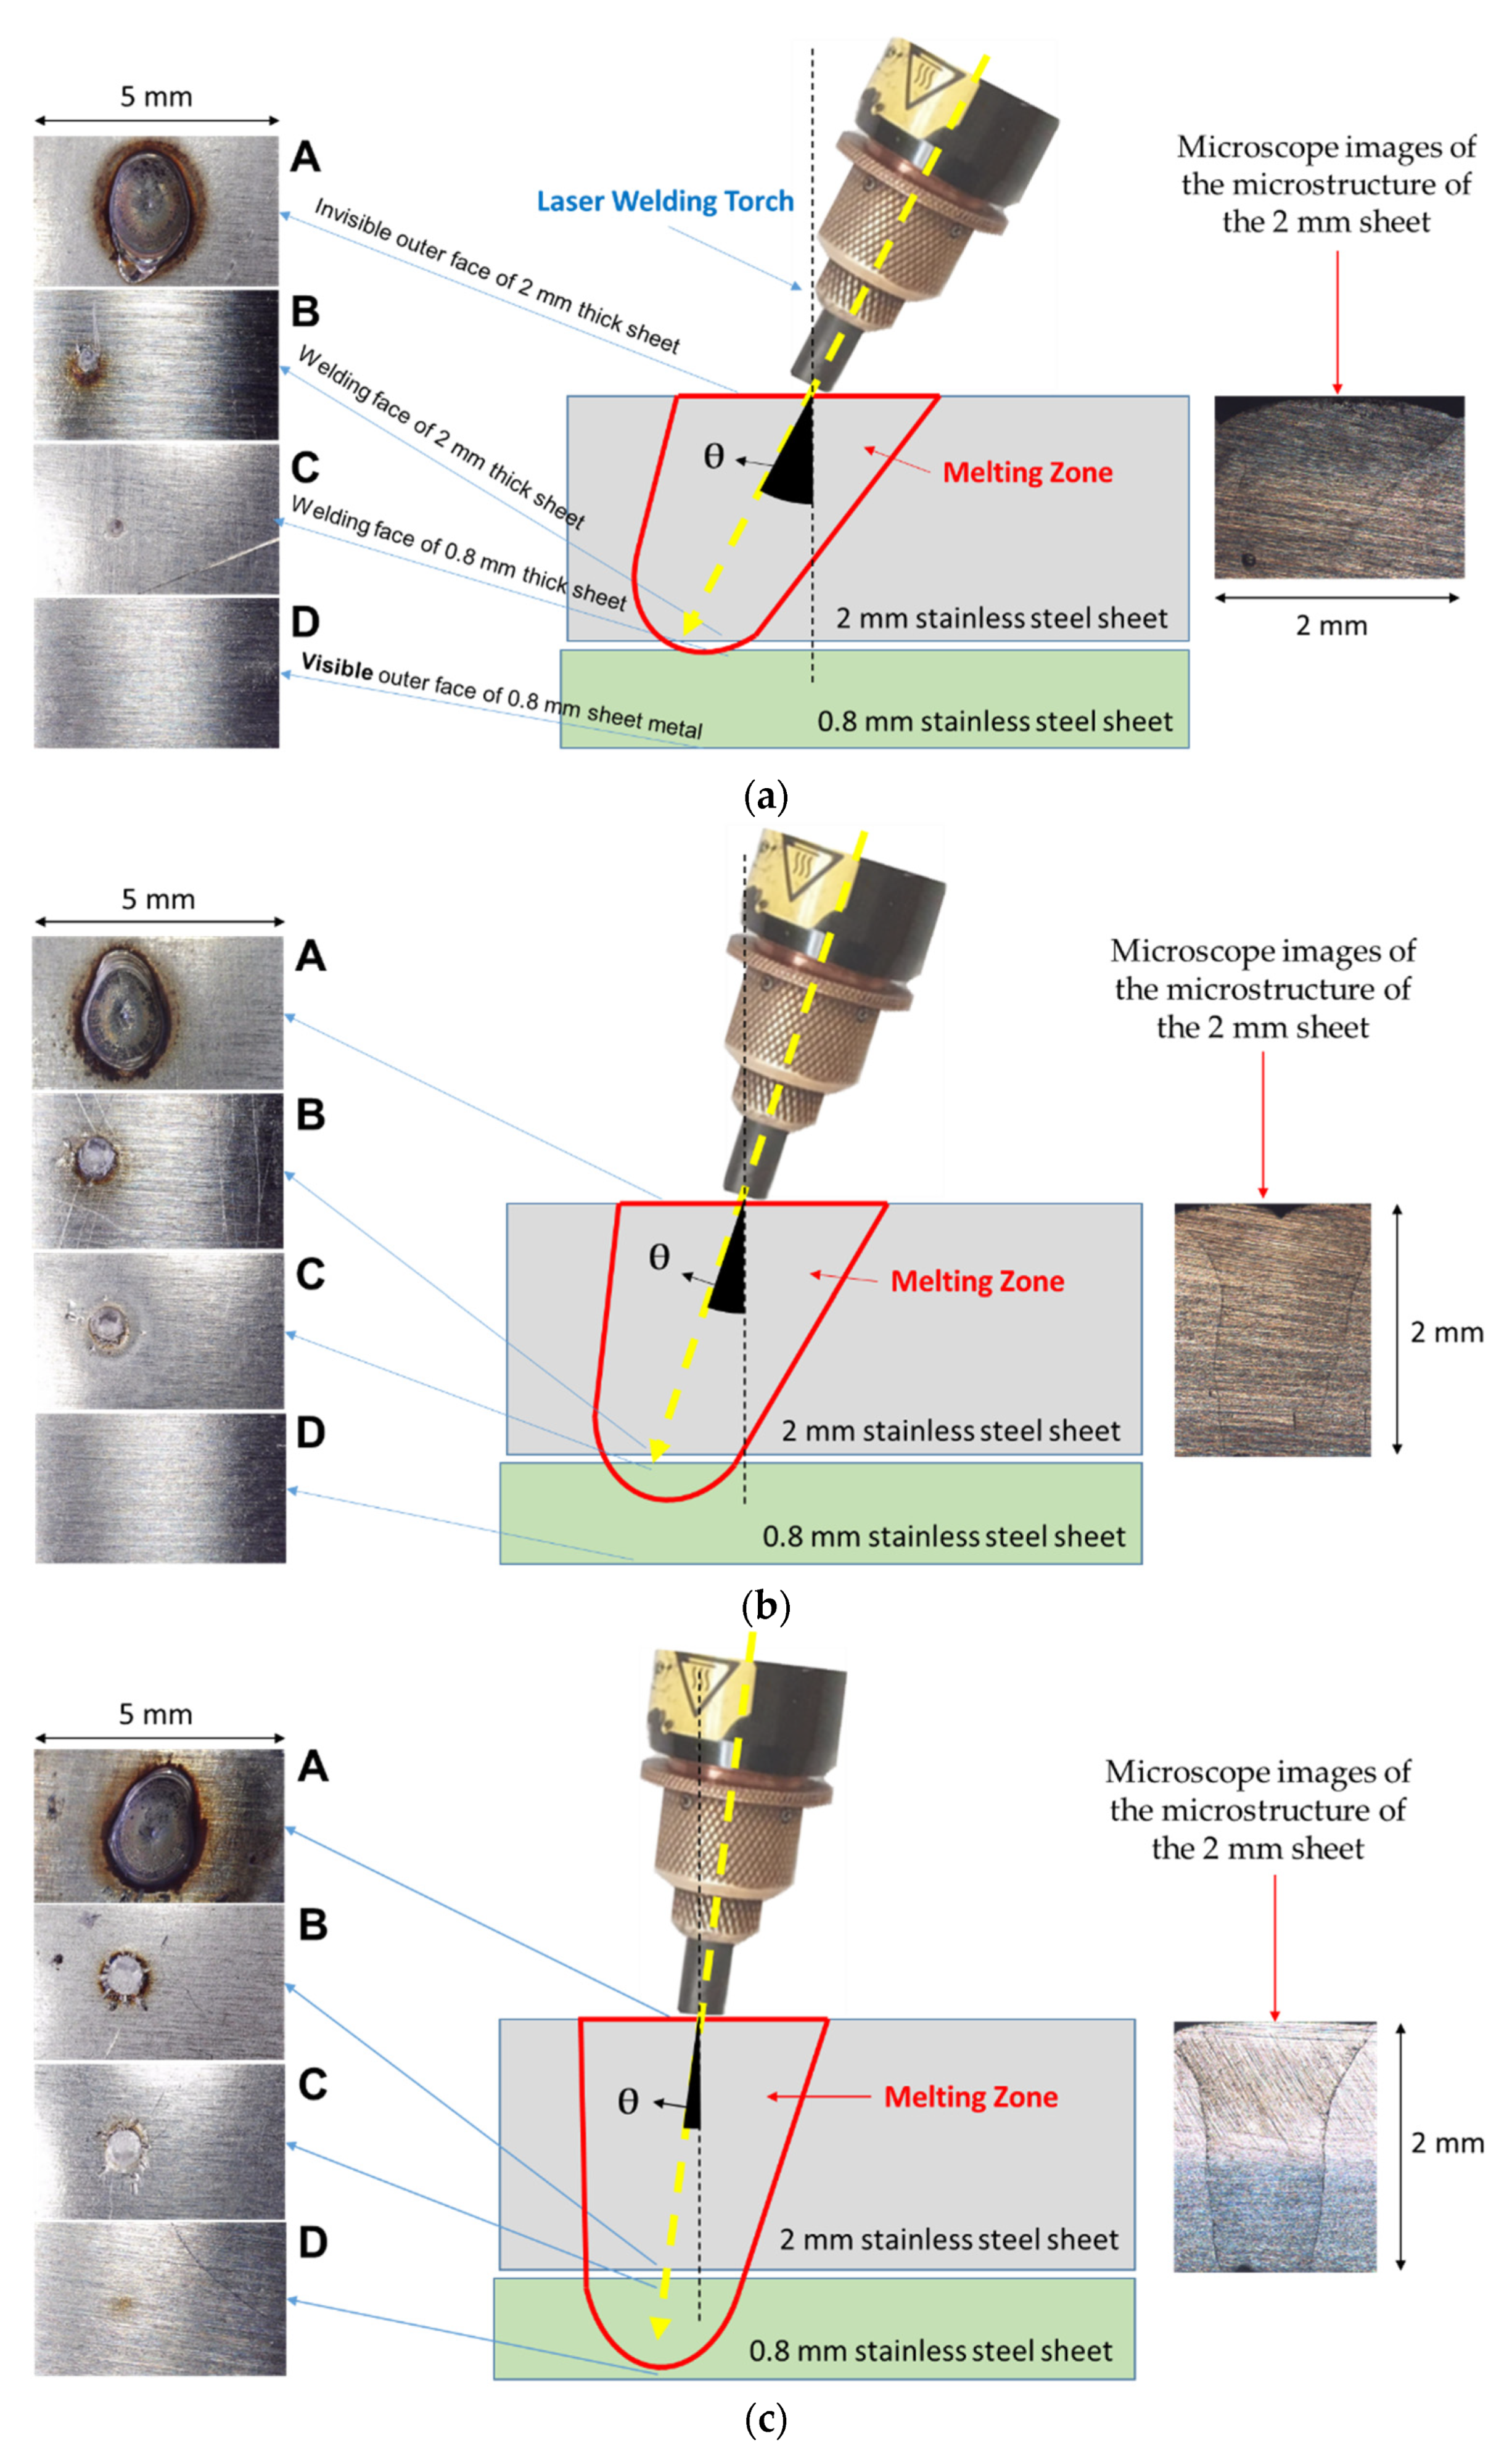
The first step of the study was to determine the welding angle required to weld stainless materials so delicately that they do not create visual defects and, at the same time, overcome the loads that will arise over time under working conditions. The primary motivation of this study was to develop an auxiliary system in which the welding operator can perform the welding process in this specified angular range within a specific tolerance range. In manual micro-spot laser welding, the gap between the mating surfaces of sheet materials and the torch grip angle (the angle between the laser beam and the weld surface) are critical variables to achieving sufficient weld strength without creating heat marks on the visible surface. While the absence of weld marks on the visible surface is the essential requirement of laser welding, joint strength is often the critical quality criterion. Therefore, the heat traces on the visible surfaces of the test specimens and the weld cross-section size were examined under a microscope (Celestron Pro, Celestron, LLC., Torrance, CA, USA). The surfaces named with the capital letters A, B, C, and D in Figure 4 represent the invisible outer surface of the 2 mm thick sheet, the joining surface of the 2 mm thick sheet (after breaking it), and the joining surface of the 0.8 mm thick sheet (after breaking it). The latter refers to the visible outer surface of the 0.8 mm sheet metal. Since the melting zone could not reach the outside of the 2 mm sheet at larger angles of 30°, welding was impossible, and tests could not be performed for 30° angles. There is sufficient weld area for testing in the range of 10°–30°, and no heat trace is formed on the visible sheet surface. Micro-blisters appear on the 7.5° visible surface. The images of these surface traces, which are evident due to the light reflection at certain angles, could not be taken because the illumination angle of the microscope was not at the angle to create these light reflections. By comparison, at less than 5°, evident heat traces occur on the visible surface. Microstructure microscope (Nikon Eclipse MA100, Nikon Instruments Inc., Melville, NY, USA) photographs obtained by the metallurgical cutting and etching method at the welding point of the 2 mm thick top sheet are given on the right of Figure 4. As the angle between the torch and the welding surface changes, it is understood from the microscope images of the welding section that the angular position of the melting zone changes parallel to this.
In Figure 5, the effect of the torch holding angle approaching the 0° perpendicular holding angle in increments from 30° to 2.5° on the weld cross-section, and thus on the weld cross-sectional area, is shown with the microscope photographs of the joining surface of the 0.8 mm sheet metal. The tests were cut at 5° at a 0° vertical angle so that the laser beam does not reflect and damage the optical system. The microscope photographs show that the welding cross-section increases smoothly as the torch grip angle approaches the surface perpendicular to the surface.
Figure 6 shows the variation in the force (F) carried by a single spot weld with elongation for different torch angles. It is understood that the maximum force held by the weld from 5° to 30° decreases from 320 to 100 N. In this paper, the 10° angle with the highest welding strength without heat traces or blisters on the visible surface is referred to as the critical torch angle. This value is used in the following to obtain the normalized yield strength of each weld.
Figure 7 shows the normalized yield strength of the weld versus laser torch holding angle and welding quality mapping. The normalized yield strength of the weld expresses the ratio of the maximum force carried by each weld until it is broken to the maximum weld load at the critical torch angle. As can be seen in Figure 6, the critical torch angle for the current laser signal parameters is 10° and the critical weld load (Fcrt) is 277 N, which does not produce a heat trace on the visible surface. By dividing the weld loads obtained for each weld sample by this value, Figure 7 is obtained, which shows how much the weld weakens with the angular positional error and how much it becomes stronger despite the heat trace on the visible face. Suitable and unsuitable torch angles for welding are shown in the chart with different colors and descriptions. Red zone: Extremely steep torch holding angle with risk of laser reflection on lenses or heat mark on visible inox surface. Green zone: Appropriate welding angle (the steepest torch-holding angle that does not cause a heat trace mark on the visible inox surface). Blue zone: Average or weak weld (torch holding angle is more horizontal than the limit value, leaving no heat trace on the visible inox surface, resulting in relatively weak weld bond formation). Angles greater than 30 degrees and less than −30 degrees, where the torch is too horizontal to form a weld, are outside the graphic area.

3.2. Design, Programming, and Welding with the Angular Positioning Assistant Device (Welding with the Smart Manual Welding Torch)

As a result of the preliminary studies in the previous section, the use of the smart welding torch device is introduced in Figure 8. Initial experiments revealed the following risk situations depending on the weld holding angle. In cases where the laser angle is close to 90 degrees, the laser beam partially reflects from the shiny stainless sheet surface and may damage the optical system in the torch. Therefore, welding should not be done at angles close to 90 degrees. The second risk situation is the risk that the laser will create a melting zone that is deep enough to make a heat trace on the visible sheet surface at vertical angles that vary depending on the welding intensity. These two risks are shown as a three-dimensional zone in Figure 8a. The angular positions that do not create heat traces on the visible surface and give the highest acceptable welding load due to the deepest melting area are shown with the three-dimensional green zone. This region can be narrowed and expanded with software to the extent of the operator’s ability to use the smart welding torch. The angular range indicated by the three-dimensional blue zone in the figure shows the angular positions that result in relatively weak welds. Since the melting area cannot reach the junction of the two sheets at more horizontal angles than the border of the blue zone, there is no fusion. These angle values depend on many factors, such as laser intensity, application time, and beam cross-section. However, these values are kept constant, and only the change in torch holding angle is examined.
The holding angle of the welding torch should be adjusted according to the angle of the surfaces to be welded. Therefore, it is necessary to measure the sheet metal surface’s pitch (surface normal) to be welded before starting the welding process. This measurement can be measured without needing an external device by attaching a cap to the tip of the smart welding torch, which allows it to be held vertically to the surface (Figure 8b). Due to the head attached to the tip of the welding torch, it has the surface area to be kept perpendicular to the surface. It calculates the surface normal with the angle values obtained from the MPU50 sensor by recording the angles of this starting position with the help of a button on the device. This calculation is carried out as follows: The MPU6050 angular position sensor provides angle information in the range of 0–360 degrees from three axes. Only two of these angle values (x,y) are sufficient to calculate the direction of the surface normal. While the surface normal changes in the range of 0–180 degrees, it requires an angular transformation for the sensor to measure in the range of 0–360 degrees. The direction of the surface normal can be easily calculated with the help of the transformed two-angle information and the cosine theorem. When the surface angle measurement button is pressed, the measured initial values are continuously subtracted from the subsequent values, and the angle between the device (laser direction) and the surface normal is calculated every 100 ms. According to the limit values of the angles (θA, θB, and θC) determined in the program, the RGB LED at the tip of the welding torch warns the welding operator in red (Figure 8c), green (Figure 8d), and blue (Figure 8e) colors depending on the relative angle of the torch with the surface. In this way, the operator can perform the welding process in the correct position.
Thirty test specimens were prepared with constant laser intensity with and without the aid of an angular positioning device. By determining the maximum loads of spot welds of these samples, the distribution range is shown in Figure 9 as box curves. Samples made with the aid of an angular positioning device collected in a narrow range show that the standardization and weld strength increase in manual laser spot welds.

4. Discussion

Product-based production processes are established in industrial areas where mass production is not performed. In such custom-made systems, manual welding methods are preferred instead of robotic automation. This type of manually welded joint may be in the invisible parts of the product and in the visible positions that may contribute to or damage the marketing of the product. In such cases, welding should be done more meticulously than in everyday operations. Increasing the welding strength in terms of high strength requirements can cause visual defects in the material. Reducing the weld strength in order not to create visible defects will adversely affect the strength of the material. For this reason, minimizing all the negativities by determining the optimum values is vital in some industrial applications. In the manual welding process, the process is usually under the initiative of the personnel. Although the product often looks the same, there may be large-scale differences between the products when the necessary examinations are made in the laboratory environment. In order to prevent human-induced errors, feasibility studies based on experiments should be carried out, and additional features should be added to the devices used to obtain the most suitable values for the work to be done in different parameters.
Although the laser power, frequency, pulse time, laser beam diameter, and similar parameters in manual laser welding devices may change in the long term, they can be kept constant in the short term. However, in manual laser spot welding, the torch grip angle is the most error-prone parameter at the operator’s discretion. Therefore, in this study, a supporting device that can stabilize the welding angle was developed. The device helps to keep the torch-welding surface angle at a fixed and appropriate value within specific tolerances with visual warning signs. In this way, it was shown that the manual welding process can be standardized in industrial areas where there is no mass production, due to the welding process developed with the smart welding torch.
In order to eliminate operator initiative in manual laser spot welding applications, an electronic link can be established between the electronic circuit measuring the angular position of the torch and the laser shot trigger. In this way, even if the trigger is pressed for shooting outside the appropriate angle range, the circuit cannot be completed, and faulty welding can be prevented.
In visual micro-laser welding of thin sheets, the suitable welding angle range may be too narrow to be set manually. In the case of such a need, automatic laser firing can be performed as soon as the appropriate angle is detected, with the help of communication and software to be established between the laser ignition trigger and the angular position sensor circuit.
In order to measure the weld surface normal, a cap should be attached to the torch tip, and the measurement button should be pressed while the cap’s flat surface is held so that it fits snugly to the welding surface. Errors may occur in this measurement process, such as if the operator acts in a hurry or has low command of the torch. To prevent this, an electronic system can be designed to activate the measurement button when the device is fully seated on the surface and thus detect the surface normal.

5. Conclusions

  • It was observed that in cases where laser spot welding must be done manually, standard welding cannot be performed.
  • Experiments showed that the quality of the weld changes with the change in angle between the weld surface and the laser beam in laser spot welding, even if all other variables are kept constant.
  • It was demonstrated in the study that this problem can be solved with a smart manual torch equipped with a system that measures the surface angle and helps keep the surface laser angle within a certain range.

6. Patents

The patent application process has been started for the device introduced in the study.

Author Contributions

Conceptualization, E.Ş. and M.R.; methodology, M.R.; software, E.Ş.; validation, E.Ş. and M.R.; formal analysis, E.Ş.; investigation, E.Ş. and M.R.; resources, M.R.; data curation, E.Ş.; writing—original draft preparation, M.R.; writing—review and editing, M.R.; visualization, E.Ş.; supervision, M.R.; project administration, E.Ş.; funding acquisition, E.Ş. All authors have read and agreed to the published version of the manuscript.

Funding

This research was funded by EVINOKS SERVIS EKIPMANLARI SAN. VE TIC. A.Ş., grant number 2022-01.

Institutional Review Board Statement

Not applicable.

Informed Consent Statement

Not applicable.

Data Availability Statement

Not applicable.

Conflicts of Interest

The authors declare no conflict of interest. The funders had no role in the design of the study; in the collection, analyses, or interpretation of data; in the writing of the manuscript; or in the decision to publish the results.

References

  1. Luangpaiboon, P. Constrained response surface optimization for a laser beam welding process. J. Math Stat. 2011, 7, 5–11. [Google Scholar] [CrossRef]
  2. Tsukamoto, S. Laser welding. Weld. Int. 2003, 17, 767–774. [Google Scholar] [CrossRef]
  3. Chen, W.; Ackerson, P.; Molian, P. CO2 laser welding of galvanized steel sheets using vent holes. Mater. Design 2009, 30, 245–251. [Google Scholar] [CrossRef]
  4. Ghosh, P.S.; Sen, A.; Chattopadhyaya, S.; Sharma, S.; Singh, J.; Dwivedi, S.P.; Saxena, A.; Khan, A.M.; Pimenov, D.Y.; Giasin, K. Prediction of Transient Temperature Distributions for Laser Welding of Dissimilar Metals. Appl. Sci. 2021, 11, 5829. [Google Scholar] [CrossRef]
  5. Ishide, T.; Tsubota, S.; Nayama, M.; Shimokusu, Y.; Nagashima, T.; Okimura, K. 10 kW Class YAG Laser Application for Heavy Components. In High-Power Lasers in Manufacturing, Proceedings of the SPIE, Advanced High-Power Lasers and Applications, Osaka, Japan, 1–5 November 1999; SPIE: Bellingham, WA, USA, 1999; Volume 3888, pp. 543–550. [Google Scholar]
  6. Katayama, S.; Seto, N.; Kim, J.; Matsunawa, A. Formation Mechanism and Reduction Method of Porosity in Laser Welding of Stainless Steel. In Proceedings of the ICALEO, Section G, San Diego, CA, USA, 17–18 November 1997; pp. 83–92. [Google Scholar]
  7. Katayama, S.; Matsunawa, A. Formation Mechanism and Prevention of Defects in Laser Welding of Aluminum Alloys. In Proceedings of the 6th International Conference on Welding and Melting by Electron and Laser Beams CISFFEL 6, Toulon, France, 15–19 June 1998; Volume 1, pp. 215–222. [Google Scholar]
  8. Katayama, S.; Seto, N.; Kim, J.; Matsunawa, A. Formation Mechanism and Suppression Procedure of Porosity in High Power Laser Welding of Aluminum Alloys. In Proceedings of the ICALEO, Section C, Orlando, FL, USA, 16–19 November 1998; pp. 24–33. [Google Scholar]
  9. Zhou, J.; Tsai, H. Porosity Formation and Prevention in Pulsed Laser Welding. ASME J. Heat Transfer 2006, 129, 1014–1024. [Google Scholar] [CrossRef]
  10. Sun, J.; Nie, P.; Feng, K.; Li, Z.; Guo, B.; Jiang, E. The elimination of pores in laser welds of AISI 304 plate using different shielding gases. J. Mater Process. Technol. 2017, 248, 56–63. [Google Scholar] [CrossRef]
  11. Kumar, N.; Mukherjee, M.; Bandyopadhyay, A. Comparative study of pulsed Nd:YAG laser welding of AISI 304 and AISI 316 stainless steels. Opt. Laser Technol. 2017, 88, 24–39. [Google Scholar] [CrossRef]
  12. Siva Shanmugam, N.; Buvanashekaran, G.; Sankaranarayanasamy, K. Some studies on weld bead geometries for laser spot welding process using finite element analysis. Mater. Des. 2012, 34, 412–426. [Google Scholar] [CrossRef]
  13. Cedeño-Viveros, L.D.; García-López, E.; Vázquez, E.V.; Siller, H.R.; Rodríguez, C.A. Laser micro-spot welding of AISI 302 stainless steel sheets. In Laser-Based Micro and Nano Processing XII, Proceedings of the SPIE LASE, San Francisco, CA, USA, 27 January–1 February 2018; SPIE: Bellingham, WA, USA, 2018; p. 105. [Google Scholar]
  14. Kumar, N.; Dhara, S.; Masters, I.; Das, A. Substituting Resistance Spot Welding with Flexible Laser Spot Welding to Join Ultra-Thin Foil of Inconel 718 to Thick 410 Steel. Materials 2022, 15, 3405. [Google Scholar] [CrossRef]
  15. Ventrella, V.A.; Berretta, J.R.; de Rossi, W. Pulsed Nd:YAG laser seam welding of AISI 316L stainless steel thin foils. J. Mater. Process. Technol. 2010, 210, 1838–1843. [Google Scholar] [CrossRef]
  16. Kleine, K.F.; Fox, W.J.; Watkins, K.G. Micro Welding with Pulsed Single Mode Fiber Lasers; Laser Institute of America: San Francisco, CA, USA, 2004; p. M501. [Google Scholar]
  17. Gillner, A.; Holtkamp, J.; Hartmann, C.; Olowinsky, A.; Gedicke, J.; Klages, K.; Bosse, L.; Bayer, A. Laser applications in micro technology. J. Mater. Process. Technol. 2005, 167, 494–498. [Google Scholar] [CrossRef]
  18. Tolinski, M. Lasers seal the deal in medical. Manuf. Eng. 2008, 140, 14–20. [Google Scholar]
  19. Quazi, M.; Ishak, M.; Fazal, M.; Arslan, A.; Rubaiee, S.; Aiman, M.; Qaban, A.; Yusof, F.; Sultan, T.; Ali, M. A comprehensive assessment of laser welding of biomedical devices and implant materials: Recent research, development and applications. Crit. Rev. Solid State Mater. Sci. 2021, 46, 109–151. [Google Scholar] [CrossRef]
  20. Shaikh, U.F.; Das, A.; Barai, A.; Masters, I. Electro-Thermo-Mechanical Behaviours of Laser Joints for Electric Vehicle Battery Interconnects. In Proceedings of the 2019 Electric Vehicles International Conference (EV), Bucharest, Romania, 3–4 October 2019; IEEE: Piscataway, NJ, USA, 2019; pp. 1–6. [Google Scholar]
  21. Pakmanesh, M.R.; Shamanian, M. Optimization of pulsed laser welding process parameters in order to attain minimum under fill and undercut defects in thin 316L stainless steel foils. Opt. Laser Technol. 2018, 99, 30–38. [Google Scholar] [CrossRef]
  22. Kim, J.D.; Kim, C.J.; Chung, C.M. Repair welding of etched tubular components of nuclear power plant by Nd:YAG laser. J. Mater. Process. Tech. 2001, 114, 51–56. [Google Scholar] [CrossRef]
  23. Ahmad, G.N.; Raza, M.S.; Singh, N.K.; Kumar, H. Experimental investigation on Ytterbium fiber laser butt welding of Inconel 625 and Duplex stainless steel 2205 thin sheets. Opt. Laser Technol. 2020, 126, 106117. [Google Scholar] [CrossRef]
  24. Ahmad, G.N.; Raza, M.S.; Singh, N.K.; Muvvala, G. Investigating the effect of process parameters on weld pool thermal history and mechanical properties of laser welded Inconel 625 and Duplex stainless steel 2205 dissimilar welds. Optik 2021, 248, 168134. [Google Scholar] [CrossRef]
  25. Yan, L.; Jam, J.E.; Beni, M.H.; Kholoud, M.J.; Baleanu, D.; Shahraki, M.E.; Ghaemi, F. Effect of laser welding parameters on the temperature distribution, microstructure and mechanical properties of dissimilar weld joint of Inconel 625 and stainless steel 304. Int. Commun. Heat Mass Transf. 2022, 131, 105859. [Google Scholar] [CrossRef]
  26. Wohlers, T. Making Products by Using Additive Manufacturing. Manuf. Eng. 2011, 146, 70–77. [Google Scholar]
  27. Sukhov, D.I.; Bogachev, I.A.; Hodyrev, N.A.; Filonova, E.V. Multiple recycling of nickel alloy powder for selective laser melting process: Influence on properties of the powder and printed material. Rapid Prototyp. J. 2022, 28, 1933–1942. [Google Scholar] [CrossRef]
  28. Sezer, H.; Tang, J.; Ahsan, A.N.; Kaul, S. Modeling residual thermal stresses in layer-by-layer formation of direct metal laser sintering process for different scanning patterns for 316L stainless steel. Rapid Prototyp. J. 2022, 28, 1750–1763. [Google Scholar] [CrossRef]
  29. Ullah, A.; Ur Rehman, A.; Salamci, M.U.; Pıtır, F.; Liu, T. The influence of laser power and scanning speed on the microstructure and surface morphology of Cu2O parts in SLM. Rapid Prototyp. J. 2022, 28, 1796–1807. [Google Scholar] [CrossRef]
  30. Khorasani, M.; Ghasemi, A.; Leary, M.; Sharabian, E.; Cordova, L.; Gibson, I.; Downing, D.; Bateman, S.; Brandt, M.; Rolfe, B. The effect of absorption ratio on meltpool features in laser-based powder bed fusion of IN718. Opt. Laser Technol. 2022, 153, 108263. [Google Scholar] [CrossRef]
  31. Srikanth, S.; Parthiban, A. Microstructural analysis of Nd:YAG laser welding for Inconel alloy. Mater. Today Proc. 2020, 21, 568–571. [Google Scholar] [CrossRef]
  32. Cheepu, M.; Kumar Reddy, Y.A.; Indumathi, S.; Venkateswarlu, D. Laser welding of dissimilar alloys between high tensile steel and Inconel alloy for high temperature applications. Adv. Mater. Process. Technol. 2020, 1–12. [Google Scholar] [CrossRef]
  33. Sidharth, D.; KV, P.P.; Rajendran, R.; Narayanan, S. Microstructure and properties of inconel 718 and AISI 416 laser welded joints. J. Mat. Proc. Tech. 2019, 266, 52–62. [Google Scholar]
  34. Lin, J.; Wang, X.; Lei, Y.; Wei, R.; Guo, F. Study on hot cracking in laser welded joints of inconel 718 alloy foils. J. Manuf. Process. 2021, 64, 1024–1035. [Google Scholar] [CrossRef]
  35. Lertora, E.; Mandolfino, C.; Gambaro, C. Mechanical Behaviour of Inconel 718 Thin-Walled Laser Welded Components for Aircraft Engines. Int. J. Aer. Eng. 2014, 721680. [Google Scholar] [CrossRef]
  36. Simonds, B.J.; Sowards, J.; Hadler, J.; Pfeif, E.; Wilthan, B.; Tanner, J.; Harris, C.; Williams, P.; Lehman, J. Time-Resolved Absorptance and Melt Pool Dynamics during Intense Laser Irradiation of a Metal. Phys. Rev. Appl. 2018, 10, 044061. [Google Scholar] [CrossRef]
  37. Gennari, C.; Lago, M.; Bögre, B.; Meszaros, I.; Calliari, I.; Pezzato, L. Microstructural and Corrosion Properties of Cold Rolled Laser Welded UNS S32750 Duplex Stainless Steel. Metals 2018, 8, 1074. [Google Scholar] [CrossRef] [Green Version]
  38. Liu, Y.; Yuan, K.; Li, T.; Li, S.; Ren, Y. NDT Method for Line Laser Welding Based on Deep Learning and One-Dimensional Time-Series Data. Appl. Sci. 2022, 12, 7837. [Google Scholar] [CrossRef]
Figure 1. (a) Standard hand laser welding torch. (b) Smart hand torch with angular positioning assistant device. (c) Circuit diagram of angular positioning assist device.
Applsci 12 11137 g001
Figure 2. Visual micro-laser spot welding application on thin inox material. (a) Visible surface (0.8 mm thick 304 stainless steel sheet on “Cold well with fan”). It is expected that there will be no heat trace or deformation due to welding on this inox surface of the device. (b) Invisible surface (2 mm thick 304 stainless steel sheet “well support, hook sheet”). Laser marks on this surface, located on the hidden interior of the device, are an acceptable error.
Applsci 12 11137 g002
Figure 3. (a) Dimensions of test specimens and welding of 2 mm and 0.8 mm 304 series stainless steel test specimens from two points. (b) Laser welding parameters and signal form. (c) Photograph of the custom-made benchtop tensile test device with a test specimen.
Applsci 12 11137 g003
Figure 4. Weld traces and weld sections for different welding torch angles (70.43 Joules). (a) θ = 30° (extremely tilted holding angle). (b) θ = 15° (appropriate holding angle). (c) θ = 5° (extremely steep holding angle).
Applsci 12 11137 g004
Figure 5. Welding traces the C surface (welding surface of 0.8 mm thick sheet) for different welding torch angles, θ (70.43 Joules).
Applsci 12 11137 g005
Figure 6. Force–elongation curves of test specimens welded at different torch angles (70.43 Joules).
Applsci 12 11137 g006
Figure 7. Normalized yield strength of the weld versus laser torch holding angle and welding quality mapping.
Applsci 12 11137 g007
Figure 8. Using the smart welding torch. (a) Representation of the critical laser holding angles. (b) Measurement of the normal of the welding surface by the operator. (c) Excessively vertical holding angle, 0 < θ < θA. (d) Appropriate holding angle, θA < θ < θB. (e) Excessively inclined holding angle, θB < θ < θC.
Applsci 12 11137 g008
Figure 9. Distribution of maximum loads of point welds with and without the aid of an angular positioning device.
Applsci 12 11137 g009
Table 1. Material properties of test sample stainless steel sheets. (Guangdong Yongjin Metal Technology Co., Ltd. Test Certificate, Certificate No: YJ2021122336, Date of Survey: 12 December 2021).
GradeChemical Composition (%)Shear Stress (N/mm2)Yield Stress (N/mm2)Hardness (HV)
CSiMnPSNiCrN
304/304L/1.4301/1.43070.0220.341.380.0280.0028.0118.150.065632274164
Publisher’s Note: MDPI stays neutral with regard to jurisdictional claims in published maps and institutional affiliations.