Article

Methodology Proposal and 3D Model Creation of a Car Steering Wheel

University of Žilina, University Science Park UNIZA, 010 26 Žilina, Slovakia
*
Author to whom correspondence should be addressed.
Appl. Sci. 2023, 13(14), 8054; https://doi.org/10.3390/app13148054
Submission received: 22 May 2023 / Revised: 7 July 2023 / Accepted: 8 July 2023 / Published: 10 July 2023
(This article belongs to the Special Issue Smart Manufacturing and Materials Ⅱ)

Abstract

:
Currently, the largest milestone to successfully bring products to market is to shorten the production time interval, so the production of any product should be very fast. Customers are far more demanding and recently prefer the option to customize products. A key element in the development of prototypes and the overall shortening of the production process is rapid prototyping, an integral part of which is virtual modeling. Modeling is completed through explicit or parametric 3D CAD software. This article proposes a methodology for creating a 3D virtual model of a car steering wheel and then creates an assembled spatial model in real size. Attention is focused on the theoretical knowledge of the problem, the specification of dimensions, the number of assembly members and the selection of a suiTable 3D CAD application in which the steering wheel is modeled. Many specific software features are also described that are not standardly used and make a significant contribution to a more design-attractive output.

1. Introduction

Modern methods are used in the production of prototypes, which enable the creation of a digital spatial model, assembly model and complete drawing documentation “from concept to realization.” The collective name for these methods is CAx systems. According to different application areas, different CAx systems named after different CAx methods have been developed [1,2,3,4]:
  • CAD (computer-aided design) that includes computer-aided styling (CAS), computer-aided aesthetic design (CAAD), computer-aided conceptual design (CACD);
  • CAM (computer-aided manufacturing) that includes NC (numerical controlled) and CNC computer numerical controlled);
  • CAE (computer-aided engineering) that includes FEA (finite element method) and CFD (computational fluid dynamics);
  • PLM (product lifecycle management);
  • PDM (product data management).
There are many computer-aided design (CAD) softwares on the market. Some are simpler and enable the rapid design of spatial models (explicit or direct CAD software), while the initial focus is not on exact dimensions but on overall spatial design. Others are more complicated and slower (parametric CAD software) since the emphasis is on the exact dimensions and sequence of individual features that add or remove volume in the 3D model [5,6,7,8,9,10]. Parametric models can be modified repeatedly and their design can be optimized on the basis of well-defined rules without the risk of “collapse” geometry. Another method of creating 3D CAD models is reverse engineering [11,12,13], which is based on an existing real object and its interpretation into a 3D digital model. The prototype, which is based on the 3D model, can then be created either by conventional methods or by rapid prototyping technology, which includes an additive manufacturing method [14,15]. The automotive industry faces demands on all fronts, including the need to optimize production and rationalize supply chains and logistics, as well as the demand for newer, more powerful vehicles. Rapid prototyping assists with these challenges. In addition to its extensive use for rapid prototyping, this technology is also used to produce tools and, in some cases, final parts.
In response to increasing demand for customized products and experiences, automotive companies are increasingly offering consumers the opportunity to customize their vehicles with customized components [16,17]. The constructors design the parts in CAD software, and the resulting prototypes are then produced in a relatively short time. Rapid prototyping enables automobile manufacturers to reduce lead times and production costs for low-volume parts and custom production thanks to the use of 3D printing. This is partly due to the fact that the technology eliminates the need to create individual tooling for each customized element, which would be financially impractical.
In 2016, Daihatsu, the oldest automobile manufacturer in Japan, launched an initiative to customize its Copen car model. Customers can choose from a variety of panel designs available or create their own to be placed on the front and rear bumpers after production [18].
In Europe, BMW also uses rapid prototyping to create customized MINI components. Since early 2018, customers have been able to customize various decorative elements, such as the dashboard, LED sills and door lighting lettering, as well as choosing from different colors and textures [19].
Techniplas LLC, a global designer and manufacturer of automotive products and services, introduced an open innovation program in early 2018 for rapid prototyping companies to validate and integrate their automotive additive manufacturing equipment. At the end of 2018, it presented an innovative steering wheel concept that combines the patented technology of cognitive intelligent lighting with electronics [20].
Paper [21] examines the possibilities of 3D printing on textiles for the automotive industry, as well as its adhesion and other mechanical properties. Another goal is to explore the potential of new design methods and aesthetic performance of materials used in automobiles, as well as ergonomically beneficial effects.
Another study [22] describes the design, modeling and manufacturing process for a multi-purpose steering wheel for a formula-style racing car. Pre-impregnated carbon-fiber-reinforced polymer (CFRP) is used for the steering wheel, which has been cured in an autoclave. The design of the layers of the composite material is described in detail, followed by the material deformation test. The final product is a component of the Formula Student Electric Racing Car SGT-FE18.
Paper [23] describes functional automobile components modeled in CAD software and subsequently manufactured. It features a functional ducting design, center console and functional alternator bracket. It was concluded that some 3D-printed parts contain sporadic small ‘voids’ or cavities that can reduce their overall strength. In some cases, the accuracy of dimensions is not always comparable to the accuracy of conventionally manufactured parts. These and other quality issues can reduce product uniformity and consistency, a challenge for industries such as the automotive industry where quality and reliability are essential.
As progress and innovation continue, car manufacturers will have to undertake more efforts to stay competitive and meet the high demands of their customers with their designs and personalization of car parts.
The goal of this work is to propose a methodology for creating a 3D virtual model of a passenger car steering wheel and then to create a design-attractive assembled spatial model in real size. The main points are theoretical knowledge of the issue, specification of dimensions, number of assembly members, selection of a suiTable 3D CAD application in which the steering wheel will be modelled and the creation of the assembly model. Many specific software features are also described, which are not used by default and significantly contribute to a more design-attractive output.

2. Methodology of Vehicle Steering Wheel Creation

The proposed solution to this issue is based on the development of innovative technologies. These must be considered when creating a methodology according to the stated specifications of the research problem. It is necessary to describe the individual steps from defining the input variables of the problem to the virtual creation of the geometry of the individual components and the overall assembly model.
According to the specifications of the research problem, we divided the methodology into 2 phases, while each phase has individual subphases:
  • preparatory phase of the proposal for the vehicle steering wheel creation;
  • phase of virtual modeling.

2.1. Preparatory Phase of the Proposal for the Vehicle Steering Wheel Creation

In the preparatory phase, it is necessary to establish partial goals that will provide concrete results in the later implementation phase, i.e., to be able to create assembly model virtually. This phase is demanding regarding theoretical knowledge and also requires the designer’s imagination as the design of the steering wheel is largely individual. Figure 1 shows the different types of steering wheels, from simple versions to multi-function steering wheels, which can be said to have served as inspiration for the new design.
Steering wheels are currently manufactured as assemblies of metal and plastic parts. Polyurethane and the upper plastic part are applied to the lightweight metal frame using an injection mold. Almost all steering wheels can currently be additionally personalized using leather, silicone and plastic parts that are placed around the circumference of the steering wheel (on the handle). On some types of steering wheels, it is possible to exchange standardized parts for personalized ones. The aim of the work is to design and create a customized assembly of a car steering wheel without multifunction and without an airbag.
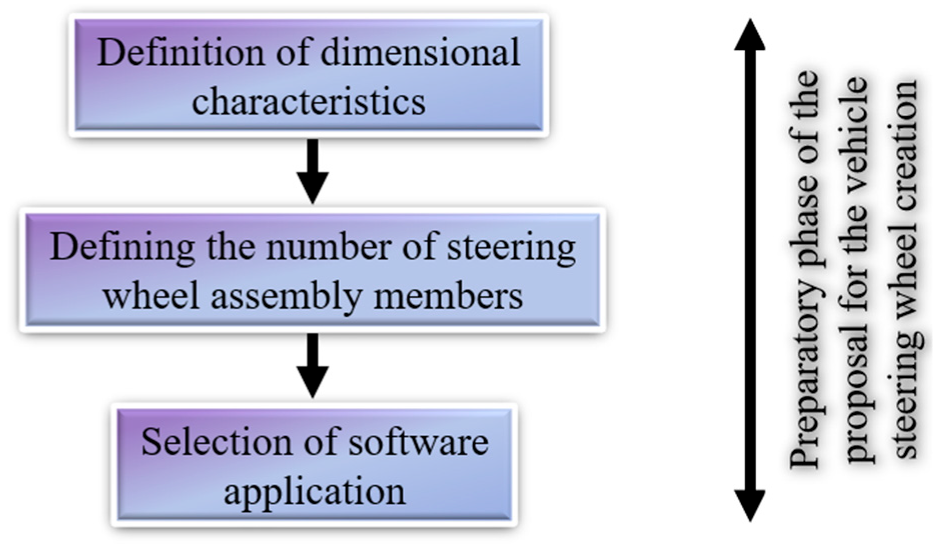
The preparatory phase is divided into the following sub-phases and is shown in Figure 2.

2.1.1. Definition of Dimensional Characteristics

Due to the fact that the steering wheel is part of the vehicle’s interior, it is not possible to choose arbitrary dimensions. The dimensions of the steering wheel also depend on the type of car. Different dimensions are, for example, in an SUV car, others in a classic sedan or van. In general, the wider the vehicle, the larger the steering wheel can be, but it must meet the condition that it will not limit the driver by its dimensions and will not significantly affect the reach of the driver’s hands on the steering wheel and also the driver’s cone of visibility from the seat to the interior and to the immediate surroundings of the vehicle. Manufacturers of steering wheels for the automotive industry strictly guard production drawings with exact dimensions, so we determine steering wheel dimension intervals based on our steering wheel measurements on the following vehicles: MPV/Van, hatchback, 2x SUV, 2x Sedan. Table 1 provides the steering wheel values outer diameter, total height, handle circumference and the presence of a cover on the handle.
Dimensional characteristics have been determined on the basis of measurements for a sedan type vehicle as follows:
  • the outer diameter was determined in the interval 37–39 cm;
  • the total height was determined in the interval 9–12 cm;
  • handle circumference was determined in the interval 10–10.9 cm.

2.1.2. Defining the Number of Steering Wheel Assembly Members

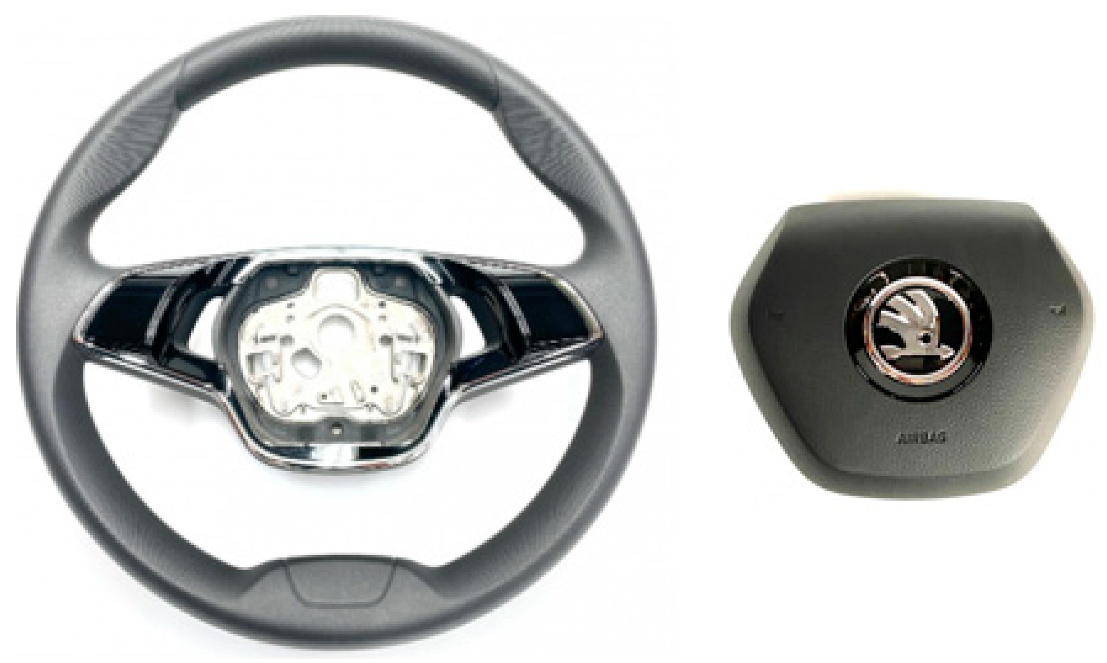
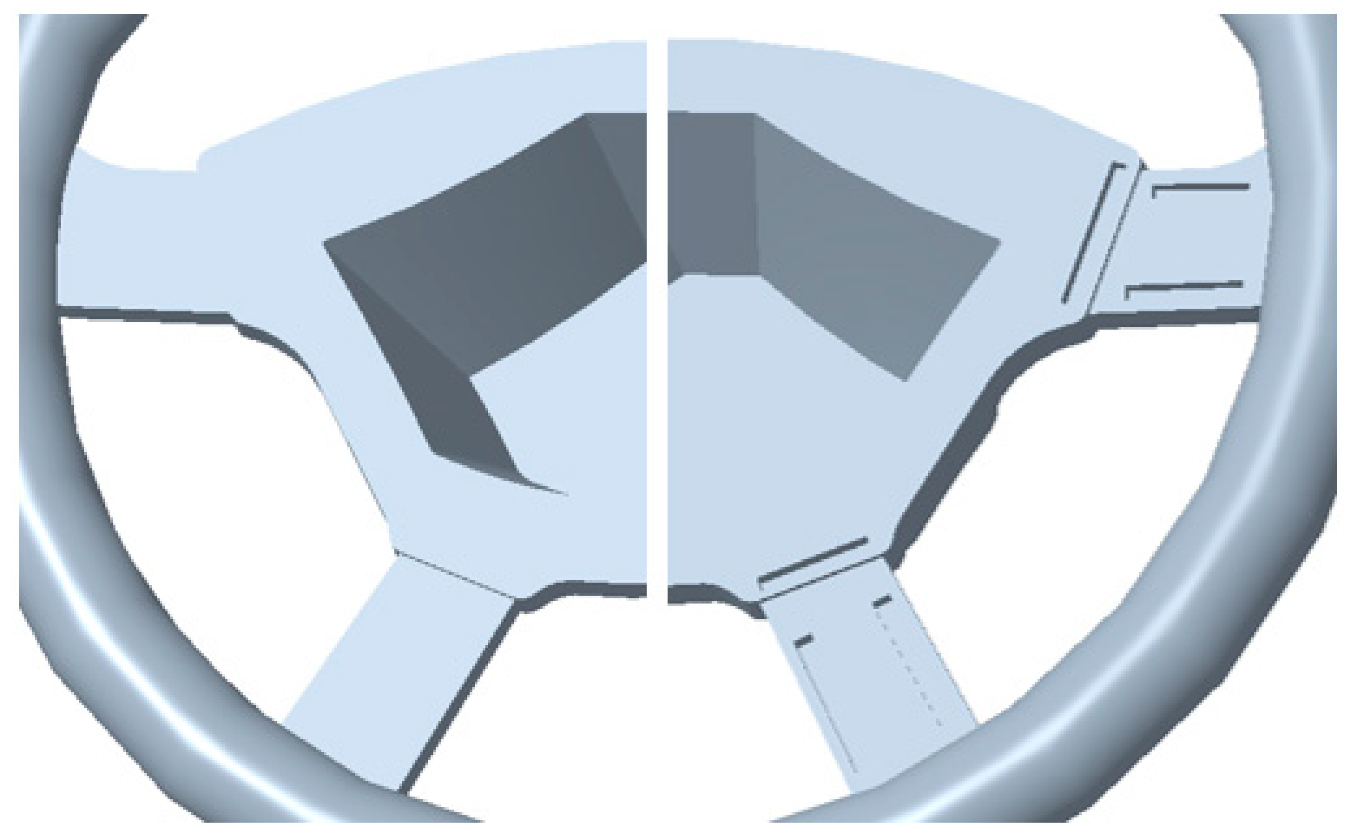
The basic parts of a simple airbag steering wheel without multifunction currently consist of two parts: the lower part, which is directly connected to the steering (Figure 3—left) and the upper airbag part, which is connected to the lower part (Figure 3—right).
As can be seen in Figure 3—left, other small parts are the black and silver parts located on the lower parts of the arm and the manufacturer’s company emblem located in the center part of the upper part (Figure 3—right).
The steering wheel assembly of the car will consist of three basic parts, namely the bottom, top and central decorative aspect, which will be located on the upper part instead of the original emblem. The number of additional decorative members will depend on the number of arms of the bottom part, assuming 1 decorative part per arm. Table 2 shows the number of assembly members depending on the number of arms of the lower part.
The maximum number of arms of the bottom part has been set to 4. A higher number of arms could cause obstacles to the visibility of some lights located on the vehicle dashboard.

2.1.3. Selection of Software Application

The development of new CAD application functions allows their inclusion in the design of the creation of the steering wheel, opening up new possibilities for creating the geometry of virtual 3D models.
Before selecting a suitable CAD application, we had to consider the following:
  • The design of both the lower and upper parts will be complex and will likely consist of advanced curve-based volumetric geometry generation functions. It will be necessary to create a number of spatial curves and planar sketches that will form the basis of the surfaces. The surfaces will additionally be smoothed by means of further so-called control curves in order to achieve a smooth transition. When volume is added, the desired shape is achieved without sharp edges with smooth transitions between different geometric shapes.
  • The virtual steering wheel model will consist of 5, 6 or 7 components, which requires the creation of an assembly. Within the new assembly, the other parts of the assembly should be created using dependent geometry (reference axes, planes, points, curves, which will create the so-called skeleton model) in a top-down design style, ensuring that, in case of any major change to the geometry, the designer will be alerted to the dependent geometry and will not make modeling mistakes. Top-down design is a process that progresses from a high-level design concept to a lower level. The high-level design concept is larger, broader and more general. The lower-level design concept is smaller, more specific and detailed.
  • In order to personalize the assembly according to the customer’s requirements, it will be necessary to create a so-called generic model. The generic model allows you to select model parameters (dimensions, texts, elements of different kinds) that will vary. The values of these parameters are entered in the table so that one generic model becomes, for example, twenty virtual models. Such virtual models can be opened and written to disk, or they can be inserted into an assembly and written to disk by saving the assembly. The method of creating generic models saves time but requires the experience of the designer.
Considerations about the complexity of the model led us to believe that it was appropriate to use parametric 3D CAD software. Our personal experience includes 4 parametric softwares. However, there are many more applications available on the market. According to [26], the following 8 parametric 3D CAD softwares are currently the most widely used:
  • SOLIDWORKS—The software is intuitive, simple and designed to make the designer’s work as easy as possible. Around 200 novelties are programmed each year, most of which have been created specifically on the initiative of users. It includes tools not only for 3D design but also for data management, simulations, electrical designs, plastic simulations, product inspection and CAM machining, thus covering the entire spectrum from development to production. Software license is charged [27].
  • CATIA—The software offers a wide range of solutions integrated into one environment for all aspects and disciplines. It covers the areas of product design and development, working in 3D based on a single database, interfacing with PLM systems, supporting production without drawings, ensuring collaboration in teams and optimizing technological processes. Software license is charged [28].
  • FreeCAD—It is an open-source 3D program with an intuitive interface that suits even beginners. This feature-based software can also be used by professionals, for example, for architectural or engineering projects. The software license is free [29].
  • Creo Parametric—The software allows you to create complex 3D models and work on 2D or 3D complex surfaces, designs and model assemblies. It includes a variety of powerful tools adapted to the production environment. The software is widely used in many industries, including automotive. Software license is charged [30].
  • Siemens NX—The software enables complex product development from product design, through simulations, CNC machine programming and measurement machine programming. In addition, it allows you to store company know-how, check compliance with company standards and, in conjunction with Teamcenter, track and manage the entire product life cycle. Software license is charged [31].
  • RHINO—The software is professional and is used in many different industries. However, it is challenging for beginners. It allows you to work on parametric or non-parametric modeling. However, for parametric modeling, it is necessary to add the Grasshopper plugin. Software license is charged [32].
  • Fusion 360—The software is not a fully parametric modeling software. It can be used for both explicit and parametric modeling, which is why it is classified as a polyvalent program. It is based on web-cloud technologies. It enables 3D modeling of parts and assemblies, direct editing of volumetric and large-scale models, their analysis, visualization, publishing, production (CAM), simulation, data management and online collaboration with colleagues, suppliers or customers. Software license is charged [33].
  • INVENTOR—The software allows you to create, document and simulate objects, including their measurements, assumed movements and assembly. Once the design is created, communication with stakeholders is possible thanks to a shared view in the cloud and the possibility of real-time commenting. Software license is charged [34].
Creo Parametric was selected as the 3D CAD software to virtually model the steering wheel design because of its convenient features that will be sufficient to create a 3D model of the steering wheel assembly.

2.2. Phase of Virtual Modeling

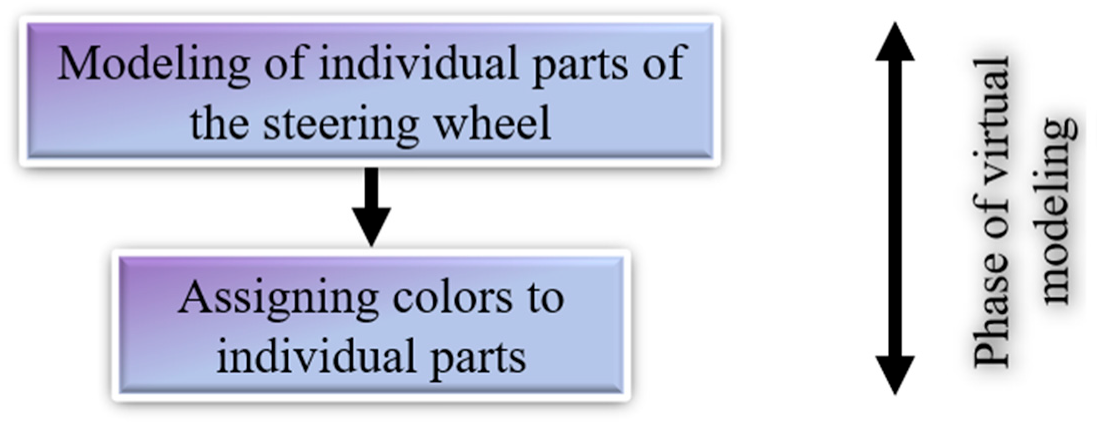
In the parametric 3D CAD application Creo Parametric, it is possible to create geometry and at the same time define precise parameters, such as dimensions, elements and mathematical relationships (relations), in which the designer needs to capture the planned behavior of the system. This approach requires significant experience and knowledge of the designer for the correct application of constraints and relationships within the model. Parametric modeling is accompanied by the automatic creation of the so-called model tree, which shows all the steps that the designer used to create the virtual model. The sub-phases of the virtual modeling and testing phase are shown in Figure 4.

2.2.1. Modeling of Individual Parts of the Steering Wheel

The maximum number of assembly members has been set at 7. According to the designer’s imagination, the design of the bottom part will be created, on which the total number of assembly members will depend. We have considered 2 design alternatives; their schematics are shown in Figure 5.
To implement the virtual 3D design, we chose a design with 7 members. The eighth member will form an assembly model that is superior to the others. The individual models (parts) are not copied into the assembly model; only links are inserted to connect the models to the other parts. This creates a parent–child relationship where the parent is the assembly and the children are the other parts. Therefore, before the actual modeling, it is necessary to select a folder that will serve as the so-called working directory. All the models created will then be saved into it one by one. It should be mentioned that Creo Parametric does not have an auto-save function for models as saving is only possible after the features are complete, not while they are being created. If the models were placed in different folders and an assembly model was created, after closing the application and reloading the assembly model, this would result in a so-called crash, and, therefore, all parts would need to be imported again. A very useful function is backup. This way, all models will be moved to the desired directory. The Slovak language contains punctuation marks, but, in Creo Parametric, it is not possible to create models or other elements with punctuation marks.
1.
Assembly model
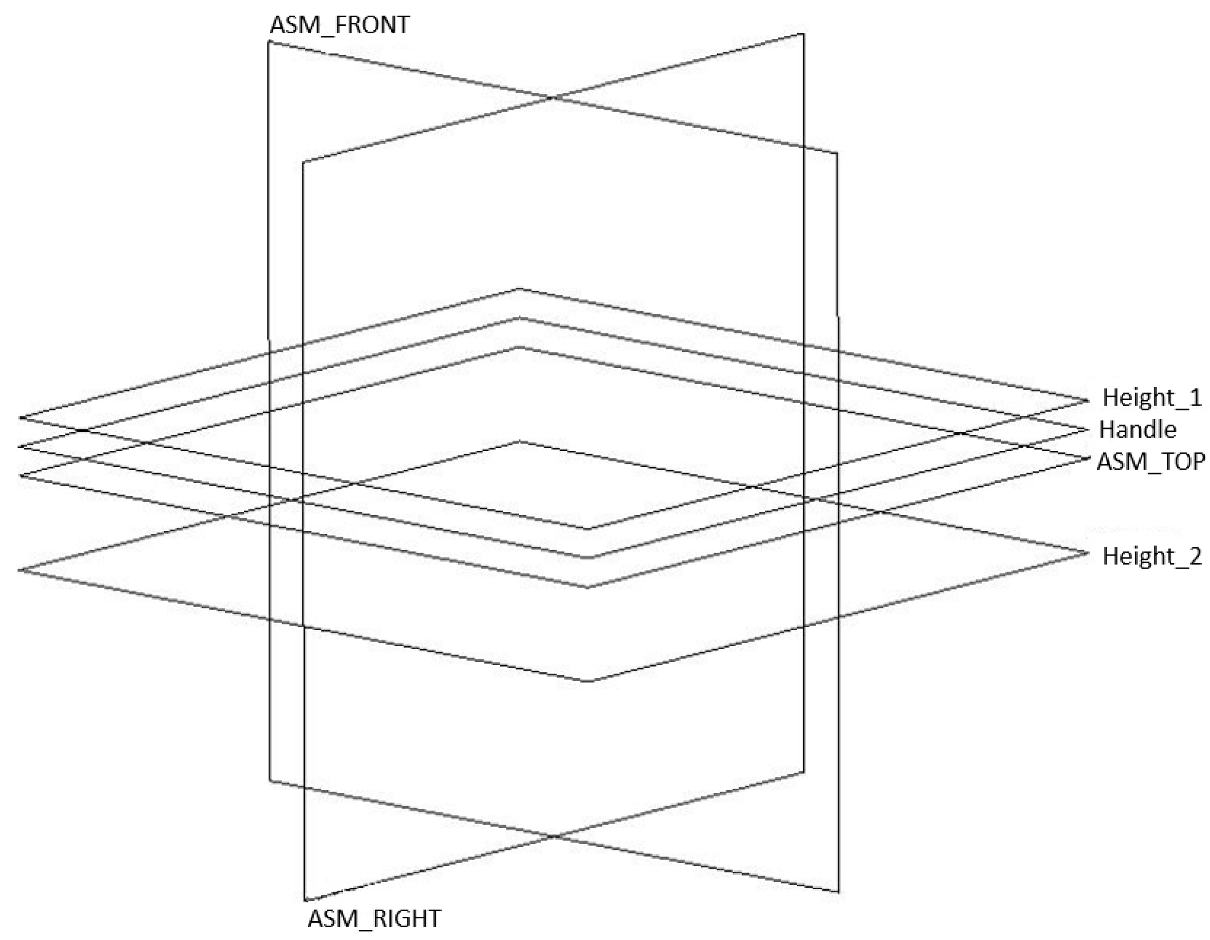
Virtual modeling starts at the level of creating a new assembly, where a file with the extension *.asm is created. The assembled model will be the basis for the design. At the highest level of modeling, the basic 3 reference datum planes (front, top, right and the corresponding axes in the X, Y and Z directions) are created based on the assembly template. The skeleton will consist of 2 datum planes (height_1 and height_2), which will be parallel to the top plane and their mutual distance will define the height of the steering wheel. The other reference plane will be a plane parallel to the top plane and offset by a distance that will define the height of the circular rotation of the steering wheel. If necessary, new reference elements can be inserted into the skeleton at any time. These are then transferred to individual models as needed.
The alternative solution only involves the creation of all the above datum elements within the assembly model. If the assembly consists of a small number of parts, as in the present case, this alternative can be used.
2.
Bottom part
At the assembly level, a model called bottom_part is created with the file extension *.prt. The model is activated and the necessary references from the skeleton are copied into it, on which the volume geometry will be based. This will allow the bottom part volume (lower modeling level) to be modelled directly at the assembly level (higher modeling level). The second option is to open bottom_part from the model tree and create elements directly at a lower level, which will lead to the creation of the volume geometry. Considering that this is a symmetric model, it would be appropriate to create a half model. The model will have 4 arms. At the appropriate time, the Mirror operation is then selected using the model tree and the remaining half of the model is generated dependently. Creating a half part saves creation time and also ensures symmetry of the resulting geometry, especially if advanced curves are used during creation process. Volume features are created using the Extrude, Revolve, Parallel Blend and many rounding features. It is necessary to consider how the top part will be connected to the bottom part and include holes in the geometry.
3.
Top part
An analogous procedure as for the bottom part is chosen when creating a model with the name top_part and the file extension *.prt. In addition to the skeleton references, new references will be added that will come from the bottom_part. These are the edges and curves that will serve as a basis for the creation of the volume geometry. It is as if an imprint of the original surface geometry has been obtained and new volumes have been based on it. This will ensure that the bottom and top geometries are overlapped and the assembly will act as a whole. It will be necessary to create a volume that will connect the polyline reference sketch with the sketch of the circular section that will later serve as the basis for the central ornament. It will be necessary to use the Parallel Blend feature (Parallel connection of cross-sections) to split the circular cross-section sketch into the appropriate number of points according to the reference sketch. A simple example is to join a square and circular cross-section if the circle sketch is divided into 4 parts. In order to obtain a cavity in the model that could accommodate an airbag in the future, we use the Shell command to define the thickness of the remaining geometry, the surfaces that will be omitted but also removed. To avoid the geometry appearing angular, sharp edges are rounded using appropriate radii of curvature. The connection between the top part and the bottom part is created by protrusions that fit into already prepared holes in the bottom part. The same procedure should be followed for the top circular section, where the central decoration will later be inserted.
4.
Central ornament
When creating a central_ornament model with the file extension *.prt, references from the top part are needed, namely the circular cross-section and the cutout into which it will later be inserted. The creation of ornaments is highly individual and depends on the customer’s requirements. This can be extruded geometry in multiple heights and color shades, or advanced techniques to improve the spatial design of the model (Warp feature), which include bending the geometry through selected curves or planes, twisting the geometry around a selected axis, lengthening or shortening the geometry in selected vertices and so on.
5.
Right upper ornament
The curves of the bottom_part model will be the references for creating the right_upper_ornament model with the file extension *.prt. Again, the geometries need to overlap. After the volume is generated, protrusions are added to allow the ornament to be inserted into the bottom part. If the bottom part does not have these cutouts, they can be quickly modeled as a reference at the assembly level. Again, it is possible to use the functionality of post-modification of any model using an appropriately chosen feature that either adds or removes volume.
6.
Left upper ornament
The left_upper_ornament model with the file extension *.prt can be created in several ways:
  • Full dependence on the original model—is to create a mirror model of the right_upper_ornament model with the new name left_upper_ornament. This model cannot be modified. A parent–child relationship is created, where left_upper_ornament is the child. The modification can only be transferred to the parent model and the change will be reflected in both models.
  • Partial dependence on the original model—is the creation of a mirror model of the right_upper_ornament model with a new name left_upper_ornament, which can be partially modified based on predefined rules. The modification can be transferred to both models, with the change being reflected based on the defined rules.
  • Full dependence on the original model with the addition of the required shapes. A simple example is engraved text. The requirement is to have different texts on the right and left ornaments, but the geometry of the shape should remain the same and dependent. The principle of creation is as follows: a mirror model of the right_upper_ornament part is created with a new name, left_upper_ornament. Then, elements for adding or removing material in the form of text are added to both the right and left ornament; each text can be edited separately.
  • Complete independence from the original model—is the creation of a mirror model, right_upper_ornament, with a new name, left_upper_ornament, which is completely independent. However, if the original model is changed, new model will not change, so such a creation is unsatisfactory.
7.
Right lower ornament
When creating the right_lower_ornament model with the file extension *.prt, the same procedure is used as when creating the right_upper_ornament model.
8.
Left lower ornament
When creating the left_lower_ornament model with the file extension *.prt, the same procedure is used as when creating the left_upper_ornament model.

2.2.2. Assigning Colors to Individual Parts

The impact of color on the human psyche has become a major topic in recent years, especially in the field of product marketing, with marketing departments relying on studies in the field of color psychology. These have confirmed that human feelings about color are often deeply rooted in the person’s own experience or, more generally, in the culture in which the human was born and lives. For example, while the color white is used in many Western countries to express purity and innocence, in many Eastern countries, it is considered a symbol of sadness. Although color perception is largely subjective, there are certain colors whose meaning is universal. Colors in the red region of the color spectrum are known as warm colors and include red, orange, and yellow. These warm colors evoke a variety of emotions, from feelings of comfort and warmth to feelings of anger and hostility. Colors on the blue side of the spectrum are known as cool colors and include blue, violet and green. These colors are often described as calm but can also evoke feelings of sadness or indifference. The subjectivity of color perception is also demonstrated by the color black. While some individuals perceive it as ominous and mysterious, others perceive it as dominant, attention-grabbing or confident.
The 7 parts of the steering wheel are divided into the following groups:
  • Single color number 1—the color will copy the color of the vehicle’s dashboard. The vast majority of cars have a black dashboard and steering wheel. Bottom_part and top_part models will belong in this group.
  • Two-color—will be assigned according to the design of the central_ornament model and its color range will match the customer’s requirements and also the color range of suiTable 3D printing materials.
  • Single color number 2—should complement the color of the central ornament and thus complete the desired but unobtrusive complex color effect. This group includes left_upper_ornament and right_upper_ornament models.
  • Single color number 3—should complement the color of the central ornament to provide the desired but unobtrusive color effect. It is assumed to be a different color than in single color number 1. This group includes left_lower_ornament and right_lower_ornament models.

3. Creation of a 3D Design for the Steering Wheel

The main topic of the chapter is the design proposal of individual 3D models, the assembly model of the steering wheel and the assignment of colors to individual models. The parametric modeling technique based on the sequential modeling of elements (points, axes, planes, curves, surfaces, volumes) allows the initial design regarding the construction of the model. Parametricity allows the geometric definitions of the design, such as dimensions, to be adjusted as required at almost any point in the modeling process.

3.1. Creation of the Assembly Model

The assembly model is the basis for individual models because we use a top-down design. In the working directory, we created a new assembly model called steering_wheel with the file extension *.asm. According to the preset template, the basic reference datum planes ASM_FRONT, ASM_TOP and ASM_RIGHT were imported into the model. Due to the number of parts, we decided not to create a skeleton but only the creation of limiting datum planes at the assembly level. In them, we will gradually create models. These were the datum planes for limiting the height of the steering wheel and the circular cross-section of the handle. Figure 6 shows an assembly model with datum planes.

3.2. Creation of the Bottom Part

The creation of the bottom part is the most challenging process as it is the basis for five other models. As mentioned before, we used a top-down design process. At the steering_wheel assembly level, we created a new model called bottom_part.prt. We then activated it, which is reflected by a green star on the model name in the model tree (Applsci 13 08054 i001). Activating a model at the assembly level opens up new modeling possibilities and allows you to create geometric features by writing them into the activated model. The result is a model created at the assembly level. The usual procedure is to create a model with the file extension *.prt and then insert it into the assembly using relevant constraints.
In the central part of the model, we used a parallel connection of cross-sections with different sketches located in parallel planes (parallel blend feature). A matching number of sketch points is required to successfully create a feature. Therefore, it is necessary to either have the same number of curves in the sketch or to additionally divide the sketch so that the number of points in both sketches is the same.
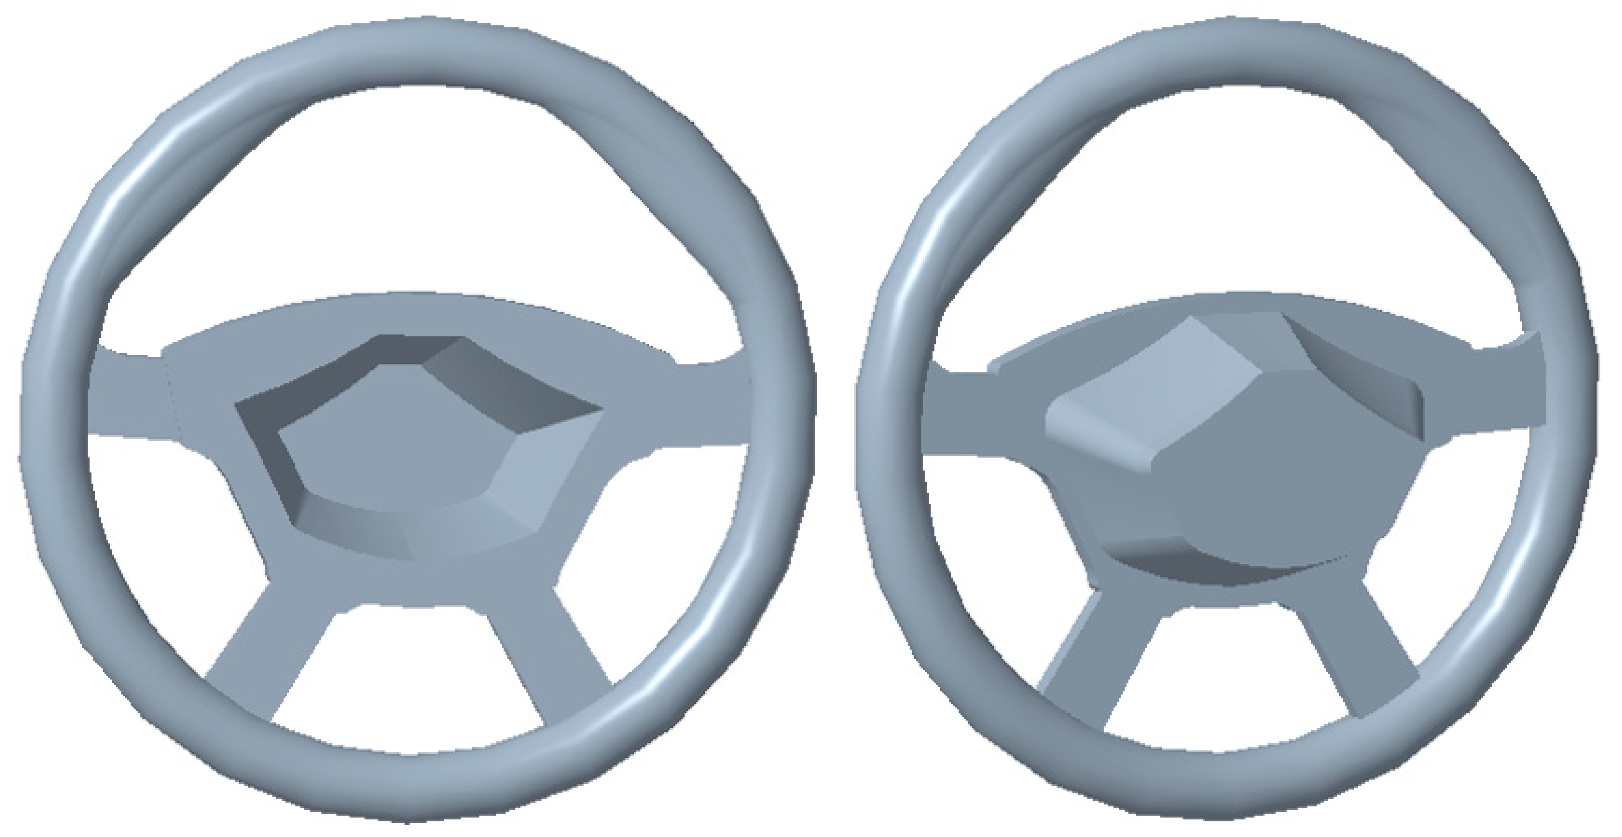
We were aware that, later on, it would be necessary to create the grooves into which the other five models will be inserted with their protrusions. The grooves will be realized after the creation of these models. Figure 7 shows the model of the bottom part from several perspectives. The color shown is the standard color in which models are created in Creo Parametric.

3.3. Creation of the Top Part

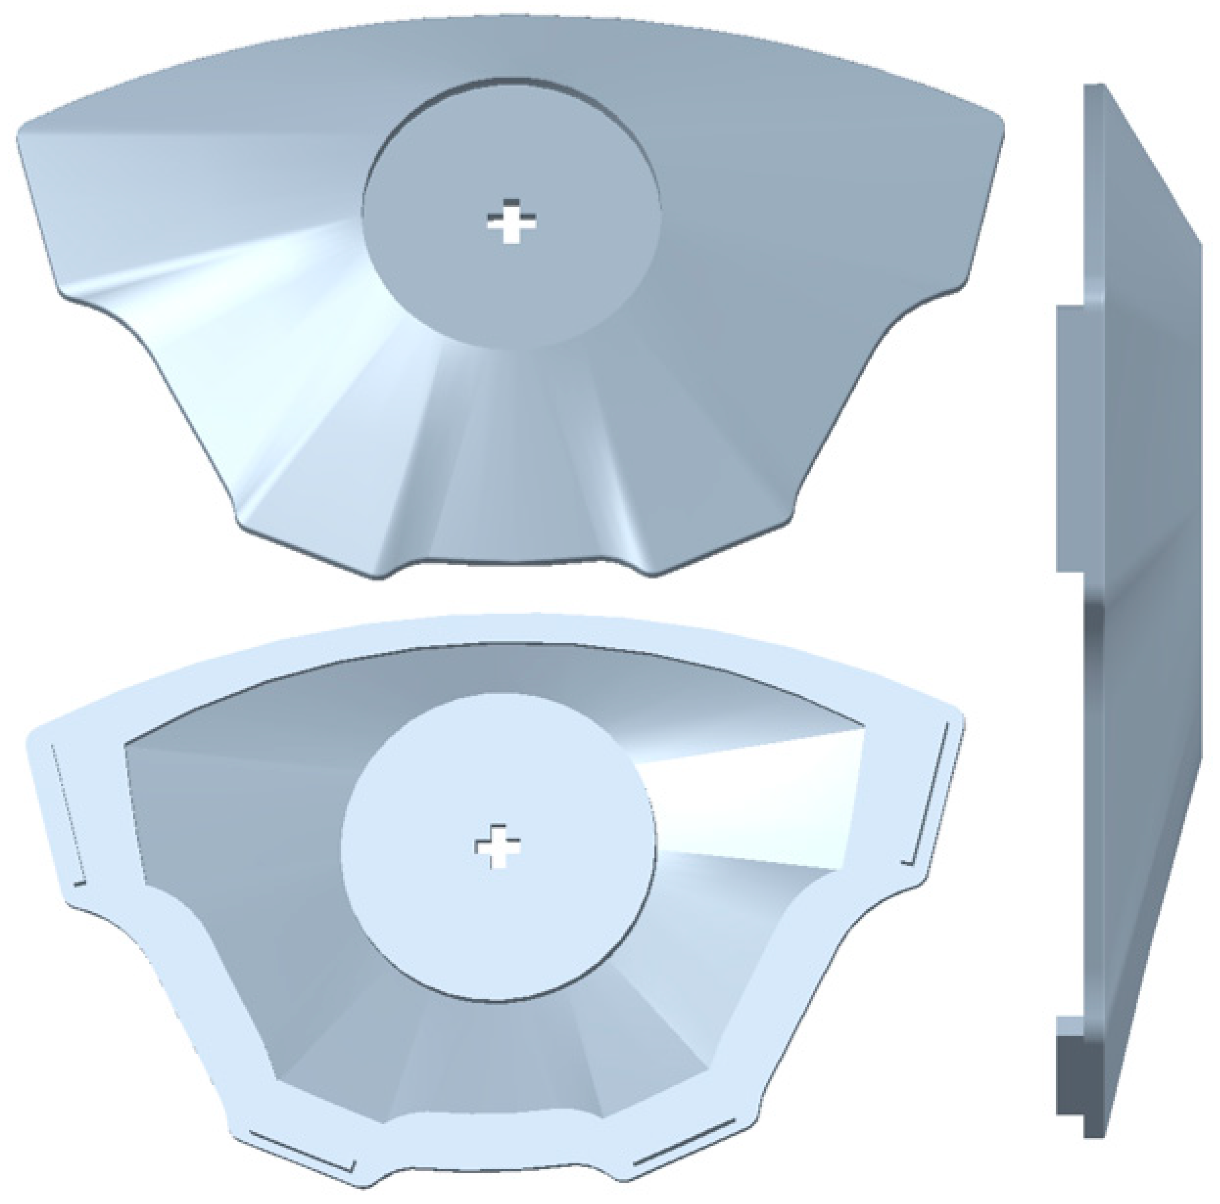
At the steering_wheel assembly level, we created a new model called top_part.prt, which we then activated. Subsequently, we copied some curves from the bottom part into it via the Project option. Some curves needed to be completed. The advantage of modeling at the assembly level is that we could see the contours of the bottom part and modeling became easier in some steps. Once the desired shape was generated, we used the Shell feature, which removed the material and the top surface of the model. The last feature was to add material using the Extrude feature, where we drew two sketches, mirrored them and extruded them at once. These created the protrusions that we used to insert the top part into the bottom part. Figure 8 shows a model of the top part with multiple perspectives in standard color.
After saving the model, we activated the bottom_part model and used the Offset feature to create the grooves where the top part would be inserted into the bottom part, using the protrusions on the upper part as a template.

3.4. Creation of the Central Ornament

The central ornament is a model that
  • does not affect the strength of the steering wheel;
  • meets the customer’s ideas of design;
  • fills the circular hole on the top part;
  • in its center, there is a protrusion for insertion into the model of the top part;
  • does not exceed a specified height.
We decided to create four models using several techniques to create volume geometry.

3.4.1. Central Ornament—Angel

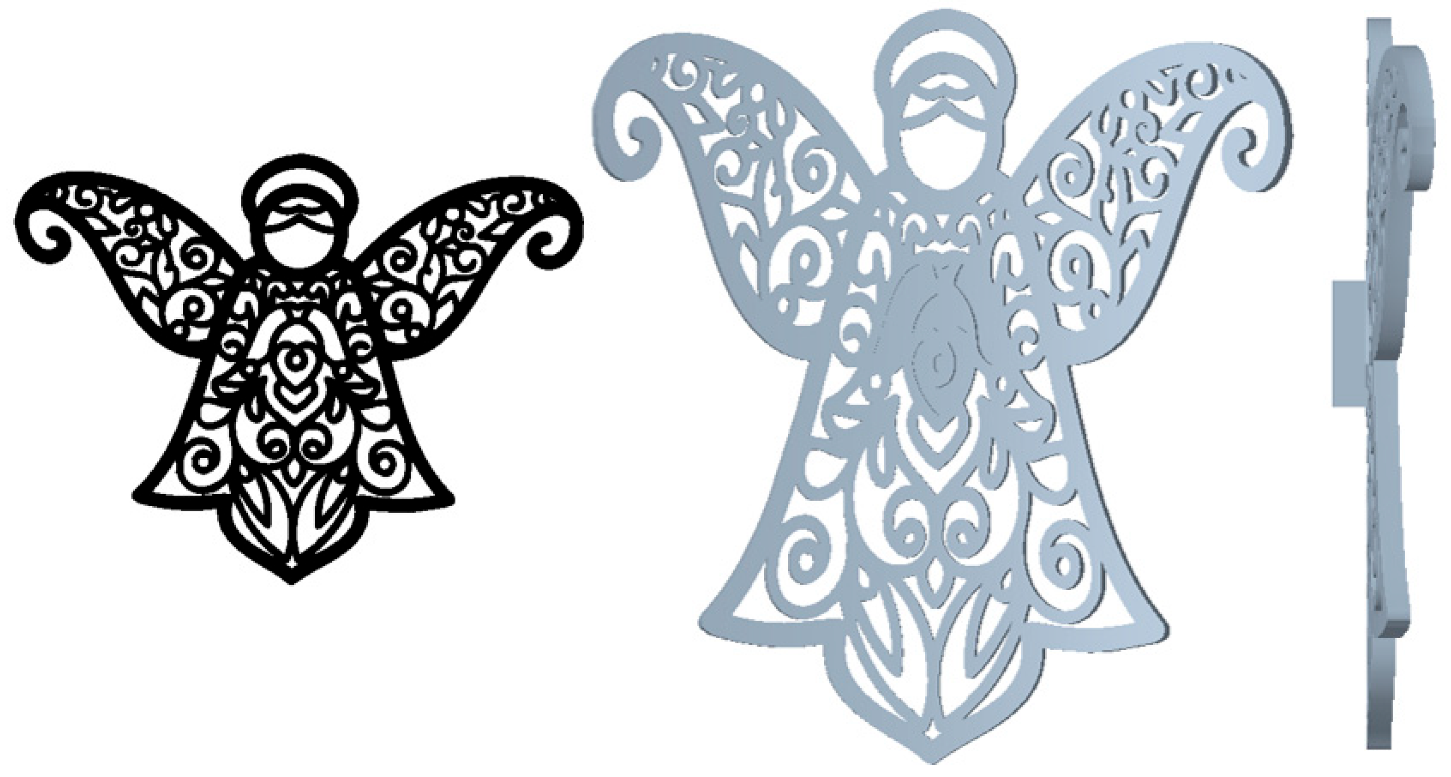
The model was created in a datum circular sketch with the diameter coming out of the top part. We used the image import technique. Creo Parametric can import many image formats, the most popular being TIFF, JPEG, GIF, BMP and PNG. Further, 50% transparency was used in the image import. The following can be completed with the image: move it freely along the plane, resize it approximately or exactly according to the values, rotate the image, offset it parallel to the plane on which it was placed and flip it horizontally and vertically. In sketch mode, we outlined the image (we created the image in other software) and then generated the 3D model. Later, we used an advanced feature to improve the spatial rendering of the model—Warp—which we used to extend and bend the model in space. Then, we added a protrusion to insert the model into the top_part. In Figure 9, the original image of the angel is shown on the left in black, and the perspectives of the 3D model of the angel are shown in grey.

3.4.2. Central Ornament—Cross

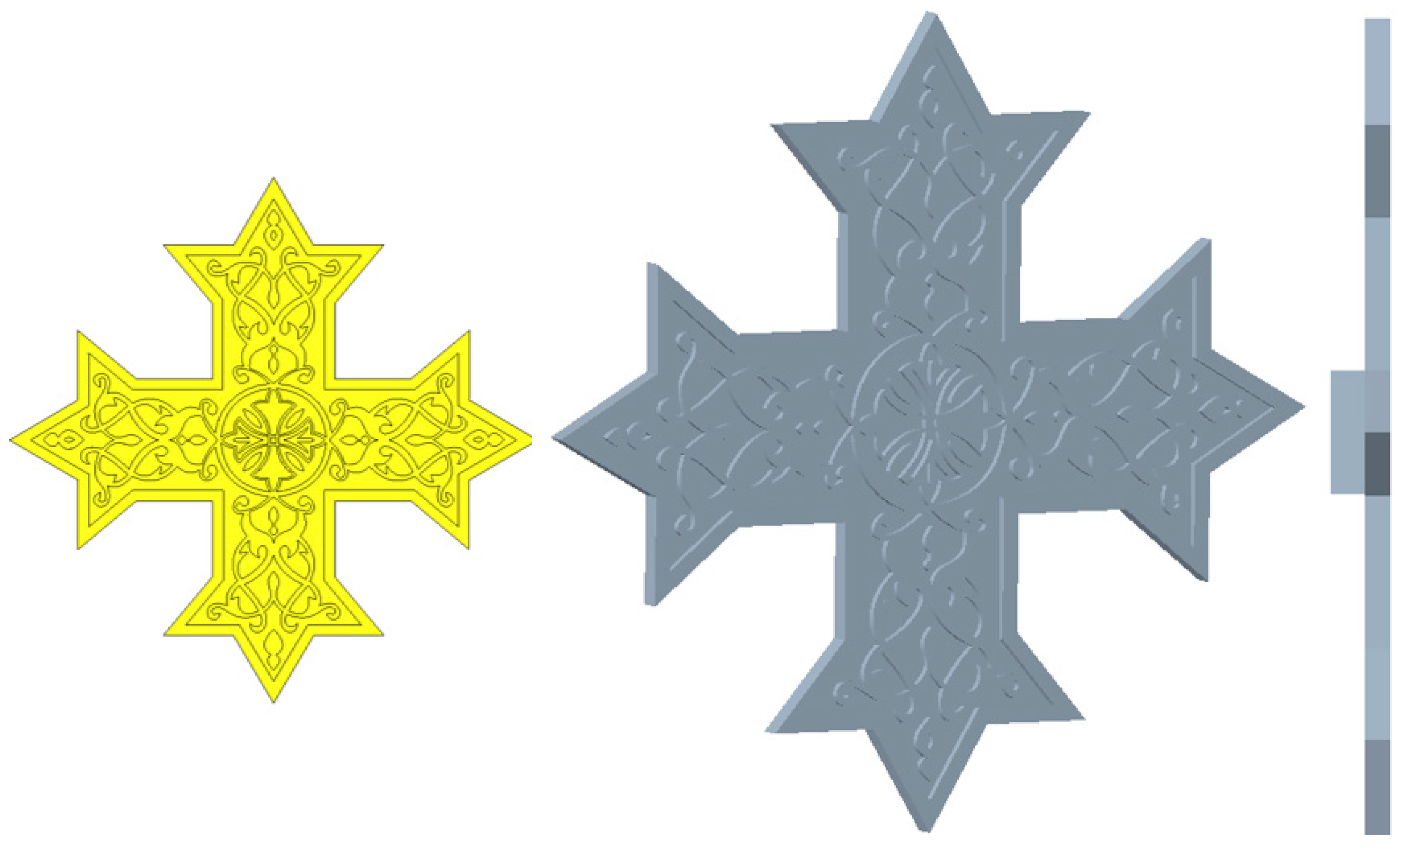
The basis of the model was again a circular sketch and import of the image (we created the image in other software). However, we used two sketches. We added volume to the first one, removed the second one and the resulting model was like an engraving. In Figure 10, the original image of the cross is shown on the left in yellow and the perspectives of the 3D model of the cross are shown in grey.

3.4.3. Central Ornament—Horse

The modeling technique was the same as the technique of creating the cross. In Figure 11, the original image of the horse is shown in yellow on the left, and the perspectives of the 3D model of the horse are shown in grey.

3.4.4. Central Ornament—Flower

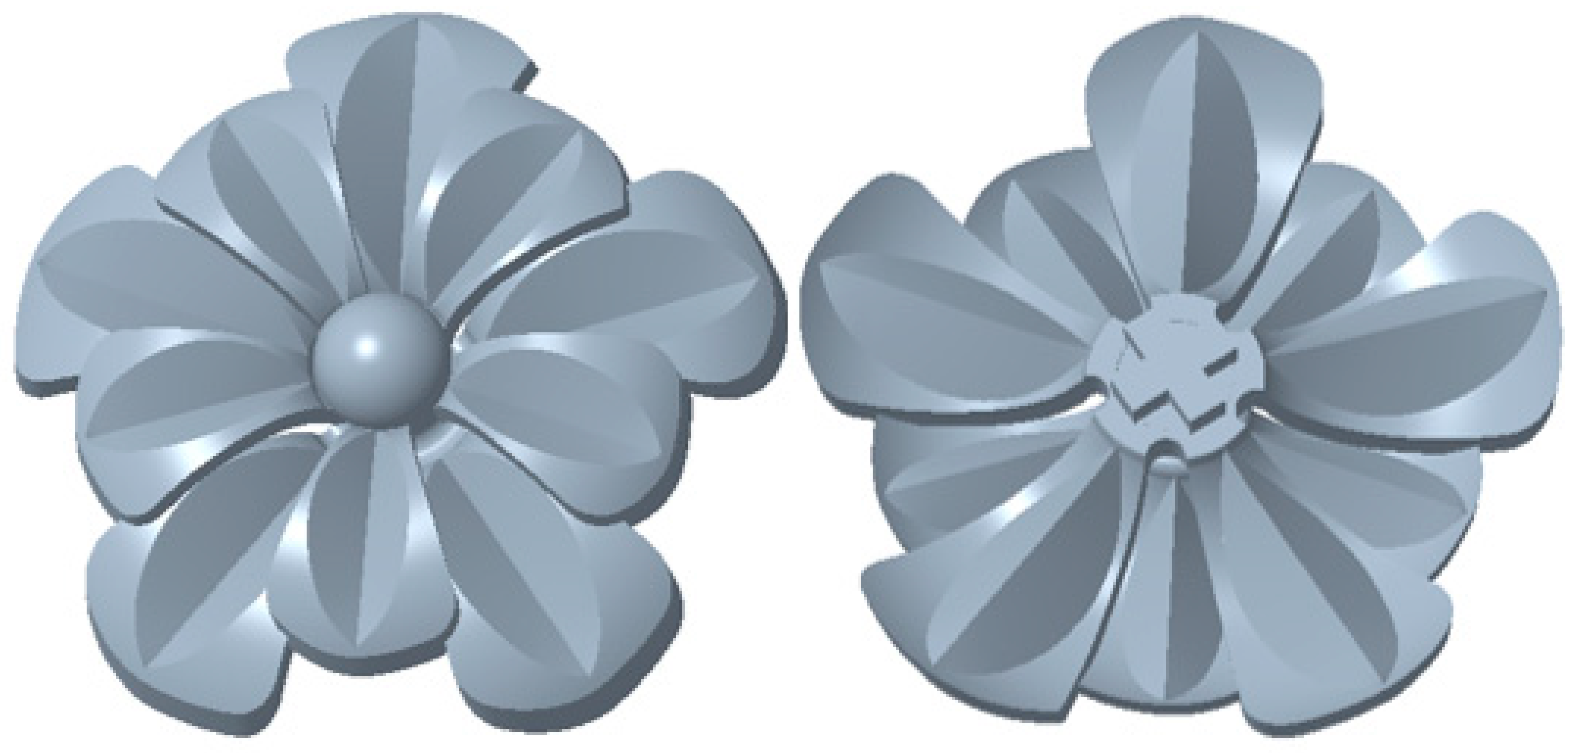
This model has a more complex shape than the others and consists of two models, so the result is an assembled model. An advanced technique of creating curves, surfaces and volumes was used to create the first petal; the others were multiplied through the Pattern feature. The second model was then copied, scaled and centered at its center. Figure 12 shows the assembly model of the flower, consisting of two parts in a standard color.

3.5. Creation of the Right Upper Ornament

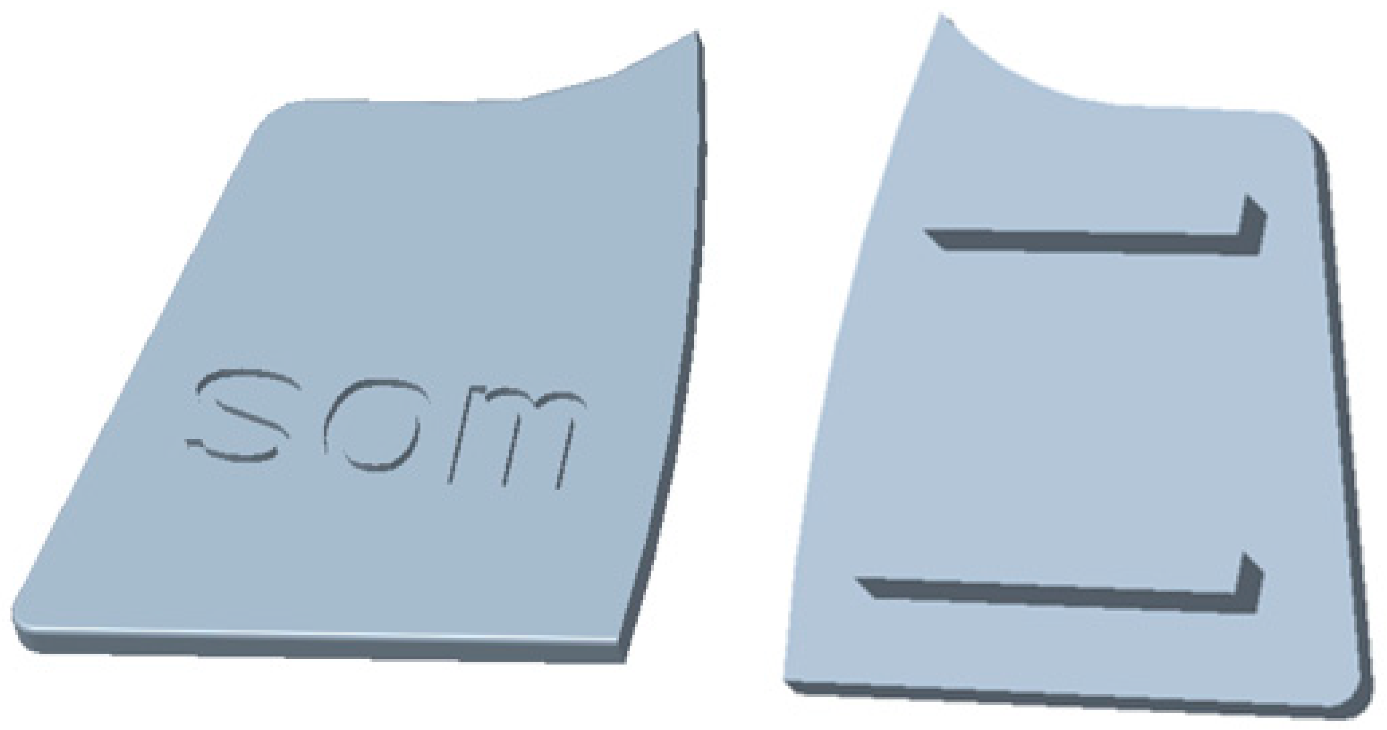
At the steering_wheel assembly level, we created a new model named right_upper_ornament.prt, which we then activated. Its height is controlled from the surface of the bottom part to the edge of the top part. Many parts of the sketches were created by projection from the bottom part via the Project feature. Some curves had to be completed. In order to soften the transitions between individual elements, we implemented a series of roundings—Rounds—which removed the material. The final feature was to add protrusions to allow the upper right ornament to insert into the bottom part. Figure 13 shows a multi-perspective model of the upper right ornament in standard color.
After saving the model, we activated the bottom_part model. Using the Extrude feature, we completed the sketch by offset feature (the protrusions on the upper right ornament were the template) and created grooves by choosing the remove material option. The right_upper_ornament will be inserted into these grooves.

3.6. Creation of the Left Upper Ornament

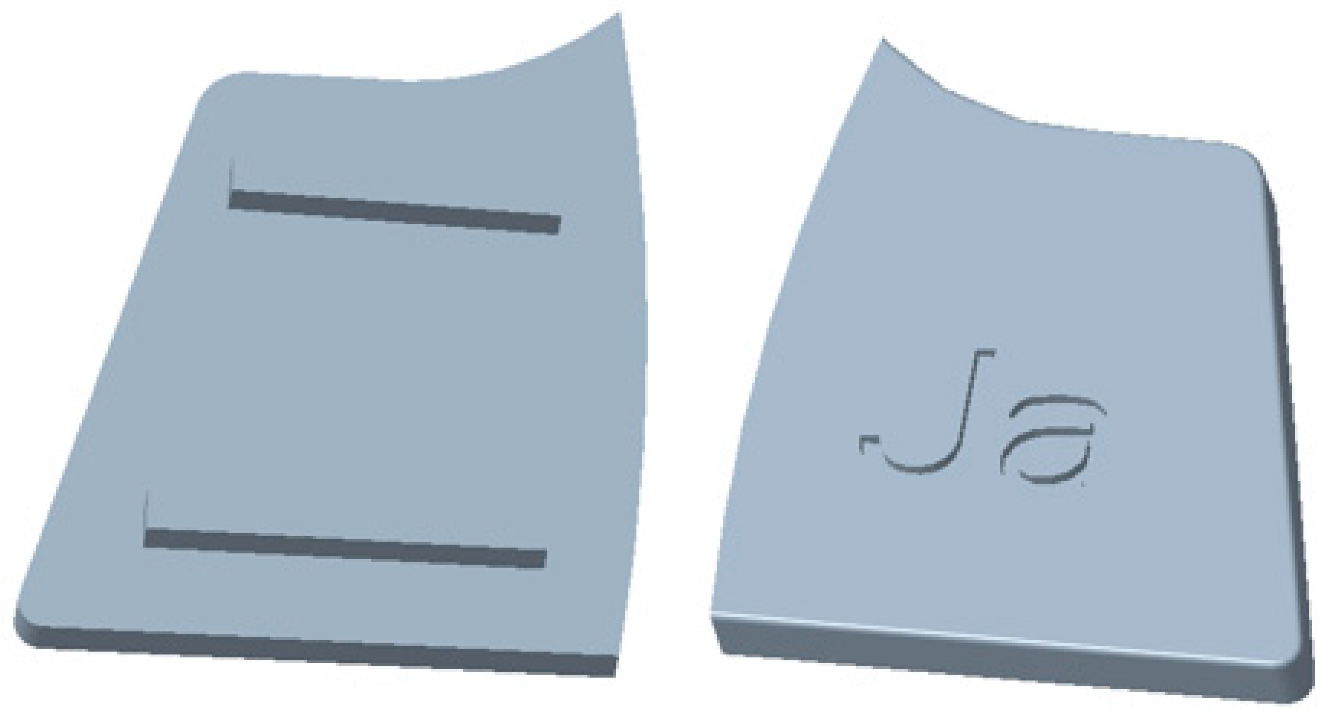
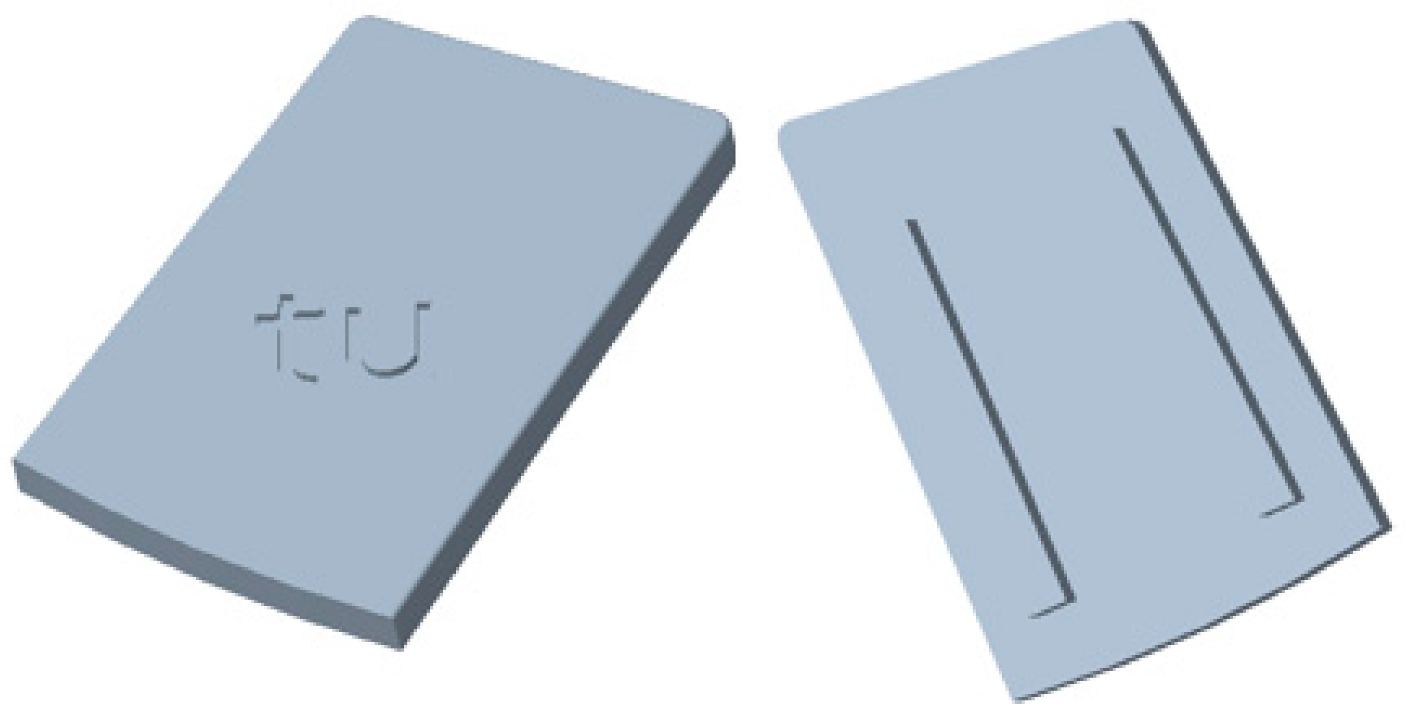
In point 6 of Section 2.2.1., we described four possible ways to create a copied model. We decided for option three—full dependence on the original model with completion of the required shapes. We opened the model right_upper_ornament. We mirrored the model with full dependence and named it left_upper_ornament.prt. The next feature was to engrave the text using the 3D font that Creo Parametric has. We entered the text in Slovak. We found that the given font does not have punctuation marks. That is why we had to model in the “šéf” (boss) text as protrusions with remove material option. Figure 14 shows a mirrored model of the upper left ornament from multiple perspectives in standard color.
We activated the right_upper_ornament model in the assembly model. We engraved the desired text into it.
We activated the bottom_part model and added the grooves into which the left_upper_ornament model will be inserted.

3.7. Creation of the Right Lower Ornament

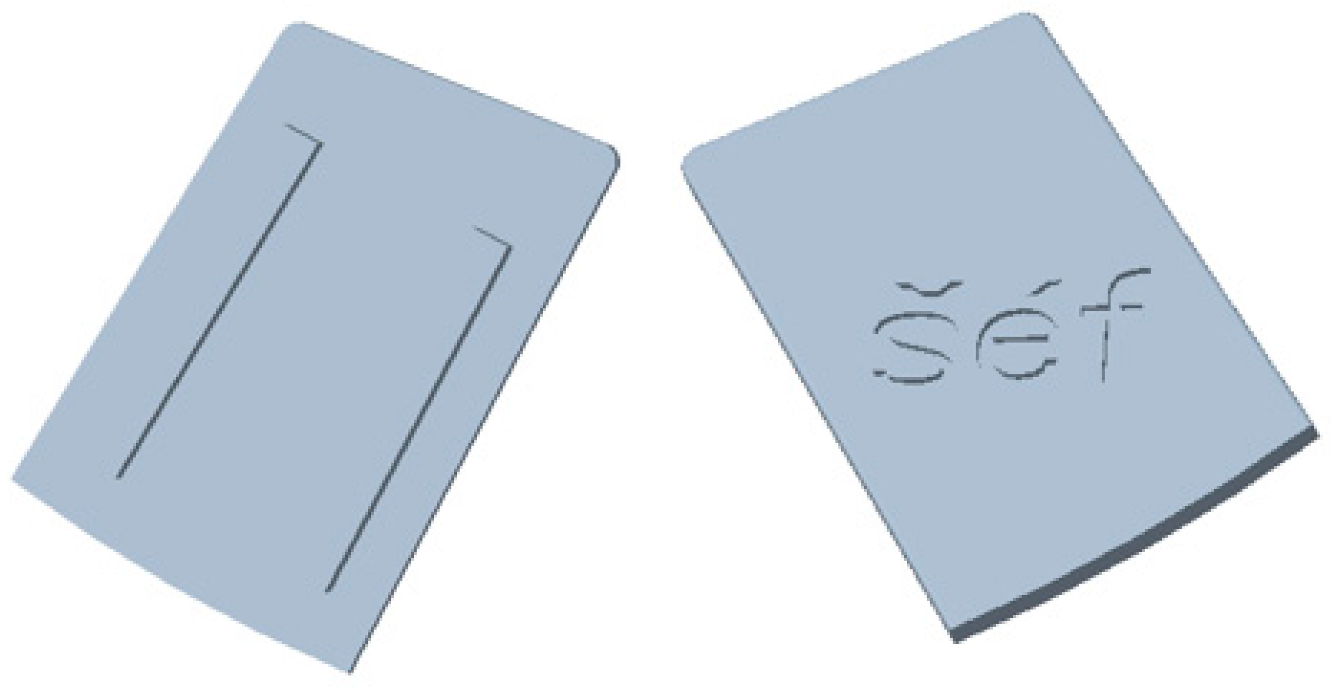
At the steering_wheel assembly level, we created a new model named right_lower_ornament.prt, which we then activated. We created the geometry analogously to the right_upper_ornament. Figure 15 shows a multi-perspective model of the lower right ornament in standard color.
We activated the bottom_part model and created grooves into which the right_lower_ornament will insert.

3.8. Creation of the Left Lower Ornament

We created the mirrored model of the lower left ornament analogous to the left_upper_ornament model, with the reference model being the right_lower_ornament. Figure 16 shows the mirror model of the lower left ornament from multiple perspectives in standard color.
We activated the bottom_part model and created the grooves into which the left_lower_ornament will insert.
While modelling the other parts, many grooves were added to the bottom_part model. A detail of the changes compared to the original model can be seen in Figure 17, where the original model is on the left and the model with the added grooves is on the right.

3.9. Assigning Colors to Individual Models

The next step was to assign colors to each model. In the section Assigning colors to individual parts, we divided the seven parts of the assembly into four groups with different colors. This color will depend on the customer’s requirements but also on the available color fill options of the selected 3D printer on which the prototype will later be printed.
1.
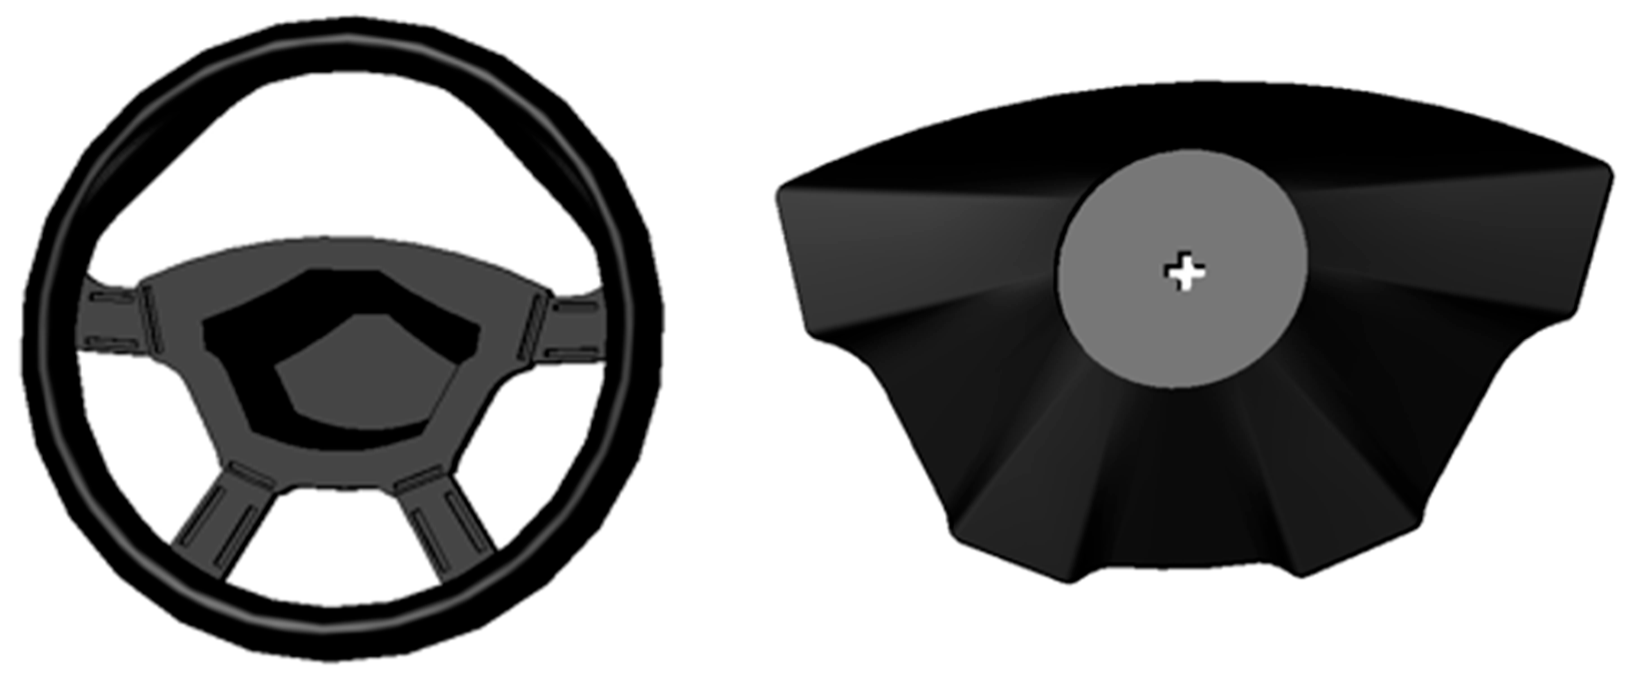
The bottom_part and the top_part are monochromatic, mostly black, as they match the color of the vehicle dashboard. Their models are shown in Figure 18.
2.
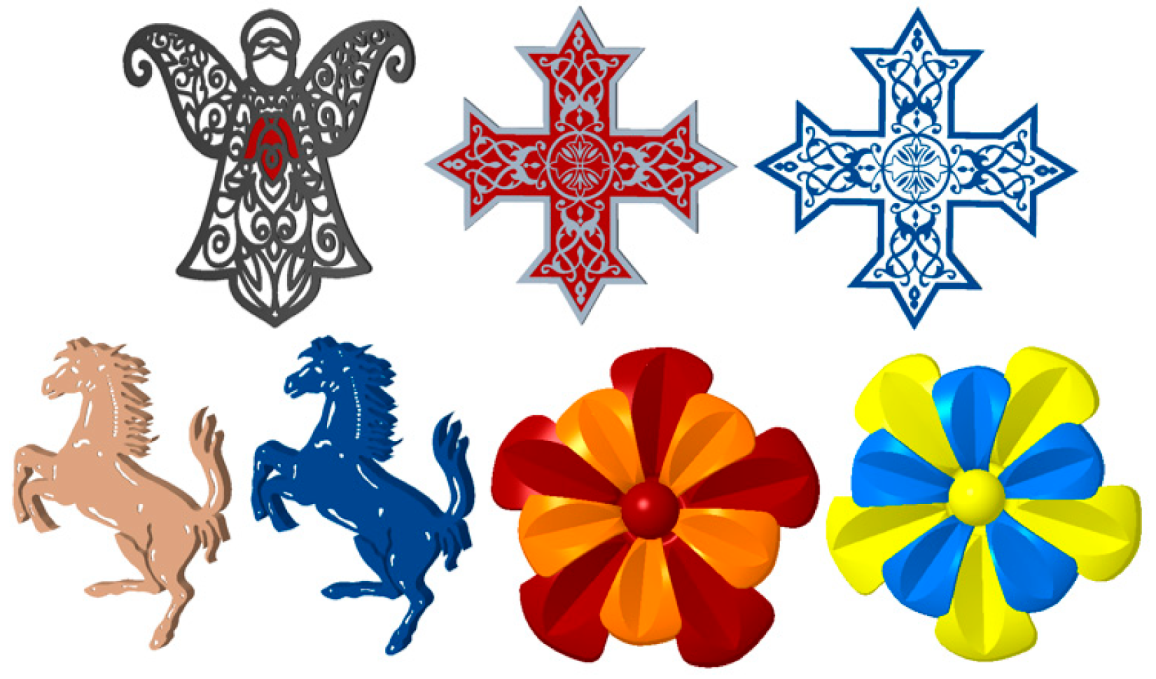
The central ornament is two-colored. Figure 19 shows all four models, with three in two-color variants.
3.
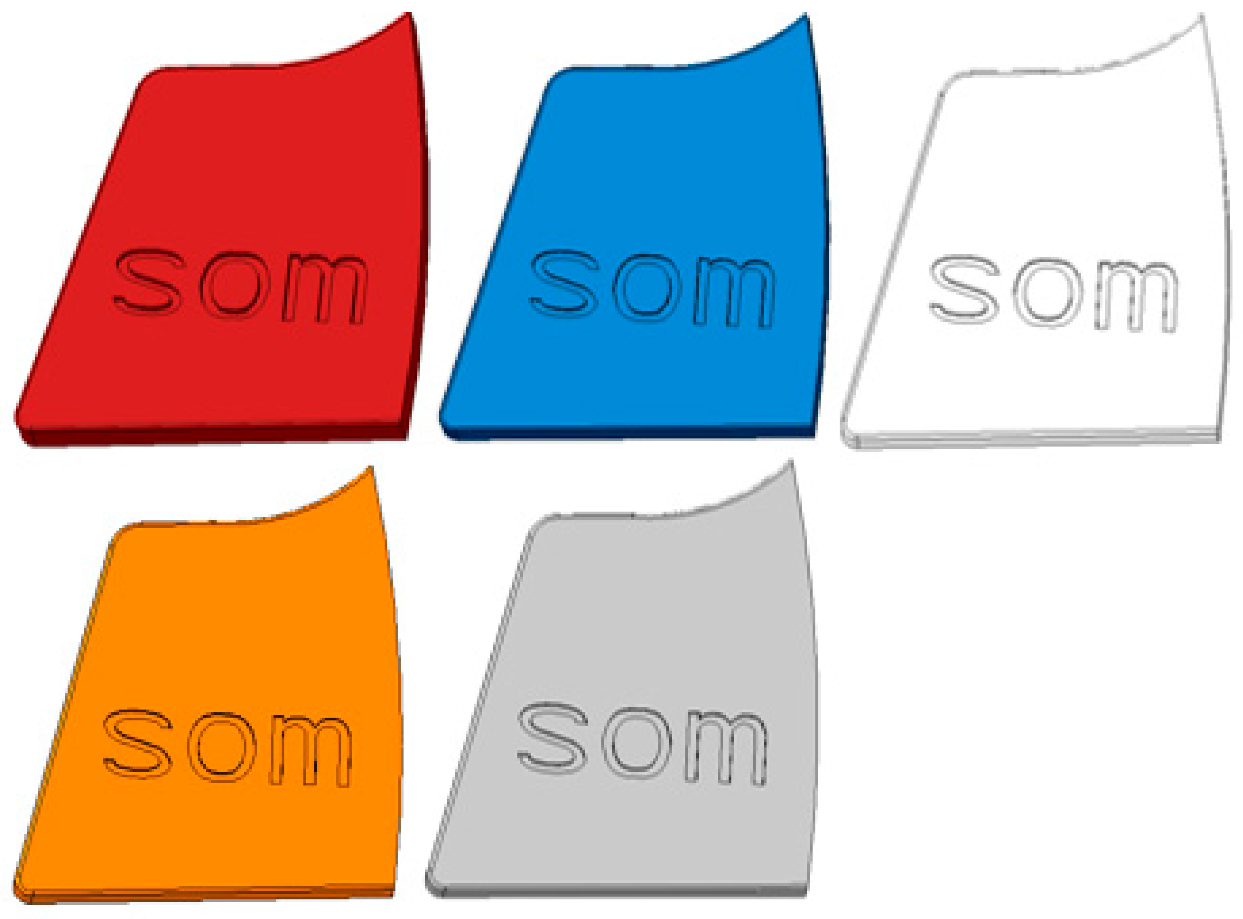
Right_upper_ornament and left_upper_ornament are monochromatic and their color adds to the complexity of the color effect. We chose the colors as follows: on the central ornament, one color is always dominant, represented in a higher proportion, and the other color is in a minor proportion. For the right and left upper ornament, we have chosen the minority color. Figure 20 shows the color variations in the upper right ornament only (the left ornament is identical in color; only the text differs), complementing the colors of the central ornaments. The models are shown with visible edges for better visibility of the text.
4.
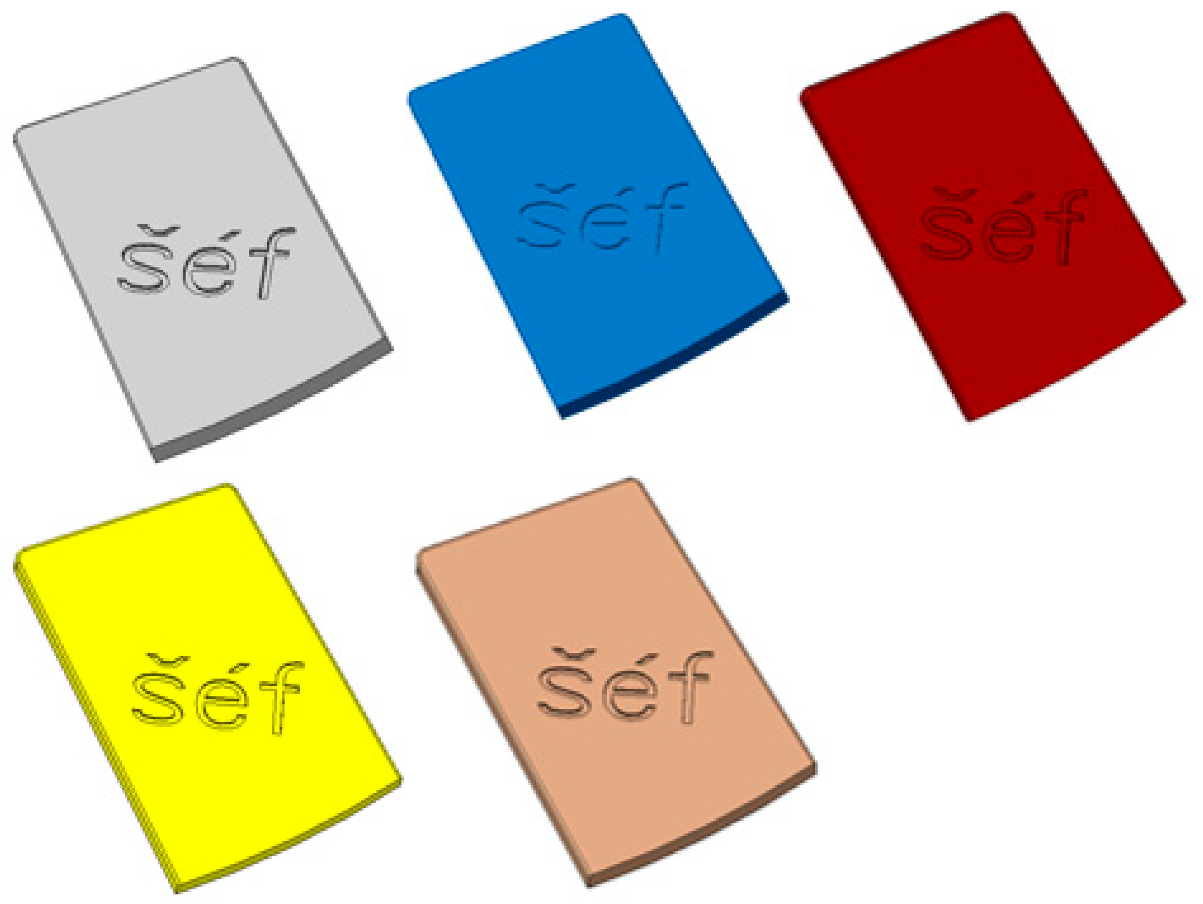
Right_lower_ornament and left_lower_ornament are monochromatic and their color adds to the complexity of the color effect. We have chosen the colors as follows: on the central ornament, one color is always dominant, represented in a higher proportion, and the other color is in a minor proportion. For the right and left bottom ornament, we have chosen the majority color. Figure 21 shows the color variants of the lower right ornament only (the left ornament is identical in color; only the text differs), complementing the color of the central ornament. The models are shown with visible edges for better visibility of the text.
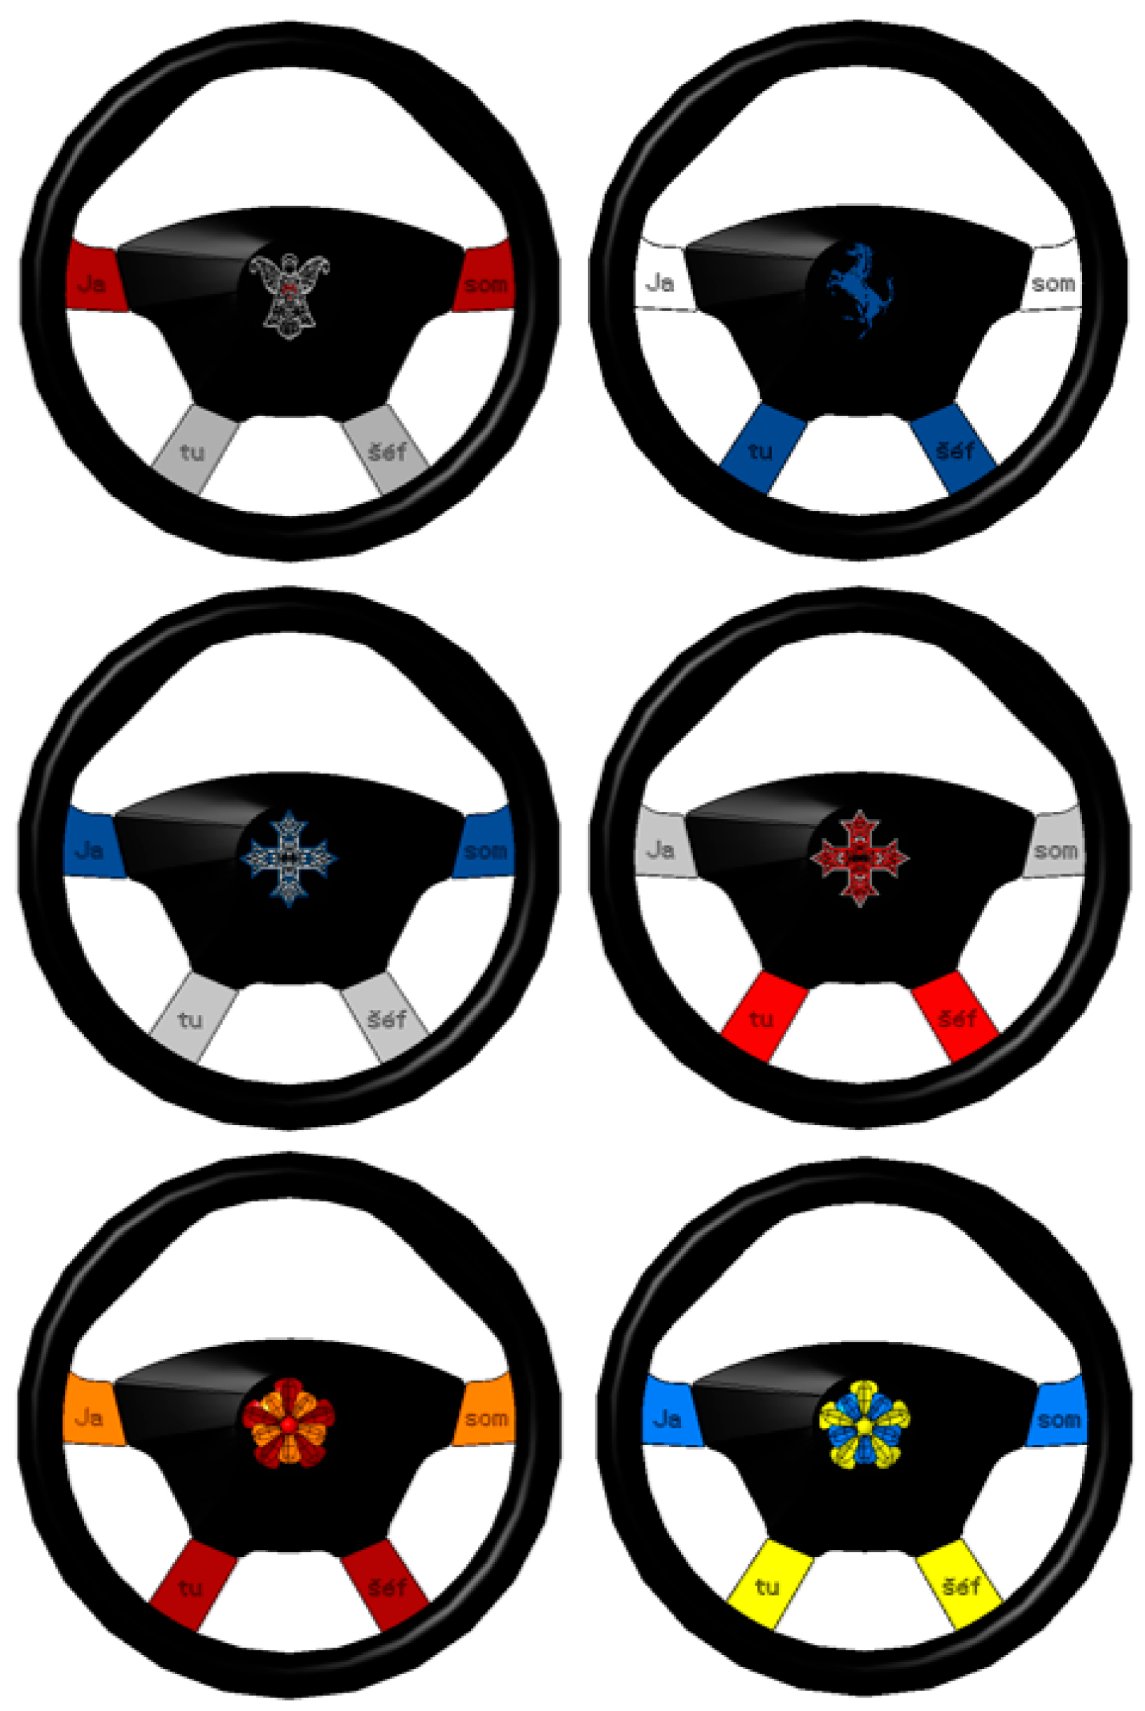
Figure 22 shows the different selected steering wheel color variants depending on the chosen center decoration. The models are displayed with visible edges for better text visibility.

4. Future Challenges

The next stage is the creation of a prototype. However, this phase includes many other sub-phases, which are:
  • Selection of suitable material for 3D printing;
  • Virtual simulations of model strength with selected materials;
  • Optimization of the model based on the results;
  • Selection of a suiTable 3D printer according to the type of material, color variability and printing area;
  • 3D printing of the prototype;
  • Mechanical tests of material samples.

5. Conclusions

In an effort to quickly place products on the market and reduce production costs for the final product and customer intervention in the final form of the product, rapid prototyping technologies are currently very helpful. Many car manufacturers are already responding to these challenges and allow customers to personalize their vehicles to a certain extent, either regarding the exterior or the interior. Further, 3D CAD modeling (part of rapid prototyping) is a technology that allows car manufacturers to reduce lead times and production costs for low-volume and personalized parts. This is partly because it eliminates the need to create expensive individual aids for each personalized part.
The article presents the utilization of 3D CAD technology for the design of a new prototype of a car steering wheel.
The methodology is divided into two phases: the preparatory phase of the design of the steering wheel of a vehicle and the virtual modeling phase. The preparatory phase included a number of sub-goals and was demanding in terms of theoretical knowledge and also required the designers’ imagination as the design of the steering wheel is largely individual. Within this phase, the dimensional characteristics, the number of assembly members and the software application in which the model was later modelled were defined. The virtual modeling phase included modeling individual parts of the steering wheel, creating an assembly and assigning colors. As part of deciding on the number of parts, a variant with seven parts was chosen.
This was followed by the actual modeling in the software application Creo Parametric. The final assembly consisted of the following parts:
  • Bottom_part;
  • Top_part;
  • Central_ornament, which had four variants;
  • Right_upper_ornament;
  • Left_upper_ornament;
  • Right_lower_ornament;
  • Left_lower_ornament.
Subsequently, color variations were assigned to the individual parts. These were divided into four groups, while three groups were monochrome and one bicolor, and several color variants of the assembly were created.
The outputs processed in this way fulfilled the research tasks set by us with a comprehensive view of the issue. In conclusion, it can be said that the methodology and chosen procedures can be applied to similar cases of creation of a 3D digital model of a car steering wheel.

Author Contributions

Conceptualization, M.F., M.P. and P.K.; methodology, M.F.; validation, M.P. and P.K.; formal analysis, P.K.; investigation, M.F. and M.P.; resources, M.F., M.P. and P.K.; modeling, M.F., M.P. and P.K.; writing—original draft preparation, M.F., M.P. and P.K.; writing—review and editing, M.F., M.P. and P.K.; funding acquisition, M.F. All authors have read and agreed to the published version of the manuscript.

Funding

This publication was realized with support of Operational Program Integrated Infrastructure 2014–2020 of the project: Innovative Solutions for Propulsion, Power and Safety Components of Transport Vehicles, code ITMS 313011V334, co-financed by the European Regional Development Fund. Applsci 13 08054 i002

Institutional Review Board Statement

Not applicable.

Informed Consent Statement

Not applicable.

Data Availability Statement

No new data were created or analyzed in this study. Data sharing is not applicable to this article.

Acknowledgments

Special thanks to University Science Park UNIZA for support during writing this paper.

Conflicts of Interest

The authors declare no conflict of interest.

References

  1. Dankwort, C.W.; Weidlich, R.; Guenther, B.; Blaurock, J.E. Engineers’ CAx education—It’s not only CAD. Comput.-Aided Des. 2004, 36, 1439–1450. [Google Scholar] [CrossRef]
  2. Łukaszewicz, A.; Skorulski, G.; Szczebiot, R. The main aspects of training in the field of computer-aided techniques (CAx) in mechanical engineering. In Proceedings of the 17th International Scientific Conference on Engineering for Rural Development, Jelgava, Latvia, 23–25 May 2018; pp. 865–870. [Google Scholar]
  3. Łukaszewicz, A.; Szafran, K.; Józwik, J. CAx techniques used in UAV design process. In Proceedings of the 2020 IEEE 7th International Workshop on Metrology for AeroSpace (MetroAeroSpace), Pisa, Italy, 22–24 June 2020; IEEE: Piscataway, NJ, USA, 2020; pp. 95–98. [Google Scholar]
  4. Rodríguez-Sevillano, Á.A.; Casati-Calzada, M.J.; Bardera-Mora, R.; Nieto-Centenero, J.; Matías-García, J.C.; Barroso-Barderas, E. Rapid Parametric CAx Tools for Modelling Morphing Wings of Micro Air Vehicles (MAVs). Aerospace 2023, 10, 467. [Google Scholar] [CrossRef]
  5. Bodein, Y.; Rose, B.; Callaud, E. Explicit reference modeling methodology in parametric CAD system. Comput. Ind. 2014, 65, 136–147. [Google Scholar] [CrossRef]
  6. Camba, J.D.; Contero, M.; Company, P. Parametric CAD modeling: An analysis of strategies for design reusability. Comput.-Aided Des. 2016, 74, 18–31. [Google Scholar] [CrossRef] [Green Version]
  7. Liu, Y.J.; Zhang, D.L.; Yuen, M.M.F. A survey on CAD methods in 3D garment design. Comput. Ind. 2010, 61, 576–593. [Google Scholar] [CrossRef] [Green Version]
  8. Aranburu, A.; Cotillas, J.; Justel, D.; Contero, M.; Camba, J.D. How Does the Modeling Strategy Influence Design Optimization and the Automatic Generation of Parametric Geometry Variations. Comput.-Aided Des. 2022, 151, 103364. [Google Scholar] [CrossRef]
  9. Chahid, Y.; Racasan, R.; Pagani, L.; Townsend, A.; Liu, A.; Bills, P.; Blunt, L. Parametrically designed surface topography on CAD models of additively manufactured lattice structures for improved design validation. Addit. Manuf. 2021, 37, 101731. [Google Scholar] [CrossRef]
  10. Sanchez, F.; Liscouët-Hanke, S.; Tfaily, A. Improving aircraft conceptual design through parametric CAD modellers—A case study for thermal analysis of aircraft systems. Comput. Ind. 2021, 130, 103467. [Google Scholar] [CrossRef]
  11. Varady, T.; Martin, R.R.; Cox, J. Reverse engineering of geometric models—An introduction. Comput.-Aided Des. 1997, 29, 255–268. [Google Scholar] [CrossRef]
  12. Bidanda, P.; Hosni, Z. Reverse engineering and its relevance to industrial engineering: A critical review. Comput. Ind. Eng. 1994, 26, 343–348. [Google Scholar] [CrossRef]
  13. Lee, K.H.; Woo, H. Use of reverse engineering method for rapid product development. Comput. Ind. Eng. 1998, 35, 21–24. [Google Scholar] [CrossRef]
  14. Wang, G.G. Definition and Review of Virtual Prototyping. Comput. Inf. Sci. Eng. 2002, 2, 232–236. [Google Scholar] [CrossRef] [Green Version]
  15. Yan, X.; Gu, P. A review of rapid prototyping technologies and systems. Comput.-Aided Des. 1996, 28, 307–318. Available online: https://www.sciencedirect.com/science/article/pii/0010448595000356 (accessed on 12 April 2023). [CrossRef]
  16. Kabasakal, I.; Demircan Keskin, F.; Ventura, K.; Soyuer, H. From mass customization to product personalization in automotive industry: Potentials of industry 4.0. J. Manag. Mark. Logist. 2017, 4, 244–250. [Google Scholar] [CrossRef]
  17. Dalpadulo, E.; Pini, F.; Leali, F. Integrated CAD Platform Approach for Design for Additive Manufacturing of High Performance Automotive Components. Int. J. Interact. Des. Manuf. 2020, 14, 899–909. Available online: https://link.springer.com/article/10.1007/s12008-020-00684-7 (accessed on 12 April 2023). [CrossRef]
  18. Hipolite, W. The Daihatsu Copen Roadster is a Modular Car Featuring 3D Printed Custom Parts. 3DPRINT 2015. Available online: https://3dprint.com/76146/daihatsu-copen-roadster (accessed on 12 April 2023).
  19. MINI Enhances Personalization Options with Mini Yours Customised. BMW Group. 2017. Available online: https://www.press.bmwgroup.com/usa/article/detail/T0277451EN_US/mini-enhances-personalization-options-with-mini-yours-customised?language=en_US (accessed on 12 April 2023).
  20. Techniplas Unveils Illuminated Steering Wheel Concept. Techniplast 2018. Available online: https://www.prnewswire.com/news-releases/techniplas-unveils-illuminated-steering-wheel-concept-300747210 (accessed on 12 April 2023).
  21. Ražič, E.S.; Ludaš, A.; Kaurin, T.; Zojic, T. Applicability of polymers printed on textiles with a 3D printer for possible use in car interior. In IOP Conference Series: Earth and Environmental Science, Proceedings of the 27th Power Engineering and Power Machines Conference, Sozopol, Bulgaria, 15–19 May 2022; Volume 1128; Open Access Proceedings Journal of Physics: Conference Series (iop.org); IOP Publishing: Bristol, UK, 2022. [Google Scholar]
  22. Sismisova, D.; Mikulas, E.; Zeman, S.; Kucera, L. Design and Manufacturing of Multipurpose Steering Wheel. In Proceedings of the 59th International Conference of Machine Design Departments (ICMD), Lecture Notes in Mechanical Engineering, Demanovska Dolina, Slovakia, 11–14 September 2018; pp. 175–183. Available online: https://www.webofscience.com/wos/woscc/full-record/WOS:000613081400021 (accessed on 12 April 2023).
  23. Gadagi, B.; Lekurwale, R. A review on advances in 3D metal printing. Mater. Proc. 2021, 45, 277–283. Available online: https://www.sciencedirect.com/science/article/pii/S2214785320380573?via%3Dihub (accessed on 12 April 2023). [CrossRef]
  24. Wikimedia. Available online: https://upload.wikimedia.org/wikipedia/commons/1/11/Steering_wheels_from_different_periods.jpg (accessed on 12 April 2023).
  25. Steering Wheel with Airbag without Multifunction. Available online: https://www.cars-equipment.com/en/shop/octavia-iv/ (accessed on 12 April 2023).
  26. Sculpteo. Top 8 of the Best Parametric Modeling Software in 2023. Available online: https://www.sculpteo.com/blog/2018/03/07/top-8-of-the-best-parametric-modeling-software (accessed on 12 April 2023).
  27. Arpit, A.; Pathak, A.; Juneja, A.; Shakkarwal, P.; Kumar, R. Design & analysis of progressive die using SOLIDWORKS. Dep. Mech. Eng. FET MRIIRS Faridabad India 2022, 51, 956–960. Available online: https://www.sciencedirect.com/science/article/pii/S2214785321047283 (accessed on 12 April 2023).
  28. Banerjee, S.; Thomas, P.; Cai, X. CATIA V5-Based Parametric Aircraft Geometry Modeler. SAE Int. J. Aerosp. 2013, 6, 311–321. [Google Scholar] [CrossRef]
  29. Allagui, A.; Belhadj, I.; Aifaoui, N.; Hammadi, M.; Choley, J.Y. CAD—System engineering interoperability by Enriching CAD database with functional information. In Proceedings of the 18th International Multi-Conference on Systems, Signals & Devices (SSD), Monastir, Tunisia, 22–25 March 2021; pp. 1452–1458. [Google Scholar] [CrossRef]
  30. Thien, N.D.; Truong, G.N. An Approach to Design a Globoid CAM Using CREO Parametric 3.0. In Proceedings of the 3rd International Conference on Green Technology and Sustainable Development (GTSD), Kaohsiung, Taiwan, 24–25 November 2016; pp. 200–205. Available online: https://ieeexplore.ieee.org/document/7796649 (accessed on 12 April 2023).
  31. Das, P.; Chandran, R.; Samant, R.; Anand, S. Optimum Part Build Orientation in Additive Manufacturing for Minimizing Part Errors and Support Structures. In Proceedings of the 43rd North American Manufacturing Research Conference, NAMRC 43, Charlotte, NC, USA, 8–12 June 2015; Volume 1, pp. 343–354. Available online: https://www.webofscience.com/wos/woscc/full-record/WOS:000380512300030 (accessed on 12 April 2023).
  32. Sotiropoulos, S.; Kazakis, G.; Lagaros, N.D. Conceptual design of structural systems based on topology optimization and prefabricated components. Comput. Struct. Pers. Co-Creat. (MCPC) Montr. 2020, 226, 106136. [Google Scholar] [CrossRef]
  33. Song, P.P.; Qi, Y.M.; Cai, D.C. Research and Application of Autodesk Fusion360 in Industrial Design. In Proceedings of the International Conference on Computer Information and Automation Engineering, IOP Conference Series-Materials Science and Engineering, Yichang, China, 17–19 November 2018; Volume 359. [Google Scholar] [CrossRef] [Green Version]
  34. Gembarski, P.C.; Li, H.B.; Lachmayer, R. KBE-Modeling Techniques in Standard CAD-Systems: Case Study-Autodesk Inventor Professional. In Proceedings of the 8th World Conference on Mass Customization, Personalization, and Co-Creation (MCPC), Montreal, QC, Canada, 20–22 October 2017; pp. 215–233, ISBN 978-3-319-29058-4978-3-319-29056-0. [Google Scholar]
  35. Ferrari Logo. Available online: https://www.peakpx.com/en/hd-wallpaper-desktop-fguzy (accessed on 12 April 2023).
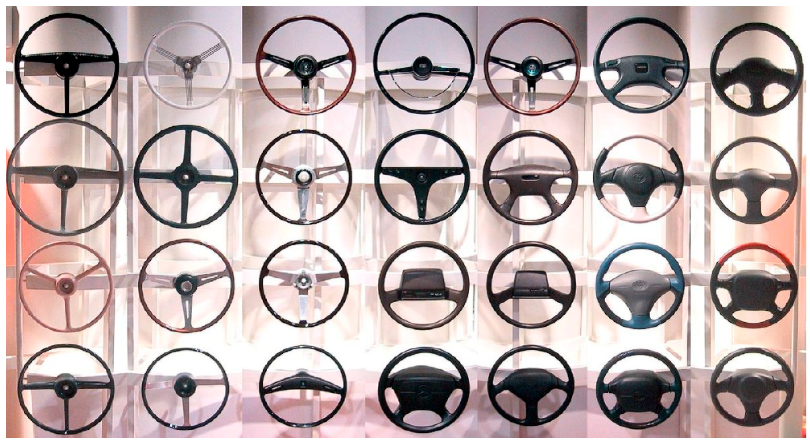
Figure 1. Steering wheels from different time periods, with different complexity of design [24].
Applsci 13 08054 g001
Figure 2. Sub-phases of the preparatory phase of the design for the creation of the vehicle steering wheel.
Applsci 13 08054 g002
Figure 3. Basic steering wheel parts with airbag without multifunction, lower part (left) and upper part (right) [25].
Applsci 13 08054 g003
Figure 4. Sub-phases of the virtual modeling phase.
Applsci 13 08054 g004
Figure 5. Design of a steering wheel assembly with 6 and 7 members.
Applsci 13 08054 g005
Figure 6. Limiting datum planes in the assembly model.
Applsci 13 08054 g006
Figure 7. Bottom_part model with multiple perspectives.
Applsci 13 08054 g007
Figure 8. Top_part model with multiple perspectives.
Applsci 13 08054 g008
Figure 9. Image of an angel (black) and 3D model of an angel (grey).
Applsci 13 08054 g009
Figure 10. Image of the cross (yellow) and 3D model of the cross (grey).
Applsci 13 08054 g010
Figure 11. Horse picture (color) [35] and horse 3D model (grey).
Applsci 13 08054 g011
Figure 12. Assembled flower model, consisting of two parts.
Applsci 13 08054 g012
Figure 13. 3D model of right_upper_ornament from several perspectives (engraved text “som” means “am”).
Applsci 13 08054 g013
Figure 14. 3D model of left_upper_ornament from several perspectives (engraved text “Ja” means “I”).
Applsci 13 08054 g014
Figure 15. 3D model of right_lower_ornament from several perspectives (engraved text “šéf” means “boss”).
Applsci 13 08054 g015
Figure 16. 3D model of left_lower_ornament from several perspectives (engraved text “tu” means “here”).
Applsci 13 08054 g016
Figure 17. Original bottom part (left) and model with added grooves (right).
Applsci 13 08054 g017
Figure 18. Bottom_part and the top_part.
Applsci 13 08054 g018
Figure 19. Color variants of center ornaments.
Applsci 13 08054 g019
Figure 20. Color variants of the right_upper_ornament (engraved text “som” means “am”).
Applsci 13 08054 g020
Figure 21. Color variants of the right_lower_ornament (engraved text “šéf” means “boss”).
Applsci 13 08054 g021
Figure 22. Color variants of the steering wheel (engraved text “Ja som tu šéf” means “I am boss here”).
Applsci 13 08054 g022
Table 1. Measured values in selected cars.
VehicleOuter Diameter
(cm)
Total Height
(cm)
Handle
Circumference
(cm)
Cover Presence
MPV/Van37.611.910.7Yes
SUV39.312.310.9Yes
Sedan37.41110.6No
Hatchback37.211.710.3No
Sedan nr. 238.311.610.9No
SUV nr. 236.58.510No
Table 2. Total number of steering wheel assembly members depending on the number of bottom arms.
Total Number of Assembly Members567
Bottom part111
Top part111
Central decorative part111
The number of arms of the lower part, affecting the number of decorative parts234
Disclaimer/Publisher’s Note: The statements, opinions and data contained in all publications are solely those of the individual author(s) and contributor(s) and not of MDPI and/or the editor(s). MDPI and/or the editor(s) disclaim responsibility for any injury to people or property resulting from any ideas, methods, instructions or products referred to in the content.