Article

Fast Calibration Method for Base Coordinates of the Dual-Robot Based on Three-Point Measurement Calibration Method

1
School of Mechanical and Electrical Engineering, Wuhan Institute of Technology, Wuhan 430205, China
2
School of Engineering, The University of Birmingham, Edgbaston, Birmingham B15 2TT, UK
3
College of Engineering, Huazhong Agricultural University, Wuhan 430070, China
*
Author to whom correspondence should be addressed.
Appl. Sci. 2023, 13(15), 8799; https://doi.org/10.3390/app13158799
Submission received: 13 June 2023 / Revised: 24 July 2023 / Accepted: 28 July 2023 / Published: 30 July 2023
(This article belongs to the Section Applied Industrial Technologies)

Abstract

:
Multi-robot systems can perform more complex tasks with high precision and large loads than single-robot systems. The calibration of the base coordinate system is the basis and premise to ensure the collaborative operation between the dual-robot. In this study, a dual-robot calibration system based on calibration tooling components was established, which could quickly and accurately obtain the relative position between dual robots. Based on three reference measurement points of the orthogonal distribution in the calibration tool coordinate system, a mapping relationship between the distance from the reference measurement point to the robot end point and the parameters of the robot base system was established, and a fast dual-robot base system parameter calibration solution method based on "three-point measurement calibration" was proposed. The experimental results show that this method can quickly and accurately obtain the transformation relationship between the dual robot base coordinate systems. The accuracy and efficiency of the calibration have been greatly improved. It is of great significance for meeting the requirements of high efficiency, low cost, and easy operation in the factory application process.

1. Introduction

Robots have exhibited extremely high work and execution capabilities in the fields of machining, production, and assembly, and are highly adaptable to harsh work environments [1,2]. Although robot technology has made great progress, in the face of increasingly complex tasks, the load capacity and working space of a single robot are limited, and some complex large-scale load tasks cannot be completed by a single robot. In this case, multi-robot collaborative systems are needed. Compared with a single robot, multiple robots have several advantages such as better flexibility, collaboration, and reliability [3].
Multi-robot systems have been widely used in the medical field [4,5], aerospace [6,7], and industrial applications such as welding and assembly [8]. For example, Guo et al. [9] proposed a non-destructive testing scheme for semi-enclosed workpieces with a dual-robot system and used it for testing composite parts with complex curved surfaces. Pellegrinelli et al. [10] proposed a multi-robot overall cell design and motion planning optimization method to reduce the manual work for assembling metal panels. In addition, Talasaz et al. [11] used a tactile dual-arm master–slave remote operating system to measure the interaction force between the tissue and the tool and found that direct force feedback could minimize tissue damage. In summary, the multi-robot system has been widely used to fulfill high-precision, large-load, and complex tasks, exhibiting high efficiency and desirable effects.
The calibration of the dual-robot system mainly solves the problem of the coordinate matrix relationship of robot hand-eye, base coordinate-base coordinate, and tool-flange [12]. Among them, the calibration of the single robot system also includes robot hand-eye and tool-flange calibration [13,14]. Therefore, the calibration of the dual-robot base coordinate system is the basis, prerequisite, and necessary condition for realizing the dual-robot collaborative operation. For the base coordinate system of dual-robot, there are mainly two calibration methods, namely, contact and non-contact [15].
Non-contact calibration generally obtains the pose relationship of the dual robots through external sensors such as cameras and laser trackers. Ren et al. [16] proposed a calibration method for the 3D laser sensor and robot pose, and the test showed that the calibration accuracy reached 0.062 mm. Nguyen and Pham [17] provided a rigorous derivation method for solving the covariance of X in the AX = XB problem, and A and B are random perturbation matrices. The experimental results show that this method has good accuracy in predicting the covariance of the hand-eye transformation. Zhuang et al. [18] proposed a linear solution. Given the transformation from the robot base frame to the robot flange frame, the transformation matrix from robot world to robot base and from robot tool to robot flange coordinate frames can be obtained by measuring the pose of the robot end-effector. Tan et al. [19] converted the underactuated robotic hand and soft finger calibration problem into an AX = YB problem and compared three methods based on nonlinear optimization and evolutionary computation. In addition, Ruan et al. [20] used the binocular vision system and the method of coordinate transformation theory to obtain the spatial pose relationship between the base coordinate and the base coordinate of the grinding robots. Zhao et al. [7] proposed a dual-robot kinematic modeling and base frame calibration method for an automatic drilling and riveting system of aircraft panel assembly. The experimental results showed that the positioning accuracy of the dual-robot was 0.1 mm and 0.07°, respectively, and after compensation, the calibration accuracy of the base frame after compensation improved from 0.187 mm and 0.052° to 0.053 mm and 0.022°, respectively. Fan et al. [15] used a vision-based fast base frame calibration method to obtain the relative pose of the coordinating robot by marking images to meet real-time calibration requirements. Experimental results showed that the accuracy of this calibration method reached 2 mm and 0.1°. To sum up, X, Y, and Z in these methods are obtained step by step, and there will be cumulative errors in the calibration process, thus affecting the reliability of the calibration results. In order to reduce the errors of the above calibration methods, Wang et al. [21] proposed a linear approximation iterative algorithm to solve the matrix equation AXB = YCZ, achieving simultaneous calibration of hand-eye, tool-flange, and robot-robot for a dual-robot system. Wu et al. [22] and Ma et al. [23] used iterative and probabilistic methods to simultaneously solve X, Y, and Z in the multi-robot system, respectively. However, it takes a long time for the iterative method to calculate, and the probabilistic method is seriously affected by noise interference. Wang et al. [12] proposed a new dual-robot calibration method by combining the closed-form method based on the Kronecker product and the iterative method of the convex function optimization problem. This method improved the efficiency and accuracy of iteration. Fu et al. [24] proposed a calibration problem based on dual quaternion and singular value decomposition algorithm, and simulation and experiment verified higher calibration accuracy of this method. Qin et al. [25] proposed a combined solution to solve the unknown parameters in the AXB = YCZ equation based on the dual quaternion closed form solution and Levenberg Marquardt (LM) iterative solution, realizing the calibration of the dual-robot system in orthopedic surgery. Although these non-contact calibration methods can be automated, the dual-robot system using this method is complex with high cost, and sensor measurement errors will cause calibration errors. These problems limit its batch application in industrial production.
Contact calibration uses special tools for auxiliary positioning and calculates the relative positional relationship of the base coordinate system. Gan et al. [26] proposed a dual-robot base coordinate calibration method only using a series of “handclasp” operations and corresponding joint information. Quaternion and Lagrange multiplier methods are used to carry out the iteration of the orthogonal normalization rotation matrix. However, when these methods are used, the calculation process is complicated, and manual operation will enlarge the calibration error. Wang et al. [27] proposed a method using the unit quaternion to calibrate the robot base coordinate system, which improved the orthogonality of the rotation matrix, and this method measured five different tool center points (TCPs), but the TCP operation was time-consuming and inaccurate. Zhang et al. [8] used the three-point calibration method to complete the calibration of the dual-robot base coordinate system for the welding process. By adding a calibration bar at the end of the dual robots, the dual robots were driven to position at three points in space, and the pose transformation matrix of the dual robots was solved. Lu et al. [28] realized the conversion between the base coordinates of the dual robots by measuring the coordinates of three non-collinear calibration points. They proposed an optimization method based on Lie algebra exponential mapping to ensure the orthogonality of the rotation matrix. Kong and Yu [29] proposed a calibration method based on three non-collinear points to establish a new coordinate system, which completes the calibration through transformations between coordinate systems. Deng et al. [30] proposed a three-point calibration method using laser sensor and buzzer. Wang et al. [31] used a planar projection-based asynchronous calibration method with two calibration points to improve calibration efficiency and accuracy. Although the contact calibration method has low cost and simple operation, the calibration tool is not a standard component, and its universality needs to be improved. The manual teaching operation will also cause a significant error in the specific constraint posture formed by the robot. The errors will accumulate in the calibration process, thus decreasing calibration accuracy.
The above analysis shows that the non-contact calibration method is of high accuracy, but it is accompanied by an increase in cost, while the contact calibration method is of low accuracy, and it cannot meet the needs of processing, production, and assembly. Considering this, the current study proposes a “three-point measurement calibration” multi-robot calibration method. This method obtains three positions of the end adapter relative to the wire sensor by adjusting the pose of the robots. Then, the relationship between the calibration tooling coordinate system and the dual-robot base coordinate system is established by using the sensor line length, and then the transformation matrix between the dual-robot base coordinate systems is obtained. The experimental verification is carried out on the platform of the dual-robot collaborative system.

2. Multi-Robot Environment

In a multi-robot collaboration platform, robots need to work collaboratively. Therefore, the positional relationship between robots needs to be obtained. In the construction of the robot collaboration platform, due to the large weight and size of the robot, robot track and other components, there will be deviations from the designed installation size, so it is necessary to calibrate the robot after the installation is completed.
The multi-robot collaborative platform used in this paper is mainly composed of two industrial robots, two robot tracks, and a rotary workpiece table (Figure 1). By replacing the end tool of the robot, the collaborative platform can realize functions such as robot milling, welding, measurement, and assembly.

3. Robot Calibration Principle

3.1. TCF Calibration

The calibration of the robot tool coordinate system is directly related to the positioning of the tool pose, which can affect the accuracy of the robot machining or assembly parts. The function of TCF calibration is teaching the robot to the top of the calibration rod and obtaining the pose transformation matrix from the tool coordinate system to the end of the robot body by the known tool coordinate system Euler angle, position and robot joint angles, and other information.
As shown in Figure 2, defining the tool coordinate system of the robot as T , the body flange end coordinate system as E , and the base coordinate system as B . According to the coordinate system conversion relationship:
H E T = H B E 1 H B T
In Formula (1), H B T is the transformation matrix of the tool coordinate system T relative to the robot base coordinate system B , H B E is the transformation matrix of the robot flange end coordinate system E relative to the base coordinate system B , and H E T is the transformation matrix of the robot tool coordinate system T to be obtained relative to the flange end coordinate system E .
When the teaching robot is at the top of the calibration rod, H E T can be calculated from the positive kinematics by changing the angle of each joint. By reading and recording Euler angles α , β , γ and their positions p x , p y , p z from the teach pendant, the transformation matrix of the tool coordinate system T relative to the robot base coordinate system B can be expressed as:
H B T = R o t z α R o t y β R o t x γ T r a n s p x , p y , p z = n 11 n 12 n 21 n 22 n 13 p x n 23 p y n 31 n 32 0 0 n 33 p z 0 1
In Formula (2), n 11 = cos α cos β , n 12 = cos α sin β sin γ sin α cos β , n 13 = cos α sin β cos γ + sin α sin γ , n 21 = sin α cos β , n 22 = cos α sin β sin γ + cos α cos γ , n 23 = sin α sin β cos γ cos α sin γ , n 31 = sin β , n 32 = cos β sin γ , n 33 = cos β cos γ .

3.2. Base Coordinate Calibration of Multi Robots

Since the robot collaboration needs to determine the positional relationship between the robots, two robots or even multiple robots can perform different processes on the same part to achieve an orderly and fast processing process. For the base coordinate calibration of dual-robot, the three-point measurement and marking method is proposed, which has the characteristics of being fast, low cost, high accuracy, and easy implementation.
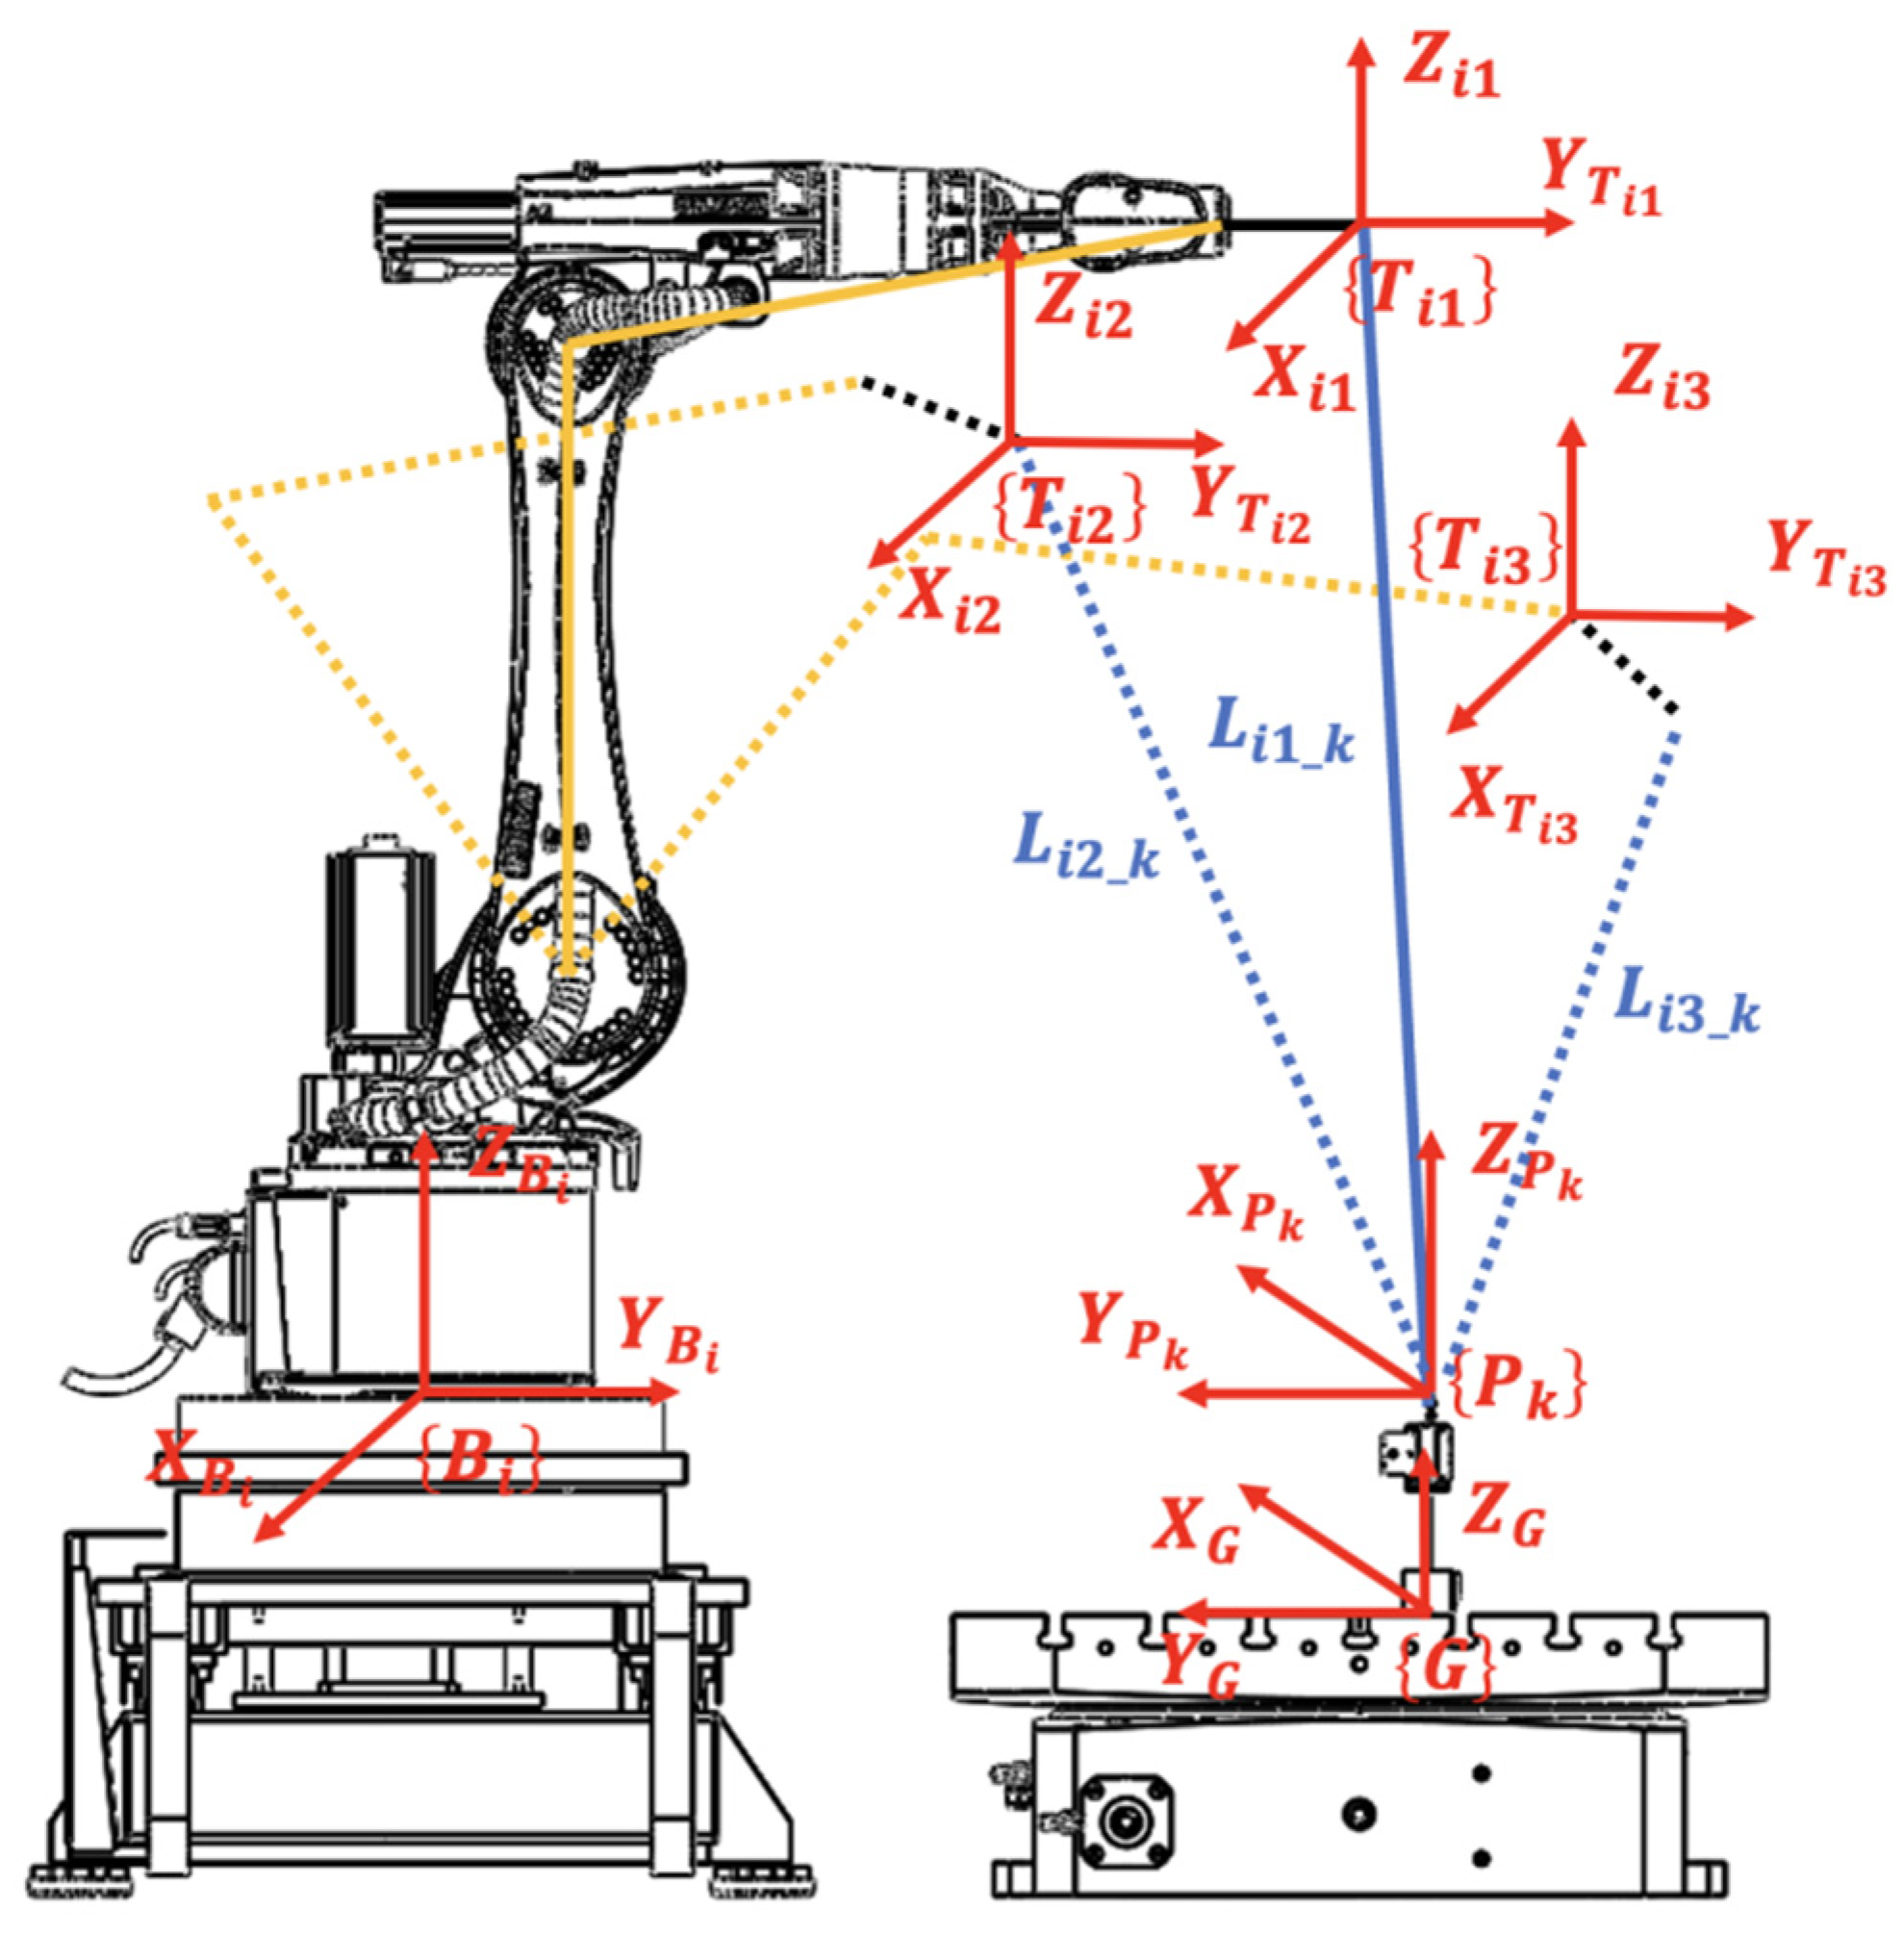
The calibration tool is fixed on the steel plate base between the two robots. The tool guide rod can be made in two different directions (can be vertical or horizontal) by adjusting the upper knob of the tool. After adjusting the position of the wire sensor, the locking screw should be locked (Figure). In Figure 3, B i is the robot base coordinate system ( i = 1 , 2 are robot 1, 2), T i j is the robot tool coordinate system ( j = 1 , 2 , 3 are the three points taught by the robot tool), G is the calibration tool base coordinate system, P k is the calibration point coordinate system ( k = 1 , 2 , 3 ; where p 1 , p 2 are two non-coincident points along Z-axis direction of the base coordinate of the calibration tool G , and p 3 is the point along the X-axis direction of G ), which satisfies that p 1 , p 2 and p 3 are coplanar. The purpose of the dual-robot calibration is to determine the transformation matrix H B 2 B 1 of the robot base coordinate system B 1 relative to the robot base coordinate B 2 . The requirements for H B i G are as follows:
p k B i , 1 T = H B i G p k G , 1 T
H B 2 B 1 = H B 2 G H B 1 G 1
In Formula (3), p k B i is the position of the calibration point p k relative to the base coordinate system B i , and p k G is the position of the calibration point p k relative to the base coordinate system G of the calibration tool. In Formula (4), H B 1 G is the transformation matrix of the calibration tool base coordinate system {G} relative to the robot i = 1 base coordinate system B 1 and H B 2 G is the transformation matrix of the calibration tool base coordinate system G relative to the robot i = 2 base coordinate system B 2 .
The three-point measurement and marking method determines the position of the calibration point. As shown in Figure 4, the cable output end of the positioning wire sensor is the calibration point p k which connecting the robot tool end adapter through the rope. The robot end adapter is taught to three points T i j j = 1,2 , 3 (actually, there should be more than three points in the experiment). Measuring the length of T i j to P k as L i j _ k , and reading the position of the coordinate system T i j from the teach pendant as t i j , the position of the calibration point p k B i can be calculated by the following formula
t i j p k B i = L i j _ k
In Formula (5), is the Euclidean norm on Euclidean space R 3 .
As shown in Figure 5a, it is determined that the unit direction vector X ^ G , Y ^ G , Z ^ G of the calibration tool base coordinate system G is projected to the robot base coordinate system as X ^ G B i , Y ^ G B i and Z ^ G B i .
Z ^ G B i = p 2 1 p 2 1 = p 1 B i p 2 B i p 1 B i p 2 B i Y ^ G B i = Z ^ G B i × p 2 3 p 2 3 = Z ^ G B i × p 3 B i p 2 B i p 3 B i p 2 B i X ^ G B i = Y ^ G B i × Z ^ G B i
In Formula (6), the positions of the calibration points p 1 , p 2 and p 3 are shown in Figure 5b. From p 1 , p 2 are any two points in the Z G direction, p 3 is a point in the X G direction, the formula can be determined:
p 1 G = 0,0 , z 1 p 2 G = 0,0 , z 2 p 3 G = x 3 , 0,0
In Formula (7), z 1 , z 2 and x 3 are variables which z 1 z 2 ; z 1 0 ; z 2 0 ; x 3 0 . p 1 G , p 2 G and p 3 G are the positions of the calibration points p 1 , p 2 , p 3 relative to the tool base coordinate system G .
From Formulas (3) and (6), H B i G can be denoted as
H B i G = n 11 n 12 n 21 n 22 n 13 p G B i X n 23 p G B i Y n 31 n 32 0 0 n 33 p G B i Z 0 1 = X ^ G B i p G B i X Y ^ G B i p G B i Y Z ^ G B i p G B i Z 0 1 × 3 1
In Formula (8), p G B i M M = X , Y , Z is the value of the calibration tool base coordinate system origin p G projected to the M direction of the robot base coordinate system B i .
From Formulas (3), (5), (7) and (8), can be obtained:
p G B i X = Q W p G B i Y = p 3 B i Y p 3 B i X p G B i X r 21 r 11 p G B i Z = p 3 B i Z p 3 B i X p G B i X r 31 r 11
In Formula (9), W = r 13 r 21 r 11 r 23 , Q = p 1 B i Y p 3 B i Y r 11 r 13 p 1 B i X r 11 r 23 + p 3 B i X r 13 r 21 .
H B i G can be obtained, and Formula (4) can be combined to obtain the transformation matrix H B 2 B 1 of the base coordinate B 1 of robot 1 relative to the base coordinate B 2 of robot 2.

3.3. Comparison of Calibration Methods for Dual-Robot

Combining the existing dual-robot calibration methods: handshake method [30,31] and coordinate measuring machine method [27], the three calibration methods are compared in terms of accuracy, cost, human factors, and robot workspace limitation. The comparison results are shown in Table 1. The meanings of “-”, “o” and “+” in Table 1 are poor, medium, and good.
The handshake method is limited by the working space of the robots, which requires that the working spaces of the two robots overlap. Since the operator needs to manually control the connection of the two robot end adapters, the results of this calibration method will be affected by human factors and produce errors.
The coordinate measuring machine method has good calibration accuracy, but the equipment used for calibration is expensive, and there are difficulties in practical application.
The accuracy of the three-point measurement calibration method meets the calibration requirements. The coordinate data of the robot calibration point comes from the robot data and the wire sensor measurement and is not affected by the human factors of the operator. This method does not have the limitation of the working space of the robot and the cost is very low, so it has good practicability when used in the actual factory.

4. Calibration Experiment

4.1. Repeated Positioning and Calibration Experiment of Single Robot

The experiment uses the 1600 ABB robot to carry out the repeated calibration experiment of the base coordinates of the single robot ( i = 1 ). The lower computer communicates with the wire sensor through the MODBUS protocol through the single chip microcomputer (the chip is STM32F103ZET6).
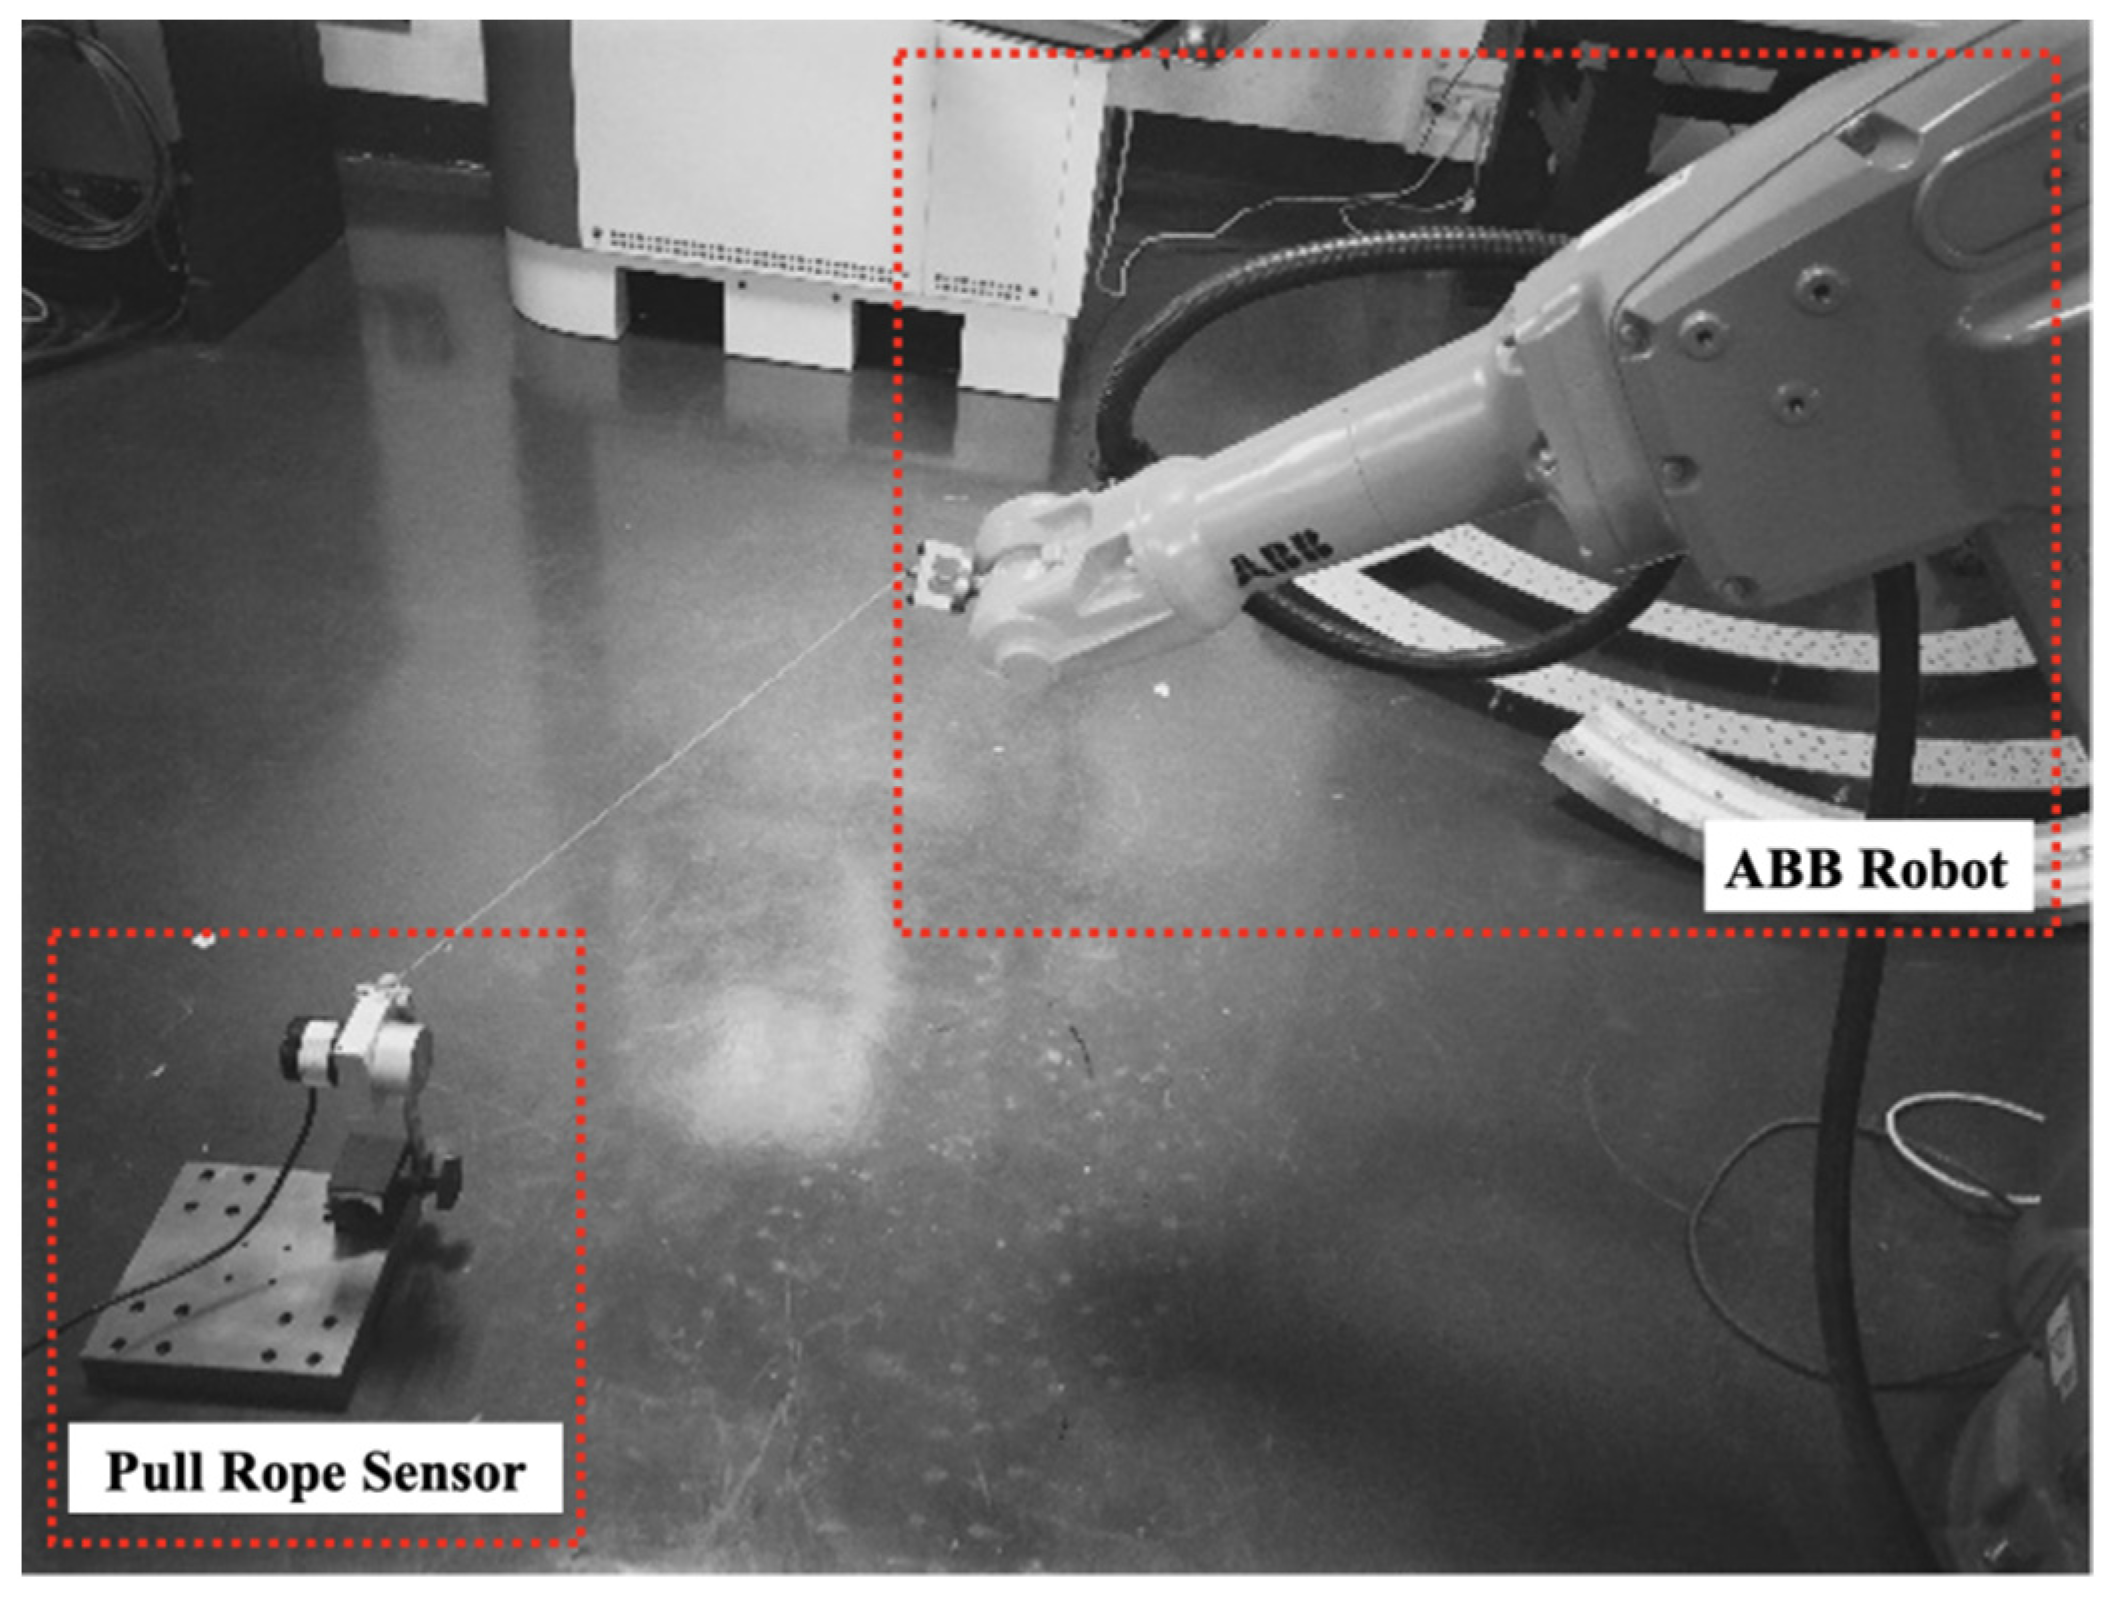
As shown in Figure 6, the robot is controlled to different positions through the teach pendant (in order not to lose generality, there are 14 groups of teaching point measurement, j = 1,2 , , 14 ), the rope length which output by the sensor and tool end adapter position shown on the teach pendant are recorded (Figure 7). After that, adjust the calibration tooling to continue the measurement, and the recorded data is shown in Table A1.
The 14 items of data in Table A1 are divided into two groups (7 items of data in each group), and the objective function is constructed to calculate the optimal value of p k B i in Formula (5). L 1 j _ k is the rope length output by the wire sensor and t 1 j is the position of the robot end adapter.
S k _ 1 = j = 1 7 t 1 j p k _ 1 B 1 L 1 j _ k 2 S k _ 2 = j = 8 14 t 1 j p k _ 2 B 1 L 1 j _ k 2
In Formula (10), S k _ 1 and S k _ 2 are the objective functions of the first seven groups and the last seven groups of data corresponding to the calibration point p k . p k _ 1 B 1 and p k _ 2 B 1 are the value of p k B 1 calculated corresponding to the two groups of data.
The objective function is written by MATLAB 2022b, and the optimal value of the objective function is calculated by genetic algorithm. Set the number of optimization variables to 3 and set the number of initial populations to 50. In order to find the local optimal value, the definition domain is set to 1400 , 400,50 ~ 1600 , 50,350 , and other conditions are defaulted. The final result is rounded to three decimal places.
p 1 _ 1 B 1 = 1557.915 , 172.479 , 293.644
p 2 _ 1 B 1 = 1549.650 , 176.344 , 186.724
p 3 _ 1 B 1 = 1553.236 , 356.504 , 83.975
p 1 _ 2 B 1 = 1554.390 , 172.439 , 293.414
p 1 _ 2 B 1 = 1548.649 , 175.940 , 185.964
p 1 _ 2 B 1 = 1553.048 , 355.722 , 83.659
Write a MATLAB program to calculate H B i G corresponding to the above two groups of data through Formulas (6), (8), (9), named H B 1 1 G and H B 1 2 G .
H B 1 1 G = 0.058 0.848 0.077 0 0.85 0.055 0.036 0 0.026 0.068 0.996 0 1564.579 189.606 99.142 1
H B 1 2 G = 0.049 0.852 0.053 0 0.853 0.047 0.032 0 0.025 0.047 0.998 0 1562.684 187.948 94.137 1
In order to better evaluate the error of this calibration experiment, the error Δ is defined as:
Δ = Δ p , Δ a
In Formula (11), Δ p is the calibration error in the position and Δ a is the calibration error in the angle. The definitions of the position error Δ p and the angle error Δ a are followed:
Δ p = p x 1 p x 2 2 + p y 1 p y 2 2 + p z 1 p z 2 2
Δ a = α 1 α 2 2 + β 1 β 2 2 + γ 1 γ 2 2
In Formula (12), p x 1 and p x 2 are the distances on X-axis of the two groups data. p y 1 , p y 2 and p z 1 , p z 2 are the distances on Y-axis and Z-axis. In Formula (13), α 1,2 , β 1,2 and γ 1,2 are Euler angles of the wo groups data.
According to Formula (2), the calculation formulas of Euler angles α , β , γ can be obtained:
α = tan 1 n 21 / n 11
β = sin 1 n 31
γ = tan 1 n 32 / n 33
Based on Formulas (14)–(16), Euler angles of the two groups data can be obtained by H B 1 1 G and H B 1 2 G .
α 1 , β 1 , γ 1 = 86.087 ° , 4.416 ° , 2.070 °
α 2 , β 2 , γ 2 = 86.708 ° , 3.038 ° , 1.837 °
Though Formulas (12) and (13), the error of this calibration experiment Δ can be obtained:
Δ = 5.603   m m , 1.529 °

4.2. Dual-Robot Base Coordinate Calibration Experiment

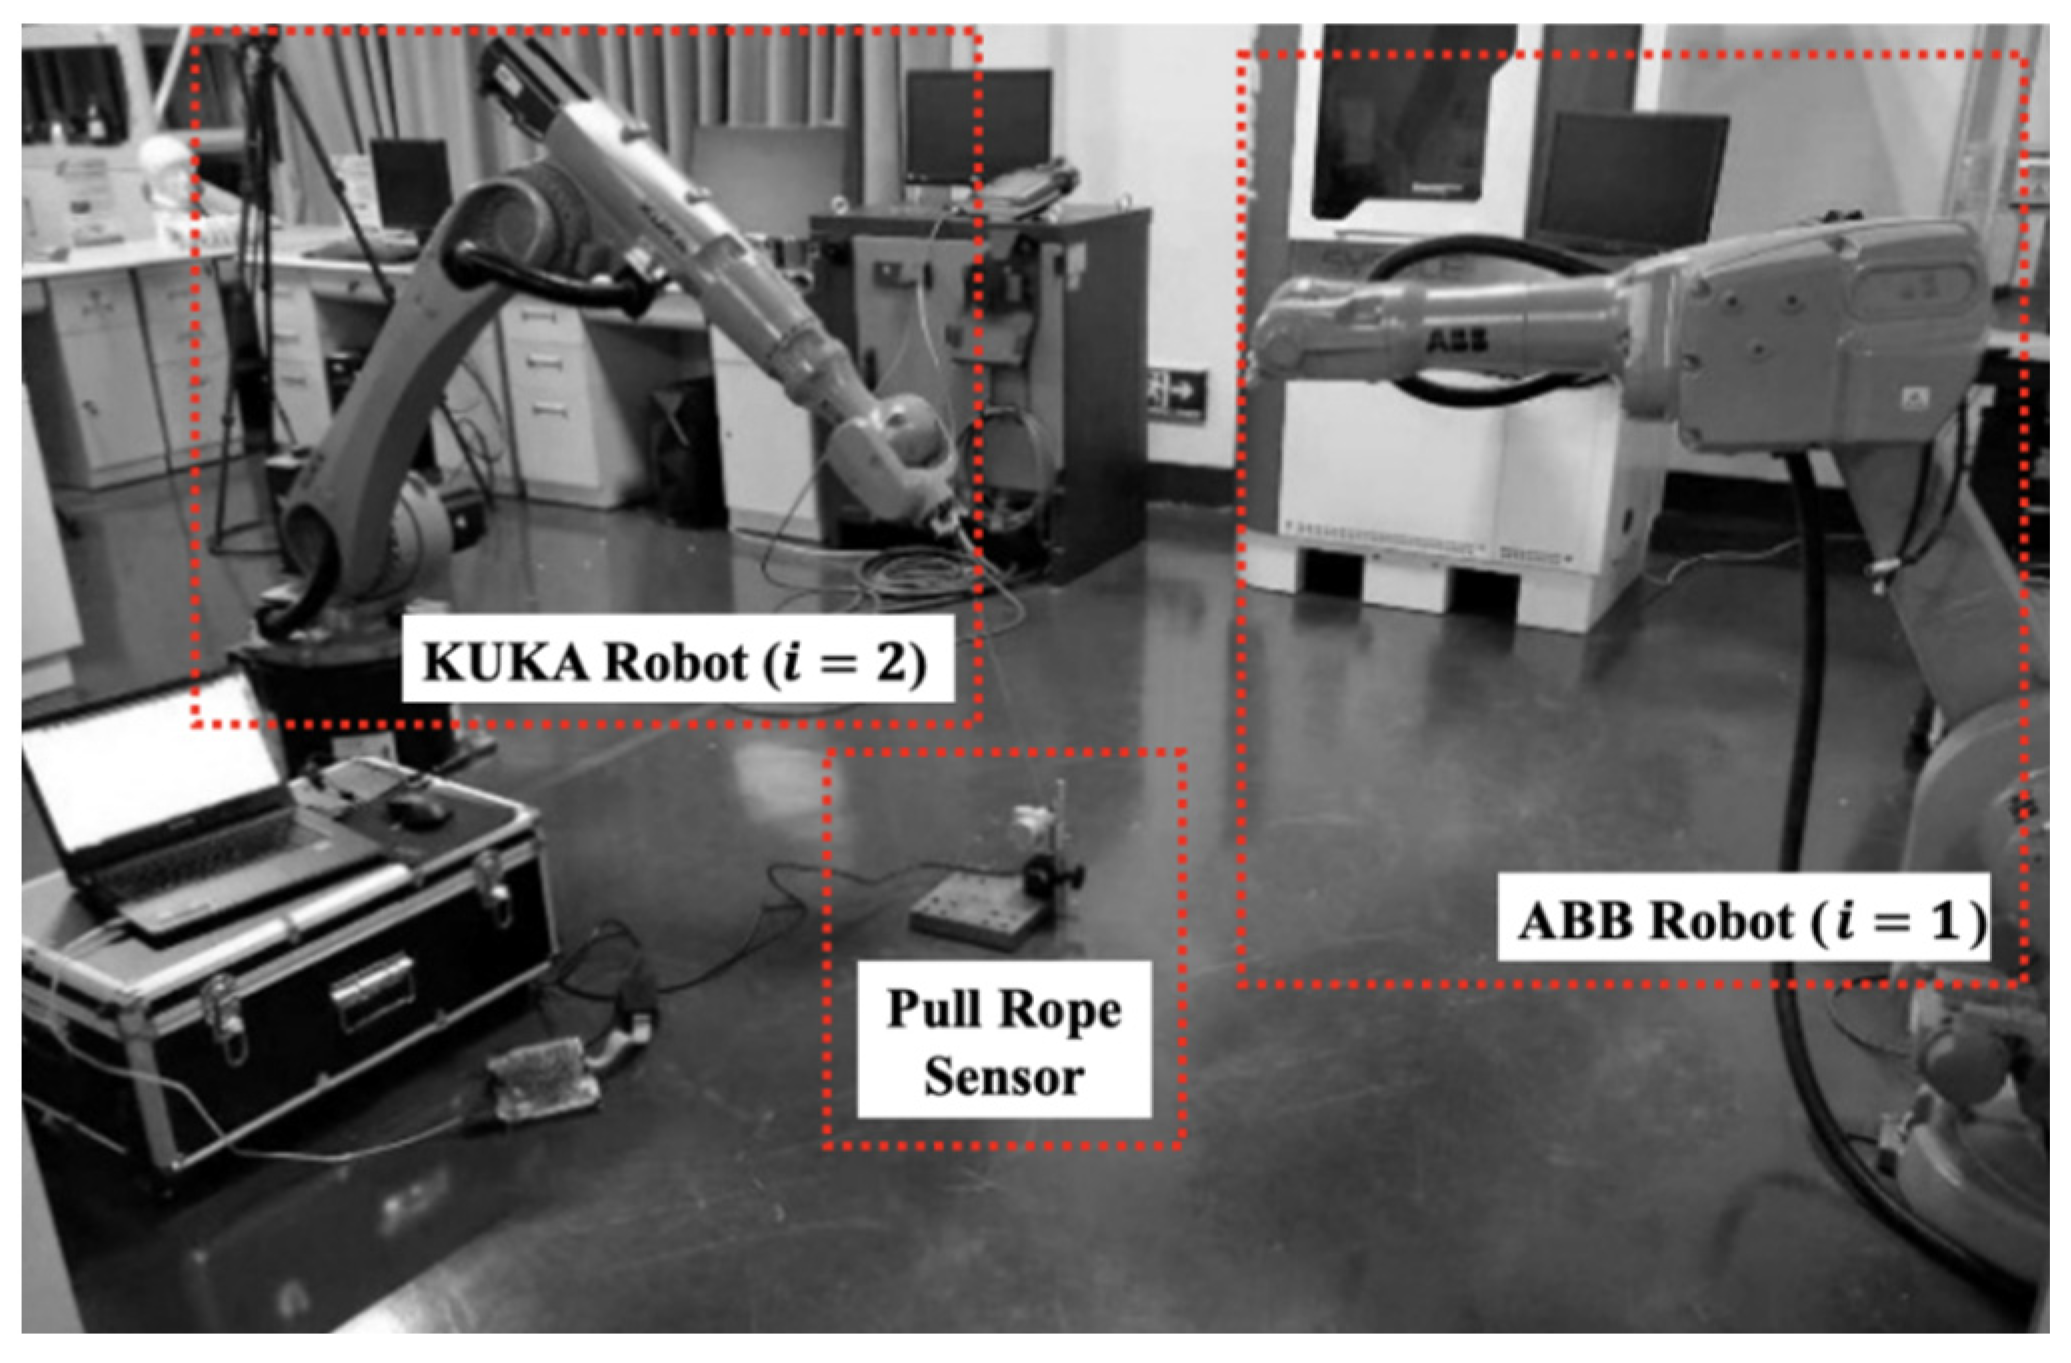
As shown in Figure 8, the right side is the ABB robot ( i = 1 ), and its base coordinate system is B 1 , the left side is the KUKA robot ( i = 2 ), and its base coordinate system is B 2 , and the measurement data are shown in Table A2. Figure 9 and Figure 10 show the position of the robot i = 1 and robot i = 2 end adapters.
According to the data in Table A2, construct the objective function, calculate the positions of p 1 , p 2 , p 3 relative to the base coordinate system B 1 and B 2 , and calculate H B 1 G and H B 2 G by Formulas (6), (8), (9). Then, based on Formula (4), the base coordinate transformation relationship H B 2 B 1 of the ABB robot relative to the KUKA robot is calculated.
H B 1 G = 0.030 0.858 0.023 0 0.858 0.031 0.042 0 0.037 0.019 0.999 0 1601.866 122.710 94.0803 1
H B 2 G = 0.103 0.848 0.001 0 0.848 0.103 0.019 0 0.016 0.003 0.999 0 1545.780 78.066 131.368 1
H B 2 B 1 = 0.989 0.085 0.072 0 0.084 0.991 0.023 0 0.054 0.013 0.997 0 3124.378 178.282 149.727 1 1 0 0 0 0 1 0 0 0 0 1 0 3124 178 145 1
Through the base coordinate transformation relationship H B 2 B 1 , the base coordinate relationship of the two robots in this dual-robot collaborative platform can be obtained. The X-axis of the base coordinates of the two robots is parallel and reversed, and the distance is p x = 3124   m m ; the Y-axis is parallel and reversed, and the distance is p y = 178   m m ; the Z-axis is parallel and the same direction, and the distance is p z = 145   m m . This result is consistent with the platform design value.
The error between the experimental results and the design value of the collaboration platform comes from:
(a)
Processing accuracy of robot end adapter and calibration tooling
In order to make the calibration simple and fast, an adjustable magnetic base and an easy-to-remove end adapter are used in the experimental equipment uses. Therefore, the calibration accuracy will be affected by its processing error in calibration.
(b)
Repeated positioning error of robots and measuring accuracy of the wire sensor
The fast calibration method for base coordinates of the dual-robot is limited by the accuracy of the wire sensor used in the measurement, and the error also comes from the repeated positioning accuracy of the robot to be calibrated.
(c)
Actual installation error of the dual-robot collaborative platform
There will be a certain deviation between the actual value and the design value of the dual-robot collaborative platform due to factors such as the installation site, installation tools, and installers.

5. Conclusions

The calibration of the base coordinate system of the dual-robot is crucial for realizing the coordinated operation of dual-robot in processing, production, and assembly. In this study, a dual-robot calibration system is established based on calibrated tooling components, and this calibration system is easy to operate. By adjusting the vertical or horizontal direction of the tooling guide rod and the position of the wire sensor, the conversion matrix between the dual-robot base coordinate systems can be obtained. An effective method for the calibration of the base coordinate system of the contact dual-robot based on the “three-point measurement calibration method” is proposed. A fast solution method for calibrating the parameters of the dual-robot base coordinate system is obtained by calibrating the mapping relationship between the distance from the three reference measurement points of the orthogonal distribution on the tooling components to the end point of the robot and the robot base coordinate system. Further, the dual-robot base coordinate conversion matrix is solved. The experimental results show that our calibration method can effectively improve the calibration accuracy and efficiency. Meanwhile, the base coordinate calibration between robots with arbitrary position distance can be realized by replacing the wire sensor stroke, which exhibits good adaptability. The calibration method can also be applied to the calibration of three or more robot base coordinate systems, which provide valuable references and guidance for robot processing, production, and assembly.

Author Contributions

Conceptualization, J.M. and R.X.; methodology, J.M. and R.X.; software, R.X., X.M. and S.H.; validation, J.M., R.X. and X.M.; formal analysis, S.H. and X.B.; investigation, J.M.; resources, R.X.; data curation, X.M. and S.H.; writing—original draft preparation, R.X., X.M. and S.H.; writing—review and editing, J.M.; visualization, X.B.; supervision, X.B.; project administration, J.M. and X.B.; funding acquisition, J.M. and X.B. All authors have read and agreed to the published version of the manuscript.

Funding

This research was funded by the Natural Science Foundation of Hubei Province, China (No. 2021CFB 471) and the National Natural Science Foundation of China (No. 51875415).

Institutional Review Board Statement

Not applicable.

Informed Consent Statement

Not applicable.

Data Availability Statement

Not applicable.

Conflicts of Interest

The authors declare no conflict of interest.

Appendix A

Table A1. Single-robot experiment record data.
Calibration   Point   k Teaching   Point   j Rope Length
L 1 j _ k (mm)
End Adapter Position
t k j (mm)
11804.29199[1295.78, −46.49, 1042.74]
2881.30255[1295.80, 209.68, 1042.73]
3841.0332[1295.84, −452.11, 1042.68]
41026.1182[1188.90, −393.30, 1226.34]
5995.62207[1189.90, −5.61, 1203.27]
6655.6239[1083.19, −160.56, 748.53]
7524.83978[1185.55, −344.85, 617.74]
8811.8349[1183.51, 486.36, 592.35]
9511.94385[1183.51, 12.84, 592.32]
10612.43469[1183.52, −399.40, 726.54]
11684.37616[1183.53, −79.43, 860.12]
12804.41364[1183.53, 261.18, 860.11]
13811.26715[1183.54, −213.55, 1013.35]
14909.52759[1183.55, −378.61, 1098.11]
21571.39484[1183.55, −378.60, 574.92]
2640.6192[1242.34, 82.64, 684.60]
3878.05829[1242.35, 329.93, 836.34]
4933.41345[1242.35, 253.74, 956.09]
5944.32227[1242.32, −185.89, 1079.38]
6871.93476[1242.33, −761.67, 755.57]
71073.4843[851.20, −761.64, 755.55]
8628.61548[1320.24, −309.33, 755.49]
9744.27325[1320.32, −650.78, 712.68]
10736.04095[1116.61, 102.07, 712.66]
11900.36261[1094.85, 397.44, 712.63]
12868.85272[1365.47, 263.65, 912.28]
13553.59198[1392.19, −166.39, 716.20]
14868.97437[831.75, −157.43, 675.53]
31535.82971[1291.28, −427.45, 545.64]
2755.26318[1150.48, −427.44, 719.50]
3802.1427[1120.64, −747.38, 634.62]
4889.89984[879.12, −543.42, 634.60]
5892.25195[1147.75, −929.28, 634.58]
61102.2771[823.17, −973.16, 633.98]
71035.486[676.96, −387.26, 633.97]
8309.01553[1333.11, −387.26, 295.92]
9506.99634[1097.99, −425.64, 295.88]
10756.56085[911.11, −425.64, 479.18]
11905.06677[875.38, −718.42, 562.85]
12790.13892[1099.97, −891.76, 444.98]
13785.5564[1284.93, −772.33, 693.52]
141066.6714[917.88, −641.63, 892.68]
Table A2. Dual-robot experiment record data for robot i = 1 .
Calibration   Point   k Teaching   Point   j Rope Length
L 1 j _ k (mm)
End Adapter Position
t k j (mm)
11603.26971[1384.59, −236.38, 819.10]
2552.45648[1421.48, −97.68, 788.31]
3567.33954[1380.72, −166.95, 788.28]
4552.86206[1307.30, −265.06, 715.18]
5571.84094[1256.81, −344.70, 670.12]
6605.784[1186.12, −404.16, 614.38]
7654.08289[1131.13, −435.67, 605.88]
8611.13702[1140.43, −350.05, 605.81]
9643.98511[1083.60, −398.44, 545.23]
10603.83746[1137.74, −451.52, 488.08]
21808.75287[1229.18, −423.74, 845.20]
2742.69165[1264.41, −376.20, 804.28]
3718.60303[1293.55, −463.75, 745.99]
4702.50343[1327.68, −507.81, 713.20]
5668.68207[1351.13, −574.71, 617.97]
6573.62531[1308.20, −526.70, 480.69]
7574.88245[1324.42, −559.91, 447.93]
8656.67828[1229.56, −603.47, 450.41]
9659.8009[1251.96, −631.34, 433.26]
10678.8609[1251.95, −670.43, 398.73]
31449.08636[1435.53, −443.97, 473.23]
2396.44827[1385.01, −363.58, 412.82]
3396.97546[1345.13, −411.26, 364.54]
4402.04462[1324.28, −449.74, 327.71]
5352.04251[1358.84, −464.42, 265.54]
6352.04251[1389.23, −501.13, 320.50]
7384.52563[1408.98, −488.70, 287.69]
8347.41943[1418.09, −513.93, 265.90]
9347.50055[1383.09, −484.86, 261.06]
10345.22955[1408.05, −456.91, 213.79]
Table A3. Dual-robot experiment record data for robot i = 2 .
Calibration   Point   k Teaching   Point   j Rope Length
L 1 j _ k (mm)
End Adapter Position
t k j (mm)
11907.58105[1119.17, 87.08, 1087.22]
2915.81335[1125.13, −217.85, 1045.38]
3823.47369[1167.65, −334.74, 888.71]
4679.22589[1219.71, 29.90, 872.91]
5724.96991[1183.83, 313.41, 858.93]
6747.67969[1151.50, 497.45, 745.08]
7641.71417[1180.49, 481.53, 592.28]
8525.08307[1215.77, 390.95, 498.04]
9413.72394[1479.82, 311.29, 626.07]
10271.62546[1476.73, 227.68, 496.36]
21462.75278[1412.96, 1.45, 651.90]
2479.13629[1407.24, −162.82, 610.44]
3456.79147[1402.31, −222.09, 534.68]
4565.23077[1397.74, −60.30, 748.18]
5575.81519[1380.21, 237.45, 740.18]
6567.90729[1362.25, 375.05, 652.09]
7796.87079[1409.91, 519.25, 868.02]
8599.295471460.99, 492.77, 638.04 []
9483.96213[1538.52, 310.33, 646.87]
10362.62689[1564.49, 174.00, 575.08]
31350.17706[1577.84, 544.55, 267.43]
2467.70029[1548.53, 646.68, 328.53]
3597.67334[1482.34, 784.46, 320.59]
4715.35876[1429.55, 886.67, 364.30]
5878.99103[1373.98, 984.15, 528.43]
6939.65863[1388.06, 943.87, 707.46]
7941.19965[1449.27, 783.60, 878.32]
8844.52081[1521.57, 640.62, 863.99]
9669.97974[1579.38, 569.90, 703.42]
10467.7814[1625.95, 461.11, 530.22]

References

  1. Sherwani, F.; Asad, M.; Ibrahim, B. Collaborative robots and industrial revolution 4.0 (ir 4.0). In Proceedings of the International Conference on Emerging Trends in Smart Technologies (ICETST), Karachi, Pakistan, 26–27 March 2020. [Google Scholar]
  2. Javaid, M.; Haleem, A.; Singh, R.; Suman, R. Substantial capabilities of robotics in enhancing industry 4.0 implementation. Cogn. Robot. 2021, 1, 58–75. [Google Scholar] [CrossRef]
  3. Mukherjee, D.; Gupta, K.; Chang, L.H.; Najjaran, H. A survey of robot learning strategies for human-robot collaboration in industrial settings. Robot. Comput. -Integr. Manuf. 2022, 73, 102231. [Google Scholar] [CrossRef]
  4. Leporini, A.; Oleari, E.; Landolfo, C.; Sanna, A.; Larcher, A.; Gandaglia, G. Technical and functional validation of a teleoperated multirobots platform for minimally invasive surgery. IEEE Trans. Med. Robot. Bionics 2020, 2, 148–156. [Google Scholar] [CrossRef]
  5. Wang, Z.; Liu, Z.; Ma, Q.; Cheng, A.; Liu, Y.; Kim, S.; Deguet, A.; Reiter, A.; Kazanzides, P.; Taylor, R. Vision-based calibration of dual RCM-based robot arms in human-robot collaborative minimally invasive surgery. IEEE Robot. Autom. Lett. 2017, 3, 672–679. [Google Scholar] [CrossRef]
  6. Xiao, J.; Zhao, S.; Guo, H.; Huang, T.; Lin, B. Research on the collaborative machining method for dual-robot mirror milling. Int. J. Adv. Manuf. Technol. 2019, 105, 4071–4084. [Google Scholar] [CrossRef]
  7. Zhao, D.; Bi, Y.; Ke, Y. Kinematic modeling and base frame calibration of a dual-machine-based drilling and riveting system for aircraft panel assembly. Int. J. Adv. Manuf. Technol. 2018, 94, 1873–1884. [Google Scholar] [CrossRef]
  8. Zhang, T.; Ouyang, F. Offline motion planning and simulation of two-robot welding coordination. Front. Mech. Eng. 2012, 7, 81–92. [Google Scholar] [CrossRef]
  9. Guo, C.; Xu, C.; Hao, J.; Xiao, D.; Yang, W. Ultrasonic non-destructive testing system of semi-enclosed workpiece with dual-robot testing system. Sensors 2019, 19, 3359. [Google Scholar] [CrossRef] [Green Version]
  10. Pellegrinelli, S.; Pedrocchi, N.; Tosatti, L.M.; Fischer, A.; Tolio, T. Multi-robot spot-welding cells for car-body assembly: Design and motion planning. Robot. Comput. -Integr. Manuf. 2017, 44, 97–116. [Google Scholar] [CrossRef]
  11. Talasaz, A.; Trejos, A.L.; Patel, R.V. The role of direct and visual force feedback in suturing using a 7-DOF dual-arm teleoperated system. IEEE Trans. Haptics 2016, 10, 276–287. [Google Scholar] [CrossRef]
  12. Wang, G.; Li, W.; Jiang, C.; Zhu, D.; Xie, H.; Liu, X.; Ding, H. Simultaneous calibration of multicoordinates for a dual-robot system by solving the AXB = YCZ problem. IEEE Trans. Robot. 2021, 37, 1172–1185. [Google Scholar] [CrossRef]
  13. Wang, X.; Huang, J.; Song, H. Simultaneous robot–world and hand–eye calibration based on a pair of dual equations. Measurement 2021, 181, 109623. [Google Scholar] [CrossRef]
  14. Nubiola, A.; Bonev, I. Absolute calibration of an ABB IRB 1600 robot using a laser tracker. Robot. Comput. -Integr. Manuf. 2013, 29, 236–245. [Google Scholar] [CrossRef]
  15. Fan, Q.; Gong, Z.; Zhang, S.; Tao, B.; Yin, Z.; Ding, H. A vision-based fast base frame calibration method for coordinated mobile manipulators. Robot. Comput. -Integr. Manuf. 2021, 68, 102078. [Google Scholar] [CrossRef]
  16. Ren, Y.; Yin, S.; Zhu, J. Calibration technology in application of robot-laser scanning system. Opt. Eng. 2012, 51, 114204. [Google Scholar] [CrossRef]
  17. Nguyen, H.; Pham, Q. On the Covariance of X in AX = XB. IEEE Trans. Robot. 2018, 34, 1651–1658. [Google Scholar] [CrossRef]
  18. Zhuang, H.; Roth, Z.; Sudhakar, R. Simultaneous robot/world and tool/flange calibration by solving homogeneous transformation equations of the form AX = YB. IEEE Trans. Robot. Autom. 1994, 10, 549–554. [Google Scholar] [CrossRef]
  19. Tan, N.; Gu, X.; Ren, H. Simultaneous robot-world, sensor-tip, and kinematics calibration of an underactuated robotic hand with soft fingers. IEEE Access 2017, 6, 22705–22715. [Google Scholar] [CrossRef]
  20. Ruan, C.; Gu, X.; Li, Y.; Zhang, G.; Wang, W.; Hou, Z. Base frame calibration for multi-robot cooperative grinding station by binocular vision. In Proceedings of the 2017 2nd International Conference on Robotics and Automation Engineering (ICRAE), Shanghai, China, 29–31 December 2017. [Google Scholar]
  21. Wang, J.; Wu, L.; Meng, M.; Ren, H. Towards simultaneous coordinate calibrations for cooperative multiple robots. In Proceedings of the International Conference on Intelligent Robots and Systems, Chicago, IL, USA, 14–18 September 2014. [Google Scholar]
  22. Wu, L.; Wang, J.; Qi, L.; Wu, K.; Ren, H.; Meng, M. Simultaneous Hand–Eye, Tool–Flange, and Robot–Robot Calibration for Comanipulation by Solving the AXB = YCZ Problem. IEEE Trans. Robot. 2016, 32, 413–428. [Google Scholar] [CrossRef]
  23. Ma, Q.; Goh, Z.; Ruan, S.; Chirikjian, G. Probabilistic approaches to the AXB = YCZ calibration problem in multi-robot systems. Auton. Robot. 2018, 42, 1497–1520. [Google Scholar] [CrossRef]
  24. Fu, Z.; Pan, J.; Spyrakos-Papastavridis, E.; Chen, X.; Li, M. A Dual Quaternion-Based Approach for Coordinate Calibration of Dual Robots in Collaborative Motion. IEEE Robot. Autom. Lett. 2020, 5, 4086–4093. [Google Scholar] [CrossRef]
  25. Qin, Y.; Geng, P.; Lv, B.; Meng, Y.; Song, Z.; Han, J. Simultaneous Calibration of the Hand-Eye, Flange-Tool and Robot-Robot Relationship in Dual-Robot Collaboration Systems. Sensors 2022, 22, 1861. [Google Scholar] [CrossRef]
  26. Gan, Y.; Dai, X. Base frame calibration for coordinated industrial robots. Robot. Auton. Syst. 2011, 59, 563–570. [Google Scholar] [CrossRef]
  27. Wang, W.; Liu, F.; Yun, C. Calibration method of robot base frame using unit quaternion form. Precis. Eng. 2015, 41, 47–54. [Google Scholar] [CrossRef]
  28. Lu, Z.; Xu, C.; Pan, Q.; Meng, F.; Li, X. Automatic method for synchronizing workpiece frames in twin-robot nondestructive testing system. Chin. J. Mech. Eng. 2015, 28, 860–868. [Google Scholar] [CrossRef]
  29. Kong, M.; Yu, G. The calibration for dual-robot system based on the three-point method. Adv. Mater. Res. 2014, 998, 678–681. [Google Scholar] [CrossRef]
  30. Deng, H.; Wu, H.; Yang, C.; Guan, Y.; Zhang, H.; Liu, J. Base frame calibration for multi-robot coordinated systems. In Proceedings of the 2015 IEEE International Conference on Robotics and Biomimetics (ROBIO), Zhuhai, China, 6–9 December 2015. [Google Scholar]
  31. Wang, J.; Wang, W.; Wu, C.; Chen, S.; Fu, J.; Lu, G. A plane projection based method for base frame calibration of cooperative manipulators. IEEE Trans. Ind. Inform. 2018, 15, 1688–1697. [Google Scholar] [CrossRef]
Figure 1. Schematic diagram of dual-robot collaboration.
Applsci 13 08799 g001
Figure 2. Layout of TCF calibration coordinate system.
Applsci 13 08799 g002
Figure 3. Principle of dual-robot calibration.
Applsci 13 08799 g003
Figure 4. Principle diagram three-point measurement.
Applsci 13 08799 g004
Figure 5. The pose relationship diagram: (a) G relative to B i ; (b) calibration points p 1 , p 2 , p 3 relative to G .
Applsci 13 08799 g005
Figure 6. Single robot calibration measurement view.
Applsci 13 08799 g006
Figure 7. Single robot tool end adapter location diagram: (a) calibration point k = 1 ; (b) calibration point k = 2 ; (c) calibration point k = 3 .
Applsci 13 08799 g007
Figure 8. Dual-robot calibration measurement view.
Applsci 13 08799 g008
Figure 9. Robot i = 1 tool end adapter location diagram: (a) calibration point k = 1 ; (b) calibration point k = 2 ; (c) calibration point k = 3 .
Applsci 13 08799 g009
Figure 10. Robot i = 2 tool end adapter location diagram: (a) calibration point k = 1 ; (b) calibration point k = 2 ; (c) calibration point k = 3 .
Applsci 13 08799 g010
Table 1. Comparison of the three calibration methods for dual-robot.
Comparison ConditionAccuracyCostHuman FactorWorkspace Limitation
Handshakeo+--
Coordinate measuring machine+-++
Three-point measuremento+++
Disclaimer/Publisher’s Note: The statements, opinions and data contained in all publications are solely those of the individual author(s) and contributor(s) and not of MDPI and/or the editor(s). MDPI and/or the editor(s) disclaim responsibility for any injury to people or property resulting from any ideas, methods, instructions or products referred to in the content.