Article

End Face Attitude Detection of Special Steel Bars Based on Improved DBSCAN

1
College of Mechanical and Vehicle Engineering, Taiyuan University of Technology, Taiyuan 030024, China
2
School of Electronic Information Engineering, Taiyuan University of Science and Technology, Taiyuan 030024, China
*
Author to whom correspondence should be addressed.
Appl. Sci. 2023, 13(23), 12640; https://doi.org/10.3390/app132312640
Submission received: 31 October 2023 / Revised: 21 November 2023 / Accepted: 22 November 2023 / Published: 24 November 2023
(This article belongs to the Section Applied Industrial Technologies)

Abstract

:
An end face attitude detection system for special steel bars is designed to solve the problem of defect localization for steel bar grinding. A circle detection method based on improved Density-Based Spatial Clustering of Applications with Noise (DBSCAN) is proposed for calculating special steel bars’ end face attitude. Firstly, the images are subjected to edge detection, connected region marking, and improved DBSCAN in accordance with the image characteristics. After that, the arcs belonging to the same circle are clustered into the same category to create virtual connected regions. Then, circle parameters of a virtual connected region are clustered using an improved DBSCAN algorithm. The actual circle parameter is obtained by calculating the centroid of each category. Finally, the vector is generated under the set coordinate system, passing through the center of the circumcircle of the steel bar end and one endpoint of the two-dimensional code, and the angle of the vector is calculated to determine the attitude of the special steel bar’s end face. The experimental results demonstrate that the method can obtain an attitude angle resolution of 0.2 degrees with an error range of ±0.1 degrees. This will provide accurate defect localization support for the digitization and intelligence of the grinding platform on the special steel bar production line.

1. Introduction

Currently, the special steel bar production line has a relatively low level of intelligence and digitalization, especially in the grinding process for special steel bars. The grinding of special steel bars is separated from the instrument for detecting surface defects. However, the present defect detection instrument does not include traceable information about the circumferential position. As soon as the bar leaves the detection instrument, the surface defect position of the bar will no longer be able to be determined. Therefore, the current surface defect grinding process still relies on manual inspection of the defect position and grinding of the defect. This not only reduces production efficiency, but also worsens the working environment in the steel bar production workshop, and the debris generated by grinding may cause various degrees of harm to human health, which presents new challenges for scientists and technologists. Innovation in science and technology has enabled the digitization, networking, and intelligent construction of steel bar production lines to become a key development objective and primary direction in the steel industry. And the automatic grinding system for special steel bars is an essential component of the digitalization and intelligence of the production line for special steel bars. Providing automatic grinding for special steel bars can not only improve production efficiency and product quality, but also obtain consistent grinding results and reduce hidden risks.
At present, steel bar surface defect detection methods include the eddy current detection method [1,2,3], the magnetic flux leakage detection method [4,5,6], the laser ultrasonic detection method [7,8,9], the infrared imaging detection method [10,11,12], the machine vision detection method [13,14,15], and so on. These detection methods, however, focus only on the presence of defects on the surface of the steel bar. And they do not consider the problem that the defect needs to be repositioned after the bar leaves the detection instrument. But to accomplish automatic surface defect grinding, off-line traceable surface defect location information must be obtained. The existing steel bar surface defect detection instruments can obtain axial and circumferential position information of the surface defect when the bar is placed in the detection instrument. The axial position is represented by the length from the end of a steel bar, whereas a circumferential position is generally expressed by the counterclockwise expansion angle of the random reference zero position. Once the steel bar leaves the detection instrument, the circumferential position is impossible to locate again due to using a random reference zero position. Consequently, the special steel bar end face attitude detection system 1 was installed in the flaw detection workshop as shown in Figure 1. The rotation attitude of the end face during defect detection is calculated based on the characteristics of the steel bars’ end face. By recording the rotation attitude, the circumferential position of defect detection has an absolute reference zero position. At this moment, once the special steel bar end face attitude detection system 2 has also been installed at the position of the grinding platform, the surface defect location can be re-located for use in the steel bar automatic grinding system.
In order to calculate the end face attitude of special steel bars, the characteristics of the steel bars’ end faces must be determined first. As a first consideration, the end face’s texture should be considered. The texture features can be used to extract defects [16] and perform identification [17]. However, the collection of texture features requires high-definition acquisition equipment, and the light requirements are high, which is difficult to implement on a steel bar production line. Therefore, it is pertinent to consider the features added by human factors based on the actual production site situation. It is understood that different enterprises have different treatment processes for the steel bars’ end faces. Some companies mark the bar ID by spraying the code [18,19,20] on the end of the bar while others mark the bar ID by spraying or sticking a two-dimensional code on it. According to Figure 2, the end face features of the three cases are mainly numbers, text, two-dimensional codes, and some regular shapes. For the purpose of representing the rotation attitude of a bar’s end face in a way that is more intuitive and making the angle of the steel bar’s end face correspond to the rotation angle of the bar, we selected the center of the circumscribed circle of the bar’s end face and a feature point outside the center to determine the angle of the rotation attitude. Additionally, another feature point can be the end point of a number, text, or QR code, which can be selected based on the actual situation on site. The feature in Figure 2c is selected for investigation, which is the steel bar’s end face feature on the production line of the HBIS GROUP SHISTEEL COMPANY, so it is more practical to study such a feature.
In Figure 2c, the end face of the special steel bar has two obvious characteristics, one is the QR code feature, and the other is its round shape. Generation and recognition of QR codes [21,22] is widely used in a variety of fields, making them ubiquitous in everyday life. And the QR code recognition algorithm is generally considered to be stable. As for circle detection, it is now extensively used in spacecraft [23], industrial component measurement [24], iris localization [25], nanoparticle research in medicine [26], traffic signs [27], automated bar statistics [28], and in other fields. Currently, the most used circle detection methods are Hough transform (HT) [29], random circle detection (RCD) [30], etc. As pointed out in the literature, these methods have poor detection results in complex scenes, occlusions, and minimax circles. Therefore, it is necessary to improve circle detection methods to calculate steel bars’ end face attitude. According to circle parameter characteristics, intelligent clustering algorithms can be applied to circle detection. DBSCAN [31,32] is an intelligent clustering algorithm with a noise removal function, which can be used for better circle parameter clustering. Therefore, a circle detection method based on improved DBSCAN is proposed in this paper to solve the instability problems caused by occlusion, noise, and random point selection in the traditional circle detection algorithm. Combined with the position information of the QR code, the resolution of the end face attitude angle reaches 0.2 degrees. And the calculation time at the resolution of 2048 × 1536 does not exceed 2.3 s on average, which complies with the bar production line’s timing requirements.
The major contributions of this paper are as follows:
  • A circle detection algorithm based on improved DBSCAN is proposed, which overcomes the problem that the current circle detection algorithm does not detect circles accurately in complex scenes.
  • A method is proposed to represent the circumferential position of the current steel bar using the end face attitude angle, which provides a theoretical foundation for automatic surface defect location.
  • An end face attitude detection system is proposed to solve the problem that surface defects of special steel bars cannot be located during automatic grinding.

2. Related Work and Related Definition

2.1. Related Work

At present, most research on the detection of steel bar end faces focuses on the automatic counting of the steel bar, the spraying of a code, the spraying of paint, and the recognition of characters [33,34,35,36]. Zhang [33] mainly employed morphological methods to segment the end faces of different steel bars and counted the number of steel bars. Zhu [34] used an iterative training method to train the SVM classifier for many times, and counted steel bars. Feng [19] utilized HT to locate the center of steel bars’ end faces, which provided positioning data for the spray code robot. Xie et al. [35] used HT to locate a steel bar’s end face and spray paint the steel bar’s end face. Zhang et al. [36] used HT to segment the image of a steel bar’s end face, and identified the bar’s end face characters. As can be seen in Table 1a, most of the current methods for detecting and localizing steel bars’ end faces only focus on quantity and relative position, but not the attitude of the end face. And most of the current research uses HT to recognize the steel bars’ end faces. Despite this, HT circle detection is time-consuming, sensitive to noise, and has low accuracy in complex backgrounds.
It Is important to note that there are many other methods of circle detection besides HT, as shown in Table 1b. Yao et al. [37] proposed an algorithm of curvature-aided HT for circle detection (CACD), and by pre-estimating the curvature, the cumulative operation of all points can be avoided and interruptions between different scales avoided, making circle detection faster and more accurate. However, appropriate edge detection information is required to calculate the curvature. Jiang et al. [38] proposed a fast circle detection algorithm using differential region sampling (DRSCD), but it still needs to reach a certain number of points on the candidate circle. The random sampling method is limited by random characteristics, and it is difficult to adapt to many noise points or complex scenes. When there are many false points, it not only affects the detection speed, but also affects the actual accuracy of detection. Chung et al. [39] proposed an improved RCD and used an effective refinement strategy to improve the accuracy of circle detection. Also, due to random sampling, multiple attempts were required to obtain valid sampling points. Zhao et al. [40] proposed a new circle detection algorithm based on inscribed triangles (ITCD), which achieved good detection results, but it is difficult to ensure the accuracy of large-diameter circles with occlusions when multiple small arcs are reserved. González et al. [41] proposed an evolutionary algorithm to automatically detect circles in images (EACD), which performed well on synthetic and hand-drawn images, but needs to be improved in real images. Therefore, it is necessary to study circle detection methods to solve the problem of low detection accuracy and poor anti-noise ability of the current circle detection methods in complex scenes.

2.2. Related Definitions

2.2.1. Definition for Circle Parameters of Connected Regions

It can be seen from Figure 3a that any three points are taken to calculate the circle parameters on a complex background, and a lot of invalid circle parameter data will be obtained. Therefore, different connected regions are marked with different colors in Figure 3d. We can get any three points P 1 C ( x 1 C , y 1 C ) , P 2 C ( x 2 C , y 2 C ) , and P 3 C ( x 3 C , y 3 C ) , which belong to the same connected region C on the image. The distance between any two points is not less than G L , where G L generally takes 1/4 of the maximum length of the connected region. Then, the circle parameter of the connected region is defined as follows:
x O C = a / k 13 c / k 12 + b d / 1 / k 13 1 / k 12
y O C = d k 12 b k 13 + c a / k 12 k 13
r C = ( x O C x 1 C ) 2 + ( y O C y 1 C ) 2
In which k 12 = ( y 1 C y 2 C ) / ( x 1 C x 2 C ) , k 13 = ( y 1 C y 3 C ) / ( x 1 C x 3 C ) , a = ( x 1 C + x 3 C ) / 2 , b = ( y 1 C + y 3 C ) / 2 , c = ( x 1 C + x 2 C ) / 2 , and d = ( y 1 C + y 2 C ) / 2 . Obviously, when k 12 is equal to k 13 , since all three points are on a straight line, it is not possible to determine the effective circle parameter, which is discarded.

2.2.2. Definition of Circle Parameter Density

Three points are randomly selected multiple times for the same connected region to obtain multiple circle parameters for the same region. If the connected region belongs to a part of a circle, the circle parameters are relatively concentrated. If the connected region is irregular in shape, the calculated circle parameters will be extremely scattered, and all these circle parameter data will be distributed in a three-dimensional space. In order to characterize the density of these data, the definition of a circle parameter density block is introduced.
Assuming that the circle parameter sample set is D = d 1 , d 2 , , d m , the circle parameter density block is defined as follows:
(1)
Establish a coordinate system: As we know, d i are three-dimensional data ( x , y , r ) , and a three-dimensional coordinate system ( X , Y , Z ) can be established. Then, the circle parameter data ( x , y , r ) are mapped to the three-dimensional coordinate ( x , y , z ) .
(2)
Division of a cube block: In order to characterize the circle parameter data distribution, the maximum value M a x X , M a x Y , M a x Z and the minimum value M i n X , M i n Y , M i n Z in the three directions of X, Y and Z are taken, respectively, and the planes are drawn with Equations (5)–(7). Then the N c cube with a side length of G is established.
N c = M a x X / G M i n X / G M a x Y / G M i n Y / G M a x Z / G M i n Z / G
x = k G , k   is   an   integer , and M i n X / G k M a x X / G
y = m G , m   is   an   integer , and M i n Y / G m M a x Y / G
z = n G , n   is   an   integer , and M i n Z / G n M a x Z / G
(3)
Definition of circle parameter density: For any d i D , it must fall in a certain cube j , which is denoted as d i , j . If the number of d i , j in block j is denoted as N j , the density of block can be defined as follows:
D Y j = N j / G 3

3. Proposed End Face Attitude Detection Algorithm for Special Steel Bars

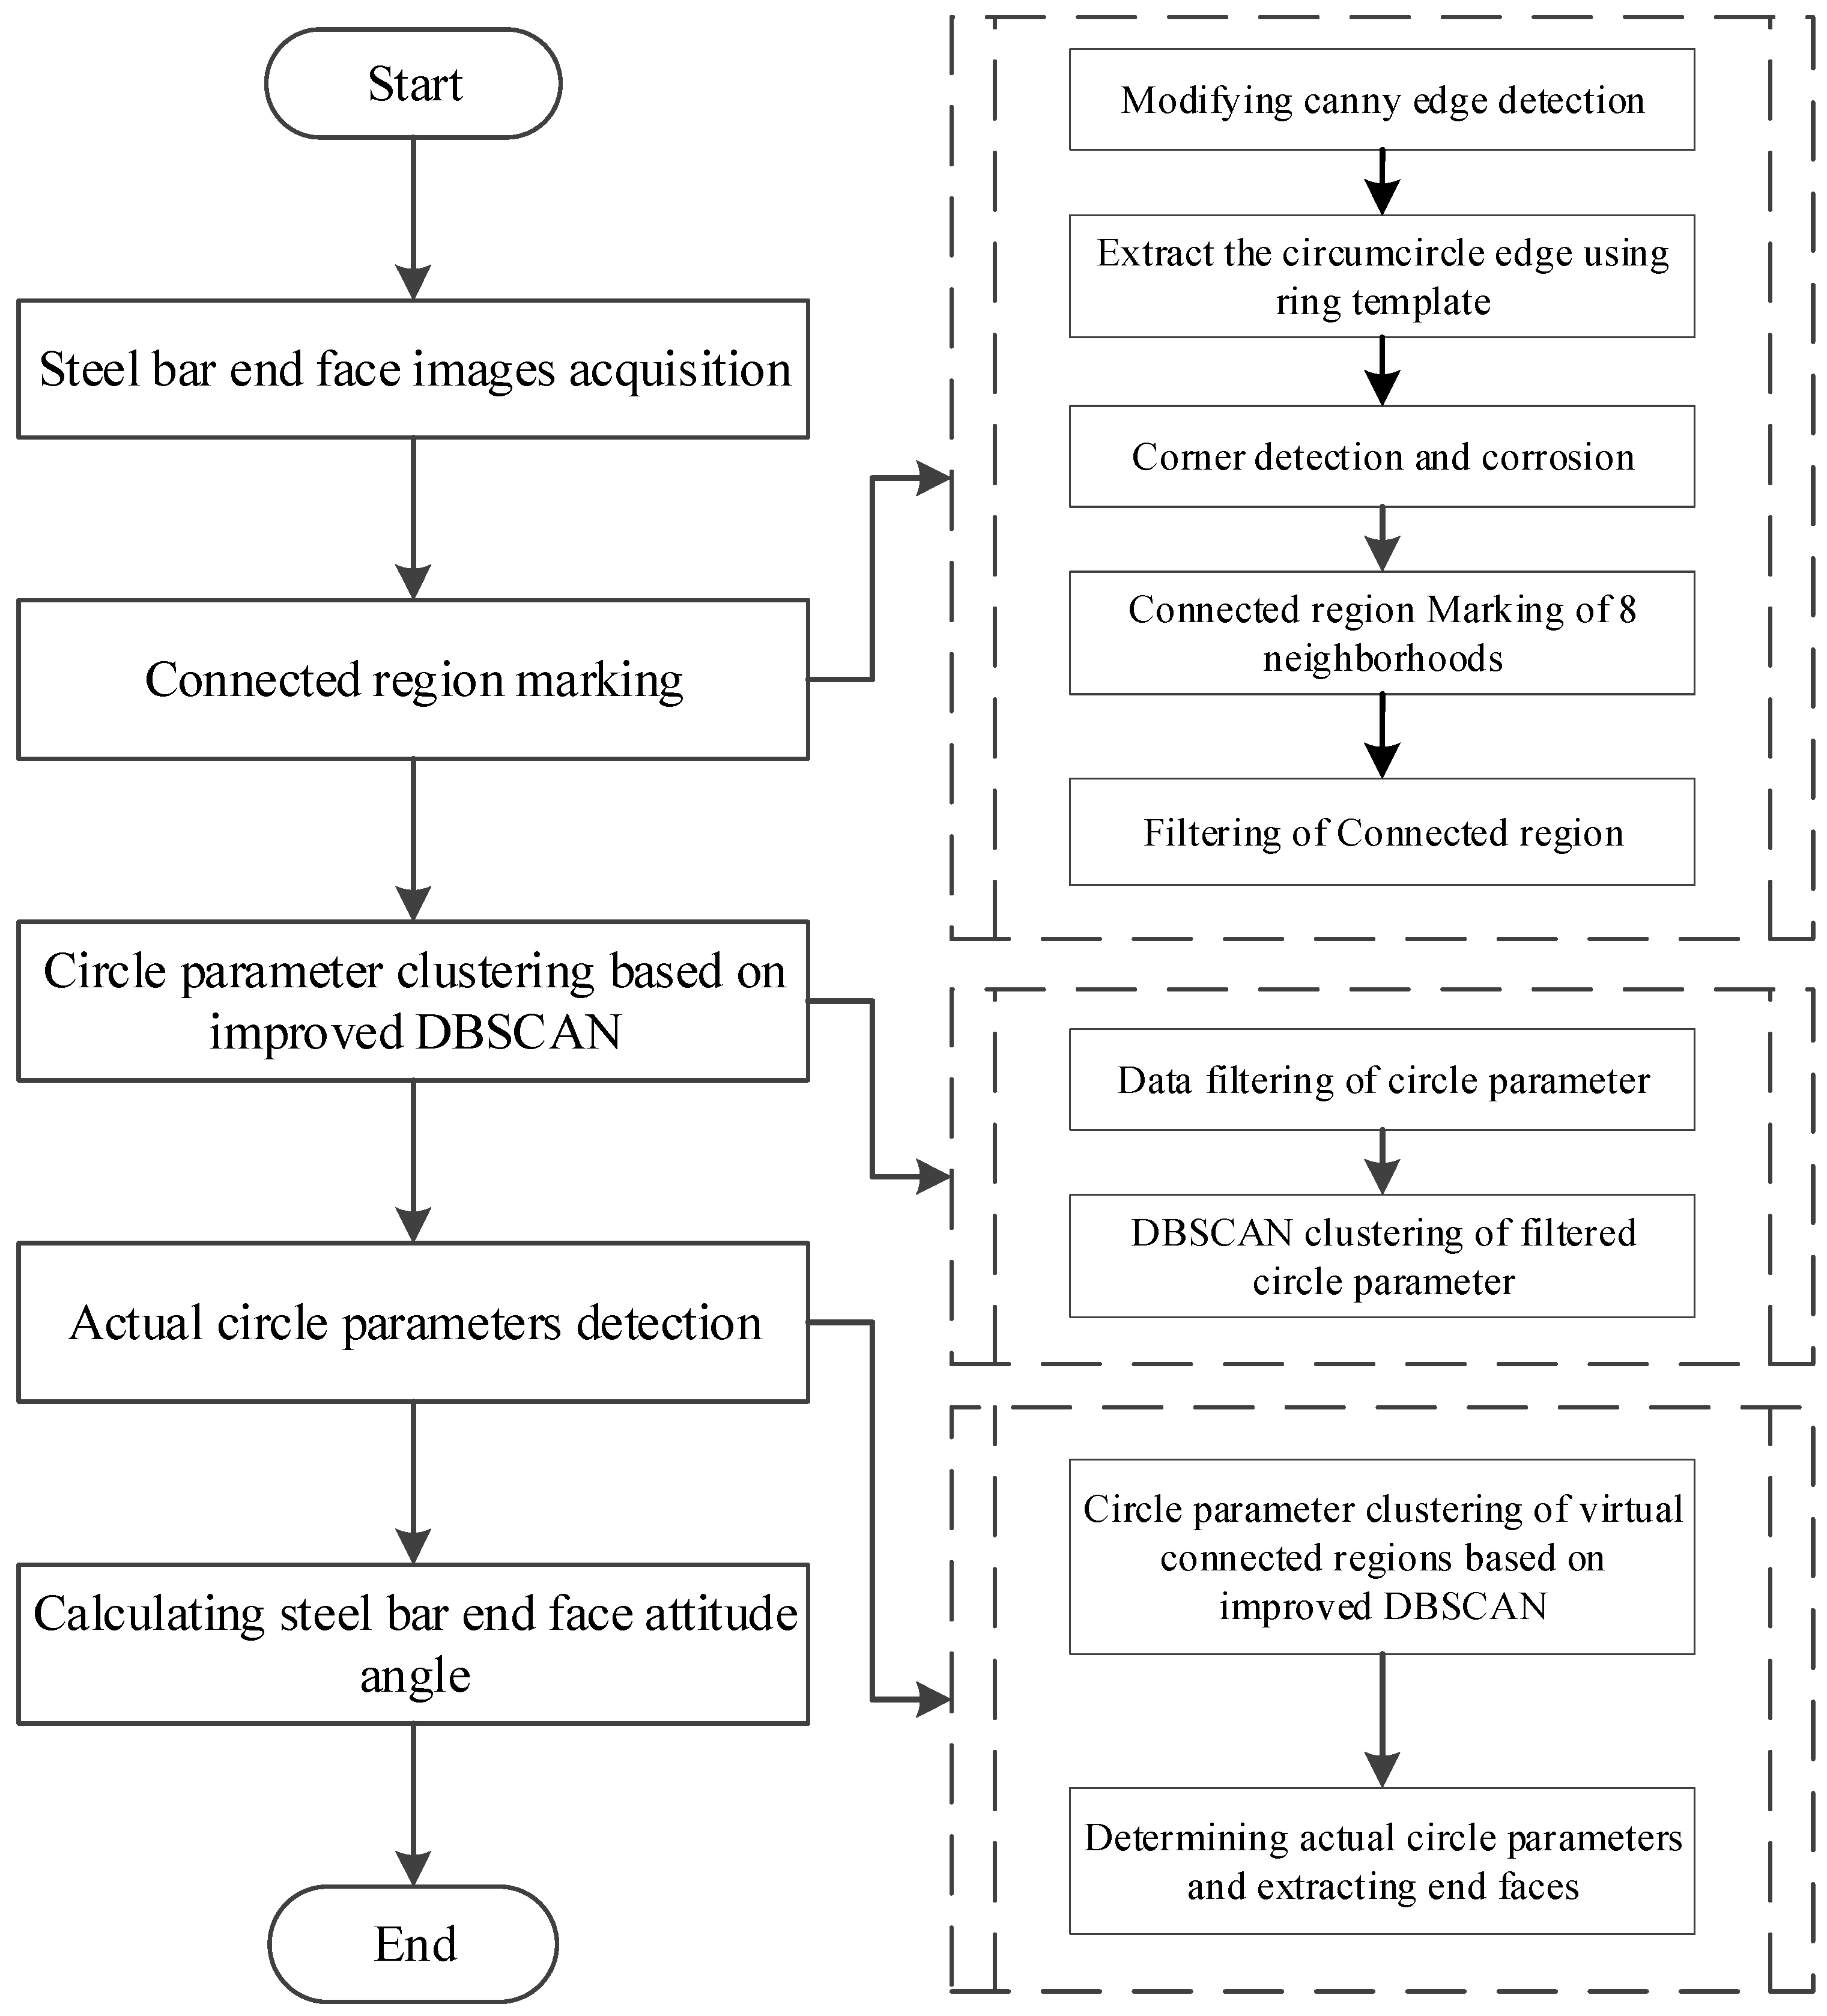
As previously mentioned, the bar end face attitude is determined primarily by two feature points. Since the two-dimensional code has a more mature identification and positioning method, the accuracy of the bar end face attitude angle is primarily determined by the accuracy of the center of a steel bar’s end face. For illustrating our detection algorithm, we use the algorithm flow chart shown in Figure 4 to illustrate its implementation. The flow chart not only illustrates the detection process of the steel’s end face attitude, but also the key steps involved in its implementation. The detection process mainly includes the following steps: steel bar end face image acquisition, connected region marking, circle parameter clustering based on improved DBSCAN, actual circle parameter detection, and calculating steel bar end face attitude angles. The specific implementation is as follows.

3.1. Connected Regions Marking

3.1.1. Modifying Canny Edge Detection

The filtering in the canny edge detection [42] method generally adopts Gaussian filtering. We mainly extract the rough outline information from the image of the steel bar’s end face in this paper and do not pay attention to the detailed information. To this end, the filtering in canny edge detection is improved to minimum filtering to highlight the edge information of the main contour according to Equation (9).
I m a g e N e w ( i , j ) = min ( I m a g e N i × N j . K N × N )
In Equation (9), K N × N is the N × N all-one template, I m a g e N e w ( i , j ) is the pixel value of any point after filtering, and I m a g e N i × N j is the N × N neighborhood of the pixel position ( i , j ) . Then, the edge information of the image is calculated as shown in Figure 3a.

3.1.2. Marking the Connected Regions

The edge image is relatively complex from the edge image in Figure 3a, and the arc of the circle to be detected is often connected to or intersected with the background or arcs of other circles. When circle parameters are calculated directly, not only is the calculation large, but also the accuracy cannot be guaranteed. In order to detect the circle more accurately, the Harris corner detection method is used to detect the position of the corner point, and the detection result is shown in Figure 3b. Then, the position of the corner point is corroded, resulting in a complete disconnect between the intersection point and the position of the broken line in the original image. Then, the marking matrix I m a g e L a b e l is obtained by using the 8-neighborhood connected region marking method as shown in Figure 3c. Smaller connected regions are removed according to a threshold, and a new marking matrix F I m a g e L a b e l is obtained as shown in Figure 3d.
It is evident from Figure 3d that not only does the final marking result retain the effective arc, but it also removes a large amount of invalid edge information, which also eliminates an extensive amount of interference data for calculating circle parameters, thereby speeding up the calculation process.

3.2. Circle Parameter Clustering Based on Improved DBSCAN

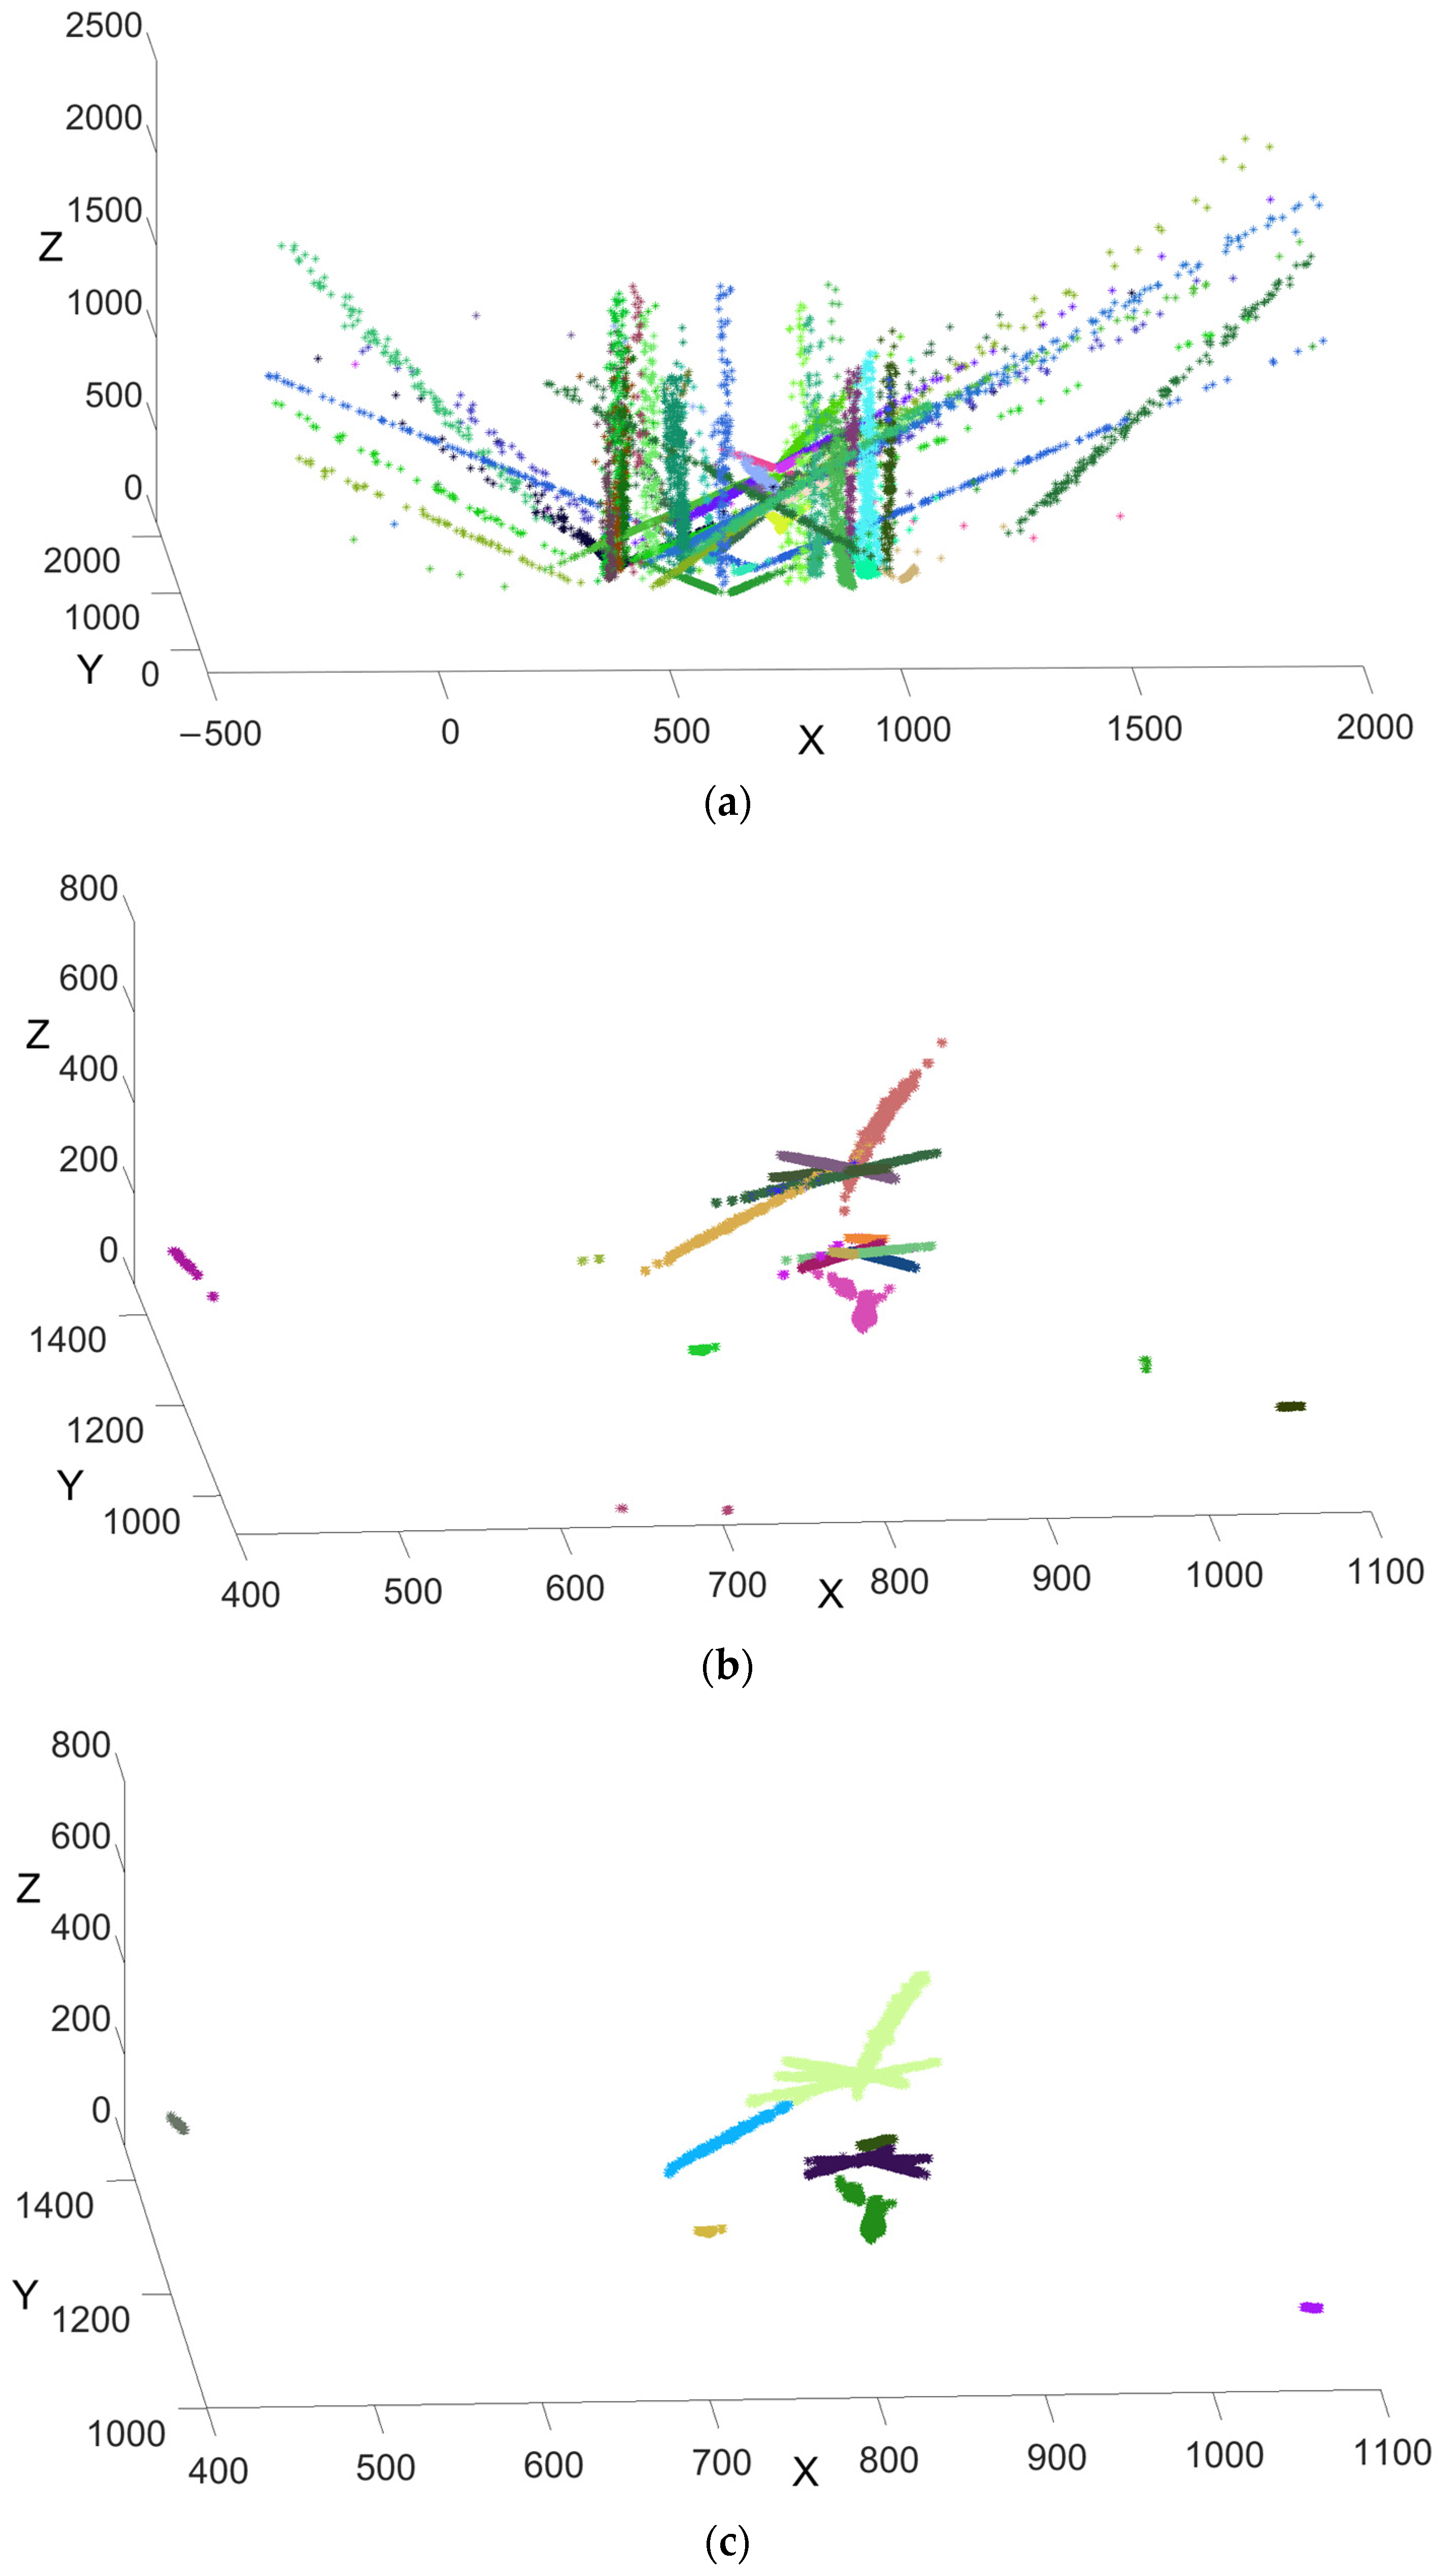
The circle parameters of the marking results are calculated using the method described in Section 2.2.1, and all circle parameters are shown in Figure 5a. In order to obtain the circumcircle parameters of the steel bar’s end face accurately, data filtering is added to DBSCAN as an improved method to reduce the large amount of useless data involved in clustering. The improved DBSCAN implementation steps are as follows:
(1)
In order to reduce the large amount of useless data involved in clustering, and the circle parameter filtering is completed according to the following steps:
(a)
The coordinates of the circle center are set as the X and Y axes, respectively, and the coordinates of the radius are set as the Z axis. At this time, all the circle parameters ( x , y , r ) are mapped to a three-dimensional coordinate ( x , y , z ) .
(b)
According to Equation (8), the number of data N j is counted in the j-th cube, whose side length is G , and the density values of cubes D Y j are acquired.
(c)
We set the cube density threshold to be T H c u b e ; when density value of a cube is D Y j < T H c u b e , delete all data points in the cube, otherwise reserve them. The data filtering of the circle parameter data is completed. The result of the filtering can be seen in Figure 5b, and the same color in Figure 5b indicates that the filtered circle parameter data belong to the same connected region. After filtering, most of the invalid circle parameters are filtered out.
(2)
The core object, clustering number, unvisited sample set, and cluster division are initialized to Ω = ϕ , k = 0 , Γ = D , and C = ϕ , respectively.
(3)
For j = 1 , 2 , , m , all core objects are found as follows:
(a)
The sample number N ε ( d j ) of the ε neighborhood subsample set of d j is calculated using distance measurements.
(b)
If the number of samples in the subsample set satisfies N ε ( d j ) > M i n P t s , the sample d j is added to the core object sample set Ω = Ω d j .
(4)
If the core object is Ω = ϕ , the algorithm is ended, otherwise go to step (5).
(5)
In the core object set Ω , a core object A is selected randomly; the current cluster core object set, clustering number, the current cluster sample set. and the unvisited sample set are updated to Ω cur = A , k = k + 1 , C k = A , and Γ = Γ A , respectively.
(6)
If the current cluster core object queue Ω cur = ϕ , the current cluster C k is generated, and the cluster division and the new core object set are updated to C = C 1 , C 2 , , C k and Ω = Ω C k , respectively, then go to step (4).
(7)
A core object A is fetched from the current cluster core object queue Ω cur , the sample number N ε A of the ε neighborhood subsample set is found according to the distance neighborhood; let Δ = N ε A Γ , and the current cluster sample set, the unvisited sample set, and the current cluster core object queue are updated to C k = C k Δ , Γ = Γ Δ , and Ω cur = Ω cur Δ Ω A , then go to step (6).
The output results are cluster division C = C 1 , C 2 , , C k , the final clustering results are shown in Figure 5c, and the same color data in Figure 5c indicate that they belong to the same clustering result.
According to Figure 5, the DBSCAN clustering method with a dedicated filter significantly reduces interference from non-circular parameters. Due to the reduction in the amount of data involved in the calculation, the algorithm’s clustering efficiency is also improved. In this instance, the improved DBSCAN clustering system can not only classify the data more accurately, but also allow a wider range of clustering parameters to be set.

3.3. Actual Circle Parameter Detection

3.3.1. Generation of Virtual Connected Regions

As shown in Figure 5c, several categories of the circle parameter are determined. Circle parameters are clustered into the same category, when they basically come from one or more arcs of the same circle, which also shows that the DBSCAN clustering method can well detect circle detection. However, there is still a lot of interference information in the clustering results, and for the same circle, the centrality of a circle parameter obtained by multiple independent arcs is generally inferior to that of a circle parameter obtained by multiple independent arcs participating simultaneously. In order to obtain accurate circle parameters, the arcs related to the same cluster are marked as one connected region. This is not a real connected relationship and is defined as a virtual connected region. The generation method of the virtual connected region is as follows:
C i r V C A j = U C A j i
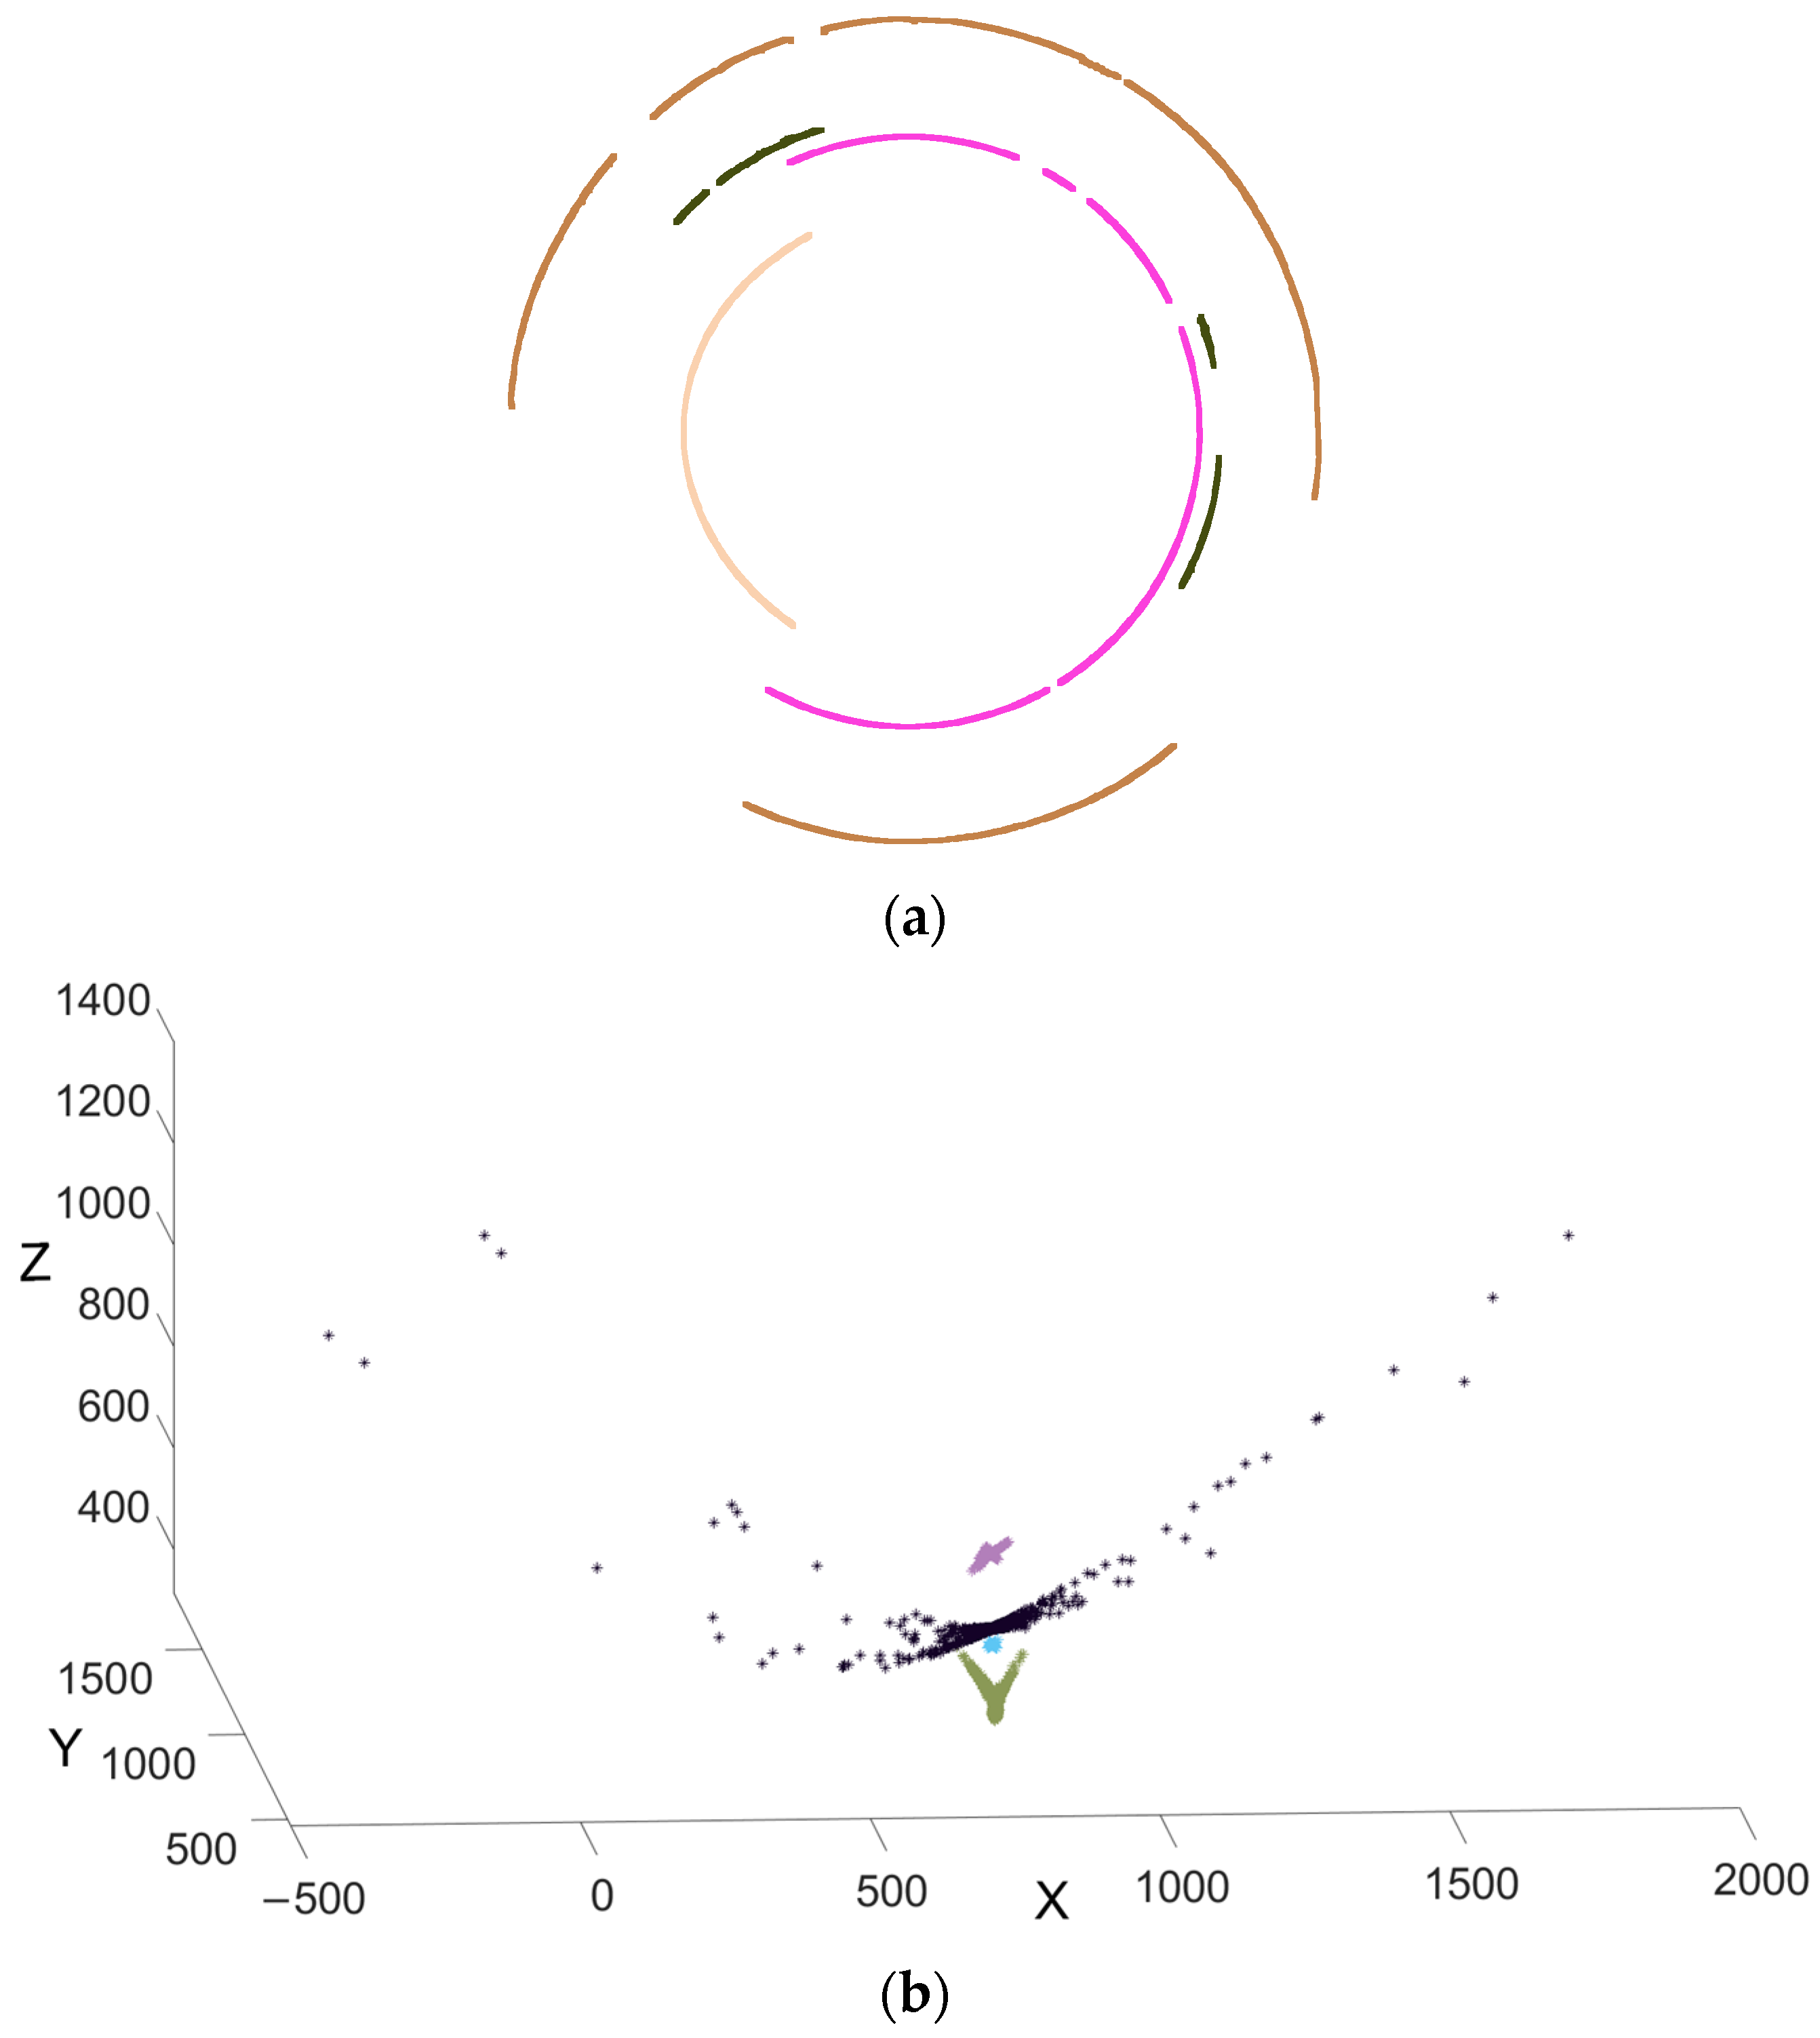
In Equation (10), C i r V C A j represents the virtual connected region generated by the j-th type of data in the DBSCAN clustering result, and C A j i is the i-th arc in the j-th type of data in the clustering result. The final generated virtual connected region is shown in Figure 6a, and different colors in Figure 6a represent different virtual connected regions.

3.3.2. Circle Parameter Clustering Results of Virtual Connected Regions

Figure 6b shows the circle parameters of virtual connected regions. Different colors in Figure 6b indicate that the data come from different virtual connected regions. Compared with Figure 5a, the circle parameters of virtual connected regions are denser, and the amount of discrete circle parameters is significantly less, which also shows that after the first clustering, the connected regions belonging to the circle are basically preserved, and the connected regions which are quite different from the circle are deleted. The improved DBSCAN is performed according to Section 3.2, and a final clustering result is obtained as shown in Figure 6c. The same color data in Figure 6c indicate that they belong to the same clustering result. The circle parameters are concentrated in four unrelated regions, which represent the four circles on the steel bar’s end face in Figure 2c.

3.3.3. Determination of Circle Parameters

As can be seen in Figure 6c, each category is a set of data representing a particular circle parameter. We need to determine which data represent the actual circle parameter best among the data. In theory, the closer the actual circle parameters are, the denser the circle parameters around them should be. Consequently, we consider that the position of the actual circle parameter corresponds to the position where the sum of the distances from all points in the class to the position is the smallest. The distance sum from the point C d i to all points can be calculated as follows:
S C d i = j = 1 N C d j C d i , 1 i N
In Equation (11), N is the number of elements in the current category, and then the circle parameter corresponding to the minimum value of S C d i is regarded as the actual circle parameter of the category.

3.3.4. Verification of Circle Parameters

To ensure the validity of the circle parameter, it is necessary to verify the circle parameters. S P N i represents the number of pixels in the virtual connected region that participate in the calculation of the i-th circle. C P N i represents the number of pixels at the circle’s edge corresponding to the parameters detected in the image. The true circle can be determined as follows:
C P i = delete , others reserve ,   C P N i > 0.8 S P N i
The circle detection results are shown in Figure 7a, in which the red part represents the circle detection results. It can be seen from the results that all circles in the steel bar’s end face image were accurately detected. Among all circles, the circumcircle of the steel bar is the largest. Therefore, the largest circle is retained, which means that the steel bar’s end face was completely located, as shown in Figure 7b.

3.4. Acquisition of the Special Steel Bar End Face Attitude

3.4.1. Calculation steps of the Special Steel Bar End Face Attitude

At this point, we have obtained the feature point of the steel bar’s end face, which is the center of the circumcircle. The steel bar’s ends are sprayed or pasted with two-dimensional codes, so the existing mature two-dimensional code identification method is applied. The end point of the two-dimensional code far from the circle center is selected as the second feature point. These two feature points can be used to calculate the attitude angle of the steel bar’s end face. The specific calculation steps are as follows:
(1)
The circumcircle of the steel bar’s end face is detected according to our method, and the circle center and radius of the circumcircle are obtained. The results are shown in Figure 7b.
(2)
No matter how the steel bar is rotated, the circumcircle center of its end face remains the same. Therefore, the circumcircle center is taken as the coordinate origin O . The horizontal and rightward direction passing through the origin is taken as the positive direction of the X-axis. The vertical upward direction passing through the origin is taken as the positive direction of the Y-axis, resulting in a Cartesian coordinate system X O Y .
(3)
The two-dimensional code on the steel bar’s end face is detected and identified, and the steel bar product information as well as the four endpoint positions of the two-dimensional code can be obtained.
(4)
The QR code end point P Q R is selected that is farthest from the center O of the bar, and the angle between the vector O P Q R and the positive direction of the X-axis is calculated, so the current attitude angle of the steel bar end face is obtained. The results are shown in Figure 7c, and the attitude angle is 25.393 degrees.

3.4.2. Fast Calculation Method of the Special Steel Bar End Face Attitude

From the circle detection results, it can be concluded that the proposed algorithm can accurately detect all circular targets in the image, providing a new method for detecting circles. However, we only need the circumcircle parameters when calculating the end face attitude. When the acquisition system captures the image each time, the distance between the camera and the end face is basically the same, so in the image, the steel bar circumcircle should fall within a circle ring. We establish a circle ring template centered on the center of the circumscribed circle and with a radius in the range of ±30 pixels based on the first set of accurate circumscribed circle parameters we have obtained. As shown in Figure 4, the fast template is applied to the image after canny edge detection, so that the edge information within the template range is retained and other edge information is removed. Through this approach, a vast amount of edge information that has no relationship to the steel bar’s circumscribed circle is removed. This significantly reduces the amount of calculation, enhances the efficiency of end face pose detection, and ultimately improves the speed of end face pose detection. This paper analyzes the calculation time for 1800 images. The average time consumption of each image is 2.254 s, and the maximum time consumption is 3.656 s, which fully meets the timing requirements of the current production line.

4. Result Analysis of Steel Bar End Face Attitudes

4.1. Constructing of Experimental Devices

Due to the inconvenience of verifying and debugging algorithms on the bar production line, we built an automated platform for detecting and grinding surface defects as shown in Figure 8. The platform is mainly composed of an axial surface defect detection system, a steel bar end face attitude detection system, and a surface defect grinding system. The axial surface defect detection system consists of a line-scan camera, a bar rotation device, a light source, etc. The steel bar end face attitude detection system includes a three-coordinate device, an industrial area-array camera, a laser ranging device, and a light source, etc. And the surface grinding system includes an industrial metallurgy manipulator, a six-dimensional force sensor, and a grinding head device, etc. This platform is designed to detect surface defects and grind surface defects. The steel bar end face attitude detection system can be used to verify the end face attitude detection algorithm in this paper. When taking photos of a steel bar’s end face, it is necessary to adjust the distance between the camera and the steel bar’s end face using the laser ranging sensor. The distance is adjusted to the optimal distance for taking pictures, and the steel bar end face image is taken as shown in Figure 2c. For the purpose of verifying the accuracy of steel bar end face attitude detection, the steel bar is rotated at a constant speed and 1800 pictures are taken at regular intervals. A database with a resolution of 0.2 degrees is obtained for algorithm verification.

4.2. Analysis of Steel Bar End Face Attitude Detection Results

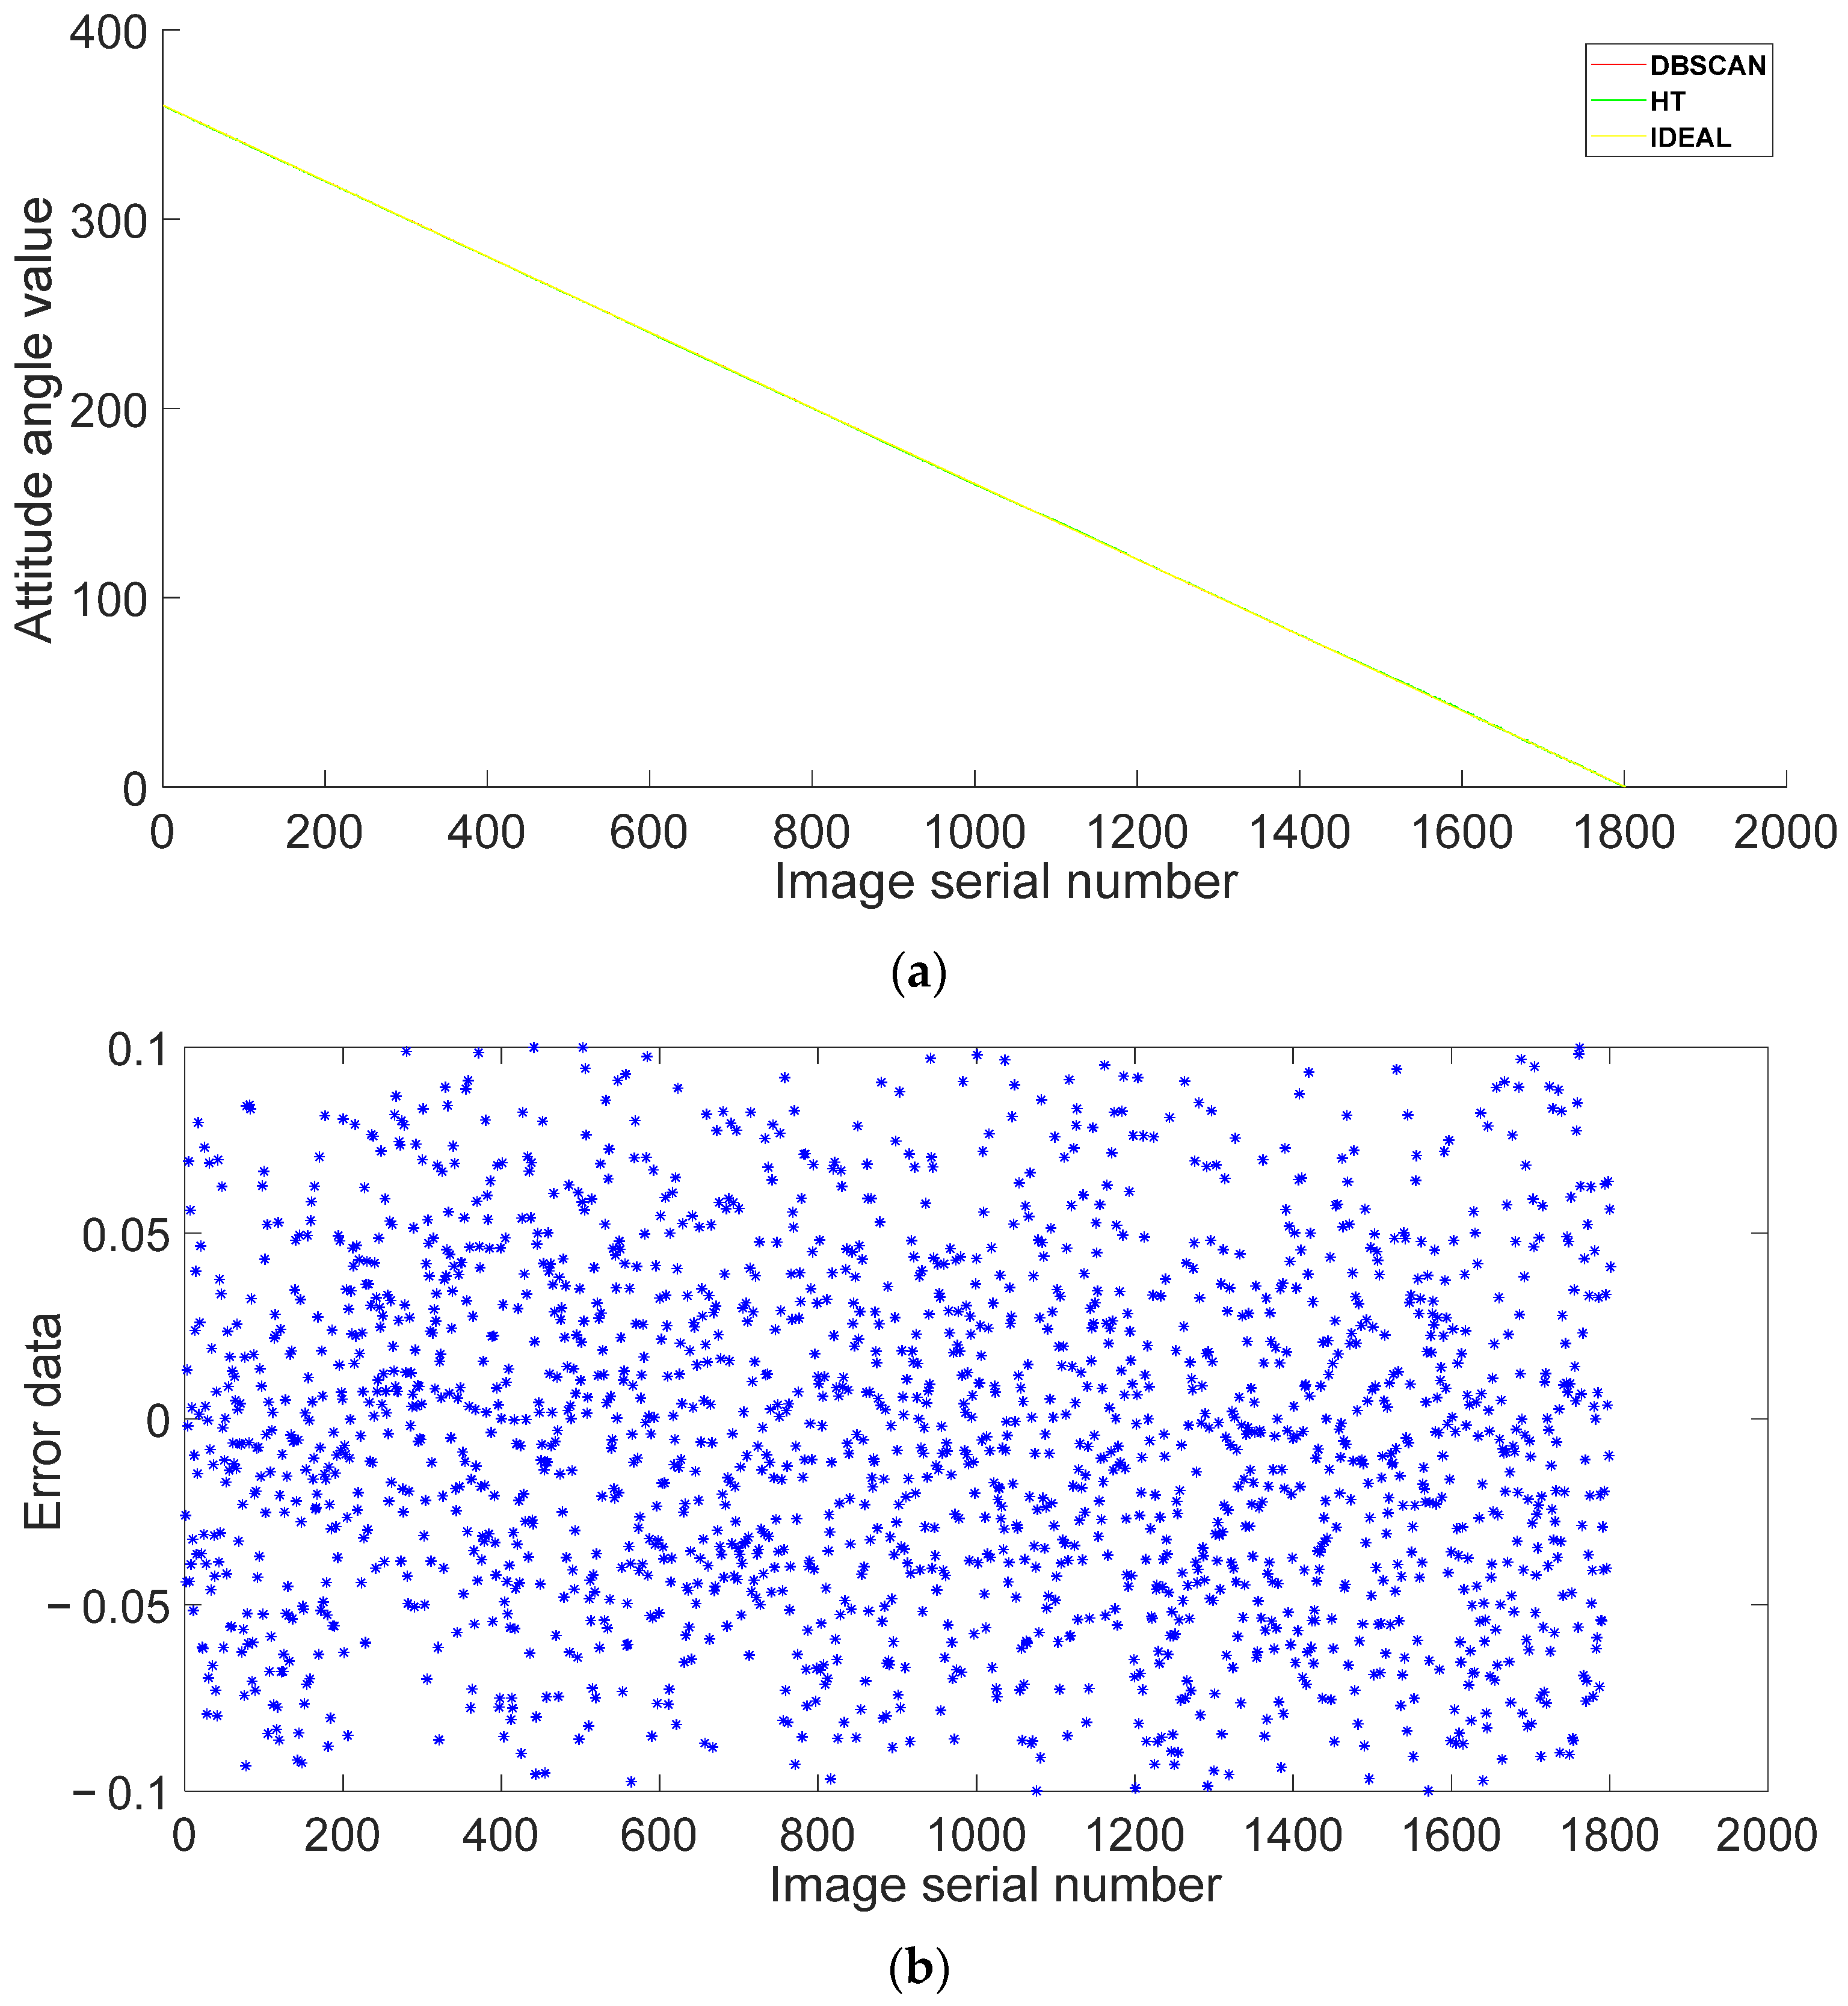
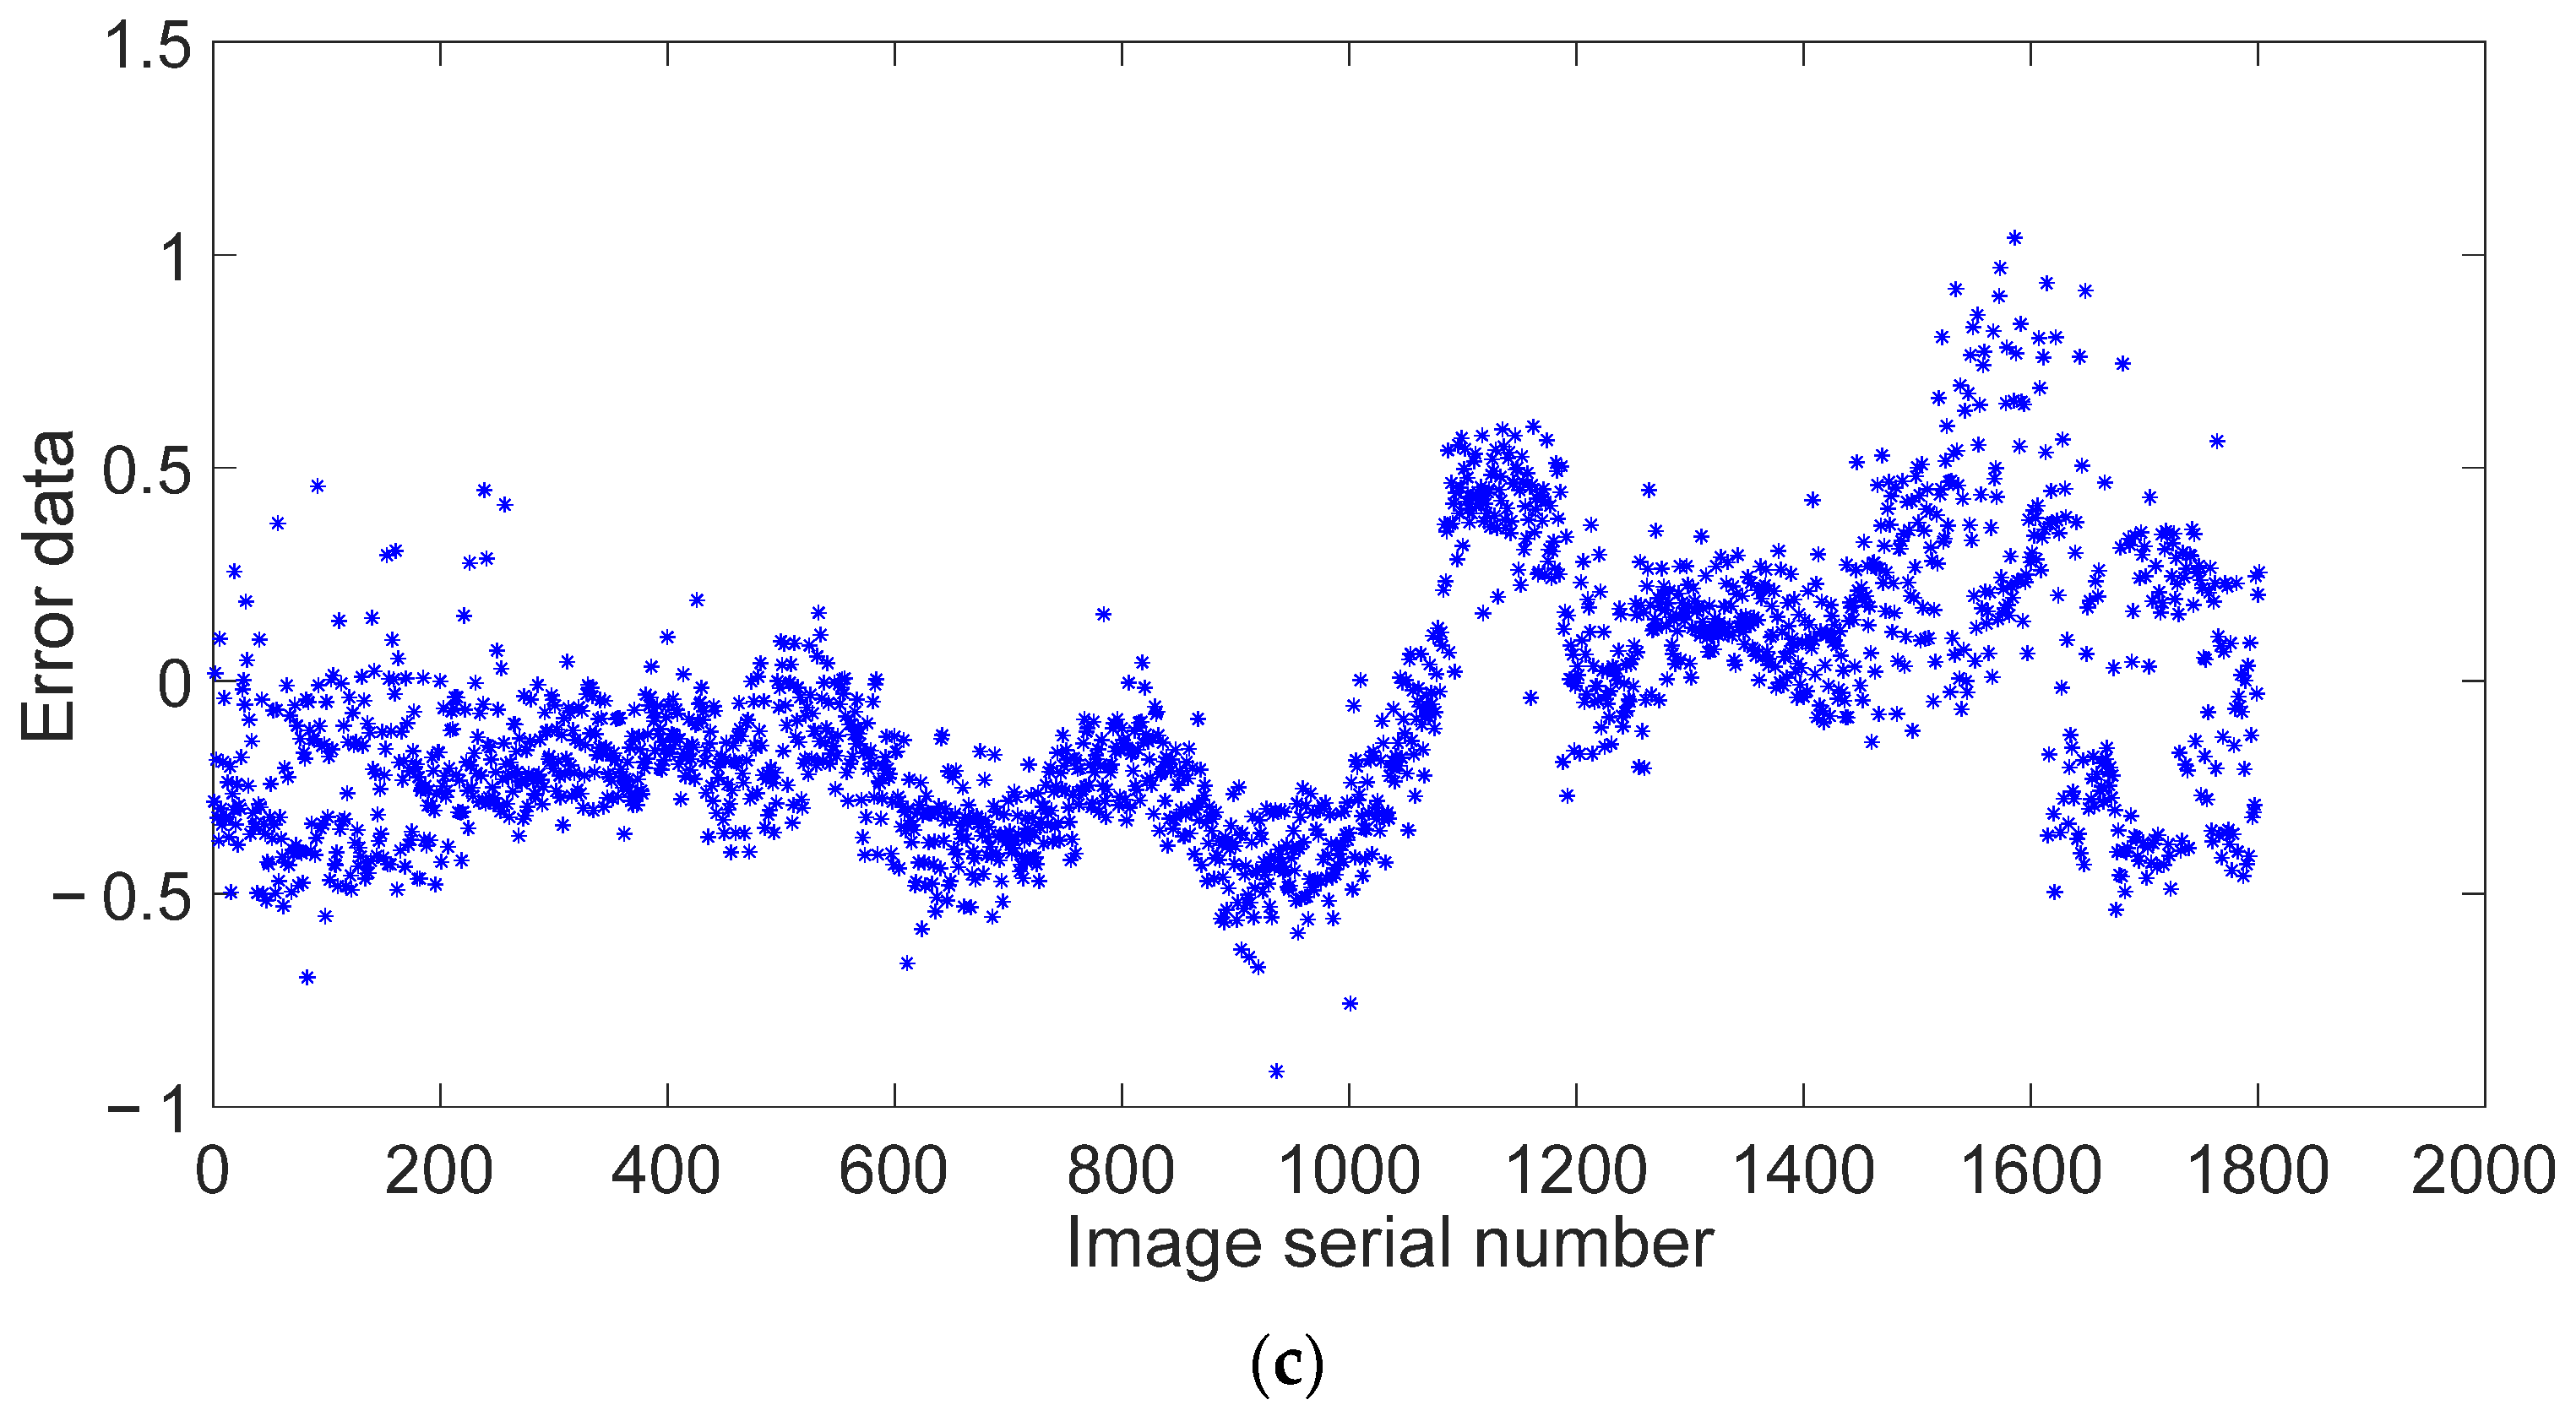
The experiment device captured more than 1800 images of the steel bar’s end face. The attitude angle value of each image is calculated using the method in this paper. At the same time, the commonly used Hough circle detection (HT) method is employed to extract the circumscribed circle parameters, and the attitude angle value of each image is also calculated. Figure 9a is a comparison curve between the attitude angle value calculated using our method or HT method, and the ideal data. The yellow line represents the ideal curve with an equal interval of 0.2 degrees, the green line represents the attitude angle curve calculated using the HT method, and the red line represents the attitude angle curve calculated using our method. Due to the ideal curve covering the other curves, the yellow line and green line can be seen more clearly on attitude angle curves, whereas the red line is only visible in a few places, which indicates that the calculation results for this paper are closer to the ideal value than for the HT method. For further quantitative evaluation of the accuracy of the two methods, the difference between attitude angle calculated using our method and the ideal value was compared to the difference between attitude angle calculated using the HT method and the ideal value. The results are shown in Figure 9b,c. From Figure 9b, we can see that the error range between the attitude angle value calculated using our method and the ideal attitude angle value is within 0.1 degrees. But in Figure 9c, the error range between the attitude angle value calculated using the HT method and the ideal angle value is within 1.1 degrees. According to the distribution of error data, the distribution of the error data of the method in this paper is relatively uniform. In contrast, the distribution of the error data of the HT method is messy. In addition, the error data of the HT method are not centered at 0, the first half is biased towards data below zero, while the second half is skewed towards data in excess of zero, and there is no specific rule to follow. As can be seen from the results in this paper, the method presented in this paper performs significantly better than the HT detection method.
Researchers have studied the detection of steel bars’ end faces in recent years. Zhang [33] and Zhu [34] counted the steel bars. The method focuses on dividing steel bars’ end faces to achieve the purpose of statistical counting. Zhang [36] and Xie [35] used the HT method to locate the steel bars’ end faces to identify the end face characters and spray paint. Effective positioning results are given in the literature. Feng [19] used HT to locate steel bars’ end faces to realize automatic inkjet coding through positioning. The accuracy of the distance between two adjacent bars was analyzed. It can be seen that these studies do not pay attention to the attitude angle of the steel bars’ end faces. And we could not find a current study of calculating steel bar end face attitude. However, steel bar end face attitude detection is a key step in surface defect circumferential positioning. In order to illustrate the accuracy of the algorithm, the HT method is used to calculate the steel bar end face attitude, and the method proposed in this paper is compared. The comparison results are presented in Table 2. Using our method, the attitude error value of 1220 images is within an error range of ±0.05, accounting for about 67.78% of the total amount of data, while using the HT method, only 174 images are within the error range of ±0.05, accounting for 9.67% of the total amount of data. All the error of attitude data in our method are distributed in the range of ±0.1; at this time, only 18.89% of the attitude data of the HT method are within this error range. The final error range of the attitude data calculated using the HT method is ±1.1, while the error range of our method is ±0.1, which is an order of magnitude smaller than the error of HT. The error data illustrate that the method in this paper is far superior to the calculation results of the HT method.

4.3. Estimation of Algorithm Execution Time

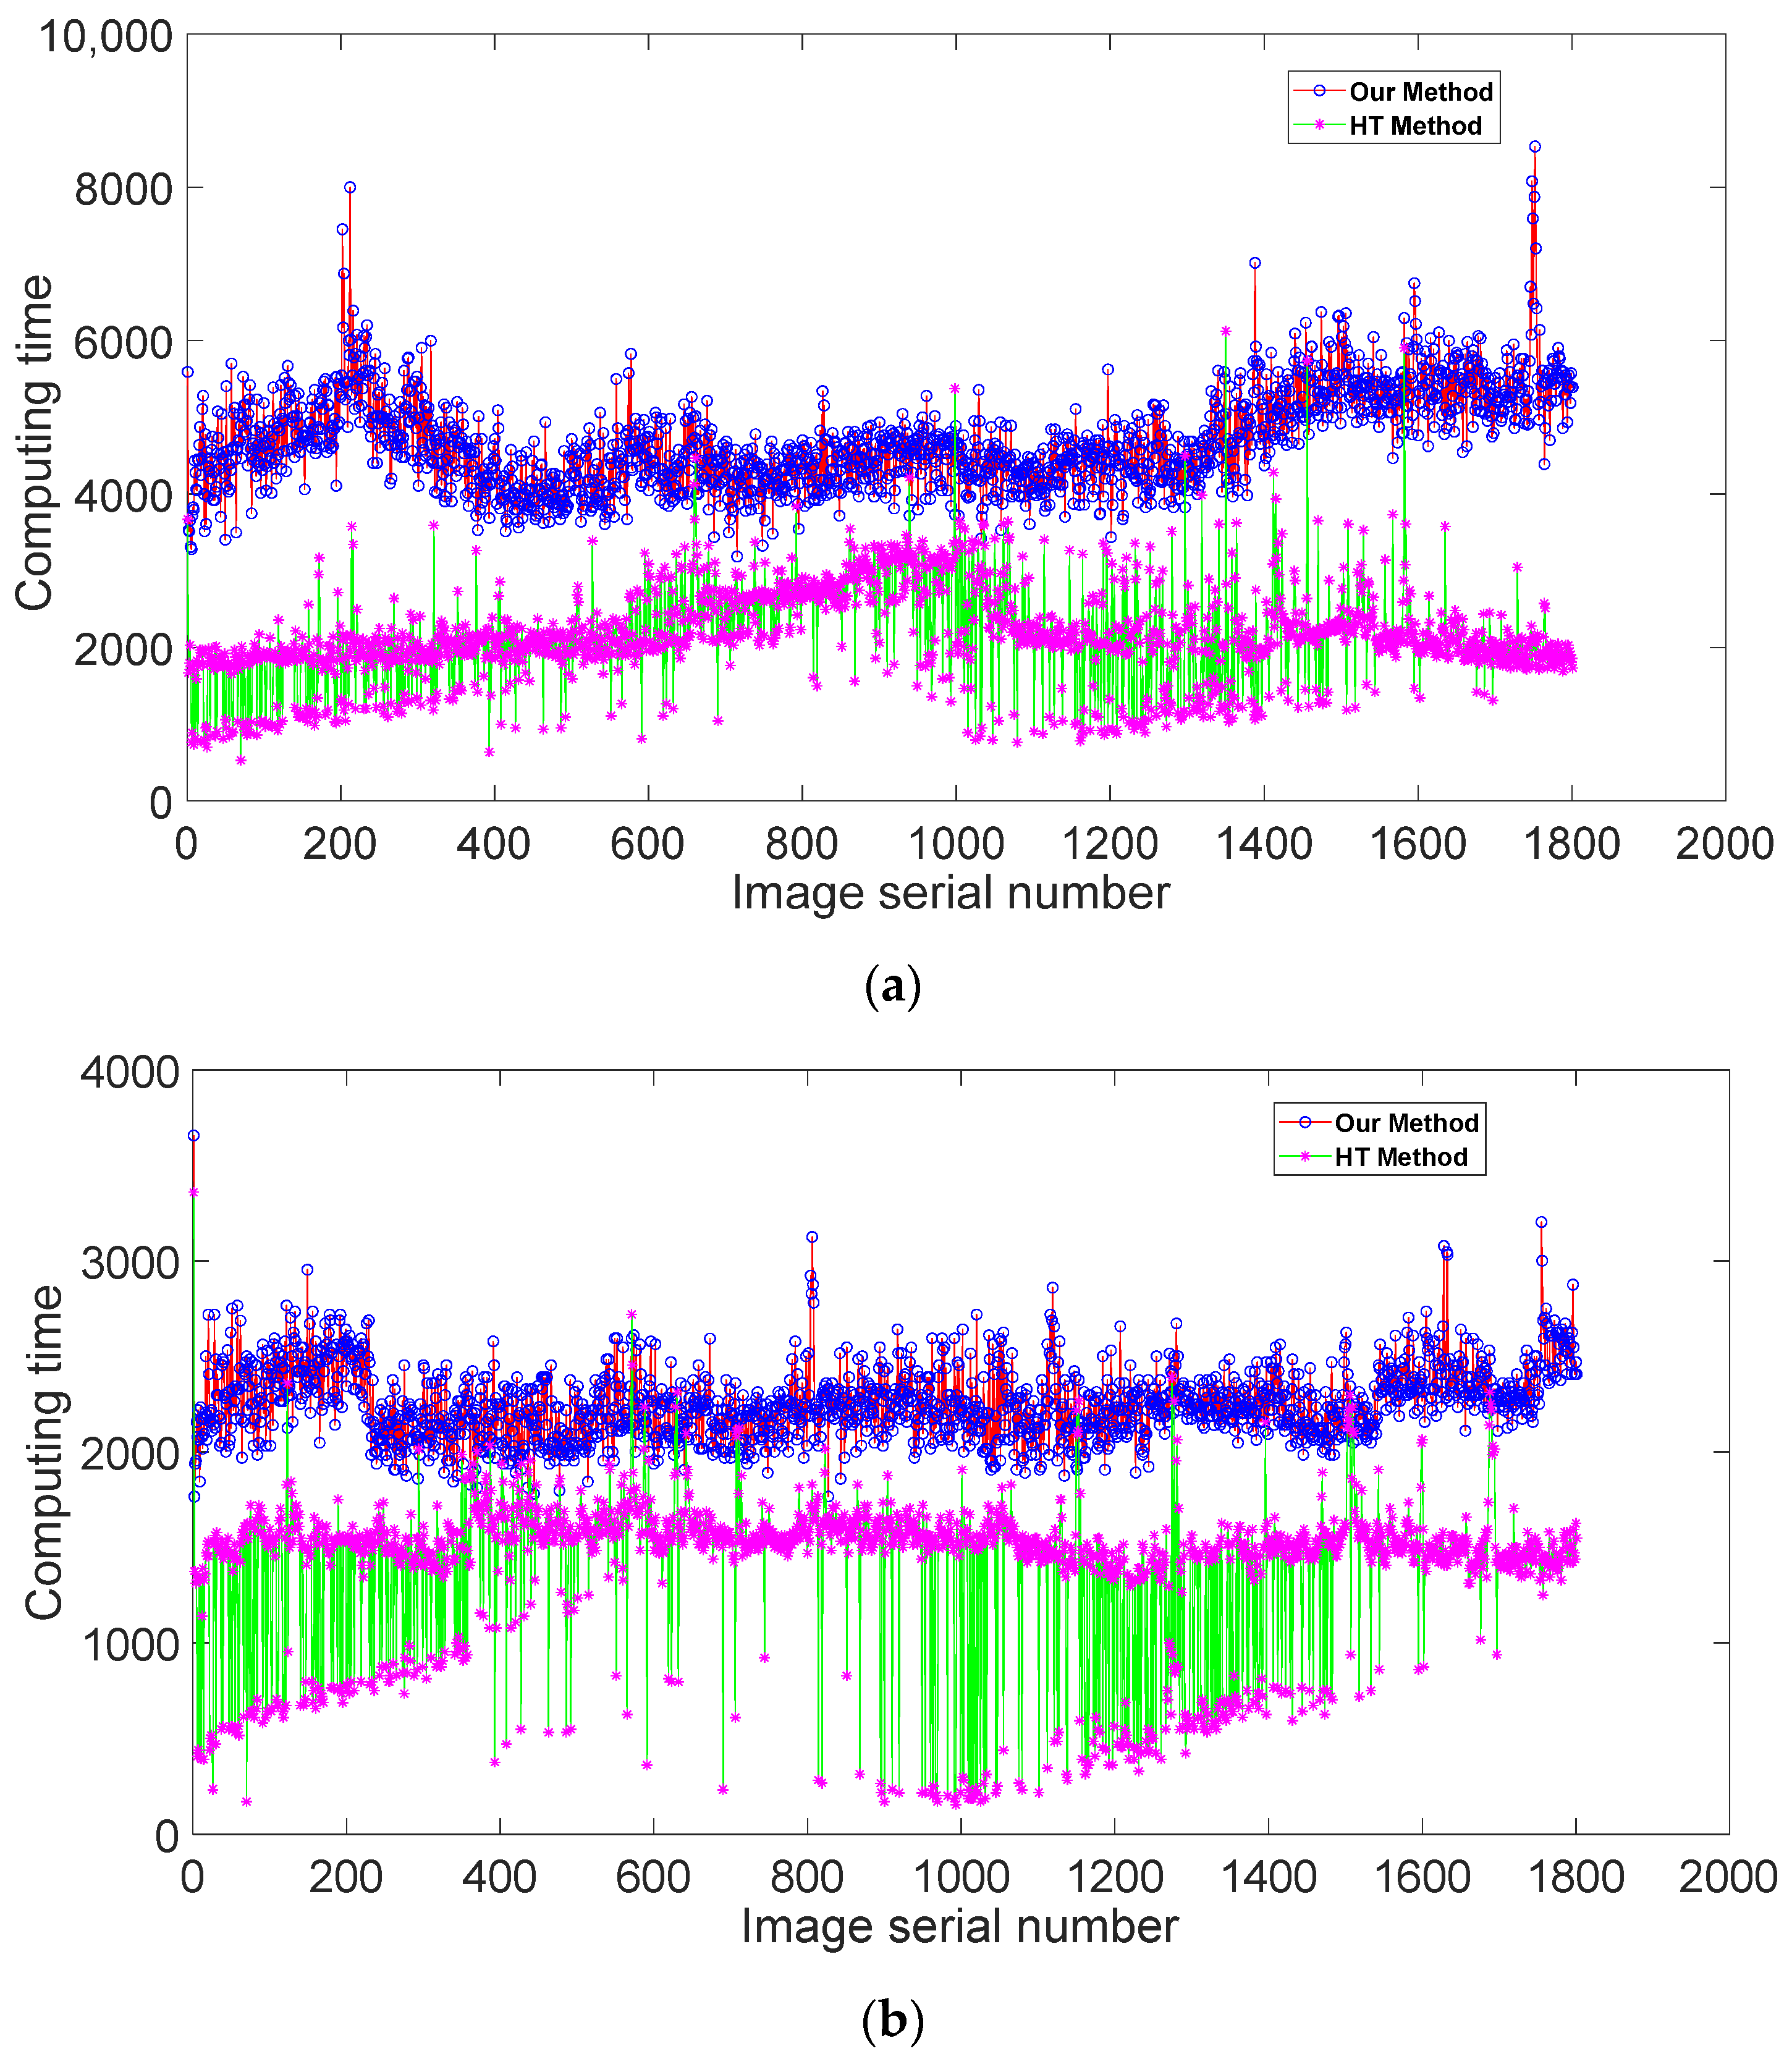
Currently, the running speed of the steel bar surface defect detection line of the HBIS GROUP SHISTEEL COMPANY is 1 m/s, and the length of the bar is between 6 m and 12 m. This means that the bar end face attitude detection system must perform the end face attitude calculation within 6 s to meet the bar production line’s timing requirements. Our algorithm and the HT method are both implemented on the VS2019 platform, and the calculation time of 1800 images was statistically analyzed. The statistical results are shown in Figure 10a. Additionally, the same time-consuming statistical calculation is performed on the fast attitude detection algorithm, and the results are shown in Figure 10b.
As shown in Table 3, the maximum, minimum, and average values of time consumption are also calculated under different conditions. In combination with Figure 10 and Table 3, it is apparent that both methods have more than 6 s of data before using the fast template. Although our method contains more data above 6 s, as long as there are more than 6 s calculation data, it cannot meet the minimum timing requirements of the production line. After using the fast template, it is obvious that the calculation time of the two methods is much reduced. The maximum time consumption of our method and the HT method is 3.656 s and 3.359 s, respectively, and the average calculation time is 2.254 s and 1.402 s, respectively. The results indicate that the two methods can meet the production line timing requirements after using the template. Although the HT method has some advantages in computing time, the advantages of both the maximum computing time and the average computing time are limited with respect to the required time of the production line of 6 s. From the perspective of detection accuracy, our method is much better than the HT method. Considering comprehensive performance, our method can provide more accurate data of end face attitude for bar surface defect grinding stations, which can be more effectively applied to industrial production lines.

5. Conclusions

To address the issue of defect relocation during surface defect grinding of special steel bars, this paper proposes a method for calculating the attitude of the end face. This method is based on a steel bar’s end face circumcircle and its two-dimensional code. And the feasibility and effectiveness of the proposed method of this paper are verified using a detection and grinding platform for bar surface defects. Using this platform, 1800 images of the steel bar’s end face were collected at intervals of 0.2 degrees, and the images were used to conduct experimental verifications. At the same time, the proposed method was compared with the HT method, which is the most commonly used method for steel bar end face detection. As can be seen from the calculated results, when the circumferential resolution of the steel bar’s end face is 0.2 degrees, the error range is within 0.1 degrees. The error data are evenly distributed within the range. However, the error range of the results calculated using the HT method is within a range of ±1.1 degrees, and the data distribution is irregular. The execution time of the algorithm is also analyzed in this paper. After using the template to participate in the calculation, the maximum calculation time of the proposed method is approximately 3.656 s, slightly longer than the maximum calculation time of the HT method of 3.359 s, which is perfectly in accordance with the production line’s schedule. Moreover, our method is more accurate and stable, which establishes a foundation for locating and grinding the entire special steel bar surface defect.

Author Contributions

Conceptualization, J.Z. and T.W.; methodology, Z.L.; software, Z.L.; validation, J.Z. and W.S.; formal analysis, J.Z. and Z.L.; investigation, X.X.; resources, T.W.; data curation, J.Z.; writing—original draft preparation, Z.L.; writing—review and editing, Z.L.; visualization, W.S.; supervision, Q.H.; project administration, X.X. and Q.H.; funding acquisition, J.Z. and T.W. All authors have read and agreed to the published version of the manuscript.

Funding

This work was supported by the National Key Research and Development Program of China (Grant No. 2021YFB3401000, 2018YFB1308702) and the National Nature Science Foundation of China (Grant No. 51905367).

Institutional Review Board Statement

Not applicable.

Informed Consent Statement

Not applicable.

Data Availability Statement

The data presented in this study are available on request from the corresponding author. The data are not publicly available due to privacy.

Conflicts of Interest

The authors declare no conflict of interest.

References

  1. Xie, S.; Tian, M.; Xiao, P.; Pei, C.; Chen, Z.; Takagi, T. A hybrid nondestructive testing method of pulsed eddy current testing and electromagnetic acoustic transducer techniques for simultaneous surface and volumetric defects inspection. NDT E Int. 2017, 86, 153–163. [Google Scholar] [CrossRef]
  2. Zhang, H.; Ma, L.; Xie, F. A method of steel ball surface quality inspection based on flexible arrayed eddy current sensor. Measurement 2019, 144, 192–202. [Google Scholar] [CrossRef]
  3. Ma, Q.; Gao, B.; Tian, G.; Yang, C.; Xie, L.; Chen, K. High sensitivity flexible double square winding eddy current array for surface micro-defects inspection. Sens. Actuators A Phys. 2020, 309, 111844. [Google Scholar] [CrossRef]
  4. Wu, D.; Liu, Z.; Wang, X.; Su, L. Mechanism analysis of influence of surface-breaking orientation on magnetic leakage field distribution. Acta Phys. Sin. 2017, 4, 262–272. [Google Scholar]
  5. Kikuchi, H.; Tschuncky, R.; Szielasko, K. Challenges for detection of small defects of submillimeter size in steel using magnetic flux leakage method with higher sensitive magnetic field sensors. Sens. Actuators A Phys. 2019, 300, 111642. [Google Scholar] [CrossRef]
  6. Zhang, J.; Liu, X.; Xiao, J.; Yang, Z.; Wu, B.; He, C. A comparative study between magnetic field distortion and magnetic flux leakage techniques for surface defect shape reconstruction in steel plates. Sens. Actuators A Phys. 2019, 288, 10–20. [Google Scholar] [CrossRef]
  7. Jiang, Y.; Wang, H.; Chen, S.; Tian, G. Visual quantitative detection of rail surface crack based on laser ultrasonic technology. Optik 2021, 237, 166732. [Google Scholar] [CrossRef]
  8. Kou, X.; Pei, C.; Chen, Z. Fully noncontact inspection of closed surface crack with nonlinear laser ultrasonic testing method. Ultrasonics 2021, 114, 106426. [Google Scholar] [CrossRef]
  9. Zeng, Y.; Wang, X.; Qin, X.; Hua, L.; Liu, G.; Guan, S. Laser ultrasonic inspection of defects in wire arc additive manufactured samples with different surface profiles. Measurement 2022, 188, 110597. [Google Scholar] [CrossRef]
  10. Ramzan, B.; Malik, M.S.; Martarelli, M.; Ali, H.T.; Yusuf, M.; Ahmad, S.M. Pixel frequency based railroad surface flaw detection using active infrared thermography for Structural Health Monitoring. Case Stud. Therm. Eng. 2021, 27, 101234. [Google Scholar] [CrossRef]
  11. Puthiyaveettil, N.; Thomas, K.R.; Myrach, P.; Ziegler, M.; Rajagopal, P.; Balasubramaniam, K. Defect detection in steel bars up to 600 °C using laser line thermography. Infrared Phys. Technol. 2020, 111, 103565. [Google Scholar] [CrossRef]
  12. Lei, L.; Ferrarini, G.; Bortolin, A.; Cadelano, G.; Bison, P.; Maldague, X. Thermography is cool: Defect detection using liquid nitrogen as a stimulus. NDT E Int. 2019, 102, 137–143. [Google Scholar] [CrossRef]
  13. Zhao, L.; Wu, Y. Research progress of surface defect detection method based on machine vision. Chin. J. Sci. Instrum. 2022, 43, 198–219. [Google Scholar]
  14. He, W.; Jiang, Z.; Ming, W.; Zhang, G.; Yuan, J.; Yin, L. A critical review for machining positioning based on computer vision. Measurement 2021, 184, 109973. [Google Scholar] [CrossRef]
  15. Koch, C.; Georgieva, K.; Kasireddy, V.; Akinci, B.; Fieguth, P. A review on computer vision based defect detection and condition assessment of concrete and asphalt civil infrastructure. Adv. Eng. Inform. 2015, 29, 196–210. [Google Scholar] [CrossRef]
  16. Zhang, H.; Sun, H.; Shi, P. Chip Appearance Inspection Method for High-Precision SMT Equipment. Machines 2021, 9, 34. [Google Scholar] [CrossRef]
  17. Hefetz, I.; Pasternak, Z.; Liptz, Y.; Bet-Yosef, M. Preliminary investigation of the ability of fingerprint examiners in detection of sib-sib relationships based upon finger and palm prints similarities. Forensic Sci. Int. 2022, 337, 111381. [Google Scholar] [CrossRef] [PubMed]
  18. Song, L. Study on the Control System of the Special Steel Bar End Face Code Spraying Robot. Master’s Thesis, Hebei University of Science and Technology, Shijiazhuang, China, 2021. [Google Scholar]
  19. Feng, H. Research on the Key Technologies of Cartesian Coordinate Inkjet Robot System. Master’s Thesis, Hebei University of Science and Technology, Shijiazhuang, China, 2021. [Google Scholar]
  20. Guo, W. Study on Key Technologies of Marking and Recognition for End Faces of Special Steel Bars. Master’s Thesis, Hebei University of Science and Technology, Shijiazhuang, China, 2021. [Google Scholar]
  21. Peltokorpi, J.; Isojärvi, L.; Häkkinen, K.; Niemi, E. QR code-based material flow monitoring in a subcontractor manufacturer network. Procedia Manuf. 2021, 55, 110–115. [Google Scholar] [CrossRef]
  22. Li, L.; Qiu, J.; Lu, J.; Chang, C. An aesthetic QR code solution based on error correction mechanism. J. Syst. Softw. 2016, 116, 85–94. [Google Scholar] [CrossRef]
  23. Cai, J.; Huang, P.; Chen, L.; Zhang, B. An efficient circle detector not relying on edge detection. Adv. Space Res. 2016, 57, 2359–2375. [Google Scholar] [CrossRef]
  24. Kim, H.S.; Kim, J.W. A two-step circle detection algorithm from the intersecting chords. Pattern Recognit. Lett. 2001, 22, 787–798. [Google Scholar] [CrossRef]
  25. Soltany, M.; Zadeh, S.T.; Pourreza, H.R. Fast and accurate pupil positioning algorithm using circular hough transform and gray projection. Int. Conf. Comput. Commun. Manag. 2011, 5, 556–561. [Google Scholar]
  26. Mirzaei, M.; Rafsanjani, H.K. An automatic algorithm for determination of the nanoparticles from TEM images using circular hough transform. Micron 2017, 96, 86–95. [Google Scholar] [CrossRef]
  27. Berkaya, S.K.; Gunduz, H.; Ozsen, O.; Akinlar, C.; Gunal, S. On circular traffic sign detection and recognition. Expert Syst. Appl. 2016, 48, 67–75. [Google Scholar] [CrossRef]
  28. Liu, C.; Zhu, L.; Zhang, X. Bundled round bars counting based on iteratively trained SVM. In Proceedings of the International Conference on Intelligent Computing Theories and Application, ICIC 2019, Nanchang, China, 3–6 August 2019; pp. 156–165. [Google Scholar]
  29. Hough, P.V. Method and Means for Recognizing Complex Patterns. U.S. Patent 3,069,654, 18 December 1962. [Google Scholar]
  30. Chen, T.; Chung, K.L. An efficient randomized algorithm for detecting circles. Comput. Vis. Image Underst. 2001, 83, 172–191. [Google Scholar] [CrossRef]
  31. Ester, M.; Kriegel, H.-P.; Sander, J.; Xu, X. A Density-Based Algorithm for Discovering Clusters in Large Spatial Databases with Noise. In Proceedings of the Second International Conference on Knowledge Discovery and Data Mining, Portland, OR, USA, 2–4 August 1996; pp. 226–231. [Google Scholar]
  32. Rui, Y.; Zhou, Z.; Cai, X.; Dong, L. A novel robust method for acoustic emission source location using DBSCAN principle. Measurement 2022, 191, 110812. [Google Scholar] [CrossRef]
  33. Zhang, S. The Applied Research on Image Processing Methods of Bar Automatic Counting. Master’s Thesis, Northeastern University, Shenyang, China, 2009. [Google Scholar]
  34. Zhu, L. Research on Counting Method of Bundled Bars Based on Machine Learning. Master’s Thesis, Shenyang Ligong University, Shenyang, China, 2020. [Google Scholar]
  35. Xie, W.; Yu, J.; Zhang, X.; Miao, C.; Zhang, F.; Liu, Z. Robot spraying system for special steel bar end. Hebei Metall. 2020, 11, 70–75. [Google Scholar]
  36. Zhang, F.; Guo, W.; Huang, Y.; Wang, C.; Huang, F. Study on character recognition algorithm for end face of bundled special steel bars. J. Hebei Univ. Sci. Technol. 2021, 42, 470–480. [Google Scholar]
  37. Yao, Z.; Yi, W. Curvature aided Hough transform for circle detection. Expert Syst. Appl. 2016, 51, 26–33. [Google Scholar] [CrossRef]
  38. Jiang, L.; Wang, Z.; Ye, Y.; Jiang, J. Fast circle detection algorithm based on sampling from difference area. Optik 2018, 158, 424–433. [Google Scholar] [CrossRef]
  39. Chung, K.L.; Huang, Y.; Shen, S.; Andrey, S.K.; Dmitry, V.Y.; Ekaterina, V.S. Efficient sampling strategy and refinement strategy for randomized circle detection. Pattern Recognit. 2012, 45, 252–263. [Google Scholar] [CrossRef]
  40. Zhao, M.; Jia, X.; Yan, D. An occlusion-resistant circle detector using inscribed triangles. Pattern Recognit. 2021, 109, 107588. [Google Scholar] [CrossRef]
  41. González, M.R.; Martínez, M.E.; León, M.C.; Cervantes, H.; Brizuela, C.A. Multiple circle detection in images: A simple evolutionary algorithm approach and a new benchmark of images. Pattern Anal. Appl. 2021, 24, 1583–1603. [Google Scholar] [CrossRef]
  42. Lu, Y.; Duanmu, L.; Zhai, Z.; Wang, Z. Application and improvement of Canny edge-detection algorithm for exterior wall hollowing detection using infrared thermal images. Energy Build. 2022, 274, 112421. [Google Scholar] [CrossRef]
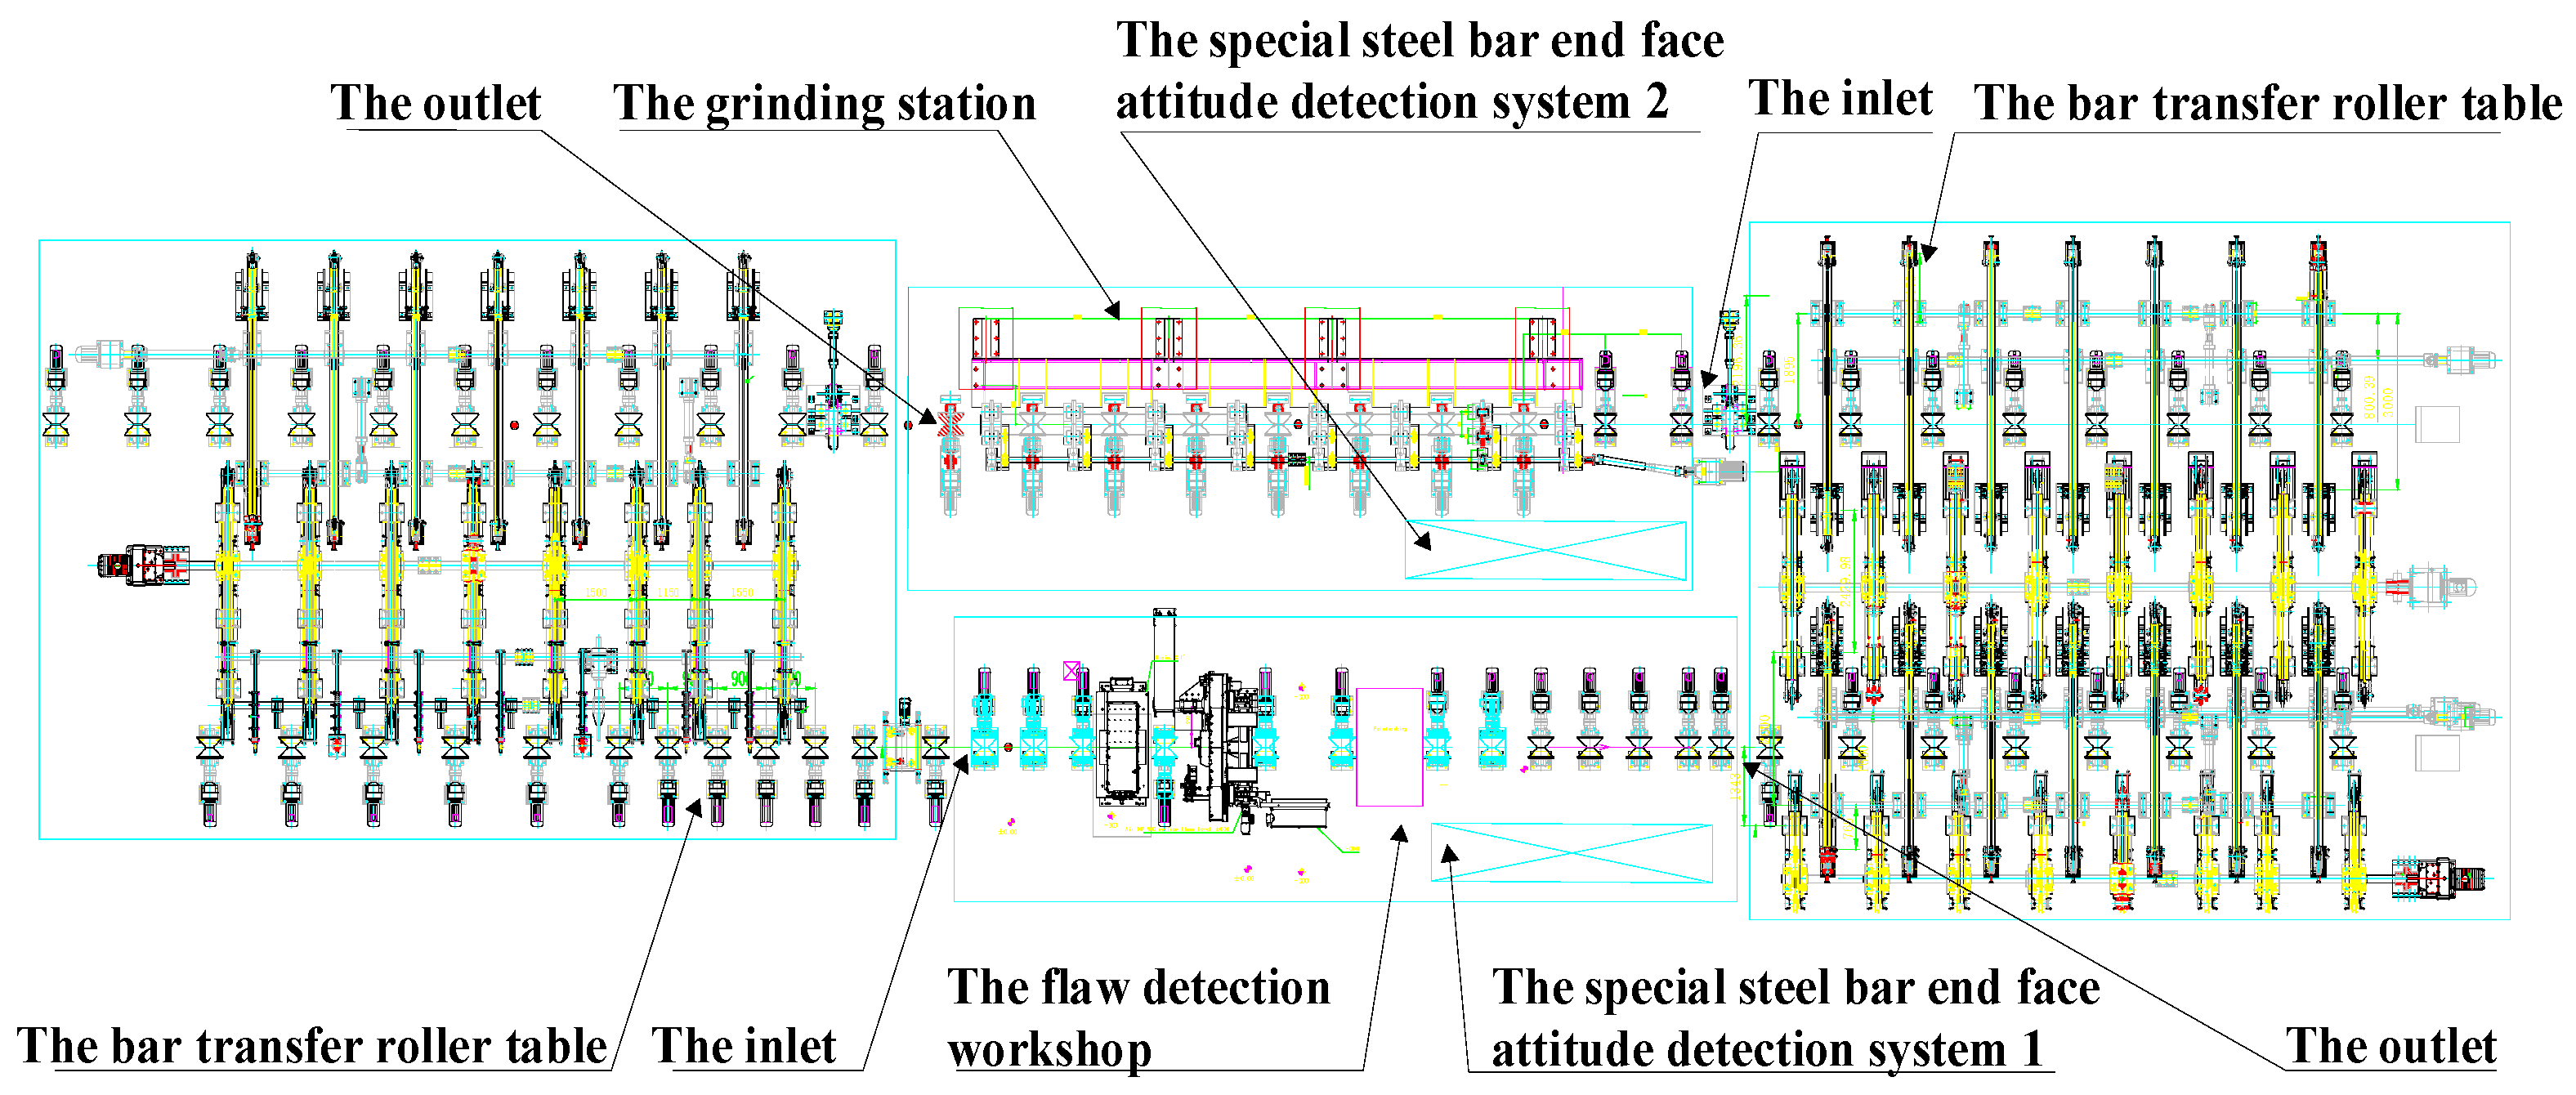
Figure 1. Layout of the flaw detection workshop and grinding station in the special steel bar production line.
Applsci 13 12640 g001
Figure 2. Steel bar end face identification patterns: (a) Numerical symbols. (b) QR code symbols. (c) Label with product information and QR code.
Applsci 13 12640 g002
Figure 3. Simulation results of marking connected regions: (a) Results of canny edge detection. (b) Results of corner detection. (c) Marking results. (d) Filtering results.
Applsci 13 12640 g003
Figure 4. Flow chart of steel bar end face attitude detection.
Applsci 13 12640 g004
Figure 5. Simulation results of improved DBSCAN: (a) Circle parameters of connected regions. (b) Filtering results of circle parameters. (c) Clustering results based on improved DBSCAN.
Applsci 13 12640 g005
Figure 6. Virtual connected regions and their circle parameters. (a) Generated virtual connected regions. (b) Circle parameters of virtual connected regions. (c) Clustering results of circle parameters.
Applsci 13 12640 g006aApplsci 13 12640 g006b
Figure 7. Simulation results of steel bar end face attitude detection. (a) Results of circle detection. (b) Extraction results of the steel bar end face. (c) Calculation results of the end face attitude.
Applsci 13 12640 g007
Figure 8. The platform of detecting and grinding surface defects.
Applsci 13 12640 g008
Figure 9. Comparison of steel bar end face attitudes calculated using different methods: (a) Comparative display of attitude data. (b) The difference between the attitude data calculated using our method and the ideal data. (c) The difference between the attitude data calculated using the HT method and the ideal data.
Applsci 13 12640 g009aApplsci 13 12640 g009b
Figure 10. Calculation time of steel bar end face attitude angle: (a) Calculation time without template. (b) Calculation time with template.
Applsci 13 12640 g010
Table 1. Summary of the current research status.
(a) Research Status of Steel Bar End Face
Zhang [33]Zhu [34]Feng [19]Xie [35]Zhang [36]
PurposesStatistics of the number of steel barsStatistics of the number of steel barsProviding positioning dataProviding positioning dataIdentifying bars’ end face characters.
MethodsMorphological methodsIterative training methodHough transformHough transformHough transform
Common featuresThe end face detection mostly uses the HT method, and there is no research on the attitude angle of the end face.
(b) Research Status of Circle Detection
HTCACDDRSCDRCDITCDEACD
ShortcomingsTime-consuming, sensitive to noise and occlusionsNeed for proper edge detection informationSensitive to noise, complex scenes, and occlusionsRequires multiple valid points and is sensitive to occlusionsSensitive to multiple occlusions in large circlesNeeds to be improved for real images
Main problemsThese methods have poor detection results in complex scenes, occlusions, and the presence of minimax circles.
Table 2. Statistics table of error data.
≤0.01≤0.03≤0.05≤0.07≤0.09≤0.10≤0.20≤0.50≤0.80≤1.10
Our Method (%)16.8943.1767.7884.9497.17100100100100100
HT method (%)2.505.229.6713.4417.1118.8941.2894.2899.22100
Table 3. Statistics table of end face attitude calculation time.
Without TemplateWith Template
HT MethodOur MethodHT MethodOur Method
Maximum (s)6.1258.5323.3593.656
Minimum (s)0.5313.1870.1561.765
Average (s)2.1584.6951.4022.254
Disclaimer/Publisher’s Note: The statements, opinions and data contained in all publications are solely those of the individual author(s) and contributor(s) and not of MDPI and/or the editor(s). MDPI and/or the editor(s) disclaim responsibility for any injury to people or property resulting from any ideas, methods, instructions or products referred to in the content.