Abstract
Breakage of tibial interlocking nails is a rare complication and is associated with tibial nonunion. The distal part of a broken tibial nail is difficult to extract and can be a real challenge. Preoperative planning is important, as the retrieval techniques of broken implants are not routine operations. There are various techniques and instruments described by different authors with none being uniformly successful. Therefore, surgeons should know as many methods as possible to choose the most suitable one. Minimally invasive retrieval techniques should be favored because of their reduced morbidity, while fenestration extraction methods should be used as the second intention. Cannulated intramedullary nails are more prone to benefitting from minimally invasive retrieval techniques than solid ones. This paper reviews and describes the present techniques used to extract the distal part of broken tibial nails, to serve as a quick guide for surgeons who need it.
1. Introduction
Fractures of the tibial shaft are the most frequently occurring type of long bone fractures [1]. Intramedullary (IM) nailing has become the preferred method of treatment for most long bone fractures [2] because of biological and biomechanical advantages [3,4].
Complications may occur, such as delayed union, nonunion, migration of hardware, or breakage of the tibial nail or screws [5].
Open or multi-comminuted fractures are more frequently related to nonunion, delayed union, and risk of nail breakage [6]. Fatigue failure of the nail (fracture) due to over-stress (cyclical loading and stress accumulation at the fracture level or locking holes) is a possible scenario in a nonunion or delayed union [7]. Nonunion can be associated with residual pain and limitations in function [2], and usually necessitates reoperation (12–60% of cases) [8,9].
Treatment of an aseptic tibia nonunion, with or without nail failure, requires closed exchange nailing. Intramedullary reaming is biologically important and has to be performed after (broken) nail removal, while re-osteosynthesis with a larger (1–4 mm) diameter nail offers mechanical advantages [10]. Closed exchange nailing is now one of the most accepted and popular methods to address tibia nonunion.
Closed replacement of a broken nail, which involves removing of the broken end of the nail, may be a challenging operation [11]. Typically, the proximal portion of a broken nail can be removed without much difficulty. The most difficult part is the extraction of the distal part. Multiple techniques have been developed for this purpose, but there is no standard procedure. All procedures have limitations regarding the success rate and failure to extract the broken part is not uncommon [11].
Several specialized techniques to remove broken intramedullary tibial nails, as well as tips and tricks, have been described in the literature [12,13,14,15,16,17,18,19,20,21].
It is important for the surgeon to be familiar with a range of extraction methods and have the necessary equipment readily to ensure a successful outcome [7]. Unfortunately, these tools and pieces of equipment may not always be readily available. Some of them are commercialized by industry, others can be self-manufactured. Most described surgical techniques for removing nails in a retrograde manner involve the use of hooks, olive wires, or self-manufactured (improvised) instruments [11]. This paper reviews various methods for extracting a broken tibial nail and is describing some tips and tricks that can save the day. There is a wide variety of methods and instruments available, and it is crucial that surgeons have the knowledge and skills to choose the most appropriate method for their specific situation when removing broken distal nail components. In this article, we aim to provide a review of the different methods and instruments available, their indications, and their limitations. We acknowledge the importance of the surgeon’s expertise and previous experience in selecting the right method for the right case. We hope this information will help surgeons make informed decisions when removing broken distal nail components.
This review is unique in its examination of the extraction of a broken interlocking tibial nail. We highlight the importance of surgeons being familiar with a range of extraction techniques and having access to the necessary equipment, despite some of these tools and equipment potentially being difficult to obtain or requiring self-manufacture. We present a review of various methods for extracting a broken tibial nail, including practical advice for addressing challenging cases. Our review includes the most used techniques for extracting a broken tibial nail, as well as improvised methods that can be employed in situations where commercialized equipment is not available.
2. Planning
The distal piece of a broken nail can be extracted using various techniques and methods. As these techniques are not successful in all cases, one must prepare multiple plans.
Like in other surgical procedures, planning is essential for success. The lack of an adequate plan is the best recipe for failure. Having a flexible plan is important, the surgeon should think of the possible failure of the main plan; therefore, a need to backtrack or reset at different stages should be also considered. The time to extract a broken nail can take longer than anticipated or exceed the time for implantation. One must not only plan the necessary surgical steps but also prepare the adequate and necessary tools for surgery. This procedure is not benign and can generate various incidents or complications (excessive soft tissue damage or bone damage, fractures, infections) [22]. Identifying the brand and size of the broken nail or even obtaining a similar nail may be of great help [14]. Various instruments can be used, some of them are generic and adapted to the procedure and others are specially designed for it. The cost of the procedure and the potential financial burden on the patient should be considered, and the patient’s age, medical history, and overall health status should be considered when choosing a technique. The patient’s preferences and expectations should be discussed with them and taken into consideration when deciding.
As these operations are unusual, rare, and can be difficult, we think that discussing the details with the trauma team or at the morning meeting is crucial to ensure a successful outcome for the patient. It allows for the exchange of ideas and perspectives among the medical team and can lead to the identification of potential risks or complications. It also ensures that all team members are aware of the plan and can provide the necessary support during the operation.
3. Techniques for Distal Broken Tibial Nail Extraction
The extraction of the distal portion of an intramedullary nail can be made using minimally invasive techniques which do not require opening the nonunion site, or by fenestration extraction methods [7]. Minimally invasive retrieval techniques should be favored because of their reduced morbidity, while fenestration extraction methods should be used as the second intention. Cannulated intramedullary nails are more prone to benefit from minimally invasive retrieval techniques than solid ones. The minimally invasive removal techniques are the press/thread fitting of the nail, the interference fit guide wire technique, and the hook technique.
The availability of equipment and instruments necessary for the chosen technique should always be considered when planning to extract failed hardware. Common and practical techniques for extracting broken tibial nails include using a hook or the interference fit-guide wire (with or without impacted guidewires) to remove the nail. These techniques, if successful, are minimally invasive, with very little morbidity, and with low operation time. These techniques are also very practical as they are efficient, safe, and have a high success rate. Variants of these methods can be used if the standard procedure is not successful. The size and location of the broken segment, as well as the type of nail used, can affect the success rate and ease of removal using common techniques and, therefore, must be considered.
Uncommon or unpractical techniques for extracting broken tibial nails may require specialized (self-made) equipment or instruments (extractors) or techniques that could be unavailable in certain settings and are not widely used or accepted such as the self-made stainless steel minimally invasive nail extractor, the self-manufactured V-shaped groove hook, or the closed cerclage wire pull-out technique for solid non-cannulated nail implants.
Unpractical techniques for extracting broken tibial nails may include methods that are more invasive, complex, time-consuming with longer operating time, or may have a higher risk of complications such as the fenestration techniques. The potential for additional surgical procedures or complications should also be considered, and the length of time required for the procedure and the patient’s recovery time should be evaluated. Therefore, these techniques should be used as salvage variants.
The choice of technique depends on the surgeon’s expertise, the patient’s condition, the type of nail, the location of the break, the surgical setting, and whether it’s an emergency or elective case. It’s always important to weigh the benefits and risks of each technique before deciding.
3.1. Press/Thread Fitting of the Broken Nail
3.1.1. Solid Threaded Kirschner Nail Reamer
Yadav et al. have proposed a straightforward, repeatable method for extraction using an antegrade approach. This method involves using a solid threaded K-nail reamer (Figure 1) without opening the fracture site or using a C-arm. With an adequate reamer, one should try to gain purchase in the cannulated part of the broken nail piece through press fit, according to the authors series of “K-nail reamers that are smaller in size than the diameter of the nail are used” [4,23]. The proximal piece can be used to determine the appropriate reamer size [24]. However, this technique is limited to larger nails that can accommodate these reamers and for nails broken at the proximal portion, which can be reached by these straight reamers.
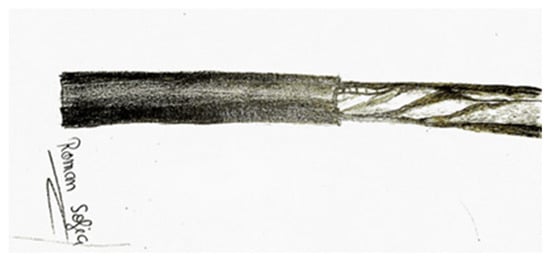
Figure 1.
Solid T-reamer for the distal tibial nail fragment removal.
One of the difficulties of using this technique is that it requires a high level of precision and skill from the surgeon. The reamer must be inserted at the correct angle and depth without causing damage to surrounding tissue to ensure the successful removal of the broken nail and to avoid the reamer hitting the opposite cortex. The use of K-nail reamers of size smaller than the nail diameter could also pose a challenge, as it requires an accurate measurement of the broken nail diameter. Another limitation of the technique is that it is not suitable for nails broken at the distal portion since it requires a straight reamer that can only reach the proximal portion. While the use of a C-arm is not essential, it can be helpful in confirming the nail location and the reamer position.
3.1.2. Small Kuntscher Nail—For Press Fit
Other authors described removal techniques using the same principle of press-fitting but using different tools/devices. They used smaller Kuntscher nails (Figure 2), which may not be widely available in most orthopedic centers, and tried to achieve a press fit with the distal piece of the nail [16,25]. The potential complication of these methods is pushing the distal tibial nail into the ankle joint by applying too much force [14]. This technique is also limited to larger nails that can accommodate these Kuntscher nails.
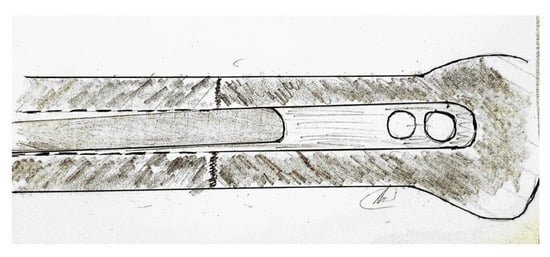
Figure 2.
Small Kuntscher nail—for press fit.
One of the difficulties of using this technique is that it requires the use of specialized tools, specifically Kuntscher nails, which may not be readily available in most orthopedic centers. Another difficulty is that the procedure requires a high level of skill and precision to ensure proper press-fitting without causing damage to surrounding tissue. The use of this technique is limited to larger nails that can accommodate Kuntscher nails. Another limitation of the technique is that it may not be suitable for nails broken at the distal portion. Finding the right size of the Kuntscher nails and matching them with the broken nail size could be a challenge and may lead to difficulties in the extraction process.
3.1.3. Conical-Threaded Stainless-Steel Extractors
As a more advanced method, conical-threaded stainless-steel extractors have been manufactured (they are commercially available) (Figure 3). In addition to the press-fit devices, these have threads to better gain purchase inside the nail. This is possible only for nails composed of titanium and aluminum alloys that are “softer” materials than stainless steel. If the fixation of the threaded extractor bit into the nail has been performed, they both can be pulled out of the tibial canal [14]. If the nail is broken in the proximal 1/3 of the nail, the use of a 3.5 mm or larger tap, to engage in the inner whole of the nail, can be considered [26]. Another possible tool that can be used is the Schanz screw.
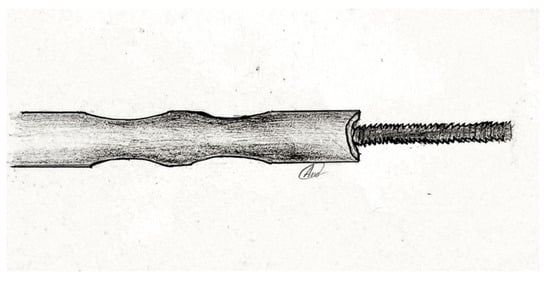
Figure 3.
Threaded stainless steel extractors (3.5 mm tap).
These techniques are limited by the interior dimension of the nail canal and its potential rotation inside the tibial canal. If the rotational movement of the nail remover, as it is inserted into the nail, is not efficiently opposed by counter forces, its insertion might not be possible as both the device, and the nail piece will rotate inside the tibial canal. This rotational stability can be obtained by leaving one distal locking screw in situ or, much less reliably, by the fit fixation of the nail itself into the tibial bone. Rotational stability can also be obtained by introducing a pin into the most distal locking hole or by leaving one distal locking screw in situ [27].
One of the difficulties of using this technique is that it requires specialized equipment, specifically conical-threaded stainless steel extractors, which may not be widely available. Another difficulty is that the technique requires a high level of skill and precision to ensure proper engagement of the extractor bit into the nail without causing damage to surrounding tissue. This technique may not be suitable for nails broken in the distal 2/3 of the nail, as the use of a 3.5 mm or larger tap to engage in the cannulation of the nail is usually required. The success of this technique depends on the size of the nail, the size of the extractor, and the surgeon’s skill and experience. The use of a C-arm is beneficial and recommended for this technique to confirm the nail location and the extractor position.
3.2. Interference Fit Guide Wire Methods
3.2.1. Original Interference Fit–Guide Wire Method
The interference fit–guide wire technique does not require any specific instrumentation and consists in passing first a guide wire with a small ball-shaped tip and then a non-tipped wire through the nail (Figure 4). By filling the canal, and pulling back, the distal portion is extracted. The principle of this technique is to utilize the resistance created by friction between the enlarged ball and the canal margins [19,27].
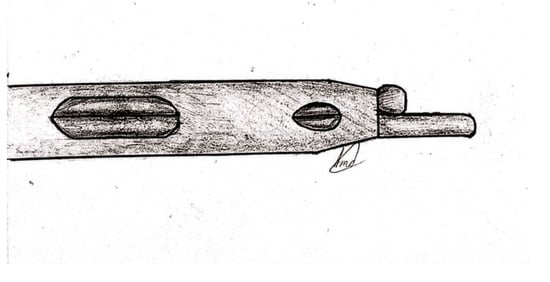
Figure 4.
The interference fit–guide wire method.
This method has the advantage of available and cheap instruments and can be used in the majority of orthopedic services but has its limits in the case of very narrow nail canals.
This method is suitable for emergency cases, where specialized instrumentation may not be available. The technique is relatively simple and can be performed quickly, but it may not be as effective as other techniques in certain cases.
One of the difficulties of using this technique is that it requires a high level of skill and precision to ensure proper passage of the guide wire through the nail canal without causing damage to surrounding tissue. Another difficulty is that the method requires the use of two guide wires, a ball-tipped guide wire and a non-tipped guide wire or Kirschner wire, which can be challenging to handle during the procedure. The technique relies on the resistance generated by friction between the enlarged ball at the front of the wire and the canal wall, which can vary depending on the size and condition of the nail. The use of a C-arm is not necessary, but it could be helpful to confirm the nail location and the guide wire position. The success of this technique depends on the size of the nail, the size of the guide wire, and the surgeon’s skill and experience.
3.2.2. Adaptation 1–3.5 mm Screw Inserted through the Nail Distal Locking Hole
Using the same ball-tipped guide wire principle, an adaptation of this technique was described in which the ball-tipped guide wire was held in place within the canal using a 3.5 mm screw inserted through the nail distal locking hole (Figure 5) [28]. The disadvantage of this method is that it cannot be used if the nail canal is too narrow and the screw and the wire cannot fit together inside.
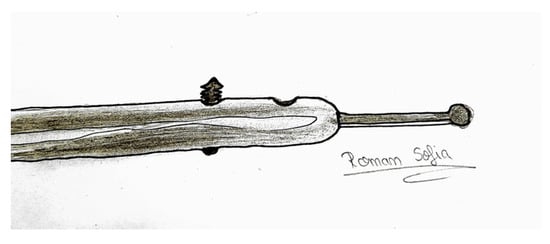
Figure 5.
Screw of 3.5 mm inserted through the nail distal locking hole.
One of the difficulties of using this technique is that it requires a high level of skill and precision to ensure proper passage of the guide wire through the nail canal and the screw through the locking hole without causing damage to surrounding tissue. Another difficulty is that the method requires the use of a 3.5 mm screw, which can be challenging to handle during the procedure. The technique relies on the resistance generated by friction between the enlarged ball at the front of the wire and the canal wall, which can vary depending on the size and condition of the nail. The use of a C-arm could be helpful to confirm the nail location and the guide wire position.
3.2.3. Adaptation 2—Retrograde Ball-Tipped Guide Wire
Metikala et al. described a similar technique using a retrograde ball-tipped guide wire for the retrieval of a femoral nail (Figure 6). As this technique uses a retrograde insertion technique of a ball-tipped guide, through an anterior counter-incision and a reamed, widened canal, it is associated with more comorbidity due to anterior arthrotomy and cannot be used for tibial nail extraction [29]. Adaptations of this technique, based on the same principle, are the ones proposed by Garg and Levine and described later in this article [11,15].

Figure 6.
The retrograde ball-tipped guide wire principle.
3.3. Hooks
The extraction technique with a dedicated (commercially available) or self-manufactured hook is also widely used because it is simple, intuitive, and logical. It uses the same principle as the interference fit guide wire method and is performed in a similar way [30]. The difference is that it does not use press fit but mechanical anchorage of the tip of the hook, which is passed through the opening at the end of the nail to grasp it and then pulled back with the distal part of the tibial nail [13].
3.3.1. Dedicated Extraction Hook (Commercially Available)
AO recommended an extraction hook to remove the broken piece of the nail after previously extracting the proximal fragment and over-reaming the medullary canal to reach the nail fragment (Figure 7) [12]. Several companies have developed various extraction hooks.
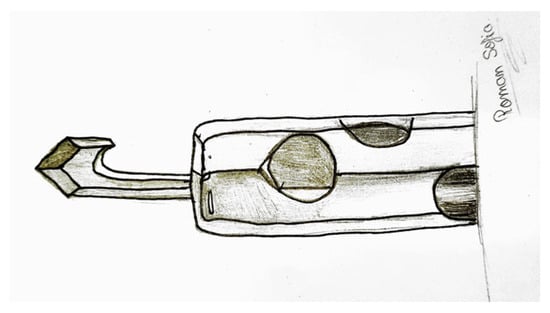
Figure 7.
Dedicated extraction hook.
In cases where the hook cannot capture the locking holes or the distal margins of the nail, some tips and tricks can be used.
One of the difficulties of using this method is the need for specialized equipment, such as the extraction hook, which may not be widely available. Additionally, the procedure requires a high level of skill and precision to ensure the successful capture of the broken distal piece. The technique may also necessitate over-reaming the medullary canal, which can be difficult to execute. Utilizing a C-arm during the procedure is highly recommended to confirm the nail’s location and the extractor’s position. Nails inserted with a poor technique are not suitable for this method, as it increases the risk of complications. The success of this technique is contingent on the size of the nail and the size of the extractor. The extraction hook may not be suitable for nails that have been impacted in the canal.
3.3.2. Modified AO Technique Using Impacted Guidewires
A variation of the AO-recommended method, using guidewires positioned around the hook, was described by other authors (Figure 8) [13]. First, a guide wire or K-wire is introduced in the nail canal together with the hook. The hook should engage the nail outlet by impinging it toward the margin of the nail canal. The modified technique results in a secure construction that can be effortlessly removed as a single unit. The method demands that the canal is of adequate size to fit both the hook and the wire, which can pose a challenge in certain scenarios.
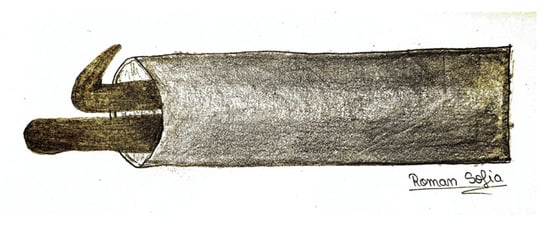
Figure 8.
Guidewires impacted around the hook.
This technique also requires the use of specialized equipment, (the extraction hook) and guidewires, which may not be readily available in most orthopedic centers. In cases where the hook cannot capture either the locking holes nor the distal end of the nail, this technique may not be effective, and other methods may need to be considered. The use of a C-arm is very important for this technique to confirm the nail location and the extractor position. The extraction hook may also not be suitable for nails that have been impacted in the canal.
3.3.3. Modified AO Technique Using a Cortical Screw to Deflect the Hook
In addition to the limitations and difficulties already mentioned in the previous two paragraphs, this method requires a high level of skill and precision and is technically more demanding.
If the extraction is still not possible, another trick can be used. After introducing the hook past the tip of the nail, a cortical screw is inserted through one of the locking holes of the nail against the extraction hook deflecting it (Figure 9).
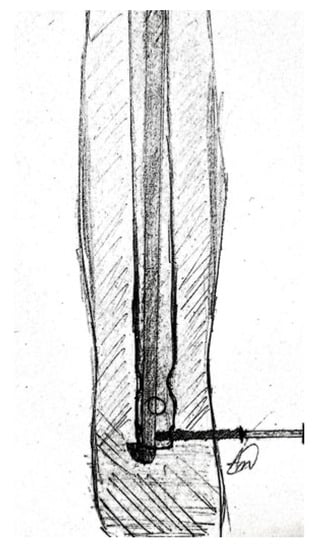
Figure 9.
Modified AO technique using a cortical screw to deflect the hook.
To make sure that the hook is oriented in the right direction, cautious traction should be exerted till it engages the nail outlet and then the extraction should be possible [18]. In some cases where the intramedullary tibial canal is not large enough, further reaming should be performed to enlarge it.
3.3.4. Modified AO Technique Using a 2 mm Flexible Nail Introduced into Distal Slot
Another adaptation of the hook distractor method, which is useful for situations where the nail canal is too narrow to accommodate both the hook and guide wire, was described [14]. Because of the small size of the cannulation, the hook could not capture the outlet of the nail and the introduction of an additional guide wire was not possible. Therefore, a 2-inch piece of a 2 mm flexible nail was inserted into the slot of the interlocking screw (Figure 10). This helped to incarcerate the hook inside the nail permitting further extraction of the distal nail piece [14]. This method, also ingenious, may be technically more demanding and requires an additional incision to open the tibial cortex to obtain access to the distal hole of the nail, which can generate additional comorbidity.
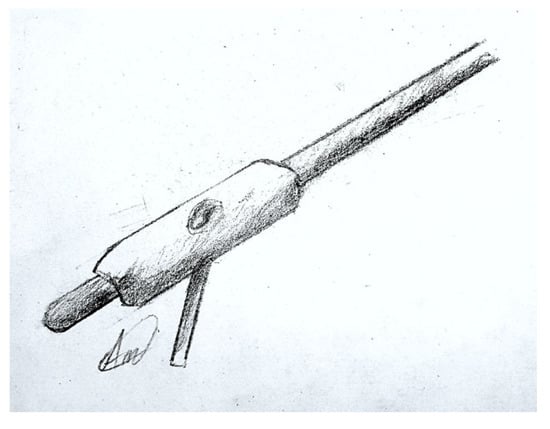
Figure 10.
Modified AO technique using a flexible nail introduced into distal slot.
This procedure also requires a high level of skill and precision to ensure proper capture of the distal broken piece using the small piece of a flexible nail and the success of this technique depends on the size of the nail, the size of the extractor, the size of the guide wire and the surgeon’s skill and experience. This technique may require an additional incision to open the tibial cortex to access the distal hole of the nail, which can generate additional comorbidity.
3.3.5. Self-Made Stainless Steel Minimally Invasive Nail Extractor
A simple reproducible extraction method using a self-made stainless steel minimally invasive nail extractor made of a 2.5–2.8 mm guide wire and a spear, welded together, was described (Figure 11) [7,31]. The spear is made of two 1.0 mm Kirschner wires, each with a 2.5 mm long barb on one side. The extractor’s diameter at the barb can be modified to suit the specific situation [7]. If necessary, if there is resistance at extraction, the tibial canal can be enlarged by progressive reaming to avoid unnecessary bending or breakage of the barb [31]. This technique is most suitable for short distal tibial nail fragments and is performed under an image intensifier. It has the advantage of being simple in design and cheap to fabricate.
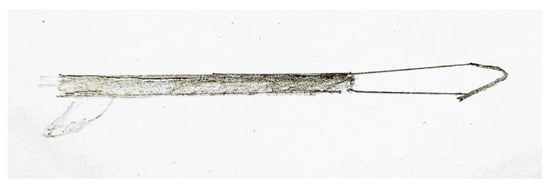
Figure 11.
Self-made stainless steel minimally invasive nail extractor.
The use of self-made stainless steel minimally invasive nail extractor in this technique presents a challenge as it may not be easily accessible in most orthopedic centers. The procedure also requires a high level of skill and precision to successfully extract the distal broken piece. Additionally, this technique requires the use of an image intensifier during the procedure. It may also not be suitable for nails that have been impacted within the canal.
3.3.6. Self-Manufactured V-Shaped Groove Hook
Although these techniques are suitable for most cases, nails with smaller diameters and narrow hallows cannot be removed by a conventional extraction hook or an ordinary bulb-tipped guide wire.
Park et al. described a self-manufactured hook from a smooth guide wire, bent to an angle of about 15 degrees at 15 mm to the distal end, which has a V-shaped groove located 5 mm to the end (Figure 12). The groove is made using a high-speed burr, and is used to hook and engage the margins of the nail. This device can be easily manufactured in the operating room with the help of a metal cutting instrument. This method may not always successful due to the weaker holding power of the V-shaped groove (hook) compared to a regular hook, meaning that it can slip off the nail margins when the resistance exceeds its capacity to hold the nail [32].
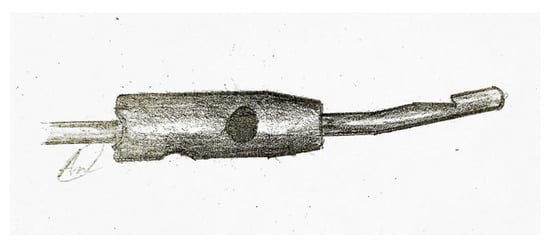
Figure 12.
Self-manufactured V-shaped groove hook.
Using this technique can be challenging, as it necessitates specialized equipment, such as a custom-made V-shaped groove hook, which may not be easily accessible in most orthopedic clinics. The procedure demands a high level of expertise and precision to ensure proper engagement of the end of the nail with the V-shaped groove hook and to remove the distal broken piece. The success of this technique is contingent on the size of the nail and the V-shaped groove hook. The technique may also not be suitable for nails that have been impacted in the canal or for larger nails.
3.3.7. Kirschner Wire Angled Hook
Pan et al. described a simple and cheap method of extracting the distal broken nail piece using a small, angled hook made of a 2.0 mm Kirschner wire. After bending its tip, they shortened it to 2–3 mm, facilitating the engagement of the locking holes. In their report, the hook is oriented towards the locking holes (Figure 13). After catching it, the broken piece is extracted retrogradely with the help of a T-handle. This technique also has some limitations as it may not be suitable in cases of narrow canal nails, or when there is a lack of a long K- wire, or if the nail fragment has a snug fit with the surrounding bone [33].
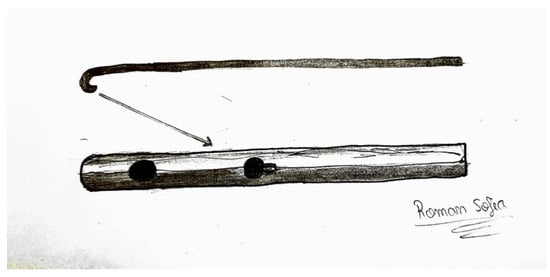
Figure 13.
Kirschner wire angled hook.
Other issues may be related to this technique, such as difficulty in engaging the screw holes with the small, angled hook made of a 2.0 mm Kirschner wire or in handling the T-handle while extracting the broken piece retrogradely.
3.3.8. Retrograde Kirschner Wire Angled Hook
A variation of this method was described by Garg and Dave. After removing the interlocking screws, a mosquito forceps can be introduced through the distal hole and used to push the piece proximally, until the distalmost end of the nail piece is at the level of the screw hole. Once the distalmost end of the nail piece is at the level of the screw hole, a long guide wire is introduced retrograde through the distal most screw whole using fluoroscopy, into the tip of the broken nail piece, and pushed proximally until it exits through the knee wound. Then, the distal end of the guide wire is bent in a U-shape to catch the tip of the nail and can be extracted by back-slapping or pulling out (Figure 14) [11]. The authors affirm that the technique does not require any additional incision, bone drilling, or opening of the tibial cortex. However, this maneuver might not always be possible.
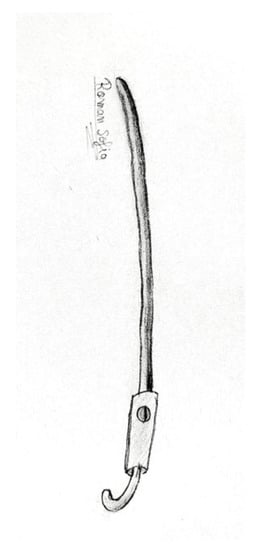
Figure 14.
Retrograde Kirschner wire angled hook.
It is technically challenging to push the nail piece proximally using mosquito forceps to reach the distalmost end of the nail piece at the level of the screw hole. Introducing the long guide wire in a retrograde manner into the distal tip of the broken nail piece and progressing it proximally until it exits through the knee wound may also encounter difficulty. Engaging the distal end of the guide wire in a U-shape to hook around the tip of the broken nail piece is not always possible. The use of a C-arm could be helpful to confirm the nail location and the guide wire position.
3.4. Closed Cerclage Wire Pull-Out Technique for Solid Non-Cannulated Nail Implants
Removal of a piece of solid tibial nail is much more difficult than for cannulated nails and most of the methods described in this paper cannot be used. Gosling et al. proposed the closed cerclage wire pull-out technique for solid non-cannulated nail implants. The principle is that a thin, stemmed cylinder with a cross hole through its cavity is slipped over the short remainder of the implant, from proximal to distal, so that the cylinder holes are aligned with the nail holes (Figure 15). Then, a 1.2 mm cerclage is passed through the cortex, cylinder, and nail locking holes. When the cylinder is pulled out, the cerclage wire bends, and the cylinder and nail fragment become jammed so that it can then be pulled out with the cylinder. Extensive reaming to enlarge the tibial canal is probably necessary [34].
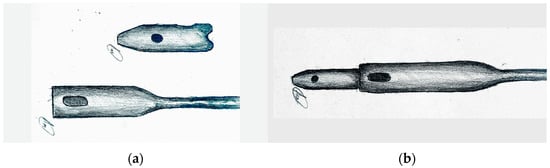
Figure 15.
The closed cerclage wire pull-out technique for solid non-cannulated nail implants. (a) Distal nail piece and cylinder hole; (b) Cylinder hole inserted over distal nail piece till the wholes are aligned.
Removing solid nails is a complex task that requires skill and experience. The success rate is lower, and complications can occur. The alignment of the cylinder with the nail holes in the implant; passing the cerclage wire through the cortex, cylinder, and nail locking holes; and removing the cylinder and nail fragment without causing damage to surrounding tissue or extensive reaming of the tibial canal all present significant challenges.
3.5. Laparoscopic Forceps
Capturing the tip of the failed tibial nail can also be performed with help of laparoscopic grasping forceps under fluoroscopic guidance (Figure 16). For this technique to be successful, preliminary extensive reaming to enlarge the tibial canal must be performed [35]. As there is a paucity of techniques for removing broken solid nails from within the tibia, this technique has more value in removing these [36]. Although it was originally described for a femoral nail extraction, it can be used similarly for tibial nails too. Previous enlarging of the tibial canal through extensive reaming might be necessary.
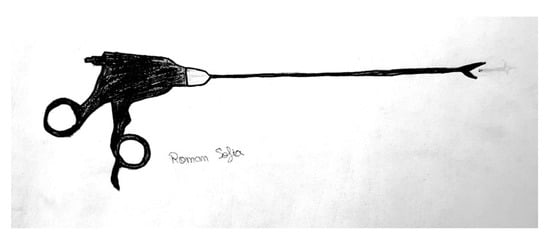
Figure 16.
Laparoscopic grasping forceps.
Using laparoscopic grasping forceps to capture the distal part of a broken tibial nail can be a challenging task and should only be performed under fluoroscopic guidance. The availability of appropriate sizes and shapes of laparoscopic grasping forceps for different patients may be limited, making it difficult for many orthopedic centers to use this technique. For surgeons, ensuring proper positioning, alignment, and maneuvering of the laparoscopic grasping forceps with precision and accuracy within the tibial canal during the procedure can be technically challenging.
3.6. The Fenestration Extraction Method
In cases where the mini-invasive methods are not successful, opening the distal tibia to gain access to the tip of the nail may be a solution.
The fenestration extraction method for a broken tibial nail can be challenging, as it requires correct identification of the location for the fenestration and appropriate size and shape selection for different patients, as well as performing the procedure without causing damage to the surrounding tissue or applying excessive force during the extraction process. Additionally, there is a risk of complications such as infection, bleeding, or improper healing and recovery after the removal of the broken tibial nail.
Additionally, in complex situations, the fenestration extraction method can provide better visualization of the area and make removal easier. This method can be performed under fluoroscopic guidance to provide surgeons real-time imaging during the procedure, reducing potential complications. It can be a viable alternative for patients who are not candidates for other extraction methods, such as the closed cerclage wire pull-out technique or laparoscopic grasping forceps, especially when the nail has been in place for an extended period.
3.6.1. Retrograde 3 mm Ball-Tipped Guide Wire through a Medial Malleolus Opening
Opening the tibial malleolus to pass a 3 mm ball-tipped wire through the distal outlet of the broken nail, under fluoroscopic guidance, is the least invasive of all and can be a solution to reach the implant (Levine). It uses the same principle as described by Metikala [29]. The wire is then further pushed through the tibial canal till it exits through the knee incision. As the ball tip of the wire reaches the tip of the nail, both can be pulled out (Figure 17) [15]. This technique, although appealing, is technically difficult and the degree of irradiation may be higher as one insists on capturing the tip of the nail.
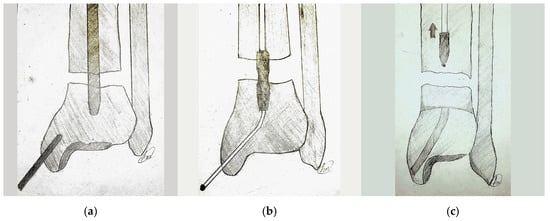
Figure 17.
Retrograde 3 mm ball-tipped guide wire through the opening in the medial malleolus. (a) Fenestration of the medial malleolus. (b) Pushing the wire through the tibial canal until it exits. (c) Pulling out of the broken nail.
The method of using a 3 mm ball-tipped guide wire to remove a broken nail through fluoroscopic guidance may present challenges such as difficulty in maneuvering the wire through the tibial canal and difficulty in extracting the broken nail once the guide wire reaches it. Additionally, there may be technical difficulties in accessing the medial malleolus and positioning the guide wire correctly, as well as risks of local complications such as bleeding, infection, or injury to surrounding structures. Furthermore, a higher degree of irradiation may be necessary to capture the distal outlet of the nail.
All other procedures that reach the distal tip of the broken nail from caudal need an opening of the tibial cortex.
3.6.2. Tibial Cortical Windowing and Retrograde Levering
Removal of broken nails may require the use of a window in the tibial cortex to directly reach the broken segment. After performing the fenestration, the broken nail can be either extracted directly or it can be impacted and removed through the proximal incision (Figure 18). This method can be a solution, especially for the retrieval of short, broken solid tibial nails.
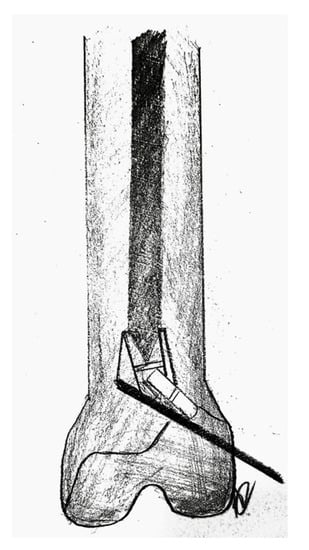
Figure 18.
Tibial cortical windowing and retrograde levering.
Krettek et al. described a technique in which the short distal fragment of a broken solid femoral intramedullary nail was removed with the use of retrograde levering through a cortical window, just proximal to the articular surface. The window was used for anterograde nail removal with a small Hohmann retractor serving as a guide [37]. The same principle can be applied to the extraction of a tibial nail, solid or cannulated.
During the tibial cortical windowing and retrograde levering process, there may be challenges such as the risk of damaging surrounding structures during the bone window creation, difficulty in securely removing the broken nail, especially if it is impacted, and the risk of local complications. Additionally, the retrograde levering technique may require a high level of skill and experience and may pose difficulty in positioning the Hohmann retractor properly. Moreover, there may be a risk of damage to the articular surface during the removal of the broken nail.
3.6.3. Tibial Cortical Windowing, Creating a Hole, and Retrograde Punching
If the distal segment of the broken nail is incarcerated and minimally invasive techniques are ineffective, another fenestration technique can be used by making an anterior window in the tibial cortex to reach it (2–3 cm in length, 1–3 mm wider than the nail), making a hole in the nail, and removing it carefully [38]. The window should be situated so an osteotome can be used to approach the nail at an angle of 30–45°. Under image intensifier, the appropriate location for the cortical window is chosen in order to reach the nail. As the nail progresses proximally, the process of drilling a new hole in the nail is repeated, followed by punching it further proximally. This is then repeated until the nail exists, the nail reaches the existing hole and is captured (Figure 19) [38]. There is a risk of stress riser fracture, therefore care must be exercised.
Figure 19.
Tibial cortical windowing, creating a hole, and retrograde punching. (a) Anterior strategic window in the tibial bone. (b) Making a hole in the nail and punching it out. (c) The nail progresses proxi-mally by repeating it.
The challenges associated with removing a broken nail include creating an appropriately sized and shaped window to access the nail, positioning the window correctly, drilling the nail, and removing the nail without damaging surrounding structures. There are also some risks involved like stress-riser fractures, and infection.
3.6.4. Distal Tibial Cortical Windowing and Retrograde Punching Using a Tamp
A variant of the previous technique is punching the nail retrogradely with a curved bone tamp, using an anterior cortical window, just distal to the nail tip (Figure 20). This method is interesting if the nail is broken in the proximal part and the distal piece is long enough. In short distal pieces, it is ineffective.
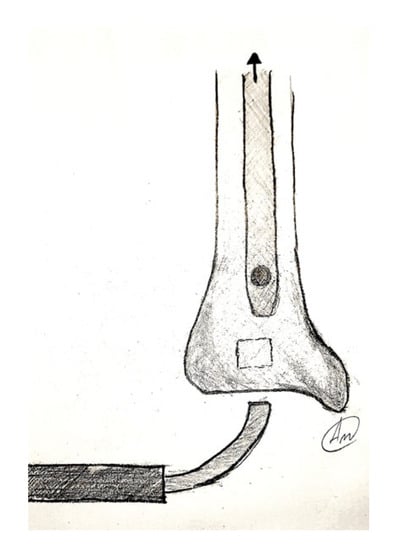
Figure 20.
Distal tibial cortical windowing–bone tamp.
The challenges of distal tibial cortical windowing and retrograde punching using a tamp are numerous. One of the main challenges is creating a window that is the appropriate size and shape to access the broken nail. This can be difficult because it requires precise measurements and skill in creating the window. Another challenge is positioning the window correctly for retrograde punching. This is important because if the window is not positioned correctly, it can be difficult to effectively punch out the broken nail with a curved bone tamp. Ensuring that the tamp is inserted at the correct angle is also important, as this is crucial to minimizing the risk of damage to surrounding structures. There is also a risk of damage to the articular surface during the removal of the broken nail if it is not properly executed. Additionally, there is a certain risk of stress riser fractures from the creation of the cortical window, as well as the risk of bleeding, infection, or injury to surrounding structures during the extraction process.
We believe the fenestration extraction method should be performed only if non-invasive techniques fail. Although very successful and with less radiation exposure, these techniques are biologically disadvantageous by causing a significant amount of surgical damage with additional soft-tissue damage, periosteal stripping, or even opening the fracture/nonunion site and risking infection. Sometimes, many of these techniques require significant metaphyseal and cortical bone destruction that may compromise the integrity of the long bone [14,39,40].
The success rate of nail breakage retrieval techniques may vary depending on the specific case and the skill of the surgeon performing the procedure. The choice of technique may also depend on the type and location of the nonunion, as well as the length and condition of the broken nail piece. The use of a combination of techniques may be necessary in some cases for optimal outcomes. All the techniques described are compiled in a table for a better overview (Table 1).

Table 1.
Summary of the figures by categories. Short overview of the advantages and disadvantages of the techniques, of the availability of the instruments and tools (C.A.—commercially available; S.M.—self-manufactured; R.A.—readily available (that are usually available in an orthopedic department)) and of the nail type (hallow or solid) that it is can be addressed with each method.
4. Future Perspectives
As prevention is easier and has numerous advantages in comparison to treatment, our recommendations to the patients should be focused on prevention. In most instances, the location of nail breakage appeared to be connected to implant wear and tear caused by slow bone healing, but in rare cases, it was also caused by insufficient trauma [41]. To avoid tibial nail breakage after tibial fracture nailing, patients should follow their doctor’s instructions, avoid high-impact activities, wear proper shoes, use assistive devices as directed, be careful when getting in and out of bed, avoid heavy lifting, and report any symptoms.
To prevent nail breakage, it is important to closely monitor patients and identify those with delayed healing or where nonunion is likely. Planning revision surgery (involving replacing the nail) at an earlier stage can help avoid nail breakage. Additionally, extracting an intact implant is much easier, more cost-effective, and carries less risk when performed sooner [42].
To avoid implant failure, further improvement of the implant is required. By using more advanced materials for implants, it could be possible to improve their strength and durability, thus reducing the risk of failure. By improving the design of the implant and by optimizing the implant size and shape, it could be possible to improve its biomechanical properties, making it more resistant to failure and to better match the implant to the patient’s anatomy, and reduce the risk of failure. Moreover, by implementing more rigorous testing protocols for implants, it could be possible to better identify potential issues before they lead to implant failure. Orthobiologic products such as platelet-rich plasma (PRP), stem cells, or growth-factor therapy to promote healing could reduce the risk of complications and improve outcomes.
New techniques for broken tibial nail removal could be considered in the future, as the technology is constantly progressing. Developing new techniques that involve smaller incisions and less tissue disruption reduces the risk of complications and speeds up recovery. Using intraoperative computer-aided navigation systems during the surgery could help the surgeon to accurately place the instruments and tools to improve the accuracy of the procedure, remove the broken implant, and reduce the risk of complications. Robotic-assisted surgery could also improve the precision of the surgery and reduce associated comorbidity. Biodegradable implants that dissolve over time could eliminate the need for a second surgery to remove the implant. Three-dimensional printing technology could be used in the future to create custom-made instruments that could improve the extraction of the implant and reduce the risk of complications. While these future ideas may seem costly and futuristic now, experience has shown that anything is achievable with time and effort.
5. Conclusions
Nail failure (breakage) is a known and unusual complication of intramedullary osteosynthesis of tibial fractures. Retrieval of the distal nail component may be extremely challenging and unpredictable. The most common techniques for the removal of the distal nail segment, described in the literature, were presented. Most of them are oriented toward minimally invasive approaches rather than the opening of fracture or nonunion sites. Some require dedicated instruments offered by the industry, some require the adaptation of already available orthopedic instruments, while others are using self-manufactured instruments created especially for this operation. Each technique has benefits and limitations; therefore, surgeons should be informed about as many techniques as possible to choose the most suitable one for every specific case.
Author Contributions
Conceptualization, M.D.R., S.R.F. and C.I.M., Formal analysis, M.D.R.; Methodology, M.D.R., A.G.B. and S.R.F.; Project administration, M.D.R.; Resources, S.R.F., C.I.M., A.G.B., D.B., B.-A.B. and A.T.; Supervision, M.D.R., S.R.F., C.I.M. and A.G.B.; Validation, M.D.R., S.R.F., C.I.M., B.-A.B. and A.G.B.; Visualization, M.D.R., S.R.F., C.I.M., C.B., D.B., A.T., B.-A.B. and A.G.B.; Writing—original draft, M.D.R., S.R.F. and A.G.B.; Writing—review and editing, M.D.R. and S.R.F. All authors have read and agreed to the published version of the manuscript.
Funding
This work was supported by the Ministry of Research, Innovation, and Digitization through Program 1—Development of the national research-development system, Subprogram 1.2—Institutional performance—Projects for financing excellence in RDI, contract no. 28PFE/30.12.2021.
Institutional Review Board Statement
Not applicable.
Informed Consent Statement
Not applicable.
Acknowledgments
We acknowledge all the support provided by Roman Andrei Dan and Roman Sofia Alexandra who drew all the figures in this article.
Conflicts of Interest
The authors declare no conflict of interest.
References
- Xia, L.; Zhou, J.; Zhang, Y.; Mei, G.; Jin, D. A Meta-Analysis of Reamed Versus Unreamed Intramedullary Nailing for the Treatment of Closed Tibial Fractures. Orthopedics 2014, 37, e332–e338. [Google Scholar] [CrossRef] [PubMed]
- Duan, X.; Al-Qwbani, M.; Zeng, Y.; Zhang, W.; Xiang, Z. Intramedullary Nailing for Tibial Shaft Fractures in Adults. Cochrane Database Syst. Rev. 2012, 1, CD008241. [Google Scholar] [CrossRef] [PubMed]
- Maini, L.; Upadhyay, A.; Aggarwal, A.; Dhaon, B.K. A New Method of Removing a Fractured Interlocked Nail. Injury 2002, 33, 261–262. [Google Scholar] [CrossRef] [PubMed]
- Yadav, D.; Garg, V.; Goyal, A.; Aggarwal, N. Removal of a Broken Distal Cannulated Intramedullary Femoral Nail with Solid Reamer with Closed Methods and without Using C-Arm: A Case Report. J. Arthrosc. Jt. Surg. 2015, 2, 9–11. [Google Scholar] [CrossRef]
- Manon, J.; Detrembleur, C.; Van de Veyver, S.; Tribak, K.; Cornu, O.; Putineanu, D. Predictors of Mechanical Complications after Intramedullary Nailing of Tibial Fractures. Orthop. Traumatol. Surg. Res. 2019, 105, 523–527. [Google Scholar] [CrossRef]
- Ruiz, A.L.; Kealey, W.D.C.; McCoy, G.F. Implant Failure in Tibial Nailing. Injury 2000, 31, 359–362. [Google Scholar] [CrossRef]
- Zhou, Z.; Jiang, Y.; Dai, B.; Mao, G.; Liu, Y.; Wei, C.; Lin, W. A Novel Minimally Invasive Broken Nail Extractor for Cannulated Intramedullary Nails: Trial and Application in a Few Cases. Medicine 2022, 101, e31549. [Google Scholar] [CrossRef]
- Lam, S.W.; Teraa, M.; Leenen, L.P.H.; van der Heijden, G.J.M.G. Systematic Review Shows Lowered Risk of Nonunion after Reamed Nailing in Patients with Closed Tibial Shaft Fractures. Injury 2010, 41, 671–675. [Google Scholar] [CrossRef]
- Tay, W.-H.; de Steiger, R.; Richardson, M.; Gruen, R.; Balogh, Z.J. Health Outcomes of Delayed Union and Nonunion of Femoral and Tibial Shaft Fractures. Injury 2014, 45, 1653–1658. [Google Scholar] [CrossRef]
- Brinker, M.R.; O’Connor, D.P. Exchange Nailing of Ununited Fractures. J. Bone Jt. Surg. 2007, 89, 177–188. [Google Scholar] [CrossRef]
- Garg, B.K.; Dave, H. Extraction of Broken Tibial Interlock Nail with a Retrograde Hooked Guide Wire: A Novel Surgical Technique. J. Orthop. Case Rep. 2021, 11, 38. [Google Scholar] [CrossRef]
- Müller, M.E.; Perren, S.M.; Allgöwer, M.; Müller, M.E.; Schneider, R.; Willenegger, H. Manual of Internal Fixation: Techniques Recommended by the AO-ASIF Group; Springer Science & Business Media: Berlin/Heidelberg, Germany, 1991. [Google Scholar]
- Brewster, N.T.; Ashcroft, G.P.; Scotland, T.R. Extraction of Broken Intramedullary Nails—An Improvement in Technique. Injury 1995, 26, 286. [Google Scholar] [CrossRef]
- Abdelgawad, A.A.; Kanlic, E. Removal of a Broken Cannulated Intramedullary Nail: Review of the Literature and a Case Report of a New Technique. Case Rep. Orthop. 2013, 2013, 461703. [Google Scholar] [CrossRef]
- Levine, J.W.; Georgiadis, G.M. Removal of a Broken Cannulated Tibial Nail: A Simple Intramedullary Technique. J. Orthop. Trauma 2004, 18, 247–249. [Google Scholar] [CrossRef]
- Sivananthan, K.S.; Raveendran, K.; Kumar, T.; Sivananthan, S. A Simple Method for Removal of a Broken Intramedullary Nail. Injury 2000, 31, 433–434. [Google Scholar] [CrossRef]
- Khan, M.; Schranz, P.J.; Ward, M.W. Removal of a Broken Intramedullary Tibial Nail Using a Hand Reamer. Injury 1997, 28, 693–694. [Google Scholar] [CrossRef]
- Gil, J.A.; McClure, P.; Born, C.T. Removal of the Distal Aspect of a Broken Tibial Nail. Am. J. Orthop. 2017, 46, E112–E115. [Google Scholar]
- Blake, S. A Technique for the Removal of the Distal Part of a Broken Intramedullary Nail. Ann. R. Coll. Surg. Engl. 2009, 91, 169–170. [Google Scholar] [CrossRef]
- Sidky, A.; Buckley, R.E. Hardware Removal after Tibial Fracture Has Healed. Can. J. Surg. 2008, 51, 263–268. [Google Scholar]
- Reith, G.; Schmitz-Greven, V.; Hensel, K.O.; Schneider, M.M.; Tinschmann, T.; Bouillon, B.; Probst, C. Metal Implant Removal: Benefits and Drawbacks—A Patient Survey. BMC Surg. 2015, 15, 96. [Google Scholar] [CrossRef]
- Krettek, C.; Mommsen, P. Implantatentfernung nach intramedullären Osteosynthesen: Literaturreview, technische Hinweise und Tipps und Tricks. Unfallchirurg 2012, 115, 299–314. [Google Scholar] [CrossRef] [PubMed]
- Pongsamakthai, W.; Apivatthakakul, T.; Sangkomkamhang, T. Removal of the Broken Femoral Nail with T-Reamer Technique: A Three-Case Report. J. Clin. Orthop. Trauma 2016, 7, 22–26. [Google Scholar] [CrossRef] [PubMed]
- Georgilas, I.; Mouzopoulos, G.; Neila, C.; Morakis, E.; Tzurbakis, M. Removal of Broken Distal Intramedullary Nail with a Simple Method: A Case Report. Arch. Orthop. Trauma Surg. 2009, 129, 203–205. [Google Scholar] [CrossRef] [PubMed]
- Steinberg, E.L.; Luger, E.; Menahem, A.; Helfet, D.L. Removal of a Broken Distal Closed Section Intramedullary Nail: Report of a Case Using a Simple Method. J. Orthop. Trauma 2004, 18, 233–235. [Google Scholar] [CrossRef] [PubMed]
- Smith, G.; Khan, A.; Marsh, A. A Novel Way to Remove a Broken Intramedullary Nail. Ann. R. Coll. Surg. Engl. 2012, 94, 605. [Google Scholar] [CrossRef]
- Hak, D.J.; McElvany, M. Removal of Broken Hardware. J. Am. Acad. Orthop. Surg. 2008, 16, 113–120. [Google Scholar] [CrossRef]
- Karladani, A.H. Removal of a Broken Nail Using a Guide Wire and a Screw. Acta Orthop. 2006, 77, 986–988. [Google Scholar] [CrossRef]
- Metikala, S.; Mohammed, R. Closed Retrograde Retrieval of the Distal Broken Segment of Femoral Cannulated Intramedullary Nail Using a Ball-Tipped Guide Wire. Indian J. Orthop. 2011, 45, 347–350. [Google Scholar] [CrossRef]
- Randall, R.L.; Hall, R.J.; Slabaugh, P.B. Case Report: Closed Removal of a Segmental Intramedullary Rod: A Technical Report. J. Orthop. Trauma 1996, 10, 363–365. [Google Scholar] [CrossRef]
- Wei, C.; Luo, J.; Mao, G.; Gu, S.; Liu, Y.; Yin, Q. Minimally Invasive Removal of the Distal Broken Segment of a Hollow Tibial Intramedullary Nail Using a Homemade Broken Nail Extractor. J. Surg. Case Rep. 2022, 2022, rjac108. [Google Scholar] [CrossRef]
- Park, S.Y.; Yang, K.H.; Yoo, J.H. Removal of a Broken Intramedullary Nail with a Narrow Hollow. J. Orthop. Trauma 2006, 20, 492–494. [Google Scholar] [CrossRef]
- Pan, K.; Pr, R. A Simple Method for Removal of the Distal Segment of a Broken Femoral Intramedullary Nail: A Case Report. Malays. Orthop. J. 2012, 6, 66–68. [Google Scholar] [CrossRef]
- Gosling, T.; Allami, M.; Koenemann, B.; Hankemeier, S.; Krettek, C. Minimally Invasive Exchange Tibial Nailing for a Broken Solid Nail: Case Report and Description of a New Technique. J. Orthop. Trauma 2005, 19, 744–747. [Google Scholar] [CrossRef]
- Charnley, G.J.; Farrington, W.J. Laparoscopic Forceps Removal of a Broken Tibial Intramedullary Nail. Injury 1998, 29, 489–490. [Google Scholar] [CrossRef]
- Giannoudis, P.V.; Matthews, S.J.; Smith, R.M. Removal of the Retained Fragment of Broken Solid Nails by the Intra-Medullary Route. Injury 2001, 32, 407–410. [Google Scholar] [CrossRef]
- Krettek, C.; Schandelmaier, P.; Tscherne, H. Removal of a Broken Solid Femoral Nail: A Simple Push-out Technique. A Case Report. J. Bone Jt. Surg. 1997, 79, 247–251. [Google Scholar] [CrossRef]
- Lahoti, O.; Somerville, C.M.; Hanschell, H.; Tofighi, M. A Novel Surgical Technique for Extraction of a Firmly Integrated Broken Intramedullary Nail. Strateg. Trauma Limb Reconstr. 2022, 17, 55–58. [Google Scholar] [CrossRef]
- Whalley, H.; Thomas, G.; Hull, P.; Porter, K. Surgeon versus Metalwork—Tips to Remove a Retained Intramedullary Nail Fragment. Injury 2009, 40, 783–789. [Google Scholar] [CrossRef]
- Pullen, W.M.; Erdle, N.J.; Crickard, C.; Smith, C.S. A Modified Levering Technique for Removing a Broken Solid Intramedullary Tibial Nail: A Technical Tip. Am. J. Orthop. 2016, 45, E352–E354. [Google Scholar]
- Hidden, K.A.; Dahl, M.T.; Ly, T.V. Management of a Broken PRECICE Femoral Nail at an Ununited Distraction Osteogenesis Site: A Case Report. JBJS Case Connect. 2020, 10, e0267. [Google Scholar] [CrossRef]
- Rentenberger, C.; Haider, T.; Zak, L.; Wozasek, G.E. Implant Failure after Externally Magnetic-Controlled Nail Lengthening. Injury 2021, 52, 3350–3354. [Google Scholar] [CrossRef] [PubMed]


Disclaimer/Publisher’s Note: The statements, opinions and data contained in all publications are solely those of the individual author(s) and contributor(s) and not of MDPI and/or the editor(s). MDPI and/or the editor(s) disclaim responsibility for any injury to people or property resulting from any ideas, methods, instructions or products referred to in the content. |
© 2023 by the authors. Licensee MDPI, Basel, Switzerland. This article is an open access article distributed under the terms and conditions of the Creative Commons Attribution (CC BY) license (https://creativecommons.org/licenses/by/4.0/).