Article

Stray Magnetic Field Measurement Method of Magnetic Hysteresis Curve of Open-Ended Sensor and Actuator Cores

1
Faculty of Aeronautics, Technical University of Košice, Rampová 7, 041 21 Košice, Slovakia
2
EDIS v.v.d., Rampová 7, 041 21 Košice, Slovakia
*
Author to whom correspondence should be addressed.
Appl. Sci. 2023, 13(8), 4885; https://doi.org/10.3390/app13084885
Submission received: 20 March 2023 / Revised: 8 April 2023 / Accepted: 11 April 2023 / Published: 13 April 2023
(This article belongs to the Special Issue Hysteresis in Engineering Systems)

Abstract

:

Featured Application

The proposed measuring workstation, based on a stray magnetic field measurement method, can be generally used in applications where the magnetic hysteresis curves of long open-ended ferromagnetic components need to be determined to describe their magnetic behavior. The current design of the workstation allows measuring the magnetic characteristics of samples with a length and diameter of up to 100 mm and 10 mm, respectively. Therefore, it has already been used to reconstruct the magnetic hysteresis curves of ferromagnetic cores utilized in spacecraft and magnetometric devices and to determine the magnetic properties of various construction components of a complex sensor system to describe their response to an applied magnetic field.

Abstract

In the design and development of measurement systems, such as magnetometric security systems or sophisticated devices such as satellites, it is necessary to consider the magnetic properties of all its parts and components, especially if it contains any magnetometric subsystem. The magnetic parameters of the materials are generally well described by the manufacturers in relation to their unprocessed raw state. However, their magnetic properties change as the subsequent machining or heat treatment is performed. These behavioral reactions of the material may lead to changes in its hysteresis during the magnetization cycles. This effect is necessary to consider, especially in the case of metallic ribbons, the magnetic characteristics of which are usually estimated by measurements performed on toroidal cores. Since the magnetic properties of a toroidal core differ from the magnetic properties of the preferably used open-ended samples, the corresponding measurement method needs to be used to determine its magnetic characteristics. Therefore, in the proposed article, the authors present a stray magnetic field-based method and measuring workstation intended to measure the magnetic hysteresis curves of the ferromagnetic open-ended samples used in the applications concerning the magnetometric systems and stabilization subsystems of small satellites. The physical background of the measurement method is described in detail, as well as the hardware and software used. The magnetic hysteresis curves of a small satellite electromagnetic actuator were measured as an example of an open-ended ferromagnetic component produced from amorphous ribbons, the permeability of which differs in comparison to manufacturer-stated permeability of raw amorphous material. The results are supplemented by measurements of the core characteristics of the used magnetometer probe, as well as by the characteristics of the semi-produced materials used for the production of both investigated cores. The primary advantage of the presented measurement method lies in the ability of design validation prior to the production of the final component and its assembly.

1. Introduction

Modularity, complexity, and miniaturization have been the watchwords of industrial design in recent decades. Nowadays, we can see the direct technological impact of these trends on the space industry, especially in connection with the technological approach of nanosatellites and CubeSats implementations. According to [1,2], a total of 1960 CubeSats have been launched as of 1 January 2023, of which 338 were in 2022, while 1135 are still operational. The CubeSat standard, introduced in 1999, opened the path to nanosatellite standardization, leading to the fast commercialization of this spacecraft segment. As a consequence, the CubeSats, initially developed as a university project for educational purposes, quickly transformed into a technology testing platform and finally became an economically advantageous scientific apparatus.
Today, the CubeSats are widely used in various scientific and research missions, such as Earth observation science [3,4,5,6,7,8,9,10], quantum communication from Earth to LEO [11], asteroid impact prevention [12,13], optical observations [14], stellar astrophysics observations of stars and planets [15,16,17], and solar [18,19] or lunar [20,21] science. Concerning the technological solutions of the CubeSats, most of the scientific papers focus on topics related to Attitude Determination and Control Systems (ADCS), which typically contain magnetometers [22] and electromagnetic actuators [23,24,25,26] used for position controlling and stabilization.
The sensitive magnetometers and electromagnetic actuators working on the principle of magnetic field interactions are the main study area of our team. We have participated in the Slovak CubeSat program since the first Slovak satellite—skCUBE [27]. Although the mission’s primary scientific goal was not reached due to the communication failure between an onboard computer and a radio transmitter, the mission was successful from a technological point of view, especially concerning the integrated electromagnetic actuators. Consequently, the skCUBE was taken as a basis for the following pure scientific GRBAlpha mission [28], designed to test a CubeSat-size gamma-ray detector [29]. In the case of both missions, the skCUBE and the GRBAlpha, a special calibration method [30] was used to calibrate their onboard magnetometers in an ordinary laboratory environment without the use of a shielding chamber.
During the skCUBE mission, innovative electromagnetic actuators have been developed. The structure of these actuators consisted of a solenoidal winding with a ferromagnetic core made of soft amorphous ribbons, the volume and shape of which were designed to optimize overall actuator performance. The conceptual design phase was performed by using only an analytical method. Ultimately, the produced actuators were tested by an external fluxgate magnetometer to measure their current/magnetic field transfer curve. Although we were able to measure the B-H characteristics of the core’s material sample, it was unable to measure the state of magnetization of the whole core due to the limits of the apparatus used and the measurement method.
Concerning changes in the core shape, usually associated with the machining process, they can significantly affect its magnetic properties since a magnetic anisotropy alters as a result of such structural intervention. The significant one is a shape anisotropy, manifesting through a demagnetizing field, which occurs during the open-ended sample’s magnetization and leads to modifications of its hysteresis curve. Consequently, the final product’s magnetic parameters differ from the raw material parameters stated by manufacturers. Since these steps are difficult to simulate using numerical methods, the possibility of measuring the magnetic hysteresis curve of the core, or generally any magnetic component, is beneficial for the designer to validate the design before producing the complex device; in our case, the CubeSat actuator.
Nowadays, several methods and devices are used to measure the magnetic properties of ferromagnetic materials in the form of magnetic hysteresis curves. Most of them are based on the measurement using a toroidal-shaped specimen or Epstein frame device [31,32,33,34]. Occasionally, a single-yoke open configuration is used [35]. However, many experimental methods are particularly designed to measure the magnetic characteristics of ferromagnetic materials with specific properties or with use in highly specialized applications [36,37,38,39,40]. Therefore, our original measuring workstation, using a flux gate VEMA magnetometer, was redesigned in 2022 to determine the magnetization state of an open-ended actuator core for the complete magnetization reversal cycle. The measurement process is fully automated by implemented software algorithms, which output a complex hysteresis curve as a functional dependence of a material magnetic polarization on an excitation magnetic field. The usage of the measuring method, based on stray magnetic field measurement, is not limited only to the space sector. The proposed method with the designed workstation can be used for measuring the hysteresis curves of various ferromagnetic and paramagnetic components of industrial and security sensor systems.
Regarding security sensor systems, the magnetic field represents an information medium that is hard to manipulate without conspicuous notice. The fluctuations of the magnetic field can be caused by various sources in the monitored area of interest. One of the most common is the object’s movement in a geomagnetic field or an ambient magnetic field, given as the superposition of surrounded devices. Since such variations of the magnetic field can be relatively easy to measure with the proper devices, various experimental measurements using the magnetic field as the medium to secure the given protective perimeter were already performed; for example, possibilities of indoor technical security by the magnetic field, measured with a magnetometer insensitive to industrial frequencies (50 Hz) [41]. The magnetometer, in the function of security devices, can also be used in open spaces to protect a given perimeter against ground vehicles or flying objects. Concerning the flying objects, there is a proof of concept utilizing a small unmanned aerial vehicle (UAV) with an attached magnetometer to secure the surrounding area against a potential flying intruder—another small multirotor UAV [42]. Experimental measurements have also been performed using the UAV with an integrated magnetometer for an indoor mapping of the ambient magnetic field [43].
The purposeful ambient magnetic field measurements intended for the security applications (such as those mentioned above) are usually based on a relatively simple method using a relax-type fluxgate magnetometer. One of the primary sensing elements of the relax-type magnetometer probes is an open-ended ferromagnetic core, which is periodically saturated by an excitation coil during a measurement process. The time between the saturation state and the relaxed state of the core, conditioned by the measured ambient magnetic field, represents a parameter used to calculate sensed magnetic flux density in a given direction. Therefore, the ferromagnetic core with a suitable magnetic characteristic must be considered to acquire the desired measurement parameters of the relax-type fluxgate magnetometer. In accordance with this fact, the presented measuring workstation, based on the stray magnetic field method, can also be used to measure the magnetic properties of the ferromagnetic core utilized as the sensing element of the relax-type magnetometer probe.
Consequently, in order to demonstrate the capabilities and potential spectrum of use of the presented measuring workstation, the magnetic hysteresis curve of the open-ended ferromagnetic core, used as the sensing element of the relax-type VEMA magnetometer probes, is also discussed. In addition, the attached hysteresis curves are also supplemented by measurements of magnetic characteristics of ferromagnetic ribbons-like magnetically soft materials used as an initial semi-finished product for the actuator core and VEMA probe core production. Furthermore, the physical principle of the measuring method, workstation hardware, and measured magnetic hysteresis curves are discussed below in the following sections.

2. Materials and Methods

2.1. Principle of the Measurement Method

The magnetic hysteresis curve of a ferromagnetic material can be determined by several methods [38]; however, most of them are based on measuring the magnetization of a toroidal-shaped sample [39,40,41]. According to the apparent reasons described in the introduction, the information corresponding to the magnetic characteristics of the toroidal sample has no practical use for specific applications. Therefore, we introduce the workstation designed to measure the magnetic hysteresis curves of non-toroidal shaped components. The measuring workstation is based on an experimental method involving real-time measurement of a stray magnetic field of an open-end sample, which is exposed to a magnetization field during the measurement process. The time-variating magnetizing field, referred to as excitation magnetic field H e x , is generated by a solenoid (coil) in the center of which an investigated ferromagnetic sample is placed and longitudinally magnetized in defined steps. A stray magnetic field B s t r a y is measured by a flux-gate magnetometer using a relax-type sensing probe based on an amorphous ribbons core. During the measurement process, a magnetometer probe is positioned so that the longitudinal axis of its amorphous core is aligned parallel to the longitudinal axis of the measured ferromagnetic sample at an appropriate perpendicular distance r from their center points where the effect of a cross-field is negligible, see Figure 1. Such a spatial location of the sensing probe allows the amorphous core to be magnetized homogeneously in its longitudinal direction, which leads to the correct interpretation of the measured stray field B s t r a y at a given point. In addition, aligning the center of the sensing probe to the same plane as the center of the investigated core simplifies the calculation of its magnetic properties during the magnetization process. A diagram showing the principle of the stray field measuring method is depicted in Figure 1.
At the stray field measurement point, the penetration of the excitation field H e x , generated by the magnetizing coil, is compensated by a secondary winding with identical parameters. This secondary winding, a compensating coil, is connected in series with the magnetizing coil in an excitation circuit. Consequently, two external fields H , with an equal magnitude but opposite directions, are generated simultaneously during the sample magnetization process. Since both coils occupy a mutually symmetrical position concerning the longitudinal axis of the measuring probe, at the point of the stray field measurement, the excitation field H e x of the magnetizing coil is suppressed by the field H e x generated by the compensating coil. Accordingly, there is no interference of the B s t r a y and H e x fields during the measurement process, which would otherwise introduce an unwanted additive component into the measured value.

2.2. Mathematical Apparatus for Magnetic Hysteresis Curve Reconstruction

This sub-chapter is devoted to the derivation of a mathematical equation, based on which it is possible to quantify the magnetic polarization, in this case as a quantity defining the magnetic state of the open-ended sample, from the measured value of the stray magnetic field. The entire analytical process of derivation is purposefully processed into individual extensive and systematically consecutive steps, which, with the use of theorems of classical magnetostatics, lead to a final definition of a sought equation. The reason for this complex approach is that current authors that deal with similar issues use only the resulting mathematical relationships, which alone are insufficient for understanding the physical essence of the measurement method and the meaning of the theorems used to define the final mathematical relation.
The construction of a typical magnetic hysteresis curve, like dependence of a magnetization M or polarization J on the excitation field H e x , is given by linear proportionality between measured stray magnetic field B s t r a y of the ferromagnetic open-ended sample and its actual state of magnetization. This interdependence stems from the physical nature of the magnetization process, during which the infinitesimal magnetic moments of the ferromagnetic sample gradually align in the preferred direction corresponding to the excitation (applied) magnetic field H e x , leading to the formation of a dominant magnetic moment. As a consequence of magnetization, surface and volume magnetic poles, collectively called free or isolated magnetic poles, are created. Since, according to magnetostatic theory, free magnetic poles of the magnetized material represent locally uncompensated dipole magnetic moments, their surface and volume distribution on and inside the open-end sample, respectively, must naturally give rise to an internal and external magnetic field H which can be in an arbitrary position inside or around the sample generally expressed as a divergence of a magnetic scalar potential φ m [44]:
H r = φ m
This statement is valid only in situations where the magnetic field H is not produced by the free currents. The field H is then conservative, whereas the magnetic field B act solenoidal; therefore, Ampère’s law becomes:
× H = 0
And Gauss’s law for magnetism states:
· B = 0
Consequently, from the definition of the equation for divergence-free field B , it follows that:
· B = μ 0 · H + M = 0
· H = · M
Considering Equations (1) and (4), the magnetic scalar potential must satisfy Poisson’s equation:
2 φ m = φ m = · M
Discontinuities of the magnetic field H , described in terms of divergence of magnetization M , implicitly suggest the existence of the above-mentioned surface and volume magnetic poles. These free magnetic poles, consisting of positive and negative “monopoles”, thus act as sources of magnetization, the discontinuity of which can occur either at the sample boundaries or in the interior. Consequently, the magnetic scalar potential φ m   and, thus, the magnetic field H can generally be calculated using the following equations [45]:
φ m r = 1 4 π   · M r r d V + M · n ^ r r d s
H r = 1 4 π · M r r r r 3 d V + M · n ^ r r r r 3 d S
Here, r r is the magnitude of the displacement vector from the elementary magnetic charge at point r to point r , at which the magnetic field H is being computed.
Equations (6) and (7) show that the first and second terms describe the effect of the volume and surface magnetic poles as a volume magnetic charge density, ρ m , and a surface magnetic charge density, σ m , respectively. Accordingly,
ρ m = · M
and
σ m = M · n ^
where n ^ denotes an outward-directed unit vector normal to the surface of the magnetized sample. Therefore, the infinitesimal increment of the magnetic field d H is given by the contribution of the magnetic volume and surface pole densities. In the context of the integral form, the magnitude and the directionality of the magnetic field H is at the point of interest, given by the vector r , conditioned by the distribution σ m , the total surface concentration of which depends on the shape of the magnetized sample, and the spatial distribution ρ m , formed due to inhomogeneous magnetization, which in case of amorphous alloys arise mainly by the inducted heterogeneous stresses. Consequently, based on the divergent nature of magnetization and the conditions related to the formation of free magnetic poles, it is obvious that the properties of the internal and external magnetic field H generated by the magnetized sample are given by its shape and induced anisotropy.
The stated premises, supplemented by relations for the calculation of the magnetic scalar potential φ m and the magnetic field H —Equations (6) and (7), respectively, represent a fundamental theorem enabling the definition of the mathematical model according to which magnetization characteristics of the examined sample can be reconstructed. Although these equations accurately describe the properties of the magnetic field around the magnetized body, their applicability to the stray field measurement method is not generally universal due to the diversity of the structure and shape of the individual investigated samples. Based on this fact, a simplification based on the assumption of homogeneous magnetization in the entire sample volume was introduced during the derivation of the mathematical apparatus. In such a case, the first terms of Equation (6) disappear, and only the second term, considering the effect of the surface charge, remains:
φ m r = 1 4 π σ m r r d S
From this point, a multipole expansion is performed on Equation (10), leading to an approximation of the original function into a form of a scalar dipole potential given by a second term (first order) of a binomial identity. The first non-zero term of scalar potential is therefore given as follows [46]:
φ m r = 1 4 π m · r r 3
where m is a magnetic dipole moment. The above equation is valid for condition l / 2 r 1 , so the charge distribution tends to look like a point magnetic dipole from the position at which the magnetic field is investigated. Consequently, this magnetic scalar potential gives an external magnetic field function in the following form [45,46]:
H r = 1 4 π 3 m · r r r 5 m r 3
Since the external magnetic field H is symmetric under rotations about the magnetic moment axis, it can be simpler expressed in spherical coordinates [46]:
H r = m 4 π 2 cos θ j ^ + sin θ i ^
where the first term inside the parenthesis is a radial component of the external magnetic field, H r , so the second one corresponds to its tangential component, H t . Accordingly, j ^ and i ^ must corresponds to radial and tangential unit vectors.
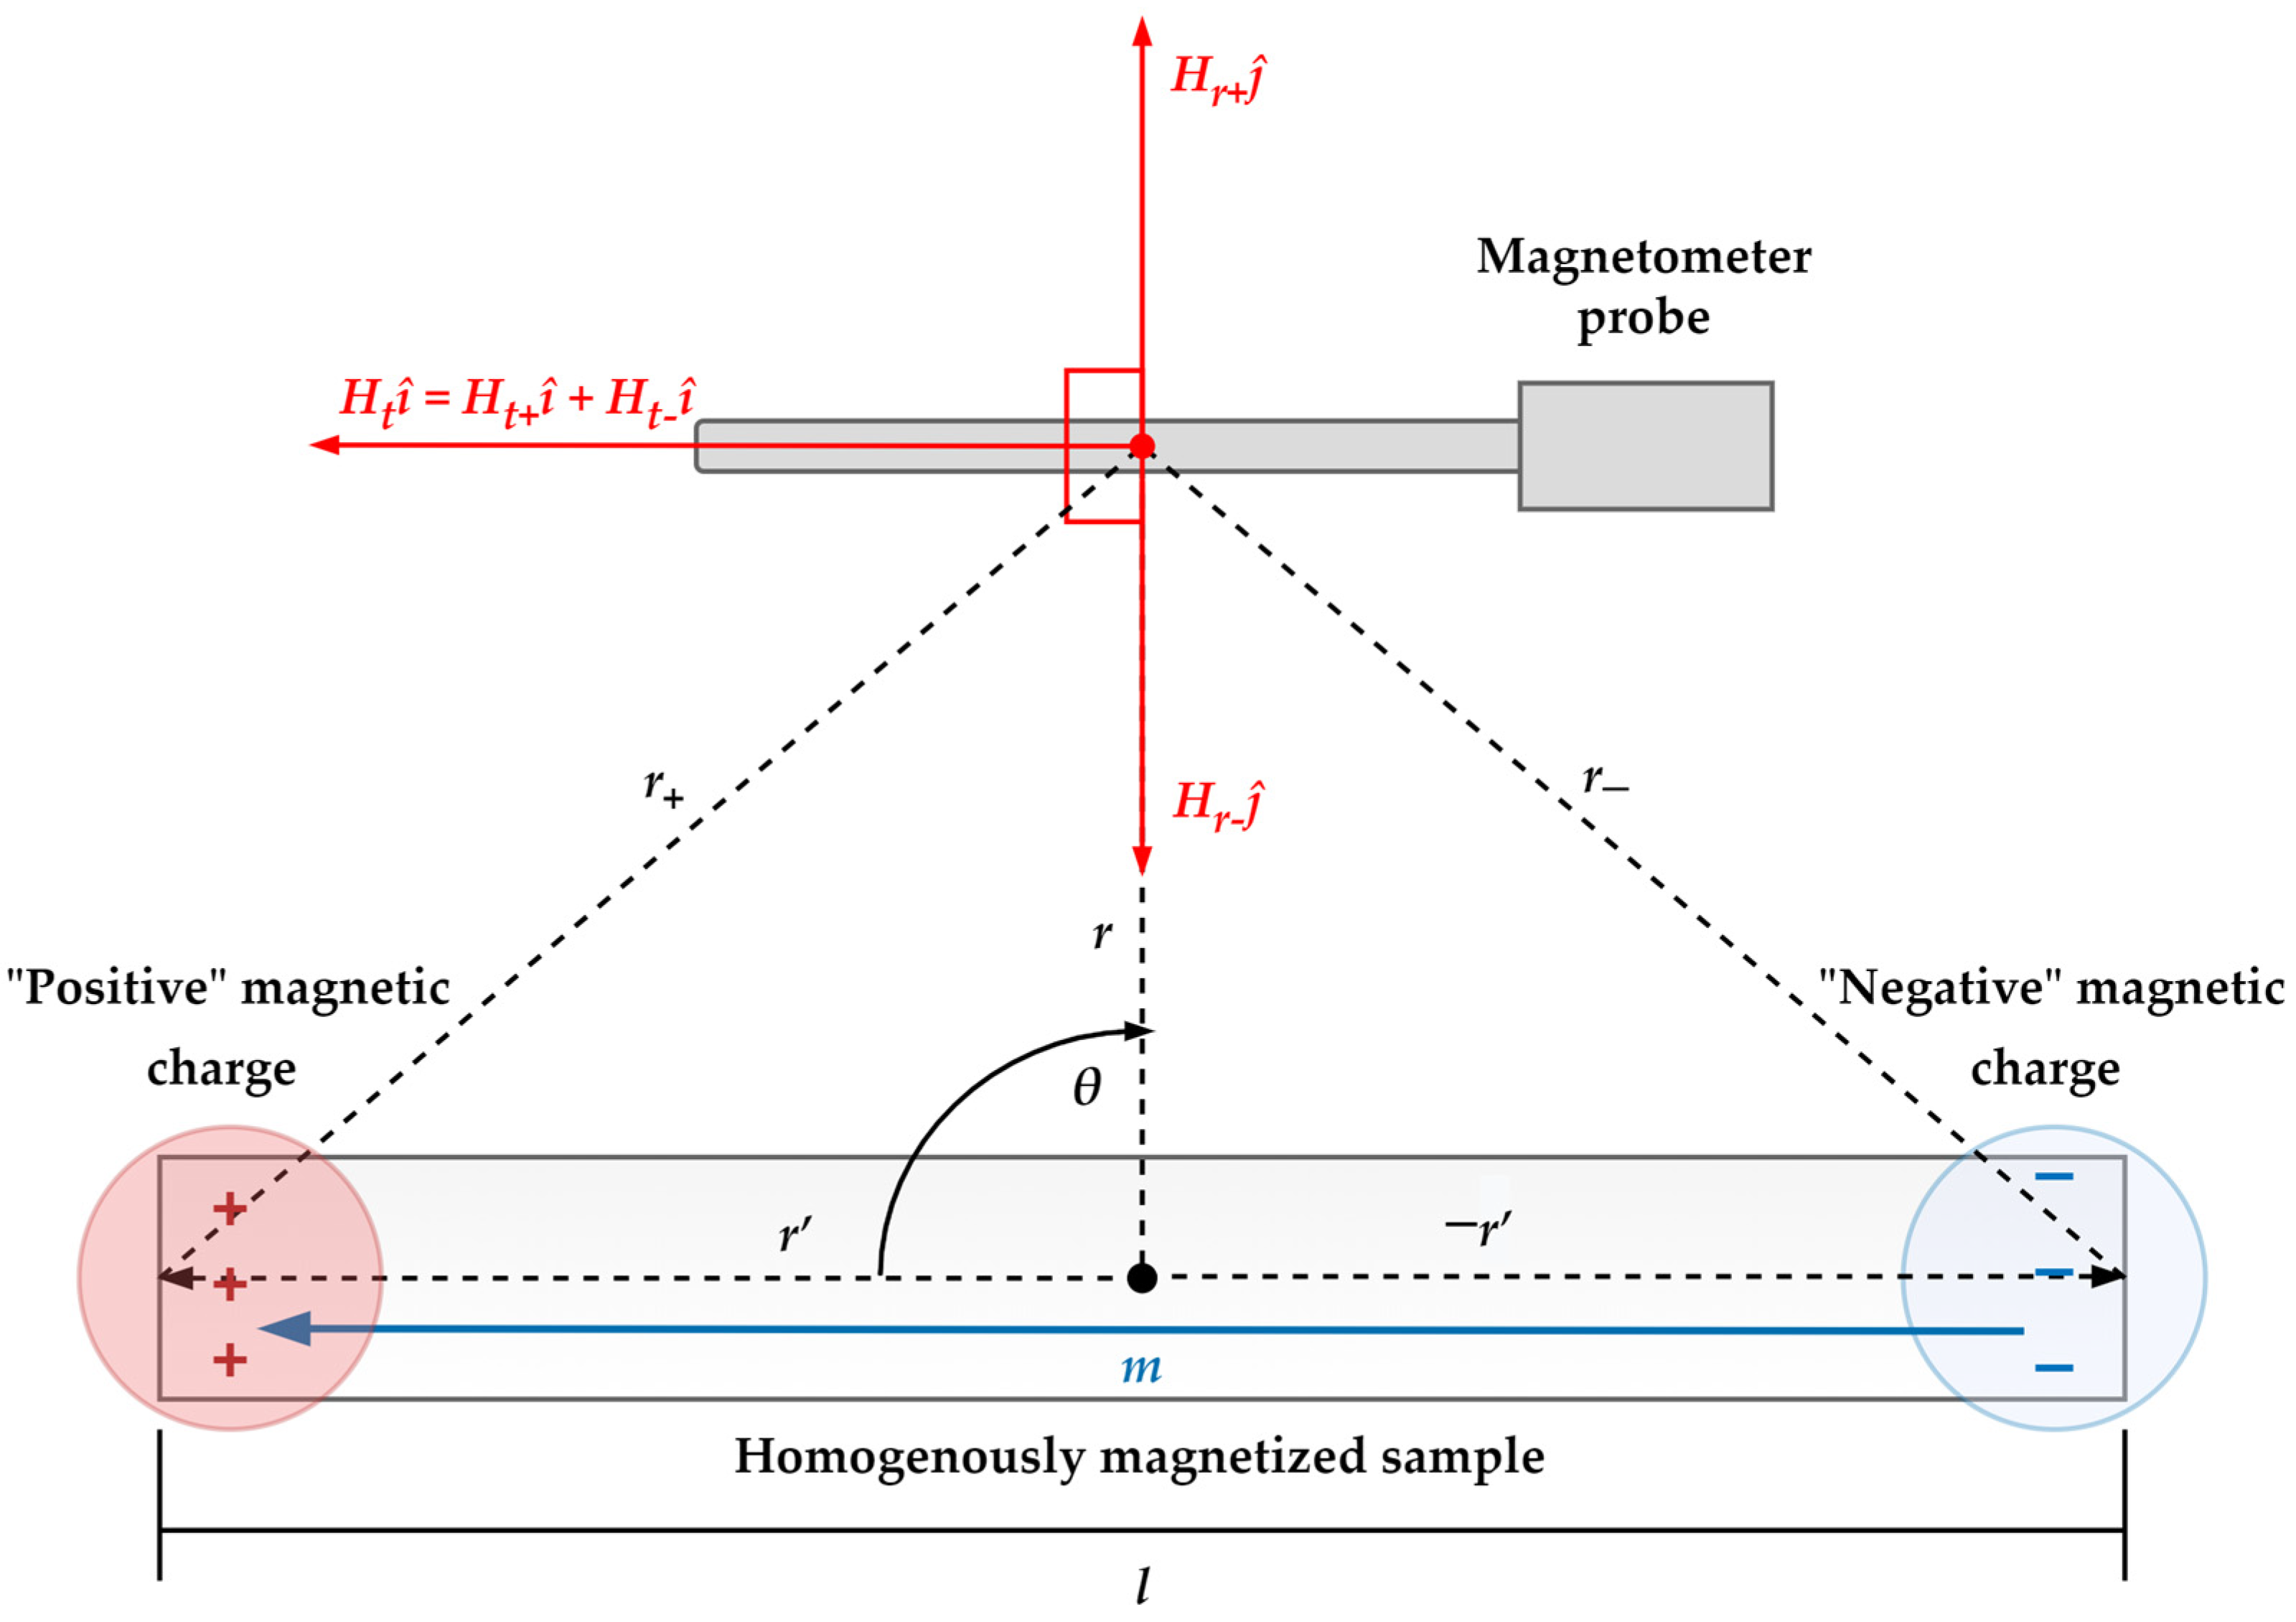
The above equations describe the external magnetic field excited by the point dipole. Therefore, since the magnetic dipole moment generated by the uniformly magnetized open-ended sample is considered, the mathematical modification in terms of monopolies macroscopic separations must be performed on Equation (13) to yield a matching approximation. Moreover, if we consider the predetermined position of the sensing probe, with respect to which the vector r is perpendicular to the longitudinal axis of the magnetized sample (see Figure 2), the radial components of the magnetic field H must disappear, and thus only the tangential component remains. Consequently, for the quantitative interpretation of a stray magnetic field H s t r (formerly denoted as the external field H ) given by pair of quasi-magnetic monopoles, each located at the end of the sample and mutually separated by a distance l = 2 r , the following equation was derived based on the Formula (13):
H r s t r = H r j ^ + H t i ^ =
= H r j ^ + m 4 π sin θ 2 r + 3 + sin θ 2 r 3 i ^ =
= m 4 π 1 2 r + 3 + 1 2 r 3 i ^
Here the expression H r j ^ is always zero due to the considered position of the probe. Therefore, the first and second terms inside the parenthesis correspond only to tangential components of the positive and negative magnetic monopoles, both distant from the measurement point by the magnitude of vector r ± , given by
r ± = r l n ^ 2
A diagram showing a distribution of the individual stray magnetic field components of the homogeneously magnetized open-ended sample is shown in Figure 2.
Since the terms r + 3 and r 3 of Equation (14) can be according to (15) rewritten as
r ± = r ± · r ± 3 2 =
= r l n ^ 2 · r l n ^ 2 3 2 =
= r 2 r · l + l 2 4 3 2
The final mathematical expression of the stray magnetic field magnitude takes the following form (under the consideration that θ = π / 2 ):
H s t r = m 4 π 1 r 2 + l 2 4 3 2
Based on Equation (17), a relatively simple and straightforward functional relation can be derived between the desired sample magnetic polarization J and its measured stray magnetic field H s t r :
J = 4 π r 2 + l 2 4 3 2 V · μ 0 H s t r
where V denotes the volume of the magnetized sample. Note that in the case of inhomogeneous magnetization, the value of the J , expressed through relation (18), corresponds to the mean sample polarization. Thus, the true value of the polarization J can only be expressed under the assumption that the magnetization is constant throughout the entire volume of the sample.
It is clear from the previous equation that the magnetization characteristics in the form of polarization or magnetization dependencies on magnetic field strength could be obtained if the values of an excitation magnetic field are known. These are continuously calculated during the measurement using well-known coils configurations parameters and excitation current values. The entire measurement process leading to the magnetic hysteresis curve reconstruction is discussed in the next section.

2.3. Measurement Chain

The measuring workstation is designed as a modular system intended to measure the magnetic properties of long open-ended samples. The output of the measurement, using workstation algorithms, is given as the typical magnetic hysteresis curve, the reconstruction process of which consists of four consecutive parts—magnetization of the investigated sample, measurement of the stray magnetic field, pre-processing and post-processing of the measured value, and a real-time graphical representation of processed data. These are implemented by individual functional modules forming a measurement chain of the measuring workstation, which consists of the following hardware and software equipment:
  • Relax-type fluxgate magnetometer VEMA 04 developed at the Department of Aviation Technical Studies at the Faculty of Aeronautics of the Technical University of Košice. The total range and sensitivity of the VEMA magnetometer are up to ±50,000 nT and 3.5 nT, respectively. The sample rate of a used model is about 500 Hz [47].
  • Measuring stand with integrated magnetizing (excitation) and compensation coils, between which a sensing probe holder is located. The total length and radius of the coils are 290 mm and 50 mm, respectively. Both coils can generate a relatively identical but opposite magnetic field with a magnitude of 3896.55 A/m per ampere at their midpoint, from which the magnetic field drop is at a distance of 50 mm less than 2% (Note that the magnetized sample should be during the measurement process constantly exposed to a homogenous magnetic field). A skeleton of the measuring stand was made by an additive manufacturing process based on fused depositing modeling technology.
  • Evaluation board with high precision 20-bit AD5791 digital to analog converter enables to generate bipolar supply up to ±15 V.
  • Arduino Mega 2560 microcontroller unit (MCU) based on the ATmega2560 microprocessor with an integrated program intended for control and configuration of the D/A controller.
  • A personal computer with application software [48] that defines and controls the measuring process, statistically processes the measured data in order to reduce measurement uncertainties, calculates the magnetization characteristics according to the integrated mathematical apparatus, and provides its real-time visualization using a graphical user interface.
  • Constant-current power supply with input ranges up to ±3 V.
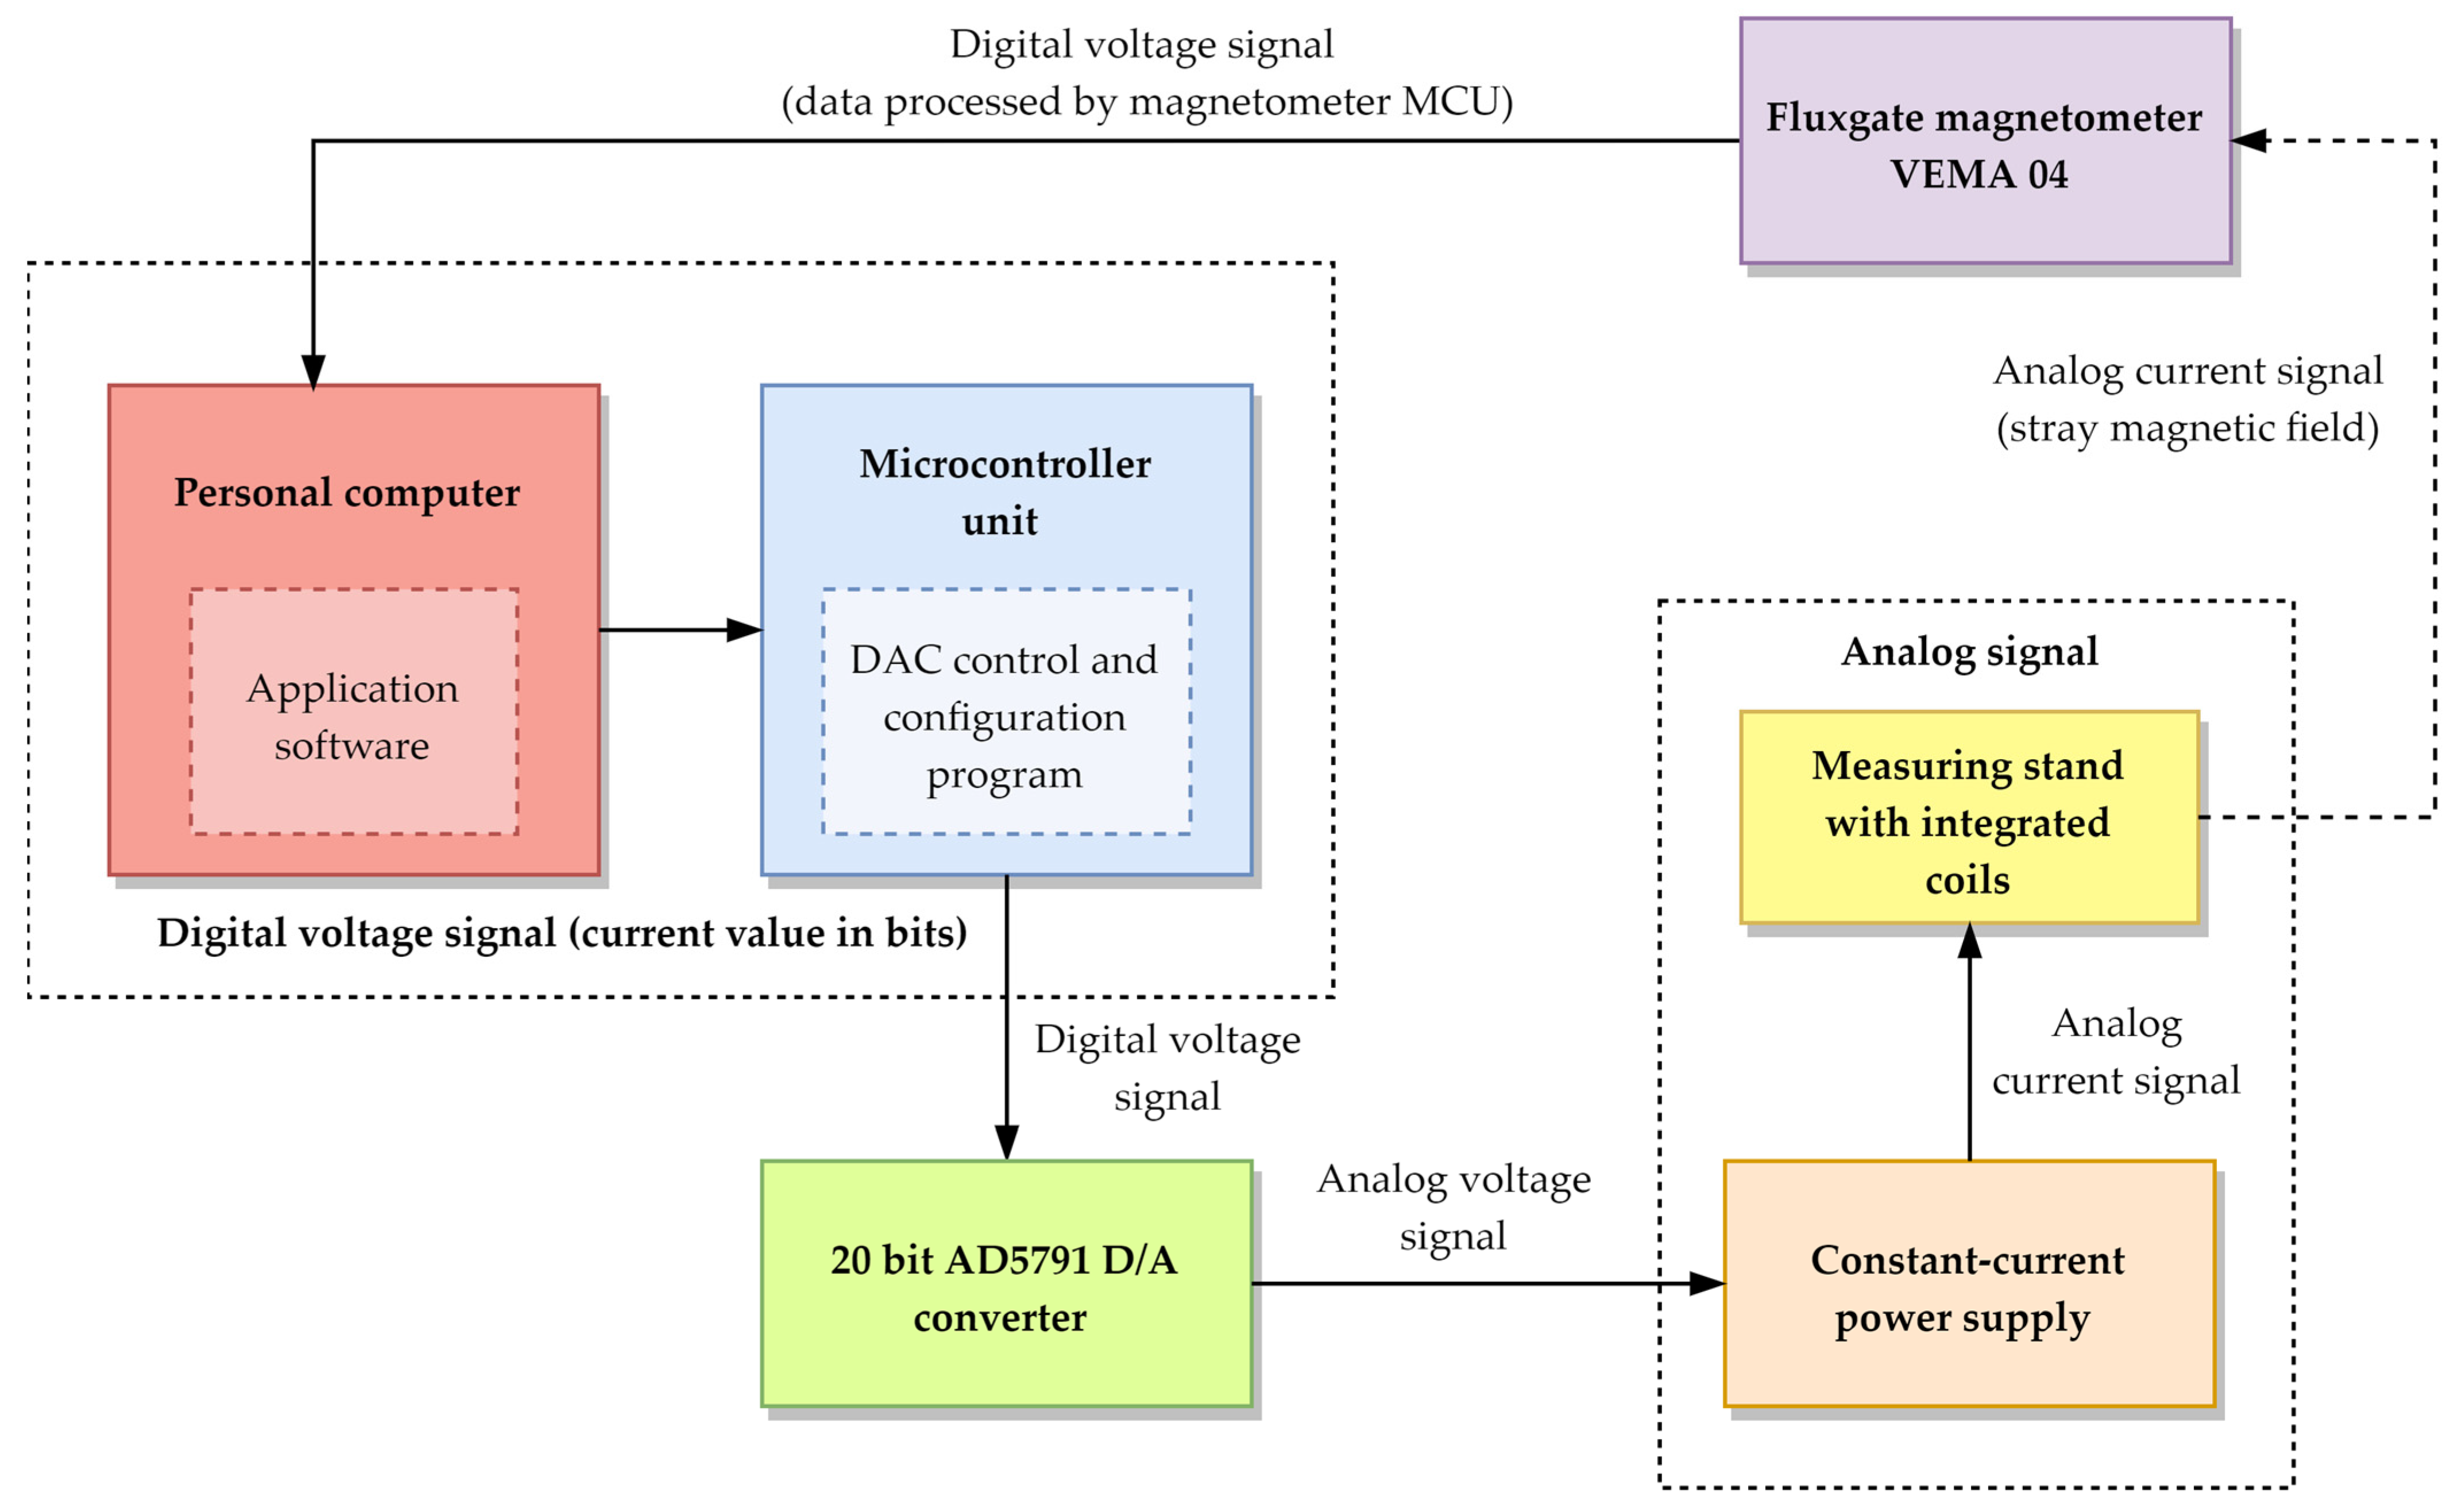
The start of the measuring process is initiated by the application software after the measuring workstation is configured. During the measurement, data in the form of binary digits, which corresponds to a desired current level, are continuously emitted by the application software and transferred to an input of the microcontroller unit. Once the microcontroller unit processes the acquired data, communication with the D/A converter is initiated. As a result, the D/A converter can receive digital information about the desired current value, which is subsequently converted into an analog voltage signal necessary for further processing. From this point, the voltage signal needs to be transformed to the corresponding current level since the excitation magnetic field is the function of the current, not the voltage. Therefore, the current power supply is included in the measurement chain to generate the direct current with a value equivalent to the magnitude of the voltage signal from the D/A converter output. The generated current then supplies the compensation and excitation coils. Within the excitation coil, the investigated ferromagnetic core is placed. As the current runs through both coils, the excitation magnetic field is produced, in consequence of which the stray magnetic field arises around the magnetized core. Since the magnitude of the stray magnetic field represents the input parameter necessary for the magnetic hysteresis curve reconstruction, its value is continuously sensed by the magnetometer probe at a rate of about 500 samples per second. The measured value is first processed by a magnetometer post-processing unit and then transmitted to the personal computer as a scalar quantity of the magnetic field flux density. From the received data, the magnetic polarization of the magnetized core is computed by the application software. Moreover, in addition to the magnetic polarization, the excitation field value for a given current level is also quantified using the coil configuration parameters. Subsequently, based on the calculated values, the polarization contribution is graphically represented in real-time as a dependence on the latest value of the excitation field. In conclusion, the application software requests the microcontroller unit to change the excitation current value. This measurement chain cycle is systematically repeated until the magnetization characteristic in the form of a hysteresis curve is reconstructed. The measurement chain of the used measuring workstation is in the form of a block diagram depicted in Figure 3.
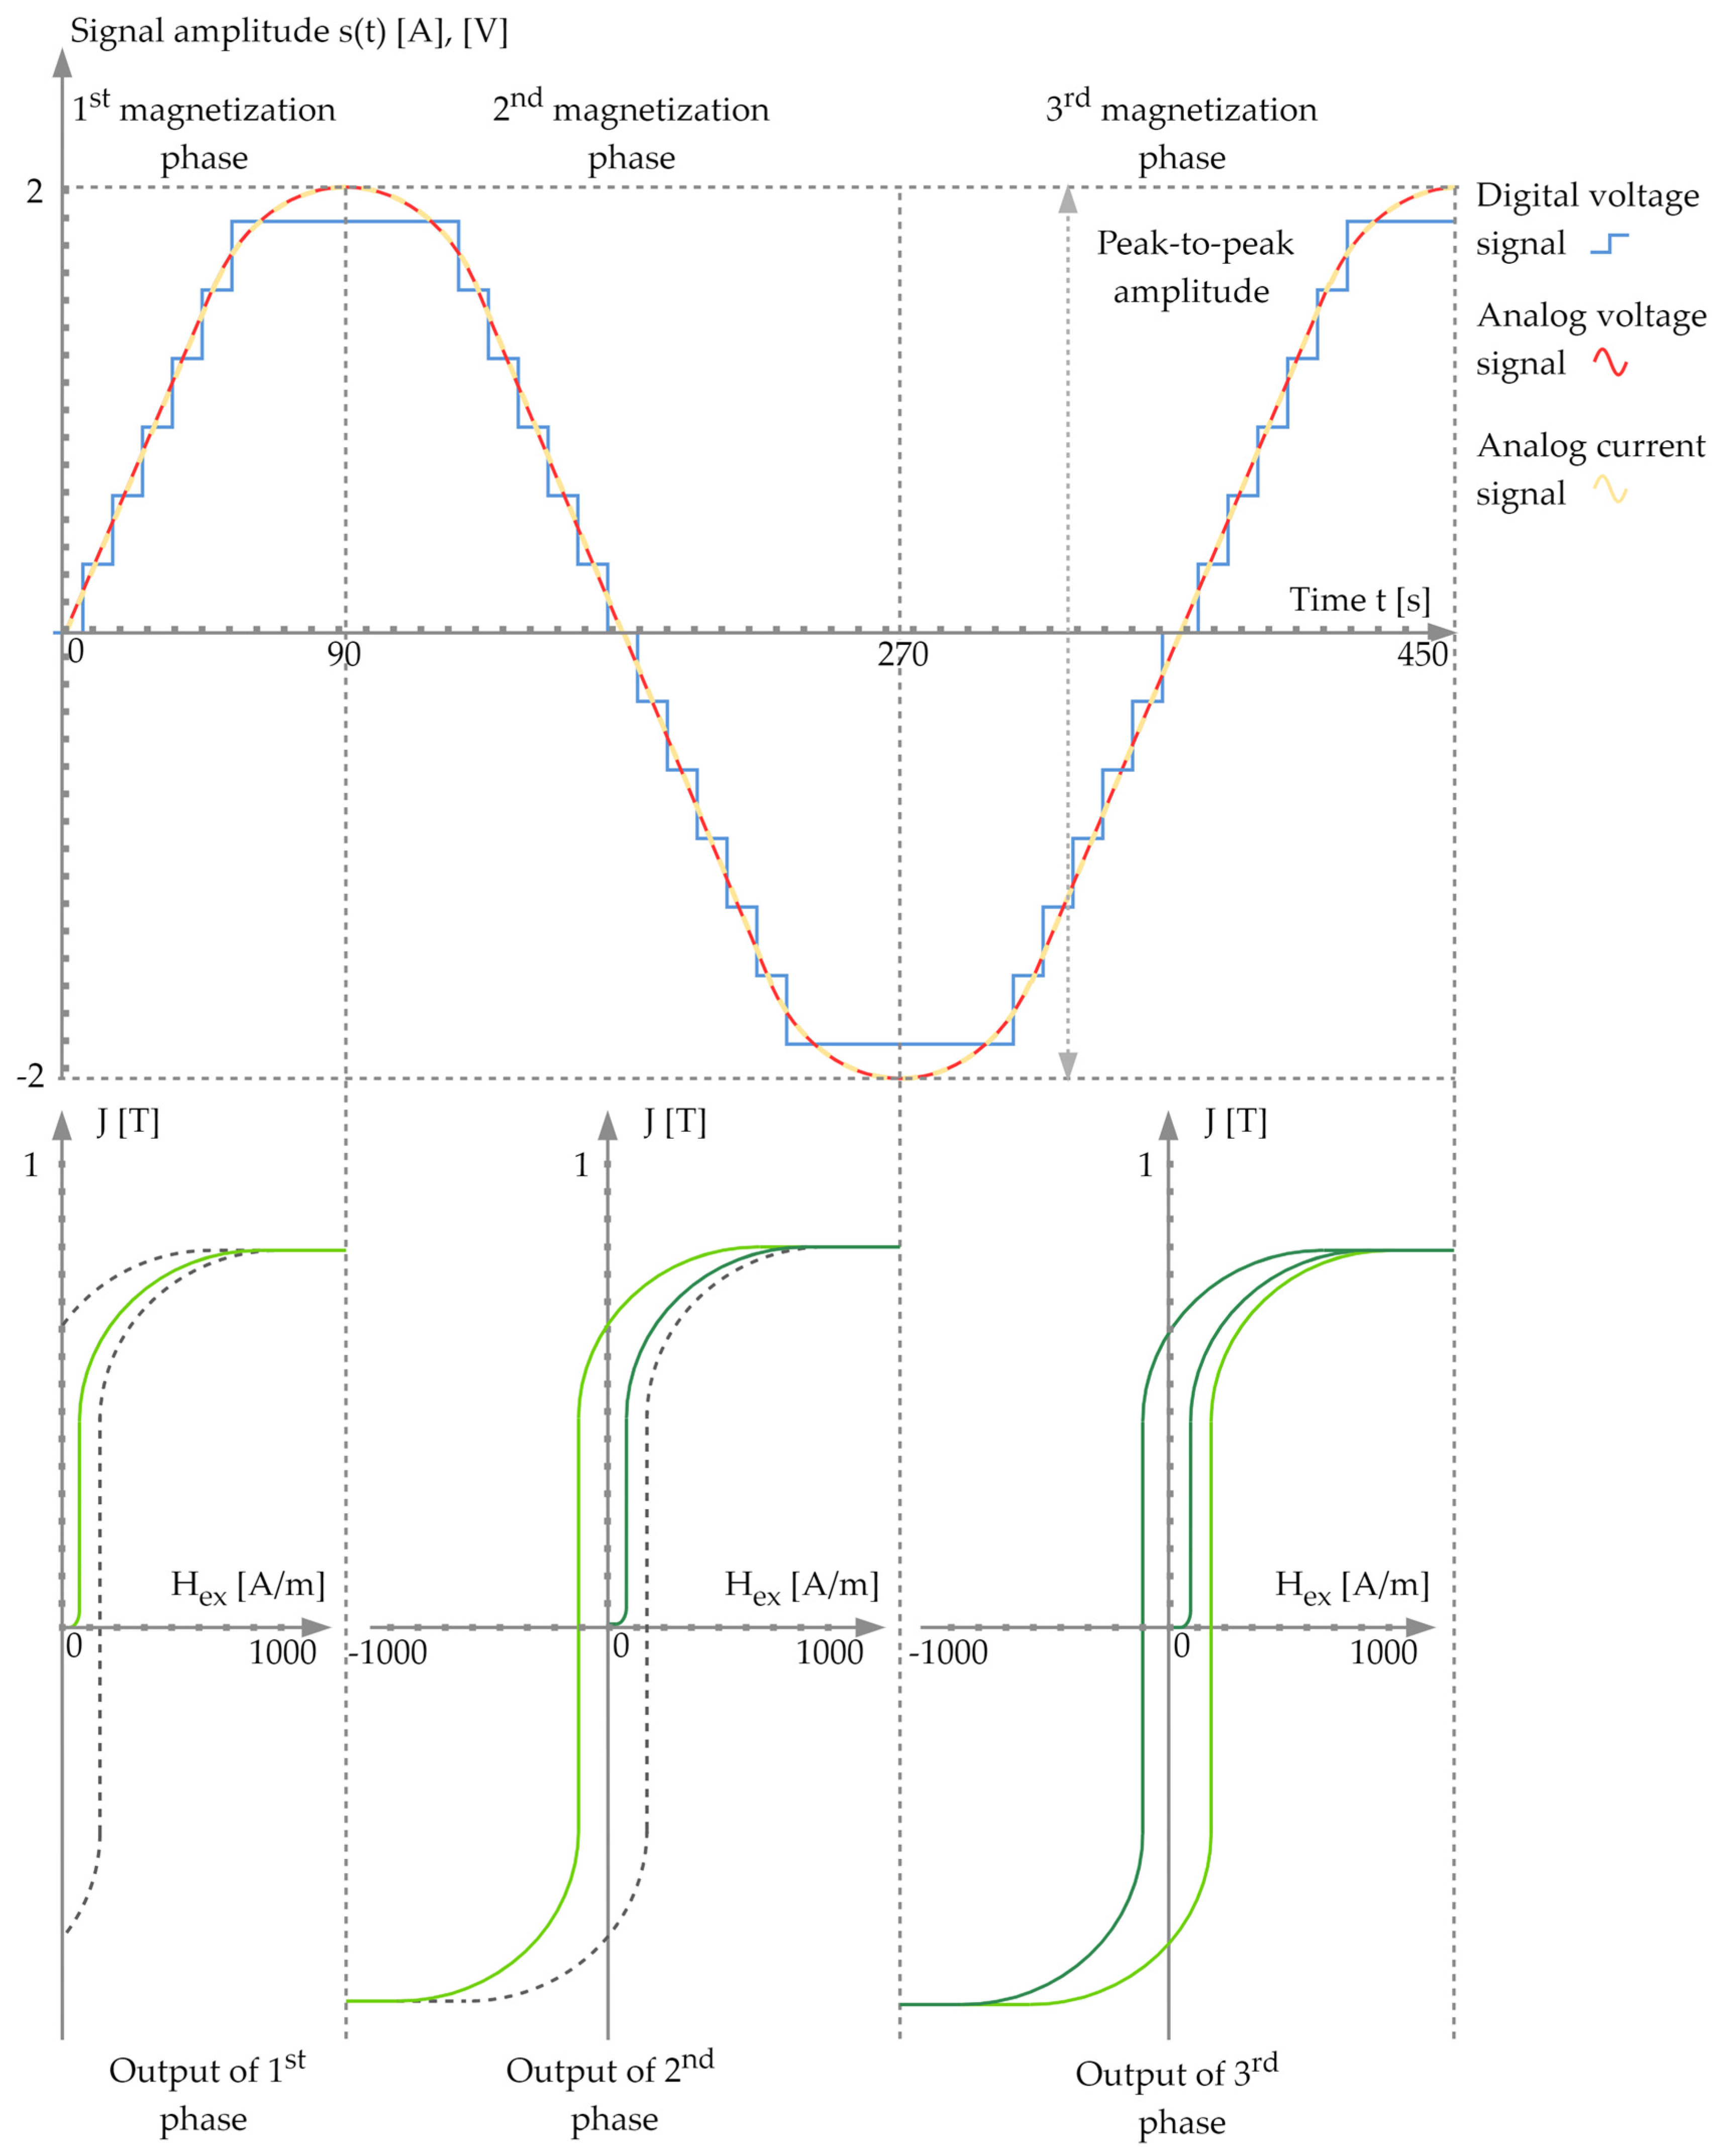
The above-described process is algorithmized by the application software into three successive phases, which control how the excitation current level changes. During the first phase, the excitation current value increases monotonically from zero to the maximum value, the magnitude of which is defined within the process of the workstation configuration. Therefore, an initial magnetization curve is created at the end of the first phase. The output of a second magnetization phase is a curve ranging from positive to negative saturation. Accordingly, the third phase creates a magnetization curve that reverses to positive saturation, giving the final form the hysteresis curve, interpreted as the sample magnetic polarization dependence on the excitation magnetic field. The output of each measurement phase as the reaction on the excitation signal is depicted in Figure 4.
A view of the measuring workstation in a laboratory environment can be seen in Figure 5.

3. Results and Discussion

3.1. Measurement of Magnetic Hysteresis Curve of Actuator Core

Since the magnetic properties of amorphous materials are by default specified by the manufacturers in relation to their toroidal shapes, the presented measuring workstation based on the stray magnetic field measuring method was used to experimentally determine a response of an open-ended sample to an applied external magnetic field. The object of measurement was a ferromagnetic core intended for use as an element of amplifying the power of the electromagnetic actuator. The investigated core was made by folding annealed Co-based VITROVAC 6025 amorphous metallic ribbons with a typical F-type hysteresis curve. The final product contains 120 of these superimposed ferromagnetic ribbons in a composition forming a prismatic shape with dimensions of 80 × 4 × 2.4 mm and a volume of 768 mm3. In the context of the geometrical parameters of the core, it should be noted that due to the coil’s physical dimensioning (see the previous chapter), the systematic error caused by the inhomogeneity of the generated excitation field can be, in this case, negligible during the measurement.
Before the measurement initialization, the investigated core was demagnetized by an externally applied alternating magnetic field with a gradually decreasing amplitude to remove residual magnetization. Moreover, to suppress an undesired inducted constant offset caused by the geomagnetic field or magnetic fields of active devices included in the measurement process, the measuring stand was aligned in the proper direction, in which this parasitic effect can be with respect to the magnetometer probe neglected.
In order to optimize the measurement process, the measuring workstation was configured by application software under the consideration of the ferromagnetic core properties and specifications of the used magnetometer. Therefore, besides the calibration constants of the measuring probe, the maximum excitation current value and the probe’s distance from the magnetized core were defined as the necessary input parameters. With the intention to achieve the saturation state of the magnetized core, considering its volume, the maximum excitation current was set to a value of 104,857.6 bits, corresponding to 2 A. Concerning the position of the measuring probe sensitivity point, it was separated from the center of the core by an equatorial distance of 157.064 mm during the measurement, thus complying with the conditions given by the used mathematical apparatus. At this point, the stray magnetic field was measured with a defined step of 200 bits, which for a range of 0 to the maximum set value of the excitation current (2 A), gives 524.3 measuring points (rounded to 524 by the application software). For each set excitation current value, the 200 samples of the stray magnetic field were measured and subsequently used for further statistical processing, the essence of which was to numerically suppress measurement uncertainties caused by induced noises of a local environment, like an ambient grid system with a standard industrial frequency. The measured hysteresis curve of the investigated ferromagnetic core is depicted in Figure 6.
Part of Figure 6 is also the magnetization curve of the same core measured without the use of the designed measuring workstation (red curve). In this case, the measurement method was based on ferromagnetic core magnetization using an actuator excitation winding. From the technical point of view, such a measurement hardware configuration corresponds to a fully functioning electromagnetic actuator whose winding was during the measurement supplied with a time-varying current to generate an excitation magnetic field, while the compensation coil and the mathematical apparatus for the material’s real-time state of magnetization determination were not included into the measuring chain. Due to the method used, the magnitude of the magnetic field sensed by the magnetometer probe was given as a superposition of the stray field of the inhomogeneously magnetized core and the excitation magnetic field generated by the actuator winding. Therefore, the output of the performed measurement corresponds to a functional dependency of a measured stray magnetic flux density on the excitation current, see Figure 6.
Although in Figure 6 it is possible to see a small correlation between the shape of both characteristics, due to the form of the measured data interpretation (dependence of the superimposed magnetic flux density on the excitation current) conditioned by the used measurement method, information about the magnetic properties of the core is, in the case of the red magnetization curve, absent. Ultimately, based on the used measurement method, it is not possible to objectively evaluate the response of the investigated material to the external excitation field; only the magnitude of the generated magnetic dipole moment, given as a sum of a winding dipole moment and a dipole moment of the magnetized ferromagnetic core, can be quantified.
On the contrary, the magnetic hysteresis curve of the ferromagnetic core acquired by the presented measuring workstation, using the method based on measuring the stray magnetic field of the open-ended samples, describes the variation of the core magnetic polarization as a function of the excitation magnetic field. Therefore, since a change in the state of the core magnetization is for a complete magnetization reversal cycle described by the reconstructed hysteresis curve, it is possible to determine its magnetic properties via typical state describing magnetic quantities, such as remanent magnetic polarization, saturation polarization, coercivity, effective permeability (if the value of the demagnetization factor is known), etcetera, even at the time of its design phase.
It should be noted that when comparing the magnetic hysteresis curve between the open sample and the toroidal core, only the saturation would acquire the same value among these magnetization quantities. Therefore, for the verification, we present the obtained value of saturation polarization, which, as can be seen from Figure 6, reaches a value of about 0.6 T, corresponding to the saturation stated by the manufacturer for the same amorphous alloy designed in the shape of the toroidal core [49].

3.2. Measurement of Magnetic Hysteresis Curve of Magnetometric Relax-Type Probe Core

In order to demonstrate a wide variety of the proposed measuring station utilization, the magnetic hysteresis curve of another sample made of metallic alloy is presented. The investigated sample corresponds to an open-ended core used as a sensing element of a relax-type fluxgate magnetometer magnetometric probe. The purpose of measuring the magnetic hysteresis of the magnetometric probe core is generally based on the need to determine its magnetic properties in order to objectively assess its potential use in the given application before final production.
The magnetometric probe core was produced from the eight identical Co-based amorphous ribbons, VITROVAC 6025, assembled into a single prismatic core, with total dimensions of 80 × 2 × 0.2 mm. Since the dimensions of the probe differ in comparison to the previously discussed actuator core, so does its total volume, which equals 25.6 mm3. In the case of the magnetometric probe core, a smaller volume represents a more desired solution due to the higher sensitivity to the measured magnetic field. Conversely, a higher volume is a preferable option regarding the actuator core since the high magnitude of generated magnetic moment is required to acquire a fast response to sudden changes in position.
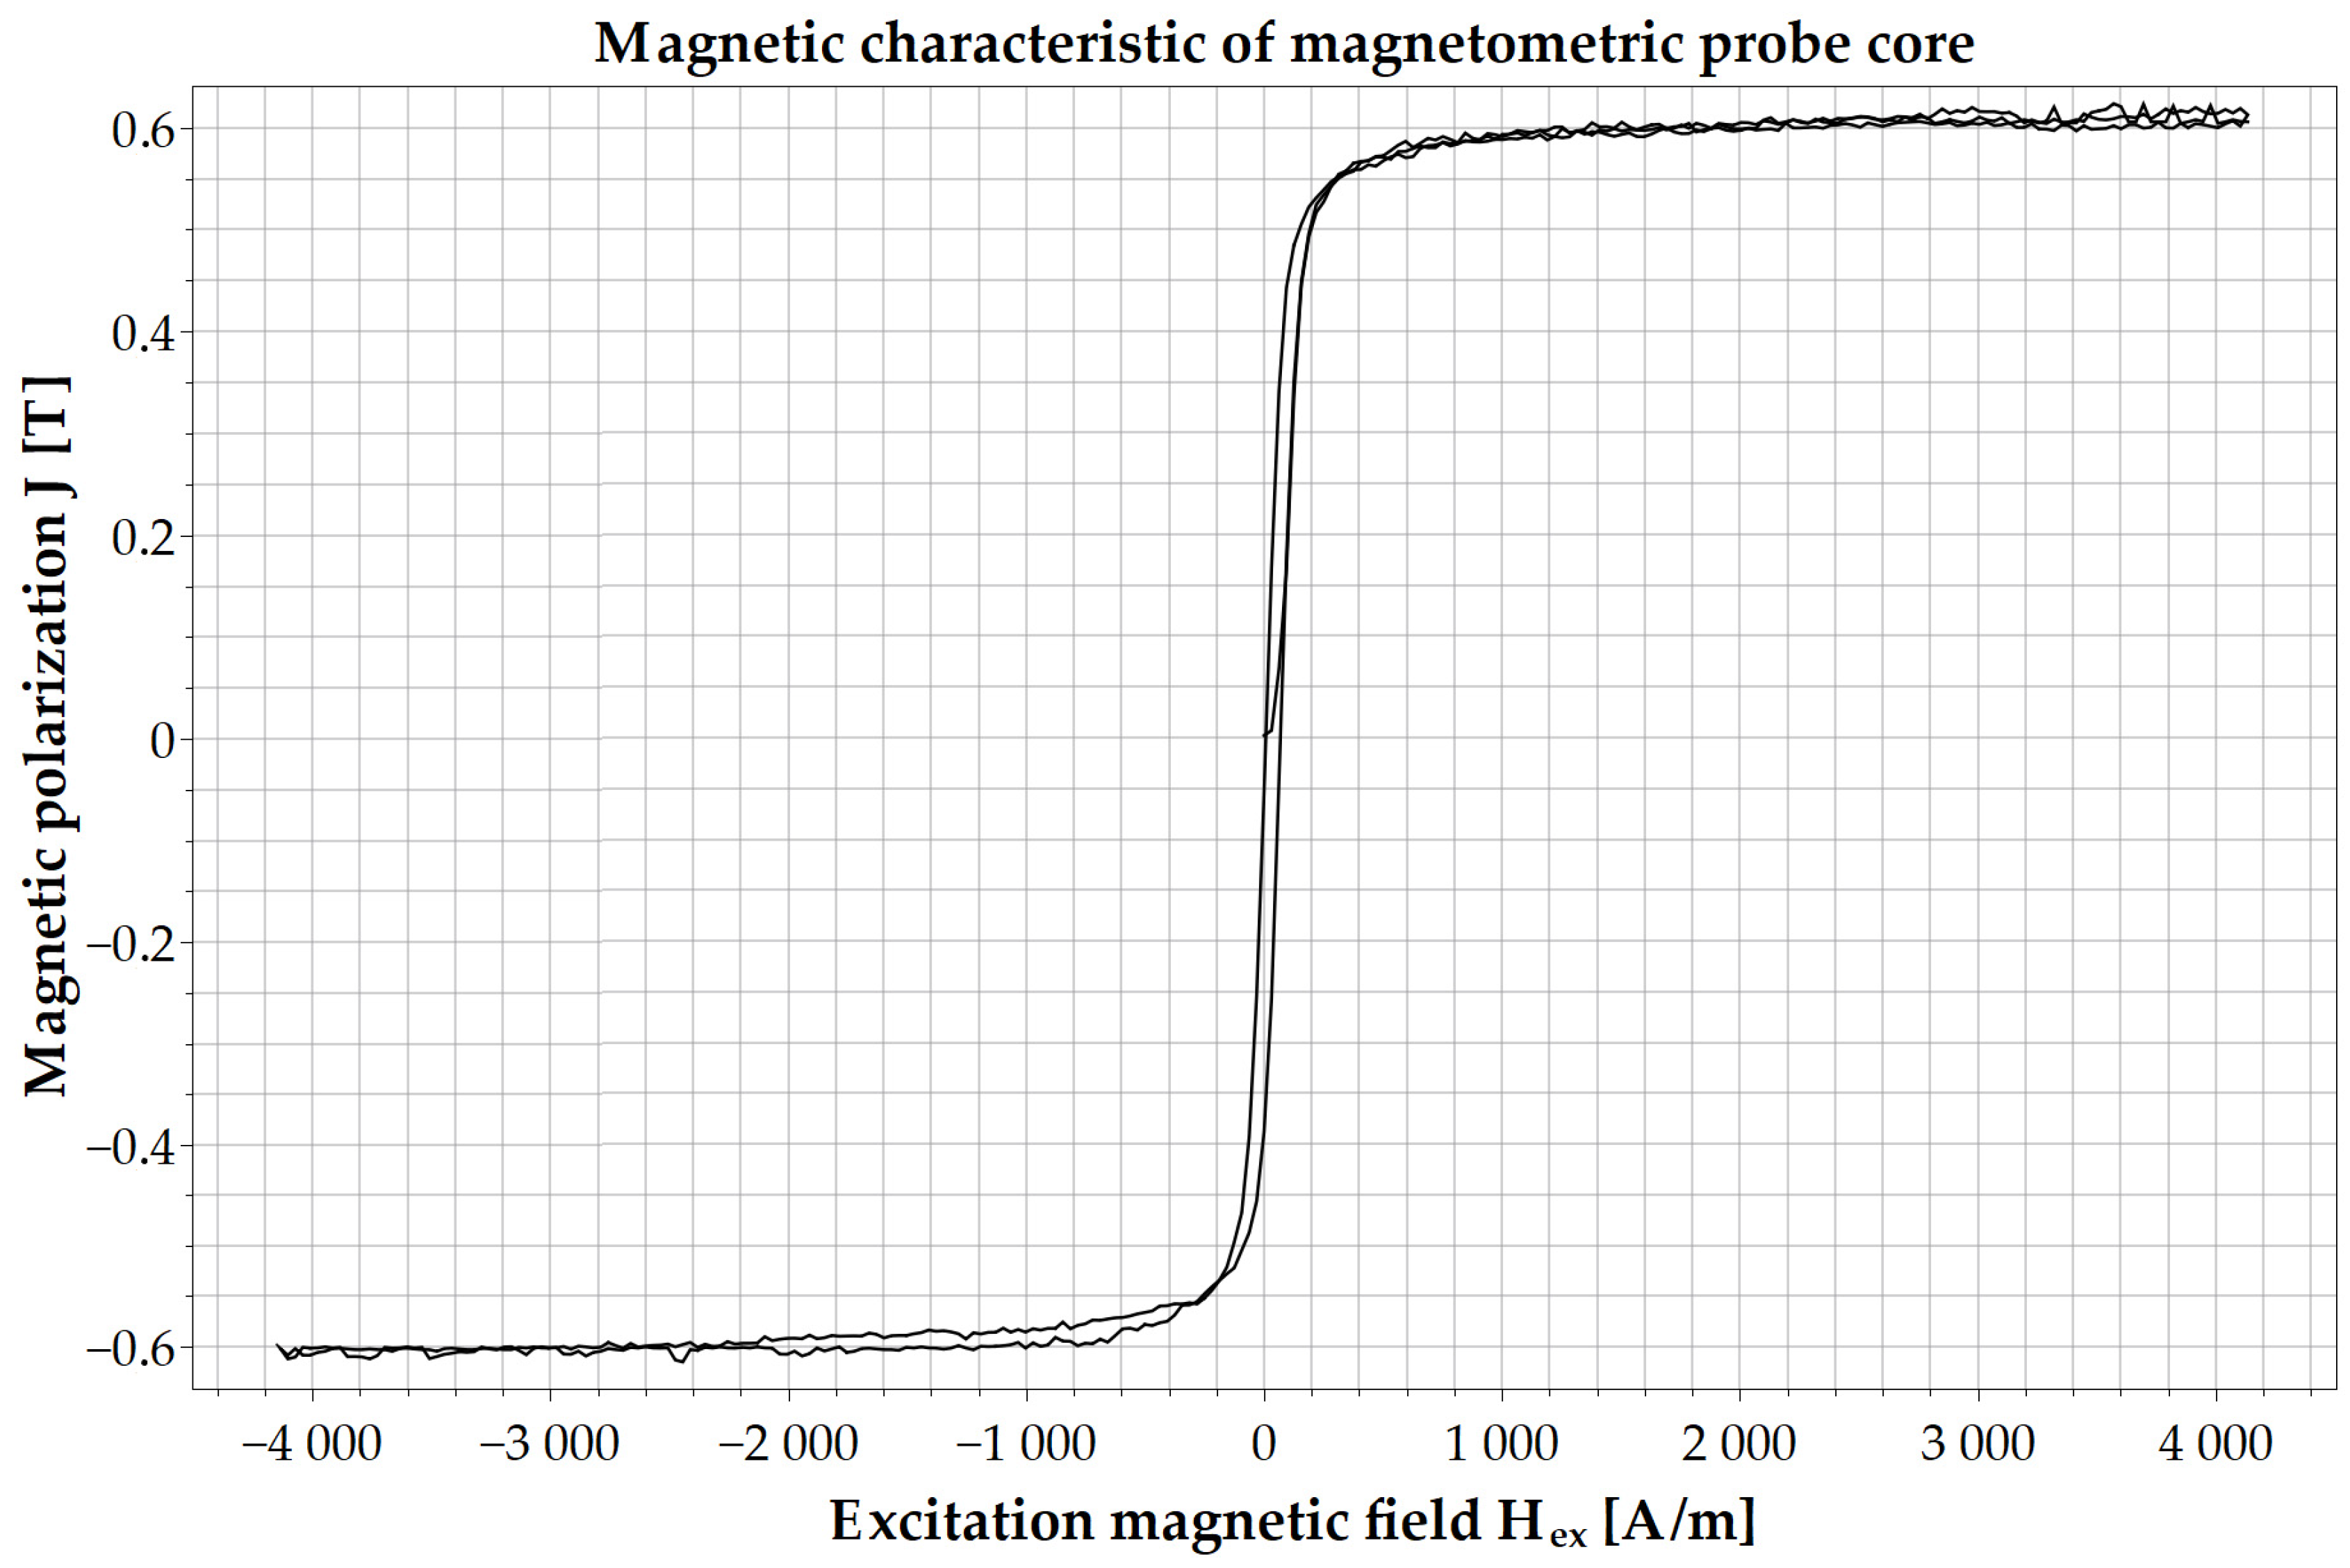
Before the initialization of the measurement, the same demagnetization procedures designed to remove the residual magnetization of the measured sample were performed, as well as the workstation configuration intended to optimize the measuring process. Due to a smaller sample volume, the excitation current was set to a value of 52,428.8 bits, which corresponds to 1 A. Since the length of the sample is equal to 80 mm, the distance between the sensitive point of the probe and the center point of the core was again 157.064 mm during the measurement to comply with a condition of the used measurement method— l / 2 r 1 . The measurement was performed with a defined step of 100 bits (524 measuring points). At each given set value of excitation current, the 200 samples of the stray magnetic field of the magnetized core were measured to compress inducted measurement uncertainties. The measured magnetic hysteresis curve of the investigated magnetometric probe core is shown in Figure 7.
As can be seen, the measured hysteresis corresponds to a magnetically soft material with an amplitude of 0.6 T in the saturated state. The large linearity, low residual magnetization, and magnetically soft nature giving a small coercivity (approximately 32.2 A/m) are preferable options regarding the magnetometric relax type probe since fast relaxation to the area of initial permeability is required for the magnetometric applications. In comparison to the actuator core, the hysteresis curve of the probe core reaches a higher slope of a linear part (see Figure 7), which equals the value of 0.00365 approximately (the slope of the actuator core is for the same point equal to the value of 0.000127). This effect is caused by the smaller ratio of the cross-sectional area of the core to its total length, which leads to the manifestation of the smaller demagnetization fields that suppress the excitation magnetization field during the magnetization process. In Figure 7, it is also possible to observe the induced noise appearing, especially in core saturation. These sudden fluctuations in magnetic polarization are caused by the magnetized core’s low generated magnetic moment, which results in the formation of weak stray magnetic fields. The low magnitude of the magnetic flux density of the stray magnetic fields of the core is then more significantly influenced by the core’s noise and the noise of the surrounding environment.
Despite the inducted noises, the magnetic properties of the probe core, investigated by the demonstrated measuring workstation, can be determined from the obtained magnetic characteristics. Therefore, based on the above-discussed properties, we can confirm that the measured core is suitable for utilization as the sensing element of the flux-type magnetometric probe used in various magnetometric applications.

3.3. Supplementary Measurements of Magnetic Hysteresis Curves of Co-Based Amorphous Ribbons

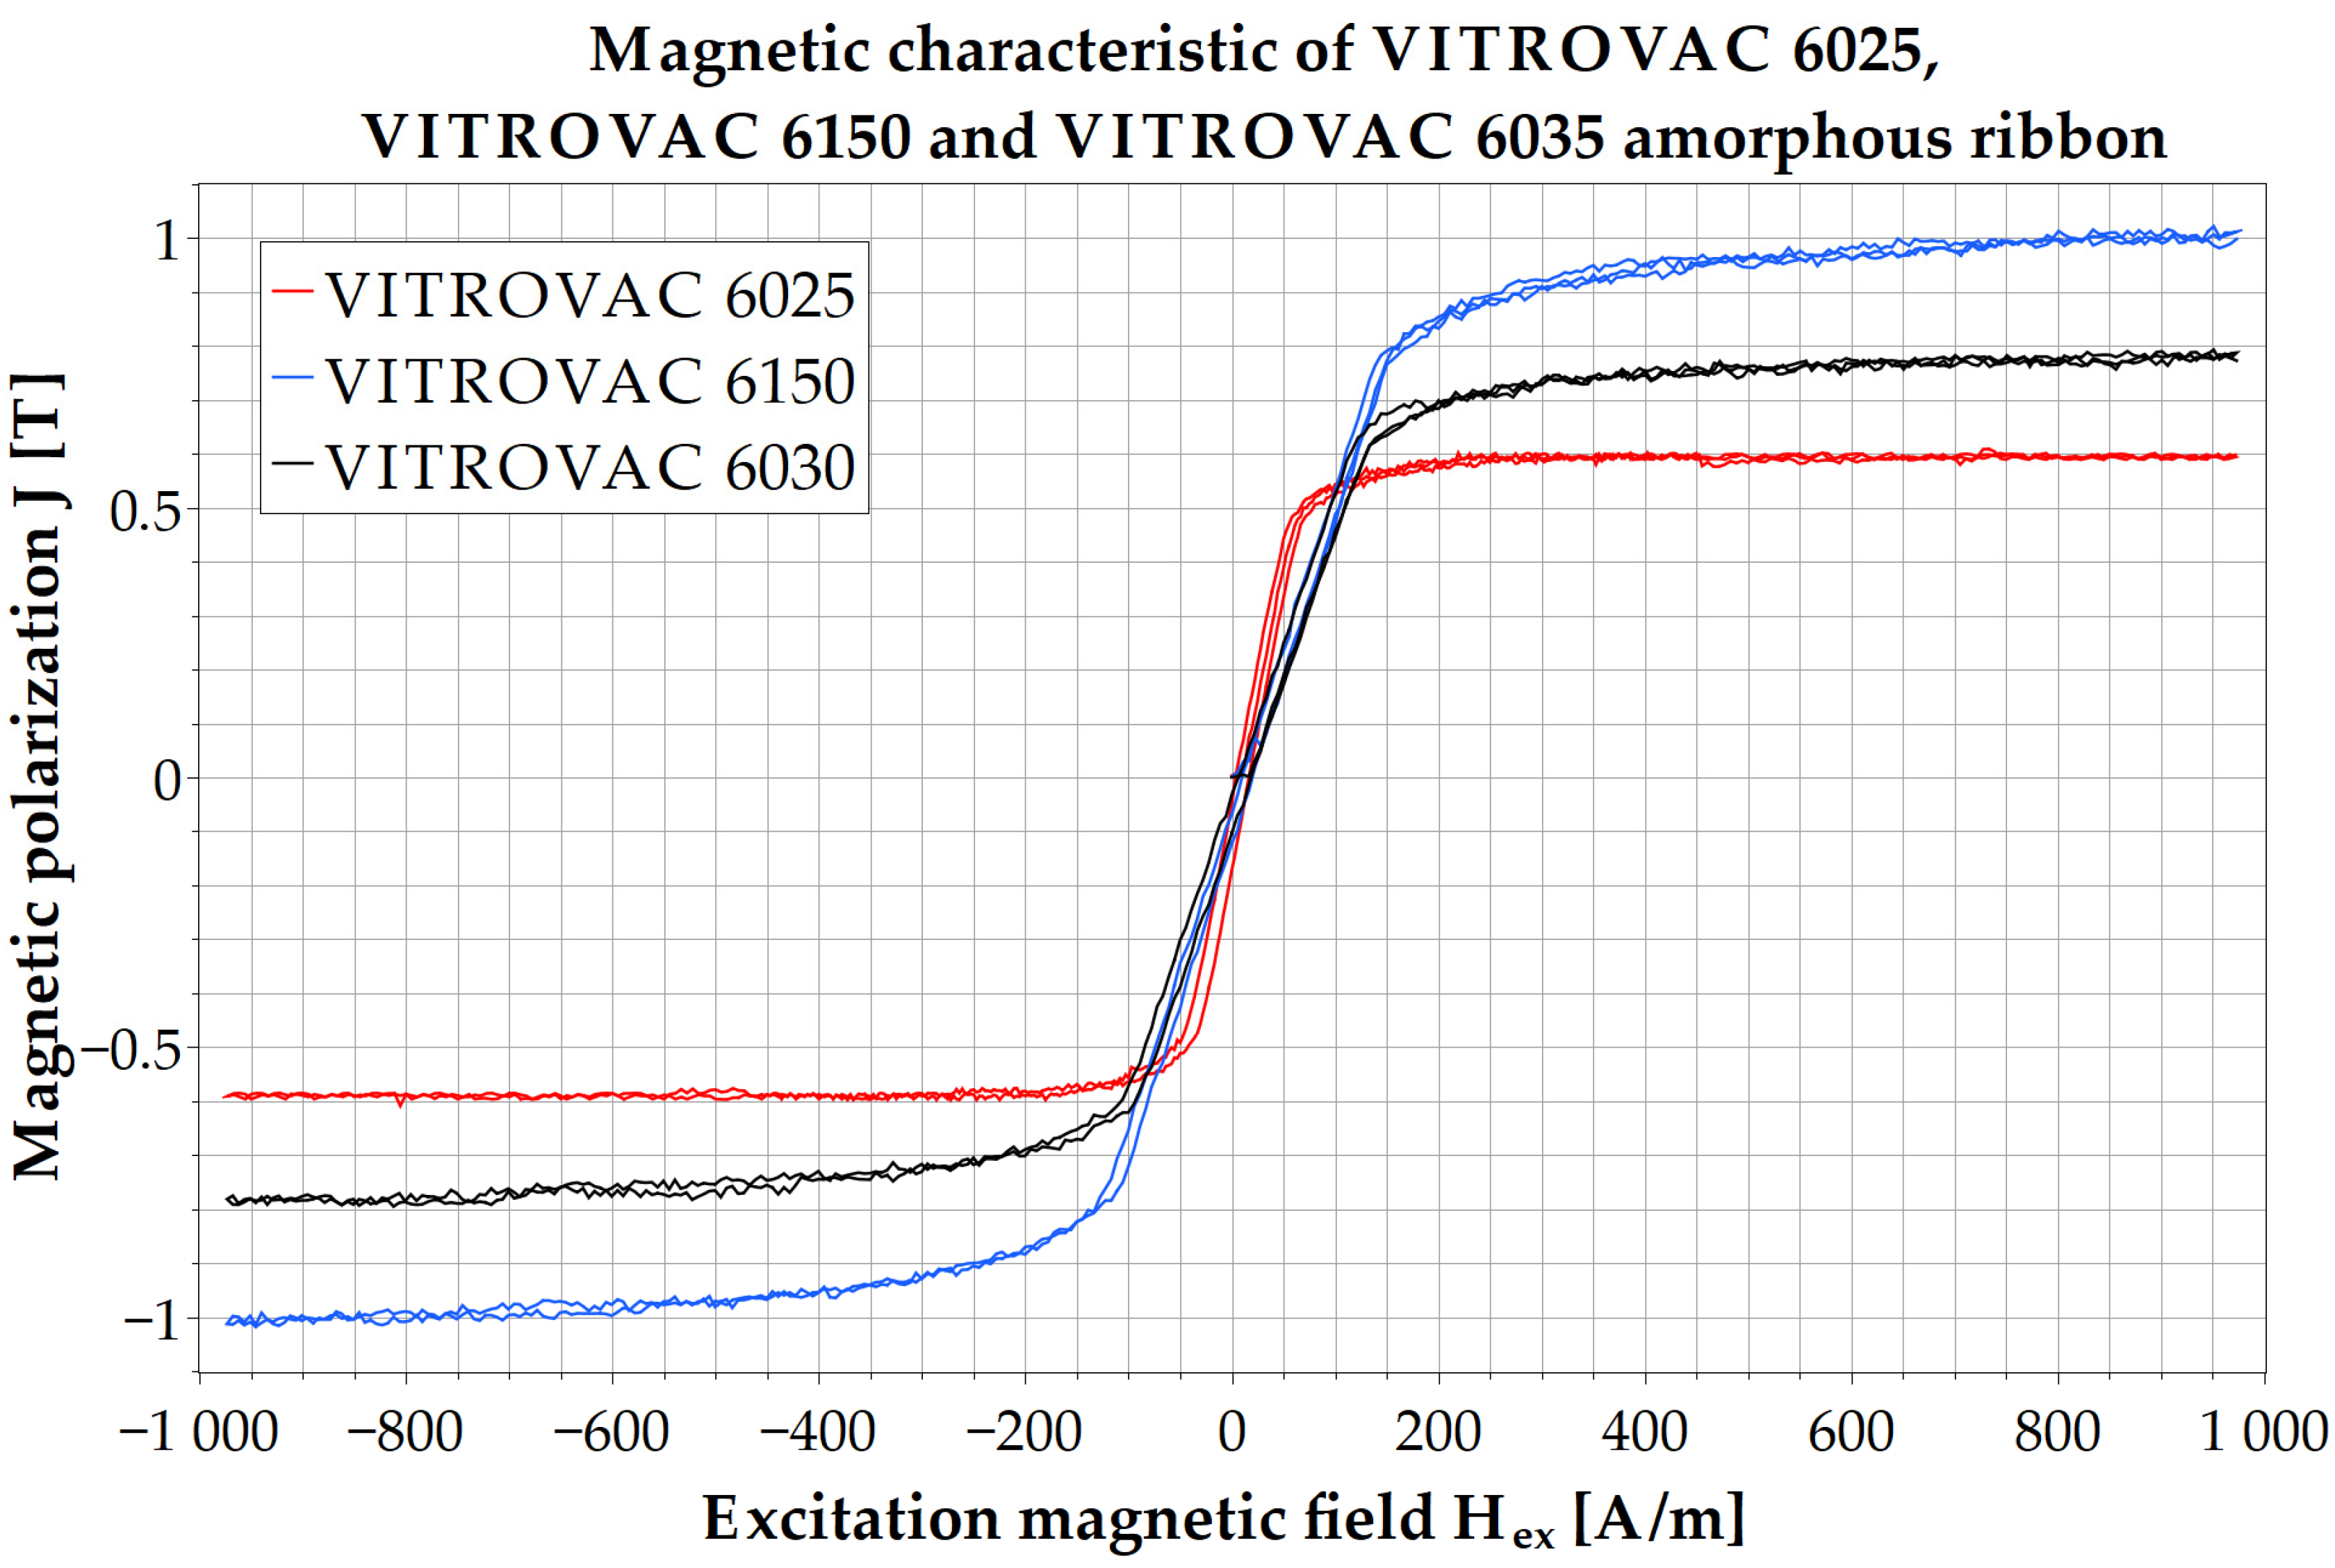
For practical reasons, an analysis of the magnetic properties of an initial semi-finished product precedes the final production of the core. Consequently, supplementary hysteresis measurements of three types of amorphous ribbons are presented. These are the above-discussed VITROVAC 6025, VITROVAC 6030, and VITROVAC 6150 samples, belonging to a set of Co-based metallic alloys, well known for their magnetically soft behavior and zero magnetostriction.
Measurements were gradually performed on individual demagnetized samples with the same dimensions of 40 × 6.5 × 0.02 mm and a total volume of 5.2 mm3. A maximum excitation current was set to 13,107.2 bits, corresponding to 0.25 A. A constant measurement step was configured to 100 bits, giving a 131 measurement point from 0 to maximum excitation currents. After each measurement step, 200 samples of the stray magnetic field were measured at a distance of 108.8 mm from the core midpoint. The measured hysteresis curves of all three samples are depicted in Figure 8 as the dependence of magnetic polarization on the applied excitation magnetic field.
The measured magnetic hysteresis curves of all samples show properties of a typical magnetically soft material. As can be seen, the VITROVAC 6025, VITROVAC 6030, and VITROVAC 6150 samples reach a saturation value of 0.6 T, 0.8 T, and 1.0 T, respectively, which corresponds with the magnetic properties stated by the manufacturer [49]. The analysis of the linear area of the individual characteristics confirmed that the highest slope, 0.00776, corresponds to the VITROVAC 6025 magnetic characteristic. On the contrary, the lowest slope has the VITROVAC 6030, with a value of 0.00376. Regarding the VITROVAC 6150 characteristics, its slope of the linear area is equal to 0.00397. Therefore, there is an apparent reason to prefer the VITROVAC 6025 amorphous ribbon as the initial semi-finished product for the actuator core production since the higher slope of the linear area of the core characteristics leads to lower energy consumption, which corresponds to one of the most critical parameters regarding the satellite applications.

4. Conclusions

When designing measuring systems containing magnetometric elements or devices whose principle of operation consists in the interaction of magnetic fields, such as active stabilization systems of small satellites, it is necessary to take into account the magnetic properties of the incorporated components, which directly or indirectly affect the operation of these systems. Regarding ferromagnetic components, their magnetic properties are often stated through magnetic quantities derived from the reconstructed magnetization characteristics, usually represented in the form of a hysteresis curve. Although the stated magnetic quantities can vary by different factors such as heat treatment, lattice defects, grain boundaries, etc., the significant one can be the shape of the produced part in the many applications. In this case, the effect of demagnetizing fields is manifested, the character of which varies with the change of material shape, consequently affecting its magnetic properties. This effect is of significant importance and needs to be taken into account regarding amorphous alloy ribbons since manufacturers state their magnetic properties for the toroidal-shaped cores, which differ in technical practice, where it is often required to design the produced part made of amorphous ribbons in shape with so-called open ends, due to which the demagnetization field arises. Ultimately, neglecting this phenomenon may have an impact on the functionality of the entire system. Therefore, in such a case, it is necessary to experimentally determine the magnetic properties of the final produced part.
Nowadays, there are several methods for measuring the magnetic hysteresis curve of ferromagnetic materials. However, these are primarily intended for measuring toroid-shaped cores. Therefore, the measuring workstation using the method based on measuring the stray magnetic field of the open-ended samples was introduced in this manuscript. Besides the description of its measuring chain and the included devices, the complex procedure of deriving the mathematical apparatus capturing the physical essence of the method was implemented.
For the comparison, the core of the electromagnetic actuator in the role of the produced component made of the amorphous ribbon core was measured as an example. The measurement process was performed in two ways. From the view of chronological order, the first measurement was carried out to obtain the magnetic characteristic of the investigated core assembled with the actuator winding coils as the single produced part, forming the fully functional electromagnetic actuator. In this case, the actuator winding was used to magnetize the ferromagnetic core, the stray magnetic field of which was subsequently measured without the use of the introduced mathematical apparatus since the compensation and the excitation coils, which would be capable of homogeneously magnetizing the core in its entire volume, were not included into this measurement. Subsequently, the second measurement was performed using the designed measuring workstation based on the stray magnetic field measuring method intended for the open-ended samples.
As can be seen from the achieved results, the first measurement method, widely used in manufacturing, gives the characteristics in the form of the dependency of the measured stray magnetic field on the excitation current. Consequently, the output of this method does not provide information about the magnetic state of the material for a given magnetization cycle. Moreover, it can be used only after the product’s final production since the actuator winding is the active part of the measuring chain. On the contrary, the result of the second measurement performed by the introduced workstation is magnetization characteristic as the variation of the core magnetic polarization dependent on the excitation magnetic field. Therefore, the state of core magnetic polarization for the complete magnetization reversal cycle is in the case of the proposed method obtained. Based on that, the typical magnetic quantities describing the core magnetic properties can be derived and subsequently used for the discussion and evaluation of the core qualities even during the phase of its design review.
Concludingly, it is appropriate to mention that the presented workstation is used to design and optimize cores of electromagnetic actuators and magnetometric probes for commercial use as well as for scientific research. In order to support this statement, the supplementary measurements of the magnetometric probes were analyzed and consequently discussed, as well as the amorphous ribbons used as the semi-finished initial product for the production of the measured cores.

Author Contributions

Conceptualization, P.K., J.K. and M.Š.; methodology, P.K., M.Š., J.K. and P.L.; software, P.K. and P.L.; validation, K.D., J.K. and M.Š.; formal analysis, K.D.; investigation, P.K. and M.Š; data curation, P.K. and M.Š.; writing—original draft preparation, P.K., M.Š. and K.D.; writing—review and editing, P.K., M.Š., P.L, J.K. and K.D.; visualization, P.K. and J.K.; supervision, M.Š.; project administration, P.L. and K.D. All authors have read and agreed to the published version of the manuscript.

Funding

This research was supported by the Research Agency projects with the ITMS codes 313011AUP1 and 313011T557, co-funded by the European Regional Development Fund under the Operational Program Integrated Infrastructure and by the Slovak Research and Development Agency, grant number APVV-18-0248 and APVV-17-0184 and internal grant of Technical University of Košice titled “Design and implementation of a workstation for measuring performance parameters of electromagnetic actuators used for stabilization and position control of nanosatellites”, grant number 03/TUKE/2023.

Institutional Review Board Statement

Not applicable.

Informed Consent Statement

Not applicable.

Data Availability Statement

The data in this work are available from the corresponding authors upon reasonable request.

Acknowledgments

We would like to acknowledge the EDIS vvd. company for support during skCUBE actuator design and production in the area of magnetic measurement as well as for the support of young researchers—students working on research.

Conflicts of Interest

The authors declare no conflict of interest.

References

  1. Nanosats. Available online: https://www.nanosats.eu/ (accessed on 10 March 2023).
  2. Nanosats. Available online: https://www.nanosats.eu/img/fig/Nanosats_years_2023-01-01_large.png (accessed on 10 March 2023).
  3. Chiu, Y.-C.; Chang, L.C.; Chao, C.-K.; Tai, T.-Y.; Cheng, K.-L.; Liu, H.-T.; Tsai-Lin, R.; Liao, C.-T.; Luo, W.-H.; Chiu, G.-P.; et al. Lessons Learned from IDEASSat: Design, Testing, on Orbit Operations, and Anomaly Analysis of a First University CubeSat Intended for Ionospheric Science. Aerospace 2022, 9, 110. [Google Scholar] [CrossRef]
  4. Issa, H.; Marpu, P.; Jallad, A.H.; Al Marar, A. Mission Operations and Science Plan for the MeznSat CubeSat Mission for Greenhouse Gases Monitoring. In Proceedings of the IGARSS 2020-2020 IEEE International Geoscience and Remote Sensing Symposium, Waikoloa, HI, USA, 26 September–2 October 2020; pp. 5454–5457. [Google Scholar] [CrossRef]
  5. Lim, B.; Mauro, D.; De Rosee, R.; Sorgenfrei, M.; Vance, S. CHARM: A CubeSat water vapor radiometer for earth science. In Proceedings of the 2012 IEEE International Geoscience and Remote Sensing Symposium, Munich, Germany, 22–27 July 2012; pp. 1022–1025. [Google Scholar] [CrossRef]
  6. Orger, N.C.; Cay, Y.; Kaymaz, Z.; Berat Karyot, T.; Nikbay, M. Optimization of a plasma instrument design for a CubeSat with space weather research. In Proceedings of the International Conference on Recent Advances in Space Technologies (RAST), Istanbul, Turkey, 16–19 June 2015. [Google Scholar] [CrossRef]
  7. Doyle, M.; Gloster, A.; Griffin, M.; Hibbett, M.; Kyle, J.; O’Toole, C.; Mangan, J.; Murphy, D.; Wong, N.L.; Akarapu, S.K.R.; et al. Design, development, and testing of flight software for EIRSAT-1: A university-class CubeSat enabling astronomical research. Softw. Cyberinfrastructure Astron. VII 2022, 12189, 445–463. [Google Scholar] [CrossRef]
  8. Berg, W.; Kummerow, C.; Reising, S.; Chandrasekar, V.; Schulte, R.; Goncharenko, Y.; Kilmer, B.; Brown, S.; Lim, B.; Pad-manabhan, S.; et al. Demonstrating the viability of the TEMPEST-D CubeSat radiometer for science applications. In Proceedings of the IEEE International Geoscience and remote sensing symposium (IGARSS), Yokohama, Japan, 28 July–2 August 2019. [Google Scholar] [CrossRef]
  9. Misra, S.; Brown, S.; Jarnot, R.; Felten, C.; Bendig, R.; Kocz, J.; McKelvey, C.; Ball, C.; Chen, C.-C.; O’Brien, A.; et al. CubeSat radiometer radio frequency interference technology (Cub-eRRT) validation mission: Enabling future resource-constrained science missions. In Proceedings of the IEEE International Geoscience and Remote Sensing Symposium (IGARSS), Valencia, Spain, 22–27 July 2018. [Google Scholar] [CrossRef]
  10. Fields, R.; Sun, X.; Abshire, J.B.; Beck, J.; Rawlings, R.M.; Sullivan, W.; Hinkley, D. A linear mode photon-counting (LMPC) detector array in a CubeSat to enable Earth science lidar measurements. In Proceedings of the IEEE International Geoscience and Remote Sensing Symposium (IGARSS), Milan, Italy, 26–31 July 2015. [Google Scholar] [CrossRef]
  11. Mazzarella, L.; Lowe, C.; Lowndes, D.; Joshi, S.K.; Greenland, S.; McNeil, D.; Mercury, C.; Macdonald, M.; Rarity, J.; Oi, D.K.L. QUARC: Quantum Research Cubesat—A Constellation for Quantum Communication. Cryptography 2020, 4, 7. [Google Scholar] [CrossRef] [Green Version]
  12. Capannolo, A.; Zanotti, G.; Lavagna, M.; Epifani, E.M.; Dotto, E.; Della Corte, V. Challenges in LICIA Cubesat trajectory design to support DART mission science. Acta Astronaut. 2021, 182, 208–218. [Google Scholar] [CrossRef]
  13. Lightholder, J.; Thompson, D.R.; Castillo-Rogez, J.; Basset, C. Near Earth asteroid scout CubeSat science data retrieval op-timization using onboard data analysis. In Proceedings of the IEEE Aerospace Conference, Big Sky, MT, USA, 2–9 March 2019. [Google Scholar] [CrossRef]
  14. Bakken, S.; Henriksen, M.B.; Birkeland, R.; Langer, D.D.; Oudijk, A.E.; Berg, S.; Pursley, Y.; Garrett, J.L.; Gran-Jansen, F.; Honoré-Livermore, E.; et al. HYPSO-1 CubeSat: First Images and In-Orbit Characterization. Remote Sens. 2023, 15, 755. [Google Scholar] [CrossRef]
  15. Ramiaramanantsoa, T.; Bowman, J.D.; Shkolnik, E.L.; Loyd, R.O.P.; Ardila, D.R.; Jewell, A.; Barman, T.; Basset, C.H.; Beasley, M.; Cheng, S.; et al. Onboard dynamic image exposure control for the Star–Planet Activity Research CubeSat (SPARCS). Mon. Not. R. Astron. Soc. 2022, 509, 5702–5712. [Google Scholar] [CrossRef]
  16. Ramiaramanantsoa, T.; Bowman, J.D.; Shkolnik, E.L.; Loyd, R.O.P.; Ardila, D.R.; Barman, T.; Basset, C.; Beasley, M.; Cheng, S.; Gamaunt, J.; et al. Time-resolved photometry of the high-energy radiation of M dwarfs with the Star-Planet Activity Research Cubesat. Astron. Nachr. 2022, 343, e210068. [Google Scholar] [CrossRef]
  17. Gibson, B.M. Miniaturized ring-down spectrometer for CubeSat-based planetary science. Appl. Opt. 2019, 58, 1941–1949. [Google Scholar] [CrossRef]
  18. Mason, J.P.; Woods, T.N.; Caspi, A.; Chamberlin, P.C.; Moore, C.; Jones, A.; Kohnert, R.; Li, X.; Palo, S.; Solomon, S.C. Miniature X-ray solar spectrometer: A sci-ence-oriented, university 3U CubeSat. J. Spacecr. Rocket. 2016, 53, 328–339. [Google Scholar] [CrossRef] [Green Version]
  19. Kim, G.N.; Park, S.Y.; Lee, T.; Kang, D.E.; Jeon, S.; Son, J.; Kim, N.; Park, Y.; Song, Y. Development of CubeSat Systems in Formation Flying for the Solar Science Demonstration: The CANYVAL-C Mission. Adv. Space Res. 2021, 68, 4434–4455. [Google Scholar] [CrossRef]
  20. Garrick-Bethell, I.; Lin, R.P.; Sanchez, H.; Jaroux, B.A.; Bester, M.; Brown, P.; Cosgrove, D.; Dougherty, M.K.; Halekas, J.S.; Hemingway, D.; et al. Lunar magnetic field measurements with a cubesat. Proceeding of the SPIE 8739, Sensors and Systems for Space Applications VI, Baltimore, MD, USA, 21 May 2013. [Google Scholar] [CrossRef]
  21. Jeong-Ah, L.; Sang-Young, P.; Youngkwang, K.; Jonghee, B.; Donghun, L.; Gwanghyeok, J. Mission orbit design of CubeSat impactor measuring lunar local magnetic field. J. Astr. S. Sci. 2017, 34, 127–138. [Google Scholar] [CrossRef] [Green Version]
  22. Mateos, I.; Sánchez-Mínguez, R.; Ramos-Castro, J. Design of a CubeSat payload to test a magnetic measurement system for space-borne gravitational wave detectors. Sen. Act. A Phys. 2018, 273, 311–316. [Google Scholar] [CrossRef] [Green Version]
  23. Carletta, S.; Nascetti, A.; Gosikere Matadha, S.S.; Iannascoli, L.; Baratto de Albuquerque, T.; Maipan Davis, N.; Schirone, L.; Impresario, G.; Pirrotta, S.; Brucato, J.R. Characterization and Testing of the Passive Magnetic Attitude Control System for the 3U AstroBio CubeSat. Aerospace 2022, 9, 723. [Google Scholar] [CrossRef]
  24. Williams, A.; Yamrick, K.; Asundi, S.; Wriggers, W.; Liu, Z. An Experimental Approach to Mapping of Magnetic Fields of CubeSat Attitude Actuator Representations. In Proceedings of the IEEE Aerospace Conference, Byg Sky, Montana, 7–14 March 2020. [Google Scholar] [CrossRef]
  25. Cervettini, G.; Pastorelli, S.; Park, H.; Lee, D.Y.; Romano, M. Development and experimentation of a CubeSat magnetic attitude control system testbed. IEEE Trans. Aerosp. Electron. Syst. 2021, 57, 1345–1350. [Google Scholar] [CrossRef]
  26. Miyagusuku, R.; Arias, K.R.; Villota, E. Hybrid magnetic attitude control system under CubeSat standards. In Proceedings of the IEEE Aerospace Conference Proceedings 2012, Big Sky, MT, USA, 3–10 March 2012; pp. 1–9. [Google Scholar] [CrossRef]
  27. Musilova, M.; Smelko, M.; Lipovsky, P.; Kapus, J.; Zavodsky, O.; Slosiar, R. skCUBE very-low-frequency radio waves detector and whistlers. In Proceedings of the International Conference on Mechanical and Aerospace Engineering (ICMAE), Prague, Czech Republic, 22–25 July 2017. [Google Scholar] [CrossRef]
  28. Pál, A.; Ohno, M.; Mészáros, L.; Werner, N.; Ripa, J.; Frajt, M.; Hirade, N.; Hudec, J.; Kapuš, J.; Koleda, M. GRBAlpha: A 1U CubeSat mission for validating timing-based gamma-ray burst localization. In Proceedings of the Space Telescopes and Instrumentation 2020: Ultraviolet to Gamma Ray, Online, 14–18 December 2020. [Google Scholar] [CrossRef]
  29. Ripa, J.; Pal, A.; Ohno, M.; Werner, N.; Meszaros, L.; Csak, B.; Dafčíková, M.; Dániel, V.; Dudáš, J.; Frajt, M. Early results from GRBAlpha and VZLUSAT-2. In Proceedings of the Space Telescopes and Instrumentation 2022: Ultraviolet to Gamma Ray, Montréal, QC, Canada, 17–23 July 2022. [Google Scholar] [CrossRef]
  30. Kliment, T.; Praslička, D.; Lipovský, P.; Draganová, K.; Závodský, O. Calibration of magnetometer for small satellites using neural network. A. Phys. Pol. A 2017, 131, 1129–1131. [Google Scholar] [CrossRef]
  31. Polik, Z.; Kuczmann, M. Measuring and control the hysteresis loop by using analog and digital integrators. J. Optoel. Adv. Mat. 2008, 10, 1861–1865. [Google Scholar]
  32. Zhao, X.; Liu, X.; Zhao, Z.; Zou, X.; Xiao, Y.; Li, G. Measurement and modeling of hysteresis characteristics in ferromagnetic materials under DC magnetizations. AIP Adv. 2019, 9, 025111. [Google Scholar] [CrossRef] [Green Version]
  33. Shirane, T.; Ito, M. Measurement of Hysteresis Loop on Soft Magnetic Materials Using Lock-In Amplifier. In IEEE Transactions on Magnetics; IEEE: Piscataway, NJ, USA, 2012; Volume 48, pp. 1437–1440. [Google Scholar] [CrossRef]
  34. Najgebauer, M.; Gryś, S.; Hiergeist, R. Uncertainty of hysteresis loop measurements in magnetic materials. Zesz. Nauk. Wydziału Elektrotechniki I Autom. Politech. Gdańskiej 2018, 59, 149–152. [Google Scholar] [CrossRef]
  35. Stupakov, O. Controllable Magnetic Hysteresis Measurement of Electrical Steels in a Single-Yoke Open Configuration. In IEEE Transactions on Magnetics; IEEE: Piscataway, NJ, USA, 2012; Volume 48, pp. 4718–4726. [Google Scholar] [CrossRef]
  36. Jinghui, W.; Dayi, S.; Wei, C. A new pulse measurement method for magnetization characteristics of small loss angle core. EIT Power Elec. 2021, 14, 51–62. [Google Scholar] [CrossRef]
  37. Morino, H.; Ishihara, Y.; Todaka, T. Measuring method of magnetic characteristics in any direction for silicon steel. J. Magn. Mag. Mat. 1992, 112, 115–119. [Google Scholar] [CrossRef]
  38. Zhang, C.; Zhang, M.; Li, Y. Measurement and Simulation of Magnetic Properties of Nanocrystalline Alloys under High-Frequency Pulse Excitation. Materials 2023, 16, 2850. [Google Scholar] [CrossRef]
  39. Lu, H.Y.; Zhu, J.G.; Hui, S.Y.R. Measurement and Modeling of Thermal Effects on Magnetic Hysteresis of Soft Ferrites. In IEEE Transactions on Magnetics; IEEE: Piscataway, NJ, USA, 2007; Volume 43, pp. 3952–3960. [Google Scholar] [CrossRef]
  40. Vrijsen, N.H.; Jansen, J.W.; Compter, J.C.; Lomonova, E.A. Measurement method for determining the magnetic hysteresis effects of reluctance actuators by evaluation of the force and flux variation. Rev. Sci. Instrum. 2013, 84, 075003. [Google Scholar] [CrossRef] [PubMed] [Green Version]
  41. Oravec, M.; Hesko, F.; Szőke, Z.; Smelko, M.; Gazda, T. Magnetometry for security applications. In Advances in Physical, Social & Occupational Ergonomics; AHFE 2021, Lecture Notes in Networks and Systems; Springer: Cham, Switzerland, 2021; Volume 273, pp. 236–243. [Google Scholar] [CrossRef]
  42. Lipovský, P.; Novotňák, J.; Blažek, J. Possible Utilization of Low Frequency Magnetic Fields in Short Range Multirotor UAV Detection System. In Proceedings of the 11th International Conference on Air Transport–INAIR 2022, Returning to the Skies, Bratislava, Slovakia, 24–25 November 2022; Volume 65, pp. 106–115. [Google Scholar] [CrossRef]
  43. Lipovský, P.; Draganová, K.; Novotňák, J.; Szőke, Z.; Fiľko, M. Indoor Mapping of Magnetic Fields Using UAV Equipped with Fluxgate Magnetometer. Sensors 2021, 21, 4191. [Google Scholar] [CrossRef]
  44. Krishnan, K.M. Magnetostatic energy. In Fundamentals and Applications of Magnetic Materials, 1st ed.; Oxford University Press: Oxford, UK, 2016; pp. 347–348. [Google Scholar]
  45. Coey, J.M.D. Magnetic field calculations. In Magnetism and Magnetic Materials, 1st ed.; Cambridge University Press: New York, NY, USA, 2010; pp. 43–49. [Google Scholar]
  46. BENDA Oldrich. Feromagnetizmus; Slovenské Vydavate’stvo Technickej Literatúry: Bratislava, Slovakia, 1963. [Google Scholar]
  47. Hudák, J.; Blažek, J.; Praslička, D.; Mikita, I.; Lipovský, P.; Gonda, P. Sensitivity of VEMA-04.1 Magnetometer. J. Electr. Eng. 2010, 61, 28–31. [Google Scholar]
  48. Kašper, P.; Lipovský, P.; Šmelko, M. Application Software of Modular System for Magnetic Characteristics Measurement. In Proceedings of the 2022 16th International Scientific Conference on New Trends in Aviation Development, Nový Smokovec–High Tatras, Slovakia, 24–25 November 2022; pp. 95–100. [Google Scholar] [CrossRef]
  49. Hilzinger, R.; Rodewald, W. Magnetic field calculations. Magnetic properties of amorphous alloys. In Magnetic Materials, Fundamental, Product, Properties, Applications, 1st ed.; Seitfudem, G., Ed.; Publicis Publishing: Erlangen, Germany, 2013; p. 277. [Google Scholar]
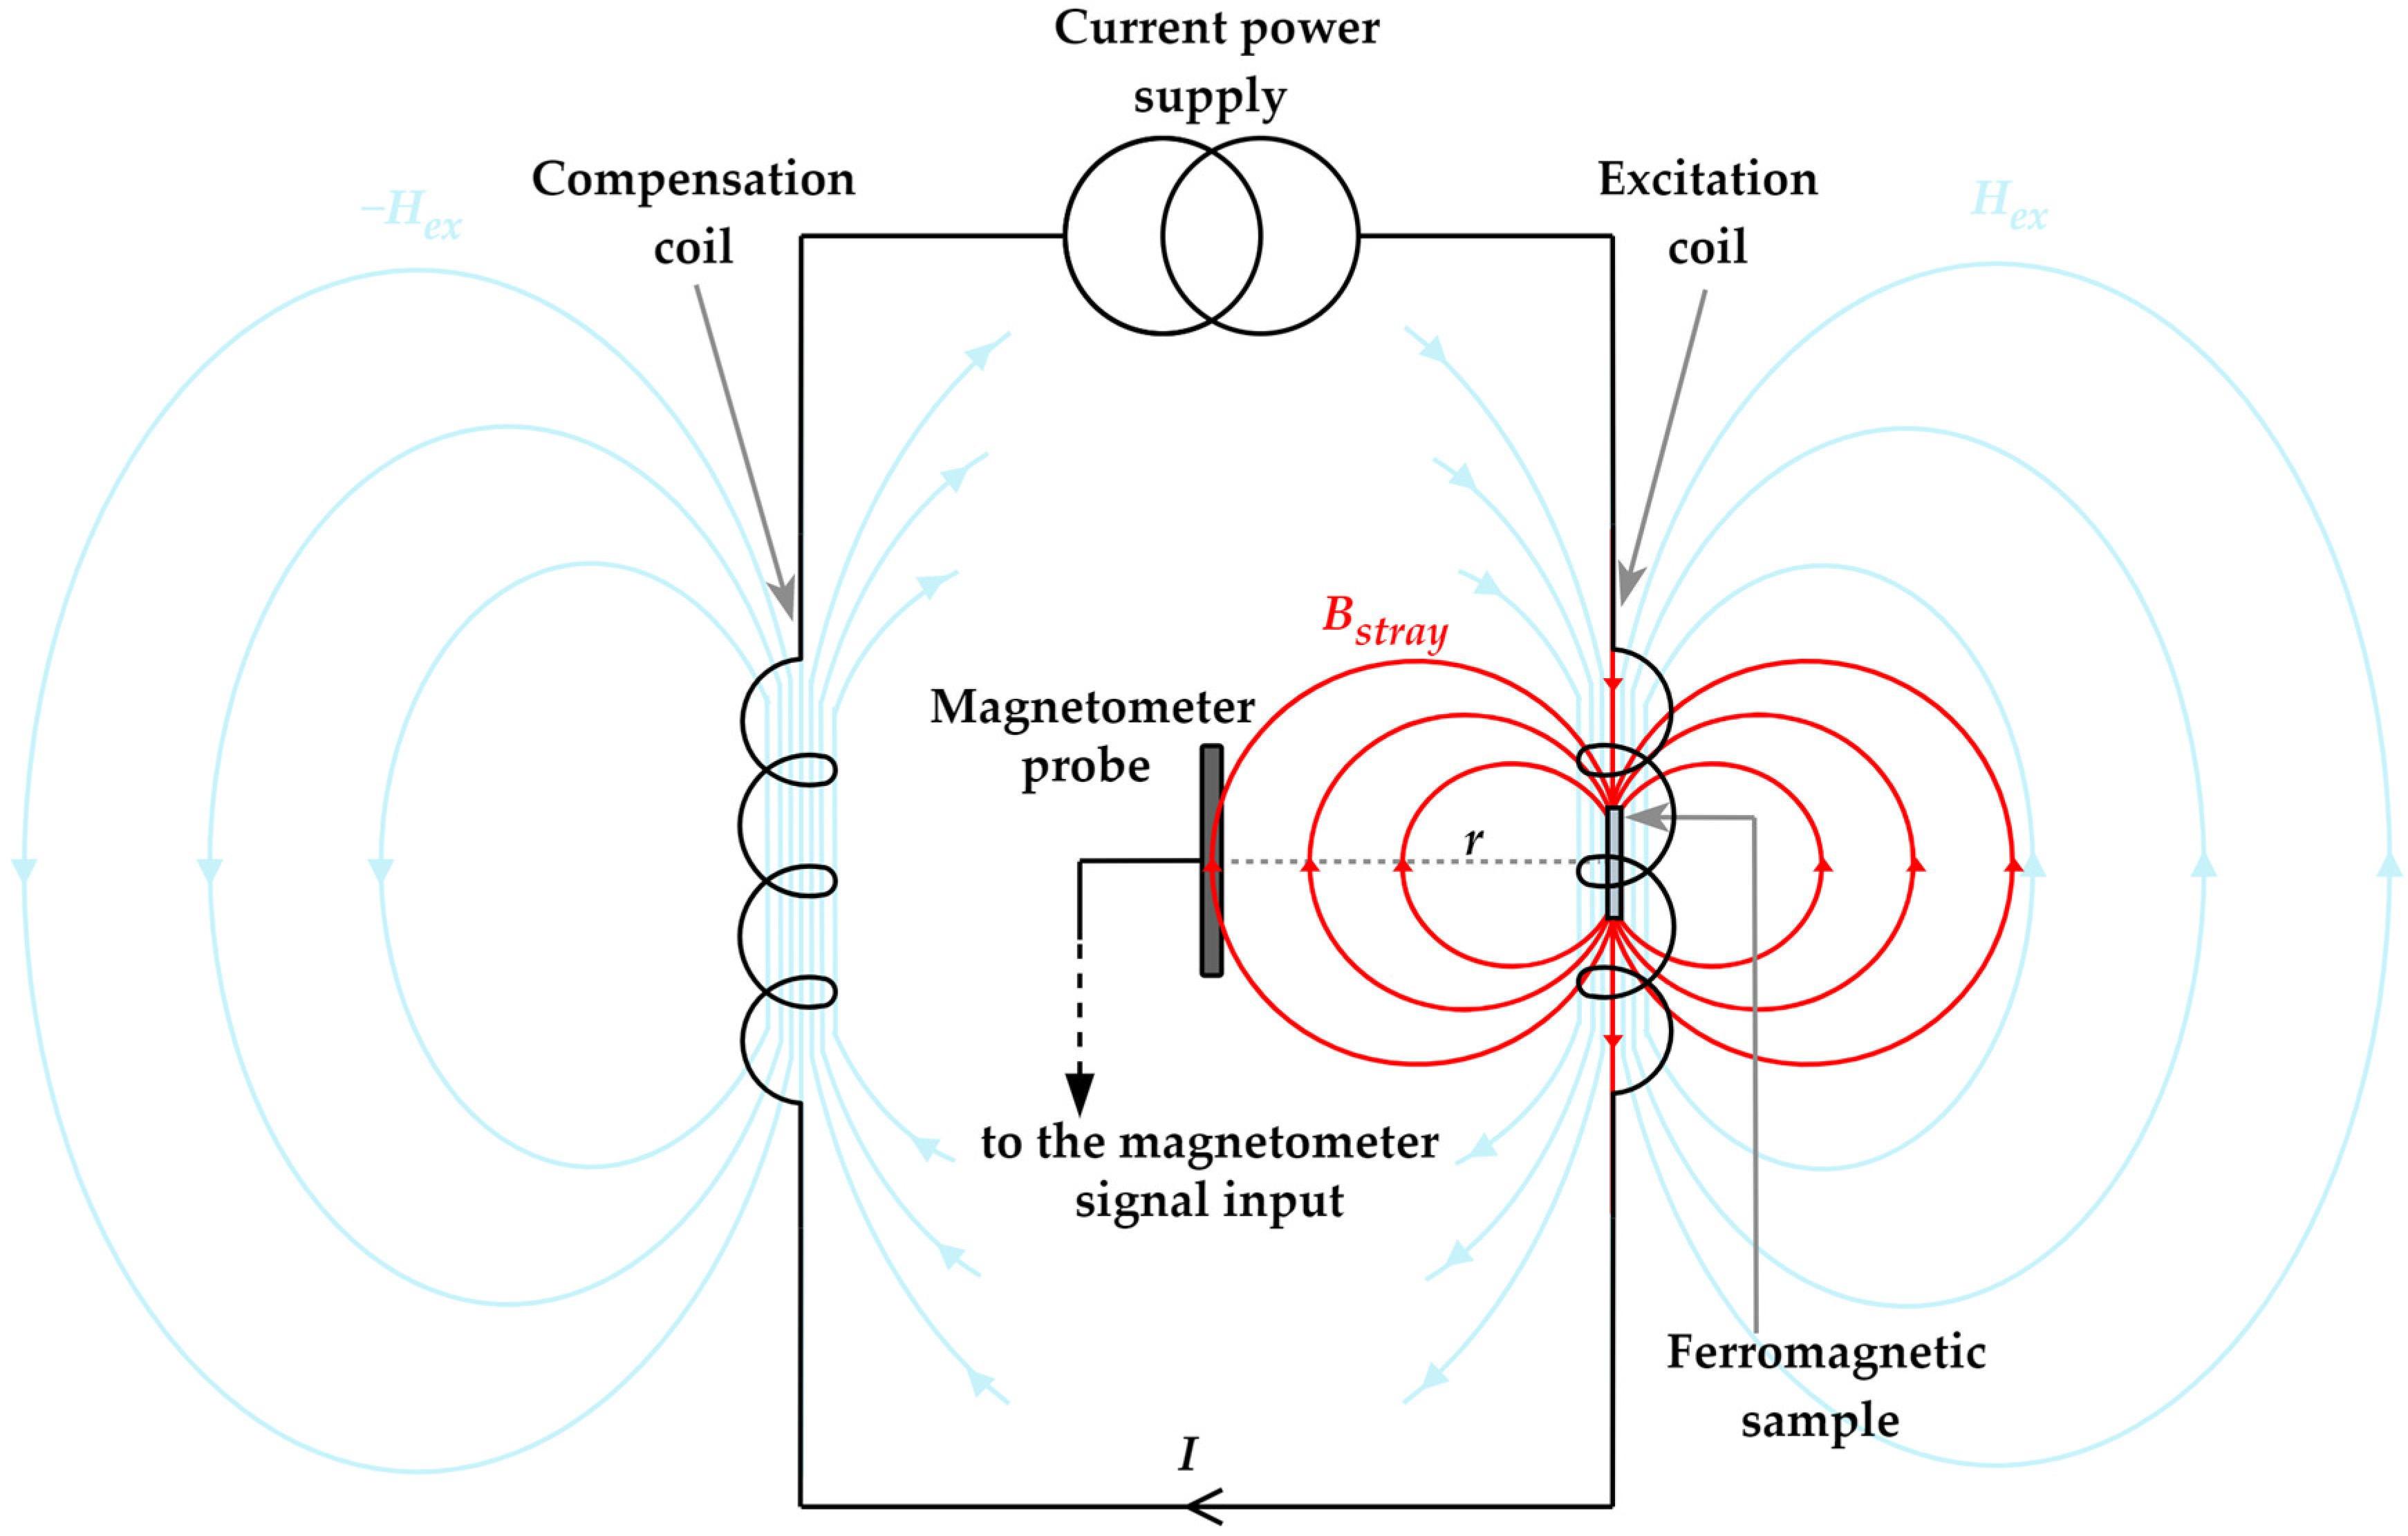
Figure 1. Principle of the stray magnetic field measuring method.
Applsci 13 04885 g001
Figure 2. Magnetic dipole moment represented by a pole model using hypothetical magnetic point charges: distribution of the magnetic stray field components at the measurement point.
Applsci 13 04885 g002
Figure 3. Block diagram of the workstation measurement chain.
Applsci 13 04885 g003
Figure 4. Outputs of the individual integrated measurement phases of the presented measuring workstation.
Applsci 13 04885 g004
Figure 5. The measuring workstation in a laboratory environment: (a) The photo of the configured measuring workstation with all devices included in the measurement chain; (b) A detailed view of the measuring stand with attached probe and integrated excitation and compensation coils.
Applsci 13 04885 g005
Figure 6. Comparison of the magnetic hysteresis curves of the magnetically soft ferromagnetic core measured by two different methods.
Applsci 13 04885 g006
Figure 7. Magnetic characteristic of magnetometric probe core made of VITROVAC 6025 amorphous ribbons.
Applsci 13 04885 g007
Figure 8. Magnetic characteristics of VITROVAC 6025, VITROVAC 6030, and VITROVAC 6150 amorphous ribbons.
Applsci 13 04885 g008
Disclaimer/Publisher’s Note: The statements, opinions and data contained in all publications are solely those of the individual author(s) and contributor(s) and not of MDPI and/or the editor(s). MDPI and/or the editor(s) disclaim responsibility for any injury to people or property resulting from any ideas, methods, instructions or products referred to in the content.