Article

Comparative Analysis of Tribological Behavior of 45 Steel under Intensive Quenching-High-Temperature Tempering and Queenching-Tempering Process

1
Engineering Research Center of Environmental and Functional Materials, Xinjiang University, Urumqi 830046, China
2
School of Materials Science and Chemical Engineering, Harbin Engineering University, Harbin 150006, China
*
Author to whom correspondence should be addressed.
Appl. Sci. 2024, 14(13), 5942; https://doi.org/10.3390/app14135942
Submission received: 6 June 2024 / Revised: 28 June 2024 / Accepted: 4 July 2024 / Published: 8 July 2024
(This article belongs to the Section Additive Manufacturing Technologies)

Abstract

:
The intensive quenching process compared to traditional methods results in a lower quenching cracking tendency. The comprehensive mechanical properties of an intensive quenching workpiece has good advantages. In order to improve the performance and product quality of a 45 steel workpiece, the hardening–tempering treatment used in the traditional quenching process is replaced by an intensive quenching process. This study investigates the tribological properties of 45 steel and their differences and connection under the intensive quenching and high-temperature tempering process in comparison to when under the traditional hardening–tempering process. Both intensive quenching and tempering and hardening–tempering workpieces are composed of carburized particles and ferrite. Compared with hardening–tempering workpieces, intensive quenching and high-temperature tempering workpieces have a finer and more uniform microstructure and higher hardness, impact toughness, and yield strength. Wear tests show that intensive quenchingand tempered specimens have better wear resistance. At the same frequency, the coefficient of friction and relative wear rate of the intensive quenching and tempering specimens were lower than those of the hardening–tempering treatment, and the wear surface was flatter. The wear morphology shows that the main wear mechanisms of the intensive quenching and tempering workpieces and those of hardening–tempering are abrasive and adhesive wear, and that the main wear mechanism changes from adhesive wear to abrasive wear as the frequency increases.

1. Introduction

As a medium-carbon alloy structural steel, 45 steel is widely used in machinery manufacturing and automobile manufacturing due to its moderate carbon content and good workability [1,2,3]. In practice, friction and wear are caused by the relative motion of parts made of 45 steel under the action of external forces [4,5,6,7]. The accumulation of such wear directly affects their performance and service life. Therefore, improving its material properties is essential to extend the service life of mechanical parts. In order to meet the requirements of hardness, strength, and wear resistance of metal parts, the hardening–tempering process is widely used.
The enhancement of material properties through heat treatment processes primarily involves the modulation of the microstructure [8,9,10]. Quench-tempering stands out as a prevalent heat treatment method for carbon steel, aiming to attain a uniform microstructure by controlling the heating temperature and holding time. This process effectively improves the material’s strength and hardness. Zhang Hequan et al. [11] optimized the hardening–tempering process of 34CrNi3MoV steel box body and found that optimizing the tempering temperature can improve the product quality. Liu Hongtao et al. [12] compared the friction and wear properties of 45 steel and 40Cr under different heat treatment conditions, and concluded that the heat treatment process of 45 steel varies under different conditions of use. Zhang et al. [13] carried out the hardening–tempering treatment in the hot rolling process of Q345 steel, which is the material of the pressure vessel, and through the tempering treatment, the strength and toughness of the hot-rolled plates were improved, which in turn improved the performance of the pressure vessel.
The hardening–tempering process consists of two steps: quenching and tempering, i.e., rapid cooling (quenching) is performed to obtain high-hardness martensite, followed by high-temperature tempering to reduce the brittleness of the material and enhance its toughness and plasticity [14,15,16,17]. However, different quenching media have a significant effect on the effectiveness of the tempering process. In the carbon steel tempering process, water quenching can significantly improve the hardness and strength of the material due to its fast cooling rate, but it is also prone to causing the cracking phenomenon, which restricts its popularization in practical applications. Although oil quenching can effectively reduce the risk of cracking due to its slower cooling rate, it can cause environmental pollution during its use, which triggers concerns about environmental protection.
In view of these problems, it is particularly important to find a new quenching process that avoids cracking and reduces environmental pollution. Nikolai Kobasko et al. proposed the intensive quenching process [18,19,20]. Rapidly cooling the specimen in a salt solution at a rate greater than 600 °C/S is a process that leads to high compressive stress on the surface of the specimen and reduces the possibility of quench cracking and deformation [21]. This process is characterized by low energy consumption, non-pollution and a “super-strengthening” of the material [22]. At the same time, they proposed a general formula for calculating the heating and cooling times in the quenching process, which accelerated the widespread application of strengthened quenching in the heat treatment industry [23,24]. Furthermore, Lowrie J et al. [25] completed a study on the weight reduction of heavy truck components and concluded that the intensive quenching process is superior to the oil quenching process in terms of both residual stress and strength. However, high-temperature tempering can adjust the residual stresses in the microstructure and improve the toughness and fatigue resistance of the material. Therefore, through a rational design of the heat treatment process and intensive quenching and high-temperature tempering, carbon steel can be improved in some aspects of performance. Comparing this new process and the quench-tempered process should present certain advantages. Y. Comparing this new process and the quench-tempered process should present certain advantages. Yang Denggui et al.’s study [26] showed that upon comparing between 40Cr that underwent intense quenching followed by high-temperature tempering treatment and the conventional tempering treatment, the former obtained finer and more uniform tempered austenite organization, with an increased hardness from 8% to 18%, increased strength from 3% to 5%, and increased impact properties from 16% to 30%.
It was found that the comprehensive mechanical properties of intensely quenched workpieces and intensively quenched–high-temperature tempering workpieces are both higher than those of conventional hardening–tempering treatment. Therefore, in this paper, the friction and wear characteristics and properties of carbon steel under the intensive quenching–high-temperature tempering process are investigated by comparing it with traditional hardening–tempering carbon steel. The purpose is to reveal the potential of the intensive quenching process in improving the frictional properties of materials and to provide a valuable reference for its further application in carbon steel.

2. Materials and Methods

Commercial 45 steel long bar specimens with the size of 55 mm × 10 mm × 10 mm and Φ15 × 170 mm tensile specimens were selected. Their chemical composition is shown in Table 1.
After austenitizing the specimens in a muffle furnace at 850 °C for 25 min, some of the specimens were intensively quenched in aqueous NaCl (10%) solution at 25 °C under high-speed stirring, while others were quenched in quenching oil at 25 °C. Subsequently, all specimens were held at 580 °C for 120 min for tempering treatment to prepare for intensive quenching and high-temperature tempering of tempered carbon steel (CS_IQAT) and hardening–tempering carbon steel (CS_QAT) specimens of 45 steel.
The heat-treated samples were ground and polished and then corroded with 4% nitric acid alcohol, and the microstructure was characterized using an optical microscope (VS200–500U from Olympus, Tokyo, Japan) and a scanning electron microscope (Zeiss Supra55 VP from Carl Zeiss AG, Oberkochen, Germany). Physical phase analysis was carried out using an X-ray diffractometer (XRD, D8 Advance from Bruker, Berlin, Germany) with a scanning speed of 4°/min. Tensile testing was carried out using a microcomputer-controlled electronic universal testing machine MTS (E44.304 from MTS, Shenzhen, China). Impact toughness test was carried out using impact testing machine (JB-30B from MTS, Washington, DC, USA). Vickers hardness tester (HXD-1000TB from caikon, Shanghai, China) was used to measure the hardness with a load of 1000 g and by holding the load for 10 s. The tensile test and impact test involved three specimens, whose average value is taken as the experimental results. The fiber hardness test involved the same selection of three specimens, where five adjacent points of each specimen were selected for hardness measurement, and finally the average value is taken as the hardness measurement results.
The reciprocating motion is a common form of movement for moving parts, such as linear sliding guides. We used the MFT-5000 friction from Rtec Silicon Valley, San Jose, CA, USA and wear testing machine for reciprocating wear experiments; its working principle is shown in Figure 1. Because the intensive quenching and high-temperature tempering of 45 steel is a new process, we conducted friction experiments of 45 steel that had undergone tempering treatment and compared it with a selection of commonly used parameters: a hardness of 770 HV and a commercial GCr15 ball with a diameter of 9 mm as a pair of wear vice. We used 45 steel tempering specimens measuring 25 mm × 10 mm × 10 mm in size and intensive-quenching-and-high-temperature-tempering specimens as the friction and wear specimens. In the test, the fixed load was 30 N, and the frequencies were 2 Hz, 3 Hz, 4 Hz, and 5 Hz, which were designed to simulate the different working conditions of linear sliding guides. The wear time was 40 min and the reciprocating distance was 20 mm. In the second set of tests, the sliding speed and total distance were (0.04 m/s and 96 m), (0.06 m/s and 144 m), (0.08 m/s and 192 m), and (0.10 m/s and 240 m), respectively.
The wear surfaces of 45 steel-tempered specimens and intensely quenched–high-temperature tempered specimens were characterized using scanning electron microscopy (SEM). The wear track profiles were determined using a surface 3D profiler (SuperView W1 from CHOTEST, Shenzhen, China) and the relative wear rate k was calculated using Equation (1):
K = A L F S
where F is the normal load (N), S is the total sliding distance (m), A is the average cross-sectional area of the trajectory (mm2), and L is the stroke length (mm).

3. Results and Discussion

3.1. Microstructure

Figure 2 shows the optical microscopic images of CS_QAT and CS_IQAT. It can be observed that both specimens are composed of ferrite and carbide. The microstructure of CS_IQAT (Figure 2b) is significantly finer and more homogeneous than that of CS_QAT (Figure 2a).
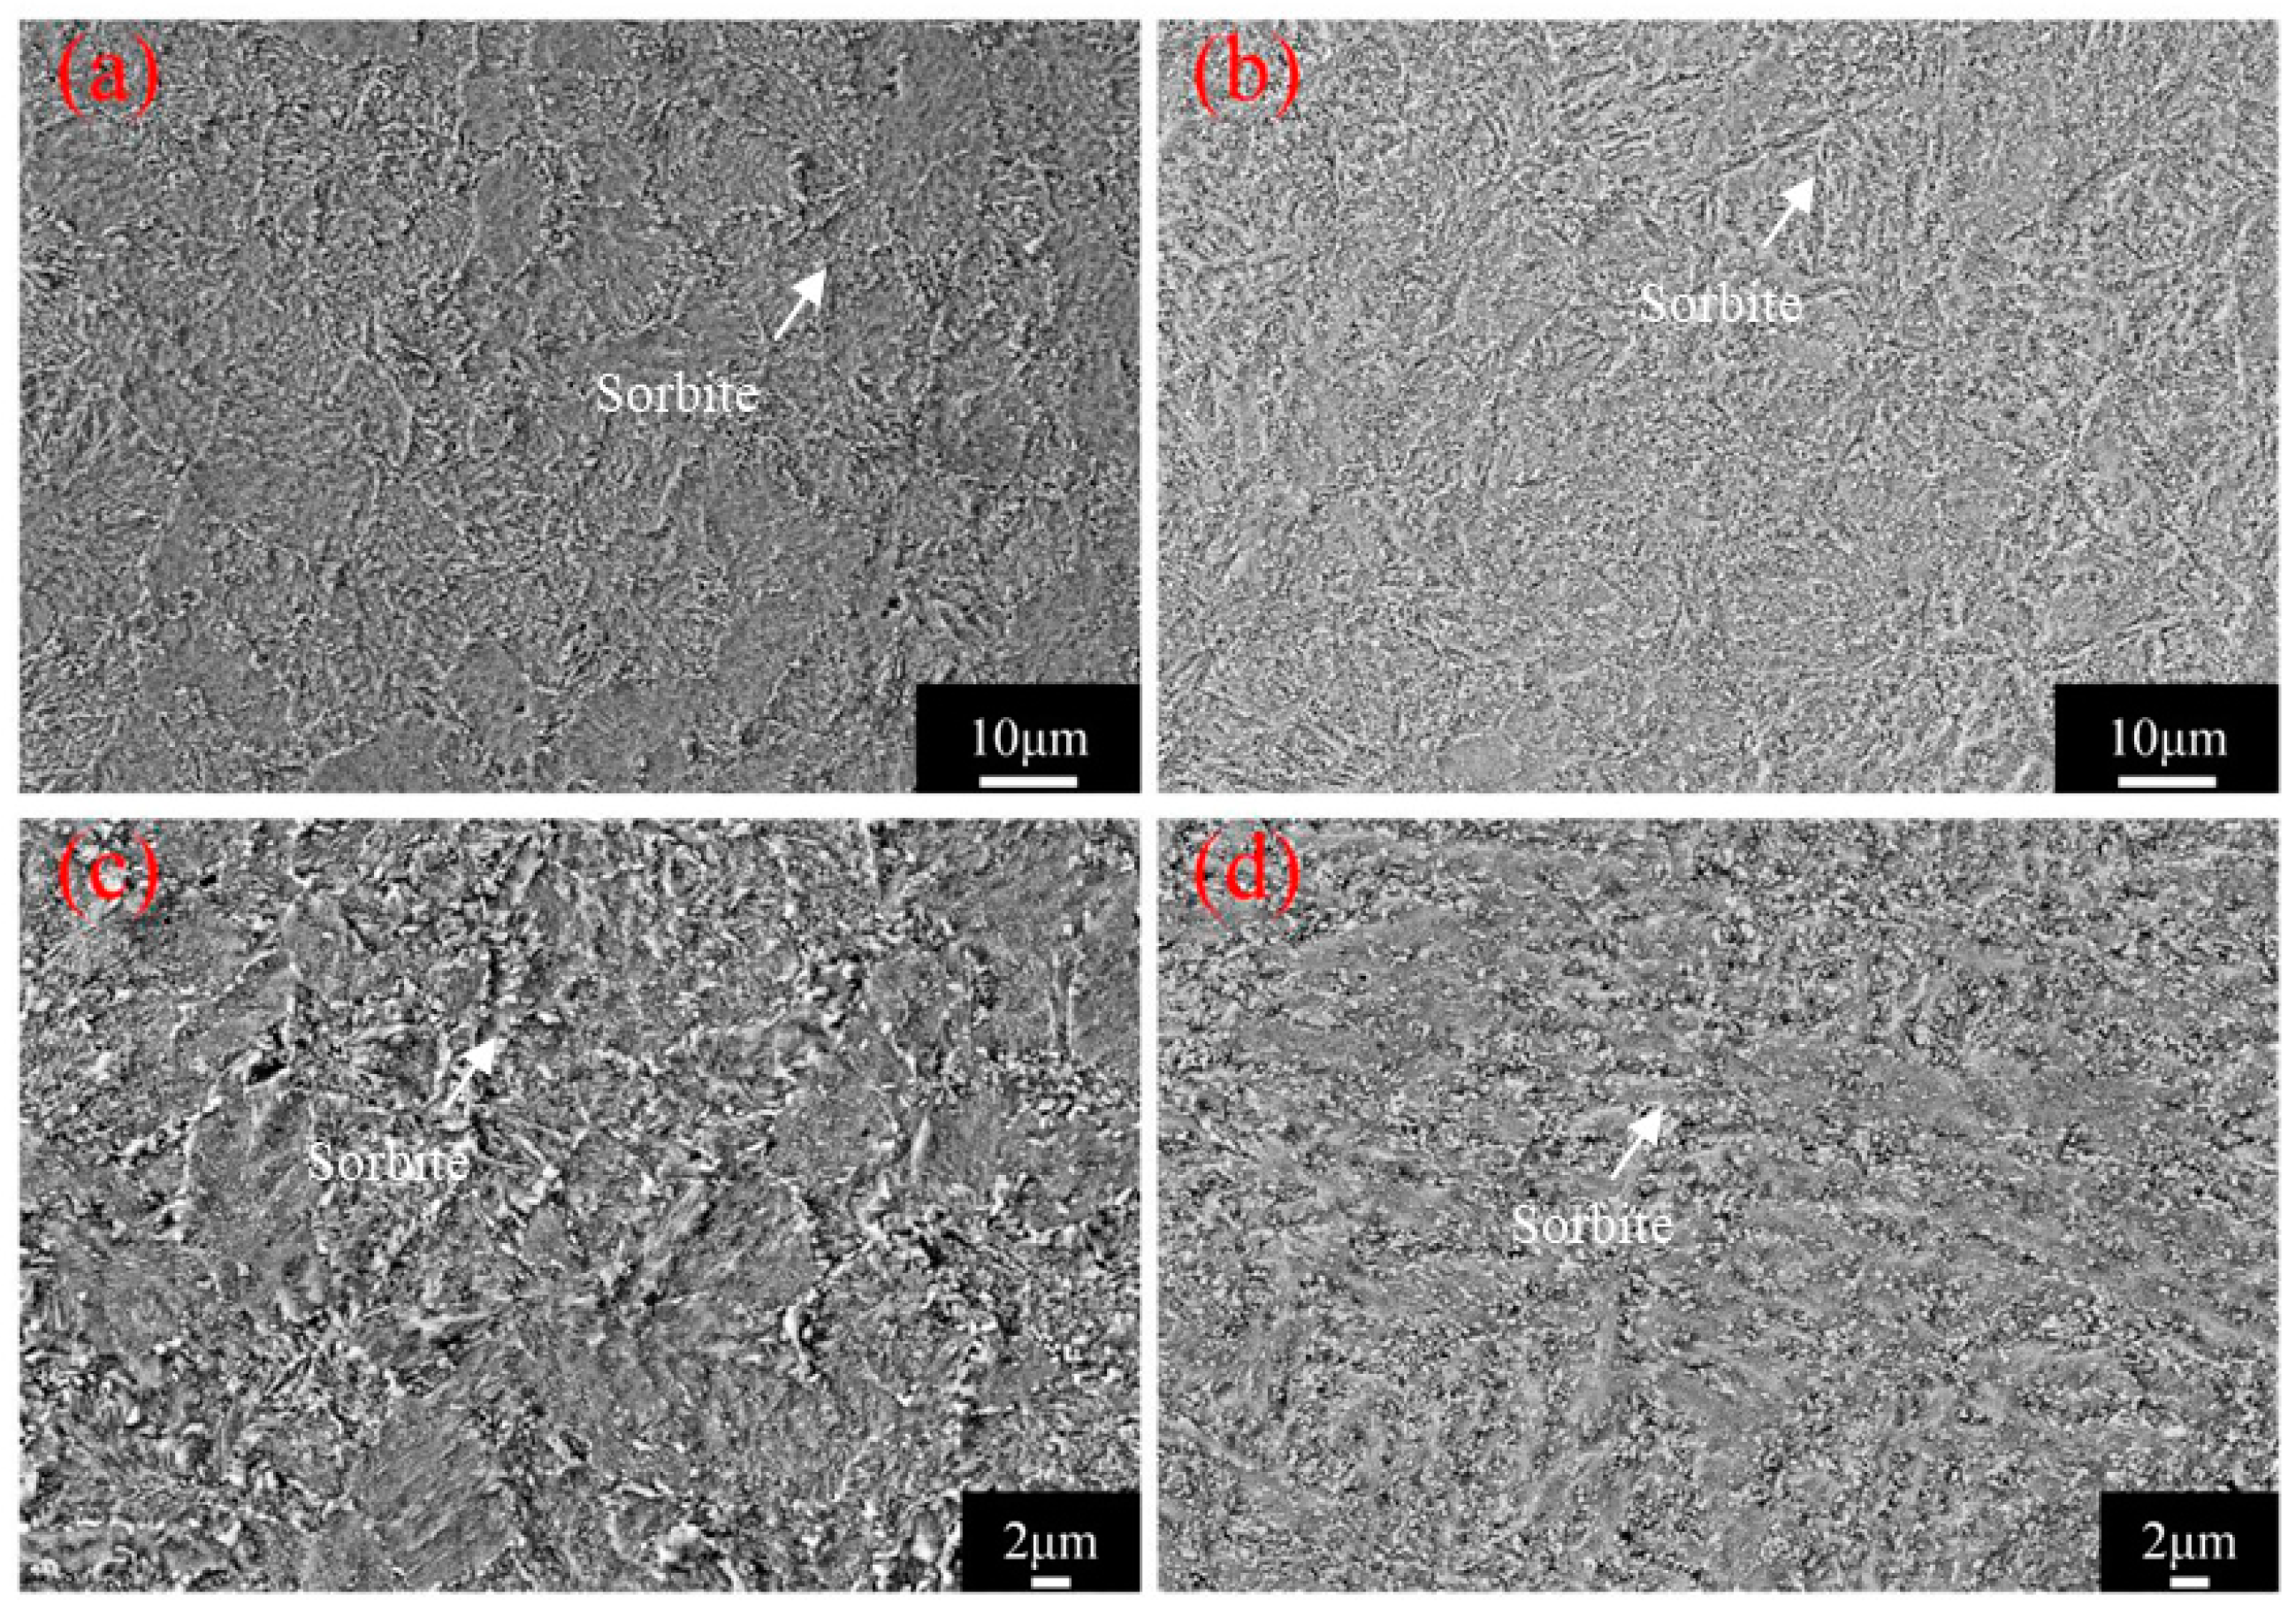
Figure 3 shows the SEM images of CS_QAT and CS_IQAT. It can be observed that the tempered microstructure of both consists of ferrite and Fe3 C particles. Compared with CS_QAT, the Fe3 C particles of CS_IQAT are finer and more uniform. The ultra-fast cooling rate during the intensive quenching process increases the amount of subcooling, nucleation drive, and nucleation sites, resulting in finer and more uniform martensite. The subsequent high-temperature tempering process induces martensite decomposition and promotes a uniform redistribution of carbon, resulting in the formation of finer Soxhlet.
Figure 4 shows the XRD images of CS_QAT and CS_IQAT. Diffraction peaks of α-phase (ferrite) and Fe3 C were detected, which is consistent with the results of optical microscopy and SEM.

3.2. Mechanical Properties

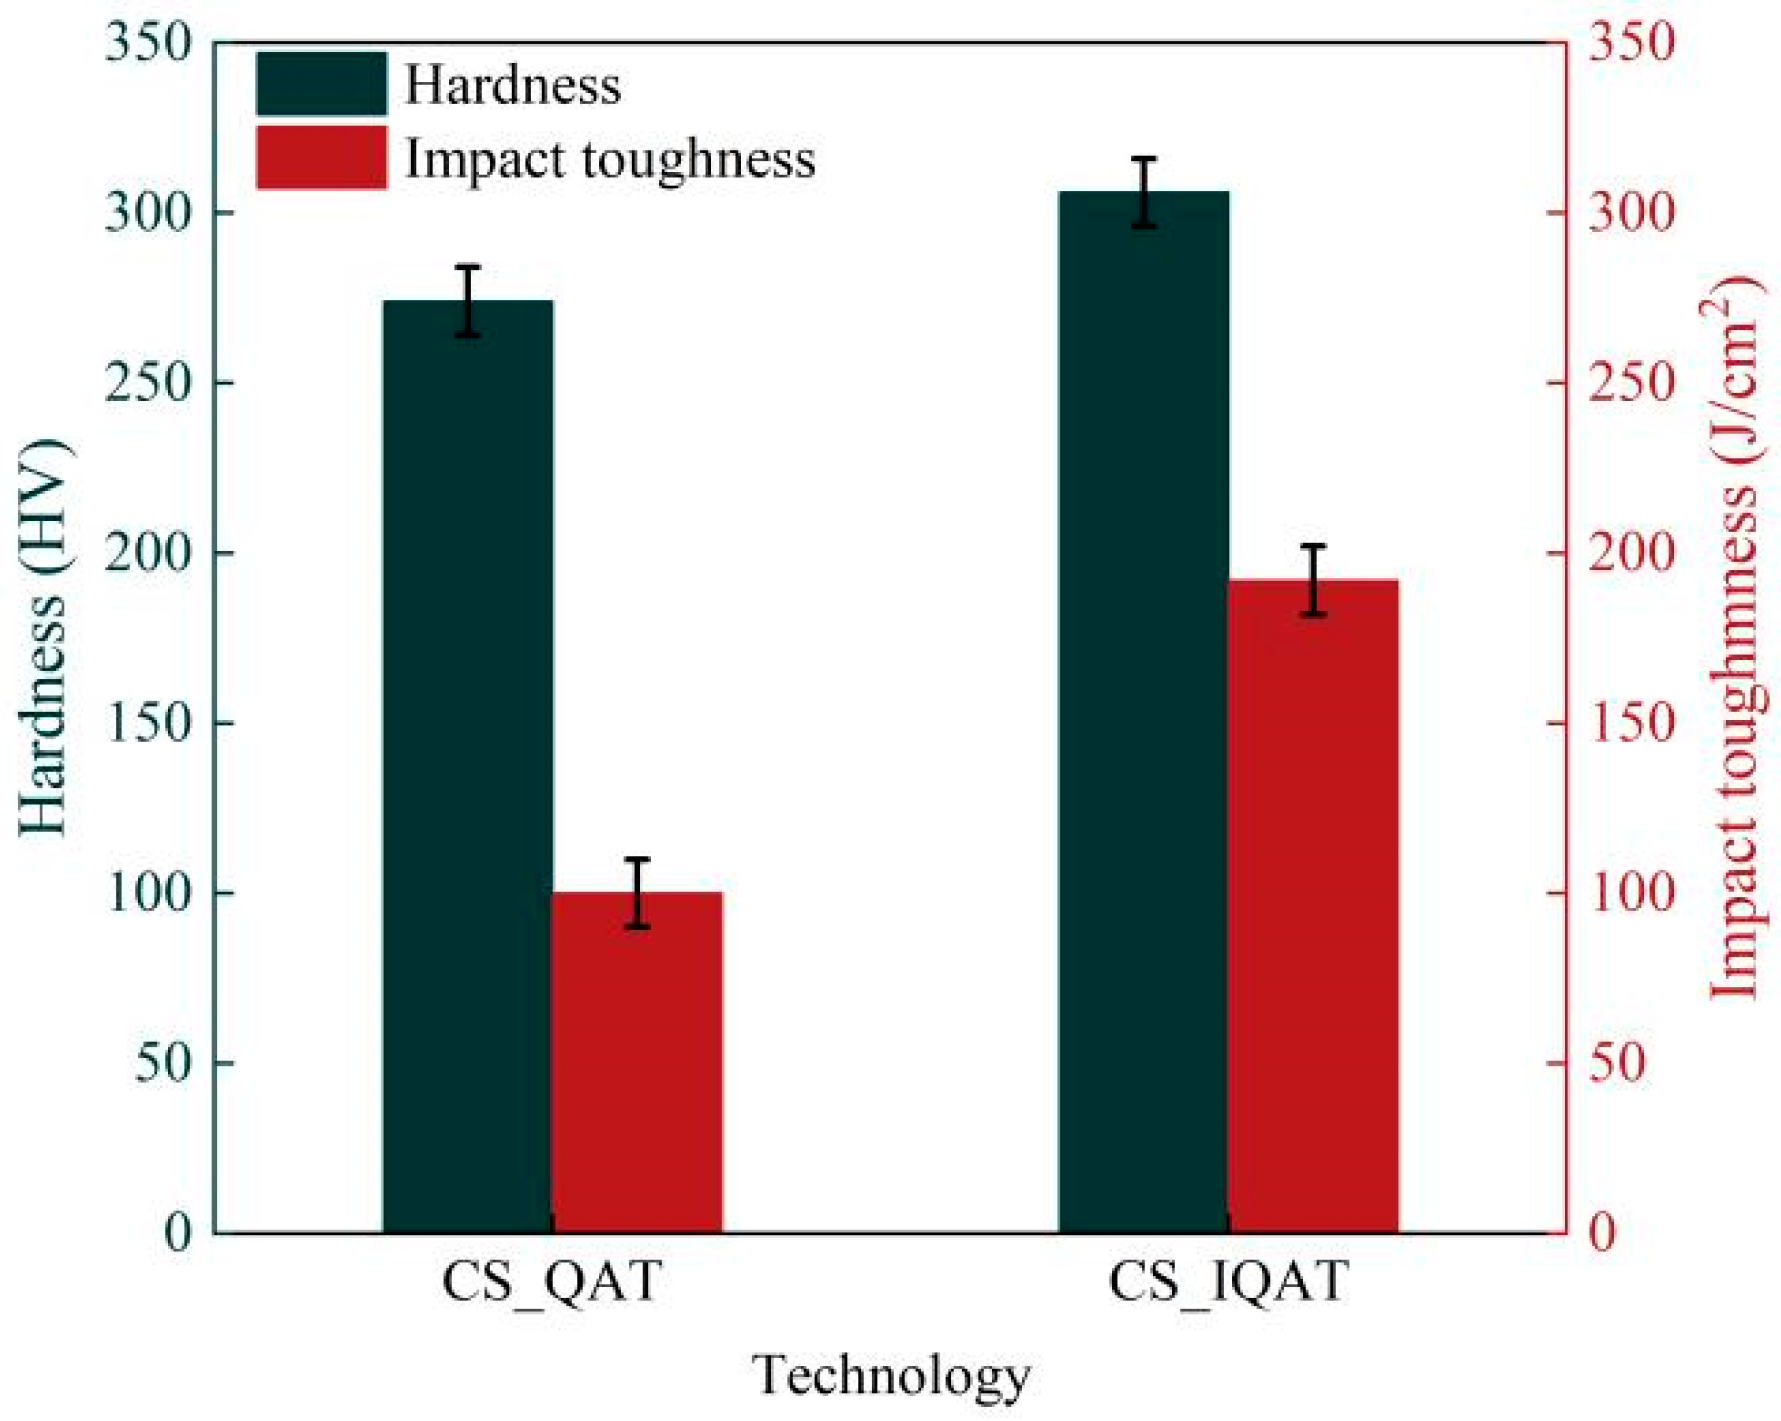
Figure 5 shows the hardness and impact toughness plots of CS_QAT and CS_IQAT. CS_QAT has a hardness of 274HV and an impact toughness of 100 J/cm2. CS_IQAT has a hardness of 306 10 HV and an impact toughness of 192 J/cm2. Compared to CS_QAT, the hardness of CS_IQAT improved by a factor of 32 HV and a 1.9 times higher impact toughness. An improved impact toughness of workpieces has multiple benefits: firstly, it significantly improves the safety and durability of workpieces when subjected to impacts or collisions, reducing the risk of accidents; secondly, high-impact toughness materials prolong the service life of workpieces because they can effectively absorb energy and withstand the effects of the external environment; and lastly, this property helps to improve the stability and efficiency of the machining process, reducing the incidence of cracks and deformations.
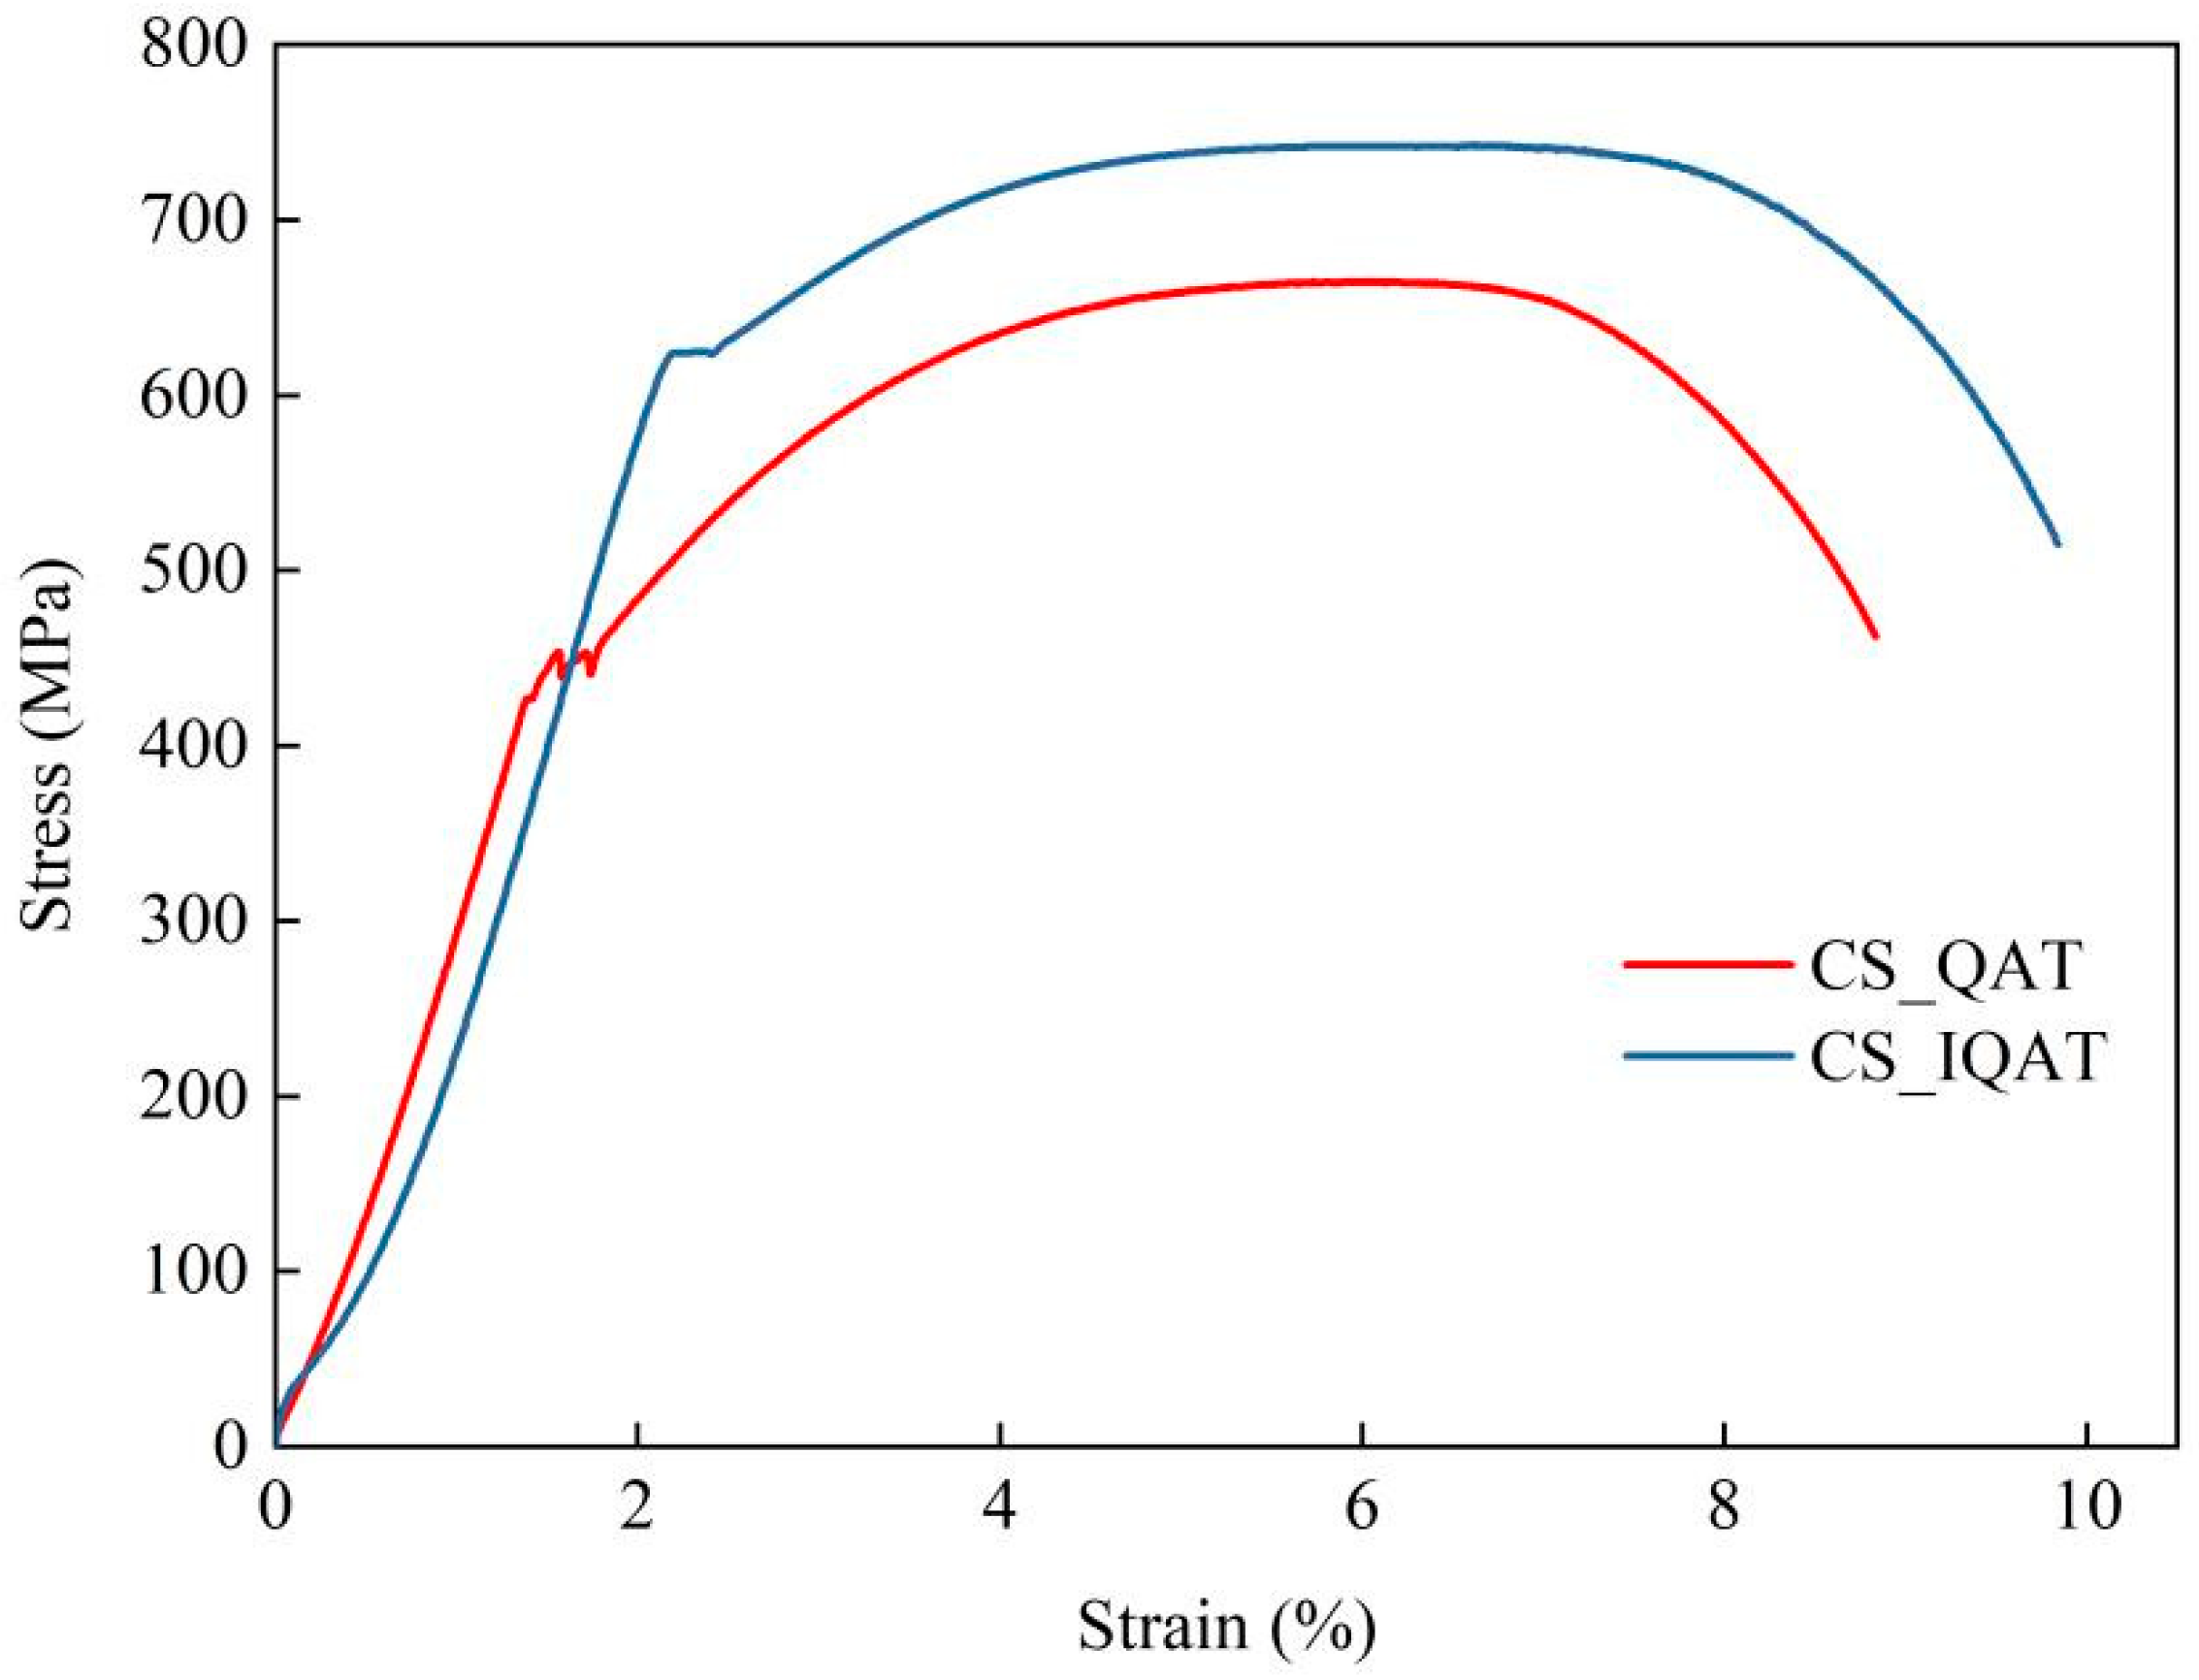
Figure 6 shows the stress–strain curves of CS_QAT and CS_IQAT. It can be observed that there is a difference between the stress–strain curves of the two specimens. The yield strength of CS_IQAT (657 MPa) is higher than that of CS_QTA (506 MPa). The elongation of CS_IQAT (9.8%) is also higher than that of CS_QTA (8.8%).
The strength of CS_QAT and CS_IQAT is affected by the number and size of Fe3 C particles, while plasticity is mainly provided by ferrite. According to Orowan’s theory [27], the strength is proportional to the number of hard particles and inversely proportional to the size of the particles. In CS_IQAT, the number of Fe3 C particles is higher and the size is smaller. It helps to increase the strength of CS_IQAT.

3.3. Tribological Behavior

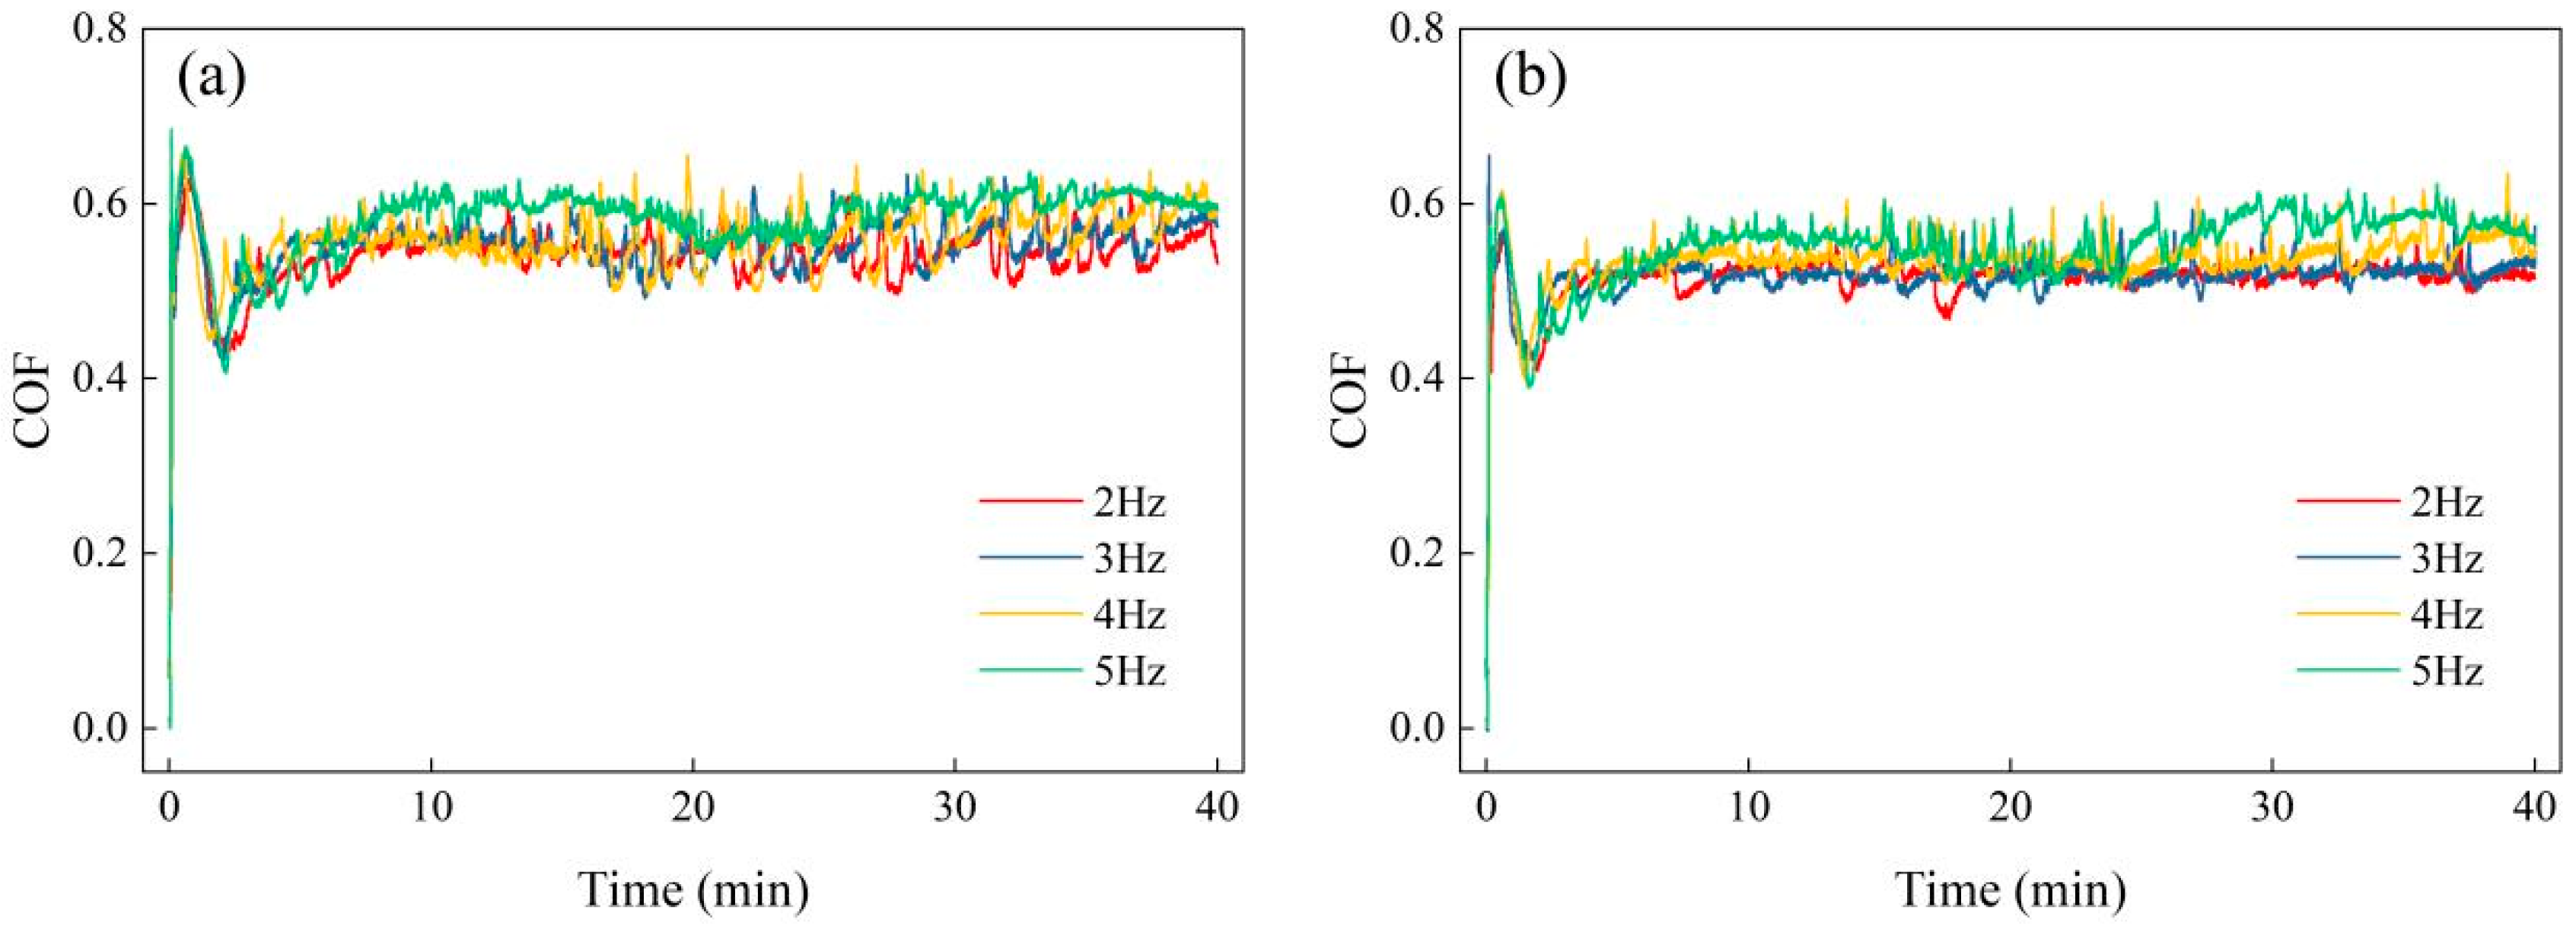
Figure 7 shows the friction coefficient curves of CS_QAT and CS_IQAT at different frequencies. It is observed that the friction coefficient curves of CS_IQAT specimens are lower than those of CS_QAT specimens at the same frequency and are relatively smooth. This difference is closely related to the finer and more uniform microstructure and higher hardness and yield strength of CS_IQAT specimens. The fine and uniform microstructure can better distribute and withstand external stresses, preventing localized stress concentration and helping to reduce micro-unevenness and micro-crack formation on the material surface. Higher hardness reduces the degree of plastic deformation and wear of the material surface during friction, thus reducing friction. Materials with high yield strengths are less prone to deformation, helping to maintain surface integrity and contact area stability. The surface of CS_IQAT specimens is smoother, more wear-resistant, and has a more stable contact area during friction. The combination of these factors results in a lower and smoother coefficient of friction for CS_IQAT than for CS_QAT.
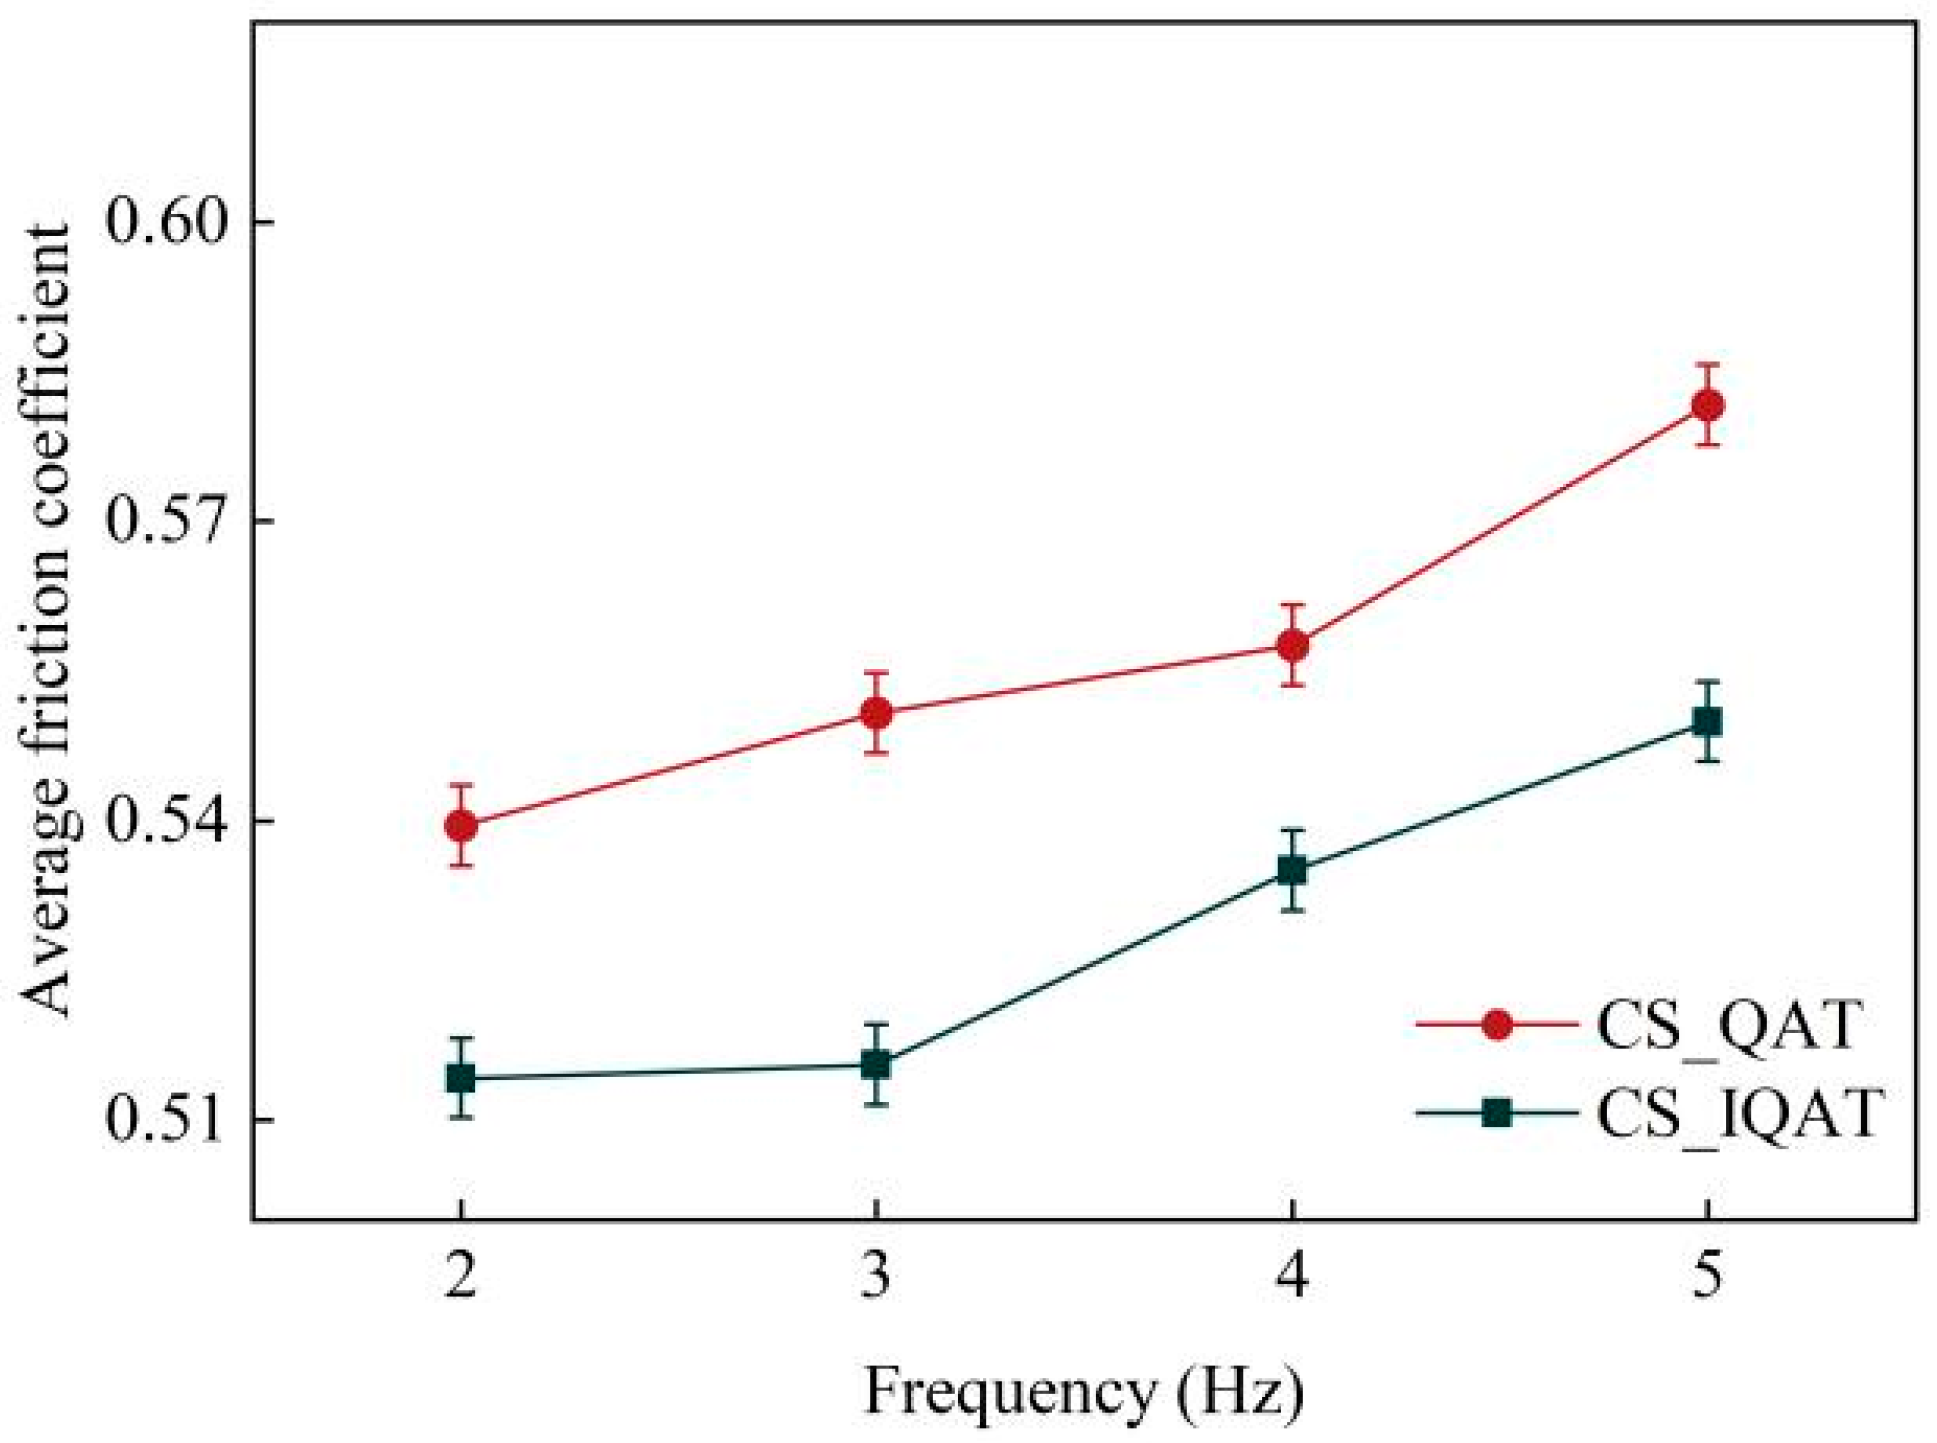
In addition, the friction coefficient curves of the two gradually increase as the frequency increases. This is because the increase in frequency leads to more frequent relative motion between the friction surfaces, the heat generated by friction cannot be emitted in time, and the heat accumulates in the friction contact area. The increase in temperature intensifies the softening of the friction surface material and increases the plastic deformation of the surface, which leads to an increase in the coefficient of friction. The average friction coefficient is shown in Figure 8, and the results are consistent with the above.
Figure 9 shows the relative wear rate of CS_QAT and CS_ IQAT at different frequencies. It is observed that the relative wear rate of CS_QAT and CS_IQAT tends to increase as the load increases. The relative wear of CS_IQAT is significantly lower than that of CS_QAT at the same frequency. This is related to the fact that CS_IQAT has a fine and uniform microstructure and higher hardness and yield strength, and its surfaces are smoother, more wear-resistant, and have a more stable contact area during the friction process.
At frequencies of 2 Hz, 3 Hz, 4 Hz, and 5 Hz, the relative wear rates of CS_QAT specimens were 5.2 mm3/N-m, 8.5 mm3/N-m, 9.8 mm3/N-m, and 13.3 mm3/N-m, whereas those of CS_IQAT specimens were 3.0 mm3/N -m, 5.0 mm3/N-m, 6.5 mm3/N-m, and 9.6 mm3/N-m, respectively. The relative wear rates of the CS_IQAT specimens constitute 58% at 2 Hz, 59% at 3 Hz, 66% at 4 Hz, and 72% at 5 Hz relative to the CS_QAT specimen.
Figure 10 shows the width and depth of wear of CS_QAT and CS_IQAT at different frequencies. It can be observed that the depth of wear marks of CS_QAT and CS_IQAT increases gradually with the increase in frequency, which is mainly due to the increase in frequency that leads to an increase in the temperature of the friction surface, which makes the material more prone to plastic deformation and wear. It is also observed that the depth of wear marks of CS_IQAT is much smaller than that of CS_QAT at the same frequency. The three-dimensional morphology is detailed in Figure 11. The friction and wear performance of CS_IQAT is better than that of CS_QAT, and it is possible to replace CS_IQAT with CS_QAT, which can be used in harsher environments.
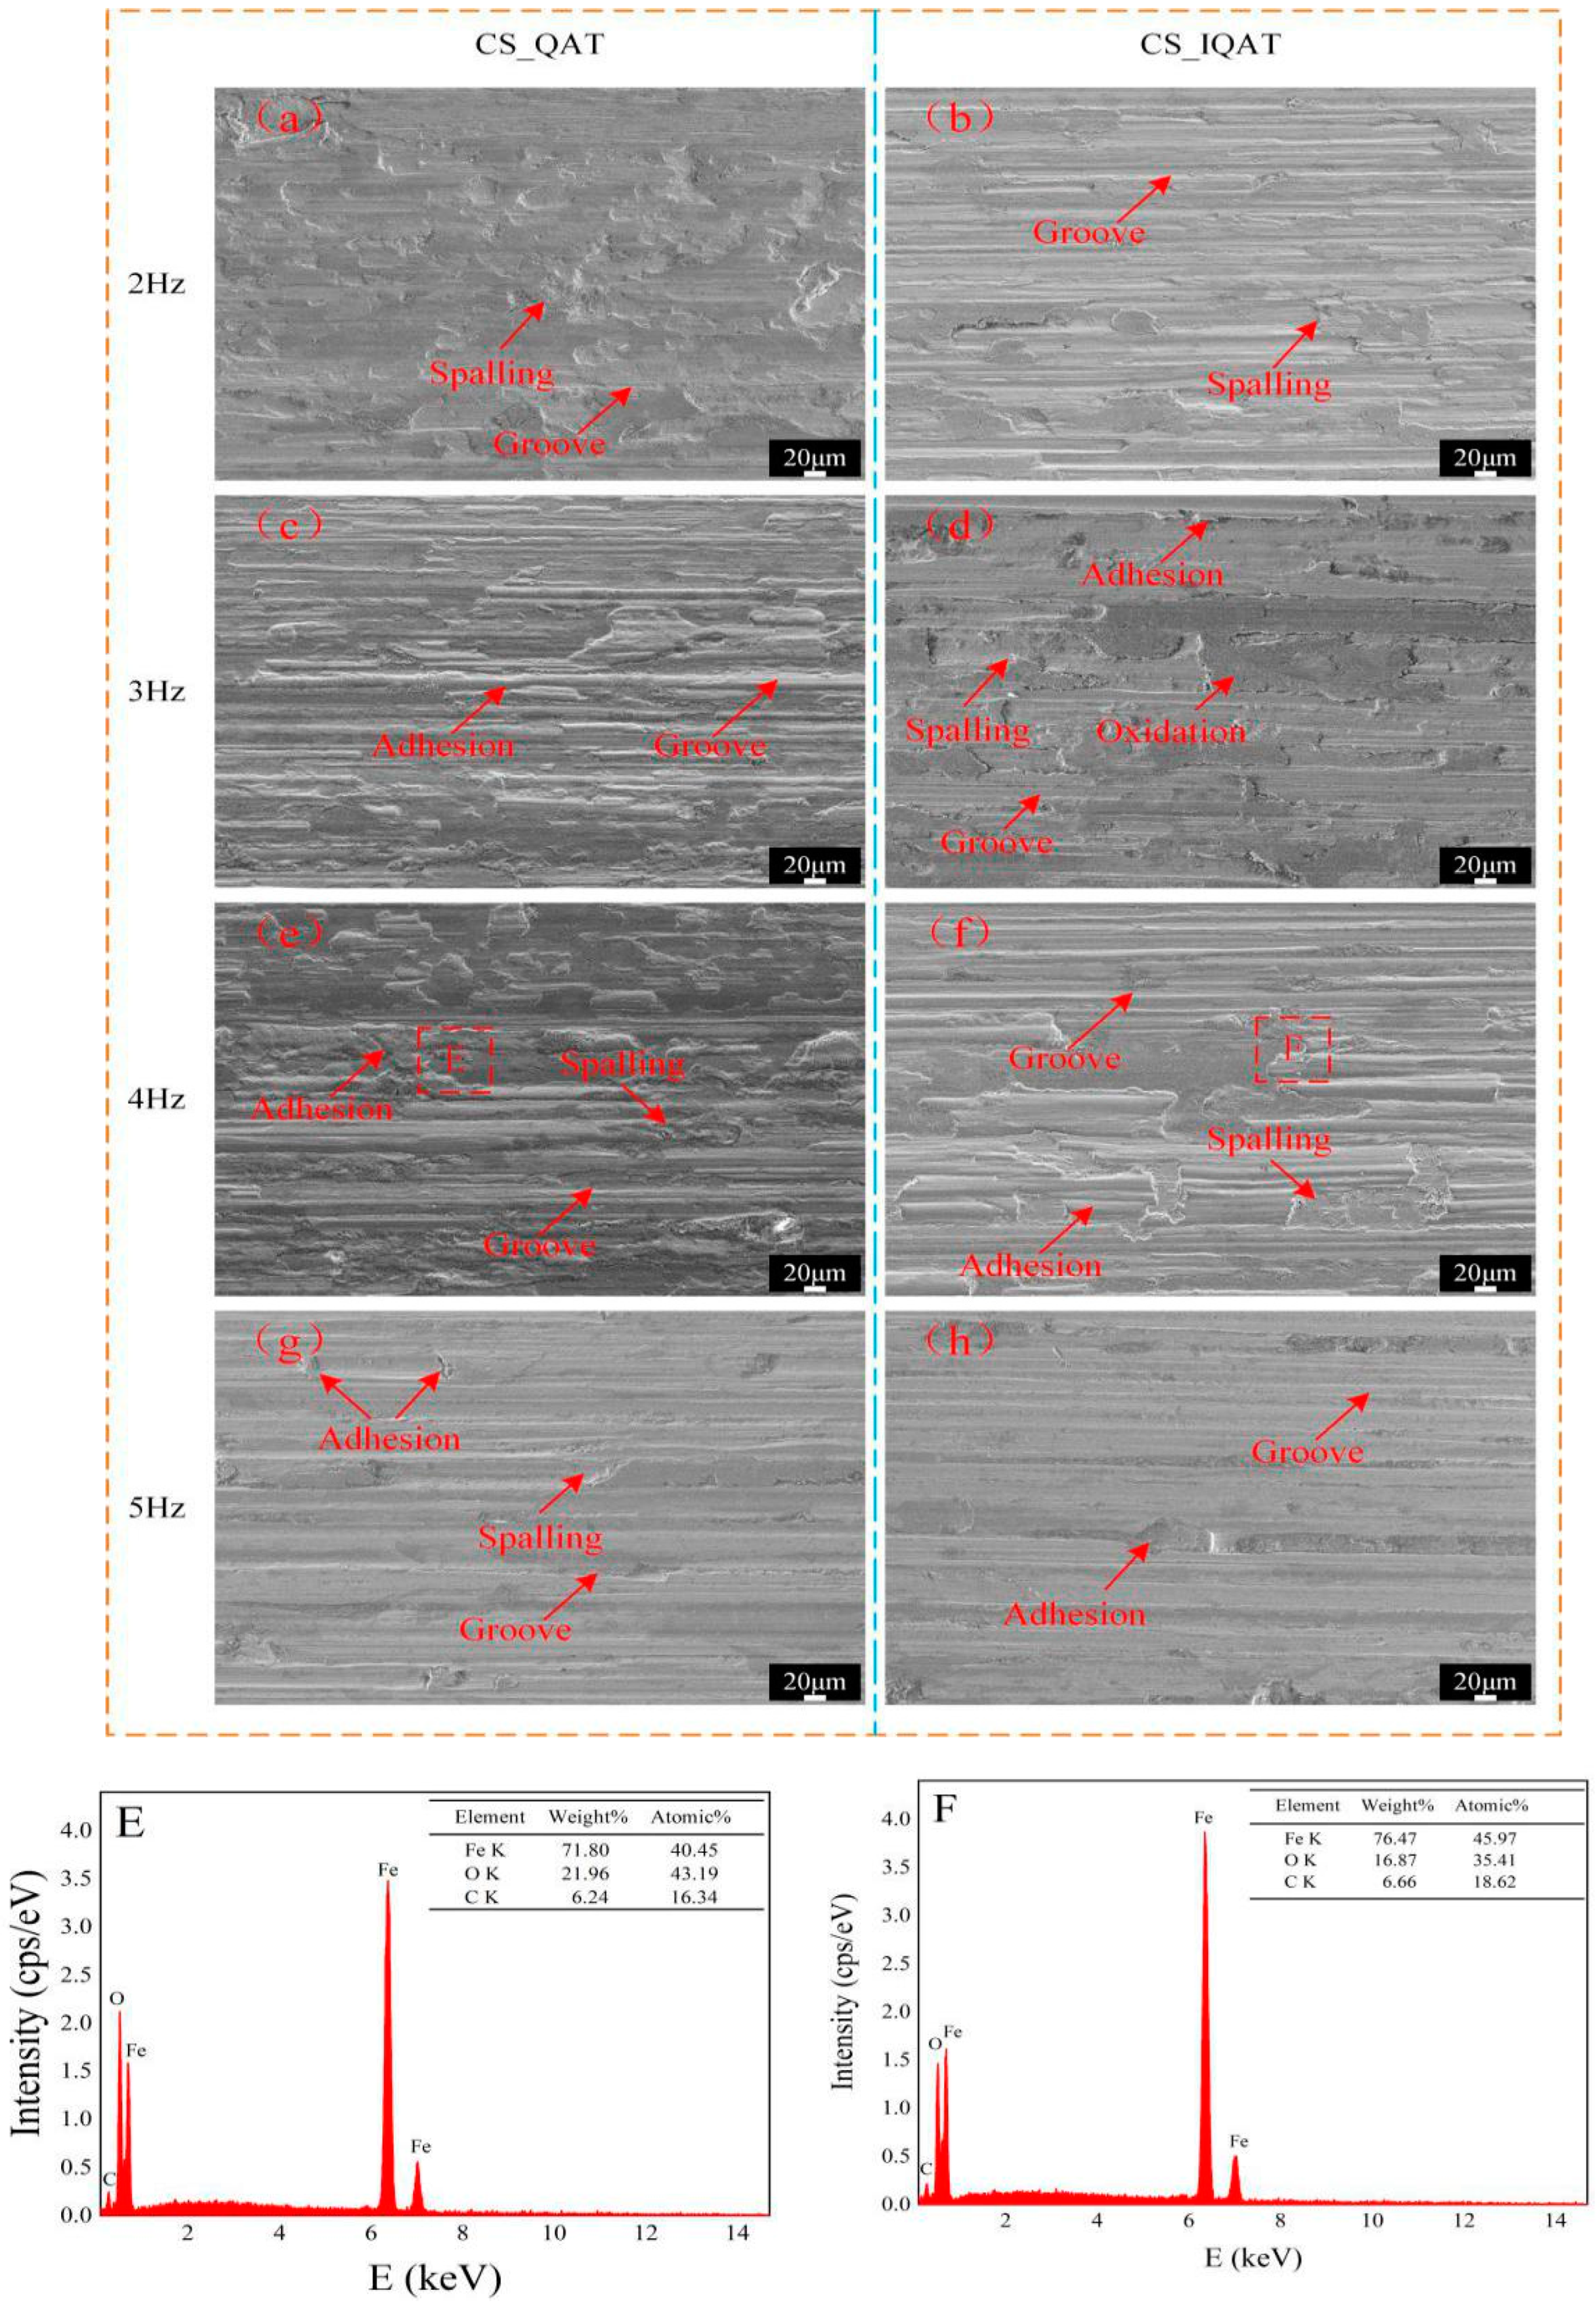
Figure 12 shows the SEM images and energy spectra of the wear surfaces of CS_QAT and CS_ IQAT at different frequencies. Furrows, flaking, oxidation, and adhesion were observed on the wear surfaces of CS_QAT and CS_IQAT, indicating that abrasive and adhesive wear occurred. In addition, the main wear mechanism of the CS_IQAT specimens changed from adhesive wear to abrasive wear with increasing frequency. The revelation of this mechanism is of great significance for the optimization of process parameters and improvement of part design.
Overall, the wear surface of CS_IQAT specimens is flatter compared to CS_QAT specimens at the same frequency. This can be attributed to the finer and more uniform organization of Fe3 C in CS_IQAT, as well as the higher hardness and yield stress. The fine and uniform organization effectively prevents crack propagation; the high hardness helps reduce wear on the material surface and the high yield stress helps maintain the shape and integrity of the material surface. These factors work together to make CS_IQAT specimens exhibit greater wear resistance under the same operating conditions.
When the frequency is 2 Hz, traces of flaking and plowing are observed on the surface of CS_QAT and CS_IQAT specimens, where the flaking phenomenon is more serious in CS_QAT. When the frequency is increased to 3 Hz, obvious traces of adhesion and furrowing can be observed on the wear surfaces of both, which leads to an increase in the roughness of the wear surfaces and an increase in the loss of material. The microstructures of both CS_QAT and CS_IQAT are composed of soft ferrite and hard Fe3C particles. During the wear process, the load application deforms the ferrite and part of the material is transferred to the friction surface or the surface of the corresponding GCr15 ball. At the same time, the hard Fe3C particles are exposed on the friction surface and act as abrasive particles. When the frequency is increased to 4 Hz, the relative sliding is further increased, generating a larger friction force, which leads to more frictional heat and increased adhesion. The energy spectrum results show that oxygen elements are present on the wear surfaces of both, indicating that some high-temperature oxidation reaction occurs during the adhesive wear process. The CS_QAT specimens have a higher oxygen content and more severe surface adhesion. Finally, when the frequency is increased to 5 Hz, the adhesion phenomenon of both is reduced, while the furrow phenomenon becomes obvious. This may be due to the fact that at high frequencies, the oxidation process is more intense and the generated oxide layer is able to partially alleviate the adhesive wear, thus reducing the adhesion phenomenon. However, the furrowing phenomenon becomes more significant due to the presence of oxide particles and exposed Fe3C particles.

4. Conclusions

This study comprehensively investigates the tribological behavior of 45 steel after intensive quenching and high-temperature tempering treatment, and analyzes in detail the correlation between microstructural and mechanical properties and friction and wear performance. By comparing the conventional CS_QAT process with the new CS_IQAT process, the following conclusions are drawn:
  • The microstructure of 45 steel obtained by the CS_IQAT process is more detailed and homogeneous, and its hardness and yield strength are significantly increased. The impact toughness is enhanced by nearly 1.9 times compared with the traditional CS_QAT specimens. This improvement significantly optimizes the overall mechanical properties of the material and is expected to significantly extend the service life of the workpiece.
  • In terms of wear resistance, specimens from the CS_IQAT process show lower average coefficients of friction and relative wear rates than those from CS_QAT, especially at high frequencies, where the relative wear rate is only 58 to 72 percent of that of CS_QAT specimens, and the wear surface is much flatter. This finding indicates that the CS_IQAT process can effectively replace the conventional process and significantly improve the wear resistance of the workpiece.
  • Comparison of the two processes revealed that the main wear mechanism shifted from adhesive wear to abrasive wear, and that the effect of abrasive wear on part life became more pronounced as the frequency of testing increased. The revelation of this mechanism is of great significance for the optimization of process parameters and improvement of part design.

Author Contributions

Conceptualization, S.X. and X.Z.; methodology, S.X. and X.Z.; validation, X.Z., Y.F. and Y.L.; formal analysis, X.S.; investigation, S.X.; resources, S.X.; data curation, S.X.; writing—original draft preparation, S.X.; writing—review and editing, X.Z., Y.F. and Y.L.; visualization, X.S.; supervision, Y.F.; project administration, S.X.; funding acquisition, S.X. All authors have read and agreed to the published version of the manuscript.

Funding

This work is supported by the Tianchi Program for High-level Talents of Xinjiang Uygur Autonomous Region (100400018).

Institutional Review Board Statement

Not applicable.

Informed Consent Statement

Not applicable.

Data Availability Statement

The datasets generated for this study are available on request to the corresponding author.

Conflicts of Interest

The authors declare no conflicts of interest.

References

  1. Hao, W.; Ping, C.; Yang, L.; Tianshou, M. Effect of Axial Vibration on Sliding Frictional Force between Shale and 45 Steel. Shock Vib. 2018, 2018, 4179312. [Google Scholar] [CrossRef]
  2. Singh, S.; Samir, S.; Kumar, K.; Thapa, S. Effect of heat treatment processes on the mechanical properties of AISI 1045 steel. Mater. Today Proc. 2021, 45, 5097–5101. [Google Scholar] [CrossRef]
  3. Rogante, M. Wear characterization and tool performance of sintered carbide inserts during automatic machining of AISI 1045 steel. J. Mater. Process Technol. 2009, 209, 4776–4783. [Google Scholar] [CrossRef]
  4. Lesyk, D.A.; Mordyuk, B.N.; Martinez, S.; Iefimov, M.O.; Dzhemelinskyi, V.V.; Lamikiz, A. Influence of combined laser heat treatment and ultrasonic impact treatment on microstructure and corrosion behavior of AISI 1045 steel. Surf. Coat. Technol. 2020, 401, 126275. [Google Scholar] [CrossRef]
  5. Lu, S.; Miao, B.; Song, L.; Song, R.; Wei, K.; Hu, J. Enhancement of wear resistance of AISI 1045 steel by a two-step plasma treatment. Vacuum 2017, 145, 153–157. [Google Scholar] [CrossRef]
  6. Pereira, D.; Gandra, J.; Pamies-Teixeira, J.; Miranda, R.M.; Vilaça, P. Wear behaviour of steel coatings produced by friction surfacing. J. Mater. 2014, 214, 2858–2868. [Google Scholar] [CrossRef]
  7. Li, J.; Cao, Z.; Liu, L.; Liu, X.; Peng, J. Effect of microstructure on hardness and wear properties of 45 steel after induction hardening. Steel Res. Int. 2002, 92, 2000540. [Google Scholar] [CrossRef]
  8. Fortini, A.; Bertarelli, E.; Cassola, M.; Merlin, M. An Industrial-Scale Study of the Hardness and Microstructural Effects of Isothermal Heat Treatment Parameters on EN 100CrMo7 Bearing Steel. Appl. Sci. 2024, 14, 737. [Google Scholar] [CrossRef]
  9. Arana, M.; Ukar, E.; Rodriguez, I.; Aguilar, D.; Alvarez, P. Influence of deposition strategy and heat treatment on mechanical properties and microstructure of 2319 aluminium WAAM components. Mater. Design 2022, 221, 110974. [Google Scholar] [CrossRef]
  10. Burton, J.; Love, H.; Richards, K.; Burton, C.; Summers, S.; Pitman, J.; Easterbrook, E.; Davies, K.; Spencer, P.; Roberts, A.D.; et al. The effect of heat-treatment on SARS-CoV-2 viability and detection. J. Virol. Methods 2021, 290, 114087. [Google Scholar] [CrossRef]
  11. Zhang, H.; Xie, Z.; Zhu, X.; Cheng, H.; Ma, H.; Lv, Z.; Wang, G. Optimization of heat treatment process of 34CrNi3MoV steel case. Met. Heat Treat. 2023, 48, 224–228. [Google Scholar] [CrossRef]
  12. Liu, H. Comparison of tribological properties between 45~# steel and 40Cr steel under different heat treatment conditions. Lubr. Oil 2007, 7, 129–131. [Google Scholar]
  13. Zhang, J.; Zhao, M.-C.; Tian, Y.; Zhang, J.; Wang, Z.; Zhao, Y.-C.; Peng, L. Simultaneous Enhancement of Strength and Sulfide Stress Cracking Resistance of Hot-Rolled Pressure Vessel Steel Q345 via a Quenching and Tempering Treatment. Materials 2024, 17, 1636. [Google Scholar] [CrossRef]
  14. Kuznetsov, A.A.; Rudnev, V.I. Causes of Cracking in Quenching of the Parts Made of Steels and Cast Iron and Recommendations for Their Removal: A Review. Russ. Metall. 2017, 2017, 1125–1130. [Google Scholar] [CrossRef]
  15. Cai, W.; Meng, F.; Gao, X.; Hu, J. Effect of QPQ nitriding time on wear and corrosion behavior of 45 carbon steel. Appl. Surf. Sci. 2012, 261, 411–414. [Google Scholar] [CrossRef]
  16. Kruthiventi, S.; Basavakumar, K.G.; Nambala, S.; Subramanyacharyulu, G. Influence of Heat Treatment on Microstructural and Mechanical Properties of Nodular Cast Iron. J. Inst. Eng. Ser. D 2014, 95, 75–79. [Google Scholar] [CrossRef]
  17. Yim, S.; Bian, H.; Aoyagi, K.; Chiba, A. Effect of multi-stage heat treatment on mechanical properties and microstructure transformation of Ti–48Al–2Cr–2Nb alloy. Mat. Sci. Eng. A Struct. 2021, 816, 141321. [Google Scholar] [CrossRef]
  18. Kobasko, N.I.; Aronov, M.A.; Powell, J.A.; Canale, L.C.F.; Totten, G.E. Intensive quenching process classification and applications. Heat Treat. Met. 2004, 31, 51–58. [Google Scholar] [CrossRef]
  19. Kobasko, N.I. Quench Process and Steel Chemistry Optimization to Prevent Quench Cracking during Hardening of Splined Semi—Axles. Eur. J. Appl. Phys. 2021, 3, 23–28. [Google Scholar] [CrossRef]
  20. Freborg, A.M.; Ferguson, B.L.; Aronov, M.A.; Kobasko, N.I.; Powell, J.A. Intensive quenching theory and application for imparting high residual surface compressive stresses in pressure vessel components. J. Press. Vess. Technol. 2003, 125, 188–194. [Google Scholar] [CrossRef]
  21. Amatanweze, K.T.; Buchely, M.F.; Athavale, V.A.; Bartlett, L.N.; O’Malley, R.J.; Suzuki, T. Residual Stress Distribution, Distortion, and Crack Initiation in Conventional and Intensive Quench Practices. J. Mater. Eng. Perform. 2024, 33, 3838–3848. [Google Scholar] [CrossRef]
  22. Samuel, A.; Prabhu, K.N. Residual stress and distortion during quench hardening of steels: A review. J. Mater. Eng. Perform. 2022, 31, 5161–5188. [Google Scholar] [CrossRef]
  23. Huang, B.; Xu, H.; Jiang, N.; Wang, M.; Huang, J.; Guan, L. Tensile-Strained RuO2 Loaded on Antimony-Tin Oxide by Fast Quenching for Proton-Exchange Membrane Water Electrolyzer. Adv. Sci. 2022, 9, 2201654. [Google Scholar] [CrossRef]
  24. Chen, X.; Zhu, Y.; Wu, Y.; Hao, J.; Ma, X.; Lu, P. Modeling of fast ionization waves in pure nitrogen at moderate pressure. Plasma Sources Sci. Technol. 2021, 30, 065002. [Google Scholar] [CrossRef]
  25. Lowrie, J.; Pang, H.; Ngaile, G. Weight reduction of heavy-duty truck components through hollow geometry and intensive quenching. J. Manuf. Process. 2017, 28, 523–530. [Google Scholar] [CrossRef]
  26. Yang, D.; Zhu, X.; Bo, Y.; Maimaiti, A. Intensive quenching + tempering treatment of 40Cr steel. Met. Heat Treat. 2023, 48, 117–123. [Google Scholar] [CrossRef]
  27. Peng, S.; Wang, Z.; Li, J.; Fang, Q.; Wei, Y. Beyond Orowan hardening: Map the four distinct mechanisms associated with dislocation-precipitate interaction. Int. J. Plast. 2023, 169, 103710. [Google Scholar] [CrossRef]
Figure 1. MFT-5000 (from Rtec Silicon Valley, San Jose, CA, USA) working principle diagram.
Applsci 14 05942 g001
Figure 2. Optical microscopic images of (a) CS_QAT and (b) CS_IQAT.
Applsci 14 05942 g002
Figure 3. SEM images of CS_QAT and CS_IQAT (a) CS_QAT; (c) CS_QAT; (b)CS_IQAT; (d) CS_IQAT.
Applsci 14 05942 g003
Figure 4. XRD images of CS_QAT and CS_IQAT.
Applsci 14 05942 g004
Figure 5. Hardness and impact toughness of CS_QAT and CS_IQAT.
Applsci 14 05942 g005
Figure 6. Stress–strain curves of CS_QAT and CS_IQAT.
Applsci 14 05942 g006
Figure 7. Friction coefficient curves of CS_QAT and CS_IQAT at different frequencies: (a) CS_QAT; (b) CS_IQAT.
Applsci 14 05942 g007
Figure 8. Average friction coefficient at different frequencies.
Applsci 14 05942 g008
Figure 9. Relative wear rates of CS_QAT and CS_IQAT at different frequencies.
Applsci 14 05942 g009
Figure 10. Wear width and depth plots of CS_QAT and CS_IQAT at different frequencies: (a) CS_QAT; (b) CS_IQAT.
Applsci 14 05942 g010
Figure 11. Three-dimensional morphology of CS_QAT and CS_IQAT wear at different frequencies: (a) CS_QAT; (b) CS_IQAT.
Applsci 14 05942 g011
Figure 12. SEM images and energy spectra of CS_QAT and CS_IQAT on the worn surface at different frequencies: (a,b) 2 Hz; (c,d) 3 Hz; (e,f) 4 Hz; (g,h) 5 Hz; (E) 4 Hz CS_QAT energy spectrum; (F) 4 Hz CS_IQAT energy spectrum.
Applsci 14 05942 g012
Table 1. Chemical composition of 45 steel (wt.%).
Chemical
Element
CCrMnNiPSSiFe
Content0.42~
0.50
0.001~
0.25
0.50~
0.80
0.001~
0.25
0.001~
0.035
0.001~
0.035
0.17~
0.37
excess
Disclaimer/Publisher’s Note: The statements, opinions and data contained in all publications are solely those of the individual author(s) and contributor(s) and not of MDPI and/or the editor(s). MDPI and/or the editor(s) disclaim responsibility for any injury to people or property resulting from any ideas, methods, instructions or products referred to in the content.