Article

Modelling of Acoustic Emission Signals Due to Fiber Break in a Model Composite Carbon/Epoxy: Experimental Validation and Parametric Study

1
Univ Lyon, INSA de Lyon, MATEIS UMR 5510, F-69621 Villeurbanne, France
2
Univ Lyon, INSA-Lyon, LVA EA677, F-69621 Villeurbanne, France
*
Author to whom correspondence should be addressed.
Appl. Sci. 2019, 9(23), 5124; https://doi.org/10.3390/app9235124
Submission received: 7 November 2019 / Revised: 18 November 2019 / Accepted: 22 November 2019 / Published: 26 November 2019
(This article belongs to the Section Acoustics and Vibrations)

Abstract

:
The present paper focuses on experiments and numerical simulation of the acoustic emission (AE) signals due to fiber break in a model composite. AE signals are related to wave effects due to the source, the propagation medium and the sensor. For quantitative AE analysis, it is very important to understand the effect of the piezoelectric sensors and propagation on the “primitive” AE signals. In this study, we investigate the influence of sensors, thickness, and position of the fiber by finite element simulations. This parametric study can allow an enlargement of the library for supervised classification of AE signals.

1. Introduction

In addition to allowing fault detection, the acoustic emission (AE) technique has garnered growing interest as a method for improving our understanding of the fracture processes of composite materials. There is a strong interest in AE for real-time diagnostics and prognostics [1,2,3,4]. Damage processes in composites materials, such as fiber breakage, induce local changes in the stress states and radiate elastic waves. If the amplitude of the elastic waves is large enough to be detected by sensors applied directly on the surface of the samples, AE can give an indication of the damage mechanisms. Due to inhomogeneity of the composites, the elastic waves are considerably affected. However, we can consider that the AE signal contains some features characteristic of the source. Indeed, the opportunity to identify AE signatures of several damage mechanisms is an established field [5,6,7,8,9,10,11]. In the phenomenological approach, it is assumed that signals are affected by propagation and acquisition but that they remain images of sources. In this context, the different types of failures such as fiber breaks, fiber/matrix debonding, several kinds of matrix cracking and delamination are identified thanks to their AE signature, described by descriptors or features such as amplitude, energy, peak frequency, frequency centroid, etc. In most of the studies dealing with failures in polymer matrix composites, higher frequency and higher amplitude are assigned to fiber breaks and lower frequency and amplitude are attributed to matrix cracking.
Certainly, the possibility to separate matrix cracking from fiber failure and fiber/matrix debonding depends on different visco-elastic relaxation processes [12,13,14]. Intrinsic frequencies fi and velocities ci of relaxation processes are different in fiber and matrix due to the relationship between the relaxation times τi, elastic moduli Ei and densities, according ρi to the following equation:
f i     1 τ i c i   E i ρ i
Figure 1 represents the whole AE process. The AE signal is the convolution of the AE source mechanism and the different transfer functions of the propagation medium, of the sample geometry, of the sensor and of the acquisition system. The propagation of acoustic signals is subject to boundary effects; in addition, the propagation of the elastic waves is subject to attenuation that modifies the waves. In fact, besides the type of failures, the AE signals depend on other parameters such as type of sensor, the sample geometry and propagation distance. All these parameters influence the AE signal [15,16,17,18,19,20,21,22]. In AE analysis, it is important to distinguish the effect of the AE source from the influence of the propagation medium and the recording system. The quantitative AE method requires understanding and modelling of all the components in Figure 1. The influence of the propagation medium and its geometry cannot be separated. Nevertheless, the estimation of the transfer function of the sensor and the amplifier can be established with experimental methods. Based on experimental tests, it is not possible to comprehend the impact of the different parameters. Nevertheless, modelling of AE using analytical or numerical methods allows us to go further and establish a quantitative relationship between the AE source and the signal. Various authors have applied analytical or numerical methods to the simulation of AE formation and AE propagation [23,24,25,26,27,28,29,30,31,32,33,34,35,36,37,38]. Following the works of Ono and Ohtsu [28], who proposed a generalized theory of AE by using the integral formulation of elastodynamics, AE sources can be modelled using buried dipoles sources. The AE source was classically modelled as point force couple utilizing a multi-scale approach. In addition, various source-time function are employed which model kinematics. Moreover, signal propagation suffers drastically from boundary reflections, which complicates the identification of the modes. Suzuki et al. [38] extended the analyses to a dissipative medium including a relaxation function. In the case of viscoelastic plates, Giordano et al. [14] developed a model for AE wave propagation and predicted the displacement based on the ray theory. Dietzhausen et al. [23] investigated the dynamic behaviour due to a single fiber break using finite element methods and carried out parametric studies with different laws for the matrix effect (elastic, a non-linear elastic and an elastic-plastic model) and different fiber positions. A dynamic finite element method (DFEM) has been developed for prediction AE waveforms in the far field plates [24,26]. Sause et al. [31] modelled, by a finite element method, AE sources in a composite material for different damage mechanisms, in addition to the signal propagation and the different elements of the acquisition chain. They compared the experimental values of the descriptors with the theoretical values generated by the damage mechanism in order to validate the labelling of the signals. Wilcox et al. [33] have implemented a deterministic modular AE model using analytical formulation for AE sources, finite element methods for the wave propagation and reception by finite sized transducers. For the signal detection, some analytical approaches considered the sensors transfer function explicitly. Some authors [39,40,41,42,43] have proposed a finite element approach to include the piezoelectric sensor in a modelling environment in order to take into account the interface between the sensor and the material.
In this work, we focus on identifying AE features due to fiber break using the Finite Element Method. We perform experiments and simulations on a model composite consisting of an epoxy matrix with a single carbon fiber. In the experimental part, we use different types of sensors both in the experiments and in the simulations in order to understand and to quantify the sensor effect on the signal waveform. Indeed, the problem that has received the least attention is that of the sensor effects. Moreover, this model is used to analyse and decompose simulated AE “primitive “signals without a sensor near the source. We underline the interest in using the results obtained with the modelling work, in order to increase the robustness of the supervised classification of AE signals. Indeed, a supervised classification is based on the creation of a library of labelled data. This approach is based on the assumption that the feature measurements and the identified classes for the library are error-free. However, one cannot exclude that the library may contain uncertainty. The performance of the classifier depends on both the number of the available training signals as well as the specific values of the signals. In this context, merging the simulated and the experimental data enables to enlarge the library.
The present paper is organized as follows: The experimental procedure and the acoustic emission analysis are first detailed in Section 2. The model is described in Section 3. The validation of the numerical method is presented in Section 4. With the validated FEM, the out-of-plane and the in-plane velocities corresponding to fiber breaks are calculated. At first, our approach is to study the numerical AE signals without any sensor effect (with a virtual perfect contact point sensor), then adding the sensor effect and compare the results. In the parameter study, the effects of the sensor, the thickness of the specimen, the position of the fiber are investigated in order to generate artificial data that can be merged with experimental data in a training set. The results of the parametric study are discussed in Section 5. As an additional point, we have performed 2D Fourier Transform-based time/frequency analyses in order to improve our understanding of the frequency content of AE signals and the effects of both sensor and propagation on it. Conclusions are provided in Section 6.

2. Experimental Procedure and Acoustic Emission Signal Analysis

2.1. Single Fiber Fragmentation Tests (SFFT) and Acoustic Emission Monitoring

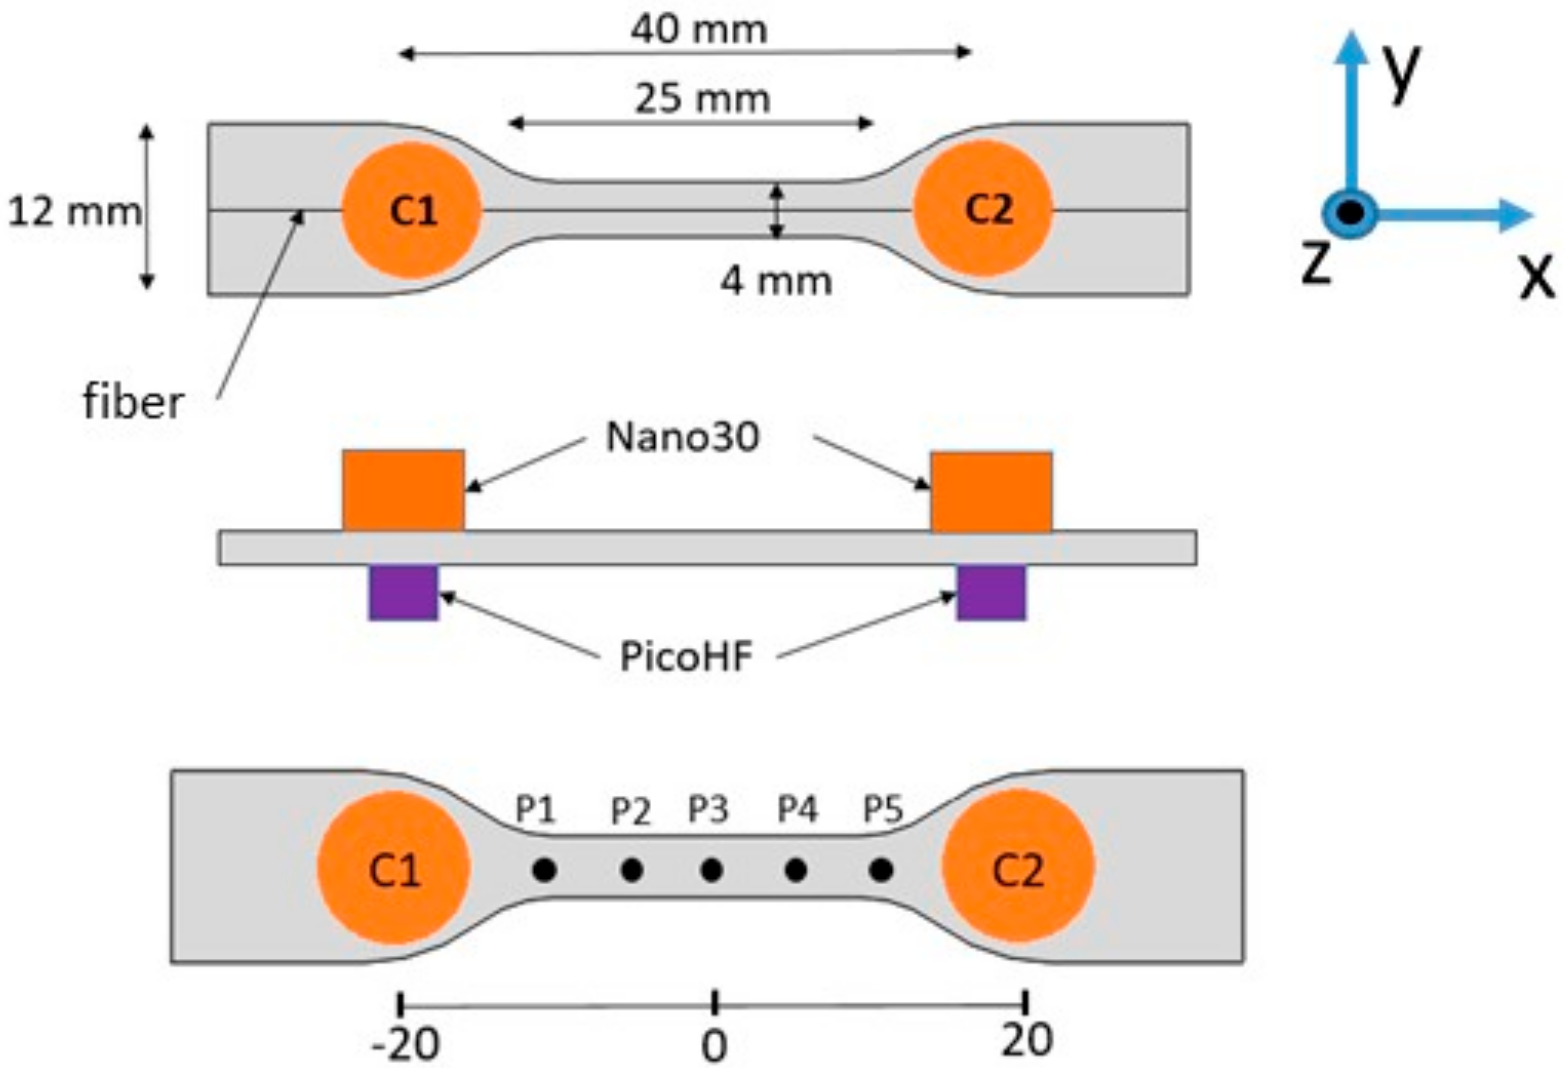
The specimen consists of a single long T700 carbon fiber (diameter 6 μm) inserted in an epoxy/amine matrix (3DCM). The sizes of the specimen are summarized in Figure 2 and Table 1 gathers the mechanical properties of the fiber and the matrix.
The thickness of the experimental specimens is 2.8 mm or 1.7 mm, respectively. In both cases, the fiber is not positioned in the middle of the sample along the z-axis but rather 0.5 mm from the surface. The position of the fiber is a little asymmetric with respect to the mid-plane of the specimen to excite symmetric and antisymmetric modes. The SFFT is carried out at room temperature and with a deformation rate of 0.5 mm/min ensured by the tensile test machine (type: MTS, capacity 5 kN). The AE monitoring is conducted by means of multiple sensors using a PCI-2 data acquisition system (Mistras Group, Sucy en Brie, France). In order to study the sensors’ effects, tensile tests are conducted with two types of sensors (nano30 and picoHF sensors) placed at the same position on each face of the specimen 40 mm apart (Figure 2). These two sensors show a good sensitivity in the frequency range of 200 to 400 kHz for nano30 sensor and 500-1850 kHz for picoHF sensor (Mistras Group data). Thus, by using both of them for tensile testing it is interesting to investigate, from an experimental point of view, the effect of the sensor on AE descriptors. In all tests, the coupling agent is medium viscosity vacuum grease.
Each sensor is linked to a preamplifier (gain 40 dB, type 20 H). Each waveform is digitized and recorded. We set the sampling rate to 2 MSPS or 5 MSPS in order to make a compromise between the respective peak frequencies of the sensors, the digitization capabilities of our system and the volume of data to be stored. The value of the acquisition threshold is equal to 32 dB, depending on the background noise and the acquisition parameters are set to 25 μs, 50 μs and 1000 μs for the peak definition time (PDT), the hit definition time (HDT) and the hit lockout time (HLT). All signals are filtered in the bandwidth 20–1200 kHz. Since two sensors are used, only the located signals along the gauge length are used. The AE wave velocities are measured with pencil lead breaks. The velocity is equal to 1750 m/s with nano30 sensors and to 1500 m/s with the picoHF sensors.

2.2. Signal Analysis

In conventional acoustic emission, different features or descriptors are extracted from the signals [44,45]. For each signal, prior to the extraction of descriptors, the waveform pre-processing consists in the three following steps [44]: pre-trigger removing, tail cutting, and Shape Preserving Interpolation (SPI) resampling.
The interest in the use of this specific resampling technique is that, after tail cutting, each waveform has a different number of points, thus it is not possible to numerically store them all in a matrix for further processing. With the SPI resampling, the original sampling frequency can be recovered and the full pre-processed waveforms can be stored. The beginning of the signal is determined when a fixed threshold is exceeded (32 dB). For the tail cutting, to determine the end of the signal, we employ a floating threshold (10 % of the peak amplitude). We calculated more than 15 parameters on each AE signal (Table 2).
Temporal features, such as amplitude, rise time, duration, can be extracted from the temporal evolution of the signal. In this work, the main features investigated are amplitude, energy, frequency centroid (FC) and peak frequency (PF). The opening frequency (fop) or the roll-on frequency is such that the interval [0; fop] contains 5% of the energy of the complete spectrum. Thus, it gives information on the presence of components at low frequencies. The cut-off frequency (fcut) or the roll-off frequency is such that the interval [0; fcut] contains 95% of the energy of the complete spectrum. Additionally, the spectral contents of the waveforms are analysed in frequency domain by a Fast Fourier transform (FFT) and with the Smoothed Pseudo Wigner-Ville Distribution (SPWVD).

3. Finite Element Simulation of Acoustic Emission (AE) Signal

3.1. Fiber Break Model

In this study, we perform all FEM simulations using the ABAQUS software (Dassault Systèmes Simulia Corp., Providence, RI, USA) with dynamic calculations. We model the full geometry of the sample. Figure 3 shows the boundary conditions. Clamping jaws are taken into account as boundary conditions. The geometry is meshed using tetrahedral elements (C3D4), the element size varies between 0.01 mm and 0.2 mm and the calculation step time is 0.1 µs. The resolution of the finite mesh is gradually refined from 0.2 mm down to 0.01 mm close to the model source. The element size determines the frequency range that can be modelled: smaller elements are required to capture higher frequencies. A total duration of 170 μs was calculated. Sensitivity studies are conducted on mesh refinement and for the size of the time step. The selected step size and mesh element size are appropriate to obtain convergent results in the frequency range between 10 kHz and 1500 kHz. Simulation results are filtered with Butterworth passband filter [20 kHz, 1.2 MHz]. Table 1 shows the main properties of the material. Epoxy is modelled by elastoplastic material with damping properties. The viscoelasticity of the matrix is taken into account by the Rayleigh parameters ( α R = 50 , 000   s 1 et β R = 10 8   s ) . Fiber direction is oriented along the x–axis. We place the origin of the coordinate system at the centre of the specimen. The fiber breakage is mimicked by an instantaneous separation of nodes, which forms fracture faces and generates elastic waves. During the modelling of AE signals, the failure process is supposed to occur without change in its rate. Hamstad et al. initially [46] showed that the depth of an acoustic emission event significantly affects the wave modes excited and the spectral content of the signal. For this reason, two depths of fiber position are considered (0.5 mm from the surface, and in the middle of the specimen). Three thicknesses of the sample are also investigated (1 mm, 1.7 mm and 2.8 mm). The in-plane direction is the direction perpendicular to the fiber (Y axis in Figure 3) and the out-of-plane direction is normal to the specimen’s surface (Z axis in Figure 3). For the fiber failure, the major displacement is along the fiber axis, while the dominant source emissions are in the xy plane (in-plane). The AE numerical signals from a single node provide the out-of-plane top surface velocity (vz) corresponding to a virtual perfect point-contact sensor located on the surface of the specimen. The AE numerical signals from a single node on the lateral surface provide the in-plane lateral surface velocity (vy) corresponding to a virtual perfect point-contact sensor located on the lateral surface. For the extraction of the descriptors on numerical models, an amplification of the modelled signals by 115 dBAE allows a direct comparison of the AE signal amplitudes.
We use the two-dimensional Fourier Transform (2DFT) [30,47] to analyse the modal content of the propagating waves. The 2DFT allows visualizing 2D matrix signals in the frequency domain. One dimension of the matrix is time and the other dimension is the distance to the source. The 2DFT displays the evolution of the wave number as a function of the temporal frequency. For a discrete signal matrix s(n,m) of size N × M, the 2DFT is given by:
S u , v =   n = 0 N 1 m = 0 M 1 s n , m e j 2 π u n N + v m M
The 2DFT are computed using the particle velocity (vz) or (vy) of every node of the finite element mesh along the median line of the upper face of each sample or of the lateral face, from the epicentre source to a distance of 34 mm or 18 mm. The use of 2D Fourier Transform allows visualizing the modal content of propagating waves in each cases. Due to the large number of signals required to calculate the 2DFT only numerical models allow us to extract simultaneously several signals out of one unique simulation. Those signals have been filtered between 20 kHz and 1.2 MHz by a Butterworth bandpass filter. In order to compare the values of the features with the experimental values, we set the threshold values for the extraction of descriptors with respect to the experimental signals.

3.2. Sensor Effect

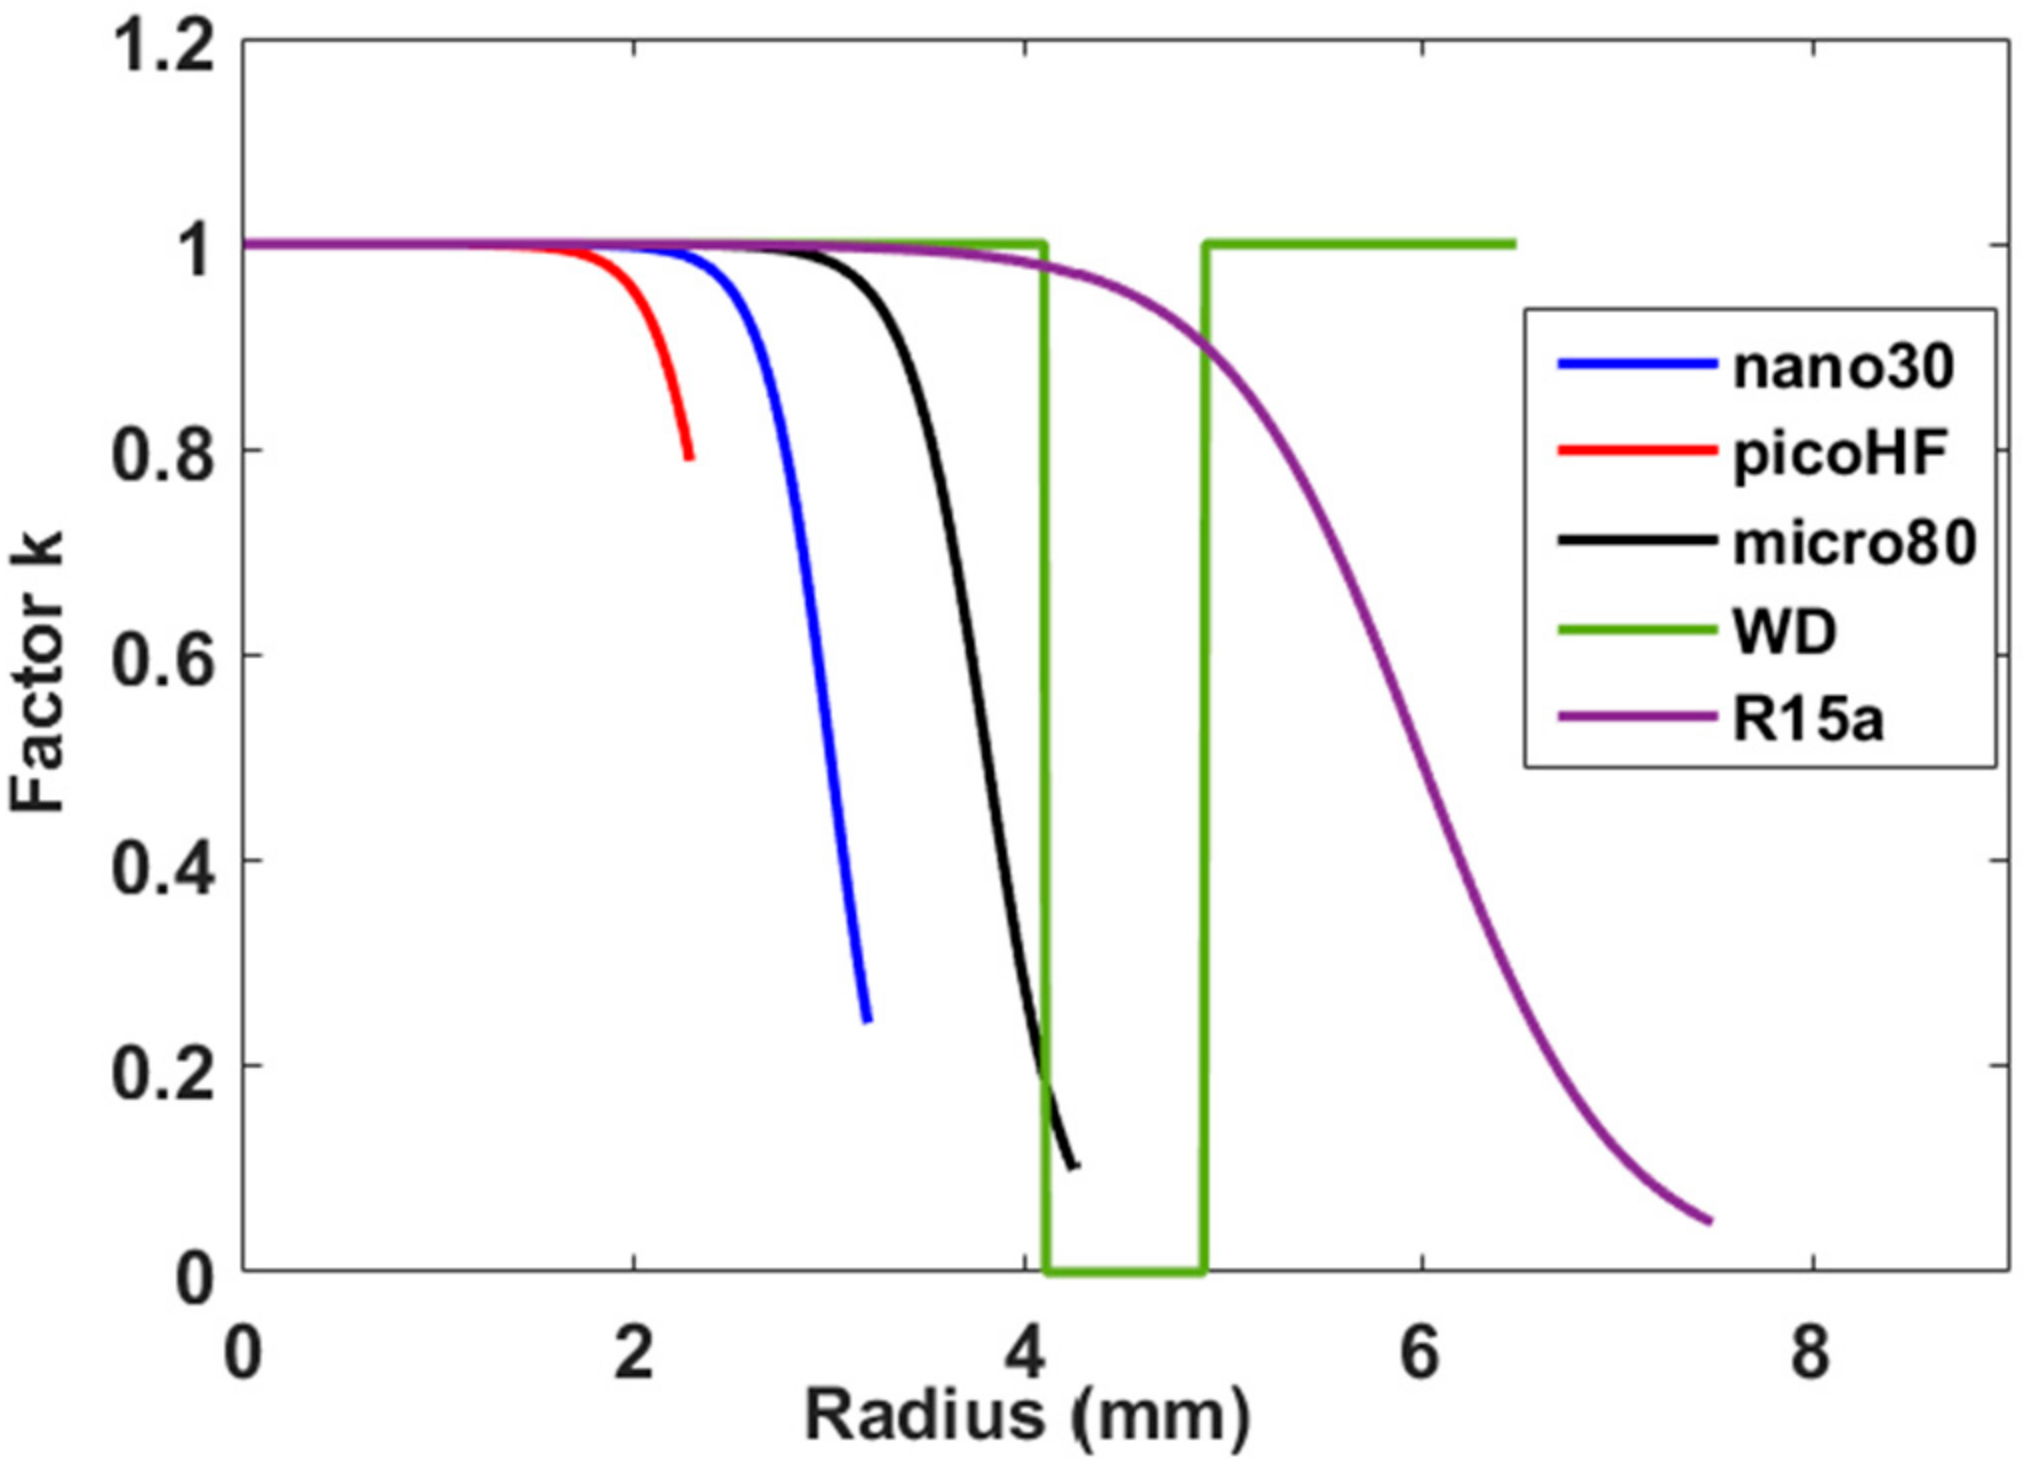
The sensors are assumed to be solely sensitive to displacement normal to the surface of the sample. The quantitative analysis of the AE data involves understanding of the sensors response in reception [48,49,50,51,52]. The reciprocity method is used for sensor’s calibration [50,51,52]. The determination of the sensitivity needs three transducers alternatively working as transmitters and receivers. The reception wave sensitivity is measured on a steel block [51,52] for Rayleigh waves. Figure 4a shows the Rayleigh wave reception sensitivity of a µ80 sensor, nano30, R15 and picoHF sensor obtained with the reciprocity method. For the WD sensor, Sause et al. [39] obtained the calibration curve used in this study on a composite material by a modelling approach. WD is wideband transducers with a bandwidth of 100–1000 kHz and a resonant frequency at 650 kHz. R15 is a general-purpose 150 kHz resonant sensor, nano30 with nominal operating frequency of 200 kHz–400 kHz.
In order to simulate sensors, axial wave velocities at nodal locations vz are calculated on the sensor surface (Figure 4b). The normal vibration velocity at each point of its surface is not uniform. An average VZ axial wave velocity is numerically calculated by Equation (3):
V z t = 1 A S e n s o r k . v z x , y , t d x d y
Asensor represents the area of the sensor. The radius for the sensors are equal to Rnano30 = 3.2 mm, RpicoHF = 2.3 mm and RR15 = 7.5 mm. In order to take into account the aperture effect, we introduce the k parameter, which is a real number between 0 and 1. It represents the sensitivity of a point at the distance r from the centre of the sensor surface. Figure 5 represents the evolution of the parameter k. This evolution is deduced from the work of Boulay [42]. The aperture function depends not only on the geometry of the sensor and the spatial evolutions of the sensitivity of sensor surface but also on the frequency. In this study, we do not take into account the effect of the frequency.
For the WD sensors, we use the calculation proposed by Sause et al. [39], following Equation (4). The signal is obtained from the average at the surface of the disc and ring sensor elements:
V z t = 1 A D i s c v z x , y , t d x d y + 1 A r i n g v z x , y , t d x d y
where ADisc is the area of the disc and Aring is the area of the second element in the sensor, the ring (RDisc = 4.1 mm and the thickness of the ring is equal to 1.6 mm).
This transfer function is added in the post-processing phase in the Fourier domain, following Equation (5):
V s u r f a c e ω × S s e n s o r ω = V s e n s o r ω
where Vsensor is the velocity calculated with considering sensor, Vsurface (ω) represents the mean of out of plane velocity on the surface and Ssensor (ω) the sensitivity function. In this study, the coupling medium is not taken into account. All numerical velocity signals are filtered with a Butterworth 20 kHz to 1200 kHz band pass filter. As it has been pointed out in literature [39,52,53], the propagation medium used for calibration will not only disturb the signals due to modifications in the waves velocity but will also modify the sensor response due to change in acoustic impedance. In this study, we do not take into account such change of the sensor response. As reported by [42,53,54], the couplings show slight influence of the sensors reception sensitivity, but this is negligible compared to the other contributions. Since no measurements were possible for frequencies below 100 kHz for Micro80 and R15 sensors, we assigned the missing values to the value of the sensitivity obtained for 100 kHz. Similarly, we extended the missing range for nano30 and R15 sensors, above 1 MHz, by the constant value obtained for the calibration at 1 MHz.

4. Results and Discussion

4.1. Experimental Results

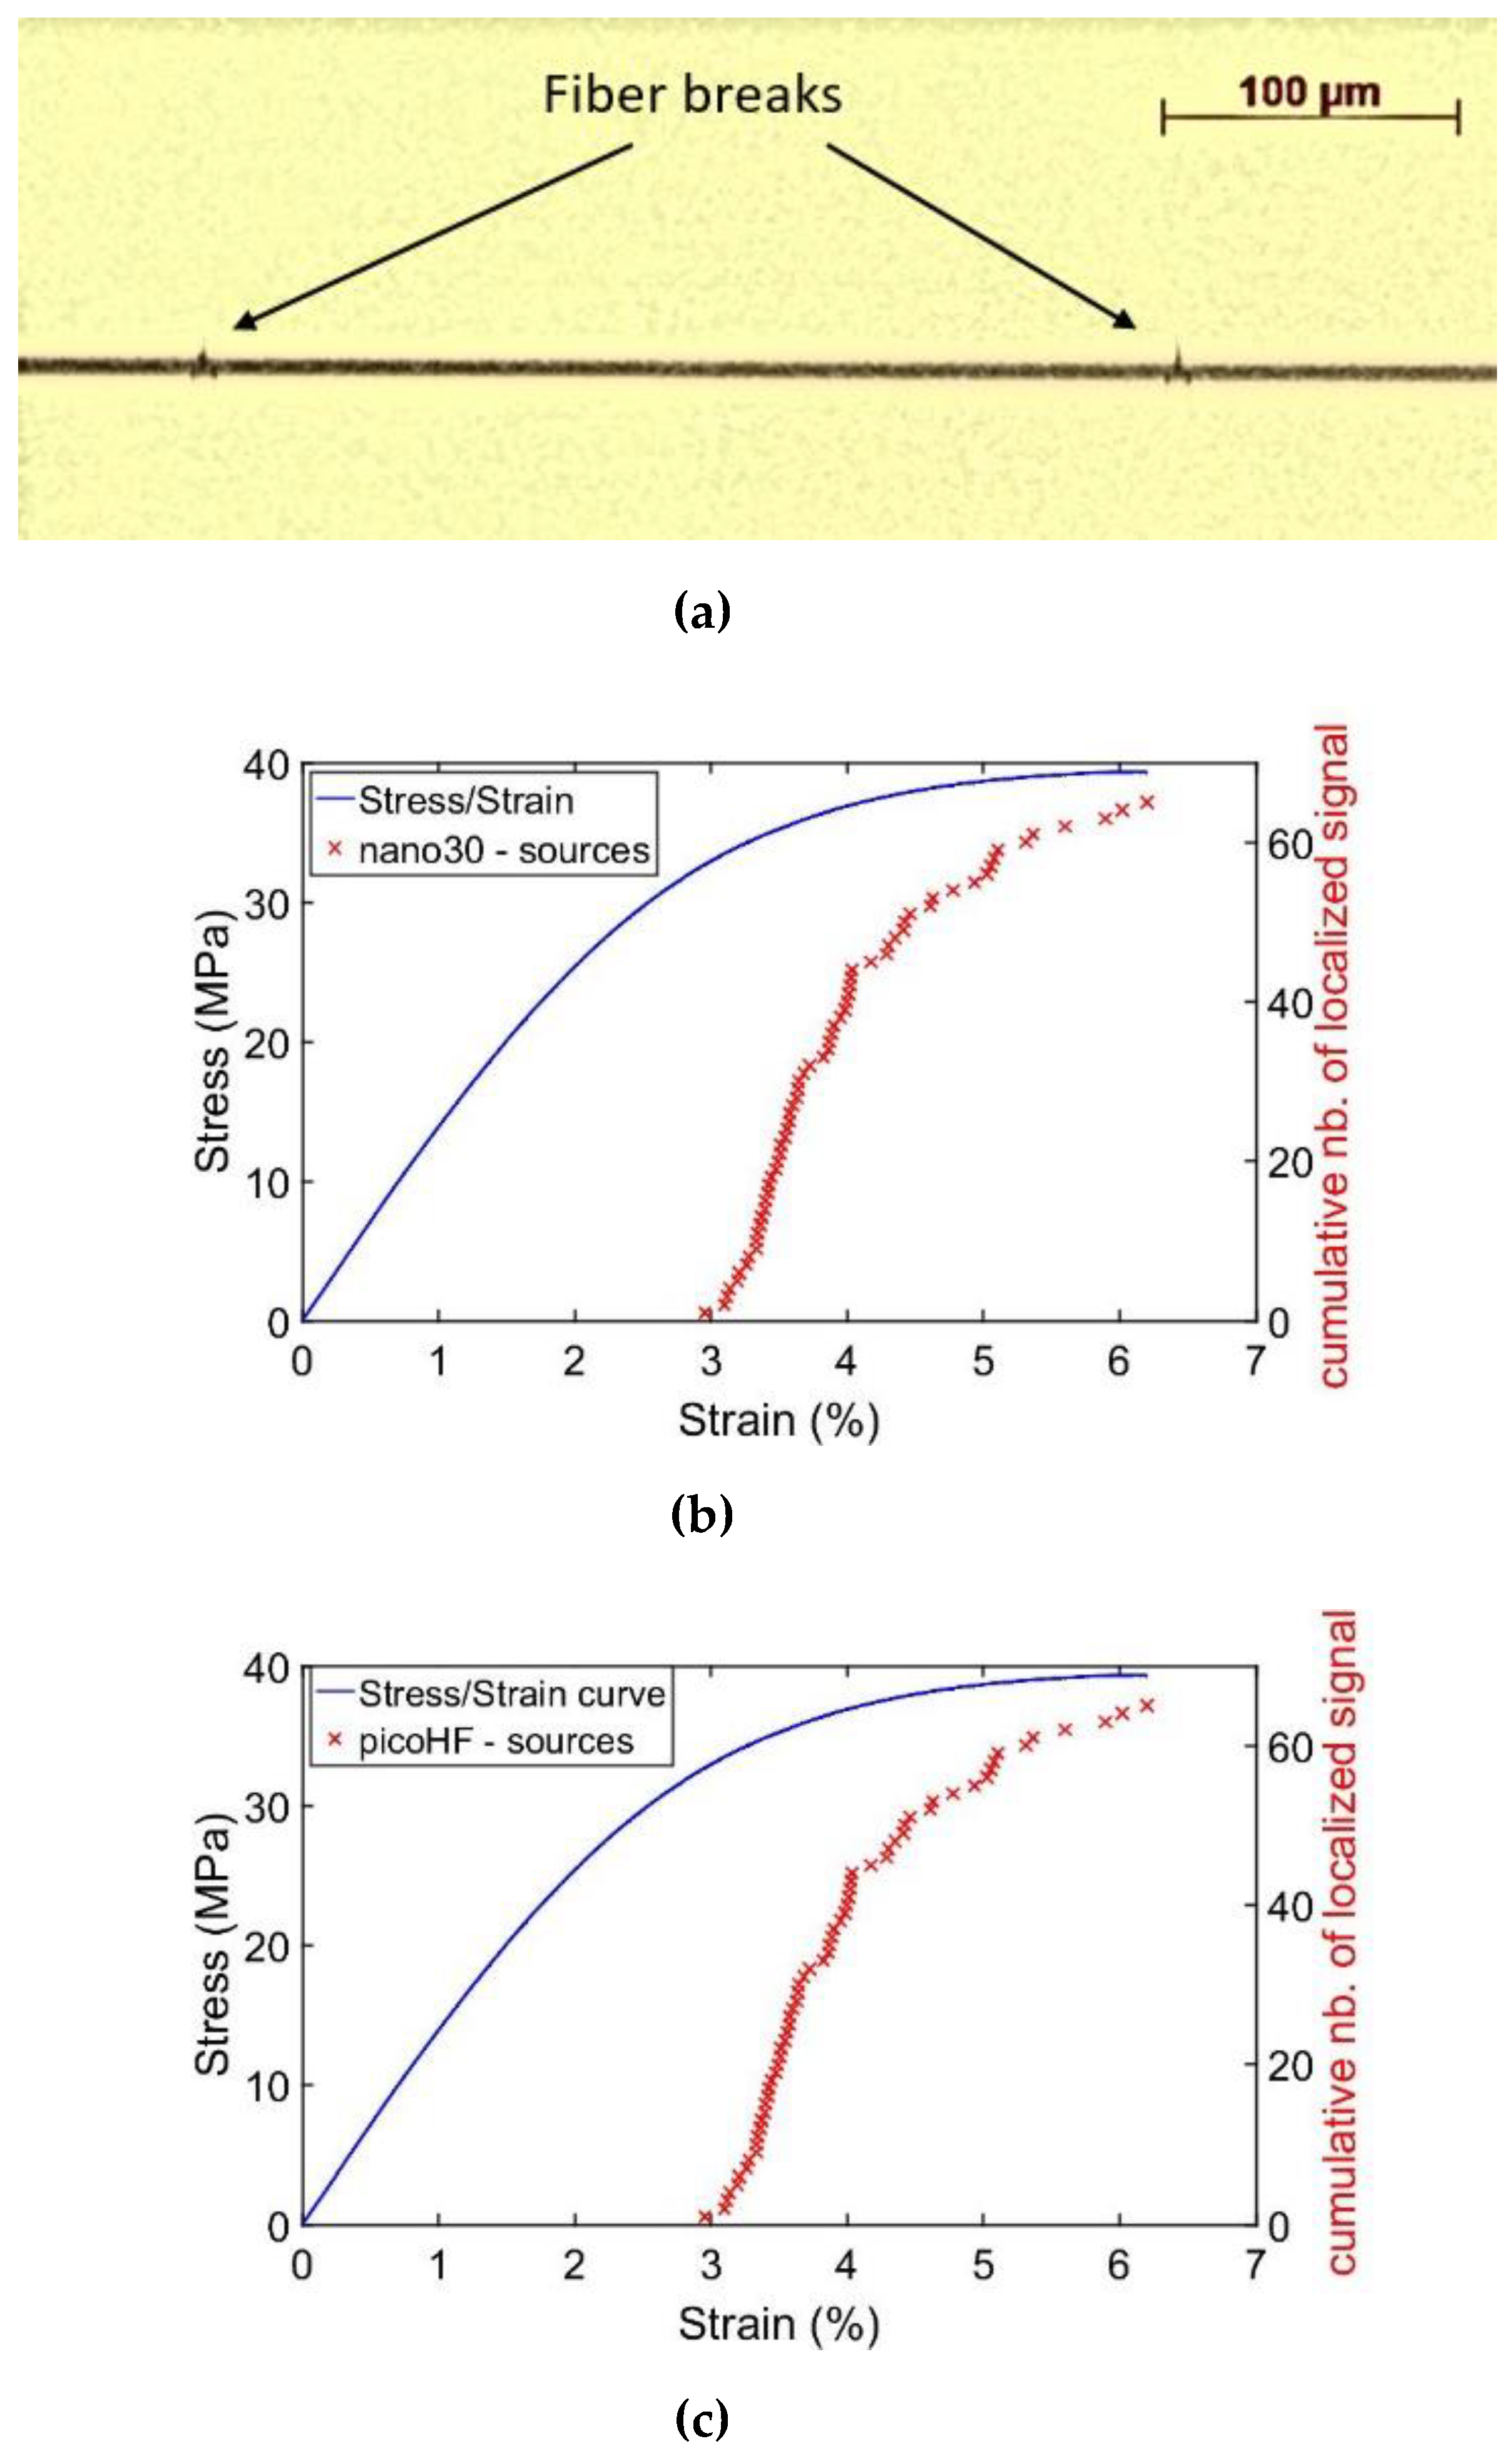
During SFFT, we have used a classical 1D linear localization process to determine the positions of AE signal sources. Moreover, the number of localized AE source and the number of fiber breaks observed by means of transmission optical microscope (Figure 6 and Table 3) are in good agreement. The observations demonstrate several fragmentations in the fiber without any significant other processes (Figure 6a). We have established a one-to-one correlation between the numbers of AE located signals and the observed fiber breaks. Therefore, in the tests, every located source originates from a fiber break. Optical observations confirmed the absence of fiber/matrix debonding. In Figure 6, one can observe that the two types of sensors used in experimental tests localized exactly the same cumulative number of signals from the same sources. Therefore, they are both suitable for this test.
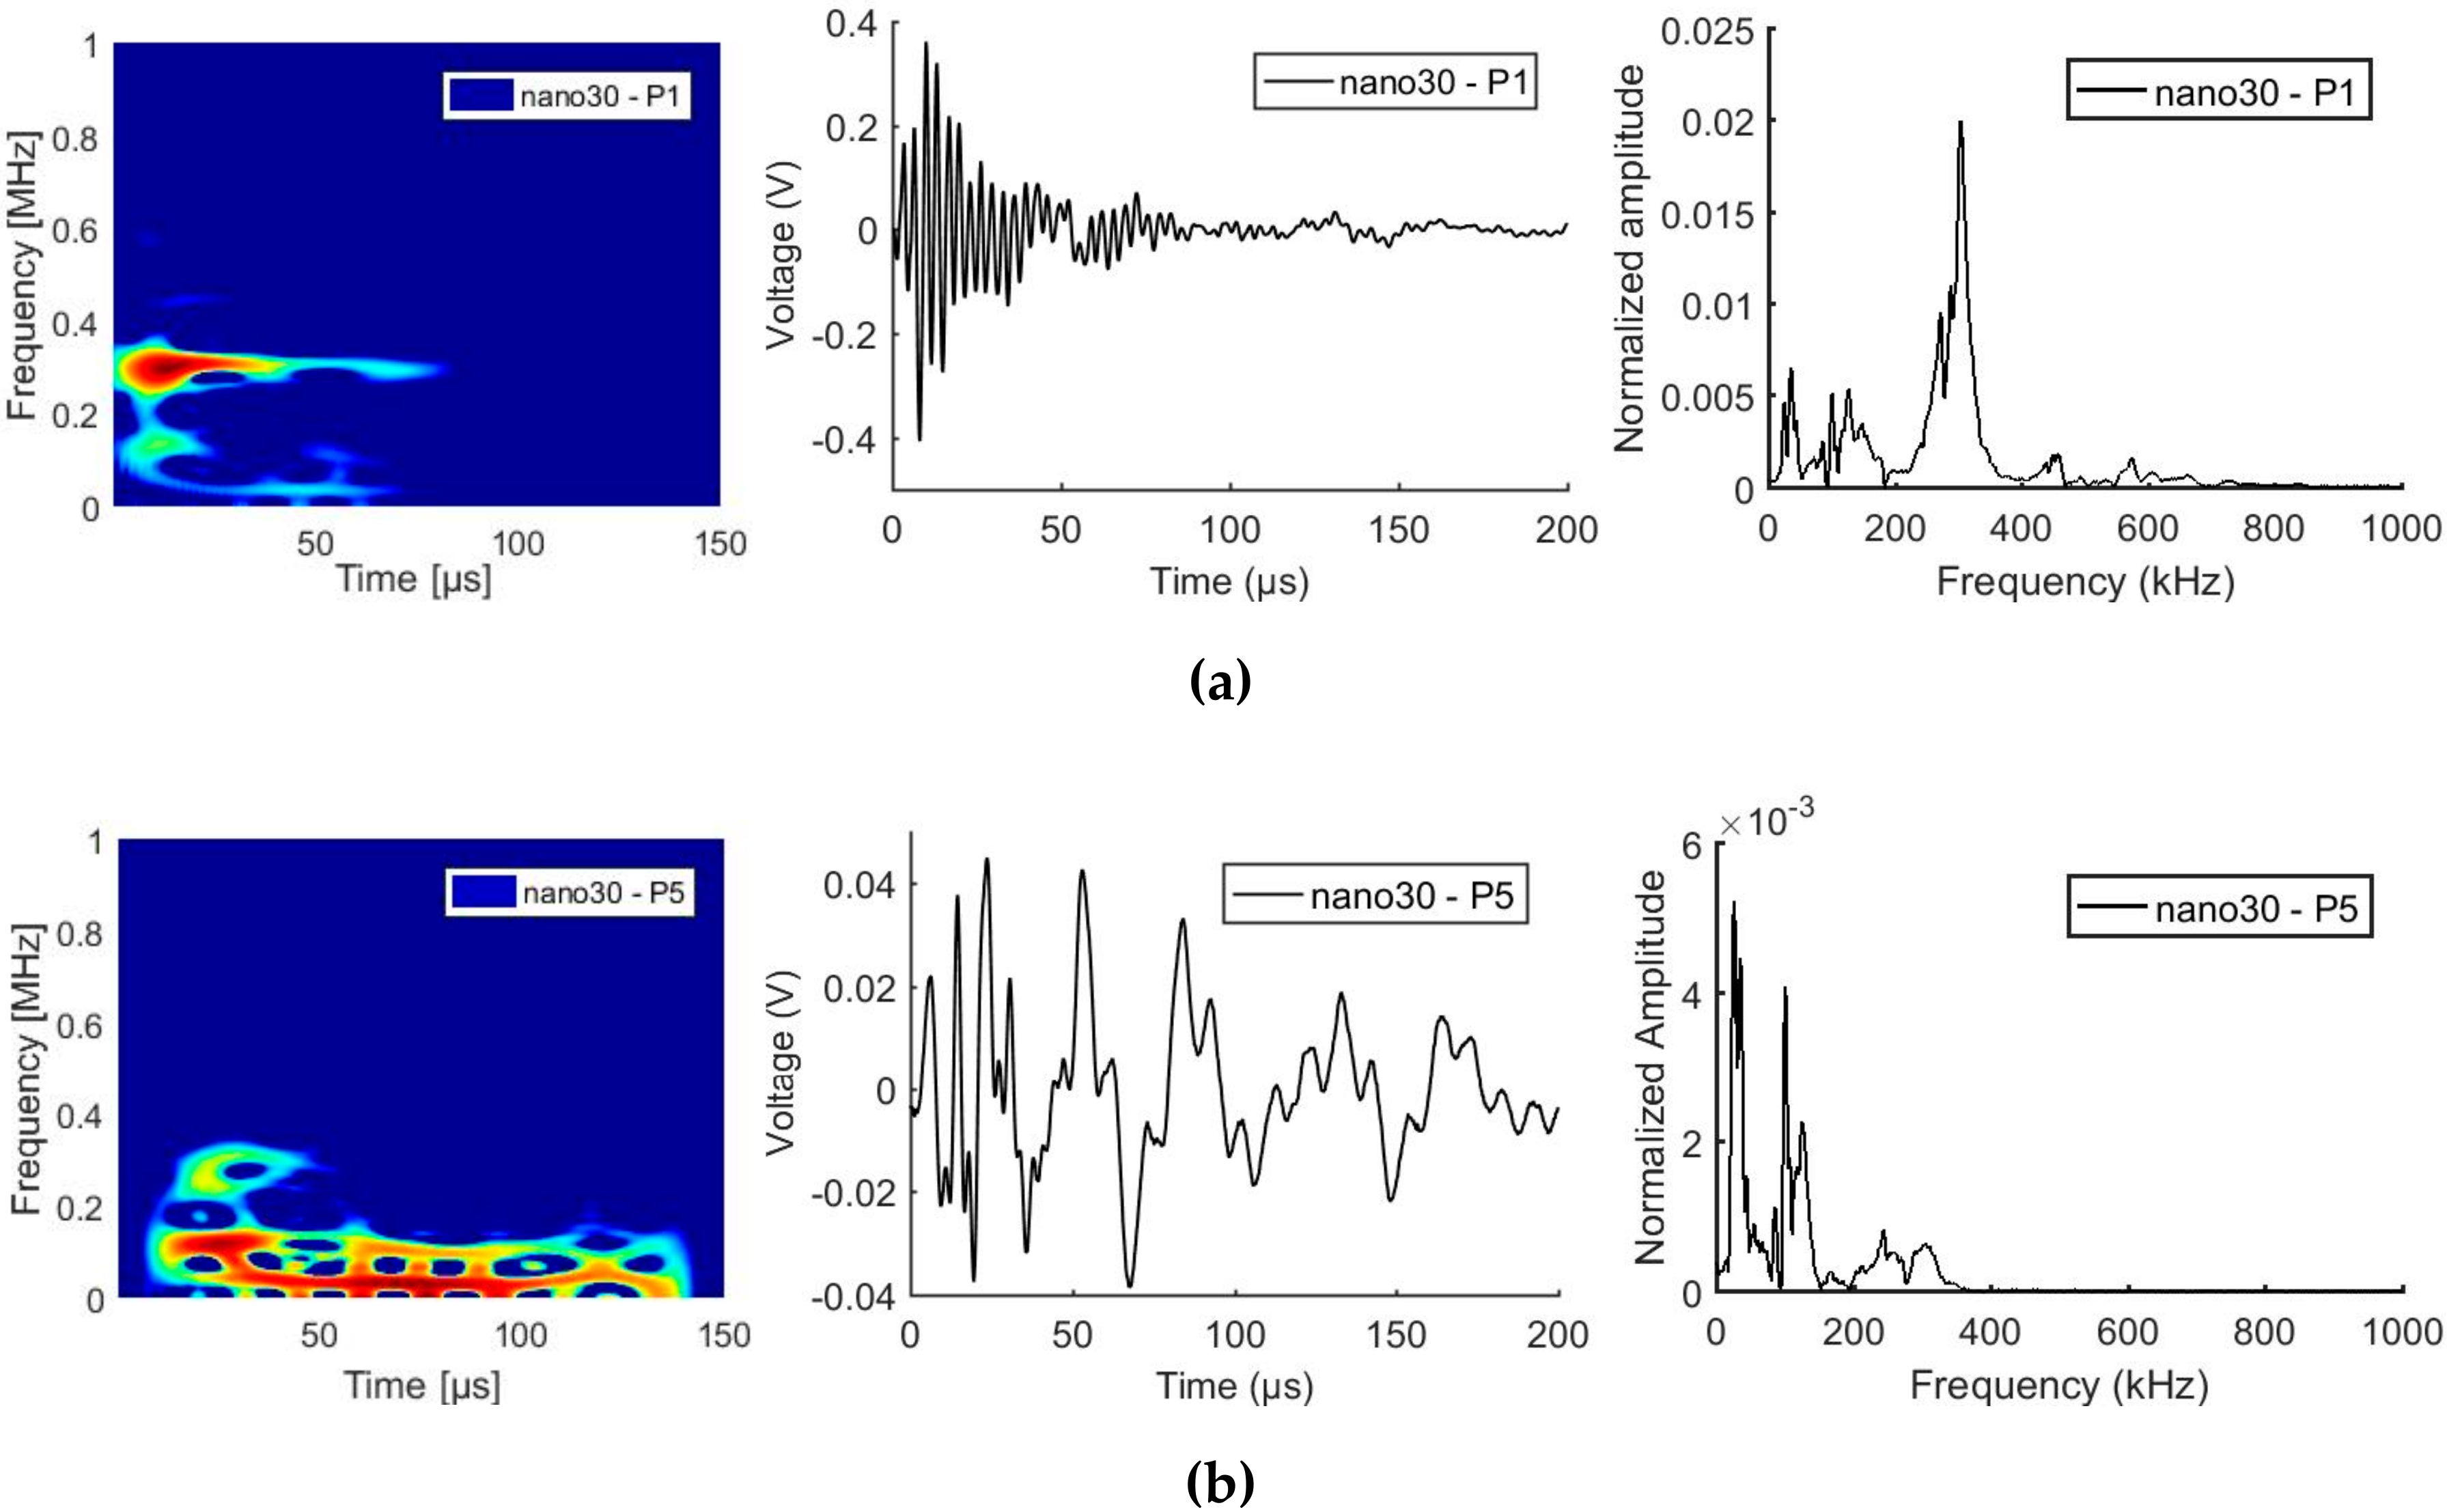
Figure 7 and Figure 8 show the time-frequency maps obtained with Smoothed Pseudo Wigner-Ville Distribution (SPWVD) for signals assigned to fiber breaks for two positions of the source: near the sensor (position P1, at 6 mm from the sensor centre) and far from the sensor position (position P5, at 34 mm from the sensor centre). Figure 7a,b show the dispersion of the wave modes. For the shortest propagation distance, the main energy in the signal is concentrated around 10 μs and in the range of 200–400 kHz. When the propagation distance increases, the lower frequencies tend to arrive later in the signal. We can observe a significant decrease in the frequency content certainly due to the propagation effect. Their signatures vary due to differences in the propagation distance. For the same signals recorded by the picoHF sensors, the SPWVD (Figure 8) reveals a higher frequency content, especially at the P1 position. In this case, the main energy on the signal is concentrated around 10 μs and in the range of 400–700 kHz. At the position P5, the main energy is in the range below 300 kHz. The acoustic signature of the fiber break varies due to the choice of the sensor.
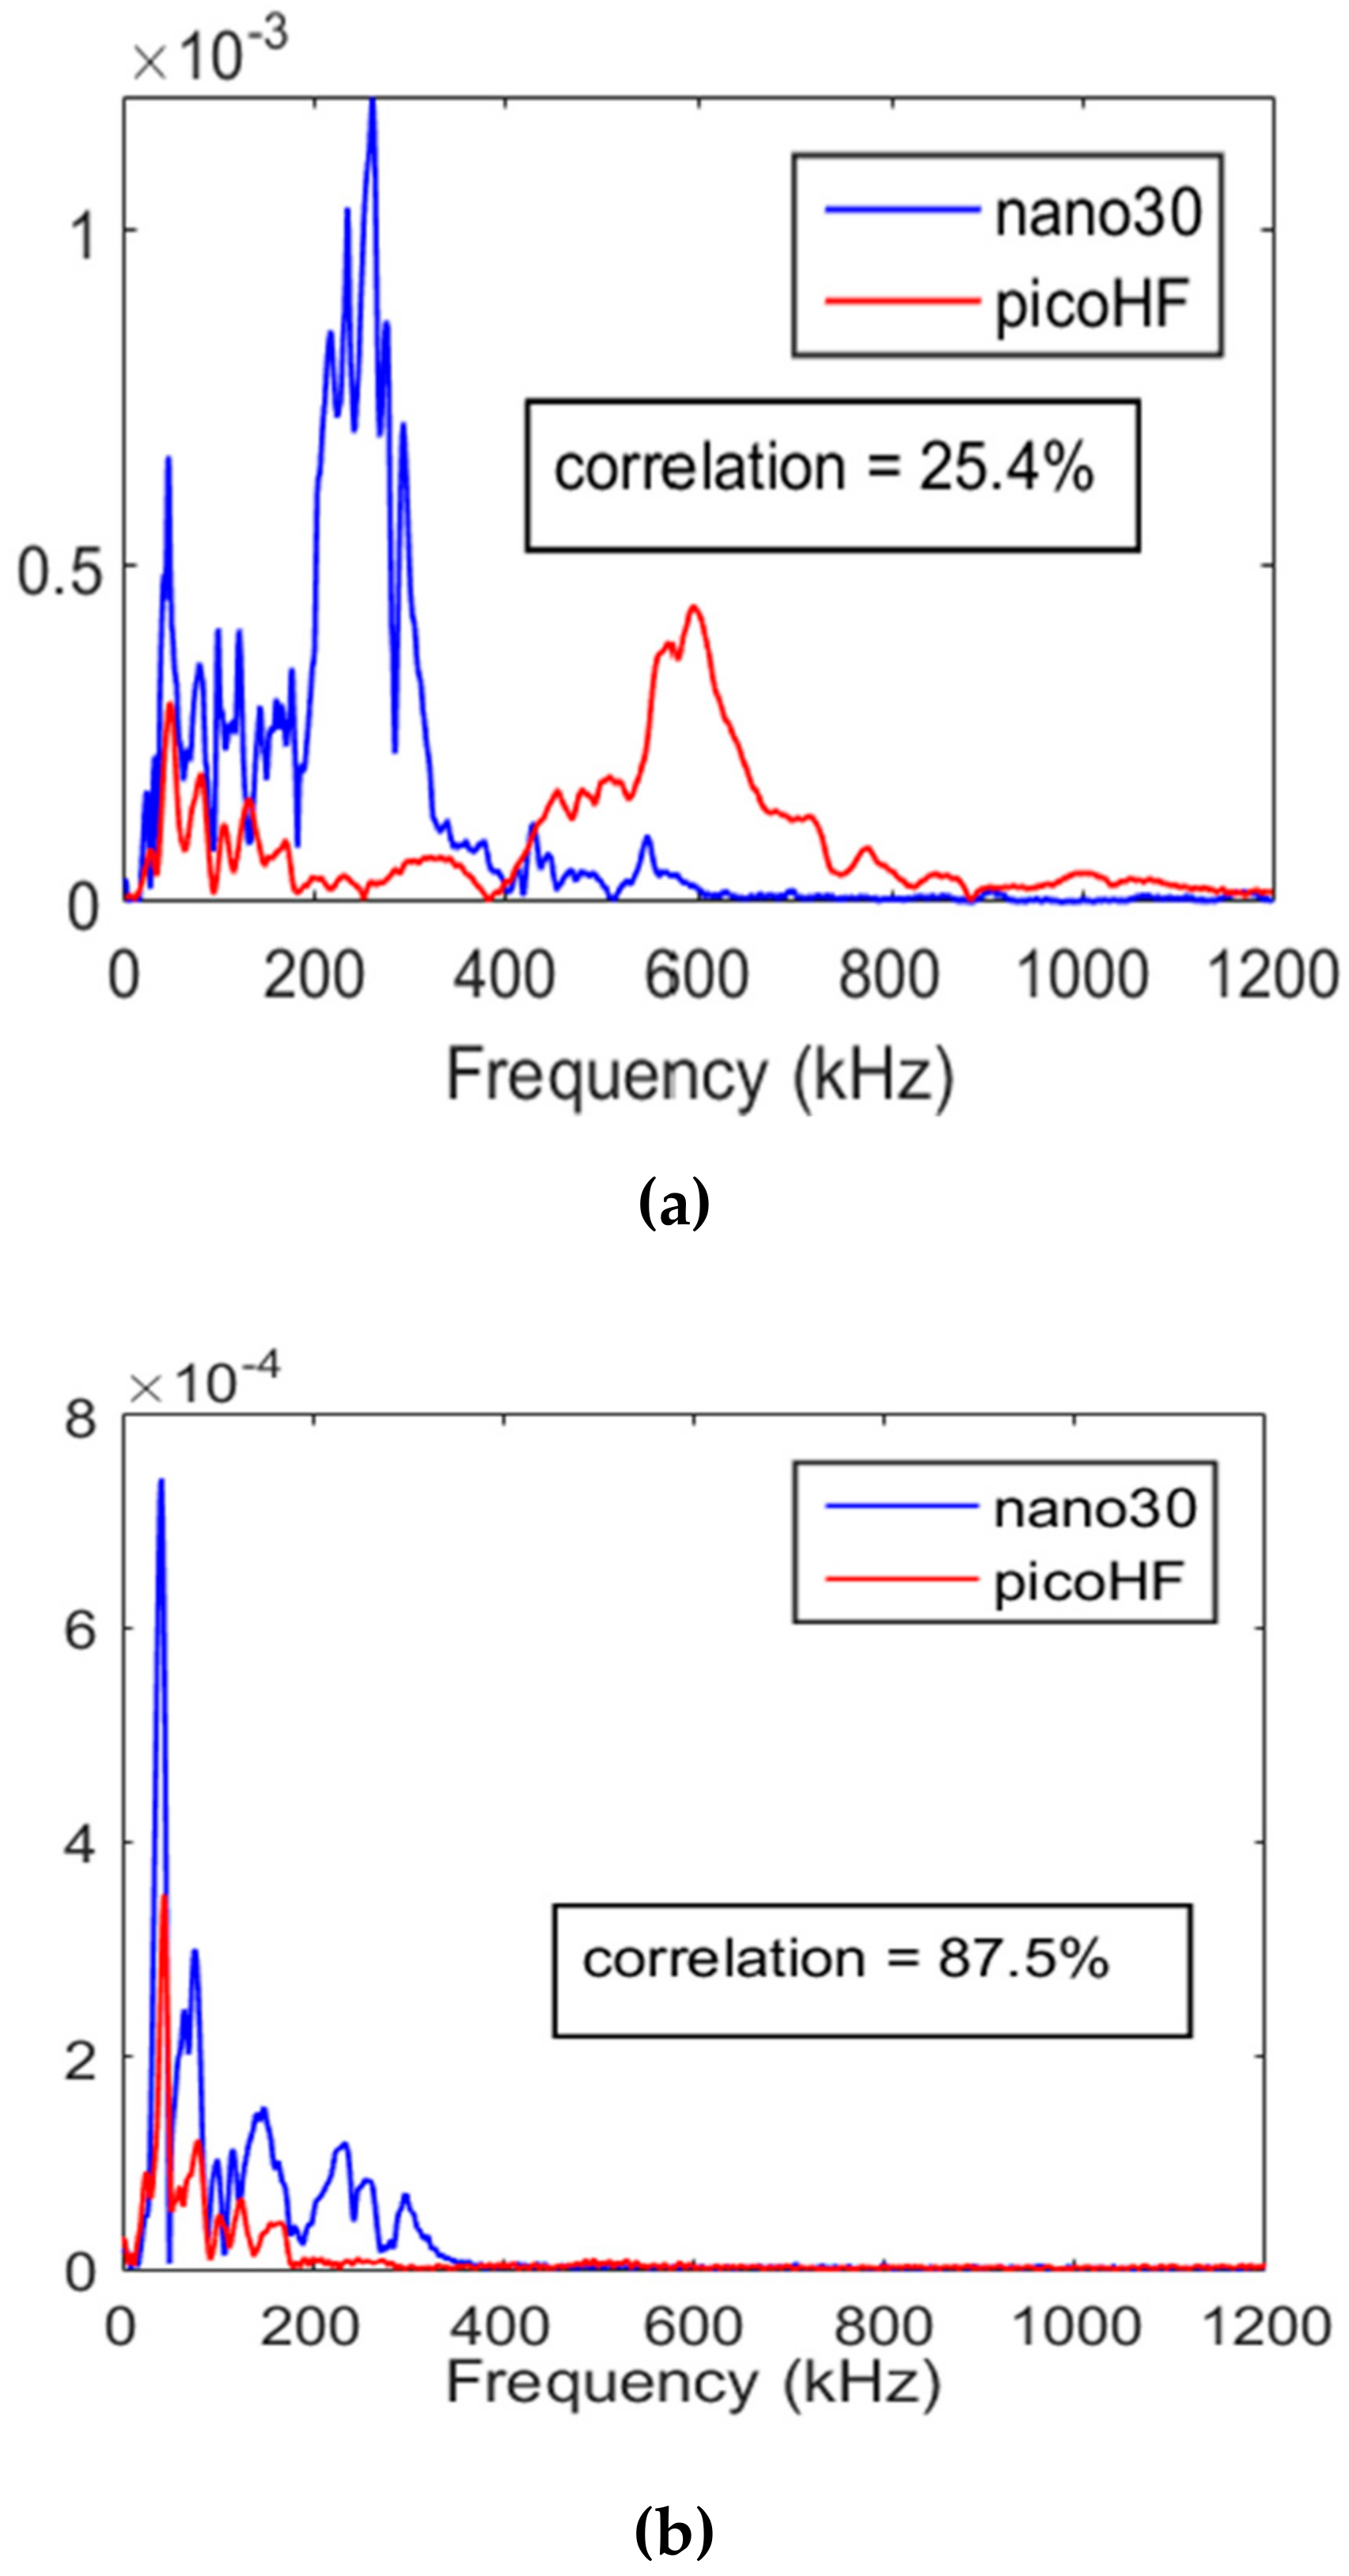
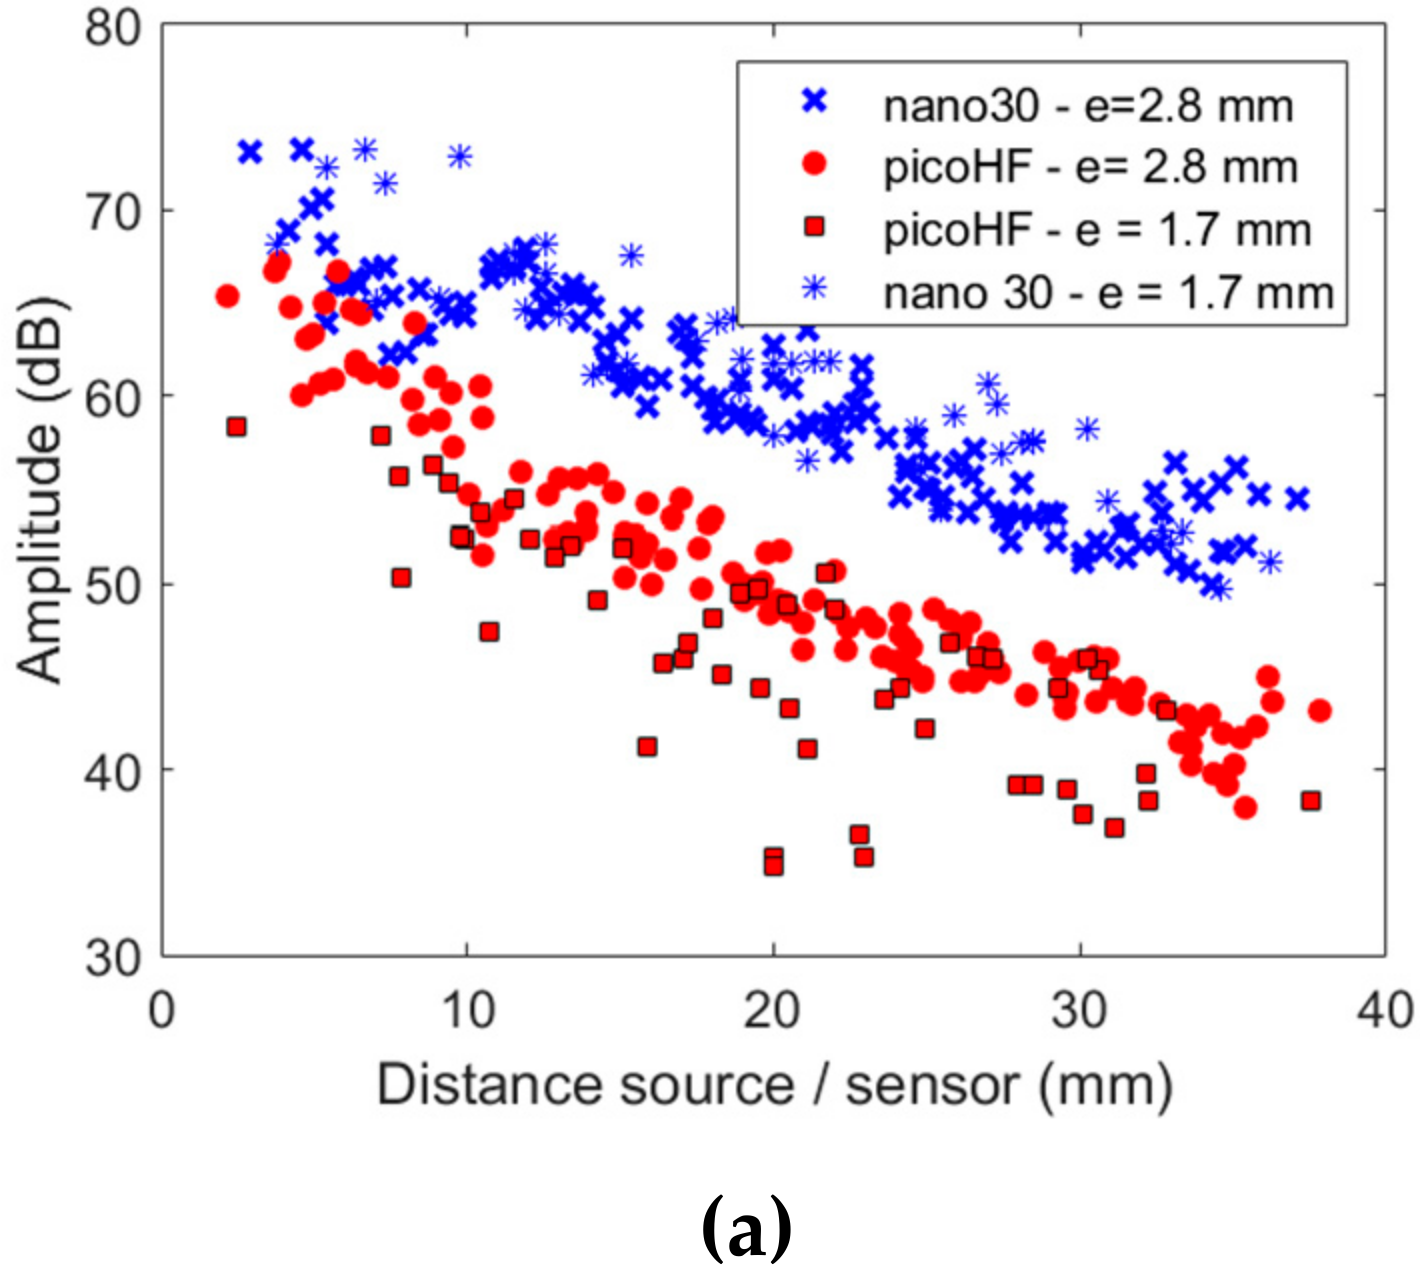
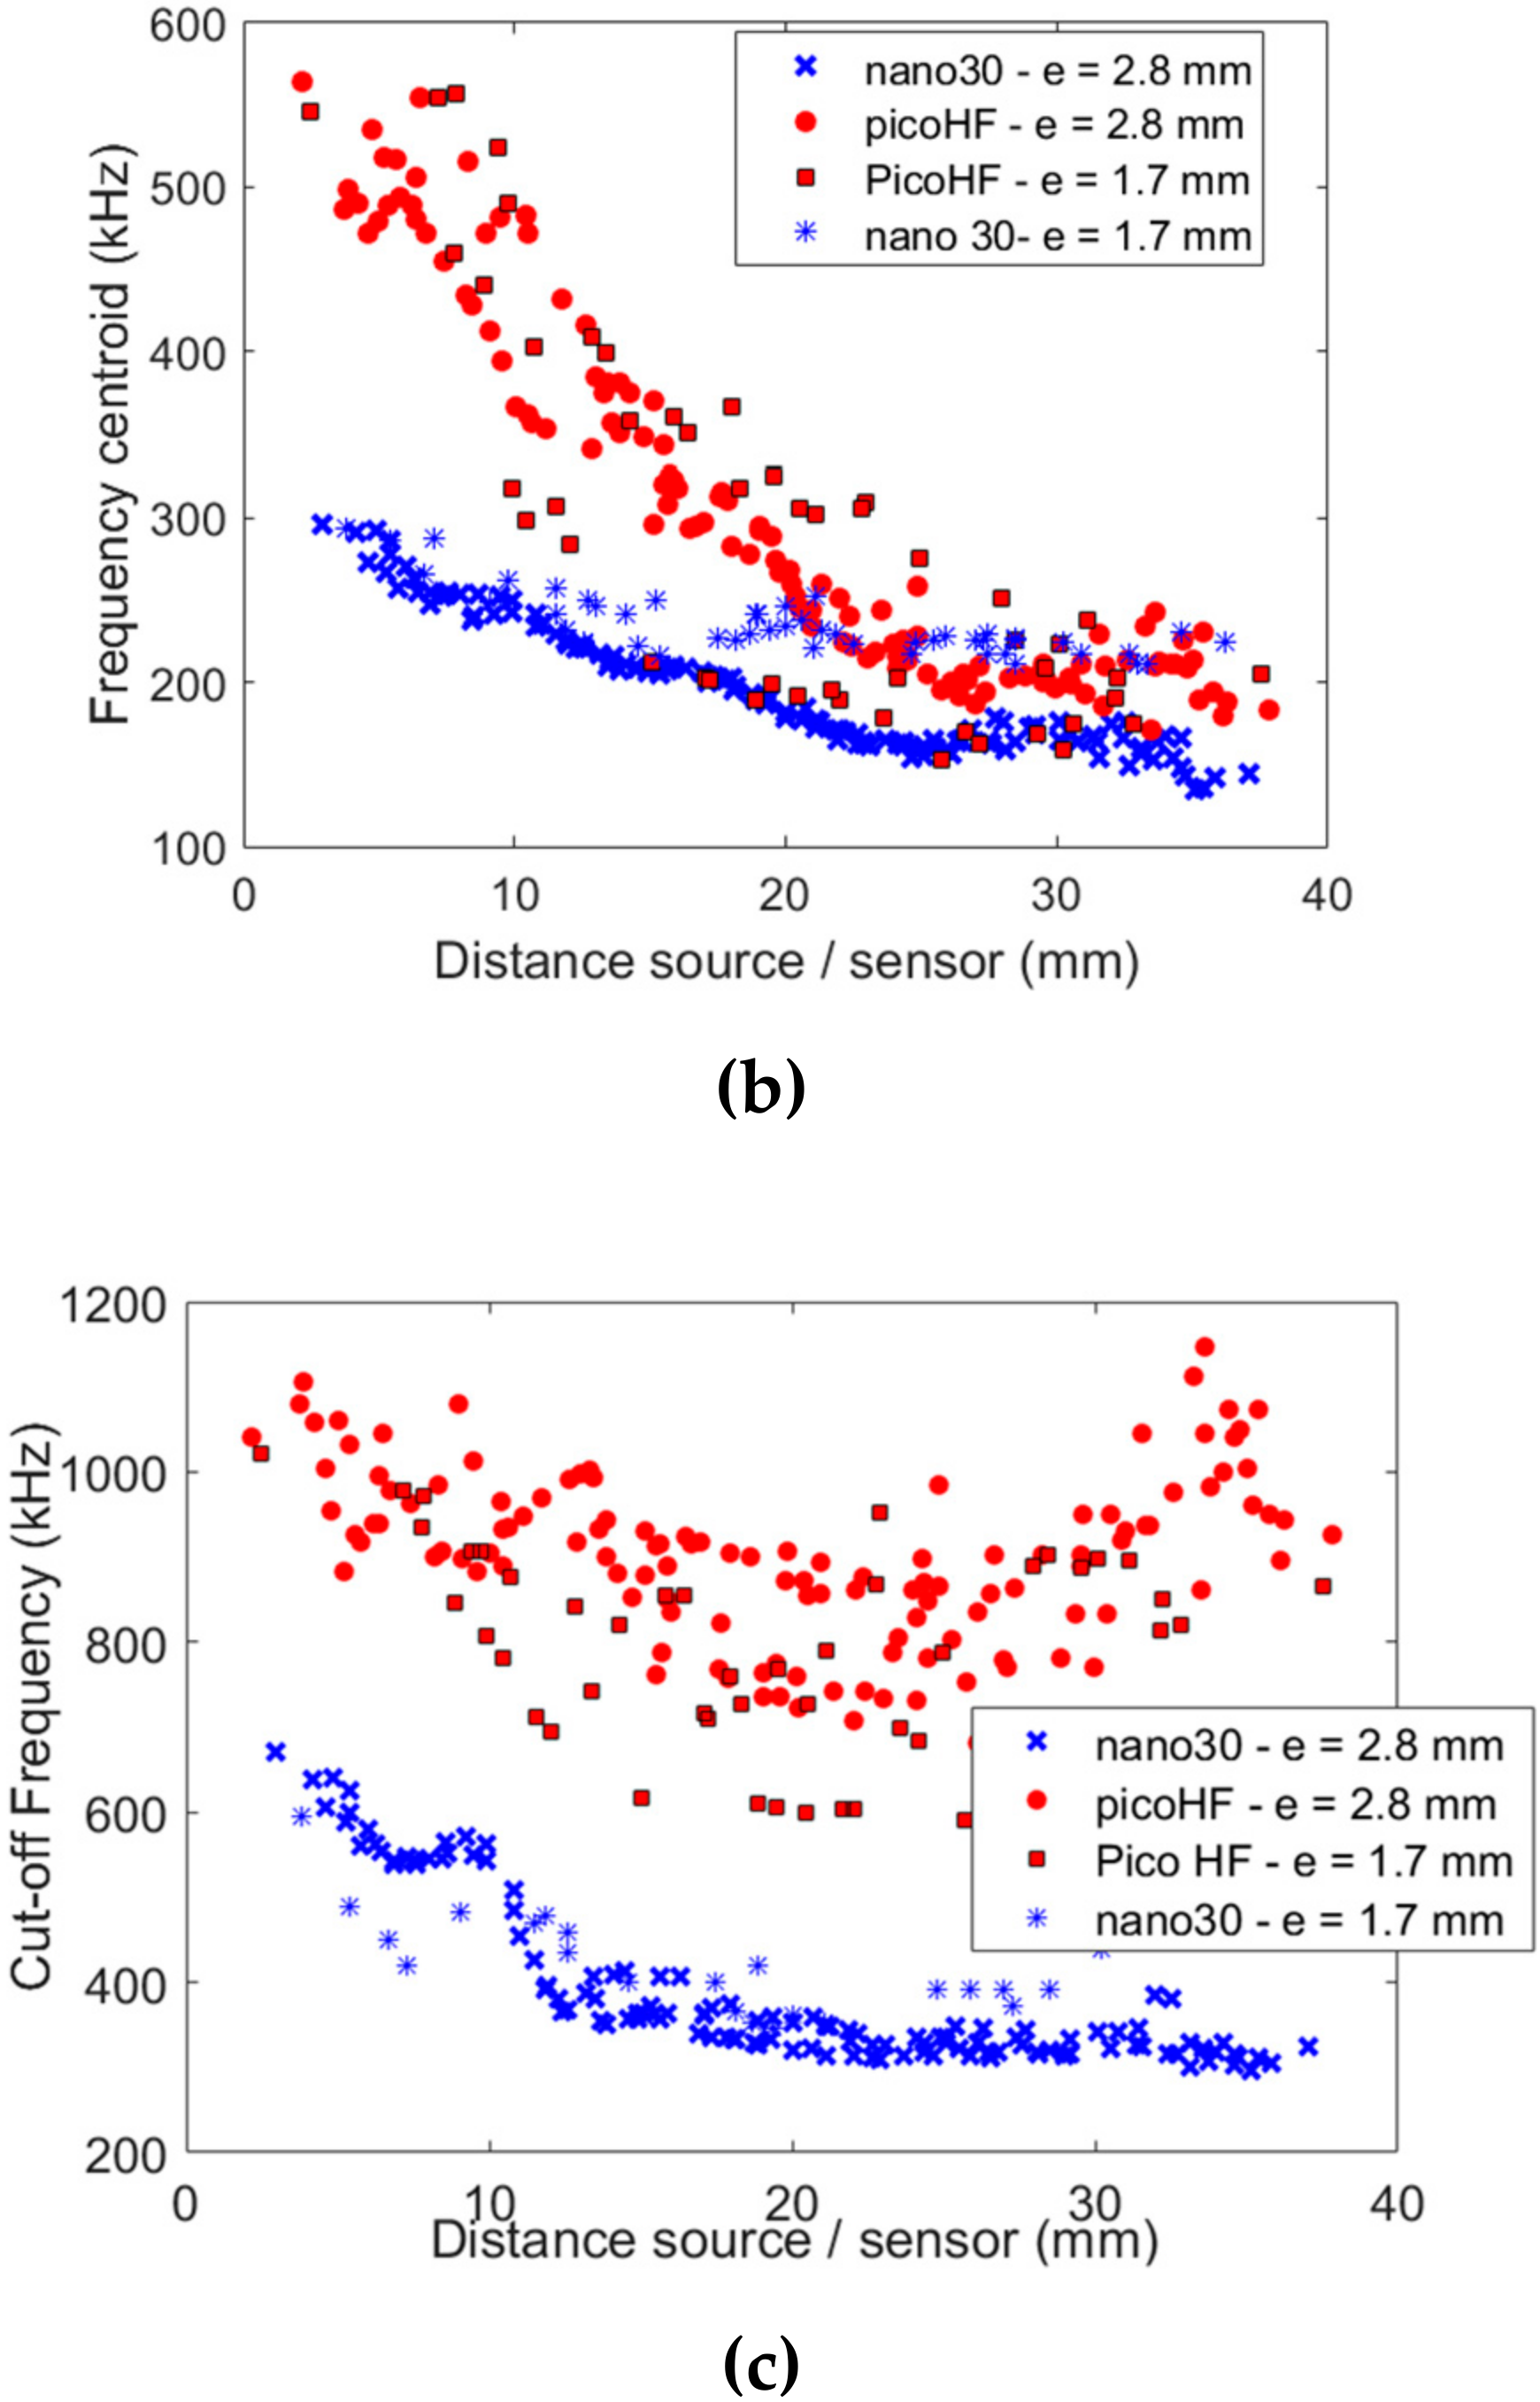
Figure 9 enables us to compare, in the frequency domain, signals detected by nano30 and picoHF sensors, respectively, when they stem from the same source and whether it is close or far from the sensors. Cross-correlation analysis performed between the signals recorded by these two sensors exhibits the maximum values of cross-correlation around 87% far from the source and only 25% near it. Such a low correlation coefficient in the frequency domain clearly indicates that these two kinds of sensors do not record the same information. Near the source, the nano30 is very sensitive around 300 kHz and does not detect high frequency above 500 kHz. However, the picoHF is very responsive around 600 kHz and detects high frequencies. Far from the source, the sensors detect an equivalent information lower than 400 kHz. Figure 10 shows the evolution of several descriptors extracted from the signals recorded by the two type of sensors during the same mechanical test. These results show a strong difference on the waveforms, frequency spectra and descriptors with different sensors. The waveform and frequency spectra signatures have different shapes and magnitudes. This means that in this case, with this kind of sensors, there is practically no chance of source identification from frequency spectra or amplitude values of AE signals after long wave travel.

4.2. Validation of The Model: Comparison Between Experimental Results and Finite Element Simulation Results

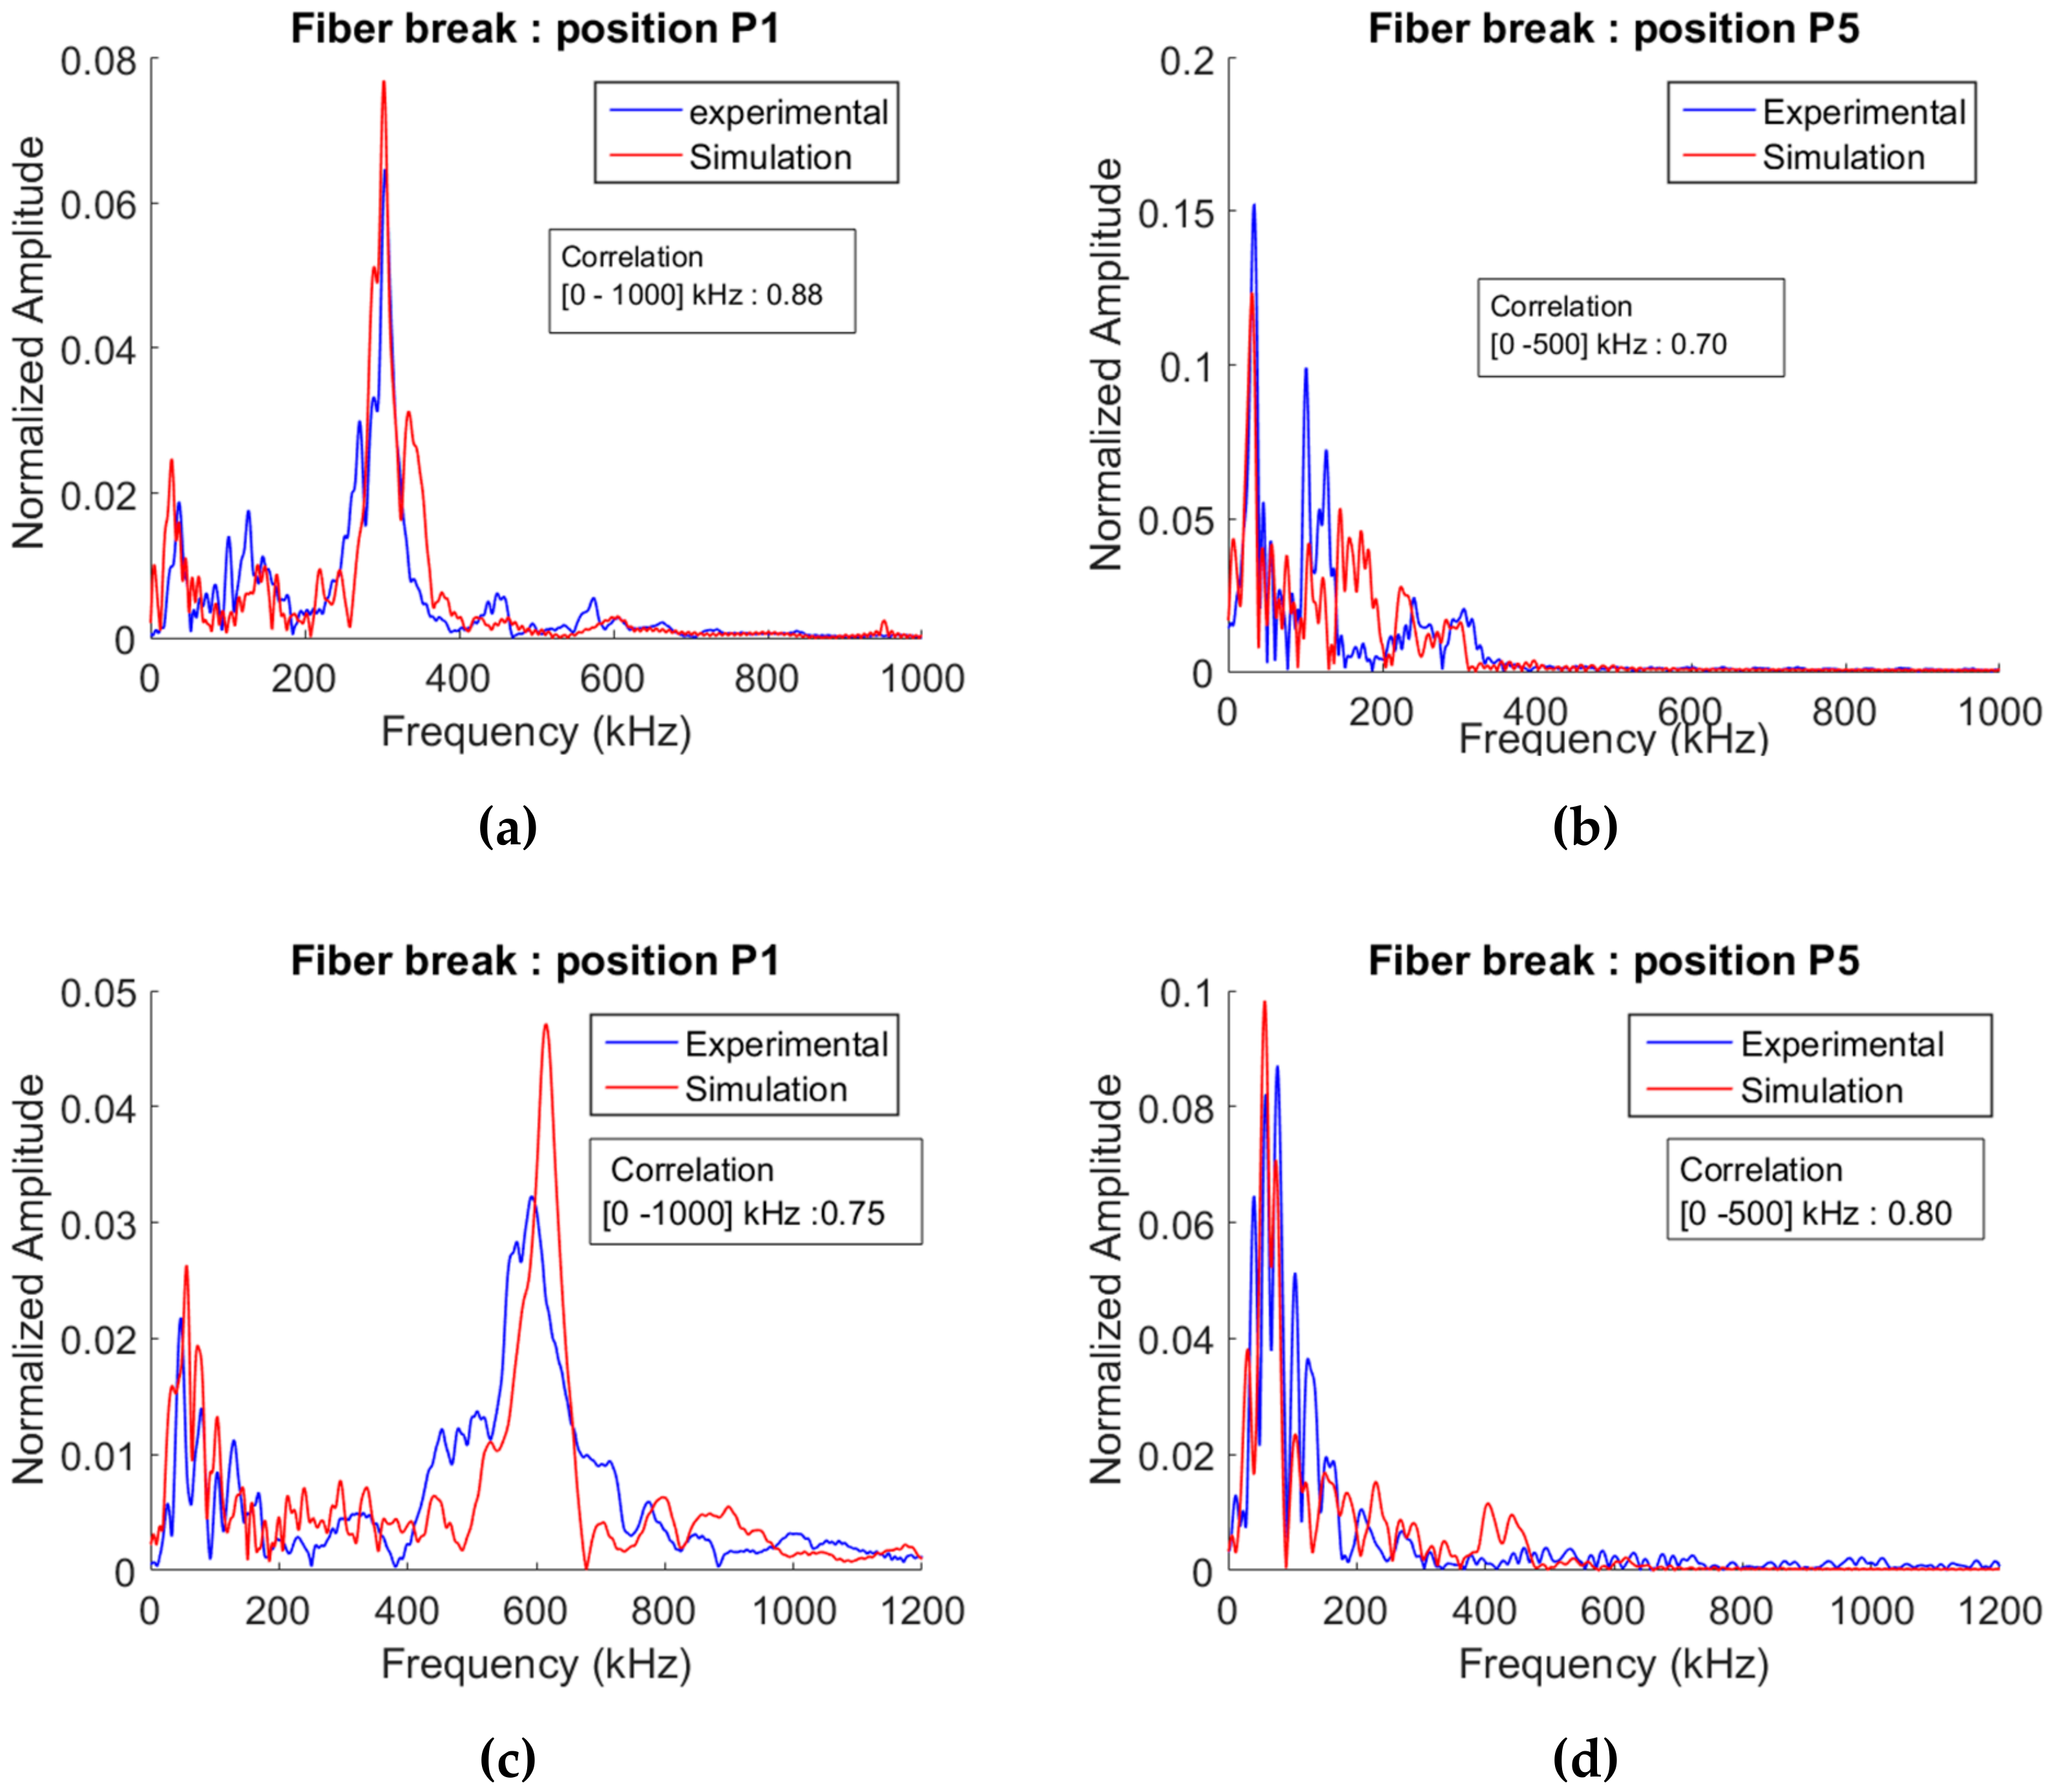
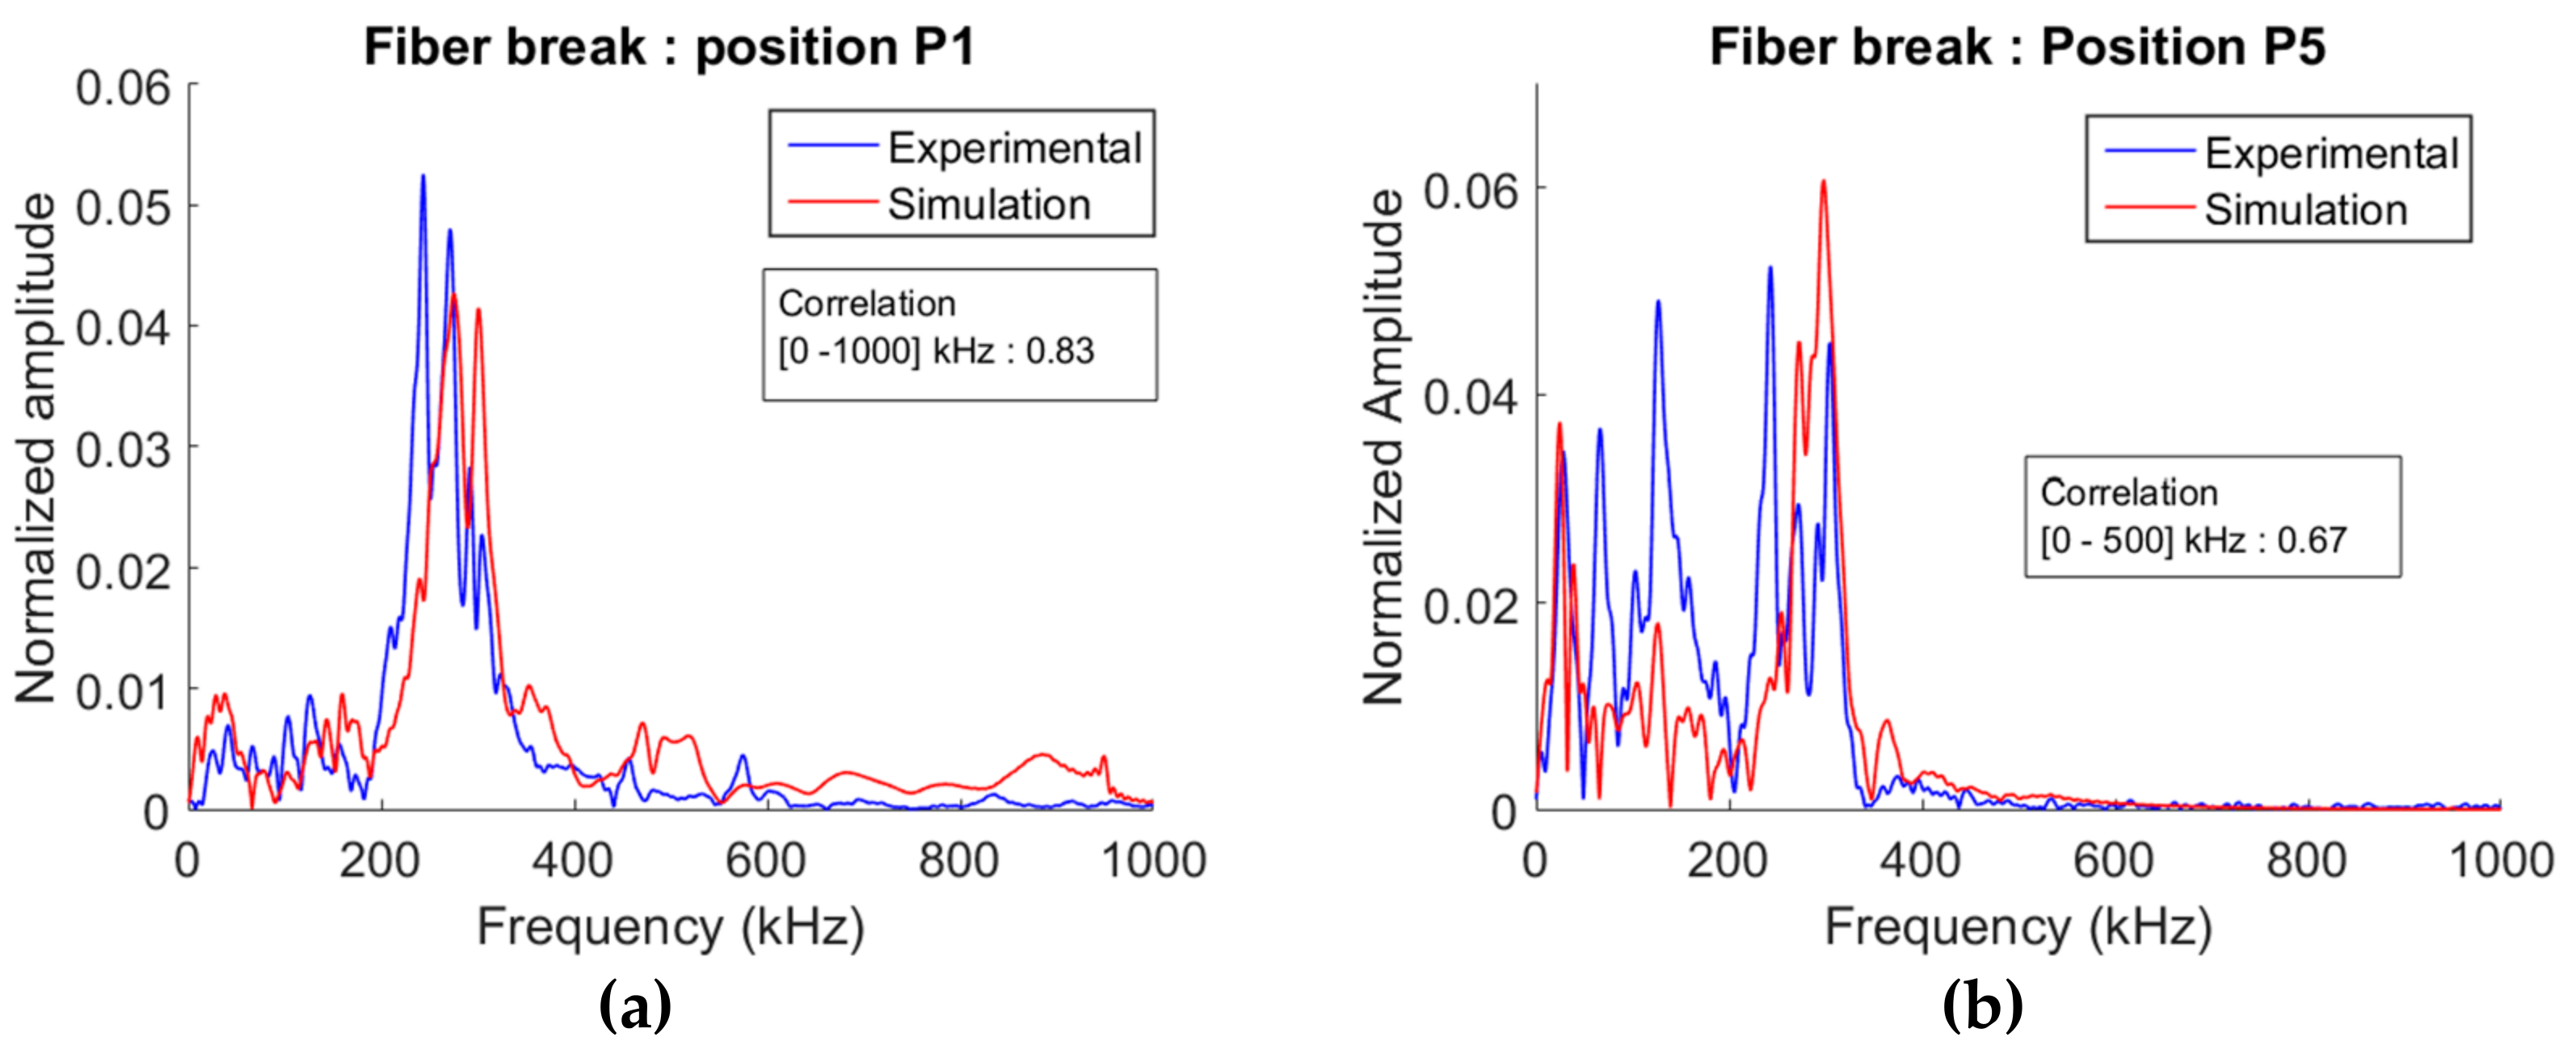
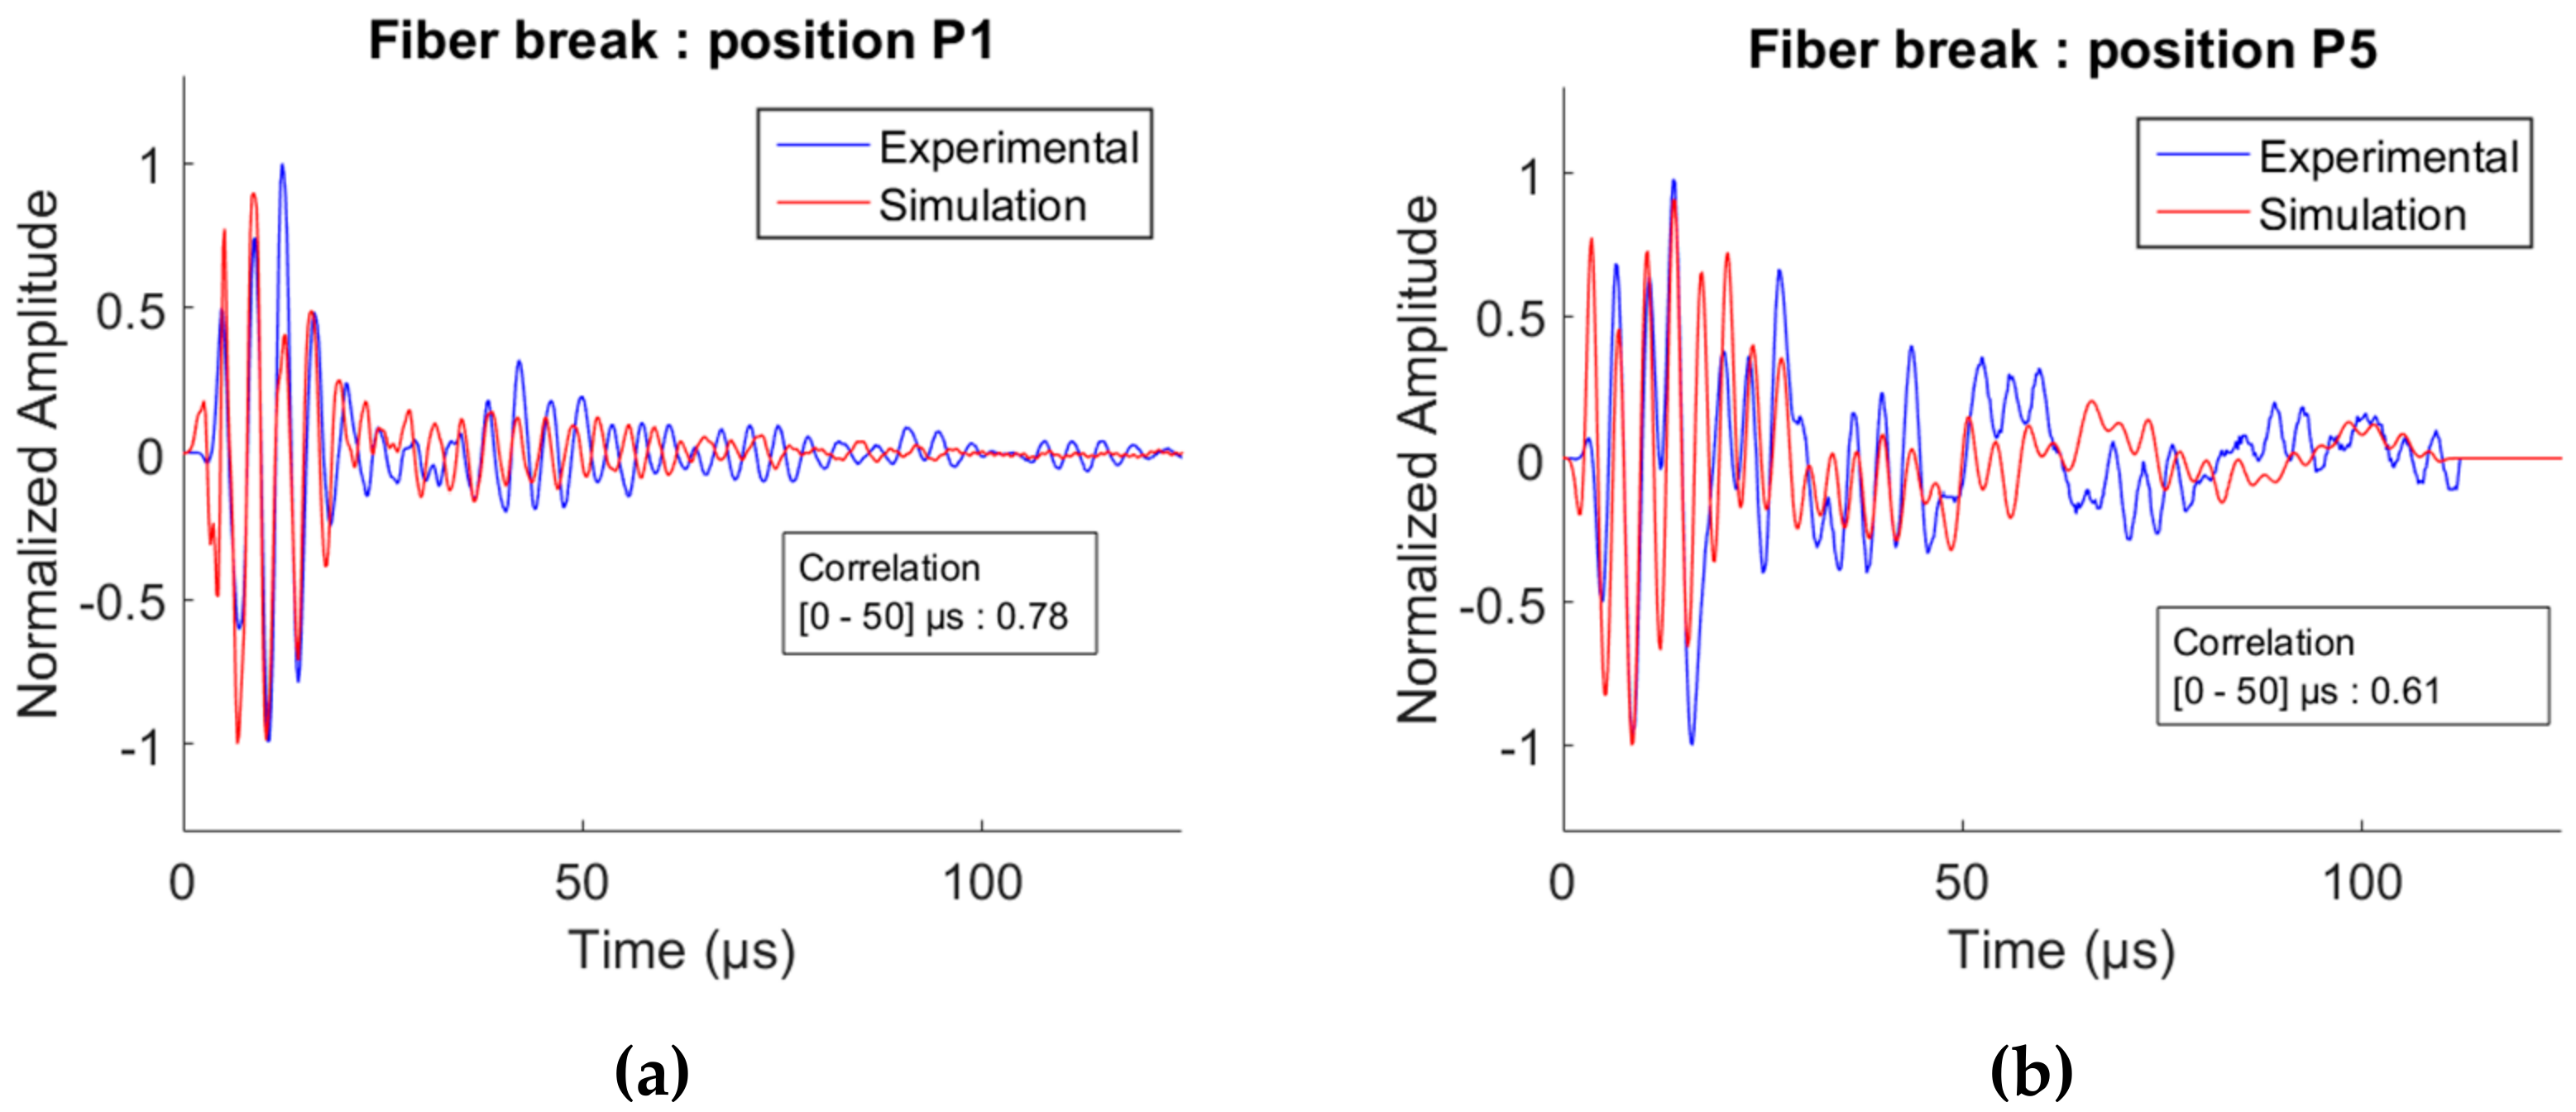
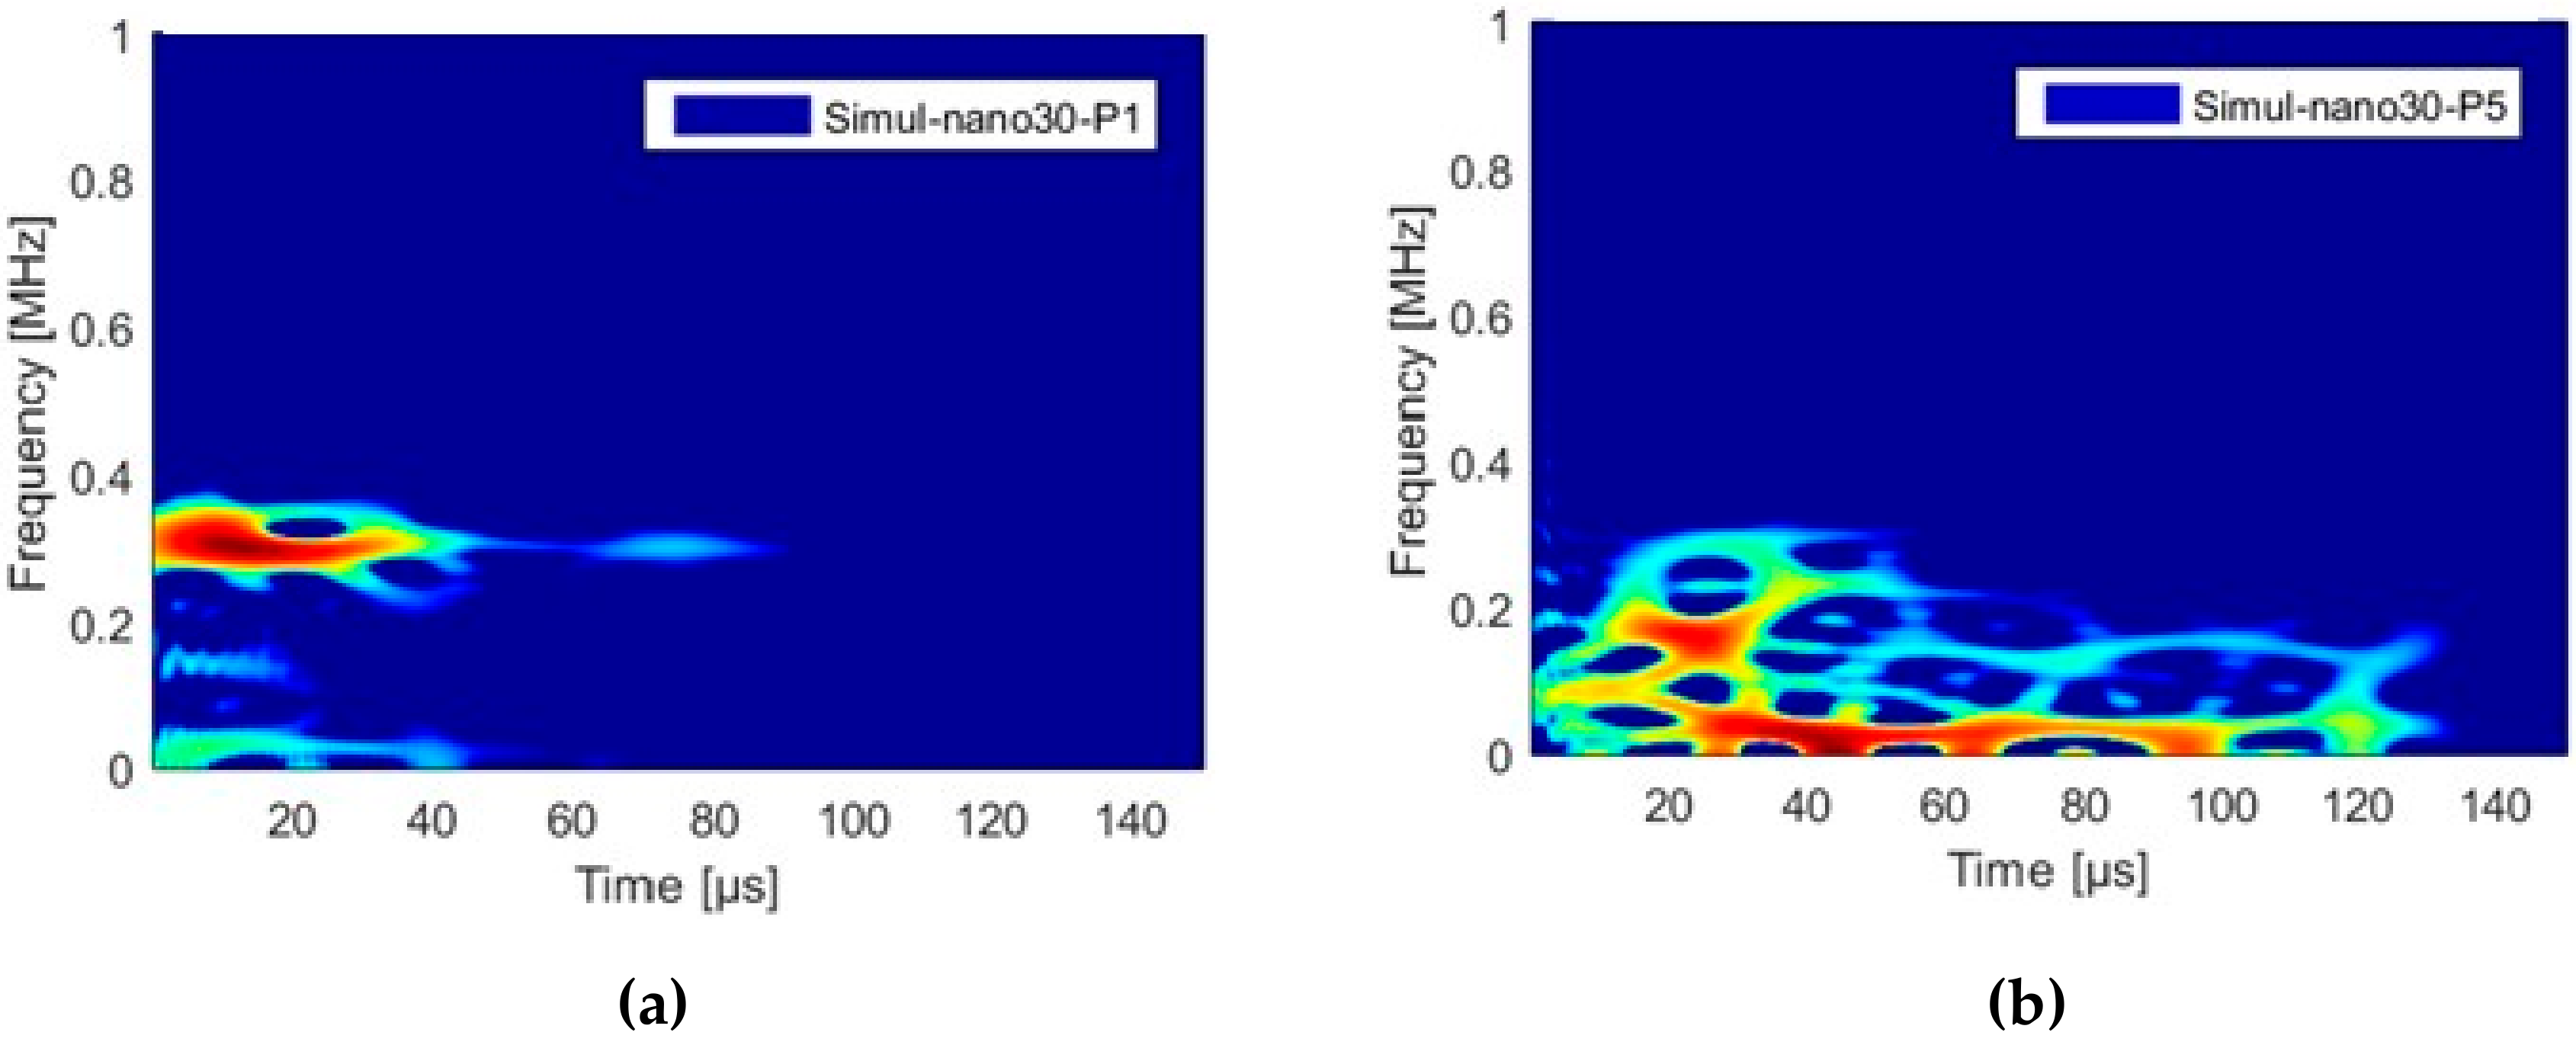
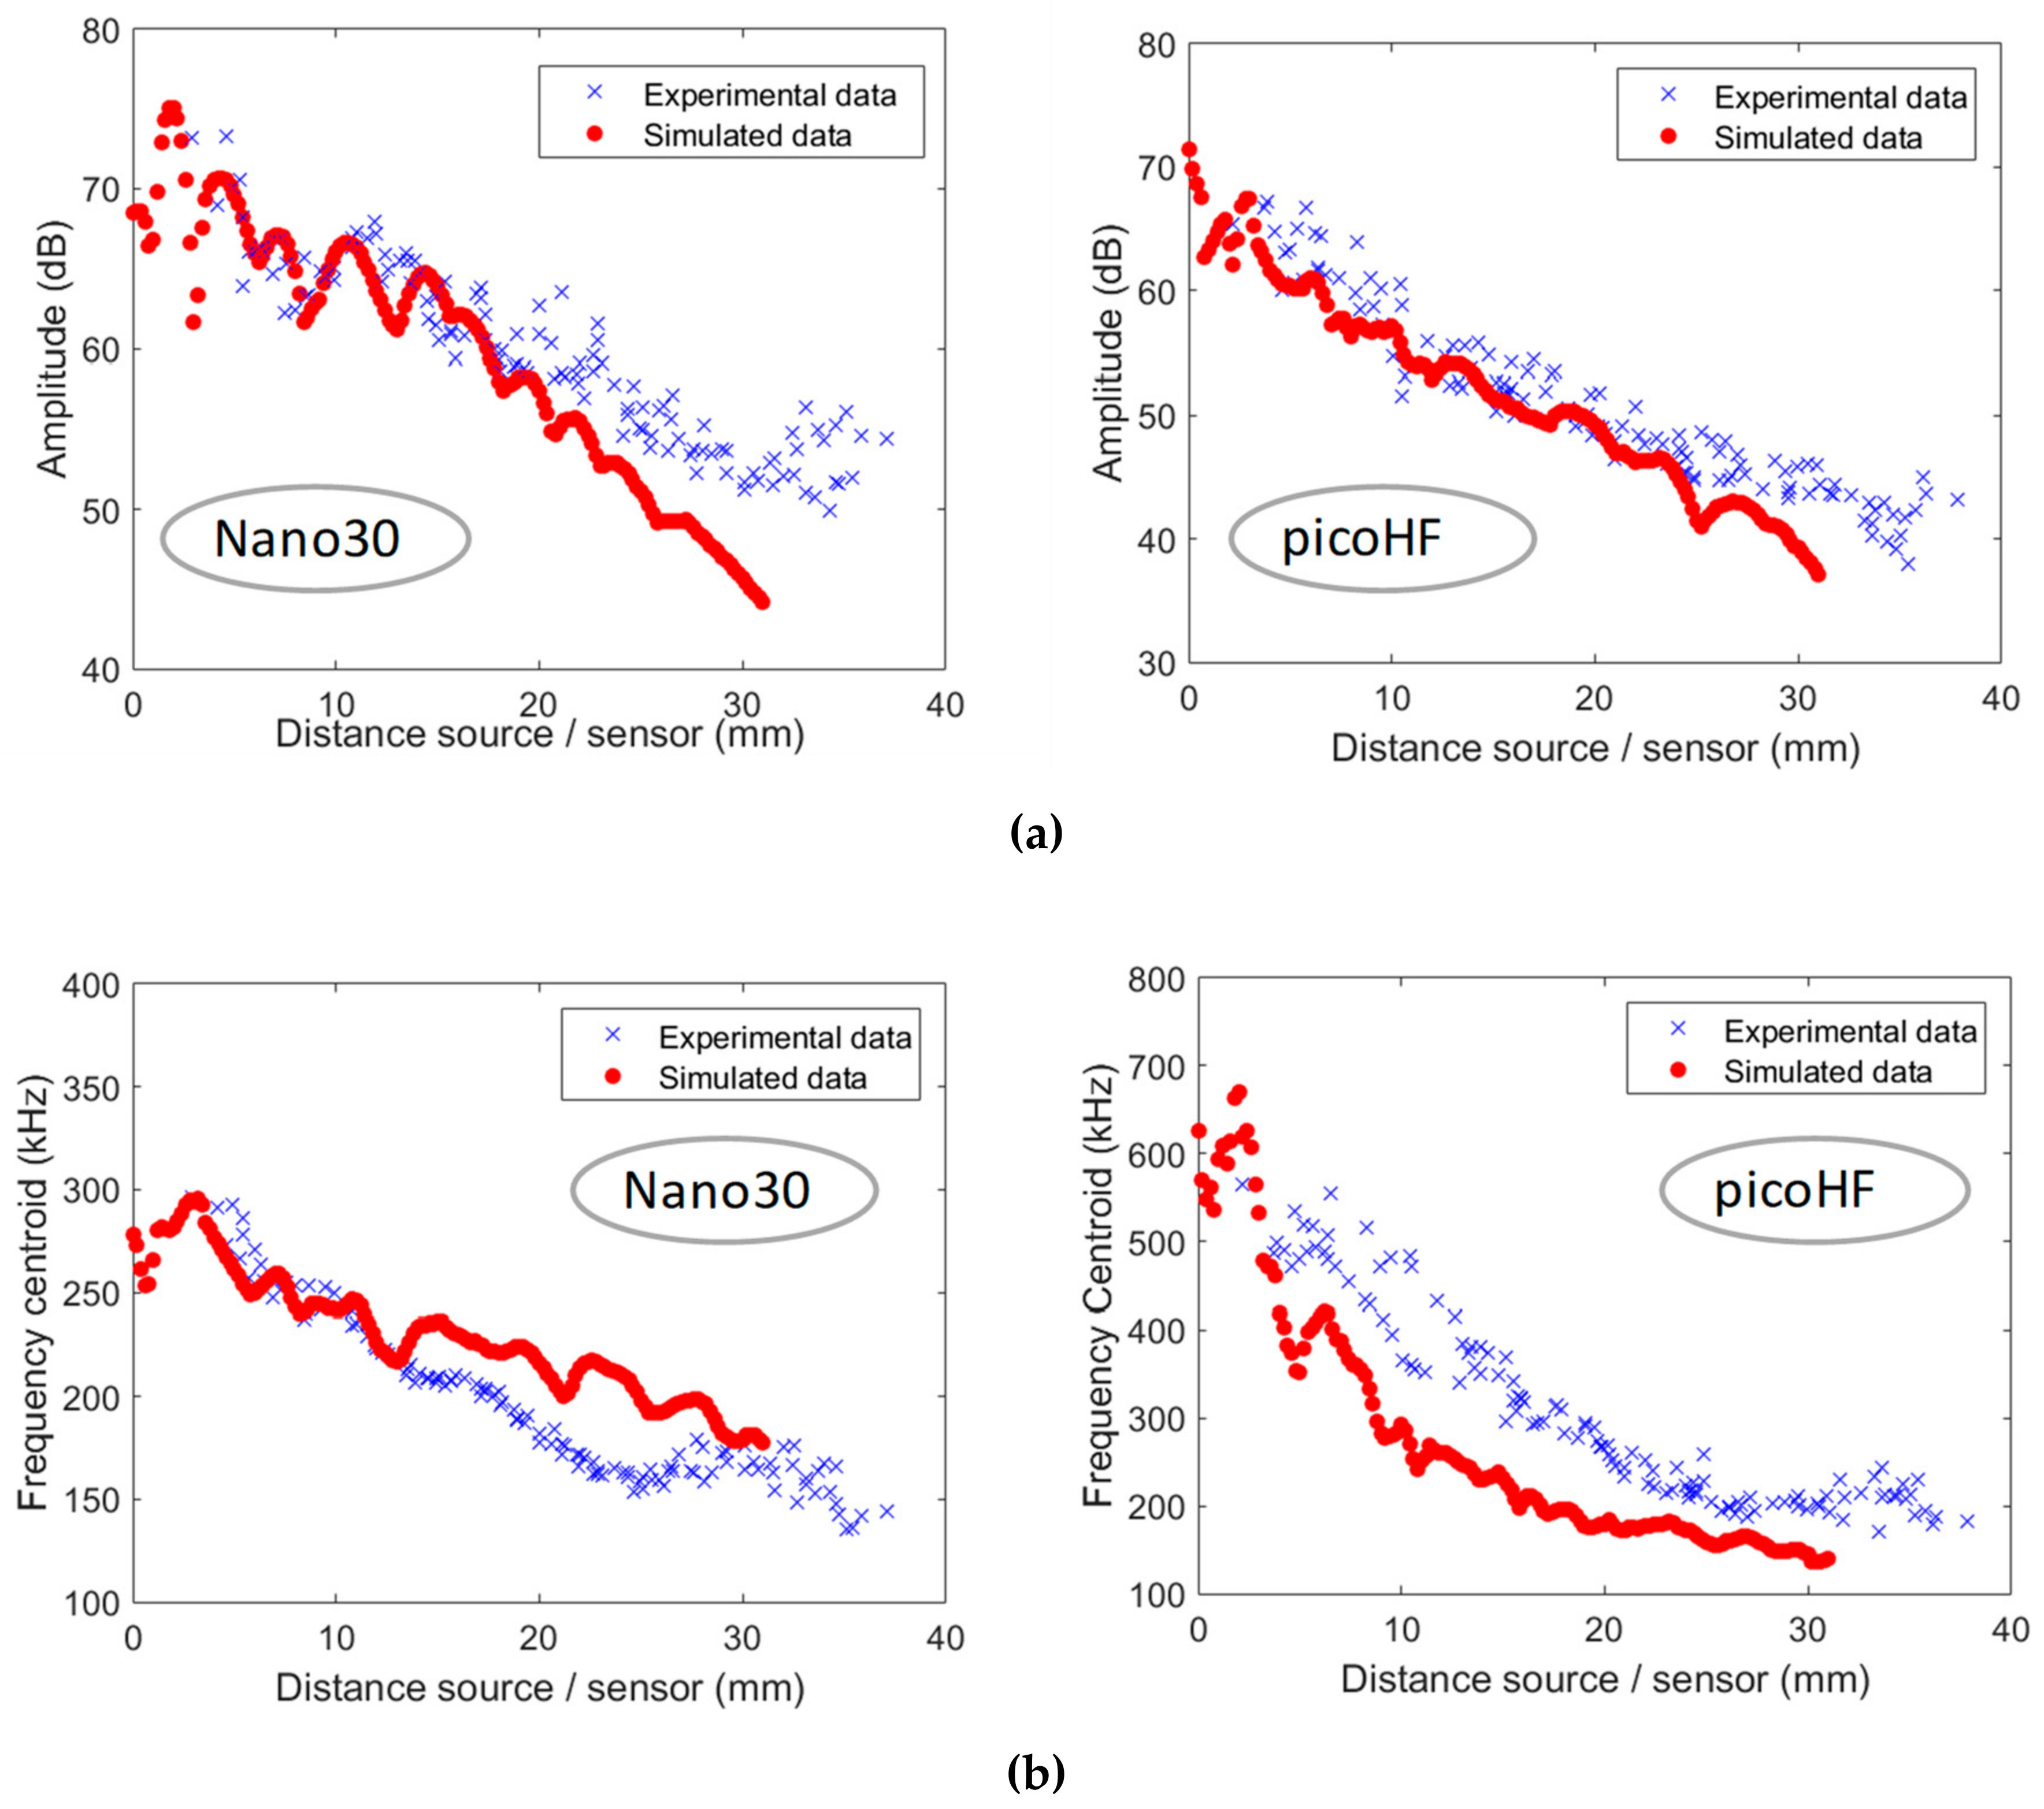
In this section, in order to validate the model before expanding this numerical study to different sensors and specimens, we compare the experimental signals with the simulated signals, which are derived from calculated surface signals using sensor effect according to Equation (5). This comparison is carried out for fiber breaks signals at different positions, recorded at sensor C1 position for the two types of sensors (nano30 and picoHF). Figure 11 and Figure 12 show the experimental and the numerical results with the two sensors excited by a fiber break at positions P1 and P5 for the specimen with thickness e = 2.8 mm and e = 1.7 mm, respectively. Figure 13 shows the comparison in the time domain for waveform due to fiber breaks and obtained with the sensor nano30 at two positions of the sensor: near the source (position P1) and far from it (position P5) while Figure 14 shows the Smoothed Pseudo Wigner-Ville Distribution of the simulated signals. There are some minor differences in the time and frequency domain responses. Nevertheless, in general the numerical and experimental results agree with each other. The correlation coefficients of experimental and simulated waveforms are calculated to determine the similarity in time. In addition, visual comparison is made in frequency domain. The correlation coefficient shows that the measured and the computed waveforms have high similarity, around 0.70. The simulated and experimental results agree well in spite of minor differences, attributed to the influence of coupling effects [53,54] we neglected in the calculation. The results show that the higher frequencies attenuate considerably with propagation. Moreover, it is demonstrated that the features values calculated from the simulated signals match well with those obtained with the experimental results (Figure 15). Figure 15 shows the evolution of several descriptors extracted from the simulated waveforms recorded by sensors nano30 and picoHF for the same fiber breaks (at position P2). For the simulated data, the fiber break is located at position P2 and the sensor moves along the gauge length, from the epicentre of the source to the end of the gauge length. For experimental data, the sensor is located at position C1 and the fiber breaks are distributed over the gauge length. Although the data are not equivalent, we can compare trends in evolutions. We can notice that the simulated data show the same evolution as the experimental data. Overall, a good agreement is observed between the experimental results and the numerical simulations, allowing us to validate the FEM model. Accordingly, we can conclude that the numerical approach is able to describe AE signal propagation and detection due to fiber break. Nevertheless, the amplitude shown in Figure 15 does not follow the 1 / r curve, where r stands for the distance to the source. For a specimen of such a small size, the signal weakening due plate wave dispersion and geometrical spreading is partially overcome by the signal amplification that can come from the superposition of edges reflections onto the direct signal.

4.3. Acoustic Emission Signature Obtained with A Virtual Perfect Point Local Sensor

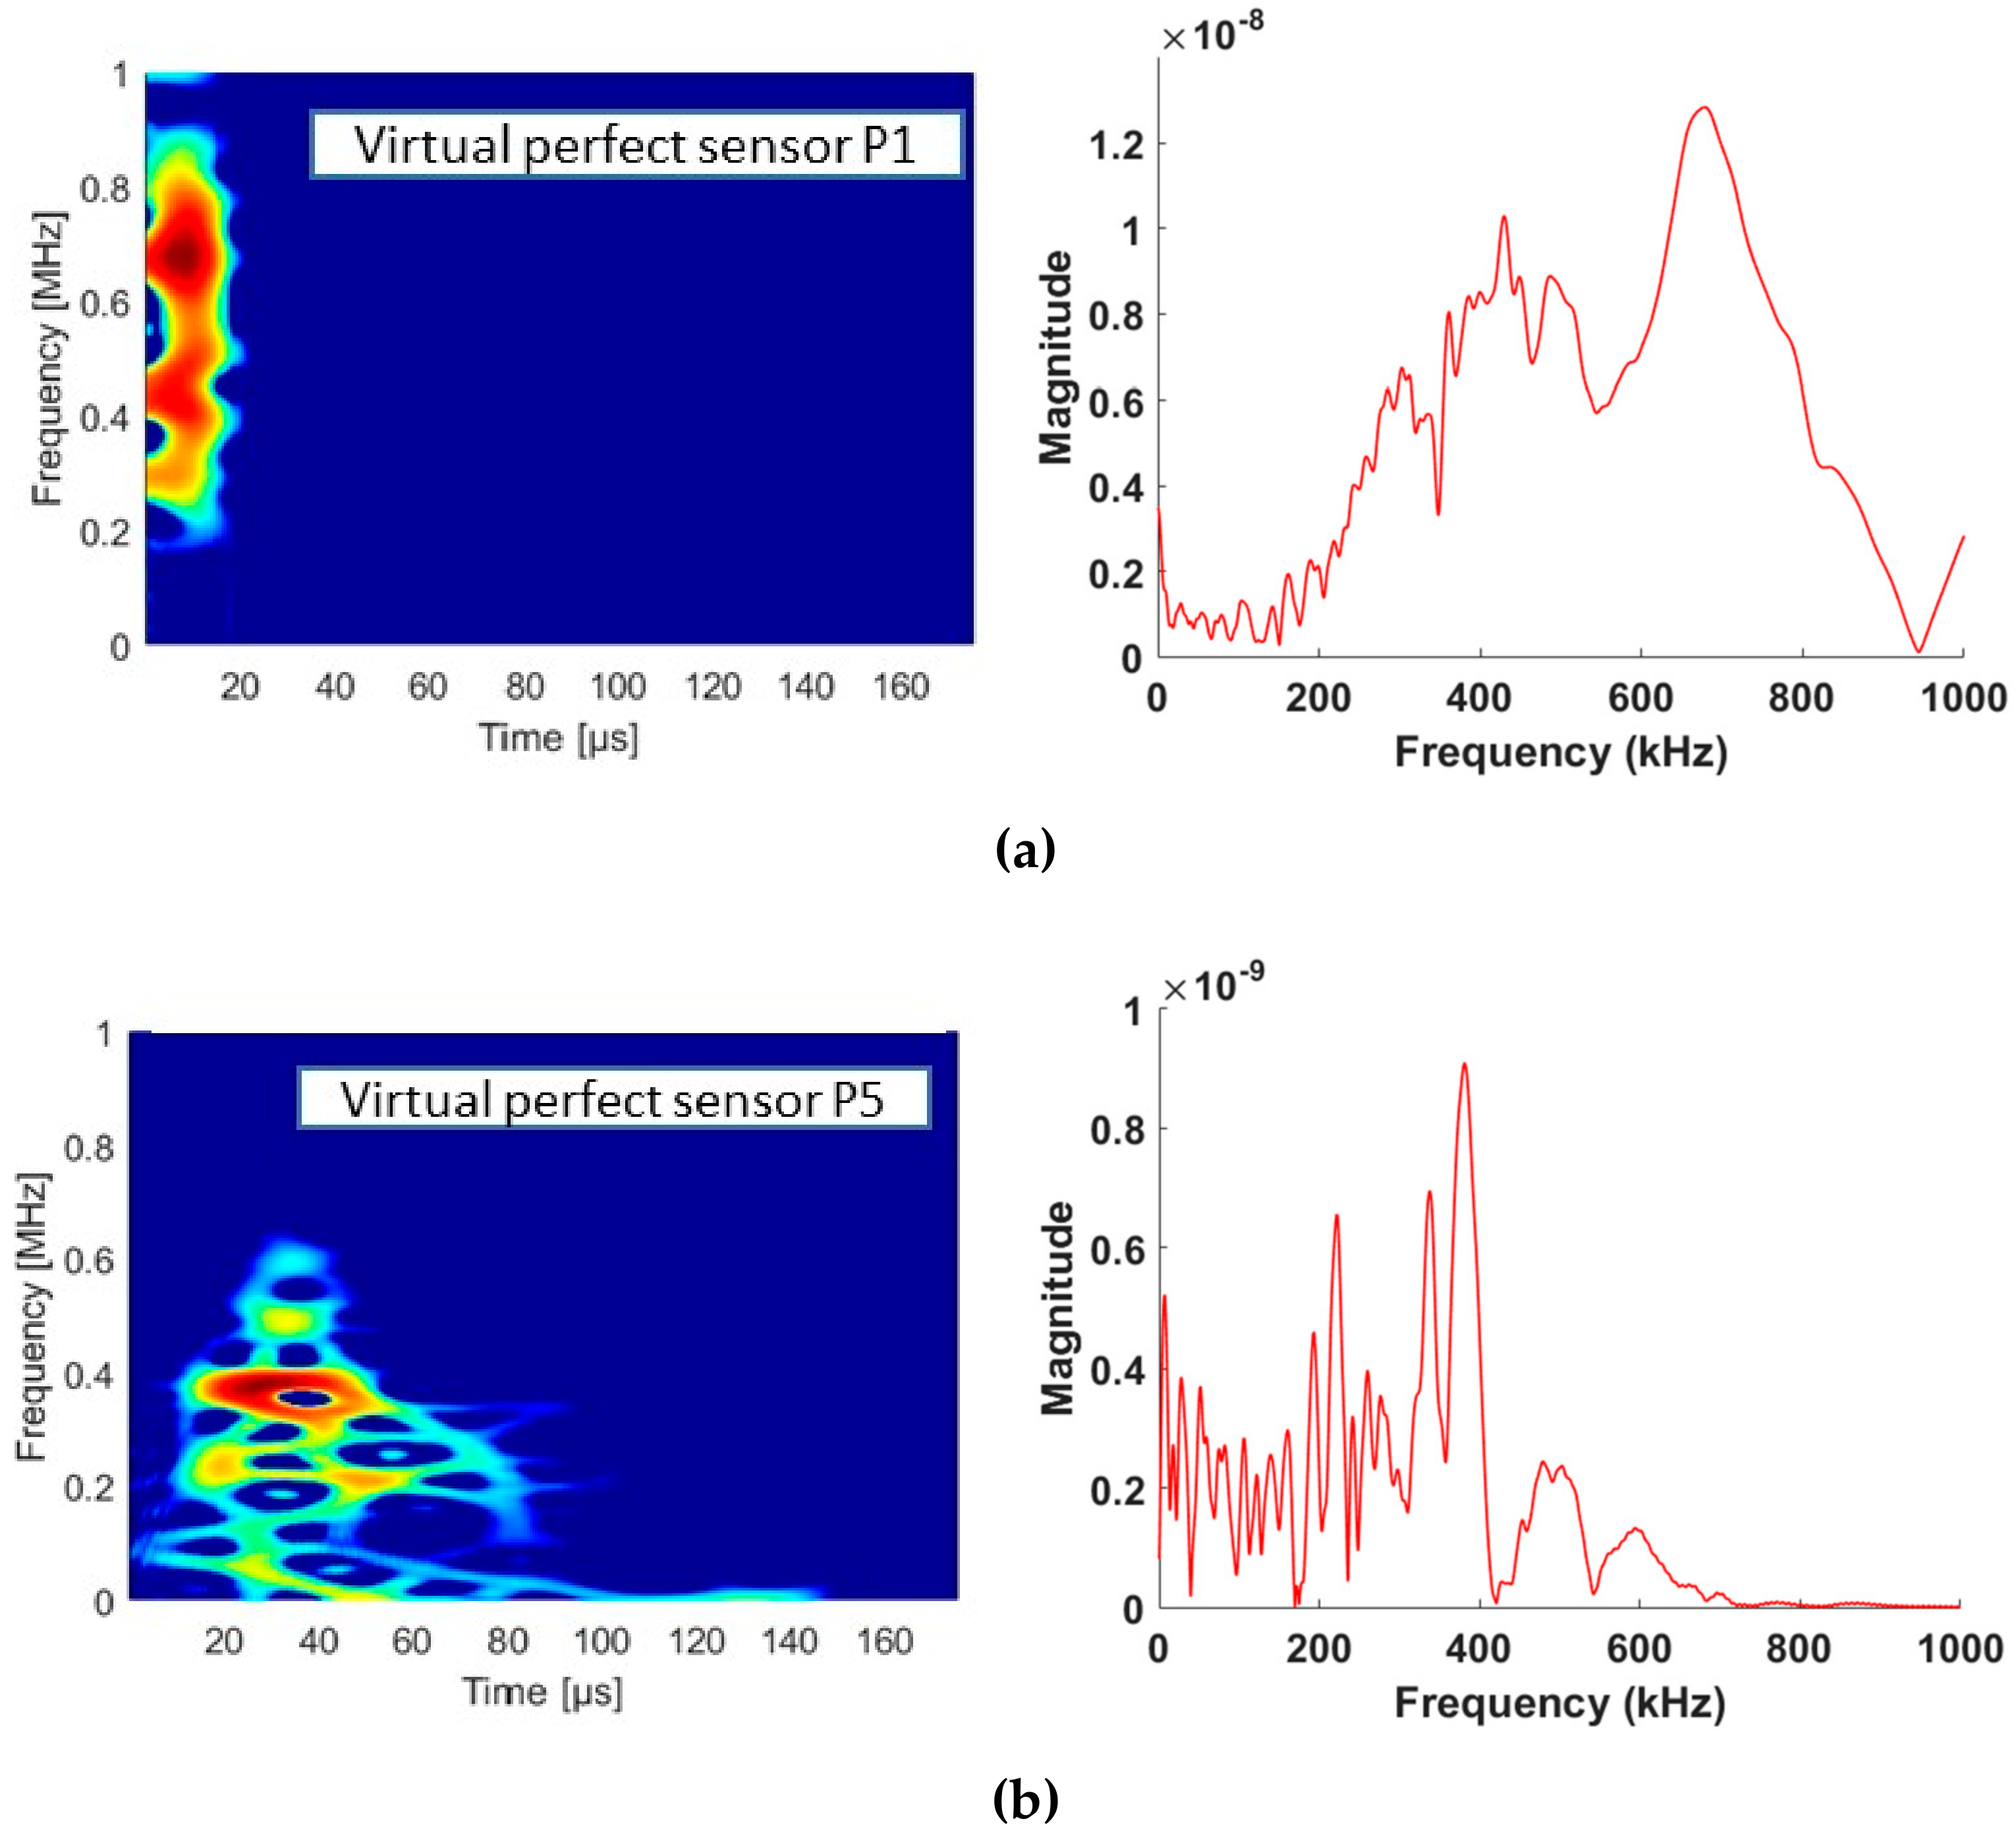
Figure 16 shows the result obtained with a virtual perfect point-like local sensor situated at the position of the sensor C1. The velocity Vz calculated at a single node provides the signal recorded by a virtual perfect local point sensor. Based on these results, most of the energy of the wave is concentrated in the 400 to 800 kHz frequency band and a peak frequency appears around 700 kHz for fiber break located at the position P1. Without the sensor effect, the frequency content is higher, especially for fiber breaks near the sensor.
Simulation also provides waveforms computed along a straight line on the surface in order to further analyze the characteristics of the wave propagation in the medium. In this case, the fiber break is located at the position P2 and the waveforms are calculated on a single node from the epicentre of the source to the boundaries of the gauge length on the top surface (out-of plane velocity Vz) and on the lateral surface (in plane velocity Vy). In both cases, the waveform amplitude significantly decreases in comparison to the one extracted at the epicentre of the AE source. These simulations suggest a shift in the main frequencies as the wave propagates from the source to the boundaries. One can observe changes in both the out-of-plane and the in-plane velocity amplitude and the frequency content (Figure 17). Finally, mainly the lower frequency components (around 500 kHz) appear far from the fiber break position. These are also information of “primitive” AE, which is defined as the waveform near the source (both in distance and in time). A high frequency content, around 900 kHz for the out-of-plane velocity and 700 kHz for the in-plane velocity, typifies the primitive AE signal, which corresponds to the signal detected at the epicenter of the source. For the in-plane velocity, the distance between the source and the epicenter point is equal to 2 mm. For the out-of-plane velocity, the distance is equal to 0.5 mm. Waveform analysis reveals a strong dependence of AE parameters on the distance between the source crack and the receiver point, stressing out that the influence of distance is crucial and should be taken into account for a successful identification of AE sources.
The comparison between the data recorded with the two kinds of sensors and the data recorded with a virtual perfect point-like local sensor shows that the data recorded by the picoHF sensor near the source are more representative of the frequency content than the data recorded by the nano30. These results may be very useful in order to choose the more suitable sensor. In this case, the modelling approach delivers very good information over experimentally inaccessible parameters.
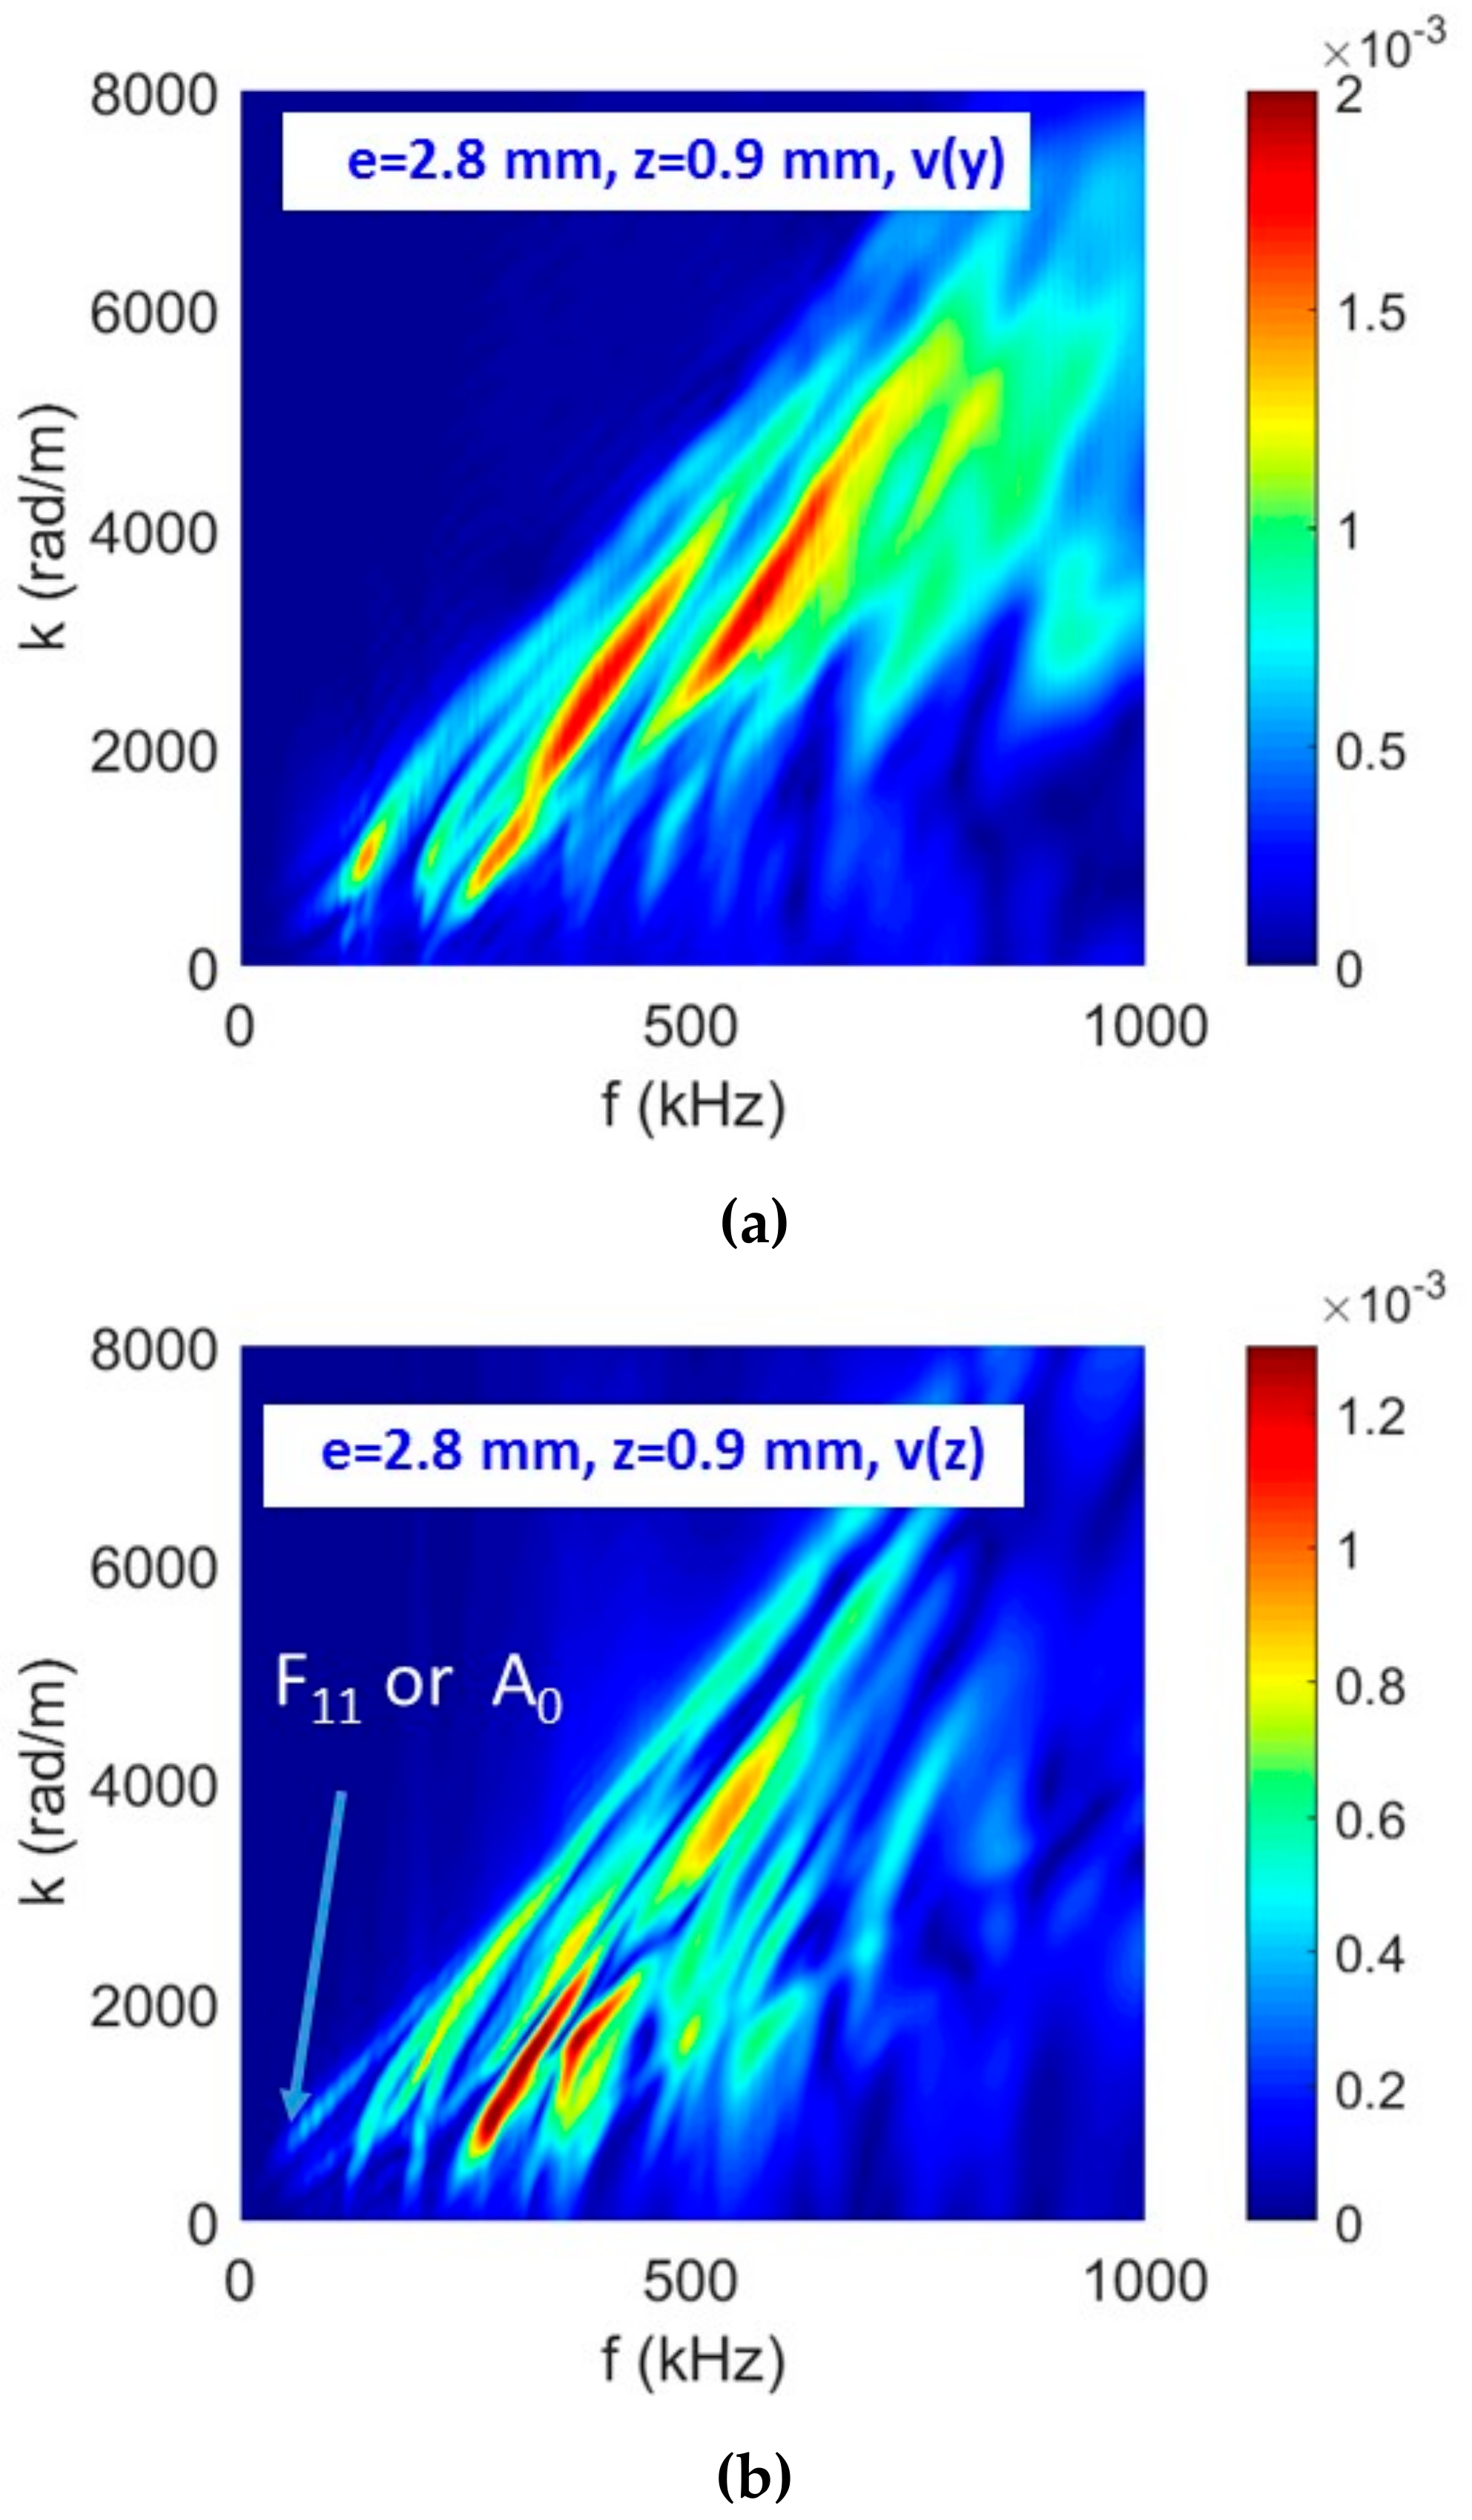
The fiber failure mechanism results in different amplitudes of symmetric and antisymmetric modes. Figure 18 shows the 2DFFT for the simulated signal recorded on the faces of the specimen. It displays the dispersion curve of each mode through a colour map of its modulus as a function of the wave number k and the frequency f. On the lateral edge of the sample, larger amplitudes of the measurable modes are observed than on the face. Of course, this finding must be qualified by the fact that the modes excited by a source placed outside the median plane of the sample do not necessarily have a strong component in the y direction. This is for example the case of the F11 bending mode, which can be compared to the well-known A0 antisymmetric mode for an infinite plate. In fact, the antisymmetric modes do not have a component in the y direction, when the measurement is made in the middle of the slice (at z = 0). It is however expected this mode to be excited because of the position of the source. It is clearly visible in Figure 18b. For a specimen of such thickness, in the frequency band of 1 MHz or for a frequency-thickness product up to 2.8 MHz.mm, the source excites a significant amount of modes, the predominant ones being bending modes and to a lesser extent torsion modes.
Many parameters strongly affect the AE signal. With the aim of increasing the reliability of supervised classifications, a parametric study can be carried out to enrich the library associated with fiber breakage and to decrease the uncertainty. In the next section, several parameters are investigated such as the thickness of the sample, the position of the fiber, and the choice of the sensor.

5. Parametric Study Based on the Numerical Model

5.1. Effect of the Sensors

Figure 19 shows the evolution of the descriptors extracted from numerical signals with several sensor effects (picoHF, WD, micro80, nano30, R15). While the medium and the excitation source are the same, significant differences are observed in the time and frequency domain results.
The aperture effect consists of the progressive elimination of higher frequency wavelengths. The frequency response of the AE sensor strongly influences the characteristics of the output signal. This result shows a strong influence of the type of sensor, which controls the frequency content such as frequency centroid or peak frequency (two common features used). In this context, it is difficult to develop generalized pattern recognition methods using the resonant type AE sensors. It is further noted that the R15 sensor is active in a smaller frequency range than that of the WD, hence energy distribution with frequency seems to match with the sensor properties near the source. The peak amplitude is also strongly affected by the sensor. With the numerical approach, it may be possible to enlarge the library with the acoustic signature obtained with different sensors.

5.2. Effect of the Thickness of the Sample and the Position of the Fiber

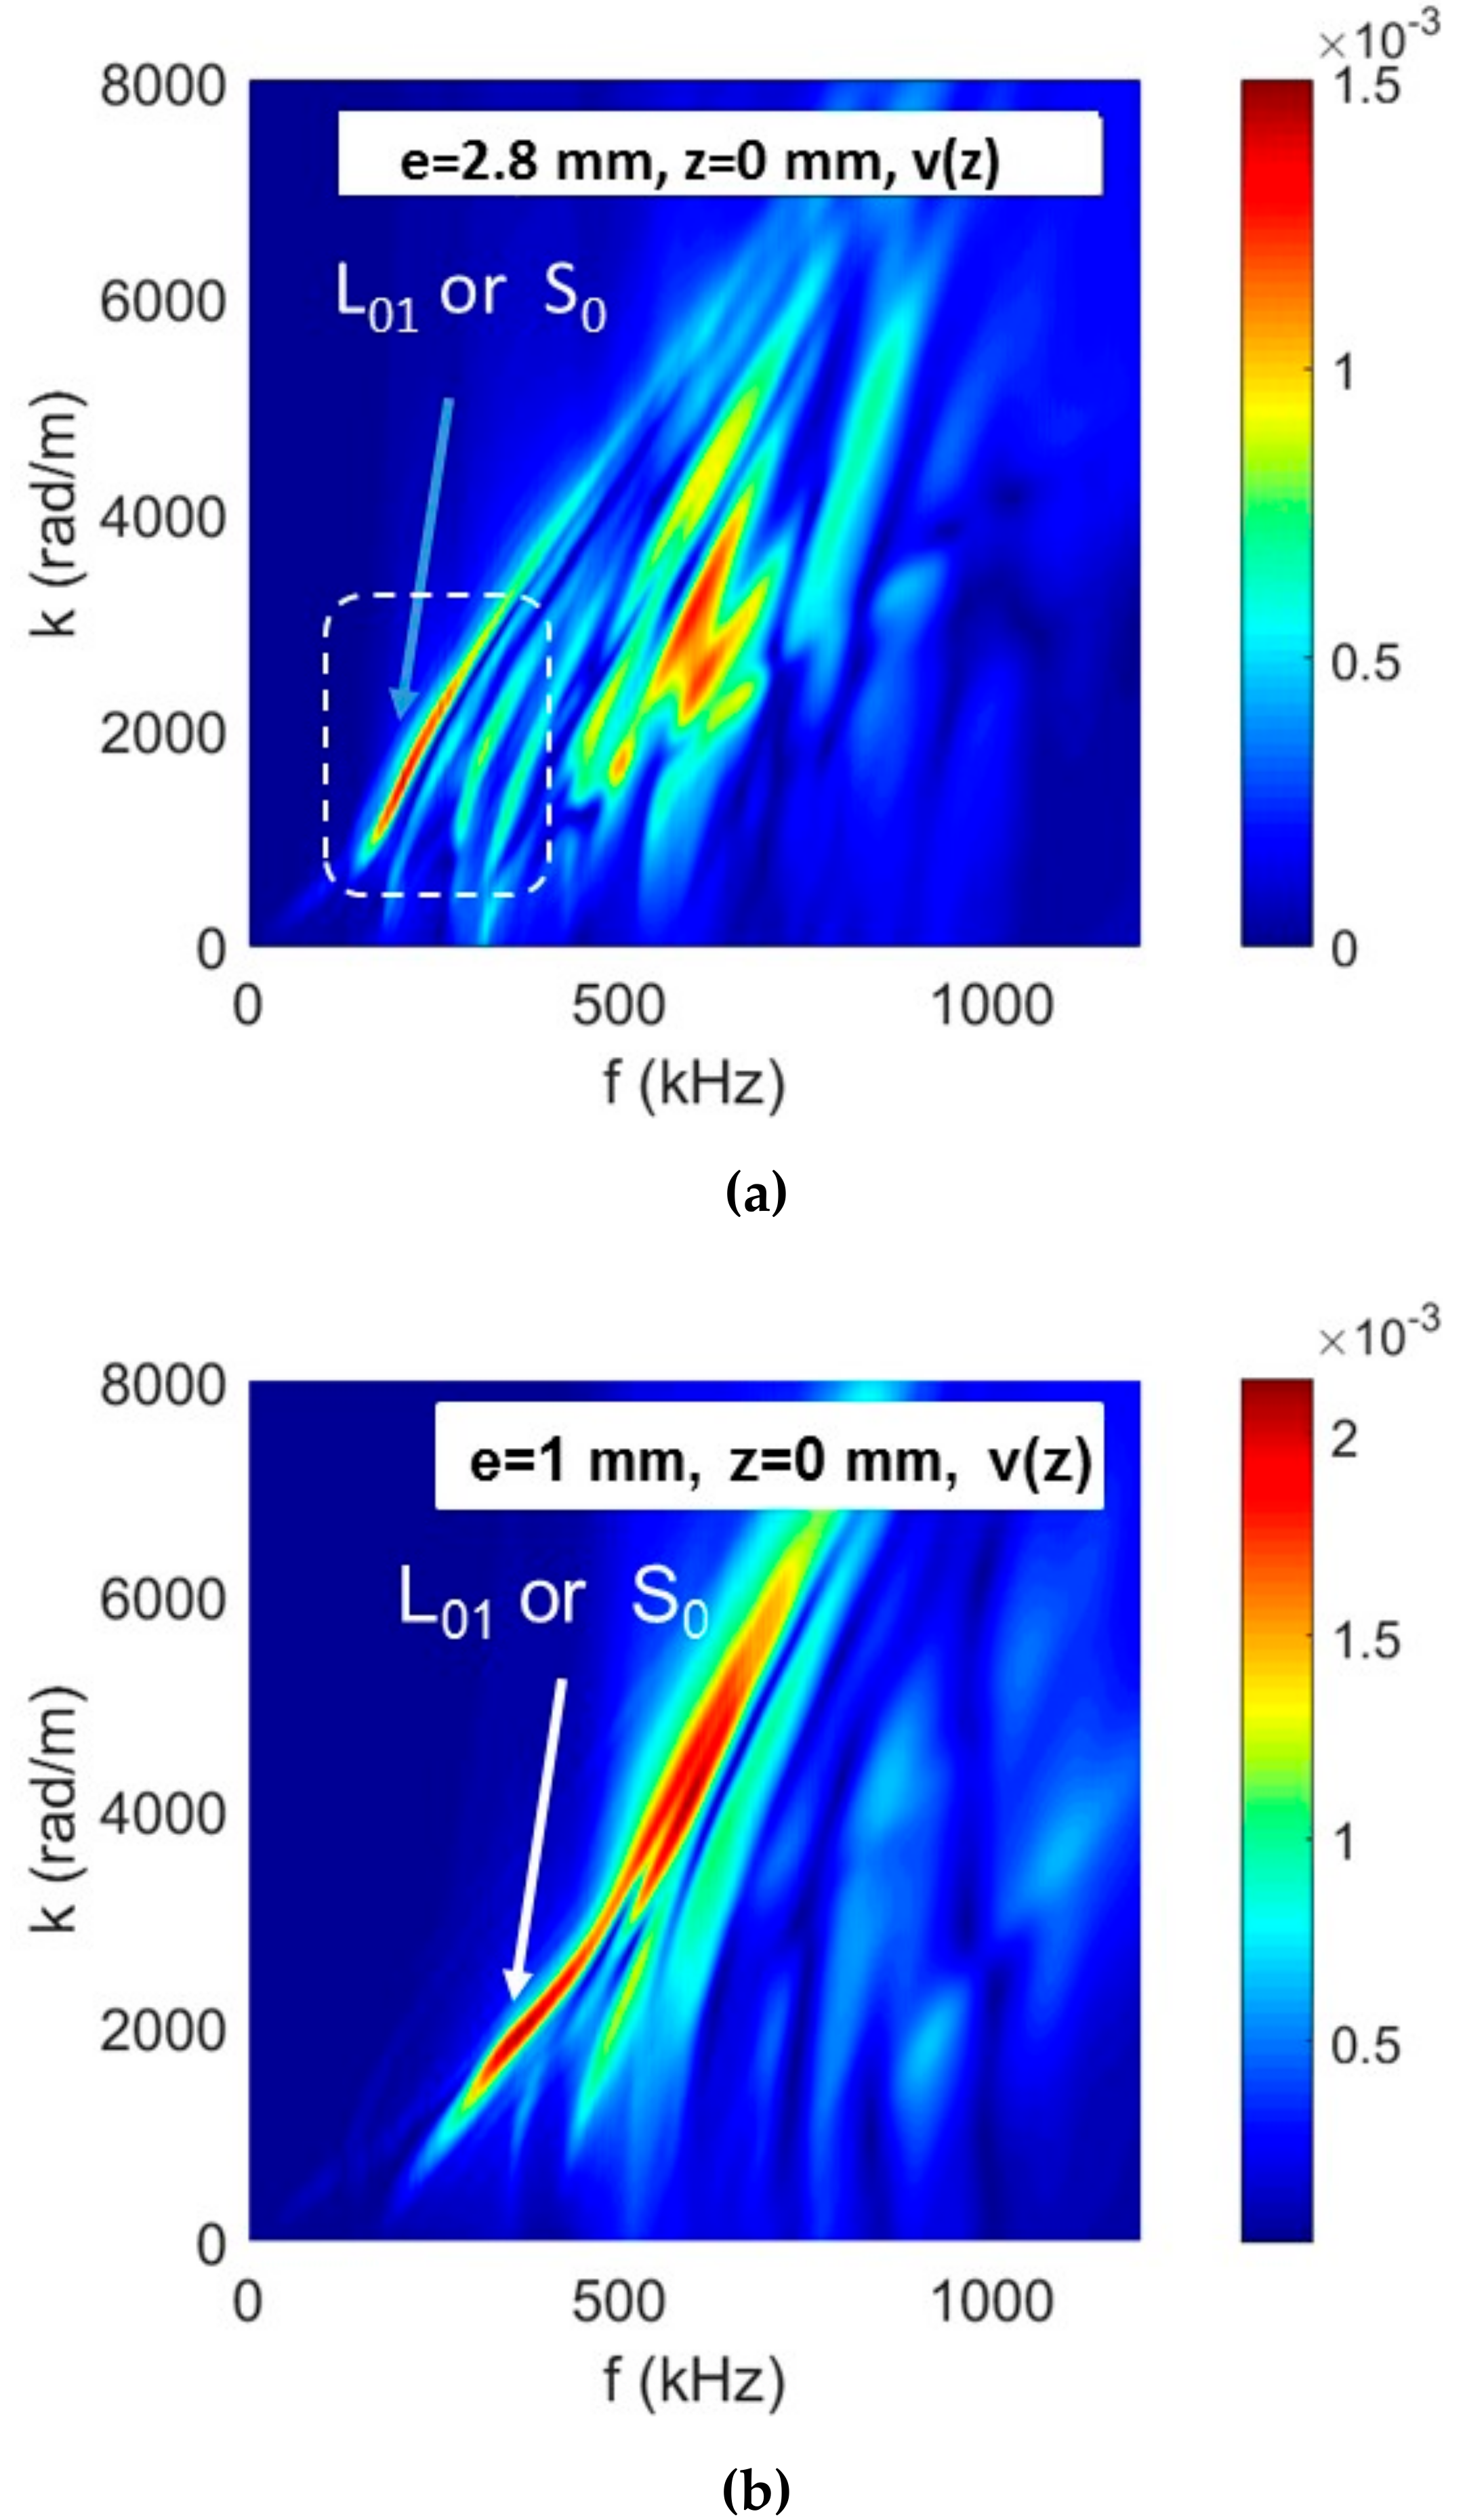
The thickness and the source position along the z-axis are varied. Figure 20a shows the results for the 2DFFT obtained with a virtual perfect point-like contact sensor for two values of the thickness (e = 2.8 mm and e = 1 mm), when the fiber is located in the mid-plane of the specimen. A comparison can be made with the Figure 18b. When the source is located in the mid-plane (z = 0), only the longitudinal (L01 in particular) or symmetrical modes are excited (Figure 20a). Even if the identification of the excited modes is complicated due to the reflections, we can observe that the excited modes are not the same. With decreasing the z-position, the spectral contributions above 500 kHz increase significantly.
In Figure 20b, we investigate the effect of the thickness of the sample. It is not surprising to find the fundamental longitudinal mode L01 excited mainly around 500 kHz in a 1mm-thick sample, because this corresponds to the situation observed around the frequency 178.6 kHz in the 2.8 mm-thick sample. Indeed, in terms of guided wave dispersion, the frequency-thickness product is the reference invariant. The dispersion figure thus logically undergoes a homothety of the frequency axis, that it to say that the full extent of the frequency range (1000 kHz) of the Figure 20b,c correspond to the dashed box of Figure 20a. Consequently, less modes are observable and the excitability zone of the L01 mode is now centered on the bandwidth accessible to the measurement.
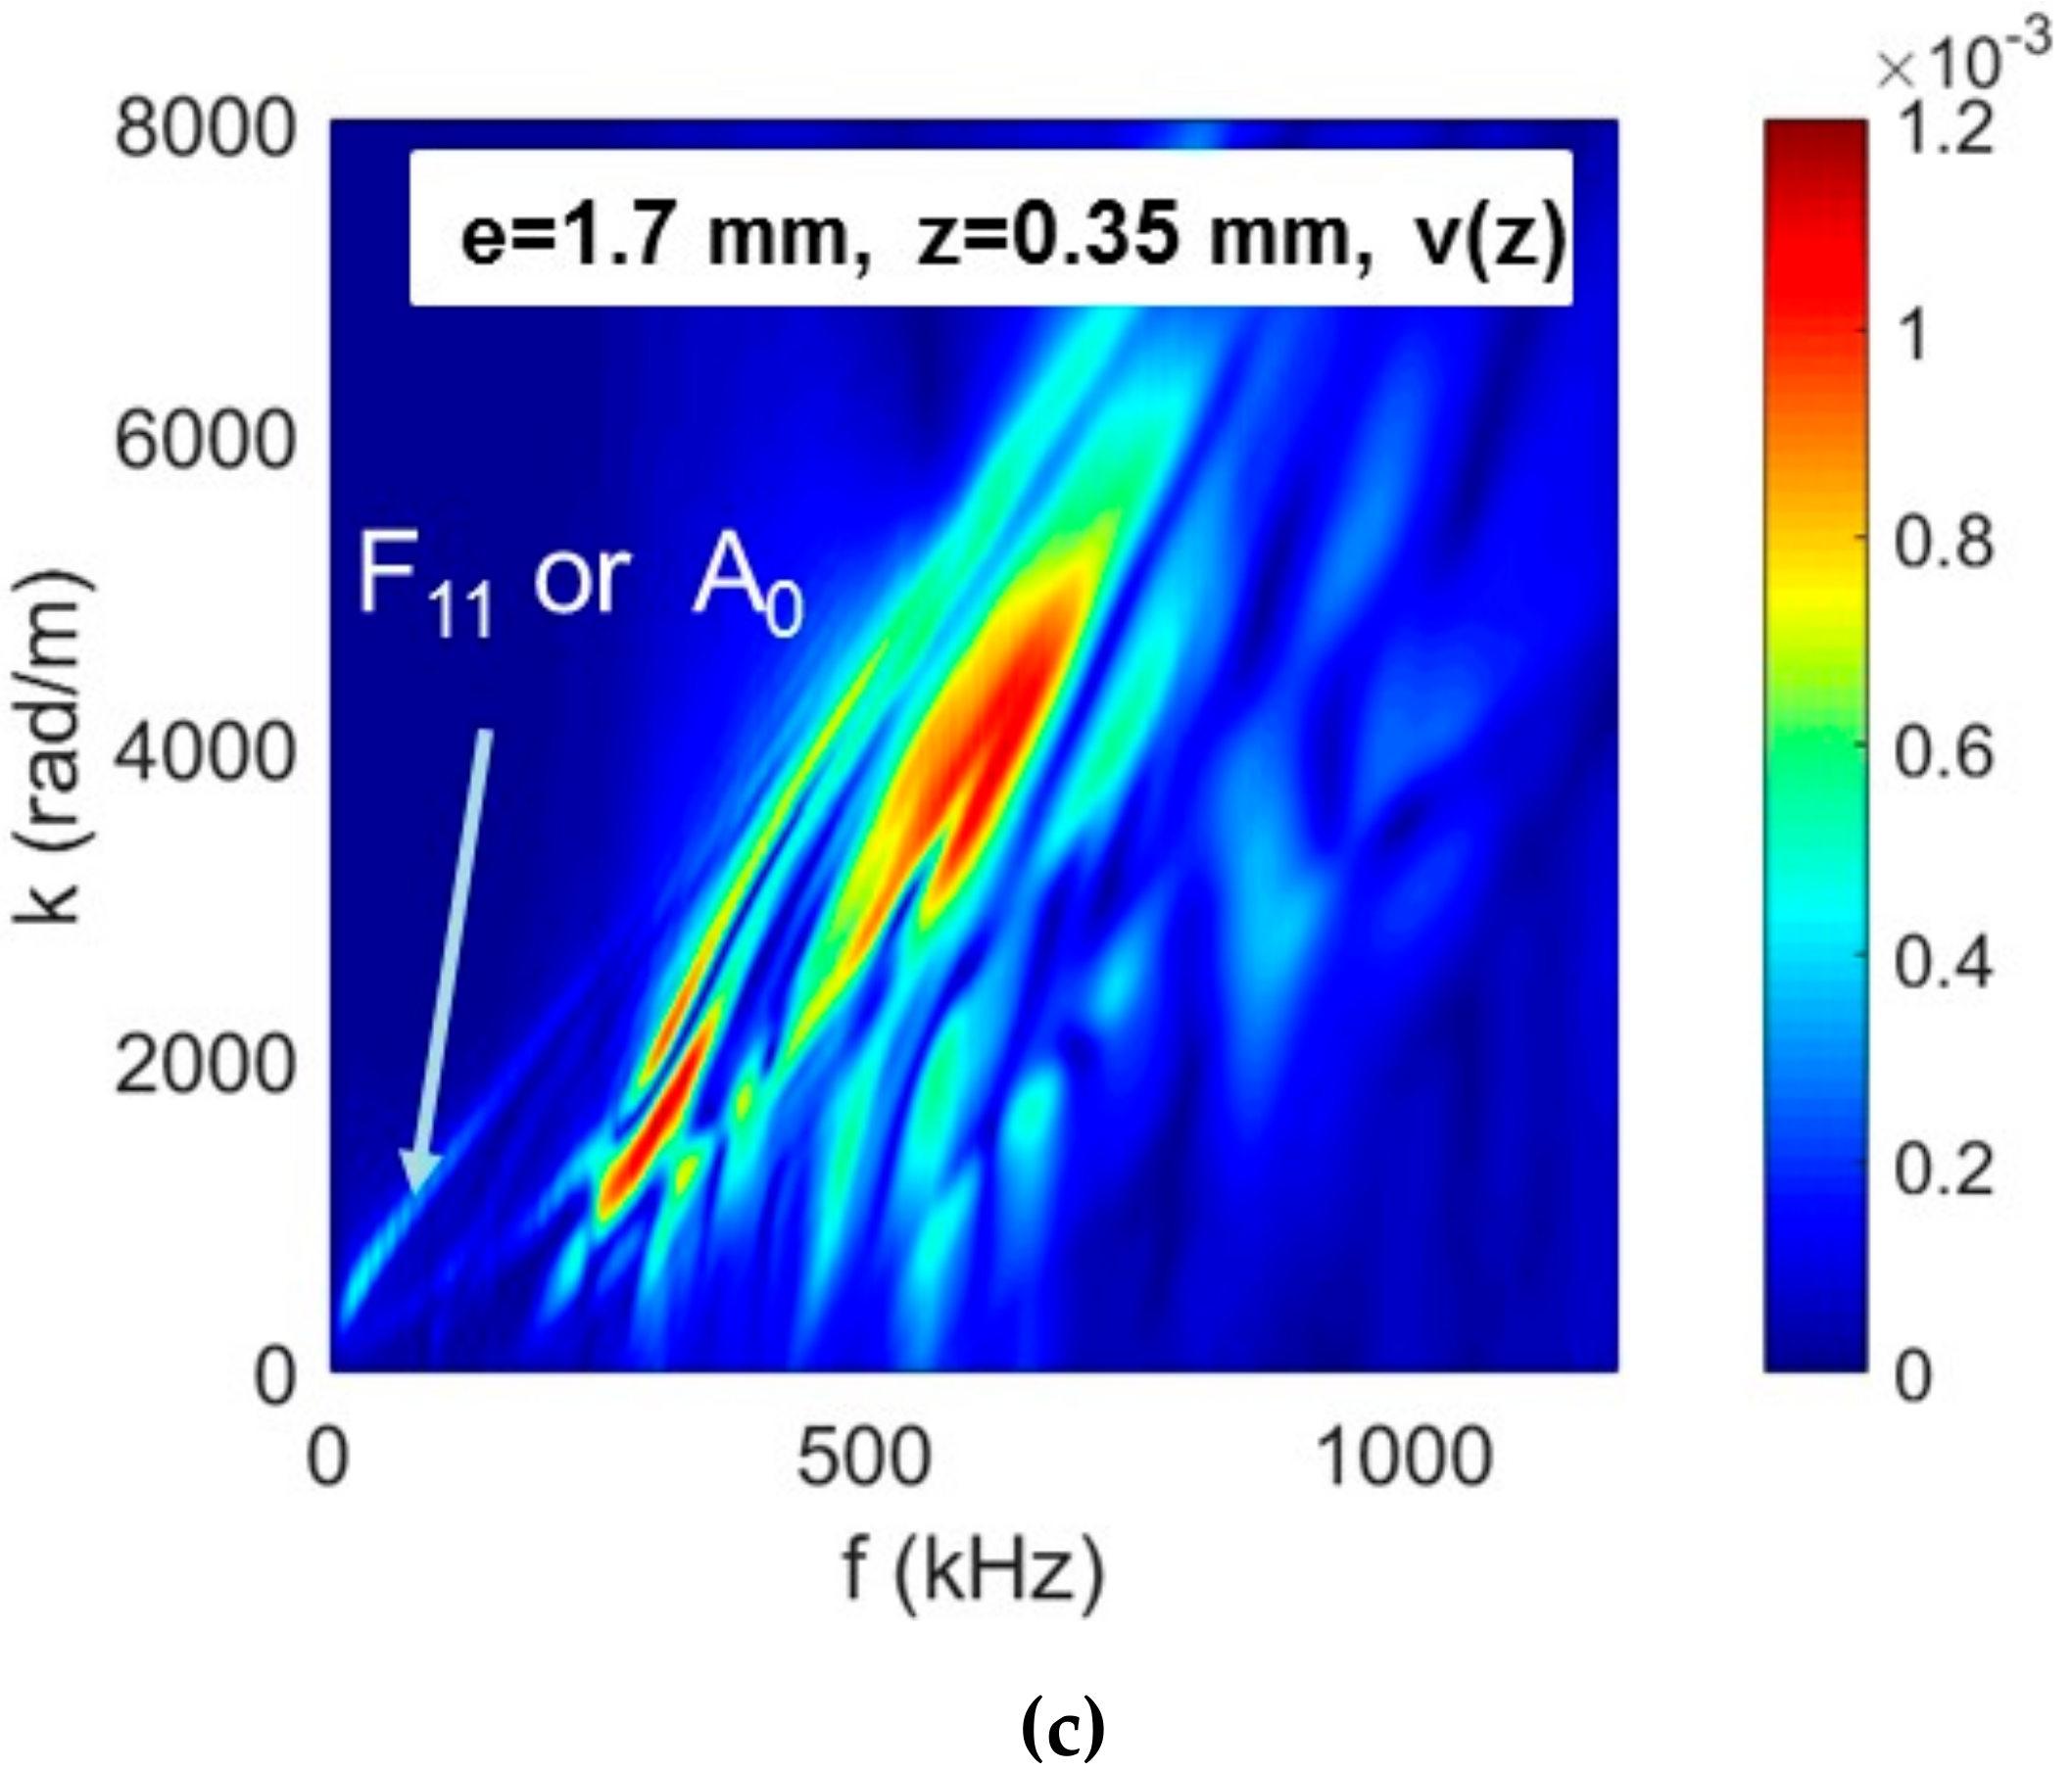
All things equal otherwise, when the source is out of the median plane of the sample (Figure 20c) the same conclusion could be drawn observing the dispersion of guided waves. As a matter of fact, the previously described outcomes, that is to say the homothety of frequency axis (here by a 0.6 factor compared to Figure 18b) resulting in a frequency shift of the excited portion of the dispersion curves accompanied by a switch of the nature of the excited modes, from longitudinal to flexural, remain valid.
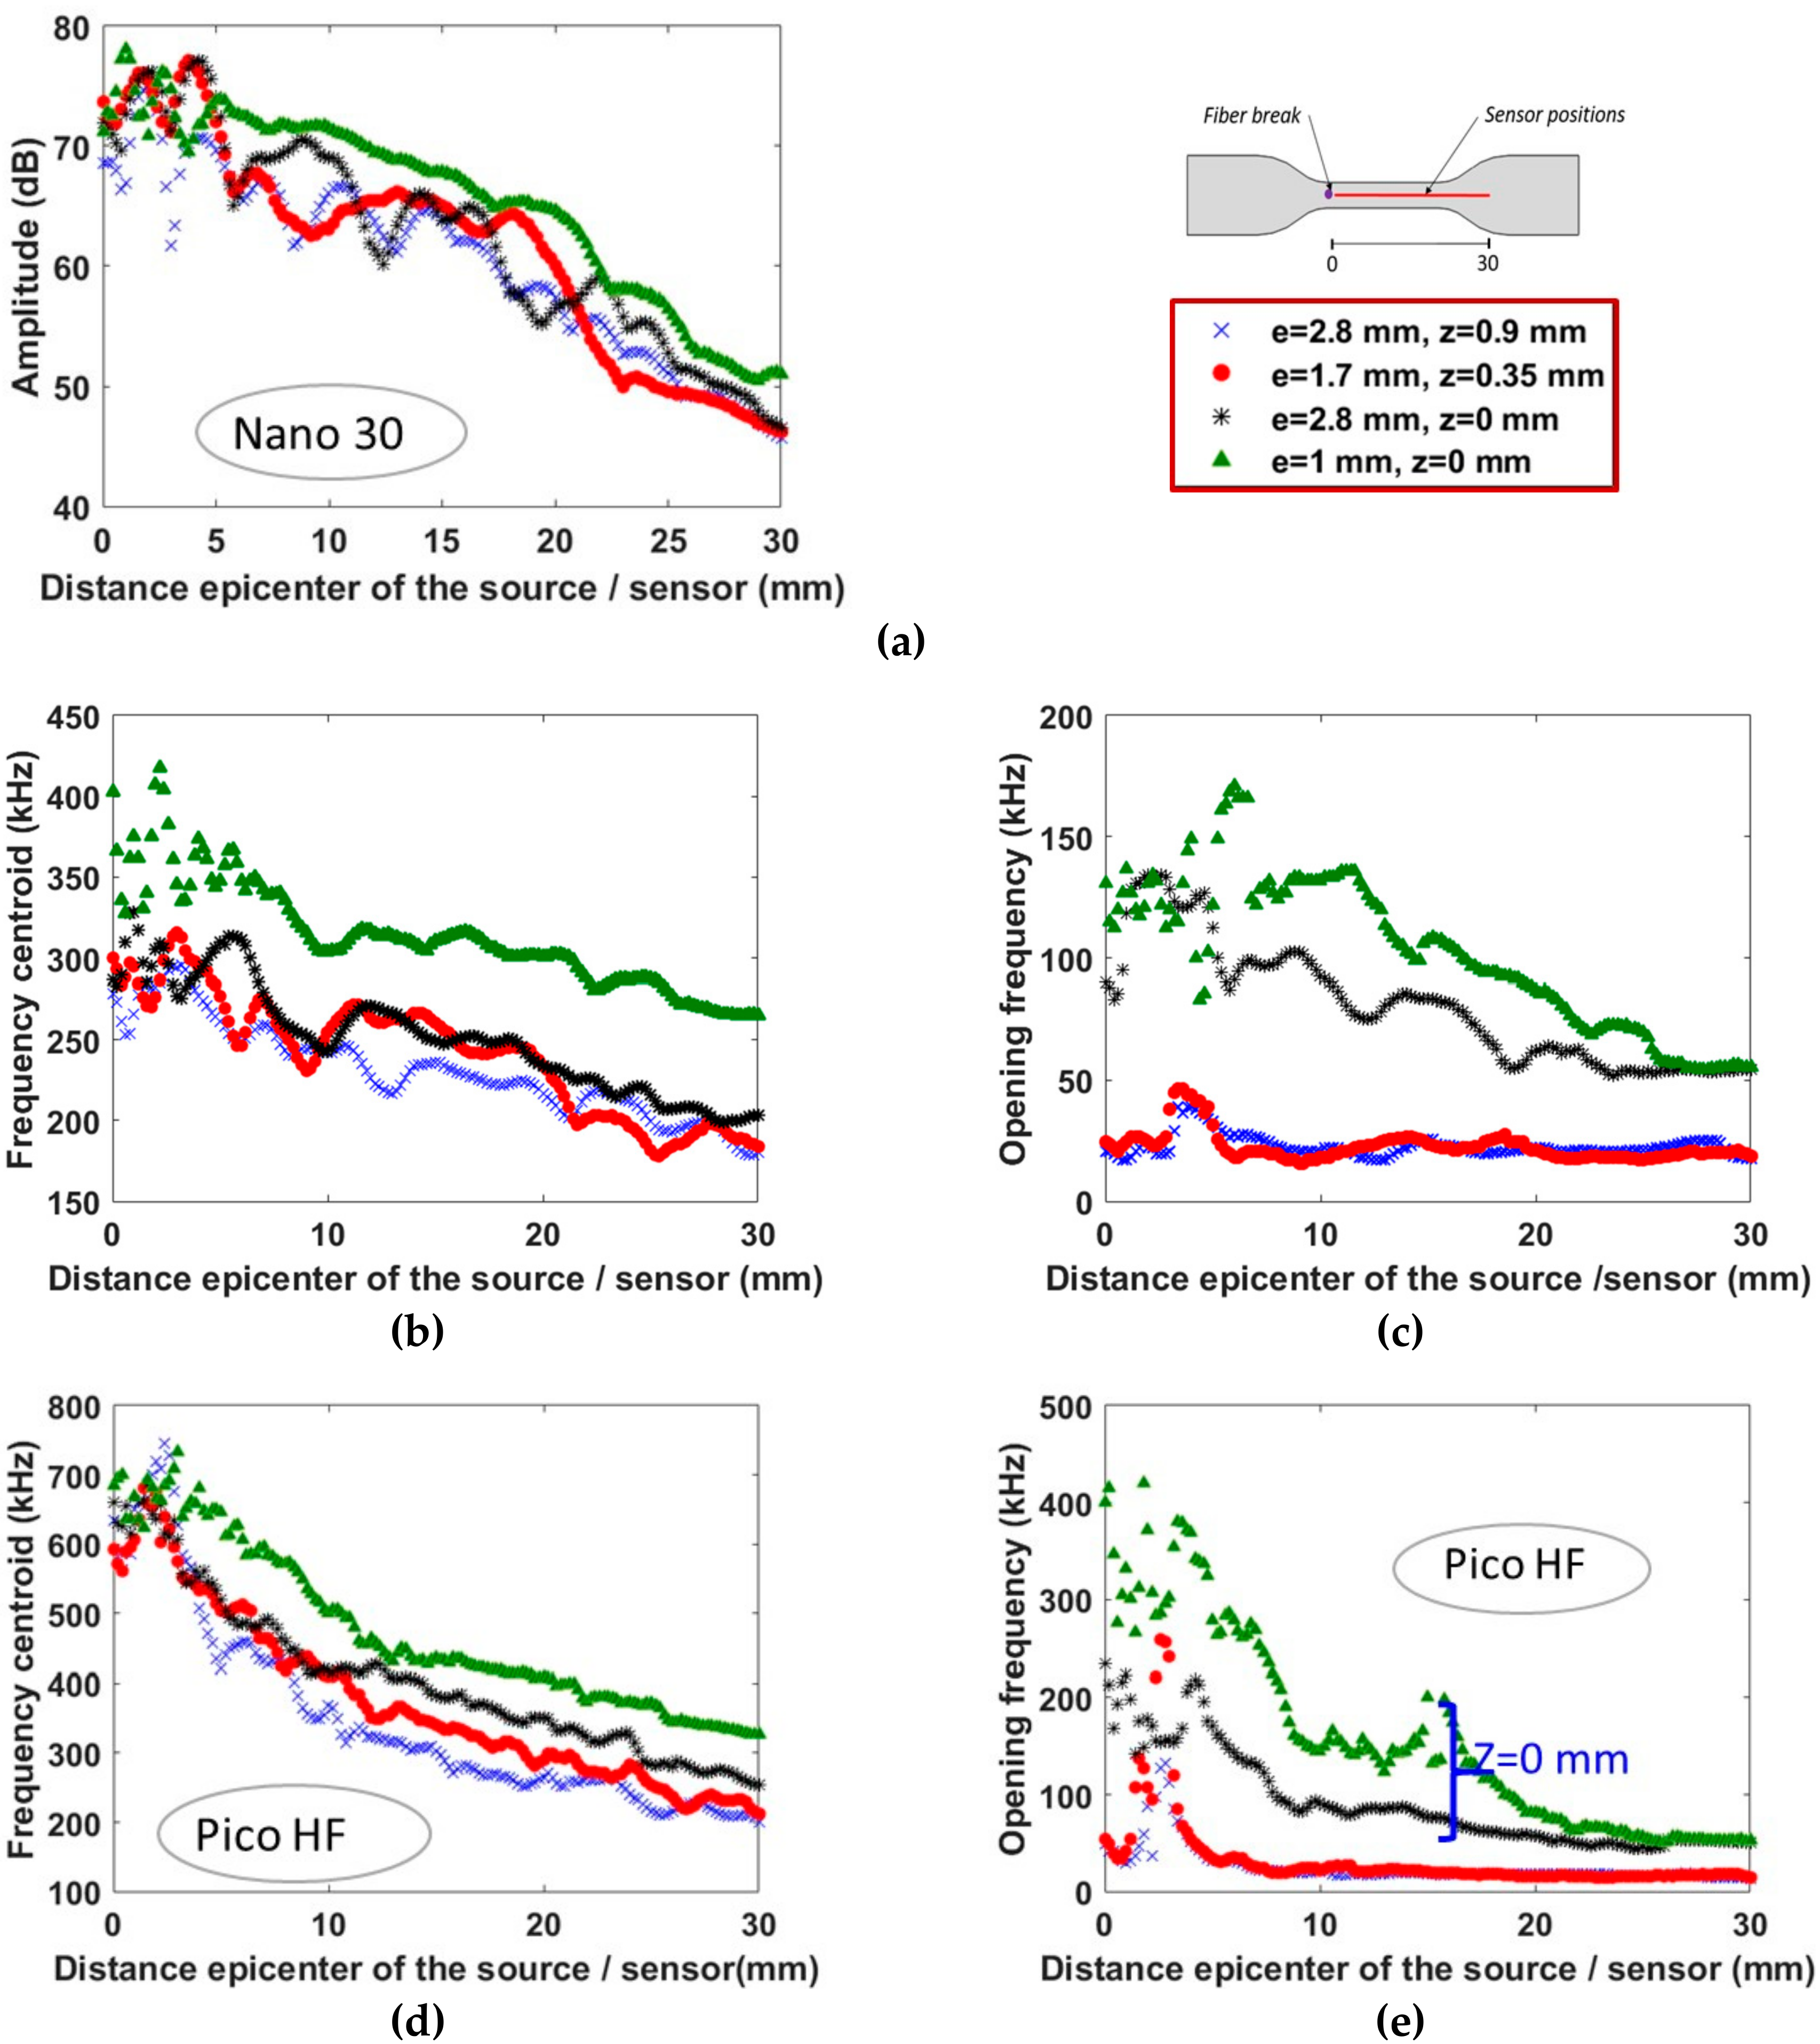
Figure 21 shows the evolution of the descriptors obtained with two kinds of sensors (nano30 and picoHF) for several thicknesses and positions of the fiber. The main differences are observed in the frequency content. The thickness of the specimens and the position of the fiber are major factors of influence for the frequency of the AE signals. By inserting modelling results taking into account these factors we enrich the experimental library of acoustic signatures, what can certainly improve the robustness of the supervised classification. In practice, it is arduous to obtain a sufficiently comprehensive library from an experimental point of view.

6. Conclusions

A modelling approach has been developed to predict the characteristics of the AE signal due to fiber breaks. The effects of the source position, wave propagation and the transducers are treated numerically and are compared with experiments. The simulated waveforms near the source provide a valuable understanding of the signature of the AE source. In particular, the study of the 2DFFT can identify the typical modes excited during the signal propagation, which strongly depend on the position of the fiber and on the thickness of the sample. Thus, the analysis of the dispersion modes, which is only accessible by numerical simulations, reveals interesting geometry-dependent features of the waveforms. The results of this work highlight the main limitations of the conventional source identification procedures.
Modelling approaches that simulate “primitive” AE sources can be use in order to: (1) optimize sensor selection and location, (2) quantify the wave propagation effects and (3) generate training datasets for machine learning algorithms. In addition, modelling AE signals with our numerical approach allows us to enlarge the training datasets while avoiding the high costs required by extensive experimental campaigns.
In spite of its simplicity, the proposed model represents a first step towards a quantitative understanding of the influence of experimental parameters on AE signals generated by fiber breaks. Other damage mechanisms, such as matrix cracking and fiber-matrix debonding, will be considered in a future work.

Author Contributions

Conceptualization (Z.H., N.G., C.F., T.M.), Data curation (Z.H.), Formal analysis (Z.H.), Investigation (Z.H.), Methodology (Z.H., C.F, N.G., T.M.), Supervision (N.G, C.F., T.M.), Writing (N.G., C.F., T.M.).

Funding

This research received no external funding.

Conflicts of Interest

The authors declare no conflict of interest.

References

  1. Godin, N.; Reynaud, P.; Fantozzi, G. Acoustic Emission and Durability of Composites Materials; ISTE-Wiley: London, UK, 2018; ISBN 9781786300195. [Google Scholar]
  2. Sause, M.; Schmitt, S.; Kalafat, S. Failure load prediction for fiber-reinforced composites based on acoustic emission. Compos. Sci. Technol. 2018, 164, 24–33. [Google Scholar] [CrossRef]
  3. Loutas, T.; Eleftheroglou, N.; Zarouchas, D. A data-driven probabilistic framework towards the in-situ prognostics of fatigue life of composites based on acoustic emission data. Compos. Struct. 2017, 161, 522–529. [Google Scholar] [CrossRef]
  4. Godin, N.; Reynaud, P.; Fantozzi, G. Contribution of AE analysis in order to evaluate time to failure of ceramic matrix composites. Eng. Fract. Mech. 2019, 210, 452–469. [Google Scholar] [CrossRef]
  5. Anastassopoulos, A.; Philippidis, T. Clustering methodology for the evaluation of acoustic emission from composites. J. Acoust. Emiss. 1995, 13, 11–12. [Google Scholar]
  6. Kostopoulos, V.; Loutas, T.; Kontsos, A.; Sotiriadis, G.; Pappas, Y. On the identification of the failure machanisms in oxide/oxide composites using acoustic emission. NDT E Int. 2003, 36, 571–580. [Google Scholar] [CrossRef]
  7. Ramasso, E.; Placet, V.; Boubakar, L. Unsupervised Consensus Clustering of Acoustic Emission Time-Series for Robust Damage Sequence Estimation in Composites. IEEE Trans. Instrum. Meas. 2015, 64, 3297–3307. [Google Scholar] [CrossRef]
  8. Marec, A.; Thomas, J.-H.; El Guerjouma, R. Damage characterization of polymer-based composite materials: Multivariable analysis and wavelet transform for clustering acoustic emission data. Mech. Syst. Signal Process. 2008, 22, 1441–1464. [Google Scholar] [CrossRef]
  9. Li, L.; Lomov, S.V.; Yan, X. Correlation of acoustic emission with optically observed damage in a glass/epoxy woven laminate under tensile loading. Compos. Struct. 2015, 123, 45–53. [Google Scholar] [CrossRef]
  10. Alia, A.; Fantozzi, G.; Godin, N.; Osmani, H.; Reynaud, P. Mechanical behaviour of jute fiber-reinforced polyester composite: Characterisation of damage mechanisms using Acoustic Emission and microstructural observations. J. Compos. Mater. 2019, 53, 3377–3394. [Google Scholar] [CrossRef]
  11. Sause, M.; Gribov, A.; Unwin, A.R.; Horn, S. Pattern recognition approach to identify natural clusters of acoustic emission signals. Pattern Recognit. Lett. 2012, 33, 17–23. [Google Scholar] [CrossRef]
  12. Bohse, J. Acoustic emission characteristics of micro-failure processes in polymer blends and composites. Compos. Sci. Technol. 2000, 60, 1213–1226. [Google Scholar] [CrossRef]
  13. Giordano, M.; Condelli, L.; Nicolais, L. Acoustic emission wave propagation in a viscoelastic plate. Compos. Sci. Technol. 1999, 59, 1735–1743. [Google Scholar] [CrossRef]
  14. Giordano, M.; Calabro, A.; Esposito, C.; D’Aùmore, A.; Nicolais, L. An acoustic-emission characterization of the failure modes in polymer-composite materials. Compos. Sci. Technol. 1998, 58, 1923–1928. [Google Scholar] [CrossRef]
  15. Godin, N.; Reynaud, P.; Fantozzi, G. Challenges and limitations in the identification of acoustic emission signature of damage mechanisms in composites materials. Appl. Sci. 2018, 8, 1267. [Google Scholar] [CrossRef]
  16. Oz, F.E.; Ersoy, N.; Lomov, S.V. Do high frequency acoustic emission events always represent fiber failure in CFRP laminates? Compos. Part A Appl. Sci. Manuf. 2017, 103, 230–235. [Google Scholar] [CrossRef]
  17. Aggelis, D.; Shiotani, T.; Papacharalampopoulos, A.; Polyzos, D. The influence of propagation path on elastic waves as measured by acoustic emission parameters. Struct. Health Monit. 2011, 11, 359–366. [Google Scholar] [CrossRef]
  18. Carpinteri, A.; Lacidogna, G.; Accornero, F.; Mpalaskas, A.; Matikas, T.; Aggelis, D. Influence of damage in the acoustic emission parameters. Cem. Concr. Compos. 2013, 44, 9–16. [Google Scholar] [CrossRef]
  19. Aggelis, D.G.; Matikas, T. Effect of plate wave dispersion on the acoustic emission parameters in metals. Comput. Struct. 2012, 98–99, 17–22. [Google Scholar] [CrossRef]
  20. Maillet, E.; Baker, C.; Morscher, G.N.; Pujar, V.V.; Lemanski, J.R. Feasibility and limitations of damage identification in composite materials using acoustic emission. Compos. Part A Appl. Sci. Manuf. 2015, 75, 77–83. [Google Scholar] [CrossRef]
  21. Kharrat, M.; Placet, V.; Ramasso, E.; Boubakar, L. Influence of damage accumulation under fatigue loading on the AE-based health assessment of composite material: Wave distortion and AE-features evolution as a function of damage level. Compos. Part A Appl. Sci. Manuf. 2018, 109, 615–627. [Google Scholar] [CrossRef]
  22. Al-Jumaili, S.K.; Holford, K.M.; Eaton, M.J.; Pullin, R. Parameter Correction Technique (PCT): A novel method for acoustic emission characterisation in large-scale composites. Compos. Part B Eng. 2015, 75, 336–344. [Google Scholar] [CrossRef]
  23. Dietzhausen, H.; Dong, M.; Schmauder, S. Numerical simulation of acoustic emission in fiber reinforced polymers. Comput. Mater. Sci. 1998, 13, 23–30. [Google Scholar] [CrossRef]
  24. Prosser, W.H.; Hamstad, M.A.; Gary, J.; O’Gallagher, A. Finite Element and Plate Theory Modeling of Acoustic Emission Waveforms. J. Nondestruct. Eval. 1999, 18, 83–90. [Google Scholar] [CrossRef]
  25. Sause, M.G.; Richler, S. Finite element modelling of cracks as acoustic emission sources. J. Nondestruct. Eval. 2015, 34, 4. [Google Scholar] [CrossRef]
  26. Hamstad, M.A.; O’Gallagher, A.; Gary, J. Modeling of Buried Acoustic Emission Monopole and Dipole Sources with a Finite Element Technique. J. Acoust. Emiss. 1999, 17, 97–110. [Google Scholar]
  27. Scruby, C.; Wadley, H.; Hill, J. Dynamic elastic displacements at the surface of an elastic half-space due to defect sources. J. Phys. D-Appl. Phys. 1983, 16, 1069–1083. [Google Scholar] [CrossRef]
  28. Ohtsu, M.; Ono, K. A generalized theory of acoustic emission and source representations of acoustic emission. J. Acoust. Emiss. 1986, 5, 124–133. [Google Scholar]
  29. Ben Khalifa, W.; Jezzine, K.; Hello, G.; Grondel, S. Analytical modelling of acoustic emission from buried or surface-breaking cracks under stress. J. Phys. Conf. Ser. 2012, 353, 012016. [Google Scholar] [CrossRef]
  30. Le Gall, T.; Monnier, T.; Fusco, C.; Godin, N.; Hebaz, S.E. Towards quantitative acoustic emission by finite element modelling: Contribution of modal analysis and identification of pertinent descriptors. Appl. Sci. 2018, 8, 2557. [Google Scholar] [CrossRef]
  31. Sause, M.G.R.; Horn, S. Simulation of acoustic emission in planar carbon fiber reinforced plastic specimens. J. Nondestruct. Eval. 2010, 29, 123–142. [Google Scholar] [CrossRef]
  32. Hamstad, M.; O’Gallagher, A.; Gary, J. Effects of lateral plate dimensions on acoustic emission signals from dipole sources. J. Acoust. Emiss. 2001, 19, 258–274. [Google Scholar]
  33. Wilcox, P.; Lee, C.; Scholey, J.; Friswell, M.I.; Winsom, M.; Drinkwater, B. Progress Towards a Forward Model of the Complete Acoustic Emission Process. Adv. Mater. Res. 2006, 13–14, 69–76. [Google Scholar] [CrossRef]
  34. Cuadra, J.; Vanniamparambil, P.; Servansky, D.; Bartoli, I.; Kontsos, A. Acoustic emission source modeling using a data-driven approach. J. Sound Vib. 2015, 341, 222–236. [Google Scholar] [CrossRef]
  35. Cuadra, J.A.; Baxevanakis, K.P.; Mazzotti, M.; Bartoli, I.; Kontsos, A. Energy dissipation via acoustic emission in ductile crack initiation. Int. J. Fract. 2016, 199, 89–104. [Google Scholar] [CrossRef]
  36. Åberg, M. Numerical modeling of acoustic emission in laminated tensile test specimens. Int. J. Solids Struct. 2001, 38, 6643–6663. [Google Scholar] [CrossRef]
  37. Burks, B.; Kumosa, M. A modal acoustic emission signal classification scheme derived from finite element simulation. Int. J. Damage Mech. 2014, 23, 43–62. [Google Scholar] [CrossRef]
  38. Suzuki, H.; Takemoto, M.; Ono, K. The fracture dynamics in a dissipative glass-fiber/epoxy model composite with the AE source simulation analysis. J. Acoust. Emiss. 1996, 14, 35–50. [Google Scholar]
  39. Sause, M.G.R.; Hamstad, M.A. Numerical modeling of existing acoustic emission sensor absolute calibration approaches. Sens. Actuators A Phys. 2018, 269, 294–307. [Google Scholar] [CrossRef]
  40. Zhang, L.; Yalcinkaya, H.; Ozevim, D. Numerical approach to absolute calibration of piezoelectric acoustic emission sensors using multiphysics simulations. Sens. Actuators A 2017, 256, 12–23. [Google Scholar] [CrossRef] [Green Version]
  41. Cervena, O.; Hora, P. Analysis of the conical piezoelectric acoustic emission transducer. Appl. Comput. Mech. 2008, 2, 13–24. [Google Scholar]
  42. Boulay, N.; Lhémery, A.; Zhang, F. Simulation of the spatial frequency-dependent sensitivities of Acoustic Emission sensors. J. Phys. Conf. Ser. 2018, 1017, 012008. [Google Scholar] [CrossRef]
  43. Wu, B.S.; McLaskey, G.C. Broadband Calibration of Acoustic Emission and Ultrasonic Sensors from Generalized Ray Theory and Finite Element Models. J. Nondestruct. Eval. 2018, 37, 8. [Google Scholar] [CrossRef]
  44. Morizet, N.; Godin, N.; Tang, J.; Maillet, E.; Fregonese, M.; Normand, B. Classification of acoustic emission signals using wavelets and Random Forests: Application to localized corrosion. Mech. Syst. Signal Process. 2016, 70–71, 1026–1037. [Google Scholar] [CrossRef]
  45. Godin, N.; Reynaud, P.; R’Mili, M.; Fantozzi, G. Identification of damage mechanisms with acoustic emission monitoring: Interests and limitations. In Focus on Acoustic Emission Research; Pappalettera, G., Barile, C., Eds.; Nova Science Publishers: Hauppauge, NY, USA, 2017; pp. 1–51. [Google Scholar]
  46. Hamstad, M.A.; Gallagher, A.O.; Gary, J. A wavelet transform applied to acoustic emission signals: Part 1 source identification. J. Acoust. Emiss. 2002, 20, 39–61. [Google Scholar]
  47. Bracewell, R. The Two-Dimensional Fourier Transform. In Fourier Analysis and Imaging; Springer: Boston, MA, USA, 2003; pp. 140–173. [Google Scholar]
  48. Hsu, N.; Breckenridge, F. Characterization and calibration of acoustic emission sensors. Mater. Eval. 1981, 39, 60–68. [Google Scholar]
  49. McLaskey, G.C.; Glaser, S.D. Acoustic Emission Sensor Calibration for Absolute Source Measurements. J. Nondestruct. Eval. 2012, 31, 157–168. [Google Scholar] [CrossRef]
  50. Hatano, H. Acoustic-emission transducer and its absolute calibration. J. Acoust. Soc. Am. 1976, 59, 344. [Google Scholar] [CrossRef]
  51. Dia, S.; Monnier, T.; Godin, N.; Zhang, F. Primary Calibration of Acoustic Emission Sensors by the Method of Reciprocity, Theoretical and Experimental Considerations. J. Acoust. Emiss. 2012, 30, 152–166. [Google Scholar]
  52. Goujon, L.; Baboux, J.C. Behaviour of acoustic emission sensors using broadband calibration techniques. Meas. Sci. Technol. 2003, 14, 903–908. [Google Scholar] [CrossRef]
  53. Theobald, P.; Zeqiri, B.; Avison, J. Couplants and their influence on AE sensor sensitivity. J. Acoust. Emiss. 2008, 26, 91–97. [Google Scholar]
  54. Ono, K. Through—Transmission Characteristics of AE Sensor Couplants. J. Acoust. Emiss. 2017, 34, 1–11. [Google Scholar]
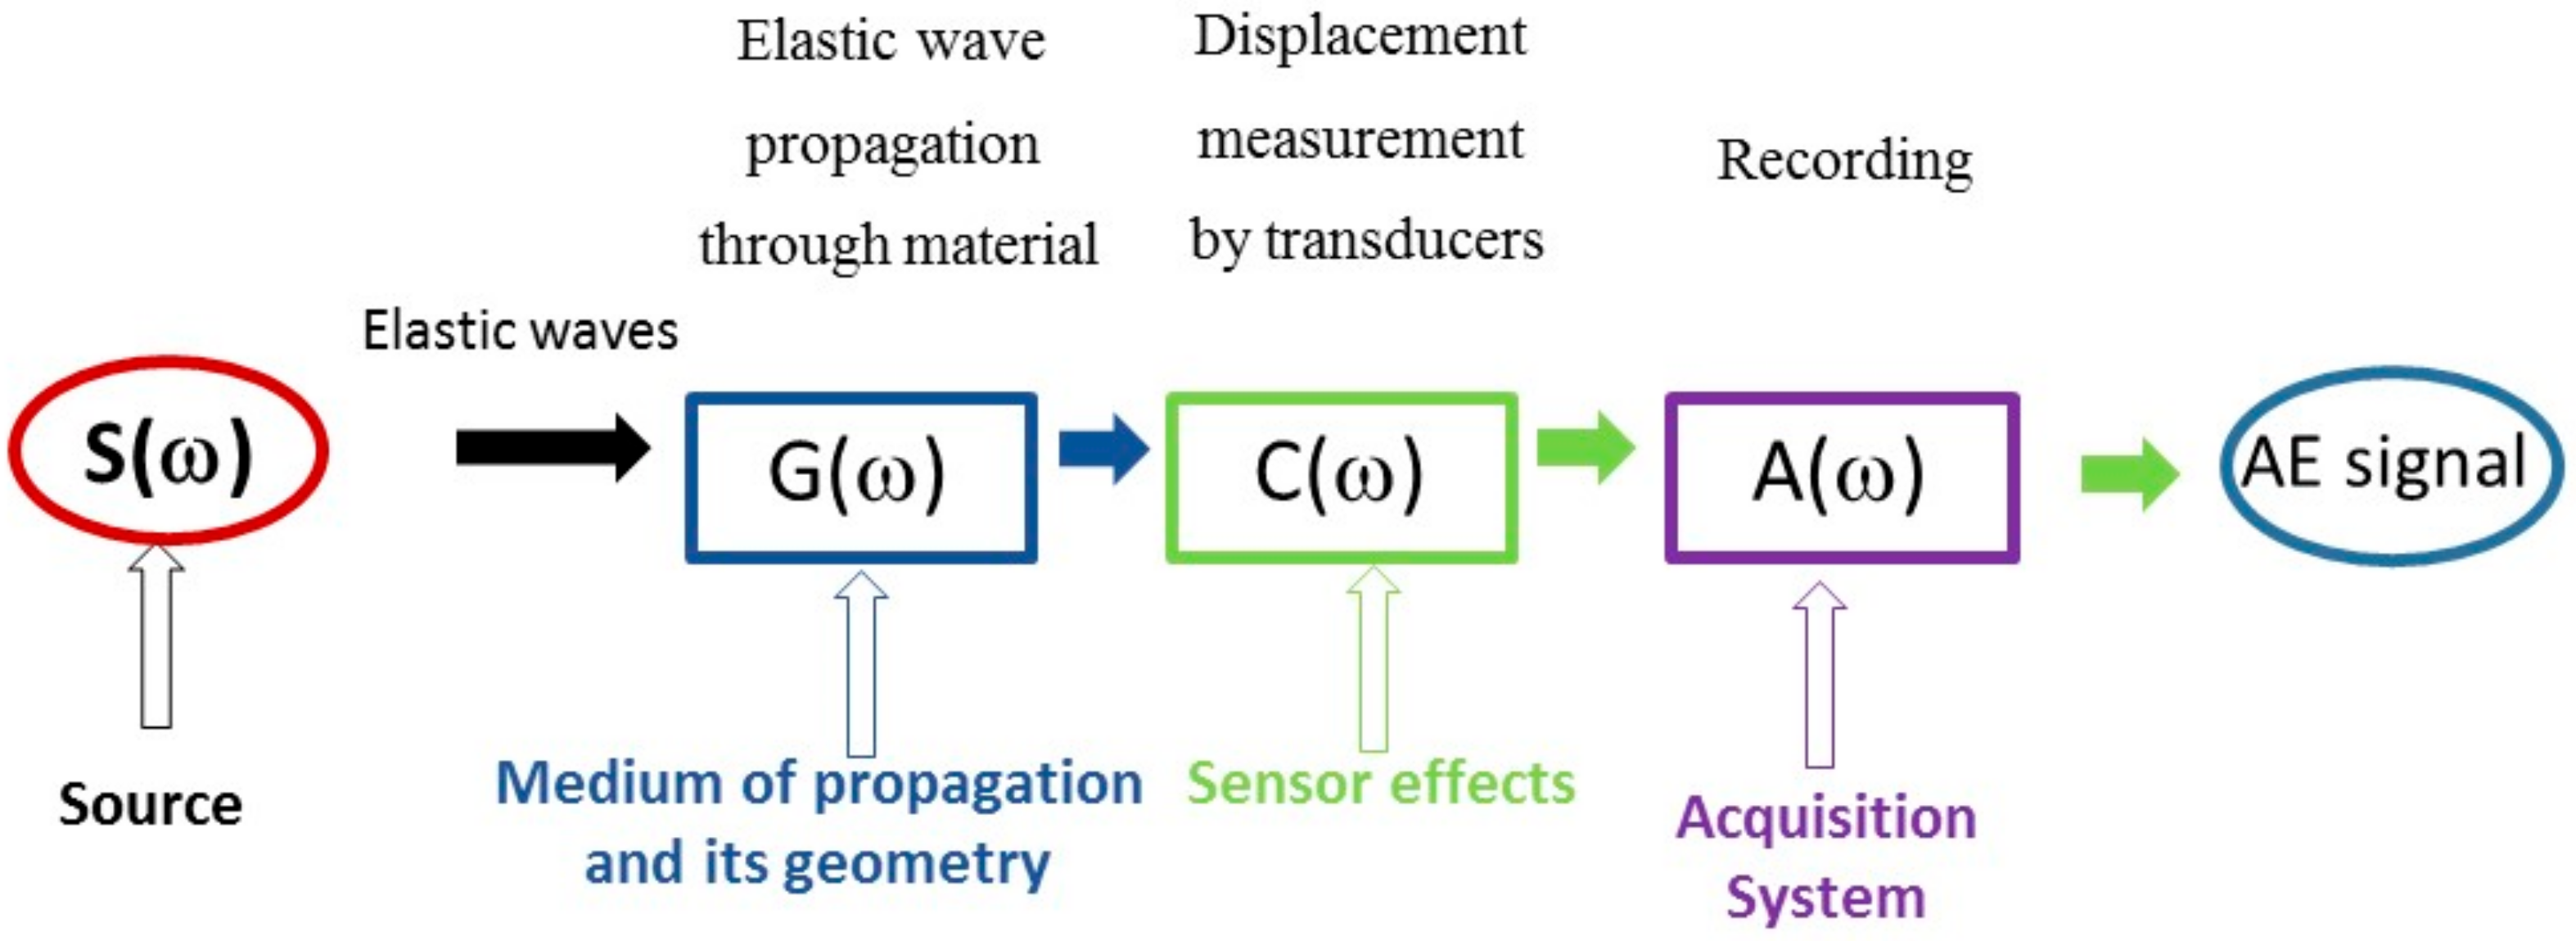
Figure 1. Principles of acoustic emission measurement and the different transfer functions.
Applsci 09 05124 g001
Figure 2. Dimension of specimen, sensors placement (C1 and C2) and positions of the simulated fiber breaks Pi (P1 is located 6 mm from the sensor C1 and P5 is located 34 mm from the sensor C1).
Applsci 09 05124 g002
Figure 3. Scheme of the numerical specimen with the boundary conditions.
Applsci 09 05124 g003
Figure 4. Response in reception (a) on steel block for the sensor nano30, PicoHF, R15 alpha and micro80 sensors obtained with the reciprocity method; (b) visualisation of the surface of the nano30 and picoHF sensors.
Applsci 09 05124 g004
Figure 5. Aperture function for the sensors: evolution of the k factor versus the distance from the centre of the sensor surface.
Applsci 09 05124 g005
Figure 6. (a) Fiber breaks as observed by optical microscopy. Cumulative localized signal and applied stress versus strain during SFFT detected by (b) nano30 and by (c) picoHF (e = 2.8 mm and z = 0.9 mm, Test 04).
Applsci 09 05124 g006
Figure 7. Experimental signals recorded by the sensor nano30 with the associated FFT and SPWVD results (a) near the source P1 position and (b) far from the source P5 position (e = 2.8 mm and z = 0.9 mm).
Applsci 09 05124 g007
Figure 8. SPWVD of experimental signals recorded by the sensor picoHF (a) near the source (P1 position) and (b) far from the source (P5 position). e = 2.8 mm and z = 0.9 mm.
Applsci 09 05124 g008
Figure 9. FFT of the experimental signals recorded by the sensor nano30 and picoHF for the same fiber break (a) near the source and (b) far from the source (e = 2.8 mm and z = 0.9 mm).
Applsci 09 05124 g009
Figure 10. Descriptors of the experimental signals recorded by the nano30 and picoHF sensors for the same test (e = 2.8 mm and z = 0.9 mm or e = 1.7 mm and z = 0.25 mm): (a) Amplitude (b) Frequency centroid and (c) Cut-off frequency.
Applsci 09 05124 g010aApplsci 09 05124 g010b
Figure 11. Comparison between the FFT of simulated waveforms and experimental waveforms for two positions P1 and P5 of the fiber break (a,b) nano30 and (c,d) picoHF (e = 2.8 mm and z = 0.9 mm).
Applsci 09 05124 g011
Figure 12. Comparison between the FFT of simulated waveforms and experimental waveforms for two positions denoted P1 (near the source) (a) and P5 (far from the source) (b) for nano30 sensors (e = 1.7 mm and z = 0.35 mm).
Applsci 09 05124 g012
Figure 13. Comparison between the simulated waveforms and experimental waveforms recorded with the nano30 sensors for a fiber break at (a) P1 (near the source) and (b) P5 (far from the source). (e = 1.7 mm and z = 0.35 mm).
Applsci 09 05124 g013
Figure 14. SPWVD of simulated signals recorded by nano30sensors (a) near the source P1 position and (b) far from the source P5 position (e = 2.8 mm and z = 0.9 mm).
Applsci 09 05124 g014
Figure 15. Descriptors vs. source/sensor distance for experimental signals and numerical signals detected by nano30 and PicoHF sensors: (a) amplitude in dB, (b) frequency centroid in kHz, e 2.8 mm and z = 0.9 mm.
Applsci 09 05124 g015
Figure 16. SPWVD results and FFT obtained with a virtual perfect local point sensor for two different simulated fiber break (a) at position P1 and (b) at position P5 (e = 2.8 mm and z = 0.9 mm).
Applsci 09 05124 g016
Figure 17. Comparison of the descriptors, in the plane Frequency Centroid/Peak Frequency, between the virtual perfect local point sensor and (a) the nano30, (b) picoHF sensor (e = 2.8 mm, z = 0.9 mm).
Applsci 09 05124 g017aApplsci 09 05124 g017b
Figure 18. Simulated dispersion curves (wavenumber k versus frequency f) via 2DFFT of signals recorded along a straight line for a fiber break at the position P2 (a) on the lateral side of the specimen v(y) (b) on the top surface v(z) of computational specimen (e = 2.8 mm and z = 0.9 mm).
Applsci 09 05124 g018
Figure 19. Model and experimental: Evolution of the descriptors in the Frequency Centroid/Amplitude plane detected with five types of sensor. (e = 2.8 mm, z = 0.9 mm).
Applsci 09 05124 g019
Figure 20. Simulated dispersion curves via 2DFFT of signals v(z) recorded on the top surface for a fiber break located at the position P2, (a) e = 2.8 mm and z = 0 mm, (b) e = 1 mm and z = 0 mm and (c) e = 1.7 mm and z = 0.35 mm.
Applsci 09 05124 g020aApplsci 09 05124 g020b
Figure 21. Evolution of the descriptors vs. distance between epicenter of the source (P2 position) and sensor for the simulated signals detected with nano30 sensors for several thicknesses and positions of the fiber (a) amplitude in dB, (b) frequency centroid in kHz and (c) roll-on frequency and for the picoHF (d) and (e).
Applsci 09 05124 g021
Table 1. Mechanical properties of the matrix and the fiber.
Young Modulus (GPa)Poisson RatioDensity (kg/m3)
Carbon fiber1870.221800
DGEBD-3DCM1.410.381034
Table 2. AE-signal features calculated from the numerical signals or the experimental signals.
DescriptorUnit
Calculated descriptors
in the time domain
AmplitudedB
Durationµs
EnergyJ
Zero crossings rate%
Rise timeµs
Time centroidµs
Temporal decay-
Calculated descriptors
in the frequency domain
Frequency centroidkHz
Peak frequencykHz
Spectral spreadkHz
Spectral skewness-
Spectral kurtosis-
Spectral slopekHz−1
Roll-off frequency
Cut-off frequency (95 %)
kHz
Spectral spread to peakkHz
Spectral skewness to peak-
Spectral kurtosis to peak-
Roll-on frequency
Opening frequency (5%)
kHz
Table 3. Comparison between the number of AE-located sources and the number of observed fiber breaks.
Nb. of Localized AE SourcesMicroscopic Observation
Nano30PicoHF
e = 2.8 mmTest 01565658
Test 02454546
e = 1.7 mmTest 03262627