Article

Study on Strain Field Reconstruction Method of Long-Span Hull Box Girder Based on iFEM

1
China Ship Scientific Research Center, Wuxi 214082, China
2
National Key Laboratory of Ship Structural Safety, Wuxi 214082, China
*
Author to whom correspondence should be addressed.
J. Mar. Sci. Eng. 2024, 12(9), 1482; https://doi.org/10.3390/jmse12091482
Submission received: 18 July 2024 / Revised: 11 August 2024 / Accepted: 22 August 2024 / Published: 26 August 2024

Abstract

:
The box girder’s condition significantly impacts the safety and overall performance of the entire ship because it is the primary stress component of the hull construction. This work used experimental research on the long-span hull box girder based on IFEM (Inverse Finite Element Method) technology to ensure the structural safety of the hull box girder. Due to the limitations of conventional experiments in this technical field, such as their reliance on finite element data and lack of input from physical tests, numerous research methods combining the strain sensing data from physical tests with the strain data from virtual sensors were conducted. The strain fields of the top plate, side plate, and bottom plate were each reconstructed in turn, and the verifier measuring points in the physical model test were used to assess the accuracy of the reconstruction results. The findings demonstrate that the top plate, side plate, and bottom plate reconstructions had relative errors of 0.24–7.86%, 0.75–8.13%, and 3.31–2.52%, respectively. This enables the reconstruction of the strain field of the long-span hull box girder using physical test data and promotes the use of iFEM technology in the field of structural health monitoring of large marine structures.

1. Introduction

Due to their small weight and excellent strength, box girders are frequently employed in ships, buildings, bridges, and other technical applications. The box girder, which is used in ship construction, essentially defines the entire longitudinal bearing capacity of the ship and increases its longitudinal strength. Long-term cyclic loads and short-term high loads can cause various types of deformations in ships, including bending, torsional deformations, and fatigue damage. Long-term cyclic loads, such as those induced by repeated wave stresses, can lead to material fatigue, gradually weakening the structural integrity. On the other hand, short-term high loads, such as those resulting from impacts or extreme weather events, may cause localized buckling, plastic deformation, or even sudden structural failure. These deformations not only compromise the structural integrity of the ship, but also pose significant risks to its durability and safety. Therefore, it is crucial to account for these factors in ship design and maintenance. Setting up a structural health-monitoring (SHM) system for the hull box girder to gather local or global strain data and perform precise structural health management is a crucial step in efficiently ensuring the safety of the structure [1,2]. Measurement of the high-precision strain field of fused and rebuilt structures using discrete structural strain information has long been a hot topic for researchers both domestically and internationally because it serves as a key indicator of structural response.
Four popular strain field reconstruction techniques are being used both domestically and internationally: the modal method [3,4,5], KO displacement theory [6,7], artificial intelligence [8], and the iFEM method [9,10]. The fundamental tenet of the modal technique is that structural deformation is viewed as a linear combination of several modes and that the precision of modal analysis has a significant bearing on the accuracy of reconstruction. Because Ko displacement theory is derived from the deflection curve, it can only be used to reconstruct unidirectional structural deformation [11]. The artificial neural network model serves as the foundation for most artificial intelligence techniques. The deformation reconstruction model has strong universality and a weak correlation with the material properties, structural parameters, and distribution form of the environmental load of the measured object, but the precision of the reconstruction displacement is greatly influenced by the richness of the load set used to train the network [12]. IFEM builds the least square error function between the measured strain value and the theoretical value and combines the shape and size information. The potential for using iFEM in engineering is very strong because it can do away with the restrictions of conventional reconstruction techniques and ignore the material qualities and load of the structure. Scholars domestically and internationally have conducted extensive research on plates, girders, shells, and other structures since Adnan Tessler and Spangler [13] first officially presented the concept and theory of iFEM in 2003. This research has further confirmed the robustness and viability of iFEM in the fields of structural health monitoring of wings and hulls, as well as the reconstruction of composite deformation fields [14,15].
Currently, the majority of iFEM technology research in the fields of ship and ocean engineering is conducted abroad. Adnan Kefal [16] et al. made the initial demonstration of iFEM’s suitability for use in managing the health and safety of offshore structures in 2015. It is believed that the iFEM method is a promising technology for precise real-time monitoring of offshore structures after theoretical verification of the stiffened plates, such as the quadrilateral plate bearing bending force and the side parts of typical longitudinal and transverse frame tankers bearing bending load. Adnan Kefal [17] et al. used the iFEM approach to monitor the displacement and tension of the midship of a conventional chemical tanker for the first time in 2016. However, a long barge with the same cross-section as a conventional chemical tanker was simplified by employing the iQS4 element as opposed to the original model of a chemical tanker. In 2016, Adnan Kefal [9] et al. used the iQS4 element to simulate the typical parallel intermediate of the Panamanian container ship. Using the simulated sensor strains obtained under three different conditions—pure vertical bending, pure horizontal bending, and pure torsion—they then made three different iFEM analyses of the parallel intermediate. Adnan Kefal [18] used the FBG (fiber Bragg grating) strain sensing technology in 2018 to reconstruct the real-time three-dimensional displacement and stress of the overturned bulk carrier. Adnan Kefal’s research completely confirmed the viability and robustness of iFEM, but it was based on numerical simulation, meaning that no actual physical model testing was conducted and the strain output of the finite element model was used to represent the “experimental” strain measurement (that is, in-situ strain data or virtual sensor strain). Putranto T took the hull box girder as the research object, and ultimate strength predictions obtained from equivalent single-layer (ESL) approach were compared to the full three-dimensional finite element method (3D FEM) and the international association of classification societies (IACS) incremental-iterative method. The comparison between different methods was provided in terms of longitudinal bending moment and cross-sectional stress distribution. Overall, the ESL approach yields good agreement compared to the 3D FEM results in predicting the ultimate strength of a ship hull girder while providing up to 3 times the computational efficiency and ease of modeling [19,20].
Domestic research in the fields of naval architecture and marine engineering was slow to begin. In 2023, Yan Hongsheng [21] and others applied iFEM to the deformation reconstruction of a ship-stiffened plate structure, but this falls under the two-dimensional structure reconstruction category. Hu Mingyue [14] and colleagues performed the reconstruction of a three-dimensional wallboard structure’s deformation field in 2022. The issue of the structure’s discontinuous internal rotation angle under the over-constraint condition was resolved by combining sub-region division and the inverse finite element method, and the statically indeterminate structure’s full-field deformation reconstruction was realized using measured strain data. However, in the process of experimental verification, there were considerably fewer physical measurement points than under the simulation settings, and it was not possible to reconstruct the strain field using the physical test data as input. In 2023, Qingfeng Zhu proposed a method for strain reconstruction in stiffened ship panels, employing optical fiber sensors and the strain function–inverse finite element principle (SF-iFEM), addressing the crucial need for monitoring the health of ship structures [22]. In 2024, Pengyu Wei employed the inverse finite element method to derive the deformation field of the ship structure in real time using sensor strain data. The deformation field data obtained based on the iFEM algorithm were converted into general visualization data conducive to interpretation within virtual reality (VR) applications. Lastly, a digital twin software tool was built to enable synchronous responses and interactions between the virtual scene and the physical scene [23]. The potential benefits of iFEM in the realm of engineering application can be tested by reconstructing the strain field using the measured data from the physical model test as input. Additionally, the strain field reconstruction based on the results of the physical model test is more trustworthy and significant for engineering applications.
Based on this, this paper conducts the first study on the long-span hull box girder based on iFEM technology. The research direction of combining a significant amount of physical test strain sensing data with virtual sensor strain data is explored due to the phenomenon that the traditional test in this technical field heavily relies on finite element data, there are few experimental measurement data., and the reconstruction results have a low degree of matching with the actual strain field of the physical model. The strain field of long-span hull box girders using physical test data is realized, laying the groundwork for structural health monitoring of massive marine structures and the application. The strain field of the long-span hull box girder is reconstructed according to the structural form of the hull box girder and according to the top surface, side surface, and bottom surface, and the accuracy of the reconstruction results is verified by physical verification measuring points.

2. Inverse Finite Element Formulation for Shells

2.1. Constructing Inverse Shell Element

In order to adapt to different structural forms and physical models, different inverse elements need to be constructed. At present, iCS8 and iQS4 are often used in the reconstruction of deformation field of offshore structures. iCS8 is suitable for constructing inverse shell elements of curved structures such as submarines and cylinders. Because the strain studied in this paper is in a linear changing stage; the top, side, and bottom plates are flat; and the influence of shear deformation on the structure is considered, the strain field is rebuilt using Mindlin plate theory and iQS4 as the inverse shell element [17]. The local coordinate system ( x , y , z ) of a plate element is constructed, as seen in Figure 1, with the coordinate origin at the centroid of the neutral surface of the plate element. u , v , and w indicate the displacements in the directions of x , y , and z in the local coordinate system. The rotation angles about the axes of x , y , and z are θ x , θ y , and θ z , respectively. The four nodes of the element are points 1, 2, 3, and 4, and the thickness of the element is 2 h .
u = u 0 + z θ y 0 v = v 0 z θ x 0 w = w 0
where the distributions of u 0 , v 0 , and u 0 represent the displacements of points in directions x , y , z ; θ x 0 and θ y 0 denote the rotation angles of a point on the median plane around the x -axis and y -axis directions, where the displacement w in the z -axis direction is unchanged along the thickness direction, z [ h , + h ] .
N i = 1 4 ( 1 + x i x ) ( 1 y i y ) , i = 1 , 2 , 3 , 4
u i e = [ u i   v i   w i   θ x i   θ y i   θ z i ] T   i = 1 , 2 , 3 , 4
The displacement matrix of the four-node element can be expressed as:
u e = [ u 1   u 2   u 3   u 4 ] T
As stated in Formulas (5)–(7), the theoretical strain of a box girder structure can be broadly divided into linear combinations of in-plane tension and compression strain, bending strain, and shear strain.
e ( u e ) = e 1 e 2 e 3 =   𝜕 u 𝜕 x   𝜕 v 𝜕 y 𝜕 u 𝜕 y + 𝜕 v 𝜕 x
k ( u e ) = k 1 k 2 k 3 =     𝜕 θ y 𝜕 x     𝜕 θ x 𝜕 y 𝜕 θ x 𝜕 x + 𝜕 θ y 𝜕 y
s ( u e ) = s 1 s 2 = 𝜕 w 𝜕 x + θ y 𝜕 w 𝜕 y θ x
Additionally, the relationship between theoretical strain and the element node displacement matrix can be established through the partial derivative matrix of shape function. As shown in Formula (8), the surface strain ε b of the box girder structure can be expressed as partial derivative matrices B m and B k of the four-node inverse shell element shape function and element node displacement matrix u e .
ε b = e ( u e ) + z k ( u e ) = B m u e + z B k u e
The partial derivative matrix B s of the four-node inverse shell element shape function and the element node displacement matrix u e can both be used to define the transverse shear strain ε s , as shown in Formula (9).
ε s = s ( u e ) = B s u e
The literature [17] illustrates the precise calculation method and theory of the shape function partial derivative matrices B m , B k , and B s .

2.2. Data Input

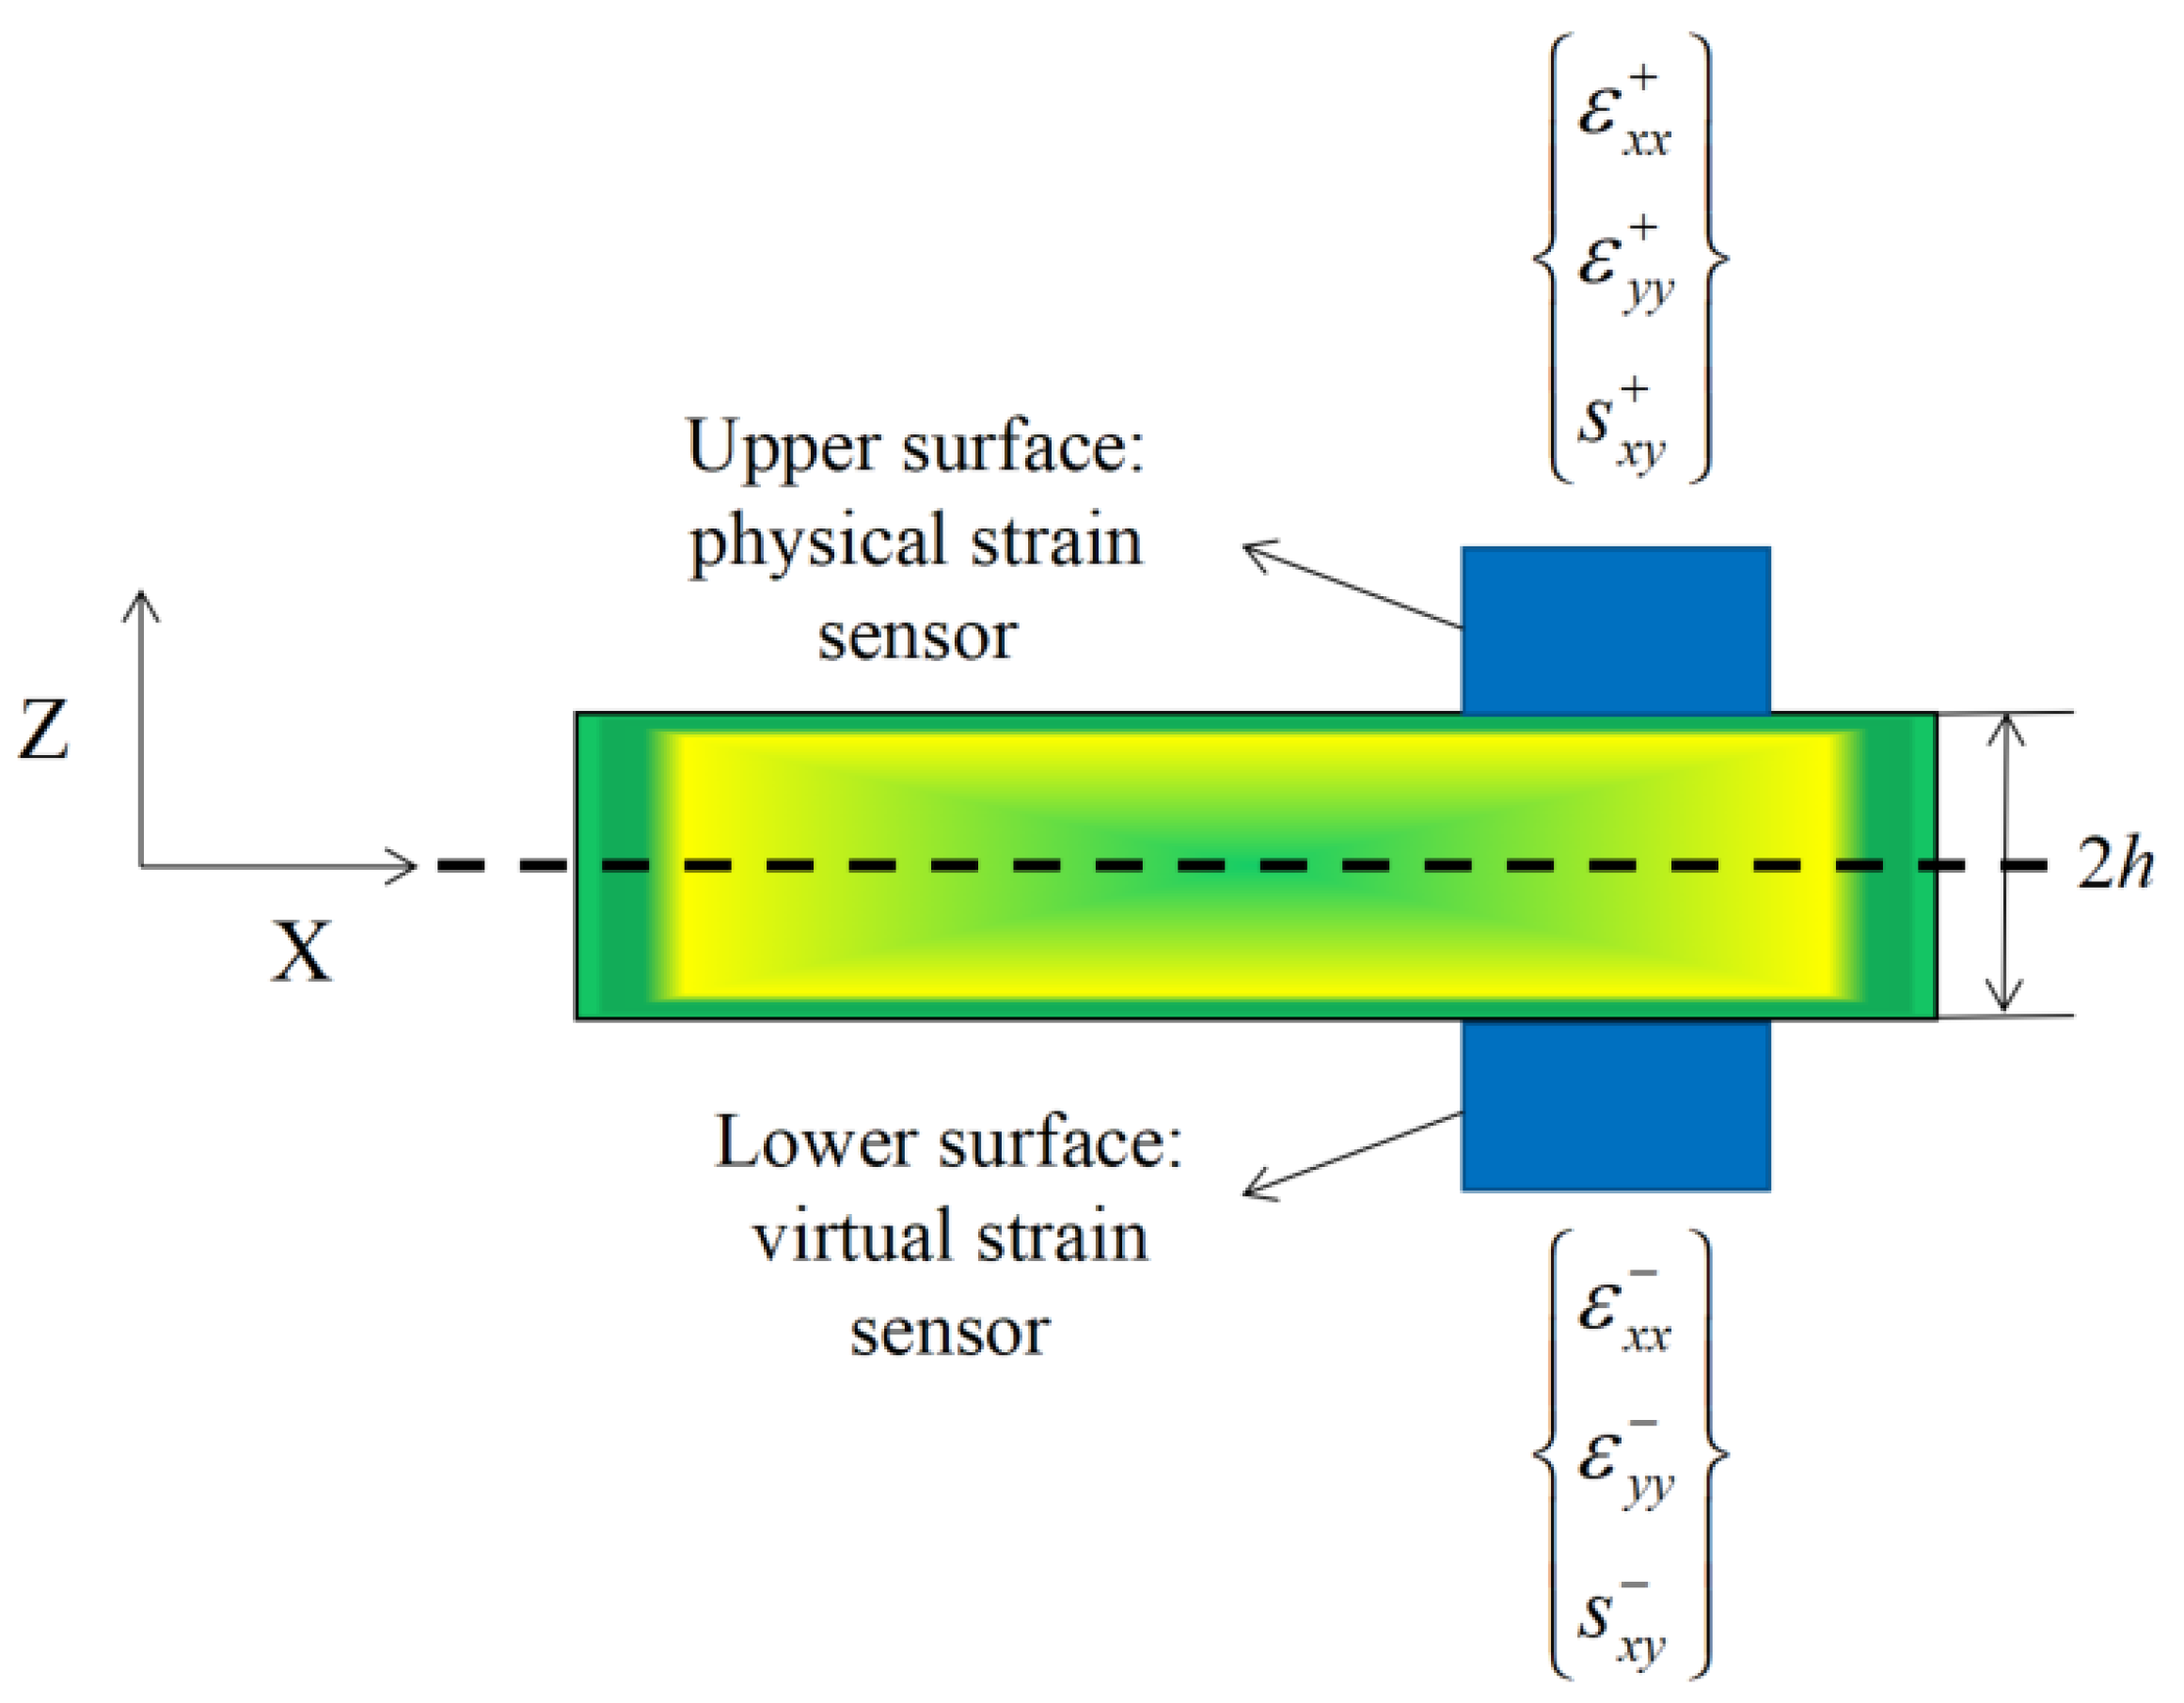
Using physical strain sensors and virtual strain sensors to measure the strain of the upper and lower surfaces of the box girder, respectively, the strain of the upper surface is ( ε x x + , ε y y + , s x y + ) j and the strain of the lower surface is ( ε x x , ε y y , s x y ) j , As shown in Figure 2. j = 1 , 2 , 3 n , n is the number of strain sensors in the element, “+”and “−”respectively represent the upper and lower surfaces of the structure, and 2 h is the plate thickness of the box girder, which can be expressed by the measured strain of the upper and lower surfaces in Equations (10) and (11). Virtual strain sensor refers to the technical means of using the numerical analysis method to give the strain response of structural target position under different loading conditions instead of the physical strain sensor.
e j c = 1 2 ( ε j + + ε j )   j = 1 , 2 , 3 n
k j c = 1 2 h ( ε j + ε j )   j = 1 , 2 , 3 n
ε j + = ε x x +   ε y y +   s x y + j T ;   ε j = ε x x   ε y y   s x y j T
where: superscript c stands for the discrete strain detected in the test, superscript e j c stands for the tensile and compressive strain of the plate neutral surface throughout the test, and superscript k j c stands for the bending strain of the plate neutral surface. Since the shear strain s j c is significantly smaller than the tensile-compressive strain e j c , it is omitted during measurements for simplicity and subsequently determined using a proportional relationship.

2.3. Least Squares Error Function

Between the measured strain and the theoretical strain, the least square error function is built. The theoretical displacement value of each element node is obtained when the partial derivative of the error function with respect to the displacement of the element node is equal to 0, and it is assumed that the displacement distribution of each element node at this time corresponds to the actual displacement distribution in the measured strain state at this time.
ϕ e ( u e ) = w e e ( u e ) e c 2 + w k k ( u e ) k c 2 + w s s ( u e ) s c 2
Among them, e ( u e ) , k ( u e ) , s ( u e ) are the theoretical tension, compression, bending, and shear strains of the element represented by neutral surface displacement field; e c , k c , and s c are the tension, compression, bending, and shear strains of the neutral surface derived from the surface strain information obtained by simulation test or strain gauge measurement; and w e , w k , and w s are dimensionless weighting coefficients, which are related to the strain of each section and control the strength relationship between the theoretical neutral surface strain and the actual neutral surface strain. If the strain e c , k c , and s c of the element can be obtained, the weighting coefficient can be w e = w k = w s = 1. For the case of an actual lack of strain, such as the shear strain mentioned above, the accuracy and rationality of the result can be controlled by adjusting the corresponding coefficient [11,24]. After a comprehensive analysis of the structure and material of the box girder, w s = λ = 10 4 ( 0 < λ 1 , λ is the penalty parameter) [25,26,27].
e ( u e ) e c 2 = 1 n A e i = 1 n ( e ( u e ) i e i c ) 2 dxdy
k ( u e ) k c 2 = ( 2 h ) 2 n A e i = 1 n ( k ( u e ) i k i c ) 2 dxdy
s ( u e ) s c 2 = 1 n A e i = 1 n ( s ( u e ) i s i c ) 2 dxdy
where: A e is the area in the plate element; n is the number of sensors in the element.
𝜕 ϕ e ( u e ) 𝜕 u e = k e u e f e = 0
The Formula (16) can be obtained:
k e u e = f e
k e = A e [ ( B m ) T B m + ( 2 h ) 2 ( B k ) T ( B k ) + λ ( B s ) T ( B s ) ] dxdy
f e matrix consists of B m , B k , B s matrices and their corresponding weighting coefficients w e , w k , and w s , which are also related to the number of strain sensors n and the thickness of the cell plate h . w e = w k = 1, w s = λ = 10 4 . The specific form is as follows:
f e = 1 n A e [ ( B m ) T e i c + ( 2 h ) 2 ( B k ) T k i c + λ ( B s ) T s i c ] dxdy
Assemble the element matrix to create the entire matrix. The stiffness matrix equation of the element in the local coordinate system can be transformed into the stiffness matrix equation in the global coordinate system using the coordinate transformation matrix, and then the stiffness matrix equation of the discrete structure can be integrated to obtain the overall stiffness matrix equation of the overall structure. This procedure is analogous to the thought of finite elements [15].
K U = F
The specific solution and form are as follows:
K = e = 1 n e l ( T e ) T k e T e
F = e = 1 n e l ( T e ) T f e
U = e = 1 n e l ( T e ) T u e
where K is the overall stiffness matrix, which is related to the position and number of discrete elements in the structure; n e l is the total number of inverse finite elements; U is the overall structural displacement vector; F is the overall load matrix, which is related to the mid-plane strain of discrete elements in the structure; and T e is the coordinate transformation matrix. The k matrix is a symmetric matrix that has nothing to do with the strain measurement value, but is related to the location of the cell node and the location of the strain measurement point in the inverse cell. The coefficient matrix k will be simplified to a positive definite matrix when combined with the cell boundary conditions, and the global displacement U of the cell node can be determined after inversion.
When the shear deformation of the plate element is ignored, the shape function partial derivative matrix and the element’s node displacement matrix can be used to express it.
ε b = e ( u e ) + z k ( u e ) = B m u e + z B k u e = ( B m + z B k ) u e
If the structural shear strain of the plate element is taken into account, the penalty parameters can be suitably chosen based on the relationship between shear strain and tensile and compressive strain λ .
ε = e ( u e ) + z k ( u e ) + λ e ( u e ) = B m u e + z B k u e + λ B s u e = ( B m + z B k + λ B s ) u e
ε ( x , y ) = ε x x ε y y γ x y = 𝜕 u = 𝜕 N q e = B q e
For the assembly of discrete strain elements, the form function partial derivative matrix is multiplied by the element node displacement matrix to give the global strain ε .

3. Model Parameters

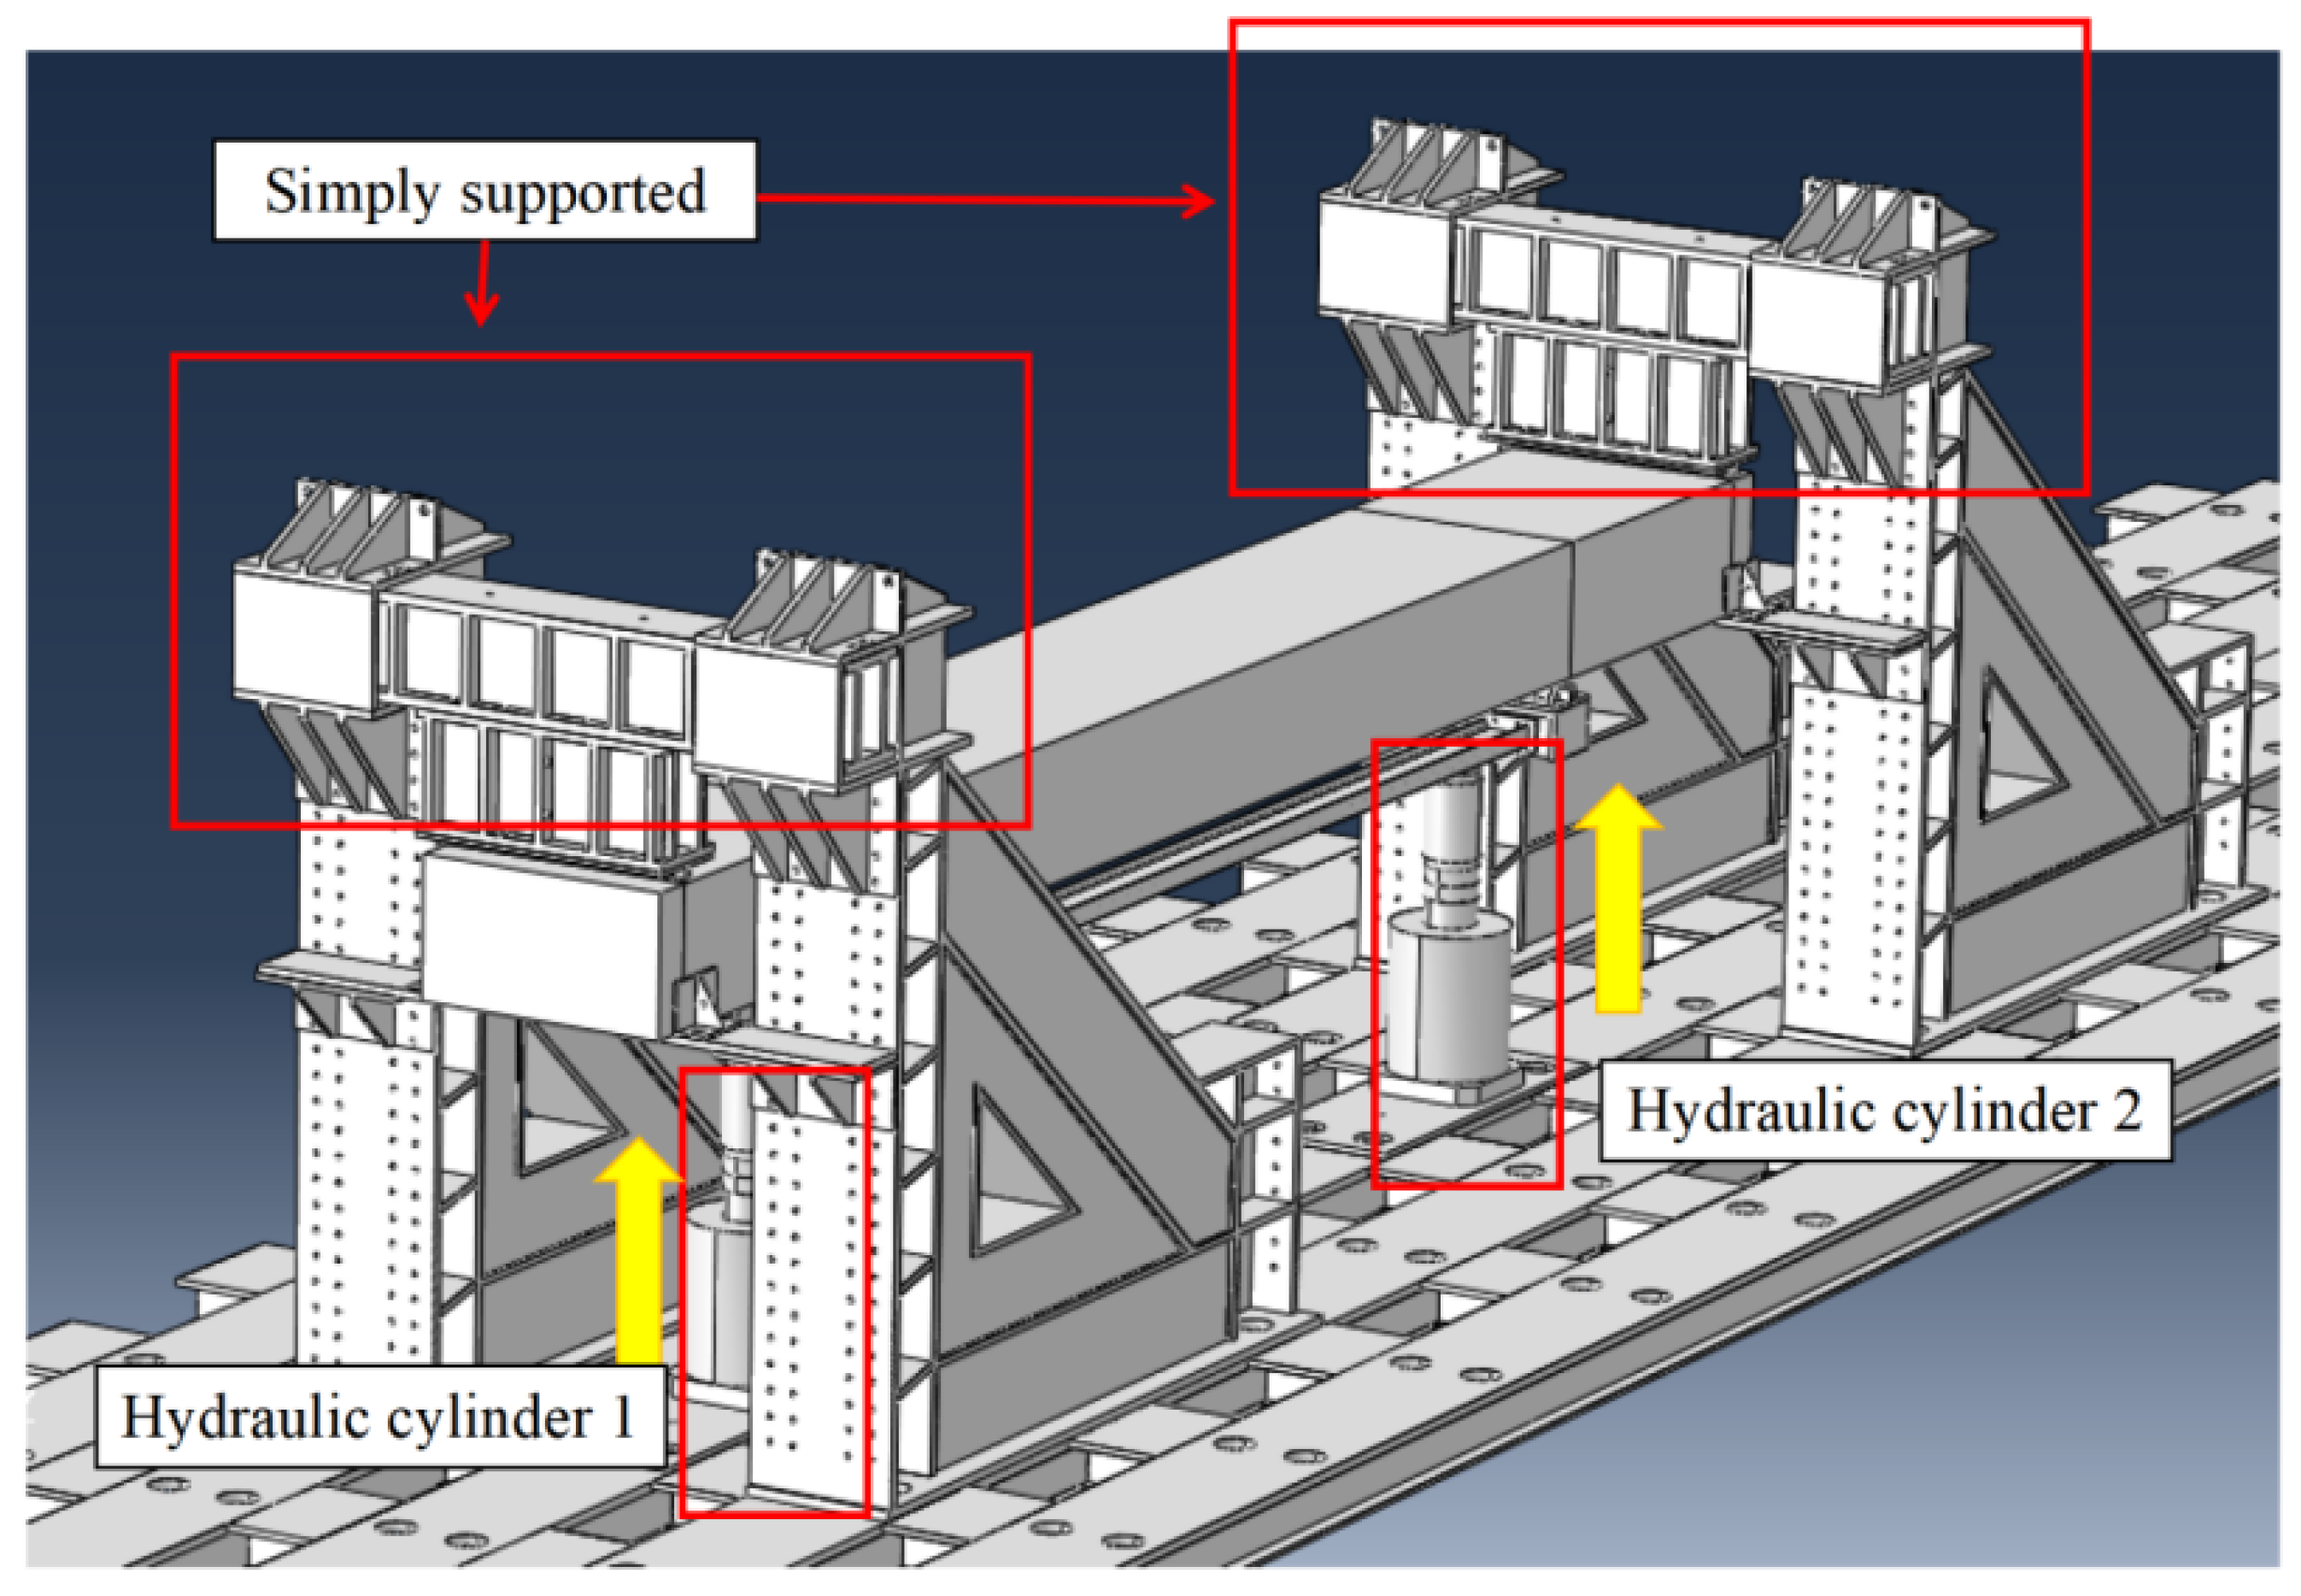
The model material of the hull box girder studied in this paper is Q235 steel, with a total length of 12.5 m, a width of 1.5 m, and a height of 0.8 m. The model is divided into two loading sections, two changeover portions, one test section, and two tooling occupation sections, which are symmetrically distributed along the length with the test section as the center. In numerical simulation, the thickness of the top plate is 5.55 mm, the other three plates are 5.75 mm, the elastic modulus is set to 205 GPa, and Poisson’s ratio is 0.3. It should be noted that the test section is created thinner than the plates in the loading and transition sections during model processing to ensure that the test can be effectively controlled and damaged in the test section, and no longitudinal bone material is set. When the model boundary is set, two simple supports are set at the top plate to limit the vertical movement of the model, and different upward thrust forces are applied to the tooling loading section at the top of the model. During the test, there are two 4000 kN hydraulic cylinders at the bottom of the model, which work together on a horizontal cross bar, and the top of the model is fixed by a fixture, which contacts the top plate of the box girder in a semi-circular arc to realize the four-point bending loading test of the model. Figure 3 is a schematic front view of model loading. Table 1 displays the geometric characteristics and finite element material properties of the test model.
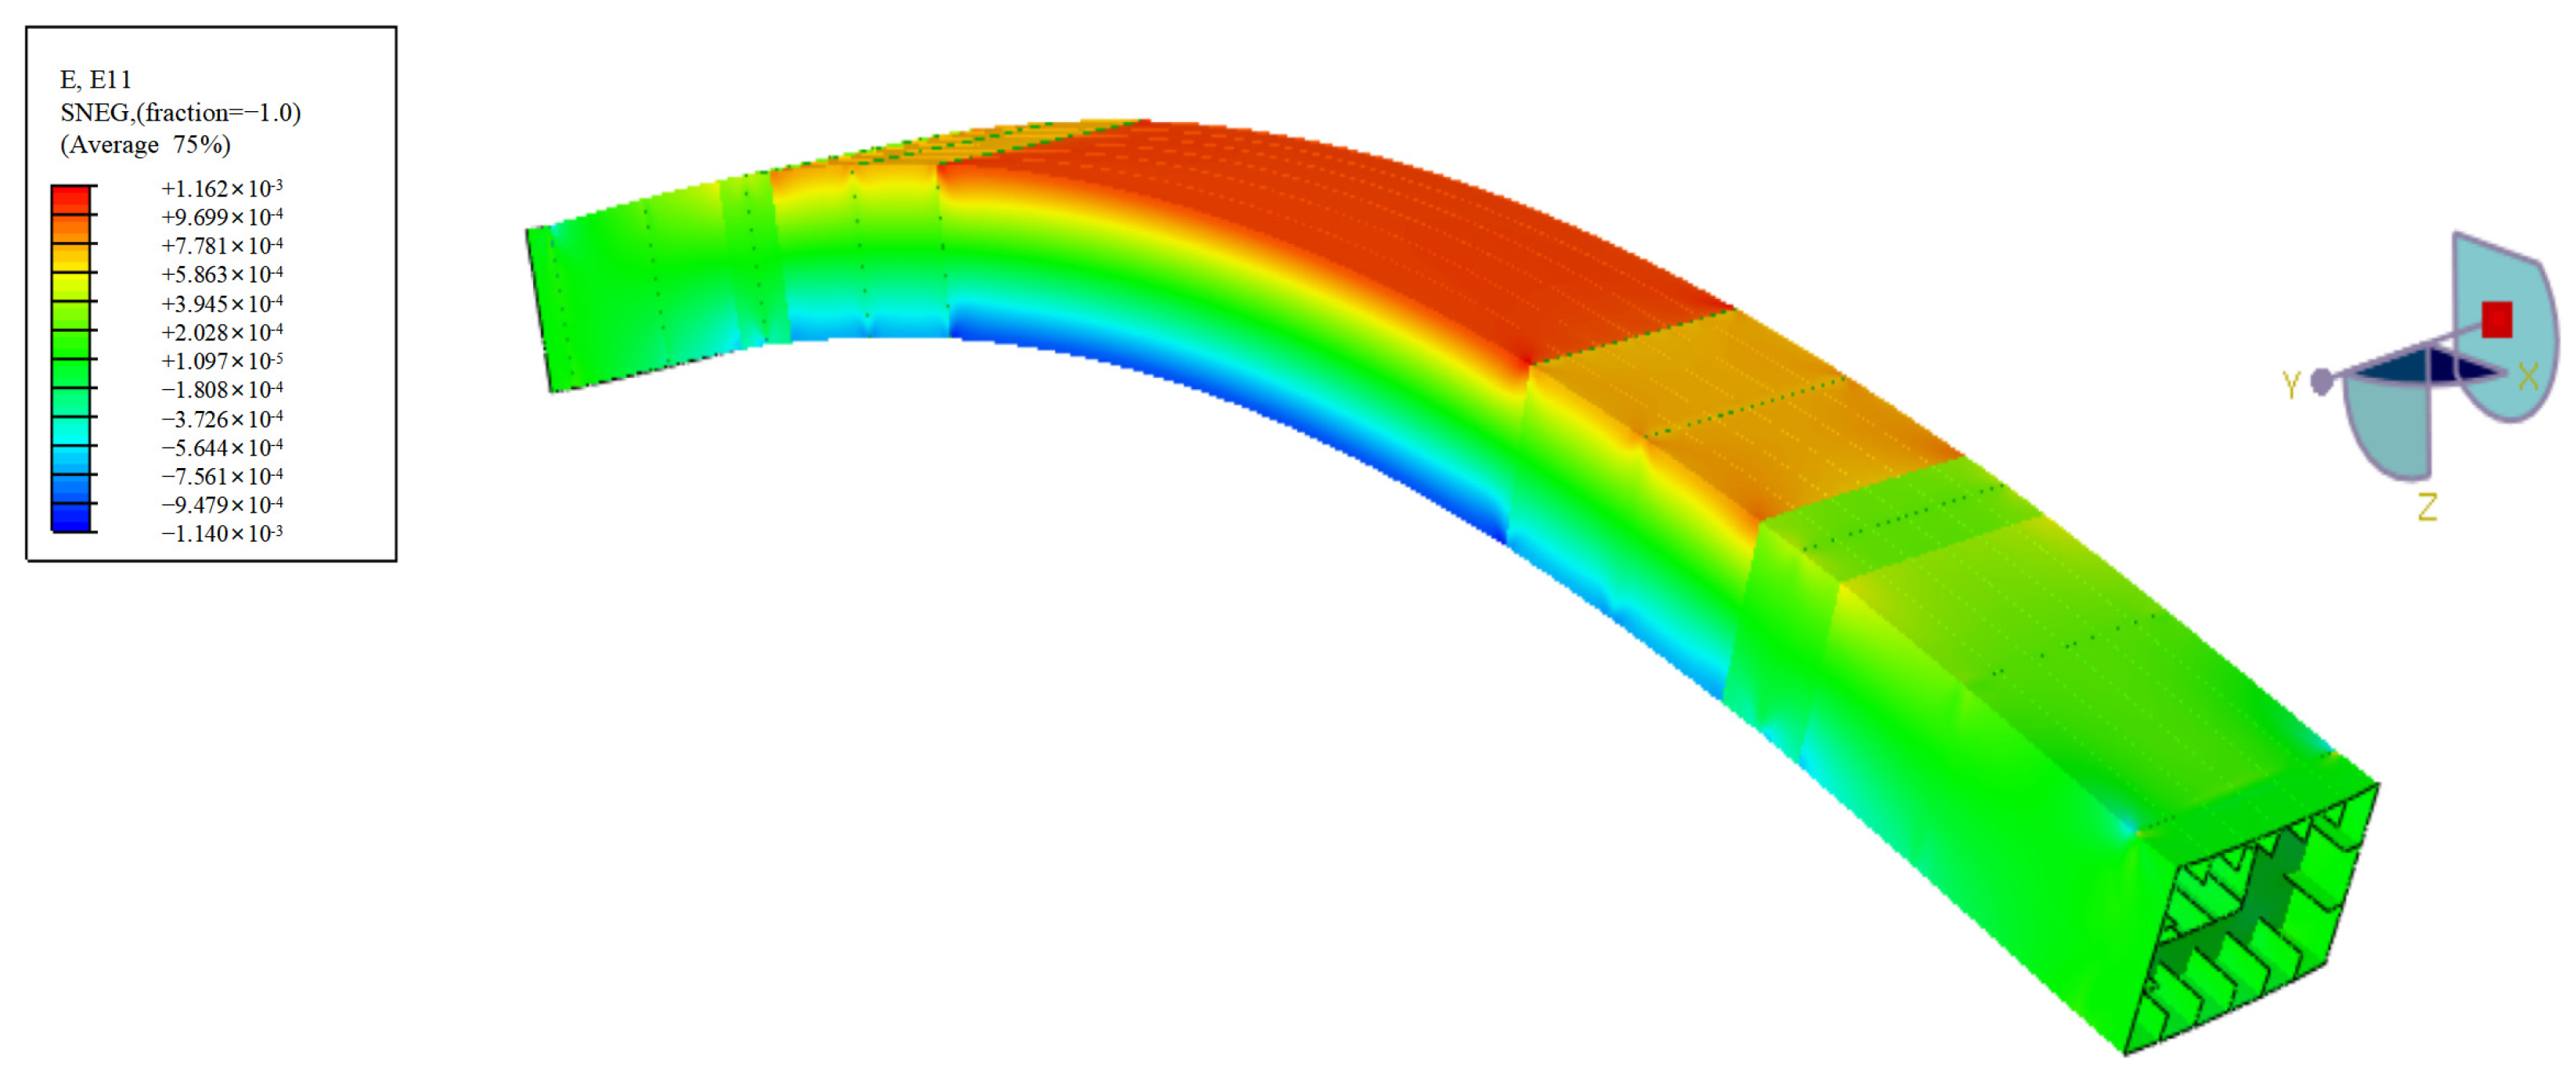
Figure 4 and Figure 5 present numerical simulations conducted using the finite element software Abaqus 2022. The primary goal of these simulations is to guide the placement of measurement points in the experimental model. The strain distribution on the port exhibits a trend from the top to the bottom, transitioning from a positive high-strain zone to a low-strain zone, and then to a negative high-strain zone. Accordingly, strain sensors are placed in each of these zones. Additionally, strain data from virtual sensors within the model are used to supplement the experimental data from the physical model. The hull box girder has two longitudinal ribs (three rows of areas) on the left and right sides, and five longitudinal ribs (six rows of areas) on the top and lower sides. By evaluating the model’s longitudinal strain distribution law, it is discovered that the strain is symmetrical left and right along the middle longitudinal portion and symmetrical bow and stern along the middle transverse section; thus, the test scheme is established in portion 3.1 in accordance with this law.

4. Design of Test Scheme for Hull Box Girder

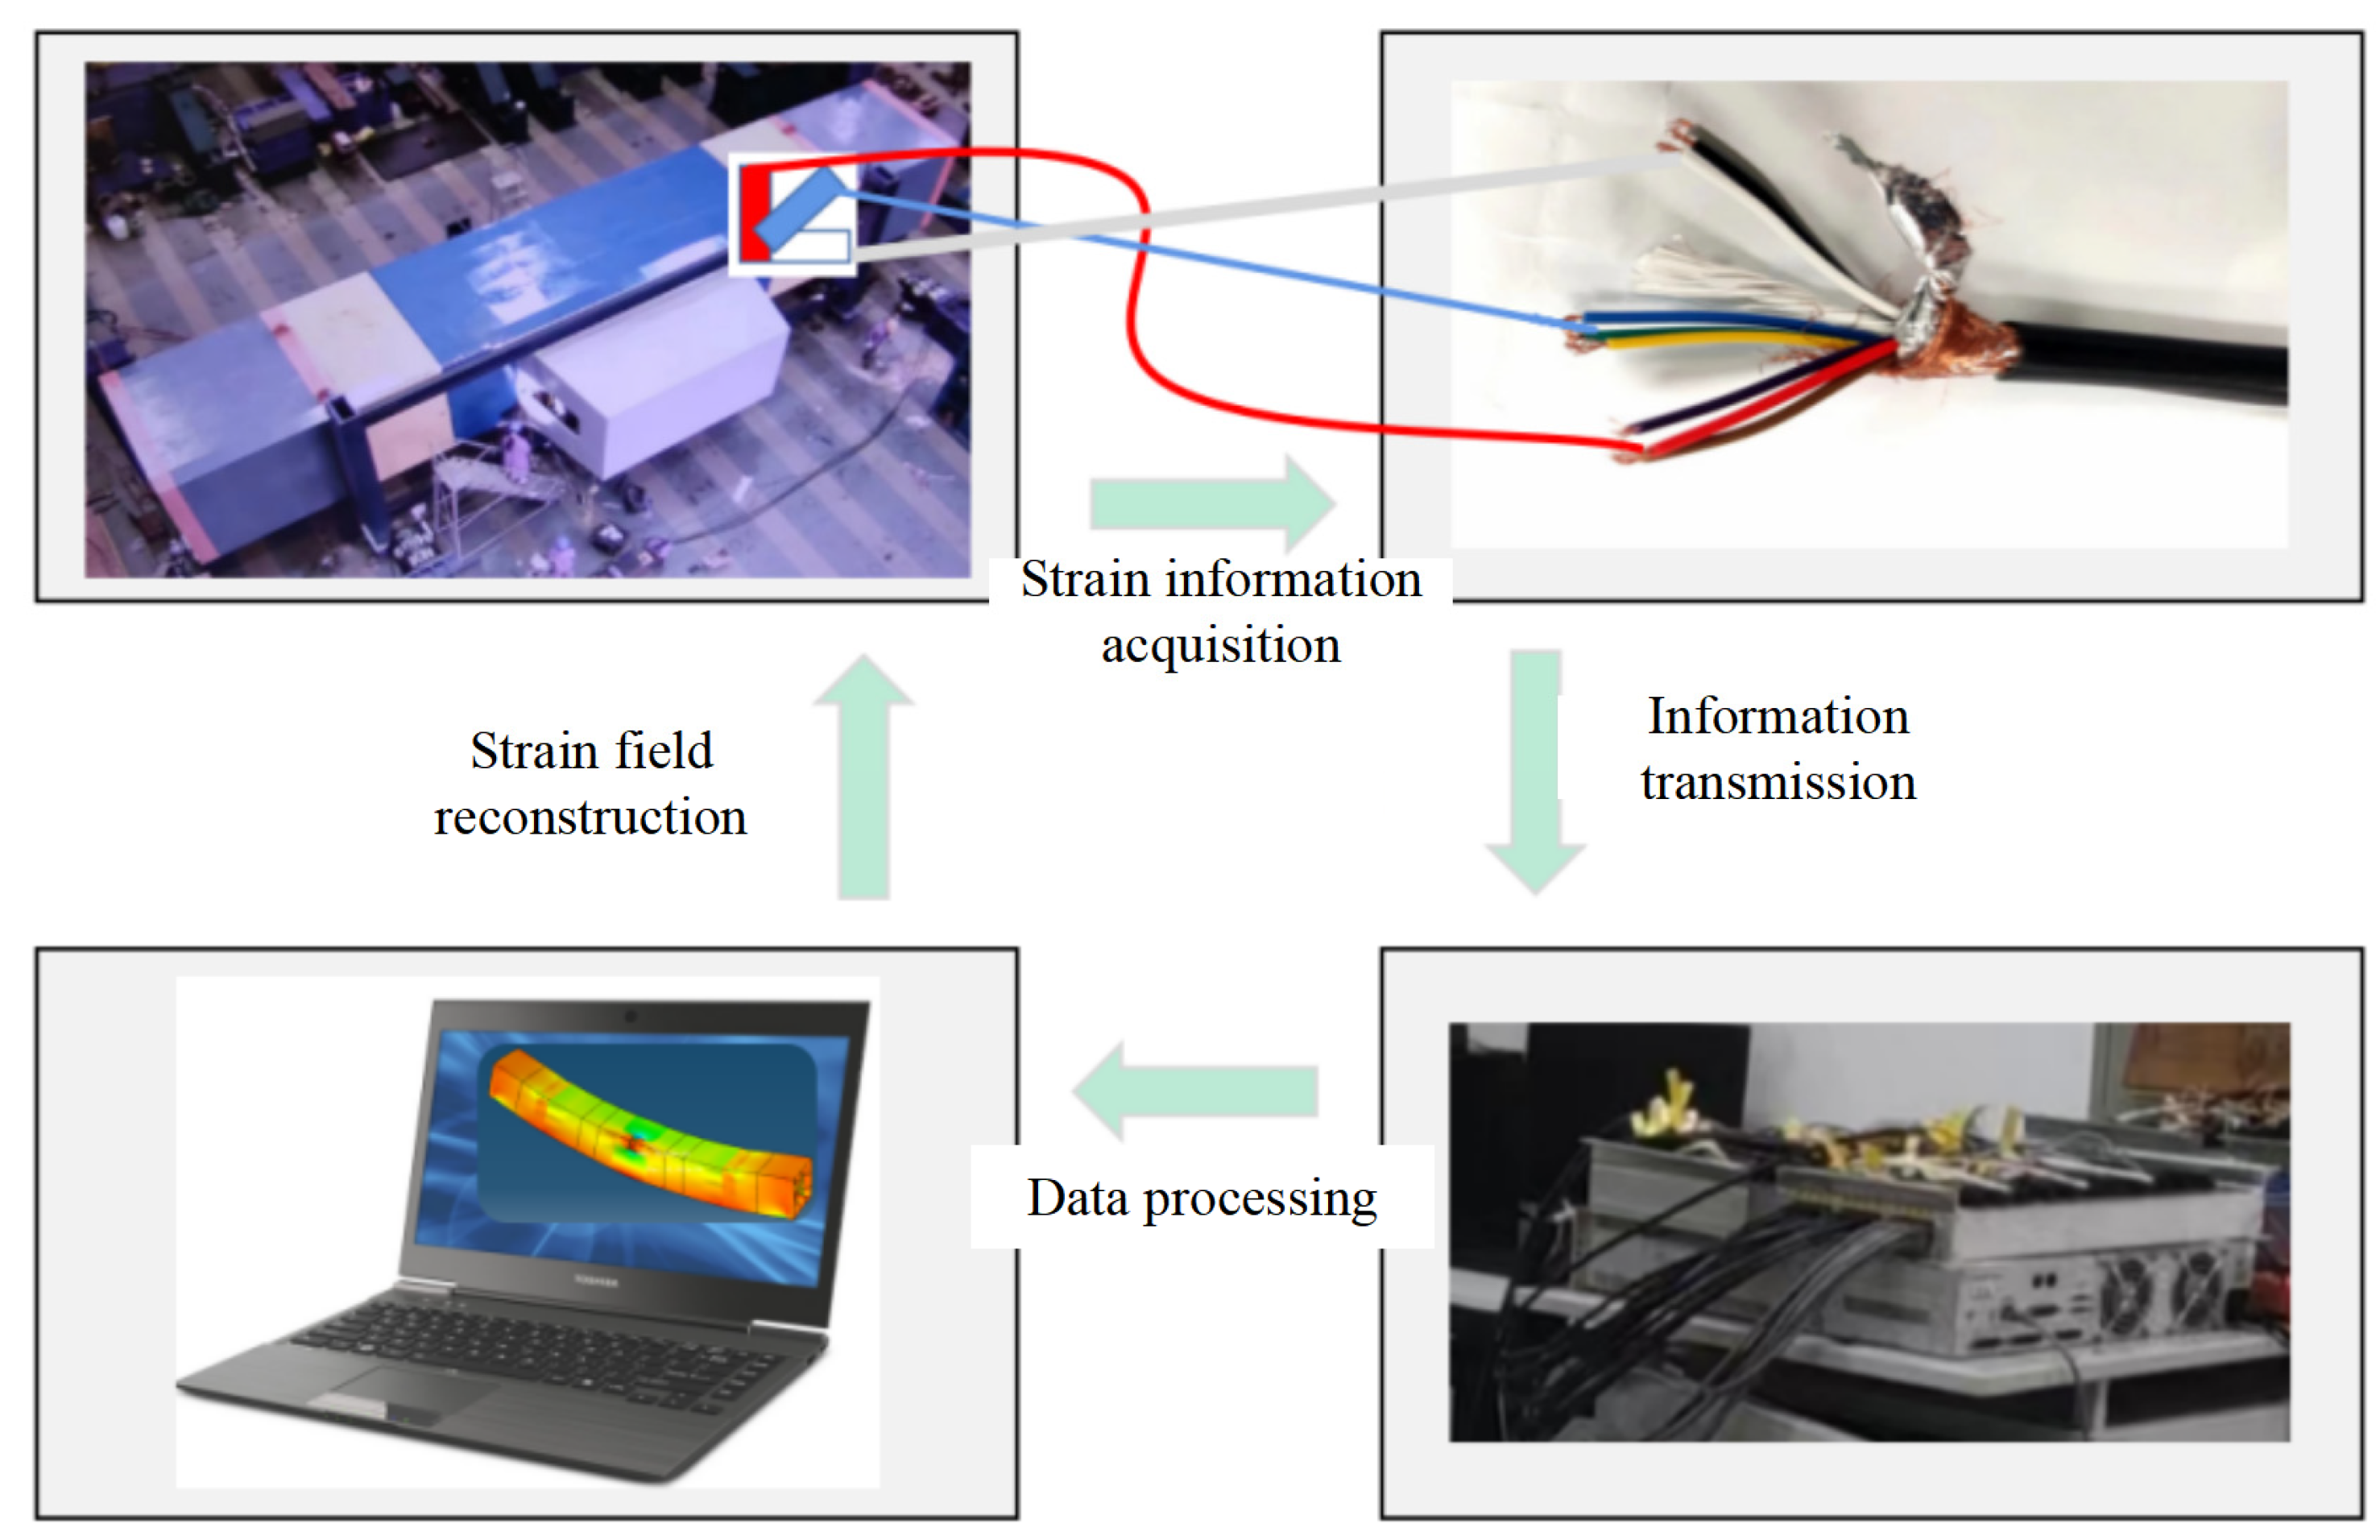
The experimental model adopts two kinds of sensor acquisition technologies: strain gauge and optical fiber. In this paper, only the acquisition results of strain gauge sensor are used as the input of strain field reconstruction, and the results of the optical fiber sensor are not collected. In this paper, the information acquisition process based on strain gauge is to connect the strain gauge and the acquisition instrument through a 9-core cable to realize the collection and transmission of structural strain information, and then reconstruct the strain field of the structure after processing the collected results. The main process of structural strain information acquisition is shown in Figure 6.
Under the condition of four-point bending, by analyzing the numerical simulation results, it is found that the distribution of strain field of box beam is symmetrical in the middle longitudinal section and symmetrical in the middle transverse section. Therefore, the distributed optical fiber sensor and strain sensor are set in two symmetrical areas along the longitudinal section, and the main purpose is to form mutual verification of the acquisition accuracy of the two sensing acquisition technologies. The collected data show that the accuracy of the two sensing acquisition technologies is high in the linear stage of the structure, but only the strain gauge acquisition technology is used for related research in this study. Additionally, as indicated in Figure 7, the box girder is separated into multiple compartments along the longitudinal direction in order to meet the test criteria.
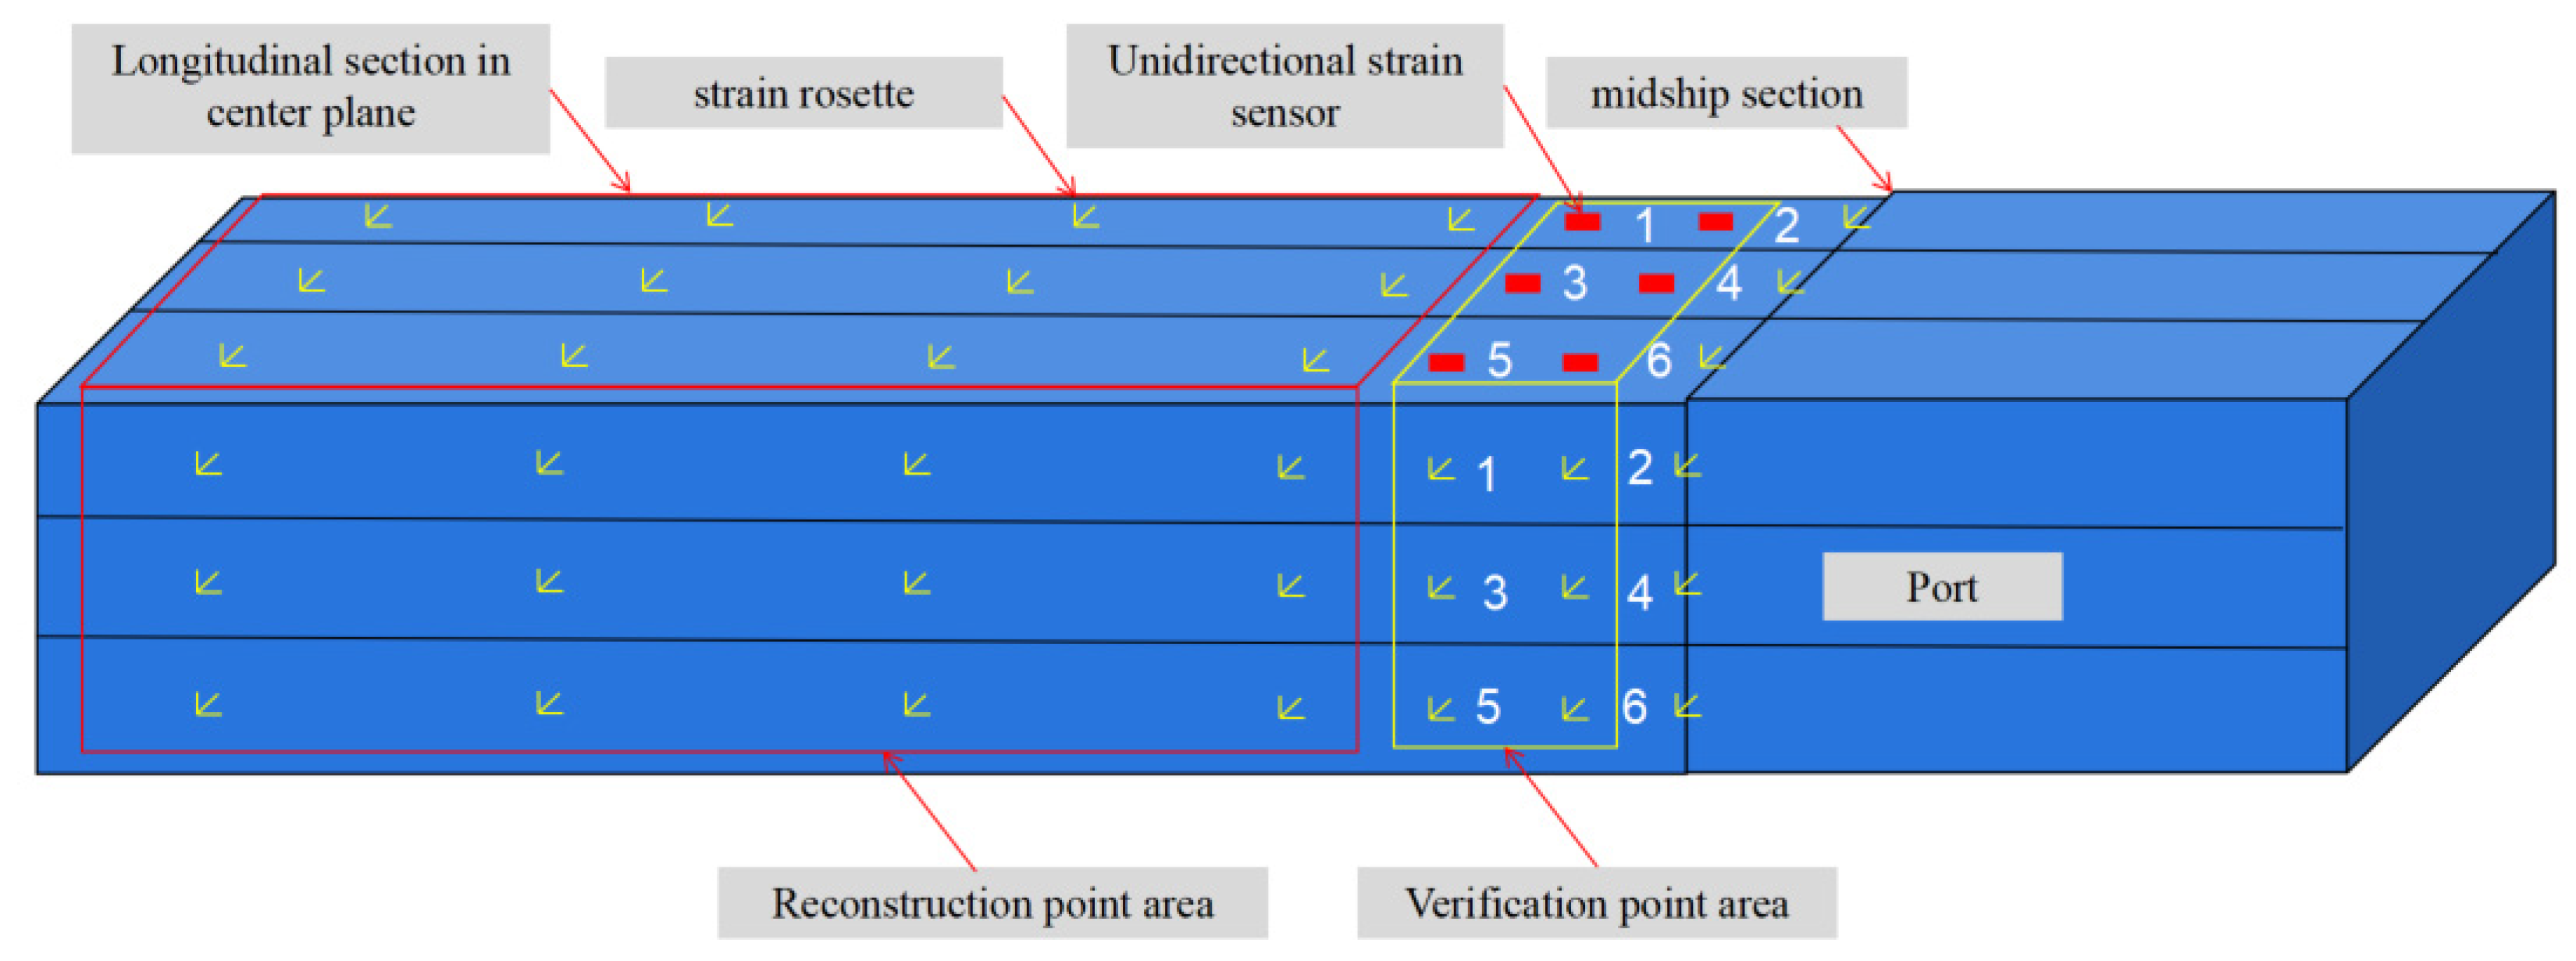
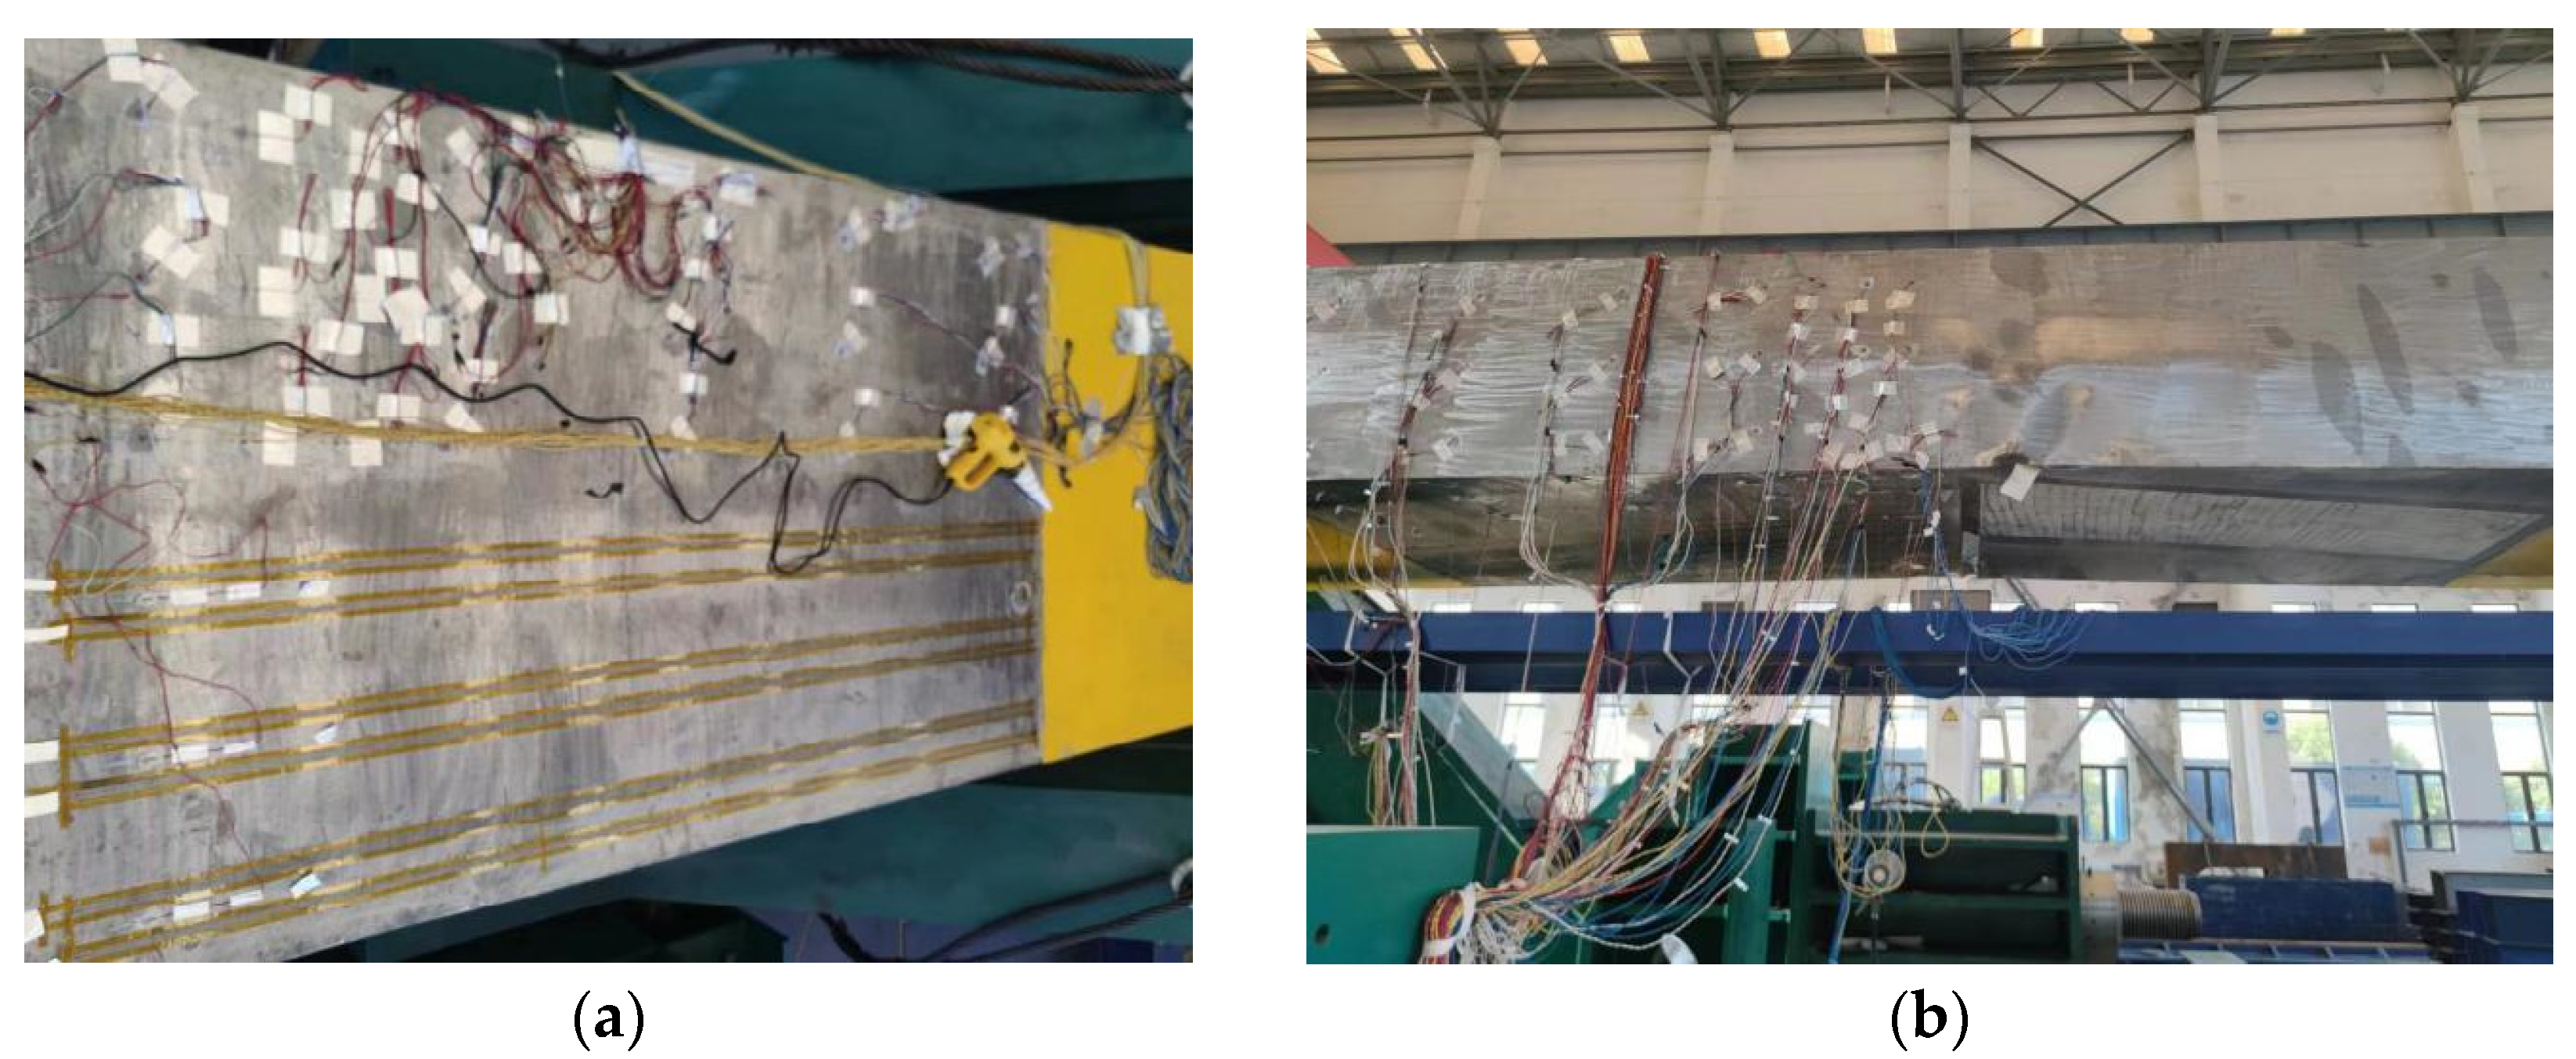
As shown in Figure 8, the layout area of the strain rosettes is symmetrical with the optical fiber along the longitudinal section, and 45 reconstructed physical measuring points are placed every 0.5 m along the centerline of the array board. Additionally, 12 additional strain rosettes and 6 unidirectional strain gauges are placed as verification points. Of the points, 45 are used for reconstructing the strain field, while the 15 validation points are solely for verifying the reconstruction accuracy and do not participate in the strain field reconstruction. Figure 9 is the sensor layout diagram of the test site.
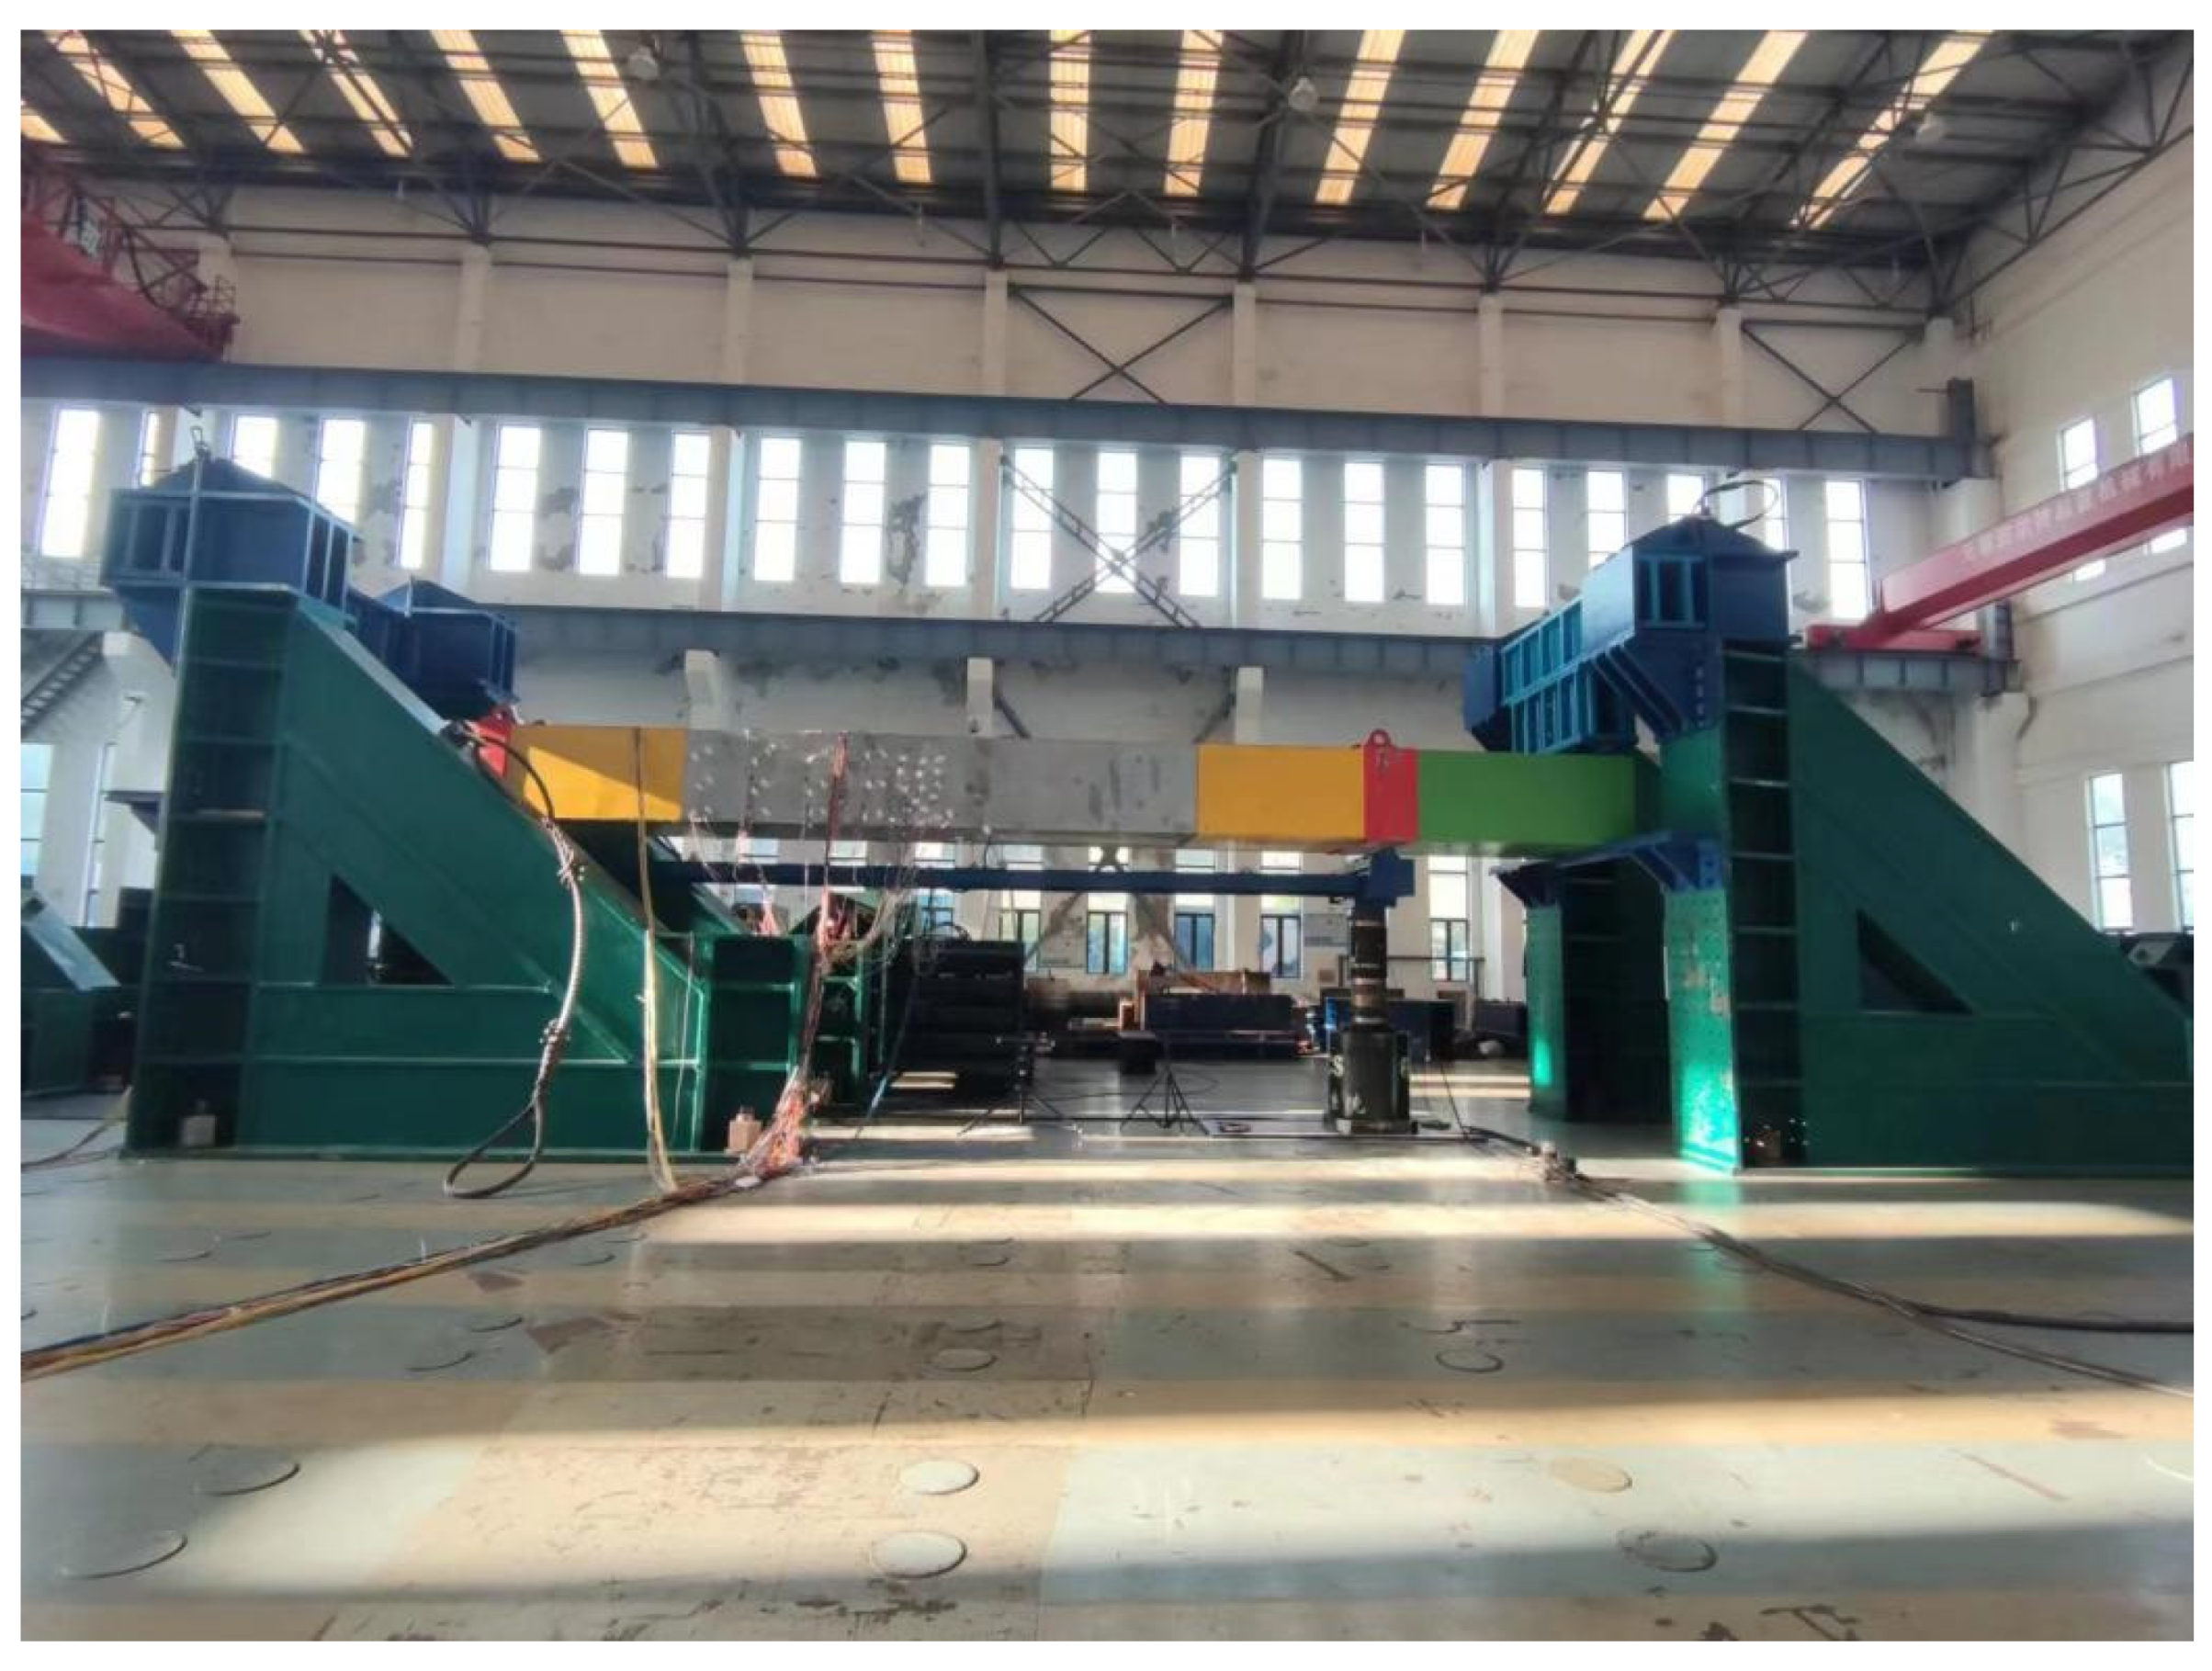
The long-span hull’s box girder underwent a four-point bending test to imitate the mid-arch when the ship was sailing against the waves. The semi-circular loading block was in line contact with the surface of the box girder, the loading section above the box girder was fixed by tooling, and the two oil cylinders at the bottom were loaded simultaneously. Figure 10 shows the schematic diagram of the test loading, and Table 2 shows the loading conditions. The test site is shown in Figure 11.

5. Discussion

5.1. Analysis of Test Data

The experimental data under 1200 kN working conditions were used in this research as an example to show the reconstruction, and the linear stage reconstruction method was the same under various working conditions. The top plate was in tension, the bottom plate was in compression, and the neutralization axis was close to the centerline of the side plate when the long-span box girder was bent at four points. The whole trend fits the “pull positive pressure negative” strain pattern. The trend is also consistent with the strain distribution characteristics of long-span box girders, as shown in Figure 8, as the number of measuring points was arranged from top surface to side surface to bottom surface from left to right, with five measuring points in one row, a total of nine rows, and nine local fluctuations.
The relative error of the measured data at the verification sites is assessed in accordance with the reconstruction results in order to confirm the accuracy of the strain field reconstruction for long-span box girders. One can easily and intuitively represent the relative error between the strain reconstruction value and the measured value of the verification point using P D ( ε ) . Among them, ε L , i i F E M ( i = 1 ,         2 ,         3 18 ) represents the strain reconstruction value of each verification point along the longitudinal direction of the box girder, and ε L , i V P ( i = 1 ,       2 ,       3 18 ) represents the measured data of each verification point along the longitudinal direction of the box girder.
P D ( ε ) = ε V , i i F E M ε V , i V P ε V , i V P
The measured values near the neutral axis range from −6 to 44 μ ε ; the maximum measured strain value is found at the intersection of the top plate and the midship section, measuring 1216.6 μ ε ; and the minimum measured strain value is found at the intersection of the bottom plate and the midship section, measuring −1328.41 μ ε . A maximum inaccuracy of −2563.51% exists between the measured value and the reconstructed value. The measured strain value is low since this site is close to the neutral axis. Due to the measuring point’s inadequate layout precision, which results in a measured value of −15 μ ε and a reconstructed value of 0.61 μ ε , the measuring point may be slightly off from the neutral axis. The bottom surface displays a minimum error of 0.1% between the measured value and the reconstructed value. The relative errors between the measured value and the reconstructed value are all less than 10%, with the exception of the measuring spots close to the neutral axis.
Figure 12 vividly depicts the alignment trends between the measured values and reconstructed values for 45 points across three surfaces. Meanwhile, Table 3 provides the detailed data and relative errors for the points on these three panels.
The side and close to the axis are where there is the greatest relative error in the rebuilt value of the verification point. Measuring points 6–10 on the port are arranged at the neutral axis position. Near the neutral axis of the box girder, the strain gradient becomes smaller, and the strain value gradually approaches zero. At the same time, the structure is easily affected by external disturbance, measurement accuracy, and material micro-inhomogeneity, which leads to the amplification of experimental measurement errors. The reconstruction process is influenced by iFEM algorithm, and the recognition degree of low strain region is low, which continues to expand the reconstruction error. Table 4 displays the relative errors of the other verification points, excluding the neutral axis, which ranges from −0.40% to 2.51%.
The number and position of sensors are very important to the accuracy of strain field reconstruction via the inverse finite element method. The more sensors there are, the higher the reconstruction accuracy is, but it also increases the calculation cost and prolongs the calculation time. The reasonable arrangement of sensor positions can significantly improve the reconstruction effect, especially in the stress concentration area, which can effectively capture key data and reduce the reconstruction error. Therefore, optimizing the number and location of sensors is the key to improving the accuracy of strain reconstruction.

5.2. Strain Field Reconstruction

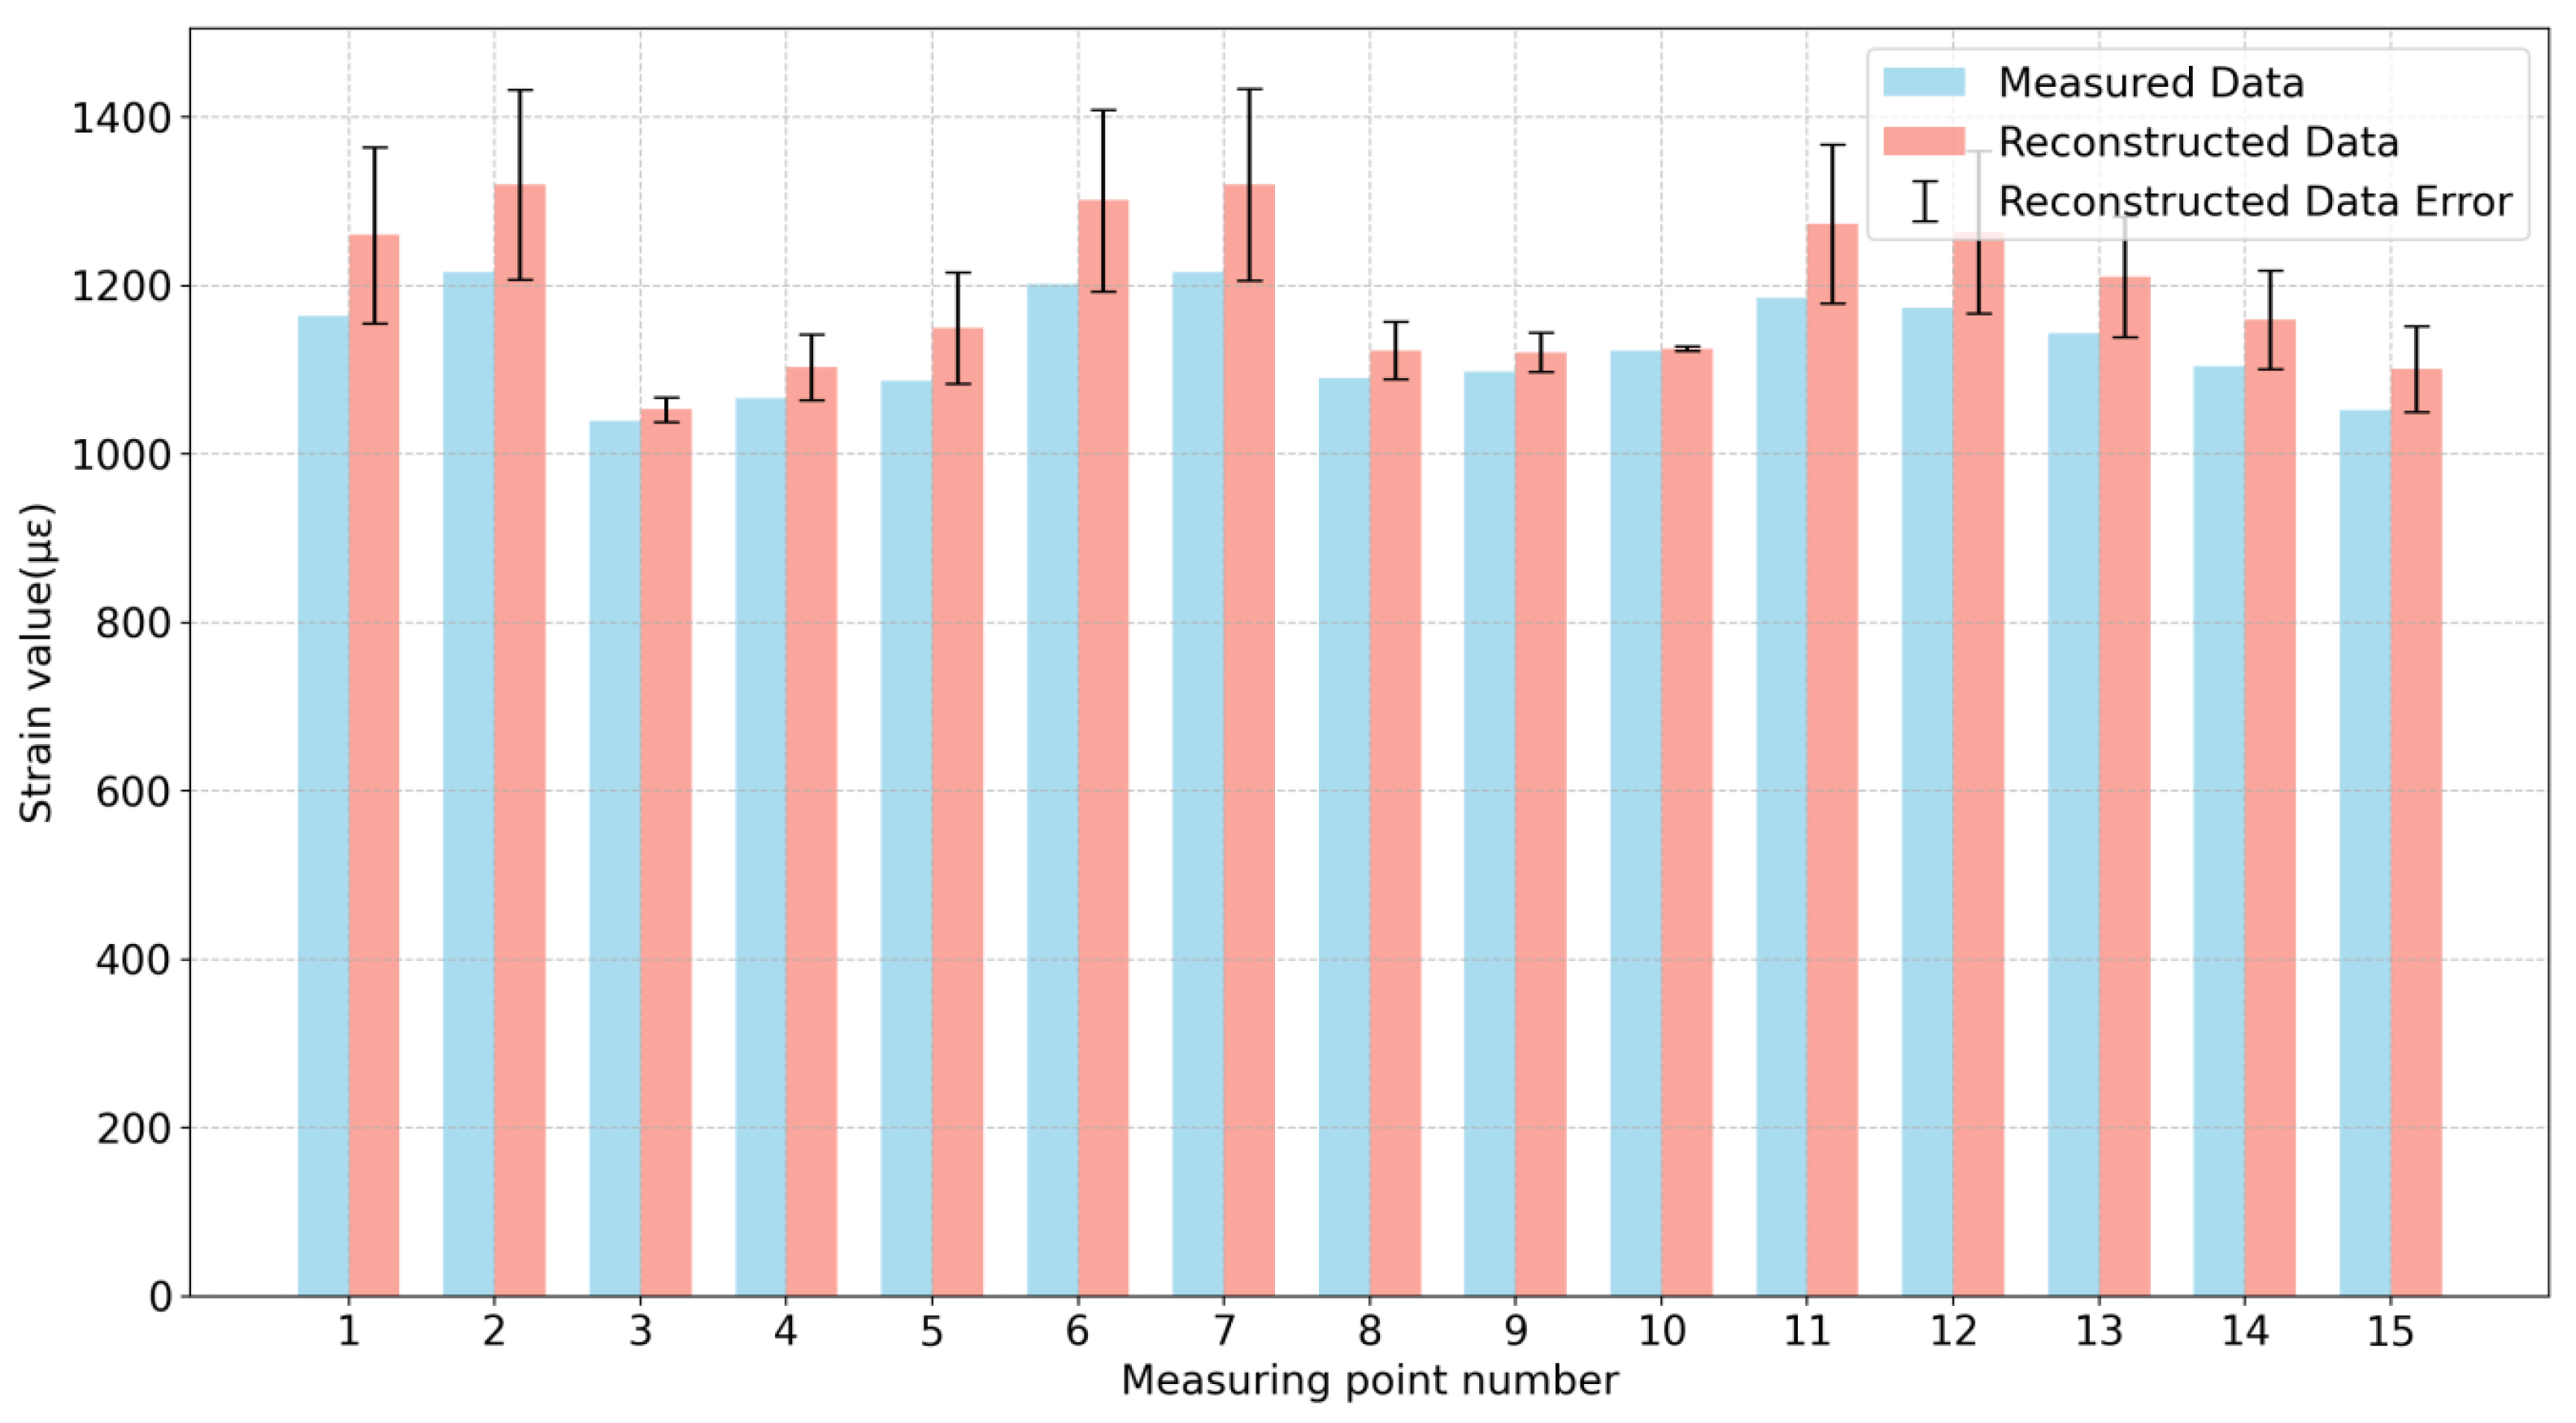
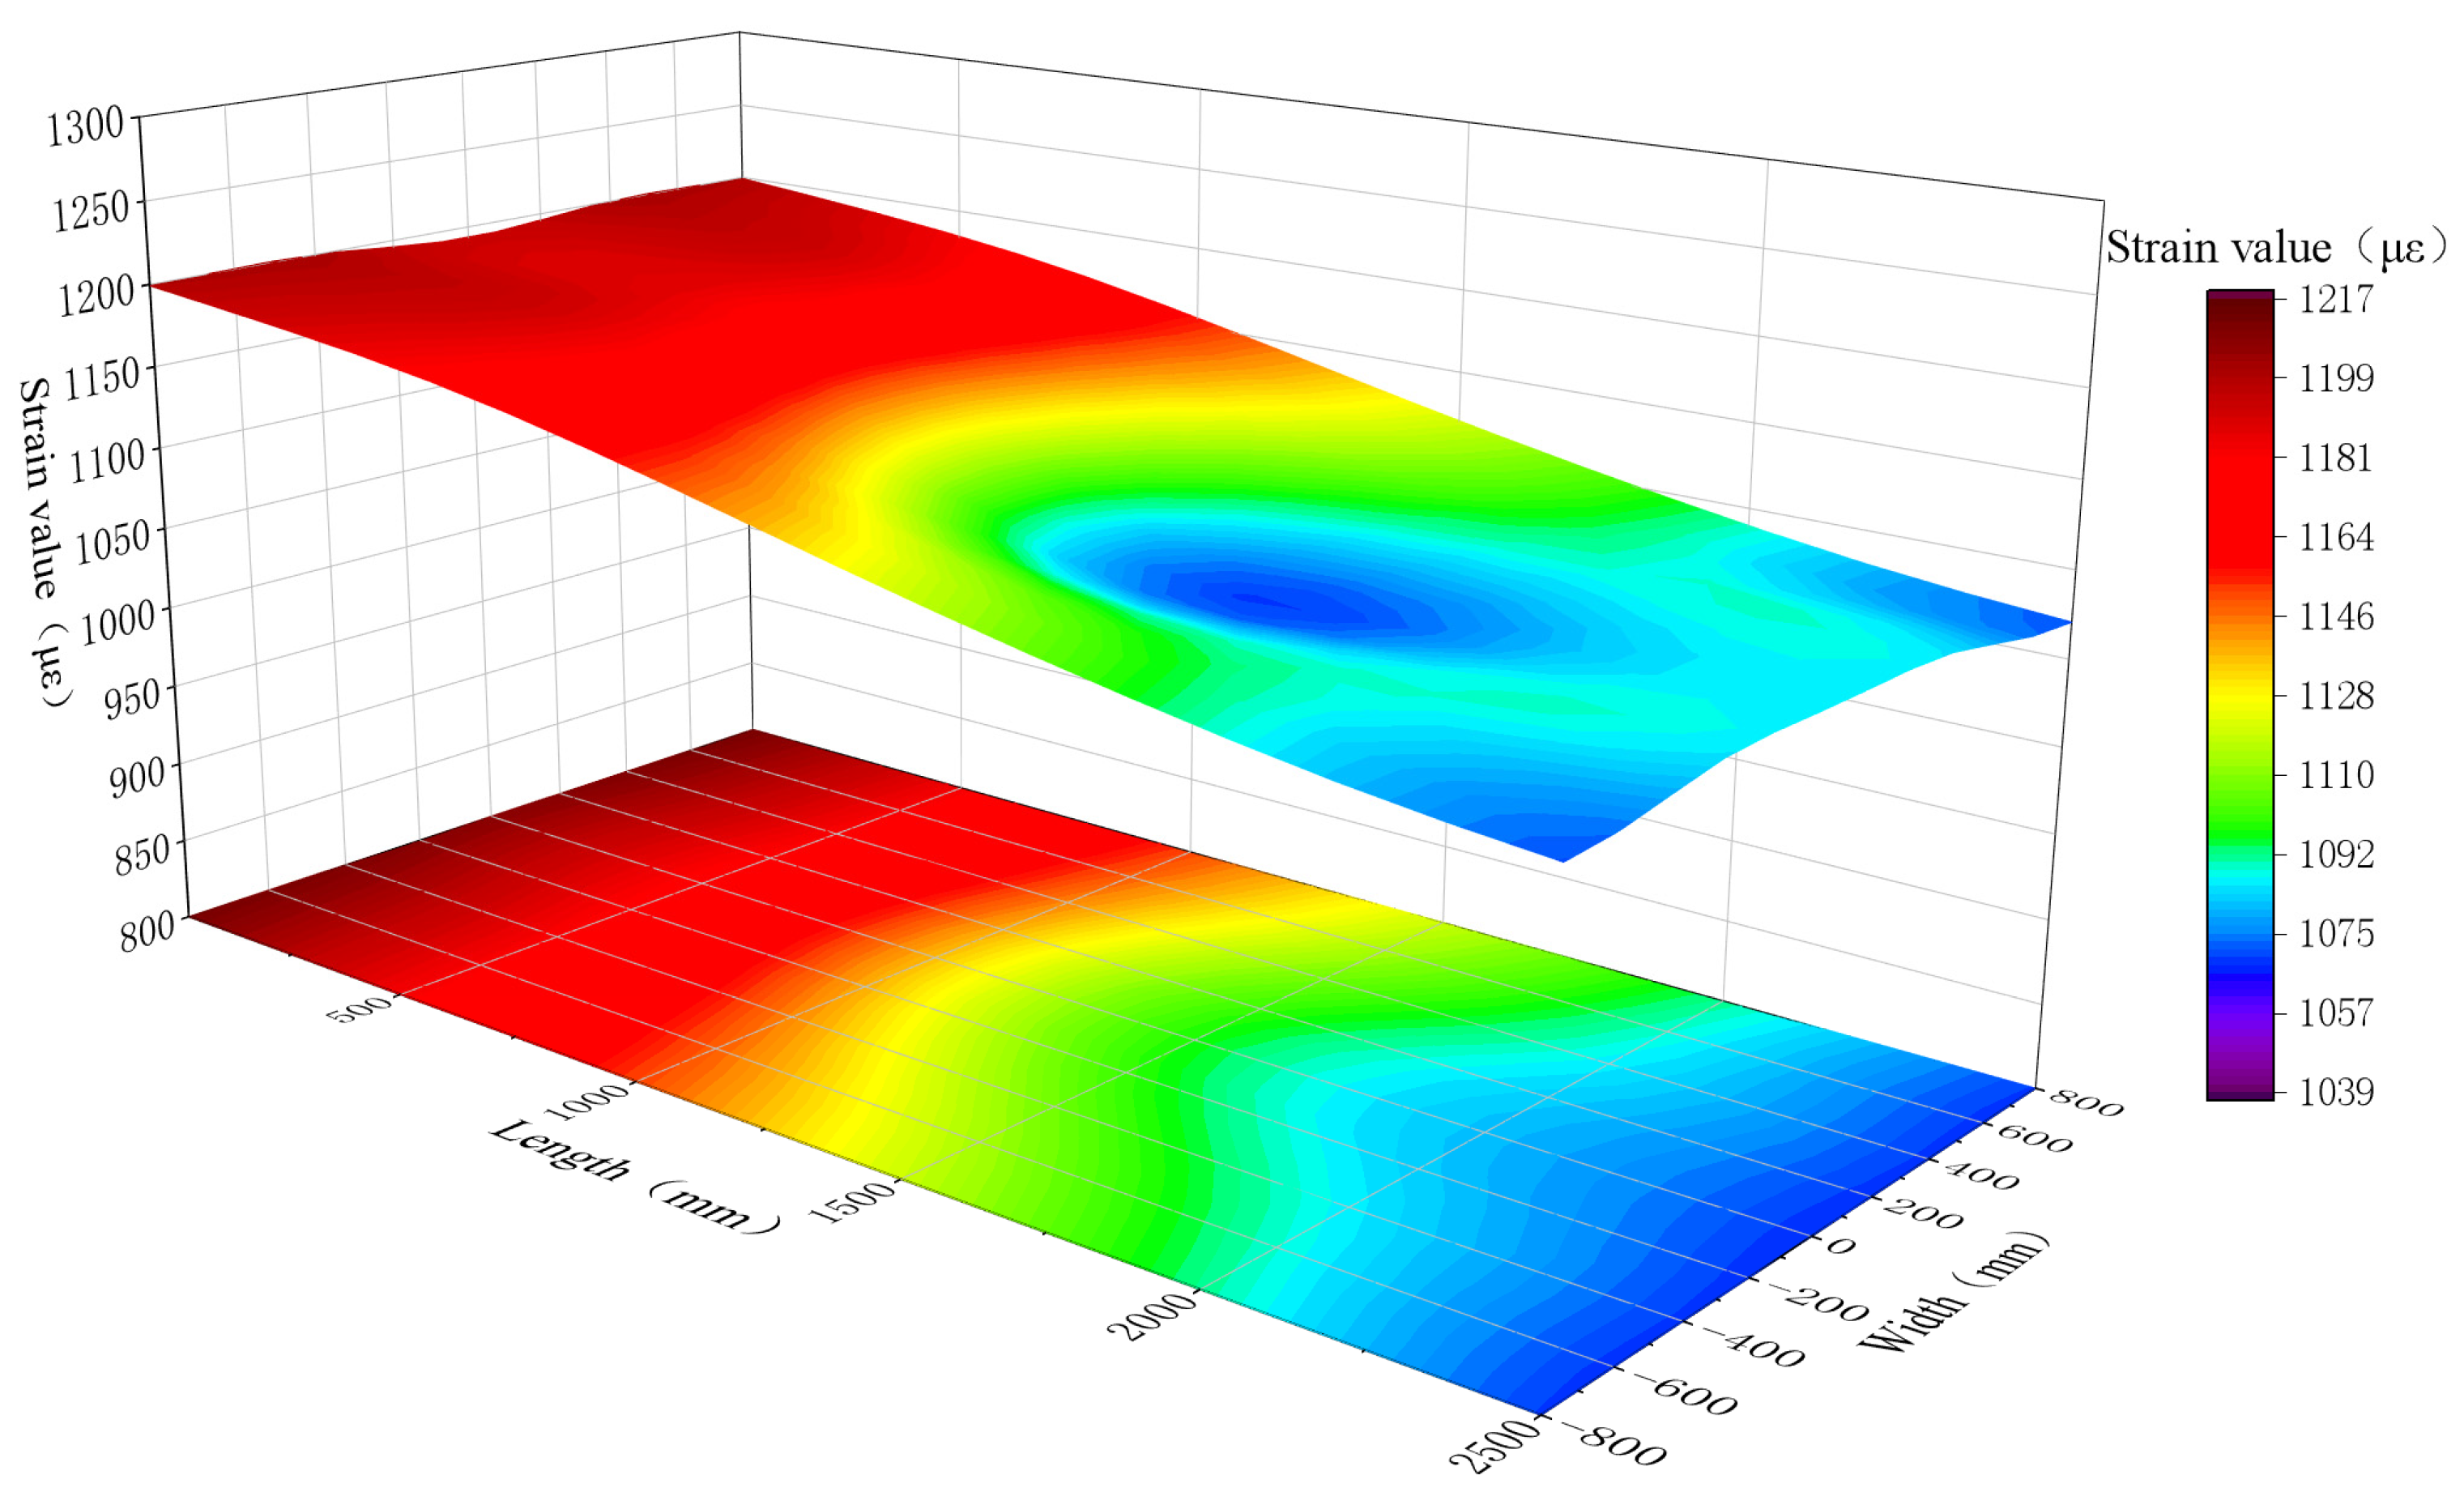
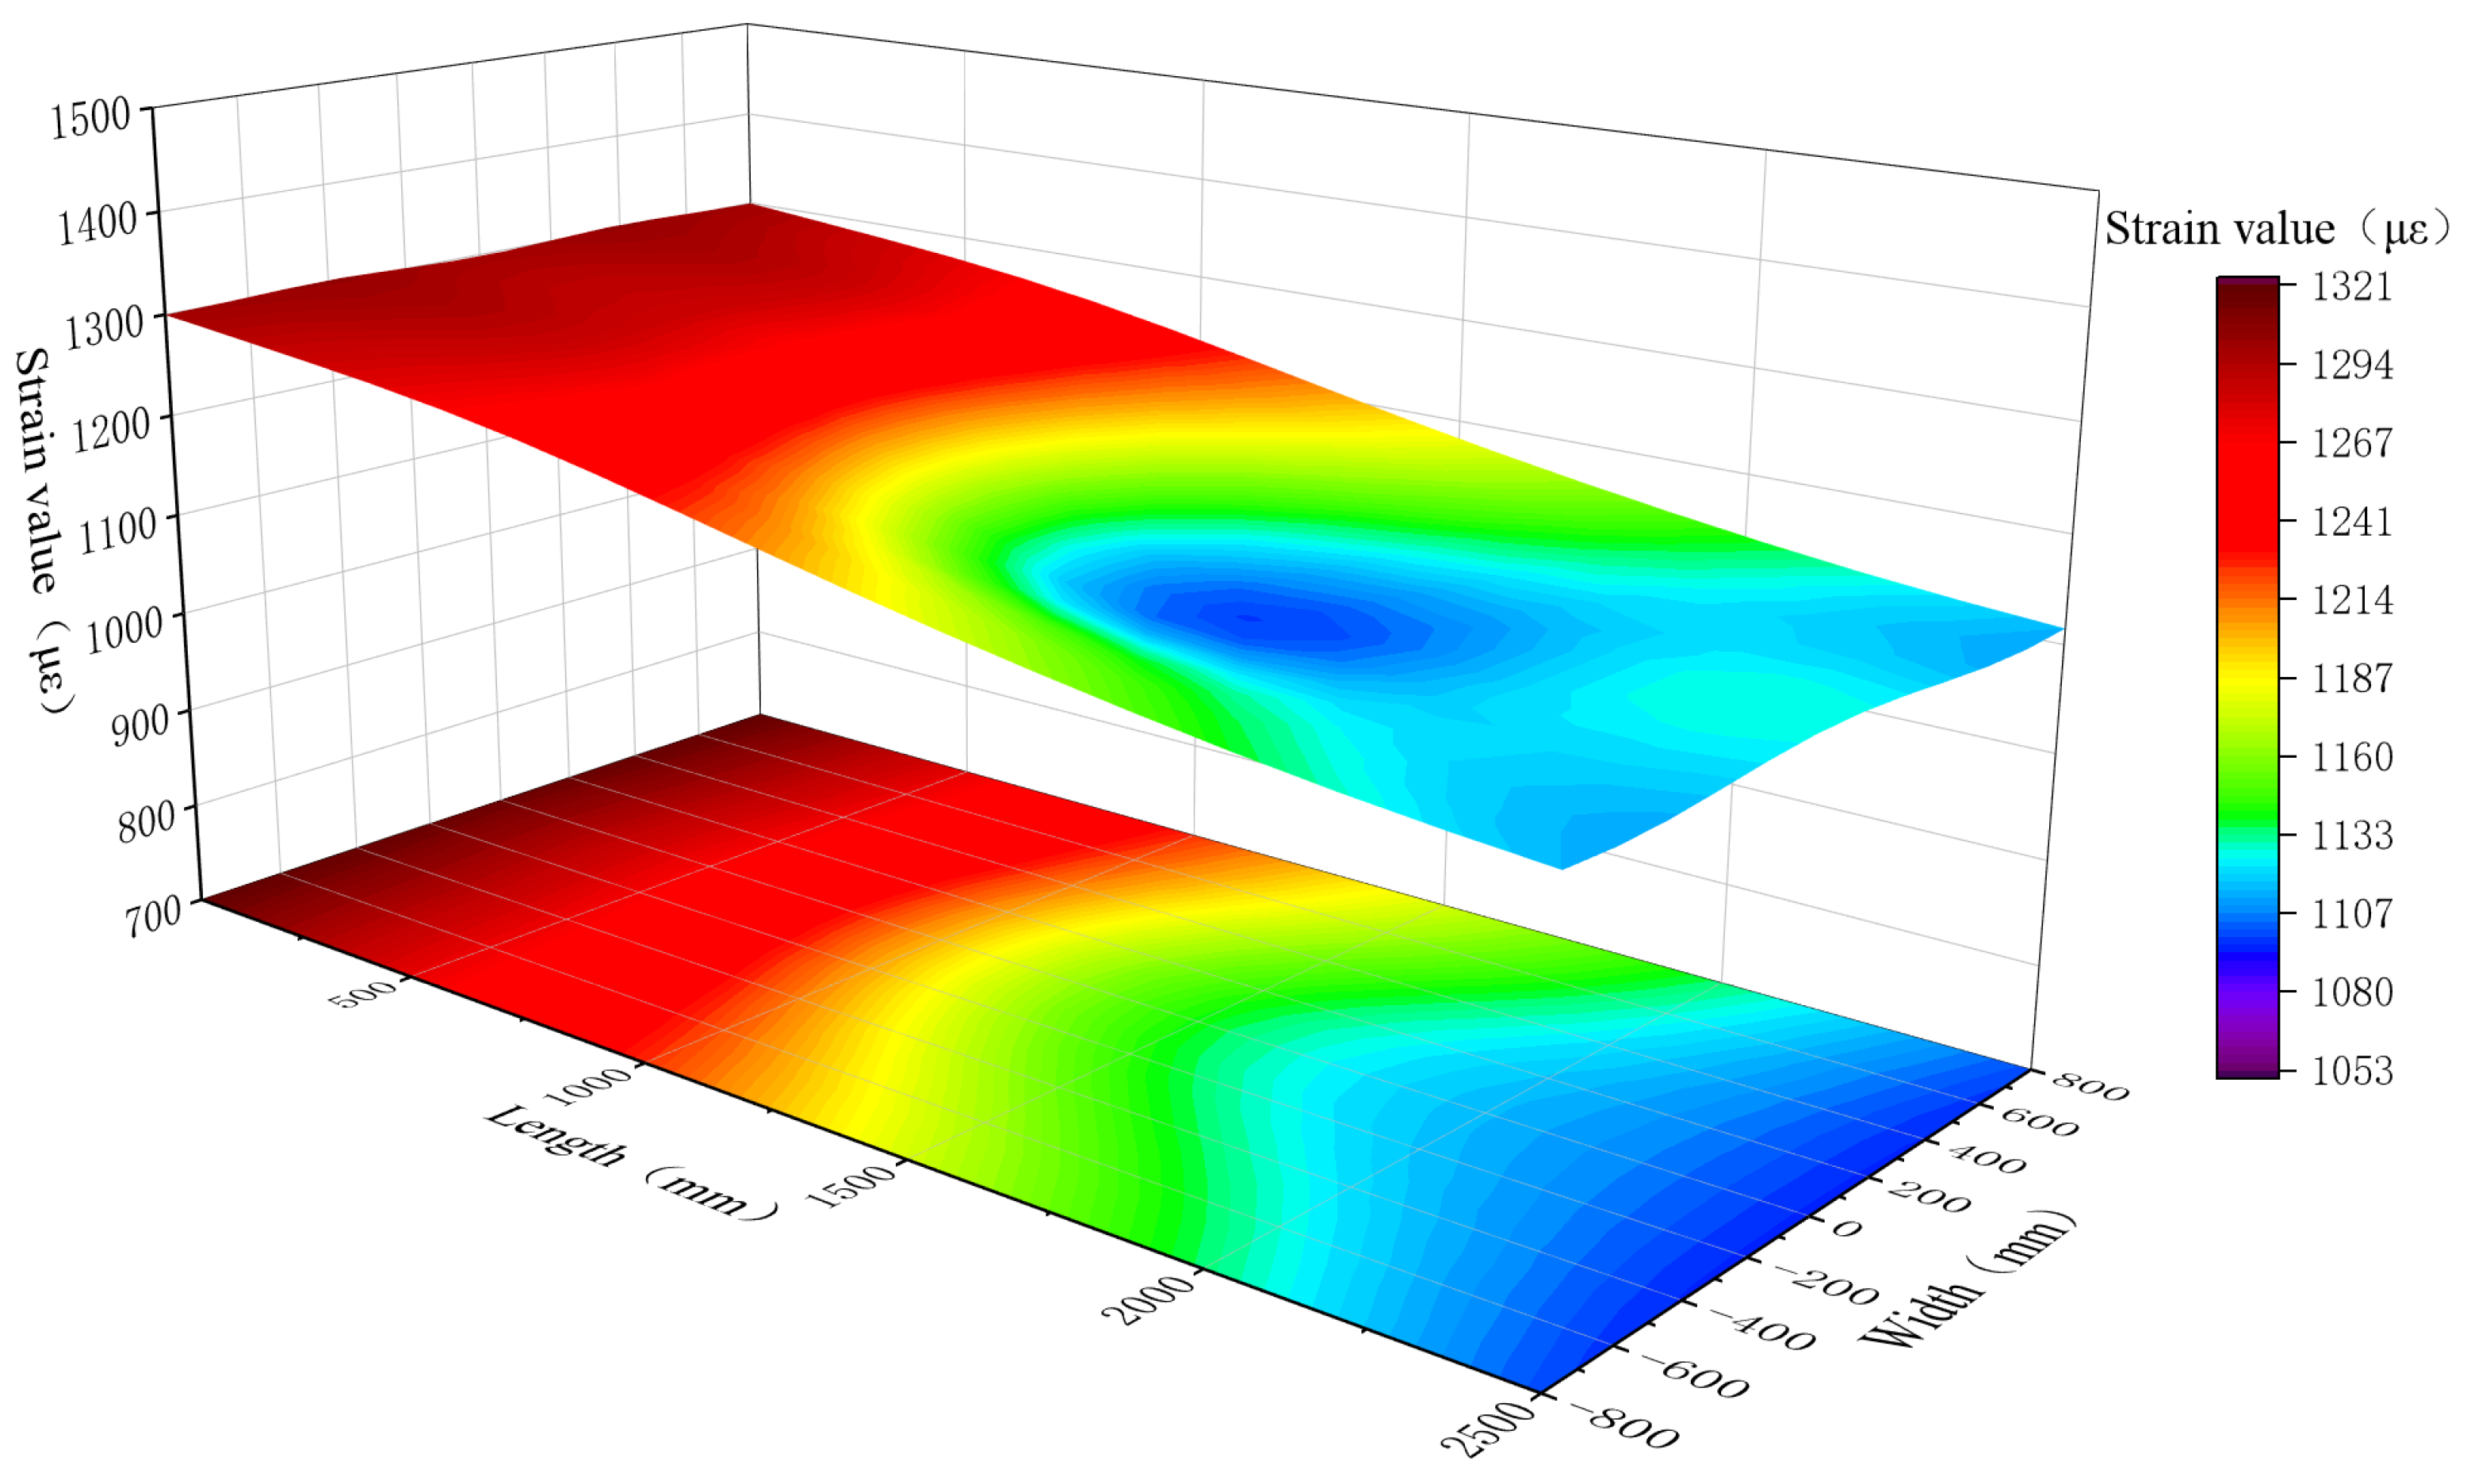
The top plate’s reconstructed value has a maximum relative error of 7.86% and a minimum relative error of 0.24%. According to Figure 13, the reconstructed value’s trend and the measured value’s trend are both in good agreement. Figure 14 and Figure 15, respectively, depict the top surface’s measured strain field and reconstructed strain field.
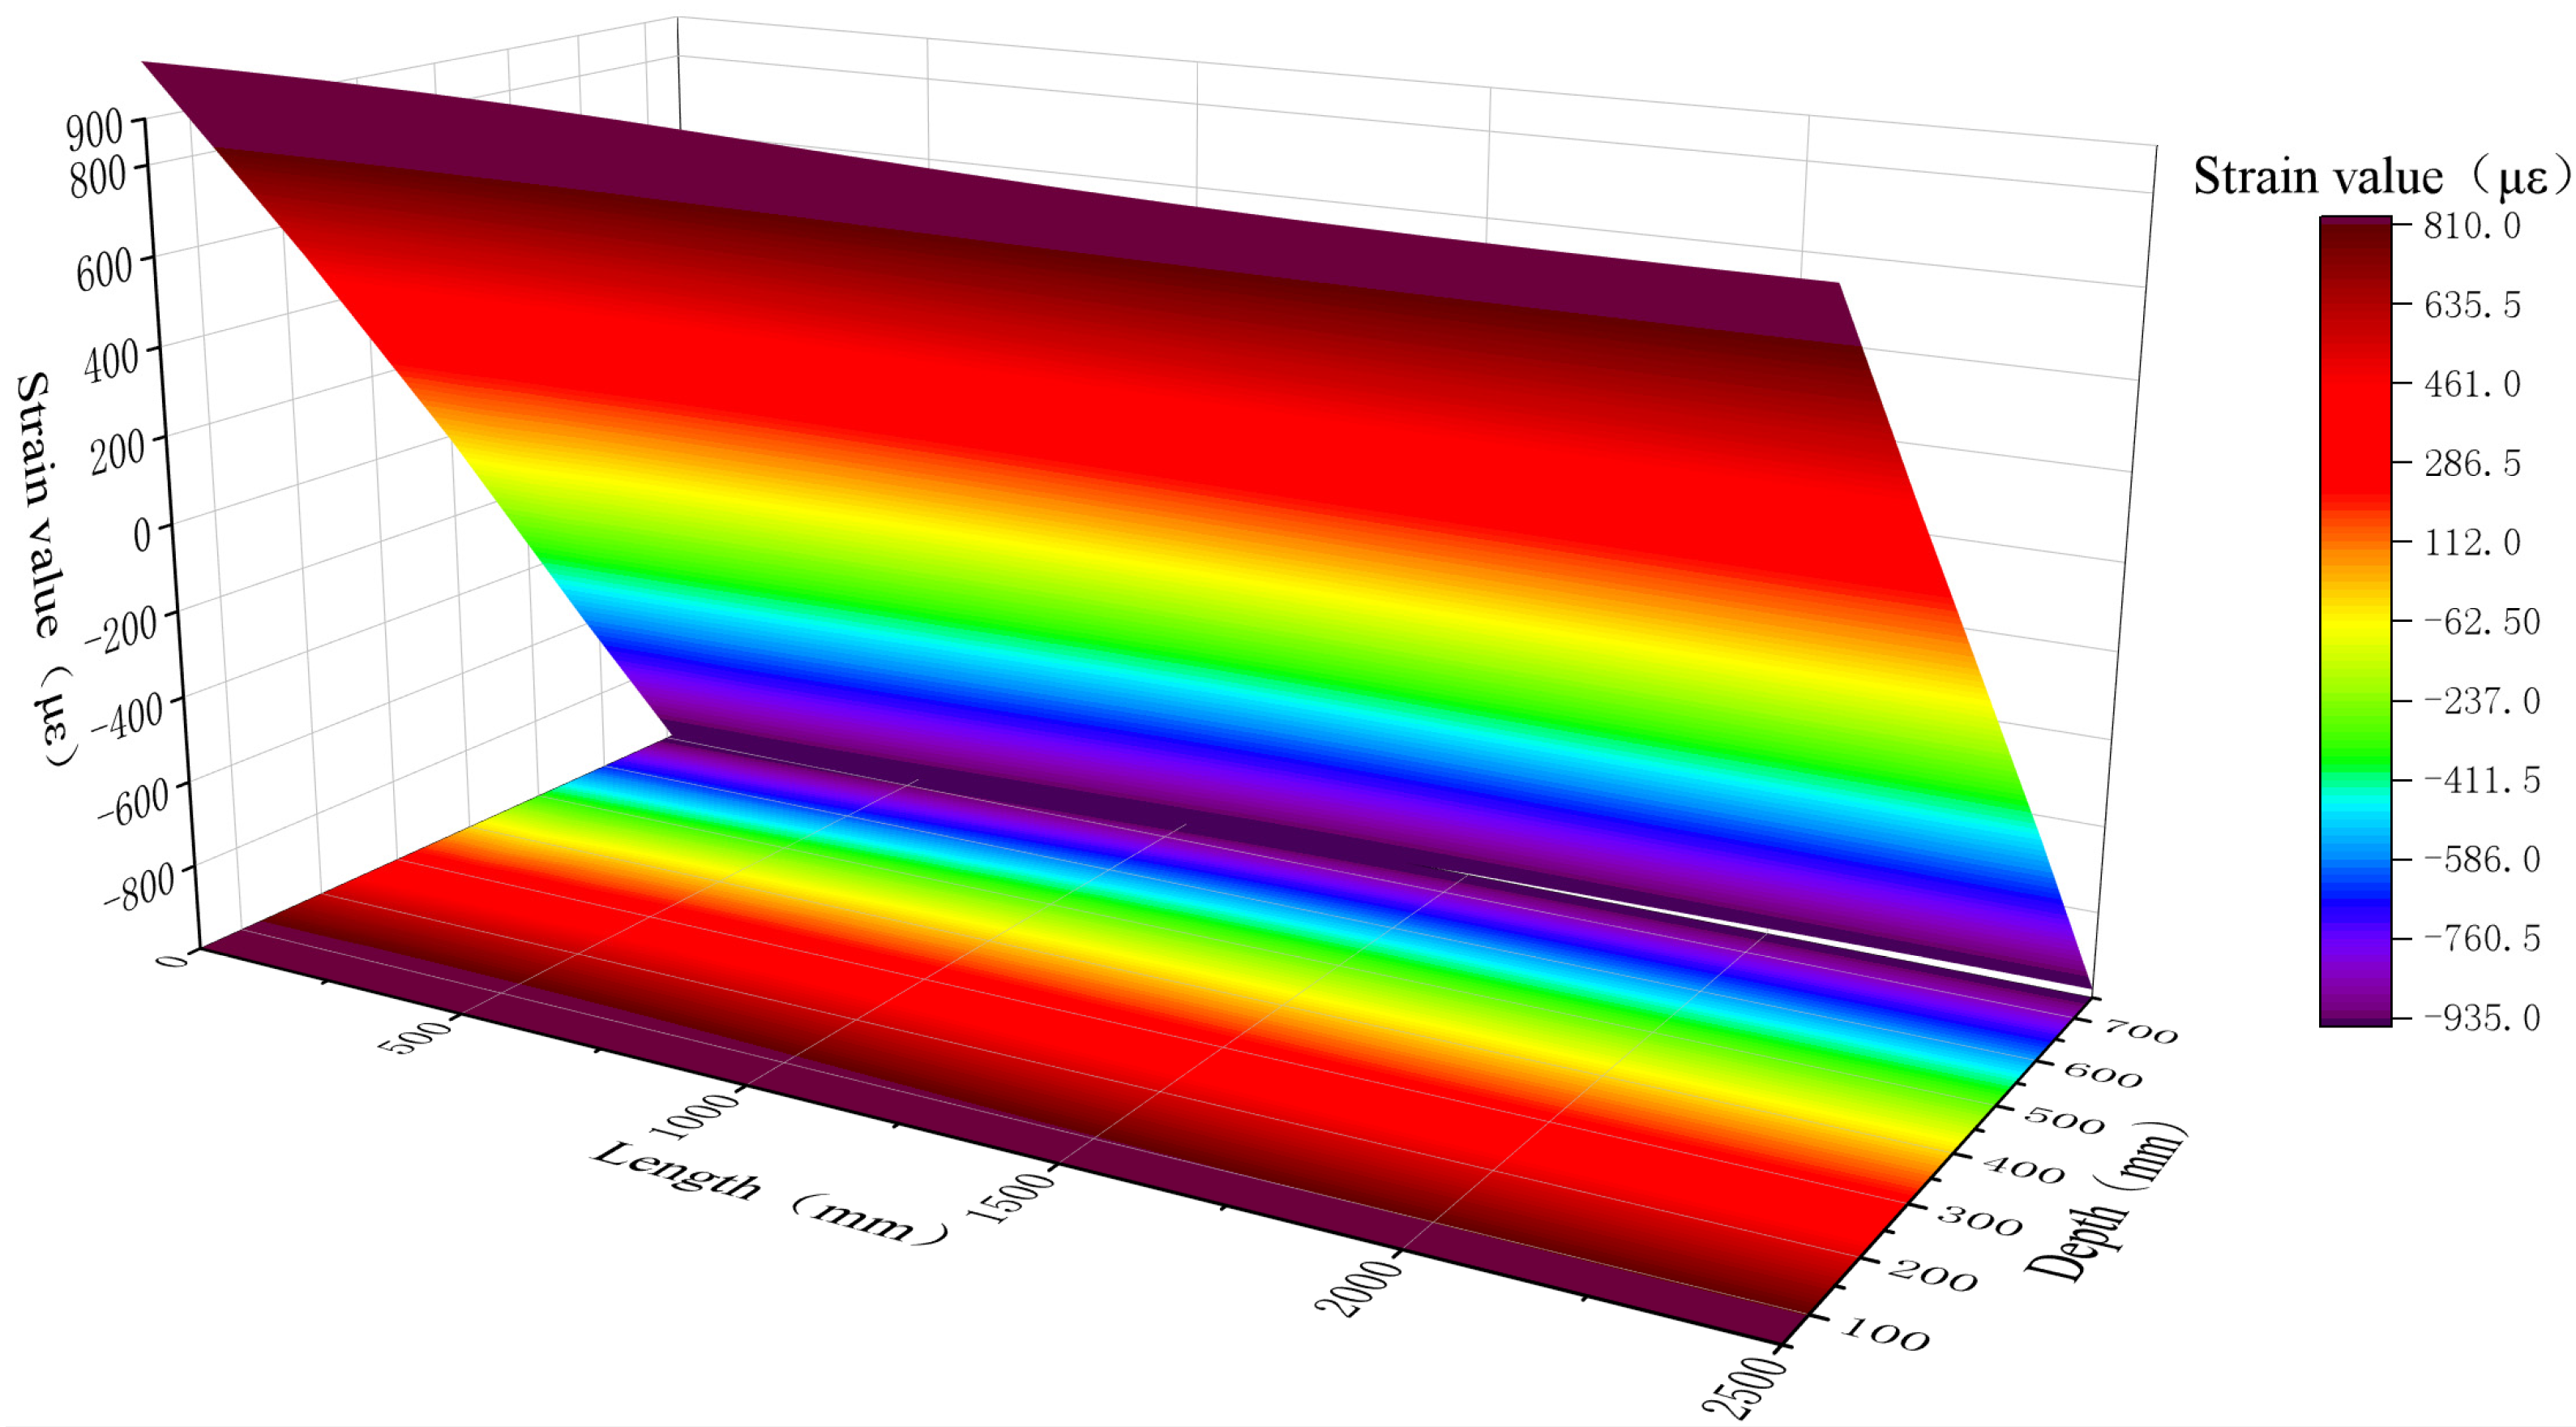
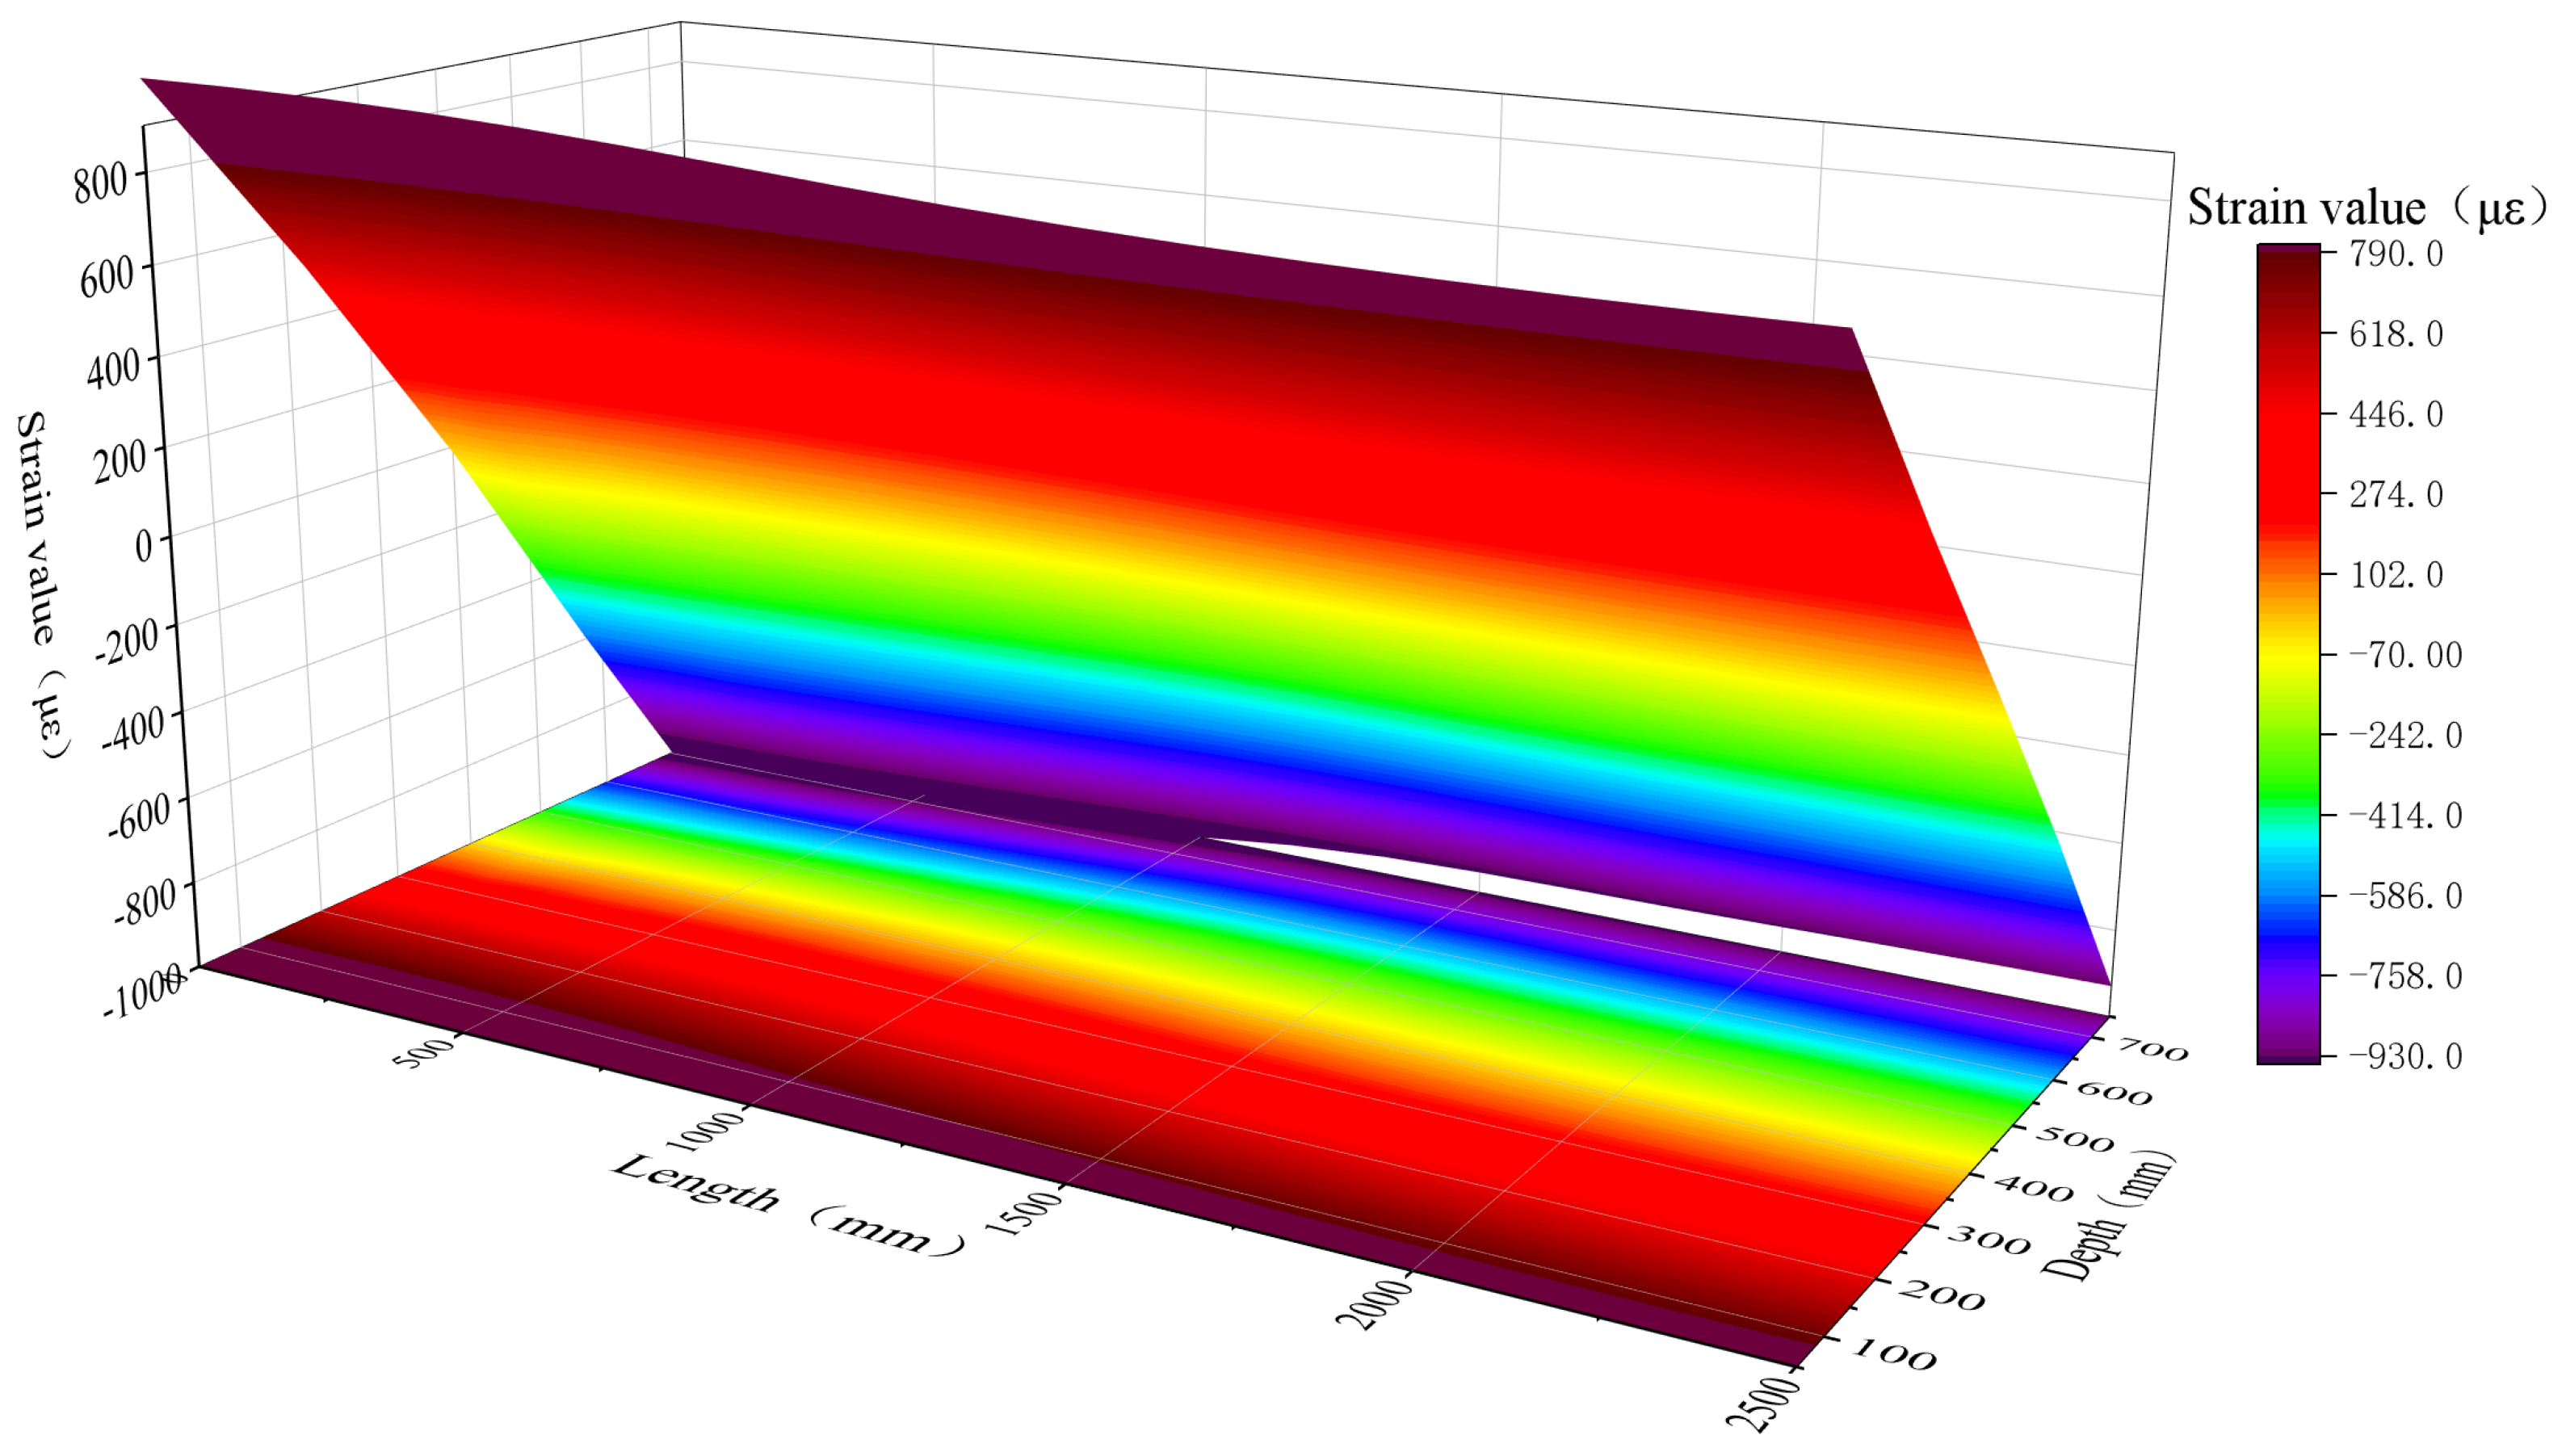
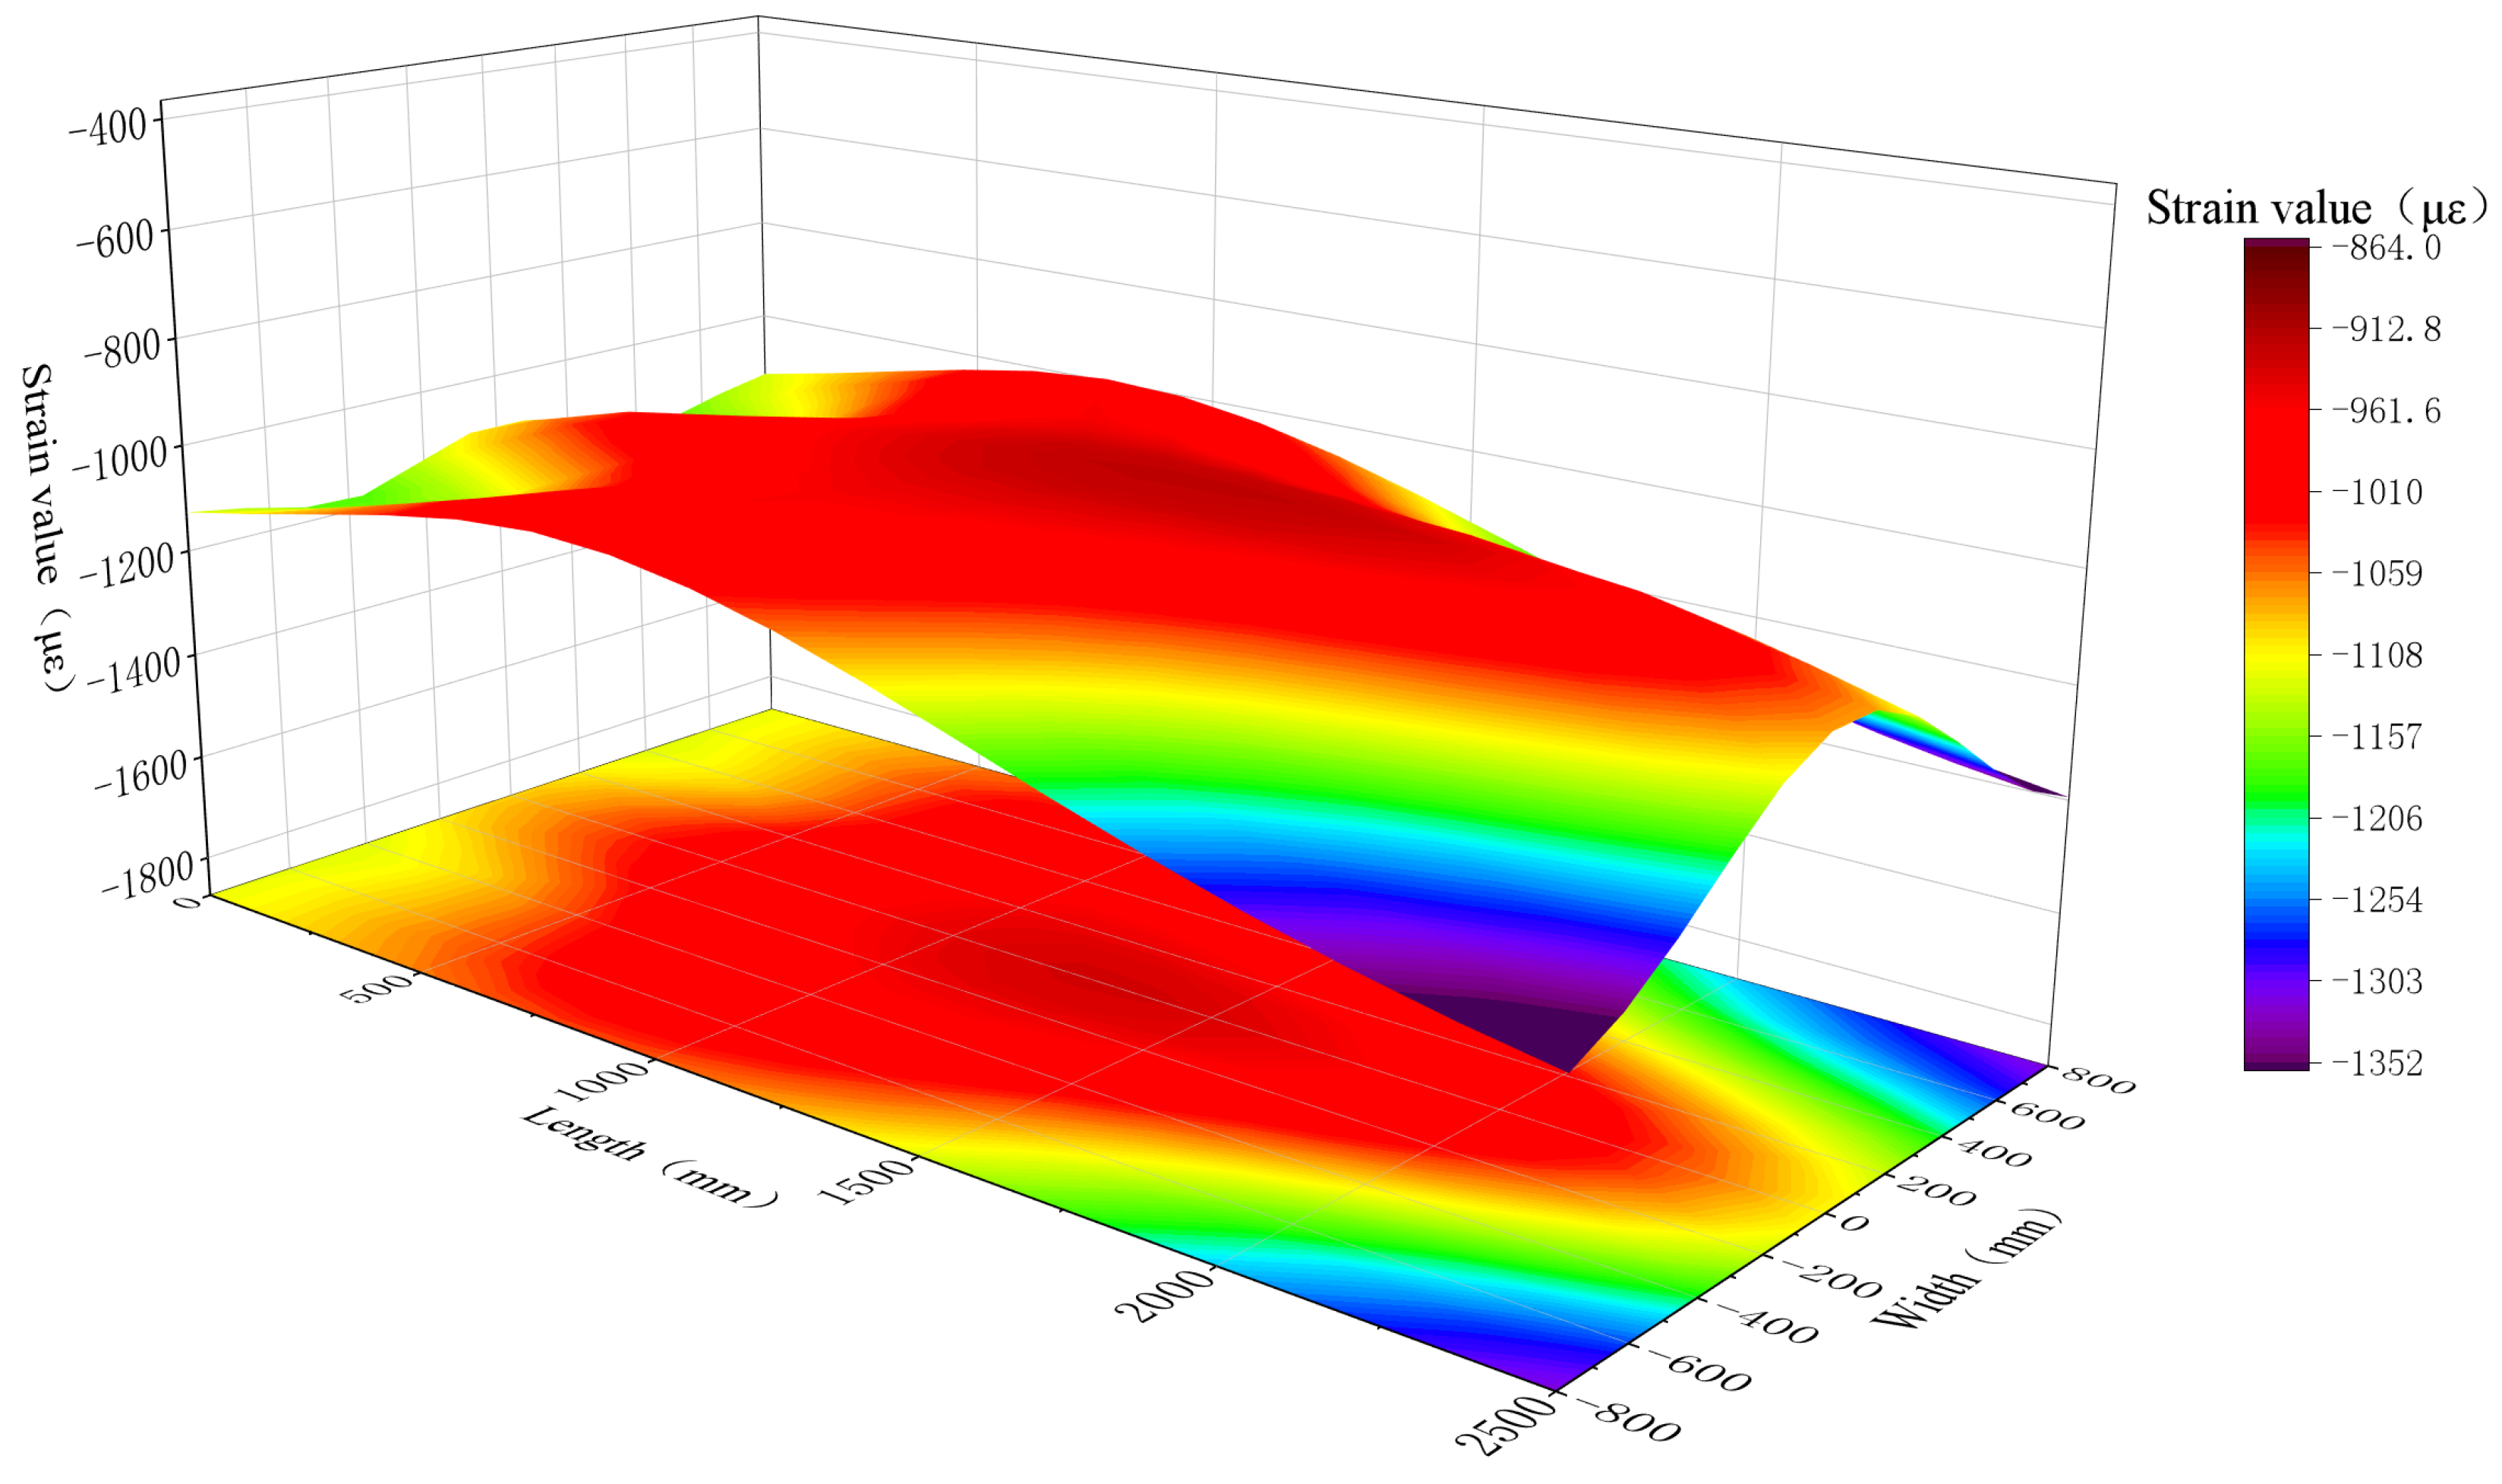
In each strain field, the top one is drawn based on actual measurements or reconstructed data, while the bottom one represents the vertical projection of the top strain field within the plane.
Except for the errors of the measuring points close to the neutral axis on the side, the relative errors between the reconstructed values and the measured values of other measuring points are between 0.75% and 8.13%. Their trends are in good agreement, as shown in Figure 16, and the measured strain field and the reconstructed strain field on the broadside are shown in Figure 17 and Figure 18, respectively.
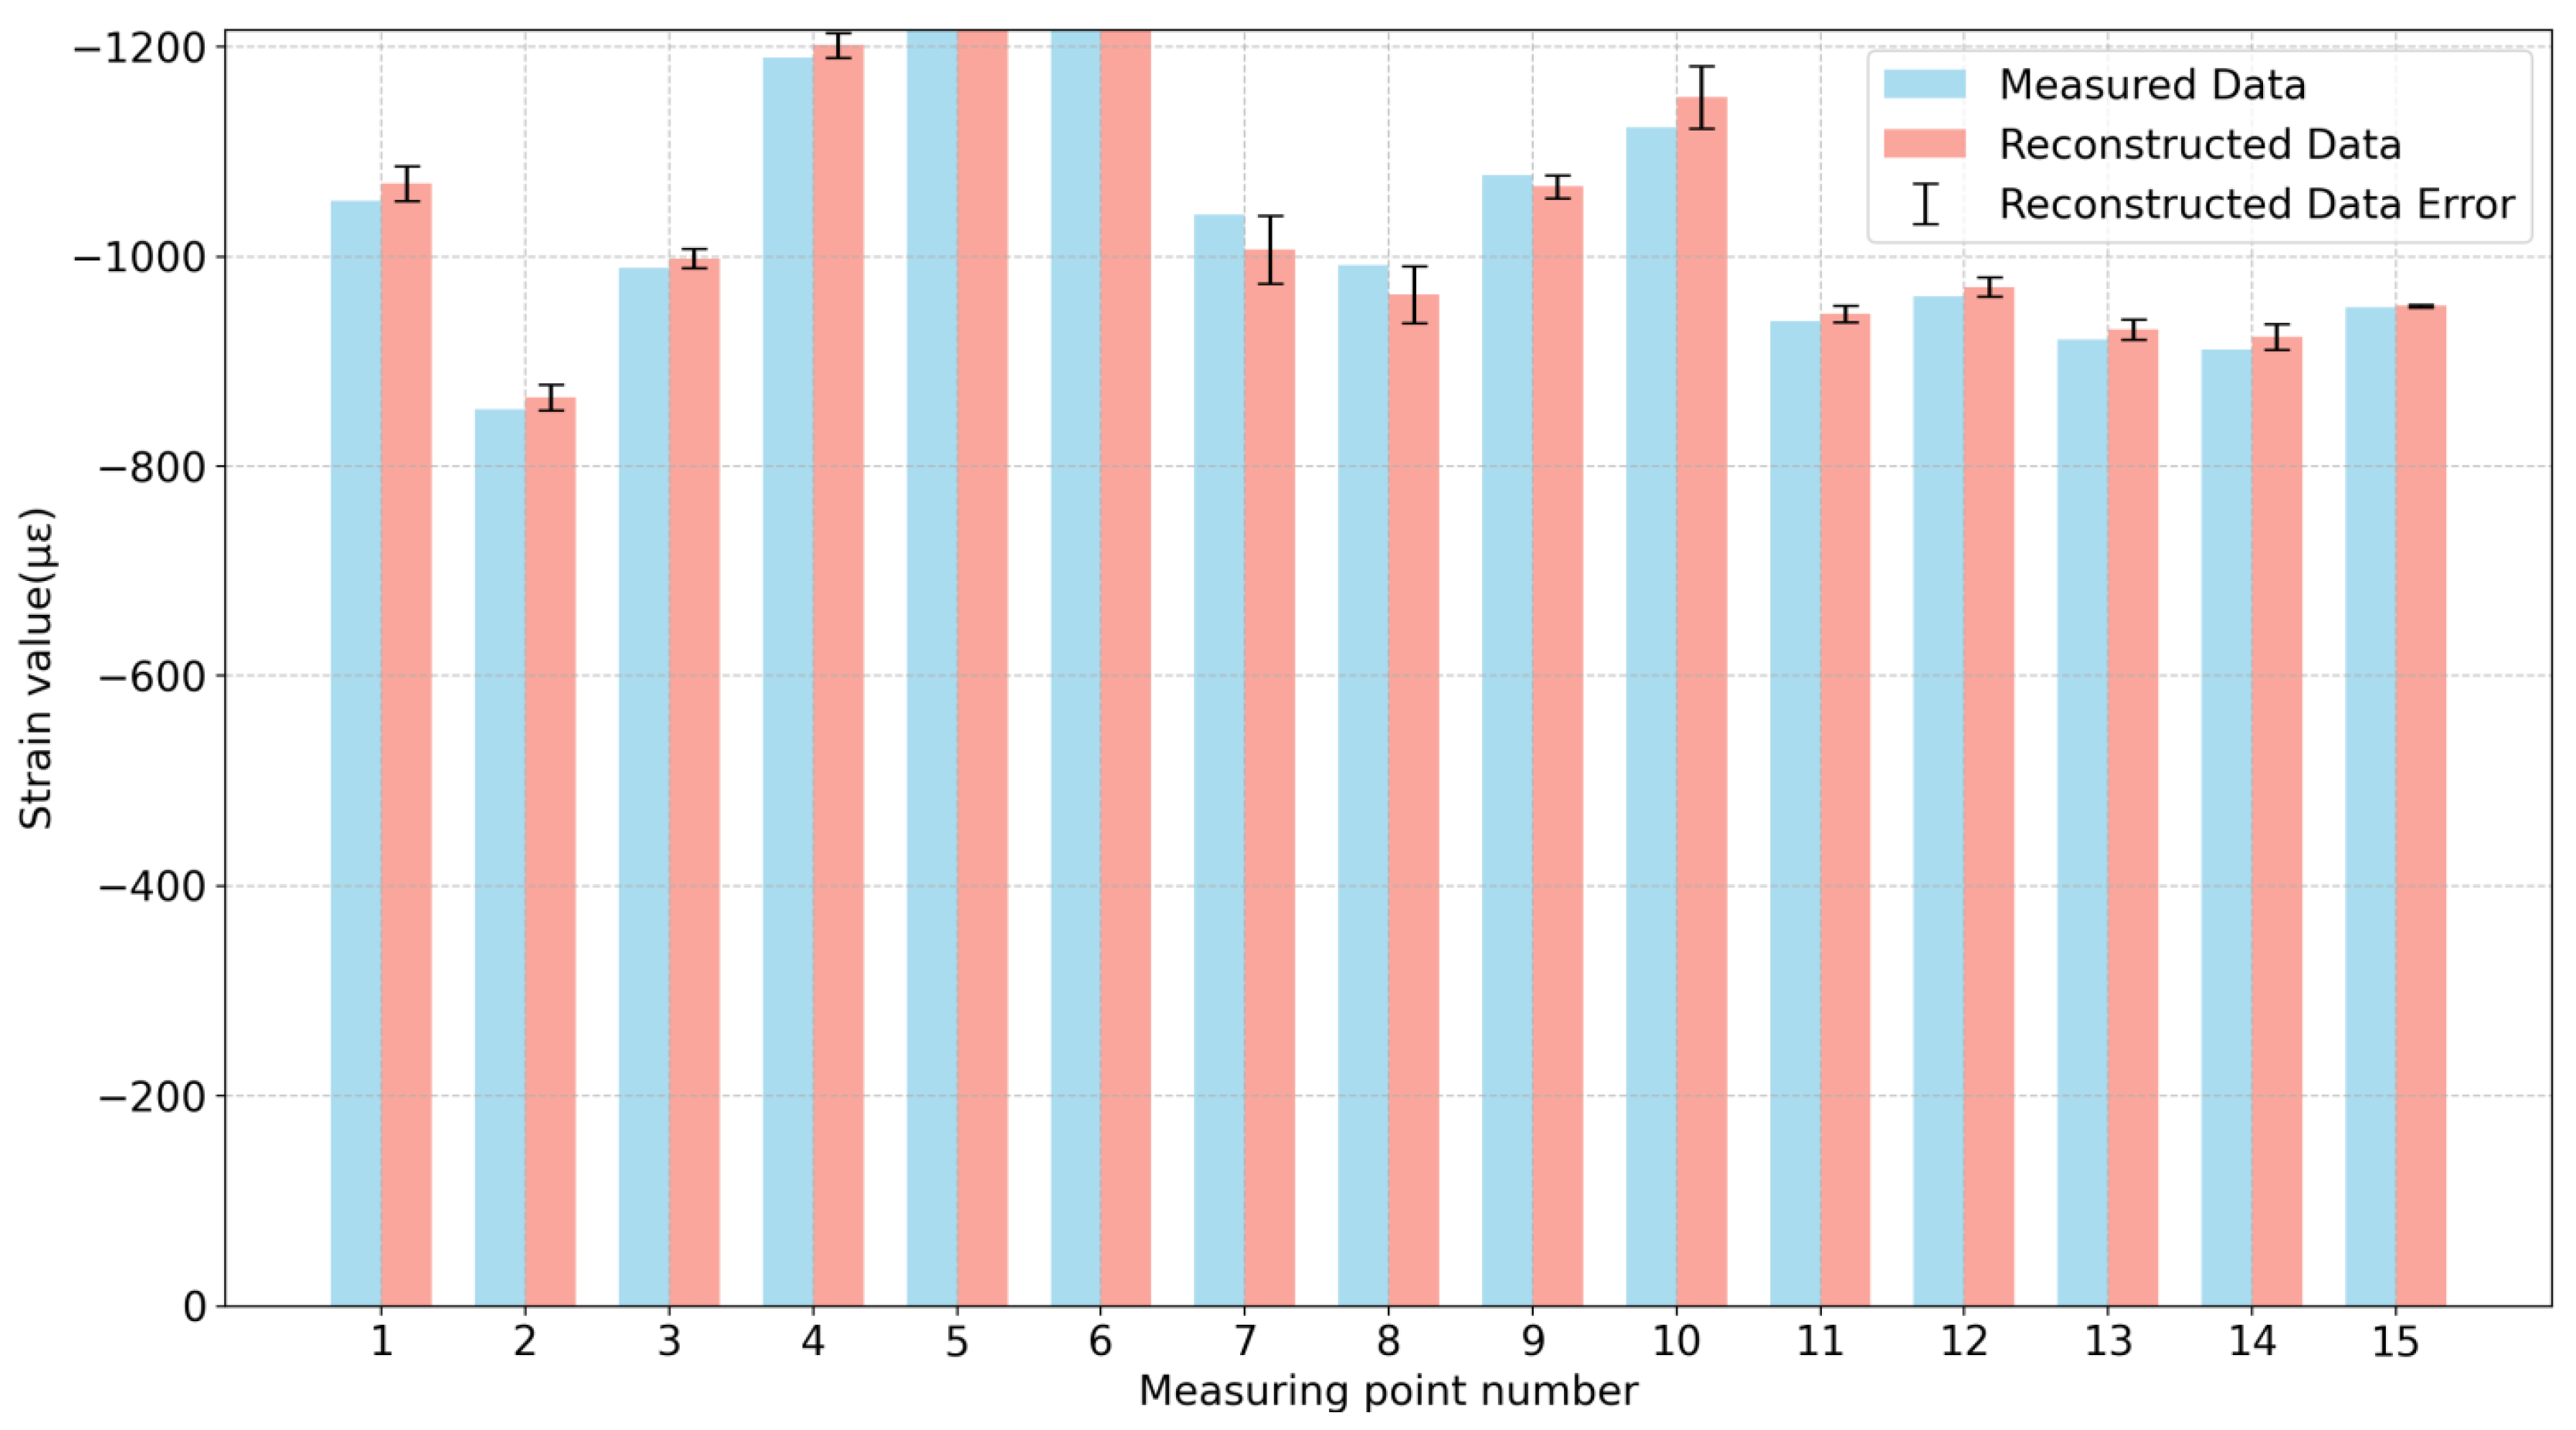
During the loading process, the box girder’s bottom plate is compressed, which makes it vulnerable to widespread local deformation. Figure 19 illustrates the good agreement between the two trends and the relative error between the measured value and the reconstructed value of the measuring point, which ranges from −3.31% to 2.52%. Figure 20 and Figure 21, respectively, depict the measured strain field and the reconstructed strain field of the ship’s bottom plate.

6. Conclusions

This study uses iFEM technology and the iQS4 element to successfully recreate the strain field of a long-span box girder.
  • For the first time, significant quantities of measured data and virtual sensor strain data were used to reconstruct the strain field of the top plate, broadside, and bottom plate of the box girder test section under a certain working environment.
  • By confirming the reconstruction results, it was found that the average error between the reconstructed value and the measured value (again, excluding the measurement points near the neutral axis) was 3.42% and the reconstruction error of the verification points ranged from −0.40% to 2.51%.
  • In this study, a large number of experimental data were used to reconstruct the strain field of a long-span hull box girder and present it visually, allowing us to quickly evaluate the stress state of the hull structure in complex sea conditions, prevent potential structural damage, and ensure the safety of ship structure.
In the future, iFEM will have broad prospects in the field of ship and ocean engineering health monitoring. The research directions that need to be further improved may include improving the rapidity and computational efficiency of the algorithm, optimizing the sensor layout strategy, and verifying its accuracy and reliability under more complex load conditions so as to further enhance the safety of ship structures and improve the life cycle.

Author Contributions

Methodology, G.C.; validation, P.W. and T.Z.; formal analysis, Z.J. and H.C.; investigation, N.Z.; data curation, F.L.; writing—original draft, G.C.; writing—review and editing, X.W.; supervision, X.W.; funding acquisition, X.W. All authors have read and agreed to the published version of the manuscript.

Funding

This paper was supported by program of China (WDZC70202010101), the National Key Research and Development Program of China (2021YFC2802300) and Intergovernmental International Science, Technology, and Innovation Cooperation Key Project under the National Key Research and Development Program of China (2024YFE0104300).

Institutional Review Board Statement

Not applicable.

Informed Consent Statement

Informed consent was obtained from all subjects involved in the study.

Data Availability Statement

Relevant research data are mostly displayed in the paper. If you need other data, you can contact the author by email (except private data).

Acknowledgments

Thanks to all the experimenters and participants in the research content of this paper.

Conflicts of Interest

The authors declare no conflicts of interest.

References

  1. Wang, X.; Zhu, Q.; Zhang, T.; Yang, H.; Chen, G. Research progress of ship structure monitoring technology. J. Ship Mech. 2022, 26, 1246–1253. [Google Scholar]
  2. Zheng, Q.; Wang, X.; Zhao, X.; Yang, H.; Xu, C.; Jiang, Z. Research on strain sensor technology applied to structural safety monitoring of ships and offshore engineering. Equip. Environ. Eng. 2023, 20, 83–89. [Google Scholar]
  3. Bernasconi, O.; Ewins, D.J. Application of strain modal testing to real structures. In Proceedings of the 7th International Modal Analysis Conference, Las Vegas, NV, USA, 30 January–2 February 1989; Society for Experimental Mechanics: Bethel, CT, USA, 1989; Volume 2, pp. 1453–1464. [Google Scholar]
  4. Chopra, I. Review of state of art of smart structures and integrated systems. AIAA J. 2002, 40, 2145–2187. [Google Scholar] [CrossRef]
  5. Sun, J. Inverstigation on Morphing Wing Structures Based on Shape Memory Polymer Composite (SMPC) Skins and Active Honeycomb Structures. Ph.D. Thesis, Harbin Institute of Technology, Harbin, China, 2015. [Google Scholar]
  6. Ko, W.L.; Richards, W.L.; Tran, V.T. Displacement Theories for In-Flight Deformed Shape Predictions of Aerospace Structures. NASA/TP-2007-214612, 1 October 2007. [Google Scholar]
  7. Derkevorkian, A.; Masri, S.F.; Alvarenga, J.; Boussalis, H.; Bakalyar, J.; Richards, W.L. Strain-based deformation shape-estimation algorithm for control and monitoring applications. AIAA J. 2013, 51, 2231–2240. [Google Scholar] [CrossRef]
  8. Zhang, T.; Hu, J.; Wang, X.; Chen, G.; Zhu, Q.; Jiang, Z.; Wang, Z. Solving approach for global stress field of the 3D structures based on artificial intelligence. J. Ship Mech. 2023, 27, 238–249. [Google Scholar]
  9. Kefal, A.; Oterkus, E. Displacement and stress monitoring of a Panamax containership using inverse finite element method. Ocean. Eng. 2016, 119, 16–29. [Google Scholar] [CrossRef]
  10. Kefal, A. An efficient curved inverse-shell element for shape sensing and structural health monitoring of cylindrical marine structures. Ocean. Eng. 2019, 188, 106262. [Google Scholar] [CrossRef]
  11. Huang, H. Research on Deformation Reconstruction of Plateand Girder Structure Based on Inverse Finite Element Method. Master’s Thesis, University of Science and Technology, Huazhong, China, 2021. [Google Scholar] [CrossRef]
  12. Mao, Z. Comparison of Shape Reconstruction Strategies in a Complex Flexible Structure. Master’s Thesis, University of California, San Diego, CA, USA, 2008. [Google Scholar]
  13. Tessler, A.; Spangler, J. A Variational Principle for Reconstruction of Elastic Deformations in Shear Deformable Plates and Shells; National Aeronautics and Space Administration, Langley Research Center: Hampton, VA, USA, 2003. [Google Scholar]
  14. Hu, M.; Wu, S.; Dong, E. Deformation reconstruction of a three-dimensional panel structure opon IFEM. Eng. Mech. 2024, 41, 235–245. [Google Scholar]
  15. Ke, Z.; Yuan, S.; Ren, Y.; Xu, Y. Shape reconstruction of self-adaptive morphing wings’ fishbone based on iFEM. Acta Aeronaut. 2020, 41, 250–260. [Google Scholar]
  16. Kefal, A.; Oterkus, E. Structural health monitoring of marine structures by using inverse finite element method. In Analysis and Design of Marine Structures V, 1st ed.; CRC Press: Boca Raton, FL, USA, 2015; pp. 341–349. [Google Scholar]
  17. Kefal, A.; Oterkus, E. Displacement and stress monitoring of a chemical tanker based on inverse finite element method. Ocean. Eng. 2016, 112, 33–46. [Google Scholar] [CrossRef]
  18. Kefal, A.; Mayang, J.B.; Oterkus, E.; Yildiz, M. Three dimensional shape and stress monitoring of bulk carriers based on iFEM methodology. Ocean. Eng. 2018, 147, 256–267. [Google Scholar] [CrossRef]
  19. Putranto, T.; Kõrgesaar, M.; Tabri, K. Application of equivalent single layer approach for ultimate strength analyses of ship hull girder. J. Mar. Sci. Eng. 2022, 10, 1530. [Google Scholar] [CrossRef]
  20. Putranto, T. Equivalent single layer approach for ultimate strength analysis of box girder under bending load. Ocean. Eng. 2024, 292, 116535. [Google Scholar] [CrossRef]
  21. Yan, H.; Bai, C.; Jia, T.; Liu, C. Application of inverse finite element in deformation and reconstruction of ship reinforced plate structure. Shipbuild. China 2023, 64, 168–179. [Google Scholar]
  22. Zhu, Q.; Wu, G.; Zeng, J.; Jiang, Z.; Yue, Y.; Xiang, C.; Zhan, J.; Zhao, B. Enhanced Strain Field Reconstruction in Ship Stiffened Panels Using Optical Fiber Sensors and the Strain Function-Inverse Finite Element Method. Appl. Sci. 2023, 14, 370. [Google Scholar] [CrossRef]
  23. Wei, P.; Li, C.; Jiang, Z.; Wang, D. Real-Time Digital Twin of Ship Structure Deformation Field Based on the Inverse Finite Element Method. J. Mar. Sci. Eng. 2024, 12, 257. [Google Scholar] [CrossRef]
  24. Vazquez, S.L.; Tessler, A.; Quach, C.C.; Cooper, E.G.; Parks, J.; Spangler, J.L. Structural Health Monitoring Using High-Density Fiber Optic Strain Sensor and Inverse Finite Element Methods. NASA/TM-2005-213761, 1 May 2005. [Google Scholar]
  25. Tessler, A.; Spangler, J.L. Inverse FEM for full-field reconstruction of elastic deformations in shear deformable plates and shells. In Proceedings of the 2nd European Workshop on Structural Health Monitoring, Munich, Germany, 7–9 July 2004. [Google Scholar]
  26. Kefal, A.; Oterkus, E.; Tessler, A.; Spangler, J.L. A quadrilateral inverse-shell element with drilling degrees of freedom for shape sensing and structural health monitoring. Eng. Sci. Technol. Int. J. 2016, 19, 1299–1313. [Google Scholar] [CrossRef]
  27. Cao, Z.; Fei, Q.; Jiang, D.; Zhang, D.; Jin, H.; Zhu, R. Dynamic sensitivity-based finite element model updating for nonlinear structures using time-domain responses. Int. J. Mech. Sci. 2020, 184, 105788. [Google Scholar] [CrossRef]
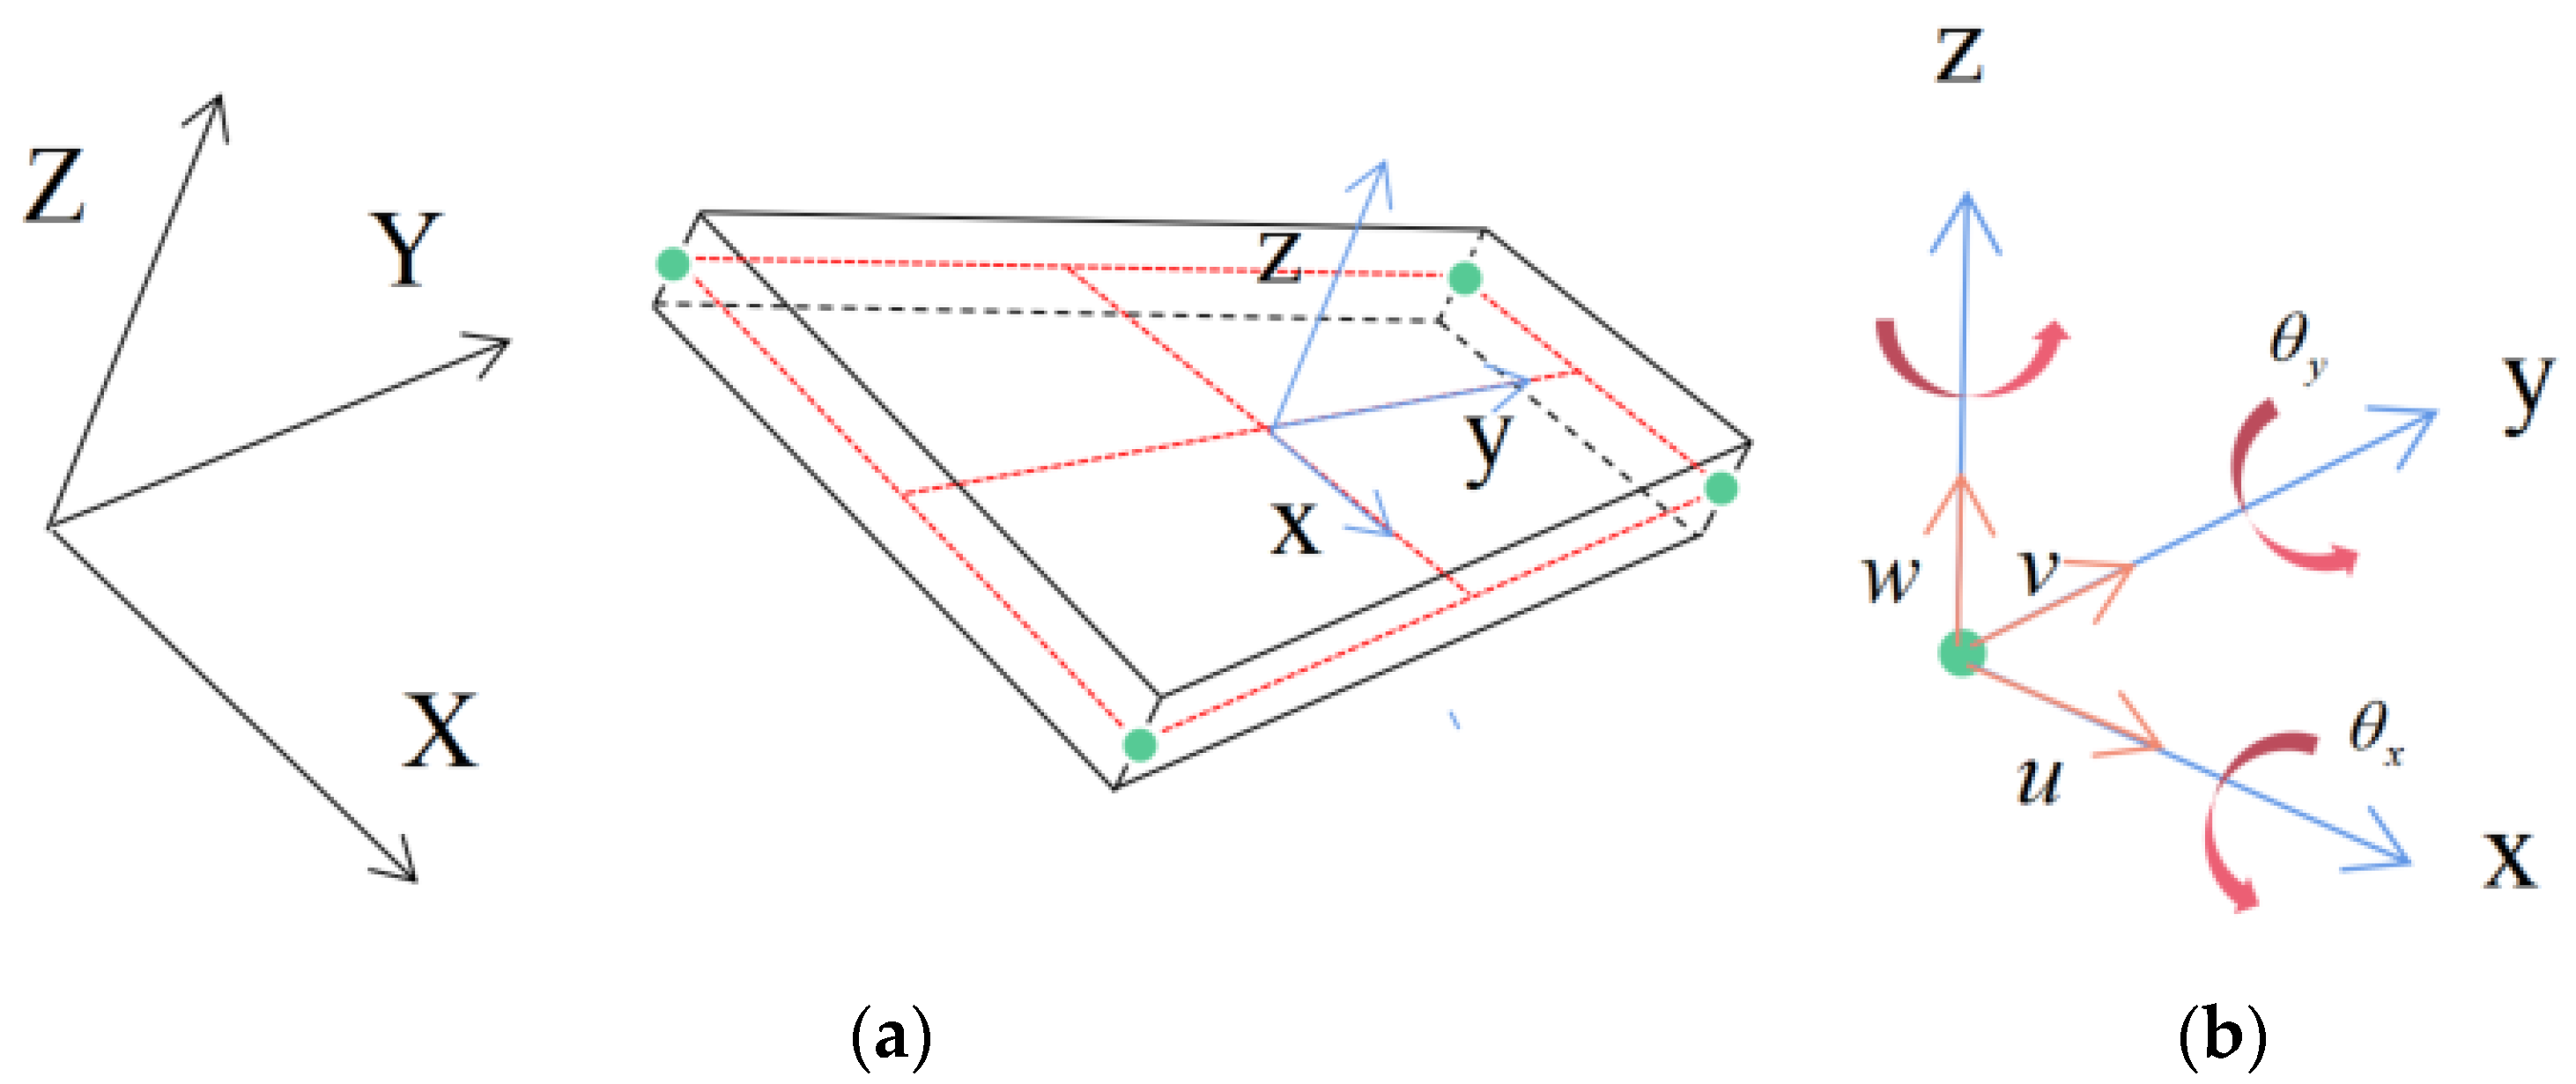
Figure 1. Four-node inverse shell element iQS4; (a) iQS4 element showing global and local coordinate systems; (b) nodal DOF in the local coordinate system xyz.
Jmse 12 01482 g001
Figure 2. Discrete surface strain measured by strain flower in iQS4 element.
Jmse 12 01482 g002
Figure 3. Schematic diagram of four-point bending of hull box girder.
Jmse 12 01482 g003
Figure 4. Finite element model of long-span hull box girder.
Jmse 12 01482 g004
Figure 5. Nephogram of strain distribution in direction (longitudinal direction) of box girder.
Jmse 12 01482 g005
Figure 6. Test data acquisition–application process.
Jmse 12 01482 g006
Figure 7. Schematic diagram of compartments division.
Jmse 12 01482 g007
Figure 8. Schematic diagram of strain sensor arrangement.
Jmse 12 01482 g008
Figure 9. Layout of physical sensors on the test site; (a) layout of strain sensor on top surface; (b) layout diagram of shipboard physical sensor.
Jmse 12 01482 g009
Figure 10. Loading diagram of four-point bending test of long-span box girder.
Jmse 12 01482 g010
Figure 11. Test loading site of long-span box girder.
Jmse 12 01482 g011
Figure 12. Strain trend of measured values and reconstructed values of box girder top surface–side surface–bottom surface.
Jmse 12 01482 g012
Figure 13. Comparison and error between measured values and reconstructed values of measuring points on the top surface.
Jmse 12 01482 g013
Figure 14. Measured strain field on top plate surface.
Jmse 12 01482 g014
Figure 15. Reconstruction strain field of top plate surface.
Jmse 12 01482 g015
Figure 16. Comparison and error between measured values and reconstructed values of measuring points on the side.
Jmse 12 01482 g016
Figure 17. Measured strain field on the side.
Jmse 12 01482 g017
Figure 18. Strain field of the side reconstruction.
Jmse 12 01482 g018
Figure 19. Comparison and error between measured values and reconstructed values of measuring points on the bottom surface.
Jmse 12 01482 g019
Figure 20. Measured strain field on bottom plate surface.
Jmse 12 01482 g020
Figure 21. Reconstruction strain field of bottom plate surface.
Jmse 12 01482 g021
Table 1. Geometric parameters and numerical simulation material properties of box girder.
Box Girder Dimensions (mm)Division and Size of Box Girder Cabin (mm)Quantity (pcs)Thickness of Plate and Shell in Test Section (mm)Elastic Modulus (GPa)Poisson’s Ratio
Length12,500Loading section15002Top plate5.552050.3
Width1500Changeover portion15002Port5.752050.3
Height800Test section45002Bottom plate5.752050.3
Tooling occupation section5004Starboard5.752050.3
Table 2. Box girder loading condition table.
Loading TypeLoad Size (kN)Number of Replication
Four-point bending0, 200, 400, 600, …1400, 1600, 1700…1
Table 3. Table of relative errors of reconstruction points.
Reconstruction Point AreaReconstruction Point Number Measured   Value   ( μ ε ) Reconstruction   Value   ( μ ε ) Relative Error
Top plate11163.681260.06−7.65%
21216.601320.45−7.86%
31039.001053.30−1.36%
41066.001103.55−3.40%
51087.421150.11−5.45%
61201.731301.33−7.65%
71215.691320.24−7.92%
81090.001123.39−2.97%
91098.001120.86−2.04%
101122.811125.56−0.24%
111185.751273.76−6.91%
121174.001263.91−7.11%
131143.001210.53−5.58%
141104.001159.82−4.81%
151052.051100.87−4.43%
Port1800.00787.751.55%
2807.00776.863.88%
3708.00669.665.73%
4696.00662.565.05%
5707.75654.538.13%
627.0023.1516.62%
744.0056.00−21.43%
824.0038.96−38.39%
9−15.00−36.49−58.89%
10−15.000.61−2563.51%
11−933.00−926.050.75%
12−851.00−835.381.87%
13−620.00−590.984.91%
14−814.00−771.595.50%
15−712.29−678.834.93%
Bottom plate1−1053.00−1069.711.56%
2−854.00−865.981.38%
3−989.00−998.250.93%
4−1190.00−1201.750.98%
5−1348.98−1350.950.15%
6−1341.00−1340.940.00%
7−1040.00−1006.64−3.31%
8−992.00−963.82−2.92%
9−1078.00−1066.70−1.06%
10−1123.14−1152.122.52%
11−938.00−945.510.79%
12−962.00−971.230.95%
13−921.00−930.391.01%
14−911.00−923.321.33%
15−951.42−952.970.16%
Table 4. Table of relative errors of verification points.
Verification Point AreaVerification Point Number Measured   Value   ( μ ε ) Reconstruction   Value   ( μ ε ) Relative Error
Top plate111041108.94−0.45%
2940939.150.09%
311071111.58−0.41%
410391036.080.28%
511281134.08−0.54%
610861090.37−0.40%
Port1712703.051.27%
2746732.671.82%
3−13−10.7620.81%
4−61.11−640.95%
5−530−517.042.51%
6−774−771.580.31%
Bottom plate1−1315−1328.411.01%
2−1166−1172.550.56%
3−1131−1138.520.66%
4−1114−1123.130.81%
5−861−856.05−0.58%
6−1116−1121.320.47%
Disclaimer/Publisher’s Note: The statements, opinions and data contained in all publications are solely those of the individual author(s) and contributor(s) and not of MDPI and/or the editor(s). MDPI and/or the editor(s) disclaim responsibility for any injury to people or property resulting from any ideas, methods, instructions or products referred to in the content.