
Interactive Teaching Aid Kit for Cardiopulmonary Resuscitation


Abstract
:1. Introduction
2. Framework of the Interactive Teaching Aid Kit for CPR
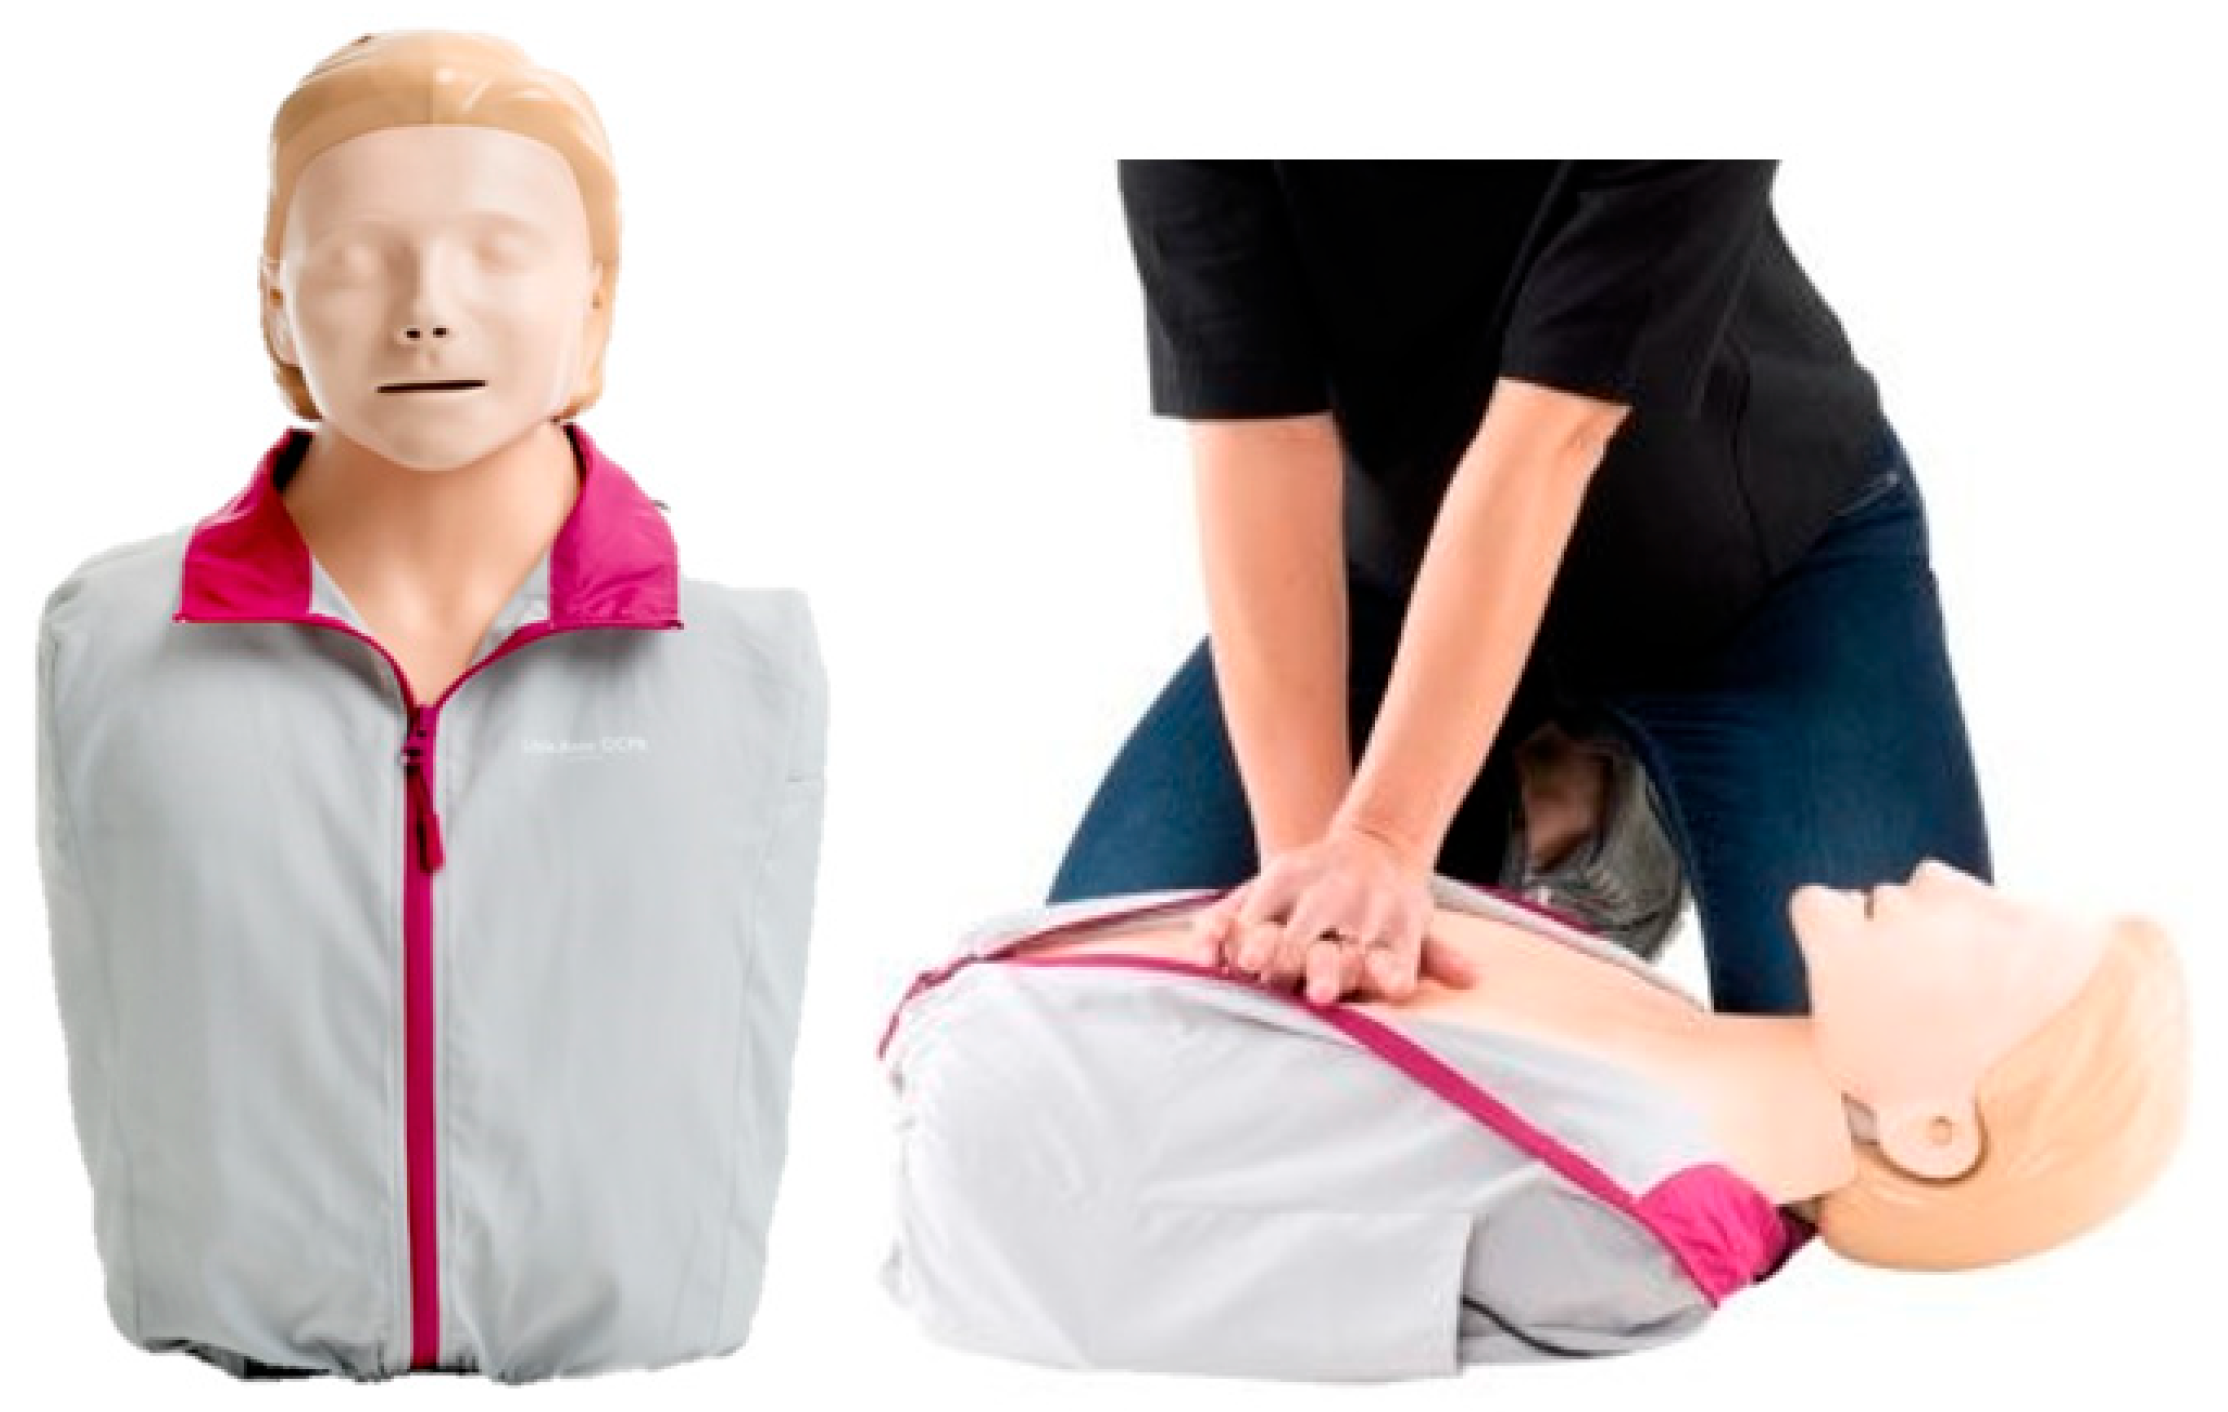
2.1. Teaching Aid Kit for CPR Manikin
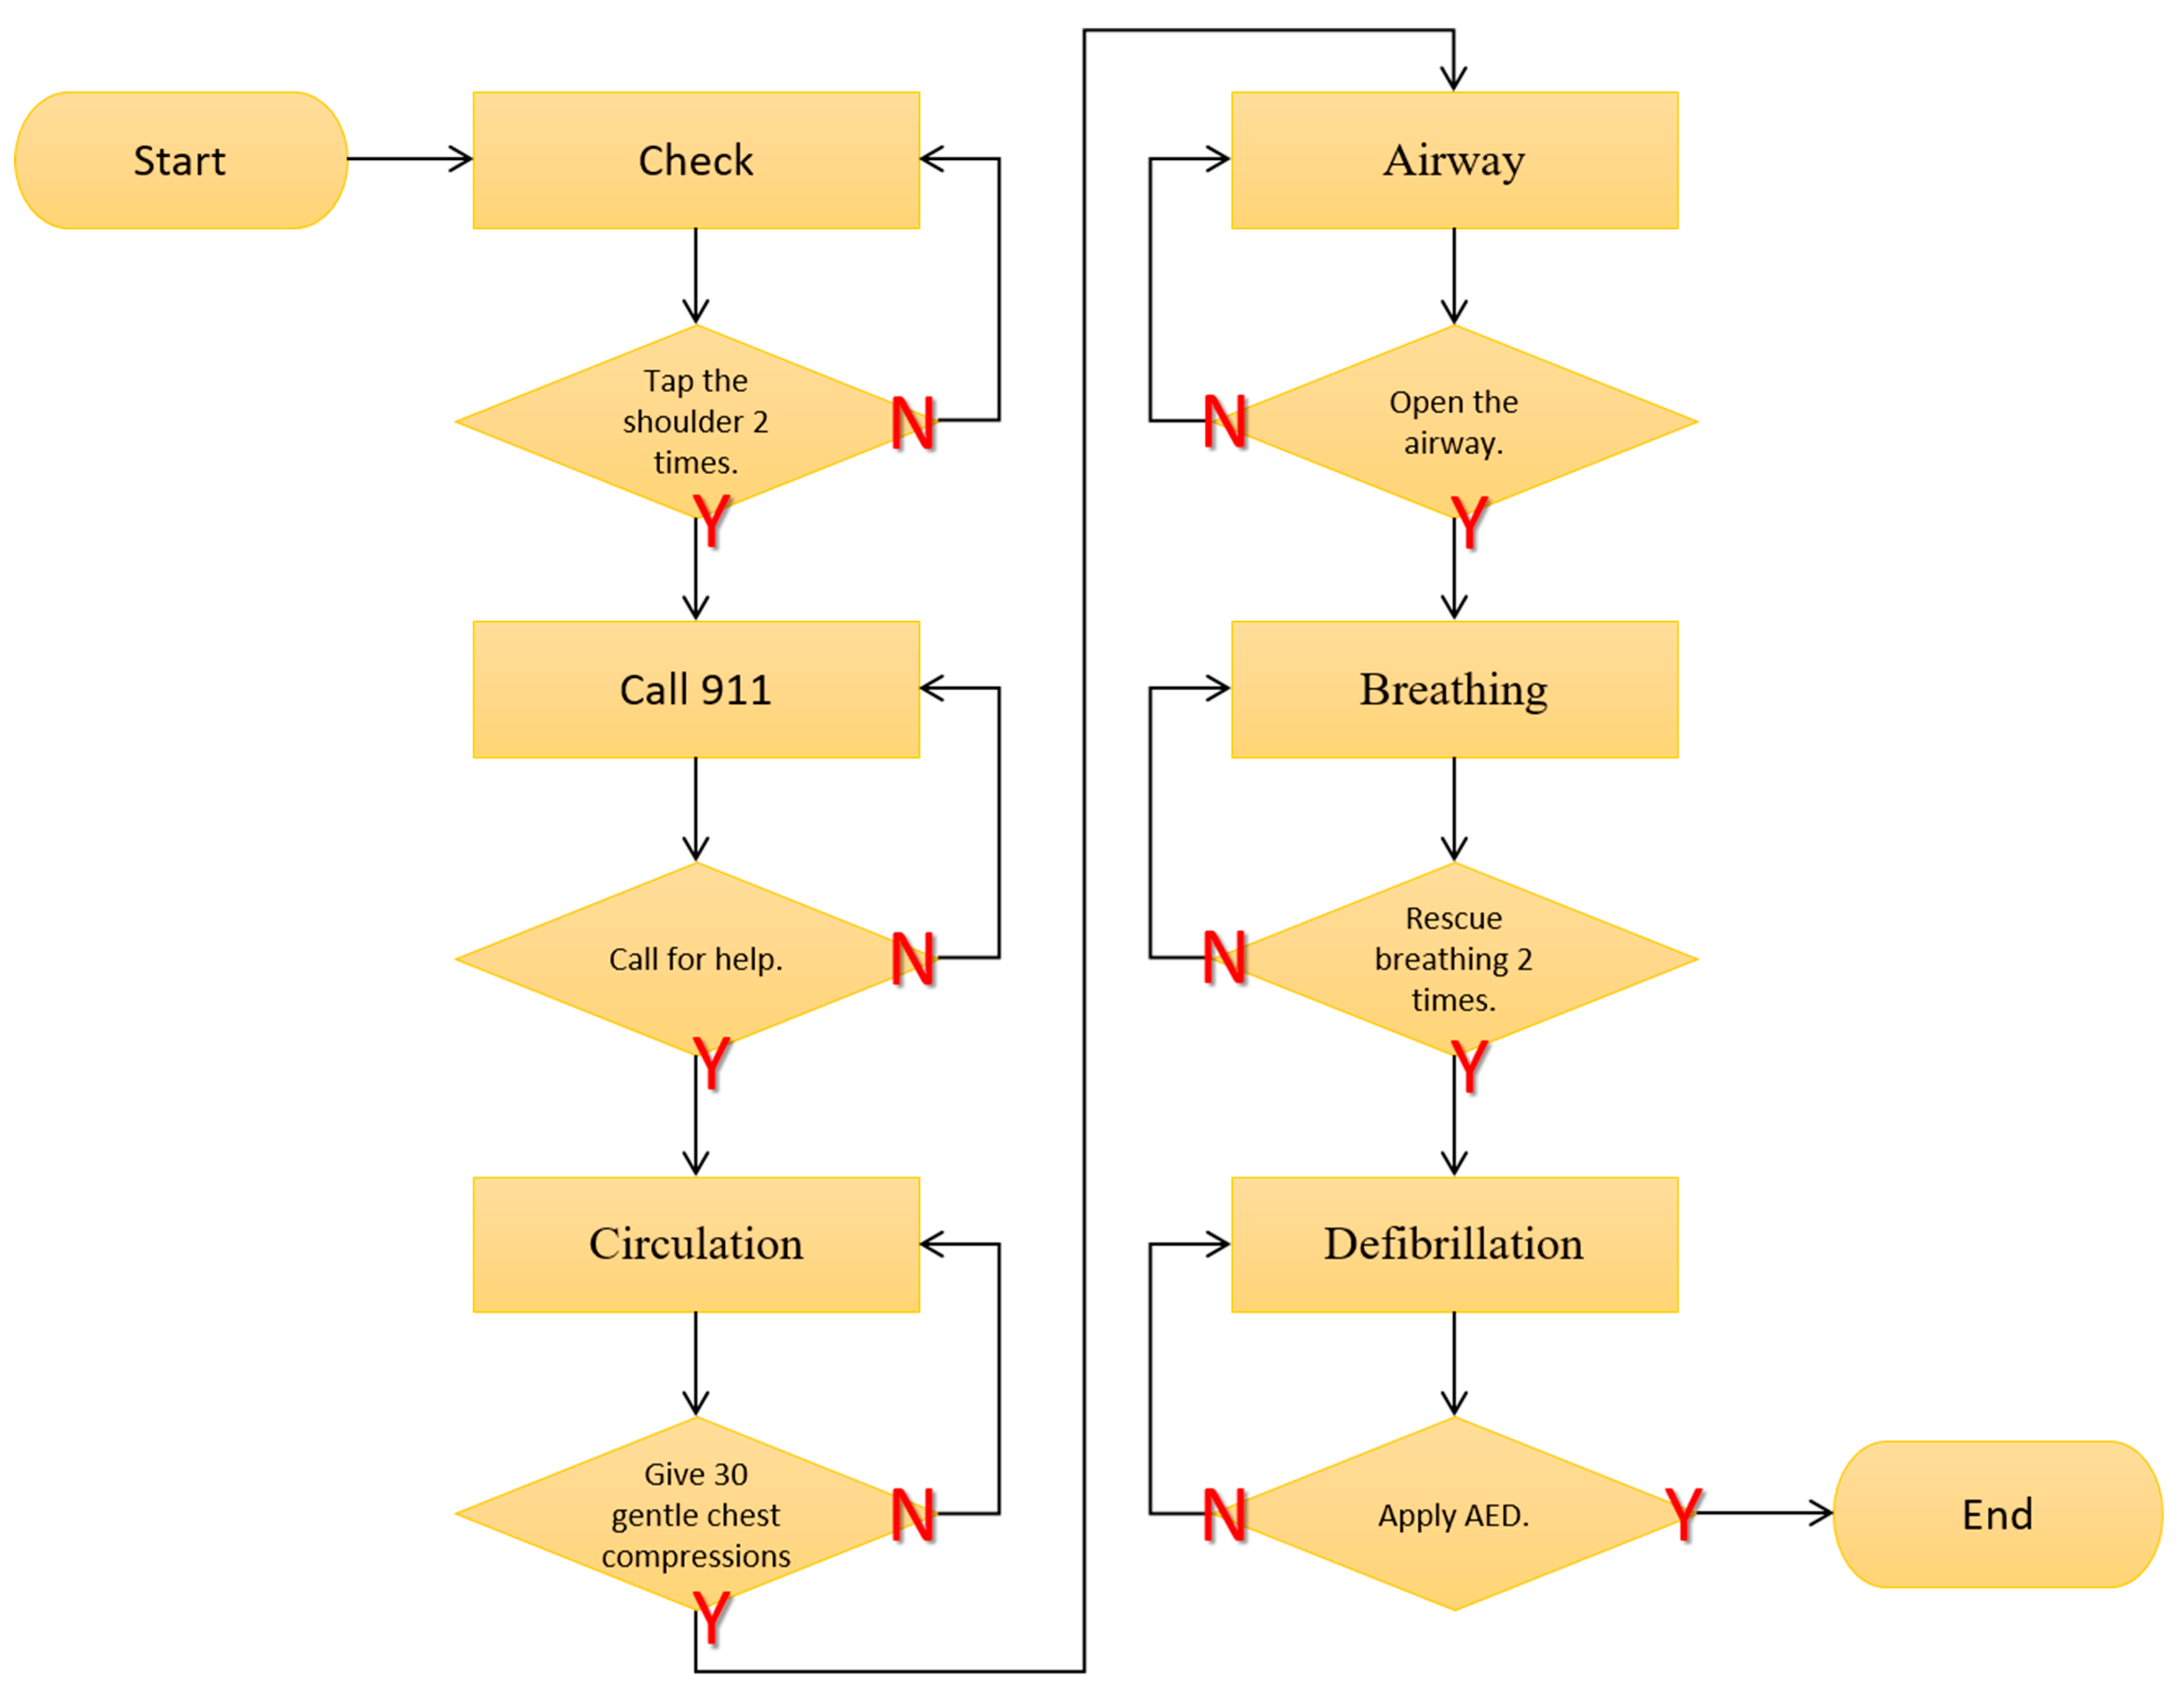
- Check: Assess the patient’s responsiveness;
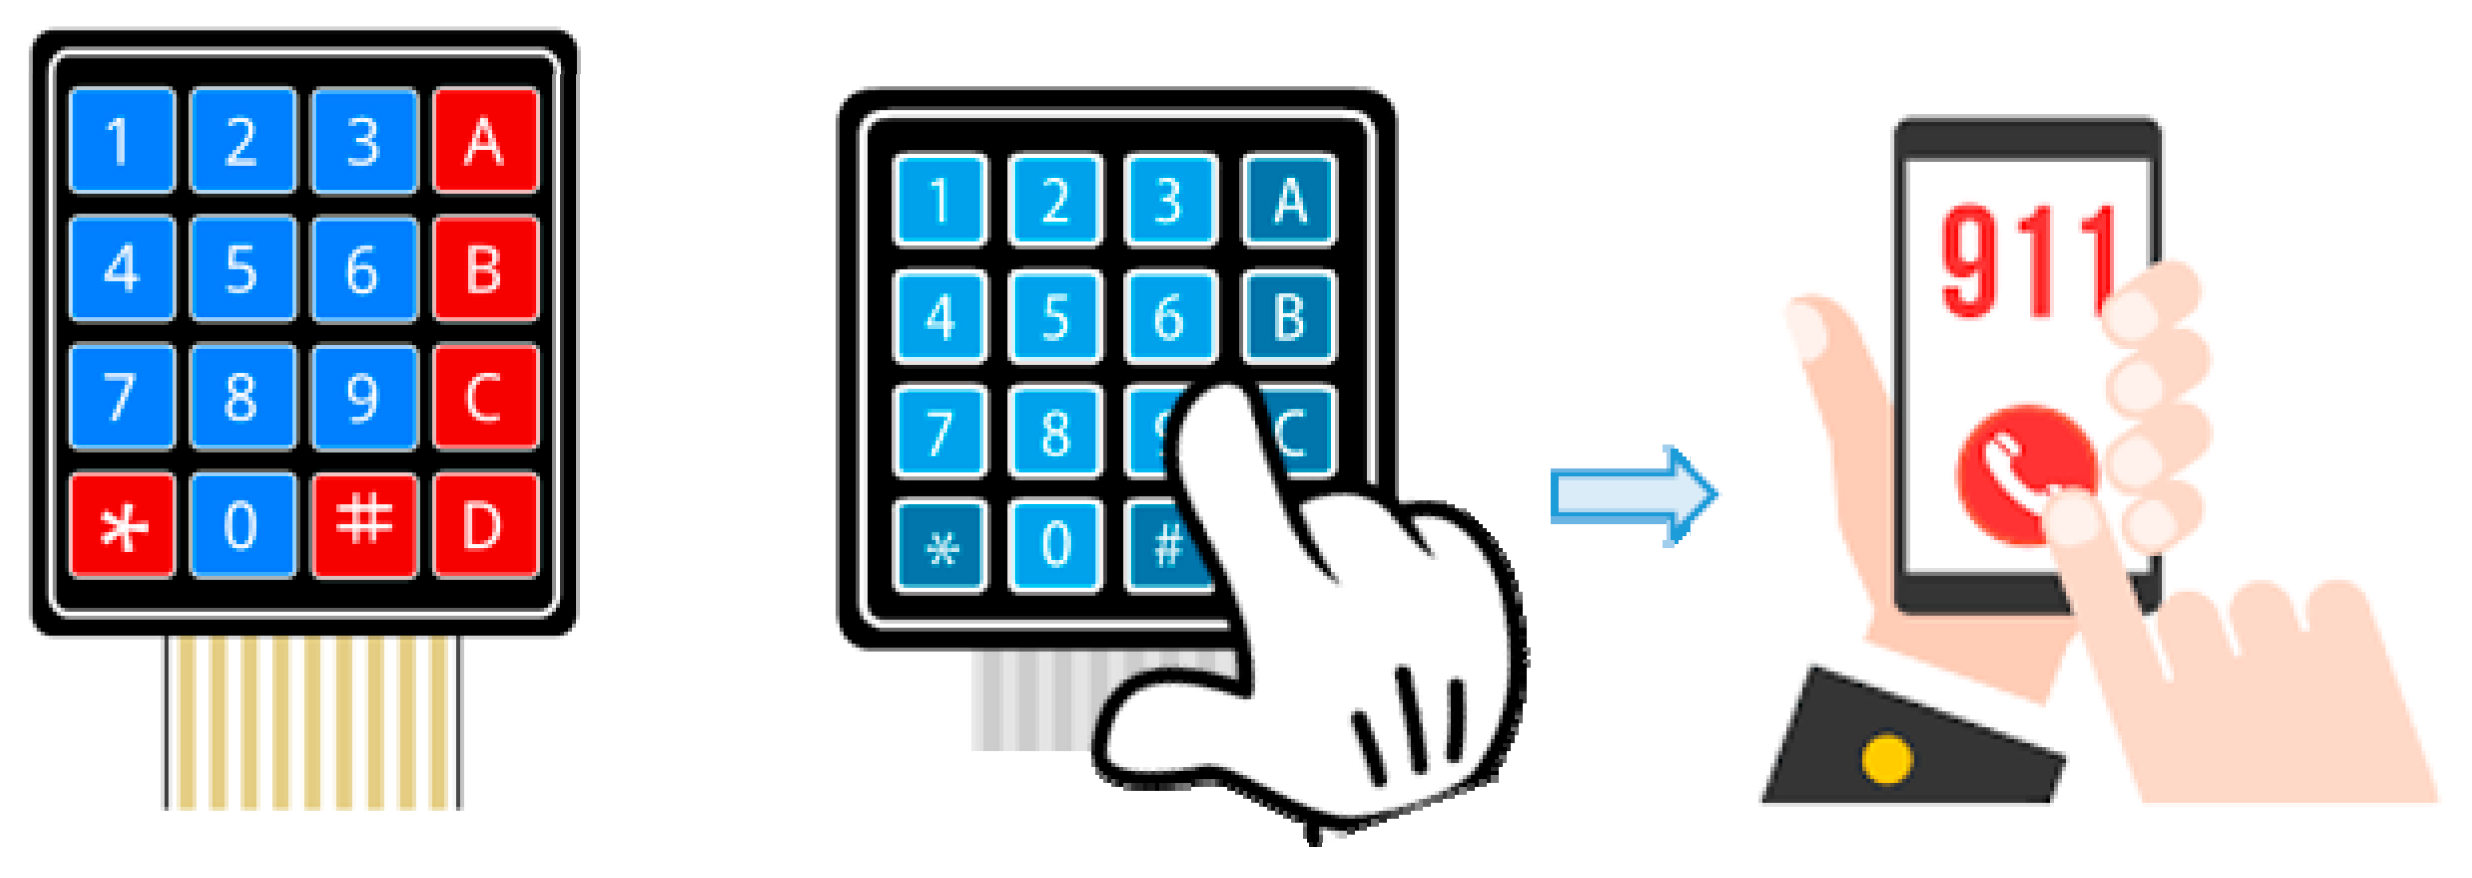
- Call 911: If unresponsive, call for help;
- Compressions: Give 30 gentle chest compressions at the rate of 100–120/min. Use two or three fingers in the center of the chest just below the nipples. Press down approximately one-third the depth of the chest (about 1 and a half inches);
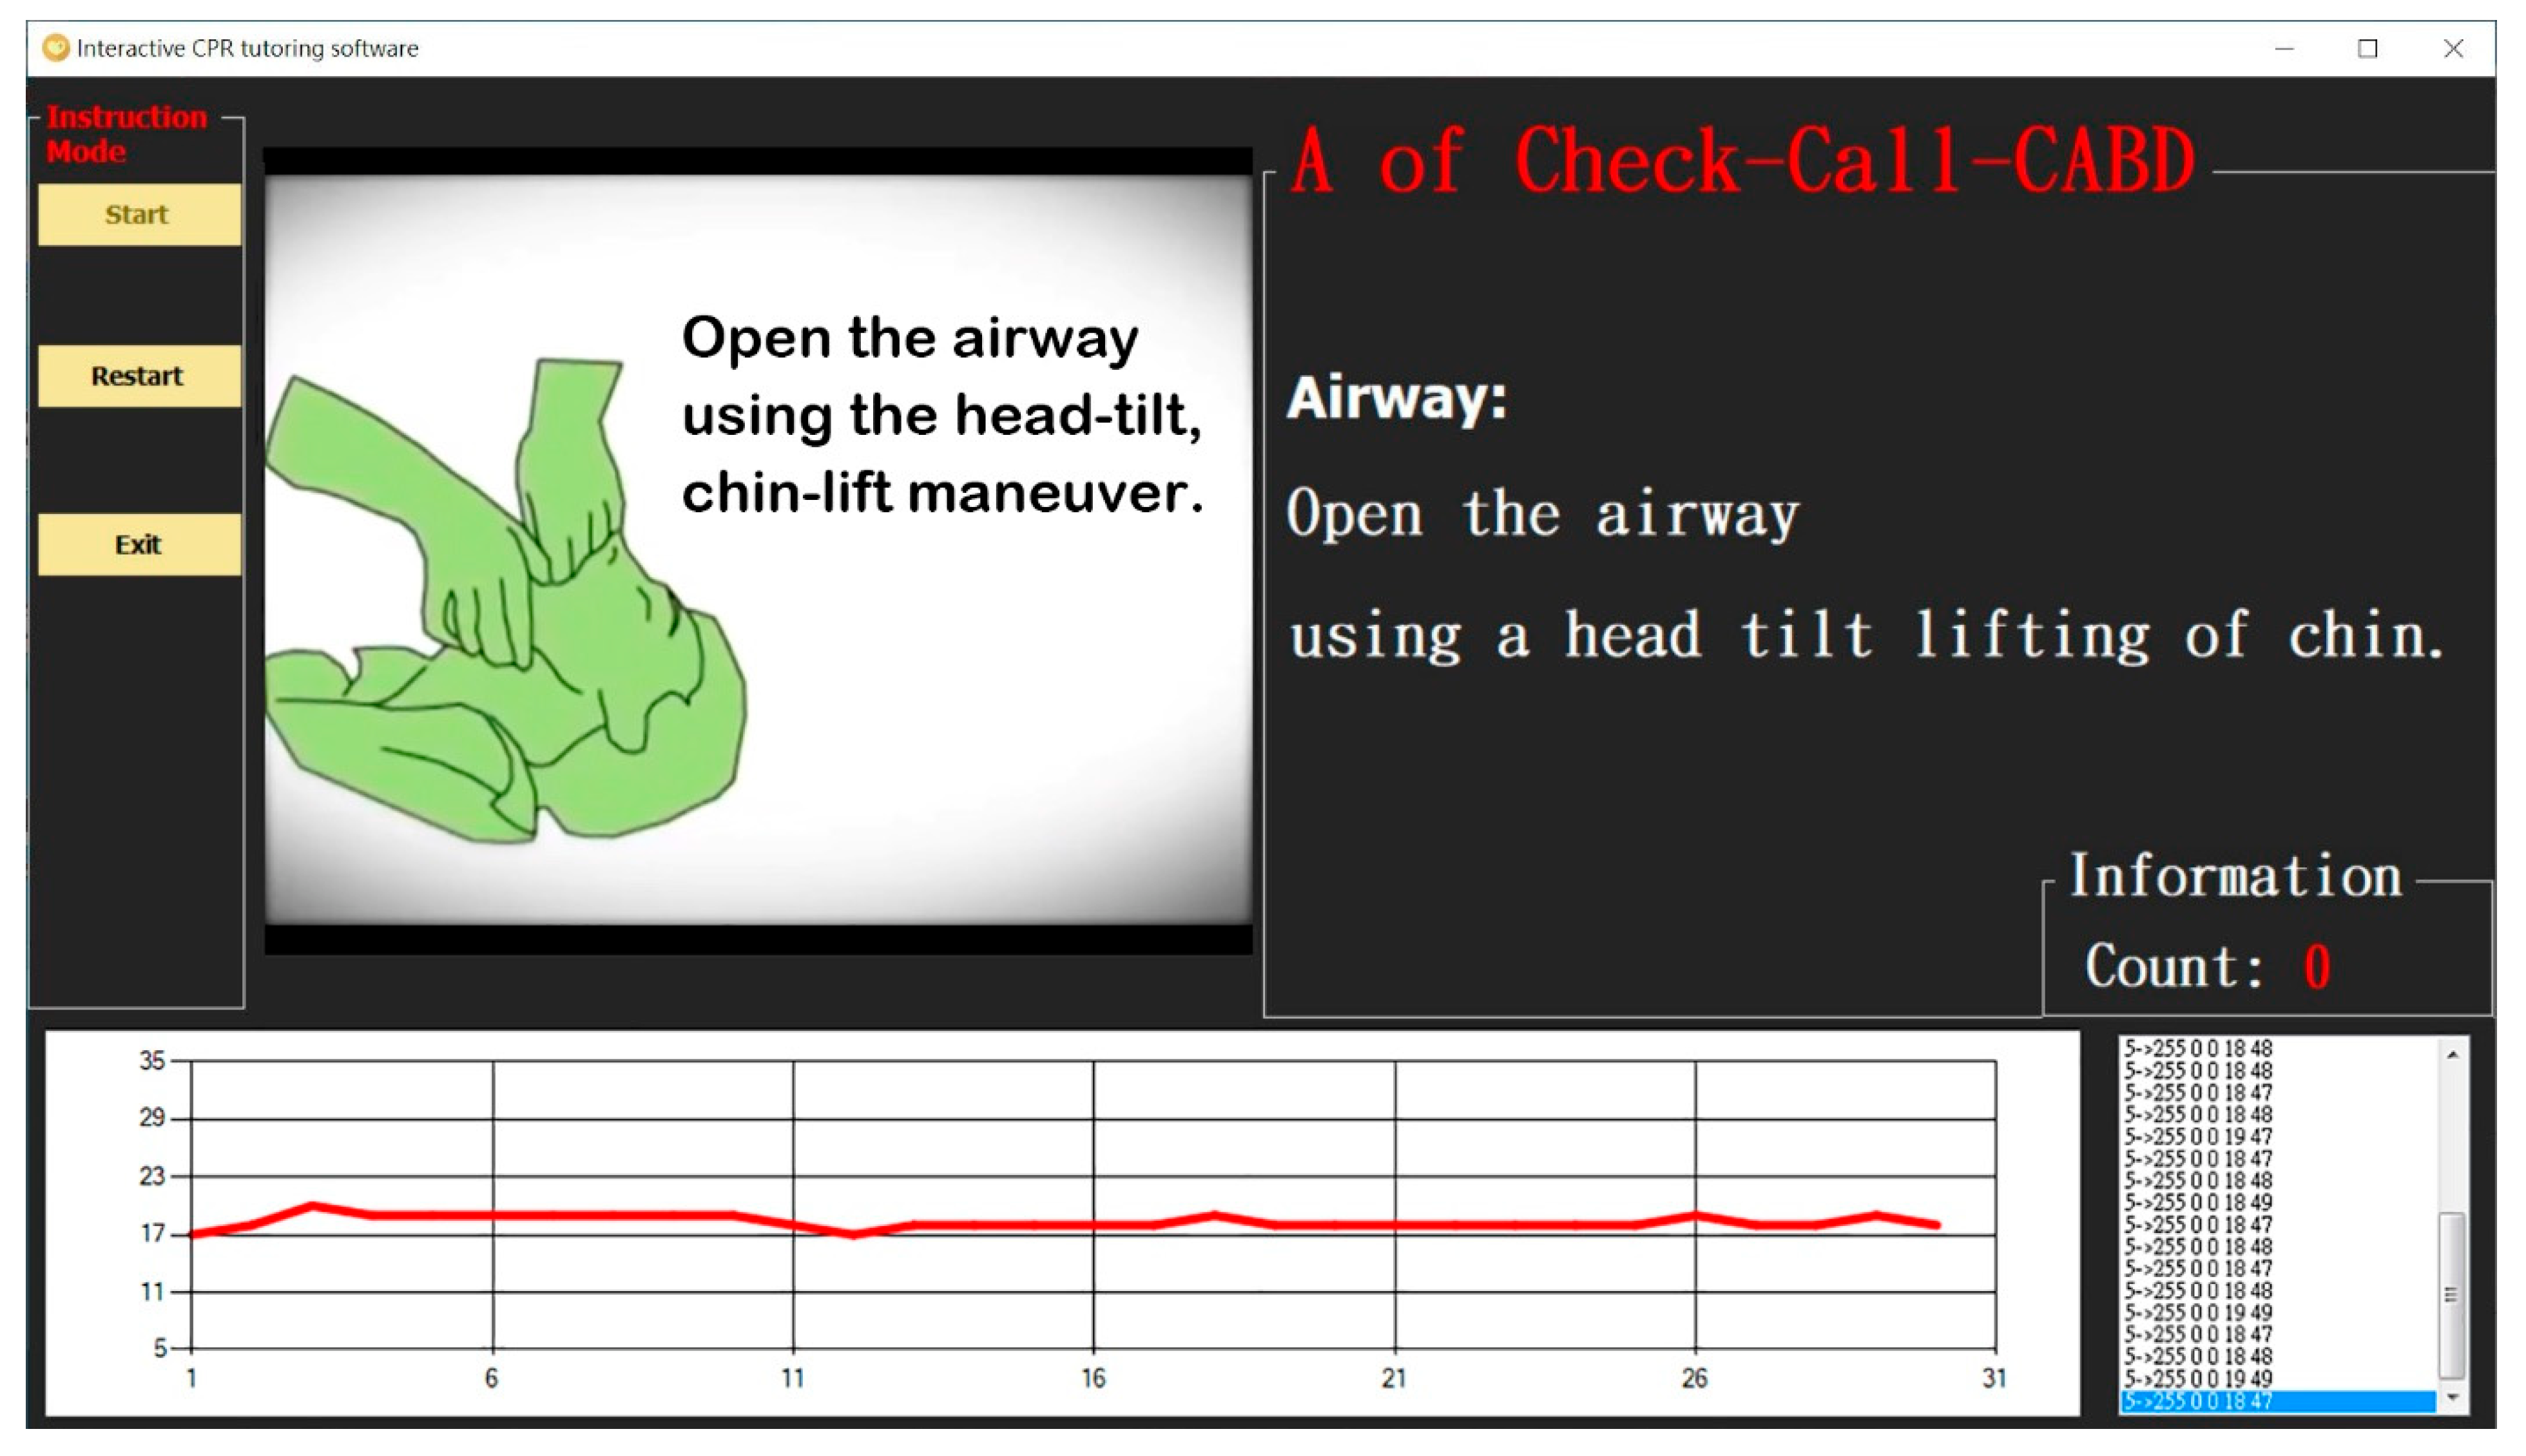
- Airway: Open the airway using a head tilt lifting of chin. Do not tilt the head too far back;
- Breathing: Rescue breathing starts after the 30 compressions, when the airway is open. Someone doing rescue breathing breathes for the victim by forcing air into the lungs; and
- Defibrillation: When the second rescuer returns, have them follow the AED prompts, apply AED pads and help with CPR.
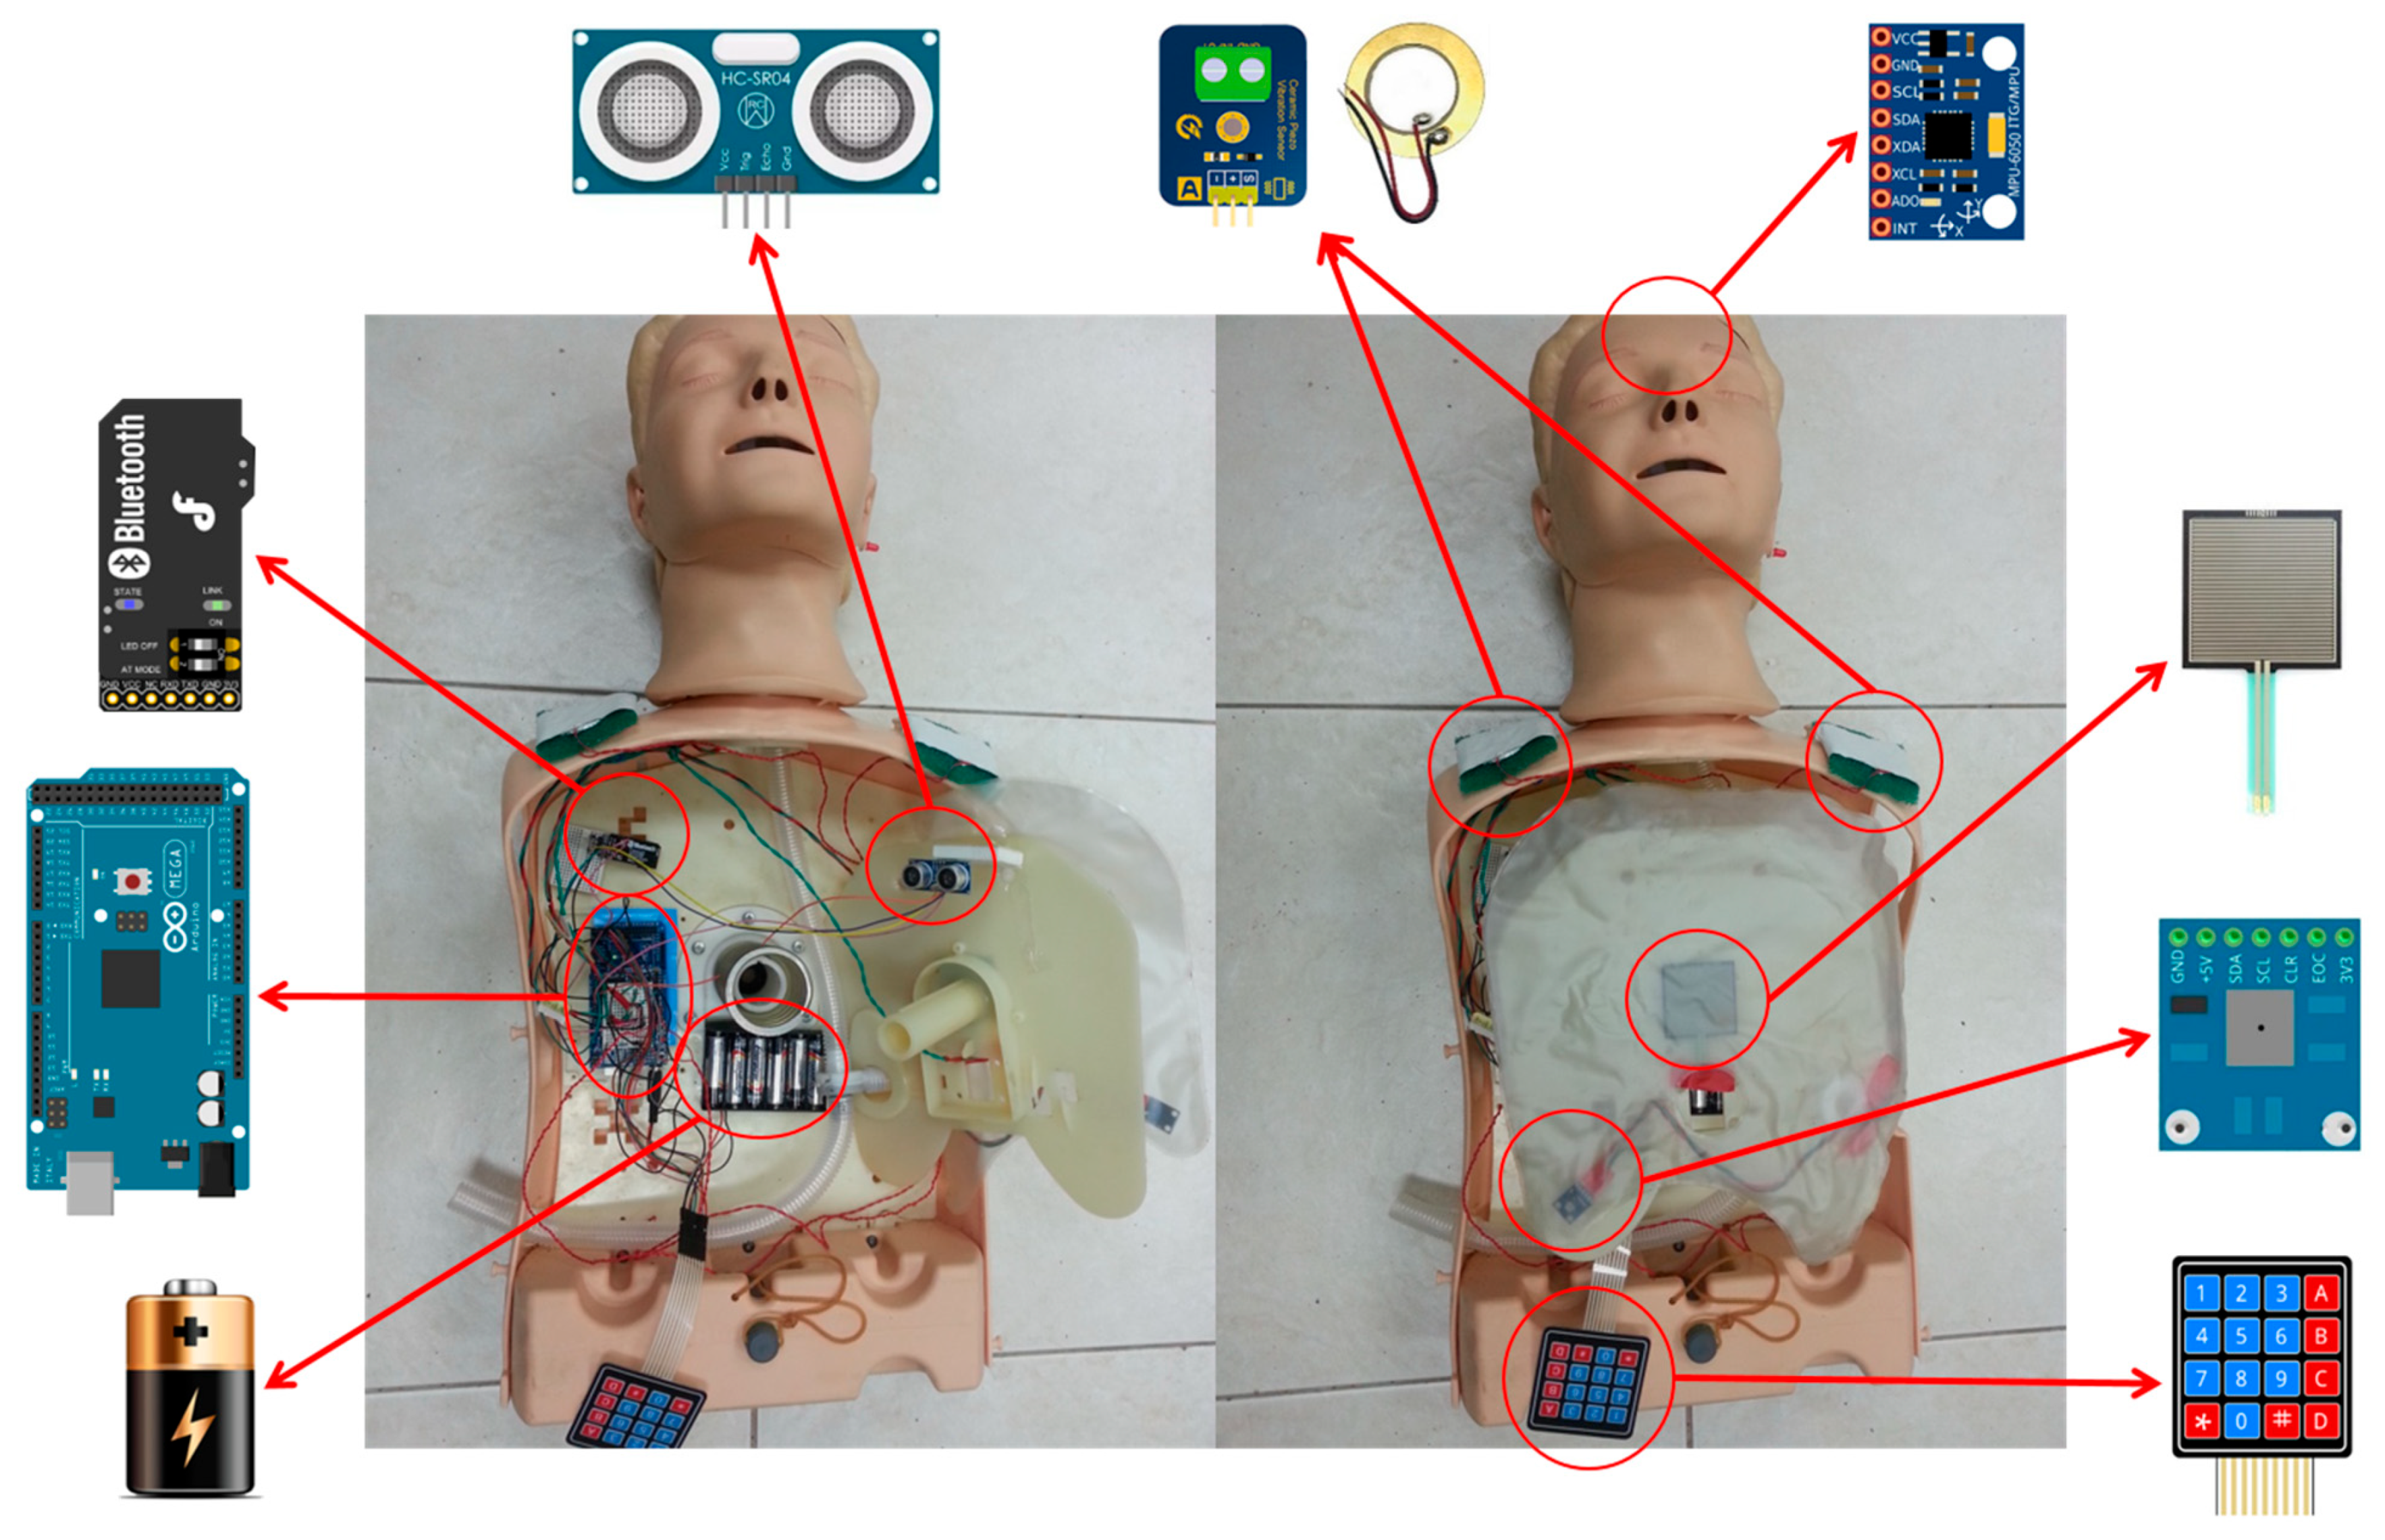
2.1.1. CPR Manikin Module
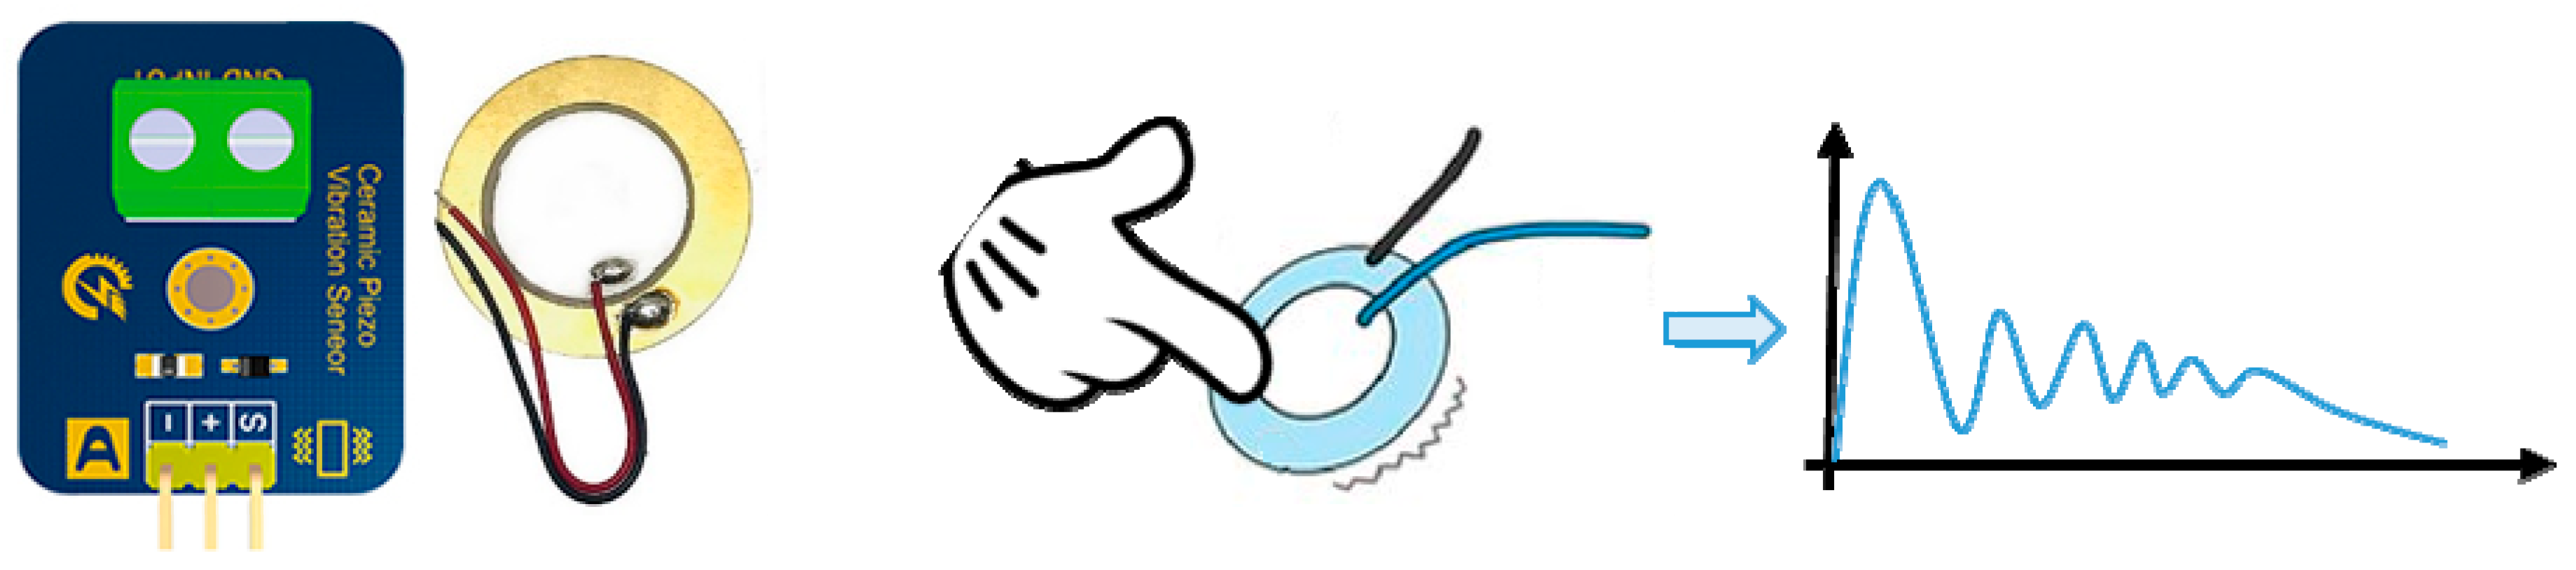
2.1.2. Sensor Module
- Analog piezoelectric ceramic shock sensor
- 2.
- Thin-film keyboard
- 3.
- Ultrasonic sensor
- 4.
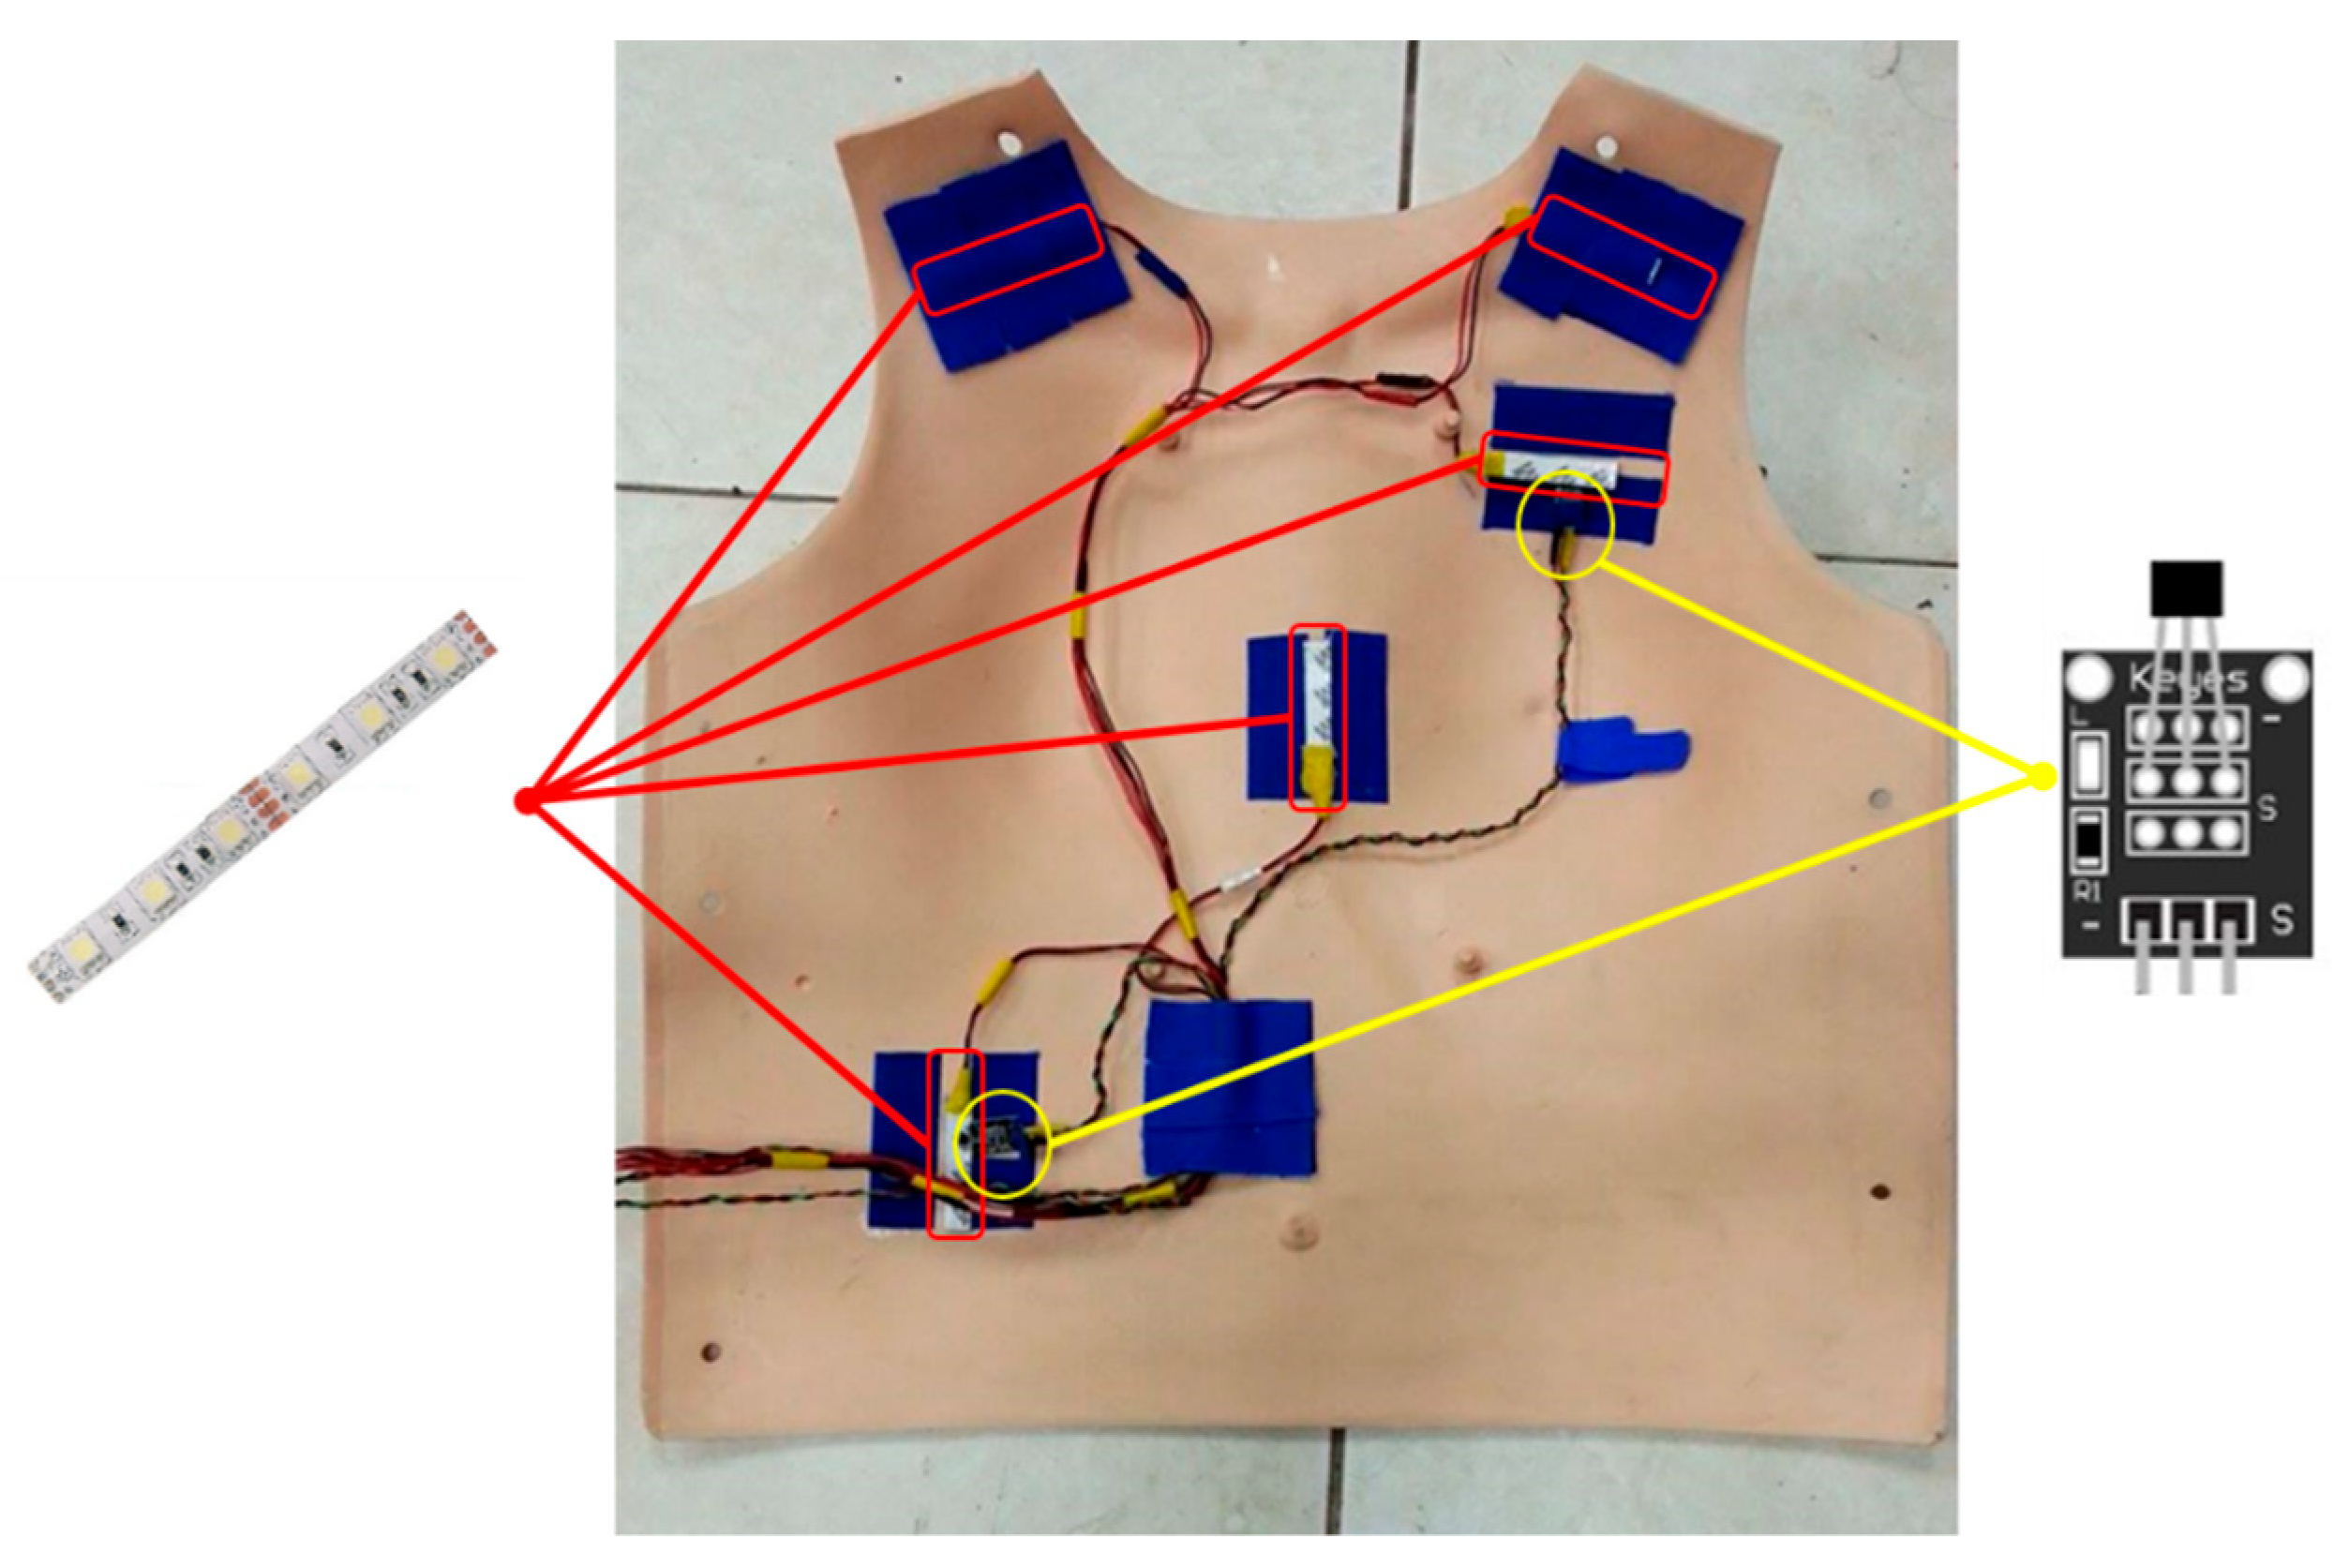
- Pressure sensor
- 5.
- Gyro sensor
- 6.
- Hall magnetic sensors
- 7.
- Barometric pressure sensor
- 8.
- LED indicator bars
2.1.3. CPU Module
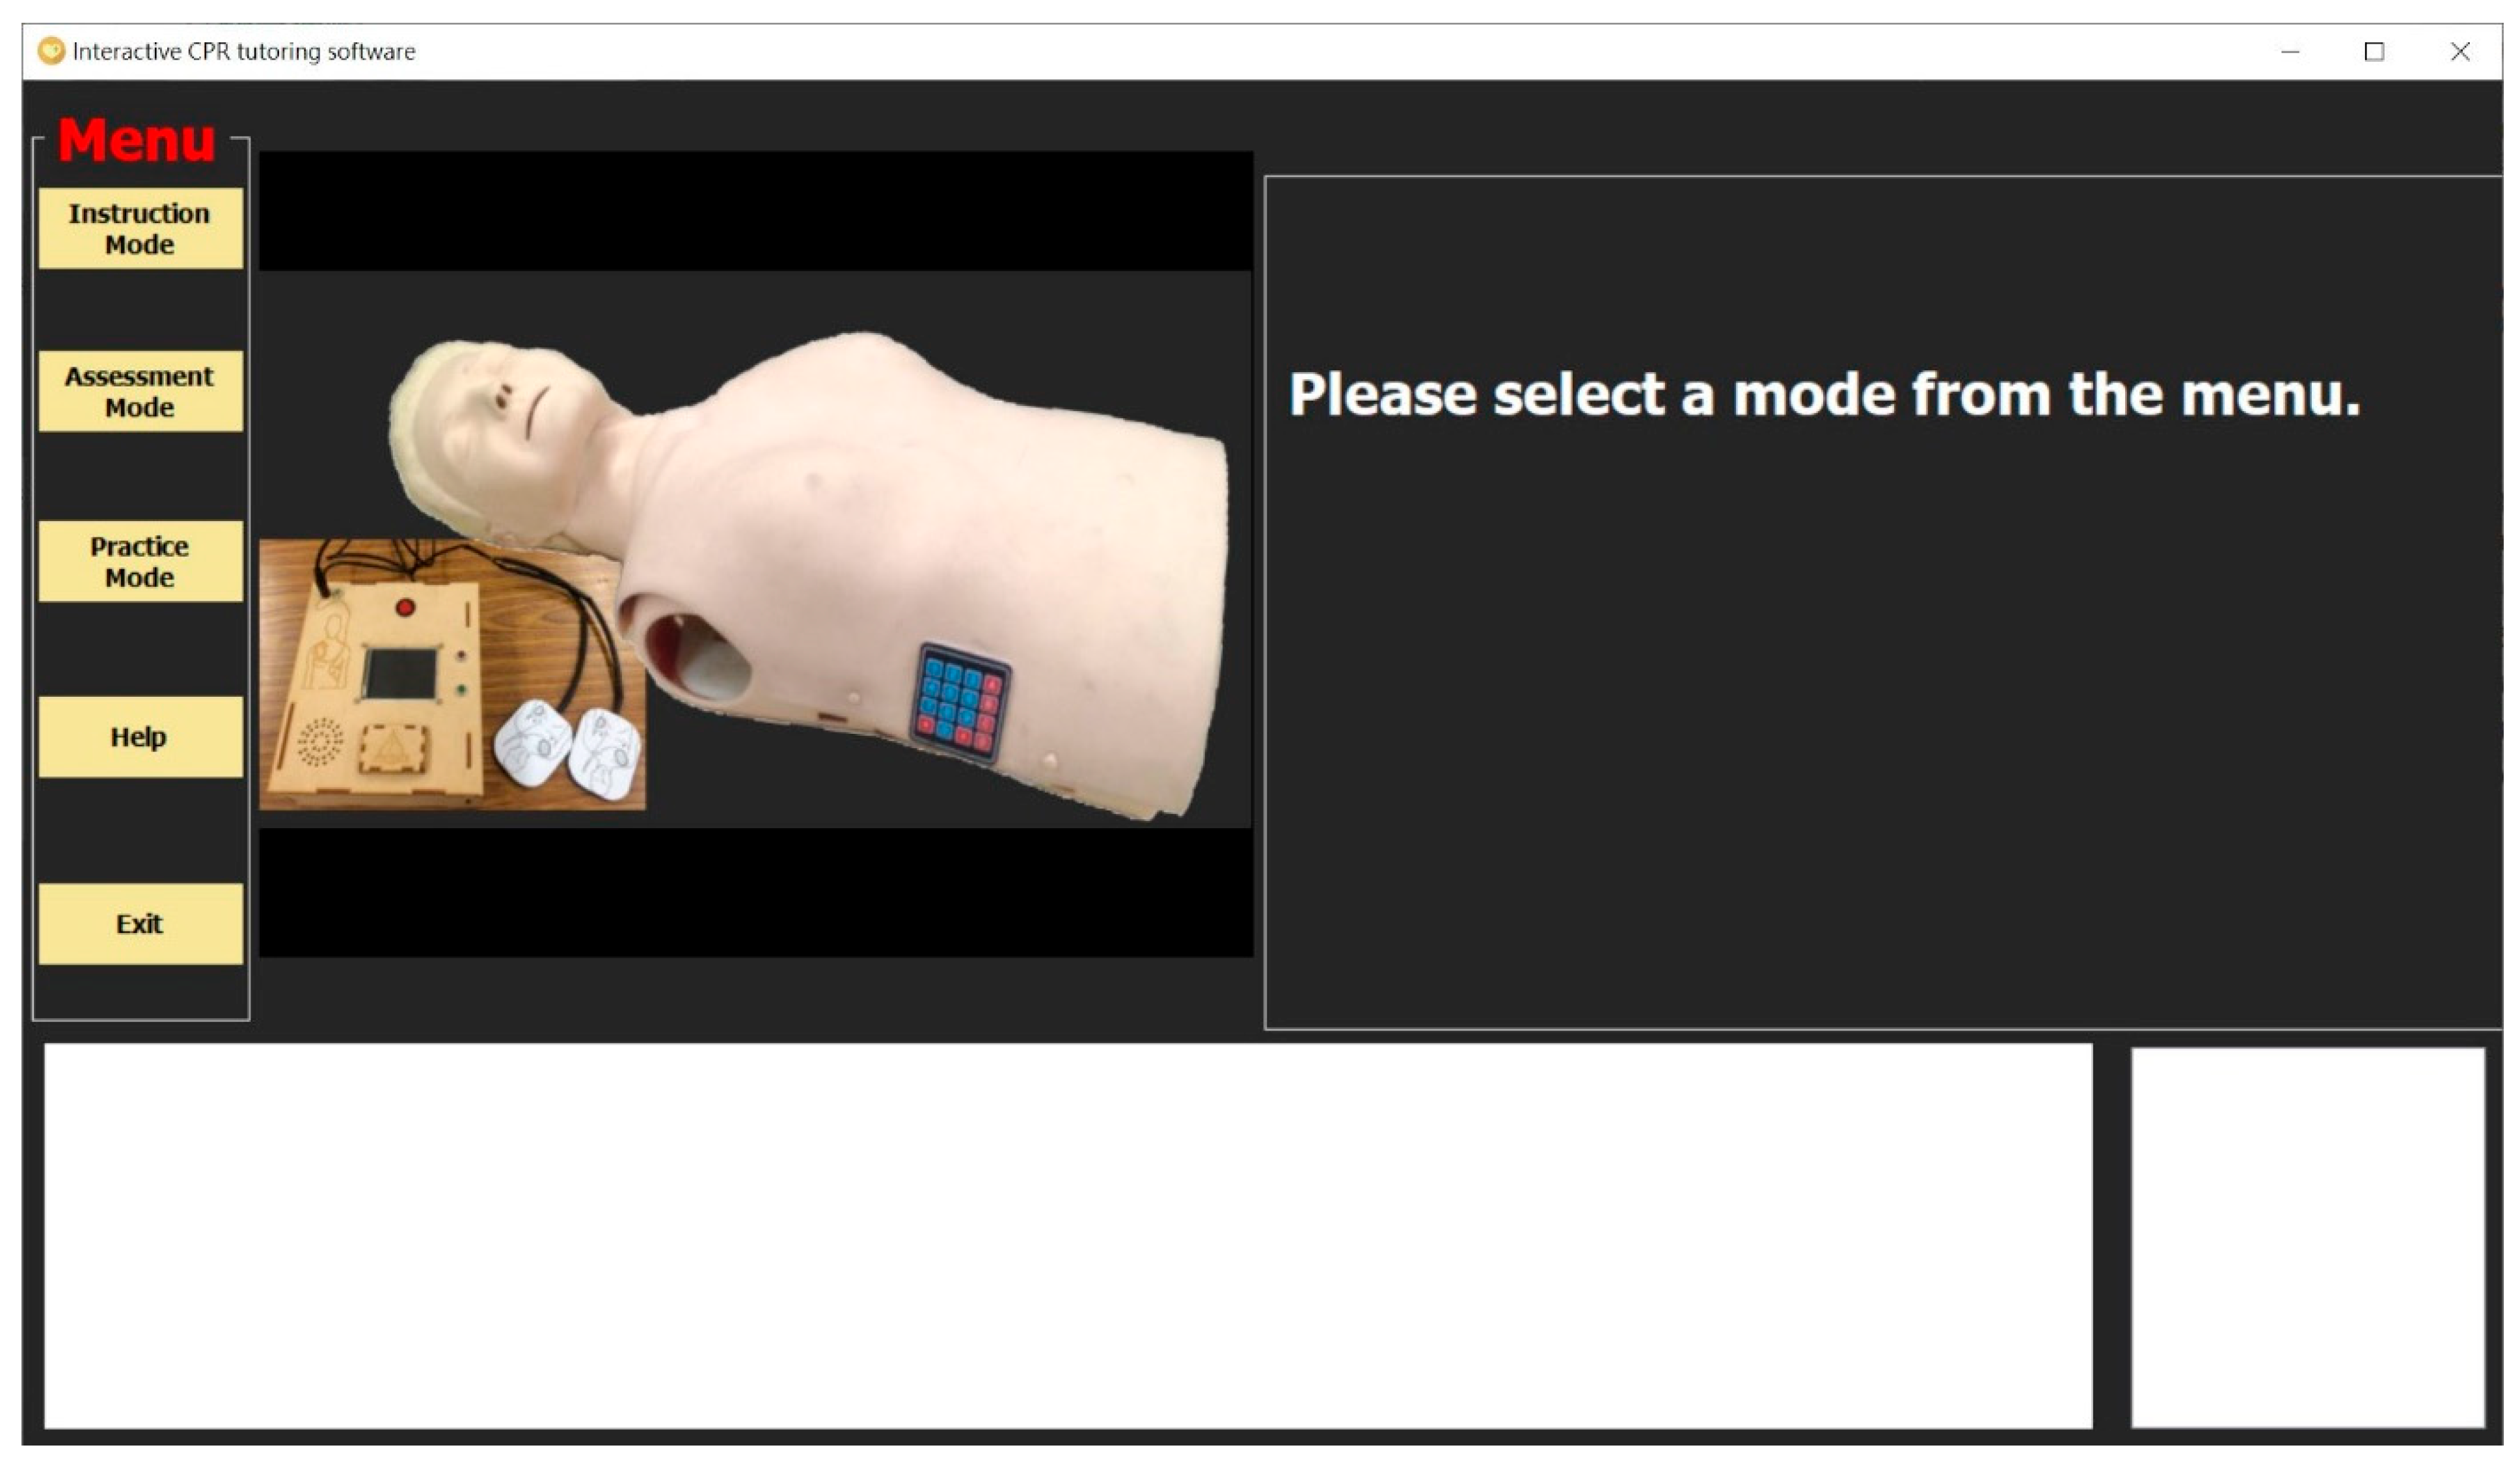
2.2. Interactive CPR Tutoring Software
2.2.1. Wireless Transmission Module
2.2.2. Interactive Interface Module
- The instruction mode
- 2.
- The practice mode
- 3.
- The assessment mode
2.3. Interactive Teaching Aid Kit for CPR
3. Experimental Results
3.1. User Testing
3.2. Questionnaire Design
3.3. System Analysis
4. Conclusions
Author Contributions
Funding
Institutional Review Board Statement
Informed Consent Statement
Data Availability Statement
Conflicts of Interest
References
- Jones, S.A. ACLS, CPR, and PALS: Clinical Pocket Guide; FA Davis: Philadelphia, PA, USA, 2014. [Google Scholar]
- Kouwenhoven, W.B.; Jude, J.R.; Knickerbocker, G.G. Closed-chest cardiac massage. JAMA 1960, 173, 1064–1067. [Google Scholar] [CrossRef] [PubMed] [Green Version]
- Aufderheide, T.P.; Kalra, R.; Kosmopoulos, M.; Bartos, J.A.; Yannopoulos, D. Enhancing cardiac arrest survival with extracorporeal cardiopulmonary resuscitation: Insights into the process of death. Ann. N. Y. Acad. Sci. 2022, 1507, 37–48. [Google Scholar] [CrossRef] [PubMed]
- Perkins, G.D.; Graesner, J.-T.; Semeraro, F.; Olasveengen, T.; Soar, J.; Lott, C.; Van de Voorde, P.; Madar, J.; Zideman, D.; Mentzelopoulos, S.; et al. European Resuscitation Council Guidelines 2021: Executive summary. Resuscitation 2021, 161, 1–60. [Google Scholar] [CrossRef]
- Morley, P.T.; Atkins, D.L.; Finn, J.C.; Maconochie, I.; Nolan, J.P.; Rabi, Y.; Singletary, E.M.; Wang, T.-L.; Welsford, M.; Olasveengen, T.M.; et al. Evidence Evaluation Process and Management of Potential Conflicts of Interest: 2020 International Consensus on Cardiopulmonary Resuscitation and Emergency Cardiovascular Care Science with Treatment Recommendations. Circulation 2020, 142 (Suppl. 1), S28–S40. [Google Scholar] [CrossRef] [PubMed]
- Magid, D.J.; Aziz, K.; Cheng, A.; Hazinski, M.F.; Hoover, A.V.; Mahgoub, M.; Panchal, A.R.; Sasson, C.; Topjian, A.A.; Rodriguez, A.J.; et al. Part 2: Evidence Evaluation and Guidelines Development: 2020 American Heart Association Guidelines for Cardiopulmonary Resuscitation and Emergency Cardiovascular Care. Circulation 2020, 142 (Suppl. 2), S358–S365. [Google Scholar] [CrossRef]
- De Buck, E.; Van Remoortel, H.; Dieltjens, T.; Verstraeten, H.; Clarysse, M.; Moens, O.; Vandekerckhove, P. Evidence-based educational pathway for the integration of first aid training in school curricula. Resuscitation 2015, 94, 8–22. [Google Scholar] [CrossRef] [Green Version]
- Böttiger, B.W.; Van Aken, H. Kids save lives: Training school children in cardiopulmonary resuscitation worldwide is now endorsed by the World Health Organization (WHO). Resuscitation 2015, 94, A5–A7. [Google Scholar] [CrossRef]
- Calicchia, S.; Cangiano, G.; Capanna, S.; De Rosa, M.; Papaleo, B. Teaching Life-Saving Manoeuvres in Primary School. BioMed Res. Int. 2016, 2016, 2647235. [Google Scholar] [CrossRef] [Green Version]
- Vaughan, N.; John, N.; Rees, N. CPR Virtual Reality Training Simulator for Schools. In Proceedings of the 2019 International Conference on Cyberworlds (CW), Kyoto, Japan, 2–4 October 2019; pp. 25–28. [Google Scholar]
- Santos, I.; Sa-Couto, C.; Vieira-Marques, P. Gamification in CPR—A Review of Game Dynamics and Mechanics. In Proceedings of the 2019 14th Iberian Conference on Information Systems and Technologies (CISTI), Coimbra, Portugal, 19–22 June 2019; pp. 1–4. [Google Scholar]
- Durai, V.S.I.; Arjunan, R.; Manivannan, M. The Effect of Audio and Visual Modality Based CPR Skill Training with Haptics Feedback in VR. In Proceedings of the 2019 IEEE Conference on Virtual Reality and 3D User Interfaces (VR), Osaka, Japan, 23–27 March 2019; pp. 910–911. [Google Scholar]
- Habibian, T.; Mehta, A.; Harr, A.; Hernandez, L. Design of a mechanical CPR device: Automated CPR To-Go (ACT). In Proceedings of the 2012 38th Annual Northeast Bioengineering Conference (NEBEC), Philadelphia, PA, USA, 16–18 March 2012; pp. 355–357. [Google Scholar]
- Dumcke, R.; Werger, C.; Bottiger, B.W.; Kucknat, L.; Rahe-Meyer, N. The process of implementing cardiopulmonary resus-citation training in schools: A review of current research. J. Innov. Psychol. Educ. Didact. 2019, 23, 141–166. [Google Scholar]
- Stroop, R.; Kerner, T.; Strickmann, B.; Hensel, M. Mobile phone-based alerting of CPR-trained volunteers simultaneously with the ambulance can reduce the resuscitation-free interval and improve outcome after out-of-hospital cardiac arrest: A German, population-based cohort study. Resuscitation 2020, 147, 57–64. [Google Scholar] [CrossRef] [Green Version]
- Vaughan, N.; John, N.; Rees, N. ParaVR: Paramedic Virtual Reality Training Simulator. In Proceedings of the 2019 International Conference on Cyberworlds (CW), Kyoto, Japan, 2–4 October 2019; pp. 21–24. [Google Scholar]
- Durai, S.I.V.; Arjunan, R.; Manivannan, M. Affordable hi-fidelity VR based CPR simulator with haptics feedback. In Proceedings of the 2017 IEEE International Symposium on Haptic, Audio and Visual Environments and Games (HAVE), Abu Dhabi, United Arab Emirates, 22–23 October 2017; pp. 1–5. [Google Scholar]
- Liyanage, S.U.; Jayaratne, L.; Wickramasinghe, M.; Munasinghe, A. Towards an Affordable Virtual Reality Solution for Car-diopulmonary Resuscitation Training. In Proceedings of the 2019 IEEE Conference on Virtual Reality and 3D User Interfaces (VR), Osaka, Japan, 23–27 March 2019; pp. 1054–1055. [Google Scholar]
- Everson, T.; Joordens, M.; Forbes, H.; Horan, B. Virtual Reality and Haptic Cardiopulmonary Resuscitation Training Ap-proaches: A Review. IEEE Syst. J. 2021, 16, 1391–1399. [Google Scholar] [CrossRef]
- Semeraro, F.; Ristagno, G.; Giulini, G.; Gnudi, T.; Kayal, J.S.; Monesi, A.; Tucci, R.; Scapigliati, A. Virtual reality cardiopul-monary resuscitation (CPR): Comparison with a standard CPR training mannequin. Resuscitation 2019, 135, 234–235. [Google Scholar] [CrossRef] [Green Version]
- Leary, M.; McGovern, S.K.; Chaudhary, Z.; Patel, J.; Abella, B.S.; Blewer, A.L. Comparing bystander response to a sudden cardiac arrest using a virtual reality CPR training mobile app versus a standard CPR training mobile app. Resuscitation 2019, 139, 167–173. [Google Scholar] [CrossRef]
- Nas, J.; Thannhauser, J.; Vart, P.; Van Geuns, R.-J.; Van Royen, N.; Bonnes, J.L.; Brouwer, M.A. Rationale and design of the Lowlands Saves Lives trial: A randomised trial to compare CPR quality and long-term attitude towards CPR performance between face-to-face and virtual reality training with the Lifesaver VR app. BMJ Open 2019, 9, e033648. [Google Scholar]
- García Fierros, F.J.; Moreno Escobar, J.J.; Sepúlveda Cervantes, G.; Morales Matamoros, O.; Tejeida Padilla, R. Virtual CPR: Virtual Reality Mobile Application for Training in Cardiopulmonary Resuscitation Techniques. Sensors 2021, 21, 2504. [Google Scholar] [CrossRef]
- Boada, I.; Rodriguez-Benitez, A.; Garcia-Gonzalez, J.M.; Olivet, J.; Carreras, V.; Sbert, M. Using a serious game to complement CPR instruction in a nurse faculty. Comput. Methods Programs Biomed. 2015, 122, 282–291. [Google Scholar] [CrossRef]
- Wattanasoontorn, V.; Magdics, M.; Boada, I.; Sbert, M. A Kinect-Based System for Cardiopulmonary Resuscitation Simulation: A Pilot Study. Serious Games Dev. Appl. 2013, 8101, 51–63. [Google Scholar]
- Di Mitri, D.; Schneider, J.; Specht, M.; Drachsler, H. Detecting Mistakes in CPR Training with Multimodal Data and Neural Networks. Sensors 2019, 19, 3099. [Google Scholar] [CrossRef] [Green Version]
- Park, N.; Kwon, Y.; Lee, S.; Woo, W.; Jeong, J. Projected AR-Based Interactive CPR Simulator. In Systems and Applications, Proceedings of the International Conference on Virtual, Augmented and Mixed Reality, Las Vegas, NV, USA, 21–26 July 2013; Springer: Berlin/Heidelberg, Germany, 2013; Volume 8022, pp. 83–89. [Google Scholar]
- Hubail, D.; Mondal, A.; Al Jabir, A.; Patel, B. Comparison of a virtual reality compression-only Cardiopulmonary Resuscitation (CPR) course to the traditional course with content validation of the VR course—A randomized control pilot study. Ann. Med. Surg. 2022, 73, 103241. [Google Scholar] [CrossRef]
- Kuyt, K.; Park, S.-H.; Chang, T.P.; Jung, T.; MacKinnon, R. The use of virtual reality and augmented reality to enhance cardio-pulmonary resuscitation: A scoping review. Adv. Simul. 2021, 6, 11. [Google Scholar] [CrossRef]
- Jeffers, J.M.; Schreurs, B.A.; Dean, J.L.; Scott, B.; Canares, T.; Tackett, S.; Smith, B.; Billings, E.; Billioux, V.; Sampathkumar, H.D.; et al. Paediatric chest compression performance improves via novel augmented-reality cardiopulmonary resuscitation feedback system: A mixed-methods pilot study in a simulation-based setting. Resusc. Plus 2022, 11, 100273. [Google Scholar] [CrossRef] [PubMed]
- Stumpf, E.; Ambati, R.T.; Shekhar, R.; Staffa, S.J.; Zurakowski, D.; Sinha, P. A smartphone application to provide real-time cardiopulmonary resuscitation quality feedback. Am. J. Emerg. Med. 2022, 60, 34–39. [Google Scholar] [CrossRef]
- Gugelmin-Almeida, D.; Tobase, L.; Polastri, T.F.; Peres, H.H.C.; Timerman, S. Do automated real-time feedback devices improve CPR quality? A systematic review of literature. Resusc. Plus 2021, 6, 100108. [Google Scholar] [CrossRef] [PubMed]
- Picard, C.; Drew, R.; Norris, C.M.; O’Dochartaigh, D.; Burnett, C.; Keddie, C.; Douma, M.J. Cardiac Arrest Quality Improvement: A Single-Center Evaluation of Resuscitations Using Defibrillator, Feedback Device, and Survey Data. J. Emerg. Nurs. 2022, 48, 224–232.e8. [Google Scholar] [CrossRef] [PubMed]
- Koyama, Y.; Matsuyama, T.; Kaino, T.; Hoshino, T.; Nakao, J.; Shimojo, N.; Inoue, Y. Adequacy of compression positioning using the feedback device during chest compressions by medical staff in a simulation study. BMC Emerg. Med. 2022, 22, 1–7. [Google Scholar] [CrossRef]
- Lee, S.Y.; Ahn, C. A chest compression feedback device for cardiopulmonary resuscitation in the novel design of a weight-light card holder shape. Resuscitation 2022, 175, 28–29. [Google Scholar] [CrossRef]
- Austin, A.L.; Spalding, C.N.; Landa, K.N.; Myer, B.R.; Cure, D.; Smith, J.E.; Platt, G.; King, H.C. A randomized control trial of cardiopulmonary feedback devices and their impact on infant chest compression quality: A simulation study. Pediatric Emerg. Care 2020, 36, e79–e84. [Google Scholar] [CrossRef]
- Truszewski, Z.; Szarpak, L.; Kurowski, A.; Evrin, T.; Zasko, P.; Bogdanski, L.; Czyzewski, L. Randomized trial of the chest compressions effectiveness comparing 3 feedback CPR devices and standard basic life support by nurses. Am. J. Emerg. Med. 2016, 34, 381–385. [Google Scholar] [CrossRef]
- Vahedian-Azimi, A.; Hajiesmaeili, M.; Amirsavadkouhi, A.; Jamaati, H.; Izadi, M.; Madani, S.J.; Hashemian, S.M.R.; Miller, A.C. Effect of the Cardio First Angel™ device on CPR indices: A randomized controlled clinical trial. Crit. Care 2016, 20, 147. [Google Scholar] [CrossRef] [Green Version]
- Sauro, J. A Practical Guide to the System Usability Scale: Background, Benchmarks & Best Practices; CreateSpace Independent Publishing Platform: Scotts Valley, CA, USA, 2011. [Google Scholar]


| Step | Action | Deduct Score |
|---|---|---|
| Check | Operation time exceeds 10 s | 10 |
| Call 911 | Operation time exceeds 10 s | 10 |
| C | Compression depth less than 5 cm | 2 |
| Not reaching the compression at the rate of 100–120/minute | 16 | |
| The chest does not return to its original position | 2 | |
| The interruption time exceeds 10 s | 32 | |
| Incorrect position of the chest compression | 32 | |
| A | Operation time exceeds 15 s | 16 |
| B | Blow time less than 1 s | 8 |
| Blowing too much or too little | 8 | |
| D | Incorrect position of the AED patch | 10 |
| System Usability Scale Questionnaire of the Proposed Interactive Teaching Aid Kit for CPR | Strongly Disagree | Disagree | Neutral | Agree | Strongly Agree |
|---|---|---|---|---|---|
| 0 | 2 | 6 | 24 | 11 |
| 0 | 4 | 6 | 17 | 16 |
| 0 | 1 | 8 | 16 | 18 |
| 3 | 5 | 17 | 11 | 7 |
| 0 | 3 | 7 | 22 | 11 |
| 0 | 3 | 7 | 22 | 11 |
| 1 | 0 | 3 | 22 | 17 |
| 0 | 0 | 4 | 20 | 19 |
| 1 | 1 | 5 | 25 | 11 |
| 1 | 5 | 19 | 12 | 6 |
| System Usability Scale Questionnaire of the Proposed Interactive Teaching Aid Kit for CPR | Average | Standard Deviation | Standard Error |
|---|---|---|---|
| 4.02 | 0.77 | 0.12 |
| 4.05 | 0.95 | 0.14 |
| 4.19 | 0.82 | 0.13 |
| 3.33 | 1.11 | 0.17 |
| 3.95 | 0.84 | 0.13 |
| 3.95 | 0.84 | 0.13 |
| 4.26 | 0.79 | 0.12 |
| 4.35 | 0.65 | 0.10 |
| 4.02 | 0.83 | 0.13 |
| 3.40 | 0.95 | 0.15 |
| Average | 3.95 | 0.86 | 0.13 |
| System Usability Scale Questionnaire of the Proposed Interactive Teaching Aid Kit for CPR | Below 22 Years Old | Above 23 Years Old | Average Deviation |
|---|---|---|---|
| 4.04 | 4.00 | 0.04 |
| 4.17 | 3.89 | 0.27 |
| 4.29 | 4.05 | 0.24 |
| 3.46 | 3.16 | 0.30 |
| 4.04 | 3.84 | 0.20 |
| 4.08 | 3.79 | 0.29 |
| 4.33 | 4.16 | 0.18 |
| 4.50 | 4.16 | 0.34 |
| 4.17 | 3.84 | 0.32 |
| 3.42 | 3.37 | 0.05 |
| Average | 4.05 | 3.83 | 0.22 |
| System Usability Scale Questionnaire of the Proposed Interactive Teaching Aid Kit for CPR | Learned CPR Before | Never Learned CPR | Average Deviation |
|---|---|---|---|
| 4.00 | 4.08 | −0.08 |
| 4.13 | 3.83 | 0.30 |
| 4.26 | 4.00 | 0.26 |
| 3.45 | 3.00 | 0.45 |
| 4.10 | 3.58 | 0.51 |
| 4.03 | 3.75 | 0.28 |
| 4.42 | 3.83 | 0.59 |
| 4.48 | 4.00 | 0.48 |
| 4.19 | 3.58 | 0.61 |
| 3.45 | 3.25 | 0.20 |
| Average | 4.05 | 3.69 | 0.36 |
| CPR Steps | Related Sensor | Analysis Method |
|---|---|---|
| Check | Analog piezoelectric ceramic shock sensor | Threshold trigger method |
| Call 911 | Thin-film keyboard | Thin-film keyboard input |
| Circulation | Ultrasonic sensor | Waveform analysis method |
| Airway | Gyro sensor | Threshold trigger method |
| Breathing | Barometric pressure sensor | Waveform analysis method |
| Defibrillation | Hall magnetic sensors | Threshold trigger method |
Publisher’s Note: MDPI stays neutral with regard to jurisdictional claims in published maps and institutional affiliations. |
© 2022 by the author. Licensee MDPI, Basel, Switzerland. This article is an open access article distributed under the terms and conditions of the Creative Commons Attribution (CC BY) license (https://creativecommons.org/licenses/by/4.0/).
Share and Cite
Zhao, Y.-X. Interactive Teaching Aid Kit for Cardiopulmonary Resuscitation. Processes 2022, 10, 1515. https://doi.org/10.3390/pr10081515
Zhao Y-X. Interactive Teaching Aid Kit for Cardiopulmonary Resuscitation. Processes. 2022; 10(8):1515. https://doi.org/10.3390/pr10081515
Chicago/Turabian StyleZhao, Yu-Xiang. 2022. "Interactive Teaching Aid Kit for Cardiopulmonary Resuscitation" Processes 10, no. 8: 1515. https://doi.org/10.3390/pr10081515
APA StyleZhao, Y.-X. (2022). Interactive Teaching Aid Kit for Cardiopulmonary Resuscitation. Processes, 10(8), 1515. https://doi.org/10.3390/pr10081515