Article

Physics-Based Simulations of Chip Flow over Micro-Textured Cutting Tool in Orthogonal Cutting of Alloy Steel

Manufacturing and Automation Research Lab., Department of Industrial and Systems Engineering, Rutgers University-New Brunswick, Piscataway, NJ 08854, USA
*
Author to whom correspondence should be addressed.
J. Manuf. Mater. Process. 2021, 5(3), 65; https://doi.org/10.3390/jmmp5030065
Submission received: 27 May 2021 / Revised: 14 June 2021 / Accepted: 17 June 2021 / Published: 22 June 2021
(This article belongs to the Special Issue Progress in Digital Twin Integration for Smart Machining)

Abstract

:
Physics-based process simulations have the potential to allow virtual process design and the development of digital twins for smart machining applications. This paper presents 3D cutting simulations using the finite element method (FEM) and investigates the physical state variables that are fundamental to the reduction in cutting forces, friction, and tool wear when micro-textured cutting tools are employed. For this goal, textured cemented carbide cutting tool inserts are designed, fabricated, and tested in the orthogonal dry cutting of a nickel-chromium-molybdenum alloy steel. Cutting forces and friction coefficients are compared against the non-textured tool, revealing the effects of texture parameters. Chip flow over the textured tool surface and process variables at the chip-tool contact are investigated and compared. The results reveal the fundamental sources of such improvements. Archard’s wear rate as a composition of process variables is utilized to compare experimental and simulated wear on the textured cutting tools. The effects of texture and cutting conditions on tool wear and adhesion characteristics are further discussed on the simulation results with experimental comparisons. It was found that the results obtained from these simulations provide further fundamental insights about the micro-textured cutting tools.

1. Introduction

The Industry 4.0 and computerization have a significant impact on the machining industry, facilitating its development and evolution to meet new demands arising from increasing part complexity, quality requirements, and the increased demand for parts made from difficult-to-cut alloys. Within the machining industry, the utilization of computational techniques, including physics-based machining simulations, is associated with the concept of smart machining [1]. Physics-based simulations can provide a powerful tool to design cutting tools and virtually test their performance in various machining processes. Such an approach provides an ability to monitor the machining process in real time to improve its performance and meet the target goals. This can be achieved by establishing relations between the physical machining tool, its sensors, monitoring equipment, and the computer hardware/software that allows for process monitoring, digitalization, and simulation (Digital Shadow/Digital Twin) for process optimization and the adjustment of machining parameters, either in real time or for subsequent operations [2]. Machine Learning algorithms can be further utilized here for a number of purposes, ranging from on-line process monitoring (be it in the aspect of machine health/performance or product quality), to process optimization to improve productivity/workpiece quality. From this perspective, a digital twin for the cutting tool can be developed [3] where the role of the physics-based tool wear rate models, depending on the contact conditions, chip flow, temperature, and stress at the tool-chip interface, becomes even more valuable if such calculations can be integrated within the smart machining and digital shadow/digital twin framework. This paper aims to provide a digital model of a micro-textured cutting tool by exploring the role of the physics-based simulation modeling evaluated against experimental outputs. Micro-textures applied on cutting tool faces reduce contact area and friction force at the chip-tool interface, improve anti-adhesion, flaking and crater wear resistance, reduce abrasive wear by captivating wear debris, enhance thermal transport, and enable the effective utilization of lubricants in cutting processes. Therefore, this introduction section will review the physics-based cutting tool wear and contact mechanisms to establish a background in the premise of micro-texture cutting tools.
This goal of this paper is to test the hypothesis that a fundamental understanding of the physical state variables obtained from physically based process simulations during cutting process, detailed chip material flow behavior over micro-textured tool surface, and wear rate, will reveal the benefits offered for enabling virtual process design and digital twin for machining, compared to conventional (non-textured) tools.

1.1. Cutting Tool Wear

The most accepted tool wear mechanisms include abrasion and adhesion due to high contact pressure between tool-chip and tool-workpiece interfaces and resultant forces, and chemical reactions in the form of diffusion, dissolution, and oxidation due to chemical affinities between tool and workpiece materials. Tool wear mechanisms that include abrasion (or attrition), adhesion, and chipping-type wear can be broadly grouped under stress-dependent wear mechanisms, which are generally initiated due to some form or level of mechanical contact. In the machining of alloy steels, mechanically triggering wear mechanisms mainly include abrasion, adhesion, and chipping/fracture under the influence of mechanical or thermal stresses generated on the tool-chip and tool-workpiece interfaces, as reported by several studies [4,5,6,7,8,9]. The abrasion and adhesion mechanisms may couple with one another and contribute to tool wear in machining. In terms of wear patterns, abrasion and adhesion may lead to typical flank wear and/or crater wear, and chipping may present itself as catastrophic tool failure or a small chipping of the cutting edge. In addition, abrasive wear can take the form of two-body or three-body abrasion in alloy steel machining. This occurs when a resulting chip slides against the tool rake face and the machined surface rubs against the tool flank face (two-body abrasion) as well as when entrapped hard particles plough through the tool rake and flank faces (three-body abrasion). The three-body abrasion is commonly reported as the main wear mechanism [4], and abrasive wear occurs in the tool flank face [5].
Adhesion (or attrition), diffusion, abrasion, and oxidation are the most prevalent wear mechanisms occurring during dry cutting of alloy steel, where they are largely temperature dependent. Jianxin et al. [6] conducted studies to understand the wear mechanism of cemented carbide tools in dry cutting. They reported that wear mechanisms were mainly abrasive wear, adhesion, and diffusion wear. Diniz et al. [7] also reported similar findings regarding wear mechanisms. Corrêa et al. [8] reported that abrasion and diffusion were wear mechanisms effective in the machining of stainless steel, while attrition and abrasion were dominant for highly martensitic stainless steel. Breidenstein et al. [9] found that the crater wear type is dominant in PcBN tools, due to the predominant presence of temperature-dependent wear mechanisms.

1.2. Chip-Tool Contact Mechanism

In real-life conditions, the actual tool-chip and tool-workpiece contact areas are made up of asperities. Plastic deformation of asperities and subsequent adhesion take place at the junctions, forming micro-welds under high temperatures and high stress in machining; these are made stronger by the absence of oxides and protective films in the nascent chip surface. Micro-weld shearing may take place at the contact areas, causing adhesive wear. If adhesive wear happens, it usually first appears on the tool rake face where the cutting temperature is higher. The workpiece steel alloy material sticks to the cutting tool face. As the chip flows along the rake face, the adhered workpiece material is separated away from the tool. The particles and lumps of the tool material are further torn away from the rake face.
The dynamic contact between the tool and the chip on the rake face could be either a sliding type, a sticking type, or a combination of both types, depending on the balance between these two contact regimes during the cutting process. The basic premise of the micro-texturing of tool rake face is to reduce the sticking contact and improve the tribological performance. This contact at the chip-tool interface is controlled by interactions of several physical process variables including normal and friction stresses, σn and τf, respectively, shear stress of chip material k, and nominal (apparent) and real contact areas, An and Ar, respectively [10]. The friction stress τf tends to be constant in the vicinity of the cutting edge (Figure 1).
A relative stress to material shear strength k curve is used to illustrate the stress distribution along the chip-tool contact area. The relative distance l, measured from the cutting edge to the chip thickness, t, is adopted in these graphs. Friction stress is often proportional to normal stress. However, when normal stress exceeds the shear strength of the material (i.e., σn > k), the friction stress reaches its limit (τf = mk). The mechanics of rough surfaces in contact should result in a limiting friction stress situation. This is inevitable when the real contact area Ar increases and becomes close to the nominal area An, as the friction stress becomes proportional to Ar. Therefore, when the tool rake face is textured or structured, the contact phenomenon could reverse in the favor of reduced friction stress [10,11].
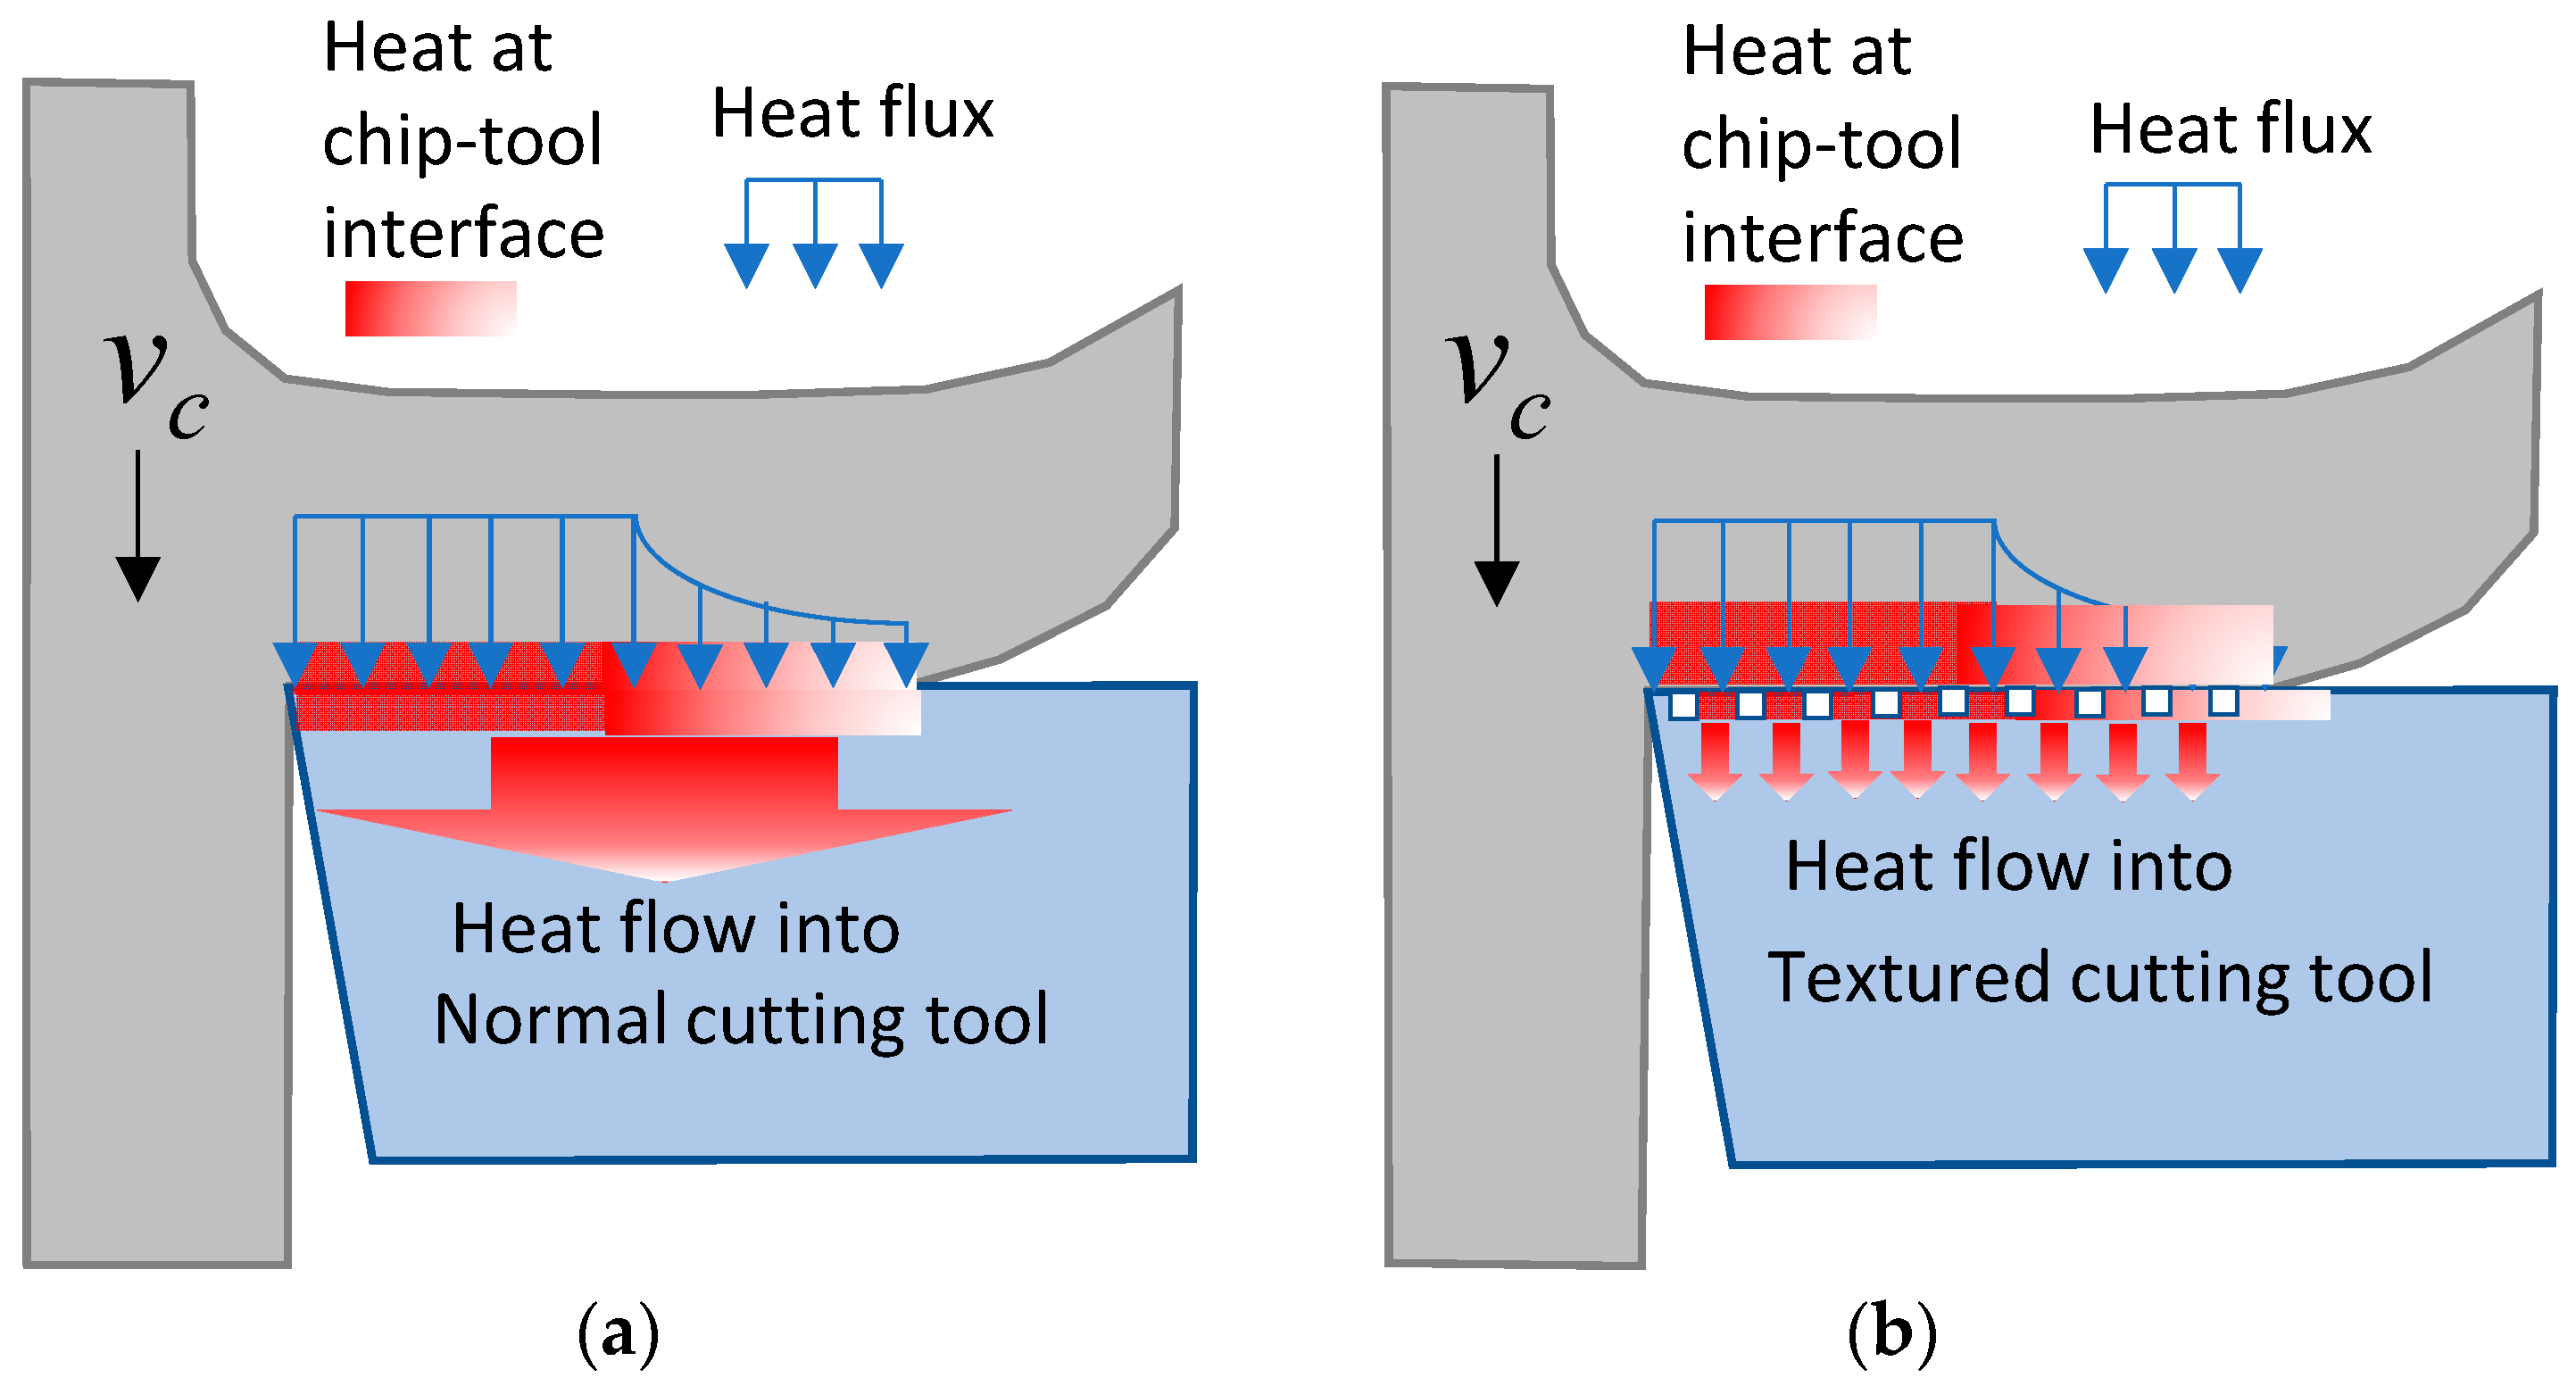
Although contact mechanics become more complex when surface texturing is applied, contact patterns can be altered and the heat flux into the tool can be reduced by creating textures on the rake face. Furthermore, a textured tool rake face provides improved coolant retention by allowing it to penetrate the chip-tool interface, cooling the chip and reducing friction between contact surfaces (see Figure 2). It is noted that the current state of the art still lacks a full understanding of the contact mechanics and heat transfer between the sticking/sliding chip flow over the textured rake face during the cutting process [11].
Chemically driven tool wear mechanisms that include diffusion, dissolution, and other phenomena can be considered temperature-dependent wear mechanisms, which are generally initiated due to a chemical potential. Tribochemical wear, which is not commonly observed in conventional metal cutting, has been recognized as a wear mechanism in alloy steel machining [12]. The chemical reaction between the tool and workpiece materials may result in a lowered strength and/or melting point, and less wear resistance of the tool compound material. The degree of tribochemical wear predominantly depends on the chemical stability of tool material with respect to the workpiece material under high temperature conditions. It should be noted that abrasion adhesion type wear models (Archard’s wear rate) do not capture diffusion wear.

1.3. Micro-Textured Cutting Tool

Micro-textures applied on cutting tool faces reduce contact area and friction force at the chip-tool interface, improve anti-adhesion, flaking and crater wear resistance, reduce abrasive wear by entrapping wear debris, enhance thermal transfer, and improve cooling/lubrication efficiency in cutting processes [13]. Micro-textures include various grooved, dimpled, and pitted patterns fabricated with the use of various processing techniques [14,15]. These patterns are often employed on the tool rake face on a section close to the cutting edge, but also on the tool flank face to reduce friction and flank wear [16] and can be employed under dry or lubricated cutting conditions [17].
The literature is plentiful on different micro-texture applications on cutting tools. In general, perpendicular and parallel micro-grooves are more effective in reducing cutting forces, friction, and adhesion [18] and flank wear [19], whereas diagonal micro-grooves are functional in improving crater wear resistance [20]. Micro-dimples improve wear resistance, as mechanical interlocking causes formation of adhesion layers which mitigate built-up edge (BUE) and/or built-up layer (BUL) development [21]. Micro-grooves (as open texture) and micro-dimples (as closed texture) on tool faces provide wear resistance under wet cutting conditions by providing reservoirs for the lubricants and cutting fluids [22]. Hao et al. [23] used laser surface texturing on polycrystalline diamond (PCD) tools to obtain lyophilic/lyophobic wettability. In dry cutting, air trapped in micro-grooves between the chip and the tool provides enough oxygen for forming a mild oxide layer at the chip-tool interface, improving wear resistance. In cutting carbon steel, where abrasive wear is dominant, the effect of micro-texture on wear debris becomes important to reduce abrasive particles flaked from tool surface through adhesion. Micro-grooves act as micro-pockets to trap the wear debris that flake out from cemented carbide tool and steel workpiece, resulting in significant improvement in wear resistance of micro-texture cutting tools [24]. Polvorosa et al. [25] showed that tapping tools with resharpened and restructured cutting edges can significantly improve tool wear and mitigate material adhesion in machining of Inconel 718. Martinez Krahmer et al. [26] conducted tool wear investigations during dry and wet turning of free-cutting steels (SAE 1212, SAE 12L14, and SAE 1215). The work identified that tool wear has improved, regardless of workpiece material, in dry cutting at cutting speeds greater than 180 m/min. Fatima and Mativenga [27] proved that textured inserts reduce cutting force values due to texture patterns acting as lubricant reservoirs and reducing the tool-chip contact area.
These recent studies on the application of micro-textured cutting tools in the cutting of various workpiece materials reveal that textured tool surfaces demonstrate a high potential to effectively improve machining processes and industrial productivity, especially when applied to machining with difficult-to-cut alloys, by significantly reducing cutting forces, contact pressures, tool temperatures, frictional stresses, chip adhesion, tool edge chipping, and flaking if micro-texture is designed optimally and applied properly. However, experimental studies are somewhat limited in identifying which micro-texture parameters are optimal to reach the full potential benefits. Fundamental studies are recommended to understand how micro-texture and chip formation process interact with one another, and how physical variables, such as sliding velocity, contact pressure (normal stress), temperature, and wear rate, can be improved on the tool surfaces without any contributions from lubricants or cutting fluids. A simple micro-texture with parallel micro-grooves that are aligned along the chip flow direction is suitable to explore interactions between micro-texture on the cutting tool and chip flow in the orthogonal cutting process. For this purpose, cutting experiments using specially designed micro-textured cutting inserts are planned and performed. Under the same cutting conditions, 3D chip formation simulations using the Finite Element Method are performed to predict the physical process variables at the tool-chip interface, including contact temperature, contact normal stress, sliding velocity at the interface, and Archard’s wear rate.

2. Materials and Methods

2.1. Orthogonal Cutting Experiments

In this study, uncoated cemented carbide cutting tool inserts are selected as the tool material for reducing the complexities involved with coated tool surface morphology, such as irregular thickness and conformity, and eliminating the challenge of dealing with coating delamination behavior in cutting experiments.
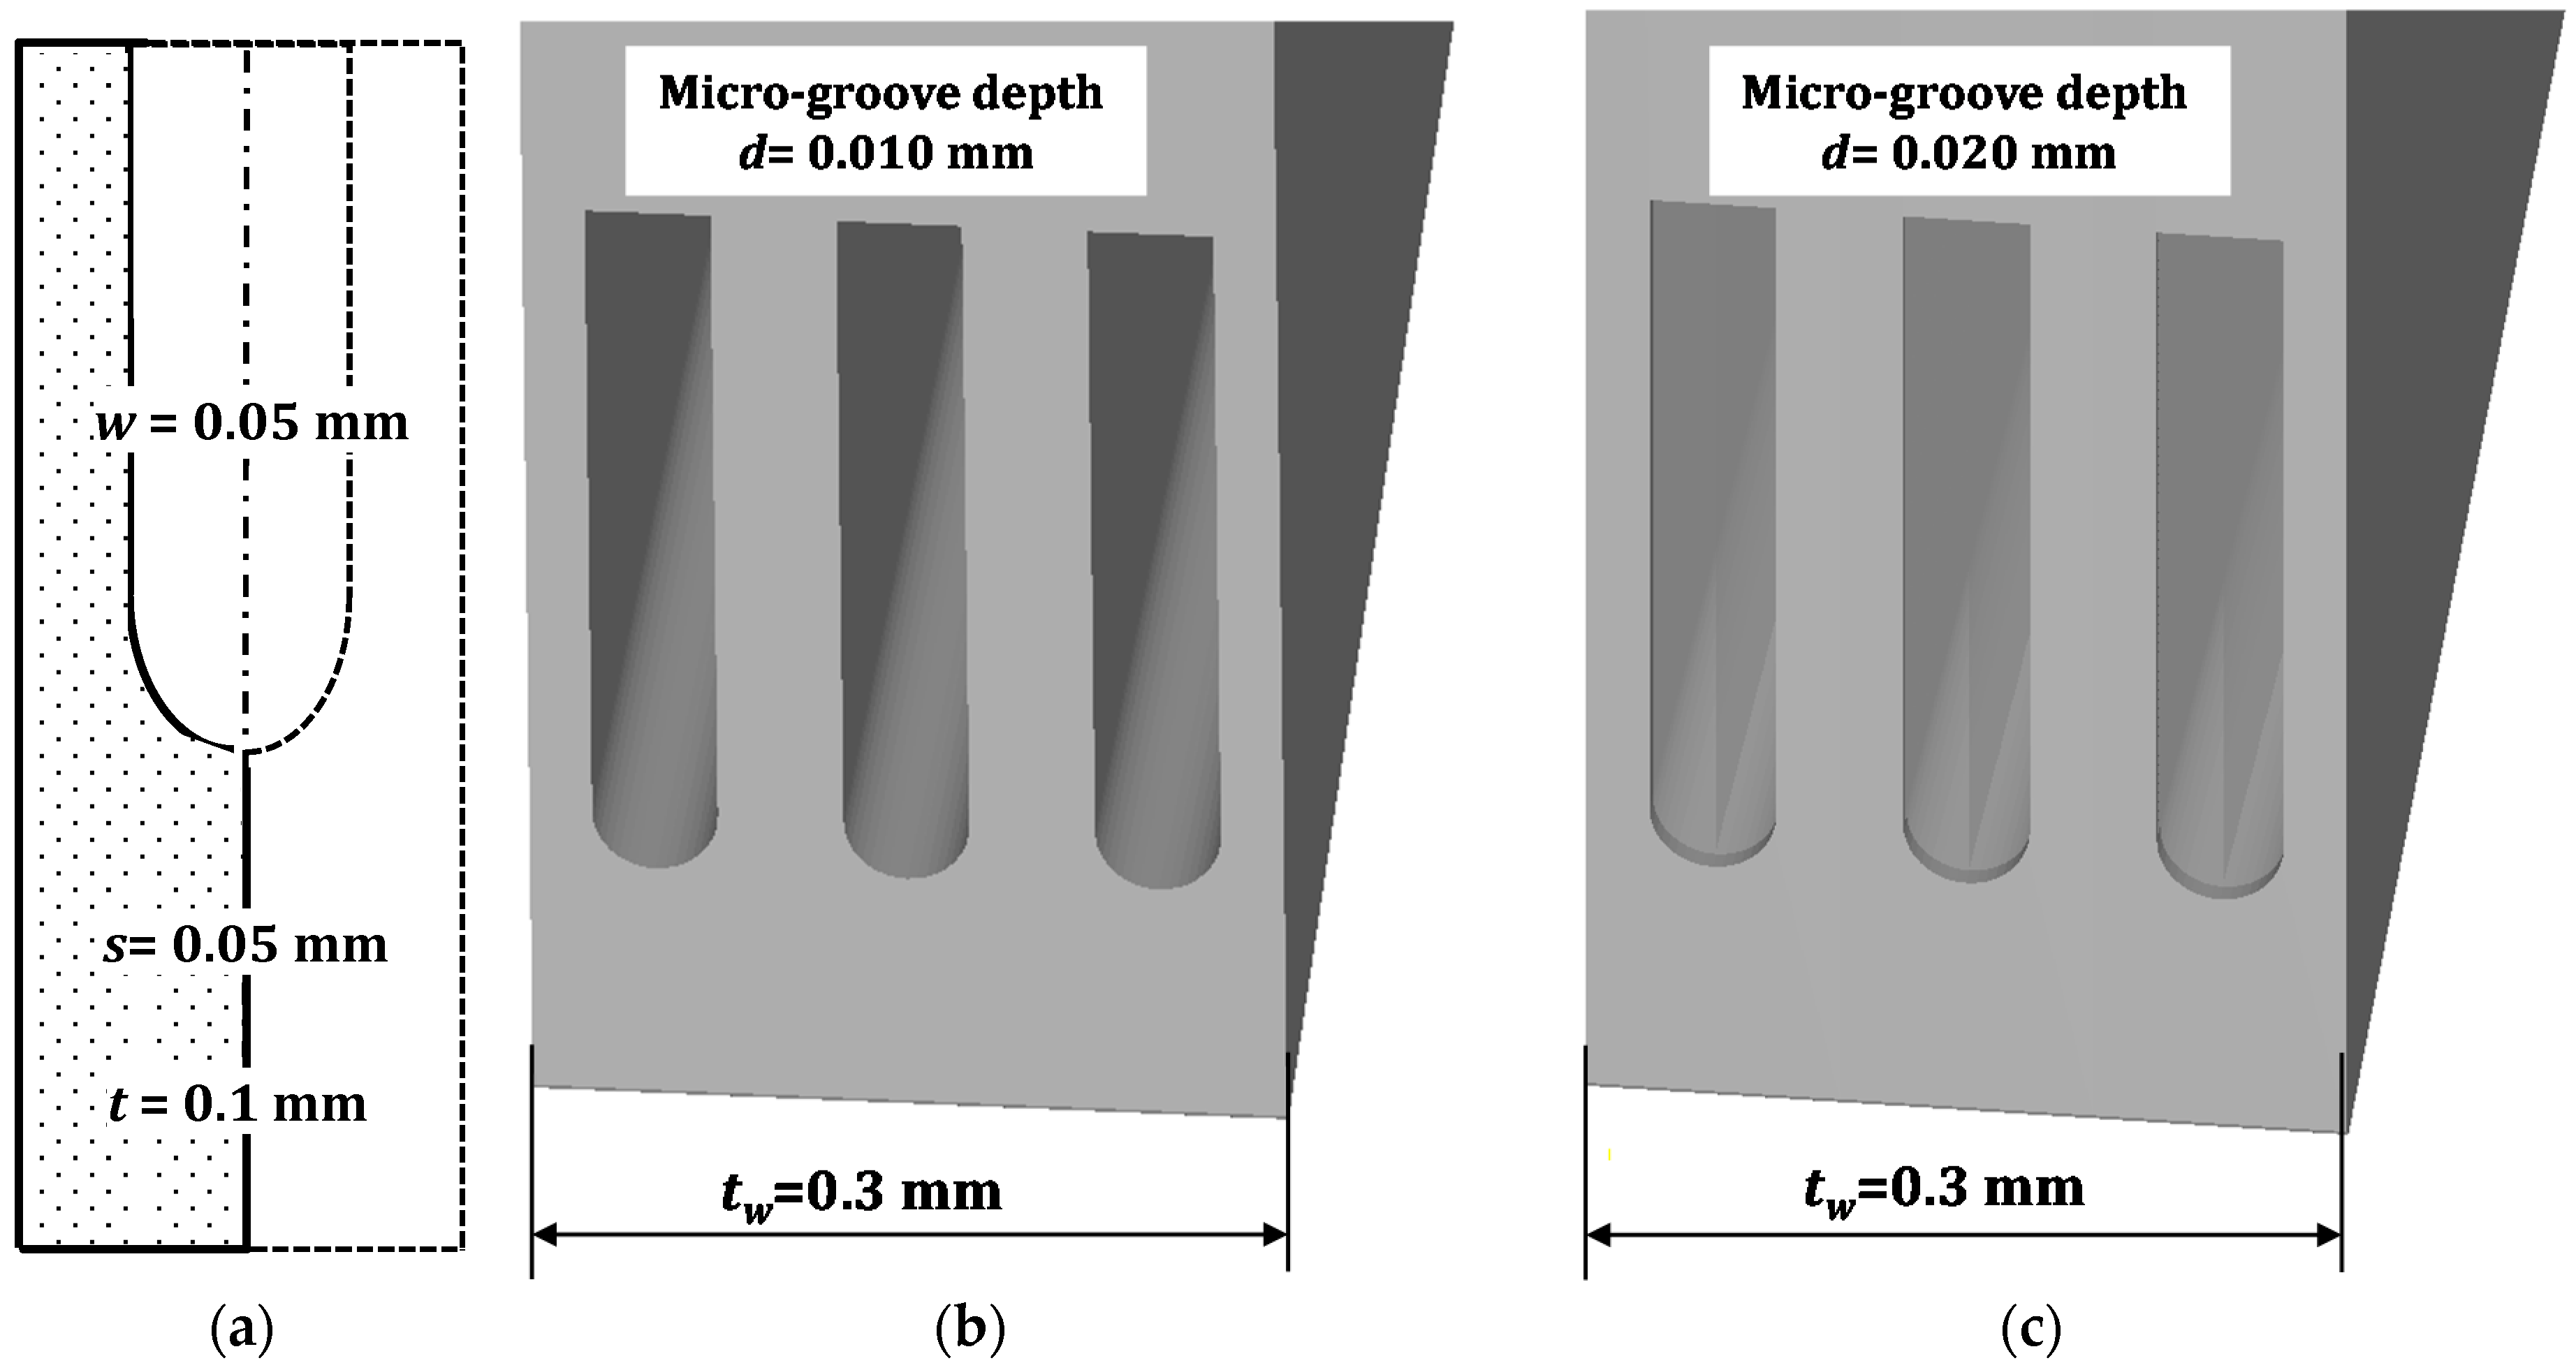
Micro-grooves perpendicular to the cutting edge on the rake face of cemented carbide inserts (Kennametal K313 grade, ISO code TPGN220408, ANSI code TPG432) are fabricated with Electrical Discharge Machining (EDM) milling process using different size electrodes on the SARIX SX100 EDM station. Micro-EDM milling parameters are optimized to reduce the effect of electrode wear on the micro-groove geometry. Different micro-texture patterns are fabricated using groove width variations between w = 0.05 mm and 0.10 mm, groove spacing in the range between s = 0.05 mm and 0.20 mm, and groove depth variations from d = 0.01 mm to 0.02 mm. All micro-grooved inserts were designed to have a constant distance from the groove beginning to the cutting edge as t = 0.10 mm, and a length of grooved region as l = 0.50 mm, where lf is the chip-tool contact length, and aw is the width, as shown in Figure 3a. The micro-EDM milling electrode provides curvilinear inner corners at both ends of the micro-grooves, while allowing the retention of sharp edges along the side walls to promote mechanical interlocking between the chip and the micro-texture. Surface profile measurements are obtained on rake faces of micro-textured tools by using a focus variation microscopy system (Alicona InFocus G4 XL200). Surface profile measurements on the micro-textured tool surface depict the actual shape of these edges with minor geometrical inaccuracies when compared to ideal profile, due to limitations in micro-EDM milling, as shown in Figure 3b. The surfaces of non-textured areas are characterized with the arithmetic mean deviation values of Ra = 0.19 ± 0.02 µm and root-mean squared deviation values of Rq = 0.25 ± 0.04 µm at standard filtering conditions by averaging ten sample measurements.
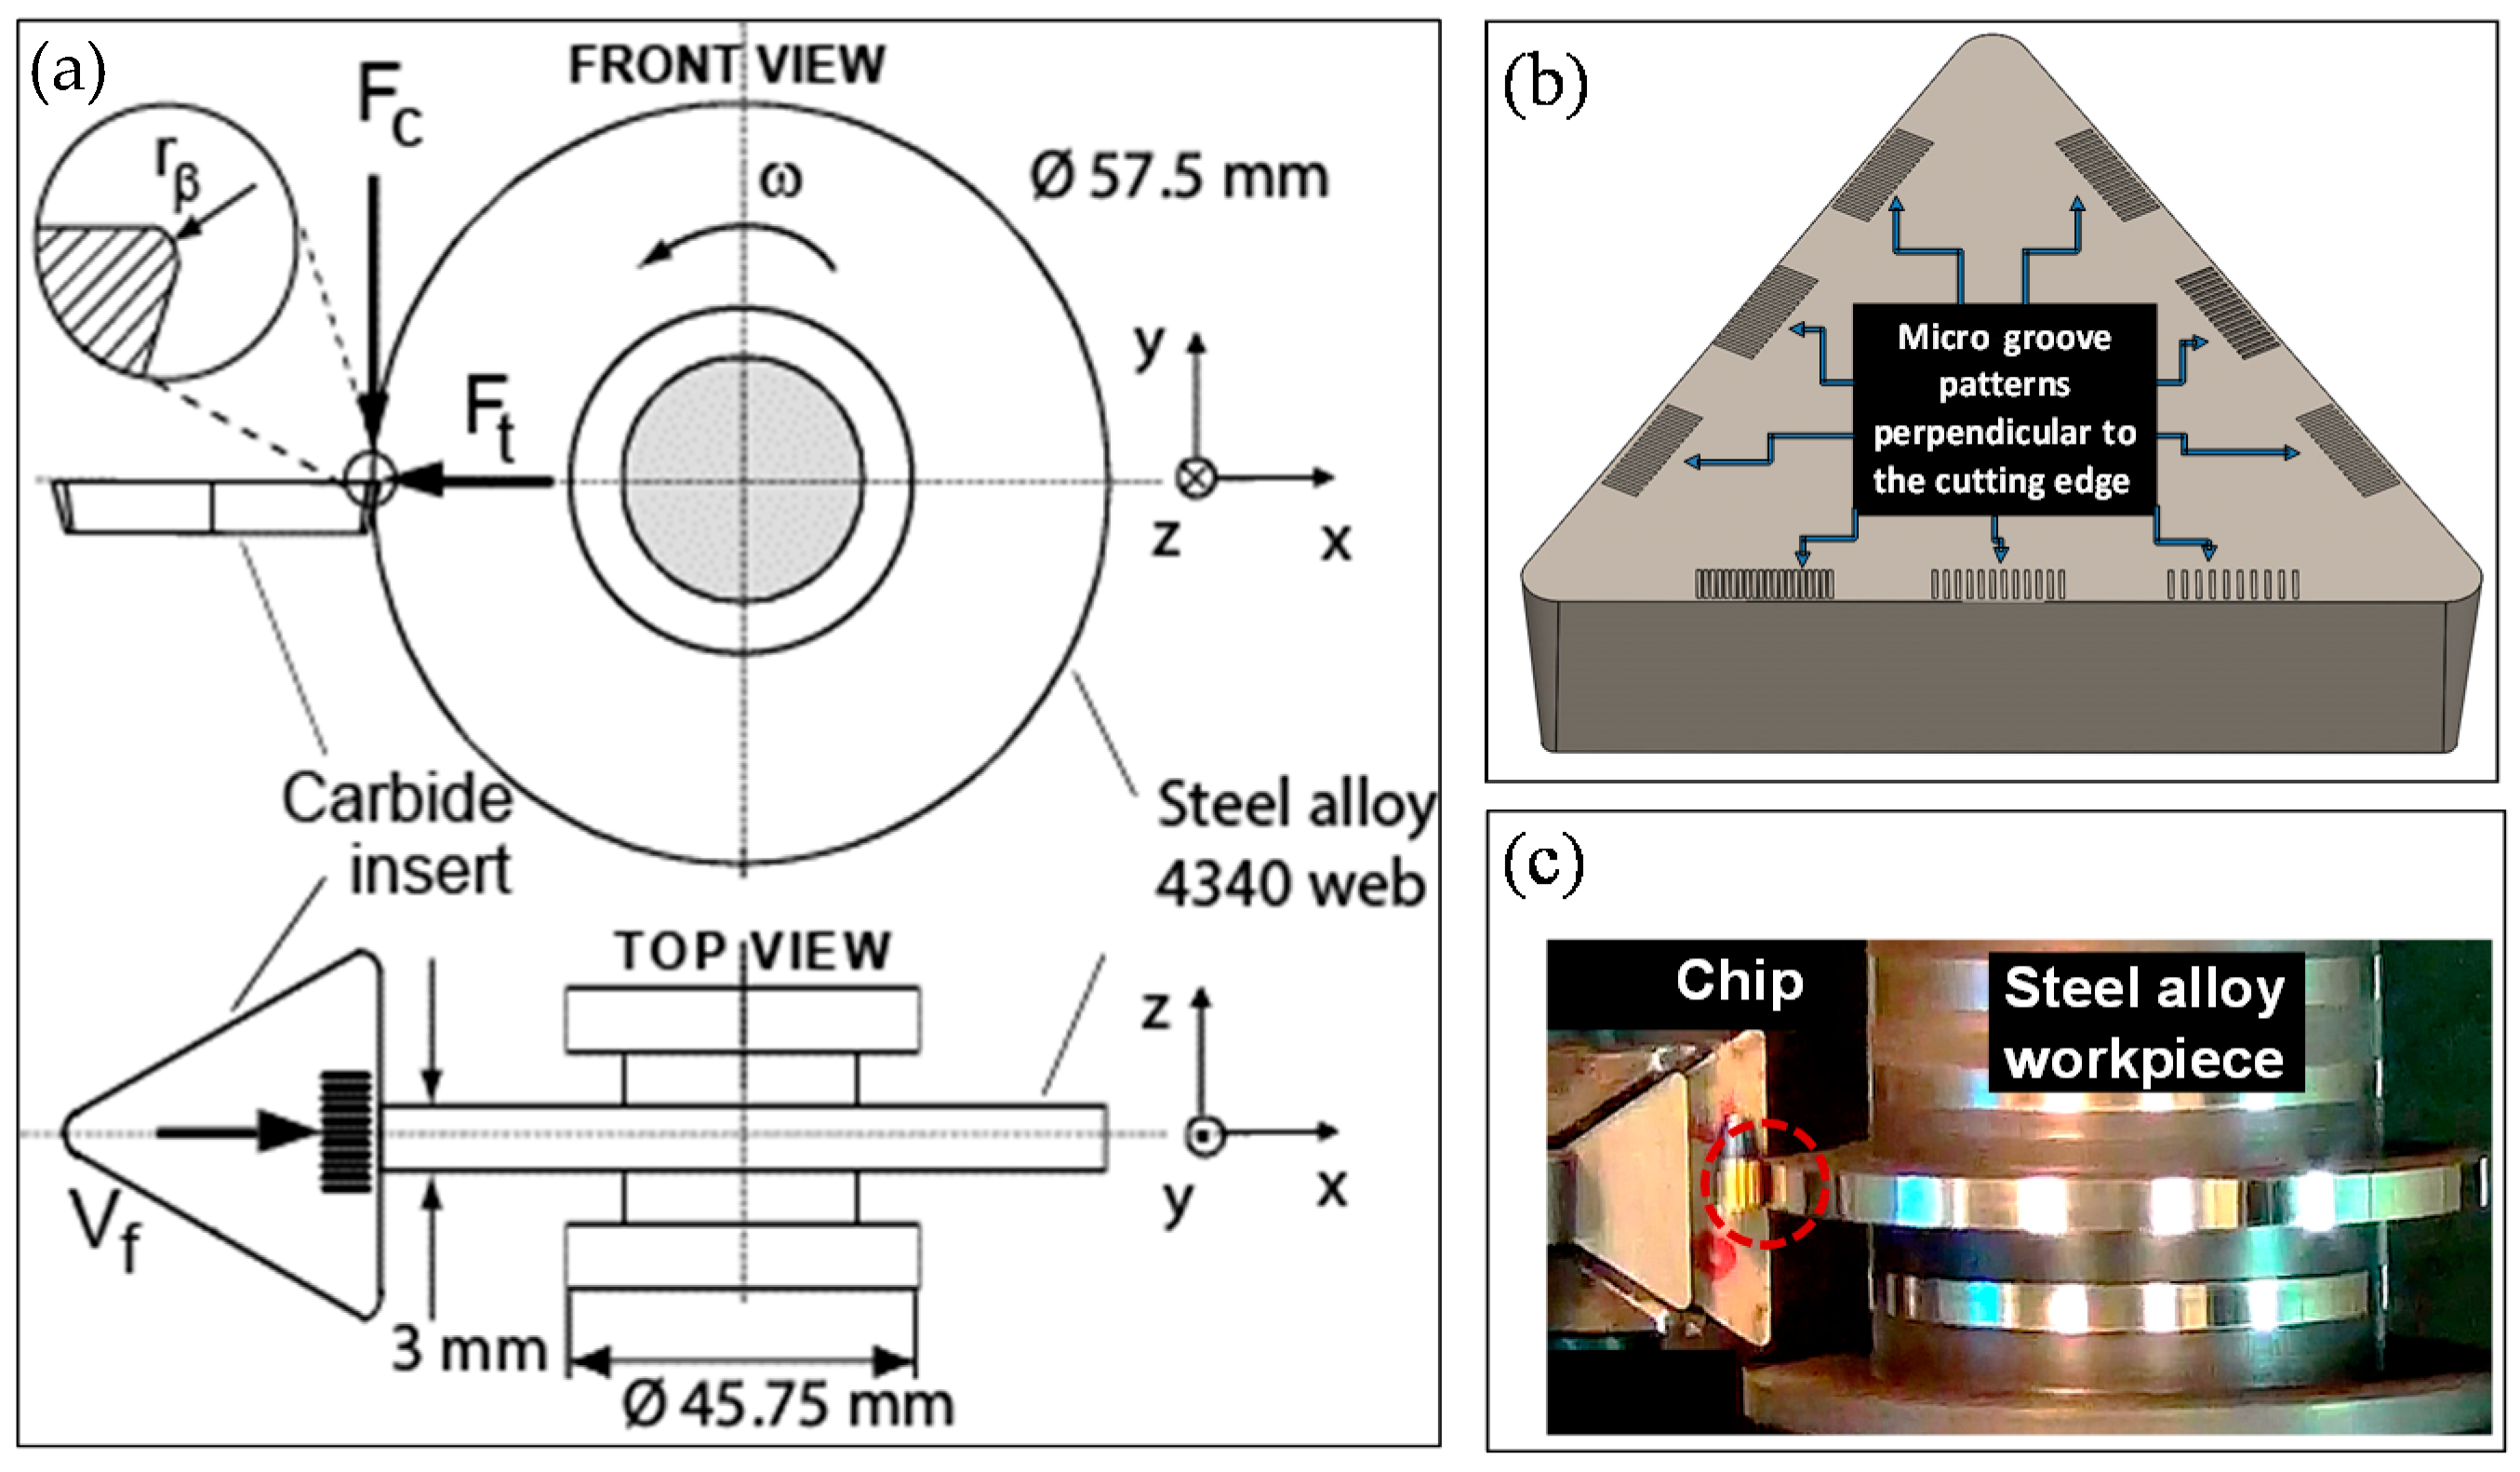
For orthogonal cutting experiments, an annealed Ni-Cr-Mo alloy steel AISI 4340 (217 Brinell hardness) was selected as workpiece material. On the cylindrical bar workpiece, several grooves, approximately 3 mm wide and 15 mm deep, were machined using parting/grooving inserts in orthogonal cutting tests. The workpiece is annealed with a heat treatment process to remove and relieve the machining induced stresses. Then, plunge turning of thin grooves on the alloys steel AISI 4340 is performed by using a tool holder with γ = 0° rake angle (Kennametal CTODN 64-4F) and non-textured (rβ = 5 μm) as well as micro-textured inserts in a rigid Computer Numerical Controlled (CNC) turning center at dry conditions, as shown in Figure 4. Due to the different thickness sizes of the grooves obtained in the workpiece, the width of cut at the orthogonal cutting tests ranges between aw = 2.7 mm and 3.0 mm. Measurements are taken to assure that the actual width of cut values are employed in specific force calculations. Cutting forces are also measured in order the compare the effects of applying micro-texture patterns to the cutting tool surface. For this purpose, a force dynamometer (Kistler Type 9121), a charge amplifier (Kistler Type 5814B1), and a data acquisition system are employed for measuring dynamic cutting forces i.e., main cutting or tangential force, Fc, and radial or thrust force, Ft as shown in Figure 4 and as detailed in [19].

2.2. Chip-Tool Contact Analysis

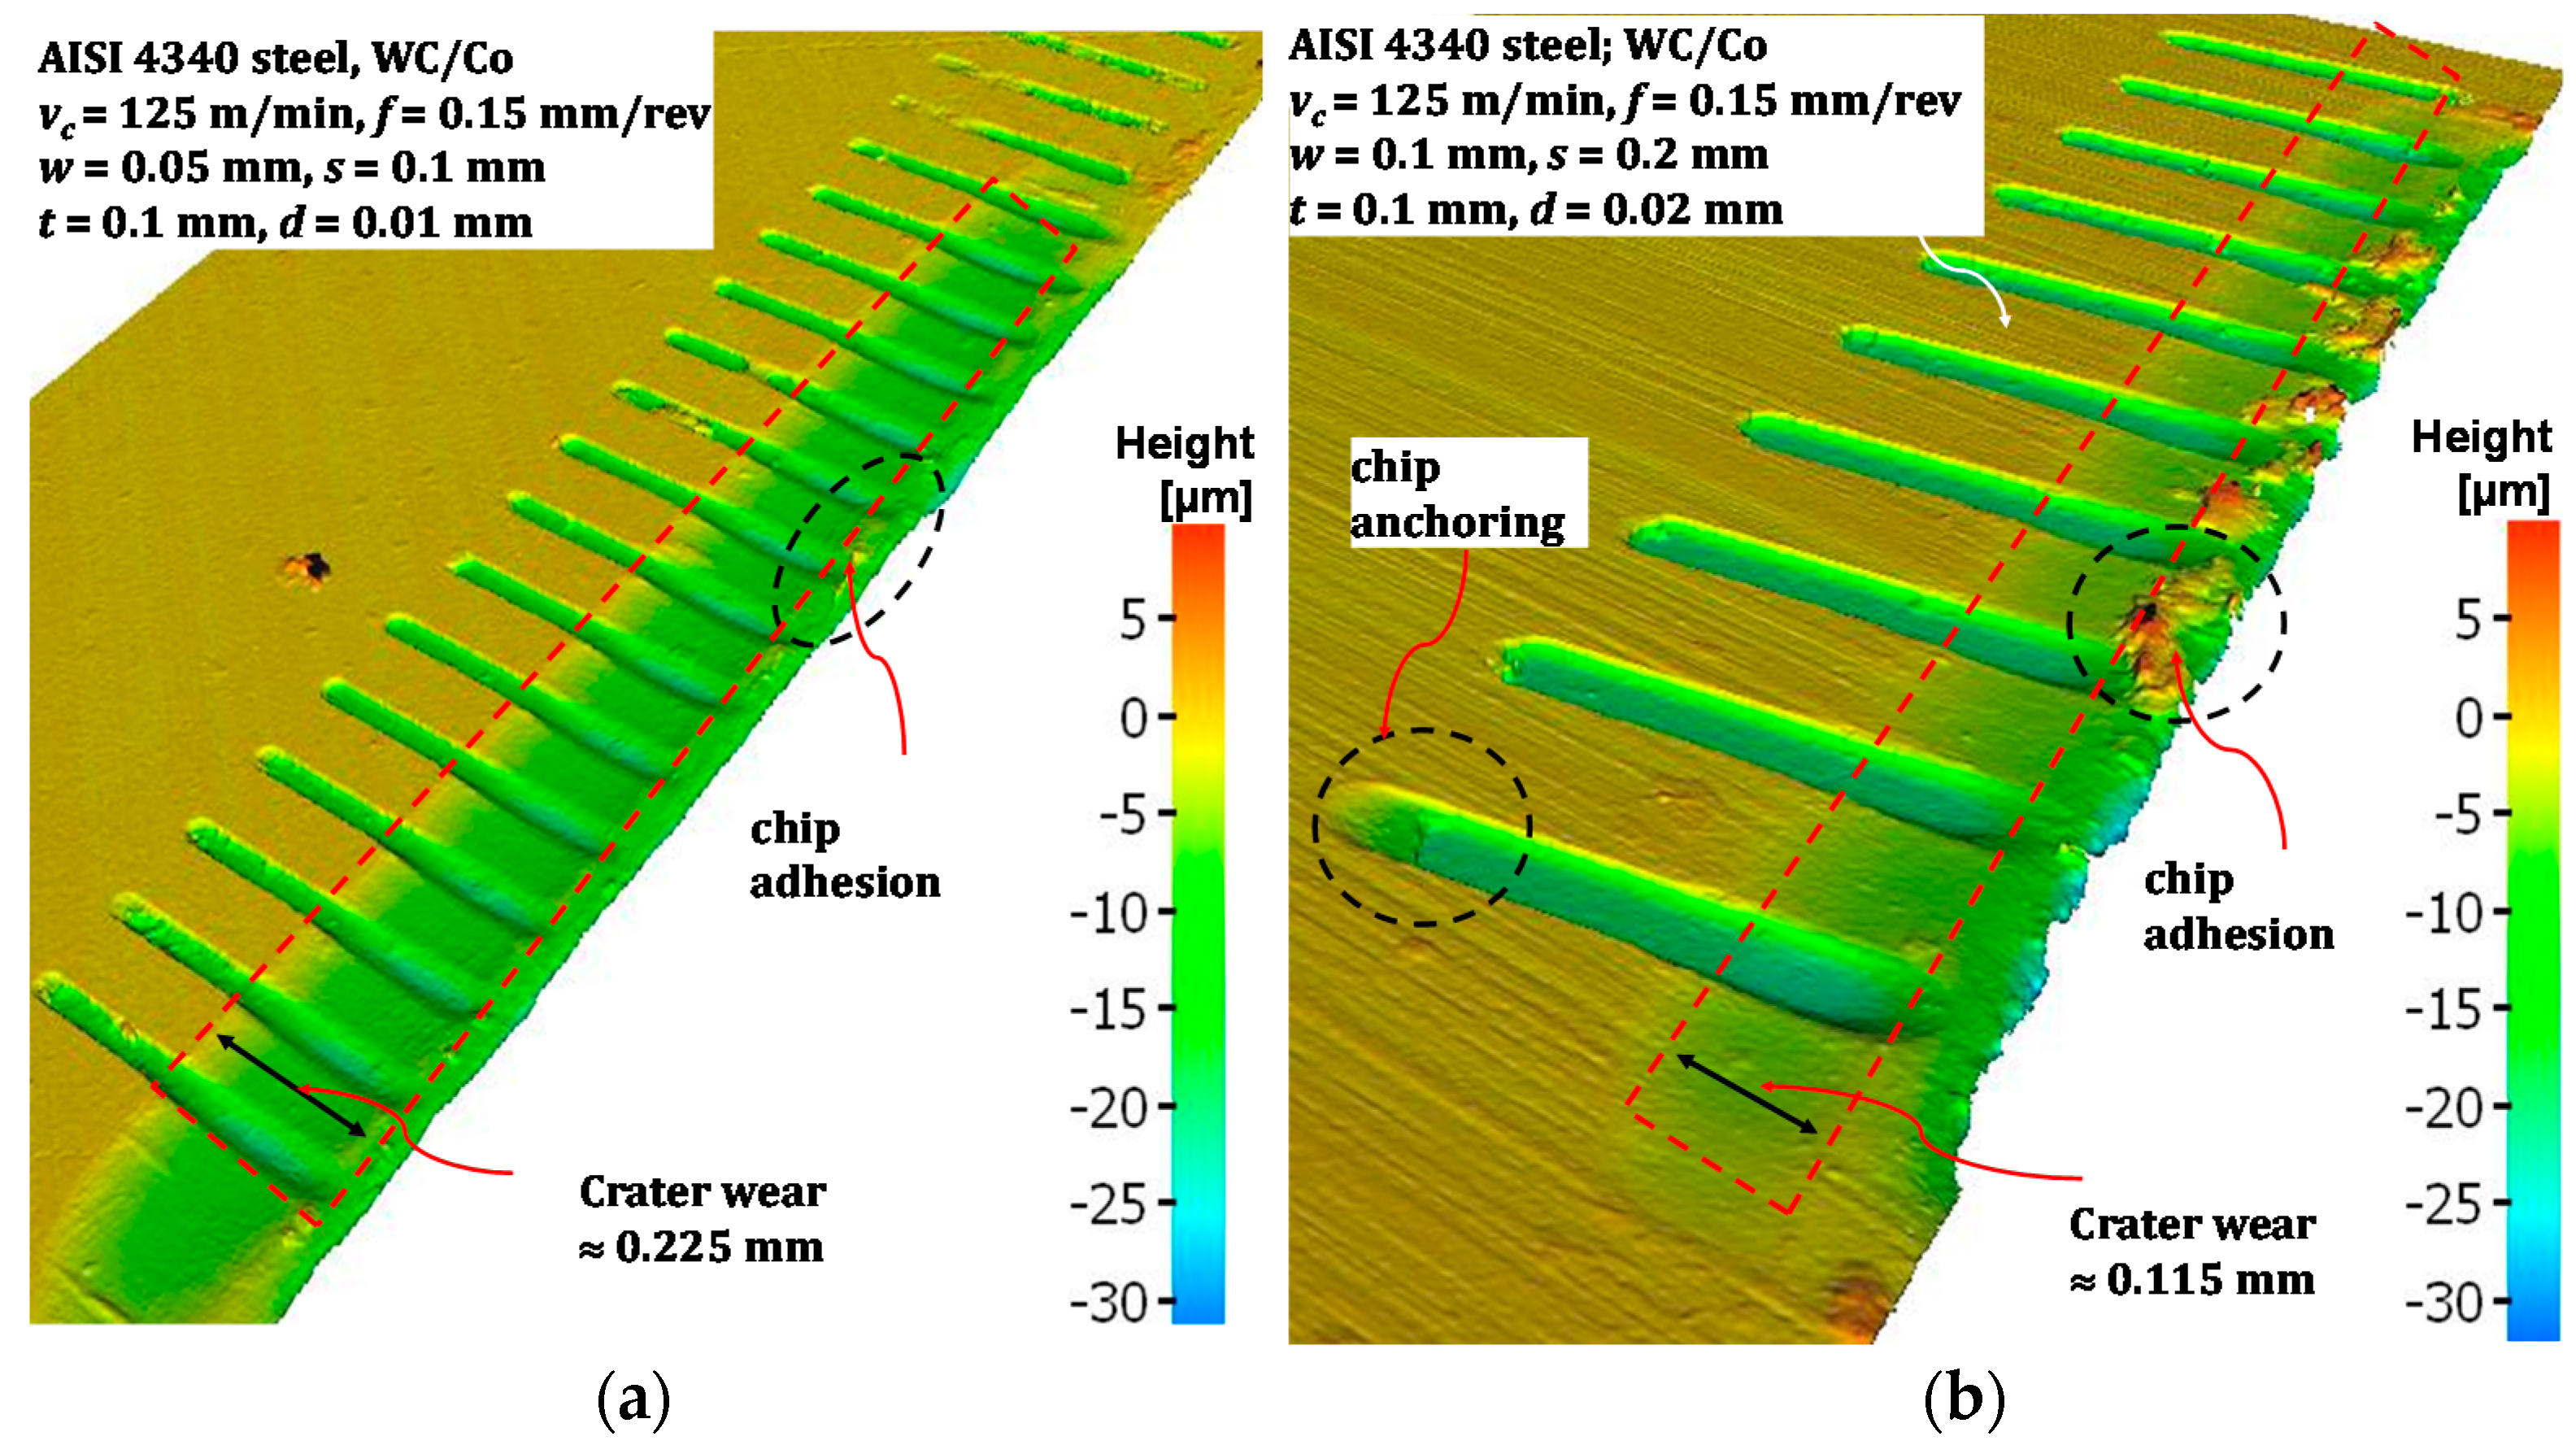
After the cutting tests are conducted, tool surfaces are inspected in detail to identify the worn sections of the cemented carbide tool rake face due to adhesion, abrasion, or attrition. The chip-tool contact and tool wear regions are inspected on the textured tool rake face with optical microscopy (Alicona InFocus G4 XL200, Bruker-Alicona, Raaba/Graz, Austria). The areal surface height maps are obtained from rake faces of textured tool inserts by using focus variation technique. On the rake face of the worn tools, particular regions of interest can be noted. These regions include adhesion region, abrasive or crater wear region, a region exhibiting sliding marks, and a region of chip anchoring as identified by observation using 3D areal height maps, as shown in Figure 5.
Three distinct regions are considered: (i) a chip adhesion region where chips adhere and anchor into micro-grooves, promoting adhesion and built-up layer formation; (ii) a abrasive wear region where chips abrasively erode the surface and leave crater-like marks on the rake face; and (iii) a sliding wear region where chips rub the surface and leave sliding marks. Abrasive wear is incurred on the tool rake face during all cutting conditions. The smearing of chips into micro-grooves is found on all insert rake faces. It can also be seen that the degree of wear on the rake face is higher near to the main cutting edge and lower toward the micro-grooved section, which means that the tool wear rate varies along the chip-tool contact into the micro-grooved section. These regions can also be combined as severe wear (adhesion and heavy abrasion) and sliding wear regions (mild abrasion only). These regions will be later used to compare the simulation outputs against experimental crater wear observations.
Cutting tools with textured rake face provide a reduced contact area at the chip-tool interface. The apparent area of contact, Ap, dependent upon the micro-texture parameters can be calculated as per Equation (1) by using the micro-texture geometry and its parameters. For non-textured cutting tools (where w = 0 ,   s = a w ) , this equation is simply reduced to the form of A p = a w l f , where aw is the width of the textured surface, lf is the chip-tool contact length, s is the spacing between micro-grooves, w is the groove width, and t is the distance from cutting edge, as shown in Figure 3.
A p = a w t + ( l f t ) s ( a w w + s ) π 4 w 2   ( a w w + s )
The mean friction coefficient can be calculated from measured main cutting and radial thrust forces, as per Equation (2).
μ = t a n [ γ 0 + a r c t a n ( F t / F c ) ]
In cutting tests, a constant cutting speed (vc = 125 m/min) is selected, while the feed per revolution is varied (f = 0.1~0.2 mm/rev). The actual width of cut (aw) and the feed (f) at each testing condition are used to calculate specific forces. Measured chip-tool contact length (lf), apparent contact area (Ap), and friction coefficient (μ) are reported for each cutting condition and micro-texture parameters as given in Table 1.

3. Results and Discussion

3.1. Effects of Micro-Texture on Cutting Forces

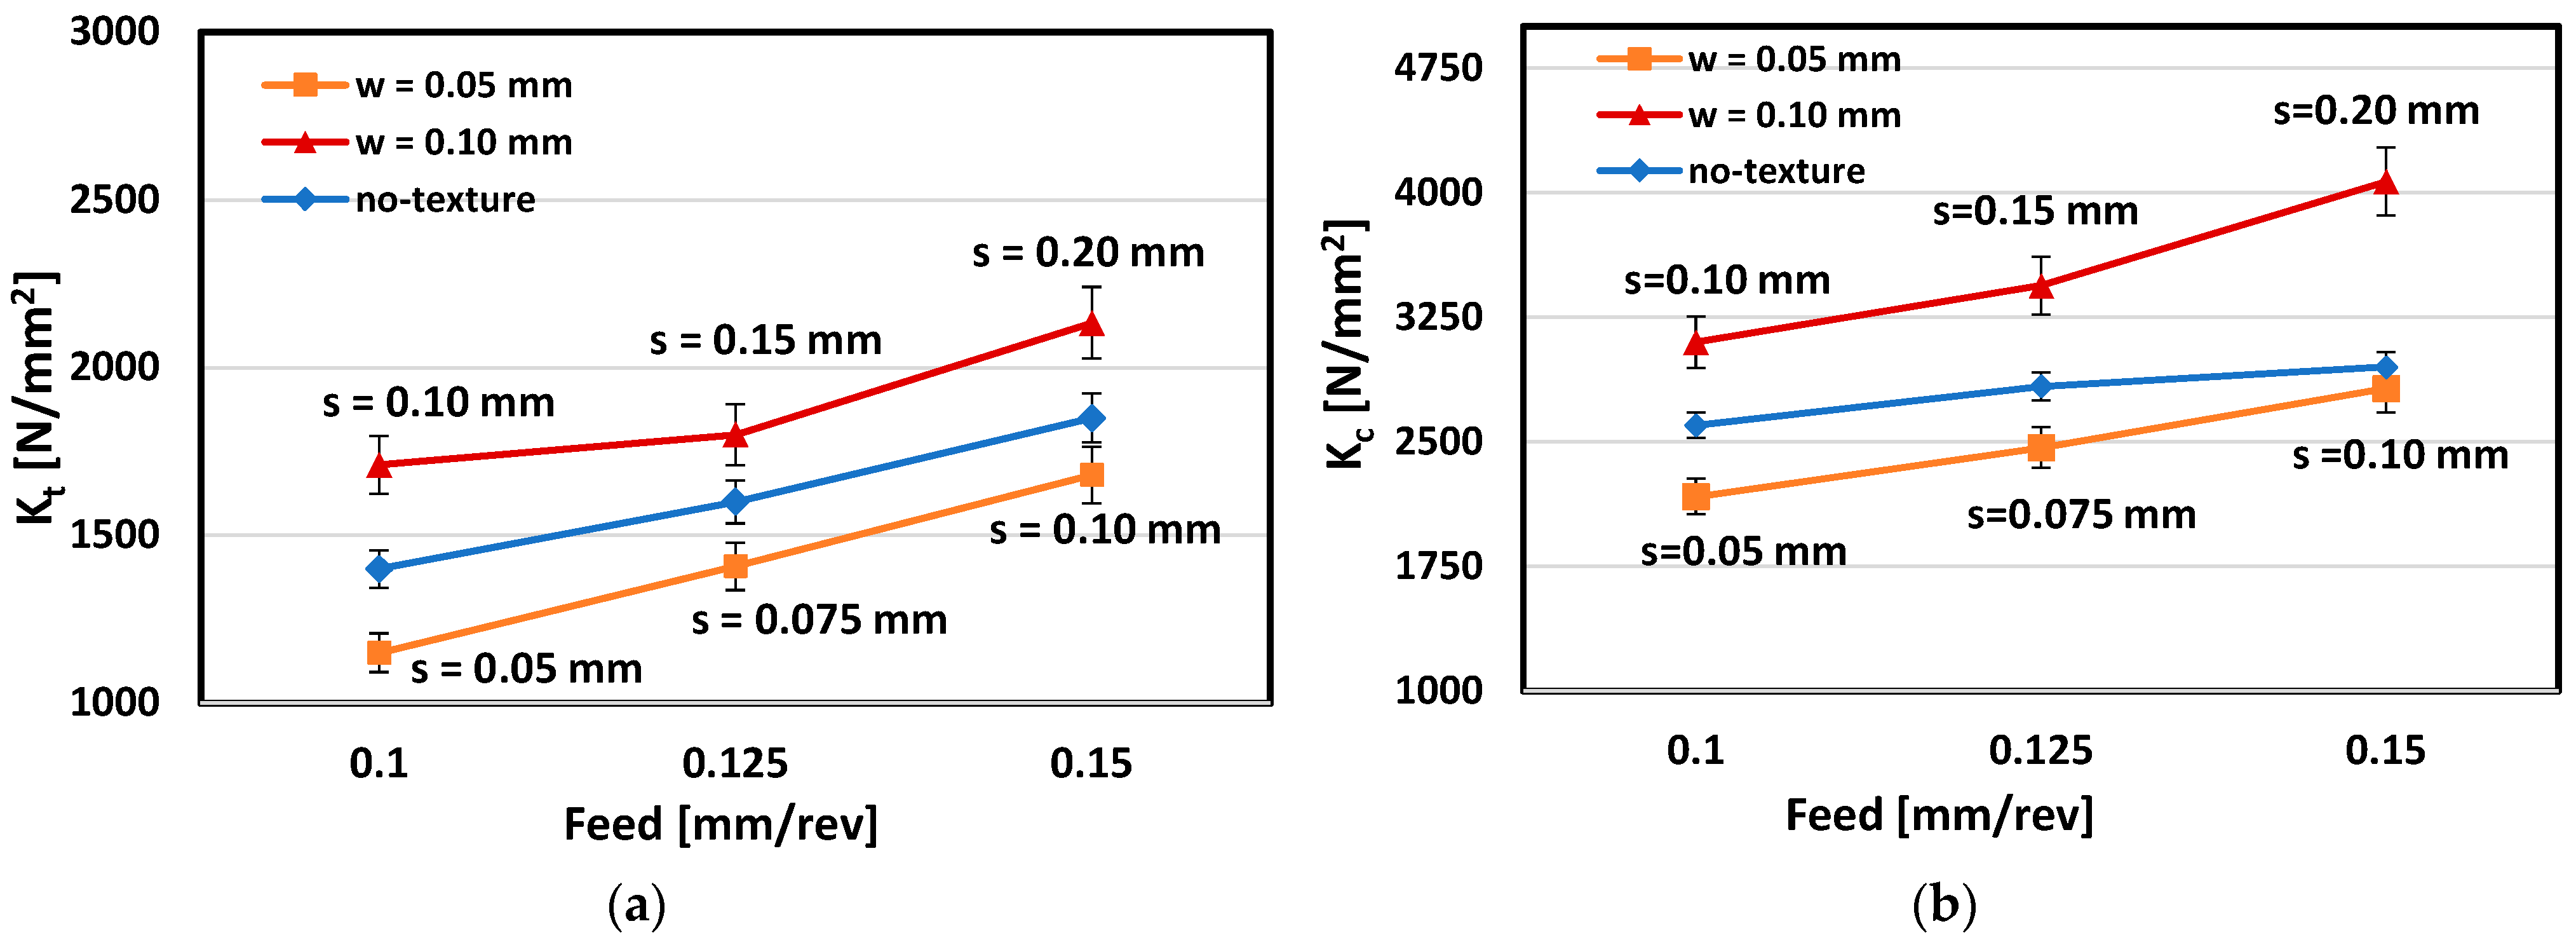
The effects of micro-texture parameters and feed rate on specific forces (both Kc and Kt) are analyzed and shown in Figure 6. The effect of micro-texture is mostly negligible at the lower feed rate (f = 0.1 mm/rev), as most of the chip load is concentrated at the non-textured section on the rake face (t = 0.1 mm). As varying width and spacing is used, the effect of the micro-groove width and spacing is found to be more significant on the specific thrust forces. Shear strength is expected to decrease due to lower thrust or friction force when a larger micro-groove width and spacing parameters are applied.

3.2. Effects of Micro-Texture on Tool Wear and Chip Adhesion

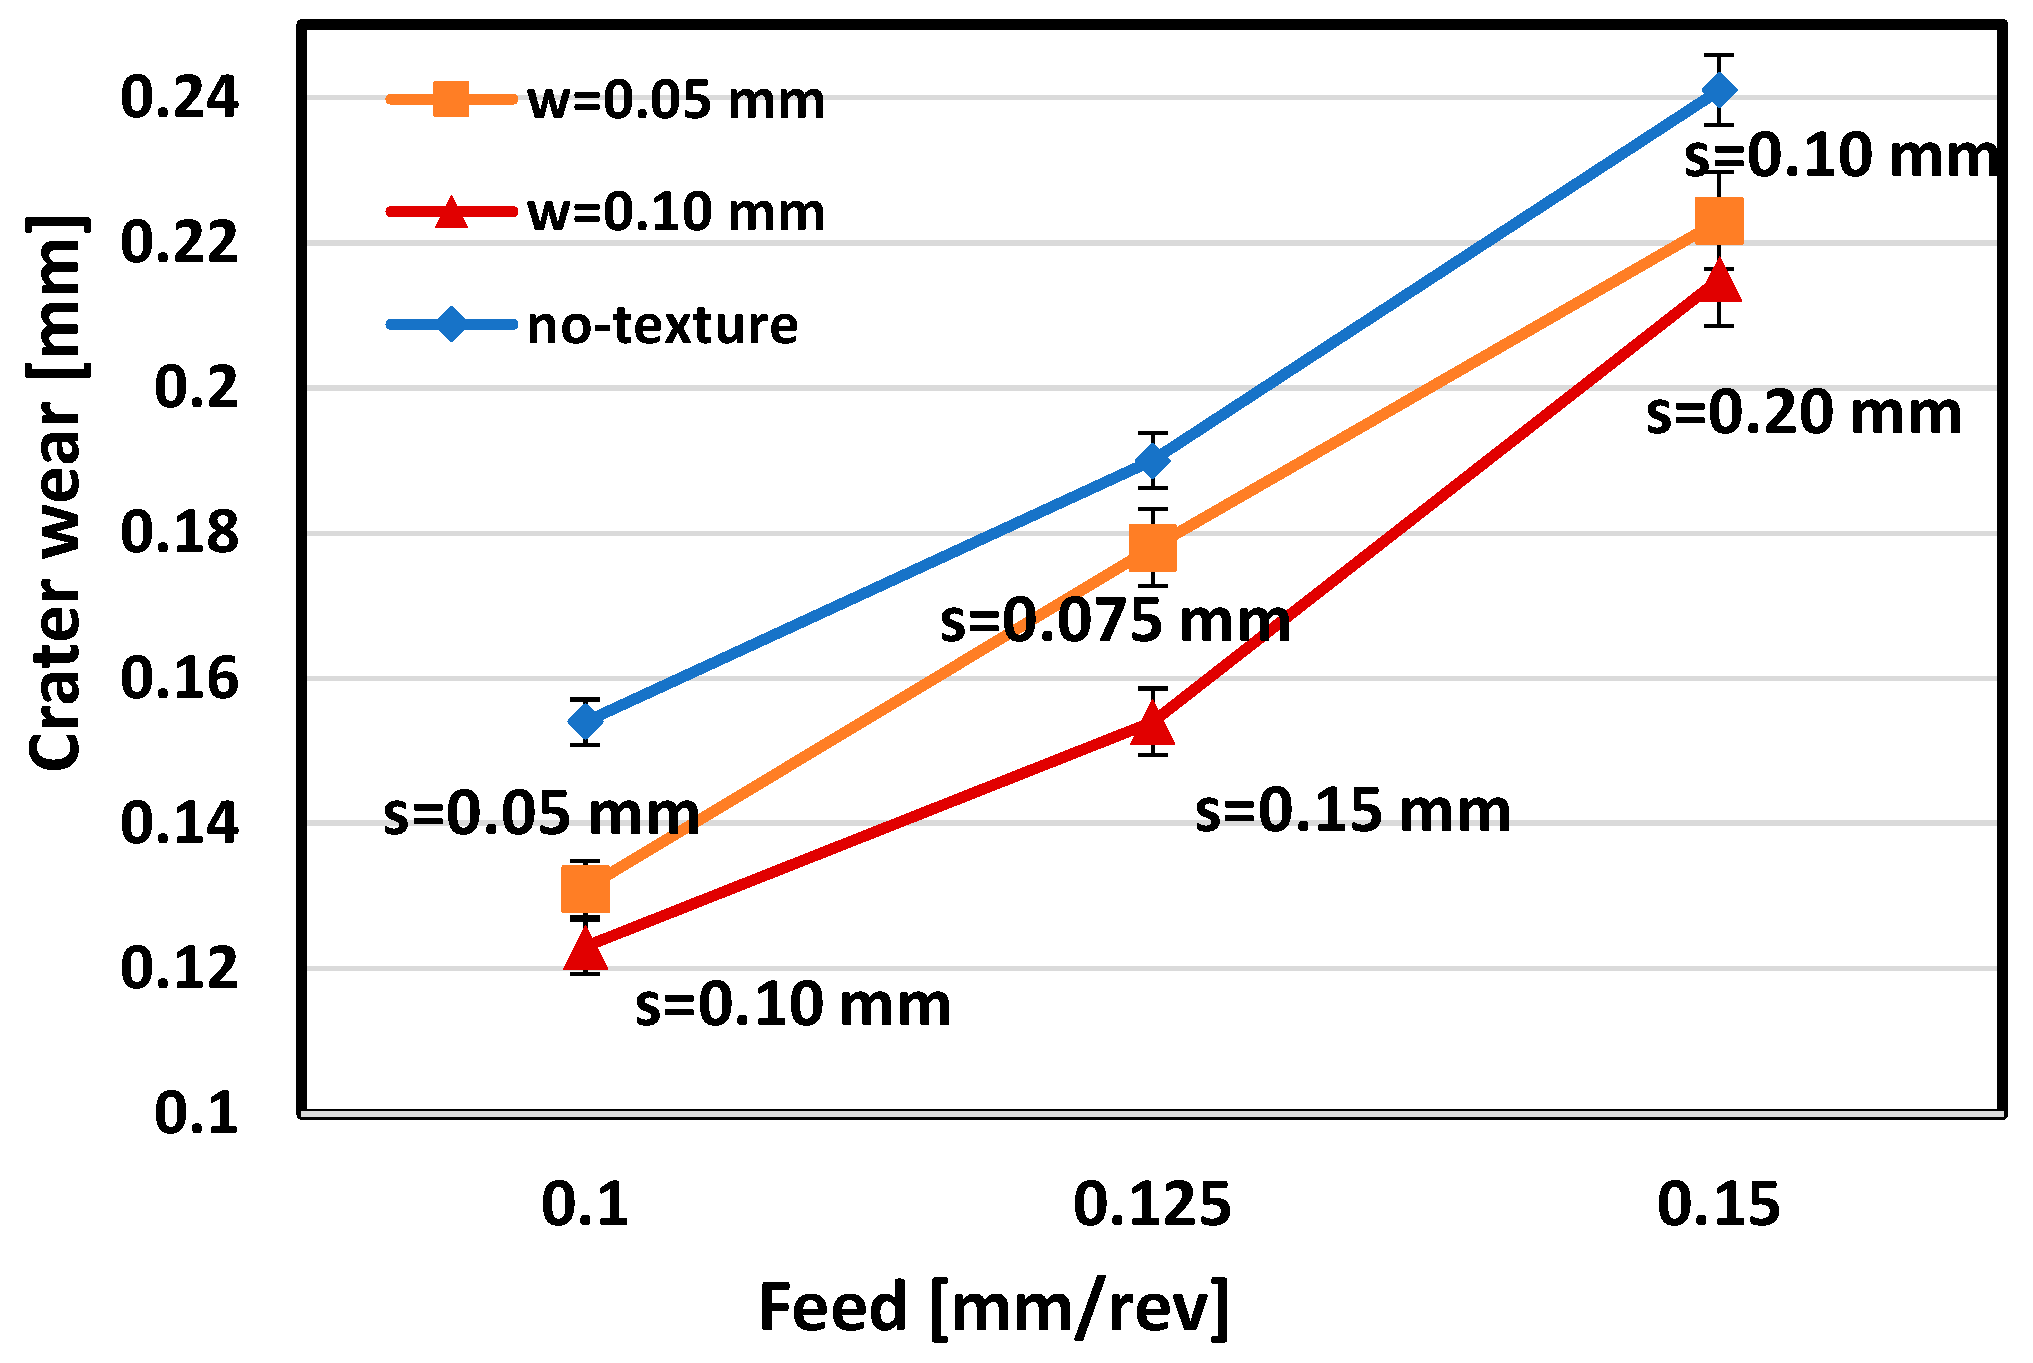
The surface texture of modified cutting tools is investigated using 3D areal height maps. These height maps provide further details about crater wear, locations of chip adhesion and smearing into micro-grooves, and tool edge chipping. The crater wear on the tool rake face of the micro-textured area is compared against the cutting tools with no texture (untextured tool inserts) when the same distance of cut is used under all cutting conditions, as given in the charts of Figure 7. It can be observed that the higher the feed rate, the higher the crater wear land becomes. This indicates the severity of tool-chip contact conditions. Observed types of wear marks along the rake face can represent the combined effect of micro-texture and variable feed rate. The effects of micro-groove width and micro-groove spacing are observable. Namely, a larger micro-groove width results in higher amount of chip material smearing into the micro-grooves, whilst crater wear is reduced. This trend is reversed when smaller micro-groove width and spacing is adopted. This indicates that there is an intermediate optimal design of tool surface texturing for this particular cutting application.
Several studies point out that surface texture can suppress chip adhesion on the tool surface by reducing the effective contact area [21,22]. The cutting conditions at high feed rate result in chip adhesion and crater wear (Figure 5). Some chipping of the cutting edge is also observed at high feed rates f > 0.2 mm/rev. Chip material that is smearing and anchoring into micro-grooves constitutes evidence of chip flow along micro-groove directions and some chip penetration over micro-grooved surfaces due to high chip-tool contact pressures. Noticeably, a large micro-groove width (w) has resulted in more chip smearing, anchoring, and penetration into micro-grooves on the tool rake face (Figure 5b).

3.3. Simulation of Cutting with Micro-Textured Tool

Finite element method-based (FEM) modeling is utilized to analyze the influence of micro-textured tools on the orthogonal cutting process and to evaluate the effect of micro-textures on cutting force, temperature, friction coefficient, and chip morphology. Arulkirubakaran et al. [28] and Kim et al. [29] both used DEFORM-3D software, while Mishra et al. [30] and Liu et al. [31] used AdvantEdge software for cutting simulation using textured tools. Patel et al. [32] used 3D FEM-based cutting simulations for diagonal micro-grooves in turning of titanium alloy Ti6Al4V in DEFORM-3D. These attempts show that FEM modeling and simulations have great potential for providing valuable assistance in the design of cutting tools with new texture patterns and assessing their performance in the simulation environment.
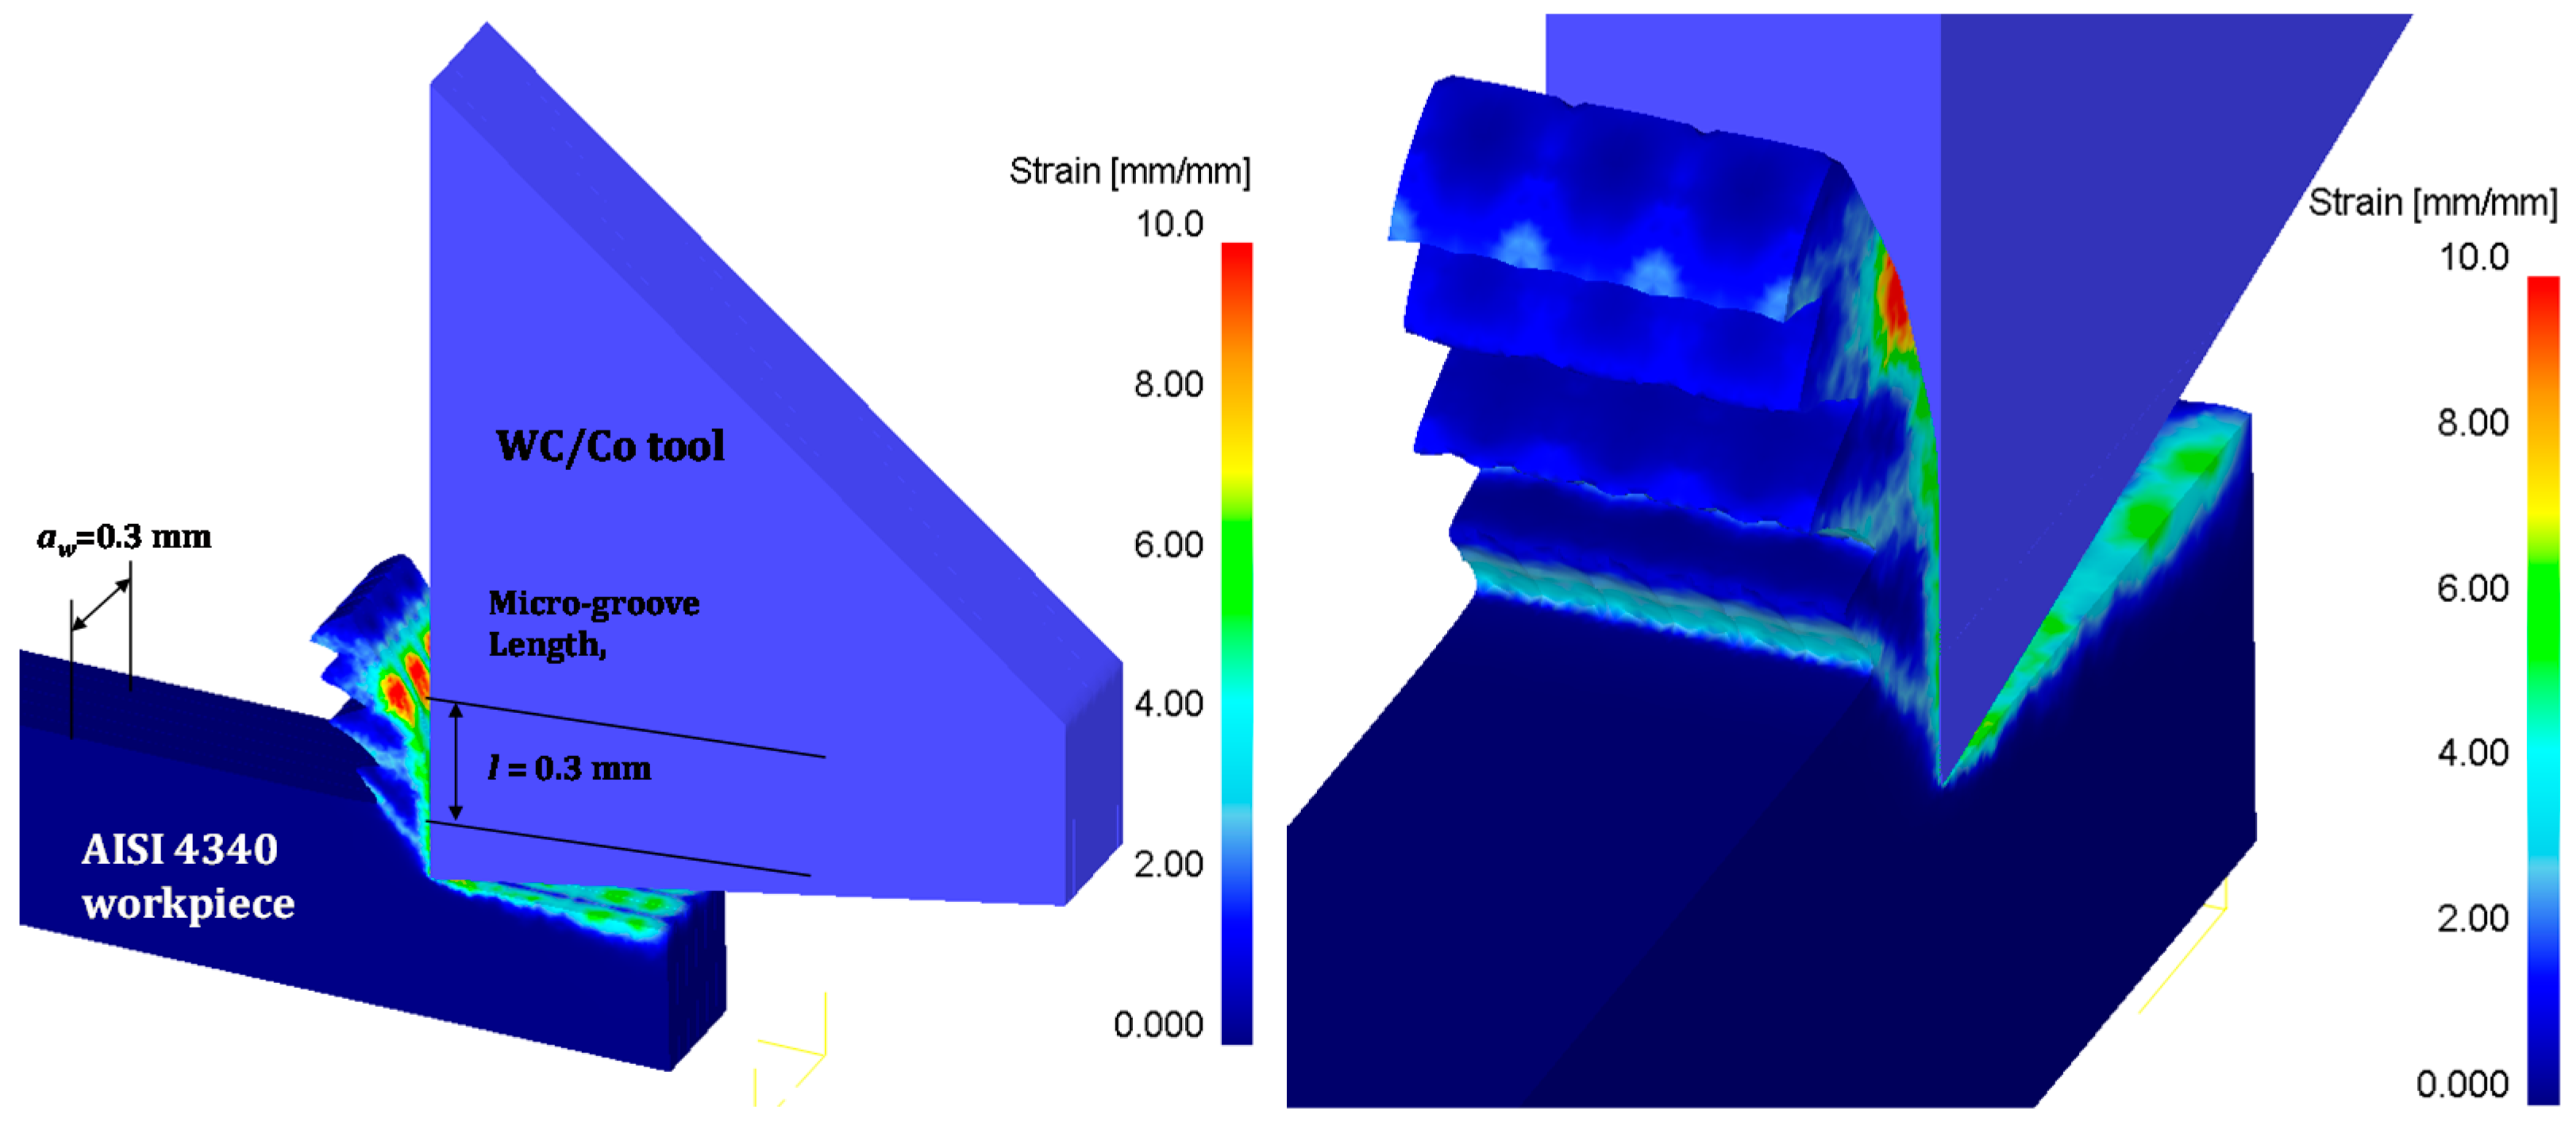
In this study, FEM simulations are designed and performed by considering a 3D symmetry model for cutting, with a single micro-grooved tool section and a narrow width of cut, to obtain a wide range of numerical simulation results by using the DEFORM-3D software. The Johnson–Cook work material constitutive constants for AISI-4340 steel A = 1504 MPa, B = 569 MPa, n = 0.22, C = 0.003, and m = 1.17 are adapted from [33] under rigid-plastic material deformation conditions, whilst the melting point of AISI-4340 steel is taken as 1427 °C. In order to simulate serrated chips, which are observed during high feed cutting conditions, a damage model proposed by Cockcroft and Latham [33] is employed, with a critical damage value of 90 MPa with 10% flow stress softening. Friction coefficients obtained from orthogonal cutting tests given in Table 1 are used, along with a shear friction factor m = 0.6 implemented as suggested in [33], based on the constant shear hypothesis τ f = m τ 0 , where τ 0 is the shear flow stress of the steel material. The cutting tool is defined as a symmetry model in DEFORM-3D for a half of the textured groove as shown in Figure 8a. Then, the 3D symmetry model is combined to obtain a cutting tool with a tool width of 0.3 mm for three grooves in the orthogonal cutting direction, using a textured cutting tool model (see Figure 9). The cutting tool is defined as an elastic deformable body by assigning a modulus of elasticity of E = 212 GPa to calculate the stress state of normal and Von Mises stresses acting during the cutting process. The boundary conditions allow heat transfer with environment through a convection coefficient of 0.2 N/s/mm/°C.
The simulations are validated by comparing measured forces (Fc_exp, Ft_exp) with cutting forces predicted from 3D FEM simulations for both the textured cutting tools (d = 0.01 mm, s = 0.05 mm, w = 0.05 mm) as summarized in Table 2, and a cutting tool where no micro-texture was applied, as shown in Figure 10. The mismatch of cutting forces is found to be less than 15% for Fc and 40% for Ft, indicating a good agreement of results, especially when accounting for highly complex contact mechanisms present in actual cutting experiments.
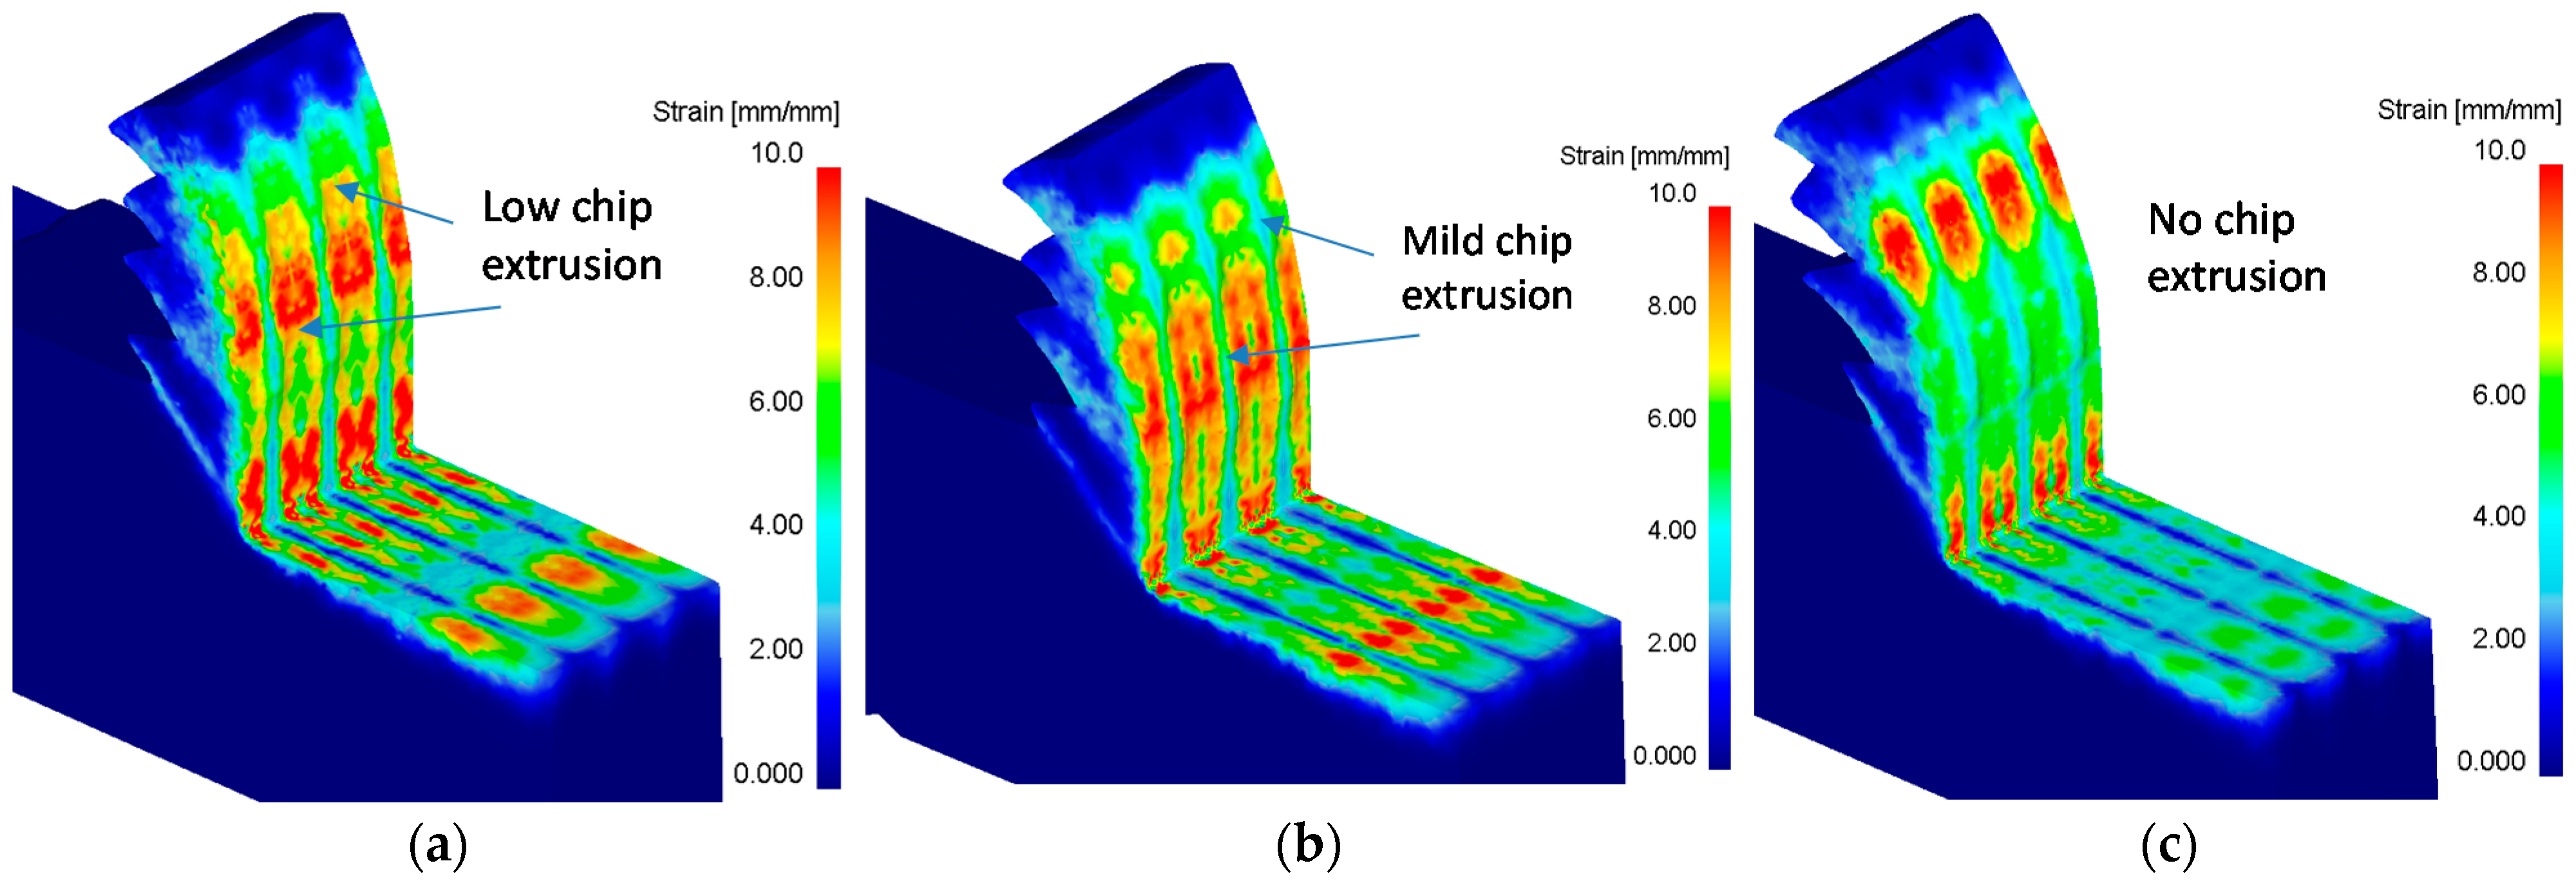
In addition, the 3D FEM simulations are run with for two different cutting tools designed with micro-texture parameters (d = 0.01 mm and d = 0.02 mm; others kept constant s = 0.05 mm, w = 0.05 mm) and compared against outputs for a non-textured cutting tool. In these comparisons, chip formation and chip extrusion into the micro-grooves and anchoring, as well as tool wear rate parameters (contact normal stress, interface temperature, and sliding velocity) were studied under each cutting condition (see Figure 11).
The dry cutting conditions used in this study show substantial chip adhesion and tool wear, especially when cutting speed is increased from 125 m/min to 150 m/min and the feed is increased above 0.01 mm/rev. Hence, the simulations were run for the cutting speed value of 125 m/min. Subsequently, the physical contact variables at the tool-chip interface calculated by using the FEM simulation model are used to estimate deterministic tool wear rate by using Archard’s tool wear rate model proposed by Usui et al. [33]. It should be noted that the tool wear rate can be predicted when the cutting tool is defined as an elastic-deformable body, as a key physical variable at the chip-tool interface is normal contact stress (σn). The tool wear rate model proposed in [34] is described using the following expression (Equation (3)),
d w d t = a σ n v s e x p ( b T i n t )
where d w d t = w ˙ is the tool wear rate (volume loss per unit contact area per unit time), σ n is the normal stress, v s is the sliding velocity at chip-tool interface, and T i n t is the interface temperature. All of the physical contact variables are calculated at each element or node. The model relies on two material parameters: a and b. The parameter a in the wear rate model controls the rate at which wear rate will increase with increasing contact stress and sliding velocity combined, and the parameter b adjusts the exponent for temperature dependency of this wear rate ( d w d t ). The wear rate model parameters for a carbon steel workpiece and cemented carbide tool material pair are as given below in Equations (4) and (5) [35].
a = 7.80   ×   10 9   and   b = 5.302   ×   10 3   for   T i n t     1150   K
a = 1.198   ×   10 2   and   b = 2.195   ×   10 4   for   T i n t     1150   K
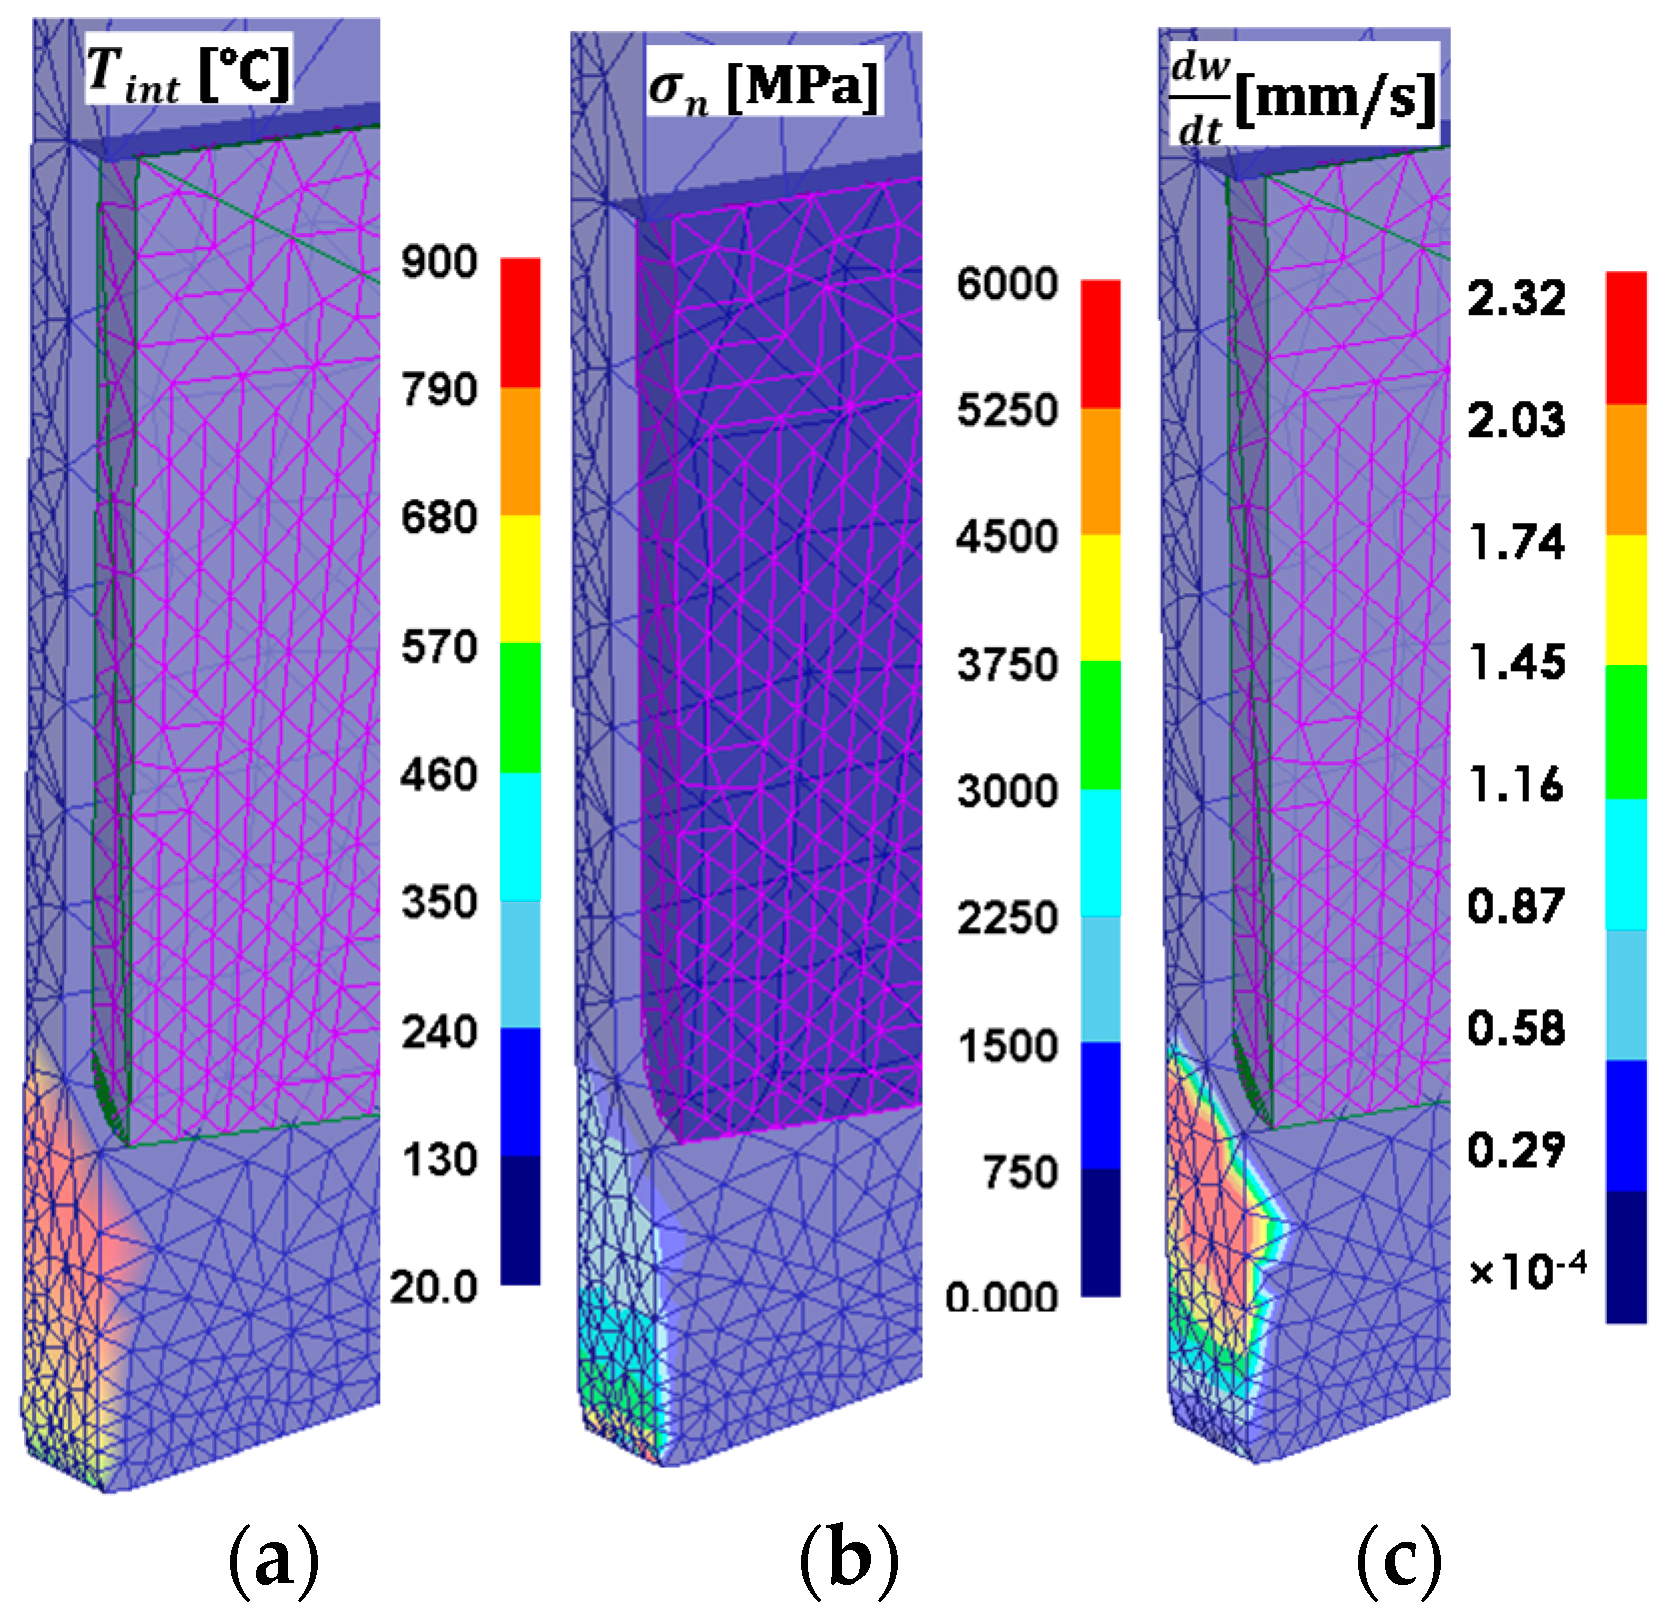
It should be noted that the wear rate calculated using Archard’s model does not fully capture chemically driven wear mechanisms at high cutting speed and cutting zone temperatures above 900 °C. The physical contact variables at the chip-tool interface on the axisymmetric micro-groove are obtained from the FE simulation outputs, such as sliding velocity, interface temperature, contact pressure, and wear rate, as shown in Figure 12 for the half-symmetry textured tool model. According to Childs [10], a normal contact stress above 800–1000 MPa should cause a certain degree of chip material adhesion at the tool-chip contact, if the contact temperature is above half of the melting point of the steel material (714 °C in the case of AISI 4340 steel). The normal contact stress is above 1500 MPa, and the interface temperature is around 680–790 °C at the rake face of the untextured section of the cutting tool. These conditions should cause chip material adhesion at the asperity contact zones on the cutting tool’s rake face surface.
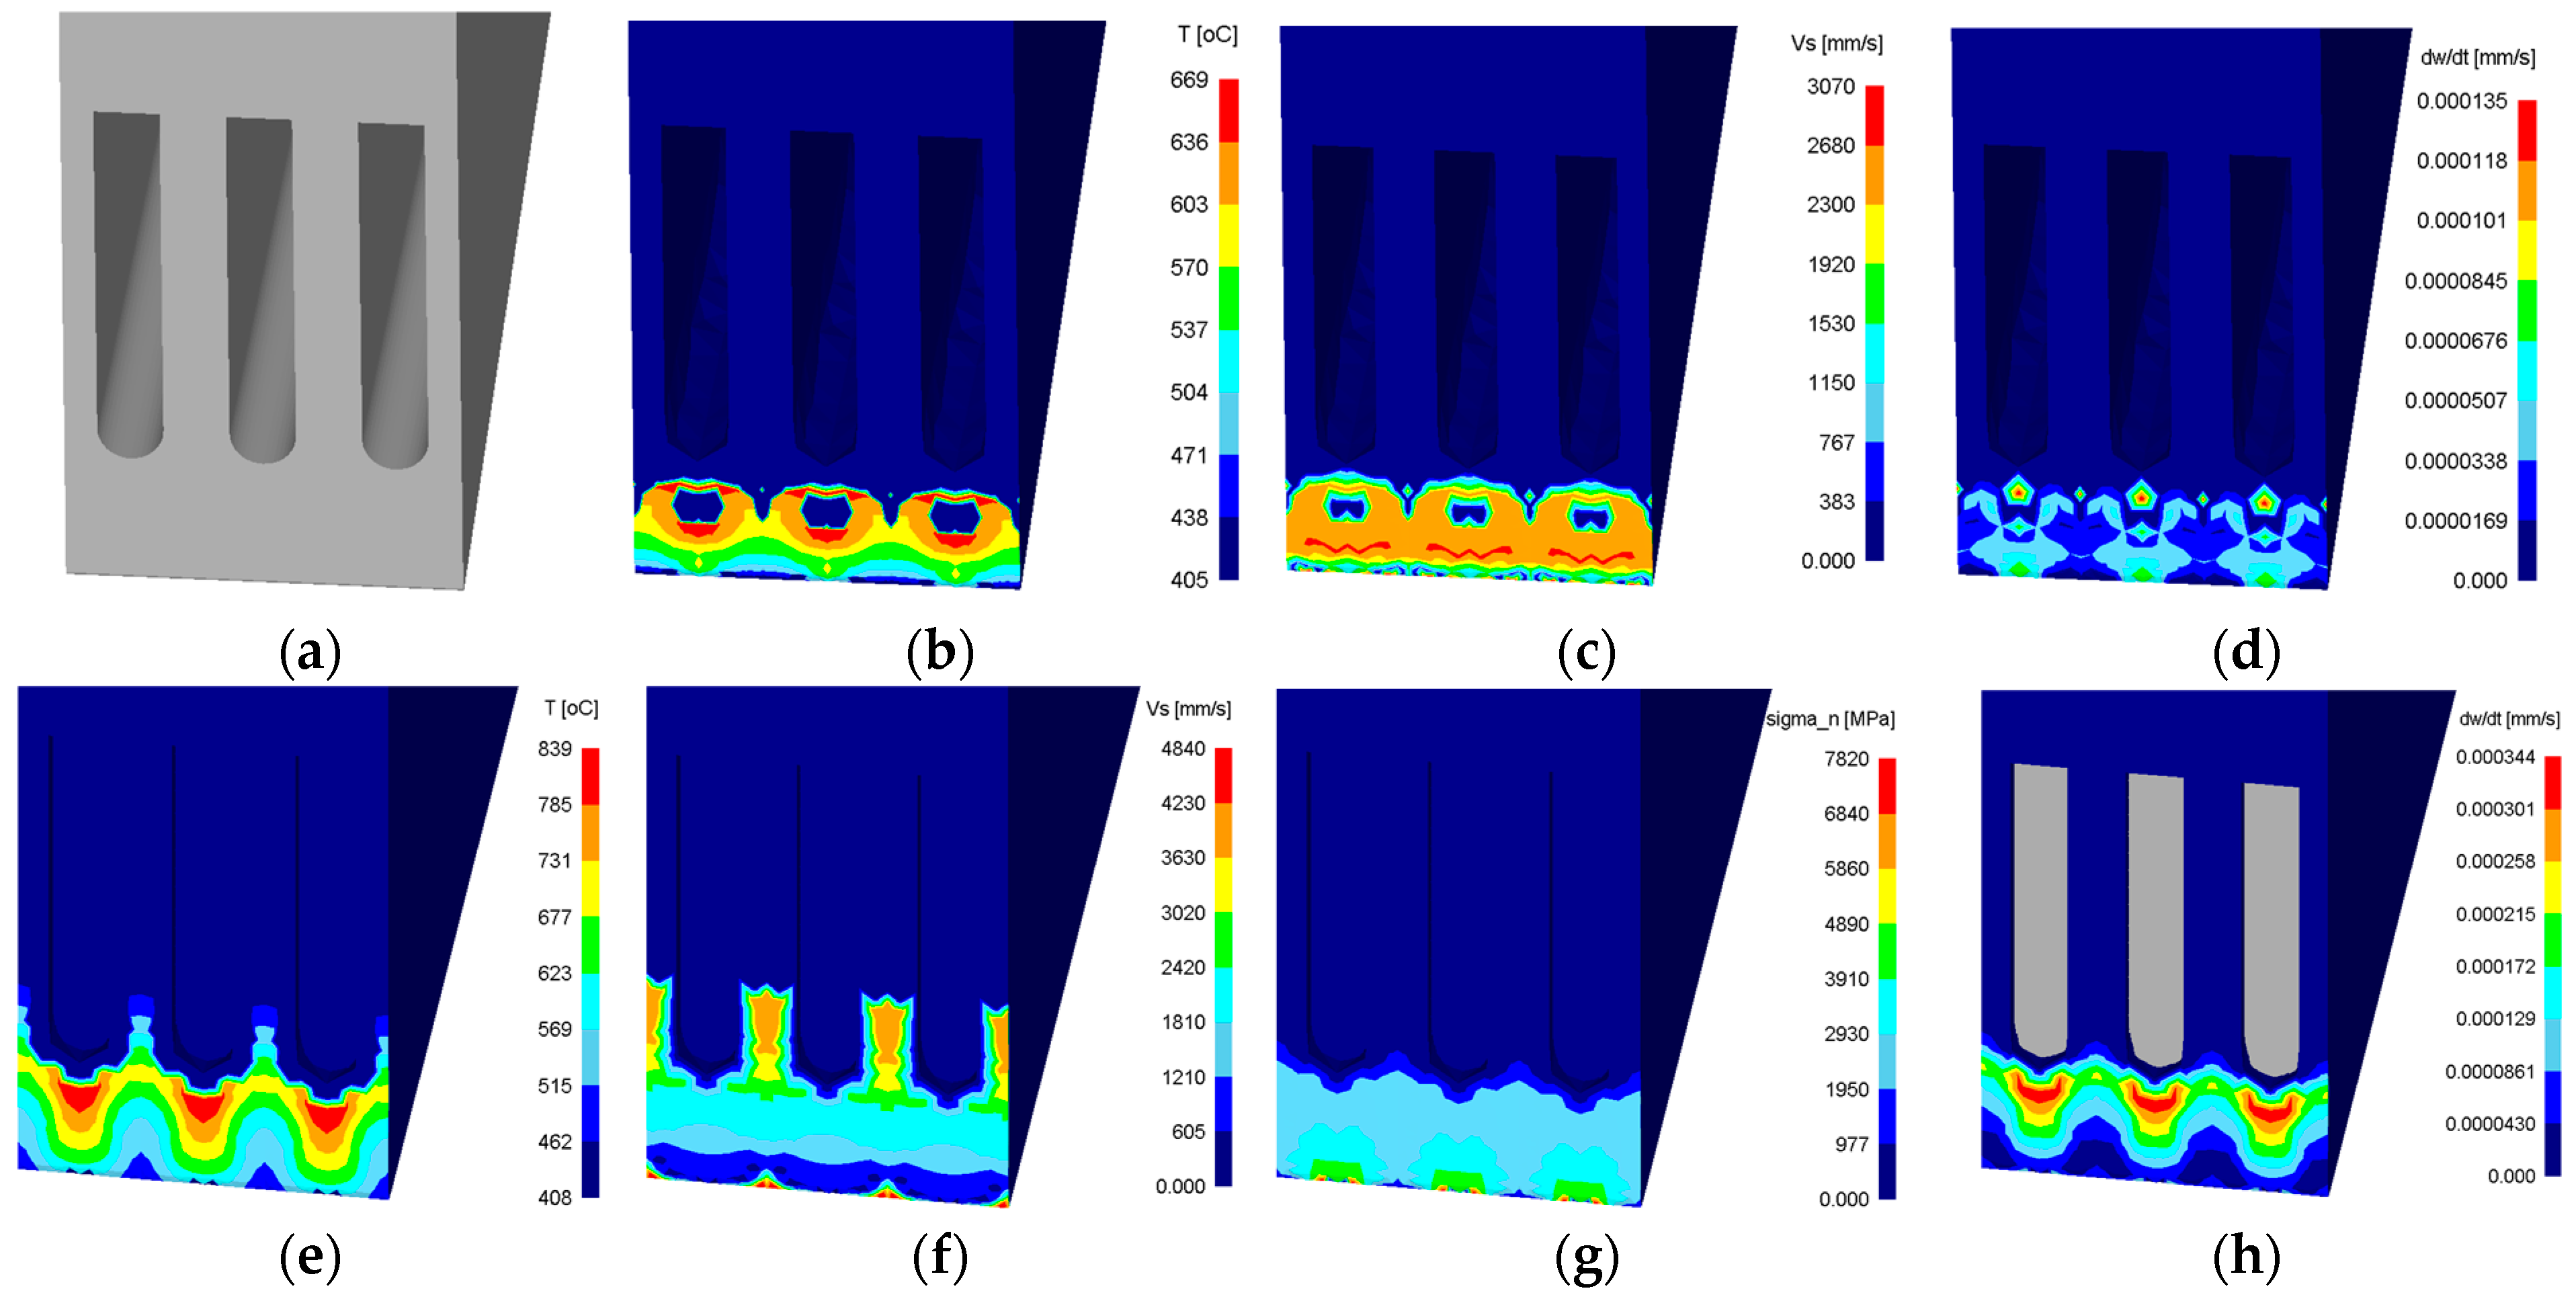
Overall, interface temperatures higher than 600 °C and contact pressures around 3000 MPa are calculated by the FEM model near the beginning of the micro-groove. A comparison of contact pressures and wear rates at increasing feed rates is shown to amplify the effects of increasing feed rates on the expected increase in chip material adhesion on the cutting tool rake face surface. In fact, the contact stresses are quite high (>4000 MPa) at or near the tool cutting edge, indicating more concentration of chip material adhesion. This is in agreement with experimental observations (Figure 5). The predicted interface normal contact stress near the micro-texture indicates that, when the normal contact stress is higher than 3000 MPa and at high interface temperatures (>600 °C), the welding (adhering) of alloy steel chip material to the tool surface should be expected. The premise of a textured cutting tool surface is that the micro-texture is creating a relief on these sections of the cutting tool where high normal contact stresses and high interface temperatures are expected. The same results are illustrated when the symmetry tool section model is used to generate a 0.3 mm wide cutting tool with three grooves in it (see Figure 13 and Figure 14) with two groove depths (d = 0.01 mm and d = 0.02 mm).
The predicted wear rate values for each simulation are utilized to calculate two distinct wear regions:
Sliding   wear   region : d w d t   <   3.0   ×   10 4   mm / s   for   T i n t     600   ° C   and   σ n <   700   MPa
Severe   wear   region : d w d t     3.0   ×   10 4   mm / s   for   T i n t     600   ° C   and   σ n   700   MPa
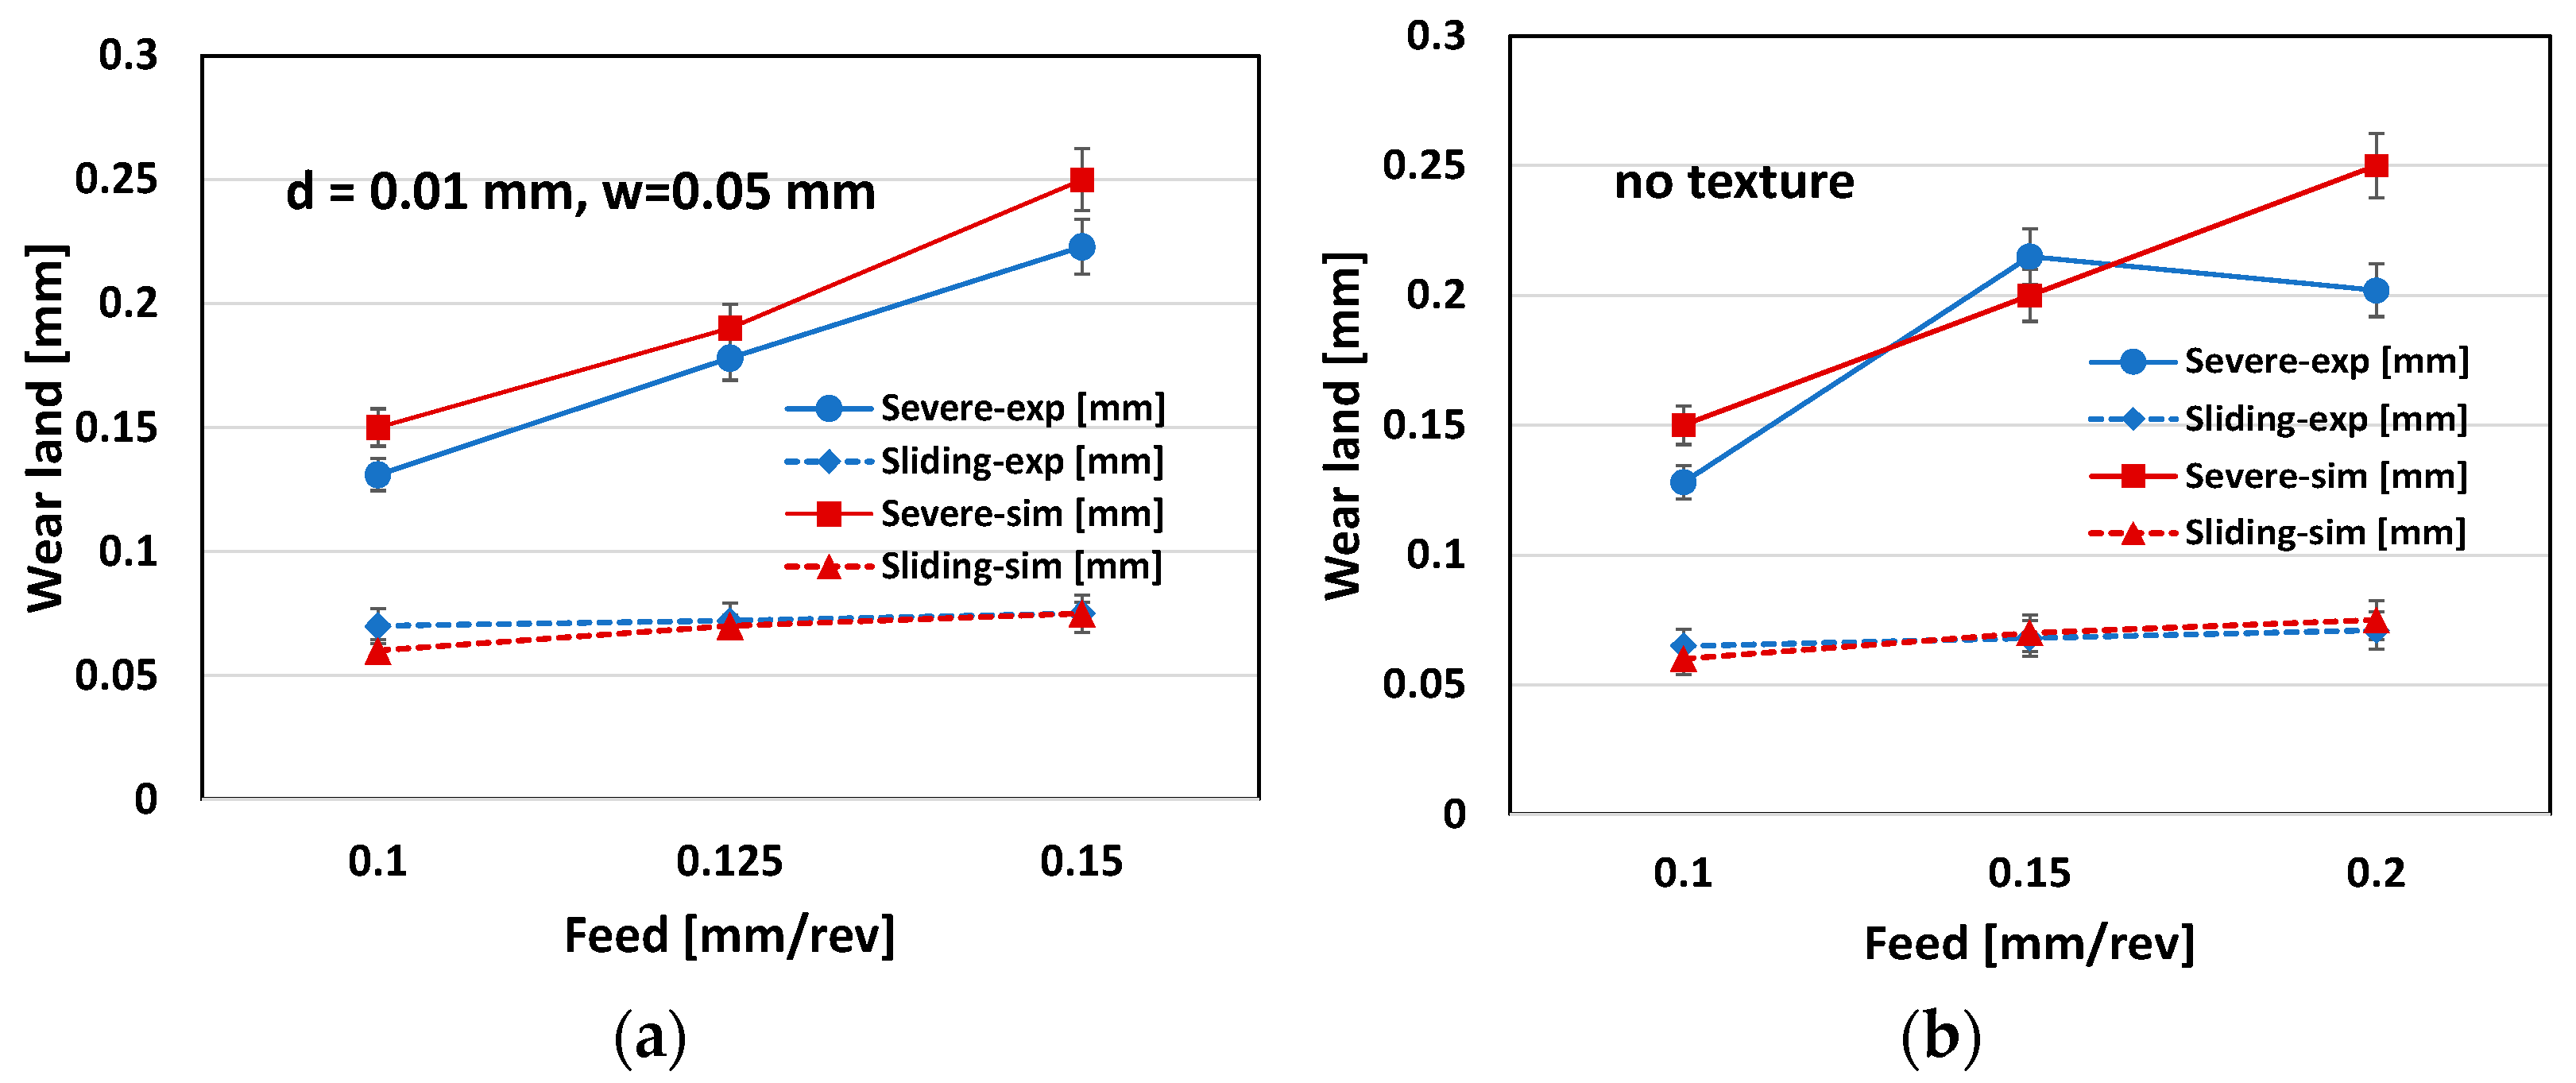
The comparison of the experimental and simulation results on the wear land for both severe and sliding wear regions are given in Figure 15 for the non-texture tool and the textured tool with a groove depth of d = 0.01 mm. The wear rate predicted using the FEM simulation model is applied to a total cutting time of 103 s to reach this wear land over the tool rake face. Then, the wear land for each region was calculated using this approach. However, the wear depth is not accounted for in these calculations.

4. Conclusions

This study aims to provide a digital twin for a micro-textured cutting tool, and investigates the effect of micro-texture fabricated using a micro-EDM milling technique on a cemented carbide tool rake face by using physics-based simulations and experiments. It is found that micro-texture affects forces, chip-tool contact, and wear compared to non-textured tools. Micro-groove width and spacing are influential factors on the degree of crater wear and chip adhesion. A mechanical interlocking effect at the closed end of the micro-texture provides adhesion and smearing, preventing crater wear. However, severe adhesion at the cutting edge causes some adhesion layer flaking the cemented carbide material. At moderate interface pressures, chip adhesion prevents flaking, but promotes it at higher pressures. As a new contribution, physics-based simulation using 3D FEM modeling is proposed. The simulation results reveal the ranges of actual contact pressure and interface temperature for chip adhesion and micro-texture interaction towards optimizing micro-texture geometry. The following are specific conclusions drawn from this study.
  • Micro-texture patterns fabricated in cutting tools show some geometrical irregularities, but may also result in certain subsurface alterations to cemented carbide substrate, subsequently affecting its wear behavior;
  • Micro-textures perpendicular to the cutting edge influence the chip flow and material adhesion along the open and closed sections of the micro-grooves;
  • Measured areas of the adhered material and worn areas of the textured cutting tool surface indicate that physical chip material accumulations or tool material losses are affected by chip flow, its speed, and the contact pressure that forms between the chip and textured tool surface;
  • Physics-based FEM simulations reveal actual contact pressure, contact temperature, and sliding velocity profiles that reflect the amount of material accumulating on the tool surface, as well as tool volume loss due to active wear mechanisms. This information should be valuable for developing a digital twin for textured cutting tools for design and optimization purposes.

Author Contributions

K.V.P.: Conceptualization, methodology, formal analysis, investigation, data curation, writing, and visualization. K.J.: Conceptualization, writing—review, validation, and resources. T.Ö.: Conceptualization, methodology, formal analysis, investigation, data curation, supervision, writing—review, validation, and resources. All authors have read and agreed to the published version of the manuscript.

Funding

This research was funded by Taiho Kogyo Tribology Research Foundation.

Data Availability Statement

Data can be made available upon request subject to approval.

Conflicts of Interest

The authors declare no conflict of interest.

References

  1. Kim, D.H.; Kim, T.J.; Wang, X.; Kim, M.; Quan, Y.J.; Oh, J.W.; Ahn, S.H. Smart machining process using machine learning: A review and perspective on machining industry. Int. J. Precis. Eng. Manuf.-Green Technol. 2018, 5, 555–568. [Google Scholar] [CrossRef]
  2. Cimino, C.; Negri, E.; Fumagalli, L. Review of digital twin applications in manufacturing. Comput. Ind. 2019, 113, 103130. [Google Scholar] [CrossRef]
  3. Botkina, D.; Hedlind, M.; Olsson, B.; Henser, J.; Lundholm, T. Digital twin of a cutting tool. Procedia CIRP 2018, 72, 215–218. [Google Scholar] [CrossRef]
  4. Poulachon, G.; Moisan, A.; Jawahir, I.S. Tool-wear mechanisms in hard turning with polycrystalline cubic boron nitride tools. Wear 2001, 250, 576–586. [Google Scholar] [CrossRef]
  5. Luo, S.; Liao, Y.; Tsai, Y. Wear characteristics in turning high hardness alloy steel by ceramic and CBN tools. J. Mater. Process. Technol. 1999, 88, 114–121. [Google Scholar] [CrossRef]
  6. Jianxin, D.; Jiantou, Z.; Hui, Z.; Pei, Y. Wear mechanisms of cemented carbide tools in dry cutting of precipitation hardening semi-austenitic stainless steels. Wear 2011, 270, 520–527. [Google Scholar] [CrossRef]
  7. Diniz, E.; Machado, A.R.; Corrêa, J.G. Tool wear mechanisms–in the machining of steels and stainless steels. Int. J. Adv. Manuf. Technol. 2016, 87, 3157–3168. [Google Scholar] [CrossRef]
  8. Corrêa, J.G.; Schroeter, R.B.; Machado, A.R. Tool life and wear mechanism analysis of carbide tools used in the machining of martensitic and supermartensitic stainless steels. Tribol. Int. 2017, 105, 102–117. [Google Scholar] [CrossRef]
  9. Breidenstein, B.; Grove, T.; Krödel, A.; Sitab, R. Influence of hexagonal phase transformation in laser prepared PcBN cutting tools on tool wear in machining of Inconel 718. Met. Powder Rep. 2019, 74, 237–243. [Google Scholar] [CrossRef]
  10. Childs, T.H.C. Friction Modelling in Metal Cutting. Wear 2006, 260, 310–318. [Google Scholar] [CrossRef]
  11. Özel, T.; Biermann, D.; Enomoto, T.; Mativenga, P. Structured and textured cutting tool surfaces for machining applications. CIRP Ann. Manuf. Technol. 2021, 70, in press. [Google Scholar]
  12. Huang, Y.; Chou, Y.K.; Liang, S.Y. CBN tool wear in hard turning: A survey on research progresses. Int. J. Adv. Manuf. Technol. 2007, 35, 443–453. [Google Scholar] [CrossRef]
  13. Kawasegi, N.; Sugimori, H.; Morimoto, H.; Morita, N.; Hori, I. Development of cutting tools with microscale and nanoscale textures to improve frictional behavior. Precis. Eng. 2009, 33, 248–254. [Google Scholar] [CrossRef]
  14. Sugihara, T.; Enomoto, T. Development of a cutting tool with a nano/micro-textured surface-Improvement of anti-adhesive effect by considering the texture patterns. Precis. Eng. 2009, 33, 425–429. [Google Scholar] [CrossRef]
  15. Sawant, M.S.; Jain, N.K.; Palani, I.A. Influence of dimple and spot-texturing of HSS cutting tool on machining of Ti-6Al-4V. J. Mater. Process. Technol. 2018, 261, 1–11. [Google Scholar] [CrossRef]
  16. Alagan, N.T.; Zeman, P.; Hoier, P.; Beno, T.; Klement, U. Investigation of micro-textured cutting tools used for face turning of alloy 718 with high-pressure cooling. J. Manuf. Proc. 2019, 37, 606–616. [Google Scholar] [CrossRef]
  17. Sugihara, T.; Enomoto, T. Crater and flank wear resistance of cutting tools having micro textured surfaces. Precis. Eng. 2017, 37, 888–896. [Google Scholar] [CrossRef]
  18. Sugihara, T.; Nishimoto, Y.; Enomoto, T. Development of a novel cubic boron nitride cutting tool with a textured flank face for high-speed machining of Inconel 718. Precis. Eng. 2017, 48, 75–82. [Google Scholar] [CrossRef]
  19. Kim, D.M.; Lee, I.; Kim, S.K.; Kim, B.H.; Park, H.W. Influence of a micropatterned insert on characteristics of the tool-workpiece interface in a hard turning process. J. Mater. Process. Technol. 2016, 229, 160–171. [Google Scholar] [CrossRef]
  20. Durairaj, S.; Guo, J.; Aramcharoen, A.; Castagne, S. An experimental study into the effect of micro-textures on the performance of cutting tool. Int. J. Adv. Manuf. Technol. 2018, 98, 1011–1130. [Google Scholar] [CrossRef]
  21. Sugihara, T.; Enomoto, T. Performance of cutting tools with dimple textured surfaces: A comparative study of different texture patterns. Precis. Eng. 2017, 49, 52–60. [Google Scholar] [CrossRef]
  22. Enomoto, T.; Sugihara, T.; Yukinaga, S.; Hirose, K.; Satake, U. Highly wear-resistant cutting tools with textured surfaces in steel cutting. CIRP Ann. Manuf. Technol. 2012, 61, 571–574. [Google Scholar] [CrossRef]
  23. Hao, X.; Cui, W.; Li, L.; Li, H.; Khan, A.M.; He, N. Cutting performance of textured polycrystalline diamond tools with composite lyophilic/lyophobic wettabilities. J. Mater. Process. Technol. 2018, 260, 1–8. [Google Scholar] [CrossRef]
  24. Patel, K.V.; Shah, S.R.; Özel, T. Orthogonal cutting of alloy steel 4340 with micro-grooved cutting tools. Procedia CIRP 2019, 82, 178–183. [Google Scholar] [CrossRef]
  25. Polvorosa, R.; de Lacalle, L.N.L.; Egea, A.S.; Fernandez, A.; Esparta, M.; Zamakona, I. Cutting edge control by monitoring the tapping torque of new and resharpened tapping tools in Inconel 718. Int. J. Adv. Manuf. Technol. 2020, 106, 3799–3808. [Google Scholar] [CrossRef]
  26. Krahmer, D.M.; Hameed, S.; Egea, A.J.S.; Pérez, D.; Canales, J.; de Lacalle, L.N.L. Wear and MnS Layer Adhesion in Uncoated Cutting Tools When Dry and Wet Turning Free-Cutting Steels. Metals 2019, 9, 556. [Google Scholar] [CrossRef] [Green Version]
  27. Fatima, A.; Mativenga, P.T. Femtosecond Laser Surface Structuring of Carbide Tooling for Modifying Contact Phenomena. Proc. Inst. Mech. Eng. Part B J. Eng. Manuf. 2015, 228, 1325–1337. [Google Scholar] [CrossRef]
  28. Arulkirubakaran, D.; Senthilkumar, V.; Kumawat, V. Effect of micro-textured tools on machining of Ti–6Al–4 V alloy: An experimental and numerical approach. Int. J. Refract. Met. Hard Mater. 2016, 54, 165–177. [Google Scholar] [CrossRef]
  29. Kim, D.M.; Bajpai, V.; Kim, B.H.; Park, H.W. Finite element modeling of hard turning process via a micro-textured tool. Int. J. Adv. Manuf. Technol. 2015, 78, 1393–1405. [Google Scholar] [CrossRef]
  30. Mishra, S.K.; Ghosh, S.; Aravindan, S. 3D finite element investigations on textured tools with different geometrical shapes for dry machining of titanium alloys. Int. J. Mech. Sci. 2018, 14, 424–449. [Google Scholar] [CrossRef]
  31. Liu, G.; Huang, C.; Su, R.; Özel, T.; Liu, Y.; Xu, L. 3D FEM simulation of the turning process of stainless steel 17-4PH with differently texturized cutting tools. Int. J. Mech. Sci. 2019, 155, 417–429. [Google Scholar] [CrossRef]
  32. Patel, K.; Liu, G.; Shah, S.R.; Özel, T. Effect of Micro-textured tool parameters on forces, stresses, wear rate, and variable friction in titanium alloy machining. J. Manuf. Sci. Eng. 2020, 142, 021007. [Google Scholar] [CrossRef]
  33. Karpat, Y.; Özel, T. Mechanics of high speed cutting with curvilinear edge tools. Int. J. Mach. Tool Manuf. 2008, 48, 195–208. [Google Scholar] [CrossRef]
  34. Usui, E.; Shirakashi, T.; Kitagawa, T. Analytical prediction of three dimensional cutting process. Part 3. Cutting temperature and crater wear of carbide tool. J. Eng. Ind. 1978, 100, 236–243. [Google Scholar]
  35. Kitagawa, T.; Maekawa, K.; Shirakashi, T.; Usui, E. Analytical prediction of flank wear of carbide tools in turning plain carbon steels. Part 2. Prediction of flank wear. Bull. Jpn. Soc. Precis. Eng. 1989, 23, 126–134. [Google Scholar]
Figure 1. Stress distribution in cutting alloy steels.
Jmmp 05 00065 g001
Figure 2. Heat transfer at the chip-tool interface; (a) non-textured cutting tool and (b) textured cutting tool.
Jmmp 05 00065 g002
Figure 3. Micro-textured tool with (a) texture pattern parameters and (b) measured profile.
Jmmp 05 00065 g003
Figure 4. (a) Orthogonal cutting configuration, (b) micro-textured tool inserts design, and (c) in situ chip flow during the cutting process.
Jmmp 05 00065 g004
Figure 5. Focus variation optical microscopy image of tool rake face: (a) mild adhesion but wide crater wear, (b) heavy adhesion and build-up but mild crater wear.
Jmmp 05 00065 g005
Figure 6. Effects of micro-groove width and spacing on specific cutting forces of (a) Kt, and (b) Kc, with varying feed rate per unit width of cut and feed.
Jmmp 05 00065 g006
Figure 7. Tool rake face crater wear measured.
Jmmp 05 00065 g007
Figure 8. Micro-textured tool with (a) half-symmetry geometry, and (b,c) micro-textured tool CAD model with six half-symmetry geometry combined.
Jmmp 05 00065 g008
Figure 9. 3D Finite element simulation model (vc = 125 m/min, f = 0.15 mm/rev).
Jmmp 05 00065 g009
Figure 10. Comparison of measured and simulated forces at vc = 125 m/min; (a) micro-textured cutting tool (d = 0.01 mm, s = 0.05 mm, w = 0.05 mm), and (b) cutting tool with no micro-texture.
Jmmp 05 00065 g010
Figure 11. Comparison of chip formation at vc = 125 m/min; (a) micro-textured tool (d = 0.01 mm, s = 0.05 mm, and w = 0.05 mm), (b) micro-textured tool (d = 0.02 mm, s = 0.05 mm, and w = 0.05 mm), and (c) tool with no micro-texture.
Jmmp 05 00065 g011
Figure 12. Computed state variables on axisymmetric tool and micro-groove with 3D FEM simulation: (a) interface temperature, T i n t , (b) contact normal stress, σ n , and (c) tool wear rate, d w d t , (vc = 125 m/min, f = 0.15 mm/rev).
Jmmp 05 00065 g012
Figure 13. Predicted interface temperature, sliding velocity and tool wear rate on the rake face of textured cutting tool with a groove depth of d = 0.01 mm: (ad) at f = 0.15 mm/rev, and (eh) at f = 0.10 mm/rev (vc = 125 m/min).
Jmmp 05 00065 g013
Figure 14. Predicted interface temperature, sliding velocity and tool wear rate on the rake face of textured cutting tool with a groove depth d = 0.02 mm: (ad) at f = 0.15 mm/rev, and (eh) at f = 0.10 mm/rev (vc = 125 m/min).
Jmmp 05 00065 g014
Figure 15. Comparison of measured and simulated wear lands at vc = 125 m/min; (a) micro-textured cutting tool (d = 0.010 mm, s = 0.050 mm, and w = 0.050 mm) and (b) cutting tool with no micro-texture.
Jmmp 05 00065 g015
Table 1. Cutting, micro-texture, and chip-tool interaction parameters.
Test No.Cutting ParametersMicro-Texture ParametersChip-Tool ContactFriction Coef.
vc [m/min]f [mm/rev]w [mm]s [mm]d [mm]lf [mm]Ap [mm2]μ
11250.100No-texture0.1930.5270.54
21250.150No-texture0.2830.7730.56
31250.200No-texture0.2730.7450.63
41250.1000.050.050.010.201878.80.53
51250.1250.050.0750.010.2501009.80.57
61250.1500.050.100.010.2981151.20.60
71250.1000.100.100.020.1920.3120.55
81250.1250.100.150.020.2460.4560.52
91250.1500.100.200.020.3100.6240.52
Table 2. Comparison of simulated and experimental forces.
Test No.Cutting ParametersMicro-Texture ParametersMeasured ForcesSimulated Forces
vc
[m/min]
f
[mm/rev]
w
[mm]
s
[mm]
d
[mm]
Fc
[N/mm]
Ft
[N/mm]
Fc
[N/mm]
Ft
[N/mm]
11250.100No-texture260140240116
21250.150No-texture425240340152
31250.200No-texture590370494196
41250.1000.050.050.01217115216106
51250.1250.050.0750.01308176300138
61250.1500.050.100.01423252380210
Publisher’s Note: MDPI stays neutral with regard to jurisdictional claims in published maps and institutional affiliations.