1. Introduction
Additive manufacturing began to emerge in the 1980s with stereolithography and makes it possible to manufacture a part layer by layer. Today, this method has become a very interesting alternative to conventional manufacturing processes and is particularly well suited in the case of single parts, small series or complex geometry shapes such as lattice structures [
1]. Amongst the various additive manufacturing processes, the most commonly used, Ref. [
2] and the most affordable is the hot wire deposition process, called FDM (Fused Deposition Modeling) or FFF (Fused Filament Fabrication). It consists of depositing a thermoplastic material on a support in order to build a part layer by layer. The material is packaged in the form of a coil of wire or granulates. Material used for this process are thermos fusible polymers like Poly-Lactic Acid (PLA), Acrylonitrile Butadiene Styrene (ABS), Polyethylene Terephthalate Glycol (PETG), and Acrylonitrile Styrene Acrylate (ASA).
In recent years, most research about the FDM process has focused on the reduction of the manufacturing time or the increase of mechanical stiffness. Despite its name of rapid prototyping, additive manufacturing by hot wire deposition (FDM) is a relatively slow process. Numerous studies have been conducted in order to reduce FDM manufacturing time. Some researchers have proposed deposition strategies to reduce nozzle displacement [
3] or to maximise the feed speeds during printing [
4]. Yu-An, Yon et al. [
5] suggest locally producing the part on several successive layers before changing the printing zone. Another way to reduce manufacturing time is continuous printing. The aim of continuous printing is to drive the airtime to zero. Without it, around 25% of the nozzle travel distance are displacements without extrusion. Moreover, these kinds of material depositions can cause local heterogeneity in the manufactured part, and therefore can lead to fragility against mechanical loading. However, to attain continuous printing, a constraint should be satisfied, and a path that visits each node only once shall be generated [
6,
7]: This is also called the Chinese Postman Problem. Very few studies have been proposed so far connecting this problem with FDM manufacturing process.
The FDM process offers the capability to produce parts of complex external shapes, but also complex internal geometries (infill) such as cellular or lattice structures. The main benefit of using a lattice structure is to decrease both material and time consumption while keeping the strength of the part constant, thus resulting in cost reductions. The infill design is generally created by slicing software and it is generally uniform throughout the structure. Infill percentage influences the printing time, the weight of the part and also the mechanical stiffness of the part. Optimising the strength-to-weight ratio is therefore one of the main objectives of the research. Several studies have investigated the effect of different regular infill patterns and infill densities on mechanical strength [
8,
9]. Ei Cho et al. [
10] investigated several infill patterns: zigzag, grid and triangle. Among these last three, triangle pattern has given the highest strength. As these infill designs are kept uniform throughout the part, localised mechanical stresses are not addressed. Furthermore, Ahn et al. [
11] have shown that specimens fabricated by fused deposition modelling display anisotropic behaviour and are significantly influenced by the orientation of the layered raster.
Using the results of finite element simulation to guide the filament trajectory is another approach to improve the mechanical properties of the FDM printing part. Gopsill and Hicks [
12], J. Gardan et al. [
13] and Madugula et al. [
14] have shown that the alignment of the filament trajectory in the direction of the principal stress can improve the mechanical properties of the part. Similar work has been done by Kwock et al. [
15] and Wu et al. [
16]. Gopsill and Hicks [
12] have proved that around 76% more stiffness of the part can be obtained with the alignment of the filament in the direction of the principal stress. This proved that placing material in the direction of principal stress truly could help to reduce material usage and increase the stiffness of the part. In another study, the same authors [
17] have proposed a method using the results of finite element analysis (FEA) to influence the internal geometry of components. A rectangular part undergoing different loading scenarios has been studied. The part with optimised infill was then compared to a part containing uniform honeycomb infill. Results have shown an increase in the stiffness of the optimised part. Here, a FE Simulation was used just as a guide to define the final infill design.
In addition, S. I. Park et al. [
18] and W. Chen et al. [
19] developed lattice cells for the internal structures of the part, which is a very strategical approach for reducing the material usage, whereas a more innovative technique was adopted by L. Cheng et al. [
20] and W. Chen et al. [
19]. They have worked on a variable cross-sectional area of lattice infill depending upon the stresses undergone. However, this approach does not take into account the constraints induced while really printing variable sized lattice structure, using the FDM process, and also does not present the ability to print the part without having an airtime.
In the literature, many studies were conducted on topological optimisation. The purpose of topological optimisation is to find the most beneficial material deposition by changing the contour of the part. Whereas, infill optimisation addresses the same idea of the best material deposition while keeping the contour of the part constant. For this, many studies have been carried out using lattice structures [
19,
20]. However, the importance of printing parameters was not taken into consideration while optimising infill. Therefore, our goal was to propose the infill optimisation technique taking into account the printing parameters such as minimum printable infill size possible and to reduce the manufacturing time of the final part using continuous extrusion.
In this paper, we would like to introduce an iterative process, coupled with FE Simulation software and a refinement technique that will both increase the stiffness of the part and drive to zero airtime. In our approach, the contour of the part is assumed to always be constant. This paper presents the different steps of the proposed method. This proposed approach is implemented on a rectangular part of a constant section, subjected to four-point bending forces, in order to evaluate and validate the proposed method. The part with optimised infill design obtained by the refinement procedure is then compared to the part with uniform infill designs. Results are discussed with some possible future works before coming to the conclusion.
4. Comparison
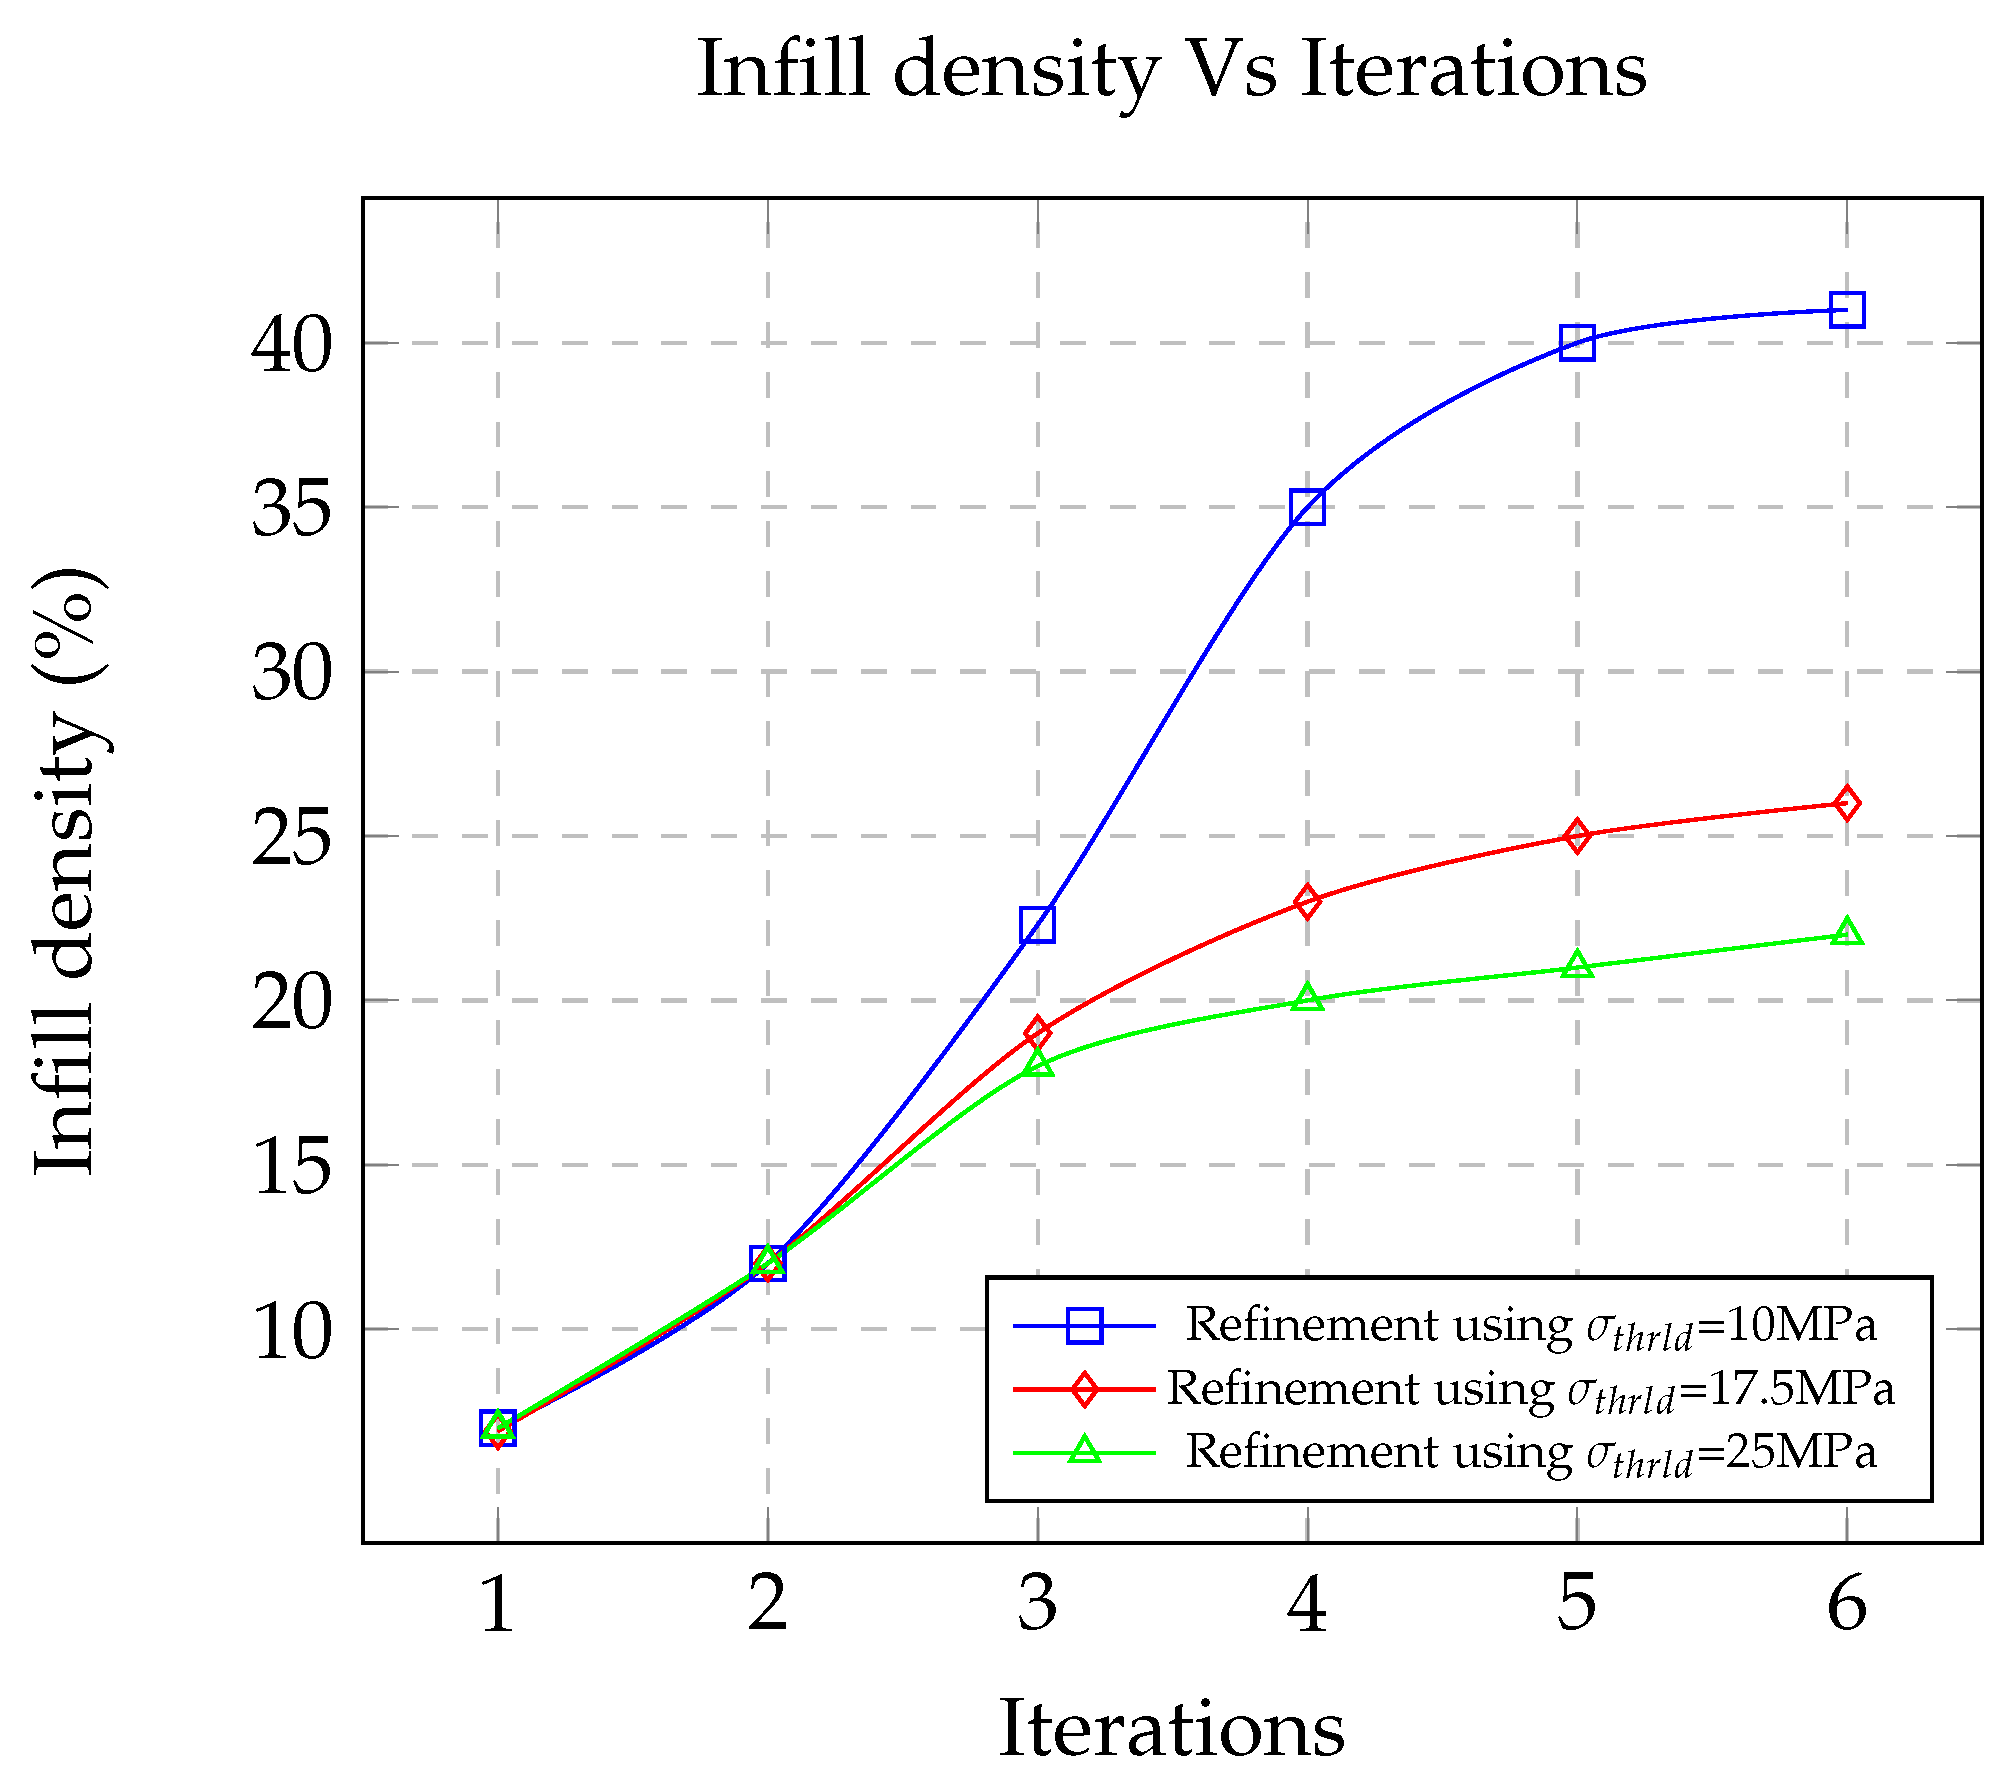
Infill density percentages of the final part generated after using refinement technique, with threshold stress as 10 MPa, 17.5 MPa and 25 MPa are 41%, 26% and 22%, respectively. For comparison, structures with uniform infill design with the same dimensions (180 × 30 × 20 mm) and the same infill density (41%, 26% and 22%) have been generated using BL2D software [
21] as shown in
Figure 12,
Figure 13 and
Figure 14. It should be noted that these parts with uniform infill do not allow continuous printing.
Table 5 presents the FE Simulation results of parts with uniform infill density (41%, 26% and 22%) using the same boundary and loading conditions as the one used for the optimised case study in the previous section. Corresponding G-codes for printing are generated using Matlab script
Section 2.2.7.
Table 6,
Table 7 and
Table 8 show comparison between parts with optimised and uniform infill design in terms of FE Simulations and printing time.
4.1. Comparison of Parts with Same Infill Density of 41%
Focusing on
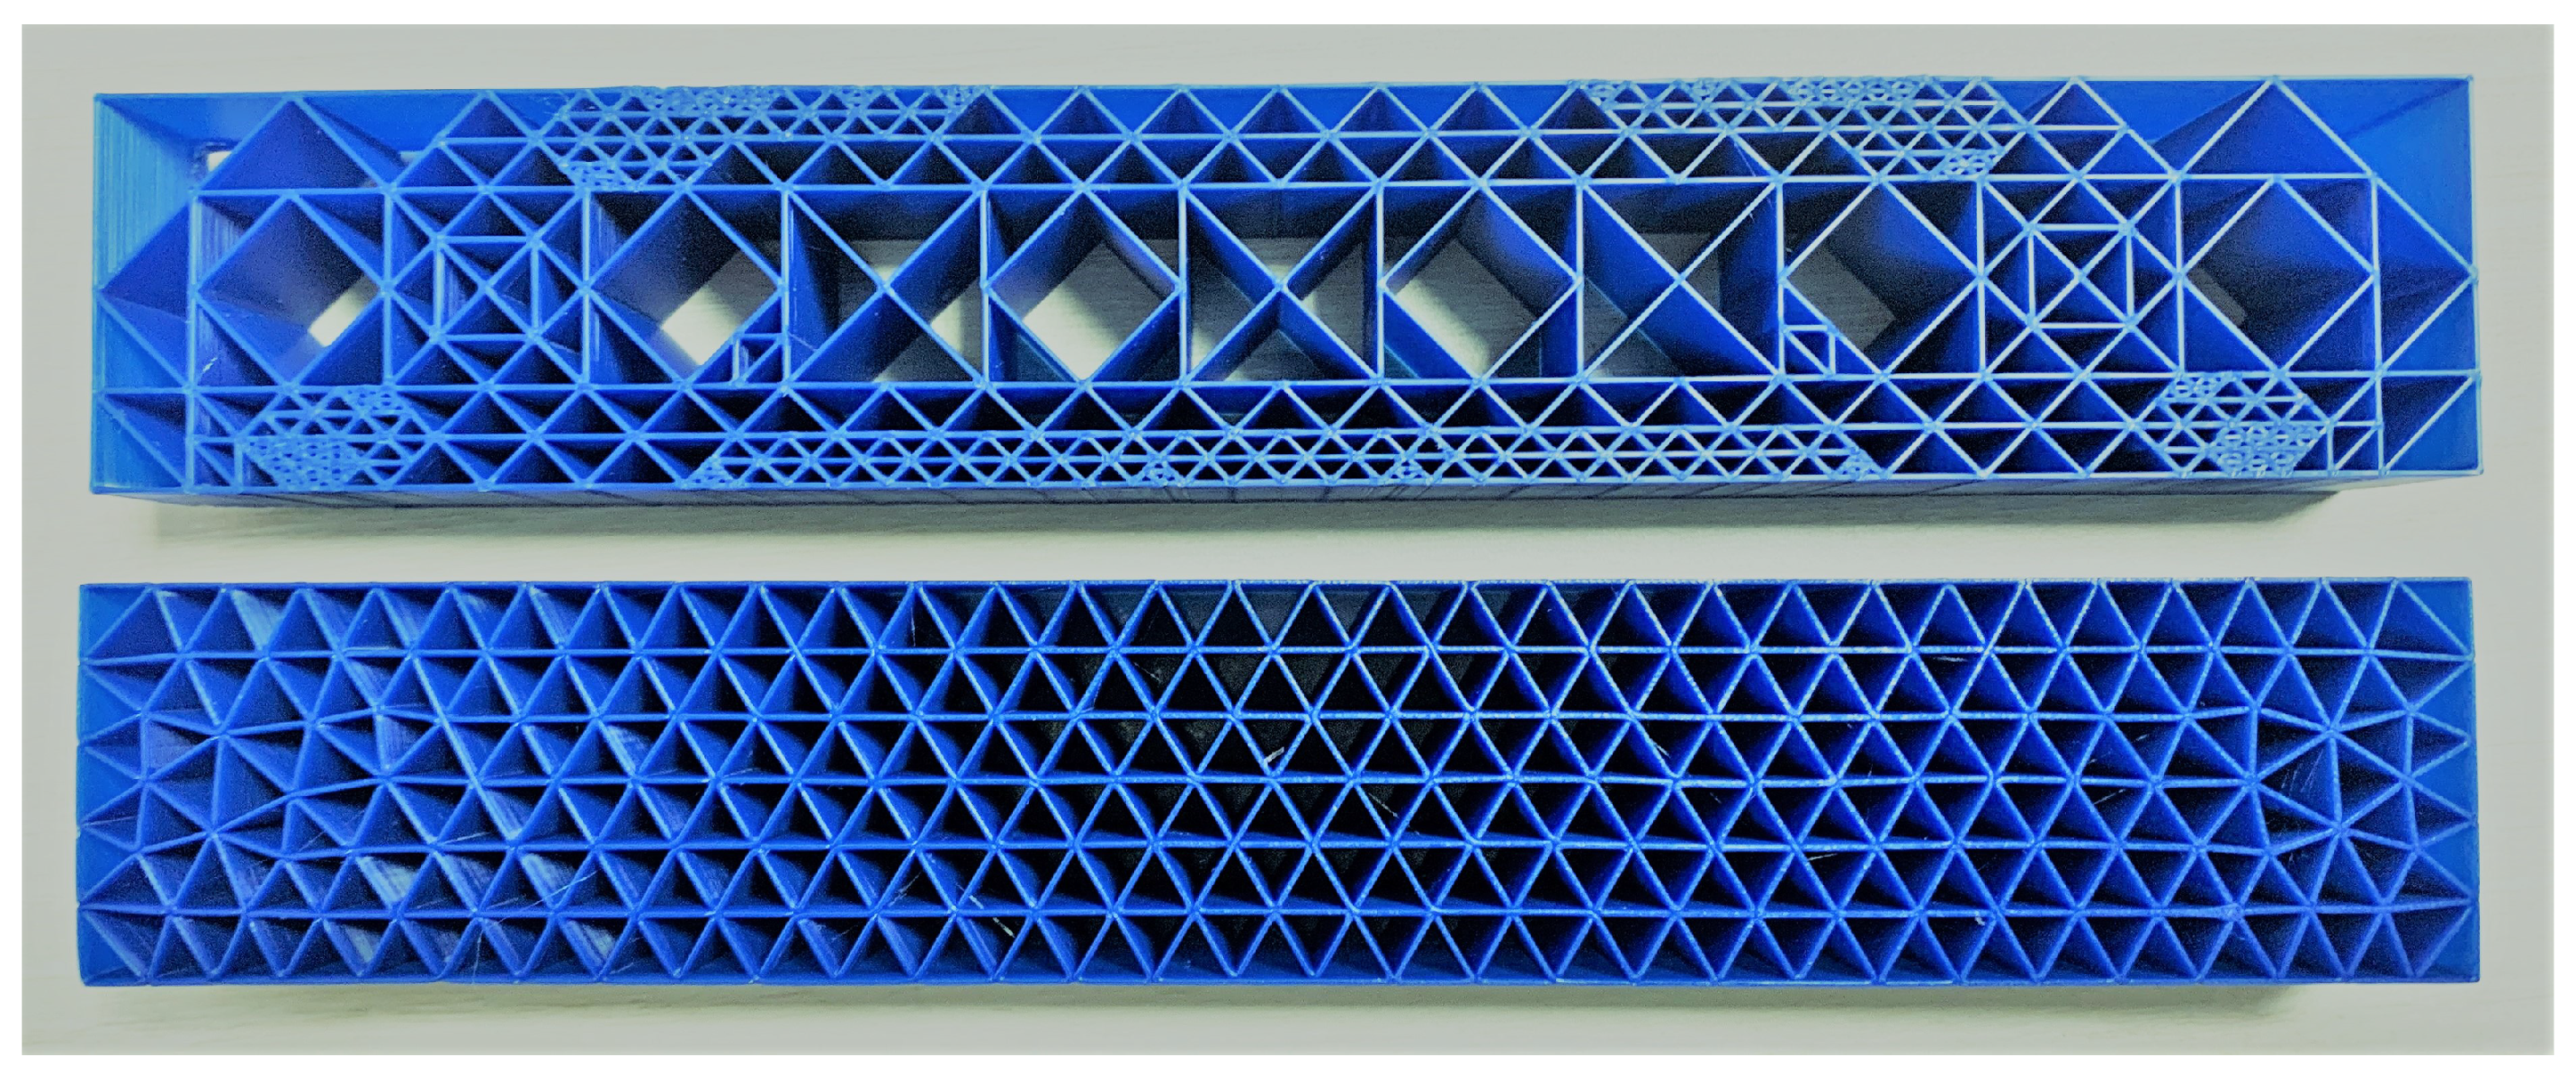
Table 6, it is immediately apparent that for the same infill density of 41% and almost same filament weight usage, the infill of the part generated by the refinement process performs better than the part with uniform infill design in terms of displacement and strain energy. Comparing maximum displacement, structure with infill design generated by the refinement process has lower displacement value (0.51 mm) than the structure with uniform infill design (0.83 mm) by 35%. For a similar instance, if we compare strain energy for the optimised infill part, it is 92.24 mJ. While on the other side, the value is 141.31 mJ for the part with 41% uniform infill density. This highlights the importance of placing the material in the high-stress zones as infill compared to uniformly placing material. Finally, printing time for the part with optimised infill design consumes 5.11 h compared to it’s counterpart with uniform infill in 7.01 h (see
Figure 15). This is possible due to defined refinement rule for continuous printing.
Although, the maximum von Mises stress () value of the optimised infill design (35.3 MPa) is higher than the part with a uniform infill design (23.5 MPa). This is due to the fact that beam orientation in the part with uniform infill is better than the one in the part with optimised infill design.
Figure 16.
Part with optimised infill design (top) and uniform infill design (bottom).
Figure 16.
Part with optimised infill design (top) and uniform infill design (bottom).
4.2. Comparison of Parts with Same Infill Density of 26%
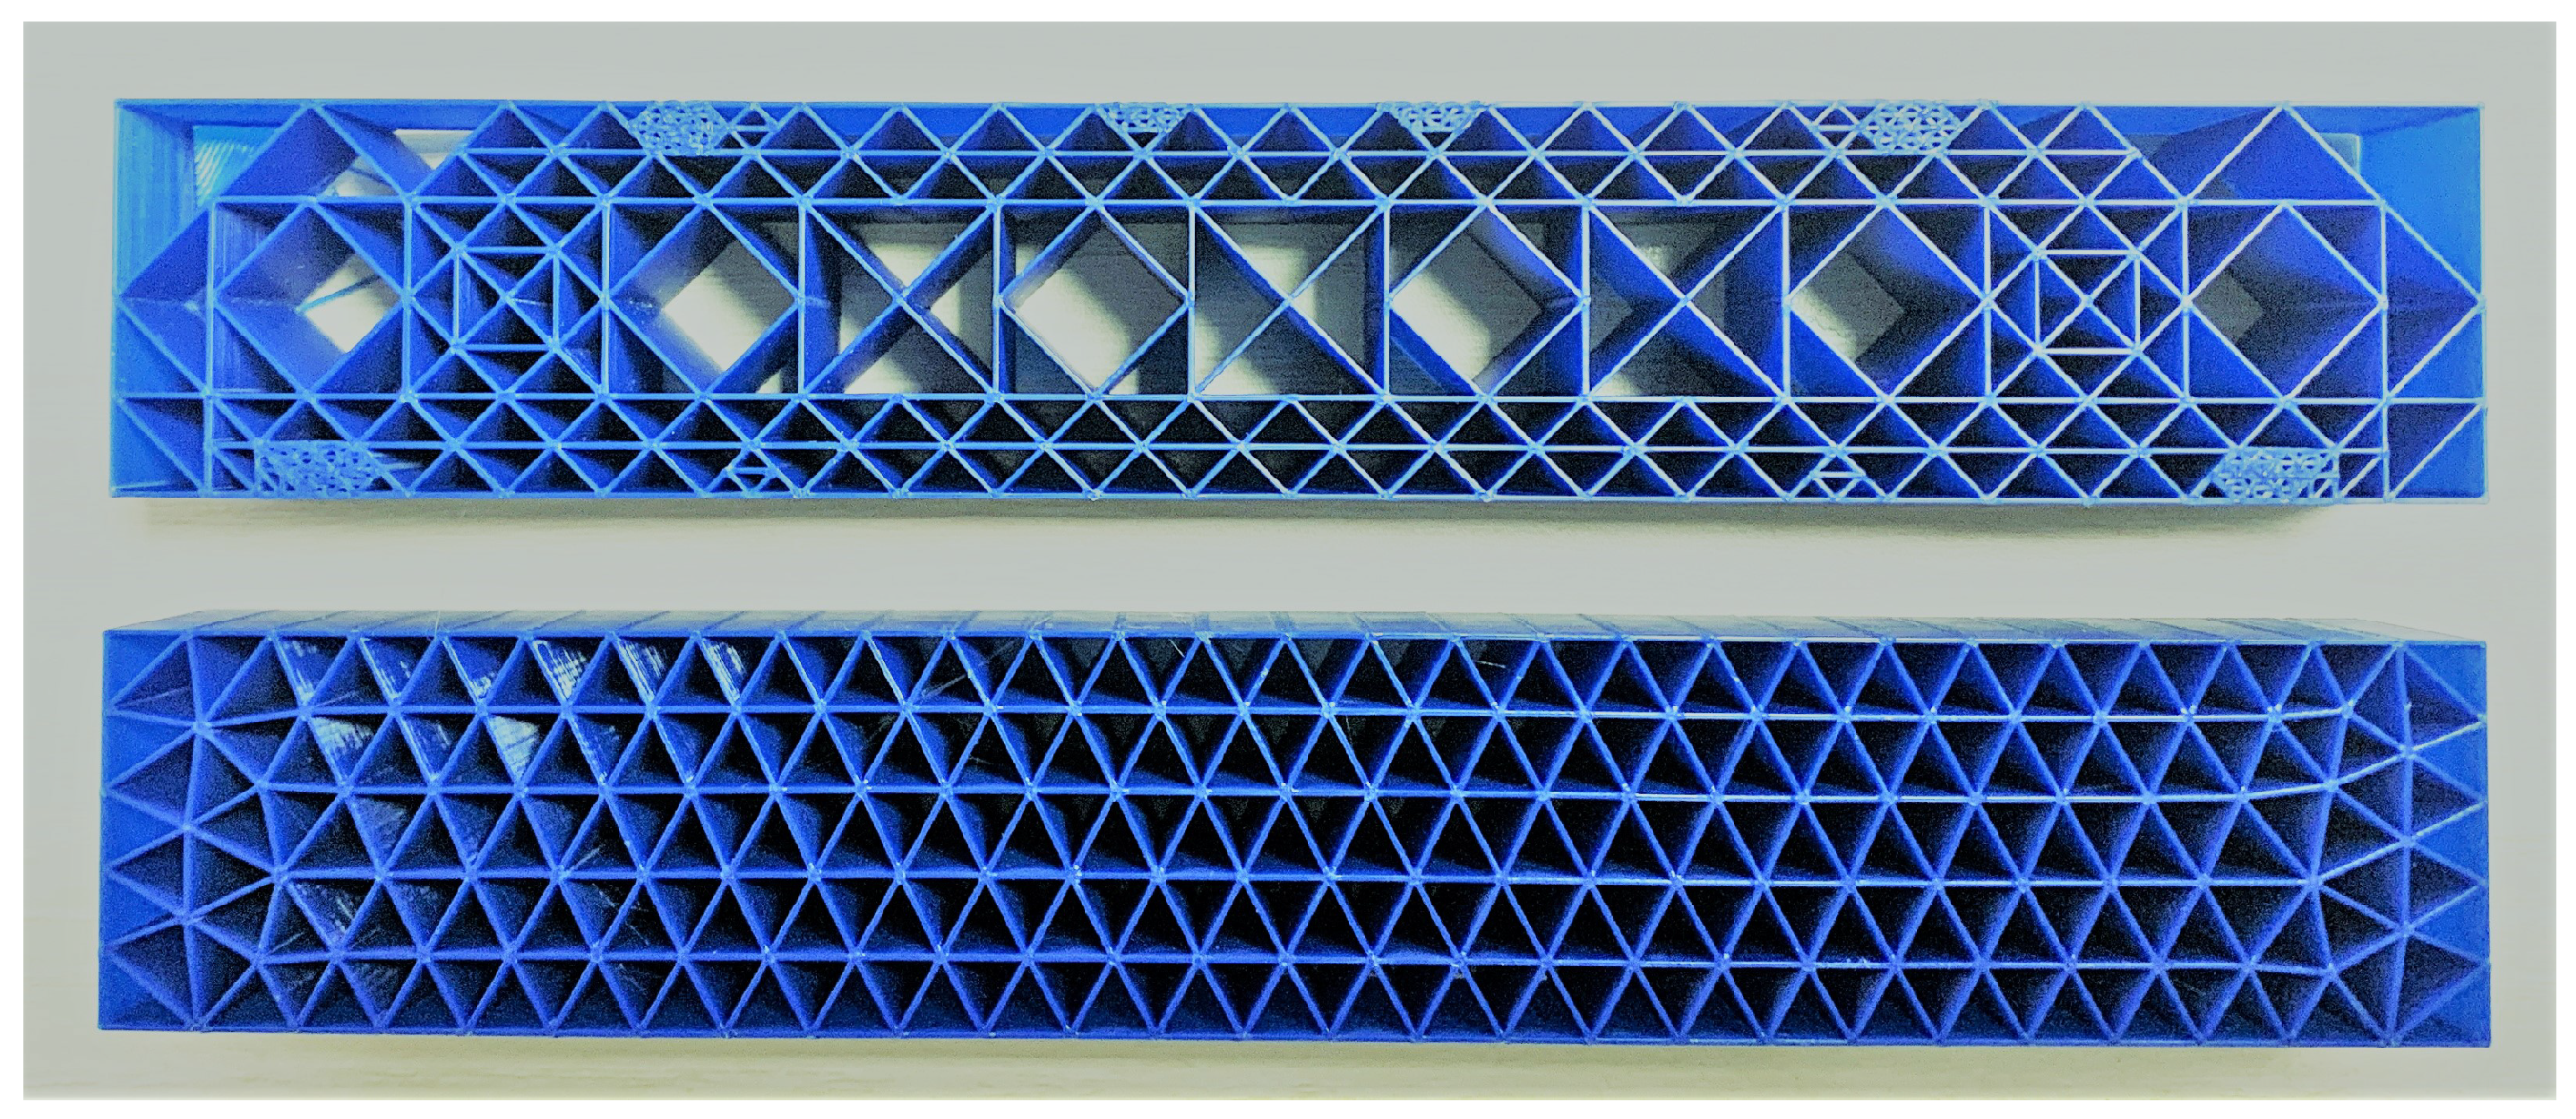
Similarly, in
Figure 17 and
Table 7, a comparison is illustrated between the part with uniform infill to the part with optimised infill with same infill density of 26%. Both in terms of maximum displacement (0.8 mm) and strain energy (156.28 mJ), the part with optimised infill using the refinement technique has shown significantly better performance in terms of maximum displacement and strain energy. Thanks to continuous printing, manufacturing time for the part with optimised infill design is 3.08 h compared to the part with uniform infill, which is 4.16 h (see
Figure 18).
In contrast, maximum von Mises stress () in the case where the part with optimised infill is higher, when compared to part with uniform infill. This is due to the same reason mentioned in the previous comparison.
4.3. Comparison of Parts with Same Infill Density of 22%
Finally,
Figure 19 and
Table 8 portray a comparison of the part with uniform infill to the part with infill generated using refinement technique having same infill density (22%). The strain energy of a structure with uniform infill is then 225.9 mJ, whereas the part with infill generated using refinement technique using threshold stress as 25 MPa has a strain energy of 187.2 mJ, again indicating that the part with optimised infill is stiffer. Likewise, maximum displacement in the part with uniform infill is 1.33 mm, compared to 1.06 mm in the part having infill generated by refinement technique. Comparing manufacturing time, it is evident that, by using the refinement technique (continuous printing), the manufacturing time is reduced by 0.8 h for the part with optimised infill compared to the part with uniform infill with almost same amount of mass (23 g) (See
Figure 20).
Additionally, the maximum von Mises stress () in both cases is still different and is still higher in the part with optimised infill.
These comparisons conclude and hold strong evidence that the refinement technique to generate infill brings benefits in terms of maximum displacement, strain energy and manufacturing time (continuous printing and zero airtime) over uniform infill distribution. The Printer used to manufacture the parts is Rise 3D V2 Plus (see
Figure 21).
5. Discussion
In the presented methodology, the refinement technique has been used for the generation of infill design. The ability to solve the problem of continuous printing has been achieved by using the Eulerian path. Using this refinement process, continuous printing is feasible while increasing the mechanical performance of the part at the same time. To illustrate the effectiveness of the proposed approach, an application using a case study has been presented and compared to the parts with uniform infill in
Table 6,
Table 7 and
Table 8.
Focusing on the maximum absolute von Mises stress while comparing, it is noticeable that regardless of using the threshold stress (
) as 10 MPa, 17.5 MPa and 25 MPa, the maximum absolute von Mises stress (
) of the final parts (35.3 MPa, 36.45 MPa and 35.1 MPa) are still not satisfying the stopping criteria of threshold stress (
). Further continuing the iterative process is not possible due to the limitation of the length of the side of the infill, which is already below the given limit (L ≥ 2.4 mm). According to this refinement technique, the objective was to subdivide infill design in such a way that continuous printing constraint is satisfied while increasing the strength of the part. In hindsight, like the work in [
12,
17], we suspect it could bring benefits to place the material as infill along the stress field direction during the refinement.
Some of the ideas that we will address concerning the present refinement methodology as future works are:
Adding the capability to align the infill along the stress field by moving the nodes of the elements of infill design.
Testing this refinement technique with more complex structures and loading conditions.
Defining initial infill design of the part
5.1. Adding the Capability to Align the Infill along the Stress Field by Moving the Nodes of the Elements of Infill Design
Adding the capability to align the infill along the stress field by moving the nodes of the elements of infill design. The ability to align the beams in the stress direction could increase the strength of the part and decrease the maximum stress simultaneously. This could be possible with available optimisation techniques.
5.2. Testing This Refinement Technique with More Complex Structures and Loading Conditions
This process has been evaluated for two-dimensional loading cases. There is a need to understand more complex loading structures. This includes a 3D structure with complex contours. The ability to find a standardised procedure for the complex part would enable us to compare along with a wide range of parts presenting different contours and infill designs.
5.3. Defining Initial Infill Design of the Part
The very first step of the refinement technique is to define the coarse initial infill structure of the part (see
Figure 2). This initial infill structure for the case study part with 6.5% infill density (
Figure 7) is arbitrarily defined. Hence, the final optimised part (see
Figure 8) after the completion of the iterative process is dependent on the initial infill structure of the part chosen. This implies that the final infill structure of a part varies according to the initial infill structure of the part chosen. Hence, it raises the enigma to find the best initial infill structure that will result in the most optimised infill structure at the end of the refinement technique.
The opposite methodology could also be implemented by starting with full dense uniform infill as the initial infill of the part, then later removing the material as infill where it is not crucial during each iteration. This problem will be addressed in the next work.


