Article

Creation of Tool Coatings Based on Titanium Diboride for Highly Efficient Milling of Chromium–Nickel Alloys

by
Sergey N. Grigoriev
,
Marina A. Volosova
*,
Sergey V. Fedorov
,
Artem P. Mitrofanov
,
Vladimir D. Gurin
and
Anna A. Okunkova
Department of High-Efficiency Processing Technologies, Moscow State University of Technology STANKIN, Vadkovskiy per. 1, 127994 Moscow, Russia
*
Author to whom correspondence should be addressed.
J. Manuf. Mater. Process. 2024, 8(5), 210; https://doi.org/10.3390/jmmp8050210
Submission received: 21 August 2024 / Revised: 17 September 2024 / Accepted: 23 September 2024 / Published: 26 September 2024
(This article belongs to the Topic Advanced Manufacturing and Surface Technology)

Abstract

:
This paper describes the principles of obtaining wear-resistant coatings based on titanium diboride that are deposited on the cutting tool for use in the machining of chromium–nickel alloys. The spark plasma sintering of samples from the TiB2/Ti powder composition was studied, and the influence of sintering modes on the characteristics of the ceramic targets was analyzed. The regularities of the magnetron sputtering of sintered targets were revealed. The dependences of the physical and mechanical properties of coatings formed on hard alloy substrates on deposition conditions were established. The wear resistance of carbide samples with TiB2-based coatings under friction-sliding conditions and coated carbide ball-end mills in milling Inconel 718 chromium–nickel alloy that is widely used in the industry was assessed.

1. Introduction

The volume of structural heat-resistant chromium–nickel alloys in aircraft engineering is constantly increasing because of their excellent performance properties. Moreover, these alloys are characterized by poor cutting machinability, associated with low thermal conductivity and increased chemical adhesion with hard alloys for tool purposes, which causes intense wear of cutting tools [1,2,3]. The problem of ensuring the high wear resistance of cutting tools when machining chromium–nickel alloys is especially relevant in the manufacture of critical aircraft parts with complex-shaped surfaces, such as monowheels, turbine blades, combustor shells, turbine disks and shafts machined on multi-axis CNC machines. When machining such parts, it is necessary to ensure high cutting productivity (cutting speed) on the one hand and to preserve the cutting properties of the cutter throughout the entire machining cycle on the other hand. Today, wear-resistant coatings based on refractory metal nitrides see widespread industrial use, increasing the wear resistance of a wide range of carbide tools in cutting structural materials, particularly chromium–nickel alloys. Their use is aimed at increasing the microhardness of the contact areas of tools, ensuring their physical and chemical passivity, and reducing adhesive binding with chromium–nickel alloys under machining, which together can increase the wear resistance of tools when cutting at high speeds [4,5,6,7].
Over the past decade, one of the main directions in developing nitride coatings for tool purposes has been the improvement of their chemical composition and structure. A typical example is multicomponent coatings, such as TiAlCrSiYN and AlCrN-bSiTiN [8], and multilayer coatings, including various oxide, diamond-like and other layers in addition to nitride compounds such as TiN/AlTiN/AlCrN/AlCrO/AlTiCrN, CrN/TiCrN/DLC/Cr-DLC, etc. [9,10]. This approach involves increasing the complexity of the coating compositions and structure and has largely exhausted itself. In addition, the use of such coatings is accompanied by a significant increase in technological costs. Thus, the developed coatings often remain at the laboratory level. One of the leading global trends in the development of wear-resistant coatings for tool production is using transition metal borides of Ti and Zr (their most thermally stable modification is MeB2) [11,12]. Diborides have higher hardness and less intense adhesive bonding with the counterbody during high-temperature friction than metal nitrides [13,14]. TiB2 coatings can potentially minimize the frictional interaction between the tool and the materials to be machined in cutting due to protective compounds and tribofilms forming during high-temperature exposure. For example, the authors of [15] studied the wear characteristics of carbide inserts with TiB2 coatings in turning Ti6Al4V titanium alloy. They found that these coatings form B2O3 tribofilms in cutting, which increase the lubricity of the coatings and reduce friction at the “tool–chip” interface, minimizing adhesion with the workpiece material. However, diboride coatings have their drawbacks, such as their quite high fragility and the relatively low strength of their adhesive bonds with tool substrates, which can be compensated by the formation of intermediate coatings, such as TiN, (CrAlSi)N, etc., before TiB2 coating deposition [16,17,18].
Despite a relatively long period of laboratory research on TiB2 coatings, the potential capabilities of which were investigated in 2000s [19,20], examples of real industrial applications of cutting tools with TiB2 coatings have been sporadic. For example, the company Ceratizit S.A. (Mamer, Luxembourg) produces some standard sizes of milling inserts made of the CTCS245 hard alloy with TiB2 coatings ~2.5 μm thick, having a TiN subcoating, deposited by chemical vapor deposition (CVD). Another example of the industrial application of TiB2 coating technology is the production of vacuum plasma units of the PLATIT 411 series by Platit AG (Selzach, Switzerland). The units are equipped with a central rotating ceramic target for non-reactive magnetron sputtering (MS-PVD), allowing the deposition of TiB2 coatings with a thickness of ~1.8 μm in an argon environment on cutting tools with a pre-formed intermediate (CrAlSi)N coating.
Magnetron sputtering is carried out at relatively low temperatures and does not involve the use of toxic reagents. Thus, this is the most suitable method for the formation of TiB2 coatings. Therefore, the share of this method currently accounts for more than a third of all published research in the field of diboride coating deposition for various functional purposes. When using magnetron sputtering as a tool for the deposition of coatings based on refractory metal diborides, the most important role is played by the ceramic targets that are used in processing, the quality and composition of which directly determine the properties of the deposited coatings. Therefore, the issues of obtaining high-quality sputtering targets from powder and the deposition of coatings with improved properties are inextricably linked. The most promising methods of producing ceramic workpieces today include the processes of self-propagating high-temperature synthesis of composites [21], spark plasma sintering [22] and electro-thermal explosion under pressure [23]. These processes of obtaining targets from diboride powders are currently insufficiently studied, which hinders their practical application in the industry.
Spark plasma sintering is a relatively recently developed but already well-proven method of vacuum sintering powder placed in graphite dies under mechanical force and current pulses. Special electrodes supply electric current to the dies and create spark discharges between the sintered particles, ensuring heating to high temperatures and their binding. This process is attractive for manufacturing workpieces from difficult-to-sinter ceramics with high melting temperatures since they require high activation energy [24,25].
Within the frames of the current study, we aimed to solve the problem of studying the possibility of using spark plasma sintering to obtain high-density targets from TiB2 powders and the subsequent deposition of wear-resistant coatings on carbide substrates by magnetron sputtering of sintered targets, and also investigate the effectiveness of using deposited TiB2-based coatings in milling chromium–nickel alloys (using a case study of the alloy Inconel 718, which is common in the industry) with carbide end mills with a ball end, designed for machining complex shaped surfaces.

2. Materials and Methods

2.1. Technological Principles and Equipment for Spark Plasma Sintering of Targets from a Powder Composition Based on TiB2

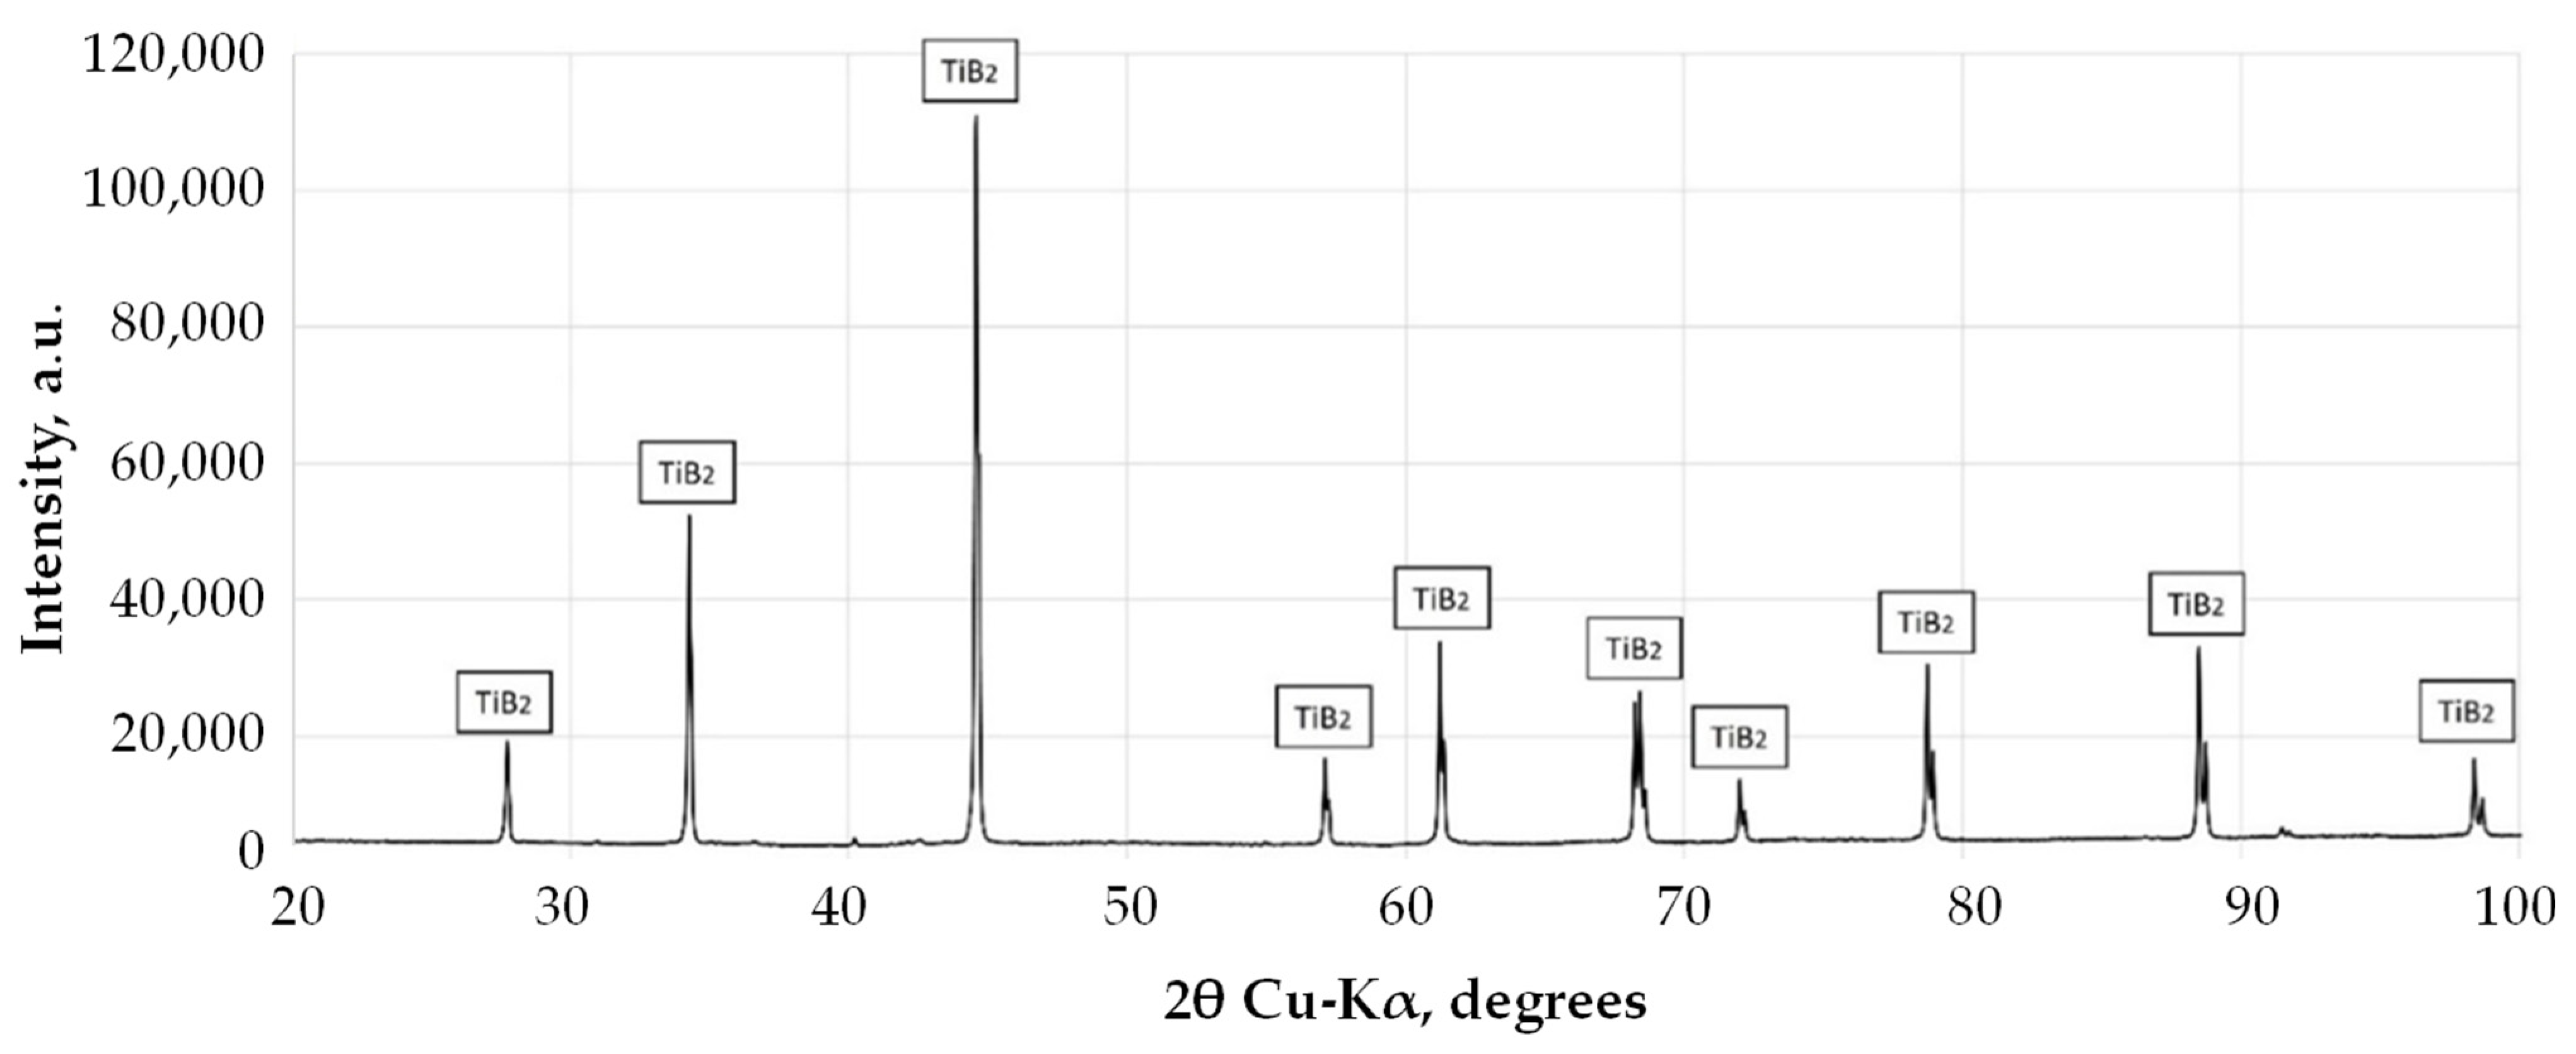
The spark plasma sintering method was used to produce a sputtered target. The technology consisted of sintering the initial powder under mechanical force and current pulses. TiB2 powder (Plasmotherm, Moscow, Russia) with a purity of 99.8% and a density of 4.35 g/cm3 was used to obtain targets. Figure 1 shows an SEM image of the TiB2 powder and the results of its granulometric analysis using an Eyetech particle analyzer (AmbiValue B.V., Dussen, The Netherlands). The proportion of particles was 50% for a size of 1–10 µm and 30% for 10–16 µm. A total of 113.6 g of TiB2 powder was used to sinter a disk-shaped target with a diameter of 80 mm and a height of 5 mm. Figure 2 shows an X-ray diffraction pattern of the original TiB2 powder obtained on an Empyrean diffractometer (PANalytical, Almelo, The Netherlands). The resulting diffractogram of titanium diboride corresponds to pure TiB2, as indicated in the electronic file. Ultrafine titanium powder with particle sizes of 1–5 μm in a quantity of 4 vol.% was added to the TiB2 powder to reduce the sintered sample’s porosity. It acted as a binding element during sintering, filling the gaps between the particles of the main TiB2 component.
During sintering, the initial TiB2/Ti powder was placed in a graphite mold under a press in the technological chamber of the unit under vacuum conditions. An H-HP D 25 SD Spark unit (FCT, Rauenstein, Germany) was used in the experiments. Electrodes are integrated into the mechanical part of the press. They supply electric current to the mold and create spark discharges between the TiB2 particles to be sintered. The powder material in the impact zone is heated to high temperatures, and pulsed currents pass directly through the conductive TiB2 + Ti powder and the mold, bypassing the entire volume of the chamber during the heating stage. This ensures the concentration of the thermal effect directly in the zone of the sintered target workpiece, which significantly reduces the required isothermal holding time and possible coagulation of powder particles using the approach compared with the widespread method of hot isostatic pressing [26].
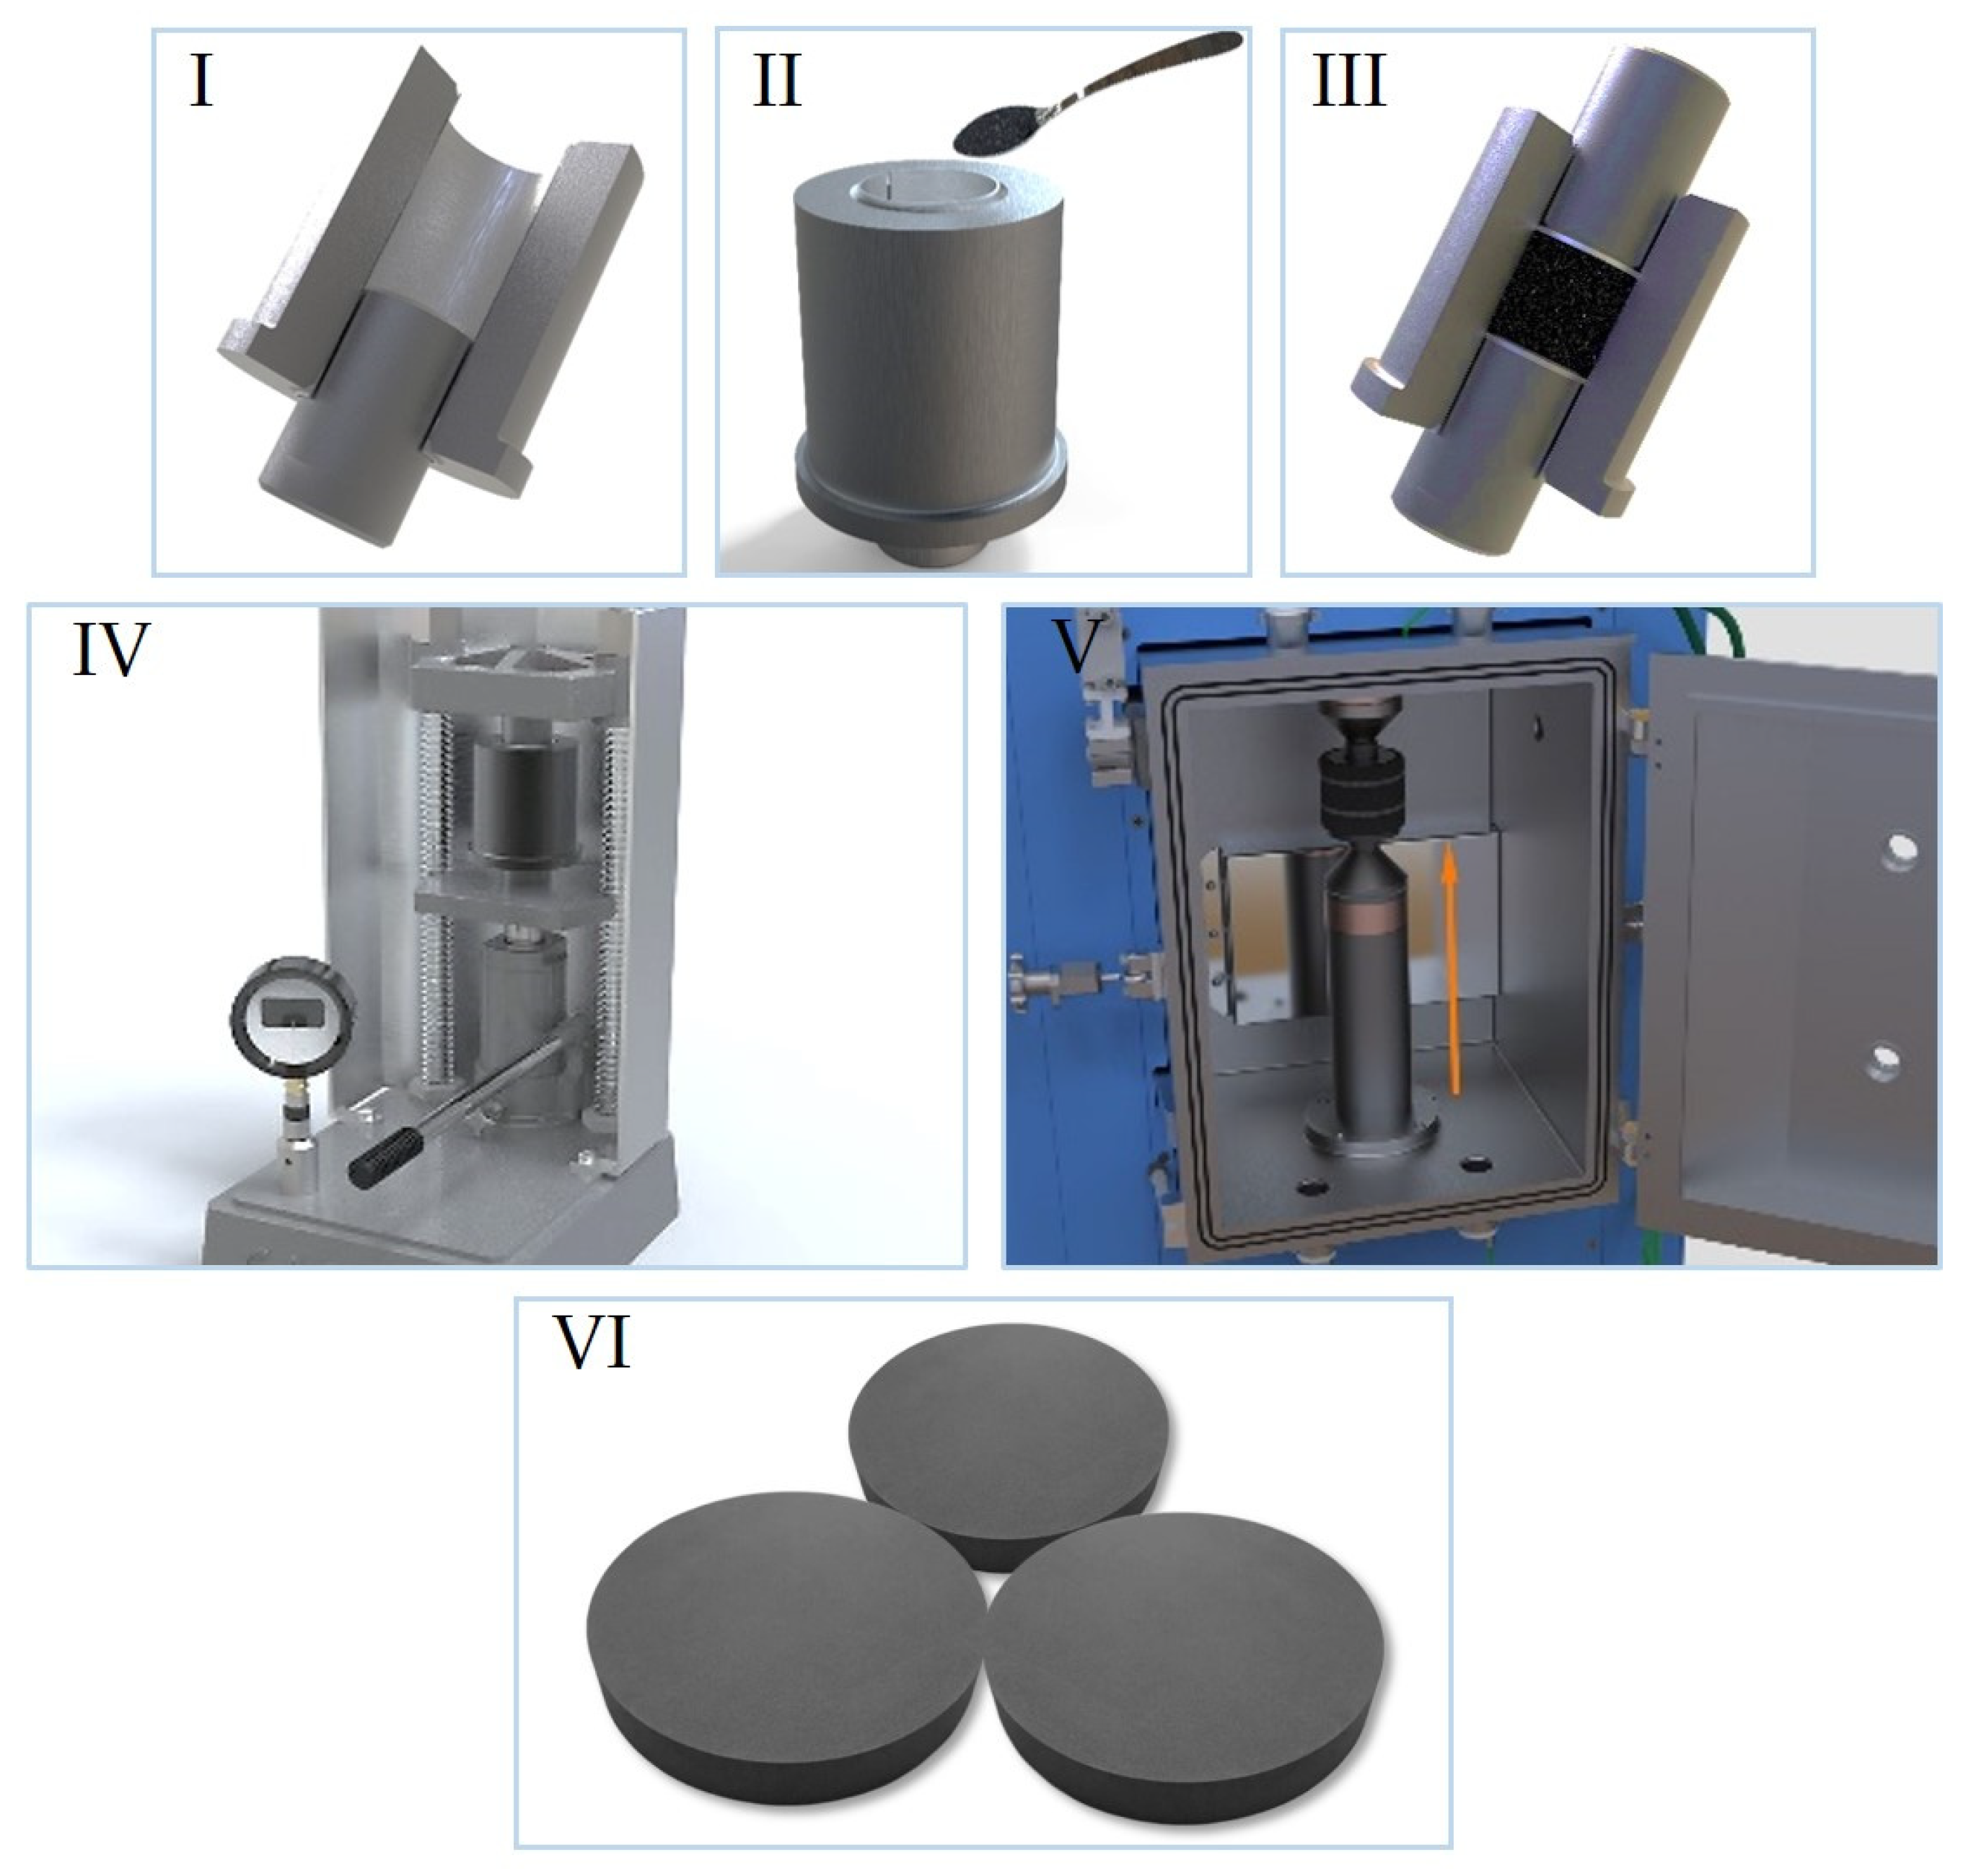
The sequence of the main stages of sintering target blanks made of TiB2 powder is shown in Figure 3. The process includes the preliminary assembly of a graphite mold (I), pouring sifted powder into the mold (II), the final assembly of the mold (III), the preliminary pressing of ceramic powder on a manual press at a pressure of 5 MPa (IV), setting up the mold in the sintering chamber and lifting it to the upper current supply (V) and the subsequent sintering of the powder and production of TiB2 targets (VI). Information on the range of parameters varied during the spark plasma sintering of TiB2 + Ti powder is provided in Table 1.
The sintering was implemented as follows: a minimum pressure on the sample was maintained (43 MPa) until the sintering temperature of 300 °C was reached, and then the pressure and temperature were continuously increased to the required values with a heating rate of 100 °C/min. Before reaching the required maximum temperature, the last 100 °C was achieved at a heating rate of 25 °C/min. After sintering, the target blanks were subjected to finishing treatments, such as cleaning graphite foil residues on a grinding and polishing machine and the diamond grinding of horizontal surfaces on a grinding sharpening machine.
A set of studies was carried out to research the influence of process modes, such as temperature, pressure on the sintered material and isothermal holding time, on the characteristics of sintered materials (density and crack resistance) to identify rational conditions for sintering targets made of TiB2 powder. The density of the samples was determined by hydrostatic weighing as a percentage of the theoretical density. The crack resistance was determined by microindentation with a Vickers pyramid for 10 s with a load of 98 N.

2.2. Technological Principles and Equipment for Deposition of Coatings Based on TiB2

An experimental hybrid PVD setup STANKIN-APP3 (MSTU Stankin, Moscow, Russia) was used to study the deposition process of TiB2 coatings. This setup allows subcoating deposition by vacuum-arc evaporation and TiB2 coating by the magnetron sputtering of sintered targets in a single technological cycle. Figure 4 shows the general view and internal structure of the vacuum chamber of the experimental PVD setup.
A modern coating of three-component nitride (TiAlSi)N was used as a subcoating to improve the adhesion of the TiB2 coating to carbide substrates. Today, this coating is recommended by cutting tool manufacturers for cutting difficult-to-cut alloys [27,28]. When choosing a coating design, we proceeded from the fact that by combining a nitride subcoating with a promising wear-resistant TiB2 coating, it is possible to obtain an optimal system aimed at machining chromium–nickel alloys with an increased level of thermal and mechanical loads.
Before coating deposition, the surface layer of the carbide substrates that were mounted on a work table rotating at a frequency of 6 rpm was degassed for 30 min. The substrates were heated by tubular electric heaters to a temperature of 480 °C at a pressure of 0.03 Pa in the vacuum chamber, and argon was supplied through a multi-channel gas injection system. Subsequently, cleaning was carried out with gas and metal ions: cleaning for 20 min in a non-self-sustaining gas discharge at a pressure of 0.8 Pa in the vacuum chamber and a bias on the substrates of 650 V; cleaning with Ti ions for 20 min at an arc current of 90 A on a titanium cathode, with a pressure of 2.2 Pa and a bias of 750 V.
The (TiAlSi)N subcoating was deposited at a pressure of 1.2 Pa in a vacuum chamber in an Ar/N2 gas mixture in a ratio of 5/95 vol% and a bias of 120 V on a rotating table with substrates. During the deposition, the temperature in the working chamber was 500 °C, and the arc current was 90 A on the titanium cathode and 80 A on the silumin cathode. The deposition time was 40 min, which ensured a subcoating thickness of ~2.8 μm. Information on the range of parameters that varied during the magnetron deposition of TiB2 coatings is provided in Table 2.
The Berkovich pyramid nanoindentation method was used on a Nano Hardness Tester (CSM Instruments S.A., Peseux, Switzerland), with an indenter penetration depth of 380 nm and an applied load of 4.0 mN, to establish the effect of deposition modes on the hardness and elastic modulus of TiB2 coatings. A Dektak 150 stylus profilometer (Bruker AXS, Billerica, MA, USA) was used to study the roughness of the coatings. The strength of the adhesion bond between the TiB2 coating and hard alloy substrates was assessed using the Revetest RST3 scratch tester (Anton Paar GmbH, Graz, Austria) by the sclerometry method with recordings of the spectra of acoustic emission signals [29]. Tests were carried out at a linearly increasing load on the indenter (Rockwell diamond cone) from 0.1 to 40 N and a loading speed of 5 N/min. The characteristic levels of critical loads were determined based on the signal spectra: crack formation in the coating (Lc1) and delamination of the coating sections of the hard alloy substrate (Lc2). Tribological tests were carried out under heating conditions of up to 600 °C according to the “pin-on-disk” scheme on a Ducom POD-4.0 friction machine (Ducom Instruments Inc., Bohemia, NY, USA) with a load of 15 N, a rotation speed of 15 cm/s and a friction distance of 500 m. Inconel 718 chromium–nickel alloy was used as the material of the counterbody, in other words, as a pin, when a hard alloy substrate with various types of developed coatings was tested. The principal scheme of testing is provided in [30].

2.3. Experimental Samples of End Mills and a Method for Wear Resistance Assessing in Cutting

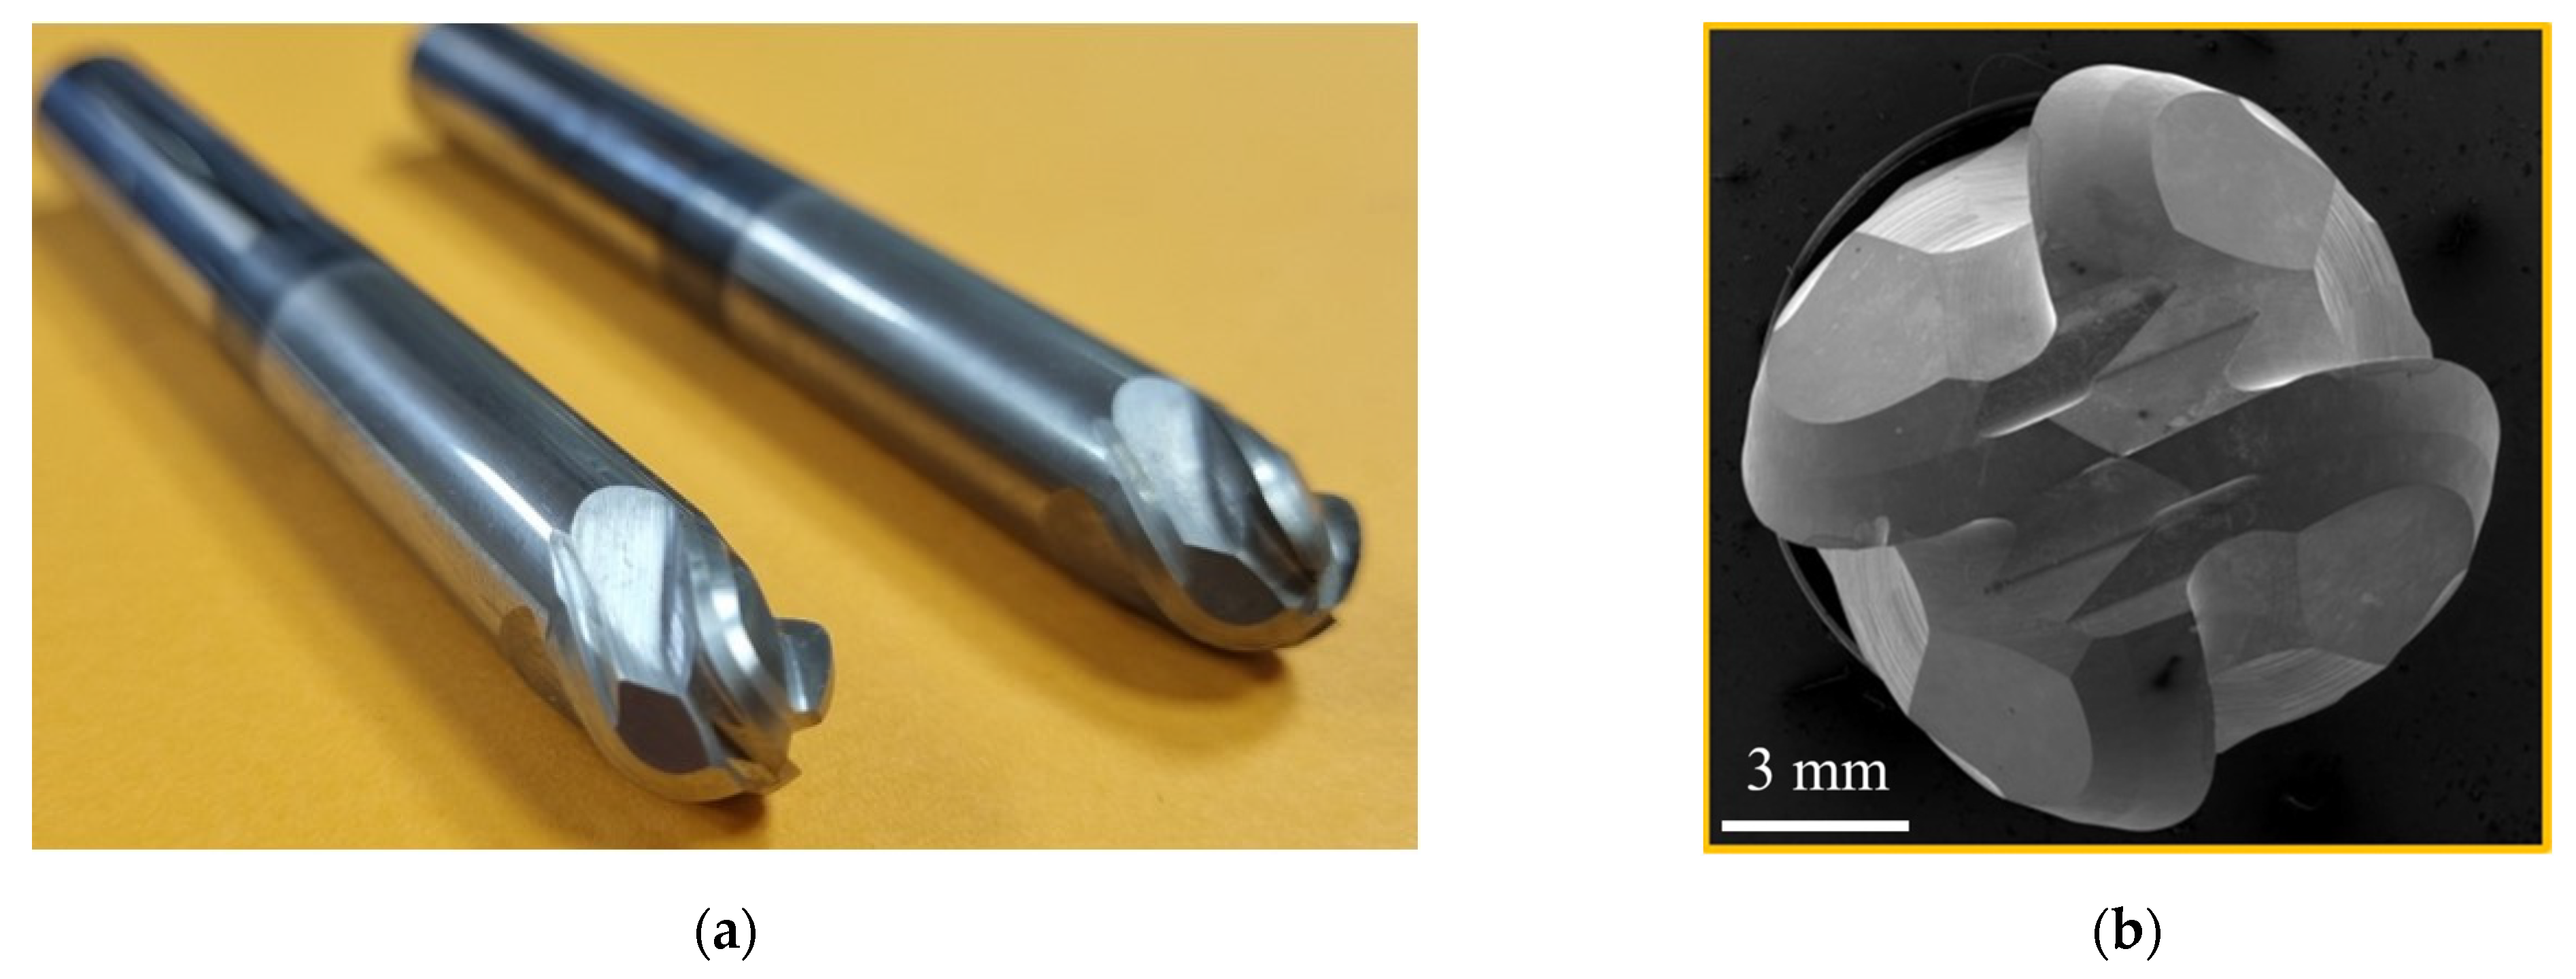
Carbide ball-end mills made of KFM 39 tungsten–cobalt hard alloy (WC—91 wt.%, Co—9 wt.%) were used as cutting tool samples, coated according to the technological principles described above. Figure 5 shows the design of the end mill samples used. Table 3 shows information about the design and geometric parameters. Four variants of cutting tools were used for testing: without coatings, with (TiAlSi)N and TiB2 monocoatings, and with a double-layer coating of “subcoating/external coating” structure of (TiAlSi)N/TiB2 composition.
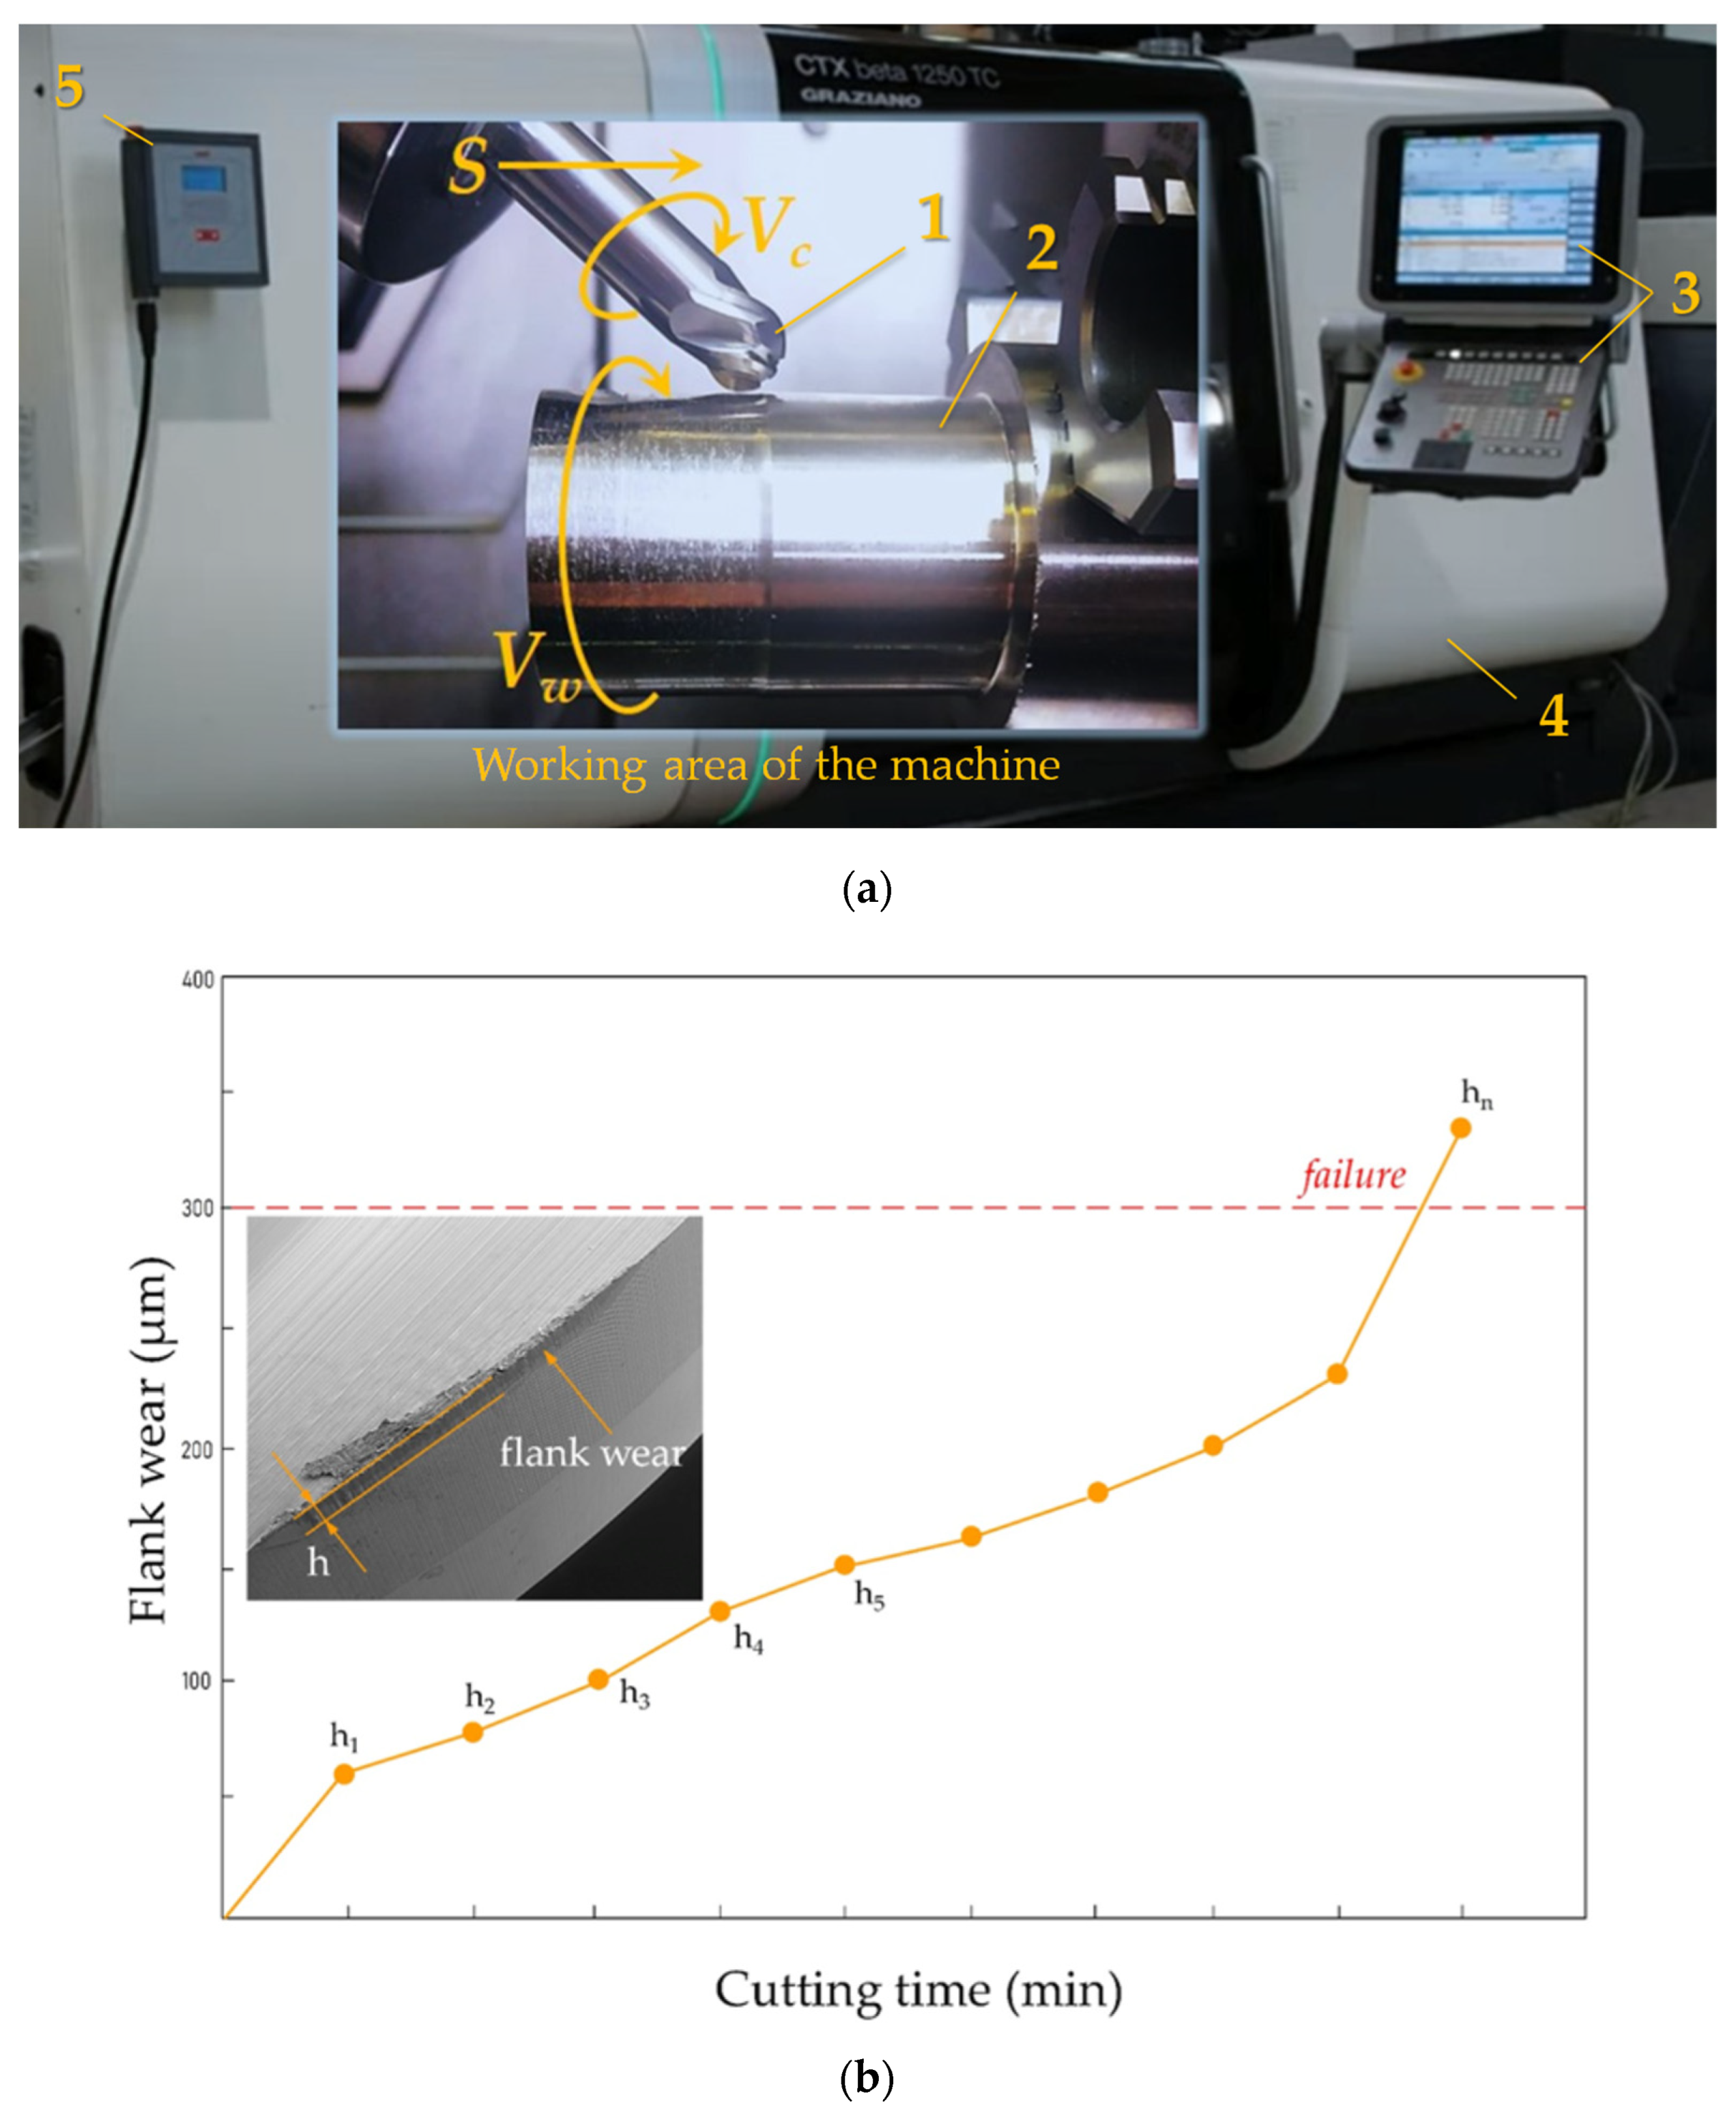
The wear resistance of the end mills was assessed by cutting a workpiece made of the heat-resistant nickel alloy Inconel 718 (the chemical composition is provided in Table 4). Figure 6 shows the relative position of the end mill and the workpiece and the cutting movements during the experiments and the flank wear measurement technique, which is a quantitative assessment of the wear chamfer of the cutting tool’s flank face over certain intervals until the critical wear criterion is reached (h = 300 µm). Data on the test conditions are provided in Table 5. The process was stopped after cutting for 5 min, and the flank wear on each end mill tooth was measured on an Axio Lab.A1 ZEISS binocular microscope (Carl Zeiss MicroImaging GmbH, Jena, Germany).

3. Results

3.1. Spark Plasma Sintering of Targets from a Powder Composition Based on TiB2

The results of the experiments carried out with the spark plasma sintering modes showed that it is not possible to achieve the formation of pore-free high-density samples in the case of using pure TiB2 powder: the sintered target blanks had numerous pores (Figure 7), and the density of the samples was no more than 84% (Table 6). It was possible to significantly reduce the porosity of the sintered samples and increase their relative density by adding Ti micropowder with particle sizes of up to 10 μm at 2, 4 and 6 vol.% to the TiB2 powder (Table 6). In this case, the maximum density of the samples (~99%) after sintering was recorded with a Ti powder content of 4 vol.% in a powder composition based on TiB2 and a sintering temperature of 1700 °C. A further increase in the content of Ti powder increased the porosity and contributed to a decrease in the density of the sintered samples. The significant compaction and reduction in porosity of the sintered samples established during the study of the SPS process due to the addition of spherical Ti powder to the TiB2 powder can be explained by the fact that titanium particles act as a binding component that improves the interparticle binding of the solid phase the main component of TiB2 and filling the pores during high-temperature sintering. A rather sharp decrease in the density of the target samples made of a powder composition based on TiB2 is obviously associated with grain growth of the sintered material, as revealed during sintering in the 1700–1900 °C temperature range. Considering the obtained data, a powder composition of 96 vol.% TiB2—4 vol.% Ti was used when sintering target blanks in subsequent studies. Figure 8 shows the results of the EDX analysis of a sintered target sample. The dosage of powder components to obtain one sample with a diameter of 80 mm and a thickness of 5 mm was established by calculation and amounted to 109.056 g of TiB2 and 4.53 g of Ti.
Figure 9 shows the experimentally obtained dependences of the relative density and crack resistance of sintered TiB2 targets on sintering temperature, sintering pressure and isothermal holding time. An increase in the sintering temperature in the range of 1500–1700 °C leads to a significant increase in the characteristics under study. In the range of 1700–1900 °C, a relatively sharp decrease is observed (especially for the density of the samples). The noted decrease is apparently associated with the phenomenon of some grain growth with increasing temperature. An increase in the pressure from 50 to 65 MPa significantly increases the density and crack resistance of the sintered material. It is definitely caused by a decrease in the volume and number of pores (shrinkage) in the sintered sample, which occurs with increasing pressure. With a further increase in pressure (from 65 to 80 MPa), the increase in sample density slows down somewhat, and the crack resistance remains virtually unchanged. With isothermal exposure for 3 min, the density of the sintered samples is about 95%, and then begins to increase sharply, reaching a maximum value (more than 99%) when held for 5 min. A subsequent increase in exposure to 10 min does not affect the change in the relative density of the samples. The performed studies made it possible to identify a rational combination of conditions for the spark plasma sintering of target blanks made of a powder composition of 96 vol.% TiB2 + 4 vol.% Ti: the sintering temperature was 1700 °C, the pressure on the material was 80 MPa and the isothermal holding time was 5 min. Notably, the maximum density during sintering of a powder composed of 96 vol.% TiB2—4 vol.% Ti was achieved in a short isothermal holding time (5 min), making the spark plasma process promising for industrial use.

3.2. Deposition of TiB2-Based Coatings on Carbide Substrates

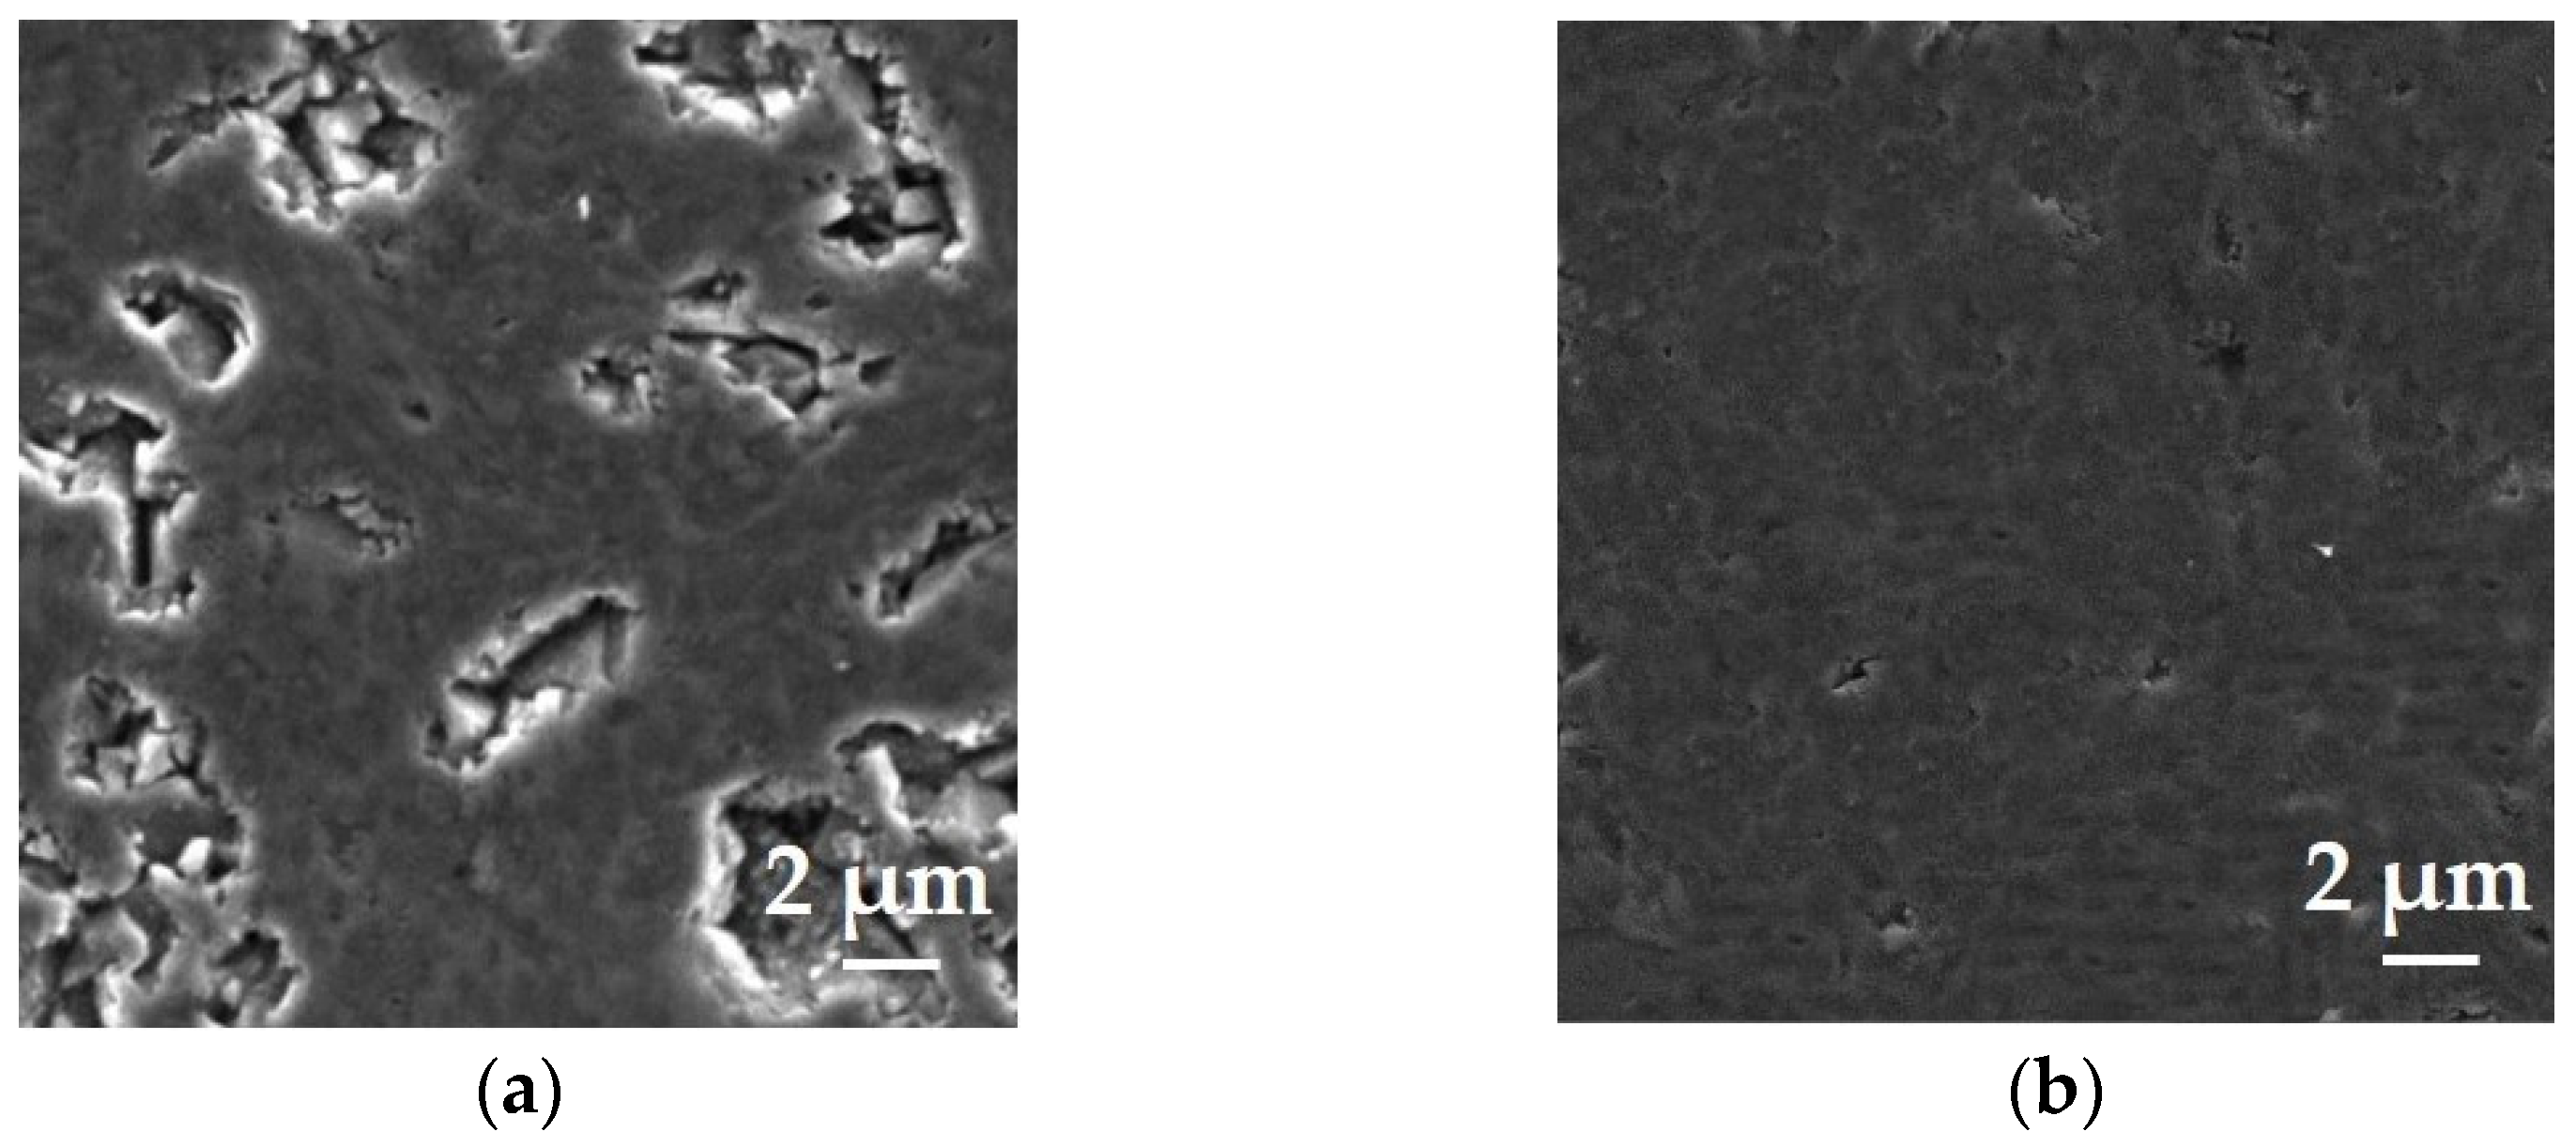
Figure 10 shows an SEM image of a cross-section of a TiB2 coating obtained by magnetron deposition on a hard alloy substrate and an X-ray diffraction pattern of the sample’s surface layer. The deposited coating is characterized by a relatively dense columnar microstructure. The peaks of the TiB2 and hard alloy substrate phases (WC and Co) are detected in the surface layer.
Figure 11 shows the experimentally obtained dependences of nanohardness, elastic modulus, roughness and thickness of TiB2 coatings on the discharge bias, Ar pressure and deposition time during the magnetron sputtering of the target. It can be seen that the nanohardness and elastic modulus of TiB2 coatings change extremely ambiguously depending on the discharge bias, varying within the ranges of 19–40 GPa and 380–560 GPa, respectively. The maximum ductility of coatings must be ensured, since coatings with increased hardness are simultaneously characterized by excessive rigidity, which sharply increases the tendency of brittle fracture during microdeformations under the mechanical loads in cutting. The ratio of their hardness to the elastic modulus (H/E parameter) is often used to measure the plasticity of coatings [31,32,33]. It was found that the nanohardness of TiB2 coatings increases noticeably with an increase in Ar pressure from 0.2 to 1.0 Pa. At the same time, the roughness of the deposited coatings also increases.
The deposition rate of TiB2 coatings has a traditional character depending on the target sputtering time (Figure 11). In this case, the mobility of the hard alloy substrate noticeably affects the thickness of the formed coating: the deposition speed was ~1.7 μm/h for rotating samples and ~2.5 μm/h for stationary samples. Also, the influence of deposition time (coating thickness) on the morphology of the TiB2 coating was revealed during this research. It has been established that with the increasing thickness of TiB2 coatings, their morphology changes significantly, a significant number of dislocations appear and the misorientation of the grain structure is observed (Figure 12). The formation of dislocations during the growth of PVD coatings can be considered a natural process [34,35].
For tool purposes, the thickness of coatings is one of the critical parameters affecting the adhesion of coatings to substrates and wear resistance when exposed to thermal and mechanical loads. On the one hand, an increase in the coating thickness has a positive effect on the wear resistance of a surface, but, on the other hand, it traditionally leads to a decrease in the adhesion strength of the coating and the tool material and worsens the ability of the coating to resist brittle fracture during microdeformations [36]. Therefore, when conducting research, special attention was paid to choosing the rational thickness of TiB2 coatings deposited on carbide substrates. Table 7 shows the results of assessing the adhesion strength of TiB2 coatings with thicknesses of 1.0, 2.0 and 2.5 μm during scratch testing. Adhesion was assessed for both coatings deposited directly on hard alloy substrates and on pre-formed (TiAlSi)N subcoatings. It can be seen that an increase in the thickness of the coatings significantly reduces the critical loads at which cracking (Lc1) and peeling of sections of the coating (Lc2) occur. It was found that the deposition of TiB2 coatings on substrates with a pre-formed (TiAlSi)N subcoating with a thickness of 2.8 μm ensures a shift in load to the region of higher values, i.e., it increases the adhesion of coatings to substrates. This effect is especially pronounced for Lc2 loads, at which the peeling of the coatings occurs when Lc1 does not increase significantly. For example, the average load Lc2 was 23 N for a TiB2 monocoating with a thickness of 2.0 μm, and the ultimate load increased by more than 30% and amounted to 31 N for the (TiAlSi)N/TiB2 coating. Table 7 also presents the experimental data on the elastic moduli of TiB2 coatings of different thicknesses formed on substrates without a subcoating and with a (TiAlSi)N subcoating. The presented results demonstrate a certain correlation between the adhesion strength of the TiB2 coating to the hard alloy substrate and its elastic modulus. It is known that higher values of the elastic modulus usually correspond to higher values of residual stresses in the coating, which can lead to the development of cracking, and a lower elastic modulus ensures high resistance to plastic deformation [31,35]. This relation can be applied to the samples with TiB2 coatings under study. An increase in its elastic modulus and a decrease in loads leading to cracking in the coating (Lc1) and delamination of coating areas (Lc2) are observed when the coating thickness increases (Table 7). However, it is possible to reduce this effect by introducing the (TiAlSi)N intermediate layer, providing lower stresses in the “hard alloy substrate—TiB2 coating” system and the satisfactory adhesion strength of the TiB2 coating. Thus, when the TiB2 coating thickness was 2.0 μm, the elastic modulus of the coating deposited on a hard alloy substrate was ~390 GPa, and, with (TiAlSi)N subcoating, it was ~366 GPa.
Thus, the results of studies of the deposition of TiB2 coatings on hard alloy substrates (WC-Co) using magnetron sputtering of sintered targets produced from a composition of 96 vol.% TiB2—4 vol.% Ti show that it is possible to obtain coatings with a wide range of critical physical and mechanical properties by varying the deposition modes. For TiB2 coating tool purposes, a combination of deposition modes was chosen to provide the maximum ratio of nanohardness and elastic modulus (H/E), i.e., making it possible to obtain coatings that simultaneously combine sufficiently high hardness (H = 38 GPa) and acceptable ductility (E = 390 GPa). The sufficient adhesion of TiB2 coatings can be achieved with a thickness of 2.0 μm and deposition of coatings on carbide substrates with a (TiAlSi)N subcoating, which additionally ensures a reduction in the elastic modulus of the outer TiB2 coating. The specified design of TiB2-based coatings is potentially capable of resisting brittle fracture and peeling from the surface of a carbide tool under increased mechanical loads in milling. An analysis of the obtained experimental data made it possible to identify the preferred modes of TiB2 coating deposition, which were used to deposit coatings on samples of carbide end mills: the discharge voltage was 400 V, argon pressure was 0.6 Pa and deposition time was 70 min.

3.3. Wear Resistance of TiB2-Based Coatings Deposited on Carbide Substrates during Tribological Tests

Figure 13 shows the results of studies of the changes over time of the friction coefficient of WC-Co hard alloy substrates with various coatings under conditions of high-temperature sliding friction with counterbodies made of Inconel 718 alloy on distance. The large amplitude of friction coefficient fluctuations for a sample without a coating indicates that frictional interaction is accompanied by intense adhesive bonding with the material of the counterbody. This is illustrated by the SEM image of a section of a wear track (Figure 14), which shows destructive processes in the surface layer of the WC-Co sample, the formation of scuffing and the adhesion of the counterbody material. The deposition of a (TiAlSi)N monocoating reduces the amplitude of fluctuations in the friction coefficient but does not reduce its average value compared with the original sample (Figure 13). At the same time, destructive processes are significantly less pronounced on the friction path of a sample with a nitride coating. The TiB2 monocoating reduces the average friction coefficient at the initial testing stage, but its value increases noticeably with increasing friction distance. It can be assumed that the TiB2 monocoating is gradually destroyed under the influence of thermal and mechanical loads, and the friction conditions approach those characteristics equally compared to the uncoated samples. In this case, the type of friction path for the diboride monocoating and the observed destructive process are similar to the sample with nitride monocoating (Figure 14). For the (TiAlSi)N/TiB2 coating, an increase in the friction coefficient is observed at the running-in stage. Then, it has stable values at the level of ~0.6 m with small amplitudes of its fluctuation throughout the entire friction distance (Figure 13). The SEM image of a section of a wear track of a sample with (TiAlSi)N/TiB2 coating (Figure 14) allows us to conclude that destructive processes on the surface of the carbide substrate and the adhesion of the counterbody material are minimized.
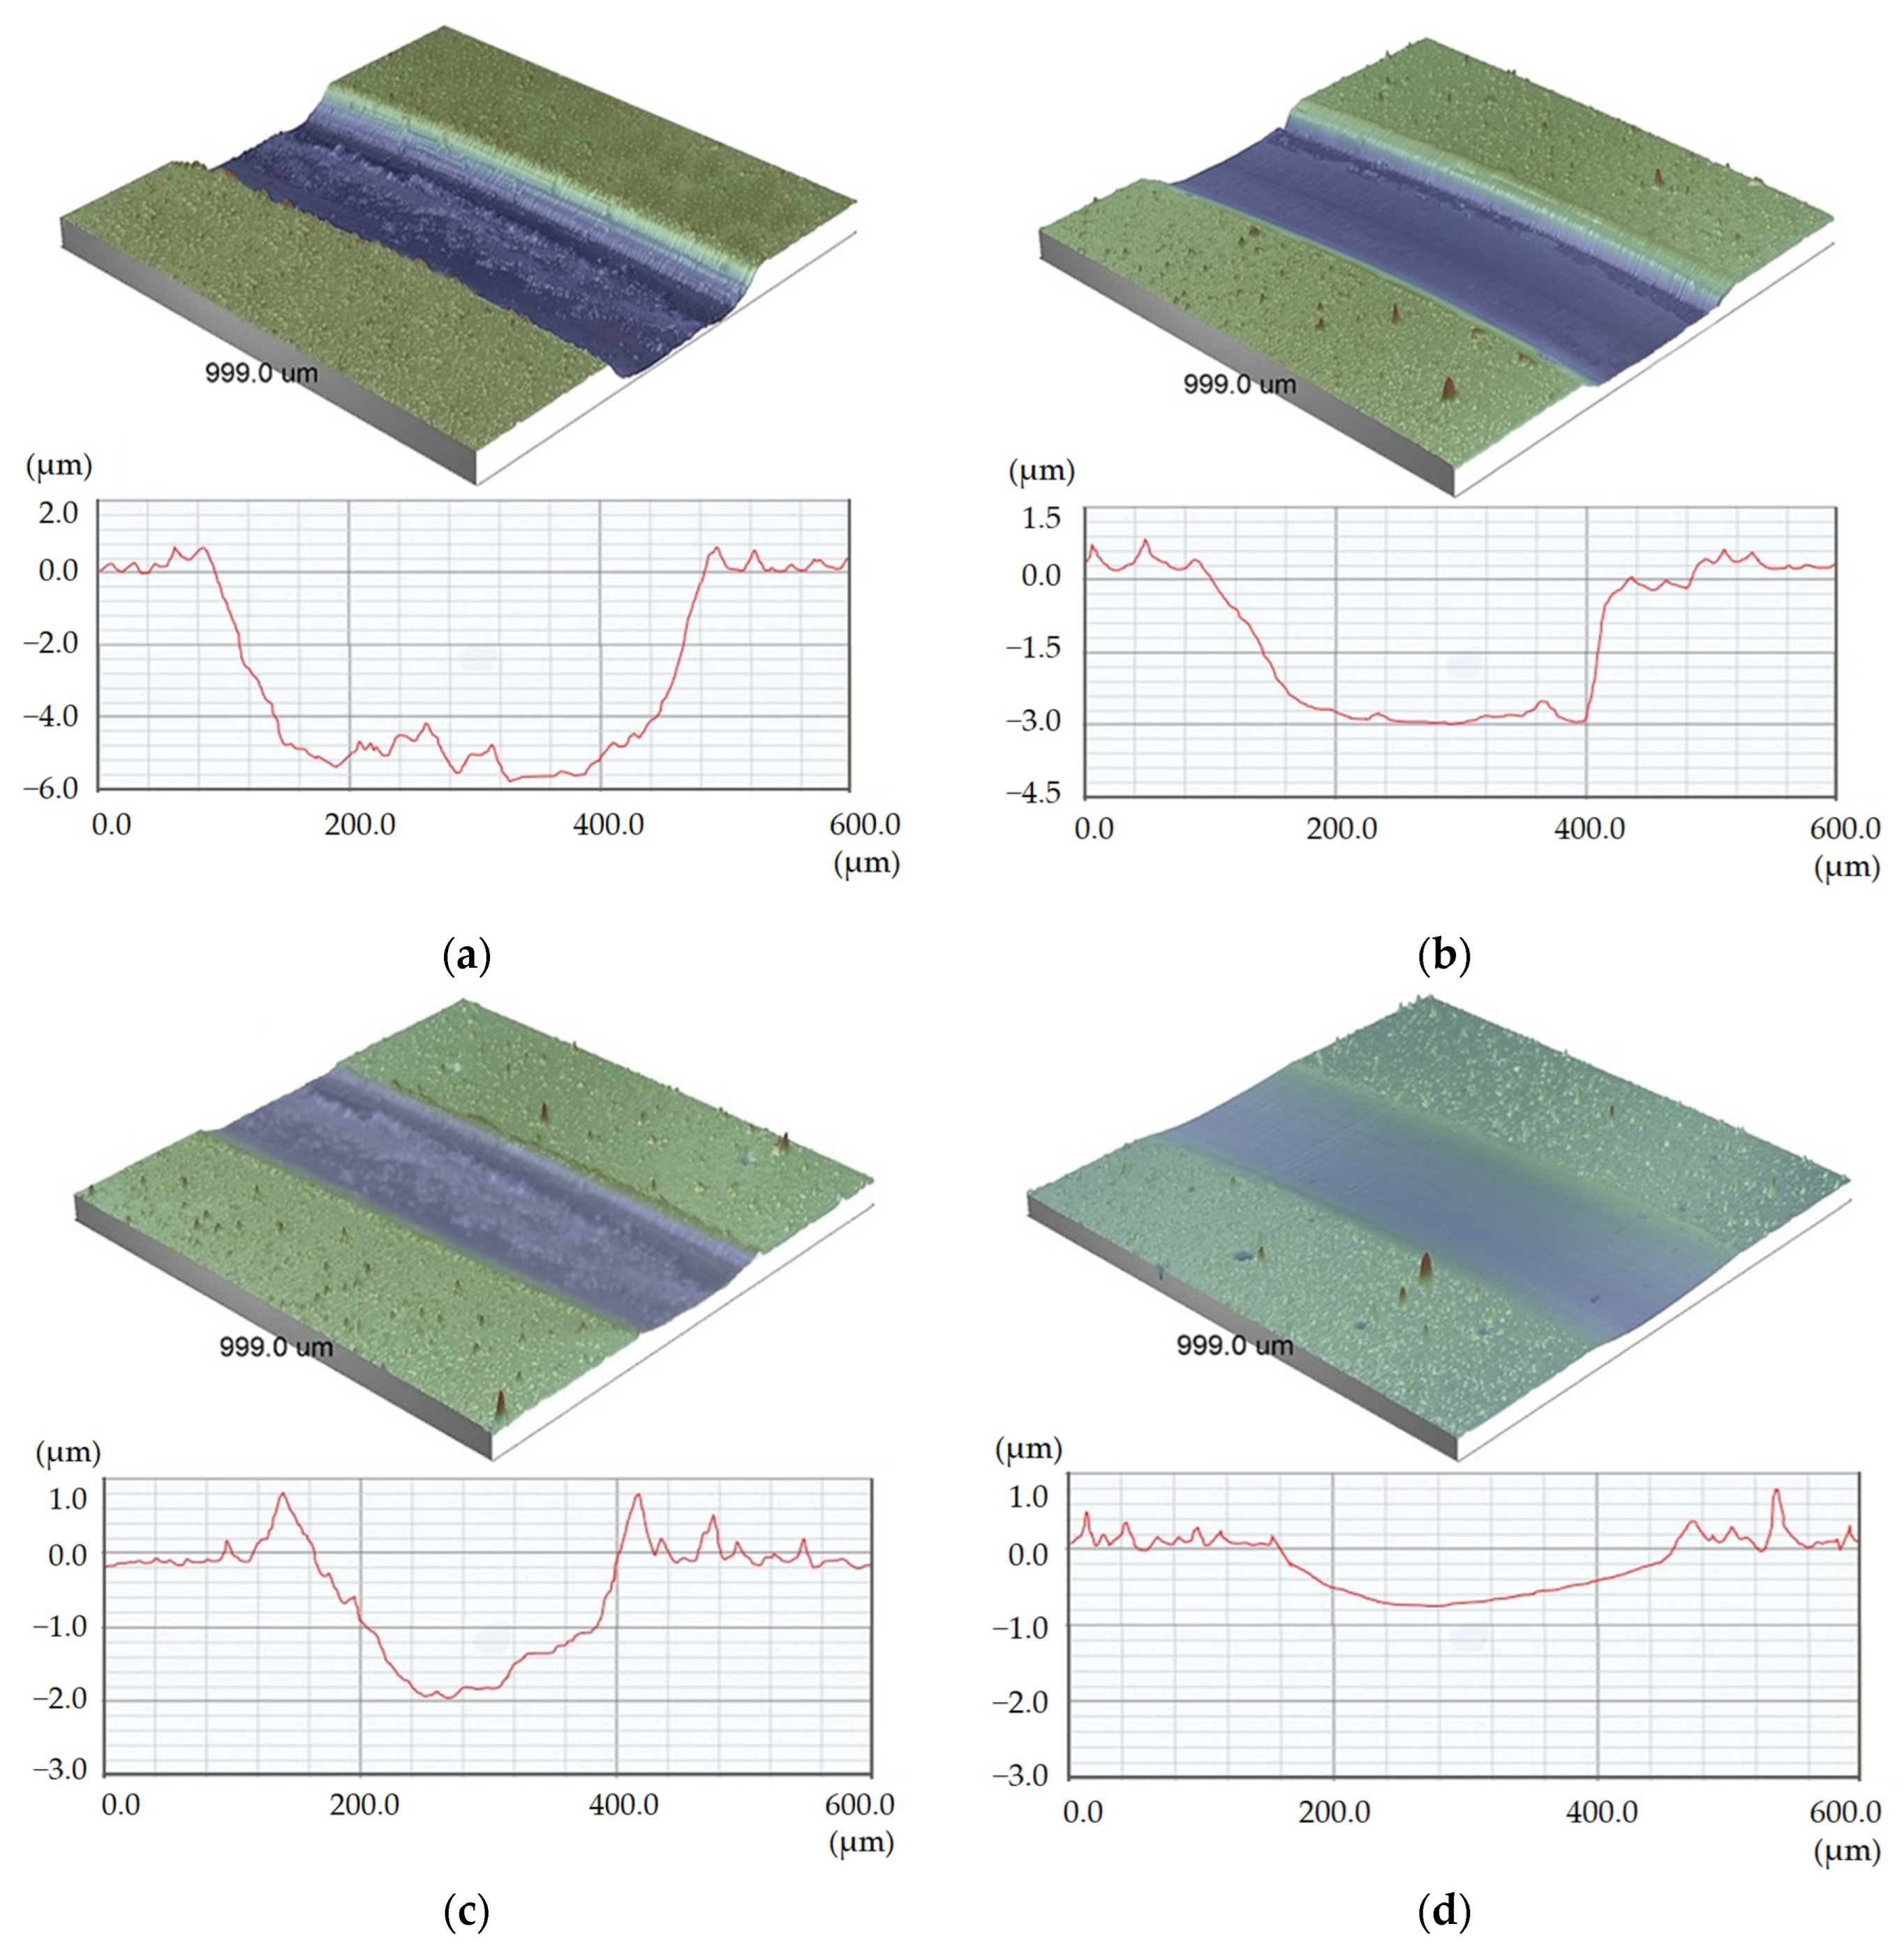
A comparative quantitative analysis of the wear resistance of the WC-Co hard alloy substrates with various coatings was performed based on a comparison of the 3D profiles and profilograms of sections of wear tracks (Figure 15). It can be seen that the formed wear areas for samples without a coating and with (TiAlSi)N, TiB2 and (TiAlSi)N/TiB2 coatings differ significantly as a result of contact interaction with chromium–nickel alloy during friction sliding (especially the maximum depth of wear tracks) and amount to 5.9, 3.0, 2.0 and 0.8 μm, respectively. The TiB2 monocoating has some effect in comparison with samples without a coating and with the (TiAlSi)N monocoating, but is noticeably inferior in wear resistance to the (TiAlSi)N/TiB2 coating. High thermomechanical loads during tribological tests lead to destructive processes to which the TiB2 monocoating is poorly resistant. The results of scratch testing (Table 7) show that the forces expended on cracking and tearing off sections of the TiB2 coating are noticeably less than for the (TiAlSi)N/TiB2 coating. Throughout the entire high-temperature tribotests, the (TiAlSi)N/TiB2 coating retains its functions, which allows us to conclude that there is a high potential for its use to increase the wear resistance of carbide tools during the cutting when the cutting edges experience an increased level of thermal and mechanical loads. It should be noted that since the tribological tests were carried out by the “pin-on-disk” scheme, the profile of the wear tracks was equal along the entire track and specific areas were absent.

3.4. Wear Resistance of TiB2-Based Coatings Deposited on Carbide End Mills When Tested in Cutting

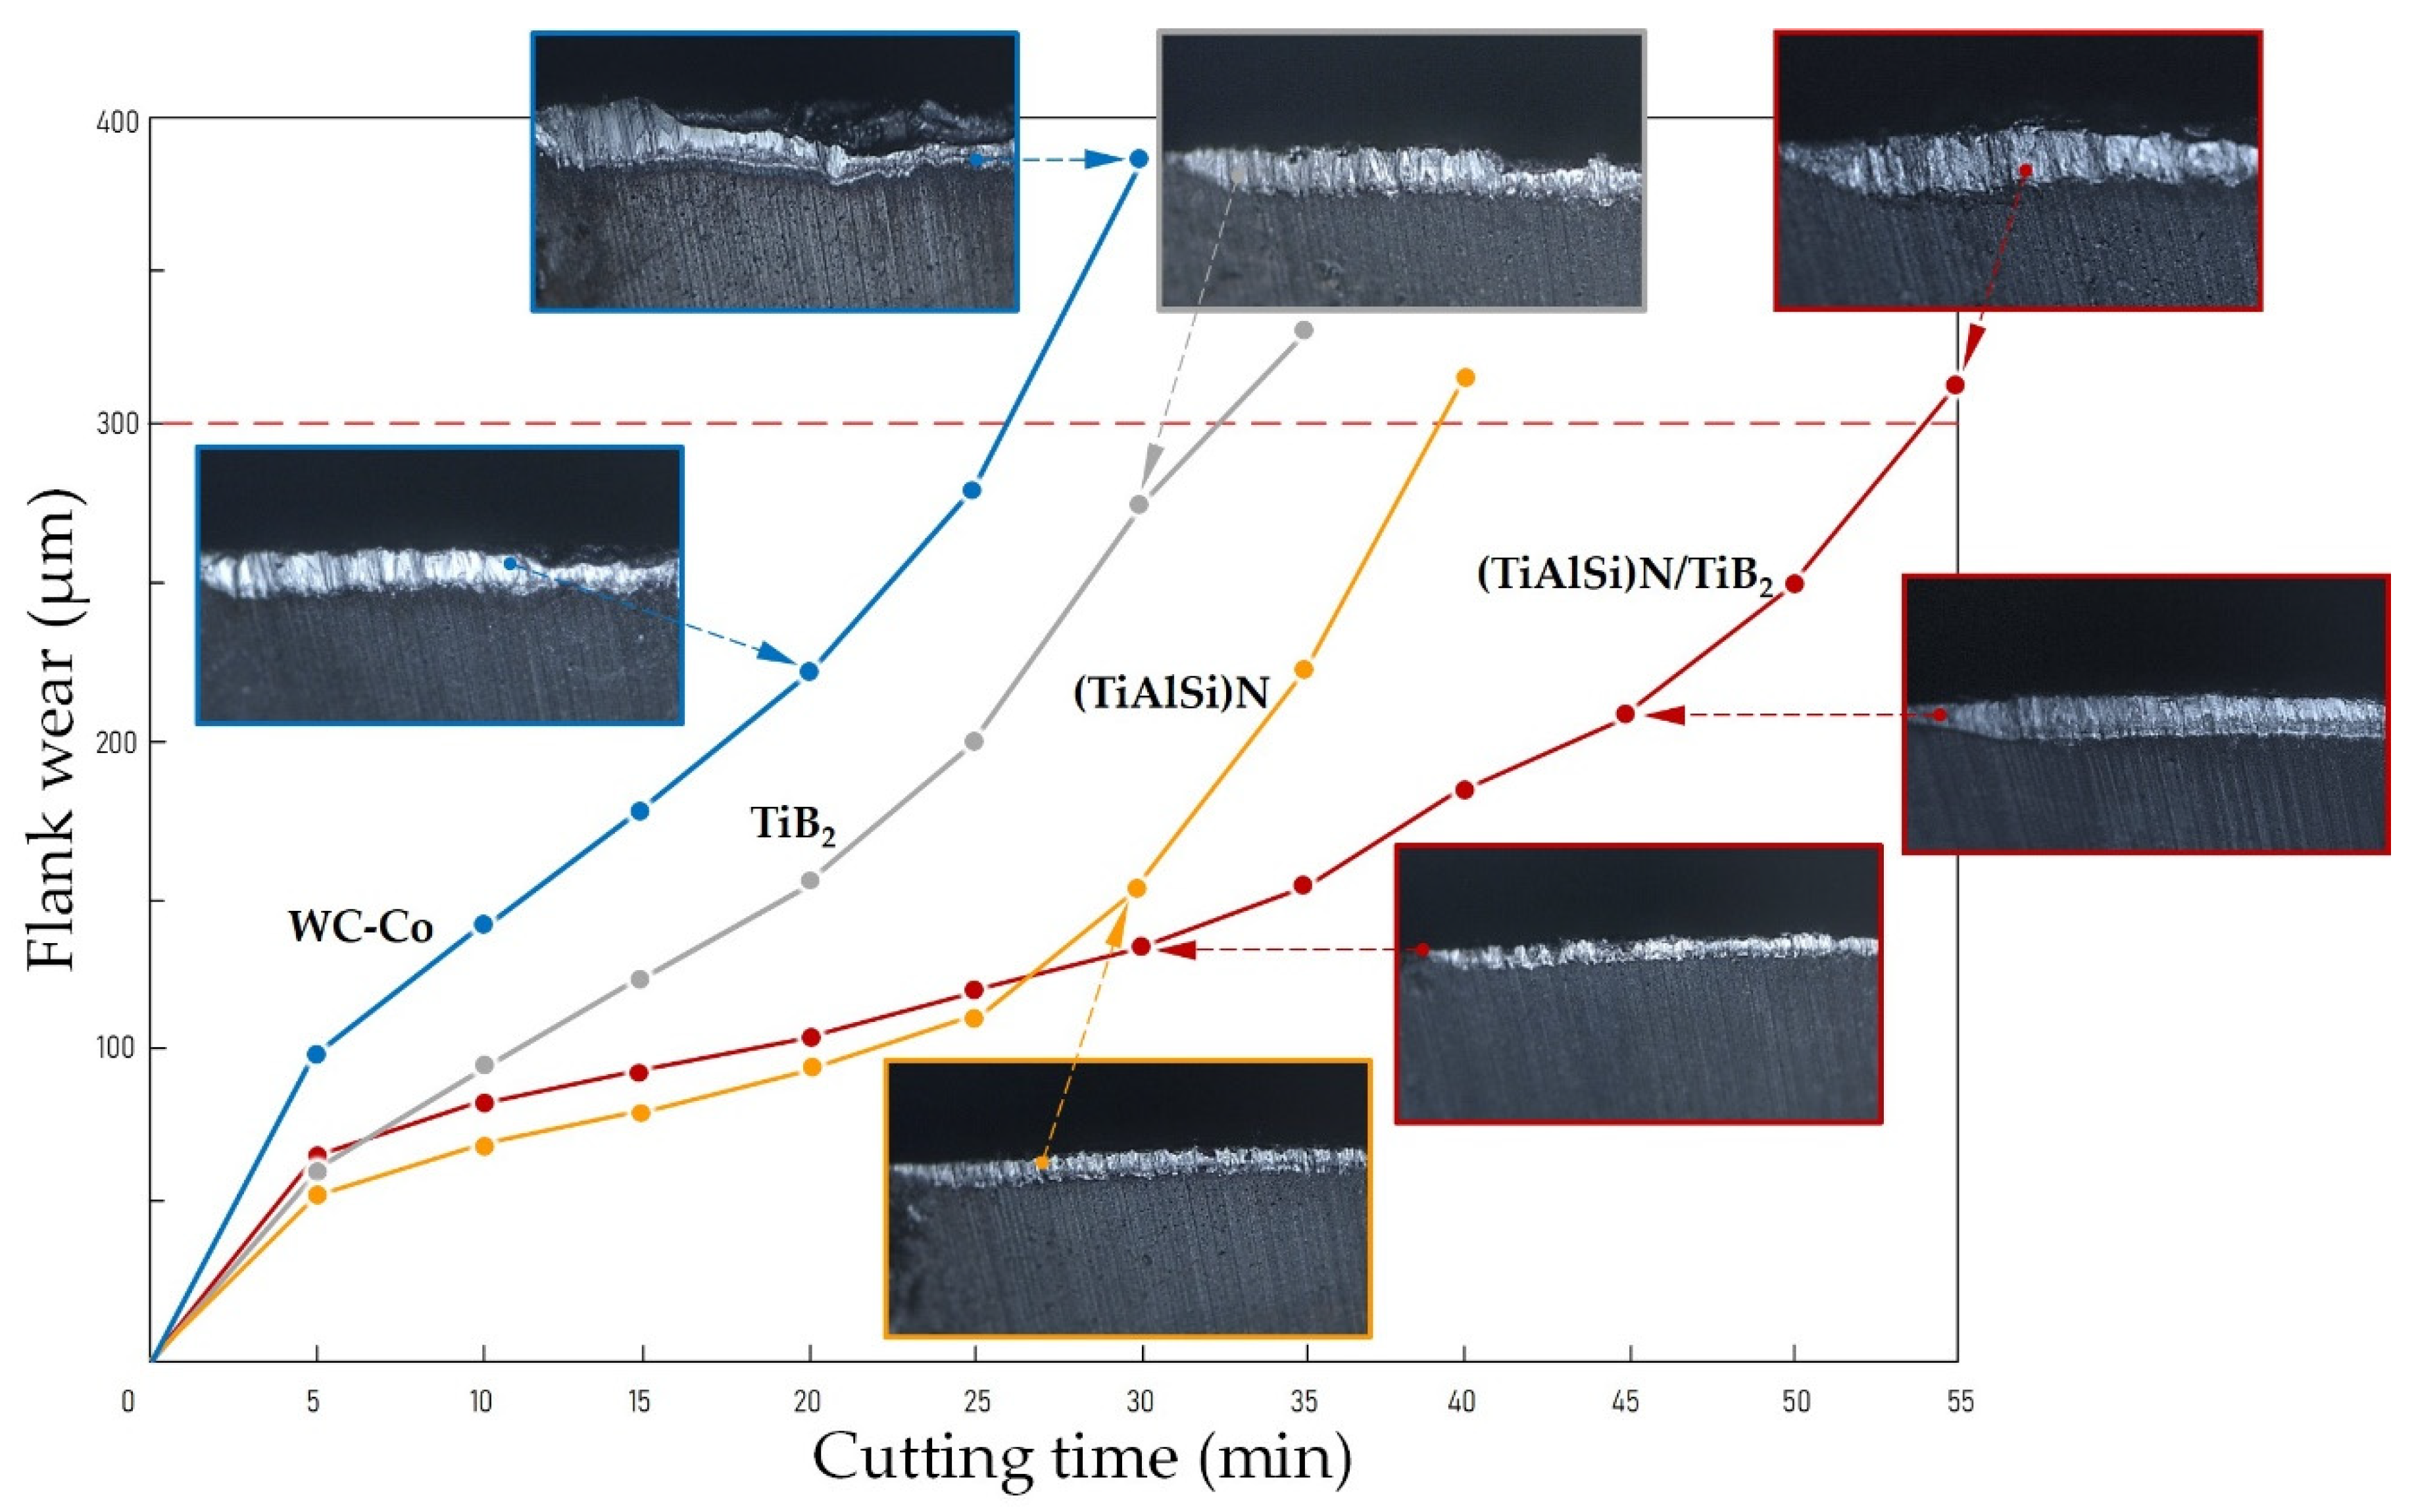
Full-scale tests were carried out at increased cutting speeds to evaluate the effectiveness of TiB2 coatings in milling chromium–nickel alloys. Figure 16 shows the experimentally obtained curves of wear on the flank faces of carbide ball-end mills with various coatings versus cutting time in machining workpieces made of Inconel 718 alloy with a cutting speed of 263.7 m/min, a feed of 0.04 mm/tooth and a depth of 0.25 mm. The wear curves for all four samples under study had a rather classic character. At the short stage of running-in, the wear of the cutting part of the end mills occurs due to the microdeformation of the surface layer. Then, the stage of steady wear follows and is characterized by constant friction conditions and a monotonically increasing wear rate. It is known that the stage of catastrophic wear occurs when the optimal friction conditions typical for the previous stage are violated, which leads to a sharp increase in the wear rate [36,37]. The curves presented in Figure 16 vary significantly in wear rate on cutting time and correlate to some extent with the high-temperature tribological test results presented above.
The wear resistance until critical wear (300 µm) was reached at ~26 min for uncoated end mills. The (TiAlSi)N monocoatings that are widely used in the industry significantly slowed down the wear rate and increased the wear resistance of cutters up to ~38 min. This effect of nitride coatings is explained by their ability to maintain high hardness under increased thermal loads [38,39]. The deposition of TiB2 monocoatings on the cutting part of end mills slightly slows the wear rate compared to end mills without coatings (~33 min) but is inferior in wear resistance to the nitride coating. This is apparently due to the insufficient adhesive bond of TiB2 coatings with carbide tools and destructive processes occurring under high thermal and mechanical loads, which have already been discussed when assessing the results of tribological tests. End mills with (TiAlSi)N/TiB2 coatings are characterized by the longest stage of steady-state wear and the minimum wear rate, and their wear resistance before reaching critical wear is ~54 min, which is 2.0, 1.6 and 1.4 times more than for tools without coatings and with TiB2 and (TiAlSi)N monocoatings, respectively (Figure 16).
The different behavior of the coating in the cutting zone correlates with the tribological behavior of the coating and surface processes in the contact zone between materials under corresponding thermal and mechanical loads. Not only does the coating material itself affect the wear behavior of the cutting tool, but also the substrate material, the quality of the surface before coating deposition, the adhesion of the coating to the underlying material, contact conditions, etc. During wear, the stability of the coating behavior and the friction coefficient plays an important role, which is also responsible for the release of heat during cutting, which in turn depends not only on the mechanical characteristics of the formed wear pad but also on the chemical composition of the coating and its physical properties, which determine the nature of the interaction of the coating with the workpiece material and the environment.
Diborides definitely have higher hardness and less intense adhesive bonding with the counterbody during high-temperature friction than nitrides of metal and form tribofilms during high-temperature exposure. During the development of our innovative coating structure, the three-nitride coating was chosen as a sublayer to improve the adhesion of the TiB2 coating to the carbide cutting tool. Combining a three-nitride sublayer with a promising wear-resistant TiB2 coating provides a solution for machining chromium–nickel alloys, where the TiB2 outer layer is addressed to improve the resistance of the cutting tool and the three-nitride underlayer allows better adhesion to the hard alloy substrate.

4. Conclusions

The results of our experimental studies allow us to conclude that spark plasma sintering can be used as a high-performance process for producing high-density targets from TiB2-based powder compositions. It has been established that it is possible to significantly reduce the porosity of sintered samples and increase their relative density by adding Ti micropowder of 4 vol.% to the TiB2 powder. The revealed dependencies of the sintering process made it possible to select rational conditions (temperature of 700 °C, pressure of 80 MPa, exposure time of 5 min), which ensured the production of targets with a diameter of 80 mm and a thickness of 5 mm from a powder composition of 96 vol.% TiB2—4 vol.% Ti with a relative density of at least 99% and a crack resistance of at least 7.3 MPa∙m1/2.
The use of sintered targets for the TiB2 coating deposition by magnetron sputtering makes it possible to deposit coatings on rotating WC-Co hard alloy substrates at a rate of 1.7 μm/h and to obtain coatings with a wide range of physical and mechanical properties by changing the discharge voltage and argon pressure. Taking into account the specific operation of cutting tools and the need for TiB2 coatings to function under conditions of increased thermal and mechanical loads, it is recommended to use coatings that simultaneously combine a sufficiently high hardness (~38 GPa) and an acceptable elastic modulus (~390 GPa). The indicated properties can be obtained at a discharge voltage of 400 V and an argon pressure of 0.6 Pa. A satisfactory adhesion strength of TiB2 coatings to carbide substrates can be achieved with a thickness of 2.0 μm (target sputtering time 70 min) and deposition of coatings onto a pre-formed (TiAlSi)N subcoating.
Tribological tests under high-temperature friction-sliding conditions of samples made of WC-Co with(TiAlSi)N, TiB2 and (TiAlSi)N/TiB2 coatings have established that the presence of a two-layer coating significantly stabilizes the frictional interaction with a counterbody made of chromium–nickel alloy and reduces the wear rate. Among all the studied samples, the (TiAlSi)N/TiB2 coating had the most stable friction coefficient and a significantly smaller friction track depth throughout the entire testing period.
Full-scale tests carried out on milling workpieces made of Inconel 718 alloy with carbide ball-end mills at increased cutting speeds (263.7 m/min) showed the high efficiency of (TiAlSi)N/TiB2 coatings. For end mills with (TiAlSi)N/TiB2 coatings, the longest stage of steady wear and the minimum wear rate were established, and their wear resistance before reaching critical wear was ~54 min, which is 2.0, 1.6 and 1.4 times more than for the tools without coatings and with TiB2 and (TiAlSi)N monocoatings, respectively. This allows us to consider TiB2-based coatings as promising for solving various problems of machining parts made of difficult-to-cut materials using carbide tools.

Author Contributions

Conceptualization, S.N.G.; methodology, M.A.V. and V.D.G.; software, A.P.M. and A.A.O.; validation, S.V.F. and V.D.G.; formal analysis, S.V.F. and V.D.G.; investigation, M.A.V.; resources, A.P.M. and S.V.F.; data curation, A.P.M. and A.A.O.; writing—original draft preparation, M.A.V.; writing—review and editing, M.A.V.; visualization, M.A.V.; supervision, M.A.V. and S.N.G.; project administration, S.N.G.; funding acquisition, S.N.G. All authors have read and agreed to the published version of the manuscript.

Funding

The research was financially supported by the Ministry of Science and Higher Education of the Russian Federation (project No. FSFS-2023-0003).

Data Availability Statement

The original contributions presented in this study are included in the article; further inquiries can be directed to the corresponding author.

Conflicts of Interest

The authors declare no conflicts of interest.

References

  1. Yin, Q.; Liu, Z.; Wang, B.; Song, Q.; Cai, Y. Recent progress of machinability and surface integrity for mechanical machining Inconel 718: A review. Int. J. Adv. Manuf. Technol. 2020, 109, 215–245. [Google Scholar] [CrossRef]
  2. Bartolomeis, A.; Newman, S.T.; Jawahir, I.S.; Biermann, D.; Shokrani, A. Future research directions in the machining of Inconel 718. J. Mater. Process. Technol. 2021, 297, 117260. [Google Scholar] [CrossRef]
  3. Grguras, D.; Kern, M.; Pusavec, F. Suitability of the full body ceramic end milling tools for high speed machining of nickel based alloy Inconel 718. Procedia CIRP 2018, 77, 630–633. [Google Scholar] [CrossRef]
  4. Gusarov, A.V.; Migranov, M.S.; Mitrofanov, A.P.; Gusev, A.S.; Migranov, A.M.; Khmyrov, R.S. Effect of Surface Modification via Laser Irradiation on the Operability of Carbide End Mills When Cutting Aircraft Alloys. Coatings 2023, 13, 1823. [Google Scholar] [CrossRef]
  5. Sortino, M.; Belfio, S.; Totis, G.; Kuljanic, E.; Fadelli, G. Innovative Tool Coatings for Increasing Tool Life in Milling Nickel-coated Nickel-Silver Alloy. Procedia Eng. 2015, 100, 946–952. [Google Scholar] [CrossRef]
  6. Yu, J.; Wang, Y.; Zhao, X.; Li, Q.; Qiao, Q.; Zhao, J.; Zhai, S. Wear Resistance of Ni-Based Alloy Coatings. Adv. Mater. Sci. Eng. 2019, 2019, 1–7. [Google Scholar] [CrossRef]
  7. Liu, Y.; Li, Z.; Li, G.; Tang, L. Friction and wear behavior of Ni-based alloy coatings with different amount of WC–TiC ceramic particles. J. Mater. Sci. 2023, 58, 1116–1126. [Google Scholar] [CrossRef]
  8. Grigoriev, S.; Vereschaka, A.; Zelenkov, V.; Sitnikov, N.; Bublikov, J.; Milovich, F.; Andreev, N.; Mustafaev, E. Specific features of the structure and properties of arc-PVD coatings depending on the spatial arrangement of the sample in the chamber. Vacuum 2022, 200, 111047. [Google Scholar] [CrossRef]
  9. Yuan, J.; Yamamoto, K.; Covelli, D.; Tauhiduzzaman, M.; Arif, T.; Gershman, I.; Veldhuis, S.; Fox-Rabinovich, G. Tribo-films control in adaptive TiAlCrSiYN/TiAlCrN multilayer PVD coating by accelerating the initial machining conditions. Surf. Coat. Technol. 2016, 294, 54–61. [Google Scholar] [CrossRef]
  10. Alamgir, A.; Yashin, M.; Bogatov, A.; Viljus, M.; Traksmaa, R.; Sondor, J.; Lümkemann, A.; Sergejev, F.; Podgursky, V. High-Temperature Tribological Performance of Hard Multilayer TiN-AlTiN/nACo-CrN/AlCrN-AlCrO-AlTiCrN Coating Deposited on WC-Co Substrate. Coatings 2020, 10, 909. [Google Scholar] [CrossRef]
  11. Lim, C.S.; Sofer, Z.; Mazanek, V.; Pumera, M. Layered titanium diboride: Towards exfoliation and electrochemical applications. Nanoscale 2015, 7, 12527–12534. [Google Scholar] [CrossRef] [PubMed]
  12. Gild, J.; Zhang, Y.; Harrington, T.; Jiang, S.; Hu, T.; Quinn, M.C.; Mellor, W.M.; Zhou, N.; Vecchio, K.; Luo, J. High-Entropy Metal Diborides: A New Class of High-Entropy Materials and a New Type of Ultrahigh Temperature Ceramics. Sci. Rep. 2016, 6, 37946. [Google Scholar] [CrossRef] [PubMed]
  13. Casais, R.; Baptista, A.M.; Silva, F.J.; Andrade, F.; Sousa, V.; Marques, M.J. Experimental study on the wear behavior of B4C and TiB2 monolayered PVD coatings under high contact loads. Int. J. Adv. Manuf. Technol. 2022, 120, 6585–6604. [Google Scholar] [CrossRef]
  14. Grishin, A.M.; Putrolaynen, V.V. Hard and Highly Adhesive AlMgB14 Coatings RF Sputtered on Tungsten Carbide and High-Speed Steel. Materials 2023, 16, 6930. [Google Scholar] [CrossRef] [PubMed]
  15. Chowdhury, M.S.I.; Bose, B.; Fox-Rabinovich, G.; Veldhuis, S.C. Investigation of the Wear Performance of TiB2 Coated Cutting Tools during the Machining of Ti6Al4V Alloy. Materials 2021, 14, 2799. [Google Scholar] [CrossRef]
  16. Schalk, N.; Tkadletz, M.; Mitterer, C. Hard coatings for cutting applications: Physical vs. chemical vapor deposition and future challenges for the coatings community. Surf. Coat. Technol. 2022, 429, 127949. [Google Scholar] [CrossRef]
  17. Sroba, V.; Fiantok, T.; Truchly, M.; Roch, T.; Zahoran, M.; Grancic, B.; Svec, P.; Nagy, S.; Izai, V.; Kus, P.; et al. Structure evolution and mechanical properties of hard tantalum diboride films. J. Vac. Sci. Technol. A 2020, 38, 033408. [Google Scholar] [CrossRef]
  18. Grigoriev, S.N.; Volosova, M.A.; Vereschaka, A.A.; Sitnikov, N.N.; Milovich, F. Properties of (Cr,Al,Si)N-(DLC-Si) composite coatings deposited on a cutting ceramic substrate. Ceram. Int. 2020, 46, 18241–18255. [Google Scholar] [CrossRef]
  19. Rao, J.; Cruz, R.; Lawson, K.J.; Nicholls, J.R. Carbon and titanium diboride multilayer coatings. Diam. Relat. Mater. 2004, 13, 2221–2225. [Google Scholar] [CrossRef]
  20. Lee, K.W.; Chung, Y.W.; Korach, C.; Keer, L.M. Tribological and dry machining evaluation of superhard TiB2/TiC multilayer coatings deposited on Si(001), M2 steel, and C3 WC cutting tool inserts using magnetron sputtering. Surf. Coat. Technol. 2005, 194, 184–189. [Google Scholar] [CrossRef]
  21. Levashov, E.A.; Mukasyan, A.S.; Rogachev, A.S.; Shtansky, D.V. Self-propagating high-temperature synthesis of advanced materials and coatings. Int. Mater. Rev. 2017, 62, 203–239. [Google Scholar] [CrossRef]
  22. Twardowska, A.; Podsiadło, M.; Sulima, I.; Bryła, K.; Hyjek, P. Microstructure and Properties of TiB2 Composites Produced by Spark Plasma Sintering with the Addition of Ti5Si3. Materials 2021, 14, 3812. [Google Scholar] [CrossRef] [PubMed]
  23. Shcherbakov, V.A.; Gryadunov, A.N.; Semenchuk, I.E.; Alymov, M.I. Ta4HfC5 Ceramic by Electro-Thermal Explosion under Pressure: Thermal and Electrical Parameters of the Process. Int. J. Self-Propag. High-Temp. Synth. 2022, 31, 1–5. [Google Scholar] [CrossRef]
  24. Oguntuyi, S.D.; Johnson, O.T.; Shongwe, M.B. Spark Plasma Sintering of Ceramic Matrix Composite of ZrB2 and TiB2: Microstructure, Densification, and Mechanical Properties—A Review. Met. Mater. Int. 2021, 27, 2146–2159. [Google Scholar] [CrossRef]
  25. Grigoriev, S.N.; Volosova, M.A.; Peretyagin, P.Y.; Seleznev, A.E.; Okunkova, A.A.; Smirnov, A. The Effect of TiC Additive on Mechanical and Electrical Properties of Al2O3 Ceramic. Appl. Sci. 2018, 8, 2385. [Google Scholar] [CrossRef]
  26. Cohen, S.; Ratzker, B.; Kalabukhov, S.; Frage, N. Diffusion bonding of transparent ceramics by spark plasma sintering (SPS) complemented by hot isostatic pressing (HIP). J. Eur. Ceram. Soc. 2023, 43, 6628–6633. [Google Scholar] [CrossRef]
  27. Rajguru, R.R.; Vasudevan, H. A study of micro hardness in the machining of Inconel 625 using TiAlSiN coated tools under dry cutting conditions. Adv. Mater. Process. Tec. 2022, 10, 120–130. [Google Scholar] [CrossRef]
  28. Yue, Q.B.; He, H.B.; Li, H.Y.; Zhang, J.; Li, Y.M.; Ma, L. Research on Friction Characteristics of AlCrN and TiAlSiN Coatings and Properties of Coated Tools. Int. J. Precis. Eng. Manuf. 2019, 20, 1581–1589. [Google Scholar] [CrossRef]
  29. Drobný, P.; Mercier, D.; Koula, V.; Škrobáková, S.I.; Čaplovič, Ľ.; Sahul, M. Evaluation of Adhesion Properties of Hard Coatings by Means of Indentation and Acoustic Emission. Coatings 2021, 11, 919. [Google Scholar] [CrossRef]
  30. Vithal, N.D.; Krishna, B.B.; Krishna, M.G. Impact of dry sliding wear parameters on the wear rate of A7075 based composites reinforced with ZrB2 particulates. J. Mater. Res. Technol. 2021, 14, 174–185. [Google Scholar] [CrossRef]
  31. Beake, B.D. The influence of the H/E ratio on wear resistance of coating systems–Insights from small-scale testing. Surf. Coat. Technol. 2022, 442, 128272. [Google Scholar] [CrossRef]
  32. Bouzakis, K.D.; Michailidis, N.; Skordaris, G.; Bouzakis, E.; Biermann, D.; M’Saoubi, R. Cutting with coated tools: Coating technologies, characterization methods and performance optimization. CIRP Annals 2012, 61, 703–723. [Google Scholar] [CrossRef]
  33. Storchak, M.; Zakiev, I.; Zakiev, V.; Manokhin, A. Coatings strength evaluation of cutting inserts using advanced multi-pass scratch method. Measurement 2022, 191, 110745. [Google Scholar] [CrossRef]
  34. Panjan, P.; Gselman, P.; Kek-Merl, D.; Čekada, M.; Panjan, M.; Dražić, G.; Bončina, T.; Zupanič, F. Growth defect density in PVD hard coatings prepared by different deposition techniques. Surf. Coat. Technol. 2013, 237, 349–356. [Google Scholar] [CrossRef]
  35. Panjan, P.; Drnovšek, A.; Kovač, J. Tribological aspects related to the morphology of PVD hard coatings. Surf. Coat. Technol. 2018, 343, 138–147. [Google Scholar] [CrossRef]
  36. Volosova, M.; Grigoriev, S.; Metel, A.; Shein, A. The Role of Thin-Film Vacuum-Plasma Coatings and Their Influence on the Efficiency of Ceramic Cutting Inserts. Coatings 2018, 8, 287. [Google Scholar] [CrossRef]
  37. Shuster, L.S.; Fox-Rabinovich, G.S.; Chertovskikh, S.V. Influence of Cutting Conditions on the Wear Resistance of Tools with a TiB2 Coating during Titanium Alloy Machining. J. Frict. Wear 2021, 42, 466–472. [Google Scholar] [CrossRef]
  38. Su, K.; Liu, D.; Pang, H.; Shao, T. Improvement on thermal stability of TiAlSiN coatings deposited by IBAD. Surf. Eng. 2017, 34, 504–510. [Google Scholar] [CrossRef]
  39. Kovalev, A.; Wainstein, D.; Konovalov, E.; Vakhrushev, V.; Fox-Rabinovich, G.; Fox-Rabinovich, M.; Dmitrievskii, S.; Tomchuk, A. Features of Tribooxidation of the High-Entropy Coating (AlCrZrTiTa)N during Dry High-Speed Cutting. Coatings 2023, 13, 1508. [Google Scholar] [CrossRef]
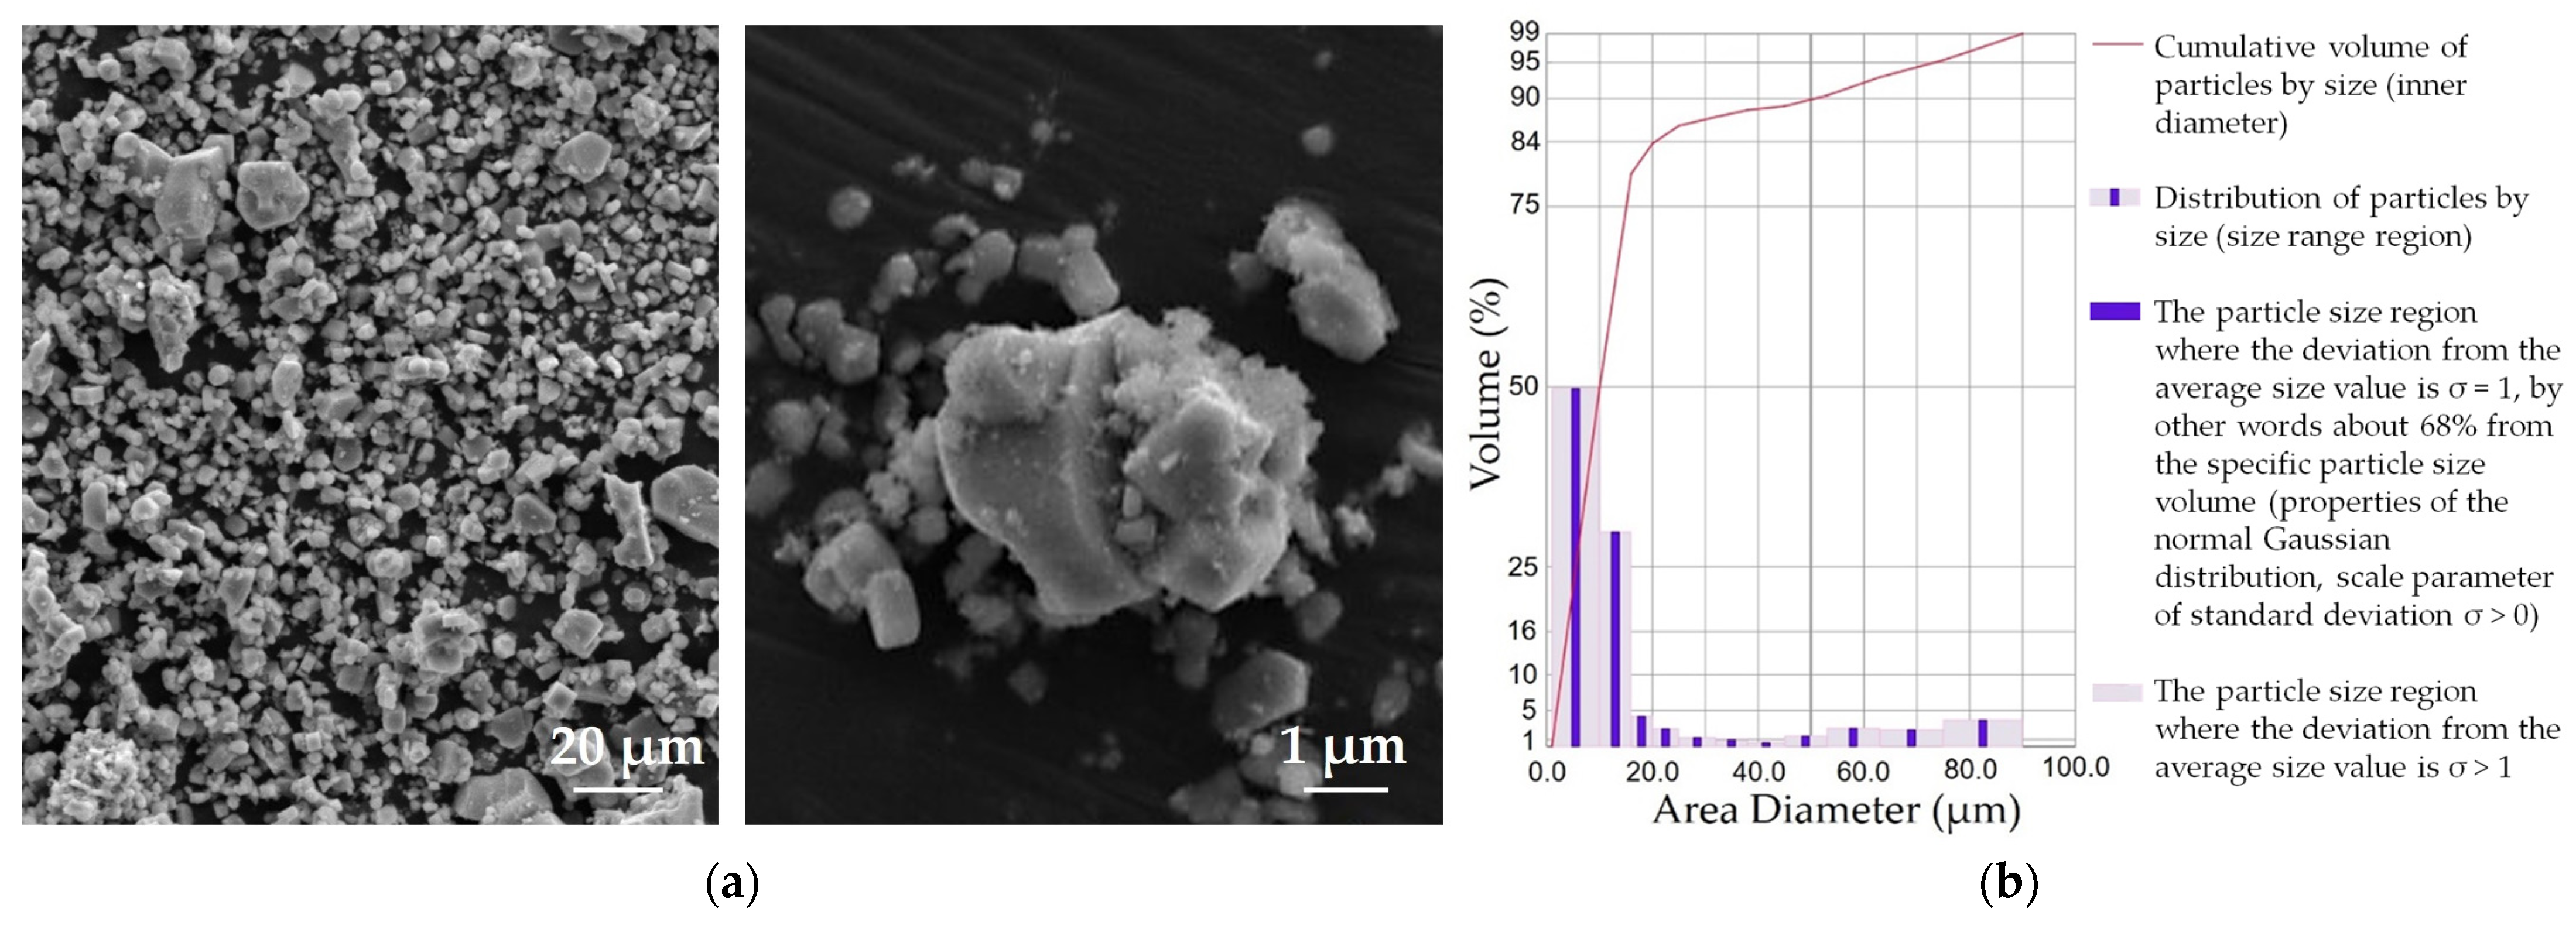
Figure 1. SEM image of TiB2 powder (a) and volume fraction of TiB2 particles of different sizes (b).
Jmmp 08 00210 g001
Figure 2. X-ray diffraction pattern of the initial TiB2 powder used to produce targets by spark plasma sintering.
Jmmp 08 00210 g002
Figure 3. The sequence of the main stages of spark plasma sintering of targets of TiB2 powder, where (I) is a graphite mold pre-assembly; (II) is sifted powder poured into the mold; (III) is the final mold assembly; (IV) is powder pre-pressing at 5 MPa; (V) is setting up the mold in the chamber and lifting it to the upper current supply; and (VI) is powder sintering for the production of TiB2 targets.
Jmmp 08 00210 g003
Figure 4. General view (a) and the vacuum chamber (b) of the experimental hybrid setup, equipped with a magnetron sputtering system with a sintered TiB2 target (1) and vacuum-arc evaporators with AlSi (2) and Ti (3) cathodes, power cabinet (4), arc generators (TRUMPF Hüttinger GmbH + Co. KG, Freiburg im Breisgau, Germany), up to 4 pcs. (5), high-voltage unit arc cathode power supply ARM 25/6 (TRUMPF Hüttinger GmbH + Co. KG) (6), magnetron pulsed bias power supply PBP-26 (Applied Electronics Ltd., Tomsk, Russia) (7), pulsed power supply Apel-M-5PDC-650-2 (Applied Electronics Ltd.) (8).
Jmmp 08 00210 g004
Figure 5. General view (a) and end nose design (b) of carbide ball-end mills used for coating and subsequent testing in cutting Inconel 718 alloy.
Jmmp 08 00210 g005
Figure 6. Methodology for testing carbide end mills on a CTX beta 1250 TC integrated mill and turn center when cutting a workpiece made of chromium–nickel alloy: (a): the scheme of the workpiece and cutting tool placement, where 1 is an end mill made of tungsten–cobalt hard alloy, and 2 is a workpiece made of chromium–nickel alloy, 3 is a computer numerical control system, 4 is a CNC machining center, 5 is a remote controller; (b) the flank wear measurement technique.
Jmmp 08 00210 g006
Figure 7. SEM images of the microstructure of sintered samples produced from a powder composition based on TiB2 without the addition of Ti (a), and with the addition of 4 vol.% Ti (b).
Jmmp 08 00210 g007
Figure 8. Elemental mapping (a,b) and elemental composition (c) obtained by EDX fracture analysis of a target sample sintered from a powder composition of 96 vol.% TiB2—4 vol.% Ti.
Jmmp 08 00210 g008
Figure 9. Dependences of the density (D) and crack resistance (CR) of TiB2 targets on the sintering temperature (a), sintering pressure (b) and isothermal exposure time (c).
Jmmp 08 00210 g009
Figure 10. SEM image of the fracture cross-section of a TiB2-coated hard alloy sample (a), and the X-ray diffraction pattern of the surface layer (b).
Jmmp 08 00210 g010
Figure 11. Dependences of nanohardness (H), elastic modulus (E) and roughness (Ra) and thickness of TiB2 coatings when deposited on stationary (S) and rotating (R) hard alloy substrates on discharge voltage (a), argon pressure (b) and deposition time (c).
Jmmp 08 00210 g011
Figure 12. SEM images of the surface morphology of TiB2 coatings with thicknesses of 1.0 μm (a), 2.0 μm (b) and 2.5 μm (c).
Jmmp 08 00210 g012
Figure 13. The changes over time of the friction coefficient between substrates made of WC-Co hard alloy and counterbodies made of Inconel 718 alloy on friction distance: uncoated and with (TiAlSi)N coating (a), and with TiB2 and (TiAlSi)N/TiB2 coatings (b).
Jmmp 08 00210 g013
Figure 14. SEM images of areas of wear tracks formed during tribological tests of carbide substrates without coating (a), and with a (TiAlSi)N coating (b), TiB2 coating (c) and (TiAlSi)N/TiB2 coating (d).
Jmmp 08 00210 g014
Figure 15. Three-dimensional profiles and profilograms of sections of wear tracks formed during tribological tests of hard alloy substrates without a coating (a), with (TiAlSi)N coating (b), TiB2 coating (c) and (TiAlSi)N/TiB2 coating (d). NB: 2D profile patterns of the wear tracks were typical for the whole track and were obtained approximately in the center of the resulting 3D profile.
Jmmp 08 00210 g015
Figure 16. Dependence of flank wear of carbide end mills with various coatings on cutting time in machining workpieces of Inconel 718 alloy with a cutting speed of 263.7 m/min, feed of 0.04 mm/tooth and depth of 0.25 mm.
Jmmp 08 00210 g016
Table 1. Range of variable parameters in spark plasma sintering of targets made of TiB2 powder.
ParameterValueMeasuring Unit
Pre-pressing pressure5MPa
Sintering temperature1500, 1600, 1700, 1800, 1900°C
Sintering pressure5 × 10−5, 6.5 × 10⁻⁵, 8 × 10⁻⁵MPa
Isothermal holding time3, 5, 10min
Chamber operating pressure5 × 10−6MPa
Table 2. Range of variable parameters in magnetron sputtering of TiB2-based targets and coating deposition.
ParameterValueMeasuring Unit
Discharge bias200, 300, 400, 500, 600 V
Argon pressure0.2, 0.4, 0.6, 0.8, 1.0 Pa
Deposition time30, 40, 50, 60, 70 min
Table 3. Design and geometric parameters of carbide ball-end mills.
ParameterValueMeasuring Unit
Outer diameter12mm
Number of teeth4pcs.
Total length75mm
Cutting part length30mm
Tool materialKFM 39-
Table 4. Content of elements (%) in the Inconel 718 alloy for testing carbide end mills.
ElementNiCrNbMoFeTiAlCoMnSiRest
%58.020.85.53.13.01.40.80.60.320.30.73
Table 5. Wear test conditions for carbide end mills.
ParameterValueMeasuring Unit
Metal-working machineCNC mill and turn center, CTX beta 1250 TC
(DMG MORI Co., Ltd., Tokio, Japan)
-
Material and shape of the workpieceInconel 718, round rod-
Workpiece diameter60mm
End mill rotation frequency7000min
End mill rotation speed263.7m/min
Workpiece rotation speed1.75m/min
Cutting feed0.04mm/tooth
Cutting depth0.25mm
Flank wear limit value (failure criterion)300μm
Table 6. The density of samples sintered with a powder composition based on TiB2 with Ti powder additives at different temperatures.
Sintering Temperature, °CDensity (%) of Sintered TiB2 Targets
0 vol.% Ti2 vol.% Ti4 vol.% Ti6 vol.% Ti
150077839487
160081859789
170084889992
180082879890
190081879585
Table 7. Results of assessing the adhesion strength of TiB2 coatings to carbide substrates during scratch testing and the elastic moduli of those coatings.
Type of CoatingTiB2 Coating Thickness (μm)Critical Load Value (N)Elastic Modulus, GPa
Lc1Lc2
without subcoating1.022 ± 129 ± 2365 ± 7
2.015 ± 323 ± 3390 ± 8
2.512 ± 218 ± 4472 ± 8
with subcoating (TiAlSi)N1.025 ± 134 ± 1332 ± 6
2.018 ± 231 ± 2366 ± 7
2.514 ± 323 ± 2446 ± 8
Disclaimer/Publisher’s Note: The statements, opinions and data contained in all publications are solely those of the individual author(s) and contributor(s) and not of MDPI and/or the editor(s). MDPI and/or the editor(s) disclaim responsibility for any injury to people or property resulting from any ideas, methods, instructions or products referred to in the content.